

Page 1
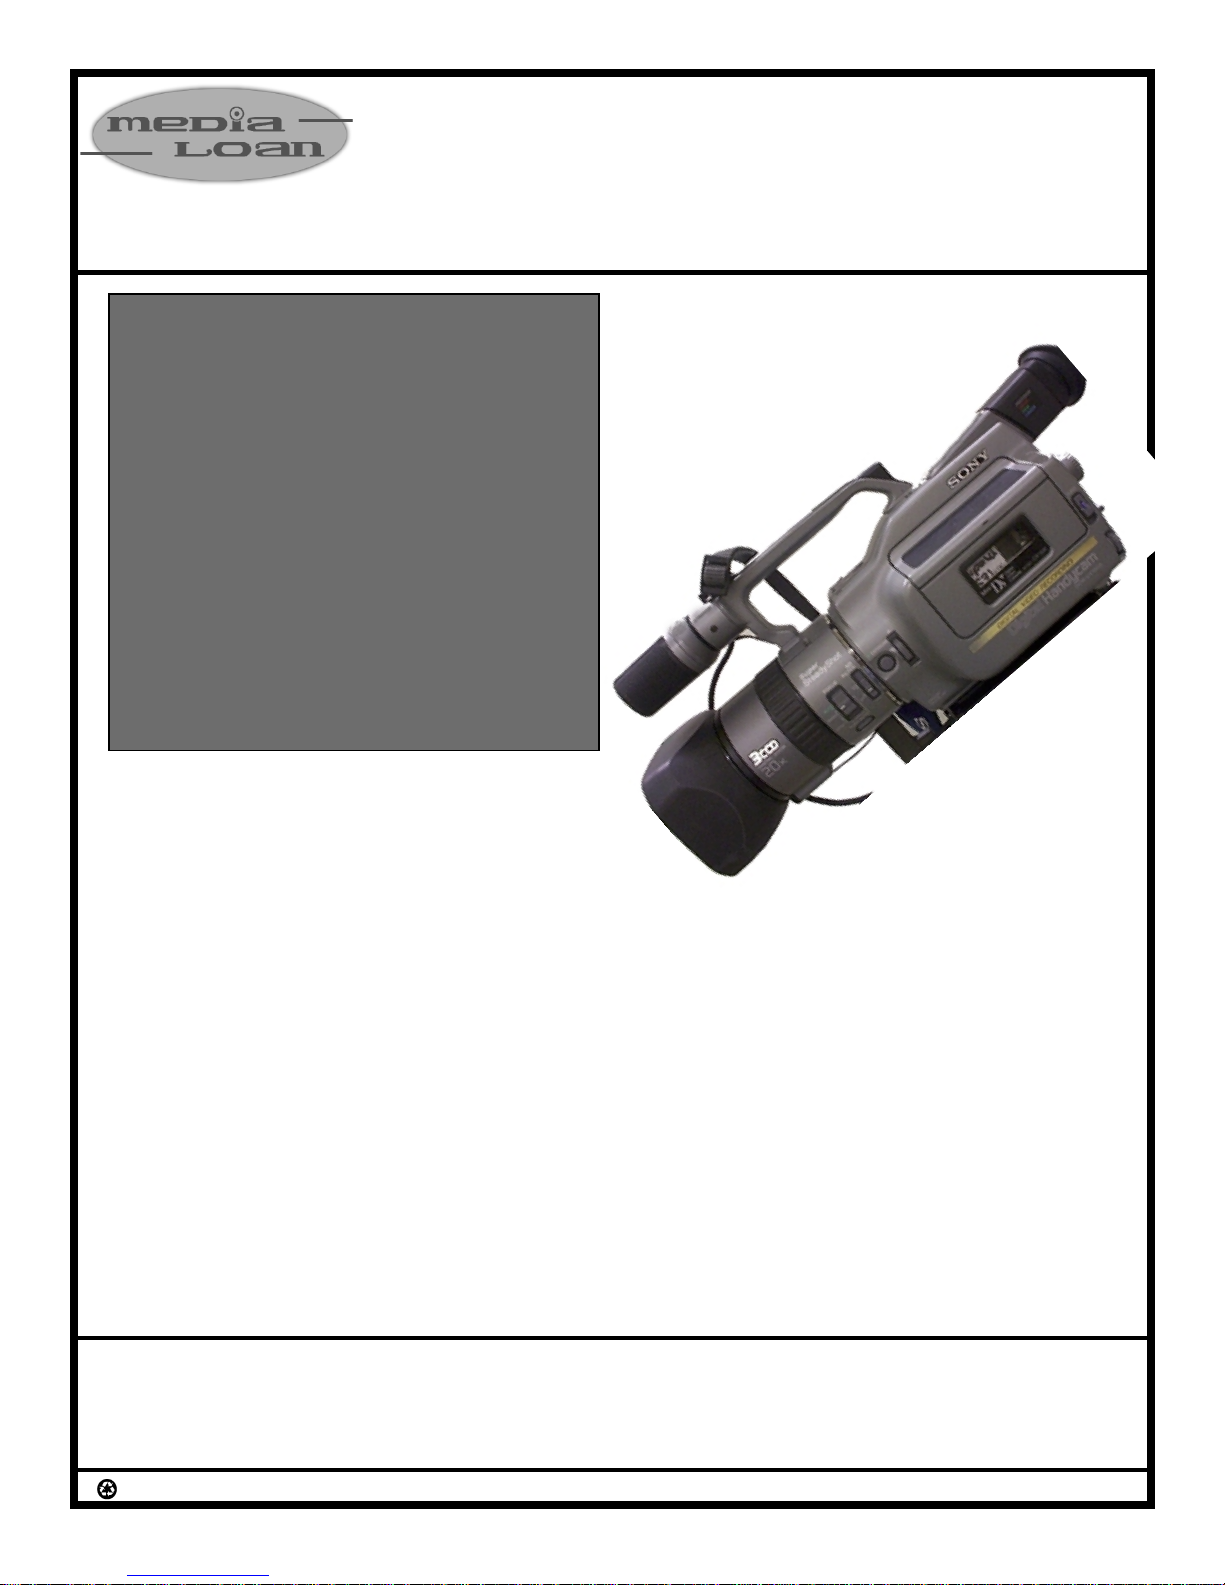
Operating Guide for
Camcorder and Palmcorder Proficiency Required
16MM WORK ORDER REQUIRED
3 Chip Digital Camcorder—Proficiency Required
Precautions:
Avoid mechanical shock
Keep the camcorder away from strong magnetic fields
or mechanical vibration
Keep the POWER switch set to OFF when not using
Do Not use near water
Do Not aim at the sun or other bright objects
Do Not expose camcorder to extreme temperatures
Do Not leave unattended (remember borrower is totally
liable for lost or damaged equipment)
Do Not touch the surface of the lens
Do Not try to clean the electronic viewfinder or LCD
panel
Do Not lift or carry by the viewfinder
Do Not wrap up the camcorder and operate since heat
may build up internally
Do Not force camera to accept tape.
Do make sure that there is no protruding labels on the
tape (can interfere with cassette insertion)
Do test before checking out & returning to Media Loan
Specifications:
Image Device: 3 CCD’s (Charged Coupled Device)
Video Recording System: 2 rotary heads, helical scanning system
Video Signal: NTSC color
Format: Use mini DV cassette ME (metal evaporative)
Recording and Playback Time: 1 hour with a 60 min. tape @SP
Resolution: Over 500 lines
Viewfinder: Color LCD
Zoom: 10x optical; 20x digital; (42-420mm when converted to a
35mm still camera)
Photo shot: Captures more than 500 images on a 60 minute tape
*Iris: Between F1.6 and F11. Note: When focusing in telephoto,
cannot use F1.6
Shutter Speeds: 1/4 to 1/10,000
Min. Illumination: 4 lux (F1.6); recommended more than 100 lux.
Audio Recording Format: Rotary heads, PCM (Pulse Code
Modulation) system: 16 bit (48 kHz), or 12 bit (32 kHz)
Mic: 4-capsule stereo w/external mic jack
Battery Power: Typical recording time (with a full charged
battery)=40 min.
Manual Controls:
Program Auto Exposure (3-mode AE): Shutter priority, iris priority,
and night mode
Manual exposure: Iris and gain (20 step), shutter speed (16 speeds)
Manual White Balance
Custom Preset: Controls auto exposure shift, white balance.
Sony VX-1000
Media Loan VX1000 Package Includes:
AC adapter w/battery charger and DC cable
Dubbing cables (S-VHS & RCA)
Remote control
Hood cap
Two eyecups
Pelican case
BeachTek Dual XLR Adapter
Special Features:
*A/V Digital Fader and Overlap Transitions: Fades to/from black or
from previous still pictures
*Photo Mode: Records still image and audio signal for 7 seconds
*Interval and Frame Recording: For single frame recording and
time-lapse effects
*2-Speed Search Feature
*Steadyshot Picture Stabilization
*Zebra-Pattern Feature: Indicates overexposed areas
*Full Range Auto Focus: From macro to infinity
*ND Filter: Prevents picture from going out of focus under bright
light conditions
Editing:
*DV Interface: For direct input and output, digital-to-digital audio
and video editing with virtually no quality loss (A/V control)
*Time Code: For hour, minute, second, and frame; identifies and
locates scenes for editing
Media Loan The Library Group (360)867-6253
The Evergreen State College Olympia, WA 98505
Recycled & Recyclable
http://www.evergreen.edu/media
SonyVX1000/10.4.02/hs/lc
Page 2
Sony VX-1000
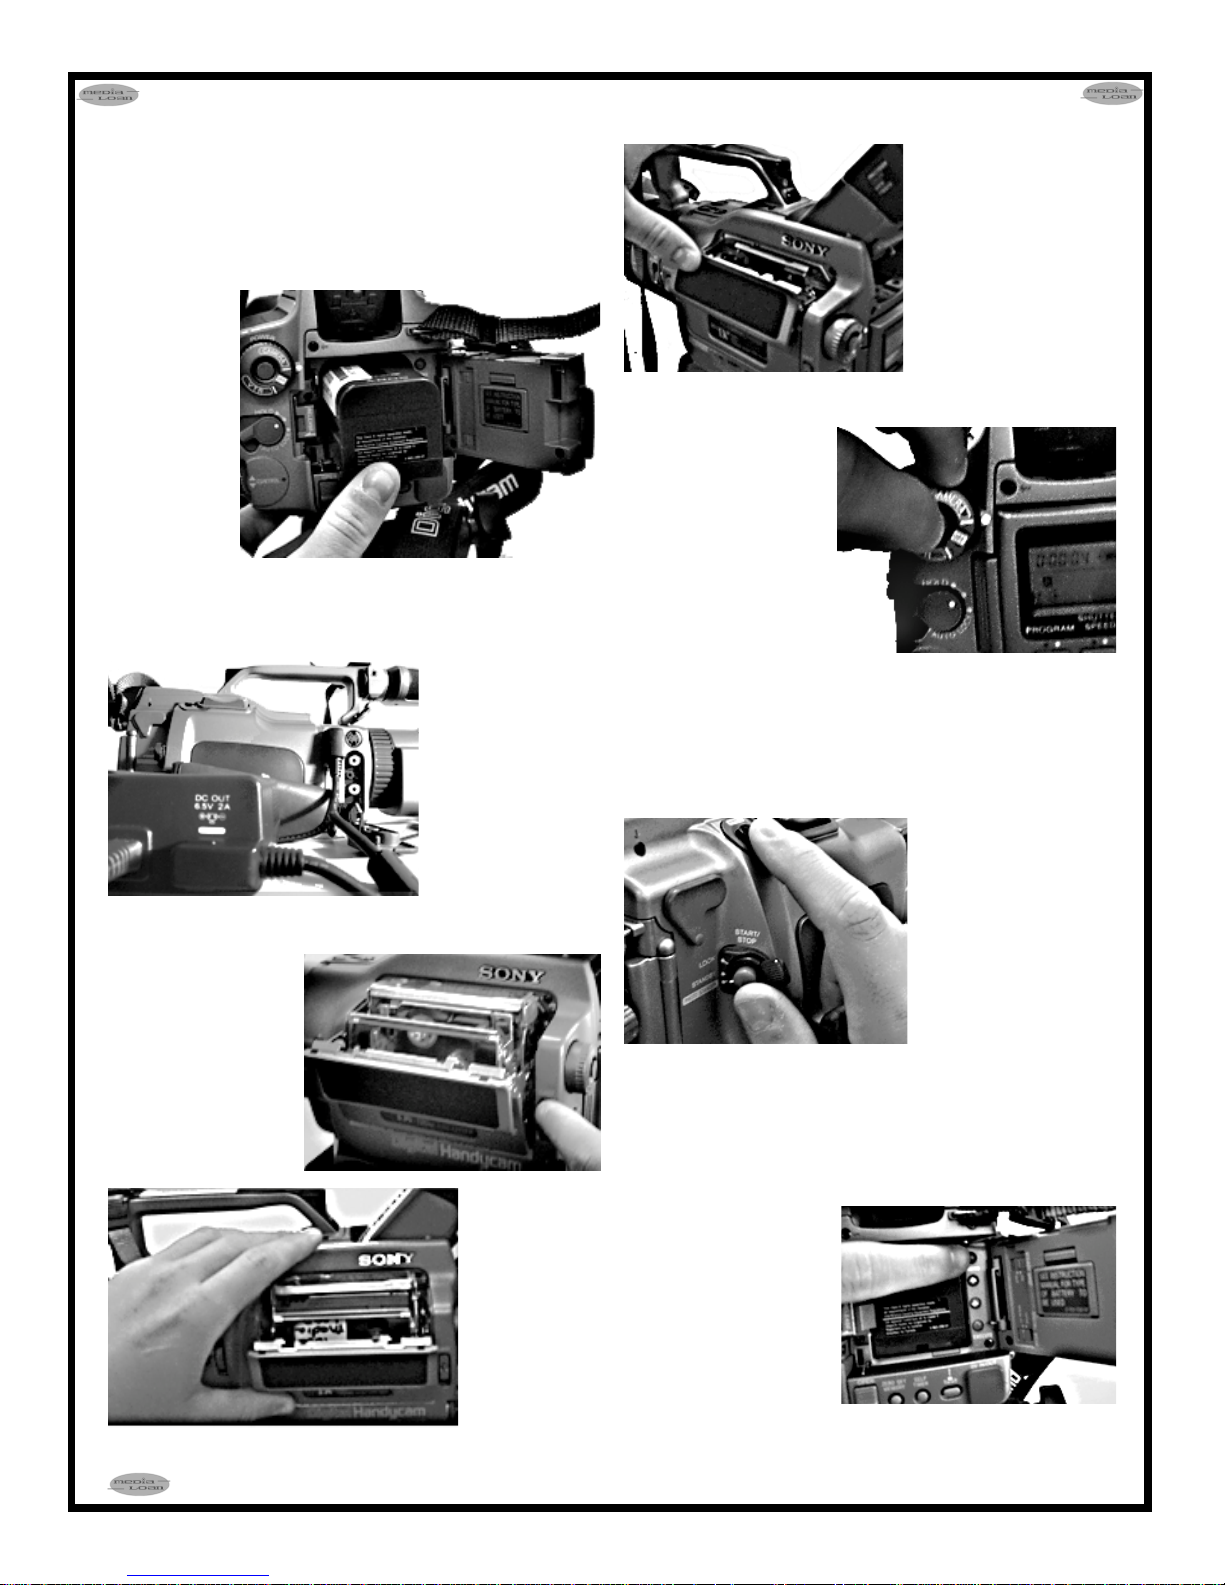
Supply Power with a Battery:
1. Slide the battery door OPEN button to OPEN the battery
cover.
2. Gently insert the battery pack (making sure the arrow on the
battery is pointing toward the battery compartment) until it is
hooked by the
RELEASE
knob.
3. Close cover.
4. Press the
center button
on the
POWER
switch, set to
CAMERA or
VTR.
To remove the
battery, open
the battery
door and slide
the RELEASE
knob leftward..
Supply Power with AC Adapter:
1. Connect the AC
power cord to an
outlet.
2. Connect the
camcorder and the
AC power adapter
using the supplied
cord.
When not in use,
unplug the AC
adapter from the
outlet..
Cassette Insertion:
1. Connect the
camcorder to a power
source (battery or AC)
2. Slide EJECT button.
The cassette compartment automatically lifts
and opens.
3. Insert a cassette with
the widow facing out..
6. After the cassette
compartment cover has
retracted, press the upper
cassette compartment flap
until it clicks.
Camera Recording:
1. Remove the hood cap,
and attach it to the grip
strap.
2. While pressing the
center button on the
POWER switch, set it to
CAMERA.
3. Turn STANDBY
switch upward.
4. Press START/STOP
button. The camcorder
starts recording. The
“REC” indicator appears
in the viewfinder, and red lamp indicator lights up in the front and
the back of the camcorder.
5. Press STOP/START to stop recording. STBY appears in
viewfinder and the red lamp goes off.
Photo Recording:
1. Set the STANDBY
switch to PHOTO
STANDBY.
2. Keep pressing the
PHOTO button lightly until
a still picture appears in the
viewfinder. To change the
still picture, release the
PHOTO button. Select
another still picture and
keep pressing the PHOTO
button lightly.
3. Press the PHOTO button deeper. This still image and sound is
recorded for 7 seconds. If the POWER or STANDBY switch is
moved during the photo shot, the operation of these switches is
performed after the 7 second photo shot.
4. Gently! Press
the outside of the
compartment
cover to close.
5. Wait for the
compartment to
automatically
retract!
Changing Mode Settings:
1. Slide OPEN and open
the battery cover door.
2. Press MENU to display
the menu in viewfinder
3. Press or to select
desired item, then press
EXECUTE.
4. Press or to select
desired mode, then press
EXECUTE.
To change other modes,
repeat steps 3 and 4.
5. Press MENU to erase menu display.
➜
➜
Page 2
Page 3
Sony VX-1000
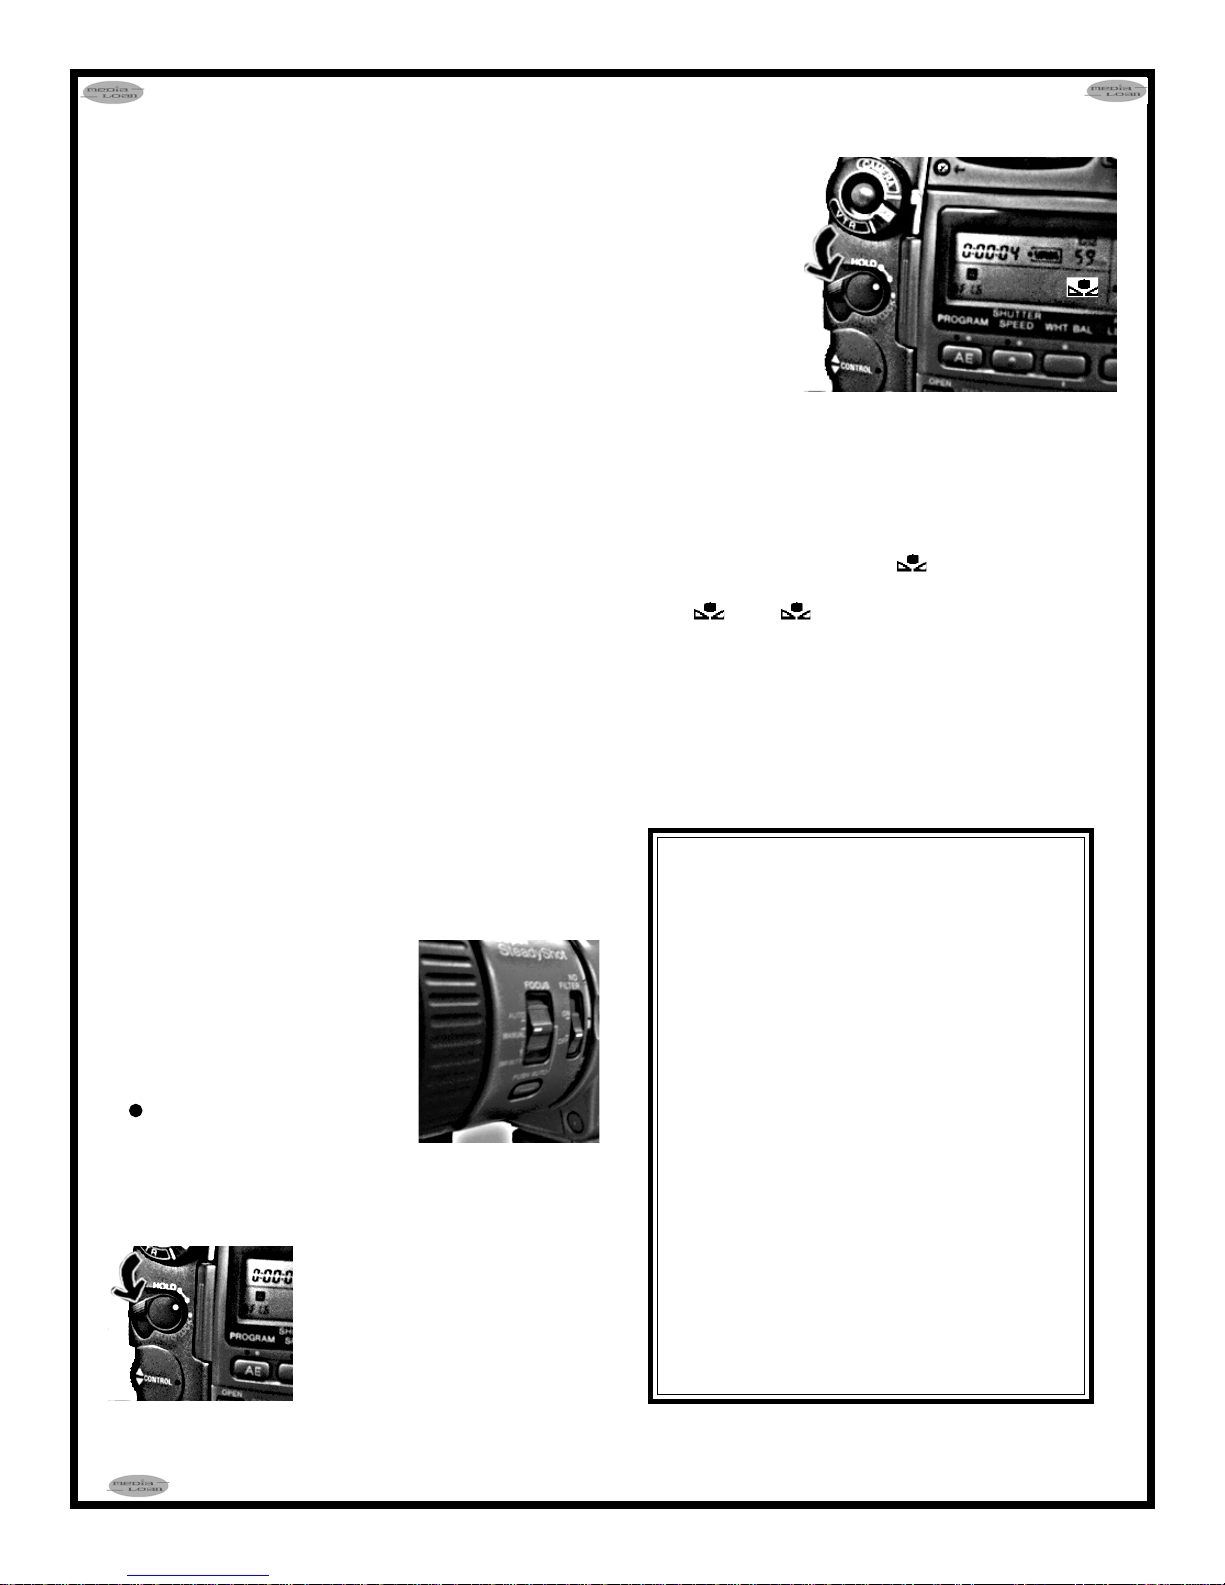
Releasing Steadyshot Feature:
1. Slide OPEN and open the battery door cover.
2. Set the STEADYSHOT MODE on the rear of the battery cover
to OFF so that the “hand” indicator disappears.
To Activate Steadyshot Feature:
1. Set to Steadyshot to ON to display the “hand” indicator in the
viewfinder.
Note: the Steadyshot feature detects and compensates for normal
camera- shake, but this wont correct for excessive camera-shake.
Using the Overlap Function:
1. Slide OPEN and open the battery cover.
2. Set DIGITAL MODE on the rear of battery cover to OVERLAP.
3. Press FADER/OVERLAP repeatedly until “OVERLAP” appears
in the viewfinder. The stored last scene overlaps the scene being
shot.
4. Press START/START to start recording.
The scene being shot gradually fades in over the still picture of the
last recorded scene.
Notes on overlap function:
* You cannot set D ZOOM to ON. Once you set DIGITAL MODE
to OVERLAP, D ZOOM settings are changed to OFF automatically.
Using the Fading Function:
1. Follow the steps in “Using the Overlap Function.”
2. In step 3, press FADER/OVERLAP repeatedly until “FADER”
appears in the viewfinder.
To use the fading function repeatedly, start from step 1 each time.
Notes on the fading and overlap function
* You cannot fade in, fade out, or use the overlap function while
you record with interval recording, cut recording or photo recording.
* The last scene for overlap is stored only when you record and
press START/STOP again (recording standby/pause mode) before
using overlap. In other cases, this camcorder starts Rec Review
automatically to store the picture on the tape before it overlaps the
scene being shot.
Focusing Manually:
1. Set FOCUS to MANUAL while the
camcorder is recording or in Standby
mode. A “
viewfinder.
2. Keep pushing the “ T ” (telephoto) side
of the zoom button until the zooming stops.
3. Turn the focus ring to achieve a sharp
focus. Turn the focus ring until
appears in the viewfinder in focus.
➮
4. Set the desired shot length using the
zoom button.
☞ ” appears in the
➮
Using the PROGRAM AE Function:
1. Set HOLD/AUTO LOCK selector to the center (auto lock
release) position.
2. Press PROGRAM AE repeatedly to
select the desired mode.
The modes changes AE A (Priority to
iris) AE S (Priority to shutter speed),
(Twilight) or No indication (Manual),
cyclically in the viewfinder.
* Turn the CONTROL dial to select the
desired exposure (iris) or shutter speed.
Two Ways of
Adjusting the
White
Balance:
1. Set HOLD/AUTO
LOCK selector to the
center (auto lock
release) position
while the camcorder
is in Standby mode.
2. Press WHT BAL
repeatedly to select
the appropriate white
balance mode.
Each time you press the button, the indicator inside the viewfinder
changes: No indicator (auto), "sun" (outdoor), "bulb" (indoor).
One-push White Balance Mode:
1. Set HOLD/AUTO LOCK selector to the center (auto lock
release) position.
2. Press WHT BAL twice to display
3. Shoot a white object such as paper fully in the viewfinder.
4. Press The indicator flashes rapidly. When the
white balance has been adjusted and stored in memory, the
indicator stops flashing.
in the viewfinder.
Charging the Battery Pack:
1. Connect the AC power adapter to a
wall outlet.
2. Align the surface of the battery pack
indicated by the ( mark with the edge of
the terminal shutter of the AC power
adapter. Then fit and slide the battery
pack in the direction of the arrow. The
CHARGE lamp (orange) lights up.
Charging begins.
When charging is completed, the
CHARGE lamp goes out. Unplug the
unit from the wall outlet.
Charging Time: 190 minutes
Battery Life:
*Typical recording time: 40 minutes
*Continuous using time: 80 minutes
Page 3
Page 4
Sony VX-1000
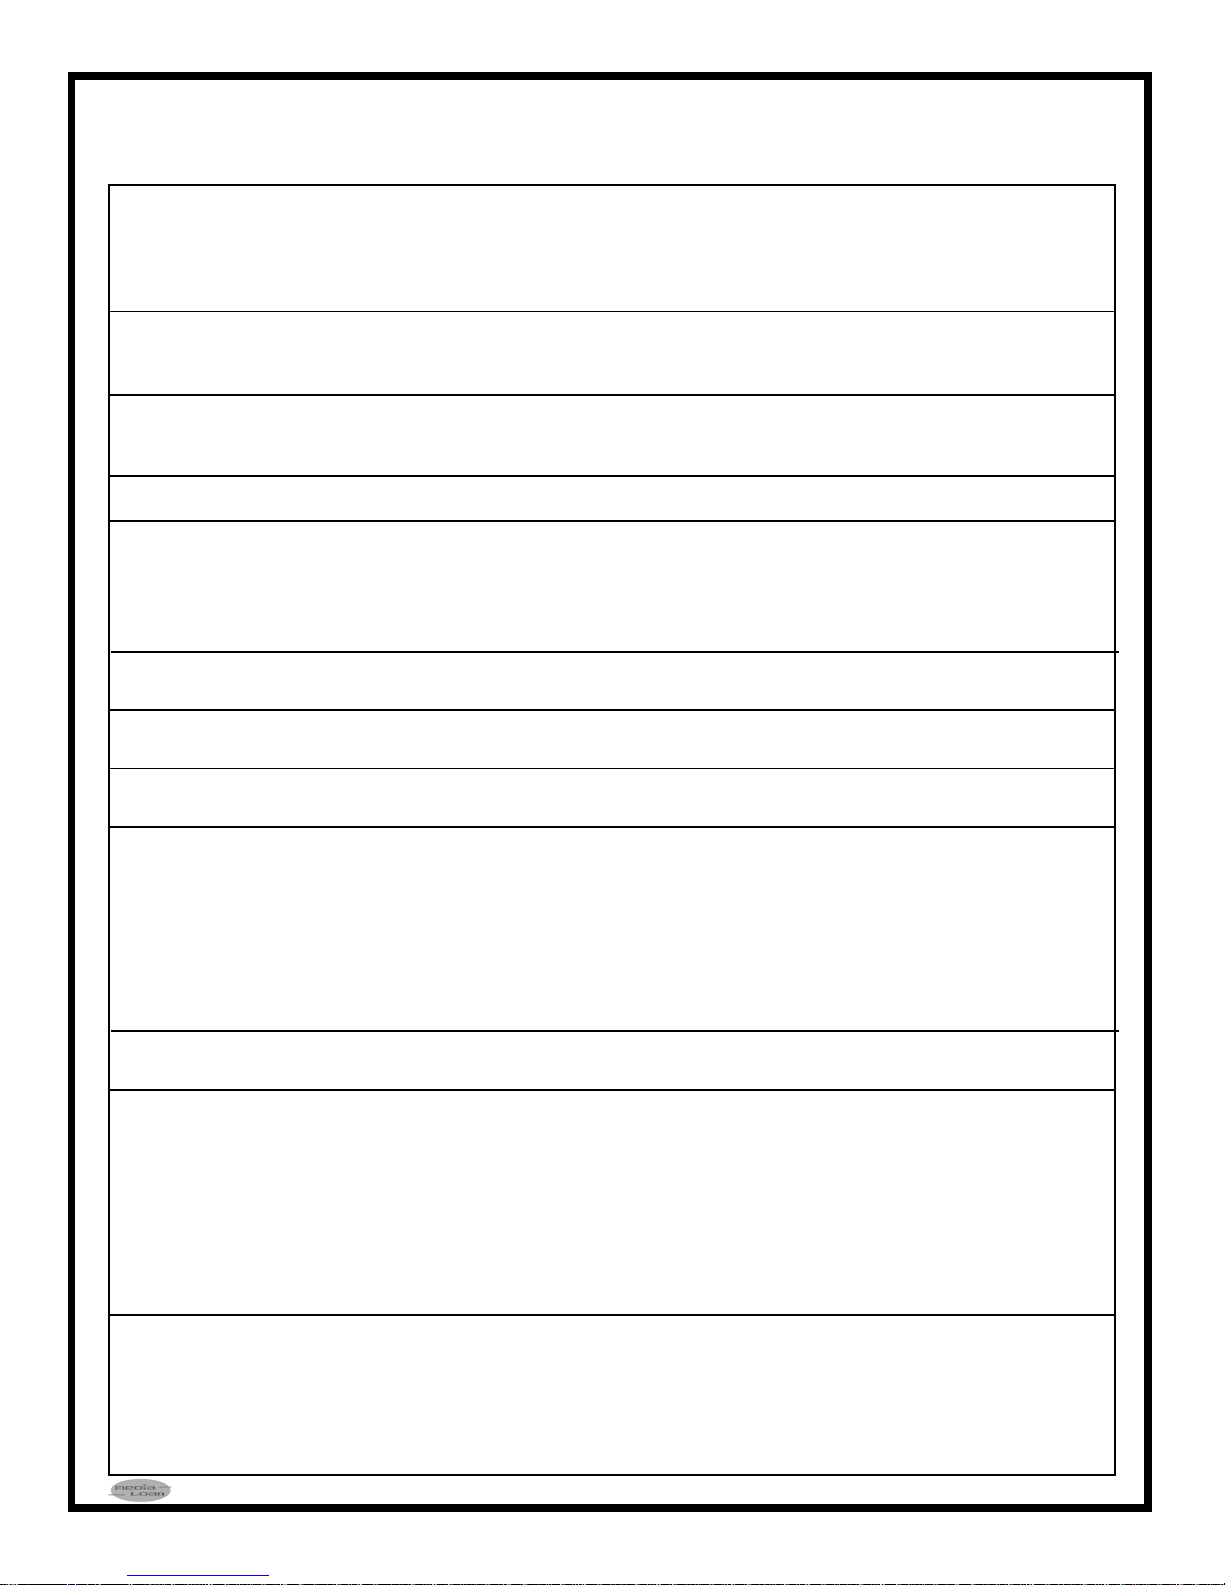
To change the mode settings in the menu system: 1)Slide OPEN and open the battery cover; 2)Press MENU to display the menu in the
viewfinder; 3)Press or to select the desired item, then press EXECUTE; 4)Press or to select the desired mode, then press EXECUTE. Repeat steps 3 and 4 to change the other modes; 5)Press MENU to erase the menu display. In the chart below "*" is NORMAL
Setting the Mode of Items in CAMERA and VTR Modes
1. COMMANDER
*VTR4
OFF
ID
ID SET
Select VTR4 normally
Select when not using a remote
Select when using remote with the ID number set
Select to register the ID number when using the same number as remote
2. HEADPHONE
3. EVF
4. CLOCK SET
1. A SHUTTER
2. D ZOOM
3. ZEBRA
4. FRAME REC
5. INT REC
*LOW
MID
HIGH
RETURN
COLOR
BRIGHT
Select LOW normally
Slightly raises the volume of headphones
Raises the volume of headphones
Select the item and change the level of the indicator by pressing or
to adjust the color intensity
Or brightness of picture in viewfinder.
Select to reset date and time.
Items in CAMERA Mode Only
*ON
OFF
*ON
OFF
ON
*OFF
ON
*OFF
RETURN
SET:
*OFF/ON
INTERVAL:
30sec, 1min,
5min, 10min
REC TIME:
0.2sec, 0.5sec,
1sec, 2sec
Select ON normally
Select OFF when adjusting shutter speed
Select ON normally (Cannot select ON if OVERLAP switch is ON)
Select OFF if using OVERLAP function. Zoom becomes 10x optical
Select ON to indicate overexposed areas. Will not show up on recording
Select OFF normally
Select ON for cut recording.
Automatically selects OFF when removed from power source
Select RETURN to go back to main menu
Select OFF normally unless using INT REC
Select a time interval to set or change the waiting time for interval
recording
Select or change the recording time for the time interval
6. SELFTIMER
7. CUSTOM
1. A MIX BAL
2. SEARCH
*10sec
25sec
RETURN
SET:
*OFF/ON
COLOR LEVEL
SHARPNESS
WB SHIFT
AE SHIFT
GAINSHIFT
*OdB/-3dB
RESET
ST1 & ST2 Changes the level of the indicator by pressing or to adjust the
*C MEMORY
OFF
Select 10sec normally
Select 25sec if more time is needed
Select to go back to main menu
Select OFF if not customizing/ Select ON if not using preset settings in
the CUSTOM menu
Change the levels by pressing or
Change the levels by pressing or
Change the levels by pressing or
Change the levels by pressing or
Select OdB normally/ Select -3dB if subject is too dark (shifting too
much can make noise level increase
Select to reset adjusted levels
Items in VTR Mode Only
volume balance between audio ST1 & ST2
Select C MEMORY normally to activate cassette memory function
Select OFF only if recorded picture is searched w/out cassette memory
function
Page 4
Page 5
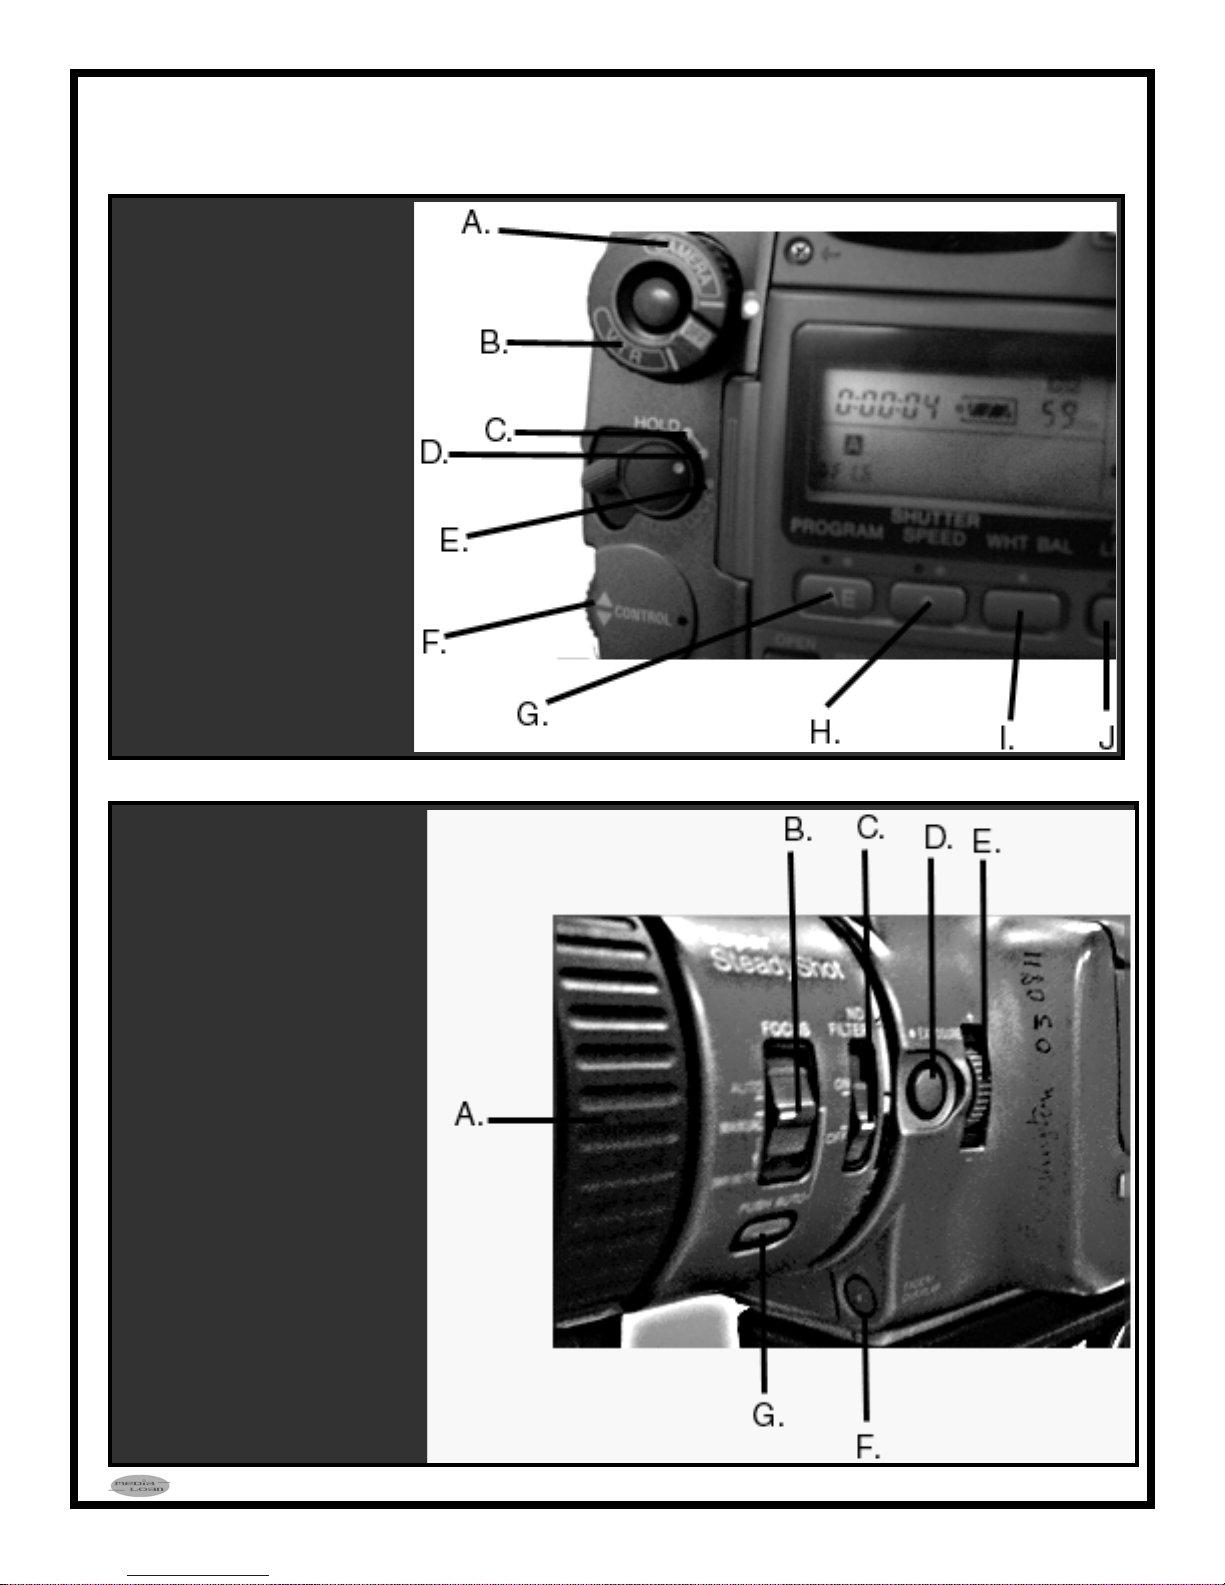
Camcorder Controls on the Back of the Sony VX-1000
A. Camera Power Switch
B. VTR Mode Switch
C. Custom Hold Selector
D. Auto Lock Release
E. Auto Lock Selector
F. AE Control Dial
G. Program AE / Iris
Priority Button
H. Shutter Priority Button
Sony VX-1000
I. White Balance Button
J. Rec Level Button
A. Manual Focus Ring
B. VTR Mode Switch
C. Auto / Manual
Focus Selector
D. Exposure Button
E. Exposure Control
Dial
F. Fader Button
G. Auto Focus Button
Page 5
Page 6

Sony VX-1000
Glossary
CCD:
Stands for Charged Couple Device. It is the
imaging device made of light sensing pixels,
which are used in the camera to capture images
for video. Higher pixel counts usually mean
better imageand detail quality.
White Balance:
Automatic on all models, this establishes the
tint, or hue, of the picture by adjusting sensitivity to red and green light. After it does this,
white objects will appear white.
Pixels:
The elements that make up a display or imager.
The larger the number of pixels, the greater the
detail and clarity of the display or the image.
Zoom:
16x or 18x allows for zooming in on subjects or
pull back for wide shots - Precision 64x or 72x
DigitalZoom uses a Hyper-Precision CCD to
maintain excellent image detail.
Lithium-Ion:
Type of rechargeable battery system that will
not develop a memory, and can be recharged at
any time.
Shutter Speed:
The shutter speed is the speed at which the
camera captures the image. The shutter ranges
from 1/60 -1/4000.
Νοτε:
Page 6
 Loading...