

Page 1
Visual Communication Camera
VGP-UVC100
取扱説明書 / Operating Instructions / Mode d'emploi
Bedienungsanleitung / Istruzioni per I'uso / Manual de instrucciones
/
http://www.sony.net/
2006 Sony Corporation / Printed in Japan
2-685-285-02(1)
Printed on 100% recycled paper using
VOC (Volatile Organic Compound)-free
vegetable oil based ink.
IMPORTANTE!
POR FAVOR LEA DETALLADAMENTE ESTE MANUAL DE
INSTRUCCIONES ANTES DE CONECTAR Y OPERAR ESTE
EQUIPO.
RECUERDE QUE UN MAL USO DE SU APARATO PODRIA
ANULAR LA GARANTIA.
Page 2
電波障害自主規制について
この装置は、情報処理装置等電波障害自主規制協議会(
術装置です。この装置は、家庭環境で使用することを目的としていますが、この装置がラジオ
やテレビジョン受信機に近接して使用されると、受信障害を引き起こすことがあります。
取扱説明書に従って正しい取り扱いをして下さい。
)の基準に基づくクラスB情報技
VCCI
•
• Microsoft
る商標または登録商標です。
• IBM
• Intel、Pentium、CeleronはIntel Corporation
• Bluetooth
に基づきこのマークを使用しています。他のトレードマークおよびトレード名称について
は、個々の所有者に帰属するものとします。
• Adobe
の米国ならびに他の国における登録商標または商標です。
その他、本書に記載されているシステム名、製品名は、一般に各開発メーカーの登録商標
•
あるいは商標です。なお、本文中では™、®マークは明記していません。
はソニー株式会社の商標です。
および
Windows
および
および
は米国
PC/AT
ワードマークとロゴは、
International Business Machines Corporation
Adobe Readerは、Adobe Systems Incorporated
は、米国
Microsoft Corporation
Bluetooth SIG, Inc.
の米国およびその他の国におけ
の登録商標です。
の商標または登録商標です。
の所有であり、ソニーはライセンス
(アドビシステムズ社)
本書での記載について
本書では、オペレーティングシステムおよびソフトウェアの名称を次のように表記しています。
Microsoft® Windows® XP Home Edition
、
Edition
本製品をお使いになる前に、必ず本取扱説明書のソフトウェア使用許諾契約書をお読みください。
Microsoft® Windows® XP Media Center EditionをWindows XP
□ 権利者の許諾を得ることなく、本製品に付属のソフトウェアおよび取扱説明書の
内容の全部または一部を複製すること、およびソフトウェアを賃貸することは、著作
権法上禁止されております。
□ 本製品に付属のソフトウェアを使用したことによって生じた損害、逸失利益、および第
三者からのいかなる請求等につきましても、当社は、一切その責任を負いかねます。
□ 本製品に付属のソフトウェアは、本製品以外には使用できません。
□ 必ず事前に試し撮りをし、正常に録画・録音されていることを確認してください。
□ 万一、機器やソフトウェアなどの不具合により録画・録音がされなかった場合、記録
内容の補償についてはご容赦ください。
□ 本製品に付属のソフトウェアの仕様は、改良のため予告なく変更することがあります
が、ご容赦ください。
□ 各種サービスは、都合によりソニーおよび提供者の判断にてご提供を中止・中断する
場合があります。その場合、対象ソフトウェアまたは対象ソフトウェアの一部機能が
ご使用いただけなくなることがありますので、あらかじめご了承ください。
および
Microsoft® Windows® XP Professional
と表記しています。
2
JP
Page 3
安全のために
ソニー製品は安全に十分配慮して設計されています。しか
し、電気製品はまちがった使い方をすると、火災や感電な
どにより人身事故につながることがあり危険です。事故を
防ぐために次のことを必ずお守りください。
安全のための注意事項を守る
ページの注意事項をよくお読みください。製品全般の注
5
意事項が記載されています。
故障したら使わない
すぐに
ださい。
カスタマーリンク修理窓口に修理をご依頼く
VAIO
万一異常が起きたら
煙が出たら
•
異常な音、においが
•
したら
内部に水、異物が入っ
•
たら
製品を落としたり、
•
破損したとき
1
2
b
ケーブルを抜く
USB
カスタマー
VAIO
リンク修理窓口に
修理を依頼する
警告表示の意味
取扱説明書および製品で
は、次のような表示をして
います。表示の内容をよく
理解してから本文をお読み
ください。
この表示の注意事項を守ら
ないと、火災・感電などに
より死亡や大けがなどの
人身事故につながることが
あります。
この表示の注意事項を守ら
ないと、感電やその他の
事故によりけがをしたり
周辺の物品に損害を与え
たりすることがあります。
注意を促す記号
行為を禁止する記号
お買い上げいただきありがとうございます。
電気製品は安全のための注意事項を守らないと、火災や人身事故になる
ことがあります。
この取扱説明書には、事故を防ぐための重要な注意事項と製品の取り扱いかたを示して
います。この取扱説明書をよくお読みのうえ、製品を安全にお使いください。お読みに
なったあとは、いつでも見られるところに必ず保管してください。
3
JP
Page 4

目次
................................................................................................
はじめに ................................................................................................
使用できるコンピュータ .......................................................................
準備 .......................................................................................................
付属品を確かめる ............................................................................
ドライバおよびソフトウェアをインストールする ..........................
カメラを取り付ける ......................................................................
ソフトウェアを起動する ...............................................................
マニュアルを見るには ...........................................................
PDF
使用上のご注意 ...................................................................................
お手入れ ..............................................................................................
保証書とアフターサービス .................................................................
主な仕様 ..............................................................................................
お問い合わせ先について .....................................................................
ソフトウェア使用許諾契約書 ..............................................................
5
6
7
8
8
8
10
11
12
13
13
14
15
16
17
4
JP
Page 5
下記の注意事項を守らないとけがをしたり周辺の
物品に損害を与えたりすることがあります。
油煙、湯気、湿気、ほこりの多い場所には置かない
上記のような場所に置くと、故障の原因となることが
あります。取扱説明書に記されている使用条件以外の
環境でのご使用は、故障の原因となることがあります。
内部に水や異物を入れない
水や異物が入ると故障の原因となります。万一、水や
異物が入ったときは、
窓口に点検・修理をご依頼ください。
そのままコンピュータに接続すると、コンピュータの故障の原
因となることがあります。
内部を開けない
内部の点検、修理は
ださい。
本体を布や布団などでおおった状態で使用しない
熱がこもって本体が変形したり、火災の原因となる
ことがあります。
本製品を落とさないようにご注意ください
カスタマーリンク修理
VAIO
カスタマーリンク修理窓口にご依頼く
VAIO
直射日光のあたる場所や炎天下の車内、熱機具の
近くに設置・保管しない
内部の温度が上がり、火災や故障の原因となることが
あります。
コード類は正しく配置する
コード類は足に引っかけたりして引っぱると製品の落下や転倒
などによりけがの原因となることがあるため、十分注意して接
続・配置してください。
5
JP
Page 6

はじめに
本カメラは、お使いのコンピュータでテレビ電話が楽しめる
応したビジュアルコミュニケーションカメラです。次の特長があります。
本カメラは有効
•
ラです。
付属の「
•
て、動画や静止画を撮影し、ビデオメールとして送ることができます。
付属の「
•
さの調整、フレームの設定のような映像に加える効果など、本カメラを
使ううえでのさまざまな設定を行うことができます。
ウェブカメラとしてお使いいただくと、ビデオチャットなどを行うこと
•
ができます。
ご注意
お使いになるメッセンジャーソフトウェアによっては、スピーカーとのハウリングを
防ぐために自動的にマイク音量を変更してしまうものがあります。マイクとスピー
カーの位置が近いためにソフトウェア側で音量を小さく設定してしまうためです。ハ
ウリングによって相手の声が聞き取れない場合は、ヘッドホンまたはヘッドセットの
併用をおすすめします。
詳細についてはお使いのソフトウェアのヘルプなどをご確認ください。
VAIO
VGP-UVC100
万画素
131
カメラキャプチャーユーティリティ」ソフトウェアを使っ
用デバイスドライバ」を使って、逆光補正や明る
センサー、マイクを搭載した
CMOS
USB2.0
USB
に対
カメ
6
JP
Page 7

使用できるコンピュータ
本カメラは、次の条件を満たすコンピュータにつないで使用できます。
コネクタが装備され、
• USB
るコンピュータ
* Windows XP Service Pack 2
XP Service Pack 2
らダウンロードしてください。
ご注意
自作コンピュータおよびOSのアップグレード、マルチブート環境での動作保証は
•
いたしません。
上記の動作環境において、すべてのコンピュータについて動作保証するものではあ
•
りません。
カメラを搭載している機種には対応していません。搭載している機種に本カメラを
•
接続してもカメラをお使いになることはできません。
本カメラで、
•
作環境が必要です。
CPU:Pentium III
なお、搭載メモリは
像が乱れる等がありましたら、撮影サイズおよび画面表示サイズを小さくすること
をおすすめします。
本カメラで
•
対応したコネクタへ本カメラを接続する必要があります。
本カメラを使用するには付属のインストールディスクよりソフトウェアをコン
•
ピュータにインストールする必要があります。
がインストールされていない場合は、
以上のサイズで動画撮影や静止画撮影をするためには下記の動
VGA
または
256 MB
万画素以上の画像を表示するには、
100
Windows XP*
がインストールされている必要があります。
Celeron 1.2 GHz
以上であることをおすすめします。また、撮影中に画
がプリインストールされてい
Windows
Microsoft
以上
のホームページか
Hi-Speed USB(USB2.0
)に
7
JP
Page 8

準備
付属品を確かめる
梱包箱から取り出したら、以下の付属品がそろっているか確認してください。
付属品の中に欠けているものがあるときは、
口にご連絡ください。
ビジュアルコミュニケーションカメラ
•
インストールディスク(
•
取扱説明書(本書)
•
保証書
•
CD-ROM1
ドライバおよびソフトウェアをインストールする
VAIO
枚)
カスタマーリンク修理窓
カメラをコンピュータで使用できるようにするため、「
バイスドライバ」をインストールします。動画や静止画を撮影するための
「
カメラキャプチャーユーティリティ」ソフトウェアもここでインス
VAIO
トールできます。
ご注意
お使いの
•
•「VAIO
•
•
「コンピュータの管理者」権限でログインしてください。
•
「新しいハードウェアの追加ウィザード」が表示されたときは、[キャンセル]をク
•
CD-ROM
てください。本書では
ライブ」と総称します。
または
CD-ROM
カメラキャプチャーユーティリティ」ソフトウェアをお使いいただくには
以上のハードディスクの空き容量が必要です。
GB
ドライバおよびソフトウェアをインストールする前に、お使いの
のものにアップデートしてください。
ドライバおよびソフトウェアをインストールする前に、他のソフトウェアをすべて
終了してください。
リックしてカメラを一度コンピュータから取りはずしてから再度インストールを
行ってください。
ドライブなどのディスクドライブを使用できる状態にしておい
CD-ROM
ドライブに付属の取扱説明書や電子マニュアルをご覧ください。
ドライブなどのディスクドライブを「
CD-ROM
ドライブの接続方法については、コンピュータ
VGP-UVC100
CD-ROM
Windows
を最新
用デ
ド
2
8
JP
Page 9

コンピュータの電源を入れ、
1
トールディスクを
インストールプログラムが自動的に起動し、「
CD-ROM
Windows
ドライブに入れる。
を起動し、付属のインス
Sony Visual
Communication Camera VGP-UVC100 Application Installer
」画面が表示されます。
Setup
インストールするソフトウェアのチェックボックスがチェックさ
2
れていることを確認し、[次へ]をクリックする。
z
ヒント
ソフトウェアがすでにインストール済みの場合は、チェックボックスは表示さ
れません。
ウィザードの画面が閉じるまで、表示される画面の指示に従って
3
[次へ]または[完了]をクリックする。
z
ヒント
インストール完了後に、コンピュータの再起動を要求する画面が表示されるこ
とがあります。その場合は、[はい]を選択してください。
カメラの
4
自動的に必要なドライバがインストールされます。コンピュータの再
起動を要求する画面が表示された場合は、[はい]を選択してくださ
い。
Windows
ご注意
• Windows
ください。カメラやコンピュータが正常に動作しない可能性があります。
カメラの
•
行うと、コンピュータの動作が不安定になることがあります。
本カメラは、高画質の映像を表示するために
•
確保する仕様になっています。このため、
同時に接続して使用する場合に転送帯域が不足して正常に動作しなくなることがあ
ります。
の起動または終了の途中で、カメラの
USB
ケーブルをコンピュータの
USB
の再起動後、カメラが使用できるようになります。
USB
ケーブルはゆっくり抜き挿ししてください。短い間隔で抜き挿しを
USB
ハブなどを使って他の
USB
コネクタにつなぐ。
USB
ケーブルを抜き挿ししないで
の一定のデータ転送帯域を常に
機器と
USB
次のページにつづく
9
JP
Page 10
z
ヒント
複数の
•
USB
ると、必要なドライバが自動的にインストールされます。コンピュータの再起動を
要求する画面が表示された場合は、[はい]を選択してください。
動後、接続した
ドライバが正しくインストールされていない場合は、一度アンインストールしてか
•
ら再度インストールし直します。ドライバのインストールの確認方法やアンインス
トールのしかたは、
ページをご覧ください。
12
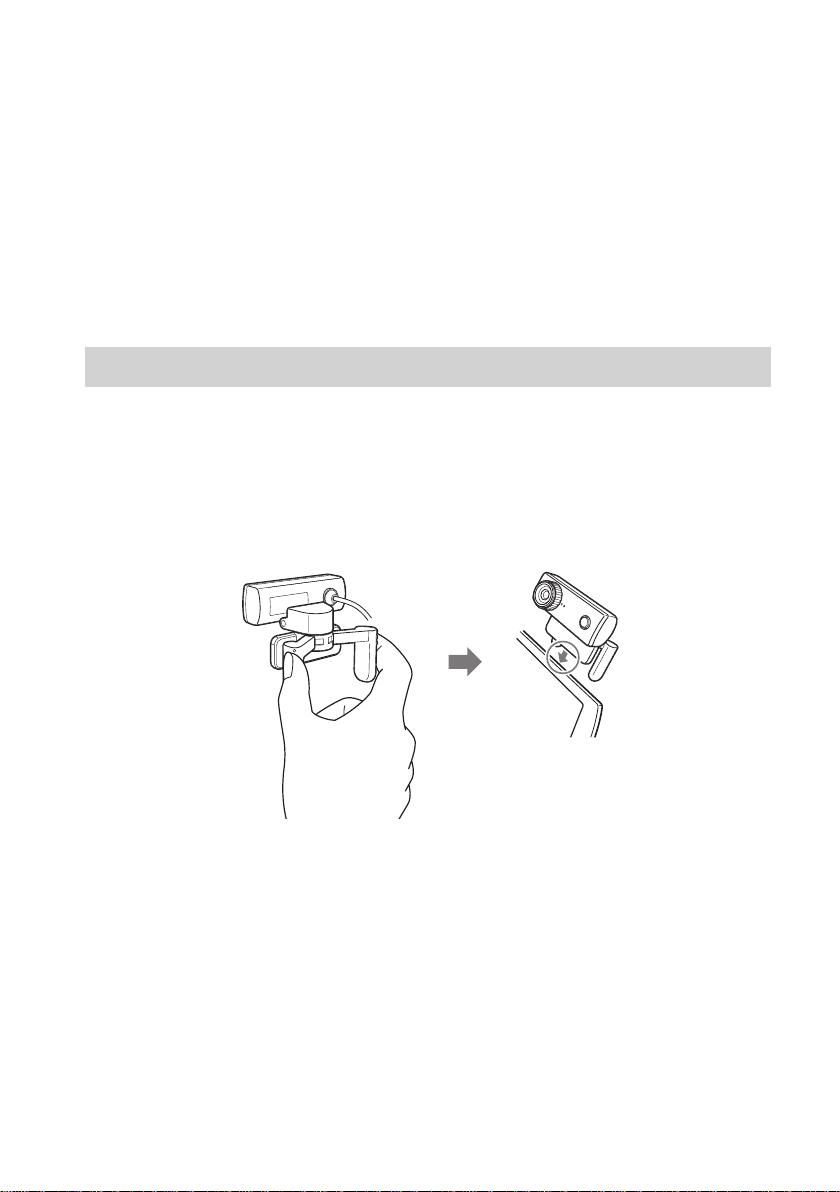
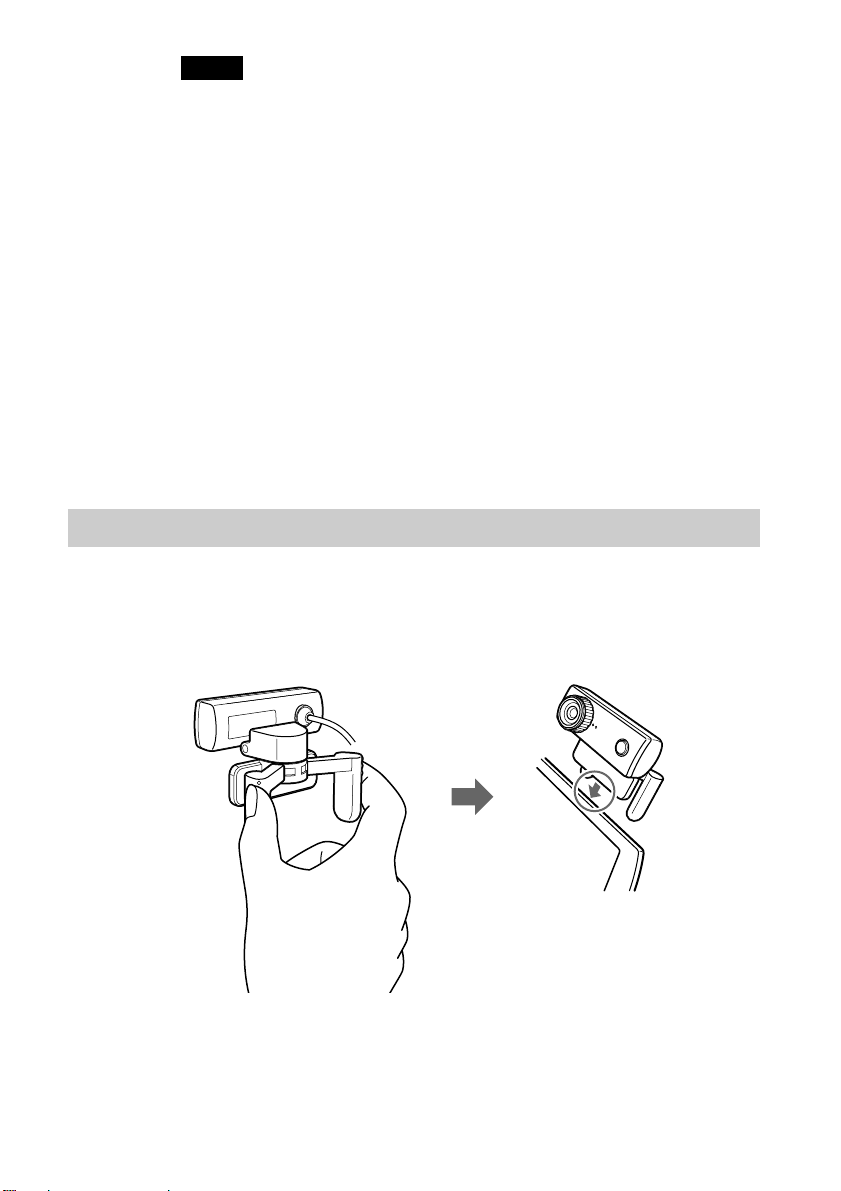
カメラを取り付ける
ディスプレイパネルに直接取り付けるには
カメラをディスプレイパネルに取り付ける。
アームをつまんで、ディスプレイパネルにはさんで取り付けます。
コネクタがある場合は、異なる
コネクタでカメラが使用できるようになります。
USB
マニュアルをご覧ください。
PDF
USB
コネクタに
ケーブルを接続す
USB
Windows
マニュアルの見かたは
PDF
の再起
10
JP
z
ヒント
お使いのコンピュータによっては、カメラを直接取り付けられないことがあります。
この場合は、この後の「水平に置く」をご覧ください。
Page 11
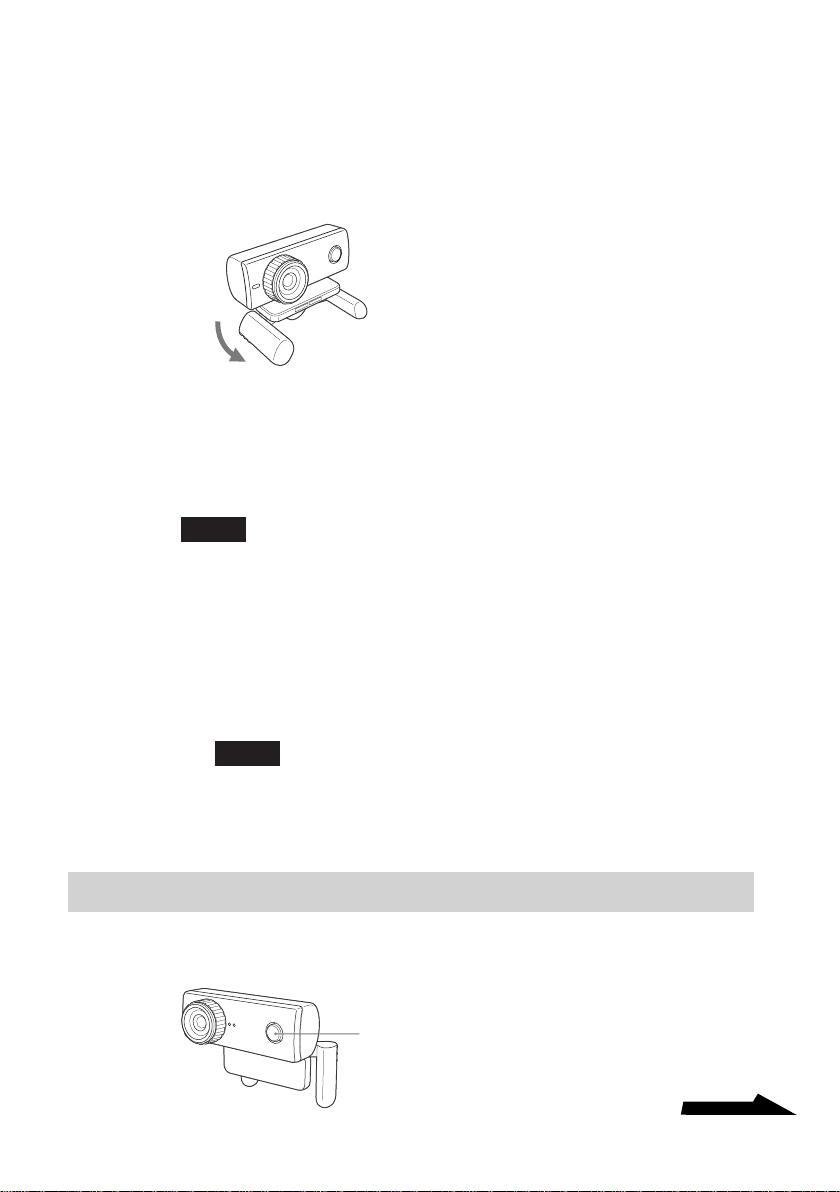
水平に置くには
ディスプレイやコンピュータ本体の上など、平らで安定した場所に水
CRT
平にカメラを置くときは、次のように使用します。
アームとアームプレートを手前に回転させる。
1
アームを下にして、カメラを安定した場所に置く。
2
カメラを取りはずすには
ご注意
コンピュータの電源が切れているときは、次の手順1の操作は不要です。ただし、省電
力動作モードで
カメラを使用しているソフトウェアを終了する。
1
ケーブルを抜き、再度挿入しても認識されないことがあります。
USB
ケーブルをコンピュータから抜き、カメラを取りはずす。
USB
2
ご注意
ケーブル部分を引っぱって
ります。必ずコネクタ部を持って引き抜いてください。
ソフトウェアを起動する
カメラの
CAPTURE
ケーブルを抜くと、故障の原因となることがあ
USB
ボタンを押す。
CAPTURE
ボタン
次のページにつづく
JP
11
Page 12

「
VAIO
静止画や動画の撮影は「
ウェアで行います。カメラの設定の変更や、映像に効果を加えるときは
「
VGP-UVC100
使いかたについて詳しくは付属のインストールディスクに収録されている
マニュアルや、「
PDF
ウェアのヘルプをご覧ください。
ご注意
ソフトウェアの起動時間はお使いのコンピュータにより異なります。一度
CAPTURE
い。
マニュアルを見るには
PDF
静止画や動画の撮影のしかたや、逆光補正や明るさの調整などのカメラの
設定の変更のしかたは、付属のインストールディスクに収録されている
マニュアルに記載されています。
PDF
z
ヒント
あらかじめ、付属のインストールディスクを
•
があります。インストールディスクを入れる毎に「
Camera VGP-UVC100 Application Installer Setup
で、ドライバおよびソフトウェアのインストールが終わっている場合は[キャンセ
ル]をクリックしてください。
マニュアルをご覧になるには、
•PDF
ピュータにインストールされていない場合は、下記よりダウンロードしてくださ
い。
http://www.adobe.co.jp/
カメラキャプチャーユーティリティ」ソフトウェアが起動します。
カメラキャプチャーユーティリティ」ソフト
VAIO
用デバイスドライバ」を使います。
カメラキャプチャーユーティリティ」ソフト
VAIO
ボタンを押したあとは何度も押さずに、しばらくお待ちくださ
CD-ROM
Adobe Reader
ドライブに入れておく必要
Sony Visual Communication
」画面が表示されますの
が必要です。お使いのコン
12
JP
[スタート]ボタン、[マイコンピュータ]の順にクリックし、
1
ドライブアイコンをダブルクリックする。
ROM
「
Manual
2
[
VGP-UVC100_
3
」フォルダを開き、「JP」フォルダを開く。
取扱説明書
]をダブルクリックする。
.pdf
CD-
Page 13

使用上のご注意
置いてはいけない場所
使用中、保管中にかかわらず、次のような
場所には置かないでください。故障の原因
となります。
異常に高温になる場所
•
炎天下や夏場の窓を閉めきった自動車内
は特に高温になり、放置すると、変形し
たり、故障したりすることがあります。
直射日光の当たる場所、熱器具の近く
•
変形したり、故障したりすることがあり
ます。
砂地や砂浜などの砂ぼこりの多い場所
•
海辺や、砂地、あるいは砂ぼこりが起こ
る場所などでは、砂がかからないように
してください。故障の原因となるばかり
か、修理できなくなることもあります。
レンズを太陽に向けたままにしない。
•
焼き付きを起こすなどレンズを傷めてし
まいます。窓際や室外に置くときなどは
ご注意ください。
操作について
ソフトウェアの動作中にカメラの
•
ケーブルを抜かないでください。誤動作
の原因になります。
カメラ
•
•
の上に物を載せないでください。
急激な温度変化は避けてください。寒い
ところから暖かいところに移したり、
室温を急に上げた直後は使わないでくだ
さい。内部に結露が生じている場合が
あります。しばらく放置してからお使い
ください。
USB
カメラを無理に回転させないでくださ
•
い。無理にカメラを回転させると、故障
の原因となることがあります。
指定以外のコンピュータで使わないでく
•
ださい。故障の原因となることがありま
す。
レンズについて
カメラ
のレンズには触れないでください。
異常や不具合が起きたら
万一異常や不具合が起きたとき、異物が
中に入ったときは、コンピュータ本体から
ケーブルをはずし、
USB
リンク修理窓口にご相談ください。
VAIO
カスタマー
お手入れ
本製品の汚れは
柔らかい布で空ぶきします。汚れがひどい
ときは、うすい中性洗剤溶液でしめらせた
布でふいてください。シンナー、ベンジ
ン、アルコールなどは表面の仕上げをいた
めますので使わないでください。
レンズの汚れは
レンズ表面のほこりは、ブロワーブラシ
か、柔らかい刷毛で取ります。
13
JP
Page 14

保証書と
アフターサービス
保証書
本カメラは保証書が添付されていますの
•
で、お買い上げの際、お買い上げ店から
お受け取りください。
所定事項の記入および記載内容をお確か
•
めのうえ、大切に保存してください。
アフターサービス
調子が悪いときはまずチェックを
この取扱説明書をもう一度ご覧になって
お調べください。
それでも具合の悪いときは
マーリンクへご連絡ください
カスタマーリンクについては、保証
VAIO
書をご覧ください。
保証期間中の修理は
保証書の記載内容に基づいて修理させてい
ただきます。ただし、保証期間内であって
も、有償修理とさせていただく場合がござ
います。
詳しくは保証書をご覧ください。
保証期間経過後の修理は
修理によって機能が維持できる場合は、
ご要望により有料で修理させていただき
ます。
VAIO
カスタ
修理について
当社では本カメラの修理は引取修理を行っ
ています。
当社指定業者がお客様宅に修理機器をお引
き取りにうかがい、修理完了後にお届けし
ます。詳しくは、
へご連絡ください。
修理用補修部品について
ソニーでは、長期にわたる修理部品のご提
供、ならびに環境保護などのため、修理
サービスご提供の際に、再生部品を使用す
ることがあります。
また原則として交換した部品は、上記の理
由によりソニーの所有物として回収させて
いただいておりますので、あらかじめご了
承ください。
部品の保有期間について
当社では本カメラの補修用性能部品(製品
の機能を維持するために必要な部品)を、
製造打ち切り後最低
す。この部品保有期間を修理可能の期間と
させていただきます。保有期間が経過
したあとも、故障箇所によっては修理可能
の場合がありますので、
リンク修理窓口にご相談ください。
ご相談になるときは次のことをお知ら
せください。
型名:保証書に記載されています。
•
製造番号:本カメラの底面に記載されて
•
います。
故障の状態:できるだけ詳しく
•
購入年月日:
•
カスタマーリンク
VAIO
年間保有していま
6
VAIO
カスタマー
14
JP
Page 15

主な仕様
ビジュアルコミュニケーションカメラ
撮像素子
1/4型133
シブ方式
万画素(有効
イメージセンサー
CMOS
レンズ
2群2枚、F2.3
焦点距離
(
f=3.8 mm
f=31.3 mm、35 mm
フォーカス範囲:
画角 水平全画角:約
垂直全画角:約
ホワイトバランス
屋内/屋外
シャッタースピード
オート
フリッカーキャンセル
50 Hz/60 Hz
ビデオフォーマット
ビット
RGB 24
サイズ
Picture
1,280 × 1,024
×
640
480
×
320
240
サイズ
Movie
640 × 480、WMV
×
320
240、WMV、MPEG1
×
160
120、WMV
×
160
112、MPEG1
万画素)原色プログレッ
131
カメラ換算)
∞
3 cm ~
度
56.8
度
42.6
表示フレーム数
最大30フレーム/秒
コンピュータのスペック、アプリケーションの
*
使用状態などにより異なります。
*
カメラユニット可動範囲
上10度、下90度
度( ケ ーブルが許す限り
左右
360
)
消費電力
約
1.0 W
外形寸法
通常時:
(幅)
約
55
平置き時:
(幅)
約
55
x 50.5
x 39.5
(高さ)
(高さ)
x 40.5
x 39.0
(奥行き)
(奥行き)
ケーブル長
約
100 cm
質量
約
55 g
環境条件/保存条件
動作温度:
動作湿度:
保存温度: −
(温度勾配
保存湿度:
5°C〜35°C
20%〜80%
ただし、
65%
20°C〜60°C
10%〜85%
ただし、
20%
(温度勾配
(結露のないこと)
における湿度は
35°C
以下(湿球温度
/時以下)
10°C
(結露のないこと)
における湿度は
60°C
以下(湿球温度
10°C
29°C
35°C
以下)
以下)
付属品
インストールディスク
(
CD-ROM1
取扱説明書(
保証書(
枚)
)
1
)
1
mm
mm
/時以下)
仕様および外観は、改良のため予告なく変更する
ことがありますが、ご了承ください。
15
JP
Page 16

お問い合わせ先について
「故障かな?と思ったら」の項目をチェックしても具合が悪いときは、以下
のお問い合わせ先にご相談ください。
カスタマーリンク
VAIO
電話番号 (
受付時間
平日
土、日、祝日
(年末年始は除く)
お電話は音声認識を用いた自動音声のアナウンスに従って、
ご希望のメニューをお選びください。各メニューの担当オペ
レーターが対応いたします。
お電話の前に以下の内容をご用意ください。
1 お客様の
2 カスタマー登録していただいたときの電話番号(ご登録いただいている
場合)
zちょっと一言
発信者番号通知でお電話していただくとよりスムーズに担当者につながります。
3 本カメラの型名(保証書に記載されています)
4 本カメラの製造番号(本カメラの底面に記載されています)
5 接続して使用しているコンピュータ本体の型名(コンピュータの保証書
またはカスタマー登録カードに記載されています)
6 表示されたエラーメッセージ
7 本カメラに対応していないソフトウェアを追加した場合は、そのソフト
ウェアの名前とバージョン
8 トラブルが発生する前または直前に行った操作
9 トラブルがどのくらいの頻度で再現するか
0 その他お気づきの点
qa 筆記用具(修理を受付する際にお伝えする修理受付番号を控えるのに必
要です)
0466)30-3000
10時〜21
10時〜17
カスタマーID(ご登録いただいている場合)
VAIO
時
時
一般的にお電話は午前中
より午後の方がつながり
やすくなっております。
16
JP
Page 17

この度は弊社ビジュアルコミュニケーションカメラ(以下本製品とします)をお買い上げいただき
ありがとうございます。本製品には下記のソフトウェア製品(以下許諾ソフトウェアとします)が同
梱されておりますが、許諾ソフトウェアをご使用いただく前に下記ソフトウェア使用許諾契約書を
あらかじめお読みください。お客様による許諾ソフトウェアの使用開始をもって、下記ソフトウェア
使用許諾契約書にご同意いただいたものとします。
「
VAIO Camera Capture Utility
「
Sony Visual Communication Camera VGP- UVC100
」
」
ソフトウェア使用許諾契約書
本契約は、お客様(以下使用者とします)と弊社(以下ソニーとします)との間での許諾
ソフトウェアの使用権の許諾に関して合意するものです。
第1条(総則)
ソニーは、許諾ソフトウェアの日本国内における非独占的かつ譲渡不能な使用権を使用者に
許諾します。
第2条(使用権)
本契約によって生ずる許諾ソフトウェアの使用権とは、許諾ソフトウェアがインストール
1.
されるパーソナルコンピュータにおいてのみ、使用者がソフトウェアを使用する権利を言い
ます。
使用者は、許諾ソフトウェアおよび関連書類の一部もしくは全部を複製、複写もしくは
2.
修正、追加等の改変をすることができません。
第3条(譲渡等の禁止)
使用者は、ソニーの事前の文書による承諾なくして前条に規定する使用権を第三者に譲渡
1.
し、もしくはその他の方法で使用させてはならないものとします。
使用者は許諾ソフトウェアおよび関連書類等を日本国外に輸出、移送をしてはならないもの
2.
とします。
使用者は許諾ソフトウェアに関し逆アセンブル、逆コンパイル等のソースコード解析作業を
3.
行なってはならないものとします。
第4条(許諾ソフトウェアの権利)
許諾ソフトウェアおよびその関連書類に関する著作権等一切の権利は、ソニーまたはソニー
が許諾ソフトウェアの使用、再許諾を許諾された原権利者(以下原権利者とします)にある
ものとし、使用者は許諾ソフトウェアおよびその関連書類に関して本契約に基づき許諾され
た使用権以外の権利を有しないものとします。
第5条(ソニーの免責)
ソニーは、使用者が本契約に基づき許諾された使用権を行使することにより生じた使用者
もしくは第三者の損害に関していかなる責任も負わないものとします。
17
JP
Page 18

第6条(第三者に対する責任)
使用者が許諾ソフトウェアを使用することにより、第三者との間で著作権、特許権その他の
知的財産権の侵害を理由として紛争を生じたときは、使用者自身が自らの費用で解決する
ものとし、ソニーおよび原権利者に一切の迷惑をかけないものとします。
第7条(秘密保持)
使用者は、本契約により提供される許諾ソフトウェア、その関連書類等の情報および本契約
の内容のうち公然と知られていないものについて秘密を保持するものとし、ソニーの承諾を
得ることなく第三者に開示または漏洩しないものとします。
第8条(契約の解除)
ソニーは、使用者において次の各号の一に該当する事由があるときは、直ちに本契約を解除
し、またそれによって蒙った損害の賠償を使用者に対し請求することができるものとしま
す。
(1)本契約に定める条項に違反したとき
(2)差押、仮差押、仮処分その他強制執行の申立を受けたとき
第9条(許諾ソフトウェアの廃棄)
前条の規定により本契約が終了した場合、使用者は契約の終了した日から2週間以内に許諾
ソフトウェア、関連書類およびその複製物を廃棄するものとし、その旨を証明する文章を
ソニーに差し入れるものとします。
第10条(保証)
ソニーは、使用者の本製品の購入後90日間は以下の通り保証を行ないます。
1.
(1)許諾ソフトウェアに関し、
ソニーは自己の判断で、良品の
(2)前号の保証は、ソニーが指定する場所にて行われ、媒体、郵送料等の費用は、使用者が
負担するものとします。
ソニーが許諾ソフトウェアに関し使用者に対し行う保証は本条に定められているもののみと
2.
します。
第11条(その他)
本契約に定めなき事項もしくは本契約の解釈に疑義を生じた場合は、ソニー、使用者は誠意
をもって協議し、解決するものとします。
CD-ROM
の破損、損傷等の外的瑕疵が発見された場合は、
CD-ROM
を使用者に提供するものとします。
以上
JP
18
Page 19

Page 20
WARNING
To reduce the risk of fire or
electric shock, do not expose this
apparatus to rain or moisture.
To avoid electrical shock, do not
open the cabinet. Refer servicing
to qualified personnel only.
When connecting to the USB port, please connect
to the USB port with mark.
For customers in the U.S.A.
Owner’s Record
The model number and the serial number are located
on the bottom of the camera. Record the serial
number in the space provided below. Refer to this
number whenever you call your Sony dealer
regarding this product.
Model No. VGP-UVC100
Serial No. ________________________________
FCC Notice
This equipment has been tested and found to comply
with the limits for a Class B digital device, pursuant
to Part 15 of the FCC Rules. These limits are
designed to provide reasonable protection against
harmful interference in a residential installation. This
equipment generates, uses, and can radiate radio
frequency energy and, if not installed and used in
accordance with the instructions, may cause harmful
interference to radio communications. However, there
is no guarantee that interference will not occur in a
particular installation. If this equipment does cause
harmful interference to radio or television reception,
which can be determined by turning the equipment
off and on, the user is encouraged to try to correct the
interference by one or more of the following
measures:
– Reorient or relocate the receiving antenna.
– Increase the separation between the equipment and
receiver.
– Connect the equipment into an outlet on a circuit
different from that to which the receiver is
connected.
– Consult the dealer or an experienced radio/TV
technician for help.
The shielded interface cable recommended in this
manual must be used with this equipment in order to
comply with the limits for a digital device pursuant to
subpart B of Part 15 of FCC Rules.
You are cautioned that any changes or modifications
not expressly approved in this manual could void
your authority to operate this equipment.
For questions regarding your product or for the Sony
Customer Information Service Center nearest you,
call 1-888-476-6972 in the United States or 1-800961-7669 in Canada.
The number below is for FCC related matters only.
Declaration of Conformity
Trade Name: SONY
Model No.: VGP-UVC100
Responsible Party: Sony Electronics Inc.
Address: 16530 Via Esprillo,
Telephone No.: 858-942-2230
This device complies with Part 15 of the FCC
Rules. Operation is subject to the following two
conditions: (1) This device may not cause
harmful interference, and (2) this device must
accept any interference received, including
interference that may cause undesired operation.
San Diego, CA 92127
U.S.A.
For customers in Canada
This Class B digital apparatus complies with
Canadian ICES-003.
For customers in Europe
This product conforms with the following
European Directives:
89/336/EEC, 92/31/EEC (EMC Directives)
93/68/EEC (CE-Marking Directive)
This product complies with European standards
EN55022 Class B and EN55024 for use in the
following areas: residential, commercial and light
industrial.
Pictures and/or sound distortion may occur if this
unit is positioned in close proximity to any
equipment emitting electromagnetic radiation.
Repair and maintenance only by authorized Sony
technicians. Improper use and repairs can create a
safety hazard.
This equipment has been tested and found to
comply with the limits set out in the EMC Directive
by using connecting cables not longer than 3 meters.
GB
2
Page 21
Disposal of Old Electrical &
Electronic Equipment
(Applicable in the European
Union and other European
countries with separate
collection systems)
This symbol on the product or on its packaging
indicates that this product shall not be treated as
household waste.
Instead it shall be handed over to the applicable
collection point for the recycling of electrical and
electronic equipment. By ensuring this product is
disposed of correctly, you will help prevent
potential negative consequences for the
environment and human health, which could
otherwise be caused by inappropriate waste
handling of this product. The recycling of
materials will help to conserve natural resources.
For more detailed information about recycling of
this product, please contact your local Civic
Office, your household waste disposal service or
the shop where you purchased the product.
• Sony, VAIO, , and the Eco Info logo
are trademarks of Sony Corporation.
• Microsoft and Windows are registered trademarks
of Microsoft Corporation in the United States and/
or other countries.
• IBM and PC/AT are registered trademarks of
International Business Machines Corporation.
• Intel, Pentium and Celeron are trademarks and
registered trademarks of Intel Corporation.
• The Bluetooth word mark and logos are owned by
the Bluetooth SIG, Inc. and any use of such marks
by SONY is under license.
• Adobe and Adobe Reader are trademarks or
registered trademarks of Adobe Systems
Incorporated in the United States and/or other
countries.
• All other names of systems, products, and services
are trademarks of their respective owners. In this
manual, the ™ or ® marks are not specified.
In this manual, Microsoft® Windows® XP Home
Edition, Microsoft® Windows® XP Professional and
Microsoft® Windows® Media Center Edition are
referred to as Windows XP.
Table of Contents
Introduction ........................................... 4
Compatible Computers .......................... 4
Setting up ............................................... 5
Checking the supplied
accessories.................................... 5
Installing the driver and the
software ........................................ 6
Mounting the camera ...................... 7
Activating software ........................ 9
Seeing the PDF manual ................ 10
Precautions .......................................... 11
Maintenance ........................................ 11
Getting Help ........................................ 12
Specifications ...................................... 13
GB
GB
3
Page 22

Introduction
This camera is a USB 2.0 compatible visual communication camera. The
camera enables you to use the TV telephone function on your computer.
These are the following features.
• 1.3 Mega-pixel CMOS sensor and microphone.
• Shoot moving and still images, and transfer as video mail with the
supplied “VAIO Camera Capture Utility” software.
• Various camera settings, such as Backlight compensation adjustment and
brightness, added effects, such as setting a frame, etc., with “VGPUVC100 device driver.”
• Video chatting when used as a web camera.
Note
Your “Messenger Software” may change the microphone volume automatically to
prevent the speaker from howling; the software lowers the speaker volume when the
microphone is close to the speaker. If voices are not easily audible, use a headphone or
headset.
Refer to the help section of your software instructions for details.
Compatible Computers
The camera is designed to work with computers pre-installed with
Windows XP* and equipped with USB ports.
* Requires Windows XP Service Pack 2 to be installed. If it is not installed,
download it from Microsoft’s website.
Notes
• There is no guarantee of proper operation on a home-built computer or OS upgrade/
multi-boot.
• In the above operation environments, there is no guarantee of proper operation on every
computer.
•A computer equipped with a camera is incompatible. Even if the camera is connected to
the computer, you cannot use it.
• The following operation environments are necessary for capturing still images and
movies in the size of VGA or the larger size.
CPU: Pentium III, or Celeron 1.2 GHz or more
We recommend 256 MB of memory or more.
We recommend reducing the screen size or image size, if the image is distorted during
GB
4
Page 23

capturing.
• If you display over a million-pixels, this camera is necessarily connected to the
connector with Hi-Speed USB (USB 2.0).
• It is necessary to install the software from the supplied installation disc, in order to use
the camera.
Setting up
Checking the supplied accessories
Remove the camera from the box and make sure that the box contains the
accessories listed below.
If any of the accessories are missing, contact the Sony dealer where you
purchased this product or a Sony service representative in your area.
• Visual Communication Camera
• Installation disc (CD-ROM × 1)
• Operating instructions (this manual)
• Warranty card*
* The accessories included vary according to country and region.
GB
5
Page 24

Installing the driver and the software
Install the VGP-UVC100 device driver for using the camera on the
computer. You can install “VAIO Camera Capture Utility” software for
capturing still images and movies.
Notes
• Make sure that your disk drive, such as CD-ROM drive etc., is available for use on your
computer. In this manual, the CD-ROM drives or multiple disk drives are referred to as
“the CD-ROM drive.” For details on how to connect a CD-ROM drive, refer to the
manuals provided with your computer or CD-ROM drive.
• To use “VAIO Camera Capture Utility,” more than 2 GB free space of the hard disc is
necessary.
• Update Windows before installing the driver and software.
• Exit all software before installing the driver and software.
• Log on as Administrator before installing the driver and software.
• If the “Add New Hardware Wizard” dialog box appears, click “Cancel,” then
disconnect the camera from your computer and reinstall it.
1 Turn on the computer, start the Windows operating system
and insert the supplied installation disc into the CD-ROM
drive.
The installation program starts automatically and the “Sony Visual
Communication Camera VGP-UVC100 Application Installer Setup”
screen appears.
2 Make sure that the checkbox to install the software has been
checked, and click “Next.”
z Hint
The checkbox will not appear if the software is already installed.
3 Follow the on-screen instructions until the setup finishes and
display closes.
z Hint
Click “Yes” if a restart pop-up message appears after installation.
4 Connect the USB cable of the camera to the USB port on
your computer.
The necessary driver is installed automatically.
Click “Yes” if a restart pop-up message appears after installation. After
restarting Windows, you can begin using the camera.
GB
6
Page 25
Notes
• Do not disconnect/reconnect the camera’s USB cable while your Windows operating
system is starting up or shutting down; doing so may cause the camera or your
computer to malfunction.
• Carefully disconnect/reconnect the USB cable of the camera; doing it quickly might
result in unstable operation of your computer.
• This camera is designed to constantly secure a fixed amount of USB bandwidth for data
transfer to display high-quality images. Therefore, if you use a USB hub to connect
USB composite device simultaneously, the amount of bandwidth available for data
transfer might not be sufficient to support proper operation.
z Hints
• When there are the multiple USB ports, after connecting the USB cable to different
USB ports, the necessary driver is automatically installed. Click “Yes” if a restart popup message appears after installation. After restarting Windows and connecting to the
USB port, you can begin using the camera.
• If the driver is not properly installed, uninstall and then reinstall. Refer to the PDF
manual to confirm installing and to uninstall. For details on how to see the PDF
manual, see page 10.
Mounting the camera
When mounting directly
Mount the camera onto the display panel.
Pinch the arms together and hang the camera on top of the display panel.
z Hint
Depending on the type of computer you use, this camera sometimes cannot be mounted
directly.
In this case, see “Placing horizontally” on the next page for details.
7
GB
Page 26
Placing horizontally
If the camera is to be put on a flat and stable place, such as on the CRT
display, the computer, etc., do the following:
1 Turn the arm and arm plate towards you.
2 Put the camera on a stable surface.
Removing the camera
Note
When your computer is off, you do not need to perform step 1 below. However, if you
disconnect the USB cable while your computer is in power-saving mode, and then
connect it again, the camera may not be detected.
1 Close the software used by the camera.
2 Pull out the USB cable from your computer, and then
remove the camera.
Note
If you pull on the cable itself when disconnecting the USB cable, you may damage
the cable. Make sure that you hold onto the connector when disconnecting the cable.
GB
8
Page 27
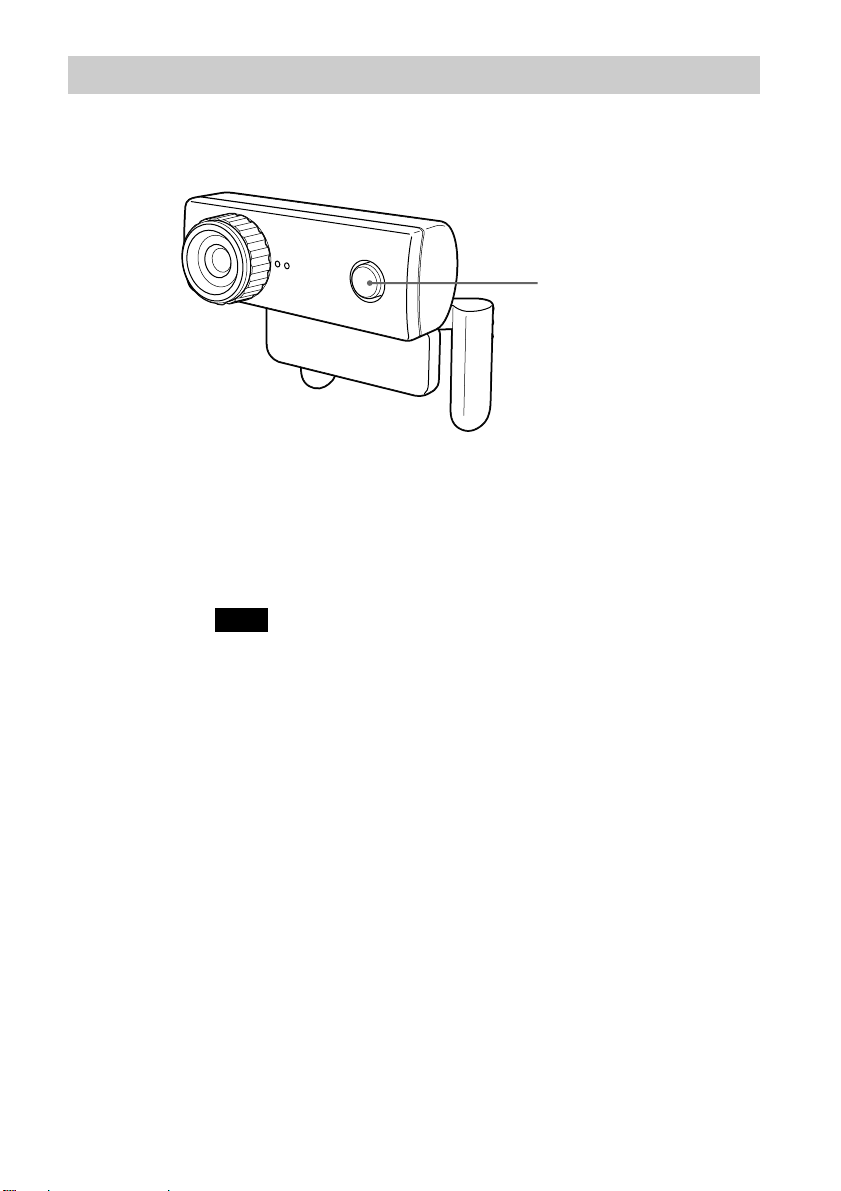
Activating software
Press the CAPTURE button on the camera.
“VAIO Camera Capture Utility” software activates.
Capturing still images and movies requires “VAIO Camera Capture
Utility.” When you change the setup of the camera and add effects to
images, “VGP-UVC100 device driver” is available. For details
regarding use, see the PDF manual in the supplied installation disc and
the help section of “VAIO Camera Capture Utility.”
Note
The start-up time of software depends on your computer. Once you press the
CAPTURE button, wait for being activated.
CAPTURE button
GB
9
Page 28

Seeing the PDF manual
The way to capture still images and movies and to change the setup of the
camera, such as adjustment of Backlight Comp and brightness, are
described in the PDF manual included the supplied installation disc.
z Hints
• The supplied installation disc is required to be inserted in the CD-ROM drive in
advance. When the installation disc is inserted, the “Sony Visual Communication
Camera VGP-UVC100 Application Installer Setup” screen will appear. Click “Cancel”
when you finish installing the driver and software.
• To see the PDF manual, Adobe Reader is necessary. If it is not installed on your
computer, download from the following website:
http://www.adobe.com/
1 Click the “Start” button, “My computer” and then double click
the CD-ROM drive icon.
2 Open the “Manual” folder and then open the “GB” folder.
3 Double click “VGP-UVC100_manual_gb.pdf.”
10
GB
Page 29

Precautions
Usage and storage
locations
Do not use or store this product in the
following locations. Doing so may
damage the camera.
• Locations subject to abnormally
high temperatures
During periods of hot weather or the
summer season, the temperature inside
closed vehicles becomes especially
high, and if the camera is left in such a
location, it may warp or be damaged.
• Locations subject to direct
sunlight or next to heating
appliances
The camera may warp or be damaged.
• Sandy locations, such as the
beach
Do not place the camera in a location
where sand may be present, such as the
beach or other sandy areas. Doing so
may damage the camera, and in some
cases, repair may not be possible.
• Do not point the lens at the sun.
This could cause burn-in or other lens
damage. Be careful when leaving the
camera next to a window or outdoors.
Operation
• Do not remove the camera’s USB cable
during operation. Doing so may cause
the camera to malfunction.
• Do not place any objects on top of the
camera.
• Avoid placing the camera in locations
subject to sudden temperature changes.
Do not use the camera immediately
after moving it from a cold location to a
warm location, or after the ambient
temperature has risen drastically.
Otherwise, condensation may occur
inside the camera. Let the camera stand
for a moment before using it.
• Do not turn around the camera forcedly.
Doing so, the malfunction might occur.
• Do not use the computer except the
specification.
• Do not allow water or objects to get
inside the camera. Do not open the
camera.
Lens
Do not touch the lens.
Maintenance
Cleaning the cabinet
Wipe the outside of the camera with a
soft, dry cloth. To remove stubborn stains,
moisten the cloth with a mild, neutral
detergent. Do not use solvents, cleaning
alcohol, benzine or other substances that
may damage the finish.
Cleaning the lens
Remove any dust from the front of the
lens using a blower brush or soft brush.
11
GB
Page 30

Getting Help
This section provides information on how
to get help and support from Sony, and on
troubleshooting tips for your Visual
Communication Camera.
For customers in Europe
❑ VAIO-Link. For addresses and
numbers, refer to
http://www.vaio-link.com/
For customers in other
countries and regions
About Sony’s support
options
Sony provides several support options for
your Visual Communication Camera.
When you have questions about your
camera or the software, refer to the
following:
❑ This guide explains how to use your
camera.
For customers in the United
States and Canada
❑ The Sony Customer Information
Service Center offers information
about your notebook and other Sony
products that work with your computer.
To contact Sony Customer Information
Service Center, call 1-888-4SONYPC
(1-888-476-6972).
❑ Sony Online Support
This service provides instant access to
information on commonly encountered
problems. Type a description of the
problem and the Knowledge Database
searches for the corresponding solutions
online. You can visit Sony Online
Support at
http://esupport.sony.com/
❑ VAIO Website provides Frequently
Asked Questions and solutions.
vaio-online.sony.com/
12
GB
Page 31

Specifications
Visual Communication
Camera
Image pickup
1/4” 1,330,000-pixel (1,310,000 effective pixels)
colour CMOS progressive scanning image sensor.
Lens
2 groups, 2 lenses, F2.3
Focal length f=3.8 mm (0.1 inch)
(equivalent to a 35 mm (1.4 inch) camera at
f=31.3 mm (1.1 inch))
Focus range 30 mm to ∞ (1.2 inch to ∞)
Angular field of view Horizontal approx. 56.8°
Vertical approx. 42.6°
White balance
Indoors/Outdoors
Shutter speed
Auto
Flicker cancel function
50 Hz/60 Hz
Video capture format
RGB24 bits
Picture sizes
1,280 × 1,024
640 × 480
320 × 240
Movie sizes
640 × 480, WMV
320 × 240, WMV, MPEG1
160 × 120, WMV
160 × 112, MPEG1
Number of display frames
Maximum: 30 frames/sec*
* This rate differs depending on the specifications of
your computer and the application you are using.
Camera rotational range
Above 10° below 90°
Right and left 360° (as cable permits)
Power consumption
Approx. 1.0 W
Dimensions
Normal
Approx. 2.4 × 2 × 1.8 inches (55 × 50.5 × 40.5 mm)
(W × H × D)
Horizontal
Approx. 2.4 × 1.2 × 1.2 inches (55 × 39.5 × 39 mm)
(W × H × D)
Cable length
Approx. 39.4 inches (100 cm)
Weight
Approx. 2.0 oz. (55 g)
Operating environment
Operating temperature
41°F to 95°F (5°C to 35°C)
(temperature gradient less than 18°F (10°C)/hour)
Operating humidity
20% to 80% (not condensed),
provided that humidity is less than 65% at 95°F
(35°C)
(hygrometer reading of less than 84°F (29°C))
Storage temperature
–4°F to 140°F (–20°C to 60°C)
(temperature gradient less than 18°F (10°C)/hour)
Storage humidity
10% to 85% (not condensed),
provided that humidity is less than 20% at 140°F
(60°C)
(hygrometer reading of less than 95°F (35°C))
Supplied accessories
• Installation disc (CD-ROM × 1)
• Operating instructions (1)
• Warranty card (1)*
* The accessories included vary according to country
and region.
Design and specifications are subject to change
without notice.
13
GB
Page 32

AVERTISSEMENT
Afin de réduire les risques
d’incendie ou de choc électrique,
n’exposez pas cet appareil à la
pluie ni à l’humidité.
Pour prévenir tout risque
d’électrocution, n’ouvrez pas le
boîtier. Confiez l’entretien
exclusivement au personnel
qualifié.
Lors du raccordement au port USB, veuillez
brancher l’appareil sur le port USB portant la
marque .
Pour les utilisateurs au Canada
Cet appareil numérique de la classe B est
conforme à la norme NMB-003 du Canada.
Pour les utilisateurs en Europe
Ce produit est conforme aux directives
européennes suivantes:
89/336/CEE, 92/31/CEE
(Compatibilité électromagnétique)
93/68/CEE (Directive Marquage CE)
Cet équipement est conforme aux normes
EN55022 Classe B et EN55024, limitant l’emploi
dans les environnements résidentiel, commercial
et industriel léger.
Les images et/ou le son peuvent être déformés si
vous placez cet appareil près d’équipements
émettant des champs électromagnétiques.
Confiez la réparation et l’entretien uniquement à
des techniciens agréés Sony. Toute utilisation ou
réparation incorrecte est dangereuse.
Cet appareil a été testé et s’est révélé conforme
aux limites définies par la directive CEM en cas
d’utilisation de câbles de raccordement d’une
longueur inférieure à 3 mètres.
Traitement des appareils
électriques et électroniques
en fin de vie (Applicable
dans les pays de l’Union
Européenne et aux autres
pays européens disposant
de systèmes de collecte sélective)
Ce symbole, apposé sur le produit ou sur son
emballage, indique que ce produit ne doit pas être
traité avec les déchets ménagers. Il doit être remis
à un point de collecte approprié pour le recyclage
des équipements électriques et électroniques. En
s’assurant que ce produit est bien mis au rebut de
manière appropriée, vous aiderez à prévenir les
conséquences négatives potentielles pour
l’environnement et la santé humaine. Le recyclage
des matériaux aidera à préserver les ressources
naturelles. Pour toute information supplémentaire
au sujet du recyclage de ce produit, vous pouvez
contacter votre municipalité, votre déchetterie ou
le magasin où vous avez acheté le produit.
• Sony, VAIO, et le logo Eco Info sont
des marques commerciales de Sony Corporation.
• Microsoft et Windows sont des marques déposées
de Microsoft Corporation aux Etats-Unis et/ou
dans d’autres pays.
• IBM et PC/AT sont des marques déposées
d’International Business Machines Corporation.
• Intel, Celeron, et Pentium sont des marques
commerciales et déposées d’Intel Corporation.
• Le nom Bluetooth et les logos sont la propriété de
Bluetooth SIG Inc. et sont utilisés sous licence
uniquement par SONY.
• Adobe et Adobe Reader sont des marques
déposées ou des marques commerciales d’Adobe
Systems Incorporated aux Etats-Unis et/ou dans
d’autres pays ou régions.
• Les autres noms de systèmes, de produits et de
services sont des marques commerciales de leurs
propriétaires respectifs. Les symboles ™ ou ® ne
sont pas utilisés dans le présent document.
Dans le présent document, Microsoft® Windows® XP
Edition Familiale, Microsoft® Windows® XP
Professionnel et Microsoft® Windows® Edition
Media Center sont désignés par Windows XP.
FR
2
Page 33

Table des
matières
Introduction ........................................... 4
Ordinateurs compatibles ........................ 4
Configuration initiale ............................. 5
Vérification des accessoires
fournis .......................................... 5
Installation du pilote et du
logiciel .......................................... 6
Fixation de la caméra ..................... 7
Activation du logiciel ..................... 9
Consultation du mode d’emploi au
format PDF ................................. 10
Précautions .......................................... 11
Entretien .............................................. 11
Obtenir de l’aide .................................. 12
Spécifications ...................................... 13
FR
3
Page 34

Introduction
Cette caméra est une caméra de communication visuelle compatible USB
2.0. Elle vous permet d’utiliser la fonction visiotéléphonie de votre
ordinateur. Elle présente les caractéristiques suivantes :
• Microphone et capteur CMOS 1 310 000 pixels.
•
Enregistrement d’images fixes et animées et transfert par courrier électronique
sous forme de vidéo grâce au logiciel « VAIO Camera Capture Utility » fourni.
• Divers réglages de la caméra tels que le réglage de la compensation de
contre-jour et de la luminosité, effets spéciaux tels que le réglage d’une
image, etc., grâce au « pilote de périphérique VGP-UVC100 ».
• Discussion en vidéoconférence lors de l’utilisation comme webcam.
Remarque
Votre logiciel de messagerie peut modifier automatiquement le volume du microphone
pour éviter tout effet Larsen de l’enceinte. Il baisse le volume de l’enceinte lorsque le
microphone est situé à proximité de celle-ci. Si les voix ne sont pas suffisamment
audibles, utilisez un casque ou un micro-casque.
Reportez-vous à la section d’aide du mode d’emploi de votre logiciel pour plus d’informations.
Ordinateurs compatibles
La caméra est conçue pour fonctionner avec des ordinateurs sur lesquels
Windows XP* est préinstallé et dotés de ports USB.
* Le Service Pack 2 pour Windows XP doit être installé. Si ce n’est pas le
cas, vous pouvez le télécharger à partir du site Web de Microsoft.
Remarques
• Le fonctionnement correct n’est pas garanti pour les ordinateurs montés par l’utilisateur
ou les ordinateurs dont le système d’exploitation a été mis à niveau et les systèmes à
double amorçage.
• Dans les environnements d’exploitation ci-dessus, le fonctionnement correct n’est pas
garanti sur tous les ordinateurs.
• Un ordinateur équipé d’une caméra est incompatible. Même si vous raccordez la
caméra à l’ordinateur, vous ne pouvez pas l’utiliser.
• Les environnements d’exploitation suivants sont requis pour la capture d’images fixes
et de films de format VGA ou de taille supérieure.
UC : Pentium III, Celeron 1,2 GHz ou plus
Il est conseillé d’utiliser une mémoire de 256 Mo ou plus.
Nous vous recommandons de réduire la taille de l’écran ou de l’image si celle-ci est
déformée pendant la capture.
FR
4
Page 35

• Si vous affichez plus d’un million de pixels, cette caméra doit impérativement être
raccordée au connecteur avec une connexion USB haut débit (USB 2.0).
• Il est nécessaire d’installer le logiciel à partir du disque d’installation fourni pour
utiliser la caméra.
Configuration initiale
Vérification des accessoires fournis
Retirez la caméra de l’emballage et vérifiez que tous les accessoires
indiqués ci-après sont inclus.
S’il manque un accessoire, contactez le revendeur Sony auprès duquel vous
avez acheté ce produit ou le représentant du service après-vente Sony de
votre région.
• Caméra de communication visuelle
• Disque d’installation (CD-ROM × 1)
• Mode d’emploi (ce manuel)
• Carte de garantie*
* Les accessoires inclus varient en fonction du pays et de la région.
FR
5
Page 36

Installation du pilote et du logiciel
Installez le pilote de périphérique VGP-UVC100 pour utiliser la caméra sur
l’ordinateur. Vous pouvez installer le logiciel « VAIO Camera Capture
Utility » pour la capture d’images fixes et de films.
Remarques
• Assurez-vous que votre lecteur de disques, par exemple le lecteur de CD-ROM, etc., est
disponible pour votre ordinateur. Dans ce manuel, les lecteurs de CD-ROM ou les
lecteurs multidisques sont désignés par « lecteur de CD-ROM ». Pour plus
d’informations sur le raccordement du lecteur de CD-ROM, reportez-vous aux manuels
fournis avec votre ordinateur ou votre lecteur de CD-ROM.
• L’utilisation du logiciel « VAIO Camera Capture Utility » requiert plus de 2 Go
d’espace libre sur le disque dur.
• Mettez Windows à jour avant d’installer le pilote et le logiciel.
• Quittez tous les logiciels avant d’installer le pilote et le logiciel.
• Connectez-vous comme administrateur avant d’installer le pilote et le logiciel.
• Si la boîte de dialogue « Assistant Ajout de nouveau matériel » apparaît, cliquez sur
« Annuler », puis débranchez la caméra de l’ordinateur et réinstallez-la.
1 Mettez l’ordinateur sous tension, démarrez le système
d’exploitation Windows et insérez le disque d’installation
fourni dans le lecteur de CD-ROM.
Le programme d’installation démarre automatiquement et l’écran
« Sony Visual Communication Camera VGP-UVC100 Application
Installer Setup » apparaît.
2 Assurez-vous que la case réservée à l’installation du logiciel
est cochée, puis cliquez sur « Suivant ».
z Conseil
La case n’apparaît pas si le logiciel est déjà installé.
3 Suivez les instructions affichées à l’écran jusqu’à ce que
l’installation soit terminée et que l’écran se ferme.
z Conseil
Cliquez sur « Oui » si un message automatique de redémarrage apparaît après
l’installation.
4 Raccordez le câble USB de la caméra au port USB de votre
ordinateur.
Le pilote requis est automatiquement installé. Cliquez sur « Oui » si un
message automatique de redémarrage apparaît après l’installation.
Après avoir redémarré Windows, vous pouvez commencer à utiliser la
caméra.
FR
6
Page 37

Remarques
• Ne débranchez pas le câble USB de la caméra pour le rebrancher ensuite lorsque votre
système d’exploitation Windows est en cours de démarrage ou de fermeture. Cela peut
entraîner un problème de fonctionnement de la caméra ou de votre ordinateur.
• Débranchez puis rebranchez le câble USB de la caméra avec précaution car le
fonctionnement de l’ordinateur risque d’être instable si vous effectuez cette opération
rapidement.
• Cette caméra est conçue pour garantir de façon constante une largeur de bande USB
définie pour le transfert de données afin d’afficher des images de haute qualité. Par
conséquent, si vous utilisez un concentrateur USB pour raccorder simultanément un
périphérique USB composite, la largeur de bande disponible pour le transfert des
données risque de ne pas être suffisante pour permettre un fonctionnement correct.
z Conseils
• Lorsqu’il existe plusieurs ports USB, après avoir raccordé le câble USB à différents
ports, le pilote nécessaire est automatiquement installé. Cliquez sur « Oui » si un
message automatique de redémarrage apparaît après l’installation. Après avoir
redémarré Windows et raccordé le port USB, vous pouvez commencer à utiliser votre
caméra.
• Si le pilote n’est pas installé correctement, désinstallez-le, puis recommencez
l’installation. Reportez-vous au mode d’emploi au format PDF pour vérifier
l’installation et exécuter la désinstallation. Pour plus d’informations sur la consultation
du mode d’emploi au format PDF, reportez-vous à la page 10.
Fixation de la caméra
Installation directe
Fixez la caméra sur l’écran.
Saisissez les deux bras et accrochez la caméra sur le haut de l’écran.
z Conseil
Selon le type d’ordinateur utilisé, il se peut que cette caméra ne puisse pas être fixée
directement.
Dans ce cas, reportez-vous à la section « Installation horizontale » sur la page suivante
pour plus d’informations.
FR
7
Page 38

Installation horizontale
Si vous souhaitez placer la caméra sur une surface plane et stable, par
exemple sur l’écran CRT, sur l’ordinateur, etc., procédez comme suit :
1 Tournez le bras et la plaque de fixation de celui-ci vers vous.
2 Posez la caméra sur une surface stable.
Retrait de la caméra
Remarque
Si votre ordinateur est éteint, vous pouvez sauter l’étape 1 ci-dessous. Toutefois, si vous
débranchez le câble USB alors que votre ordinateur est en mode d’économie d’énergie,
puis que vous le rebranchez, la caméra risque de ne pas être détectée.
1 Fermez le logiciel utilisé par la caméra.
2 Débranchez le câble USB de votre ordinateur, puis retirez la
caméra.
Remarque
Si vous tirez sur le câble lui-même lorsque vous débranchez le câble USB, vous
risquez d’endommager le câble. Tenez bien le connecteur lorsque vous débranchez
le câble.
FR
8
Page 39

Activation du logiciel
Appuyez sur le bouton CAPTURE de l’appareil photo.
Le logiciel « VAIO Camera Capture Utility » est activé.
« VAIO Camera Capture Utility » est nécessaire pour la capture
d’images fixes et de films. « VGP-UVC100 device driver » est
disponible pour modifier la configuration de la caméra et ajouter des
effets spéciaux aux images. Pour plus d’informations sur l’utilisation,
reportez-vous au mode d’emploi au format PDF sur le disque
d’installation fourni et à la section d’aide de « VAIO Camera Capture
Utility ».
Remarque
L’heure de démarrage du logiciel dépend de votre ordinateur. Une fois que vous
avez appuyé sur le bouton CAPTURE, attendez l’activation.
Bouton CAPTURE
FR
9
Page 40

Consultation du mode d’emploi au format PDF
Le mode d’emploi au format PDF inclus sur le disque d’installation fourni
décrit comment capturer des images fixes et des films et comment modifier
les réglages de la caméra, tels que le réglage de la compensation de contrejour et de la luminosité.
z Conseils
• Le disque d’installation fourni doit être inséré dans le lecteur de CD-ROM de votre
ordinateur à l’avance. Lorsque le disque d’installation est inséré, l’écran « Sony Visual
Communication Camera VGP-UVC100 Application Installer Setup » apparaît. Cliquez
sur « Annuler » une fois que vous avez fini d’installer le pilote et le logiciel.
• Adobe Reader est nécessaire pour visualiser le mode d’emploi au format PDF. Si ce
logiciel n’est pas installé sur votre ordinateur, vous pouvez le télécharger à partir du site
Web suivant :
http://www.adobe.com/
1 Cliquez sur « Démarrer », « Poste de travail » puis double-
cliquez sur l’icône du lecteur CD-ROM.
2 Ouvrez le dossier « Manual » puis le dossier « FR ».
3 Double-cliquez sur « VGP-UVC100_manual_fr.pdf ».
10
FR
Page 41

Précautions
Emplacements d’utilisation
et de stockage
N’utilisez pas et ne conservez pas ce produit
dans les emplacements suivants. En effet,
vous risqueriez d’endommager la caméra.
•
Endroits soumis à des températures
anormalement élevées
Pendant les périodes de forte chaleur ou
en été, la température dans un véhicule
fermé peut devenir particulièrement
élevée et si la caméra se trouve dans un
tel endroit, elle risque de se déformer ou
d’être endommagée.
• Endroits soumis à la lumière
directe du soleil ou situés à
proximité de radiateurs
La caméra risque de se déformer ou
d’être endommagée.
• Endroits sablonneux, par
exemple à la plage
Ne placez pas la caméra dans un endroit
où il peut y avoir du sable, par exemple
à la plage ou dans d’autres endroits
sablonneux. Cela peut endommager la
caméra et dans certains cas une
réparation peut être impossible.
• Ne dirigez pas l’objectif vers le
soleil.
Cela pourrait brûler l’objectif ou le
détériorer. Prenez des précautions
lorsque vous laissez votre caméscope
près d’une fenêtre ou à l’extérieur.
Fonctionnement
• Ne débranchez pas le câble USB de la
caméra pendant le fonctionnement. Cela
pourrait entraîner un problème de
fonctionnement de la caméra.
• Ne placez aucun objet sur la caméra.
•
Evitez de placer la caméra dans des
endroits soumis à des brusques variations
de température. N’utilisez pas la caméra
immédiatement après l’avoir déplacée
d’un endroit froid vers un endroit chaud
ou après une augmentation importante de
la température ambiante. Sinon, de la
condensation risque de se former à
l’intérieur de la caméra. Laissez la
caméra au repos pendant un moment
avant de l’utiliser.
•
Ne forcez pas pour faire pivoter la caméra.
Cela peut entraîner un dysfonctionnement
de l’appareil.
•
N’utilisez pas l’ordinateur autrement que
spécifié.
•
Ne laissez pas d’eau ou des objets
s’introduire dans la caméra. N’ouvrez
pas la caméra.
Objectif
Ne touchez pas l’objectif.
Entretien
Nettoyage du boîtier
Nettoyez la surface extérieure de la
caméra avec un chiffon doux et sec. Pour
éliminer les taches tenaces, imprégnez le
chiffon d’une solution détergente douce et
neutre. N’utilisez pas de solvants,
d’alcool, d’essence ou d’autres substances
qui pourraient endommager la finition.
Nettoyage de l’objectif
Enlevez toute poussière à l’avant de l’objectif
avec une soufflette ou une brosse douce.
11
FR
Page 42

Obtenir de l’aide
Cette section donne des informations sur
l’aide et l’assistance technique offertes par
Sony et donne des conseils de dépannage
pour votre caméra de communication
visuelle.
A propos des options
d’assistance technique de
Sony
Sony offre plusieurs options d’assistance
technique pour votre caméra de
communication visuelle. Si vous avez des
questions concernant votre caméra ou le
logiciel, reportez-vous aux références
suivantes :
❑ Ce manuel explique comment utiliser
votre caméra.
Pour les clients résidant aux
Etats-Unis et au Canada
Pour les clients résidant en
Europe
❑ VAIO-Link. Rendez-vous sur le site
http://www.vaio-link.com/
Pour les clients résidant dans
d’autres pays ou régions
❑ Le site Web de VAIO Website
comporte une rubrique des Questions
les plus fréquentes et les réponses à ces
questions.
vaio-online.sony.com/
❑ Le Sony Customer Information
Service Center offre des informations
concernant votre ordinateur portable et
d’autres produits Sony compatibles avec
votre ordinateur. Pour contacter le
Centre des services d’information client
Sony, composez le 1-888-4SONYPC
(1-888-476-6972).
❑ Aide en ligne de Sony
Ce service offre un accès immédiat aux
informations concernant les problèmes
les plus fréquents. Saisissez une
description du problème et la base de
données Knowledge recherche la
solution correspondante en ligne. Vous
pouvez visiter le site Sony Online
Support à l’adresse :
http://esupport.sony.com/
FR
12
Page 43

Spécifications
Caméra de communication
visuelle
Recherche d’image
Capteur d’images par balayage progressif CMOS
couleur 1/4 de pouce, 1 330 000 pixels
(1 310 000 pixels effectifs)
Objectif
2 groupes, 2 objectifs, F2.3
Distance focale f=3,8 mm
(équivalent à un appareil photo 35 mm à
f=31,3 mm
Distance focale comprise entre 30 mm et ∞
Angle de champ Horizontal, environ 56,8°
Vertical, environ 42,6°
Equilibre des blancs
Intérieur/extérieur
Vitesse d’obturation
Auto
Suppression du scintillement
50 Hz/60 Hz
Format de capture vidéo
RGB24 bits
Tailles des images
1 280 × 1 024
640 × 480
320 × 240
Tailles des films
640 × 480, WMV
320 × 240, WMV, MPEG1
160 × 120, WMV
160 × 112, MPEG1
Nombre d’images affichées
Maximum : 30 images/sec*
* Ce taux varie en fonction des spécifications de
votre ordinateur et de l’application utilisée.
Plage de rotation de la caméra
10 ° vers le haut 90 ° vers le bas
360 ° vers la droite et la gauche (si le câble le
permet)
Puissance consommée
Environ 1,0 W
Dimensions
Normal
Environ 55
(l × H × p)
Horizontale
Environ 55
(l × H × p)
×
×
50,5
39,5
×
40,5 mm
×
39 mm
Longueur du câble
Environ 100 cm
Poids
Environ 55 g
Environnement de
fonctionnement
Température de fonctionnement
5 °C à 35 °C
(gradient de température inférieur à 10 °C/heure)
Humidité de fonctionnement
20 % à 80 % (sans condensation)
à condition que l’humidité soit inférieure à 65 % à
35 °C
(lecture hygrométrique indiquant moins de 29 °C)
Température de stockage
–20 °C à 60 °C
(gradient de température inférieur à 10 °C/heure)
Humidité de stockage
10 % à 85 % (sans condensation)
à condition que l’humidité soit inférieure à 20 % à
60 °C
(lecture hygrométrique indiquant moins de 35 °C)
Accessoires fournis
• Disque d’installation (CD-ROM × 1)
• Mode d’emploi (1)
• Carte de garantie (1)*
* Les accessoires inclus varient en fonction du
pays et de la région.
La conception et les spécifications sont
susceptibles d’être modifiées sans préavis.
13
FR
Page 44

ACHTUNG
Um die Gefahr eines Brands oder
elektrischen Schlags zu
reduzieren, darf dieses Gerät
weder Regen noch Feuchtigkeit
ausgesetzt werden.
Um einen elektrischen Schlag zu
vermeiden, öffnen Sie das
Gehäuse nicht.
Überlassen Sie Wartungsarbeiten
stets qualifiziertem Fachpersonal.
Wenn Sie das Gerät mit einem USB-Anschluss
verbinden, verwenden Sie bitte einen
USB-Anschluss mit der Markierung .
Für Kunden in Europa
Richtlinien:Dieses Gerät erfüllt die
Richtlinien
89/336/EWG, 92/31/EWG
(EMV-Richtlinien)
93/68/EWG (CE-Zeichen)
Dieses Gerät erfüllt die Standards EN55022
Klasse B und EN55024 für folgende Gebiete:
• Wohngebiete
• Gewerbegebiete
• Leichtindustriegebiete
Bild- und/oder Tonstörungen können auftreten,
wenn dieses Gerät sehr nahe bei Geräten steht, die
elektromagnetische Strahlung abgeben.
Reparaturarbeiten sind ausschließlich von SonyTechnikern durchzuführen. Falsche Anwendung
und unsachgemäße Reparaturarbeiten stellen ein
Sicherheitsrisiko dar.
Dieses Gerät wurde geprüft und erfüllt die EMVRichtlinie, sofern Verbindungskabel von maximal
3 m Länge verwendet werden.
Entsorgung von
gebrauchten elektrischen
und elektronischen Geräten
(anzuwenden in den
Ländern der Europäischen
Union und anderen
europäischen Ländern mit
einem separaten Sammelsystem für
diese Geräte)
Das Symbol auf dem Produkt oder seiner
Verpackung weist darauf hin, dass dieses Produkt
nicht als normaler Haushaltsabfall zu behandeln
ist, sondern an einer Annahmestelle für das
Recycling von elektrischen und elektronischen
Geräten abgegeben werden muss. Durch Ihren
Beitrag zum korrekten Entsorgen dieses Produkts
schützen Sie die Umwelt und die Gesundheit Ihrer
Mitmenschen. Umwelt und Gesundheit werden
durch falsches Entsorgen gefährdet.
Materialrecycling hilft, den Verbrauch von
Rohstoffen zu verringern. Weitere Informationen
über das Recycling dieses Produkts erhalten Sie
von Ihrer Gemeinde, den kommunalen
Entsorgungsbetrieben oder dem Geschäft, in dem
Sie das Produkt gekauft haben.
• Sony, VAIO, und das Eco Info-Logo
sind Markenzeichen der Sony Corporation.
• Microsoft und Windows sind eingetragene
Markenzeichen der Microsoft Corporation in den
USA und/oder anderen Ländern.
• IBM und PC/AT sind eingetragene Markenzeichen
der International Business Machines Corporation.
• Intel, Pentium und Celeron sind Markenzeichen
oder eingetragene Markenzeichen der Intel
Corporation.
• Der Bluetooth-Schriftzug und die Bluetooth-
Logos sind Eigentum von Bluetooth SIG, Inc., und
ihre Verwendung durch SONY erfolgt in Lizenz.
• Adobe und Adobe Reader sind Markenzeichen
oder eingetragene Markenzeichen der Adobe
Systems Incorporated in den USA und/oder
anderen Ländern.
• Alle anderen System-, Produkt- und
Dienstleistungsnamen sind Markenzeichen der
jeweiligen Eigentümer. In diesem Handbuch sind
die Markenzeichen nicht mit dem Zeichen TM oder
® markiert.
In diesem Handbuch werden Microsoft® Windows
XP Home Edition, Microsoft® Windows® XP
Professional und Microsoft® Windows® Media
Center Edition als Windows XP bezeichnet.
®
DE
2
Page 45

Inhalt
Einführung ............................................. 4
Kompatible Computer ........................... 4
Vorbereitungen ...................................... 5
Überprüfen des mitgelieferten
Zubehörs ...................................... 5
Installieren von Treiber und
Software ....................................... 6
Anbringen bzw. Aufstellen der
Kamera ......................................... 7
Starten der Software ....................... 9
Anzeigen des Handbuchs
(PDF-Format) ............................. 10
Sicherheitsmaßnahmen ........................ 11
Wartung ............................................... 11
Hilfeinformationen und Support.......... 12
Technische Daten ................................ 13
DE
3
Page 46

Einführung
Diese Kamera für die visuelle Kommunikation ist mit USB 2.0 kompatibel.
Sie können die Kamera für die Bildtelefoniefunktion Ihres Computers
verwenden. Die Kamera zeichnet sich durch die folgenden Merkmale aus:
• CMOS-Sensor mit 1.310.000 Pixeln und Mikrofon.
• Mit der mitgelieferten Software „VAIO Camera Capture Utility“ können
Sie Filme und Standbilder aufnehmen und als Video-Mail senden.
• Mit dem „VGP-UVC100-Gerätetreiber“ können verschiedene
Kameraeinstellungen wie Ausgleich der Hintergrundbeleuchtung und
Helligkeit vorgenommen und Effekte, wie z. B. Rahmen, angewendet
werden.
• Bei Verwendung als Web-Kamera unterstützt die Kamera den VideoChat.
Hinweis
Die Messenger-Software stellt die Mikrofonlautstärke möglicherweise automatisch so ein,
dass über den Lautsprecher kein Heulton ausgegeben wird. Wenn sich das Mikrofon zu
nahe beim Lautsprecher befindet, wird die Lautsprecherlautstärke gesenkt. Verwenden
Sie Kopfhörer oder ein Headset, wenn Stimmen schwer zu verstehen sind.
Einzelheiten finden Sie in der Hilfe zu Ihrer Software.
Kompatible Computer
Die Kamera kann mit Computern mit vorinstalliertem Windows XP* und
USB-Anschlüssen verwendet werden.
* Windows XP Service Pack 2 muss installiert sein. Wenn das Service
Pack nicht installiert ist, laden Sie es von der Microsoft-Website
herunter.
Hinweise
• Bei selbst zusammengestellten Computern sowie bei Computern mit aufgerüstetem
Betriebssystem/mehreren boot-fähigen Betriebssystemen kann der einwandfreie Betrieb
nicht gewährleistet werden.
• Auch bei der oben angegebenen Betriebsumgebung kann der einwandfreie Betrieb
nicht für alle Computer gewährleistet werden.
• Ein mit einer Kamera ausgestatteter Computer ist nicht kompatibel. Auch wenn die
Kamera an den Computer angeschlossen ist, können Sie sie nicht verwenden.
• Die folgenden Systemvoraussetzungen müssen erfüllt sein, wenn Filme und Standbilder
mit VGA-Bildgröße oder größer aufgenommen werden sollen.
CPU: Pentium III oder Celeron mit mindestens 1,2 GHz
Mindestens 256 MB Hauptspeicher sind empfehlenswert.
Wenn das Bild bei der Aufnahme verzerrt ist, empfiehlt es sich, die Bildschirm- oder
Bildgröße zu verringern.
DE
4
Page 47

• Wenn Sie mehr als eine Million Pixel anzeigen wollen, muss diese Kamera über HiSpeed USB (USB 2.0) angeschlossen werden.
• Bevor Sie die Kamera verwenden können, müssen Sie die Software von der
mitgelieferten Installations-Disc installieren.
Vorbereitungen
Überprüfen des mitgelieferten Zubehörs
Nehmen Sie die Kamera aus dem Karton und überprüfen Sie, ob die unten
aufgeführten Zubehörteile im Karton enthalten sind.
Sollten Zubehörteile fehlen, wenden Sie sich bitte an den Sony-Händler, bei
dem Sie dieses Produkt erworben haben, oder an den örtlichen SonyKundendienst.
• Kamera für die visuelle Kommunikation
• Installations-Disc (CD-ROM × 1)
• Bedienungsanleitung (diese Anleitung)
• Garantiekarte*
* Die mitgelieferten Zubehörteile variieren je nach Land und Region.
DE
5
Page 48

Installieren von Treiber und Software
Installieren Sie den VGP-UVC100-Gerätetreiber, damit die Kamera
zusammen mit dem Computer verwendet werden kann. Installieren Sie
„VAIO Camera Capture Utility“, wenn Sie Filme und Standbilder
aufnehmen wollen.
Hinweise
• Vergewissern Sie sich, dass Ihr Computer über ein geeignetes Laufwerk, wie z. B. ein
CD-ROM-Laufwerk, verfügt. In diesem Dokument werden CD-ROM- und andere
Disc-Laufwerke als „CD-ROM-Laufwerk“ bezeichnet. Erläuterungen zum Anschließen
eines CD-ROM-Laufwerks finden Sie in der Dokumentation zum Computer und zum
CD-ROM-Laufwerk.
• Um „VAIO Camera Capture Utility“ verwenden zu können, sind mehr als 2 GB freier
Speicherplatz auf der Festplatte erforderlich.
• Aktualisieren Sie Windows, bevor Sie den Treiber und die Software installieren.
• Beenden Sie alle Programme, bevor Sie Treiber und Software installieren.
• Melden Sie sich zur Installation des Treibers und der Software als Administrator an.
• Wenn das Dialogfeld „Hardware-Assistent“ angezeigt wird, klicken Sie auf
„Abbrechen“, lösen die Kamera vom Computer und installieren sie erneut.
1 Schalten Sie den Computer ein, starten Sie Windows und
legen Sie die mitgelieferte Installations-Disc in das CDROM-Laufwerk ein.
Das Installationsprogramm wird automatisch gestartet und der
Bildschirm „Installationsprogramm für Sony Visual Communication
Camera VGP-UVC100“ wird angezeigt.
2 Vergewissern Sie sich, dass das Kontrollkästchen zum
Installieren der Software aktiviert ist, und klicken Sie auf
„Weiter“.
z Tipp
Das Kontrollkästchen wird nicht angezeigt, wenn die Software bereits installiert ist.
3 Gehen Sie nach den Anweisungen auf dem Bildschirm vor,
bis die Konfiguration abgeschlossen ist und die
entsprechende Anzeige ausgeblendet wird.
z Tipp
Klicken Sie auf „Ja“, wenn Sie nach der Installation gefragt werden, ob der
Computer neu gestartet werden soll.
4 Schließen Sie das USB-Kabel der Kamera an einen USB-
Anschluss am Computer an.
Der erforderliche Treiber wird automatisch installiert. Klicken Sie auf
„Ja“, wenn Sie nach der Installation gefragt werden, ob der Computer
neu gestartet werden soll. Nach dem Neustart von Windows können
Sie die Kamera verwenden.
DE
6
Page 49

Hinweise
• Lösen Sie nicht das USB-Kabel der Kamera und schließen Sie es auch nicht an, solange
Windows gestartet oder heruntergefahren wird. Andernfalls kann es an der Kamera
oder am Computer zu einer Fehlfunktion kommen.
• Gehen Sie beim Lösen bzw. Anschließen des USB-Kabels der Kamera vorsichtig vor.
Wenn Sie das Kabel zu schnell anschließen bzw. lösen, wird der Computer
möglicherweise instabil.
• Diese Kamera belegt ständig eine feste USB-Bandbreite für die Datenübertragung, um
Bilder hoher Qualität zu erzeugen. Wenn Sie einen USB-Hub verwenden und
gleichzeitig ein USB-Verbundgerät anschließen, steht daher möglicherweise nicht
genug Datenübertragungs-Bandbreite für einen ordnungsgemäßen Betrieb zur
Verfügung.
z Tipps
• Wenn es mehrere USB-Anschlüsse gibt und Sie das USB-Kabel an verschiedene USBAnschlüsse angeschlossen haben, wird der erforderliche Treiber automatisch installiert.
Klicken Sie auf „Ja“, wenn Sie nach der Installation gefragt werden, ob der Computer
neu gestartet werden soll. Nachdem Sie Windows neu gestartet und die Kamera an den
USB-Anschluss angeschlossen haben, können Sie die Kamera verwenden.
• Wenn der Treiber nicht richtig installiert wird, müssen Sie ihn deinstallieren und
danach erneut installieren. Im Handbuch (PDF-Format) finden Sie Informationen zum
Überprüfen der Installation und zum Deinstallieren. Einzelheiten dazu finden Sie im
Handbuch (PDF-Format) auf Seite 10.
Anbringen bzw. Aufstellen der Kamera
Anbringen am Bildschirm
Bringen Sie die Kamera am Bildschirm an.
Drücken Sie die Halterungsarme zusammen und hängen Sie die
Kamera oben am Bildschirm ein.
z Tipp
Je nach Computer lässt sich die Kamera möglicherweise nicht am Bildschirm anbringen.
Schlagen Sie in diesem Fall unter „Waagrechte Aufstellung“ auf der nächsten Seite nach.
DE
7
Page 50

Waagrechte Aufstellung
Sie können die Kamera auf einer ebenen und stabilen Oberfläche, wie z. B.
einem Bildschirm mit Kathodenstrahlröhre oder einem Computer, aufstellen:
1 Drehen Sie die Halterungsarme und Halterungsplatte auf
sich zu.
2 Stellen Sie die Kamera auf eine stabile Oberfläche.
Trennen der Kamera vom Computer
Hinweis
Wenn der Computer ausgeschaltet ist, brauchen Sie Schritt 1 unten nicht auszuführen.
Wenn Sie jedoch das USB-Kabel lösen, während sich der Computer im
Energiesparmodus befindet, und das Kabel dann wieder anschließen, wird die Kamera
möglicherweise nicht erkannt.
1 Schließen Sie die Software, die von der Kamera verwendet
wird.
2 Trennen Sie das USB-Kabel vom Computer und nehmen
Sie gegebenenfalls die Kamera ab.
Hinweis
Wenn Sie beim Lösen des USB-Kabels am Kabel selbst ziehen, kann das Kabel
beschädigt werden. Ziehen Sie zum Lösen des Kabels immer am Stecker, nicht am
Kabel selbst.
DE
8
Page 51

Starten der Software
Drücken Sie die Taste CAPTURE an der Kamera.
Das Programm „VAIO Camera Capture Utility“ wird gestartet.
Zum Aufnehmen von Filmen und Standbildern ist „VAIO Camera
Capture Utility“ erforderlich. Wenn Sie Einstellungen der Kamera
ändern und Effekte zu den Bildern hinzufügen wollen, steht der „VGPUVC100-Gerätetreiber“ zur Verfügung. Einzelheiten zum Verwenden
der Software finden Sie im Handbuch (PDF-Format) auf der
mitgelieferten Installations-Disc und in der Hilfe zu „VAIO Camera
Capture Utility“.
Taste CAPTURE
Hinweis
Wie lange das Starten der Software dauert, hängt vom Computer ab. Warten Sie
nach dem Drücken der Taste CAPTURE, bis die Software gestartet ist.
DE
9
Page 52

Anzeigen des Handbuchs (PDF-Format)
Die Schritte zum Aufnehmen von Standbildern und Filmen sowie zum
Ändern von Kameraeinstellungen, wie beispielsweise Ausgleich der
Hintergrundbeleuchtung und Helligkeit, sind im Handbuch (PDF-Format)
auf der mitgelieferten Installations-Disc beschrieben.
z Tipps
• Die mitgelieferte Installations-Disc muss zuvor in das CD-ROM-Laufwerk eingelegt
werden. Beim Einlegen der Installations-Disc erscheint der Bildschirm
„Installationsprogramm für Sony Visual Communication Camera VGP-UVC100“.
Klicken Sie auf „Abbrechen“, wenn Sie die Installation von Treiber und Software
abschließen wollen.
• Zum Anzeigen des Handbuchs (PDF-Format) ist Adobe Reader erforderlich. Wenn das
Programm nicht auf Ihrem Computer installiert ist, laden Sie es von folgender Website
herunter:
http://www.adobe.com/
1 Klicken Sie auf die Schaltfläche „Start“ und auf „Arbeitsplatz“
und doppelklicken Sie dann auf das Symbol für das CDROM-Laufwerk.
2 Öffnen Sie den Ordner „Manual“ und dann den Ordner „DE“.
3 Doppelklicken Sie auf „VGP-UVC100_manual_de.pdf“.
10
DE
Page 53

•
Sicherheitsmaßnahmen
Geeignete Umgebung für
Betrieb und Lagerung
Lagern und verwenden Sie das Gerät nicht
an folgenden Orten. Andernfalls kann die
Kamera beschädigt werden.
• Orte, die extrem hohen
Temperaturen ausgesetzt sind
An warmen oder sonnigen Tagen kann
die Temperatur im Fahrzeuginneren
sehr stark ansteigen. Die Kamera könnte
sich verformen oder beschädigt werden.
• Orte, die direktem Sonnenlicht
ausgesetzt sind, bzw. in der Nähe
von Heizgeräten
Die Kamera könnte sich verformen oder
beschädigt werden.
•
Orte, die Sand oder Staub
ausgesetzt sind, wie z. B. am Strand
Bringen Sie die Kamera nicht an einen
Ort, der Stand oder Staub ausgesetzt ist,
wie dies z. B. an einem Strand der Fall
ist. Andernfalls könnte die Kamera
beschädigt werden. Unter Umständen ist
dann keine Reparatur mehr möglich.
• Richten Sie das Objektiv nicht in
die Sonne.
Es könnte zum Einbrennen von Bildern
kommen oder das Objektiv könnte
anderweitig beschädigt werden. Seien
Sie vorsichtig, wenn Sie die Kamera in
der Nähe eines Fensters oder im Freien
ablegen.
Betrieb
•
•
•
Berühren Sie das Objektiv nicht.
Wartung
Reinigen Sie das Gehäuse der Kamera mit
einem weichen, trockenen Tuch. Zum
Entfernen hartnäckiger Verschmutzungen
feuchten Sie das Tuch mit einem milden,
neutralen Reinigungsmittel an. Verwenden
Sie keine Lösungsmittel wie Alkohol,
Benzin oder andere Substanzen, die die
Oberfläche angreifen könnten.
Halten Sie die Kamera von Orten fern, die
plötzlichen Temperaturschwankungen
ausgesetzt sind. Verwenden Sie die
Kamera nicht unmittelbar, nachdem Sie
sie von einem kalten an einen warmen Ort
gebracht haben oder nachdem die
Umgebungstemperatur drastisch
angestiegen ist. Andernfalls kann sich im
Inneren der Kamera Feuchtigkeit
niederschlagen. Lassen Sie die Kamera
einige Zeit unbenutzt, bevor Sie sie in
Betrieb nehmen.
Drehen Sie die Kamera nicht mit
Gewalt herum. Andernfalls kann es zu
Fehlfunktionen kommen.
Verwenden Sie nur einen Computer mit
den angegebenen Spezifikationen.
Achten Sie darauf, dass keine
Flüssigkeiten oder Fremdkörper in die
Kamera gelangen. Öffnen Sie die
Kamera nicht.
Objektiv
Reinigen des Gehäuses
• Lösen Sie nicht während des Betriebs
das USB-Kabel der Kamera.
Andernfalls kann es an der Kamera zu
Fehlfunktionen kommen.
• Stellen Sie keine Gegenstände auf die
Kamera.
Reinigen des Objektivs
Entfernen Sie Staub mit einem
Staubbläser oder einem weichen Pinsel
von der Objektivoberfläche.
11
DE
Page 54

Hilfeinformationen
und Support
In diesem Abschnitt finden Sie
Informationen zu Hilfe und Support von
Sony sowie Tipps zur Störungsbehebung
an der Kamera für visuelle
Kommunikation.
Supportoptionen von Sony
Sony bietet für die Kamera für visuelle
Kommunikation mehrere Supportoptionen
an. Bei Fragen zur Kamera bzw. zur
Software finden Sie hier weitere
Informationen:
❑ Diese Anleitung erläutert den
Gebrauch der Kamera.
Für Kunden in den USA und
Kanada
Für Kunden in Europa
❑ Wenden Sie sich an VAIO-Link.
Adressen und Telefonnummern finden
Sie unter
http://www.vaio-link.com/
Für Kunden in anderen Ländern
und Regionen
❑ Auf der VAIO-Website finden Sie
Antworten auf häufig gestellte Fragen:
vaio-online.sony.com/
❑ Unter der Nummer des Sony-
Kundeninformationscenters
erhalten Sie Informationen zum
Notebook und zu anderen SonyProdukten, die mit dem Computer
eingesetzt werden können. Das SonyKundeninformationscenter erreichen Sie
unter 1-888-4SONYPC
(1-888-476-6972).
❑ Online-Support von Sony
Dieser Service von Sony ermöglicht den
sofortigen Zugriff auf Informationen
über Probleme, die häufiger auftreten.
Geben Sie eine Problembeschreibung
ein und durchsuchen Sie die
Wissensdatenbank online nach
passenden Abhilfemaßnahmen. Der
Online-Support von Sony steht unter
folgendem URL zur Verfügung:
http://esupport.sony.com/
DE
12
Page 55

Technische Daten
Kamera für visuelle
Kommunikation
Bildsensor
CMOS-Farbbildsensor mit 1/4 Zoll, 1.330.000
Pixeln (1.310.000 Pixel effektiv) und progressiver
Abtastung.
Objektiv
2 Gruppen, 2 Linsen, F2,3
Brennweite f=3,8 mm
(entsprechend einer 35-mm-Kamera bei
f=31,3 mm)
Brennweitenbereich 30 mm bis ∞
Bildwinkel horizontal ca. 56,8°
vertikal ca. 42,6°
Weißabgleich
Innenaufnahmen/Außenaufnahmen
Verschlusszeit
Automatisch
Flimmerunterdrückung
50 Hz/60 Hz
Videoaufnahmeformat
RGB, 24 Bit
Bildgrößen
1.280 × 1.024
640 × 480
320 × 240
Filmgrößen
640 × 480, WMV
320 × 240, WMV, MPEG1
160 × 120, WMV
160 × 112, MPEG1
Bildrate
Maximal: 30 Vollbilder/Sekunde*
* Die Bildrate hängt von den Spezifikationen des
Computers und der verwendeten Anwendung
ab.
Kameradrehbereich
Nach oben: 10°, nach unten: 90°
Nach rechts und links: 360° (abhängig vom Kabel)
Leistungsaufnahme
ca. 1,0 W
Abmessungen
Normal
ca. 55 × 50,5 × 40,5 mm
(B × H × T)
Horizontal
ca. 55 × 39,5 × 39 mm
(B × H × T)
Kabellänge
ca. 100 cm
Gewicht
ca. 55 g
Umgebungsbedingungen
für den Betrieb
Betriebstemperatur
5 °C bis 35 °C
(Temperaturschwankungen von unter 10 °C/Stunde)
Luftfeuchtigkeit bei Betrieb
20 % bis 80 % (nicht kondensierend),
bei einer Temperatur von 35 °C muss die
Luftfeuchtigkeit unter 65 % liegen
(Hygrometerstand unter 29 °C)
Lagertemperatur
-20 °C bis 60 °C
(Temperaturschwankungen von unter 10 °C/Stunde)
Luftfeuchtigkeit bei Lagerung
10 % bis 85 % (nicht kondensierend),
bei einer Temperatur von 60 °C muss die
Luftfeuchtigkeit unter 20 % liegen
(Hygrometerstand unter 35 °C)
Mitgeliefertes Zubehör
• Installations-Disc (CD-ROM × 1)
• Bedienungsanleitung (1)
• Garantiekarte (1)*
* Die mitgelieferten Zubehörteile variieren je
nach Land und Region.
Änderungen, die dem technischen Fortschritt
dienen, bleiben vorbehalten.
13
DE
Page 56

ATTENZIONE
Per ridurre il rischio di incendi o
scosse elettriche, non esporre
questo apparecchio alla pioggia o
all’umidità.
Per evitare scosse elettriche, non
aprire l’apparecchio. Per le
riparazioni rivolgersi solo a
personale qualificato.
Per il collegamento alla porta USB, utilizzare la
porta contrassegnata dal simbolo .
Per gli utenti in Europa
Il presente prodotto è conforme alle
seguenti Direttive europee:
89/336/EEC, 92/31/EEC (Direttive EMC)
93/68/EEC (Direttiva relativa al marchio
CE)
Questo prodotto è conforme inoltre alle norme
EN55022 Classe B ed EN55024 per l’impiego
nelle seguenti aree: residenziali, aziendali e di
industria leggera.
Se il presente apparecchio viene collocato in
prossimità di apparecchi che emettono radiazioni
elettromagnetiche, le immagini e/o l’audio
potrebbero risultare distorti.
Per ricevere assistenza tecnica, rivolgersi
esclusivamente a tecnici Sony autorizzati. Uso e
riparazioni impropri possono causare pericoli per
la sicurezza.
Il presente apparecchio è stato testato ed è
risultato conforme ai limiti stabiliti dalla Direttiva
EMC utilizzando cavi di collegamento di
lunghezza non superiore a 3 metri.
Trattamento del dispositivo
elettrico od elettronico a
fine vita (applicabile in tutti
i paesi dell’Unione Europea
e in altri paesi europei con
sistema di raccolta
differenziata)
Questo simbolo sul prodotto o sulla confezione
indica che il prodotto non deve essere considerato
come un normale rifiuto domestico, ma deve
invece essere consegnato ad un punto di raccolta
appropriato per il riciclo di apparecchi elettrici ed
elettronici. Assicurandovi che questo prodotto sia
smaltito correttamente, voi contribuirete a
prevenire potenziali conseguenze negative per
l’ambiente e per la salute che potrebbero
altrimenti essere causate dal suo smaltimento
inadeguato. Il riciclaggio dei materiali aiuta a
conservare le risorse naturali. Per informazioni
più dettagliate circa il riciclaggio di questo
prodotto, potete contattare l’ufficio comunale, il
servizio locale di smaltimento rifiuti oppure il
negozio dove l’avete acquistato.
• Sony, VAIO, e il logo Eco Info sono
marchi di fabbrica di Sony Corporation.
• Microsoft e Windows sono marchi di fabbrica
registrati di Microsoft Corporation negli Stati
Uniti e/o in altri paesi.
• IBM e PC/AT sono marchi di fabbrica registrati di
International Business Machines Corporation.
• Intel, Pentium e Celeron sono marchi di fabbrica e
marchi di fabbrica registrati di Intel Corporation.
• Bluetooth e i relativi loghi sono di proprietà di
Bluetooth SIG, Inc. L’uso di tali marchi è
concesso in licenza a SONY.
• Adobe e Adobe Reader sono marchi di fabbrica o
marchi di fabbrica registrati di Adobe Systems
Incorporated negli Stati Uniti e/o in altri paesi.
• Tutti gli altri nomi di sistemi, prodotti e servizi
sono marchi di fabbrica dei rispettivi proprietari.
Nel presente manuale, i simboli ™ e ® non
vengono specificati.
Nel presente manuale, Microsoft® Windows® XP
Home Edition, Microsoft® Windows® XP
Professional e Microsoft® Windows® Media Center
Edition sono indicati come Windows XP.
IT
2
Page 57

Indice
Introduzione ........................................... 4
Computer compatibili ............................ 4
Impostazione.......................................... 5
Verifica degli accessori in
dotazione ...................................... 5
Installazione del driver e del
software ........................................ 6
Montaggio della fotocamera........... 7
Software di attivazione ................... 9
Consultazione del manuale in
formato PDF............................... 10
Precauzioni .......................................... 11
Manutenzione ...................................... 11
Come ottenere supporto ....................... 12
Caratteristiche tecniche ....................... 13
IT
3
Page 58

Introduzione
La presente fotocamera è una Visual Communication Camera compatibile
con lo standard USB 2.0. Essa consente di utilizzare la funzione di
videotelefonia via Internet del computer. Di seguito, vengono riportate le
principali caratteristiche.
• Microfono e sensore CMOS da 1.310.000 pixel.
• Ripresa di filmati e di fermi immagine, nonché trasferimento come video
mail mediante il software “VAIO Camera Capture Utility” in dotazione.
• Varie impostazioni disponibili: regolazione della funzione
Compensazione retroilluminazione e luminosità, aggiunta di effetti quali
una cornice e così via mediante il software “VGP-UVC100 device
driver”.
• Chat video se la fotocamera viene utilizzata come Webcam.
Nota
È possibile che il software di messaggistica in uso modifichi automaticamente il volume
del microfono onde evitare il fenomeno del feedback acustico dal diffusore; il software
riduce il volume del diffusore se il microfono si trova vicino al diffusore stesso. Se le voci
non sono chiaramente udibili, utilizzare cuffie o auricolari. Per ulteriori informazioni,
consultare la sezione relativa alla guida delle istruzioni per il software in uso.
Computer compatibili
La presente fotocamera è stata progettata per il funzionamento con
computer con Windows XP* preinstallato e dotati di porte USB.
*È necessario che Windows XP Service Pack 2 sia installato. Se non è
installato, è possibile scaricarlo presso il sito Web di Microsoft.
Note
• Non è garantito il funzionamento corretto con i computer assemblati dall’utente o con i
computer con aggiornamenti di sistemi operativi/sistemi ad avvio multiplo.
• Negli ambienti operativi descritti sopra, non è garantito il funzionamento corretto con
qualsiasi computer.
•I computer dotati di fotocamera sono incompatibili. Anche se la fotocamera è collegata
al computer, non è possibile utilizzarla.
•I requisiti di ambiente operativo riportati di seguito sono necessari per la ripresa di
fermi immagine e filmati nel formato VGA o in un formato superiore.
CPU: Pentium III oppure Celeron da 1,2 GHz o superiore
Si consiglia di utilizzare una memoria da 256 MB o superiore.
Se le immagini risultano distorte durante le riprese, si consiglia di ridurre il formato
dello schermo o le dimensioni delle immagini stesse.
IT
4
Page 59

• Per la visualizzazione di un numero di pixel superiore a un milione, la fotocamera è
necessariamente collegata al connettore USB Hi-Speed (USB 2.0).
• Per utilizzare la fotocamera, è necessario installare il software dal disco di installazione
in dotazione.
Impostazione
Verifica degli accessori in dotazione
Rimuovere la fotocamera dalla confezione e assicurarsi che quest’ultima
contenga gli accessori riportati sotto.
Qualora uno degli accessori non fosse presente, rivolgersi al rivenditore
Sony presso il quale è stato effettuato l’acquisto oppure a un rappresentante
locale dell’assistenza Sony.
• Visual Communication Camera
• Disco di installazione (CD-ROM × 1)
• Istruzioni per l’uso (il presente manuale)
• Scheda di garanzia*
* Gli accessori inclusi variano a seconda del paese/della regione.
IT
5
Page 60

Installazione del driver e del software
Per poter utilizzare la fotocamera, installare sul computer il driver della
periferica VGP-UVC100. È possibile installare il software “VAIO Camera
Capture Utility” per riprendere fermi immagine e filmati.
Note
• Assicurarsi che l’unità disco del computer (ad esempio l’unità CD-ROM e simili) sia
disponibile per l’uso. Nel presente manuale, le unità CD-ROM o le unità disco sono
indicate come “unità CD-ROM”. Per ulteriori informazioni sulle modalità di
collegamento di un’unità CD-ROM, consultare i manuali forniti con il computer o con
l’unità CD-ROM stessa.
• Per utilizzare “VAIO Camera Capture Utility”, è necessario disporre di oltre 2 GB di
spazio libero sul disco fisso.
• Aggiornare Windows prima di installare il driver e il software.
• Uscire da tutti i software in esecuzione prima di installare il driver e il software.
• Accedere come Amministratore prima di installare il driver e il software.
• Se viene visualizzata la finestra di dialogo “Installazione guidata Nuovo hardware”,
fare clic su “Annulla”, quindi scollegare la fotocamera dal computer ed eseguire di
nuovo l’installazione.
1 Accendere il computer, avviare il sistema operativo
Windows, quindi inserire il disco di installazione in dotazione
nell’unità CD-ROM.
Il programma di installazione viene avviato automaticamente e
compare la schermata “Programma di installazione dell’applicazione
Sony Visual Communication Camera VGP-UVC100”.
2 Assicurarsi che la casella di controllo relativa all’installazione
del software sia selezionata, quindi fare clic su “Avanti”.
z Suggerimento
Se il software è già stato installato, questa casella di controllo non compare.
3 Seguire le istruzioni a schermo fino al completamento
dell’installazione e alla chiusura della finestra.
z Suggerimento
Fare clic su “Sì” se viene visualizzato un messaggio che richiede il riavvio dopo
l’installazione.
4 Collegare il cavo USB della fotocamera alla porta USB del
computer.
Il driver necessario viene installato automaticamente. Fare clic su “Sì”
se viene visualizzato un messaggio che richiede il riavvio dopo
l’installazione. Dopo avere riavviato Windows, è possibile cominciare
a utilizzare la fotocamera.
IT
6
Page 61

Note
• Non scollegare/ricollegare il cavo USB della fotocamera durante l’avvio o l’arresto del
sistema operativo Windows, onde evitare problemi di funzionamento della fotocamera
o del computer.
• Scollegare/ricollegare lentamente e con attenzione il cavo USB della fotocamera, onde
evitare problemi di instabilità del computer.
•
La presente fotocamera è stata progettata per garantire un valore fisso e costante di
larghezza di banda USB per il trasferimento dei dati, al fine di visualizzare immagini di
qualità elevata. Pertanto, se viene utilizzato un hub USB per collegare contemporaneamente
una periferica composita USB, è possibile che il valore di larghezza di banda disponibile per
il trasferimento dei dati non sia sufficiente ad assicurare il funzionamento corretto.
z Suggerimenti
•
Se si dispone di più porte USB, una volta collegato il cavo USB a una delle porte USB, il
driver necessario viene installato automaticamente. Fare clic su “Sì” se viene visualizzato
un messaggio che richiede il riavvio dopo l’installazione. Dopo aver riavviato Windows e
aver collegato la porta USB, è possibile cominciare a utilizzare la fotocamera.
• Se il driver non viene installato correttamente, disinstallarlo e reinstallarlo. Per
verificare l’installazione e per eseguire la disinstallazione, consultare il manuale in
formato PDF. Per ulteriori informazioni su come visualizzare il manuale in PDF,
vedere a pagina 10.
Montaggio della fotocamera
Montaggio diretto
Applicare la fotocamera allo schermo.
Premere contemporaneamente entrambi i bracci della fotocamera e
agganciarla alla parte superiore dello schermo.
z Suggerimento
A seconda del tipo di computer in uso, potrebbe non essere possibile montare
direttamente la fotocamera.
In tal caso, per ulteriori informazioni consultare la sezione “Montaggio orizzontale” alla
pagina successiva.
7
IT
Page 62

Montaggio orizzontale
Se si desidera installare la fotocamera su una superficie piana e stabile, ad
esempio sullo schermo CRT, sul computer e così via, attenersi alla seguente
procedura:
1 Ruotare i bracci e la relativa piastra verso di sé.
2 Collocare la fotocamera su una superficie stabile.
Rimozione della fotocamera
Nota
Se il computer è spento, non è necessario eseguire le operazioni descritte al punto 1
riportato sotto. Tuttavia, se il cavo USB viene scollegato e ricollegato mentre il computer
si trova nel modo di risparmio energetico, la fotocamera potrebbe non venire rilevata.
1 Chiudere il software utilizzato dalla fotocamera.
2 Scollegare il cavo USB dal computer, quindi rimuovere la
fotocamera.
Nota
Se per scollegare il cavo USB viene tirato il cavo stesso, quest’ultimo potrebbe
risultare danneggiato. Assicurarsi di afferrare il connettore per scollegare il cavo.
IT
8
Page 63

Software di attivazione
Premere il tasto CAPTURE sulla fotocamera.
Viene attivato il software “VAIO Camera Capture Utility”.
La ripresa di fermi immagine e filmati richiede il software “VAIO
Camera Capture Utility”. La modifica dell’impostazione della
fotocamera e l’aggiunta di effetti alle immagini richiede il software
“VGP-UVC100 device driver”. Per ulteriori informazioni sull’uso di
questi programmi, consultare il manuale in formato PDF contenuto nel
disco di installazione in dotazione e la sezione della guida di “VAIO
Camera Capture Utility”.
Tasto CAPTURE
Nota
Il tempo di avvio del software dipende dal computer. Una volta premuto il tasto
CAPTURE, attendere l’attivazione.
IT
9
Page 64

Consultazione del manuale in formato PDF
Nel manuale in formato PDF incluso nel disco di installazione in dotazione
vengono descritte le modalità di ripresa di fermi immagine e filmati,
nonché di modifica delle impostazioni della fotocamera, quali la
regolazione della funzione Compensazione retroilluminazione e della
luminosità.
z Suggerimenti
•È innanzitutto necessario inserire il disco di installazione in dotazione nell’apposita
unità del computer. Una volta inserito il disco di installazione, compare la schermata
“Programma di installazione dell’applicazione Sony Visual Communication Camera
VGP-UVC100”. Una volta completata l’installazione del driver e del software, fare clic
su “Annulla”.
• Per visualizzare il manuale in formato PDF, è necessario disporre di Adobe Reader. Se
non è installato sul computer, è possibile scaricare tale software presso il sito Web
all’indirizzo riportato di seguito.
http://www.adobe.com/
1 Fare clic su “Start”, “Risorse del computer”, quindi fare
doppio clic sull’icona dell’unità CD-ROM.
2 Aprire la cartella “Manual”, quindi aprire la cartella “IT”.
3 Fare doppio clic su “VGP-UVC100_manual_it.pdf”.
10
IT
Page 65

Precauzioni
Posizioni di utilizzo e di
conservazione
Non utilizzare o conservare il presente
prodotto nei seguenti luoghi, onde evitare
di danneggiare la fotocamera.
• Luoghi soggetti a temperature
eccessivamente elevate
Durante periodi particolarmente caldi o
in estate, la temperatura all’interno di
veicoli chiusi può aumentare
considerevolmente. Se la fotocamera
viene lasciata in questo tipo di luoghi,
potrebbe deformarsi o risultare
danneggiata.
• Luoghi soggetti a luce solare
diretta o in prossimità di impianti
di riscaldamento
La fotocamera potrebbe deformarsi o
risultare danneggiata.
• Luoghi esposti a sabbia, ad
esempio spiagge
Non collocare la fotocamera in luoghi
esposti a sabbia, ad esempio in spiaggia
o in altre aree sabbiose. Diversamente,
la fotocamera potrebbe subire danni,
talvolta irreparabili.
• Non puntare l’obiettivo
direttamente sul sole.
Diversamente potrebbero verificarsi
immagini residue o altri danni
all’obiettivo. Prestare pertanto attenzione
se la fotocamera viene lasciata in
prossimità di finestre o in esterni.
Funzionamento
• Non scollegare il cavo USB della
fotocamera durante le operazioni.
Diversamente, è possibile che si
verifichino problemi di funzionamento
della fotocamera.
• Non posizionare oggetti sopra la
fotocamera.
• Evitare di posizionare la fotocamera in
luoghi soggetti a improvvisi
cambiamenti di temperatura. Non
utilizzare la fotocamera subito dopo lo
spostamento da un luogo freddo a uno
caldo né dopo che la temperatura
ambiente ha subito un notevole
incremento. In caso contrario, è
possibile che si formi della condensa
all’interno della fotocamera. Prima di
utilizzare di nuovo la fotocamera,
attendere alcuni minuti.
• Non ruotare la fotocamera in modo
forzato, onde evitare problemi di
funzionamento.
• Non utilizzare computer con
caratteristiche tecniche diverse da quelle
indicate.
• Evitare che acqua od oggetti penetrino
nella fotocamera. Non aprire la
fotocamera.
Obiettivo
Non toccare l’obiettivo.
Manutenzione
Pulizia del rivestimento
Pulire l’esterno della fotocamera con un
panno morbido e asciutto. Per eliminare
macchie persistenti, inumidire il panno
con un blando detergente neutro. Non
utilizzare solventi, alcool detergente,
benzene o altre sostanze che potrebbero
danneggiare la finitura.
Pulizia dell’obiettivo
Rimuovere eventuali tracce di polvere
dalla parte anteriore dell’obiettivo
utilizzando un soffietto o un pennello
morbido.
11
IT
Page 66

Come ottenere
supporto
In questa sezione vengono fornite le
informazioni necessarie per ottenere
assistenza e supporto da Sony; sono
inoltre riportati alcuni suggerimenti per la
risoluzione di eventuali problemi della
Visual Communication Camera.
Opzioni di supporto Sony
Sony fornisce svariate opzioni di supporto
per la Visual Communication Camera. In
caso di domande relative alla fotocamera o
al software, consultare:
❑ Il presente manuale, che spiega le
modalità d’uso della fotocamera.
Per i clienti negli Stati Uniti e in
Canada
Per i clienti in Europa
❑ VAIO-Link. Per indirizzi e numeri
telefonici, accedere al seguente
indirizzo.
http://www.vaio-link.com/
Per i clienti in altri paesi/altre
regioni
❑ Sito Web di Vaio, che include una
sezione di domande frequenti (FAQ)
con le relative soluzioni.
vaio-online.sony.com/
❑ Il centro di assistenza Customer
Information Service (CSI) di Sony,
che offre informazioni sul notebook in
uso e su altri prodotti Sony che possono
venire utilizzati con il proprio computer.
Per rivolgersi al centro di assistenza
CSI, chiamare il numero 1-8884SONYPC (1-888-476-6972).
❑ Supporto online di Sony
Questo servizio consente l’accesso
immediato a informazioni su problemi
comuni. Immettere una descrizione del
problema verificatosi; il Knowledge
Database esegue una ricerca per le
corrispondenti soluzioni online. È
possibile accedere al supporto online di
Sony accedendo al seguente indirizzo.
http://esupport.sony.com/
IT
12
Page 67

Caratteristiche
tecniche
Visual Communication
Camera
Cattura delle immagini
Sensore immagini a scansione progressiva CMOS
a colori da 1/4 di pollice, 1.330.000 pixel
(1.310.000 pixel effettivi)
Obiettivo
2 gruppi, 2 obiettivi, F2.3
Lunghezza focale f=3,8 mm
(equivalente di una fotocamera da 35 mm a
f=31,3 mm)
Campo di messa a fuoco da 30 mm a ∞
Campo visivo angolare Orizzontale circa 56,8°
Verticale circa 42,6°
Bilanciamento del bianco
Interni/esterni
Velocità dell’otturatore
Automatica
Funzione di eliminazione dello
sfarfallio
50 Hz/60 Hz
Formato di cattura video
RGB 24 bit
Dimensioni delle immagini
1.280 × 1.024
640 × 480
320 × 240
Dimensioni dei filmati
640 × 480, WMV
320 × 240, WMV, MPEG1
160 × 120, WMV
160 × 112, MPEG1
Numero di fotogrammi visualizzati
Massimo: 30 fotogrammi/sec*
* Questo valore varia in base alle caratteristiche
tecniche del computer e all’applicazione in uso.
Campo di rotazione della fotocamera
In alto, 10° in basso, 90°
Destra e sinistra, 360° (in base a quanto consentito
dal cavo)
Consumo energetico
Circa 1,0 W
Dimensioni
Posizione normale
Circa 55
×
50,5
×
39,5
40,5 mm
×
39 mm
(L × A × P)
Posizione orizzontale
Circa 55
×
(L × A × P)
Lunghezza del cavo
Circa 100 cm
Peso
Circa 55 g
Ambiente di funzionamento
Temperatura di utilizzo
Da 5 °C a 35 °C
(gradiente termico inferiore a 10 °C/ora)
Umidità di utilizzo
Dal 20% all’80% (senza condensa),
a condizione che l’umidità sia inferiore al 65% a 35 °C
(lettura igrometrica inferiore a 29 °C)
Temperatura di deposito
Da –20 °C a 60 °C
(gradiente termico inferiore a 10 °C/ora)
Umidità di deposito
Dal 10% all’85% (senza condensa),
a condizione che l’umidità sia inferiore al 20% a 60 °C
(lettura igrometrica inferiore a 35 °C)
Accessori in dotazione
• Disco di installazione (CD-ROM × 1)
• Istruzioni per l’uso (1)
• Scheda di garanzia (1)*
* Gli accessori inclusi variano a seconda del
paese/della regione.
Il design e le caratteristiche tecniche sono soggetti
a modifiche senza preavviso.
13
IT
Page 68

Nombre del producto: Visual
Communication Camera
Modelo: VGP-UVC100
AVISO
Para reducir el riesgo de
incendios o electrocución, no
exponga el aparato a la lluvia ni a
la humedad.
Para evitar descargas eléctricas,
no abra el aparato. Solicite
asistencia técnica únicamente a
personal especializado.
Para realizar la conexión en un puerto USB, utilice
el puerto USB identificado mediante el siguiente
símbolo .
Este producto cumple con las siguientes
Directivas Europeas:
89/336/CEE, 92/31/CEE (Directivas CEM),
93/68/CEE (Directiva de marcas de la
CE).
Este producto también cumple con las normas EN
55022 Clase B y EN 55024 para su uso en las
siguientes áreas: residenciales, comerciales y de
industria ligera.
La imagen o el sonido pueden aparecer
distorsionados si la unidad se coloca muy cerca de
aparatos que emitan radiaciones
electromagnéticas.
Encargue las operaciones de servicio únicamente a
técnicos autorizados de Sony. Un uso y una
reparación incorrectos pueden provocar riesgos en
la seguridad.
Este equipo ha sido probado y cumple con lo
establecido por la Directiva EMC si se utiliza un
cable de conexión de menos de 3 metros de
longitud.
Tratamiento de los equipos
eléctricos y electrónicos al
final de su vida útil
(aplicable en la Unión
Europea y en países
europeos con sistemas de
recogida selectiva de
residuos)
Este símbolo en el equipo o el embalaje indica
que el presente producto no puede ser tratado
como residuos domésticos normales, sino que
debe entregarse en el correspondiente punto de
recogida de equipos eléctricos y electrónicos. Al
asegurarse de que este producto se desecha
correctamente, Ud. ayuda a prevenir las
consecuencias negativas para el medio ambiente y
la salud humana que podrían derivarse de la
incorrecta manipulación en el momento de
deshacerse de este producto. El reciclaje de
materiales ayuda a conservar los recursos
naturales. Para recibir información detallada sobre
el reciclaje de este producto, póngase en contacto
con el ayuntamiento, el punto de recogida más
cercano o el establecimiento donde ha adquirido
el producto.
• Sony, VAIO, y el logotipo de Eco
Info son marcas comerciales de Sony Corporation.
• Microsoft y Windows son marcas comerciales
registradas de Microsoft Corporation en los
Estados Unidos y/o en otros países.
• IBM y PC/AT son marcas comerciales registradas
de International Business Machines Corporation.
• Intel, Pentium y Celeron son marcas comerciales y
marcas comerciales registradas de Intel
Corporation.
• La marca de la palabra Bluetooth y sus logotipos
son propiedad de Bluetooth SIG, Inc. y cualquier
uso de los mismos por parte SONY se realiza bajo
licencia.
• Adobe y Adobe Reader son marcas comerciales o
marcas comerciales registradas de Adobe Systems
Incorporated en los Estados Unidos o en otros
países.
• Todos los demás nombres de sistemas, productos
y servicios son marcas comerciales de sus
respectivos propietarios. En este manual no se
especifican las marcas ™ ni ®.
En este manual, el término Windows XP se utiliza
como nombre genérico para designar los siguientes
productos: Microsoft® Windows® XP Home Edition
y Microsoft® Windows® XP Professional.
ES
2
Page 69

Índice
Introducción ........................................... 4
Ordenadores compatibles ...................... 4
Instalación y montaje ............................. 5
Comprobación de los accesorios
suministrados ............................... 5
Instalación del controlador y del
software ........................................ 6
Instalación de la cámara ................. 7
Activación del software .................. 9
Consulta del manual en formato
PDF ............................................ 10
Atención .............................................. 11
Mantenimiento ..................................... 11
Ayuda .................................................. 12
Características...................................... 13
ES
3
Page 70

Introducción
Esta cámara es una cámara de comunicación visual compatible con el
sistema USB 2.0. Esta cámara le permite utilizar la función de
videoteléfono de su ordenador. Sus características principales son:
• Sensor CMOS de 1.310.000 píxeles y micrófono.
• Permite tomar imágenes fijas o en movimiento y enviarlas como un
mensaje de correo de vídeo mediante el software suministrado “VAIO
Camera Capture Utility”.
• El controlador del dispositivo VGP-UVC100 proporciona distintas
opciones de configuración para la cámara como, por ejemplo, el ajuste de
compensación de luz de fondo o el brillo así como la posibilidad de
añadir efectos, como marcos, etc.
• Chat de vídeo si se utiliza como cámara Web.
Nota
Con el fin de evitar que el altavoz se acople, su software de mensajería puede cambiar el
volumen del micrófono de forma automática; el software baja el volumen del altavoz si el
micrófono está cerca del altavoz. Si la voz no se oye con claridad, utilice auriculares con
o sin micrófono.
Para obtener más información, consulte el manual del usuario de su software.
Ordenadores compatibles
La cámara está diseñada para funcionar con ordenadores con Windows XP*
preinstalado y que dispongan de puertos USB.
* Requiere la instalación de Windows XP Service Pack 2. Si no lo tiene
instalado, descárguelo del sitio Web de Microsoft.
Notas
• No se puede garantizar el funcionamiento de ordenadores de fabricación doméstica y de
ordenadores con un sistema operativo actualizado o con un entorno de sistema de inicio
múltiple.
• En los entornos operativos descritos anteriormente, no se puede garantizar el
funcionamiento correcto en todos los ordenadores.
• No es posible utilizar la unidad en un ordenador con cámara incorporada, incluso si la
cámara está conectada al ordenador.
• Se requieren los siguientes entornos operativos para poder capturar imágenes fijas y en
movimiento de tamaño VGA o mayor.
CPU: Pentium III o Celeron a 1,2 GHz o superior
Es recomendable disponer de 256 MB de memoria como mínimo.
ES
4
Si la imagen aparece distorsionada durante la captura, es recomendable reducir el
tamaño de la pantalla o el tamaño de la imagen.
Page 71

• Si muestra más de un millón de píxeles, esta cámara deberá estar conectada a un
conector USB de alta velocidad (USB 2.0).
• Para utilizar la cámara es indispensable instalar el software desde el disco de instalación
suministrado.
Instalación y montaje
Comprobación de los accesorios suministrados
Saque la cámara de la caja y compruebe que dispone de todos los
accesorios que se enumeran a continuación.
Si falta algún accesorio, póngase en contacto con el distribuidor de Sony al
que adquirió este producto o con un representante del servicio técnico de
Sony de su zona.
• Cámara de comunicación visual
• Disco de instalación (CD-ROM × 1)
• Manual de instrucciones (este manual)
• Tarjeta de garantía*
* Los accesorios incluidos varían en función del país y región.
ES
5
Page 72

Instalación del controlador y del software
Para utilizar la cámara en el ordenador, instale el controlador del
dispositivo VGP-UVC100. Instale el software “VAIO Camera Capture
Utility” para tomar imágenes fijas y en movimiento.
Notas
• Asegúrese de que tanto el disco duro como la unidad de CD-ROM de su ordenador
están disponibles para su uso. En este manual, la unidad de CD-ROM o cualquier
unidad de discos múltiples se denomina “la unidad de CD-ROM”. Para obtener más
información acerca de cómo conectar una unidad de CD-ROM, consulte el manual de
su ordenador o el de la unidad de CD-ROM.
• Se necesitan más de 2 GB de espacio disponible en el disco duro para utilizar “VAIO
Camera Capture Utility”.
• Actualice Windows antes de instalar el controlador y el software.
• Cierre todos los programas antes de instalar el controlador y el software.
• Para instalar el controlador y el software, debe iniciar la sesión como Administrador.
• Si aparece el cuadro de diálogo “Asistente para agregar nuevo hardware”, haga clic en
“Cancelar”, desconecte la cámara del ordenador e instálela de nuevo.
1 Encienda el ordenador, inicie el sistema operativo Windows
e introduzca el disco de instalación suministrado en la
unidad de CD-ROM.
El programa de instalación se inicia automáticamente y aparece la
pantalla “Sony Visual Communication Camera VGP-UVC100
Application Installer Setup”.
2 Asegúrese de que la casilla de verificación para instalar el
software está marcada y haga clic en “Siguiente”.
z Sugerencia
Si el software ya está instalado, la casilla de verificación no aparece.
3 Siga las instrucciones que aparecen en pantalla hasta que
finalice la instalación y la pantalla se cierre.
z Sugerencia
Haga clic en “Aceptar” si aparece un mensaje de reinicio después de la instalación.
4 Conecte el cable USB de la cámara al puerto USB del
ordenador.
El controlador necesario se instala automáticamente. Haga clic en
“Aceptar” si aparece un mensaje de reinicio después de la instalación.
Después de reiniciar Windows, ya puede utilizar la cámara.
ES
6
Page 73

Notas
• No conecte ni desconecte el cable USB de la cámara mientras el sistema operativo
Windows se inicia o cierra, de lo contrario pueden producirse fallos de funcionamiento
de la cámara o del equipo.
• Cuando desconecte y vuelva a conectar el cable USB de la cámara, hágalo suavemente;
un manejo brusco puede afectar a la estabilidad del ordenador.
•
Esta cámara está diseñada de modo que siempre disponga de una cantidad fija del ancho
de banda USB para la transferencia de datos y poder ofrecer imágenes de alta calidad.
En consecuencia, si utiliza un concentrador USB para conectar diversos dispositivos
USB de forma simultánea, el ancho de banda disponible para la transferecnia de datos
puede no ser suficiente para garantizar un funcionamiento correcto.
z Sugerencias
• Si existen varios puertos USB, el controlador necesario se instala automáticamente
después de conectar el cable USB a los distintos puertos. Haga clic en “Aceptar” si
aparece un mensaje de reinicio después de la instalación. Después de reiniciar Windows
y conectar la cámara al puerto USB, ya puede utilizar la cámara.
• Si el controlador no se ha instalado correctamente, siga los pasos que se describen a
continuación para desinstalarlo e instálelo de nuevo. Consulte el manual en formato
PDF para confirmar la instalación y para realizar la desinstalación. Consulte la página
10 para obtener información sobre cómo consultar el manual en formato PDF.
Instalación de la cámara
Si instala la cámara directamente
Instalación de la cámara sobre la pantalla.
Presione sobre ambos brazos y coloque la cámara sobre la parte
superior de la pantalla.
z Sugerencia
En función del tipo de ordenador que tenga, es posible que no pueda montar la cámara
directamente sobre la pantalla.
En este caso, consulte “Montaje horizontal” en la página siguiente, para obtener más
información.
ES
7
Page 74

Montaje horizontal
Si la cámara se va a utilizar sobre una superficie plana y estable, como un
monitor CRT o un ordenador, por ejemplo, siga los pasos a continuación:
1 Gire el brazo y la abrazadera hacia usted.
2 Sitúe la cámara sobre una superficie estable.
Desinstalación de la cámara
Nota
Si el ordenador está apagado, no es necesario llevar a cabo el paso 1 indicado a
continuación. Sin embargo, si desconecta el cable USB mientras el sistema está en modo
de ahorro de energía y vuelve a conectarlo, es posible que no detecte la cámara.
1 Cierre el software que utiliza la cámara.
2 Desconecte el cable USB del ordenador y, a continuación,
retire la cámara.
Nota
No tire del cable USB al desconectarlo, ya que podría dañarlo. Para desconectarlo
tire del conector.
ES
8
Page 75

Activación del software
Pulse el botón CAPTURE de la cámara.
Se activa el software “VAIO Camera Capture Utility”.
La toma de imágenes fijas y en movimiento se realiza con el software
“VAIO Camera Capture Utility”. Para cambiar la configuración de la
cámara y añadir efectos a las imágenes, dispone del controlador de
dispositivo VGP-UVC100. Para obtener más información acerca del
uso de dicho software, consulte el manual en formato PDF que
encontrará en el disco de instalación suministrado, así como la sección
de ayuda de “VAIO Camera Capture Utility”.
Botón CAPTURE
Nota
El tiempo de inicio del software depende del ordenador. Espere a que se active una
vez que haya pulsado el botón CAPTURE.
9
ES
Page 76

Consulta del manual en formato PDF
La manera de tomar imágenes fijas y en movimiento y de cambiar la
configuración de la cámara, así como el ajuste de la compensación de luz
de fondo y del brillo, se describen en el manual en formato PDF que se
incluye en el disco de instalación suministrado.
z Sugerencias
• En primer lugar, debe introducir el disco de instalación suministrado en la unidad de
CD-ROM. Cuando introduzca el disco de instalación, aparecerá la pantalla de “Sony
Visual Communication Camera VGP-UVC100 Application Installer Setup”. Haga clic
en “Cancelar” al finalizar la instalación del controlador y del software.
• Necesita Adobe Reader para consultar el manual en formato PDF. Si no lo tiene
instalado en el ordenador, descárguelo del sitio Web que se indica a continuación.
http://www.adobe.com/
1 Haga clic en el botón “Inicio” y en “Mi PC” y, a continuación,
haga doble clic en el icono de la unidad de CD-ROM.
2 Abra la carpeta “Manual” y, a continuación, abra la carpeta
“ES”.
3 Haga doble clic en “VGP-UVC100_manual_es.pdf”.
10
ES
Page 77

Atención
Lugares de uso y
almacenamiento
No utilice ni almacene este producto en
ninguno de los siguientes lugares; podría
dañar la cámara.
• Ubicaciones sujetas a
temperaturas inusualmente
elevadas
No deje la cámara en el interior de un
vehículo en verano o en épocas de
mucho calor; podría deformarse o
dañarse.
• Ubicaciones expuestas a la luz
solar directa o próximas a
aparatos de calefacción.
La cámara podría deformarse o dañarse.
• Lugares arenosos, como la playa.
No deje la cámara en un lugar donde
pueda haber arena, como la playa u
otros entornos arenosos. La cámara
puede resultar dañada y, en algunos
casos, imposible de reparar.
• No dirija el objetivo directamente
hacia el sol.
El objetivo se puede quemar o sufrir
algún otro tipo de daño. Tenga cuidado
si deja la cámara cerca de una ventana o
en el exterior.
Funcionamiento
• No desconecte el cable USB de la
cámara mientras ésta está en
funcionamiento; podría provocar un
fallo de funcionamiento de la cámara.
• No coloque objetos de ningún tipo
encima de la cámara.
• Evite colocar la cámara en ubicaciones
sujetas a cambios bruscos de
temperatura. No utilice la cámara
inmediatamente después de trasladarla
de una ubicación fría a otra cálida o
después de que la temperatura ambiente
haya subido significativamente. En caso
contrario, puede producirse
condensación en el interior de la
cámara. Deje a la cámara reposar unos
momentos antes de utilizarla.
•
No gire la cámara en exceso. Si lo hace,
puede provocar un error de
funcionamiento.
•
Sólo utilice el ordenador siguiendo las
especificaciones.
•
No deje que se introduzcan agua u
objetos dentro de la cámara. No abra la
cámara.
Objetivo
No toque el objetivo.
Mantenimiento
Limpieza de la unidad
Limpie la parte exterior de la cámara con
un paño suave y seco. Para eliminar las
manchas difíciles, humedezca el paño con
un detergente suave y neutro. No utilice
disolventes, alcohol, bencina ni ninguna
otra sustancia que pueda dañar la
superficie.
Limpieza del objetivo
Elimine el polvo de la superficie del
objetivo mediante un cepillo de aire o un
cepillo suave.
11
ES
Page 78

Ayuda
En esta sección se describe cómo obtener
ayuda y soporte de Sony, además de
sugerencias para la resolución de
problemas con la Cámara de
comunicación visual.
Acerca de las opciones de
soporte de Sony
Sony ofrece varias opciones de soporte
para la Cámara de comunicación visual. Si
tiene alguna pregunta sobre la cámara o el
software, consulte la siguiente
información:
❑ En esta guía se describe cómo utilizar
su cámara.
Para los clientes en los Estados
Unidos y Canadá
❑ El Centro de servicio de
información al cliente de Sony
ofrece información acerca de su
ordenador portátil y de otros productos
Sony compatibles con el ordenador. Si
desea ponerse en contacto con el Centro
de servicio de información al cliente de
Sony, llame al 1-888-4SONYPC
(1-888-476-6972).
❑ Asistencia técnica en línea de
Sony
Este servicio proporciona acceso
inmediato a la información relacionada
con los problemas más habituales.
Escriba una descripción de su problema
y la base de datos de conocimientos
busca las soluciones correspondientes en
línea. Para visitar el sitio de asistencia
técnica en línea de Sony, vaya a
http://esupport.sony.com/
ES
12
Para los clientes en Europa
❑ VAIO-Link. Para obtener direcciones y
números, consulte
http://www.vaio-link.com/
Para los clientes en otros países
y regiones
❑ El sitio Web de VAIO cuenta con un
apartado de preguntas más frecuentes y
soluciones.
vaio-online.sony.com/
Page 79

Características
Cámara de comunicación
visual
Captación de imágenes
Sensor de imágenes CMOS de escaneado
progresivo en color de 0,635mm (1/4") con
1.330.000 píxeles (1.310.000 píxeles efectivos).
Objetivo
2 grupos, 2 objetivos, F2.3
Distancia focal f=3,8mm (0,1")
(equivale a f=31,3mm (1,1") en una cámara
de 35mm (1,4"))
Rango de enfoque de 30mm a ∞ (1,2" a ∞)
Ángulo de visión Horizontal aprox. 56,8°
Vertical aprox. 42,6°
Balance de blancos
Interior/exterior
Velocidad de obturación
Automática
Función de cancelación del parpadeo
De 50 Hz a 60 Hz
Formato de captura de vídeo
RGB 24 bits
Tamaños de imagen
1.280 × 1.024
640 × 480
320 × 240
Tamaños de imagen en movimiento
640 × 480, WMV
320 × 240, WMV, MPEG1
160 × 120, WMV
160 × 112, MPEG1
Número de fotogramas
Máximo: 30 fotogramas/segundo*
* Esta relación varía en función de las
especificaciones del equipo y de la aplicación
que utilice.
Capacidad de giro de la cámara
Hacia arriba 10° hacia abajo 90°
Horizontal 360° (tanto como el cable permita)
Consumo de energía
Aprox. 1,0 W
Dimensiones
Normal
Aprox. 55
(An × Al × F)
Horizontal:
Aprox. 55
(An × Al × F)
×
×
50,5
39,5
×
40,5mm (2,4
×
39mm (2,4
× 2 ×
×
1,2
×
1,8")
1,2")
Longitud del cable
Aprox. 100cm (39,4")
Peso
Aprox. 55 gr (2,0 oz.)
Entorno operativo
Temperatura de funcionamiento
Entre 5°C y 35°C (41°F a 95°F)
(gradiente de temperatura inferior a 10°C (18°F)/
hora)
Humedad de funcionamiento
Del 20% al 80% (sin condensación)
siempre que la humedad sea inferior al 65% a
35°C (95°F)
(lectura de higrómetro inferior a 29°C (84°F))
Temperatura de almacenamiento
De -20°C a 60°C (-4°F a 140°F)
(gradiente de temperatura inferior a 10°C (18°F)/
hora)
Humedad de almacenamiento
Del 10% al 85% (sin condensación)
siempre que la humedad sea inferior al 20% a
60°C (140°F)
(lectura de higrómetro inferior a 35°C (95°F))
Accesorios suministrados
• Disco de instalación (CD-ROM × 1)
• Manual de instrucciones (1)
• Tarjeta de garantía (1)*
* Los accesorios incluidos varían en función del
país y región.
El diseño y las especificaciones están sujetos a
cambios sin previo aviso.
13
ES
Page 80

경고
화재 또는 감전 사고의 위험을 줄이려
면 본제품에 비나 수분이 닿지 않도록
주의하십시오.
케이스를 열면 감전의 위험이 있습니
다. 서비스는 자격이 있는 기술자에게
의뢰하십시오.
USB 포트를 연결할 때에는 표시가 있는
USB 포트에 연결하십시오.
• Sony, VAIO, 및 Eco Info 로
고는 Sony Corporation의 상표입니다.
• Microsoft 및 Windows는 미국 및/또는
기타 국가에서 Microsoft Corporation
의 등록 상표입니다.
• IBM 및 PC/AT는 International
Business Machines Corporation의 등
록 상표입니다.
• Intel, Pentium 및 Celeron은 Intel
Corporation의 상표 및 등록 상표입니다.
• Bluetooth 워드마크 및 로고는
Bluetooth SIG, Inc.의 소유이며 SONY
는 라이센스 하에 해당 상표를 사용합니다.
• Adobe 및 Adobe Reader는 미국 및/또
는 기타 국가에서 Adobe Systems
Incorporated의 상표 또는 등록 상표입
니다.
• 다른 모든 시스템, 제품 및 서비스는 해당
소유자의 등록 상표이며, 본 사용설명서에
서는 ™ 및 ® 마크를 별도로 기재하지 않습
니다.
목차
처음에 ......................................... 3
호환 컴퓨터 .................................. 3
셋업 ............................................ 4
부속 액세서리 확인하기 ............ 4
드라이버와 소프트웨어
설치하기 ................................ 5
카메라 연결하기 ...................... 6
소프트웨어 활성화하기.............8
PDF 사용설명서 보기 ............... 9
주의사항.....................................10
손질법........................................10
도움말 정보.................................11
사양 ........................................... 12
본 사용설명서에서는 Microsoft® Windows
XP Home Edition, Microsoft® Windows
XP Professional 및 Microsoft® Windows
Media Center Edition은 Windows XP로
표기했습니다.
KR
2
®
®
®
Page 81

처음에
본 카메라는 USB 2.0과 호환되는 비주얼 커뮤니케이션 카메라입니다.
이 카메라를 사용하면 컴퓨터에서 TV 전화 기능을 사용할 수 있습니다.
본 카메라에는 다음과 같은 기능이 포함되어 있습니다.
• 1,310,000픽셀 CMOS 센서 및 마이크로폰 탑재.
• 제공된 "VAIO Camera Capture Utility" 소프트웨어를 사용하여
동영상 및 정지영상을 촬영하여 비디오 메일로 전송 가능.
• "VGP-UVC100 장치 드라이버"를 사용하여 백라이트 보정 및 밝기
조절과 같은 다양한 카메라 설정 가능, 프레임 설정 등과 같은 효과 추
가 가능.
• 웹 카메라로 사용하여 비디오 채팅 가능.
주의점
메신저 소프트웨어는 마이크로폰 볼륨을 자동으로 변경하여 스피커가 윙윙거리는 것
을 방지할 수 있습니다. 즉, 마이크로폰이 스피커와 가까운 위치에 있으면 소프트웨어
가 스피커 볼륨을 낮춥니다. 소리가 편안하게 들리지 않으면 헤드폰이나 헤드셋을 사
용하여 주십시오.
자세한 내용은 소프트웨어 사용설명서의 도움말 부분을 참조하여 주십시오.
호환 컴퓨터
본 카메라는 Windows XP*가 사전 설치되어 있고 USB 포트가 장착
된 컴퓨터와 함께 사용하도록 설계되었습니다.
* Windows XP Service Pack 2가 설치되어 있어야 합니다. 설치되
어 있지 않으면 Microsoft 웹 사이트에서 다운로드하여 주십시오.
주의점
• 직접 조립한 컴퓨터, 운영체제 업그레이드 또는 멀티 부팅 시 카메라가 제대로 작동
하지 않을 수 있습니다.
• 위와 같은 운영 환경의 컴퓨터에서 제대로 작동되지 않을 수 있습니다.
• 카메라가 장착된 컴퓨터는 호환되지 않습니다. 카메라가 컴퓨터에 연결되더라도 사
용할 수 없습니다.
• 정지영상 및 동영상을 VGA 또는 그보다 더 큰 크기로 캡처하려면 다음과 같은 운영
환경이 필요합니다.
CPU: Pentium III 또는 Celeron 1.2 GHz 이상
메모리를 256 MB 이상 사용하는 것이 좋습니다.
캡처 중에 이미지가 왜곡되는 경우 화면 크기 또는 이미지 크기를 줄이는 것이 좋습
니다.
다음 페이지에 계속
KR
3
Page 82

• 백만 픽셀 이상으로 표시할 경우에는 카메라를 Hi-Speed USB(USB 2.0)가 있는
커넥터에 연결해야 합니다.
• 카메라를 사용하려면 제공된 설치 디스크에서 소프트웨어를 설치해야 합니다.
셋업
부속 액세서리 확인하기
상자에서 카메라를 꺼내고 상자에 다음과 같은 액세서리가 들어있는지
확인하여 주십시오.
없는 액세서리가 있을 때에는 본 제품을 구입하신 Sony 판매점 또는 거
주 지역의 Sony 서비스 담당자에게 연락하여 주십시오.
• 비주얼 커뮤니케이션 카메라
• 설치 디스크(CD-ROM × 1)
• 사용설명서(본 책자)
• 보증서
*
*
부속 액세서리는 국가 및 지역에 따라 다릅니다.
KR
4
Page 83

드라이버와 소프트웨어 설치하기
카메라를 사용하기 전에 컴퓨터에 VGP-UVC100 장치 드라이버를
설치합니다. 정지영상 및 동영상을 캡처하기 위해 "VAIO Camera
Capture Utility" 소프트웨어를 설치할 수 있습니다.
주의점
• 컴퓨터에서 CD-ROM 드라이브 같은 디스크 드라이브를 이용할 수 있는지 확인하
여 주십시오. 본 사용설명서에서는 CD-ROM 드라이브와 다양한 디스크 드라이브
를 "CD-ROM 드라이브"라고 합니다. CD-ROM 드라이브 연결 방법에 대한 자세
한 내용은 컴퓨터나 CD-ROM 드라이브와 함께 제공된 사용설명서를 참조하여 주
십시오.
• "VAIO Camera Capture Utility"를 사용하려면 하드 디스크에 2 GB 이상의 여
유 공간이 있어야 합니다.
• 드라이버와 소프트웨어를 설치하기 전에 Windows를 업데이트하여 주십시오.
• 드라이버와 소프트웨어를 설치하기 전에 모든 소프트웨어를 종료하여 주십시오.
• Administrator로 로그 온하고 드라이버와 소프트웨어를 설치하여 주십시오.
• "새 하드웨어 추가 마법사" 대화 상자가 나타나면 "취소"를 클릭하고 컴퓨터에서 카
메라를 분리한 후 다시 설치하여 주십시오.
1 컴퓨터 전원을 켭니다. Windows 운영체제가 시작됩니다. 제공
된 설치 프로그램 디스크를 CD-ROM 드라이브에 넣습니다.
설치 프로그램이 자동으로 시작되고 "Sony Visual
Communication Camera VGP-UVC100 Application
Installer Setup" 화면이 나타납니다.
2 설치하고 싶은 소프트웨어가 선택되어 있는지 확인하고 "Next"
를 클릭합니다.
z 힌트
소프트웨어가 이미 설치되어 있으면 확인란은 나타나지 않습니다.
3 설치가 완료되고 표시가 사라질 때까지 화면에 나타나는 지시에
따릅니다.
z 힌트
설치한 후 컴퓨터를 다시 시작하라는 메시지가 나타나면 "Yes"를 클릭하여
주십시오.
4 카메라의 USB 케이블을 컴퓨터의 USB 포트에 연결합니다.
필요한 드라이버가 자동으로 설치됩니다. 설치한 후 컴퓨터를 다시
시작하라는 메시지가 나타나면 "Yes"를 클릭하여 주십시오.
Windows를 다시 시작한 후에는 카메라를 사용할 수 있습니다.
다음 페이지에 계속
KR
5
Page 84

주의점
• 운영체제의 시작 중이나 종료 중에는 카메라 USB 케이블을 빼거나 연결하지 마십
시오. 카메라나 컴퓨터가 고장 나는 원인이 됩니다.
• 카메라의 USB 케이블을 조심스럽게 분리/다시 연결하여 주십시오. 너무 서두르면
컴퓨터 동작이 불안정해질 수 있습니다.
• 카메라는 고화질 영상을 표시하기 위해 데이터 전송용으로 항상 일정량의 USB 대
역폭을 확보하고 있습니다. 따라서 USB 허브를 사용해서 여러 대의 USB 장치를
동시에 연결하면 데이터 전송에 사용 가능한 대역폭이 부족하게 되고 정상으로 작동
하지 않게 됩니다.
z 힌트
• USB 포트가 여러 개 있을 경우, USB 케이블을 다른 USB 포트에 연결하면 필요한
드라이버가 자동으로 설치됩니다. 설치한 후 컴퓨터를 다시 시작하라는 메시지가 나
타나면 "Yes"를 클릭하여 주십시오. Windows를 재시작하고 USB 포트를 연결한
후 카메라를 사용할 수 있습니다.
• 드라이버가 정상으로 설치되지 않으면 드라이버를 제거한 후 다시 설치하여 주십시
오. 설치를 확인하고 설치를 제거하려면 PDF 사용설명서를 참조하십오. PDF 사용
설명서를 보는 방법에 대한 자세한 내용은 10페이지를 참조하여 주십시오.
카메라 연결하기
직접 연결하는 경우
카메라를 디스플레이 패널에 장착합니다.
암을 잡아당기고 카메라를 디스플레이 패널 위에 겁니다.
z 힌트
사용 중인 컴퓨터 유형에 따라서는 본 카메라를 직접 장착할 수 없는 경우가 있습니다.
그런 경우에는 다음 페이지의 "수평으로 고정하기"에서 자세한 내용을 참조하여 주십
시오.
KR
6
Page 85

수평으로 고정하기
아래 그림과 같이 카메라를 CRT 디스플레이나 컴퓨터 윗면과 같은 평
평하고 안정된 장소에 고정합니다.
1 암과 암 플레이트를 사용자 쪽으로 향하게 합니다.
2 카메라를 안정된 장소에 놓습니다.
카메라 분리하기
주의점
컴퓨터가 전원이 꺼져 있을 때에는 다음의 순서 1은 조작할 필요가 없습니다. 단 컴퓨
터가 절전 모드일 때 USB 케이블을 뺐다가 다시 연결하면 카메라가 감지되지 않는 경
우가 있습니다.
1 카메라에서 사용 중인 소프트웨어를 종료합니다.
2 컴퓨터에서 USB 케이블을 빼고 카메라를 제거합니다.
주의점
USB 케이블을 뺄 때 케이블을 잡고 잡아당기면 케이블이 파손될 염려가 있습니
다. 케이블은 반드시 커넥터를 잡고 빼 주십시오.
KR
7
Page 86

소프트웨어 활성화하기
카메라의 CAPTURE 버튼을 누릅니다.
"VAIO Camera Capture Utility" 소프트웨어가 활성화됩니다.
정지영상과 동영상 캡처에는 "VAIO Camera Capture Utility"
가 필요합니다. 카메라의 설정을 변경하고 이미지에 효과를 추가할
때 "VGP-UVC100 장치 드라이버"를 사용할 수 있습니다. 사용법
에 대한 자세한 내용은 제공된 설치 디스크에 있는 PDF 사용설명
서와 "VAIO Camera Capture Utility"의 도움말 부분을 참조
하여 주십시오.
CAPTURE 버튼
주의점
소프트웨어의 기동 시간은 컴퓨터에 따라 다릅니다. CAPTURE 버튼을 누르고
활성화되는 동안 기다려 주십시오.
KR
8
Page 87

PDF 사용설명서 보기
정지영상 및 동영상을 캡처하는 방법, 백라이트 보정 및 밝기 조정과 같
은 카메라의 설정을 변경하는 방법은 제공된 설치 디스크에 포함된
PDF 사용설명서에 설명되어 있습니다.
z 힌트
• 제공된 설치 디스크를 CD-ROM 드라이브에 미리 넣어 놓아야 합니다. 설치 디스
크를 넣으면 "Sony Visual Communication Camera VGP-UVC100
Application Installer Setup" 화면이 나타납니다. 드라이버 및 소프트웨어 설치
가 완료되면 "취소"를 클릭합니다.
• PDF 사용설명서를 보려면 Adobe Reader가 필요합니다. 컴퓨터에 이 프로그램이
설치되어 있지 않으면 아래 웹 사이트에서 다운로드하십시오.
http://www.adobe.com/
1 "시작" 버튼, "내 컴퓨터"를 클릭한 다음 CD-ROM 드라이브 아
이콘을 더블 클릭합니다.
2 "Manual" 폴더를 연 다음 "KR" 폴더를 엽니다.
3 "VGP-UVC100_manual_kr.pdf"를 더블 클릭합니다.
KR
9
Page 88

주의사항
사용 및 보관 장소
다음 장소에서는 본 제품을 사용하거나
보관하지 마십시오. 카메라가 손상될 수
도 있습니다.
• 온도가 매우 높아지는 장소
더운 날씨나 여름철, 창문을 꼭 닫은
자동차 안은 온도가 특히 점점 높아지
기 때문에 이런 장소에 카메라를 방치
하면 카메라가 틀어지거나 파손될 염
려가 있습니다.
• 직사광선이 닿는 장소나 난방기구가
가까이 있는 장소
카메라가 틀어지거나 파손될 염려가
있습니다.
• 해변 등 모래가 많은 장소
해변 등 모래가 많은 장소에 카메라를
놓지 마십시오. 카메라가 파손되거나
경우에 따라서는 수리할 수 없는 경우
가 있습니다.
• 렌즈는 태양을 향해 놓지 마십시오.
탄 자국이 생기거나 렌즈가 손상되는
원인이 됩니다. 카메라를 창 가까이나
옥외에 둘 때 주의하십시오.
• 카메라를 억지로 돌리지 마십시오. 그
럴 경우 고장날 수 있습니다.
• 지정된 사양 이외의 컴퓨터를 사용하
지 마십시오.
• 카메라 내부에 물이나 물건이 들어가
지 않도록 하십시오. 카메라를 열지 마
십시오.
렌즈
렌즈는 만지지 마십시오.
손질법
캐비닛 클리닝
카메라 표면은 부드럽고 마른 헝겊으로
닦아내십시오. 잘 지워지지 않는 더러움
은 묽은 중성세제를 적신 헝겊으로 닦아
내십시오. 용해제, 세탁용 알코올, 벤젠
등은 표면이 손상될 염려가 있으므로 사
용하지 마십시오.
렌즈 클리닝
조작
• 조작 중에는 카메라의 USB 케이블을
빼지 마십시오. 카메라가 고장 나는 경
우가 있습니다.
• 카메라 위에 어떤 물건도 올려 놓지 마
십시오.
• 온도 변화가 급격한 장소에 카메라를
놓지 마십시오. 온도가 낮은 곳에서 높
은 곳으로 카메라를 이동한 직후나 주
위 온도가 급격히 상승된 후에는 사용
하지 마십시오. 그렇지 않으면 카메라
내부에 응결 현상이 생기는 경우가 있
습니다. 카메라를 잠시 그대로 두었다
가 사용하여 주십시오.
KR
10
렌즈 앞면의 먼지는 블로어 브러시 또는
부드러운 솔을 사용해서 제거하여 주십
시오.
Page 89

도움말 정보
여기에서는 Sony로부터 도움말과 지원
을 받는 방법 및 비주얼 커뮤니케이션 카
메라의 문제점에 대한 해결 정보를 설명
합니다.
Sony의 지원에 대하여
Sony에서는 사용 중인 비주얼 커뮤니케
이션 카메라에 몇 가지 지원을 제공합니
다. 사용 중인 카메라 또는 소프트웨어에
대하여 질문이 있을 때에는 다음 사항을
참조하여 주십시오:
❑ 본 가이드에서는 카메라의 사용 방법
을 설명합니다.
미국 및 캐나다 거주 고객의 경우
❑ Sony Customer Information
Service Center로 문의하여 사용 중
인 노트북 컴퓨터와, 사용 중인 컴퓨터
와 작동되는 기타 Sony 제품에 관한
정보를 얻을 수 있습니다. Sony
Customer Information Service
Center에 연락하려면 1-8884SONYPC(1-888-476-6972)로 문
의하십시오.
❑ Sony 온라인 지원
Sony 온라인 지원 서비스에서는 일반
적으로 당면하게 되는 문제에 대한 정
보를 제공해 드리고 있습니다. 문제에
대한 설명을 입력하면 지식 데이터베
이스가 해당 해결책을 온라인으로 검
색합니다. Sony 온라인 지원 서비스
는 아래 주소를 통해 이용하실 수 있습
니다:
http://esupport.sony.com/
유럽에 거주하는 고객의 경우
❑ VAIO-Link. 주소 및 번호는 아래의
사이트를 확인하십시오.
http://www.vaio-link.com/
그외 국가 및 지역에 거주하는 고객
의 경우
❑ VAIO 웹사이트에서는 일반적인 질문
및 해결책을 제공해 드리고 있습니다.
vaio-online.sony.com/
11
KR
Page 90

사양
비주얼 커뮤니케이션 카메라
이미지 픽업
1/4" 1,330,000픽셀(유효 화소수 1,310,000)
컬러 CMOS 프로그레시브 스캐닝 이미지 센서.
렌즈
2 그룹, 2 렌즈, F2.3
초점 거리 f=3.8 mm
(f=31.3 mm에서 35 mm 카메라 상당)
초점 범위 30 mm에서 ∞
시야각 수평방향 약 56.8°
화이트 밸런스
Indoors/Outdoors
셔터 속도
Auto
플리커 보정 기능
50 Hz/60 Hz
비디오 캡쳐 형식
RGB24 비트
영상 사이즈
1,280 × 1,024
640 × 480
320 × 240
무비 사이즈
640 × 480, WMV
320 × 240, WMV, MPEG1
160 × 120, WMV
160 × 112, MPEG1
디스플레이 프레임 개수
최대: 30프레임/초
* 이 값은 컴퓨터 사양 및 사용 응용 프로그램에
따라 다릅니다.
카메라 회전 범위
약 10°에서 90°
수직방향 약 42.6°
*
오른쪽 및 왼쪽 360°(케이블이 허용하는 경우)
소비 전력
약 1.0 W
외형치수
일반
약 55 × 50.5 × 40.5 mm
(W × H × D)
가로
약 55 × 39.5 × 39 mm
(W × H × D)
케이블 길이
약 100 cm
중량
약 55 g
작동 환경
작동 온도
5°C에서 35°C
(시간당 10°C 이하 온도 변화)
작동 습도
20%에서 80%(비응결),
습도가 35°C에서 65% 미만일 때
(습도계 29°C 미만)
보관 온도
-20°C에서 60°C
(시간당 10°C 이하 온도 변화)
보관 습도
10%에서 85%(비응결),
습도가 60°C에서 20% 미만일 때
(습도계 35°C 미만)
부속 액세서리
• 설치 디스크(CD-ROM × 1)
• 사용설명서(1)
• 보증서(1)
*
부속 액세서리는 국가 및 지역에 따라 다릅니다.
*
12
디자인 및 주요 제원은 예고 없이 변경하는 경우
가 있습니다.
KR
Page 91

Page 92

警告
為減少火災或觸電的危險,請勿將本裝置
暴露在雨中或潮濕環境中。
為防止觸電,不要打開外殼,必須請專業
人員進行維修。
連接 USB 連接埠時,請連接到有 符號的
USB 連接埠。
• Sony、VAIO、 和環境生態資訊標
誌是 Sony Corporation 的商標。
• Microsoft 和 Windows 是 Microsoft Corporation
在美國和或其他國家的註冊商標。
• IBM 和 PC/AT 是 International Business
Machines Corporation 的註冊商標。
• Intel、Pentium 和 Celeron 是 Intel Corporation
的商標和註冊商標。
• Bluetooth 的字樣和標誌歸 Bluetooth SIG,
Inc. 所有,SONY 經許可使用此類標誌。
• Adobe 和 Adobe Reader 是 Adobe Systems
Incorporated 在美國和/或其他國家的商標或註
冊商標。
• 系統、產品和維修的所有其他名稱均為其各自
所有者的商標。在本手冊中,對 ™ 或 ® 標記
未標明。
在本手冊中,Microsoft® Windows® XP Home
Edition、Microsoft® Windows® XP Professional 和
Microsoft® Windows® Media Center Edition 被簡稱
為 Windows XP。
目錄
介紹 ........................... 3
相容電腦 ....................... 3
設定 ........................... 4
檢查隨機附件 ................ 4
安裝驅動程式和軟體 .......... 5
安裝攝影機 .................. 6
啟動軟體 .................... 8
參閱 PDF 手冊 ............... 9
注意事項 ...................... 10
維護 .......................... 10
獲取幫助 ...................... 11
規格 .......................... 12
CT
2
Page 93

介紹
本攝影機是 USB 2.0 相容的可視通訊攝影機。您可以透過本攝影機在
電腦上使用語音視訊功能。功能如下:
• 1310000 畫素的 CMOS 感應器和麥克風。
• 拍攝動態影像和靜止影像,並且透過附送的“VAIO Camera Capture
• 透過“VGP-UVC100 裝置驅動程式”軟體進行各種攝影機設定,例
• 當作網路攝影機使用時,可以進行視訊聊天。
附註
您的即時通訊軟體可能會自動調節麥克風音量,以免揚聲器發出尖銳的雜音;當麥
克風靠近揚聲器時,軟體會降低揚聲器音量。如果聲音聽不清楚,請使用耳機。
有關詳細資訊,請參閱軟體操作的說明章節。
相容電腦
本攝影機是為搭配預裝 Windows XP* 和配備 USB 連接埠的電腦所設
計。
* 需要安裝 Windows XP Service Pack 2。如果電腦內沒有安裝,請從
Utility”軟體傳送影音郵件。
如背光補償調節和亮度,以及增加效果,例如設定畫格等。
Microsoft 的網站下載。
附註
• 本攝影機不保證能在組裝電腦或作業系統升級多重開機的電腦上正常運作。
• 在上述作業環境中,不保證能在每台電腦上正常運作。
• 配備攝影機的電腦不相容。即使攝影機與電腦連接,仍然無法使用。
• 以 VGA 或較大尺寸擷取靜止影像和動態影像時,必須具備以下作業環境。
CPU:Pentium III 或 Celeron 1.2 GHz 以上
建議使用 256 MB 以上的記憶體。
如果擷取的影像扭曲時,建議縮小螢幕尺寸或影像尺寸。
• 若要顯示百萬畫素的影像,必須使用 Hi-Speed USB(USB 2.0)將相機連接到連
接埠。
• 若要使用相機,必須安裝附送安裝光碟的軟體。
3
CT
Page 94

設定
檢查隨機附件
將攝影機從包裝盒中取出,並確定盒中含有下面列出的附件。
如果缺少任何附件,請聯絡您購買該產品時的 Sony 銷售商或者您所
在地區的 Sony 服務代表。
• 可視通訊攝影機
• 安裝光碟 (CD-ROM × 1)
• 操作說明(本手冊)
• 保固卡*
* 隨機附件視國家和地區而異。
CT
4
Page 95

安裝驅動程式和軟體
安裝 VGP-UVC100 裝置驅動程式,以便在電腦上使用攝影機。您可
以安裝“VAIO Camera Capture Utility”軟體以擷取靜止影像和動態影
像。
附註
• 請確認您的電腦的磁碟機,例如 CD-ROM 光碟機等可用。在本手冊中,
CD-ROM 光碟機或多片磁碟機均被稱為“CD-ROM 光碟機”。有關如何連接
CD-ROM 光碟機的詳細資訊,請參閱與您的電腦或 CD-ROM 光碟機一起附送的
手冊。
• 若要使用“VAIO Camera Capture Utility”,硬碟可用空間必須超過 2 GB。
• 在安裝驅動程式和軟體之前,先更新 Windows。
• 在安裝驅動程式和軟體之前,先關閉所有軟體。
• 在安裝驅動程式和軟體前以管理員的身份登錄。
• 如果出現“新增硬體精靈”對話方塊,按一下“取消”,切斷攝影機與您的電腦
的連接並重新安裝。
1 打開電腦,啟動 Windows 作業系統,把附送的安裝光碟插入
CD-ROM 光碟機。
安裝程式自動啟動,螢幕上出現“Sony Visual Communication
Camera VGP-UVC100 Application Installer Setup”的字樣。
2 確認選擇了您想安裝的軟體,然後按一下“下一步”。
z 提示
如果已經安裝了該軟體,核取方塊將不會出現。
3 按照螢幕指示,直到設定完成且畫面關閉。
z 提示
當安裝完成後,如果出現重新啟動的提示訊息,按一下“是”。
4 將攝影機的 USB 電纜連接到您的電腦的 USB 連接埠。
將自動安裝所需的驅動程式。當安裝完成後,如果出現重新啟動
的提示訊息,按一下“是”。在您的 Windows 作業系統重新啟動
後,您就可以開始使用攝影機了。
接下頁
CT
5
Page 96

安裝攝影機
直接安裝時
附註
• 在您的 Windows 作業系統正在啟動或者關閉時,請不要插入拔出攝影機的
USB 電纜;否則可能會使攝影機或您的電腦出現故障。
• 請小心插入拔出攝影機的 USB 電纜;如果動作太快可能會導致您的電腦操作
不穩定。
• 本攝影機可以確保 USB 資料傳輸的頻寬固定,以顯示高品質的影像。所以,如
果您使用一個 USB 集線器同時連接多個 USB 裝置,可用的資料傳輸頻寬可能不
足以支援進行正常操作。
z 提示
• 有數個 USB 連接埠時,連接 USB 電纜到不同的 USB 連接埠後,將自動安裝所
需的驅動程式。當安裝完成後,如果出現重新啟動的提示訊息,按一下“是”。
在您的 Windows 作業系統重新啟動並且連接到 USB 連接埠後,您就可以開始使
用攝影機了。
• 如果驅動程式未正確安裝,先將它移除然後重新安裝。請參閱 PDF 手冊,確認
安裝以及進行移除。有關如何閱讀 PDF 手冊的詳細資訊,請參閱第 10 頁。
將攝影機安裝到顯示面板上。
將支架捏在一起,將攝影機安裝到顯示面板上方。
z 提示
根據您使用的電腦類型,也許有時不能直接安裝攝影機。
如果出現這種情況,請參閱下頁的“水平安裝”章節,以獲取詳細的說明。
CT
6
Page 97

水平安裝
拔掉攝影機
如果攝影機安裝在平坦、穩定的表面,例如 CRT 顯示器或電腦上,
請進行以下操作:
1 將支架和支架板轉向您。
2 將攝影機安裝在穩定的表面上。
附註
如果您的電腦已經關閉,您無須執行下面的步驟 1。不過,如果您在電腦處於省電
模式的時候拔出 USB 電纜,然後又把它插上,攝影機可能不會被檢測到。
1 關閉攝影機所使用的軟體。
2 從電腦上拔出 USB 電纜,然後取下攝影機。
附註
如果您在拔出 USB 電纜的時候只拔電纜本身,可能會損壞電纜。在拔出電纜
的時候請確認您捏住了連接埠。
CT
7
Page 98

啟動軟體
按下相機上的 CAPTURE 按鈕。
CAPTURE 按鈕
“VAIO Camera Capture Utility”軟體啟動。
擷取靜止影像和動態影像需要“VAIO Camera Capture Utility”。
您要變更攝影機設定以及為影像增加效果時,可以使用“VGP-
UVC100 裝置驅動程式”。有關使用的詳細資訊,請參閱附送安
裝光碟內的 PDF 手冊,以及“VAIO Camera Capture Utility”的說
明章節。
註
軟體啟動時間根據您的電腦而不同。按下 CAPTURE 按鈕時,請等待啟動。
CT
8
Page 99

參閱 PDF 手冊
擷取靜止影像和動態影像與變更攝影機設定的方式,例如背光補償和
亮度的調節,請參閱附送安裝光碟內的 PDF 手冊。
z 提示
• 請先將需要的附送安裝光碟插入 CD-ROM 光碟機。插入安裝光碟後,將會顯示
“Sony Visual Communication Camera VGP-UVC100 Application Installer Setup”螢
幕。驅動程式和軟體完成安裝後,按一下“取消”。
• 若要參閱 PDF 手冊,必須具備 Adobe Reader。如果電腦內沒有安裝,請從以下
網址下載:
http://www.adobe.com/
1 按一下“開始”按鈕,按一下“我的電腦”,然後按兩下
CD-ROM 光碟機圖示。
2 開啟“Manual”資料夾,然後開啟“CT”資料夾。
3 按兩下“VGP-UVC100_manual_ct.pdf”。
CT
9
Page 100

注意事項
使用和存放位置
請不要在下列場所使用和存放本產品。
否則可能會導致對攝影機的損壞。
• 異常高溫的場所
在高溫或夏季的時候,封閉車輛內部
的溫度會變得特別高,如果將攝影機
放置在這樣一個環境中,可能會導致
它變形或損壞。
• 受陽光直射或靠近發熱器具的場所
攝影機可能會變形或損壞。
• 沙地場所,例如海灘
不要將攝影機放置在可能有沙石存在
的地方,例如海灘或其他沙地區域。
否則可能會損壞攝影機,在某些情
況,甚至可能造成無法修復的損壞。
• 不要將鏡頭對著太陽。
否則可能導致內燃或其他鏡頭損壞。
在窗邊或戶外使用攝影機的時候要當
心。
鏡頭
請不要觸摸鏡頭。
維護
清潔外殼
用一塊柔軟的乾布來清潔攝影機的外
部。為除去難以去除污漬,用柔和的、
中性清潔劑將布弄濕。不要使用溶劑、
清洗酒精、汽油或其他可能損壞塗層的
物質。
清潔鏡頭
使用吹風刷或者軟刷從鏡頭前面除去所
有灰塵。
操作
• 在操作時不要拔出攝影機的 USB 電
纜。否則可能會導致攝影機故障。
• 不要在攝影機上放置任何物品。
• 避免將攝影機放在溫度變化劇烈的地
方。在將攝影機從寒冷場所移動到溫
暖場所後,或是周圍溫度劇烈上升
後,不要立即使用它。否則,可能會
導致攝影機內部結露。在使用前請將
攝影機放置一會。
• 請勿用力旋轉攝影機。否則,可能會
造成故障。
• 請勿使用不符合規格的電腦。
• 請勿讓水或物體進入攝影機內。請勿
打開攝影機。
CT
10
 Loading...