

Page 1
Page 2

Page 3

Using Instant Mode ................................................................................ 4
Support Formats .............................................................................. 4
Getting to Know the Instant Mode Main Menu ................................. 4
Playing a CD/DVD ................................................................................. 5
Inserting/Removing a Disc ............................................................... 6
Viewing Images...................................................................................... 7
Inserting/Removing a Memory Stick Media ..................................... 8
Inserting/Removing an SD Memory Card ........................................ 9
Customizing Instant Mode ................................................................... 10
Changing the Menu Language....................................................... 10
Setup Menu Items .......................................................................... 11
Troubleshooting ................................................................................... 15
Aviso importante acerca de Instant Mode............................................ 17
Uso de Instant Mode ............................................................................ 18
Formatos compatibles.................................................................... 18
Menú principal de Instant Mode..................................................... 18
Reproducción de un CD/DVD .............................................................. 19
Inserción y extracción de un disco................................................. 20
Visualización de imágenes .................................................................. 21
Inserción y extracción de un Memory Stick ................................... 22
Inserción y extracción de una tarjeta de memoria SD ................... 23
Personalización de Instant Mode ......................................................... 24
Cambio del idioma del menú ......................................................... 24
Elementos del menú de configuración ........................................... 25
Resolución de problemas .................................................................... 29
1
Page 4

Page 5

Important Notice on Instant Mode
Before using Instant Mode for the first time, please thoroughly read the separate
booklet that includes the description on the End User Software License
Agreement concerning InterVideo InstantON™. Your use of Instant Mode shall
be considered that you have read and agreed upon the information contained in
the booklet.
US
3
Page 6
Using Instant Mode
Instant Mode enables you immediately to play CDs and DVDs and view the
image data stored in the memory card, such as a Memory Stick media or SD
memory card, without launching Windows. To activate Instant Mode, your
computer must be either off or in Hibernate.
Support Formats
In Instant Mode, you can play optical discs in the following formats and view
images in the following formats stored in a Memory Stick media or SD
memory card.
CD Audio CD
DVD Commercially available DVD, DVD-Video Format,
DVD-VR Format
Image formats Bitmap, JPG, GIF (“animation GIF” is not supported),
TIFF, PNG
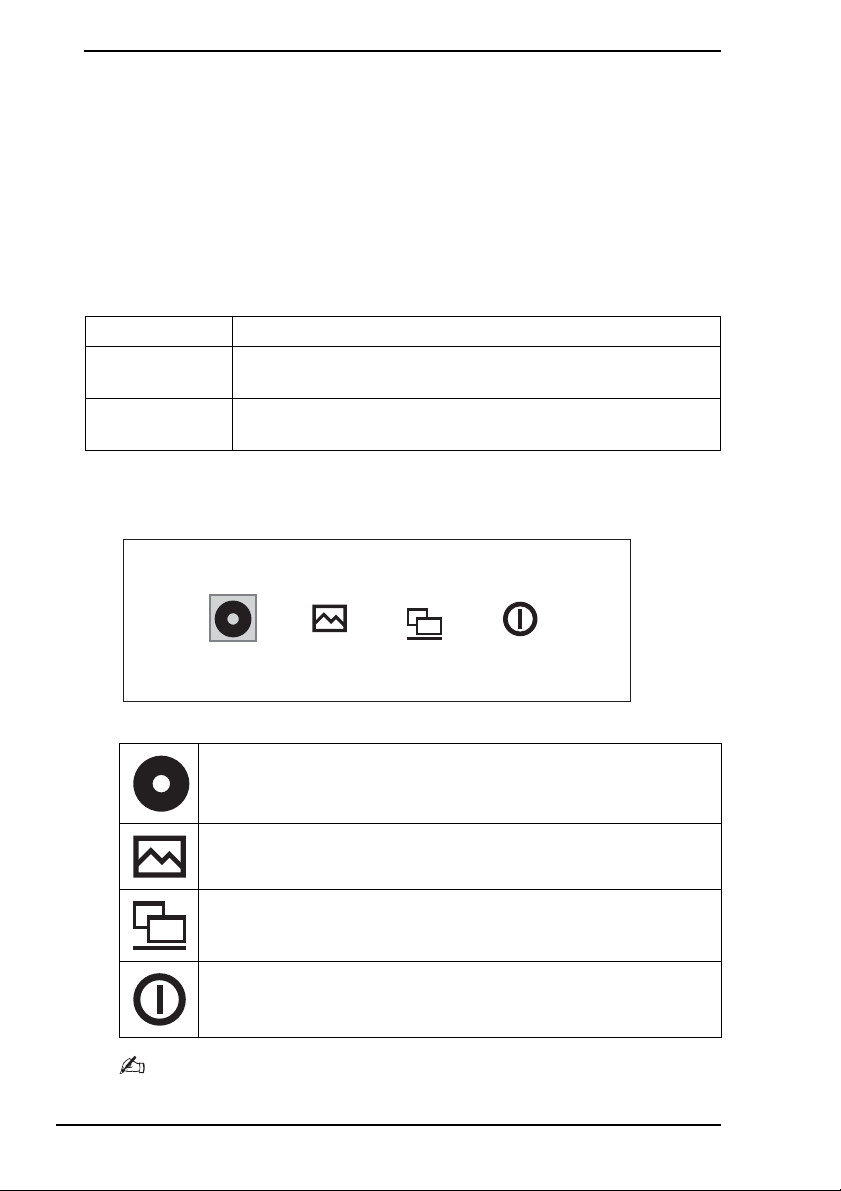
Getting to Know the Instant Mode Main Menu
Launching Instant Mode displays the Main Menu as shown below.
CD·DVD Power OffPhoto Start Windows
Launches CD
view.
Launches Photo mode and displays the thumbnail view for
media selection.
Exits Instant Mode and launches Windows.
Exits Instant Mode and turns off the computer.
You can display the screen view in several languages. See Changing the Menu Language on
page 10 for more information.
·DVD mode and displays the CD/DVD playback
4
Page 7

Playing a CD/DVD
1 Press the AV M ODE button.
Instant Mode launches and displays the Main Menu.
2 Use the < or , key to select .
The CD·DVD mode icon is highlighted in blue.
3 Insert a CD or DVD.
See Inserting/Removing a Disc on page 6 for detailed instructions.
4 Press the Enter key.
The CD/DVD playback automatically starts.
By default, the Operation Guide appears at the bottom of the screen to guide you through
operations.
US
5
Page 8
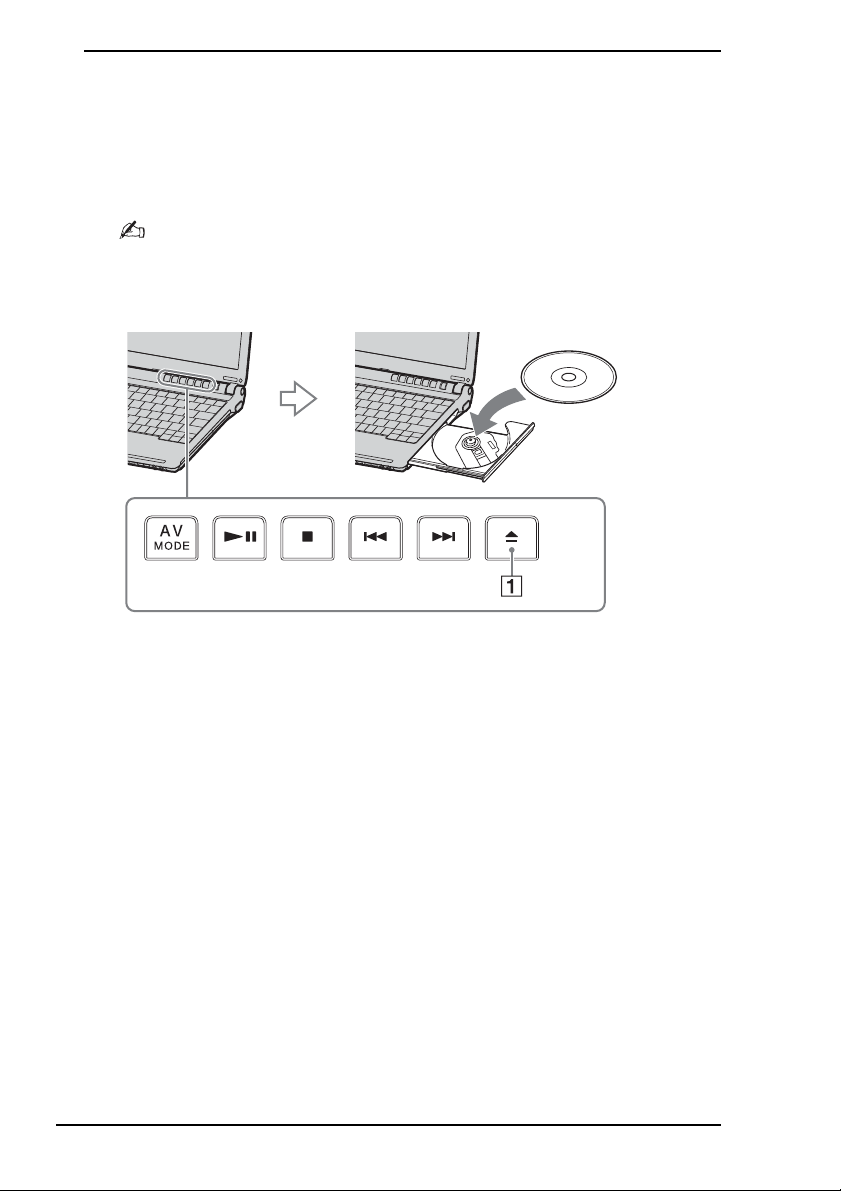
Inserting/Removing a Disc
Your computer is equipped with an optical disc drive on the right.
To insert a disc
1 Press the drive eject button A to open the drive.
The drive tray slides out.
If this button does not work, try the substitute drive eject button on the optical disc drive.
2 Place a disc in the middle of the tray with the label side facing up until the disc
clicks into place.
3 Close the tray by pushing it in gently.
To remove a disc
1 Make sure that the optical disc drive indicator is off.
2 Press the drive eject button A to open the drive.
The tray slides out.
3 Take the disc out of the drive tray.
4 Close the tray by pushing it in gently.
6
Page 9

Viewing Images
1 Insert a Memory Stick media or an SD memory card.
See Inserting/Removing a Memory Stick Media on page 8 or Inserting/
Removing an SD Memory Card on page 9 for detailed instructions.
2 Press the AV M ODE button.
Instant Mode launches and displays the Main Menu.
3 Use the < or , key to select .
The Photo mode icon is highlighted in blue.
4 Press the Enter key.
The thumbnail view for media selection appears.
5 Use the < or , key to select Memory Stick or SD Memory Card,
depending on the media that you inserted in step 1.
The stored images are displayed in the thumbnail view.
6 To start a slide show of the stored images, press the Play/Pause button.
To view a specific image, press the Enter key to display the thumbnail view,
use the < or , key to select the image, and press the Enter key.
By default, the Operation Guide appears at the bottom of the screen to guide you through
operations.
US
7
Page 10
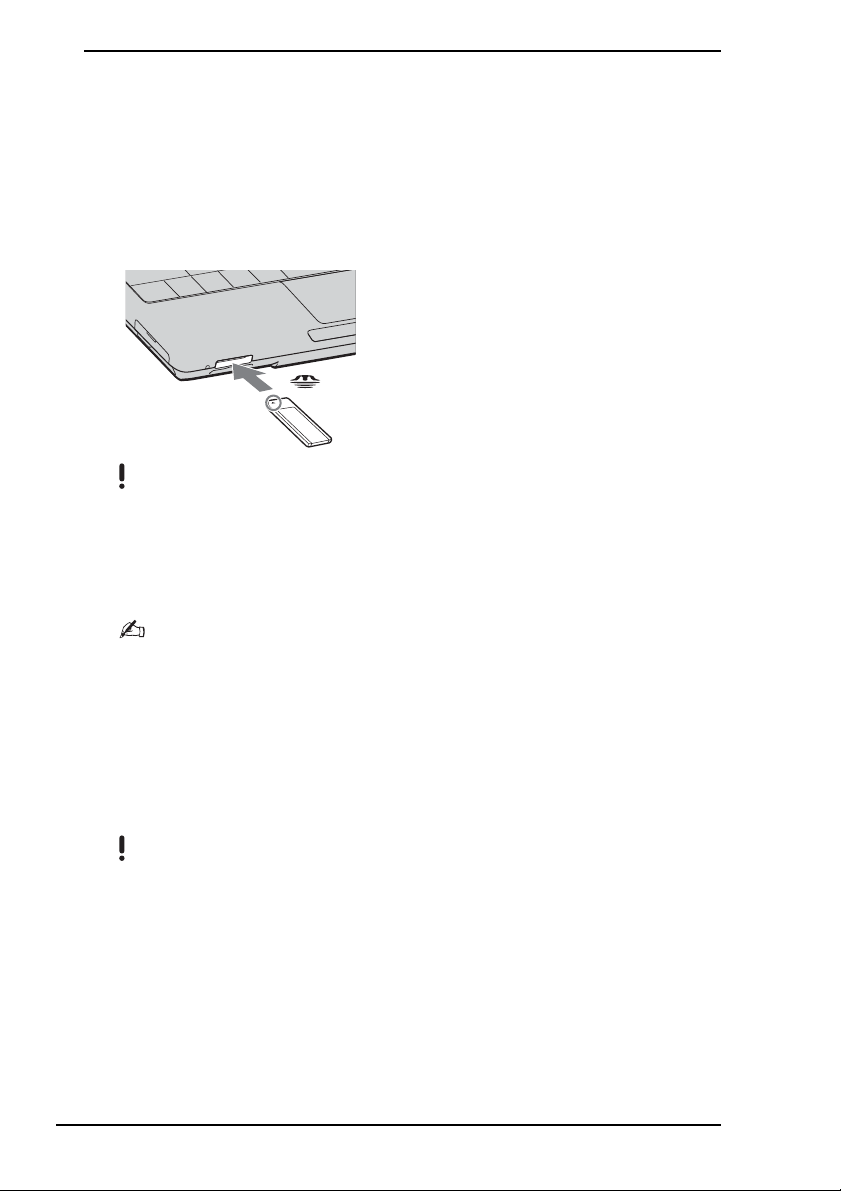
Inserting/Removing a Memory Stick Media
Your computer is equipped with an Memory Stick media slot on the front. You can
only insert one Memory Stick media at a time.
To insert a Memory Stick media
1 Insert the Memory Stick media with the arrow facing up and toward the
Memory Stick media slot.
2 Carefully slide the Memory Stick media into the slot until it clicks into place.
Be sure to hold the Memory Stick media with the arrow pointing in the correct direction as you
insert it into the slot. To avoid damaging the computer or the Memory Stick media, do not force
the Memory Stick media into the slot if it does not insert smoothly.
Do not insert more than one Memory Stick media into the Memory Stick media slot. Inserting the
media improperly may damage the computer.
Your computer supports Memory Stick Duo media and is equipped with the Memory Stick combo
slot that is compatible with both standard- and duo-size media.
To remove a Memory Stick media
1 Make sure that the Media Access indicator is off.
2 Push the Memory Stick media in toward the computer.
The Memory Stick media ejects.
3 Pull the Memory Stick media carefully out of the slot.
Always remove the Memory Stick media gently, or it may pop out unexpectedly.
Do not remove the Memory Stick media while the Media Access indicator is turned on. If you do,
you may lose data. Large volumes of data may take time to load, so be sure the indicator is off
before removing the Memory Stick media.
8
Page 11
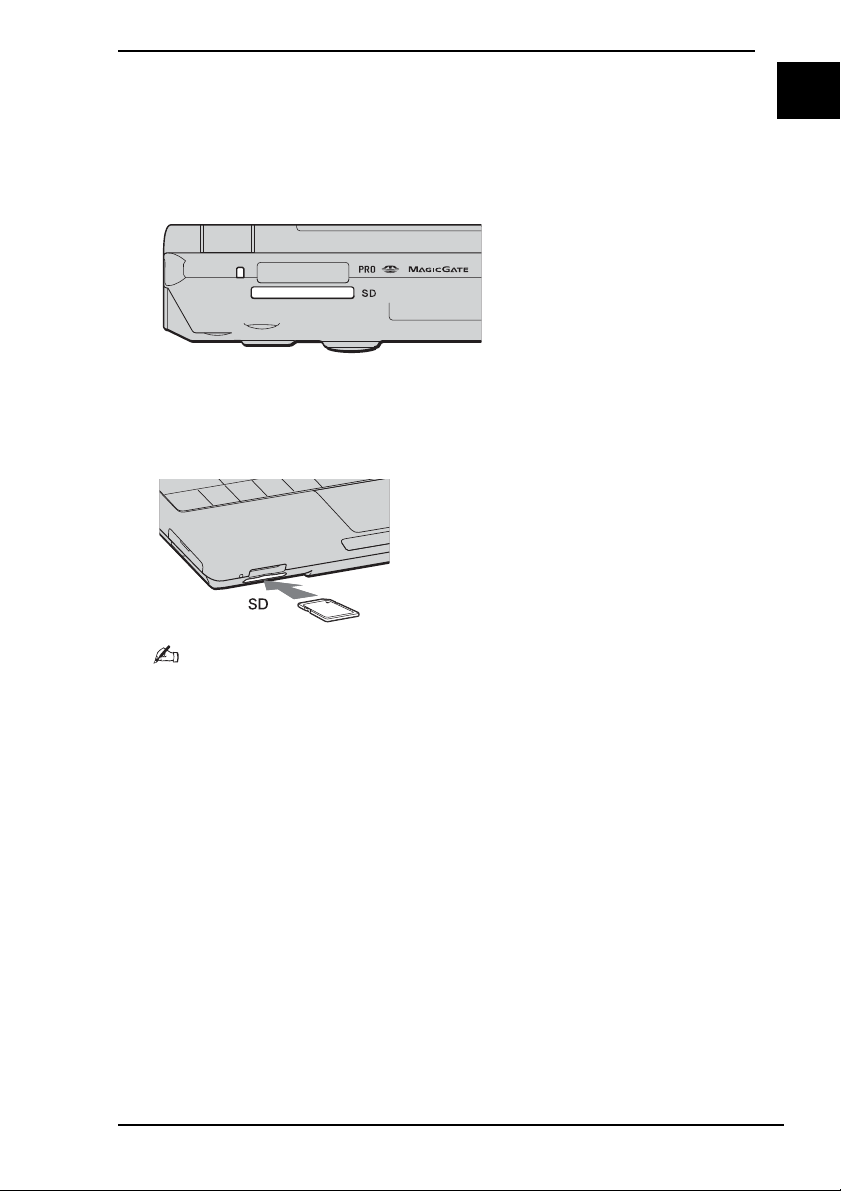
Inserting/Removing an SD Memory Card
In addition to the Memory Stick media slot, your computer is equipped with an SD
memory card slot on the front to accommodate the SD memory card.
To insert an SD memory card
1 Locate the SD memory card slot on the front of the computer.
2 Insert the SD memory card into the slot with the arrow facing up and toward
the SD memory card slot.
3 Carefully slide the SD memory card into the slot until it clicks into place.
Do not force the card into the slot.
US
If the SD memory card does not go into the slot easily, remove it gently and verify you are
inserting it in the proper direction.
To remove an SD memory card
1 Make sure that the Media Access indicator is off.
2 Push the extended part of the SD memory card in toward the computer.
The SD memory card ejects.
3 Pull the SD memory card carefully out of the slot.
9
Page 12

Customizing Instant Mode
Instant Mode is provided with the Setup Menu for customization. With the Setup
Menu, you can change various settings including the menu language and
playback mode.
Changing the Menu Language
By default, launching Instant Mode displays the Main Menu in English. Seven
other languages are available for displaying the screen view: Traditional Chinese,
Simplified Chinese, Japanese, Korean, French, German, and Italian.
To change the menu language
1 Press the AV M O D E button.
Instant Mode launches and displays the Main Menu.
2 Use the < or , key to select or .
The selected icon is highlighted in blue.
3 Press the Enter key.
4 Press the Applications key .
The Setup Menu appears.
5 Use the m or M key to select General Setup and press the Enter key.
The General Setup menu appears.
6 Use the , key to list the menu languages.
7 Use the m or M key to select the desired language and press the Enter key.
10
For other available setup items, see Setup Menu Items on page 11.
Page 13

Setup Menu Items
DVD Mode Setup Menu
Menu item Option Description
Title Menu — Displays the DVD title menu.
Root Menu — Displays the DVD root menu.
LCD
Brightness
Picture
Properties…
Display
Setting
Audio XXXXX Displays the language of the audio
Subtitle None
Angle All available angles Select the desired angle, if any,
Closed
Caption
Information
On/Off
General
Setup…
* Default setting
—Use the < or , key to adjust the
LCD brightness.
— Displays the Picture Properties
Setup Menu (page 12).
*
Auto
4:3
16:9
Subtitle options
On
*
Off
— Shows or hides the information on
— Displays the General Setup Menu
Select the desired display ratio for
the DVD movie in play.
data.
Select the desired subtitle, if any,
for the DVD movie in play.
Selecting None hides the subtitle.
for the DVD movie in play.
Select whether to show or hide the
closed caption, if any.
the DVD movie in play, the sleep
timer, and the battery.
(page 14).
US
11
Page 14

Picture Properties Setup Menu
Menu item Option Description
Hue — Use the < or , key to adjust hue of the
DVD movie in play.
Contrast — Use the < or , key to adjust contrast of
the DVD movie in play.
Brightness — Use the < or , key to adjust brightness
of the DVD movie in play.
Saturation — Use the < or , key to adjust saturation
of the DVD movie in play.
Reset to
— Resets all properties to the default values.
Default
Back to Setup
Menu
— Displays the DVD Mode Setup Menu
(page 11).
Audio CD Mode Setup Menu
Menu item Option Description
Repeat Repeat All
Repeat One
*
Off
Shuffle On
*
Off
LCD
— Use the < or , key to adjust the
Brightness
Information
— Shows or hides the information on
On/Off
General
— Displays the General Setup Menu
Setup…
* Default setting
Select whether to repeat all the songs
in the audio CD or the current one only;
or disable the function.
Select whether to enable or disable the
random-order playback function.
LCD brightness.
the audio CD in play, the sleep timer,
and the battery.
(page 14).
12
Page 15

Photo Mode Setup Menu
Thumbnail view
Menu item Option Description
LCD
Brightness
Information
On/Off
General
Setup…
Slide show view
Menu item Option Description
Rotate 3 90°
Speed Slow
Repeat All On
General
Setup…
* Default setting
—Use the < or , key to adjust the LCD
brightness.
— Shows or hides the information on the
sleep timer and the battery.
— Displays the General Setup Menu
(page 14).
Rotates the current image by 90 degrees
4 90°
Medium
High
Off
— Displays the General Setup Menu
*
*
clockwise or counter-clockwise.
Select the desired playback speed of
the slide show.
Select whether to repeat the slide show.
(page 14).
US
13
Page 16

General Setup Menu
Menu item Option Description
Menu
Language
Sleep Timer Off
Version
Information
Operation
Guide On/Off
Back to Setup
Menu
English
Traditional Chinese
Simplified Chinese
Japanese
Korean
French
German
Italian
30 Min
60 Min
90 Min
Ver: x.x.x Displays the version information.
— Shows or hides the Operation Guide.
— Displays the previous setup menu.
Select the desired language for
the screen view.
Select the desired sleep timer.
14
Page 17

Troubleshooting
What should I do if Instant Mode won’t launch?
❑ When the computer is in Standby mode, pressing the AV MODE button
launches the WinDVD software by default. To launch Instant Mode, turn off
or place the computer in Hibernate mode and press the AV MODE button.
What should I do if the optical disc drive isn’t playing my CD
or DVD or if CD/DVD playback is interrupted?
❑ Make sure the disc was inserted into the optical disc drive with the label
facing up.
❑ Check the DVD package to make sure the region code is compatible with the
optical disc drive. You cannot play a DVD if a region code is not assigned to
the optical disc drive or the assigned region code is not the same as the one
on the package.
For more information on the region code, refer to Notes on playing DVDs in
Using the Optical Disc Drive in the online User Guide.
❑ Instant Mode only supports commercially available DVDs, DVDs in the Video
format, and DVD-RW/DVD-RAM discs in the Video Recording format.
To play any other DVD, launch Windows and use the WinDVD software.
Additionally note that DTS (Digital Theater System) audio is not available for
playback in Instant Mode.
Why can’t I move to a folder displayed in the thumbnail view
in Photo mode?
❑ You cannot move to any folder that contains no images in the
supported
formats.
US
What should I do if my Memory Stick media or SD memory
card isn’t detected?
❑ Do not use the Windows Format function to format your memory card.
Use the bundled Memory Stick Formatter software or a generally available
SD memory card format utility; or format your memory card on your device,
for example a digital camera.
❑ Exit Instant Mode with your Memory Stick media or SD memory card inserted
in the slot and launch Instant Mode once again.
15
Page 18

Page 19

Aviso importante acerca de Instant Mode
Antes de usar Instant Mode por primera vez, lea detenidamente el folleto que
incluye la descripción del Acuerdo de licencia de software para el usuario final
con respecto a InterVideo InstantON™. Si usa Instant Mode, se considera que
usted ha leído y aceptado la información que contiene el folleto.
ES
17
Page 20

Uso de Instant Mode
Instant Mode le permite reproducir CD y DVD en forma inmediata y ver los datos
de imagen guardados en una tarjeta de memoria, tal como Memory Stick o tarjeta
de memoria SD, sin iniciar Windows. Para activar Instant Mode, su computadora
debe estar apagada o en modo de Hibernación.
Formatos compatibles
En Instant Mode, puede reproducir discos ópticos y ver imágenes almacenadas
en un Memory Stick o en una tarjeta de memoria SD en los formatos que se
indican a continuación.
CD CD de audio
DVD DVD, formato DVD-Video y formato DVD-VR disponibles en el
comercio
Formatos
de imagen
Menú principal de Instant Mode
Al iniciar Instant Mode, aparece el menú principal como se muestra a continuación.
Bitmap, JPG, GIF (no se admiten “GIF animados”), TIFF, PNG
CD·DVD Power OffPhoto Start Windows
18
Inicia el modo de CD
de CD/DVD.
Inicia el modo de Foto y muestra la vista de miniaturas para la
selección de medios.
Sale de Instant Mode e inicia Windows.
Sale de Instant Mode y apaga la computadora.
Puede ver la pantalla en diversos idiomas. Para obtener más información, consulte Cambio del
idioma del menú
en la página 24.
·DVD y aparece la vista de reproducción
Page 21

Reproducción de un CD/DVD
1 Pulse el botón AV MODE.
Instant Mode se inicia y muestra el menú principal.
2 Use la tecla < o , para seleccionar .
El icono de modo de CD·DVD se resalta en color azul.
3 Inserte un CD o DVD.
Consulte Inserción y extracción de un disco en la página 20 para obtener
instrucciones detalladas.
4 Pulse la tecla Intro.
La reproducción CD/DVD se inicia automáticamente.
De manera predeterminada, aparece la Guía de operación en la parte inferior de la pantalla para
ofrecer una guía acerca del funcionamiento del programa.
ES
19
Page 22

Inserción y extracción de un disco
Su computadora se encuentra equipada con una unidad óptica en el
costado derecho.
Para insertar un disco
1 Pulse el botón de expulsión de la unidad A para abrirla.
La bandeja se desliza hacia afuera.
Si este botón no funciona, intente con el botón de expulsión alternativo en la unidad óptica.
2 Coloque un disco en medio de la bandeja, con la cara de la etiqueta
orientada hacia arriba, hasta que encaje en su lugar.
3 Empuje la bandeja levemente para cerrarla.
Para extraer un disco
1 Asegúrese de que el indicador de la unidad óptica esté apagado.
2 Pulse el botón de expulsión de la unidad A para abrirla.
La bandeja se desliza hacia afuera.
3 Retire el disco de la bandeja.
4 Empuje la bandeja levemente para cerrarla.
20
Page 23

Visualización de imágenes
1 Inserte un Memory Stick o una tarjeta de memoria SD
Consulte Inserción y extracción de un Memory Stick en la página 22 o
Inserción y extracción de una tarjeta de memoria SD en la página 23 para
obtener instrucciones detalladas.
2 Pulse el botón AV MODE.
Instant Mode se inicia y muestra el menú principal.
3 Use la tecla < o , para seleccionar .
El icono de modo de Foto se resalta en color azul.
4 Pulse la tecla Intro.
Aparece la vista de miniaturas para la selección de medios.
5 Use la tecla < o , para seleccionar Memory Stick o Ta r j e ta d e
memoria
Las imágenes almacenadas aparecen en la vista de miniaturas.
6 Para iniciar una presentación de diapositivas con las imágenes
almacenadas, pulse el botón Reproducir/Pausa.
Para ver una imagen específica, pulse la tecla Intro para abrir la vista
de
tecla Intro.
De manera predeterminada, aparece la Guía de operación en la parte inferior de la pantalla para
ofrecer una guía acerca del funcionamiento del programa.
SD, dependiendo del medio que haya insertado en el paso 1.
miniaturas, use la tecla < o , para seleccionar la imagen y pulse la
ES
21
Page 24

Inserción y extracción de un Memory Stick
Su computadora posee una ranura para Memory Stick en la parte delantera.
Puede insertar sólo un Memory Stick a la vez.
Para insertar un Memory Stick
1 Inserte el Memory Stick con la flecha mirando hacia arriba y hacia la ranura
para Memory Stick.
2 Deslice cuidadosamente el Memory Stick en la ranura hasta que encaje
su lugar.
en
Asegúrese de sostener el Memory Stick con la flecha apuntando en la dirección correcta
al insertarlo en la ranura. Para evitar causar daños a la computadora o al Memory Stick,
no introduzca el Memory Stick a la fuerza en la ranura si no se inserta con suavidad.
No inserte más de un Memory Stick en la ranura para Memory Stick. Insertar el medio de manera
inadecuada puede causar daños a la computadora.
La computadora admite Memory Stick Duo y viene equipada con una ranura combinada para
Memory Stick, que es compatible con medios estándar y de doble tamaño.
Para extraer un Memory Stick
1 Compruebe que el indicador de Acceso a medios esté apagado.
2 Presione el Memory Stick hacia dentro de la computadora.
El Memory Stick se expulsa.
3 Extraiga cuidadosamente el Memory Stick de la ranura.
Siempre extraiga el Memory Stick con cuidado, o puede expulsarse inesperadamente.
No extraiga el Memory Stick mientras el indicador de Acceso a medios esté encendido. Si lo hace,
puede perder datos. Es posible que las cantidades grandes de datos tarden en cargarse,
asegúrese de que la luz indicadora esté apagada antes de extraer el Memory Stick.
22
Page 25

Inserción y extracción de una tarjeta de memoria SD
Además de la ranura para Memory Stick, la parte delantera de la computadora
cuenta con una ranura para tarjetas de memoria SD que permite utilizar la tarjeta
de memoria SD.
Para insertar una tarjeta de memoria SD
1 Ubique la ranura para tarjetas de memoria SD que se encuentra en la parte
delantera de la computadora.
2 Inserte una tarjeta de memoria SD en la ranura con la flecha apuntando
hacia arriba y hacia la ranura.
3 Deslice cuidadosamente la tarjeta de memoria SD en la ranura hasta que
encaje en su lugar.
No introduzca la tarjeta por la fuerza.
ES
Si la tarjeta de memoria SD no ingresa con facilidad en la ranura, retírela cuidadosamente y
compruebe si la está insertando en la dirección correcta.
Para extraer una tarjeta de memoria SD
1 Compruebe que el indicador de Acceso a medios esté apagado.
2 Presione la parte sobresaliente de la tarjeta de memoria SD hacia dentro de
la computadora.
La tarjeta de memoria SD se expulsa.
3 Extraiga cuidadosamente la tarjeta de memoria SD de la ranura.
23
Page 26

Personalización de Instant Mode
Instant Mode cuenta con un menú de configuración para su personalización.
Con el menú de configuración, puede modificar diversas opciones, incluidos
el idioma del menú y el modo de reproducción.
Cambio del idioma del menú
De manera predeterminada, al iniciar Instant Mode aparece el menú principal
en inglés. Sin embargo, hay siete idiomas más disponibles para visualizar la
pantalla: chino tradicional, chino simplificado, japonés, coreano, francés, alemán
e italiano.
Para cambiar el idioma del menú
1 Pulse el botón AV MODE.
Instant Mode se inicia y muestra el menú principal.
2 Use la tecla < o , para seleccionar o .
El icono seleccionado se resalta en color azul.
3 Pulse la tecla Intro.
4 Pulse la tecla de Aplicaciones .
Aparece el menú de configuración.
5 Use la tecla m o M para seleccionar General Setup y pulse la tecla Intro.
Aparece el menú de configuración general.
6 Use la tecla , para ver una lista de los idiomas del menú.
7 Use la tecla m o M para seleccionar el idioma deseado y pulse la tecla Intro.
24
Para conocer otros elementos disponibles en el menú de configuración, consulte Elementos del
menú de configuración
en la página 25.
Page 27

Elementos del menú de configuración
Menú de configuración del modo de DVD
Elemento del
menú
Title Menu — Muestra el menú de títulos del DVD.
Root Menu — Muestra el menú raíz del DVD.
LCD
Brightness
Picture
Properties…
Display
Setting
Audio XXXXX Muestra el idioma de los datos de
Subtitle None
Angle Todos los ángulos
Closed
Caption
Information
On/Off
General
Setup…
* Valor predeterminado
Opción Descripción
—Use la tecla < o , para ajustar el
brillo de la pantalla LCD.
— Muestra el menú de configuración
de propiedades de imagen
(página 26).
*
Auto
4:3
16:9
Opciones de
subtítulos
disponibles
On
*
Off
— Permite ocultar o mostrar la
— Muestra el menú de configuración
Permite seleccionar la proporción
de visualización deseada al
reproducir una película en DVD.
audio.
Permite seleccionar los subtítulos
deseados al reproducir una
película en DVD. Al seleccionar
None, los subtítulos se ocultan.
Permite seleccionar el ángulo
deseado, si existe, al reproducir
una película en DVD.
Permite seleccionar si mostrar
u ocultar los subtítulos ocultos,
de haberlos.
información acerca del DVD
que se está reproduciendo,
del temporizador para apagado
automático y de la batería.
general (página 28).
ES
25
Page 28

Menú de configuración de propiedades de imagen
Elemento del
Opción Descripción
menú
Hue — Use la tecla < o , para ajustar
el tono de la película que está
reproduciendo.
Contrast — Use la tecla < o , para ajustar
el contraste de la película que está
reproduciendo.
Brightness — Use la tecla < o , para ajustar
el brillo de la película que está
reproduciendo.
Saturation — Use la tecla < o , para ajustar
la saturación de la película que
está reproduciendo.
Reset to
Default
Back to Setup
Menu
— Restablece todas las propiedades
a sus valores predeterminados.
— Muestra el menú de configuración
del modo de DVD (página 25).
Menú de configuración del modo de CD de audio
Elemento del
menú
Repeat Repeat All
Shuffle On
LCD
Brightness
Information
On/Off
General
Setup…
* Valor predeterminado
Opción Descripción
Permite seleccionar si desea
Repeat One
*
Off
repetir todas las canciones del
CD de audio o sólo la que está
reproduciendo actualmente,
o si desea desactivar la función.
Permite seleccionar si desea
Off
*
activar o desactivar la función de
reproducción aleatoria.
— Use la tecla < o , para ajustar
el brillo de la pantalla LCD.
— Permite ocultar o mostrar la
información acerca del CD de
audio que se está reproduciendo,
del temporizador para apagado
automático y de la batería.
— Muestra el menú de configuración
general (página 28).
26
Page 29

Menú de configuración del modo de Foto
Vista de miniaturas
Elemento del
menú
LCD
Brightness
Information
On/Off
General
Setup…
Vista de presentación de diapositivas
Elemento del
menú
Rotate 3 90°
Speed Slow
Repeat All On
General
Setup…
* Valor predeterminado
Opción Descripción
— Use la tecla < o , para ajustar
el brillo de la pantalla LCD.
— Permite mostrar u ocultar la
información del temporizador de
apagado automático y la batería.
— Muestra el menú de configuración
general (página 28).
Opción Descripción
Gira la imagen actual 90 grados
4 90°
Medium
High
Off
— Muestra el menú de configuración
*
*
hacia la derecha o hacia la
izquierda.
Permite seleccionar la velocidad
de reproducción deseada para la
presentación de diapositivas.
Permite seleccionar si desea
repetir la presentación de
diapositivas.
general (página 28).
ES
27
Page 30

Menú de configuración general
Elemento del
menú
Menu
Language
Sleep Timer Off
Version
Information
Operation
Guide On/Off
Back to Setup
Menu
Opción Descripción
English
Traditional Chinese
Simplified Chinese
Japanese
Korean
French
German
Italian
30 Min
60 Min
90 Min
Ver: x.x.x Muestra la información de la
— Permite mostrar u ocultar la Guía
— Muestra el menú de configuración
Permite seleccionar el idioma en
que desea visualizar la pantalla.
Permite seleccionar el
temporizador de apagado
automático deseado.
versión.
de operación.
anterior.
28
Page 31

Resolución de problemas
¿Qué debo hacer si Instant Mode no se inicia?
❑ Cuando la computadora se encuentra en modo de Suspensión, al pulsar la
tecla AV MODE, se inicia el software WinDVD de manera predeterminada.
Para iniciar Instant Mode, apague la computadora o colóquela en modo de
Hibernación y pulse el botón AV MODE.
¿Qué debo hacer si la unidad óptica no reproduce mi CD o
DVD o si la reproducción se interrumpe?
❑ Asegúrese de que el disco esté insertado en la unidad óptica con la etiqueta
hacia arriba.
❑ Revise el empaque del DVD para asegurarse de que el código de región sea
compatible con la unidad óptica. No puede reproducir un DVD si su código
de región no está asignado a la unidad óptica o si el código de región
asignado a ésta no es el mismo que aparece en el empaque del DVD.
Para obtener más información acerca del código de región, consulte Notas
acerca de la reproducción de DVD en la secció n Uso de la unidad óptica
de la Guía del usuario en línea.
❑ Instant Mode admite sólo discos DVD, DVD en formato de video y DVD-RW/
DVD-RAM en formato de grabación de video disponibles en el comercio.
Para reproducir otros tipos de DVD, inicie Windows y utilice el software
WinDVD.
Además, tenga en cuenta que la reproducción de audio DTS (Digital Theater
System) no está disponible en Instant Mode.
ES
¿Por qué no puedo mover una carpeta que aparece en la vista
de miniaturas del modo de Fotos?
❑ No es posible mover carpetas que no contienen imágenes en los formatos
compatibles.
¿Qué debo hacer si el sistema no detecta el Memory Stick o
la tarjeta de memoria SD?
❑ No use la función de formateo de Windows para formatear la tarjeta de
memoria.
Use el software Memory Stick Formatter incluido o una utilidad de
formato para tarjetas de memoria SD disponible para el público en general;
o formatee la tarjeta de memoria en un dispositivo, como por ejemplo, en una
cámara digital.
❑ Salga de Instant Mode con el Memory Stick o tarjeta de memoria SD
insertada en la ranura e inícielo nuevamente.
29
Page 32

Page 33

Page 34

Page 35

Page 36

 Loading...