

Sony VGN-S150, VGN-S150P, VGN-S170, VGN-S170B, VGN-S170P User Guide

Welcome
Congratulations on your purchase of this Sony VAIO® computer, and welcome to the online VAIO® Computer User Guide.
This user guide provides detailed information on all aspects of using your new VAIO computer, from keyboard functions to
preinstalled software programs.
In the left navigation window, click the topics you want to learn more about, and that information will be displayed in this
main window.
View the Electronic Flyer, which provides updates and supplemental information about your computer.
Go to the Sony Computing Support Web site to view the VAIO® Computer Specifications, which list your computer's
hardware specifications and preinstalled software information.
For Sony software information, click Start and select Welcome to VAIO life.
Page 1

Ergonomics and Caring for Your Computer
This section provides information on how to safely use your Sony computer.
Page 2

Applying Ergonomics
Your computer is a portable device and can be used in a variety of environments. Whenever possible, you should apply the
following ergonomic considerations:
Position of your computer — Place the computer directly in front of you as you work. Keep your forearms
horizontal, with your wrists in a neutral, comfortable position while using the keyboard, touch pad, or external
mouse. Let your upper arms hang naturally at your sides. Take breaks during sessions with your computer.
Excessive use of the computer may strain muscles or tendons.
Furniture and posture — Sit in a chair with good back support and armrests. Adjust the level of the chair so your
feet are flat on the floor. A footrest may make you more comfortable. Sit in a relaxed, upright posture and avoid
slouching forward or leaning far backward.
Viewing angle of the computer's display — Tilt the display to find the best viewing angle. Also try adjusting the
brightness setting of the display. Following these suggestions can reduce eye strain and muscle fatigue.
Lighting — Choose a location where windows and lights do not create glare or reflection on the display. Use indirect
lighting to avoid bright spots on the display. You can purchase accessories for your display that help reduce glare.
Proper lighting adds to your comfort and work effectiveness.
Placement of an external display — When using an external display, set the display at a comfortable viewing
distance. Make sure the display screen is at eye level or slightly lower when you are sitting in front of the monitor.
Page 3

Storing Your Computer
Do not use or store your computer in a location subject to:
Heat sources, such as radiators or air ducts
Direct sunlight
Excessive dust
Moisture or rain
Mechanical vibration or shock
Strong magnets or speakers that are not magnetically shielded
Ambient temperature higher than 95ºF (35ºC) or less than 40ºF (5ºC)
High humidity
Do not place electronic equipment near your computer. When running, the computer's electromagnetic field may
cause other electronic equipment in close proximity to malfunction.
Provide adequate air circulation to prevent internal heat buildup. Do not place your computer on porous surfaces
such as rugs or blankets, or near materials such as curtains or draperies that may block ventilation. Leave a space
of at least 8 inches (20 cm) behind the back of the computer.
If the computer is brought directly from a cold location to a warm one, moisture may condense inside your computer.
In this case, allow at least one hour before turning on your computer. If any problems occur, unplug your computer,
and contact your Sony Service Center.
The computer uses high-frequency radio signals and may interfere with radio or TV reception. Should this occur,
move the computer a suitable distance away from the radio or TV.
Do not drop the computer or place heavy objects on top of the computer.
Page 4

Using Cables and Connections
Use only specified peripheral equipment and interface cables.
Do not use cut or damaged connection cables.
If the telephone company makes a service call to your home or office and determines that your computer is
responsible for a problem, the telephone company may bill you for the service call. Also, if you do not disconnect
your computer when it is adversely affecting a telephone line, the telephone company has the right to disconnect
your service until you correct the problem.
Page 5

Cleaning Your Computer
Clean the computer with a soft, dry cloth or a soft cloth lightly moistened with a mild detergent solution. Do not use
any type of abrasive pad, scouring powder, or solvent such as alcohol or benzine, as these may damage the finish
of your computer. You can use canned compressed air specifically for computers to remove dust.
If a solid object falls onto the computer or a liquid leaks into the computer, immediately turn off and unplug the
computer. It is best to have the computer checked by qualified personnel before you use it again.
Avoid rubbing the LCD screen as this can damage the screen. Use a soft, dry cloth to wipe the LCD screen or
canned compressed air.
Always disconnect the power cord before cleaning the computer.
Page 6

Handling the LCD Screen
Direct sunlight can damage the LCD. Be careful when using the computer near a window.
Do not scratch the LCD or exert pressure on it. This can cause a malfunction.
Using the computer in low temperature conditions may produce a residual image on the screen. This is not a
malfunction. When the computer returns to normal temperature, the screen returns to normal.
The screen becomes warm during operation. This is normal and does not indicate a malfunction.
The LCD is manufactured using high-precision technology. You may, however, see tiny black points and/or bright
points (red, blue, or green) that continuously appear on the LCD. This is a normal result of the manufacturing
process and does not indicate a malfunction.
Page 7
Locating Controls and Ports
Congratulations on your purchase of the Sony® VAIO® computer. Sony has combined leading-edge technology in audio,
video, computing, and communications to provide state-of-the-art personal computing.
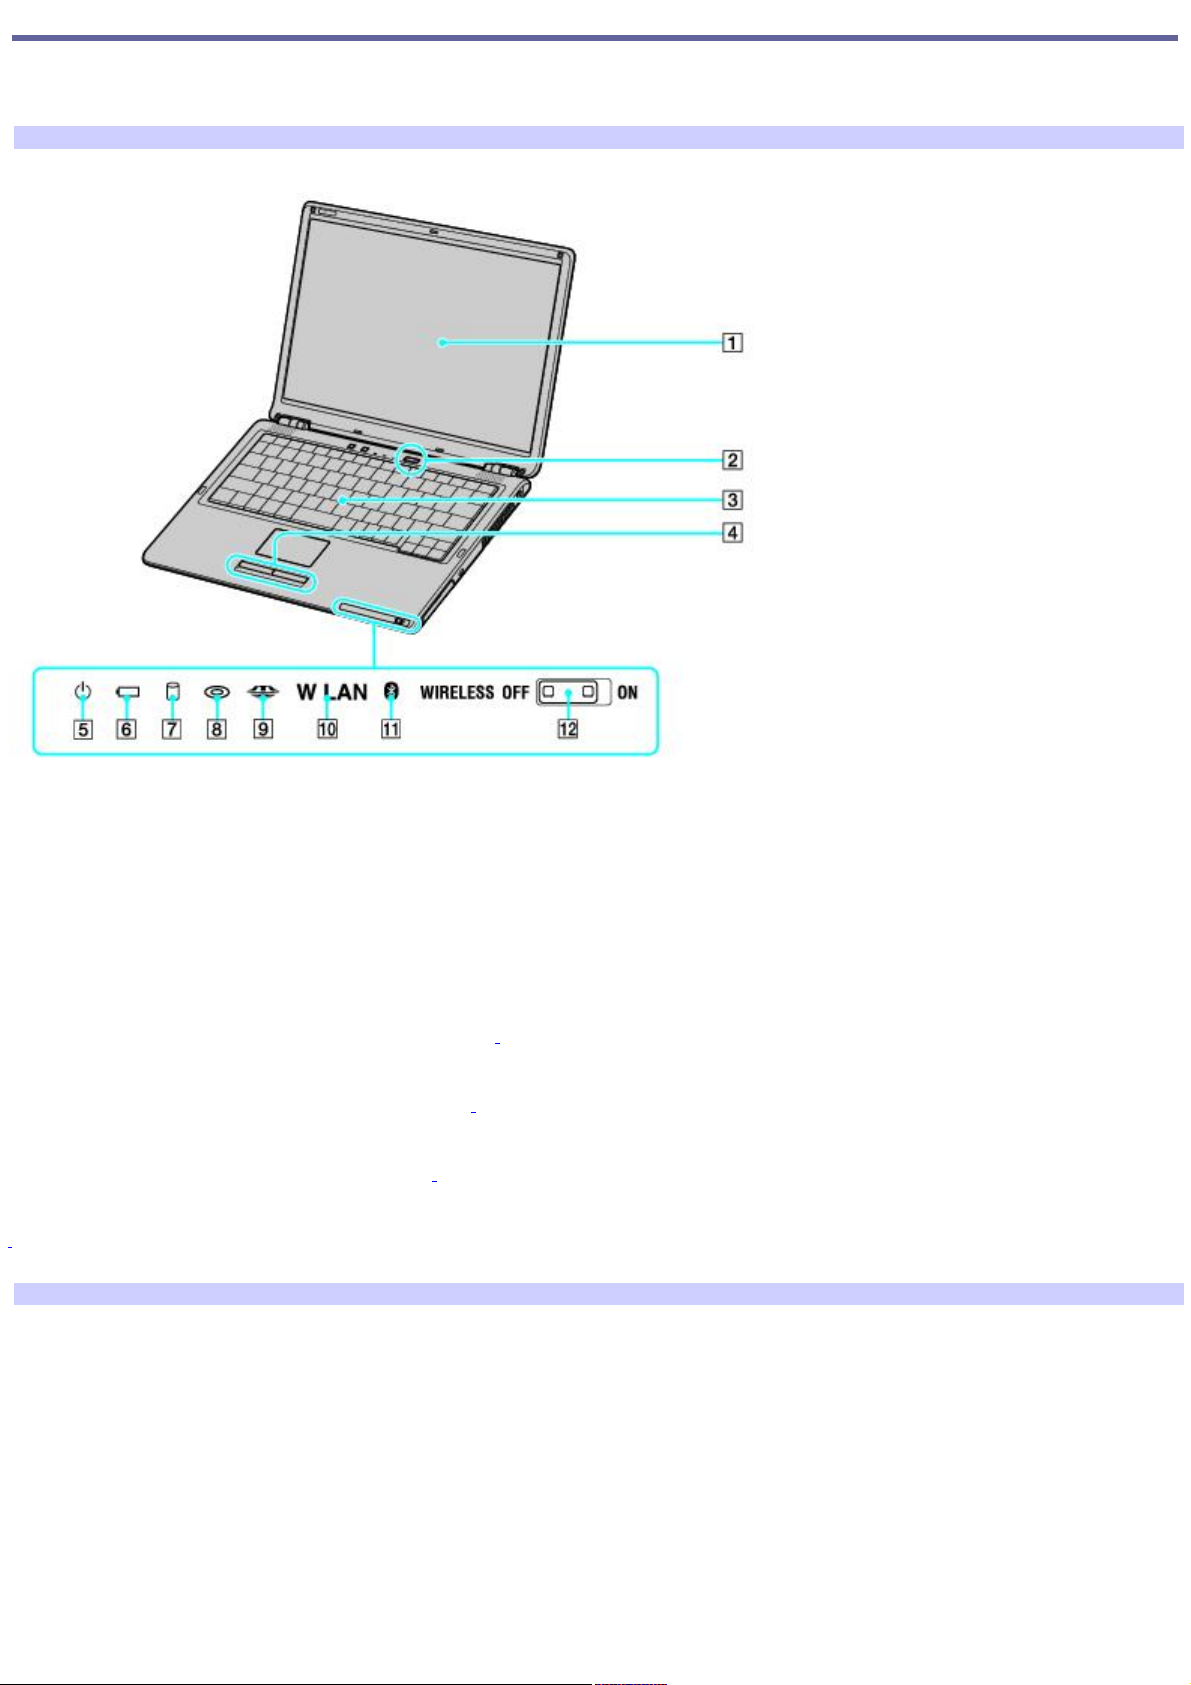
Front
1 Computer screen (LCD) 7 Hard disk drive indicator
2 Power button 8 Optical drive indicator
3 Keyboard 9 Memory Stick® media indicator
4 Left and right buttons 10 Wireless LAN indicator1
5 Power indicator 11 Bluetooth® indicator1
6 Battery indicator 12 Wireless switch1
1
Wireless LAN and Bluetooth capabilities are available on s elected models only.
Front
Page 8

1 S1 and S2 programmable buttons 6 Touch pad
2 Num lock indicator 7 Optical drive
3 Caps lock indicator 8 Optical drive eject button
and manual eject hole
4 Scroll lock indicator 9 Memory Stick® media slot
5 Speakers 10 Air vent
Left
Page 9

1 Network (Ethernet) port 5 Monitor (VGA) port
2 Modem jack 6 PC Card slot
3 Microphone jack 7 PC Card eject button
4 Headphone jack
Gently pull the protective tab away from the computer to find the Ethernet port and modem jack.
Only connect 10BASE-T or 100BASE-TX cables to the Network (Ethernet) port. Do not connect any
other type of network cable or any telephone line to this port. Connecting cables other than those listed above may
result in an electric current overload and could cause a malfunction, excessive heat, or fire in the port. To connect the
unit to a network, see Network Connections or contact your network administrator.
Right
Page 10
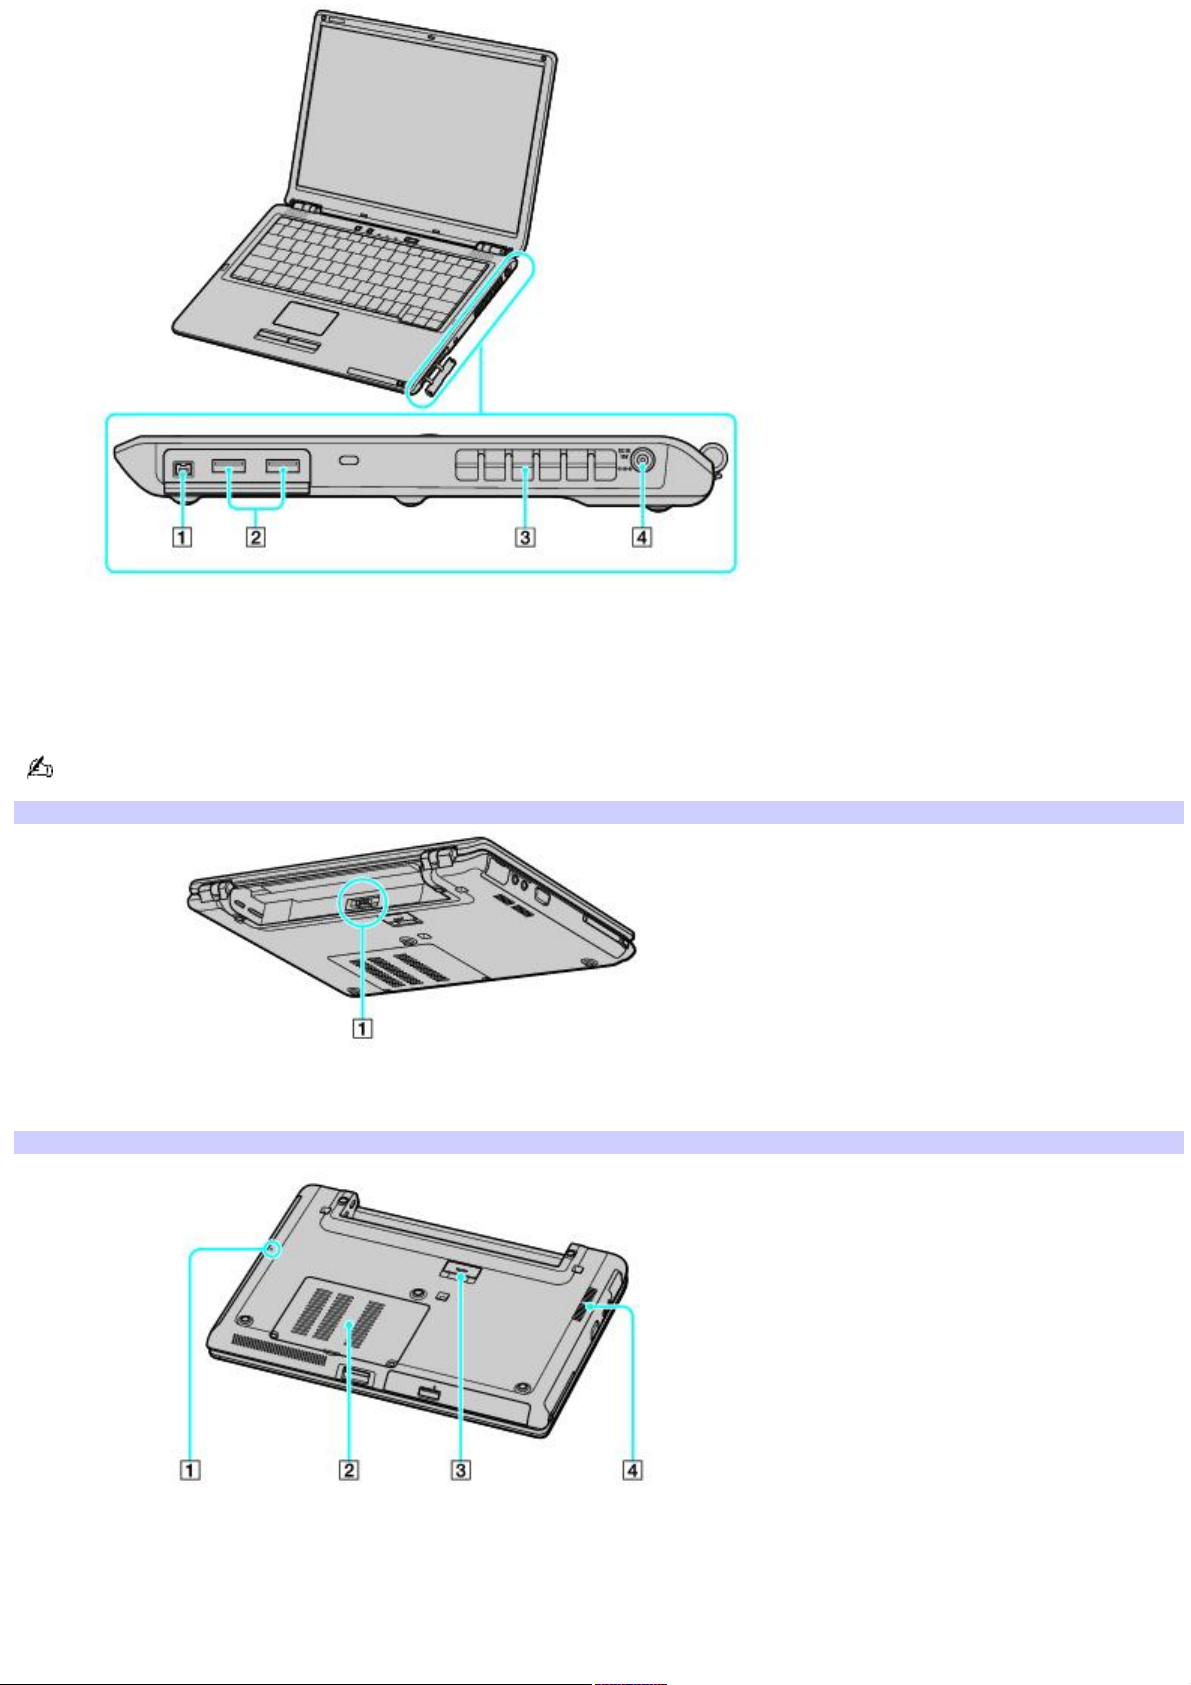
1 i.LINK® (IEEE 1394) S400 port 3 Air Vent
2 USB 2.0 ports 4 DC IN port
Gently pull the protective tab away from the computer to find the i.LINK S400 and USB 2.0 ports.
Back
1 Battery connector
Bottom
1 Reset button 3 Port replicator connector
Page 11

2 Memory module cover 4 Air vent
Page 12
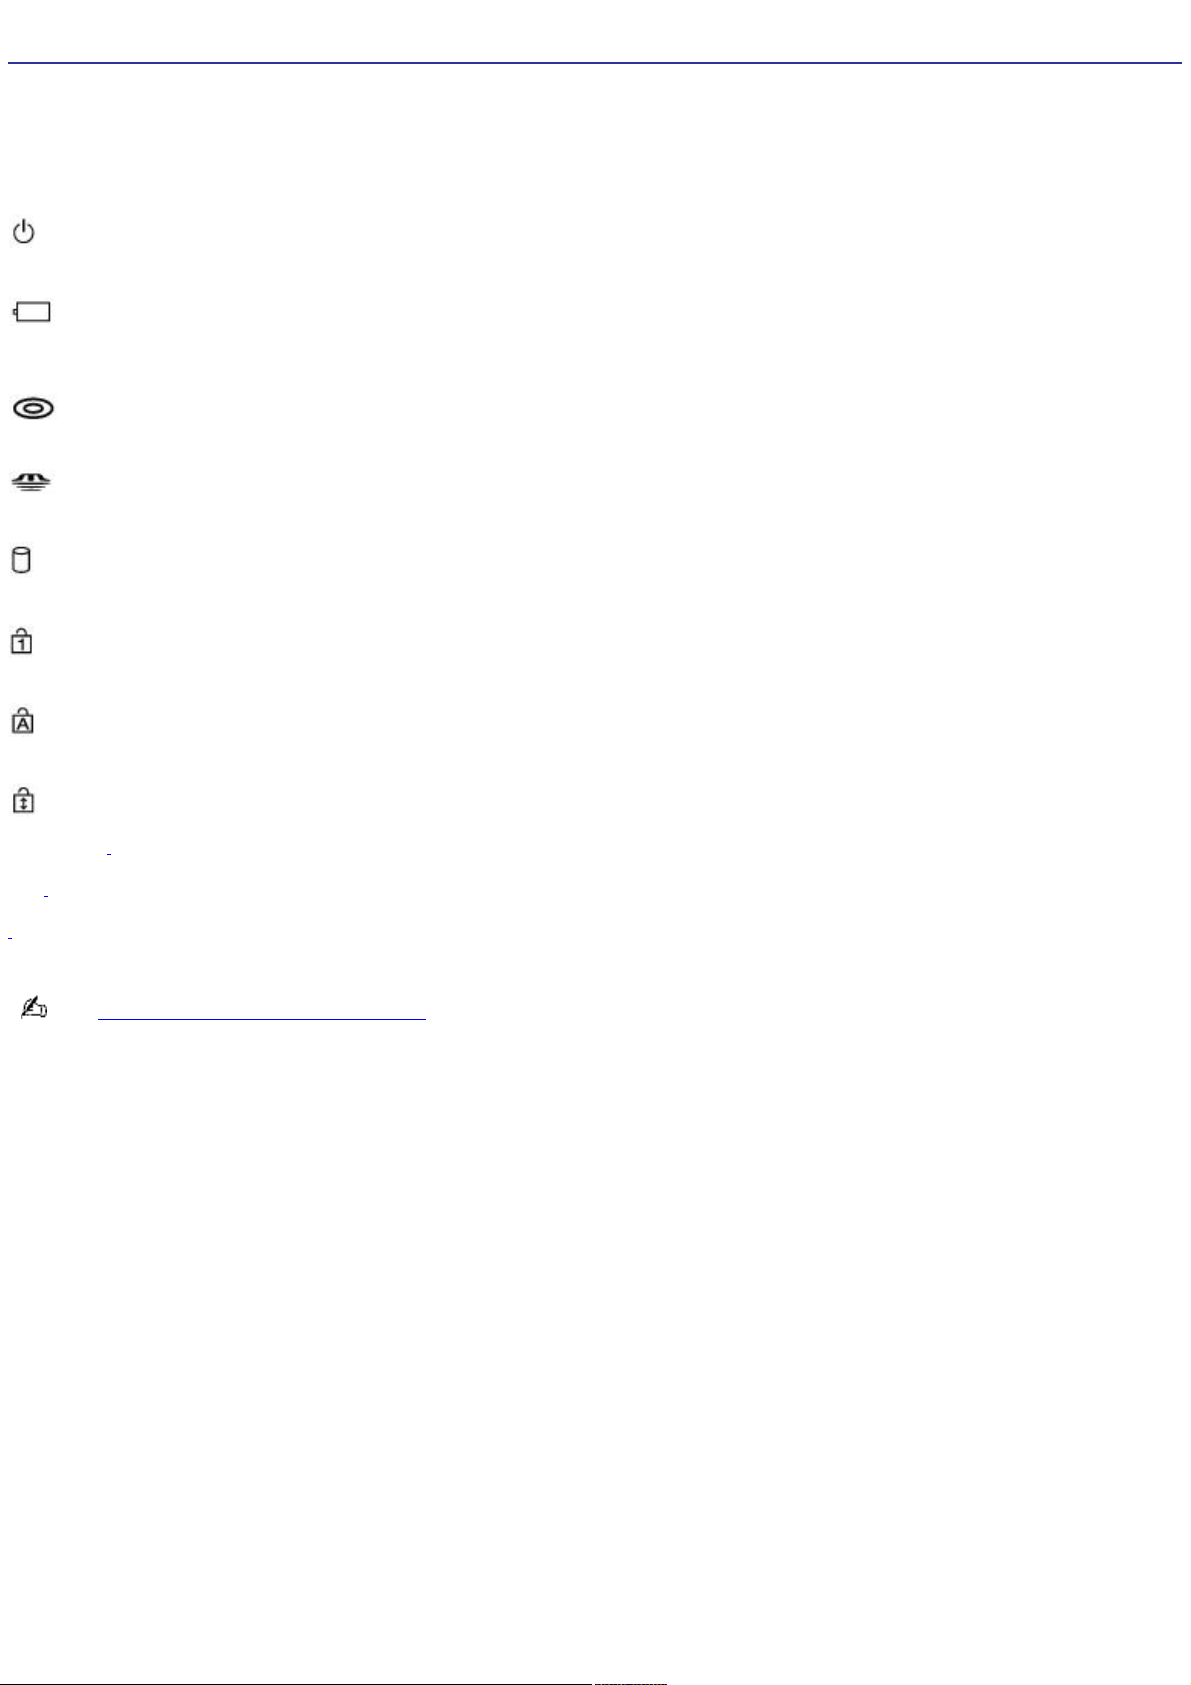
About the Indicator Lights
Indicator Function
Power
Turns on when the power to the computer is on, blinks in Standby mode, and turns off when the computer is
in Hibernate mode or off.
Battery
Turns on when the computer is using battery power, blinks when the battery is running out of power,
double-blinks when the battery is charging.
Optical Drive
Turns on when data is read from or written to the optical drive. Do not enter Standby mode or turn off the
computer when this indicator is on.
Memory Stick®
Turns on when data is read from or written to the Memory Stick media. (Do not enter Standby mode or turn off
the computer when this indicator is on.) When the indicator is off, the Memory Stick media is not being used.
Hard Disk
Turns on when data is read from or written to the hard disk. Do not enter Standby mode or turn off the
computer when this indicator is on.
Num Lock
Press this key to activate the numeric keypad. Press it a second time to deactivate the numeric keypad. The
numeric keypad is not active when the indicator is off.
Caps Lock
Press this key to type letters in uppercase. Letters appear in lowercase if you press Shift while the indicator is
on. Press the key a second time to turn off the indicator. Normal typing resumes when the Caps Lock indicator is off.
Scroll Lock
Press this key to change how you scroll the display. Normal scrolling resumes when the Scroll Lock indicator is
off. The Scroll Lock key functions differently depending on the program you are using and does not work with all programs.
Bluetooth®1 Turns on when the wireless switch is set to ON and Bluetooth technology is enabled.
Wireless
LAN1 Turns on when the wireless LAN function is running.
1
O n selected models only.
See Internet and Network Connections for more information about Bluetooth and wireless technology.
Page 13

Using S1 and S2 Buttons
The S1 and S2 buttons are pre-programmable buttons that enable you to quickly enter a power saving mode, switch
between displays, launch an application, alter the sound, or increase the screen's brightness.
Page 14

About the S1 and S2 buttons
The following information shows where the S1 and S2 buttons are located, and briefly describes their functionality.
Page 15
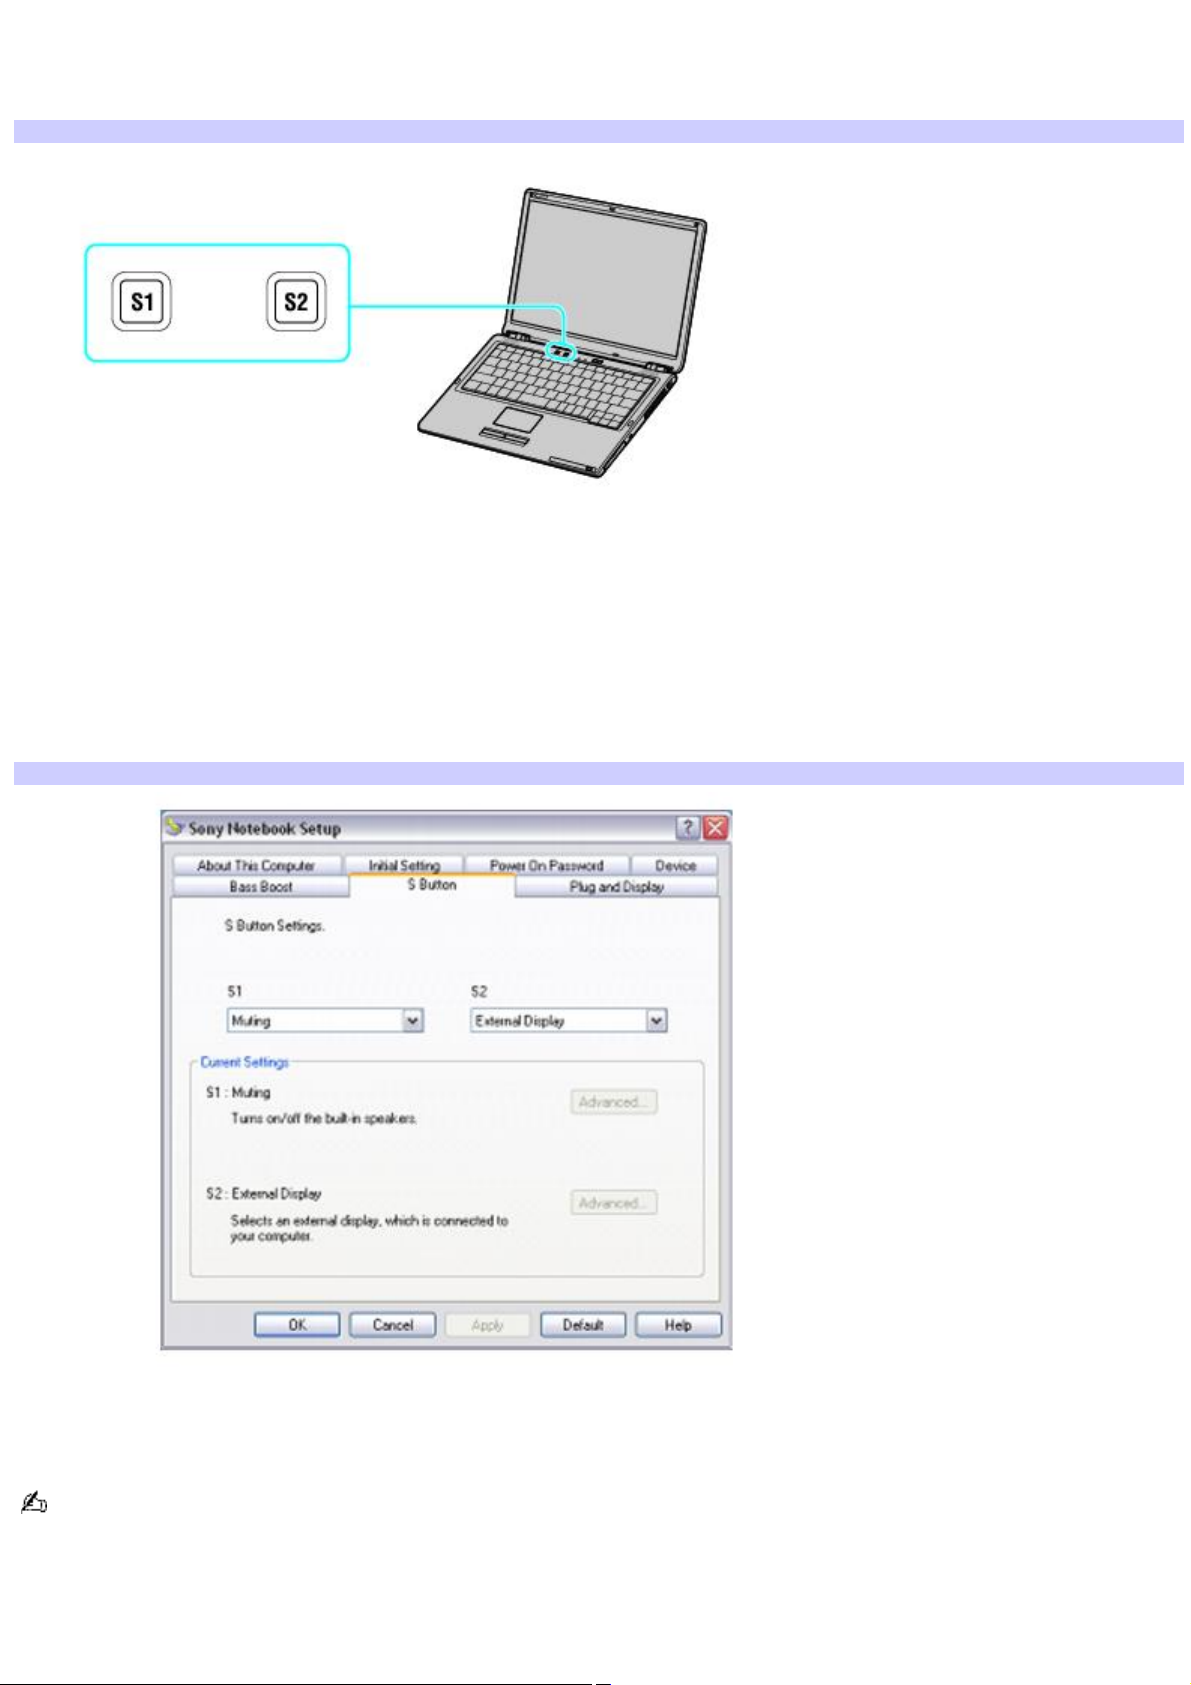
Locating the S1 and S2 buttons
The S1 and S2 buttons are located just above the keyboard.
Locating the S1 and S2 buttons
Using the S1 and S2 buttons
To assign a function to the button
1.
Click Start, and point to All Programs and then Sony Notebook Setup.
2.
From the Sony Notebook Setup submenu, click Sony Notebook Setup.
3.
Click to select the S Button tab.
Sony Notebook Setup
4.
Click to select a key assignment from the S1 or S2 drop-down menu.
5.
Click Apply.
Depending on the key assignment, you may be able to customize the S1 and S2 buttons further by clicking Advanced,
if it becomes available, in the Current Settings box.
Page 16

Using the Touch Pad
Describing the Touch Pad
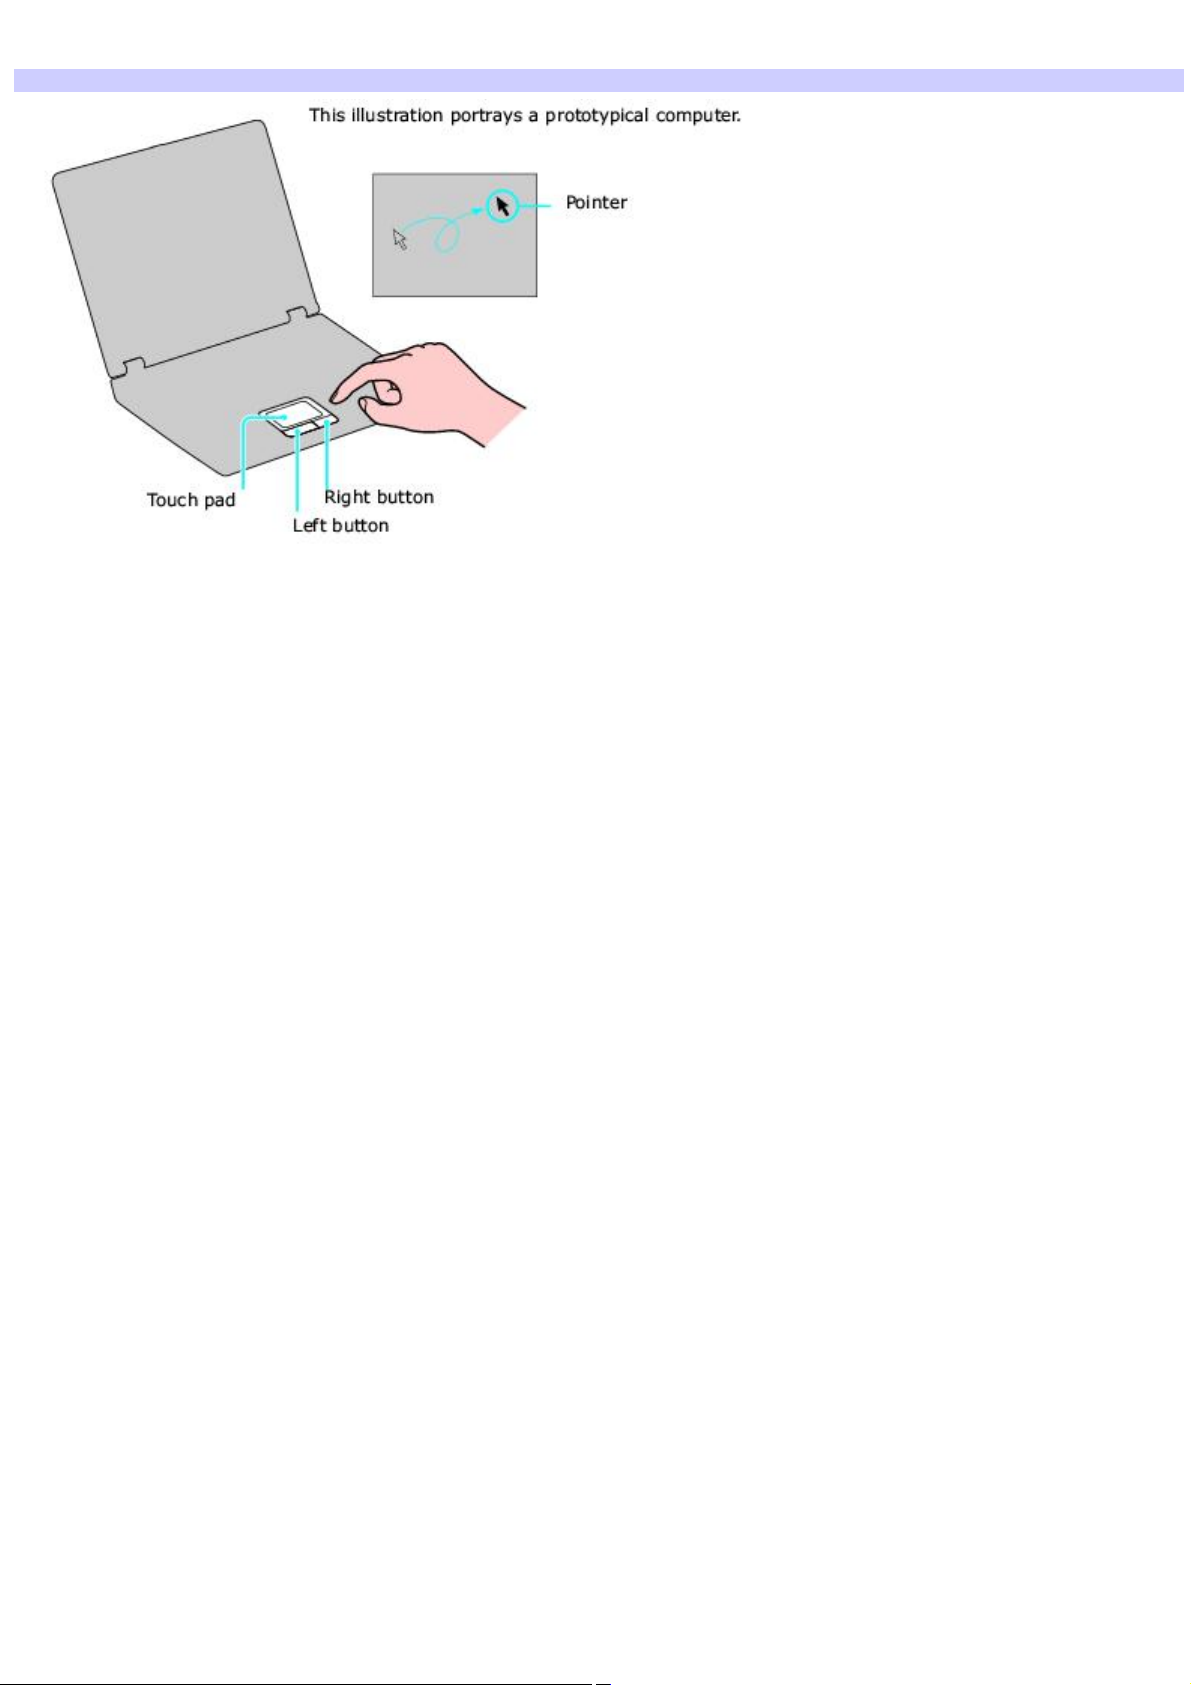
A pointing device called a touch pad is located in front of the keyboard. You can point to, select, drag, and scroll objects on
the screen using the built-in touch pad.
Page 17

Using the Touch Pad
Describing the Touch Pad
A pointing device called a touch pad is located in front of the keyboard. You can point to, select, drag, and scroll objects on
the screen using the built-in touch pad.
Page 18
Locating and using the touch pad
Locating the Touch Pad
Touch Pad Action Description
Sliding one finger Equivalent to using a mouse to place the pointer on an item.
Tapping once Equivalent to pressing the left button once.
Tapping twice Equivalent to pressing the left button twice.
Sliding one finger while pressing the left button Equivalent to using the mouse to drag an item.
Moving your finger along the right edge of the touch pad Equivalent to scrolling vertically. (The scroll function is available
only with programs that support a touch pad scroll feature.)
Moving your finger along the bottom to scroll horizontally Equivalent to scrolling horizontally. (The scroll function is
available only with programs that support a touch pad scroll feature.)
Page 19

Customizing the touch pad
Sony Notebook Setup lets you customize, enable, or disable the touch pad. Open the Mouse Properties dialog box to set
your touch pad and mouse preferences, such as changing pointers, enabling or disabling the tapping feature, clicking both
buttons simultaneously, and adjusting the touch pad speed.
To customize the touch pad and mouse
Right-click the Touchpad icon on the Taskbar Notification area, and click Mouse Properties from the shortcut
menu. The Mouse Properties dialog box appears.
To enable the touch pad
1.
Press the Windows key . The Start menu appears.
2.
Press P until All Programs is selected, and press Enter.
3.
Press S until Sony Notebook Setup is selected, and press Enter. A submenu appears with Sony Notebook
Setup preselected.
4.
Press Enter. The Sony Notebook Setup dialog box appears.
5.
Press the Right Arrow key to select the Device tab.
6.
Press the Tab key to select the Default button, and press Enter. A pop-up window appears.
7.
Press the Left Arrow key to select OK, and press Enter. The Enable Touchpad option is automatically
selected.
8.
Press the Tab key to select the Apply button, and press Enter.
9.
Click OK.
To disable the touch pad
1.
Click Start on the Windows® taskbar, and point to All Programs.
2.
Point to Sony Notebook Setup, and click Sony Notebook Setup in the submenu. The Sony Notebook Setup
dialog box appears.
3.
Click the Device tab.
4.
In the left panel, click to cancel the Pointing Device check box.
5.
Click Apply. A Sony Notebook Setup message appears.
6.
Click Yes.
Page 20

Using Memory Stick Media
Your VAIO® computer is equipped with a Memory Stick® media slot that supports certain types of Memory Stick® media.
Page 21

About Memory Stick media
Memory Stick® media are a compact, portable, and versatile data storage media designed for exchanging and sharing digital
data with compatible devices. You can store different data formats on a single Memory Stick media. The following types of
Memory Stick media are available, but compatibility with your computer can vary.
MagicGate Memory Stick media — Provides copyright protection with authentication and encryption, using Sony
®
MagicGate technology. Authentication ensures that protected content is only transferred between compliant devices
and media. Protected content can be recorded and transferred in an encrypted format to prevent unauthorized
duplication or playback.
Memory Stick PRO media — Provides MagicGate copyright protection and high-speed transfer features when used
with compatible Memory Stick PRO devices. VAIO® computers support Memory Stick PRO media for data storage
purposes only. Currently, MagicGate technology features, such as authentication and encryption, are not available.
Memory Stick media — Provides data storage only. The Memory Stick media does not provide MagicGate technology
or high-speed data transfer.
Currently, Sony® SonicStage® and OpenMG software are not compatible with Memory Stick PRO media. Sony suggests
using only MagicGate Memory Stick media to store and transfer any data created with SonicStage or OpenMG software.
Visit the Sony Computing Support Web site at http://www.sony.com/pcsupport regularly for the latest information on
Memory Stick PRO media.
Memory Stick media may not support playback of some video files directly from the media. Copy the video file to your
hard disk drive and then play back the file.
Page 22
Inserting Memory Stick media
Before using Memory Stick® media, back up important data. The media slot accommodates only one Memory Stick media at a
time.
To insert Memory Stick media
1.
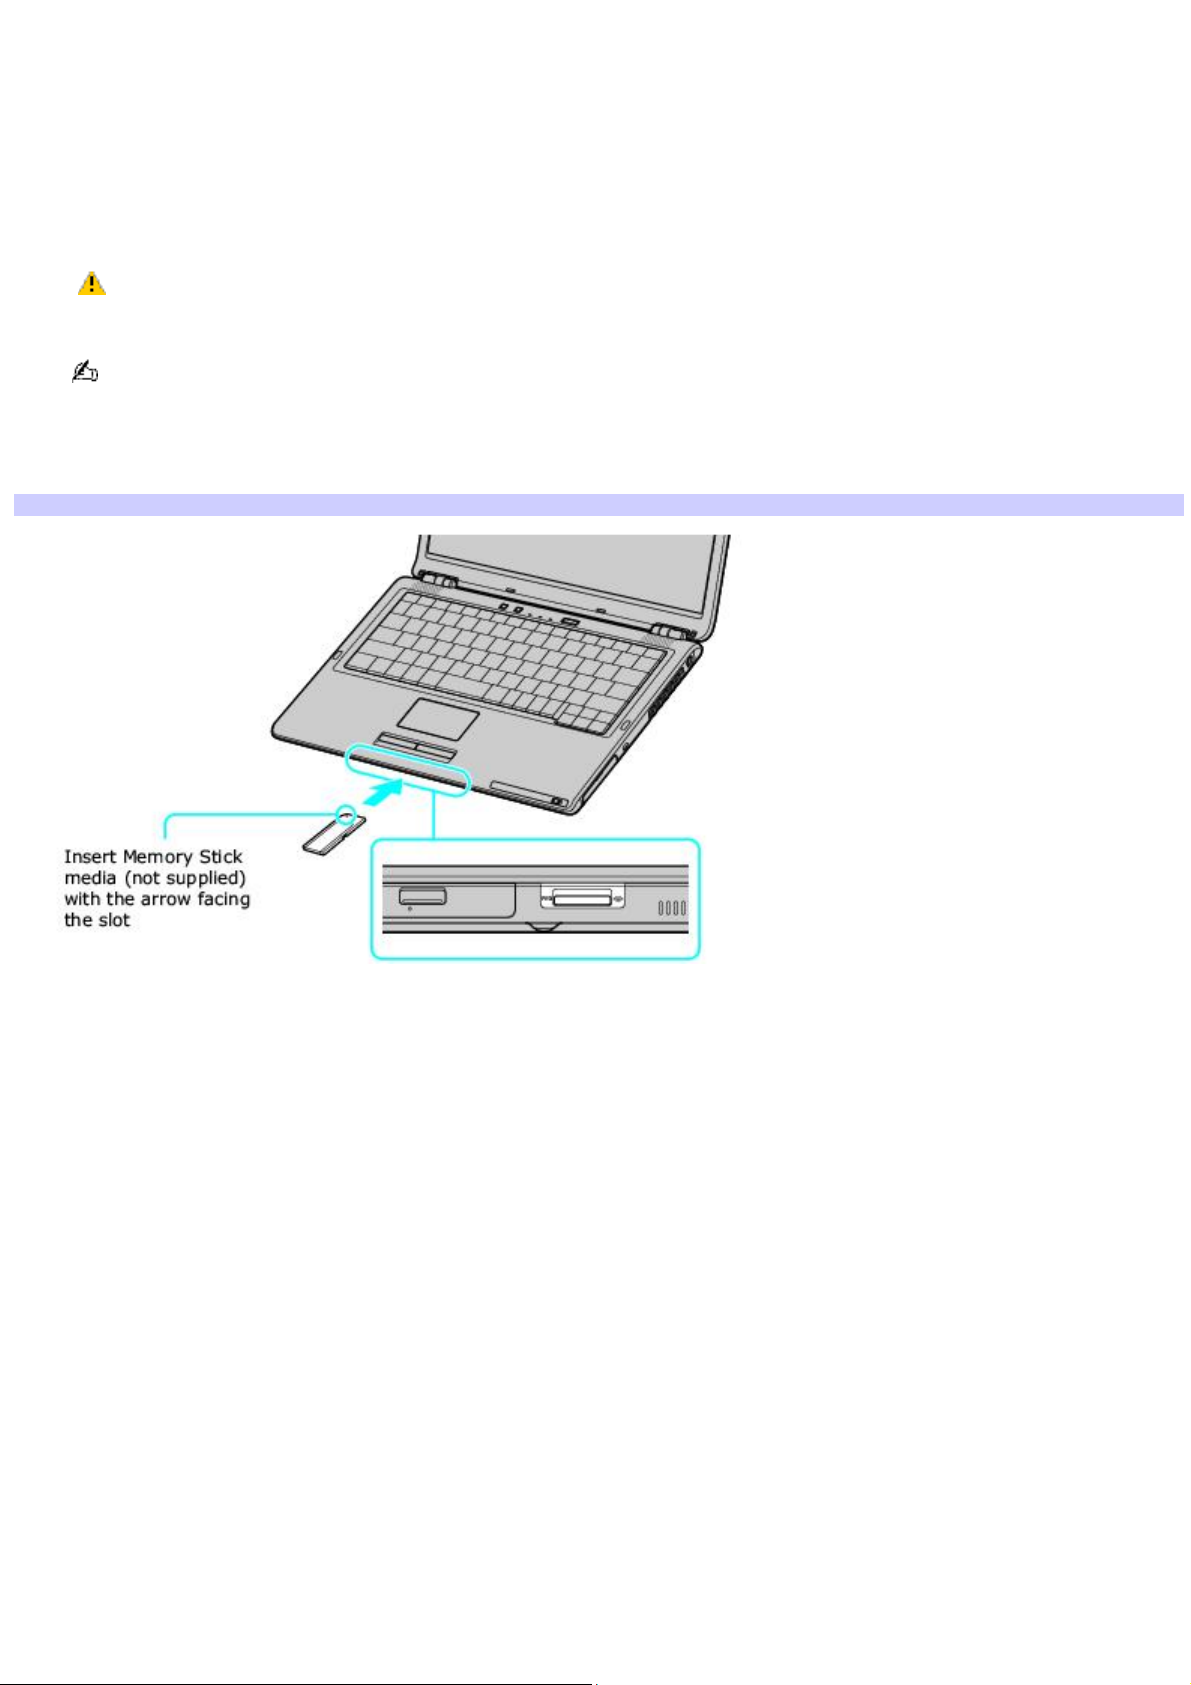
Insert the Memory Stick media with the arrow facing up and toward the Memory Stick media slot.
Do not insert more than one Memory Stick media into the Memory Stick media slot. Inserting the media
improperly may damage the computer.
If you are using Memory Stick® Duo media, attach the media to its adapter before inserting it into the Memory
Stick media slot.
2.
Carefully slide the Memory Stick media into the slot until it clicks in place. The Memory Stick media indicator briefly
blinks.
Inserting Memory Stick Media
Page 23

Viewing the contents
Depending on the model you purchased, the Sony Memory Stick window may appear when you insert a Memory Stick
®
media. From this window, you can choose to view, print, copy or organize your images or data stored on the Memory Stick
media. If the Sony Memory Stick window does not appear when you insert your Memory Stick media, then follow these
steps:
To view the contents
1.
From the Start menu, click My Computer. The My Computer window appears.
2.
Click Sony MemoryStick. The Sony MemoryStick window appears, displaying the contents stored on the
Memory Stick media.
Page 24
Protecting data on Memory Stick media
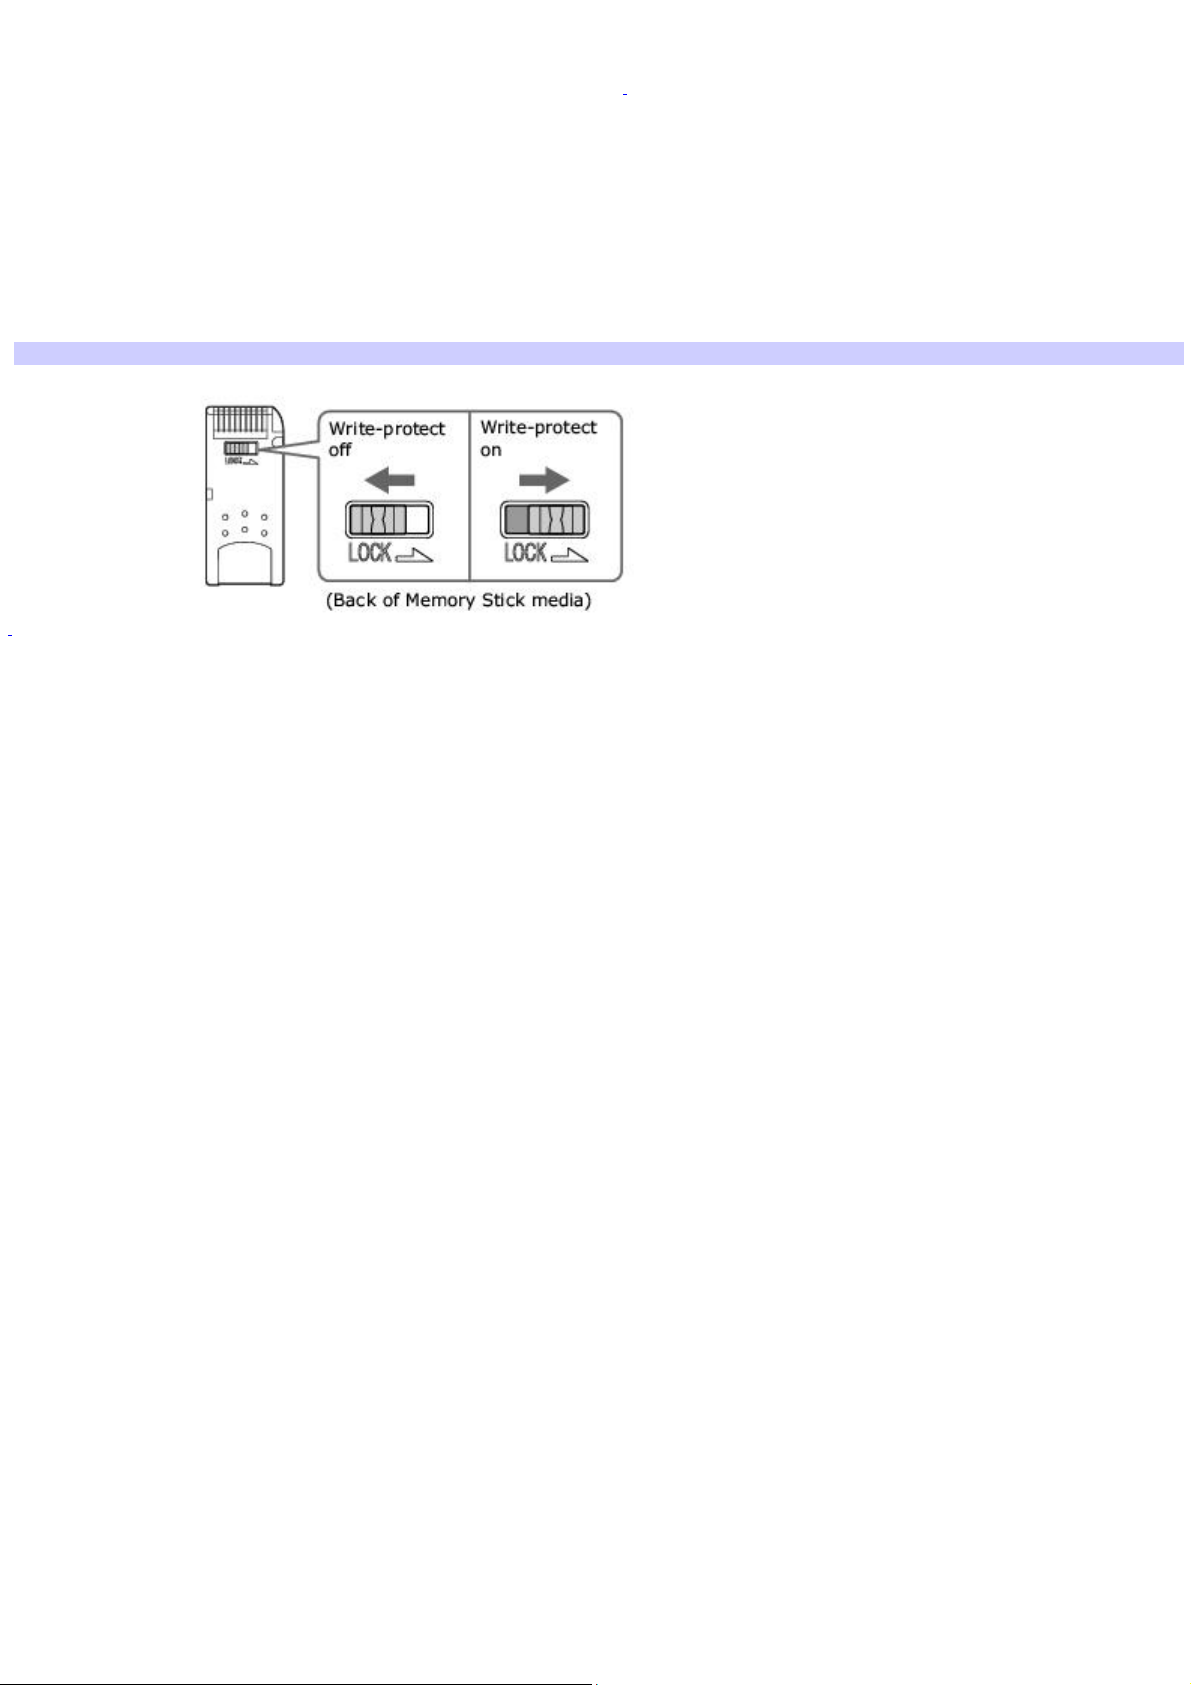
Some Memory Stick® media are equipped with a write-protect tab1. The write-protect tab prevents accidental changes to
information recorded on your Memory Stick media. When you slide the write-protect tab to the LOCK position, your Memory
Stick media is write-protected. You cannot delete, copy, or save information on the media while the write-protect tab in the
LOCK position. When you slide the tab to the un-LOCK position, you can write to or modify your Memory Stick media's
contents.
Write-protect off Data can be saved on the Memory Stick media.
Write-protect on Data can be read from but not saved on the Memory Stick media.
Using the Write-Protect Tab
1
Some Memory Stick media do not have a write-protect tab, and the loc ation or pos ition of the write-protec t tab may vary, depending on the type of M emory
Stick media. See the information s heet provided with your M emory Stic k media.
Page 25

Formatting Memory Stick media
Memory Stick® media is formatted for immediate use when you purchase it. If you need to reformat Memory Stick media, use
the Memory Stick Formatter that is provided with the media. For more information about using Memory Stick Formatter, refer
to Formatter Help.
Formatting Memory Stick media erases all data, including music data, previously saved to it. Before you
reformat Memory Stick media, confirm that the media does not contain files you want to keep. Back up important data
before formatting the media.
To format Memory Stick media
1.
Insert the Memory Stick media into the Memory Stick media slot. See To insert Memory Stick media for more
information.
2.
From the Start menu, click All Programs, select Memory Stick Utility, and click Memory Stick Formatter. The
Memory Stick Formatter window appears.
3.
Click Start Format, and follow the on-screen directions.
4.
After formatting, click Exit.
Page 26

Removing Memory Stick media
If the Memory Stick® media is removed prematurely, a blue screen with a message may appear prompting you to continue or
exit. Reinsert the media into the slot and press Enter to continue. This enables the media to finish reading or writing data.
To remove Memory Stick media
1.
Wait a minimum of 10 seconds after the Memory Stick media finishes reading or writing data before removing the
media.
2.
Make sure the access light is off.
3.
Push the Memory Stick media in toward the computer.
4.
When the Memory Stick media ejects, pull it out.
Be careful when removing the Memory Stick media, as it may not eject completely from the slot.
Page 27

Mice and Keyboards
Using the Keyboard
Although your computer's keyboard is very similar to a typewriter's keyboard, you can use the additional keys on the
computer's keyboard to perform specific computer-related tasks.
Page 28

Mice and Keyboards
Using the Keyboard
Although your computer's keyboard is very similar to a typewriter's keyboard, you can use the additional keys on the
computer's keyboard to perform specific computer-related tasks.
Page 29
Key descriptions
Key Description
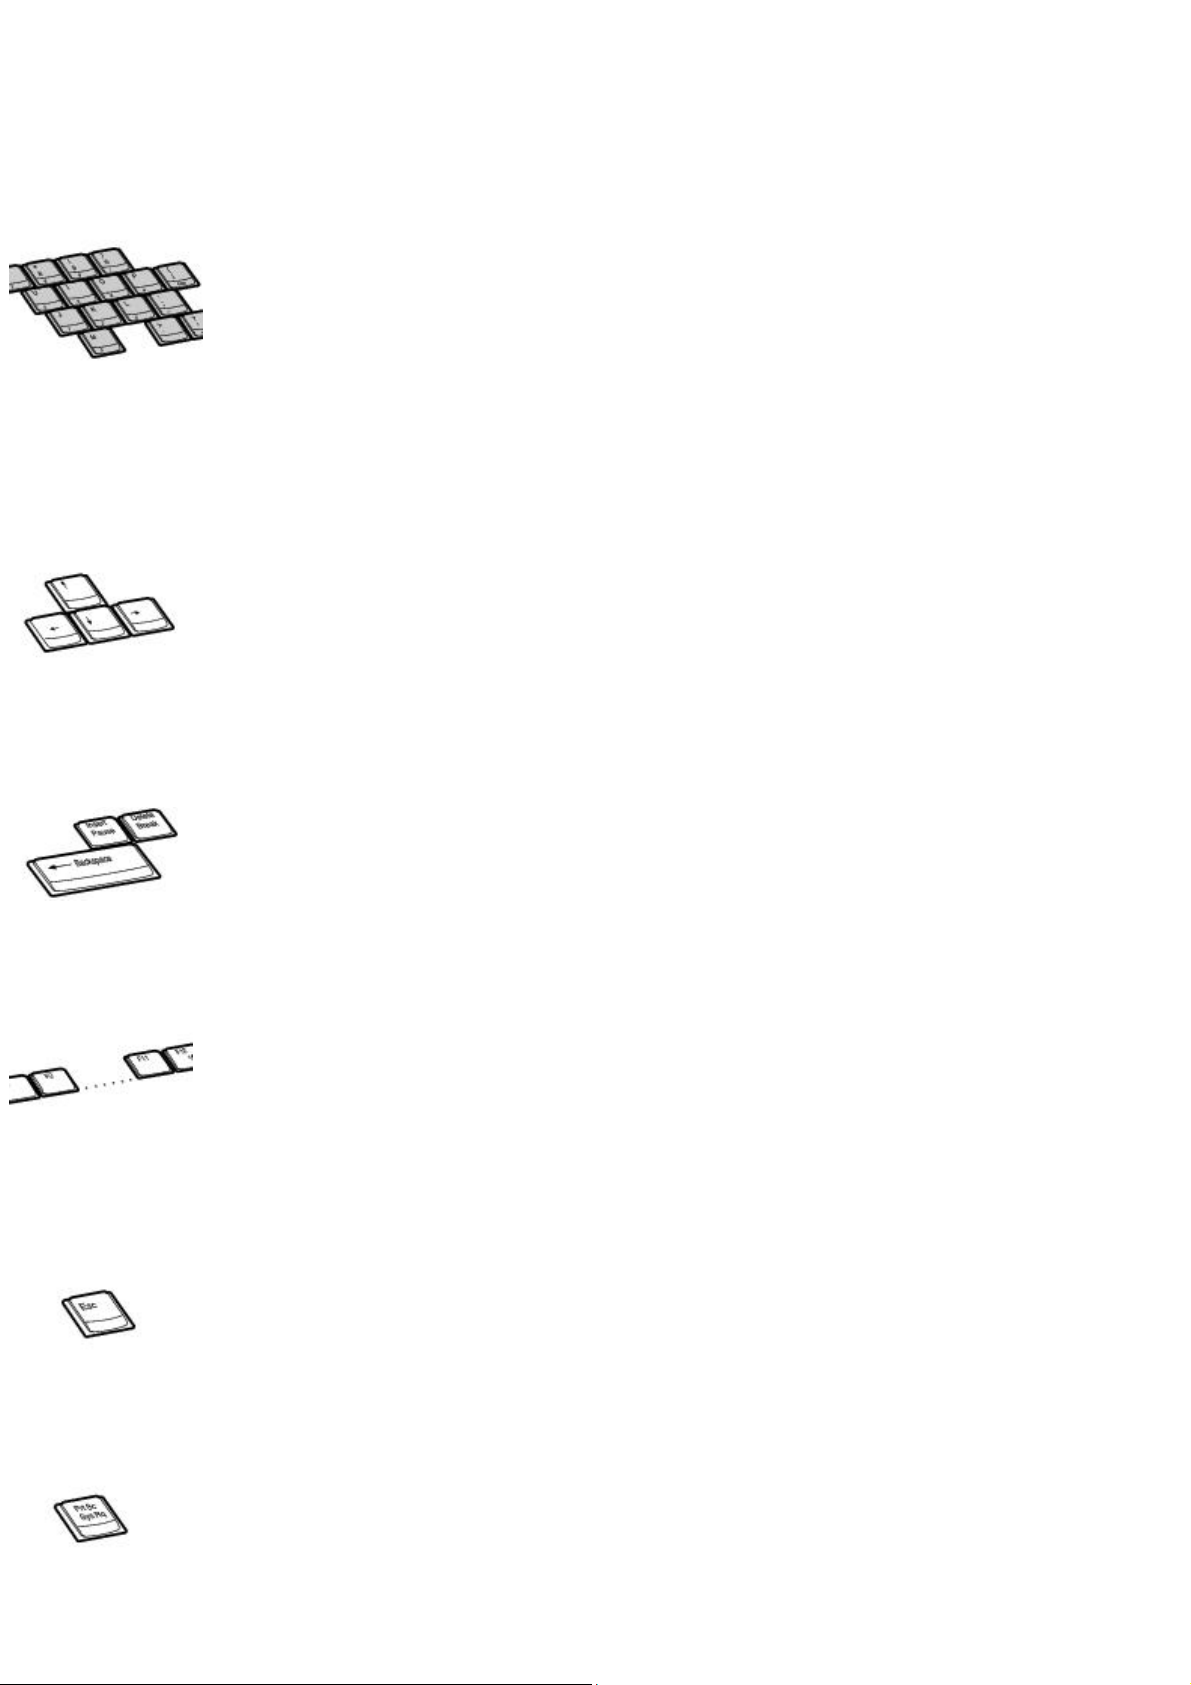
Numeric keypad
Contains the keys found on a typical calculator. Use the numeric keypad area to type numbers or to
perform mathematical calculations, such as addition and subtraction. Numbers appear on the front beveled edge of the
numeric keys. Press the Num Lock key to activate the numeric keypad. (When you do so, the Num Lock indicator light turns
on.) Press the Num Lock key again to deactivate the numeric keypad.
Arrow keys
The Left, Right, Up, and Down arrow keys move the pointer on the screen. They also function as the
Home, End, Page Up, and Page Down keys, respectively, when the Fn key is pressed.
Correction keys
The Insert, Back Space, and Delete keys enable you to make corrections to keystrokes.
Function keys
The 12 function keys along the top of the keyboard are used to perform designated tasks. For
example, in many programs, F1 is the Help key. The task associated with each function key may vary from one program to
the next.
Escape key
The Esc (Escape) key is used to cancel commands.
Print Screen key
The Print Screen key takes an electronic snapshot of the screen and moves it to the Clipboard. You can
then paste the screen shot into a document and print it.
Operator keys
Page 30
 Loading...