

Page 1

Security Features Guide
Guía de características de
seguridad
Before using the security features, please read this guide
thoroughly and keep it at hand for future reference.
Antes de usar las funcionalidades de seguridad, lea
cuidadosamente esta guía y manténgala a mano para futuras
consultas.
Page 2

Page 3

Contents
Setting the Password...........................................................6
Power-on Password .............................................................................. 7
Adding the Power-on Password...................................................... 7
Changing/Removing the Power-on Password ................................ 8
Hard Disk Password .............................................................................. 9
Adding the Hard Disk Password ..................................................... 9
Changing the Hard Disk Password ............................................... 11
Removing the Hard Disk Password .............................................. 11
Windows Password ............................................................................. 12
Adding the Windows Password .................................................... 12
Changing/Removing the Windows Password ............................... 12
Using Fingerprint Authentication .......................................14
Precautions on Using Fingerprint Authentication ................................ 15
Enrolling a Fingerprint ......................................................................... 17
Logging Onto Your System ................................................................. 20
Using the Password Bank ................................................................... 22
Adding an Entry to the Password Bank ........................................ 22
Using a Password Bank Entry to Access a Web Site ................... 22
Importing/Exporting Password Bank Entries................................. 23
Using the My Safe Folder.................................................................... 24
Trusted Platform Module (TPM) ........................................28
Precautions on Using the TPM............................................................ 28
Important Notice .................................................................................. 29
Configuring the TPM............................................................................ 31
US
3
Page 4

Page 5

Setting the Password
Page 6

Setting the Password
You can use BIOS functions to set two types of passwords to protect your
computer: power-on password and hard disk password.
Once you have set the power-on password, you will have to enter the
password after the VAIO logo appears to start your computer. The
power-on password will allow you to protect your computer from
unauthorized access.
The hard disk password provides additional security for the data stored
on your hard disk. If you set the hard disk password, no other users will
be able to access the data without knowing the password, even if the
hard disk is installed in another computer.
You can substitute fingerprint authentication for entering these passwords. See "Using
Fingerprint Authentication" on page 14 for more information.
6
Page 7

Setting the Password
Power-on Password
Adding the Power-on Password
Once you have set the power-on password, you cannot start the computer without entering
the password. Make sure not to forget the password. Write down your password and keep
it safe and private from other people.
If you forget the power-on password and need assistance to reset, a password reset fee will
be charged, and your computer may need to be sent in for depot service for password reset.
You can substitute fingerprint recognition for password entry when turning on the
computer. For more information, see "Using Fingerprint Authentication" on page 14.
To add the power-on password
1 Turn on the computer.
2 Press the F2 key when the VAIO logo appears.
The BIOS setup screen appears. If not, restart the computer and
press the F2 key several times when the VAIO logo appears.
3 Use the < or , key to select Security to display the Security tab,
select Set Machine Password, and then press the Enter key.
4 On the password entry screen, enter a new password, enter the
same password again for confirmation, and then press the Enter key.
The password can be up to 32 alphanumeric characters (including
spaces) long.
5 Select Password When Power ON under Security.
Press the space bar to change the setting from Disabled to Enabled.
6 Use the < or , key to select Exit and select Exit (Save Changes);
and then press the Enter key.
On the Setup Confirmation screen, make sure that Ye s is selected
and then press the Enter key.
7
Page 8

Changing/Removing the Power-on Password
To change or remove the power-on password
1 Turn on the computer.
2 Press the F2 key when the VAIO logo appears.
The BIOS setup screen appears. If not, restart the computer and
press the F2 key several times when the VAIO logo appears.
3 Enter the current password for Enter Password.
4 Use the < or , key to select Security to display the Security tab,
select Set Machine Password, and then press the Enter key.
5 On the password entry screen, enter the current password once,
enter a new password twice, and then press the Enter key.
To remove the password, leave the Enter New Password and
Confirm New Password fields blank and press the Enter key.
6 Use the < or , key to select Exit and then Exit (Save Changes);
and press the Enter key.
On the Setup Confirmation screen, make sure that Ye s is selected
and then press the Enter key.
8
Page 9
Setting the Password
Hard Disk Password
Adding the Hard Disk Password
In order to add the hard disk password, you must set both the master and
user passwords. The master password is provided for users with
administrator rights on the computer to reset the user password on the
BIOS setup screen. The user password is provided to lock your hard disk.
Once you have set the user password, you will have to enter the
password along with the power-on password (if set), after the VAIO logo
appears.
You cannot start the computer with the master password.
You cannot set the hard disk password on the optional 80GB HDD bay unit.
If you forget the master password or the keyboard fails, which is critical to password entry,
no bypass is possible and the data stored in the hard disk will not been accessible. There
is NO RESET of this password. You will have to replace the hard disk at your own expense
and lose all the data stored in the original hard disk. Make sure to write down the master
password and keep it safe and private from other people.
You can substitute fingerprint recognition for password entry when turning on the
computer. For more information, see "Using Fingerprint Authentication" on page 14.
9
Page 10
To add the hard disk password
1 Turn on the computer.
2 Press the F2 key when the VAIO logo appears.
The BIOS setup screen appears. If not, restart the computer and
press the F2 key several times when the VAIO logo appears.
If you have set the power-on password, enter your power-on password.
3 Use the < or , key to select Security to display the Security tab,
select Hard Disk Password, and then press the Enter key.
The password entry screen appears.
On 17-inch LCD models, you can set a distinctive hard disk password on each of the two
hard disks. Select Hard Disk1 Password or Hard Disk2 Password in place of Hard Disk
Password above and press the Enter key.
4 Select Enter Master and User Passwords and press the Enter key.
5 Select Continue on the warning screen and press the Enter key.
6 Enter the master password twice and press the Enter key.
The password can be up to 32 alphanumeric characters (including
spaces) long.
7 Enter the user password twice and press the Enter key.
The password can be up to 32 alphanumeric characters (including
spaces) long.
8 Press the Enter key when the success message appears.
10
Page 11

Setting the Password
Changing the Hard Disk Password
To change the hard disk password
1 Turn on the computer.
2 Press the F2 key when the VAIO logo appears.
The BIOS setup screen appears. If not, restart the computer and
press the F2 key several times when the VAIO logo appears.
If you have set the power-on password, enter your power-on password.
3 Use the < or , key to select Security to display the Security tab,
select Hard Disk Password, and then press the Enter key.
The password entry screen appears.
4 Select Change Master Password or Change User Password and
press the Enter key.
5 Enter the current password once and then a new password twice.
6 Press the Enter key.
7 Press the Enter key when the success message appears.
Removing the Hard Disk Password
To remove the hard disk password
1 Turn on the computer.
2 Press the F2 key when the VAIO logo appears.
The BIOS setup screen appears. If not, restart the computer and
press the F2 key several times when the VAIO logo appears.
If you have set the power-on password, enter your power-on password.
3 Use the < or , key to select Security to display the Security tab,
select Hard Disk Password, and then press the Enter key.
The password entry screen appears.
4 Select Enter Master and User Password and press the Enter key.
5 Enter the current password for Enter Current Hard Disk Master
Password and press the Enter key, leaving everything else blank.
6 Press the Enter key when the success message appears.
11
Page 12

Windows Password
Adding the Windows Password
To add the Windows password
1 Click Start and then Control Panel.
2 Click the User Accounts icon.
3 Click your user account under or pick an account to change.
4 Click Create a password.
5 In the Type a new password and Type the new password again to
confirm fields, enter the password for your account.
6 Click Create Password.
See "Help and Support Center" for more information on the Windows password.
Changing/Removing the Windows Password
To change the Windows password
1 Click Start and then Control Panel.
2 Click the User Accounts icon.
3 Click your user account under or pick an account to change.
4 Click Change my password.
5 Enter the current password under Type your current password.
6 Enter a new password under Type a new password and the same
password under Type the new password again to confirm.
7 Click Change Password.
To remove the password
1 Click Start and then Control Panel.
2 Click the User Accounts icon.
3 Click your user account under or pick an account to change.
4 Click Remove my password.
5 Enter the current password that you want to remove.
6 Click Remove Password.
12
Page 13

Using Fingerprint Authentication
Page 14

Using Fingerprint Authentication
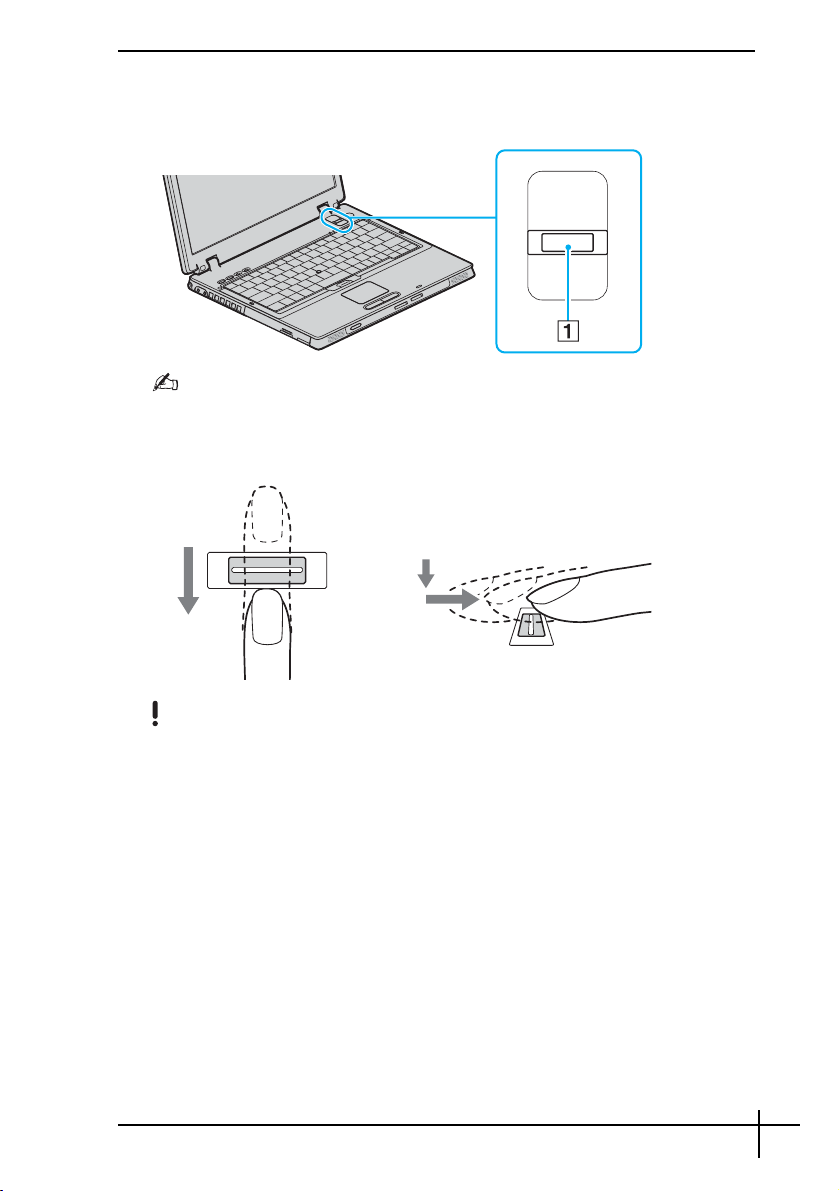
Your computer is equipped with a fingerprint reader to provide you with
additional convenience. A small horizontal bar located at the upper right of
the keyboard is the sensor of the fingerprint reader and will be referred to as
the fingerprint sensor hereinafter.
Once you have registered your fingerprint(s), the fingerprint authentication
functionality offers:
❑ A substitute for password entry
You can log onto your password-protected system without entering the
power-on, hard disk, and Windows passwords. If you share a computer
with other people, you can skip user selection as well.
❑ Quick web-site access
Once you have registered your user information (user accounts,
passwords, etc.) for web sites in the password bank, you can substitute
fingerprint authentication for entering required information and access
the password-protected web sites.
❑ Access to the encrypted (locked) My Safe folder
The My Safe folder is provided to protect your data against unauthorized
access. With the fingerprint authentication functionality, you can decrypt
(unlock) this folder to access your data.
14
Page 15

Using Fingerprint Authentication
Precautions on Using Fingerprint
Authentication
❑ The fingerprint authentication technology does not assure 100%
verification.
Sony Corporation assumes no liabilities for any problems and damages
arising out of your use of or inability to use the fingerprint sensor.
❑ The fingerprint authentication technology does not assure complete
protection of your data and hardware.
Sony Corporation assumes no liabilities for any problems and damages
arising out of your use of or inability to use the fingerprint sensor.
❑ The fingerprint recognition rate depends on your operating conditions
and varies among individuals as well.
❑ Make sure to make a backup copy of the data stored in the hard disk,
especially in the My Safe folder, before sending your computer for repair.
Sony Corporation assumes no liabilities for any loss or modification of
your data that might have occurred during the course of repair.
❑ The hard disk may be initialized and returned after the repair work and,
in such a case, you will not be able to restore your fingerprint templates.
❑ The maintenance and management of data concerning fingerprint
authentication must be carried out at your own risk.
Sony Corporation assumes no liabilities for any defects arising out of
your data maintenance and management.
❑ When enrolling your fingerprint(s), keep the following in mind:
❑ Enroll more than one fingerprint in case of inability to recognize the
fingerprint due to injury.
❑ You may not be able to enroll your fingerprint(s) due to some
biological factors.
❑ Up to 10 fingerprints can be enrolled per person.
Note that up to 21 fingerprints can be enrolled on a first-com, firstserved basis for logging on to your system using the Boot Security
functionality. If you share your computer with other people, you may
not be able to use your enrolled fingerprint to log on to your system.
15
Page 16

❑ When swiping your finger across the fingerprint sensor, keep the
following in mind:
❑ Place your fingertip flat in the center of the fingerprint sensor.
❑ Scan your fingerprint from the top joint of the finger to the fingertip.
❑ Swipe your finger perpendicularly across the fingerprint sensor.
❑ Keep your finger in contact with the fingerprint sensor while swiping.
❑ Let the fingerprint sensor take about one second to scan your
fingerprint.
❑ It may be hard to enroll or recognize your fingerprint if your finger is:
❑ dry or wet
❑ wrinkled
❑ injured
❑ dirty
❑ The soiled fingerprint sensor may cause poor recognition performance.
❑ Wipe off the fingerprint sensor regularly with a soft cloth.
❑ Use a lens cleaning cloth when the fingerprint sensor is extremely
soiled.
❑ Blow off dust with an air blower or a soft brush.
16
Page 17

Using Fingerprint Authentication
Enrolling a Fingerprint
To use the fingerprint authentication functionality, you must enroll your
fingerprint(s) in your computer. Launch Windows to display the Welcome
window and follow the instructions described below.
Set the Windows password on your computer before enrollment. See "Adding the Windows
Password" on page 12 for detailed instructions.
To enroll a fingerprint
Up to 21 fingerprints can be enrolled on a first-com, first-served basis for logging on to
your system using the Boot Security functionality. If you share your computer with other
people, you may not be able to use your enrolled fingerprint to log on to your system.
1 Click Enroll now on the Welcome window.
If the Windows password is not set on your computer, password registration will be
prompted.
1 Click OK on the prompt window.
2 Click Yes for confirmation.
3 Enter your password twice and click OK.
2 Click Next.
3 Enter the Windows password and click Next.
4 Select the Run interactive tutorial check box and click Next.
5 Read the tutorial information and click Next.
17
Page 18

6 Swipe your finger across the fingerprint sensor four times to perform a
swipe test, and then click Next.
The Enrollment window appears.
See "To scan a fingerprint" on page 19 for the scan procedure.
7 Click on the finger of which fingerprint you want to enroll.
8 Swipe the finger across the fingerprint sensor three times.
9 Click Finish.
18
To enroll more fingerprints, repeat steps 7 and 8 above.
If enrollment scan fails in step 8 above, click Manual mode and follow the on-screen
instructions to try manual mode enrollment.
To edit or add fingerprint templates, right-click the Protector Suite QL icon on the taskbar.
Page 19

Using Fingerprint Authentication
To scan a fingerprint
1 Place the top joint of your fingertip on the fingerprint sensor A.
Place your fingertip flat in the center of the fingerprint sensor.
2 Swipe your finger perpendicularly across the fingerprint sensor.
Keep your finger in contact with the fingerprint sensor while swiping.
Fingerprint enrollment may fail if you move your finger too fast or too slow. Take about one
second to swipe your finger across the sensor.
19
Page 20

Logging Onto Your System
To use the fingerprint authentication functionality in place of password entry
to log onto your system, you need to set the power-on, hard disk, and
Windows passwords and configure your computer for fingerprint
authentication.
For setting the power-on and hard disk passwords, see "Setting the
Password" on page 6.
To log onto Windows
If your fingerprints are enrolled for your user account, you will be able to
substitute fingerprint recognition for password entry when logging on to
Windows.
1 Swipe the finger with the enrolled fingerprint across the fingerprint
sensor when the Windows log-on window appears.
Window is launched.
You can log onto to your user account just by swiping the finger with the enrolled
fingerprint even if your computer is shared by multiple users.
To configure the computer for fingerprint authentication
1 Swipe the finger with the enrolled fingerprint across the fingerprint
sensor to display the menu.
2 Select Settings.
The Protector Suite QL window appears.
3 Click the Boot Security tab.
The Boot Security tab is not displayed if you have not set the power-on and hard disk
passwords in advance.
4 Select the Enable boot security check box and the Automatically log
onto system after power-on authentication check box.
With the Automatically log onto system after power-on authentication check box
selected, you can start your system and launch Windows by swiping your finger only once.
If only the Enable boot security check box has been selected, you will be prompted to swipe
your finger or enter the password before Windows is launched.
20
Page 21

Using Fingerprint Authentication
To log onto the system using the Boot Security functionality
1 Turn on the computer.
The authentication window appears following the VAIO logo.
2 Swipe the finger with the enrolled fingerprint across the fingerprint
sensor.
Windows is launched.
Alternatively, you can press the Esc key and enter your password.
If only the Enable boot security check box has been selected in step 4 in "To configure the
computer for fingerprint authentication” on page 20, you will be prompted to swipe your
finger or enter the password before Windows is launched.
Up to 21 fingerprints can be enrolled on a first-com, first-served basis for logging on to
your system using the Boot Security functionality. If you share your computer with other
people, you may not be able to use your enrolled fingerprint to log on to your system.
21
Page 22

Using the Password Bank
Once you have registered your user information (user accounts, passwords,
etc.) for web sites in the password bank, you can substitute fingerprint
authentication for entering required information and access the passwordprotected web sites.
Adding an Entry to the Password Bank
To access a password-protected web site using the fingerprint authentication
functionality, you need to add a password bank entry for the web site.
To add an entry to the password bank
1 Visit the desired password-protected web site to display the user account
and password entry window.
2 Enter your user information (user account, password, etc.).
3 Swipe the finger with the enrolled fingerprint across the fingerprint
sensor to display the menu.
4 Select Register Window.
5 Click Continue on the displayed window.
Upon completion, a message balloon appears at the title bar.
To view or edit the entry, click Registration Details on the message
balloon.
Never add TPM passwords (see page 28) to the password bank.
Using a Password Bank Entry to Access a Web Site
Once you have added an entry to the password bank, you can use it to
access the respective password-protected web site.
To access a password-protected web site
1 Visit the desired password-protected web site to display the user account
and password entry window.
A message balloon appears to indicate that you have a password bank
entry for the site.
2 Swipe the finger with the enrolled fingerprint across the fingerprint
sensor.
3 Click Yes on the confirmation window.
If a security warning window appears, click Yes or OK to proceed.
You can always enter your user information that has been registered in the password bank
to access password-protected web sites.
22
Page 23

Using Fingerprint Authentication
Importing/Exporting Password Bank Entries
You can export/import entries to/from the password bank for a backup or
recovery purpose.
To export an entry
1 Swipe the finger with the enrolled fingerprint across the fingerprint
sensor to display the menu.
2 Select Settings.
The Protector Suite QL window appears.
3 Click the Registrations tab.
4 Select the desired entry name from the list and click Export.
5 Enter a file name and click Save.
6 Enter a password twice and click OK.
7 Click OK.
To import an entry
1 Swipe the finger with the enrolled fingerprint across the fingerprint
sensor to display the menu.
2 Select Settings.
The Protector Suite QL window appears.
3 Click the Registrations tab.
4 Click Import.
5 Select an exported file and click Open.
6 Enter the password that you used for export and click OK.
7 Click OK.
23
Page 24

Using the My Safe Folder
The encrypted My Safe folder is provided to protect your data against
unauthorized access. With the fingerprint authentication functionality, you
can decrypt (unlock) this folder to access your data.
When you use the My Safe folder for the first time, you need to initialize and
create the folder.
To initialize the My Safe folder
1 Double-click the My Safe icon on the desktop.
2 Swipe the finger with the enrolled fingerprint across the fingerprint
sensor.
3 Click Next.
4 Enter a backup password twice and click Next.
The password should be at least 8 alphanumeric characters long.
You will need the backup password if the fingerprint sensor fails. Without the backup
password, you will not be able to restore your data in the My Safe folder. Make sure to write
down the backup password and keep it safe and private from other people.
5 Specify the folder size and click Finish.
The My Safe folder opens.
The maximum size of the My Safe folder is 2 GB.
To lock the My Safe folder
Right-click the My Safe icon on the desktop and select Lock My Safe from
the menu.
The My Safe folder is locked against unauthorized access.
To unlock the My Safe folder
1 Right-click the My Safe icon on the desktop and select Unlock My Safe
from the menu.
2 Swipe the finger with the enrolled fingerprint across the fingerprint
sensor.
The My Safe folder will stay unlocked until you lock it again or restart the
computer.
24
Page 25

Using Fingerprint Authentication
To resize the My Safe folder
The maximum size of the My Safe folder is 2 GB.
1 Swipe the finger with the enrolled fingerprint across the fingerprint
sensor to display the menu.
2 Select Settings and then click the My Safe tab.
3 Click Change size.
The window for changing the folder size appears.
If the My Safe folder is unlocked when you click Change size in step 3, the window for
locking the folder will appear. Click OK to lock the My Safe folder and close the window.
4 Change the folder size and click OK.
5 Click OK on the Protect Suite QL window.
25
Page 26

Page 27

Trusted Platform Module (TPM)
Page 28

Trusted Platform Module (TPM)
For selected models, the embedded Trusted Platform Module (TPM) provides
your computer with basic security functions. In combination with the TPM,
you can encrypt and decrypt your data to strengthen computer security
against inappropriate access.
TPMs are defined by Trusted Computing Group (TCG) and also called
security chips.
See the online Specifications to see whether your model is equipped with
the TPM.
Precautions on Using the TPM
❑ Although your computer is provided with the latest TPM security
functions, these functions do not assure complete protection of your data
and hardware. Sony Corporation assumes no liabilities for any problems
and damages arising out of your use of the functions.
❑ After you have installed the Infineon TPM Professional Package, you
need to set a few TPM passwords on your computer. Without these
passwords, you will not be able to restore any TPM-protected data. Make
sure to write down the passwords and keep them safe and private from
other people.
❑ Make sure to make backup copies of the latest emergency recovery
archive file and the latest emergency recovery token file and keep them
safe and private from other people before sending your computer for
repair. The data stored in the TPM that are embedded on the
motherboard may be lost or corrupted during the course of repair.
❑ During the course of repair, the TPM may be replaced even if there are
no problems with the modules. In such a case, use the backup copies of
the emergency recovery archive file and the emergency recovery token
file to restore the TPM configuration.
❑ Make sure to make a backup copy of the data stored on the hard disk
before sending your computer for repair. The hard disk may be initialized
and returned after the repair work and, in such a case, you will not be
able to restore the data on the hard disk using the backup copies of the
emergency recovery archive file and the emergency recovery token file.
❑ The maintenance and management of TPM-protected data must be
carried out at your own risk. Sony Corporation assumes no liabilities for
any defects arising out of your data maintenance and management.
28
Page 29

Trusted Platform Module (TPM)
Important Notice
❑
Do not encrypt the
Encrypting the folders containing basic user keys and others, which are
listed later in this section, using the Encrypting File System (EFS) will
disable you to launch your TPM software successfully and decrypt the
encrypted data if:
❑ The TPM software has been installed.
❑ The platform has been initialized.
❑ The EFS functionality has been enabled in user initialization process.
In addition, encrypting the following folder will disable you to log onto
your system.
C:\Domument and Settings\<account>\Local Settings (invisible by
default)
❑ Encrypting the archive, backup, and token files will disable emergency
restoration.
Encrypting the password reset token and secret files will disable
password reset.
❑ Do not encrypt the following folders and files. There will be no way to
restore the following folders and files or the archive, backup, token,
password reset token and secret files of your TPM software if you
carelessly encrypt them.
Sony Corporation assumes no liability for any troubles and damages
arising out of your careless encryption of such folders and files.
❑ Folders containing basic user keys and others
C:\Domuments and Settings\All Users\Application Data\Infineon\
C:\Domuments and Settings\<account>\Application Data\Infineon\
TPM Software 2.0\
(Both folders are invisible by default.)
❑ Automatic backup file
Default file name: SPSystemBackup.xml
Default path: None (Clicking Browse displays the My Document
window.)
❑ Token file for decryption
Default file name: SPEmRecToken.xml
Default path: Removable media (FD, USB memory, etc.)
❑ Password reset token file
Default file name: SPPwdResetToken.xml
Default path: Removable media (FD, USB memory, etc.)
❑ Password reset secret file
Default file name: SPPwdResetSecret.xml
Default path: Removable media (FD, USB memory, etc.)
Documents and Settings
folder.
29
Page 30

❑ Key and certificate backup file
Default file name: SpBackupArchive.xml
Default path: None (Clicking Browse displays the My Document
window.)
❑ PSD backup file
Default file name: SpPSDBackup.fsb
Default path: None (Clicking Browse displays the My Document
window.)
30
Page 31

Trusted Platform Module (TPM)
Configuring the TPM
To use the embedded TPM, you need to:
a Enable the TPM on the BIOS setup screen.
b Install the Infineon TPM Professional Package.
c Initialize and configure the TPM.
a To enable the TPM
1 Turn on your computer.
2 Press the F2 key when the VAIO logo appears.
The BIOS setup screen appears. If not, restart the computer and press
the F2 key several times when the VAIO logo appears.
3 Use
4 Use
the < or , key to select Security and then select Enabled for
TPM on the Security tab.
the < or , key to select Exit and then Exit (Save Change); and
press the Enter key.
Before enabling the TPM, make sure to set the power-on and hard disk passwords to
protect against unauthorized modification of the TPM configuration.
You can also disable the TPM and clear the TPM configuration on the BIOS setup screen.
Note that you will not be able to access any TPM-protected data if you clear the TPM
Ownership.
b To install the Infineon TPM Professional Package
Read the Readme.txt in the C:\infineon\Readme folder. Then, double-click
C:\Infineon\setup.exe to install the package.
To install this package, you must have administrator rights on the computer.
c To initialize and configure the TPM
See the online documentation for detailed information. To open the
documentation, click Start, point to All Programs and Infineon Security
Platform Solutions, and click Help on Security Platform.
The maintenance and management of TPM-protected data must be carried out at your own
risk. Sony Corporation assumes no liabilities for any defects arising out of your data
maintenance and management.
31
Page 32

Page 33

Contenido
Configuración de la contraseña.........................................36
Contraseña de inicio............................................................................ 37
Adición de la contraseña de inicio ................................................ 37
Cambio o eliminación de la contraseña de inicio.......................... 38
Contraseña de disco duro ................................................................... 39
Adición de la contraseña de disco duro ........................................ 39
Cambio de la contraseña de disco duro ....................................... 41
Eliminación de la contraseña de disco duro ................................. 41
Contraseña de Windows ..................................................................... 42
Adición de la contraseña de Windows .......................................... 42
Cambio o eliminación de la contraseña de Windows ................... 42
Uso de la autenticación de huella digital ...........................44
Precauciones en el uso de la autenticación de huella digital .............. 45
Registro de una huella digital .............................................................. 47
Inicio de sesión en su sistema............................................................. 50
Uso del Password Bank ...................................................................... 52
Adición de una entrada al Password Bank ................................... 52
Uso de una entrada del Password Bank para acceder a un sitio de
Internet .................................................................................. 52
Importación/Exportación de entradas del Password Bank ........... 53
Uso de la carpeta My Safe .................................................................. 54
Trusted Platform Module (TPM) ........................................59
Precauciones en el uso del TPM......................................................... 59
Aviso importante.................................................................................. 60
Configuración del TPM ........................................................................ 62
LA
33
Page 34

Page 35

Configuración de la contraseña
Page 36

Configuración de la contraseña
Puede usar las funciones del BIOS para definir dos tipos de contraseña
para proteger su equipo: contraseña de encendido y contraseña de
disco duro.
Después de definir la contraseña de encendido, tendrá que escribirla
una vez que aparezca el logotipo VAIO para iniciar su computadora.
La contraseña de inicio le permite proteger su computadora del acceso
no autorizado.
La contraseña de disco duro proporciona seguridad adicional para los
datos almacenados en el disco duro. Si define una contraseña para el
disco duro, otros usuarios no podrán acceder a los datos si no conocen
la contraseña, aún cuando el disco duro se instale en otro equipo.
Puede reemplazar la autenticación de huella digital por el ingreso de estas contraseñas.
Para obtener más información, consulte “Uso de la autenticación de huella digital” en la
página 44.
36
Page 37

Configuración de la contraseña
Contraseña de inicio
Adición de la contraseña de inicio
Una vez que ha definido la contraseña de inicio, no puede iniciar la computadora sin
ingresar la contraseña. Asegúrese de no olvidarla. Escriba su contraseña y guárdela en un
lugar seguro y que no conozcan otras personas.
Si olvida la contraseña de encendido y necesita asistencia para restablecerla, se le cobrará
un cargo de restablecimiento de contraseña y deberá enviar su equipo al servicio técnico
para realizar el procedimiento.
Puede reemplazar el reconocimiento de huella digital por el ingreso de contraseña para
encender la computadora. Para obtener más información, consulte “Uso de la autenticación
de huella digital” en la página 44.
Para agregar la contraseña de inicio
1 Encienda la computadora.
2 Pulse la tecla F2 cuando aparezca el logotipo VAIO.
Aparece la pantalla de configuración del BIOS. De lo contrario,
reinicie el equipo y cuando aparezca el logotipo VAIO, pulse varias
veces la tecla F2.
3 Use la tecla < o , para seleccionar Security (Seguridad) para
mostrar la ficha Security, seleccione Set Machine Password
(Definir contraseña de equipo) y pulse la tecla Intro.
4 En la pantalla de ingreso de contraseña, escriba una nueva
contraseña, ingrese nuevamente la misma contraseña para
confirmar y luego pulse la tecla Intro.
La contraseña puede tener hasta 32 caracteres alfanuméricos
(incluyendo espacios).
5 Seleccione Password When Power ON (Solicitar contraseña al
encender) debajo de Security (Seguridad).
Pulse la barra espaciadora para cambiar la configuración de
Disabled (Desactivado) a Enabled (Activado).
6 Use la tecla < o , para seleccionar Exit (Salir) y seleccione Exit
(Save Changes) (Salir y guardar los cambios) y a continuación pulse
la tecla Intro.
En la pantalla Setup Confirmation (Confirmación de configuración),
asegúrese de que Yes (Sí) esté seleccionado y pulse la tecla Intro.
37
Page 38

Cambio o eliminación de la contraseña de inicio
Para cambiar o eliminar la contraseña de inicio
1 Encienda la computadora.
2 Pulse la tecla F2 cuando aparezca el logotipo VAIO.
Aparece la pantalla de configuración del BIOS. De lo contrario,
reinicie el equipo y cuando aparezca el logotipo VAIO, pulse varias
veces la tecla F2.
3 Escriba la contraseña actual en Enter Password
(Escribir contraseña).
4 Use la tecla < o , para seleccionar Security (Seguridad) para
mostrar la ficha Security, seleccione Set Machine Password
(Definir contraseña de equipo) y pulse la tecla Intro.
5 En la pantalla de ingreso de contraseña, escriba la contraseña
actual una vez y una contraseña nueva dos veces y luego pulse
la tecla Intro.
Para eliminar la contraseña, deje en blanco los campos Enter New
Password (Escribir nueva contraseña) y Confirm New Password
(Confirmar nueva contraseña) y pulse la tecla Intro.
6 Use la tecla < o , para seleccionar Exit (Salir) y luego Exit
(Save Changes) (Salir y guardar los cambios) y pulse la tecla Intro.
En la pantalla Setup Confirmation (Confirmación de configuración),
asegúrese de que Ye s (Sí) esté seleccionado y pulse la tecla Intro.
38
Page 39

Configuración de la contraseña
Contraseña de disco duro
Adición de la contraseña de disco duro
Para agregar la contraseña de disco duro, debe definir tanto la
contraseña maestra como la de usuario. La contraseña maestra se
proporciona a los usuarios con derechos de administrador en la
computadora para restablecer la contraseña de usuario en la pantalla de
configuración del BIOS. Se proporciona la contraseña de usuario para
bloquear el disco duro. Luego de definir la contraseña de usuario,
una vez que aparezca el logotipo VAIO, tendrá que ingresarla junto con
la contraseña de inicio, si definió alguna.
No puede iniciar el equipo con la contraseña maestra.
No se puede definir la contraseña de disco duro en la unidad opcional HDD de 80GB.
Si olvida la contraseña maestra o si falla el teclado, lo cual es grave en el caso de necesitar
ingresar una contraseña, no habrá ninguna otra manera de acceder a los datos
almacenados en el disco duro. Esta contraseña NO SE PUEDE RESTABLECER. Tendrá que
reemplazar el disco duro a su propio costo y perder todos los datos almacenados en el
disco duro original. Asegúrese de escribir la contraseña maestra y guardarla en un lugar
seguro y que no conozcan otras personas.
Puede reemplazar el reconocimiento de huella digital por el ingreso de contraseña para
encender la computadora. Para obtener más información, consulte “Uso de la autenticación
de huella digital” en la página 44.
39
Page 40

Para agregar la contraseña de disco duro
1 Encienda la computadora.
2 Pulse la tecla F2 cuando aparezca el logotipo VAIO.
Aparece la pantalla de configuración del BIOS. De lo contrario,
reinicie el equipo y cuando aparezca el logotipo VAIO, pulse varias
veces la tecla F2.
Si ha definido la contraseña de encendido, ingrésela.
3 Use la tecla < o , para seleccionar Security (Seguridad) para
mostrar la ficha Security, seleccione Hard Disk Password
(Contraseña del disco duro) y pulse la tecla Intro.
Aparece la pantalla de ingreso de contraseña.
En los modelos con pantallas LCD de 17 pulgadas, puede definir contraseñas del disco duro
diferenciadas para cada uno de los dos discos duros. Seleccione Hard Disk1 Password
(Contraseña de disco duro 1) o Hard Disk2 Password (Contraseña de disco duro 2) en
lugar de Hard Disk Password (Contraseña de disco duro), mencionada anteriormente,
y luego pulse la tecla Intro.
4 Seleccione Enter Master and User Passwords (Ingrese la
contraseña maestra y de usuario) y pulse la tecla Intro.
5 Seleccione Continue (Continuar) en la pantalla de advertencia
y pulse la tecla Intro.
6 Escriba la contraseña maestra dos veces y pulse la tecla Intro.
La contraseña puede tener hasta 32 caracteres alfanuméricos
(incluyendo espacios).
7 Escriba la contraseña de usuario dos veces y pulse la tecla Intro.
La contraseña puede tener hasta 32 caracteres alfanuméricos
(incluyendo espacios).
8 Pulse la tecla Intro cuando aparezca el mensaje de
operación exitosa.
40
Page 41

Configuración de la contraseña
Cambio de la contraseña de disco duro
Para cambiar la contraseña de disco duro
1 Encienda la computadora.
2 Pulse la tecla F2 cuando aparezca el logotipo VAIO.
Aparece la pantalla de configuración del BIOS. De lo contrario,
reinicie el equipo y cuando aparezca el logotipo VAIO, pulse varias
veces la tecla F2.
Si ha definido la contraseña de encendido, ingrésela.
3 Use la tecla < o , para seleccionar Security (Seguridad) para
mostrar la ficha Security, seleccione Hard Disk Password
(Contraseña del disco duro) y pulse la tecla Intro.
Aparece la pantalla de ingreso de contraseña.
4 Seleccione Change Master Password (Cambiar contraseña
maestra) o Change User Password (Cambiar contraseña de
usuario) y pulse la tecla Intro.
5 Escriba la contraseña actual una vez y luego dos veces la
contraseña nueva.
6 Pulse la tecla Intro.
7 Pulse la tecla Intro cuando aparezca el mensaje de operación exitosa.
Eliminación de la contraseña de disco duro
Para eliminar la contraseña de disco duro
1 Encienda la computadora.
2 Pulse la tecla F2 cuando aparezca el logotipo VAIO.
Aparece la pantalla de configuración del BIOS. De lo contrario,
reinicie el equipo y cuando aparezca el logotipo VAIO, pulse varias
veces la tecla F2.
Si ha definido la contraseña de encendido, ingrésela.
3 Use la tecla < o , para seleccionar Security (Seguridad) para
mostrar la ficha Security, seleccione Hard Disk Password
(Contraseña del disco duro) y pulse la tecla Intro.
Aparece la pantalla de ingreso de contraseña.
4 Seleccione Enter Master and User Passwords (Ingrese la
contraseña maestra y de usuario) y pulse la tecla Intro.
5 Ingrese la contraseña actual en Enter Current Hard Disk Master
Password (Ingrese la contraseña actual de disco duro y maestra)
y pulse la tecla Intro, dejando todo lo demás en blanco.
6 Pulse la tecla Intro cuando aparezca el mensaje de operación exitosa.
41
Page 42

Contraseña de Windows
Adición de la contraseña de Windows
Para agregar la contraseña de Windows
1 Haga clic en Inicio y luego en Panel de control.
2 Haga clic en el icono Cuentas de usuario.
3 Haga clic en su cuenta de usuario en o elija una cuenta para modificar.
4 Haga clic en Crear contraseña.
5 En los campos Escribir contraseña nueva y Escribir nuevamente la
contraseña nueva para confirmar, ingrese la contraseña de su cuenta.
6 Haga clic en Crear contraseña.
Para obtener más información sobre la contraseña de Windows, consulte “Centro de ayuda
y soporte”.
Cambio o eliminación de la contraseña de Windows
Para cambiar la contraseña de Windows
1 Haga clic en Inicio y luego en Panel de control.
2 Haga clic en el icono Cuentas de usuario.
3 Haga clic en su cuenta de usuario en o elija una cuenta para modificar.
4 Haga clic en Cambiar mi contraseña.
5 Escriba la contraseña actual en Escribir su contraseña actual.
6 Ingrese una contraseña nueva en Escribir una contraseña nueva y la
misma contraseña en Escribir nuevamente la contraseña nueva para
confirmar.
7 Haga clic en Cambiar contraseña.
Para eliminar la contraseña
1 Haga clic en Inicio y luego en Panel de control.
2 Haga clic en el icono Cuentas de usuario.
3 Haga clic en su cuenta de usuario en o elija una cuenta para
modificar.
4 Haga clic en Eliminar mi contraseña.
5 Escriba la contraseña actual que desea eliminar.
6 Haga clic en Eliminar contraseña.
42
Page 43

Uso de la autenticación de
huella digital
Page 44

Uso de la autenticación de huella digital
Para brindarle mayor comodidad, su computadora está equipada con un
lector de huellas digitales. El sensor del lector de huellas digitales es una
pequeña barra horizontal ubicada en el extremo superior derecho del teclado
y será denominado de aquí en adelante como el sensor de huellas digitales.
Una vez que haya registrado sus huellas digitales, la funcionalidad de
autenticación de huella digital ofrece:
❑ Un sustituto para el ingreso de contraseña
Puede iniciar sesión en su sistema protegido por contraseñas,
sin ingresar las contraseñas de inicio, disco duro y Windows.
Si comparte su computadora con otras personas, también puede
omitir la selección de usuario.
❑ Acceso rápido a sitios de Internet
Una vez que haya registrado en el banco de contraseñas su información
de usuario para sitios de Internet (cuentas de usuario, contraseñas,
etc.), puede sustituir la autenticación de huella digital por el ingreso de
la información requerida y acceder a los sitios de Internet protegidos por
contraseña.
❑ Acceder a la carpeta encriptada (bloqueada) My Safe (Mi caja fuerte)
Se proporciona la carpeta My Safe para proteger sus datos del acceso
no autorizado. Con la funcionalidad de autenticación de huella digital,
puede desencriptar (desbloquear) esta carpeta para acceder a sus datos.
44
Page 45

Uso de la autenticación de huella digital
Precauciones en el uso de la autenticación
de huella digital
❑ La tecnología de autenticación de huella digital no asegura una
verificación de un 100%.
Sony Corporation no asume la responsabilidad por ningún problema
o daño derivado del uso o de su incapacidad para usar el sensor de
huellas digitales.
❑ La tecnología de autenticación de huella digital no asegura una
protección completa de sus datos ni del hardware.
Sony Corporation no asume la responsabilidad por ningún problema
o daño derivado del uso o de su incapacidad para usar el sensor de
huellas digitales.
❑ La tasa de reconocimiento de la huella digital depende de las
condiciones de operación que usted tenga y además varía de un
individuo a otro.
❑ Antes de enviar su computadora a reparar, asegúrese de hacer una
copia de respaldo de los datos almacenados en el disco duro,
especialmente aquellos contenidos en la carpeta My Safe.
Sony Corporation no asume la responsabilidad por ninguna pérdida
o modificación que puedan sufrir sus datos durante el curso de una
reparación.
❑ El disco duro puede ser inicializado y devuelto después del trabajo de
reparación, en cuyo caso, no podrá restaurar sus plantillas de huellas
digitales.
❑ El mantenimiento y administración de datos relativos a la autenticación
de huella digital debe ser efectuada bajo su propio riesgo.
Sony Corporation no asume la responsabilidad por ningún defecto
resultante del mantenimiento y administración de datos que
usted efectúe.
❑ Cuando registre sus huellas digitales, tenga presente lo siguiente:
❑ Registre más de una huella digital en caso de que no pueda
reconocer la huella debido a una herida.
❑ Debido a algunos factores biológicos, es posible que no pueda
registrar sus huellas digitales.
❑ Se pueden registrar hasta 10 huellas digitales por persona.
Tenga presente que se pueden registrar hasta 21 huellas digitales,
siguiendo el criterio “según orden de llegada” para iniciar sesión en
el sistema usando la funcionalidad Boot Security (Seguridad al
iniciar). Si comparte su computadora con otras personas, es posible
que no pueda utilizar su huella registrada para iniciar sesión en
el sistema.
45
Page 46

❑ Cuando deslice su dedo a través del sensor de huella digital, tenga
presente lo siguiente:
❑ Oprima la yema del dedo en el centro del sensor de huella digital.
❑ Explore su huella digital desde la articulación superior hacia la yema
del dedo.
❑ Deslice el dedo en forma perpendicular a través del sensor de
huella digital.
❑ Mantenga su dedo en contacto con el sensor de huella digital
mientras lo desliza.
❑ Permita que el sensor tenga alrededor de un segundo para explorar
su huella digital.
❑ Puede ser difícil registrar o reconocer su huella digital si su dedo está:
❑ seco o mojado
❑ arrugado
❑ herido
❑ sucio
❑ Un sensor de huella digital sucio puede causar un rendimiento de
reconocimiento deficiente.
❑ Limpie regularmente el sensor de huella digital con un paño suave.
❑ Cuando el sensor de huella digital esté extremadamente sucio,
utilice un paño para limpiar lentes.
❑ Sacuda el polvo con un soplador de aire o con un pincel suave.
46
Page 47

Uso de la autenticación de huella digital
Registro de una huella digital
Debe registrar sus huellas digitales en la computadora para usar la
funcionalidad de autenticación de huella digital. Inicie Windows para que
muestre la ventana Welcome y luego siga las instrucciones detalladas a
continuación:
Defina la contraseña de Windows en su computadora antes de hacer el registro. Para
obtener instrucciones detalladas, consulte “Adición de la contraseña de Windows” en la
página 42.
Para registrar una huella digital
Se pueden registrar hasta 21 huellas digitales siguiendo el criterio “según orden de llegada”
para iniciar sesión en el sistema usando la funcionalidad Boot Security (Seguridad al
iniciar). Si comparte su computadora con otras personas, es posible que no pueda utilizar
su huella registrada para iniciar sesión en el sistema.
1 Haga clic en Enroll now (Registrar ahora), en la ventana Welcome.
Si en su computadora no está definida la contraseña de Windows, se le solicitará
registrarla.
1 Haga clic en Aceptar en la ventana de solicitud.
2 Haga clic en Sí para confirmar.
3 Escriba dos veces la contraseña y haga clic en Aceptar.
2 Haga clic en Siguiente.
3 Escriba la contraseña de Windows y haga clic en Siguiente.
4 Seleccione la casilla de verificación Run interactive tutorial
(Ejecutar guía interactiva), y haga clic en Siguiente.
5 Lea la información de la guía y haga clic en Siguiente.
47
Page 48

6 Deslice cuatro veces su dedo a través del sensor de huella digital para
hacer una prueba de deslizamiento, y luego haga clic en Siguiente.
Aparece la ventana Enrollment (Registro).
Para ver el procedimiento de exploración, consulte “Explorar una huella digital” en la página 49.
7 Haga clic en el dedo con el que desea registrar la huella digital.
8 Deslice el dedo tres veces a través del sensor de huella digital.
9 Haga clic en Finalizar.
48
Para registrar más huellas digitales, repita los pasos 7 y 8 descritos anteriormente.
Si el registro falla en el paso 8 mencionado anteriormente, haga clic en Manual mode y siga
las instrucciones que aparecen en pantalla para intentar el registro en modo manual.
Para editar o agregar plantillas de huellas digitales, haga clic con el botón derecho del
mouse en el icono Protector Suite QL de la barra de tareas.
Page 49
Uso de la autenticación de huella digital
Para explorar una huella digital
1 Ponga la articulación superior de la yema del dedo sobre el sensor de
huella digital A.
Oprima la yema del dedo en el centro del sensor de huella digital.
2 Deslice el dedo en forma perpendicular a través del sensor de
huella digital.
Mantenga su dedo en contacto con el sensor de huella digital mientras lo desliza.
El registro de la huella digital puede fallar si mueve su dedo muy rápido o muy lento. Deslice
su dedo a través del sensor durante un segundo aproximadamente.
49
Page 50

Inicio de sesión en su sistema
Para usar la funcionalidad de autenticación de huella digital en lugar del
ingreso de contraseña para iniciar sesión en el sistema, necesita definir las
contraseñas de inicio, disco duro y Windows y además configurar su
computadora para autenticación de huella digital.
Para definir las contraseñas de inicio y disco duro, consulte “Configuración
de la contraseña” en la página 36.
Para iniciar sesión en Windows
Si sus huellas digitales están registradas en su cuenta de usuario, cuando
inicie sesión en Windows, podrá reemplazar el reconocimiento de huella por
el ingreso de contraseña.
1 Deslice el dedo con la huella registrada a través del sensor de huella
digital cuando aparezca la ventana de inicio de sesión de Windows.
Se inicia Windows.
Puede ingresar a su cuenta de usuario con sólo deslizar el dedo con la huella digital
registrada, aun si varios usuarios comparten su computadora.
Para configurar la computadora para autenticación de huella digital
1 Deslice el dedo con la huella digital registrada a través del sensor de
huella digital para ver el menú.
2 Seleccione Settings (Configuración).
Aparece la ventana Protector Suite QL.
3 Haga clic en la ficha Boot Security (Seguridad al iniciar).
La ficha Boot Security (Seguridad al iniciar) no aparece si antes no ha definido las
contraseñas de inicio y de disco duro.
4 Seleccione la casilla de verificación Enable boot security
(Activar seguridad al iniciar), y la casilla de verificación Automatically
log onto system after power-on authentication (Iniciar sesión
automáticamente luego de la autenticación de inicio).
Con la casilla de verificación Automatically log onto system after power-on authentication
(Iniciar sesión automáticamente luego de la autenticación de inicio) seleccionada, puede
iniciar el sistema y Windows deslizando su dedo sólo una vez.
Sólo si ha seleccionado la casilla de verificación Enable boot security (Activar seguridad al
iniciar), se le solicitará deslizar el dedo o ingresar una contraseña antes de iniciar Windows.
50
Page 51

Uso de la autenticación de huella digital
Para iniciar sesión en el sistema usando la funcionalidad Boot Security
(Seguridad al iniciar)
1 Encienda la computadora.
A continuación del logo VAIO, aparece la ventana de autenticación.
2 Deslice el dedo con la huella digital registrada a través del sensor de
huella digital.
Se inicia Windows.
Como alternativa, puede pulsar la tecla Esc e ingresar su contraseña.
Sólo si ha seleccionado la casilla de verificación Enable boot security (Activar seguridad
al iniciar), en el paso 4 “Configurar su computadora para autenticación de huella digital”
en la página 50, se le solicitará deslizar el dedo o ingresar una contraseña antes de
iniciar Windows.
Se pueden registrar hasta 21 huellas digitales siguiendo el criterio “según orden de llegada”
para iniciar sesión en el sistema usando la funcionalidad Boot Security (Seguridad al
iniciar). Si comparte su computadora con otras personas, es posible que no pueda utilizar
su huella registrada para iniciar sesión en el sistema.
51
Page 52

Uso del Password Bank
Una vez que haya registrado en el banco de contraseñas su información de
usuario para sitios de Internet (cuentas de usuario, contraseñas, etc.), puede
sustituir la autenticación de huella digital por el ingreso de la información
requerida y acceder a los sitios de Internet protegidos por contraseña.
Adición de una entrada al Password Bank
Para acceder a un sitio de Internet protegido por contraseña usando la
funcionalidad de autenticación de huella digital, necesita agregar una
entrada del banco de contraseñas para el sitio de Internet.
Para agregar una entrada al banco de contraseñas
1 Visite el sitio de Internet protegido por contraseña que desea para
mostrar la ventana de cuenta de usuario e ingreso de contraseña.
2 Ingrese su información de usuario (cuenta de usuario, contraseña, etc.).
3 Deslice el dedo con la huella digital registrada a través del sensor de
huella digital para ver el menú.
4 Seleccione Register Window (Ventana de registro).
5 En la ventana que aparece, haga clic en Continue (Continuar).
Al finalizar, aparece un globo de mensaje en la barra de título.
Para ver o editar una entrada, haga clic en Registration Details
(Detalles de registro) en el globo de mensaje.
Nunca agregue contraseñas TPM (consulte la página 58) al banco de contraseñas.
Uso de una entrada del Password Bank para
acceder a un sitio de Internet
Una vez que ha agregado una entrada al banco de contraseñas, puede
usarla para acceder al respectivo sitio de Internet protegido por contraseña.
Para acceder a un sitio de Internet protegido por contraseña
1 Visite el sitio de Internet protegido por contraseña que desea para
mostrar la ventana de cuenta de usuario e ingreso de contraseña.
Aparece un globo de mensaje que indica que tiene una entrada en el
banco de contraseñas para el sitio.
2 Deslice el dedo con la huella digital registrada a través del sensor de
huella digital.
3 En la ventana de confirmación, haga clic en Sí.
Si aparece una ventana de advertencia de seguridad, haga clic en
Sí oen Aceptar para proceder.
Siempre puede ingresar la información de usuario que ha sido registrada en el banco de
contraseñas para acceder a los sitios de Internet protegidos por contraseña.
52
Page 53

Uso de la autenticación de huella digital
Importación/Exportación de entradas del
Password Bank
Puede importar/exportar entradas desde y hacia el banco de contraseñas
para respaldarlas o recuperarlas.
Para exportar una entrada
1 Deslice el dedo con la huella digital registrada a través del sensor de
huella digital para ver el menú.
2 Seleccione Settings (Configuración).
Aparece la ventana Protector Suite QL.
3 Haga clic en la ficha Registrations (Registros).
4 En la lista, seleccione el nombre de la entrada deseada y haga clic en
Export (Exportar).
5 Ingrese un nombre de archivo y haga clic en Guardar.
6 Escriba dos veces la contraseña y haga clic en Aceptar.
7 Haga clic en Aceptar.
Para importar una entrada
1 Deslice el dedo con la huella digital registrada a través del sensor de
huella digital para ver el menú.
2 Seleccione Settings (Configuración).
Aparece la ventana Protector Suite QL.
3 Haga clic en la ficha Registrations (Registros).
4 Haga clic en Import (Importar).
5 Seleccione un archivo exportado y haga clic en Abrir.
6 Ingrese la contraseña que usó para exportar y haga clic en Aceptar.
7 Haga clic en Aceptar.
53
Page 54

Uso de la carpeta My Safe
Se proporciona la carpeta encriptada My Safe para proteger sus datos del
acceso no autorizado. Con la funcionalidad de autenticación de huella
digital, puede desencriptar (desbloquear) esta carpeta para acceder a
sus datos.
Cuando usa por primera vez la carpeta My Safe, debe inicializar y crear la
carpeta.
Inicializar la carpeta My Safe
1 En el escritorio, haga doble-clic en el icono My Safe.
2 Deslice el dedo con la huella digital registrada a través del sensor de
huella digital.
3 Haga clic en Siguiente.
4 Escriba dos veces una contraseña de respaldo y haga clic en Siguiente.
La contraseña debe tener 8 caracteres alfanuméricos como mínimo.
Necesitará la contraseña de respaldo si falla el sensor de huella digital. Sin la contraseña de
respaldo, no podrá restaurar sus datos en la carpeta My Safe. Asegúrese de escribir la
contraseña de respaldo y guardarla en un lugar seguro y que no conozcan otras personas.
5 Especifique el tamaño de la carpeta y haga clic en Finalizar.
Se abre la carpeta My Safe.
El tamaño máximo de la carpeta My Safe es 2 GB.
Para bloquear la carpeta My Safe
Haga clic con el botón derecho del mouse en el icono My Safe en el
escritorio y en el menú seleccione Lock My Safe (Bloquear mi caja fuerte).
La carpeta My Safe está bloqueada contra acceso no autorizado.
Para desbloquear la carpeta My Safe
1 Haga clic con el botón derecho del mouse en el icono My Safe en el
escritorio y en el menú seleccione Unlock My Safe (Desbloquear mi
caja fuerte).
2 Deslice el dedo con la huella digital registrada a través del sensor de
huella digital.
La carpeta My Safe se mantendrá desbloqueada hasta que usted vuelva
a bloquearla o reinicie la computadora.
54
Page 55

Uso de la autenticación de huella digital
Para volver a definir el tamaño de la carpeta My Safe
El tamaño máximo de la carpeta My Safe es 2 GB.
1 Deslice el dedo con la huella digital registrada a través del sensor de
huella digital para ver el menú.
2 Seleccione Settings (Configuración) y luego haga clic en la ficha
My Safe.
3 Haga clic en Change size (Cambiar tamaño).
Aparece la ventana para cambiar el tamaño de la carpeta.
Si la carpeta My Safe está desbloqueada , cuando hace clic en Change size (Cambiar
tamaño) en el paso 3, aparece la ventana para bloquear la carpeta. Haga clic en Aceptar
para bloquear la carpeta My Safe y cerrar la ventana.
4 Modifique el tamaño de la carpeta y haga clic en Aceptar.
5 Haga clic en Aceptar en la ventana Protect Suite QL.
55
Page 56

Page 57

Trusted Platform Module (TPM)
Page 58

Trusted Platform Module (TPM)
Para los modelos seleccionados, el Trusted Platform Module (TPM)
le proporciona a su computadora las funciones básicas de seguridad.
En combinación con TPM, puede encriptar y desencriptar sus datos para
fortalecer la seguridad de la computadora contra el acceso indebido.
Los TPM son definidos por Trusted Computing Group (TCG) y también son
llamados chip de seguridad.
Consulte Especificaciones en línea para ver si su computadora cuenta
con el TPM.
Precauciones en el uso del TPM
❑ Aún cuando su computadora esté provista de las últimas funciones de
seguridad de TPM, estas funciones no aseguran la protección completa
de sus datos y hardware. Sony Corporation no asume la responsabilidad
por ningún problema o daño derivado del uso que usted haga de estas
funciones.
❑ Luego de haber instalado el paquete Infineon TPM Professional
Package, necesita definir algunas contraseñas TPM en su computadora.
Sin estas contraseñas, no podrá restaurar ningún dato protegido por
TPM. Asegúrese de escribir las contraseñas y guardarlas en un lugar
seguro y que no conozcan otras personas.
❑ Antes de enviar su computadora a reparar, asegúrese de hacer copias
de respaldo del último archivo de almacenamiento de recuperación de
emergencia y del último token de recuperación de emergencia
y guárdelos en un lugar seguro que no conozcan otras personas.
Los datos guardados en el TPM que están integrados a la tarjeta madre
se pueden perder o dañar durante la reparación.
❑ Durante la reparación, se puede reemplazar el TPM aun cuando no haya
problemas con los módulos. En dicho caso, utilice las copias de respaldo
del archivo de almacenamiento de recuperación de emergencia y del
token de recuperación de emergencia para restaurar la configuración
del TPM.
❑ Asegúrese de hacer una copia de seguridad de los datos guardados en
el disco duro antes de enviar su computadora a reparar. El disco duro
puede ser inicializado y devuelto después del trabajo de reparación,
en cuyo caso, no podrá restaurar los datos del disco duro usando las
copias de respaldo del archivo de almacenamiento de recuperación de
emergencia y del token de recuperación de emergencia.
❑ El mantenimiento y administración de datos protegidos por TPM debe
ser efectuado bajo su propio riesgo. Sony Corporation no asume la
responsabilidad por ningún defecto resultante del mantenimiento
y administración de datos que usted efectúe.
58
Page 59

Trusted Platform Module (TPM)
Aviso importante
❑
No encripte la carpeta
La encriptación de carpetas que contengan claves de usuario básicas
y otros (que se describen más adelante en esta sección) mediante el
sistema Encrypting File System (EFS) no le permitirá iniciar
adecuadamente su software TPM ni desencriptar los datos encriptados si:
❑ Se ha instalado el software TPM.
❑ Se ha inicializado la plataforma.
❑ Se ha activado la funcionalidad EFS en el proceso de inicialización
por el usuario.
Además, encriptar la siguiente carpeta no le permitirá iniciar sesión en
el sistema.
C:\Documents and Settings\<cuenta>\Local Settings (invisible en forma
predeterminada)
❑ Encriptar los archivos de almacenamiento, respaldo y token desactivará
la restauración de emergencia.
Encriptar el token para restablecer contraseña y los archivos secretos
desactivará la función para restablecer contraseña.
❑ No encripte las siguientes carpetas y archivos. No hay forma de
restaurar las siguientes carpetas y archivos o los archivos secretos,
de almacenamiento, token y token para restablecer contraseña del
software TPM si en un descuido los encripta.
Sony Corporation no asume la responsabilidad por ningún problema
o daño derivado de la encriptación descuidada que usted haga de estas
carpetas y archivos.
❑ Carpetas que contienen claves de usuario básicas y otros
C:\Documents and Settings\All Users\Application Data\Infineon\
C:\Documents and Settings\<cuenta>\Application Data\Infineon\
TPM Software 2.0\
(En forma predeterminada ambas carpetas son invisibles.)
❑ Archivo de respaldo automático
Nombre de archivo predeterminado: SPSystemBackup.xml
Ruta predeterminada: Ninguna (si hace clic en Explorar, aparecerá
la ventana Mis documentos)
❑ Token para desencriptar
Nombre de archivo predeterminado: SPEmRecToken.xml
Ruta predeterminada: Medios extraíbles (FD, memoria USB, etc.)
❑ Token para restablecer contraseña
Nombre de archivo predeterminado: SPPwdResetToken.xml
Ruta predeterminada: Medios extraíbles (FD, memoria USB, etc.)
Documents and Settings
.
59
Page 60

❑ Archivo secreto para restablecer contraseña
Nombre de archivo predeterminado: SPPwdResetSecret.xml
Ruta predeterminada: Medios extraíbles (FD, memoria USB, etc.)
❑ Archivo de respaldo de clave y certificado
Nombre de archivo predeterminado: SpBackupArchive.xml
Ruta predeterminada: Ninguna (si hace clic en Explorar, aparecerá
la ventana Mis documentos)
❑ Archivo de respaldo de PSD
Nombre de archivo predeterminado: SpPSDBackup.fsb
Ruta predeterminada: Ninguna (si hace clic en Explorar, aparecerá
la ventana Mis documentos)
60
Page 61

Trusted Platform Module (TPM)
Configuración del TPM
Para usar el TPM incorporada, necesita:
a Activar el TPM en la pantalla de configuración de BIOS.
b Instalar el paquete Infineon TPM Professional Package.
c Inicializar y configurar el TPM.
a Para activar el TPM
1 Encienda la computadora.
2 Pulse la tecla F2 cuando aparezca el logotipo VAIO.
Aparece la pantalla de configuración del BIOS. De lo contrario, reinicie
el equipo y cuando aparezca el logotipo VAIO, pulse varias veces la tecla
F2.
3 Use
4 Use
las teclas < o , para seleccionar Security (Seguridad) y luego
seleccione Enabled (Activado) para el TPM en la ficha Security
(Seguridad).
la tecla < o , para seleccionar Exit (Salir) y luego Exit
(Save Change) (Salir y guardar los cambios); y pulse la tecla Intro.
Antes de activar el TPM, asegúrese de configurar las contraseñas de inicio y de disco duro
para protegerse de las modificaciones no autorizadas de la configuración de TPM.
También puede desactivar el TPM y eliminar la configuración de TPM en la pantalla de
configuración de BIOS. Tenga presente que no podrá acceder a ningún dato protegido por
TPM si borra la propiedad de TPM.
b Para instalar el paquete Infineon TPM Professional Package.
Lea Readme.txt en la carpeta C:\infineon\Readme. Luego, haga doble clic
en C:\Infineon\setup.exe para instalar el paquete.
Para instalar este paquete, debe tener derechos de administrador en la
computadora.
c Para inicializar y configurar el TPM
Consulte la documentación en línea para obtener información detallada.
Para abrir la documentación, haga clic en Inicio, señale Todos los
programas e Infineon Security Platform Solutions, y haga clic en Help on
Security Platform (Ayuda sobre la plataforma de seguridad).
El mantenimiento y administración de datos protegidos por TPM debe ser efectuado bajo
su propio riesgo. Sony Corporation no asume la responsabilidad por ningún defecto
resultante del mantenimiento y administración de datos que usted efectúe.
61
Page 62

Page 63

Page 64

VAIO Homepage
http://www.sony.com/pcsupport (for customers in USA)
http://www.sony.ca/support (for customers in Canada)
http://esupport.sony.com/ES/ (para usuarios en países
o regiones de América Latina)
© 2005 Sony Corporation/ Printed in China
2-657-548-11(1)
 Loading...