

Page 1

For customer support information, visit the following website:
http://esupport.sony.com/EN/VAIO/ for customers in USA and Canada,
http://www.sony.com.sg/vaio/ for customers in Asia and Pacific countries or areas.
http://www.sony.net/
Wireless Digital Audio
VGF-WA1
Operating Instructions
© 2007 Sony Corporation / Printed in China
3-094-116-12 (1)
Page 2

WARNING
To prevent fire or shock hazard, do not
expose the device to rain or moisture.
To avoid electrical shock, do not open
cabinet. Refer servicing to qualified
personnel only.
The power socket outlet shall be installed near the
equipment and shall be easily accessible.
Audio and picture distortion may occur if this
equipment is positioned in close proximity to any
equipment emitting electromagnetic radiation.
For customers in the USA
– Connect the equipment into an outlet on a circuit
different from that to which the receiver is
connected.
– Consult the dealer or an experienced radio/TV
technician for help.
The supplied interface cable must be used with the
equipment in order to comply with the limits for a
digital device pursuant to Subpart B of Part 15 of FCC
Rules.
You are cautioned that any changes or modifications
not expressly approved in this manual could void
your authority to operate this equipment.
For questions regarding your product or for the Sony
Customer Information Service Center nearest you,
call 1-888-476-6972 in the United States.
The number below is for FCC related matters only.
Owner’s record
The model number and serial number are located on
the bottom of your Wireless Digital Audio.
Record the serial number in the space provided
below. Refer to this number whenever you call your
Sony dealer regarding this product.
Model No. VGF-WA1
Serial No.
Thank you for purchasing this SONY product.
Registering your product will allow us to contact
you in the unlikely event that your product
needs adjustment or modification. In addition, if
you choose to do so during registration, periodic
mailings about new products and services can
be automatically mailed to you.
Please register your product here:
http://productregistration.sony.com
FCC Notice
This equipment has been tested and found to comply
with the limits for a Class B digital device, pursuant to
Part 15 of the FCC Rules. These limits are designed to
provide reasonable protection against harmful
interference in a residential installation. This
equipment generates, uses, and can radiate radio
frequency energy and, if not installed and used in
accordance with the instructions, may cause harmful
interference to radio communications. However,
there is no guarantee that interference will not occur
in a particular installation. If this equipment does
cause harmful interference to radio or television
reception, which can be determined by turning the
equipment off and on, the user is encouraged to try to
correct the interference by one or more of the
following measures:
– Reorient or relocate the receiving antenna.
– Increase the separation between the equipment
and receiver.
Declaration of Conformity
Trade Name: SONY
Model No.: VGF-WA1/VGF-UWA1
Responsible Party: Sony Electronics Inc.
Address: 16530 Via Esprillo
San Diego, CA 92127 USA
Telephone No.: 858-942-2230
This device complies with Part 15 of the FCC
Rules.
Operation is subject to the following two
conditions: (1) This device may not cause harmful
interference, and (2) this device must accept any
interference received, including interference that
may cause undesired operation.
2
Page 3

FCC Radiation Exposure Statement
For VGF-WA1
This equipment complies with FCC radiation
exposure limits set forth for an uncontrolled
environment.
This equipment should be installed and operated with
minimum distance 20 cm (7 7/8 inches) between
radiator and your body (excluding extremities: hands,
wrists and feet).
This equipment must not be co-located or operating
in conjunction with any other antenna or transmitter.
For VGF-UWA1
This equipment complies with FCC radiation
exposure limits set forth for an uncontrolled
environment. End users must follow the specific
operating instructions for satisfying RF exposure
compliance. To maintain compliance with FCC RF
exposure compliance requirements, please follow
operation instruction as documented in this manual.
This transmitter must not be co-located or operating
in conjunction with any other antenna or transmitter.
SAR compliance has been established in typical
laptop computer(s) with USB slot, and product could
be used in typical laptop computer with USB slot.
Other application like handheld PC or similar device
has not been verified and may not compliance with
related RF exposure rule and such use shall be
prohibited.
Highest reported SAR is body: 1.28W/kg.
About the Wireless LAN Function
The built-in wireless LAN function has been found to
comply with the Wi-Fi Specifications established by
the WFA (Wi-Fi Alliance).
Industry Canada Notice
This Class B digital apparatus complies with
Canadian ICES-003.
Avis de L’Industrie Canada
Cet appareil numérique de la classe B est conforme à
la norme NMB-003 du Canada.
IC RSS-210 (Canada)
Operation is subject to the following two conditions;
(1) this device may not cause harmful interference,
and (2) this device must accept any interference
received, including interference that may cause
undesired operation of the device.
L’utilisation de ce dispositif est autorisée seulement
aux deux conditions suivantes : (1) il ne doit pas
produire de brouillage, et (2) l’utilisateur du dispositif
doit être prêt à accepter tout brouillage
radioélectrique reçu, même si ce brouillage est
susceptible de compromettre le fonctionnement du
dispositif.
IC Exposure of Humans to RF Fields
The installer of this radio equipment must ensure that
the antenna is located or pointed such that it does not
emit RF field in excess of Health Canada limits for the
general population; consult Safety Code 6, obtainable
from Health Canada’s website : www.hc-sc.gc.ca/rpb.
L’installateur du présent matériel radio doit s’assurer
que l’antenne est située ou pointée de manière à ce
que cette dernière n’émette pas de champs
radioélectriques supérieurs aux limites spécifiées par
Santé Canada pour le grand public; consulter le Code
de sécurité 6, disponible sur le site Web de Santé
Canada, à I’adresse suivante : www.hc-sc.gc.ca/rpb.
Trademarks
VAIO, , and VAIO Media are registered
trademarks of Sony Corporation.
Microsoft, Windows, and Windows Media are
registered trademarks and Windows Vista is a
trademark of Microsoft Corporation in the United
States and/or other countries.
Adobe and Adobe Reader are registered
trademarks of Adobe Systems Incorporated.
is a trademark of Live365.com.
Other system names and product names appearing
in this document are generally registered
trademarks or trademarks of their manufacturers.
and marks are not shown in this document.
In this manual, Microsoft Windows XP Home
Edition, Microsoft Windows XP Professional
and Microsoft Windows XP Media Center
Edition are referred to as Windows XP.
In this manual, Microsoft Windows Vista
Home Basic, Microsoft Windows Vista Home
Premium, Microsoft Windows Vista Business
and Microsoft Windows Vista Ultimate are
referred to as Windows Vista.
This product is protected by certain intellectual
property rights of Microsoft Corporation. Use or
distribution of such technology outside of this
product is prohibited without a license from
Microsoft or an authorized Microsoft subsidiary.
3
Page 4

Table of Contents
Introduction 7
What this product can do ................................ 7
Useful features to enjoy music .................
Operating environment ...................................
Computers that can be connected to
this product ..............................................
Additional Supporting Software ............
Check the supplied accessories .....................
Names of parts ................................................
Overview ................................................... 12
Display window .......................................
Control panel
Rear view
Wireless Adapter ......................................
Remote control .........................................
............................................ 15
................................................... 16
10
11
12
13
16
17
Connection and Preparation 19
Overview of connection and preparation ... 19
About connecting the Wireless Digital
Audio and a computer ..........................
Overview of setup ....................................
Plug into a power outlet ..........................21
Install and set up the necessary software
to use this device ..........................................
Setting up using the supplied
Wireless Adapter ....................................
Setting up using the supplied
CD-ROM ................................................ 23
Preparing the computer ..........................24
To use the VAIO Media
Integrated Server ...................................
When using Windows Media Connect
When using Windows Media Player 11
..................................................................
19
20
21
22
24
.... 24
27
Operation 29
Operation flow ................................................ 29
8
9
9
Turning on the power ....................................
Using the internal battery .......................
Listening to music files stored on a computer
(PC Streaming Function) ............................
Playable file formats ................................
Selecting a server .....................................
Selecting music from the list
(Browse Function) .................................
About play modes ....................................
Listening to web radio
(Web Radio Function) .................................
Selecting a radio station from the list
(Browse Function) .................................
Listening to an audio device
(Auxiliary Function) ....................................
Listening to music files stored on the internal
memory (Internal Memory Function) ......
Downloadable file formats .....................
Downloading a music file to the
internal memory ....................................
Selecting music from the list
(Browse Function) .................................
Deleting music files in the internal
memory ................................................... 38
Initializing the internal memory ...........
About play modes ....................................
Sound settings .................................................
Providing a consistent volume level for
music files (Dynamic Normalizer) ......
Boosting bass (Dynamic Bass Boost) ....
Adjusting the sound quality to suit your
taste (6 Band Equalizer) ........................
Enhancing the stereo feeling
(VPT Wide Stereo) ................................
Adjusting the acoustic response of the
speakers (Digital Linear Phase) ...........
Timer settings .................................................
Using the Sleep Timer .............................
Using On-Timer ......................................
30
30
31
31
32
33
34
35
35
36
36
36
37
37
38
39
39
39
39
40
41
41
42
42
42
4
Page 5

Others 45
For more convenient use of the Wireless
Digital Audio ................................................
Setting your computer to start up
automatically .......................................... 45
Confirming/changing the go to
standby time ...........................................
Changing settings ...........................................
Wireless LAN settings ...................................
To connect via the Wireless Adapter .....
To connect via an access point ...............
Using the Access Point connection tool ......
Setting up the proxy server settings for
the Wireless Adapter connection ........
Using the Wireless Adapter Manager ..........
Starting the Wireless Adapter
Manager .................................................. 55
Refreshing the Wireless Digital Audio
list ............................................................56
Registering a Wireless Digital Audio ....
Resetting the registration ........................
Enabling the Internet connection ..........
Precautions ...................................................... 58
Do not drop this device ..........................
About install location ..............................
About condensation ................................
Precautions when disposing
of the battery ..........................................
About this device .....................................
45
46
48
52
52
52
54
54
55
56
56
57
58
58
58
58
59
Cleaning........................................................... 60
Specifications .................................................. 61
Playable/downloadable file formats ......
Getting Help ....................................................
Sony support options ..............................
Troubleshooting 65
Troubleshooting .............................................65
Turning on ................................................
Charging ...................................................67
Listening to the music files stored on a
computer (PC Streaming Function) ...
Listening to web radio
(Web Radio Function) ..........................
Listening to the audio device (Auxiliary
Function) ................................................ 72
Listening to the music files stored
on the internal memory
(Internal Memory Function) ...............
Timer settings
Changing settings ....................................
Others ........................................................ 74
........................................... 73
62
63
63
65
68
71
72
73
About the supplied guides
The following guides are included with this Wireless Digital Audio.
Operating Instructions (this document): Contains information on how to use the Wireless Digital
Audio.
Setup Guide: Contains information on how to connect and set up the Wireless Digital Audio.
Illustrations used in this guide
Illustrations and screens used in this guide may vary from the actual screens.
5
Page 6

6
Page 7

What this product can do
The Wireless Digital Audio is a device with which you can play music files that are stored on your
computer, or listen to web radio, via a wireless LAN. You can enjoy music with high quality speakers.
This device supports the following four ways to enjoy music.
Listening to music files stored on a computer (PC Streaming Function)
You can play music files that are stored on your computer with this device via a wireless LAN.
Listening to web radio (Web Radio Function)
You can listen to web radio offered by a service provider (Live365). You can listen to web radio by
connecting this device to a computer that has an Internet connection, or to an access point.
Listening to an audio device (Auxiliary Function)
You can connect an audio device, such as a Walkman, to this device to listen to music from the audio device
via the speakers of this product.
Listening to music files stored on the internal memory (Internal Memory Function)
You can play music files that are stored on the internal memory (128 MB) of this product. At the time of
purchase, the internal memory contains sample music files.
While playing a music file from a computer with PC Streaming Function, you can download the music file
to this device.
Introduction
7
Page 8

Useful features to enjoy music
This product has various features to enhance your music enjoyment.
Browse Function
You can see a list of content to easily find your favorite content and play it back.
What is content?
In this guide, “content” refers to music files or streaming media that are playable by this product, such as music
files stored on a computer, web radio stations, and music files downloaded to the internal memory.
Timer Function
Sleep Timer
You can set this device to enter standby mode automatically after a certain length of playback time.
On-Timer
You can set start time, stop time, the day of the week and favorite content to start playback automatically.
You can set two separate On-Timers.
Sound Settings
You can set the sound quality and sound effects to fit the music genre or your taste, as shown below:
Settings Effects
Dynamic Normalizer
(D-Normalizer)
Dynamic Bass Boost
(D-Bass Boost)
6 Band Equalizer Allows you to customize the sound quality to match the genre of music.
Provides a consistent volume level for music files. With this setting,
when listening to music files of different volume level, they play at the
same level.
Boosts the low frequencies of music, offering a strong and powerful
sound.
VPT Wide Stereo Increases the virtual distance between the right and left speakers, and
enhances the stereo feeling.
Digital Linear Phase
(D-Linear Phase)
Adjusts the phase response and frequency response of the speaker’s
mid-high range to achieve a highly precise localization of sounds and a
sense of greater depth.
8
Page 9
Operating environment
Computers that can be connected to this product
To use this device with your computer, the following environment is required:
Computer
Operating System
IBM PC/AT compatible
CPU: Celeron 1.00 GHz or higher
Available hard disk drive space: 1.2 GB or more
(The amount of space varies according to the Windows version and the number of music files
stored on the hard disk drive.)
RAM: 256 MB or more
Others
CD drive (capable of digital playback by WDM)
Sound card
USB port
The following manufacturer installed versions only:
Windows XP (Service Pack 2)
Windows Vista
Display
Highcolor (16bit) or higher, 800 × 600 dots or better
(1024 × 768 dots or better is recommended)
Other
Internet connection (for Web Radio Function)
Operating systems other than those indicated above, homebuilt computers, upgrade of the original
manufacturer-installed operating system, multi-boot environment, multi-monitor environment, and
Macintosh computers are not supported.
Notes
It is not guaranteed that all the computers that meet the recommendations shown above can be used with this
product.
You can use the NTFS format of Windows XP only when the operating system is the original manufacturer-
installed version.
It is not guaranteed that all the computers can go on system suspend, system standby, or system hibernate.
Introduction
9
Page 10

10
Additional Supporting Software
Server
– VAIO Media Integrated Server Ver.6.0*
– Windows Media Connect 2.0
– Windows Media Player 11
* You may not be able to use some functions with the VAIO Integrated Server Ver.6.0 included on the supplied
CD-ROM. Update your VAIO Media Integrated Server to the latest version by using VAIO Update or by visiting
the following website:
Sony eSupport web site
For customers in USA and Canada: http://esupport.sony.com/EN/VAIO/
For customers in Asia and Pacific countries or areas: http://www.sony.com.sg/vaio/
What is a server?
In this manual, “server” refers to software that delivers content stored on a computer to this device. Playable file
formats vary depending on the server used. For details, refer to “Playable/downloadable file formats” (page 62).
Music management software
– SonicStage Ver.4.2 *
– SonicStage Ver.4.3
– Windows Media Player 10
– Windows Media Player 11
* If your computer is installed with Windows Vista, you cannot use some functions of SonicStage Ve4.2. Update
your SonicStage to the latest version with VAIO Update or visit the following website:
Sony eSupport web site
For customers in USA and Canada: http://esupport.sony.com/EN/VAIO/
For customers in Asia and Pacific countries or areas: http://www.sony.com.sg/vaio/
Access Point connection tool
This tool configures the network settings (settings for the access point connection) of this device.
Wireless Adapter Manager
When connecting via a Wireless Adapter (supplied), this software registers the Wireless Digital Audio and
configures the Internet connection settings.
About the support information on the Additional Supporting Software
For the support information on the Additional Supporting Software, visit the following website:
Sony eSupport web site
For customers in USA and Canada: http://esupport.sony.com/EN/VAIO/
For customers in Asia and Pacific countries or areas: http://www.sony.com.sg/vaio/
Notes
Depending on the performance of your computer or operating environment, the software may work with some
limitations.
For the latest information about VAIO Media Integrated Server and SonicStage, visit the following website:
Sony eSupport web site
For customers in USA and Canada: http://esupport.sony.com/EN/VAIO/
For customers in Asia and Pacific countries or areas: http://www.sony.com.sg/vaio/
For the latest information about Windows Media Connect and Windows Media Player 11, visit the Microsoft
Corporation website.
Page 11
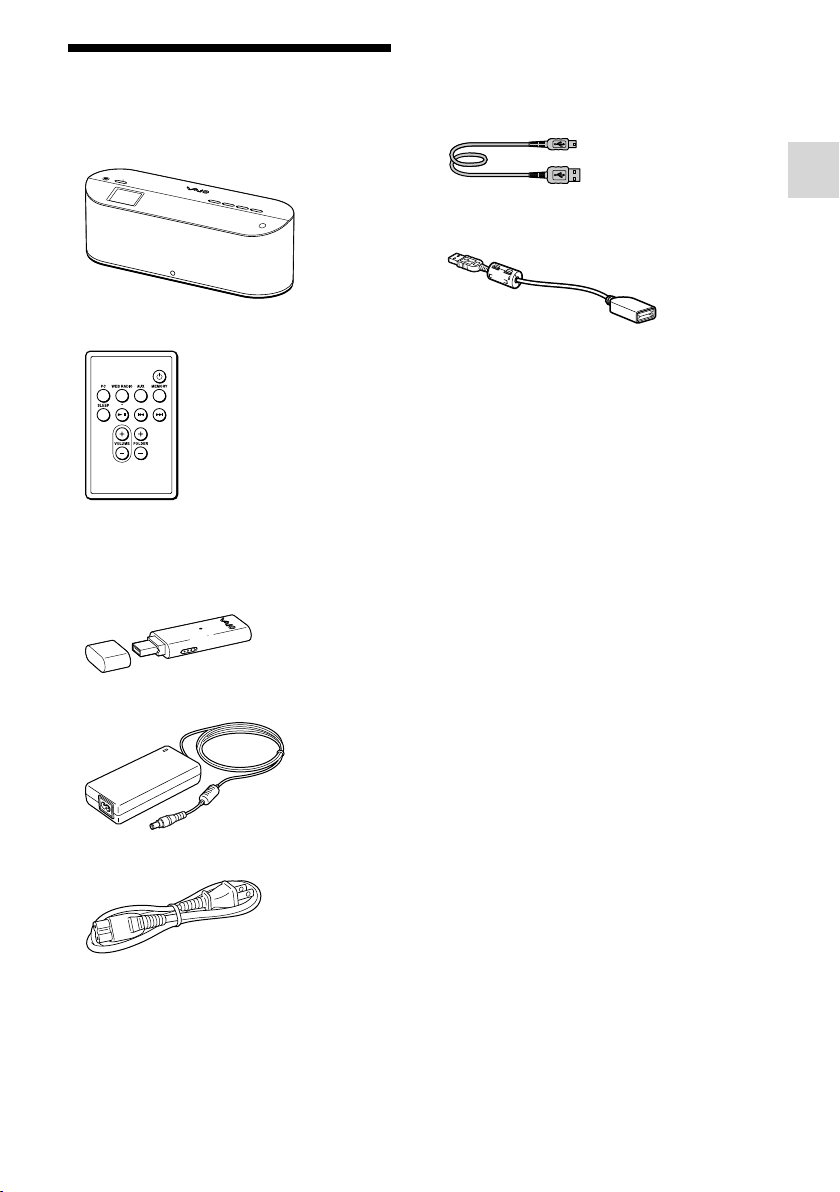
Check the supplied accessories
Wireless Digital Audio
Remote control
Wireless Adapter
Included software:
— Wireless Adapter Setup
— Wireless Adapter Manager
USB cable
Wireless Adapter connection support
cable
Setup CD-ROM
Included software:
— SonicStage Ver.4.2
— VAIO Media Integrated Server Ver.6.0
— Windows Media Connect 2.0
— Wireless Adapter Setup
— Wireless Adapter Manager
— Access Point connection tool
— Adobe Reader
Operating Instructions (this document)
Setup Guide
Warranty card
Introduction
AC adapter
Power cord
11
Page 12

Names of parts
Overview
Sensor
(POWER) button/lamp
Press this button to turn this device on.
When turned on, the lamp lights in green.
When this device is turned on, press this
button to go into standby mode. During
standby mode, the lamp lights in red.
(Headphones) jack
Connect headphones (not supplied) to this
jack.
Display window (page 13)
A music title, settings and messages appear
on this display window.
PC button/lamp
Press this button to select the PC Streaming
Function. While this device is in the PC
Streaming Function, the lamp lights up.
WEB RADIO button/lamp
Press this button to select the Web Radio
Function. While this device is in the Web
Radio Function, the lamp lights up.
AUX button/lamp
Press this button to select the Auxiliary
Function. While this device is in the
Auxiliary Function, the lamp lights up.
MEMORY button/lamp
Press this button to select the Internal
Memory Function. While this device is in
the Internal Memory Function, the lamp
lights up.
Light button
Press this button to light up the backlight.
Control panel (page 15)
If you stand in front of this device while it is
turned on, the sensor detects your presence
and lights up the backlight.
BATT lamp
This lamp shows the internal battery status
(page 30).
Remote sensor
WIRELESS lamp
This lamp shows the wireless LAN status.
On (without flashing):
The wireless LAN power is turned on.
Flashing on and off :
This device is attempting to connect to
wireless LAN.
Off:
The wireless LAN power is turned off.
12
Page 13
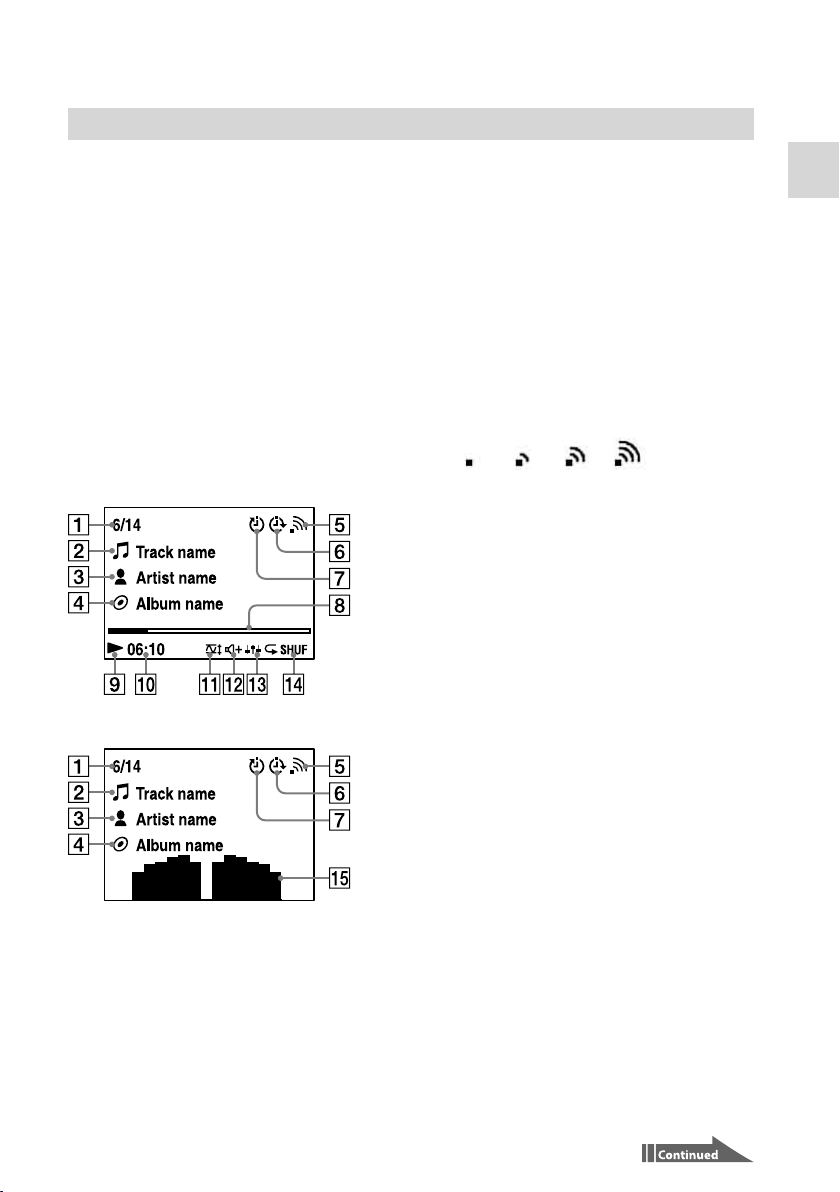
Display window
The display window shows the playback screen,
browse screen, settings screen, messages, etc.
What appears on the window varies depending on
the function you are using.
PC Streaming Function/Internal Memory
Function
During playback, press / on the control panel
to switch between elapsed time view (default) and
spectrum analyzer view.
Tip
If you change the function or the device goes into
standby mode during spectrum analyzer view, it
restores to elapsed time view.
Elapsed time view (default)
Spectrum analyzer view
Current track number/total track
count
Track name
Artist name
Album name
Wireless LAN signal strength
During PC Streaming, this antenna icon
indicates the strength of the wireless LAN
signal to which this device is connected. The
more wave marks around the icon, the
stronger the signal.
→ → →
This icon flashes on and off while receiving
playback data from a server during playback.
On-Timer (page 42)
Sleep Timer (page 42)
Progress bar
Playback status
Playback elapsed time
Dynamic Normalizer (page 39)
Dynamic Bass Boost (page 39)
Effects (6 Band Equalizer/VPT Wide
Stereo/Digital Linear Phase) (pages 40
to 41)
Play mode (pages 34 and 39)
Spectrum analyzer
The spectrum analyzer shows the sound
strength of each frequency band in real time.
Introduction
13
Page 14
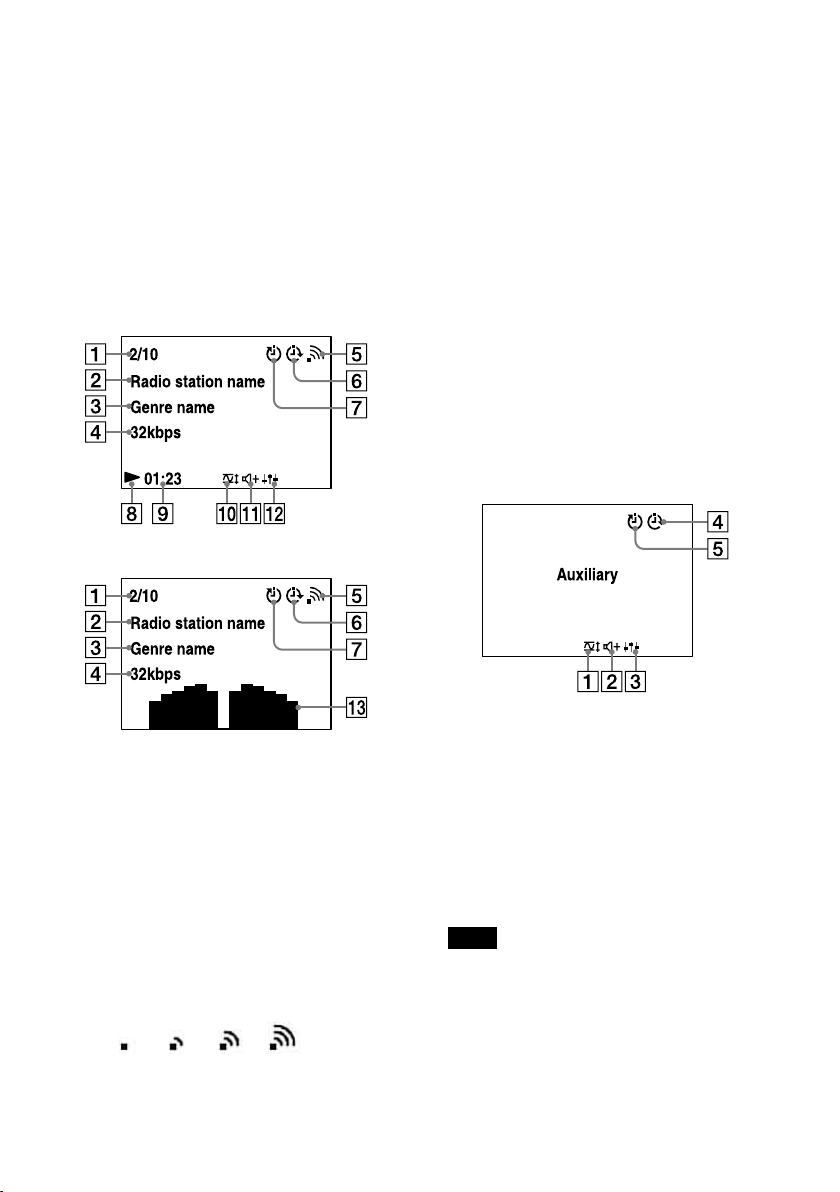
Web Radio Function
During playback, press / on the control panel
to switch between elapsed time view (default) and
spectrum analyzer view.
Tip
If you change the function or the device goes into
standby mode during spectrum analyzer view, it
restores to elapsed time view.
Elapsed time view (default)
Spectrum analyzer view
On-Timer (page 42)
Sleep Timer (page 42)
Playback status
Playback elapsed time
Dynamic Normalizer (page 39)
Dynamic Bass Boost (page 39)
Effects (6 Band Equalizer/VPT Wide
Stereo/Digital Linear Phase) (pages 40
to 41)
Spectrum analyzer
The spectrum analyzer shows the sound
strength of each frequency band in real time.
Auxiliary Function
14
Current radio station number/total
radio station count
Radio station name
Genre name
Transfer bit rate
Wireless LAN signal strength
This antenna icon indicates the strength of
the wireless LAN signal to which this device
is connected. The more wave marks around
the icon, the stronger the signal.
→ → →
Dynamic Normalizer (page 39)
Dynamic Bass Boost (page 39)
Effects (6 Band Equalizer/VPT Wide
Stereo/Digital Linear Phase) (pages 40
to 41)
On-Timer (page 42)
Sleep Timer (page 42)
Note
When you are using the Auxiliary Function, you
cannot switch the display window to spectrum
analyzer view even if you press / on the
control panel.
Page 15
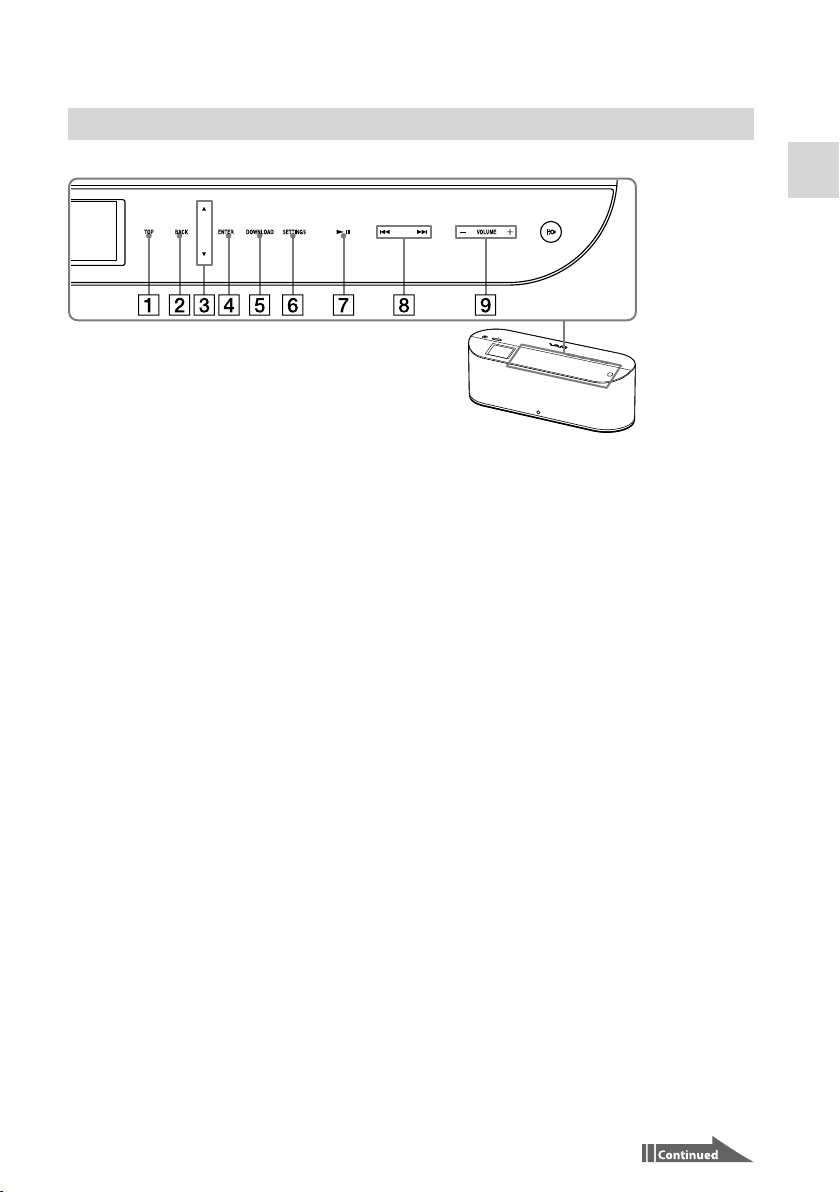
Control panel
If you stand in front of this device while it is turned on, the sensor embedded in the front side detects your
presence and lights up the backlight.
Introduction
TOP
Press here to see a list of playable music or
radio stations (Browse Function).
BACK
Press here to return to the previous screen.
/
In browse mode and settings mode, press
here to move the cursor up or down.
In the playback screen, press here to switch
the view of the display window.
ENTER
Press here to confirm your option selection.
DOWNLOAD
During playback of a music file using the PC
Streaming Function, press here to download
the file to the internal memory of this device.
SETTINGS
Press here to see the settings (page 48).
When using the PC Streaming Function/
Web Radio Function/Internal Memory
Function, press here to start/pause playback.
/
When using the PC Streaming Function or
the Internal Memory Function, press here to
skip to the beginning of the current, previous
or next song. To fast-rewind or fast-forward,
press and hold here.
When using the Web Radio Function, press
here to switch to the previous or next radio
station.
In browse mode, press here to switch to the
previous or next page.
VOLUME +/-
Press here to turn the volume up or down.
15
Page 16
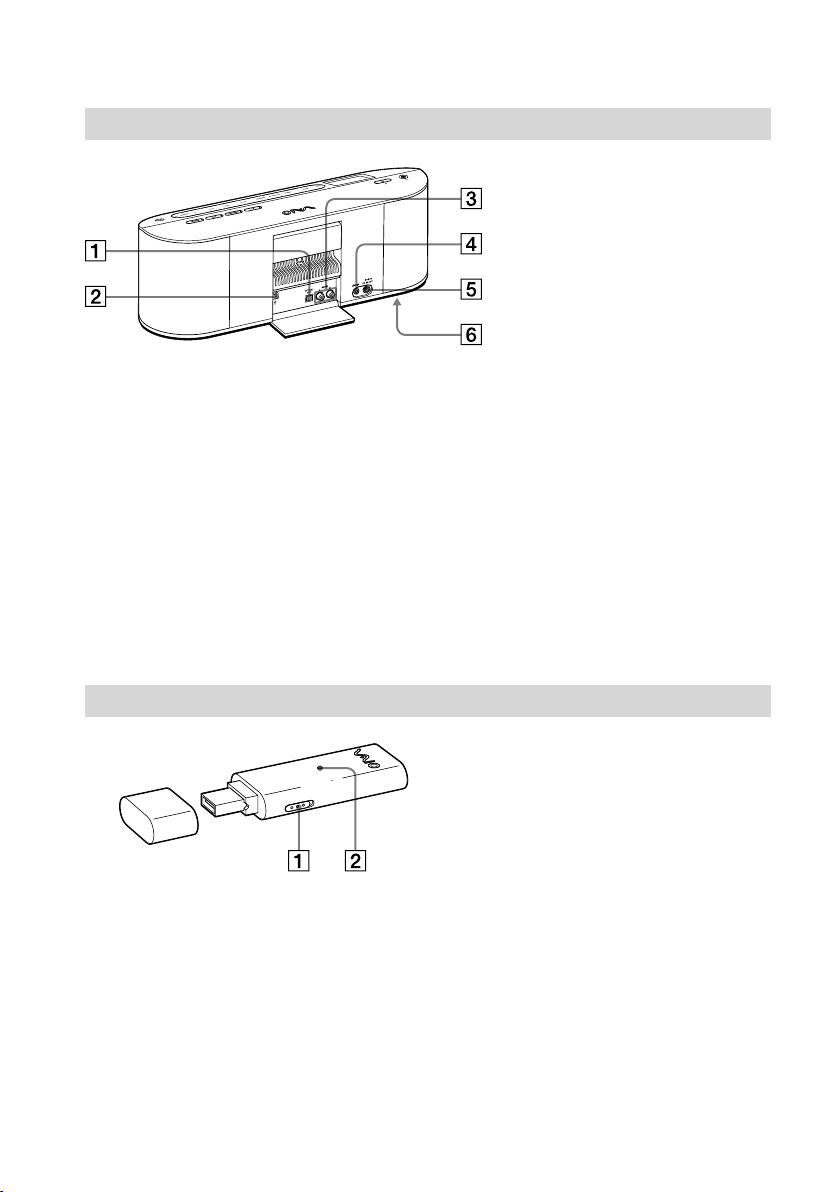
Rear view
16
OPTICAL OUT jack
Use this jack to connect the device to another
audio device with an optical cable (not
supplied).
USB port
Use this port to connect the device with a
USB cable to a computer. This option allows
you to set up the device using the included
software.
LINE OUT jacks
Use these jacks to connect to the audio input
jacks of an audio device.
Wireless Adapter
AUTO INSTALL switch
The Wireless Adapter contains some
software. If you turn this switch to ON and
insert the Wireless Adapter into a USB port
of a computer, the software installer starts
automatically (page 22). Once you have
installed the software, turn this switch to
OFF for normal use.
AUX jack
Use this jack to connect to an audio device
(page 36).
DC IN 16V jack
Connect the supplied AC adapter to this
jack.
BATTERY switch (bottom side)
Turn this switch to ON to use the internal
battery (page 30).
WIRELESS lamp
This lamp shows the connection status with
a computer.
On (without flashing):
This device is connected to a computer.
Flashing on and off :
This device is communicating with a
computer.
Off:
This device is not connected to a
computer.
Page 17
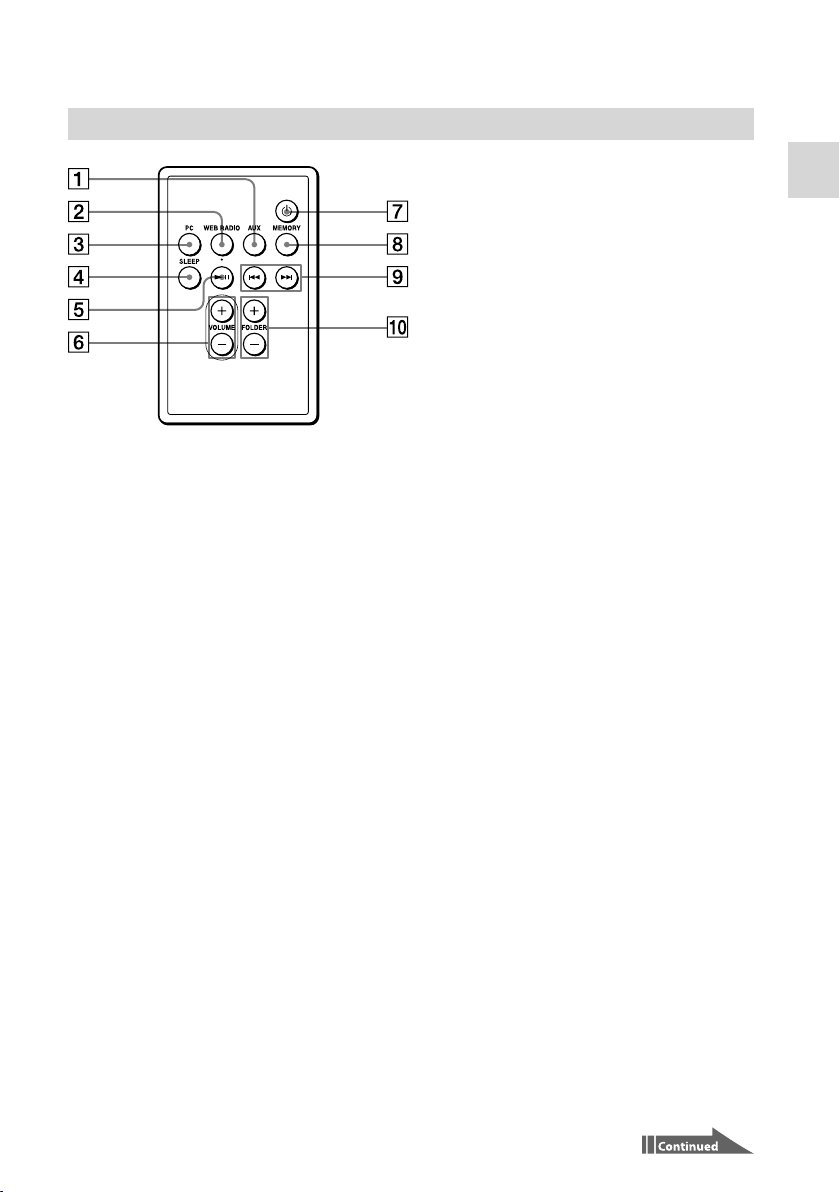
Remote control
AUX button
Press this button to select the Auxiliary
Function.
This button works in the same manner as the
AUX button of this device.
WEB RADIO button
Press this button to select the Web Radio
Function.
This button works in the same manner as the
WEB RADIO button of this device.
PC button
Press this button to select the PC Streaming
Function.
This button works in the same manner as the
PC button of this device.
SLEEP button
Press this button to set up the Sleep Timer
function (page 42). Each time you press the
button, the Sleep Timer setting is changed as
follows:
“Off” → “30 minutes” → “45 minutes” → “60
minutes” → “90 minutes” → “Off” …
button
When using the PC Streaming Function/
Web Radio Function/Internal Memory
Function, press here to start/pause playback.
This button works in the same manner as
of the control panel of this device.
VOLUME +/- buttons
Press one of these buttons to turn the volume
up or down.
These buttons work in the same manner as
VOLUME +/- of the control panel of this
device.
(POWER) button
Press this button to turn this device on.
When this device is turned on, press this
button to go to standby mode.
This button works in the same manner as the
(POWER) button of this device.
MEMORY button
Press this button to select the Internal
Memory Function.
This button works in the same manner as the
MEMORY button of this device.
/ buttons
When using the PC Streaming Function or
Internal Memory Function, press one of
these buttons to skip to the beginning of the
current, previous or next song. To fastrewind or fast-forward, press and hold one of
these buttons.
When using Web Radio Function, press one
of these buttons to switch to the previous or
next radio station.
These buttons work in the same manner as
/ of the control panel of this device.
FOLDER +/- buttons
Press one of these buttons to skip to the first
music file of the current playing folder or the
next/previous folder.
Introduction
17
Page 18

Preparing the remote control for use
Pull out the insulation sheet to use the
remote control.
A battery is already inserted into the remote
control.
About replacing the battery
If the battery weakens, you cannot use the
remote control from a distance.
Replace the battery with a new one by
following this procedure. The battery lasts
about six months in normal use.
Pull out the battery case.
1
Replace the battery with a new
2
CR2025 Lithium battery, with the
positive side (+) facing up.
Positive side (+)
Note
Be sure to keep the remote sensor of this
device out of direct sunlight or bright lights,
or the remote control may stop working.
18
Insert the battery case into its place.
3
Page 19

Overview of connection and preparation
About connecting the Wireless Digital Audio and a computer
You can connect this device to a computer with one of these methods:
Connecting via the supplied Wireless Adapter
Connecting via your access point
Note
The Wireless Digital Audio does not support wireless Ad-Hoc Mode (Peer-to-Peer Mode) communication (no
access point).
Connecting via the supplied Wireless Adapter
If you do not have a wireless LAN environment that contains an access point, you can plug the supplied
Wireless Adapter into a computer to connect this device directly to the computer.
Use this method when you intend to connect this device to only one computer.
Notes
You can connect only the Wireless Digital Audio to a computer via the supplied Wireless Adapter.
You can listen to web radio only when the computer is connected to the Internet.
Connection and Preparation
Connecting via your access point
If you already have a wireless LAN environment, you can connect this device to a computer via your access
point.
Use this method when you intend to connect this device to more than one computer.
19
Page 20

Overview of setup
The setup procedure varies depending on the computer to which you intend to connect this device and on
how to connect them.
1. Plugging the Wireless Digital Audio into a power outlet.
Plug this device into a power outlet using the supplied AC adapter.
2. Installing and setting up the necessary software for Wireless
Digital Audio.
The flow varies depends on the computer to which you intend to connect this device and the
connection type.
Using the supplied Wireless Adapter
Using the supplied CD-ROM
Setting up using the supplied Wireless Adapter
To connect this device to a Sony VAIO computer with Windows Vista installed via the supplied
Wireless Adapter, you can follow section in step 2.
Setting up using the supplied CD-ROM
To connect this device to a computer other than Sony VAIO computers with Windows Vista installed,
you can follow section in step 2.
3. Preparing the computer.
Prepare the computer for connecting it to this device.
20
Note
You must redo the connection and preparation if you reinstall or recover the operating system of the computer
that is configured to connect to this device.
Page 21

Plug into a power outlet
1
Connect the supplied AC adapter into the device, and then plug into a wall outlet.
The POWER lamp lights up in red.
Note
Be sure not to disconnect the AC adapter during the setup of this device. It may cause a malfunction.
Install and set up the necessary software to use
this device
Do you already have a wireless LAN environment that contains an access point?
Connection and Preparation
No
Do you intend to connect the Wireless Digital
Audio to a Sony VAIO computer?
Yes
Proceed to . (page 22)
Yes
No
Proceed to . (page 23)
21
Page 22

22
Setting up using the supplied Wireless Adapter
To connect the device to a Sony VAIO computer (Windows Vista), you can use the supplied Wireless
Adapter.
This allows you to install and set up the necessary software.
1
Turn the AUTO INSTALL switch of the Wireless Adapter to ON.
2
Insert the Wireless Adapter into the USB port of the computer.
The Setup automatically starts.
Tip
If you cannot insert the Wireless Adapter directly into the USB port of your computer, connect via the
supplied Wireless Adapter connection support cable.
3
Perform the setup following the instructions on the screen of your computer.
Be sure to read the precautions on the screen thoroughly.
Page 23

Setting up using the supplied CD-ROM
To connect the device to a computer other than a Sony VAIO computer (Windows Vista), you can use the
supplied CD-ROM.
This allows you to install and set up the necessary software.
Notes
Do not insert the Wireless Adapter into your computer until an instruction to do so appears on the Setup
screen.
Do not connect this device to your computer via the USB cable until an instruction to do so appears on the
Setup screen.
1
Close all applications that are running on your computer.
Check to see if the following conditions are met before you proceed to step 2. If these conditions
are not met, the installation may fail.
You are logged in as a user who has administrative privileges (Administrator).
You have also temporarily closed the antivirus software (because it uses large memory).
2
Insert the supplied CD-ROM into the CD drive of your computer.
The Setup automatically starts.
3
Perform setup following the instructions on the screen of your computer.
Be sure to read the precautions on the screen thoroughly.
Connection and Preparation
23
Page 24

24
Preparing the computer
Prepare the computer to connect to the Wireless Digital Audio.
To use the VAIO Media Integrated Server
If you have already set up the VAIO Media Integrated Server using the Setup, you do not need to perform
this step.
Notes
You may not be able to use some functions of VAIO Media Integrated Server Ver.6.0 included on the CD-ROM.
Update VAIO Media Integrated Server using VAIO Update or visit the following web site.
Sony eSupport web site
For customers in USA and Canada: http://esupport.sony.com/EN/VAIO/
For customers in Asia and Pacific countries or areas: http://www.sony.com.sg/vaio/
You cannot use some functions of SonicStage Ver.4.2. Update SonicStage using VAIO Update or visit the
following web site.
Sony eSupport web site
For customers in USA and Canada: http://esupport.sony.com/EN/VAIO/
For customers in Asia and Pacific countries or areas: http://www.sony.com.sg/vaio/
If you have not set up the VAIO Media Integrated Server by using the Setup yet, start the setup software for
VAIO Media Integrated Server “VAIO Media Setup” and perform the necessary settings.
When using Windows Media Connect
To play content on this device, start Windows Media Connect and register this device as a content delivery
destination.
1
Make sure that this device is started in PC Streaming Function.
On this device, the PC lamp lights and [Select Server] appears in the display window.
Notes
When making the access point connection, if the USB cable connected to your computer is disconnected, this
device automatically connects to the wireless LAN and starts in PC Streaming Function. Please wait a while for
the wireless LAN connection to be established.
If you have not completed the access point connection settings in the Setup, this device does not connect to the
wireless LAN even after it reboots. If this happens, start the Access Point connection tool, reconfigure the
network settings, and then perform setup for the Windows Media Connect.
Page 25

2
On the computer screen, click [All Programs] from the [Start] menu, then click
[Windows Media Connect].
When starting Windows Media Connect for the first time after installation, the Windows Media
Connect Wizard appears.
Tip
If Windows Media Connect is already installed, the main window appears.
3
Check the MAC address of this device.
On this device, press SETTINGS to enter the settings, and then select [Device Information] and
[MAC Address].
4
On the computer screen, select this device.
For a device which is compatible with this device, the MAC address checked in step 3 appears.
When a device is compatible with this device, but does not appear, click [Next], then proceed to
step 6.
After completing step 7, open the Windows Media Connect main window, then register the
device.
5
Click [Allow].
The status of a device which is compatible with this device changes from [Deny] to [Allow].
6
Select the shared folder settings.
7
Click [Finish].
Preparation is complete.
When you listen to music stored on your computer (PC Streaming Function), select a desired
server on the server selecting screen. Connection with the server starts. When you select a song,
playback starts.
Connection and Preparation
25
Page 26

26
Windows Media Connect main window
In the main window, you can set the following options.
[Devices] Register a device so that you can access the content.
[Sharing] Specify the folder in which contents distributed to the device are saved.
[Settings] Set whether to automatically start Windows Media Connect and start distributing content
when the computer is started.
For more information about Windows Media Connect
For more information on how to use or configure Windows Media Connect, refer to the online help of
Windows Media Connect. To open the online help, click [Help] on the main screen of Windows Media
Connect.
Page 27

When using Windows Media Player 11
Start Windows Media Player 11 and register this device as a content delivery destination.
1
Make sure that this device is started in the PC Streaming Function.
On this device, the PC lamp lights and [Select Server] appears in the display window.
Notes
When making the access point connection, if the USB cable connected to your computer is disconnected,
this device automatically connects to the wireless LAN and starts in PC Streaming Function. Please wait a
while for the wireless LAN connection to be established.
If you have not completed the access point connection settings in the Setup, this device does not connect
to wireless LAN even after it starts in the PC Streaming Function. If this happens, start the Access Point
connection tool, reconfigure the network settings, and then perform setup for Windows Media Player 11.
2
On the computer screen, click [All programs] from the [Start] menu, and then click
[Windows Media Player].
When starting Windows Media Player, the Windows Media Player main window appears.
3
Click [Sync], and then click [More Options].
The [Option] window appears.
4
Click the [Library] tab.
5
Click [Configure Sharing].
The [Media Sharing] window appears.
6
Check [] the [Share my media] check box.
Connection and Preparation
7
Click [OK].
Tip
When the [User Account Control] message window appears after clicking [OK], click [Continue].
8
Check the MAC address of this device.
On this device, press SETTINGS to enter the settings and then select [Device Information] and
[MAC Address].
27
Page 28

9
On the computer screen, select this device.
10
Click [Allow].
The status of this device changes from [Deny] to [Allow].
11
Click [OK].
Preparation is complete.
When you listen to music stored on your computer (PC Streaming Function), select a desired
server on the server selecting screen. Connection with the server starts. When you select a song,
playback starts.
For more information about the Windows Media Player 11
For more information on how to use or configure the Windows Media Player 11, refer to the online help of
the Windows Media Player 11. To open the online help, click the desired menu on the menu bar to open
the menu list, and then click [Help] under the menu list.
28
Page 29

Operation flow
1. Turning on the power.
2. Selecting the function
Select one of the following functions according to the content you want to play:
Listening to the music files stored on a computer (PC Streaming Function) (page 31)
Listening to the web radio (Web Radio Function) (page 35)
Listening to an audio device (Auxiliary Function) (page 36)
Listening to music files stored on the internal memory (Internal Memory Function) (page 36)
3. Selecting content
When you are using the PC Streaming Function/Web Radio Function/Internal Memory Function, you
can choose content to play from a list by using the browse function.
4. Playing content
Operation
29
Page 30

30
Turning on the power
1
Prepare the power supply (page 21).
2
Press the (POWER) button on this
device or on the remote control.
The POWER lamp of this device lights up
in green.
Tip
You can press the PC button, WEB RADIO button,
AUX button, or MEMORY button on this device
or on the remote control to turn it on and select
the desired function directly.
Using the internal battery
BATTERY switch (bottom side)
1
Unplug the AC adapter from this
device, and then turn the BATTERY
switch to ON.
This device runs on the internal battery.
As the internal battery discharges, the
BATT lamp shows the internal battery
status as follow:
On (not flashing) → Flashing on and off
slowly → Flashing on and off rapidly → Off
If the internal battery has run out, the
BATT lamp goes out, a “No battery power
remaining” message appears on the
display window, and then this device goes
into standby mode. If the internal battery
has run out during playback or
downloading, it pauses.
BATT lamp
Notes
When the “No battery power remaining” message
appears on the display window, this device does
not accept any operations except pressing the
(POWER) button.
The internal battery lasts about four hours (based
on the measurement method of Japan Electronics
and Information Technology Industries
Association (JEITA)). However, battery life
depends on use.
Tip
If you plug the AC adapter into this device while it
is running on the internal battery, it switches to
running on the AC adapter and begins charging
the internal battery.
To charge the internal battery
Turn the BATTERY switch to ON.
1
Plug the AC adapter (supplied) into
2
this device and into a wall outlet.
Charging begins. The BATT lamp flashes on
and off during charging.
After the battery is fully charged, the BATT
lamp goes out.
Notes
If the BATTERY switch is set to OFF, charging
does not begin even if you plug the AC adapter
into this device. Be sure to turn the BATTERY
switch to ON for charging.
If you turn the BATTERY switch to OFF while the
AC adapter is disconnected, the clock and OnTimer settings are reset.
Charging time depends on use and the ambient
temperature. Make sure that the ambient
temperature is +5°C to +35°C (41°F to 95°F) when
charging.
Tip
Set the BATTERY switch to OFF when running
this device on the AC adapter, or when you do not
use this device for a long time to maintain strong
battery life.
Page 31

To put the Wireless Digital Audio in
standby mode
While this device is powered on, press the
button on this device or on the remote control.
The (POWER) lamp lights up in red.
If the AC adapter is plugged into this device, a
clock appears on the display window.
Notes
If this device is connected to a computer via the
USB cable, the (POWER) button does not work.
If you press the (POWER) button while
downloading a music file from a computer to the
internal memory, while deleting music files stored
on the internal memory, or while initializing the
internal memory, this device finishes the operation
before going into standby mode.
In standby mode, the backlight of the control panel
does not light even if you press the LIGHT button.
When this device is running on the AC adapter
and the [Options] – [Wireless LAN Power] option
is set to [Power Save], if you press the (POWER)
button to put this device in standby mode, the
wireless LAN power will be turned off.
When this device is running on the internal
battery, if you put this device in standby mode, the
wireless LAN power is turned off and the backlight
of the display window goes out.
To fully shut down
Unplug the AC adapter and turn the BATTERY
switch to OFF.
Listening to music files stored on a computer (PC Streaming Function)
You can play music files that are stored on your
computer with this device via wireless LAN.
This device can connect to one server at a time.
You can also download the music file that is being
played to the internal memory of this device (page
37).
Playable file formats
ATRAC3
ATRAC3plus
MP3
WMA
AAC
Linear PCM (WAV)
1)
You can play these formats only when the server is
the VAIO Media Integrated Server. You cannot
play content obtained from online music stores.
2)
You can play a copyrighted file in this format only
when the server is Windows Media Connect or
Windows Media Player.
Note
Depending on the server to which you are
connecting, there may be some files which you
cannot play. For details, see “Playable/
downloadable file formats” (page 62).
1)
1)
2)
1)
Operation
31
Page 32

32
Selecting a server
Specify a computer as a server to connect this
device to via wireless LAN. After you prepare to
connect this device to a computer (page 19),
follow the instructions below.
1
Press the PC button.
The PC lamp lights up and this device
changes to the PC Streaming Function.
If the [Server Settings] – [Server Auto
Connect] option is set to [On], this device
automatically connects to the last
connected server and starts to play the last
played music file.
If the [Server Auto Connect] option is set
to [Off], or if there is no information on
the last played music, the server selection
screen appears.
2
Press TOP.
This device goes into browse mode.
3
Press / to select [Select Server]
and then press ENTER.
A confirmation screen for server
disconnection appears.
4
Press / to select [OK] and then
press ENTER.
This device is disconnected from the
server, and a list of servers appears.
The icon next to the server name indicates
the server type.
Icons Server types
No icon A server you have connected to
before, and which is working now.
A server you have connected to
before, but which is not working
now or cannot be verified now.
A server you have never connected
to before.
Tip
If there is a server to which you have connected,
but cannot be checked if it is working now, it may
be in system standby or in system hibernation. You
can perform “Configure a computer to
automatically wake up” (page 45) to automatically
wake up a computer that is in system standby or in
system hibernation.
5
Press / to select the desired server,
and then press ENTER.
After connecting, the top level folder of
the server appears.
To refresh the server list
Select [Update the list] in step 3 above, and then
press ENTER.
This device searches for new servers and an
updated server list appears.
Tip
This device keeps a history of up to ten recently
connected servers. You can also delete the history
(below).
To edit the server list
You can delete the server that is not working or
that cannot be checked from the server list. If the
server does not appear in the list, you cannot
delete it.
In PC Streaming Function, press
1
SETTINGS.
Press / to select [Server Settings],
2
and then press ENTER.
Press / to select [Server Delete],
3
and then press ENTER.
A list of servers you have connected to
appears.
Page 33

Press / to select an unwanted
4
server, and then press ENTER.
Each time you press ENTER, the check box
status (checked or unchecked) changes.
To check all the check boxes, choose [Select
all] and then press ENTER.
Press/ to select [OK], and then
5
press ENTER.
All the servers you checked are deleted.
Note
Servers that are working do not appear on the list,
and you cannot delete them from the list.
To select a server manually every time
At the default settings, this device automatically
connects to the last connected server when it
changes to the PC Streaming Function.
If you want to select a server manually whenever
you change to the PC Streaming Function, set the
[Server Auto Connect] option to [Off].
Press SETTINGS.
1
Press / to select [Server Settings],
2
and then press ENTER.
Press / to select [Server Auto
3
Connect], and then press ENTER.
Press / to select [Off], and then
4
press ENTER.
Whenever you change to the PC Streaming
Function, the server selection screen will
appear.
Selecting music from the list (Browse Function)
You can move to the beginning of the desired
music and start playback.
The information that appears in browse mode,
such as title name, artist name, album name,
genre, registered folder, etc., varies depending on
the server.
If you enter browse mode by selecting a server,
start at step 3.
1
Press the PC button.
The PC lamp lights up, and this device
changes to the PC Streaming Function.
2
Press TOP or BACK.
This device changes to the browse mode,
and the playable music list appears.
3
Press / to select the desired music,
and then press ENTER.
The playback of the selected music starts
and the playback screen appears.
Notes
You cannot rearrange the playable music list.
If you do not operate for one minute during
browsing, browse mode is cancelled.
Tips
You can press BACK while browsing to display the
area of the upper layer.
You can press BACK during playback to display
the playing area. You can press TOP to display the
top layer area.
You can press / while browsing to switch
to the previous or next page.
Operation
33
Page 34

34
Basic Operations
To Operation
Playback
Pause
Fast-rewind the
current song
Fast-forward the
current song
Skip to the beginning
of the current song
Skip to the beginning
of a previous song
Skip to the beginning
of the next
Skip to the beginning
of the first song of the
current folder
Skip to the beginning
of the first song of a
previous folder
Skip to the beginning
of the first song of a
succeeding folder
Change the playback
screen view (page 13)
Adjust the volume Press VOLUME +/-.
Note
You cannot fast-rewind or fast-forward a music file
if a progress bar does not appear during playback
of the music file.
Press .
Press
during
playback.
.
Hold
.
Hold
.
Press
repeatedly
Press
until the desired song
starts.
repeatedly
Press
until the desired song
starts.
Press the FOLDER button of the remote
control.
Press the FOLDER button of the remote
control repeatedly until
the desired song starts.
Press the FOLDER +
button of the remote
control repeatedly until
the desired song starts.
/ of the
Press
control panel of this
device.
3
Press / to select the desired play
mode, and then press ENTER.
Play mode type/
Icon
Normal (default)/
No icon
All Repeat/
1 Repeat/
Shuffle/
Shuffle Repeat/
Tip
You can separately set the play mode for the PC
Streaming Function and the Internal Memory
Function.
Notes
During shuffle playback, you cannot skip to the
beginning of the previous song even if you press
. However, you can skip to the beginning of
the current song.
During shuffle playback, folders are not shuffled.
Description
All songs after the selected
song are played in the order
of the music list, and then
playback pauses.
All the songs in the playback
area that includes the current
song are played repeatedly in
the order of the music list.
The current song is played
repeatedly.
All the songs in the playback
area that includes the current
song are played once in
random order, and then
playback pauses.
All the songs in the playback
area that includes the current
song are played repeatedly in
random order.
About play modes
You can select to play the music files in random
order or to play repeatedly.
1
In PC Streaming Function, press
SETTINGS.
2
Press / to select [Play Mode], and
then press ENTER.
Page 35

Listening to web radio (Web Radio Function)
You can listen to web radio (radio program
transmitted via the Internet) offered by a service
provider (Live365).
Notes
You cannot listen to web radio if the computer is
not turned on or it is not connected to the Internet.
If you have not adjusted the clock of this device
yet, you cannot obtain the radio station list which
is edited on the Live365 website.
1
Press the WEB RADIO button.
The WEB RADIO lamp lights up and this
device switches to the Web Radio
Function.
If a record is kept of the last played radio
station, it starts playing. Otherwise,
browse mode is entered.
Selecting a radio station from the list (Browse Function)
You can directly tune in to a desired radio station
and listen.
1
In the Web Radio Function, Press TOP
or BACK.
This device goes into browse mode and a
list of radio stations appears.
2
Press / to select the desired radio
station, and then press ENTER.
Playback of the selected radio station
begins and the playback screen appears.
Note
If you do not operate for one minute during
browsing, the browse mode is cancelled.
Tip
You can press / while browsing to switch
to the previous or next page.
To refresh the radio station list
Select [Refresh] in the step 2 above, and then press
ENTER.
This device searches new radio stations and an
updated radio station list appears.
Basic Operations
To Operation
Playback
Pause
Switch to a previous
radio station
Switch to the next or a
successive radio
station
Change the playback
screen view (page 13)
Adjust the volume Press VOLUME +/-.
Note
The FOLDER +/- buttons do not work in the Web
Radio Function.
Press
.
Press during
playback.
repeatedly
Press
until the desired radio
station is selected.
Press repeatedly
until the desired radio
station is selected.
/ of the
Press
control panel of this
device.
Operation
35
Page 36

36
Listening to an audio device (Auxiliary Function)
You can connect an audio device, such as a
Walkman, to this product to listen to music from
the audio device via the speakers of this device.
1
Connect an audio device to the AUX
jack of this device.
2
Press the AUX button.
The AUX lamp lights up and this device
switches to the Auxiliary Function.
3
Play music on the audio device.
The music on the audio device is played
via the speakers of this device.
Press VOLUME +/- to adjust the volume.
Tip
If the output level of the audio device is too high
and the audio is distorted, you can adjust the
sensitivity of the AUX jack by setting the [Options]
– [AUX Sensitivity] option.
Notes
You cannot operate the audio device through this
device.
Use a non-resistor type cable to connect the audio
device to this device.
Listening to music files stored on the internal memory (Internal Memory Function)
While playing a music file that is stored on a
computer using the PC Streaming Function, you
can download the music file to the internal
memory (128 MB) of this device. Then, you can
play the downloaded music file even when
disconnected from the computer.
Demonstration mode
If you have not downloaded a music file to the
internal memory, you can start the demonstration
mode of this device by switching to the Internal
Memory Function.
This device comes preinstalled with sample music
files (about 3.8 MB) for a demonstration.
After you download a music file, the
demonstration mode does not work.
Downloadable file formats
ATRAC3
ATRAC3plus
MP3
1)
1)
WMA
AAC
Linear PCM (WAV)
You cannot download a copyrighted file in this
format.
Notes
You may not be able to download some files
depending on your computer. For details, see
“Playable/downloadable file formats” (page 62).
Some files are encoded into ATRAC3 (132 kbps)
format when downloading. It may take a while to
complete.
Page 37

Downloading a music file to the internal memory
Selecting music from the list (Browse Function)
While playing a music file that is stored on a
computer using the PC Streaming Function, you
can download the music file to the internal
memory of this device.
1
In PC Streaming Function, play a music
file (page 31).
2
Press DOWNLOAD.
The playback pauses, and downloading to
this device starts.
After the download is complete, the
playback restarts at the paused position.
To cancel the downloading
Press DOWNLOAD once more during the
downloading. The music file that is partially
downloaded to the internal memory is
automatically deleted.
Note
You cannot download during setting or browsing.
You can move to the beginning of the desired
music and start playback.
1
Press the MEMORY button.
The MEMORY lamp lights up and this
device switches to the Internal Memory
Function.
2
Press TOP or BACK.
This device switches to browse mode and
a list of the music files that are stored on
this device appears.
The music files appear in the order of date
and time downloaded, oldest first.
3
Press / to select the desired music
file, and then press ENTER.
The playback of the selected music file
starts and the playback screen appears.
Notes
You cannot rearrange the music file list of the
internal memory.
If there are no music files on the internal memory,
you cannot switch to the browse mode.
If the internal memory malfunctions, you cannot
switch to the browse mode.
Tip
You can press / while browsing to switch
to the previous or next page.
Operation
37
Page 38

38
Basic Operations
To Operation
Playback
Pause
Fast-rewind the
current song
Fast-forward the
current song
Skip to the beginning
of the current song
Skip to the beginning
of a previous song
Skip to the beginning
of the next
Change the playback
screen view (page 13)
Adjust the volume Press VOLUME +/-.
Press
.
Press during
playback.
.
Hold
.
Hold
.
Press
repeatedly
Press
until the desired song
starts.
repeatedly
Press
until the desired song
starts.
/ of the
Press
control panel of this
device.
Deleting music files in the internal memory
Note
You cannot delete the preinstalled sample music
files one by one. If you check a sample music file in
the list, all the sample music files are checked.
Initializing the internal memory
If you initialize the internal memory, all the music
files are deleted.
1
In Internal Memory Function, press
SETTINGS.
2
Press / to select [Memory Edit],
and then press ENTER.
3
Press / to select [Initialize], and
then press ENTER.
A confirmation screen for initializing
appears.
4
Press / to select [OK], and then
press ENTER.
The internal memory is initialized.
You can select unwanted music files to delete.
1
In Internal Memory Function, press
SETTINGS.
2
Press / to select [Memory Edit],
and then press ENTER.
3
Press / to select [Track Delete],
and then press ENTER.
A list of the music files appears.
4
Press / to select an unwanted file,
and then press ENTER.
Each time you press ENTER, the check
box status (checked or unchecked)
changes.
To check all the check boxes, choose
[Select all] and then press ENTER.
5
Press / to select [OK], and then
press ENTER.
All the checked music files are deleted.
When sample music files are stored on
the internal memory
After selecting [OK] in the step 4 above, a
confirmation screen for deleting the sample music
files appears. Select [OK] and then press ENTER
to initialize the internal memory.
Page 39

About play modes
Sound settings
You can select to play music files in random order
or to play repeatedly.
1
In Internal Memory Function, press
SETTINGS.
2
Press / to select [Play Mode], and
then press ENTER.
3
Press / to select the desired play
mode, and then press ENTER.
Play
mode type/Icon
Normal (default)/
No icon
All Repeat/
1 Repeat/
Shuffle/
Shuffle Repeat/
Tip
You can separately set the play mode for the
Internal Memory Function and the PC Streaming
Function.
Description
All songs after the selected
song are played in the order
of the music list, and then
playback pauses.
All the songs in the playback
area that includes the current
song are played repeatedly in
the order of the music list.
The current song is played
repeatedly.
All the songs in the playback
area which includes the
current song are played once
in random order, and then
playback pauses.
All the songs in the playback
area which includes the
current song are played
repeatedly in random order.
Providing a consistent volume level for music files (Dynamic Normalizer)
This setting provides a consistent volume level for
music files. With this setting, when listening to
music files of different volume level, they play at
the same level.
1
Press SETTINGS.
2
Press / to select [Sound], and then
press ENTER.
3
Press / to select [Dynamic
Normalizer], and then press ENTER.
4
Press / to select [On], and then
press ENTER.
Dynamic Normalizer is activated and
appears on the playback screen.
Boosting bass (Dynamic Bass Boost)
This setting boosts the low frequencies of music for
a strong and powerful sound.
1
Press SETTINGS.
2
Press / to select [Sound], and then
press ENTER.
3
Press / to select [Dynamic Bass
Boost], and then press ENTER.
Operation
Notes
During shuffle playback, you cannot skip to the
beginning of the previous song even if you press
. However, you can skip to the beginning of
the current song.
During shuffle playback, the actual folders are not
shuffled.
4
Press / to select [On], and then
press ENTER.
Dynamic Bass Boost is activated and
appears on the playback screen.
Note
You cannot activate Dynamic Bass Boost when:
– [Options] – [Audio Out] is set to
[Line/Optical].
– Headphones are plugged into this device.
39
Page 40

40
Adjusting the sound quality to suit your taste (6 Band Equalizer)
6 Band Equalizer allows you to customize the
sound quality to match the genre of music.
1
Press SETTINGS.
2
Press / to select [Sound], and then
press ENTER.
3
Press / to select [Effects], and then
press ENTER.
4
Press / to select [6 Band Equalizer],
and then press ENTER.
5
Press / to select the desired sound
quality, and then press ENTER.
6 Band Equalizer is activated and
appears on the playback screen.
6 Band Equalizer setting options
Option Description
Heavy
(default)
Pops Stresses the middle range audio,
Jazz
Custom1
Custom2
Boosts bass and tremble for a
dynamic and powerful sound.
ideal for vocals.
Boosts bass and tremble for a
massive and dynamic sound.
Allows you to customize the
sound quality. See the next
section for settings.
Note
You cannot activate the 6 Band Equalizer when:
– [Options] – [Audio Out] is set to
[Line/Optical].
– Headphones are plugged into this device.
Customizing the sound quality (Custom
settings)
In addition to the preset sound quality settings,
you can customize up to two sound quality
settings to suit your taste. In custom settings, you
can adjust six frequency ranges, each has seven
levels.
You can select one of the customized settings from
[Sound] – [Effects] – [6 Band Equalizer] option,
[Custom1] or [Custom2].
Press SETTINGS.
1
Press / to select [Sound], and then
2
press ENTER.
Press / to select [Effects], and then
3
press ENTER.
Press / to select [6 Band
4
Equalizer], and then press ENTER.
Press / to select [Custom1] or
5
[Custom2], and then press ENTER.
Press / to set the level for each
6
frequency range, and then press
ENTER.
You can set for 100 Hz, 250 Hz, 630 Hz, 1.6
kHz, 4 kHz, and 10 kHz frequency ranges.
You can select a level for each frequency
range from seven levels: -6 dB, -4 dB, -2 dB, 0
dB, +2 dB, +4 dB, and +6 dB.
Page 41

Enhancing the stereo feeling (VPT Wide Stereo)
By using VPT (Virtual Phone Technology), the
virtual distance between the right and left
speakers is increased, and the stereo feeling is
enhanced.
1
Press SETTINGS.
2
Press / to select [Sound], and then
press ENTER.
3
Press / to select [Effects], and then
press ENTER.
4
Press / to select [VPT Wide Stereo],
and then press ENTER.
VPT Wide Stereo is activated and
appears on the playback screen.
Note
You cannot activate VPT Wide Stereo when:
– [Options] – [Audio Out] is set to
[Line/Optical].
– Headphones are plugged into this device.
Adjusting the acoustic response of the speakers (Digital Linear Phase)
Adjusts the phase response and frequency
response of the speaker’s mid-high range to
achieve a highly precise localization of sounds and
a feeling of greater depth.
1
Press SETTINGS.
2
Press / to select [Sound], and then
press ENTER.
3
Press / to select [Effects], and then
press ENTER.
4
Press / to select [D-Linear Phase],
and then press ENTER.
5
Press / to select the desired type,
and then press ENTER.
Digital Linear Phase is activated and
appears on the playback screen.
Digital Linear Phase setting options
Option Description
Type A
(default)
Type B Stresses the middle range audio,
Type C Attains an intermediate response
Attains a flat frequency response
such as with monitor speakers,
suitable for a wide variety of
genres, from pops to classics.
ideal for vocals.
between [Type A] and [Type B].
Operation
Note
You cannot activate Digital Linear Phase when:
– [Options] – [Audio Out] is set to
[Line/Optical].
– Headphones are plugged into this device.
41
Page 42

42
Timer settings
Using the Sleep Timer
You can set the Sleep Timer to automatically go to
standby mode after a specified time elapses (Sleep
Timer function).
1
In any function, press SETTINGS.
2
Press / to select [Sleep Timer], and
then press ENTER.
3
Press / to select the interval from
[30 minutes], [45 minutes], [60
minutes], or [90 minutes], and then
press ENTER.
The Sleep Timer is set and appears on
the playback screen. After the selected
time elapses, the volume turns down
gradually and this device goes into
standby mode automatically.
Tips
You can also press the SLEEP button on the remote
control to set the Sleep Timer. Each time you press
the SLEEP button, the interval changes as follows:
[Off] → [30 minutes] → [45 minutes] → [60
minutes] → [90 minutes] → [Off] …
If the Sleep Timer is set, you can press the SLEEP
button on the remote control to see the remaining
time before going on to standby mode. If you press
the button once more, the Sleep Timer is set again.
Notes
If you perform the following operations before the
Sleep Timer expires, the Sleep Timer resets.
– Turn the power off.
– Go into standby mode manually.
– Connect to a computer via a USB cable.
– Set the interval for the Sleep Timer again.
– Set the Sleep Timer to [Off ].
– Perform [Options] - [Factory Default] in
settings.
– Perform [Network Settings] - [Access Point] or
[Wireless Adapter] in settings. (This device
restarts.)
While setting the Sleep Timer on the main unit of
this device, you cannot set the Sleep Timer by
pressing the SLEEP button on the remote control.
Using On-Timer
You can set the On-Timer to start playing the
desired content at a specified time (On-Timer
function).
You can set up to two On-Timers.
1
While playing the content that you
want the On-Timer to play, press
SETTINGS.
2
Press / to select [On-Timer], and
then press ENTER.
3
Press
/
to select [Timer1] or
[Timer2], and then press ENTER.
4
Press / to select [On], and then
press ENTER.
The On-Timer time setting wizard screen
appears.
5
Press
/
, ENTER, or BACK to set
[Start Time] and [Finish Time].
6
Press
/
and ENTER to set the day
of the week.
Page 43

7
Press
/
and ENTER to set the
playback content.
If you select [Yes], the currently playing
content is played when turned on by the
On-Timer.
If you select [No], the content that you set
last time is played.
8
Press VOLUME +/- to adjust the
playback volume, and then press /
and ENTER to set the volume.
If you select [Yes], the current volume is
set when turned on by the On-Timer.
If you select [No], the volume you set last
time remains set.
“Confirm On-Timer settings” appears.
9
Press / to select [OK], and then
press ENTER.
The On-Timer is set and appears on
the playback screen.
Three minutes prior to the time you set,
this device prepares for the On-Timer
playback.
Tips
If you do not want to set the Finish Time, set it to
[--:--].
When you are setting the On-Timer in PC
Streaming Function or in Internal Memory
Function, the playback mode changes temporarily
to [1 Repeat]. After completing the setting, it is
restored.
If the specified content has been deleted before the
On-Timer playback starts or if the content cannot
be found, an alarm sounds at the start time. Press
any buttons to stop the alarm.
If the time periods for the timer1 and timer2
overlap, the timer that is set to start earlier
overrides the later one.
Notes
You cannot use the On-Timer function in
Auxiliary Function.
If you fully shut down this device (page 31), the
On-Timer settings are reset.
If this device has already been turned on before
three minutes from the start time of the On-Timer,
the On-timer is not activated.
Operation
43
Page 44

44
Page 45

For more convenient use of the Wireless Digital Audio
You can set your computer to start up
automatically whenever this device connects to it
via a wireless access point.
You can also set your computer to go to standby
automatically after a specified period of time.
This convenient feature allows your computer
from a distance, to start or go to standby
automatically.
Note
This function can be used when connected to an
access point. If connected using the Wireless
Adaptor, this function cannot be used, even if the
settings are completed.
Setting your computer to start up automatically
This function is used to automatically start the
computer from [system standby] or [system
hibernate] status by connecting this device to the
computer.
Notes
Your computer will not start simply by switching
on this device’s power. This device must be
connected to the computer for the computer to
start.
In some cases, you may not be able to use this
function depending on the settings and
environment of the connected computer. You may
not be able to use this function on laptop
computers, or computers that are connected by
wireless LAN.
Some computers cannot be set to start
automatically.
When using a Windows XP SP2-based
computer
On the computer screen, click [Control
1
Panel] from the [Start] menu, then
click [Performance and Maintenance],
and [System].
The [System Properties] window appears.
Click the [Hardware] tab, then click
2
[Device Manager].
The [Device Manager] window appears.
Click the “+” next to [network
3
adapters].
Double-click the network device
4
name that this device is connected to.
The [Properties] window appears.
Tip
There is a [Power Management] tab for
the network device that is connected to
this device. If there are more than one
network devices, select the network device
that has a [Power Management] tab.
Click the [Power Management] tab.
5
Check [] the [Allow this device to
bring the computer out of standby.]
check box.
Check [] the [Only allow
management stations to bring the
computer out of standby] check box.
Click [OK].
6
Close the [Device Manager] window,
7
and click [OK] on the [System
properties] window.
Others
45
Page 46

46
When using a Windows Vista-based
computer
On the computer screen, click [Control
1
Panel] from the [Start] menu, click
[System and Maintenance], and
[System].
The [System] window appears.
Click [Device Manager].
2
The [Device Manager] window appears.
Tip
When the [User Account Control]
message window appears after clicking
[Device Manager], click [Continue].
Click the “+” next to [network
3
adapters].
Double-click the network device
4
name that this device is connected to.
The [Properties] window appears.
Tip
There is a [Power Management] tab for
the network device that is connected to
this device. If there is more than one
network devices, select the network device
that has a [Power Management] tab.
Click the [Power Management] tab.
5
Check [] the [Allow this device to
wake the computer] check box.
Check [] the [Only allow
management stations to wake the
computer] check box.
Click [OK].
6
Close the [Device Manager] window.
7
Confirming/changing the go to
standby time
You can confirm and change the settings for the
computer’s standby mode.
You can set the computer connected from a
distance, to automatically switch to [system
standby] when this device’s power is switched off.
If you do not make this setting, the computer will
not automatically switch to standby mode, and
you will need to manually switch the computer
either to standby mode or off after switching off
the device’s power.
When using a Windows XP SP2-based
computer
On the computer screen, click [Control
1
Panel] from the [Start] menu, then click
[Performance and Maintenance], and
[Power Options].
The [Power Options Properties] window
appears.
Click the [Power Schemes] tab.
2
Select the go to standby or hibernate
3
time in [System standby] or [System
hibernate].
Note
Set the go to standby or hibernate time
longer than [after 3 mins].
Tip
If you set the value to [Never], the power
remains on.
Click [OK].
4
Page 47

When using a Windows Vista-based
computer
On the computer screen, click [Control
1
Panel] from the [Start] menu, then click
[System and Maintenance], and [Power
Options].
The [Power Options] window appears.
Click [Change when the computer
2
sleeps].
The [Edit Plan Settings] window appears.
Select the go to standby time in [Put
3
the computer to sleep].
In the [Edit Plan Settings] window,
4
click [Change advanced power
settings].
The [Advanced Settings] window appears.
Click the “+” next to “Sleep”, and then
5
click the “+” next to “Hibernate after”.
Click [Settings].
6
Tip
Depending on your computer, [On
battery:] and [Plugged In:] may appear
instead of [Settings].
Select the go to hibernate time.
7
Click [OK].
8
In the [Edit Plan Settings] window,
9
click [Save Changes].
Note
Set the go to standby or hibernate time
longer than [after 3 mins].
Tip
If you set the value to [Never], the power
remains on.
Others
47
Page 48

48
Changing settings
1
Press SETTINGS.
The setting options appear.
2
Press / to select the desired option, and then press ENTER.
You can press BACK to return to the upper layer.
3
Repeat step 2 until you complete the settings.
To cancel the settings
Press SETTINGS to return to the top settings screen. Press SETTINGS once more to exit from the settings
screen.
Setting Options
Top layer Second layer
Play Mode
Sound
Dynamic
Normalizer
Dynamic Bass
Boost
Effects
Sleep Timer
On-Timer
Memory Edit
Track Delete
Initialize
Description
You can set the play mode to play the music files in random order or to
play repeatedly (pages 34 and 39). (default: Normal)
You can set sound effects (default: Normal).
You can reduce the volume level between music files automatically
during playback (page 39). (default: Off)
When using the speakers of this device, you can boost the low
frequencies of music, offering a strong and powerful sound (page 39).
(default: Off)
You can select one of the following sound effects for the speakers.
Off (default)
6 Band Equalizer (page 40)
VPT Wide Stereo (page 41)
D-Linear Phase (page 41)
You can set the time interval for the standby mode (page 42).
You can set to start playback at a specified time (page 42). You can set
up to two On-Timers.
You can delete music files stored in the internal memory, and can
initialize the memory.
(page 38)
(page 38)
Page 49

Top layer Second layer
Server Settings
Server Auto Connect
Server Delete
Network
Settings
Options
Beep
Audio Out
AUX Sensitivity
Backlight
Description
You can set to connect to a server automatically; and can delete a
server from the history list.
You can set to connect to the last connected server automatically in PC
Streaming Function (page 32). (default: On)
(page 32)
You can set how to connect to the server via wireless LAN, either with
the Wireless Adapter or with an access point (page 52).
Wireless Adapter (default)
Access Point
You can change various settings.
You can set to beep or not to beep when a button is pressed. (default:
On)
You can set where to output the audio, the speakers or the LINE OUT
and OPTICAL OUT jacks.
Speaker (default)
Line/Optical
Notes
You cannot output the audio to both the speakers and the LINE OUT
and OPTICAL OUT jacks at the same time.
If headphones are plugged into this device, the audio is output to the
headphones regardless of this setting.
You cannot adjust the volume when [Line/Optical] is selected.
You may not be able to play some content when outputting to the
OPTICAL OUT jack.
When you output the audio to the OPTICAL OUT jack, you cannot
record the audio by using a recording device which has an optical input
jack (such as MD or DAT), as SCMS (Serial Copy Management System)
prevents the recording.
You can adjust the sensitivity of the AUX jack to match the output level
of the audio device connected to the AUX jack.
Normal (for connecting to a portable audio device, such as a
Walkman) (default)
Middle
Low (for connecting to a stereo component, etc.)
Note
You can change this setting only when you are in Auxiliary Function.
You can set whether the backlight of the display window and control
panel always stays on or goes on/out automatically while this device is
turned on.
Auto On/Off - The backlight turns off automatically after 90
seconds elapses without operations. When the backlight is off, if you
stand in front of this device or operate it, the backlight lights up
automatically (default).
Always On - The backlight always stays on.
Notes
If the AC adapter is plugged into this device and it is in standby mode,
the backlight of the display window always stays on regardless of this
setting.
If the USB cable is plugged into this device, the backlight of the keys
stays off.
Others
49
Page 50

50
Top layer Second layer
Options
Contrast
(Continued)
Wireless LAN
Power
Clock
Factory Default
Description
You can adjust the contrast of the display window, that has seven levels
from -3 to +3. (default: 0)
You can set whether to turn on the wireless LAN power when the AC
adapter is plugged into the device, depending on the status of this
device.
Power On - The wireless LAN power is always turned on.
Power Saving - The wireless LAN power is turned on only when this
device is turned on (default).
Note
If the AC adapter is not plugged in, this option is always set to [Power
Saving].
You can set the current date and time. (default: 2007/1/1 12:00AM)
You can reset all the settings to default. After resetting, this device
restarts automatically with the following status:
[Network Settings] option is set to [Wireless Adapter].
Wireless LAN power is turned on and this device switches to PC
Streaming Function.
If you are using with the Wireless Adapter, you need to redo the
registration of this device by using the Wireless Adapter Manager after
resetting to the factory default (page 55). If you are using with an
access point, you need to redo the network setting by using the Access
Point connection tool after resetting (page 54).
Hint
The music files stored on the internal memory are not deleted. Also, if
you have deleted the preinstalled sample music files, they are not
recovered even if you performed this setting.
Page 51

Top layer Second layer
Device
Information
Network
Information
MAC Address
Firmware
Version
Device ID
Description
You can see the network information, MAC address, firmware version,
and device ID of this device.
If the [Network Settings] option is set to [Wireless Adapter], the
following options are displayed:
Network Settings
Proxy Settings
If the [Network Settings] option is set to [Access Point], the following
options are displayed:
Network Settings
Network Name (SSID)
Security Settings
IP Address Settings
IP Address / Subnet Mask
Default Gateway
DNS Server Settings
Primary DNS Server / Secondary DNS Server
Proxy Settings
You can see the MAC address of this device.
You can see the firmware version of this device.
You can see the device ID that is used in web radio.
Others
51
Page 52

52
Wireless LAN settings
To connect this device to a computer via wireless
LAN, you need to configure the wireless LAN
settings of this device.
You can configure by using the Access Point
connection tool (page 54) to connect via an access
point.
Note
To configure the proxy server settings, use the
access point settings tool (page 54).
To connect via the Wireless Adapter
1
Press SETTINGS.
2
Press / to select [Network
Settings], and then press ENTER.
3
Press / to select [Wireless
Adapter], and then press ENTER.
The settings initialization screen appears.
4
Press / to select [Yes] or [No], and
then press ENTER.
If you select [Yes], the Wireless Adapter
connection settings are initialized and this
device can connect to any Wireless
Adapter.
If you select [No], the Wireless Adapter
connection settings stay the same and this
device is able to connect to the same
Wireless Adapter as before.
The settings confirmation screen appears.
Note
If you select [Yes] in step 4, you cannot
connect to your Wireless Adapter anymore
unless you register again your Wireless
Digital Audio by using the Wireless Adapter
Manager (page 55).
To connect via an access point
1
Press SETTINGS.
2
Press / to select [Network
Settings], and then press ENTER.
3
Press / to select [Access Point],
and then press ENTER.
The settings initialization screen appears.
4
Press / to select [Yes] or [No], and
then press ENTER.
If you select [Yes], the network name
(SSID) input screen appears.
If you select [No], the setting confirmation
screen appears. Proceed to step 9.
5
Press
/
to enter the network
name, and then press ENTER.
You can enter a network name (SSID) of
up to 32 characters long (alphanumeric).
The security setting screen appears.
5
Press / to select [OK], and then
press ENTER.
[Network Settings] option is set to
[Wireless Adapter].
This device restarts automatically, and
waits for wireless LAN connection.
Page 53

6
Press / to select from [WEP64bit],
[WEP128bit], [WPA-PSK TKIP], [ WPAPSK AES], or [Off], and then press
ENTER.
If you select [WEP64bit], [WEP128bit],
[WPA-PSK TKIP], or [WPA2-PSK AES],
you can enter a hexadecimal encryption
key.
Encryption key
WEP64bit 10 characters
WEP128bit 26 characters
WPA-PSK TKIP 64 characters
WPA2-PSK AES 64 characters
If you select [Off], the IP address setting
screen appears.
7
Press / to select [Auto(DHCP)] or
[Manual], and then press ENTER.
If you select [Auto(DHCP)], the Digital
Wireless Audio obtains an IP address
automatically.
If you select [Manual], you can set an IP
address manually. Enter an IP address,
subnet mask, and default gateway.
The DNS server setting screen appears.
Number of
characters
9
Press / to select [OK], and then
press ENTER.
The [Network Settings] option is set to
[Access Point].
This device restarts automatically, and
waits for a wireless LAN connection.
Others
8
Press / to select [Auto] or
[Manual], and then press ENTER.
If you select [Auto], the Digital Wireless
Audio obtains the DNS server settings
automatically.
If you select [Manual], you can set the
DNS server settings manually. Enter your
primary DNS server and secondary DNS
server.
The setting confirmation screen appears.
Note
If you set the [IP Address Setting] option to
[Manual] in step 7, you can only select
[Manual] for [DNS Server Settings] option in
step 8.
53
Page 54

54
Using the Access Point connection tool
If you connect this device to a computer via an
access point, you can use the Access Point
connection tool to configure the network settings
of this device.
1
Make sure that this device is plugged
into a wall outlet through the supplied
AC adapter.
2
Make sure that this device is in
standby mode.
The POWER lamp stays on in red.
3
Connect this device to a computer via
the supplied USB cable.
“Now connecting via the USB cable”
appears on the display window of this
device.
4
On the computer screen, click [Sony
Wireless Digital Audio] from the [Start]
menu, and then click [Access Point
Connection Tool].
The Access Point connection tool starts.
5
Follow the instructions on the
computer screen.
Be sure to read the precautions
thoroughly.
6
Follow the instructions on the
computer screen to close the Access
Point connection tool, and then
disconnect the USB cable.
This device restarts.
Notes
Do not unplug the AC adapter while connecting
this device to a computer via the USB cable.
Otherwise, it causes a malfunction.
We recommend that you fully charge the internal
battery before connecting this device to a
computer to protect against accidents, such as a
power failure or becoming detached from the AC
adapter.
If the computer connected to this device goes to
system suspend, system standby, or system
hibernation, it may cause a malfunction. Be sure
not to set the computer to automatically enter into
such status.
Do not connect this device to a computer via a
USB hub.
Setting up the proxy server settings for the Wireless Adapter connection
You can set up the proxy server settings using the
Access Point connection tool. The proxy server
settings you set are used for both the Wireless
Adapter connection and the access point
connection.
If the Access Point connection tool has already
been installed on your computer
After completing step 6 above, follow the
procedure in “To connect via the Wireless
Adapter” (page 52) to use the Wireless Adapter
with the proxy server settings you set.
If the Access Point connection tool has not been
installed on your computer yet
If you are connecting this device to your computer
via the Wireless Adapter, the Access Point
connection tool may not have been installed on
your computer. Install the Access Point
connection tool from the supplied CD-ROM.
1
Close all applications that are running
on your computer.
2
Insert the supplied CD-ROM into the
CD drive of your computer.
3
Read the [License Agreement]
thoroughly, and then click [Yes], if you
agree.
Page 55

4
Set the [Jukebox to be used] and
[Method of connection with your
computer] options.
Be sure to check [] the [Use an Access
Point you already have] check box of the
[Method of connection with your
computer] option.
5
Click [Next>].
6
Follow the instructions on the screen.
Read the precautions thoroughly.
After the Access Point connection tool
starts, set up the network settings as
follows:
Network name (SSID): You can enter any
characters.
Security type: Select [none].
IP address settings: Select [Automatically
obtain IP address].
DNS server address settings: Select
[Automatically obtain DNS server
address].
Proxy settings: Set up to match your
network environment.
7
Follow the instructions on the screen
of your computer to close the Access
Point connection tool, and then
disconnect the USB cable from this
device.
This device restarts.
8
Set the [Network Settings] option of
this device to [Wireless Adapter] (page
52).
Using the Wireless Adapter Manager
If you connect this device and a computer via the
supplied Wireless Adapter, you can use the
Wireless Adapter Manager to set up the Wireless
Adapter connection.
Starting the Wireless Adapter Manager
1
Plug the Wireless Adapter into the USB
port of a computer.
2
Double-click
(WirelessAdapterManager) on the
desktop of the computer.
The Wireless Adapter Manager starts and
the main screen appears. The Wireless
Digital Audio list appears on the main
screen.
Wireless Digital Audio list
Status
Connecting A Wireless Digital Audio that has
Not found A Wireless Digital Audio that has
Unregistered A Wireless Digital Audio that is
already been registered and is
turned on and connected to the
computer.
already been registered, but is not
turned on and is not connected to
the computer.
turned on, but has not been
registered yet and cannot connect
to the computer.
Others
55
Page 56

56
Notes
A Wireless Digital Audio does not appear in the
list in the following cases:
– It is not registered, and it is not turned on.
– It is turned on, but it is connected to another
Wireless Adapter.
– It is turned on, but the [Network Settings]
option is set to [Access Point].
All of the Wireless Digital Audios that are
indicated as [Connecting] are connected to the
same wireless LAN, so the strongest signal is
indicated on all of the Wireless Digital Audios.
Refreshing the Wireless Digital Audio list
1
Click [Update].
The Wireless Digital Audio list is
refreshed.
After completing, the latest Wireless
Digital Audio list appears.
Registering a Wireless Digital Audio
You can register an “unregistered” Wireless Digital
Audio. You can register up to five Wireless Digital
Audios.
After registering, the network setting of the
Wireless Digital Audio is performed.
1
Press the PC button of the desired
Wireless Digital Audio.
The Wireless Digital Audio starts in the
PC Streaming Function.
A string of 12 characters (symbols and
numbers) appears on the display window
of the Wireless Digital Audio.
4
Click [Register].
The network setting of the Wireless
Digital Audio is performed.
After completing, the status of the
registered Wireless Digital Audio changes
from [Unregistered] to [Connecting].
Tip
If the desired Wireless Digital Audio does not appear
on the list, follow the procedures below:
On the Wireless Digital Audio, press SETTINGS to
select [Network Settings] - [Wireless Adapter], and
then select [Yes] to initialize the network settings and
to set the [Network Settings] to [Wireless Adapter]
(page 52). And then, perform from step 2 again.
Resetting the registration
You can reset the Wireless Digital Audio
registration.
If you perform the registration reset, all the
Wireless Digital Audio registrations are reset.
1
Press the (POWER) buttons on all of
the Wireless Digital Audios you want to
reset.
2
Click [Reset Registration] on the screen
of the computer.
All of the Wireless Digital Audio’s
registrations are reset.
After the registration reset, the latest list of
Wireless Digital Audios appears.
2
Click [Update] on the computer
screen.
3
Click the desired Wireless Digital
Audio in the Wireless Digital Audio list.
A cursor appears on the clicked Wireless
Digital Audio.
Page 57

Enabling the Internet connection
You can configure the Internet connection of the
Wireless Adapter. You can configure the network
device for the Internet connection and enable the
Internet connection to use the Web Radio
Function of the registered Wireless Digital Audio.
If the Internet connection is enabled, “Web Radio
connection has been enabled.” appears on the
main screen of the Wireless Adapter Manager.
Notes
If you have not registered the Wireless Digital
Audio yet, you cannot configure the Internet
connection.
If your computer is not connected to the Internet,
“Web Radio connection has been disabled.”
appears and you cannot use the Web Radio
Function even if you completed the following
settings.
1
Click [Internet connection] on the
screen of the computer.
The Internet connection setting screen
appears.
2
Select [Enable the Internet
Connection], and then select a
network device.
Others
3
Click [OK].
The setting to enable the Internet
connection starts.
After completed, “Web Radio connection
has been enabled.” appears.
To disable the Internet connection
Select [Disable Internet connection] in step 2
above, and then click [OK]. After completing,
“Web Radio connection has been disabled.”
appears.
57
Page 58

58
Precautions
About condensation
Do not drop this device
Avoid giving an impact to this device. It may
cause a malfunction.
Avoid exerting pressure on the front side of this
device where the speakers are mounted.
Speakers
About install location
Do not install this device in the following
locations:
In direct sunlight or near heat sources, where
the air temperature is too high. (Operate this
device at temperatures between 5°C and 35°C
(between 41°F and 95°F.)
On a dashboard of a car, and inside a car in
direct sunlight with closed windows (especially,
during the summer months).
Near a magnet, speakers, TV, etc. where
magnetic fields are produced.
Near a microwave oven.
In a dusty location.
On an insecure or uneven surface.
In a location that is subject to vibration.
In a location that is subject to moisture, such as
a bathroom.
Near obstacles that shield or block electrical
wave, such as metal or concrete walls.
In a location with poor ventilation.
Near a cordless phone (base and handset).
If there is a rapid change in temperature,
condensation (water droplets) may form in this
device, causing it to malfunction. If this occurs,
leave this device off for two to three hours. This
device should resume normal operation.
Precautions when disposing of the battery
For ecological protection, remove the internal
battery (rechargeable battery) from this device.
CAUTION
Do not remove the screws unless disposing of
the battery for this device.
NOTES
Make sure that the internal rechargeable battery
is completely dead before removing it.
Be very careful when you touch the metal parts
inside this device (such as mounting plates).
RECYCLING LITHIUM-ION BATTERIES
Lithium-Ion batteries are recyclable.
You can help preserve our
environment by returning
your used rechargeable
batteries to the collection and
recycling location nearest you.
For more information
regarding recycling of
rechargeable batteries, call toll free 1-800-8228837, or visit
http://www.rbrc.org/.
Page 59

To remove the internal battery
Loosen the screw on the bottom side of
1
this device by using a coin, etc., and then
remove the cover.
Carefully pull out the battery from inside of
2
this device, and then unplug the cord.
About this device
The internal flash memory of this device is not
identified by the Windows Operating System as
an external storage device.
If you have connected to an outside network,
such as the Internet, and have allowed access
from other devices, unauthorized access by
malicious outsiders can occur depending on
your network configuration. It may cause
damages such as data falsification. To avoid this
problem, before using this device, you need to:
– Use a router and configure it correctly.
– Register the equipment that is to access this
device.
It is prohibited to send or leave copyrighted
products to/on an out-of-home network which
can be accessed from many people without the
author’s permission by the Copyright Act.
About DLNA support:
This product is designed in accordance with
DLNA Guideline v1.0. This product is
commercialized to gain formal DLNA
accreditation. This product may be upgraded to
maintain interconnectivity.
Others
59
Page 60

60
Cleaning
Clean this device with a soft cloth. If this device
becomes very dirty, clean it with a soft cloth
slightly moistened with a mild detergent solution.
Be careful to keep the jacks from getting wet. Do
not use thinner, benzene, alcohol, etc., because
they can cause damage to the surface of this
device.
Page 61

Specifications
Interface
Wireless LAN: IEEE802.11b/g
(WEP64bit/WEP128bit/
WPA-PSK TKIP/WPA2PSK AES)
Radio frequency: 2.4 GHz
Audio output:
Audio input: AUX jack:
USB port: USB-B port
Rated power
Speakers: 8 W + 8 W (using the AC adapter)
4 W + 4 W (using the internal battery)
Headphones: 30 mW + 30 mW (common) (16 )
Power supply
AC Adapter
Input: AC 100-240 V 1.5 A 50/60 Hz
(The supplied power cord is for
AC100 V.)
Output: DC 16 V 4 A
Internal battery
Output voltage: DC 11.1 V (rated)
(Headphones) jack:
Stereo mini-jack
LINE OUT jacks:
RCA pin jacks (stereo)
Rated output level:
500 mV (10 k)
OPTICAL OUT jack
Stereo mini-jack
Rated input level:
194 mV (AUX
Sensitivity: Normal)
375 mV (AUX
Sensitivity: Middle)
500 mV (AUX
Sensitivity: Low)
Operating temperature range
5°C to 35°C (41°F to 95°F) (temperature gradient
less than 10°C (50°F)/hour)
Operating humidity
20% to 80% (no condensation)
Humidity at 35°C (95°F) less than 65% (wet bulb
temperature less than 29°C (84°F))
Storage temperature
-20°C to 60°C (-4°F to 140°F) (temperature
gradient less than 10°C (50°F)/hour)
Storage humidity
10% to 90% (no condensation)
Humidity at 60°C (140°F) less than 20% (wet bulb
temperature less than 35°C (95°F))
Dimensions
Approx. 380 × 138.5 × 116 mm (w/h/d)
(15 × 5 1/2 × 4 5/8 inches)
Mass
Approx. 2.5 kg (5 lb 8 oz) (including the internal
battery)
Supported equipment
Computer installed with Windows XP SP2
Computer installed with Windows Vista
DLNA Guidelines-compliant equipment
(DLNA HNv1 compliant)
Supplied accessories
See page 11.
DLNA support
You can enjoy music from DLNA-compliant
equipment connected to your home network.
Design and specifications subject to change for
improvements without notice.
Others
61
Page 62

62
Playable/downloadable file formats
When the server is VAIO Media Integrated Server
Source content File format at playback/downloading
File format
ATRAC3
ATRAC3plus
MP3 No
WMA
AAC
WAV No − Linear PCM
Linear PCM
DRM, such as used by online
music store
Yes − Unable to play −
Recorded by
SonicStage with
[DRM on]
No
Recorded by
SonicStage with
[DRM off]
Yes − Unable to play −
Recorded by
SonicStage with
[DRM on]
No
Recorded by
SonicStage with
[DRM off]
Yes − Unable to play −
No − WMA WMA
Yes − Unable to play −
No − Linear PCM
No − Linear PCM
Bit rate/sampling
frequency
66/105/132 kbps
− Linear PCM
48/64/256 kbps
Other than 48/64/256
kbps
− Linear PCM
Less than 32 kHz Linear PCM
32 kHz or more
At playback At downloading
ATRAC3 ATRAC3
ATRAC3plus ATRAC3plus
Linear PCM
MP3 MP3
Encoded into ATRAC3
(132 kbps)
Encoded into ATRAC3
(132 kbps)
Encoded into ATRAC3
(132 kbps)
Encoded into ATRAC3
(132 kbps)
Encoded into ATRAC3
(132 kbps)
Encoded into ATRAC3
(132 kbps)
Encoded into ATRAC3
(132 kbps)
When the server is Windows Media Connect or Windows Media Player
Source content File format at playback/downloading
File format
ATRAC3 Yes/No − Unable to play −
ATRAC3plus Yes/No − Unable to play −
MP3 No − MP3 MP3
WMA
AAC Yes/No − Unable to play −
WAV No − WAV
Linear PCM
Note
You cannot encode a file into ATRAC3 (132 kbps) format unless the file fulfills the following requirements:
– resolution of 16 bit per sample
– 2-channel stereo
– 44.1 kHz sampling rate
DRM, such as used by online
music store
Yes − WMA Unable to download
No − WMA WMA
No − Linear PCM
Bit rate/sampling
frequency
At playback At downloading
Encoded into ATRAC3
(132 kbps)
Encoded into ATRAC3
(132 kbps)
Page 63

Getting Help
This section provides information on how to get
help and support from Sony and troubleshooting
tips for your Wireless Digital Audio.
Sony support options
Sony provides several support options for your
Wireless Digital Audio. When you have questions
about your Wireless Digital Audio or the software,
refer to the following:
Use this guide for questions about setup and
operating your Wireless Digital Audio.
For customers in the United States
Sony Online Support provides instant access to
information on commonly encountered
problems. You can search the Knowledge
Database for the corresponding solutions
online.
Visit Sony Online Support at:
http://www.esupport.sony.com/
The Sony Customer Information
Service Center offers information about your
Wireless Digital Audio and other Sony products
that work with your Wireless Digital Audio. To
contact the Sony Customer Information Service
Center, call 1-888-4SONYPC
(1-888-476-6972).
Others
63
Page 64

64
Page 65

Troubleshooting
If you have any problems with this product, follow the procedures below to check your device before
consulting our Customer Information Service Center.
If any messages or error codes appear, make note of them.
1
Check this “Troubleshooting” to inspect the corresponding problem.
You may be able to find some information in the instructions of this manual. Check the
corresponding instructions.
2
Refer to our support information website.
You can see the latest support information and frequently asked questions and answers.
For customers in USA and Canada: http://esupport.sony.com/EN/VAIO/
For customers in Asia and Pacific countries or areas: http://www.sony.com.sg/vaio/
3
If you still cannot solve your problem, consult our Customer Information Service Center
(page 63) or the dealer where you purchased this product.
Turning on
Problem Causes/measures
You cannot turn the device on.
You cannot turn the device off.
Plug the AC adapter securely into this device and to a wall outlet (page
21).
Check if the BATTERY switch is set to ON.
The internal battery may run down (either “No battery power
remaining” appears, or nothing appears). Plug this device into a wall
outlet (page 21).
The internal system of this device may have a malfunction. The device
may have electronic noise from being dropped; a power surge; or static
electricity. Disconnect the AC adapter, and turn the BATTERY switch
to OFF. After about 30 seconds, plug in the AC adapter again.
The internal system of this device may have a malfunction. The device
may have electronic noise from being dropped; a power surge; or static
electricity. Disconnect the AC adapter, and turn the BATTERY switch
to OFF. After about 30 seconds, plug in the AC adapter again.
If you press the (POWER) button while this device is turned on, the
device goes into standby mode (the POWER lamp stays lit in red). If
you want to fully shut down the device, disconnect the AC adapter and
turn the BATTERY switch to OFF.
Troubleshooting
65
Page 66

66
Problem Causes/measures
“The DC-IN voltage is too
high. Connect the specified
AC Adapter” appears, and the
device goes into standby
mode.
“The internal temperature
of the device is too high”
appears, and the device goes
to standby mode.
The device goes to standby
mode, no messages appear
on the display window, and
the POWER lamp flashes
on and off.
An AC adapter other than the supplied one may be plugged into this
device, so the power voltage is too high. Use the supplied AC adapter.
If you use this device at high-volume levels for a long time, the internal
temperature of this device may become too high. Turn off the device,
wait for a while until it cools down, and then turn on again.
Page 67

Charging
Problem Causes/measures
You cannot charge the
battery or you cannot
completely charge the
battery.
Check if the BATTERY switch is set to ON.
You may not have plugged in the AC adapter correctly. Plug it in
correctly (page 21).
The internal battery may have run out. If the device does not start
recharging within one minute after you turn the BATTERY switch to
ON and connect the AC adapter to the device, disconnect the AC
adapter and reconnect it.
The air temperature may be too low or too high (“Please charge
between +5°C and +35°C (41°F and 95°F)” appears). Keep the air
temperature between 5°C and 35°C (41°F and 95°F) when recharging.
The battery life is almost half
its original capacity even after
you fully charge it.
“An error has occurred in the
internal system. Set the
BATTERY switch to OFF”
appears and you cannot
recharge the battery.
The capacity may be reduced because the internal battery may be
approaching the end of its capacity. Consult your dealer or our
Customer Information Service Center.
The recharging system may have some problems, so you cannot
recharge the internal battery. Turn the BATTERY switch to OFF, and
then consult your dealer or our Customer Information Service Center.
Troubleshooting
67
Page 68

68
Listening to the music files stored on a computer (PC Streaming Function)
Problem Causes/measures
You cannot connect the
device to a wireless LAN.
“Cannot connect to the
server” appears.
“Connection with the server
has ended” appears.
“Connection with the server
has ended. Information
retrieval cancelled” appears.
The computer does not turn
on (cannot wake up from
“system standby” or “system
hibernate” status.)
Check if your access point is turned on.
Check if your computer is turned on.
Check if the Wireless Adapter is firmly plugged into the USB port of
your computer.
If you performed the registration reset with the Wireless Adapter
Manager, you cannot connect this device to a computer unless you
register this device with the Wireless Adapter Manager (page 55).
The network settings of this device may be incorrect. Press SETTINGS
to check the [Device Information] - [Network Information] options.
Your computer may be unstable. Restart it.
Check the following to see if your computer is correctly set up:
The server has started.
The server is in [Start] status.
This device has been registered.
If the Internet Connection Firewall (ICF) of your computer has been
activated, this device may not be able to connect to your computer. You
may need to change the settings of the firewall to connect.*
If you performed a system recovery of your computer, redo the
connection and setup again (page 19).
If the Wireless Digital Audio connects to your computer via the
Wireless Adapter, you cannot wake up your computer even if you
turned this device on.
Your computer may not be set up correctly. Set up your computer
correctly.
You cannot use the device to wake up some computers.
* To change the settings of your firewall, refer to the operating instructions of your computer.
Page 69

Problem Causes/measures
Your computer does not
appear in the server selection
screen.
You cannot play music files in
the normal order.
Intermittent audio.
You may have turned on this device before you turned on the
computer. Select [Refresh] in the server selection screen to update the
server list (page 32).
Check if your access point is turned on.
Check if your computer is turned on.
Check if the Wireless Adapter is firmly plugged into the USB port of
your computer.
Check the following to see if your computer is correctly set up:
The server has started.
The server is in [Start] status.
This device has been registered.
If you performed the registration reset with the Wireless Adapter
Manager, you cannot connect this device to any computers unless you
use the Wireless Adapter Manager to register again (page 55).
Repeat mode or shuffle mode is selected. Press SETTINGS to set the
[Play Mode] option to [Normal] (page 34).
The bandwidth of your wireless LAN may be too low. Move this device
closer to the access point or the Wireless Adapter, and make sure that
there are no obstacles between them.
Your computer may be overloaded. Temporarily disable antivirus
software when connecting this device to your computer, because the
software may interfere.
Troubleshooting
69
Page 70

70
Problem Causes/measures
You cannot fast-forward or
fast-rewind.
“This file is not a supported
format and cannot be played”
message appears in browse
mode.
“Cannot play this track”
appears in browse mode.
“There are no playable tracks”
appears in browse mode.
You cannot play tracks of
ATRAC3 or ATRAC3plus
format.
You cannot play a copyrighted
track of WMA format.
You cannot fast-forward or fast-rewind such content as follows by
system limitations:
Content where the time length is unknown.
Copyrighted WMA format files.
When you are playing these types of files, the progress bar does not
appear on the playback screen.
You cannot play any files other than audio files.
You cannot play the following:
A track that violates playback restrictions.
A track with irregular copyright information.
A track that you bought at an online music store that does not allow
home network streaming.
If there are no tracks or folders under the layer of the selected folder,
you cannot extend the folder to display its contents.
You may have connected to your computer with Windows Media
Connect or Windows Media Player 11 as a server. Use VAIO Media
Integrated Server as a server to connect to your computer (page 62).
You may have connected to your computer with VAIO Media
Integrated Server as a server. Use Windows Media Connect or
Windows Media Player 11 as a server to connect to your computer
(page 62).
Page 71

Listening to web radio (Web Radio Function)
Problem Causes/measures
You cannot connect this
device to the Internet.
“Cannot connect to the
service provider” appears.
“Cannot connect to the
radio station” appears.
“Connection with the
service provider has ended.
Information retrieval
cancelled.” appears.
Intermittent audio.
The radio station list on the
display window is different
from the list which you edited
on your computer.
Check if your access point is turned on.
If you are connecting this device to your computer via the Wireless
Adapter, check the followings:
Check if your computer is turned on.
Check if the Wireless Adapter is plugged into the USB port of your
computer.
Check if the Internet connection of the Wireless Adapter is enabled
(page 57).
Check if the proxy server settings are correct (page 51).
Check if you are connecting to the Internet via the network device
you enabled (page 57).
Your computer may be unstable. Restart it.
If the Internet Connection Firewall (ICF) of your computer has been
activated, this device may not be able to connect to your computer. You
may need to change the settings of the firewall to connect.*
If you performed a system recovery of your computer, redo the
connection and setup again (page 19).
The network settings of this device may be incorrect. Press SETTINGS
to check the [Device Information] - [Network Information] options.
If you are using a broadband router and a modem, Check if they are
turned on.
Check if the LAN cable is securely plugged in.
If your contract for the Internet connection permits you to connect
only one device to the Internet at a time, you cannot connect both this
device and another device. Consult your carrier or provider.
The bandwidth of your wireless LAN may be too low. Bring this device
closer to the access point or the Wireless Adapter, and make sure that
there are no obstacles between them.
Your computer may be overloaded. If you are running antivirus
software, stop it when connecting this device to your computer,
because the software puts a heavy load on your computer.
You may not have adjusted the clock of the device yet, or the clock may
be ahead or behind. Press SETTINGS, and then select [Options] [Clock] to adjust the clock (page 50).
Troubleshooting
* To change the settings of your firewall, refer to the operating instructions of your computer.
71
Page 72

72
Listening to the audio device (Auxiliary Function)
Problem Causes/measures
The audio is too loud or
distorted when using the
Auxiliary Function.
The output level of the audio device connected to the AUX jack of this
device may be too high. Press SETTINGS to adjust the [Options] [AUX Sensitivity] option (page 49).
Listening to the music files stored on the internal memory (Internal Memory Function)
Problem Causes/measures
You cannot play music files in
the normal order.
“There are no playable tracks”
appears.
You cannot go to browse mode
(even if you press TOP or
BACK).
“Cannot download this track”
appears.
“Not enough internal memory”
appears.
“An error has occurred in
the internal memory”
appears.
“An error has occurred in
the internal memory.
Cannot download” appears.
“Connection with the server
has ended. Download
cancelled” appears.
Repeat mode or shuffle mode is selected. Press SETTINGS to set the
[Play Mode] option to [Normal] (page 39).
If there are no music files other than sample music, this device enters
the demonstration mode when switching to the Internal Memory
Function and you cannot use it in the normal manner. After you
download a file to the internal memory while playing it in the PC
Streaming Function, this device no longer enters the demonstration
mode.
There may be no music files in the internal memory.
If there are no music files in the internal memory, you cannot go to
browse mode.
If the internal memory malfunctions, you cannot go to browse mode.
You cannot play some tracks because of system limitations. Download
only music files of the downloadable formats (page 62).
If available memory size is insufficient, you cannot download a file.
Delete unwanted music files from the internal memory to increase the
available memory size (page 38), and then download a file.
The internal memory has a malfunction. If the internal memory has a
problem, you cannot play or download music files to the internal
memory. Initialize the internal memory (page 38).
Check if your access point is turned on.
Check if your computer is turned on.
Check if the Wireless Adapter is securely plugged into the USB port of
your computer.
Check the followings to see if your computer is correctly set up:
The server has started.
The server is in [Started] status.
This device has been registered.
Page 73

Timer settings
Problem Causes/measures
“Set the clock first” appears.
“Select the day(s) you want to
set” appears.
“Set the contents for use with
timed playback during
playback” appears.
If you have not adjusted the clock on this device, you cannot set the
On-Timer. Adjust the clock before setting the On-Timer (page 50).
In the [On-Timer] - [On] - [Day Settings] option, you need to check at
least one day of the week before selecting [OK]. Check at least one
option, and then select [OK].
If no music files are played during the On-Timer settings, you cannot
set the [On-Timer] - [On] - [Contents Settings] option to [Yes]. Set the
On-Timer during playback of the desired music file.
In the Auxiliary Function, you cannot set the [On-Timer] - [On] -
[Contents Settings] option to [Yes].
Changing settings
Problem Causes/measures
“There is no server to delete”
appears.
“Settings cannot be performed
when the headphone plug is
inserted” appears.
If there is no server to delete, you cannot select [Server Delete].
If the headphones are plugged into the (Headphones) jack of this
device, you cannot set the following [Sound] options:
[Dynamic Bass Boost]
[Effects] - [6 Band Equalizer]
[Effects] - [VPT Wide Stereo]
[Effects] - [D-Linear Phase]
Troubleshooting
73
Page 74

74
Others
Problem Causes/measures
This device does not
respond to any operations.
This device does not work
correctly.
You cannot operate this device
with the remote control.
The speakers do not emit
sound.
Your headphones do not emit
sound.
Your audio device that is
connected to the LINE OUT
jack or the OPTICAL OUT
jack does not emit sound.
“Volume cannot be adjusted
when audio out is set to line/
optical” appears.
The backlight of the display
window and control panel
does not light up even though
you stand in front of this
device.
The latter part of the music
title, radio station name, etc.
does not appear.
The internal battery may have run out (“No battery power remaining”
appears, or no message appears). Plug this device into a wall outlet
(page 21).
The internal system of this device may have a malfunction. The device
may have electronic noise from being dropped; a power surge; or static
electricity. Disconnect the AC adapter, and turn the BATTERY switch
to OFF. After about 30 seconds, plug in the AC adapter again.
While this device is connecting to a computer via the USB cable, it
does not respond to any button operations on the main unit or the
remote control. Disconnect the USB cable.
The battery of the remote control may not be inserted correctly. Insert
the battery into the remote control correctly (page 18).
The [Options] - [Audio Out] option may be set to [Line/Optical]. Set
the option to [Speaker] (page 49).
Headphones may be plugged into this device. Disconnect them.
Your headphones may not be plugged securely into this device. Plug
them in securely.
The [Options] - [Audio Out] option may be set to [Speaker]. Set the
option to [Line/Optical] (page 49).
Headphones may be plugged into this device. Disconnect them.
If the [Options] - [Audio Out] option is set to [Line/Optical], you
cannot adjust the volume.
If this device is in standby mode, the backlight does not light up
automatically because the sensor is not working.
If the air temperature is almost the same as your body temperature, it
is difficult for the sensor to detect your presence, so the backlight may
not light up automatically. Press the LIGHT button.
By system limitations, the display window displays up to about 120
characters (PC Streaming Function/Web Radio Function) or 60
characters (Internal Memory Function) for one title.
Page 75

Troubleshooting
75
 Loading...