

Page 1
Page 2

WARNING
To prevent fire or shock hazard, do not
expose the device to rain or moisture.
To avoid electrical shock, do not open
the cabinet. Refer servicing to qualified
personnel only.
Use your product only with the AC adapter
supplied with the unit.
To disconnect your product completely from the
main voltage, unplug the AC adapter from the
mains.
The socket-outlet shall be installed near the
equipment and shall be easily accessible.
Opening or dismantling this equipment, for
whatever reason, could lead to damages that are
not covered by the guarantee.
Sony is not responsible for any interference that
you may experience or that may be caused when
operating this device.
Do not use or store this equipment in a location
subject to heat sources, such as radiators or air
ducts; direct sunlight; excessive dust; moisture or
rain; mechanical vibration or shock; strong
magnets or speakers that are not magnetically
shielded; ambient temperature higher than 95ºF
(35ºC) or less than 50ºF (10ºC); and high humidity.
Owner’s record
The model number and serial number are located on
the bottom of your Home Server.
Record the serial number in the space provided
below. Refer to this number whenever you call your
Sony dealer regarding this product.
Model No. VGF-HS1
Serial No.
For customers in the USA
FCC Notice
This equipment has been tested and found to comply
with the limits for a Class B digital device, pursuant to
Part 15 of the FCC Rules. These limits are designed to
provide reasonable protection against harmful
interference in a residential installation. This
equipment generates, uses, and can radiate radio
frequency energy and, if not installed and used in
accordance with the instructions, may cause harmful
interference to radio communications. However,
there is no guarantee that interference will not occur
in a particular installation. If this equipment does
cause harmful interference to radio or television
reception, which can be determined by turning the
equipment off and on, the user is encouraged to try to
correct the interference by one or more of the
following measures:
– Reorient or relocate the receiving antenna.
– Increase the separation between the equipment
and receiver.
– Connect the equipment into an outlet on a circuit
different from that to which the receiver is
connected.
– Consult the dealer or an experienced radio/TV
technician for help.
All cables used to connect peripherals must be
shielded and grounded. Operation with cables
connected to peripherals that are not shielded and
grounded may result in interference to radio and
television reception.
You are cautioned that any changes or modifications
not expressly approved in this manual could void
your authority to operate this equipment.
If you have questions about this product, you can write
to the Sony Customer Information Service Center at
12451 Gateway Blvd., Fort Myers, FL 33913, USA or
find Sony Customer Service on the Web site at:
http://esupport.sony.com/EN/VAIO/ for customers in
the USA
2
Page 3
Declaration of Conformity
Trade Name: SONY
Model No.: VGF-HS1
Responsible Party: Sony Electronics Inc.
Address: 16530 Via Esprillo
San Diego, CA 92127 USA
Telephone No.: 858-942-2230
(For FCC-related matters only).
This device complies with Part 15 of the FCC
Rules.
Operation is subject to the following two
conditions: (1) this device may not cause harmful
interference, and (2) this device must accept any
interference received, including interference that
may cause undesired operation.
WARNING
Battery may explode if mistreated.
Do not recharge, disassemble or dispose of in fire.
To change the backup battery, please contact your
nearest Sony Service Center.
For the State of California, USA only
Perchlorate Material - special handling may apply, See
www.dtsc.ca.gov/hazardouswaste/perchlorate
Perchlorate Material: Lithium battery contains perchlorate.
For customers in Europe
This product complies with the following European
Directives:
2006/95/EC (Low Voltage Directive)
2004/108/EC (EMC Directive)
This product complies with EN 55022 Class B and
EN 55024 for use in the following areas: residential,
commercial and light industrial.
This product has been tested and found compliant
with the limits set out in the EMC Directive for using
connection cables not longer than 3 meters (9.8 feet).
The supplied interface cable must be used with the
equipment in order to comply with the limits for a
digital device pursuant to EN 55022.
Disposal of the internal backup memory
battery
Your VAIO product is equipped with an internal
backup memory battery that should not have to be
replaced during the lifetime of the product. When
the battery needs to be replaced, please contact
VAIO-Link.
Danger of explosion if the battery is incorrectly
replaced.
Dispose of the battery properly at its end-of-life.
In some areas the disposal of non-hazardous
batteries in household or business waste may be
prohibited.
Please use the public collection system.
Disposal of Old Electrical &
Electronic Equipment
(Applicable in the European
Union and other European
countries with separate
collection systems)
This symbol on the product or on its packaging
indicates that this product shall not be treated as
household waste. Instead it shall be handed over to
the applicable collection point for the recycling of
electrical and electronic equipment. By ensuring this
product is disposed of correctly, you will help prevent
potential negative consequences for the environment
and human health, which could otherwise be caused
by inappropriate waste handling of this product. The
recycling of materials will help to conserve natural
resources. For more detailed information about
recycling of this product, please contact your local
Civic Office, your household waste disposal service or
the shop where you purchased the product.
3
Page 4
Safety Information
Europe Only
Disposal of waste batteries
(applicable in the European
Union and other European
countries with separate
collection systems)
This symbol on the battery or on the packaging
indicates that the battery provided with this product
shall not be treated as household waste.
By ensuring these batteries are disposed of correctly,
you will help prevent potentially negative
consequences for the environment and human health
which could otherwise be caused by inappropriate
waste handling of the battery. The recycling of the
materials will help to conserve natural resources.
In case of products that for safety, performance or
data integrity reasons require a permanent
connection with an incorporated battery, this battery
should be replaced by qualified service staff only.
To ensure that the battery will be treated properly,
hand over the product at end-of-life to the applicable
collection point for the recycling of electrical and
electronic equipment.
For all other batteries, please view the section on how
to remove the battery from the product safely.
Hand the battery over to the applicable collection
point for the recycling of waste batteries.
For more detailed information about recycling of this
product or battery, please contact your local Civic
Office, your household waste disposal service or the
shop where you purchased the product.
The manufacturer of this product is Sony
Corporation, 1-7-1 Konan Minato-ku Tokyo,
108-0075 Japan. The Authorized Representative for
EMC and product safety is Sony Deutschland GmbH,
Hedelfinger Strasse 61, 70327 Stuttgart, Germany. For
any service or guarantee matters, please refer to the
addresses given in the Guarantee document.
Customer Support Information in Europe
Please refer to the separate Guarantee and Service
Support booklet provided with your Home
Server.
Data backup
Make backup copies of the content of your storage
devices, including a hard disk drive. Sony assumes no
liability for any damages arising out of loss or
corruption of data caused by hard disk troubles or
restoration of such data.
Power cord
A damaged power cord may cause a fire or an electric
shock.
Do not press the power cord between your Home
Server and a wall or shelf.
Do not modify or damage the power cord.
Do not place a heavy object on the power cord or
pull the cord with excessive force.
Keep the power cord away from heat sources.
Be sure to grab the plug when unplugging the
power cord.
AC adapters
Do not use any AC adapters other than designated, as
it may cause an electric shock or a failure.
Placement or location
Use of your Home Server under the conditions stated
above or any environmental conditions other than
described in this User Guide may cause a fire or an
electric shock. Do not place your Home Server in a
location subject to oily smoke, steam, humidity, and
dust.
Liquid(s) or fine object(s)
If any liquid or fine objects enter the interior of your
Home Server, turn off the Home Server and unplug
the power cord and connection cables.
Disassemble or modification
Your Home Server contains high-voltage
components. Disassembling or modifying the Home
Server may cause a fire or an electric shock.
Weather prevention
Do not use your Home Server when a thunder storm
is approaching. Lightning strikes may cause an
electric shock. Unplug all connected cables including
the power cord and the network (LAN) cable when a
thunder storm is forecasted.
4
Page 5

Network LAN port
Do not plug a telephone cable or an irrelevant
network cable into the network (LAN) port on your
Home Server. High electric current to the port may
cause hardware failures, if the network (LAN) port is
connected to telephone lines mentioned below:
Put Especially, never ... underneath the bulleted list.
Network lines other than 10BASE-T, 100BASE-TX,
and 1000BASE-T lines
Public telephone subscriber line
Digital jack of ISDN public telephone subscriber
lines
PBX (private branch exchange)
Home (intercom speakerphone) or business-use
telephone lines (multiline business telephone)
Telephone lines other than those mentioned above.
Power plug
Keep wet hands away from the power plug. Plugging
and unplugging with wet hands may cause an electric
shock.
Before connecting
Before connecting the power cord or any
peripheral cables, turn off your Home Server and
all peripheral devices and disconnect the power
cords from power sources to avoid electric shock.
Use of any power cord and connection cables other
than specified in this User Guide and the Setup
Guide may cause an electric shock.
Do not wind the power cord or any connection
cable around the AC adapter.
This may break the cord or cable.
Air vents
Keep air vents unblocked. Do not block air-intake
and -exhaust vents, as it may build up internal heat
and cause a fire. To provide adequate air circulation,
take care of the following:
Place your Home Server at least 6.0 inches (15.0
cm) away from a wall.
Do not push your Home Server into a closed, tight
space.
Do not place your Home Server on porous surfaces
such as rugs or blankets.
Do not bundle up your Home Server with a cloth.
Do not place your Home Server upside down.
Rear cover
Firmly attach the rear cover. Unless the rear cover is
firmly secured, applying some kind of force to the
cables connected to the back of your Home Server
may cause the cover to come off the Home Server;
you may step on the cover and hurt your foot.
Surface placement
Place your Home Server on a stable, flat surface
and keep it upright so as to prevent the Home
Server from falling and avoid personal injuries. Be
sure to choose a place that is strong enough to
support the weight of the Home Server.
Place your Home Server in a flat position.
Be sure to place your Home Server in a flat
position, as it is not designed for upright
placement. An attempt to place the Home Server
in the upright position will cause it to roll and
damage itself or surrounding objects.
Cleaning
Turn off your Home Server and unplug the power
cord before cleaning. Cleaning your Home Server
while it is turned on may cause an electric shock.
Moving your Home Server
Be sure to hold your Home Server on its both sides
and keep the Home Server balanced before moving it.
Do not grasp the front of the Home Server and the
rear cover to lift the Home Server, as you may fail to
hold the Home Server still and may drop it, resulting
in personal injuries.
Top of the Home Server
Do not place any products other than the following
on top of your Home Server:
VGX-TP Series Personal Computer
VGF-HS1 Series Home Server
Your Home Server is designed to hold only one
unit of the above products on top of it. Placing
more than one unit may cause the units to fall off,
resulting in product failures or personal injuries.
Note that double-stacking may cause discoloration
on the surface of the Home Server.
Place a designated product precisely onto the top
of your Home Server.
Inappropriate placement many cause the product
to fall off, resulting in product failures or personal
injuries.
5
Page 6

Direct sunlight and heat sources
Keep your Home Server away from direct sunlight
and heat sources. Placing and keeping your Home
Server in such conditions may cause internal heat to
build up, resulting in a fire.
Wireless LAN Security
Creating security settings for the Wireless LAN is
extremely important. When your Home Server is
connected to a wireless LAN without security
settings, it can be accessed by unauthorized users. To
protect the Home Server against such access, be sure
to make appropriate security settings on your wireless
LAN devices. Sony assumes no responsibility for any
security problems that may arise from the use of the
Wireless LAN.
About the illustrations and the screen
captures used in this guide
The product illustrations and the screen captures
used in this guide may appear different from the
actual ones.
This User Guide, the Setup Guide, the Quick
Start Guide, and the information contained in
the documents shall not be reproduced in
whole or in part and shall not be lent to any
third parties.
The terms of warranty for this product are
defined in the separate warranty certificate
provided with your Home Server.
The license agreement for the supplied
software is defined in the software license
agreement for each software application.
Sony Corporation provides no warranty with
regard to the supplied software. In no event
shall Sony Corporation be liable for any
incidental, consequential, or special damages,
where based on tort, contract, or otherwise,
arising out of or in connection with the
supplied software.
Sony Corporation reserves the right to make
any modification to this product and the
supplied software. The specifications of this
product and the supplied software are subject
to change without prior notice.
Sony Corporation and the software vendors
reserve the right to terminate or suspend the
network services to the supplied software. In
no event shall Sony Corporation be liable for
inconvenience wholly or partially resulted
from the termination or suspension of the
services.
Some information described in this User
Guide, the Setup Guide, and the Quick Start
Guide and/or in the help files on the supplied
software may not be implemented due to
restrictions imposed by using such software on
this product. Sony Corporation assumes no
liability for inconvenience resulted from the
restrictions.
6
Page 7
Trademarks
, “Memory Stick,” “Memory Stick Duo,”
“MagicGate,” “MagicGate Memory Stick,”
“Memory Stick PRO,” “Memory Stick PRO Duo,”
“Memory Stick PRO-HG,” and VAIO are
trademarks or registered trademarks of Sony
Corporation.
Microsoft, Windows, Internet Explorer, and
Windows Vista are registered trademarks of
Microsoft Corporation in the United States and
other countries.
PLAYSTATION is a registered trademark of Sony
Computer Entertainment Inc.
iTunes is a trademark of Apple Inc., registered in
the U.S. and other countries.
The SD logo is a trademark.
The SDHC logo is a trademark.
CompactFlash is a trademark of SanDisk
Corporation, registered in the United States and
other countries.
Adobe and Flash are registered trademarks of
Adobe Systems Incorporated in the United States
and other countries.
Firefox is a registered trademark of Mozilla
Foundation.
Intel is a registered trademark of Intel Corporation.
The Ricoh bitmap font, manufactured and sold by
Ricoh Company, Ltd., is employed for indications
on the display of this product.
In this document, Windows Vista Home Basic,
Windows Vista Home Premium, Windows Vista
Business, and Windows Vista Ultimate are
referred to as Windows Vista; Microsoft
Windows XP Home Edition and Microsoft
Windows XP Professional are referred to as
Windows XP.
All other names of systems and products, in
general, are registered trademarks or trademarks of
their respective manufacturers. In this document,
the and marks are not specified.
7
Page 8
Table of Contents
Safety Information ........................................... 4
Introduction 9
Software and Hardware Requirements ..........9
Locating Controls and Ports ......................... 10
Front .......................................................... 10
Back ...........................................................12
Bottom....................................................... 13
Preparation 17
Hardware Installation and Connection .......17
Sharing your Home Server with
2 or more personal computers ............. 17
Precautions on the recovery
after power failures ................................17
Precautions on the NETSERVER switch
About the Supplied Software ........................ 18
Using the PC Link software .................... 18
Using the VAIO Media software ............ 19
Customizing Your Home Server ..................20
About the Home Server Settings Page
What you can do on
the Home Server Settings Page ............ 20
... 17
... 20
Operations 24
Using Your Home Server as a Network
Storage Device for Personal Computers ... 24
Default folder configuration and
access privilege ....................................... 24
Opening a shared folder .........................25
Creating a shared folder .......................... 26
Using your Home Server as
a data storage device .............................. 27
Using the Back Up function ................... 32
Connecting from DLNA Devices ................. 35
Playing the Home Server content
on the DLNA device .............................. 35
Playing the Home Server content on
the Wireless Digital Audio ................... 36
Folder configuration on the Home Server
when accessed from a DLNA device ... 39
Using the Remote Home Access Functions ...
Network requirement for
the Remote Home Access functions ...42
Enabling the Remote Home Access
functions ................................................. 42
Using the VAIO Picture Lab function ... 43
Using the Media Link function .............. 44
Transferring data to a personal computer
or a Home Server outside your home
(Data Sync) ............................................. 45
Making Backup Copies .................................. 49
Copying the data on the Home Server
to a USB hard disk drive ....................... 49
Copying the data from a personal
computer to your Home Server ........... 51
40
Others 52
Updating the Firmware .................................52
Updating the firmware with the
automatically downloaded update files
Updating the firmware by accessing
the support Web site .............................. 53
Restoring Your Home Server ........................ 54
Restoring Your System ................................... 55
State of the Home Server after Restoring
the Home Server or the System .................. 56
Precautions ...................................................... 57
Before Disposing of Your Home Server ......59
Getting Help .................................................... 60
Sony support options ..............................60
Specifications .................................................. 60
...
52
Troubleshooting 62
Error Messages ................................................ 62
Troubleshooting .............................................65
Home Server ............................................. 65
PC Link software .....................................72
End User License Agreement 74
Manuals
Your Home Server is provided with (1) Quick Start Guide, (2) Setup Guide, and (3) User Guide (this
document). The Quick Start Guide helps you get your Home Server ready for operation. Please read the Quick
Start Guide first to set up the Home Server and reference the Setup Guide and the User Guide for more
information.
8
Page 9
Software and Hardware Requirements
This product is a Home Server that is intended for use with personal computers and DLNA devices
connected via the Internet or a home network.
To connect to this product, your personal computer must meet the following software and hardware
requirements:
Operating system
Microsoft Window XP Professional (Service Pack 2 or later)
Microsoft Window XP Home Edition (Service Pack 2 or later)
Microsoft Windows Vista Ultimate
Microsoft Windows Vista Business
Microsoft Windows Vista Home Premium
Microsoft Windows Vista Home Basic
Network (LAN) port
Accessibility to the Internet
To play AVC (Advanced Video Coding) content with the VAIO Media software, the following requirements
must be met.
Operating system
Microsoft Window XP Professional (Service Pack 2 or later)
Microsoft Window XP Home Edition (Service Pack 2 or later)
Microsoft Windows Vista Ultimate (32 bit)
Microsoft Windows Vista Business (32 bit)
Microsoft Windows Vista Home Premium (32 bit)
Microsoft Windows Vista Home Basic (32 bit)
CPU
Intel Core 2 Duo processor (operating frequency 2.33 GHz or faster)
System memory
512 MB or higher (1 GB or higher for Windows Vista operating system)
Introduction
To use the Remote Home Access functions, your computer must meet additional requirements (page 42).
Notes
The VAIO Media software supplied with your Home Server does not support the Windows Vista 64-bit
operating system.
If your VAIO personal computer supports the Windows Vista 64-bit operating system, you can use the pre-
installed VAIO Media plus software to take advantage of your Home Server.
9
Page 10
10
Locating Controls and Ports
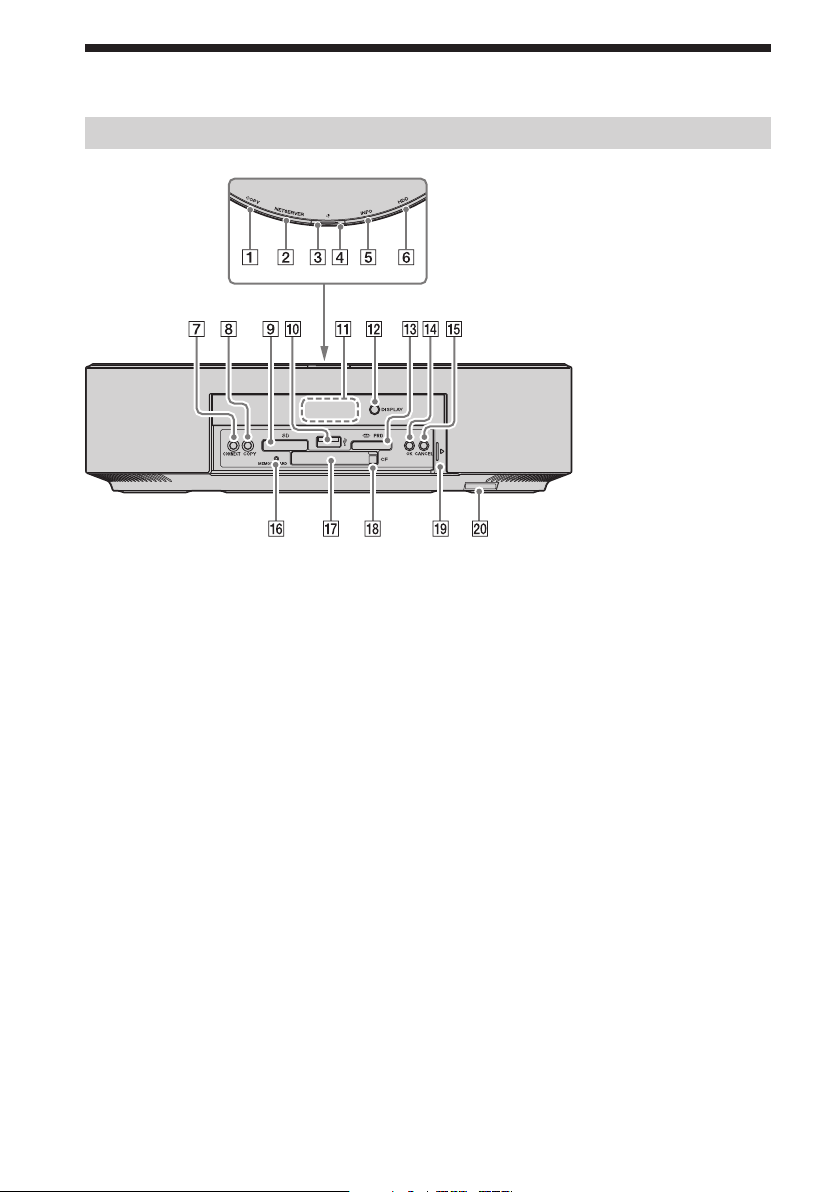
Front
COPY indicator light (page 28
Indicates the state of a USB device or a
memory card and the status of data imported
from the device or card.
NETSERVER indicator light (page
71
)
Indicates the server test status or the state of
the Home Server.
(POWER) indicator light (page 71)
Indicates the state of the power supply or the
state of the Home Server.
(POWER) button
Press this button to turn on and off the
Home Server.
INFO indicator light (page
Indicates the state of the Home Server.
About the indication lights
See page 14 for further information.
52, 71)
, 29)
42,
HDD indicator light (page 71
Indicates the remaining capacity or the state
of the hard disk drive.
CONNECT button
Press this button to obtain a permission code
for adding a Data Sync (receiving) profile.
COPY button (page 28
Press this button to import data from a USB
device or a memory card.
SD memory card) slot (page 29)
SD (
Insert an SD memory card.
(USB) port (page 14, 28)
Connect a USB mass storage class device,
such as a digital still camera and a digital
camcorder. This port is also labeled as Front
USB on the Home Server Settings Page (page
20).
, 29)
)
Page 11

Introduction
Display (page
Displays information on the Home Server.
DISPLAY button (page
Press this button to turn on the display on
the Home Server and select the required
information.
Memory Stick slot (page 29)
Insert a “Memory Stick” media. This slot can
also accommodate the Duo-type media
without an adapter.
OK button (page 62
Press this button to confirm the information
displayed on the display.
CANCEL button (page 23
Press this button to cancel the on-going
operation. Additionally, you can press and
hold this button for 10 seconds to clear the
administrator registration and the IP address
settings.
16, 62)
16)
)
)
MEMORY CARD access indicator light
(page 29)
Blinks while access to the memory card is in
progress.
CF (CompactFlash) slot (page 29
Insert a CompactFlash media.
CF (CompactFlash) media eject button
(page 29)
Front door
To open the front door, put your fingertip on
the left end of the door and slide it half way
to the right. The door will automatically be
retracted under the front panel. To close the
door, slide it half way to the left. The door
will keep sliding on its own and shut.
ID label
Shows the model name of the Home Server.
)
11
Page 12
12
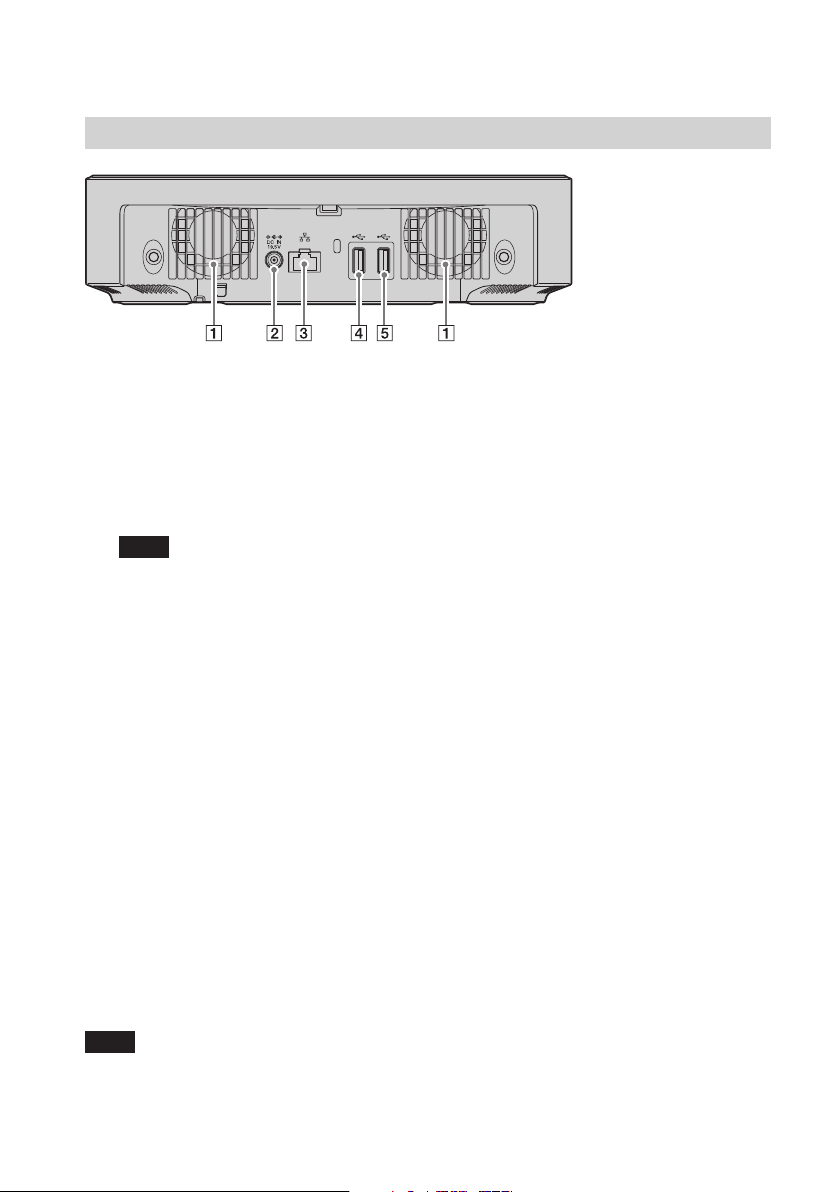
Back
Air vents
DC IN port
Connect to the AC adapter.
Network (LAN) port
Connect a network (LAN) cable.
Note
Be sure not to connect any unsupported
networks or any telephone lines to the
Network port. At the time of delivery, this
port is covered by a protective sticker to
warn the users. Remove the sticker before
connecting to the network.
(USB) port 1 (page 14, 28)
Connect a USB mass storage class device,
such as a digital still camera and a digital
camcorder. This port is also labeled as Rear
USB1 on the Home Server Settings Page
(page 20).
(USB) port 2 (page 14, 28)
Connect a USB mass storage class device,
such as a digital still camera and a digital
camcorder. This port is also labeled as Rear
USB2 on the Home Server Settings Page
(page 20).
About attaching/removing the rear cover
Refer to the Setup Guide.
Note
The air vents on the back of your Home Server and the rear cover may get warm while the Home Server is in
operation. Keep this in mind before you touch them.
Page 13
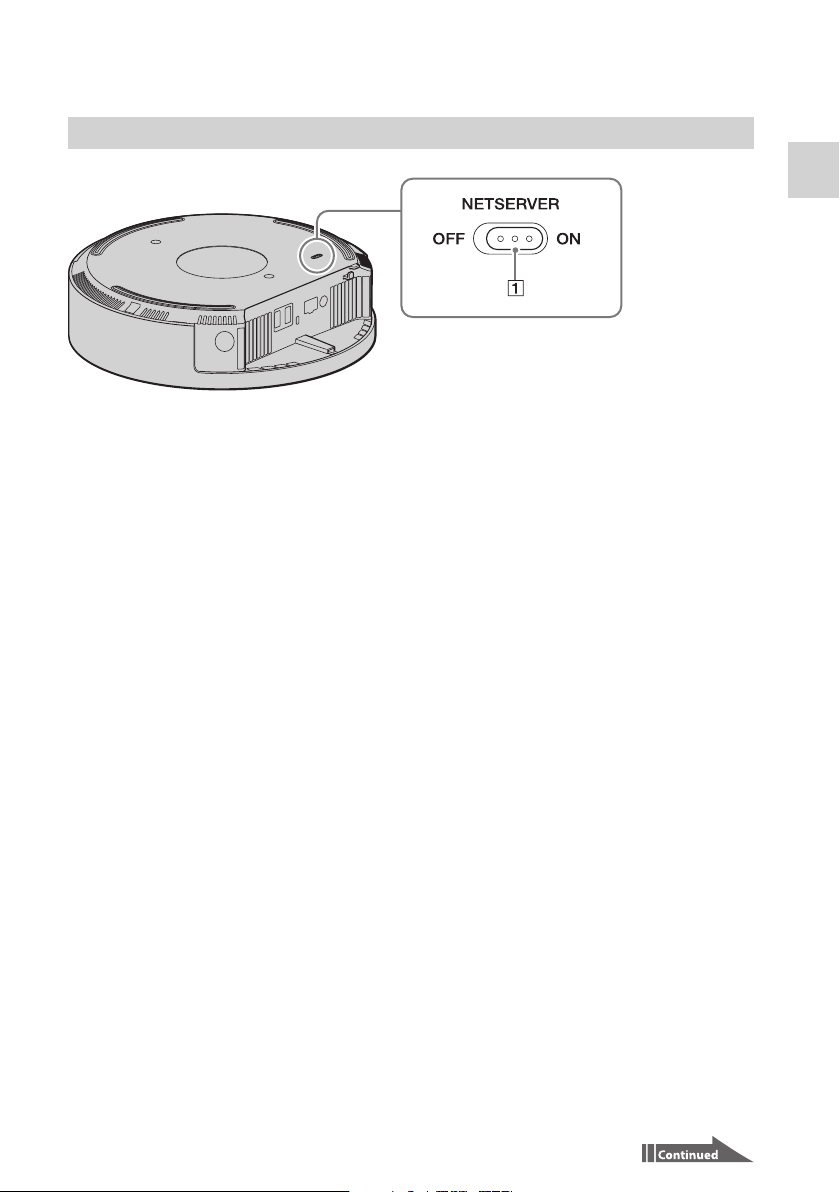
Bottom
NETSERVER switch (page 42)
Slide this switch to the ON position to allow
access via the Internet.
Turning on this switch will register the
Home Server on the dynamic DNS server
and enable the port forwarding capability of
the network router to allow access via the
Internet.
To use the Remote Home Access functions
(page 40), be sure to turn on this switch.
Introduction
13
Page 14
14
About the (USB) ports
The USB ports on your Home Server is compliant with the USB 2.0 standards (High-speed, Full-speed, and
Low-speed). The USB 2.0 standards are new Universal Serial Bus (USB) standards and provide faster data
transfer than the USB 1.1 standards (Full-speed and Low-speed). The USB ports of the USB 2.0 standards
are capable of accepting the USB 1.1 standard devices.
About the indicator lights
The indicator lights help you obtain various kinds of information on your Home Server.
Indicator
State
light
COPY Lights in green Indicates that the USB mass storage class device, such as a digital
Blinks in green Indicates that the One Touch Copy function is in operation.
Unlit Other than the above.
NETSERVER Lights in green
Blinks in green
Unlit Indicates that:
(POWER)
Blinks in orange Indicates that the Home Server is turning on.
Lights in green Indicates that the Home Server is completely turned on and the
Lights in orange Indicates that the Home Server is completely turned on, but in
Blinks in green Indicates that the Home Server is turning off.
Blinks alternately in
green and orange
Unlit
still camera, a digital camcorder, or a USB hard disk drive is
connected or a memory card is inserted.
Tip
If a USB port is specified for the Home Server backup operation (page
49), connecting a USB device to the port does not turn on this
indicator light as the One Touch Copy function is disabled for the port.
Indicates that the Home Server is open to access via the Internet.
Indicates that the server test (page 42) is in progress.
The previous server test (page 42) failed.
The NETSERVER switch is turned off.
hard disk drive is in operation.
power saving mode. The internal hard disk drive is not in
operation while the Home Server is in this mode.
Tip
After about 30 minutes of inactivity following completion of the
internal process, the Home Server stops the hard disk drive operation
and enters power saving mode.
Indicates that the firmware update is in progress.
Indicates that the Home Server is turned off.
Page 15
Indicator
light
INFO Blinks in blue
Blinks in red Indicates that an error occurred while the One Touch Copy
Lights in red Indicates that an error has occurred while the One Touch Copy
Lights in blue Indicates that:
Unlit
HDD Lights in green
Lights in orange
Blinks in orange
Blinks in green
Blinks alternately in
green and orange
Unlit
State
Indicates that a search for the Home Server was initiated by a personal
computer via the network and in progress for device registration
purposes. The indicator light will stop blinking when the Home Server
is selected or canceled.
function is active, the Wireless Digital Audio* is connected, or
device registration for one of the Remote Home Access functions
is in progress.
* The VGF-WA1 Wireless Digital Audio may not be available, depending
on the country or region of residency.
Tip
The error description appears on the display. You can press the OK
button to turn off this indicator light.
function is NOT active, the Wireless Digital Audio* is NOT
connected, or device registration for one of the Remote Home
Access functions is NOT in progress.
* The VGF-WA1 Wireless Digital Audio may not be available, depending
on the country or region of residency.
Tip
If an error occurs during the Back Up, Data Sync, Home Server backup,
or Home Server restore operation, the error description will be
displayed on the Home Server Settings Page. When you confirm the
error, this indicator light automatically turns off.
A new file was created or (a) file(s) was updated by one of the
Remote Home Access functions in the last 24 hours.
The VAIO Update software has received an important message
or downloaded a firmware update to the Home Server.
Tip
When you confirm the message or the update on the Home Server
Settings Page, this indicator light automatically stops blinking.
Other than the above.
Indicates that the remaining free space of the internal hard disk drive is
at least 10% of the total capacity and access to the drive is in progress.
Indicates that the remaining free space of the internal hard disk drive is
less than 10% of the total capacity and the drive is in operation.
Indicates that the remaining free space of the internal hard disk drive is
less than 1 MB.
Indicates that the internal hard disk drive is being formatted.
Indicates that the internal hard disk drive is not detected.
Other than the above.
Introduction
15
Page 16

About the Display indications
When the Home Server is not in operation, you can press the DISPLAY button to turn on the display and
view the following information: the Home Server name, the IP address settings, the used space on the
internal hard disk drive, the firmware version, the error message (if any), and the important message (if
any). The display indication changes when you press the COPY or the CONNECT button.
Tip
The display will go blank in 60 seconds after you press the DISPLAY button.
16
Page 17

Hardware Installation and Connection
Your Home Server is intended for use on a network.
For detailed instructions on connecting the Home Server to a network, refer to the Setup Guide.
Tip
In a stand-alone environment, the Home Server can provide:
Access to the content of the Home Server from a DLNA device (page 40).
Data import from the USB mass storage class device, such as a digital still camera and a digital camcorder, or a
memory card (page 28).
Sharing your Home Server with 2 or more personal computers
You can access your Home Server from 2 or more personal computers as long as the Home Server and the
computers are connected to the same network. In addition, you can install the PC Link software on each
computer to use the Back Up function (page 32).
1
Connect the Home Server and the personal computers to the same network.
2
Install the PC Link software on each computer with the supplied CD-ROM disc and
complete the initial setup of the software.
For further information on the initial setup, refer to the Setup Guide.
Tip
If the Receive folder name for the Back Up function is not unique on the Home Server, a sequential number in
parentheses, (2) or (3) for example, is automatically appended to the end of the folder name.
Precautions on the recovery after power failures
In case of a blackout, or when you unplug the power cord while your Home Server is still on, it will recover
to its previous state. Please note it might take some time before you can use the user due to automatic file
recovery.
Precautions on the NETSERVER switch
When the NETSERVER switch (page 13) is turned off, you cannot use the following Remote Home Access
functions:
VAIO Picture Lab
Media Link
Data Sync (receiving) from other Home Servers and personal computers.
Preparation
17
Page 18

About the Supplied Software
The CD-ROM disc provided with your Home Server contains the following software applications:
PC Link (page 18)
The PC Link software provides easy ways to keep folder data updated between a personal computer and
a Home Server.
About the Restore Tool
The Restore Tool is installed along with the PC Link software.
Your Home Server is capable of copying files to the connected USB hard disk drive for backup purposes and
copying them back to the Home Server for data restoration. The Restore Tool is an additional function that
allows you to copy the backup files from the USB hard disk drive to a personal computer (page 50).
VAIO Media (page 19)
The VAIO Media software allows access to music, photo, and video contents of your Home Server from
all personal computers on the home network.
To use the above software applications, you must install each software application on your personal computer
with the supplied CD-ROM disc. If you already have the VAIO Media software installed on the computer,
you may skip installation of this particular application depending on the software version. Refer to the Setup
Guide and install the software application of your choice.
Notes
The VAIO Media software supplied with your Home Server does not support the Windows Vista 64-bit
operating system.
If your VAIO personal computer supports the Windows Vista 64-bit operating system, you can use the pre-
installed VAIO Media plus software to take advantage of your Home Server.
Using the PC Link software
18
What you can do with the PC Link software
The PC Link software has the following functions:
Back Up
You can create a Back Up profile on your personal computer and have the files in a specified folder
automatically uploaded to your Home Server via your home network or the Internet (page 40).
Note
You must connect the computer and the Home Server to the home network before creating Back Up profiles.
Tip
You can specify the following options in a Back Up profile:
– Backup timing
– Whether or not to delete files from the Home Server when the corresponding files are removed from
the source folder
– Whether or not to add information for the Music Channel Function to music files.
Data Sync
You can create a Data Sync profile on your personal computer and have the files in a specified folder sent
to a destination device or received from a source device via the Internet. With this function, you can
exchange data between your computer and Home Server for data synchronization.
Tip
You can specify the schedule for sending files in Data Sync (transmitting) profiles.
Page 19
Metadata analysis
If you want to upload a music file to a Home Server, PC Link can analyze it using VAIO Content
Analyzer and add the results to the music file as metadata to make it compatible on the DLNA devices
supporting the Music Channel Function. With the Music channels, you can play music according to your
mood or situation.
Tips
Metadata analysis can be applied to the files in MP3, ATRAC, and WMA format.
Metadata is data with content information. DLNA devices use this added metadata for file management
and search.
Starting the PC Link software
Click “Start,” “All Programs,” “PC Link,” and “PC Link.”
1
The PC Link software starts and the main window appears on the desktop.
Tip
You can also, double-click the PC Link icon on the taskbar to start the software.
Using the VAIO Media software
What you can do with the VAIO Media software
The VAIO Media software allows you to access music, photo, and video contents of your Home Server from
all personal computers and DLNA devices on the home network.
For further information, refer to the software’s help file. To open the help file, click “Start,” “All Programs,”
“VAIO Media,” “Help.”
Notes
The VAIO Media software supplied with your Home Server does not support the Windows Vista 64-bit
operating system.
If your VAIO personal computer supports the Windows Vista 64-bit operating system, you can use the pre-
installed VAIO Media plus software to take advantage of your Home Server.
Preparation
19
Page 20

20
Customizing Your Home Server
You can use the Home Server Settings Page and change the default settings to customize your Home Server.
About the Home Server Settings Page
The Home Server Settings Page provides a tool to set up the functions of your Home Server that you can
access with browser software on your personal computer.
To access the Home Server Settings Page, your computer must have one of the following software browsers
installed:
Microsoft Internet Explorer 6 (on personal computers with the Windows XP operating system)
Microsoft Internet Explorer 7 (on personal computers with the Windows XP operating system SP2 or
the Windows Vista operating system)
Firefox 2
What you can do on the Home Server Settings Page
You can set up, view, and change the following functions.
Menu Function You can:
Server
function
Basic Information
Shared folders Create or delete shared folders; or view or change the shared
User accounts
Web/Media Link
DLNA device
View or change the Home Server name and the work group name.
folder properties.
Manage the administrator account and the user accounts; or
view or change the account properties.
Create or delete user accounts.
View or change the properties of the folders used for the
VAIO Picture Lab function or the Media Link function.
Add or remove the folders used for the VAIO Picture Lab
function or the Media Link function.
Send e-mails that contain the URL addresses for the folders
used for the VAIO Picture Lab function.
Accept or deny a connection to the Home Server from a
DLNA device.
View the list of the devices permitted for connection to the
Home Server and the list of devices that are waiting for
permission.
Page 21

Menu Function You can:
Remote
Home Access
Back Up
View Back Up profiles that include a Receive folder for files
sent from a personal computer.
Change the Receive folder names, the description of the
shared folders containing a Receive folder, or the description
of the Receive folder.
Remove Back Up profiles.
Advanced
settings
Data Sync (transmitting)
View Data Sync (transmitting) profiles that include a Send
folder.
Add or remove Data Sync (transmitting) profiles or change
the transmission schedule specified in the profiles.
Manually start or stop transmissions.
Data Sync (receiving)
View Data Sync (receiving) profiles that include a Receive
folder.
Change the Data Sync (receiving) profile names.
Add or remove Data Sync (receiving) profiles.
Server test
Start the server test.
Change the port number for the Media Link function or the
VAIO Picture Lab function.
Change the options.
Network
View or change the IP address settings.
View or change the proxy server settings.
Date and time View, change, or adjust the clock settings on the Home Server.
One Touch Copy View or change the content type to be copied by the One Touch
Copy function.
VGF-WA1
View the number of the Wireless Digital Audio units*
registered on the Home Server.
Change the wireless LAN channel used.
Register the Wireless Digital Audio or remove the
registration.
Home Server backup Create, view, or change the Home Server backup profile for
copying data from the Home Server to the USB hard disk; or
start the Home Server backup process.
Home Server restore Restore the backup copies to the Home Server from the USB
hard disk drive.
Firmware update
Reset
View the firmware information of the Home Server.
Update the firmware.
Rebuild the database.
Rebuild the playlist.
Restore the factory default settings while keeping hard drive
content.
Restore the factory default settings while deleting all hard
drive content.
Preparation
* The VGF-WA1 Wireless Digital Audio may not be available, depending on the country or region of your
residency.
21
Page 22

22
Opening the Home Server Settings Page
To open from the folder
Click “Start” and “My Network Places” or “Network.”
1
The My Network Places window or the Network window appears.
Double-click “MyStation” (the default name) or “(Home Server name).”
2
The window containing the list of the shared folders on the Home Server appears.
If the user name and the password are prompted, enter a temporary text string, “Sony” for example.
Tip
If you cannot find your Home Server name in the window displayed in step 2 or if double-clicking
“MyStation” or “(Home Server name)” starts the Windows Media Player software, specify the Home
Server name or change the work group name of the Home Server or the personal computer.
To specify the Home Server name
Press the DISPLAY button on the Home Server several times to display the Home Server name or the IP
1
address on the display.
Enter “\\(MyStation),” “\\(Home Server name),” or “\\(IP address of the Home Server)” in the address field
2
at the upper part of the My Network Places or Network window, and then press the Enter key.
If the address field is not displayed on the window, click “View,” “Toolbars,” and “Address Bar.”
To change the work group of the Home Server or the personal computer
If the Home Server name is not displayed, the Home Server and the personal computer may not be
assigned to the same work group.
Change the work group name of the Home Server or the personal computer.
To change the work group name of the Home Server, go to the Basic Information page on the Home
Server Settings Page and change the work group name.
To change the work group name of the personal computer, refer to the Windows Help and Support
for detailed instructions.
Double-click “help” and “HomeServerSetting.html.”
3
The Web top page appears in the browser software window.
Click “Home Server Settings Page.”
4
The Home page is displayed.
Tips
If a window appears, asking for the administrator name and password, enter your registered administrator
name and password and click “Log in.”
The default name of your Home Server is “MyStation.” You can change this default name on the Basic
Information page on the Home Server Settings Page.
To open from the PC Link software
Start the PC Link software (page 18).
1
The main window appears on the desktop.
Click the name of the Home Server for which you want to access the Home Server Settings
2
Page.
The Web top page appears in the browser software window.
Click “Home Server Settings Page.”
3
The Home page is displayed.
Tip
If a window appears, asking for the administrator name and the password, enter your registered
administrator name and password and click “Log in.”
Page 23
To open directly with the browser software
Press the DISPLAY button on the Home Server several times to display the Home Server
1
name or the IP address on the display.
Start the browser software on the personal computer.
2
Enter “http://(Home Server name)/” or “http://(IP address)/” and press the Enter key.
3
The Web top page appears in the browser software window.
Click “Home Server Settings Page.”
4
The Home page is displayed.
Tip
If a window appears, asking for the administrator name and password, enter your registered administrator
name and password and click “Log in.”
Note
Accessing the Home Server Settings Page requires entering the administrator name and the password. If you
cannot remember your administrator name and/or password, press the CANCEL button on the Home Server for
10 seconds or longer to clear the administrator registration and the password settings. For information on the state
of your Home Server after you cleared the settings, see “State of the Home Server after Restoring the Home Server
or the System” on page 56.
Changing the system settings of your Home Server
Access the Home Server Settings Page and change the settings.
If you want to: Go to:
Change the IP address. Network page
Use a proxy server.
Change the work group name to which the Home Server belongs. Basic Information page
Change the Home Server name on the network.
Change the clock settings on the Home Server. Date and time page
Preparation
Tip
For further information on each settings page, click “Help” at the top right corner of the page.
Notes
If you exit the browser software while changing the setup, all modifications applied to the Home Server Settings
Page will be discarded.
Clicking the previous button on the browser software will not display the previous page, but the top page of the
setup item.
23
Page 24
Using Your Home Server as a Network Storage Device
for Personal Computers
The following describes the default folder configuration and access privilege at the time of delivery and what your
Home Server offers as a network storage device.
Default folder configuration and access privilege
MyStation Media folder
Help folder
Folder name Description Access privilege
Media The shared folder with
content accessible from
DLNA devices. You cannot
block access from DLNA
devices to this folder.
Creating a Back Up profile on
the personal computer will
create a Receive folder for the
profile in this shared folder.
One Touch Copy Using the One Touch Copy
function will create a folder
with the name of the import
date and save the import data
into the created folder.
Sample Contains sample music,
photo, and video contents
accessible from DLNA
devices.
Note
Restoring the factory default
settings of your Home Server
will remove this Sample
folder and you will not be
able to restore the folder.
Help Contains the file that shows
the URL address for the
Home Server Settings Page.
All users can access these folders and read and
write the content by default.
To change the access privilege on the folders,
access the Home Server Settings Page and go to
the Shared folders page.
You cannot modify the file or create a new file or
folder in this folder.
Additionally, you cannot change the access
privilege on the Help folder.
One Touch
Copy folder
Sample
folder
24
Page 25

Opening a shared folder
1
Click “Start” and “My Network Places” or “Network.”
The My Network Places window or the Network window appears.
2
Double-click “MyStation” (the default name) or “(Home Server name).”
The window containing the list of the shared folders on the Home Server appears.
Tips
If MyStation or your Home Server name is not listed, see the tip in “To open from the folder” on page 22.
If the Network window in the Windows Vista operating system in step 1 shows the message that network
discovery and file sharing are disabled, follow the steps below:
Click the message and select “Turn on network discovery and file sharing” from the menu.
If the User Account Control window appears, read the information and click “Continue.”
On the Network discovery and file sharing window, click to select “No, make the network that I am
connected to a private network.”
If the Home Server has a global IP address and you have not completed administrator registration
Follow the steps below to register yourself as an administrator before opening a shared folder:
Double-click “help” and “HomeServerSetting.html.”
1
The Web top page appears in the browser software window.
Click “Home Server Settings Page.”
2
The security warning message is displayed.
Click “Continue.”
3
The Administrator Registration page is displayed.
Enter an administrator account name of up to 10 characters in length in the Administrator
4
name field.
Tips
The characters available for entry are:
Alphanumeric characters and spaces
! # $ % & ‘ ( ) - . @ ^ _ ` { }
You cannot enter an administrator account name that only consists of either periods or spaces.
Spaces at the beginning and end of the entered administrator name will automatically be removed.
Enter a password from 5 to 14 characters in length in the Password field.
5
The entered password is displayed as a series of dots.
Tips
The characters available for entry are:
Alphanumeric characters and spaces
\ : , ; * < > | ‘ [ ] = + . ` ( ) ~ $ “ / ?
You cannot enter a password that only consists of spaces.
Enter the same password as in step 5 in the Password field.
6
Click “Register.”
7
The DLNA device management page is displayed.
Operations
25
Page 26

Confirm or change the settings.
8
For further information, click “Help” at the top right corner of the DLNA device management page.
Click “Next.”
9
The Shared folder management page is displayed.
Confirm the settings.
10
For further information, click “Help” at the top right corner of the Shared folder management page.
Creating a shared folder
1
Access the Home Server Settings Page (page 22).
2
Click “Shared folders” in the left pane.
The Shared folders page is displayed in the right pane.
3
Click “Create a shared folder” and specify the necessary properties.
A new shared folder is created.
Note
You can create up to 20 shared folders.
Tip
For further information, click “Help” at the top right corner of the Shared folders page.
To change the administrator registration and the IP address settings
Press and hold the CANCEL button on the Home Server for 10 seconds or longer.
1
The administrator registration and the IP address settings are cleared.
26
To register yourself as an administrator, see “If the Home Server has a global IP address and you have not
completed administrator registration” on page 25.
Tip
The IP address is automatically assigned to your Home Server.
Page 27
Using your Home Server as a data storage device
You can import music, photo, and video contents to your Home Server from a digital still camera or a
digital camcorder or data from a personal computer for storage purposes.
The import method depends on the source device.
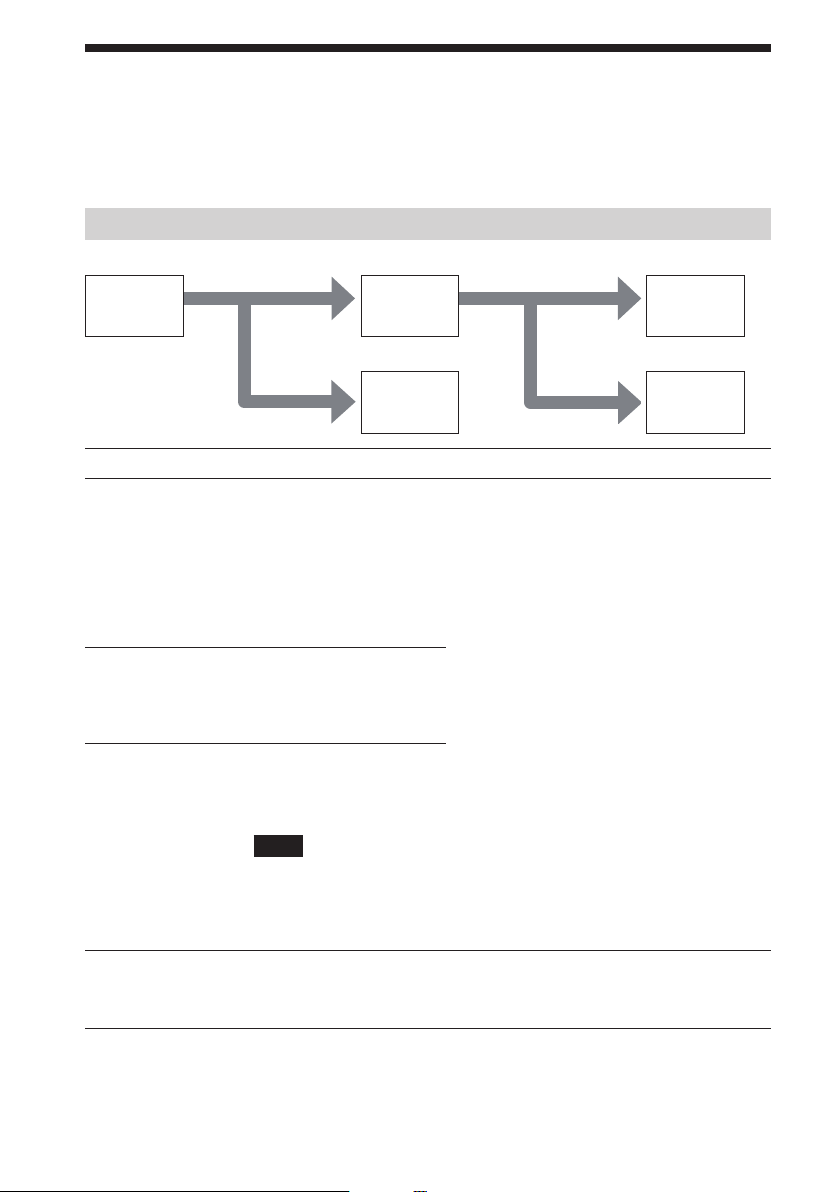
Source device Import timing Import method
Digital still camera,
Digital camcorder
Personal computer Automatic
Another Home Server Automatic
One Touch Copy function (page 28)
The One Touch Copy function allows you to import content from connected device or memory
card just by pressing the COPY button on your Home Server.
Before pressing the COPY button, be sure to do either of the following:
Connect a USB device, such as a digital still camera or a digital camcorder, to the Home Server.
Insert a memory card, such as a “Memory Stick” media, an SD memory card, or a CompactFlash
media, into an appropriate card slot.
Tip
For viewing imported content, see page 30.
Manual (from the source
device)
Manual (from a memory
card)
Manual
One Touch Copy function
Back Up function
Windows copy function
Data Sync (receiving) function
Operations
Back Up function (page 32)
Data will be automatically imported from a personal computer at the time of an upload by the
Back Up function.
Tip
If you select the option to add information for the Music Channel Function in the Back Up profile, the music
content will be sorted automatically by genre. Then, you can play the content according to your mood or
situation on a DLNA device that supports the Music Channel Function.
Windows copy function (page 25)
You can access the Home Server from a personal computer via the network and copy the
content from the computer to shared folders on the Home Server.
Tips
To play imported content on a DLNA device, such as VGF-CP1, copy the content(s) into the One
Touch Copy folder on the Home Server.
For opening or creating a shared folder, see page 25 or page 26, respectively.
Data Sync (receiving) function (page 45)
Data will automatically be imported at the time of a reception by the Data Sync (receiving)
function from another Home Server.
27
Page 28

Importing data with the One Touch Copy function
To import from a USB device
Note
When the USB port on the digital still camera is in PTP or PictBridge mode, you cannot use the One Touch Copy
function. Place the USB port into mass storage mode before proceeding with the following steps.
Connect a digital still camera or a digital camcorder to one of the (USB) ports on the
1
Home Server with a USB cable.
The COPY indicator light on the Home Server turns on.
Tip
If no content has been updated since the previous import, the COPY indicator light will not turn on.
COPY indicator light
Note
If you connect a USB device to the USB port specified for Home Server backup (page 49), the content will
not be imported to the Home Server.
Press the COPY button.
2
28
COPY button
The message notifying the progress of the copy process appears on the display on your Home Server and
the COPY indicator light blinks while the copy process is in progress.
Upon completion of the copy process, the completion message appears on the display and the COPY
indicator light turns off.
For viewing the destination folder, see “To view the copied photo and video contents” on page 30.
Wait until the COPY indicator light turns off, and then unplug the USB cable.
3
Page 29

About compatible file formats
When the option to import video and photo only is selected on the One Touch Copy page on the Home
Server Settings Page, the files in the following formats will be imported.
USB device File format
Digital still camera DCF (photo)
Digital camcorder (DVD storage type*) DCF (photo)
Digital camcorder (Hard disk storage
type)
* DVD media must be finalized to be available for file importing.
DVD video (standard image quality)
AVCHD (high definition image quality)
DCF (photo)
MPEG2 (standard image quality)
AVCHD (high definition image quality)
Notes
To allow playback of the imported content on a DLNA device, select the option to import video and photo only
on the One Touch Copy page on the Home Server Settings Page.
When a digital camcorder of the DVD storage type is connected to the Home Server, only video and photo
contents will be imported even if the option to import all type of content is selected on the One Touch Copy
page on the Home Server Settings Page.
To import from a memory card
Insert a memory card into a memory card slot (page 10 and 11) on the front of the Home
1
Server.
Be sure to select the memory card slot appropriate for the media you are using.
Insert the media until it clicks into place. The MEMORY CARD access indicator light (page 11) blinks
and the COPY indicator light turns on.
Notes
Be sure to insert the media in the correct orientation. To avoid damaging the memory card slot or the
media, do not force the media into the slot.
To avoid loss or corruption of the stored data, be sure NOT to:
– Remove the media or turn off the Home Server while access to the media is in progress.
– Use the media in a location subject to static electricity or electric noise.
Tips
Insert one memory card at a time even when you want to import data from multiple media cards.
If no content has been updated since the previous import, the COPY indicator light will not turn on.
Operations
29
Page 30
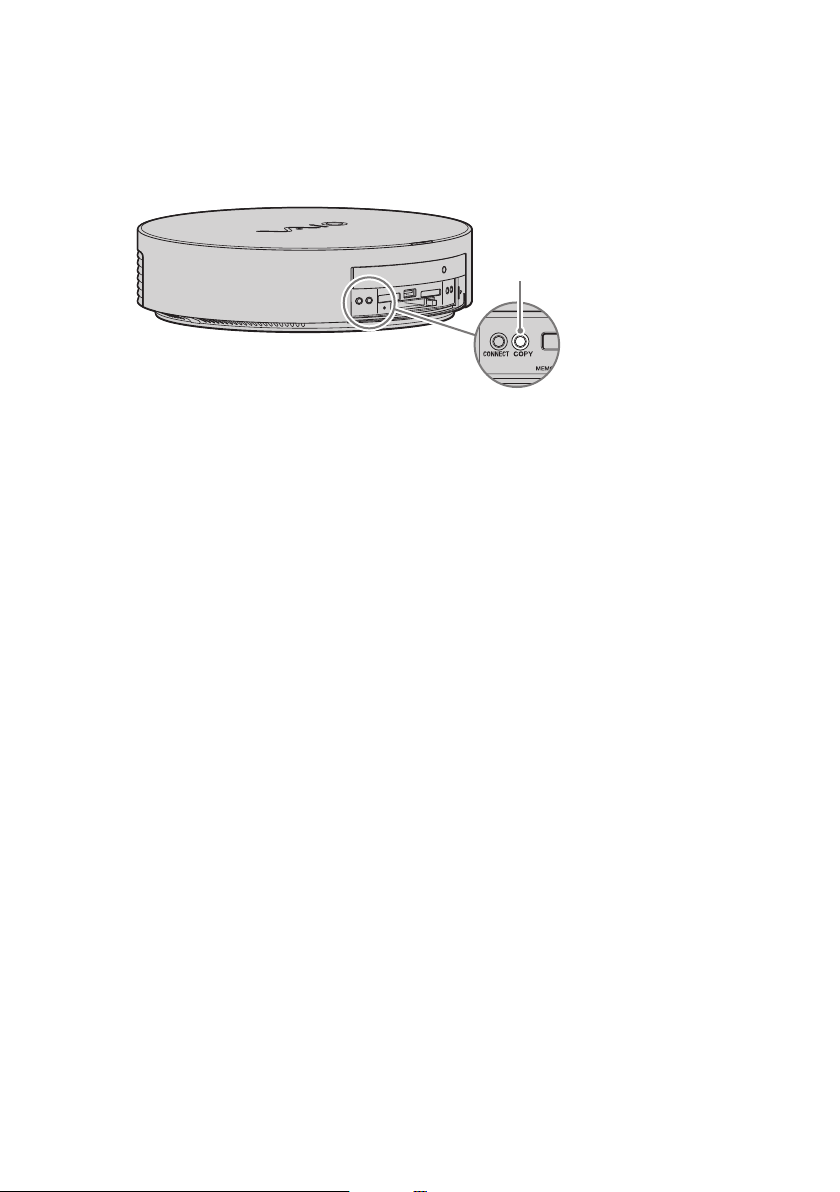
When the COPY indicator light turns on, press the COPY button.
2
The copy process notification message appears on the display and the COPY indicator light blinks while
the copy process is in progress.
COPY button
Once the copy process is complete, a completion message will appear on the display and the MEMORY
CARD access indicator light and the COPY indicator light turns off.
For viewing the destination folder, see “To view the copied photo and video contents” on page 30.
Wait until both the MEMORY CARD access indicator light and the COPY indicator light are
3
off, and then remove the media from the slot.
To remove the “Memory Stick” media or the SD memory card, push in and release the media, then pull it
out. If you failed, repeat this action.
To remove the CompactFlash media, press the CF (CompactFlash) media eject button (page 11) and pull
out the media.
To view the copied photo and video contents
From a DLNA device
Access the Recently Added folder or the Albums folder within the Photo folder. See “Folder
configuration on the Home Server when accessed from a DLNA device” on page 39 for further
information.
When your Home Server is used as a network storage device
Access the One Touch Copy folder. See “Default folder configuration and access privilege” on page 24 for
further information.
30
Page 31

About memory cards
Your Home Server supports the “Memory Stick” media, the SD memory card, and the CompactFlash
media. The following describes the precautions on using individual types of media.
“Memory Stick” media
– You can use 5 types of the “Memory Stick” media on your Home Server:
“Memory Stick,” “Memory Stick Duo”, “Memory Stick PRO”, “Memory Stick PRO Duo”, and “Memory Stick
PRO-HG Duo.”
– The Memory Stick slot on your Home Server can accommodate both standard- and Duo-size media. You can
insert the Duo-size “Memory Stick” media directly into the Memory Stick slot without using the adapter.
– Do not insert the “Memory Stick” media and the “Memory Stick Duo” media into the Memory Stick slot at
the same time, as it may damage the slot and/or the media.
– The Memory Stick slot on your Home Server does not support the MagicGate feature of the “Memory Stick”
media. This means that you cannot use copyright-protected data on the Home Server.
About “MagicGate”
MagicGate is the general name of the copyright protection technology developed by Sony. This technology
ensures that the protected content is only transferred between a MagicGate compliant device and the
“Memory Stick” media (authentication) and that the protected content is recorded and transferred in an
encrypted format. Before playing the protected content, the MagicGate feature also checks for authenticity
and decrypts the protected content only if authentication has succeeded in order to protect against playback
of copyright-protected data on an unauthenticated device.
– The Memory Stick slot on your Home Server does not support 8-bit parallel data transfer.
– Your Home Server has been tested and found compatible with Sony branded “Memory Stick” media with a
capacity of up to 16 GB that are available as of August 2008. However, not all “Memory Stick” media that
meet the same specifications as the compatible media are guaranteed of compatibility.
SD memory card
Your Home Server has been tested and found compatible only with SD memory cards with a capacity of
up to 2 GB and SDHC memory cards with a capacity of up to 16 GB available as of May 2008. However,
not all memory card meet the same specifications.
CompactFlash media
Your Home Server supports the Type-I and II CompactFlash media. However, not all CompactFlash
media meet the same specifications.
Operations
About the compatible file formats
When the option to import video and photo only is selected on the One Touch Copy page on the Home Server
Settings Page, the files in the following format can be imported.
Memory card File format
“Memory Stick,” “Memory Stick Duo,”
“Memory Stick PRO,” “Memory Stick
PRO Duo,” and “Memory Stick PRO-HG
DCF (photo)
DVD video (standard image quality)
AVCHD (high definition image quality)
Duo”
SD/SDHC memory card DCF (photo)
CompactFlash (Type-I and II compliant) DCF (photo)
When the option to import all types of content is selected, there are no restrictions on the file formats.
Note
To play the imported content on a DLNA device, select the option to import video and photo only on the One
Touch Copy page on the Home Server Settings Page.
To cancel the on-going import
Press the CANCEL button on your Home Server.
31
Page 32

About the One Touch Copy settings
If you want to:
Change the type of the content to be imported. (Video and photo only/All)
Access the Home Server Settings Page and go to the One Touch Copy page.
Tip
For further information on the One Touch Copy page, click “Help” at the top right corner of the page.
Using the Back Up function
What you can do with the Back Up function
The Back Up function provides a way to automatically upload files in the specified folder on a personal
computer to your Home Server via your home network or the Internet in connection with the PC Link
software.
In addition to starting an upload as you scheduled in the Back Up profile, you can manually start any
backup at any time.
The Back Up function also provides metadata analysis that adds additional information to music content so
that DLNA devices can use it for file management and searching. Additionally, Sony branded DLNA
devices use this information to categorize the music files stored in the Release Year, Music channels, and
Mood folders. You can select the option for this metadata analysis when adding or changing Back Up
profiles on your computer with the PC Link software.
For further information on the Back Up function, refer to the help file on the PC Link software.
32
Notes
To add or change Back Up profiles, you must connect the computer and the Home Server to your home
network. Back Up uploading via the Internet has additional requirements. See page 42 for further information.
Playback of the music files in the Music channels and the Mood folders can only be available on Sony branded
DLNA devices.
About importing music content
To add metadata to music content at the time of an upload by the Back Up function, you must select the
option to add information for the Music Channel Function to the music files on the Back Up properties
window of the PC Link software.
The music content with added metadata information will be sorted as follows for playback on the
destination DLNA devices.
By released years (Release Year)
By channels, such as general feelings and time zones (Music channels)
By musical moods (Mood).
Page 33

Adding a Back Up profile
Use the PC Link software on your personal computer.
Note
To add a Back Up profile, you must connect the computer and the Home Server to your home network. For
information on network connection, consult the following section in the Setup Guide: Hardware connection and
setup - Connecting to a network.
Click “Start,” “All Programs,” “PC Link,” and “PC Link.”
1
The PC Link software starts and the main window appears on the desktop.
For further instructions, refer to the help file on the PC Link software.
Tip
You can also, double-click the PC Link icon on the taskbar to start the software.
You can view the upload source device name and the upload source folder name on the Back Up page on
the Home Server Settings Page.
About Back Up profiles
To view or change Back Up profiles, access the Home Server Settings Page or start the PC Link software.
If you want to:
Accept or deny Back Up uploading to the Home Server.
Change the Receive folder names, the description on shared folders, or the description of the Receive
folders.
Access the Home Server Settings Page and go to the Back Up page.
Tip
For further information on the Back Up page, click “Help” at the top right corner of the page.
Operations
33
Page 34

If you want to:
Create, view, or change Back Up profiles.
Start a backup manually.
Abort the on-going backup.
Remove Back Up profiles.
Start the PC Link software.
Tips
Refer to the help file on the PC Link software for detailed instructions.
Removing a Back Up profile does not delete the corresponding Receive folder on the Home Server.
To delete this folder, remove the folder content first. Next, access the Home Server Settings Page, go
to the Shared folders page, and delete the folder. For further information on the Shared folders page,
click “Help” at the top right corner of the page.
If you want to:
Remove Back Up profiles.
34
Start the PC Link software or access the Home Server Settings Page.
Tips
When using the PC Link software
– Refer to the help file on the PC Link software for detailed instructions.
– It is recommended that you use the PC Link software for removing Back Up profiles. Removing a Back
Up profile on the software removes the corresponding Data Sync (receiving) profile on the Home Server
as well.
When using the Home Server Settings Page
– Go to the Back Up page and click “Help” at the top right corner to see the detailed instructions.
– Removing a Data Sync (receiving) profile does not delete the Receive folder.
Note
Removing a Data Sync (receiving) profile on the Home Server Settings Page does not remove the
corresponding Back Up profile of the PC Link software on the personal computer.
Page 35

Connecting from DLNA Devices
You can connect to your Home Server from DLNA devices, such as some TVs, Wireless Digital Audio*,
and PLAYSTATION3, and access the Home Server content.
* The VGF-WA1 Wireless Digital Audio may not be available, depending on the country or region of your
residency.
The prerequisites for connection depends on the IP address settings of your Home Server.
When the Home Server has a global IP address
Connection from a DLNA device requires DLNA device registration on the Home Server. Access the
Home Server Settings Page and complete the registration.
When the Home Server has a private IP address
If your network is set up as described in the Setup Guide, you can connect your DLNA device and access
the content.
Note
While the content of the Home Server are accessed from DLNA devices, doing one of the following may shut
down the connections and stops the playback on the DLNA devices.
Restoring the Home Server
Restoring the system
Pressing the CANCEL button on the Home Server for 10 seconds or longer
Playing the Home Server content on the DLNA device
1
Connect the DLNA device to the network.
For detailed instructions, refer to the manual that came with the device.
Operations
If the Home Server has a private IP address, the DLNA device will automatically be registered
on the Home Server.
Proceed to step 3.
2
Register the Home Server on the DLNA device.
For detailed instructions, refer to the manual that came with the device.
3
Select a file in a shared folder on the Home Server and play the file.
Tip
For the folder configuration on the Home Server, see “Folder configuration on the Home Server when
accessed from a DLNA device” on page 39.
35
Page 36

About the DLNA device settings
If you want to:
View the DLNA device names registered on the Home Server.
Restrict access from DLNA devices.
Permit or reject access from a DLNA device.
Access the Home Server Settings Page and go to the DLNA device page.
Tip
For further information on the DLNA device page, click “Help” at the top right corner of the page.
Playing the Home Server content on the Wireless Digital Audio
When the Sony VGF-WA1* Wireless Digital Audio is registered on the Home Server, you can play the
Home Server’s music content on the Wireless Digital Audio via wireless LAN connection by connecting a
Wireless Adapter to the Home Server. Additionally, if the Home Server is connected to the Internet, you
can listen to the web radio.
* The VGF-WA1 Wireless Digital Audio may not be available, depending on the country or region of residency.
Connecting the Wireless Digital Audio to the Home Server for the first time
For detailed instruction, consult the following section in the Setup Guide: Letting DLNA devices to access
audio/video content - To access the music content stored on your Home Server from a Wireless Digital
Audio device.
36
Note
You can register up to 5 Wireless Digital Audio units.
To register additional Wireless Digital Audio units, you must remove the registration of all devices. See page 37 for
the detailed instructions.
Tip
Additionally you can also connect the Wireless Digital Audio to the Home Server via a wireless LAN access point.
For detailed instructions, refer to the manual that came with your Wireless Digital Audio.
Page 37

Playing music content
You play the Home Server’s music content just by connecting a Wireless Adapter to the Home Server with
the designated Wireless Adapter connection support cable.
Note
Accessing the music content on the Home Server from multiple Wireless Digital Audio units at the same time may
interrupt the playback.
Tips
When the display window on the Wireless Digital Audio shows the MAC address of the Home Server,
you can press the CANCEL button on the Home Server to clear it.
For the file formats compatible on the Wireless Digital Audio, refer to the manual that came with the
Wireless Digital Audio.
When the Home Server is connected to the Internet, you can listen to the web radio. If the Home Server
is connected to the Internet via a proxy server, you must set up the proxy server on the Wireless Digital
Audio. Refer to the manual that came with the Wireless Digital Audio for detailed instructions.
Removing registration of the Wireless Digital Audio
You can remove the registration of the Wireless Digital Audio by:
Restoring the Home Server (page 54).
Restoring the system (page 55).
Removing the registration on the VGF-WA1 page on the Home Server Settings Page.
Follow the steps below to remove the registration on the VGF-WA1 page.
Access the Home Server Settings Page (page 22).
1
Click “VGF-WA1” in the left pane.
2
The VGF-WA1 page is displayed in the right pane.
Click “Remove all registrations.”
3
On the confirmation page, click “OK.”
4
Operations
Note
You cannot remove the registration of a particular Wireless Digital Audio unit.
37
Page 38

About the Wireless Digital Audio settings
If you want to:
View the number of the Wireless Digital Audio units and their device names and MAC addresses.
Remove the registration of the Wireless Digital Audio units.
Note
You can only remove the registration of all Wireless Digital Audio units, but not the registration of a
particular unit.
Change the wireless LAN channel.
Access the Home Server Settings Page and go to the VGF-WA1 page.
Tip
For further information on the VGF-WA1 page, click “Help” at the top right corner of the page.
38
Page 39

Folder configuration on the Home Server when accessed from
a DLNA device
The following shows the folder configuration on the Home Server.
Top layer Second layer
Video Albums
The names of the folders containing videos are listed.
Genre
This folder appears only when the videos that have genre information added, are stored
on the Home Server.
Date
All Videos
Recently Added
The content that has been imported within the last one week is listed.
Data Sync
The content received by the Data Sync function is listed.
Music Playlists
Artists
Albums
Genre
Music Cannel
Mood
This folder is a hidden folder.
Release Year
All Music
Recently Added
The content that has been imported within a week before is listed.
Jackets
Data Sync
The content received by the Data Sync function is listed.
Photo Albums
Date
Tags
The XMP tags added by the Windows Photo Gallery software are listed.
All Photos
Recently Added
The content that has been imported within a week before is listed.
Data Sync
The content received by the Data Sync function is listed.
Recently Added The content that has been imported within a week before is listed.
Data Sync The content received by the Data Sync function is listed.
Operations
39
Page 40

Using the Remote Home Access Functions
You can use the Remote Home Access functions to share content on your Home Server with your family
and friends in distant locations via the Internet. Additionally, you can keep the data updated between your
Home Server and a personal computer or the Home Server at your family’s or friend’s home by exchanging
the data periodically or manually.
The Remote Home Access functions include:
VAIO Picture Lab function
You can use your Home Server as a Web server and let other users view the photo content in a specified
shared folder on your Home Server with Web browser software.
Internet
Personal
computer
Home Server
Media Link function
Web browser software
You can use the Media Link function and allow the use of the registered Media Link devices, Digital
Photo Frame VGF-CP1 for example, view the photo content in the specified shared folder on your Home
Server.
Internet
Media Link
device
Home Server
Photos
40
Page 41

Data Sync function
You can use the Data Sync function to keep the folder content updated between your Home Server and a
personal computer or another Home Server at your family’s or friend’s home by exchanging the content
periodically or manually.
Internet
Personal
computer
Your Home Server
Internet
Your Home Server Another Home Server
Back Up function
Once you have created a Back Up profile, you can use the Back Up function via the Internet. See page 32
for further information on the Back Up function.
Personal
computer
Home Server
Operations
41
Page 42

Network requirement for the Remote Home Access functions
To use the Remote Home Access functions, your Home Server must be connected to a home network that
is accessible from the Internet. To meet this requirement, you must have a UPnP compliant network router.
If your network router is not UPnP compliant
You may be able to allow access via the Internet by enabling the port forwarding capability of your network router.
Port forwarding setting requires the following steps:
1
Disable “UPnP (automatic router setup)” of the Home Server.
Uncheck “Use UPnP (automatic router setup)” in Options settings for the Server (NETSERVER)
test on the Home Server Settings Page.
2
Set IP address fixed for the Home Server.
Change the network connection setting on the Settings pages to “IP address (manual)” and set
the IP address for the Home Server fixed.
3
Set up the port forwarding for the router.
Set the protocol type as TCP and the port number as configured for Remote Home Access, and
specify the port number configured for VAIO Picture Lab.
(For port numbers for Remote Home Access and VAIO Picture Lab, see the Server
(NETSERVER) test page of the Home Server Settings Page. )
For details, refer to the instruction manual of your router.
Enabling the Remote Home Access functions
Follow the steps below to enable the Remote Home Access functions:
1
Turn off the Home Server.
42
2
Check if the NETSERVER switch (page 13) on the bottom of the Home Server is turned on.
This switch is turned on at the time of delivery.
3
Turn on the Home Server.
4
Check if the NETSERVER indicator light becomes green.
It will take some time for the NETSERVER indicator light to turn on after you turn on the
Home Server.
If the NETSERVER indicator light stays unlit for 5 minutes or longer, run the server test (page 42).
Starting the server test
Access the Home Server Settings Page (page 22).
1
Click “Server test” in the left pane.
2
The Server (NETSERVER) test page is displayed in the right pane.
Click “Run.”
3
The server test begins.
Upon completion, the test results will be displayed in another browser window.
Follow the on-screen instructions.
4
If you are using a network router that is not UPnP compliant, see “If your network router is not UPnP
compliant” on page 42.
Page 43

Using the VAIO Picture Lab function
The VAIO Picture Lab function lets the registered users access the folder containing photos via the Internet.
You can use this function to create a Web page that shows the folder content and let the users view the
content by entering the URL address for the Web page on Web browser software. Additionally, you can set a
password for viewing the content to protect against unauthorized access.
Note
Except for your personal use, it is against the copyright law to copy products of copyright holders without prior
consent from the respective copyright holders. Keep this in mind when moving or copying files to a shared folder.
Requirements on the personal computer to access the content
The personal computer must have Adobe Flash Player 9.0 or later and one of the following software browser
installed:
Microsoft Internet Explorer 6 (on computers with the Windows XP operating system)
Microsoft Internet Explorer 7 (on computers with the Windows XP operating system SP2 or the
Windows Vista operating system)
Firefox 2
Making the photos open to users
Add a shared folder to be used for the VAIO Picture Lab function on the Home Server Settings Page and
share the URL address of the shared folder by e-mail.
Access the Home Server Settings Page (page 22).
1
Click “Web/Media Link” in the left pane.
2
The Web/Media Link page is displayed in the right pane.
Click “Add” for VAIO Picture Lab settings.
3
The Add page is displayed. Click “Help” at the top right corner of the page and follow the instructions on
adding a shared folder in the help file.
Click “Start” and “My Network Places” or “Network.”
4
The My Network Places window or the Network window appears.
Double-click “MyStation” (the default name) or “(Home Server name).”
5
Double-click the folder that you added in step 3 to open the folder and copy the desired
6
photo files into the folder.
Let the users know the URL address of the shared folder.
7
Click “Help” at the top right corner of the page and follow the instructions in “Sending an e-mail that
contains information on the shared folder used for the VAIO Picture Lab function.”
The users can view the content by entering the notified URL address on Web browser software.
Operations
43
Page 44

About the VAIO Picture Lab settings
If you want to:
Change the shared folder used for the VAIO Picture Lab function.
Select whether or not to prompt password entry for accessing the shared folder.
Change the password for accessing the shared folder.
Preview the content of the shared folder used for the VAIO Picture Lab function.
View or change the settings.
Remove the shared folder registration.
Access the Home Server Settings Page and go to the VAIO Picture Lab page through the Web/Media
Link page.
Tip
For further information on the VAIO Picture Lab page, click “Help” at the top right corner of the page.
Using the Media Link function
This function lets the users who are registered to share data, access the folder content via the Internet.
Note
Except for your personal use, it is against the copyright laws to copy products of copyright holders without prior
consent from the respective copyright holders. Keep this in mind when moving or copying a file to a shared folder.
44
Making the content open to users
Access the Home Server Settings Page (page 22).
1
Click “Web/Media Link” in the left pane.
2
The Web/Media Link page is displayed in the right pane.
Click “Add” for Media Link settings.
3
The Add page is displayed. Click “Help” at the top right corner of the page and follow the instructions on
adding a shared folder in the help file.
Click “Start” and “My Network Places” or “Network.”
4
The My Network Places window or the Network window appears.
Double-click “MyStation” (the default name) or “(Home Server name).”
5
Double-click the folder that you added in step 3 to open the folder and copy the desired
6
music, photo, and video contents into the folder.
Page 45

About the Media Link settings
If you want to:
Change the Media Link device name.
Change the shared folder.
View or change the settings.
Remove the shared folder registration.
Access the Home Server Settings Page and go to the Media Link settings page through the Web/Media
Link page.
Tip
For further information on the Media Link settings page, click “Help” at the top right corner of the
page.
Transferring data to a personal computer or a Home Server outside
your home (Data Sync)
You can periodically and manually transfer data from the specified folder on your Home Server to a
computer or another Home Server.
Note
You can create only one Data Sync profile for a single destination or source device.
Operations
Creating Data Sync profiles
You can create Data Sync (transmitting) and Data Sync (receiving) profiles. The tool that you use for profile
creation depends on the type of the source or destination device.
Source device Destination device Tool
Personal computer Your Home Server
Your Home Server Personal computer
Your Home Server Another Home Server Home Server Settings Page (on your Home Server)
Data Sync profile creation involves device registration between the personal computer and your Home
Server or between your Home Server and the other Home Server.
Software required on the personal computer
To create Data Sync profiles on the personal computer, the computer must have the PC Link software
installed. If not, visit the support Web site at the following URLs and download the software:
http://esupport.sony.com/EN/VAIO/ for customers in the USA.
http://www.vaio-link.com/ for customers in Europe.
Home Server Settings Page (on your Home Server)
PC Link software (on the computer)
Home Server Settings Page (on your Home Server)
PC Link software (on the computer)
45
Page 46

To add a Data Sync (transmitting) profile with the Home Server on the personal
computer
Start the PC Link software (page 18).
1
Click “Settings” in the Data Sync (Transmitting) section on the main window.
2
The Data Sync (transmitting) settings window appears.
Add a Data Sync (transmitting) profile.
3
For detailed instructions, refer to the help file of the PC Link software.
Click “Start” and “My Network Places” or “Network.”
4
The My Network Places window or the Network window appears.
Double-click “MyStation” (the default name) or “(Home Server name).”
5
Double-click the source folder you specified in a profile in step 3 to open the folder and
6
copy the desired data into the folder.
The copied data will be sent from the folder to your Home Server according to the Data Sync
(transmitting) profile.
To add a Data Sync (transmitting) profile to a personal computer or Home Server on
your Home Server
Access the Home Server Settings Page (page 22).
1
Click “Data Sync (transmitting)” in the left pane.
2
The Data Sync (transmitting) page is displayed in the right pane.
Click “Add transmission.”
3
The Add transmission page is displayed. Click “Help” at the top right corner of the page and follow the
instructions on adding a profile in the help file.
Click “Start” and “My Network Places” or “Network.”
4
The My Network Places window or the Network window appears.
Double-click “MyStation” (the default name) or “(Home Server name).”
5
Double-click the source folder you specified in a profile in step 3 to open the folder and
6
copy the desired data into the folder.
The copied data will be sent from the folder to the destination personal computer or Home Server
according to the Data Sync (transmitting) profile.
46
Page 47

About the Data Sync profiles
If you want to:
Create, view, or change Data Sync (transmitting/receiving) profiles on the personal computer.
Start a transmission manually on the personal computer.
Remove Data Sync (transmitting/receiving) profiles on the personal computer.
Start the PC Link software.
Tips
Refer to the help file on the PC Link software for detailed instructions.
Removing a Data Sync profile does not delete the corresponding Receive folder on the Home Server.
To delete this folder, remove the folder content first. Next, access the Home Server Settings Page, go
to the Shared folders page, and delete the folder. For further information on the Shared folders page,
click “Help” at the top right corner of the page.
If you want to:
View, add, or remove a Data Sync (transmitting) profile on your Home Server.
Change the transmission schedule or the destination device name on your Home Server.
Start the transmission manually on your Home Server.
Abort the on-going transmission on your Home Server.
Operations
Access the Home Server Settings Page and go to the Data Sync (transmitting) page.
Tips
For further information on the Data Sync (transmitting) page, click “Help” at the top right corner of
the page.
Removing a Data Sync (transmitting) profile does not delete the corresponding shared folder (the
Send folder) on the Home Server. To delete this folder, remove the folder content first. Next, access
the Home Server Settings Page, go to the Shared folders page, and delete the folder. For further
information on the Shared folders page, click “Help” at the top right corner of the page.
47
Page 48

If you want to:
View, add, or remove a Data Sync (receiving) profile on your Home Server.
Change Data Sync (receiving) profile names on your Home Server.
Access the Home Server Settings Page and go to the Data Sync (receiving) page.
Tips
For further information on the Data Sync (receiving) page, click “Help” at the top right corner of the
page.
To remove a Data Sync (receiving) profile on your Home Server, it is recommended that you remove
the corresponding Data Sync (transmitting) profile on the source device. Removing the Data Sync
(transmitting) profile on the source device will automatically remove the corresponding Data Sync
(receiving) profile on your Home Server.
Removing a Data Sync (receiving) profile does not delete the corresponding shared folder (the
Receive folder) on the Home Server. To delete this folder, remove the folder content first. Next,
access the Home Server Settings Page, go to the Shared folders page, and delete the folder. For
further information on the Shared folders page, click “Help” at the top right corner of the page.
Note
Deleting a Data Sync (receiving) profile on the Home Server Settings Page does not delete the corresponding
Data Sync (transmitting) profile on the source device.
48
Page 49

Making Backup Copies
You can make two types of backup copies.
Copying the data on the Home Server to a USB hard disk drive
You can create a Home Server backup profile on a per -folder basis on the Home Server Settings Page
and make a backup copy of each folder on a USB hard disk drive connected to your Home Server. Next,
you can restore the backup data to your Home Server from the USB hard disk drive. Then, with the PC
Link software, you can copy the backup data from the USB hard disk drive to your personal computer.
Copying the data on the personal computer to the Home Server
You can use the PC Link software to create Home Server backup profiles and upload the data to your
Home Server for backup purposes.
Copying the data on the Home Server to a USB hard disk drive
Making a backup copy
Access the Home Server Settings Page.
Connect a USB hard disk drive to the Home Server.
1
Access the Home Server Settings Page (page 22).
2
Click “Home Server backup” in the left pane.
3
The Home Server backup page is displayed in the right pane. Click “Help” at the top right corner of the
page and follow the instructions on creating a Home Server backup profile and starting the backup
process.
Note
Your Home Server supports USB hard disk drive in FAT32 format, but not those in NTFS format.
Tips
About the backup destination folders
Creating a Home Server backup profile on the Home Server Settings Page creates the backup folder with the
name, “HomeServer - [MAC-ADDRESS],” on the USB hard disk drive. Starting the Home Server backup
process will create another folder with the name, which you specified in the Home Server backup profile, within
the backup folder and make a backup copy of the backup source folder.
On the Home Server backup page on the Home Server Settings Page, you can:
– Create Home Server backup profiles.
– View Home Server backup profiles.
– Change the backup schedule in a Home Server backup profile.
– Delete Home Server backup profiles.
– Start the Home Server backup process manually.
Operations
49
Page 50

Notes
You can create up to 10 Home Server backup profiles.
If a USB hard disk drive is not connected to the Home Server at the time of starting the Home Server backup
process, the Home Server backup process will not begin.
If a Home Server backup process is in progress at the time of starting another process, the second Home Server
backup process will begin as soon as the first one completes. If multiple Home Server backup processes are
scheduled to start at the same time, the processes will begin in a random order.
If a restore process is in progress at the time of starting a Home Server backup process, the Home Server backup
process will begin as soon as the restore process is completed.
When the USB hard disk drive has multiple partitions in FAT32 format, backup files will be created in the
partition with the first partition number.
If the same backup file name is specified in more than one Home Server backup profile, starting a Home Server
backup process will overwrite the backup data that was created by the previous process.
Starting the Home Server backup process for a deleted folder will remove the backup data that was created by
the previous process.
If the backup source folder contains a file with the size of over 4 GB, it will be divided into pieces of 4 GB.
Starting a Home Server backup process for such a folder will create the folder with the same name as the 4 GB
file and stores the divided files and the division information before making a backup file.
Restoring the backup data
You can restore the backup data to your Home Server or copy it to your personal computer.
To restore the backup data to the Home Server
Access the Home Server Settings Page.
Connect the USB hard disk drive with the backup data to the Home Server.
1
Access the Home Server Settings Page (page 22).
2
Click “Home Server restore” in the left pane.
3
The Home Server restore page is displayed in the right pane. Click “Help” at the top right corner of the
page and follow the instructions in the help file.
To restore the backup data to a personal computer
Start the PC Link software.
Connect the USB hard disk drive with the backup data to a personal computer.
1
Click “Start,” “All Programs,” “PC Link,” and “Restore Tool.”
2
Click “Restore.”
3
The USB hard drive Restore window appears.
Select the restore source folder and the restore destination folder and click “Restore.”
4
The restore process begins.
On the completion window, click “Continue” or “Close.”
5
50
Note
You cannot start a restore process while a Home Server backup process is in progress.
Page 51

Copying the data from a personal computer to your Home Server
You can use the PC Link software to create a Home Server backup profile and send a copy of the data to the
Home Server (page 32).
Operations
51
Page 52

Updating the Firmware
You can update the firmware of your Home Server with the automatically downloaded update files or by
accessing the support Web site.
Note
Do not update the firmware while a Home Server backup process to the USB hard disk drive is in progress or the
One Touch Copy function is active.
Updating the firmware with the automatically downloaded update
files
When a firmware update file is downloaded to your Home Server via the Internet, the INFO indicator light
turns on in blue.
Follow the steps below to update the firmware.
1
Access the Home Server Settings Page (page 22).
2
Click “Firmware update” in the left pane.
The Firmware update page is displayed in the right pane.
3
Confirm that the message “New firmware version is available” is displayed to the right
of the Status in the Automatic Update section.
4
Check the version in the New version field.
5
Click “Start update” in the New version section.
The Start update page is displayed.
52
6
Thoroughly read the terms and conditions of the end user license agreement and click
“I Agree.”
The firmware update begins and the (POWER) indicator light on the Home Server blinks
alternately in green and orange.
When the (POWER) indicator light stops blinking, the Home Server restarts.
The new firmware will be activated after the restart.
Page 53

Updating the firmware by accessing the support Web site
When the firmware update files are not downloaded on your Home Server, follow the steps below to update
the firmware.
1
From the personal computer connected to the Home Server via the home network,
access the support Web site at:
http://esupport.sony.com/EN/VAIO/ for customers in the USA.
http://www.vaio-link.com/ for customers in Europe.
2
Download the latest update program of VGF-HS1 Series Home Server.
3
Access the Home Server Settings Page (page 22).
4
Click “Firmware update” in the left pane.
The Firmware update page is displayed in the right pane.
5
Click “Browse...” to the right of the Firmware file field in the Manual update section.
6
Select the downloaded firmware file and click “Open.”
7
Click “Start update” in the Manual update section.
The firmware update begins and the power indicator light on the Home Server blinks alternately
in green and orange.
When the (POWER) indicator light stops blinking, the Home Server restarts.
The new firmware will be activated after the restart.
Tip
Updating the firmware may change the IP address of the Home Server Settings Page. Proceed with either of the
following procedures to access the Home Server Settings Page.
Accessing from the PC Link software
Start the PC Link software (page 18).
On the main window, click the server name of your Home Server in the Back Up section.
Accessing by entering the IP address
Press the DISPLAY button several times until the IP address appears on the display on the Home Server.
Start your browser software on the personal computer and enter the IP address in the URL address field.
Others
53
Page 54

Restoring Your Home Server
You can restore the factory default settings while keeping hard drive content. For information on the state
of your Home Server after restoring your Home Server, see “State of the Home Server after Restoring the
Home Server or the System” on page 56.
1
Access the Home Server Settings Page (page 22).
2
Click “Reset” in the left pane.
The Reset page is displayed in the right pane.
3
Click “Restore defaults.”
On the confirmation page, click “OK.”
The Rebooting page is displayed and the Home Server restarts.
The (POWER) indicator light on the Home Server blinks in orange until the restoring
process is completed.
Upon completion, the (POWER) indicator light stays lit in green.
Tip
Restoring the Home Server may change the IP address of the Home Server Settings Page. Proceed with either of
the following procedures to access the Home Server Settings Page:
Accessing from the PC Link software
Start the PC Link software (page 19).
On the main window, click the server name of your Home Server in the Back Up section.
Accessing by entering the IP address
Press the DISPLAY button several times until the IP address appears on the display on the Home Server.
Start your browser software on the personal computer and enter the IP address in the URL address field.
54
Page 55

Restoring Your System
You can restore the factory default settings while deleting all hard drive content and restore the state of the
Home Server at the time of delivery. For information on the state of your Home Server after restoring your
system, see “State of the Home Server after Restoring the Home Server or the System” on page 56.
Notes
You cannot restore the firmware.
Restoring system will also delete the sample content from the Media folder. To restore the sample content, copy
the content from the Sample folder on the supplied CD-ROM.
1
Access the Home Server Settings Page (page 22).
2
Click “Reset” in the left pane.
The Reset page is displayed in the right pane.
3
Click “Restore system.”
On the confirmation page, click “OK.”
The Rebooting page is displayed and the Home Server restarts. The Restoration and hard disk
format process start.
The (POWER) indicator light on the Home Server blinks in orange until both processes are
completed.
Upon completion, the (POWER) indicator light stays lit in green.
Tip
Restoring the system may change the IP address of the Home Server Settings Page. Proceed with either of the
following procedures to access the Home Server Settings Page:
Accessing from the PC Link software
Start the PC Link software(page 19).
On the main window, click the server name of your Home Server in the Back Up section.
Accessing by entering the IP address
Press the DISPLAY button several times until the IP address appears on the display on the Home Server.
Start your browser software on the personal computer and enter the IP address in the URL address field.
Others
55
Page 56

56
State of the Home Server after Restoring the Home Server or the System
The following shows the state of your Home Server after restoring the Home Server or the system.
Operation executed on the
Item to be affected
Administrator
Administrator name
At the
time of
delivery
Reset administrator name
Home Server Settings Page
Restore system Restore defaults
Password Reset password
Server name MyStation Not affected
Work group WORKGROUP Not affected
IP address Automatically obtained
Proxy server Reset proxy settings Not affected
Users Users deleted. If necessary, add users. Not affected
Shared
folders
Media Access
privilege:
Full
privilege
granted
to all
users
One Touch
Copy
Empty
folders
Sample Sample
content*
Access privilege:
Access privilege
is fully granted
to all users
The folder
content is
deleted.
Access privilege:
Access privilege
is fully granted
to all users
The folder
content is
deleted.
All sample content
is deleted.
Help Access privilege:
Not affected Not affected
Not affected Not affected
Not affected Not affected
Not affected Not affected
Read privilege granted to all
users
Shared folder created
using the Home Server
Settings Page
Clock NTP**
Automatic
None
All empty
shared folders
are deleted.
The folders with
content are
renamed to
“share” with a
sequential
number and
access privilege
is fully granted
to all users.
On Not affected
synchronization
Server time.windows.com Not affected
DLNA device
registration
Device
registration
None Not affected
Back Up Registration None Not affected
Data Sync Registration None Not affected
One Touch Copy
Wireless Digital
Audio***
* The sample content is stored in the Sample folder on the supplied CD-ROM.
** NTP means network time protocol.
*** The VGF-WA1 Wireless Digital Audio may not be available, depending on the country or region of your
residency.
Target content
Video and photo only Not affected
Registration None Not affected
Used channels
6 channels Not affected
After the COPY button
has been pressed
for 10 seconds
(The administrator and
IP settings are cleared).
Not affected
Page 57

Precautions
Handling your Home Server
Do not expose your Home Server to any
physical shocks or drop the Home Server, as it
may cause loss of data or a malfunction.
Do not place your Home Server in a location
subject to direct sunlight or heat sources where
the ambient temperature rises, as it may cause a
malfunction.
Do not put any small metal objects, such as
paperclips, into your Home Server.
Do not use your Home Server on an unstable
surface or a place subject to vibration.
Your Home Server is a high-precision device.
Do not use the Home Server in a place subject
to dust, as it may cause a malfunction.
Do not use your Home Server in a place subject
to high humidity.
Do not use your Home Server in a place with
poor ventilation.
Do not use your Home Server in close
proximity of magnetic sources, as it may cause a
malfunction.
Moisture condensation
Exposing your Home Server to a sudden
temperature rise, such as bringing the Home
Server suddenly from a cold place to a warmer
place or using it in a heated room on a winter
morning, will cause moisture condensation on the
surface or in the interior of the Home Server,
which may result in a malfunction.
When you find moisture condensation on your
Home Server, wipe it off with tissue paper,
preferably. When the LCD tubes and surface are
cold, moisture condensation will form again after
you wipe it off. Leave the Home Server for about 1
hour without turning it on until it warms up to the
ambient temperature.
Handling the hard disk drive
Your Home Server includes a hard disk drive (a
storage device for applications and data). When
the hard disk drive fails for some reason, Sony
assumes no liability for restoring data stored on
the hard disk drive. To avoid loss of data, observe
the following:
Do not use your Home Server on an unstable
surface or a place subject to vibration.
Do not move your Home Server while powered.
Do not expose your Home Server to any
physical shocks.
Do not turn off or restart your Home Server
while data writing or reading is in progress.
Do not use your Home Server in a place with
sudden changes of 50ºF (10ºC) or more in
temperature.
Keep any objects with magnetic fields, such as a
TV, speakers, a magnet, and a magnetic
bracelet, away from your Home Server.
Do not remove the built-in hard disk drive
from your Home Server.
Making backup copies of the hard disk
drive
The hard disk drive is capable of storing an
extremely large amount of data, but can easily be
damaged and can lose the data. To avoid losing
critical data, it is recommended that you make
backup copies of the hard disk data on a regular
basis. For detailed instructions on making and
restoring backup data, see “Making Backup
Copies” on page 49. Sony assumes no liability for
loss of data.
Others
57
Page 58

Handling the “Memory Stick” media
To protect data stored in the “Memory Stick”
media, observe the following:
Do not touch the “Memory Stick” media
connector with your fingers or metal objects.
Use only the adhesive label supplied with the
“Memory Stick” media as a label.
Be sure to adhere the supplied label on the
designated area on the “Memory Stick” media.
Use the storage case supplied with the Memory
Stick media for carrying around or for storage.
Do not bend, drop, or apply strong shock to the
“Memory Stick media.”
Do not disassemble or modify the “Memory
Stick” media.
Do not expose to the “Memory Stick” media to
water.
Do not use the “Memory Stick” media in a
location subject to:
Extremely high temperatures, such as in a car
parked in the sun.
Direct sunlight.
High humidity.
Corrosive substances.
Using the “Memory Stick Duo” media
Do not use a fine-tipped pen to write on the
label that is adhered to the “Memory Stick Duo”
media. Exerting pressure on the media may
damage internal components.
Be sure to insert the “Memory Stick Duo”
media in the correct orientation. Forcing the
media in a wrong orientation into the Memory
Stick slot may damage the slot or the media.
Do not insert the “Memory Stick” media and
the “Memory Stick Duo” media into the
Memory Stick slot at the same time, as it may
damage the slot and/or the media.
Using the “MagicGate Memory Stick” media
The Memory Stick slot on your Home Server does
not support the MagicGate feature of the
“Memory Stick” media. You cannot use copyrightprotected files, such as music files, on the Home
Server. An attempt to access such files in the
“MagicGate Memory Stick” media with the file
management software, the Windows Explorer for
example, may disable use of the files.
Be sure to use the device compatible with the
“MagicGate Memory Stick” media, a “Memory
Stick” Walkman for example, and the designated
software for handling copyright-protected files.
Do not use the Memory Stick slot on your Home
Server for handling such files.
Using the AC adapter
Be sure to use the AC adapter supplied with your
Home Server for your safety.
Do not use any AC adapter with a broken cable for
your safety.
Illegal software copying
The software applications supplied with your
Home Server are provided under a license or
royalty agreement. Copying the supplied software
without consent is against the law. It is also against
the law to lend the software to a third person or
make a copy of the rented software. Be sure to
read the End User License Agreement thoroughly
before using the supplied software.
Playing digital data
You can make and store backup copies of digital
data, such as digital broadcast recordings and
video content, on your Home Server but cannot
play the copies. To play such digital data, you must
restore it to the original device.
58
Page 59

Cleaning your Home Server
Be sure to turn off your Home Server and
disconnect the power cord before cleaning.
Use a dry cloth to wipe off dust.
Be sure to use a dry, soft cloth to clean your
Home Server. If you find it difficult to clean,
blow on the spot and rub with a dry cloth; or
wipe with a slightly moistened cloth and then
use a dry cloth to wipe away the moisture.
Do not use any solvents, such as benzene,
acetone, alcohol, or thinner, as it will damage
the finish on your Home Server.
Be sure to read the instructions before using a
chemical cloth.
Unplug the power cord and connection
cables before moving your Home Server.
Moving your Home Server with the power cord
and other cables connected may damage the
cables, resulting in a fire or an electric shock. It
may also cause personal injuries by knocking
down devices connected to your computer. Take
extra care not to drop your computer.
Make sure that connectors are firmly
plugged.
Do not drop metal debris into a receptacle, as it
may cause a short circuit, resulting in a fire.
Plug a connector straight into a receptacle to
avoid a short circuit and a possible fire.
If the connector is equipped with tabs or screws
for securing, be sure to tighten them to avoid
loose connection.
Before Disposing of Your
Home Server
Before disposing of your Home Server, be sure to
erase your valuable data.
The Home Server Settings Page provides a way to
restore the state of the Home Server at the time of
delivery. You can click “Restore system” on the
Reset page to restore the system settings and
delete all the data you previously stored. This
process, however, only changes the management
data on the hard disk drive to make the stored
data disabled for access from the operating
system, Linux for example, and does not really
erase the data. If you dispose of your Home Server
in this state, therefore, a third person could access
and restore your data with special software; and
then use it for unethical purposes.
It is crucial that you completely erase your data on
the hard disk drive at your own risk before
disposing of your Home Server to avoid
information leaks.
To completely erase your data, expose the hard
disk drive to magnetic fields to destroy the data on
the drive and then physically destroy the drive.
Others
59
Page 60

Getting Help Specifications
The following provides information on how to get
help and support from Sony and troubleshooting
tips for your Home Server.
Sony support options
Sony provides several support options for your
Home Server. When you have questions about
your Home Server or the software, refer to the
following:
This User Guide explains how to use your
Home Server.
For customers in the United States
Sony Online Support provides instant access to
information on commonly encountered
problems. You can search the Knowledge
Database for the corresponding solutions
online.
Visit Sony Online Support at:
http://www.esupport.sony.com/EN/VAIO/
The Sony Customer Information
Service Center offers information about your
Home Server and other Sony products that
work with your Home Server. To contact the
Sony Customer Information Service Center,
call 1-888-4SONYPC (1-888-476-6972).
For customers in Europe
VAIO-Link. For addresses and telephone
numbers, refer to
http://www.vaio-link.com/
For further service support information, refer to
Warranty sheet or Guarantee and Service Support
booklet (depending on the country or region of
residency).
Interface
USB ports: Type-A receptacles (3)
(USB 2.0 compliant)
Network (LAN)
port:
Memory card
slots:
10Base-T/100Base-TX/
1000Base-T compliant port (1)
(Auto-MDIX compliant)
“Memory Stick”/”Memory Stick
Duo” compatible slot (1)
SD memory card slot (1)
CompactFlash slot (1)
Hard disk drive
Capacity: Approx. 1 TB*
* Calculated where one gigabyte equals to one
billion bytes. 3 GB is reserved for the system.
Power supply
Input: AC 100 - 240 V, 50/60 Hz
Output: DC 19.5 V
Power consumption
(with no USB device connected)
28 W (in normal mode),
12 W (in power-saving mode)
Operating temperature
50ºF to 95ºF (10ºC to 35ºC)
(temperature gradient less than 18ºF (10ºC)/hour)
Operating humidity
40% to 80% (not condensed), provided that
humidity is less than 65% at 95°F (35°C)
(hygrometer reading of less than 84°F (29°C))
Storage temperature
-4ºF to 140ºF (-20ºC to 60ºC) (temperature
gradient less than 18ºF (10ºC)/hour)
60
Storage humidity
10% to 90% (not condensed), provided that
humidity is less than 20% at 140°F (60°C)
(hygrometer reading of less than 95°F (35°C))
Page 61

Dimensions
Approx. 10.6 x 2.8 inches (270 x 71 mm)
(Diameter x Height)
Mass
Approx. 6.8 lb. (3.1 kg)
Supported devices
Personal computer with Windows XP operating
system SP2 or later installed
Personal computer with Windows Vista
operating system installed
DLNA Guidelines-compliant device (DLNA
HNv1 compliant)
Accessories
Refer to the supplied Setup Guide.
DLNA support
You can enjoy content from DLNA devices on the
home network.
Design and specifications are subject to change
without notice.
Others
61
Page 62

Error Messages
The following table lists the error messages displayed on the display of your Home Server and the measures
to cope with the problems. Be sure to read or write down the error code and/or the error message before
pressing the OK button.
Error message Causes/measures
20 DLNA devices already
registered.
Press OK
5 devices already registered.
Press OK
Cannot create Data Sync
receive folder
Press OK
Cooling Fan
failure
Data Sync device already
registered
Press OK
Data Sync setup failed
Press OK
Data Sync setup timed out
Press OK
Data Sync
Updated
Defective USB
device connected
Device registration failed.
Press OK
Error during copying.
Press OK
You cannot connect another DLNA device because 20 DLNA devices
have already been registered. Go to the DLNA device page on the
Home Server Settings Page and delete unnecessary devices.
An attempt to register the sixth VGF-WA1 Wireless Digital Audio unit
was made. To register a new unit, go to the DLNA device page on the
Home Server Settings Page and delete the registration of all Wireless
Digital Audio units.
The number of shared folders has already reached the limit. Go to the
Shared folders page on the Home Server Settings Page (page 22) and
delete unnecessary shared folders.
The cooling fan on your Home Server is not working. Check the
exhaust air vent on the back (page 12) for any obstacles.
There already is a Data Sync (transmitting) profile on the destination
device. Use the specified folder on the destination device or delete the
profile to add a new one.
A session to create a new profile for the Remote Home Access
functions failed. Start the session all over again.
A session to change a Data Sync (transmitting) profile timed out. Start
the session all over again.
A new file was created or an existing file was updated on your Home
Server by the Data Sync (receiving) function. This message will
automatically disappear in 24 hours.
A defective USB device is connected. Check the device for
performance.
Device registration for the Remote Home Access functions failed. Start
the registration all over again.
Data import with the One Touch Copy function failed. Check your
data for corruption.
62
Page 63

Error message Causes/measures
Error: YY
Error during Data Sync
(receiving)
Error: YY
Error during Data Sync
(transmitting)
Error: YY
Error during Home Server
backup
Error: YY
Error during Home Server
restore
Error: YY
Error during PC Link Back Up
Error: YY
Home Server was not properly
shut down
Files already
copied
Global IP
Must be registered as an
administrator
Hard drive needs
formatting
In progress
Please wait
A reception by the Data Sync (receiving) function failed. The source
device might not be turned on or connected to the Internet. Check the
device for the power status and the network connection (page 9 and
42).
A transmission by the Data Sync (transmitting) function failed. The
destination device might not be turned on or connected to the
Internet. Check the device for the power status and the network
connection (page 9 and 42).
The Home Server backup process to the USB hard disk drive failed.
Start the process all over again.
Access was made from a personal computer to the folder or files under
the Home Server backup process. Do not access the folder or files while
being copied for backup.
The Home Server restore process from the USB hard disk drive failed.
Start the process all over again.
Access was made from a personal computer to the folder or files under
the Home Server restore process. Do not access the folder or files while
being copied for restoration.
An upload by the Back Up function from a personal computer failed.
The computer might not be turned on or connected to the network.
Check the computer for the power status and the network connection
(page 42).
The Home Server has once been forced to turn off due to a power
failure, such as a blackout, but now is in normal operation. If this error
message keeps appearing, check the power cord for proper connection.
The content of the connected device has already been imported.
Capture new photos or videos first and then use the One Touch Copy
function.
Your Home Server has a global IP address and unknown devices could
access the Home Server from the outside of your network. Go to the
User accounts page on the Home Server Settings Page and register
yourself as an administrator. In addition, it is recommended that you
restrict access from DLNA devices and access to the shared folders on
your Home Server.
Access the Home Server Settings Page and restore your Home Server
(page 54).
An attempt to start a new process was made while another process is in
progress. Wait until the on-going process completes.
Troubleshooting
63
Page 64

Error message Causes/measures
LAN cable not connected
Nothing to copy.
Press OK
NOTICE:
Firmware update ready
NOTICE:
Important message
Obtaining Confirmation code
failed.
Press OK
Obtaining Permission code
failed.
Press OK
Scanning
Hard drive…
Shared folder maximum
reached
Press OK
Unit temp.
too high
The network cable is not properly connected. Connect the cable
properly. Refer to the Setup Guide and see “Connecting to a network.”
There are no files to be imported with the One Touch Copy function
on the connected device. Capture new photos or videos first and then
use the One Touch Copy function.
You might have pressed the COPY button without connecting a copy
source device. Connect your device.
A firmware update was downloaded. Access the Home Server Settings
Page and update your Home Server (page 52).
An important message was downloaded. Check the Home Server
Settings Page (page 20) for the message.
A confirmation code was not obtained during the course of creating a
Data Sync (transmitting) profile. Check your Home Server for Internet
access (page 42).
A permission code was not obtained during the course of creating a
Data Sync (transmitting) profile. Check your Home Server for Internet
access (page 42).
A hard disk failure has occurred and the checking is now in progress.
Wait until the checking completes without turning off your Home
Server.
The number of shared folders has already reached the limit. Go to the
Shared folders page on the Home Server Settings Page (page 22) and
delete unnecessary shared folders.
Heat is building up inside your Home Server. Place the Home Server in
a place with good ventilation. Refer to the Setup Guide and see
“Precautions on placement” as well.
64
Page 65

Troubleshooting
If you have any problems with your Home Server, follow the steps below to search for a solution to your
problem before consulting our service contacts. If an error code and/or an error message is present, write it
down for your problem solving or later consultation.
1
Search this “Troubleshooting” for a solution.
You might want to search other sections of this User Guide as well. There may be tips and notes
in the instructions that might help you solve your problem.
2
Visit the support Web site at the following URLs:
http://esupport.sony.com/EN/VAIO/ for customers in the USA.
http://www.vaio-link.com for customers in Europe.
You could find the latest support information and frequently asked questions and answers there.
3
If you still cannot solve your problem, see page 60 to find out more about getting help
or consult your sales representative.
Home Server
DLNA devices
Problem Causes/measures
The VAIO Media software
does not indicate the sound
type (stereo, etc). when you
play the video content stored
on the Home Server with a
DLNA device.
The VAIO Media software
shows the message notifying of
a failure to display a photo list
when you try to view the
photo content stored on the
Home Server with a DLNA
device.
While you are playing the
content stored on the Home
Server with a DLNA device, a
communication error occurs
and the playback stops.
The sound type indication is part of the software function and is not
supported on the DLNA device.
When large photo content is stored on the Home Server, it takes some
time before a photo list appears. Move the content to another folder to
exclude it from the list. In addition, wait a while before viewing the
content when the photo list is displayed.
Connecting or removing a Wireless Adapter for the VGF-WA1
Wireless Digital Audio* while the playback process from a DLNA
device is in progress, restarts the DLNA server function of the Home
Server. Retry the playback on the DLNA device.
Troubleshooting
65
Page 66

Problem Causes/measures
You cannot play the content
you imported to the Home
Server with the One Touch
Copy function with a DLNA
device.
You cannot access the Home
Server or the Home Server
name is not displayed.
You do not see any music
entries on the Music channels.
* The VGF-WA1 Wireless Digital Audio may not be available, depending on the country or region of
residency.
To make imported content from an HDD Handycam or a “Memory
Stick” Handycam available for viewing with DLNA devices, select the
option to only import the video and photo content of the One Touch
Copy page on the Home Server Settings Page.
If the option to import all types of content is selected, you cannot play
the imported content from an HDD Handycam or a “Memory Stick”
Handycam with a DLNA device.
The IP address is not correct. Check if the Home Server has obtained
an IP address from your network router or Internet service provider.
Press the DISPLAY button several times to display the IP address of
the Home Server. If it begins with “169.,” it is not the IP address
obtained from the network router or the Internet service provider.
Check the network devices, including cables and network hubs for
appropriate connection.
Press and hold the CANCEL button on the Home Server for 10
seconds or longer to clear the administrator registration and the IP
address settings.
The music content on the Home Server has not been analyzed by
VAIO Content Analyzer.
Start the PC Link software and select the option to add metadata to the
music content at the time of Back Up uploading. Then, upload the
music content once again.
66
Page 67

Network storage devices
Problem Causes/measures
While the text string of the
shared folder name includes
two or more consecutive
spaces, the Explorer shows
only one space.
While the text string of the
shared folder name includes
upper-case letters, the Explorer
shows only lower-case letters.
You cannot delete large files on
the Home Server from a
personal computer with
Windows Vista operation
system installed.
The files copied from a
personal computer are corrupt.
You cannot access a shared
folder with access restriction
that you previously accessed
with another user account.
You cannot access a shared
folder with access restriction
after you restarted the Home
Server while access from the
personal computer to the
video or music content in the
shared folder was in progress.
While a shared folder on the
Home Server should be
accessible from all users, you
cannot change the folder
content from your personal
computer.
While a shared folder on the
Home Server should be
accessible from all users, you
cannot access the shared folder
from your personal computer.
This is the way the Explorer shows the text strings.
Upper and lower case letters are not distinguished on the Home Server.
Restart the personal computer or log off and on to the computer before
deleting such files.
File transfer may have failed due to a power supply failure or a network
connection failure. Copy the files once again.
Log off or restart the personal computer and log on to the computer
with another user account, and then access the shared folder.
Restart the Home Server or log off and on to the personal computer.
Then, log onto the computer and access the shared folder.
Write privileges are not granted to your user account. Access the Home
Server Settings Page from your personal computer, create another user
account, and grant write privileges to the account.
When the user account of the personal computer does not match the
Home Server account name, you may not be able to access shared
folders on the Home Server. On the Home Server, create a user
account with the same user name and password as those used on the
computer.
Troubleshooting
67
Page 68

Problem Causes/measures
The network window on your
personal computer does not
show the Home Server.
The work group name of the personal computer does not match the
one used on the Home Server. Assign the Home Server to the same
work group as the computer on the Basic Information page on the
Home Server Settings Page.
The IP address is not correct. Check if the Home Server has obtained
an IP address from your network router or Internet service provider.
Press the DISPLAY button several times to display the IP address of
the Home Server. If it begins with “169.,” it is not the IP address
obtained from the network router or the Internet service provider.
Check the network devices, including cables and hub devices for
appropriate connection.
Press and hold the CANCEL button on the Home Server for 10
seconds or longer to clear the administrator registration and the IP
address settings.
One Touch Copy
Problem Causes/measures
You cannot copy the video
content captured with a
camcorder (“Memory Stick,”
DVD, or HDD Handycam) to
the Home Server.
Connecting a USB flash drive
to one of the USB ports on the
Home Server does not turn on
the COPY indicator light.
You cannot find the files that
you have copied with the One
Touch Copy function.
The information file required for import to the Home Server, the
“INDEX.BDM” file on the “Memory Stick Duo” media for example,
has been deleted or renamed. Copy the content to a personal computer
first, and then copy them to the Home Server.
The USB flash drive may have been formatted in a format type other
than FAT32. Be sure to use a compatible USB device. Use of the USB
flash drive is not supported on the Home Server.
The used USB port is reserved for the Home Server backup function
and you cannot use it for the One Touch Copy function. Try another
USB port.
The file should be imported on the Home Server. Search other folders
for the file. To copy the same file again, select the option to import all
types of content on the One Touch Copy page on the Home Server
Settings Page.
68
Page 69

Shared folder
Problem Causes/measures
You see the message that you
cannot delete the shared folder
because it contains files when
you try to delete the shared
folder on the Home Server.
The shared folder contains a hidden temporary folder used for file
transfer by the Data Sync function. Change the folder view on your
personal computer to show hidden files and delete the temporary file
in the Data Sync folder.
Back Up
Problem Causes/measures
The INFO indicator light
lights in red and the display
shows “Error during PC Link
Back Up.”
Back Up uploading may fail if the Home Server is heavily loaded with
multiple processes, such as simultaneous content playbacks by multiple
personal computers. Quit the playback to unload the Home Server and
restart the Back Up uploading. The Back Up uploading will eventually
complete and the INFO indicator light will turn off.
Data Sync
Problem Causes/measures
When you change the Home
Server name, the on-going
Data Sync transmission fails.
Data Sync transmissions from
the Home Server, which is
connected to an xDSL
network, to other Home
Servers fail.
You cannot create a Data Sync
(transmitting) profile and you
are notified that the
destination device already has
one Data Sync (transmitting)
profile.
Do not change the Home Server name. While a Data Sync
transmission is in progress, changing the Home Server name aborts
the transmission.
The network traffics on the xDSL bandwidth may be congested. Start
the transmissions some other time or change their profiles to manual
transmission and start one transmission at a time.
A Data Sync (transmitting) profile with the destination device already
exists.
When the destination device is another Home Server:
Ask the owner of the Home Server to delete the corresponding Data
Sync (receiving) profile on the Data Sync (receiving) page on the
Home Server Settings Page. Then, create a Data Sync (transmitting)
profile on your Home Server.
When the destination device is a personal computer:
Ask the owner of the computer to delete the corresponding Data Sync
(receiving) with the PC Link software. Then create a Data Sync
(transmitting) profile on your Home Server.
Troubleshooting
69
Page 70

Home Server backup
Problem Causes/measures
Backup copies are made on an
unexpected USB device.
The Home Server backup
process fails.
Your Home Server is not capable of distinguishing USB device types.
Check the device name.
The backup source folder may have been accessed while the Home
Server backup process was in progress. Do not access the source folder
while the process is in progress.
Home Server restore
Problem Causes/measures
The Home Server restore
process fails.
The destination folder may have been accessed while the Home Server
restore process was in progress. Do not access the destination folder
while the process is in progress.
Wireless Adapter*
* The VGF-WA1 Wireless Digital Audio may not be available, depending on the country or region of
residency.
Problem Causes/measures
You cannot register your
VGF-WA1 Wireless Digital
Audio on your Home Server.
Check if the AUTO INSTALL switch on the Wireless Adapter is in the
OFF position.
You may have connected the Wireless Adapter while your Home
Server is turned off. Be sure to turn on the Home Server before
connecting the Wireless Adapter.
You may have connected multiple Wireless Adapter units. You can
connect only one Wireless Adapter unit.
Your Home Server may be executing another process, such as Back Up
uploading. Wait until the process completes.
The Wireless Digital Audio may have been configured to connect via
an access point. Change the network settings to connect the Wireless
Digital Audio via the Wireless Adapter.
70
Page 71

Problem Causes/measures
You have registered the
Wireless Digital Audio on the
Home Server without
specifying the device name,
but cannot find the Wireless
Digital Audio on the
VGF-WA1 page on the Home
Server Settings Page.
You may have connected or removed the Wireless Adapter while you
were registering the Wireless Digital Audio. Place the Wireless Digital
Audio into standby mode, turn on the Home Server and register the
device once again.
Others
Problem Causes/measures
You cannot access the Home
Server Settings Page.
The IP address is not correct. Check if the Home Server has obtained
an IP address from your network router or Internet service provider.
Press the DISPLAY button several times to display the IP address of
the Home Server. If it begins with “169.,” it is not the IP address
obtained from the network router or the Internet service provider.
Check the network devices, including cables and hub devices for
appropriate connection.
Press and hold the CANCEL button on the Home Server for 10
seconds or longer to clear the administrator registration and the IP
address settings.
Troubleshooting
Indicator lights
Problem Causes/measures
The NETSERVER indicator
light is blinking.
The NETSERVER indicator
light does not turn on.
The HDD indicator light lights
in orange.
The HDD indicator light is
blinking in orange.
The HDD indicator light is
blinking alternately in green
and orange.
Your Home Server is getting ready for access from the Internet. If the
indicator light stays unlit for 5 minutes or longer, run the server test on
the Home Server Settings Page (page 42).
Access from the Internet is disabled. Your network router may not be
UPnP compliant or has not been assigned a global IP address. Run the
server test on the Home Server Settings Page (page 42).
The remaining free space on the hard disk drive of your Home Server
is less than 10%. Delete unnecessary data.
The remaining free space on the hard disk drive of your Home Server
is 1 MB or less. Delete unnecessary data.
The hard disk drive on your Home Server is not accessible. Restore
your Home Server on the Home Server Settings Page (page 54).
71
Page 72

72
Problem Causes/measures
The INFO indicator light is
blue.
The INFO indicator light is
red.
The INFO indicator light is
blinking in red.
The (POWER) indicator
light is blinking in orange.
The (POWER) indicator
light is blinking alternately in
orange and green.
An important message has been downloaded to your Home Server.
Check the Basic Information page on the Home Server Settings Page
for the message.
An error has occurred on your Home Server. Check the Basic
Information page on the Home Server Settings Page for the error
description.
An error has occurred while file transfer by the One Touch Copy
function is in progress, the Wireless Digital Audio is connected, or
device registration for one of the Remote Home Access functions is in
progress. Press the CANCEL button.
Your Home Server is in the process of turning on or off. If the indicator
light stays blinking for 10 minutes or longer, unplug the power cord to
shut down the power supply. Then plug the cord back in and turn on
the Home Server.
The firmware update is in progress. If the indicator light stays blinking
for 10 minutes or longer, unplug the power cord to shut down the power
supply. Then plug the cord back in and turn on the Home Server.
PC Link software
Problem Causes/measures
You are notified that the
selected Home Server already
has 5 registered devices and
cannot register your device.
You are notified that the folder
where you attempted to create
the Send folder for a Data Sync
transmission already includes
the Receive folder for a Data
Sync reception and cannot
create a new Data Sync
(transmitting) profile.
You are notified that the folder
where you attempted to create
the Receive folder for a Data
Sync reception already
includes the Send folder for a
Data Sync transmission and
cannot create a new Data Sync
(receiving) profile.
You can register up to 5 devices for Back Up uploading on a single
Home Server. Go to the Back Up page on the Home Server Settings
Page and delete unnecessary profiles.
The folder that you specified as the source folder for a Data Sync
transmission has already been specified as the destination folder for a
Data Sync reception. Specify the folder that has not been specified as
the destination folder for any Data Sync reception.
You cannot specify the folder that includes the source folder for a
backup upload or a Data Sync transmission as the destination folder
for a Data Sync reception. Specify the folder that does not include the
source folder for a backup upload or a Data Sync transmission.
Page 73

Problem Causes/measures
You are notified of
unavailability of the selected
folder and cannot create a
Back Up profile or a Data Sync
profile.
You are notified that the
number of Back Up profiles
created for the selected Home
Server has already reached the
maximum and cannot create a
new Back Up profile.
The Home Server was not
found in the search for the
registered Home Servers.
You are notified that the
selected Home Server has
already been specified in
another Back Up profile or a
Data Sync profile on your
personal computer and cannot
create a new Back Up profile.
You are notified that the
selected Home Server has
already been specified in a
Back Up profile or another
Data Sync profile on your
personal computer and cannot
create a new Data Sync
(transmitting) profile.
You cannot specify the Windows system folder as the source folder for
Back Up uploading or the source/destination folder for a Data Sync
transmission/reception. Specify any folder other than the Windows
system folder.
This message may appear when you uninstall or install the PC Link
software on the personal computer where you have previously created
profiles for Back Up uploading and/or Data Sync transmission/
reception with the PC Link software. Go to the Back Up page on the
Home Server Settings Page and delete all profiles created on the
computer.
Your anti-virus software may have interrupted the search.
If your personal computer is connected to the Home Server via a
network router on a network, you cannot find the Home Server on the
network. Refer to the Setup Guide and see “Restrictions on access to a
network with multiple network routers“ in “Connecting to a network.”
Your personal computer is not connected to the Home Server via a
network. Check the network devices, including cables and network
hubs for appropriate connection.
The Home Server already has a Back Up profile with your personal
computer specified as the source device. Go to the Back Up page on
the Home Server Settings Page and delete the profile for the failed
upload, and then create a Back Up profile once again.
The Home Server already has the corresponding Data Sync (receiving)
profile. Go to the Data Sync (receiving) page on the Home Server
Settings Page and delete the profile for the failed Data Sync
transmission, and then create a Data Sync (transmitting) profile once
again.
Troubleshooting
73
Page 74

End User License Agreement
For customers in the USA
END USER LICENSE AGREEMENT FOR SONY SOFTWARE
YOU SHOULD CAREFULLY READ THE FOLLOWING AGREEMENT BEFORE USING THE
SOFTWARE INCLUDED WITH THIS PRODUCT. USING THIS SOFTWARE INDICATES YOUR
ACCEPTANCE OF THE AGREEMENT.
IMPORTANT-READ CAREFULLY:
This End-User License Agreement (“License”) is a legal agreement between you and Sony Electronics Inc.
(“SONY”), the manufacturer of your Sony device (“DEVICE”). All Sony software and third party software
included with your DEVICE , shall be referred to herein as the SOFTWARE. This License covers only the
SOFTWARE. The SOFTWARE includes DEVICE software, any associated media, any printed materials,
and any “on-line” or electronic documentation, as well as Sony-supplied or authorized updates/upgrades
thereto. By installing, copying, downloading or otherwise using the SOFTWARE, you agree to be bound by
the terms of this License. If you do not agree to the terms of this License, SONY is unwilling to license the
SOFTWARE to you. In such event, you may not use or copy the SOFTWARE, and you should promptly
contact SONY for instructions on return of the entire DEVICE and included SOFTWARE for a refund of
the purchase price of the DEVICE.
SOFTWARE LICENSE
The SOFTWARE is protected by copyright laws and international copyright treaties, as well as other
intellectual property laws and treaties. The SOFTWARE is licensed, not sold.
GRANT OF LICENSE
This License grants you right to use the SOFTWARE on the DEVICE solely for its intended purpose. This
SOFTWARE and the related documentation are licensed to you by SONY. The SOFTWARE is licensed as
single product and may not be separated for your personal use. You may install and use the SOFTWARE
(1) on the DEVICE or (2) in conjunction with the DEVICE by (i) downloading the SOFTWARE onto your
personal computer and (ii) subsequently uploading the SOFTWARE onto the DEVICE by accessing the
designated SOFTWARE set-up page.
74
DESCRIPTION OF OTHER RIGHTS AND LIMITATIONS
Limitation on Reverse Engineering, Decompilation and Disassembly. You may not modify, reverse
engineer, decompile, or disassemble the SOFTWARE in whole or in part.
Use Restriction. The SOFTWARE is considered a single integrated product that may only be used with the
DEVICE except as specifically described in documentation provided with the SOFTWARE.
Data Files. The SOFTWARE may create data files automatically for use with the SOFTWARE. Any such
data files will be deemed as part of the SOFTWARE.
Rental. You may not rent or lease the SOFTWARE.
Software Transfer. You may permanently transfer all of your rights under this License only as part of a sale
or transfer of the DEVICE, provided you retain no copies, transfer all of the SOFTWARE (including all
copies, component parts, the media and printed materials, all versions and any upgrades of the
SOFTWARE and this License), and the recipient agrees to the terms of this License.
Page 75

Termination. Without prejudice to any other rights, SONY may terminate this License if you fail to comply
with the terms and conditions of this License. In such event, you must destroy all copies of the SOFTWARE
and all of its component parts.
Dependent Software. The software, network services or other products other than the SOFTWARE upon
which the SOFTWARE’s performance depends on might be interrupted or discontinued at the discretion of
the suppliers (software suppliers, service providers, or Sony). Sony and its suppliers do not warrant that
those software, network services or other products will continue to be available, or will operate without
interruption or modification.
COPYRIGHT
All title and copyrights in and to the SOFTWARE (including but not limited to any images, photographs,
animation, video, audio, music, text and “applets,” incorporated into the SOFTWARE), and any copies of
the SOFTWARE, are owned by SONY or its suppliers. All rights not specifically granted under this License
are reserved by SONY.
USE OF SOFTWARE WITH COPYRIGHTED MATERIALS
The SOFTWARE is capable of being used by you to store, process and use content created by you and third
parties. Such content may be protected by copyright, other intellectual property laws, and/or agreements.
You agree to use the SOFTWARE only in compliance with all such laws and agreements that apply to such
content. You agree that SONY may take appropriate measures to protect copyright of content stored,
processed or used by the SOFTWARE. Such measures include, but are not limited to, counting the
frequency of your backup and restoration through certain SOFTWARE features, refusal to accept your
request to enable restoration of data through certain SOFTWARE features and termination of this License
in the event of your improper use of the SOFTWARE.
HIGH RISK ACTIVITIES
The SOFTWARE is not fault-tolerant and is not designed, manufactured or intended for use or resale as
on-line control equipment in hazardous environments requiring fail-safe performance, such as in the
operation of nuclear facilities, aircraft navigation or communication systems, air traffic control, direct life
support machines, or weapons systems, in which the failure of the SOFTWARE could lead directly to death,
personal injury, or severe physical or environmental damage (“High Risk Activities”). SONY and its
suppliers specifically disclaim any express or implied warranty of fitness for High Risk Activities.
PROHIBITION ON EXPORT. EXCEPT FOR EXPORT TO CANADA FOR USE IN CANADA BY
CITIZENS OF THE UNITED STATES OR CANADA, THE SOFTWARE AND ANY UNDERLYING
TECHNOLOGY MAY NOT BE EXPORTED OUTSIDE THE UNITED STATES OR TO ANY FOREIGN
ENTITY OR “FOREIGN PERSON” AS DEFINED BY U.S. GOVERNMENT REGULATIONS,
INCLUDING WITHOUT LIMITATION, ANYONE WHO IS NOT A CITIZEN, NATIONAL OR
LAWFUL PERMANENT RESIDENT OF THE UNITED STATES. BY USING THE SOFTWARE, YOU
ARE AGREEING TO THE FOREGOING AND YOU ARE WARRANTING THAT YOU ARE NOT A
“FOREIGN PERSON” OR UNDER THE CONTROL OF A FOREIGN PERSON.
U.S. GOVERNMENT RESTRICTED RIGHTS
The SOFTWARE is provided with RESTRICTED RIGHTS. Use, duplication, or disclosure by the United
States Government is subject to restrictions as set forth in subparagraph (c)(1) and (2) of the Commercial
Computer Software-Restricted Rights at 48 CFR 52.227-19, as applicable. Manufacturer is Sony Electronics
Inc., 16530 Via Esprillo, San Diego, CA 92127.
75
Page 76

LIMITED WARRANTY ON MEDIA
In situations where a back-up copy of the SOFTWARE is furnished on media, SONY warrants that for a
period of ninety (90) days from the date of its delivery to you the media on which the back-up copy of the
SOFTWARE is furnished to you will be free from defects in materials and workmanship under normal use.
This limited warranty extends only to you as the original licensee. SONY’s entire liability and your exclusive
remedy will be replacement of the media not meeting SONY’s limited warranty and which is returned to
SONY with proof of purchase in the form of a bill of sale (which is evidence that the media is within the
warranty period). SONY will have no responsibility to replace a disk damaged by accident, abuse or
misapplication. ANY IMPLIED WARRANTIES ON THE MEDIA, INCLUDING THE IMPLIED
WARRANTIES OF MERCHANTABILITY AND FITNESS FOR A PARTICULAR PURPOSE, ARE
LIMITED IN DURATION TO NINETY (90) DAYS FROM THE DATE OF DELIVERY. SOME STATES
DO NOT ALLOW LIMITATIONS ON HOW LONG AN IMPLIED WARRANTY LASTS, SO THESE
LIMITATIONS MAY NOT APPLY TO YOU. THIS WARRANTY GIVES YOU SPECIFIC LEGAL
RIGHTS, AND YOU MAY ALSO HAVE OTHER RIGHTS WHICH VARY FROM STATE TO STATE.
EXCLUSION OF WARRANTY ON SOFTWARE
You expressly acknowledge and agree that use of the SOFTWARE is at your sole risk. The SOFTWARE is
provided “AS IS” and without warranty of any kind and SONY and SONY’s licensors (In this Section,
SONY and SONY’s licensors shall be collectively referred to as “SONY”) EXPRESSLY DISCLAIM ALL
WARRANTIES, EXPRESS OR IMPLIED, INCLUDING, BUT NOT LIMITED TO, THE IMPLIED
WARRANTIES OF NON-INFRINGEMENT, MERCHANTABILITY AND FITNESS FOR A
PARTICULAR PURPOSE. SONY DOES NOT WARRANT THAT THE FUNCTIONS CONTAINED IN
THE SOFTWARE WILL MEET YOUR REQUIREMENTS, OR THAT THE OPERATION OF THE
SOFTWARE WILL BE ERROR FREE. FURTHERMORE, SONY DOES NOT WARRANT OR MAKE ANY
REPRESENTATIONS REGARDING THE USE OR THE RESULTS OF THE USE OF THE SOFTWARE IN
TERMS OF ITS CORRECTNESS, ACCURACY, RELIABILITY, OR OTHERWISE. NO ORAL OR
WRITTEN INFORMATION OR ADVICE GIVEN BY SONY OR A SONY AUTHORIZED
REPRESENTATIVE SHALL CREATE A WARRANTY OR IN ANY WAY INCREASE THE SCOPE OF
THIS WARRANTY. SHOULD THE SOFTWARE PROVE DEFECTIVE. YOU (AND NOT SONY OR A
SONY AUTHORIZED REPRESENTATIVE) ASSUME THE ENTIRE COST OF ALL NECESSARY
SERVICING, REPAIR OR CORRECTION. SOME JURISDICTIONS DO NOT ALLOW THE
EXCLUSION OF IMPLIED WARRANTIES, SO THE ABOVE EXCLUSION MAY NOT APPLY TO YOU.
Without limiting the foregoing, you specifically acknowledge that the SOFTWARE is not designed or
intended for use on a DEVICE other than the DEVICE. You expressly understand that any other DEVICE
hardware, software or data could be damaged by the installing or using the SOFTWARE on such other
DEVICE and that SONY is not responsible for any such damage. You expressly acknowledge and agree that
all use of the SOFTWARE is at your sole risk and you are solely responsible for installation of the
SOFTWARE and use of the SOFTWARE on your DEVICE.
76
Page 77

LIMITATION OF LIABILITY
IN THIS SECTION, SONY AND SONY’S LICENSOR’S SHALL BE COLLECTIVELY REFERRED TO AS
“SONY.” SONY SHALL NOT BE LIABLE FOR ANY INDIRECT, SPECIAL, INCIDENTAL, PUNITIVE OR
CONSEQUENTIAL DAMAGES FOR BREACH OF ANY EXPRESS OR IMPLIED WARRANTY, BREACH
OF CONTRACT, NEGLIGENCE, STRICT LIABILITY OR ANY OTHER LEGAL THEORY RELATED TO
THE SOFTWARE OR THIS DEVICE. SUCH DAMAGES INCLUDE, BUT ARE NOT LIMITED TO, LOSS
OF PROFITS, LOSS OF REVENUE, LOSS OF DATA, LOSS OF USE OF THE PRODUCT OR ANY
ASSOCIATED EQUIPMENT, DOWN TIME AND PURCHASER’S TIME, EVEN IF SONY HAS BEEN
ADVISED OF THE POSSIBILITY OF SUCH DAMAGES. IN ANY CASE, SONY’S ENTIRE LIABILITY
UNDER ANY PROVISION OF THIS LICENSE SHALL BE LIMITED TO THE AMOUNT ACTUALLY
PAID BY YOU ALLOCABLE TO THE SOFTWARE. SOME STATES DO NOT ALLOW THE
EXCLUSION OR LIMITATION OF CERTAIN TYPES OF DAMAGES, SO THE ABOVE EXCLUSION OR
LIMITATION MAY NOT APPLY TO YOU.
SOFTWARE DATA COLLECTION AND MONITORING
The SOFTWARE contains features which may allow SONY and/or third parties to collect data from,
control and/or monitor the DEVICE and other devices running or interacting with the SOFTWARE. You
hereby consent to such activities. SONY’s current privacy policy is located at http://products.sel.sony.com/
SEL/legal/privacy.pdf. Please contact applicable third parties for privacy policies related to their software
and services.
AUTOMATIC UPDATE FEATURE
From time to time, SONY or third parties may automatically update or otherwise modify the SOFTWARE,
for example, but not limited to, for purposes of enhancement of security functions, error correction and
improvement of functions. Such updates or modifications may delete or change the nature of features or
other aspects of the SOFTWARE, including functions you may rely upon. You hereby agree that such
activities may occur at SONY’s sole discretion and that SONY may condition continued use of the
SOFTWARE upon your complete installation or acceptance of such update or modifications.
GOVERNING LAW AND JURISDICTION, JURY TRIAL WAIVER
This License shall be governed by the laws of the State of California, United States of America, without
regards to conflict of laws provisions. Any dispute arising out of this License shall be subject to the exclusive
venue of the state and federal courts of San Diego County, California, and the parties hereby consent to the
venue and jurisdiction of such courts. THE PARTIES HERETO WAIVE TRIAL BY JURY WITH RESPECT
TO ANY MATTERS ARISING UNDER OR RELATING TO THIS LICENSE.
SEVERABILITY
If any part of this License is held invalid or unenforceable, the other parts will remain valid.
THIRD PARTY BENEFICIARY
For all purposes of this License, each of Sony’s third party licensors of any of the SOFTWARE shall be
expressly deemed an intended third party beneficiary of this License and shall have the right to enforce the
terms and conditions of this License.
Should you have any questions concerning this license or this limited warranty, you may contact SONY by
writing to SONY at Sony Technical Response Center, 12451 Gateway Boulevard, Fort Myers, Florida 33913.
77
Page 78

For customers in Europe
This End User Software License Agreement (the “EULA”) is a legal agreement between you and Sony
Corporation (hereinafter referred to as “SONY”), a corporation organized under Japanese Law, the
manufacturer of your SONY hardware system (the “SONY HARDWARE”) and each of Sony’s third party
licensors of any of the SONY SOFTWARE (“THIRD PARTY LICENSORS”). Please read this EULA
carefully before installing or using the Sony software and any third party software distributed together with
this EULA (the “SONY SOFTWARE”), or clicking on the “ACCEPT” button or similar button or links as
may be designated by SONY. By installing and using the SONY SOFTWARE, or clicking on the “ACCEPT”
button or similar button or links as may be designated by SONY, you agree to be bound by the terms of this
EULA. You may use the SONY SOFTWARE only in connection with the use of the SONY HARDWARE.
SONY SOFTWARE is licensed and not sold.
Notwithstanding the foregoing, software distributed together with separate End User Software License
Agreement (the “Third Party EULA”) shall be covered by the Third Party EULA.
If you do not agree to the terms of this EULA, you must not use it.
1. License. This SONY SOFTWARE and the related documentation are licensed to you by SONY. The SONY
SOFTWARE is licensed as single product and may not be separated for your personal use. You may install and
use the SONY SOFTWARE (1) on the SONY HARDWARE or (2) in conjunction with the SONY HARDWARE
by (i) downloading the SONY SOFTWARE onto your personal computer and (ii) subsequently uploading the
SONY SOFTWARE onto the SONY HARDWARE by accessing the designated SONY SOFTWARE set-up page.
2. Restrictions. The SONY SOFTWARE contains copyrighted material and other proprietary material. In order to
protect them, and except as permitted by applicable law, you may not decompile, reverse engineer or
disassemble the SONY SOFTWARE in whole or in part. Except for the transfer of the SONY SOFTWARE
together with the SONY HARDWARE and prior agreement of the recipient to be bound by the terms and
conditions of this EULA, you may not sell or rent the SONY SOFTWARE and its copy to any third party.
78
3. Limited Warranty. SONY warrants the media on which the SONY SOFTWARE is recorded to be free from
physical defects for a period of ninety (90) days from the date of purchase as evidenced by a copy of the receipt.
During the applicable warranty period, SONY will replace free of charge such media that proved to be defective.
SONY will have no responsibility to replace media damaged by accident, abuse, or misapplication.
The above limited warranty replaces all other representations, conditions and warranties, whether express
or implied, by statute or otherwise and SONY AND ITS THIRD PARTY LICENSORS EXPRESSLY
DISCLAIM ALL OTHER WARRANTIES AND ALL CONDITIONS INCLUDING, BUT NOT LIMITED
TO, THE IMPLIED WARRANTIES AND/OR CONDITIONS OF SATISFACTORY QUALITY AND
FITNESS FOR A PARTICULAR PURPOSE. The terms of this limited warranty do not affect or prejudice
your statutory rights as an ultimate consumer, neither do they limit or exclude any liability for death or
personal injury caused by the negligence of SONY.
4. Automatic Update Feature. From time to time, SONY may automatically update or otherwise modify the SONY
SOFTWARE, for example for purposes of enhancement of security functions, error correction and
improvement of updating functions at such time as you interact with SONY’s or SONY’s designee’s server(s).
Any such updates/modifications shall be deemed to constitute part of the SONY SOFTWARE for purposes of
this EULA. By acceptance of this EULA, you consent to such update/modification.
Page 79

5. Limitation of Liability. NEITHER SONY NOR ITS THIRD PARTY LICENSORS SHALL BE LIABLE FOR ANY
INDIRECT, SPECIAL, INCIDENTAL, PUNITIVE OR CONSEQUENTIAL DAMAGES FOR BREACH OF
ANY EXPRESS OR IMPLIED WARRANTY, BREACH OF CONTRACT, NEGLIGENCE, STRICT LIABILITY
OR ANY OTHER LEGAL THEORY RELATED TO THE SONY SOFTWARE OR THE SONY HARDWARE.
SUCH DAMAGES INCLUDE, BUT ARE NOT LIMITED TO, LOSS OF PROFITS, LOSS OF REVENUE, LOSS
OF DATA, LOSS OF USE OF THE PRODUCT OR ANY ASSOCIATED EQUIPMENT, DOWN TIME AND
PURCHASER’S TIME, EVEN IF SONY OR ITS THIRD PARTY LICENSORS HAVE BEEN ADVISED OF
THE POSSIBILITY OF SUCH DAMAGES. IN ANY CASE, SONY’S AND ITS THIRD PARTY LICENSORS’
ENTIRE LIABILITY UNDER ANY PROVISION OF THIS AGREEMENT SHALL BE LIMITED TO THE
AMOUNT ACTUALLY PAID BY YOU ALLOCABLE TO THE SOFTWARE. SOME JURISDICATIONS DO
NOT ALLOW THE EXCLUSION OR LIMITATION OF CERTAIN TYPES OF DAMAGES, SO THE ABOVE
EXCLUSION OR LIMITATION MAY NOT APPLY TO YOU.
6. Termination. This EULA is effective until terminated. You may terminate this EULA at any time by destroying
the SONY SOFTWARE, related documentation, and all copies thereof. This EULA will terminate immediately
without notice from SONY, if you fail to comply with any provision of this EULA. Upon termination you must
destroy the SONY SOFTWARE, related documentation, and all copies thereof.
7. Governing Law. This EULA shall be governed by and construed in accordance with the laws of Japan.
Should you have any questions concerning this EULA or this limited warranty, please refer to the Customer
Service Guide on how to contact VAIO-Link.
79
Page 80

GNU GPL/LGPL-applicable Software Notices
This product includes the software packages to which the GNU General Public License (referred to as
“GPL” hereinafter) or the GNU Lesser General Public License (referred to as “LGPL” hereinafter) is applied.
Sony hereby informs you that you have the right to obtain, modify, and redistribute the software source
codes in accordance with the GPL or LPGL.
Package List
bash
busybox
e2fsprogs
gcc
wireless-tools
linux-kernel
mdadm
xfsprogs
iptables
net-tools
rsync
samba
pump-autoip
Linux-PAM
util-linux
procps
glibc
dmapi
Linux-PAM
util-linux
libqrencode
80
The source codes are available on the Web site at http://www.sony.net/Products/Linux but Sony assumes no
liability for answering technical inquires about the source codes. The original text of the GNU GENERAL
PUBLIC LICENSE is as follows:
Page 81

GNU GENERAL PUBLIC LICENSE
Version 2, June 1991
Copyright (C) 1989, 1991 Free Software Foundation, Inc.
59 Temple Place - Suite 330, Boston, MA 02111-1307, USA
Everyone is permitted to copy and distribute verbatim copies of this license document, but changing it is
not allowed.
Preamble
The Licenses for most software are designed to take away your freedom to share and change it. By contrast,
the GNU General Public License is intended to guarantee your freedom to share and change free software-to make sure the software is free for all its users. This General Public License applies to most of the Free
Software Foundation’s software and to any other program whose authors commit to using it. (Some other
Free Software Foundation software is covered by the GNU Lesser General Public License instead). You can
apply it to your programs, too.
When we speak of free software, we are referring to freedom, not price. Our General
Public Licenses are designed to make sure that you have the freedom to distribute copies of free software
(and charge for this service if you wish), that you receive source code or can get it if you want it, that you
can change the software or use pieces of it in new free programs; and that you know you can do these
things.
To protect your rights, we need to make restrictions that forbid anyone to deny you these rights or to ask
you to surrender the rights. These restrictions translate to certain responsibilities for you if you distribute
copies of the software, or if you modify it.
For example, if you distribute copies of such a program, whether gratis or for a fee, you must give the
recipients all the rights that you have. You must make sure that they, too, receive or can get the source code.
And you must show them these terms so they know their rights.
We protect your rights with two steps: (1) copyright the software, and (2) offer you this license which gives
you legal permission to copy, distribute and/or modify the software.
Also, for each author’s protection and ours, we want to make certain that everyone understands that there is
no warranty for this free software. If the software is modified by someone else and passed on, we want its
recipients to know that what they have is not the original, so that any problems introduced by others will
not reflect on the
original authors’ reputations.
Finally, any free program is threatened constantly by software patents. We wish to avoid the danger that
redistributors of a free program will individually obtain patent licenses, in effect making the program
proprietary. To prevent this, we have made it clear that any patent must be licensed for everyone’s free use
or not licensed at all.
81
Page 82

The precise terms and conditions for copying, distribution and modification follow.
TERMS AND CONDITIONS FOR COPYING, DISTRIBUTION AND MODIFICATION
0. This License applies to any program or other work which contains a notice placed by the copyright holder
saying it may be distributed under the terms of this General Public License. The “Program”, below, refers to any
such program or work, and a “work based on the Program” means either the Program or any derivative work
under copyright law: that is to say, a work containing the Program or a portion of it, either verbatim or with
modifications and/or translated into another language. (Hereinafter, translation is included without limitation
in the term “modification”). Each licensee is addressed as “you”.
Activities other than copying, distribution and modification are not covered by this License; they are
outside its scope. The act of running the Program is not restricted, and the output from the Program is
covered only if its contents constitute a work based on the Program (independent of having been made by
running the Program). Whether that is true depends on what the Program does.
1. You may copy and distribute verbatim copies of the Program’s source code as you receive it, in any medium,
provided that you conspicuously and appropriately publish on each copy an appropriate copyright notice and
disclaimer of warranty; keep intact all the notices that refer to this License and to the absence of any
warranty; and give any other recipients of the Program a copy of this License along with the Program.
You may charge a fee for the physical act of transferring a copy, and you may at your option offer warranty
protection in exchange for a fee.
2. You may modify your copy or copies of the Program or any portion of it, thus forming a work based on the
Program, and copy and distribute such modifications or work under the terms of Section 1 above, provided that
you also meet all of these conditions:
a) You must cause the modified files to carry prominent notices stating that you changed the files and the date
of any change.
b) You must cause any work that you distribute or publish, that in whole or in part contains or is derived from
the Program or any part thereof, to be licensed as a whole at no charge to all third parties under the terms of
this License.
c) If the modified program normally reads commands interactively when run, you must cause it, when started
running for such interactive use in the most ordinary way, to print or display an announcement including an
appropriate copyright notice and a notice that there is no warranty (or else, saying that you provide a
warranty) and that users may redistribute the program under these conditions, and telling the user how to
view a copy of this License.
(Exception: if the Program itself is interactive but does not normally print such an announcement, your work
based on the Program is not required to print an announcement).
82
These requirements apply to the modified work as a whole. If identifiable sections of that work are not
derived from the Program, and can be reasonably considered independent and separate works in
themselves, then this License, and its terms, do not apply to those sections when you distribute them as
separate works. But when you distribute the same sections as part of a whole which is a work based on the
Program, the distribution of the whole must be on the terms of this License, whose permissions for other
licensees extend to the entire whole, and thus to each and every part regardless of who wrote it.
Thus, it is not the intent of this section to claim rights or contest your rights to work written entirely by you;
rather, the intent is to exercise the right to control the distribution of derivative or collective works based on
the Program.
Page 83

In addition, mere aggregation of another work not based on the Program with the Program (or with a work
based on the Program) on a volume of a storage or distribution medium does not bring the other work
under the scope of this License.
3. You may copy and distribute the Program (or a work based on it, under Section 2) in object code or executable
form under the terms of Sections 1 and 2 above provided that you also do one of the following:
a) Accompany it with the complete corresponding machine-readable source code, which must be distributed
under the terms of Sections 1 and 2 above on a medium customarily used for software interchange; or,
b) Accompany it with a written offer, valid for at least three years, to give any third party, for a charge no more
than your cost of physically performing source distribution, a complete machine-readable copy of the
corresponding source code, to be distributed under the terms of Sections 1 and 2 above on a medium
customarily used for software interchange; or,
c) Accompany it with the information you received as to the offer to distribute corresponding source code.
(This alternative is allowed only for noncommercial distribution and only if you received the program in
object code or executable form with such an offer, in accord with Subsection b above).
The source code for a work means the preferred form of the work for making modifications to it. For an
executable work, complete source code means all the source code for all modules it contains, plus any
associated interface definition files, plus the scripts used to control compilation and installation of the
executable. However, as a special exception, the source code distributed need not include anything that is
normally distributed (in either source or binary form) with the major components (compiler, kernel, and so
on) of the operating system on which the executable runs, unless that component itself accompanies the
executable. If distribution of executable or object code is made by offering access to copy from a
designated place, then offering equivalent access to copy the source code from the same place counts as
distribution of the source code, even though third parties are not compelled to copy the source along with
the object code.
4. You may not copy, modify, sublicense, or distribute the Program except as expressly provided under this
License. Any attempt otherwise to copy, modify, sublicense or distribute the Program is void, and will
automatically terminate your rights under this License. However, parties who have received copies, or rights,
from you under this License will not have their licenses terminated so long as such parties remain in full
compliance.
5. You are not required to accept this License, since you have not signed it. However, nothing else grants you
permission to modify or distribute the Program or its derivative works. These actions are prohibited by law if
you do not accept this License. Therefore, by modifying or distributing the Program (or any work based on the
Program), you indicate your acceptance of this License to do so, and all its terms and conditions for copying,
distributing or modifying the Program or works based on it.
6. Each time you redistribute the Program (or any work based on the Program), the recipient automatically
receives a license from the original licensor to copy, distribute or modify the Program subject to these terms
and conditions. You may not impose any further restrictions on the recipients’ exercise of the rights granted
herein. You are not responsible for enforcing compliance by third parties to this License.
7. If, as a consequence of a court judgment or allegation of patent infringement or for any other reason (not
limited to patent issues), conditions are imposed on you (whether by court order, agreement or otherwise) that
contradict the conditions of this License, they do not excuse you from the conditions of this License. If you
cannot distribute so as to satisfy simultaneously your obligations under this License and any other pertinent
obligations, then as a consequence you may not distribute the Program at all. For example, if a patent license
would not permit royaltyfree redistribution of the Program by all those who receive copies directly or indirectly
through you, then the only way you could satisfy both it and this License would be to refrain entirely from
distribution of the Program.
83
Page 84

If any portion of this section is held invalid or unenforceable under any particular circumstance, the
balance of the section is intended to apply and the section as a whole is intended to apply in other
circumstances.
It is not the purpose of this section to induce you to infringe any patents or other property right claims or
to contest validity of any such claims; this section has the sole purpose of protecting the integrity of the free
software distribution system, which is implemented by public license practices. Many people have made
generous contributions to the wide range of software distributed through that system in reliance on
consistent application of that system; it is up to the author/donor to decide if he or she is willing to
distribute software through any other system and a licensee cannot impose that choice.
This section is intended to make thoroughly clear what is believed to be a consequence of the rest of this
License.
8. If the distribution and/or use of the Program is restricted in certain countries either by patents or by
copyrighted interfaces, the original copyright holder who places the Program under this License may add an
explicit geographical distribution limitation excluding those countries, so that distribution is permitted only in
or among countries not thus excluded. In such case, this License incorporates the limitation as if written in the
body of this License.
9. The Free Software Foundation may publish revised and/or new versions of the General Public License from
time to time. Such new versions will be similar in spirit to the present version, but may differ in detail to
address new problems or concerns.
Each version is given a distinguishing version number. If the Program specifies a version number of this
License which applies to it and “any later version”, you have the option of following the terms and
conditions either of that version or of any later version published by the Free Software Foundation. If the
Program does not specify a version number of this License, you may choose any version ever published by
the Free Software Foundation.
84
10.
If you wish to incorporate parts of the Program into other free programs whose distribution conditions are
different, write to the author to ask for permission. For software which is copyrighted by the Free Software
Foundation, write to the Free Software Foundation; we sometimes make exceptions for this. Our decision will
be guided by the two goals of preserving the free status of all derivatives of our free software and of promoting
the sharing and reuse of software generally.
NO WARRANTY
11. BECAUSE THE PROGRAM IS LICENSED FREE OF CHARGE, THERE IS NO WARRANTY FOR THE
PROGRAM, TO THE EXTENT PERMITTED BY APPLICABLE LAW. EXCEPT WHEN OTHERWISE
STATED IN WRITING THE COPYRIGHT HOLDERS AND/OR OTHER PARTIES PROVIDE THE
PROGRAM “AS IS” WITHOUT WARRANTY OF ANY KIND, EITHER EXPRESSED OR IMPLIED,
INCLUDING, BUT NOT LIMITED TO, THE IMPLIED WARRANTIES OF MERCHANTABILITY AND
FITNESS FOR A PARTICULAR PURPOSE. THE ENTIRE RISK AS TO THE QUALITY AND
PERFORMANCE OF THE PROGRAM IS WITH YOU. SHOULD THE PROGRAM PROVE DEFECTIVE,
YOU ASSUME THE COST OF ALL NECESSARY SERVICING, REPAIR OR CORRECTION.
Page 85

12.
IN NO EVENT UNLESS REQUIRED BY APPLICABLE LAW OR AGREED TO IN WRITING WILL ANY
COPYRIGHT HOLDER, OR ANY OTHER PARTY WHO MAY MODIFY AND/OR REDISTRIBUTE THE
PROGRAM AS PERMITTED ABOVE, BE LIABLE TO YOU FOR DAMAGES, INCLUDING ANY
GENERAL, SPECIAL, INCIDENTAL OR CONSEQUENTIAL DAMAGES ARISING OUT OF THE
USE OR INABILITY TO USE THE PROGRAM (INCLUDING BUT NOT LIMITED TO LOSS OF
DATA OR DATA BEING RENDERED INACCURATE OR LOSSES SUSTAINED BY YOU OR THIRD
PARTIES OR A FAILURE OF THE PROGRAM TO OPERATE WITH ANY OTHER PROGRAMS),
EVEN IF SUCH HOLDER OR OTHER PARTY HAS BEEN ADVISED OF THE POSSIBILITY OF
SUCH DAMAGES.
END OF TERMS AND CONDITIONS
How to Apply These Terms to Your New Programs
If you develop a new program, and you want it to be of the greatest possible use to the public, the best way
to achieve this is to make it free software which everyone can redistribute and change under these terms.
To do so, attach the following notices to the program. It is safest to attach them to the start of each source
file to most effectively convey the exclusion of warranty; and each file should have at least the “copyright”
line and a pointer to where the full notice is found.
<one line to give the program’s name and an idea of what it does.>
Copyright (C) <year> <name of author>
This program is free software; you can redistribute it and/or modify it under the terms of the GNU General
Public License as published by the Free Software Foundation; either version 2 of the License, or (at your
option) any later version.
This program is distributed in the hope that it will be useful, but WITHOUT ANY WARRANTY; without
even the implied warranty of MERCHANTABILITY or FITNESS FOR A PARTICULAR PURPOSE. See
the GNU General Public License for more details.
You should have received a copy of the GNU General Public License along with this program; if not, write
to the Free Software Foundation, Inc., 59 Temple Place - Suite 330, Boston, MA 02111-1307, USA.
Also add information on how to contact you by electronic and paper mail.
If the program is interactive, make it output a short notice like this when it starts in an interactive mode:
Gnomovision version 69, Copyright (C) year name of author
Gnomovision comes with ABSOLUTELY NO WARRANTY; for details
type `show w’. This is free software, and you are welcome to redistribute it under certain conditions; type
`show c’ for details.
The hypothetical commands `show w’ and `show c’ should show the appropriate parts of the General
Public License. Of course, the commands you use may be called something other than `show w’ and `show
c’; they could even be mouse-clicks or menu items--whatever suits your program.
85
Page 86

You should also get your employer (if you work as a programmer) or your school, if any, to sign a
“copyright disclaimer” for the program, if necessary. Here is a sample; alter the names:
Yoyodyne, Inc., hereby disclaims all copyright interest in the program `Gnomovision’ (which makes passes
at compilers) written by James Hacker.
<signature of Ty Coon>, 1 April 1989
Ty Coon, President of Vice
This General Public License does not permit incorporating your program into
proprietary programs. If your program is a subroutine library, you may consider it more
useful to permit linking proprietary applications with the library. If this is what you want
to do, use the GNU Lesser General Public License instead of this License.
GNU LESSER GENERAL PUBLIC LICENSE
Version 2.1, February 1999
Copyright (C) 1991, 1999 Free Software Foundation, Inc.
59 Temple Place, Suite 330, Boston, MA 02111-1307 USA Everyone is permitted to copy and distribute
verbatim copies of this license document, but changing it is not allowed.
[This is the first released version of the Lesser GPL. It also counts as the successor of the
GNU Library Public License, version 2, hence the version number 2.1.]
Preamble
The licenses for most software are designed to take away your freedom to share and change it. By contrast,
the GNU General Public Licenses are intended to guarantee your freedom to share and change free
software--to make sure the software is free for all its users.
86
This license, the Lesser General Public License, applies to some specially designated software packages-typically libraries--of the Free Software Foundation and other authors who decide to use it. You can use it
too, but we suggest you first think carefully about whether this license or the ordinary General Public
License is the better strategy to use in any particular case, based on the explanations below.
When we speak of free software, we are referring to freedom of use, not price. Our General Public Licenses
are designed to make sure that you have the freedom to distribute copies of free software (and charge for
this service if you wish); that you receive source code or can get it if you want it; that you can change the
software and use pieces of it in new free programs; and that you are informed that you can do these things.
To protect your rights, we need to make restrictions that forbid distributors to deny you these rights or to
ask you to surrender these rights. These restrictions translate to certain responsibilities for you if you
distribute copies of the library or if you modify it.
For example, if you distribute copies of the library, whether gratis or for a fee, you must give the recipients
all the rights that we gave you. You must make sure that they, too, receive or can get the source code. If you
link other code with the library, you must provide complete object files to the recipients, so that they can
relink them with the library after making changes to the library and recompiling it. And you must show
them these terms so they know their rights.
Page 87

We protect your rights with a two-step method: (1) we copyright the library, and (2) we offer you this
license, which gives you legal permission to copy, distribute and/or modify the library.
To protect each distributor, we want to make it very clear that there is no warranty for the free library. Also,
if the library is modified by someone else and passed on, the recipients should know that what they have is
not the original version, so that the original author’s reputation will not be affected by problems that might
be introduced by others.
Finally, software patents pose a constant threat to the existence of any free program. We wish to make sure
that a company cannot effectively restrict the users of a free program by obtaining a restrictive license from
a patent holder. Therefore, we insist that any patent license obtained for a version of the library must be
consistent with the full freedom of use specified in this license.
Most GNU software, including some libraries, is covered by the ordinary GNU General Public License.
This license, the GNU Lesser General Public License, applies to certain designated libraries, and is quite
different from the ordinary General Public License. We use this license for certain libraries in order to
permit linking those libraries into nonfree programs.
When a program is linked with a library, whether statically or using a shared library, the combination of the
two is legally speaking a combined work, a derivative of the original library. The ordinary General Public
License therefore permits such linking only if the entire combination fits its criteria of freedom. The Lesser
General Public License permits more lax criteria for linking other code with the library.
We call this license the “Lesser” General Public License because it does Less to protect the user’s freedom
than the ordinary General Public License. It also provides other free software developers Less of an
advantage over competing non-free programs. These disadvantages are the reason we use the ordinary
General Public License for many libraries. However, the Lesser license provides advantages in certain
special circumstances.
For example, on rare occasions, there may be a special need to encourage the widest possible use of a
certain library, so that it becomes a de-facto standard. To achieve this, non-free programs must be allowed
to use the library. A more frequent case is that a free library does the same job as widely used non-free
libraries. In this case, there is little to gain by limiting the free library to free software only, so we use the
Lesser General Public License.
In other cases, permission to use a particular library in non-free programs enables a greater number of
people to use a large body of free software. For example, permission to use the GNU C Library in non-free
programs enables many more people to use the whole GNU operating system, as well as its variant, the
GNU/Linux operating system.
Although the Lesser General Public License is Less protective of the users’ freedom, it does ensure that the
user of a program that is linked with the Library has the freedom and the wherewithal to run that program
using a modified version of the Library.
The precise terms and conditions for copying, distribution and modification follow. Pay close attention to
the difference between a “work based on the library” and a “work that uses the library”. The former
contains code derived from the library, whereas the latter must be combined with the library in order to
run.
87
Page 88

TERMS AND CONDITIONS FOR COPYING, DISTRIBUTION AND MODIFICATION
0. This License Agreement applies to any software library or other program which contains a notice placed by the
copyright holder or other authorized party saying it may be distributed under the terms of this Lesser General
Public License (also called “this License”). Each licensee is addressed as “you”.
A “library” means a collection of software functions and/or data prepared so as to be conveniently linked
with application programs (which use some of those functions and data) to form executables.
The “Library”, below, refers to any such software library or work which has been distributed under these
terms. A “work based on the Library” means either the Library or any derivative work under copyright law:
that is to say, a work containing the Library or a portion of it, either verbatim or with modifications and/or
translated straightforwardly into another language. (Hereinafter, translation is included without limitation
in the term “modification”).
“Source code” for a work means the preferred form of the work for making modifications to it. For a library,
complete source code means all the source code for all modules it contains, plus any associated interface
definition files, plus the scripts used to control compilation and installation of the library.
Activities other than copying, distribution and modification are not covered by this License; they are
outside its scope. The act of running a program using the Library is not restricted, and output from such a
program is covered only if its contents constitute a work based on the Library (independent of the use of
the Library in a tool for writing it). Whether that is true depends on what the Library does and what the
program that uses the Library does.
1. You may copy and distribute verbatim copies of the Library’s complete source code as you receive it, in any
medium, provided that you conspicuously and appropriately publish on each copy an appropriate copyright
notice and disclaimer of warranty; keep intact all the notices that refer to this License and to the absence of any
warranty; and distribute a copy of this License along with the Library.
You may charge a fee for the physical act of transferring a copy, and you may at your option offer warranty
protection in exchange for a fee.
88
2. You may modify your copy or copies of the Library or any portion of it, thus forming a work based on the
Library, and copy and distribute such modifications or work under the terms of Section 1 above, provided that
you also meet all of these conditions:
a) The modified work must itself be a software library.
b) You must cause the files modified to carry prominent notices stating that you changed the files and the date
of any change.
c) You must cause the whole of the work to be licensed at no charge to all third parties under the terms of this
License.
d) If a facility in the modified Library refers to a function or a table of data to be supplied by an application
program that uses the facility, other than as an argument passed when the facility is invoked, then you must
make a good faith effort to ensure that, in the event an application does not supply such function or table, the
facility still operates, and performs whatever part of its purpose remains meaningful.
(For example, a function in a library to compute square roots has a purpose that is entirely well-defined
independent of the application. Therefore, Subsection 2d requires that any application-supplied function or
table used by this function must be optional: if the application does not supply it, the square root function must
still compute square roots).
Page 89

These requirements apply to the modified work as a whole. If identifiable sections of that work are not derived
from the Library, and can be reasonably considered independent and separate works in themselves, then this
License, and its terms, do not apply to those sections when you distribute them as separate works. But when you
distribute the same sections as part of a whole which is a work based on the Library, the distribution of the
whole must be on the terms of this License, whose permissions for other licensees extend to the entire whole,
and thus to each and every part regardless of who wrote it.
Thus, it is not the intent of this section to claim rights or contest your rights to work written entirely by you;
rather, the intent is to exercise the right to control the distribution of derivative or collective works based on
the Library.
In addition, mere aggregation of another work not based on the Library with the Library (or with a work
based on the Library) on a volume of a storage or distribution medium does not bring the other work
under the scope of this License.
3. You may opt to apply the terms of the ordinary GNU General Public License instead of this License to a given
copy of the Library. To do this, you must alter all the notices that refer to this License, so that they refer to the
ordinary GNU General Public License, version 2, instead of to this License. (If a newer version than version 2 of
the ordinary GNU General Public License has appeared, then you can specify that version instead if you
wish). Do not make any other change in these notices.
Once this change is made in a given copy, it is irreversible for that copy, so the ordinary GNU General
Public License applies to all subsequent copies and derivative works made from that copy.
This option is useful when you wish to copy part of the code of the Library into a program that is not a
library.
4. You may copy and distribute the Library (or a portion or derivative of it, under Section 2) in object code or
executable form under the terms of Sections 1 and 2 above provided that you accompany it with the complete
corresponding machine-readable source code, which must be distributed under the terms of Sections 1 and 2
above on a medium customarily used for software interchange.
If distribution of object code is made by offering access to copy from a designated place, then offering
equivalent access to copy the source code from the same place satisfies the requirement to distribute the
source code, even though third parties are not compelled to copy the source along with the object code.
5. A program that contains no derivative of any portion of the Library, but is designed to work with the Library by
being compiled or linked with it, is called a “work that uses the Library”. Such a work, in isolation, is not a
derivative work of the Library, and therefore falls outside the scope of this License.
However, linking a “work that uses the Library” with the Library creates an executable that is a derivative of
the Library (because it contains portions of the Library), rather than a “work that uses the library”. The
executable is therefore covered by this License. Section 6 states terms for distribution of such executables.
When a “work that uses the Library” uses material from a header file that is part of the Library, the object
code for the work may be a derivative work of the Library even though the source code is not. Whether this
is true is especially significant if the work can be linked without the Library, or if the work is itself a library.
The threshold for this to be true is not precisely defined by law.
89
Page 90

If such an object file uses only numerical parameters, data structure layouts and assessors, and small
macros and small inline functions (ten lines or less in length), then the use of the object file is unrestricted,
regardless of whether it is legally a derivative work. (Executables containing this object code plus portions
of the Library will still fall under Section 6).
Otherwise, if the work is a derivative of the Library, you may distribute the object code for the work under
the terms of Section 6. Any executables containing that work also fall under Section 6, whether or not they
are linked directly with the Library itself.
6. As an exception to the Sections above, you may also combine or link a “work that uses the Library” with the
Library to produce a work containing portions of the Library, and distribute that work under terms of your
choice, provided that the terms permit modification of the work for the customer’s own use and reverse
engineering for debugging such modifications.
You must give prominent notice with each copy of the work that the Library is used in it and that the
Library and its use are covered by this License. You must supply a copy of this License. If the work during
execution displays copyright notices, you must include the copyright notice for the Library among them, as
well as a reference directing the user to the copy of this License. Also, you must do one of these things:
a) Accompany the work with the complete corresponding machine-readable source code for the Library including
whatever changes were used in the work (which must be distributed under Sections 1 and 2 above); and, if the
work is an executable linked with the Library, with the complete machine-readable “work that uses the Library”,
as object code and/or source code, so that the user can modify the Library and then relink to produce a
modified executable containing the modified Library. (It is understood that the user who changes the contents
of definitions files in the Library will not necessarily be able to recompile the application to use the modified
definitions).
b) Use a suitable shared library mechanism for linking with the Library. A suitable mechanism is one that (1) uses
at run time a copy of the library already present on the user’s computer system, rather than copying library
functions into the executable, and (2) will operate properly with a modified version of the library, if the user
installs one, as long as the modified version is interface-compatible with the version that the work was made
with.
c) Accompany the work with a written offer, valid for at least three years, to give the same user the materials
specified in Subsection 6a, above, for a charge no more than the cost of performing this distribution.
d) If distribution of the work is made by offering access to copy from a designated place, offer equivalent access to
copy the above specified materials from the same place.
e) Verify that the user has already received a copy of these materials or that you have already sent
this user a copy.
90
For an executable, the required form of the “work that uses the Library” must include any data and utility
programs needed for reproducing the executable from it. However, as a special exception, the materials to
be distributed need not include anything that is normally distributed (in either source or binary form) with
the major components (compiler, kernel, and so on) of the operating system on which the executable runs,
unless that component itself accompanies the executable.
It may happen that this requirement contradicts the license restrictions of other proprietary libraries that
do not normally accompany the operating system. Such a contradiction means you cannot use both them
and the Library together in an executable that you distribute.
Page 91

7. You may place library facilities that are a work based on the Library side-by-side in a single library together
with other library facilities not covered by this License, and distribute such a combined library, provided that
the separate distribution of the work based on the Library and of the other library facilities is otherwise
permitted, and provided that you do these two things:
a) Accompany the combined library with a copy of the same work based on the Library, uncombined with any
other library facilities. This must be distributed under the terms of the Sections above.
b) Give prominent notice with the combined library of the fact that part of it is a work based on the Library, and
explaining where to find the accompanying uncombined form of the same work.
8. You may not copy, modify, sublicense, link with, or distribute the Library except as expressly provided
under this License. Any attempt otherwise to copy, modify, sublicense, link with, or distribute the
Library is void, and will automatically terminate your rights under this License.
However, parties who have received copies, or rights, from you under this License will not have their
licenses terminated so long as such parties remain in full compliance.
9. You are not required to accept this License, since you have not signed it. However, nothing else grants
you permission to modify or distribute the Library or its derivative works. These actions are prohibited
by law if you do not accept this License. Therefore, by modifying or distributing the Library (or any work
based on the Library), you indicate your acceptance of this License to do so, and all its terms and
conditions for copying, distributing or modifying the Library or works based on it.
10.
Each time you redistribute the Library (or any work based on the Library), the recipient automatically
receives a license from the original licensor to copy, distribute, link with or modify the Library subject to
these terms and conditions. You may not impose any further restrictions on the recipients’ exercise of the
rights granted herein. You are not responsible for enforcing compliance by third parties with this
License.
11.
If, as a consequence of a court judgment or allegation of patent infringement or for any other reason (not
limited to patent issues), conditions are imposed on you (whether by court order, agreement or otherwise) that
contradict the conditions of this License, they do not excuse you from the conditions of this License. If you
cannot distribute so as to satisfy simultaneously your obligations under this License and any other pertinent
obligations, then as a consequence you may not distribute the Library at all. For example, if a patent license
would not permit royalty-free redistribution of the Library by all those who receive copies directly or indirectly
through you, then the only way you could satisfy both it and this License would be to refrain entirely from
distribution of the Library.
If any portion of this section is held invalid or unenforceable under any particular circumstance, the
balance of the section is intended to apply, and the section as a whole is intended to apply in other
circumstances.
It is not the purpose of this section to induce you to infringe any patents or other property right claims or
to contest validity of any such claims; this section has the sole purpose of protecting the integrity of the free
software distribution system which is implemented by public license practices. Many people have made
generous contributions to the wide range of software distributed through that system in reliance on
consistent application of that system; it is up to the author/donor to decide if he or she is willing to distribute
software through any other system and a licensee cannot impose that choice.
This section is intended to make thoroughly clear what is believed to be a consequence of the rest of this License.
91
Page 92

12.
If the distribution and/or use of the Library is restricted in certain countries either by patents or by copyrighted
interfaces, the original copyright holder who places the Library under this License may add an explicit
geographical distribution limitation excluding those countries, so that distribution is permitted only in or
among countries not thus excluded. In such case, this License incorporates the limitation as if written in the
body of this License.
13.
The Free Software Foundation may publish revised and/or new versions of the Lesser General Public License
from time to time. Such new versions will be similar in spirit to the present version, but may differ in detail to
address new problems or concerns.
Each version is given a distinguishing version number. If the Library specifies a version number of this
License which applies to it and “any later version”, you have the option of following the terms and
conditions either of that version or of any later version published by the Free Software Foundation. If the
Library does not specify a license version number, you may choose any version ever published by the Free
Software Foundation.
14.
If you wish to incorporate parts of the Library into other free programs whose distribution conditions are
incompatible with these, write to the author to ask for permission. For software which is copyrighted by the
Free Software Foundation, write to the Free Software Foundation; we sometimes make exceptions for this. Our
decision will be guided by the two goals of preserving the free status of all derivatives of our free software and of
promoting the sharing and reuse of software generally.
NO WARRANTY
15.
BECAUSE THE LIBRARY IS LICENSED FREE OF CHARGE, THERE IS NO WARRANTY FOR THE
LIBRARY, TO THE EXTENT PERMITTED BY APPLICABLE LAW. EXCEPT WHEN OTHERWISE STATED
IN WRITING THE COPYRIGHT HOLDERS AND/OR OTHER PARTIES PROVIDE THE LIBRARY “AS IS”
WITHOUT WARRANTY OF ANY KIND, EITHER EXPRESSED OR IMPLIED, INCLUDING, BUT NOT
LIMITED TO, THE IMPLIED WARRANTIES OF MERCHANTABILITY AND FITNESS FOR A
PARTICULAR PURPOSE. THE ENTIRE RISK AS TO THE QUALITY AND PERFORMANCE OF THE
LIBRARY IS WITH YOU. SHOULD THE LIBRARY PROVE DEFECTIVE, YOU ASSUME THE COST OF
ALL NECESSARY SERVICING, REPAIR OR CORRECTION.
92
16.
IN NO EVENT UNLESS REQUIRED BY APPLICABLE LAW OR AGREED TO IN WRITING WILL ANY
COPYRIGHT HOLDER, OR ANY OTHER PARTY WHO MAY MODIFY AND/OR REDISTRIBUTE THE
LIBRARY AS PERMITTED ABOVE, BE LIABLE TO YOU FOR DAMAGES, INCLUDING ANY GENERAL,
SPECIAL, INCIDENTAL OR CONSEQUENTIAL DAMAGES ARISING OUT OF THE USE OR INABILITY
TO USE THE LIBRARY (INCLUDING BUT NOT LIMITED TO LOSS OF DATA OR DATA BEING
RENDERED INACCURATE OR LOSSES SUSTAINED BY YOU OR THIRD PARTIES OR A FAILURE OF
THE LIBRARY TO OPERATE WITH ANY OTHER SOFTWARE), EVEN IF SUCH HOLDER OR OTHER
PARTY HAS BEEN ADVISED OF THE POSSIBILITY OF SUCH DAMAGES.
Page 93

END OF TERMS AND CONDITIONS
How to Apply These Terms to Your New Libraries
If you develop a new library, and you want it to be of the greatest possible use to the public, we recommend
making it free software that everyone can redistribute and change. You can do so by permitting
redistribution under these terms (or, alternatively, under the terms of the ordinary General Public License).
To apply these terms, attach the following notices to the library. It is safest to attach them to the start of
each source file to most effectively convey the exclusion of warranty; and each file should have at least the
“copyright” line and a pointer to where the full notice is found.
<one line to give the library’s name and an idea of what it does.>
Copyright (C) <year> <name of author>
This library is free software; you can redistribute it and/or modify it under the terms of the GNU Lesser
General Public License as published by the Free Software Foundation; either version 2.1 of the License, or
(at your option) any later version.
This library is distributed in the hope that it will be useful, but WITHOUT ANY WARRANTY; without
even the implied warranty of MERCHANTABILITY or FITNESS FOR A PARTICULAR PURPOSE. See
the GNU Lesser General Public License for more details.
You should have received a copy of the GNU Lesser General Public License along with this library; if not,
write to the Free Software Foundation, Inc., 59 Temple Place, Suite 330, Boston, MA 02111-1307 USA
Also add information on how to contact you by electronic and paper mail.
You should also get your employer (if you work as a programmer) or your school, if any, to sign a
“copyright disclaimer” for the library, if necessary. Here is a sample; alter the names:
Yoyodyne, Inc., hereby disclaims all copyright interest in the library `Frob’ (a library for tweaking knobs)
written by James Random Hacker.
signature of Ty Coon, 1 April 1990
Ty Coon, President of Vice
That’s all there is to it!
93
Page 94

NetBSD Software Notices
Copyright (c) 1994-2004 The NetBSD Foundation, Inc. All rights reserved.
Redistribution and use in source and binary forms, with or without modification, are permitted provided
that the following conditions are met:
1. Redistributions of source code must retain the above copyright notice, this list of conditions and the following
disclaimer.
2. Redistributions in binary form must reproduce the above copyright notice, this list of conditions and the
following disclaimer in the documentation and/or other materials provided with the distribution.
3. All advertising materials mentioning features or use of this software must display the following
acknowledgement:
This product includes software developed by the NetBSD Foundation, Inc. and its contributors.
4. Neither the name of The NetBSD Foundation nor the names of its contributors may be used to endorse or
promote products derived from this software without specific prior written permission.
THIS SOFTWARE IS PROVIDED BY THE REGENTS AND CONTRIBUTORS ``AS IS’’ AND ANY
EXPRESS OR IMPLIED WARRANTIES, INCLUDING, BUT NOT LIMITED TO, THE IMPLIED
WARRANTIES OF MERCHANTABILITY AND FITNESS FOR A PARTICULAR PURPOSE ARE
DISCLAIMED. IN NO EVENT SHALL THE REGENTS OR CONTRIBUTORS BE LIABLE FOR ANY
DIRECT, INDIRECT, INCIDENTAL, SPECIAL, EXEMPLARY, OR CONSEQUENTIAL DAMAGES
(INCLUDING, BUT NOT LIMITED TO, PROCUREMENT OF SUBSTITUTE GOODS OR SERVICES;
LOSS OF USE, DATA, OR PROFITS; OR BUSINESS INTERRUPTION) HOWEVER CAUSED AND ON
ANY THEORY OF LIABILITY, WHETHER IN CONTRACT, STRICT LIABILITY, OR TORT
(INCLUDING NEGLIGENCE OR OTHERWISE) ARISING IN ANY WAY OUT OF THE USE OF THIS
SOFTWARE, EVEN IF ADVISED OF THE POSSIBILITY OF SUCH DAMAGE.
The following notices are required to satisfy the license terms of the software that we have mentioned in
this document:
This product includes software developed by Adam Glass.
This product includes software developed by Bill Paul.
This product includes software developed by Charles M. Hannum.
This product includes software developed by Christian E. Hopps.
This product includes software developed by Christopher G. Demetriou.
This product includes software developed by Christopher G. Demetriou for the NetBSD Project.
This product includes software developed by Christos Zoulas.
This product includes software developed by Gardner Buchanan.
This product includes software developed by Gordon W. Ross
This product includes software developed by Manuel Bouyer.
This product includes software developed by Rolf Grossmann.
This product includes software developed by TooLs GmbH.
This product includes software developed by the NetBSD Foundation, Inc. and its contributors.
This product includes software developed by the University of California, Berkeley and its contributors.
This product includes software developed by the University of California, Lawrence Berkeley Laboratory
and its contributors.
This product includes software developed by the University of California, Lawrence Berkeley Laboratory.
This product includes software developed for the NetBSD Project by Wasabi Systems, Inc.
This product includes software developed for the NetBSD Project by Matthias Drochner.
This product includes software developed under OpenBSD by Per Fogelstrom Opsycon AB for RTMX Inc,
North Carolina, USA.
94
Page 95

OpenSSL Software Notices
This product includes the OpenSSL software (including the Original SSLeay libraries) that Sony uses under
the license agreement with the copyright holder of the software. In response to the request from the
copyright holder, Sony is obliged to inform you of the following terms and conditions. Please read them
thoroughly.
OpenSSL License
Copyright (c) 1998-2007 The OpenSSL Project. All rights reserved.
Redistribution and use in source and binary forms, with or without modification, are permitted provided
that the following conditions are met:
1. Redistributions of source code must retain the above copyright notice, this list of conditions and the following
disclaimer.
2. Redistributions in binary form must reproduce the above copyright notice, this list of conditions and the
following disclaimer in the documentation and/or other materials provided with the distribution.
3. All advertising materials mentioning features or use of this software must display the following
acknowledgment: “This product includes software developed by the OpenSSL Project for use in the OpenSSL
Toolkit. (http://www.openssl.org/)”
4. The names “OpenSSL Toolkit” and “OpenSSL Project” must not be used to endorse or promote products
derived from this software without prior written permission. For written permission, please contact opensslcore@openssl.org.
5. Products derived from this software may not be called “OpenSSL” nor may “OpenSSL” appear in their names
without prior written permission of the OpenSSL Project.
6. Redistributions of any form whatsoever must retain the following acknowledgment:
software developed by the OpenSSL Project for use in the OpenSSL Toolkit (http://www.openssl.org/)”
THIS SOFTWARE IS PROVIDED BY THE OpenSSL PROJECT ``AS IS’’ AND ANY EXPRESSED OR
IMPLIED WARRANTIES, INCLUDING, BUT NOT LIMITED TO, THE IMPLIED WARRANTIES OF
MERCHANTABILITY AND FITNESS FOR A PARTICULAR PURPOSE ARE DISCLAIMED. IN NO
EVENT SHALL THE OpenSSL PROJECT OR ITS CONTRIBUTORS BE LIABLE FOR ANY DIRECT,
INDIRECT, INCIDENTAL, SPECIAL, EXEMPLARY, OR CONSEQUENTIAL DAMAGES (INCLUDING,
BUT NOT LIMITED TO, PROCUREMENT OF SUBSTITUTE GOODS OR SERVICES; LOSS OF USE,
DATA, OR PROFITS; OR BUSINESS INTERRUPTION) HOWEVER CAUSED AND ON ANY THEORY
OF LIABILITY, WHETHER IN CONTRACT, STRICT LIABILITY,
OR TORT (INCLUDING NEGLIGENCE OR OTHERWISE) ARISING IN ANY WAY OUT OF THE USE
OF THIS SOFTWARE, EVEN IF ADVISED OF THE POSSIBILITY OF SUCH DAMAGE.
This product includes cryptographic software written by Eric Young (eay@cryptsoft. com). This product
includes software written by Tim Hudson (tjh@cryptsoft.com).
“This product includes
95
Page 96

Original SSLeay License
Copyright (C) 1995-1998 Eric Young (eay@cryptsoft.com) All rights reserved.
This package is an SSL implementation written by Eric Young (eay@cryptsoft.com). The implementation
was written so as to conform with Netscapes SSL.
This library is free for commercial and non-commercial use as long as the following conditions are aheared
to. The following conditions apply to all code found in this distribution, be it the RC4, RSA, lhash, DES,
etc., code; not just the SSL code. The SSL documentation included with this distribution is covered by the
same copyright terms except that the holder is Tim Hudson (tjh@cryptsoft.com).
Copyright remains Eric Young’s, and as such any Copyright notices in the code are not to be removed.
If this package is used in a product, Eric Young should be given attribution as the author of the parts of the
library used.
This can be in the form of a textual message at program startup or in documentation
(online or textual) provided with the package.
Redistribution and use in source and binary forms, with or without modification, are permitted provided
that the following conditions are met:
1. Redistributions of source code must retain the copyright notice, this list of conditions and the following
disclaimer.
2. Redistributions in binary form must reproduce the above copyright notice, this list of conditions and the
following disclaimer in the documentation and/or other materials provided with the distribution.
3. All advertising materials mentioning features or use of this software must display the following
acknowledgement:
“This product includes cryptographic software written by Eric Young (eay@cryptsoft.com)” The word
‘cryptographic’ can be left out if the rouines from the library being used are not cryptographic related :-).
4. If you include any Windows specific code (or a derivative thereof ) from the apps directory (application code)
you must include an acknowledgement:
“This product includes software written by Tim Hudson (tjh@cryptsoft.com)”
96
THIS SOFTWARE IS PROVIDED BY ERIC YOUNG ``AS IS’’ AND ANY EXPRESS OR IMPLIED
WARRANTIES, INCLUDING, BUT NOT LIMITED TO, THE IMPLIED WARRANTIES OF
MERCHANTABILITY AND FITNESS FOR A PARTICULAR PURPOSE ARE DISCLAIMED. IN NO
EVENT SHALL THE AUTHOR OR CONTRIBUTORS BE LIABLE FOR ANY DIRECT, INDIRECT,
INCIDENTAL, SPECIAL, EXEMPLARY, OR CONSEQUENTIAL DAMAGES (INCLUDING, BUT NOT
LIMITED TO, PROCUREMENT OF SUBSTITUTE GOODS OR SERVICES; LOSS OF USE, DATA, OR
PROFITS; OR BUSINESS INTERRUPTION) HOWEVER CAUSED AND ON ANY THEORY OF
LIABILITY, WHETHER IN CONTRACT, STRICT LIABILITY, OR TORT (INCLUDING NEGLIGENCE
OR OTHERWISE) ARISING IN ANY WAY OUT OF THE USE OF THIS SOFTWARE, EVEN IF
ADVISED OF THE POSSIBILITY OF SUCH DAMAGE.
The licence and distribution terms for any publically available version or derivative of this code cannot be
changed. i.e. this code cannot simply be copied and put under another distribution licence
[including the GNU Public Licence.]
Page 97

AES Notices
Copyright (c) 2003, Dr Brian Gladman, Worcester, UK. All rights reserved.
LICENSE TERMS
The free distribution and use of this software in both source and binary form is allowed (with or without
changes) provided that:
1. distributions of this source code include the above copyright notice, this list of conditions and the following
disclaimer;
2. distributions in binary form include the above copyright notice, this list of conditions and the following
disclaimer in the documentation and/or other associated materials;
3. the copyright holder’s name is not used to endorse products built using this software without
permission.
ALTERNATIVELY, provided that this notice is retained in full, this product may be distributed under the
terms of the GNU General Public License (GPL), in which case the provisions of the GPL apply INSTEAD
OF those given above.
DISCLAIMER
This software is provided ‘as is’ with no explicit or implied warranties in respect of its properties, including,
but not limited to, correctness and/or fitness for purpose.
specific written
MD5 Notices
md5.c
RSA Data Security, Inc. MD5 Message Digest Algorithm
Created: 2/17/90 RLR
Revised: 1/91 SRD,AJ,BSK,JT Reference C Version
Copyright (C) 1990, RSA Data Security, Inc. All rights reserved.
License to copy and use this software is granted provided that it is identified as the “RSA Data Security, Inc.
MD5 Message Digest Algorithm” in all material mentioning or referencing this software or this function.
License is also granted to make and use derivative works provided that such works are identified as “derived
from the RSA Data Security, Inc. MD5 Message Digest Algorithm” in all material mentioning or
referencing the derived work.
RSA Data Security, Inc. makes no representations concerning either the merchantability of this software or
the suitability of this software for any particular purpose. It is provided “as is” without express or implied
warranty of any kind.
These notices must be retained in any copies of any part of this documentation and/or software.
97
Page 98

TAILQ Macro Notices
$NetBSD: queue.h,v 1.41 2005/05/29 21:14:40 christos Exp $
Copyright (c) 1991, 1993
The Regents of the University of California. All rights reserved.
Redistribution and use in source and binary forms, with or without modification, are permitted provided
that the following conditions are met:
1. Redistributions of source code must retain the above copyright notice, this list of conditions and the following
disclaimer.
2. Redistributions in binary form must reproduce the above copyright notice, this list of conditions and the
following disclaimer in the documentation and/or other materials provided with the distribution.
3. Neither the name of the University nor the names of its contributors may be used to endorse or
products derived from this software without specific prior written permission.
THIS SOFTWARE IS PROVIDED BY THE REGENTS AND CONTRIBUTORS ``AS IS’’ AND ANY
EXPRESS OR IMPLIED WARRANTIES, INCLUDING, BUT NOT LIMITED TO, THE IMPLIED
WARRANTIES OF MERCHANTABILITY AND FITNESS FOR A PARTICULAR PURPOSE ARE
DISCLAIMED. IN NO EVENT SHALL THE REGENTS OR CONTRIBUTORS BE LIABLE FOR ANY
DIRECT, INDIRECT, INCIDENTAL, SPECIAL, EXEMPLARY, OR CONSEQUENTIAL DAMAGES
(INCLUDING, BUT NOT LIMITED TO, PROCUREMENT OF SUBSTITUTE GOODS OR
SERVICES; LOSS OF USE, DATA, OR PROFITS; OR BUSINESS INTERRUPTION) HOWEVER
CAUSED AND ON ANY THEORY OF LIABILITY, WHETHER IN CONTRACT, STRICT LIABILITY,
OR TORT (INCLUDING NEGLIGENCE OR OTHERWISE) ARISING IN ANY WAY OUT OF THE
USE OF THIS SOFTWARE, EVEN IF ADVISED OF THE POSSIBILITY OF SUCH DAMAGE.
@(#)queue.h 8.5 (Berkeley) 8/20/94
promote
JPEG Notices
98
The engineering results of the Independent JPEG Group are employed in part of this product.
In plain English:
1. We don’t promise that this software works. (But if you find any bugs, please let us know!)
2. You can use this software for whatever you want. You don’t have to pay us.
3. You may not pretend that you wrote this software. If you use it in a program, you must
somewhere in your documentation that you’ve used the IJG code.
In legalese:
The authors make NO WARRANTY or representation, either express or implied, with respect to this
software, its quality, accuracy, merchantability, or fitness for a particular purpose. This software is
provided“ AS IS”, and you, its user assume the entire risk as to its quality and accuracy.
acknowledge
Page 99

This software is copyright (c) 1991-1998, Thomas G. Lane.
All Rights Reserved except as specified below.
Permission is hereby granted to use, copy, modify, and distribute this software (or portions thereof ) for any
purpose, without fee, subject to these conditions:
(1)
If any part of the source code for this software is distributed, then this README file must be included, with this
copyright and no-warranty notice unaltered; and any additions, deletions, or changes to the original files must
be clearly indicated in accompanying documentation.
(2)
If only executable code is distributed, then the accompanying documentation must state that “this software is
based in part on the work of the Independent JPEG Group”.
(3)
Permission for use of this software is granted only if the user accepts full responsibility for any undesirable
consequences; the authors accept NO LIABILITY for damages of any kind.
These conditions apply to any software derived from or based on the IJG code, not just to the unmodified
library. If you use our work, you ought to acknowledge us.
Permission is NOT granted for the use of any IJG author’s name or company name in advertising or
publicity relating to this software or products derived from it. This software may be referred to only as“ the
Independent JPEG Group’s software”.
We specifically permit and encourage the use of this software as the basis of commercial products, provided
that all warranty or liability claims are assumed by the product vendor.
lighttpd Software Notices
Copyright (c) 2004, Jan Kneschke, incremental
All rights reserved.
Redistribution and use in source and binary forms, with or without modification, are
permitted provided that the following conditions are met:
Redistributions of source code must retain the above copyright notice, this list of conditions and the following
disclaimer.
Redistributions in binary form must reproduce the above copyright notice, this list of conditions and the
following disclaimer in the documentation and/or other materials provided with the distribution.
Neither the name of the ‘incremental’ nor the names of its contributors may be used to endorse or promote
products derived from this software without specific prior written permission.
THIS SOFTWARE IS PROVIDED BY THE COPYRIGHT HOLDERS AND CONTRIBUTORS “AS IS”
AND ANY EXPRESS OR IMPLIED WARRANTIES, INCLUDING, BUT NOT LIMITED TO, THE
IMPLIED WARRANTIES OF MERCHANTABILITY AND FITNESS FOR A PARTICULAR PURPOSE
ARE DISCLAIMED. IN NO EVENT SHALL THE COPYRIGHT OWNER OR CONTRIBUTORS BE
LIABLE FOR ANY DIRECT, INDIRECT, INCIDENTAL, SPECIAL, EXEMPLARY, OR
CONSEQUENTIAL DAMAGES (INCLUDING, BUT NOT LIMITED TO, PROCUREMENT OF
SUBSTITUTE GOODS OR SERVICES; LOSS OF USE, DATA, OR PROFITS; OR BUSINESS
INTERRUPTION) HOWEVER CAUSED AND ON ANY THEORY OF LIABILITY, WHETHER IN
CONTRACT, STRICT LIABILITY, OR TORT (INCLUDING NEGLIGENCE OR OTHERWISE) ARISING
IN ANY WAY OUT OF THE USE OF THIS SOFTWARE, EVEN IF ADVISED OF THE POSSIBILITY OF
SUCH DAMAGE.
99
Page 100

prototype.js Notices
Copyright (c) 2005-2008 Sam Stephenson
Permission is hereby granted, free of charge, to any person obtaining a copy of this software and associated
documentation files (the “Software”), to deal in the Software without restriction, including without
limitation the rights to use, copy, modify, merge, publish, distribute, sublicense, and/or sell copies of the
Software, and to permit persons to whom the Software is furnished to do so, subject to the following
conditions:
THE SOFTWARE IS PROVIDED “AS IS”, WITHOUT WARRANTY OF ANY KIND, EXPRESS OR
IMPLIED, INCLUDING BUT NOT LIMITED TO THE WARRANTIES OF MERCHANTABILITY,
FITNESS FOR A PARTICULAR PURPOSE AND NONINFRINGEMENT. IN NO EVENT SHALL THE
AUTHORS OR COPYRIGHT HOLDERS BE LIABLE FOR ANY CLAIM, DAMAGES OR OTHER
LIABILITY, WHETHER IN AN ACTION OF CONTRACT, TORT OR OTHERWISE, ARISING FROM,
OUT OF OR IN CONNECTION WITH THE SOFTWARE OR THE USE OR OTHER DEALINGS IN
THE SOFTWARE.
sha1.js Notices
Copyright (c) 1998 - 2008, Paul Johnston & Contributors All rights reserved.
Redistribution and use in source and binary forms, with or without modification, are permitted provided
that the following conditions are met:
Redistributions of source code must retain the above copyright notice, this list of conditions and the
following disclaimer. Redistributions in binary form must reproduce the above copyright notice, this list of
conditions and the following disclaimer in the documentation and/or other materials provided with the
distribution.
100
Neither the name of the author nor the names of its contributors may be used to endorse or promote
products derived from this software without specific prior written permission.
THIS SOFTWARE IS PROVIDED BY THE COPYRIGHT HOLDERS AND CONTRIBUTORS “AS IS”
AND ANY EXPRESS OR IMPLIED WARRANTIES, INCLUDING, BUT NOT LIMITED TO, THE
IMPLIED WARRANTIES OF MERCHANTABILITY AND FITNESS FOR A PARTICULAR PURPOSE
ARE DISCLAIMED. IN NO EVENT SHALL THE COPYRIGHT OWNER OR CONTRIBUTORS BE
LIABLE FOR ANY DIRECT, INDIRECT, INCIDENTAL, SPECIAL, EXEMPLARY, OR
CONSEQUENTIAL DAMAGES (INCLUDING, BUT NOT LIMITED TO, PROCUREMENT OF
SUBSTITUTE GOODS OR SERVICES; LOSS OF USE, DATA, OR PROFITS; OR BUSINESS
INTERRUPTION) HOWEVER CAUSED AND ON ANY THEORY OF LIABILITY, WHETHER IN
CONTRACT, STRICT LIABILITY, OR TORT (INCLUDING NEGLIGENCE OR OTHERWISE) ARISING
IN ANY WAY OUT OF THE USE OF THIS SOFTWARE, EVEN IF ADVISED OF THE POSSIBILITY OF
SUCH DAMAGE.
 Loading...