

Sony VGC-JS155J User Guide

User Guide
Personal Computer
VGC-JS100 Series
N

Contents
Before Use .........................................................................................................................................................................5
Documentation .............................................................................................................................................................6
Ergonomic Considerations.........................................................................................................................................10
Getting Started .................................................................................................................................................................12
Locating Controls and Ports.......................................................................................................................................13
About the Indicator Lights ..........................................................................................................................................17
Setting Up Your Computer.........................................................................................................................................18
Shutting Down Your Computer Safely .......................................................................................................................21
Using Your VAIO Computer .............................................................................................................................................22
Using the Keyboard ...................................................................................................................................................23
Using the Built-in MOTION EYE Camera...................................................................................................................26
Using the Optical Disc Drive ......................................................................................................................................29
Using the Memory Stick .............................................................................................................................................38
Using the SD Memory Card .......................................................................................................................................44
Using the Internet.......................................................................................................................................................47
Using Wireless LAN (WLAN) .....................................................................................................................................48
Using the Bluetooth Function.....................................................................................................................................51
2
nN

3
nN
Using Peripheral Devices .................................................................................................................................................56
Connecting External Speakers ..................................................................................................................................57
Connecting a Universal Serial Bus (USB) Device......................................................................................................59
Connecting a Printer ..................................................................................................................................................61
Connecting an i.LINK Device .....................................................................................................................................62
Connecting to a Network (LAN) .................................................................................................................................64
Customizing Your VAIO Computer ..................................................................................................................................65
Setting the Password .................................................................................................................................................66
Setting Up Your Computer with VAIO Control Center................................................................................................71
Using the Power Saving Mode...................................................................................................................................72
Upgrading Your VAIO Computer......................................................................................................................................74
Adding and Removing Memory..................................................................................................................................75
Precautions ......................................................................................................................................................................81
Handling the LCD Screen ..........................................................................................................................................82
Using the Power Source ............................................................................................................................................83
Handling Your Computer ...........................................................................................................................................84
Handling the Built-in MOTION EYE Camera..............................................................................................................86
Handling Floppy Disks ...............................................................................................................................................87
Handling Discs ...........................................................................................................................................................88
Using Headphones ....................................................................................................................................................89
Handling the Memory Stick ........................................................................................................................................90
Handling the Hard Disk ..............................................................................................................................................91
Updating Your Computer ...........................................................................................................................................92

4
nN
Troubleshooting ...............................................................................................................................................................93
Computer ...................................................................................................................................................................95
System Security .......................................................................................................................................................100
Built-in MOTION EYE Camera.................................................................................................................................101
Networking ...............................................................................................................................................................104
Bluetooth Technology ..............................................................................................................................................107
Optical Discs ............................................................................................................................................................111
Display .....................................................................................................................................................................116
Printing.....................................................................................................................................................................117
Microphone ..............................................................................................................................................................118
Mouse ......................................................................................................................................................................119
Speakers..................................................................................................................................................................120
Keyboard..................................................................................................................................................................122
Floppy Disks ............................................................................................................................................................123
Audio/Video..............................................................................................................................................................124
Memory Stick ...........................................................................................................................................................127
Peripherals ...............................................................................................................................................................128
Support Options .............................................................................................................................................................129
Sony Support Information ........................................................................................................................................130
Program Support Information...................................................................................................................................133
Trademarks ....................................................................................................................................................................144

nN
Before Use
Before Use
Congratulations on your purchase of this Sony VAIO® computer, and welcome to the on-screen User Guide. Sony has
combined leading-edge technology in audio, video, computing, and communications to provide state-of-the-art personal
computing experience.
!
External views illustrated in this manual may look slightly different from those of your computer.
5

Documentation
Your documentation includes printed information and user guides to read on your VAIO computer.
Printed Documentation
❑ Welcome mat — Contains an overview of components connection, set-up information, etc.
❑ Safety Information — Contains safety guidelines and owner information.
6
nN
Before Use
7
nN
Before Use
Non-printed Documentation
❑ User Guide (this manual) — Explains features of your computer. It also includes information about the software programs
included with your computer, as well as information on solving common problems.
✍
To go to web sites described in this manual by clicking their respective URLs beginning with http://, your computer must be connected to the Internet.
❑ Specifications — The online specifications describe the hardware and software configurations of your VAIO computer.
To view the online specifications:
1 Connect to the Internet.
2 Go to the Sony online support web site at the following URLs:
http://esupport.sony.com/EN/VAIO/
http://www.sony.ca/support/
http://esupport.sony.com/ES/VAIO/
http://esupport.sony.com/ES/VAIO/BR/
❑ VAIO Recovery Center User Guide — Provides information about restoring individual software programs, hardware
drivers, and drive partition(s) or your entire hard disk drive to the original factory settings.
To access this on-screen guide:
for customers in Canada
for customers in USA
for customers in Spanish-speaking Latin American countries or areas
for customers in Brazil
1 Click Start and Help and Support.
2 Click Use My VAIO.
3 Click VAI O Recovery Center User Guide.

nN
Before Use
❑ SmartWi™ Connection Utility Help — Provides information about setting up Bluetooth*, wireless LAN, and wireless
*
WAN
functions.
To access this on-screen guide:
1 Click Start, All Programs, and SmartWi Connection Utility.
2 Click SmartWi Connection Utility Help.
* The Bluetooth and wireless WAN functions are available on selected models only. See the online specifications to find out whether your model
supports the functions.
8

9
nN
Before Use
Help and Support
Help and Support is easy to access and provides a single location for general information and technical assistance for your
VAIO computer. Choose from the following categories to find the answers you need.
To access Help and Support, click Start and Help and Support.
❑ Get started with my VAIO
Get help with Internet and wireless setup, security setup, personalizing your VAIO computer, and creating recovery DVDs
and more.
❑ Use my VAIO
Access your VAIO user guide, interactive help in the form of VAIO tutorials, how-to articles, the VAIO technology page,
specifications, and system and software information.
❑ Troubleshoot my VAIO
Maintain and troubleshoot your VAIO computer with VAIO Care, system restore, backup and recovery, and contact Sony
support.
Ergonomic Considerations
Whenever possible, you should attempt to take account of the following ergonomic considerations:
10
nN
Before Use
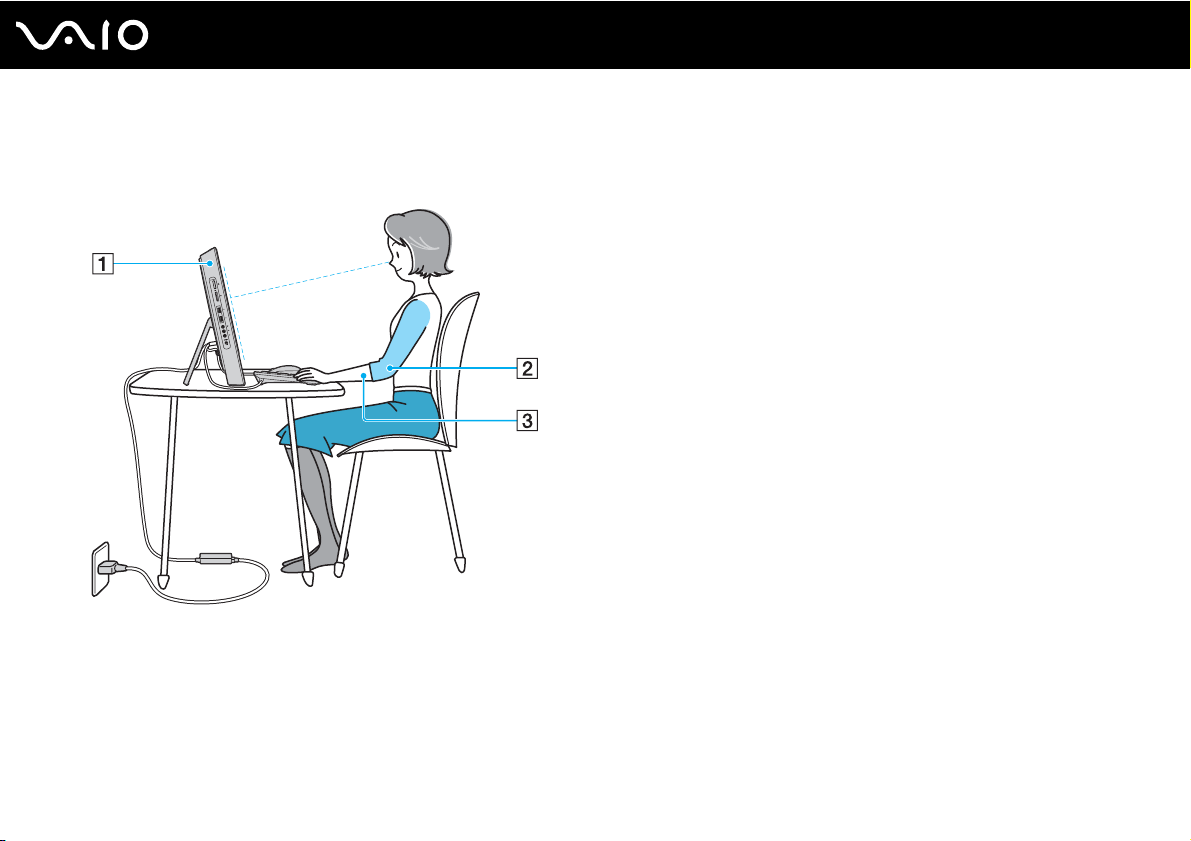
❑ Position of your computer – Place the display directly in front of you (1). Keep your forearms horizontal (2), with your
wrists in a neutral, comfortable position (3) while using the keyboard, pointing device, or external mouse. Let your upper
arms hang naturally at your sides. Take frequent breaks while using your computer. Excessive use of the computer may
strain eyes, muscles, or tendons.
❑ Furniture and posture – Sit in a chair with good back support. Adjust the level of the chair so your feet are flat on the
floor. A footrest may make you more comfortable. Sit in a relaxed, upright posture and avoid slouching forward or leaning
far backwards.
11
nN
Before Use
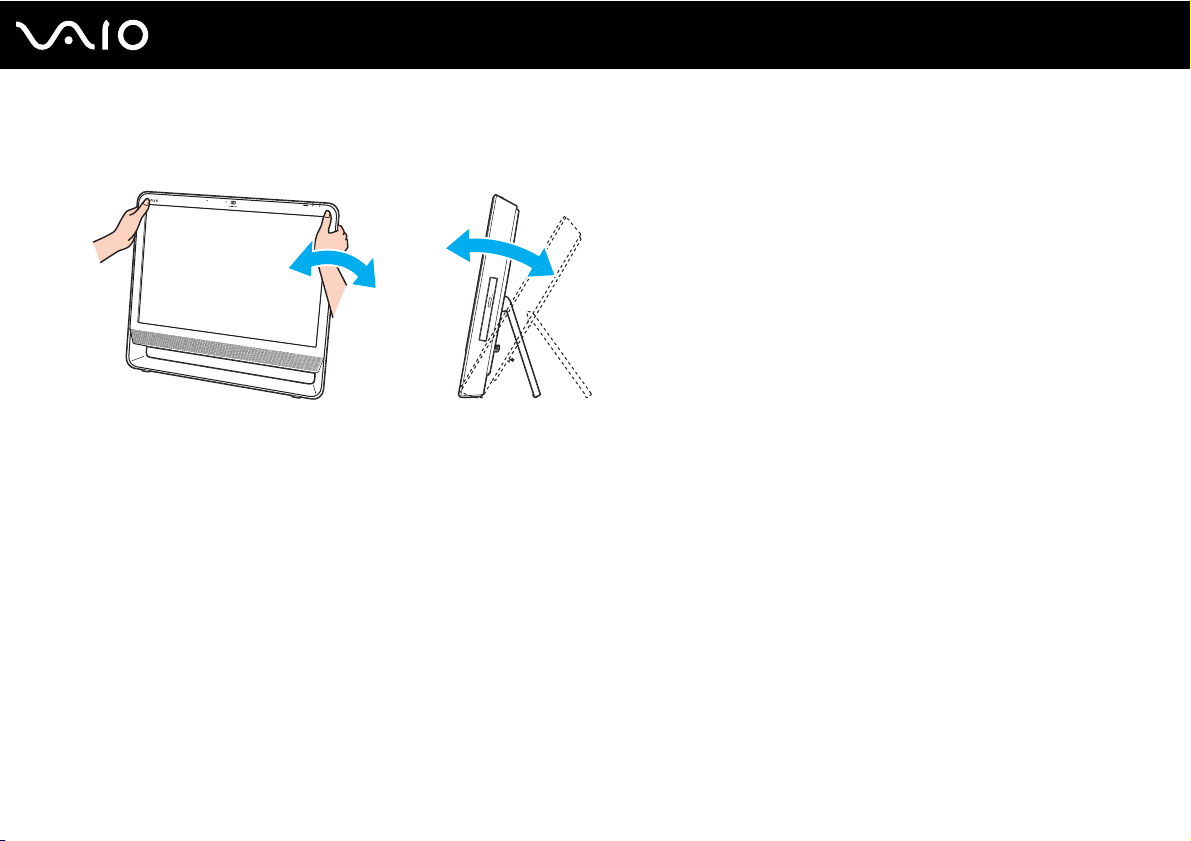
❑ Viewing angle of the display – Use the display's tilting feature to find the best position. You can reduce eye strain and
muscle fatigue by adjusting the tilt of the display to the proper position. Adjust the brightness level of the display as well.
!
While adjusting the viewing angle, do not exert excessive pressure on your computer to eliminate a risk of mechanical damage.
❑ Lighting – Choose a location where windows and lights do not cause glare and reflection on the display. Use indirect
lighting to avoid bright spots on the display. Proper lighting adds to your comfort and work efficiency.
❑ Ventilation – Make sure you leave at least 4 inches (10 cm) of space behind and at least 8 inches (20 cm) of space on
each side of the main unit.

Getting Started
This section describes how to get started using your VAIO computer.
❑ Locating Controls and Ports (page 13)
❑ About the Indicator Lights (page 17)
❑ Setting Up Your Computer (page 18)
❑ Shutting Down Your Computer Safely (page 21)
12
nN
Getting Started
Locating Controls and Ports
Take a moment to identify the controls and ports shown on the following pages.
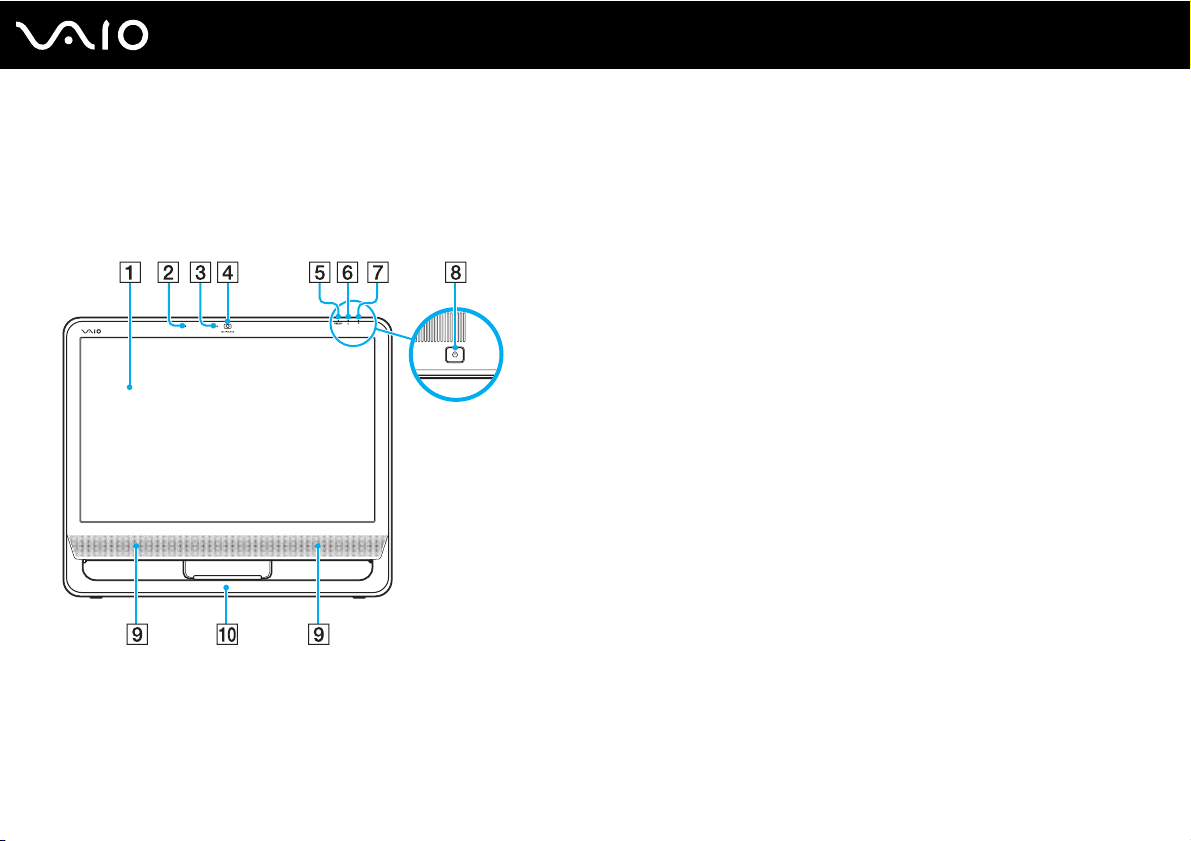
Front
A LCD screen (page 82)
B Built-in microphone (monaural)
C Built-in MOTION EYE camera indicator (page 17)
D Built-in MOTION EYE camera (page 26)
E WIRELESS indicator (page 17)
F Hard disk drive/Optical disc drive indicator (page 17)
G Power indicator (page 17)
H Power button
I Built-in speakers (stereo)
J Bottom chassis frame (page 85)
13
nN
Getting Started
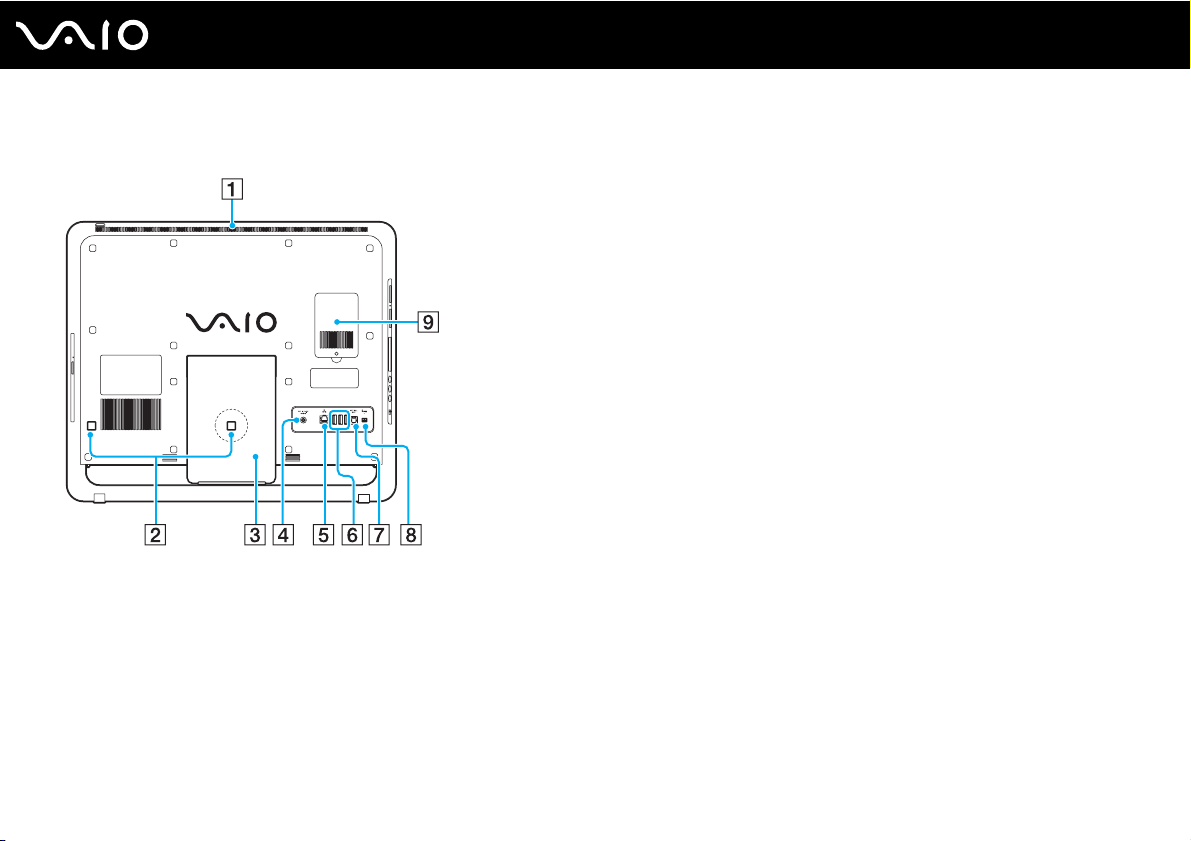
Back
!
The area around the air vent (1) becomes hot while your computer is on. Be sure to
wait until the computer cools down before you touch it.
A Air vent
B Cable clamps (page 18), (page 19)
C Prop-up stand (page 85)
D DC IN port (page 19)
E Network (Ethernet) port (page 64)
F Hi-Speed USB (USB 2.0) ports
*
(page 59)
G OPTICAL OUT port (page 57)
(Output Sampling Rate: 44.1 KHz/48.0 KHz/96.0 KHz)
H i.LINK 4-pin (S400) port (page 62)
I Memory module compartment cover (page 75)
* Support high-/full-/low- speeds.
14
nN
Getting Started
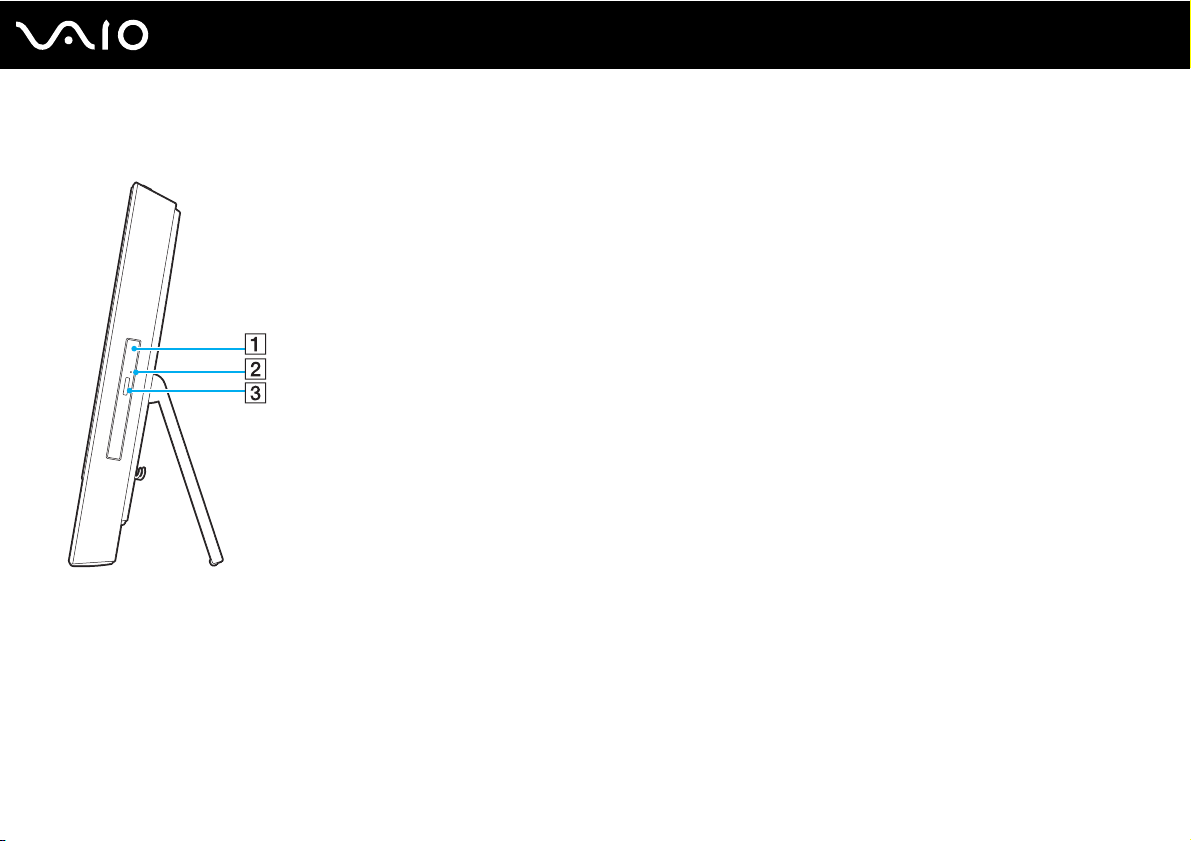
Right
A Optical disc drive (page 29)
B Manual eject hole (page 111)
C Drive eject button (page 29)
15
nN
Getting Started
Left
16
nN
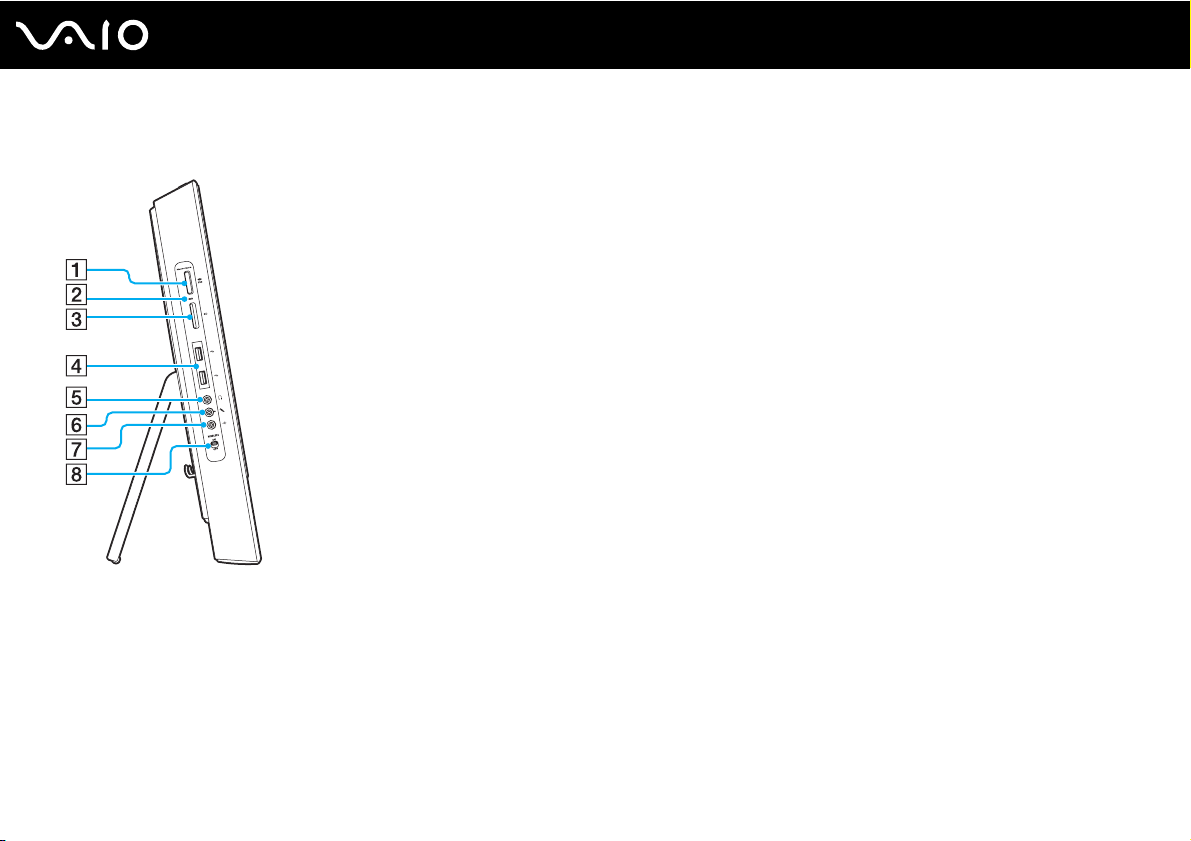
Getting Started
A Memory Stick slot
*1
(page 38)
B Media Access indicator (page 17)
C SD memory card slot (page 44)
D Hi-Speed USB (USB 2.0) ports
*2
(page 59)
E Headphones jack (page 57)
F Microphone jack
Connect an external microphone.
G Line In jack
Connect an external audio device for audio input.
H WIRELESS switch (page 48)
*1
Your computer supports both standard- and Duo-size Memory Stick.
*2
Support high-/full-/low- speeds.
Getting Started
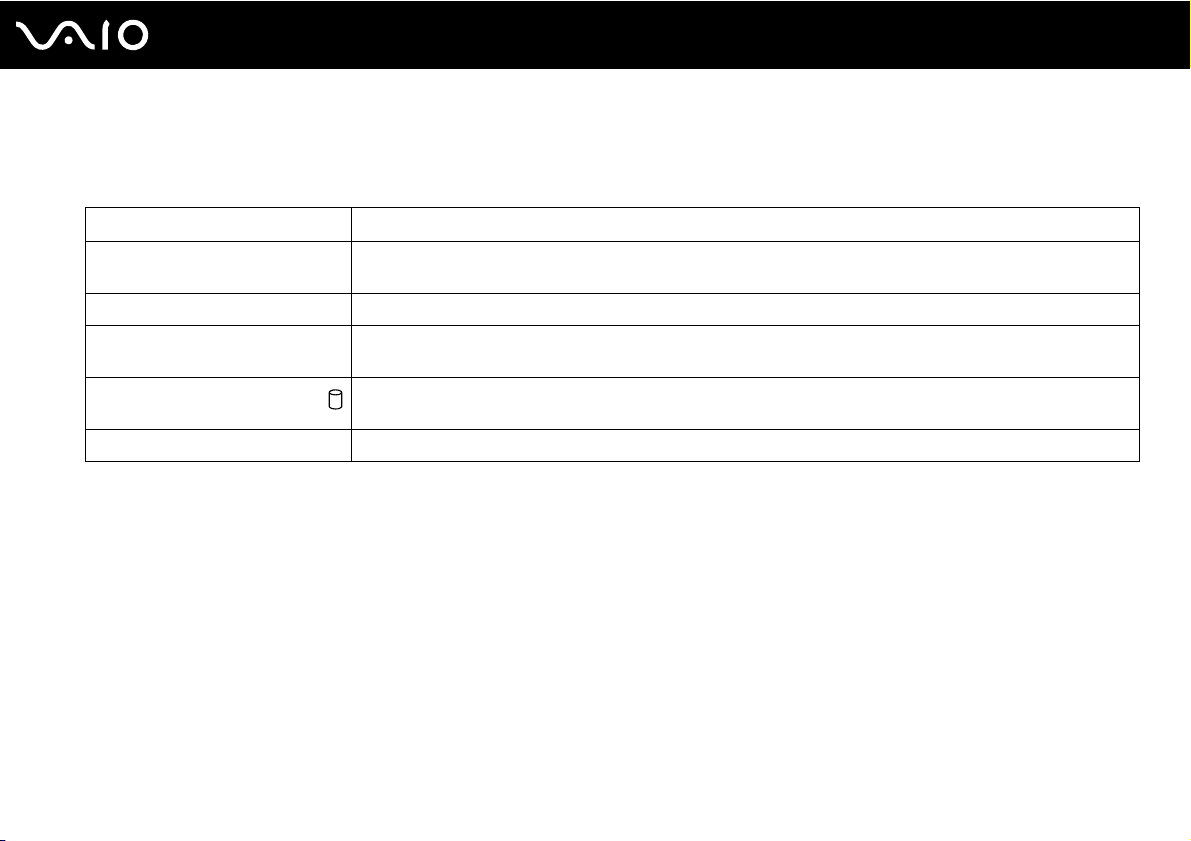
About the Indicator Lights
Your computer is equipped with the following indicator lights:
Indicator Functions
Power 1 Illuminates in green when the computer is on, illuminates in orange while the computer is in Sleep mode, and
turns off when the computer is off.
Built-in MOTION EYE camera Illuminates while the built-in MOTION EYE camera is in use.
Media Access Illuminates when data is read from or written to a memory card. (Do not place the computer into Sleep mode or
Hard disk drive/Optical disc drive
WIRELESS Illuminates when the WIRELESS switch is turned on.
turn it off when this indicator is lit.) When the indicator is unlit, the memory card is not in use.
Illuminates when the drive is reading or writing data. Do not place the computer into Sleep mode or turn it off
when this indicator is lit.
17
nN
Getting Started
Setting Up Your Computer
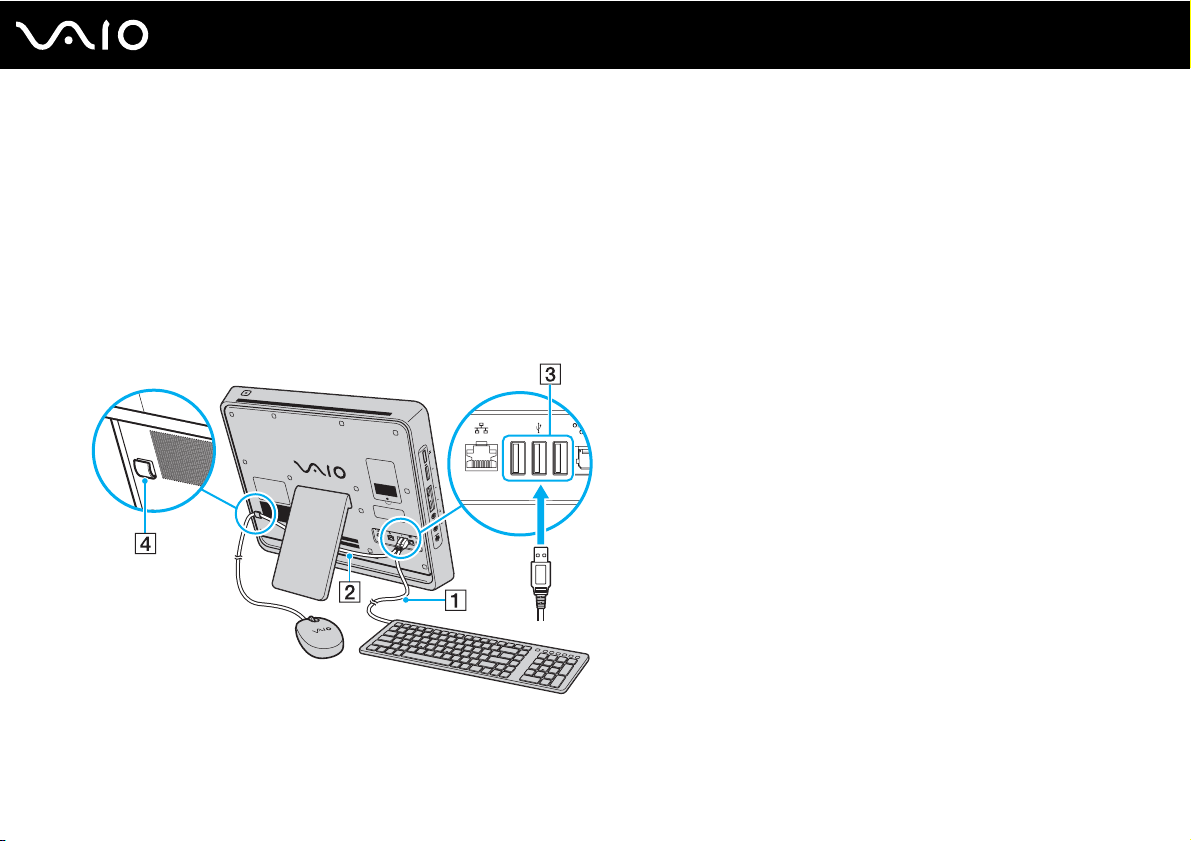
Connecting the Keyboard and the Mouse
A USB keyboard and a USB mouse are supplied with your computer.
To connect the keyboard and the mouse
1 Plug the keyboard cable (1) and the mouse cable (2) to your desired USB ports (3) on the back of the computer.
2 Route the mouse cable (2) through the cable clamp (4) on the back of your computer.
18
nN

Connecting a Power Source
You need an AC adapter to connect your computer to an AC power source.
✍
Use only the supplied AC adapter for your computer.
To connect the AC adapter
1 Plug one end of the power cord (1) into the AC adapter (3).
2 Plug the other end of the power cord into an AC outlet (2).
3 Plug the AC adapter cable (4) into the DC IN port (5).
4 Route the AC adapter cable through the cable clamp (6).
19
nN
Getting Started
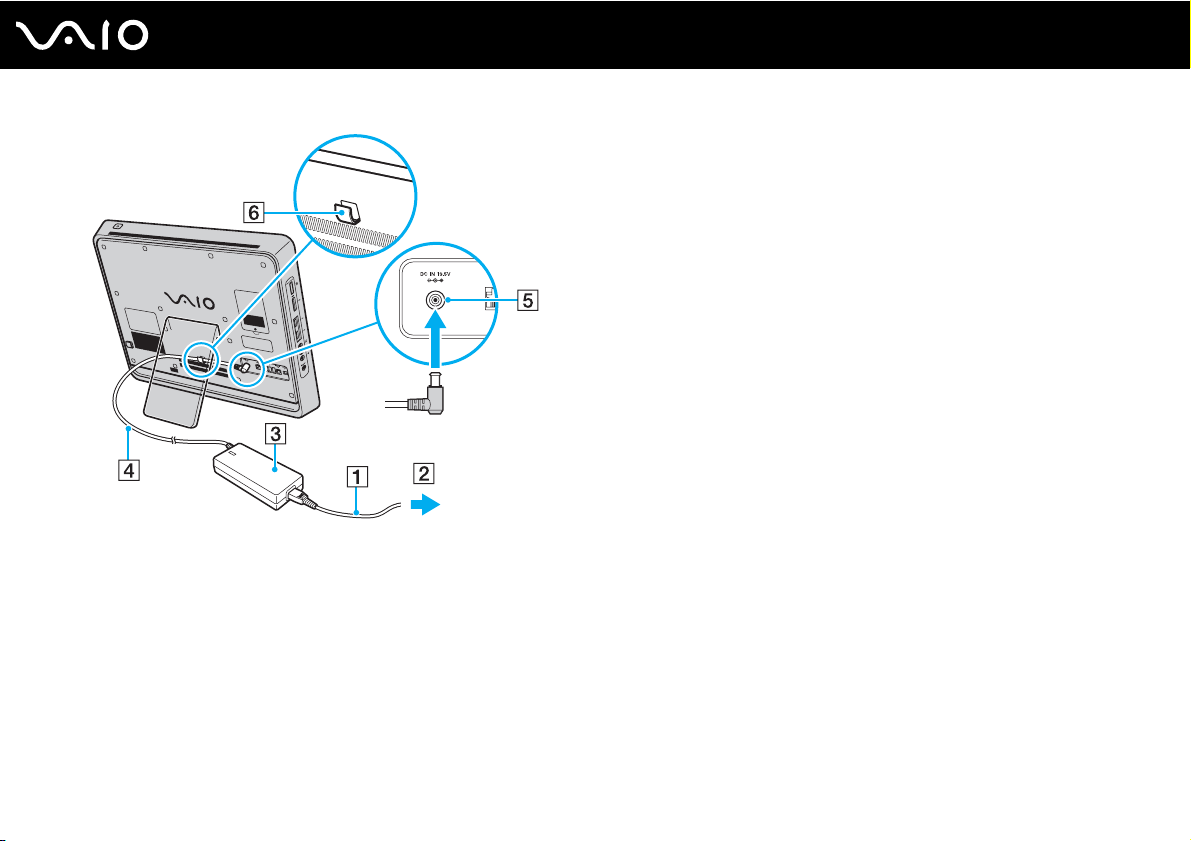
!
The shape of the DC In plug varies depending on the AC adapter.
20
nN
Getting Started
✍
To disconnect your computer completely from AC power, unplug the AC adapter when the computer is off.
Make sure that the AC outlets are easily accessible.
!
If you unplug the AC adapter from your computer while the computer is on or in Sleep mode, you may lose all unsaved data.

21
nN
Getting Started
Shutting Down Your Computer Safely
To avoid losing unsaved data, be sure to shut down your computer properly, as described below.
To shut down your computer
1 Turn off any peripherals connected to the computer.
2 Click Start, the arrow next to the Lock button, and then Shut Down.
3 Respond to any prompts warning you to save documents or to consider other users and wait for the computer to turn off
automatically.
The power indicator light turns off.

Using Your VAIO Computer
This section describes how to get the most out of using your VAIO computer.
❑ Using the Keyboard (page 23)
❑ Using the Built-in MOTION EYE Camera (page 26)
❑ Using the Optical Disc Drive (page 29)
❑ Using the Memory Stick (page 38)
❑ Using the SD Memory Card (page 44)
❑ Using the Internet (page 47)
❑ Using Wireless LAN (WLAN) (page 48)
❑ Using the Bluetooth Function (page 51)
22
nN
Using Your VAIO Computer

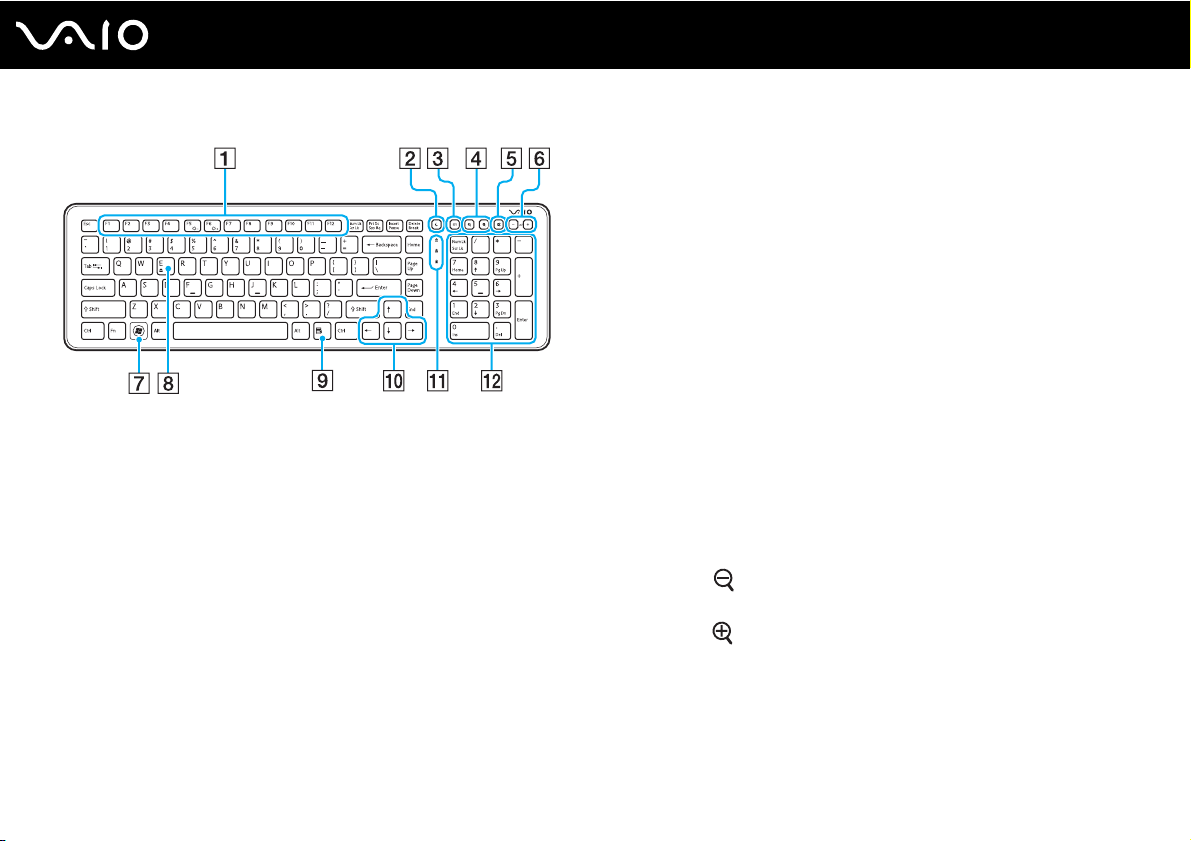
Using the Keyboard
A USB keyboard is supplied with your computer.
The keyboard uses a standard key arrangement with additional keys that perform specific functions.
23
nN
Using Your VAIO Computer
Using Your VAIO Computer
A Function keys
Perform certain tasks. The task associated with each function
key varies among software applications except the following
combinations with the Fn key.
Fn+F5: Decreases lighting intensity of the LCD screen.
Fn+F6: Increases lighting intensity of the LCD screen.
B Sleep button
Provides for the lower level of power consumption.
For details on power management, see Using the Power
Saving Mode (page 72).
C S1 button
By default, the S1 button opens the Media Center Start menu.
24
nN
✍
Illustrated above is the English keyboard as an example.
✍
The default S1 button assignment may be different from the above. In such a
case, you can change the assignment with the VAIO Control Center. See Setting
Up Your Computer with VAIO Control Center (page 71) and find out more in its
help file.
D Zoom buttons
Change the view size of your screen.
Press
away (zoom out).
Press
in).
See the help file included with the VAIO Control Center for
more information.
to make the screen view look smaller and further
to make the screen view look bigger and closer (zoom
25
nN
Using Your VAIO Computer
E Muting button
Turns the volume on and off.
F Volume control buttons
Increase (+) or decrease (-) the volume.
G Windows key
Displays the Start menu.
H E key
Ejects the optical disc drive tray when used in combination with the
Fn key.
I Applications key
Displays a shortcut menu in certain software applications.
J Directional arrow keys
Move the pointer on the computer screen.
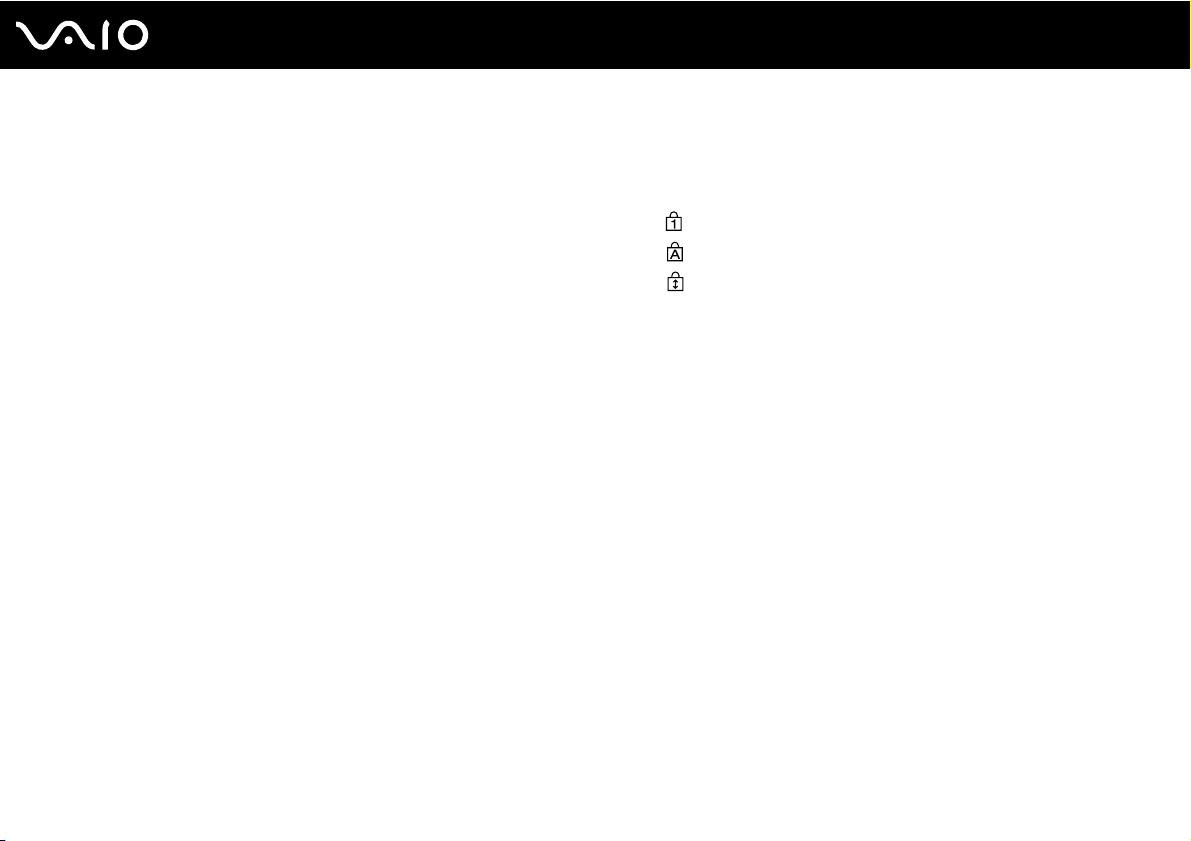
K Indicator lights
(Num Lk): Turns on while in the Num Lock state.
(Caps Lock): Turns on while in the Caps Lock state.
(Scr Lk): Turns on while in the Scroll Lock state.
L Numeric keypad
Use the numeric keypad to type numbers or to perform basic
math calculations.

nN
Using Your VAIO Computer
Using the Built-in MOTION EYE Camera
Your computer is equipped with a built-in MOTION EYE camera.
The built-in MOTION EYE camera adds video functionality to instant messaging software and video editing software and
enables you to capture still images and movies with the preinstalled image capture software.
Turning on the computer activates the built-in MOTION EYE camera. Video conference is possible with the appropriate
software.
Note that launching or exiting your instant messaging or video editing software does not activate or deactivate the built-in
MOTION EYE camera, respectively.
✍
The built-in MOTION EYE camera cannot be shared by more than one software application. If another software application is using the camera, exit the
application before using the built-in MOTION EYE camera with your desired application.
!
The viewer window may show some noise, for example horizontal streaks, if you view a rapid-moving object. This is normal and does not indicate a
malfunction.
You cannot operate the built-in MOTION EYE camera with the Microsoft Windows Movie Maker software.
26

nN
Using Your VAIO Computer
Capturing Still Images
To capture a still image
1 Click Start, All Programs, ArcSoft WebCam Companion 2, and WebCam Companion 2 to launch the WebCam
Companion 2.
2 Click the Capture icon in the main window.
3 Frame your subject in the viewfinder.
4 Click the Capture button below the displayed image.
The current image in the viewfinder is captured and its thumbnail image is added as a the thumbnail in the left pane of
the main window.
✍
When capturing an image in a dark place, click the WebCam Settings icon after step 2 and select the low light or low light compensation option in the
properties window.
The WebCam Companion 2 provides many more features. See the help file included with the software for more information.
27

nN
Using Your VAIO Computer
Capturing Movies
To capture a movie
1 Click Start, All Programs, ArcSoft WebCam Companion 2, and WebCam Companion 2 to launch the WebCam
Companion 2.
2 Click the Record icon in the main window.
3 Frame your subject in the viewfinder.
4 Click the Record Video button below the displayed image to start movie recording.
5 When finished, click the Record Video button once again to stop movie recording.
The first scene of the captured movie is added as a thumbnail in the left pane of the main window.
✍
When capturing a movie in a dark place, click the WebCam Settings icon after step 2 and select the low light or low light compensation option in the
properties window.
The WebCam Companion 2 provides many more features. See the help file included with the software for more information.
28
29
nN
Using Your VAIO Computer
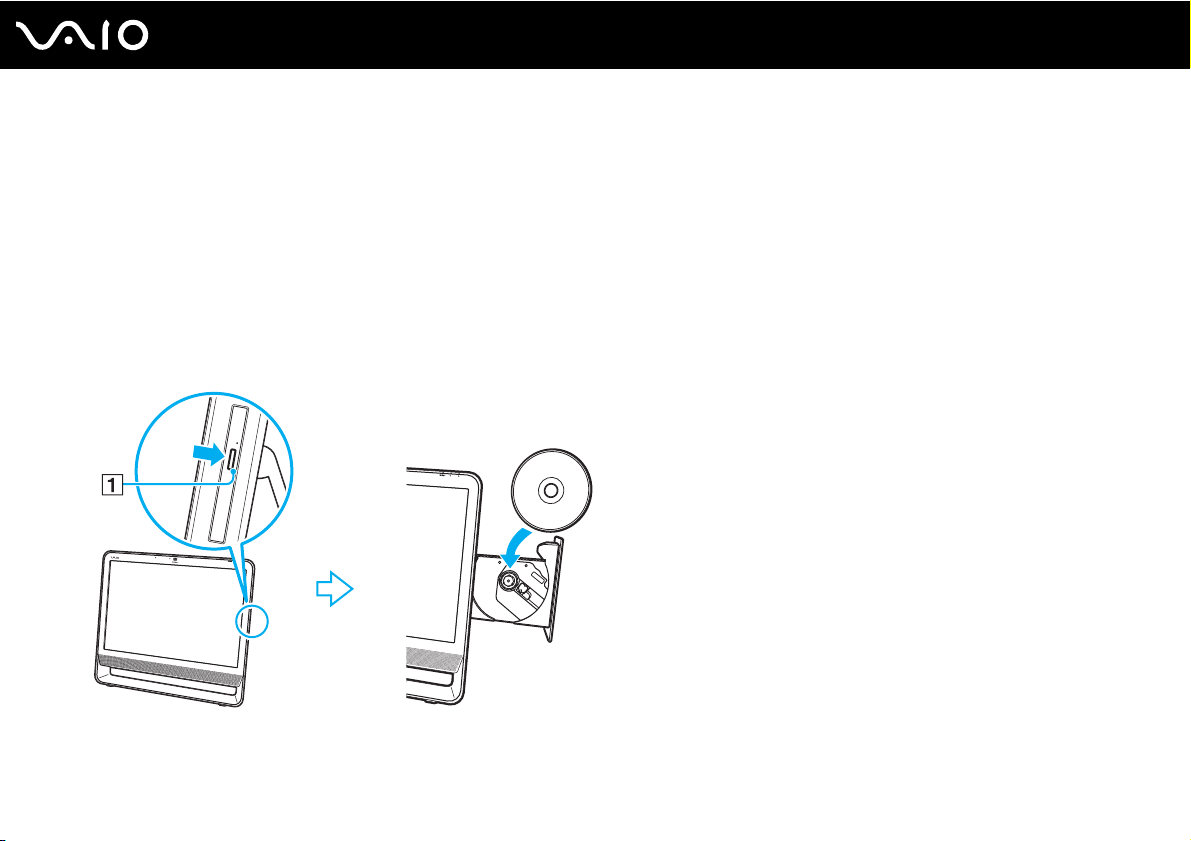
Using the Optical Disc Drive
Your computer is equipped with an optical disc drive.
To insert a disc
1 Turn on the computer.
2 Press the drive eject button (1) or the Fn+E keys to open the drive.
The tray slides out.
3 Hold the back of the tray with one hand, place a disc in the middle of the tray with the label side facing toward you, and
gently push it toward the tray until the disc clicks into place.
!
Do not exert pressure on the drive tray. Be sure to hold the back of the drive tray when placing/removing a disc onto/from the tray.
4 Close the tray by pushing it in gently.

Using Your VAIO Computer
!
Do not remove the optical disc when your computer is in Sleep mode. Doing so may cause the computer to malfunction.
✍
If you plan to use an external optical disc drive, connect the drive before you launch any preinstalled disc operation program.
30
nN
 Loading...