

SONY VCL-HG0872K User Manual
4-122-627-01 (1)
ワイド コンバージョンレンズ
Wide Conversion Lens
Objectif de conversion
grand-angle
取扱説明書/Operating Instructions/Mode d’emploi/
Bedienungsanleitung/Manual de instrucciones/
Istruzioni per l’uso/
お買い上げいただきありがとうございます。
この取扱説明書には、事故を防ぐための重要な注意事項
と製品の取り扱いかたを示しています。この取扱説明書
をよくお読みのうえ、製品を安全にお使いください。お読みになった
あとは、いつでも見られる所に必ず保管してください。
VCL-HG0872K
©2008 Sony Corporation Printed in Japan
A
B
2
1
C
D
1
2
E
4
/ /
B
C
3
4
2
F
A
E
日本語
このコンバージョンレンズは、ソニーのデジタルHDビデオカメラレコー
ダー
HVR-Z5
ソニー製品は、安全に充分配慮されています。しかし、間違った使いかた
をすると、人身事故が起きる恐れがあり危険です。事故を防ぐために次の
ことを必ずお守りください。
安全のための注意事項を守る。
•
故障したら使わずに、ソニー業務用商品相談窓口に相談する。
•
直接太陽を覗かないでください。
目をいためたり、失明の原因となることがあります。
(以下、カメラとする)専用です。
安全のために
下記の注意事項を守らないと、事故により死亡や大
の原因となります。
けが
下記の注意事項を守らないとけがをすることがあり
ます。
レンズを落下して、けがをしないように充分にご注意ください。
注意を怠ると、思わぬけがをすることがあります。
コンバージョンレンズを取り付けるまえに
レンズカバー付きフード、MCプロテクター、フィルターを取りはずして
から、カメラにコンバージョンレンズを取り付けてください。
コンバージョンレンズの取り付けかた/取りはずしかた
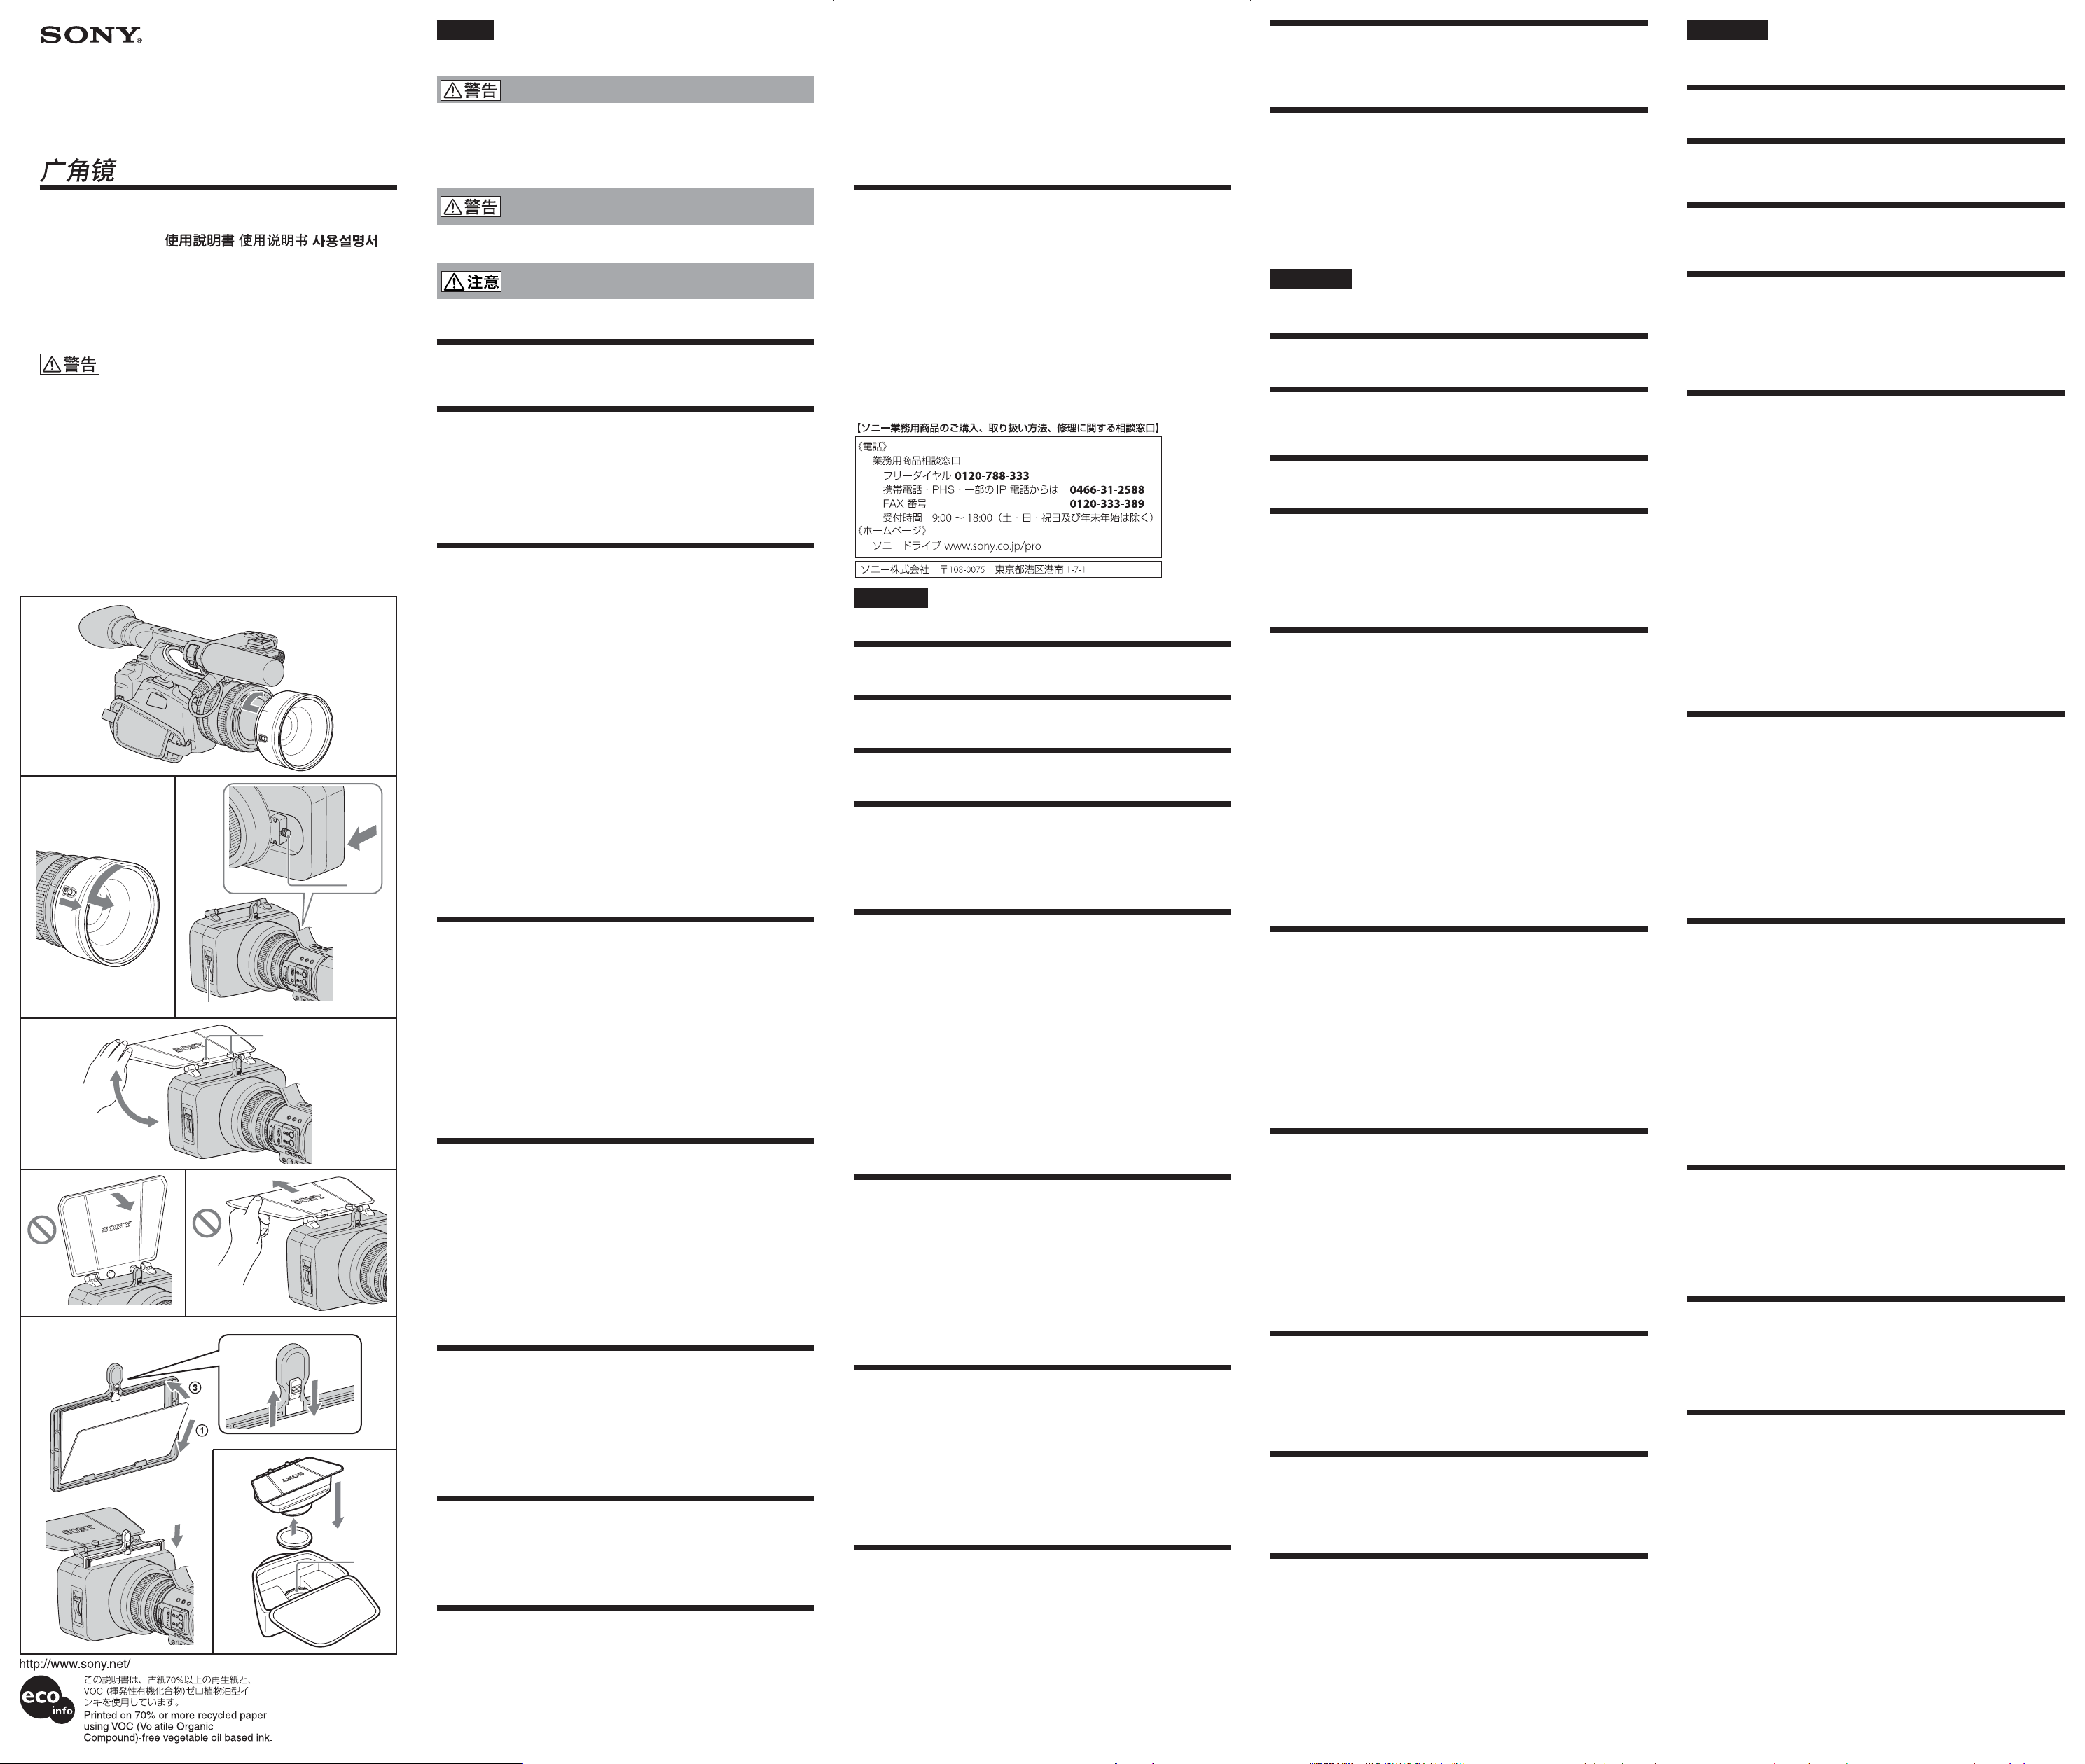
取り付けかた(イラストA)
カメラとレンズの位置合わせマークを一致させる。
1
レンズを軽くカメラに押し当てながら、時計方向に「カチッ」とロック
2
するまで回して固定する。
取りはずしかた(イラストB)
ロック解除スイッチ(1)をスライドさせながら、レンズを反時計方向に回
してはずす(2)。
使用上のご注意
持ち運びの際は、コンバージョンレンズを取りはずしてください。
•
コンバージョンレンズや、付属レンズフードを取りはずす際は、遮光
•
シェードを持たないでください。(D-3)遮光シェードがはずれて、フー
ドやレンズが落下し破損するおそれがあります。また、遮光シェードが破
損するおそれがあります。
風の強い場所では遮光シェードを使用しないでください。
•
遮光シェードの角度によっては、本体内蔵マイク及びマイク使用時の記
•
録音声に影響を与えることがあります。
保管の際は、必ずコンバージョンレンズにキャップを取り付けてくださ
•
い。
湿度の高い場所に長期間置かないでください。カビが発生することがあ
•
ります。
結露について
結露とは、コンバージョンレンズを寒い場所から急に暖かい場所へ持ち込
んだときなどに、コンバージョンレンズの内側や外側に水滴が付くことで
す。結露を起こりにくくするためには、一度コンバージョンレンズをビ
ニール袋かバッグなどに入れて、使用する環境の温度になじませてから、
取り出してください。
お手入れについて
コンバージョンレンズ表面に付いたホコリは、ブロワ−ブラシか柔らかい
刷毛で取ってください。指紋、その他の汚れは中性洗剤液をしみ込ませた
柔らかい布で拭き取ってください。(クリーニングキット
めします。)
KK-LC1
をおすす
C 付属レンズフードの取り付けかた/取りはずしかた
カメラにコンバージョンレンズを取り付けたまま、付属レンズフードを取
り付けることができます。
取り付けかた
フード固定ネジ(A)がゆるめてあることを確認する。
1
コンバージョンレンズとレンズフードのセンターマークを合わせて、
2
フードを矢印の方向にはめこむ。
フード固定ネジをしっかりと締める。
3
取りはずしかた
フード固定ネジをゆるめる。
1
フードを矢印と反対方向に引っ張りながらはずす。
2
レンズカバーを開閉するには
レンズカバーを開けるときは、レンズカバーレバー(B)を「
じるときは「
CLOSE
」に動かす。
OPEN
」に、閉
D 遮光シェードの取り付けかた/取りはずしかた
取り付けかた
シェード固定ネジ(C)をゆるめて、遮光シェードを差しこむ。
1
シェード固定ネジを締める。
2
取りはずしかた
シェード固定ネジをゆるめて、遮光シェードを取りはずす。
※シェード固定ネジには落下防止機能がありますので、遮光シェードを取
りはずした後にシェード固定ネジを締めなおす必要はありません。
※遮光シェードを取りはずした状態でシェード固定ネジを締める場合は、
シェード固定ネジを正面に向けた状態で締めて下さい。
遮光シェードを開閉するには
遮光シェードを持って開閉する。(D-1)
※遮光シェードは、
°以上開閉することができません。(D-2)
180
E フィルターホルダーの取り付けかた
フィルターホルダーは、以下の手順で市販のフィルター(4×
サイズ)を取り付けることができます。
フィルターをホルダー底部に差しこむ(1)。
1
ホルダーのレバーを上げて(2)、フィルターをホルダーの枠に合わせる
2
(3)。
レバーを下げて、フィルターをはさむ(4)。
3
レバーをレンズ側に向けた状態で、ホルダーをフードのスロット部に差
4
しこみ、取り付ける。(E-4)
5.65
インチ
F 収納について
コンバージョンレンズとレンズフードは、イラストの方法で付属のキャリ
ングケースに収納してください。その際、前レンズキャップ(E)は表面を
下に向けて、ケース内クッションの間に収納してください。後レンズ
キャップはコンバージョンレンズに取り付けた状態で収納してください。
※ 収納の際は、遮光シェードを閉じてください。
保証書とアフターサービス
保証書について
この製品には保証書が添付されていますので、お買い上げの際、お受け
•
取りください。
所定事項の記入および記載内容をお確かめのうえ、大切に保管してくだ
•
さい。
保証期間は、お買い上げ日より1年間です。
•
アフターサービスについて
調子が悪いときはまずチェックを
この説明書をもう一度ご覧になってお調べください。それでも具合の悪い
ときは、ソニー業務用商品相談窓口にご相談ください。
保証期間中の修理は
保証書の記載内容に基づいて修理させていただきます。詳しくは保証書を
ご覧ください。
保証期間経過後の修理は
修理によって機能が維持できる場合は、ご要望により有料修理させていた
だきます。
主な仕様
倍率
レンズ構成
外形寸法 最大径 約
全 長約
質量(キャップを除く) 約
同梱物 ワイドコンバージョンレンズ
仕様および外観は、改良のため予告なく変更することがありますが、ご了
承ください。
倍
0.8
枚
3群3
ø106mm
47mm
g
550
レンズキャップ(前後各1)
レンズフード(
遮光シェード(1)
フィルターホルダー(
キャリングケース(
印刷物一式
)
1
)
1
)
1
(1)
English
The Sony VCL-HG0872K wide conversion lens is designed for use only with the
Sony digital HD video camera recorder HVR-Z5 (referred to below as “camera”).
WARNING
Do not directly look at the sun through this lens.
Doing so might harm your eyes or cause loss of eyesight.
Caution on detaching the conversion lens
Be careful not to injure yourself by dropping the lens.
Careless handling may cause injury.
Before attaching the conversion lens
First remove the lens hood with lens cover, MC protector or filter, and then attach
the conversion lens to the camera.
Attaching/detaching the conversion lens
Attaching the lens (illustration A)
1 Align the aligning marks on the lens and the camera.
2Insert the lens into the camera and turn it clockwise until it locks into place.
Detaching the lens (illustration B)
Turn the lens counterclockwise while sliding the lock release switch (1) and
detach it (2) .
Notes on use
• Remove the conversion lens when transporting.
• Do not hold the shade when you detach the conversion lens or the supplied lens
hood (D-3). Doing so may cause the hood or the lens to fall off, and then
damage it. Also doing so may cause the shade to be damaged.
• Do not use the shade in windy conditions.
• If you use the microphone or the built-in microphone when the shade is
attached, the recorded audio may be affected by shade mounting angle.
•Always place the lens caps on the conversion lens when storing.
• Do not keep the lens in a very humid place for a long period of time to prevent
mold.
Condensation
If your lens is brought directly from a cold place to a warm place, condensation
may appear on the lens. To avoid this, place the lens in a plastic bag or something
similar. When the air temperature inside the bag reaches the surrounding
temperature, take the lens out.
Cleaning the conversion lens
Brush off any dust from the surface of the lens with a blower brush or soft brush.
Wipe off fingerprints or other smears with a soft cloth slightly moistened with a
mild detergent solution. (Use of the Cleaning Kit KK-LC3 is recommended.)
C Attaching/detaching the supplied lens hood
You can attach the supplied lens hood while the conversion lens is still attached to
the camera.
Attaching the lens hood
1Loosen the hood securing screw (A).
2 Align the marks on the lens and the lens hood and fit the hood in the direction
of the arrow.
3 Firmly tighten the hood securing screw.
Detaching the lens hood
1 Loosen the hood securing screw.
2 Detach the hood by pulling it in the opposite direction of the arrow.
Opening/closing the lens cover of the lens hood
Move the lens cover lever (B) to OPEN to open the lens cover, and move the lever
to CLOSE to close the lens cover.
D Attaching/detaching the shade
Attaching the shade
1 Loosen the shade securing screw (C) , and fit the shade.
2 Tighten the shade securing screw.
Detaching the shade
Loosen the shade securing screw, and detach the shade.
* There is safety catcher at the shade securing screw. You do not need to tighten
the shade securing screw again, after detaching the shade.
*In case you tighten the shade securing screw without the shade, tighten it on
front direction.
Opening and closing the shade
The shade is opened and closed by holding the shade (D-1).
* Do not open or close the shade 180º or more (D-2).
E Attaching the filter holder
You can attach the commercial filter what 4 × 5.65 inch size by using the filter
holder.
1 Fit the filter at the bottom of the filter holder (1).
2 Push up the lever of filter holder (2), and align the filter and the flame of filter
holder (3).
3 Push down the lever of filter holder, and clip the filter to flame of filter holder
(4).
4 Install the filter holder with the lever of filter holder pointing lens side, and
attach it (E-4).
F Storing the conversion lens and lens hood
Store the conversion lens and the lens hood in the supplied carrying case as
illustrated. Store the front lens cap (E) with front side pointing downward and fit
the carrying case cushion. Store the back lens cap while it is attached to the
conversion lens.
* Close the shade when storing.
Specifications
Magnification 0.8
Lens structure 3 groups, 3 elements
Dimensions
Maximum diameter: Approx. ø 106 mm (4 1/4 in.)
Total length: Approx. 47 mm (1 7/8 in.)
Mass (excluding the caps) Approx. 550 g (1 lb 3 oz.)
Included items Wide conversion lens (1), Lens cap(for the front and
Design and specifications are subject to change without notice.
back of the lens) (2), Lens hood (1), Shade (1),
Filter holder (1), Carrying case (1), Set of printed
documentation
Français
Le objectif de conversion grand-angle VCL-HG0872K de Sony est spécialement
conçu pour être utilisé avec le caméscope HD numérique HVR-Z5 Sony (désigné
ci-après par le terme « caméscope »).
AVERTISSEMENT
Ne regardez pas directement le soleil à travers le objectif.
Ceci peut causer des lésions visuelles ou entraîner la perte de la vue.
Précautions à prendre lors du retrait du objectif de
conversion
Pour éviter de vous blesser, veillez à ne pas laisser tomber le objectif.
Une mauvaise manipulation peut provoquer des blessures.
Avant de fixer le objectif de conversion
Retirez d’abord le pare-soleil avec bouchon d’objectif, le protecteur ou le filtre MC,
puis fixez l’objectif de conversion au caméscope.
Fixation et retrait du objectif de conversion
Fixation du objectif (illustration A)
1 Alignez les repères de l’objectif sur ceux du caméscope.
2 Insérez l’objectif dans le caméscope et tournez-le dans le sens horaire, jusqu’à ce
qu’il se bloque.
Retrait du objectif (illustration B)
Tournez l’objectif dans le sens anti-horaire tout en faisant glisser le commutateur
de déverrouillage (1) et retirez-le (2).
Remarques sur l’utilisation
• Retirez le objectif de conversion lorsque vous transportez le caméscope.
• Ne tenez pas la visière pare-soleil lorsque vous retirez l’objectif de conversion ou
le pare-soleil fourni (
détacher et d’être endommagés. Ceci pourrait également endommager la visière
pare-soleil.
• N’utilisez pas la visière pare-soleil en cas de vent.
• Si vous utilisez le microphone ou le microphone intégré lorsque la visière pare-
soleil est en place, l’angle de montage de cette dernière peut avoir un impact sur
le son enregistré.
•Placez toujours le capuchon sur le objectif de conversion avant de le ranger.
•Ne laissez pas le objectif dans un endroit très humide pendant une période
prolongée afin d’éviter la formation de moisissure.
Condensation
Si votre objectif est déplacé directement d’un endroit froid à un endroit chaud, de
la condensation risque de se former sur le objectif. Pour éviter ce phénomène,
placez le objectif dans un sac plastique ou autre. Sortez le objectif du sac lorsque la
température de l’air à l’intérieur du sac a atteint la température ambiante.
Nettoyage du objectif de conversion
Enlevez toute poussière de la surface du objectif à l’aide d’une brosse soufflante ou
d’une brosse douce. Nettoyez également les traces de doigts et autres saletés à
l’aide d’un chiffon doux légèrement imbibé d’une solution neutre. (L’utilisation du
kit de nettoyage KK-LC3 est recommandée.)
C Fixation et retrait du pare-soleil fourni
Vous pouvez fixer le pare-soleil fourni lorsque le objectif de conversion est fixé sur
le caméscope.
Fixation du pare-soleil
1Desserrez la vis de fixation du pare-soleil (A).
2 Alignez les repères du objectif sur ceux du pare-soleil, puis insérez le pare-soleil
dans le sens de la flèche.
3 Serrez fermement la vis de fixation du pare-soleil.
Retrait du pare-soleil
1 Desserrez la vis de fixation du pare-soleil.
2 Retirez le pare-soleil en le tirant dans le sens inverse de la flèche.
Ouverture/fermeture du capuchon d’objectif du pare-soleil
Placez le levier du capuchon d’objectif (B) sur la position OPEN pour ouvrir le
capuchon d’objectif, puis placez le levier sur la position CLOSE pour fermer le
capuchon d’objectif.
D Fixation et retrait de la visière pare-soleil
Fixation de la visière pare-soleil
1 Desserrez la vis de fixation de la visière pare-soleil (C), puis mettez-la en place.
2 Serrez la vis de fixation de la visière pare-soleil.
Retrait de la visière pare-soleil
Desserrez la vis de fixation de la visière pare-soleil, puis retirez la visière.
* La vis de fixation de la visière pare-soleil comporte un dispositif de sécurité. Une
fois la visière pare-soleil retirée, vous n’avez pas besoin de resserrer la vis de
fixation.
*Si vous resserrez la vis de fixation de la visière pare-soleil en l’absence de cette
dernière, resserrez-la de l’avant.
Ouverture et fermeture de la visière pare-soleil
Il vous suffit de manipuler la visière pare-soleil pour l’ouvrir et la refermer (D-1).
*N’ouvrez pas ou ne refermez pas la visière pare-soleil selon un angle de 180 º ou
plus
(D-2)
.
E Installation du porte-filtre
Vous pouvez fixer le filtre disponible dans le commerce d’une taille de 4 ×
5,65 pouces au moyen du porte-filtre.
1 Insérez le filtre dans la partie inférieure du porte-filtre (1).
2 Relevez la languette du porte-filtre (2), puis alignez le filtre et le cadre du
porte-filtre (3).
3Rabaissez la languette du porte-filtre, puis clipsez le filtre au cadre du porte-
filtre (4).
4Mettez le porte-filtre en place avec la languette côté objectif, puis fixez-le (E-4).
F Rangement de l’objectif de conversion et du
pare-soleil
Rangez l’objectif de conversion et le pare-soleil dans le boîtier de transport fourni
comme illustré. Rangez le capuchon avant de l’objectif (E) avec la partie avant
orientée vers le bas, puis installez coussinet du boîtier. Rangez le capuchon arrière
de l’objectif lorsqu’il est fixé à l’objectif de conversion.
* Refermez la visière pare-soleil pour le rangement.
Spécifications
Grossissement 0,8
Structure du convertisseur 3 groupes, 3 éléments
Dimensions
Diamètre maximum : environ ø 106 mm (4 1/4 po.)
Longueur totale : environ 47 mm (1 7/8 po.)
Poids (sans les capuchons) environ 550 g (1 lb 3 oz)
Articles inclus objectif de conversion grand-angle (1),
La conception et les spécifications peuvent être modifiées sans préavis.
). Le pare-soleil ou l’objectif risqueraient de se
D-3
capuchon d’objectif (pour l’avant et l’arrière du
objectif) (2), pare-soleil (1), Visière pare-soleil (1),
porte-filtre (1), boîtier de transport (1),
jeu de documents imprimés
Deutsch
Das Weitwinkelkonverterobjektiv VCL-HG0872K von Sony ist ausschließlich für
die digitale HD-Videokamera HVR-Z5 von Sony (im Folgenden als „Kamera“
bezeichnet) konzipiert.
ACHTUNG
Blicken Sie nicht direkt durch das Objektiv in die Sonne.
Dies kann zu Verletzungen der Augen oder zu Erblindung führen.
Vorsicht beim Abnehmen des Konverterobjektivs
Achten Sie darauf, das Objektiv nicht fallen zu lassen, denn Sie könnten sich dabei
verletzen.
Nachlässiger Umgang mit dem Objektiv kann zu Verletzungen führen.
Vorbereitungen für das Anbringen des
Konverterobjektivs
Nehmen Sie die Gegenlichtblende mit Objektivabdeckung, den MC-Schutzfilter
oder andere Filter ab, bevor Sie das Konverterobjektiv an der Kamera anbringen.
Anbringen/Abnehmen des Konverterobjektivs
Anbringen des Objektivs (Abbildung A)
1 Richten Sie die Markierungen an Objektiv und Kamera aneinander aus.
2 Setzen Sie das Objektiv in die Kamera ein und drehen Sie es im Uhrzeigersinn,
bis es einrastet.
Abnehmen des Objektivs (Abbildung B)
Verschieben Sie den Entriegelungsschalter (1), drehen Sie das Objektiv gegen den
Uhrzeigersinn und nehmen Sie es ab (2).
Hinweise zur Verwendung
• Nehmen Sie das Konverterobjektiv beim Transport ab.
•Halten Sie das Gerät beim Abnehmen des Konverterobjektivs oder der
mitgelieferten Gegenlichtblende nicht an der Sonnenblende (D-3). Andernfalls
könnte sich die Gegenlichtblende oder das Objektiv lösen, herunterfallen und
beschädigt werden. Auch die Sonnenblende selbst könnte beschädigt werden.
• Verwenden Sie die Sonnenblende nicht bei Wind.
•Wenn die Sonnenblende angebracht ist und Sie mit einem Mikrofon bzw. mit
dem eingebauten Mikrofon aufnehmen, kann der Aufnahmeton je nach
Montagewinkel der Sonnenblende beeinträchtigt werden.
• Setzen Sie bei Nichtverwendung stets die Objektivschutzkappen auf das
Konverterobjektiv.
•Achten Sie darauf, dass das Objektiv nicht über längere Zeit hoher Feuchtigkeit
ausgesetzt ist, da sich sonst Schimmel ansetzen kann.
Kondensation
Wenn das Objektiv direkt von einem kalten an einen warmen Ort gebracht wird,
kann sich Kondenswasser auf dem Objektiv bilden. Um dies zu verhindern,
stecken Sie das Objektiv in einen Plastikbeutel o. Ä. Wenn die Temperatur im
Beutel die Umgebungstemperatur angenommen hat, nehmen Sie das Objektiv
heraus.
Reinigen des Konverterobjektivs
Entfernen Sie Staub mit einem Blasepinsel oder einem sonstigen weichen Pinsel
von der Objektivoberfläche. Zum Entfernen von Fingerabdrücken oder Schlieren
verwenden Sie ein weiches, leicht mit mildem Haushaltsreiniger angefeuchtes
Tuch. (Wir empfehlen, das Reinigungskit KK-LC3 zu verwenden.)
C Anbringen/Abnehmen der mitgelieferten
Gegenlichtblende
Die mitgelieferte Gegenlichtblende können Sie auch dann anbringen, wenn das
Konverterobjektiv an der Kamera angebracht ist.
Anbringen der Gegenlichtblende
1 Lösen Sie die Sicherungsschraube der Gegenlichtblende (A).
2Richten Sie die Markierungen an Objektiv und Gegenlichtblende aneinander aus
und setzen Sie die Gegenlichtblende in Pfeilrichtung auf das Objektiv.
3 Ziehen Sie die Sicherungsschraube der Gegenlichtblende fest an.
Abnehmen der Gegenlichtblende
1Lösen Sie die Sicherungsschraube der Gegenlichtblende.
2Ziehen Sie die Gegenlichtblende entgegen der Pfeilrichtung vom Objektiv.
Öffnen/Schließen der Objektivabdeckung der Gegenlichtblende
Stellen Sie den Objektivabdeckungshebel (B) auf OPEN, um die
Objektivabdeckung zu öffnen, und auf CLOSE, um sie zu schließen.
D Anbringen/Abnehmen der Sonnenblende
Anbringen der Sonnenblende
1 Lösen Sie die Sicherungsschrauben für die Sonnenblende (C) und richten Sie
die Sonnenblende korrekt aus.
2 Ziehen Sie die Sicherungsschrauben für die Sonnenblende an.
Abnehmen der Sonnenblende
Lösen Sie die Sicherungsschrauben für die Sonnenblende und nehmen Sie die
Sonnenblende ab.
* Die Sicherungsschrauben für die Sonnenblende sind so gesichert, dass sie nicht
verloren gehen können. Daher brauchen Sie die Sicherungsschrauben für die
Sonnenblende nach dem Abnehmen der Sonnenblende nicht wieder anzuziehen.
* Falls Sie die Sicherungsschrauben für die Sonnenblende nach dem Abnehmen
der Sonnenblende doch anziehen möchten, schrauben Sie von der Vorderseite
her.
Öffnen und Schließen der Sonnenblende
Fassen Sie die Sonnenblende und klappen Sie sie nach oben oder nach unten
(D-1).
* Klappen Sie die Sonnenblende nicht über 180º weit nach oben oder nach unten
(D-2).
E Anbringen des Filterhalters
Mit dem Filterhalter können Sie einen handelsüblichen Filter mit einer Größe von
4 × 5,65 Zoll anbringen.
1 Setzen Sie den Filter in den unteren Rand des Filterhalters ein (1).
2 Schieben Sie den Schieber am Filterhalter (2) nach oben und richten Sie den
Filter am Rahmen des Filterhalters aus (3).
3 Schieben Sie den Schieber am Filterhalter nach unten, so dass der Schieber den
Filter am Rahmen des Filterhalters arretiert (4).
4 Setzen Sie den Filterhalter so ins Gerät ein, dass der Schieber am Filterhalter auf
das Objektiv weist (E-4).
F Aufbewahren des Konverterobjektivs und der
Gegenlichtblende
Bewahren Sie das Konverterobjektiv und die Gegenlichtblende wie in der
Abbildung dargestellt in der mitgelieferten Tragetasche auf. Legen Sie die vordere
Objektivschutzkappe (E) mit der Vorderseite nach unten in die Tragetasche ein
und legen Sie das Polster darüber. Bringen Sie die hintere Objektivschutzkappe am
Konverterobjektiv an, bevor Sie es in der Tragetasche verstauen.
* Schließen Sie zum Verstauen die Sonnenblende.
Technische Daten
Vergrößerung 0,8
Objektivaufbau 3 Gruppen, 3 Elemente
Abmessungen
Maximaler Durchmesser: ca. ø 106 mm
Gesamtlänge: ca. 47 mm
Gewicht (ohne Kappen) ca. 550 g
Mitgeliefertes Zubehör Teile Weitwinkelkonverterobjektiv (1),
Änderungen bei Design und technischen Daten bleiben ohne vorherige
Ankündigung vorbehalten.
Objektivschutzkappen (für Vorder- und Rückseite
des Objektivs) (2), Gegenlichtblende (1),
Sonnenblende (1), Filterhalter (1), Tragetasche (1),
Anleitungen

Español
El objetivo de conversión gran angular VCL-HG0872K Sony ha sido diseñado para
utilizarse sólo con la videocámara digital de alta definición Sony HVR-Z5 (en
adelante denominada “cámara”).
ADVERTENCIA
No mire directamente al sol a través del objetivo.
De lo contrario, podría dañarse los ojos o provocar la pérdida de vista.
Precaución al extraer el objetivo de conversión
Para evitar lesiones, procure no dejar caer el objetivo.
Es posible que se produzcan lesiones si no lo manipula con cuidado.
Antes de colocar el objetivo de conversión
En primer lugar, extraiga el parasol con tapa, el protector MC o el filtro y, a
continuación, fije el objetivo de conversión a la videocámara.
Colocación/extracción del objetivo de conversión
Colocación del objetivo (ilustración A)
1 Alinee las marcas de alineación del objetivo y las de la cámara.
2 Inserte el objetivo en la cámara y gírelo en el sentido de las agujas del reloj hasta
que encaje en su sitio.
Extracción del objetivo (ilustración B)
Gire el objetivo en el sentido contrario al de las agujas del reloj mientras pulsa el
botón de liberación (1) y extráigalo (2).
Notas sobre el uso
• Antes de transportar el objetivo de conversión, quítelo de la cámara.
• No sujete el parasol cuando extraiga el objetivo de conversión o la cubierta de
este
Asimismo, podría causar que el parasol se dañase.
• No utilice el parasol cuando haya viento.
• Si utiliza el micrófono o el micrófono incorporado cuando el parasol está
colocado, es posible que el sonido grabado se vea afectado por el ángulo de
montaje del parasol.
• Antes de guardar el objetivo, colóquele las tapas.
•No guarde el objetivo en un lugar muy húmedo durante mucho tiempo para
evitar que se enmohezca.
Condensación de humedad
Si traslada el objetivo directamente de un lugar frío a otro cálido, es posible que se
produzca condensación de humedad en el mismo. Para evitar esto, coloque el
objetivo en una bolsa de plástico o algo similar. Cuando la temperatura del interior
de la bolsa alcance la ambiental, extraiga el objetivo.
Limpieza del objetivo de conversión
Limpie el polvo de la superficie del objetivo con un cepillo soplador u otro suave.
Limpie las huellas dactilares u otras manchas con un paño suave ligeramente
humedecido en una solución poco concentrada de detergente. (Se recomienda
utilizar el juego de limpieza KK-LC3.)
C Colocación/extracción de la cubierta del objetivo
suministrada
Es posible colocar la cubierta del objetivo suministrada una vez fijado el objetivo
de conversión en la cámara.
Colocación de la cubierta del objetivo
1Afloje el tornillo de fijación de la cubierta (A).
2 Alinee las marcas del objetivo y de la cubierta para encajarla en la dirección de la
flecha.
3 Apriete firmemente el tornillo de fijación de la cubierta.
Extracción de la cubierta del objetivo
1 Afloje el tornillo de fijación de la cubierta.
2 Extraiga la cubierta tirando de ella en la dirección contraria a de la flecha.
Apertura y cierre de la tapa de la cubierta del objetivo
Mueva la palanca de la cubierta del objetivo (B) hasta OPEN para abrirla y, a
continuación, mueva la palanca hasta CLOSE para cerrar la cubierta.
D Colocación/extracción del parasol
Colocación del parasol
1 Afloje el tornillo de fijación del parasol (C), y coloque el parasol.
2 Apriete el tornillo de fijación del parasol.
Extracción del parasol
Afloje el tornillo de fijación del parasol, y extráigalo.
* Hay un enganche de seguridad en el tornillo de fijación del parasol. No es
necesario volver a apretar el tornillo de fijación del parasol una vez extraído.
* En caso de apretar el tornillo de fijación del parasol sin el parasol, apriete el
tornillo hacia la parte delantera.
Apertura y cierre del parasol
Sujete el parasol para abrirlo y cerrarlo (D-1).
*No abra o cierre el parasol 180º o más (D-2).
E Colocación del soporte del filtro
Es posible colocar el filtro disponible en el mercado de 4 × 5,65 pulgadas mediante
el soporte del filtro.
1Coloque el filtro en la parte inferior del soporte del filtro (1).
2 Empuje hacia arriba la palanca del soporte del filtro (2), y alinee el filtro y la
franja del soporte del filtro (3).
3 Empuje hacia abajo la palanca del soporte del filtro, y sujete el filtro a la franja
del soporte del filtro (4).
4 Instale el soporte del filtro con la palanca del soporte del filtro orientada hacia el
objetivo y colóquelo (E-4).
F Almacenamiento del objetivo de conversión y el
parasol
Almacene el objetivo de conversión y la cubierta del objetivo en la funda de
transporte suministrada, como se muestra en la ilustración. Guarde la tapa frontal
del objetivo (E) con la parte frontal orientada hacia abajo y coloque la protección
de la funda de transporte. Guarde la tapa posterior del objetivo cuando esté
colocada en el objetivo de conversión.
* Cierre el parasol cuando lo guarde.
Especificaciones
Ampliación 0,8
Estructura del objetivo 3 grupos, 3 elementos
Dimensiones
Diámetro máximo: Aprox. ø 106 mm
Longitud total: Aprox. 47 mm
Peso (sin incluir las tapas) Aprox. 550 g
Elementos incluidos objetivo de conversión para gran angular (1), tapa
El diseño y las especificaciones están sujetos a cambios sin previo aviso.
, puesto que podría causar la caída del objetivo y podría dañarse.
(D-3)
del objetivo (para la parte frontal y trasera del
objetivo) (2), cubierta del objetivo (1), parasol (1),
soporte del filtro (1), funda de transporte (1),
juego de documentación impresa
Italiano
Il presente obiettivo ad ampia conversione Sony VCL-HG0872K è stato progettato
per il solo uso con la videocamera HD digitale Sony HVR-Z5 (di seguito chiamata
“videocamera”).
ATTENZIONE
Non osservare il sole direttamente attraverso il presente obiettivo.
Diversamente, è possibile causare lesioni agli occhi o la perdita della vista.
Avvertenza relativa alla rimozione dell’obiettivo di
conversione
Prestare attenzione a non ferirsi facendo cadere l’obiettivo.
Maneggiare l’obiettivo con cura onde evitare di ferirsi.
Prima dell’applicazione dell’obiettivo di
conversione
Rimuovere innanzitutto il paraluce con copriobiettivo, la protezione MC o il filtro,
quindi applicare l’obiettivo di conversione alla videocamera.
Applicazione/rimozione dell’obiettivo di
conversione
Applicazione dell’obiettivo (illustrazione A)
1 Allineare i contrassegni sull’obiettivo con quelli presenti sulla videocamera.
2 Inserire l’obiettivo nella videocamera e ruotarlo in senso orario finché non scatta
in posizione.
Rimozione dell’obiettivo (illustrazione B)
Ruotare l’obiettivo in senso antiorario facendo scorrere l’interruttore di rilascio del
blocco (1), quindi rimuoverlo (2).
Note sull’uso
• Durante il trasporto, rimuovere l’obiettivo di conversione.
• Non tenere con le mani l’aletta paraluce durante la rimozione dell’obiettivo di
conversione o del paraluce in dotazione (D-3). Diversamente, il paraluce e
l’obiettivo potrebbero cadere e danneggiarsi. Ciò potrebbe inoltre causare danni
all’aletta paraluce.
• Non utilizzare l’aletta paraluce in presenza di vento.
• Se si utilizza il microfono o il microfono integrato mentre è applicata l’aletta
paraluce, l’audio registrato potrebbe essere influenzato dall’angolo di
montaggio dell’aletta stessa.
• Per il deposito, applicare sempre l’apposito copriobiettivo all’obiettivo di
conversione.
• Non conservare l’obiettivo in luoghi eccessivamente umidi per periodi di tempo
prolungati, onde evitare la formazione di muffa.
Formazione di condensa
Se l’obiettivo viene trasportato direttamente da un luogo freddo ad uno caldo, è
possibile che su di esso si formi della condensa. Per evitare che questo accada,
inserire l’obiettivo in una busta di plastica o simili, quindi estrarlo non appena la
temperatura all’interno della busta ha raggiunto la temperatura circostante.
Pulizia dell’obiettivo di conversione
Rimuovere l’eventuale polvere dalla superficie dell’obiettivo utilizzando un
soffietto o un pennello morbido. Eliminare eventuali impronte o macchie con un
panno morbido leggermente inumidito con una soluzione detergente neutra. (Si
consiglia di utilizzare il kit di pulizia KK-LC3.)
C Applicazione/rimozione del paraluce in
dotazione
È possibile applicare il paraluce in dotazione mentre l’obiettivo di conversione è
applicato alla videocamera.
Applicazione del paraluce
1 Allentare la vite di fissaggio del paraluce (A).
2Allineare i contrassegni sull’obiettivo con quelli presenti sul paraluce, quindi
inserire il paraluce nella direzione della freccia.
3Stringere in modo saldo la vite di fissaggio del paraluce.
Rimozione del paraluce
1Allentare la vite di fissaggio del paraluce.
2 Rimuovere il paraluce tirandolo nella direzione opposta della freccia.
Apertura/chiusura del copriobiettivo del paraluce
Per aprire il copriobiettivo, spostare la leva del copriobiettivo (B) sulla posizione
OPEN; per chiuderlo, spostare la leva sulla posizione CLOSE.
D Applicazione/rimozione dell’aletta paraluce
Applicazione dell’aletta paraluce
1Allentare la vite di fissaggio dell’aletta paraluce (C), quindi applicare l’aletta.
2Stringere la vite di fissaggio dell’aletta paraluce.
Rimozione dell’aletta paraluce
Allentare la vite di fissaggio dell’aletta paraluce, quindi rimuovere l’aletta.
*È presente un fermo di sicurezza in corrispondenza della vite di fissaggio
dell’aletta paraluce. Non è necessario stringere di nuovo la vite di fissaggio
dell’aletta paraluce dopo la rimozione di quest’ultima.
* Per stringere la vite di fissaggio senza l’aletta paraluce, procedere verso la parte
anteriore.
Apertura e chiusura dell’aletta paraluce
Afferrare l’aletta paraluce per aprirla e chiuderla (D-1).
*Non aprire né chiudere l’aletta paraluce con un angolo pari o superiore a 180º
(D-2).
E Installazione della sezione di applicazione del
filtro
È possibile installare il filtro da 4 × 5,65 pollici disponibile in commercio
utilizzando l’apposita sezione di applicazione.
1 Inserire il filtro nella parte inferiore dell’apposita sezione di applicazione (1).
2 Spostare verso l’alto la leva della sezione di applicazione del filtro (2), quindi
allineare il filtro alla cornice della sezione di applicazione stessa (3).
3 Spostare verso il basso la leva della sezione di applicazione del filtro, quindi
agganciare il filtro alla cornice della sezione di applicazione (4).
4 Collocare la sezione di applicazione del filtro con la relativa leva rivolta verso
l’obiettivo, quindi inserirla in posizione (E-4).
F Conservazione dell’obiettivo di conversione e
del paraluce
Riporre l’obiettivo di conversione e il paraluce nella custodia di trasporto in
dotazione come illustrato. Riporre il copriobiettivo anteriore (E) con il lato
anteriore rivolto verso il basso, quindi applicare il cuscinetto della custodia di
trasporto. Riporre il copriobiettivo posteriore mentre è applicato all’obiettivo di
conversione.
* Chiudere l’aletta paraluce prima dell’inserimento nella custodia.
Caratteristiche tecniche
Ingrandimento 0,8
Struttura dell’obiettivo 3 gruppi, 3 elementi
Dimensioni
Diametro massimo: circa ø 106 mm
Lunghezza totale: circa 47 mm
Peso (esclusi i copriobiettivi) circa 550 g
Accessori inclusi Obiettivo ad ampia conversione (1), Copriobiettivo
Disegno e caratteristiche tecniche sono soggetti a modifiche senza preavviso.
(per la parte anteriore e e posteriore dell’obiettivo)
(2), Paraluce (1), Aletta paraluce (1),
Sezione di applicazione del filtro (1),
Custodia di trasporto (1),
Corredo di documentazione stampata
中文(繁)
Sony VCL-HG0872K 廣角鏡頭設計僅用於 Sony 高清晰度數位攝像機 HVR-Z5(以下簡稱
“攝像機”)。
警告
請勿透過鏡頭直視太陽。
否則可能會傷害眼睛或造成視力喪失。
拆卸轉換鏡頭時須注意
小心不要掉落鏡頭,以免受傷。
操作不慎可能會導致人身傷害。
安裝轉換鏡頭之前
首先取出帶鏡蓋的鏡頭罩、 MC 保護鏡或濾光鏡,然後將轉換鏡安裝到相機。
安裝拆卸轉換鏡頭
安裝鏡頭 (圖 A)
1 對準鏡頭和攝像機上的對準標誌。
2 將鏡頭插入攝像機,然後順時針轉動鏡頭,直至其鎖定到位。
拆卸鏡頭 (圖 B)
在滑動解鎖開關(1)的同時,逆時針轉動鏡頭,將其拆下(2)。
使用須知
• 運輸時請取下轉換鏡頭。
• 請勿在拆卸轉換鏡頭或附帶的鏡頭罩時握持遮光片(D-3)。否則可能會導致鏡頭
罩或鏡頭掉落,並致其受損。此外,還可能會導致遮光片受損。
• 請勿在有風的條件下使用遮光片。
• 安裝了遮光片時,如果使用麥克風或內置麥克風,則遮光片安裝角度可能會影響錄
製的音頻。
• 存放時請一定蓋好轉換鏡頭的鏡頭蓋。
• 請勿將鏡頭長期存放在潮濕的地方以免發霉。
濕氣凝結
如果直接將鏡頭從寒冷處帶到溫暖處,濕氣可能會凝結在鏡頭上。要避免濕氣凝結,
請將鏡頭放入塑料袋或類似的物品中。當袋內的空氣溫度達到周圍環境的溫度時,再
將鏡頭取出。
清潔轉換鏡頭
用吹氣刷或軟刷拂去鏡頭表面的灰塵。請將軟布在柔性的清潔劑溶液中略微蘸濕,然
後用它擦淨鏡頭上的指印或其他汙漬。(建議使用 KK-LC3 清潔工具包。)
C 安裝拆卸附帶的鏡頭罩
可以在轉換鏡頭仍裝在攝像機上時安裝附帶的鏡頭罩。
安裝鏡頭罩
1 鬆開鏡頭罩固定螺釘(A)。
2 對準鏡頭和鏡頭罩上的標誌,按照箭頭所示方向裝上鏡頭罩。
3 旋緊鏡頭罩固定螺釘。
拆卸鏡頭罩
1 鬆開鏡頭罩固定螺釘。
2 按照箭頭所示相反方向拉鏡頭罩,將其拆下。
打開關閉鏡頭罩的鏡頭蓋
將鏡頭蓋控制杆(B)移至 OPEN 位置打開鏡頭蓋;將控制杆移至 CLOSE 位置關閉鏡頭
蓋。
D 安裝拆卸遮光片
安裝遮光片
1 鬆開遮光片固定螺釘(C),安裝遮光片。
2 旋緊遮光片固定螺釘。
拆卸遮光片
鬆開遮光片固定螺釘,拆卸遮光片。
* 遮光片固定螺釘具有防墜器。拆卸遮光片之後無需再次旋緊遮光片固定螺釘。
* 如果在沒有遮光片的情況下旋緊遮光片固定螺釘,則請向前方將其旋緊。
打開和關閉遮光片
握持遮光片即可將其打開和關閉(D-1)。
* 打開或關閉遮光片的角度不要等於或超過 180º (D-2)。
E 安裝濾光鏡固定裝置
採用濾光鏡固定裝置可安裝 4 × 5.65 英寸規格的商用濾光鏡。
1 將濾光鏡裝入濾光鏡固定裝置底部(1)。
2 向上推起濾光鏡固定裝置控制杆(2),並將濾光鏡與濾光鏡固定裝置框對齊(3)。
3 向下推放濾光鏡固定裝置控制杆,將濾光鏡卡入濾光鏡固定裝置框(4)。
4 將濾光鏡固定裝置控制杆朝向鏡頭端安裝濾光鏡固定裝置,並安裝到位(E-4)。
F 存放轉換鏡和鏡頭罩
如圖所示,將轉換鏡頭和鏡頭罩存放到附帶的便攜盒中。正面朝下存放前端鏡頭蓋
(E)並安裝便攜盒軟墊。安裝到轉換鏡頭時,請存放後端鏡頭蓋。
* 存放時請關閉遮光片。
規格
放大率 0.8
鏡頭結構 3 組, 3 片
尺寸
最大直徑︰ 約 ø 106 mm
總長度︰ 約 47 mm
質量(不含鏡頭蓋) 約 550 g
所含物品 廣角鏡頭(1),鏡頭蓋(用於鏡頭前端和後端)(2),
設計和規格有所變更時,恕不另行奉告。
鏡頭罩(1),遮光片(1),濾光鏡固定裝置(1),
便攜盒(1),成套印刷文件
中文(简)
Sony VCL-HG0872K广角镜设计仅用于Sony 高清晰度数码摄像机 HVR-Z5(以下
简称“摄像机”)。
警告
请勿透过镜头直视太阳。
否则可能会伤害眼睛或造成视力丧失。
拆卸转换镜头时须注意
小心不要掉落镜头,以免受伤。
操作不慎可能会导致人身伤害。
安装转换镜头之前
首先取出带镜盖的镜头罩、MC 保护镜或滤光镜,然后将转换镜安装到相机。
安装/拆卸转换镜头
安装镜头 (图 A)
1 对准镜头和摄像机上的对准标志。
2 将镜头插入摄像机,然后顺时针转动镜头,直至其锁定到位。
拆卸镜头 (图 B)
在滑动解锁开关(1)的同时,逆时针转动镜头,将其拆下(2)。
使用须知
• 运输时请取下转换镜头。
• 请勿在拆卸转换镜头或附带的镜头罩时握持遮光片(D-3)。否则可能会导致镜头
罩或镜头掉落,并致其受损。此外,还可能会导致遮光片受损。
• 请勿在有风的条件下使用遮光片。
• 安装了遮光片时,如果使用麦克风或内置麦克风,则遮光片安装角度可能会影响录
制的音频。
• 存放时请一定盖好转换镜头的镜头盖。
• 请勿将镜头长期存放在潮湿的地方以免发霉。
结露
如果直接将镜头从寒冷处带到温暖处,湿气可能会凝结在镜头上。要避免结露,请将
镜头放入塑料袋或类似的物品中。当袋内的空气温度达到周围环境的温度时,再将镜
头取出。
清洁该转换镜头
用吹气刷或软刷拂去镜头表面的灰尘。请将软布在柔性的清洁剂溶液中略微蘸湿,然
后用它擦净镜头上的指印或其它污渍。(建议使用 KK-LC3 清洁工具包。)
C 安装/拆卸附带的镜头罩
可以在转换镜头仍装在摄像机上时安装附带的镜头罩。
安装镜头罩
1 松开镜头罩固定螺钉(A)。
2 对准镜头和镜头罩上的标志,按照箭头所示方向装上镜头罩。
3 旋紧镜头罩固定螺钉。
拆卸镜头罩
1 松开镜头罩固定螺钉。
2按照箭头所示相反方向拉镜头罩,将其拆下。
打开/关闭镜头罩的镜头盖
将镜头盖控制杆(B)移至OPEN 位置打开镜头盖;将控制杆移至CLOSE位置关闭镜
头盖。
D 安装/拆卸遮光片
安装遮光片
1松开遮光片固定螺钉(C),安装遮光片。
2 旋紧遮光片固定螺钉。
拆卸遮光片
松开遮光片固定螺钉,拆卸遮光片。
* 遮光片固定螺钉具有防坠器。拆卸遮光片之后无需再次旋紧遮光片固定螺钉。
*如果在没有遮光片的情况下旋紧遮光片固定螺钉,则请向前方将其旋紧。
打开和关闭遮光片
握持遮光片即可将其打开和关闭(D-1)。
*打开或关闭遮光片的角度不要等于或超过 180º (D-2)。
E 安装滤光镜固定装置
采用滤光镜固定装置可安装 4 × 5.65 英寸规格的商用滤光镜。
1 将滤光镜装入滤光镜固定装置底部(1)。
2向上推起滤光镜固定装置控制杆(2),并将滤光镜与滤光镜固定装置框对齐(3)。
3向下推放滤光镜固定装置控制杆,将滤光镜卡入滤光镜固定装置框(4)。
4将滤光镜固定装置控制杆朝向镜头端安装滤光镜固定装置,并安装到位(E-4)。
F 存放转换镜和镜头罩
如图所示,将转换镜头和镜头罩存放到附带的便携盒中。正面朝下存放前端镜头盖
(E)并安装便携盒软垫。安装到转换镜头时,请存放后端镜头盖。
* 存放时请关闭遮光片。
规格
放大倍率 0.8 倍
镜头结构 3 组,3片
尺寸
最大直径: 约 ø 106 mm
总长度: 约 47 mm
重量(不含镜头盖) 约 550 g
所含物品 广角镜(1),镜头盖(用于镜头前端和后端)(2),
设计或规格如有变动,恕不另行通知。
索尼公司
出版日期∶2008 年 10 月
镜头罩(1),遮光片(1),滤光镜固定装置(1),
便携盒(1),成套印刷文件
한국어
Sony VCL-HG0872K 와이드 컨버전 렌즈는 Sony 디지털 HD 비디오 카메라 레코더
HVR-Z5(이하 “카메라”라 함) 전용입니다.
경고
본 렌즈를 통해서 절대로 태양을 직시하지 마십시오.
눈을 다치거나 시력이 저하될 염려가 있습니다.
컨버전 렌즈를 분리할 때의 주의
렌즈를 떨어뜨려서 다치지 않도록 주의하십시오.
함부로 취급하면 다칠 염려가 있습니다.
컨버전 렌즈를 장착하기 전에
카메라에서 우선 렌즈 커버와 함께 렌즈 후드 또는 MC 프로텍터, 필터를 분리한 후 컨버전
렌즈를 장착하여 주십시오.
컨버전 렌즈 장착하기/분리하기
렌즈 장착하기(그림 A)
1 렌즈와 카메라의 위치결정 마크를 맞춥니다.
2 카메라에 렌즈를 장착하고 소정의 장소에 고정될 때까지 오른쪽으로 돌립니다.
렌즈 분리하기(그림 B)
잠금 해제 스위치(1)를 밀면서 렌즈를 왼쪽으로 돌려서 분리합니다(2).
사용상의 주의
• 운반 중에는 컨버전 렌즈를 분리하여 주십시오.
• 컨버전 렌즈 또는 부속된 렌즈 후드를 분리할 때에는 가리개를 잡지 마십시오(D-3).
후드나 렌즈가 빠져서 파손될 염려가 있습니다. 또 가리개도 파손될 염려가 있습니다.
• 바람이 심할 때에는 가리개를 사용하지 마십시오.
• 가리개를 장착하고 있을 때 마이크로폰이나 내장 마이크로폰을 사용하면 가리개의 각도
에 따라서 녹음되는 음성에 영향을 미치는 경우가 있습니다.
• 컨버전 렌즈를 보관할 때에는 반드시 렌즈 캡을 장착하여 주십시오.
• 렌즈는 습도가 높은 장소에서는 곰팡이가 필 염려가 있으므로 장기간 보관하지 마십시오.
결로 현상
온도가 낮은 장소에서 따뜻한 장소로 렌즈를 직접 이동하면 렌즈 표면에 이슬이 맺히는 경
우가 있습니다. 그것을 방지하려면 렌즈를 비닐 봉지 등에 넣어 주십시오. 비닐 봉지 안의
온도가 주위 온도가 되면 렌즈를 꺼내 주십시오.
컨버전 렌즈 청소하기
송풍 브러시나 부드러운 솔로 렌즈 표면의 먼지를 털어 주십시오. 지문 등이 묻었을 때에는
묽은 중성 세제로 살짝 적신 부드러운 헝겊으로 닦아내십시오.(클리닝 키트 KK-LC3를 사
용하실 것을 권장합니다.)
C 부속된 렌즈 후드 장착하기/분리하기
컨버전 렌즈를 카메라에 장착한 상태에서 부속된 렌즈 후드를 장착할 수 있습니다.
렌즈 후드 장착하기
1후드 고정 나사(A)를 느슨하게 풉니다.
2 렌즈와 렌즈 후드의 마크를 맞추어서 후드를 화살표 방향으로 장착합니다.
3나사 고정 나사를 단단히 조입니다.
렌즈 후드 분리하기
1후드 고정 나사를 느슨하게 풉니다.
2 후드를 화살표와 반대 방향으로 당겨서 분리합니다.
렌즈 후드의 렌즈 커버를 열기/닫기
렌즈 커버를 열려면 렌즈 커버 레버(B )를 OPEN으로 움직이고 렌즈 레버를 닫으려면
CLOSE로 움직입니다.
D 가리개 장착하기/분리하기
가리개 장착하기
1 가리개 고정 나사(C)를 느슨하게 풀고 가리개를 장착합니다.
2 가리개 고정 나사를 조입니다.
가리개 분리하기
가리개 고정 나사를 느슨하게 풀고 가리개를 분리합니다.
* 가리개 고정 나사에는 안전 기능이 있습니다. 가리개를 분리한 후에 가리개 고정 나사를
다시 조일 필요가 없습니다.
* 가리개 없이 가리개 고정 나사를 조일 때에는 정면을 향하고 조이십시오.
가리개 열기 및 닫기
가리개를 잡고 열거나 닫으십시오(D-1).
* 가리개는 180° 이상 열거나 닫지 마십시오(D-2).
E 필터 홀더 장착하기
필터 홀더에는 4 × 5.65인치 사이즈의 시판용 필터를 장착할 수 있습니다.
1필터 홀더 밑면에 필터를 끼웁니다(1).
2필터 홀더의 레버를 올려서(2) 필터와 필터 홀더 프레임을 맞춥니다(3).
3필터 홀더의 레버를 내리고 필터와 필터 홀더의 프레임에 고정합니다(4).
4필터 홀더의 레버를 렌즈 쪽으로 향하고 필터 홀더를 삽입해서 장착합니다(E-4).
F 컨버전 렌즈와 렌즈 후드 수납하기
컨버전 렌즈와 렌즈 후드는 그림과 같이 부속된 휴대용 케이스에 수납하십시오. 앞 렌즈 캡
(E)는 표면을 아래로 해서 휴대용 케이스의 쿠션 사이에 수납하십시오. 뒤 렌즈 캡은 컨버
전 렌즈에 장착한 상태로 수납하십시오.
* 수납할 때에는 가리개를 닫으십시오.
주요 제원
배율 0.8
렌즈 구성 3군, 3매
외형 치수
최대 직경: 약 ø 106 mm
전장: 약 47 mm
중량(캡은 제외) 약 550 g
동봉품 와이드 컨버전 렌즈(1), 렌즈 캡(렌즈 앞뒤용)(2),
디자인 및 주요 제원은 예고없이 변경할 경우가 있습니다.
렌즈 후드(1), 가리개(1), 필터 홀더(1), 휴대용 케이스(1),
도큐먼트 세트
 Loading...