

Sony VAIO VGN-FS920, VAIO VGN-FS980, VAIO VGN-FS990, VAIO VGN-FS960P, VAIO VGN-FS940 User Manual
Page 1

User Guide
Personal Computer
VGN-FS900 Series
N
Page 2

Contents
Before Use .........................................................................................................................................................................5
Documentation .............................................................................................................................................................5
Ergonomic Considerations...........................................................................................................................................7
Getting Started ...................................................................................................................................................................9
Locating Controls and Ports.......................................................................................................................................10
About the Indicator Lights ..........................................................................................................................................16
Connecting a Power Source ......................................................................................................................................17
Using the Battery Pack ..............................................................................................................................................18
Shutting Down Your Computer Safely .......................................................................................................................23
Using Your VAIO Computer .............................................................................................................................................24
Using the Keyboard ...................................................................................................................................................25
Using the Touch Pad .................................................................................................................................................27
Using the Optical Disc Drive ......................................................................................................................................28
Using PC Cards .........................................................................................................................................................36
Using the Memory Stick Media ..................................................................................................................................39
Using the Internet.......................................................................................................................................................42
Using Wireless LAN (WLAN) .....................................................................................................................................43
2
nN
Page 3

3
nN
Using Peripheral Devices .................................................................................................................................................52
Connecting External Speakers ..................................................................................................................................53
Connecting an External Display.................................................................................................................................54
Selecting Display Modes............................................................................................................................................58
Using the Multiple Monitors Function.........................................................................................................................59
Connecting an External Microphone..........................................................................................................................61
Connecting a Universal Serial Bus (USB) Device......................................................................................................62
Connecting a Printer ..................................................................................................................................................65
Connecting an i.LINK Device .....................................................................................................................................66
Connecting to a Network (LAN) .................................................................................................................................68
Customizing Your VAIO Computer ..................................................................................................................................69
Setting the Password .................................................................................................................................................70
Setting Up Your Computer with VAIO Central ...........................................................................................................73
Using the Power Saving Modes.................................................................................................................................74
Managing Power with VAIO Power Management ......................................................................................................79
Upgrading Your VAIO Computer......................................................................................................................................82
Adding and Removing Memory..................................................................................................................................83
Page 4

4
nN
Precautions ......................................................................................................................................................................89
On Handling the LCD Screen ....................................................................................................................................90
On Using the Power Source ......................................................................................................................................91
On Handling Your Computer......................................................................................................................................92
On Handling Floppy Disks .........................................................................................................................................94
On Handling Discs .....................................................................................................................................................95
On Using the Battery Pack.........................................................................................................................................96
On Using Headphones...............................................................................................................................................97
On Handling Memory Stick Media..............................................................................................................................97
On Handling the Hard Disk ........................................................................................................................................98
Troubleshooting ...............................................................................................................................................................99
Computer .................................................................................................................................................................100
System Security .......................................................................................................................................................108
Battery......................................................................................................................................................................110
Internet.....................................................................................................................................................................112
Networking ...............................................................................................................................................................114
CDs and DVDs.........................................................................................................................................................117
Display .....................................................................................................................................................................122
Printing.....................................................................................................................................................................124
Microphone ..............................................................................................................................................................125
Mouse ......................................................................................................................................................................126
Speakers..................................................................................................................................................................127
Touch Pad................................................................................................................................................................128
Keyboard..................................................................................................................................................................129
Page 5

5
nN
Floppy Disks ............................................................................................................................................................130
PC Cards .................................................................................................................................................................131
Audio/Video..............................................................................................................................................................132
Memory Stick Media ................................................................................................................................................133
Peripherals ...............................................................................................................................................................134
Support Options .............................................................................................................................................................135
Sony Support Information ........................................................................................................................................135
Program Support Information...................................................................................................................................138
Page 6

nN
Before Use
Before Use
Congratulations on your purchase of this Sony VAIO® computer, and welcome to the on-screen User Guide. Sony has
combined leading-edge technology in audio, video, computing, and communications to provide state-of-the-art personal
computing.
Documentation
Your documentation includes printed information and user guides to read on your VAIO computer.
Printed Documentation
❑ Welcome mat — Contains an overview of connections, setting up information, etc.
❑ Safety information — Contains safety guidelines and owner information.
5
Page 7

6
nN
Before Use
Non-printed Documentation
❑ User Guide (this manual) — Contains features of your computer. It also includes information about the software programs
included with your computer, as well as information on solving common problems.
❑ Specifications — The online Specifications describe the hardware and software configuration of your VAIO computer.
To view the online Specifications:
1 Connect to the Internet.
2 Go to the Sony online support Web site at http://esupport.sony.com/EN/VAIO/
at http://www.sony.ca/support
for customers in Canada, or at http://esupport.sony.com/ES/ for customers in Latin
American countries or areas.
❑ VAIO Recovery Guide — Provides information about restoring individual software programs, software drivers, and drive
partition(s) or your entire hard disk drive to the original factory installed settings.
To access this online guide:
1 Click Start, point to All Programs, and click VAIO Support Central.
2 Click VAIO Documentation.
3 Click VAI O Recovery Guide.
for customers in USA,
Page 8

7
nN
Before Use
Ergonomic Considerations
You will be using your computer as a portable device in a variety of environments. Whenever possible, you should attempt
to take account of the following ergonomic considerations to both stationary and portable environments:
❑ Position of your computer – Place the computer directly in front of you (1). Keep your forearms horizontal (2), with your
wrists in a neutral, comfortable position (3) while using the keyboard, touch pad, or external mouse. Let your upper arms
hang naturally at your sides. Have breaks during sessions with your computer. Excessive use of the computer may strain
muscles or tendons.
❑ Furniture and posture – Sit in a chair with good back support. Adjust the level of the chair so your feet are flat on the
floor. A footrest may make you more comfortable. Sit in a relaxed, upright posture and avoid slouching forward or leaning
far backwards.
Page 9

8
nN
Before Use
❑ Viewing angle of the computer's display – Use the display's tilting feature to find the best position. You can reduce eye
strain and muscle fatigue by adjusting the tilt of the display to the proper position. Adjust the brightness setting of the
display as well.
❑ Lighting – Choose a location where windows and lights do not create glare and reflection on the display. Use indirect
lighting to avoid bright spots on the display. You can also purchase accessories for your display that help reduce glare.
Proper lighting adds to your comfort and work effectiveness.
❑ Positioning an external display – When using an external display, set the display at a comfortable viewing distance.
Make sure the display screen is at eye level or slightly lower when you are sitting in front of the monitor.
Page 10

Getting Started
Getting Started
This section describes how to get started with using your VAIO computer.
!
Before the first computer startup, do not connect any new hardware that did not normally come with your computer. Make sure to start up your
computer with only the supplied accessories connected and set up your system. Upon completion, connect one device (for example, a printer, external
hard disk drive, scanner, and so on) at a time, following the manufacturer's instructions.
❑ Locating Controls and Ports (page 10)
❑ About the Indicator Lights (page 16)
❑ Connecting a Power Source (page 17)
❑ Using the Battery Pack (page 18)
❑ Shutting Down Your Computer Safely (page 23)
9
nN
Page 11

Locating Controls and Ports
Take a moment to identify the controls and ports shown on the following pages.
Front
A LCD screen (page 90)
B Speakers
C Keyboard (page 25)
D Touch pad (page 27)
E Power indicator (page 16)
F Battery indicator (page 16)
G Hard disk drive/Optical disc drive indicator (page 16)
H Memory Stick media indicator (page 16)
I WLAN (Wireless LAN) switch (page 43)
J WLAN (Wireless LAN) indicator (page 16)
K Headphones jack (page 53)
L Microphone jack (page 61)
10
nN
Getting Started
Page 12
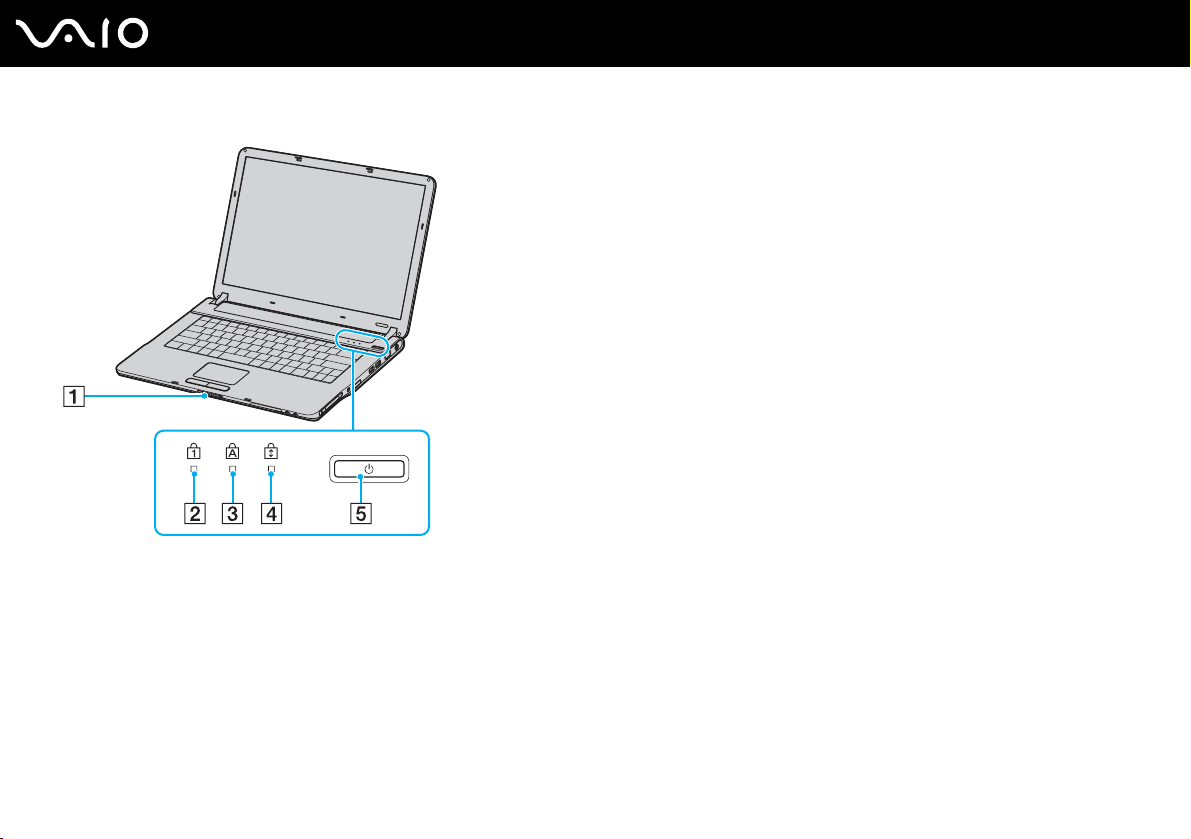
Display lock latch
A
B Num lock indicator (page 16)
C Caps lock indicator (page 16)
D Scroll lock indicator (page 16)
E Power button
11
nN
Getting Started
Page 13
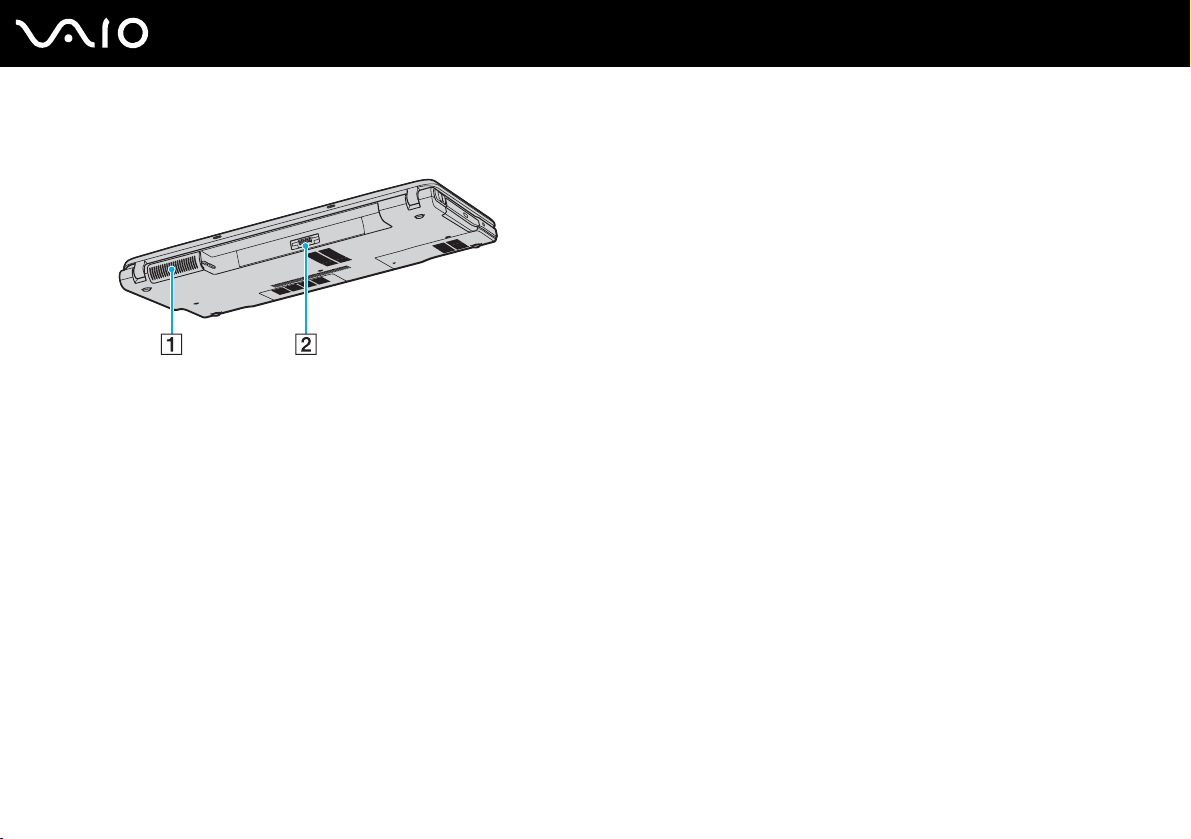
Back
A Air vent
B Battery connector (page 18)
12
nN
Getting Started
Page 14
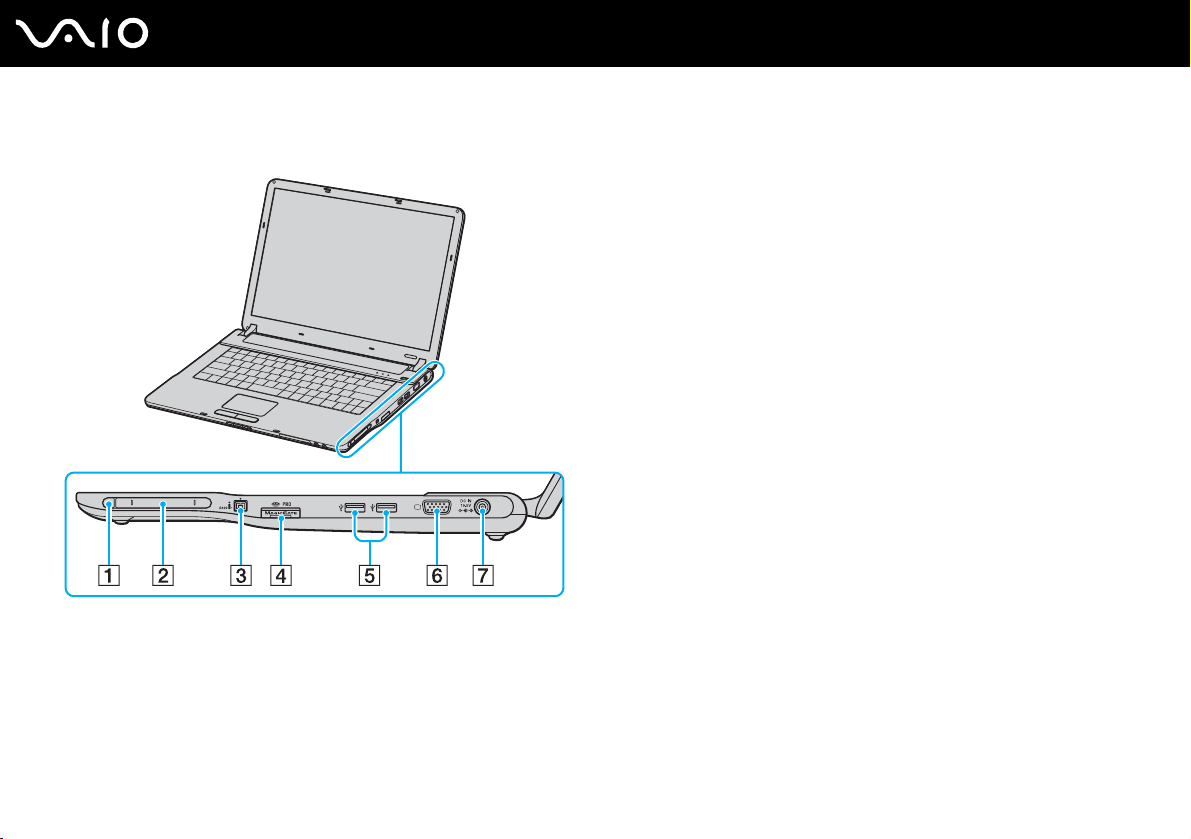
Right
Getting Started
A PC Card eject button (page 38)
B PC Card slot (page 36)
C i.LINK
D Memory Stick media slot
E Hi-Speed USB (USB 2.0) ports
®
(IEEE1394) S400 port (page 66)
*1
(page 39)
*2
(page 62)
F Monitor (VGA) port (page 55)
G DC In port (page 17)
*1
Your computer supports Memory Stick Duo media and Memory Stick PRO
high speed and high capacity capabilities.
*2
Supports high-/full-/low- speeds.
13
nN
Page 15

Left
A Network (Ethernet) port (page 68)
B Modem port (page 42)
C Optical disc drive (page 28)
D Manual eject hole (page 117)
E Drive eject button (page 28)
14
nN
Getting Started
Page 16
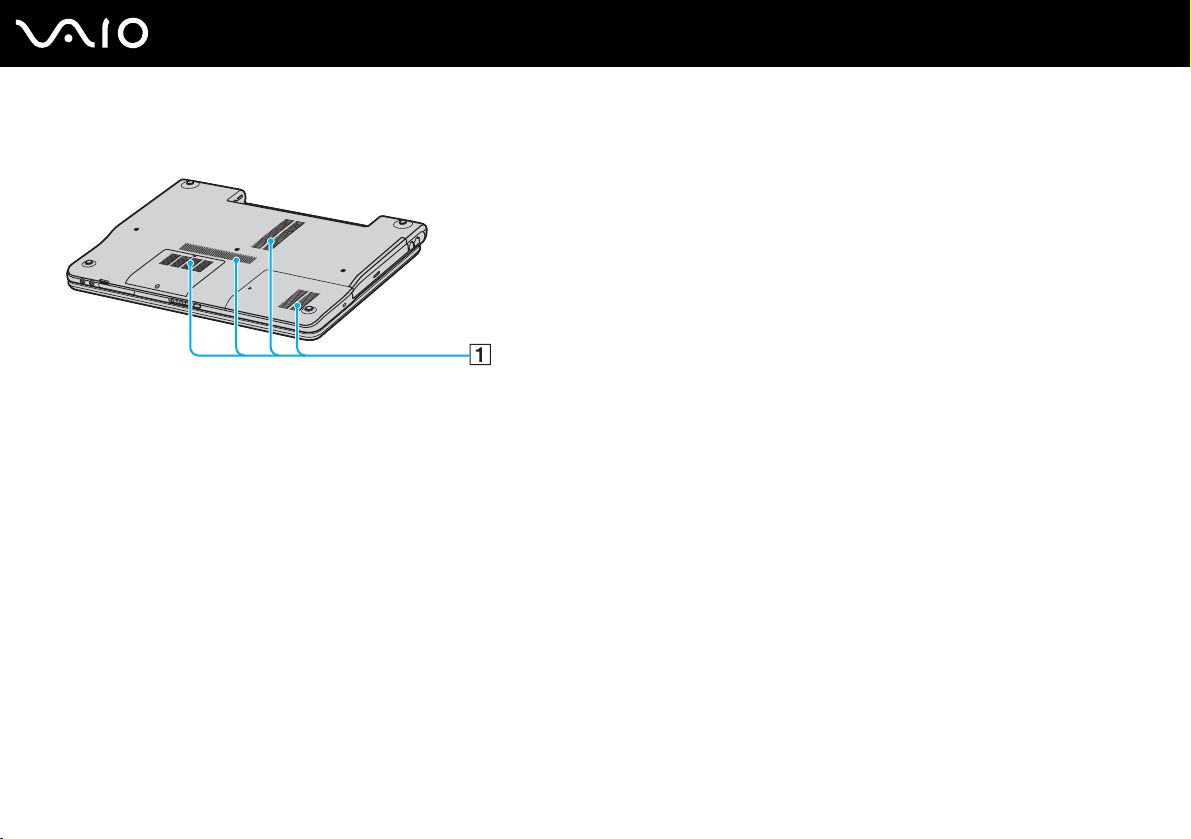
Bottom
A Air vents
15
nN
Getting Started
Page 17
Getting Started
About the Indicator Lights
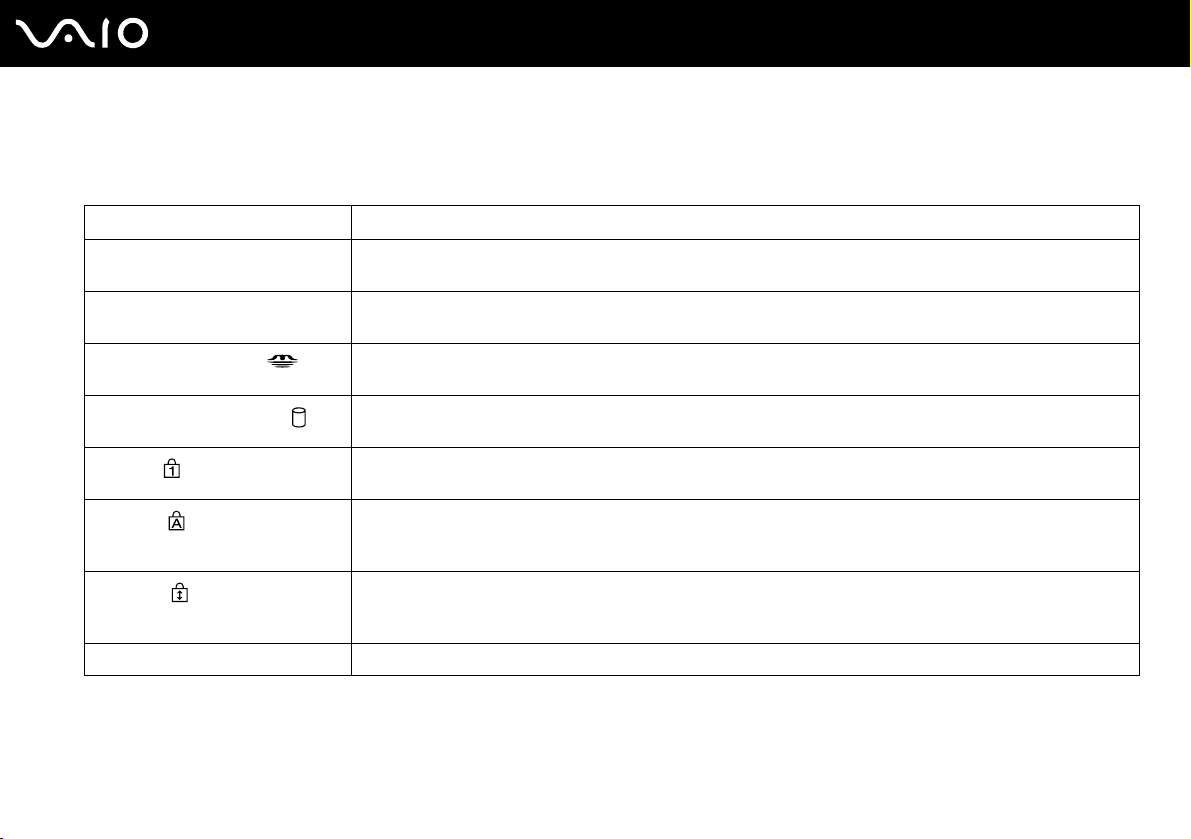
Your computer is equipped with the following indicator lights.
Indicator Functions
Power 1 Illuminates when the power of the computer is on, blinks in Standby mode, and turns off when the computer is
in Hibernate mode or off.
Battery e Illuminates when the computer is using battery power, blinks when the battery is running out of power, and
Memory Stick PRO/Duo
Hard disk/Optical disc drive
Num lock
Caps lock
Scroll lock
WIRELESS LAN Illuminates when the wireless LAN function is running.
double-blinks when the battery is charging.
Illuminates when data is read from or written to the Memory Stick media. (Do not enter Standby mode or turn
off the computer when this indicator is on.) When the indicator is off, the Memory Stick media is not being used.
Illuminates when data is read from or written to the hard disk or the optical disc. Do not enter Standby mode or
turn off the computer when this indicator is on.
Press the Num Lk key to activate the numeric keypad. Press it a second time to deactivate the numeric keypad.
The numeric keypad is not active when the indicator is off.
Press the Caps Lock key to type letters in uppercase. Letters appear in lowercase if you press the Shift key
while the indicator is on. Press the key a second time to turn off the indicator. Normal typing resumes when the
Caps lock indicator is off.
Press the Scr Lk key to change how you scroll the display. Normal scrolling resumes when the Scroll lock
indicator is off. The Scr Lk key functions differently depending on the program you are using and does not work
with all programs.
16
nN
Page 18
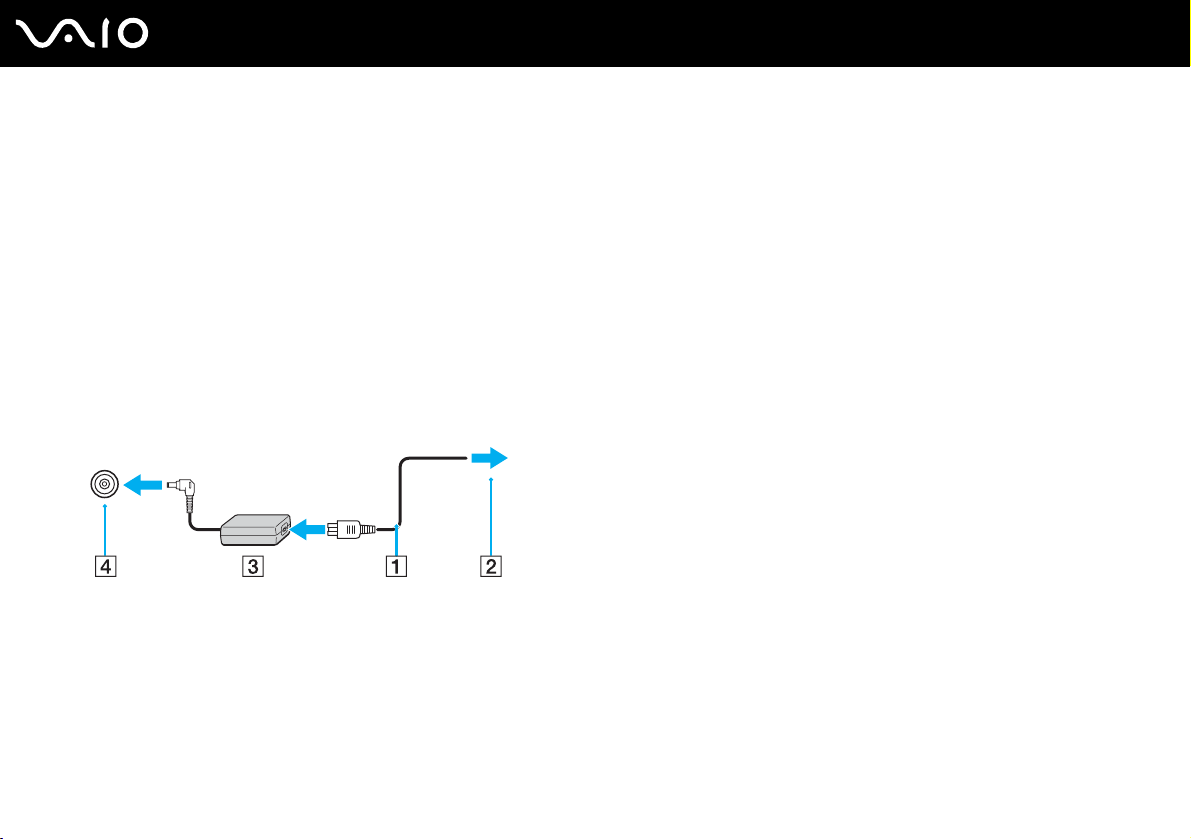
Connecting a Power Source
You can use either an AC adapter or a rechargeable battery pack as a power source for your computer.
Using the AC Adapter
✍
Use the computer only with the supplied AC adapter.
To use the AC adapter
1 Plug one end of the power cord (1) into the AC adapter (3).
2 Plug the other end of the power cord into an AC outlet (2).
3 Plug the cable attached to the AC adapter (3) into the DC In port (4) on the computer.
17
nN
Getting Started
!
The shape of the DC In plug varies depending on the AC adapter.
✍
To disconnect the computer completely from AC power, unplug the AC adapter.
Make sure that the AC outlet is easily accessible.
If you do not use the computer for a long period of time, put the computer into Hibernate mode. See Using Hibernate Mode (page 77). This power
saving mode saves the time of shutting down or resuming.
Page 19
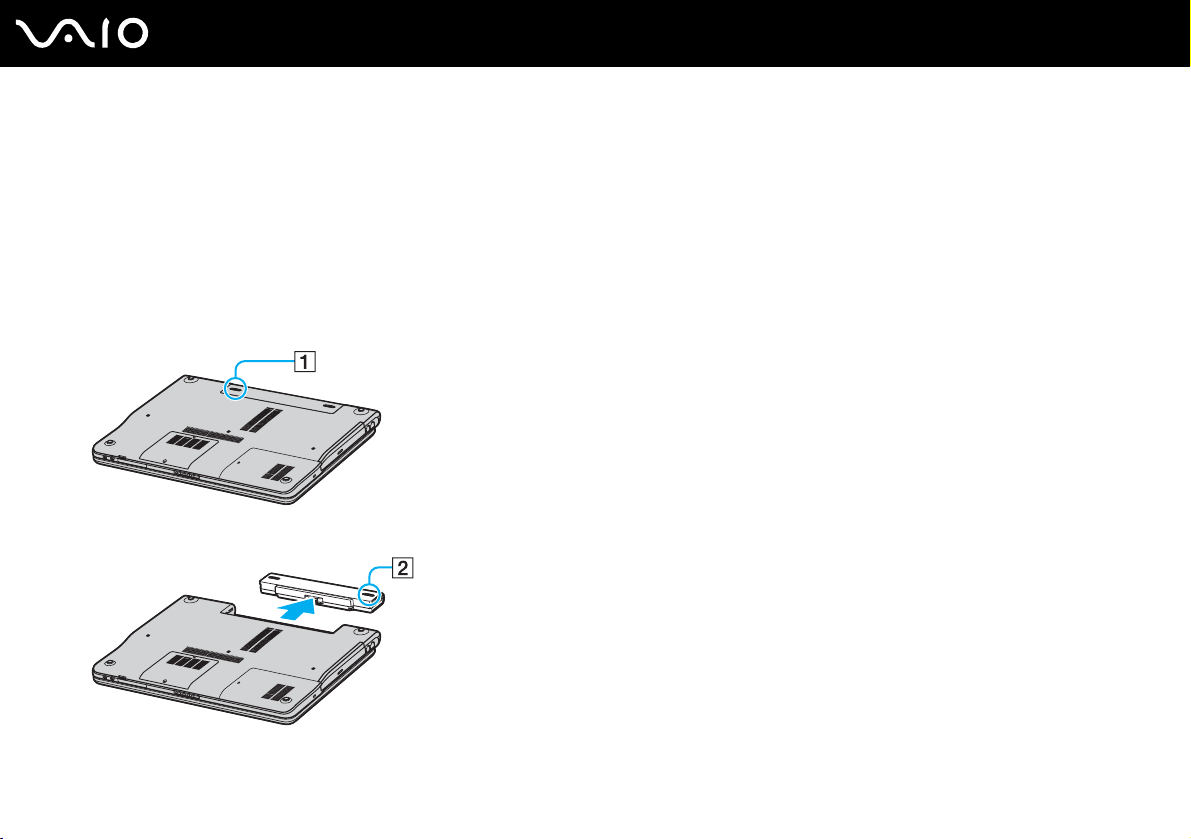
Using the Battery Pack
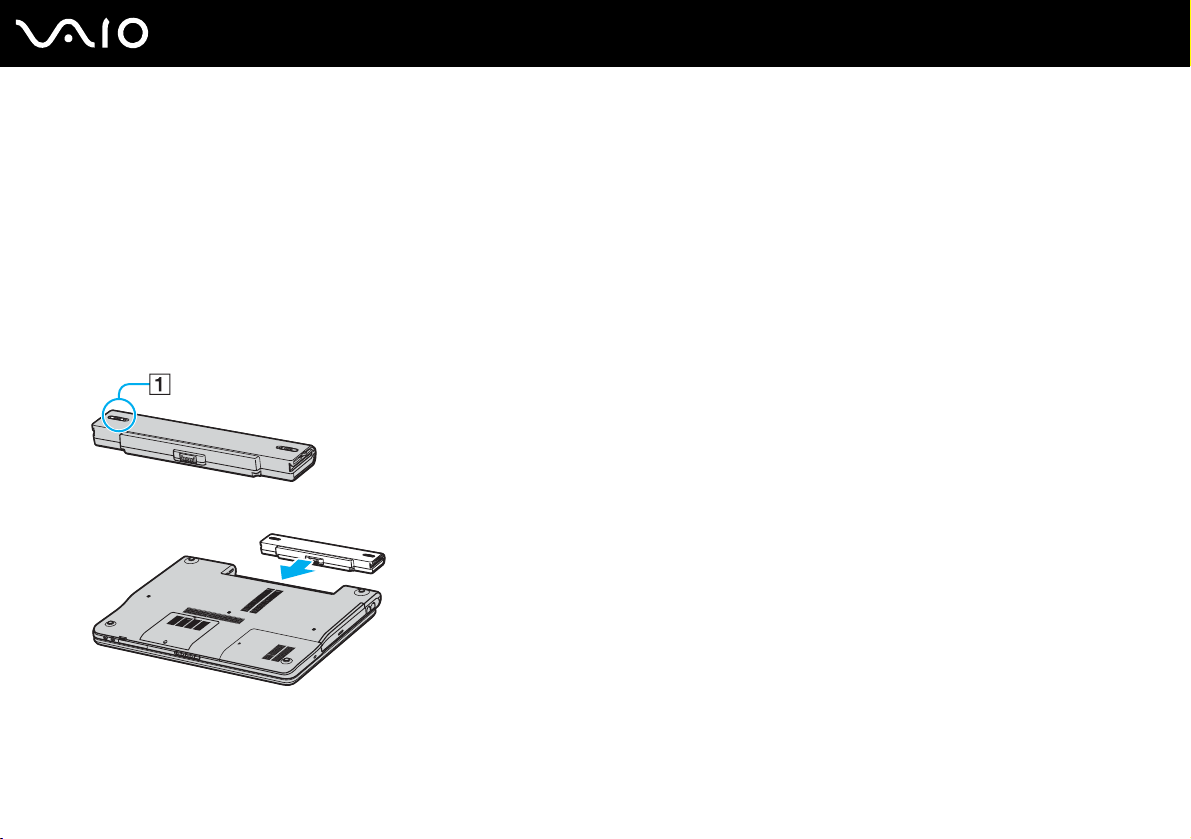
The battery pack supplied with your computer is not fully charged at the time of purchase.
Installing the Battery Pack
To install the battery pack
1 Turn off the computer and close the LCD screen lid.
2 Slide the lock switch (1) to the UNLOCK position.
3 Slide the battery into the battery compartment until it clicks into place.
18
nN
Getting Started
Page 20

4 Slide the lock switch (1) to the LOCK position to secure the battery on the computer.
✍
When the computer is directly connected to AC power and has a battery pack installed, it uses power from the AC outlet.
!
This computer is designed to operate only with genuine Sony batteries.
19
nN
Getting Started
Page 21
Getting Started
Charging the Battery Pack
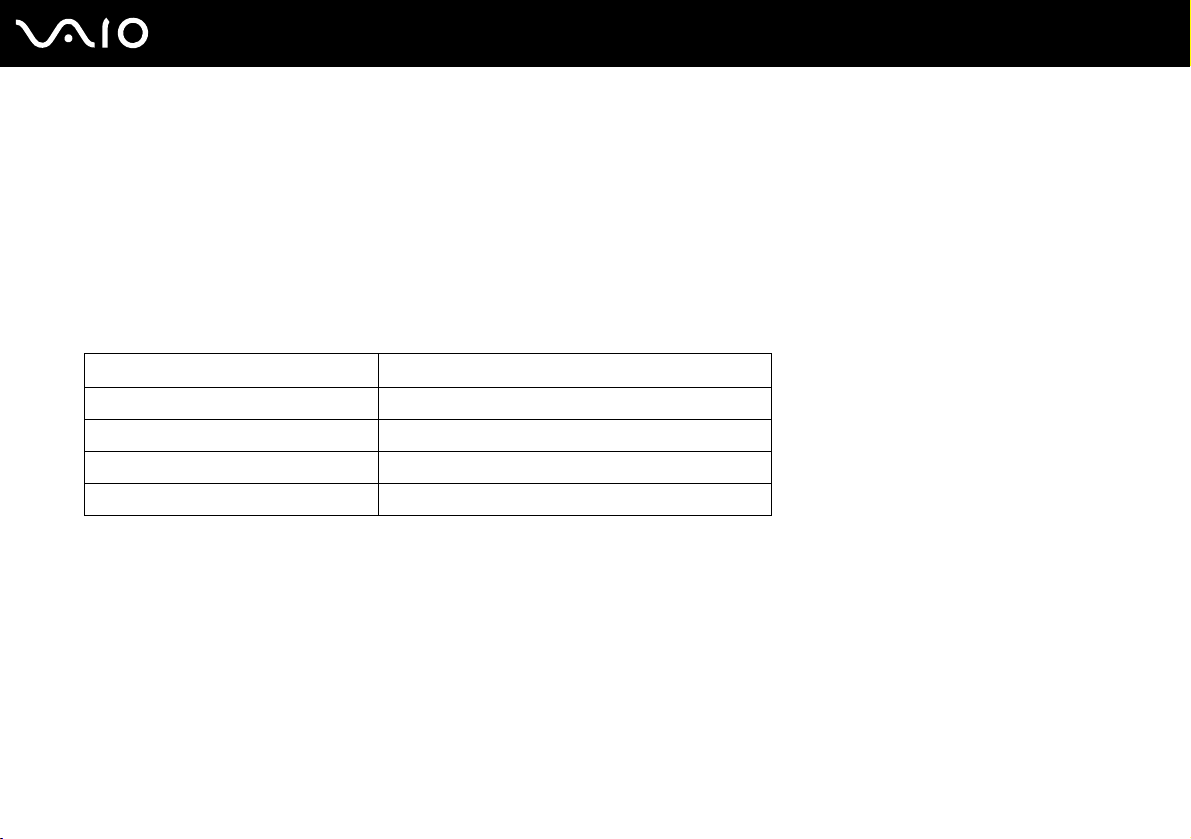
The battery pack supplied with your computer is not fully charged at the time of purchase.
To charge the battery pack
1 Install the battery pack.
2 Connect the AC adapter to the computer.
The computer automatically charges the battery (the battery indicator light flashes in a double blink pattern as the battery
charges). When the battery is about 85% charged, the battery indicator turns off.
Battery indicator light status Meaning
On The computer is using battery power.
Blinks The battery is running out of power.
Double blinks The battery is charging.
Off The computer is using AC power.
20
nN
Page 22

Getting Started
✍
When the battery is running out of power, both the battery and power indicator lights blink.
Keep the battery pack in the computer while it is directly connected to AC power. The battery pack continues to charge while you are using the computer.
If the battery level falls below 10%, you should either attach the AC adapter to recharge the battery or shut down the computer and install a fully charged
battery.
The battery pack supplied with the computer is a lithium ion battery and can be recharged any time. Charging a partially discharged battery does not
affect battery life.
The battery indicator light is on while you use the battery pack as a power source. When the battery life is nearly depleted, both the battery and power
indicator lights start flashing.
For some software applications and some peripheral devices, the computer may not enter Hibernate mode even when battery life is low. To avoid loss
of data when using battery power, you should save your data frequently and manually activate a power management mode, such as Standby or
Hibernate. If the battery wears out when the computer enters Standby mode, you will lose any unsaved data. Going back to the previous work state is
impossible. To avoid loss of data, you should save your data frequently.
When the computer is directly connected to AC power and has a battery pack installed, it uses power from the AC outlet.
21
nN
Page 23
Getting Started
Removing the Battery Pack
!
You may lose data if you remove the battery pack while the computer is on and not connected to the AC adapter or if you remove the battery while the
computer is in Standby mode.
To remove the battery pack
1 Turn off the computer and close the LCD screen lid.
2 Slide the lock switch (1) to the UNLOCK position.
3 Slide and hold the release latch (2) and slide the battery away from the computer.
22
nN
Page 24

23
nN
Getting Started
Shutting Down Your Computer Safely
To avoid losing unsaved data, be sure to shut down your computer properly, as described below.
To shut down your computer
1 Turn off any peripherals connected to the computer.
2 Click Start and then Turn Off Computer.
The Turn off computer window appears.
3 Click Turn Off.
4 Respond to any prompts warning you to save documents or to consider other users and wait for the computer to turn off
automatically.
The power indicator light turns off.
Page 25

Using Your VAIO Computer
This section describes how to get the most out of using your computer.
❑ Using the Keyboard (page 25)
❑ Using the Touch Pad (page 27)
❑ Using the Optical Disc Drive (page 28)
❑ Using PC Cards (page 36)
❑ Using the Memory Stick Media (page 39)
❑ Using the Internet (page 42)
❑ Using Wireless LAN (WLAN) (page 43)
24
nN
Using Your VAIO Computer
Page 26
nN
Using Your VAIO Computer
Using the Keyboard
Your keyboard is very similar to a desktop computer keyboard, but has additional keys that perform model-specific tasks.
Combinations and Functions with the Fn Key
✍
Some functions are not available until Windows is launched.
Combinations/Feature Functions
Fn + % (F2): speaker switch Turns on and off the built-in speakers and the headphones.
Fn + 2 (F3/F4): speaker volume Adjusts the built-in speaker volume.
Fn + 8 (F5/F6): brightness control Adjusts the brightness of the LCD.
Fn + /T (F7): switch to the external display
To increase volume, press Fn+F4 and then M or ,, or keep pressing Fn+F4.
To decrease volume, press Fn+F3 and then m or <, or keep pressing Fn+F3.
To increase lightness intensity, press Fn+F6 and then M or ,, or keep pressing Fn+F6.
To decrease lightness intensity, press Fn+F5 and then m or <, or keep pressing Fn+F5.
Toggles between the LCD, external device (e.g. monitor) and both LCD and external device.
25
Page 27
Combinations/Feature Functions
Fn + (F10): zoom
Fn + (F12): Hibernate
26
nN
Using Your VAIO Computer
Changes the screen resolution to magnify/restore the screen view.
✍
The magnified view is not as clear as the standard view, as it is implemented by applying a lower resolution
to the LCD screen with a higher resolution.
This key combination is disabled during video playback. Make sure to quit such software before pressing
the key combination.
This key combination may not work with graphic images as it magnifies the screen view by changing the
resolution.
The location and size of software windows may change when the screen view is magnified or the standard
view is restored because pressing this key combination changes the resolution.
When the LCD screen view is magnified, switching the view to the external display disables the function
and restores the standard view.
Provides for the lowest level of power consumption. When you execute this command, the
states of the system and the peripheral devices are written to the hard disk and the system
power is turned off. To return the system to its original state, use the power button to turn on the
power.
For details on power management, see Using the Power Saving Modes (page 74).
Page 28
27
nN
Using Your VAIO Computer
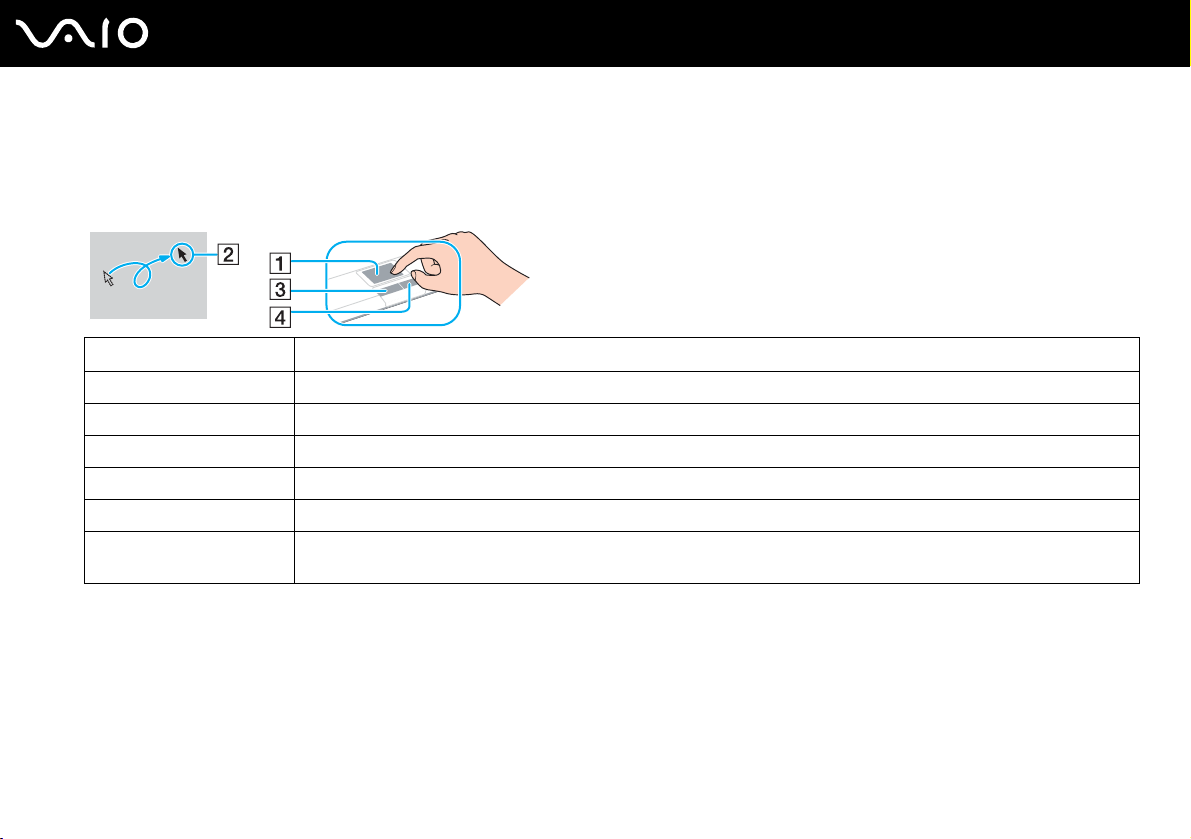
Using the Touch Pad
The keyboard contains a cursor-pointing device, the touch pad (1). You can point to, select, drag, and scroll objects on the
screen using the touch pad.
Action Description
Point Slide one finger on the touch pad to place the pointer (2) on an item or object.
Click Press the left button (3) once.
Double-click Press the left button twice.
Right-click Press the right button (4) once. In many applications, this action displays a shortcut menu.
Drag Slide one finger on the touch pad while pressing the left button.
Scroll Move your finger along the right edge of the touch pad to scroll vertically. Move your finger along the bottom to scroll
horizontally (the scroll function is available only with applications that support a touch pad scroll feature).
Page 29
Using Your VAIO Computer
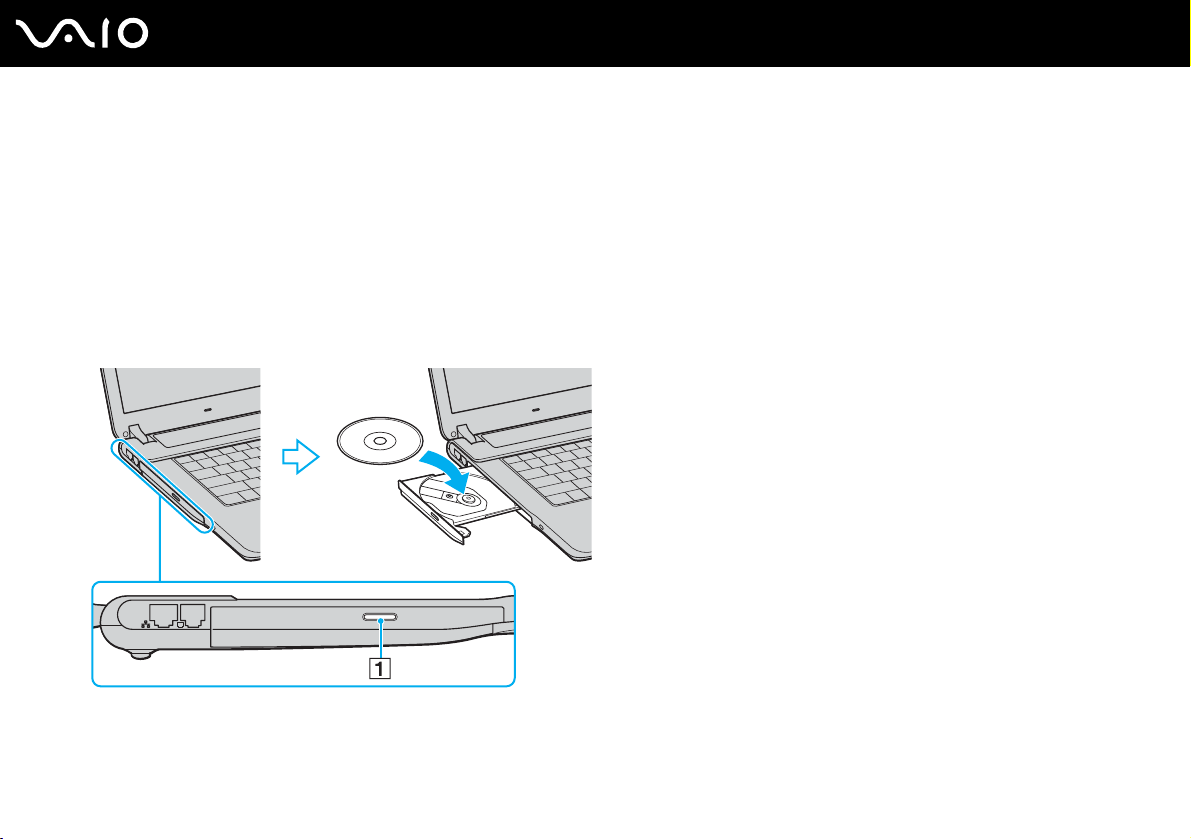
Using the Optical Disc Drive
Your computer is equipped with an optical disc drive.
To insert a disc
1 Turn on the computer.
2 Press the drive eject button (1) to open the drive.
The tray slides out.
3 Place a disc in the middle of the tray with the label side facing up and gently push until the disc clicks into place.
28
nN
Page 30

Using Your VAIO Computer
4 Close the tray by pushing it in gently.
!
Do not remove the optical disc when the computer is in a power saving mode (Standby or Hibernate). Doing so may cause the computer to malfunction.
✍
If you plan to use an external optical disc drive, connect the drive before you launch any preinstalled CD/DVD program.
29
nN
Page 31

30
nN
Using Your VAIO Computer
Reading and Writing CDs and DVDs
Your computer plays and records CDs and DVDs, depending on the model you purchased. Check your specifications for the
type of optical disc drive installed on your model. Use the table below to see which types of media your optical disc drive
supports.
Optical disc drive Plays Records to
DVD-ROM DVD and most DVD-R, DVD-RW, DVD+R, DVD+RW
CD-RW/DVD-ROM CD, CD-R, CD-RW, DVD, most DVD-R, DVD-RW,
DVD±RW CD, CD-R, CD-RW, DVD, most DVD-R, DVD-RW,
DVD±RW/RAM CD, CD-R, CD-RW, DVD, most DVD-R, DVD-RW,
* On selected models only.
and DVD+R DL (Double Layer)
DVD+R, DVD+R DL (Double Layer) and DVD+RW
DVD+R, DVD+R DL (Double Layer) and DVD+RW
DVD+R, DVD+R DL (Double Layer), DVD+RW and
DVD-R AM
*
!
This product is designed to playback discs that conform to the Compact Disc Digital Audio standard specifications (CD Standard). A DualDisc is a two
sided disc product which mates DVD recorded material on one side with digital audio material on the other side. Please be aware that the audio side
(non-DVD side) of a DualDisc may not play on this product because it does not conform to the CD Standard.
—
CD-R and CD-RW
CD-R, CD-RW, DVD-R, DVD-RW, DVD+R,
DVD+R DL (Double Layer) and DVD+RW
CD-R, CD-RW, DVD-R, DVD-RW, DVD+R,
DVD+R DL (Double Layer), DVD+RW and DVD-RAM
*
!
Due to the multiple formats of discs now available, when buying pre-recorded or blank discs for use with a VAIO computer, be sure to read the notices
on the disc packaging carefully to check both playback and recording compatibility with your computer's optical disc drives. Sony does NOT guarantee
the compatibility of VAIO CD drives with discs that not compliant with the official "CD" format standard (or "DVD" standard in relation to DVD drives).
USING NON-COMPLIANT DISCS CAN CAUSE FATAL DAMAGE TO YOUR VAIO PC OR CREATE SOFTWARE CONFLICTS AND CAUSE SYSTEM HANGING.
For inquiries about disc formats, contact the individual publisher of the pre-recorded disc or the manufacturer of the recordable disc.
Page 32

31
nN
Using Your VAIO Computer
✍
Supports writing to DVD-RW discs compliant with DVD-RW version 1.1/1.2.
Supports writing to DVD-R discs compliant with DVD-R for General version 2.0/2.1.
Supports 8cm disc reading, but does not support 8cm disc writing.
Writing to DVD+R DL (Double Layer) discs is available only on discs supporting DVD+R DL (Double Layer) recording.
The DVD±RW/RAM disc drive on your computer does not support the DVD-RAM cartridge. Use non-cartridge discs or discs with removable cartridge.
Writing to single-sided DVD-RAM discs (2.6 GB) compliant with DVD-RAM version 1.0 is not supported.
Notes on writing data onto a disc
❑ To make the data on a disc readable on an optical disc drive, you need to close the session when you eject it. To complete
this process, follow the instructions included with your software.
❑ Only use circular discs. Do not use discs in any other shape (star, heart, card, etc.), as this may damage the optical disc
drive.
❑ Do not strike or shake the computer while writing data onto a disc.
❑ Deactivate the screen saver and exit anti-virus software before writing data onto a disc.
❑ Do not use memory-resident utility software while writing data to a disc. This may cause the computer to malfunction.
❑ When using your software application to burn discs, make sure you exit and close all other applications.
❑ Never touch the surface of the disc. Fingerprints and dust on the surface of a disc may cause writing errors.
❑ Do not switch power modes while using the pre-installed software and while using the CD burning software.
❑ Never put stickers on discs. This will affect the use of the disc irreparably.
❑ Connect and use the AC adapter to power the computer or make sure your battery is at least 50 percent charged.
❑ Some DVD players and computer's DVD drives may not be able to play DVDs created on applicable models using the
VAIO Zone software.
Page 33

32
nN
Using Your VAIO Computer
Notes on playing DVDs
To achieve optimum performance when playing DVDs, you should follow these recommendations.
❑ You can play DVDs using the optical disc drive and the DVD playback software, such as VAIO Zone or WinDVD. See the
help file on such software for details.
❑ Close all open applications before playing a DVD movie.
❑ Do not use memory-resident utility software to speed up disc access when playing a DVD. This may cause the computer
to malfunction.
❑ Deactivate the screen saver and exit anti-virus software before playing a disc.
❑ Some discs recorded at 20 or 24 bits may produce noise while playing. If you have audio devices connected, this may
damage your hearing and the speakers. Reduce the volume before playing a DVD.
❑ Do not switch power saving modes while the computer is playing a DVD.
❑ Region code indicators are labeled on the DVDs to indicate in which region and on what type of player you can play the
disc. If the DVD is labeled "all," this means that you can play this DVD in most regions of the world. If the region code of
your residence area is different from the label on the DVD disc or on the packaging, you cannot play the disc on this player.
!
You can change the DVD region code only a limited number of times. When you have exceeded this number, the drive's DVD region code is permanently
assigned and you will not be able to change it again. Reconfiguring the computer does not reset this count.
If you change the DVD region code while the WinDVD software is running, restart the software or eject the disc and re-insert it to make the new setting
effective.
❑ If the computer has Wireless LAN and Wireless LAN is activated, playing DVDs may cause some interruptions in audio
and video.
❑ When you are playing a DVD (video or audio) and you want to remove a USB device, such as USB-compatible speakers,
make sure you stop the DVD first. Removing a USB-compatible device during DVD (video or audio) playback may cause
a malfunction.
Page 34

33
nN
Using Your VAIO Computer
Playing CDs
To play an audio CD
1 Insert a disc into the optical disc drive.
2 If nothing appears on the desktop, then click Start, point to All Programs, and click to open a CD program, such as the
SonicStage software.
If the Audio CD window appears, click to select an option.
Page 35

34
nN
Using Your VAIO Computer
Copying Files to CDs
See the online Specifications to find the type of your optical disc drive, and then Reading and Writing CDs and DVDs
(page 30) to find about the supported disc media.
To copy files to a disc
!
Do not strike or shake the computer while writing data onto a disc.
1 Insert a blank disc into the optical disc drive.
If the CD Drive window appears, click Take no action and then click OK.
2 Right-click Start and then click Explorer.
3 In the Folders panel on the left, locate the file(s) or folder(s) you want to copy, right-click the file(s) or folder(s), point to
*
Send To, and then click the optical disc drive
4 Close the window.
5 Click Start and then My Computer.
6 Click the optical disc drive icon under Devices with Removable Storage. A new window appears with the file(s) or
folder(s) you want to copy listed under Files Ready to Be Written to the CD.
7 In the CD Writing Tasks box, click Write these files to CD.
8 Follow the instructions in the CD Writing Wizard.
* The read/write drive letter designation may vary, depending on your system's hardware configuration.
name.
Page 36

35
nN
Using Your VAIO Computer
Playing DVDs
To play a DVD
1 Close all open programs.
2 Insert a DVD into the optical disc drive.
3 If nothing appears on the desktop, then click Start, point to All Programs, and click to open a DVD program to play the
DVD.
For instructions on how to use a program, see the help file included with the DVD program.
Copying Files to DVDs
The DVD writing function is available on selected models only. See the online Specifications to find the type of your optical
disc drive, and then Reading and Writing CDs and DVDs (page 30) to find about the supported disc media.
To copy files to a disc
1 Connect the AC adapter to the computer.
2 Insert a disc into the optical disc drive.
3 If nothing appears on the desktop, then click Start, point to All Programs, and click to open a DVD program you want to
use.
For instructions on how to use a program, see the help file included with the DVD program.
Page 37

Using PC Cards
PC Cards allow you to connect portable external devices to your computer.
Inserting a PC Card
!
Some PC Cards or their functions may not be compatible with the computer.
You do not need to shut down the computer before inserting or removing a PC Card.
To insert a PC Card
1 Insert the PC Card into the PC Card slot with the front label facing up.
2 Gently push the PC Card into the slot.
The PC Card is automatically detected by your system.
The Safely Remove Hardware icon appears on the taskbar.
36
nN
Using Your VAIO Computer
Page 38

Using Your VAIO Computer
✍
Some devices may not function properly if you continually switch to Normal mode from Standby mode or Hibernate mode. For some PC Cards, if you
alternate between Normal mode and Standby or Hibernate mode while the card is inserted, you may find that a device connected to your system is not
recognized. Restart your system to correct the problem. Restarting will restore the original state of the computer.
While the card is inserted, the computer may not enter Hibernate power management mode. It may enter Standby mode. We recommend that you
remove the card before the computer enters Hibernate mode.
Make sure you use the most recent software driver provided by the PC Card manufacturer.
If an "!" mark appears on the Device Manager tab in the System Properties window, remove the software driver and then reinstall it.
Do not force a PC Card into the slot. It may damage the connector pins. If you have difficulty inserting a PC Card, check that you are inserting the PC
Card in the correct direction. See the manual supplied with your PC Card for more information on use.
37
nN
Page 39

38
nN
Using Your VAIO Computer
Removing a PC Card
Follow the steps below to remove the PC Card while your computer is on. If it is not removed properly, your system may not
work properly.
To remove a PC Card
✍
To remove a PC Card when the computer is off, skip steps 1 to 6.
1 Double-click the Safely Remove Hardware icon on the taskbar.
The Safely Remove Hardware window appears.
2 Select the hardware you want to unplug.
3 Click Stop.
The Stop a Hardware Device window appears.
4 Confirm that the device can be safely removed from the system.
5 Click OK.
A window appears, explaining that it is safe to remove the device.
6 Click Close.
7 Push the PC Card release button so that the release button pops out.
8 Push the PC Card release button a second time so that the PC Card pops out.
9 Gently take hold of the Card and pull it out of the slot.
10 If the PC Card release button is still out, push it back in.
Page 40

39
nN
Using Your VAIO Computer
Using the Memory Stick Media
Your computer supports the Memory Stick media. Memory Stick media is a compact, portable, and versatile device especially
designed for exchanging and sharing digital data with compatible products, such as digital cameras, mobile phones and other
devices. Because it is removable, it can be used for external data storage.
For the latest information on Memory Stick media, visit the Sony online support Web site at http://esupport.sony.com/EN/VAIO/
for customers in USA, at http://www.sony.ca/support
in Latin American countries or areas.
!
Your computer has been tested and found compatible with the Sony branded Memory Stick media with capacity of up to 4 GB. Sony assumes no liability
for compatibility with any other Memory Stick media.
Write-protecting a Memory Stick Media
Some versions of Memory Stick media are designed with an erasure prevention switch to protect valuable data from
accidental erasure or overwriting.
Move the tab horizontally or vertically
be saved on the Memory Stick media. When the erasure prevention switch is on, data can be read from but not saved on the
Memory Stick media.
*
to set or release write-protection. When the erasure prevention switch is off, data can
for customers in Canada, or at http://esupport.sony.com/ES/ for customers
* Some versions of Memory Stick media do not have an erasure prevention switch.
Page 41

Using Your VAIO Computer
Inserting a Memory Stick Media
To insert a Memory Stick media
1 Hold the Memory Stick media with the arrow facing up and toward the Memory Stick media slot.
2 Lift the Memory Stick media slot cover.
3 Carefully slide the Memory Stick media into the slot until it clicks in place.
The Memory Stick media is automatically detected by your system and appears in your My Computer window as a local
drive, under the appropriate letter (depending on the configuration of the computer).
!
Be sure to hold the Memory Stick media with the arrow pointing in the correct direction as you insert it into the slot. To avoid damaging the computer
or the Memory Stick media, do not force the Memory Stick media into the slot if it does not insert smoothly.
40
nN
Do not insert more than one Memory Stick media into the Memory Stick media slot. Inserting the media improperly may damage the computer.
✍
The computer supports Memory Stick Duo media and is equipped with the Memory Stick combo slot that is compatible with both standard- and duo-
size media. For more information on Memory Stick Duo media, visit the Memory Stick web site at http://www.memorystick.com/en/
.
Page 42

Using Your VAIO Computer
To view the contents of the Memory Stick media
1 Click Start and then My Computer to open the My Computer window.
2 Double-click the Memory Stick media icon to view the list of data files saved in the Memory Stick media.
To format a Memory Stick media
Use the Memory Stick Formatter software. See the help file on the Memory Stick Formatter software for details.
Removing a Memory Stick Media
To remove a Memory Stick media
1 Check that the Memory Stick media indicator is off.
2 Push the Memory Stick media in toward the computer.
The Memory Stick media ejects.
3 Pull the Memory Stick media out of the slot.
!
Always remove the Memory Stick media gently, or it may pop out unexpectedly.
Do not remove the Memory Stick media while the Memory Stick media indicator is turned on. If you do, you may lose data. Large volumes of data may
take time to load, so be sure the indicator is off before removing the Memory Stick media.
41
nN
Page 43

42
nN
Using Your VAIO Computer
Using the Internet
Setting Up a Dial-up Internet Connection
Before you can connect to the Internet, you need to connect your computer to a telephone line via a telephone cable (may
not supplied). Once you set up your telephone cable, you're ready to connect to the Internet.
To connect a telephone cable
1 Plug one end of the phone cable (1) into the modem port on the computer.
2 Plug the other end into the wall jack (2).
✍
The computer does not work with party lines, cannot be connected to a coin-operated telephone, and may not work with multiple telephone lines or a
private branch exchange (PBX). Some of these connections may result in excess electrical current and could cause a malfunction in the internal modem.
If you connect a telephone cable coming through a splitter, the modem or connected device may not work properly.
To set up a dial-up connection to the Internet
1 Click Start, point to All Programs, Accessories, Communications, and click New Connection Wizard.
The New Connection Wizard appears.
2 Click Next. If the Location Information window appears, follow the on-screen instructions.
3 If it is not already selected, click to select Connect to the Internet, and click Next.
4 Follow the on-screen instructions.
Page 44

43
nN
Using Your VAIO Computer
Using Wireless LAN (WLAN)
Using the Sony Wireless LAN (WLAN), all your digital devices with built-in WLAN functionality communicate freely with each
other through a powerful network. A WLAN is a network in which a user can connect to a local area network (LAN) through
a wireless (radio) connection. So there is no need anymore to pull cables or wires through walls and ceilings.
The Sony WLAN supports all normal Ethernet activities, but with the added benefits of mobility and roaming. You can still
access information, internet/intranet and network resources, even in the middle of a meeting, or as you move from one place
to another.
You can communicate without an Access Point, which means that you can communicate between a limited number of
computers (ad-hoc). Or you can communicate through an Access Point, which allows you to create a full infrastructure
network (infrastructure).
✍
WLAN uses the IEEE802.11b/g standard, which specifies the used technology. The standard includes the encryption method: Wired Equivalent Privacy
(WEP), which is a security protocol and WiFi Protected Access (WPA - Proposed jointly by the IEEE and Wi-Fi Alliance, WiFi Protected Access is a
specification of standards based, interoperable security enhancements that increase the level of data protection and access control for existing WiFi
networks. WPA has been designed to be forward compatible with the IEEE802.11i specification. It utilizes the enhanced data encryption TKIP (Temporal
Key Integrity Protocol) in addition to user authentication using 802.1X and EAP (Extensible Authentication Protocol)). Data encryption protects the
vulnerable wireless link between clients and Access Points. Besides that, there are other typical LAN security mechanisms to ensure privacy, such as:
password protection, end-to-end encryption, virtual private networks, and authentication.
Wireless LAN devices using the IEEE802.11a standard and the ones using the IEEE802.11b or g standard cannot communicate because the frequencies
are different.
IEEE802.11b: The standard speed is 11 Mbps, or about 30 to 100 times faster than a standard dial up.
IEEE802.11a/g: The standard speed is 54 Mbps, or about 5 times faster than a Wireless LAN device using the IEEE802.11b standard.
Page 45

44
nN
Using Your VAIO Computer
Communicating without an Access Point (Ad-hoc)
An ad-hoc network is a network in which a local network is created only by the wireless devices themselves, with no other
central controller or Access Point. Each device communicates directly with other devices in the network. You can set up an
ad-hoc network easily at home.
Page 46

To communicate without an Access Point (ad-hoc)
1 Turn on the WIRELESS or WIRELESS LAN switch.
The WIRELESS LAN indicator lights up.
On models with the Bluetooth functionality
Switch window. Select the Enable 2.4 GHz Wireless LAN check box and click OK.
2 Click Start and then Control Panel.
3 Click Network and Internet Connections.
4 Click Network Connections.
The Network Connections window appears.
5 Right-click Wireless Network Connection, then click Properties.
The Wireless Network Connection Properties window appears.
6 Select the Wireless Networks tab.
7 Click the Add… button.
The Wireless network properties window appears.
8 Enter a Network name (SSID)
*2
.
You can choose a 32-digit alphanumeric name.
9 Select Open from the Network Authentication drop-down box.
10 Select WEP from the Data Encryption drop-down box.
11 Deselect the The key is provided for me automatically option button.
Some information becomes visible.
*1
, double-click ( / ) on the taskbar to display the Wireless Device
45
nN
Using Your VAIO Computer
Page 47

46
nN
Using Your VAIO Computer
12 Enter the Network key*2.
The network key should be 5 or 13 alphanumeric characters or 10 or 26 hexadecimal
*3
characters long. You can choose
whatever you want.
13 Enter exactly the same Network key again, for confirmation.
14 Select the check box This is a computer-to-computer (ad hoc) network; wireless access points are not used at the
bottom of the screen.
15 Click OK.
Your Network name appears in the Preferred networks.
16 Click Advanced.
The Advanced window appears.
17 Select the Computer-to-computer (ad hoc) networks only option button.
18 Click Close.
19 Click OK.
The computer is ready to communicate with another computer.
*1
See the online Specifications to see whether your model supports the Bluetooth functionality.
*2
If you want to communicate between two or more computers, you need to configure all these computers the exact same way. This means that you need to enter the same
Network name and the same Network key on all computers as on the first computer you configure.
*3
Hexadecimal: A number representation using the digits 0-9, with their usual meaning, plus the letters A-F (or a-f) to represent hexadecimal digits with values of (decimal)
10 to 15.
✍
An ad-hoc network does not support WPA.
Page 48

To disconnect from a computer-to-computer (ad-hoc) network
1 Click Start and then Control Panel.
2 Click Network and Internet Connections.
3 Click Network Connections.
The Network Connections window appears.
4 In the right panel under LAN or High-Speed Internet, right-click Wireless Network Connection.
5 Click Properties.
The Wireless Network Connection Properties window appears.
6 On the Wireless Networks tab, click Advanced.
The Advanced window appears.
7 Click to select Any available network (access point preferred), and click Close.
8 Click OK.
9 Close the Network Connections window.
10 Turn off the WIRELESS or WIRELESS LAN switch.
47
nN
Using Your VAIO Computer
Page 49

48
nN
Using Your VAIO Computer
Communicating with an Access Point (Infrastructure)
An infrastructure network is a network that extends an existing wired local network to wireless devices by providing an Access
Point, for example the Sony Access Point. The Access Point bridges the wireless and wired LAN and acts as a central
controller for the Wireless LAN. The Access Point coordinates transmission and reception from multiple wireless devices
within a specific range.
Page 50

Using Your VAIO Computer
To connect to a wireless network
1 Make sure an access point is set up.
See the instructions that accompanied the access point for more information.
2 Turn on the WIRELESS or WIRELESS LAN switch.
The WIRELESS LAN indicator lights up.
*
On models with the Bluetooth functionality
Switch window. Select the Enable 2.4 GHz Wireless LAN check box and click OK.
3 Click Start and then Control Panel.
4 Click Network and Internet Connections.
5 Click Network Connections.
6 In the right panel under LAN or High-Speed Internet, double-click Wireless Network Connection.
The Wireless Network Connection window appears.
7 Follow the on-screen instructions.
* See the online Specifications to see whether your model supports the Bluetooth functionality.
, double-click ( / ) on the taskbar to display the Wireless Device
49
nN
Page 51

Using Your VAIO Computer
To connect to a wireless network (Models with the Wireless Setup Utility software only)
Use the Wireless Setup Utility software to guide you through the set up process and provide you with more detailed
information about wireless connections.
1 Make sure an access point is set up.
See the instructions that accompanied the access point for more information.
2 Turn on the WIRELESS or WIRELESS LAN switch.
The WIRELESS LAN indicator lights up.
On models with the Bluetooth functionality
*
, double-click ( / ) on the taskbar to display the Wireless Device
Switch window. Select the Enable 2.4 GHz Wireless LAN check box and click OK.
3 Click Start, point to All Programs, and click Wireless Setup Utility.
The Wireless Setup Utility appears.
4 Follow the on-screen instructions.
* See the online Specifications to see whether your model supports the Bluetooth functionality.
To disconnect from a wireless network
Turn off the WIRELESS or WIRELESS LAN switch.
!
Turning off the wireless LAN functionality while accessing remote documents, files, or resources may result in data loss.
50
nN
✍
The WPA key needs to contain at least 8 characters.
Page 52

51
nN
Using Your VAIO Computer
Wireless LAN Channel Selection
In an 802.11b/g configuration, channel 1 to 11 can be used.
(a) With an Access Point ("Infrastructure")
❑ The channel used will be the channel selected by the Access Point.
!
For details on how to select the channel that will be used by the Access Point, see the access point manual.
(b) Without an Access Point ("ad-hoc")
❑ If the Wireless connection is initiated by the VAIO computer, channel 11 will be selected.
❑ If the Wireless connection is initiated by a peer Wireless LAN equipment, the Wireless LAN communication will make use
of the channel selected by the peer Wireless LAN equipment.
✍
The 2.4 GHz bandwidth used by wireless LAN compatible devices is also used by other various devices. Although technologies to minimize interference
from other devices that uses the same bandwidth are employed on wireless LAN compatible devices, such interference may cause lower
communication speed, narrower communication range, or broken wireless connections.
The communication speed varies depending on the distance between communication devices, existence of obstacles between such devices, the device
configuration, the radio conditions, and the software in use. In addition, communications may be cut off depending on the radio conditions.
The communication range varies depending on the actual distance between communication devices, existence of obstacles between such devices, the
radio conditions, the ambient environment that includes existence of walls and materials of such walls, and the software in use.
Deploying IEEE802.11b and IEEE802.11g products on the same wireless network may reduce the communication speed due to radio interference.
Taking this into consideration, the IEEE802.11g products are designed to reduce the communication speed to ensure communications with
IEEE802.11b products.
When the communication speed is not as fast as expected, changing the wireless channel on the access point may increase the communication speed.
Page 53

Using Peripheral Devices
You can add functionality to your computer by using the various ports on the computer.
❑ Connecting External Speakers (page 53)
❑ Connecting an External Display (page 54)
❑ Selecting Display Modes (page 58)
❑ Using the Multiple Monitors Function (page 59)
❑ Connecting an External Microphone (page 61)
❑ Connecting a Universal Serial Bus (USB) Device (page 62)
❑ Connecting a Printer (page 65)
❑ Connecting an i.LINK Device (page 66)
❑ Connecting to a Network (LAN) (page 68)
52
nN
Using Peripheral Devices
Page 54

Connecting External Speakers
You can enhance the sound quality of your computer by connecting external speakers.
To connect external speakers
1 Plug the speaker cable (1) into the headphones jack (2) i.
2 Plug the other end of the speaker cable to the external speaker (3).
3 Turn down the volume of the speakers before you turn them on.
✍
Make sure your speakers are designed for computer use.
53
nN
Using Peripheral Devices
!
Do not place floppy disks on the speakers; their magnetic field may damage the data on the disks.
Page 55

54
nN
Using Peripheral Devices
Connecting an External Display
You can connect an external display to your computer. For example, you can use the computer with a computer display or a
projector.
❑ Connecting a Computer Display (page 55)
❑ Connecting a Multimedia Computer Display (page 56)
❑ Connecting a Projector (page 57)
✍
Connect the power cord after connecting all other cables.
Connected external displays are used as second screens.
On Windows systems only, you can also use an external display to set up multiple monitors.
Page 56

Using Peripheral Devices
Connecting a Computer Display
You can connect a computer display (monitor) directly to your computer.
To connect a computer display
1 If necessary, plug one end of the display's power cord (1) into the display, and the other end into an AC outlet.
2 Plug the display cable (2) (not supplied) into the monitor (VGA) port (3) a on the computer.
!
A video adapter device is required to connect a VGA monitor using the DVI-D port.
55
nN
Page 57

Using Peripheral Devices
Connecting a Multimedia Computer Display
You can connect a multimedia computer display that includes built-in speakers and a microphone to your computer.
To connect a multimedia computer display
1 Plug the power cord of the multimedia computer display (1) into an AC outlet.
2 Plug the display cable (2) (not supplied) into the monitor (VGA) port (3) a on the computer.
3 Plug the speaker cable (4) into the headphones jack (5) i on the computer.
4 Plug the microphone cable (6) into the microphone jack (7) m on the computer.
56
nN
Page 58

Connecting a Projector
You can connect a projector (for example, the Sony LCD projector) directly to your computer.
To connect a projector
1 Connect the power cord (1) of the projector into an AC outlet.
2 Plug the RGB signal cable (2) into the monitor (VGA) port (3) a on the computer.
3 Plug the audio cable (4) (not supplied) into the headphones jack (5) i.
4 Plug the RGB signal cable and the audio cable into the jack and port on the projector (6).
57
nN
Using Peripheral Devices
Page 59

58
nN
Using Peripheral Devices
Selecting Display Modes
You can select which display to be used as the primary monitor when an external display (desktop monitor, etc.) is connected
to your computer.
If you want to work on the computer's LCD and the external display at the same time, see Using the Multiple Monitors
Function (page 59) for more information.
To select a display
1 Right-click on the desktop to display the context menu.
2 Click the menu item for graphic properties.
3 Follow the on-screen instructions to change the settings.
✍
You may not be able to display on the computer's LCD and the external display or projector at the same time, depending on the type of your external
display or projector.
Before turning on the computer, turn on the peripheral devices.
Page 60

59
nN
Using Peripheral Devices
Using the Multiple Monitors Function
The Multiple Monitors function allows you to distribute portions of your desktop across separate displays. For example, if you
have an external display attached to the monitor (VGA) port, your computer's LCD and the external display can function as
a single desktop.
You can move the cursor from one display to the other. This allows you to drag objects, such as an open application window
or a toolbar, from one display to the other.
✍
Your external display may not support the Multiple Monitors function.
Certain software applications may not be compatible with Multiple Monitors settings.
Make sure that the computer does not enter Standby or Hibernate mode while you are using Multiple Monitors mode; otherwise the computer may not
return to Normal mode.
If you set different colors on each display, do not divide one single window on two displays; otherwise your software may not work properly.
Set fewer colors or a lower resolution for each display.
Page 61

To select the Multiple Monitors mode
1 Right-click on the desktop to display the context menu.
2 Click the menu item for graphic properties.
3 Follow the on-screen instructions to change the settings.
✍
Additionally, you can set the display colors and resolution for each display and customize the Multiple Monitors mode.
60
nN
Using Peripheral Devices
Page 62

nN
Using Peripheral Devices
Connecting an External Microphone
If you need to use a sound input device (for example, to chat on the Internet) you need to plug in an external microphone.
To connect an external microphone
Plug the microphone cable (1) into the microphone jack (2) m.
✍
Make sure your microphone is designed for computer use.
61
Page 63

Using Peripheral Devices
Connecting a Universal Serial Bus (USB) Device
To prevent your computer and/or USB devices from damage, observe the following:
❑ When moving the computer with USB devices connected, avoid any shock or force to the USB ports.
❑ Do not put the computer into a bag or carrying case when it has USB devices connected.
Connecting a USB Mouse
To connect a USB mouse
1 Choose the USB port (1) you prefer to use.
2 Plug the USB mouse cable (2) into the USB port.
You can now use your USB mouse (3).
62
nN
✍
The VAIO USB mouse software driver is preinstalled on the computer. As a result, you only need to plug the USB mouse into the USB port and you can
start working.
Page 64

Connecting a USB Floppy Disk Drive
You can purchase a USB floppy disk drive and connect it to your computer.
To connect a USB floppy disk drive
1 Choose the USB port you prefer to use.
2 Plug the USB floppy disk drive cable into the USB port.
Your USB floppy disk drive is now ready for use.
!
When using a USB floppy disk drive, do not apply force on the USB port. This may cause a malfunction.
63
nN
Using Peripheral Devices
Page 65

64
nN
Using Peripheral Devices
Disconnecting a USB floppy disk drive
You can disconnect a USB floppy disk drive when the computer is on or off. Disconnecting the drive when the computer is in
a power saving mode (Standby or Hibernate) may cause the computer to malfunction.
If the computer is off, you can unplug the USB cable directly from the computer.
To disconnect a USB floppy disk drive
1 Close all programs accessing the floppy disk drive.
2 Double-click the Safely Remove Hardware icon on the taskbar.
The Safely Remove Hardware window appears.
3 Select the floppy disk drive you want to unplug.
4 Click Stop.
The Stop a Hardware device window appears.
5 Make sure the floppy disk drive is selected, and click OK.
A message appears stating it is now safe to remove the hardware device.
6 Click Close to close the Safely Remove Hardware window.
7 Remove the floppy disk drive from the computer.
Page 66

Connecting a Printer
You can connect a Windows-compatible printer to your computer to print documents.
Connecting a Printer Using the USB Port
You can connect a USB printer compatible with your version of Windows to the computer.
To connect a printer using the USB port
1 Plug the printer power cord into an AC outlet (1).
2 Choose the USB port (3) you prefer to use.
3 Plug one end of a USB printer cable (2) into the USB port and the other end to your printer.
65
nN
Using Peripheral Devices
Page 67

66
nN
Using Peripheral Devices
Connecting an i.LINK Device
Notes on connecting i.LINK devices
❑ The computer includes an i.LINK (IEEE1394) port, which you can use to connect to an i.LINK device such as a digital
video camcorder or to connect two VAIO computers in order to copy, delete or edit files.
❑ The i.LINK port of the computer does not supply power to external devices generally powered by i.LINK ports.
❑ The i.LINK port supports transfer rates up to 400 Mbps; however, the actual transfer rate depends on the transfer rate of
the external device.
❑ i.LINK cables compatible with the computer include cables with the following part numbers:
VMC-IL4415 (a 1.5 meter cable with a 4-pin connector at each end), VMC-IL4408 Series (a 0.8 meter cable with a 4-pin
connector at each end).
❑ The optional i.LINK cables may not be available, depending on the country or area of your residency.
❑ An i.LINK connection with other compatible devices is not fully guaranteed.
❑ The i.LINK connection varies depending on the software applications, operating system and i.LINK compatible devices
you use. Refer to the manual that came with your software for more information.
❑ Check the working conditions and OS compatibility of i.LINK-compatible PC peripherals (for example, an HDD or CD-RW
drive) before you connect them to the computer.
Page 68

67
nN
Using Peripheral Devices
Connecting a Digital Video Camcorder
To connect a digital video camcorder
1 Plug one end of the i.LINK cable (1) into the i.LINK port (2) on the computer and the other end into the DV In/Out ports
(3) on the digital video camcorder.
2 Launch the DVgate Plus software.
✍
On Sony digital video cameras, ports labeled DV Out, DV In/Out or i.LINK are i.LINK-compatible.
The Sony digital video camcorder shown here is an example; your digital video camcorder may need to be connected differently.
You cannot access the pictures stored on a Memory Stick media when using an i.LINK connection.
Page 69

68
nN
Using Peripheral Devices
Connecting to a Network (LAN)
You can connect your computer to 100BASE-TX/10BASE-T-type networks via an Ethernet network cable. Connect one end
of an optional network cable to the Network (Ethernet) port on the computer and the other end to your network. For detailed
settings and devices needed to connect to the network, see your network administrator.
✍
The computer can be connected to the network with the default settings.
!
Telephone lines cannot be connected to the Network (LAN) connector on your computer.
If the Network (LAN) connector is connected to the telephone lines mentioned below, high electric current to the connector may cause damage,
overheating or fire.
- Home (intercom speakerphone) or business-use telephone lines (multi-line business telephone)
- Public telephone subscriber line
- PBX (private branch exchange)
!
Do not plug a telephone cable into the network port.
Page 70

69
nN
Customizing Your VAIO Computer
Customizing Your VAIO Computer
This section briefly describes how to change the main settings of your computer. Among other things, you will learn how to
use and customize the look of your Sony software and utilities, etc.
❑ Setting the Password (page 70)
❑ Setting Up Your Computer with VAIO Central (page 73)
❑ Using the Power Saving Modes (page 74)
❑ Managing Power with VAIO Power Management (page 79)
Page 71

70
nN
Customizing Your VAIO Computer
Setting the Password
Use one of the BIOS functions to set the password.
Once you have set the password, you will have to enter the password after the VAIO logo appears to start your computer.
The power-on password will allow you to protect your computer from unauthorized access.
Adding the Power-on Password
!
Once you have set the power-on password, you cannot start the computer without entering the password. Make sure not to forget the password. Write
down your password and keep it safe and private from other people.
If you forget the power-on password and need assistance to reset, a password reset fee will be charged, and your computer may need to be sent in for
depot service for password reset.
To add the power-on password
1 Turn on the computer.
2 Press the F2 key when the VAIO logo appears.
The BIOS setup screen appears. If not, restart the computer and press the F2 key several times when the VAIO logo
appears.
3 Use the < or , key to select Security to display the Security tab, select Set Machine Password, and then press the
Enter key.
4 On the password entry screen, enter the password twice and press the Enter key.
The password can be up to 7 alphanumeric characters long.
✍
The following is to configure the computer to prompt password entry when you turn it on or display the BIOS setup screen.
Page 72

Customizing Your VAIO Computer
5 Select Password when Power ON under Security.
Press the space bar to change the setting from Disabled to Enabled.
6 Use the < or , key to select Exit and select Exit (Save Changes); and then press the Enter key.
On the Setup Confirmation screen, make sure that Yes is selected and then press the Enter key.
71
nN
Page 73

72
nN
Customizing Your VAIO Computer
Changing/Removing the Power-on Password
To change or remove the power-on password
1 Turn on the computer.
2 Press the F2 key when the VAIO logo appears.
The BIOS setup screen appears. If not, restart the computer and press the F2 key several times when the VAIO logo
appears.
3 Enter the current password for Enter Password and press the Enter key.
4 Use the < or , key to select Security to display the Security tab, select Set Machine Password, and then press the
Enter key.
5 On the password entry screen, enter the current password once and a new password twice, and then press the Enter key.
To remove the password, leave the Enter New Password and Confirm New Password fields blank and press the Enter
key.
When confirmation to save the changes is prompted, press the Enter key.
6 Use the < or , key to select Exit and select Exit (Save Changes); and then press the Enter key.
On the Setup Confirmation screen, confirm that Yes is selected and then press the Enter key.
Page 74

Customizing Your VAIO Computer
Setting Up Your Computer with VAIO Central
The VAIO Central utility allows you to consult system information and specify preferences for system behavior.
To use VAIO Central
1 Click Start, point to All Programs, and click VAIO Central.
The VAIO Central window appears.
2 Select the desired control item and change the settings.
3 Once finished, click OK.
The setting of the desired item has been changed.
✍
Some of the control items will not be visible if you open VAIO Central as a limited user.
73
nN
Page 75

74
nN
Customizing Your VAIO Computer
Using the Power Saving Modes
When you use a battery as the power source for your computer, you can take advantage of power management settings to
conserve battery life. In addition to the normal operating mode, which allows you to turn off specific devices, your computer
has two distinct power saving modes: Standby and Hibernate. When using battery power, you should be aware that the
computer automatically enters Hibernate mode when the remaining battery charge becomes short, regardless of the power
management setting you select.
!
If the battery level falls below 10 percent, you should either attach the AC adapter to recharge the battery or shut down the computer and install a fully
charged battery.
Using Normal Mode
This is the normal state of the computer when it is in use. The green power indicator light is on in this mode. To save power
while not working, you can turn off a specific device such as the LCD or the hard disk.
Page 76

75
nN
Customizing Your VAIO Computer
Using Standby Mode
Standby mode turns off the LCD screen and sets the hard disk and the CPU to a low power consumption mode. The umber
power light flashes in this mode.
To activate Standby mode
1 Click Start and then Turn Off Computer.
2 Click Stand By.
To return to Normal mode
Press any key.
!
If you press the power button for more than four seconds, the computer will switch off automatically. You will lose any unsaved data.
✍
When the computer is in Standby mode, you cannot insert a disc.
The computer comes out of Standby mode quicker than out of Hibernate mode.
Standby mode uses more power than Hibernate mode.
!
If the battery runs down when the computer enters Standby mode, you will lose any unsaved data. Going back to the previous work state is impossible.
To avoid loss of data, you should save your data frequently.
If the computer is not used for 25 minutes, it will enter Standby mode. To avoid this, you can change the Standby mode
settings.
Page 77

To change the Standby mode settings
1 Click Start and then Control Panel.
2 Click Performance and Maintenance.
3 Click Power Options.
The Power Options Properties window appears.
4 Select the Power Schemes tab.
5 Change the System Standby settings.
76
nN
Customizing Your VAIO Computer
Page 78

nN
Customizing Your VAIO Computer
Using Hibernate Mode
In Hibernate mode, the state of the system is saved on the hard disk and power is turned off. Even when the battery runs
down, no data will be lost. The power indicator light is off in this mode.
To activate Hibernate mode
Press the Fn+F12 keys.
The Hibernating screen appears and the computer enters Hibernate mode.
Alternatively,
1 Click Start and then Turn Off Computer.
2 Click Hibernate.
To return to Normal mode
Turn on the computer by pressing the power button.
The computer returns to its previous state.
!
If you press the power button for more than four seconds, the computer will switch off automatically.
77
Page 79

Customizing Your VAIO Computer
✍
If you do not use the computer for a long period of time, put the computer into Hibernate mode. This power saving mode saves you the time of shutting
down or resuming.
When the computer is in Hibernate mode, you cannot insert a disc.
Hibernate mode requires more time than Standby mode to be activated.
It takes more time to return to Normal mode from Hibernate mode than from Standby mode.
Hibernate mode uses less power than Standby mode.
!
Do not move the computer until its power indicator light turns off.
78
nN
Page 80

79
nN
Customizing Your VAIO Computer
Managing Power with VAIO Power Management
Power management helps you to set up power schemes for running on AC power or batteries to suit your requirements for
power consumption.
VAIO Power Management is a software application developed exclusively for VAIO computers. With this software
application, you can enhance the Windows power management functions to ensure better operations of your computer and
for longer battery life. For more information on VAIO Power Management, see the help file on the VAIO Power Management
software.
Page 81

80
nN
Customizing Your VAIO Computer
Activating VAIO Power Management
When you start the computer, a power status icon appears on the taskbar. This icon indicates what kind of power source you
are using at that time, for example, AC power. If you double-click this icon, the window appears showing your power status.
VAIO Power Management functionalities are added to the Windows Power Options Properties.
To activate VAIO Power Management
1 Click Start and then Control Panel.
2 Click Performance and Maintenance.
3 Click Power Options.
The Power Options Properties window appears.
4 Select the VAIO Power Management tab.
To restore the default settings
1 On the VAIO Power Management tab, click Advanced.
The VAIO Power Management window appears.
2 Follow the on-screen instructions to change the settings.
Page 82

81
nN
Customizing Your VAIO Computer
Activating VAIO Power Management Power Schemes
VAIO Power Management provides several predefined power schemes. Each power scheme consists of a group of power
management settings that are designed to meet specific power management goals, ranging from maximum power
management to no power management.
To activate a VAIO Power Management power scheme
1 Click Start and then Control Panel.
2 Click Performance and Maintenance.
3 Click Power Options.
The Power Options Properties window appears.
4 Select the tab for power scheme settings.
5 Select a power scheme from the drop-down list.
6 If you now select the VAIO Power Management tab, you see that the selected power scheme appears on the tab.
7 If necessary, you can change the items in the list, for example, the brightness of the LCD.
8 Click OK.
The power scheme has been activated.
✍
You must have administrator rights on the computer to set up a power scheme.
Page 83

82
nN
Upgrading Your VAIO Computer
Upgrading Your VAIO Computer
Your computer and memory modules use high precision components and electronic connectors technology. To avoid the
invalidation of your guarantee due to mishandling, we recommend that:
❑ You contact your dealer to install a new memory module.
❑ You do not install it yourself, if you are not familiar with upgrading memory on a computer.
❑ You do not touch the connectors or open the memory panel.
For the type of module and amount of memory installed on your model, refer to the online Specifications.
For assistance, contact an authorized Sony Service Center. To find the nearest center or agent, visit the Sony online support
Web site.
Page 84

83
nN
Upgrading Your VAIO Computer
Adding and Removing Memory
If you want to expand the functionality of your computer, you can increase the memory by installing optional memory modules.
Before you upgrade your computer's memory, read the notes and procedures in the following pages. The number of available
slots depends on the configuration of your model.
Notes on adding/removing memory modules
❑ Be careful when changing memory. Improper installation of memory modules may cause damage to your system. This
damage may void your manufacturer's warranty.
❑ Only use memory modules that are compatible with the computer. If a memory module is not detected by the computer
or Windows becomes unstable, contact your sales dealer or the manufacturer of your memory module.
❑ Electrostatic discharge can damage electronic components. Before touching a memory module, ensure the following:
❑ The procedures described in this document assume familiarity with the general terminology associated with personal
computers and with the safety practices and regulatory compliance required for using and modifying electronic
equipment.
❑ Turn off the computer and disconnect the system from its power source (that is, battery or AC adapter) and from any
telecommunication links, networks, or modems before you open the computer. Failure to do so may result in personal
injury or equipment damage.
❑ Electrostatic Discharge (ESD) can damage memory modules and other components. Install the memory module only
at an ESD workstation. If such a station is not available, do not work in a carpeted area, and do not handle materials
that produce or hold static electricity (cellophane wrappers, for example). Ground yourself by maintaining contact with
an unpainted metal portion of the chassis while performing the procedure.
❑ Do not open the memory module package until you are ready to change the module. The package protects the module
from ESD.
Page 85

84
nN
Upgrading Your VAIO Computer
❑ Use the special bag delivered with the memory module or wrap the module in aluminum foil to protect it from electrostatic
discharge.
❑ Introducing any liquids or any foreign substances or objects into the memory slots, or other internal components of the
computer, will result in damage to the computer and any repair costs will not be covered by the warranty.
❑ Do not place the memory module in places subject to:
❑ Heat sources such as radiators or air ducts
❑ Direct sunlight
❑ Excessive dust
❑ Mechanical vibration or shock
❑ Strong magnets or speakers that are not magnetically shielded
❑ Ambient temperature of more than 95°F (35°C) or less than 41°F (5°C)
❑ High humidity
❑ Handle the memory module with care. To avoid injuries to your hands and fingers, do not touch the edges of the
components and circuit boards inside the computer.
Page 86

nN
Upgrading Your VAIO Computer
Removing and Installing a Memory Module
To change or add a memory module
1 Shut down the computer and disconnect all peripheral devices.
2 Unplug the computer and remove the battery pack.
3 Wait until the computer cools down.
4 Unscrew the screw (indicated by the arrow below) on the bottom of the computer and remove the memory module
compartment cover.
5 Touch a metal object (such as the connector panel on the back of the computer) to discharge static electricity.
85
Page 87

6 Remove the memory module:
❑ Pull the latches in the direction of the arrows (1).
The memory module is released.
❑ Make sure that the memory module tilts up and then pull it out in the direction of the arrow (2).
7 Remove the new memory module from its packaging.
86
nN
Upgrading Your VAIO Computer
Page 88

8 Slide the memory module into the memory module slot and push it in until it clicks into place.
!
Do not touch any other components on the motherboard.
Do not damage the inner film cover equipped for module protection.
87
nN
Upgrading Your VAIO Computer
9 Replace the memory module compartment cover.
10 Tighten the screw on the bottom of the computer.
11 Reinstall the battery and turn on the computer.
Page 89

Upgrading Your VAIO Computer
Viewing the Amount of Memory
To view the amount of memory
1 Turn on the computer.
2 Click Start, point to All Programs, and click VAIO Central.
3 Click the System Information tab in the VAIO Central window.
4 Double-click the System Information folder.
5 Double-click the System Information icon.
You can view the amount of system memory. If the additional memory does not appear, repeat the whole procedure and
restart the computer.
88
nN
Page 90

Precautions
This section describes safety guidelines and precautions to help you protect your computer from potential damage.
❑ On Handling the LCD Screen (page 90)
❑ On Using the Power Source (page 91)
❑ On Handling Your Computer (page 92)
❑ On Handling Floppy Disks (page 94)
❑ On Handling Discs (page 95)
❑ On Using the Battery Pack (page 96)
❑ On Using Headphones (page 97)
❑ On Handling Memory Stick Media (page 97)
❑ On Handling the Hard Disk (page 98)
89
nN
Precautions
Page 91

90
nN
Precautions
On Handling the LCD Screen
❑ Do not leave the LCD facing the sun. This could damage the LCD. Be careful when using the computer near a window.
❑ Do not scratch the LCD or exert pressure on it. This could cause a malfunction.
❑ Using the computer in low temperature conditions may produce a residual image on the screen. This is not a malfunction.
When the computer returns to normal temperature, the screen returns to normal.
❑ A residual image may appear on the screen if the same image is displayed for a lengthy period of time. The residual image
disappears in a while. You can use a screen saver to prevent residual images.
❑ The screen becomes warm during operation. This is normal and does not indicate a malfunction.
❑ The LCD is manufactured using high-precision technology. You may, however, see tiny black points and/or bright points
(red, blue, or green) that continuously appear on the LCD. This is a normal result of the manufacturing process and does
not indicate a malfunction.
❑ Avoid rubbing the LCD screen. This could damage the screen. Use a soft, dry cloth to wipe the LCD screen.
Page 92

91
nN
Precautions
On Using the Power Source
❑ See the online Specifications to check the power operation of your model.
❑ Do not share the AC outlet with other power-consuming equipment, such as a photocopier or shredder.
❑ You can purchase a power strip with a surge protector. This device prevents damage to the computer caused by sudden
power surges, in an electrical storm, for example.
❑ Do not place heavy objects on the power cord.
❑ To disconnect the cord, pull it out by the plug. Never pull the cord itself.
❑ Unplug the computer from the AC outlet if you are planning to not use the computer for a long time.
❑ Make sure that the AC outlet is easily accessible.
❑ When the AC adapter is not used, unplug it from the AC outlet.
❑ Use the AC adapter supplied with the computer or genuine Sony products. Do not use any other AC adapter as it may
cause a malfunction.
Page 93

92
nN
Precautions
On Handling Your Computer
❑ Clean the cabinet with a soft cloth, which is dry or lightly moistened with a mild detergent solution. Do not use any type
of abrasive pad, scouring powder, or solvent such as alcohol or benzine, as these may damage the finish of the computer.
❑ If you drop a solid object or any liquid onto the computer, shut down the computer and then unplug it. You may want to
have the computer checked by qualified personnel before operating it again.
❑ Do not drop the computer or place heavy objects on top of the computer.
❑ Do not place the computer in a location subject to:
❑ Heat sources, such as radiators or air ducts
❑ Direct sunlight
❑ Excessive dust
❑ Moisture or rain
❑ Mechanical vibration or shock
❑ Strong magnets or speakers that are not magnetically shielded
❑ Ambient temperature of more than 95°F (35°C) or less than 41°F (5°C)
❑ High humidity
❑ Do not place electronic equipment near the computer. The electromagnetic field of the computer may cause a
malfunction.
❑ Provide adequate air circulation to prevent internal heat from building up. Do not place the computer on porous surfaces
such as rugs or blankets, or near material such as curtains or draperies that may block its ventilation slots.
❑ The computer uses high-frequency radio signals and may cause interference to radio or TV reception. If this occurs,
relocate the computer a suitable distance away from the set.
❑ Use only specified peripheral equipment and interface cables; otherwise, problems may occur.
Page 94

93
nN
Precautions
❑ Do not use cut or damaged connection cables.
❑ If the computer is brought directly from a cold location to a warm one, moisture may condense inside the computer. In this
case, allow at least one hour before turning on the computer. If any problems occur, unplug the computer and contact an
authorized Sony Service Center. To find the nearest center or agent, visit the Sony online support Web site.
❑ Make sure you disconnect the power cord before cleaning the computer.
❑ To avoid losing data if the computer is damaged, back up your data regularly.
Page 95

94
nN
Precautions
On Handling Floppy Disks
❑ Do not open the shutter manually or touch the surface of the floppy disk.
❑ Keep floppy disks away from magnets.
❑ Keep floppy disks away from direct sunlight and other sources of heat.
❑ Keep the floppy disk away from any liquid. Do not let the floppy disk get wet. When you are not using the floppy disk,
always remove it from the floppy disk drive and use a storage case.
❑ If the floppy disk comes with a label, make sure that the label is properly attached. If the edge of the label is curled up,
the label may stick to the inside of the floppy disk drive and cause a malfunction or damage your floppy disk.
Page 96

95
nN
Precautions
On Handling Discs
❑ Do not touch the surface of the disc.
❑ Do not drop or bend the disc.
❑ Fingerprints and dust on the surface of a disc may cause read errors. Always hold the disc by its edges and central hole,
as shown below:
❑ Proper care of the disc is essential to its continuous reliability. Do not use solvents (such as benzine, thinner, alcohol,
commercially available cleaners, or anti-static spray) which may cause damage to the disc.
❑ For normal cleaning, hold the disc by its edge and use a soft cloth to wipe the surface from the center out.
❑ If the disc is badly soiled, moisten a soft cloth with water, wring it out well, and use it to wipe the surface of the disc from
the center out. Wipe off any remaining moisture with a dry soft cloth.
❑ Never put stickers on discs. This will affect the use of the disc irreparably.
Page 97

96
nN
Precautions
On Using the Battery Pack
❑ Do not leave the battery pack in temperatures above 140°F (60°C), such as in a car parked in the sun or under direct
sunlight.
❑ Battery life is shorter in a cold environment. This is due to decreased battery efficiency at low temperatures.
❑ Charge the batteries at temperatures between 18°F to 86°F (10°C to 30°C). Lower temperatures require a longer charging
time.
❑ This computer is designed to operate only with genuine Sony batteries.
❑ While the battery is in use or being charged, the battery pack heats up. This is normal and is not cause for concern.
❑ Keep the battery pack away from all sources of heat.
❑ Keep the battery pack dry.
❑ Do not open or try to disassemble the battery pack.
❑ Do not expose the battery pack to any mechanical shock.
❑ If you are not using the computer for an extended period of time, remove the battery pack from the computer to prevent
damage to the battery.
❑ If, after fully charging the battery pack, the battery power is still low, the battery pack may be reaching the end of its life
and should be replaced.
❑ You do not need to discharge the battery before recharging.
❑ If you have not used the battery pack for a considerable amount of time, recharge the battery.
Page 98

97
nN
Precautions
On Using Headphones
❑ Road safety – Do not use headphones while driving, cycling, or operating any motorized vehicle. It may create a traffic
hazard and is illegal in some areas. It can also be potentially dangerous to play loud music while walking, especially at
pedestrian crossings.
❑ Preventing hearing damage – Avoid using headphones at high volume. Hearing experts advise against continuous, loud
and extended play. If you experience a ringing in your ears, reduce the volume or discontinue use.
On Handling Memory Stick Media
❑ Do not use the media in locations that are subject to static electricity or electrical noise.
❑ Do not touch the Memory Stick media connector with your finger or metallic objects.
❑ Use only the label supplied with the Memory Stick media as a label.
❑ Do not bend, drop, or apply strong shock to the Memory Stick media.
❑ Do not disassemble or modify Memory Stick media.
❑ Do not let Memory Stick media get wet.
❑ Do not use or store Memory Stick media in a location subject to:
❑ Extremely high temperatures, such as in a car parked in the sun
❑ Direct sunlight
❑ High humidity
❑ Corrosive substances
❑ Use the storage case supplied with the Memory Stick media.
Page 99

98
nN
Precautions
On Handling the Hard Disk
The hard disk has a high storage density and reads or writes data in a short time. However, it can be easily damaged by
mechanical vibration, shock or dust.
Although the hard disk has the internal safety device to prevent losing data due to mechanical vibration, shock or dust, you
should be careful when handling the computer.
To avoid damaging your hard disk
❑ Do not subject the computer to sudden movements.
❑ Keep the computer away from magnets.
❑ Do not place the computer in a location subject to mechanical vibration or in an unstable position.
❑ Do not move the computer while the power is on.
❑ Do not turn off the power or restart the computer while reading or writing data to disk.
❑ Do not use the computer in a place subject to extreme changes in temperature.
✍
If the hard disk is damaged, the data cannot be restored.
Page 100

99
nN
Troubleshooting
Troubleshooting
This section describes how to solve common problems you might encounter when using your computer. Many problems have
simple solutions. Try these suggestions before visiting the Sony online support Web site at http://esupport.sony.com/EN/VAIO/
for customers in USA, at http://www.sony.ca/support
in Latin American countries or areas.
❑ Computer (page 100)
❑ System Security (page 108)
❑ Battery (page 110)
❑ Internet (page 112)
❑ Networking (page 114)
❑ CDs and DVDs (page 117)
❑ Display (page 122)
❑ Printing (page 124)
❑ Microphone (page 125)
❑ Mouse (page 126)
❑ Speakers (page 127)
❑ Touch Pad (page 128)
❑ Keyboard (page 129)
❑ Floppy Disks (page 130)
❑ PC Cards (page 131)
❑ Audio/Video (page 132)
❑ Memory Stick Media (page 133)
❑ Peripherals (page 134)
for customers in Canada, or at http://esupport.sony.com/ES/ for customers
 Loading...