

Sony VAIO VGF-HS1 User Manual

Before using your Home Server for the first time
This Setup Guide describes the preparatory process from installing to starting up your Home Server and its
major features of which you can take advantage to get the most out of your Home Server.
Follow the preparation flow below to get your Home Server ready for operation.
1. Hardware connection and setup (See page 11).
Placing your Home Server
Connecting to a network
Connecting to a power source with the supplied AC adapter
Turning on your Home Server
Upon completion of the above, you can: (See page 37).
Use your Home Server as a network storage device.
Let DLNA devices access the content of your Home Server.
Take advantage of the One Touch Copy function.
To use the following additional functions (See page 43), you must install the supplied software and
complete the initial setup of the software.
Back Up
Data Sync
Restore Tool
2. Software installation and initial setup (See page 43).
Installing software with the supplied CD-ROM disc
Completing the initial setup
For changing the software settings or obtaining troubleshooting information after the basic setup, please
refer to the User Guide.
2

Table of Contents
Before using your Home Server
for the first time.............................................. 2
What you can do with the Home Server ....... 4
Unpacking .........................................................9
Getting Started ................................................ 10
Operation flow .........................................10
Hardware connection and setup ............11
Placing your Home Server ...................... 11
Connecting to a network ........................13
Connecting to a power source ............... 34
Turning on your Home Server ............... 36
Using the Home Server features ................... 37
Using your Home Server
as a network storage device .................. 37
Letting DLNA devices
to access audio/video content .............. 38
Using the One Touch Copy function .... 41
Software installation and initial setup ... 43
Installing software ...................................45
Configuring the PC Link software ........ 46
Manuals
Your Home Server is provided with (1) Quick Start Guide, (2) Setup Guide (this document), and (3) User
Guide. The Quick Start Guide helps you get your Home Server ready for operation. Please read the Quick
Start Guide first to set up the Home Server and reference the Setup Guide and User Guide for more
information.
Illustrations used in this guide
The product illustrations and the screen captures used in this Setup Guide may appear different from the
actual ones.
3

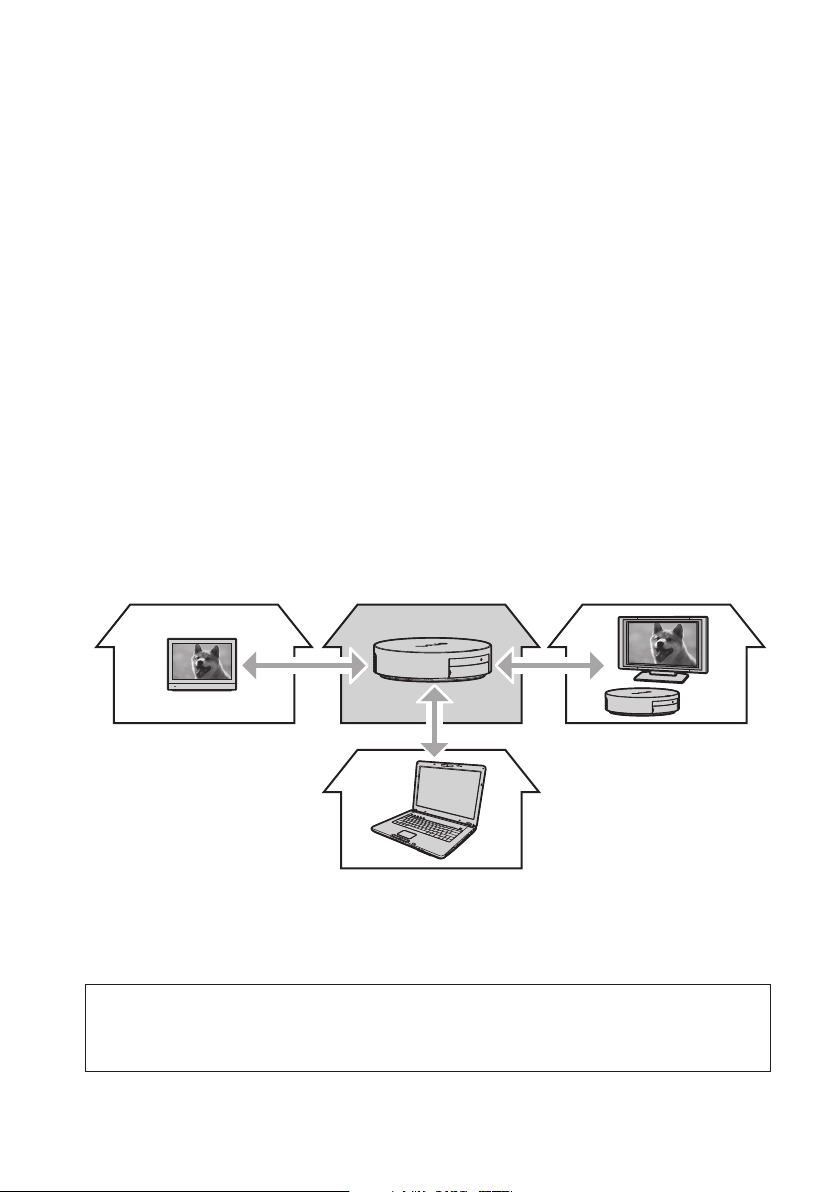
What you can do with the Home Server
Your Home Server provides additional storage for a wide variety of data, including music, photo, and video
contents, to personal computers via your home network or the Internet. It lets you access such data from a
TV in your living room or an audio device via the home network or share it with your family and friends in
distant locations via the Internet.
Note
Access to the content of the Home Server can only be made from the network devices that comply with the Digital Living
Network Alliance (DLNA) guideline (referred to as DLNA device, hereinafter).
Data storage Mass data storage
Internet
* VGF-WA1 Wireless Digital Audio: May not be a
What is DLNA?
DLNA stands for Digital Living Network Alliance and represents the organization founded with the aim of implementing
connectivity among digital AV devices and personal computers on a home network. It also represents the standards set by
the organization. As digital video and audio contents are created in compliance with a variety of manufacturer-dependent
standards, the DLNA organization has been in action to build a framework for establishing home networks for sharing
such digital contents by defining a set of standards for file formats.
The devices that are compliant with the DLNA standards are referred to as DLNA devices and these devices are further
categorized into two types: server devices capable of storing digital video and audio contents and client devices capable of
playing such contents.
vailable depending on the country or region of your residency.
Access from another house
(Remote Home Access functions)
Access within
your house
*
4

Accessing your Home Server within a house
You can access the music, photo, and video contents stored on your Home Server from the following
devices*:
Digital Photo Frame VGF-CP1
TV with a network (LAN) port
PLAYSTATION3
DLNA audio device**
* Actual playback depends on client device functionality.
** With a DLNA audio device that supports the Music channels, you can additionally play music according to your
mood or situation.
***
*** VGF-WA1 Wireless Digital Audio: May not be available depending on the country or region of your residency.
5
Accessing your Home Server from other houses (Remote Home Access functions)
You can send video and photo contents to personal computers and VGF-HS1 Series Home Servers of your
family and friends in distant locations via the Internet or let them access your Home Server to view such
contents.
You can let personal computer users access your Home Server with Web browser software and view
albums of photo content (VAIO Picture Lab function).
Additionally, you can set a password to restrict access to your Home Server.
Tip
For further information on the VAIO Picture Lab function, consult the following section in the User Guide: Using the
Remote Home Access Functions - Using the VAIO Picture Lab function.
You can let VGF-CP1 Digital Photo Frame users view photo content on your Home Server (Media Link
function).
Tip
For further information on the Media Link function, consult the following section in the User Guide: Using the Remote
Home Access Functions - Using the Media Link function.
You can establish Data Syncs between your Home Server and other personal computers or Home Servers
for sending and/or receiving video and photo contents (Data Sync function).
Once the video and photo contents that were received from other personal computers or Home Servers
have been stored on your Home Server, the contents will be available for public viewing.
Tip
For further information on the Data Sync function, see page 44 in this guide; or consult the following section in the
User Guide: Using the Remote Home Access Functions - Transferring data to a personal computer or a Home Server
outside your home (Data Sync).
The Internet related features require certain ports to be open.
Using a modem/router with UPnP is recommended.
Otherwise consult the manual that came with your modem/router for configuring port forwarding.
6

Storing photos and videos
You can use your Home Server as a mass data storage server.
You can import photos and videos from the connected digital still camera or digital camcorder that
complies with the USB mass storage class specification to your Home Server just by pressing the COPY
button (One Touch Copy function).
You can get data automatically uploaded to your Home Server from the specified folders on your
personal computer (Back Up function).
With the Back Up function, all you have to do is create or edit photo and video contents or import music
files from CD discs. The Back Up function will take care of storing the same data on your Home Server.
The music, photo, and video contents stored on your Home Server will be sorted by date or album for
viewing from DLNA devices or browsing from personal computers.
7

Using your Home Server as a network storage device
You can use your Home Server as a storage device on your network that can be accessed from multiple
personal computers at the same time.
You just store data on your Home Server. Then, individual personal computer on your network will be
able to access the data at any time.
To make the stored data available to selected users, set a password to each shared folder and grant the
write and read privilege or the read-only privilege on a per-user basis.
Making backup copies of the data on a personal computer
You can use the Back Up function to specify the folders containing your valuable data on your personal
computer and let the data automatically be uploaded to your Home Server for backup purposes. When the
computer fails, you can use the backup data stored on your Home Server and restore it on the computer.
Making backup copies of your Home Server
You can make backup copies of the data on your Home Server and store it on the connected USB hard disk
drive (not supplied). When the Home Server fails, you can use the stored backup data and restore it on the
Home Server. Additionally, you can copy the backup data from the USB hard disk drive to a personal
computer, using the Restore Tool. (See page 44).
8
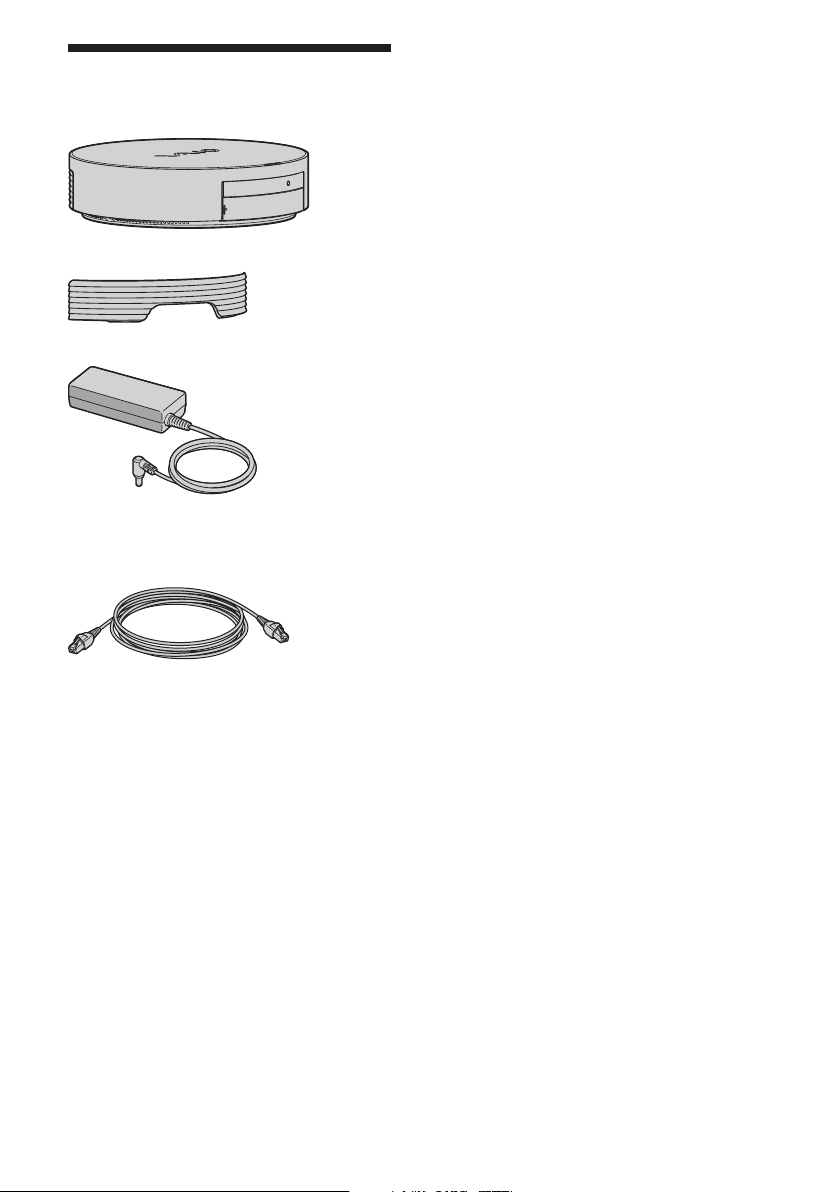
Unpacking
Home Server
Rear cover
AC adapter
Power cord
Network (LAN) cable (straight-through
Ethernet cable, 2 m)
User Guide
Setup Guide (this document)
Quick Start Guide
Warranty sheet or Guarantee and
Service Support booklet
(depending on the country or region of
residency)
CD-ROM disc
Stored software
PC Link
VAIO Media
Stored content
Sample content
(also stored on your Home Server at the time
of delivery)
9
Getting Started
Operation flow
Proceed with the following preparation flow to get started with using your Home Server.
1. Hardware connection and setup (See page 11 to 42).
1. Placing your Home Server
2. Connecting to a network
3. Connecting to a power source with the supplied AC adapter
4. Turning on your Home Server
Upon completion of the above, you can:
Use your Home Server as a network storage device.
Let DLNA devices access the content of your Home Server.
Take advantage of the One Touch Copy function.
For further information on each of the above, see page 37.
To use the following additional functions available through connection with a personal computer, you must
continue with the rest of the preparation. See page 43 for further information.
Back Up
Data Sync
Restore Tool
10
2. Software installation and initial setup (See page 43 to 47).
1. Installing software with the supplied CD-ROM disc
2. Completing the initial setup
Note
When you have recovered the personal computer that you use to connect to the Home Server, you must install the
software and complete the initial setup all over again.
Hardware connection and setup
Placing your Home Server
Unsuitable location
To prevent failures and damage, do not place your Home Server in a location subject to:
Direct sunlight
Magnetic sources
Heat sources, such as heaters
Excessive dust
High humidity
Poor ventilation
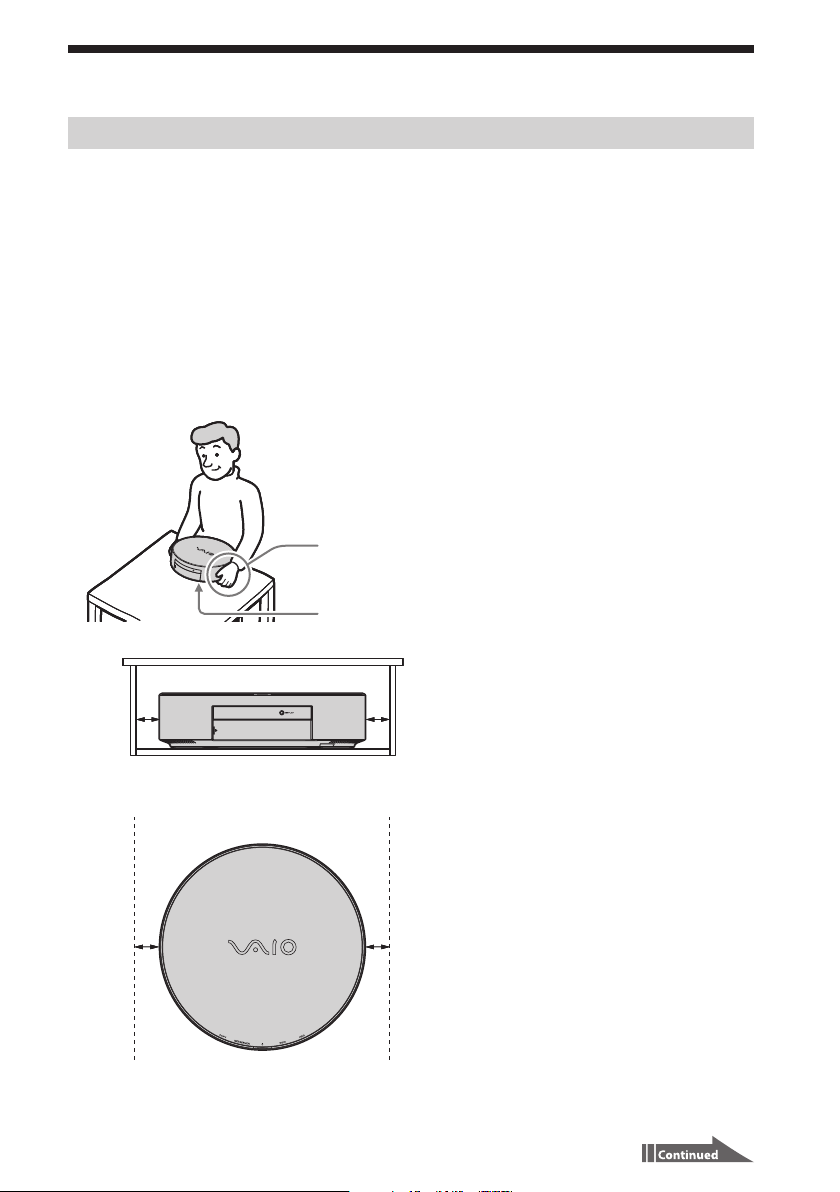
Precautions on placement
Keep the following in mind to place your Home Server.
Be sure to hold your Home Server on
both sides to lift.
Do not apply strong shock to your
Home Server when placing.
2.0 inches
(5.0 cm)
2.0 inches
(5.0 cm)
Allow clearance of at least 2.0 inches
(5.0 cm) wide on either side of your
Home Server.
Rear (unblocked)
2.0 inches
(5.0 cm)
2.0 inches
(5.0 cm)
Keep the air-intake vents on the
bottom, the sides, and the back of
your Home Server unblocked.
Place the Home Server on a flat,
solid surface so as to let the air flow
under the bottom of the Home
Server.
Be sure to provide adequate air
circulation around your Home
Server to prevent internal heat from
building up, as it will cause your
Home Server to malfunction or
result in a fire. Keep the cooling fan
on the back and the air-exhaust
vents on the sides and the bottom
unblocked to let the air flow out.
11

About the NETSERVER switch
To allow access to your Home Server from devices, such as a personal computer, via the Internet with the
Remote Home Access functions (page 6), make sure that the NETSERVER switch on the bottom on the
Home Server is turned on before you place the Home Server.
Observe the following to prevent failures.
Be sure to turn off your Home Server and unplug all cables before moving the Home Server to another
location. Moving the Home Server while powered may cause hard disk failures.
Be sure to keep your Home Server from falling or hitting against a hard object as the slightest shock or
vibration may cause hard disk failures.
Be sure to place your Home Server on a solid, stable surface.
Be sure to keep the air vents unblocked.
Be sure to place your Home Server in a flat position, as it is not designed for upright placement. An
attempt to place the Home Server in the upright position may cause it to roll and damage itself or
surrounding objects.
Be sure to keep any magnetic objects away from your Home Server.
Do not step or sit on your Home Server; or place undesignated objects on top of it.
Do not place any products other than the following (as of August 2008) on top of your Home Server:
VGX-TP Series Personal Computer
VGF-HS1 Series Home Server
Your Home Server is designed to hold only one unit of the above products on top of it. Placing more
than one unit may cause the units to fall off, resulting in product failures or personal injuries. Note that
double-stacking may cause discoloration on the surface of the Home Server.
12
Please refer to the User Guide and read “Safety Information” and “Precautions” as well.
Connecting to a network
You can connect your Home Server to your home network through either of the following:
Wired connection (page 13 to 30)
Read “Restrictions on access to a network with multiple network routers” (page 33) as well.
Wireless connection (page 31)
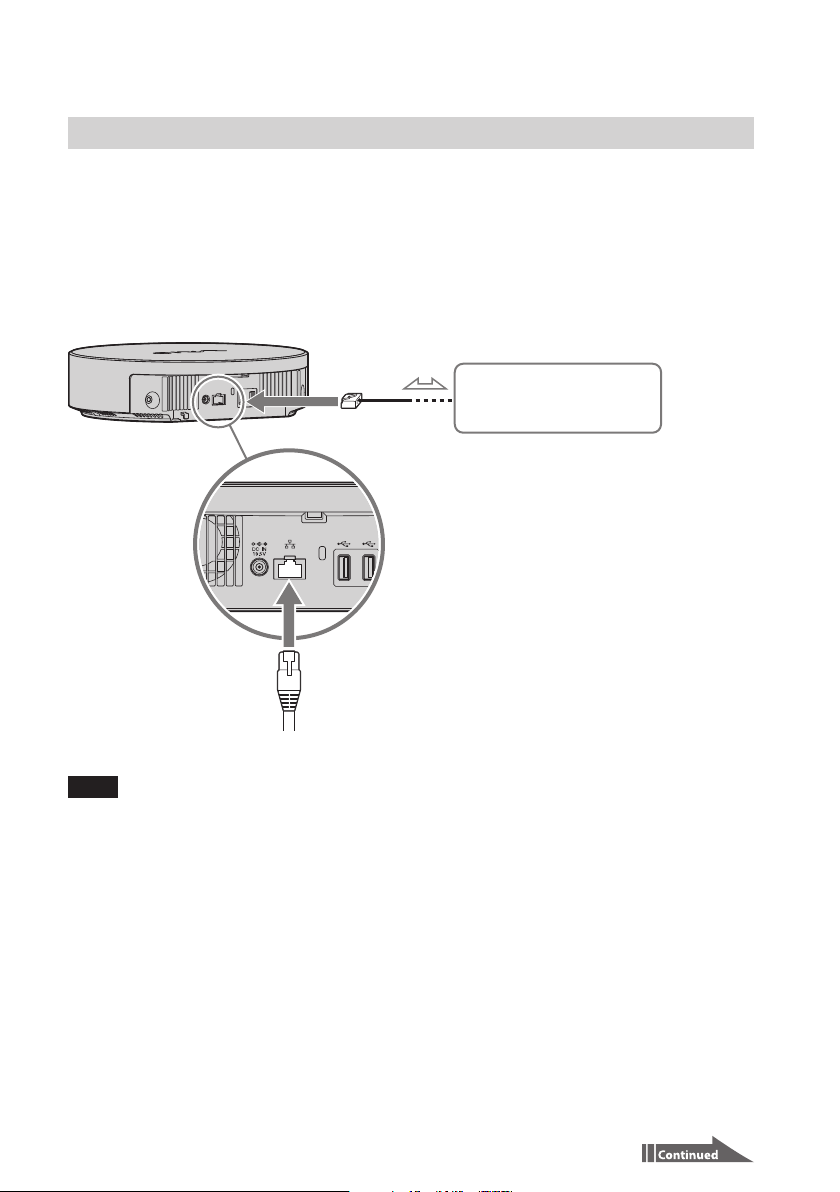
Wired connection
Connect the supplied network (LAN) cable to the network (LAN) port on the back of your Home Server.
Network (LAN)
To the network (LAN) port
You can connect your Home Server to 1000BASE-T, 100BASE-TX, and 10BASE-T networks.
Note
Do not plug a telephone cable or an irrelevant network cable into the network (LAN) port on your Home Server.
High electric current to the port may cause hardware failures, if the network (LAN) port is connected to the
following telephone lines:
Network lines other than 10BASE-T, 100BASE-TX, and 1000BASE-T lines
Public telephone subscriber line
Digital jack of ISDN public telephone subscriber lines
PBX (private branch exchange)
Home (intercom speakerphone) or business-use telephone lines (multiline business telephone)
Telephone lines other than those mentioned above
Tip
As the data transfer rate over a 10BASE-T network is rather slow, it may take some time to copy files or you may
find missing frames or sound tracks during video or audio playback. It is recommended that you connect your
Home Server to a 1000BASE-T or 100BASE-TX network.
13
For peripheral devices required for network configuration, see the connection diagrams on page 16 and the
subsequent pages. For network configuration, follow the instructions from your Internet service provider
and refer to the manuals that came with your peripheral devices.
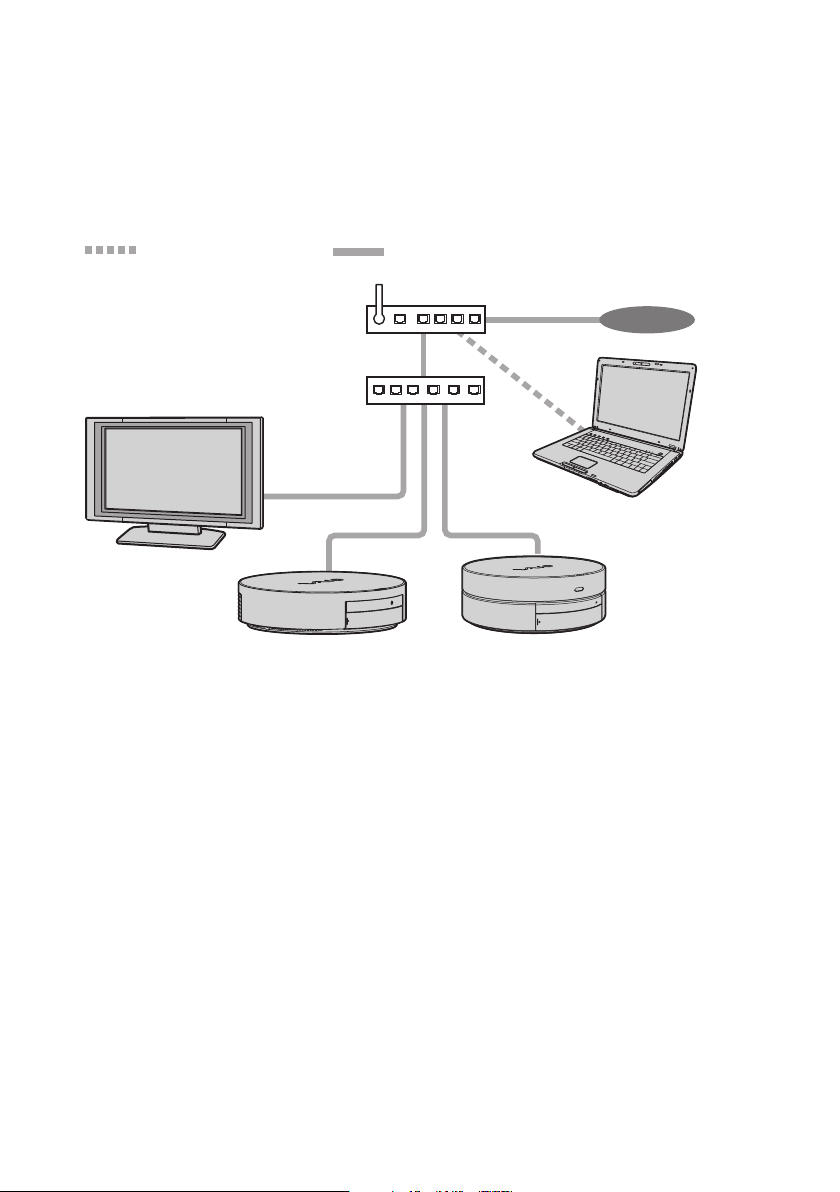
Sample network topology
: Wireless LAN connection : Wired LAN connection
DLNA device with
a network (LAN) port
Network router
Switching hub
Home Server Personal computer
Internet
Personal computer with
wireless LAN capability
14

Your Home Server setup depends on your type of network. See the following flow chart to find out the one
Internet connection from your personal computer
Do you use an xDSL, cable or optical modem?
suitable for you.
Note
If you find any of the following questions uncertain, ask your Internet service provider for assistance or refer to the
manual that came with your xDSL, cable or optical modem.
Yes
Does your xDSL, cable or
optical modem have routing
capability?
Yes
Proceed to
on page 16.
A
No
Proceed to
on page 18.
B
Can you use multiple network devices (IP
addresses)?
Do you use a network router?
Yes
Proceed to
C
on page 19.
No
Yes
No
Will you still have sufficient IP
addresses after you connect your
Home Server to your network?
Yes
Proceed to
on page 26.
D
No
Proceed to
on page 28.
Proceed to
E
on page 30.
No
F
15
 Loading...