


User Guide
Personal Computer
VGC-LV series
N

Contents
2
nN
Before Use.......................................................................... 4
Finding More about Your VAIO Computer .................... 5
Ergonomic Considerations ............................................ 7
Getting Started.................................................................... 9
Locating Controls and Ports........................................ 10
About the Indicator Lights ........................................... 15
Setting Up Your Computer .......................................... 16
Shutting Down Your Computer Safely ........................ 32
Updating Your Computer ............................................ 33
Using Your VAIO Computer.............................................. 34
Using the Keyboard..................................................... 35
Using the Touch Pad................................................... 39
Using the Mouse ......................................................... 40
Using the Built-in Camera ........................................... 43
Using the Optical Disc Drive ....................................... 45
Using the TV Function................................................. 52
Using the HDMI Input Function ................................... 61
Using the Memory Stick .............................................. 66
Using Other Modules / Memory Cards ........................ 71
Using the Internet ........................................................ 78
Using the Network (LAN) ............................................ 79
Using the Wireless LAN .............................................. 81
Using the Bluetooth Function ...................................... 88
Using Peripheral Devices..................................................94
Connecting External Speakers or Headphones ..........95
Connecting a USB Device ...........................................96
Connecting an i.LINK Device.......................................98
Customizing Your VAIO Computer..................................100
Setting the Password.................................................101
Using the VAIO Control Center .................................106
Using the Power Saving Mode ..................................107
Upgrading Your VAIO Computer.....................................110
Adding and Removing Memory .................................111
Adding the Hard Disk Drive .......................................118
Precautions .....................................................................124
Handling the LCD Screen ..........................................125
Using the Power Source............................................126
Handling Your Computer ...........................................127
Handling the Built-in Camera.....................................130
Handling Discs...........................................................131
Using Headphones ....................................................134
Handling the Memory Stick........................................135
Handling the Built-in Storage Device .........................136

Troubleshooting .............................................................. 137
Computer .................................................................. 139
System Security ........................................................ 145
Built-in Camera ......................................................... 146
Networking ................................................................ 148
Bluetooth Technology ............................................... 153
Optical Discs ............................................................. 156
Display ...................................................................... 160
Printing ...................................................................... 162
Microphone ............................................................... 163
Mouse ....................................................................... 164
Speakers ................................................................... 166
Touch Pad................................................................. 167
Keyboard................................................................... 168
Floppy Disks.............................................................. 170
Audio/Video ............................................................... 171
HDMI Input ................................................................ 174
Memory Stick ............................................................ 176
Peripherals ................................................................ 177
Trademarks..................................................................... 178
Notice.............................................................................. 180
3
nN

Before Use >
nN
Before Use
Congratulations on your purchase of this Sony VAIO® computer, and welcome to the on-screen User Guide. Sony has
combined leading-edge technology in audio, video, computing, and communications to provide state-of-the-art personal
computing experience.
!
External views illustrated in this manual may look slightly different from those of your computer.
Information in the supplied manuals including this User Guide is intended for users of the VAIO computers with the Microsoft® Windows Vista®
32-bit operating system. You may find differences in the information when your computer comes preinstalled with the 64-bit operating system.
How to find specifications
Some features, options, and supplied items may not be available on your computer.
To find out about the configuration of your computer, visit the VAIO Link web site at http://www.vaio-link.com
.
4

Before Use >
Finding More about Your VAIO Computer
5
nN
Finding More about Your VAIO Computer
This section provides support information about your VAIO computer.
1. Printed Documentation
❑ Quick Start Guide — An overview of components connection, set-up information, etc.
❑ Troubleshooting and Recovery Guide
❑ Regulations, Guarantee, EULA and Service Support
2. On-screen Documentation
❑ User Guide (This manual) — Features of your computer and information about solving common problems.
To view this on-screen guide:
1 Double-click the Me&My VAIO icon on the desktop.
2 Click Menu, Me&My VAIO, I Need Help, and VAIO User Guide.
3 Open the folder for your language.
4 Select the guide you want to read.
✍
You can manually browse to the user guides by going to Computer > VAIO (C:) (your C drive) > Documentation > Documentation and opening the
folder for your language.
❑ Windows Help and Support — A comprehensive resource for practical advice, tutorials, and demonstrations to help you
learn to use your computer.
To access Windows Help and Support, click Start and Help and Support, or press and hold the Microsoft Windows
key and press the F1 key.

Before Use >
Finding More about Your VAIO Computer
6
nN
3. Support Web Sites
If you have any problem with the computer, you can visit the VAIO-Link web site at http://www.vaio-link.com for
troubleshooting.
Before contacting VAIO-Link by telephone, try to solve the problem by reading the supplied documentation and visiting other
Sony web sites.
❑ For more about VAIO and becoming part of the growing VAIO community, visit the web site at http://www.club-vaio.com
❑ For online purchases, visit the web site at http://www.sonystyle-europe.com
❑ For other Sony products, visit the web site at http://www.sony.net
When you contact VAIO-Link by telephone, have the serial number of your VAIO computer ready at hand. The serial number
is located on the bottom, the back panel, or inside the battery compartment of your VAIO computer.
.
.
.
Before Use >
Ergonomic Considerations
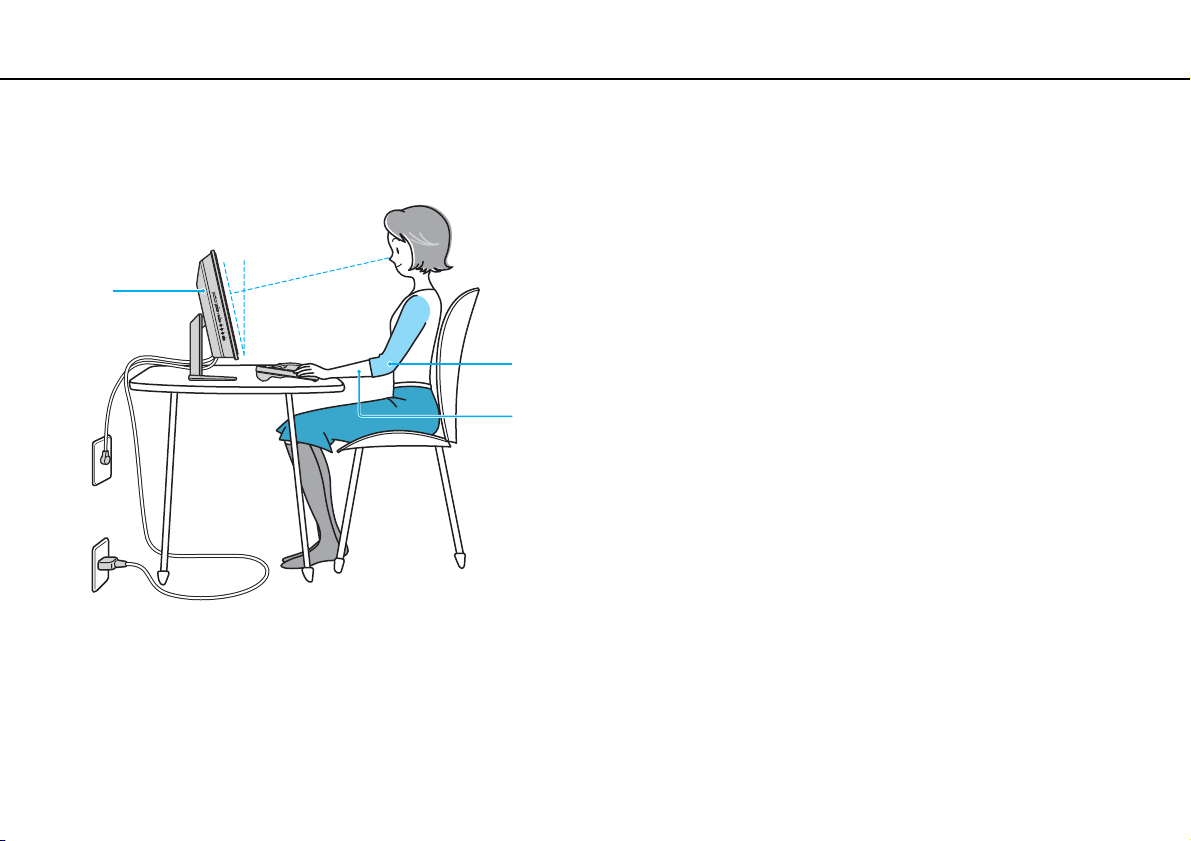
Ergonomic Considerations
Whenever possible, you should attempt to take account of the following ergonomic considerations:
1
2
3
7
nN
❑ Position of your computer – Place the display directly in front of you (1). Keep your forearms horizontal (2), with your
wrists in a neutral, comfortable position (3) while using the keyboard or the pointing device. Let your upper arms hang
naturally at your sides. Take frequent breaks while using your computer. Excessive use of the computer may strain eyes,
muscles, or tendons.
❑ Furniture and posture – Sit in a chair with good back support. Adjust the level of the chair so your feet are flat on the
floor. A footrest may make you more comfortable. Sit in a relaxed, upright posture and avoid slouching forward or leaning
far backwards.
Before Use >
Ergonomic Considerations
8
nN
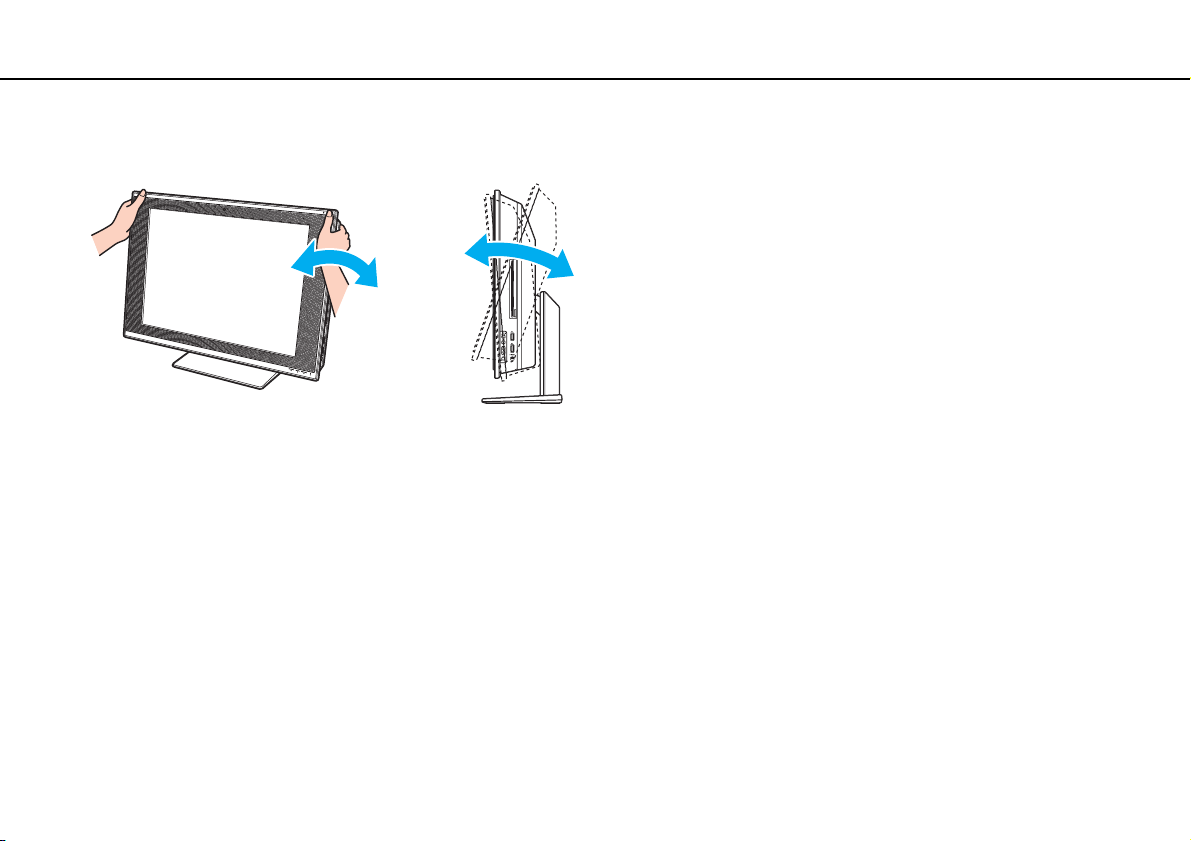
❑ Viewing angle of the display – Use the display's tilting feature to find the best position. You can reduce eye strain and
muscle fatigue by adjusting the tilt of the display to the proper position. Adjust the brightness level of the display as well.
!
While adjusting the viewing angle, do not exert excessive pressure on your computer, especially on the center of the speaker grill, to eliminate a risk of
mechanical damage.
❑ Lighting – Choose a location where windows and lights do not cause glare and reflection on the display. Use indirect
lighting to avoid bright spots on the display. Proper lighting adds to your comfort and work efficiency.
❑ Ventilation – Make sure you leave at least 10 cm of space behind and at least 20 cm of space on each side of the main
unit.

Getting Started >
Getting Started
This section describes how to get started using your VAIO computer.
❑ Locating Controls and Ports (page 10)
❑ About the Indicator Lights (page 15)
❑ Setting Up Your Computer (page 16)
❑ Shutting Down Your Computer Safely (page 32)
❑ Updating Your Computer (page 33)
9
nN
Getting Started >
Locating Controls and Ports
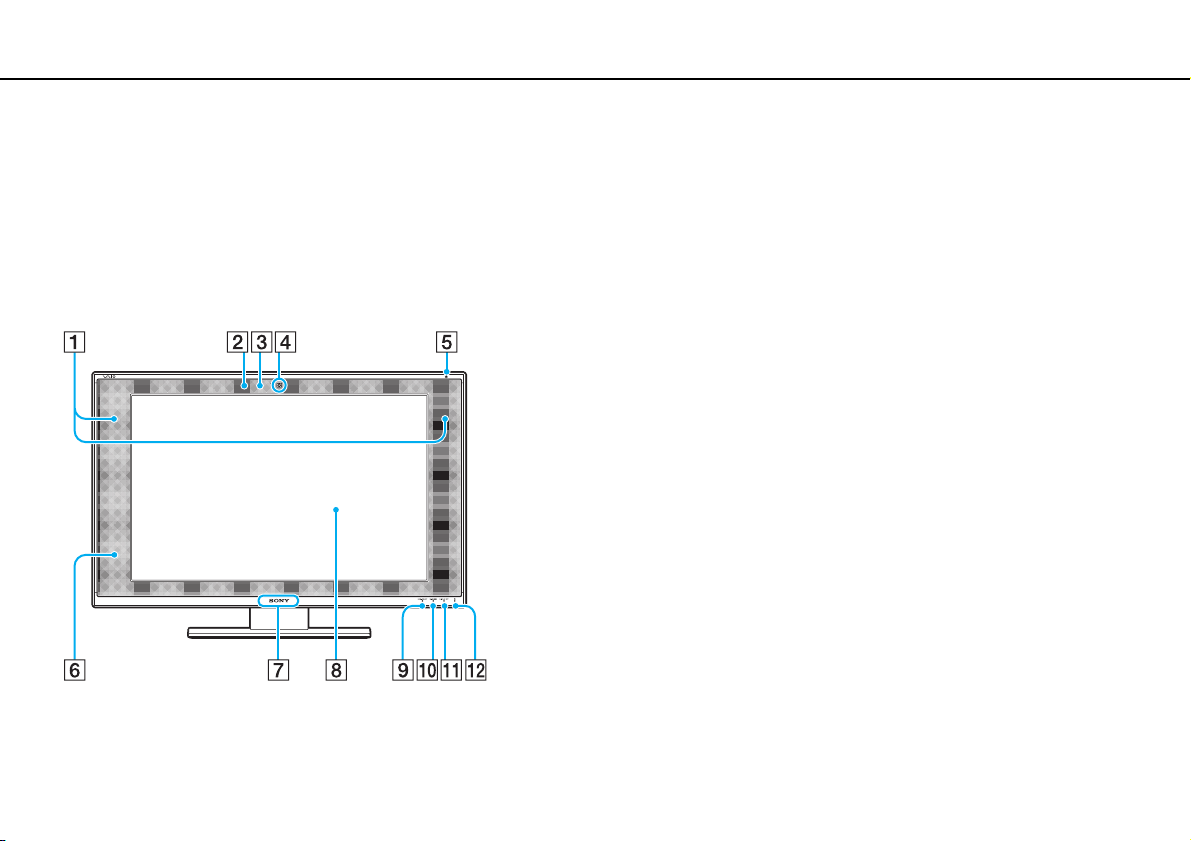
Locating Controls and Ports
Take a moment to identify the controls and ports shown on the following pages.
!
The appearance of your computer may be different from those illustrated in this manual due to variations in specifications. It may also vary in some
countries or areas.
Front
A Built-in speakers (stereo)
B Built-in microphone (monaural)
C Built-in MOTION EYE camera indicator (page 15)
D Built-in MOTION EYE camera (page 43)
E Power indicator (page 15)
F Remote sensor
Point the supplied remote commander to this sensor for
operations.
G SONY logo lamp (page 106)
H LCD screen (page 125)
I HDMI SELECT indicator (page 15)
J WIRELESS indicator (page 15)
K DISPLAY OFF indicator (page 15)
L Disc drive indicator (page 15)
10
nN

Getting Started >
Locating Controls and Ports
Back
A Power button
B DISPLAY OFF button
Press this button to turn off the LCD backlight. While the HDMI
input is selected (page 63), pressing this button also turns off
the volume.
C Capture angle adjuster (page 44)
D Back panel cover
Remove the back panel cover to access the ports and jacks
behind it (page 16).
E CONNECT button (page 25), (page 27)
F i.LINK 4-pin (S400) port (page 98)
G OPTICAL OUT port (page 95)
(Output Sampling Rate: 44.1 KHz/48.0 KHz/96.0 KHz)
H Hi-Speed USB (USB 2.0) ports
*
(page 96)
I Base stand cover
Remove the base stand cover to bundle cables to keep them
tidy (page 16).
J Base stand (page 129)
* Support high-/full-/low- speeds.
11
nN

Getting Started >
Locating Controls and Ports
A Air exhaust vent (page 128)
B HARD DISK DRIVE ACCESS BAY cover (page 119)
C Memory module compartment cover (page 113)
D AC In port (page 21)
E VHF/UHF input port
*
(page 52)
F HDMI INPUT port (page 61)
G Cable clamps (page 23)
H Network (Ethernet) port (page 79)
* On selected models only.
12
nN
!
The area around the air exhaust vent (1) becomes hot while your computer is on. Be
sure to wait until the computer cools down before you touch it.
Getting Started >
Locating Controls and Ports
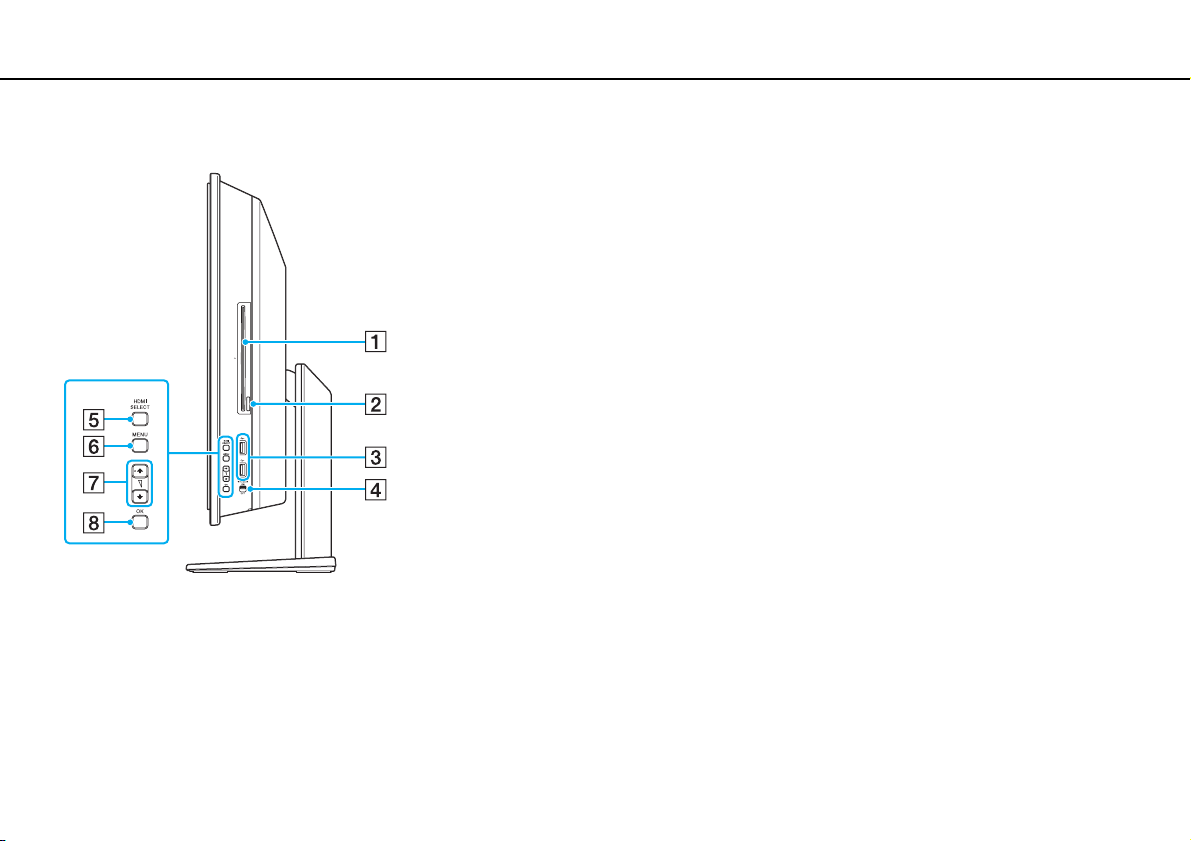
Right
A Optical disc drive (page 45)
B Drive eject button (page 46)
C Hi-Speed USB (USB 2.0) ports
D WIRELESS switch (page 81)
E HDMI SELECT button (page 63)
F MENU button (page 63)
G Up/Down buttons (page 63)
H OK button (page 63)
* Support high-/full-/low- speeds.
*
(page 96)
13
nN
Getting Started >
Locating Controls and Ports
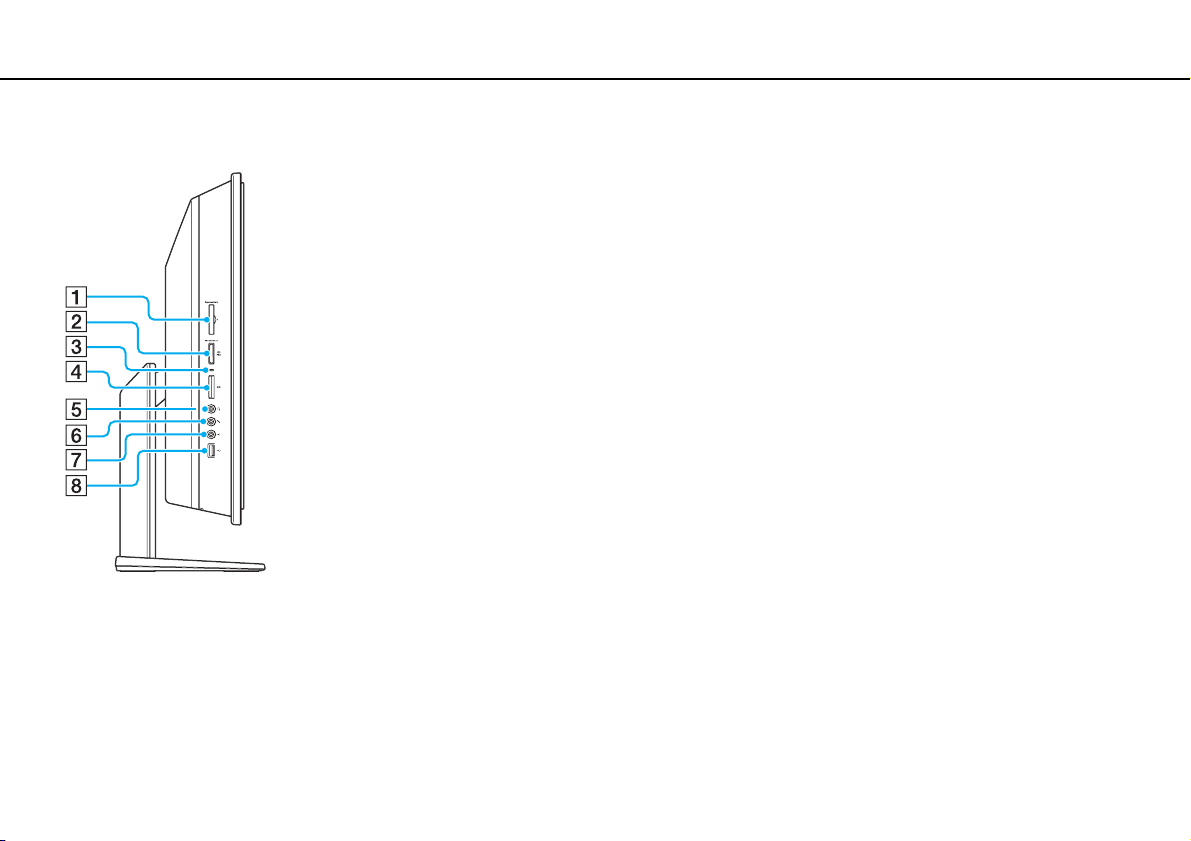
Left
14
nN
A ExpressCard/34
B Memory Stick slot
slot (page 71)
*1
(page 66)
C Media Access indicator (page 15)
D SD memory card slot (page 74)
E Headphones jack (page 95)
F Microphone jack
Connect an external microphone.
G Line In jack
Connect an external audio device for audio input.
H Hi-Speed USB (USB 2.0) port
*1
Your computer supports both the standard-size Memory Stick and the Duosize Memory Stick.
*2
Supports high-/full-/low- speeds.
*2
(page 96)
Getting Started >
About the Indicator Lights
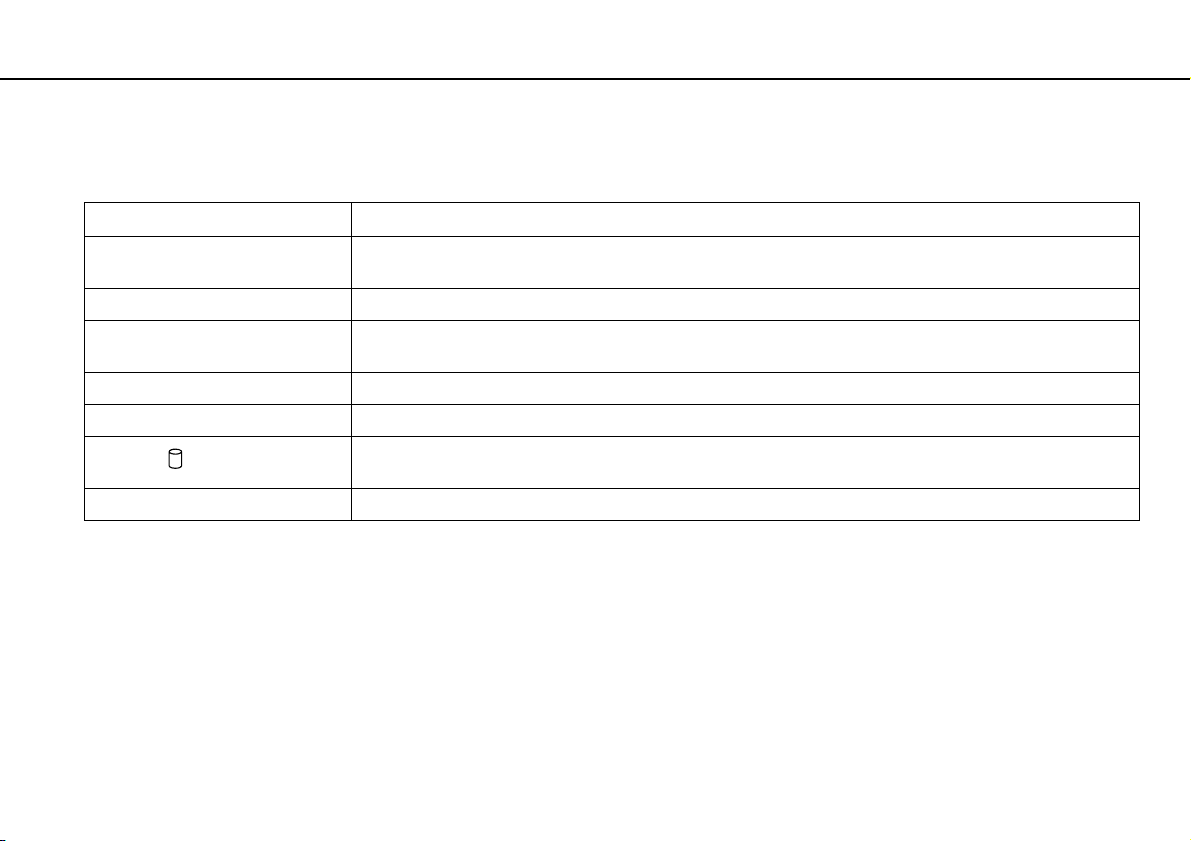
About the Indicator Lights
Your computer is equipped with the following indicator lights:
Indicator Functions
Power 1 Illuminates in green when the computer is on, illuminates in orange while the computer is in Sleep mode, and
Built-in MOTION EYE camera Illuminates while the built-in MOTION EYE camera is in use.
Media Access Illuminates when data is read from or written to a memory card. (Do not place the computer into Sleep mode or
HDMI SELECT Illuminates in green while the HDMI input is selected.
DISPLAY OFF Illuminates in orange when the LCD backlight is turned off.
Disc drive
WIRELESS Illuminates when one or more wireless options are enabled.
turns off when the computer is off.
turn it off when this indicator is lit.) When the indicator is unlit, the memory card is not in use.
Illuminates while the built-in storage device or the optical disc drive is running to read or write data.
Do not place the computer into Sleep mode or turn it off when this indicator is lit.
15
nN

Getting Started >
Setting Up Your Computer
16
nN
Setting Up Your Computer
Removing and Replacing the Covers
Before accessing some ports and jacks on the back of your computer, you first need to remove the back panel cover from
the computer and the base stand cover from the base stand.
To remove the back panel cover and the base stand cover
1 Gently face down your computer on a flat surface.
!
When facing down your computer, be sure to place it on a soft cloth to avoid damage to the LCD screen.

Getting Started >
Setting Up Your Computer
2 Grasp the back panel cover (1) with both hands, gently lift it, and remove it from the computer.
!
Put your fingertips underneath the back panel cover (2) when removing the cover from the computer.
17
nN
Getting Started >
Setting Up Your Computer
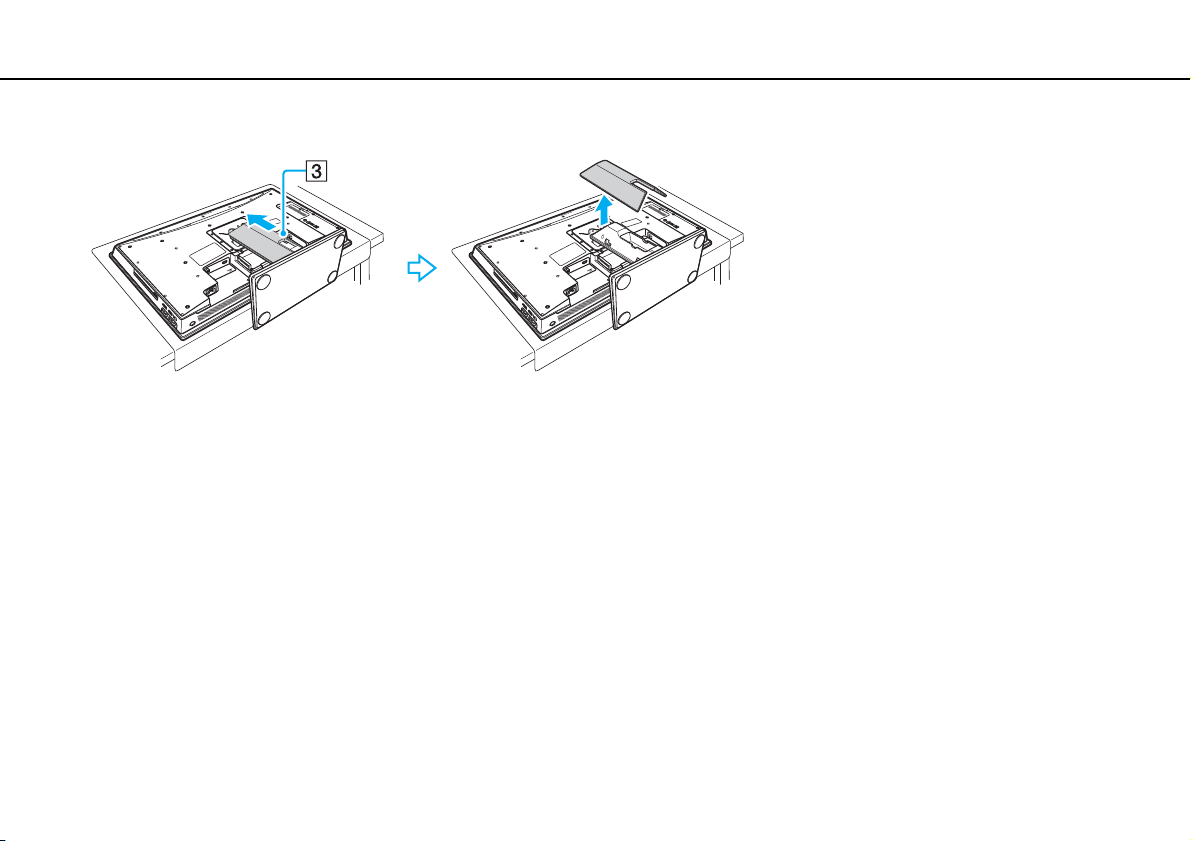
3 Slide the base stand cover (3) in the direction of the arrow and remove it from the base stand.
18
nN

Getting Started >
Setting Up Your Computer
To replace the back panel cover and the base stand cover
1 Put the base stand cover (1) back on the base stand and slide it in the direction of the arrow.
19
nN
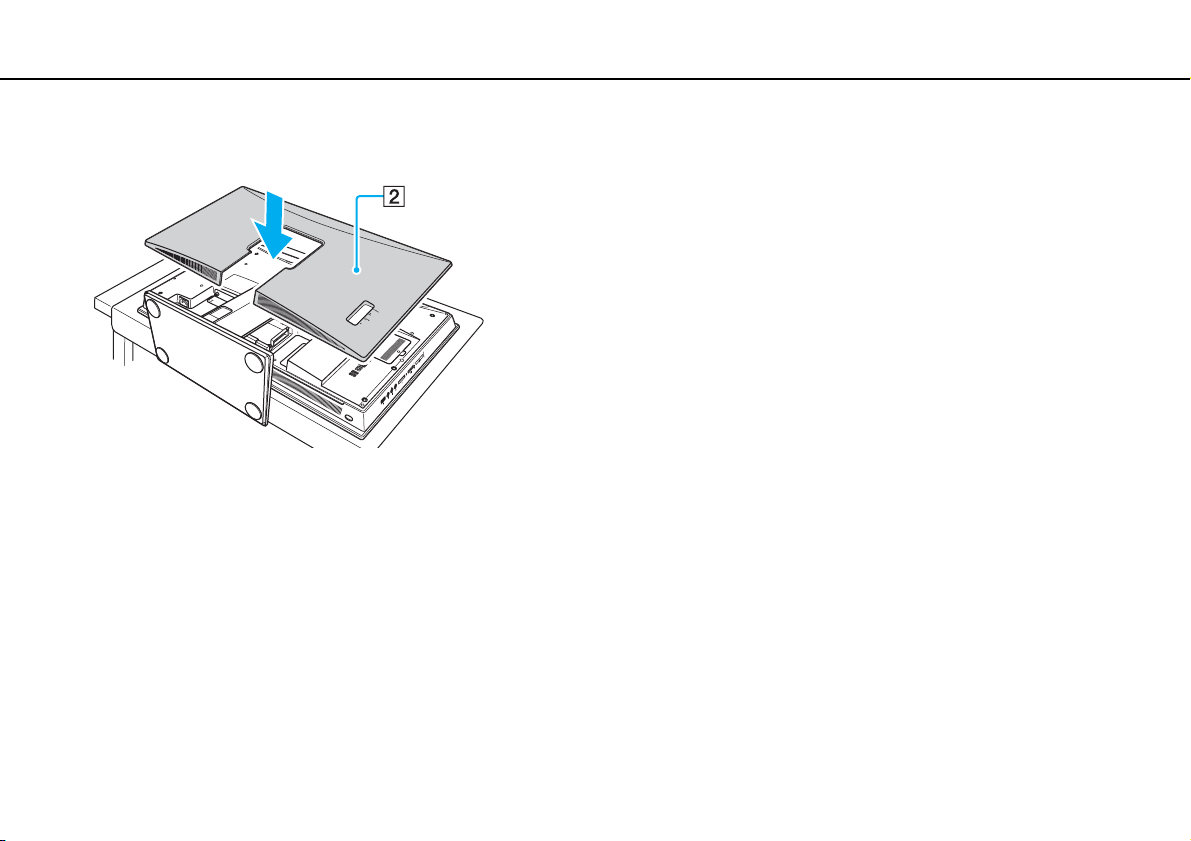
Getting Started >
Setting Up Your Computer
nN
2 Put the back panel cover (2) so as to fit the projections inside the cover into the respective holes on the back of the
computer and push in the cover toward the computer.
!
Keep the back panel cover and the stand cover on the computer unless access to the back panel is necessary.
20

Getting Started >
Setting Up Your Computer
21
nN
Connecting a Power Source and Cables
You need a power cord to connect your computer to an AC power source and it must be plugged into the power source before
you establish communication with your wireless keyboard and mouse. In addition, you need to connect other cables if you
want to use some functions of your computer, such as the TV function.
✍
Use only the supplied power cord for your computer.
To connect the power cord and other cables
1 Remove the back panel cover and the base stand cover from the computer.
See Removing and Replacing the Covers (page 16) for the procedure.
Getting Started >
Setting Up Your Computer
22
nN
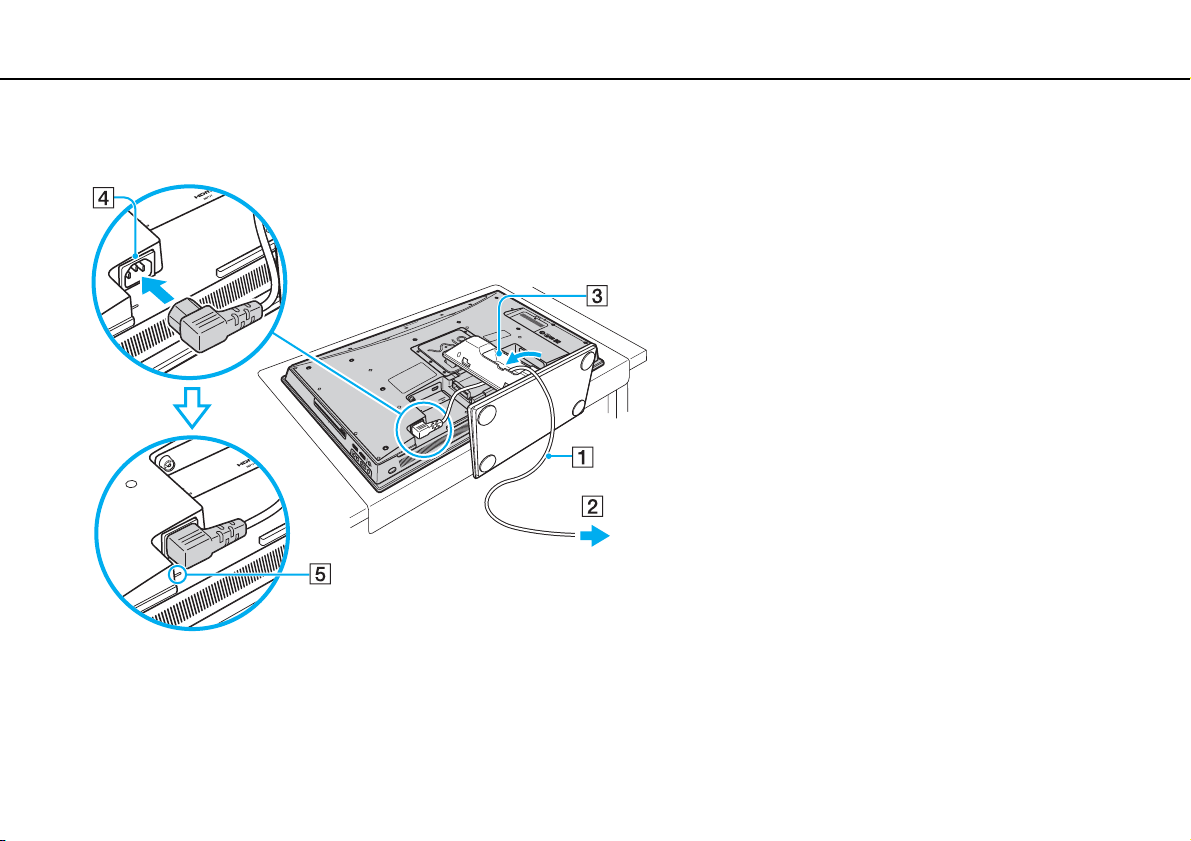
2 Plug one end of the power cord (1) into the AC outlet (2), put the other end through the hole (3) in the base stand, and
plug it into the AC In port (4) on the computer as illustrated below.
!
Be sure to push the plug into the AC In port all the way to the guide line (5).
Getting Started >
Setting Up Your Computer
23
nN
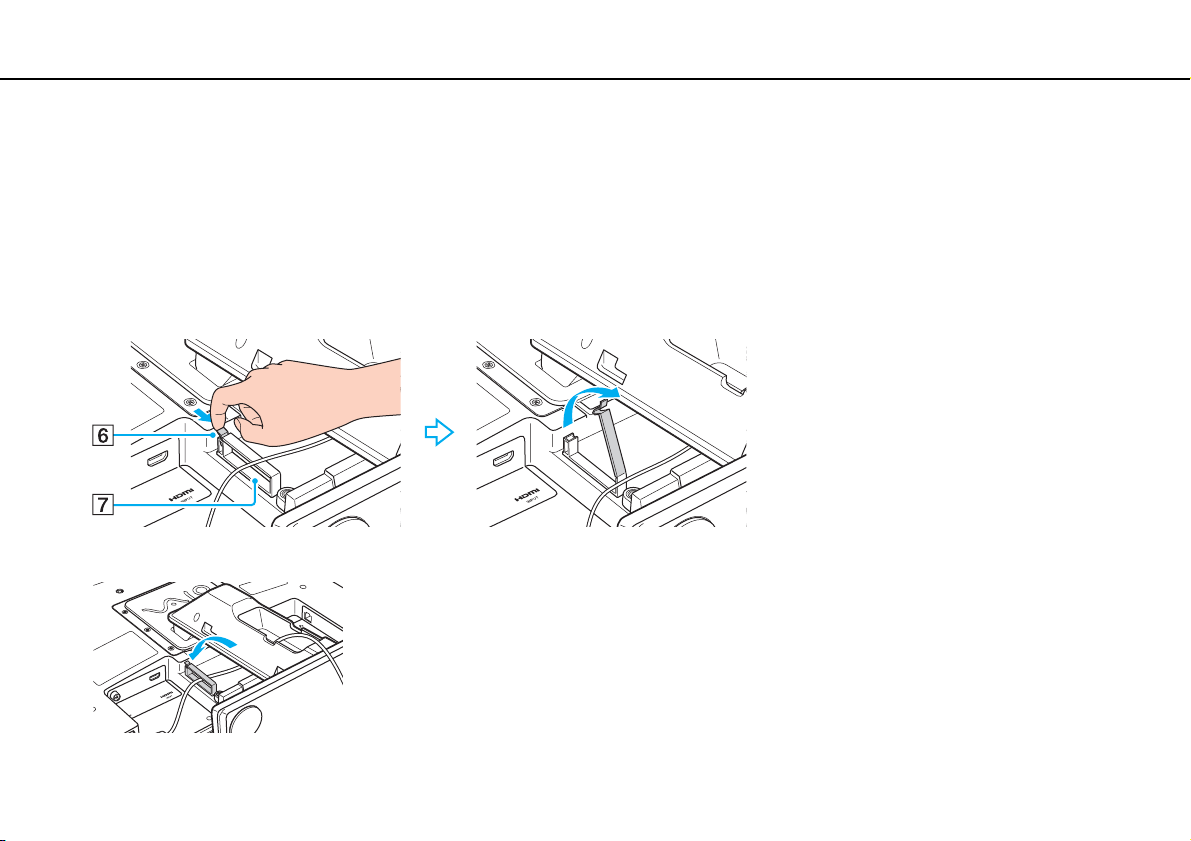
3 Connect other cables to the computer, if necessary.
❑ To set up TV connections available on models with the TV tuner board, see Using the TV Function (page 52).
❑ To connect an HDMI cable to the HDMI INPUT port for using the HDMI Input function, see Using the HDMI Input
Function (page 61).
❑ To connect your computer to an Ethernet network, see Using the Network (LAN) (page 79).
4 Slightly pull the tab (6) of the cable clamp (7) with your fingertip in the direction of the arrow and gently pull it up to open
the cable clamp.
5 Route the cable(s) through the cable clamp and then snap the cable clamp back shut.
6 Replace the stand cover and the back panel cover.
See Removing and Replacing the Covers (page 16) for the procedure.

Getting Started >
Setting Up Your Computer
✍
To disconnect your computer completely from AC power, unplug the power cord when the computer is off.
Make sure that the AC outlets are easily accessible.
!
If you unplug the power cord from your computer while the computer is on or in Sleep mode, you may lose all unsaved data.
24
nN

Getting Started >
Setting Up Your Computer
25
nN
Connecting the Wireless Keyboard
A wireless keyboard and four AA alkaline batteries for use in the keyboard are supplied with your computer. Before attempting
to use the wireless keyboard, you must install the batteries and establish communication between the computer and the
keyboard.
✍
If you find your keyboard not working, for example after replacing the keyboard batteries, try the following steps for reconnection.
To connect the wireless keyboard
!
To connect the wireless keyboard, it must be located within a range of 30 cm to 1 m from the computer.
1 Insert the supplied four AA batteries (1) into the battery compartment (2) on the bottom of the wireless keyboard.
2 Turn on the computer.
3 Slide the power switch (3) on the back of the keyboard to the ON position.
4 Press the CONNECT button (4) on the back of the computer.
5 Press the CONNECT button (5) on the bottom of the keyboard within 10 seconds from step 4.
The connect indicator turns on in the LCD window on the keyboard when connection is established between the
computer and the keyboard. If not, repeat the procedure.
!
If the wireless keyboard is left unused for 20 minutes or longer, the connect indicator will turn off to conserve battery power. This indicates that the
connection between your computer and the keyboard is lost. Press the Fn key to check that the connect indicator turns on before using the keyboard.

Getting Started >
Setting Up Your Computer
26
nN
✍
You can check the battery indicator ( or ) in the LCD window on the wireless keyboard for its battery power level.
If the wireless keyboard does not operate properly, the batteries may need to be replaced. If you do not intend to use the wireless keyboard for an
extended period of time, remove the batteries to avoid possible damage from battery leakage.
If you want to put the wireless keyboard in a more 'ergonomic' position, flip open the keyboard feet.

Getting Started >
Setting Up Your Computer
27
nN
Connecting the Wireless Mouse
A wireless mouse and two AA alkaline batteries for use in the mouse are supplied with your computer. Before attempting to
use the wireless mouse, you must install the batteries and establish communication between your computer and the mouse.
✍
If you find your mouse not working, for example after replacing the mouse batteries, try the following steps for reconnection.
To connect the wireless mouse
!
To connect the wireless mouse, it must be located within a range of 30 cm to 1 m from the computer.
1 Insert the supplied two AA batteries into the wireless mouse as shown below:
2 Turn on the computer.

Getting Started >
Setting Up Your Computer
3 Slide the power switch on the bottom of the mouse to the ON position.
4 Press the CONNECT button (1) on the back of the computer.
28
nN
5 Press the CONNECT button on the bottom of the mouse within 10 seconds from step 4.
Communication between the mouse and the computer should now be established.
✍
If the wireless mouse does not operate properly, the batteries may need to be replaced. If you do not intend to use the wireless mouse for an extended
period of time, remove the batteries to avoid possible damage from battery leakage.

Getting Started >
Setting Up Your Computer
29
nN
Preparing for Wall Mounting
Your computer is equipped with four holes on its back panel, which look similar to those compliant with the Video Electronics
Standards Association (VESA) mounting standard, for connecting to your mounting system.
!
Be sure to establish wireless communication between your computer and the wireless mouse and keyboard before mounting the computer on the wall.
It is recommended that you allow adequate clearance between the wall and the back of your computer when mounting the computer on the wall so that
you can access the ports and buttons on the back of the computer.

Getting Started >
Setting Up Your Computer
To reveal the mounting holes
1 Remove the back panel cover from the computer.
See Removing and Replacing the Covers (page 16) for the procedure.
2 Unscrew the six screws (1) and remove the base stand (2).
30
nN
 Loading...