


Contents
Using Your VAIO® PictureBook™ .............7
Using the Keyboard.....................................................7
Combinations and Functions with
the Windows Key ........................................................9
Indicators .....................................................................9
Indicator Lights .........................................................10
Combinations and Functions with the Fn Key ..........10
Using the built-in MOTION EYE™ camera ............11
Capturing a still image .........................................11
Notes on MOTION EYE camera .........................16
Using the Pointing Device.........................................17
Using PC Cards .........................................................18
To insert PC Card.................................................18
®
Connecting with another VAIO
Windows Me™ ....................................................21
computer..............21
Windows 2000 .....................................................21
®
Connecting an i.LINK
DVgate™ Applications ........................................24
The Jog Dial™ Control .............................................25
Using the Jog Dial Control with Sony Software..27
Using the Jog Dial Control with Other Software .27
Internal Timer.......................................................28
Using Memory Stick
Types of Memory Stick Media ............................28
device .................................22
®
Media....................................28
1

Change to Current Document Title
VisualFlow........................................................... 30
VAIO Action Setup .................................................. 32
Connecting Peripheral Devices...............33
Connecting a Phone Line .......................................... 34
Connecting a USB Printer......................................... 35
Connecting a USB Mouse......................................... 36
Connecting an External Display ............................... 37
Using the Floppy Disk Drive (optional) ................... 40
Connecting an Optical Drive (optional).................... 43
Notes on CD and DVD Discs .............................. 46
Connecting External Speakers .................................. 47
Connecting an External Microphone ........................ 47
Recording from a Microphone or Audio Equipment
48
Switching the connector functionality ................. 48
Expanding Your Notebook Capabilities ................... 51
Personal Digital Assistant....................................51
The Wireless LAN Access Point ......................... 51
The Wireless LAN PC Card ................................ 52
Displaying the Sony Notebook Setup Screen ........... 53
Sony Notebook Setup Tabs ................................. 54
Controlling Power Management ............................... 55
Viewing the Power Management status icons ..... 55
CPU Information ................................................. 56
Power Management Profiles................................ 57
Power Management Commands .......................... 59
2

Conserving Battery Power ...................................59
Displaying Battery Information ................................61
Battery Icon Descriptions.....................................61
Displaying Detailed Battery Information.............62
Changing the Window Design of Sony Software 63
Selecting the Display Mode ......................................64
Using the Dual Display function
(Windows Me only) ..................................................66
Selecting Dual Display mode...............................66
Setting the colors and resolution for each display67
Customizing the virtual desktop...........................67
Releasing the Dual Display setting ......................67
About the Software on Your Notebook...69
Overview ...................................................................70
MovieShaker™ .........................................................75
Importing Images and Sound Clips......................75
Creating a Movie using Shaker ............................75
Editing Clips and Scenes......................................76
Saving a Movie ....................................................78
PictureGear™............................................................79
Managing Your Pictures ......................................79
Creating a Photo Album .......................................79
Using Panorama Maker........................................80
Making Still Images and Panoramic from MPEG ...
80
OpenMG™ Jukebox 2.0............................................81
3

Change to Current Document Title
Electronic Music Distribution (EMD) Services .. 81
Starting OpenMG Jukebox 2.0 ............................ 82
Recording a CD ................................................... 84
Transferring Songs (Check-in/Check-out) .......... 85
Check-out............................................................. 85
Check-in............................................................... 86
Notes on using Portable Players .......................... 87
Notes on performing the System Restore function of
®
System Tools on Windows
Millennium Edition87
Additional Features.............................................. 88
Software Support Information .................................. 89
Sony Service Center ............................................ 90
Getting Help...............................................93
Support Options ........................................................ 93
VAIO Support Agent .................................95
Using the Quick Fix Wizard ..................................... 95
Using Common Solutions......................................... 97
About Automatic Updates ........................................ 98
Update Notification ............................................. 99
VAIO Support Agent Properties........................ 100
Using Support Central ............................................ 101
Troubleshooting......................................105
Troubleshooting your Notebook............................. 106
Troubleshooting the LCD screen....................... 109
4

Troubleshooting the mouse and pointing device110
Troubleshooting drives, PC Cards and peripheral
devices................................................................111
Troubleshooting software...................................113
Troubleshooting the modem ..............................114
Troubleshooting audio .......................................114
Troubleshooting Memory Stick media...............115
5

Change to Current Document Title
6
VAIO® Notebook Quick Start
Using Your VAIO®
1
PictureBook™
This section describes how to use the keyboard, MOTION EYE™
camera, Pointing Device, PC Cards, Jog Dial Control, Memory Stick
media, and optional floppy disk and optical drives. You will also find
information on how to connect your PictureBook to another computer or
i.LINK device.
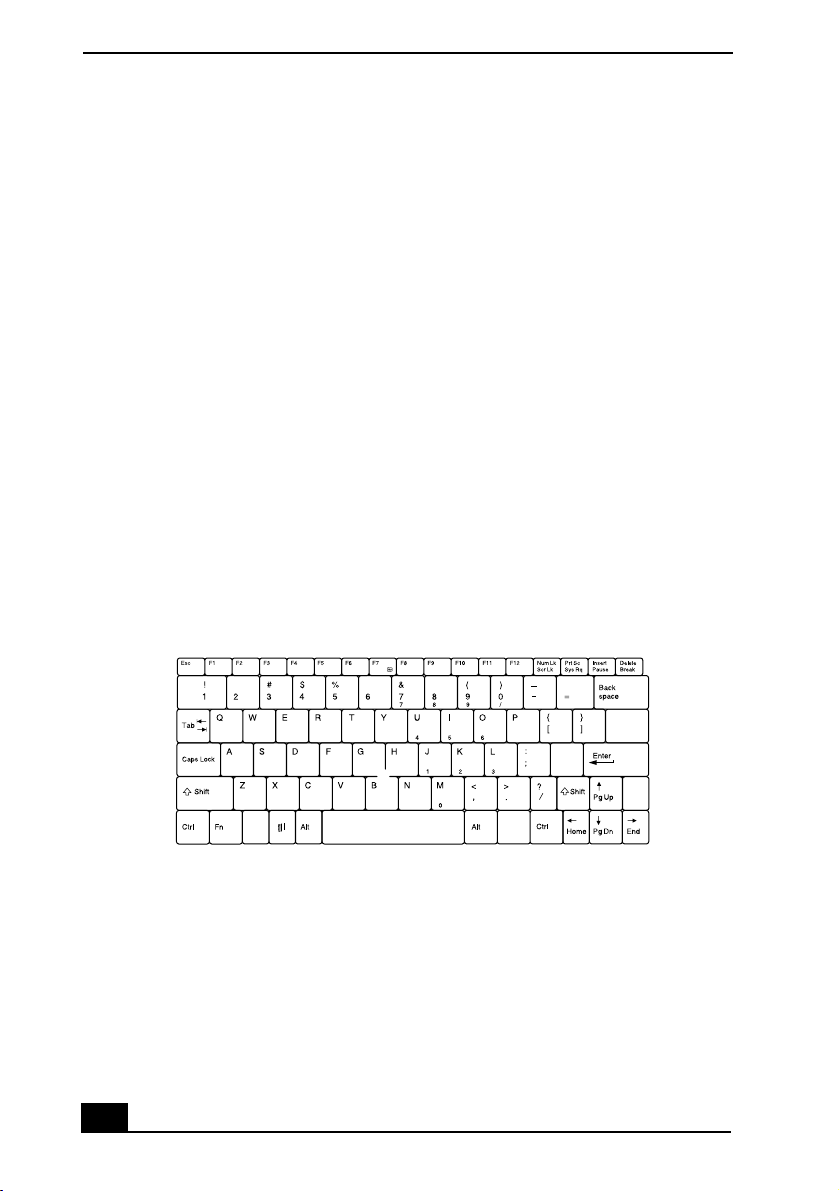
Using the Keyboard
Your keyboard is very similar to a typewriter’s, but your notebook keyboard has
additional keys that perform specific computer-related tasks.
Keyboard
7
VAIO® Notebook Quick Start
Key Description
Numeric keypad area Contains the keys found on a typical calculator. Use the numeric
keypad area to type numbers or to perform mathematical
calculations such as addition and subtraction. Numbers appear on
the front beveled edge of the numeric keys. Note that you must
press the Num Lock key to activate the numeric keypad. (When
you do so, the Num Lock light will be on.)
Navigation keys Several keys are devoted to moving the cursor on the screen (the
four arrow keys which also function as the Home, End, Page Up,
and Page Down keys).
Correction keys The Insert, Backspace, and Delete keys enable you to make
corrections in your documents.
Function keys The twelve function keys along the top of the keyboard are used to
perform designated tasks. For example, in many applications, F1
is the Help key. The task associated with each function key may
vary from one application to the next.
Escape key The Esc (Escape) key is used to cancel commands.
Print Screen key The Print Screen key takes an electronic snapshot of the screen
and places it in the Windows Clipboard. You can then paste the
screen shot into a document and print it.
Operator keys
(Shift, Ctrl, Alt keys)
Windows
Fn key The Fn key is used in combination with other keys to issue
Applications key The Applications key displays a shortcut menu of
®
key The key with the Windows® logo displays the Windows® Start
Several keys are always used with at least one other key: Ctrl, Alt,
and Shift. When held down with another key, the Ctrl (Control)
and Alt (Alternate) keys offer another way to give commands. For
example, in many applications, instead of choosing the Save
command from a menu, you can hold down Ctrl and press S
(referred to as Ctrl+S). The Shift key operates the same way as on
a typewriter; it’s used to produce capital letters or special symbols
such as @ and $.
menu; it’s the equivalent of clicking the Start button on the task
bar. See “Combinations and Functions with the Windows Key” on
page 9.
commands. The Fn keys at the left and right sides both work the
same. See “Combinations and Functions with the Fn Key” on
page 10.
context-sensitive choices; pressing this key is the equivalent of
clicking the right mouse button.
8
Combinations and Functions with the Windows Key
Combinations and Functions with
the Windows Key
Combination Function
+ F1 Displays Windows Help.
+ Tab Switches the selected button on the taskbar.
+ E Displays Windows Explorer.
+ F Displays the Windows Find: All Files window to find a file or
folder. This is the equivalent of selecting Find and then Files or
Folders from the Start menu.
+ Ctrl + F Displays the Windows Find: Computer window where you can
locate other computers. This is the equivalent of selecting Find
and then Computer from the Start menu.
+ M Minimizes all displayed windows (with Num Lock off).
Shift + + M Returns all minimized windows to their previous size.
+ R Displays the Run window. This is the equivalent of selecting
Run from the Start menu.
Fn + + Insert Displays the Properties window. This is the equivalent of
double-clicking the System icon in the Control Panel.
Indicators
Indicator Function
Power Power on: lights green.
Standby mode: flashes umber.
Battery Indicates the status of the battery inserted in the
computer.
Hard disk Lights when data is read from or written to the hard drive. Do not enter
Standby mode or turn off the computer when this indicator light is on.
9
VAIO® Notebook Quick Start
Indicator Lights
Light On Off
Memory Stick Data is read from or written to the
Memory Stick. (Do not enter
Standby mode or turn off the
computer when this indicator light
is on.)
Num Lock Turns on when the number keys
area in the numeric keypad are
active.
Caps Lock Turns on when the letters appear
in uppercase as you type. The
Shift key lowers the case of typed
letters when Caps Lock is on.
Scroll Lock Turns on when the screen scrolls
differently. (Does not work with all
applications.)
The Memory Stick is not being
accessed.
Turns off when the alphanumeric
character keys in the keypad area
are active.
Turns off when letters appear in
lower case as you type (unless you
hold down the Shift key).
Turns off when information moves
across the display normally.
Combinations and Functions with the Fn Key
Combinations/
Feature
Fn+ (ESC)
Standby
Fn+ (F3)
Speaker switch
Fn+ (F4)
Speaker volume
Fn+ (F5)
Brightness control
Fn+ (F7)
Switch to the
external display
10
Functions
Puts the system into Standby mode, a power management
state. To return the system to the active state, press any
key or press the power switch on your computer.
Toggles the built-in speaker off and on.
Adjusts the built-in speaker volume.
To increase volume, press Fn+F4, then or .
To decrease volume, press Fn+F4, then or .
Adjusts the brightness of the LCD.
To increase light intensity, press Fn+F5 and then or .
To decrease light intensity, press Fn+F5 and then
or .
Toggles through the LCD, external display (connected to
the Monitor connector), and both LCD and external
display.

Using the built-in MOTION EYE™ camera
Fn+ / (F8) Switch to
the TV
Fn+ (F12)
Hibernate
Toggles through LCD display and dual
LCD/TV.
Provides for the lowest level of power consumption. When
you execute this command, the state of the system and
state of the peripheral devices are written to the hard disk
and the system power is turned off. To return the system to
Using the built-in MOTION EYE™ camera
Your computer includes a built-in MOTION EYE camera. You can use the
camera to shoot still images and record video clips.
Capturing a still image
1 Press the CAPTURE button to start Smart Capture.
11
VAIO® Notebook Quick Start
2 Select Still Viewer/Long Movie Player/Net Movie Player from the
application list.
3 Choose Still by clicking the on-screen Capture Mode button. To switch to
Motion, click the on-screen Change Capture Mode button. (You can also use
Jog Dial to control this function.)
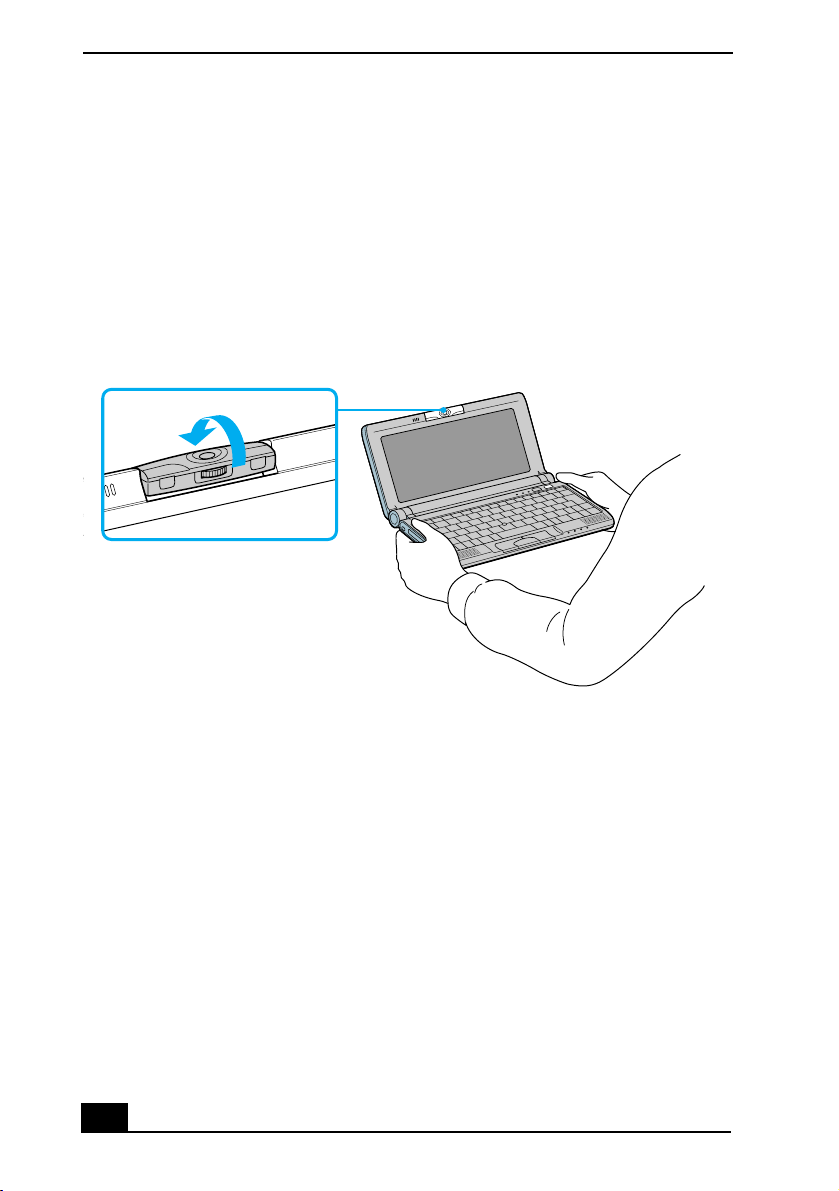
4 The Finder window appears. Turn the MOTION EYE camera lens toward
the subject you want to photograph.
Turning MOTION EYE
12

Using the built-in MOTION EYE™ camera
5 Adjust the focusing ring.
Adjusting the Focusing Ring
6 Half-press the CAPTURE button on the computer. The image remains still
for a few seconds. To display another image, release the CAPTURE button
and press again.
7 Fully press the CAPTURE button. The still viewer window opens and the
captured still image appears in the still viewer window.
8 For more detailed information about the capture software, refer to the online
Help for Smart Capture.
✍ If you turn the lens toward you, Smart Capture goes into mirror mode. You can use the
mirror mode to take a still image of yourself. A mirror-image appears in the finder
window of the display while shooting; however, after capturing, a normal image
appears.
You can capture the following still image sizes: 640 × 480, 320 × 240, 160 × 120, and
80 × 60 pixels.
✍ You can adjust the sound quality for different sound environments. Click Start, point to
Settings, and then point to Control Panel. Click Sounds and Multimedia and then
Audio tab. Click Volume under the Sound Recording category. Adjust the volume level
with the microphone slider.
13

VAIO® Notebook Quick Start
Using the Self-timer
You can take a still image 10 seconds after clicking the CAPTURE button by
using the self-timer.
1 Click Still Viewer/Movie Player from the switch applications list.
2 Select Still mode.
3 Click the Options button.
The Still Image Options dialog box appears.
4 Click Self-timer capture on the Capturing mode tab.
5 Click OK.
✍ After Self-timer capture is complete, the capturing mode changes automatically to
single image (Normal Capture).
To stop Self-timer, click the CAPTURE button.
To display the remaining time before the picture is taken, turn on the capture
information display. The capture information display can be turned on and off by
selecting Displaying Capture Information from the shortcut menu.
To create a panoramic image
You can create panoramic images by connecting still images captured with the
MOTION EYE camera.
1 Capture the still images. Using the panoramic-assist function of Smart
Capture, capture still images to be used to create your panoramic image.
For details, see Smart Capture online Help.
2 Start the PictureGear software. For details, see the PictureGear section in this
manual.
To set the image quality and mode of MOTION EYE camera
You can change the settings of image quality or mode of MOTION EYE camera.
1 Click the Start button, point to Settings, and then click Control Panel.
2 Double-click the MOTION EYE camera icon. The Camera Control Utility
appears.
14
Using the built-in MOTION EYE™ camera
✍ You can also activate the Camera Control Utility using the Jog Dial control. Camera
Control Utility is available even while using other software applications that use the
MOTION EYE camera.
3 Click the Image tab and drag the slider to the left or the right. The level
settings increase as the slider is moved to the right and decrease as it is
moved to the left.
Features Description
Brightness Adjust the brightness
Contrast Adjust the contrast of the light part and the dark part
Hue Adjust the hue of the color
Color Adjust the coloring
Sharpness Adjust the sharpness
4 Click Mode tab and click the item you want to set.
Features Description
White balance Adjust the colors to be more natural.
Auto: Adjust automatically to natural colors.
Indoor: Suitable for indoor capturing.
Outdoor: Suitable for outdoor capturing.
Hold: Suspend the proximate settings of the white balance, so that
settings do not change automatically.
Shutter speed Set the shutter speed:
Auto: Adjust the shutter speed automatically.
1
-----50
: This speed is suitable for capturing images under fluorescent
light.
Hold: Suspend the proximate settings of the shutter speed, so that
settings do not change automatically.
✍ The appropriate mode will vary depending on the situation or subject. Switching
between outdoor and indoor environments while setting the White Balance to Hold
may cause colors to appear incorrectly. For color correctness, set White Balance to
Auto and capture something white, and then wait approximately 10 seconds. The
image should now display with the correct color.
5 Click OK.
✍ Click the Default button, and then click OK to return all settings to the default settings.
15

VAIO® Notebook Quick Start
Notes on MOTION EYE camera
❑ Do not touch the camera lens.
❑ Do not point the camera toward the sun.
❑ You cannot detach the camera.
❑ Smart Capture is unavailable while other software that uses the built-in
camera is in use. Close all software that uses the built-in camera before you
use Smart Capture.
❑ You cannot transfer still images or video clips from the built-in camera while
transferring to connected i.LINK devices.
❑ You should take an initial shot before taking a final shot to ensure sound and
picture quality.
❑ Your recording is not guaranteed.
❑ If your recording fails due to conditions unfavorable to the camera, the
contents of your recording cannot be guaranteed.
❑ Clean the lens regularly. Picture quality is adversely affected when the lens is
dirty.
✍ MOTION EYE camera can also be used with the Microsoft
For more information about the Microsoft
menu, point to Programs, Accessories, Communications, and then click NetMeeting.
®
NetMeeting® application, open the Start
®
NetMeeting® application.
16

Using the Pointing Device
Using the Pointing Device
The pointing device on the keyboard allows you to point to, select, drag, and
scroll objects on the screen.
Using the Pointing Device
Action Description
Point Press the pointing device in a direction to place the pointer on an item or
object.
Click Press the left button once.
Double-click Press the left button twice.
Right-click Press the right button once. In many applications, this action displays a
shortcut menu of context-sensitive choices.
Drag Press the pointing device in a direction to place the pointer on an item or
object. While holding the left button, press the pointing device in a
direction, and then release it at the desired point.
Scroll Press the pointing device while pressing the center button.
✍ The scroll function is available only with applications that support a scroll pointing device
feature. Pressing the pointing device too hard may damage it.
17
VAIO® Notebook Quick Start
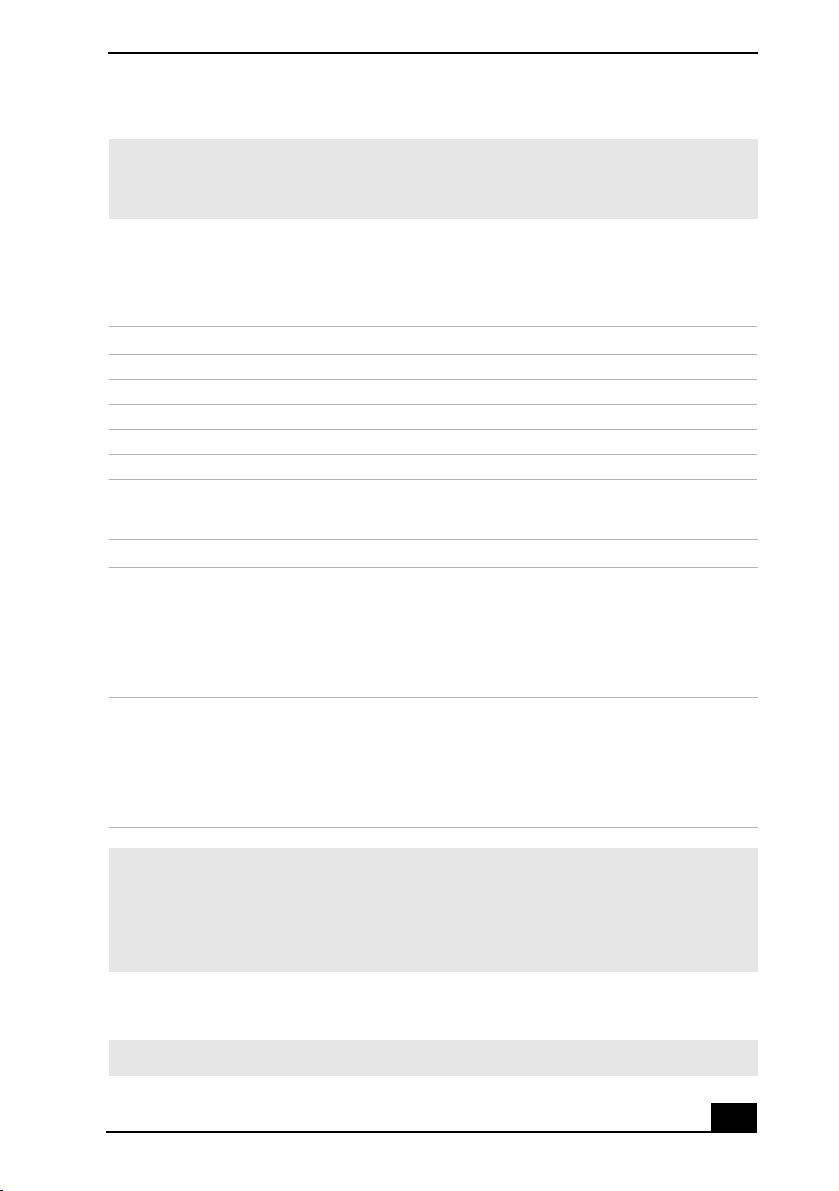
To replace the pointing device cover
You can take off the pointing device cover and replace it with the additional cover
supplied with your computer.
Replacing the Pointing Device Cover
Pointing device cover (supplied)
✍ Make sure the cover is tightly secured to prevent damage to the screen when you
close the computer.
Using PC Cards
Your computer includes a PC Card slot. PC Cards allow you to connect portable
external devices, such as a CD-ROM drive, or to connect to a network using a PC
network Interface Card.
✍ The PC Card slot can accommodate a Type II PC Card. This slot is compatible with
Card Bus. Type III PC Cards are not supported.
To insert PC Card
✍ You do not need to shut down the computer before inserting or removing a PC Card.
18
Using PC Cards
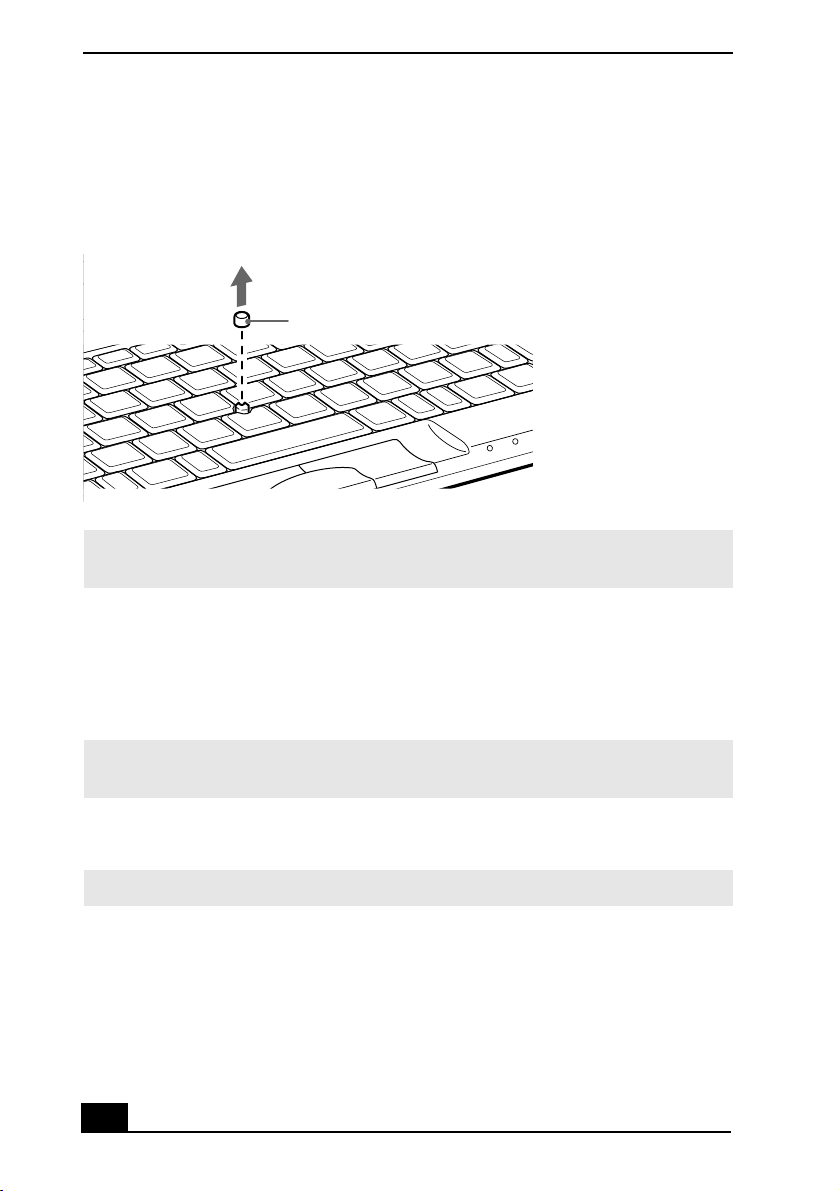
1 Insert the PC Card into the PC Card slot with the front label facing up.
Gently push the Card into the slot until it is fixed into the connector; the
release button comes out.
Inserting PC Card
Insert in the direction of the arrow.
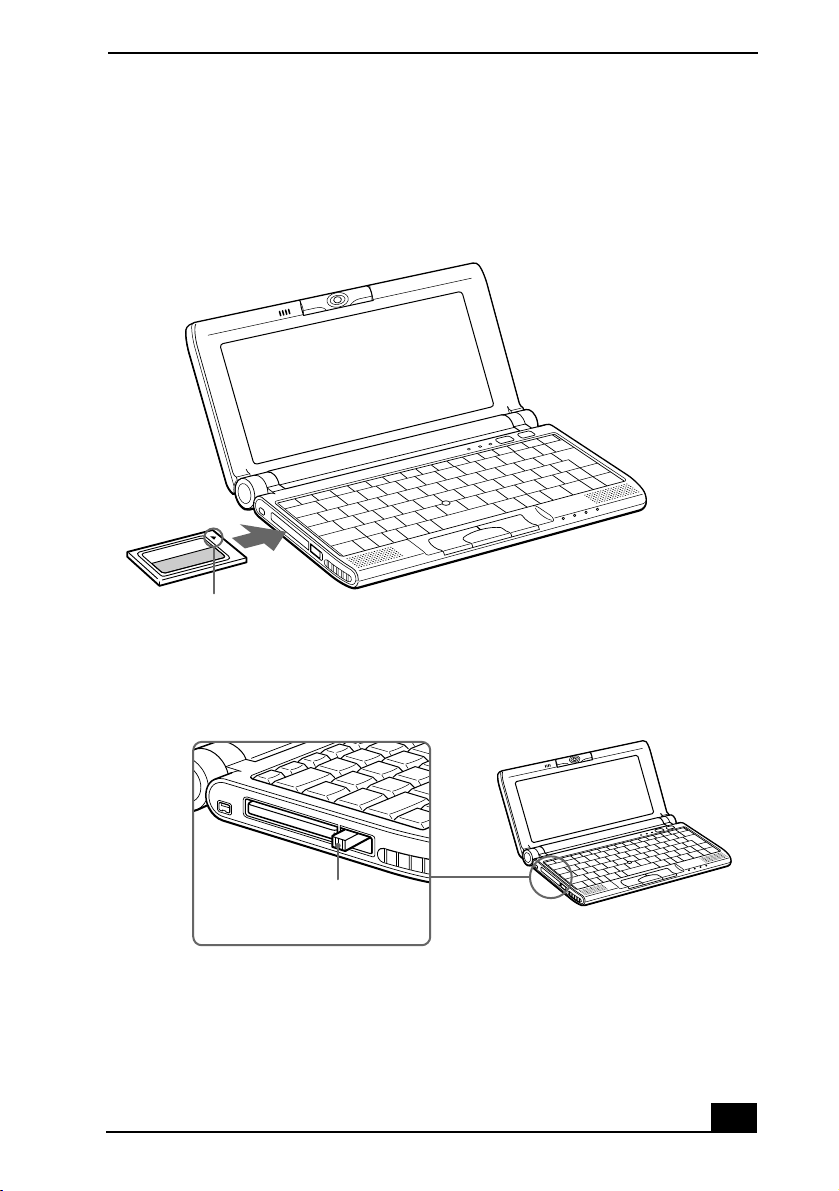
2 Press the release button down and toward the ventilation slot.
Release Button
Relea se button
Relea se button
19

VAIO® Notebook Quick Start
✍ Do not force a Card into the slot. It may damage the connector pins.
If you have difficulty inserting a PC Card, check that you are inserting the PC Card with
the correct orientation.
See the manual that came with your PC Card for more information on its use.
When a PC Card is inserted, do not place your computer in a bag or case. Pressure or
shock to a PC Card may damage your computer.
To remove a PC Card
✍ Follow the procedure below when you remove the PC Card while your computer is on.
Failure to follow this procedure may result in a malfunction. If your computer is turned
off, you do not have to follow these instructions.
1 Double-click in the task tray.
2 The “Unplug or Eject Hardware” dialog displays.
3 Select the hardware device you wish to remove by clicking it.
4 Click Stop.
5 Confirm the correct device is selected in “Stop a hardware device.”
6 The message, “PC Card can now be safely removed from the system”
appears. Click OK.
7 Pull the release button so that it is extended.
8 Press the release button toward the computer.
9 Gently grasp the PC Card and pull it out.
10 Insert the PC Card slot protector into the empty slot.
20
Connecting with another VAIO® computer
Connecting with another VAIO® computer
Windows Me™
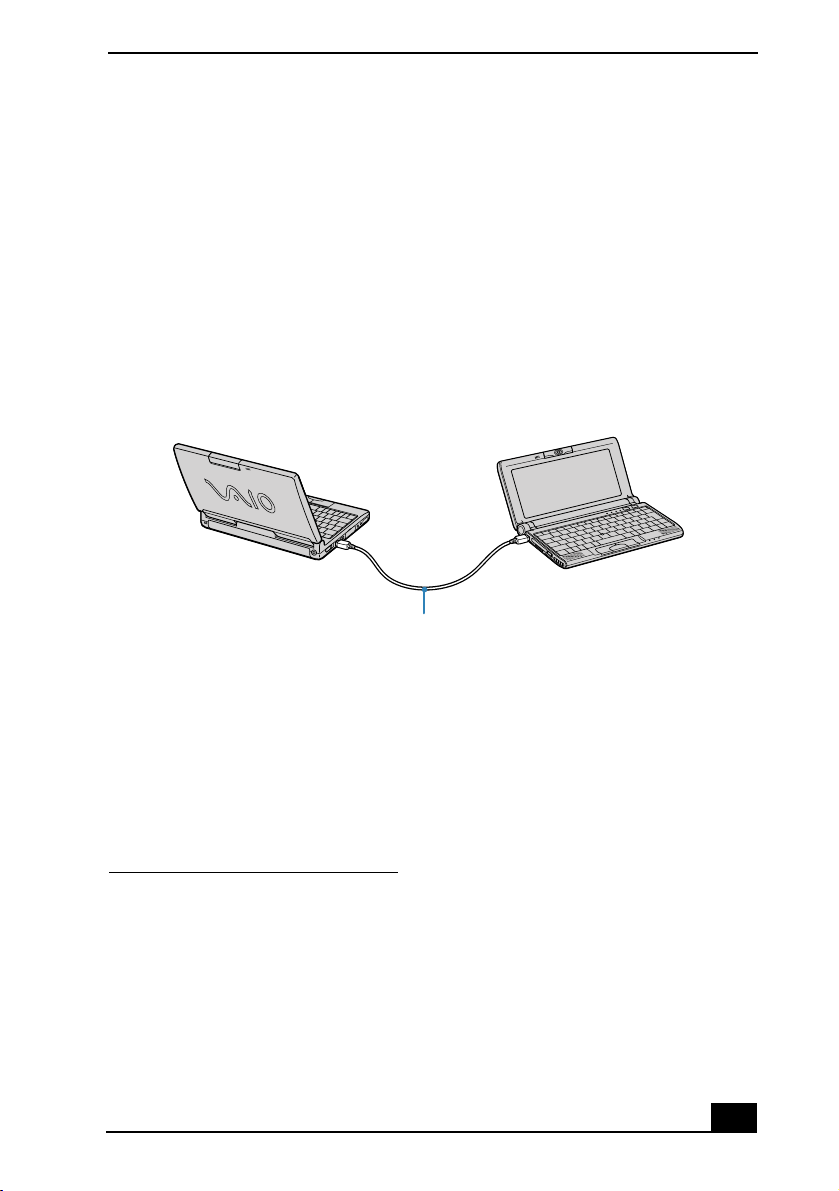
You can connect your VAIO PictureBook to another VAIO computer that has the
preinstalled Windows Me operating system or the Sony Smart Connect 3.0
software preinstalled. You may use an optional i.LINK
two systems and then use one computer to edit, copy, or delete files on the other
computer. You can also print from a printer that is attached to either computer.
Select the STD mode in Smart Connect 3.0 software to connect with another
computer that has Windows Me preinstalled.
Connecting with an i.LINK cable
i.LINK cable (optional)
®*
cable to connect the
Windows 2000
The preinstalled Smart Connect software enables you to use an optional i.LINK
cable to connect your VAIO PictureBook to another VAIO computer that also has
Smart Connect or preinstalled Windows Me. You can then use one computer to
edit, copy or delete files on the other computer. You can also print from a printer
attached to either computer.
See Smart Connect online Help for more information.
* i.LINK is a trademark of Sony used only to designate that a product contains an IEEE1394
connection. The i.LINK connection may vary, depending on the software applications, operating system and i.LINK compatible devices. All products with an i.LINK connection may
not communicate with each other.
Please refer to the documentation that came with your i.LINK compatible device for information on operating conditions and proper connection. Before connecting i.LINK compatible
PC peripherals to your system, such as a CD-RW or hard disk drive, confirm their operating
system compatibility and required operating conditions.
21
®

VAIO® Notebook Quick Start
✍ When you connect two VAIO computers, you must assign each computer a unique
name. The computers can be identified by this unique name when the two computers
are networked together.
✍ If you have previously purchased a VAIO computer or notebook that does not have the
Windows Me operating system or Smart Connect 3.0 software preinstalled, consult
the Sony website for support options (http://www.sony.com/pcsupport).
Connecting an i.LINK®* device
The VAIO C1 PictureBook includes an i.LINK S400 (IEEE1394) connector,
which you can use to connect to an i.LINK enabled digital camcorder.
To connect a digital camcorder
❑ Plug one end of an i.LINK cable into the S400 connector on the left side
of the computer and the other end into the DV In/Out connector on the
digital camcorder.
* i.LINK is a trademark of Sony used only to designate that a product contains an IEEE1394
connection. The i.LINK connection may vary, depending on the software applications, operating system and i.LINK compatible devices. All products with an i.LINK connection may
not communicate with each other.
Please refer to the documentation that came with your i.LINK compatible device for information on operating conditions and proper connection. Before connecting i.LINK compatible
PC peripherals to your system, such as a CD-RW or hard disk drive, confirm their operating
system compatibility and required operating conditions.
22
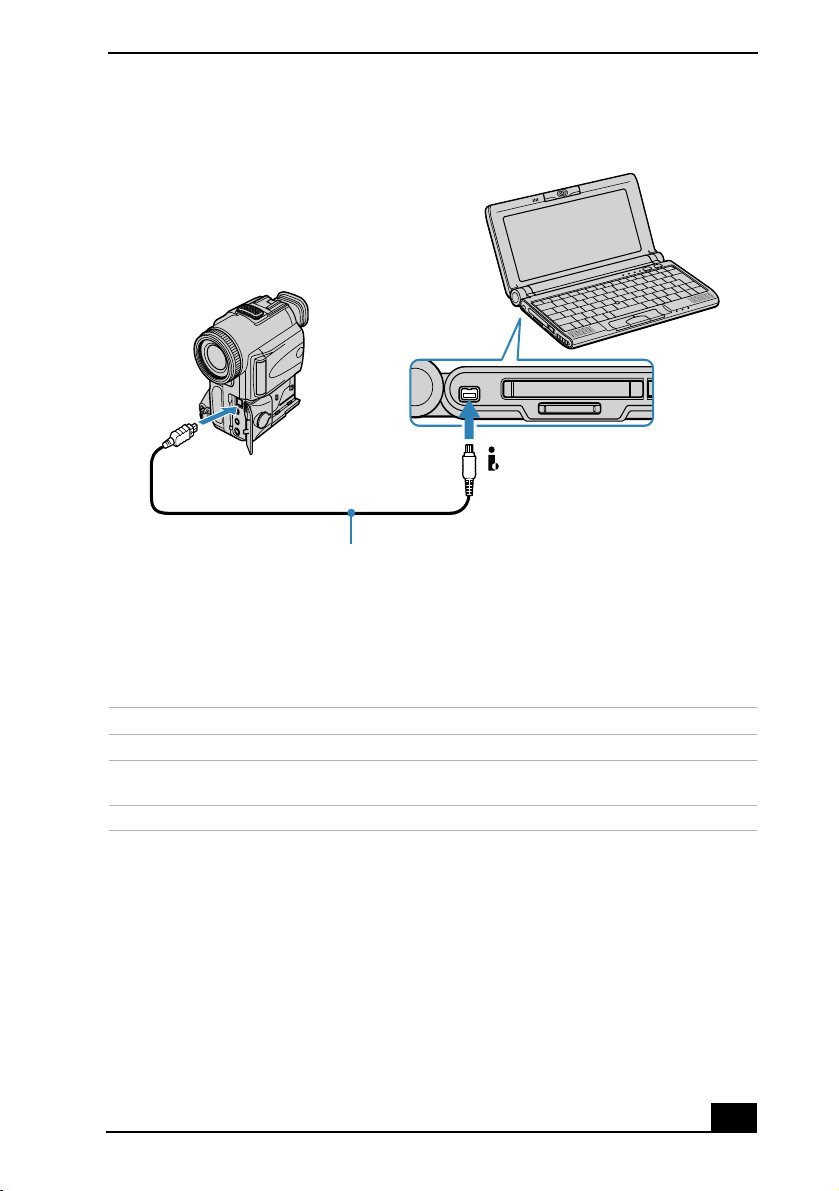
Connecting a Digital Camcorder
Connecting an i.LINK® device
to DV In/Out
Digital camcorder
i.LINK cable
(optional)
to S400
Notes on connecting an i.LINK device
❑ i.LINK cables that are compatible with your VAIO
®
C1 PictureBook
Computer include cables with the following part numbers:
Length Connector Part Number
1.5 meter 4-pin connector at each end VMC-IL4415A
1.5 meter 4-pin connector at one end and 6 pin
connector at the other end
0.8 meter 4-pin connector at each end VMC-IL4408A
VMC-IL4615A
❑ The Sony digital camcorder is pictured; your digital camcorder may need to
be connected differently.
❑ On Sony digital camcorders, connectors labeled “DV In/Out” or “i.LINK”
are compatible.
❑ See the manual that came with your digital camcorder for more information
on installation and use.
23

VAIO® Notebook Quick Start
❑ The i.LINK connector does not supply power to external devices. If the
external device requires power from the i.LINK connector, you cannot use
the device with your computer.
❑ The C1 PictureBook supports transfer rates up to 400 Mbps; however, the
actual transfer rate is limited to the maximum transfer rate supported by the
external device. If multiple devices are connected, the transfer rate will be
24
To defragment a partition
Before you begin to defragment a partition, make sure you back up all files
that you want to save.
The Jog Dial™ Control
❑ Click the Start button in the Windows
❑ Click Programs, Accessories, System Tools, and then click Disk
®
taskbar.
Defragmenter. The Disk Defragmenter window appears.
Select the drive you want to defragment from the list, and click the Defragment
®
button. See Windows
Help for more information on defragmenting.
The Jog Dial™ Control
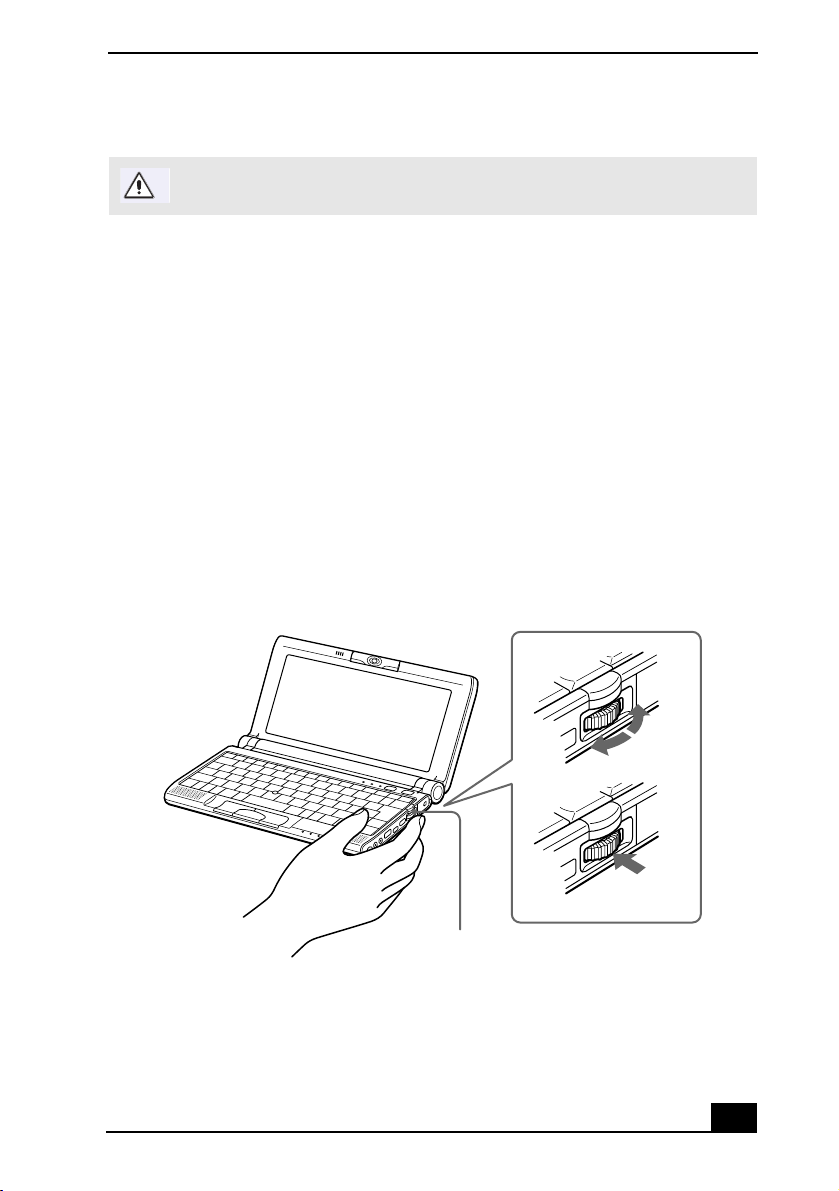
Your computer is equipped with a Jog Dial control on the right side of the unit.
The Jog Dial control enables you to open an application, folder, or document
from a predefined list by rotating and pressing the Jog Dial control. In addition,
when you press the Jog Dial control, you can turn on your computer
automatically and start the selected application or document.
Using the Jog Dial Control
Jog Dial control
The Jog Dial control window always appears in the display. It is either in the
launcher mode or in the guide mode.
25
VAIO® Notebook Quick Start
Using the Jog Dial™ Control
This section explains how to use the Jog Dial control. For information on how to
change the Jog Dial control’s settings, right-click the Jog Dial control icon in the
task tray and click Help Topics.
Launcher Mode
The Jog Dial control window is in launcher mode until a software application is
launched or the Jog Dial control window becomes active. When an arrow is
displayed next to an item in the Jog Dial control window, you can display a
submenu of that item by selecting it and pressing the Jog Dial control button.
Using Launcher Mode
To use the Jog Dial control, click the Jog Dial control window or the Jog Dial
control icon in the task tray. Alternatively, you can press the Jog Dial control
while pressing the Ctrl key on the keyboard to switch to the launcher mode.
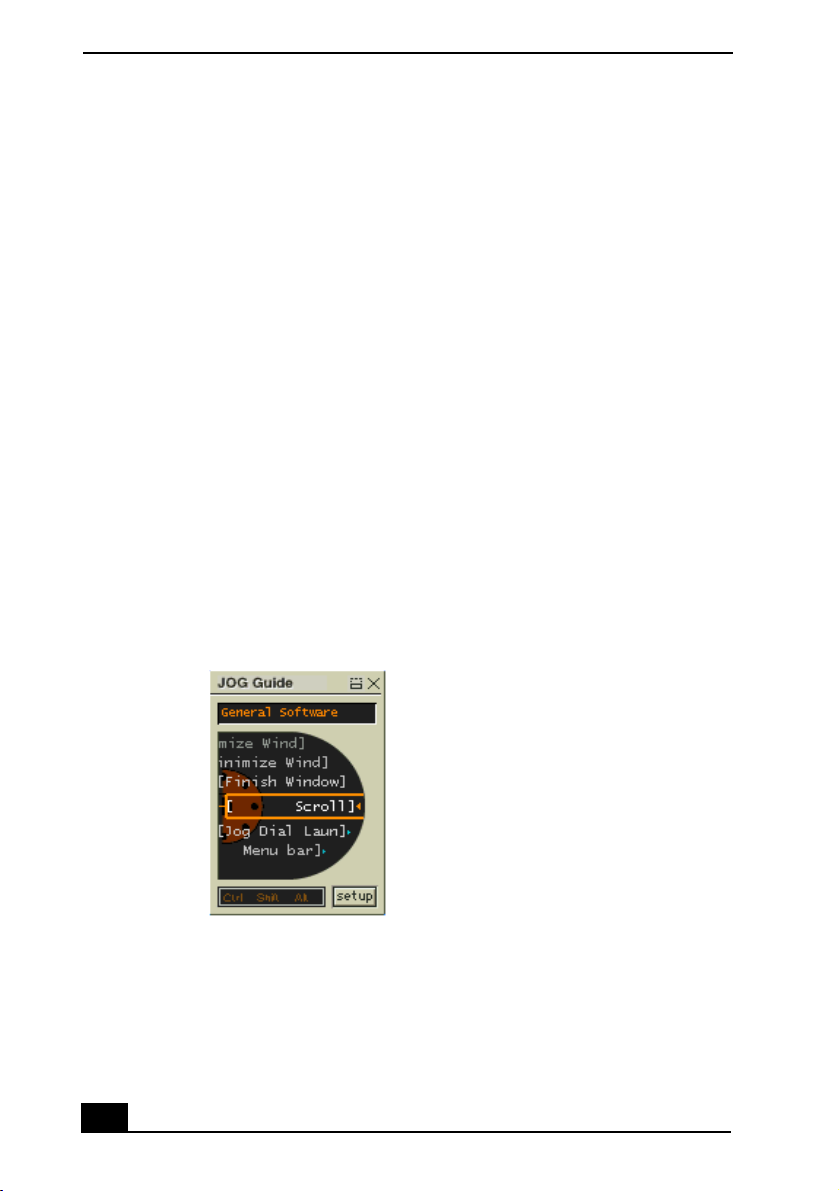
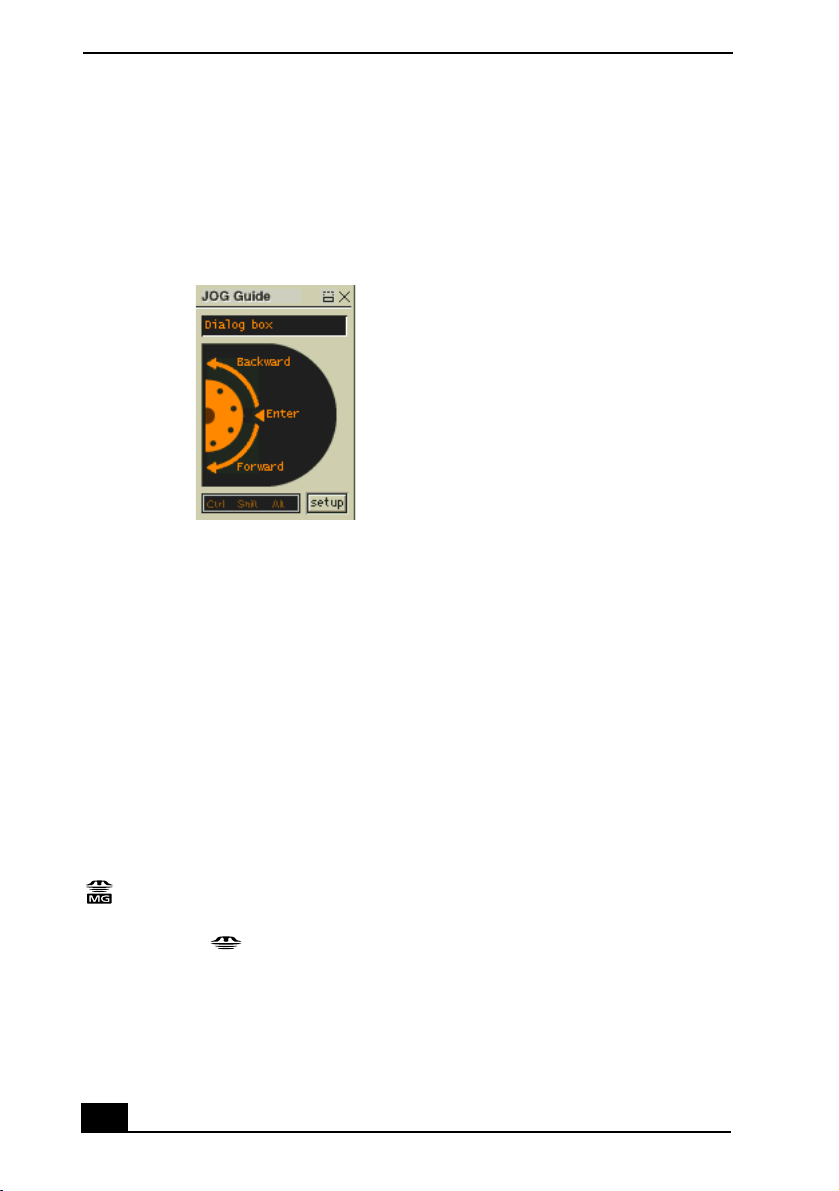
1 Turn the Jog Dial control to select the item you want, then press the Jog Dial
control. The window switches to the guide mode, and shows the Jog Dial’s
function.
JOG Guide Dialog Box
2 Turn or press the Jog Dial control to use the desired function.
3 To select another item, switch to the launcher mode and repeat from step 1.
26

The Jog Dial™ Control
Guide Mode
The Jog Dial control window is in the guide mode when software is in use and
the software window is active. Depending on the software you are using, you can
select items from the displayed list using the Jog Dial control. Some Sony
software applications have two modes in List View, Simple Menu, and Full
Menu. You can switch the mode by pressing the Shift key while turning the Jog
Dial control.
Using Guide Mode
The Jog Dial control window displays the Jog Dial’s function.
Using the Jog Dial Control with Sony Software
If Sony software that supports the Jog Dial control is active, you can use the Jog
Dial’s functions that are allocated to that software. For more information on
functions allocated to software, see the software applications online Help.
Using the Jog Dial Control with Other Software
If the software you are using does not support the Jog Dial control, you can still
perform the following functions:
Action Description
Maximize Window* Press the Jog Dial control button to maximize the size of the
active window. Press again to return to normal window size.
Minimize Window* Press the Jog Dial control button to minimize the size of the
active window. Press again to return to normal window size.
Finish Window* Press the Jog Dial control
application.
Scroll* Press the Jog Dial control
active window.
Jog Dial Launcher Press the Jog Dial control
button to close the active
button to begin scrolling within the
button to return the Jog Dial
control to Jog Launcher mode.
Menu Bar Press the Jog Dial control
to scroll through the active window’s toolbar.
control
*Some software does not support these functions.
button, then use the Jog Dial
27
VAIO® Notebook Quick Start
Using a Dialog Box
When a window such as Screen Properties is active, the Dialog box is displayed
in the Jog Dial window. You can select an item in the window by rotating the Jog
Dial control. Pressing the Jog Dial control is the equivalent of pressing Enter.
JOG Guide Dialog Box
Internal Timer
You can use the internal timer to start an application at a specific time. The timer
can start applications even when the power is off.
Using Memory Stick® Media
This new compact, portable, and versatile recording medium has a data capacity
exceeding that of a floppy disk. The media is specially designed for exchanging
and sharing digital data with compatible products. Because it is removable, the
media can be used for external data storage.
Types of Memory Stick Media
Two types of Memory Stick media are available. The first type, MagicGate™
Memory Stick media (hereafter referred as MG Memory Stick media), is
provided with copyright protection. The second type, simply referred to as
Memory Stick media, does not have the same copyright protection as
MagicGate.
You can use both media with your notebook.
28
Using Memory Stick® Media
For music, which requires copyright protection, you can only use MG Memory
Stick media with your notebook. You can also use MagicGate-compatible
devices to record and playback music when they are connected to your computer.
You can store mixed data on the Memory Stick media. For example, you can
copy an image onto MG Memory Stick media that already contains music.
What is MagicGate?
MagicGate is copyright protection that consists of authentication and encryption
technology. Authentication technology ensures that protected content is only
transferred between compliant devices and media. Protected content is recorded
and transferred in an encrypted format to prevent unauthorized duplication or
playback.
✍ Ensure that the MG Memory Stick media has the MG mark .
To Insert a Memory Stick Media
Insert the Memory Stick media into the media slot on the left side of the
notebook until it clicks into place. When the Memory Stick media is properly in
place, Sony’s VisualFlow™ software will automatically launch to display the
contents of the Memory Stick.
1 Insert with the arrow facing toward the Memory Stick media slot and the
label facing down.
✍ Inserting the media in the wrong direction may damage the connector pins.
Hold the Memory Stick media with the arrow pointing in the correct direction
and then turn it so the label side is down before inserting into the slot. To
avoid damaging the computer or the Memory Stick Media, do not force the
Memory Stick media into the slot.
29

VAIO® Notebook Quick Start
2 Carefully insert the Memory Stick media until it clicks in place.
Inserting Memory Stick
To view the contents of Memory Stick media
You can see the contents by clicking the Removable Disk (S:) icon.
Warning: When copying data between Memory Stick media with different
memory capacity, use the drag and drop method to copy data. Do not use the
Copy Disk function of Windows. The Copy Disk function will result in the loss
of the installed memory.
To Remove a Memory Stick Media
Make sure the access light is off. Push the media in toward the computer. When
the media ejects, pull it out. When removing the Memory Stick media, be
careful as it may eject completely from the slot.
VisualFlow
VisualFlow is a state-of-the-art Sony multimedia browser designed specifically
for Memory Stick media.
30
 Loading...