

Sony PCV-R545DS VAIO Computer User Guide (primary manual), VAIO PCV-R547DS, VAIO PCV-R549DS User Manual
TM
VAIO Digital Studio
Computer User Guide
PCV-R545DS/PCV-R547DS/PCV-R549DS

© 2000 Sony Electronics Inc.
Reproduction in whole or in part
without written permission is
prohibited. All rights reserved.
This manual and the software
described herein, in whole or in
part, may not be reproduced,
translated, or reduced to any
machine-readable form without
prior written approval.
NOTICE
Updates and additions to software
may require an additional charge.
Subscriptions to online service
providers may require a fee and
credit card information. Financial
services may require prior
arrangements wit h participating
financial institutions.
Sony, VAIO, the VAIO logo, VAIO
Smart, VAIO Digital Studio, Media
Park, DVgate, Media Bar,
Handycam, Mavica, PictureGear
and i.LINK are trademarks of
Sony. Intel, Pentium, and Celeron
are trademarks of Intel
Corporation. Microsoft, Windows,
and the Windows 98 logo are
registered trademarks of Microsoft
Corporation. All other trademarks
are trademarks or registered
trademarks of their respective
owners.
Regulatory Information
Declaration of Conformity
Trade Name: SONY
Model No.: PCV-R545DS/
Responsible Party: Sony Electronics Inc.
Address: 1 Sony Drive
Telephone: 201-930-6972
This phone number is for FCC-related matters only.
This device complies with Part 15 of the FCC rules.
Operation is subject to the following two
conditions:
(1) This device may not cause harmful
interference, and
(2) this device must accept any interference
received, including interference that may cause
undesired operation.
PCV-R547DS/
PCV-R549DS/
Park Ridge, NJ 07656
Owner’s Record
The model number and serial number are
located on the bottom of your Sony VAIO
Digital Studio™ computer. Record the
serial number in the space provided here.
Refer to the model and serial numbers
when you call your Sony Service Center.
Model Number:
PCV-R549DS
Serial Number:_____________ ___________
PCV-R545DS/PCV-R547DS/

Contents
Welcome...............................................................................1
Features.............................................................................................1
Unpacking Your Computer ............................................................3
Computer and Supplied Accessories................................................ 3
Manuals.................................................................................................3
Recovery CDs .......................................................................................4
Other......................................................................................................4
Software Library......................... ..........................................................4
Back Panel Overview ......................................................................5
PCV-R545DS.........................................................................................5
Front Panel Overview .....................................................................7
Setting Up Your VAIO Digital Studio Computer ............9
Registering Your Computer...........................................................9
Using the VAIO Smart™ Keyboard and the
Wheel Mouse..................................................................................10
Connecting the Optional Palmrest ..................................................10
Changing the Window Design of Sony Software..........................11
VAIO Action Setup (PCV-R547DS/PCV-R549DS only) ..............11
Using the Wheel Mouse....................................................................12
Using the Standby Function.........................................................13
Standby Mode Indicators..................................................................13
Shutting Down Your Computer..................................................14
EEE

Sony Digital Media Park Applications .............................. 15
Media Bar™ ........................................................................................15
DVgate™ Applications ...................................... ... ............................15
PictureGear™ .....................................................................................15
Smart Capture ....................................................................................15
Using Digital Video........................................................................16
Connecting a Digital Video Recorder .............................................16
Using DVgate......................................................................................16
Hard Drive Partition........................................... ...............................17
Applications That Use the TWAIN Driver.....................................18
i.LINK (IEEE-1394) Compatibility ...............................................19
Enabling Smart Connect................................................................20
Troubleshooting ................................................................ 21
Using the System Recovery CD(s)...............................................29
Using the Application Recovery CD(s).......................................31
About the Software on Your Computer......................................32
About Your Recovery CDs............................................................37
For Answers to Your Software Questions..................................38
Sony Service Center...........................................................................38
Specifications...................................................................................41
Index................................................................................... 43
EL

Welcome
Congratulations on your purchase of the Sony VAIO Digital Studio™
computer! Your new, high-performance multimedia computer combines
state-of-the-art computer functionality with the latest audio/video and
information technology convergence features.
Features
For a complete description of the specifications of your VAIO Digital Studio Computer, see
✍
page 41.
❑
i.LINK® (IEEE-1394): Two built-in i.LINK ports provide you with
front and rear digital connection capability. The i.LINK name and
logo identify a digital interface (IEEE-1394) for high-speed
communication. By using your VAIO Digital Studio Computer, a
camera that supports the i.LINK interface (such as the Sony Digital
Handycam
your computer, and the i.LINK (IEEE-1394) interface, you can easily
create and edit your own home videos.
®
Camcorder), the DVgate™ software preinstalled on
❑
Digital Media Park™: This suite of Sony original applications
includes PictureGear,™ Smart Capture, DVgate,™ and Media Bar.™
Using the i.LINK connector, you can capture, view, and share both
still and video image s, t h en catalog everything fo r fast and easy
storage and retrieval.

VAIO Digital Studio Computer User Guide
❑
Exceptional performance: Your computer includ es an Intel
processor, a high-speed V.90 compatible data/fax modem,
*
following high-performance drives:
❑
DVD drive: This new optical storage technology provides
increased storage capacity and a rich multimedia computing
experience. Your 8X (maximum) DVD-ROM drive plays both
DVDs and CDs.
❑
CD-RW drive: This drive is the ideal solution for making
backups and archiving data, with the ability to store up to 650
†
MB
of removable, rewritable storage on a single rewritable CD.
Save your movies to CD-R or CD-RW media and share videos
and images with family and friends.
❑
VAIO Smart™ Keyboard: This PS/2
®
keyboard has programmable
shortcut buttons for launching your favorite programs or accessing
the Internet.
❑
Sony audio and video quality: Hi gh- fi delity positional 3D audio
system (A3D™), high-powered 3D graphics (AGP), and “Sony-
Tuned” MPEG digital video playback-enable you to take advantage
of today’s advanced multimedia applications, games, and
entertainment software.
®
and the
❑
Microsoft® Windows® 98 Second Edition operating system: Your
system includes the latest operating system from Microsoft.
❑
Communications: Access popular online services, browse the
Internet, send faxes, and more.
* Actual upload and download speeds may vary due to line conditions, ISP support, and government
regulations.
530 MB after formatting with Direct CD.

Unpacking Your Computer
Computer and Supplied Accessories
System Unit
Speakers
Phone Cable
Unpacking Your Computer
Power Cord
!
i.LINK Cable
Keyboard
Mouse
(PCV-R547DS and
PCV-R549DS only)
Manuals
❑
Read Me First contains Frequently Asked Questions (FAQs) and
supplementary information about your computer. It also includes
information on how to contact software vendors.
❑
The VAIO Digital Studio™ Computer User Guide (this manual) contains
features and specifications for your computer. It also includes
information on the applications included with your system and how
to contact software vendors, get started with your computer, and
solve common problems.
❑
The VAIO Consumer Information Guide contains safety and regulatory
information, ergonomic considerations, information on help
resources, and your computer’s limited warranty statement.
❑
The Microsoft
use the basic features of the Windows operating system.
®
Windows®98 Getting Started manual explains how to

"
VAIO Digital Studio Computer User Guide
Recovery CDs
❑
System Recovery CD(s)
❑
Application Recovery CD(s)
Other
❑
Setting up your VAIO Digital Studio Computer (poster)
❑
Packet containing special product offers
Software Library
The Software Library contains the Microsoft software license agreement,
Sony end-user license agreement, and the following CDs:
❑
Microsoft® Word 2000
❑
Wild Metal Country
®
Install your equipment so that you can easily reach the outlet in the event of an emergency.
✍
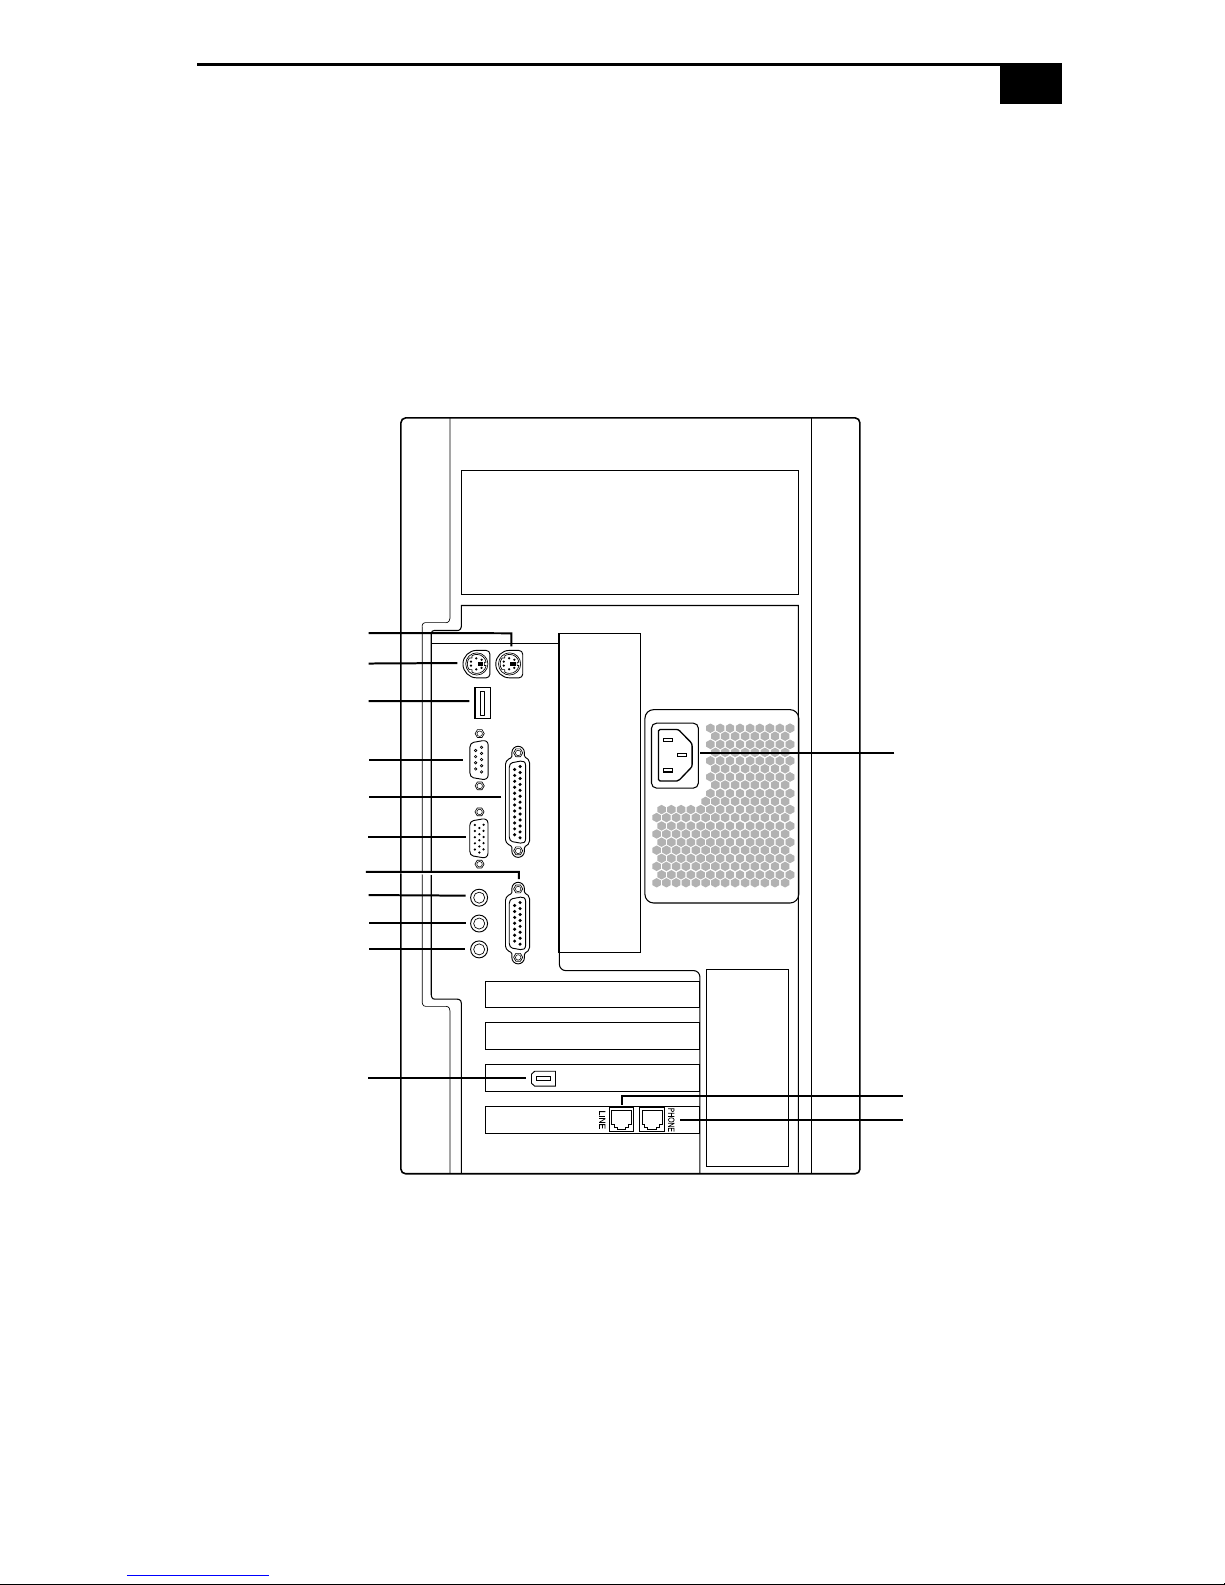
Back Panel Overview
#
Back Panel Overview
The back panel of your computer contains the connectors where you plug
in supplied and optional accessories. The icons on the back panel serve as
a map to help you locate the connectors on your computer.
PCV-R545DS
PS/2 Mouse
Keyboard
USB
Serial
Printer/Parallel
Monitor
Games/MIDI
Headphones
LINE IN
Microphone
i.LINK (IEEE-1394)
Power
Line
Telephone
$
VAIO Digital Studio Computer User Guide
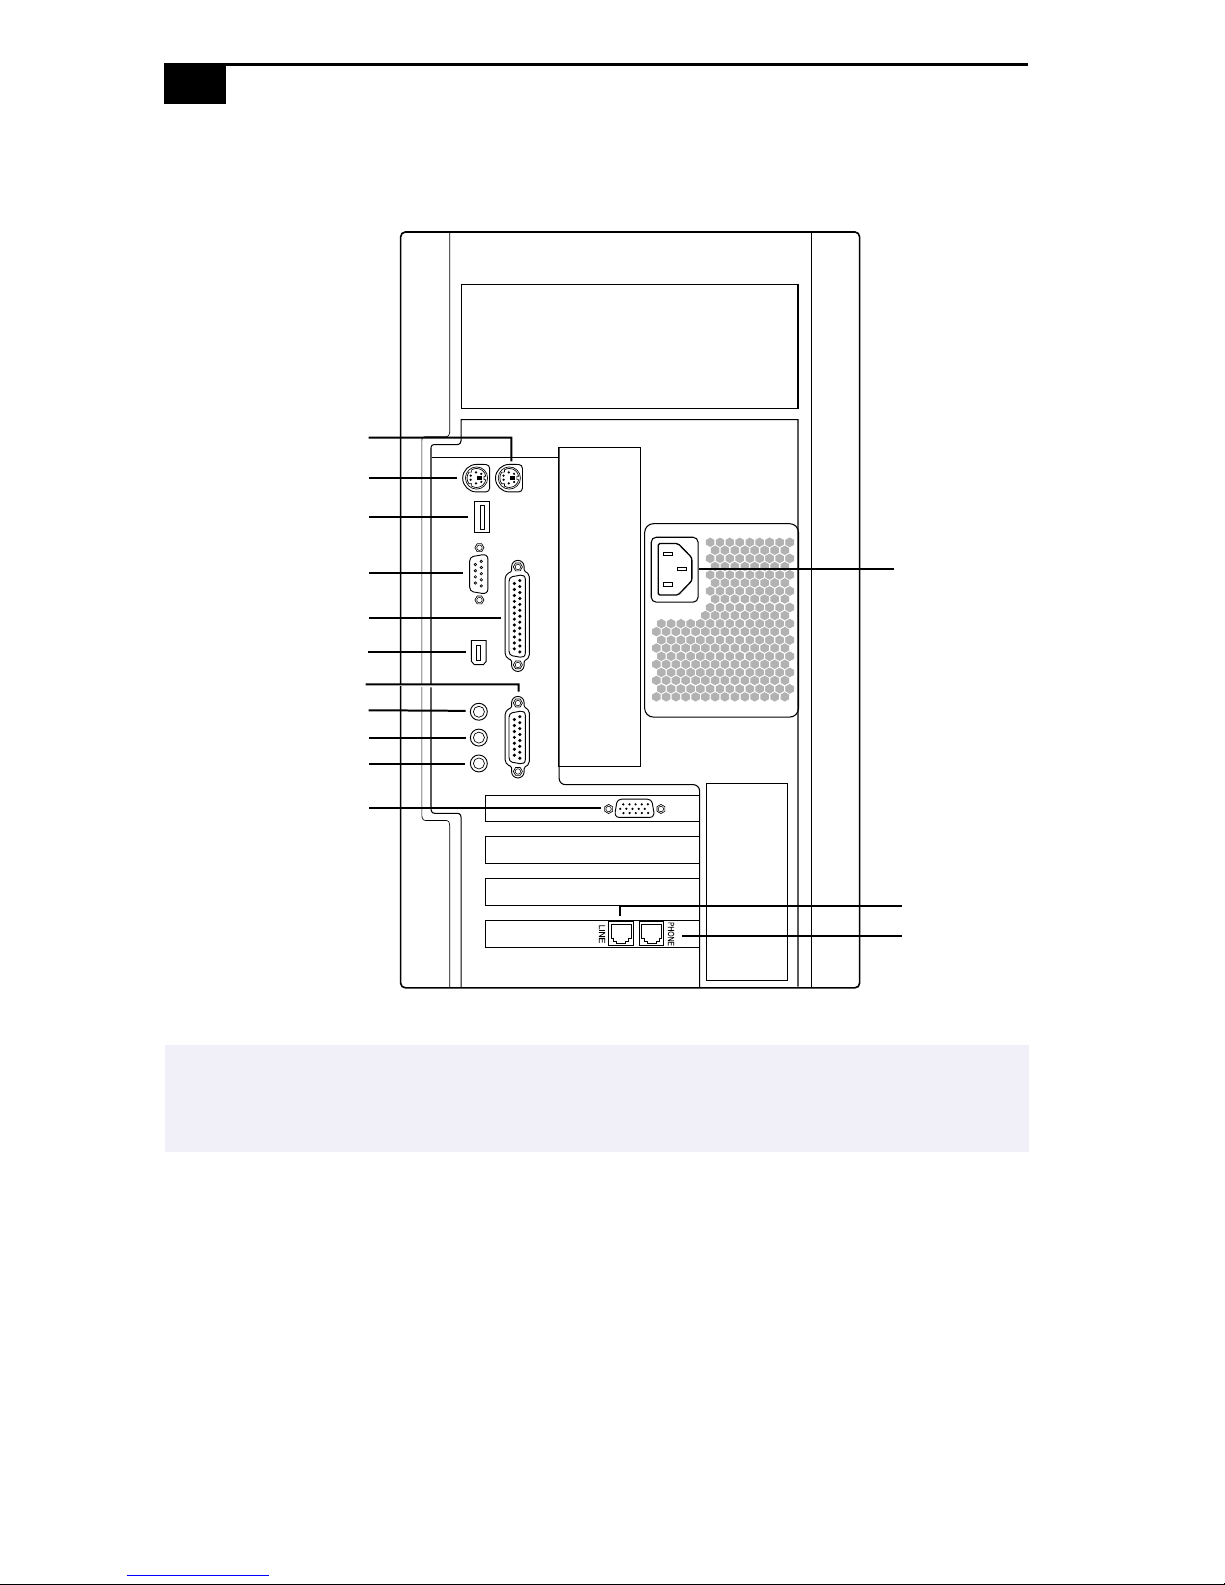
PCV-R547DS/PCV-R549DS
PS/2 Mouse
Keyboard
USB
Serial
Printer/Parallel
i.LINK (IEEE-1394)
Games/MIDI
Headphones
LINE IN
Microphone
Monitor
For your convenience, your computer includes USB and i.LINK connectors on both the front
✍
Power
Line
Telephone
and back panels, allowing you to connect to either set of connectors. The i.LINK connector on
the back of your system is a 6-pin connector.
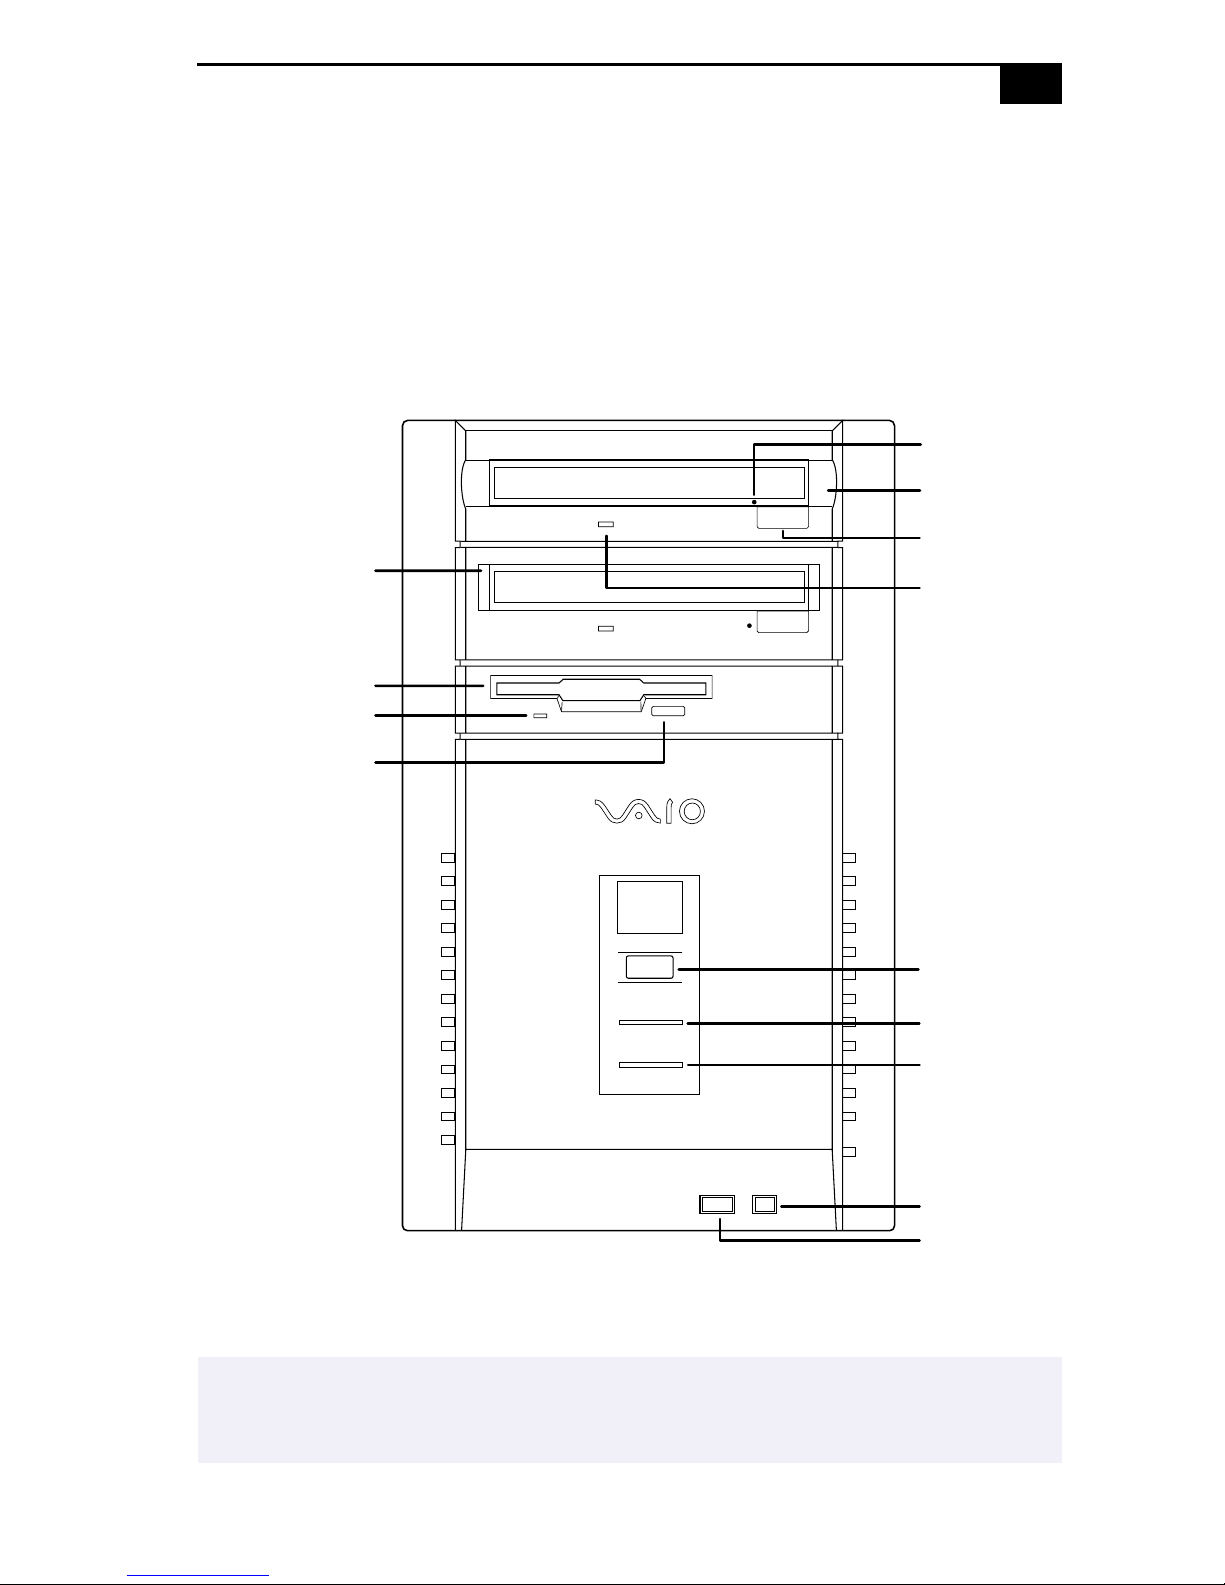
Front Panel Overview
%
Front Panel Overview
The front panel of your VAIO Digital Studio Computer allows for access
to the diskette, DVD, and CD-R W drive s. It also incl udes USB and i .LINK
ports to connect USB devices, digital equipment, or other components.
Emergency Eject
Hole
DVD-ROM Drive
Optical Drive
CD-RW Drive
Eject Button
Optical Drive
Indicator Light
Diskette Drive
Diskette Drive
Access Indicator Light
Diskette
Eject Button
Power/Standby
Switch
Power/Standby
Indicator Light
Hard Disk Drive
Access Indicator
Light
i.LINK
USB
For your convenience, your computer includes USB and i.LINK connectors on both the front
✍
and back panels, allowing you to connect to either set of connectors. The i.LINK connector on
the front of your system is a 4-pin connector.

&

Setting Up Your VAIO® Digital
Studio Computer
Registering Your Computer
Take advantage of Sony’s commitment to quality cust omer su pport and
receive these benefits by registerin g your computer:
❑
Sony customer support — Talk to a Support Representative to
troubleshoot problems you may be having with your computer.
❑
Limited warranty — Protect your investment. See “Limited Warranty
Statement” in the VAIO Consumer Information Guide for details.
✍
You must register your VAIO Digital Studio computer to extend the warranty for an
additional nine months beyond the initial 90-day warranty period.
❑
On-site service — Provides convenient resolution of problems.
If you did not register the first time you turned on your new VAIO Digital
Studio computer, follow these steps to use the computer online
registration service.
1
Click the Sony VAIO Registration icon on the VAIO desktop.
2
Enter the information requested on the first online registration form.
3
Click the Next button to advance to the next form.
4
Complete the remaining forms by clicking the Next button each time
you complete a form.
The computer automatically transfers your registration information
using your built-in modem and a toll-free telephone number.
'
VAIO Digital Studio Computer User Guide
Using the VAIO Smartc Keyboard and the
Wheel Mouse
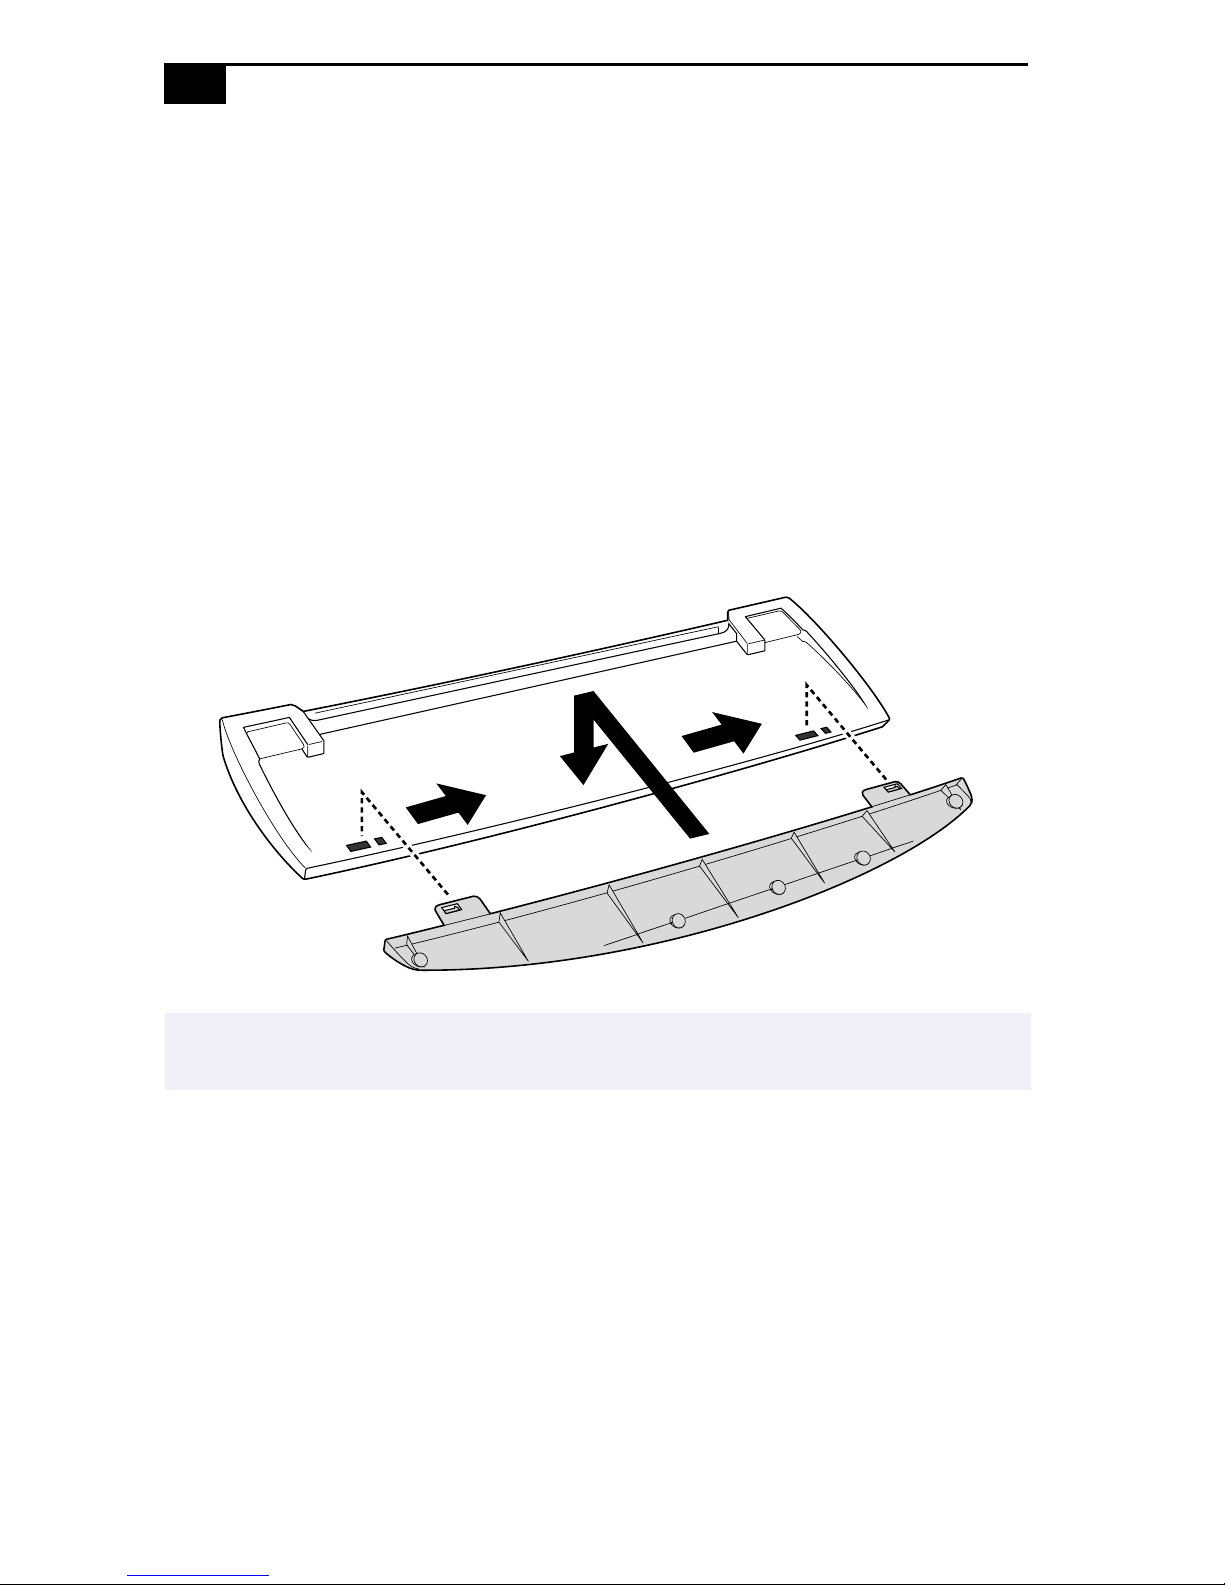
Connecting the Optional Palmrest
The keyboard that comes with your computer is equipped with an
optional palmrest that you can attach to your keyboard. Follow these
steps to connect the palmrest.
1
Place the keyboard and palmrest upside down on a flat surface.
2
Insert the latching posts on the palmrest into the openings on
the keyboard.
3
Move the palmrest to the right until you feel it snap into place.
✍
Do not keep your wrists on the palmrest while typing; use the palmrest briefly only
when resting.
To remove the palmrest
1
Turn the keyboard and palmrest upside down.
2
Push down on the palmrest, and then move it to the left.
3
Lift the palmrest away from the keyboard.
Using the VAIO Smart Keyboard and the Wheel Mouse
Changing the Window Design of Sony Software
To change the window design of Sony software:
1
Click the Start button, point to Settings, and then click Control Panel.
2
Click UI Design Selector.
3
Click << or >> and select the desired design.
4
Click Apply.
The “UI Design Selector” window design changes. The window de s ig n
for your Sony software will match the “UI Design Selector” window.
To try another selection, click << or >>. Then, click OK.
The UI Design Selector closes and the window design of your Sony
software window design displays.
✍
You may use the feature with UI Design Selector-compatible software only.
VAIO Action Setup (PCV-R547DS/PCV-R549DS only)
VAIO Action Setup manages the settings for your computer’s Shortcut
keys (S Keys) and i.LINK interface.
To change the settings of the S Keys:
1
From the Start menu, point to Programs/VAIO Action Setup/VAIO
Action Setup. Alternatively, double-click on the Wi ndows taskbar .
VAIO Action Setup opens.
2
Click the S Key whose setting you want to change.
3
From the Select Application dialog box, click the radio button for the
desired type of function. The corresponding applications appear in
the list box on the right. You may also use the Drag&Drop feature to
assign any application by simply dragging and dropping the
application into the list box. Click the application you want to assign
to the S Key. Click Next to finish this step.
4
The Confirmation Application Name window appears showing you
the application you have selected. Click Next.
5
You may now type a new name and description, if desired. Then,
click Finish.
 Loading...