

Sony VAIO PCV-MXS10 User Manual

VAIO® MX Computer
User Guide
PCV-MXS10

Change to Current Document Title
2

3
Welcome
Thank you for purchasing your Sony VAIO® MX computer! Your new
computer is a superb blend of high technology and easy-to-use
functionality. The information provided here is designed to help you to
become familiar with the hardware and software applications included
with your system.

Change to Current Document Title
4

5
Locating Controls, Ports
and Jacks
Front Panel Overview
The front panel of your VAIO® MX computer enables access to the optical
drives, Memory Stick® and PC Card slots. The front panel also provides access
to the Universal Serial Bus (USB) and i.LINK® ports to connect your compatible
peripheral devices.
✍
i.LINK is a trademark of Sony used only to designate that a product contains an
IEEE1394 connection. The i.LINK connection may vary, depending on the software
applications, operating system, and compatible i.LINK devices. All products with an
i.LINK connection may not communicate with each other.
Please refer to the documentation that came with your compatible i.LINK device for
information on operating conditions and proper connection. Before connecting
compatible i.LINK PC peripherals to your system, such as an optical or hard disk drive,
confirm their operating system compatibility and required operating conditions.
Change to Current Document Title
6
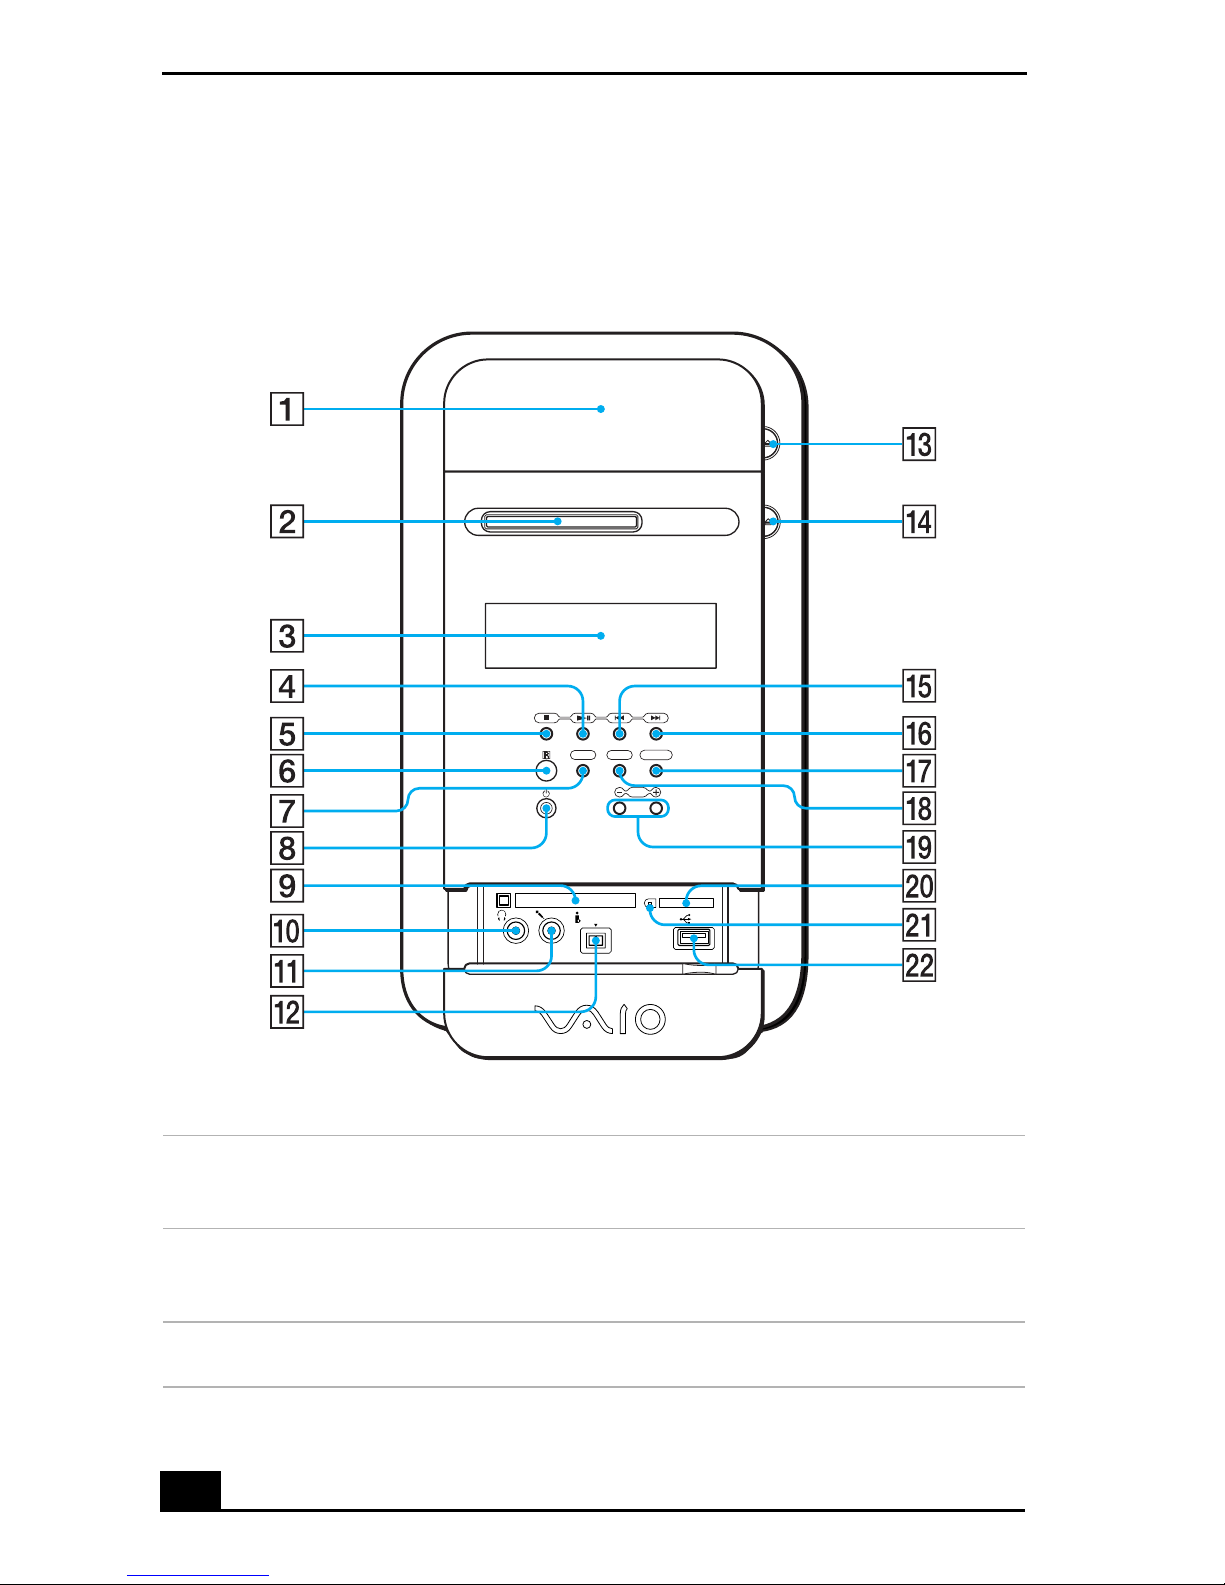
Front panel
1 DVD-RW drive
Reads data from DVD or CD media. Writes data to a DVD-R, DVD-RW, CD-R, or
CD-RW media.
2 MiniDisc drive
Plays and records music to and from the MiniDisc media. Supports Net MD
encryption protocol for secure music transfers.
3 LCD display screen
Displays the current operating mode of the computer.
VOL
DISPLAY FUNCTION
MUTING
PHONE MIC
i.LINK S400
USB
MEMORY STICK
PC CARD
Locating Controls, Ports and Jacks
7
4 Play button
Plays the current DVD, CD, or MiniDisc media contents.
5 Stop button
Stops the current playback of DVD, CD, or MiniDisc media.
6 Infrared Receiver
Enables the computer to receive signals from the remote control.
7 Muting button
Stops the current sound output.
8 Power button and indicator light
Turns the computer on and off. The indicator light is blue when the computer is on
and amber when the computer is in Stand by mode.
9 PC Card slot
A PC card (also called a PCMCIA card) can be installed using this slot, to increase
the functions of your system.
10 Headphone jack
Connection for headphones.
11 Microphone jack
Connection for a microphone.
12 i.LINK 4-pin port (IEEE1394)
Connection for a compatible digital device.
13 DVD-RW eject button
Ejects a disc from the DVD-RW drive.
14 MiniDisc eject button
Ejects a MiniDisc from the MiniDisc drive.
15 Previous/Rewind button
Skips to the previous track on the current playback of a DVD, CD or MiniDisc
media.
16 Next/ Fast Forward button
Skips to the next track on the current playback of a DVD, CD or MiniDisc media.
17 Function button
Selects the mode of operation on the computer.
18 Display button
Selects the display mode on the LCD display screen.

Change to Current Document Title
8
19 Volume control buttons
Increases or decreases the volume.
20 MagicGate™ Memory Stick® media slot
Reads and writes data to and from a MagicGate Memory Stick media.
21 Universal Serial Bus (USB) port
Connection for a compatible USB device.
✍
For your convenience, your computer includes USB and i.LINK ports and jacks on
both the front and back panels. (The 4-pin i.LINK port is located on the front panel and
the 6-pin i.LINK port is located on the back.)

Locating Controls, Ports and Jacks
9
Back Panel Overview
The back panel of your computer contains the ports for supplied and optional
accessories. The icons on the back panel locate and identify the ports on your
computer.
✍
i.LINK is a trademark of Sony used only to designate that a product contains an
IEEE1394 connection. The i.LINK connection may vary, depending on the software
applications, operating system, and compatible i.LINK devices. All products with an
i.LINK connection may not communicate with each other.
Please refer to the documentation that came with your compatible i.LINK device for
information on operating conditions and proper connection. Before connecting
compatible i.LINK PC peripherals to your system, such as an optical or hard disk drive,
confirm their operating system compatibility and required operating conditions.
Change to Current Document Title
10
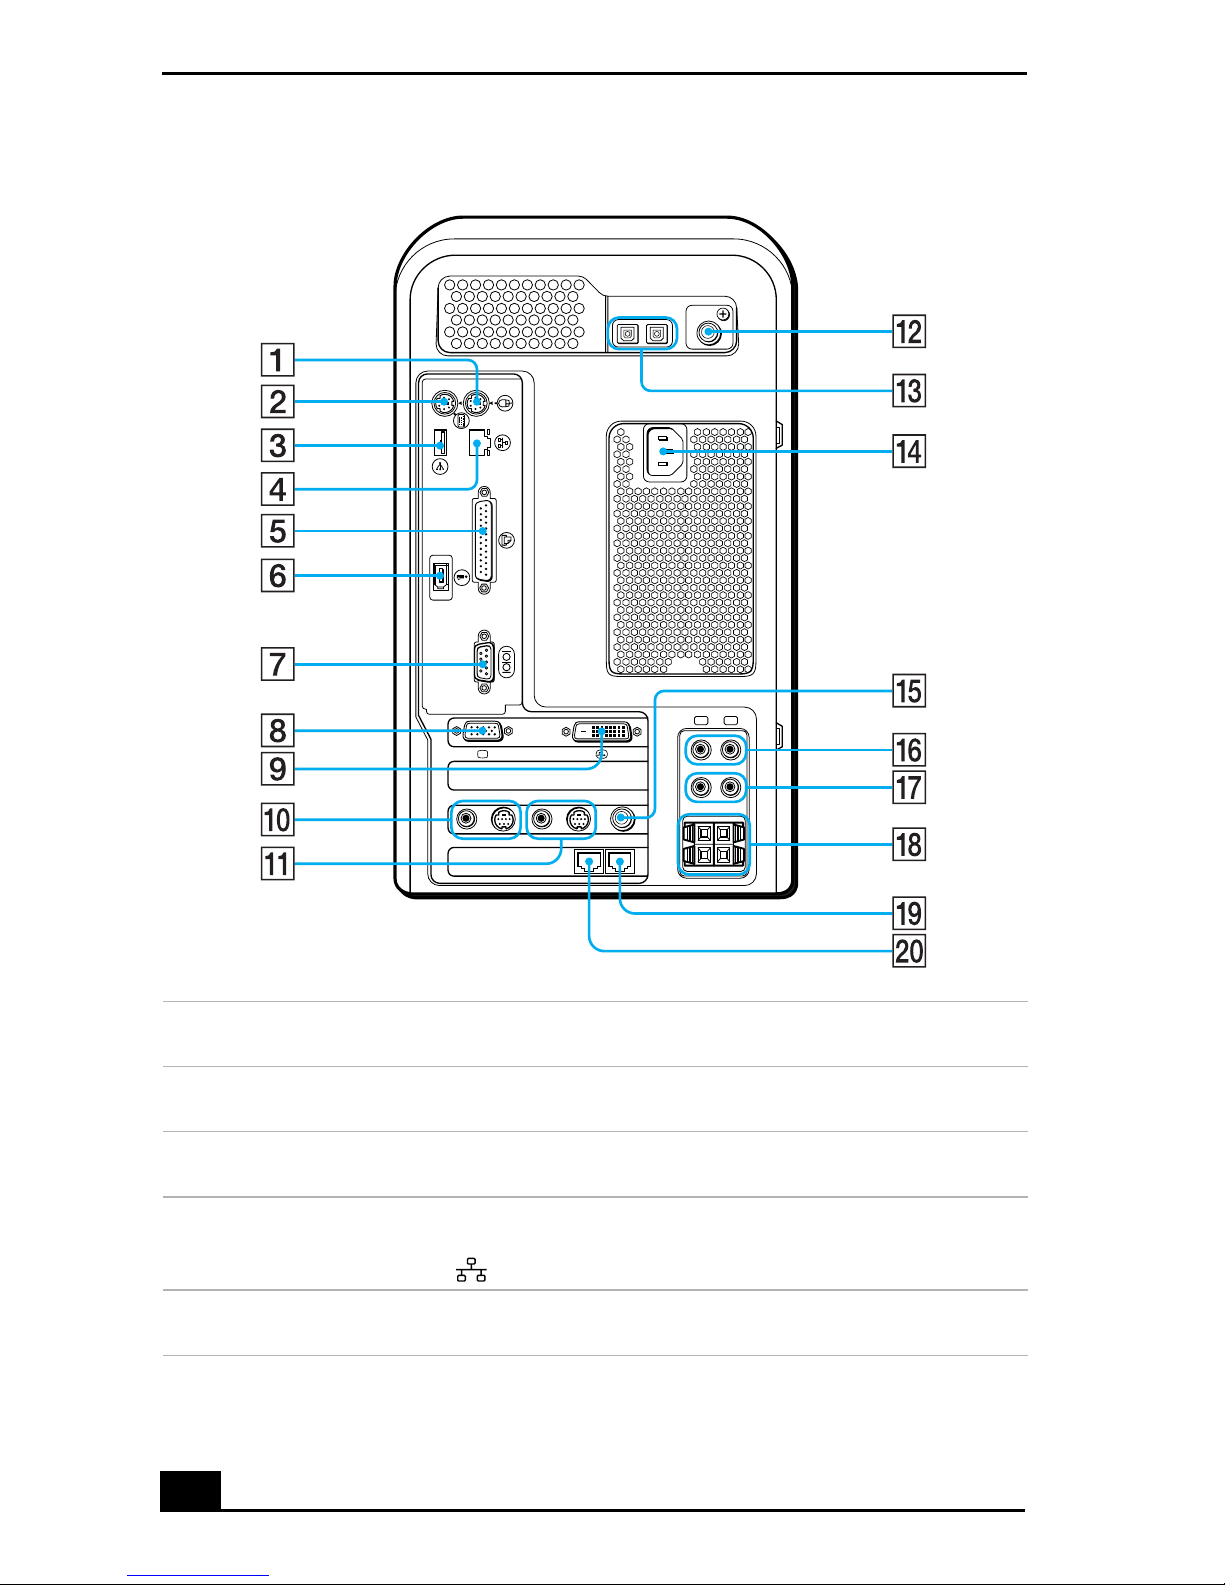
Back panel
1 Mouse port
Connection for a PS/2® mouse.
2 Keyboard port
Connection for a PS/2 Keyboard.
3 Universal Serial Bus (USB) port
Connection for a compatible USB device.
4 Ethernet port
10Base-T/100Base-TX Fast Ethernet interface.
(The port marked with (Network) is for LAN connections only.)
5 Printer port
Connection for a parallel device, such as a printer or scanner.
OPTICAL FM ANTENNA (75 )
IN OUT
KEYBOARD
MOUSE
USB
NETWORK
ACT
LINK
SERIAL
i.LINK
S400
PRINTER
LINE
IN
LINE
OUT
MONITOR DVI
R L
SPEAKER
------ VIDEO OUTPUT ------
VHF/UHF
------ VIDEO 1 INPUT ------
S VIDEO/VIDEOS VIDEO/VIDEO AUDIOAUDIO

Locating Controls, Ports and Jacks
11
6 i.LINK 6-pin port (IEEE1394)
Connection for a compatible digital device.
7 Serial port
Connection for a compatible serial device.
8 Monitor port
Connection for a standard CRT display.
9 DVI (LCD) Monitor port
Connection for an LCD monitor.
10 Audio Out jack
Connection for an audio cable (supplied).
Video/S-video Out port
Connection for a video cable adapter (supplied) or an S-video cable (optional).
11 Audio In jack
Connection for an audio cable (supplied).
Video/S-video In port
Connection for a video cable adapter (supplied) or an S-video cable (optional).
12 FM antenna port
Connection for an FM antenna.
13 S/P DIF OUT/IN optical ports
Connection for a digital audio or optical device.
14 AC Input port
Connection for the supplied power cord.
15 VHF/UHF port
Connection for a coaxial cable (supplied).
16 Line IN (R/L)
Connection for an audio device.
17 Line OUT (R/L)
Connection for an audio device.
18 Stereo Speaker jacks (R/L)
Connection for the supplied stereo speakers to the computer.
19 Telephone cable jack
Connection for a phone cable to the computer.
20 Modem line jack
Connection for a modem (supplied) cable to the wall jack.
Change to Current Document Title
12
Remote Control Overview
The features of the VAIO® Computer can be controlled using the universal
remote control (supplied). The remote control can control the functions for the
computer, television, FM tuner, MiniDisc player, Memory Stick®, Video
Cassette Recorder (VCR), and DVD/CD-ROM disc.
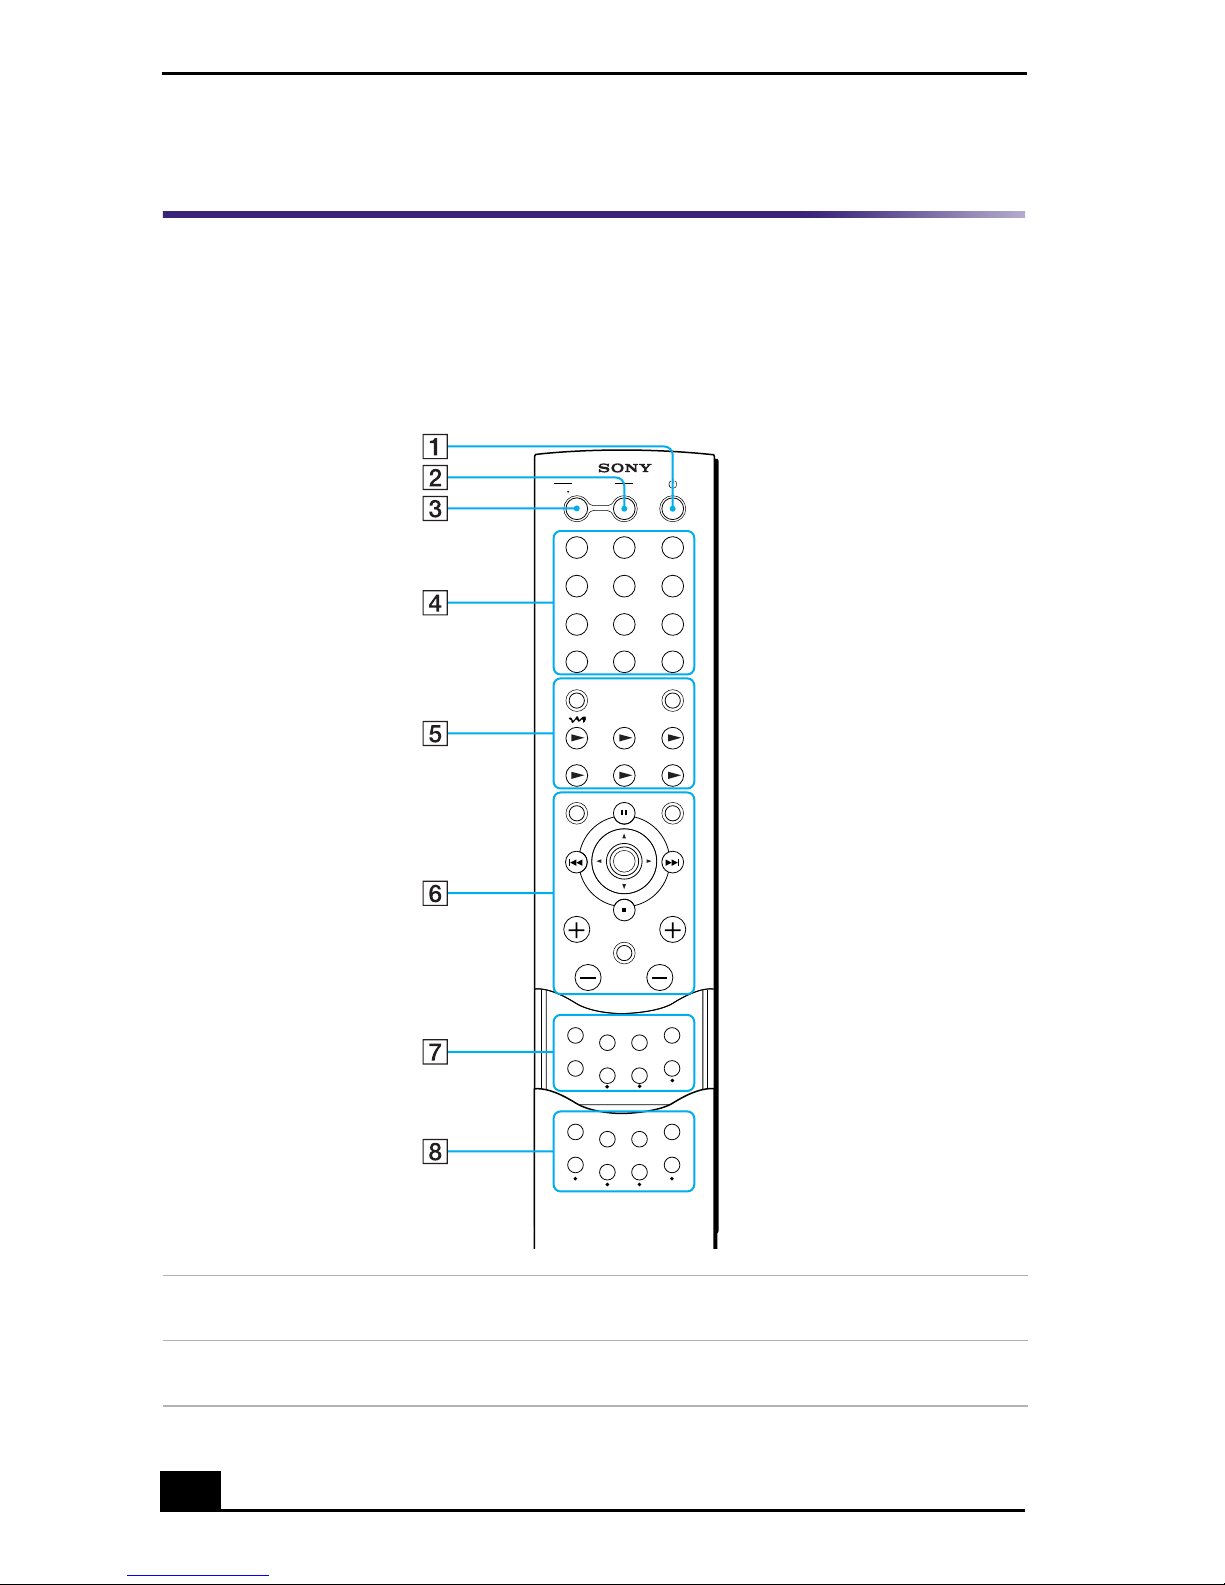
Remote Control
1 Power button
Press to turn on the computer.
2 DVD button
Press to control the DVD Player.
12 3
45 6
78 9
0
DVD
FMTV
MS VIDEO DVD
CD MD
TV VIDEO
OPEN/CLOSE
ENTER
PAUSE
CHANNELVOLUME
STOP
MUTING
MENU
CANCEL
PREV/
REW
NEXT/
FF
DISPLAY
MX
DISPLAY
TV
INPUT
DVD
JUMP
MONITOR
SLEEP
REC
REC
STOP
REC MODE
VIDEO
SIZE PLAY
MODE
AUDIO
SELECT
EQ
ANGLE
SUBTITLE
TITLE
RETURN

Locating Controls, Ports and Jacks
13
3 TV/VIDEO button
Press to change the onscreen image from the TV/Recording deck to external video
equipment, such as your VCR.
4 Channel number buttons
Press to select specific channels. (Press the ENTER button to activate channel
selection.)
Jump button
Press to return to the previous channel. Press again to return to the current channel.
Enter button
Press to activate channel selection. See channel number buttons.
5 TV button
Press to control the onscreen TV image.
FM button
Press to control the FM antenna.
M button
Press to control the M drive on the computer.
CD button
Press to control the CD-ROM drive on the computer.
MD button
Press to control the MiniDisc drive on the computer.
MS button
Press to control the Memory Stick on the computer.
Video button
Press to control an external VCR device.
DVD button
Press to control an external DVD player device.

Change to Current Document Title
14
6 Cancel button
Press to close any error message dialog box. The window returns to its original size
when displayed in full-screen mode.
Pause button
Press to pause playback.
Menu button
Press to display the menu options.
Prev/Rew button
Press to rewind to the previous selection.
Direction (center) button
Press the button the arrow direction to select a track. Press the button down to play your
selection.
Next/FF button
Press to fast forward to the next selection.
Stop button
Press to stop playback.
Volume buttons
Press to raise or lower the volume.
Muting button
Press to turn off the sound. Press again to restore the sound.
Channel buttons
Press to manually browse available channels.
7 Display button
Press to display information on an external television.
TV input button
Press to select the input source including a television tuner or external input.
MX Display button
Press to view the LCD display on the computer.
Monitor button
Press to enable the display.
Sleep button
Press to program the computer to automatically shut off.
Video Rec button
Press to record onscreen images to an external VCR device.
Video Rec Stop button
Press to stop recording onscreen images to an external VCR device.
Video Rec Mode button
Press to record a program to your VCR device.

Locating Controls, Ports and Jacks
15
8 Size button
Press to view the display in full-screen size. Press again to return the view to its original
size.
Play Mode button
Press to view your selection.
Audio Select button
Press to select your audio options.
EQ button
Press to adjust your equalizer.
9 DVD Angle button
Not available for Giga Pocket functions. See the DVD player software instructions for
more information.
DVD Subtitle button
Not available for Giga Pocket functions. See the DVD player software instructions for
more information.
DVD Title button
Press to display the current DVD title.
DVD Return button
Not available for Giga Pocket functions. See the DVD player software instructions for
more information.

Change to Current Document Title
16
17
Additional System Capabilities
To Use Memory Stick Media Slot
Your VAIO® MX computer is designed to support the Sony MagicGate™
Memory Stick® media . A Memory Stick media is a compact, portable, and
versatile data storage media designed for exchanging and sharing digital data
with similarly equipped products.
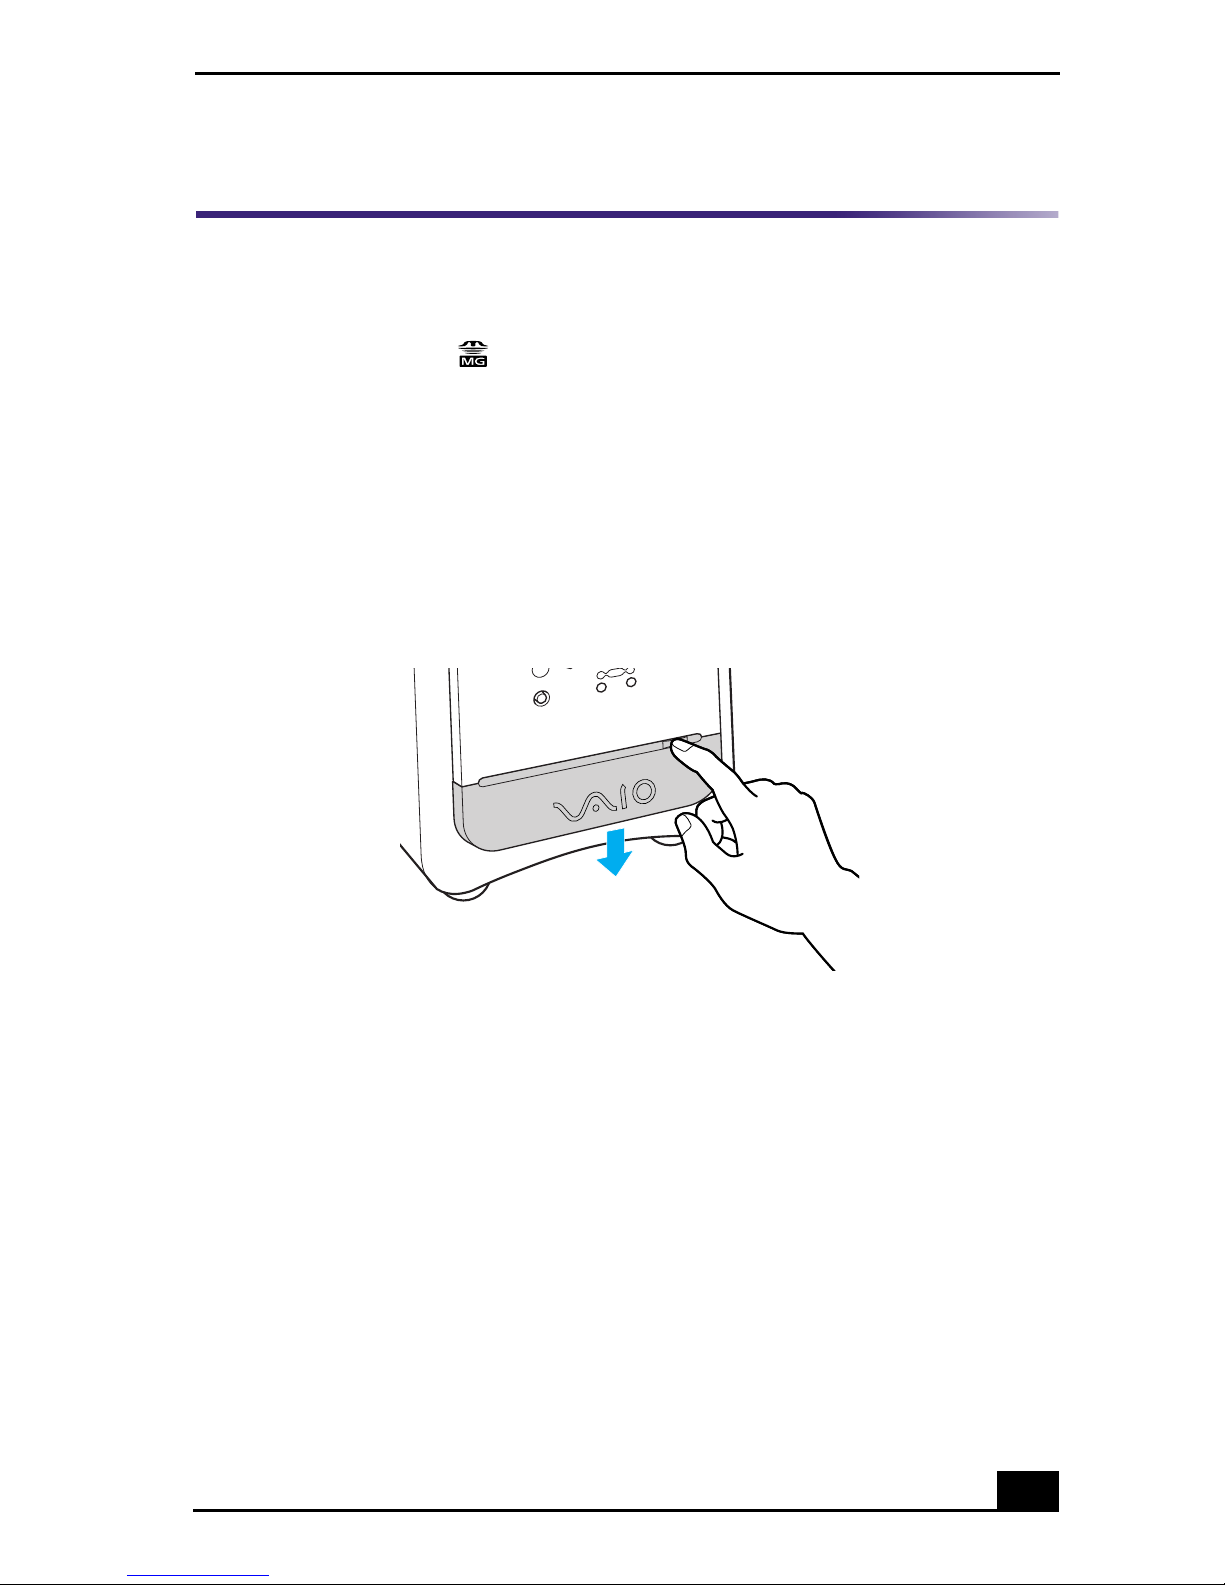
Inserting a Memory Stick media
1 Slide front panel cover in the direction of arrow as shown, to open the lower
front panel.
Opening the lower front panel
 Loading...