

Sony VAIO PCG-VX80 Series Quick Start Manual

VAIO® Computer
Quick Start
PCG-VX80 Series


Welcome.......................................................5
Features.......................................................................5
Unpacki n g Yo ur Comp u ter.........................................6
Register i n g Yo ur C omp u t er........................................9
Setting up your dial-up connection ...........................10
Setti ng Up Your VAIO Computer .............13
Locating Controls and Ports......................................14
Connecting a Power Sour ce ...... ................................18
Starting Your Computer............................................24
Turni n g Off Your Co m put er............................... ......26
Software and Support Information..........27
Software Overview....................................................28
Software Support Information...................................29
Using the Recovery CDs...........................33
Application and System Recovery CDs....................34
Using Your Recovery CDs........................................35
Troubleshooting........................................41
Getting Help........................ ................... ....47
Support Options.........................................................47
Index...........................................................49
3

V AIO® Computer Quick Start
4

Welcome
Congratulati ons on your purchase of the Sony VAI O® computer. Sony has
combined leading-edge technology in audio, vide o, co mputing, and
communications to provide you with state-of-the-art personal computing.
Features
Here are just some of the features your VAIO® computer has to offer:
❑ Exceptional performance — Your computer includes a fast Intel®
Pentium® processor.
❑ Portability — The rechargeable battery pack provides hours of use without
AC power.
❑ Wire less functionality
Network (LAN) and the Internet, all without direct cable connections.
*
— Your computer can connect to a Local Area
❑ Sony audio and video quality — A high-resolution LCD screen enables
you to take adv antage of today’s advanced m ultimedia applications, game s,
and entertainment softwar e.
❑ Microsoft® Windows® operating syst em — Your sy stem inc lud es a
Microsof t® Windows® operating system.
❑ Communications — Access popular online services, send and receive
e-mail, browse the Int ernet, and use fax features.
✍ For a complete description of the spe cificati ons of your VAIO® com puter, see the
VAIO® Comput er Specificatio ns sheet supp lied with y our computer.
* Wireless LAN cap a bi liti es ar e availa b le on selec te d mode ls only.
5
V AIO® Computer Quick Start
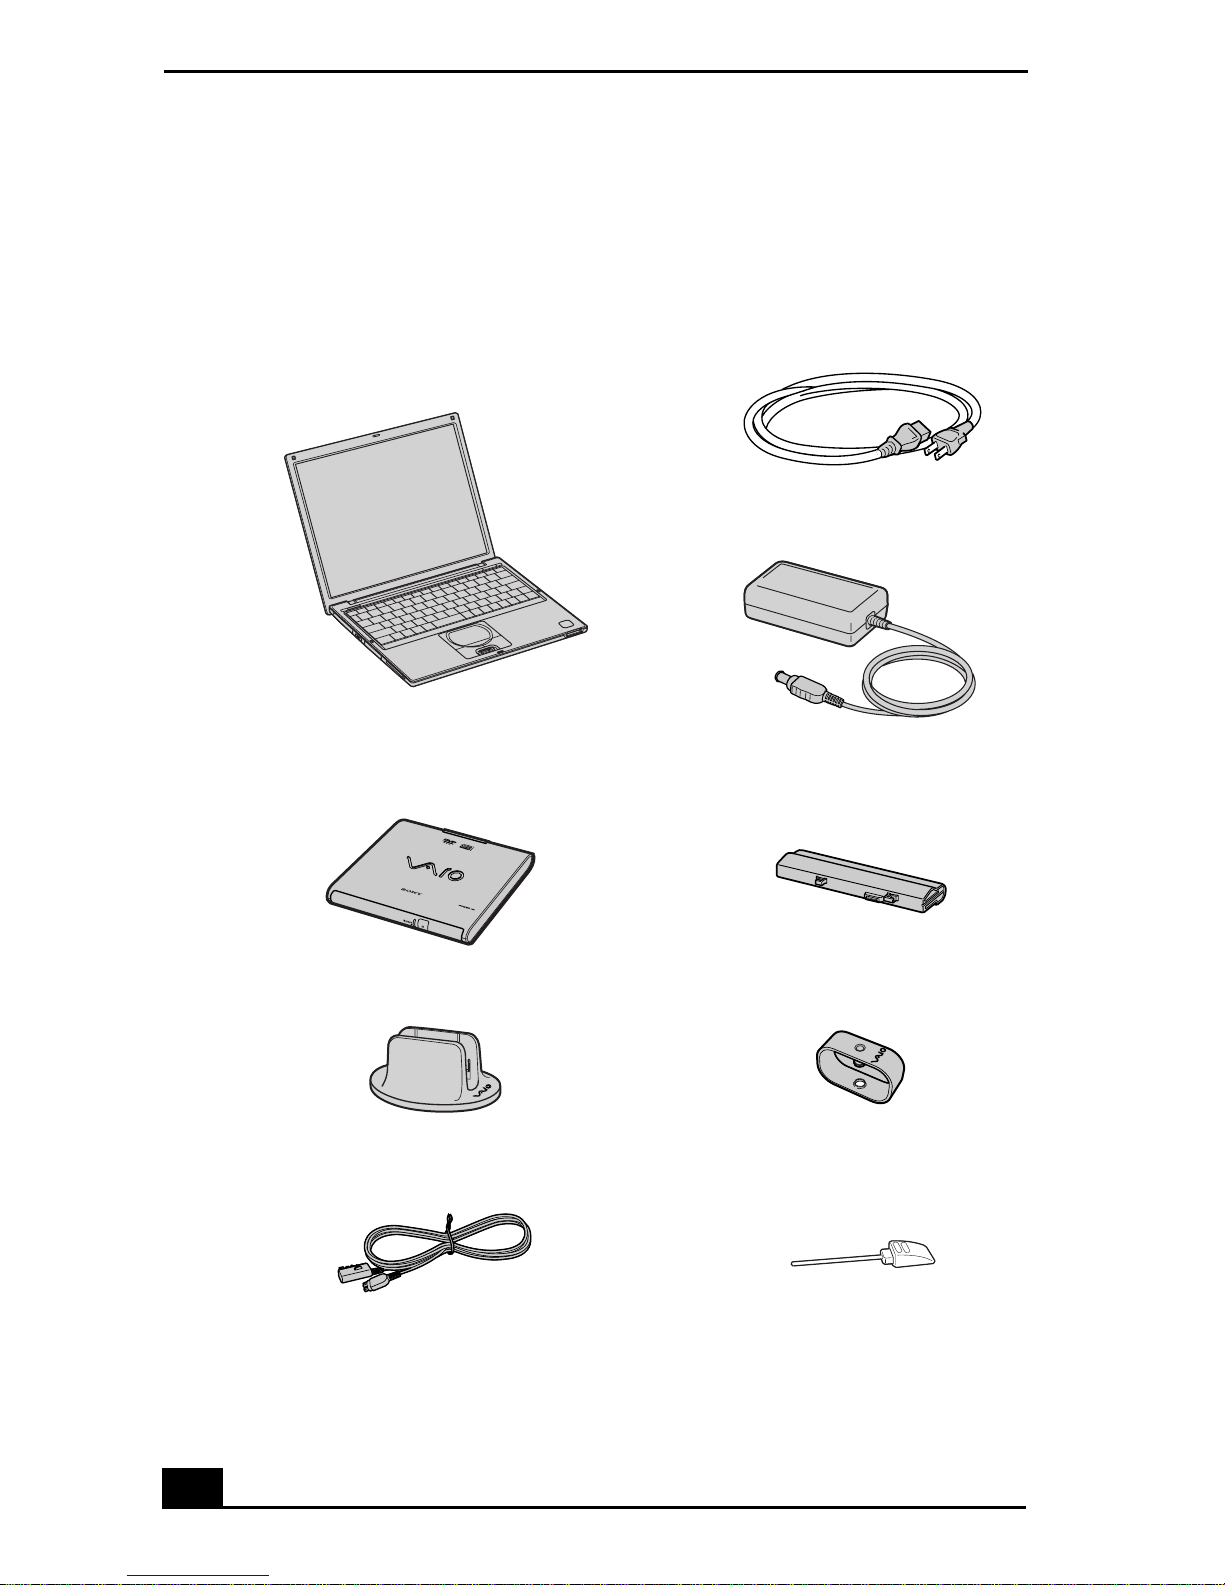
Unpacking Your Computer
Remove the following hardware items from the box:
Main Unit Power Cord
AC Adapter
i.LINK Optical Disc Drive Rechargeable Battery Pack
Vertical Installation Base Cable Clip
Peripheral Cable Manual Eject Pin
6

Unpacking Your Computer
Documents
❑ VAIO® Computer User Guide — A searchable online help file that
contain s detailed information on how to use your new computer. To open
this fil e, click Start on the Windows® operating system taskbar, Help and
Support, and VAIO User Guide.
❑ VAIO® Computer Quick Start — Conta ins inf ormati on on unpacki ng and
setting up your computer, the features of your computer, and how to solve
common proble ms.
❑ Microsoft® Windows® manual — Explains how to use the basic features
of the Windows® operating system installed on your computer.
❑ VAIO® Computer Safety Information — Explains notes on using your
computer and offers safety tips.
❑ VAIO® Computer Specifications — An online file that details the
hardware spe cifications and lis ts the installed software applica tions for your
computer. To access this file, open the VAIO® User Guide and click on the
specif ications link on the Welcome page.
Softwa re CD
❑ Microsoft® Word — Enables you to reinstall Microsoft Word to your
VAIO computer, if the application becomes corrupted or is erased.
Recovery CDs
❑ Application Recovery CD(s) — Enables you to reinstall individ u al
applications and device drivers if they become corrupted or are erased.
❑ System Recovery CD(s) — Enables you to re store the oper ating sys tem a nd
software tha t sh ipped with your computer if the y become corrupted or are
erased. This CD restores your computer to its original factory settings, so
user data and applications installed since you started using your comp uter
will be los t.
✍ To use these recovery CDs, you will need an optical drive. See “Using Your
Recovery CDs” in the online VAIO® Compu ter User Guide for information on ho w
to use th es e C D s.
7

V AIO® Computer Quick Start
Other
❑ Packet containing special product offers
❑ Limited Warranty card
8

Registering Your Computer
Registering Your Computer
Take advantage of Sony’s commitment to quality customer support and receive
these bene fits by registerin g your computer:
❑ Sony Customer Support — T alk to a s upport repres entative to tro ubleshoot
problems you m ay en counter with your computer.
❑ Limited Wa rr anty — Protect your investment. See the Warranty Card for
more details.
✍ You are prompted to register your co mputer the first time you turn on the unit .
Follow the o n-screen instructions to complete the registration pr ocess. If you are not
able to register your computer during the first session, you are provided with
additional registration opportunities later.
Acce ssing the User Gui d e
The online VAIO® Computer User Guide is a searcha ble online help file that
contain s de tailed informati on on how to use your new computer. To open this
file, click Start on the Windows® tas kbar, select Help and Support, and cl ick
VAIO User Guide.
About Adding Memory
Depending on the configuration you purchased, your computer may accept
additional memory modules. For information about installation procedu r es, refer
to the online VAIO® Computer User Guide and print thos e relevant steps. The
supplied Specifications sheet lists the amount of memory installed and required
memory modules for upgra des.
9

V AIO® Computer Quick Start
Sett in g up you r di a l- up conne ction
This section describes t he basic steps f or s etting up your di al-up connection. The
Connection Wizard guides you through the process of connecting to the Internet
and choosing an Int ernet service provider (ISP) or setting up an existing account.
Setting up your Internet connection
1 Click Start, point to All Programs, Accessories , Communications, and click
New Connection Wizard. The Loca tion Information screen appears.
Location Information screen
2 Follow the on-screen instructions , and click OK. The Phone and Modem
Options screen a ppea rs.
3 Select the location from where you are dialing, and click OK. The New
Connection Wizar d appears.
10
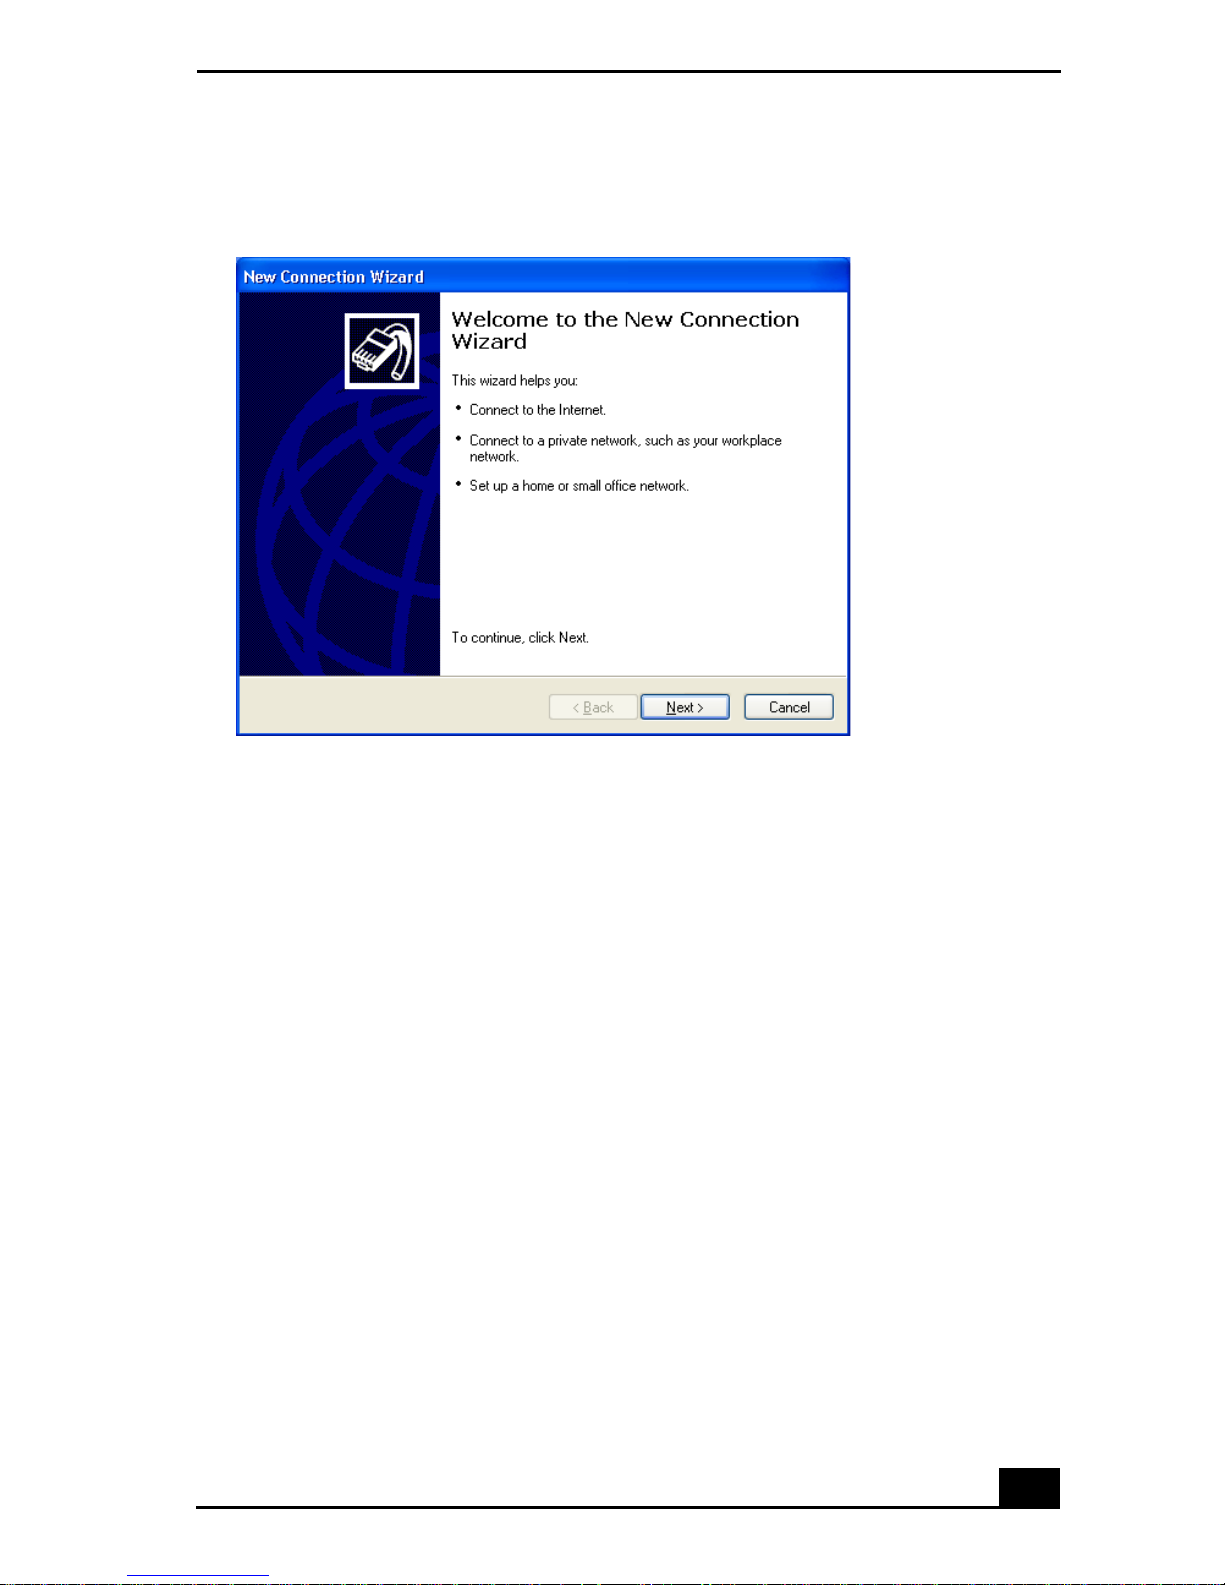
New Connection Wizard
Setting up your dial-up connection
4 Follow the on-scre en instructions.
11

V AIO® Computer Quick Start
12

Setting Up Your VAIO Computer
This section describ es all the con tr ols and por ts on your c omputer, how to
connect your c omput er to a p ower so ur ce, and how to start and s hut down
your computer.
❑ Locating Controls and Ports
❑ Connecting a Power Source
❑ Star ting Your Computer
❑ Turning Off Your Computer
13
V AIO® Computer Quick Start
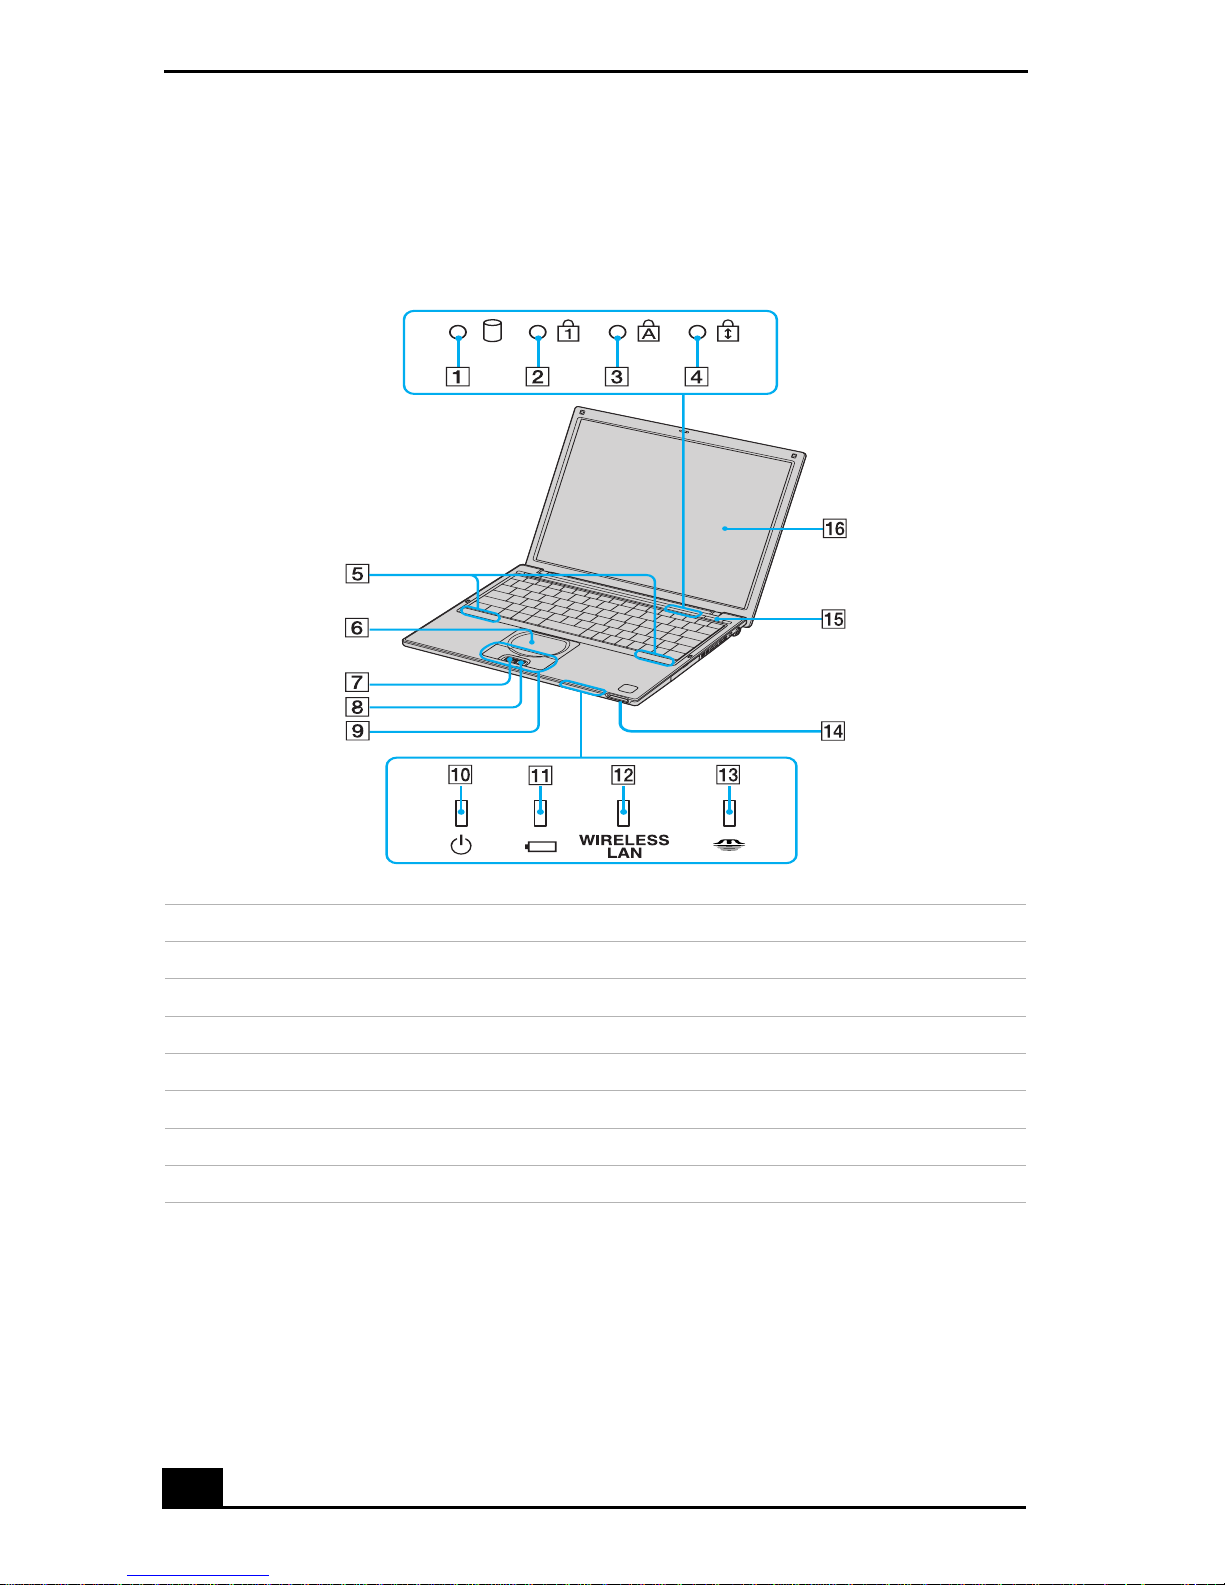
Locating Controls and Ports
Front
1 Hard disk drive indicator 9 Left/right buttons
2 Num Lock indicator 10 Power indica tor
3 Caps Lock indicator 11 Battery indicator
4 Scroll Lock indicator 12 W ir eless LAN indicator
5 Speakers 13 Memory S tick® media indi cator
6 Touchpad 14 Memory Stick® media slot
7 Jog Dial™ Control 15 Power indica tor
8 Jog Dial™ back but ton 16 Display
14
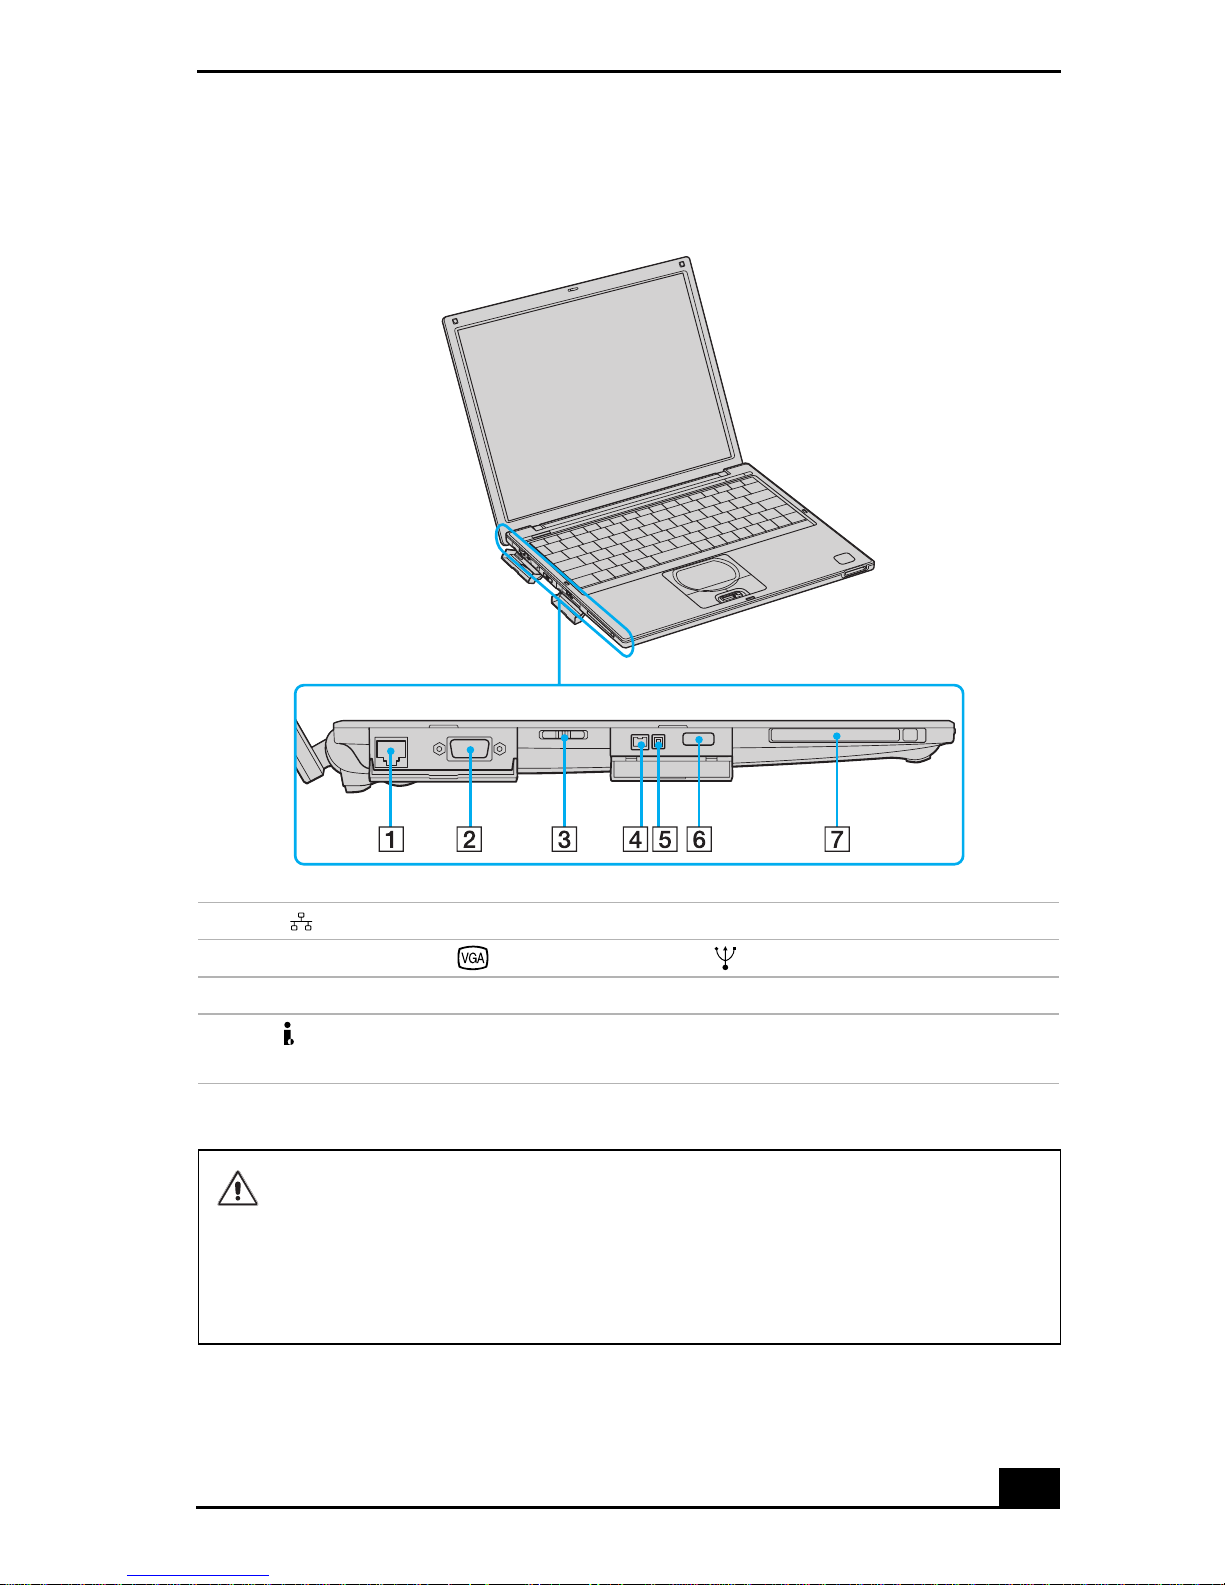
Left
Locating Controls and Ports
1 Ethernet port 5 Periphera l device DC OUT port
2 VGA (monitor) port 6 USB port
3 W ire less LAN ON/OFF switch 7 PC Card Slot
4 i.LINK® (IEEE 1394) S400
port
* Compa ti b l e with certai n op t ic al di sc dr iver s
Only connect 10BASE-T and 100BASE-TX cables to the Ethernet port.
Do not connect any other type of network cable or any te lephone line.
Connectin g cables other than those li sted above may r esult in an electric
current overload and could cause a mal function, excessive heat, or fire in
the port. To connect the unit to the network, contact your network
administrator.
15
*
V AIO® Computer Quick Start
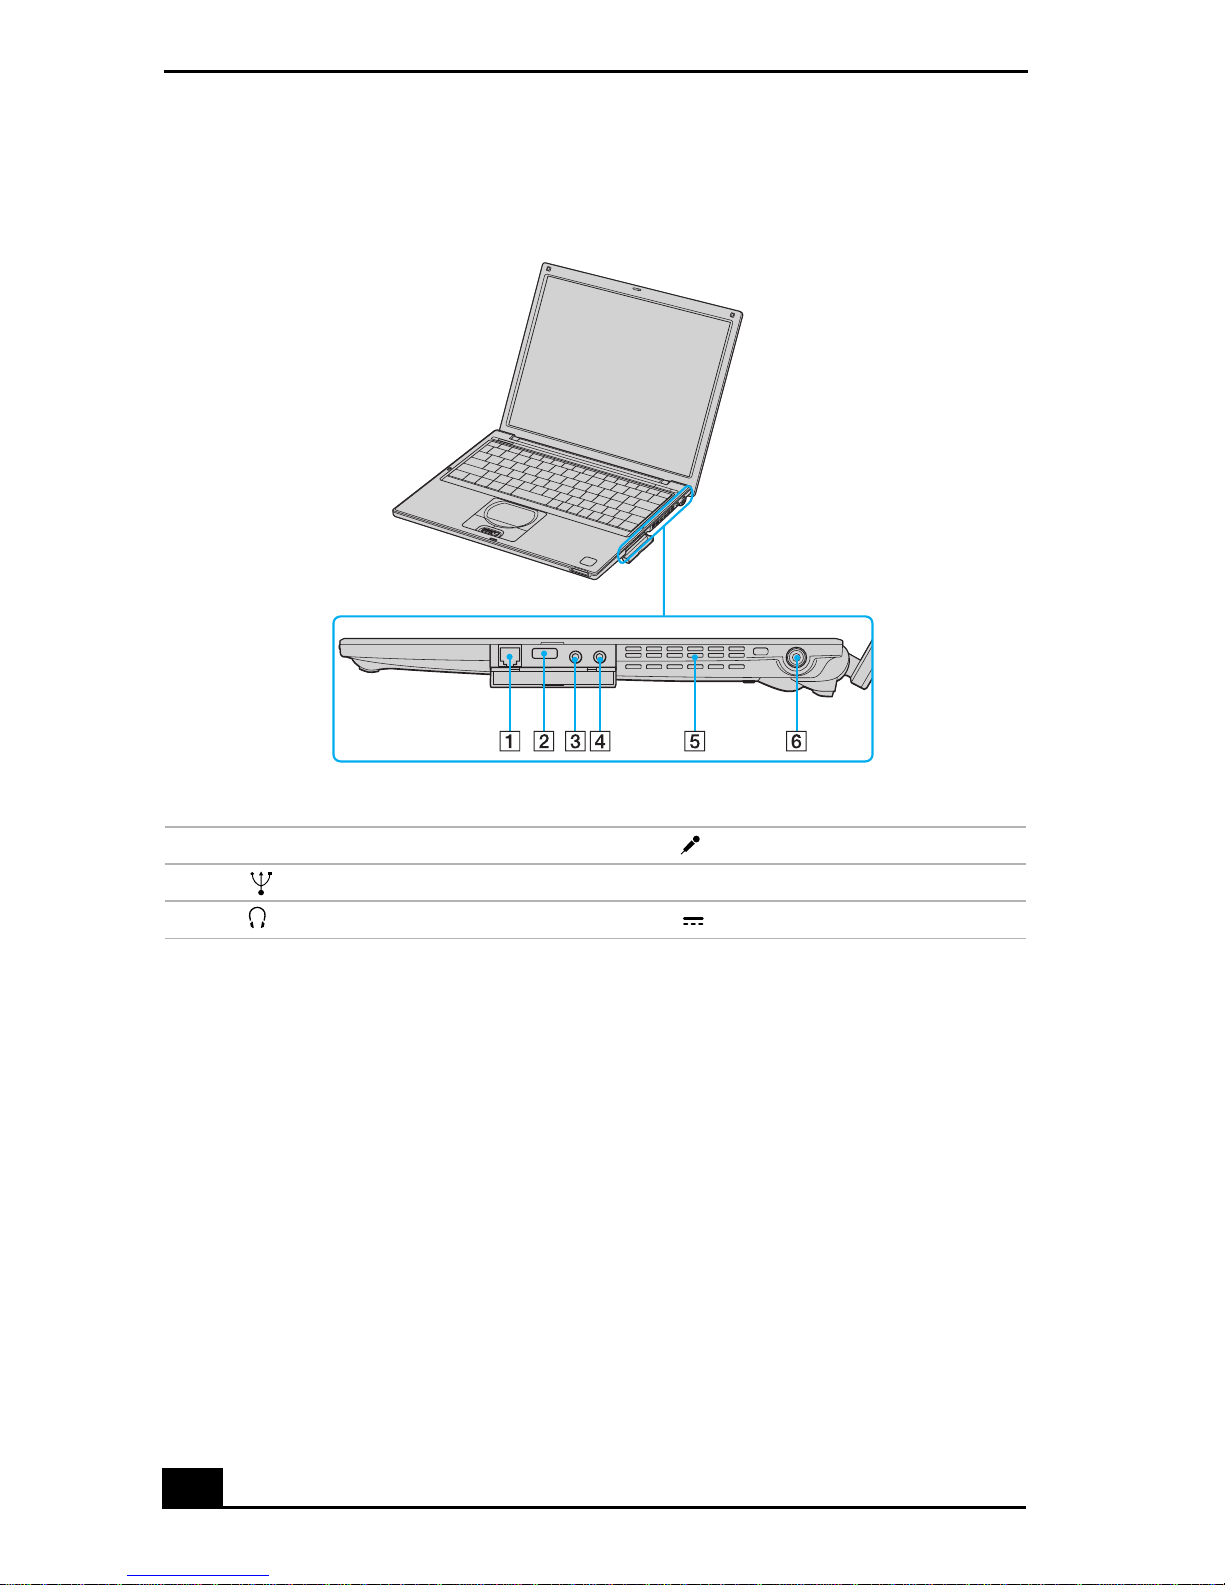
Right
1 Modem jack 4 Microphone jack
2 USB port 5 Ventilation fan
*
3 Headphone jack 6 DC IN por t
* Do no t cove r th e ventilation fan whil e th e comp ut e r is on.
16
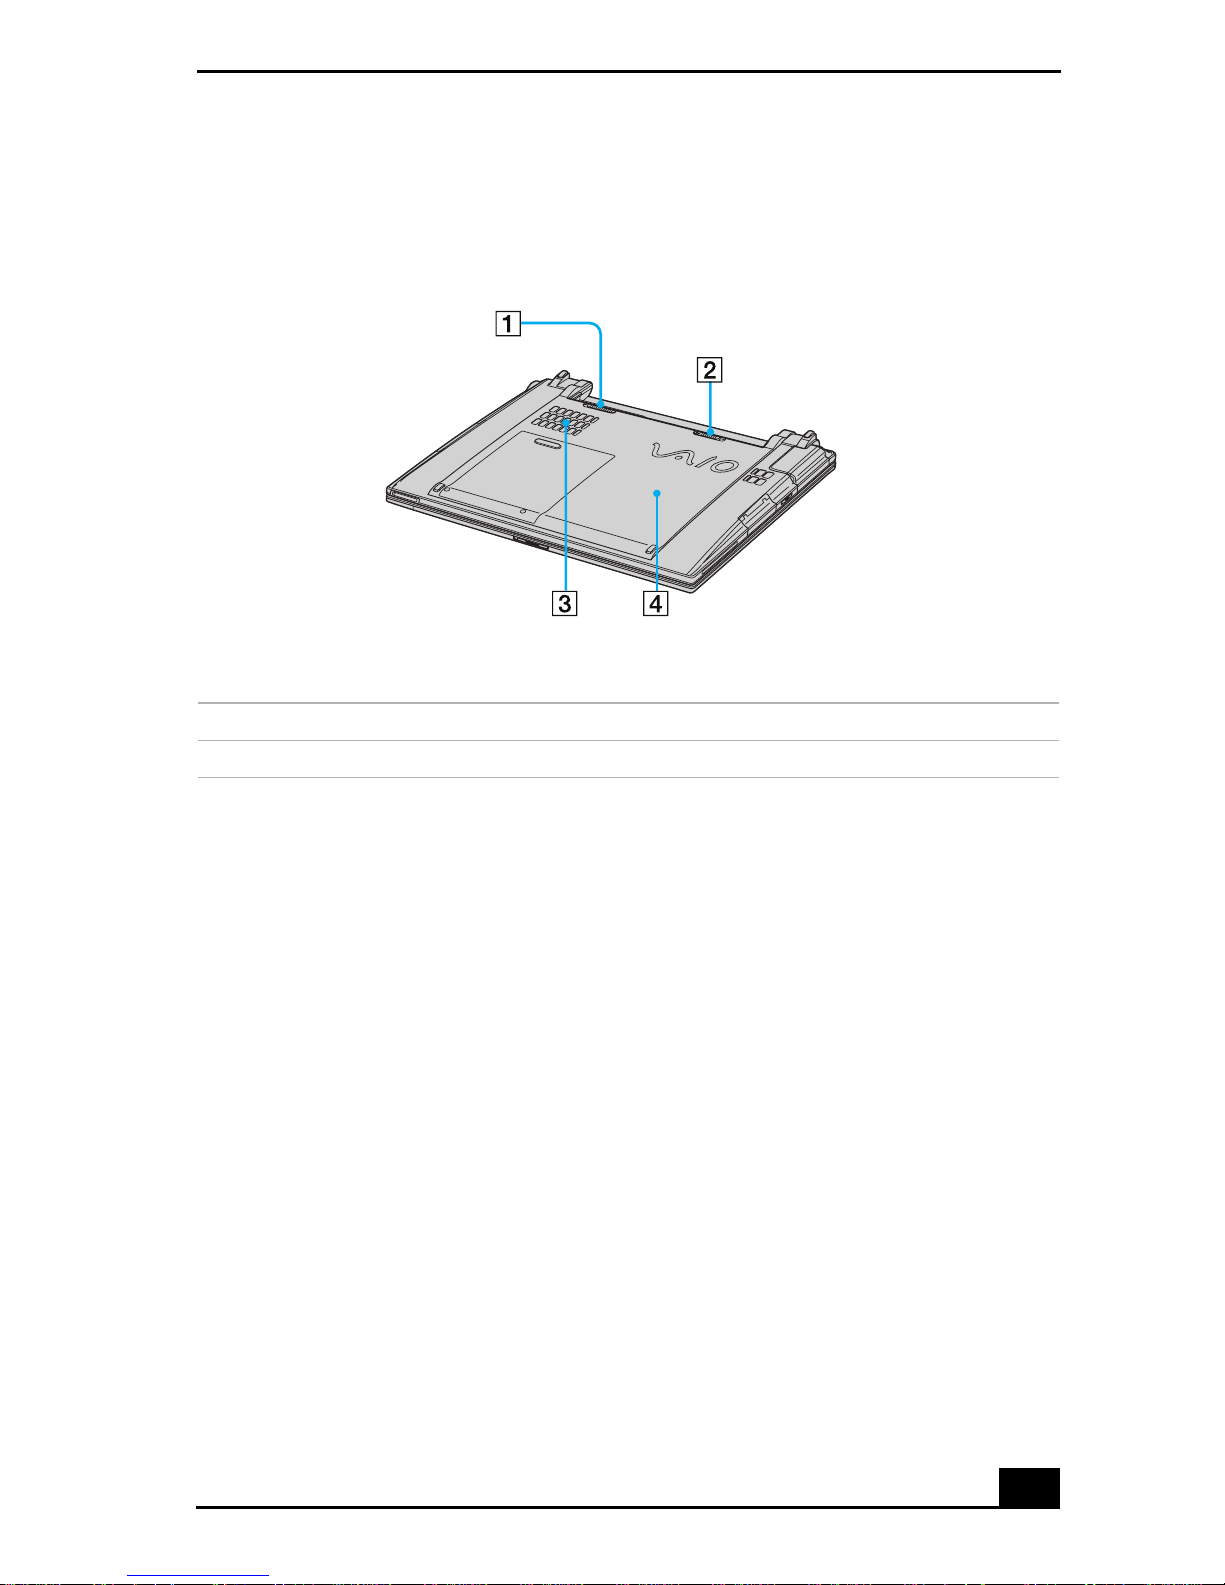
Bottom
Locating Controls and Ports
1 Battery LOCK/UNLOCK lever 3 Ventilation fan
2 Battery UNLOCK lever 4 Reset butt on
* Do not cover the ventilation fan while the computer is on.
† To press the R es e t button, use a t hin, straigh t object (such as a paper clip).
†
*
17
 Loading...