

Sony PCG-F150 Primary, VAIO PCG-F190, VAIO PCG-F160, VAIO PCG-F180, PCG F180 - VAIO - PII 333 MHz User Manual

®
VAIO Notebook Computer
User Guide
PCG-F150/PCG-F160/PCG-F180/PCG-F190
®

Notice to Users
© 1999 Sony Electronics Inc. All rights
reserved. This man ual and the software
described herein, in whole or in part, may
not be reproduced, translated, or reduced
to any machine-readab l e fo rm without
prior written approval.
SONY ELECTRONICS INC. PROVIDES
NO W ARRANTY WITH REGARD TO
THIS MANUAL, THE SOFTWARE, OR
OTHER INFORMATION CONTA INED
HEREIN AND HEREBY EXPRE S S LY
DISCLAIMS ANY IMPLIED
WARR ANTIES OF MERCHA NTABILITY
OR FITNESS FOR ANY PARTICULAR
PURPOSE WITH REGARD TO THIS
MANUAL, THE SOFTWARE, OR SUCH
OTHER INFORMATION. IN NO EVENT
SHALL SONY ELECTRONICS INC. BE
LIABLE FOR ANY INCIDENTAL,
CONSEQUENTIAL, OR SPECIAL
DAMAGES, W HE T HER BASED ON
TORT, CONTRACT, OR OTHERWISE,
ARISING OUT OF OR IN CONNECT IO N
WITH THIS MANUAL, THE SOFTWARE,
OR OTHER INFORMA T ION
CONTAINED HEREIN OR THE USE
THEREOF.
Sony Electronics Inc. reserves the right to
make any modification to this manual or
the information contained herein at any
time without notice. The software
described herein is governed by the terms
of a separate user license agreement.
fee and credit card information. Fin an cial
services may require pri or arrangements
with particip at in g financial instit ut ions.
As an ENERGY STAR
Partner, Sony Corporation
has determined that this
product meets the
TAR guidelines for energy
S
efficienc y.
The International ENERGY STAR Office
Equipment Program is an international
program that promotes energy saving
through the use of computers and other
office equipment. The program backs the
development and dissemination of
products with functions that effectively
reduce energy consumption. It is an open
system in which busi n e ss proprietors can
participate voluntar ily. The target e d
products are office equipment such as
computers, displays, printers, facsimiles
and copiers. Their standa rds and logo s are
uniform amon g p articipating nati ons.
E
NERGY STAR is a U.S. registered mark.
Sony, i.LINK, VAIO and the VAIO logo are
trademarks of Sony Corporation.
W indows, Windows NT, and the Windows
98 logo are registered trademarks of
Microsoft Corporation. Intel, MMX, and
Pentium are trademarks of Intel
Corporation.
All other trademarks are trademarks of
their respective owners.
NERGY
E
This product contains software owned by
Sony and licensed by third parties. Use of
such software is subject to the terms and
conditions of license agreements enclosed
with this product. Some of the software
may not be transported or us ed outs ide the
United States. Software specifications are
subject to change without notice and may
not necessaril y be identical to current r etail
versions.
Updates and additions to software may
require an additional charge. Subscriptions
to online serv ic e p roviders may require a

Safety Information
Owner’s Record
The model number and serial number are
located on the bottom of your Sony VAIO
Notebook Computer. Record the serial
number in the space provided here. Refer
to the model and serial number when you
call your Sony Service Center.
Model Number: PCG-F150/PCG -F16 0/
PCG-F180/PCG-F190
AVERTISSEMENT
Pour prévenir tout risque d’incendie
❏
ou d’électr ocution, gar der cet appar eil
à l’abri de la plu ie et de l’ humidité.
Pour prévenir tout risque
❏
d’électrocution, ne pas ouvir le châssis
de cet appareil et ne confier son
entretien qu’à une personne qualifi ée.
L’appareil doit êt re le plus près
❏
possible d ’une prise mur ale pour en
faciliter l’accè s.
Serial Number:__ ______________________
WARNING
To prevent fire or shock hazard, do
❏
not expose your notebook computer
to rain or moisture.
To avoid electrical shock, do not open
❏
the cab inet. Refe r servici ng to
qualified personnel only.
Never install modem or telephone
❏
wiring during a lightning storm.
Never install telephone jacks in wet
❏
locations unless the jack is specifically
designed for wet locations.
Never touch uninsulated telephone
❏
wire or termina ls unless the telephone
line has been disconnected at the
network interface.
Use caution when installing or
❏
modifying telephone lines.
Avoid using the modem during an
❏
electrical storm.
Do not use the modem or a telephone
❏
to report a gas leak in the vicinity of
the leak.
A socket outlet should be as close as
❏
possible to th e u nit and easily
accessible.
The laser beam used in the DVD-
!
ROM drive unit is harmful to the
eyes. Do not attempt to
disassemble the cabinet. Refer
servicing to qualified personnel
only .
Regulatory Information
Declaration of Conformity
Trade Name: SONY
Model No: PCG-F150/PCG -F16 0/
PCG-F180/PCG-F190
Responsible Party:
Sony Electronics Inc.
Address:
1 Sony Drive
Park Ridge, NJ 07656
Tele p h on e No. : 201-930-6970
This device complies with Part 15 of
the FCC rules. Operation is subject
to the following two conditions: (1)
This device may not cause harmful
interference, and (2) this device
must accept any interference
received , including any int erfer ence
that may cause undesir ed ope ration .
This equipment has been tested and found
to comply with the limits for a Class B
digital device, pursuant to Part 15 of the
Rules. These limits are desi gned to pr ovide
reas onable protecti on against harmful
interference in a resid e nt ial installation.
This equipment generates, uses, and can
radiate radio frequency energy and, if not
installed and u s e d in accordance with the
instructions, may cause harmful
interference to radio communic ations.

However, there is no guarantee that
interference will not occur in a particular
installation. If this equipment does cause
harmful interference to radio or television
reception, wh ich can be dete rmined by
turning the equipment off and on, the user
is encouraged to try to correct the
interference by one or more of the
following measures:
Reorient or relocate the receiv in g
❏
antenna.
Increase the separation between the
❏
equipment and the receiver.
Connect the equipment into an outlet
❏
on a circuit different from that to
which the receiver is connected.
Consult the dealer or an experienced
❏
radio/TV technician for help.
You are cautione d that an y chan ge s or
modifications not expressly approved in
this manual could void your authority to
operate this equipment.
Only peripherals (computer input/output
devices, terminals, printers, etc. ) that
comply with FCC Class B limits may be
attached to this computer product.
Operation with non-compliant peripherals
is likely to result in interference to r adio
and televis ion reception.
All cables used to connect peripherals must
be shielded and grounded. Operation with
cables, connected to peripherals, that are
not shielded and grounded, may result in
interference to radio and television
reception.
FCC Part 68
This equipment complies with Part 68 of
the FCC rules. On the bottom of this
equipment is a label that contains, among
other information, the FCC equivalenc e
number (REN) for this equipment. If
requested, this information must be
provided to the telephone company.
This modem uses the USOC RJ-11
telephone jack.
The REN is used to determine the quantity
of devices which may b e connected to the
telephone line. Excessive RENs on the
telephone line may result in the devices not
ringing in response to an incoming call. In
most, but not all areas, the sum of the RENs
should not exceed five (5.0). T o be certain of
the number of devices that may be
connected to the line, as det erm ined by the
total RENs, conta ct the t ele phone compa ny
to determine the maximum REN for the
calling area.
If the terminal equipment (Notebook
Computer PCG-F150/PCG-F160/
PCG-F180/PCG-F190) causes harm to the
telephone network, the telephone company
will notify you in advance that temporary
discontinuance of service may be required.
But if advance notice is not practical, the
telephone company will notify the
customer as soon as possible. Also, you
will be advised of your right to file a
complaint with the FC C if you believe it is
necessary.
The telephone company may make
changes in it s facilities, equ i p ment,
operations or procedures that could affect
the operations of the equipment. If this
happens, the telephone company will
provide advance notice in order for you to
make the necessary m od ifications in order
to maintain u ninterrupted service.
If trouble is experienced with this
equipment (Notebook Computer
PCG-F150/PCG-F160/ PCG -F180/
PCG-F190), please contact 1-888-4SONYPC
(1-888-476-6972), or write to the Sony
Customer Information Cent er, One Sony
Drive, Park Ridge, NJ 07656 for repair and/or
warranty information. If the trouble is
causing harm to the telephone network, the
telephone company may request that you
remove the equipment from the network
until the proble m is resolved.
Repair of this equipment should be made
only by a Sony Service Center or Sony
authorized agent. For the Sony Service

Center nearest you, call 1-888-4SONYPC
(1-888-476-6972).
Cet àppareil numérique de la classe B est
conforme à la norme NMB-003 du Canada.
This equipment cannot be used on public
coin service provided by the telephone
company. Connection to Party Line Service
is subject to st at e and p ossible provincial
tariffs. (Contact th e st at e or provincial
utility service commission, public service
commission or corporation commission for
information.)
Telephone Consumer
Protection Act of 1991
(United States)
The Telephone Consumer Protection Act of
1991 makes it unlawful for any person to
use a computer or other electronic devic e to
send any message via a telephone facsimile
machine unless such message clearly
contains, in a margin at the top or bottom
of each transmit ted p ag e or on the first
page of the transmission, the date and time
it is sent and an identification of the
business, other entity, or individual
sending the message, and the telephone
number of the sending machine or such
business, other entity, or individual.
In order to program this in formation into
your facsimile machine, see your fax
software document at ion.
Telephone Consumer
Guidelines (Canada)
Please refer to you r telepho ne directo ry
under ‘Privacy Issues’ and/or ‘Terms of
Service.’ For more detailed information
please contact:
CRTC
Terrasses de la Chaudiére, Tour centrale
1 promenade du Portage, 5 étage Hull PQ
K1A 0N2.
DISPOSAL OF LITHIUM ION
BATTERY
You can return your unwanted lithium ion
batteries to your nearest Sony Service
Center or Factory Service Center.
✍
In some a reas the di sposal of li thiu m ion
batteries in household or business trash
may be prohibited.
For the Sony Service Center nearest you
call 1-888-476-6972 in the United St at es or
1-800-961-7669 in Canada
!
Do not handle damaged or leaking
lithium ion batteries.
!
Ne pas manipuler les batteries au
lithium-ion qui fuient ou sont
endommagées.
!
Danger of explosion if battery is
incorr ec tly replac ed. Replace only
with the same or equi valent type
recommended by the
manufacturer. Discard used
batteries according to the
manufacturer’s instructio n s.
!
Une batterie non conforme
présente un danger d'explosion. La
remplacer seulement par une
batterie identique ou de type
équivalent recommandé par le
fabricant. Évacuer les batteries
usées selon les directives du
fabricant.
.
This Class B digital apparat us c omplies
with Canadian ICE S -003.

The battery pack used in this
!
device may present a fire or
chemical burn hazard if mistreated.
Do not disassemble, heat above
212°F (100°C) or incinerate.
Dispose of used battery promptly.
Keep away from children.
La manutention incorrecte du
!
module de batterie de cet appareil
présente un risque d'incendie ou
de brûlures chimiques. Ne pas
démonter, incinérer ou exposer à
une température de plus de 100°C.
Évacuer promptement la batterie
usée. Garder hors de portée des
enfants.
INDUSTRY CANADA NOTICE
NOTICE: The Industry Canada label
identifies certified equipment. This
certification means that the equipmen t
meets certain teleco mmuni cati ons networ k
protective, operational and safety
requirements as prescribed in the
appropriate Terminal Equipment Technical
Requirements document(s). The
Department does not guarantee the
equipment will operate to the user’s
satisfaction.
telecommunications company cau se to
request that the user disconnect the
equipment.
Users should ensure for their own
protection that the electrical ground
connections of the power utility, telephone
lines and in t ernal metallic water pipe
system, if present, are connected together.
This precaution may be particularly
important in rural areas.
Caution: Users should not a ttempt to make
such connections themselves, but should
contact the appropriate electric inspection
authority, o r el ect ri cian, as appropriate.
NOTICE: The Ringer Equivalence Number
(REN) assigned t o e ach t e rminal device
provides an indication of the maximum
number of terminals allowed to be
connected to a telephone interface. The
termination on an interface may consist of
any combinat ion of devices subject only t o
the requirement that the sum of the Ringer
Equivalence Numbers of all the devices
does not exceed 5. The Ringer Equivalence
Number for this equipment is 0.4.
AVIS DE L’INDUSTRIE
CANADA
AVIS: L’étiquette d’In dustrie Cana da
identifie le matériel homologué .
Before ins t a lling this equipment, users
should ensure that it is permissible to be
connected to the facilities of the local
telecommunications company. The
equipment must also be installed using an
acceptable method of connection.
The customer should be aware that
compliance with the above con di tions may
not prevent degrad at io n of s erv ice in some
situations.
Repairs to cert ified equipment shou ld be
coordinated by a r epres entative designa ted
by the supplier. Equipment malfunctions
or any repairs or alterations made by the
user to this equipment may give the
Cette étiqu ette certifie qu e le matériel est
conforme aux normes de protection ,
d’exploitatio n et de sécuri té des rés eau x de
télécom munications , comme le prescrivent
les documents concernant les exigences
techniques rela ti ves au maté riel terminal.
Le Ministère n’assure toutefois pas que le
matériel fonctionnera à la satisfaction de
l’utilisateur.
Avan t d’installer ce ma t é rie l, l’utilisateu r
doit s’assurer qu’il est permis de le
raccorder aux installations de l’ e n treprise
locale de télécommunication. Le matériel
doit également être installé en suivant une
méthode acceptée de raccordement.
L’abonné ne doit pas oublier qu’il est

possible que la conformité aux conditions
énoncées ci-dessus n’empêche pas la
dégradation du se rv ice dans certaines
situations.
Les réparations de ma t ériel homologué
doivent être coordonnées par un
représentant désigné par le fournisseur.
L’entreprise de télécommunications peut
demander à l’ u tilisateur de dé brancher un
appareil à la suite de réparations ou de
modifications effectuées par l’utilisateur ou
à cause de mauvais fonctionnement.
Pour sa propre protection, l’utilisateur doit
s’assurer que tous les fil s de mise à la terre
de la source d ’éner gie électrique, des l ignes
téléphoniques et des canalisations d’eau
métalliques, s’il y en a, son t rac co rdés
ensemble. Cette précaution est
particuliè rement importante dans le s
régions rurales .
Avertissement: L’utilisateur ne doit pas
tenter de fair e ces raccor dements lui- même;
il doit avoir recours à un service
d’inspection des in st allations électriques,
ou à un électricien, selon le cas.
AVIS: L’indice d’équivalence de la sonnerie
(IES) assigné à chaque dispositif terminal
indique le nombre maximal de terminaux
qui peuvent être raccor dés à une interface.
La terminaison d’une interfac e
téléphonique peut consister en une
combination de quelques dispositifs, à la
seule condition que la somme d’indices
d’équivalence de la sonnerie de tous les
dispositifs n’ e xcède pas 5.


Contents
Welcome
Ergonomic Considerations.............................................................2
Using Your Notebook Computer
Locating the Controls and Connectors.........................................5
Connecting a Power Source ...........................................................9
Starting Your Computer ...............................................................14
Shutting Down Your Computer..................................................15
Registering Windows
®
98.............................................................16
Registering Your Computer.........................................................17
Using the Keyboard.......................................................................18
Using the Touchpad......................................................................24
Using the Floppy Disk Drive .......................................................25
Using the DVD-ROM/CD-ROM Drive......................................27
Using PC Cards..............................................................................29
Using Infrared Communication Devices....................................32
Using Power Saving Modes.........................................................34
Using a Second Battery Pack........................................................36
Using the Weight Saver .......................................... ......... .............38
ix

x
VAIO Notebook Computer User Guide
Connecting Peripheral Devices
Connecting a Phone Line ..............................................................42
Connecting the Port Replicator....................................................43
Connecting a Printer......................................................................47
Connecting an External Display...................................................48
Connecting an External Mouse or Keyboard.............................51
Connecting External Speakers......................................................52
Connecting an External Microphone...........................................53
Connecting a Digital Still Camera or Other Serial Device .......54
Connecting a Digital Video Camera Recorder...........................55
Connecting a Universal Serial Bus (USB) Device......................56
Customizing Your Notebook Computer
Displaying the Sony Notebook Setup Screen.............................57
Controlling Power Management..................................................59
Displaying Battery Information...................................................62
Selecting the Display Mode..........................................................65
Starting Your Favorite Software with Programmable Power
Key (PPK) Setup .............................................................................69
Using the Dual Display Function.................................................71
Getting Help
Troubleshooting .............................................................................75
Replacing the Internal Backup Battery........................................82
Using the System and Application Recovery CDs....................84
Notes on Use.................. ....................... ..... ..... .... ...............87
Limited Warranty Statement............................................93
Index...................................................................................99

Welcome
Congratulations on your purchase of the Sony VAIO Notebook
Computer. Sony has combined leading-edge technology in aud io, video,
computing, and communications to provide you with state-of-the-art
personal computing.
About the User Guide
The User Guide offers a quick introduction and reference to your Sony
Notebook computer.
❑ Using Your VAIO Notebook Computer shows you how to use the
standard components of your system.
❑ Connecting Peripheral Devices explains ho w you can add
functionalit y by c onnecting various p eripherals.
❑ Getting Help explains th e support options available to you and
offers basic troubleshooting tips.
❑ Notes on Use provides facts and advice about using your notebook
computer.
❑ Limited Warranty Stat ement provides your product warranty
statement and explains how to extend your warranty for an
additiona l ni ne mo nt hs .
The online User Guide is included with your computer as an electronic
document. It includes additional information on using the Sony software
products that are installed on your computer and how to customize your
Sony noteboo k computer.
1
2
VAIO Notebook Computer User Guide
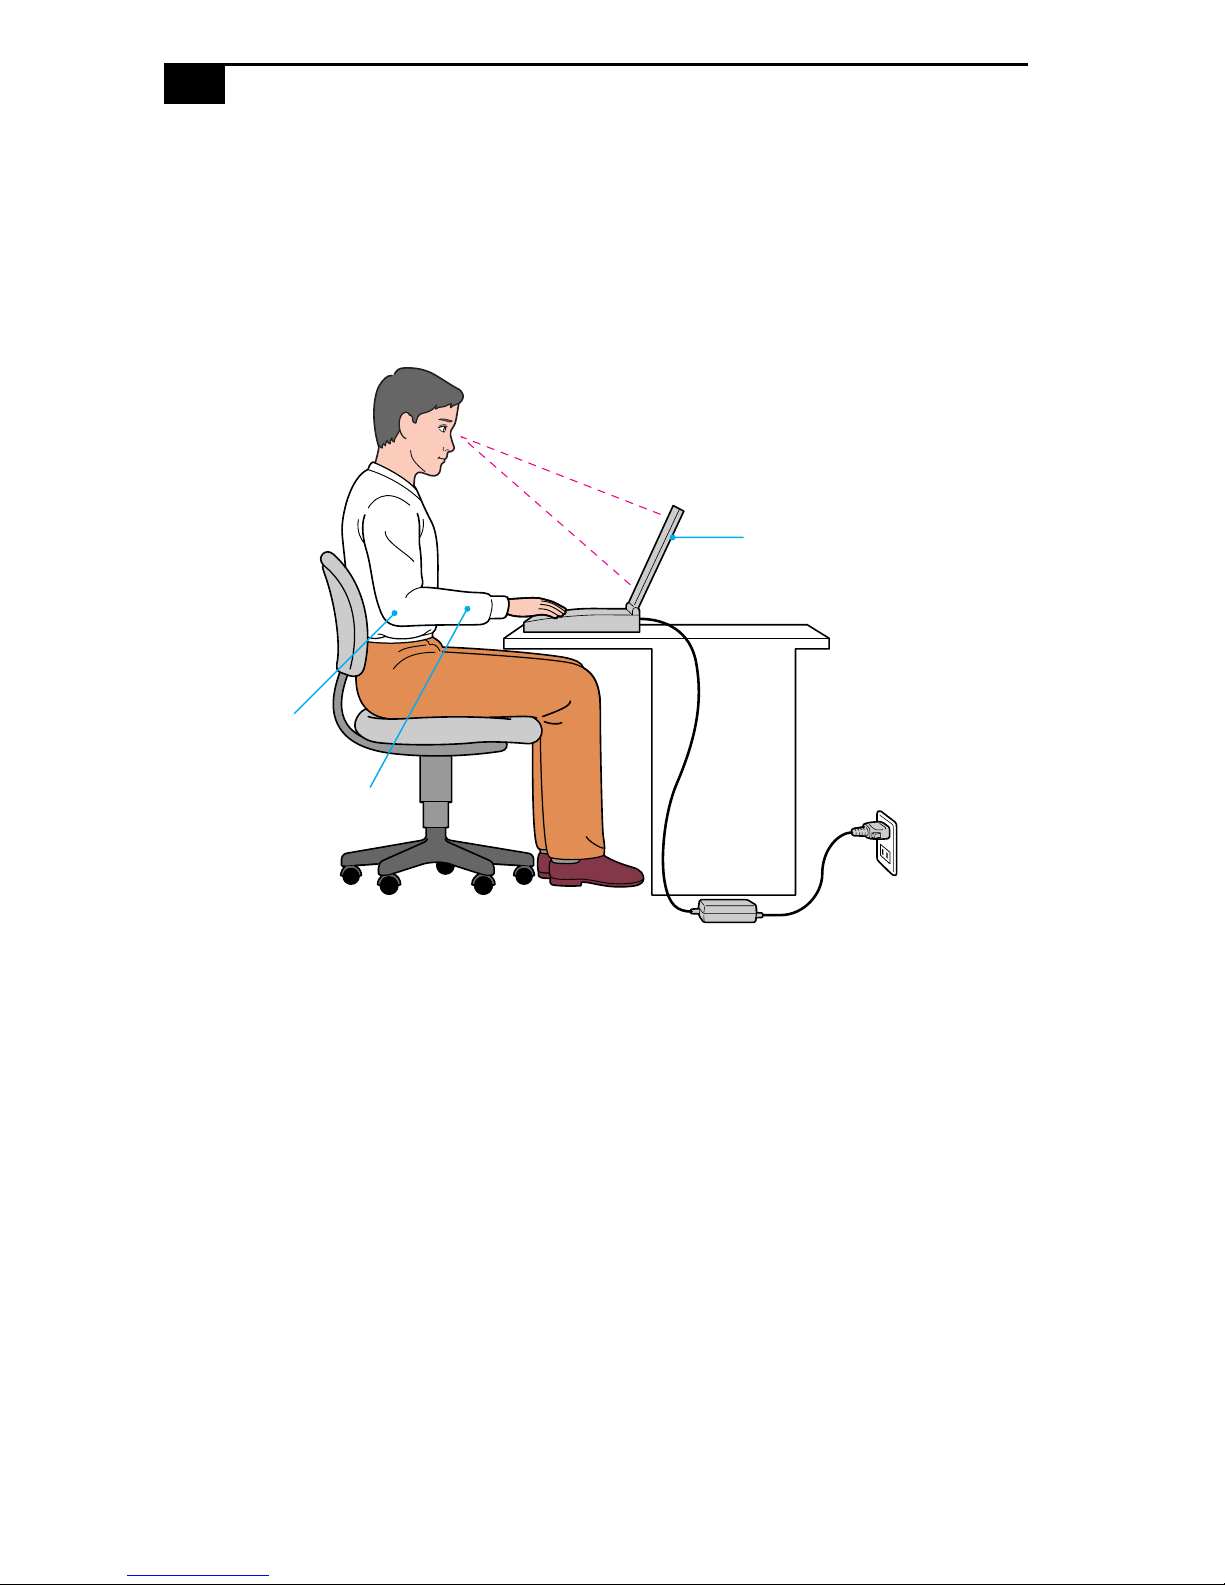
Ergonomic Considerations
You will be using your notebook computer as a portable device in a
variety of environments. Whenever possible, you should attempt to
apply the following ergonomic consi d era tions to both stationary and
portable environments.
Computer positioned
directly in front of you
Arms at desk
level
Wrists relaxed
and flat
❑ Position of your computer – Place the computer directly in front of
you as you work. Keep your forearms horizontal, with your wrists in
a neutral, comfortable position while using the keyboard, touchpad,
or external mouse. Let your upper arms hang naturally at your sides.
Take breaks during sessions with your computer . Excessive use of the
computer may strain muscles or tendons.
❑ Furniture and posture – Sit in a chair with good back support and
armrests. Adjust the level of the chair so your feet are flat on the floor .
A footrest may make you more comfortable. Sit in a relaxed, upright
posture and avoid slouching forward or leaning far backward.
❑ Viewing angle of the computer’s displa y – Use the display’s tilting
feature to find the best position. You can reduce eye strain and muscle
fatigue by adjusting the tilt of the display to the proper position.
Adjust the brightn e ss setting of the display also.
Welcome
❑ Lighting – Choose a location where windows and lights do not create
3
glare and reflection on the display. Use indirect lighting to a v oid
bright spots on the display. Yo u can also purchase accessories for
your display that help reduce glare. Proper lighting adds to your
comfort and work effectiveness.
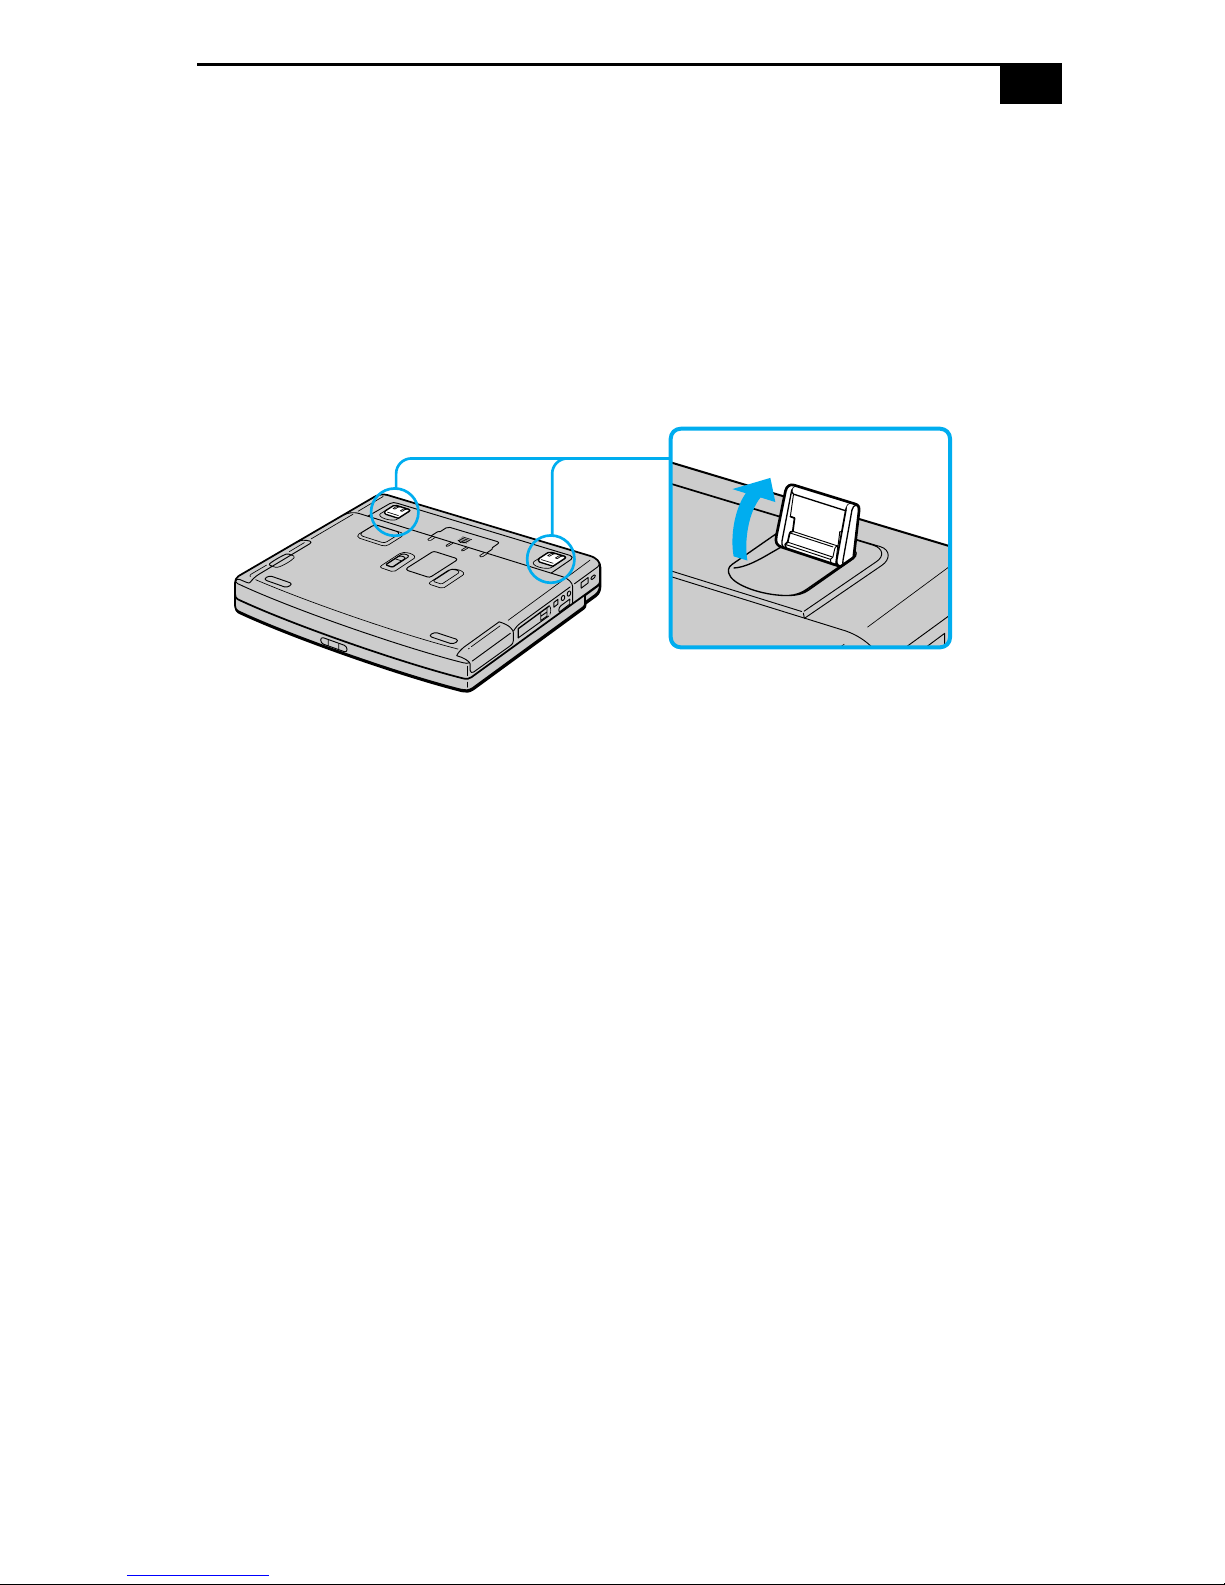
❑ Tilt stand – You use the tilt stand to place the computer at an angle
that allows comfortable typing.
❑ Placement of an external display – When using an external display,
set the display at a comfortable viewing distance. Make sure the
display screen is at eye level or slightly lower when you are sitting in
front of the monitor.

4
Using Your Notebook
Computer
This section describes how to start using your computer and how to use
your computer’s internal and external devices, such as the touchpad,
floppy disk drive, and DVD-ROM/CD-ROM drive.
Locating the Controls and Connectors
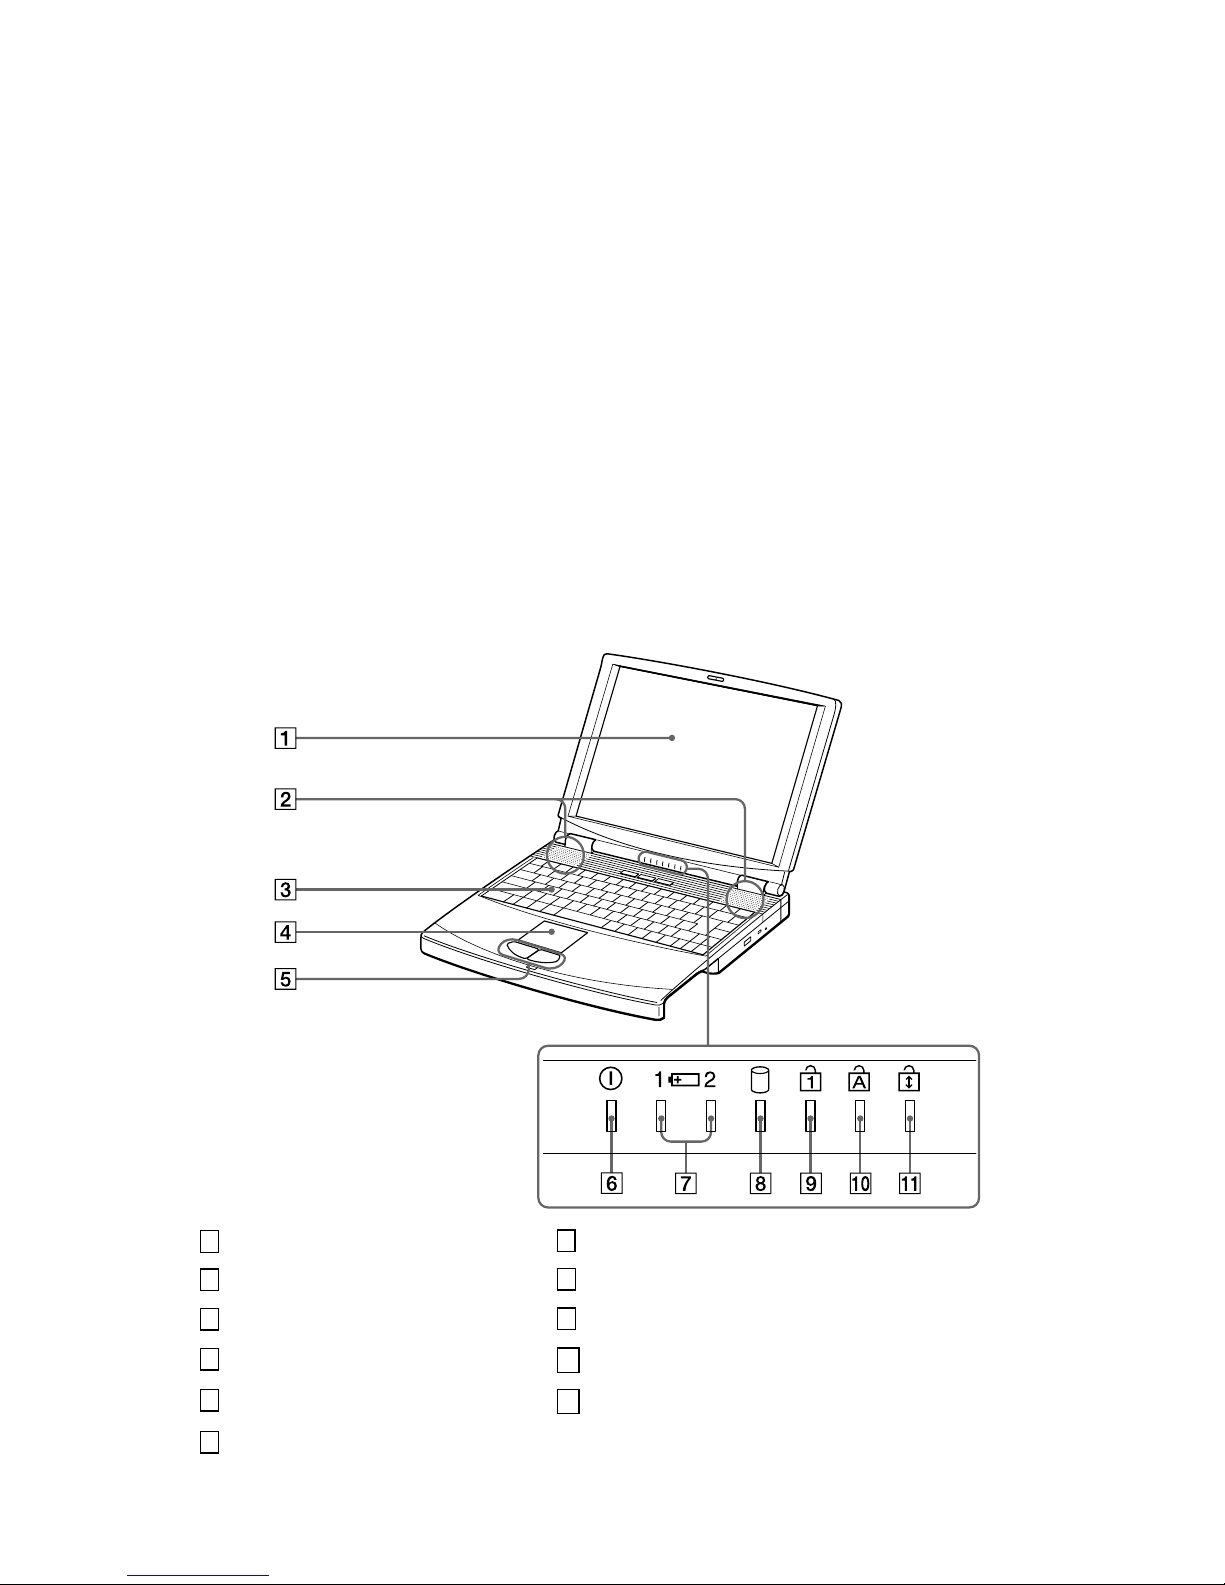
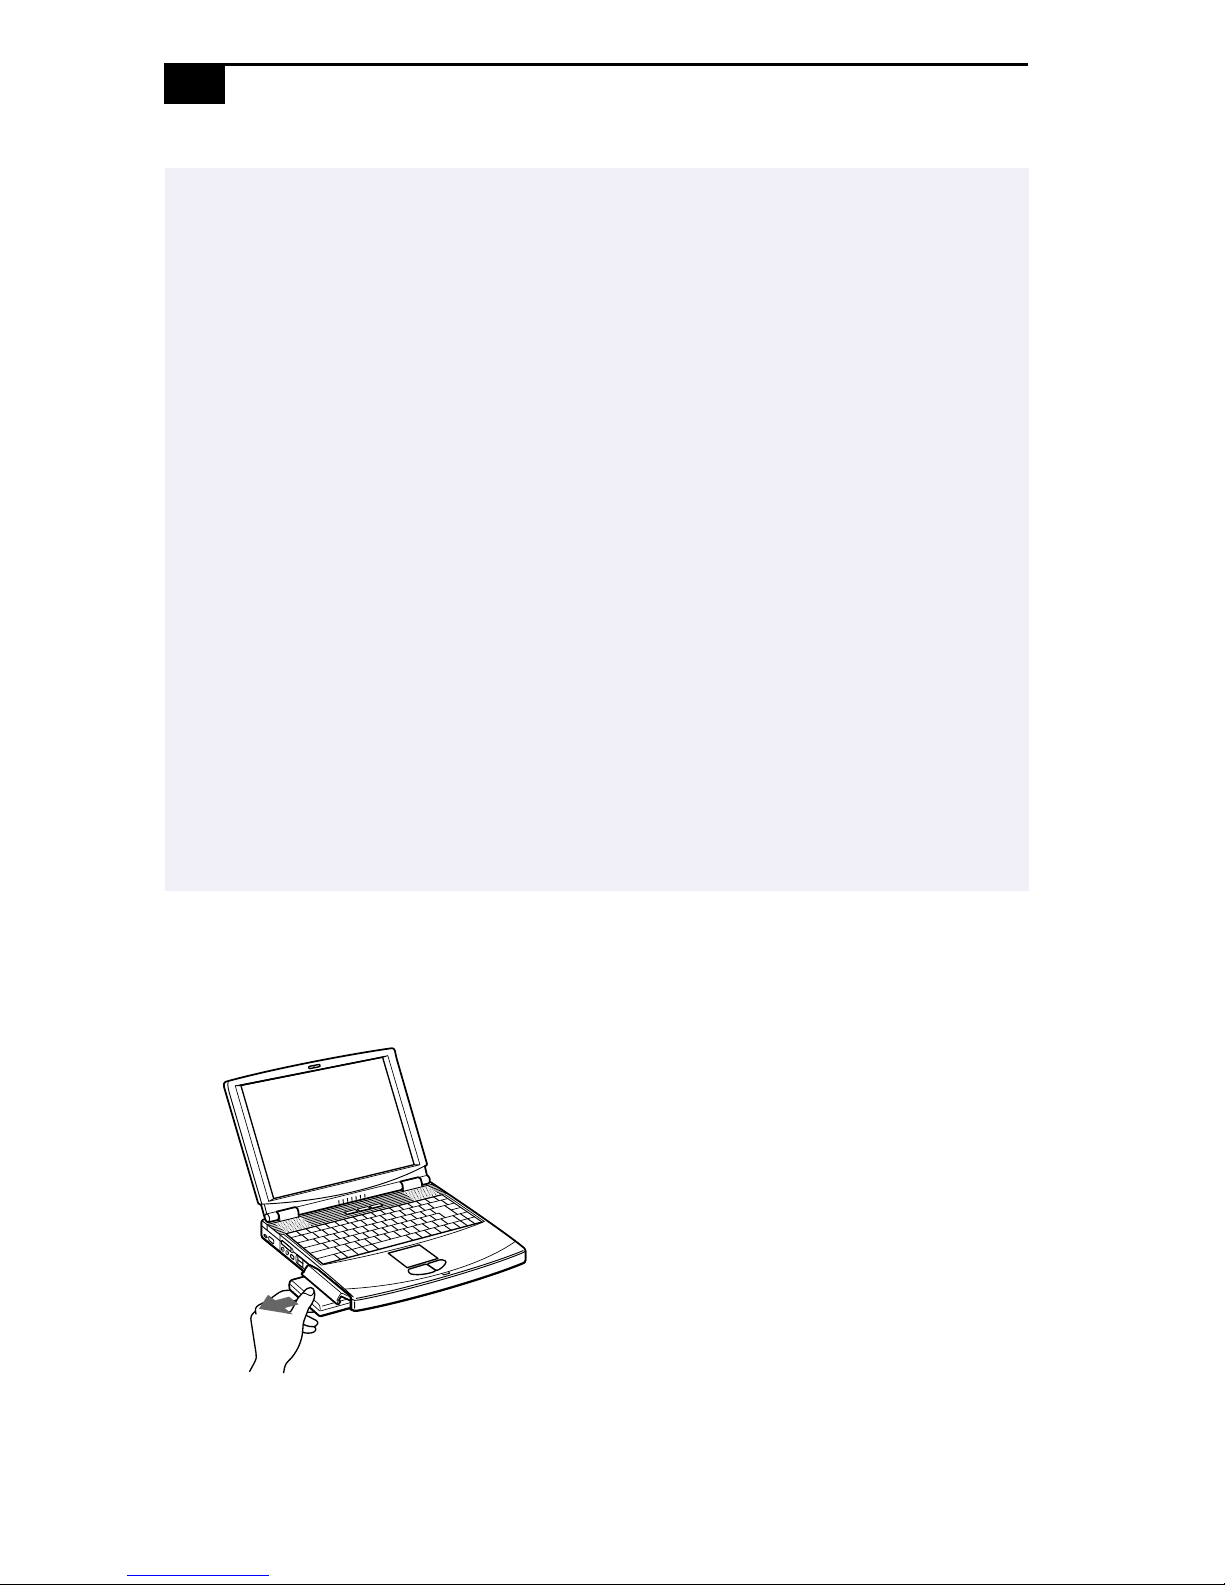
Front
1
LCD screen (pages 22, 87) Battery 1 and 2 indicators (pages 11, 21)
2
Speakers (pages 22, 52) Hard disk drive indicator (page 21)
3
Keyboard (page18) Num Lock indicator (page 21)
4
Touchpad (page24) Caps Lock indicator (page 21)
5
Left/right buttons (page 24) Scroll Lock indicator (page 21)
6
Power indicator (page11)
7
8
9
10
11
5
6
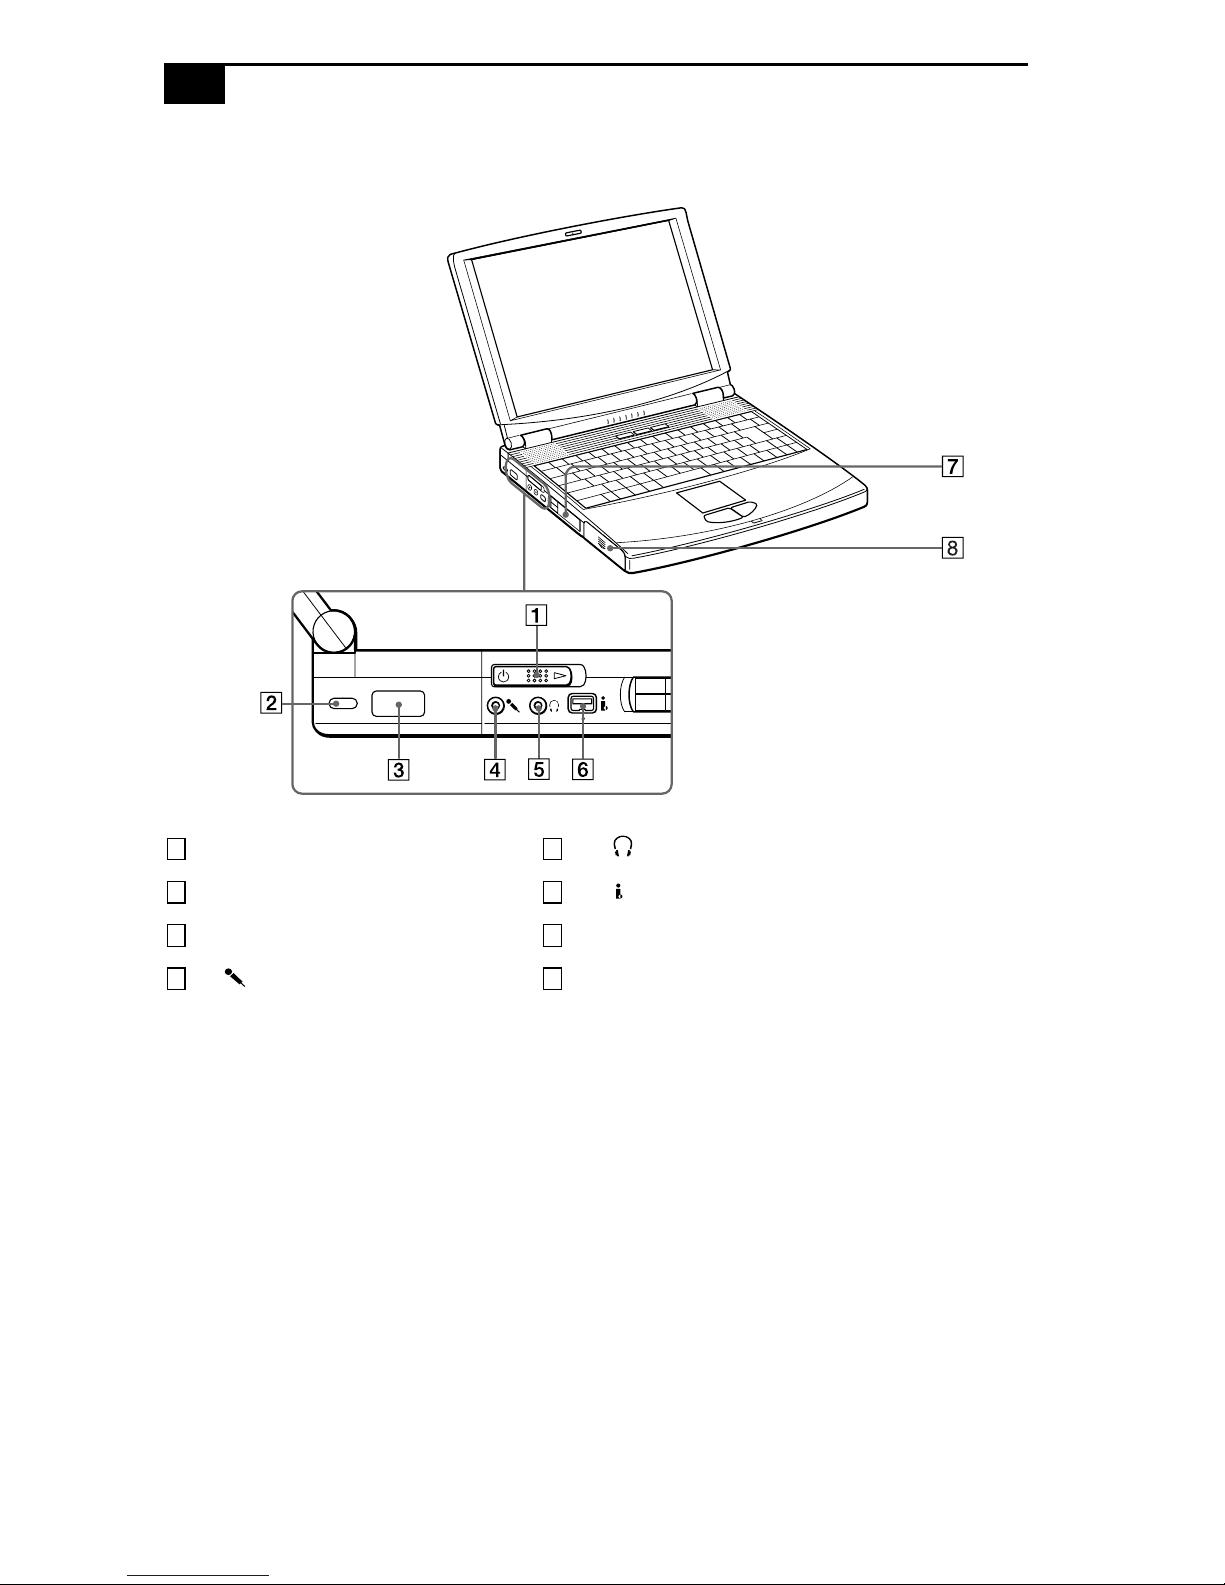
Left
VAIO Notebook Computer User Guide
Power switch (page 14)
1 5
Kensington Security Cable Lock port
2 6
Infrared port connector (page 32) PC card slots (page 29)
3 7
4 8
Microphone connector (pages 49, 53)
Headphone connector (pages 49, 52)
S200 i.LINK
Battery bay (page 10)
™
connector (page55)

Using Your Notebook Computer
526
7
Right
PPK buttons (page 69) Drive bay (pages 25, 36, 38)
1 3
DVD-ROM/CD-ROM drive (page 27) Internal microphone
2 4
7
Back
Phone line jack (page 42)
1
/ Mouse/Keyboard connector (page51)
cover
Monitor connector (page 48)
USB connector (page 56)
3
4
✍
Serial connector (page 54)
Printer connector (page 47)
There is a ventilation slot located between the USB connector and the DC In connector. Do
not cover the ventilation slot when your computer is on.
DC In connector (page9)
8
VAIO Notebook Computer User Guide
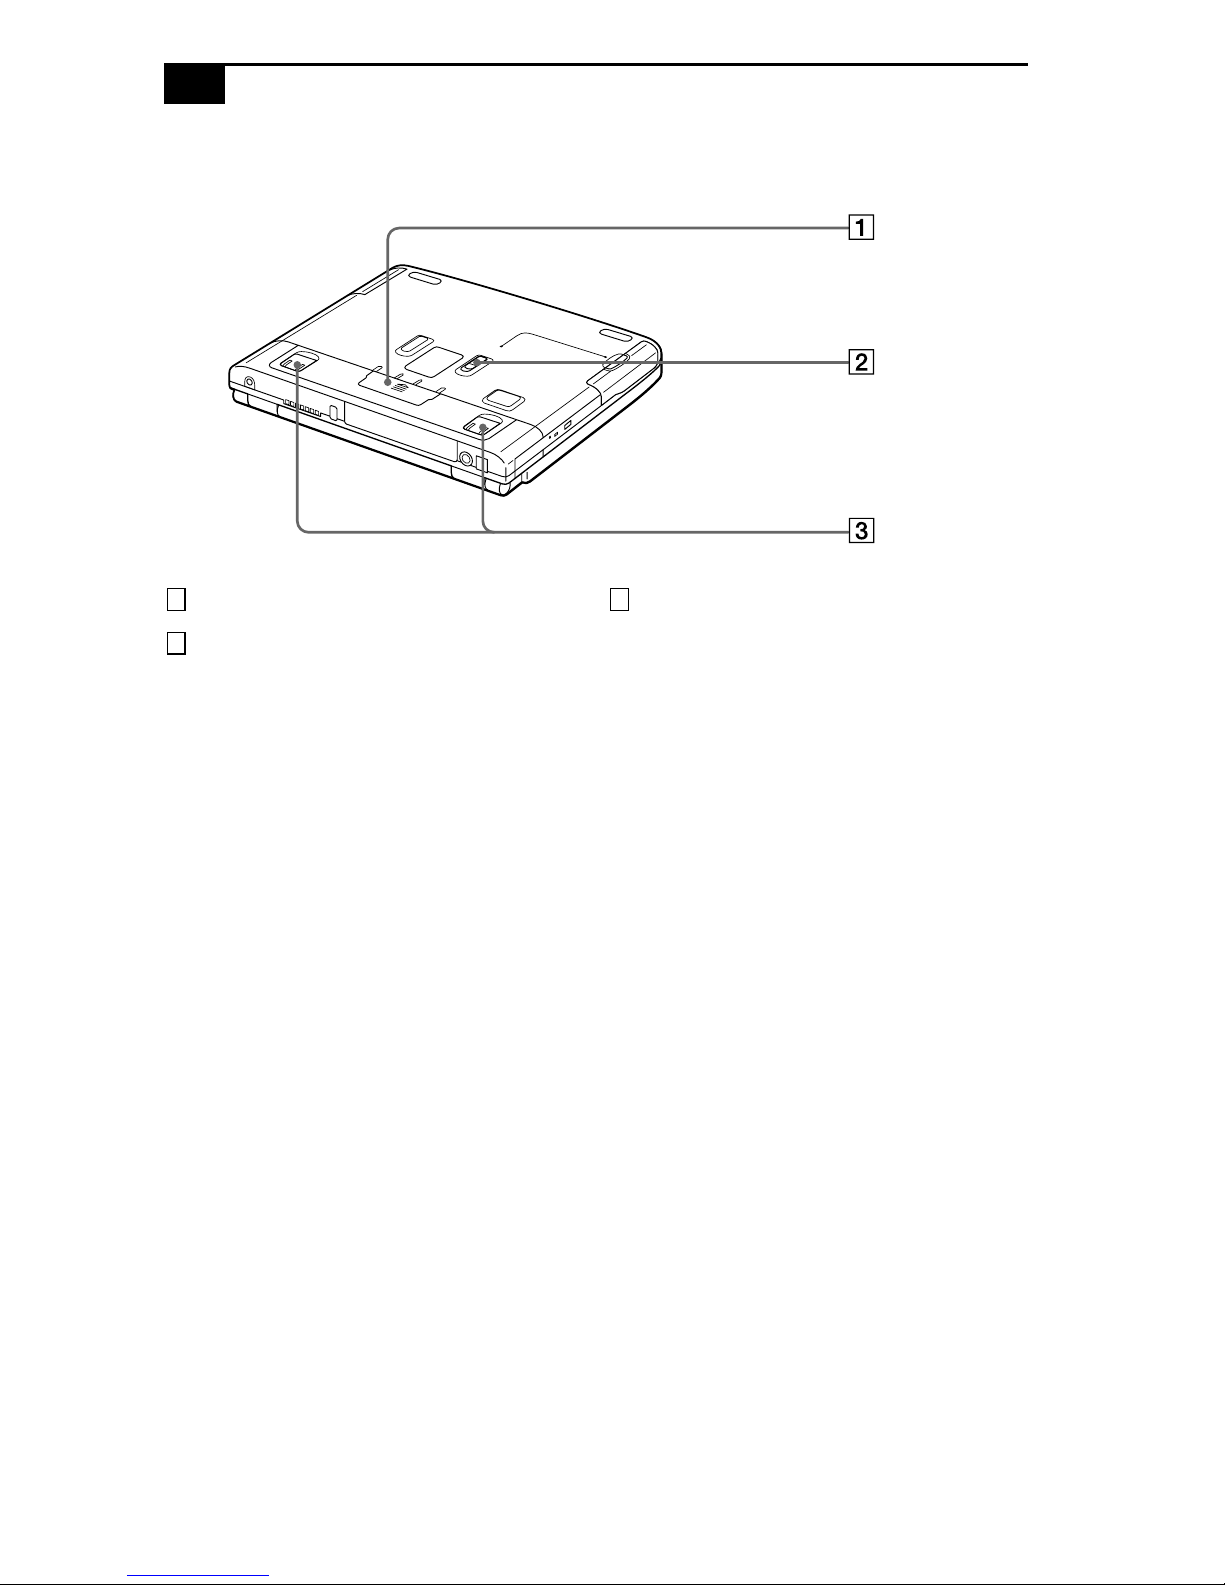
Bottom
Port replicator connector cover (pages 44, 46) Tilt stands
1 3
Drive bay RELEASE lever (pages 37, 39)
2
Using Your Notebook Computer
9
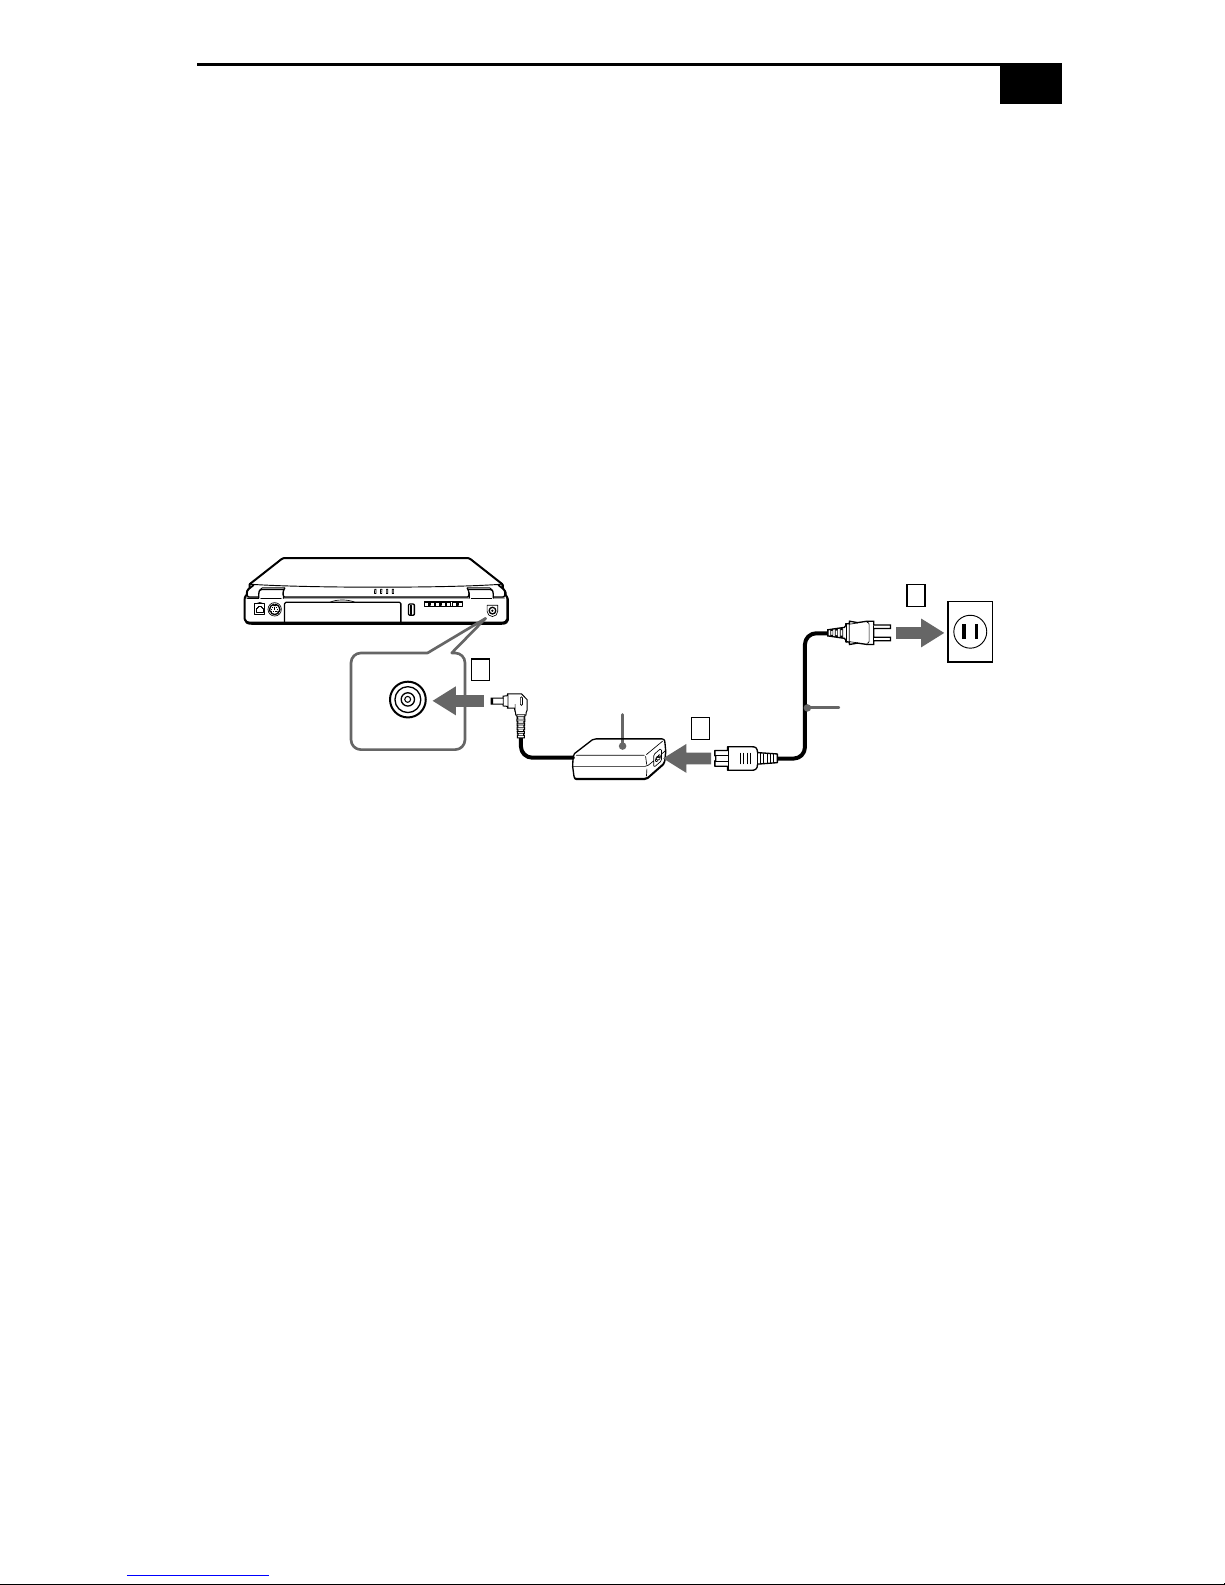
Connecting a Power Source
You can use either AC power or a rechargeable battery pack as a power
source.
Using the AC Adapter
Plug the cable attached to the AC adapter into the DC In connector on
1
the computer.
Plug one end of the power cord into the AC adapter.
2
Plug the other end of the power cord into an AC outlet.
3
DC In
Notebook computer
1
AC adapter
(supplied)
3
Power cord (supplied)
2
10
VAIO Notebook Computer User Guide
Using Battery Power
You can use one or two battery packs as a source of power. The second
battery pack inserts into the drive bay on the rig ht si de o f the computer.
(See “Using Power Saving Modes” on page 34.) Additional battery packs
are available as a separate option.
The battery pack that comes with your computer is not fully charged at
the time of purchase. Follow the steps below to insert an d charge the
battery pack.
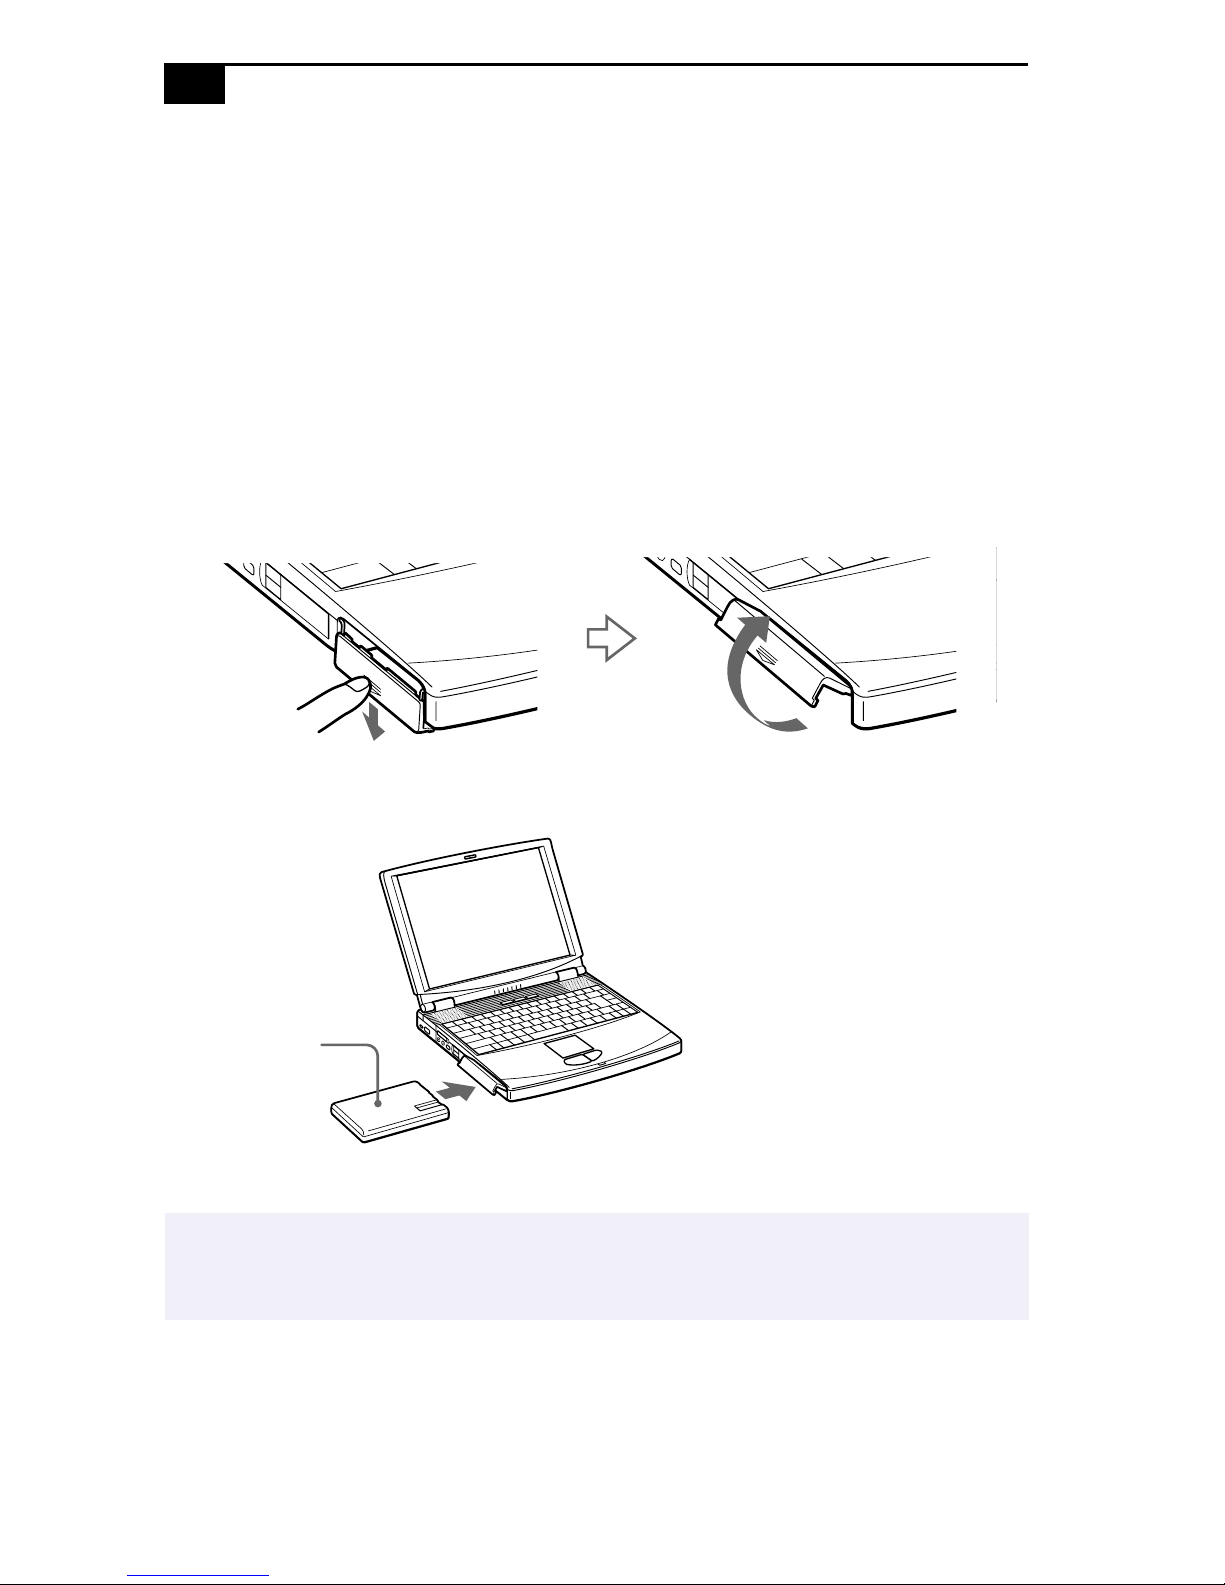
To insert the battery pack
Open the cover of the battery bay.
1
Insert the battery pack into the battery bay on the left si de o f the
2
computer.
Battery pack
(supplied)
Label side facing down
Close the cover of the battery bay until it clicks.
3
✍
When attaching yo ur comput er to th e port r eplicat or, do not attempt to insert o r remove the
battery pack. Lifting and turning the computer with an attached docking station could
cause a temporary loss of power.
Using Your Notebook Computer
To charge the batter y pack
Connect the AC adapter to the computer.
1
Insert the battery pack.
2
11
The computer automatically charges the battery (the battery indicator
light flashes in a double blink pattern as the battery charges). When the
battery is 85 percent full, the battery indicator light turns off. This
process takes approximately two hours. To charge the battery
completely, continue charging for an additional hour. See “Displaying
Detailed Battery Information” on page 63 for information on checking
the battery life.
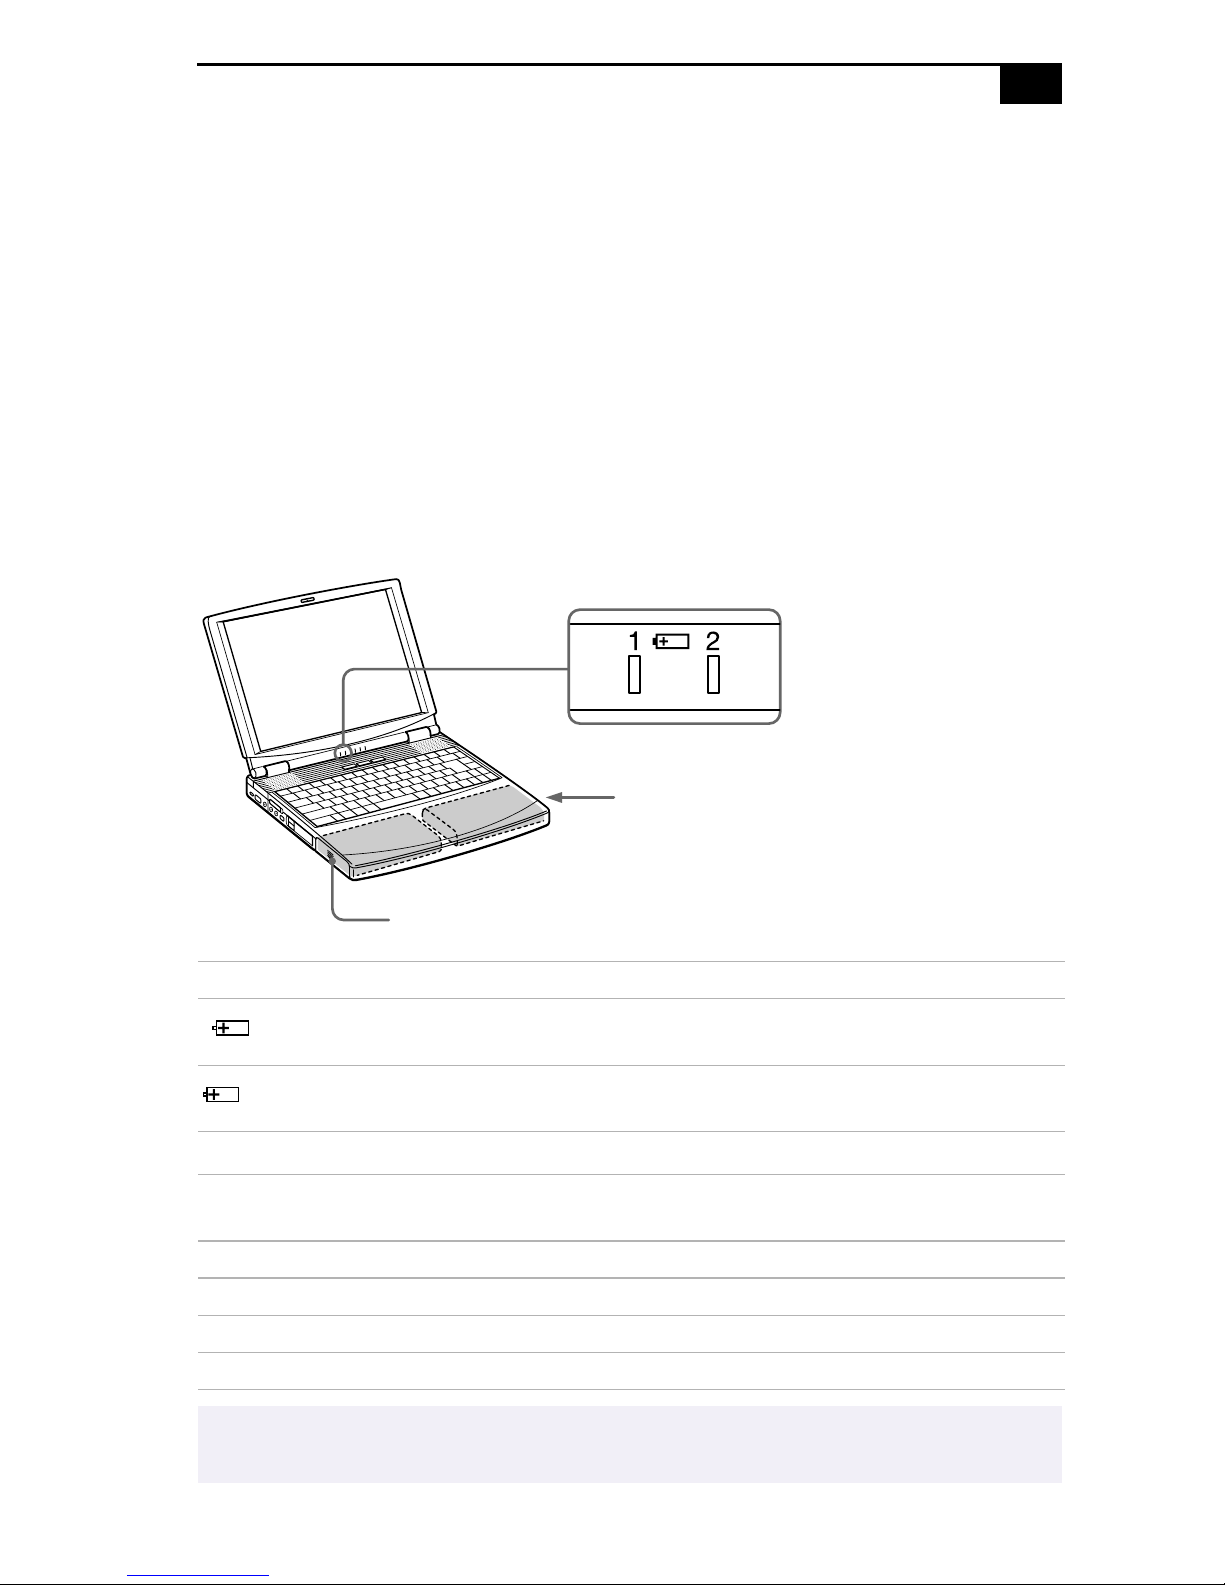
There are two battery indicator lights on the computer:
Battery indicators
Secondary battery pack
(not supplied)
Battery pack (supplied)
Battery Indicator Meaning
1
2
Battery Indicator
Light Status Meaning
On The computer is using battery power.
Single blink The battery is running out of power.
Double blink The battery is charging.
Indicates the status of the battery pack in the battery bay
on the left side of the computer.
Indicates the status of the battery pack in the drive bay on
the right side of the computer.
Off The computer is using AC power.
✍
To determine the amount of time the battery lasts, see “Displaying Battery Information” on
page 62.
12
VAIO Notebook Computer User Guide
When the battery is running out of power, both the battery and power indicators blink.
When the computer is directly con nected to A C power and has a battery pack in the battery
bay, it uses power from the AC outlet.
See “Using a Second Battery Pack” on page 36 for information on installing and charging a
battery pack in the drive bay.
Keep the battery pack in the computer while it is directly connected to AC power. The
battery pack continues to charge while you are using the computer.
If the battery level falls belo w 10%, you should either atta ch the AC ada pter to recharge the
battery or shut down your computer and insert a fully charged battery.
You can extend battery life by changing the power management modes in the PowerPanel
utility. See “Using Power Saving Modes” on page 34.
The batt ery pack s up plied with yo ur co mp uter i s a lit hium ion ba ttery and ca n be re char ged
at any time. Charging a partially discharged battery does not affect battery life.
The battery indicator light is on while you use the battery pack as a power source. When
battery life is nearly depleted, the battery indicator starts flashing.
For some software applications and some peripheral devices, your computer may not enter
System Hibernation mode when the battery life is low. To avoid loss of data when using
battery power, you should save your data frequently and manually activate a power
management mode, such as System Suspend or System Hibernation.
To remove the battery pack
Open the cover of the battery bay.
1
Pull out the battery pack.
2

Close the cover of the battery bay.
3
You may lose data if you remove the battery pack while the computer is on and
!
not connected to the AC adapter or if you remove the battery while the
compute r is in System Suspend mode.
Using Your Notebook Computer
13
14
VAIO Notebook Computer User Guide
Starting Your Computer
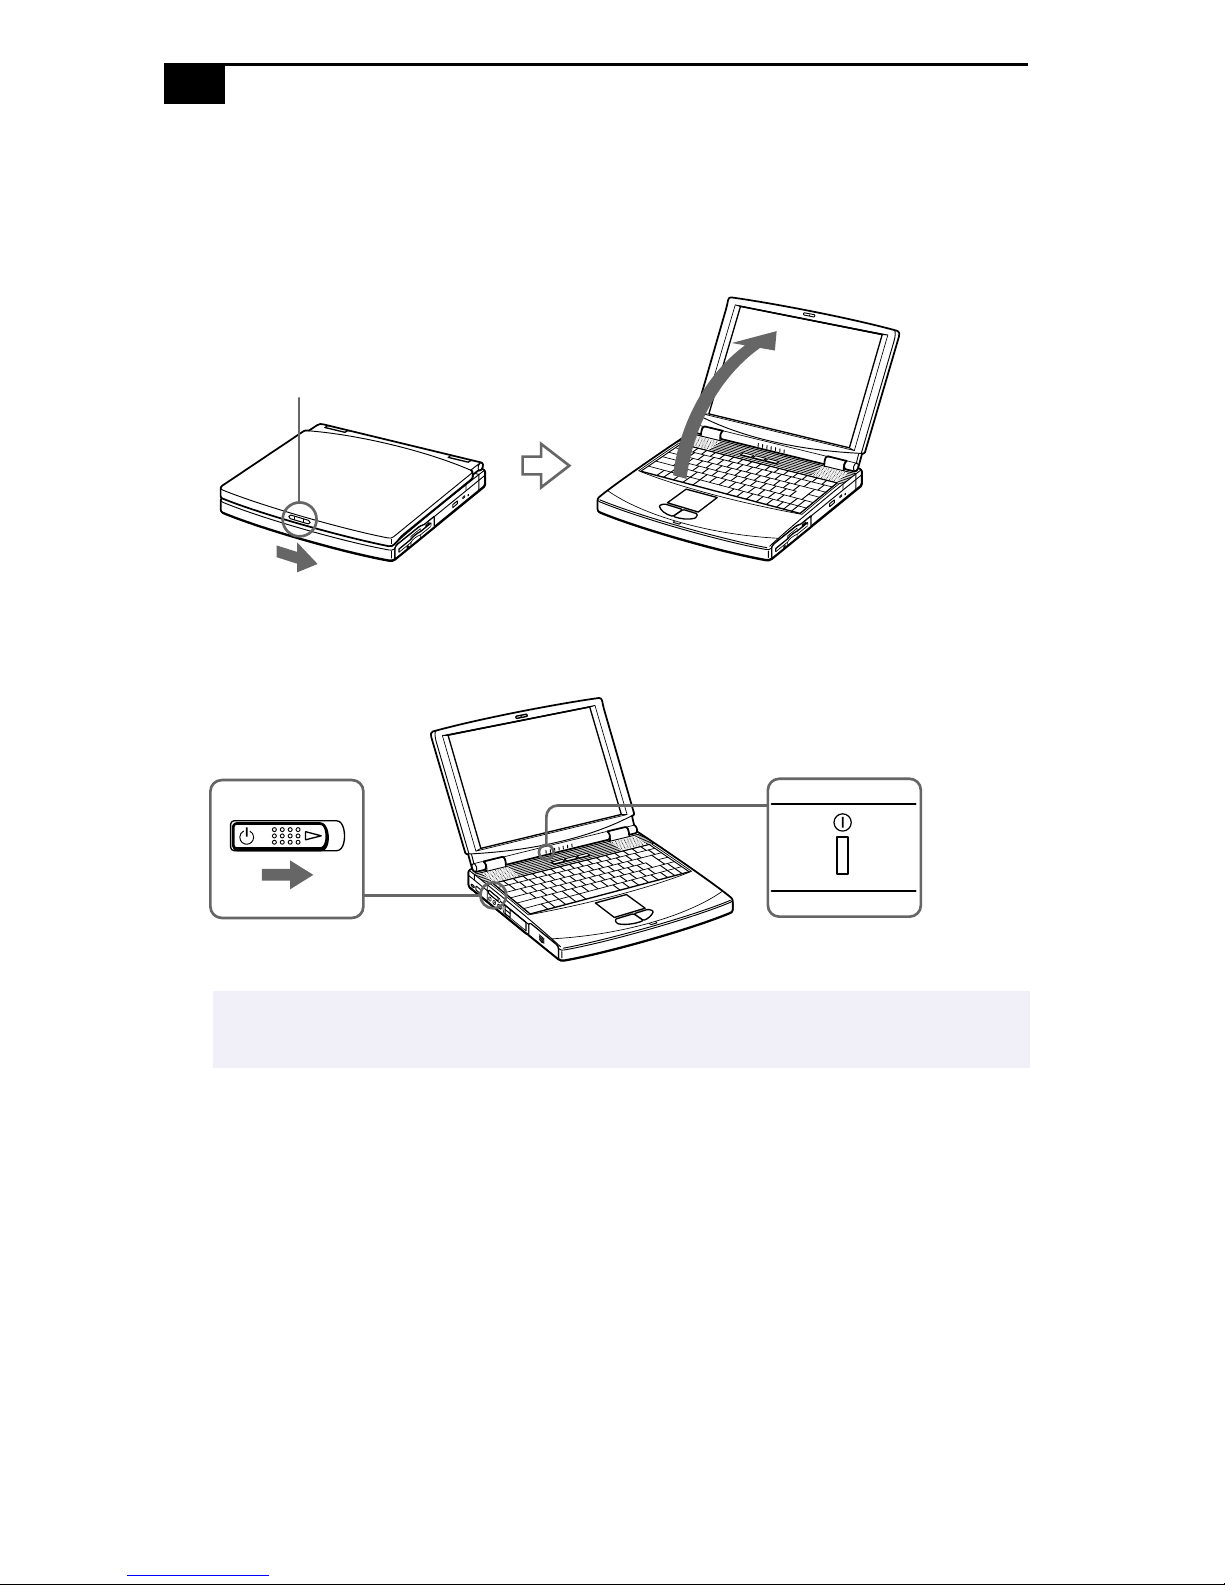
Slide the LCD lock lever in the direction of the arrow, and lift the
1
cover.
LCD lock lever
Slide the power switch on the left side toward the front of the
2
computer until the green power indicator light turns on.
Power switch
✍
If you hold the power switch in the On position for more than four seconds, the
computer turns off.
If necessary, adjust the brigh tne ss controls for the LCD displa y. To
3
decrease the brightness, press Fn+F5 and then the do wn or left a rrow
key. To increase the brightness, press Fn+F5 and then the up or right
arrow key.
Power indicator
Using Your Notebook Computer
Shutting Down Your Computer
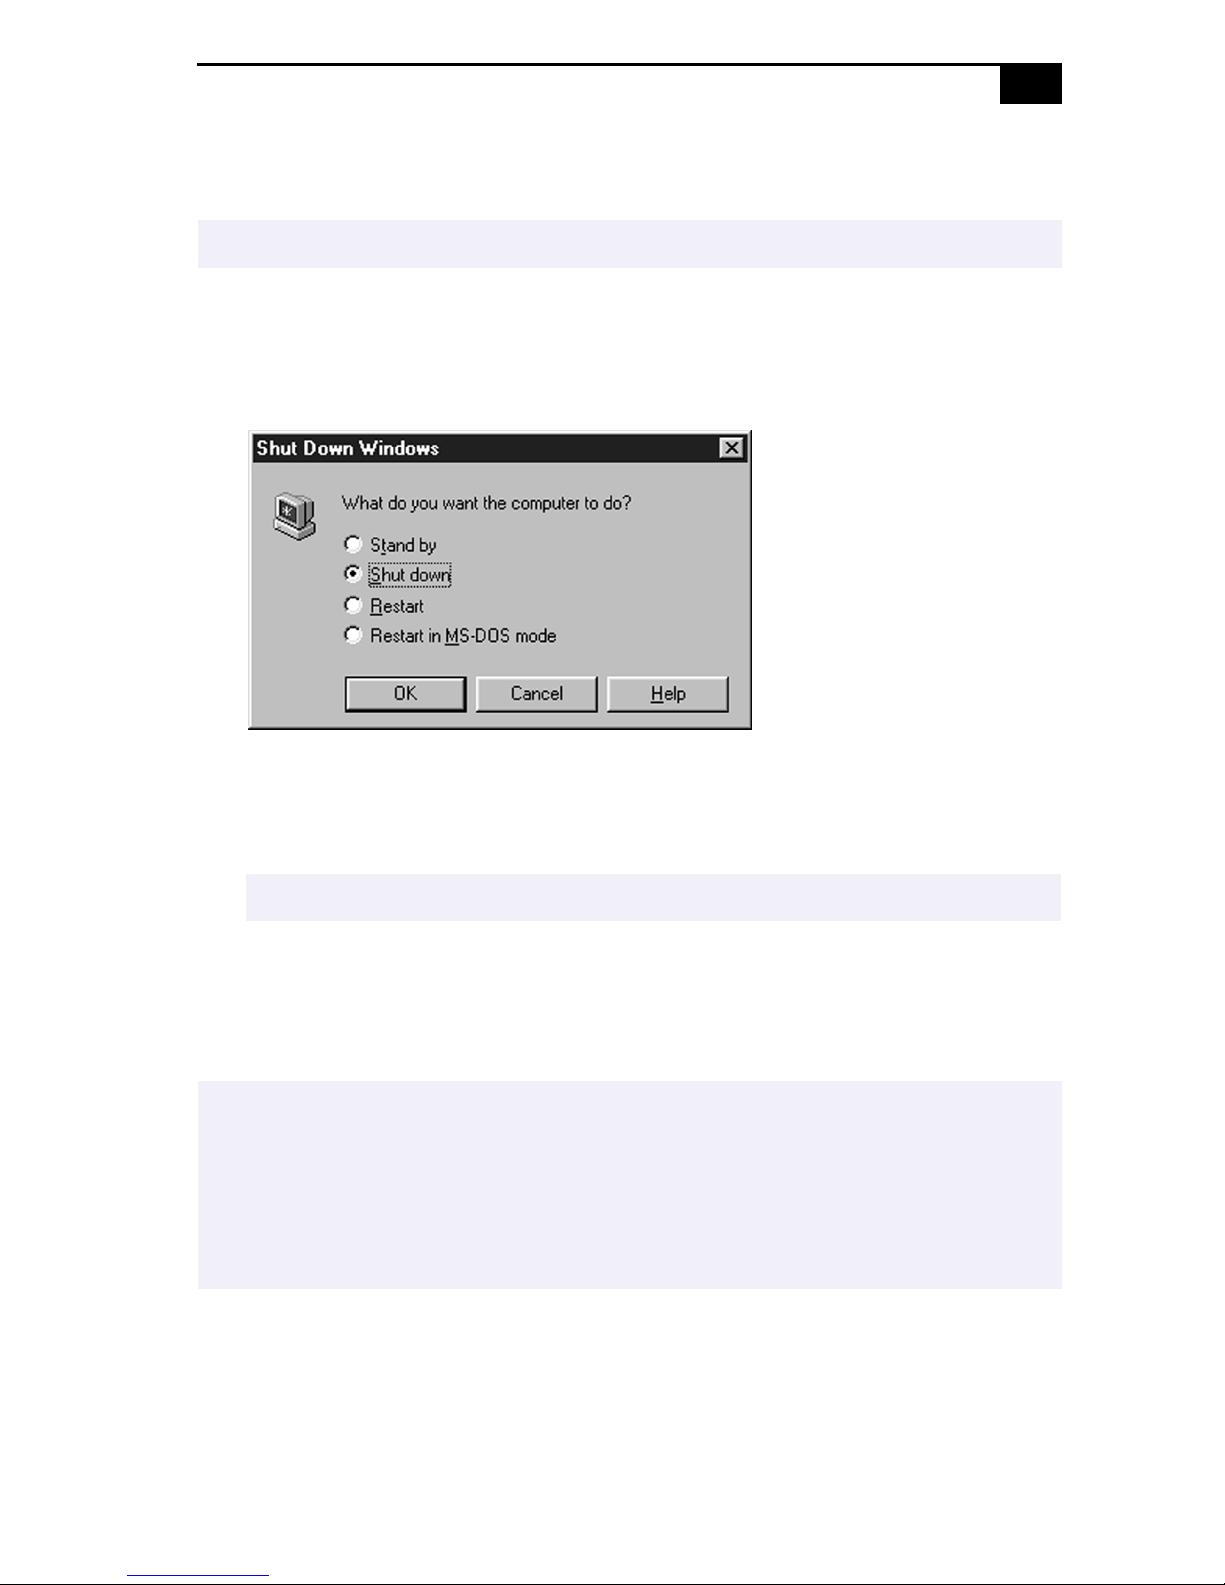
To avoid potential loss of data, follow these steps to shut down your computer.
!
Click the Start button on the Windows 98 taskbar.
1
Click Shut Down at the bottom of the Start menu to display the Shut
2
Down Windows dialog box.
15
Select Shut down.
3
Click OK.
4
✍
Respond to any prompts warning you to save documents.
Wait for your computer to turn off automatically. The power indicator
5
(green) turns off.
Turn off any peripherals connected to your computer.
6
✍
If you are unable to shut down your computer using the steps described above, press the
Ctrl+Alt+Delete keys at the same time to restart the computer. If you are unable to restart
the computer in this way, you can slide the power switch forward and hold for four seconds.
This operation may result in data loss.
During a period of inactivity, you can conserve battery life by using System Suspend mode.
See “Controlling Power Management” on page 59.

16
VAIO Notebook Computer User Guide
Registering Windows® 98
The first time you turn on your computer, you need to complete a few
steps to register and configure the Windows 98 software that is already
installed.
You must register Windows 98 before you can use the computer.
✍
The on-screen instructions guide you through the registration and
configuration process. The following is an overview of the process.
Gathering information:
1
❑ Enter your name.
❑ Read and accept the License Agreement.
❑ Enter your Certificate of Authenticity number located on the
cover of the Microsoft Windows 98
Getting Started
manual.
Window s 98 set u p :
2
Click the Finish button on th e Windows 98 Setup Wizard screen.
Selecting your computer settings:
3
If necessary, change the Time Zone, Date and Time on the Date/Time
Properties screen.
Registering your computer:
4
For details on registering your computer, see “Registering Your
Computer” on page 17. You can also sign up for your 100 free hours
of Internet service at this time.
Learning about Windows 98:
5
If you wish, take the tour of Windows 98.

Using Your Notebook Computer
17
Registering Your Computer
You can take advantage of Sony’s commitment to quality customer
support and receive the following benefits by registering your computer
with Sony.
❑ Sony Customer Support – Talk to a Support Representative to
troubleshoot problems you may be having with your computer.
❑ Extended Limited Warranty – Protect your investment. Extend your
Warranty nine months for a total of 12 months from the original date
of purchase when you register your computer.
❑ Express service – Provides convenient resolution of problems.
❑ Free Internet access – Use the Internet for up to 100 free hours when
you sign up with GTE (no credit card necessary). Free access expires
100 hours or 60 days after signing up, whichever occurs first.
If you have not already registered, follow these steps to use your
notebook computer’s online registration service.
You must connect your phone line before using any online services, including the online
✍
registration service. See “Connecting a Phone Line” on page 42.
Click the Sony VAIO Registration icon on the VAIO desktop.
1
Enter the information requested on the first online registration form.
2
Press the Tab key to move from box to box.
Click the Next button to advance to the next form.
3
Complete the remaining forms by clicking the Next button each time
4
you complete a form.
The computer automatically transfers your registration information using
your built-in modem and a to ll-free telephone number.
18
VAIO Notebook Computer User Guide
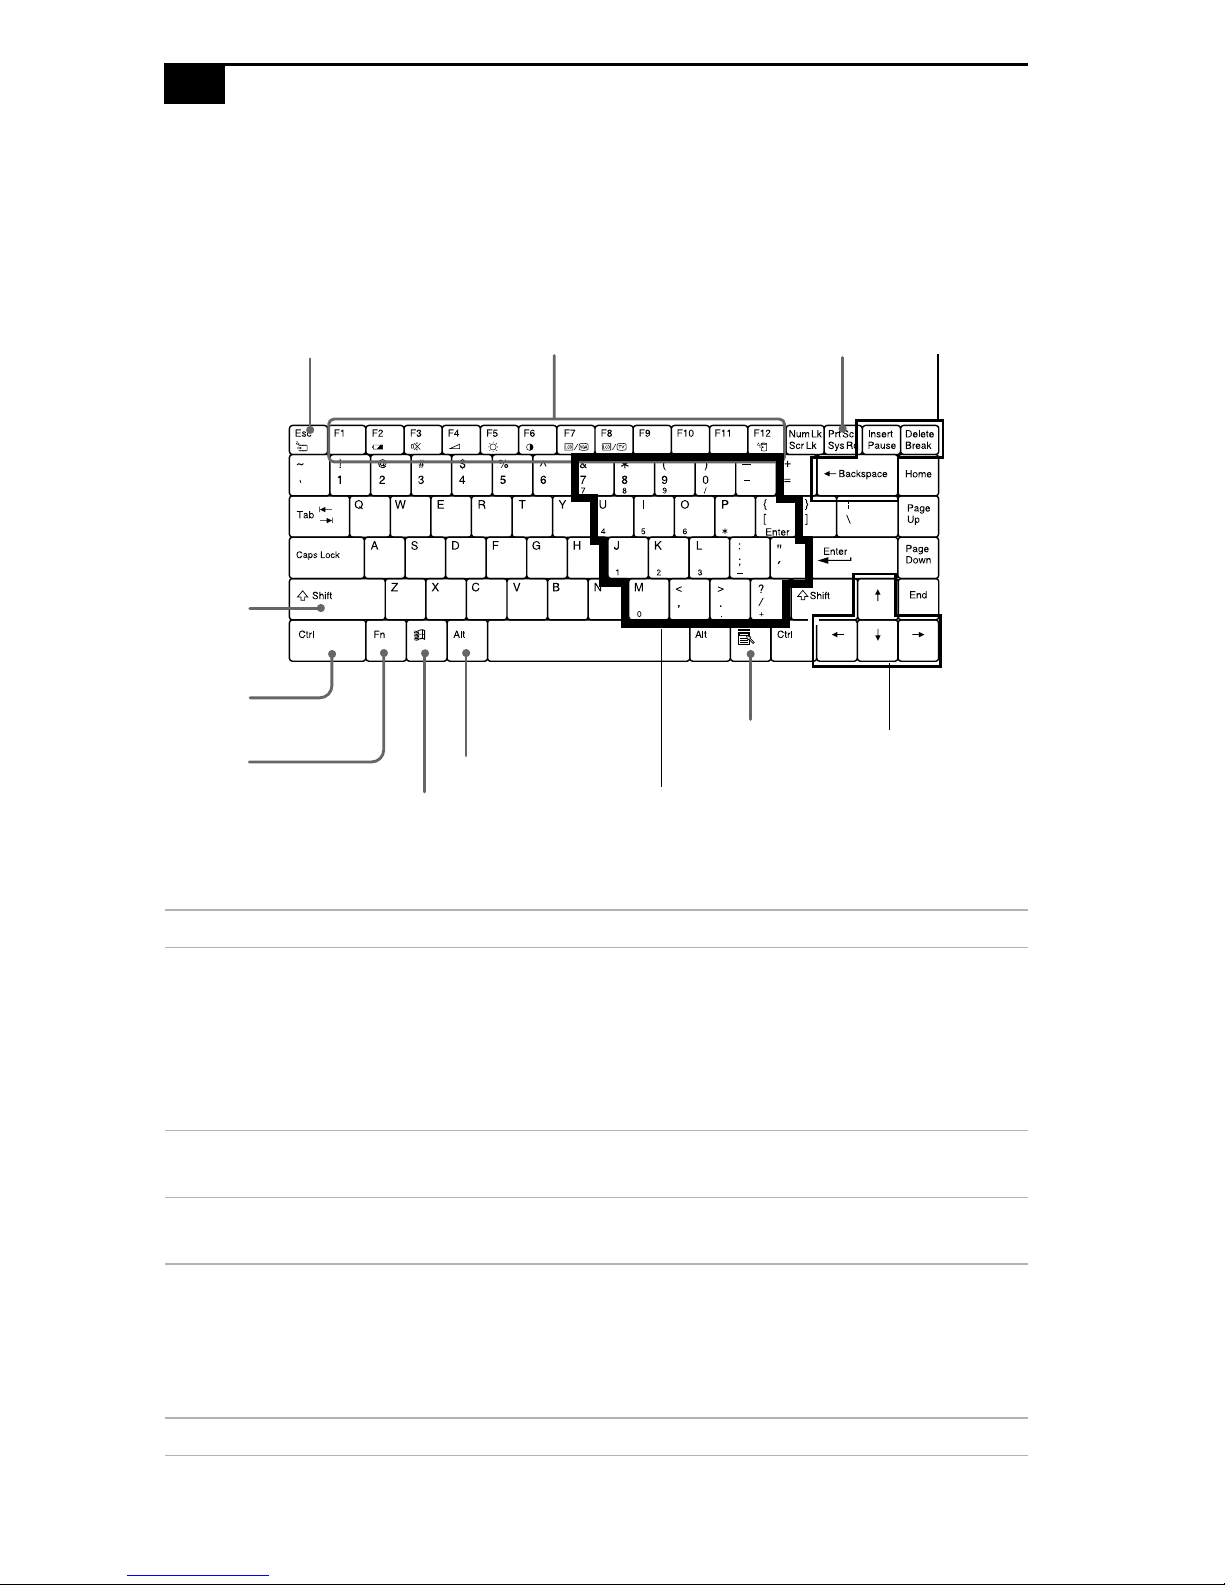
Using the Keyboard
Your keyboard is very similar to a typewriter’s, but the keyboard has
additional keys that perform specific co mputer-related tasks.
Correction
Escape Key Function keys Print Screen key
keys
US
Shift key
Ctrl key
Fn key
Alt key
Windows 98 key
Applications key
Numeric keypad area
Navigation
keys
Key Description
Numeric keypad
area
Contains the keys found on a typical calculator. Use the
numeric keypad area to type numbers or to perform
mathematical calculations such as addition and
subtraction. Note that you must press the Num Lock key
to activate the numeric keypad. (When you do so, the
Num Lock light will be on.)
Navigation keys Several keys are devoted to moving the cursor on the
screen.
Correction keys The Insert, Back Space, and Delete keys enable you to
make corrections in your documents.
Function keys The twelve function keys along the top of the keyboard
are used to perform designated tasks. For example, in
many applications, F1 is th e Help key. The task associated
with each function key may vary from one application to
the next.
Escape key The Esc (Escape) key is used to cancel commands.

Using Your Notebook Computer
Key Description
Print Screen key The Print Sc reen key takes an electronic snapshot of the
screen and places it in the Windows Clipboard. You can
then paste the screen shot into a document and print it.
Operator keys Several keys are always used with at least one other key:
Ctrl, Alt, and Shift. When held down with another key,
the Ctrl (Control) and Alt (Alternate) keys offer another
way to give commands. For example, in many
applications, instea d of choosing the Save command fr om
a menu, you can hold down Ctrl and press S (referred to
as Ctrl+S). The Shift key operates the same way as on a
typewriter; it is used to produce capital letters or special
symbols such as @ and $.
W indow s 98 key The key w ith the Windows logo displays the Windows 98
Start menu; it is the equiv alent of clic king th e Start but ton
on the taskba r. See “Combinations and Functions with
the Windows 98 Key” on page 20.
19
Fn key The Fn key is used in combinatio n with other keys to
issue commands. S ee “Com b ina t ions a nd Func tions with
the Fn Key” on page 22.
Applications key The Applications key displays a shortcut menu of
context-sensitive choices. Pressing this key is the
equivalent of clicking the right mouse button.

20
VAIO Notebook Computer User Guide
Combinations and Functions with the Windows 98 Key
Combination Function
+ F1 Displays Windows Help.
+ Tab Switches the selected butt o n on the taskbar.
+ E Displays Windows Explorer.
+ F Displays the Windows Find: All Files window to find
a file or folder. This is the equ ivalent of selec ting Fi nd
and then Files or Folders from the Start menu.
+ Ctrl + F Displays the Windows Find: Computer window
where you can locate other computers. This is the
equivalent of selecting Find and th en Computer from
the Start menu.
+ M Minimizes all display ed wind ows.
Shift + + M Returns all minimized windows to their previous
size.
+ R Displays the Run window. This is the equivale nt of
selecting Run from the Start menu.
Fn + + Insert Displays th e Properties window. This is the
equivalent of double-clicking the System icon in the
Control Panel.
 Loading...