

Sony VAIO Digital Studio PCVRX821V, VAIO Digital Studio PCV-7762 Quick Start Manual

SON_
VAIO Digital Studio TM
Computer Quick Start
Contents
GettingStarted
Unpacking Your Computer ................................... .6
Hanning An Ergonomic Work Space .............. 8
Locating Controls And Ports ..................... 9
About The Front Panel .................................. 10
About The Back Panel .................................. 12
Setting Up Your Computer ...................... 15
Connecting A Display (Monitor) ........................... 16
Connecting The Speakers .............................. 17
Connecting The Keyboard And Mouse. ................... 19
Connecting The Telephone And Modem Cable s_....20
Connecting The Power Cord(s) ................................ .21
Turning On Your Computer ........................... 22
Registering Your Computer .................................... .23
Setting Up Your Dial-up Connection ................. 24
Turning Off Your Computer ..................................... 27
m
VAIO Digital Studio Computer Quick Start
System And Application
Recovery CD(s) ......................................... 29
Using The System Recovery CD(s) .......................... 30
Using The Application Recovery CD(s) ................... 33
Troubleshooting ........................................ 37
About VAIO Computer Functions ............................ 38
About Software ......................................................... 42
About Using The Optical Disc Drive(s) ................... 46
About The Speakers .................................................. 49
About The Modem .................................................... 50
About The Microphone ............................................. 52
About The Mouse And Keyboard ............................. 53
About Using Peripheral Equipment .......................... 55
Support Options ........................................ 57
Immediate Help And Support ................................... 58
Software Help And Support ...................................... 60
Contacting Sony For Help And Support ................... 63
Notice ........................................................................ 65
Index ........................................................... 73
hml_ll

Getting Started
Congratulations on your purchase of the Sony VAIO® computer! Your
new, high-performance, multimedia computer combines audio, video, and
information technology features.
m

VAIO Digital Studio Computer Quick Start
Unpacking Your Computer
Your computer may not be supplied with all of the accessories shown, depending
on the system configuration you purchased. For details on the accessories
supplied with your computer, see the online Specifications sheet.
Computer and supplied accessories
System Unit
Speakers*
(PCVA-SP3)
with AC Adapter
Speakers*
(PCVA-SP3A)
with Speaker Power Cable
Modem Cable
Power Cord
* The supplied speakers may vary, depending on the VAIO computer model
purchased. See the online specifications sheet for details on supplied accessories.
l
Unpacking Your Computer
Manuals
VAIO Digital Studio TM Computer Quick Start -- Provides basic
information on setting up and registering your computer. The Quick Start
also provides software, support, safety and legal information.
VAIO Digital Studio TM Computer User Guide -- Contains information on
the hardware and preinstalled software applications included with your
system. To access the online manual:
1 Click Start in the Windows taskbar, then click Help and Support.
2 From the VAIO Help and Support menu, click VAIO User Guide.
c_ Specifications" -- This online specification sheet describes the hardware and
software configuration of your VA10 computer. To view this online
information:
1 Click Start in the Windows taskbar, then click Help and Support.
2 From the VA10 Help and Support Center menu, click VAIO User
Guide.
3 Click the Welcome link. The Welcome page displays in the right-side
frame.
4 Click the link in the text, "View the VAIO Computer Specifications,
which lists your computer's hardware configuration and preinstalled
software information."
_J Microsoft® Windows® XP Guide -- Explains how to use the basic features
of the latest Windows operating system.
RecoveryCDs
System Recovery CD(s) -- Restore the software applications that shipped
with your computer if they become corrupted or are erased. The supplied
System Recovery CDs can only be used to restore the hard disk of this Sony
computer.
Application Recovery CD(s) -- Reinstalls individual software applications
or drivers if they become corrupted or are erased.
Other
Packet containing special product offers.
Software Library containing the Microsoft software license agreement and
Sony end-user license agreement.
Ill
VAIO Digital Studio Computer Quick Start
Planning An Ergonomic Work Space
Before you set up your new computer, find the best location for your new
computer and plan your work space. There are several ergonomic factors to
consider when you arrange your work space:
t3 Stable work surface -- Use a stable work surface large enough to support
the computer and other peripheral equipment.
t3 Ventilation -- Leave at least eight inches of space on the left and back sides
of your computer to enable proper ventilation.
t3 Placement of the keyboard, mouse, and other input devices-- Place your
keyboard, mouse, and other input devices so that your arms and hands are in
a relaxed, comfortable position. The keyboard should be directly in front of
you. Adjust the level of the keyboard so that your lower arms are parallel to
the floor. Keep your wrists in a relaxed position when you are using the
keyboard not angled up or down. Use the palmrest only briefly, for resting.
Position the mouse at the same level as the keyboard. Hold the mouse with a
relaxed hand, and use your whole arm to move it. Take breaks during
sessions with your computer. Excessive use of the mouse or a joystick may
strain muscles or tendons.
t3 Furniture and posture-- Sit in a chair with good back support and
armrests. Adjust the level of the chair so your feet are flat on the floor. A
footrest may make you more comfortable. Sit with relaxed, upright
posture_void slouching forward or leaning far backward.
Viewing angle of the display -- Position the display 18 to 26 inches
directly in front of you, with the top of the screen at or a little below eye
level. Use the display's tilting feature to find the best position. You can
reduce eye strain and muscle fatigue by placing the display in the proper
position.
Lighting -- Choose a location where windows and lights do not create glare
and reflection on the display. Use indirect lighting to avoid bright spots on
the display. You can also purchase accessories for your display that help
reduce glare. Proper lighting adds to your comfort and work effectiveness.
Locating Controls And Ports
Th& section & &tended tojamiliarize you with the eonttvls, ports and
jacks that may be available on your computer. Your computer may not be
equipped with all of these hardware features and the location of the
controls, ports', andiacks may vat,y from the illustrations shown in this
section. To view the spee(fic connection eapabilities for your system, see
the online _peeifieations sheet.
E
VAIO Digital Studio Computer Quick Start
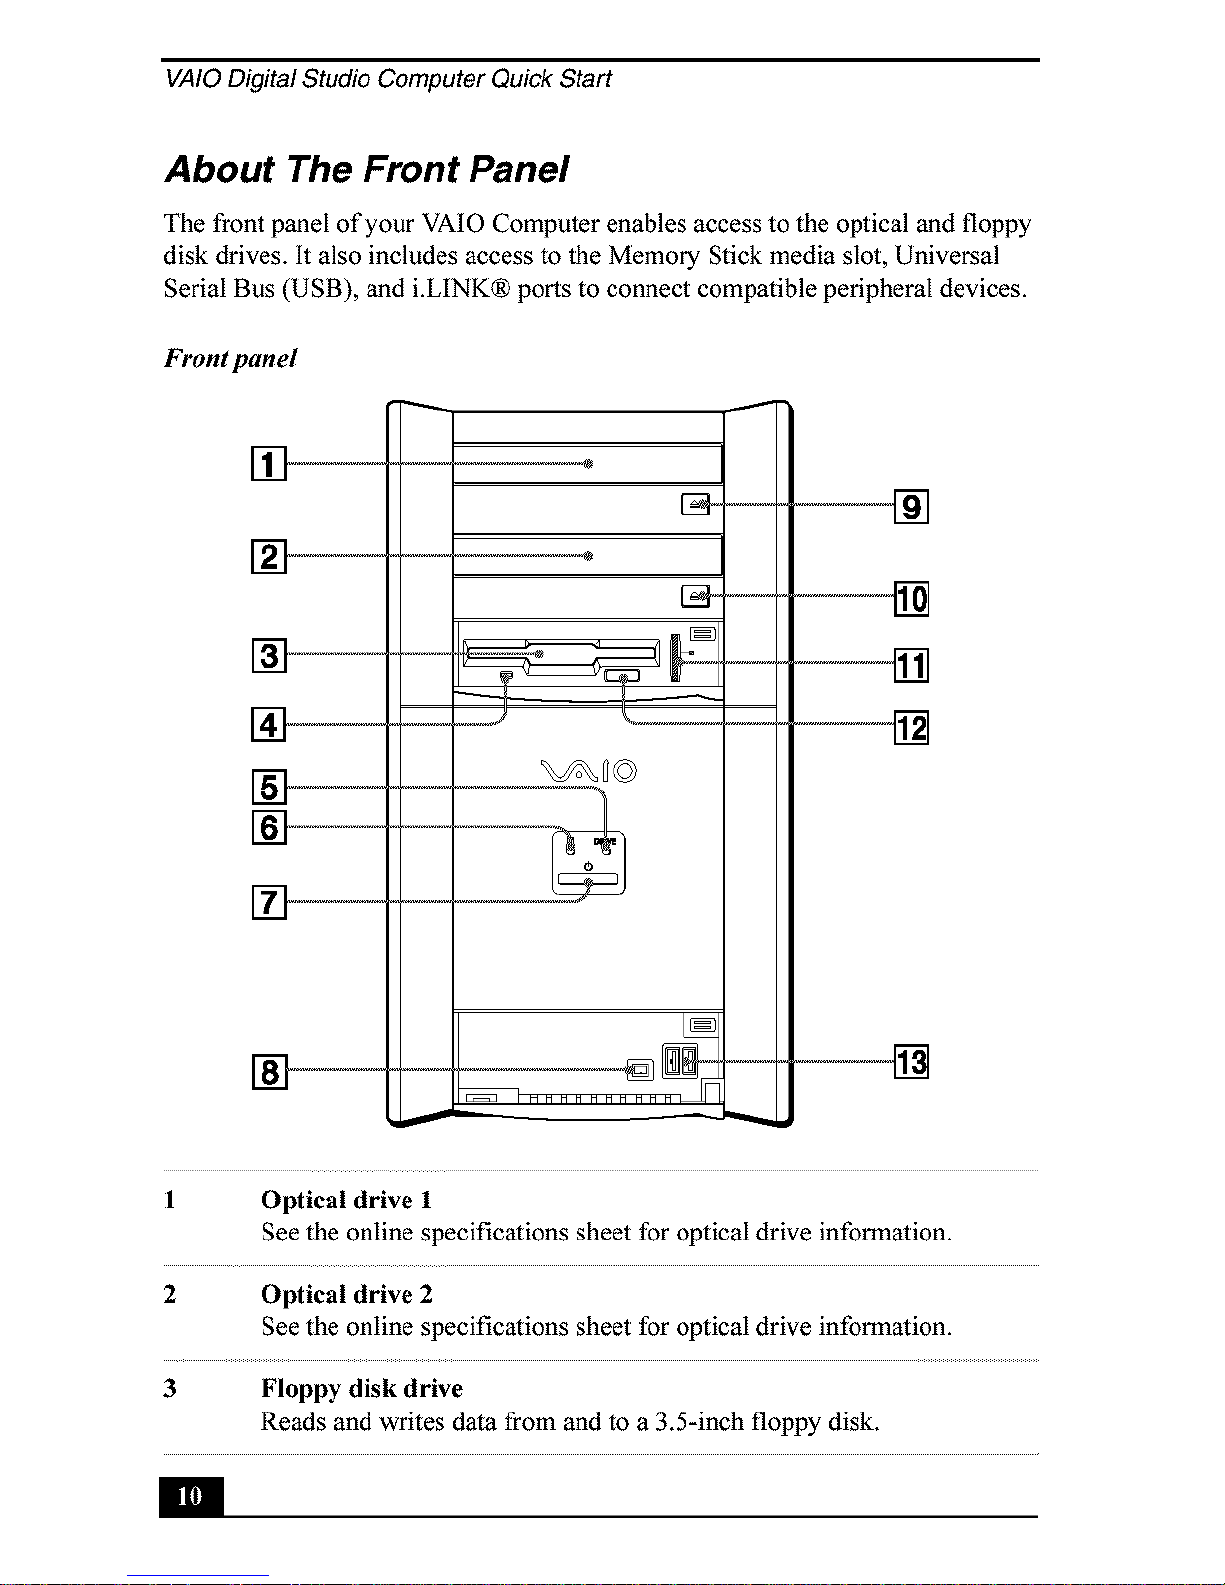
About The Front Panel
The front panel of your VAIO Computer enables access to the optical and floppy
disk drives. It also includes access to the Memory Stick media slot, Universal
Serial Bus (USB), and i.LINK® ports to connect compatible peripheral devices.
Front panel
m----
N---
m
m
1 Optical drive 1
See the online specifications sheet for optical drive information.
2 Optical drive 2
See the online specifications sheet for optical drive information.
3 Floppy disk drive
Reads and writes data from and to a 3.5-inch floppy disk.
About The Front Panel
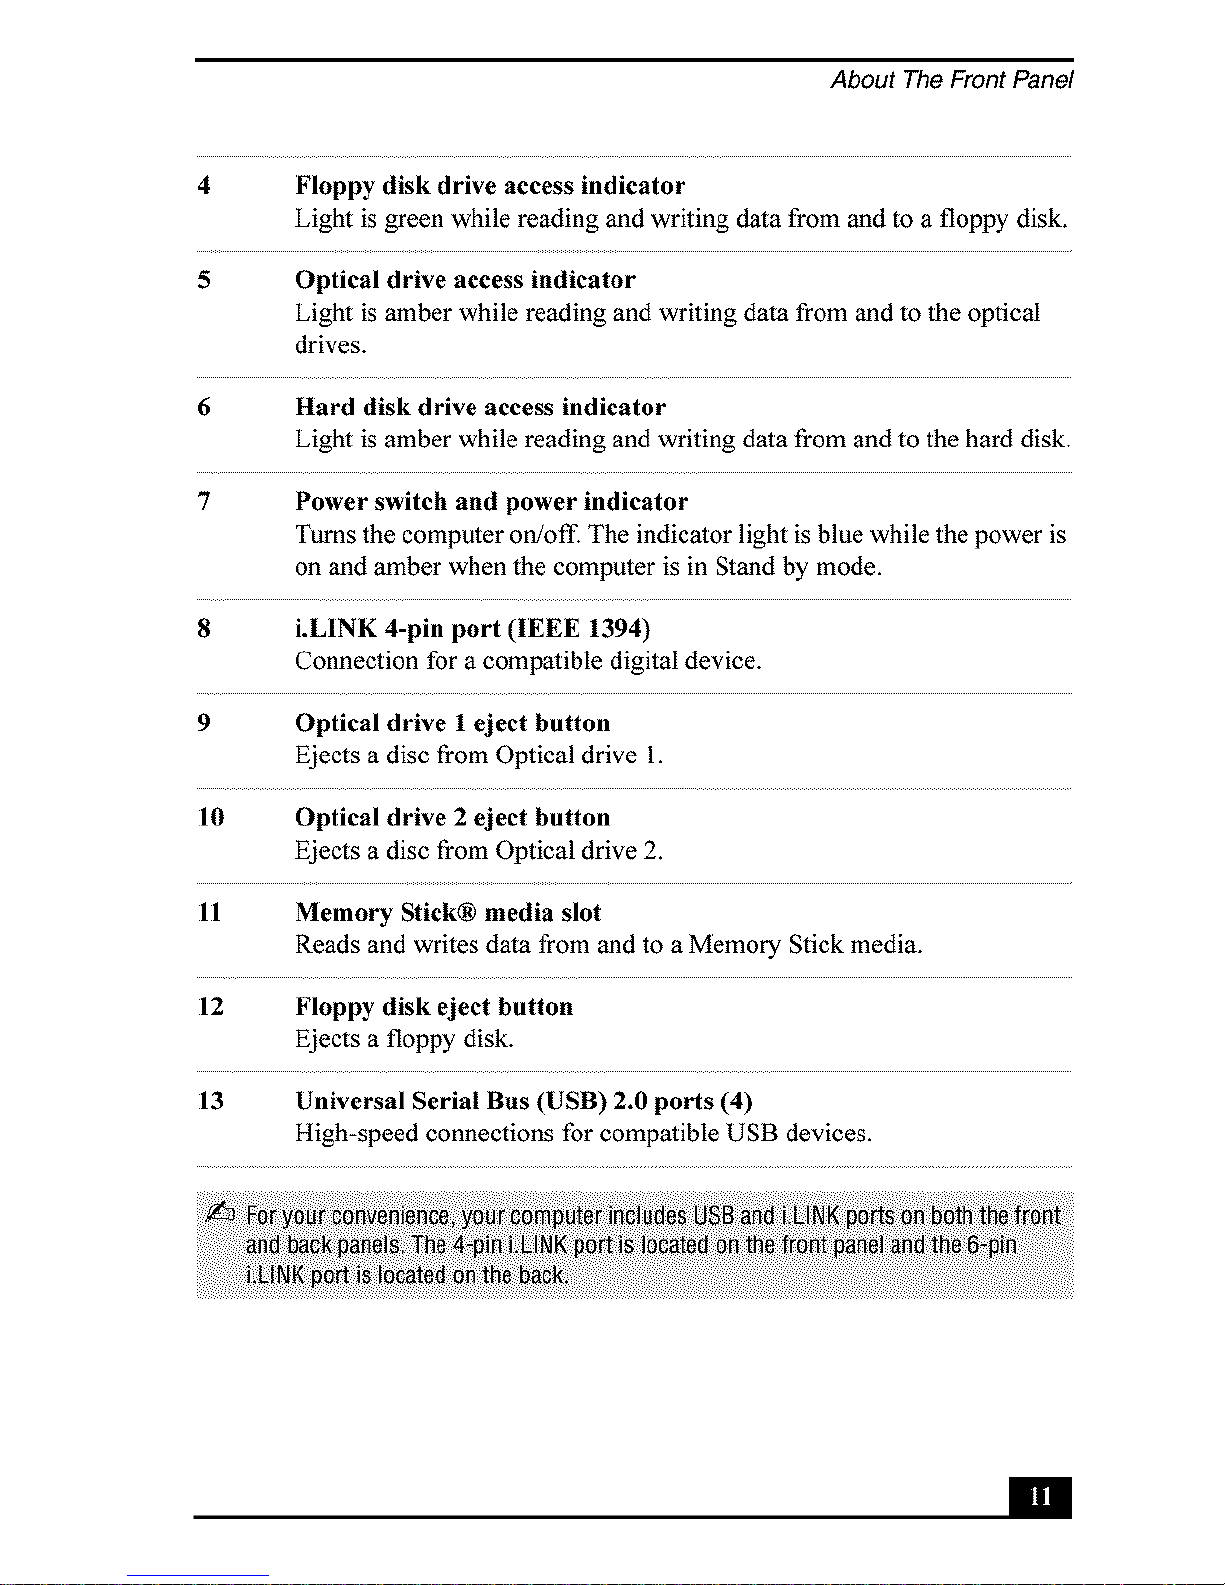
4 Floppy disk drive access indicator
Light is green while reading and writing data from and to a floppy disk.
5 Optical drive access indicator
Light is amber while reading and writing data from and to the optical
drives.
6 Hard disk drive access indicator
Light is amber while reading andwriting data from andto the hard disk.
7 Power switch and power indicator
Turns the computer on/off: The indicator light is blue while the power is
on and amber when the computer is in Stand by mode.
8 i.LINK 4-pin port (IEEE 1394)
Connection for a compatible digital device.
9 Optical drive 1 eject button
Ejects a disc from Optical drive 1.
10 Optical drive 2 eject button
Ejects a disc from Optical drive 2.
11 Memory Stick® media slot
Reads and writes data from and to a Memory Stick media.
12 Floppy disk eject button
Ejects a floppy disk.
13 Universal Serial Bus (USB) 2.0 ports (4)
High-speed connections for compatible USB devices.
_lll|ll
VAIO Digital Studio Computer Quick Start
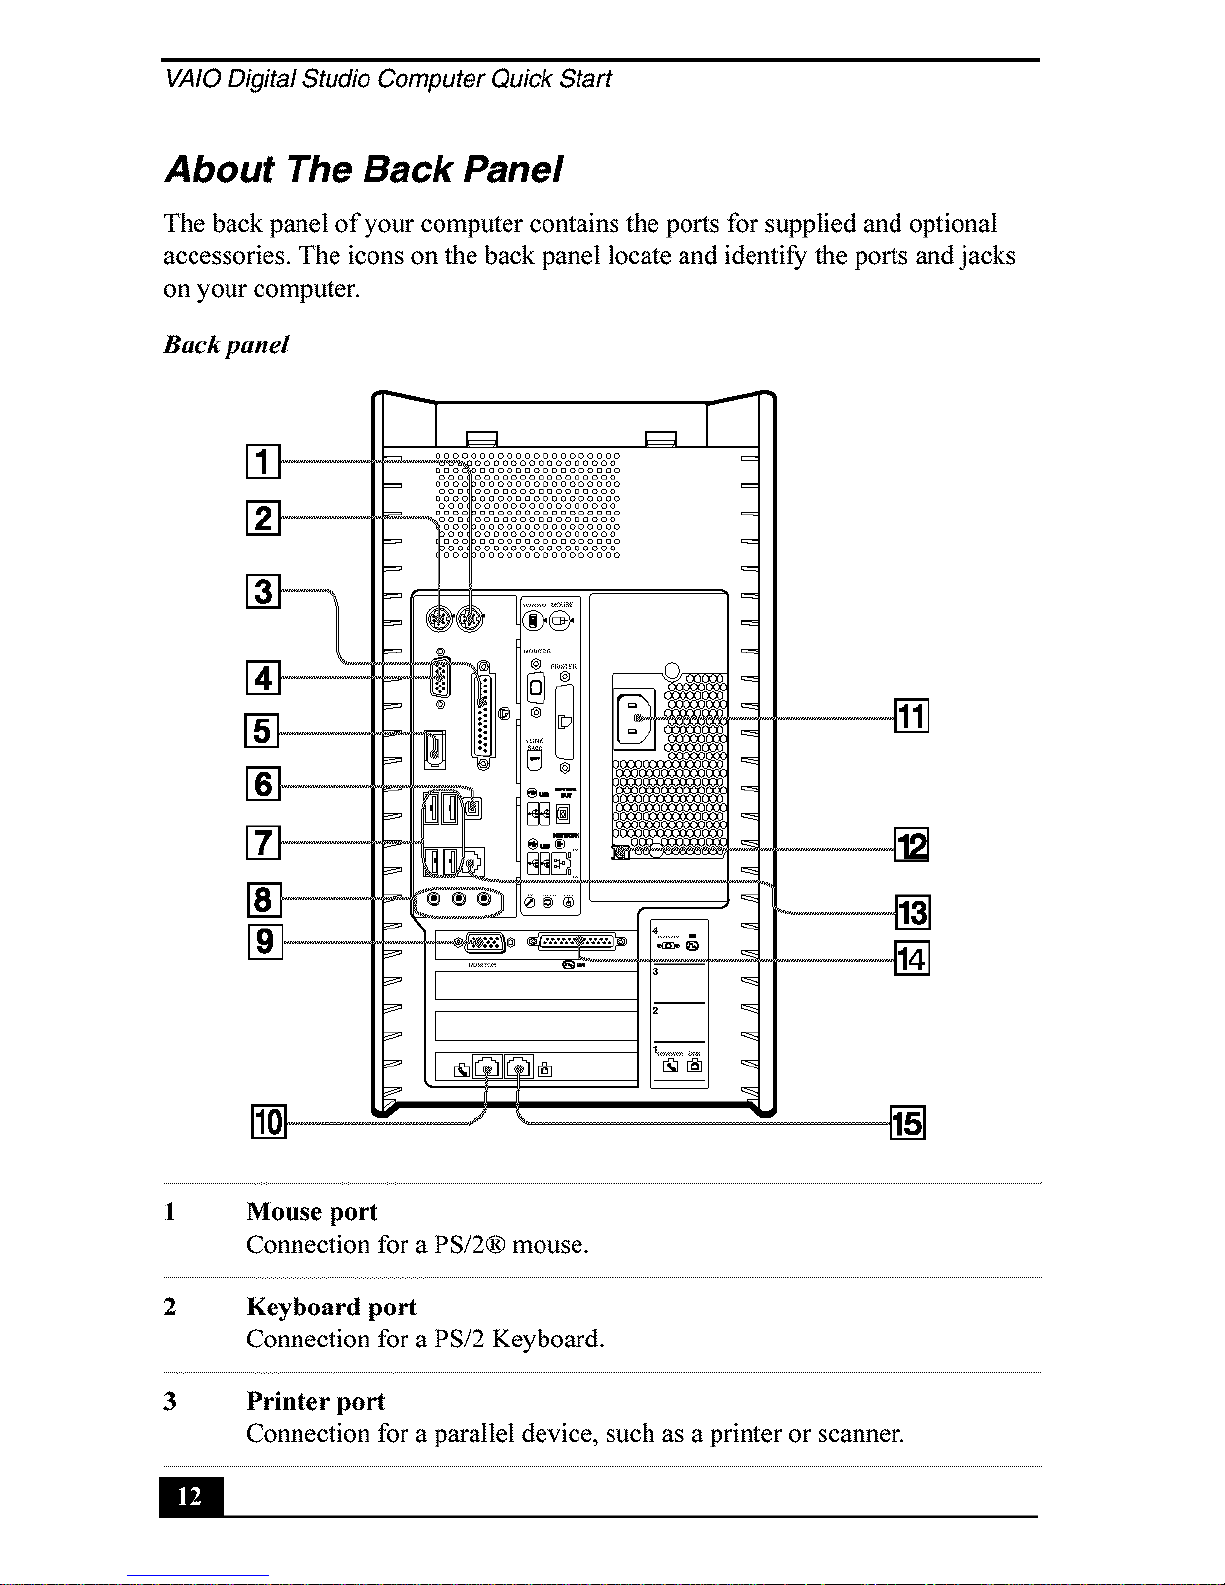
About The Back Panel
The back panel of your computer contains the ports for supplied and optional
accessories. The icons on the back panel locate and identify the ports and jacks
on your computer.
Back panel
[]
[]
[]
[]
1 Mouse port
Connection for a PS/2® mouse.
2 Keyboard port
Connection for a PS/2 Keyboard.
3 Printer port
Connection for a parallel device, such as a printer or scanner.
[1H_ll
About The Back Panel
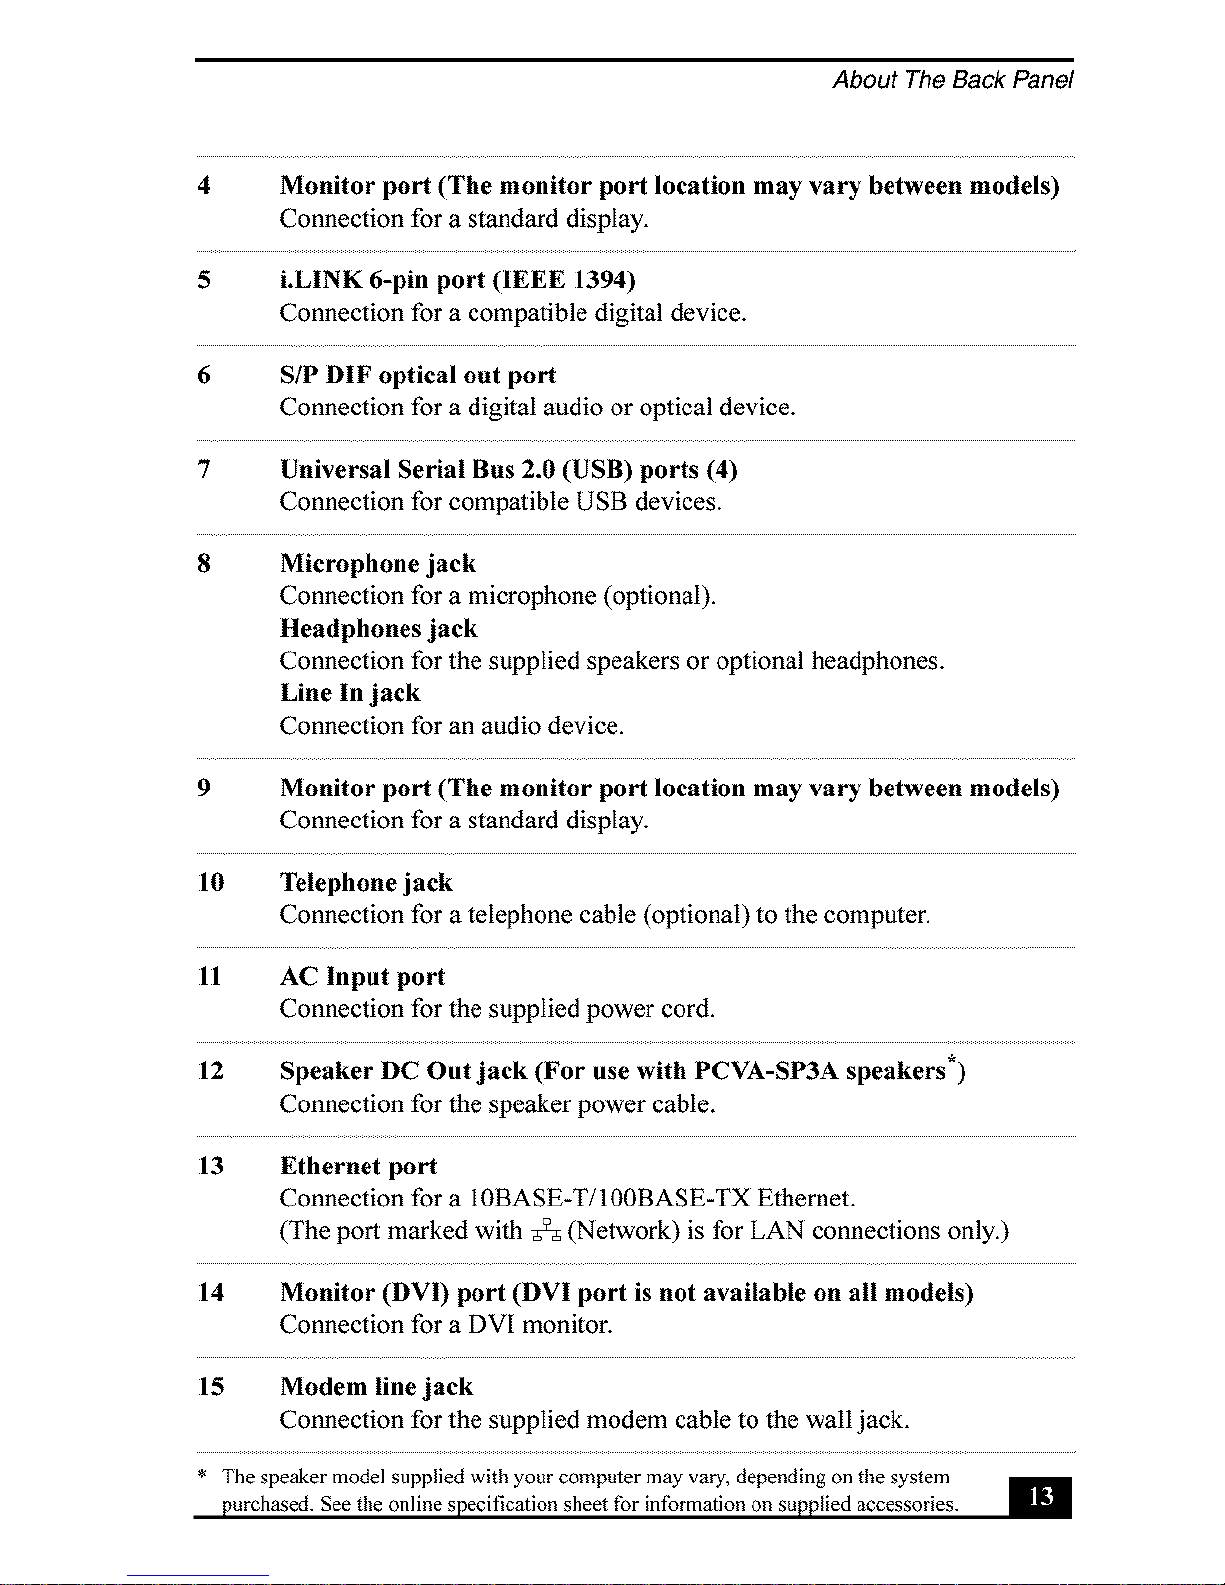
4 Monitor port (The monitor port location may vary between models)
Connection for a standard display.
5 i,LINK 6-pin port (IEEE 1394)
Connection for a compatible digital device.
6 SIP DIF optical out port
Connection for a digital audio or optical device.
7 Universal Serial Bus 2.0 (USB) ports (4)
Connection for compatible USB devices.
8 Microphone jack
Connection for a microphone (optional).
Headphones jack
Connection for the supplied speakers or optional headphones.
Line In jack
Connection for an audio device.
9 Monitor port (The monitor port location may vary between models)
Connection for a standard display.
10 Telephone jack
Connection for a telephone cable (optional) to the computer.
11 AC Input port
Connection for the supplied power cord.
12 Speaker DC Out jack (For use with PCVA-SP3A speakers*)
Connection for the speaker power cable.
13 Ethernet port
Connection for a 10BASE-T/100BASE-TX Ethernet.
(The port marked with _ (Network) is for LAN connections only.)
14 Monitor (DVI) port (DVI port is not available on all models)
Connection for a DVI monitor.
15 Modem line jack
Connection for the supplied modem cable to the wall jack.
* The speaker model supplied with your computer may vary, depending on tile system
iki
purchased. See tile online specification sheet for intbrmation on supplied accessories.

VAIO Digital Studio Computer Quick Start
Setting Up Your Computer
Your computer may not be equipped with all of these hardware featur.es,
therefore, some instructions may not apply to your spec(fie computer. The
location of the controls', ports', and jacks may vatTfrom the illustrations
shown in this seetion. See the online speetfteations sheet for your system's"
configuration.
bllgll
VAIO Digital Studio Computer Quick Start
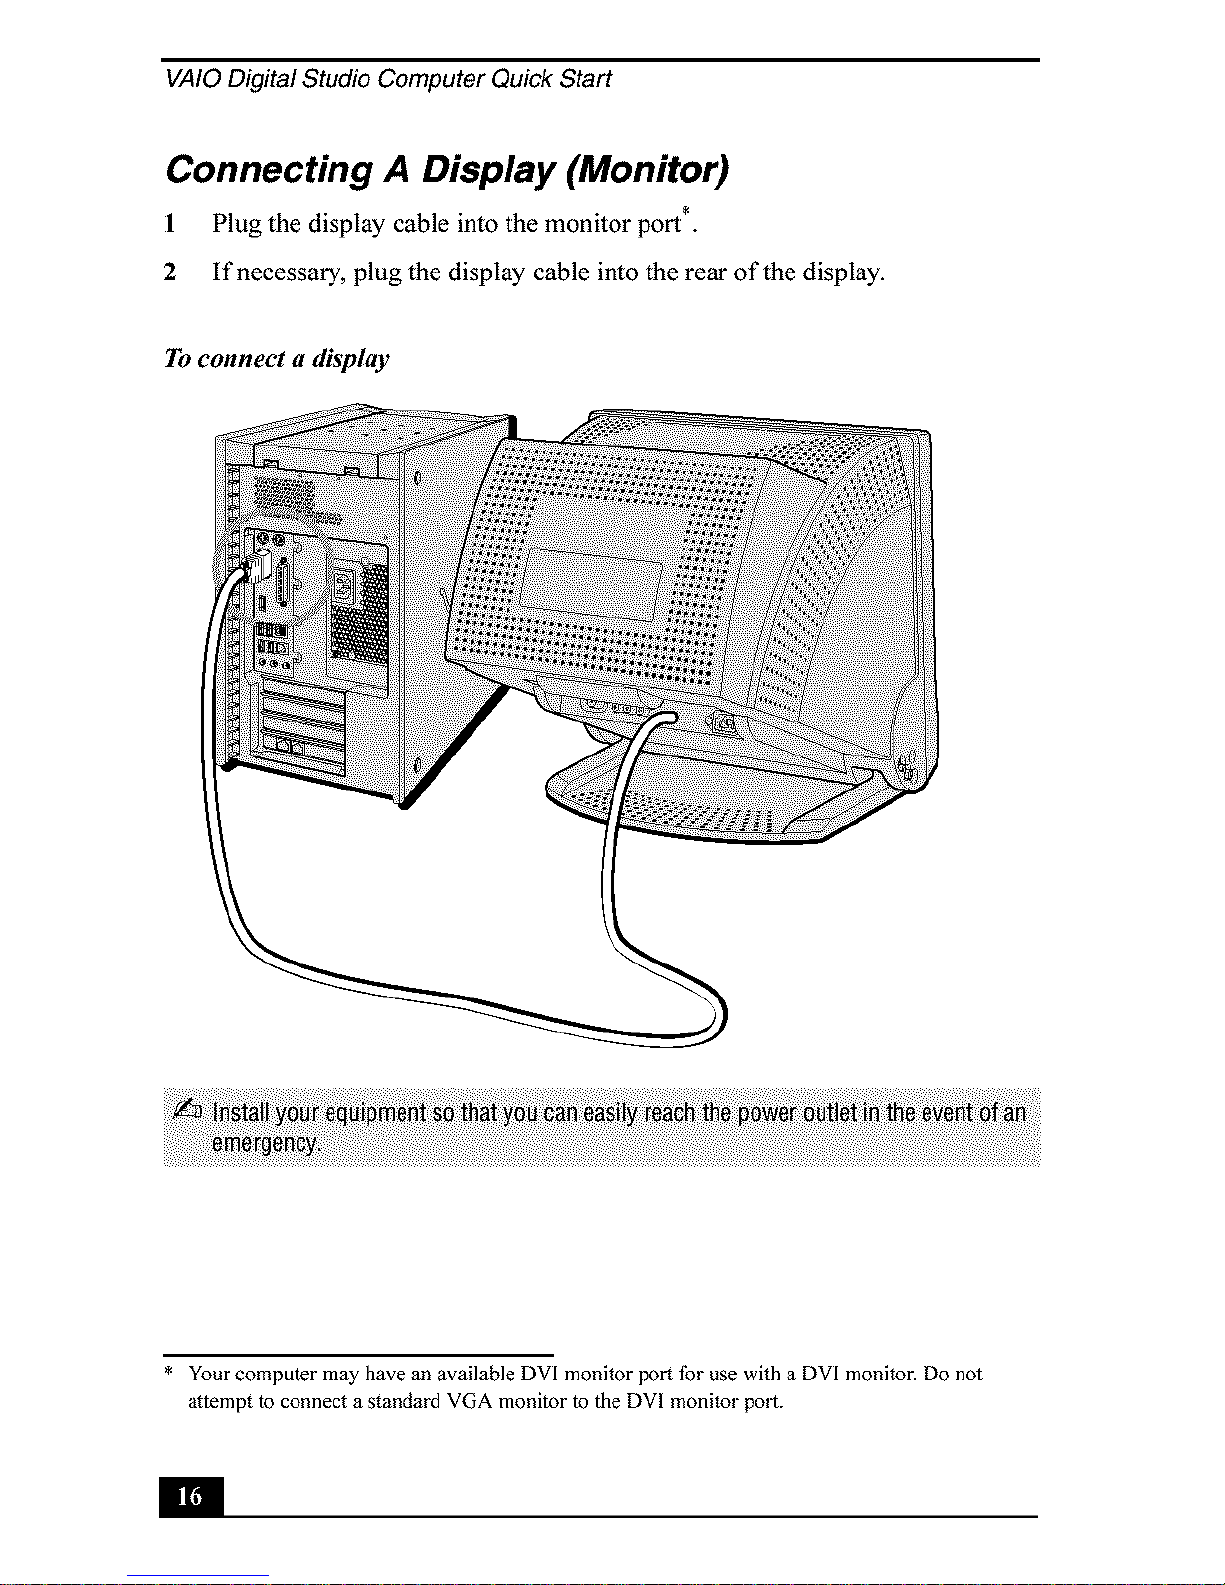
Connecting A Display (Monitor)
1 Plug the display cable into the monitor port*.
2 If necessary, plug the display cable into the rear of the display.
To connect a display
* Your computer may have an available DVI monitor port fbr use with a DVI monitor. Do not
attempt to connect a standard VGA monitor to the DVI monitor polt.
Illll_!
Connecting The Speakers
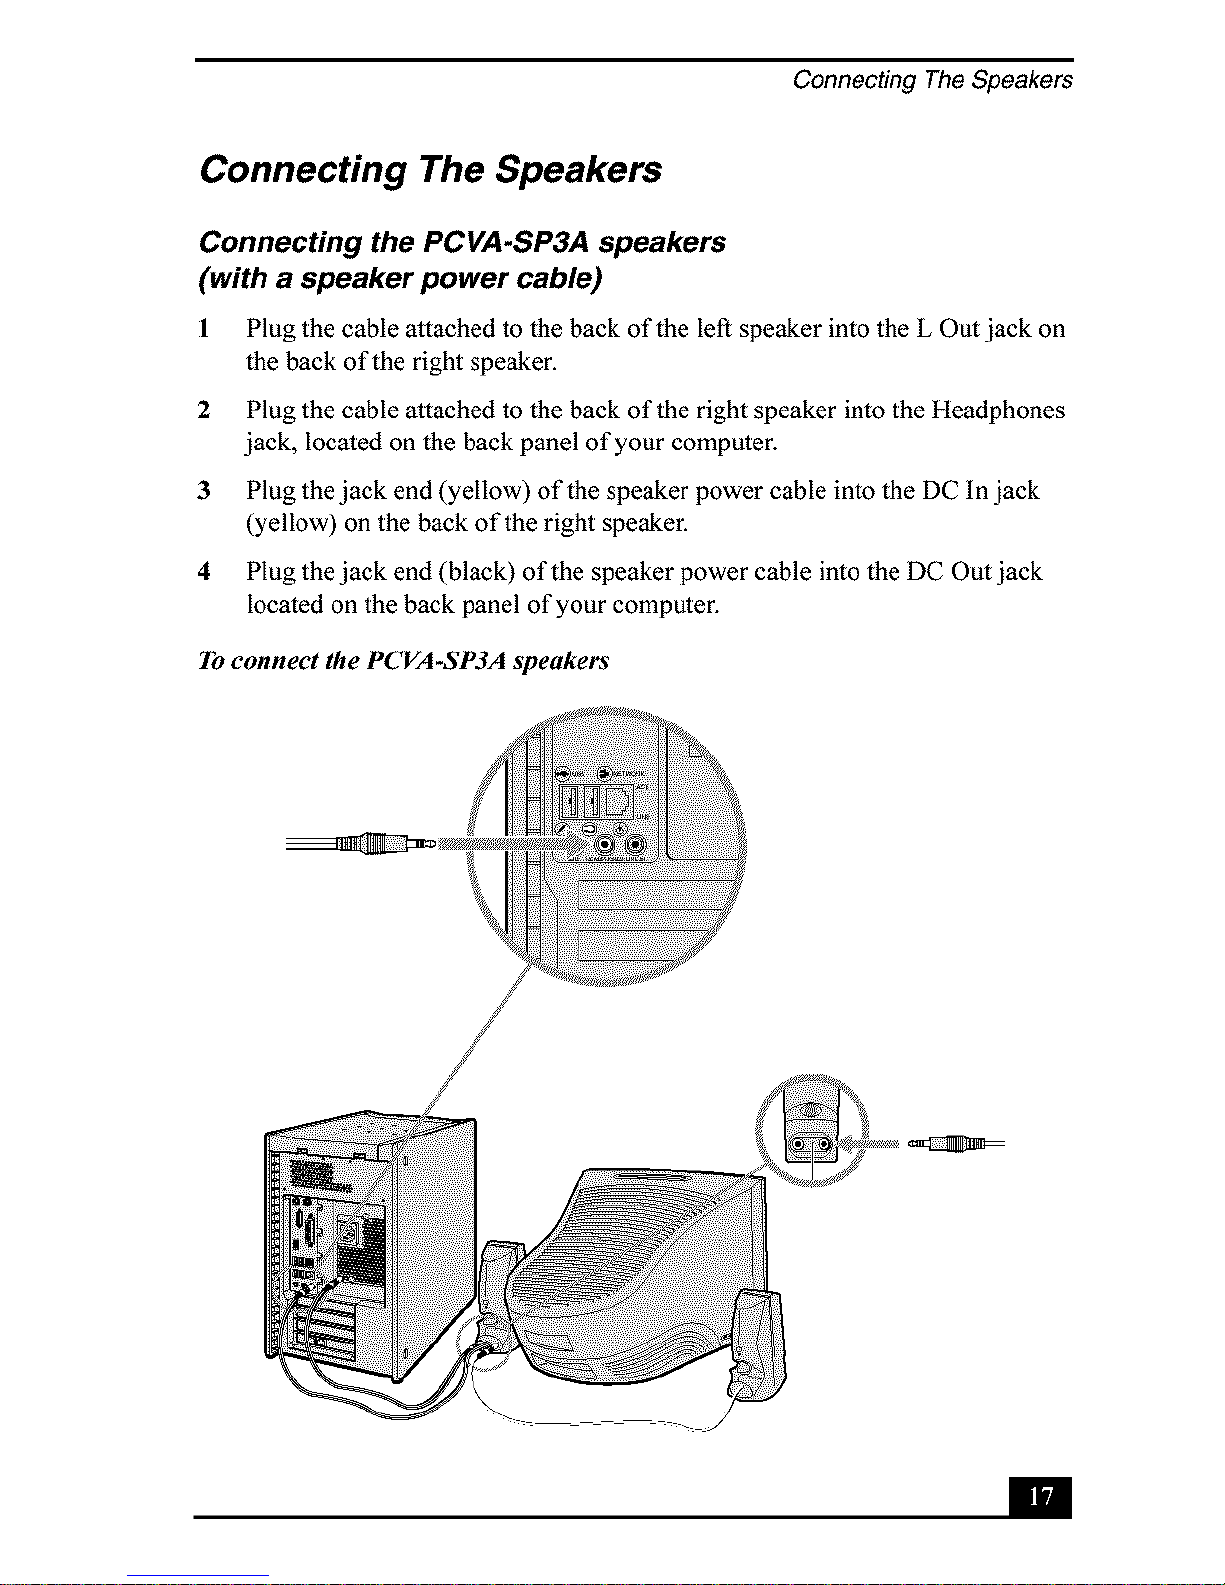
Connecting The Speakers
Connecting the PCVA-SP3A speakers
(with a speaker power cable)
1 Plug the cable attached to the back of the left speaker into the L Out jack on
the back of the right speaker.
2 Plug the cable attached to the back of the right speaker into the Headphones
jack, located on the back panel of your computer.
3 Plug the jack end (yellow) of the speaker power cable into the DC In jack
(yellow) on the back of the right speaker.
4 Plug the jack end (black) of the speaker power cable into the DC Out jack
located on the back panel of your computer.
To connect the PCVA-SP3A speakers
ilrJ
VAIO Digital Studio Computer Quick Start
Connecting the PCVA-SP3 speakers (with an AC adapter)
1 Plug the cable attached to the back of the left speaker into the L Out jack on
the back of the right speaker.
2 Plug the cable attached to the back of the right speaker into the Headphones
jack.
3 Plug the jack end of the AC adapter cord into the DC In jack on the back of
the right speaker and plug the other end into a grounded AC wall outlet or
power strip.
m

Connecting The Keyboard and Mouse
Connecting The Keyboard And Mouse
I Plug the keybo_d cable i:ate _he keyboard pert on the back ofthe cemputcr.
2 Plug the mouse cable into the mouse port,
Toconnect the keyboard and mo_*se
i[,_l
VAIO Digital Studio Computer Quick Start
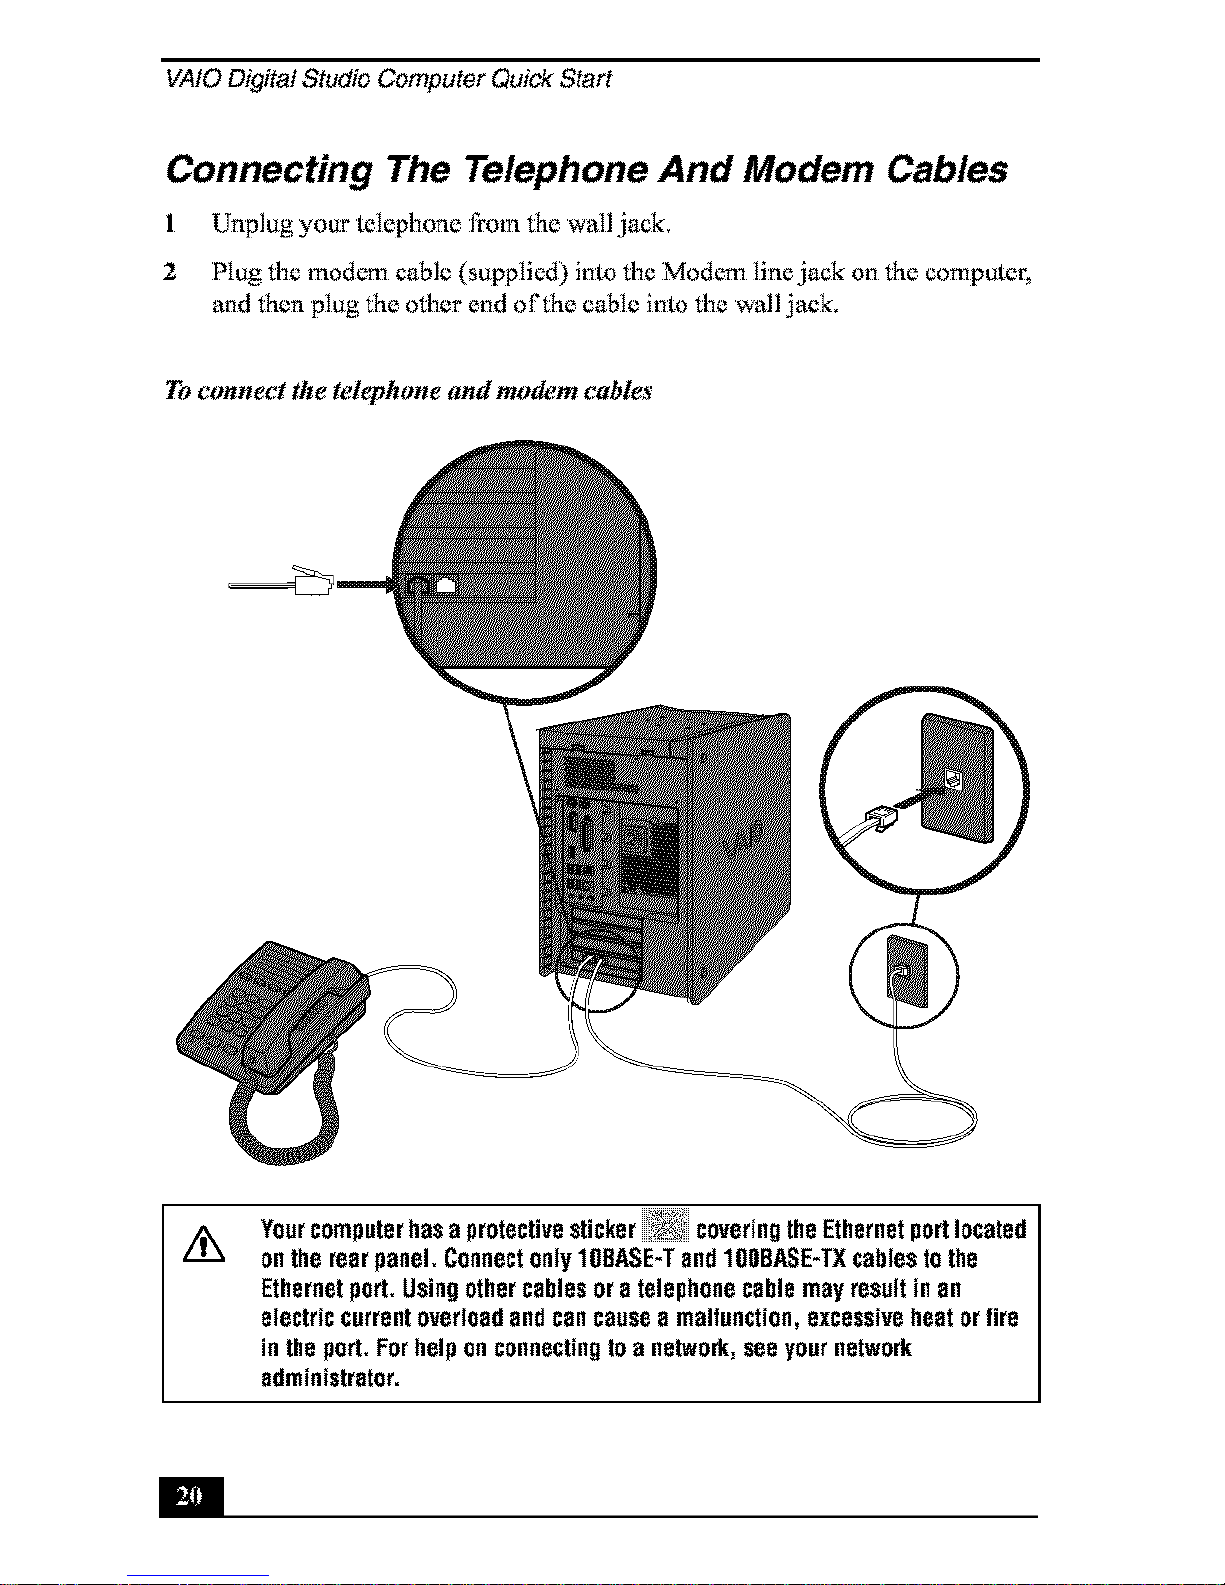
Connecting The Telephone And Modem Cables
I Unplug your telephone from _he wall jack,
2 Plug the modem cable (supplied) into the Mod_l line jack on _he compuler,
and then plug _he other end of_he cable into the wNl jack.
To connect the telephone and modem cables
Yourcomputerhasa protectivesticker"_' coveringtheEthernetportlocated
Ontherearpanel,ConnectonlyIOBASE-TendIOOBASE-TXcablestothe
Ethernetport,Usingothercablesora telephonecablemayresultinan
electriccurrentoverloadendcancausee malfunction,excessiveheatortire
intheport,Forhelponconnectingtoa network,seeyournetwork
administrator,
m
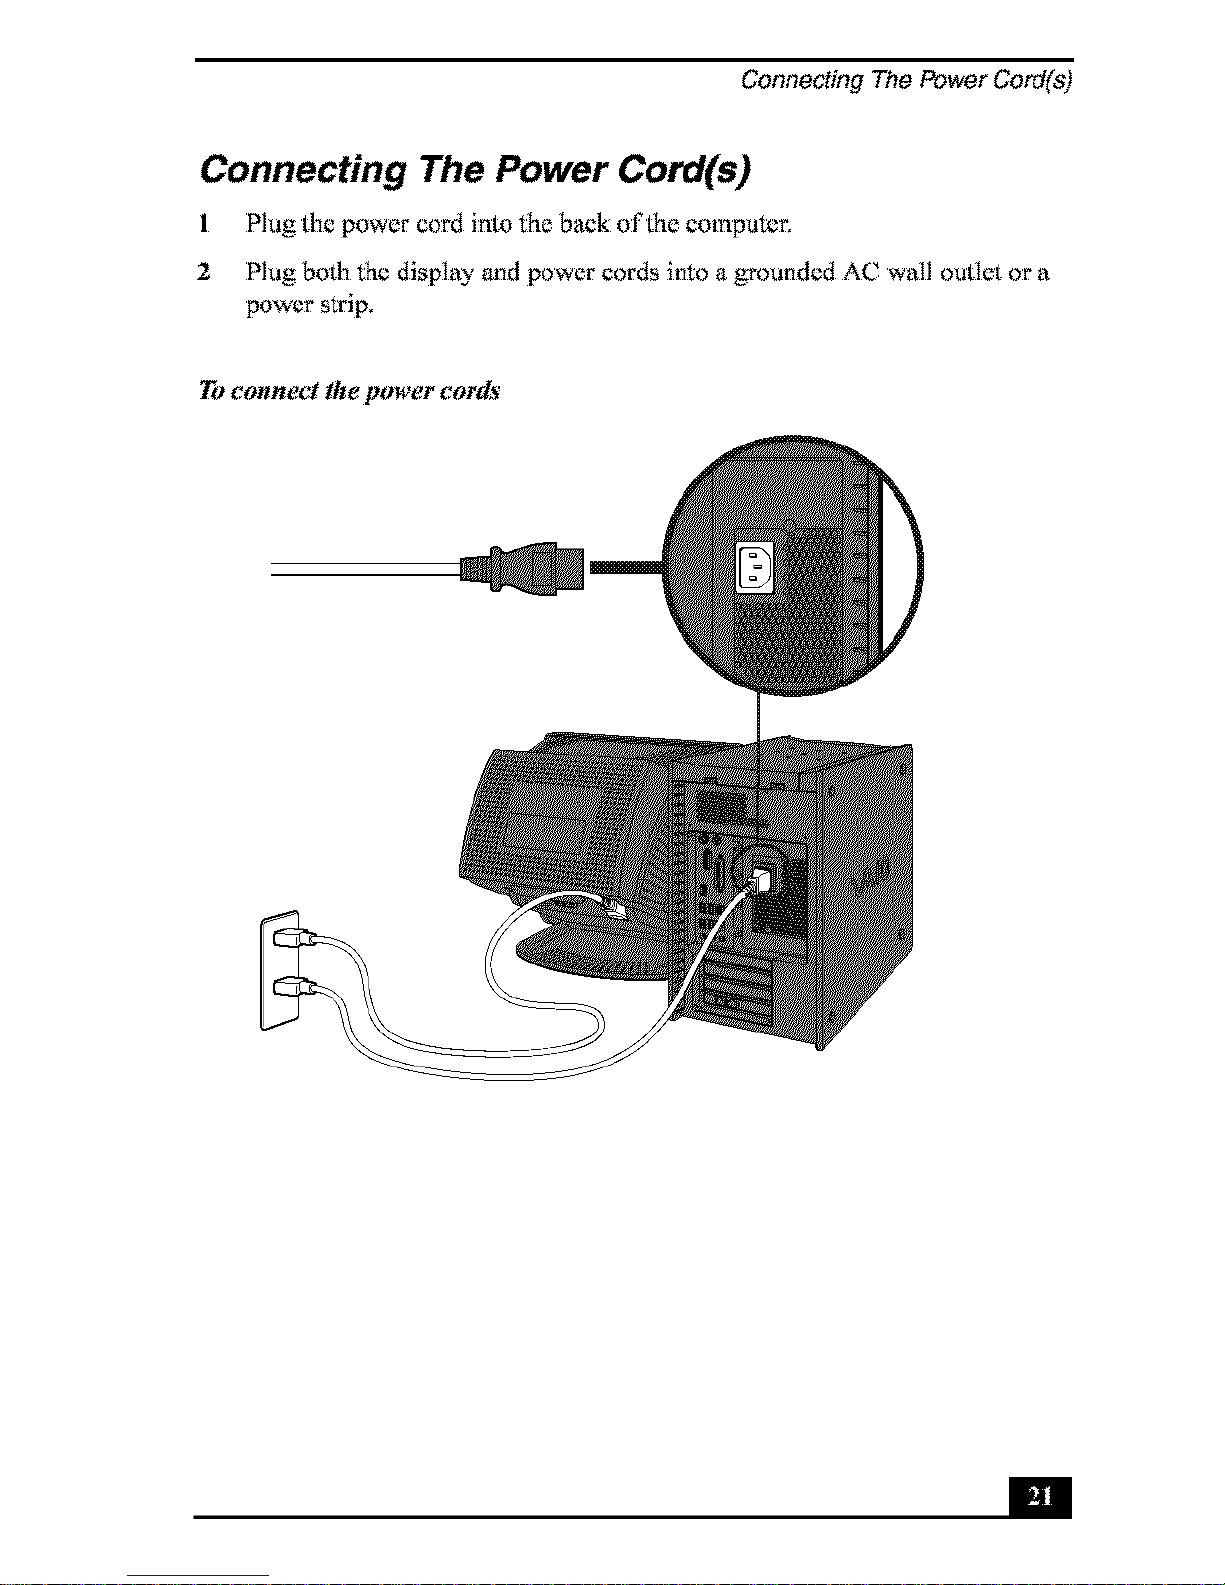
Connecting The Power Cord(s)
Connecting The Power Cord(s)
I Plug the power cord into fhe back of{he comp_ltcr.
2 Plug botl_ the displt_' m_d power cords into a grounded AC wall m_tlet or a
power strip,
To connect the power cords
VAIO Digital Studio Computer Quick Start
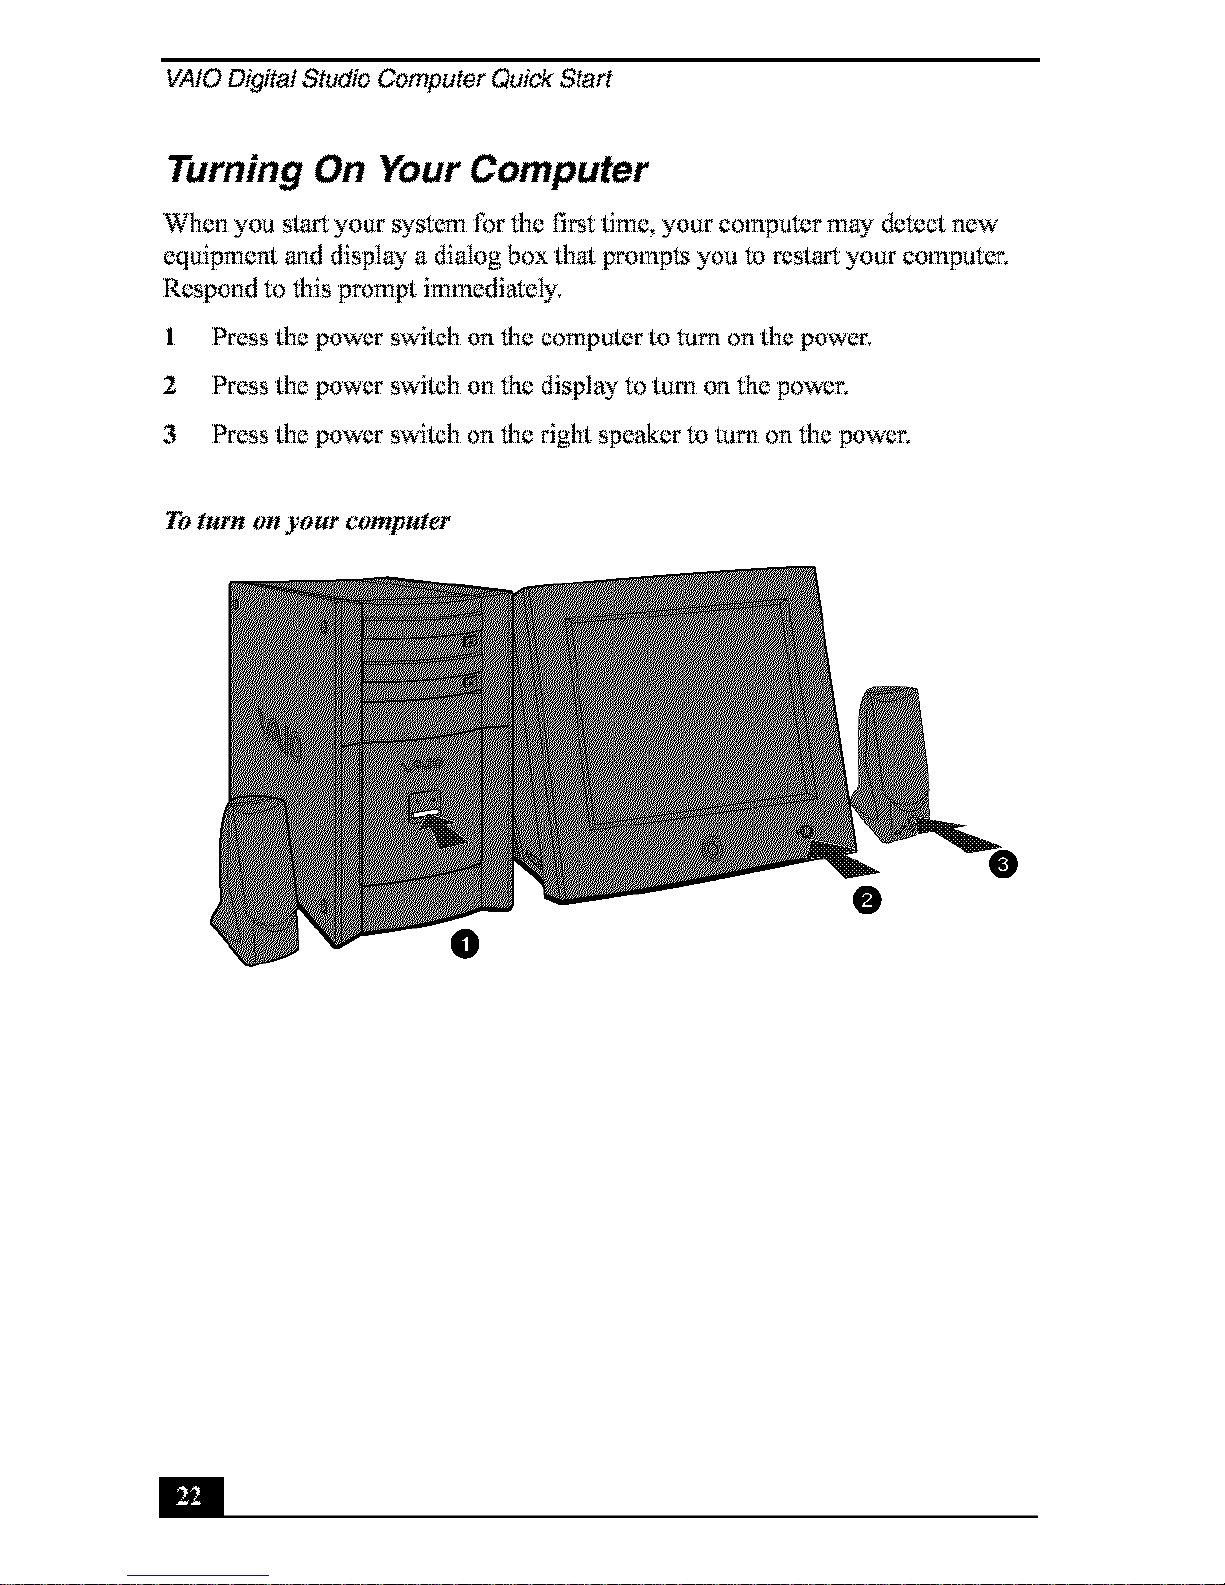
Turning On Your Computer
When you sl,al_ your s)'st_n for the l]rst lime, your eompuI_r may detect new"
equipment and displ_' a dialog box that prompts you _ restarl )'our computer.
Respond to this prompt immediately.
I Press the power swileh on the computer to turn ONthe power.
2 Press the power swilch on the displ_' to turn on (he power.
3 Press the power s_,ilch ONthe right speaker _ t_m_ONthe power.
Te lt¢J'n ott your comptt, lE_"
0
@
Registering Your Computer
Registering Your Computer
Take _vanlage of'Sony's ¢ommitolent to quality customer support m_d receive
these benefits by registering your computer:
Sony Customer Sapport-- Communicate will_ a Support Representative to
troubleshoot problems you m_' be having with your computer,
Limited warranty -- Protect your investm_t, See the Warrm_b' Card Ibr
more details.
M

VAIO Digital Studio Computer Quick Start
Setting Up Your Dial-up Connection
The first time you turn your cempt_tcr on, follew fhese steps to set up your dial-
t_pconnection:
I Click Start f¥omthe Windows taskbar and select All Programs.
2 Point to Accessories, point to Communications, m_d[hen click New
Connection W'_ard, The Loc_tion Information wiadow appears,
Location Information window
3 Enter in your in:lk_nnationas reqtiested. Click OK. The Phone and Modem
Options wiadow appears.
i Loading...