

Page 1

VAIO® User Guide
Page 2

VAIO® User Guide
Notice to Users
© 2000 Sony Electronics Inc. Reproduction in
whole or in part without written permi ssion is
prohibited. All rights reserved. This manual and
the software described here in , in whole or in
part, may not be reproduced, translated, or
reduced to any machine-readable form without
prior written approval.
SONY ELECTRONICS INC. PROVIDES NO
WARRANTY WITH REGARD TO THIS
MANUAL, THE SOFTWARE, OR OTHER
INFORMATION CONTAINED HEREIN
AND HEREBY EXPRESSLY DISCLAIMS
ANY IMPLIED WARRANTIES OF
MERCHANTABILITY OR FITNESS FOR
ANY PARTICULAR PURPOSE WITH
REGARD TO THIS MANUAL, THE
SOFTWARE, OR SUCH OTHER
INFORMATION. IN NO EVENT SHALL
SONY ELECTRONICS INC. BE LIABLE
FOR ANY INCIDENTAL,
CONSEQUENTIAL, OR SPECIAL
DAMAGES, WHETHER BASED ON TORT,
CONTRACT, OR OTHER WISE, ARISING
OUT OF OR IN CONNECTION WITH THIS
MANUAL, THE SOFTWARE, OR OTHER
INFORMATION CONTAINED HEREIN OR
THE USE TH EREOF.
Sony Electronics Inc. res erves th e right to make
any modification to this ma nual or the
information contained herein at any time
without notice. The software described herein is
governed by the terms of a separate user license
agreement.
This product contains softwa re owned by Sony
and licensed by third parties. Us e of suc h
software is subject to the terms an d conditions
of license agreements enclosed with this
product. Some of the software may not be
transported or used outside the United States.
Software speci f i cations are subject to change
without notice and may not necessarily be
identical t o current retail versions.
Updates and additions to software ma y re qui re
an additional charge. Subscriptions to online
service providers may require a fee and credit
card information. Financial services may
require prior arrangements with participating
financial institutions.
Son y, VA IO, the VA I O lo go, VAIO Sm art ,
VAIO Digital Studio, Media Park, DVgate,
Media Bar, Handycam, PictureGear and i.LINK
are trademarks of S o ny. Intel and Pentium are
trademarks of Intel Corpora tion. Microsoft,
Windows, and the Windows logo are registered
trademarks of Microsoft Corporation.
All other trademarks are trademarks or registered
trademarks of their respective o wne rs .
Owner’s Record
The model number and serial number are located
on the back of your Son y VAIO computer.
Record the serial number in the space provided
here. Refer to the model an d s e rial numbers
when you call your Sony Service Cen t er.
Model Number: PCV-J120
Serial Number:________________________
Safety Information and Caution
CD-RW Laser Diode Properties
Laser Output
Wave Length
❑
To prevent fire or shock hazard,
do not expose your desktop to
rain or moisture.To avoid
electrical shock, do not open the
cabinet. Refer servicing to
qualified personnel only.
0.7mW(Read)
23.5mW (Write)
775–790nm
2
Page 3

❑
Never install modem or
telephone wiring during a
lightning storm.
❑
Never install telephone jacks in
wet locations unless the jack is
specifically designed for wet
locations.
❑
Never touch uninsulated
telephone wire or terminals
unless the telephone line has been
disconnected at the network
interface.
❑
Use caution when installing or
modifying telephone lines.
❑
A void using the modem during an
electrical storm.
❑
Do not use th e modem or a
telephone to report a gas leak in
the vicinity of the leak.
❑
The socket outlet shall be
installed near the equipment and
shall be easily accessible.
! To change the backup battery,
please contact your nearest Sony
Service Center.
! Caution - The use of optical
instruments with this product will
increase eye hazard. As the laser
beam used in this product is
harmful to the eyes, do not
attempt to disassemble the drive
cabinet. Refer servicing to
qualified personnel only.
Notice to Users
! For CD-RW: Danger - Invisible
laser radiation when open. Avoid
direct exposure to beam.
! Caution: For ADSL modem
models, to reduce the risk of fire,
use only No. 26 AWG or larger
telecommunication line cord.
❑
Pour prévenir tout risque
d’incendie ou d’électrocution,
garder cet appareil à l’abri de la
pluie et de l ’humidité.
❑
Pour prévenir tout risque
d’électrocution, ne pas ouvrir le
châssis de cet appareil et ne
confier son entretien qu’à une
personne qualifiée.
❑
Ne jamais effectuer l’installation
de fil modem ou téléphone du rant
un orage électrique.
❑
Ne jamais effectuer l’installation
d’une prise téléphonique dans un
endroit mouillé à moins que la
prise soit conçue à cet effet.
❑
Ne jamais toucher un fil
téléphonique à découvert ou un
terminal à moins que la ligne
téléphonique n’ait été débranché
de l’interface réseau.
❑
Soyez très prudent lorsque vous
installez ou modifiez les lignes
téléphoniques.
❑
Évitez d’utiliser le modem durant
un orage électrique.
3
Page 4

VAIO® User Guide
❑
N'utilisez pas le modem ni le
téléphone pour prévenir d'une
fuite de gaz vous êtes près de la
fuite.
❑
L’appareil doit être le plus près
possible d’une prise murale pour
en faciliter l’accès.
! Pour changer la pile de rechange,
veuillez contacter votre centre de
service Sony le plus près.
Regulatory Information
Declaration of Conf ormity
Trade Name: SONY
Model No.: PCV-J120
Responsible Party: Sony Electronics Inc.
Address: 1 Sony Drive
Park Ridge, NJ 07656
Telephone: 201-930-6972
! Avertissement - L'utilisation
d'instruments optiques avec ce
produit augmente les risques pour
les yeux. Puisque le faisceau
laser utilisé dans ce produit est
dommageable pour les yeux, ne
tentez pas de désassembler le
boîtier. Adressez-vous à un agent
de service qualifié.
! Pour les CD-RW : Danger :
Radiation laser visible et invisible
si ouvert. Évitez l'exposition
directe au faisceau.
! Attention : Pour ADSL modele
modem, afin de réduire les
risques d'incendie, n'utilisez
qu'un cordon de communication
N0. 26 AWG ou plus gros.
For questions regarding your product or for the
Sony Service Center n earest you , cal l 1- 888-4 766972 in the United St ates or 1-800-961-766 9 i n
Canada.
Sony Customer Support can be reac hed at
http://www.sony.com/pcsupport
This phone number is for FCC-rel ated
matters only.
This device complies with Part 15 of the
FCC rules. Operation is subject to the
following tw o condition s :
(1) This devi ce may not cause ha r m ful
interference, and
(2) this device must accept any interference
received, including interference that may
cause undesired operat io n.
This equipment has been tested and found to
comply with the limits for a Class B digital
device, pursuant to Part 15 of the Rules. These
limits are designed to provide reasonable
protection against harm ful interference in a
residential installation. This equipment
generates, uses, and can radiate radio frequency
energy and, if not installed and used in
accordance wit h th e instructions, may cause
harmful interference to ra dio communications.
However, ther e is no guar antee t hat in terfe rence
will not occur in a partic ul ar installation. If th is
equipment does cause har mful interference to
radio or television reception , whi ch ca n be
determined by turning the equipment off and
on, the user is encouraged to try to correct the
interference by one or mor e of th e following
measures:
4
Page 5

Notice to Users
❑
Reorient or relocate the receiving
antenna.
❑
Increase the separation between
the equipment and the receiver.
❑
Connect the equipment into an
outlet on a circuit different from
that to which the receiver is
connected.
❑
Consult the dealer or an
experienced radio/TV technician
for help.
You are cautioned that any changes or
modifications not expressly appro ved in this
manual could void your authority to operate this
equipment.
Only peripherals (computer in put/output
devices, terminals, printers, etc.) that comply
with FCC Class B limi ts may be at tached to this
computer product. Op e ration with
noncompli ant peripher als is likely to r es ult in
interference to radio and te levision reception.
All cables used to connect peri pherals must be
shielded and grounded. Op eration with cables,
connected to peripherals, that are not shielded
and grounded, may result in int erference to
radio and television reception.
FCC Part 68
This equipm ent complie s w ith Part 68 of the
FCC rules. The FCC Ringer Equivalence
Number (REN) for this equipment is 0.7. If
requested, this information must be provided to
the telephon e company.
This modem uses the USO C RJ-11 telephone
jack.
The REN is used to determi ne the quantity of
devices which may be co nnected to the
telephone line. Exce ssive RENs on the
telephone line may result in th e devices not
ringing in response to an inco ming call. In
most, but not all areas, the sum of th e RENs
should not exceed five (5.0). To be certain of
the number of devi ce s th at may be c onn ect ed to
the line, as determined by the total RENs,
contact the telephone company to determine the
maximum REN for the calling area.
If the terminal eq uipment causes h arm to the
telephone network, the telephone company will
notify you in advance th at temporary
discontinuance of service m ay be required. But
if advance notice is not practical, the telephone
company will no tify the customer a s s oon as
possible. Also, you will be advised of your right
to file a complaint with the F CC if you bel iev e
it is necessar y.
The telephone company may make changes in
its facilities, equipment, operations or
procedures that could affect the operations of
the equipment. If this happens, the telephone
company will provide advance notice in order
for you to make the necessary modifications in
order to mai n tain uninterr upted servi ce.
If trouble is experienced wi th t his m odem, for
repair or warranty informat i on, ple ase contact
1-888-4SONY-PC, or write to the Sony
Customer Information Ce nte r, 12451 Gateway
Blvd., Fort Myers, FL 33913. If the trouble is
causing harm to the telephone network, the
telephone company ma y request that you
remove the equipment from the network until
the problem is r esolved.
Repair of this equipment should be made only
by a Sony Service Center or Sony autho rize d
agent. For th e So ny Se rv ice C ente r near est yo u,
call 1-888-4SONYPC (1-888-476-6972).
This equipment cannot be use d on public coin
service provided by the telephone compan y.
Connection to Party Line Service is subject to
state and possible provincial tariffs. (Contact
the state or provincial util it y service
commission, public ser v ice commission, or
corporation commi ssion for information.)
5
Page 6

VAIO® User Guide
Telephone Consumer Protection
Act of 1991
(United States)
The Telephone Consumer Protection Act of 1991
makes it unlawful for any person to use a
computer or other electronic device to send any
message via a telephone facsimile machine unless
such message clearly contains, in a margin at the
top or bottom of each transmitted page or on the
first page of the transmission, the date and time it
is sent and an identification of the business, other
entity, or individual sending the message, and the
telephone number of the sending machine or such
business, other entity, or individual.
To prog ram this inf orma tion i nto your fac sim ile
machine, see your fax software documentation.
Telephone Consumer Guidelines
(Canada)
Please refer to your t e lephone directory under
‘Privacy Issues’ and/or ‘Terms of Service.’ For
more detailed information, please co ntact:
CRTC
Terr as ses de la Chaudiére, Tour centrale
1 promenade du Portage, 5 étage Hull PQ K1A
0N2.
This Class B digit al ap p aratus complies with
Canadian ICES-003.
Cet àppareil numérique de la classe B est
conforme à la norme NMB -003 du Canada.
DISPOSAL OF LITHIUM ION
BATTERY
You can return your unwanted lithium ion
batteries to your nearest Sony Service Center or
Factory Service Center.
✍
In some areas the disposal of lithium
ion batteries in household or
business trash may be prohibited.
For the Sony Service Center nearest you, call 1888-476-6972 in the Unite d States or 1-800961-7669 in Canada.
! Do not handle damaged or leaking
lithium ion batteries.
! Danger of explosion if battery is
incorrectly replaced. Replace only
with the same or equivalent type
recommended by the manufacturer.
Discard used batteries according to
the manufacturer’s instructions.
! The battery pack used in this device
may present a fire or chemical burn
hazard if mistreated. Do not
disassemble, heat above 212°F
(100°C) or incinerate. Dispose of
used battery promptly. Keep away
from children.
! Ne pas manipuler les batteries au
lithium-ion qui fuient ou sont
endommagées.
! Une batterie non conforme
présente un danger d'explosion.
La remplacer seulement par une
batterie identique ou de type
équivalent recommandé par le
fabricant. Évacuer les batteries
usées selon les directives du
fabricant.
! La manutention incorrecte du
module de batterie de cet appareil
présente un risque d'incendie ou
de brûlures chimiques. Ne pas
démonter, incinérer ou exposer à
une température de plus de
100°C. Évacuer promptement la
batterie usée. Garder hors de
portée des enfants.
6
Page 7

Notice to Users
INDUSTRY CANADA NOTICE
NOTICE: The Industry Canada label identifies
certified equipment. This certification means that
the equipment meets certain telecommunications
network protective, operational and safety
requirements as prescribed in the appropriate Terminal Equipment Technical Requirements document(s). The Department does not guarantee the
equipment will operate to the userís satisfaction.
Before installing this equipment, users shou ld
ensure that it is permissible to be co nnected to
the faciliti es o f the local telecommunications
company. The equipment must also be installed
using an acceptable method of connection.
The customer should be aware that compliance
with the above condi ti ons may not prevent
degradation of service in some situations.
Repairs to certified equipme nt should be
coordinated by a representative designated by
the supplier. Equipment malfunctions or any
repairs or alterations made by the user to this
equipment may give the telecommunications
company cause to request that the user
disconnect the equipment.
Users should ensure for their ow n prot e ct ion
that the electrical ground connections of the
power utility, telephone lines and internal
metallic water pipe system, if present, are
connected together. This precaution may be
particularly important in rural areas.
CAUTION: Users should not attempt to make
such connections themselves, but should
contact the appropriate electrical inspectio n
authority, or electrician, as appropriate.
NOTICE: The Ringer E qu ivalence Number
(REN) assigned to each terminal device
provides an ind icati on o f th e maxi mum numb er
of terminals allowed to be connected to a
telephone interface. The termination on an
interface may consist of any combination of
devices subject only to the requirement that the
sum of the Ringer Equivale nce Numbers of all
the devices does not exceed 5. The Ringer
Equivalence Number for this equipment is 0.7.
AVIS DE L’INDUSTRIE
CANADA
AVIS: L’étiquette d’Industrie Canada identifie
le matériel homologué.
Cette étique tte certifie qu e le matériel es t
conforme aux normes de protection,
d’exploitation et de sécurité des ré sea ux de
télécommunications, comme le prescrivent les
documents concernant les exigences techniques
relatives au matériel terminal. Le Ministère
n’assure toutefois pas qu e le matériel
fonctionnera à la sat is f action de l’utilisateur.
Avant d’installer ce matériel, l’utilisateur doit
s’assurer qu’il est permis de le raccorder aux
installations de l’entreprise locale de
télécommunication. Le matériel doit également
être installé en suivant une méthode acceptée d e
raccordement. L’abonné ne doit pas oublier qu’il
est possible que la conformité aux conditions
énoncées ci-dessus n’empêche pas la
dégradation du service dans certaines situations.
Les réparations de matériel homologué doivent
être coordonnées par un représentant désigné par
le fournisseur. L ’entreprise de télécommunications
peut demander à l’utilisateur de débrancher un
appareil à la suite de réparations ou de
modifications effectuées par l’utilisateur ou à
cause de mauvais fonctionnement.
Pour sa propre protection, l’u tili s at eur doit
s’assurer que to us les fils de mise à la terre d e la
source d’énergie électrique, des lignes
téléphoniques et des canalisati ons d’e au
métalliques, s’ il y en a, sont raccordés
ensemble. Cette préc auti on e st parti culi èr ement
importante dans les régions rurales.
Avertissement: L’utilisateur ne doit pa s tenter
de faire ces raccordements lui-même; il doit
avoir recours à un service d’inspection des
7
Page 8

VAIO® User Guide
installations électriq ues, ou à un électricien,
selon le cas.
AVIS: L’indice d’équivalence de la sonnerie
(IES) assigné à chaque dispositif terminal
indique le nombre maximal de term inaux qui
peuvent être raccordés à une interface.
La terminaison d’une interface téléphonique
peut consister en une combination de quelques
dispositifs, à la seule condition que l a som m e
d’indices d’équivalence de la sonne rie de tous
les dispositifs n’excède pas 5. L’indice
d’équivalence de la sonnerie de ce matériel est
de 0.7.
8
Page 9

Contents
Notice to Users 2
Contents 9
Welcome 11
Choosing an Ergonomic Location 11
Front Panel Overview 12
Back Panel Overview 14
VAIO® Action Setup 17
Presetting i.LINK® devices 18
Sony Digital Media Park Applications 21
Movie Shaker 22
PictureGear™ 25
Using a Digital Video Camera Recorder 26
Configuring your VAIO® Computer 29
Hard Drive Partition 29
Defragmenting your Hard Disk Drive 29
i.LINK® (IEEE1394) Compatibility 29
Enabling Ethernet 31
9
Page 10

VAIO® User Guide
System and Application Recovery CD(s) 33
Using the System Recovery CD(s) 33
Using the Application Recovery CD(s) 35
Troubleshooting 37
Topics 37
Notes on Use 47
For Answers to Your Software Questions 52
Resources 54
Specifications 57
Index 59
10
Page 11

Welcome
Thank you for purchasing you r So ny VAIO® computer! Your new computer is a
superb blend of high technology and easy-to-use functionality. This User Guide
contains information about the applications included with your system, contact
information for software vendors, and the specifications for your computer.
Choosing an Ergonomic Location
Before you get started, find the best location for your new computer. Here are
some things to consider when planning your workspace:
❑
Stable work surface —
the computer and other equipment.
❑
Ventilation —
of your computer to enable proper ventil ation.
❑
Placement of the keyboard, mouse, and other input devices —
your keyboard, mouse, and other input devices so that your arms and hands are
in a relaxed, comfortable position. The keyboard should be directly in front of
you. Adjust the level of the keyboard so that your lower arms are parallel to the
floor. Keep your wrists in a relaxed position when you are using the keyboard—
not angled up or down. Use the palmrest only briefly, for resting. While typing,
never use the palmrest or rest your hands on the table. Position the mouse at the
same level as the keyboard. Hold the mouse with a relaxed hand, and use your
whole arm to move it. Take breaks during sessions with your computer.
Excessive use of the mouse or a joystick may strain muscles or tendons.
❑
Furniture and posture —
armrests. Adjust the level of the chair so your feet are flat on the floor. A
footrest may make you m ore comfortable. Sit with relaxe d, upright
posture—avoid slouching forward or leaning far backward.
❑
Viewing angle of the display —
in front of you, with the top of the screen at or a little below eye level. Use the
display’ s tilting feature to fin d the best po sition. You can reduce eye strain and
muscle fatigue by placing the display in the proper position.
Leave at least eight inches of space on the left and back sides
Use a stable work surface large enough to support
Place
Sit in a chair with good back support and
Position the display 18 to 26 inches directly
11
Page 12
VAIO® User Guide
❑
Lighting —
Choose a location where windows and lights do not create glare
and reflec t ion on the display. Use indirect lighting to avoid bright spot s on
the display. You can also purchase accessories for your display that help
reduce glare. Proper lighting adds to your comfort and work effectiveness.
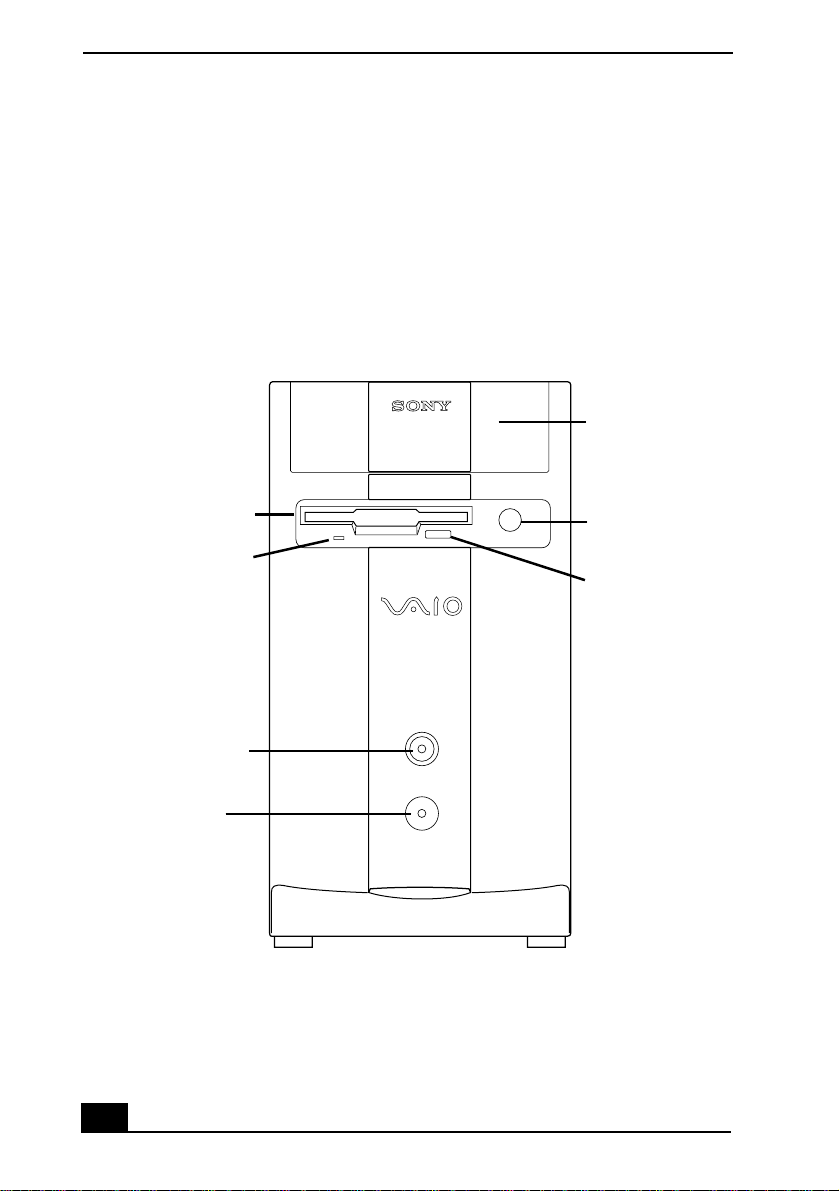
Front Panel Overview
The front panel of your VAIO Computer provides access to the diskette and
CD-RW drives.
Front Controls (PCV-J120
CD-RW Drive 5
1 Floppy Disk Drive
Floppy Disk Drive
Access Indicator Light
3 Power Switch
and Indicator
Light
4 Hard Disk Drive
Access Indicator
Light
CD-RW 6
Eject Button
Diskette 7
Eject Button
12
Page 13
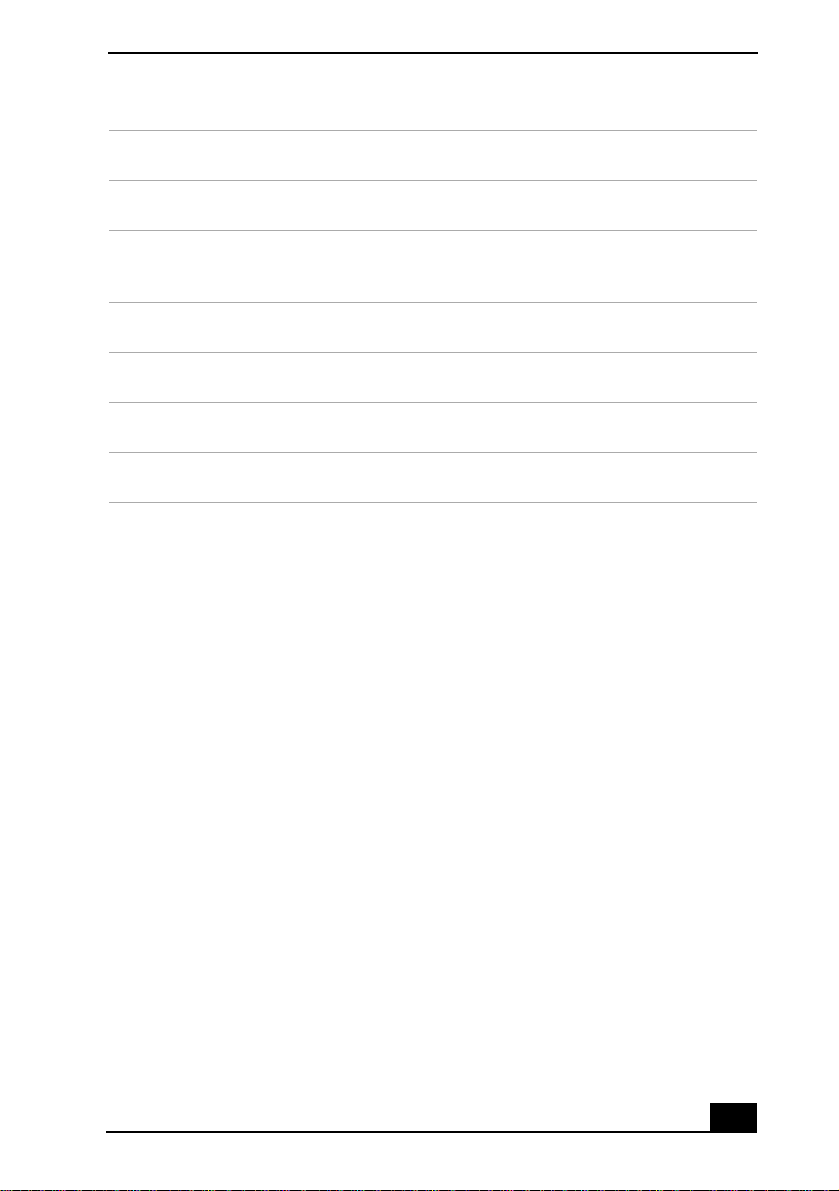
1 Floppy disk drive
Reads and writes data from and to a 3.5-inch floppy disk.
2 Floppy disk drive access indicator light
Lights in green while reading/writing data from/to a floppy disk.
3 Power switch and indicator light
Turns the co mputer on/off. The ind ica tor lig ht is g re en wh ile th e p ower is on
and amber when the computer is in st andby mode.
4 Hard disk drive access indicator light
Lights in amber while reading/writing data from/to the hard disk.
5 CD-RW drive
Reads data from a CD and writes data to a CD-R or CD-RW disc.
6 CD-RW eject button
Ejects a CD.
7 Floppy disk eject button
Ejects the flopp y disk.
Front Panel Overview
13
Page 14
VAIO® User Guide
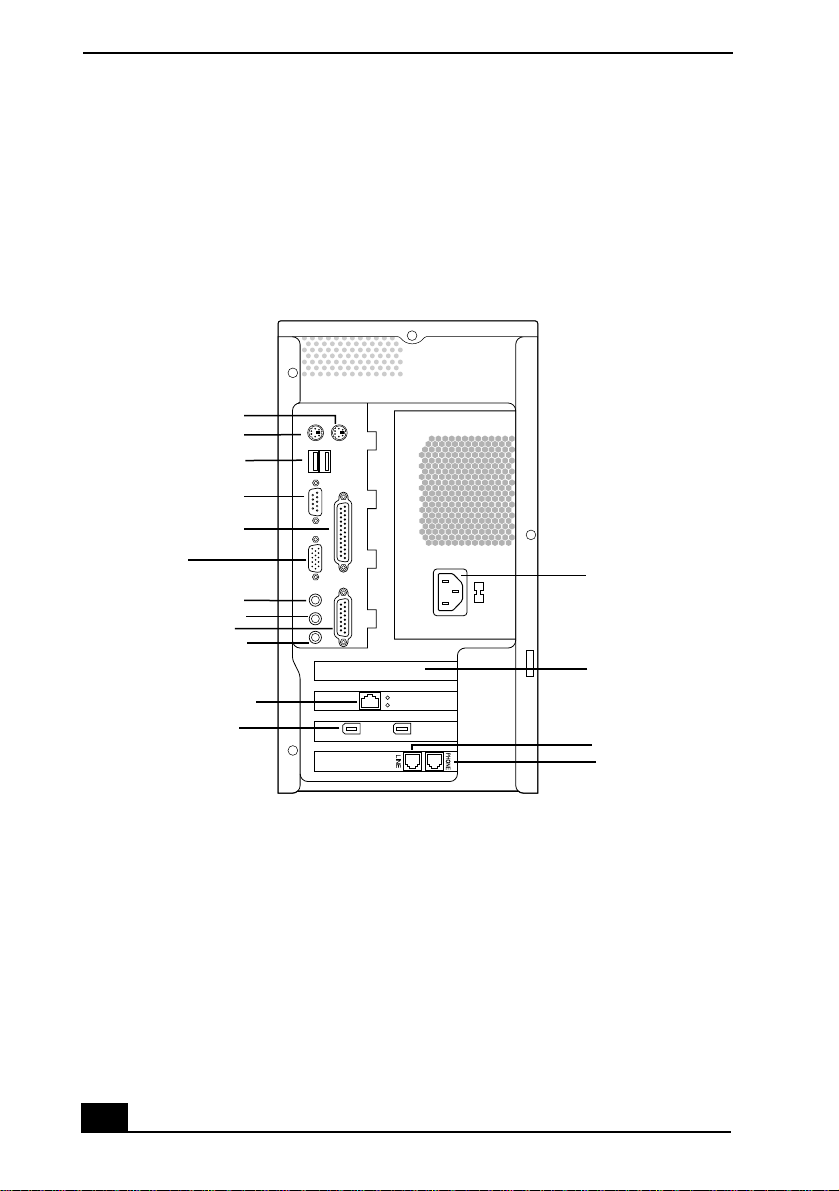
Back Panel Overview
The back panel of your computer contains the connectors for supplied and
optional accessories. The icons on the back panel help locate and identify the
connectors on your computer.
Back Controls and Connectors (PCV-J120)
1 PS/2 Mouse
2 Keyboard
3 USB
4 Serial
5 Printer/Parallel
6 Monitor
7 Headphones
9 Games/MIDI
10 Microphone
8 LINE IN
AC Input (Power) 13
PCI Slot (Empty) 14
12 i.LINK (IEEE1394)
14
11 Ethernet
Line Jack 15
Telephone Jack 16
Page 15
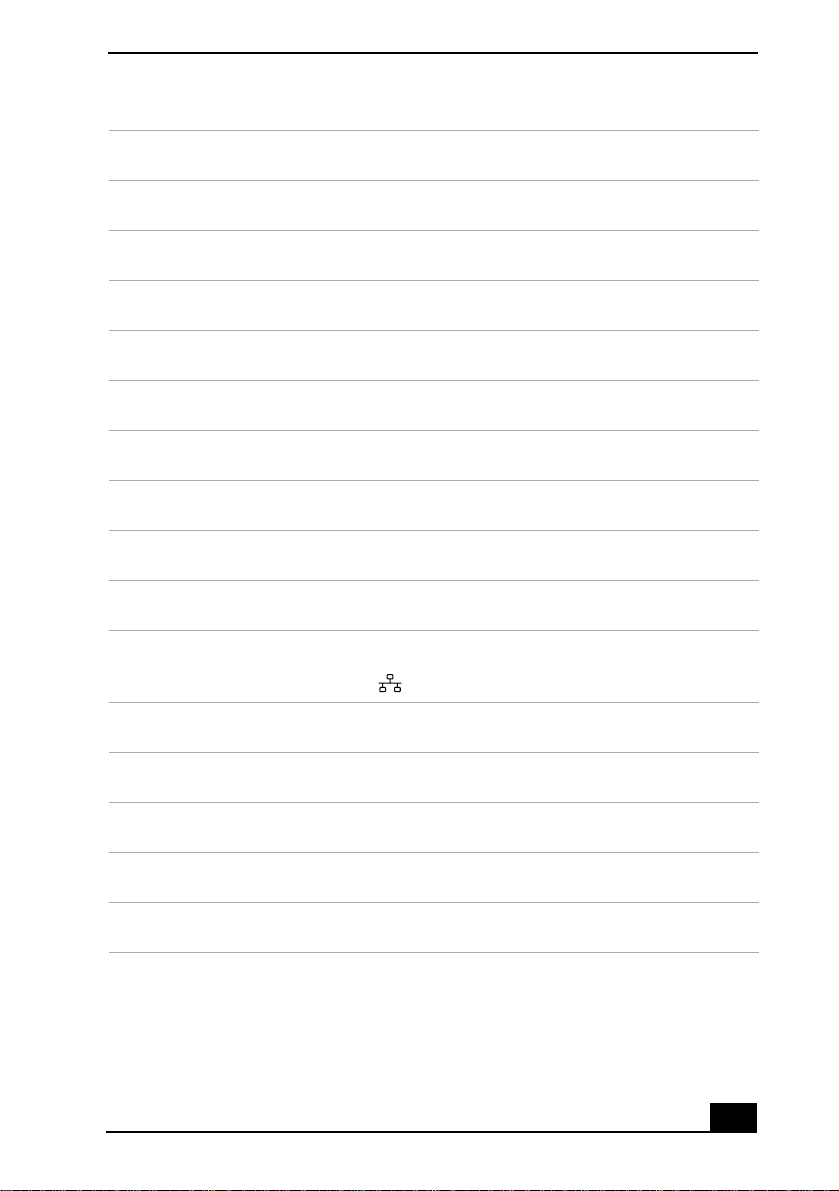
1 PS/2® mouse connector
Connects a PS/2 mouse.
2 PS/2 Keyboard connector
Connects a keyboard.
3 Universal Serial Bus (USB) connectors (2)
Connects a USB device.
4 Serial connector
Connects a compatible serial device, such as a digital still cam era.
5 Printer connector
Connects a paralle l de vice, such as a printer or scanner.
6 Monitor connector
Connects a standard CRT display.
7 Headphones connector
Connects the supplied speakers or optional headphones.
8 Line in connector
Connects an audio device.
9 Game/MIDI connector
Connects a game or MIDI device.
10 Microphone (MIC) connector
Connects a microphone (optional).
11 Ethernet connector
10Base-T/100Base -T X Fast Ethernet interf ace.
The connector marked with (Network) is for LAN connections only.
12 i.LINK 6-pin (IEEE1394) connectors (2)
Connects a digital device such as a Sony Digital Handycam
13 AC Input connector
Connects the supplied po wer cord.
14 Empty PCI Slot
For a PCI Add-On Card (optional).
15 Line jack
Connects a modem cable to the wall jack.
16 Telephone cable jack
Connects the phone cable to the computer
Back Panel Overview
®
Camcorder.
15
Page 16

VAIO® User Guide
16
Page 17

VAIO® Action Setup
VAIO Action Setup manages the settings for your computer’s Shortcut keys
(S Keys) and i.LINK® interface. The programmable S Keys come with the
following applications as their default settings:
❑
S1 —
Outlook Express
❑
S2 —
Internet Explorer
❑
S3 —
Media Bar
❑
S4 —
Picture Gear
❑
S5 —
DVGate Motion
❑
S6 —
Help/Demo
All six buttons are reprogrammable.
To change the S Key settings
1
From the Start menu, select Progr ams > VAIO Action Setup > VAIO Action
Setup.
✍
You can also double-click on the Windows taskbar to open VAIO Action Setup.
2
Click the S Key you want to change.
3
From the Select Application dialog box, click the radio button for the desired type
of function. The corresponding applications appear in the list box on the right.
✍
You may also use the drag and drop feature to place any application into the list box.
4
The Confirmation Application Name window appears showing you the
application you have selected. Click Next.
5
You may now type a new name and description, if desired. Then click
Finish.
17
Page 18

VAIO® User Guide
Presetting i.LINK® devices
Y ou can preset y our i.LINK-equipped devices to perform desired f unctions, such as
automatically starting DVgate™ applications or connecting two VAIO computers.
✍
i.LINK is a trademark of Sony used only to designate that a product contains an IEEE1394
connector. All products with an i.LINK connector may not communicate with each other.
To preset your i.LINK device to perform a desired function
1
From the Start menu, select Programs > VAIO Action Setup > VAIO Action
Setup.
2
Click i.LINK.
3
Click the Advanced Setting tab.
4
Click the Enable i.LINK launcher function checkbox and click Apply.
5
Connect the device to your computer with your i.LINK cable.
6
Turn on the device.
The VAI O Action Setup dialog box appears.
7
Click OK.
8
T o modify t he device name, click t he current device name i n the list box and
click Modify device name.
9
Type the desired name and click Apply.
10
To assign an application, click Modify.
The Select Application dialog box appears.
11
Select the desired application and click Next.
12
Click Next to confirm the application name.
The Input Application Name dialog box appears. You may change the name
and description of the application you want to launch.
13
Click Finish to complete this step.
The next time the device is connected and turned on, the assigned application
will launch automatically.
18
Page 19

Presetting i.LINK® devices
Changing the Window Design of Sony Software
To change the window design
1
Click the Start button > Settings > Control Panel.
2
Click UI Design Selector.
3
Click << or >> and select the desired design.
4
Click Apply.
5
The “UI Design Selector” window design changes. The window design for
your Sony software will match the “UI Design Selector” window.
6
To try another selection, click << or >> and then click OK.
7
UI Design Selector closes and the Sony software window design displays.
✍
You may use the feature with UI Design Selector-compatible software only.
19
Page 20

VAIO® User Guide
20
Page 21

Sony Digital Media Park
Applications
Your VAIO® computer comes with a collection of applications that make it easy
to use advanced multimedia formats. This section describes the Digital Media
Park applications and the digital video capabilities.
Media Bar™
Media Bar software is your a ll-in-one solution for a udio/video playba ck. Media Bar sof tware
handles all common computer multimedia formats, and controls certain Sony devices. Media
Bar software encompass es au dio/video library cataloging and play list ma na ge me nt, in
addition to digital video quality control and effects features. Me dia Bar seamlessly integrates
a variety of new media f or m ats w ith an ea sy- t o-use software interface .
DVgate™
DVgate makes it easy t o edit digital videos. You can grab and edit digital video clips, and
then assemble them into a polished home video everyone will enjoy. You can also use
DVgate to capture individual frames from digital video clips, and then save them as
graphic files. Enhance your Web page, send family and friends yo ur favorite stills, create
your own wallpaper—the possibilities are endless.
PictureGear™
PictureGear is a digital image management application that allows you to see all the
images stored in any directory on your comput er. Thumbnail vi ews provide quick
reminders of your pictures. Brighten, contrast, enhance, resize, crop, and col or-correct
your pictures. Create panoramic vi ews, animations, screen savers, wallpaper, and even
HTML photo albums.
Smart Capture
Smart Capture is a fun new way to send multimedia messages via e-mail. Smart Capture
manages the i.LINK® conn ec tio n be twe en you r computer and a Sony Digital Handycam
Camcorder, or other cameras that support the i.LINK interface. Smart Capture allows you to
capture and compress video or still images that you can save or share via e-mail. Captures
are low resolution, making it ideal for e-mail. For high-quality captures, use DVgate.
21
Page 22
VAIO® User Guide
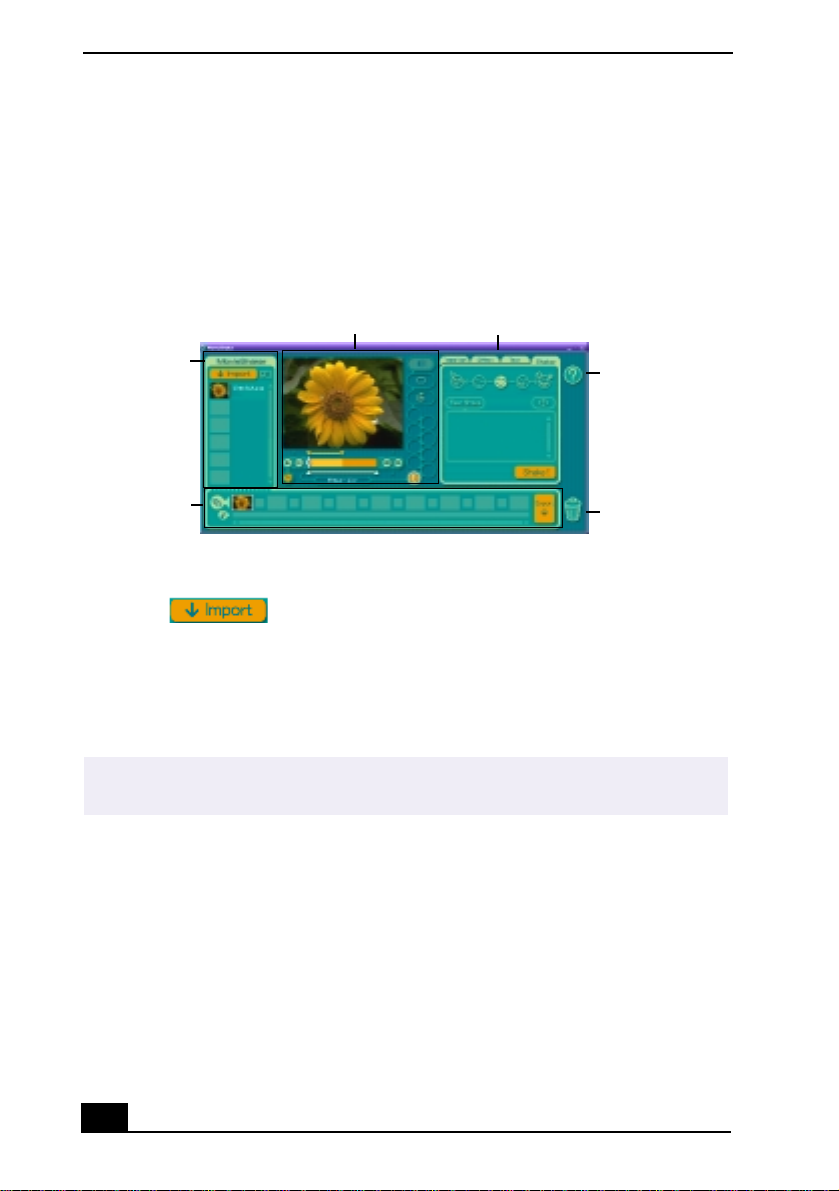
Movie Shaker
This application can be used to create fun and innovative movies without any
knowledge of film editing. In a few simple steps, motion pictures can be
combined with special effects, still images (pictures), and music files and then
saved in a format most computers can play.
Main Window
Working Panel
Clip tray
Product tray
Editing trays
Help
Trash
Importing Images and Sound Clips
1
Click .
2
Find the file you want to add.
3
Select the file.
4
Click Open. The file is added to the Clip tray.
✍
Importing files over 75 seconds in length may cause MovieShaker to stop
responding.
Create a Movie using Shaker
After adding clip(s) to the Clip tray, you can create a short movie using the Shaker
feature. Shaker randomly select clips from the Clip tray to create a 30-second scene.
22
Page 23
Movie Shaker
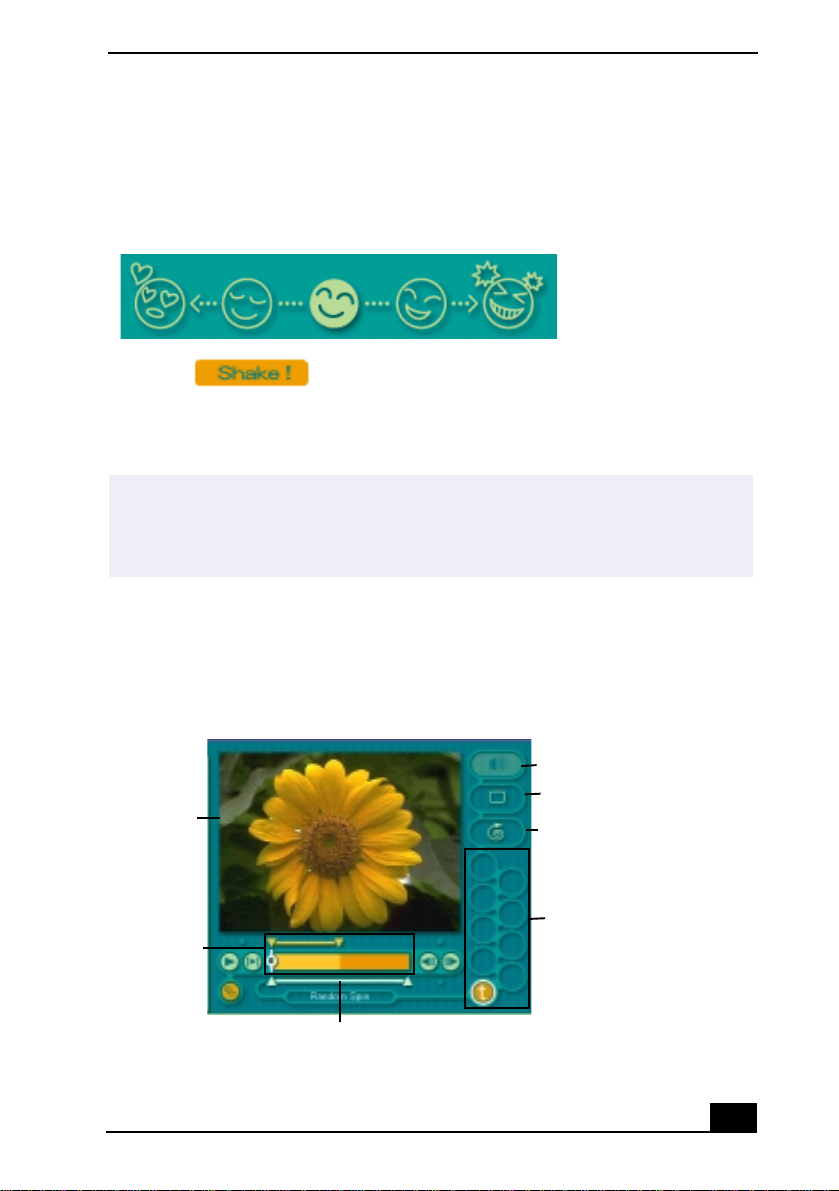
1
Click the Shake tab.
2
Select a mood by clicking a face in the Shaker tray.
Shaker tray
3
Click . A thirty second scene is automatically generated and
saved to the Product tray.
4
To preview, switch the Work Panel to Product tray mode and press play.
✍
Scenes created with Shaker begin with black frame and after processing are placed in
the first available slot on the Product tray. Limit the number of scenes placed on the
Product tray to 5 or less. MovieShaker may stop responding if too many scenes are
placed on the Product tray.
Editing Clips and Scenes
You can edit your movie by adding effects and text, adjusting the color and
contrast, and modifying the length of clips.
Working Panel
Monitor
Trim Palette
Sound
Color
Speed
Effect Palett e
Effect Knobs
23
Page 24

VAIO® User Guide
Adding effects to a scene or a clip
1
Double-click the clip or scene to move it to the Working Panel.
2
Select the Effects tab from the Editing tray.
3
Drag and drop the Effect you want to add from the Ef fects tray to the Ef fects
palette on the Working Panel.
✍
To preview an Effect, click on the clip in the Working panel monitor. Your clip displays
with the new effect on the Effect tray monitor.
4
See help for instructions on adjusting effect duration and replaying clips/
scenes.
Saving a Movie
1
Verify that the clip(s) you want to save is on the Product tray. See Help for
more details on saving movies.
2
Click Export.
3
Select the format in which you want the document to be saved.
4
Click Next.
5
Locate the folder to which you want the file saved.
6
Name the file.
7
Click Save.
! Exporting movies may take a long time to complete—Save movie as DV (Digital
Video) takes the longest and Quick-Save is the fastest. MovieShaker can play
.avi files up to 65 MB in length.
✍
For DV playback and smooth video playback, we recommend the following resolution/
refresh rates: 1024 × 768/75 Hz or lower.
24
Page 25

PictureGear™
PictureGear™
PictureGear is a digital image management application that allows you to see all
the images stored in any directory on your computer. Thumbnail views provide
quick reminders of your pictures. Brighten, contrast, enhance, resize, crop, and
color-correct your pictures. Create panoramic views, animations, screen savers,
wallpaper, still pictures from MPEG, and even html photo albums.
Managing Your Pictures
Use the collection feature to manage your pictures.
1
Click the Folder tab and browse to locate your pictures.
2
Select the pictures you want to have in a collection.
3
From Collection menu, select Create New Collection.
4
Enter a name for the collection and then click okay.
Creating a Photo Album
1
Select the pictures you want to use to make an album.
2
From the Utilities menu, select Album Maker.
3
Choose the type of Album you want and click Okay.
4
Now add more pictures, frames, text, and effects.
5
When you are finished, select Create Album in File menu or click the Create
Album icon on the toolbar.
6
Designate the folder you where want to save the Album.
7
Enter the Target Album name, select Thumbnails and click Okay.
8
The new album can be viewed using most internet browsers.
Using Panorama Maker
Panorama Maker stitches a group of still images into a 360 degree panoramic
picture. The source images should be the same size and overlap 20%.
How to stitch a panoramic picture:
25
Page 26

VAIO® User Guide
1
Gather the source images into the same folder or collection.
2
Select the images you want to use.
✍
We recommend 12 landscaped or 16 portrait pictures.
3
From the Utilities menu select Panorama Maker.
4
Select the correct lens and click Okay. (If 35m m lens is selected the pro mpt,
does not appear; to select a different lens, click the lens icon.)
5
Click the panoramic icon, near the bottom of the window.
6
Click Full Stitch.
Making Still Images and Panora mic from MPEG
1
Select the MPEG file.
2
From the Movie/Sound menu, select Scene break down.
3
Then select Movie Stitch, to create a panoramic picture.
Using a Digital Video Camera Recorder
Connecting a Digital Video Camera Recorder
Before connecting a digital video camera recorder to your computer, turn off the
power on the camera. After connecting the camera, turn the power back on. You
do not need to turn off the computer when connecting a camera.
Using DVgate™
When capturing clips
❑
Do not use DVgate when the connected digital video device is in Timer
Recording mode, as this could produce a malfunction in the device.
❑
Captures larger than 2 GB (9 minutes and 30 seconds) are automatically
continued in a second file.
❑
You can record stereo audio (stereo 1) while capturing video. You cannot
add audio on the stereo 2 track after capturing the video data.
26
Page 27

Using a Digital Video Camera Recorder
❑
You cannot use different audio modes on the same tape. You should perform
a separate capture for each audio mode you wish to use.
❑
DVgate does not support hard disk compression. You should not use disk
compression if you are planning to work with DVgate.
❑
Title data is saved in the flash memory of a digital video camera and is not
transferred to tape by DVgate.
❑
T o avoi d int errupt ion of capt ure ses sions , you s hould di sabl e the screen saver.
❑
The drop frame compensation feature does not provide accurate
compensation adjustments for tapes recorded in LP mode.
❑
For tapes that include a mixture of both SP and LP mode, the information
displayed by the capture progress indicator may not be accurate.
❑
Make sure the video head of your digital video device is properly cleaned.
Anomalies that you see in captured data could be due to dust or other
particles on the video hea d.
❑
The last frame captured is one frame before your selected [OUT] point. The
frame you see immediately after clicking the [OUT] button is not captured.
When recording AVI files to tape
❑
Do not use DVgate when the connected digital video device is in Timer
Recording mode, as this could produce a malfunction in the device.
✍
You can record only AVI files. MPEG files cannot be recorded.
❑
To avoid recording problems, such as a single frame appearing in multiple
frames, close other applications on your system while recording.
❑
You cannot use different audio modes on the same tape. If you have AVI
files that use different audio modes, they cannot be recorded at the same
time, but must be recorded separately.
❑
Do not attempt to work with AVI files that are smaller than 4 MB.
❑
DVgate does not support hard disk compression. Do not use disk
compression if you are planning to work with DVgate.
❑
In order to maximize recording capabilities, video and audio data are not
available while you are recording.
❑
If DVgate indicates that frames have been dropped, close all open
applications, or defragment your hard drive.
27
Page 28

VAIO® User Guide
28
Page 29

Configuring your VAIO® Compute r
Hard Drive Partition
In order to improve the performance of the DVgate software, the hard disk drive
on your computer has been formatted with two partitions, C and D. The DVgate
software saves files to the D partition. This prevents large video captures from
consuming the available space on your C partition. To maintain optimum DVgate
performance, you should defragment your D partition regularly.
Defragmenting your Hard Disk Drive
If you encounter frame dropping while recording digital video onto your hard
disk drive, defragmentation may be necessary.
To defragment your hard disk drive
1
Deactivate your screen saver, if applicable.
2
From the Start menu, select Programs > Accessories > System Tools > Disk
Defragmenter.
3
Run Disk Defragmenter.
✍
It may take more than a couple of hours to complete defragmentation, depending on
the data capacity and utilization of your computer’s hard disk drive(s).
i.LINK® (IEEE1394) Compatibility
Your VAIO computer includes two 6-pin i.LINK connectors on the bac k panel of
the system. A 6-pin i.LINK connector:
❑
can supply power from the computer to the co nnected device if the dev ice is
equipped with a 6-pin connector, and
❑
supplies 10V to 12V.
29
Page 30

VAIO® User Guide
! The total power supplied by the 6-pin i.LINK connector cannot exceed 6 watts.
✍
i.LINK is a trademark of Sony used only to designate that a product contains an IEEE1394
connector. All products with an i.LINK connector may not communicate with each other.
The following Sony i.LINK 400 Mbps cables are available and recommended for
use with your computer: VMC-IL4615 , VMC-IL4635, VMC-IL6615, and VMCIL6635. Sony computer supplies, accessories, and peripheral equipment can be
purchased from your local retailer, through the Sony VAIO Direct Web site
(http:///vaio.sonystyle.co m), or by calling 1-8 88- 315-7669 (toll free).
✍
If your i.LINK device has a 4-pin connector, you need a 4-pin to 6-pin connector i.LINK
converter cable such as the VMC-IL4615 or VMC-IL4635.
30
Page 31
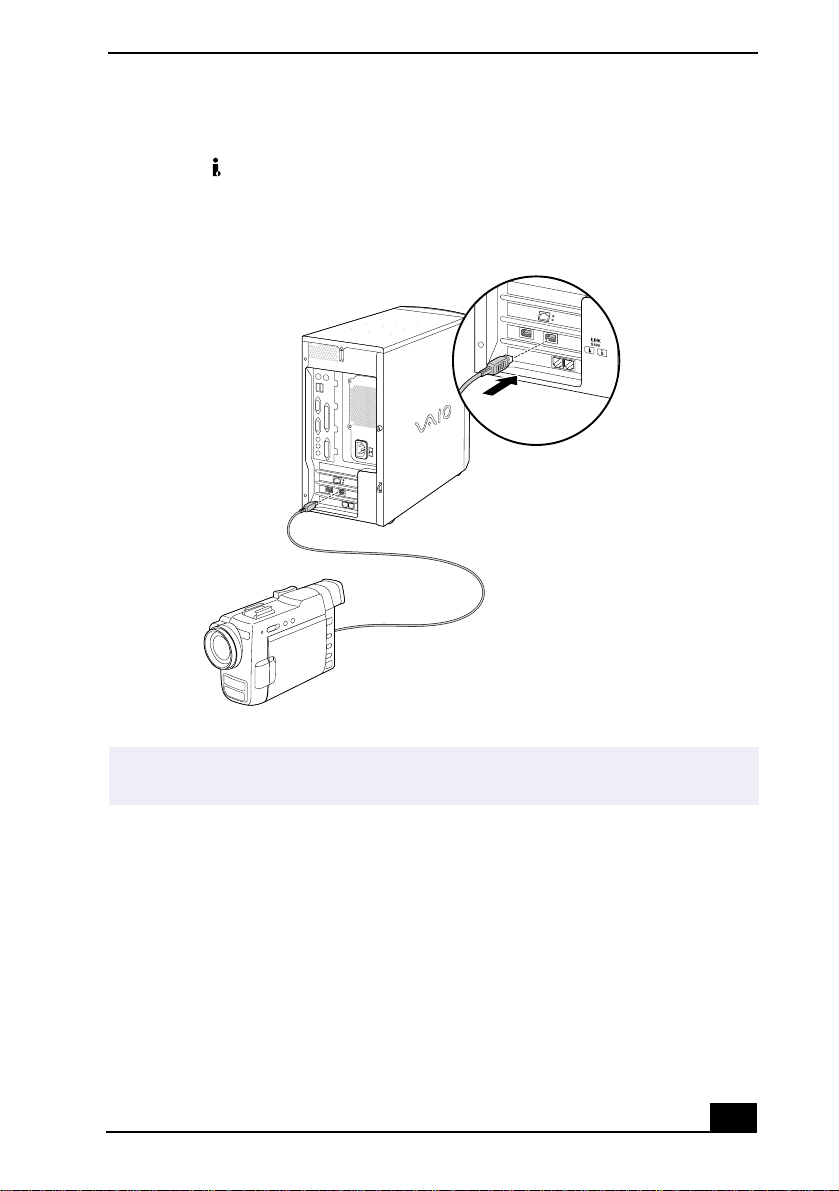
To connect an i.LINK (IEEE1394) device
Enabling Ethernet
1
Use the symbol to locate the i.LINK
2
Plug the i.LINK cable into this connector.
Connecting an i.LINK device
connector.
✍
See the manual that came with your i.LINK (IEEE1394)-equipped device for more
information on installation and use.
Enabling Ethernet
Your computer comes with a preinstalled Ethernet interface. To enable faster
startup, you r computer ships with this function disabled. You may enable
Ethernet connectivity by following the instructions below.
To enable the Ethernet connection
1
Right-click My Computer on the desktop and select Properties.
2
Click the Device Manager tab.
31
Page 32
VAIO® User Guide
3
Select “Realtek RTL8139 (A/B/C/8130) PCI Fast Ethernet NIC” under the
Network Adapters category.
4
Click Properties.
5
Click Enable Device and then click OK.
6
Click Close.
! Warning: Your computer has a protective sticker covering the Ethernet port
located on the rear panel. Connect only 10Base-T and 100Base-TX cables to the
Ethernet port. Using other cables or a telephone cable may result in an electric
current overload and can cause a malfunction, excessive heat or fire in the port.
For help on connecting to a network, see your network administrator.
32
Page 33

System and Application Recovery
CD(s)
System Recovery CD(s)
Sony Electronics
The System Recovery CD program allows you to restore the software titles that shipped
with your computer if they become corrupted or are erased. It can be used only to rest ore
the hard disk of the Sony computer you purchased.
Application Recovery CD(s)
Sony Electronics
The Application Recovery CD p rogra m allows you to reinsta ll indiv idual ap plicatio ns and
device drivers. Use it to restore corrupted or erased files.
Using the System Recovery CD(s)
You can reinstall software titles that shipped with your computer if they are
corrupted or accidentally erased. You may not need to recover the entire contents
of your hard drive. If you experience a problem with your computer, reinstalling
an individual device driver or software title may correct the problem.
✍
Use the Application Recovery CD program to reinstall individual applications or device
drivers.
The System Recovery utility options
❑
Full Restore without Format —
originally came with your computer without formatting the hard disk.
! If you choose the Full Restore without Format option, you may need to reinstall
applications that were not included with the computer when you purchased it. If
you have any questions on using the System Recovery CD(s), contact Sony
Customer Support.
❑
Full Restore with Format —
all the original software. If your hard drive is partitioned into C and D drives,
restores all the software titles that
formats the hard disk drive and then restores
33
Page 34

VAIO® User Guide
the computer will offer you the option to reformat the drive into a single
partition.
! If you choose the Full Restore with Format option, your hard disk will be
formatted, which removes all the information on the hard disk drive. You will lose
any software you have installed and any other files you have created since you
started to use your computer. You must reinstall any applications that were not
included with the computer when you purchased it.
To use the System Recovery CD(s)
✍
You need to complete the Windows registration process when you use the System
Recovery CD(s).
1
Insert the Sony System Recovery CD in the CD-RW drive.
✍
The System Recovery utility boots from the CD-RW drive. It must be in the drive when
you turn on the computer.
2
Shut down your computer.
3
Wait 30 seconds and turn on your computer.
4
Click OK to signify you have read and accept the Microsoft End-User
License Agreement.
5
When the System Recovery menu appears, follow the on-screen instruction s
to complete the recovery process.
✍
Your system may include one or two System Recovery CDs. If you have two System
Recovery CDs, insert the first CD to run the System Recovery program. You are
prompted to insert the second CD once the information from the first CD has been
installed.
The recovery process takes 30 to 60 minutes to complete.
After recovering your system using the System Recovery CD(s), you may be prompted
to insert your Application Recovery CD(s) after restarting Windows. Insert the
Application Recovery CD(s) to complete full recovery of your system.
34
Page 35

Using the Application Recovery CD(s)
Using the Application Recovery CD(s)
The Application Recovery CDs allow you to reinstall individual applications and
device drivers if they become corrupted or are accidentally erased. Reinstalling
an individual device driver or software title may correct a problem you are
experiencing with your computer, and you may not need to recover the entire
contents of your hard drive.
✍
If you do need to reinstall all the software titles that shipped with your computer, use
the System Recovery CD(s).
Y o u must be in W indo ws to run t he Applicati on Recovery C D(s). The app lication
will not run from DOS. If you have any questions on using the Application
Recovery CD(s), contact Sony Customer Support.
To use the Application Recovery CD(s)
1
Turn on your computer. If your computer is already on, close all
applications.
2
When the Windows desktop appears, insert the Sony Application Recovery
CD in the CD-RW drive. The Application Recovery utility loads
automatically.
3
When the Application Recovery menu appears, follow the on-screen
instructions to complete the recovery process.
✍
Your system may include one or two Application Recovery CDs. If you have two
Application Recovery CDs, insert the first CD to run the Application Recovery
program. You may be prompted to insert the second CD, depending on the application
you wish to restore.
35
Page 36

VAIO® User Guide
36
Page 37

Troubleshooting
This section describes how to so lv e commo n pro ble ms you may encou nte r when
using your computer. Many problems have simple solutions, so try these
suggestions before you call Sony Customer Support.
Topics
Topic: My computer does not start
❑
Check that the computer is plugged into a power source and that it is turned
on. Check that the power light is lit on the front panel of the computer.
❑
Confirm that a diskette is not in the diskette drive (unless you are using a
bootable diskette).
❑
Confirm that the power cord and all cables are connected firmly, as shown
on the color poster.
❑
If you plugged the computer into a power strip or Universal Power Supply
(UPS), make sure the power strip or UPS is turned on and working.
❑
Check that the display is plugged into a power source and turned on. Check
that the brightness and contrast controls are adjusted correctly. See the
manual that came with your display for details.
❑
Check that the computer is not in standby mode.
Topic: My files are corrupted or deleted and I want to recover applications or
drivers that came with my computer
See “Using the Application Recovery CD(s)” in this manual.
Topi c: My computer or software program stopped responding
1
Press Ctrl+Alt+Delete to close the application that has stopped responding.
2
In the Close Program dialog box, scroll down until you locate the message
“Not responding” next to an application.
37
Page 38

VAIO® User Guide
3
Select this application and click End Task. Windows attem p ts to close the
application. If the attempt is unsuccessful, a second dialog box appears.
4
Select End Task again.
❑
If you are unable to “unlock” the application, repeat the above steps but
select Shut Down when the Close Program dialog box appears.
❑
If the above steps fail to “unlock” your computer, try the following steps:
1 Save any unsaved work, if possible.
2 Press Alt+F4.
3 Select Restart.
4 C lick OK.
❑
If you cannot restart as described in the preceding steps, you can restart the
computer by pressing Ctrl+Alt+Del et e or by pressin g the power swi t ch for
more than six seconds.
✍
Pressing Ctrl+Alt+Delete twice consecutively may result in the loss of changes made
to files that are currently open.
❑
Contact the software publisher or designated provider for technical support.
See the contact information in this manual.
Topic: Why does Windows lock up during shutdown?
®
The Windows
operating system may not shut down properly for many reasons,
including incompatible or conflicting drivers, damaged files, or nonresponsive
hardware. For troubleshooting information, you can search Windows Help.
1
From the Start menu, select Help. The Help and Support dialog box opens.
2
Select Troublesh oo tin g.
3
Click the subject for which you want information, continuing to select the
subsequent topic that is most appropriate for you r probl em .
To pic: How do I change the parallel port type to ECP, EPP, or bi-directional?
You can change the parallel port type using the System Setu p utility (CMOS
Setup Utility). To access System Setup:
38
Page 39

1
From the Start menu, select Shut Down. From the drop-down list, select Restart.
2
When the Sony screen displays, press the F2 key on your keyboard.
3
Select the Advanced tab from the Setup Utility screen.
4
Select “I/O Device Configuration” and use the arrow keys to highlight
Parallel Port Mode.
✍
You can toggle between the Normal (bi-directional), EPP, ECP, and ECP+EPP options
using the directional arrow keys.
5
When the desired setting displays, press the Escape key.
Topic: My CD drive tray does not open
❑
Use the eject button
1 Make sure the computer is turned on.
2 Press the Eject button on the drive.
❑
Use the My Computer icon
1 Click the My Computer icon on the Windows
®
desktop.
2 Right-click the CD-ROM icon.
3 Select the Eject option from the pop-up menu.
Topics
✍
Avoid using adhesive labels to identify your CD media. Adhesive labels may come off
while the CD media is in use in your optical drive(s) and may cause damage to the unit.
Topic: I cannot play a CD
❑
After inserting your CD, wait a few seconds for it to be detected before
trying to access it.
❑
Make sure you place the disc in the tray with the label side facing up.
❑
Make sure the software is installed according to the program’s instructions.
❑
If your drive re ads s ome CDs, bu t not oth ers, chec k the s hiny s ide o f the disc
for dirt or scratches. Yo u may also need to clean the disc drive lens with an
appropriate cleaner.
39
Page 40

VAIO® User Guide
Topic: I want to play a CD with Microsoft Windows Media Player
When you insert a music CD, the Media Bar™ software automatically launches
to play your CD. When the Media Bar is running, the Windows Media Player
does not have access to the CD. Close Media Bar to use Microsoft Windows
Media Player. If you do not hear any music, check all your volume controls.
Topic: When I click an application icon, a message such as “You must insert
the application CD into your drive” appears and the software does not start
❑
Some titles require specific files that are located on the application’s CDROM. Insert the disc and try starting the program again.
❑
Check to make sure you inserted the CD-ROM with the label side facing up.
Topic: Why doesn't my CD-RW drive record at the highest speed?
You must use 4x CD-RW or 8x CD-R media t o achieve op t imum performance.
If you must use other media and are having d if ficu lty fo rmatting non-4 x CD-RW
media, change the write speed from 4x to a lower setting. To change the write
speed from the default to a lower speed:
1 Click the My Compute r icon on you r desktop.
2 R ight-click the CD-RW drive icon.
✍
Your CD-RW drive is assigned drive H as its default.
3 Select Properties.
4 Select the Settings tab.
5 Change the “Current Write Speed” field to 1x or 2x.
6 C lick OK.
Topic: How do I change the video resolution of my display?
1
From the Start menu, select Settings > Control Panel.
2
Click the Display icon and select the Settings tab.
3
Move the Display area slider to change the resolution.
4
Click OK.
40
Page 41
Topic: Why is there no so und in any application?
There are independent controls for your system volume.
❑
Check that the speakers are plugged into the HEADPHONES connector.
❑
If the speakers have a mute button, make sure it is off.
❑
If the speakers are powered by batteries, check that the batteries are inserted
properly and that they are charged.
❑
If the speakers use an external power source, make sure that the power cord
is plugged into a grounded wall outlet or power strip.
❑
If the speakers have their own volume control, check the volume level.
❑
If the program you are using has its own volume control, check that the
volume is turned up.
❑
Check the volume controls in the application, in the audio mixer, and in
Windows. There is a volume control icon on the Windows
®
taskbar.
Click the icon and slide the level bar up to increase the volume.
❑
Check that the Mute check box is not selected in the Windows volume
control .
❑
If you connected headphones to the computer, you will not hear sound from
the speakers.
Topics
Topic: My modem connection is slow
The computer’s modem uses Lucent 1648 technology/V.90. Many factors
influence modem connection speed, including telephone line noise or
compatibility with telephone equipment (such as fax machines or other modems).
If you think your modem is not connecting properly to other PC-based modems,
fax machines, or your Internet Service Provider, check the following:
❑
Have your phone company check that your phone line is free from any line
noise.
❑
If your problem is fax-related, check that there are no problems with the fax
machine you are calling and that it is compatible with fax modems.
❑
For optimum performance, ensure you are calling an Internet Service
Provider number that is V.90-compliant.
❑
If you are having a problem connecting with your Internet Service Provider,
check that the ISP is not experiencing technical problems.
❑
If you have a second phone line available, try connecting the modem to this line.
41
Page 42

VAIO® User Guide
Topic: My modem does not work
❑
Check that the phone line is plugged into the LINE jack.
❑
Check that the phone line is working. You can check the line by plugging in
an ordinary phone and listening for a dial tone.
❑
Check that the phone number the program is dialing is correct.
❑
Verify that the software you are using is appropriately configured to
recognize and interact with the Sony computer modem. Call the software
publisher if you do not know ho w to config ure t he s oftwa re to reco gni ze the
modem. All programs preinstalled by Sony are compatible.
❑
If you suspect your modem is not function ing, you can perfo rm a simp le test
to find out.
1 Click the My Compute r icon on you r desktop.
2 C lick Contro l Panel.
3 C lick Mod e ms.
4 C lick the Diagnostics tab.
5 Select COM3.
6 Click More Info.
If your modem is functioning, a More Info dialog box will display. If your
modem is not functioning, an error message will appear.
Topic: How do I change my modem to rotary or Touch-Tone dialing?
1
Click the My Computer icon on your desktop.
2
Click Control Panel and then click Modems.
3
Click Dialing Properties.
4
Select the Tone dial or Pulse dial radio button next to “Dial using.”
5
Click OK.
Topic: My microphone does not work
Check that the microphone is plugged into the MIC connector.
42
Page 43

Topic: My microphone is too sensitive to background noise
If you find there is too much background noise when you record sound, you
should adjust the microphone gain by following these steps:
1
Right-click the speaker icon (Volume) in the lower-right Windows
®
task
tray.
2
Click Open Volume Controls.
The Volume Control screen appears.
3
In the Options menu, select Properties.
The Properties screen appears.
4
Change the setting for “Adjust volume for” from Playback to Recording,
then click OK.
5
Decrease the microphone level.
6
If available, click the Advanced button under Microphone Balance.
The Advanced Controls for Microphone screen appears.
7
Deselect the check box for 1 Mic Gain (+20 dB), then click the Close button.
8
Close the Recording Control window.
Topics
Topic: My mouse does not work
❑
Check that the mouse is plugged into the MOUSE connector.
❑
There may be dust or dirt inside the mouse mechanism. To clean the mouse,
follow these steps:
1 Turn off your computer and turn the mouse upside down.
2 Remove the mouse ball cover on the back of the mouse by turning
clockwise the ring that covers the mouse ball.
3 Turn the mouse upright, and drop the mouse ball into your hand .
4 Using a piece of tape, remove any dust or dirt on the mouse ball and
inside the mouse ball socket.
5 Return the mouse ball to the socket, and replace the mouse ball cover.
Secure the cover by turning the ring counter-clockwise.
43
Page 44

VAIO® User Guide
Topic: My mouse needs to be set up for left-hand use
1
Click the My Computer icon on your desktop.
2
Click Control Panel, and then click Mouse.
The Mouse Properties dialog box appears.
3
In the Quick Setup tab, click Device Setup.
4
In the Device Setup Wizard dialog box, click Next.
5
Select the radio button ne xt to “Left side of the keyboard.”
6
Click Next three times, and then click Finish.
7
Click Apply.
Topic: My keyboard does not work
Check that the keyboard is plugged into the KEYBOARD connector.
Topic: I cannot find the Windows® taskbar
❑
Check that the taskbar is not hidden or shrunken.
❑
Use the mouse to point to the left, right, top, and bottom edges of the screen.
Topic: Why is my system running slowly?
❑
The system responsiveness varies depending on the number of applications
that are open and running. Close any applications that you are not currently
using.
❑
Increasing the system memory may also help. The computer has two
memory slots. For memory up grades, us e only 3.3 V 64-b it PC-100 S DRAM
DIMM modules. For information on installing memory, please see the online
document,
Topic: My i.LINK
1
Turn off and disconnect your device.
2
Reconnect your device.
3
Then turn on the power.
Upgrading and Maintaining your VAIO® Computer
®
device does not appear on the desktop
.
44
Page 45

Topics
Topic: My connected printer doesn't function after the computer resumes from
a power saving mode
When this occurs, follow the procedures below to reset the printer connection:
1
Right-click the My Computer icon on the desktop, and then select
Properties.
2
Click the Device Manager tab.
3
Select Refresh, and then click OK.
4
The printer should now function properly.
Topic: How do I enable my Ethernet interface?
1
Right-click My Computer on the desktop and select Properties.
2
Click the Device Manager tab.
3
Select “Realtek RTL8139 (A/B/C/8130) PCI Fast Ethernet NIC” under the
Network Adapters category.
4
Click Properties.
5
Click Enable Device and then click OK.
6
Click Close .
Topic: How do I install a printer?
✍
Always check the printer manufacturer's website for the latest drivers for Windows
Me before proceeding. Some printers do not function properly without updated
drivers for Windows Me.
✍
If the printer has a USB connection, do not follow the steps below. Contact the
manufacturer of your printer for updates or other information that will resolve the problem.
1
From the Start menu, select Settings > Printers.
2
Click Add Printer.
3
Click Next.
4
Select Local Printer and click Next.
45
Page 46

VAIO® User Guide
5
Select the appropriate manufacturer and model and click Next.
✍
If the printer is not included in the list and the printer manufacturer included a disk
with a Windows Me Printer driver, choose Have Disk, enter the appropriate path for
the disk or CD and click OK.
If the printer is not included on the list and no drivers are included with the printer,
choose a driver for a printer that the printer emulates (acts like). Refer to the manual
that came with your printer for specific emulation information.
6
Select LPT1 and click Next.
7
Click Yes to have Windows-based programs use this as the default printer.
8
Click Next.
9
Click No and then click Finish.
✍
If prompted for a path to the windows files, use C:\Windows\Options\Cabs.
To Reach Sony
For further assistance, call 1-888-4SONYPC (1-888-476-6972).
46
Page 47

Notes on Use
Notes on Use
On the Power Source
❑
Your computer operates on 100V–120V AC 50/60 Hz only. If you are
operating this computer outside of North America or Japan, please verify
that the local AC specifications match before plugging in the computer.
❑
The total power draw of installed add-in cards must not exceed the
specifications for the power supply . Do not overload the system by installing
add-in cards that draw excessive current. The system is designed to provide
2 amps (average) of 5V power for each card in the system not to exceed a
total of 10 amps. The total from +5V current draw in a fully-loaded system
(with all the add-in card slots filled) must not exceed 10 amps. If you add
components to the system that draw current from the power supply, the
maximum combined +3.3V and +5V output must not exceed 70 watts.
❑
Plug all the power cords for your computer and its peripheral equipment into
the same AC supply line. AC derived from different su ppl y lin es may resul t
in voltage differences that can cause unstable operation or unwanted weak
currents at the time of connection.
❑
Do not share the AC outlet with any other power-consuming equipment,
such as copying machines or shredders.
❑
You can purchase a power strip with a surge protector. This device prevents
damage to your computer caused by sudden power surges such as those that
may occur during an electrical storm.
❑
If you live in an area that experiences frequent power fluctuations, you may
want to purchase an Uninterrupted Power Supply (UPS). This device
contains both a surge protector and a battery backup. The surge protector
prevents damage to your computer caused by power surges. The battery
backup safeguards your data during a brief period of power loss.
❑
The power control button on the front panel does not turn off the system AC
power . To remove power from the system, you must sh ut down the computer
as described in the User Guide and then unplug the AC power cord from the
wall outlet or power strip.
❑
Do not place heavy objects on the power cord.
❑
Do not operate the system with the cover removed. Always reinstall the
cover before turning on the system.
❑
To disconnect the cord, pull it out by the plug. Never pull the cord itself.
47
Page 48

VAIO® User Guide
❑
Unplug your computer from the wall outlet if you will not be using the
computer for a long time.
❑
Before touching anything inside the computer, turn the system off and let it cool
for ten minutes. This will ensure that the processor heat sink will not be hot.
❑
Do not attempt to open the power supply. There are no user-serviceable parts in
the power supply. To avoid personal injury or damage to your equipment, refer
the repair or replacement of the power supply to qualified personnel only.
On Disposal of the Lithium Battery
Dispose of the lithium battery properly. In some areas, the disposal of lithium
batteries in household or business trash may be prohibited. You can return your
unwanted lithium batteries to your nearest Sony Service Center or Factory
Service Center. For the Sony Service Center nearest you, call 1-888-4SONY-PC
(1-888-476-6972).
! Do not handle damaged or leaking lithium batteries.
The lithium battery may explode if mistreated. Do not disassemble it or dispose
of it in fire.
Replace the battery with a Sony CR2032 lithium battery. Using a type of battery
other than a CR2032 may present a risk of fire or explosion.
On Handling the Computer System
❑
Do not place your Sony computer in a location subject to:
❑
Heat sources, such as radiators or air ducts
❑
Direct sunlight
❑
Excessive dust
❑
Mechanical vibration or shock
❑
Strong magnets or speakers that are not magnetically shielded
❑
Ambient temperature of more than 95ºF (35ºC) or less than 50ºF (10ºC)
❑
High humidity, moisture, or rain
❑
Do not place electronic equipment near your computer. The computer’s
electromagnetic field may cause a malfunction.
❑
Provide adequate air circulation to prevent internal heat build-up. Do not
place your computer on loose surfaces (such as rugs or blankets) or near
48
Page 49

Notes on Use
materials (such as curtains or draperies) that may block its ventilation slots.
Leave a space of at least 8 inches from the back panel of your computer.
❑
Clean the cabinet with a soft, dry cloth or a soft cloth lightly mois tened with
a mild detergent solution. Do not use any type of abrasive pad, scouring
powder, or solvent such as alcohol or benzine, as it may damage the finish of
your Sony computer.
❑
Should any solid object or liquid fall into the cabinet, keyboard, or mouse,
shut down your computer and then unplug it. You may want to have the
computer checked by qualified personnel before operating it any further.
❑
The computer uses high-frequency radio signals and may cause interference
to radio or TV reception. Should this occur, relocate the computer a suitable
distance away from the set.
❑
Use only specified peripheral equipment and interface cables; otherwise,
problems ma y result.
❑
Do not use cut or damaged connection cables.
❑
Always switch the power off before connecting your computer to peripheral
equipment; otherwise, damage may occur to the integrated circuits in your
computer.
❑
Your computer, keyboard, and mouse consist of high-precision electronic
parts. Do not drop them or bump them against other objects.
❑
Y o ur Sony computer will not work with party lines, cannot be connected to a
coin-operated telephone, and may not work with multiple phone lines or a
private branch exchange (PBX).
❑
If the telephone company makes a service call to your home or office and
determines that your computer is responsible for the problem, the telephone
company may bill you for the service call. Also, if you do not disconnect
your computer when it is adversely affecting the telephone line, the
telephone company has the right to di sconn ect your serv ice until yo u correct
the problem.
On Moisture Condensation
If your computer is brought directly from a cold location to a warm one, moisture
may condense inside your computer. In this case, allow at least an hour before
turning on your computer. If any problem occurs, unplug your computer, and
contact your Sony Service Center.
49
Page 50

VAIO® User Guide
On Upgrading the System
❑
The procedures described in the onlin e manual,
Your VAIO® Computer (PCV-J120),
assume familiarity with the general
Upgrading and Maintaining
terminology associated with personal computers and with the safety
practices and regulatory compliance required for using and modifying
electronic equipment.
❑
Disconnect the system from its power source and from any
telecommunications lin ks, ne tworks, o r m odems befo re you open the sy stem
or follow any of the procedures described in the online manual,
and Maintaining Your VAIO® Computer (PCV-J120)
. Failure to do so may
Upgrading
result in personal injury or equipment damage.
❑
Electrostatic discharge (ESD) can damage disk drives, add-on cards, and
other components. Follow the procedures described in the online manual,
Upgrading and Maintaining Your VAIO® Computer (PCV-J120)
only at an
ESD workstation. If such a station is not available, do not wo rk in a carpeted
area, and do not handle materials that produce or hold static electricity (for
example, cellophane wrappers). Ground yourself by maintaining contact
with an unpainted metal portion of the chassis while performing the
procedure.
❑
When removing a slot cover, be careful not to damage components on the
system board or add-on cards. You may need to temporarily remove add-on
cards that are next to the slot cover you want to remove.
On Handling a CRT Display
❑
Do not place the display near a strong magnetic fo rce.
❑
Do not block the ventilation slots on the display.
❑
Using the computer in low temperature conditions may produce a residual
image on the screen. This is not a malfunction. When the computer returns to
normal temperature, the screen returns to normal.
❑
A residual image may appear on the screen if the same image is displayed
for a lengthy period of time. The image disappears after a period of time.
You can use a screen saver to prevent residual images.
❑
The screen becomes warm during operation. This is normal and does not
indicate a malfunction.
50
Page 51

Notes on Use
On Using the Hard Disk Drive
❑
Do not place the computer in a location that is subject to vibration or shock.
❑
Do not move the computer during operation.
❑
Do not subject the computer to sudden changes in temperature.
❑
Do not turn off the power while the computer is accessing the hard disk
drive.
On Handling Diskettes
❑
Do not open the shutter manually and touch the surface of the diskette.
❑
Keep diskettes away from magnets.
❑
Keep diskettes away from direct sunlight and other heat sources.
On Handling CD Media
❑
Do not touch the surface of the disc.
❑
Do not drop or bend the disc.
❑
Do not use adhesive labels to identify the disc. The label may come off while
the disc is in use in the optical drive and damage the drive.
On Cleaning CD Media
❑
Fingerprints and dust on the surface of a disc may cause read errors. Proper
care of the disc is essential to maintain its reliability. Do not use solvents
such as benzine, thinner, com mercially available cleaners or anti-static spray ,
as they may cause damage to the disc.
❑
For normal cleaning, hold the disc by its edge an d use a soft cloth to wip e the
surface from the center out.
❑
If the disc is badly soiled, moisten a soft cloth with water, wring it out well,
and use it to wipe the surface of the disc from the center out. Wipe off any
remaining moisture with a dry soft cloth.
51
Page 52
VAIO® User Guide
For Answers to Your Software Questions
Sony Service Center
For the Sony Service Center nearest you, call 1-888-4SONYPC (1-888-476-
6972). This service is free of charge for 90 days after the original date of
purchase.
Acrobat
Web site http://www.adobe.com/
phone 206-628-2746 (fee- based support)
fax 206-628-5737
e-mail [email protected]
hours M - F, 6 AM - 5 PM PT
America Online
Web site http://www.aol.com/
phone 800-827-6364
hours 7 days a week, 24 hours a day
CompuServe
Web site http://www.compuserve.com/
phone 800-848-8990
hours M - F, 8AM - 1AM, Sat - Sun, 10AM - 10PM
DirectCD, Easy CD Creator
Web site http://www.adaptec.com/
phone 408-945-8600
hours M - F, 8AM - 5 PM PT
EarthLink T ota lAccess
®
Reader, Adobe PhotoDeluxe® (Adobe Systems Incorporated)
®
(America Online)
®
2000 (CompuServe Interactive Services)
™
(Adaptec, Inc.)
™
(EarthLink Network, Inc.)
Web site http://help.earthlink.net/techsupport/
phone 800-395-8410
e-mail [email protected]
hours 7 days a week, 24 hours a day
52
Page 53
For Answers to Your Software Questions
McAfee VirusScan® (Network Associates, Inc.)
Web site http://support.mcafee.com
phone 408-988-3832
e-mail [email protected]
hours M - F, 9 AM - 5 PM CT
PhotoPrinter
Web site http://www.arcsoft.com; http://www.photoisland.com
phone 510-440-9901
e-mail [email protected]
hours M - F, 8:30 AM - 5:30 PM PT
Quicken
Web site http://www.intuit.com/support/
phone 900-555-4688
hours 7 days a week, 24 hours a day
™
2000 Pro (ArcSoft, Inc.)
®
2000 Basic (Intuit, Inc.)
Sony Applications (Sony Electronics, Inc.)
Web site http://www. sony. c om/pcsupport
phone 888-4SONYPC (888-476-6972)
hours 7 days a week, 24 hours a day
* Support from 1-888-4SONYPC is free of charge for 90 days after the original date of purchase.
*
StarOffice™ (Sun Microsystems, Inc.)
Web site http: //www.sun.com/staroffice/support
phone 800-786-7638
hours 7 days a week, 7 AM - 7 PM CST
Windows
Outlook
Web site http://www. sony. c om/pcsupport
phone 888-4SONYPC (888-476-6972)
hours 7 days a week, 24 hours a day
* Support from 1-888-4SONYPC is free of charge for 90 days after the original date of purchase.
®
Millennium Edition Operating System, Internet Explorer,
®
Express (Microsoft Corporation)
*
53
Page 54

VAIO® User Guide
Resources
Sony provides several support options for your Sony computer. When you have
questions about your computer and the preinstalled sof tware, check these sources
for answers, in the following sequence:
Quick Start
VAIO Computer
User Guide
Online (Electronic)
Documentation
VAIO Support Agent
Manuals and online help
files that may
accompany your
preinstalled software
Knowledge Database
Contains information on how to set up your co mputer
quickly and easily.
The User Guide (this manual) contains information on
how to get the most from your computer, find help, and
solve common problems. Also includes product
specifications.
QuickStart
on your hard drive. Two additional guides,
Maintainin g Your VAIO® Computer (PCV-J120)
Troubleshooting Help are also available online. To access
online document ation, click the Start button, point to Help
Center, and then point to the desire d document.
VAIO Support Agent can be accessed from the Windows
desktop. Using advan ced diagnostic techno logy, Sony’s
VAIO Support Agent runs scheduled protections of your
applications, network setting s , and oth er impo rta nt
software settings. When your software is protected, you
can use VAIO Support Agent to repair software problems
by restoring your sof tware to any of the previously
protected states.
Most manuals for preinstalled software are located on your
hard disk drive as on line help files. You can access online
help files from the Help menu in a specific application. A
printed manual is available for some applications.
Provides instant access to informati on on commonly
encountered problems. Enter a description of your problem
and the Knowledge Database searches for the
corresponding solutions online. You can access the Sony
Knowledge Database at http://www.sony.com/pcsupport
and the User Guide are available electronically
Upgrading and
and the
54
Page 55

Resources
Sony Fax-on-Demand
Software Updates
VAIO Computer
Reference Manual
This service provides you with answers to commonly
asked questions. You can use this automated service to
request a list of available topics and then select the topics
that you want to receive. To contact the Sony fax-ondemand service, call 1-888-4SONYP C (1-888-476-6972).
(Requires a fax machine or fax software.)
Y ou can download the latest software updates and software
patches for your Sony computer by selecting Software
Updates on the Sony PC Support web page at
http://www.sony .com/pcsupport
Provides detailed technical information about your
computer's hardware. This document is available from
Sony's website at htt p://www.sony.com/pcsupport
55
Page 56

VAIO® User Guide
56
Page 57
Specifications
Model PCV-J120
Processor
Hard Disk Drive
C/D Partition (Approximate)
Standard SDRAM
Video RAM
MPEG
Graphics
Sound Capabilities
Diskette Drive
CD-RW Drive
Modem
Expansion Capabilities
Connection Capabilities (Rear)
700 MHz Intel® Pentium® III
*
20 GB
C = 8G / D = 12G
128 MB† PC-100 SDRAM,
expandable to 512 MB
Shared with system memory
“Sony Tuned” MPEG Digital Video supports full-screen
video playback
Intel 810
Yamaha AC-XG Audio
3.5” 1.44 MB FDD
24X max. CD-ROM reading
4X max. CD-R writing
24X max. CD-R reading
4X max. CD-RW writing
8X max. CD-RW reading
Lucent 1648 technology/V.90 compatible data/fax
modem (REN 0.7)
Hard disk drive bay
USB port (2)
PS/2® Keyboard port
Mouse port
VGA Monitor port
Serial port
Parallel (printer) port
Game/MIDI port
Headphones
Line In
Microphone
i.LINK (6-pin) ports (2)
Modem line jack (RJ-11)
Phone line jack (RJ-11)
10Base-T/100Base-TX Fast Ethernet LAN jack (RJ-45)
Specifications
‡
**
57
Page 58
VAIO Digital Studio™ Computer User Guide
Model PCV-J120
Supplied Accessories
VAIO Smart™ Keyboard
PS/2® Wheel Mouse
Speakers
Power cord
Modem cable
Service
Limited Warranty
Power Requirements
Voltage
Dimensions
90-day limited service. See Warranty Card.
90-day parts/labor standard. See Warran ty Card.
200 watts maximum
100 V - 120 V~3A
6.7”(w) x 12”(h) x 14.4”(d) (170 mm x 306 mm x
††
‡‡
367 mm)
Weight
Operating Temperature
* GB means one billio n byt es w he n referring to hard drive capacity. Accessible capacit y m ay vary.
† 127 MB available. 1 MB a llocated to video RAM.
‡ Data on a CD-RW is read a t a c onst ant transfer rate of 1x, 2x, 4x, or 8x, de pending on the data
format.
**Maximum speed for faxing is 14.4 kbps. Your modem is capable of downloading at 56 kbps using
K56flex technology or V.90. Y our phone service, online servi ce , or Inte rne t Se rvi ce Provider,
however, may not support thi s technology or operate at this speed.
††Certain restrictions apply
‡‡Certain restrictions apply
Specificatio ns ar e s u bject to change without notice.
18.7 lbs (8.5 kg)
50º F to 95º F (+10º C to 35º C)
58
Page 59

Index
A
AC input connector 15
adding additional hardware
precaution 48
adjusting voltage settings 47
air circulation 48
Application Recovery CD 33,
35
applications
launching
problems with 40
B
battery
disposing 48
C
cables 49
CD tray
opening
problems with 39
CD-ROM drive 13
CD-ROM drives
troubleshooting 39
choosing locations 11, 48
cleaning
mouse 43
computer
adjusting voltage settings 47
condensation and 49
disposing of battery 48
lithium ion battery 6
removing cover 47
setting up
precautions 48
shutting down 47
starting
problems with 37
upgrading 50
connectors
power cords 47
precautions 49
customer assistance
support options 54
D
disconnecting power cords 47
diskettes
handling 51
displaying the taskbar
problems with 44
displays
problems with 37
setting up 11
disposal of lithium ion battery 6
E
eject button, for floppy disk 13
electronic
documentation 54
equipment 48
59
Page 60

VAIO® User Guide
European power settings 47
F
floppy disk drive 13
Front Panel 12
G
games/MIDI connector 15
glare 12
H
handling diskettes 51
hard disk 50, 51
hardware
adding additional
precaution 48
troubleshooting 37, 44
headphones connector 15
help 54
I
i.LINK devices, connecting 30
IEEE-1394 devices, connecting
30
input devices
setting up 11
installing additional hardware
precaution 48
interference 49
K
keyboard 11
troubleshooting 44
L
launching applications
problems with 40
line IN connector 15
line jack 15
lithium ion battery
disposal 6
safety precautions 6
locations, choosing 11, 48
losing power 47
M
microphone connector 15
microphones
troubleshooting 42
minimizing glare 12
modem
troubleshooting 41
monitor connector 15
mouse 11
cleaning 43
troubleshooting 43
O
online
help 54
support options 54
opening
applications
problems with 40
CD tray
problems with 39
P
palmrest 11
phones
service precautions 49
PictureGear 21
power cords 47
disconnecting 47
power fluctuations or loss 47
60
Page 61

Index
power indicator
on system unit 13
power source, precautions 47–
48
power switch 13
printer connector 15
problem solving 37
R
radio interference 49
reducing glare 12
removing computer cover 47
S
screens, reducing glare 12
selecting
locations 48
serial connector 15
setting up your computer
precautions 48
Shaker 23
shutting down your computer
47
Sony Fax-on-Demand service
55
Sony Multimedia Computer
Display
problems with 37
setting up 11
Sony Online Support
options 54
speakers
precaution 48
starting your computer
problems with 37
surge protectors 47
system
troubleshooting 37
System Recovery CD 33
T
taskbar
problems viewing 44
technical support
support options 54
Topics 37
troubleshooting 37
turning off your computer 47
turning on and off the computer
13
turning on your computer
problems with 37
TV interference 49
U
Universal Serial Bus (USB)
connector 15
upgrading your computer 50
UPS (Uninterrupted Power
Supply) 47
V
VAIO Action Setup 17
ventilation 11, 48
viewing the taskbar
problems with 44
voltage settings 47
W
Wheel Mouse 18
window design of Sony software 19
61
Page 62

VAIO® User Guide
Windows taskbar
problems viewing 44
work surfaces 11
62
 Loading...