

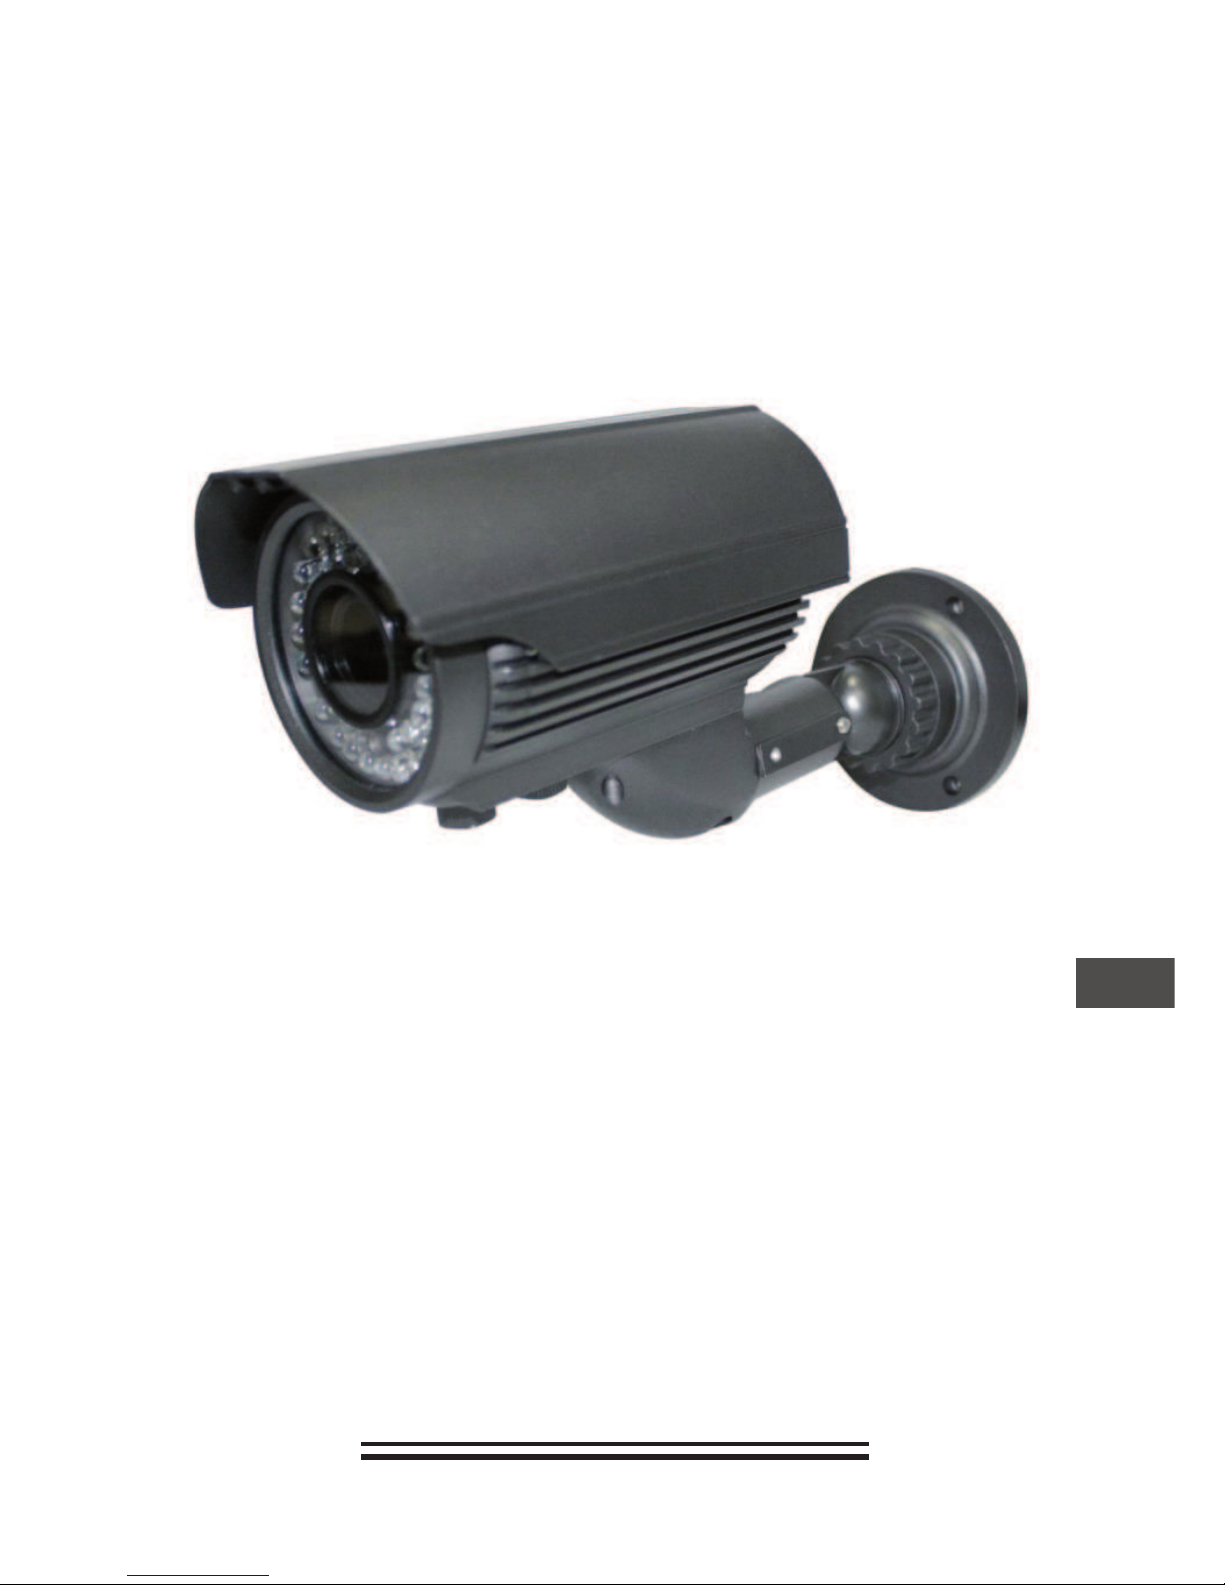
Camera CCD IR rezistenta LA APA
URZ0146
CCTV SYSTEM
RO
Wasserdichte IR CCD Kamera
DE
Wodoodporna kamera IR CCD
PL
Waterproof IR CCD camera
EN

3
Owner’s manual
EN
Specification
CCD type 1/3” Sony CCD
Pixels (HxV) 752(H) x 582(V)
Scanning system PAL
Horizontal resolution 480TV Lines
Synchronization Internal
Minimum illumination 0Lux/F1.2(IR LED ON)
Backlight compensation ON/OFF switchable
Electronic shutter 1/60~1/100.000 seconds
White balance Automatic
Lens 4~9mm
IR LED Ø5 x 42 PCS
IR wavelength 850nm
Infrared lamps distance 40m
S/N ratio >= 48dB
Gamma correction 0.45
Video output 1.0Vp-p/75ohm (BNC)
Operation temperature -20
0
C ~ 500C
Power supply DC 12V, 1000mA
Dimension (mm) 245mm x 78mm x 117mm
Weight (g) 815g
Protection rate Ip66
Owner’s manual
4
EN
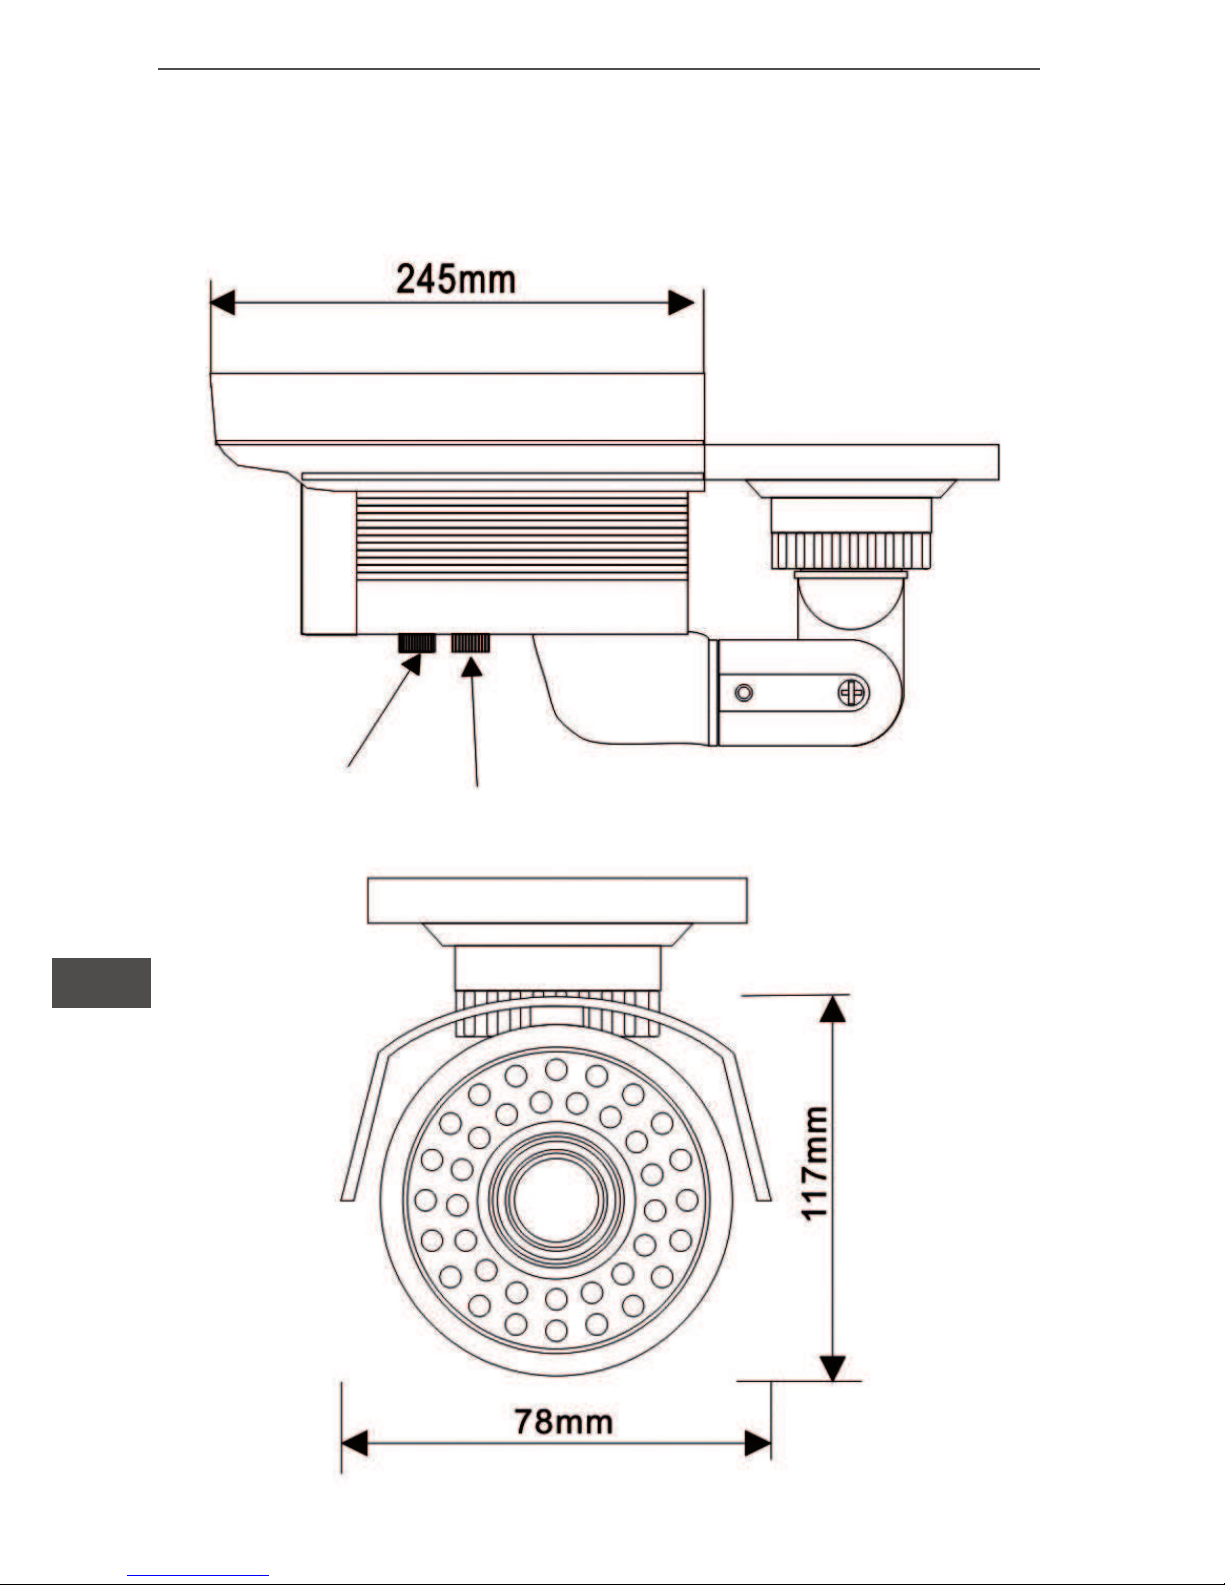
External dimension
245mm x 78mm x 117mm
Varifocal Zoom

5
Owner’s manual
EN
The use and installation attention
1. Before the installation the cameras in use please carefully read
this instruction manual.
2. Please pay special attention to this product not dropped on the
•oor or strong percussion.
3. The use must comply with electrical safety standard the DC
power cable and video transmission line with the process of high-
pressure equipment of cables maintain suf!cient distance.
4. Don’t products directly at the sun‘s rays or strong light, so as
not to affect CCD life.
5. Don’t install the product temperature above 50 degrees. Place
are directly irradiated. Metal sun‘s rays.
6. Don’t install products strong magnetic. Field next to highpower motors.
7. Camera installed in the appropriate solid cool spacious place.
8. Please select DC regulator with the power supply (for power
supply: DC 12V 1,000mA). Prohibits the use of the exchange of
power. Concentrated power supply will lead to uneven distribution
of current phenomenon could easily burn products. It’s best not
to use concentrated power. The choice of separator by-product,
approach to electricity.
9. There should be installed and tested to !nd quali!ed staff.
Non-professionals easily damaged products.
10. Camera factory infrared camera perspective and the perspective of matching is good the replacement lens will effect product
quality and if necessary please !nd quali!ed staff to handle.
Owner’s manual
6
EN
Link
- BNC connect video cable
- DC jack to DC12V
Recommended power: 1000mA
Video IN terminal on the rear of
the monitor.
1. BNC
2. DC jack
3. Video input terminal BNC
4. DC adapter
5. DC power line
7
Owner’s manual
EN
Installation and operating instruction
1. Fixed steady will be installed in the difficult off, cool spacious
place, and then the camera fixed on the steady.
2. The regulator will exchange-DC transformer (AC) plugs into AC
outlet, DC-plug power output inserted camera.
3. With 75ohm connected to the coaxial video camera sand monitors.
4. According to the surveillance area and the environment and
tested the camera direction not directly at the light source or
close-up objects.
If any of the desgin and the technical parameters and subject to
change without notice.

Instrukcja obsługi
8
PL
Specyfikacja
Przetwornik 1/3” Sony CCD
Liczba pikseli (HxV) 752(H) x 582(V)
Standard PAL
Rozdzielczość 480TV linii
Synchronizacja Wewnętrzna
Minimalne oświetlenie 0Lux/F1.2(IR LED włączone)
Kompensacja tła ON/OFF
Migawka elektroniczna 1/60~1/100.000 sekund
Balans bieli Auto
Obiektyw 4~9mm
IR LED Ø5 x 42 szt.
Długość fali IR 850nm
Zasięg podczerwieni 40m
Stosunek S/N >= 48dB
Korekcja Gamma 0.45
Wyjście video 1.0Vp-p/75ohm (BNC)
Temperatura pracy -20
0
C ~ 500C
Zasilanie DC 12V, 1000mA
Wymiary (mm) 245mm x 78mm x 117mm
Waga (g) 815g
Klasa ochrony Ip66

9
Instrukcja obsługi
PL
Wymiary zewnętrzne
245mm x 78mm x 117mm
Zmiana Zoom
ogniskowej

Instrukcja obsługi
10
PL
Użytkowanie kamery
1. Przed instalacją kamery uważnie przeczytaj instrukcję obsługi.
2. Zwróć szczególną uwagę, aby nie narażać kamery na uderzenia i silne wstrząsy.
3. Zawsze używaj kabli najwyższej jakości, zarówno do zasilania
jak i transmisji video.
4. Nie narażaj obiektywu kamery na bezpośrednie działanie
promieni słonecznych.
5. Nie używaj kamery w temperaturze powyżej 500C.
6. Nie instaluj kamery w miejscach gdzie występuje silne pole
magnetyczne oraz w pobliżu silników o dużej mocy.
7. Przymocuj kamerę do solidnego podłoża.
8. Do zasilania kamery używaj wyłącznie najwyższej klasy zasilacza zgodnego ze specyfikacją kamery (DC 12V 1,000mA).
9. Instalacja oraz testy kamery powinny być przeprowadzone
przez profesjonalnego instalatora.
10. Istnieje możliwość wymiany obiektywu kamery na inny. Aby
tego dokonać skontaktuj się z wykwalifikowanym serwisem.

11
Instrukcja obsługi
PL
Podłączenie
- Kabel video BNC
- Zasilanie DC 12V, 1000mA
Wejścia video na monitorze.
1. BNC
2. Zasilanie DC
3. Wejście video BNC
4. Zasilacz DC
5. Kabel zasilający
Instrukcja obsługi
12
PL
Instalacja kamery
1. Przymocuj trwale kamerę do stabilnego podłoża, najlepsze do
instalacji są chłodne miejsca gdzie obiektyw nie będzie narażony
na bezpośrednie działanie promieni słonecznych.
2. Podłącz kabel video 75ohm.
3. Podłącz zasilanie kamery.
4. Dostosuj położenie kamery do żądanej pozycji.
Wygląd i specyfikacja urządzenia może ulec zmianie bez powiadomienia.

13
Manual de utilizare
RO
Specificatii
Tip camera CCD 1/3" Sony CCD
Pixeli (H*V) 752(H) x 582(V)
Sistem TV PAL
Rezolutie orizontala 480 Linii TV
Sincronizare interna
Iluminare minima 0 Lux/F1.2 (IR LED pornit)
Compensare iluminare din
spate
Comutator PORNIRE/
OPRIRE
Obturator electronic 1/60~1/100.000 Sec.
Balans de alb automat
Lentile 4 – 9 mm
LED IR Ø 5x42 buc.
Lungime de unda IR 850 nm
Distanta lumini infrarosu 40 m
Raport Semnal/Zgomot ≥48 dB
Corectie gamma 0,45
Iesire video 1.0Vp-p/75Ω (BNC)
Temperatura de functionare -20
0
C ... +500C
Alimentare DC 12V, 1A
Dimensiuni (mm) 245mm x 78mm x 117mm
Greutate (g) 815 g
Grad de protectie IP 66

Manual de utilizare
14
RO
Dimensiuni externe
245mm x 78mm x 117mm
Distanta focala Zoom
variabila

15
Manual de utilizare
RO
Utilizare si instalare
1. Inainte de instalarea si utilizarea camerei cititi cu atentie manualul.
2. Va rugam sa fiti atenti ca produsul sa nu fie scapat sau sa nu
fie supus unor socuri mecanice puternice.
3. Nu expuneti camera la lumina directa a soarelui sau la alta lumina puternica, pentru a nu afecta durata de functionare a CCD.
4. Nu instalati camera in incaperi cu temperaturi ce depasesc
500C, in lumina directa a soarelui sau in apropierea pieselor de
metal direct expuse la razele soarelui.
5. Nu instalati camera in zone cu camp magnetic puternic
6. Instalati camera intr-un loc racoros si spatios.
7. Verificati tensiunea de alimentare a retelei cand alimentati
alimentatorul DC pentru alimentare (12V DC, 1.000mA).
8. Instalarea si testarea ar trebui sa fie efectuate de către personal calificat. Persoanele necalificate pot deteriora cu usurinta
produsul.
9. Reglarea din fabrica a camerei, perspectiva camerei cu infrarosu si perspectiva de adaptare este buna, inlocuirea lentilelor
va afecta calitatea produsului, iar in cazul in care este nevoie va
trebui sa contactati personal calificat.

Manual de utilizare
16
RO
Conexiuni
- Cablu video cu mufa BNC
- Mufa DC la DC12V
Amperaj maxim: 1.000mA
Video IN terminal on the rear of
the monitor.
1. BNC
2. Mufa DC
3. Terminal intrare video BNC
4. Adaptor DC
5. Cablu de alimentare DC

17
Manual de utilizare
RO
Instructiuni de instalare si functionare
1. Suportul fix va fi instalat intr-un loc spatios si racoros, iar camera va fi fixata apoi pe acesta.
2. Conectati adaptorul DC la reteaua AC iar iesirea mufei DC la
priza de alimentare a camerei.
3. Conectati cu ajutorul cablului coaxial 75Ω camera si monitoarele.
4. Testat în conformitate cu zona de monitorizare si conditiile de
mediu, camera nu trebuie sa fie indreptata spre sursa de lumina
sau spre obiecte apropiate.
Parametrii de proiectare si cei tehnici se pot modifica fara o
instiintare prealabila.

Bedienungsanleitung
18
DE
Technische Daten
CCD Type 1/3" Sony CCD
Pixel (H*V) 752(H) x 582(V)
Scanning System PAL
Horizontale Au•ösung 480 TV Linien
Synchronisation Intern
Minimale Beleuchtung 0 Lux/ F1.2 (IR LED EIN)
Gegenlichtkompensation Ein-/Ausschaltbar
Elektronischer Verschluss 1/60~1/100.000 Sekunden
Weißabgleich Automatisch
Linsen 4 – 9 mm
IR LED Ø 5x42 Stück
IR Wellenlänge 850 nm
Infrarot Lampenreichweite 40 m
Signal-Rausch-Verhältnis !48 dB
Gammakorrektur 0,45
Videoausgang 1.0Vp-p/75" (BNC)
Funktionstemperatur -200C - +500C
Stromversorgung DC 12V, 1.000 mA
Abmessungen (mm) 245mm * 78mm * 117mm
Gewicht (g) 815 g
Schutzfaktor IP 66

19
Bedienungsanleitung
DE
Äußere Abmessungen
245mm x 78mm x 117mm
Variable Brennweite Zoom

Bedienungsanleitung
20
DE
Benutzung und Installationshinweise
1. Vor der Installation und Benutzung der Kamera, lesen Sie
sorgfältig diese Bedienungsanleitung.
2. Bitte achten Sie darauf die Kamera nicht fallen zu lassen, oder
staken Schocks auszusetzen.
3. Der Einsatz muss den elektrischen Sicherheitsnormen entsprechen die Strom-Kabel und Video-Übertragungskabelmüssen
ausreichend Abstand von Hochdruck-Geräte halten.
4. Kamera nicht direktem Sonnenstrahlen oder starkem Licht
aussetzen, um die Lebensdauer der CCD zu erhöhen.
5. Produkt nicht in Umgebungen mit Temperaturen über 50 Grad,
direkter Sonnenstrahlung, oder direkt bestrahlter Metallteilen
installieren.
6. Produkt nicht in starken magnetischen Felder in der nähe
starker Elektromotoren installieren.
7. Kamera in einem entsprechenden festen kühlen geräumigen
Platz installieren.
8. Bitte wählen Sie das passende DC Netzgerät zur Stromversorgung (DC 12V 1.000 mA). Konzentrierte Stromversorgung
führt zu einer ungleichmäßigen Verteilung der Leistung, Phän-
omen das leicht zu Beschädigungen des Gerätes führen könnte.
9. Die Installation und Testung sollte von quali!ziertem Personal
ausgeführt werden. Nichtquali!zierte können leicht das Produkt
beschädigen.
10. Werkseinstellung der Kamera, Infrarot-Kamera Perspektive
und Anpassungsperspektive ist gut, das Ersatz-Objektiv wird die
Produktqualität beein"ussen und ggf. benutzen Sie quali!ziertes
Personal zur Bedienung.

21
Bedienungsanleitung
DE
Anschlüsse
- BNC Stecker Videokabel
- DC JACK für DC12V
Empfohlene Leistung: 1.000mA
Video IN terminal on the rear of
the monitor.
1. BNC
2. DC JACK
3. Videoeingangsstecker BNC
4. DC Netzteil
5. DC Stromkabel

Bedienungsanleitung
22
DE
Installation und Bedienungsanleitung
1. Kamera in kühlen geräumigen Platz installieren und dann die
Kamera ausrichten.
2. Stecker des Netzgerätes an die AC Steckdose und DC Stecker
an die Kamera anschließen. Kühlen
3. Mit 75• Koaxialkabel Kmera und Monitor verbinden.
4. Getestet gemäß dem Überwachungsbereich und Umwelt,
die Kamera nicht direkt in die Lichtquelle oder auf nahe Objekte
Ausrichten.
Design und technische Parameter können ohne Ankündigung
geändert werden.


 Loading...