

Sony Trinitron KV-XF34, Trinitron KV-XF29 Operating Instructions Manual

4-077-621-12 (1)
Trinitron Color TV
Operating Instructions
• Before operating the unit, please read this manual thoroughly and retain
it for future reference.
KV-XF34
KV-XF29
© 2000 Sony Corporation
K94

WARNING
• Dangerously high voltages are present inside the TV.
• Operate the TV only between 110 – 220 V AC.
For your own safety, do not touch any part of the
TV, the power cord and the antenna cable during
lightning storms.
To prevent fire or shock hazard, do not expose
the TV to rain or moisture.
Do not install the TV in a confined space, such
as a bookcase or built-in cabinet.
Do not block the ventilation openings of the TV.
Pull the power cord out by the plug. Do not pull
the power cord itself. Disconnect the TV if you
are not going to use it for several days.
Install the TV in a stable position. Do not allow
children to climb onto it.
Do not operate the TV if any liquid or solid object
falls into it. Have it checked immediately by
qualified personnel only.
Clean the TV with a dry and soft cloth.
Do not use benzine, thinner, or any other chemicals
to clean the TV. Do not scratch the picture tube.
Do not plug in too many appliances to the same
power socket. Do not damage the power cord.
Do not open the cabinet and the rear cover of the
TV. Refer servicing to qualified personnel.
2
Do not install the TV in hot, humid or excessively
dusty places.
Table of Contents
WARNING
Using Your New TV
Getting Started ............................................................................................. 4
Step 1: Connect the antenna .................................................................. 4
Step 2: Insert the batteries into the remote .......................................... 5
Step 3: Preset the channels automatically ........................................... 5
Connecting optional components ............................................................. 6
Securing the TV ............................................................................................ 7
Presetting the channels manually ............................................................. 8
Watching the TV .......................................................................................... 9
Using Your New TV
GB
Advanced Operations
Selecting the picture and sound
modes .................................................. 12
Viewing your favorite channels.......13
Watching two programs at the same
time ...................................................... 14
Listening with surround sound ....... 16
Enjoying a stereo or bilingual
programs .............................................17
Adjusting Your Setup (MENU)
Introducing the menu system ..........18
How to use the menu ........................ 19
The features you will enjoy include:
• “FAVORITE CH” for quick and easy channel selection (page 13)
•
“PICTURE MODE”/“SOUND MODE”/“SURROUND” for customizing your TV (pages 12, 16)
• “PIP” for watching two programs at the same time (page 14)
Your TV also offers the following setup features:
• Menu language options – English/Korean (page 10)
• “CHILD LOCK” for preventing children from watching certain programs (page 24)
• “PIC ROTATION” for picture position adjustment (page 25)
Changing the “A/V CONTROL”
setting
............................................ 20
Changing the “PIP” setting ........ 22
Changing the “SET UP”
setting
............................................ 23
Changing the Channel Preset
(“CH PRESET”) setting
.............. 26
Additional Information
Self-diagnosis function...................... 29
Troubleshooting ................................. 30
Identifying parts and controls ......... 33
Specifications ...................... Back cover
3
Using Your New TV
Getting Started
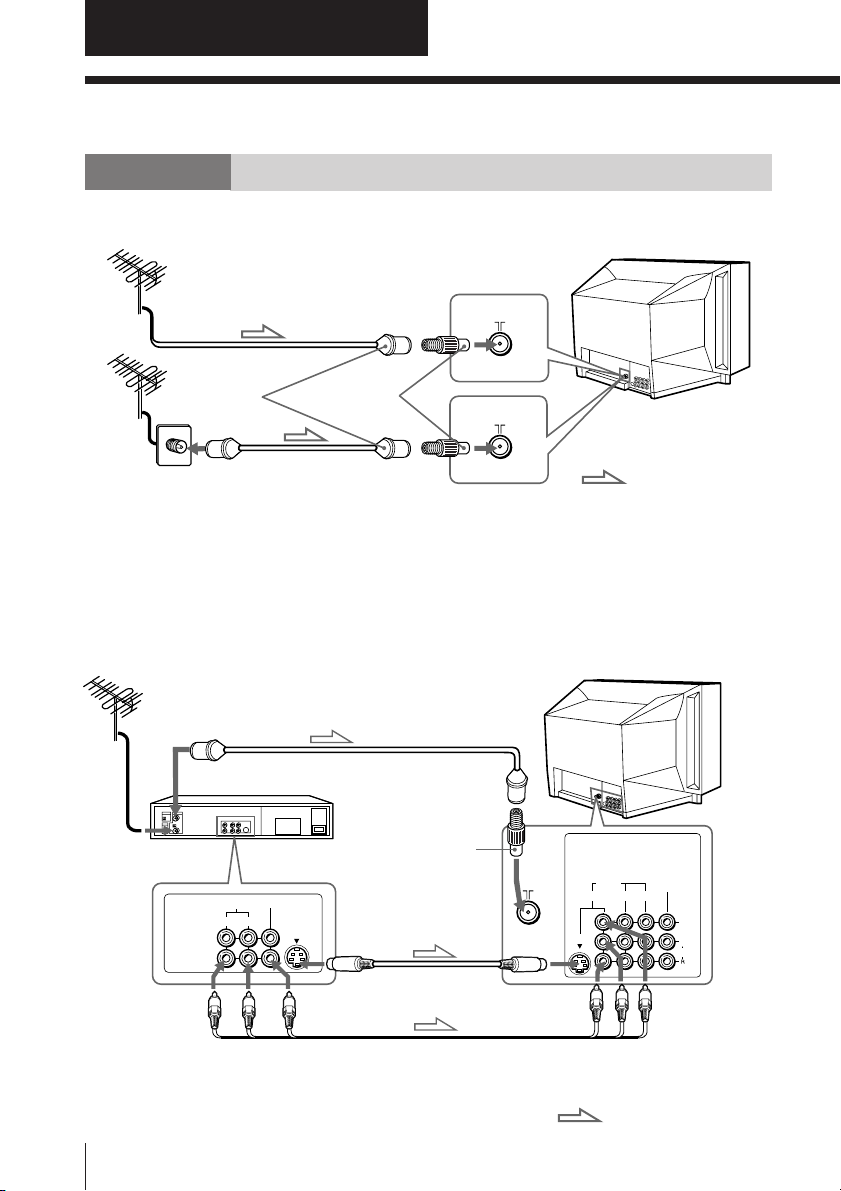
Step 1
Connect the antenna
If you wish to connect a VCR, see the “Connecting a VCR” diagram below.
Rear of TV
or
Antenna cable (not supplied)
F connector
(not supplied)
Antenna
adapter
(supplied)
Antenna cable
(not supplied)
: Signal flow
CAUTION
Do not connect the power cord until you have completed making all other
connections; otherwise a minimum leakage current might flow through the antenna
and other terminals to ground.
Connecting a VCR
To play a video tape, press VIDEO (see page 10).
Rear of TV
Antenna cable (not supplied)
To antenna
output
AUDIO
R L
VIDEO IN
VIDEO OUT
To video and
audio outputs
VIDEO
VCR
Antenna adapter
(supplied)
S video cable
(not supplied)
To S video
output
To antenna
To S video
input
WOOFER
(8 )
1 2 3
S VIDEO
VIDEO
IN
MONITOR
OUT
VIDEO
L(MONO)
AUDIO
To VIDEO IN
1, 2 or 3
4
Using Your New TV
Audio/Video cable
(not supplied)
VIDEO (yellow)
AUDIO-L (MONO) (white)
AUDIO-R (red)
: Signal flow
Notes
• If you connect a monaural VCR, connect the yellow plug to VIDEO
(the yellow jack) and the black plug to AUDIO-L (MONO) (the white jack).
• If you connect a VCR to the 8 (antenna) terminal, preset the signal
output from the VCR to the program number 0 on the TV.
• When both S VIDEO and VIDEO IN 1 input are connected, the
S VIDEO input is automatically selected. To view the video input to
VIDEO IN 1, disconnect the S video cable.
• When no signal is input to the connected video equipment, the TV screen
becomes blue.
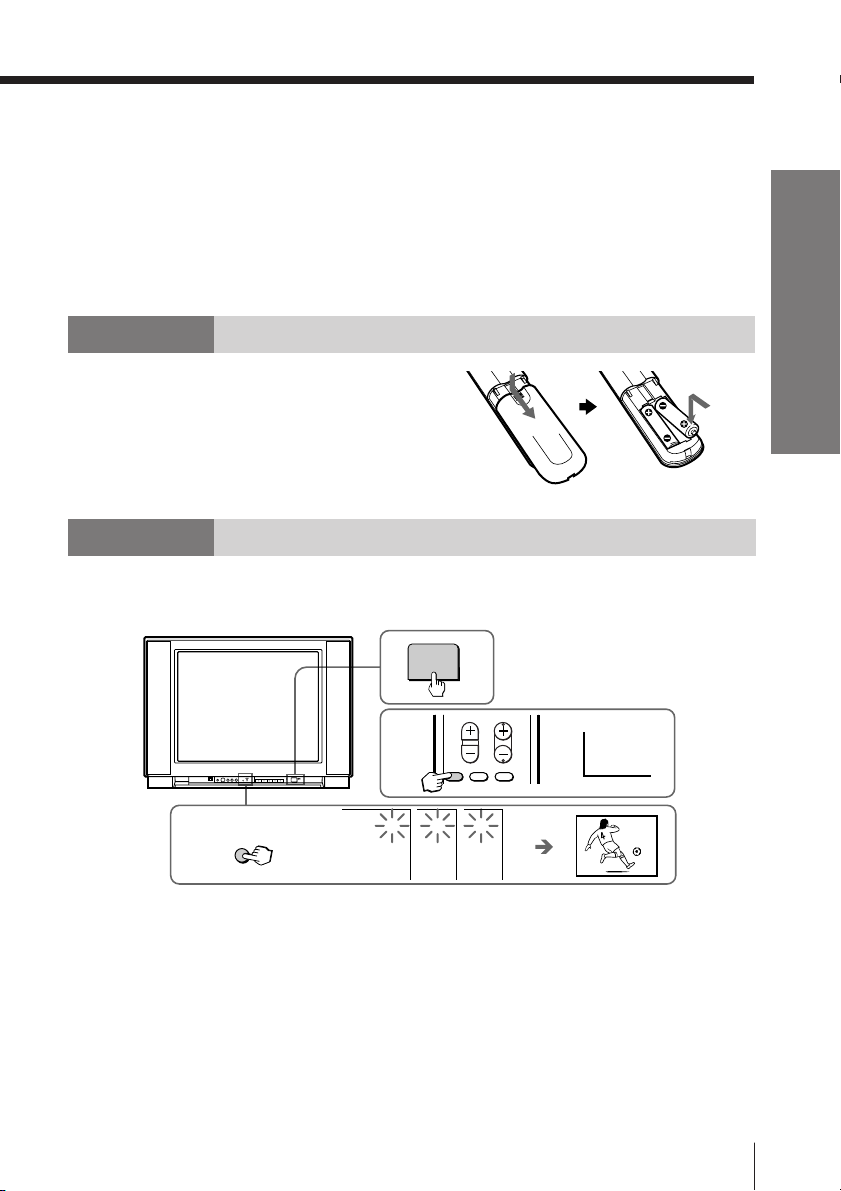
Step 2
Insert the batteries
into the remote
Note
• Do not use old batteries nor use different types of batteries together.
Step 3
Preset the channels automatically
Front of TV
1
Using Your New TV
POWER
2
AUTO
3
PROGR
AUTO PROGRAM
Notes
• To stop the automatic channel presetting, press MENU.
• If your TV has preset an unwanted channel or cannot preset a particular
channel, then preset your TV manually (see page 8).
• The AUTO PROGR button on the remote works as the AUTO PROGR
button on the TV.
1 2 3
CHVOL
AUTO PROGR ADD/ERASECABLE
CABLE: ON
1
Using Your New TV
5
Connecting optional components
You can connect optional audio/video components, such as a VCR, multi disc player,
camcorder, video game or stereo system.
To watch the picture of the connected equipment, see page 10.
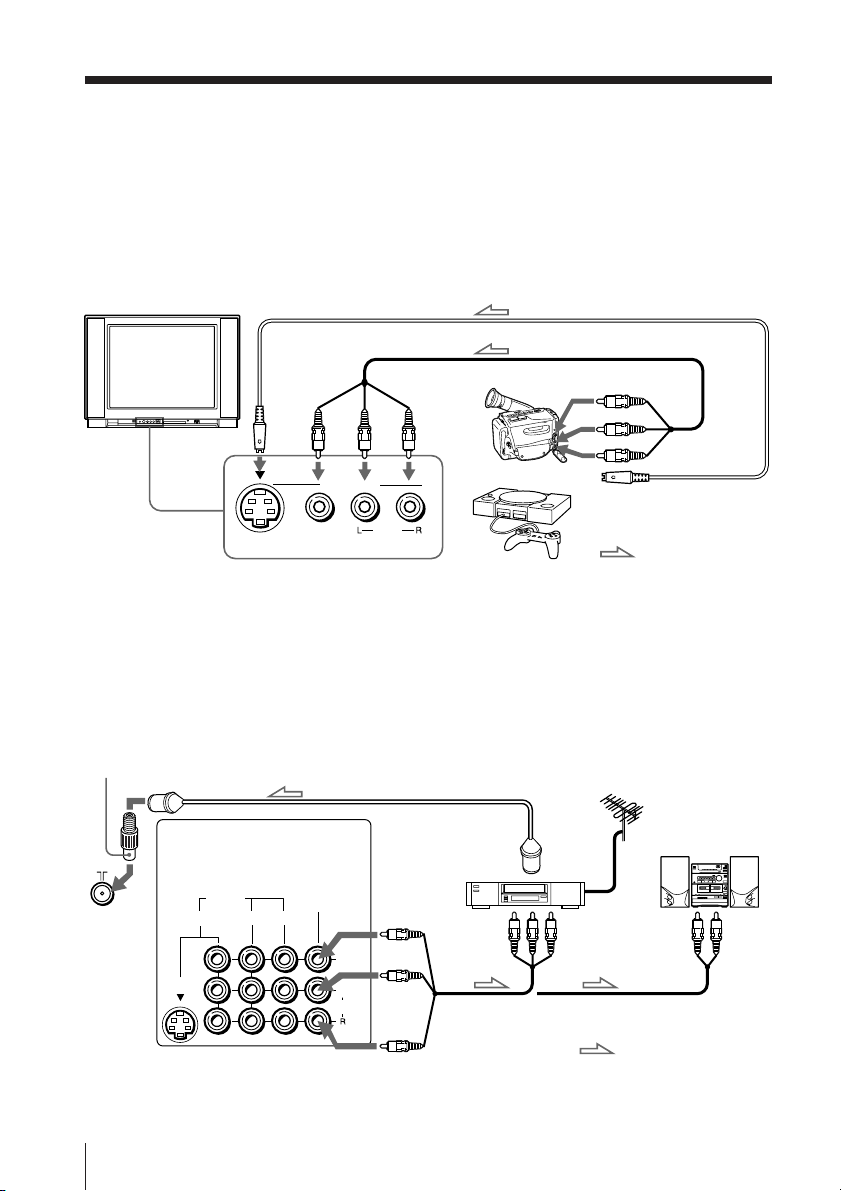
Connecting a camcorder/video game equipment using the
VIDEO IN input jacks
Front of TV
S video cable (not supplied)
To S VIDEO
input
To VIDEO 3 INPUT
Audio/Video cable (not supplied)
Camcorder
or
S VIDEO
VIDEO 3 INPUT
VIDEO
(
MONO
)
AUDIO
Note
• When both S VIDEO input and VIDEO 3 INPUT input are connected, the
S VIDEO input is automatically selected. To view the video input to
VIDEO 3 INPUT, disconnect the S video cable.
Connecting audio/video equipment using the
MONITOR OUT output jacks
Antenna adapter (supplied)
WOOFER
(8 )
VIDEO
Rear of TV
6
Using Your New TV
1 2 3
S VIDEO
IN
Note
• If you connect a monaural VCR, connect the yellow plug to VIDEO (the
yellow jack) and the black plug to AUDIO-L (MONO) (the white jack).
Antenna cable (not supplied)
To
VIDEO
L(MONO)
AUDIO
MONITOR
OUT output
VIDEO (yellow)
MONITOR
OUT
AUDIO-L (MONO)
(white)
AUDIO-R (red)
VCR
To video and
audio outputs
To S video output
Video game
equipment
To
antenna
output
or
To video and
audio inputs
Audio/Video cable
(not supplied)
: Signal flow
: Signal flow
Audio system
To
audio
inputs
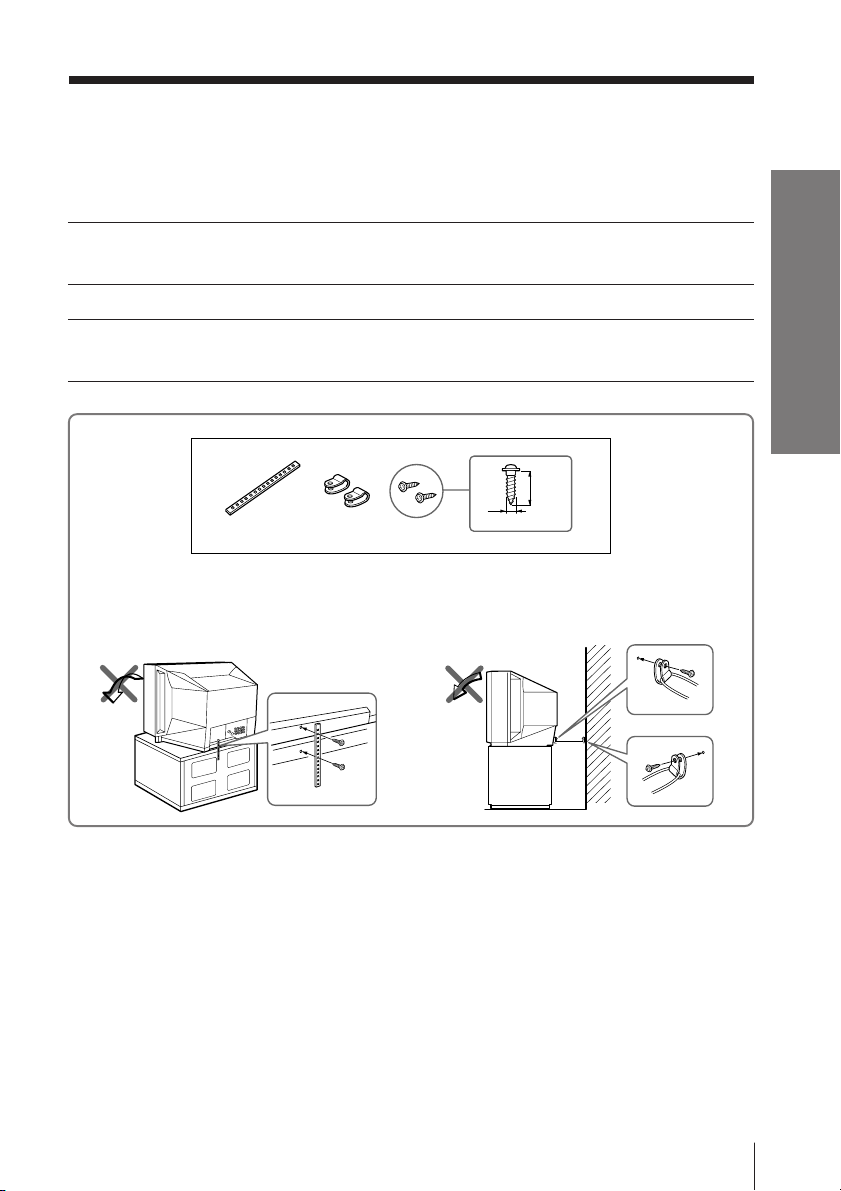
Securing the TV
To prevent the TV from falling, secure the TV using one of the following methods:
With the supplied screws, attach the stabilizer band to the TV stand and to
A
the rear of the TV using the provided hole.
or
Pass a cord or chain through the clamps to secure the TV against a wall or
B
pillar.
20
mm
3.8 mm
A
B
or
Using Your New TV
Note
• Use only the supplied screws. Use of other screws may damage the TV.
Using Your New TV
7
Presetting the
channels
manually
231
564
897
ENTER
JUMP
0
TV/VIDEO FREEZE SWAP PIP
PIP CH
FAVORITE
PIP CH
SOUND
SURROUND
WAKE UP
MODE
CHVOL
AUTO PROGR ADD/ERASECABLE
TV
MENU
SLEEP
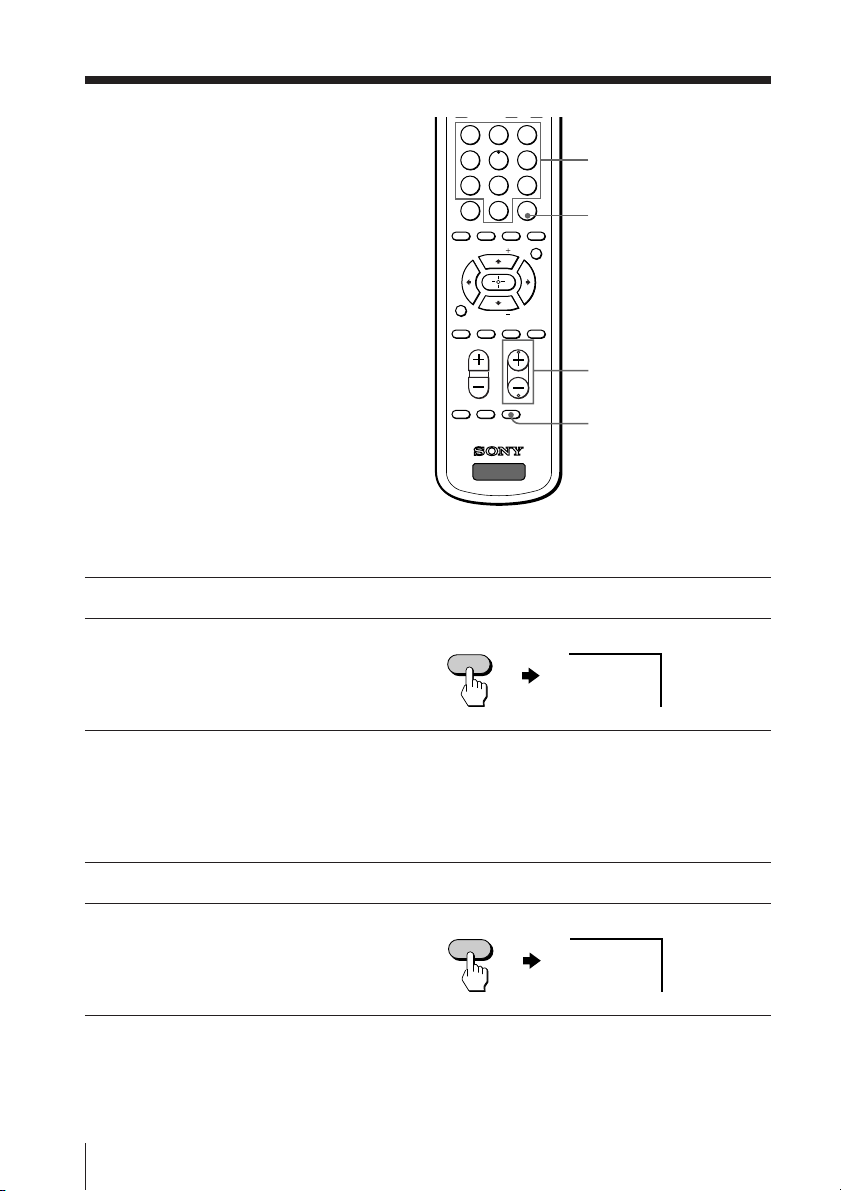
To receive a new channel or a channel with a weak signal, preset the channel
manually.
Press number buttons to select the desired channel, then press ENTER.
1
Press ADD/ERASE.
2
ADD/ERASE
“+” appears beside the
channel number, indicating
that presetting is complete.
Number
buttons
ENTER
CH +/–
ADD/ERASE
+25
Disabling channels
By disabling unused or unwanted channels, you can skip those channels when you
press CH +/–.
Press CH +/– until the unused or unwanted channel appears on the screen.
1
Press ADD/ERASE.
2
“–” appears beside the
ADD/ERASE
–25
channel number, indicating
that disabling is complete.
To cancel the skip setting
Preset the channel automatically again.
8
Using Your New TV
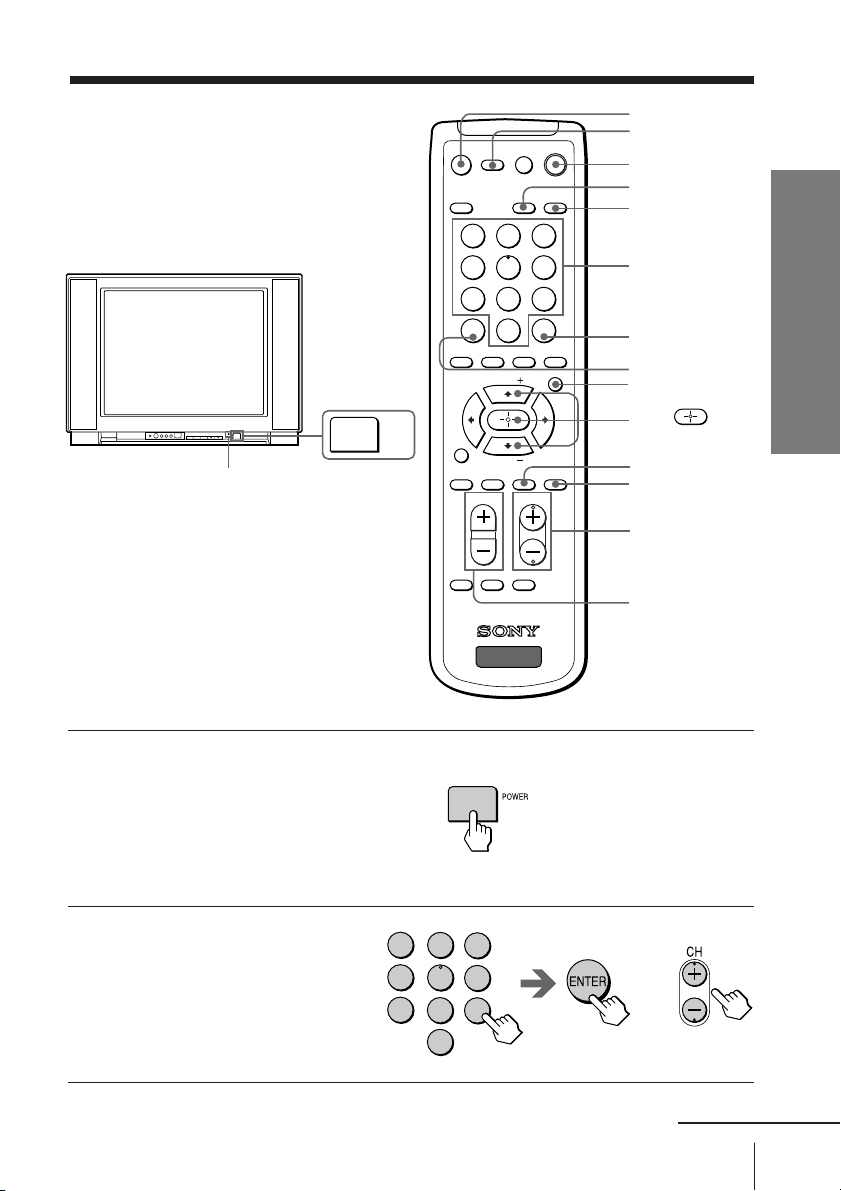
Watching the TV
This section explains functions and
operations used while watching TV.
Most operations can be done using the
remote.
STANDBY indicator
POWER
MUTING
MTS VIDEO
TV/VIDEO FREEZE SWAP PIP
FAVORITE
SOUND
MODE
PIC
DISPLAY POWER
MODE
231
564
897
JUMP
0
PIP CH
PIP CH
SURROUND
WAKE UP
AUTO PROGR ADD/ERASECABLE
ENTER
CHVOL
TV
TV
MENU
SLEEP
MUTING
DISPLAY
POWER
VIDEO
TV
Number
buttons
ENTER
JUMP
MENU
V/v/
WAKE UP
SLEEP
CH +/–
VOL +/–
Using Your New TV
Press POWER on the TV to
1
turn on the TV.
When the TV is in the standby
mode (the STANDBY indicator
on the TV is lit red), press
POWER on the remote or
CHANNEL +/– on the TV.
To select the TV program,
2
press the number buttons
and then press ENTER, or
press CH +/–.
1
2
3
4
7
6
5
8
9
or
0
continued
Using Your New TV
9

Watching the TV (continued)
A/V CONTROL
SOUND MODE : DYNAMIC
SURROUND : OFF
: DYNAMIC
PICTURE MODE
SET UP
CHILD LOCK: CH001 OFF
PIC ROTATION
FAVORITE CH
LANGUAGE:
ENGLISH
SET UP
CHILD LOCK
PIC ROTATION
FAVORITE CH
LANGUAGE:
ENGLISH
Additional tasks
To
Turn off temporarily
Turn off completely
Adjust the volume
Mute the sound
Watch the video input
(VCR, camcorder, etc.)
Jump back to the previous channel
Display the on-screen information*
* Some picture/sound settings, and either the program number or video
mode are displayed. The on-screen display for the picture/sound settings
disappears after about 3 seconds.
Do this
Press POWER on the remote. The STANDBY indicator on the
TV lights up red.
Press POWER on the TV.
Press VOL +/–.
Press MUTING.
Press VIDEO to select “VIDEO 1”, “VIDEO 2” or “VIDEO 3”.
To return to the TV program, press TV.
Press JUMP.
Press DISPLAY.
Changing the menu language
You can change the menu language as well as the on-screen language.
For details on how to use the menu, see “How to use the menu” on page 19.
Press MENU.
1
MENU
Press V or v to select
2
3
, then press .
Make sure “LANGUAGE”
is selected, then press
.
10
Using Your New TV
bb
b
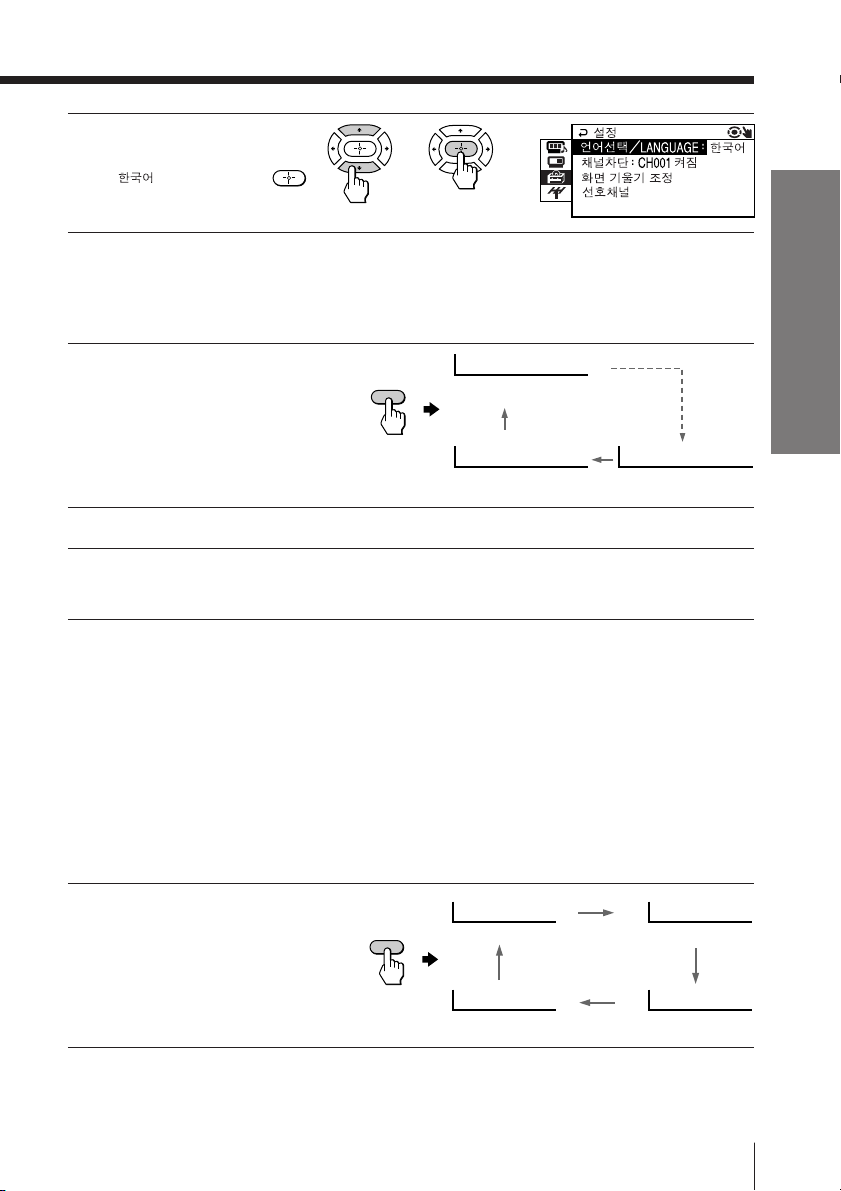
Press V or v to select the
4
desired language (e.g.,
“
”), then press .
bb
The selected menu language appears.
To return to the normal screen
Press MENU.
Setting the Wake Up timer
Press WAKE UP until the
1
desired period of time
appears.
The Wake Up timer starts
immediately after you have
set it.
Select the TV program or video mode you want to wake up to.
2
Press POWER, or set the Sleep timer if you want the TV to turn off automatically.
3
The WAKE UP indicator on the TV lights up orange.
WAKE UP
To cancel the Wake Up timer
Press WAKE UP until “WAKE UP TIMER: OFF” appears or turn off
the TV’s main power.
Notes
• The Wake Up timer starts immediately after the on-screen display disappears.
• If no buttons or controls are pressed for more than two hours after the TV is
turned on using the Wake Up timer, the TV automatically goes into the
standby mode. To continue watching the TV, press any button or control on
the TV or the remote.
WAKE UP TIMER:10M
After 10 minutes
WAKE UP TIMER:OFF
No Wake Up Timer After 12 hours
WAKE UP TIMER:12H00M
Using Your New TV
Setting the Sleep timer
Press SLEEP until the
desired period of time
appears.
The Sleep timer starts
immediately after you have
set it.
To cancel the Sleep timer
Press SLEEP until “SLEEP TIMER: OFF” appears or turn the TV off.
SLEEP
SLEEP TIMER:30M SLEEP TIMER:60M
After 30 minutes
SLEEP TIMER:OFF SLEEP TIMER:90M
No Sleep Timer
Using Your New TV
After 60 minutes
After 90 minutes
11
 Loading...