

Sony Trinitron KV-14B80, Trinitron KV-21B80, Trinitron KV-21S85 Operating Instructions Manual [en, pt]
Page 1
®
Trinitron Color TV
Operating Instructions
3-862-613-51 (1)
KV-14B80
KV-21B80
KV-21S85
© 1998 by Sony Corporation
Page 2
Table of Contents
Welcome! ........................................ 1
Precautions...................................... 1
Using This Manual .......................... 1
Important Safeguard...................... 2
Connecting and Installing the TV
Connector Type............................................5
Making Connections ...................................5
Connecting a VHF antenna with twin
lead cable............................................ 5
Connecting to VHF and UHF antennas
with twin lead cables ........................ 5
Connecting a VHF or combined VHF/
UHF antenna, through a coaxial
cable ....................................................6
Connecting a VHF antenna with coaxial
cable and a UHF antenna with twin
lead cable............................................ 6
Connecting a cable box .........................7
Connecting the telescopic antenna
(KV-14B80 only) ................................7
Connecting an antenna/cable TV
system with a VCR
(KV-21S85 only).................................8
Connecting an antenna/cable TV
system with a VCR
(KV-14B80/21B80 only) ...................8
Connecting a VCR and TV with a cable box
(KV-21S85 only) .................................. 9
Connecting a VCR and TV with a cable
box (KV-14B80/21B80 only) ............9
Connecting a DBS (Direct Broadcast
Satellite) receiver
(KV-21S85 only)...............................10
Connecting a DBS (Direct Broadcast
Satellite) receiver and a VCR
(KV-21S85 only)...............................10
Connecting a DVD Player
(KV-21S85 only)...............................11
Connecting the headphones
(KV-21S85 only)...............................11
Connecting a camcorder
(KV-21S85 only)...............................12
Connecting a camcorder
(KV-14B80/21B80 only) .................12
Basic Set Up
Inserting Batteries ......................................13
Using the Remote Control ........................13
Adjusting Sliders .......................................13
On Line Help/Instructions ......................13
Using your New TV
Presetting the Channels Automatically.. 14
Watching the TV ........................................ 16
Adjusting your SET UP (menus)
Learning Menu Selection .......................... 18
Using the IMAGEM Menu .............. 19
Using the SOM Menu
for KV-21S85 .....................................20
Using the SOM Menu
for KV-14B80/21B80 ........................ 22
Using the RELOGIO Menu ............... 23
Using the AJUSTES Menu................ 24
Setting and Selecting CANAL
FAVORITO........................................26
Troubleshooting ........................... 28
Specifications ................................ 30
Index.............................................. 31
Termo de Garantia.......... Back cover
Page 3
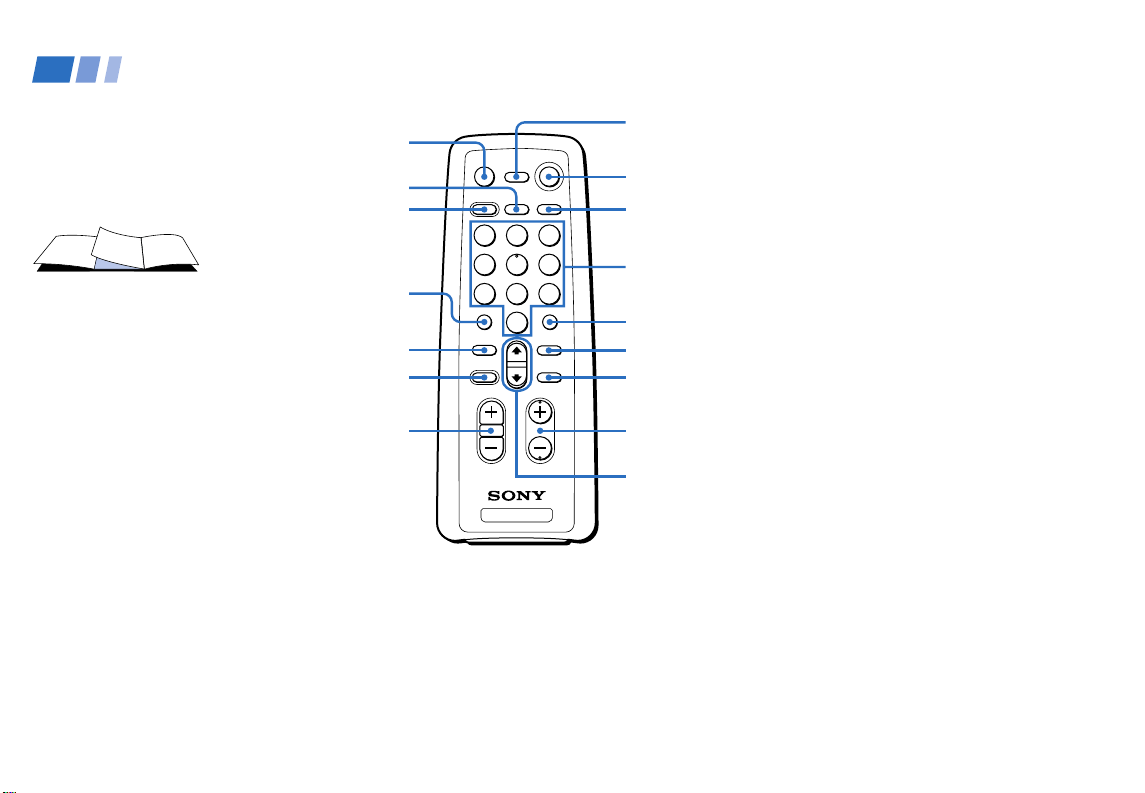
Remote Control
In the instructions that follow, we will
refer to the buttons on your remote control.
Keep this flap unfolded and use this page
for reference.
MUTING
(page 16)
DISPLAY
(page 17)
PRESET
PICTURE
(page 17)
JUMP
(page 16)
STEREO/SAP
(page 17)
RESET
VOL +/–
(page 16)
MUTING
SLEEP
PRESET
PICTURE
DISPLAY TV/VIDEO
1 2 3
4 5 6
7 809
JUMP
STEREO
/SAP
RESET
CHVOL
POWER
ENTER
MENU
SELECT
SLEEP
(page 17)
POWER
(page 16)
TV/VIDEO
(page 17)
0 -9 Buttons
(page 16)
ENTER
MENU
SELECT
(page 13)
CH +/–
(page 16)
CURSOR
(page 13)
For a detailed explanation of most buttons, see
"Watching the TV" on page 16.
Page 4
Advertências e
Precauções
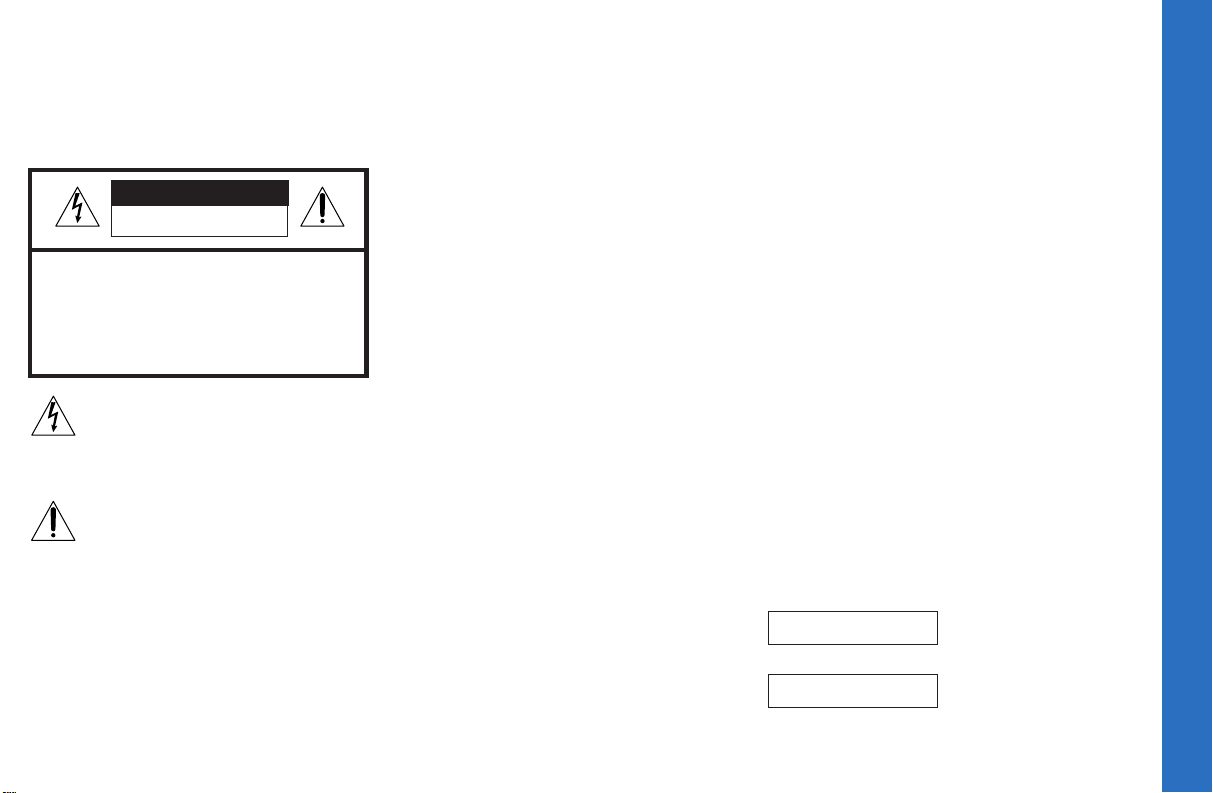
Para evitar perigo de faísca ou choque elétrico, não
exponha o televisor à chuva ou umidade.
ATENÇÃO
RISCO DE CHOQUE ELÉTRICO
NÃO ABRA
ATENÇÃO
Para reduzir risco de choque elétrico:
Em caso de avaria, consulte exclusivamente
os técnicos qualificados pelo fabricante.
CUIDADO
Ao usar jogos eletrônicos, computadores e outros produtos
semelhantes no seu televisor, mantenha as funções de
brilho e contraste em níveis baixos. Se um padrão fixo (sem
movimento) for deixado na tela por longos períodos
estando o aparelho com um nível alto de brilho ou
contraste, a imagem pode ser permanentemente gravada
na tela. Este tipo de gravação na tela não está coberto pela
garantia, porque é resultado de uso inadequado.
NÃO ABRA A TAMPA.
Este símbolo tem o propósito de alertar o
usuário sobre a presença de “voltagens
perigosas” não isoladas, localizadas dentro
do gabinete do produto, as quais podem ter
intensidade suficiente para constituir risco
de choque elétrico para as pessoas.
Este símbolo tem o propósito de alertar o
usuário quanto à presença de importantes
instruções de operação e manutenção
(serviços) constantes do material escrito que
acompanha o aparelho.
Precauções de segurança
• Este aparelho deve ser ligado somente em tomadas
110-240V/60 Hz.
• Por razões de segurança, o plugue entra na tomada
de parede somente com uma orientação. Caso não
consiga introduzir o plugue totalmente na tomada,
contate seu distribuidor.
• Se qualquer líquido ou objeto cair dentro do
televisor, desligue imediatamente o aparelho e leveo a um Serviço Autorizado Sony.
• Se não for utilizar o televisor por vários dias ou por
um período mais longo, desligue-o através da chave
POWER do TV ou desconecte o cabo elétrico. Para
desconectar o cabo elétrico, segure-o pelo plugue.
Nunca puxe o próprio cabo.
Proteção ao televisor
• Para evitar o superaquecimento interno do
aparelho, não bloqueie as aberturas de ventilação,
deixando no mínimo 10 cm entre ele e as paredes
que o cercam.
• Não instale o televisor em lugar quente ou úmido,
ou em local em que fique exposto a quantidades
excessivas de poeira ou a vibrações mecânicas.
• Para assegurar a dissipação do calor interno do
aparelho, não coloque objetos ou toalhas
decorativas sobre as aberturas para ventilação.
Observação Closed Caption
Este televisor permite ver texto sobreposto às
imagens, desde que transmitido pela emissora.
Observações para o instalador de sistema
de cabo (CATV)
O fio-terra do cabo deve conectar-se ao sistema de fioterra do edifício no ponto mais próximo à entrada do
fio-terra que for possível.
O emprego deste televisor para fins que não sejam a
visualização em privado de programas de televisão de
UHF, VHF ou transmitidos por companhias de televisão
a cabo para uso do público em geral pode requerer a
autorização da emissora ou companhia de cabo, do
proprietário do programa, ou de ambos.
Aviso
Este televisor não reproduz em cores fitas gravadas em
50 Hz, reproduzidas por vídeo cassetes
transcodificados dos sistemas PAL e SECAM europeus,
para os sistemas PAL-M e NTSC.
Limpeza
Limpe externamente o aparelho com um pano macio e
seco. Não utilize álcool, detergentes, nem solventes,
tais como benzina ou thinner, pois eles podem causar
danos ao acabamento e às superfícies do aparelho.
Antes da limpeza, por motivo de segurança, desligue o
aparelho.
Reembalagem
Guarde a caixa e os materiais da embalagem original,
para transportar o aparelho a outras localidades,
quando necessário.
Registro do usuário
Nos espaços abaixo, anote os números do modelo e de
série, que se encontram na parte posterior do
televisor.
Mencione-os quando contatar o Serviço Autorizado
Sony com respeito a este poduto
Número do modelo:
Número de série:
Open Here for Important Safety Info. and Remote Control Graphics
Page 5
Welcome!
Precautions Using This Manual
Thank you for purchasing the Sony Trinitron
Color TV. This manual is for models KV14B80, 21B80 and 21S85.
Model KV-21S85 is used for illustration purposes.
Differences in operation are indicated in the text;
for example, “KV-21S85 only.”
The features you will enjoy include:
• CANAL FAVORITO feature, allowing you
to choose from five of your favorite
programs
• AJUSTE DO TIMER function
• Two AUDIO/VIDEO inputs
• PAL- M/NTSC for, (BINORMA), allowing
connection of video equipment (NTSC)
without transcodification.
• STEREO DECODIFIER (MTS) with SAP
FUNCTION - allows for selection of the
broadcast sound or original soundtrack
(when transmitted) of a dubbed program.
®
Installing
• To prevent internal heat buildup, do not
block the ventilation openings.
• Do not install the TV in a hot or humid
place, or in a place subject to excessive dust
or mechanical vibration.
• Do not install the TV near any fire. (for
example, oven or cook fire)
• Do not put a candle etc. on the TV.
This manual is divided into four major
sections. We recommend that you carefully
review the contents of each section in the
order provided to ensure that you fully
understand the operation of your new TV.
1 Installing and Connecting the TV.
This section will guide you through your
initial set up. It will show you how to:
connect your new components, connect to
your antenna or cable, and connect any
accessories.
2 Basic Set Up.
This section will teach you the basic skills
needed to operate your new TV. It will
show you how to operate special functions
of the remote control.
3 Using your New TV.
This section will show you how to begin
using your new TV. It will show you how
to use the AUTO PROGRAMAÇÃO
feature, and how to use your remote
control's features.
4 Adjusting your Set Up (menus).
This section will teach you how to access
on-screen menus and adjust your TV's
settings.
Instructions in this manual are written for the remote
control. Similar controls may be found on the TV
console.
1
Page 6
Important Safeguard
For your protection, please read these
instructions completely, and keep this manual
for future reference.
Carefully observe and comply with all
warnings, cautions and instructions placed on
the set, or described in the operating
instructions or service manual.
WARNING
To guard against injury, the following basic
safety precautions should be observed in the
installation, use, and servicing of the set.
Use
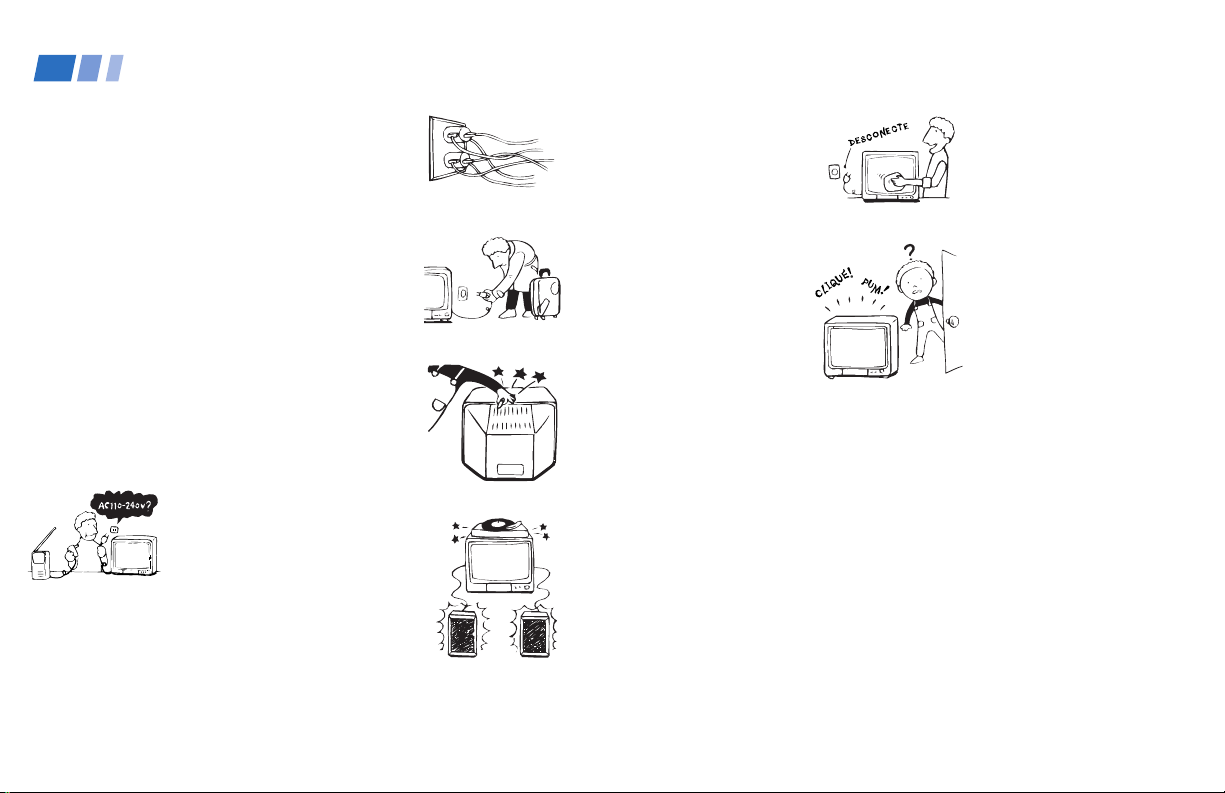
Power Sources — This set should
be operated only from the type of
power source indicated on the
serial/model plate.
If you are not sure of the type of
electrical power supplied to your
home, consult your dealer or local
power company. For those sets
designed to operate from battery
power, refer to the operating
instructions.
Overloading — Do not overload
wall outlets, extension cords or
convenience receptacles beyond
their capacity, since this can result in
fire or electric shock.
Always turn the set off when it is
not to be used. When the set is left
unattended and unused for long
periods of time, unplug it from the
wall outlet as a precaution against
the possibility of an internal
malfunction that could create a fire
hazard.
Object and Liquid Entry — Never
push objects of any kind into the set
through the cabinet slots as they
may touch dangerous voltage points
or short out parts that could result in
a fire or electric shock. Never spill
liquid of any kind on the set.
Attachments — Do not use
attachments not recommended by
the manufacturer, as they may cause
hazards.
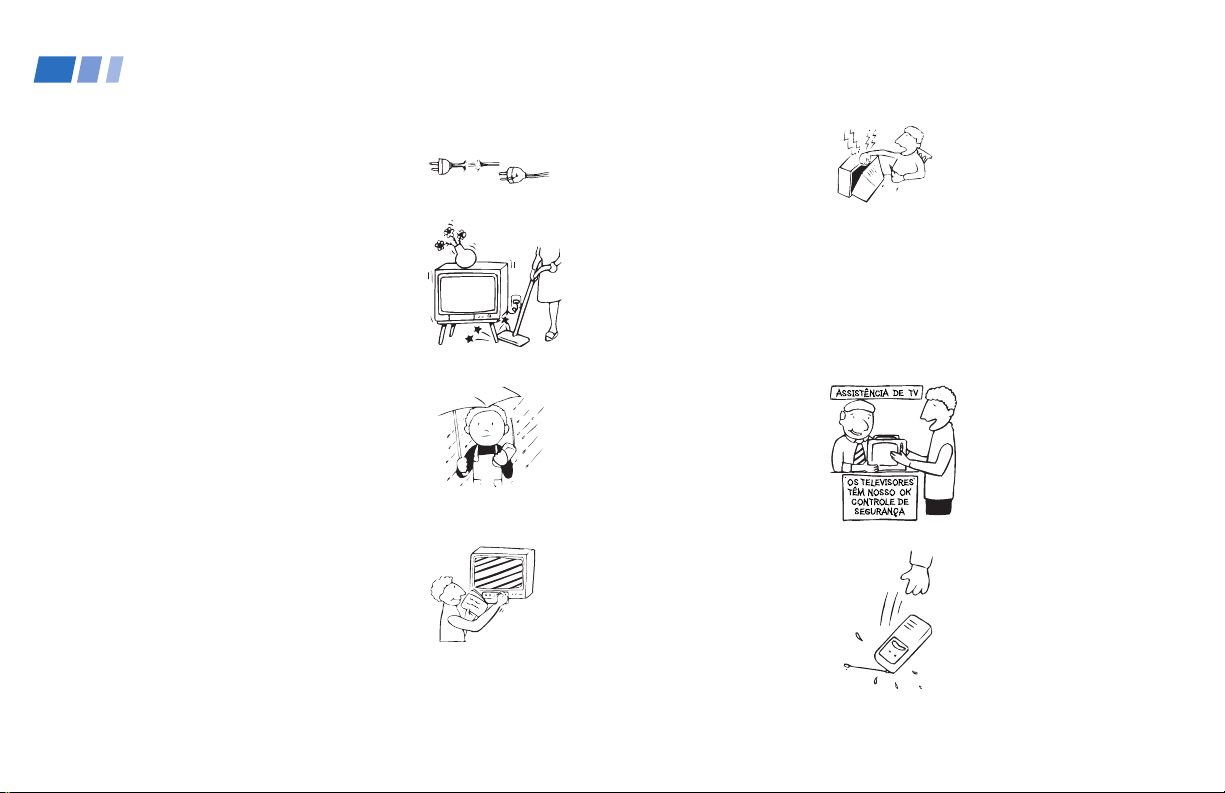
Cleaning — Unplug the set from the
wall outlet before cleaning or
polishing it. Do not use liquid
cleaners or aerosol; cleaners. Use a
cloth lightly dampened with water
for cleaning the exterior of the set.
If a snapping or popping sound
from a TV set is continuous or
frequent while the TV is operating,
unplug the TV and consult your
dealer or service technician. It is
normal for some TV sets to make
occasional snapping or popping
sounds, particularly when being
turned on or off.
2
Page 7
Installation
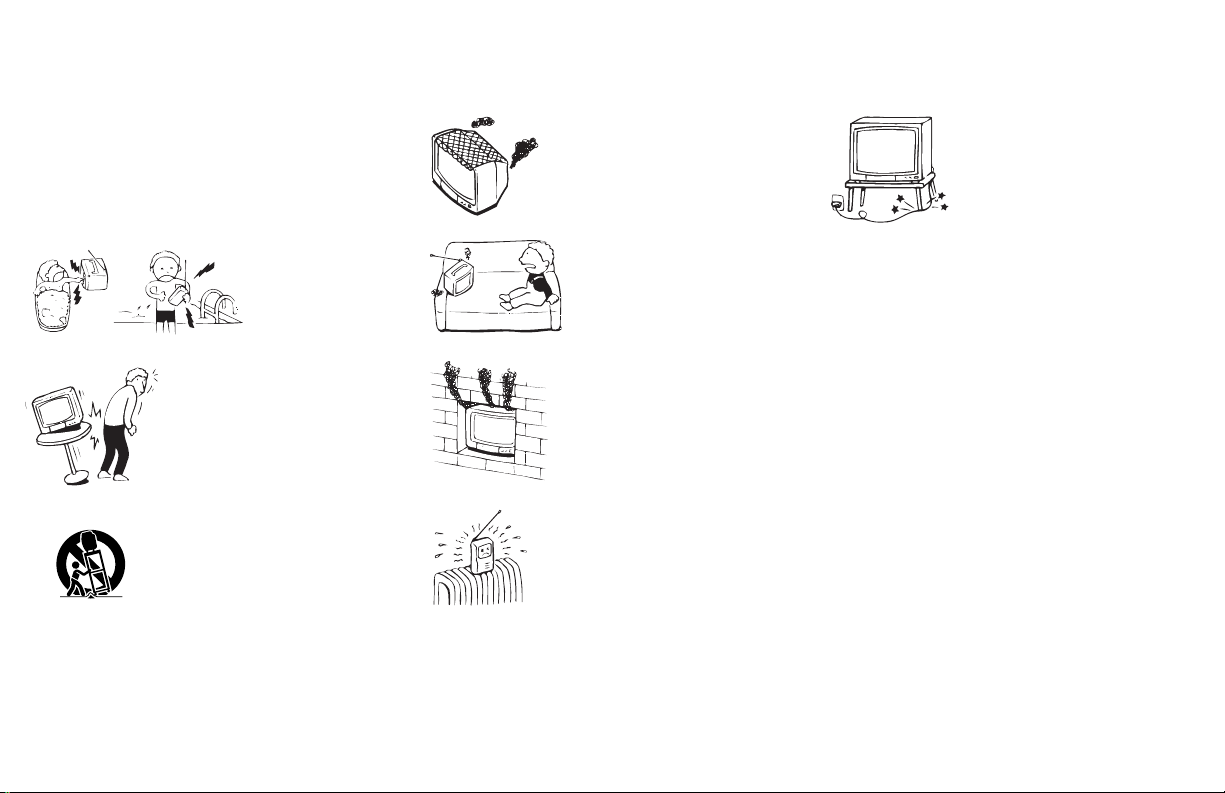
Water and Moisture — Do not use
power-line operated sets near water
— for example, near a bathtub,
washbowl, kitchen sink, or laundry
tub, in a wet basement, or near a
swimming pool, etc.
Accessories — Do not place the set
on an unstable cart, stand, table or
shelf. The set may fall, causing
serious injury to a child or an adult,
and serious damage to the set. Use
only a cart or stand recommended
by the manufacturer for the specific
model of TV.
Ventilation — The slots and
openings in the cabinet and in the
back or bottom are provided for
necessary ventilation. To ensure
reliable operation of the set, and to
protect it from overheating, these
slots and openings must never be
blocked or covered.
— Never cover the slots and
openings with a cloth or other
materials.
— Never block the slots and
openings by placing the set on a bed,
sofa, rug or other similar surface.
— Never place the set in a confined
space, such as a bookcase, or built-in
cabinet unless proper ventilation is
provided.
Power-Cord Protection — Do not
allow anything to rest on or roll over
the power cord, and do not place the
set where the power cord is subject
to wear or abuse.
An appliance and cart combination
should be moved with care. Quick
stops, excessive force, and uneven
surfaces may cause the appliance
and cart combination to overturn.
Do not place the set near or over a
radiator or heat register, or where it
is exposed to direct sunlight.
3
Page 8
Important Safeguard (continued)
Antennas
Outdoor Antenna Grounding — If an outdoor antenna is
installed, follow the precautions below.
An outdoor antenna system should not be located in the
vicinity of overhead power lines or other electric light or
power circuits, or where it, can come in contact with such
power lines or circuits.
WHEN INSTALLING AN OUTDOOR ANTENNA
SYSTEM, EXTREME CARE SHOULD BE TAKEN TO KEEP
FROM CONTACTING SUCH POWER LINES OR
CIRCUITS AS CONTACT WITH THEM IS ALMOST
INVARIABLY FATAL.
Be sure the antenna system is grounded so as to provide
some protection against voltage surges and built-up static
charges.
Lightning — For added protection for this television
receiver during a lightning storm, or when it is left
unattended and unused for long periods of time, unplug it
from the wall outlet and disconnect the antenna. This will
prevent damage to the receiver due to lightning and
power-line surges.
4
Service
Damage Requiring Service —
Unplug the set from the wall outlet
and refer servicing to qualified
service personnel under the
following conditions:
— When the power cord or plug is
damaged or frayed.
— If liquid has been spilled into the
set.
— If the set has been exposed to rain
or water.
— If the set has been subject to
excessive shock by being dropped,
or the cabinet has been damaged.
— If the set does not operate
normally when following the
operating instructions. Adjust only
those controls that are specified in
the operating instructions. Improper
adjustment of other controls may
result in damage and will often
require extensive work by a
qualified technician to restore the set
to normal operation.
— When the set exhibits a distinct
change in performance — this
indicates a need for service.
Servicing — Do not attempt to
service the set yourself since
opening the cabinet may expose you
to dangerous voltage or other
hazards. Refer all servicing to
qualified service personnel.
Replacement Parts — When replacement parts are
required, be sure the service technician certifies in writing
that he has used replacement parts specified by the
manufacturer that have the same characteristics as the
original parts.
Unauthorized substitutions may result in fire, electric
shock, or other hazards.
Safety Check — Upon completion
of any service or repairs to the set,
ask the service technician to perform
routine safety checks (as specified by
the manufacturer) to determine that
the set is in safe operating condition,
and to so certify.
When the set reaches the end of its
useful life, improper disposal could
result in a picture tube implosion.
Ask a qualified service technician to
dispose of the set.
Page 9

Connecting and Installing the TV
Connector Types
You may find it necessary to use some of the
following connector types during set up.
Coaxial cable
Standard TV cable and antenna connector
Plug Type
Press onto connection
Screw-on Type
Screw onto connection
Audio/Video cable
Press onto connection
Video - Yellow
Audio (Left) - White
Audio (Right) - Red
Audio (Monaural) - Black
Making Connections
For the best picture quality, a cable TV system
or outdoor antenna is recommended.
Connecting a VHF antenna with
twin lead cable
1 Connect the end of the 300-ohm twin lead
cable to the antenna connector.
300-ohm twin lead cable
VHF antenna
Antenna connector
(supplied)
2 Connect the antenna connector to the
VHF/UHF antenna terminal.
Connecting to VHF and UHF
antennas with twin lead cables
1 Connect the end of the 300-ohm twin lead
cable (VHF) to the antenna connector.
300-ohm twin lead cable
VHF antenna
Antenna connector
(supplied)
2 Connect the end of the 300-ohm twin lead
cable (UHF) to the VHF/UHF mixer (not
supplied).
UHF
VHF
VHF/UHF mixer
(not supplied)
UHF Antenna
5
Page 10

Connecting and Installing the TV (continued)
3 Connect the antenna connector to the
VHF/UHF mixer (not supplied).
VHF/UHF mixer
(not supplied)
UHF
VHF
antenna
connector
(supplied)
4 Connect the VHF/UHF mixer (not
supplied) to the VHF/UHF antenna
terminal.
Connecting a VHF or combined
VHF/UHF antenna, through a
coaxial cable
Note:
• The end of the coaxial cable of your
combined VHF/UHF antenna has a F type
plug, connect it directly to the VHF/UHF
antenna terminal (in this case, however,
ignore the instructions below, as there is no
need for the antenna connector).
1 Prepare the end of the coaxial cable.
6 mm
7 mm
2 Remove the cover of the antenna connector
(press the end of the two pins), position the
coaxial cable and replace the cover.
connector
tighten, using pliers
coaxial cable
antenna connector
(supplied)
cover
end of pin
3 Connect the antenna connector to the
VHF/UHF antenna terminal.
Connecting a VHF antenna with
coaxial cable and a UHF antenna
with twin lead cable
1 Connect the end of the coaxial cable to the
antenna connector, following steps 1 and 2
mentioned in the diagram above.
Note:
• If the end of the coaxial cable of your VHF
antenna has an F type plug, connect it
directly to the VHF/UHF mixer (not
supplied) ( in this case ignore steps 1 and 2
described in the diagram above) and follow
steps 2 and 3 below.
2 Connect the antenna connector (or the F
type plug) to the VHF/UHF mixer (not
supplied).
UHF twin lead cable
VHF/UHF mixer
(not supplied)
UHF
VHF
VHF coaxial cable
antenna
connector
(supplied)
3 Connect the VHF/UHF mixer (not
supplied) to the VHF/UHF antenna
terminal.
6
Page 11
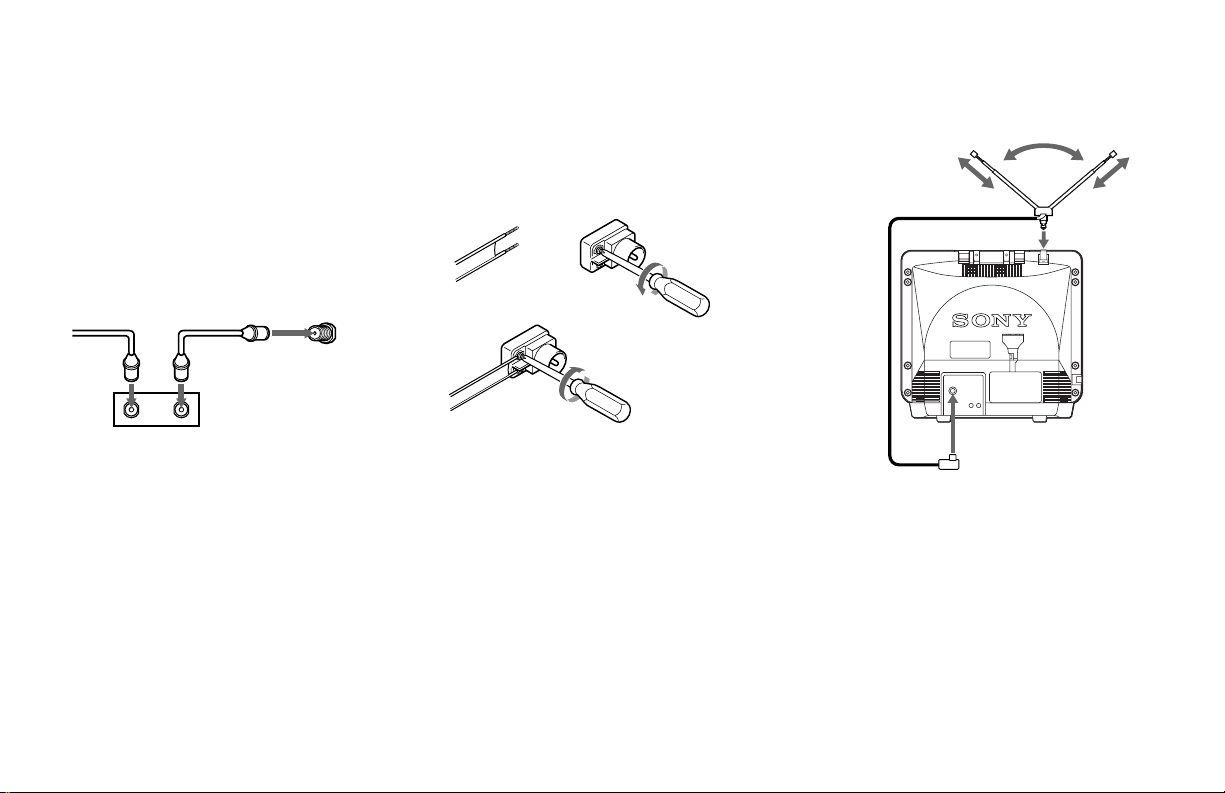
Connecting a cable box
Some pay cable TV systems use scrambled or
encoded signals that require a cable box* to
view all channels.
Please contact your local CATV or DBS
provider for cable box or DBS receiver
connection.
(Rear of TV)
Cable
VHF/UHF
Connecting the telescopic antenna
(KV-14B80 only)
1 Connect the end of the 300-ohm twin lead
cable to the antenna connector.
ab
c
loosen the screws
connect the cable and
tighten the screws
telescopic antenna (supplied)
3
IN
*Cable box
OUT
2 Connect the antenna connector to the
VHF/UHF antenna terminal.
3 Attach the telescopic antenna to the socket
on the rear panel.
Notes:
• When using the VHF/UHF mixer, noise
and image interference (fuzz etc.) may
occur while receiving cable TV channels
above 37 (W+1).
• An outdoor antenna is recommended for
receiving images of higher quality.
2
antenna connector (supplied)
1
7
Page 12
Connecting and Installing the TV (continued)
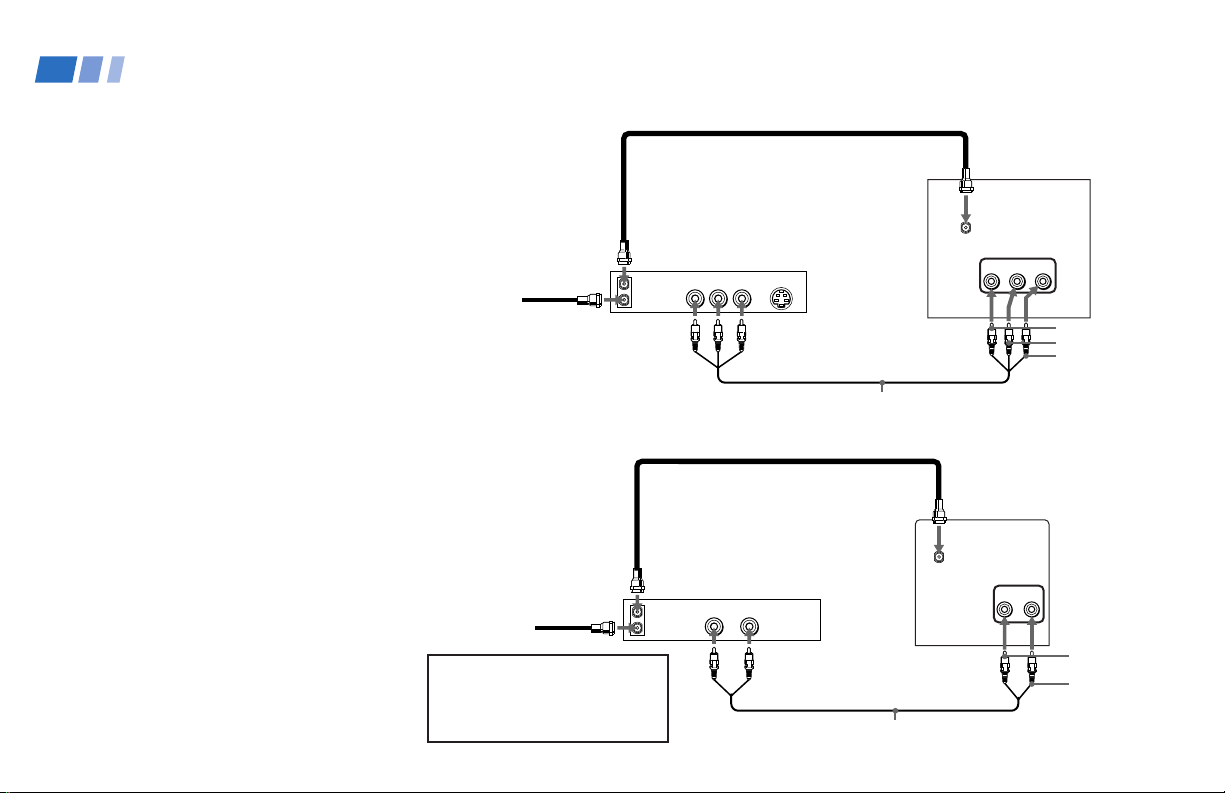
Connecting an antenna/cable TV
system with a VCR (KV-21S85 only)
1 Attach the coaxial connector from your
cable or antenna to IN on your VCR.
2 Using AUDIO/VIDEO connectors, connect
AUDIO and VIDEO OUT on your VCR to
AUDIO and VIDEO IN on your TV (YellowVIDEO, White-AUDIO Left, Red-AUDIO
Right).
3 Using a coaxial connector, connect OUT on
your VCR to VHF/UHF on your TV.
Note:
• If you are connecting a monaural VCR,
connect only the single audio output to the
left (MONO) input on your TV.
Connecting an antenna/cable TV
system with a VCR (KV-14B80/21B80
only)
1 Attach the coaxial connector from your
cable or antenna to IN on your VCR.
2 Using AUDIO/VIDEO connectors, connect
AUDIO and VIDEO OUT on your VCR to
AUDIO and VIDEO IN on your TV (YellowVIDEO, Black-AUDIO).
3 Using a coaxial connector, connect OUT on
your VCR to VHF/UHF on your TV.
8
Coaxial cable
3
Cable
1
Cable
1
Model KV-21B80 is used here for
illustration purposes. For model KV14B80, connect the cables to the
corresponding terminals of the same
name on the rear panel.
OUT
LINE
IN
OUT
OUT
IN
Disconnect all power sources before making any connections.
(Rear of TV)
VHF/UHF
VCR
AUDIO R AUDIO L VIDEO
2
Coaxial cable
VCR
LINE
OUT
VIDEOAUDIO
2
S VIDEO
VMC-810S/820S (not supplied)
(Rear of TV)
VHF/UHF
VMC-710M/720M (not supplied)
(
MONO
VIDEO 1 IN
)
VIDEO 1 IN
VIDEOR-AUDIO-L
AUDIO-R (red)
AUDIO-L (white)
VIDEO (yellow)
VIDEOAUDIO
AUDIO (black)
VIDEO (yellow)
Page 13
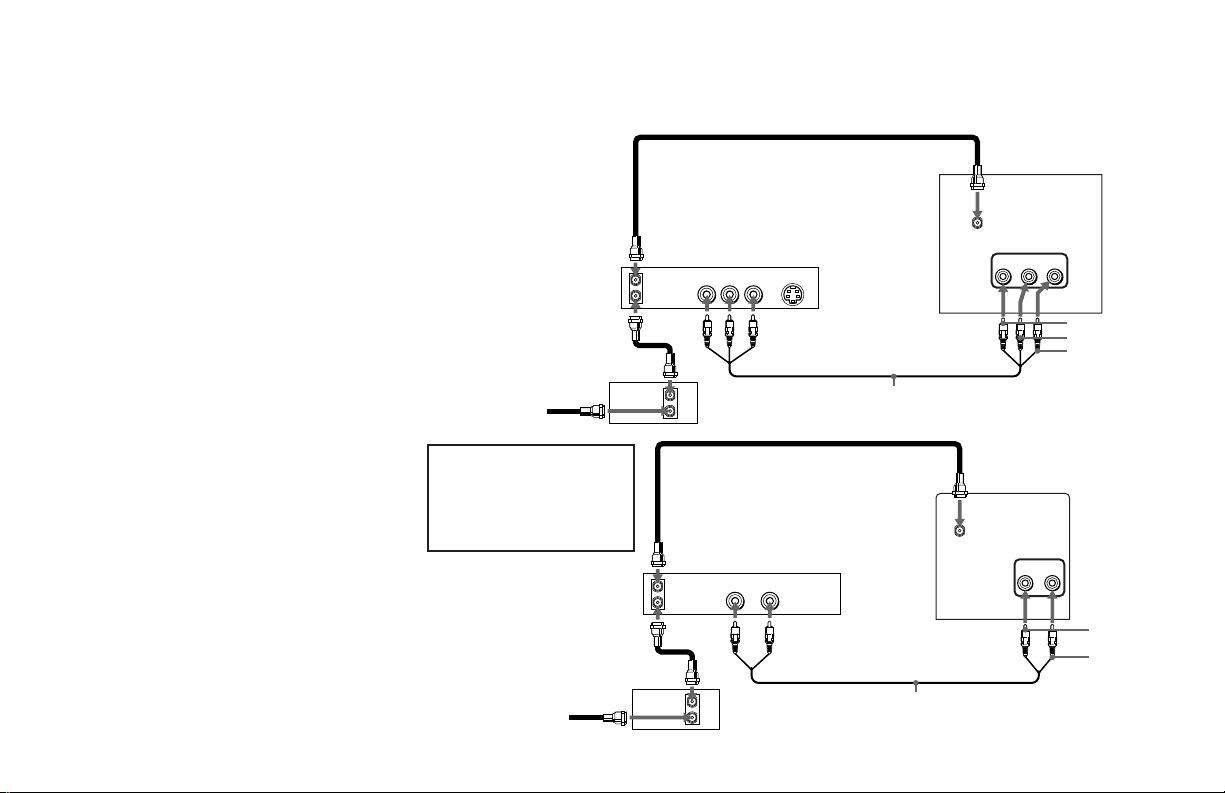
Connecting a VCR and TV with a
cable box (KV-21S85 only)
1 Attach the coaxial connector from your
cable to IN on your cable box.
2 Using a coaxial connector, connect OUT
on your cable box to IN on your VCR.
3 Using AUDIO/VIDEO connectors,
connect AUDIO and VIDEO OUT on your
VCR to AUDIO and VIDEO IN on your
TV (Yellow-VIDEO, White-AUDIO Left,
Red-AUDIO Right).
Connecting a VCR and TV with a
cable box (KV-14B80/21B80 only)
1 Attach the coaxial connector from your
cable to IN on your cable box.
2 Using a coaxial connector, connect OUT
on your cable box to IN on your VCR.
3 Using AUDIO/VIDEO connectors, connect
AUDIO and VIDEO OUT on your VCR to
AUDIO and VIDEO IN on your TV
(Yellow-VIDEO, Black-AUDIO).
Note:
• To view scrambled channels through your
cable box, select the video input which
your cable box is connected to by pressing
TV/VIDEO on the remote control.
2
Cable
Model KV-21B80 is used here
for illustration purposes. For
model KV-14B80, connect the
cables to the corresponding
terminals of the same name on
the rear panel.
Cable
1
Disconnect all power sources before making any connections.
Coaxial cable
(Rear of TV)
VHF/UHF
VIDEO 1 IN
VIDEOR-AUDIO-L
(
)
MONO
AUDIO-R (red)
AUDIO-L (white)
VIDEO (yellow)
VIDEO 1 IN
VIDEOAUDIO
AUDIO (black)
VIDEO (yellow)
OUT
LINE
IN
OUT
OUT
IN
Coaxial cable
OUT
IN
2
1
Cable box
VCR
AUDIO R AUDIO L VIDEO
3
Cable box
VCR
LINE
OUT
VIDEOAUDIO
OUT
3
IN
S VIDEO
VMC-810S/820S (not supplied)
(Rear of TV)
VHF/UHF
VMC-710M/720M (not supplied)
9
Page 14
VIDEOR-AUDIO-L
(
MONO
)
VHF/UHF
VIDEO 1 IN
AUDIO R AUDIO L VIDEO
AUDIO R AUDIO L VIDEO
SATELLITE IN
VHF/UHF
S VIDEO
OUT
IN
LINE OUT
LINE IN
VHF/UHF
S VIDEO
OUT
IN
LINE OUT
Connecting and Installing the TV (continued)
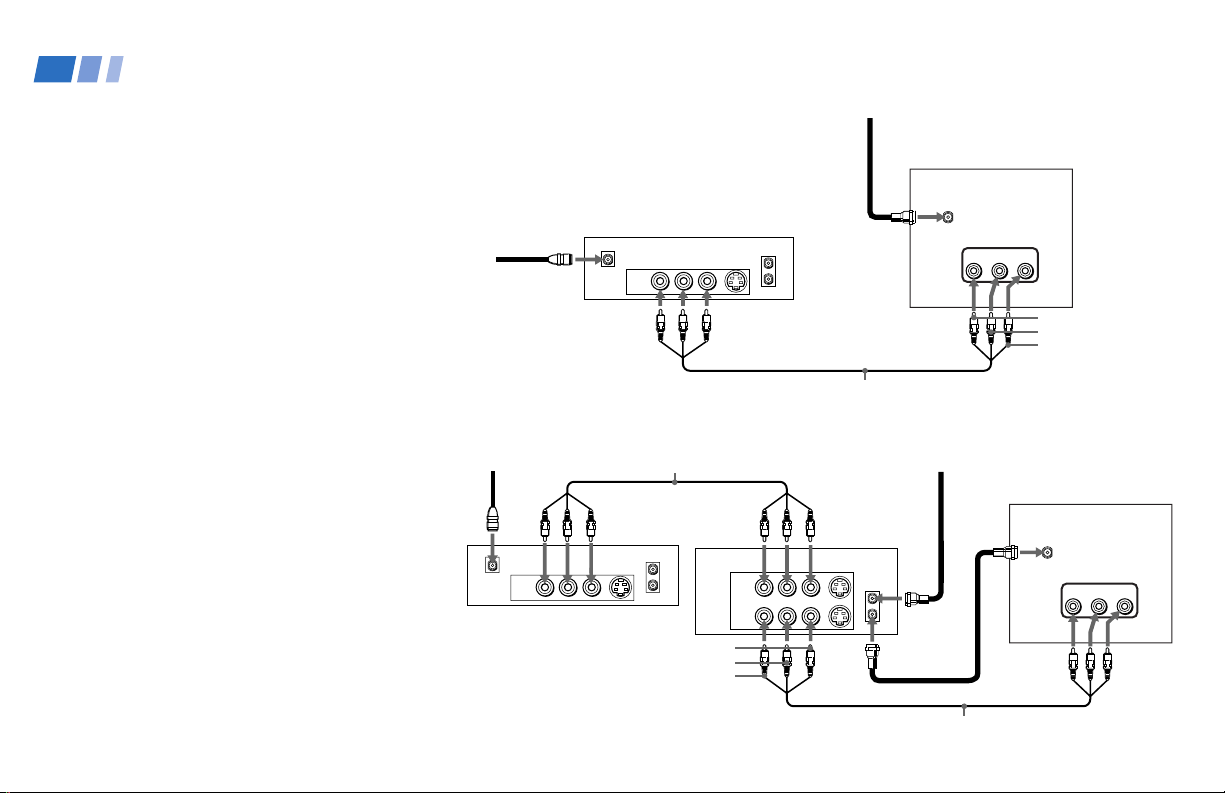
Connecting a DBS (Direct Broadcast
Satellite) receiver (KV-21S85 only)
1
Connect the cable from your satellite antenna to
your DBS receiver.
2
Attach the coaxial connector from your cable or
antenna to VHF/UHF on your TV.
3
Using AUDIO/VIDEO connectors, connect
AUDIO and VIDEO OUT on your DBS receiver
to AUDIO and VIDEO IN on your TV.
Connecting a DBS (Direct Broadcast
Satellite) receiver and a VCR
(KV-21S85 only)
1
Connect the cable from your satellite antenna to
your DBS receiver.
2
Attach the coaxial connector from your cable or
antenna to VHF/UHF-IN on your VCR.
3
Using a coaxial connector, connect VHF/UHFOUT on your VCR to VHF/UHF on your TV.
4
Using AUDIO/VIDEO connectors, connect
AUDIO and VIDEO OUT on your DBS receiver
to AUDIO and VIDEO IN on your VCR.
5
Using AUDIO/VIDEO connectors, connect
AUDIO and VIDEO OUT on your VCR to
AUDIO and VIDEO IN on your TV.
Note:
•
To view input from the DBS or VCR, select the
video input which your DBS receiver or VCR is
connected to by pressing TV/VIDEO on the
remote control.
10
Disconnect all power sources before making any connections.
2
DBS receiver
1
Satellite
antenna
cable
1
DBS receiver
SATELLITE IN
AUDIO R AUDIO L VIDEO
LINE OUT
3
VMC-810S/820S (not supplied)
4
VCR
VIDEO (yellow)
AUDIO-L (white)
AUDIO-R (red)
VHF/UHF
IN
S VIDEO
OUT
VMC-810S/820S (not supplied)
5
VMC-810S/820S (not supplied)
(Rear of TV)
VHF/UHF
(
MONO
2
3
VIDEO 1 IN
)
VIDEOR-AUDIO-L
AUDIO-R (red)
AUDIO-L (white)
VIDEO (yellow)
(Rear of TV)
Page 15
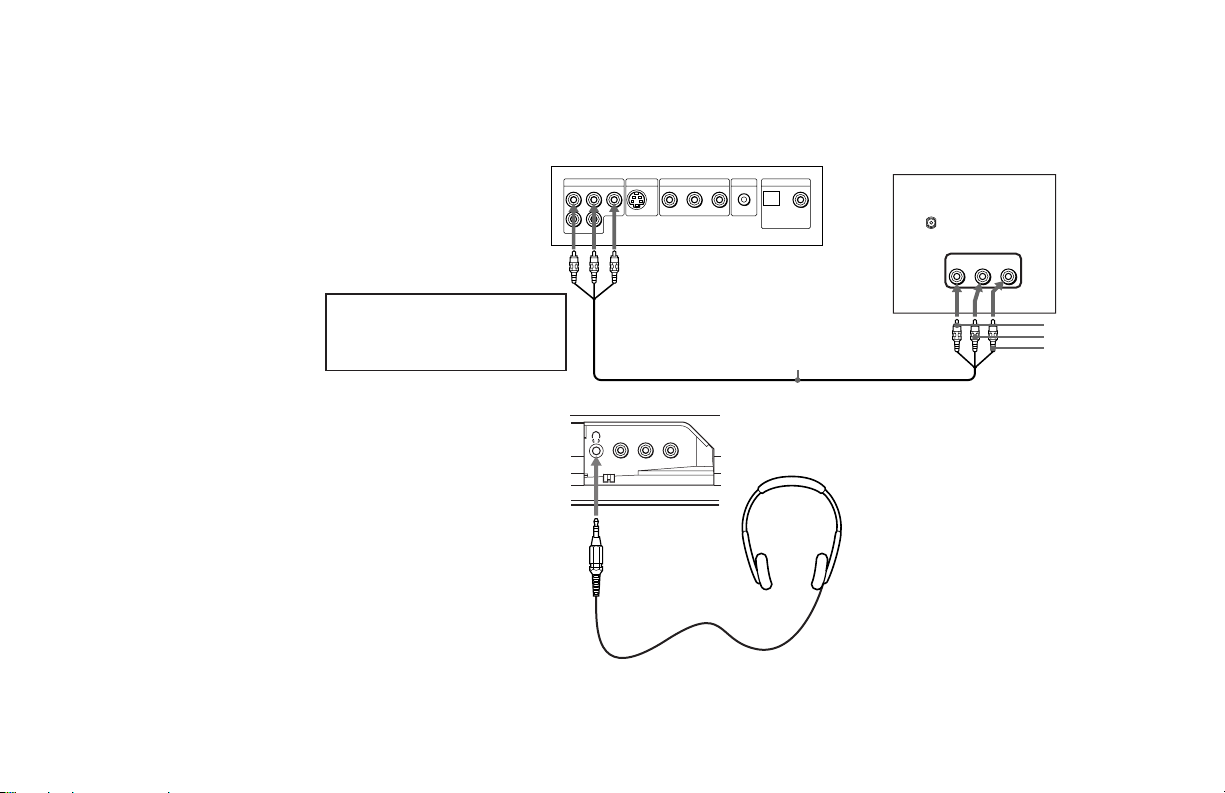
Connecting a DVD Player (KV-21S85
only)
Using AUDIO/VIDEO connectors, connect
VIDEO 1 IN on your TV to LINE OUT on
your DVD Player.
Connect your DVD Player directly to
your TV. Connecting the DVD Player
through other video equipment will
cause unwanted picture noise.
DVD
R–AUDIO 1–L VIDEO
LINE OUT
Disconnect all power sources before making any connections.
S VIDEO OUT
COMPONENT VIDEO OUT
R-YY B-Y
S-LINK
DIGITAL OUT
OPTICAL COAXIAL
VMC-810S/820S
(not supplied)
(Rear of TV)
VHF/UHF
VIDEO 1 IN
(
)
MONO
VIDEOR-AUDIO-L
AUDIO-R (red)
AUDIO-L (white)
VIDEO (yellow)
Connecting the headphones (KV21S85 only)
1 Connect the headphones to 2 on your TV.
2 Adjust the volume.
Note:
• When the headphones are connected, no
sound comes from the speakers.
VIDEO
(MONO)
VIDEO 2 INPUT
L-AUDIO-R
11
Page 16
Connecting and Installing the TV (continued)
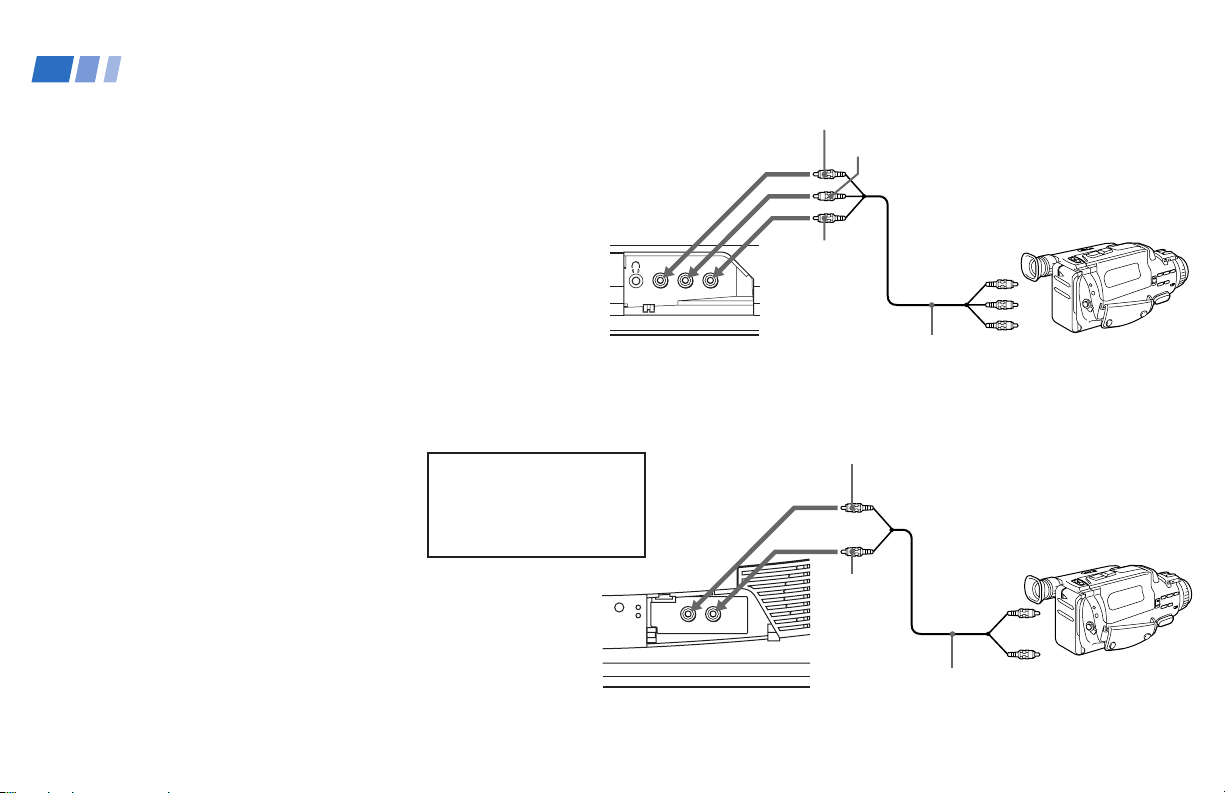
Connecting a camcorder (KV-21S85
only)
Use this connection to view a picture directly
from your camcorder.
Using AUDIO/VIDEO connectors, connect
AUDIO and VIDEO OUT on your camcorder
to VIDEO 2 IN on the front panel of your TV
(Yellow-VIDEO, White-AUDIO Left, RedAUDIO Right).
Note:
• If you are connecting a monaural
camcorder, connect only the single audio
output to the left (MONO) input on your
TV.
Connecting a camcorder (KV-14B80/
21B80 only)
Use this connection to view a picture directly
from your camcorder.
Using AUDIO/VIDEO connectors, connect
AUDIO and VIDEO OUT on your camcorder
to VIDEO 2 IN on the front panel of your TV
(Yellow-VIDEO, Black-AUDIO).
Model KV-21B80 is used here for
illustration purposes. For model
KV-14B80, connect the cables to
the corresponding terminals of
the same name on the front
panel.
VIDEO
L-AUDIO-R
(MONO)
VIDEO 2 INPUT
VIDEO 2 IN
VIDEO AUDIO
VIDEO (yellow)
AUDIO-L (white)
AUDIO-R
(red)
VIDEO (yellow)
AUDIO
(black)
AV output
VMC-810S/820S
(not supplied)
AV output
VCM-710M/720M
(not supplied)
12
Page 17
Basic Set Up
Inserting Batteries
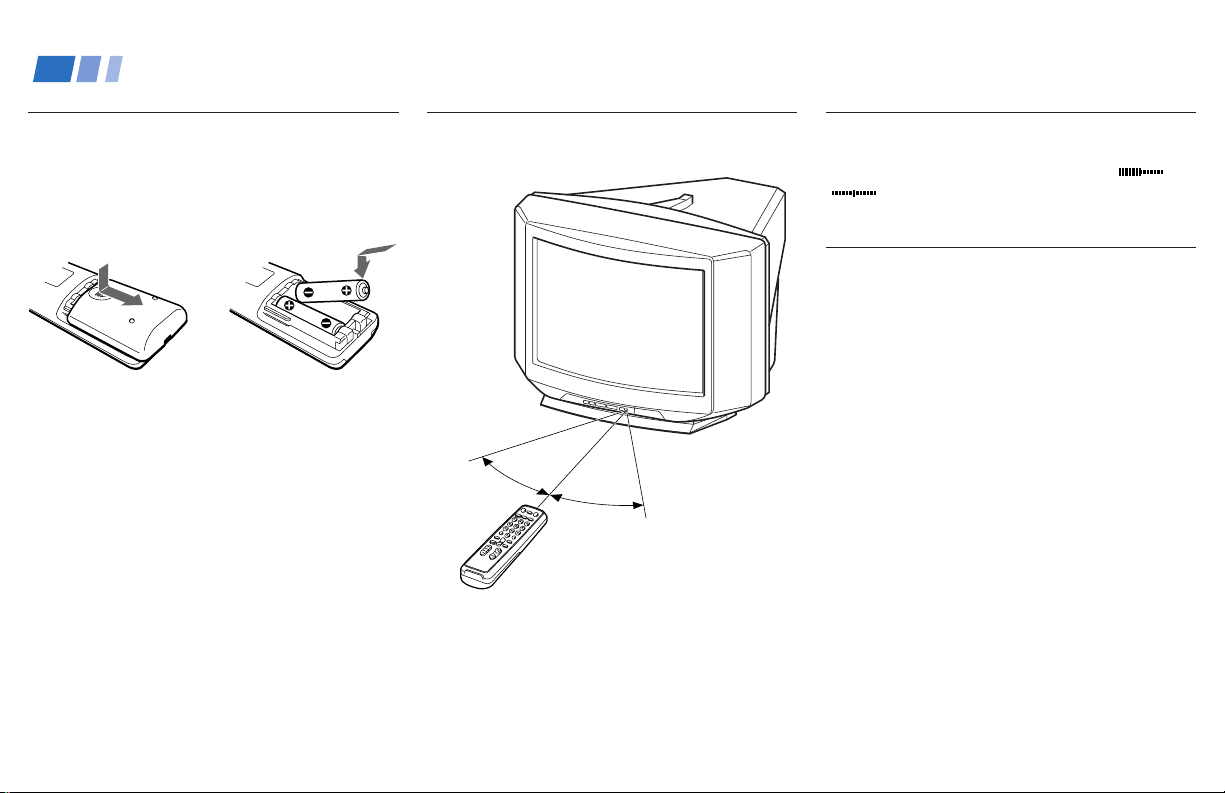
Insert two size AA (R6) batteries (supplied) by
matching the + and – on the batteries to the
diagram inside the battery compartment.
Notes:
• Remove the batteries to avoid damage
from possible battery leakage whenever
you anticipate that the remote control will
not be used for an extended period.
• Handle the remote control with care.
Avoid dropping it, getting it wet. Avoid
placing it in direct sunlight, near a heater,
or where the humidity is high.
Using the Remote Control
30°
30°
Point the remote control at the remote sensor
on the main unit.
Adjusting Sliders
When menu items present a slider ( or
), press >/. and SELECT to adjust the
setting.
On Line Help/Instructions
Several menu windows will provide prompts
and instructions to assist you in navigating
through the different functions.
When the instructions are presented, use them to
supplement the instructions in this manual.
13
Page 18
Using your New TV
Presetting the Channels
Automatically
The AUTO PROGRAMAÇÃO feature will
allow you to preset all receivable channels.
Tips
z
• Perform this function during the day, with the
antenna and/or cable properly connected, to ensure
that all available channels will be broadcasting and
receivable.
• After using AUTO PROGRAMAÇÃO, you will still
have the option of adjusting any of the system
settings, like erasing channels, through the
AJUSTES menu. (see “SELEÇÃO DE CANAL” on
page 24)
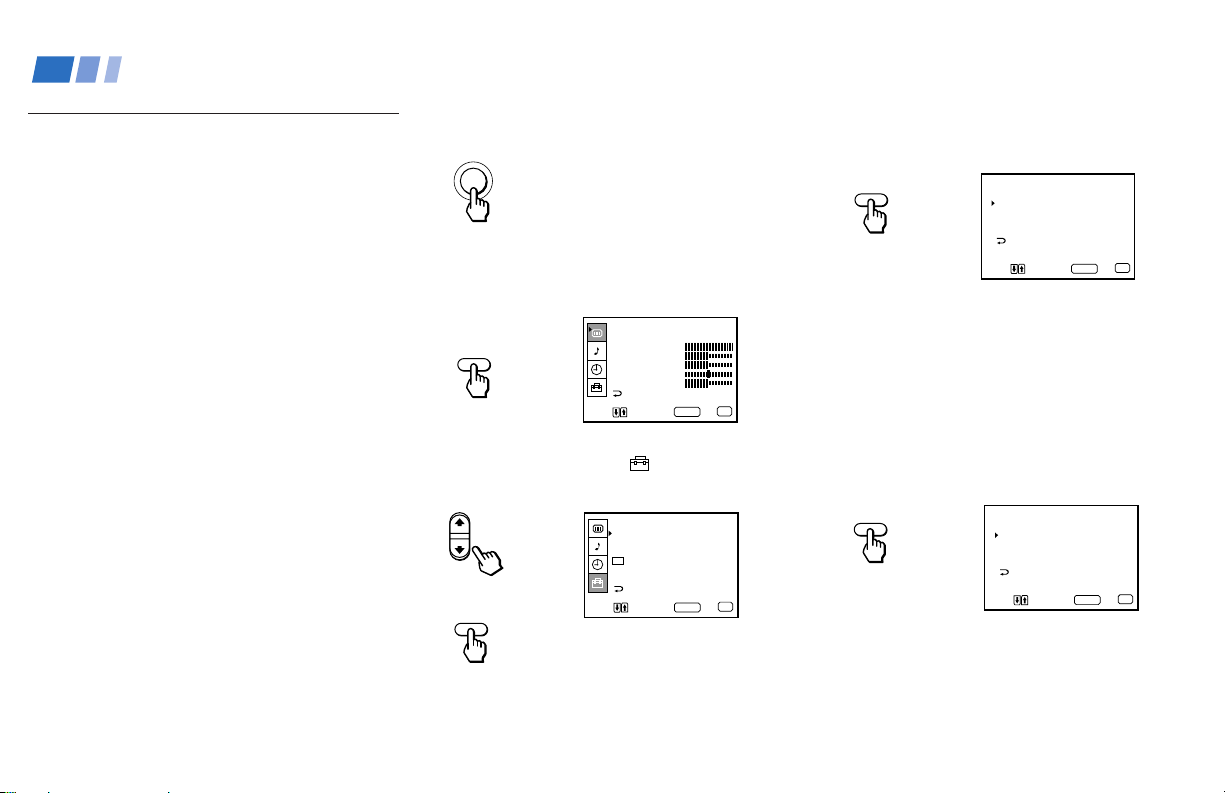
1 Press POWER to turn on the TV.
POWER
2 Press MENU.
The main menu appears.
IMAGEM
MENU
MODO : DINÂMICO
CONTRASTE
BRILHO
COR
MATIZ
NITIDEZ
MENU
Mover Sair
Selecionar SELECT
MENU
3 Press > or . to select and press
SELECT.
AJUSTES
SELEÇÃO DE CANAL
CANAL FAVORITO
BLOQUEIO DE CANAL
CC
/TEXT: CC1
PORTUGUÊS
SISTEMA DE COR
SELECT
Mover
MENU
Selecionar SELECT
MENU
Sair
4 Make sure the cursor (z) is to SELEÇÃO
DE CANAL and press SELECT.
SELECT
SELEÇÃO DE CANAL
TV A CABO: NÃO
FIXAR CANAL: NÃO
AUTO PROGRAMAÇÃO
CANC/INCLUI CANAL
MENU
Mover
Selecionar SELECT
Sair
MENU
5 If your TV receives signals from the
antenna, skip to step 8.
If your TV receives cable TV channels,
proceed from step 6.
6 Make sure the cursor (z) is to TV A CABO
and press SELECT.
SELECT
SELEÇÃO DE CANAL
TV A CABO: NÃO
FIXAR CANAL: NÃO
AUTO PROGRAMAÇÃO
CANC/INCLUI CANAL
MENU
Mover
Selecionar SELECT
MENU
Sair
14
Page 19
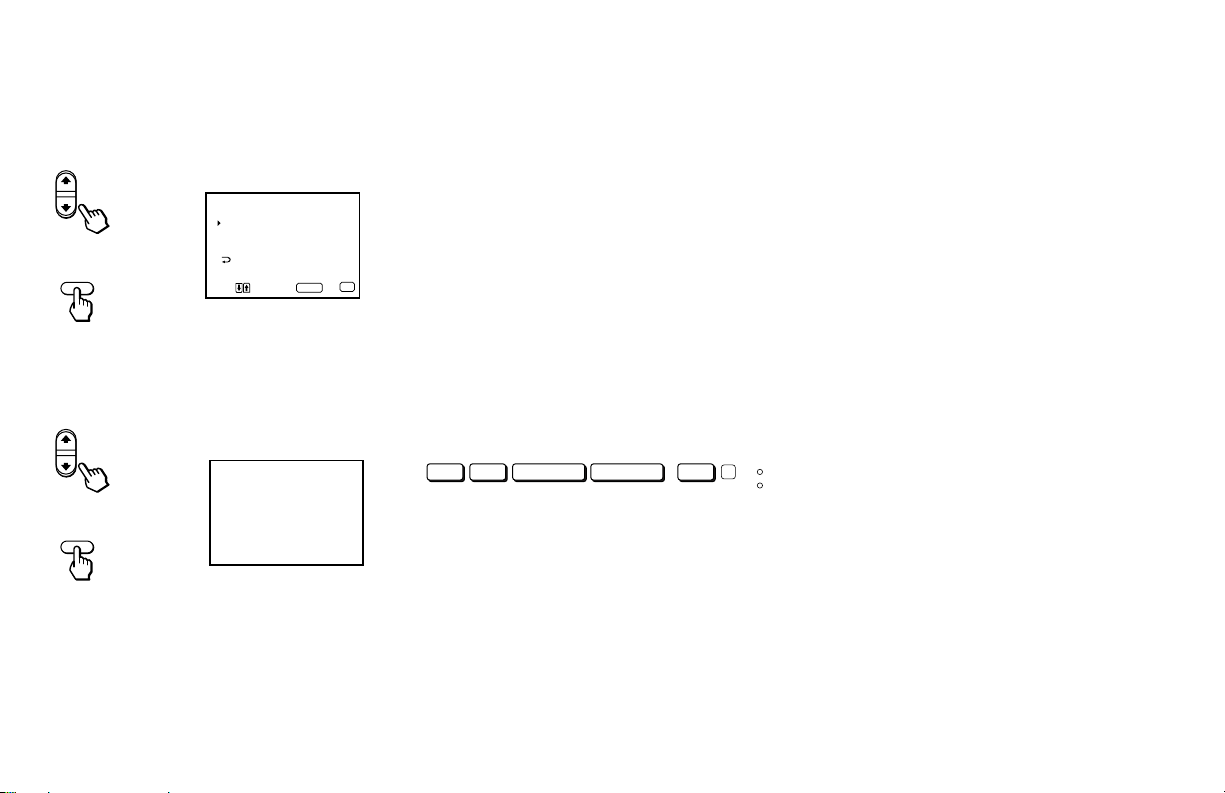
7 Press > or . to select SIM and press
SELECT.
SELEÇÃO DE CANAL
TV A CABO: SIM
FIXAR CANAL: NÃO
AUTO PROGRAMAÇÃO
CANC/INCLUI CANAL
SELECT
Mover
MENU
Selecionar SELECT
8 Press > or . to select AUTO
PROGRAMAÇÃO and press SELECT.
SELECT
“AUTO PROGRAMAÇÃO” appears and
the TV starts scanning and presetting
channels automatically. When all the
receivable channels are stored, the lowest
numbered channel is displayed.
AUTO PROGRAMAÇÃO
9 Press MENU to return to the original
screen.
To perform AUTO SET UP
(KV-21S85 only)
The EASY SETUP GUIDE feature allows you
to set the on-screen language, set all
MENU
Sair
receivable channels, perform the
demonstration, and operate the menu screen.
The EASY SETUP GUIDE feature does not
apply for installlations which use a cable box
for all channel selection.
Using the buttons on the front panel of the
TV:
POWER
SETUP
-
VOLUME
+
-
CHANNEL
+
TV/VIDEO
MAIN POWER/
STAND BY
TIMER
1 Press POWER to turn on the TV.
2 Press SETUP on the TV.
The EASY SETUP GUIDE screen appears.
3 Press CHANNEL + to select Portuguese or
CHANNEL – to select Spanish.
The screen will change to reflect your
choice.
4 Press VOLUME + to select AUTO SET
UP.
“CONTINUE TO AUTO
PROGRAMAÇÃO?” will appear on the
screen.
5 Press TV/VIDEO to operate menu
without remote cantrol.
“Operar menu sem ctr. remoto” will
appear on the screen.
6 Press SETUP to perform AUTO SET UP,
or VOLUME – to exit the menu screens.
To operate the menu screen, you can use
the following buttons on the front panel:
CHANNEL +/–: move the cursor
VOLUME +: make your selection
VOLUME –: exit from the menu screen
Notes:
• Each time AUTO PROGRAMAÇÃO is
perfomed, TIMER settings are eased.
• If your TV receives cable TV channels, set
TV A CABO to SIM in the AJUSTES menu
first. (see “SELEÇAO DE CANAL” on
page 24)
For a DEMO of functions and menus,
press VOLUME –.
15
Page 20
Using your New TV (continued)
Watching the TV
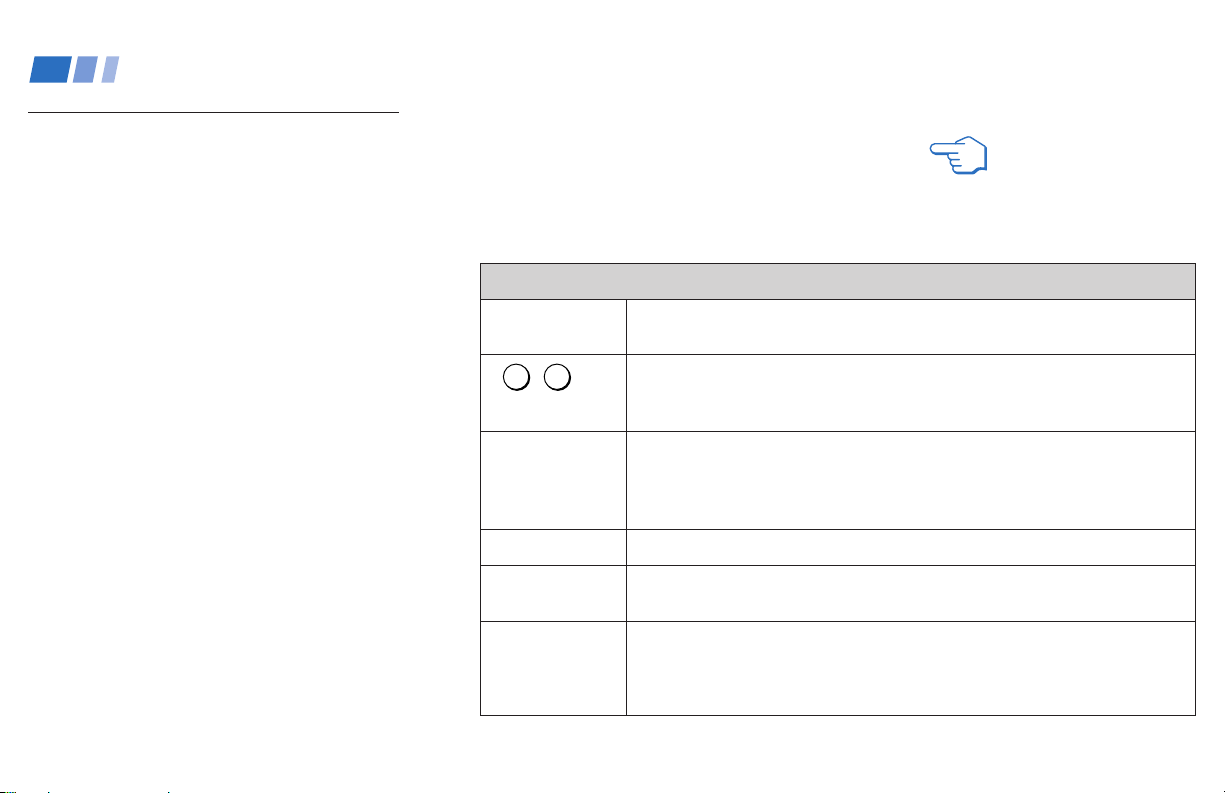
Many TV features can be accessed directly
through the remote control. The following
chart will explain the function of some
buttons found on your remote control.
POWER
-
0 9
and ENTER
CH +/–
VOL +/–
JUMP
MUTING
REFER TO THE
ILLUSTRATION OF THE
REMOTE CONTROL ON THE
INSIDE FRONT COVER OF
THIS MANUAL AS YOU
REVIEW THIS CHART
Using the Buttons for TV Operations.
Turns the TV on and off. If a video input indication (e.g., VIDEO 1, VIDEO 2)
appears on the screen, press TV/VIDEO until a channel number appears.
Use for direct channel selection. Press 0-9 to select a channel (for example,
to select channel 10, press 1 and 0), the channel will change after 3 seconds,
or you can press ENTER for immediate selection.
Every time you press this button, the channel will change (+ up or – down).
Channel Surf
1. Press and hold to change the channel number.
2. Release to display the selected channel.
Press to adjust the volume (+ up or – down).
Press to alternate or
between the current channel and the last channel selected using the 0-9 buttons.
Press to mute the sound (“MUTING” will appear on the screen). Press again
or press VOL + to restore sound.
jump
back and forth between two channels. The TV will jump
16
Page 21
SLEEP
DISPLAY
TV/VIDEO
PRESET PICTURE
STEREO/SAP
Using the Buttons for TV Operations.
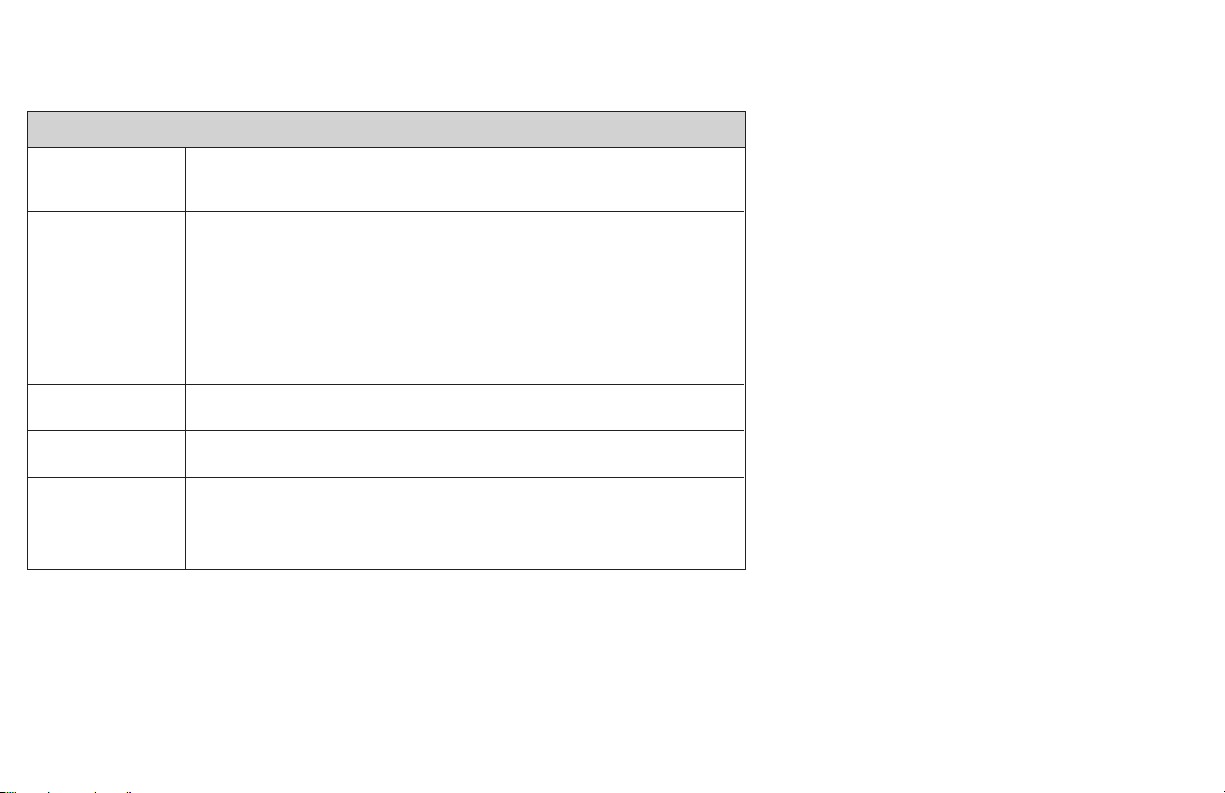
Press repeatedly until the TV displays the approximate time in minutes (30,
60, or 90) that you want the TV to remain on before shutting off automatically.
Cancel by pressing until “SLEEP OFF” appears.
Press repeatedly to cycle through available displays:
Status
Channel number and MTS mode (if SAP or STEREO is selected) are
displayed. SAP or STEREO indication disappears after 3 seconds.
Caption Vision
Caption Vision will be displayed on the screen if the broadcaster offers this
service. (see “[CC]/TEXT” on page 25)
To cancel the display, press DISPLAY repeatedly until “DISPLAY OFF”
appears. “DISPLAY OFF” disappears after 3 seconds.
Press repeatedly to cycle through available video inputs:
TV, VIDEO 1 and VIDEO 2
Press to cycle through the MODO options in the IMAGEM menu. (see
“MODO” on page 19)
Press to cycle through the Multichannel TV Sound (MTS) options. (see
“MTS” on page 21 or 22)
Note:
• The stereo mode is available for model KV-21S85 only.
17
Page 22
Adjusting your SET UP (menus)
Learning Menu Selection
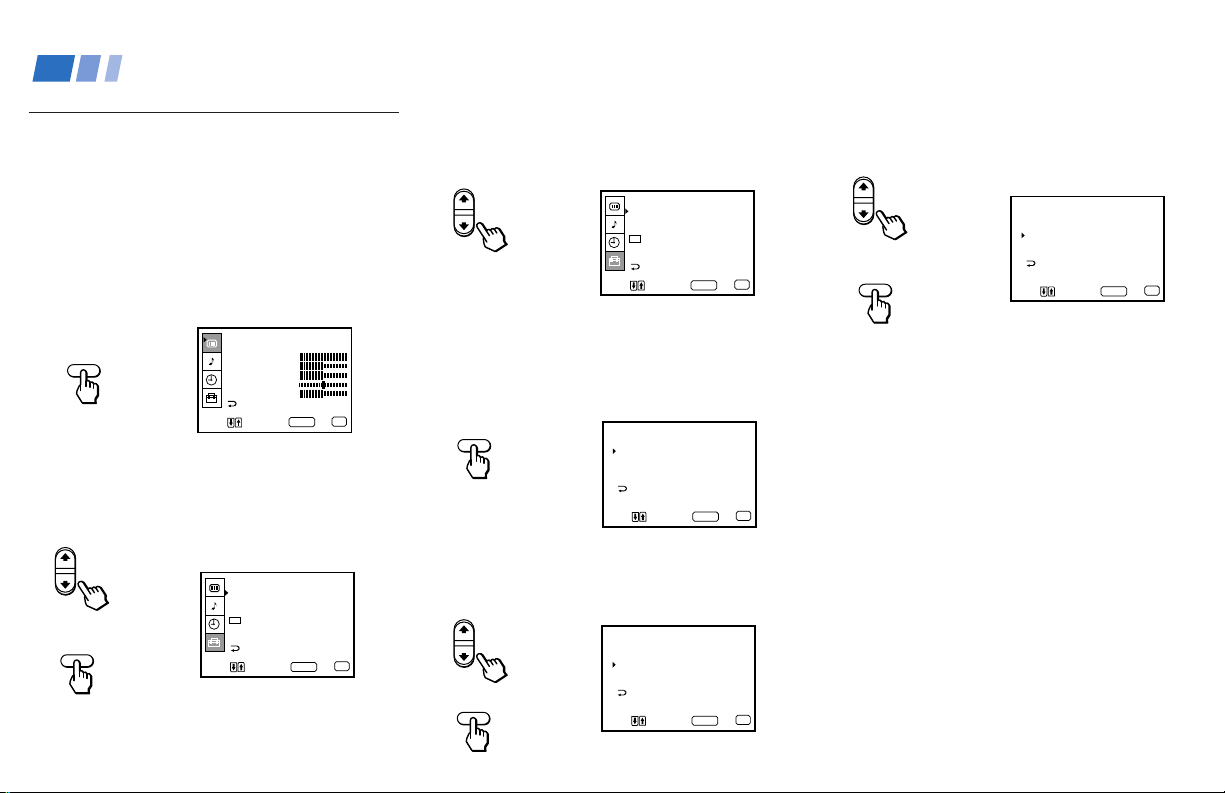
Use the MENU button to access a menu and
use the >/. and SELECT button to alter
settings. Use the following example to learn
how to modify settings.
1 Press the MENU button.
The main menu appears.
IMAGEM
MENU
2 Press > or . to highlight the desired menu
and press SELECT to activate it.
SELECT
MODO : DINÂMICO
CONTRASTE
BRILHO
COR
MATIZ
NITIDEZ
MENU
Mover Sair
Selecionar SELECT
AJUSTES
SELEÇÃO DE CANAL
CANAL FAVORITO
BLOQUEIO DE CANAL
CC
/TEXT: CC1
PORTUGUÊS
SISTEMA DE COR
MENU
Mover
Selecionar SELECT
MENU
MENU
Sair
3 Press > or . until the cursor points to the
desired option.
AJUSTES
SELEÇÃO DE CANAL
CANAL FAVORITO
BLOQUEIO DE CANAL
CC
/TEXT: CC1
PORTUGUÊS
SISTEMA DE COR
Mover
MENU
Selecionar SELECT
MENU
Sair
4 Press SELECT.
Options for your selection will be
displayed.
SELECT
SELEÇÃO DE CANAL
TV A CABO: NÃO
FIXAR CANAL: NÃO
AUTO PROGRAMAÇÃO
CANC/INCLUI CANAL
MENU
Mover
Selecionar SELECT
Sair
MENU
5 Press > or . until the cursor points to the
desired option and press SELECT.
SELEÇÃO DE CANAL
TV A CABO: NÃO
FIXAR CANAL: NÃO
AUTO PROGRAMAÇÃO
CANC/INCLUI CANAL
Mover
MENU
Selecionar SELECT
Sair
MENU
SELECT
6 Press > or . to make your selection and
press SELECT to activate it.
SELEÇÃO DE CANAL
TV A CABO: NÃO
FIXAR CANAL: SIM
AUTO PROGRAMAÇÃO
CANC/INCLUI CANAL
SELECT
When you are done with changes to the
selected menu, choose MENU to return to the
main menu. Once you have completed all
menu corrections, press MENU on the remote
control to exit the menu screens.
Note:
• Pressing MENU on the remote control will
allow you to exit from the menus at any
time.
Tip
z
For model KV-21S85, you can access a menu through the
buttons on the front panel without remote control. For
details, see “To perform AUTO SET UP (KV-21S85
only)” on page 15.
Mover
MENU
Selecionar SELECT
Sair
MENU
18
Page 23
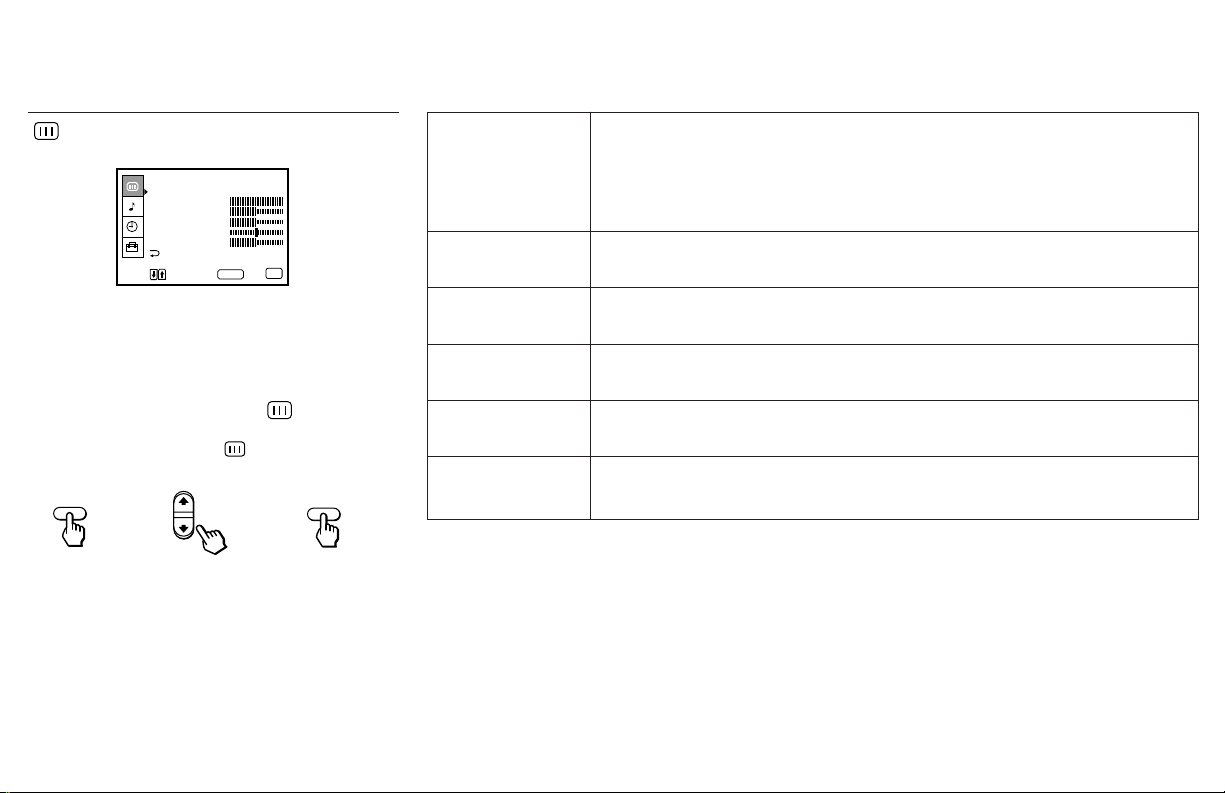
Using the IMAGEM Menu
IMAGEM
MODO : DINÂMICO
CONTRASTE
BRILHO
COR
MATIZ
NITIDEZ
MENU
Mover Sair
Selecionar
SELECT
MENU
}
Sliders
MODO
Picture setting
CONTRASTE
Picture Adjustment
You can select from three picture settings.
DINÂMICO: Select for enhanced picture contrast and sharpness.
ESPORTE: Select to display a vivid, bright picture.
PESSOAL: Select to customize the values from IMAGEM menu according to your
personal preference.
Adjust slider > to increase picture contrast and create more vivid color.
Adjust slider . to decrease picture contrast and soften the color.
For detailed information on using the remote
control to modify menu settings, refer to
“Learning Menu Selection” on page 18.
To select the IMAGEM menu:
Display / Highlight / Select
MENU
SELECT
To restore the factory settings
Press RESET on the remote control while the
IMAGEM menu is selected.
Tip
z
Press PRESET PICTURE to modify the MODO setting
directly.
BRILHO
Picture Adjustment
COR
Picture Adjustment
MATIZ
Picture Adjustment
NITIDEZ
Picture Adjustment
Adjust slider > to brighten the picture.
Adjust slider . to darken the picture.
Adjust slider > to increase color intensity.
Adjust slider . to decrease color intensity.
Adjust slider > to increase the green tones.
Adjust slider . to decrease the green tones.
Adjust slider > to sharpen the picture.
Adjust slider . to soften the picture.
19
Page 24
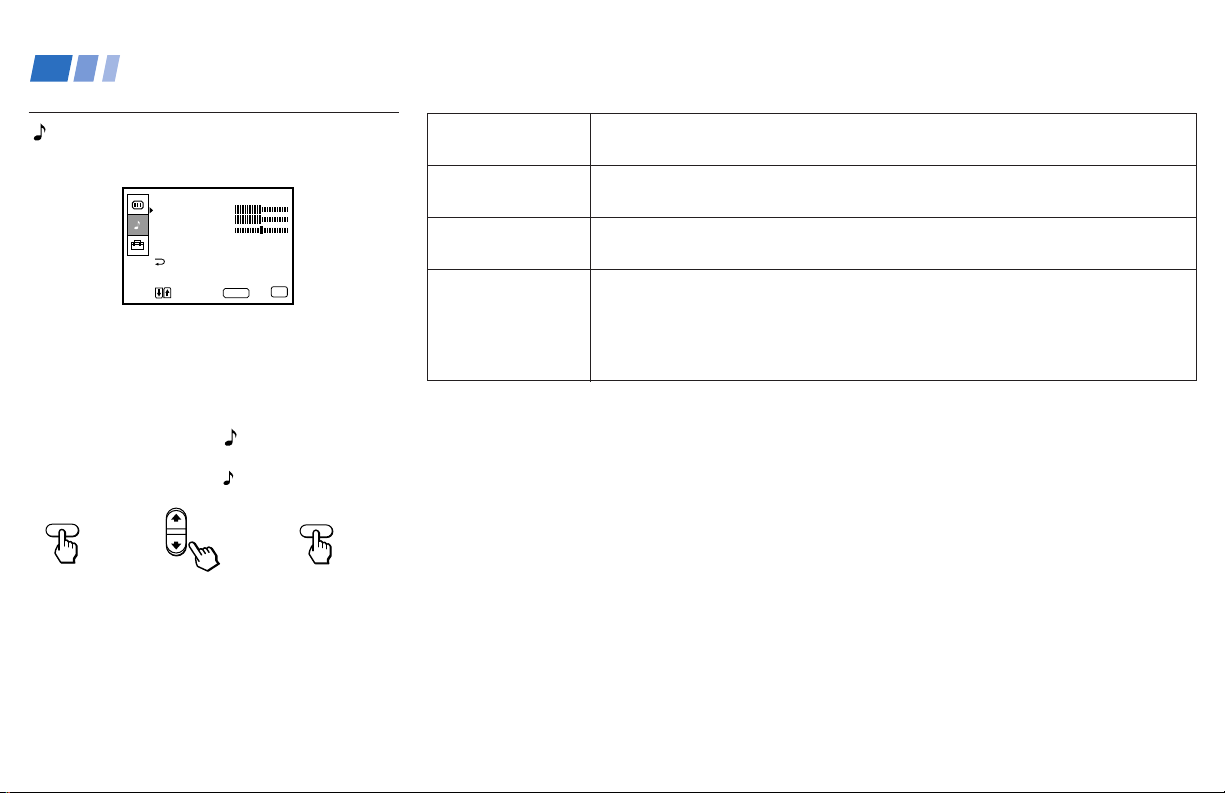
Adjusting your SET UP (menus) (continued)
Using the SOM Menu for
KV-21S85
SOM
AGUDOS
GRAVES
BALANÇO
AUTO VOLUME: NÃO
OPÇÕES
MENU
Mover
Selecionar
SELECT
For detailed information on using the remote
control to modify menu settings, refer to
“Learning Menu Selection” on page 18.
To select the SOM menu:
Display / Highlight / Select
MENU
To restore the factory settings
Press RESET on the remote control while the
SOM menu is selected.
Sair
MENU
Sliders
}
SELECT
AGUDOS
Sound Adjustment
GRAVES
Sound Adjustment
BALANCO
Sound Adjustment
AUTO VOLUME
Adjust the sound
level.
Adjust slider > to increase high pitched sounds.
Adjust slider . to decrease high pitched sounds.
Adjust slider > to increase low pitched sounds.
Adjust slider . to decrease low pitched sounds.
Adjust slider > to emphasize right speaker volume.
Adjust slider . to emphasize left speaker volume.
SIM:
Sound output coming from TV speakers have the volume level equalized for
all channel audio inputs when broadcasts have different sound transmission
levels.
NÃO: Sound output coming from the TV speakers varies according to the
received channel.
20
Page 25
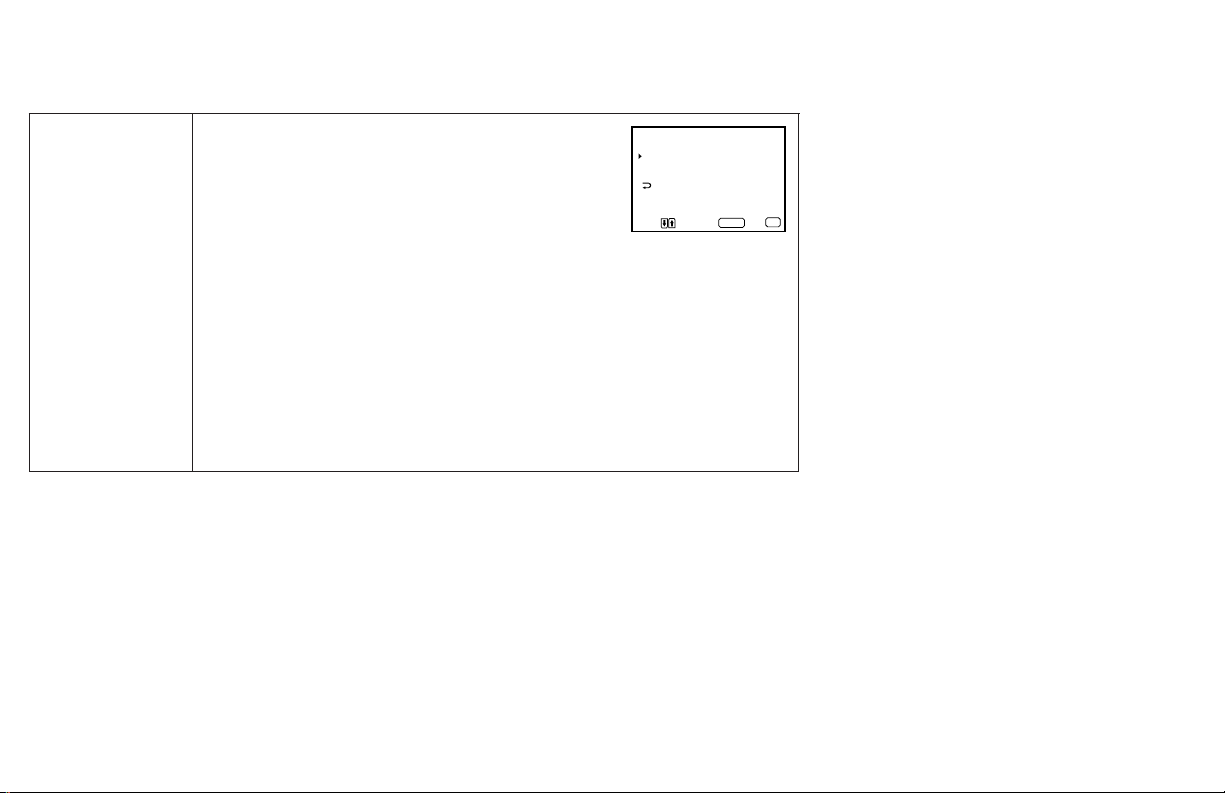
OPÇÕES
Enjoy sound effects.
MTS
ESTÉREO: Select for stereo reception when viewing a
program broadcast in stereo.
SAP: Select to listen to a bilingual broadcast.
MONO: Select for mono reception (Use to reduce
noise during stereo broadcast)
OPÇÕES
MTS: ESTÉREO
SURROUND: SIM
AUTO SAP OFF : SIM
MENU
Mover
Selecionar
Quick MTS access: Press STEREO/SAP on your
remote control to cycle through the MTS options as
follows: (ESTÉREO b SAP b MONO b ESTÉREO)
SURROUND
SIM: Activate a surround-like effect.
NÃO: Deactivate a surround-like effect.
AUTO SAP OFF
SIM: Select to return to main sound automatically when non-SAP program is
received. In this case, the SAP indication appears in yellow.
NÃO: Deactivate this function.
SELECT
Sair
MENU
21
Page 26
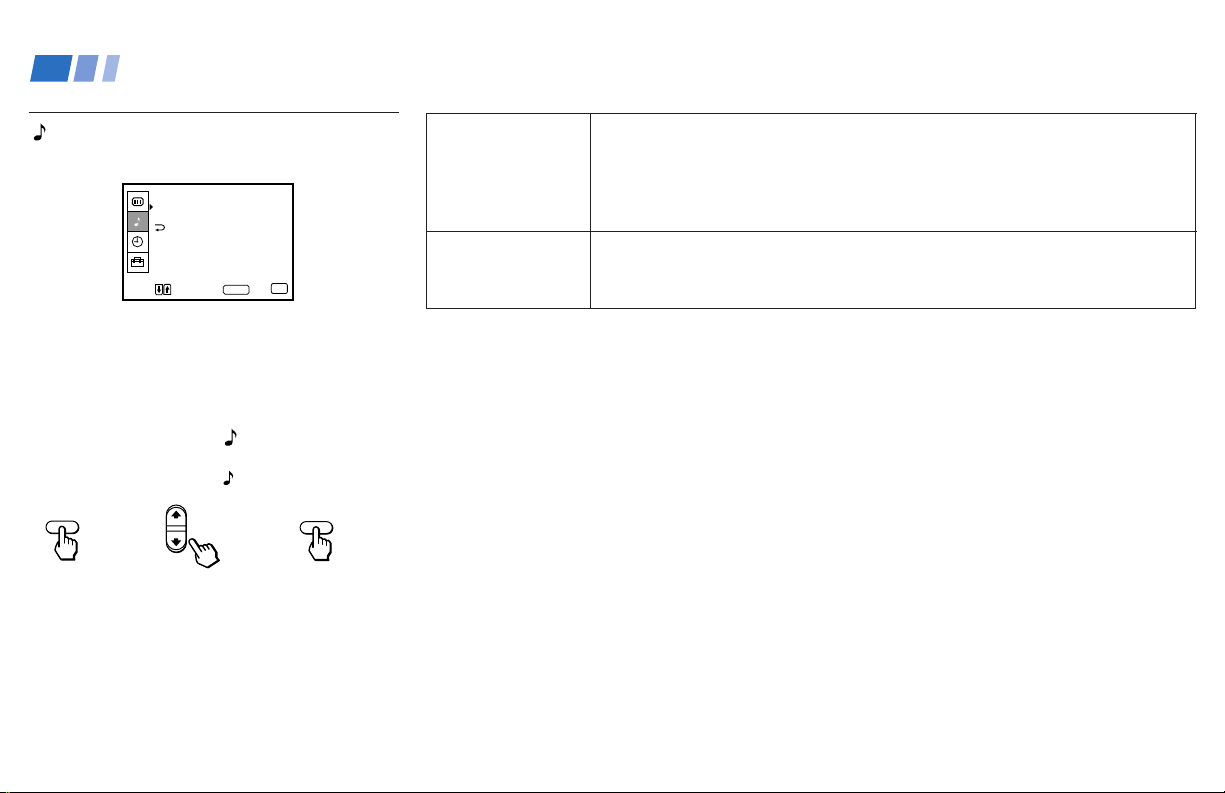
Adjusting your SET UP (menus) (continued)
Using the SOM Menu for
KV-14B80/21B80
SOM
MTS: SAP OFF
AUTO SAP OFF : SIM
MENU
Mover
Selecionar
For detailed information on using the remote
control to modify menu settings, refer to
“Learning Menu Selection” on page 18.
To select the SOM menu:
Display / Highlight / Select
MENU
To restore the factory settings
Press RESET on the remote control while the
SOM menu is selected.
SELECT
Sair
MENU
SELECT
MTS
Enjoy sound effects.
AUTO SAP OFF
SAP: Select to listen to a bilingual broadcast.
SAP OFF: Select to listen to a main sound.
Quick MTS access: Press STEREO/SAP on your remote control to select MTS
options as follows:
(
SAP ˜ SAP OFF
)
SIM: Select to return to main sound automatically when non-SAP program is
received. In this case, the SAP indication appears in yellow.
NÃO: Deactivate this function.
22
Page 27
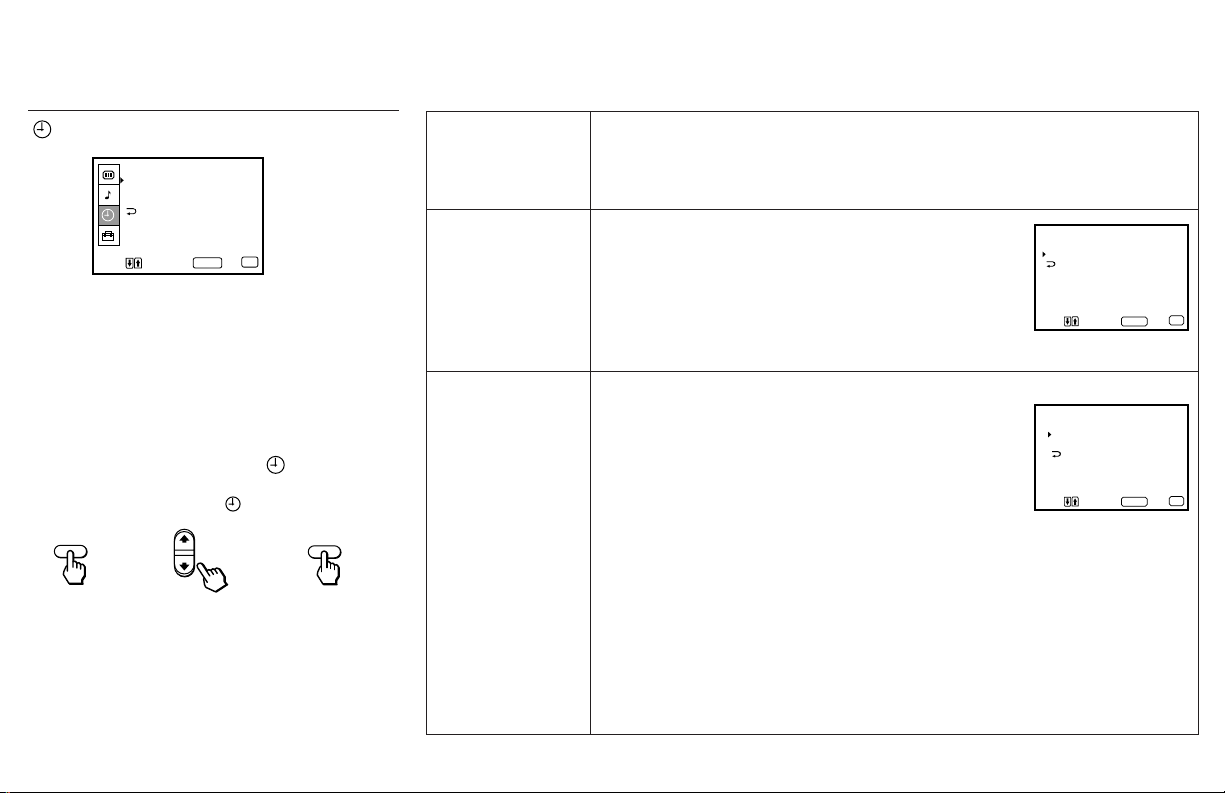
Using the RELOGIO Menu
RELOGIO
HORARIO DE VERAO: SIM
AJUSTE DO RELOGIO
AJUSTE DO TIMER
MENU
Mover
Selecionar SELECT
After setting the clock you can use the timer to
turn the TV on and off.
For detailed information on using the remote
control to modify menu settings, refer to
“Learning Menu Selection” on page 18.
To select the RELOGIO menu:
Display / Highlight / Select
MENU
Tip
z
Set daylight saving time before setting the clock. Any
loss of power will cause these settings to be erased.
Sair
MENU
SELECT
HORARIO DE
VERAO
Automatically adjusts
the time.
AJUSTE DO
RELOGIO
Necessary for the
AJUSTE DO TIMER.
AJUSTE DO
TIMER
Wake up or
scheduled viewing.
SIM: Select to compensate for Daylight Saving Time.
The current time automatically moves ahead one hour.
NÃO: Select at the end of Daylight Saving Time.
The current time moves back one hour.
1 Press SELECT, then press > or . until the current day
(DOM-SAB) is displayed, and press SELECT.
2 Press > or . until the current hour (01-12) and AM/PM
AJUSTE DO RELOGIO
_ _
_ _
_ _ _
:
AM
MENU
is displayed, and press SELECT.
3 Press > or . until the current minute (00-59) is
Mover
Selecionar
SELECT
Sair
displayed, and press SELECT.
The Clock has now started. Press MENU to exit.
1 Press SELECT, then press > or . until the desired
day (DOMINGO-SABADO), the desired days (TODO
DOMINGO-TODO SABADO) or range of days (TODO
DOM-SAB or TODO SEG-SEX) is displayed, and
press SELECT.
2 Press > or . until the time (hours and minutes) that
AJUSTE DO TIMER
_ _ _ _ _
_ _
_ _
:
AM _ h CH _ _ _
MENU
Mover
DOM 12 : 00 AM
Selecionar
SELECT
Sair
you want the TV to remain on is displayed, and then
press SELECT.
3 Press > or . to set the time duration (maximum of 6 hours) and press SELECT.
TO CANCEL THE AJUSTE DO TIMER FUNCTION, PRESS RESET.
4 Press > or .to select the desired channel and press SELECT.
The timer is now set. The TIMER indicator on your TV will be lit.
Press MENU to exit.
Notes:
• Turning off the TV by pressing POWER on the TV will erase all RELOGIO settings.
• Performing AUTO PROGRAMAÇÃO will erase all TIMER settings.
MENU
MENU
23
Page 28
Adjusting your SET UP (menus) (continued)
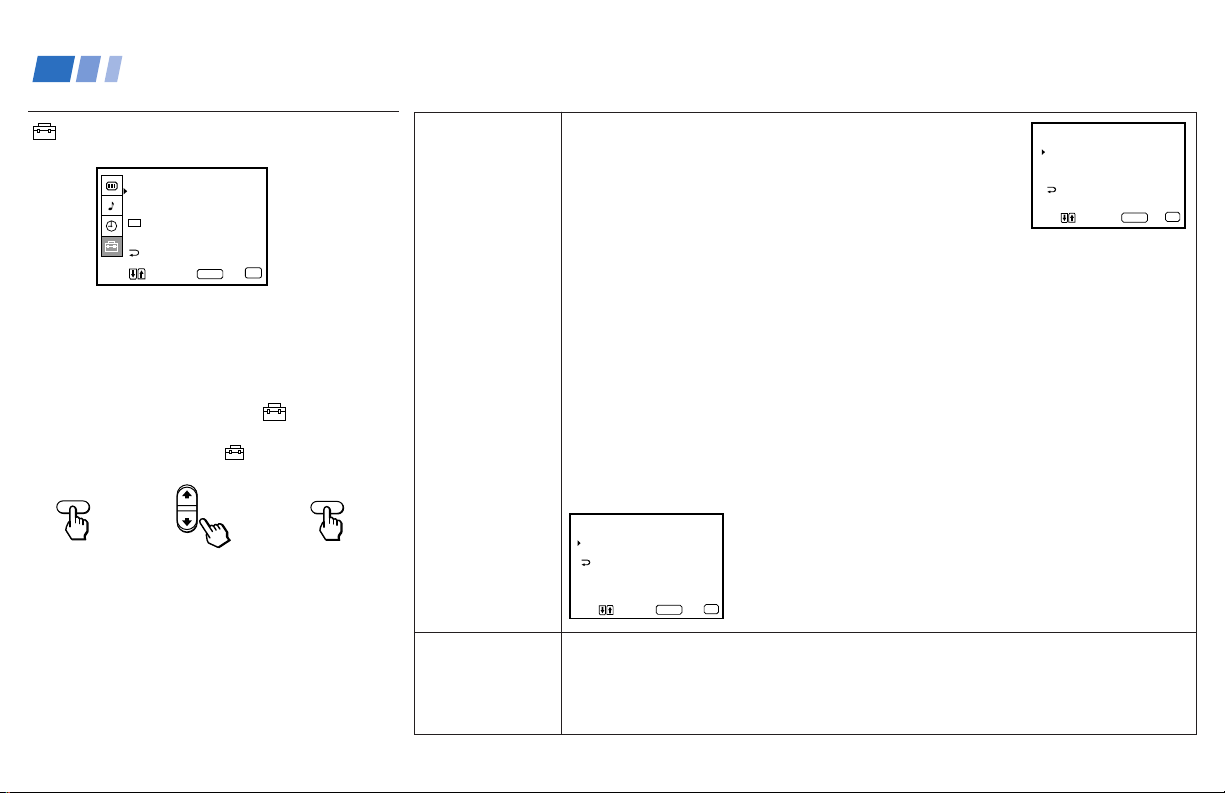
Using the AJUSTES Menu
AJUSTES
SELEÇÃO DE CANAL
CANAL FAVORITO
BLOQUEIO DE CANAL
CC
/TEXT: CC1
PORTUGUÊS
SISTEMA DE COR
MENU
Mover
Selecionar
For detailed information on using the remote
control to modify menu settings, refer to
“Learning Menu Selection” on page 18.
To select the AJUSTES menu:
Display / Highlight / Select
MENU
If any menu items are “grayed out”, press the
TV/VIDEO button on your remote control so
that a channel number appears.
SELECT
Sair
MENU
SELECT
SELEÇÃO DE
CANAL
Basic set up options
for viewing
CANAL
FAVORITO
User's favorite
channels
With the SELEÇÃO DE CANAL window open:
1 Press > or . to select the feature you want to change.
2 Press SELECT to access the feature.
TV A CABO:
Select SIM if your TV is connected to a cable system.
Select NÃO if your TV is connected to an antenna.
SELEÇÃO DE CANAL
TV A CABO: NÃO
FIXAR CANAL: NÃO
AUTO PROGRAMAÇÃO
CANC/INCLUI CANAL
MENU
Mover
Selecionar SELECT
FIXAR CANAL:
Press > or . to set the video input to one of the following options,
2-6: When the cable box is connected to the VHF/UHF input, and you want the video
input fixed on the selected channel.
VIDEO 1: When the video equipment (e.g. AV receiver) is connected, and you want the
video input fixed on VIDEO 1 only. You can alternate between video sources.
NÃO:When you want setting FIXAR CANAL to off.
Note:
• Setting FIXAR CANAL will erase all TIMER settings.
AUTO PROGRAMAÇÃO:
Signals the TV to automatically program all receivable channels. (For details on how to
set up this feature, see “Presetting the Channels Automatically” on page 14)
CANC/INCLUI CANAL: With the CANC/INCLUI CANAL window open:
1 Place the cursor next to CANCELAR or INCLUIR.
CANC/INCLUI CANAL
CANCELAR
INCLUIR
MENU
Use [0-9] ou [CH + /
selecionar o canal
Mover
Selecionar
-
] para
SELECT
2 Select the desired channel using CH+/–, or by selecting with
11
the 0-9 buttons and pressing ENTER.
3 Press SELECT.
MENU
Sair
The CANAL FAVORITO feature allows your TV to memorize your favorite
channels easily.
(For details on how to set up this feature, see “Setting and Selecting CANAL
FAVORITO” on page 26)
Sair
MENU
24
Page 29
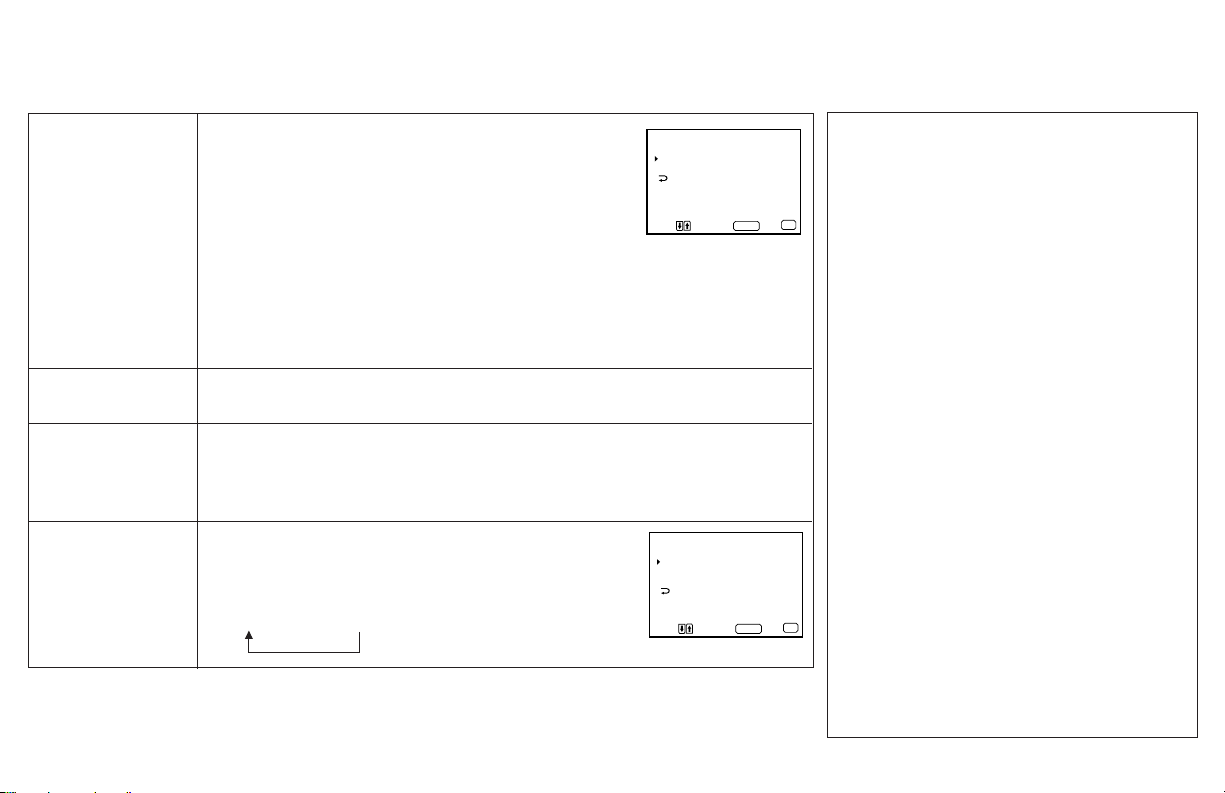
BLOQUEIO DE
CANAL
Prevent access to
certain channels.
[CC]/TEXT
Select the caption type.
PORTUGUÊS or
ESPAÑOL
User's preferred
language
SISTEMA DE COR
Select the TV color
system.
You will be able to block two channels.
1 Press > or . to select the desired number (1 or 2), and
press SELECT.
2 Press > or . to select the desired channel, and press
SELECT.
To erase your BLOQUEIO DE CANAL settings, press
BLOQUEIO DE CANAL
1 . CH_ _ _
2 . CH_ _ _
MENU
Selecione uma posiçao
Mover
Selecionar
SELECT
Sair
RESET while in the BLOQUEIO DE CANAL window.
Notes:
• When the channel which you have set to BLOQUEIO DE CANAL is selected, the
TV screen is backed out and “BLOQUEADO” appears on the screen.
• Performing AUTO PROGRAMAÇÃO will erase your BLOQUEIO DE CANAL
settings.
See the right column.
Select from available languages to display all menus in your language of
choice.
The SISTEMA DE COR feature allows you to set the TV
system for each input mode. Normally, set them to “AUTO.”
1
Press > or . to select the input mode and press SELECT.
2 Press > or . to select the TV system
(AUTO–PALM–NTSC) and press SELECT.
SISTEMA DE COR
TV : AUTO
VIDEO 1 : AUTO
VIDEO 2 : AUTO
MENU
Mover
Selecionar
SELECT
Sair
MENU
MENU
CAPTION VISION ([CC]/TEXT)
(Closed Caption)
Some programs are broadcast with Caption
Vision. To display Caption Vision, select either
CC1, CC2, CC3, CC4, TEXT1, TEXT2,
TEXT3, or TEXT4 from the menu.
CC1, CC2, CC3, or CC4 shows you the onscreen version of the dialogue or sound effects
of a program. (The mode should be set to CC1
for most programs.) TEXT1, TEXT2, TEXT3, or
TEXT4 shows you the on-screen information
presented using either half or the whole
screen. It is not usually related to the program.
1 Press > or . select [CC]/TEXT and press
SELECT.
2 Press > or . select the caption type and
press SELECT.
3 Press MENU to return to the original screen.
To display Caption Vision
Press DISPLAY repeatedly.
Notes:
• Poor reception of TV programs can cause
errors in Caption Vision.
Captions may appear as a white box or with
other errors instead of the intended text.
• Caption Vision and the status display cannot
be used at the same time.
25
Page 30
Adjusting your SET UP (menus) (continued)
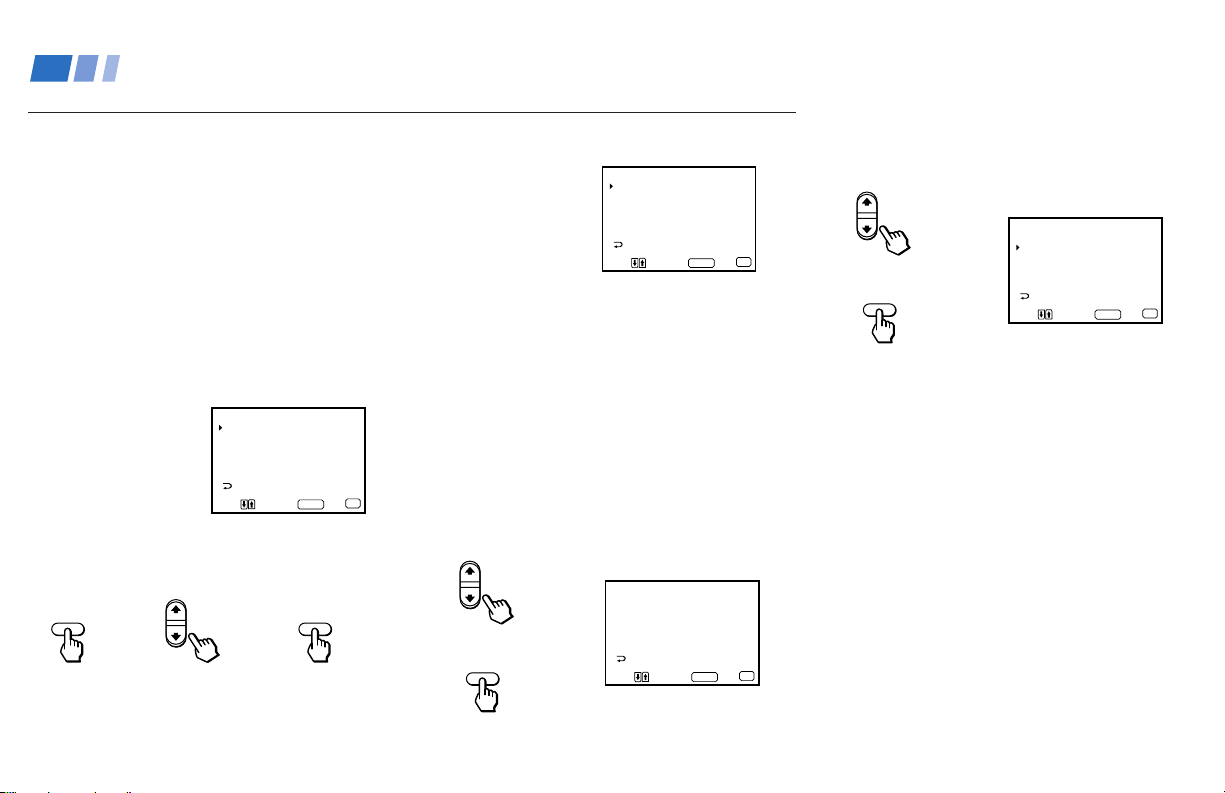
Setting and Selecting CANAL FAVORITO
The CANAL FAVORITO feature allows your
TV to memorize your favorite channels easily.
If you set to AUTO, the last five channels you
selected with the 0 – 9 buttons are
automatically set as your favorite channels. If
you want to input your own selection of
channels, set to MANUAL.
Setting your favorite channels
1 Select CANAL FAVORITO from AJUSTES
menu.
CANAL FAVORITO
MODO : AUTO
1 . _ _ _
2 . _ _ _
3 . _ _ _
4 . _ _ _
5 . _ _ _
Mover
MENU
Selecionar
SELECT
Sair
MENU
2 Press SELECT and press > or . to select
AUTO or MANUAL, and press SELECT.
SELECT
SELECT
If you select AUTO, skip steps 3 and 4.
The last five channels you selected with the 0
– 9 buttons are automatically set as your
favorite channels.
If you select MANUAL, the favorite channel
numbers become white, indicating that
favorite channels can be entered.
3 Press > or . to select a favorite channel
number, and press SELECT.
SELECT
CANAL FAVORITO
MODO : MANUAL
1 . _ _ _
2 . _ _ _
3 . _ _ _
4 . _ _ _
5 . _ _ _
MENU
Selecione uma posiçao
Mover
Selecionar
SELECT
CANAL FAVORITO
MODO : MANUAL
1 . _ _ _
2 . _ _ _
3 . _ _ _
4 . _ _ _
5 . _ _ _
MENU
Selecione o canal
Mover
Selecionar
SELECT
Sair
4 Press > or . to select the channel that you
want to set as your favorite channel, and
press SELECT.
CANAL FAVORITO
MODO : MANUAL
1 . 2
MENU
SELECT
2 . _ _ _
3 . _ _ _
4 . _ _ _
5 . _ _ _
MENU
Selecione uma posiçao
Mover
Selecionar
SELECT
MENU
Sair
5 Press MENU to return to the original
screen.
Notes:
• If the CANAL FAVORITO menu appears
in gray, the TV is set to a video input, and
you cannot select CANAL FAVORITO.
Press TV/VIDEO so that a channel
number appears.
• If more than 90 seconds elapse after you
press a button, the menu disappears
automatically.
MENU
Sair
26
Page 31
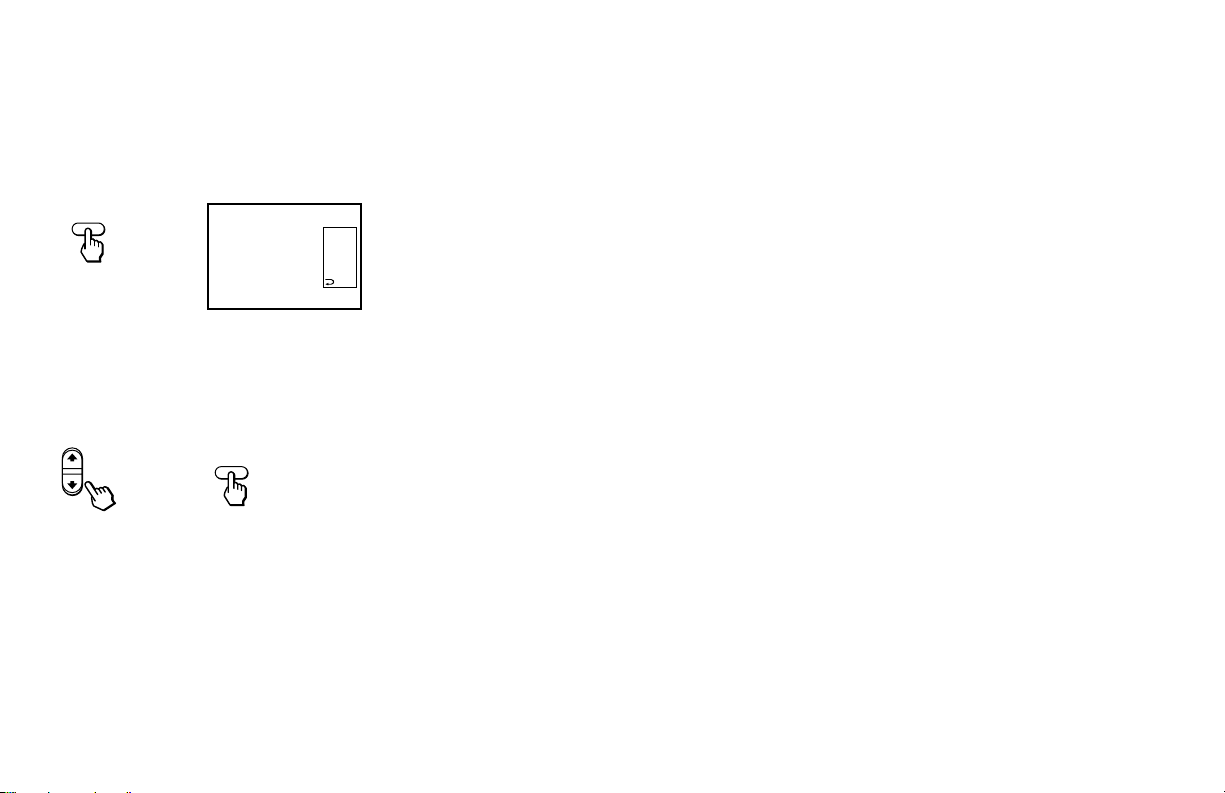
Selecting your favorite channel
1 Press SELECT.
The CANAL FAVORITO menu appears.
SELECT
2
4
32
42
5
Sair
2 Press > or . to select the favorite channel
you want to watch, and press SELECT.
The selected channel appears on the
screen.
SELECT
To cancel the CANAL FAVORITO
menu
Press > or . to select “Sair” and press
SELECT.
27
Page 32

Troubleshooting
Troubleshooting
No picture (screen not lit), no sound
• Make sure the power cord is plugged in.
• Operate with the buttons on the TV and the
remote control.
• Check to see if the TV/VIDEO setting is
correct: when watching TV, set to TV, and
when watching video tapes, set to VIDEO 1
or 2.
• Try another channel.
trouble.
Remote control does not operate
• Batteries could be weak. Replace the
batteries.
• Make sure the TV’s power cord is connected
securely to the wall outlet.
• Locate the TV at least 3-4 feet away from
fluorescent lights.
• Check the polarity of the batteries.
Poor or no picture (screen lit), good sound
• Adjust CONTRASTE in the IMAGEM menu.
(see “CONTRASTE” on page 19)
• Adjust BRILHO in the IMAGEM menu. (see
“BRILHO” on page 19)
• Check antenna/cable connections.
It could be station
Good picture, no sound
• Press MUTING so that “MUTING” disappears
from the screen.
(see “MUTING” on page 16)
• Check the MTS setting in the SOM menu.
(see “SOM” on page 21/22)
• Set the appropriate TV system in the
AJUSTES menu. Normally, set it to “AUTO.”
(see “SISTEMA DE COR” on page 25)
Cannot receive upper channels (UHF) when
using an antenna
• Make sure TV A CABO is NÃO in the
AJUSTES menu. (see “SELEÇÃO DE
CANAL” on page 24)
• Use AUTO PROGRAMAÇÃO to add
receivable channels that are not preset in the
TV memory. (see “Presetting the Channels
Automatically” on page 14)
No color
• Adjust the COR in the IMAGEM menu. (see
“COR” on page 19)
• Black and white programs cannot be seen in
color.
• Set the appropriate TV system in the
AJUSTES menu. Normally, set it to “AUTO.”
(see “SISTEMA DE COR” on page 25)
Only snow and noise appear on the screen
• Check the TV A CABO setting in the
AJUSTES menu. (see “SELEÇÃO DE
CANAL” on page 24)
• Check the antenna/cable connections.
• Make sure the channel is broadcasting
programs.
• Set the appropriate TV system in the
AJUSTES menu. Normally, set it to “AUTO.”
(see “SISTEMA DE COR” on page 25)
Dotted lines or stripes
• Adjust the antenna.
• Move the TV away from noise sources such
as cars, neon signs, or hair-dryers.
TV is fixed to one channel
• Use AUTO PROGRAMAÇÃO to add
receivable channels that are not preset in the
TV memory. (see “Presetting the Channels
Automatically” on page 14)
Double images or ghosts
• Use a highly directional outdoor antenna or a
cable (when the problem is caused by
reflections from nearby mountains or tall
buildings).
Cannot operate menu
• If the item you want to choose appears in
gray, you cannot select it. Press TV/VIDEO
correctly.
28
Page 33

Cannot receive any channels when using
cable TV
• Make sure TV A CABO is set to SIM in the
AJUSTES menu. (see “SELEÇÃO DE
CANAL” on page 24)
• Use AUTO PROGRAMAÇÃO to add
receivable channels that are not preset in the
TV memory. (see “Presetting the Channels
Automatically” on page 14)
TV is fixed to one channel
• Try turning FIXAR CANAL off. (see “FIXAR
CANAL” on page 24)
• Use AUTO PROGRAMAÇÃO to add
receivable channels that are not preset in the
TV memory. (see “Presetting the Channels
Automatically” on page 14)
Cannot gain enough volume when using a
cable box
• Increase the volume at the cable box. Then
adjust the TV’s volume.
CANAL FAVORITO does not display your
choices
• Verify that MODO is set to MANUAL in the
CANAL FAVORITO menu. (see “Setting and
Selecting CANAL FAVORITO” on page 26)
TV cannot receive stereo broadcast signal
(KV-21S85 only)
• Set MTS to ESTÉREO in the SOM menu.
(see “SOM” on page 21)
TV turned off automatically
• The Auto Switch Off function was activated.
The message “TV desligará em breve” will
appear 9 minutes after your TV does not
receive any signal. After 10 minutes, your TV
will turn off automatically.
29
Page 34

Specifications
KV-
Power
requirements
Number of
inputs/outputs
Speaker
output (W)
Power
consumption (W)
Dimensions
(W/H/D)
(mm)
Mass (kg)
1)
2)
1)
Video
2)
Audio
Headphone
In use (Max.)
In standby
1 Vp-p, 75 ohms unbalanced, sync negative
500 mVrms (100% modulation), Impedance: 47
14B80
110-240 V,
50/60 Hz
2
2
—
3W
000W
1W
000 x 000 x 000
mm
00 kg
21B80
110-240 V,
50/60 Hz
2
2
—
3W
000W
1W
000 x 000 x 000
mm
00 kg
000 x 000 x 000
kilohms
21S85
110-240 V,
50/60 Hz
2
2
1
3W x 2
000W
1W
mm
00 kg
Television system
PAL M, NTSC
Channel coverage
VHF: 2–13/UHF: 14 –69/CATV: 1 – 125
Picture tube
Hi Black Trinitron® tube
Antenna
75 ohm external terminal for VHF/UHF
Visible Screen size
14-inch picture measured diagonally (KV-14B80)
21-inch picture measured diagonally (KV-21B80,
21S85)
Actual Screen size
13-inch picture measured diagonally (KV-14B80)
20-inch picture measured diagonally (KV-21B80,
21S85)
Supplied accessories
Remote control RM-Y155B (1)
Batteries (2) size AA (R6)
Antenna connector (1)
Telescopic antenna (1) (KV-14B80 only)
Optional accessories
Connecting cables
VMC-710M/720M, VMC-810S/820S
VHF/UHF mixer 000
Design and specifications are subject to
change without notice.
30
Page 35

Index
A
AGUDOS (KV-21S85 only)....................................... 20
AJUSTE DO RELOGIO ............................................. 23
AJUSTE DO TIMER................................................... 23
AJUSTES menu operations ........................ 24-25
Antenna cable............................................................... 5
Antenna connector ...................................................5-7
Antenna connection ................................................. 5-7
Audio/Video Cable..................................................... 5
AUTO PROGRAMAÇÃO .................................. 14, 24
AUTO SAP OFF ................................................... 21, 22
AUTO SET UP............................................................ 15
AUTO VOLUME (KV-21S85 only).......................... 20
B
BALANCO (KV-21S85 only) .................................... 20
Battery installation .................................................... 13
BLOQUEIO DE CANAL .......................................... 25
BRILHO....................................................................... 19
C
CANAL FAVORITO ...................................... 24, 26-27
Setting ..................................................................... 26
Selecting ................................................................. 27
CANC/INCLUI CANAL ......................................... 24
Caption Vision ([CC]/TEXT).................................... 25
CH +/– button ........................................................... 16
Channel Surf............................................................... 16
CHANNEL +/– button............................................. 15
Coaxial cable............................................................. 5, 6
Connecting TV to
antenna .................................................................. 5-7
cable box and cable................................................. 7
camcorder .............................................................. 12
DBS receiver .......................................................... 10
DBS receiver and VCR ......................................... 10
DVD Player............................................................ 11
Headphones........................................................... 11
Telescopic antenna ................................................. 7
VCR....................................................................... 8, 9
CONTRASTE ............................................................. 19
COR ............................................................................. 19
CURSOR key .............................................................. 13
D
DEMO mode .............................................................. 15
DISPLAY button ........................................................ 17
E
EASY SETUP GUIDE ................................................ 15
ENTER button ............................................................ 16
F
Factory settings .............................................. 19, 20, 22
FIXAR CANAL .......................................................... 24
G
GRAVES (KV-21S85 only) ........................................ 20
H
HORARIO DE VERAO ............................................. 23
Hook Ups ...................................................................... 5
I
IMAGEM menu operations ............................. 19
J, K
JUMP button............................................................... 16
L
Language selection .................................................... 25
M
MATIZ......................................................................... 19
MENU button............................................................. 14
Menu selection ........................................................... 18
AJUSTES menu ..................................................... 24
IMAGEM menu .................................................... 19
Learning menu selection ..................................... 18
RELOGIO menu.................................................... 23
SOM menu ....................................................... 20, 22
MODO
DINÂMICO ........................................................... 19
ESPORTE ............................................................... 19
PESSOAL ............................................................... 19
MTS
ESTÉREO (KV-21S85 only).................................. 21
MONO (KV-21S85 only) ...................................... 21
SAP ................................................................... 21, 22
SAP OFF (KV-14B80/21B80 only) ...................... 22
MUTING button ........................................................ 16
N
NITIDEZ ..................................................................... 19
Number buttons......................................................... 16
O
On Line Help .............................................................. 13
Optional accessories .................................................. 30
OPÇÕES (KV-21S85 only) ........................................ 21
P, Q
POWER button........................................................... 16
31
Page 36

Index (continued)
PRESET PICTURE ............................................... 17, 19
R
RELOGIO menu operations ............................. 23
Remote control ........................................................... 13
Function buttons ............................................. 16, 17
Graphic Illustration .......................... (inside cover)
RESET button ........................................................ 19-23
S
Safety .......................................................................... 2-4
SELECT button........................................................... 13
SELEÇÃO DE CANAL ............................................. 24
SETUP button............................................................. 15
SISTEMA DE COR .................................................... 25
SLEEP button ............................................................. 17
Sliders .......................................................................... 13
SOM menu operations .................................. 20, 22
Specifications.............................................................. 30
STEREO/SAP button ................................................ 17
Supplied accessories.................................................. 30
SURROUND (KV-21S85 only) ................................. 21
T, U
Telescopic antenna ...................................................... 7
Troubleshooting.................................................... 28-29
TV A CABO ................................................................ 24
TV/VIDEO button..................................................... 17
Twin lead cable ......................................................... 5-7
V, W, X, Y, Z
VHF/UHF mixer ..................................................... 5, 6
VOL +/– buttons ....................................................... 16
VOLUME +/– button................................................ 15
32
Page 37

33
Page 38
Termo de Garantia
GARANTIA POR 12 MESES
N.º de série.....................
3009176
I-CONTEÚDO E PRAZO DE GARANTIA
1. A SONY COMÉRCIO E INDÚSTRIA LTDA.
garante o produto acima identificado através do
seu número de série, produto este que foi
recebido devidamente lacrado, pelo prazo de
12 (doze) meses, contados a partir da aquisição
pelo primeiro consumidor, contra defeitos de
projeto, fabricação, montagem, ou
solidariamente em decorrência de vícios de
qualidade do material, que o torne impróprio
ou inadequado ao consumo a que se destina.
2. A garantia se faz mediante a exibição deste
termo, bem como da Nota Fiscal
correspondente.
II-EXCLUDENTES DA GARANTIA
1. O presente Termo exclui despesas de
transporte, frete, seguro, constituídos tais itens,
ônus e responsabilidade do consumidor, além
de não cobrir:
a) danos à parte externa do produto (gabinete,
painel, acabamentos, botões etc.), bem como
peças e acessórios sujeitos a quebra causada
por maus tratos;
b) manuseio inadequado, indevido aos fins a
que se destina, em desacordo com as
recomendações do manual de instruções.
III-INVALIDADE DA GARANTIA
1. A Garantia fica automaticamente invalidada, se:
a) não for apresentada a Nota Fiscal de venda
no Brasil, ou documento fiscal equivalente,
conjuntamente com o Termo preenchido;
b) o produto for ligado em rede elétrica fora
dos padrões especificados ou sujeita a
flutuação excessiva de voltagem;
c) o produto tiver seu lacre violado, for aberto
para conserto, manuseado ou tiver o circuito
original alterado por técnico não autorizado
ou não credenciado;
d) o número de série do produto for removido
ou alterado;
e) o produto for utilizado em ambientes
sujeitos a gases corrosivos, umidade
excessiva ou em locais com altas/baixas
temperaturas, poeira, acidez etc;
f) o produto sofrer qualquer dano por acidente
(quebra), ou agente da natureza (raio,
enchente etc.);
g) o produto for manuseado ou usado em
desacordo com o manual de instruções que o
acompanha.
IV-FORMA E LOCAL DE UTILIZAÇÃO
DA GARANTIA
1. Para usufruir desta garantia adicional à legal, o
consumidor deverá utilizar-se de um dos
Postos de Serviço Autorizado Sony, dentre
aqueles que constam na relação que acompanha
o produto.
2. Esta garantia é válida apenas em território
brasileiro.
3. O transporte do produto ao Posto de Serviço
Autorizado é de responsabilidade do
consumidor.
ATENÇÃO
Este termo de garantia só tem validade quando
acompanhado da nota fiscal correspondente.
Conserve-os em seu poder.
Unidade comercial:
SONY DA AMAZÔNIA LTDA
Rua Inocêncio Tobias, 125
Parque Industrial Thomas Edson
Barra Funda-São Paulo-CEP
01144-000
Fone: (011)824-6600
Printed in Brazil
 Loading...