

Sony Trinitron KD-32NX200AUS Operating Instructions Manual
4-102-518-12(1)
410251812
Trinitron
Integrated Digital
Television
Operating Instructions
Before operating the TV, please read the ‘Safety Informatio n’ sec ti on of th is
manual. Retain this manual for future reference.
®
KD-32NX200AUS
© 2004 Sony Corporation
Thank you for choosing this
FD Trinitron Integrated
Digital Television
Before operating the TV, please read this instruction
manual thoroughly and retain it for future reference.
All instructions in this manual refer to buttons on the
supplied remote control un less stated otherwise.
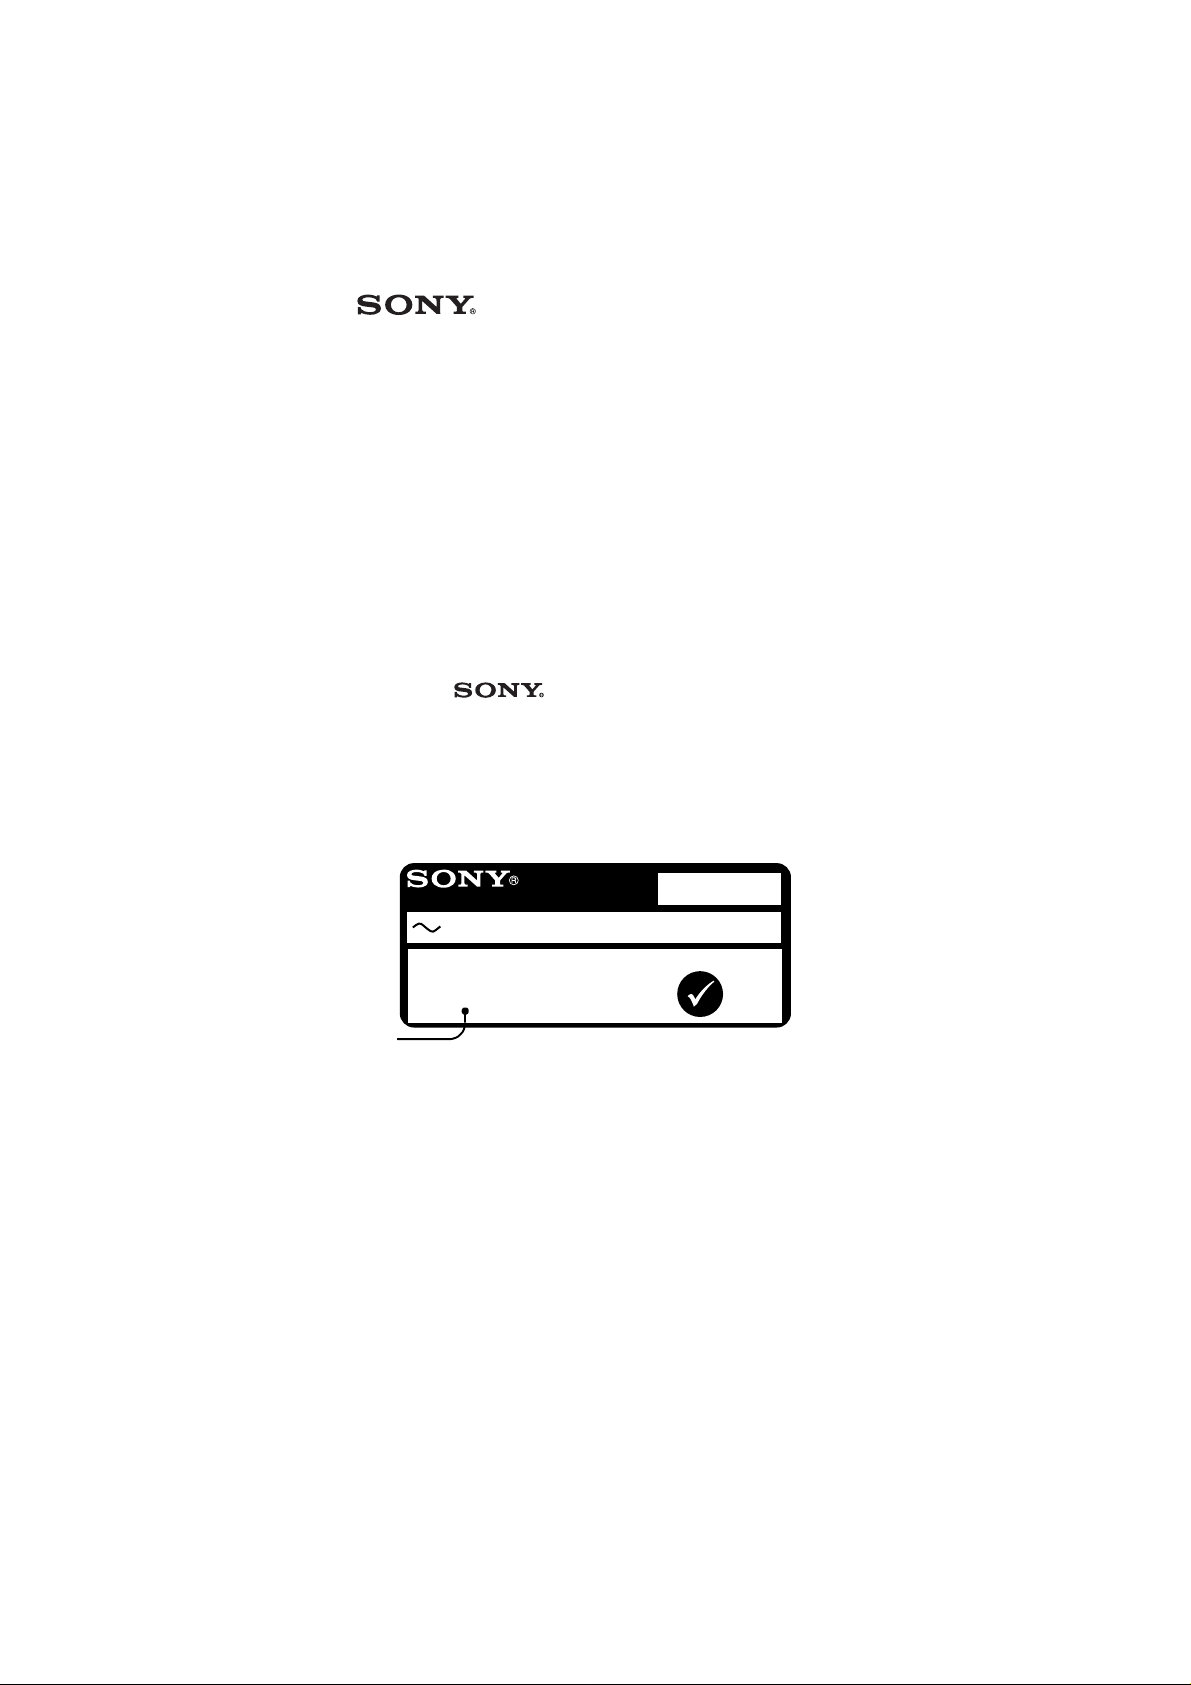
The model and serial numbers are located on the back
of the TV. Record the serial number in the space
provided below. Refer to these numbers whenever
you call your dealer regarding this product.
Model No. KD-32NX200AUS
Serial No. ______________
TRINITRON COLOUR TV
MODEL NO.
220-240V 50/60Hz 154W
SER. No.
6000001
Serial No.
Please note: The information in this manual was correct at the time of
going to print. However, s ome minor chan ges may hav e been made late
in the product’s development. All illustrations in this manual have been
created during the product’s development and may differ slightly to the
finished p roduct.
KD-
MANUFACTURED IN UK
PRODUCT BY SONY CORP
TOKYO / JAPAN
32NX200AUS
N50

Table of Contents
Table of Contents
Safety Information
Safety information. . . . . . . . . . . . . . . . . . . . . . . . . . . . . . . . . . . . . . . . . 2
Getting Started
Checking the supplied accessories . . . . . . . . . . . . . . . . . . . . . . . . . . . 3
Inserting batteries into the remote control . . . . . . . . . . . . . . . . . . . . . . 3
Connecting an aerial and VCR. . . . . . . . . . . . . . . . . . . . . . . . . . . . . . . 4
Switching on the TV . . . . . . . . . . . . . . . . . . . . . . . . . . . . . . . . . . . . . . . 5
Automatically tuning the TV . . . . . . . . . . . . . . . . . . . . . . . . . . . . . . . . . 5
Switching between digital and analogue mode . . . . . . . . . . . . . . . . . . 5
Adjusting the Brightness, Colour and Sharpness settings . . . . . . . . . . 6
Adjusting the sound settings. . . . . . . . . . . . . . . . . . . . . . . . . . . . . . . . . 6
Basic Operation
Overview of the remote control . . . . . . . . . . . . . . . . . . . . . . . . . . . . . . 7
Overview of the TV buttons . . . . . . . . . . . . . . . . . . . . . . . . . . . . . . . . . 8
Everyday use . . . . . . . . . . . . . . . . . . . . . . . . . . . . . . . . . . . . . . . . . . . . 9
Screen Mode . . . . . . . . . . . . . . . . . . . . . . . . . . . . . . . . . . . . . . . . . . . . 10
Digital Text . . . . . . . . . . . . . . . . . . . . . . . . . . . . . . . . . . . . . . . . . . . . . . 12
Analogue Text . . . . . . . . . . . . . . . . . . . . . . . . . . . . . . . . . . . . . . . . . . . 13
Advanced Operation
The Channel Index menu. . . . . . . . . . . . . . . . . . . . . . . . . . . . . . . . . . . 14
The Digital Electronic Programme Guide (EPG) . . . . . . . . . . . . . . . . . 15
The Info menu . . . . . . . . . . . . . . . . . . . . . . . . . . . . . . . . . . . . . . . . . . . 17
The Main menu. . . . . . . . . . . . . . . . . . . . . . . . . . . . . . . . . . . . . . . . . . . 18
Detail Set-up menu . . . . . . . . . . . . . . . . . . . . . . . . . . . . . . . . . . . . 19
Using the TV menu system . . . . . . . . . . . . . . . . . . . . . . . . . . . . . . . . . 20
Picture Adjustment menu . . . . . . . . . . . . . . . . . . . . . . . . . . . . . . . 20
Sound Adjustment menu. . . . . . . . . . . . . . . . . . . . . . . . . . . . . . . . 21
Features menu . . . . . . . . . . . . . . . . . . . . . . . . . . . . . . . . . . . . . . .22
Set Up menu. . . . . . . . . . . . . . . . . . . . . . . . . . . . . . . . . . . . . . . . . 23
Manual Set Up menu . . . . . . . . . . . . . . . . . . . . . . . . . . . . . . . . . . 23
Manual Programme Preset menu. . . . . . . . . . . . . . . . . . . . . . . . . 24
Further Programme Preset menu. . . . . . . . . . . . . . . . . . . . . . . . .24
Connecting Other Equipment
Overview of the rear sockets . . . . . . . . . . . . . . . . . . . . . . . . . . . . . . . . 25
Overview of the front sockets . . . . . . . . . . . . . . . . . . . . . . . . . . . . . . . . 26
Connecting other equipment to the TV. . . . . . . . . . . . . . . . . . . . . . . . .27
Connecting HD equipment . . . . . . . . . . . . . . . . . . . . . . . . . . . . . . 27
Viewing pictures from equipment connected to the rear sockets. . . . . 27
Viewing pictures from equipment connected to the front sockets . . . . 27
Remote control of other equipment . . . . . . . . . . . . . . . . . . . . . . . . . . . 28
Programming the remote control. . . . . . . . . . . . . . . . . . . . . . . . . .28
Controlling a DVD player. . . . . . . . . . . . . . . . . . . . . . . . . . . . . . . . 29
Controlling a VCR . . . . . . . . . . . . . . . . . . . . . . . . . . . . . . . . . . . . . 29
Additional Information
Specifications . . . . . . . . . . . . . . . . . . . . . . . . . . . . . . . . . . . . . . . . . . . . 30
Troubleshooting . . . . . . . . . . . . . . . . . . . . . . . . . . . . . . . . . . . . . . . . . .31
Index . . . . . . . . . . . . . . . . . . . . . . . . . . . . . . . . . . . . . . . . . . . . . . . . . . . 32
How to lift the TV . . . . . . . . . . . . . . . . . . . . . . . . . . . . . . . . . . Back cover
Table of Contents
1
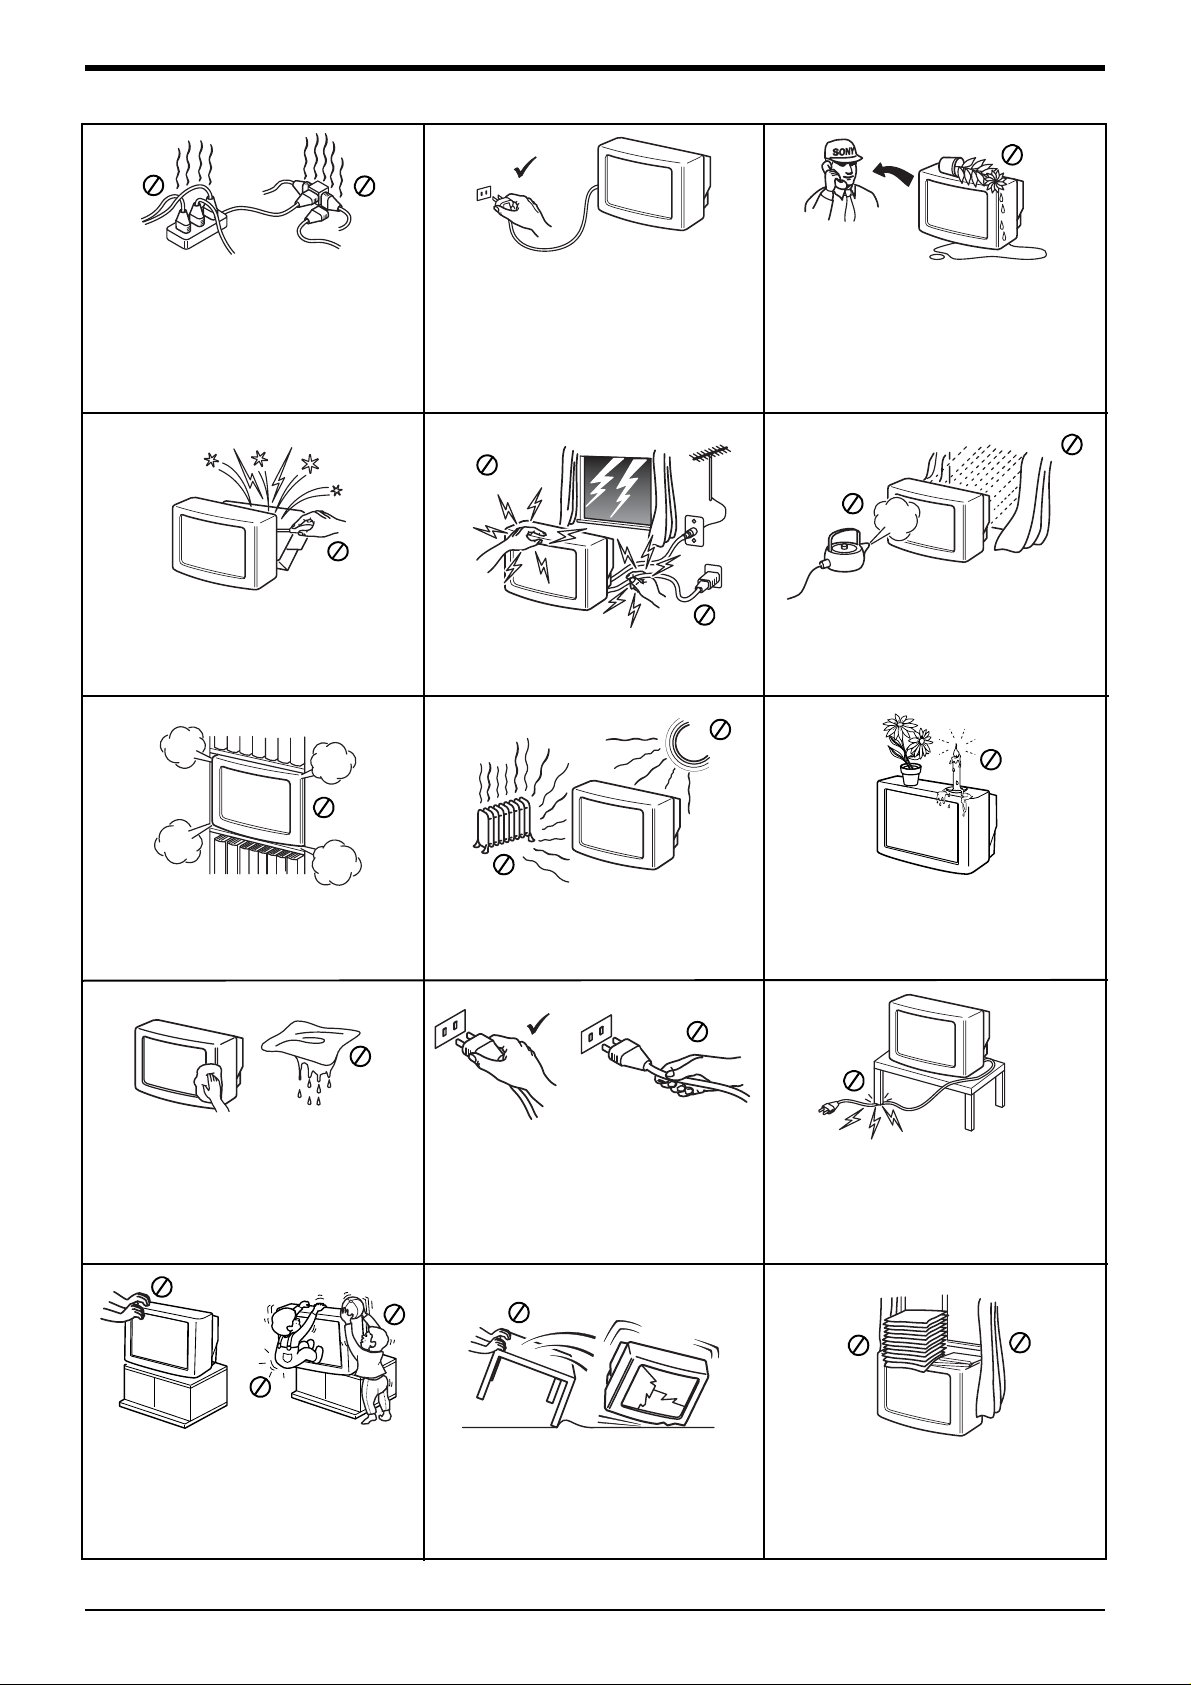
Safety Information
This set is to operate on a 220-240V AC
supply only. Take care not to connect too
many appliances to the same power socket
as this could result in fire or electric shock.
Do not open the cabinet and the rear cover
of the TV. Refer to qualified service
personnel only.
For environmental and safety reasons, it is
recommended that the TV is not left if
standby when unused. Disconnect from the
mains. However, some TVs may have
features which need the TV to be left in
standby to work correctly. The instructions
in this manual will inform you if this applies.
For your own safety, do not touch any part
of the TV, power lead or aerial lead during
lightning storms.
Never push objects of any kind into the set
as this could result in a fire or electric shock.
Never spill liquid of any kind on the set. If
any liquid or solid object does fall through,
do not operate the TV. Have it checked
immediately by qualified personnel.
To prevent fire or shock hazard, do not
expose the TV to rain or moisture.
Do not cover the ventilation openings of the
TV. For ventilation, leave a space of at least
10cm all around the set.
Clean the screen and cabinet with a soft,
lightly dampened cloth. Do not use any type
of abrasive pad, alkaline cleaner, scouring
powder or solvent, such as alcohol or
benzine, or antistatic spray. As a safety
precaution, unplug the TV before cleaning it.
Place the TV on a secure stable stand. Never
attempt to move the TV and stand together always move the TV and stand separately.
Do not place the TV on its side or face up. Do
not allow children to climb on to it.
Never place the TV in hot, humid or
excessively dusty places. Do not install the
TV where it may be exposed to mechanical
vibrations.
Pull out the power lead by the plug. Do not
pull on the power lead itself.
Unplug the power lead before moving the
TV. Avoid uneven surfaces, quick steps or
excessive force. If the set has been
dropped or damaged, have it checked
immediately by qualified service personnel.
Do not place any objects on the TV. To
prevent fire, keep inflammable objects or
naked lights (e.g. candles) away from the TV.
Take care not to place heavy objects on the
power lead as this could result in damage.
We recommend you wind any excess lead
around the holders provided on the rear of
the TV.
Do not cover the ventilation openings of the
TV with items such as curtains or
newspapers etc.
2 Safety Information

Follow steps 1 - 8 to install the TV and view programmes
1
a
DIGITAL/
Checking the supplied accessories
Check that you have the following items:
AAA LR03 AM4 1.5V
MADE IN INDONESIA FABRIQUÉ EN INDONÉSIE
IE
S
É
N
O
D
IN
N
E
É
U
IQ
R
A LR03 AM4 1.5V
B
A
F
AA
IA
S
E
N
O
D
IN
IN
E
D
A
M
Getting Started
GUIDE
ODE
M
IN
D
Remote control
Batteries
E
X
Scart lead
Scart adaptor
RF lead
2
1
Coin
Inserting batteries into the remote control
3
2
• Always observe the correct polarity when inserting batteries.
• Please dispose of batteries in an environmentally friendly way.
• Do not use old or different types of batteries together.
• To avoid battery leakage and damage to the remote control, remove the
batteries if yo u are not g oing to us e the remo te for several days. If a ny liqu id th at
has leaked from the batteries touch es you, wash i t awa y im me dia tely with wate r.
5
4
Getting Started
3
Getting Started
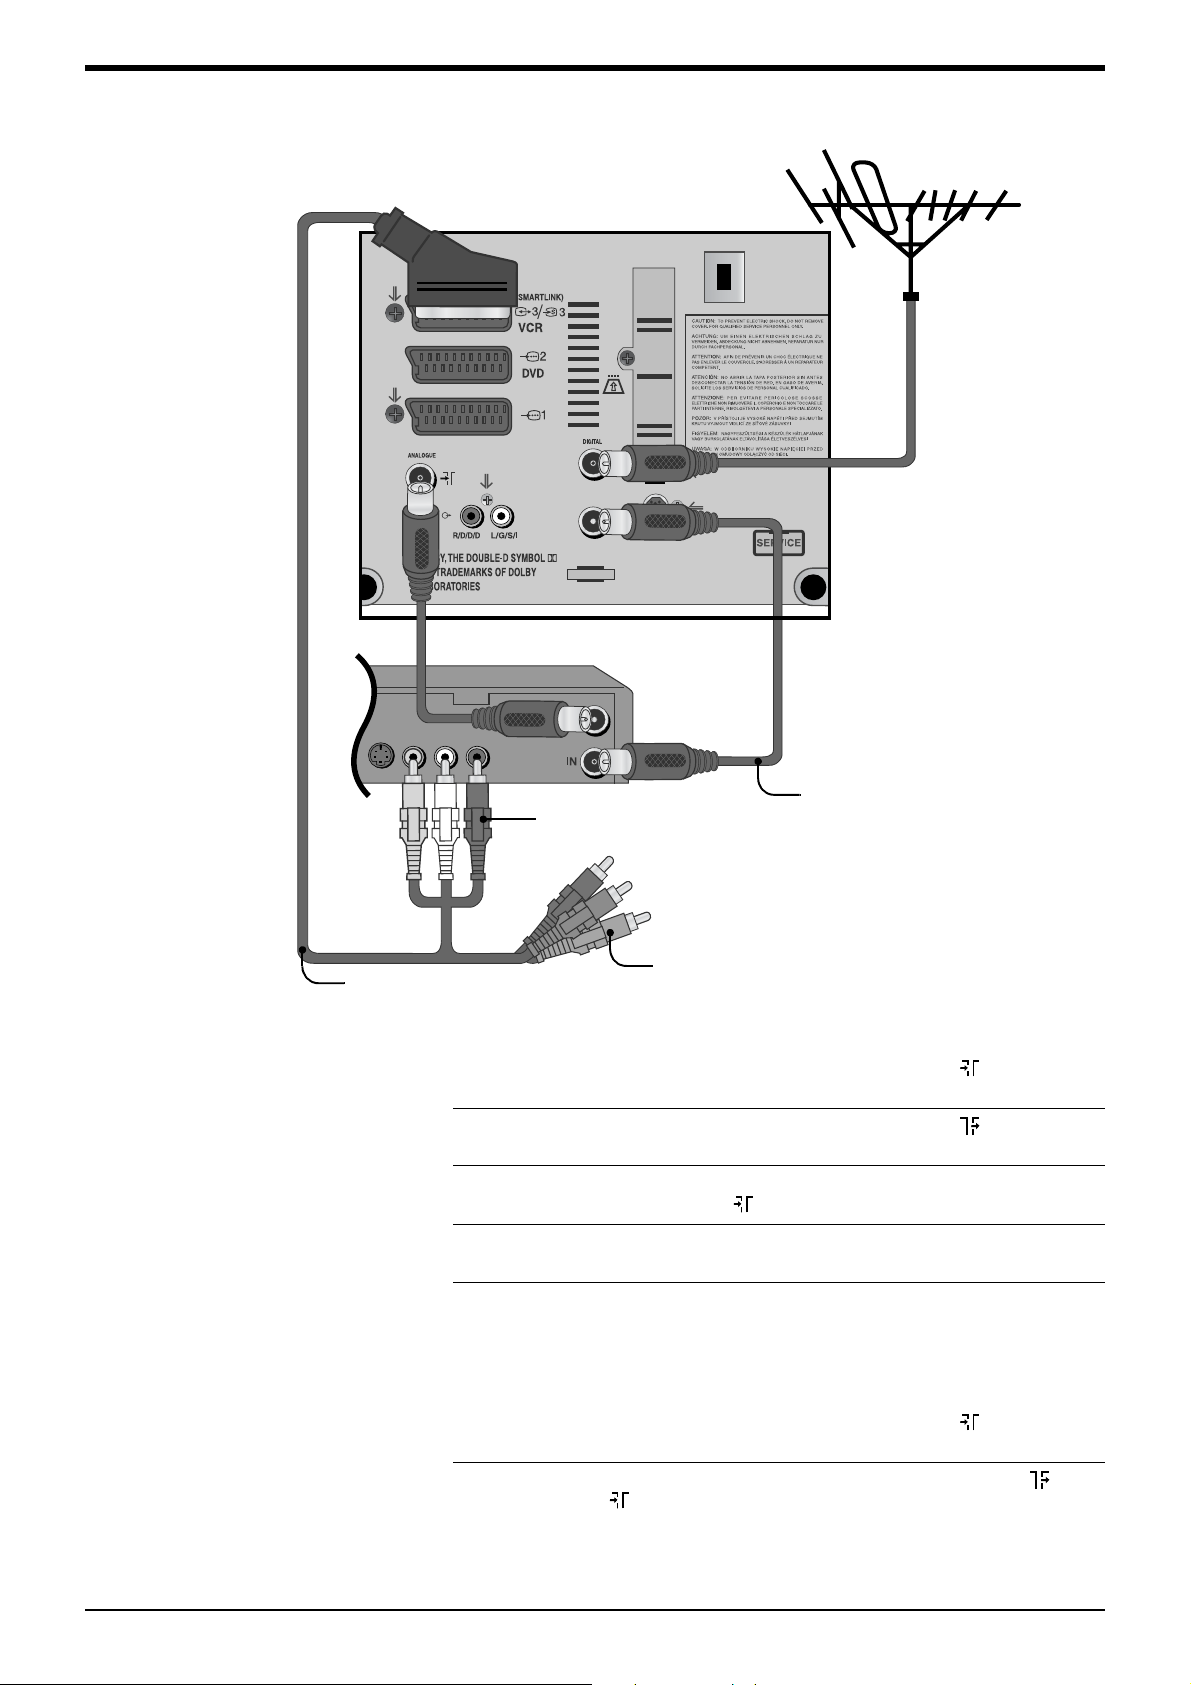
Connecting an aerial and VCR
3
Rear of TV
Rear of VCR
Supplied Scart lead
1.
2.
3.
Supplied RF lead
V/L/R connectors
Y/U/V connectors
Connect your aerial lead to the socket labelled DIGITAL on the rear of
the TV.
Connect the supplied RF lead from the socket labelled on the rear of
the TV to the socket labelled IN* on your VCR.
Connect an RF lead from the socket labelled OUT* on your VCR to the
socket labelled ANALOGUE on the rear of the TV.
4 Getting Started
Connect the suppli ed scart lea d from the sock et labelled i3/r3 on the
4.
rear of the TV to the audio/video sockets labelled TV* on your VCR.
Insert a pre-recorded tape into the VCR and press the ‘PLAY’ button.
5.
This enables the TV to locate and store the video channel during the
‘Automatically tuni ng the TV’ proc edu re.
Connecting an aerial only
Connect your aerial lead to the socket labelled DIGITAL on the rear of
1.
the TV.
Connect the supplied RF lead from the sockets labelled and
2.
ANALOGUE on the rear of the TV.
z *Socket names may vary depending on make and model of VCR. Refer to your
VCR instruction manual for details.
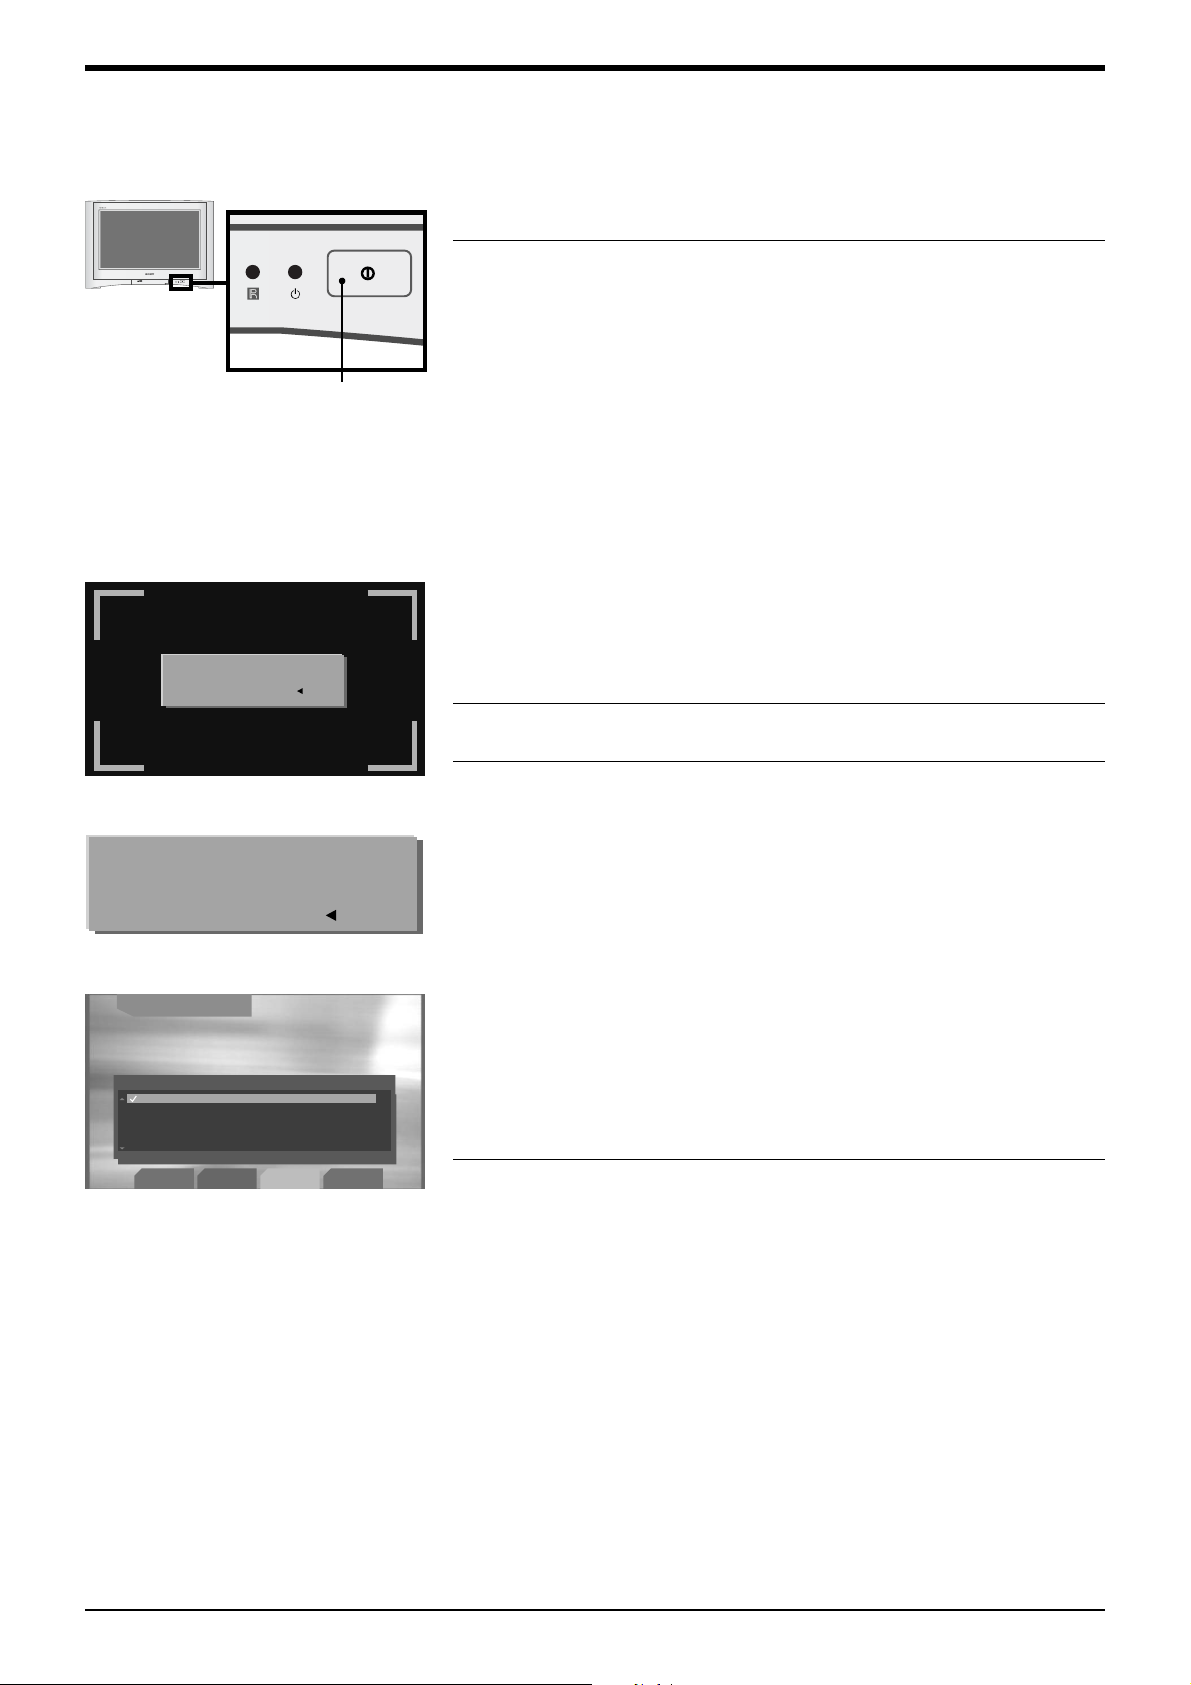
Switching on the TV
4
100Hz
Digtial Plus
Automatically tuning the TV
5
The ‘Picture Rotation’ prompt.
On/Off
button
Getting Started
Connect the TV plug to your mains socket (220 - 240V AV, 50Hz)
1.
Push in the On/Off button (labelled !) on the front of the TV.
2.
z If the red standby mode indicator on the front of the TV is lit, press the TV I/1
button on the remote control to switch on the set. Please be patient as the picture
may take a few moments to appear on the TV screen.
When you switch on the TV for the first time, the Sony logo is displayed
1.
on the TV screen, followed by the ‘Picture Rotation’ prompt. Sometimes
the Earth’s natural magnetism can cause the screen to look slanted.
a) If no correction is required, press B to select ‘Not Necessary’.
If picture slants, please
adjust picture rotation.
Not Necessary:
Adjust Now:
The ‘Autotune’ prompt.
Do you want to start
automatic tuning?
Yes:
The ‘Region Set-up’ menu.
OK
Digital Set-up
Region Set-up
NEW SOUTH WALES / AUSTRALIAN CAPITAL TERRITORY
VICTORIA
QUEENSLAND
SOUTH AUSTRALIA
WESTERN AUSTRALIA
TASMANIA
NORTHERN TERRITORY
Press OK key to set your region
OK
No:
Back
b) If some correction is required, press OK to select ‘Adjust now’.
Press V or v to correct the slant. Press OK to confirm.
The ‘Autotune’ prompt appears on the TV screen. Press OK to select
2.
‘Yes’.
The ‘Region Set-up’ menu appears on the TV screen. Press V or v to
3.
highlight your chosen region. Press OK to confirm.
The digital autotune display appears on screen and the TV starts to
search for all the available digital channels. This may take some time,
please be patient and do not press any buttons on the TV or remote
control.
If no digital or analogue channels are found, a message appears asking
to confirm that the aerial is connected correctly. Check all the aerial
connections and press OK to start the automatic tuning process again.
When the digital autotune is complete, the analogue autotune starts to
search for all the available analogue channels.
Once all available digital and analogue channels have been stored, the
TV returns to normal operation, displaying the digital channel stored on
channel number 1. If no digital channels were found, the analogue
channel stored on channel number 1 is displayed.
The TV has now tuned
in all the available channels
6
Switching between digital and analogue mode
Press the DIGITAL/a button to switch between digital and analogue
1.
mode.
In digital mode, an information banner appears briefly on screen when
the channel is changed.
In analogue mode, the chann el numbe r appears i n green le ttering when
the channel is changed.
Getting Started
5
Getting Started
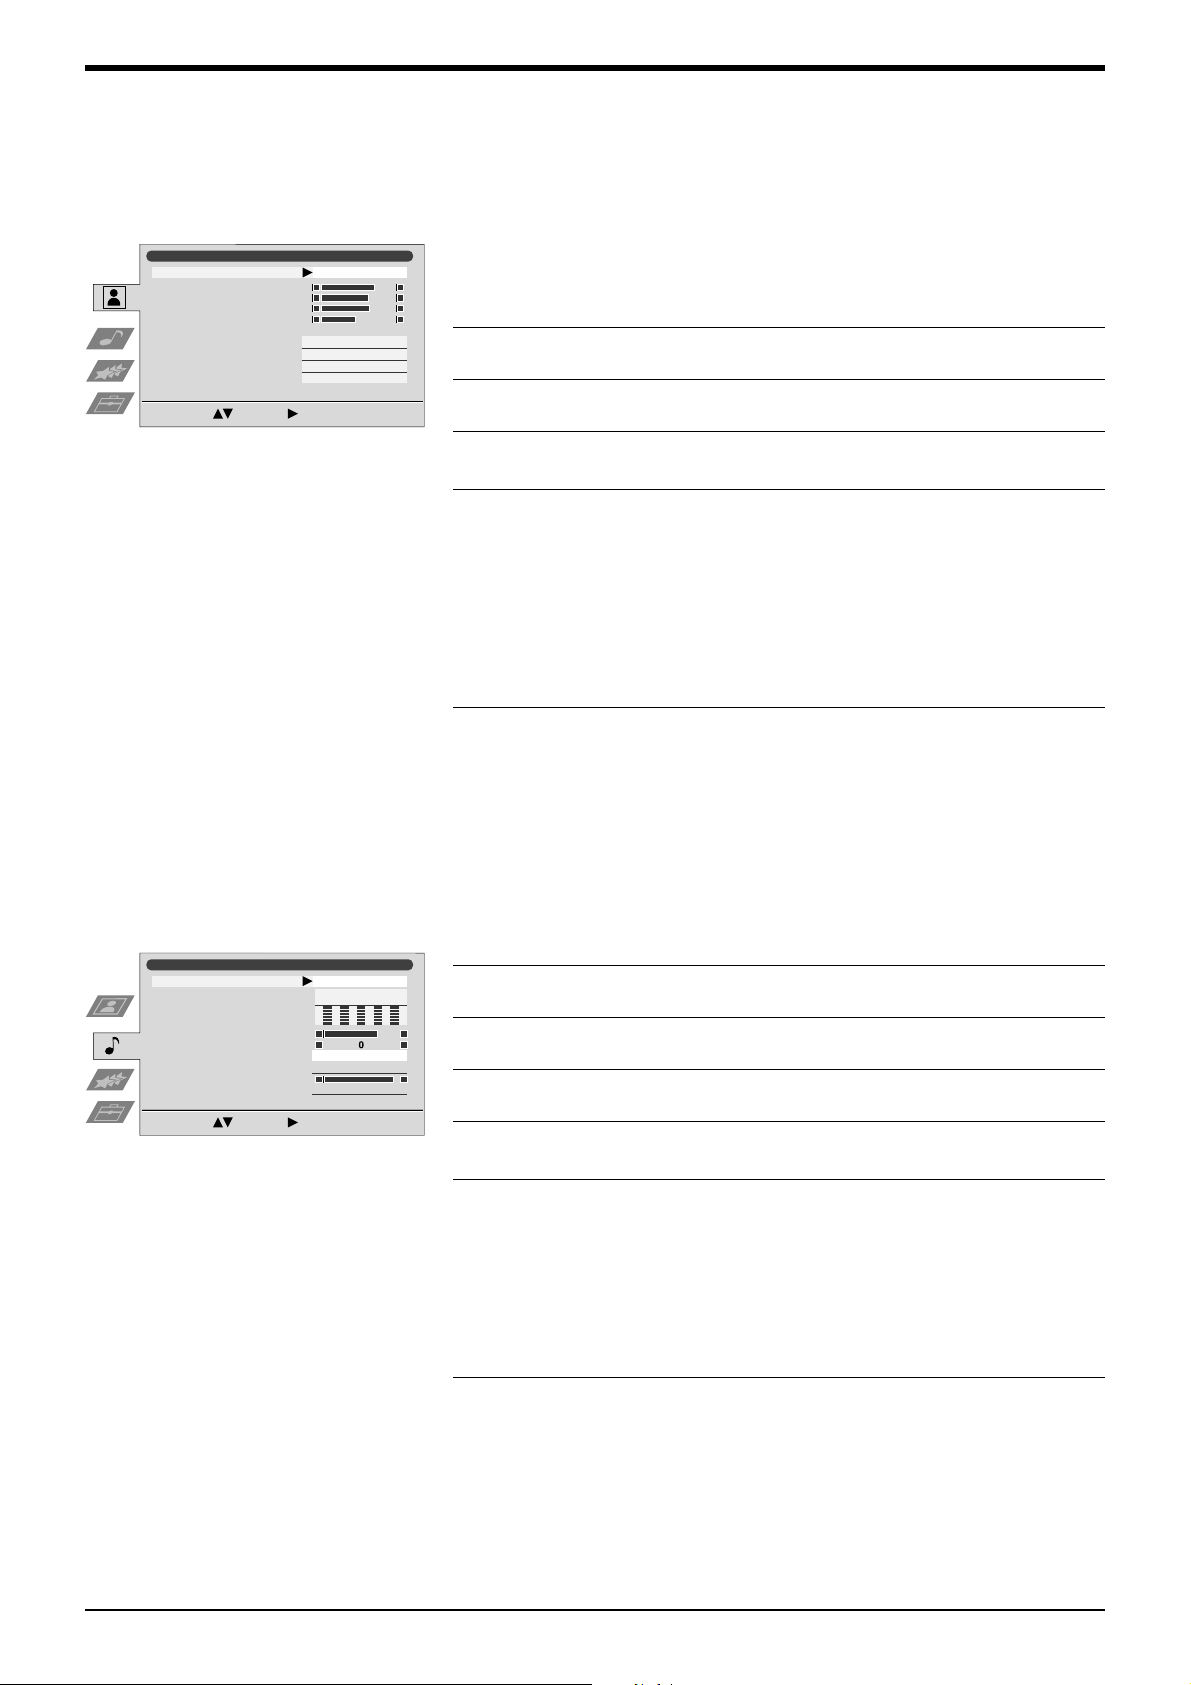
Adjusting the Brightness, Colour and Sharpness settings
7
The ‘Picture Adjustment’ menu.
Picture Adjustment
Contrast
Brightness
Colour
Sharpness
Reset
AI
Noise Reduction
DRC-MF
Colour Tone
Select: Enter:
PersonalPicture Mode
On
Auto
DRC1250
Cool
This TV has four pi cture mode sett ings, ‘Live’, ‘Pers onal’, ‘Movie’ and ‘Game’. ‘Liv e’,
‘Movie’ and ‘Game’ are preset modes and only the ‘Contrast’ setting can be
adjusted. ‘Personal’ mode however, also allows you to adjust the ‘Brightness’,
‘Colour’ and ‘Sharpness’ settings.
Press the MENU button on the remote control to display the TV menu
1.
system on the TV screen.
Press the b button to enter the ‘Picture Adjustment’ menu.
2.
The ‘Picture Mode’ option is highlighted. Press the b button.
3.
Press the V or v button to highlight ‘Live’, ‘Personal’, ‘Movie’ or ‘Game’.
4.
Press the OK button to confirm.
a) If you have selected ‘Live’, ‘Movie’ or ‘Game’:
5.
Go to step 6.
b) If you have selected ‘Personal’:
You can now adjust the ‘Brightness’, ‘Colour’ and ‘Shar pness’ settings.
(Sharpness is not adjustable in digital mode).
Adjusting the sound settings
8
The ‘Sound Adjustment’ menu.
Sound Adjustment
Sound Effect
Equaliser
Adjustment
Virtual Effect
Balance
Auto V ol. Control
Dual Sound
i
/Audio-out V ol.
i
Dual Sound
Select: Enter:
Dolby V
Off
Stereo
Stereo
Press the V or v butt on to hig hli gh t ‘Brigh tne ss’, ‘C ol our’ or ‘S harpness’ .
Press the b button. Press the B or b button to adjust the setting. Press
the OK button to store.
Press the MENU button to exit the TV menu system and retu rn to normal
6.
TV operation.
This TV has four sound settings, ‘Personal’, ‘Dolby V*, ‘Dynamic**’ and ‘Natural**’
Press the MENU button on the remote control to display the TV menu
1.
system on the TV screen.
Press the v button to select the ‘Sound Adjustment’ menu.
2.
Press the b button to enter the ‘Sound Adjustment’ menu.
3.
The ‘Sound Effect’ option is highlighted. Press the b button.
4.
Press the V or v button to highlight ‘Personal’, ‘Dolby V’, ‘Dynamic’ and
5.
‘Natural’ Press the OK button to confirm.
a) If you have selected ‘Dolby V’, ‘Natural’ or ‘Dynamic’:
6.
Go to step 7.
z *When ‘Dolby V’ is selected, the TV
simulates the full effects of Dolby Pro
Logic Surround sound without the need
for additional speakers. Manufactured
under licence from Dolby Laboratories.
‘Dolby’, ‘Pro Logic’ and the ; symbol
are trademarks of Dolby Laboratories.
**’Dynamic’ and ‘Natural’ are functions
of the ‘BBE High Definition Sound
System’. This system enhances clarity,
detail, presence of sound and increased
musical realism.
6 Getting Started
b) If you have selected ‘Per sonal’:
You can now adjust the sound using the ‘Equaliser Adjustment’ option.
With the ‘Equaliser Adjustment’ option highlighted, press b to adjust.
Press B or b to selec t the required frequency band. Press V or v to adjust
the frequency level. Press OK to confirm.
Press the MENU button to exit the TV menu system and retu rn to normal
7.
TV operation.
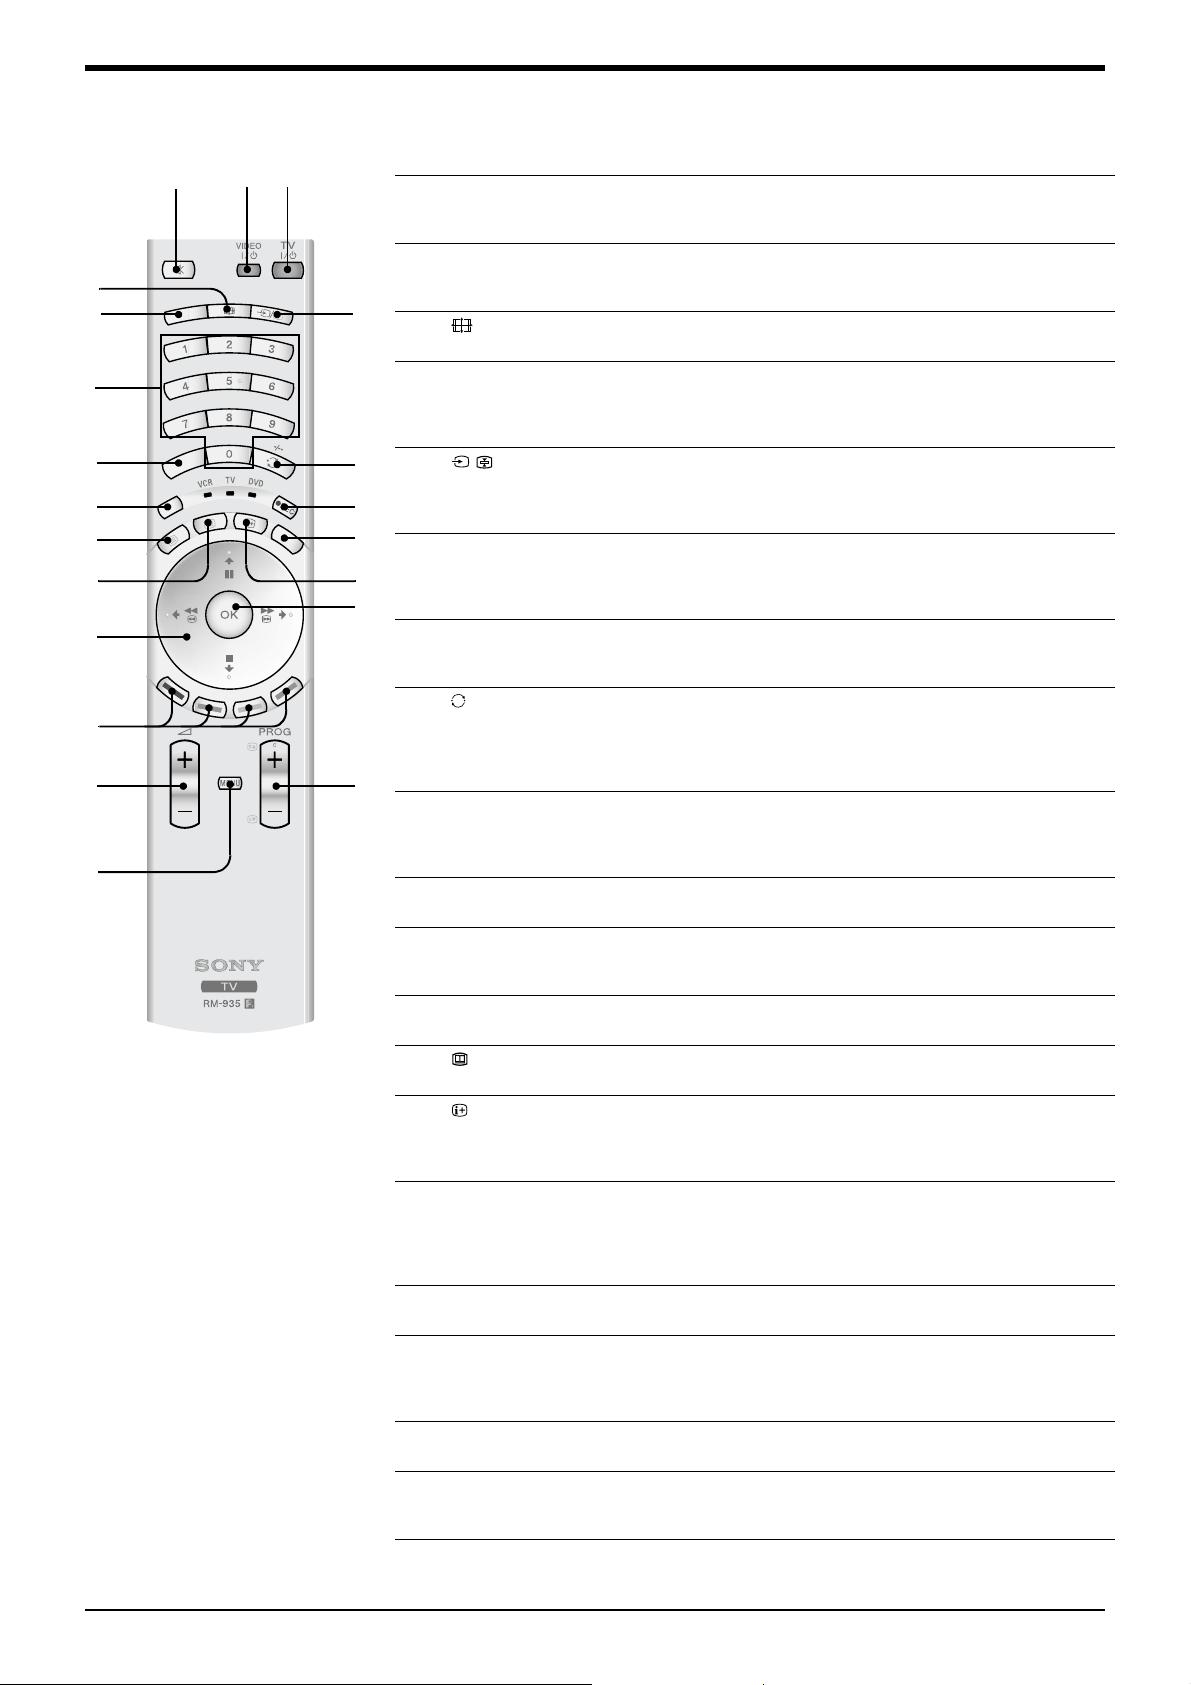
Overview of the remote control
% - Mute button
1
Press to mute the TV sound. Press again to restore.
2
1
4
a
5
DIGITAL/
7
8 9
q; qa
GUIDE
D
O
M
E
qs
qf qg
qj
qk
ql w;
wa
3
INDEX
6
qd
qh
VIDEO I/1 - VCR/DVD Standby button
2
Press to switch off your VCR/DVD player temporarily. Press again to return to
normal operation.
TV I/1 - TV Standby button
3
Press to switch off the TV temporarily. The red standby indicator on the front of the
TV is lit. Press again to return to normal operation.
4
5
6
7
8
9
q;
qa
qs
qd
qf
qg
qh
qj
qk
ql
w;
wa
- Screen Mode button
Press to change the screen mode. Refer to page 10.
DIGITAL/a - Digital/Analogue mode, TV button
In TV mode: Press to switch between digital and analogue mode.
In analogue text, video input mode, TV menu system, INFO menu, EPG and
Channel Index menu: Press to return to normal TV operation.
/ - Input Select/Text Hold button
In TV mode: Press to view signals from equipment connected to the TV sockets.
Refer to page 27 .
In analogue text mode: Press to hold the current page. Refer to page 13.
Numbered buttons
In TV mode: Press to select the requi red chan ne l num be r. For ch annel numbers 10
and above, enter the second digit within two seconds.
In analogue text mode: Press to enter the three digital page number. Refer to page 13.
GUIDE - Guide button
In digital TV mode: Press to access digital text and interactive services (depending
on availability).
- Previous channel button
In analogue TV mode: Press to return to the previous channel watched (provided
that the channel was watched for more than five seconds).
In digital TV mode: Press to remove any interactive prompts from the TV screen.
In digital text mode: Press to cancel a selection/go back a step. Refer to page 12
MODE - Remote control mode selector
This remote control can be pr ogramm ed to opera te the bas ic fu nction s of most D VD
players and VCRs. Once programmed, press this button repeatedly to select TV,
VCR or DVD mode. Refer to page 28.
•REC - VCR RECORD button
With the remote control in VCR mode: Press to start your VCR’s RECORD function
/ - Text button
In digital TV mode: Press to access digital text. Refer to page 12.
In analogue TV mode: Press to access analogue text. Refer to page 13.
INDEX - Channel Index button
In digital TV mode: Press to access the Channel Index menu. Refer to page 14.
- EPG button (Electronic Programme Guide)
In digital TV mode: Press to access the Digital EPG. Refer to page 15.
- INFO button
In digital TV mode: Press to access the Info menu. Refer to page 17.
In analogue TV mode: Press to displ ay in formation s uch a s curre nt channe l numb er
and screen mode. Press again to cancel.
OK button
In TV menu system: Press to confirm a selection. Refer to page 20.
In digital TV mode: Press to access the Channel Index menu. Refer to page 14.
In analogue TV mode: Press to access the Programme Index table. Press the V or v button
to highlight an analogue channel. Press the b button to display the chosen channel.
V, v, B and b buttons
In TV menu system: Press to move through the options. Refer to page 20.
Coloured buttons
In digital menu systems: Press to select the options at the bottom of the screen in
the Info, Main, Channel Index and EPG digital menus.
In analogue text mode: Press to use Fastext. Refer to page13.
2 +/- Volume buttons
Press to increase (+) or decrease (-) the TV volume.
PROG +/- buttons
In TV mode: Press to view the next (+) or previous (-) channel.
In analogue text mode: Press to view the next (+) or previous (-) page. Refer to page 13.
MENU button
Press to access the TV menu system. Refer to page 20.
Basic Operation
Basic Operation
7
Basic Operation
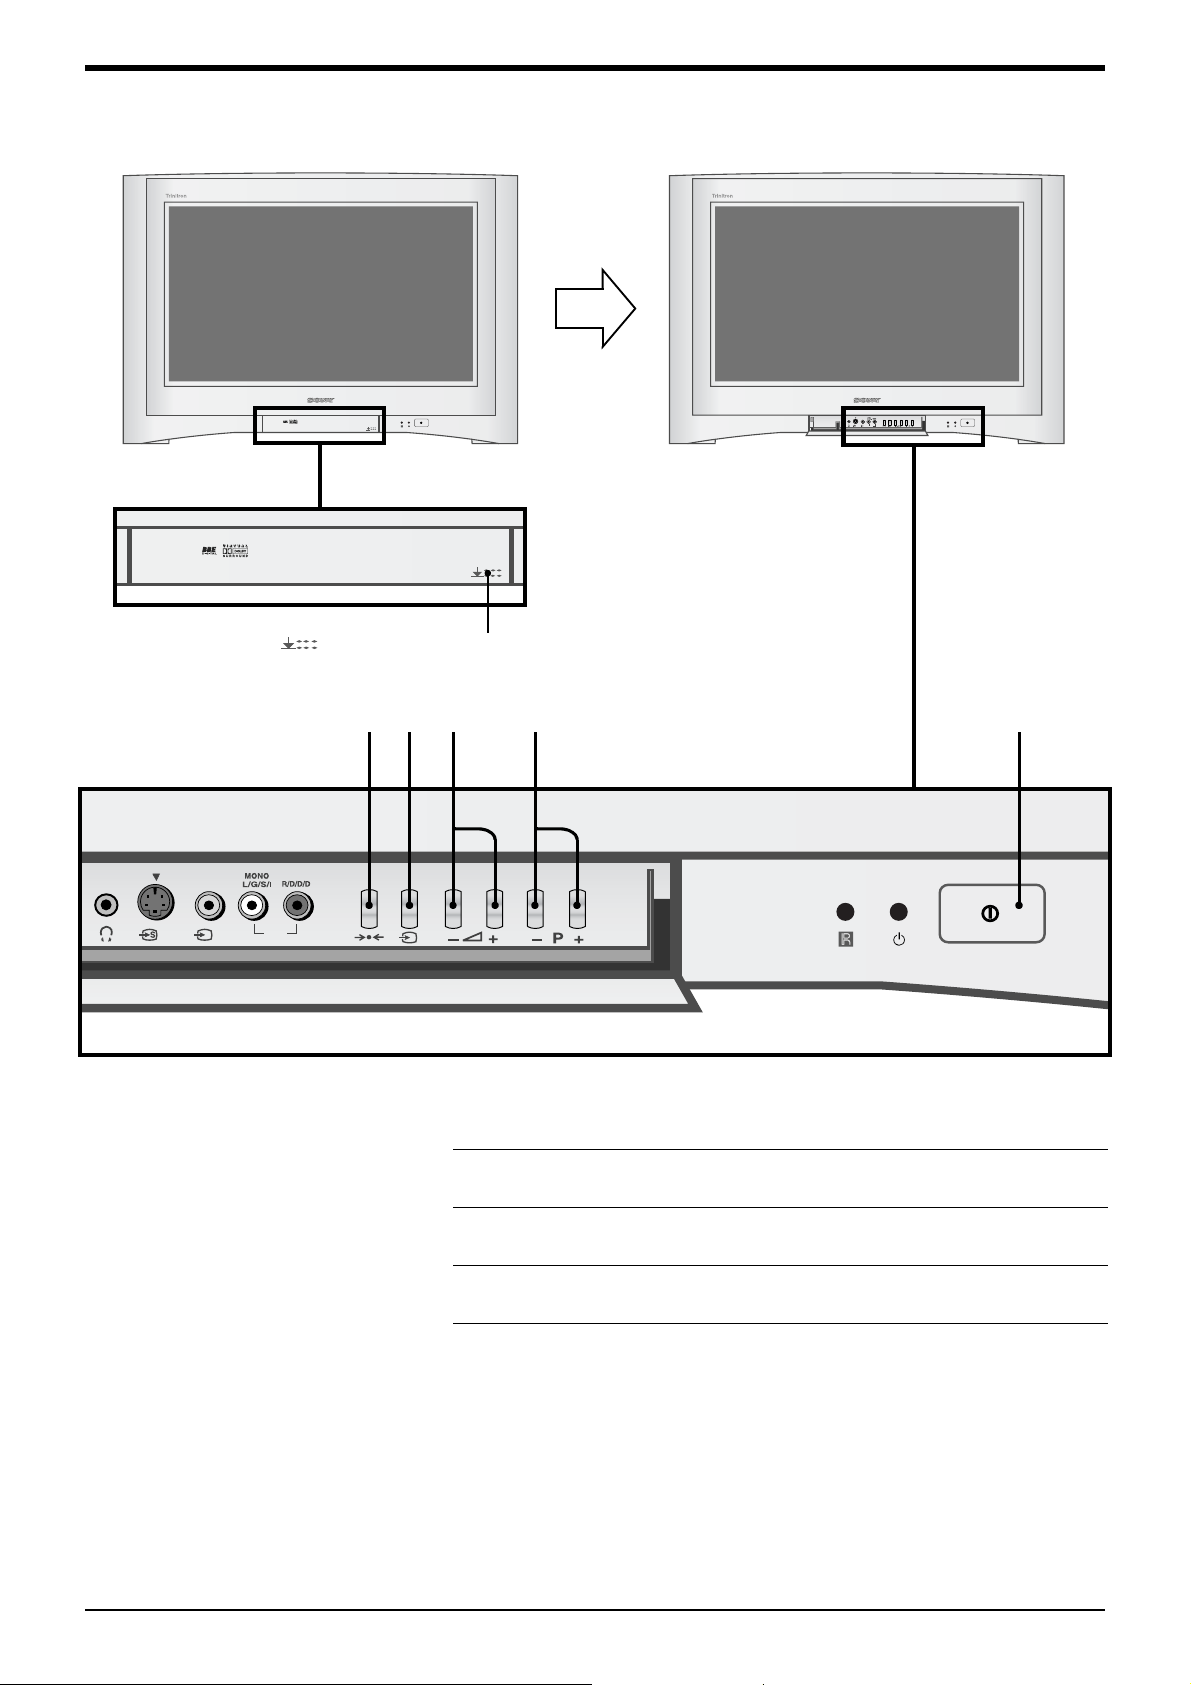
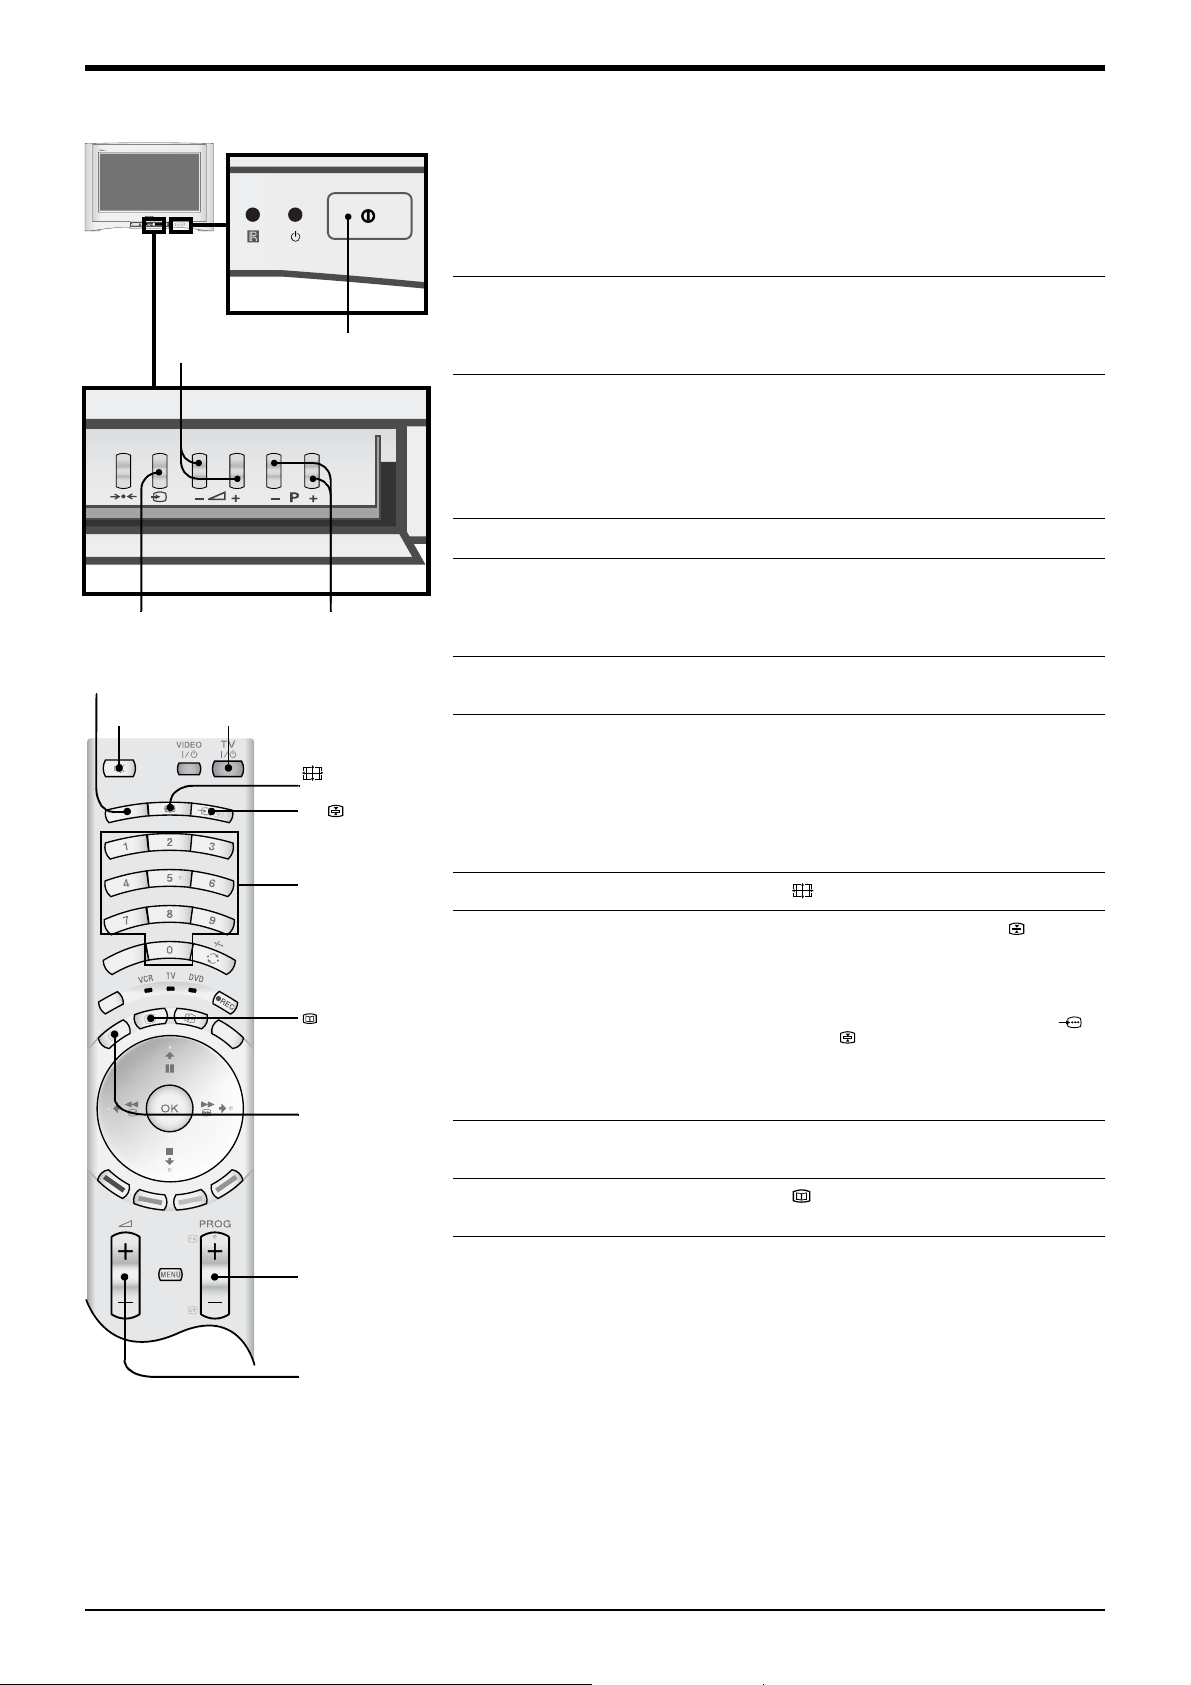
Overview of the TV buttons
100Hz
Digtial Plus
100Hz
Digital Plus
o4
4 4
Press gently on the symbol to open the door.
4 4
o4
1
2
51 2 3 4
0 - Reset button
Press to return picture and sound levels to the factory settings.
t - Video Input button
Press to view pictures from equipment connected to the TV sockets.
8 Basic Operation
2 +/- buttons
3
Press to increase (+) or decrease (-) the TV volume.
PROG +/- buttons
4
In TV mode: Press to view the next (+) or previous (-) channel.
! - On/Off button
5
Press to switch the TV on or off.
Basic Operation
DIGITAL/
a
G
U
ID
E
M
O
D
E
IN
D
E
X
Everyday use
o4
4 4
2 +/-
buttons
t
button
DIGITAL/a button
% button TV I/1 button
On/Off
button
PROG +/-
buttons
button
t/
button
Numbered
button
This section explains the various functions and operations used during everyday
viewing. Most operations can be done using the remote control.
Press the On/Off button (labelled !) on the front of the TV to switc h
1.
on the TV.
When the TV is in standby mode (the 1 indicator on the TV is lit red),
press the TV I/1 button on the remote control to switch on the TV.
Press the PROG+/- buttons on the TV or press the PROG+/- or
2.
Numbered buttons on the remote control to select a TV channel.
When selecting doubl e digit numbers us ing the Numbered buttons, enter
the second digit within two seconds.
Press the 2 +/- buttons on th e TV or on the remote control to adjust the
3.
volume.
Additional operations
To Press
Turn off the TV temporarily
(standby)...
Mute the sound... % button on the remote control. Press
Switch between analogue and digital
mode...
Change the Screen Mode... button. Refer to page 10.
Watch pictures from equipment
connected to the TV’s front and rear
sockets (video input mode)...
TV I/1 on the remote control. When
the TV is in standby mode the 1
indicator on the TV is lit red. Press
again to return to normal TV operation.
again to cancel.
DIGITAL/a button.
If the TV is in digital mode an
information banner ap pea rs b riefly on
screen when you change channels.
If the TV is in analogue mode the
channel number appears in green
lettering when you change channels.
t button on the TV or t/ button
on the remote control repeatedly until
the picture appears. Re fer to p age27.
button
/
button
PROG +/-
buttons
2 +/-
buttons
z For example, if you wish to view pictures from a DVD play er connected to the 2
socket on the rear of the TV, press the
symbol appears on the TV screen together with the DVD picture.
Please note, most equipment connected to the rear sockets, when activated, will
send a signal to the TV. The TV will automatically display the picture for you.
Access text services (depending on
availability of service)...
Access the Digital Electronic
Programme Guide (EPG)...
Return to normal TV operation (from
text, video input mode, TV menu
system, INFO menu, EPG and
Channel Index menu). ..
t/ button repeatedly until the 2
/ button on the remote control.
Refer to pages 12 and 13.
button on the remote control.
Refer to page 15.
DIGITAL/a button.
Basic Operation
9
 Loading...