

Sony TPVS615 User Manual
d
ENGLISH
PRECAUTIONS
TP-VS615
CASSETTE RECORDER
GRABADOR DE CASETES
OPERATING INSTRUCTIONS
INSTRUCCIONES DE MANEJO
MODE D’EMPLOI
8A-HT6-901-01
A
OWNER’S RECORD
For your convenience, record the model number and serial number (you will find
it in the cassette holder of your set) in the space provided below. Please refer to
them when you contact your AIWA dealer in case of difficulty.
Model No.
Serial No.
A
000605AYO-O9
Printed in Indonesia
To maintain good performance
• Do not use the unit in places which are extremely hot, cold, dusty or humid. In
particular, do not keep the unit:
• in a high humidity area such as a bathroom
• near a heater
• in an area exposed to direct sunlight (e.g., inside a parked car, where there
could be a considerable rise in temperature)
• Keep cassette tapes, magnetic cards and other magnetic recorded materials
away from the speaker as the recorded information may be erased or noise may
occur on cassette tapes.
• Do not open the cassette holder during playback, recording, fast forwarding or
rewinding.
POWER SOURCES
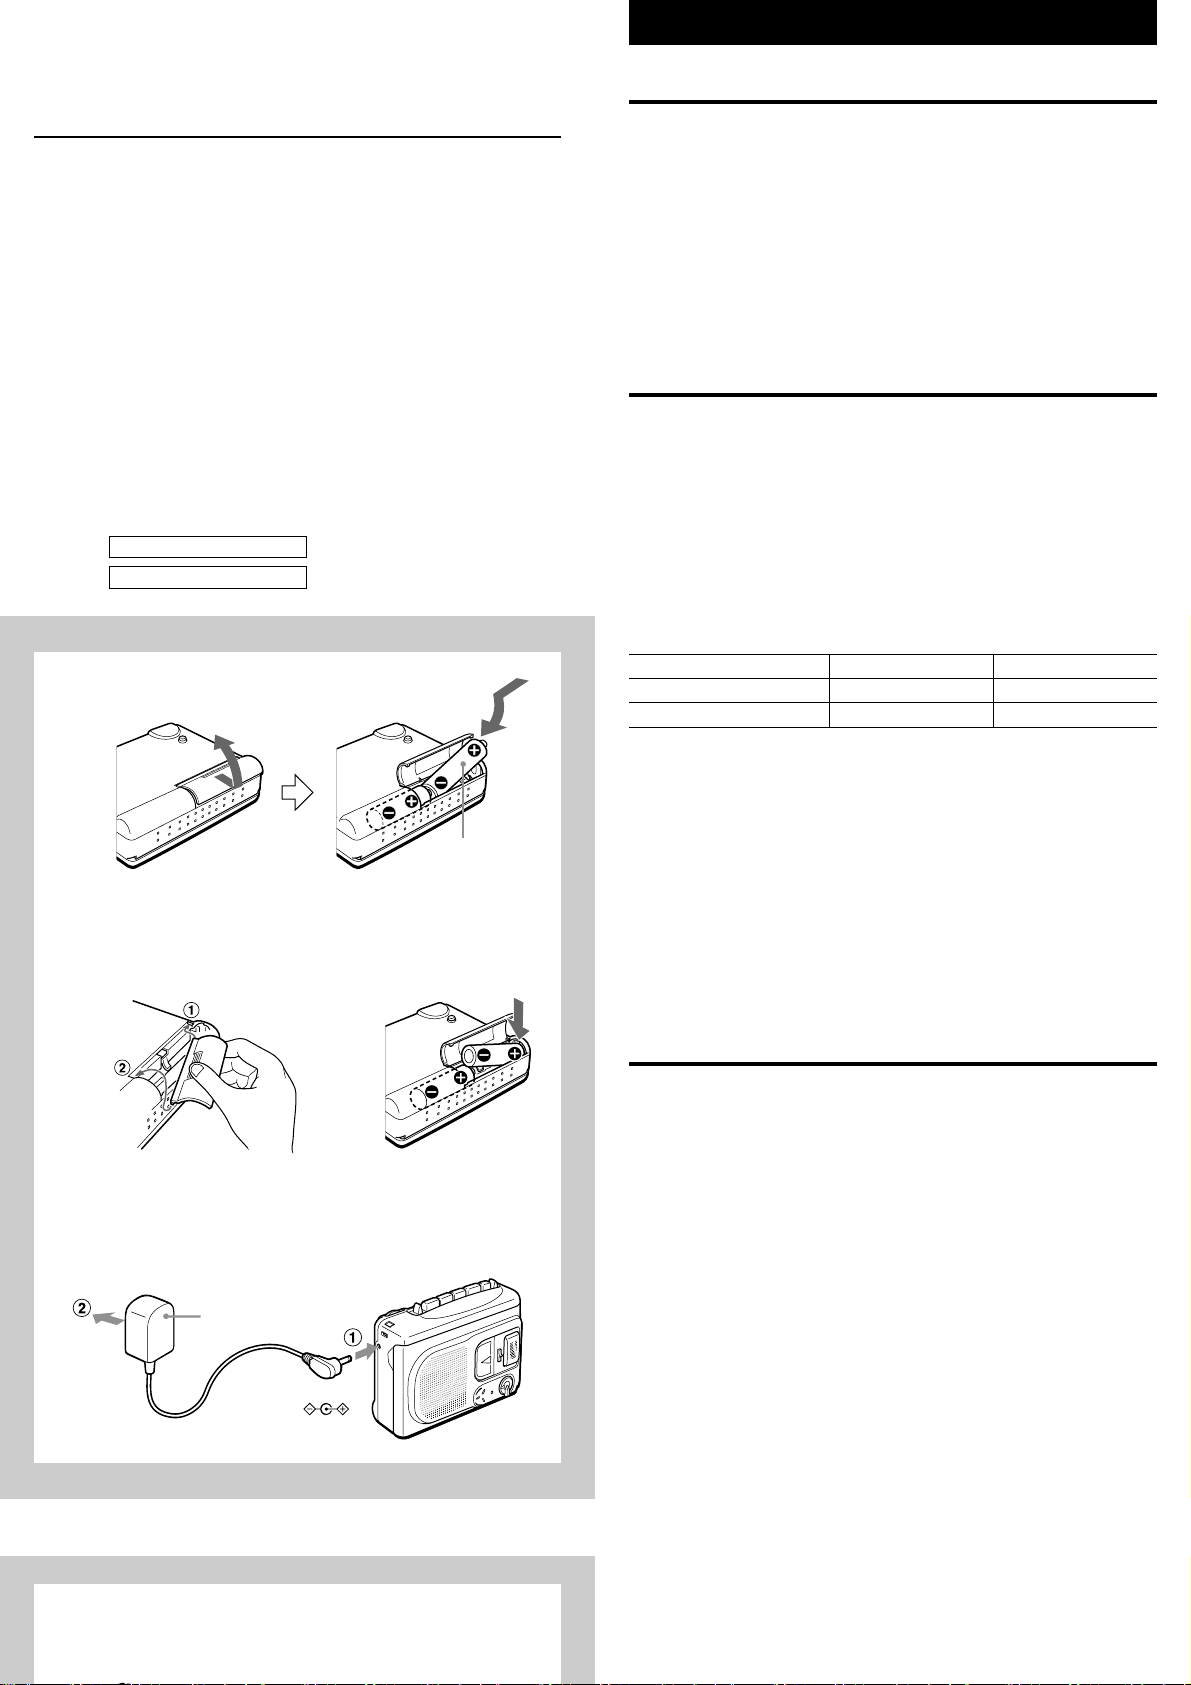
Using with dry cell batteries → A
Insert two size AA (R6) batteries with the 0 and 9 marks properly aligned.
If the cover of the battery compartment comes off → B
To remove the batteries → C
Battery replacement
Replace the batteries when the M (orange) OPE/BATT indicator goes out and the
E (red) OPE/BATT indicator lights during operation.
Battery life
Battery
Manganese (R6P) batteries
Alkaline (LR6) batteries
EIAJ Recording
Approx. 5 hrs.
Approx. 19 hrs.
EIAJ 10 mW
Approx. 4 hrs.
Approx. 13.5 hrs.
AA (R6) × 2
R6 (AA) × 2
BC
D
AC-D302
DC 3 V
Notes on dry cell batteries
• Make sure that the 0 and 9 marks are correctly aligned.
• Do not mix different types of batteries, or an old battery with a new one.
• Never recharge the batteries, apply heat to them, soak them in water, or take
them apart.
• Remove the batteries if the unit is not used for a long time.
• If liquid leaks from the batteries, wipe thoroughly to remove.
Using on AC house current → D
Contact your nearest Aiwa service personnel and purchase the AC adaptor Aiwa
AC-D302.
Connect the AC adaptor
1 to the DC 3 V jack
2 to a wall outlet
PREPARATION
Listening with the earphone
Connect an optional earphone (3.5 ø mini-plug) to the EARPHONE jack.
• The sound does not come from the built-in speaker when the earphone is
connected.
• To monitor the sound that you are recording, use the earphone. You cannot
monitor the sound currently being recorded through the speaker.
Attaching the hand strap → E
Usable tapes
Use only type I (normal) tapes.
Tape slack → F
Take up any slack in the tape with a pencil or similar tool before use. Slack tape
may break or jam in the mechanism.
100-minute or longer tapes
These are extremely thin and easily deformed or damaged. They are not
recommended.
E
To prevent accidental erasure → G
Break off the plastic tabs on the cassette tape after recording, with a screwdriver
or other pointed tool.
a Side A
b Tab for side A
To record on a cassette without tabs → H
Cover the tab openings with cellophane tape.
c Cellophane tape
MAINTENANCE

MAINTENANCE
To clean the head and tape paths → I
After every 10 hours of use, clean the head and tape paths with a head cleaning
cassette or a cotton swab moistened with cleaning fluid or denatured alcohol.
(These cleaning kits are commercially available.)
When cleaning with a cotton swab a, wipe the recording/playback head b,
erasure head c, pinchroller d, and capstan e.
Note
After cleaning the head and tape paths with a liquid head cleaning cassette or a
moistened swab, wait until the cleaned parts are completely dry before inserting
tapes.
To clean the cabinet
Use a soft cloth ligtly moistened with a mild detergent solution. Do not use strong
solvents such as alcohol, benzine or thinner.
H
I
GF
SPECIFICATIONS
Track system 2 tracks 1 channel, monaural
Frequency response 250 – 8,000 Hz (4.8 cm/sec) EIAJ
Microphone Electret condenser microphone (monaural)
Maximum output 300 mW (EIAJ/DC)
Input jack EXT MIC jack (monaural mini-jack) (1)
Output jack EARPHONE jack (monaural mini-jack) (1)
Other jack DC 3 V jack
Speaker Diameter 50 mm, 8 ohms
Recording system DC bias
Erasing system Magnet erasure
Recording speed Approx. 4.8 cm/sec. with the REC MODE switch set to
Power sources DC 3 V using two size AA (R6) dry cell batteries
Battery life See “Battery life” above.
Maxumum outseide dimensions
Weight Approx. 156.4 g (excluding batteries)
Accessory Hand strap (1)
Specifications and external appearance are subject to change without notice.
NORMAL
Approx. 1.6 cm/sec. with the REC MODE switch set to 3 ×
AC house current using the AC adaptor Aiwa AC-D302
84.3 (W) × 111.7 (H) × 33.4 (D) mm (excluding projecting
parts and controls)
COPYRIGHT
Please check the laws on copyright relating to recordings from discs, radio or
external tape for the country in which the machine is being used.
TROUBLESHOOTING GUIDE
If the unit does not perform as expected, check the following table.
Symptoms
Tape does not move.
Tape transport is unstable.
There is no sound.
The sound is too low or
distorted.
The playback speed is
not correct.
Recording cannot be done.
Tape stops during recording.
Causes
• The batteries are worn out.
• The unit is in pause mode.
• There is slack in the tape.
• The pinchroller and capstan are dirty.
• The tape is damaged.
• The volume control is turned down completely.
• The earphone is not connected firmly when
listening with the earphone.
• The playback head is dirty.
• The batteries are worn out.
• The REC MODE switch is set to the wrong
position.
• The PLAYBACK SPEED control is not set to
center position.
• The erasure prevention tab on the recording side
of the cassette has been removed.
• Set the V-SENSOR switch to OFF when not
using the V-SENSOR function.
ESPAÑOL
FRANÇAIS
PRECAUCIONES
Para mantener en buen estado de funcionamiento
• No utilice este aparato en lugares muy calientes, fríos, con polvo o humedad.
Especialmente, no deje este aparato:
• en un lugar húmedo, por ejemplo en el baño
• cerca de la calefacción
• en un lugar expuesto a los rayos del sol (dentro de un coche estacionado,
donde la temperatura en el interior puede subir mucho)
• Mantenga los casetes, tarjetas magnéticas y otros materiales que contengan
grabaciones magnéticas alejadas del altavoz, ya que la información grabada
puede borrarse o pueden aparecer ruidos en las cintas de casete.
• No abra el compartimiento del casete durante la reproducción, grabación, avance
rápido o rebobinado.
FUENTES DE ALIMENTACION
Utilización de pilas → A
Coloque dos pilas tamaño AA (R6) con las marcas 0 y 9 correctamente alineadas.
Si se sale la tapa del portapilas → B
Para sacar la pilas → C
Cambio de las pilas
Cambie las pilas cuando se apague el indicador M (naranja) OPE/BATT y se
enciende el indicador E (rojo) OPE/BATT durante el funcionamiento.
Vida útil de la pila
Pila
Pilas de manganeso (R6P)
Pilas alcalinas (LR6)
Grabación EIAJ
Aprox. 5 horas
Aprox. 19 horas
EIAJ 10 mW
Aprox. 4 horas
Aprox. 13,5 horas
PRECAUTIONS
Pour assurer un bon fonctionnement
• Ne pas utiliser l’appareil à des emplacements extrêmement chauds, froids,
poussiéreux ou humides. En particulier, ne pas ranger l’appareil:
• à un endroit très humide, tel que salle de bains
• près d’un radiateur
• à un endroit en plein soleil (à savoir dans une voiture garée, où la température
peut considérablement augmenter)
• Conserver les cassettes, cartes magnétiques et autres matériaux enregistrés
éloignés du haut-parleur, car les données enregistrées pourraient être effacées
ou des parasites pourraient apparaître sur les cassettes.
• Ne pas ouvrir le support de cassette pendant la lecture, l‘enregistrement, l‘avance
rapide ou le rebobinage.
SOURCES D’ALIMENTATION
Piles sèches → A
Insérer deux piles de format AA (R6) en respectant les polarités 0 et 9 .
Si le couvercle du logement des piles s'ouvre → B
Pour retirer les piles → C
Remplacement des piles
Remplacer les piles quand le témoin OPE/BATT M (orange) s’éteint et que le
témoin OPE/BATT E (rouge) s’allume pendant le fonctionnement.
Durée de vie des piles
Pile
Piles au manganèse (R6P)
Piles alcalines (LR6)
Enregistrement EIAJ
env. 5 heures
env. 19 heures
EIAJ 10 mW
env. 4 heures
env. 13,5 heures
Notas sobre las pilas
• Verifique que las marcas 0 y 9 están correctamente alineadas.
• No mezcle distintos tipos de pilas o una pila vieja con una pila nueva.
• No recargue las pilas, caliente o sumerja en agua, ni las abra o desarme.
•
Saque las pilas del aparato si no se va a utilizar durante un largo período de tiempo.
• Si se derramara el líquido de las pilas limpie a fondo para sacarlas.
Utilización con la CA de su hogar → D
Llame al personal de servicio de Aiwa más cercano y compre el adaptador de CA
de Aiwa AC-D302.
Conecte el adaptador de CA
1 en el enchufe de DC 3 V
2 en un tomacorriente de la pared
PREPARATIVOS
Escuchando por el auricular
Conecte un auricular opcional (mini-toma de ø 3,5) en la toma EARPHONE.
• El sonido no sale por el altavoz incorporado si se ha conectado el auricular al
aparato.
• Para controlar el sonido a medida que se va grabando, utilice el auricular. No
se puede controlar el sonido a medida que se va grabando, utilizando el altavoz.
Instalación de la correa de mano → E
Cintas que pueden utilizarse
Utilice sólo cintas del tipo I (normales).
Flojedad de la cinta → F
Elimine la flojedad de la cinta con un lápiz o herramienta similar antes de utilizar.
La flojedad en la cinta puede romper o atascar el mecanismo.
Remarques sur les piles sèches
• Vérifier que les marques 0 et 9 sont correctement alignées.
• Ne pas mélanger différents types de piles, ou des piles neuve et ancienne.
• Ne jamais recharger les piles, les chauffer, les tremper dans l’eau ni essayer de
les démonter.
• Retirer les piles si l’appareil doit rester inutilisé pendant une période prolongée.
• Si du liquide fuit des piles, l’essuyer complètement.
Courant secteur domestique → D
Contacter le centre de service Aiwa le plus proche pour l’achat d’un adaptateur
secteur Aiwa AC-D302.
Raccorder l’adaptateur secteur
1 à la prise DC 3 V
2 à une prise murale
PREPARATIFS
Ecoute avec l’écouteur
Raccorder l’écouteur en option (miniprise 3,5 ø) à la prise EARPHONE.
• Le son ne sort pas du haut-parleur quand l’écouteur est raccordé.
• Utiliser l’écouteur pour contrôler le son en cours d’enregistrement. Le contrôle
du son au haut-parleur n’est pas possible pendant l’enregistrement.
Fixation de la dragonne → E
Cassettes utilisables
Utiliser uniquement des cassettes de Type I (normales).
Mou de la bande → F
Eliminer tout mou de la bande avec un crayon ou un outil similaire avant l’utilisation.
Une bande détendue peut se casser ou s’enrouler dans le mécanisme.
Cintas de 100 minutos o más
Estas cintas son muy finas y se pueden deformar o dañar con facilidad. No se
recomienda su uso en este aparato.
Para evitar el borrado por error → G
Rompa las lengüetas de plástico en el casete después de una grabación, utilizando
el destornillador u otra herramienta puntiaguda.
a Lado A
b Lengüeta para el lado A
Para grabar en un casete sin las lengüetas → H
Cubra los orificios de las lengüetas con cinta adhesiva.
c Cinta adhesiva
MANTENIMIENTO
Cassette de 100 minutes ou plus
La bande est extrêmement fine, et se déforme ou s’endommage facilement. Ces
cassettes ne sont pas recommandées.
Pour éviter tout effacement accidentel → G
Briser les ergots en plastique de la cassette après l’enregistrement, avec un
tournevis ou un autre outil pointu.
a Côté A
b Ergot pour le côté A
Pour enregistrer sur une cassette sans ergots → H
Couvrir les ouvertures laissées par les ergots avec du ruban adhésif.
c Ruban adhésif
ENTRETIEN
 Loading...