

Page 1
3-247-590-12(1)
Cordless Stereo
Headphone
System
Operating Instructions
Mode d’emploi
Manual de instrucciones
GB
FR
ES
MDR-IF540RK
© 2003 Sony Corporation
Page 2
WARNING
NOTICE FOR THE CUSTOMERS IN
THE U.S.A.
To prevent fire or shock
hazard, do not expose the unit
to rain or moisture.
To prevent fire or shock hazard, do not
place objects filled with liquids, such as
vases, on the apparatus.
To avoid electrical shock, do not open
the cabinet. Refer servicing to qualified
personnel only.
Do not install the appliance in a
confined space, such as a bookcase or
built-in cabinet.
For the customers in the U.S.A.
Owner’s Record
The model number is located on the
bottom of the Transmitter and the left
inner side of the headband.
The serial number is located at the
bottom of the Transmitter and the inner
side of the battery compartment.
Record these numbers in the spaces
provided below. Refer to them
whenever you call upon your Sony
dealer regarding this product.
You are cautioned that any changes or
modifications not expressly approved in this
manual could void your authority to operate
this equipment.
For the customers in the U.S.A. and
Canada
RECYCLING NICKEL METAL
HYDRIDE BATTERIES
Nickel Metal
Hydride batteries
are recyclable.
You can help
preserve our
environment by
returning your used
rechargeable
batteries to the collection and
recycling location nearest you.
For more information regarding
recycling of rechargeable batteries,
call toll free
1-800-822-8837, or
visit http://www.rbrc.org/
Caution: Do not handle damaged or
leaking Nickel Metal Hydride
batteries.
Model No. MDR-IF540RK
Transmitter TMR-IF540R
Headphones MDR-IF540R
Serial No.
Transmitter
Headphones
GB
2
Page 3

Welcome!
Thank you for purchasing the Sony
MDR-IF540RK Cordless Stereo
Headphone System. Before operating
the unit, please read this manual
thoroughly and retain it for future
reference.
The MDR-IF540RK is a cordless stereo
headphone system using infrared
transmission. You can enjoy listening to
a programme free from the restriction
of the headphone cord by simply
connecting the transmitter to a TV, or
audio components equipped with a
headphone jack or a line output jack.
• Cordless, noiseless infrared headphone
system resistant to external noise, etc.
• Easy rechargeable battery system
automatically charges the headphones
when placed on the transmitter.
• Wide infrared reception range of up to 7 m
(23 ft.).
• Auto power on/off function to
automatically turn on the headphones
when they are worn, and turns them off
when they are taken off.
• Self-adjusting headband mechanism
eliminating the need for headband
adjustment.
• Single VOL control adjusts both the right
and left volume of the headphones.
• Either rechargeable nickel-metal hydride
batteries (supplied) or commercially
available (size AAA) dry batteries can be
used to power the headphones.
• Vibration function to vibrate the built-in
vibration motor by detecting low
frequency (approx. 100 Hz and lower) of
audio signals.
• SRS headphone surround function*
reproduces realistic surround sound
through the headphones.
Table of contents
Getting started
Unpacking ........................................... 4
Charging the supplied rechargeable
batteries ........................................... 5
Setting up the transmitter ................. 8
Operating the system
Listening to a programme .............. 10
The effective area of the
transmitter .....................................12
Replacing the ear pads .................... 12
Additional information
Specifications .................................... 13
Precautions ....................................... 14
Troubleshooting ............................... 14
GB
* SRS is a trademark of SRS Labs Inc.
SRS Headphones are manufactured under
license from SRS Labs. Inc.
GB
3
Page 4

N Getting started
Unpacking
Check that you have the following
items before using the headphones:
• The transmitter TMR-IF540R (1)
• AC power adaptor (1)
• Connecting cord (1)
(phono plugs h stereo mini plug)
• The headphones MDR-IF540R (1)
• Unimatch plug adaptor (1)
(stereo mini jack h stereo phone
plug)
• Rechargeable nickel-metal hydride
batteries (2)
GB
4
Getting started
Page 5
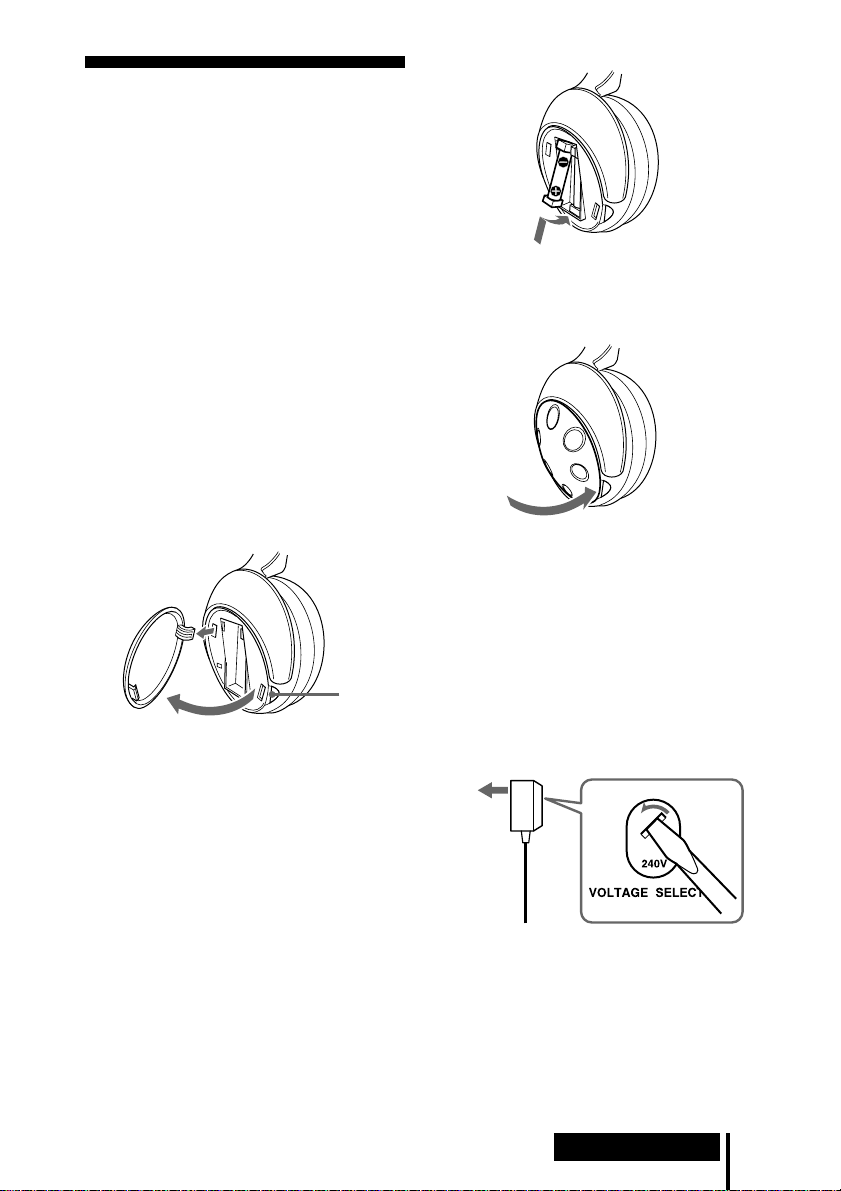
Charging the
supplied
rechargeable
batteries
The supplied rechargeable nickel-metal
hydride batteries are not charged from
the first time you use them. Be sure to
charge them before use.
To charge the headphones, place them
on the transmitter.
1 Press the button of the left
housing to open the battery
compartment lid.
The battery compartment lid comes
off.
Button
3 Close the battery compartment
lid.
4 If your AC power adaptor is
equipped with a voltage
selector, set it to the operating
voltage in your area with a
screw driver before connecting
the AC power adaptor to an AC
outlet.
2 Insert the supplied rechargeable
nickel-metal hydride batteries
into the battery compartment
matching 3 terminal on the
batteries to 3 in the
compartment.
Do not use rechargeable batteries
other than the supplied ones.
Getting started
GB
5
Page 6

5 Connect the supplied AC power
adaptor to the transmitter.
Transmitter
to an AC outlet
When the indicator is not lit
Check if the right and left headphones
are rested on the transmitter correctly.
The indicator may not be lit if the
headphones’ contact point does not
meet the transmitter’s contact pin. Take
off the headphones and place them on
the transmitter again so that the
indicator lights up.
AC power
adaptor
(supplied)
to DC IN 9V jack
6 Rest the headphones on the
transmitter so that the
headphones’ contact point
meets the transmitter’s contact
pin while making sure that the
charging indicator lights up.
The charging is completed in about
16 hours and the charging indicator
goes off.
When placing the headphones on
the transmitter, be sure to hold them
with both hands so that the right
and left housings are horizontal.
Place the headphones vertically on
the transmitter then tilt them back
as illustrated below.
To recharge the headphone
battery after use
Place the headphones on the transmitter
after you use the headphones. Since the
built-in timer recognizes when
charging is complete, there is no need to
take off the headphones from the
transmitter after the completion of
charging.
Notes
•The transmitter automatically turns off
while charging the batteries.
•This system is designed to charge only the
supplied rechargeable batteries type
BP-HP550 for safety. Note that other types
of rechargeable batteries cannot be charged
with this system.
•If dry batteries are installed, they cannot be
charged.
•Do not attempt to use the supplied BPHP550 rechargeable batteries for other
components. They are for use with this
system only.
•Charge in an environmental temperature of
between 0˚C and 40˚C (between 32˚F and
104˚F).
Right
housing
Left housing
GB
6
Getting started
Page 7

Charging and usage hours
Approx.
charging hours
1 hour
16 hours*
*1at 1 kHz, 1 mW+1 mW output when the
*2hours required to fully charge empty
*3Time stated above may vary, depending
2
VIBRATION switch is set to OFF
batteries
on the temperature or conditions of use.
Approx. usage
1
time*
1 hour and 45
minutes*
26 hours*
3
3
Using the headphones with dry
batteries (sold separately)
Commercially available (size AAA) dry
batteries can also be used to power the
headphones. Install the batteries in the
same manner as described in steps 1
through 3 of “Charging the supplied
rechargeable batteries.”
When dry batteries are installed, the
battery charge function is not
activated.
Notes on Batteries
• Do not charge a dry battery.
• Do not carry a dry battery together
with coins or other metallic objects. It
can generate heat if the positive and
negative terminals of the battery are
accidentally come into contact with
metallic objects.
• When you are not going to use the
unit for a long time, remove the
battery to avoid damage from battery
leakage or corrosion.
Checking the remaining battery
power
Pull up the self-adjusting band and
check the power indicator located on
the upper part of the right housing. The
batteries are still serviceable when the
indicator lights in red.
Charge the rechargeable batteries or
install new dry batteries if the power
indicator light dims, flashes, or the
sound becomes distorted or noisy.
Battery life
Battery
Sony alkaline battery
LR03/AM-4(N)
Sony manganese
battery R03/UM-4
(NU)
*1at 1 kHz, 1 mW+1 mW output when the
VIBRATION switch is set to OFF
*2Time stated above may vary, depending
on the temperature or conditions of use.
Approx. hours*
45 hours*
20 hours*
2
2
Note
The rechargeable nickel-metal hydride
1
batteries should be replaced with new ones
when they last only half the expected time
after a proper recharging. The rechargeable
batteries type BP-HP550 are not
commercially available. You can order the
batteries from the store where you
purchased this system, or at your nearest
Sony dealer.
Getting started
GB
7
Page 8

Setting up the
transmitter
1 Stereo system, TV, VCR,
etc.
1 Connect the transmitter to
audio/video component.
Select one of three connection
methods (1, 2 or 3) described
below.
1 When connecting the
transmitter to a component
equipped with anything other
than a headphones jack (Stereo
system, TV, VCR, etc.)
Connect to INPUT A jack on the
transmitter using the supplied
connecting cord.
2 When connecting the
transmitter to a component
equipped with a headphones
jack (WALKMAN*, TV, VCR, etc.)
Connect to INPUT B jack on the
transmitter using the supplied
connecting cord.
Left channel
(white)
to output jack
anything other
than headphones
jack
Transmitter
to INPUT A jack
to INPUT
B jack
Connecting cord (supplied)
to headphones jack
(stereo mini jack)
Right channel
(red)
Connecting
cord
(supplied)
Left channel (white)
Right channel
(red)
Unimatch plug
adaptor (supplied)
to headphones jack
(stereo phone jack)
2 WALKMAN*,
TV, VCR, etc.
* WALKMAN is a registered trademark of
Sony Corporation to represent Headphone
Stereo products.
GB
8
Getting started
Page 9
3 When connecting the
transmitter to Playstation 2
Connect to INPUT B jack on the
transmitter using the cable supplied
with Playstation 2.
Transmitter
to INPUT B
jack
Audio left
channel (white)
Audio right
channel (red)
Video channel
(yellow)
TV
Playstation 2
Note
Use the extension cord RK-C111 (sold
separately) as necessary.
AV cable (supplied
with Playstation 2)
2 If your AC power adaptor is
equipped with a voltage
selector, set it to the operating
voltage in your area with a
screw driver before connecting
the AC power adaptor to an AC
outlet.
3 Connect the supplied AC power
adaptor to the transmitter.
Transmitter
AC power
adaptor
(supplied)
to DC IN 9 V jack
Notes
•Do not connect to the INPUT A jack and
INPUT B jack at the same time. If you
connect two audio/visual components to
both jacks at the same time, both of the
audio signals may result in mixed output.
•Use only the supplied AC power adaptor.
Do not use any AC power adaptor.
Unified
polarity plug
•When you connect the connecting cord
directly to an earphone jack (monaural
mini jack), the audio signal may not be
output through the right channel. In such a
case, use the separately sold PC-236MS
plug adaptor (stereo mini jack h
monaural mini plug) between the
connecting cord and the earphone jack.
to an AC
outlet
Getting started
GB
9
Page 10

N Operating the system
Listening to a
programme
Before listening
To prevent your ears from being
damaged, first lower the volume.
1 Turn on the audio/video
component connected to the
transmitter.
When the audio signal is input, the
transmitter turns on automatically
and the infrared emitters glow but
they do not glow while the
transmitter is charging the batteries.
If the transmitter is connected to the
headphone jack, set the volume
control of the audio source
component as high as possible but
not so high that the audio signal
becomes distorted.
4 Adjust the volume.
Notes
•You may hear some noise when you
disconnect the AC power adaptor from the
transmitter before taking off the
headphones.
•If the infrared sensors are covered by your
hands when adjusting the volume, the
mute function will be activated and
volume may not be adjusted. To adjust the
volume, move nearer toward the
transmitter or orient the infrared emitters
on the left housing towards the transmitter.
2 Put on the headphones.
The power indicator on the upper
part of the right housing glows red.
Be sure to put the right housing (R)
on your right ear and the left
housing (L) on your left ear. Wear
the headphones vertically on your
head so that auto power on function
is properly activated.
3 Start playback of the
component connected to the
transmitter.
GB
10
Operating the system
Page 11
The headphones automatically
turn off when they are taken off
— Auto power on/off function
Do not pull up the self-adjusting band
when not in use, as this will consume
the battery power.
Sound is automatically muted if
noise increases
— Mute function
If the infrared rays are obstructed, or
the headphones are used outside their
effective range, noise will increase and
sound will become hard to hear. To
avoid potential ear damage as a result
of noise, this function mute any sound
from the headphones. Sound is
automatically restored when you move
nearer the transmitter or remove the
obstruction.
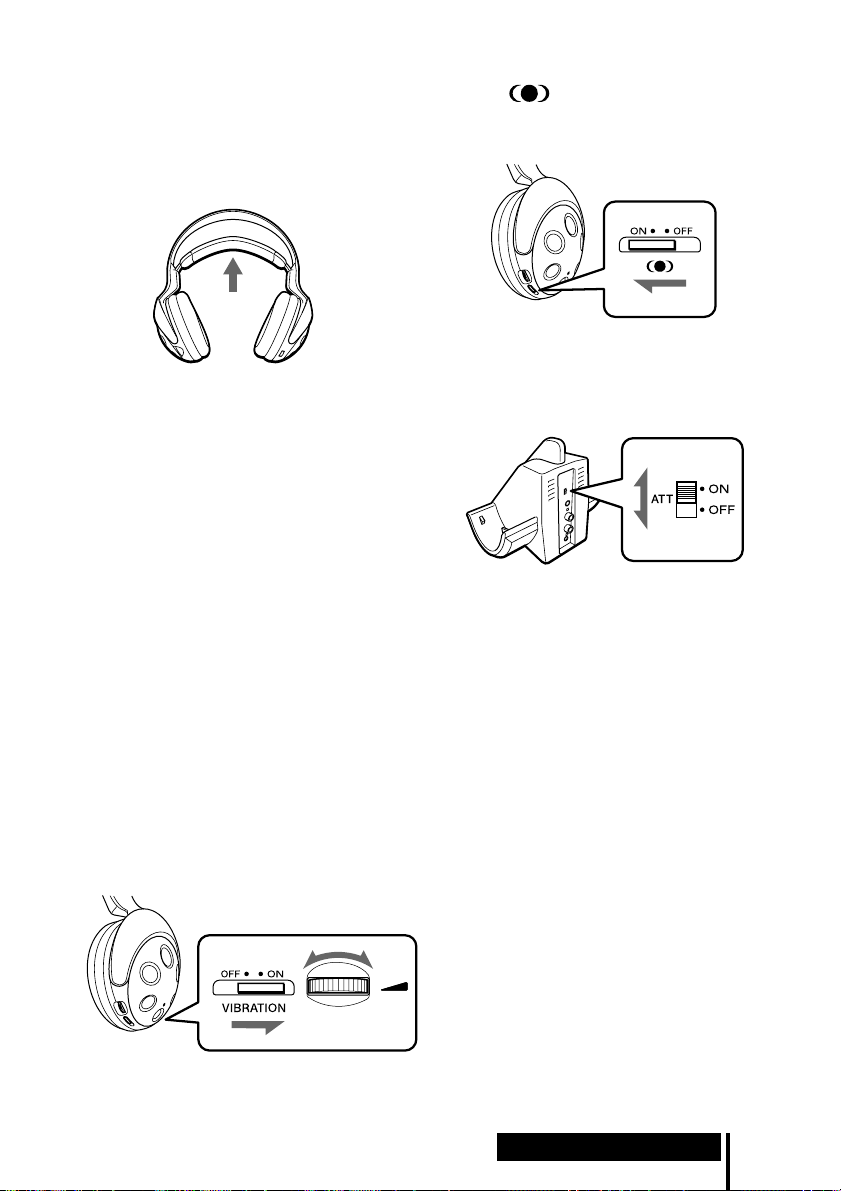
Using SRS surround function
Set the
switch to ON to reproduce
a wide surround sound field through
the headphones.
Using the ATT (Attenuator) switch
If the input volume is low, set the ATT
switch on the transmitter to OFF.
If no audio signal is input for
more than approximately 5
minutes
The transmitter turns off automatically.
Using the vibration function
Set the VIBRATION switch to ON and
adjust the level of vibration using the
vibration volume. You can enjoy
powerful bass sound when you listen to
movies or games through the
headphones.
Note
The brightness of the infrared emitters may
not be uniform, however, this is not a
malfunction.
Operating the system
11
GB
Page 12

The effective area
Replacing the ear
of the transmitter
The illustration below shows the
approximate area covered by the
infrared rays emitted from the
transmitter.
Transmitter
Approx. 3 m
1
(118
/8 in.)
Approx. 3 m
1
/8 in.)
(118
Notes
•If you use the headphones at too great a
distance from the transmitter, you may
hear a hissing noise and if there is an object
between the headphones and the
transmitter, sound may be interrupted.
These phenomena are inherent to infrared
ray communication and do not mean that
there is a problem with the system itself.
•Do not cover the infrared sensors with your
hands or hair.
•When you use the headphones inside the
area in the illustration above, the
transmitter can be placed in front, behind
or by the side of you.
•The noise you may hear through the
headphones may vary depending on the
transmitter position and room conditions.
It is recommended that you place the
transmitter in a location that produces the
clearest sound.
•Do not use this system in areas exposed to
direct sunlight or strong light. The sound
may be interrupted.
•Plasma displays may interfere with normal
operation of this system.
Infrared ray
Approx. 7 m
(23 ft.)
pads
The ear pads are replaceable. If the ear
pads become dirty or worn out, replace
them as illustrated below.
The ear pad is not commercially
available. You can order replacements
from the store where you purchased
this system, or at your nearest Sony
dealer.
1 Remove the old ear pad by
pulling it off.
2 Place the new ear pad around
the housing.
12
GB
Operating the system
Page 13

N
Additional information
Specifications
General
Modulation system
Frequency modulation
Carrier frequency
Right 2.8 MHz
Left 2.3 MHz
Frequency response
18 – 22,000 Hz
Transmitter TMR-IF540R
Power source DC IN 9 V jack accepts
Where
purchased
U.S.A.
U.K.
European countries
Japan (exept for
Japanese
domestic model)
Other countries
Audio input Phono jacks/stereo mini jack
Dimensions Approx. 133 × 124 × 136 mm
Mass Approx. 160 g (6 oz.)
power supplied from the AC
power adaptor for use on the
following voltages:
Operating
voltage
120 V AC, 60 Hz
230 – 240 V AC, 50 Hz
220 – 230 V AC, 50 Hz
110 V/120 V/220 V/
240 V AC, 50/60 Hz
220 – 230 V AC, 50/
60 Hz or 120 V AC,
60 Hz
(5 1/4 × 5 × 5 3/8 in.)
(w/h/d)
Headphone MDR-IF540R
Power source Supplied rechargeable
nickel-metal hydride
batteries BP-HP550 or
commercially available
(size AAA) dry batteries
Mass Approx. 285 g (11 oz.)
including batteries
Supplied accessories
AC power adaptor (1)
Connecting cord (approx. 1m, stereo mini
plug × 1 y phono plug × 2) (1)
Rechargeable nickel-metal hydride
batteries BP-HP550 (550 mAh) (2)
Unimatch plug adaptor (stereo mini jack
y stereo phone plug) (1)
Operating instructions (1)
Optional accessories
• If sound is not output through the right
channel when the supplied connecting
cord is connected to the earphone jack.
Plug adaptor PC-236MS
(stereo mini jack y monaural mini
plug)
• If you have lost the supplied plug
adaptor.
Plug adaptor PC-234S
(stereo mini jack y stereo phone plug)
• If you have lost the supplied connecting
cord.
RK-G129
(1.5 m, stereo mini plug y phono plug
× 2)
Design and specifications are subject to
change without notice.
Additional information
13
GB
Page 14

Precautions
Troubleshooting
• When the transmitter is not to be
used for a long period of time,
disconnect the AC power adaptor
from the AC outlet holding the plug
and remove the batteries to avoid
damage caused by battery leakage
and subsequent corrosion.
• Do not leave the cordless stereo
headphones system in a location
subject to direct sunlight, heat or
moisture (It is recommended to use
the headphones at a temperature of
between 5˚C and 35˚C (between 41˚F
and 95˚F).)
• Do not drop, hit or otherwise subject
the transmitter or headphones to
strong shocks of any kind. This could
damage the product.
Notes on headphones
preventing hearing damage
Avoid using headphones at high
volume. Hearing experts advise against
continuous, loud and extended play. If
you experience a ringing in your ears,
lower the volume or discontinue use.
Caring for others
Keep the volume at a moderate level.
This will allow you to hear outside
sounds and to be considerate to the
people around you.
If you have any questions or problems
concerning the system that are not
covered in this manual, please consult
nearest Sony dealer.
Be sure to bring the headphones and
the transmitter to Sony dealer when
requiring repair work.
No sound/Muffled sound
, Turn on the transmitter first, and then
put on the headphones.
, Check the connection of the audio/
video equipment or the AC power
adaptor.
, Check that the audio/video equipment
connected to the transmitter is turned
on.
, If the transmitter is connected to the
headphones jack, raise the volume of
the audio/video equipment connected
to the transmitter.
, The mute function is activated.
• Check if there is any object between
the transmitter and the headphones.
• Use the headphones near the
transmitter.
• Change the position and angle of the
transmitter.
, The headphones’ power indicator light
dims, flashes or goes off.
• Charge the rechargeable batteries if
the headphones’ batteries are weak,
or replace dry batteries with new
ones. If the power indicator is still off
after charging the batteries, take the
headphones to a Sony dealer.
, Set the ATT switch on the transmitter
to OFF.
Distorted sound
, If the transmitter is connected to the
headphones jack, lower the volume of
the audio/video equipment connected
to the transmitter.
, The headphones’ power indicator light
dims, flashes or goes off.
• Charge the rechargeable batteries if
the headphones’ batteries are weak,
or replace dry batteries with new
ones. If the power indicator is still
off after charging the batteries, take
the headphones to a Sony dealer.
, Set the ATT switch on the transmitter
to ON.
14
GB
Additional information
Page 15

Loud background noise
, Move closer to the transmitter. (As you
move away from the transmitter, more
noise is likely to be heard. This is
inherent in infrared ray communication
and does not mean that there is a
problem with the unit itself.)
, Check that there is no object between
the transmitter and the headphones.
, Check that the infrared sensors are not
covered with your hands or hair.
, If you use the headphones by a
window where the sunlight is too
strong, draw the curtains/blinds to
shut out the direct sunlight, or use the
headphones away from the sunlight.
, Change the position or angle of the
transmitter.
, If the transmitter is connected to the
headphones jack, raise the volume of
the audio/video equipment connected
to the transmitter.
, The headphones’ power indicator light
dims, flashes or goes off.
• Charge the rechargeable batteries if
the headphones’ batteries are weak,
or replace dry batteries with new
ones. If the power indicator is still off
after charging the batteries, take the
headphones to a Sony dealer.
, When you have another transmitter,
check if more than one transmitters are
used at the same time.
• Turn off other transmitter or move to
a place outside the range of this
transmitter.
The batteries cannot be
charged
, Check if the charging indicator light is
on. If not, put the headphones on the
transmitter correctly so that the
charging indicator light is on.
, Dry batteries are installed.
• Install the supplied rechargeable
nickel-metal hydride batteries.
, Rechargeable batteries other than the
supplied are installed.
• Install the supplied rechargeable
nickel-metal hydride batteries.
Additional information
15
GB
Page 16

AVERTISSEMENT
Pour les utilisateurs aux Etats-Unis
et au Canada
Pour éviter tout risque
d’incendie ou d’électrocution,
n’exposez pas cet appareil à la
pluie ni à l’humidité.
Pour éviter tout risque d’incendie ou
d’électrocution, ne posez pas de
récipients remplis d’eau (p. ex. des
vases) sur l’appareil.
Pour éviter tout risque d’électrocution,
n’ouvrez pas le coffret. Ne confiez les
réparations qu’à un technicien qualifié.
N’installez pas l’appareil dans un
espace restreint, comme une
biblioth
è
que ou un meuble encastré.
RECYCLAGE DES
ACCUMULATEURS À HYDRURE
MÉTALLIQUE DE NICKEL
Les accumulateurs à
hydrure métallique
de nickel sont
recyclables.
Vous pouvez
contribuer à
préserver
l’environnement en rapportant les
piles usées dans un point de
collection et recyclage le plus proche.
Pour plus d’informations sur le
recyclage des accumulateurs,
téléphonez le numéro gratuit
1-800-822-8837 (Etats-Units et Canada
uniquement), ou visitez http://
www.rbrc.org/
Avertissment: Ne pas utilliser des
accumulateurs à hidrure métallique
de nickel qui sont endommagées ou
qui fuient.
FR
2
Page 17

Félicitations !
Nous vous remercions d’avoir fait
l’acquisition de ce système de casque
d’écoute stéréo sans fil Sony MDRIF540RK. Avant d’utiliser cet appareil,
veuillez lire attentivement ce manuel et
conservez-le pour toute référence
ultérieure.
Le modèle MDR-IF540RK est un
système de casque d’écoute stéréo sans
fil utilisant une transmission à
infrarouges. Vous pouvez apprécier
l’écoute d’un programme sans être
limité par le cordon du casque en
raccordant simplement le transmetteur
à un téléviseur ou à des composants
audio équipés d’une prise destinée aux
casques ou d’une prise de sortie.
• Système de casque à infrarouges sans fil,
silencieux pour l’entourage et isolé des
bruits extérieurs.
• Un système de piles facilement
rechargeables recharge le casque lorsqu’il
est placé sur le transmetteur.
• Large plage de réception infrarouge
atteignant 7 m (23 pi.).
• Une fonction automatique de mise sous
tension/hors tension met automatiquement
le casque sous tension lorsqu’il est utilisé et
hors tension lorsqu’il est retiré.
• Un serre-tête auto-ajustable évite son
ajustement manuel.
• Une seule commande VOL ajuste le
volume droit et gauche du casque.
• Des piles rechargeables nickelhydrure
métallique (fournies) ou des piles sèches
(format AAA) disponibles dans le
commerce peuvent être utilisées pour
alimenter le casque.
• Fonction de vibration afin de faire vibrer le
moteur intégré par la détection de basses
fréquences (environ 100 Hz et au-dessous)
des signaux audio.
• La fonction ambiophonique du casque
SRS* reproduit un son ambiophonique
réaliste à travers le casque.
* SRS est une marque commerciale
de SRS Labs Inc.
Les casques SRS sont fabriqués sous
licence SRS Labs.
Table des matières
Préparatifs
Déballage............................................. 4
Recharge des piles rechargeables
fournies ............................................ 5
Installation du transmetteur............. 8
Utilisation du système
Ecoute d’un programme ................. 10
Portée du transmetteur ................... 12
Remplacement des coussinets........ 12
Informations
complémentaires
Spécifications .................................... 13
Précautions ....................................... 14
Dépannage ........................................ 14
3
FR
FR
Page 18

N Préparatifs
Déballage
Vérifiez que vous disposez bien des
éléments suivants avant d’utiliser le
casque :
• Transmetteur TMR-IF540R (1)
• Adaptateur secteur (1)
• Cordon de liaison (1)
(fiches mono h mini-fiche stéréo)
• Le casque MDR-IF540R (1)
• Adaptateur de fiche Unimatch (1)
(mini-prise stéréo h fiche de
casque stéréo)
• Piles rechargeables nickelhydrure
métallique (2)
FR
4
Préparatifs
Page 19

Recharge des
piles
rechargeables
fournies
Les piles rechargeables nickelhydrure
métallique fournies ne sont pas
chargées lors de la première utilisation.
Veillez à les charger avant de les
utiliser.
Pour recharger le casque, placez-le sur
le transmetteur.
1 Appuyez sur le bouton du
boîtier de l’écouteur gauche
pour ouvrir le couvercle du
compartiment à piles.
Le couvercle du compartiment à
piles s’ouvre.
3 Refermez le couvercle du
compartiment à piles.
4 Si votre adaptateur secteur est
doté d’un sélecteur de tension,
réglez-le sur la tension de
fonctionnement locale à l’aide
d’un tournevis avant de
raccorder l’adaptateur secteur à
une prise secteur.
Bouton
2 Insérez les piles rechargeables
nickelhydrure métallique dans le
compartiment à piles en faisant
correspondre la borne 3 des
piles au repère 3 du
compartiment.
N’utilisez pas de piles rechargeables
autres que celles fournies.
Préparatifs
FR
5
Page 20

5 Raccordez l’adaptateur secteur
fourni au transmetteur.
Transmetteur
vers une prise
secteur
Adaptateur
secteur
(fourni)
vers la prise DC IN 9 V
6
Posez le casque sur le
transmetteur de sorte que le
point de contact des écouteurs
soit en contact avec la broche de
contact du transmetteur et que le
témoin de charge s’allume.
Le chargement s’effectue en
16 heures environ et le témoin de
chargement s’éteint.
Lorsque vous placez le casque sur le
transmetteur, veillez à le tenir avec
les deux mains de sorte que les
boîtiers des écouteurs droit et
gauche restent horizontaux. Placez
le casque verticalement sur le
transmetteur, puis inclinez-le vers
l’arrière comme illustré ci-dessous.
Si le témoin ne s’allume pas
Vérifiez si les écouteurs droit et gauche
sont posés correctement sur le
transmetteur. Il se peut que le témoin
ne s’allume pas si le point de contact
des écouteurs n’est pas en contact avec
la broche de contact du transmetteur.
Retirez les écouteurs du transmetteur,
puis replacez-les sur le transmetteur
pour que le témoin s’allume.
Rechargement des piles du
casque après utilisation
Après utilisation, replacez le casque sur
le transmetteur. Etant donné que la
minuterie intégrée détecte la fin du
chargement, vous n’avez pas besoin de
retirer le casque du transmetteur une
fois le chargement terminé.
Remarques
•Le transmetteur se met automatiquement
hors tension en cours de chargement des
piles.
•Pour votre sécurité, ce système est conçu
pour recharger uniquement les piles
rechargeables fournies de type BP-HP550.
Notez que les autres types de piles
rechargeables ne peuvent pas être
rechargées avec ce système.
•Si des piles sèches sont installées, elles ne
peuvent pas être rechargées.
•N’essayez pas d’utiliser les piles
rechargeables BP-HP550 fournies pour
d’autres composants. Elles doivent être
utilisées avec ce système uniquement.
•Effectuez le rechargement à une
température ambiante comprise entre 0˚C
et 40˚C (entre 32˚F et 104˚F).
Boîtier de
l’écouteur
droit
Boîtier de
l’écouteur gauche
FR
6
Préparatifs
Page 21

Recharge et durées d’utilisation
Durée de
chargement
approximative
1 heure
16 heures*
*1à 1 kHz, sortie de 1 mW + 1 mW lorsque le
*2nombre d’heures requises pour recharger
*3La durée mentionnée ci-dessus peut varier selon
2
commutateur VIBRATION est désactivé (OFF)
entièrement des piles vides
la température ou les conditions d’utilisation.
Durée
d’utilisation
approximative*
1 heure et
45 minutes*
26 heures*
3
3
Utilisation du casque avec des
piles sèches (vendues
séparément)
Des piles sèches (format AAA)
disponibles dans le commerce peuvent
également être utilisées pour alimenter
le casque. Installez les piles de la même
façon que celle décrite dans les étapes 1
à 3 de la section « Recharge des piles
rechargeables fournies ».
Lorsque des piles sèches sont installées,
la fonction de recharge des piles est
inactive.
Remarques concernant la pile
• Ne rechargez pas une pile sèche.
• Ne mettez pas en contact une pile
1
sèche avec des pièces ou d’autres
objets métalliques. Celle-ci peut en
effet produire de la chaleur si les
bornes positive et négative entrent
accidentellement en contact avec des
objets métalliques.
• Si vous n’utilisez pas l’appareil
pendant un certain temps, retirez la
pile pour éviter tout
endommagement dû à une fuite ou à
la corrosion.
Vérification de l’autonomie
restante de la pile
Soulevez la bande auto-ajustable et
vérifiez le témoin d’alimentation situé
sur la partie supérieure du boîtier de
l’écouteur droit. Les piles sont encore
en état de marche lorsque le témoin
s’allume en rouge.
Rechargez les piles rechargeables ou
installez de nouvelles piles sèches si le
témoin d’alimentation s’allume le son
se déforme ou comporte des parasites.
Durée de vie de la pile
Pile
Pile alcaline Sony
LR03/AM-4(N)
Pile au manganèse
Sony R03/UM-4 (NU)
*1à 1 kHz, sortie de 1 mW + 1 mW lorsque le
commutateur VIBRATION est désactivé
(OFF)
*2La durée mentionnée ci-dessus peut varier
selon la température ou les conditions
d’utilisation.
Durée
approximative
1
en*
45 heures*
20 heures*
2
2
Remarque
Les piles rechargeables nickelhydrure
métallique doivent être remplacées par des
piles neuves lorsqu’elles ne durent plus que
la moitié de la durée normale après un
rechargement complet. Les piles
rechargeables de type BP-HP550 ne sont pas
disponibles dans le commerce. Vous pouvez
les commander dans le magasin où vous
avez acheté ce système ou chez votre
revendeur Sony le plus proche.
Préparatifs
7
FR
Page 22

Installation du
transmetteur
1 Chaîne stéréo, téléviseur,
magnétoscope, etc.
1 Raccordez le transmetteur à un
composant audio/vidéo.
Sélectionnez l’un des trois modes de
raccordement (1, 2 ou 3) décrits
ci-dessous.
1 Si vous raccordez le
transmetteur à un composant
équipé d’une prise différente
d’une prise de casque (chaîne
stéréo, téléviseur,
magnétoscope, etc.)
Procédez au raccordement à la prise
INPUT A du transmetteur à l’aide
du cordon de liaison fourni.
2 Si vous raccordez le
transmetteur à un composant
équipé d’une prise de casque
(WALKMAN*, téléviseur,
magnétoscope, etc.)
Procédez au raccordement à la prise
INPUT B du transmetteur à l’aide
du cordon de liaison fourni.
Canal gauche
(blanc)
vers une prise de
sortie différente
d’une prise de
casque
Transmetteur
vers la prise
INPUT A
vers la
prise
INPUT B
Cordon de liaison (fourni)
Canal droit
(rouge)
Cordon de
liaison
(fourni)
Canal gauche (blanc)
Canal droit
(rouge)
vers une prise de
casque (mini-prise
stéréo)
Adaptateur de fiche
Unimatch (fourni)
vers une prise de casque
(prise de casque stéréo)
2 WALKMAN*,
téléviseur,
magnétoscope, etc.
* « WALKMAN » est une marque déposée
par Sony Corporation pour représenter les
produits stéréo dotés d’écouteurs.
FR
8
Préparatifs
Page 23

3 Si vous raccordez le transmetteur
à une Playstation 2
Procédez au raccordement à la prise
INPUT B du transmetteur à l’aide
du câble fourni avec la Playstation 2.
Transmetteur
vers la prise
INPUT B
Canal audio
gauche (blanc)
3 Raccordez l’adaptateur secteur
fourni au transmetteur.
Transmetteur
vers une prise
secteur
Canal audio
droit (rouge)
Canal vidéo
(jaune)
Téléviseur
Playstation 2
Remarque
Utilisez le prolongateur RK-C111 (vendu
séparément), le cas échéant.
Câble AV (fourni avec
la Playstation 2)
2 Si votre adaptateur secteur est
doté d’un sélecteur de tension,
réglez-le sur la tension de
fonctionnement locale à l’aide
d’un tournevis avant de
raccorder l’adaptateur secteur à
une prise secteur.
Adaptateur
secteur
(fourni)
vers la prise DC IN 9 V
Remarques
•Ne procédez pas simultanément au
raccordement aux prises INPUT A et
INPUT B. Si vous raccordez deux
composants audio/vidéo aux deux prises
en même temps, il se peut que les signaux
audio sortent mélangés.
•Utilisez uniquement l’adaptateur secteur
fourni. N’utilisez aucun autre adaptateur
secteur.
Fiche à polarité
universelle
•Lorsque vous raccordez le cordon de
liaison directement à une prise de casque
(mini-prise monaurale), il se peut que le
signal audio ne soit pas émis via le canal
droit. En pareil cas, utilisez l’adaptateur de
fiche PC-236MS vendu séparément (miniprise stéréo h mini-fiche monaurale)
entre le cordon de liaison et la prise du
casque.
Préparatifs
FR
9
Page 24

N Utilisation du système
Ecoute d’un
programme
Avant l’écoute
Afin d’éviter des lésions auditives,
commencez par baisser le volume.
1 Mettez sous tension le
composant audio/vidéo
raccordé au transmetteur.
Lorsque le signal audio est transmis,
le transmetteur s’allume
automatiquement et les émetteurs à
infrarouges s’allument, mais ils ne
s’allument pas lorsque le
transmetteur est en train de
recharger les piles. Si le
transmetteur est raccordé à la prise
du casque, réglez la commande du
volume du composant audio source
mais de sorte que le signal audio ne
soit pas déformé.
4 Réglez le volume.
Remarques
•Il est possible que des parasites soient
audibles si vous déconnectez l’adaptateur
secteur du transmetteur avant de retirer le
casque.
•Si vos mains masquent les capteurs
infrarouges lors du réglage du volume, la
fonction de sourdine sera activée et le
volume ne sera pas peut-être pas réglé.
Afin de régler le volume, rapprochez-vous
du transmetteur ou orientez les émetteurs
infrarouges situés sur le boîtier de
l’écouteur gauche vers le transmetteur.
2 Mettez le casque.
Le témoin de mise sous tension situé
sur la partie supérieure du boîtier
de l’écouteur droit s’allume en
rouge.
Veillez à placer l’écouteur droit (R)
sur votre oreille droite et l’écouteur
gauche (L) sur votre oreille gauche.
Portez le casque verticalement sur
votre tête de sorte que la fonction de
mise sous tension automatique
puisse s’activer correctement.
3 Commencez la lecture du
composant raccordé au
transmetteur.
FR
10
Utilisation du système
Page 25

Le casque s’éteint
automatiquement lorsque vous le
retirez
— Fonction automatique de mise
sous tension/hors tension
Ne tirez pas sur la bande auto-ajustable
lorsque vous n’utilisez pas le casque,
ceci consomme l’énergie des piles.
Le son est automatiquement mis
en sourdine si les parasites
augmentent
— Fonction Mute (sourdine)
Si les rayons infrarouges rencontrent
des obstacles ou si le casque est utilisé
au-delà de sa portée, les parasites
augmentent et le son devient plus
difficile à percevoir. Afin d’éviter toute
lésion auditive potentielle résultant des
bruits parasites, cette fonction met en
sourdine tout son provenant du casque.
Le son est automatiquement rétabli
lorsque vous vous rapprochez du
transmetteur ou lorsque vous
supprimez l’obstacle.
Utilisation de la fonction
ambiophonique SRS
Réglez le commutateur
sur ON
pour reproduire un champ acoustique
ambiophonique large à travers le
casque.
Utilisation du commutateur ATT
(Atténuateur)
Si le volume d’entrée est faible, réglez le
commutateur ATT du transmetteur sur
OFF.
Utilisation de la fonction de
vibration
Réglez le commutateur VIBRATION
sur ON et ajustez le niveau de vibration
à l’aide du volume de vibration. Vous
pouvez apprécier les sons graves
puissants lorsque vous écoutez les
bandes son de films ou de jeux avec le
casque.
Si aucun signal audio n’est entré
pendant environ 5 minutes.
Le transmis éteint automatiquement.
Remarque
Il est possible que la luminosité des
émetteurs infrarouges ne soit pas uniforme,
il ne s’agit pas d’un dysfonctionnement.
Utilisation du système
11
FR
Page 26

Portée du
Remplacement
transmetteur
L’illustration ci-dessous indique la zone
approximative couverte par les rayons
infrarouges émis par le transmetteur.
Transmetteur
Environ 3 m
1
(118
/8 po.)
Environ 3 m
1
/8 po.)
(118
Remarques
• Si vous utilisez le casque à une distance
trop importante du transmetteur, il est
possible que vous perceviez un sifflement
et si un objet se trouve entre le casque et le
transmetteur, il est possible que le son soit
interrompu. Ces phénomènes sont
inhérents à la communication à rayons
infrarouges et ne signifient pas que le
système en lui-même est défectueux.
• Ne masquez pas les capteurs à infrarouges
avec vos mains ou vos cheveux.
• Lorsque vous utilisez le casque dans la
zone illustrée ci-dessus, le transmetteur
peut être placé devant, derrière ou à côté
de vous.
• Il est possible que le son qui vous parvient
des écouteurs diffère selon la position du
transmetteur et l’état de la pièce. Il est
conseillé de placer le transmetteur dans un
endroit reproduisant le son le plus clair.
• N’utilisez pas ce système dans des endroits
exposés à la lumière directe du soleil ou à
une lumière forte. Le son risquerait de
s’interrompre.
• Il est possible que les écrans plasma
interfèrent avec le fonctionnement normal
de ce système.
Rayon infrarouge
Environ 7 m.
(23 pi.)
des coussinets
Les coussinets peuvent être remplacés.
Si les coussinets se salissent ou s’usent,
remplacez-les ainsi qu’il est illustré cidessous.
Les coussinets ne sont pas disponibles
dans le commerce. Vous pouvez les
commander dans le magasin où vous
avez acheté ce système ou chez votre
revendeur Sony le plus proche.
1 Retirez le coussinet usagé en
tirant dessus.
2 Installez le nouveau coussinet
autour du boîtier de l’écouteur.
12
FR
Utilisation du système
Page 27

N Informations
complémentaires
Spécifications
Généralités
Système de modulation
Modulation de fréquence
Fréquence porteuse
Droite 2,8 MHz
Gauche 2,3 MHz
Réponse en fréquence
18 – 22 000 Hz
Transmetteur TMR-IF540R
Source d’alimentation
Lieu d’achat
Etats-Unis
R.U.
Pays européens
Japon (à l’exception
du modèle pour le
marché intérieur
japonais)
Autres pays
Entrée audio Prises phono/mini-prise
Dimensions Environ 133 x 124 x 136 mm
Poids Environ 160 g. (6 on.)
La prise DC IN 9 V accepte
le courant fourni par
l’adaptateur secteur avec les
tensions suivantes :
Tension de
fonctionnement
CA 120 V, 60 Hz
CA 230 - 240 V, 50 Hz
CA 220 - 230 V, 50 Hz
CA 110 V/120 V/220 V/
240 V, 50/60 Hz
CA 220-230 V, 50/60 Hz
ou CA 120 V, 60 Hz
stéréo
1
(5
/4 × 5 × 5
3
/8 po.) (l/h/p)
Casque MDR-IF540R
Source d’alimentation
Piles rechargeables
nickelhydrure métallique de
type BP-HP550 fournies ou
piles sèches
(format AAA) disponibles
dans le commerce
Poids Environ 285 g. (11 on.) avec
les piles
Accessoires fournis
Adaptateur secteur (1)
Cordon de liaison (environ 1 m, mini-fiche
stéréo × 1 y fiche phono × 2) (1)
Piles rechargeables nickelhydrure
métallique BP-HP550 (550 mAh) (2)
Adaptateur de fiche Unimatch (mini-prise
stéréo y fiche de casque stéréo) (1)
Mode d’emploi (1)
Accessoires en option
• Si le son n’est pas émis par le canal droit
lorsque le cordon de liaison fourni est
raccordé à la prise du casque.
Adaptateur de fiche PC-236MS
(mini-prise stéréo y mini-fiche
monaurale)
• Si vous avez perdu l’adaptateur de fiche
fourni.
Adaptateur de fiche PC-234S
(mini-prise stéréo y fiche phono
stéréo)
• Si vous avez perdu le cordon de liaison
fourni.
RK-G129
(1,5 m, mini-fiche stéréo y fiche phono)
× 2)
La conception et les spécifications sont
sujettes à modifications sans préavis.
Informations complémentaires
13
FR
Page 28

Précautions
Dépannage
• Lorsque le transmetteur n’est pas utilisé
pendant une période prolongée,
débranchez l’adaptateur secteur de la
prise secteur en prenant la fiche et
retirez les piles pour éviter tout
dommage causé par une fuite des piles
ou une corrosion.
• Ne laissez pas le système de casque
stéréo sans fil dans un endroit soumis à
la lumière directe du soleil, à la chaleur
ou à l’humidité (il est conseillé
d’utiliser le casque à une température
comprise entre 5 °C et 35 °C (entre
41 °F et 95 °F)).
• Ne laissez pas tomber, ne cognez pas
ou ne soumettez pas le casque à des
chocs violents car vous risquez de
l’endommager.
Remarques sur les casques
afin d’éviter les lésions
auditives
Evitez d’utiliser les casques à un
volume élevé. Les experts en audition
déconseillent une utilisation continue
prolongée à un volume élevé. Si vous
percevez un son persistant dans les
baissez le volume ou cessez d’utiliser le
casque.
Respect des autres
Gardez le volume à un niveau modéré.
Ceci vous permettra d’écouter les sons
de l’extérieur et d’être respectueux des
gens qui vous entourent.
Si vous avez des questions ou des
problèmes concernant ce système qui ne
sont pas traités dans ce manuel, consultez
votre revendeur Sony le plus proche.
Veillez à rapporter à la fois le casque et le
transmetteur à votre revendeur Sony si
une réparation est nécessaire.
Aucun son/son étouffé
, Mettez tout d’abord le transmetteur
sous tension, puis mettez le casque.
, Vérifiez le raccordement de
l’équipement audio/vidéo ou de
l’adaptateur secteur.
, Vérifiez que l’équipement audio/vidéo
raccordé au transmetteur est mis sous
tension.
, Si le transmetteur est raccordé à la prise
du casque, augmentez le volume de
l’équipement audio/vidéo raccordé au
transmetteur.
, La fonction de sourdine est activée.
• Vérifiez si un objet se trouve entre le
transmetteur et le casque.
• Utilisez le casque à proximité du
transmetteur.
• Changez la position et l’angle du
transmetteur.
, Le témoin d’alimentation du casque
s’allume faiblement, clignote ou
s’éteint.
• Rechargez les piles rechargeables si
les piles du casque sont faibles ou
remplacez les piles sèches par des
neuves. Si le témoin d’alimentation
reste éteint alors que les piles sont
rechargées, apportez le casque chez
un revendeur Sony.
, Réglez le commutateur ATT du
transmetteur sur OFF.
Le son est distordu
, Si le transmetteur est raccordé à la prise
du casque, baissez le volume de
l’équipement audio/vidéo raccordé au
transmetteur.
, Le témoin d’alimentation du casque
s’allume faiblement, clignote ou
s’éteint.
• Rechargez les piles rechargeables si
les piles du casque sont faibles ou
remplacez les piles sèches par des
neuves. Si le témoin d’alimentation
reste éteint alors que les piles sont
rechargées, apportez le casque chez
un revendeur Sony.
14
FR
Informations complémentaires
Page 29

, Réglez le commutateur ATT du
transmetteur sur ON.
Bruit de fond important
, Rapprochez-vous du transmetteur. (Au
fur et à mesure que vous vous éloignez
du transmetteur, les parasites risquent
d’être amplifiés. Ces phénomènes sont
inhérents à la communication à rayons
infrarouges et ne signifient pas que le
système en lui-même est défectueux.)
, Vérifiez qu'aucun objet ne se trouve
entre le transmetteur et le casque.
, Vérifiez que les capteurs à infrarouges
ne sont pas couverts par vos mains ou
vos cheveux.
, Si vous utilisez le casque à proximité
d’une fenêtre où la luminosité est trop
importante, tirez les rideaux/baissez
les volets pour obturer la lumière
directe du soleil ou utilisez le casque à
distance de la lumière du soleil.
, Changez la position ou l’angle du
transmetteur.
, Si le transmetteur est raccordé à la prise
du casque, augmentez le volume de
l’équipement audio/vidéo raccordé au
transmetteur.
, Le témoin d’alimentation du casque
s’allume faiblement, clignote ou
s’éteint.
• Rechargez les piles rechargeables si
les piles du casque sont faibles ou
remplacez les piles sèches par des
neuves. Si le témoin d’alimentation
reste éteint alors que les piles sont
rechargées, apportez le casque chez
un revendeur Sony.
, Si vous disposez d’un autre
transmetteur, vérifiez si plusieurs
transmetteurs sont utilisés
simultanément.
• Mettez l’autre transmetteur hors
tension ou déplacez-le au-delà de la
portée de ce transmetteur.
Impossible de recharger les
piles
, Vérifiez si le témoin de chargement
s’allume. Dans le cas contraire, placez
correctement le casque sur le
transmetteur, de sorte que le témoin de
chargement s’allume.
, Des piles sèches sont installées.
• Installez les piles rechargeables
nickelhydrure métallique fournies.
, Des piles rechargeables autres que
celles fournies sont installées.
• Installez les piles rechargeables
nickelhydrure métallique fournies.
Informations complémentaires
15
FR
Page 30

ADVERTENCIA
Para evitar incendios o el
riesgo de electrocución, no
exponga la unidad a la lluvia
ni a la humedad.
Para evitar el riesgo de incendio o
electrocución, no coloque sobre el
aparato objetos que contengan líquidos
como, por ejemplo, un jarrón.
Para evitar descargas eléctricas, no abra
la unidad. En caso de avería, solicite los
servicios de personal cualificado
solamente.
No sitúe el aparato en un espacio
cerrado, como una estantería o un
armario empotrado.
Para clientes en EE UU. y Canadá
RECICLADO DE BATERÍAS DE
HIDRURO DE METAL DE NÍQUEL
Las baterías de
hidruro de metal de
níquel son reciclables.
Usted podrá ayudar a
conservar el medio
ambiente
devolviendo las
baterías usadas al punto de recogida
y reciclaje más próximo.
Para más información sobre el
reciclado de baterías, llame al
número gratuito 1-800-822-8837, o
visite http://www.rbrc.org/.
Precaución:
No utilice baterías de hidruro de
metal de níquel dañadas o con fugas.
ES
2
Page 31

Bienvenido
Índice
Gracias por adquirir el sistema de
auriculares estéreo inalámbricos MDRIF540RK de Sony. Antes de utilizar la
unidad, lea este manual atentamente y
consérvelo para consultarlo en el
futuro.
MDR-IF540RK es un sistema de
auriculares estéreo inalámbricos que
utiliza una transmisión de infrarrojos.
Este sistema permite escuchar un
programa sin las limitaciones que
supone el cable de los auriculares
gracias a la conexión del transmisor al
televisor o a componentes de audio
equipados con una toma de auriculares
o con una toma de salida de línea.
• Sistema de auriculares infrarrojos silenciosos
e inalámbricos resistente al ruido externo,
etc.
• Sencillo sistema de pila recargable que carga
de manera automática los auriculares al
colocarlos en el transmisor.
• Amplia área de recepción de infrarrojos de
hasta 7 m.
• Función automática de conexión/
desconexión que activa los auriculares
cuando el usuario se los coloca y los
desactiva cuando se los saca.
• Mecanismo de autoajuste de la cinta para la
cabeza que elimina al usuario la necesidad
de ajustarla él mismo.
• Control de volumen (VOL) único para
ajustar el volumen de los auriculares
derecho e izquierdo.
• Puede alimentar los auriculares con pilas de
hidruro metálico de níquel recargables
(suministradas) o pilas secas (tamaño AAA)
de venta en establecimientos especializados.
• Función de vibración que hace vibrar el
motor de vibración incorporado al detectar
señales de audio con frecuencias bajas (de
aproximadamente 100 Hz o inferior).
• Función envolvente* de los auriculares SRS
que reproduce un sonido envolvente de alta
fidelidad a través de los auriculares.
Procedimientos iniciales
Desembalaje ........................................ 4
Carga de las pilas recargables
suministradas ................................. 5
Configuración del transmisor .......... 8
Uso del sistema
Recepción de un programa............. 10
Área efectiva del transmisor .......... 12
Sustitución de las almohadillas de
los auriculares ............................... 12
Información complementaria
Especificaciones................................ 13
Precauciones ..................................... 14
Solución de problemas .................... 14
ES
* SRS es una marca comercial
registrada de SRS Labs Inc.
Los auriculares SRS están fabricados bajo
licencia de SRS Labs. Inc.
ES
3
Page 32

N
Procedimientos iniciales
Desembalaje
Antes de utilizar los auriculares,
compruebe que dispone de los
componentes siguientes:
• Transmisor TMR-IF540R (1)
• Adaptador de alimentación de CA (1)
• Cable conector (1)
(conectores fonográficos h
miniconector estéreo)
• Auriculares MDR-IF540R (1)
• Adaptador de conector Unimatch (1)
(minitoma estéreo h conector
fonográfico estéreo)
• Pilas de hidruro metálico de níquel
recargables (2)
ES
4
Procedimientos iniciales
Page 33

Carga de las pilas
recargables
suministradas
Las pilas de hidruro metálico de níquel
recargables suministradas no estarán
cargadas la primera vez que vaya a
utilizarlas. Asegúrese de cargarlas antes
de utilizarlas.
Para cargar los auriculares, colóquelos
en el transmisor.
1 Pulse el botón del receptáculo
izquierdo para abrir la tapa del
compartimiento de las pilas.
La tapa del compartimiento de las
pilas se desprende.
Botón
2 Inserte las pilas de hidruro
metálico de níquel recargables
suministradas en el
compartimiento de las pilas
haciendo coincidir el terminal 3
de las pilas con el 3 del
compartimiento.
No utilice otras pilas recargables
que no sean las suministradas.
3 Cierre la tapa del
compartimiento de la pila.
4 Si el adaptador de alimentación
de CA está equipado con un
selector de voltaje, configúrelo
según el voltaje de alimentación
correspondiente a su área
mediante un destornillador,
antes de conectar el adaptador
de alimentación de CA a una
toma de CA .
Procedimientos iniciales
ES
5
Page 34

5 Conecte el adaptador de
alimentación de CA
suministrado al transmisor.
Transmisor
a la toma DC IN 9V
a una toma de
corriente de CA
Adaptador de
alimentación
de CA
(suministrado)
6 Coloque los auriculares en el
transmisor de modo que las
clavijas de contacto encajen en
los orificios de contacto de los
auriculares y el indicador de
carga se ilumine.
La carga finaliza transcurridas
aproximadamente 16 horas y el
indicador de carga se apaga.
Al colocar los auriculares en el
transmisor, sosténgalos con las dos
manos de modo que los
receptáculos derecho e izquierdo
permanezcan en posición
horizontal. Coloque los auriculares
en posición vertical en el transmisor
e inclínelos hacia atrás, como se
muestra a continuación.
Cuando el indicador no está
encendido
Compruebe que los auriculares derecho
e izquierdo estén colocados
correctamente en el transmisor.
Es posible que el indicador no esté
encendido si las clavijas de contacto de
los auriculares no encajan con los
orificios de contacto del transmisor.
Quítese los auriculares y colóquelos de
nuevo en el transmisor para que se
encienda el indicador.
Para recargar las pilas de los
auriculares después de su uso
Coloque los auriculares en el transmisor
cuando no los utilice. El temporizador
incorporado al sistema detecta el
momento en el que la carga finaliza, por
lo que no es necesario retirar los
auriculares del transmisor una vez
finalizada la carga.
Notas
•El transmisor se apaga automáticamente
mientras se cargan las pilas.
•Por razones de seguridad, este sistema se
ha diseñado para cargar únicamente las
pilas recargables de tipo BP-HP550
suministradas. Tenga presente que no se
puede cargar otro tipo de pilas recargables
con este sistema.
•Si utiliza pilas secas, éstas no se pueden
cargar.
•No intente utilizar las pilas recargables BPHP550 suministradas para otros
componentes. Éstas pilas sólo se pueden
utilizar con este sistema.
•Realice la carga a una temperatura
ambiental entre 0 ºC y 40 ºC.
Receptáculo
derecho
Receptáculo
izquierdo
ES
6
Procedimientos iniciales
Page 35

Horas de carga y uso
Horas de carga
aprox.
1 hora
16 horas*
*1a una salida de 1 kHz, 1 mW+1 mW
*2horas requeridas para cargar por completo
*3El tiempo indicado puede variar en función
2
cuando el interruptor VIBRATION está
ajustado en OFF.
pilas descargadas
de la temperatura y de las condiciones de
uso.
Tiempo de uso
aprox.*
1 hora y
45 minutos*
26 horas*
1
3
3
Uso de los auriculares con pilas
secas (vendidas por separado)
Las pilas secas (tamaño AAA) de venta
en establecimientos especializados
también pueden utilizarse para
alimentar los auriculares. Instale las
pilas del mismo modo descrito en los
pasos 1 a 3 de la sección “Carga de las
pilas recargables suministradas”.
Cuando se instalan pilas secas, la
función de carga de las pilas está
desactivada.
Notas acerca de las pilas
• No cargue una pila seca.
• No transporte una pila seca junto con
monedas u otros objetos metálicos, ya
que si los terminales positivo y
negativo de la pila entran en contacto
accidentalmente con los objetos
metálicos, puede generarse calor.
• Si no va a utilizar la unidad durante
un largo período de tiempo, retire la
pila para evitar que se produzcan
daños por fugas o corrosión de la
misma.
Comprobación de la energía
restante de las pilas
Levante la cinta autoajustable y
compruebe el indicador de
alimentación situado en la parte
superior del receptáculo derecho. La luz
roja del indicador señala que las pilas
todavía se encuentran en buen estado.
Cargue las pilas recargables o instale
nuevas pilas secas si la luz del
indicador de alimentación se atenúa o
parpadea, o bien si el sonido se
distorsiona o presenta ruidos.
Duración de las pilas
Pilas
Pila alcalina LR03/
AM-4 (N) de Sony
Pila de manganeso
R03/UM-4 (NU) de
Sony
*1a una salida de 1 kHz, 1 mW+1 mW
cuando el interruptor VIBRATION está
ajustado en OFF.
*2El tiempo indicado puede variar en
función de la temperatura y las
condiciones de uso.
Horas aprox*
45 horas*
20 horas*
2
2
1
Nota
Las pilas de hidruro metálico de níquel
recargables deben remplazarse por pilas
nuevas si, después de cargarlas, su duración
se reduce a la mitad de la duración esperada.
Las pilas recargables de tipo BP-HP550 no se
comercializan. Sin embargo, puede
adquirirlas en el establecimiento donde
compró el sistema o bien solicitarlas al
distribuidor Sony más cercano.
Procedimientos iniciales
7
ES
Page 36

Configuración del
transmisor
1 Sistema estéreo, televisor,
videograbadora, etc.
1 Conecte el transmisor al
componente de audio/vídeo.
Seleccione uno de los tres métodos
de conexión (1, 2 ó 3) descritos a
continuación.
1 Conexión del transmisor a un
componente que no dispone de
toma de auriculares (sistema
estéreo, televisor,
videograbadora, etc.)
Conéctelo a la toma INPUT A del
transmisor mediante el cable
conector suministrado.
2 Conexión del transmisor a un
componente equipado con una
toma de auriculares
(WALKMAN*, televisor,
videograbadora, etc.)
Conéctelo a la toma INPUT B del
transmisor mediante el cable
conector suministrado.
Canal izquierdo
(blanco)
a una toma de
salida que no sea
una toma de
auriculares
Transmisor
a la toma
INPUT A
a la toma
INPUT B
Cable conector
(suministrado)
a la toma de
auriculares
(minitoma estéreo)
Canal derecho
(rojo)
Cable
conector
(suministrado)
Canal izquierdo (blanco)
Canal derecho
(rojo)
Adaptador de
conector Unimatch
(suministrado)
a la toma de
auriculares (toma
fonográfica estéreo)
2 WALKMAN*,
televisor,
videograbadora,
etc.
* “WALKMAN” es una marca registrada de
Sony Corporation que representa los
productos audífonos estéreo.
ES
8
Procedimientos iniciales
Page 37

3 Conexión del transmisor a
Playstation 2
Conéctelo a la toma INPUT B del
transmisor mediante el cable
suministrado con Playstation 2.
Transmisor
a la toma
INPUT B
Canal de audio
izquierdo (blanco)
Canal de audio
derecho (rojo)
Canal de vídeo
(amarillo)
3 Conecte el adaptador de
alimentación de CA
suministrado al transmisor.
Transmisor
Adaptador de
alimentación de
CA (suministrado)
a una toma de
corriente de CA
Televisor
Playstation 2
Nota
Utilice el cable prolongador RK-C111
(vendido por separado) si es necesario.
Cable de audio y
vídeo (suministrado
con Playstation 2)
2 Si el adaptador de alimentación
de CA está equipado con un
selector de voltaje, configúrelo
según el voltaje de alimentación
correspondiente a su área
mediante un destornillador,
antes de conectar el adaptador
de alimentación de CA a una
toma de CA.
a la toma DC IN 9 V
Notas
•No conecte la toma INPUT A y la toma
INPUT B al mismo tiempo. Si conecta dos
componentes audiovisuales a ambas tomas
a la vez, ambas señales de audio pueden
emitirse de forma mezclada.
•Utilice únicamente el adaptador de
alimentación de CA suministrado. No
utilice ningún otro adaptador de
alimentación de CA .
Conector de
polaridad
unificada
•Al conectar el cable conector directamente
a una toma de auriculares (minitoma
monoaural), es posible que la señal de
audio no se emita a través del canal
derecho. En dicho caso, coloque el
adaptador de conector PC-236MS, vendido
por separado (minitoma estéreo h
miniconector monoaural), entre el cable
conector y la toma de auriculares.
Procedimientos iniciales
9
ES
Page 38

N Uso del sistema
Recepción de un
programa
Antes de la recepción
Para prevenir daños en los oídos,
primero baje el volumen.
4 Ajuste el volumen.
1 Encienda el componente de
audio/vídeo conectado al
transmisor.
Cuando el sistema recibe la señal de
audio, el transmisor se enciende
automáticamente y los emisores de
infrarrojos emiten luz, si bien no lo
hacen mientras el transmisor está
cargando las pilas. Si el transmisor
está conectado a la toma de
auriculares, ajuste el control de
volumen del componente de la
fuente de audio lo más alto que
pueda sin llegar a distorsionar la
señal de audio.
2 Colóquese los auriculares.
El indicador de alimentación
situado en la parte superior del
receptáculo derecho emite una luz
roja.
Asegúrese de colocarse el
receptáculo derecho (R) en el oído
derecho y el receptáculo izquierdo
(L) en el oído izquierdo. Colóquese
los auriculares en la cabeza en
sentido vertical, de manera que la
función de conexión automática se
active adecuadamente.
Notas
•Es posible que oiga cierto ruido, si
desconecta el adaptador de alimentación
de CA del transmisor antes de quitarse los
auriculares.
•Si obstruye los sensores de infrarrojos con
las manos mientras ajusta el volumen, se
activará la función de silenciamiento y no
se ajustará el volumen. Si desea ajustar el
volumen, acérquese al transmisor u oriente
los emisores de infrarrojos situados en el
receptáculo izquierdo hacia el transmisor.
3 Inicie la reproducción del
componente conectado al
transmisor.
ES
10
Uso del sistema
Page 39

Los auriculares se desconectarán
automáticamente cuando se los
quite
— Función de conexión y
desconexión automática
No levante de la cinta autoajustable
cuando no utilice los auriculares puesto
que consume energía de las pilas.
El sonido se silencia
automáticamente si aumenta el
ruido
— Función de silenciamiento
Si se obstruye la emisión de los rayos
infrarrojos o se utilizan los auriculares
fuera del área de uso efectiva,
aumentará el ruido y la recepción del
sonido será defectuosa. Esta función
silencia cualquier ruido que provenga
de los auriculares para evitar causar
daños en los oídos provocados por el
ruido. El sonido se restaura
automáticamente cuando el usuario se
acerca al transmisor o deja de obstruir
la emisión de infrarrojos.
Uso de la función de sonido
envolvente SRS
Coloque el interruptor
en ON
para reproducir un amplio campo de
sonido envolvente a través de los
auriculares.
Uso del interruptor ATT (al
transmisor)
Si el volumen de entrada es bajo,
coloque el interruptor ATT del
transmisor en OFF.
Utilización de la función de
vibración
Coloque el interruptor VIBRATION en
la posición ON y ajuste el nivel de
vibración mediante el volumen de
vibración. Podrá disfrutar del sonido de
graves potentes cuando escuche
películas o juegos a través de los
auriculares.
Si no se recibe ninguna señal de
audio durante más de
aproximadamente 5 minutos
El transmisor se apaga
automáticamente.
Nota
Es posible que el brillo de los emisores de
infrarrojos no sea uniforme. No se trata de
ningún mal funcionamiento.
Uso del sistema
11
ES
Page 40

Área efectiva del
Sustitución de las
transmisor
La ilustración siguiente muestra el área
aproximada que cubren los rayos
infrarrojos emitidos desde el
transmisor.
Transmisor
3 m
aproximadamente
3 m
aproximadamente
Notas
•Si utiliza los auriculares a una distancia
demasiado grande del transmisor, es
posible que oiga un pitido y, si hay un
objeto entre los auriculares y el transmisor,
puede que se interrumpa el sonido. Estos
fenómenos son inherentes a la
comunicación por rayos infrarrojos y no
significa que exista un problema con el
sistema.
•No obstruya los sensores de infrarrojos con
las manos o con el pelo.
•Si utiliza los auriculares dentro del área
indicada en la ilustración, puede colocarse
el transmisor delante, detrás o a un lado.
•El sonido cambiará en función de la
posición del transmisor y del tipo de
habitación. Se recomienda colocar el
transmisor en la ubicación que ofrezca el
sonido más claro.
•No utilice este sistema en áreas expuestas a
luz solar directa o a una fuerte iluminación,
ya que el sonido podría interrumpirse.
•Las pantallas de plasma pueden afectar al
funcionamiento normal de este sistema.
Rayos infrarrojos
7 m
aproximadamente
almohadillas de
los auriculares
Las almohadillas de los auriculares
pueden sustituirse. Si se ensucian o se
deterioran, remplácelas tal como se
muestra a continuación.
Las almohadillas de los auriculares no
se comercializan. Puede solicitar
recambios en el establecimiento donde
adquirió el sistema o al distribuidor
Sony más cercano.
1 Tire de la almohadilla vieja para
extraerla.
2 Coloque la nueva almohadilla
alrededor del receptáculo.
12
ES
Uso del sistema
Page 41

N
Información complementaria
Especificaciones
Generales
Sistema de modulación
Modulación de frecuencia
Frecuencia del portador
Derecho 2,8 MHz
Izquierdo 2,3 MHz
Frecuencia de respuesta
18 – 22.000 Hz
Transmisor TMR-IF540R
Fuente de alimentación
La toma cc IN 9 V acepta la
alimentación que suministra
el adaptador de alimentación
de CA para los siguientes
voltajes:
Auriculares MDR-IF540R
Fuente de alimentación
Pila de hidruro metálico de
níquel recargables BP-HP550
suministradas o
pilas secas (tamaño AAA) de
venta en establecimientos
especializados
Masa Aprox. 285 g, incluyendo las
pilas
Accesorios suministrados
Adaptador de alimentación de CA (1)
Cable conector (aprox. 1 m, 1 miniconector
estéreo y 2 conectores fonográficos) (1)
Pilas de hidruro metálico de níquel
recargables BP-HP550 (550 mAh) (2)
Adaptador de conector Unimatch
(minitoma estéreo y conector fonográfico
estéreo)
Manual de instrucciones (1)
Lugar de
adquisición
EE.UU.
Reino Unido
Europa
Japón (excepto el
modelo para Japón)
Otros países
Entrada de audio
Dimensiones Aprox. 133 × 124 × 136 mm
Masa Aprox. 160 g
Tensión de
alimentación
ca 120 V, 60 Hz
ca 230 – 240 V, 50 Hz
ca 220 – 230 V, 50 Hz
ca 110 V/120 V/220 V/
240 V, 50/60 Hz
ca 220 – 230 V, 50/60 Hz
o ca 120 V, 60 Hz
Tomas fonográficas /
minitoma estéreo
(an/al/prf)
Accesorios opcionales
• Si no se emite ningún sonido través del
canal derecho cuando el cable conector
suministrado está conectado a la toma de
auriculares.
Adaptador de conector PC-236MS
(minitoma estéreo y miniconector
monoaural)
• Si ha perdido el adaptador de conector
suministrado.
Adaptador de conector PC-234S
(minitoma estéreo y conector
fonográfico estéreo)
• Si ha perdido el cable conector
suministrado.
RK-G129
(1,5 m, miniconector estéreo y conector
fonográfico × 2)
El diseño y las especificaciones están sujetos
a cambios sin previo aviso.
Información complementaria
13
ES
Page 42

Precauciones
Solución de
• Si no va a utilizar el transmisor durante
un largo período de tiempo, desconecte
CA
el adaptador de alimentación de
CA
la toma de corriente de
pilas para evitar posibles daños por
fugas y corrosión de las mismas.
• No deje el sistema de auriculares
estéreo inalámbricos expuesto a la luz
solar directa, calor o humedad (Se
recomienda utilizar los auriculares a
una temperatura que oscile entre 5 ºC y
35 ºC) .
• Evite que el transmisor y los auriculares
se caigan, reciban golpes o sufran
fuertes impactos de cualquier índole, ya
que el producto podría dañarse.
y retire las
de
Notas sobre la prevención de
daños en los oídos causados
por los auriculares
Evite utilizar los auriculares a un
volumen alto. Los especialistas en
audición desaconsejan la reproducción
continua y prolongada de sonido a un
volumen alto. Si percibe un pitido en el
oído, reduzca el volumen o deje de
utilizar la unidad.
Respeto a los demás
Mantenga el volumen a un nivel
moderado. Esto le permitirá oír sonidos
externos y ser considerado con la gente
que le rodea.
Si tiene preguntas o problemas referentes
al sistema y no encuentra la solución en
este manual, póngase en contacto con su
distribuidor Sony más cercano.
No olvide entregar los auriculares y el
transmisor al distribuidor Sony cuando
deban repararse.
problemas
Sin sonido / sonido
amortiguado
, En primer lugar, encienda el transmisor
y, a continuación, colóquese los
auriculares.
, Compruebe la conexión del equipo de
audio/vídeo o del adaptador de
alimentación de CA .
, Compruebe que el equipo de audio/
vídeo conectado al transmisor está
encendido.
, Si el transmisor está conectado a la
toma de auriculares, suba el volumen
del equipo de audio/vídeo conectado
al transmisor.
, La función de silenciamiento está
activada.
• Compruebe si hay obstáculos entre el
transmisor y los auriculares.
• Utilice los auriculares cerca del
transmisor.
• Cambie la posición y el ángulo del
transmisor.
, El indicador luminoso de alimentación
de los auriculares se atenúa, parpadea
o se apaga.
• Cargue las pilas recargables si las
pilas de los auriculares están a punto
de agotarse o remplace las pilas secas
por pilas nuevas. Si después de
cargar las pilas, el indicador de
alimentación permanece apagado,
lleve los auriculares a un
distribuidor Sony.
, Coloque el interruptor ATT del
transmisor en OFF.
Sonido distorsionado
, Si el transmisor está conectado a la
toma de auriculares, baje el volumen
del equipo de audio/vídeo conectado
al transmisor.
14
ES
Información complementaria
Page 43

, El indicador luminoso de alimentación
de los auriculares se atenúa, parpadea
o se apaga.
• Cargue las pilas recargables si las
pilas de los auriculares están a
punto de agotarse o remplace las
pilas secas por pilas nuevas. Si
después de cargar las pilas, el
indicador de alimentación
permanece apagado lleve los
auriculares a un distribuidor Sony.
, Coloque el interruptor ATTdel
transmisor en ON.
Ruido de fondo alto
, Acérquese al transmisor. (Cuanto más
se aleje del transmisor, más
posibilidades habrá de que el sonido
presente ruido. Este factor es inherente
a la comunicación de rayos infrarrojos
y no significa que exista un problema
en la unidad.)
, Compruebe si hay obstáculos entre el
transmisor y los auriculares.
, Compruebe que no ha obstruido los
sensores de infrarrojos con las manos o
con el pelo.
, Si utiliza los auriculares cerca de una
ventana por la que entra un sol
demasiado fuerte, corra las cortinas o
las persianas para evitar que entre la
luz solar directa o aléjese de la ventana.
, Cambie la posición o el ángulo del
transmisor.
, Si el transmisor está conectado a la
toma de auriculares, suba el volumen
del equipo de audio/vídeo conectado
al transmisor.
, El indicador luminoso de alimentación
de los auriculares se atenúa, parpadea
o se apaga.
• Cargue las pilas recargables si las
pilas de los auriculares están a punto
de agotarse o remplace las pilas
secas por pilas nuevas. Si después de
cargar las pilas, el indicador de
alimentación permanece apagado,
lleve los auriculares a un
distribuidor Sony.
, Si dispone de otro transmisor,
compruebe si se está utilizando más de
uno al mismo tiempo.
• Apague el otro transmisor o sitúelo
en un lugar que esté fuera del área
efectiva del transmisor.
Las pilas no pueden
cargarse
, Compruebe que la luz del indicador de
carga está encendida. Si no lo está,
coloque los auriculares en el transmisor
correctamente para que la luz del
indicador de carga se encienda.
, Se han instalado pilas secas.
• Instale las pilas de hidruro metálico
de níquel recargables suministradas.
, Se han instalado pilas recargables
diferentes de las suministradas.
• Instale las pilas de hidruro metálico
de níquel recargables suministradas.
Información complementaria
15
ES
Page 44

Printed in Malaysia
 Loading...