

Page 1

SVT-S480ES
3-204-662-01 (1)
T ime Lapse
Videocassette
Recorder
Operating Instructions page 2
Before operating the unit, please read this manual
thoroughly, and retain it for future reference.
Mode d’emploi page 66
Avant de faire fonctionner cet appareil, lisez
attentivement le présent mode d’emploi et conservez-le
pour toute référence ultérieure.
Manual de instrucciones página 130
Antes de utilizar la unidad, lea este manual
detenidamente y consérvelo para futuras referencias.
SVT-S480ES
©2000 Sony Corporation
Page 2
Owner’s Record
For the customers in the USA
The model and serial number of your set are located on the
rear. Record the serial number in the space provided below.
Refer to these numbers whenever you call upon your Sony
dealer regarding this product.
Model No. SVT-S480ES Serial No.__________________
W ARNING
To prevent fire or shock hazard, do not
expose the unit to rain or moisture.
To avoid electrical shock, do not open the
cabinet. Refer servicing to qualified
personnel only.
This equipment has been tested and found to comply with
the limits for a Class B digital device, pursuant to Part 15 of
the FCC Rules. These limits are designed to provide
reasonable protection against harmful interference in a
residential installation. This equipment generates, uses and
can radiate radio frequency energy and, if not installed and
used in accordance with the instructions, may cause harmful
interference to radio communications. However, there is no
guarantee that interference will not occur in a particular
installation. If this equipment does cause harmful
interference to radio or television reception, which can be
determined by turning the equipment off and on, the user is
encouraged to try to correct the interference by one or more
of the following measures:
— Reorient or relocate the receiving antenna.
— Increase the separation between the equipment and
receiver.
— Connect the equipment into an outlet on a circuit different
from that to which the receiver is connected.
— Consult the dealer or an experienced radio/TV technician
for help.
You are cautioned that any changes or modifications not
expressly approved in this manual could void your authority
to operate this equipment.
The shielded interface cable recommended in this manual
must be used with this equipment in order to comply with the
limits for a digital device pursuant to Subpart B of Part 15 of
FCC Rules.
This symbol is intended to alert the user to
the presence of uninsulated "dangerous
voltage" within the product's enclosure that
may be of sufficient magnitude to constitute
a risk of electric shock to persons.
This symbol is intended to alert the user to
the presence of important operating and
maintenance (servicing) instructions in the
literature accompanying the appliance.
Notice
Depending on the battery usage it may become necessary to
change it. For replacement and disposal of the old battery,
please contact your dealer.
If you have any questions about this product, you may
call:
Sony’s Business Information Center (BIC) at 1-800-686SONY (7669) or
Write to: Sony Customer Information Services Center
6900-29 Daniels Parkway, PMB 330
Fort Myers, Florida 33912
Declaration of Conformity
Trade Name: SONY
Model No.: SVT-S480ES
Responsible Party: Sony Electronics Inc.
Address: 1 Sony Drive, Park Ridge,
NJ.07656 USA
Telephone No.: 201-930-6972
This device complies with Part 15 of the FCC Rules.
Operation is subject to the following two conditions: (1)
This device may not cause harmful interference, and (2)
this device must accept any interference received,
including interference that may cause undesired
operation.
2
Page 3

Table of Contents
English
Precautions.................................................................4
Features ......................................................................6
Location of Parts and Controls ................................8
Front Panel ...........................................................8
Rear Panel.............................................................9
Display Window...................................................9
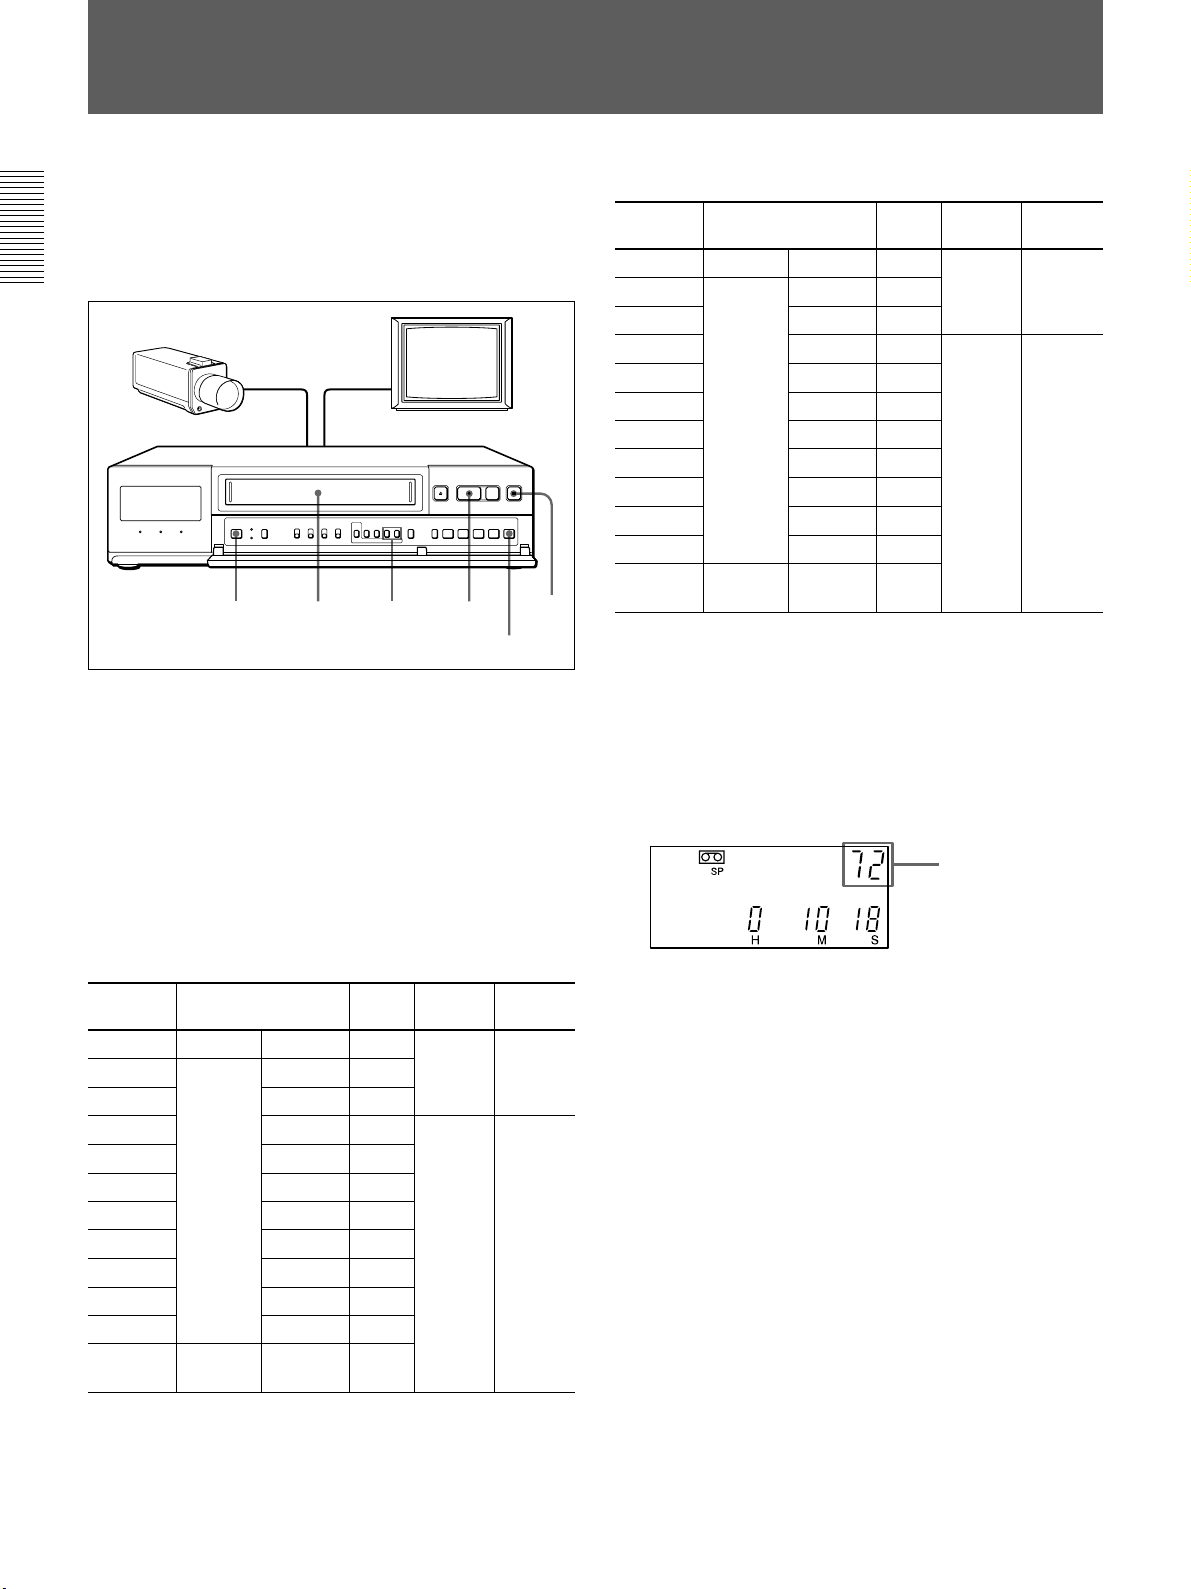
Connections ..............................................................10
Connecting a Camera, Monitor and
Microphone ................................................... 10
Connecting a Switcher........................................10
Connecting Another Unit in Series ....................11
Connecting a Computer......................................11
Menu Table ..............................................................12
Setting the Language ...............................................13
Setting the Clock......................................................14
Adjusting to Daylight Saving Time....................15
Setting the Time/Date Display ........................... 16
Changing the Display Position of the Time/Date
Display ..........................................................16
Setting the Buzzers ..................................................17
Handling a Video Cassette......................................18
Setting the S-VHS switch...................................18
Inserting a Video Cassette.................................. 18
Protecting Your Cassette from Being Erased.....18
Ejecting a Video Cassette...................................18
Setting the Recording Mode ...................................19
Selecting the Tape....................................................20
Setting the Operation Mode When Inserting
a Tape ................................................................21
Recording .................................................................22
Locking the Record Mode
— Security Lock Function ............................23
Recording on the Same Cassette Repeatedly
— Repeat Recording .....................................24
Series Recording.................................................24
Recording after Power Interruption or Moisture
Condensation.................................................25
Checking the Used Time ....................................26
Setting the Mode at the End of the Tape ............26
Monitoring the Recording Condition ................. 27
Checking the tape thread ....................................27
Checking the Number of Times the Tape Was
Used...............................................................28
Timer Recording......................................................29
Day-of-the-Week Recording ..............................29
Daily Recording .................................................32
Recording Using an External Timer...................32
Setting the Holiday............................................. 33
Changing/Cancelling the Timer Settings ...........34
Alarm Recording .....................................................35
Connecting an Alarm Sensor..............................35
Setting the Alarm Speed and Duration...............35
Setting the Alarm Recording Mode....................36
Searching the Picture of the Alarm Recordings
— Alarm Search............................................37
Scanning the Picture of the Alarm Recordings
— Alarm Scan...............................................38
Displaying the Alarm List — Alarm Recall.......38
Recording the Alarm Data on the Tape..............39
Playing Back the Alarm Data List on the Tape..40
One-shot Recording.................................................41
Playback ...................................................................43
Audio Playback ..................................................43
Adjusting Pictures ...................................................45
Adjusting the Tracking....................................... 45
Using the Adaptive Picture Control (APC)........ 45
Searching for the Time and Date
— Time/Date Search ........................................46
Selecting the Searching Interval.........................46
Searching for the Time and Date........................47
Various Playback Modes ........................................48
Picture Search.....................................................48
Still Picture .........................................................48
Field-by-Field Picture.........................................48
Reverse Playback ...............................................48
Playback in S-VHS ET Format ..............................49
Maintenance .............................................................50
Terminals..................................................................51
WARNING OUT Terminal................................51
TAPE END OUT Terminal................................ 51
SW OUT Terminal .............................................52
CLOCK SET IN/OUT Terminals.......................53
REMOTE Jack ...................................................54
RS-232C/RS-485 Interface......................................55
Command Reference ...............................................57
Data format.........................................................57
VCR Control Commands ...................................57
VCR Setup Commands ......................................59
Menu Setup Commands .....................................59
VCR Status Commands......................................59
Other Commands................................................60
Return Commands.............................................. 60
T/L STATUS SENSE (D6H) bit allocation ....... 60
STATUS SENSE (D7H) bit allocation .............. 61
RS-232C Commands.......................................... 61
RS-485 Commands.............................................62
RS-485 Return Commands.................................62
Table of Commands ................................................63
Troubleshooting .......................................................64
Specifications............................................................65
3
Page 4

Precautions
On safety
•Operate the unit on 120 V AC, 60 Hz only.
•The nameplate indicating operating voltage, power
consumption, etc., is located on the rear of the unit.
•Should any solid object or liquid fall into the cabinet,
turn off the power, unplug the unit and have it
checked by qualified personnel before operating it
any further.
•Do not drop or place heavy objects on the power
cord. If the power cord is damaged, turn off the
power immediately. It is dangerous to use the unit
with a damaged power cord.
•Connect the power cord to the wall AC outlet.
For connecting the power source, see “Connecting a
Camera, Monitor and Microphone” on page 10.
•Unplug the unit from the wall outlet if it is not to be
used for several days or more.
•Disconnect the power cord from the wall AC outlet
by grasping the plug, not by pulling the cord.
On installation
On operation
When the unit is not in use, turn the power off to
conserve energy and to extend its life.
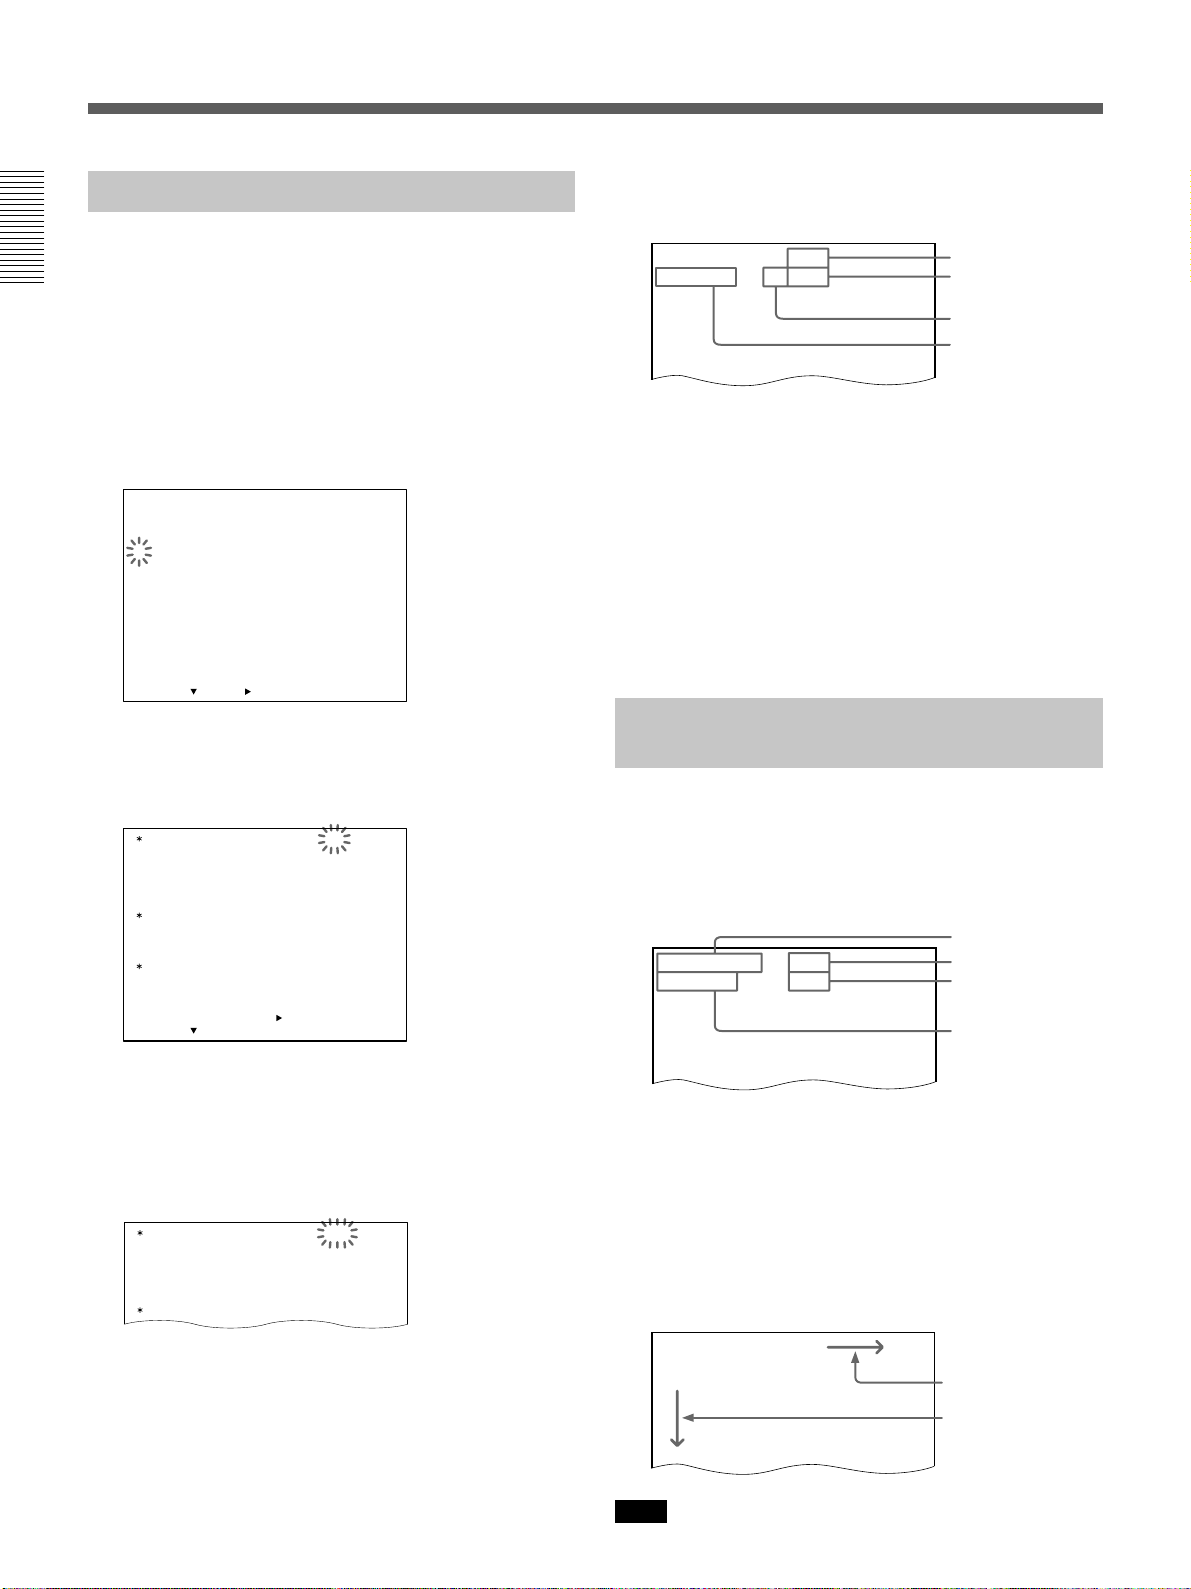
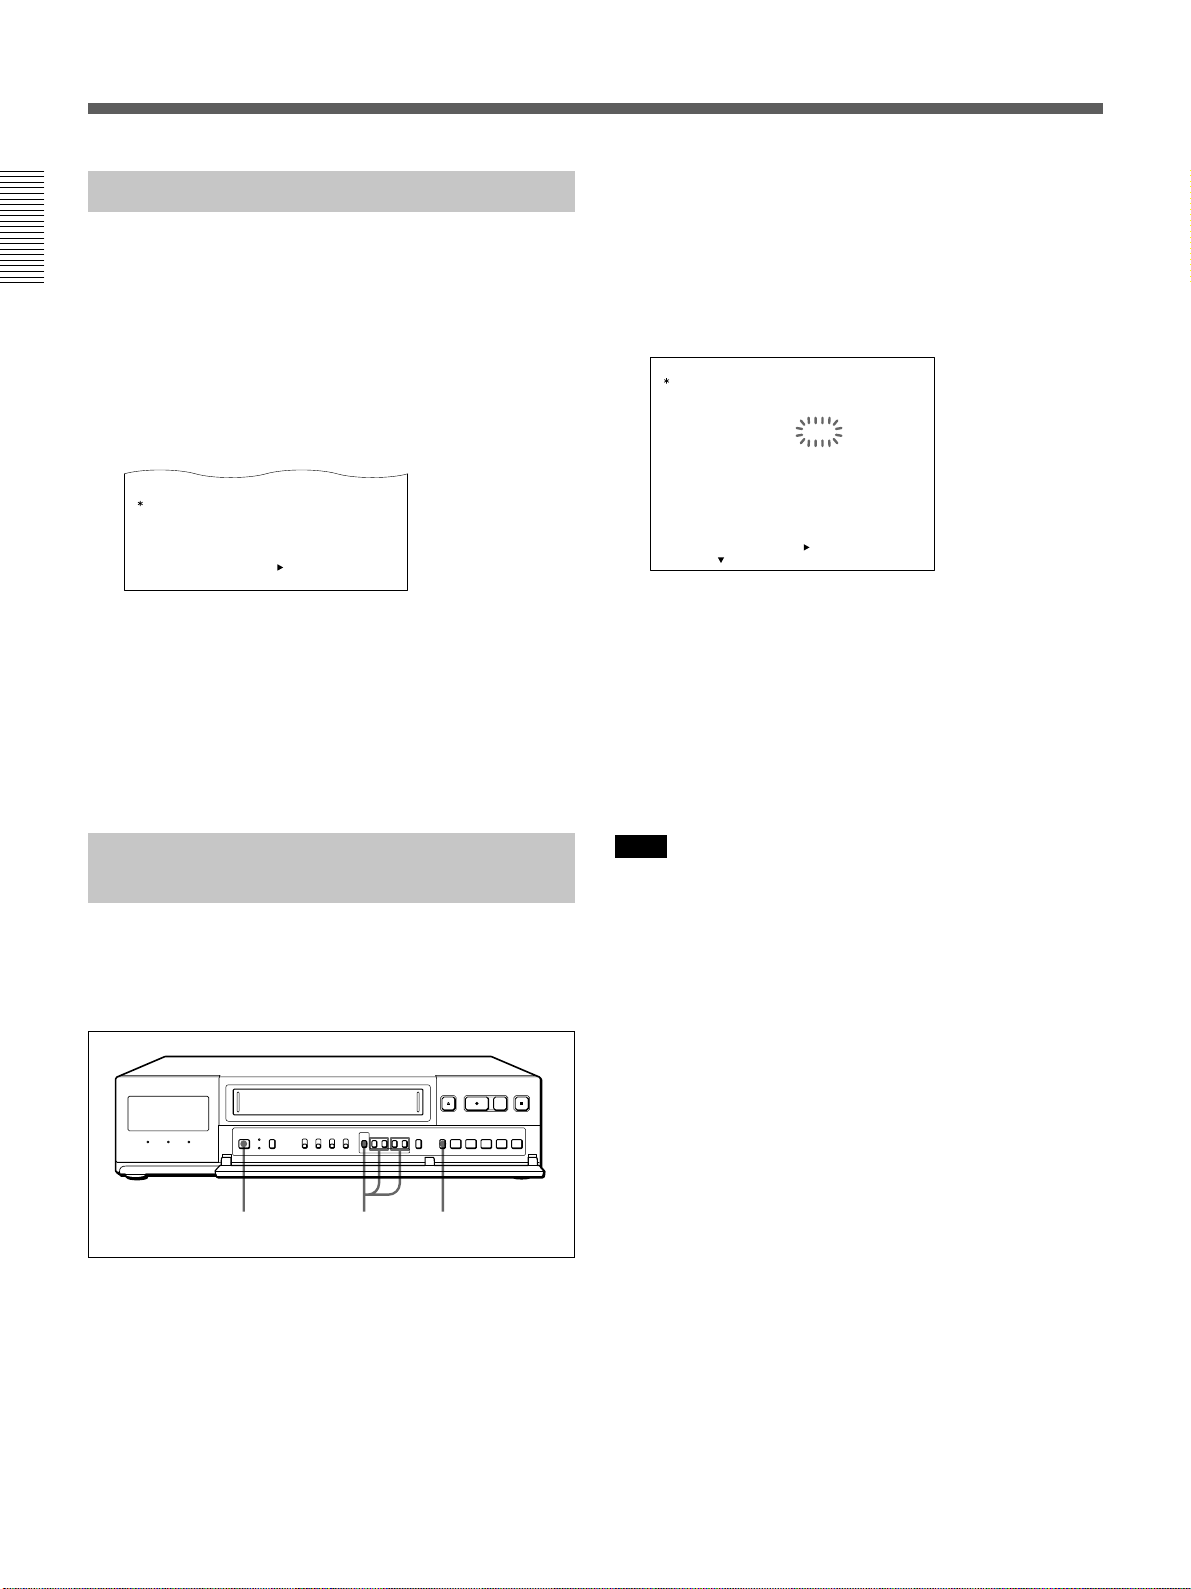
On moisture condensation
If the unit is brought directly from a cold to a warm
location, moisture may condense on the video head
drum. In this condition, the tape may adhere to the
head drum and cause serious damage to the head. To
avoid damage caused by moisture condensation, be
sure not to leave a cassette inside the compartment
when the unit will not be used. If moisture
condensation is present, the “dddd” indicator flashes in
the display window and the
unit will not operate. When
the “dddd” indicator
disappears, you can operate
the unit.
On video cassettes
•Do not place a heavy object on the unit.
•Allow adequate air circulation to prevent internal heat
build-up.
Do not place the unit on surfaces (rugs, blankets, etc.)
or near materials (curtains, draperies) that may block
the ventilation slots.
•Do not install the unit in a location near heat sources
such as radiators or air ducts.
•Place the unit to avoid direct sunlight.
•Do not install the unit in a place subject to
mechanical vibration or shock.
•Do not put magnetic objects close to the unit and
cassette tape. Magnetic fields may affect the color
reproduction of the unit and cause distortion.
•The unit is designed for operation in a horizontal
position.
Do not install it in an inclined position.
Remove and store video cassettes after recording or
playback.
On cleaning
As a safety precaution, unplug the unit before cleaning
it.
•To keep the unit looking brand-new, periodically
clean it with a mild detergent solution. Never use
strong solvents such as thinner or benzine, or abrasive
cleaners since they will damage the cabinet.
When cleaning, keep liquid away from electrical
contacts and connectors.
•When there is a buildup of dust on air vents, use a
vacuum cleaner to remove it.
4
Page 5

On repacking
•Before repacking, disconnect all cables and
connecting cords.
•Do not throw away the carton and packing materials.
They make an ideal container with which to transport
the unit. When shipping the unit to another location,
repack it.
On transportation
When transporting the unit, protect it from vibration
and impact.
If you have any questions about this unit, contact your
authorized Sony dealer.
Backup function
•This unit rear is equipped with a backup battery
(lithium battery) to maintain the clock settings.
When the unit is used under normal conditions, the
backup battery is recharged. The battery is fully
recharged after a minimum of about 30 hours, and
will maintain the clock settings for up to about 30
days.
Note
The settings may not be maintained properly if the
backup battery has been recharged for less than 30 hours
when the power goes off.
•To replace the backup battery (lithium battery),
contact your Sony dealer.
5
Page 6

Features
S-VHS ET format
Since this VCR is provided with S-VHS ET format, it
can record or play back a VHS tape with the
equivalent picture quality as an S-VHS tape. When PB
S-VHS is set to AUTO, this VCR automatically
detects the S-VHS ET format to play back a tape.
Field recording/field playback
Because single fields can be recorded one by one in
time lapse mode and all fields can be viewed
separately during playback, you can record more
information.
Various recording functions
•Repeat recording: When the tape reaches the end,
the VCR rewinds the tape and starts recording again
from the beginning of the tape.
•Timer recording: You can set the timer on daily
recording or weekly recording. You can also record
by an external signal input.
•Alarm recording: If an externally connected alarm
sensor is triggered, you can make a complete
recording of the situation that triggered the alarm.
•One-shot recording: Recording can be done on a
single-field basis.
Mode settings on monitor
You can set the modes for all functions, such as the
internal timer setting, the alarm recording mode
settings, etc., on the monitor.
Series recording function
This function permits long-term continuous recording
using two or more time lapse VCRs.
Multiple recording modes
The time lapse intervals for recording can be set in 22
and 1 (for 1 shot) steps. At the longest interval setting,
available recording time is a full 480 hours with one
120-minute tape (in SP mode).
Clear picture
This VCR uses the Reality Regenerator IC, which
makes it possible to produce a clear picture.
RS-232C/RS-485 connectors for computer
You can control this VCR from a personal computer or
a controller via an RS-232C or RS-485 interface.
Recording the alarm data at the top of the tape
You can set to record up to 100 alarm data (count, date
and time) on the beginning of the tape. These data can
be displayed on the monitor screen.
Clog detection
The VCR always checks that the video signal is
recorded without problem (in time lapse mode only).
If the recording cannot be made properly because the
recording head has become clogged, the VCR will give
a warning.
Time and date retrieval function
Because this unit uses a high-performance VASS,
recordings made in time lapse mode can be searched
by date and time (hour and minute up to every 10
minutes), a valuable type of search function in time
lapse VCRs.
Forward/reverse field advance
This VCR offers improved search functions with the
ability to move both forwards and backwards between
fields.
Real time display
The real time can be displayed even in time lapse
mode.
6
Page 7

Security lock
To guard against operation errors, this VCR locks all
of the buttons.
Monitoring the recording condition
You can check the recorded image during recording by
pressing a single button.
Checking the tape threading
To ensure correct operation, the VCR automatically
checks the tape threading whenever you insert a tape.
Other features
•Fast-forward and rewind with high speed
•Quick-start mechanism which makes the time to start
recording shorter
•Power saving mode which turns off the display
window
•The number of times the tape has been recorded will
be recorded on the beginning of the tape and
displayed in the display window
7
Page 8
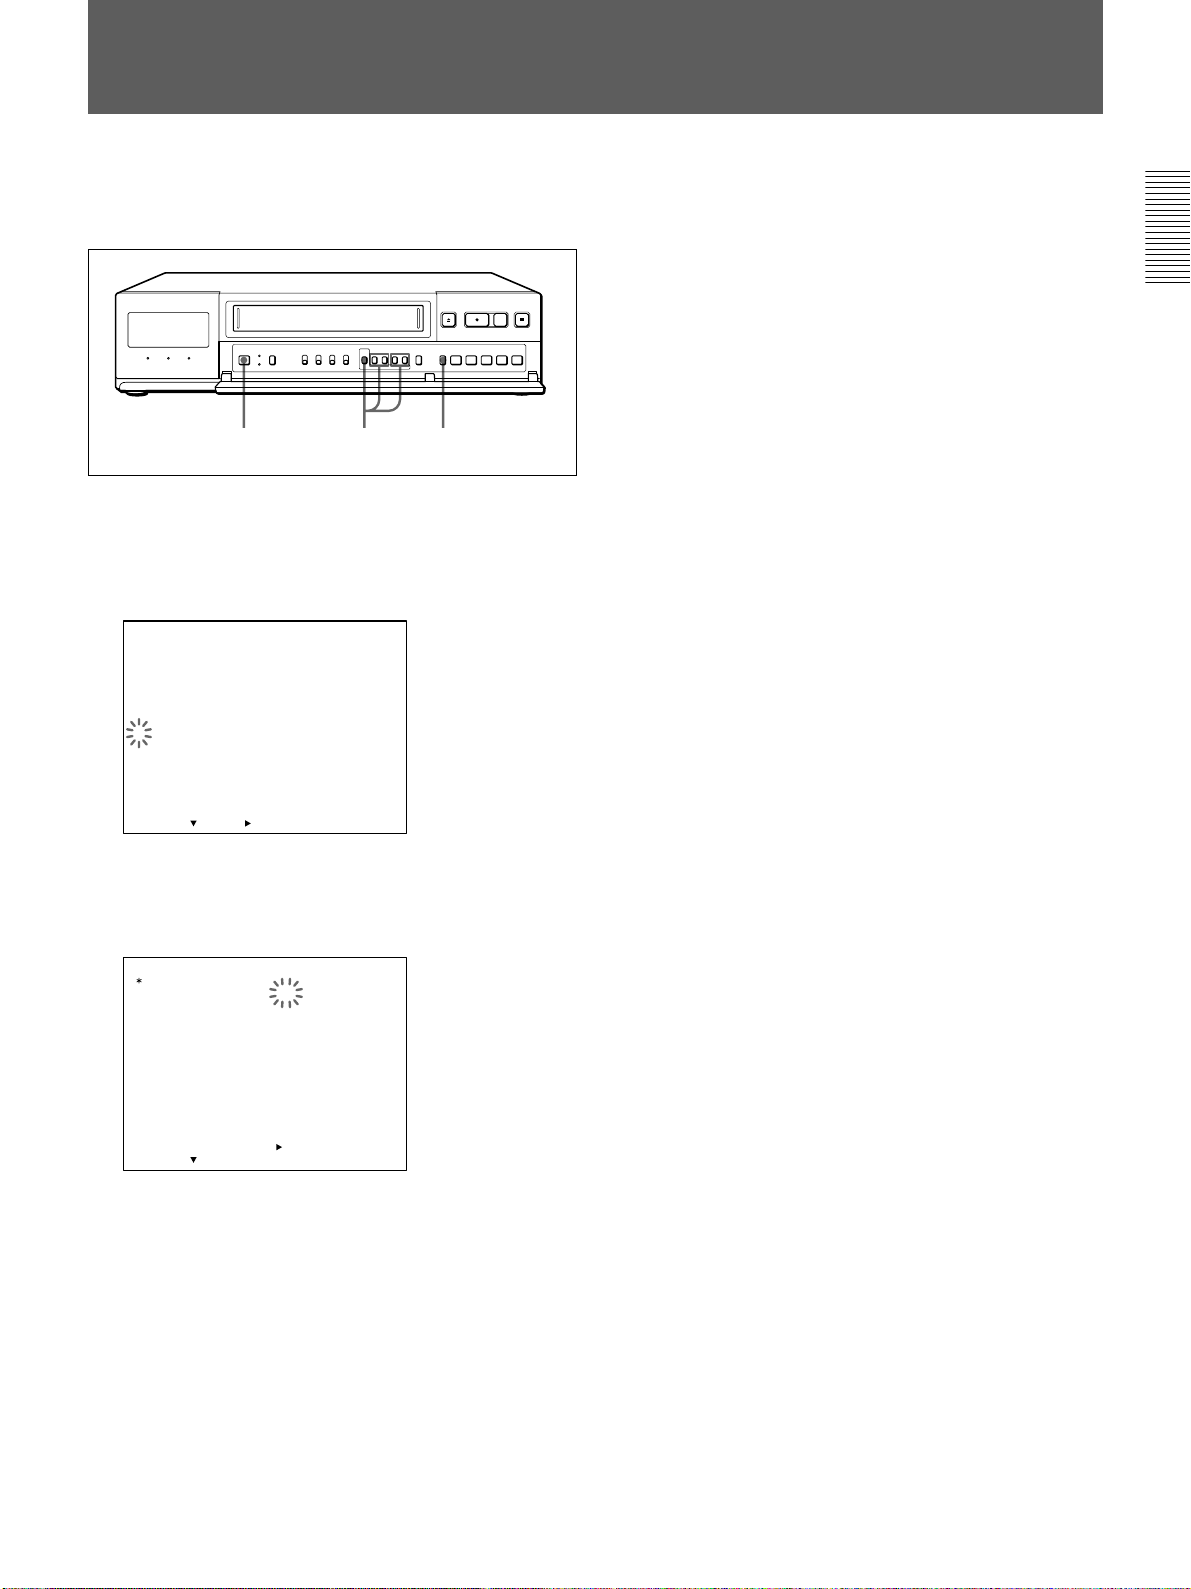
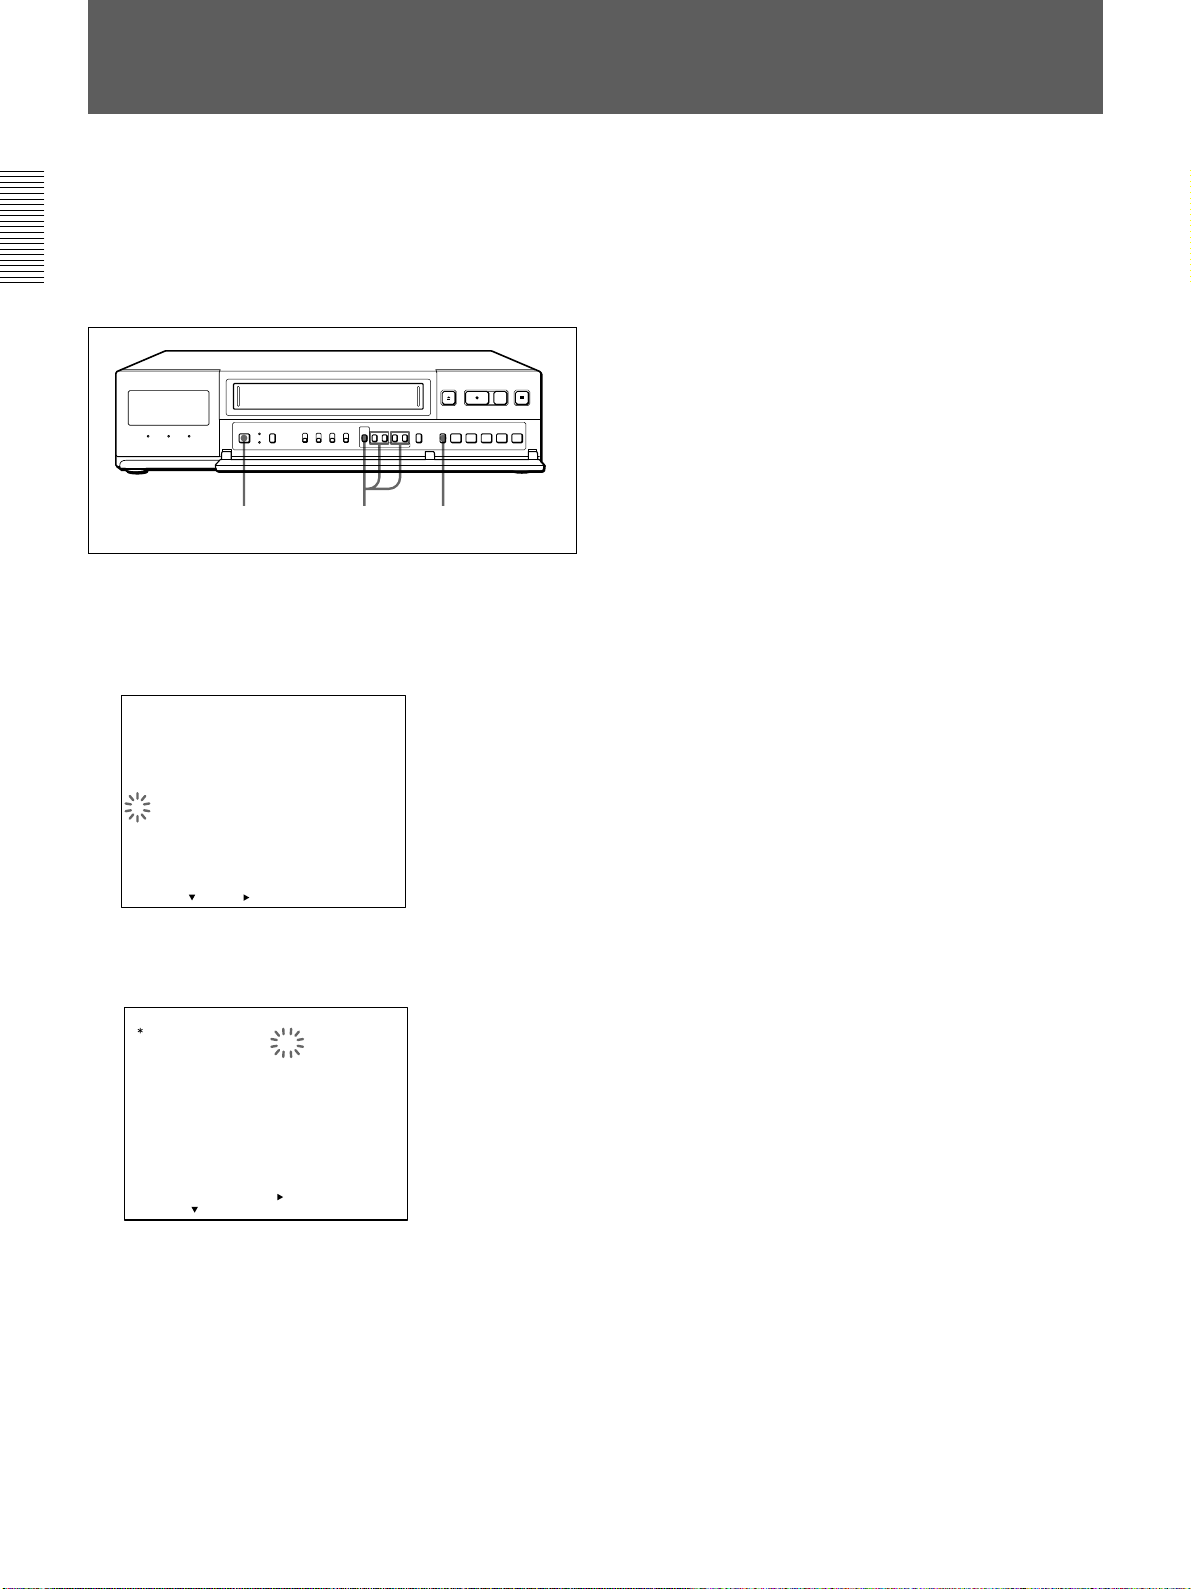
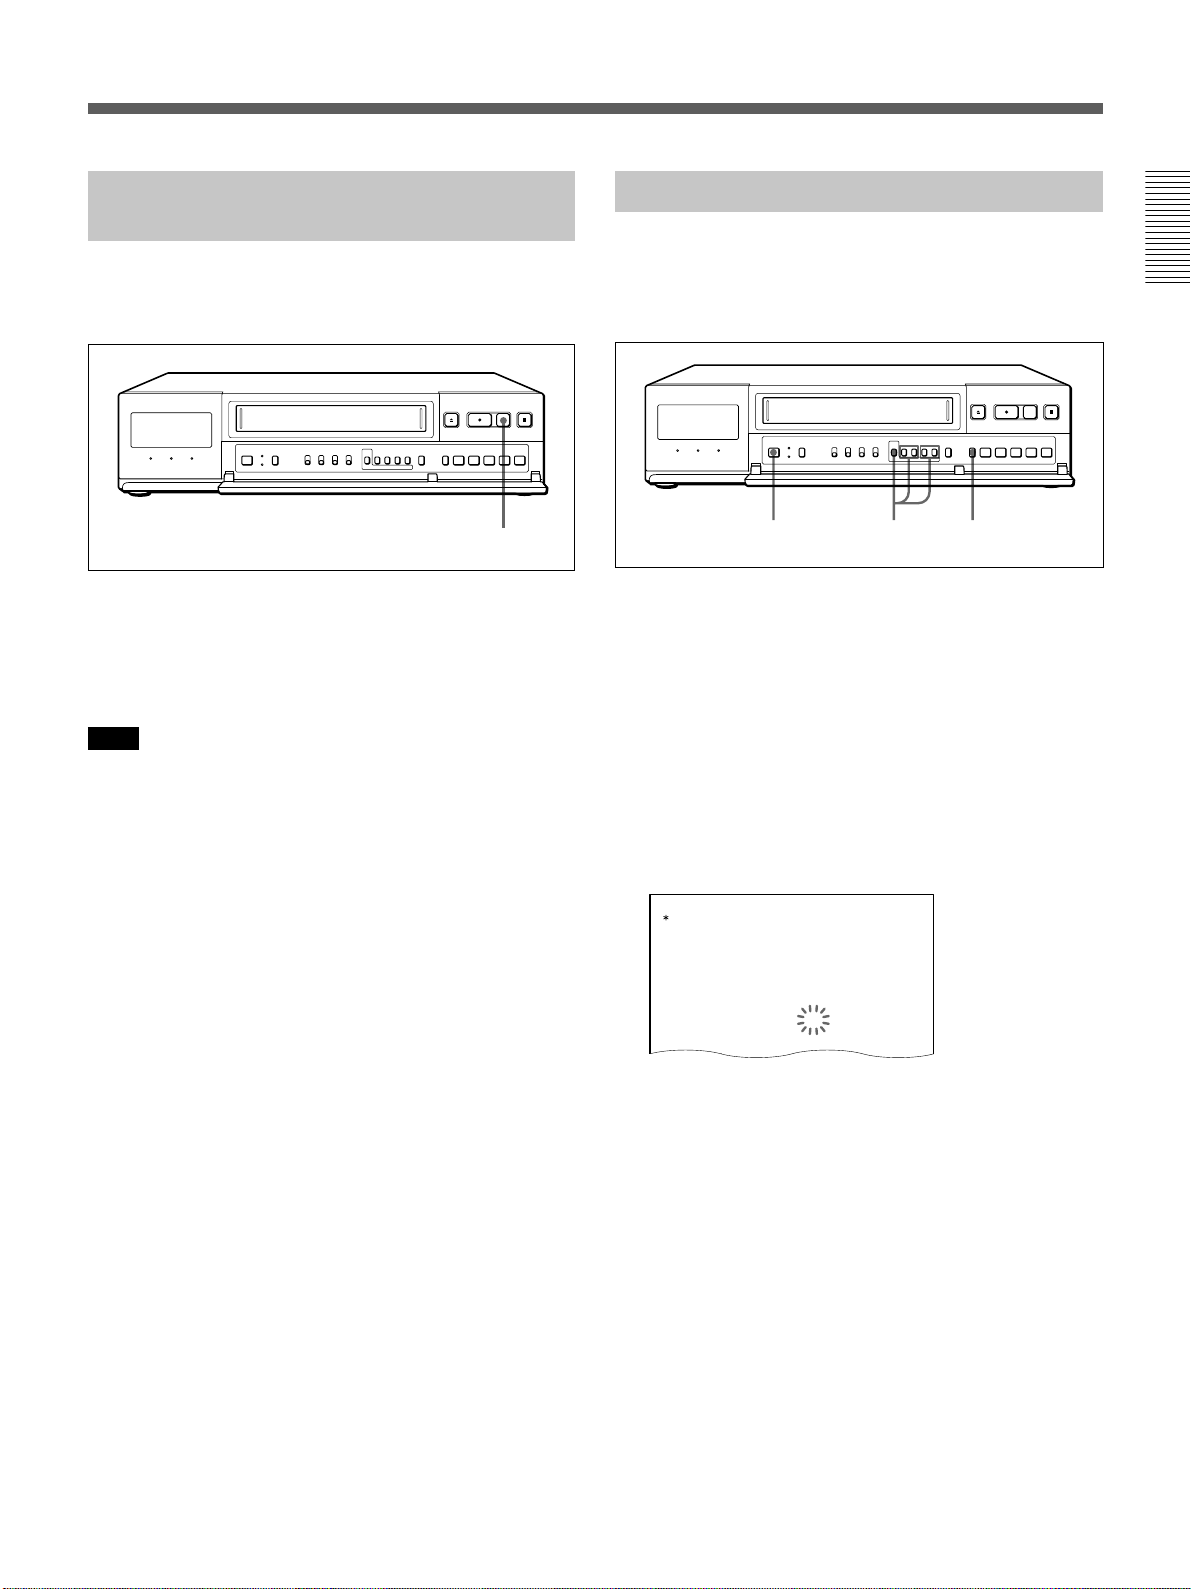
Location of Parts and Controls
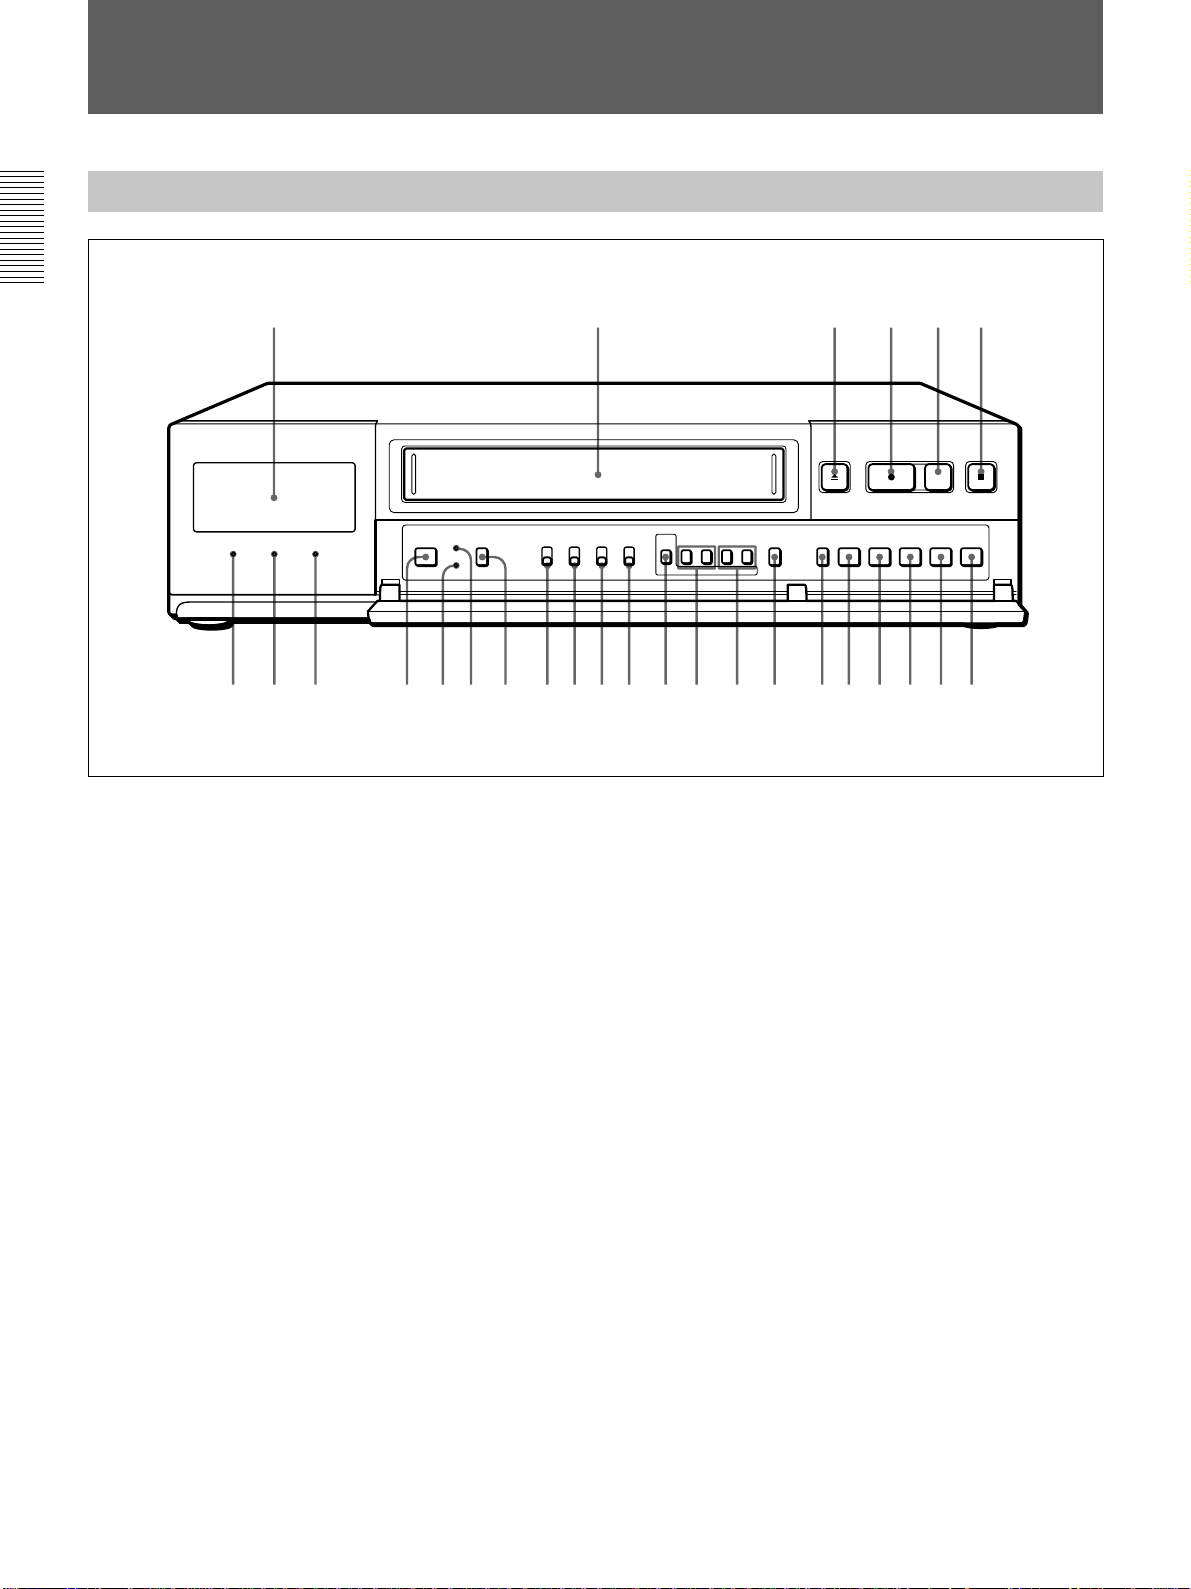
Front Panel (Refer to pages in parentheses for details.)
123456
7 9 qa qjqhqgqfq;8qdqkqs wd wf wg wh wjwswaw;ql
1 Display window (9)
2 Cassette compartment
3 EJECT Z button (18)
4 REC z button
5 REC CHECK button (27)
6 STOP x button
7 POWER indicator
8 SAVE indicator
9 REPEAT indicator (24)
0 POWER switch
qa MENU RESET button (25)
qs CL (clear) button
qd TIMER button (30)
qf POWER SAVE switch
When the switch is set to ON, the indication in the
display window goes off and the SAVE indicator
lights up.
qg COUNTER/REAL TIME switch (23, 43)
qh S-VHS switch (18)
qj ON-SCREEN switch (16)
qk MENU button (13)
ql TRACKING –, + buttons (45)
MENU V, B buttons (13)
w; REC/PLAY SPEED –, + buttons (22)
MENU –, + buttons (13)
wa COUNTER RESET button (43)
ws SEARCH/AUDIO ON button (13, 43)
wd REV b button
wf REW m button
wg PLAY B button
wh FF M button
wj PAUSE X button
8
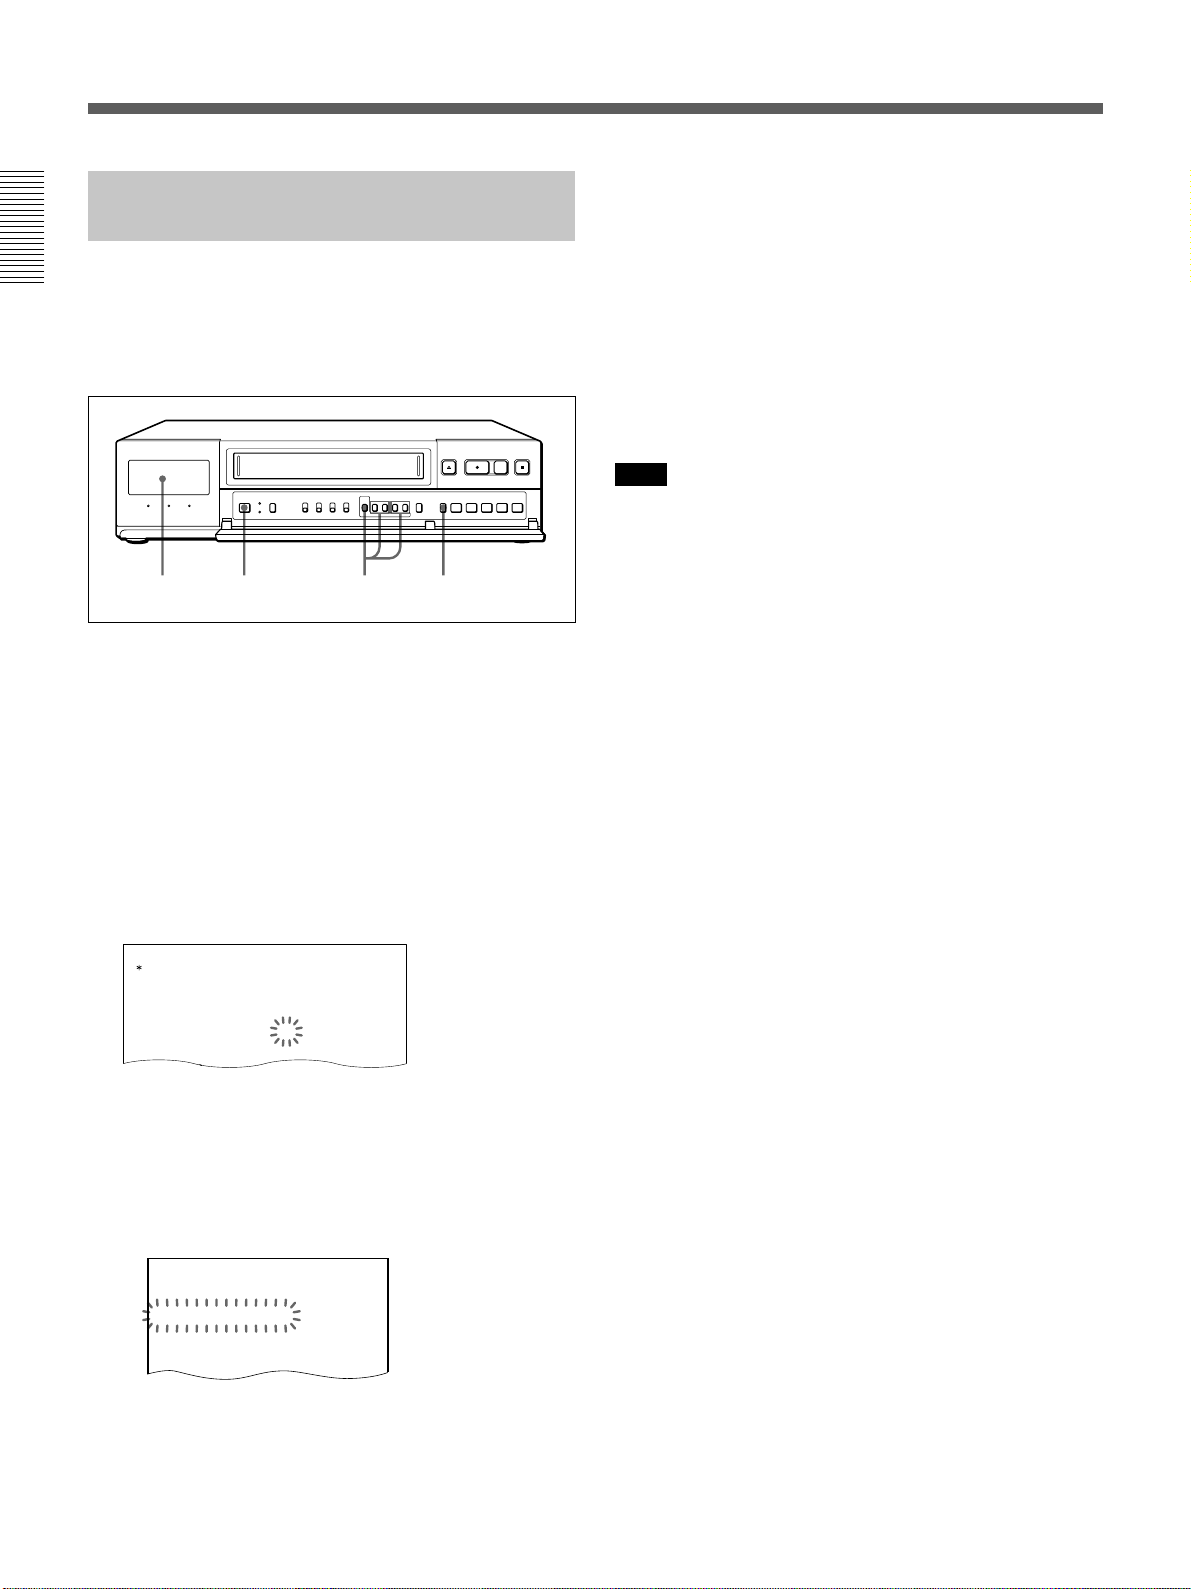
Page 9
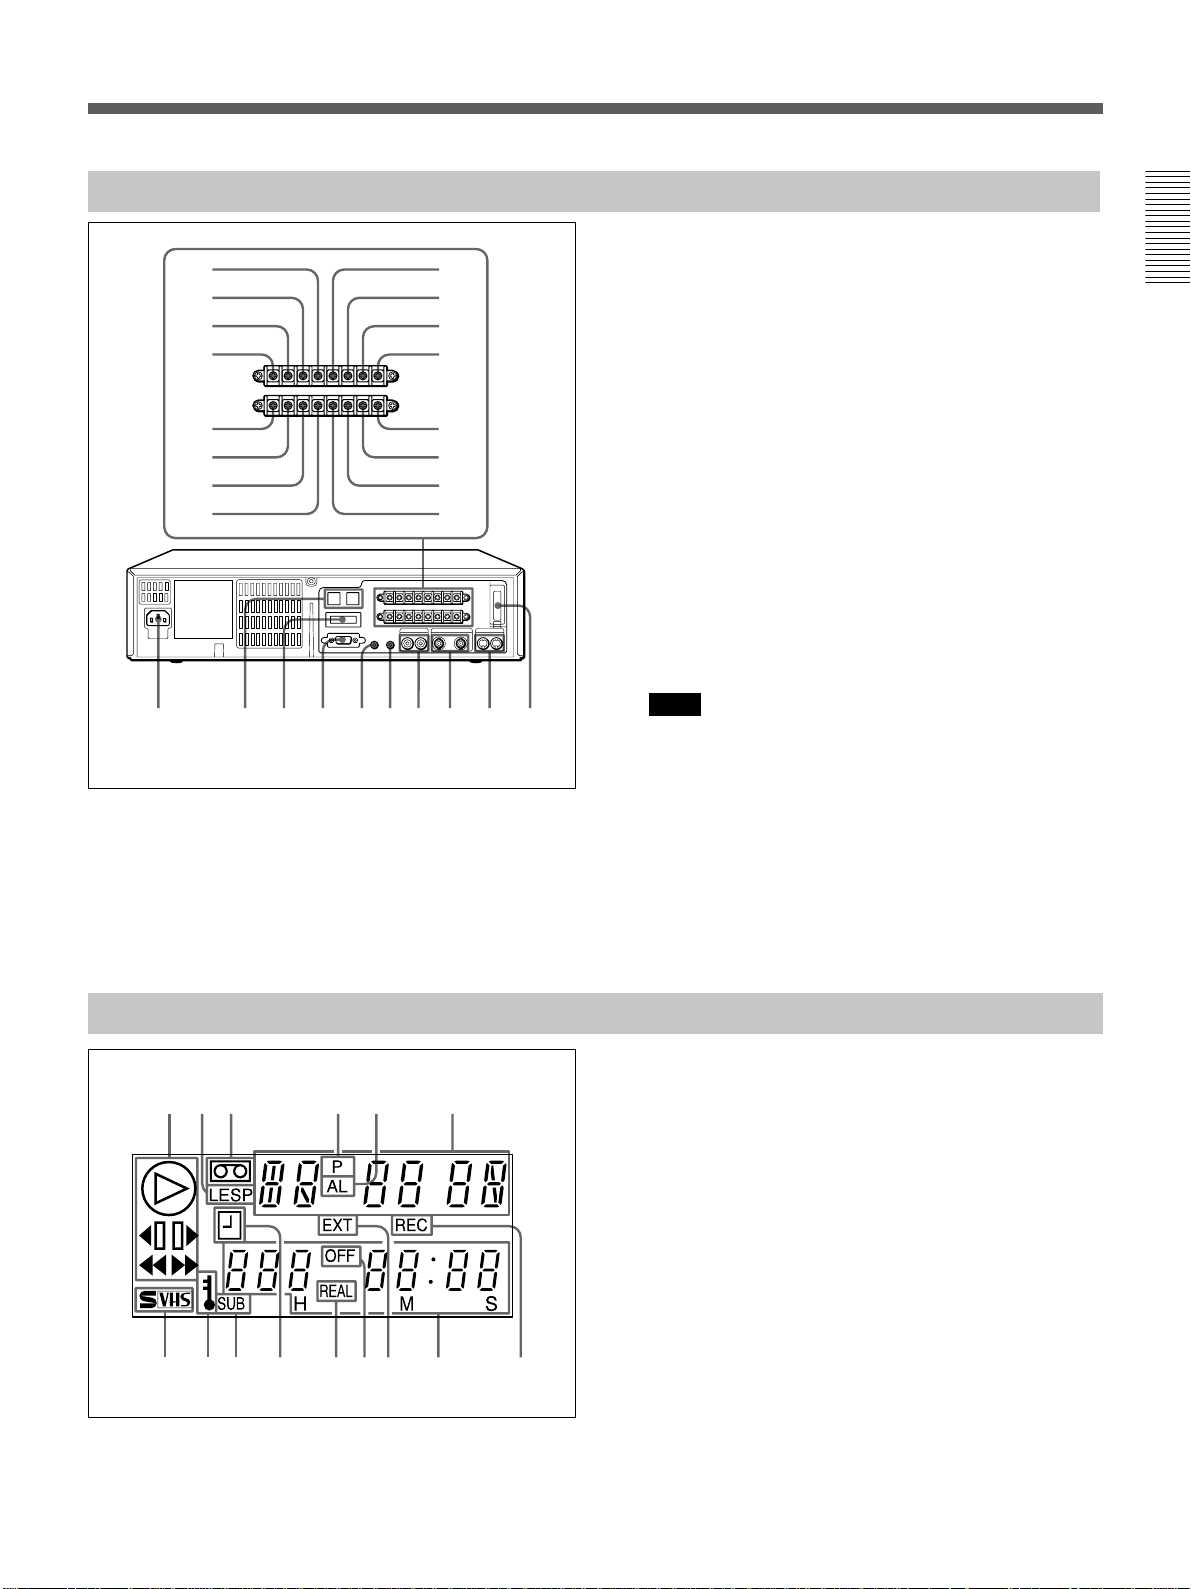
Rear Panel (Refer to pages in parentheses for details.)
15
26
37
4
9qd
qs
qj w; wf wg whwdwsqk ql wa
8
qfq;
qgqa
qh
1 TAPE END OUT terminal (51)
2 WARNING OUT terminal (51)
3 COM (common) terminal (51)
4 EXT TIMER IN terminal (32)
5 SW OUT terminal (52)
6 COM (common) terminal (52)
7 ALARM OUT terminal (35)
8 ALARM IN terminal (35)
9 CLOCK SET OUT terminal (53)
0 CLOCK SET IN terminal (53)
qa SERIES OUT terminal (11)
qs SERIES IN terminal (11)
qd ALARM RESET IN terminal
qf 1 SHOT IN terminal (41)
qg COM (common) terminal
qh COM (common) terminal (41)
qj AC IN (inlet) (10)
qk RS-485 connector (RJ-11) (11, 55)
Note
Do not connect to phone line.
ql ADDRESS/RS-485/232C selector/
RS-485 TERMINATE switches (55)
w; RS-232C connector (11, 55)
wa REMOTE jack (54)
ws MIC IN jack (10)
wd AUDIO IN/OUT jacks (phono type)
wf VIDEO IN/OUT jacks (BNC connector) (10)
wg S-VIDEO IN/OUT jacks (10)
wh Back-up battery compartment
Display Window
132456
98qsqa qfqd qgq;7
1 Tape operation indicators
2 Recording mode indication
3 Cassette indicator
4 Power interruption indicator
5 AL (alarm) indicator
6 Tape speed/Alarm search mode/Alarm scan mode/
Time/date search mode/one-shot recording/
Moisture condensation
7 S-VHS indication
8 Security lock indicator
9 SUB-head indicator
0 Timer recording standby indicator
qa REAL time indicator
qs OFF indicator
qd External timer indicator
qf Current time/Real time counter/Timer recording
indication
qg REC indicator (lights up while recording the TAPE
USED COUNT and the ALARM DATA list)
9
Page 10
Connections
Turn all the power off before making connections.
Connect the AC power cord last.
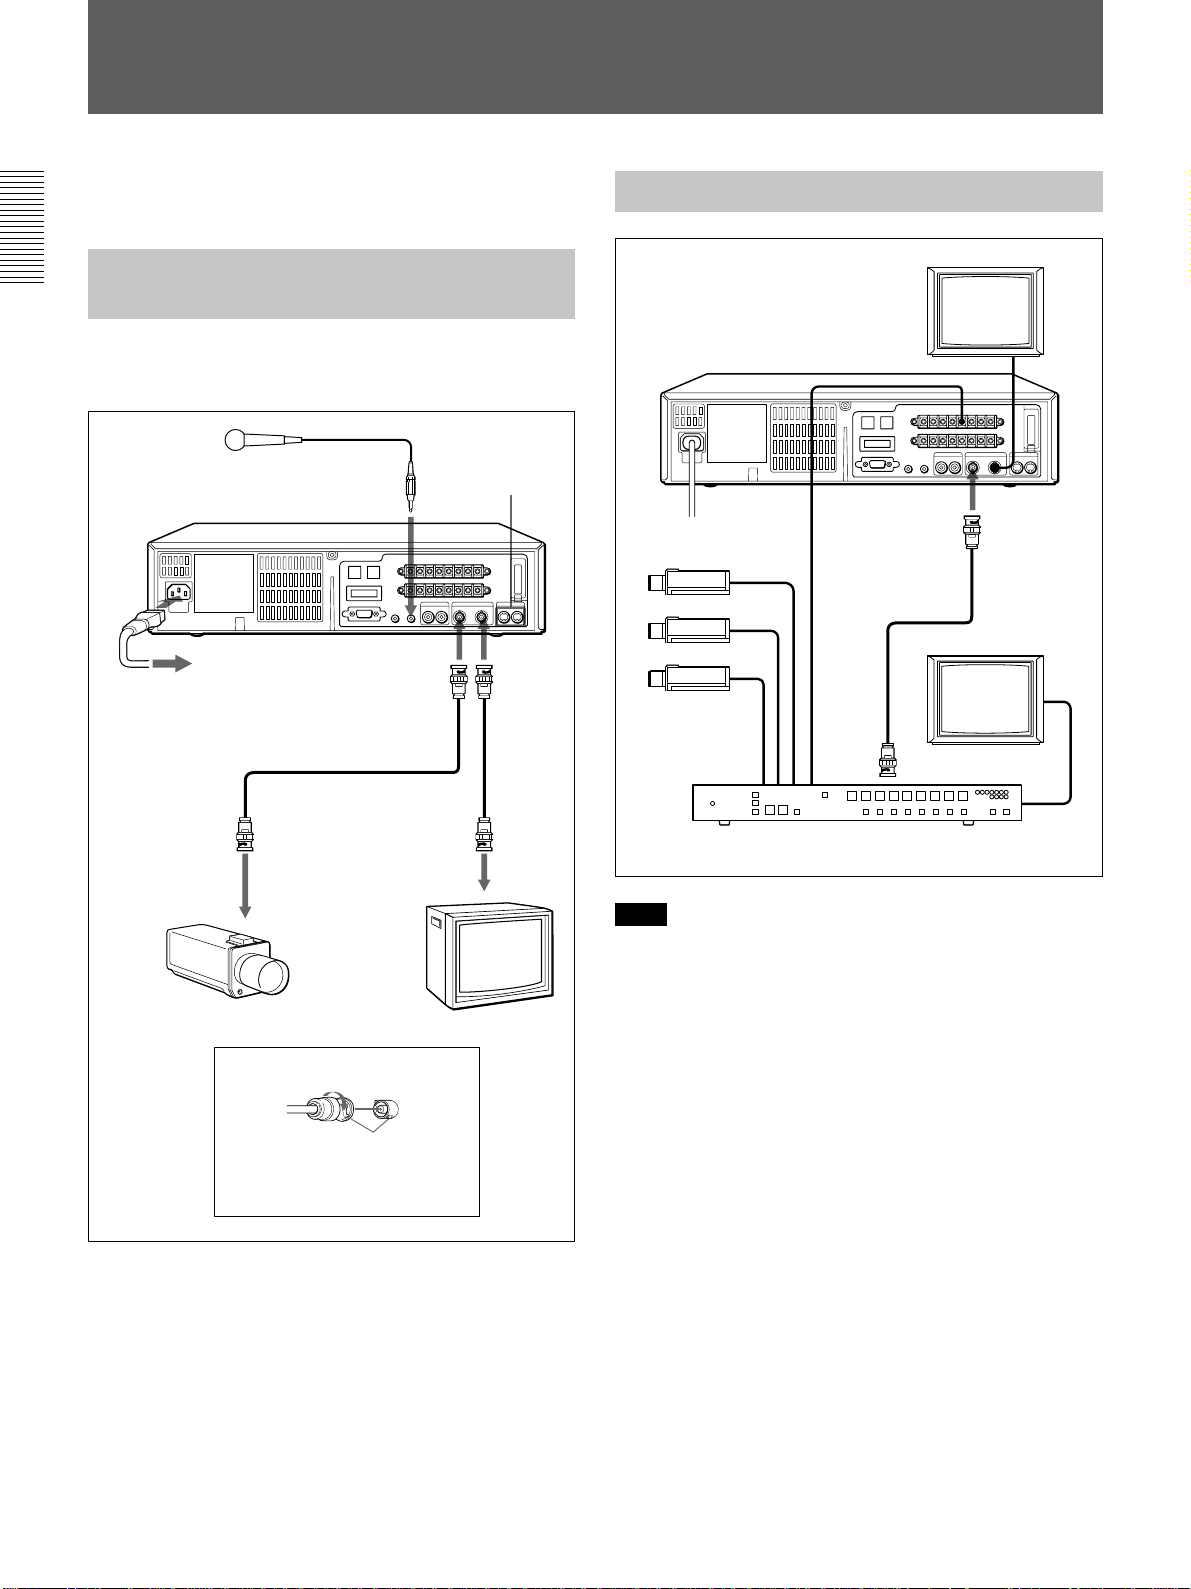
Connecting a Camera, Monitor
and Microphone
With the following connections, you can monitor the
picture and sound.
Microphone
to MIC IN
to AC
IN
to VIDEO IN
to a wall outlet
S-VIDEO
IN/OUT
to
VIDEO
OUT
Connecting a Switcher
to SW OUT
Video camera
to EXT
TIMING
IN
to VIDEO
IN
to MONITOR OUT
Monitor
to video
input
to video output
Video camera Monitor
Use of BNC connector
Align pin with cutout, insert and
turn right to lock.
To remove, turn left and pull out.
If the equipment to be connected has an SVIDEO connector
You can connect to this VCR’s S-VIDEO jacks using
an S-VIDEO cable.
If both S-VIDEO and VIDEO IN jacks are used at the
same time, the equipment connected to the S-VIDEO
IN jack has priority.
Camera switcher
Note
When you connect several cameras to a switcher,
synchronize the cameras.
If not, the picture will be disturbed.
To connect an alarm sensor
Refer to page 35.
10
Page 11

Series
Video Camera
Connecting a ComputerConnecting Another Unit in
to SERIES
OUT
to SERIES IN
to SERIES
OUT
to SERIES IN to COM
to SERIES
OUT
to COM
to COM
to COM
to COM
to VIDEO
IN
to
VIDEO
OUT
to
VIDEO
IN
to
VIDEO
OUT
to
VIDEO
IN
to
VIDEO
OUT
RS-232C connector
(9-pin D-sub type)
9-pin D-sub type cable
(not supplied)
Contoller
RS-485
BA
to RS-485 B
to RS-485 A
to RS-232C
Computer
Cross-type cable
to RS-485 A
to VIDEO IN
Monitor
For operation, refer to page 24.
to COMto SERIES IN
to
VIDEO
IN
to VIDEO
OUT
to RS-485 B
to RS-485 A
to RS-485 B
to RS-485 A
11
Page 12
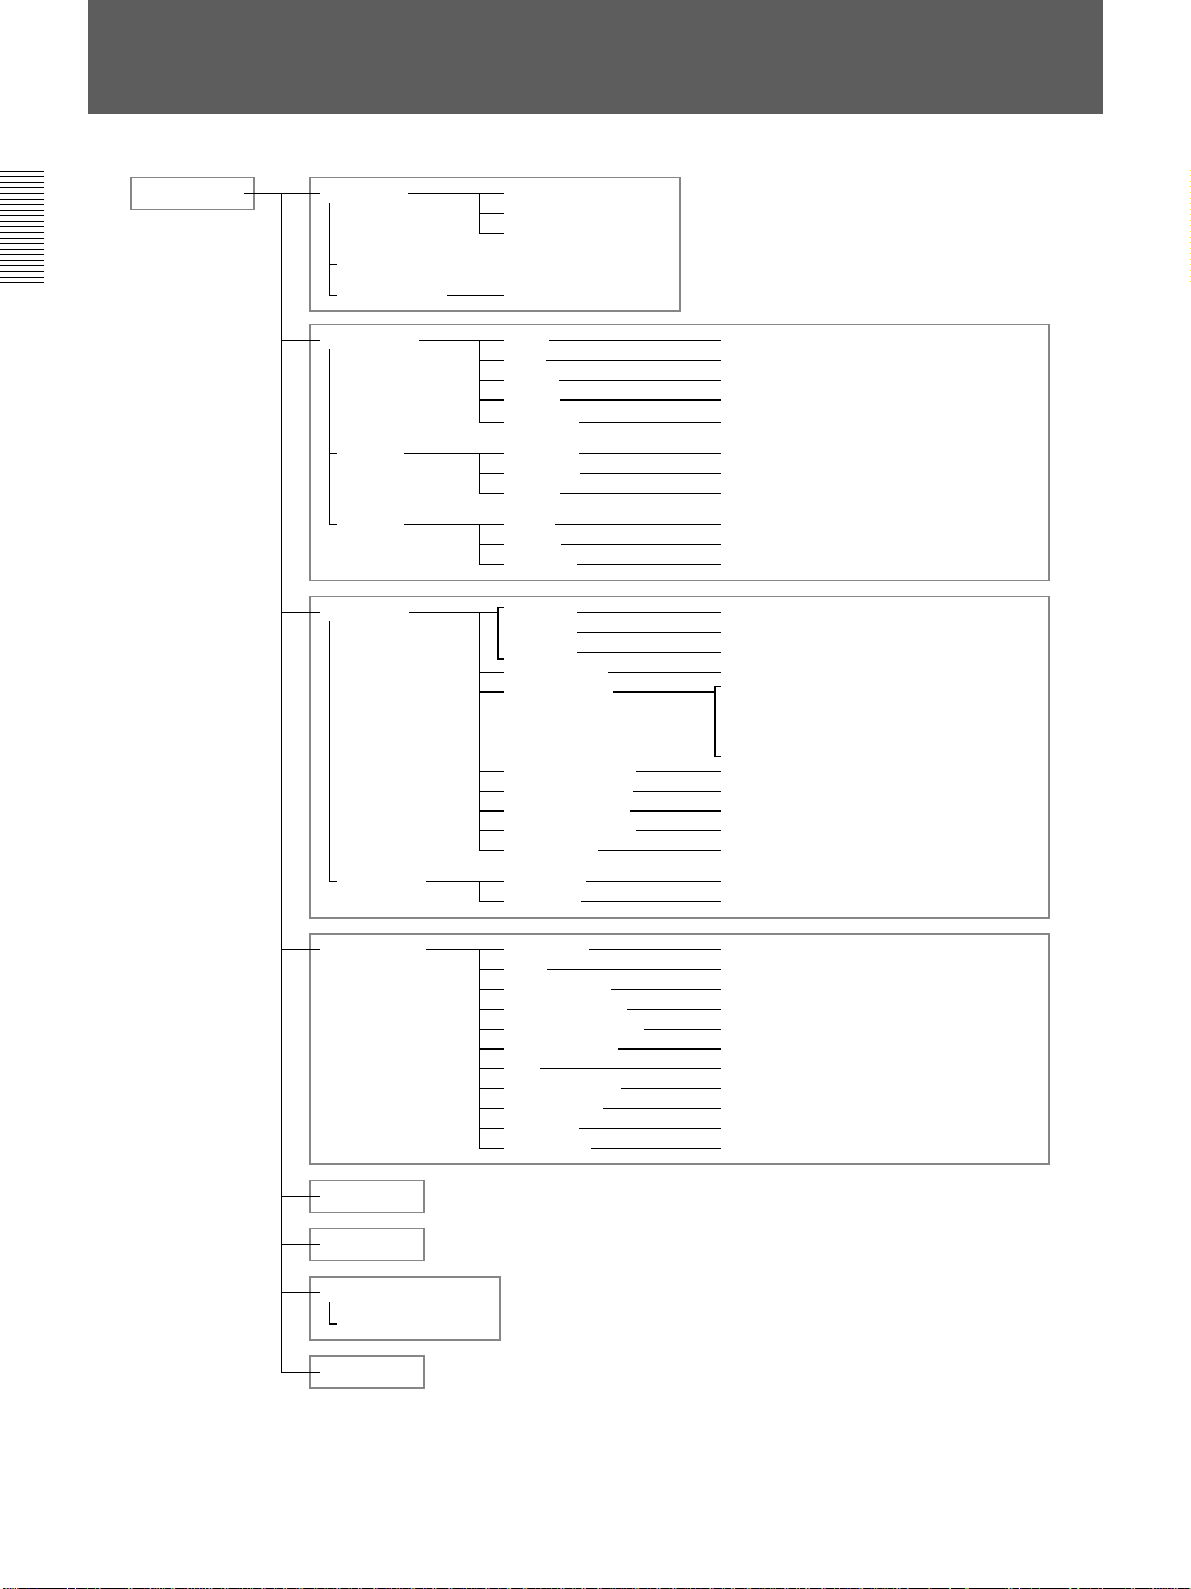
Menu Table
<
MAIN MENU
>
LANGUAGE
CLOCK SET
DAYLIGHT SET
ENGLISH
FRANCAIS
ESPANOL
NO USE / USE
DISPLAY SET
BUZZER
SW OUT
ALARM SET
1SHOT REC
DATE ON / OFF
TIME ON / OFF
SPEED ON / OFF
ALARM ON / OFF
WARNING ON / BLUE / OFF
ALARM IN ON / OFF
TAPE END ON / OFF
KEY IN OFF / ON
MODE FIELD / FRAME
TIMING 01 / 02 / 03 / 04 / 05 / 10 / 30 / 60
2H MODE ON / OFF
2H MODE ON / OFF
6H MODE ON / OFF
8H MODE ON / OFF
ALARM MODE A1 / A2 / A3 / OFF
ALARM SPEED SP 2H / SP12H / SP24H / NC (T120)
SP 2H / SP16H / SP32H / NC (T160)
EP 6H / EP18H / EP30H / NC (T120)
EP 8H / EP24H / EP40H / NC (T160)
ALARM DURATION 20s / 40s / 1min / 2min / 3min / 4min / 5min / CC
ALARM DATE REC OFF / ON
TAPE END WARN. COUNTER / TAPE END
CLOG DETECTION ON / OFF
SERIES REC OFF / ON
REC FIELD 01 / 02 / 03 / 04 / 05 / 10 / 30 / 60
INTERVAL 1min / 2min / 3min
GENERAL SET
TIMER SET
HOLIDAY SET
POWER FAILURE / DEW
USED HOUR
ALARM DATA
REC MODE SP / EP
TAPE T–120 / T–160
TAPE IN MODE STOP / REC
TAPE END MODE REW / STOP / REPEAT 1 / REPEAT 2
TAPE USED COUNT OFF / ON
CLOCK ADJUST 01 : 00
APC ON / OFF
THREAD CHECK OFF / ON
T / D SEARCH CONVENTION / NEW
PB S–VHS AUTO / OFF
BAUD RATE 19200 / 2400 / 4800 / 9600
12
Page 13
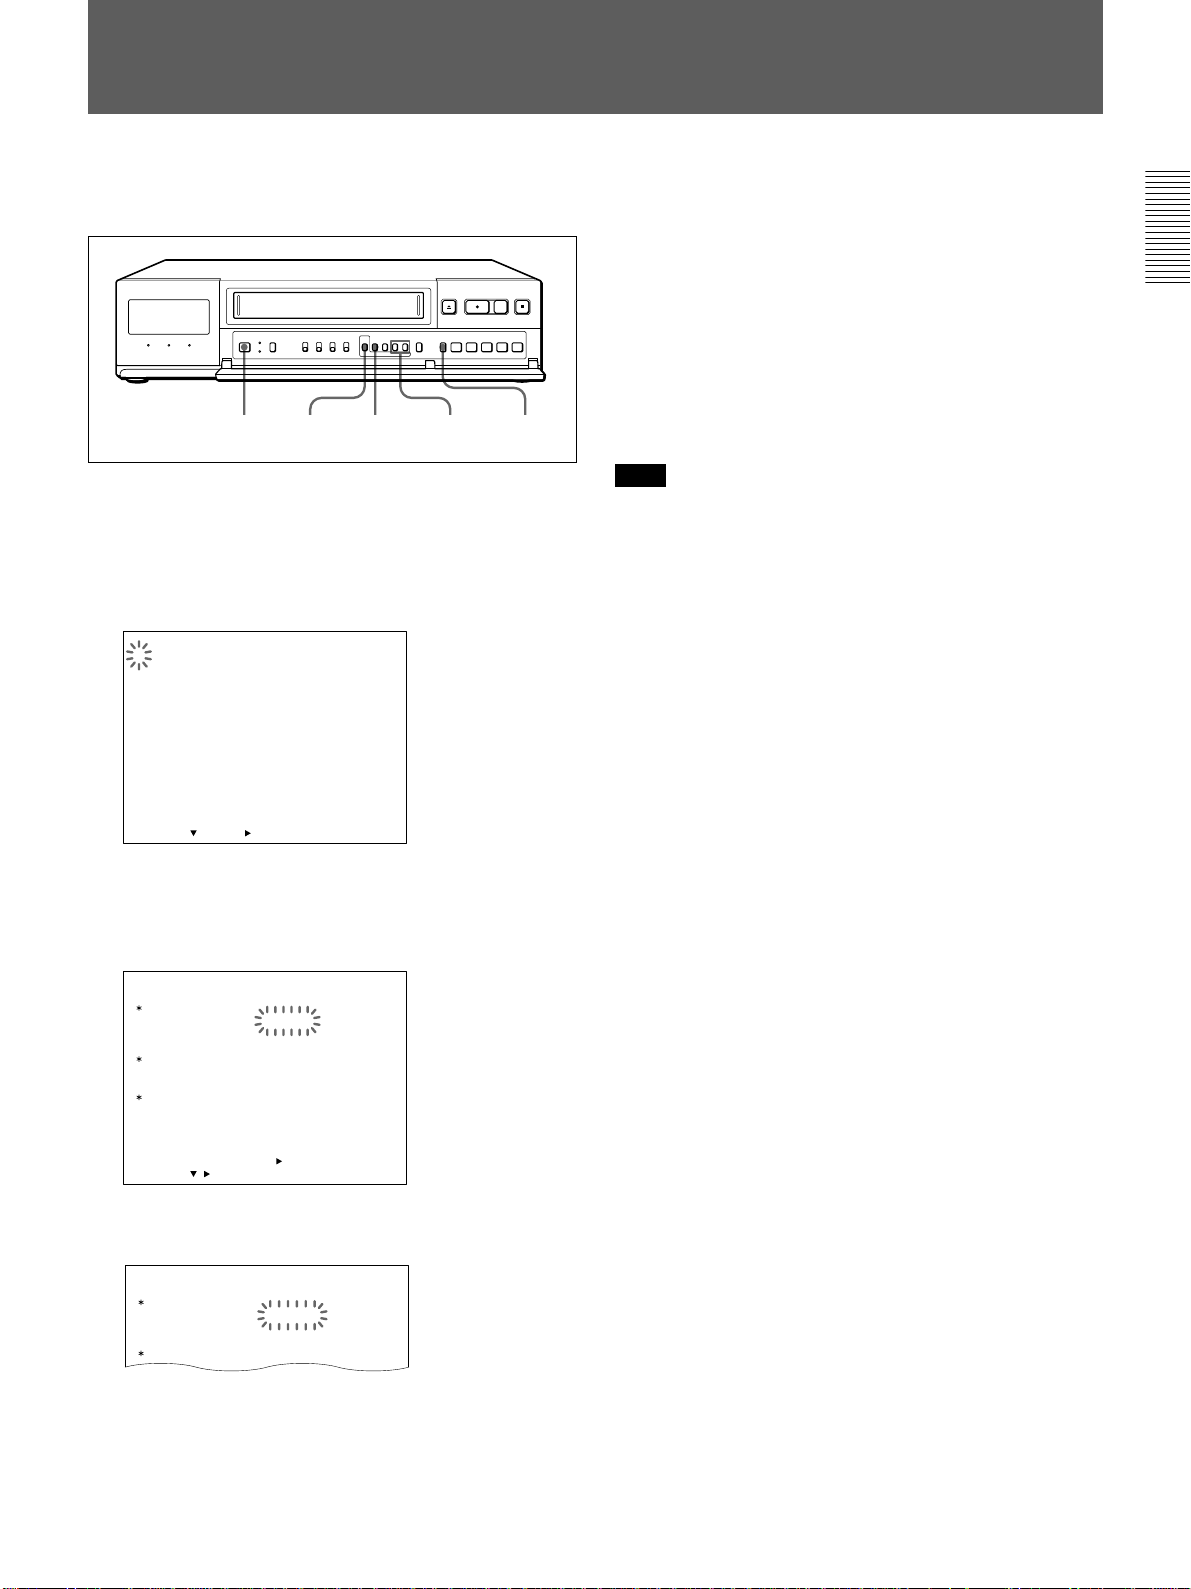
Setting the Language
Select either English, French or Spanish for the display
language.
12 4 5
3
1 Turn on the power of the equipment to be used.
2 Press MENU.
The MAIN MENU appears on the monitor screen
and “1” flashes.
<
MAIN MENU
/
DEW
>
LANGUAGE
1.
CLOCK SET
DAYLIGHT SET
2. DISPLAY SET
BUZZER
SW OUT
/
3. ALARM SET
4. GENERAL SET
5. TIMER SET
6. HOLIDAY SET
7. POWER FAILURE
8. ALARM DATA
SELECT : NEXT : RETURN : MENU
1SHOT REC
USED HOUR
5 Press SEARCH/AUDIO ON to return to the
normal display.
To return to the MAIN MENU screen from the
current menu
Press MENU again.
To go to the next menu from the current menu
V
Press MENU
press MENU
Note
When you want to change the language again, repeat steps 2
to 5 after step 5.
until “NEXT PUSH B” flashes and
B
.
3 Press MENU
B
.
The LANGUAGE/CLOCK SET/DAYLIGHT SET
menu appears.
LANGUAGE
CLOCK SET
DAYLIGHT SET
ON
OFF
SELECT : DATA SET :
<
/
ENGLISH
01–01–2000 00:00:00
NO USE
WEEK
1ST–SUN
LST–SUN
NEXT PUSH
>
+
/–RETURN : MENU
MONTH
04
10
TIME
02:00
02:00
4 Press MENU + or – to select the language.
LANGUAGE
CLOCK SET
FRANCAIS
01–01–00 00:00:00
13
Page 14
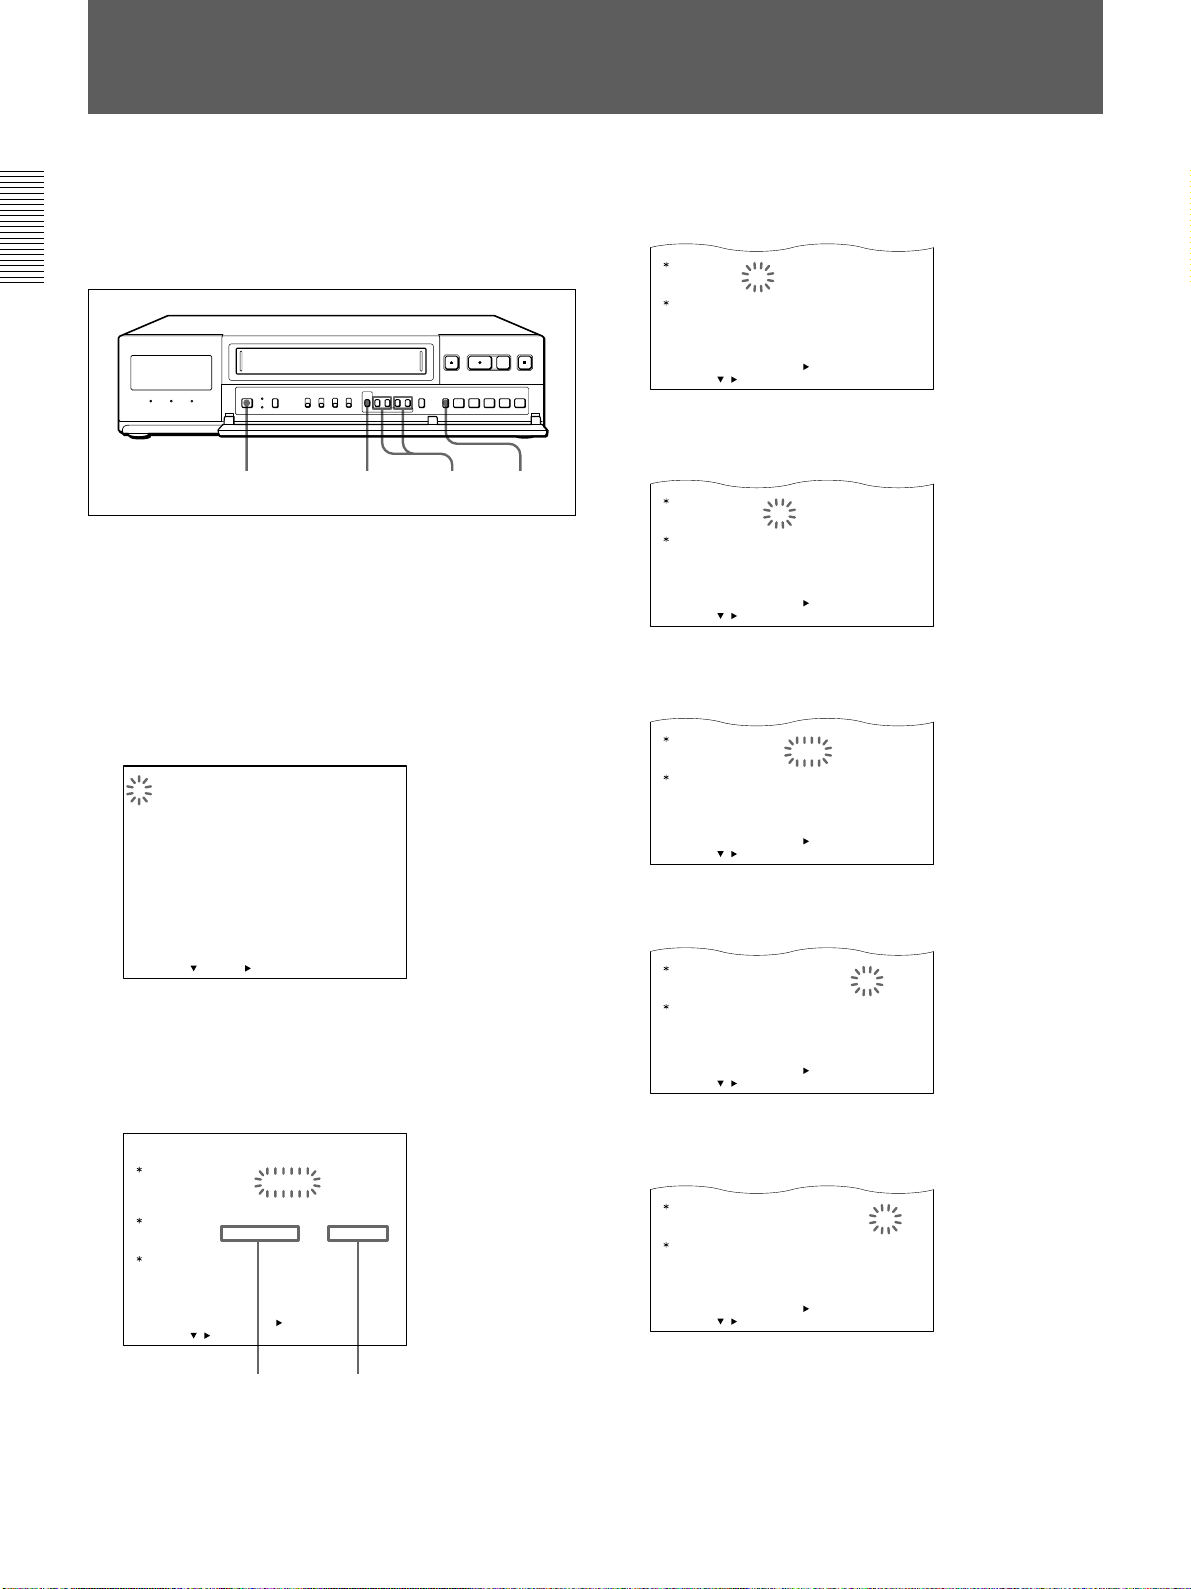
Setting the Clock
CLOCK SET
10–01– 2000 00:00:00
SUMMER TIME
SELECT : DATA SET :
+
/–RETURN : MENU
/
ON
OFF
1ST–SUN
WEEK
SET NO USE
LST–SUN
04
MONTH
10
02:00
TIME
02:00
<
NEXT PUSH
>
CLOCK SET
10–15– 2000 00:00:00
SUMMER TIME
SELECT : DATA SET :
+
/–RETURN : MENU
/
ON
OFF
1ST–SUN
WEEK
SET NO USE
LST–SUN
04
MONTH
10
02:00
TIME
02:00
<
NEXT PUSH
>
CLOCK SET
10–15– 2000 00:00:00
SUMMER TIME
SELECT : DATA SET :
+
/–RETURN : MENU
/
ON
OFF
1ST–SUN
WEEK
SET NO USE
LST–SUN
04
MONTH
10
02:00
TIME
02:00
<
NEXT PUSH
>
CLOCK SET
10–15– 2000 15:00:00
SUMMER TIME
SELECT : DATA SET :
+
/–RETURN : MENU
/
ON
OFF
1ST–SUN
WEEK
SET NO USE
LST–SUN
04
MONTH
10
02:00
TIME
02:00
<
NEXT PUSH
>
CLOCK SET
10–15– 2000 15:20:00
SUMMER TIME
SELECT : DATA SET :
+
/–RETURN : MENU
/
ON
OFF
1ST–SUN
WEEK
SET NO USE
LST–SUN
04
MONTH
10
02:00
TIME
02:00
<
NEXT PUSH
>
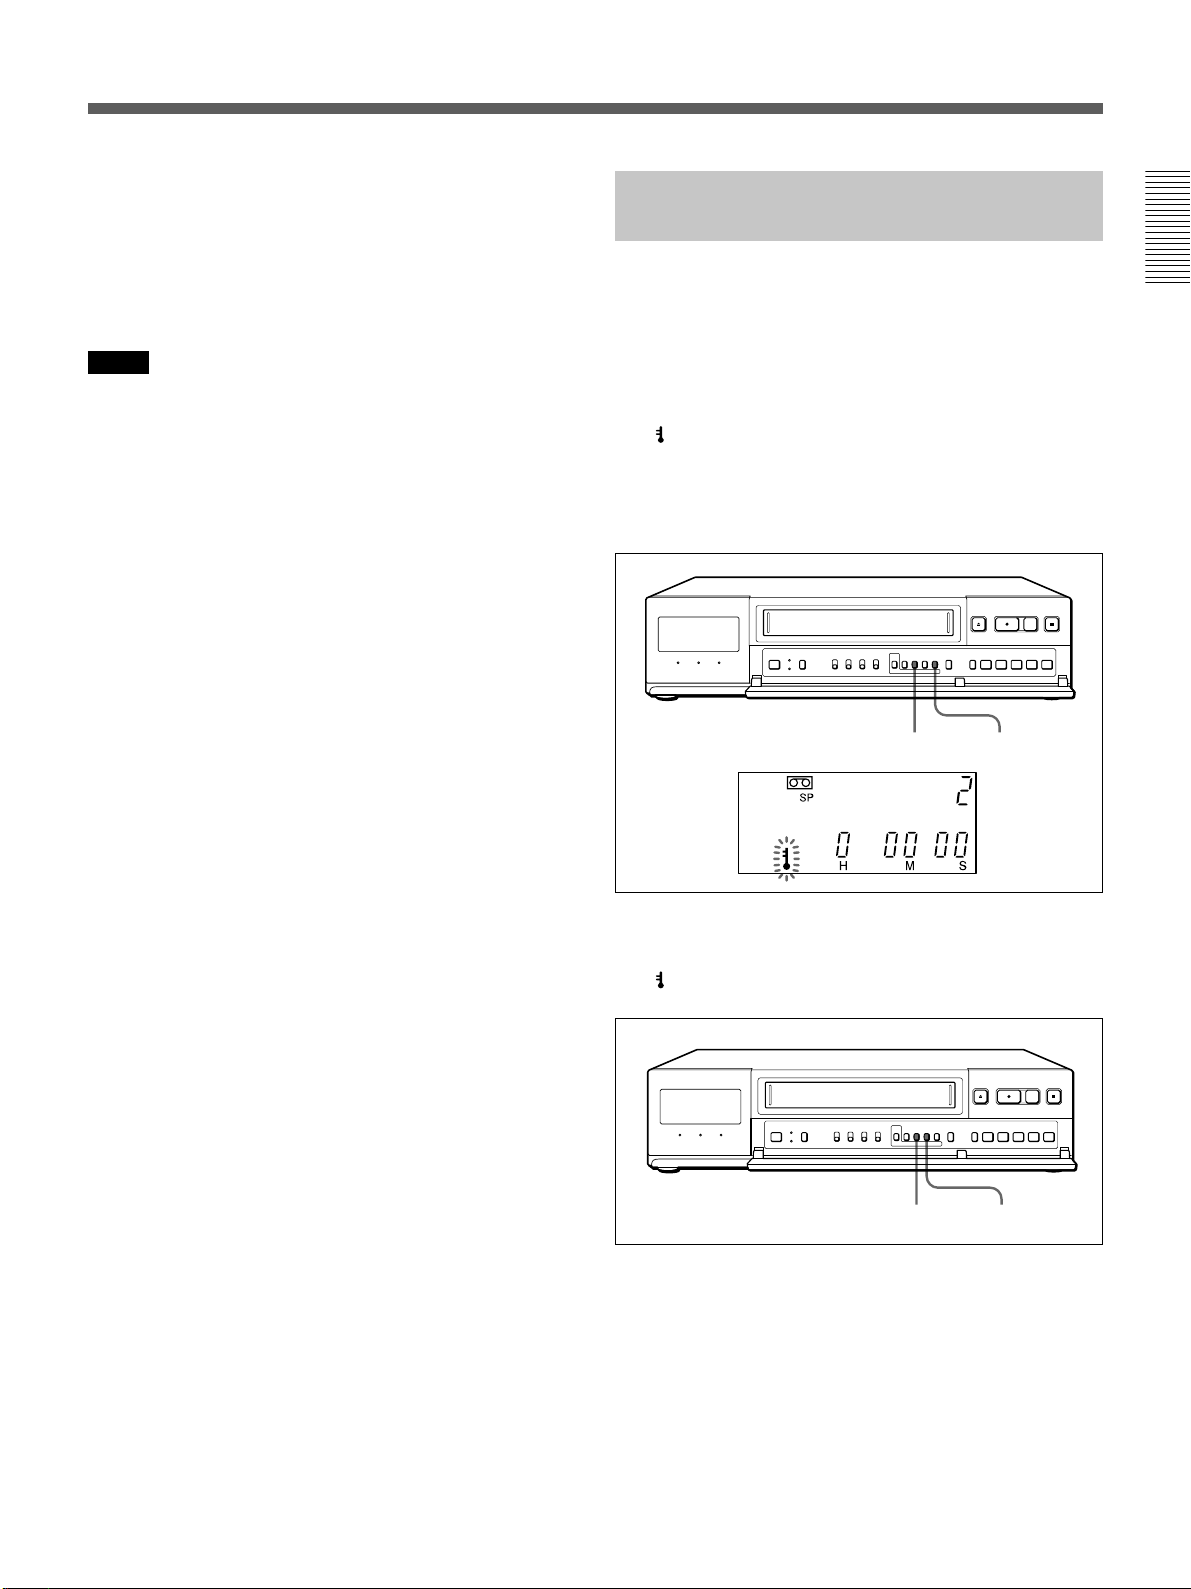
Set the clock to the current time and date on the
monitor screen. To adjust to Daylight saving Time,
proceed the steps in “Adjusting to Daylight saving
Time” on page 15 first.
1 2 3-10 11
Example:
Set the date and time to 15:20 on October 15, 2000.
1 Turn on the power of the equipment to be used.
2 Press MENU.
The MAIN MENU appears on the monitor screen
and “1” flashes.
5
Set the
month
by pressing MENU + or –, then press
MENU B.
6 Set the
MENU
day
by pressing
B
.
7 Set the year by pressing
B
MENU
.
MENU + or –
MENU + or –
, then press
, then press
<
MAIN MENU
/
DEW
B
>
.
LANGUAGE
1.
CLOCK SET
DAYLIGHT SET
2. DISPLAY SET
BUZZER
SW OUT
/
3. ALARM SET
4. GENERAL SET
5. TIMER SET
6. HOLIDAY SET
7. POWER FAILURE
8. ALARM DATA
SELECT : NEXT : RETURN : MENU
1SHOT REC
USED HOUR
3 Press MENU
The LANGUAGE/CLOCK SET/DAYLIGHT SET
menu appears.
The first display shows 1 January, 2000.
LANGUAGE
CLOCK SET
DAYLIGHT SET
ON
OFF
SELECT : DATA SET :
<
/
ENGLISH
01–01–2000 00:00:00
NO USE
WEEK
1ST–SUN
LST–SUN
NEXT PUSH
>
+
/–RETURN : MENU
MONTH
04
10
TIME
02:00
02:00
TimeMonth-Day-Year
8 Set the hour by pressing
B
MENU
.
9 Set the minutes by pressing
B
press MENU
10Press
MENU –
.
simultaneously with a time signal.
MENU + or –
MENU + or –
You can set the clock at the 00 second point.
, then press
, then
4
Press MENU V to move the flashing to 01.
14
11Press SEARCH/AUDIO ON to return to the
normal display.
Page 15
To correct the clock setting
CLOCK SET
10–15– 2000 15:20:00
DAYLIGHT SET
SELECT : DATA SET :
+
/–RETURN : MENU
/
ON
OFF
1ST–SUN
WEEK
USE
LST–SUN
04
MONTH
10
02:00
TIME
02:00
<
NEXT PUSH
>
CLOCK SET
10–15– 2000 15:20:00
DAYLIGHT SET
SELECT : DATA SET :
+
/–RETURN : MENU
/
ON
OFF
1ST–SUN
WEEK
NO USE
LST–SUN
04
MONTH
10
02:00
TIME
02:00
<
NEXT PUSH
>
B
Press MENU
to move the flashing to the setting to
correct and reset it by pressing MENU + or –.
To return to the MAIN MENU screen from the
current menu
Press MENU again.
To go to the next menu from the current menu
V
Press MENU
press MENU
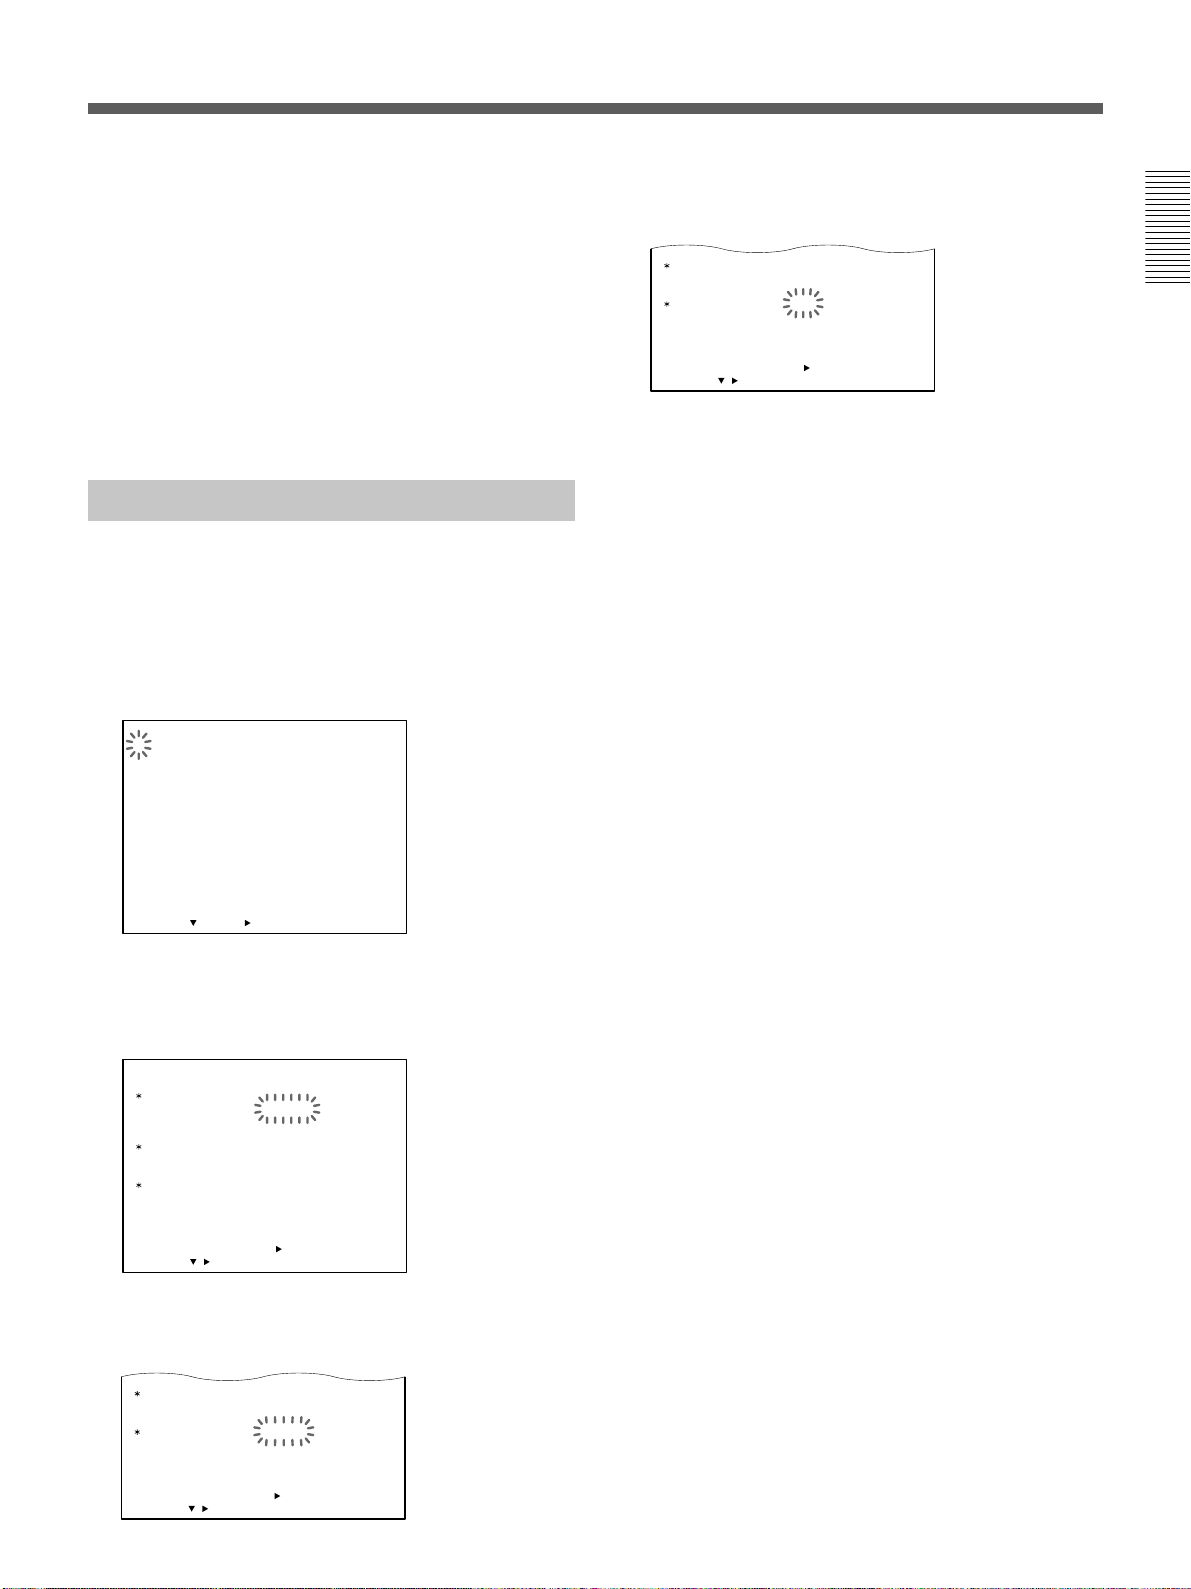
Adjusting to
until “NEXT PUSH B” flashes and
B
.
Daylight Saving
Time
You can adjust to Daylight saving Time when the
season changes.
1 Press MENU.
The MAIN MENU appears on the monitor screen
and “1” flashes.
<
LANGUAGE
1.
CLOCK SET
DAYLIGHT SET
2. DISPLAY SET
BUZZER
SW OUT
3. ALARM SET
4. GENERAL SET
5. TIMER SET
6. HOLIDAY SET
7. POWER FAILURE
USED HOUR
8. ALARM DATA
SELECT : NEXT : RETURN : MENU
MAIN MENU
/
1SHOT REC
2 Press MENU
The LANGUAGE/CLOCK SET/DAYLIGHT SET
menu appears.
/
DEW
B
>
.
4 Press
MENU + or –
to set DAYLIGHT SET to NO
USE or USE.
NO USE: no Daylight saving Time adjustment is
made
USE: Daylight saving Time adjustment is made
5 Press MENU
V
and set the date and time the
Daylight saving Time adjustment is made.
WEEK ON
Press
MENU + or –
to set which day the
Daylight saving Time adjustment is made:
1ST, 2ND, 3RD, 4TH or LST for first, second,
third, fourth or last week.
Then press MENU
, and press
MENU + or –
B
select the day of the week:
SUN, MON, TUE, WED, THU, FRI or SAT.
MONTH ON
Press MENU
MENU + or –
to set which
B
, and
month the Daylight saving Time adjustment is
made: 01, 02, 03, 04...11, 12 for January,
February .....December.
TIME ON
Press MENU
MENU + or –
to set the
B
, and
time the Daylight saving Time adjustment is
made. The time can only be set between 01 and
B
22. Then press MENU
to set the minutes.
–
, and press
MENU + or
to
3
Press MENU V to move the flashing to the setting
of
LANGUAGE
CLOCK SET
DAYLIGHT SET
SELECT : DATA SET :
10–15– 2000 15:20:00
WEEK
ON
1ST–SUN
LST–SUN
OFF
<
NEXT PUSH
/
DAYLIGHT
ENGLISH
NO USE
MONTH
04
10
>
+
/–RETURN : MENU
SET.
TIME
02:00
02:00
Following the same procedures as WEEK ON,
MONTH ON and TIME ON, set WEEK OFF,
MONTH OFF and TIME OFF when the time is
changed back from the Daylight Saving Time to
standard time.
6 Press SEARCH/AUDIO ON to return to the
normal display.
To return to the MAIN MENU screen from the
current menu
Press MENU again.
To go to the next menu from the current menu
V
Press MENU
press MENU
until “NEXT PUSH B” flashes and
B
.
15
Page 16
Setting the Clock
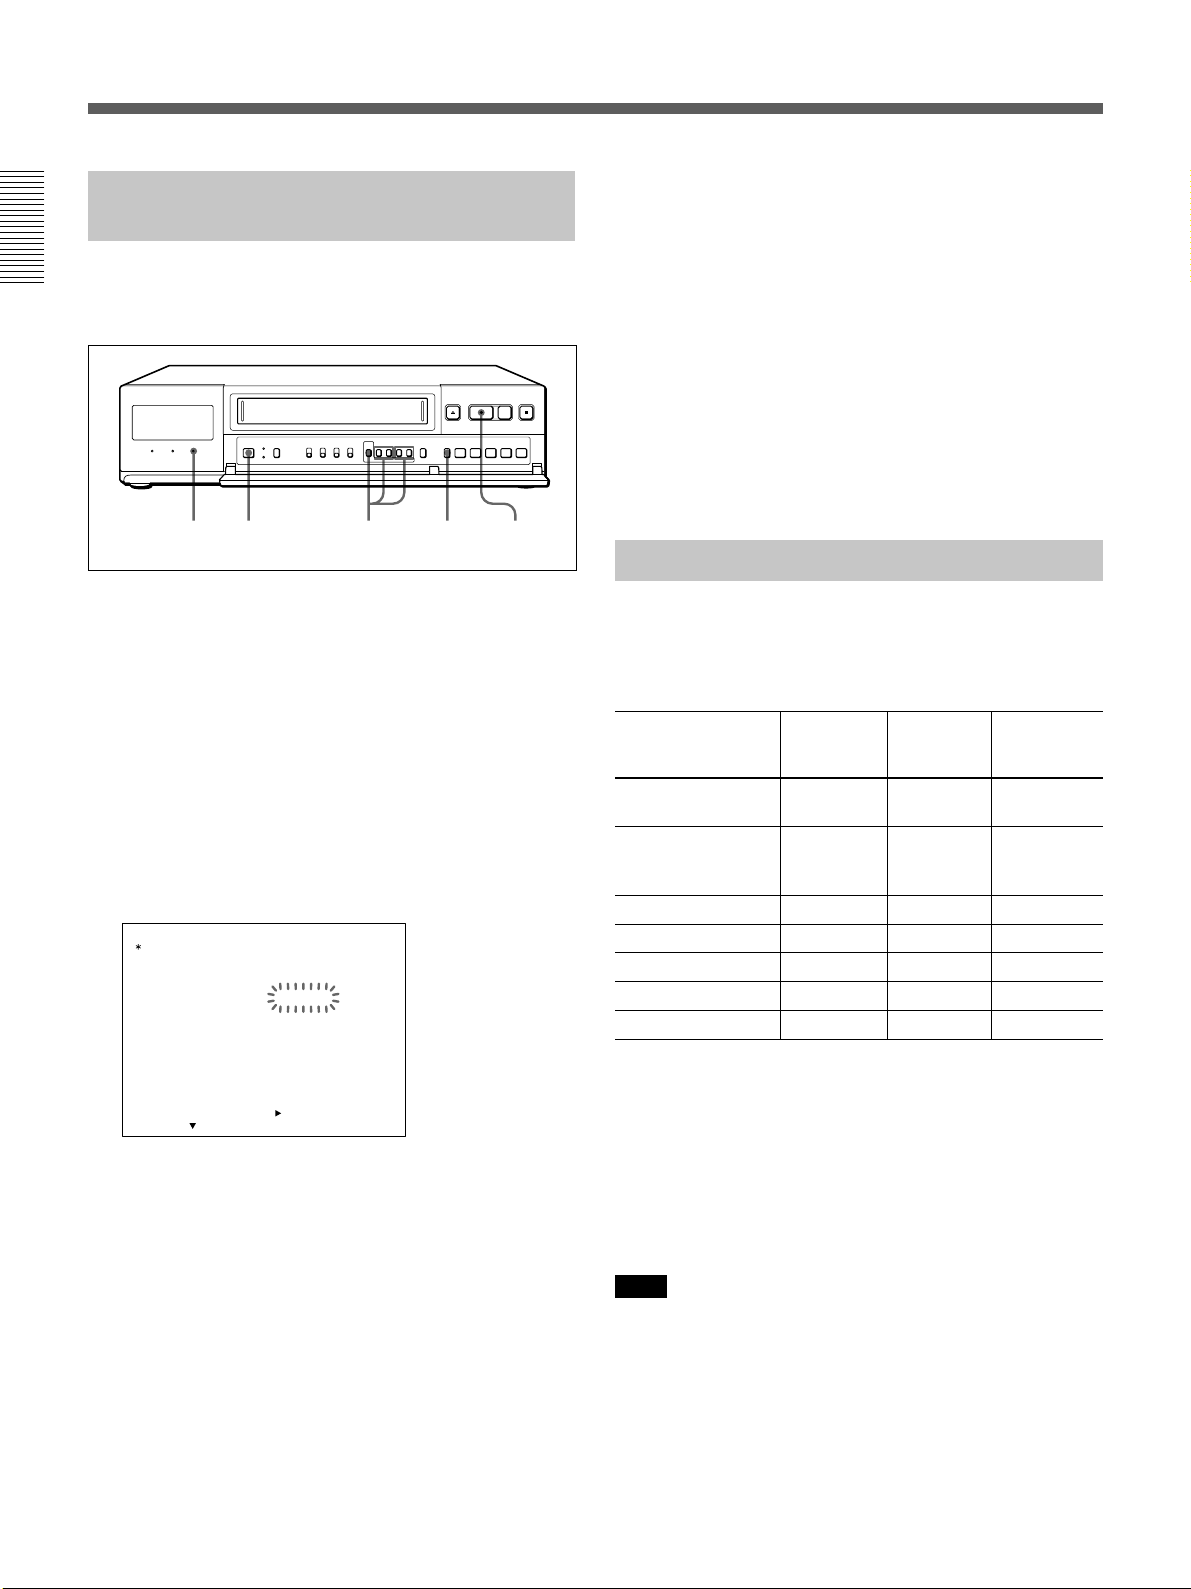
Setting the Time/Date Display
You can display five items of information (date, time,
recording/playback speed, number of alarm recordings
and warning display) and turn off each item which you
do not want to display.
1 Turn on the power of the equipment to be used.
2 Press MENU and MENU
MENU flashes on the monitor screen.
<
LANGUAGE
1.
CLOCK SET
DAYLIGHT SET
2. DISPLAY SET
BUZZER
SW OUT
3. ALARM SET
4. GENERAL SET
5. TIMER SET
6. HOLIDAY SET
7. POWER FAILURE
USED HOUR
8. ALARM DATA
SELECT : NEXT : RETURN : MENU
3 Press MENU
The DISPLAY SET/BUZZER/SW OUT menu
appears.
DISPLAY SET DATE ON
BUZZER ALARM IN ON
SW OUT MODE FIELD
SELECT : DATA SET : +/–RETURN : MENU
MAIN MENU
/
1SHOT REC
/
DEW
B
.
TIME ON
SPEED ON
ALARM ON
WARNING ON
TAPE END ON
KEY IN OFF
TIMING 01
2H MODE ON
<NEXT PUSH >
V
until “2” of the MAIN
>
5 Press SEARCH/AUDIO ON to return to the
normal display.
15-06-2000 000
15:20:00 SP 72
Alarm count
Recording/playback
speed
Recording mode
Current time
To return to the MAIN MENU screen from the
current menu
Press MENU again.
To go to the next menu from the current menu
V
Press MENU
press MENU
until “NEXT PUSH B” flashes and
B
.
To turn off the screen display
Set the ON-SCREEN switch to OFF.
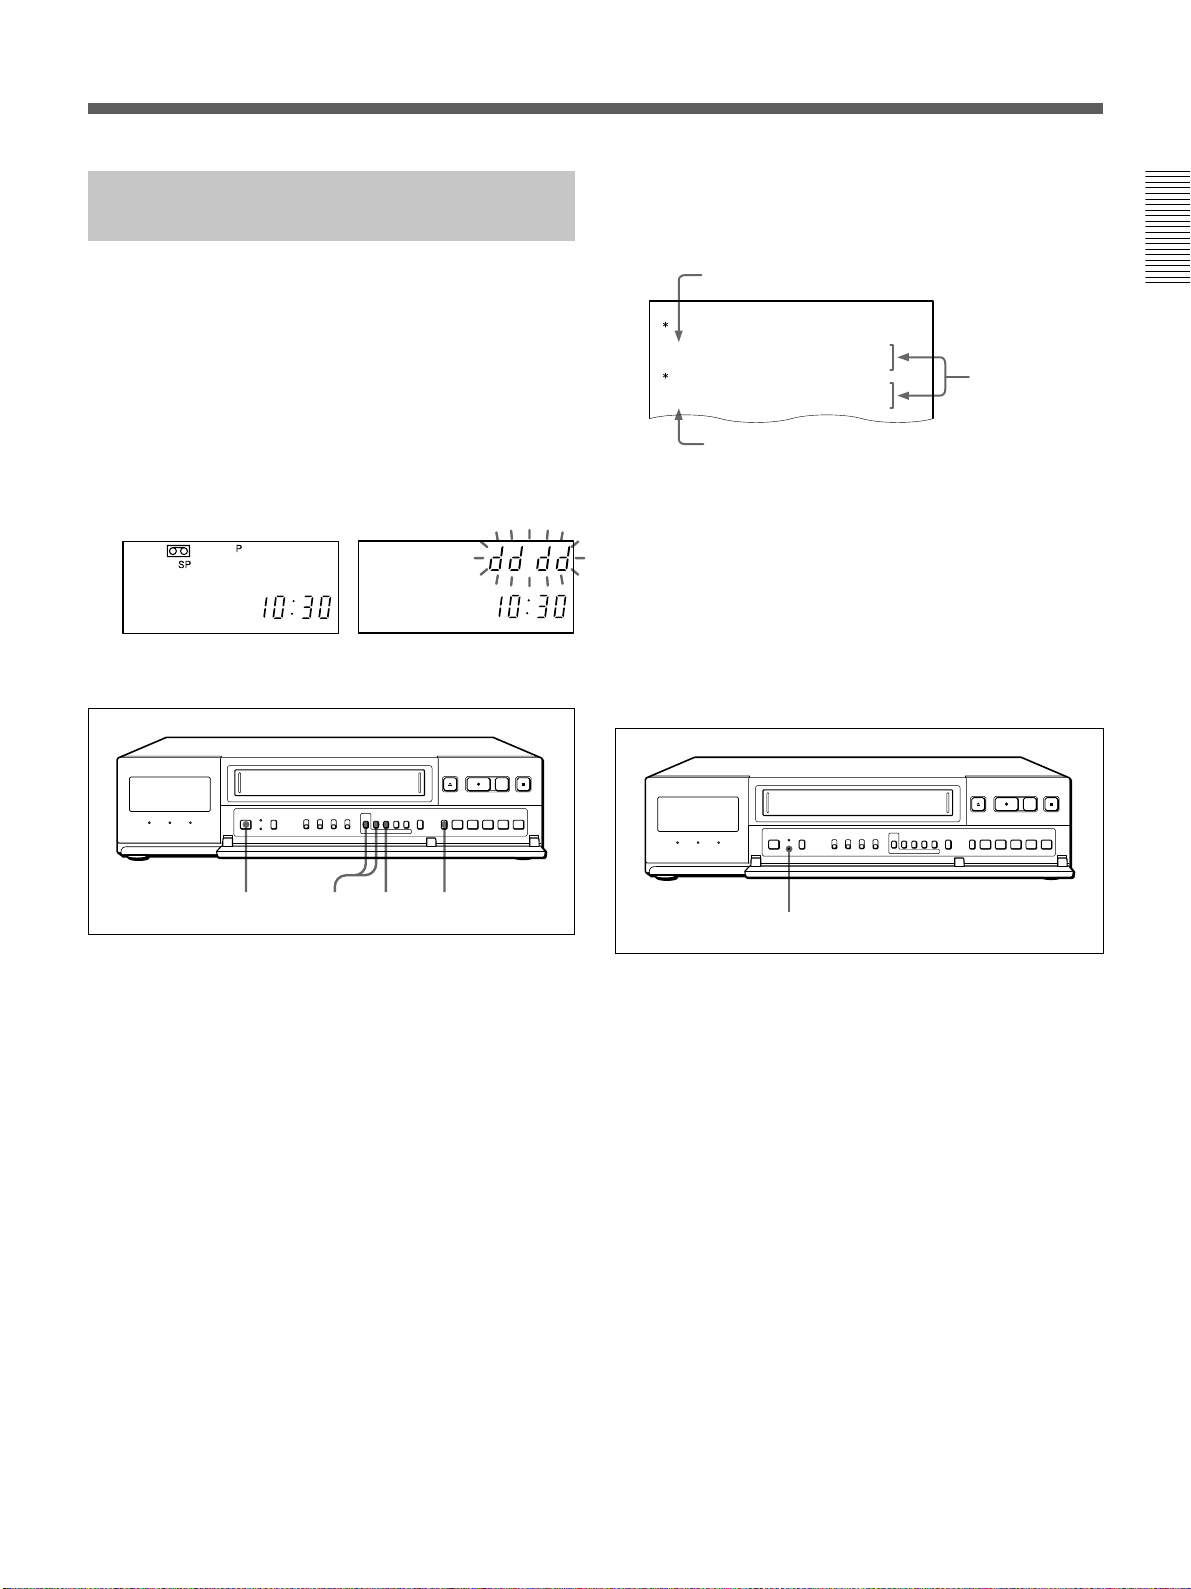
Changing the Display Position of
the Time/Date Display
You can change the position of the time/date display
that appears on the monitor screen.
1 Turn on the power of the equipment to be used.
The normal display appears.
Date
10-15-2000 000
15:20:00 SP 72
Alarm count
Recording/
playback speed
Current time
4
Press MENU V to move the flashing to the setting
each DATE, TIME, SPEED, ALARM and
of
WARNING,
MENU + or –
and set to ON or OFF by
.
pressing
Example: When you set the date display to OFF.
DISPLAY SET DATE OFF
BUZZER ALARM IN ON
TIME ON
SPEED ON
ALARM ON
WARNING ON
TAPE END ON
16
2 Change the display position as follows.
To move the display downwards, press MENU V.
(When the display reaches the bottom of the
screen, the display returns to the top of the screen.)
To move the display rightwards, press MENU B.
(When the display reaches the right-hand edge of
the screen, the display returns to the left-hand edge
of the screen.)
10-15-2000 000
15:20:00 SP 72
Note
While recording, this function does not work.
Press MENU B.
Press MENU V.
Page 17

Setting the Buzzers
You can turn on/off three types of buzzers:
•ALARM IN buzzer: beeps while it receives an
alarm signal. (See “Alarm Recording” for more
information on page 35.)
•TAPE END buzzer: beeps when the tape reaches its
end.
•KEY IN buzzer: beeps when you press a button.
1 2-4 5
1 Turn on the power of the equipment to be used.
2 Press MENU and MENU
MENU flashes on the monitor screen.
<
LANGUAGE
1.
CLOCK SET
DAYLIGHT SET
2. DISPLAY SET
BUZZER
SW OUT
3. ALARM SET
4. GENERAL SET
5. TIMER SET
6. HOLIDAY SET
7. POWER FAILURE
USED HOUR
8. ALARM DATA
SELECT : NEXT : RETURN : MENU
MAIN MENU
/
1SHOT REC
/
DEW
V
until “2” of the MAIN
>
4
Press MENU V to move the flashing to the setting
each ALARM IN, TAPE END and KEY IN,
of
set to ON or OFF by
DISPLAY SET DATE ON
BUZZER ALARM IN ON
SW OUT MODE FIELD
pressing MENU + or –
TIME ON
SPEED ON
ALARM ON
WARNING ON
TAPE END ON
KEY IN ON
TIMING 01
and
.
5 Press SEARCH/AUDIO ON to return to the
normal display.
To return to the MAIN MENU screen from the
current menu
Press MENU again.
To go to the next menu from the current menu
Press MENU V until “NEXT PUSH B” flashes and
B
press MENU
.
3 Press MENU
B
.
The DISPLAY SET/BUZZER/SW OUT menu
appears.
DISPLAY SET DATE ON
BUZZER ALARM IN ON
SW OUT MODE FIELD
SELECT : DATA SET : +/–RETURN : MENU
TIME ON
SPEED ON
ALARM ON
WARNING ON
TAPE END ON
KEY IN OFF
TIMING 01
2H MODE ON
<NEXT PUSH >
17
Page 18
Handling a Video Cassette
This section shows you how to insert a video cassette
into the VCR.
Setting the S-VHS switch
You can use S-VHS or VHS video cassettes. When
recording on S-VHS tape using S-VHS ET format or
on VHS tape using S-VHS ET format, set the S-VHS
switch to ON (S-VHS indication lights up in the
display window).
When recording on S-VHS tape using VHS format, set
the switch to OFF.
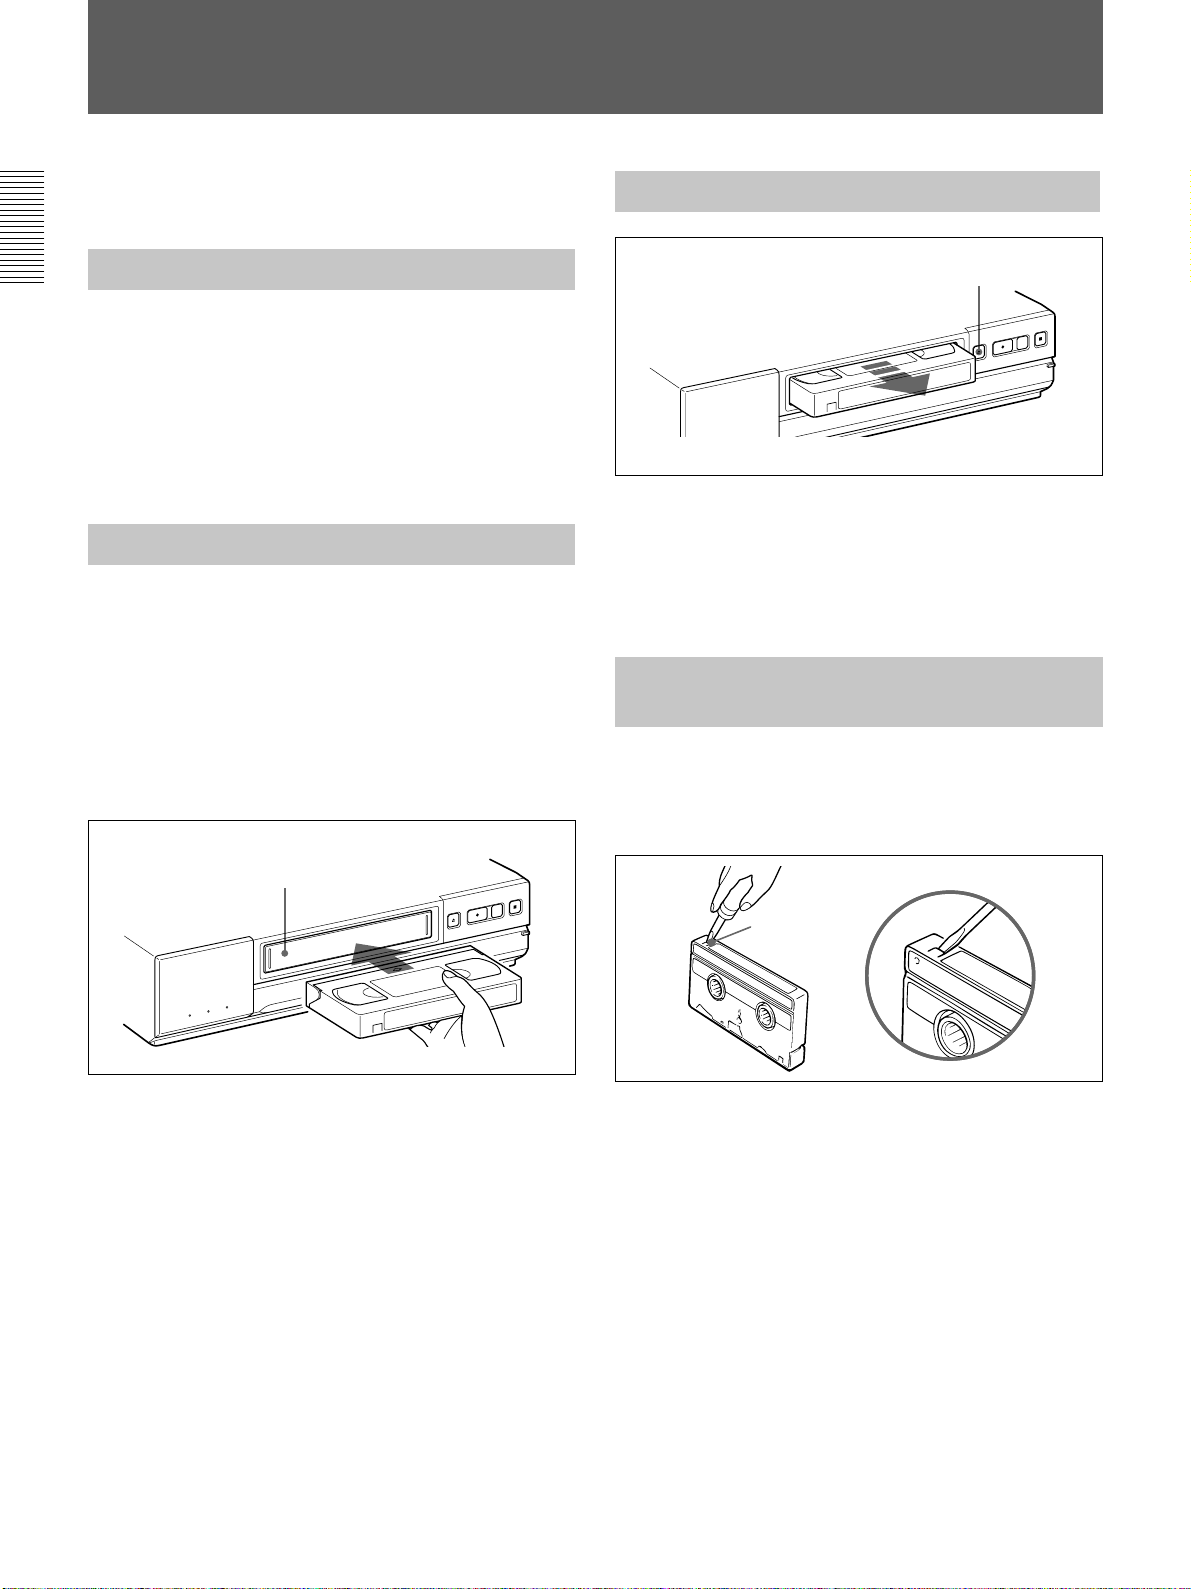
Inserting a Video Cassette
Insert the cassette into the cassette compartment by
slowly pressing its center with the arrow on the top.
When the cassette is inserted, the VCR automatically
turns on and the q indicator lights in the display
window.
If you insert the cassette without its safety tab and are
going to start recording, the VCR ejects the cassette
automatically.
Ejecting a Video Cassette
EJECT Z
To eject the cassette, press EJECT Z on the VCR.
You can eject the cassette even when the power is off.
When you press EJECT Z, the VCR turns on
automatically.
After ejecting the cassette, the VCR turns off again.
Protecting Your Cassette from
Being Erased
Remove the tab on the cassette with a screwdriver or a
similar tool as shown below. This protects your
cassette against an accidental recording.
Cassette compartment
Safety
tab
If you want to record again on the cassette without its
safety tab, simply cover the safety tab hole with a
piece of plastic tape.
18
Page 19
Setting the Recording Mode
You can record either in SP (standard play) or EP
(extended play) mode.
1 2-4 5
1 Turn on the power of the equipment to be used.
2 Press MENU and MENU
MENU flashes on the monitor screen.
<
LANGUAGE
1.
CLOCK SET
DAYLIGHT SET
2. DISPLAY SET
BUZZER
SW OUT
3. ALARM SET
4. GENERAL SET
5. TIMER SET
6. HOLIDAY SET
7. POWER FAILURE
USED HOUR
8. ALARM DATA
SELECT : NEXT : RETURN : MENU
MAIN MENU
/
1SHOT REC
/
DEW
V
until “4” of the MAIN
>
To return to the MAIN MENU screen from the
current menu
Press MENU again.
To go to the next menu from the current menu
V
Press MENU
press MENU
until “NEXT PUSH B” flashes and
B
.
3 Press MENU
B
.
The GENERAL SET menu appears and “SP” of
REC MODE flashes.
GENERAL SET
REC MODE SP
TAPE
MODE
TAPE IN
TAPE END MODE
TAPE USED COUNT
CLOCK ADJUST
APC
THREAD CHECK
/
D SEARCH
T
PB S–VHS AUTO
BAUD RATE
SELECT : DATA SET : +/–RETURN : MENU
<NEXT PUSH >
4 Set to SP or EP by pressing
T–120
STOP
REW
OFF
01:00
ON
OFF
CONVENTION
19200
MENU + or –.
5 Press SEARCH/AUDIO ON to return to the
normal display.
19
Page 20
Selecting the Tape
This VCR is designed and calibrated for 120-minute or
160-minute tape (T-120 or T-160). To ensure stable
operation and optimum picture quality, we recommend
that you use a Sony 120-minute tape for long recording
in SP mode.
1 2-5 6
1 Turn on the power of the equipment to be used.
2 Press MENU and MENU
MENU flashes on the monitor screen.
<
LANGUAGE
1.
CLOCK SET
DAYLIGHT SET
2. DISPLAY SET
BUZZER
SW OUT
3. ALARM SET
4. GENERAL SET
5. TIMER SET
6. HOLIDAY SET
7. POWER FAILURE
USED HOUR
8. ALARM DATA
SELECT : NEXT : RETURN : MENU
MAIN MENU
/
1SHOT REC
/
DEW
V
until “4” of the MAIN
>
5 Set to T-120 or T-160 by pressing
MENU + or –.
6 Press SEARCH/AUDIO ON to return to the
normal display.
To return to the MAIN MENU screen from the
current menu
Press MENU again.
To go to the next menu from the current menu
V
Press MENU
press MENU
until “NEXT PUSH B” flashes and
B
.
3 Press MENU
B
.
The GENERAL SET menu appears.
GENERAL SET
REC MODE SP
TAPE
TAPE IN
TAPE END MODE
TAPE USED COUNT
CLOCK ADJUST
APC
THREAD CHECK
T
PB S–VHS AUTO
BAUD RATE
SELECT : DATA SET : +/–RETURN : MENU
/
D SEARCH
<NEXT PUSH >
MODE
4 Press MENU
T–120
STOP
REW
OFF
01:00
ON
OFF
CONVENTION
19200
V
to move the flashing to the setting
of TAPE.
20
Page 21

Setting the Operation Mode When Inserting a Tape
You can set the mode for the VCR when a video
cassette is inserted on the GENERAL SET menu.
1 2-4 5
1 Turn on the power of the equipment to be used.
2 Press MENU and MENU
MENU flashes on the monitor screen.
<
LANGUAGE
1.
CLOCK SET
DAYLIGHT SET
2. DISPLAY SET
BUZZER
SW OUT
3. ALARM SET
4. GENERAL SET
5. TIMER SET
6. HOLIDAY SET
7. POWER FAILURE
USED HOUR
8. ALARM DATA
SELECT : NEXT : RETURN : MENU
3 Press MENU
The GENERAL SET menu appears.
MAIN MENU
/
1SHOT REC
/
DEW
B
.
V
until “4” of the MAIN
>
4 Press MENU V
to move the flashing to the setting
of TAPE IN MODE and set STOP or REC by
pressing MENU + or –.
GENERAL SET
REC MODE SP
TAPE
TAPE IN
TAPE END MODE
TAPE USED COUNT
CLOCK ADJUST
APC
THREAD CHECK
T
PB S–VHS AUTO
BAUD RATE
SELECT : DATA SET : +/–RETURN : MENU
/
D SEARCH
<NEXT PUSH >
MODE
T–120
STOP
REW
OFF
01:00
ON
OFF
CONVENTION
19200
STOP: the VCR remains in stop mode even when
a video cassette is inserted.
REC: the VCR starts recording when a video
cassette is inserted.
5 Press SEARCH/AUDIO ON to return to the
normal display.
To return to the MAIN MENU screen from the
current menu
Press MENU again.
To go to the next menu from the current menu
Press MENU V until “NEXT PUSH B” flashes and
B
press MENU
.
GENERAL SET
REC MODE SP
TAPE
MODE
TAPE IN
TAPE END MODE
TAPE USED COUNT
CLOCK ADJUST
APC
THREAD CHECK
/
D SEARCH
T
PB S–VHS AUTO
BAUD RATE
SELECT : DATA SET : +/–RETURN : MENU
<NEXT PUSH >
T–120
STOP
REW
OFF
01:00
ON
OFF
CONVENTION
19200
21
Page 22
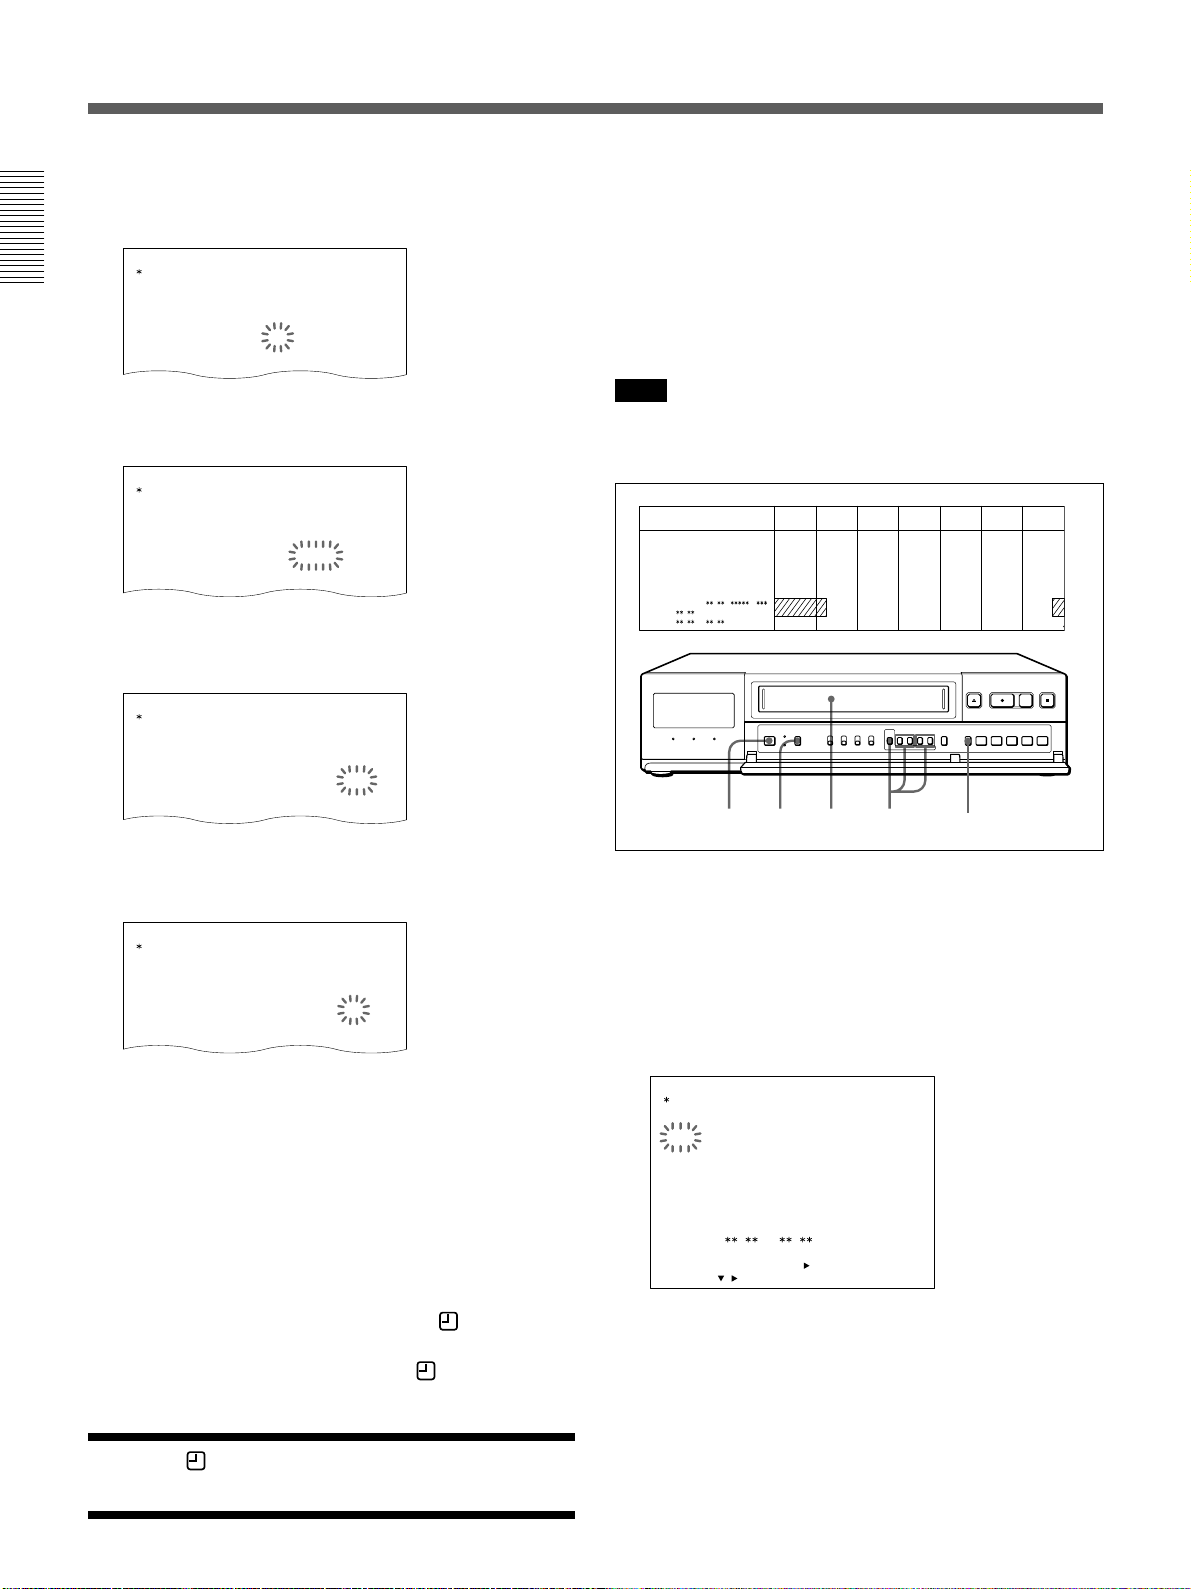
Recording
This section shows you how to record the signal from
the video camera in the normal or time lapse mode, to
set the security lock, to record repeatedly on the same
cassette and series recording.
12 43
PAUSE X
STOP
x
1 Turn on the power of the equipment to be used.
2 Insert the cassette.
3 Set the recording speed by pressing REC/PLAY
SPEED + or –.
The recording speed changes depending on the
tape used (T-120 or T-160 tape) or the setting of
REC MODE on the GENERAL SET menu.
When using T-120 (T-160) tape in EP mode
Recording Maximum recording Interval Audio Tape
speed time recording motion
6 (8) EP mode 6 (8) 1/60
18 (24) 18 (24) 1/20
30 (40) 30 (40) 1/12
48 (64) 54 (72) 0.15
72 (96) 78 (104) 0.22
96 (128) 102 (134) 0.28
120 (160) 126 (168) 0.35
168 (224) 174 (232) 0.48
240 (320) 246 (328) 0.68
360 (480) 366 (488) 1.02
480 (640) 486 (648) 1.35
*000 1-shot 21600 - 1, 2, 3
*For one-shot recording (page 41)
Time
lapse
mode
64800
minutes
Possible
Impossible
Continuous
Intemittent
In EP mode, when using a T-120 tape in 48H 480H modes, it is possible to record additionally 6
hours longer than the displayed recording time.
When using a T-160 tape in 64H - 640H modes, it
is possible to record additionally 8 hours longer
than the displayed recording time.
Recording speed
When using T-120 (T-160) tape in SP mode
Recording Maximum recording Interval Audio Tape
speed time recording motion
2 (2) SP mode 2 1/60
12 (16) 14 (18) 0.12
24 (32) 26 (34) 0.22
48 (64) 50 (66) 0.42
72 (96) 74 (98) 0.62
96 (128) 98 (130) 0.82
120 (160) 122(162) 1.02
168 (224) 170(226) 1.42
240 (320) 242(322) 2.02
360 (480) 362(482) 3.02
480 (640) 482(642) 4.02
*000 1-shot 7200 - 1, 2, 3
*For one-shot recording (page 41)
Time
lapse
mode
21600
minutes
Possible
Impossible
Continuous
Intemittent
In time lapse mode, it is possible to record an
additional 2 hours longer than the displayed
recording time.
22
In the display window
4 Press REC z.
Recording starts.
To stop recording
Press STOP x.
To pause recording
Press PAUSE X.
To resume recording, press the button again. If pause
continues for more then 5 minutes, the VCR
automatically stops.
If recording does not start and the cassette is
ejected
The tab on the cassette is removed to protect against
accidental recording. Use a cassette with its safty tab
or cover the safty tab hole with a piece of plastic tape.
Page 23
Displaying the real time (in recording or stop
mode only)
Set the COUNTER/REAL TIME switch to REAL
TIME. The real time will be displayed in the display
window. In playback mode, the display shows the tape
counter regardless of the switch position.
Notes
• When recording with S-VHS ET format, we recommend to
use high-grade (HG) VHS cassettes.
• Tapes recorded with S-VHS ET format can be played back
on the following video players:
– S-VHS video player with S-VHS ET format or
equivalent.
– video player provided with handy S-VHS playback
function.
• When recording for a long time in SP mode, we
recommend to use a T-120 tape. If you use a T-160 tape,
the VCR may not function sufficiently.
• Whenever you insert a tape and first start recording,
Adaptive Picture Control (APC) automatically improves
recording quality by adjusting the VCR to the condition of
the video heads and tape. To activate this function, set
APC in the GENERAL SET menu to ON (see page 45).
There is about a 10-second delay before the VCR actually
starts recording when REC z is pressed. (“APC” appears
in the display window and on the monitor screen.)
• This VCR is provided with a clog detection function. In
time lapse mode, if recording is not made properly, the
recording indicator will flash on the display window and a
warning signal will be output from the WARNING OUT
terminal. In this case, stop recording immediately and
check the VCR.
• If ALARM DATA REC in the ALARM SET menu and/or
TAPE USED COUNT in the GENERAL SET menu is set
to ON, the VCR will rewind the tape and recording will
start from the beginning of the tape. While the VCR is
rewinding the tape, “<ALARM DATA REC>” and/or
“<TAPE USED COUNT>” appears on the monitor screen.
• While both TAPE USED COUNT and ALARM DATA
list are being recorded, the REC indicator in the display
window lights up (in this case, the REC indicator goes out
momentarily between TAPE USED COUNT and ALARM
DATA list).
Locking the Record Mode —
Security Lock Function
Locking the record mode is useful to guard against
accidental recording interruptions when the VCR is
used for surveillance or monitoring purposes.
To set the security lock
B
While pressing MENU
indicator lights in the display window.
The
The security lock function also works in timer
recording and playback modes.
To release the security lock
While pressing MENU
indicator turns off.
The
, press MENU +.
MENU
B
B
, press MENU –.
MENU
B
MENU +
MENU –
23
Page 24
Recording
Recording on the Same Cassette
Repeatedly — Repeat Recording
You can record on the same cassette repeatedly in two
different modes: REPEAT 1 and REPEAT 2.
REPEAT
indicator
1 2-4 5 6
1 Turn on the power of the equipment to be used.
2 Press MENU and MENU
MENU flashes on the monitor screen.
3 Press MENU
The GENERAL SET menu appears.
4
Press MENU V to move the flashing to the setting
TAPE END MODE
of
REPEAT 2 by
The REPEAT indicator lights.
GENERAL SET
REC MODE SP
TAPE
TAPE IN
TAPE END MODE
TAPE USED COUNT
CLOCK ADJUST
APC
THREAD CHECK
/
D SEARCH
T
PB S–VHS AUTO
BAUD RATE
SELECT : DATA SET : +/–RETURN : MENU
REPEAT 1: If an alarm input is received during
repeat recording, the recording mode switches to
alarm recording. The REPEAT indicator goes
out. After the end of the tape is reached, the tape
is automatically rewound and stops at the
beginning. The OFF indicator lights in the
display window.
REPEAT 2: If an alarm input is received during
repeat recording, the recording mode switches to
alarm recording. Repeat recording will be
performed after alarm recording is finished.
B
.
pressing MENU + or –
MODE
<NEXT PUSH >
T–120
STOP
REPEAT 1
OFF
01:00
ON
OFF
CONVENTION
19200
V
until “4” of the MAIN
and set to REPEAT 1 or
.
5 Press SEARCH/AUDIO ON to return to the
normal display.
6 Press REC z.
Recording begins.
To return to the MAIN MENU screen from the
current menu
Press MENU again.
To go to the next menu from the current menu
V
Press MENU
press MENU
Series Recording
Connect another SVT-S480ES for series recording (for
details on connection, see page 11) and set each of the
units as follows.
Item Unit #1 Unit #2 Unit #3 and
SERIES REC on ON ON ON
ALARM SET menu
Set the COUNTER/ 0:00:00 0:00:00 0:00:00
REAL TIME switch
to COUNTER.
Cassette tape Loaded Loaded Loaded
Operating status Recording Turned off Turned off
Repeat recording Deactivated Deactivated Deactivated
Security lock Locked Locked Locked
Timer recording Deactivated Deactivated Deactivated
When all of the settings are complete, set unit #1 in
recording mode and turn off the power of unit #2 and
subsequent unit.
When recording on unit #1 is complete, the power for
unit #2 turn on and recording begins.
The unit #1 rewinds its tape when the tape come to the
end and turns off.
Note
For series recording, set SERIES REC in the ALARM SET
menu to ON. If it is set to OFF, recording cannot be done
even if a signal is input to the SERIES IN terminal.
until “NEXT PUSH B” flashes and
B
.
subsequent
unit
24
Page 25
Recording after Power Interruption
POWER
DEW
FAI LUER
FAI LUE
RESUME
ON
OFF
:
15002 12–20
015
07
:
3012–20 07
:
0012–10 11
:
0012–20 12
or Moisture Condensation
This shows a count of the power interruption and
moisture condensation and the period when the
recording was interrupted.
If a power interruption occurs, the P indicator lights in
the display window and if a moisture condensation
occurs, the “dddd” indicator flashes. Even if a power
interruption or moisture condensation occurs while
recording, the internal batteries provide backup power
for memory for about 30 days.
If the power is interrupted during recording, the
recording starts automatically after power is restored.
The internal batteries can be charged in about 48
hours.
To check power interruptions or moisture
condensation
Count of power interruption
No recording
periods
Count of moisture condensation
To return to the MAIN MENU screen from the
current menu
Press MENU again.
To go to the next menu from the current menu
V
Press MENU
press MENU
until “NEXT PUSH B” flashes and
B
.
To clear the P indicator
12 43
1 Turn on the power of the equipment to be used.
2 Press MENU and MENU
MENU flashes on the monitor screen.
3 Press MENU
The POWER FAILURE/DEW/USED HOUR
menu appears.
B
.
V
until “7” of the MAIN
4 Press SEARCH/AUDIO ON to return to the
normal display.
MENU RESET
Press MENU RESET with pointed object.
To clear the power interruption/moisture
condensation data
V
Press MENU and MENU
and B until the POWER
FAILURE/DEW/USED HOUR menu appears and
press MENU RESET with pointed object.
25
Page 26
USED HOUR
VI DEO HEAD
POWER ON
H
H
ON
OFF
RETURN : MENU
<
NEXT PUSH
>
015
0010 12 11
:
0012–20
00000
00000
12
Recording
Checking the Used Time
1 Turn on the power of the equipment to be used.
2 Press MENU and MENU
MENU flashes on the monitor screen.
3 Press MENU
The POWER FAILURE/DEW/USED HOUR
menu appears.
VIDEO HEAD: the amount of time the video head
has been used.
POWER ON: the amount of time the power has
been on.
B
.
V
until “7” of the MAIN
4 Press SEARCH/AUDIO ON to return to the
normal display.
3 Press MENU
B
.
The GENERAL SET menu appears.
4
Press MENU V to move the flashing to the setting
TAPE END MODE
of
pressing MENU + or –
GENERAL SET
REC MODE SP
TAPE
TAPE IN
TAPE END MODE
TAPE USED COUNT
CLOCK ADJUST
APC
THREAD CHECK
T
PB S–VHS AUTO
BAUD RATE
SELECT : DATA SET : +/–RETURN : MENU
/
D SEARCH
<NEXT PUSH >
MODE
and set to REW or STOP by
.
T–120
STOP
REW
OFF
01:00
ON
OFF
CONVENTION
19200
REW: when the tape comes to the end, the VCR
rewinds the tape automatically and enters stop
mode at the beginning of the tape.
STOP: when the tape comes to the end, the VCR
enters stop mode at once.
5 Press SEARCH/AUDIO ON to return to the
normal display.
Setting the Mode at the End of
the Tape
You can set the mode of the tape operation when the
tape comes to the end during recording in the
GENERAL SET menu.
1 2-4 5
1 Turn on the power of the equipment to be used.
2 Press MENU and MENU
MENU flashes on the monitor screen.
V
until “4” of the MAIN
Note
Even if TAPE END MODE is set to STOP, the VCR
operates according to the settings of ALARM DATA REC
and/or TAPE USED COUNT if those settings are set to ON.
When the tape reaches the end
The tape will be rewound and stop, and the OFF
indicator lights in the display window.
Press EJECT Z, REC z, FF M, REW m,
PLAY B or STOP x to turn off the OFF indicator.
26
Page 27
GENERAL SET
TAPE
TAPE IN
TAPE END
MODE
MODE
TAPE USED COUNT
CLOCK ADJUST
APC
THREAD CHECK
T
/
D SEARCH
STOP
REW
OFF
01:00
ON
ON
CONVENTION
T–120
PB S–VHS AUTO
REC MODE SP
Monitoring the Recording
Condition
You can check the recording condition by pressing
REC CHECK while recording in time lapse mode.
Checking the tape thread
To ensure correct operation, the VCR automatically
checks the tape threading whenever you insert a tape.
If an error is detected, the VCR ejects the tape.
REC CHECK
Press REC CHECK while recording.
After the tape is rewound for about 3 seconds and
played back for about 4 seconds, the unit returns to the
original recording mode.
Note
While monitoring the recording condition, recording is
interrupted.
1 2-4 5
1 Turn on the power of the equipment to be used.
2 Press MENU and MENU
MENU flashes on the monitor screen.
3 Press MENU
The GENERAL SET menu appears.
4
Press MENU V to move the flashing to the setting
THREAD CHECK
of
thread check function by
B
.
V
until “4” of the MAIN
and set to ON to activate the
pressing MENU + or –
5 Press SEARCH/AUDIO ON to return to the
normal display.
.
To return to the MAIN MENU screen from the
current menu
Press MENU again.
To go to the next menu from the current menu
V
Press MENU
press MENU
until “NEXT PUSH B” flashes and
B
.
27
Page 28
GENERAL SET
TAPE
TAPE IN
TAPE END
MODE
MODE
TAPE USED COUNT
CLOCK ADJUST
APC
STOP
REW
ON
01:00
ON
T–120
REC MODE SP
Recording
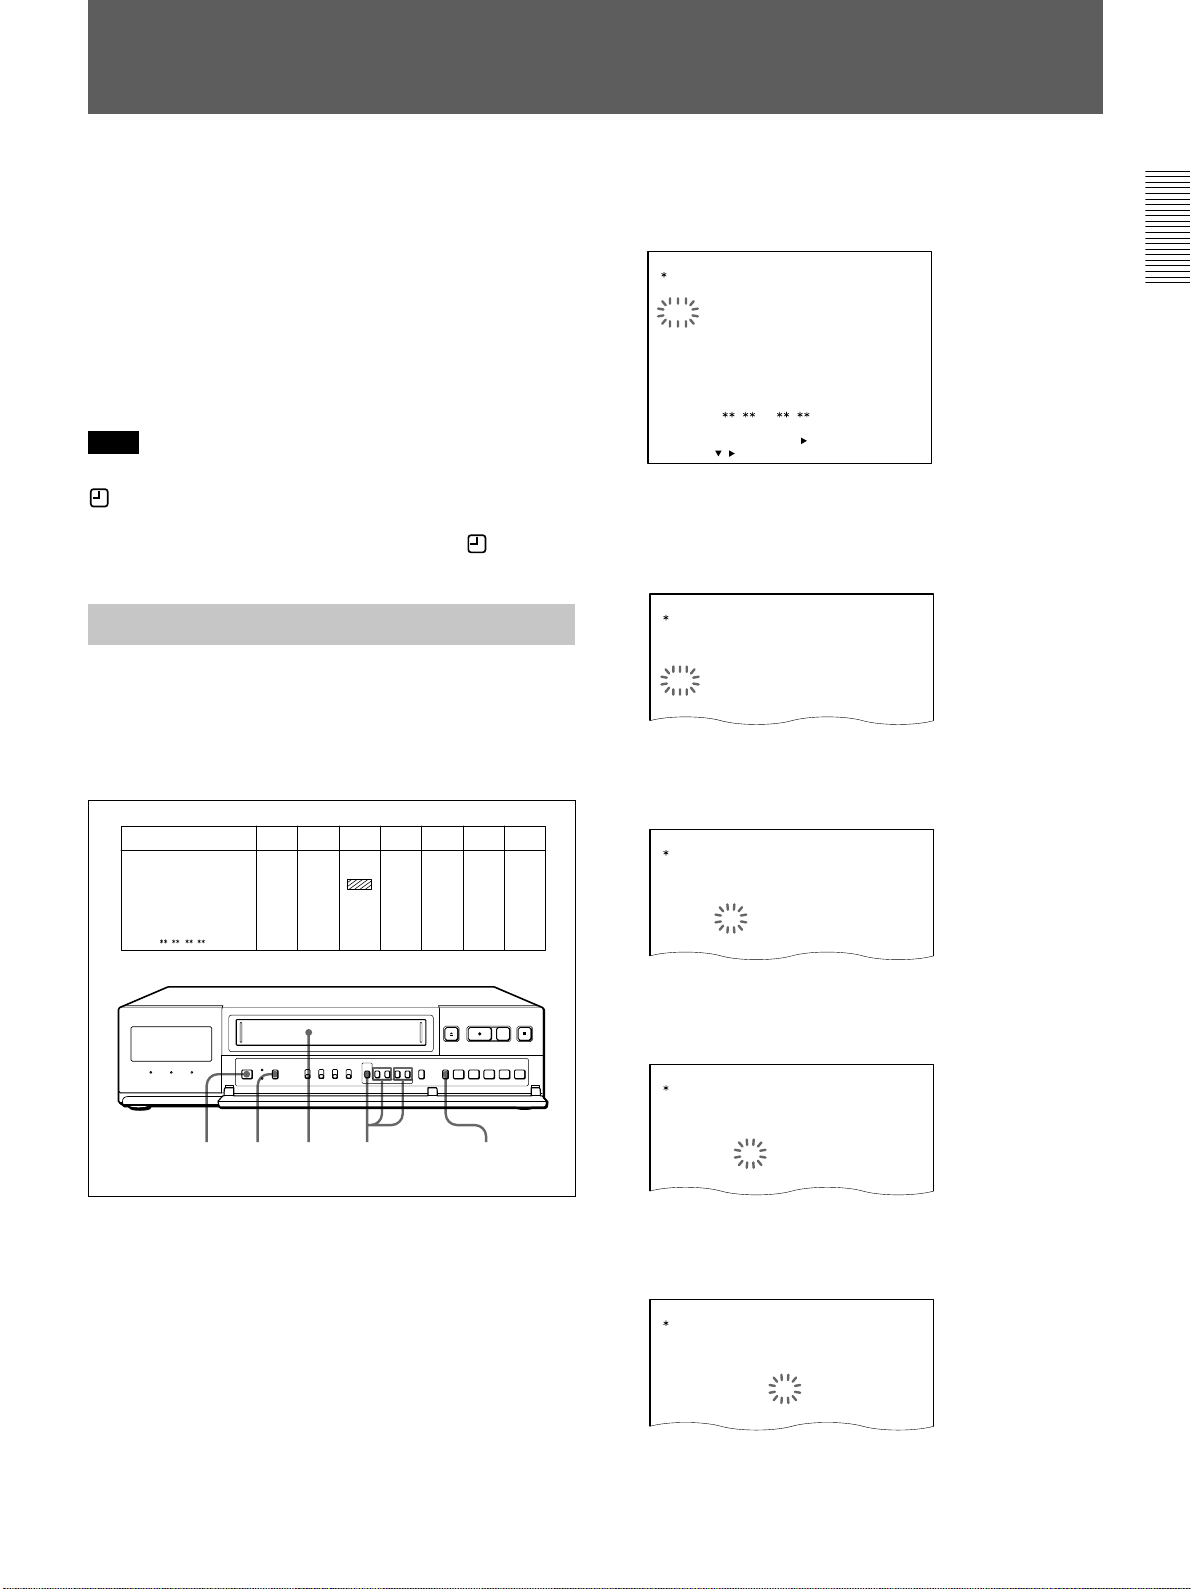
Checking the Number of Times
the Tape Was Used
You can check how many times the tape has been used
(recorded) in the GENERAL SET menu. The number
of times will be displayed in the display window and
recorded on the beginning of the tape at the same time.
Display window
1 2-4 5
1 Turn on the power of the equipment to be used.
2 Press MENU and MENU
MENU flashes on the monitor screen.
V
until “4” of the MAIN
5 Press SEARCH/AUDIO ON to return to the
normal display.
To return to the MAIN MENU screen from the
current menu
Press MENU again.
To go to the next menu from the current menu
Press MENU V until “NEXT PUSH B” flashes and
B
press MENU
Note
• While recording of the TAPE USED COUNT is in
progress, the REC indicator lights in the display window.
• When TAPE USED COUNT mode is set to ON, the VCR
will record the number of times the tape was used on the
beginning of the tape when you stop recording and press
REW m.
When you stop recording and eject the tape, the VCR does
not count it as a time used.
.
3 Press MENU
B
.
The GENERAL SET menu appears.
4
Press MENU V to move the flashing to the setting
TAPE USED COUNT
of
MENU + or –
.
and set to ON by
ON: when the tape is inserted, the VCR
automatically rewinds the tape and the number
of times the tape has been recorded will appear
in the display window. While the VCR is
rewinding the tape, “<T-USED COUNT>”
flashes on the monitor screen.
<
T-USED COUNT
>
pressing
OFF: the VCR does not check the number of times
the tape was recorded, does not record it on the
beginning of the tape, does not display it in the
display window (the VCR does not
automatically rewind the tape to the beginning).
28
Page 29
TIMER SET
WEEK
SUN
MON
TUE
W
ED
THU
FRI
START STOP SPEED
–––––
–––––
–––––
–––––
–––––
–––––
OFF
OFF
OFF
OFF
OFF
OFF
:
:
:
:
:
:
:
:
:
:
:
:
––––
––––
––––
––––
––––
––––
––––
––––
––––
––––
––––
––––
TIMER SET
WEEK
SUN
MON
TUE
W
ED
THU
FRI
START STOP SPEED
–––––
–––––
–––––
–––––
–––––
–––––
OFF
OFF
OFF
OFF
OFF
OFF
:
:
:
:
:
:
:
:
:
:
:
:
––––
––––
––––
––08
––––
––––
––––
––––
––––
––––
––––
––––
TIMER SET
WEEK
SUN
MON
TUE
W
ED
THU
FRI
START STOP SPEED
–––––
–––––
–––––
–––––
–––––
–––––
OFF
OFF
OFF
OFF
OFF
OFF
:
:
:
:
:
:
:
:
:
:
:
:
––––
––––
––––
0008
––––
––––
––––
––––
––––
––––
––––
––––
Timer Recording
TIMER SET
WEEK
SUN
MON
TUE
W
ED
THU
FRI
START STOP SPEED
OFF
OFF
OFF
OFF
OFF
OFF
:
:
:
:
:
:
:
:
:
:
:
:
–––––
–––––
–––––
–––––
–––––
–––––
––––
––––
––––
––––
––––
––––
––––
––––
––––
––––
––––
––––
You can set the timer recording to either: day-of-theweek recording or daily recording.
Before starting, make sure that the time and date are
set properly. (See page 14.)
The setting of each line of WEEK except EXT (the
lowest line) changes as follows using MENU +:
SUN t MON t TUE t WED t THU t FRI t
SAT t MON-SUN t MON-SAT t MON-FRI t
SUN....
Note
When you complete the setting of timer recording and the
indicator appears in the display window, none of the
buttons except TIMER work. To cancel the timer recording
or to do other operations, press TIMER so that indicator
disappears from the display window.
Day-of-the-Week Recording
Example 1:
Making a recording from 8:00 on Tuesday to 17:00 the
same day with the recording speed set to 24-hour mode
in SP mode using a T-120 tape.
3 Press MENU
B
.
The TIMER SET menu appears.
TIMER SET
START STOP SPEED
WEEK
SUN
MON
TUE
W
ED
THU
FRI
SAT
MON–SUN
EXT
SELECT : DATA SET :
4 Press
<
/
MENU V
:
:
––––
:
––––
:
––––
:
––––
:
––––
:
––––
:
––––
:
––––
:
NEXT PUSH
–––––
––––
:
––––
:
––––
:
––––
:
––––
:
––––
:
––––
:
––––
:
>
+
/–RETURN : MENU
OFF
––––– OFF
––––– OFF
––––– OFF
––––– OFF
––––– OFF
––––– OFF
––––– OFF
––––– OFF
to move the flashing to the line of
WEEK you want and set TUE by pressing MENU
+ or –.
5 Press MENU
B
to move the flashing to the hour
position of START.
WEEK STRAT
STOP SPEED
:
:
––––
SUN
MON ––––– OFF
TUE
W
ED
THU ––––– OFF
FRI ––––– OFF
SAT ––––– OFF
MON–SUN ––––– OFF
EXT
––––
:
:
––––
––––
:
:
0008
0017
:
:
––––
––––
:
:
––––
––––
:
:
––––
––––
:
:
––––
––––
:
:
––––
––––
:
:
SUN MON TUE WED THU FRI SAT
––––– OFF
SP 24 ON
––––– OFF
––––– OFF
1 14 13 2-11 12
1 Turn on the power of the equipment to be used.
2 Press MENU and MENU
MENU flashes on the monitor screen.
V
until “5” of the MAIN
6 Set the start hour by pressing MENU + or – and
B
press MENU
.
7 Set the start minute by pressing MENU + or – and
B
press MENU
.
29
Page 30
Timer Recording
TIMER SET
WEEK
SUN
MON
TUE
W
ED
THU
FRI
START STOP
–––––
–––––
SP 24
–––––
–––––
–––––
SPEED
OFF
OFF
OFF
OFF
OFF
OFF
:
:
:
:
:
:
:
:
:
:
:
:
––––
––––
––––
0008
––––
––––
––––
––––
––––
0017
––––
––––
TIMER SET
WEEK START
SUN
STOP SPEED
–––––
–––––
SP 24
–––––
–––––
–––––
OFF
MON OFF
TUE
OFF
W
ED
ON
THU OFF
FRI OFF
:
:
:
:
:
:
:
:
:
:
:
:
––––
––––
––––
0008
––––
––––
––––
––––
––––
0017
––––
––––
TIMER SET
WEEK
SUN
MON
TUE
W
ED
THU
FRI
START STOP
–––––
–––––
–––––
–––––
–––––
–––––
SPEED
OFF
OFF
OFF
OFF
OFF
OFF
:
:
:
:
:
:
:
:
:
:
:
:
––––
––––
––––
0008
––––
––––
––––
––––
––––
0017
––––
––––
TIMER SET
WEEK
SUN
MON
TUE
W
ED
THU
FRI
START STOP SPEED
–––––
–––––
–––––
–––––
–––––
–––––
OFF
OFF
OFF
OFF
OFF
OFF
:
:
:
:
:
:
:
:
:
:
:
:
––––
––––
––––
0008
––––
––––
––––
––––
––––
––17
––––
––––
8 Set the stop hour by pressing MENU + or – and
B
press MENU
.
9 Set the stop minute by pressing MENU + or – and
B
press MENU
10
Set the recording speed by pressing MENU + or –
and press MENU
.
B
.
You can set the timer to make a recording for 2 days
using the 7th and 8th lines on the TIMER SET display.
Example 2:
Making a recording from 17:20 on Saturday to 7:50 on
Monday with the recording speed set to 72-hour mode
in SP mode using a T-120 tape.
Note
To make a recording for 2 days, use the 7th and 8th lines
only.
WEEK START
SUN
:
––––
MON
:
––––
TUE
:
––––
W
ED
:
––––
THU
:
––––
FRI
:
––––
SAT
:
2017
MON
:
EXT
::
STOP
:
––––
:
––––
:
––––
:
––––
:
––––
:
––––
:
:
5007
SUN MON TUE WED THU FRI SAT
SPEED
OFF
–––––
OFF
–––––
OFF
–––––
OFF
–––––
OFF
–––––
OFF
–––––
ON
SP 72
OFF
–––––
11
Select ON to execute the timer recording by
pressing MENU + or –.
If you want to preset other settings, repeat steps 4
to 11.
12
Press SEARCH/AUDIO ON to return to the
normal display.
13
Insert the cassette.
14
Press TIMER.
The VCR turns off automatically, and enters the
timer recording standby mode. The
indicator
appears in the display window.
When no cassette is inserted, the
indicator
flashes and a beep sounds.
1 16 15 2-13
14
1 Turn on the power of the equipment to be used.
2 Press MENU and MENU
MENU flashes on the monitor screen.
3 Press MENU
The TIMER SET menu appears.
TIMER SET
WEEK
SUN
MON
TUE
W
ED
THU
FRI
SAT
MON–SUN
EXT
SELECT : DATA SET :
B
.
START STOP SPEED
<
/
:
:
––––
––––
:
:
––––
––––
:
:
––––
––––
:
:
––––
––––
:
:
––––
––––
:
:
––––
––––
:
:
––––
––––
:
:
––––
––––
:
:
NEXT PUSH
>
+
/–RETURN : MENU
V
–––––
OFF
––––– OFF
––––– OFF
––––– OFF
––––– OFF
––––– OFF
––––– OFF
––––– OFF
––––– OFF
until “5” of the MAIN
When the indicator appears in the display
window, the buttons except TIMER does not work.
30
Page 31

4 Press MENU
THU
FRI
SAT
SUN
EXT
–––––
–––––
–––––
–––––
SELECT : DATA SET : +/
– RETURN : MENU
/
<
NEXT PUSH
>
O
OFF
OFF
OFF
OFF
:
:
:
:
:
:
:
:
OFF
––––
––––
2017
––––
––––
––––
::
THU
FRI
SAT
MON–SUN
EXT
–––––
–––––
–––––
–––––
–––––
SELECT : DATA SET :
+
/
– RETURN : MENU
/
<
NEXT PUSH
>
O
OFF
OFF
OFF
OFF
:
:
:
:
:
:
:
:
:
:
OFF
––––
––––
––17
––––
––––
––––
––––
––––
THU
FRI
SAT
MON–SUN
EXT
–––––
–––––
–––––
–––––
–––––
SELECT : DATA SET :
+
/
– RETURN : MENU
/
<
NEXT PUSH
>
O
OFF
OFF
OFF
OFF
:
:
:
:
:
:
:
:
:
:
OFF
––––
––––
––––
2017
––––
––––
––––
––––
THU
FRI
SAT
MON
EXT
–––––
–––––
–––––
–––––
SELECT : DATA SET : +/–RETURN : MENU
/
<
NEXT PUSH
>
O
OFF
OFF
OFF
:
:
:
:
:
:
:
:
OFF
––––
––––
2017
––––
––––
––––
::
THU
FRI
SAT
MON
EXT
–––––
–––––
–––––
–––––
SELECT : DATA SET :
+
/
– RETURN : MENU
/
<
NEXT PUSH
>
O
OFF
OFF
OFF
:
:
:
:
:
:
:
:
OFF
––––
––––
2017
––––
––––
––07
::
THU
FRI
SAT
MON
EXT
–––––
–––––
–––––
–––––
SELECT : DATA SET :
+
/
– RETURN : MENU
/
<
NEXT PUSH
>
O
OFF
OFF
OFF
:
:
:
:
:
:
:
:
OFF
––––
––––
2017
––––
––––
5007
::
W
ED
THU
FRI
SAT
MON
EXT
–––––
–––––
SP 72
–––––
SELECT : DATA SET :
+
/–RETURN : MENU
/
<
NEXT PUSH
>
OFF
OFF
OFF
OFF
:
:
:
:
:
:
:
:
:
:
OFF
––––
––––
2017
––––
––––
5007
::
THU
FRI
SAT
MON
EXT
–––––
–––––
SP 72
–––––
SELECT : DATA SET :
+
/
– RETURN : MENU
/
<
NEXT PUSH
>
O
OFF
OFF
ON
:
:
:
:
:
:
:
:
OFF
––––
––––
2017
––––
––––
5007
::
V
to move the flashing to the 7th
line, set SAT by pressing MENU + or – and press
B
MENU
TIMER SET
SUN
MON
TUE
W
THU
FRI
SAT
MON–SUN
EXT
SELECT : DATA SET :
.
WEEK START
ED
:
:
:
:
:
:
:
:
:
<
NEXT PUSH
/
STOP SPEED
––––
––––
––––
––––
––––
––––
––––
––––
:
–––––
–––––
–––––
–––––
–––––
–––––
–––––
–––––
–––––
OFF
OFF
OFF
OFF
OFF
OFF
OFF
OFF
OFF
––––
:
––––
:
––––
:
––––
:
––––
:
––––
:
––––
:
––––
:
>
+
/–RETURN : MENU
5 Set the start hour by pressing MENU + or – and
B
press MENU
.
6 Set the start minute by pressing MENU + or – and
B
press MENU
.
10
Set the stop hour by pressing MENU + or – and
B
B
.
.
B
.
press MENU
11
Set the stop minute by pressing MENU + or – and
press MENU
12
Set the recording speed by pressing MENU + or –
and press MENU
7 Press MENU + or – until the
the stop time (STOP), recording speed (SPEED)
marks appear on
*
and timer execution positions in the 7th line and on
the start time (START) position in the 8th line.
The day of the week in the 8th line changes to the
day after the day in the 7th line.
8 Press MENU
V
or B.
SUN flashes.
9 Set the flashing SUN to MON by pressing MENU
B
+ or – and press MENU
the hour position of STOP.
to move the flashing to
13
Select ON to execute the timer recording by
pressing MENU + or –.
14
Press SEARCH/AUDIO ON to return to the
normal display.
15
Insert the cassette.
16
Press TIMER.
The VCR turns off automatically, and enters the
timer recording standby mode. The
indicator
appears in the display window.
When no cassette is inserted. The
indicator
flashes and a beep sounds.
When the indicator appears in the display
window, the buttons except TIMER does not work.
31
Page 32

TIMER SET
WEEK START
MON–FRI
MON
TUE
W
ED
THU
FRI
STOP SPEED
OFF
OFF
OFF
OFF
ON
OFF
:
:
:
:
:
:
:
:
:
:
:
:
––––
––––
––––
––––
0017
––––
––––
––––
––––
––––
10T08
––––
–––––
–––––
–––––
SP 24
–––––
–––––
THU
FRI
SAT
MON–SUN
EXT
–––––
–––––
–––––
–––––
SP 24
SELECT : DATA SET :
+
/
– RETURN : MENU
/
<
NEXT PUSH
>
O
OFF
OFF
OFF
OFF
:
:
:
:
:
:
:
:
:
:
OFF
––––
––––
––––
––––
––––
––––
––––
––––
THU
FRI
SAT
MON–SUN
EXT
SELECT : DATA SET :
+
/
– RETURN : MENU
/
<
NEXT PUSH
>
O
OFF
OFF
OFF
OFF
:
:
:
:
:
:
:
:
:
:
–––––
–––––
–––––
–––––
SP 24 ON
––––
––––
––––
––––
––––
––––
––––
––––
WEEK START
MON–FRI
MON
TUE
W
ED
THU
FRI
TIMER SET
STOP
–––––
–––––
–––––
–––––
–––––
–––––
SPEED
OFF
OFF
OFF
OFF
OFF
OFF
:
:
:
:
:
:
:
:
:
:
:
:
––––
––––
––––
––––
––––
––––
––––
––––
––––
––––
––––
––––
Timer Recording
Daily Recording
You can preset the timer to record Monday through
Sunday (MON-SUN), Monday through Saturday
(MON-SAT) or Monday through Friday (MON-FRI).
1 Press
V
to move the flashing to the line of WEEK
you want.
2 Set the day by pressing MENU + or – before
setting the hour position of START in step 5 on
page 29.
Then repeat steps 6 - 14 on pages 29 and 30.
When the time set in the STOP section is
earlier than the time set in the START section
The STOP time is assumed to be for the next day, and
the T (tomorrow) indicator is displayed before the stop
time.
Recording Using an External
Timer
You can preset the time to start and end recording by
using a timer connected to the EXT TIMER terminal
on the rear of the VCR. Set the recording speed on the
TIMER SET menu on screen.
1 Turn on the power of the equipment to be used.
2 Press MENU and MENU
MENU flashes on the monitor screen.
3 Press MENU
The TIMER SET menu appears.
4 Press MENU
the lowest line (EXT) and press MENU
TIMER SET
WEEK START
SUN
MON
TUE
W
ED
THU
FRI
SAT
MON–SUN
EXT
SELECT : DATA SET :
B
.
V
to move the flashing to SPEED of
STOP SPEED
:
––––
:
––––
––––
:
––––
:
––––
:
––––
:
––––
:
––––
:
:
<
NEXT PUSH
/
:
––––
:
––––
:
––––
:
––––
:
––––
:
––––
:
––––
:
––––
:
>
+
/–RETURN : MENU
–––––
–––––
–––––
–––––
–––––
–––––
–––––
–––––
–––––
V
until “5” of the MAIN
B
.
OFF
OFF
OFF
OFF
OFF
OFF
OFF
OFF
OFF
Timer recording is interrupted when the power
is interrupted
When a period of the power interruption is shorter than
the power backup time (within 30 days) and within the
timer end time, the recording is resumed after the
power is restored.
The P indicator lights in the display window to show
that the timer recording is interrupted. (To clear the P
indicator, press MENU RESET on the front panel. See
page 25.)
To stop the timer recording
Press TIMER to clear the
stops and the power is turned off.
32
indicator. The recording
5 Set the recording speed by pressing MENU + or –
B
and press MENU
.
6 Set ON to execute the timer recording by pressing
MENU + or –.
7 Press SEARCH/AUDIO ON to return to the
normal display.
Page 33

8 Insert the cassette.
HOLIDAY SET
MD
7 –––1
MD
–––––11
–––––2 –––––12
–––––3 –––––13
–––––4 –––––14
–––––5 –––––15
HOLIDAY SET
MD
7 –141
MD
–––––11
–––––2 –––––12
–––––3 –––––13
–––––4 –––––14
–––––5 –––––15
Setting the Holiday
9 Press TIMER.
The VCR turns off automatically, and enters the
timer recording standby mode. The
appears in the display window.
When no cassette is inserted, the
flashes and a beep sounds.
When the input signal from the EXT TIMER terminal
becomes low, recording starts and the EXT indicator
appears in the display window.
When the input signal from the EXT TIMER terminal
becomes high, recording stops and the VCR enters the
timer recording standby mode.
Input signal from the EXT TIMER terminal
Recording starts. Recording stops.
indicator
indicator
5 V
0 V
If you enter dates for holidays, the VCR will assume
that these dates are Sundays and will record at the
same time you set for Sundays.
1 Press MENU and MENU
V
until “6” of the MAIN
MENU flashes on the monitor screen.
2 Press MENU
B
.
The HOLIDAY SET menu appears.
HOLIDAY SET
MD
–––––1
–––––2 –––––12
–––––3 –––––13
–––––4 –––––14
–––––5 –––––15
–––––6 –––––16
–––––7 –––––17
–––––8 –––––18
–––––9 –––––19
–––––10 –––––20
<
SELECT : DATA SET :
NEXT PUSH
/
MD
–––––11
>
+
/–RETURN : MENU
3 Set the month of the holiday you want by pressing
B
MENU + or – and press MENU
.
Note
When more than one timer setting is made at the same time,
the setting with the earliest START time has priority.
4 Set the day of the holiday by pressing MENU + or
–.
To set other holidays, press MENU
V
to move to
the next row and repeat steps 2 and 3.
5 Press SEARCH/AUDIO ON to return to the
normal display.
33
Page 34

Timer Recording
Changing/Cancelling the Timer
Settings
When indicator lights in the display window, press
TIMER again to clear it.
Changing the timer settings
1 Press MENU and MENU
TIMER SET menu appears on the screen.
2 Press MENU
position where you want to change.
V
and B to move the flashing to the
V
and B until the
3 Press MENU + or – to change the setting.
4 Press SEARCH/AUDIO ON to return to the
normal display.
Cancelling the timer setting
1 Press MENU and MENU
TIMER SET menu appears on the screen.
2 Press MENU
position where you want to cancel.
3 Press MENU
execution.
V
to move the flashing to the
B
to move the flashing to the timer
V
and B until the
4 Press MENU + or – to set the timer execution to
OFF.
5 Press SEARCH/AUDIO ON to return to the
normal display.
Cancelling all timer settings
1 Press MENU and MENU
TIMER SET menu appears on the screen.
V
and B until the
2 Press MENU RESET.
All timer settings are cleared.
3 Press SEARCH/AUDIO ON to return to the
normal display.
34
Page 35

Alarm Recording
You can use a door switch or alarm sensor to trigger
alarm recording. You can make alarm recording in
recording mode, stop mode power off mode and oneshot recording mode with the selected recording speed.
Connecting an Alarm Sensor
Commercially available
switching box, etc.
to COM
to COM
to ALARM OUT
to ALARM
IN
Setting the Alarm Speed and
Duration
3 Press MENU
B
.
The ALARM SET menu appears.
ALARM SET
ALARM MODE
ALARM SPEED SP 2H
ALARM DURATION
ALARM DATA REC
TAPE END WARN.
CLOG DETECTION
SERIES REC
1SHOT REC
REC FIELD
INTERVAL
<
SELECT : DATA SET : +/–RETURN : MENU
4
Press MENU V to move the flashing to the setting
ALARM SPEED
of
or –
ALARM SET
1SHOT REC
SELECT : DATA SET : +/–RETURN : MENU
NEXT PUSH
.
ALARM MODE
ALARM SPEED SP 2H
ALARM DURATION
ALARM DATA REC
TAPE END WARN.
CLOG DETECTION
SERIES REC
REC FIELD
INTERVAL
<
NEXT PUSH
A1
20s
OFF
COUNTER
ON
OFF
01
1 min
>
and set it by
A1
20s
OFF
COUNTER
ON
OFF
01
1 min
>
pressing MENU +
When TAPE in the GENERAL SET menu is set
to T-120:
You can set to SP 2H (for recording in 2-hour
mode in SP recording mode), EP 6H (for recording
in 6-hour mode in EP recording mode), SP 12H,
EP 18H, SP 24H, EP 30H and NC (for recording at
the same speed as before the alarm was received).
1 2-5 6
1 Turn on the power of the equipment to be used.
2 Press MENU and MENU
MENU flashes on the monitor screen.
V
until “3” of the MAIN
When TAPE in the GENERAL SET menu is set
to T-160:
You can set to SP 2H (for recording in 2-hour
mode in SP recording mode), EP 8H (for recording
in 8-hour mode in EP recording mode), SP 16H,
EP 24H, SP 32H, EP 40H and NC (for recording at
the same speed as before the alarm was received).
35
Page 36

Alarm Recording
5
Press MENU V to move the flashing to the setting
ALARM DURATION
of
2min, 3min, 4min, 5min or CC by
.
or –
ALARM SET
ALARM MODE
ALARM SPEED SP 2H
ALARM DURATION
ALARM DATA REC
TAPE END WARN.
CLOG DETECTION
SERIES REC
1SHOT REC
REC FIELD
INTERVAL
<
SELECT : DATA SET : +/–RETURN : MENU
NEXT PUSH
>
and set 20s, 40s, 1min,
pressing MENU +
A1
40s
OFF
COUNTER
ON
OFF
01
1 min
20s - 5min: for recording for 20 seconds, 40
seconds, 1 minute, 2 minutes, 3 minutes, 4
minutes or 5 minutes
CC: for recording as long as the alarm signal is
being input
6 Press SEARCH/AUDIO ON to return to the
normal display.
To return to the MAIN MENU screen from the
current menu
Press MENU again.
To go to the next menu from the current menu
V
Press MENU
press MENU
Setting the Alarm Recording
Mode
until “NEXT PUSH B” flashes and
B
.
4
Set
ALARM MODE
pressing MENU + or –
to
A1, A2, A3 or OFF
.
by
A (alarm)1: always accepts alarms.
A2: accepts alarms only when timer recording is
proceeding.
A3: accepts alarms only when timer recording is
standby.
OFF: does not accept alarm even if an alarm
signal is received.
5 Press SEARCH/AUDIO ON to return to the
normal display.
To return to the MAIN MENU screen from the
current menu
Press MENU again.
To go to the next menu from the current menu
Press MENU V until “NEXT PUSH B” flashes and
B
press MENU
Notes
• While alarm recording is in progress, other modes are
inoperable.
• After the alarm recording is completed, the VCR returns to
the condition it was in before the alarm signal was
received.
• If an alarm input is received while the VCR is in repeat
recording (see page 24), repeat recording stops and the
REPEAT indicator goes out. After the tape reaches the
end, the tape is rewound and the VCR stops. The OFF
indicator lights in the display window (only when
REPEAT 1 is selected for TAPE END MODE in the
GENERAL SET menu).
.
1 Turn on the power of the equipment to be used.
2 Press MENU and MENU
MENU flashes on the monitor screen.
3 Press MENU
The ALARM SET menu appears.
ALARM SET
ALARM MODE
ALARM SPEED SP 2H
ALARM DURATION
ALARM DATA REC
TAPE END WARN.
CLOG DETECTION
SERIES REC
1SHOT REC
REC FIELD
INTERVAL
SELECT : DATA SET : +/–RETURN : MENU
36
B
.
<
NEXT PUSH
>
V
until “3” of the MAIN
A1
20s
OFF
COUNTER
ON
OFF
01
1 min
• When the OFF indicator lights, in order to prevent
accidental erasure of a recorded tape, timer recording and
alarm recording cannot be executed.
If any of REC z, FF M, REW m, PLAY B, STOP x
is pressed, the OFF indicator goes out.
• If another alarm is received while alarm recording is in
progress, the second alarm recording starts and the
recording duration is extended.
• If the power is interrupted while alarm recording is in
progress and restored again, the operation before the alarm
recording was made resumes.
Page 37

Indicators during alarm recording
The AL indicator flashes in the display window.
The count of the alarm recording flashes on the
monitor screen.
The alarm recording can be counted up to 999.
When the alarm function has worked 1000 times, the
count number returns to 000.
10-15-2000 001
04:15:43 SP 2
Alarm count number
Searching the Picture of the Alarm
Recordings — Alarm Search
13
Rewind m Fast-forward M
Present
123231
positin
24
1 Turn on the power of the equipment to be used.
To Reset the Alarm Count
1 4 2, 3
5
1 Turn on the power of the equipment to be used.
2 Press MENU and MENU
MENU flashes on the monitor screen.
3 Press MENU
The ALARM DATA menu appears.
B
.
V
until “8” of the MAIN
4 Press MENU RESET.
5 Press SEARCH/AUDIO ON to return to the
normal display.
The count on the screen are reset to 000.
10-15-2000 000
04:15:43 SP 2
2 Press SEARCH/AUDIO ON in stop mode until the
alarm search indicator flashes in the display
window and on the screen.
1H12M06S
AL SEARCH 01
In the display window On the monitor
3 Press MENU + or – to set the alarm search number
(00 to 99).
4 Press FF M or REW m.
The cassette stops at the portion where the alarm
function worked and the still picture playback is
displayed.
Press STOP x, PLAY B, FF M or REW m to
release alarm search mode.
Notes
• If the tape is reached the end during alarm searching, the
tape is rewound and the VCR enters the stop mode at the
beginning of the tape.
• To search for the 100th alarm, rewind the tape to the
beginning, enter 00 and press FF M.
• You can use the alarm search only when the alarm speed is
set to SP 2H (when using T-120 or T-160 tape in SP
recording mode), EP 6H (when using T-120 tape in EP
recording mode), or EP 8H (when using T-160 tape in EP
recording mode) and the recorded section is longer than 20
seconds.
37
Page 38

Alarm Recording
Scanning the Picture of the
Alarm Recordings — Alarm Scan
3
21
1 Turn on the power of the equipment to be used.
2 Press SEARCH/AUDIO ON in stop mode until AL
SCAN lights in the display window or on the
monitor screen.
1H12M06S
AL SCAN
In the display window
On the monitor
3 Press FF M or REW m.
The portions where the alarm function worked are
subsequently played back for five seconds one by
one.
Press PAUSE X to view a certain scene in still mode.
(Alarm scan mode will be released.)
Displaying the Alarm List —
Alarm Recall
42, 31
1 Turn on the power of the equipment to be used.
2 Press MENU and MENU
MENU flashes on the monitor screen.
3 Press MENU
The ALARM DATA list appears.
The alarm count, date and time are displayed.
The date and time are displayed up to recent 100
times.
ALARM DATA
111
212
313
414
515
616
717
818
919
10 20
NEXT DATA: RETURN : MENU
B
.
:
0012–03 19.
:
0011–01 23.
:
0010–25 15.
:
0010–25 08.
:
0010–25 06.
:
0000–00 00.
:
0000–00 00.
:
0000–00 00.
:
0000–00 00.
:
0000–00 00.
V
until “8” of the MAIN
:
0000–00 00.
:
0000–00 00.
:
0000–00 00.
:
0000–00 00.
:
0000–00 00.
:
0000–00 00.
:
0000–00 00.
:
0000–00 00.
:
0000–00 00.
:
0000–00 00.
Press STOP x, PLAY B, FF M or REW m to
release alarm scan mode.
Notes
• If the tape reaches the end during scanning, the tape is
rewound and the unit enters the stop mode at the beginning
of the tape.
• You can use the alarm scan only when the alarm speed is
set to SP 2H (when using T-120 or T-160 tape in SP
recording mode), EP 6H (when using T-120 tape in EP
recording mode), or EP 8H (when using T-160 tape in EP
recording mode) and the recorded section is longer than 20
seconds.
38
Time
Month-Day
Alarm count (“1” is the
newest data)
4 Press SEARCH/AUDIO ON to return to the
normal display.
To go to the next page of ALARM DATA
V
Press MENU
To return to the MAIN MENU screen from the
current menu
Press MENU.
.
Page 39

When the alarm data reaches more than 100
The oldest one will be erased.
To reset the alarm data
Press MENU RESET while the ALARM DATA menu
is on the screen.
The alarm count shows “000”.
Recording the Alarm Data on the
Tape
1 2-4 5
1 Turn on the power of the equipment to be used.
ON: when the recording comes to the end, the
VCR rewinds the tape to the beginning and
starts recording the alarm data on the ALARM
DATA menu up to 100 data.
OFF: the VCR does not record the alarm data on
the tape.
5 Press SEARCH/AUDIO ON to release the alarm
data search mode.
To return to MAIN MENU from the current
menu
Press MENU again.
To go to the next menu from the current menu
V
Press MENU
press MENU
Notes
• When ALARM DATA REC is set to ON, the VCR
automatically rewinds the tape when inserted. While the
VCR is rewinding the tape, “<AL DATA REC>” flashes
on the monitor screen.
until “NEXT PUSH B” flashes and
B
.
2 Press MENU and MENU
V
until “3” of the MAIN
MENU flashes on the monitor screen.
3 Press MENU
B
.
The ALARM SET menu appears.
ALARM SET
ALARM MODE
ALARM SPEED SP 2H
ALARM DURATION
ALARM DATA REC
TAPE END WARN.
CLOG DETECTION
SERIES REC
1SHOT REC
REC FIELD
INTERVAL
<
SELECT : DATA SET : +/–RETURN : MENU
4
Press MENU V to move the flashing to the setting
ALARM DATA REC
of
MENU + or –
ALARM SET
1SHOT REC
SELECT : DATA SET : +/–RETURN : MENU
NEXT PUSH
.
ALARM MODE
ALARM SPEED SP 2H
ALARM DURATION
ALARM DATA REC
TAPE END WARN.
CLOG DETECTION
SERIES REC
REC FIELD
INTERVAL
<
NEXT PUSH
A1
20s
OFF
COUNTER
ON
OFF
01
1 min
>
and set to ON by
A1
20s
ON
COUNTER
ON
OFF
01
1 min
>
pressing
<
AL DATA REC
>
• In ALARM DATA REC ON mode, when you stop
recording and press REW m, the VCR rewinds the tape
to the beginning and records the ALARM DATA entered
onto the beginning of the tape.
• The ALARM DATA will be reset when:
– the tape is ejected while recording in ALARM DATA
REC ON mode.
– all the ALARM DATA are recorded.
– ALARM DATA REC is reset to ON from OFF and
executed.
• In ALARM DATE REC ON mode the VCR records up to
100 alarm data. Although the VCR does not record the
101st or higher alarm data, it will do the alarm operation.
• While recording of the ALARM DATA list is in progress,
the REC indicator lights in the display window.
39
Page 40

Alarm Recording
Playing Back the Alarm Data List
on the Tape
1234
1 When the tape is inserted, the VCR rewinds the
tape to the beginning.
2 Press SEARCH/AUDIO ON until “AL L” flashes
in the display window.
3 Press REW m.
The ALARM DATA list appears.
To change the page of the ALARM DATA, press
FF M or REW m. (You may have to press the
button a few times.)
In the display window
ALARM DATA
:
0012–03 19.5
:
0011–01 23.4
:
0010–25 15.3
:
0010–25 08.2
:
0010–25 06.1
:
0000–00 00.100
:
0000–00 00.99
:
0000–00 00.98
:
0000–00 00.97
:
0000–00 00.96
:
0000–00 00.95
:
0000–00 00.94
:
0000–00 00.93
:
0000–00 00.92
:
0000–00 00.91
:
0000–00 00.90
:
0000–00 00.89
:
0000–00 00.88
:
0000–00 00.87
:
0000–00 00.86
Example:
To go to the 11th alarm count
Press MENU + or – to display 11 and press
FF M. At the specified alarm count, “00” appears in
the display window.
To go to the 15th alarm count after going to the
11th
Press MENU + or – to display 04 and press
FF M. At the specified alarm count, “00” appears in
the display window.
To go back to the 7th alarm count after going to the
11th
Press MENU + or – to display 04 and press REW m.
At the specified alarm count, “00” appears in the
display window.
To go to the 100th alarm data from the beginning
of the tape
Press FF M when 00 appears.
Notes
• In ALARM DATA REC ON mode, be sure not to press
REW m after the cassette on which the ALARM DATA
list is recorded has been inserted. If you do, the recorded
ALARM DATA list may be erased and replaced with new
one.
• In ALARM DATA REC ON mode, if you do the above
procedurs using the tape on which the alarm data is not
recorded, a still picture will be displayed at the point where
the alarm recording has been made.
• While searching for the ALARM DATA list, the VCR will
rewind the tape when the tape comes to the end and stop at
the beginning of the tape.
• You can search for the ALARM DATA list only when the
alarm speed is set to SP 2H (when using T-120 or T-160
tape in SP recording mode), EP 6H (when using T-120
tape in EP recording mode), or EP 8H (when using T-160
tape in EP recording mode) and the recorded section is
longer than 20 seconds.
NEXT DATA: RETURN : MENU
On the monitor
4 Press MENU + or – to set the alarm count and then
press FF M.
The tape runs to the set alarm count and the
playback picture appears in the still mode.
40
Page 41

One-shot Recording
Aside from long-term recording in time-lapse mode,
this unit is capable of one-shot recording, which has
applications with data files and animation.
92-718
1 Turn on the power of the equipment to be used.
2 Set the recording speed in this display window to
“000” by pressing REC/PLAY SPEED (MENU) +
or –.
9 Press REC z.
The unit enters the recording pause mode. After
the interval to be set passes, one-shot recording
starts.
Recording the number of fields you set.
(ex. 4 fields)
One-shot input
Interval (ex. 1 minute)
To start one-shot recording immediately
Press REC z again or short-circuit the 1 SHOT IN
and COM terminals
3 Press MENU and MENU
V
until “3” of the MAIN
MENU flashes on the monitor screen.
4 Press MENU
B
.
The ALARM SET/1 SHOT REC menu appears.
5 Press
MENU V
to move the flashing to the setting
of REC FIELD.
6 Press MENU + or – to specify REC FIELD (the
number of fields) to be recorded during one-shot
V
recording and then press MENU
ALARM SET
ALARM MODE
ALARM SPEED SP 2H
ALARM DURATION
ALARM DATA REC
TAPE END WARN.
CLOG DETECTION
SERIES REC
1SHOT REC
REC FIELD
INTERVAL
<
SELECT : DATA SET : +/–RETURN : MENU
NEXT PUSH
A1
20s
OFF
COUNTER
ON
OFF
01
1 min
>
.
7 Press MENU + or – to set the one-shot time in
INTERVAL.
to 1 SHOT INto COM
To set the desired interval for one-shot
recording
When you short-circuit the 1 SHOT IN and COM
terminals, you can set the desired interval up to three
minutes. (However, the number of fields specified in
step 6 is recorded.)
In step 7 of the operations, set INTERVAL to the same
and longer interval than the one made by shortcircuiting 1 SHOT IN and COM terminals.
In step 9, short-circuit the 1 SHOT IN and COM
terminals after you have pressed REC z to start
recording.
8 Press SEARCH/AUDIO ON to return to the
normal display.
41
Page 42

One-shot Recording
Notes on use 1 SHOT IN and COM terminals
•0.1 and more sec. are required when the switch is
turned on and one and more sec. is required for the
one-shot interval.
One and more sec.
0.1 and more sec.
•If a one-shot recording input is not received from
terminals, one-shot recording is performed according
to the settings on the 1 SHOT REC menu.
To stop the one-shot recording
Press STOP x.
If an alarm input is received while one-shot
recording is in progress
The alarm recording can be performed.
The alarm recording speed is automatically set to the
2-hour, 6-hour or 8-hour mode.
42
Page 43

Playback
COUNTER/
REAL TIME
3421
REWmFF
M
STOP
x
Audio Playback
You can play back the sound with the picture if a tape
is recorded:
In SP mode, in 2 (2)-, 12 (16)-, or 24 (32)-hour mode
using T-120 (T-160) tape.
In EP mode, in 6 (8)-, 18 (24)-, or 30 (40)-hour mode
using T-120 (T-160) tape.
Play back the tape at the same speed at which it was
recorded so that you can monitor the sound normally.
1 Turn on the power of the equipment to be used.
2 Insert the cassette.
3 Select the playback speed by pressing REC/PLAY
SPEED – or +.
The selected playback speed is displayed in the
display window.
4 Press PLAY B.
Playback starts.
To stop playback
Press STOP x.
To rewind the tape
Press STOP x and then REW m.
To fast-forward the tape
Press STOP x and then FF M.
Resetting the tape counter
The tape counter in the display window helps you to
locate a certain scene after playback. Set the
COUNTER/REAL TIME switch to COUNTER and
press COUNTER RESET to set the counter to
“0H00M00S” (counter zero) position before playing
back the tape. The VCR keeps counting the length of
the tape being played back. Note, however, that the
tape counter will not count the portions without video
signals.
For audio playback in 2-hour mode, in SP
mode or 6 (8)-hour mode, in EP mode
Play back the tape normally.
For audio playback in 12 (16)-, or 24 (32)-hour
mode, in SP mode or 18 (24)-, or 30 (40)-hour
mode, in EP mode
Press SEARCH/AUDIO ON in playback mode.
“A” (for example “A12” or “A24”) is displayed in the
display window.
To turn off the sound, press SEARCH/AUDIO ON
again.
Note
Noise may appear on the screen and the sound may be
distorted when you play back the picture in AUDIO ON
mode.
Notes
• You cannot play back tapes recorded on other time-lapse
VCRs on this VCR and vice versa.
• If ALARM DATA REC in the ALARM SET menu and/or
TAPE USED COUNT in the GENERAL SET menu is set
to ON, the VCR will rewind the tape and playback will
start from the beginning of the tape. While the VCR is
rewinding the tape, “<ALARM DATA REC>” and/or
“<TAPE USED COUNT>” flashes on the monitor screen.
43
Page 44

Playback
Playback speed
You can view the playback picture at one of the
following speeds.
When using T-120 (T-160) tape in SP mode
Recording
speed
2 (2)
12 (16)
24 (32)
48 (64)
72 (96)
96 (128)
120 (160)
168 (224)
240 (320)
360 (480)
480 (640)
2 12 24 48 72 96 120 168 240 360 480
(2) (16) (32) (64) (96) (128) (160) (224) (320) (480) (640)
1 1/6 1/12 1/24 1/36 1/48 1/60 1/84 1/120 1/180 1/240
6 1 1/2 1/4 1/6 1/8 1/10 1/14 1/20 1/30 1/40
12 2 1 1/2 1/3 1/4 1/5 1/7 1/10 1/15 1/20
24 4 2 1 2/3 1/2 2/5 2/7 1/5 2/15 1/10
36 6 3 3/2 1 3/4 3/5 3/7 3/10 1/5 3/20
48 8 4 2 4/3 1 4/5 4/7 2/5 4/48 1/5
60 10 5 5/2 5/3 5/4 1 5/7 1/2 1/3 1/4
84 14 7 7/2 7/3 7/4 7/5 1 7/10 4/15 7/20
120 20 10 5 10/3 5/2 2 10/7 1 2/3 1/2
180 30 15 15/2 5 15/4 3 15/7 3/2 1 3/4
240 40 20 10 20/3 5 4 20/7 2 4/3 1
Playback speed
When using T-120 (T-160) tape in EP mode
Recording
speed
6 (8)
18 (24)
30 (40)
48 (64)
72 (96)
96 (128)
120 (160)
168 (224)
240 (320)
360 (480)
480 (640)
6 18 30 48 72 96 ) 120 168 240 360 480
(8) (24) (40) (64) (96) (128) (160) (224) (320) (480) (640)
1 1/3 1/5 1/8 1/12 1/16 1/20 1/28 1/40 1/60 1/80
3 1 3/5 3/8 1/4 3/16 3/20 3/28 3/40 1/20 3/80
5 5/3 1 5/8 5/12 5/16 1/4 5/28 1/8 1/12 1/16
8 8/3 8/5 1 2/3 1/2 2/5 2/7 1/5 2/15 1/10
12 4 12/5 3/2 1 3/4 3/5 3/7 3/10 1/5 3/20
16 16/3 16/5 2 4/3 1 4/5 4/7 2/5 4/15 1/5
20 20/3 4 5/2 5/3 5/4 1 5/7 1/2 1/3 1/4
28 28/3 28/5 7/2 7/3 7/4 7/5 1 7/10 7/15 7/20
40 40/3 8 5 10/3 5/2 2 10/7 1 2/3 1/2
60 20 12 15/2 5 15/4 3 15/7 3/2 1 3/4
80 80/3 16 10 20/3 5 4 20/7 2 4/3 1
Playback speed
For example, when a tape recorded in 168-hour mode
is played back in 6-hour mode, you can view the
playback picture at a speed 28 times faster than the
recorded one.
44
Page 45

GENERAL SET
TAPE
TAPE IN
TAPE END
MODE
MODE
TAPE USED COUNT
CLOCK ADJUST
APC
THREAD CHECK
T
/
D SEARCH
STOP
REW
OFF
01:00
ON
OFF
CONVENTION
T–120
PB S–VHS AUTO
REC MODE SP
Adjusting Pictures
Adjusting the Tracking
If streaks or noise bands appear on the playback
picture, adjust the tracking condition.
Use TRACKING – or +.
TRACKING –, +
Using the Adaptive Picture
Control (APC)
3 Press MENU
B
.
The GENERAL SET menu appears.
GENERAL SET
REC MODE SP
TAPE
TAPE IN
TAPE END MODE
TAPE USED COUNT
CLOCK ADJUST
APC
THREAD CHECK
T
PB S–VHS AUTO
BAUD RATE
SELECT : DATA SET : +/–RETURN : MENU
4
Press MENU V to move the flashing to the setting
APC
of
MODE
/
D SEARCH
<NEXT PUSH >
and set to ON by
T–120
STOP
REW
OFF
01:00
ON
OFF
CONVENTION
19200
pressing MENU + or –
5 Press SEARCH/AUDIO ON to return to the
normal display.
.
Adaptive Picture Control (APC) automatically
improves recording and playback quality by adjusting
the VCR to the condition of the video heads and tape.
To maintain better picture quality, it is recommended
to set APC to ON in the GENERAL SET menu.
1 2-4 5
1 Turn on the power of the equipment to be used.
2 Press MENU and MENU
MENU flashes on the monitor screen.
V
until “4” of the MAIN
To return to the MAIN MENU screen from the
current menu
Press MENU again.
To go to the next menu from the current menu
V
Press MENU
press MENU
until “NEXT PUSH B” flashes and
B
.
45
Page 46

Searching for the Time and Date — Time/Date
Search
Selecting the Searching Interval
152-4
1 Turn on the power of the equipment to be used.
2 Press MENU and MENU
MENU flashes on the monitor screen.
3 Press MENU
The GENERAL SET menu appears.
GENERAL SET
REC MODE SP
TAPE
TAPE IN
TAPE END MODE
TAPE USED COUNT
CLOCK ADJUST
APC
THREAD CHECK
/
D SEARCH
T
PB S–VHS AUTO
BAUD RATE
SELECT : DATA SET : +/–RETURN : MENU
B
.
MODE
<NEXT PUSH >
T–120
STOP
REW
OFF
01:00
ON
OFF
CONVENTION
19200
V
until “4” of the MAIN
To return to the MAIN MENU screen from the
current menu
Press MENU again.
To go to the next menu from the current menu
V
Press MENU
press MENU
until “NEXT PUSH B” flashes and
B
.
4
Press MENU V to move the flashing to the setting
T/D SEARCH
of
NEW by
pressing MENU + or –
GENERAL SET
REC MODE SP
TAPE
TAPE IN
TAPE END MODE
TAPE USED COUNT
CLOCK ADJUST
APC
THREAD CHECK
T
PB S–VHS AUTO
BAUD RATE
SELECT : DATA SET : +/–RETURN : MENU
/
D SEARCH
<NEXT PUSH >
MODE
and set to CONVENTION or
.
T–120
STOP
REW
OFF
01:00
ON
OFF
NEW
19200
CONVENTION: to search every an hour
NEW: to search every 10 minutes
5 Press SEARCH/AUDIO ON to return to the
normal display.
46
Page 47

Searching for the Time and Date
1423
3 Press MENU + or – to set the date and press
MENU B to move the flashing to the time. Press +
or – to set the time. Set the minute (when NEW is
selected) on the same way.
4 Press FF M or REW m.
The cassette stops at the portion when you set the
time and date and the still picture playback is
displayed.
The time/date search mode is automatically
cleared.
1 Turn on the power of the equipment to be used.
2 Press SEARCH/AUDIO ON in stop mode until the
time/date search indicator flashes in the display
window and on the monitor screen.
When CONVENTION is selected for T/D
SEARCH on the GENERAL SET menu:
1H12M06S
T/D SEARCH
01 12
In the display window
Hour
Date
On the monitor
When NEW is selected for T/D SEARCH on the
GENERAL SET menu:
1H12M06S
T/D SEARCH
01 12 20
Notes
• When T/D SEARCH is set to NEW on the GENERAL
SET menu, the time/date search mode works during
recording in from 2H to 96H (when using T-120 tape)
mode, from 2H to 128H (when using T-160 tape) mode in
the SP mode, or from 6H to 168H (when using T-120 tape)
mode, from 8H to 224H (when using T-160 tape) mode in
the EP mode.
• If the tape reaches its end during searching, the tape is
rewound and the unit enters the stop mode at the beginning
of the tape.
• Be sure to set T/D SEARCH on the GENERAL SET menu
to the same setting as the tape was recorded with.
Otherwise, searching for the time and date cannot be done
properly.
• You can use the T/D SEARCH only when the alarm speed
is set to SP 2H (when using T-120 or T-160 tape in SP
recording mode), EP 6H (when using T-120 tape in EP
recording mode), or EP 8H (when using T-160 tape in EP
recording mode) and the recorded section is longer than 20
seconds.
In the display window
Minute
Hour
Date
On the monitor
47
Page 48

Various Playback Modes
You can play back picture at various modes: reverse
playback, still and field by field pictures, and highspeed playback in both forward and reverse directions.
TRACKING –/+
REV b
REW m
PLAY B
PAUSE
X
FF M
Picture Search
During playback, press FF M (forward direction) or
REW m (reverse direction). A high-speed picture
(about 5 times the normal speed in 2-hour mode in SP
mode, about 7 times normal speed in 6-hour mode in
EP mode) without sound appears on the monitor
screen.
Still Picture
During playback, press PAUSE X.
To resume normal playback, press PAUSE X or
PLAY B.
When the still mode lasts for more than approximately
five minutes, the VCR will automatically stop.
If the picture shakes while in the still mode
Adjust the picture with TRACKING + or –.
Field-by-Field Picture
In the still mode, press FF M or REW m.
Each time you press the button, the picture advances
by one field.
When you hold the button down, the picture advances
continuously.
When FF M is pressed When REW m is pressed
To resume normal playback, press PLAY B.
When FF M is pressed When REW m is pressed
In the display window
Note
During picture search, streaks or noise band appear on the
monitor screen.
In the display window
Reverse Playback
During playback, keep pressing REV b. Reverse
playback picture appears on the screen.
In the display window
Notes
• During reverse playback, streaks appear on the monitor
screen.
• This function works only during playback in SP 2H mode
(when using T-120 or T-160 tape in SP mode), EP 6H
mode (when using T-120 tape in EP mode) or EP 8H mode
(when using T-160 tape in EP mode).
48
Page 49

Playback in S-VHS ET Format
This VCR is equipped with S-VHS ET format, so that
when you play back a tape, the VCR automatically
detects the S-VHS ET format and gives you a high
quality picture.
You can set to activate this function on the GENERAL
SET menu.
1 2-5 6
1 Turn on the power of the equipment to be used.
2 Press MENU and MENU
MENU flashes on the monitor screen.
<
LANGUAGE
1.
CLOCK SET
DAYLIGHT SET
2. DISPLAY SET
BUZZER
SW OUT
3. ALARM SET
4. GENERAL SET
5. TIMER SET
6. HOLIDAY SET
7. POWER FAILURE
USED HOUR
8. ALARM DATA
SELECT : NEXT : RETURN : MENU
MAIN MENU
/
1SHOT REC
/
DEW
V
until “4” of the MAIN
>
5 Set to AUTO or OFF by pressing
MENU + or –.
AUTO: the VCR automatically detects S-VHS ET
format and plays back the tape (normally set to
this mode).
OFF: the VCR plays back tape using VHS format.
When a tape recorded using VHS format is
played back, if the picture becomes noisy, set
PB S-VHS to OFF.
Note
When the tape is ejected, the setting returns to AUTO.
6 Press SEARCH/AUDIO ON to return to the
normal display.
To return to the MAIN MENU screen from the
current menu
Press MENU again.
To go to the next menu from the current menu
V
Press MENU
press MENU
until “NEXT PUSH B” flashes and
B
.
3 Press MENU
B
.
The GENERAL SET menu appears.
GENERAL SET
REC MODE SP
TAPE
TAPE IN
TAPE END MODE
TAPE USED COUNT
CLOCK ADJUST
APC
THREAD CHECK
T
PB S–VHS AUTO
BAUD RATE
SELECT : DATA SET : +/–RETURN : MENU
/
D SEARCH
MODE
<NEXT PUSH >
4 Press MENU
T–120
STOP
REW
OFF
01:00
ON
OFF
CONVENTION
19200
V
to move the flashing to the setting
of PB S-VHS.
49
Page 50

Maintenance
We recommend you check the VCR daily to confirm
that the VCR works correctly.
When the security lock is in effect, release it before
operating.
Perform the following checks before starting to record.
1 Turn on the camera, monitor, and this VCR.
2 Confirm that the picture from the camera appears
on the monitor screen.
3 Confirm that the time and date display on the
monitor is correct.
4 To check the recording condition of the previous
day, rewind the tape for a few seconds and play
back the tape.
5 Confirm that playback is normal.
6 Confirm that recorded time and date information is
correct.
If you find any malfunction, switch all equipment off,
unplug the VCR from the AC outlet, and consult your
Sony dealer.
Cleaning Video Heads
Checking the Video Heads Every
1000 Hours
A VCR is a high-precision piece of equipment because
it records or plays back the picture on a magnetic tape.
In particular, the video head and other mechanical
parts become dirty or worn. To maintain a clean
picture, we recommend maintenance every 1000
hours.
To identify the service time, display the USED HOUR
screen. (See page 26.)
Maintaining Mechanical Parts
When not used for long periods, the VCR should be
switched on now and then set to the playback mode for
about three minutes. This helps to prevent mechanical
deterioration.
Servicing Periodically
To maintain optimum operating conditions and picture
quality, periodic servicing (cleaning, lubrication, parts
replacement) is necessary.
Please consult your Sony dealer.
If the VCR is to be used for critical monitoring
purposes, it may be preferable to perform servicing at
shorter intervals.
After prolonged use, the video heads may become
contaminated, which results in impaired picture quality
(snow) or loss of picture. To avoid this, clean the video
heads regularly.
Replacing Video Heads
If optimum picture quality is not restored even after
you have cleaned the video heads, head replacement
may be necessary. Please consult your Sony dealer.
50
Page 51

Terminals
WARNING OUT Terminal
This terminal will help you to know when something
wrong has happened to the VCR during recording.
The VCR outputs a pulse signal from WARNING
OUT terminal.
COM terminal
Tape recording stops.
WARNING OUT terminal
5 V
0 V
To reset the output signal,
press STOP x or
EJECT Z, or press the reset
button.
TAPE END OUT Terminal
When the VCR detects the tape end, the output level
becomes 0 V DC. When the buzzer is set to ON on the
DISPLAY/BUZZER/SW OUT menu, the VCR beeps
when the tape reaches its end. To resume the 5 V
output, press the operation button (EJECT Z, REC z,
FF M, REW m, PLAY B or STOP x etc.).
TAPE END OUT terminal
REC mode
Recording
mode
Output
signal
Tape end Beginning of tape
Rewind
COM terminal
Press operation
button
Stop
5 V
0 V
Note
To turn the clog detection function off, set CLOG
DETECTION to OFF on the ALARM SET menu.
REPEAT REC mode
Tape end
Recording
mode
Output
signal
2 sec.
Beginning of tape
Rewind Recording
5 V
0 V
51
Page 52

Terminals
1 Turn on the power of the equipment to be used.
2 Press MENU and MENU
MENU flashes on the monitor screen.
3 Press MENU
The ALARM SET menu appears.
ALARM SET
1SHOT REC
SELECT : DATA SET : +/–RETURN : MENU
4
Press MENU V to move the flashing to the setting
TAPE END WARN.
of
TAPE END
ALARM SET
1SHOT REC
REC FIELD
INTERVAL
SELECT : DATA SET : +/–RETURN : MENU
COUNTER: the time counter shows:
“2:00:00” when using T-120 tape in SP mode,
“2:40:00” when using T-160 tape in SP mode,
“6:00:00” when using T-120 tape in EP mode,
“8:00:00” when using T-160 tape in EP mode,
and then signal is output from the TAPE END
OUT terminal (recording will be continued to
the end of the tape).
TAPE END: the VCR detects the tape end.
B
.
ALARM MODE
ALARM SPEED SP 2H
ALARM DURATION
ALARM DATA REC
TAPE END WARN.
CLOG DETECTION
SERIES REC
REC FIELD
INTERVAL
<
NEXT PUSH
ALARM MODE
ALARM SPEED
ALARM DURATION
ALARM DATA REC
TAPE END WARN.
CLOG DETECTION
SERIES REC
<
NEXT PUSH
>
by
pressing MENU + or –
>
V
until “3” of the MAIN
A1
20s
OFF
COUNTER
ON
OFF
01
1 min
and set to
COUNTER or
.
A1
SP 2H
20s
OFF
COUNTER
ON
OFF
01
1 min
5 Press SEARCH/AUDIO ON to return to the
normal display.
SW OUT Terminal
The VCR outputs a pulse signal from the SW (switch)
OUT terminal to the camera switcher to control the
switching from camera to camera.
SW OUT terminal
COM terminal
Specify the interval between each pulse signal on the
DISPLAY SET/BUZZER/SW OUT menu. Also, set
MODE to FIELD or FRAME depending on the
specifications of the camera switcher.
Available settings are:
•FIELD: 1, 2, 3, 4, 5, 10, 30, or 60 fields
•FRAME: 1, 2, 3, 4, 5, 10, 30, or 60 frames
1 Turn on the power of the equipment to be used.
2 Press MENU and MENU
MENU flashes on the monitor screen.
3 Press MENU
The DISPLAY SET/BUZZER/SW OUT menu
appears.
DISPLAY SET DATE ON
BUZZER ALARM IN ON
SW OUT MODE FIELD
SELECT : DATA SET : +/–RETURN : MENU
B
.
TIME ON
SPEED ON
ALARM ON
WARNING ON
TAPE END ON
KEY IN OFF
TIMING 01
2H MODE ON
<NEXT PUSH >
V
until “2” of the MAIN
52
Page 53

4
BUZZER ALARM IN ON
TAPE END ON
KEY IN OFF
SW OUT MODE FIELD
TIMING 01
2H MODE ON
SELECT : DATA SET : +/–RETURN : MENU
<NEXT PUSH >
TAPE END ON
Press MENU V to move the flashing to the setting
MODE
of
FRAME
MENU V
5 Set TIMING by
MENU V
SW OUT MODE FIELD
SELECT : DATA SET : +/–RETURN : MENU
of SW OUT and set to
by
pressing MENU + or – and press
FIELD or
again.
pressing MENU + or – and press
.
KEY IN OFF
TIMING 04
2H MODE ON
<NEXT PUSH >
CLOCK SET IN/OUT Terminals
You can set the clock of this unit using an external
switch.
When you use one unit as the master VCR, you can set
the clock of the units connected to the master VCR
using the master VCR.
When Using an External Switch
External switch
to CLOCK SET IN
to CLOCK SET OUT
to CLOCK SET IN
to COM
to COM
6 Press MENU
V
to select whether a pulse signal is
output from the SW OUT terminal in the basic
mode.
Example:
When TAPE is set to T-120 or T-160 and REC
MODE is set to SP in GENERAL SET menu:
Set 2H (2-hour mode) MODE to ON or OFF by
pressing
MENU + or –
.
ON: a signal is output in the 2-hour mode
OFF: a signal is not output in the 2-hour mode
When TAPE is set to T-120 and REC MODE is
set to EP in GENERAL SET menu:
Set 6H (6-hour mode) MODE to ON or OFF by
pressing
MENU + or –
.
ON: a signal is output in the 6-hour mode
OFF: a signal is not output in the 6-hour mode
When TAPE is set to T-160 and REC MODE is
set to EP in GENERAL SET menu:
Set 8H (8-hour mode) MODE to ON or OFF by
pressing
MENU + or –
.
ON: a signal is output in the 8-hour mode
OFF: a signal is not output in the 8-hour mode
to CLOCK SET OUT
to CLOCK SET IN
to COM
When Using One Unit as a Master VCR
Master VCR
to CLOCK SET OUT
to CLOCK SET IN
to CLOCK SET OUT
to CLOCK SET IN
to COM
to COM
7 Press SEARCH/AUDIO ON to return to the
normal display.
53
Page 54

Terminals
1 Turn on the power of the equipment to be used.
2 Press MENU and MENU
MENU flashes on the monitor screen.
3 Press MENU
The GENERAL SET menu appears.
GENERAL SET
REC MODE SP
TAPE
TAPE IN
TAPE END MODE
TAPE USED COUNT
CLOCK ADJUST
APC
THREAD CHECK
/
D SEARCH
T
PB S–VHS AUTO
BAUD RATE
SELECT : DATA SET : +/–RETURN : MENU
4
Press MENU V to move the flashing to “01:00” of
CLOCK ADJUST
by pressing
GENERAL SET
REC MODE SP
TAPE
TAPE IN
TAPE END
TAPE USED COUNT
CLOCK ADJUST
APC
THREAD CHECK
/
D SEARCH
T
PB S–VHS AUTO
SELECT : DATA SET : +/–RETURN : MENU
B
.
MODE
<NEXT PUSH >
T–120
STOP
REW
OFF
01:00
ON
OFF
CONVENTION
19200
and
MENU + or –
MODE
MODE
<
NEXT PUSH
T–120
STOP
REW
OFF
01:00
ON
OFF
CONVENTION
19200BAUD RATE
>
V
until “4” of the MAIN
set the time for clock setting
.
5 Press SEARCH/AUDIO ON to return to the
normal display.
REMOTE Jack
The VCR can be remotely controlled by adding the
circuit shown below to the REMOTE jack or by using
the SVT-RM10 Remote Control Unit (not supplied).
REMOTE jack
R2
R3
R4
R5
R6
R7
R8
R9
R10
R11
R12
R13
1.5K
0.43K
0.51K
0.62K
0.75K
0.91K
1.1K
1.3K
2.0K
2.4K
3.6K
5.6K
SW1 ......... STOP
SW2 ......... PAUSE
SW3 ......... REW
SW4 ......... FF
SW5 ......... PLAY
SW6 ......... REC
SW7 ......... MENU
SW8 ......... REV
SW9 ......... REC/PLAY SPEED+
SW10 ....... REC/PLAY SPEED–
SW11 ....... MEN V
SW12 ....... MENU B
Resistor tolerance should be
equal to or less than ±2%.
SW1
SW2
SW3
SW4
SW5
SW6
SW7
SW8
SW9
SW10
SW11
SW12
6 When using an external switch:
When you turn the switch on and an input signal is
received at the CLOCK SET IN terminal, the
clocks of all the connected VCRs will be set to the
time adjusted in step 4.
When using one unit as the master VCR:
When the clock of the master VCR comes to the
time adjusted in step 4, the signal will be output
from the CLOCK SET OUT terminal to set the
clocks of the other connected VCRs.
54
Notes
• Use a shielded cord less than 5 m (16 ft.) in length.
• The recording indicator on the SVT-RM10 lights up when
using with this VCR.
Page 55

ADDRESS
10987654ON321
TERMINA TERS-485
RS-232C
ON
OFF OFF
RS-232C/RS-485 Interface
Pin assignment
RS-232C connector (D-sub 9-pin, female)
1 5
6
Pin No. Signal Operation Signal Direction
2 RXD Receive data VCR T Computer
3 TXD Send data VCR t Computer
7 RTS Request to send VCR t Computer
5 GND Singnal ground
RS-485 connector (RJ-11)
1 6
Pin No. A terminal signal B terminal signal
1 Not used Not used
2 Not used Not used
3 A signal B signal
4 B signal A signal
5 Not used Not used
6 Not used Not used
16
not used
1
not used
2
3
4
not used
5
not used
6
Straight type
9
16
1
2
3
4
5
6
Make the connection to the RS-485 control terminal
using a modular cable (not supplied).
•If using a straight type cable, connect it between the
A terminals, or between the B terminals (see
illustration below).
•If using a crossed type cable, connect it from the A
terminal to the B terminal, or from the B terminal to
the A terminal (see illustration below).
RS-485
AB
To terminal A
Straight-type cable
Cross-type cable
To terminal A
ADDRESS
RS-485/RS-232C selector
RS-485 TERMINATE switches
(DIP switches)
Switch No. Operation
1 - 7 Set address (1 is lowest bit and 7 is
highest) (ON:1, OFF:0)
7 is effective when using RS-485 connector
8 Not used
9 Select RS-485 or RS-232C
10 Terminate on/off when using RS-485
connector
16
not used
1
not used
2
3
4
not used
5
not used
6
Cross type
16
1
2
3
4
5
6
55
Page 56

C OC JUS
APC
THREAD CHECK
T
/
D SEARCH
000
ON
OFF
CONVENTION
PB S–VHS AUTO
19200BAUD RATE
SELECT : DATA SET : +/
– RETURN : MENU
<
NEXT PUSH
>
RS-232C/RS-485 Interface
RS-232 Interface
When the personal computer is connected to the RS232C connector, the transmission speed (baud rate)
can only be set using the GENERAL SET menu.
1 Set the RS-485/RS-232C selector at the rear to
RS-232C.
2 Turn on the power of the equipment to be used.
3 Press MENU and MENU
V
until “4” of the MAIN
MENU flashes.
4 Press MENU
B
.
The GENERAL SET menu appears.
GENERAL SET
REC MODE SP
TAPE
TAPE IN
TAPE END MODE
TAPE USED COUNT
CLOCK ADJUST
APC
THREAD CHECK
/
D SEARCH
T
PB S–VHS AUTO
BAUD RATE
SELECT : DATA SET : +/
5 Press
MODE
<NEXT PUSH >
MENU V
T–120
STOP
REW
OFF
01:00
ON
OFF
CONVENTION
19200
– RETURN : MENU
to move the flashing to BAUD
RATE and set the baud rate (19200, 2400, 4800 or
9600 bps) by pressing
MENU + or –
.
6 Press SEARCH/AUDIO ON to return to the
normal display.
56
Page 57

Command Reference
Data format
RS-232C
Mode Asynchronous
Character length 8 bits
Baud rate 2400, 4800, 9600 or 19200
Parity check None
Stop bit 1 bit
The baud rate can also be set using the VCR menu.
See page 56 for details.
Communication protocol
The communication is based on 1 byte unit. When the
computer has transmitted 1 byte, it will wait for a
response from the VCR, then send the next.
The response from the VCR consists of 1 byte or more
(for example 6 bytes like the counter value).
RS-485
Mode Asynchronous
Character length 8 bits
Baud rate 2400, 4800, 9600 or 19200
Parity check None
Start bit 1 bit
Stop bit 1 bit
Transmission line: 2 conductors
Transmission system: Half duplex
Note
The commands depend on the VCR which you are going to
use. Even if you send the commands which are not provided
with your VCR, they do not function.
The received/transmitted (RXD/TXD) signal layout is
indicated as seen from the VCR side.
The baud rate can also be set using the VCR menu.
See page 56 for details.
Note on using the RS-232C
To initiate command operation, send TL TABLE ON
(F6H).
The VCR will responde with ACK (0AH).
The VCR will receive commands until you send TL
TABLE OFF (F7H) to end command operations.
VCR Control Commands
The following commands are completed in 1 byte.
The VCR will respond with ACK (0AH). Confirm that
ACK (0AH) is returned before sending the next
command.
POWER ON/OFF (7BH)
Turns on or off the VCR.
PLAY (3AH)
Plays back a tape.
STILL/PAUSE (4FH)
Pauses tape.
When this command is sent while recording, the VCR
enters recording pause mode
STOP (3FH)
Stops tape.
FF (ABH)
Fast forwards the tape.
When this command is sent while playing, the VCR
enters playback in fast-forward mode.
During pause, the VCR plays back still picture.
During alarm search/scan or date/time search, the VCR
switches to forward search/scan.
REW (ACH)
Rewinds the tape.
When this command is sent while playing, the VCR
enters playback in reverse.
During pause, the VCR plays back still picture in
reverse.
During alarm search/scan or date/time search, the VCR
switches to reverse search/scan.
REV PLAY (4AH)
Plays back a tape in reverse at normal speed.
RP SPEED MODE DATA SET (7FH)
Sets recording mode to SP or EP.
TIMER ON/OFF (60H)
Switches on/off timer recording.
Note on using the RS-485
If the address set using the DIP switches is not correct,
the VCR will not operate.
When a group number is set, if it does not match the
group number of the VCR, the VCR will not operate.
SECURITY LOCK ON (69H)
Switches on security lock.
SECURITY LOCK OFF (6AH)
Switches off security lock.
57
Page 58

Command Reference
RXD B3
TXD 0A310A360A310A350A310A300A400AAB0A
AUDIO/SEARCH (22H)
When this command is sent while playing in the 12/24
(when using T-120 tape in SP mode), 16/32 (when
using T-160 tape in SP mode), 18/30 (when using T120 tape in EP mode) or 24/40 (when using T-160 tape
in EP mode) hour mode, the sound switches on/off.
During stop, the VCR switches to alarm search/scan or
date/time search mode.
When the menu is displayed, this command ends the
menu.
EJECT (A3H)
Ejects the tape.
The VCR returns ACK (0AH) as soon as it receives
this command, then returns to CASSETTE OUT (03H)
after it ejects the tape.
REC/DUB REQUEST (FAH)
Send this command just before you send the REC
(CAH) command.
REC (CAH)
Records.
Before sending this command, you need to send REC/
DUB REQUEST (FAH).
The use the following commands, send the command,
wait for the response ACK (0AH), then send the
numeric data value (30H to 39H) 1 byte at a time.
Finally, send the end command (40H).
When the desired point is located, the VCR returns
COMPLETION (01H).
If the tape comes to the end or beginning without the
desired point being located, the VCR returns NOT
TARGET (05H).
ALARM SEARCH/AUDIO ON/ALARM DATA
LIST (B0H)
Initiates search for a specific alarm point.
Send this command, then enter the alarm point and
send the end command (40H).
Send the FF to search forward or REW to search
backward.
Example: To search forward for the 10th alarm point
RXD B0
TXD 0A310A300A400A
AB
0A
Send this command to display the ALARM DATA list.
RXD B0
TXD 0A310A400A
AC
0A
RXD FA
TXD 0ACA0A
ALARM SCAN (B1H)
Initiates scanning of alarm points.
Send this command, then send FF to scan forward or
REW to scan backward.
When the alarm recording start point is located after
alarm scan, the VCR returns COMPLETION (01H).
If the tape comes to the end or beginning without the
alarm recording start point being located, the VCR
returns NOT TARGET (05H).
RXD B1
TXD 0A
AB
0A
REC CHECK (C1H)
When this command is sent while recording, tape is
rewound 3 seconds then played back 4 seconds. With
this operation, the VCR checks that the recording is
correct. After playback, the VCR returns to recording
mode.
58
DATE/TIME/MINUTE SEARCH (B3H)
Initiates search for a specific date/time/minute.
Send this command, followed by the date, time and
minute then send the end command (40H).
Send the FF to search forward or REW to search
backward.
Example: To search forward for the 16th, 15:10.
DATE/TIME SEARCH (B2H)
Initiates search for a specific date/time.
Send this command, followed by the date and time
then send the end command (40H).
Send the FF to search forward or REW to search
backward.
Example: To search forward for the 16th, 15 o’clock.
RXD B2
TXD 0A310A360A310A350A400AAB0A
Note
When T/D SEARCH is set to CONVENTION on the
GENERAL SET menu and this command is sent, the VCR
will return NAK (0B). (B3H command)
When T/D SEARCH is set to NEW and this command is
sent, “00” will be input as the unit of the minute. (B2H
command)
Page 59

VCR Setup Commands
VCR Status Commands
R/P SPEED SET (7EH)
Sets the recording/playback speed.
Send 3 bytes of numeric data (30H to 39H) after the
R/P SPEED SET (7EH) command and then send the
end command (40H).
Example: Setting the speed to 24H
RXD 7E
TXD 0A300A320A340A400A
COUNT RESET (E2H)
Resets the counter.
CLOCK ADJUST (E0H)
When this command is sent during stop, it resets the
minute and second to 00 . For example, when this
command is sent between 13:30:00 and 14:29:59, the
clock is reset to 14:00:00.
TRACKING UP (50H)
Sets the tracking one step up.
When this commend is sent during pause, it sets the
vertical alignment one step up.
TRACKING DOWN (51H)
Sets the tracking one step down.
When this commend is sent during pause, it sets the
vertical alignment one step down.
TRACKING CENTER (52H)
Sets the tracking to the neutral position (center).
Menu Setup Commands
When the VCR status commands are entered, the VCR
responds with the information (data) about each
command.
COUNT CODE (D0H)
In response to this command, the VCR returns the
counter value by 6 bytes.
Example: For –1:23:45, 31H, 31H, 32H, 33H, 34H,
35H will be returned.
30H indicates + and 31H indicates –.
RXD D0
TXD 31
3534333231
VCR INQUIRY (FB)
Confirms that the connected equipment is a VCR. The
VCR returns ACK (0A).
HEAD TIME (D2H)
In response to this command, the VCR returns the
operation time of the video heads by 5 bytes.
Example: For 00333, 30H, 30H, 33H, 33H, 33H will
be returned.
RXD D2
TXD 30
33333330
POWER TIME (D3H)
In response to this command, the VCR returns the
power on the by 5 bites.
Example: For 00777, 30H, 30H, 37H, 37H, 37H will
be returned.
MENU (74H)
Displays the menu.
MENU V (64H)
Shifts the cursor on the menu to the item below.
Moves the date/time display downwards.
MENU B (63H)
Displays the sub-menu.
Moves the date/time display rightwards.
MENU + (65H)
MENU – (66H)
Changes the setting of the selected item.
MENU RESET (E1H)
Resets menu settings.
RXD D3
TXD 30
37373730
T/L STATUS SENSE (D6H)
In response to this command, the VCR returns its
status by 5 bytes.
(See “T/L STATUS SENSE (D6H) bit allocation” on
page 60 for details.)
STATUS SENSE (D7H)
In response to this command, the VCR returns its
operating mode by 6 bytes.
( See “STATUS SENSE (D7H) bit allocation” on page
61 for details.)
59
Page 60

Command Reference
Other Commands
ENTER (40H)
Send this command to indicate the end of a numeric
command.
CLEAR (56H)
Clears all the commands.
Clears if an error occurs.
CLEAR ERROR (41H)
Clears the last byte entered of a multiple-byte
command.
Clears if an error occurs.
Return Commands
ACK (0AH)
Acknowledges the command.
NOT TARGET (05H)
Notifies that the tape has come to the end or beginning
without the search/scan point being located, as well as
that the search/scan has been canceled.
COMPLETION (01H)
Notifies that a search/scan point has been located.
Notifies that an alarm picture has been found during
scan.
ERROR (02H)
Indicates an error in the second or following byte of a
multiple-byte command. You cannot send any
command but the VCR returns its status. To clear an
error, send CLEAR ERROR (41H) or CLEAR (56H).
NAK (0BH)
Rejects the command if you send an unknown
command (or a command without any function).
T/L STATUS SENSE (D6H) bit
allocation
First, second, third bytes: Indicates the time lapse
recording/playback speed
Byte 1: Indicates the first digit
2: Indicates the second digit
3: Indicates the third digit
Example: 24-hour mode
Byte 1: 30
Byte 2: 32
Byte 3: 34
Fourth byte
Bit 7: ALARM REC MODE ON; the VCR is in
alarm recording mode.
6: 1 SHOT REC MODE ON; the VCR is in 1-
shot recording mode.
5: SERIES REC MODE ON; SERIES REC is set
to ON in the ALARM SET menu.
4: TIMER REC MODE ON; the VCR is in timer
recording or timer recording standby mode.
3: 0
2: 1
1: POWER ON; the VCR is turned on.
0: AUDIO ON; the VCR is in audio playback
mode.
Fifth byte
Bit 7: MENU MODE; the menu is displayed.
6: T/D SEARCH MODE; the VCR is in
searching for a time/date.
5: T/D SEARCH SET; specifying the time/date
to search
4: ALARM SCAN MODE; the VCR is scanning
alarm points.
3: 0
2: ALARM SEARCH MODE; the VCR is
searching for an alarm point.
1: ALARM SEARCH SET; specifying the alarm
point to search
0: 0
60
Page 61

Sixth byte
EP mode SP mode
(45H) (53H)
Bit 7: 0 0
6: 1 1
5: 0 0
4: 0 1
3: 0 0
2: 1 0
1: 0 1
0: 1 1
STATUS SENSE (D7H) bit
allocation
First byte
Bit 7: 1
6: 0
5: 0
4: REC INHIBIT; the tape with the tab broken is
inserted.
3: CASSETTE OUT; no tape is inserted.
2: 0
1: 0
0: ERROR; error in byte data. Send CLEAR
ERROR (41H) or CLEAR (56H) to accept
other command.
Second byte
Bit 7: 0
6: 0
5: 0
4: 0
3: WARNING; a warning is being issued
because there is something wrong with the
VCR.
2: 0
1: 0
0: 0
Third byte
Bit 7: 0
6: TIMER REC ON; the VCR is in timer
recording mode.
5: COUNTER MEMORY; the counter memory
is set to ON
4: 0
3: 0
2: REPEAT MODE; the VCR is in repeat
recording mode.
1: 0
0: 0
Fourth byte
Bit 7: PLAY MODE; the VCR is in playback mode.
6: FF MODE; the VCR is in fast-forward mode.
5: REW MODE; the VCR is in rewind mode.
4: STOP MODE; the VCR is in stop mode.
3: RVS PLAY; the VCR is in reverse playback
mode.
2: EJECT; the VCR is ejecting a tape.
1: REC MODE; the VCR is in recording mode.
0: 0
Fifth byte
Bit 7: 0
6: 0
5: CUE MODE; the VCR is in forward search
mode.
4: REVIEW MODE; the VCR is in reverse
search mode.
3: 0
2: 0
1: PAUSE MODE; the VCR is in recording
pause mode.
0: STILL MODE; the VCR is in playback pause
or frame-by-frame mode.
RS-232C Commands
T/L TABLE ON (F6H)
Starts controling the VCR.
T/L TABLE OFF (F7H)
Stops controling the VCR.
ALARM IN (06H)
The VCR returns this command when an alarm signal
is received.
RXD
TXD
CASSETTE OUT (03H)
The VCR returns this command when the cassette is
ejected.
06
61
Page 62

Command Reference
RS-485 Commands
GROUP SET (6CH)
Divides into groups (puts group numbers). In response
to this command, the VCR returns the group number
by 2 bytes.
Example: Setting to the group 5
6C0A20
TXD
6D
0A000A
0A
0A010A
7C
0A
00
RXD
GROUP CHECK (6DH)
Returns the group number.
Example: When the group number is 2
TXD
RXD
GROUP CLEAR (6EH)
Clears the group number. In response to this
command, the VCR returns the group number by 2
bytes.
Example: When the group number is 8
6E0A00
TXD
RXD
SET ON (7CH)
Turns on the VCR no matter if it is turned on or off.
TXD
RXD
SET OFF (7DH)
Turns off the VCR no matter if it is turned on or off.
RS-485 Return Commands
When the RS-485 connector is used and you operate
on the VCR, the VCR automatically returns a status
information of 2 bytes.
TXD
BE/BF
RXD
First byte: Header (BEH or BFH)
Second byte: Status information
When first byte is BFH
Bit 0, 1, 2, 3, 4: displays what mode the VCR is in.
0,0,0,0,0: no change
1,0,0,0,0: the VCR is turned on without a tape.
0,1,0,0,0: the VCR is turned off without a tape.
1,1,0,0,0: the VCR is turned on with a tape inserted.
0,0,1,0,0: the VCR is turned off with a tape inserted.
1,0,1,0,0: the VCR is in timer recording standby mode.
0,1,1,0,0: the VCR is playing back still picture.
1,1,1,0,0: the VCR is in recording pause mode.
0,0,0,1,0: the VCR is playing back a tape.
1,0,0,1,0: the VCR is recording.
0,1,0,1,0: the VCR is playing back a tape in reverse
direction.
1,1,0,1,0: the VCR is fast-forwarding during playback
(CUE).
0,0,1,1,0: the VCR is rewinding during playback
(REVIEW).
1,0,1,1,0: the VCR is fast-forwarding a tape.
0,1,1,1 0: the VCR is rewinding a tape.
1,1,1,1,0: the VCR is playing back frame by frame.
0,0,0,0,1: the VCR is playing back frame by frame in
reverse direction.
62
TXD
RXD
7D
0A
Bit 5, 6: displays when the VCR starts or ends the
alarm recording.
0,0: the VCR is in normal mode.
0,1: the VCR starts the alarm recording.
1,0: the VCR ends the alarm recording.
Bit 7: indicates warning.
1: the VCR has a mechanical problem.
0: normal
Page 63

Table of Commands
01234 5 6 789A BCD E F
00
1
COMPLETION
2 ERROR
3 CASSETTE 3 MENU B EJECT
OUT TIME/ TIME
4 4 MENU V MENU
5 NOT 5 MENU +
TARGET
6 ALARM IN 6 CLEAR MENU –
77
88
AUDIO/
SEARCH CENTER TIME TIME RESET
ENTER TRACKING
1
CLEAR TRACKING ALARM REC MENU
ERROR DOWN SCAN
2
UP
TRACKING DATE/ HEAD COUNT
TIMER
ON/OFF
ALARM COUNT CLOCK
SEARCH CODE ADJUST
SEARCH
DATE/ POWER
MIN
SEARCH
CHECK
T/L
STATUS
SENSE
STATUS
SENSE
RESET
T/L
TABLE
ON
T/L
TABLE
OFF
99
A ACK PLAY REV
B NAK POWER FF VCR
C GROUP SET REW
D GROUP SET
E GROUP R/P
F STOP
PLAY
STILL/
PAUSE
SECURITY
LOCK ON
SECURITY
LOCK OFF DUB
ON/OFF INQ
SET ON
CHECK OFF
CLEAR SPEED
SET
R/P SPEED
MODE DATA
SET
REC
REC/
REQUEST
63
Page 64

Troubleshooting
This section may help you isolate the problem. Should
the problem persist, unplug the unit and contact your
Sony dealer or local authorized Sony service facility.
Symptom
The picture does not appear on the
monitor screen.
The VCR does not respond when you
press any button.
Recording cannot be done. (The tape
ejects automatically.)
Repeat recording cannot be done.
Timer recording was not made.
Playback picture flickers or blurs.
Time and date were not recorded.
The tape does not eject.
The VCR does not function except to
play back the tape.
The ERROR display appears on the
screen.
Possible cause
Wrong connection.
No power is provided to video camera
and/or monitor TV.
No cassette.
Moisture condensation has occurred.
The VCR is in the alarm recording.
The security lock function is working.
The VCR is in timer-recording standby
mode or during timer recording.
The safety tab on the cassette has
been removed.
Alarm recording was made during
repeat recording.
Clock setting is not correct.
TIMER is not set to on.
Video heads are dirty.
The time/date display is not displayed.
System trouble.
The power of the equipment to be used
is not turned on.
There is a problem with your unit.
Corrective action
Check the connection. (See page 11.)
Turn on the power.
Insert a cassette.
Leave the VCR until its temperature
reaches the room temperature.
(See page 25.)
Wait for the alarm recording to finish.
Release the security lock. (See page 23.)
Press TIMER.
Cover the tab hole with plastic tape.
(See page 18.)
This is normal.
Set the clock correctly. (See page 14.)
Press TIMER to display the
(See page 30.)
Clean the video heads.
Set the time/date display. (See page 16.)
Set ON-SCREEN to ON. (See page 16.)
Turn the power off and on again to reset
the system.
Turn on the power.
Please contact your Sony dealer.
indicator.
If a system shutdown occurs
If the VCR does not operate at all, do the following:
1 Make sure the VCR is connected to the power
supply.
2 Turn the power off and disconnect the power cord.
3 Reconnect the power cord and turn the power on.
4 Press the RESET button.
If the VCR still does not operate, please consult the
dealer you purchased the VCR.
64
If a power interruption occurs while recording
The recording speed may change to 2 H mode due to
insufficient backup power.
Page 65

Specifications
General
Recording method Rotary 4-head azimuth helical
scanning system
Tape speed SP mode:33.35 mm/sec (2-hour
mode)
EP mode:11.12 mm/sec (6 or 8-
hour mode)
Specified video cassette tape
VHS and S-VHS 1/2 inch video
cassette tape
Recording/playback time
SP mode: 2, 12, 24, 48, 72, 96, 120,
168, 240, 360 and 480 hours
(when using T-120 tape)
2, 16, 32, 64, 96, 128, 160, 224,
320, 480 and 640 hours (when
using T-160 tape)
EP mode: 6, 18, 30, 48, 72, 96, 120,
168, 240, 360 and 480 hours
(when using T-120 tape)
8, 24, 40, 64, 96, 128, 160, 224,
320, 480 and 640 hours (when
using T-160 tape)
Fast-forward/rewind time
Approx. 100 seconds
(when using T-120 tape)
Colour system NTSC colour
Video
Recording method Luminance signal: FM method
Colour signal: Subcarrier low
frequency conversion methed
Input BNC: 1 Vp-p, 75 Ω unbalanced
S-VIDEO IN (Mini DIN 4-pin)
Output BNC: 1 Vp-p, 75 Ω unbalanced
S-VIDEO OUT (Mini DIN 4-pin)
Horizontal resolution
430 lines (S-VHS/S-VHS ET)
320 lines (VHS, Black & white
mode)
240 lines (VHS, Colour mode)
S/N SP mode: 46 dB (S-VHS),
44 dB (VHS)
EP mode: 45dB (S-VHS),
44 dB (VHS)
Output –8 dBs, phono jack
600 Ω unbalanced
Microphone input –60 dBs,
ø3.5 mm minijack,
10 kΩ
S/N SP mode: 43 dB
EP mode: 42 dB
Connector
Alarm input Low level
Alarm output +5 V, 5.7 kΩ (Low active)
Switch output +5 V, 5.7 kΩ (Low active)
Tape end output +5 V, 5.7 kΩ (Low active)
Warning output +5 V, 5.7 kΩ (Low active)
External timer input
Low level
Clock set output +5 V, 5.7 kΩ (Low active)
Clock set input Low level
Series output +5 V, 5.7 kΩ (Low active)
Series input Low level
One-shot input Low level
Alarm reset input Low level
Remote control input
ø3.5 mm stereo minijack
Other specifications
Operating temperature range
5°C to 40°C
Operating humidity range
80% or less
Power supply 120 V AC, 60 Hz
Power consumption
22 W
External dimensions
Approx. 420 × 100 × 300 mm
(w/h/d)
5
/8 × 4 × 11 7/8 in.)
(16
Mass Approx. 4.3 kg (9 lb 6 oz)
Supplied accessory
AC power cord (1)
Operating instructions (1)
Optional accessories
SVT-RM10 Remote Control Unit
Audio
Input –8 dBs, phono jack
27 kΩ unbalanced
Design and specifications are subject to change
without notice.
65
Page 66

AVERTISSEMENT
Afin d’éviter tout risque d’incendie ou
d’électrocution, gardez l’appareil à l’abri
de la pluie ou de l’humidité.
N’ouvrez jamais le boîtier de l’appareil,
sous risque d’électrocution. Confiez
l’entretien exclusivement à un personnel
qualifié.
66
Page 67

Table des matières
Français
Précautions...............................................................68
Caractéristiques .......................................................70
Emplacement des pièces et des commandes ..........72
Panneau frontal...................................................72
Panneau arrière ...................................................73
Fenêtre d’affichage.............................................73
Connexions ...............................................................74
Raccordement d’une caméra, d’un moniteur ou
d’un microphone ...........................................74
Raccordement à un partageur .............................74
Raccordement d’un autre appareil en série ........75
Raccordement d’un ordinateur ...........................75
Tableau des menus ..................................................76
Réglage de la langue ................................................77
Réglage de l’horloge ................................................78
Réglage de l’heure d’été.....................................79
Réglage de l’affichage de l’heure/date............... 80
Modification de la position de l’affichage de la
date et de l’heure ...........................................80
Réglage des bips sonores .........................................81
Manipulation d’une cassette vidéo.........................82
Réglage du commutateur S-VHS ....................... 82
Introduction d’une cassette vidéo.......................82
Ejection d’une cassette vidéo ............................. 82
Protection de votre cassette contre l’effacement 82
Réglage du mode d’enregistrement........................83
Sélection de la bande ...............................................84
Réglage du mode de fonctionnement lors de
l’insertion d’une cassette..................................85
Enregistrement ........................................................86
Verrouillage du mode d’enregistrement
— Fonction de verrouillage de sécurité ........87
Enregistrement répété sur une même cassette
— Enregistrement répété...............................88
Enregistrement en série ...................................... 88
Enregistrement après une coupure de courant ou
de la condensation d’humidité ......................89
Vérification de la durée utilisée..........................90
Réglage du mode à la fin de la cassette..............90
Contrôle des conditions d’enregistrement.......... 91
Vérification du défilement de la bande ..............91
Vérification du nombre d’utilisations de la
cassette ..........................................................92
Enregistrement programmé ...................................93
Enregistrement hebdomadaire............................ 93
Enregistrement quotidien ...................................96
Enregistrement à l’aide d’un programmateur
externe ...........................................................96
Réglage des vacances .........................................97
Modification/Annulation des réglages du
programmateur ..............................................98
Enregistrement d’alarme ........................................99
Raccordement d’un détecteur d’alarme.............. 99
Réglage de la vitesse d’alarme et de la durée.....99
Réglage du mode d’enregistrement d’alarme...100
Recherche de l’image des enregistrements
d’alarme — Recherche d’alarme ................101
Balayage de l’image des enregistrements d’alarme
— Balayage des alarmes .............................102
Affichage de la liste des alarmes — Rappel des
alarmes ........................................................102
Enregistrement des données d’alarme sur la
cassette ........................................................103
Lecture de la liste des données d’alarme sur la
cassette ........................................................104
Enregistrement d’une prise de vue ......................105
Lecture....................................................................107
Lecture audio.................................................... 107
Réglage des images ................................................109
Réglage de l’alignement................................... 109
Utilisation du contrôle adaptatif de
l’image (APC) .............................................109
Recherche de l’heure et de la date
— Recherche de l’heure/la date ....................110
Sélection de l’intervalle de recherche ..............110
Recherche de l’heure et de la date....................111
Modes de lecture variés.........................................112
Recherche d’image ...........................................112
Image fixe.........................................................112
Image par image ...............................................112
Lecture inversée ...............................................112
Lecture en format S-VHS ET ...............................113
Entretien .................................................................114
Bornes .....................................................................115
Borne WARNING OUT................................... 115
Borne TAPE END OUT...................................115
Borne SW OUT ................................................116
Bornes CLOCK SET IN/OUT .........................117
Prise REMOTE.................................................118
Interface RS-232C/RS-485....................................119
Référence de commande .......................................121
Format de données............................................121
Commandes du magnétoscope .........................121
Commandes de réglage du magnétoscope........123
Commandes de réglage du menu......................123
Commandes de statut du magnétoscope........... 123
Autres commandes ........................................... 124
Commandes de renvoi ......................................124
Allocation de bit T/L STATUS SENSE (D6H)124
Allocation de bit STATUS SENSE (D7H) ......125
Commandes RS-232C ......................................125
Commandes RS-485.........................................126
Commandes de renvoi RS-485.........................126
Table des commandes............................................127
Dépannage ..............................................................128
Spécifications..........................................................129
67
Page 68

Précautions
Sécurité
•Faites uniquement fonctionner l’appareil sur une
tension CA de 120 V, 60 Hz.
•La plaquette signalétique indiquant la tension de
fonctionnement, la consommation électrique, etc. est
située à l’arrière de l’appareil.
•Si du liquide ou un objet pénètre à l’intérieur du
boîtier, coupez l’alimentation, débranchez l’appareil
et faites-le vérifier par un personnel qualifié avant de
le remettre en service.
•Ne posez pas d’objets lourds sur le câble
d’alimentation. Si le câble est endommagé, coupez
immédiatement l’alimentation. L’utilisation d’un
appareil présentant un câble endommagé est
dangereuse.
•Branchez le câble d’alimentation à la prise murale.
Pour raccorder la source d’alimentation, reportezvous à “Raccordement d’une caméra, d’un moniteur
ou d’un microphone” à la page 74.
•Débranchez le câble de la prise murale si vous
n’utilisez pas l’appareil pendant une période
prolongée.
•Pour débrancher le câble, tirez-le par la fiche et
jamais par le câble proprement dit.
Fonctionnement
Lorsque vous n’utilisez pas l’appareil, coupez
l’alimentation pour économiser l’énergie et pour
augmenter sa durée de vie.
Condensation
Lorsque l’appareil est transporté directement d’un
endroit froid à un endroit chaud, il est possible que de
la condensation se forme sur le tambour
d’enregistrement. Dans ce cas, il est possible que la
bande adhère au tambour et endommage la tête. Pour
éviter tout dégât dû à la condensation, veillez à ne pas
laisser de cassette dans le compartiment lorsque vous
n’utilisez pas l’appareil. En cas de présence de
condensation, l’indicateur “dddd” clignote dans la
fenêtre d’affichage et l’appareil ne fonctionnera pas.
Lorsque l’indicateur “dddd”
disparaît, vous pouvez
utiliser l’appareil.
Cassettes vidéo
Retirez et stockez les cassettes vidéo après un
enregistrement ou une lecture.
Installation
•Ne placez pas d’objet lourd sur l’appareil.
•Pour éviter une surchauffe interne de l’appareil,
prévoyez un espace suffisant autour de l’appareil.
Ne placez pas l’appareil sur des surfaces (tapis,
couvertures, etc.) ou à proximité de matières
(rideaux, tentures) susceptibles de bloquer les orifices
de ventilation.
•N’installez pas l’appareil à proximité de sources de
chaleur tels que les radiateurs et les conduits d’air.
•Installez l’appareil de manière à éviter le
rayonnement direct du soleil.
•N’installez pas l’appareil à un endroit soumis à des
vibrations ou chocs mécaniques.
•Ne placez pas d’objets magnétiques à proximité de
l’appareil ou des cassettes. Les champs magnétiques
peuvent affecter la reproduction des couleurs de
l’appareil et provoquer des distorsions.
•Cet appareil est conçu pour fonctionner en position
horizontale.
Ne le mettez pas dans une position inclinée.
Nettoyage
Par précaution, il est recommandé de débrancher
l’appareil avant de le nettoyer.
•Pour conserver l’appareil dans un état neuf, nettoyezle périodiquement à l’aide d’une solution détergente
douce. N’utilisez jamais de solvants tels que les
diluants ou le benzène ou encore des nettoyants
abrasifs étant donné qu’ils risquent d’endommager le
boîtier.
Lors du nettoyage, veillez à ne pas mouiller les
contacts et les connecteurs électriques.
•En cas d’accumulation de poussière sur les orifices de
ventilation, utilisez un aspirateur pour l’enlever.
68
Page 69

Emballage
•Avant de remballer l’appareil, déconnectez tous les
câbles de raccordement.
•Conservez le carton et les matériaux de
conditionnement. Ils constituent un moyen idéal pour
transporter l’appareil. Lorsque vous transportez
l’appareil vers un autre endroit, remballez-le.
Transport
Lorsque vous transportez l’appareil, protégez-le des
vibrations et coups.
Si vous avez des questions concernant l’appareil,
contactez votre revendeur agrée Sony.
Fonction de sauvegarde
•L’arrière de cet appareil est équipée d’une batterie
rechargeable (batterie lithium) afin de préserver les
réglages de l’horloge. Lors de l’utilisation de
l’appareil dans des conditions normales, la batterie
de sauvegarde se recharge. Elle est complètement
rechargée après un minimum d’environ 30 heures
et permettra de conserver les réglages de l’horloge
pour une période allant jusqu’à environ 30 jours.
Remarque
Les réglages risquent de ne pas être conservés
correctement si la batterie de secours n’a pas été
chargée pendant au moins 30 heures au moment d’une
coupure d’alimentation.
•Pour remplacer la batterie de secours (batterie au
lithium), contactez votre revendeur Sony.
69
Page 70

Caractéristiques
Format S-VHS ET
Dans la mesure où ce magnétoscope est compatible
avec le format S-VHS ET, il peut enregistrer ou lire
une cassette VHS avec une qualité d’enregistrement ou
de lecture identique à celle obtenue avec une cassette
S-VHS. Lorsque vous réglez PB S-VHS sur AUTO, ce
magnétoscope détecte automatiquement le format SVHS ET pour la lecture de la cassette.
Enregistrement/lecture de trame d’image
Etant donné que les trames individuelles peuvent être
enregistrées une par une en mode d’enregistrement
accéléré et que toutes les trames peuvent être
visualisées séparément en cours de lecture, vous
pouvez enregistrer plus d’informations.
Fonctions d’enregistrement variées
•Enregistrement répété: Lorsque la cassette arrive en
fin de bande, le magnétoscope rembobine la cassette
et recommence l’enregistrement à partir du début.
•Enregistrement par programmateur: Vous pouvez
régler le programmateur pour un enregistrement
quotidien ou hebdomadaire. Vous pouvez également
enregistrer avec un signal d’entrée externe.
•Enregistrement d’alarme: Si un capteur d’alarme
raccordé à l’extérieur est déclenché, vous pouvez
réaliser un enregistrement complet de la situation qui
a déclenché l’alarme.
•Enregistrement à une prise de vue: Il est possible
d’effectuer un enregistrement sur base d’un seul
champ.
Réglages de mode sur le moniteur
Vous pouvez régler les modes de toutes les fonctions,
telles que le réglage du programmateur interne, les
réglages de mode d’enregistrement, etc., sur le
moniteur.
Fonction d’enregistrement en série
Cette fonction permet un enregistrement continu à long
terme à l’aide de deux ou plusieurs magnétoscopes à
enregistrement accéléré.
Modes d’enregistrement multiples
L’intervalle de temps pour l’enregistrement peut être
réglé en 22 et 1 etapes (pour 1 prise de vue). Dans le
cas du réglage du plus long intervalle, le temps
d’enregistrement disponible correspond à 480 heures
avec une cassette de 120 minutes (en mode SP).
Image claire
Ce magnétoscope intègre un circuit régénérateur de
réalité qui permet de produire une image claire.
Connecteurs RS-232C/RS-485 pour ordinateur
Il vous est possible de contrôler ce magnétoscope à
l’aide d’un ordinateur personnel ou d’un contrôleur par
l’intermédiaire d’une interface RS-232C ou RS-485.
Enregistrement des données d’alarme au
début de la cassette
Vous pouvez choisir d’enregistrer jusqu’à 100 données
d’alarme (comptage, date et heure) au début de la
cassette. Ces données peuvent être affichées sur
l’écran du moniteur.
Détection de perturbation
Ce magnétoscope vérifie toujours que le signal vidéo
peut être enregistré sans problème (en mode accéléré
uniquement).
Si l’enregistrement ne peut pas s’effectuer
correctement parce que la tête d’enregistrement est
encrassée, le magnétoscope envoie un signal et bascule
également sur la tête auxiliaire pour poursuivre
l’enregistrement.
Fonction de récupération de l’heure et de la
date
Etant donné que cet appareil utilise un VASS haute
performance, les enregistrements réalisés en mode
accéléré peuvent être recherchés par la date et l’heure
(heure et minute toutes les 10 minutes maximum), un
type de fonction de recherche précieux sur les
magnétoscopes à enregistrement accéléré.
70
Page 71

Avance/retour sur les trames d’image
Ce magnétoscope offre des fonctions de recherche
évoluées permettant d’avancer et de reculer entre les
trames d’image.
Affichage en temps réel
Le temps réel peut être affiché, même en mode
accéléré.
Verrouillage de sécurité
Pour éviter des erreurs de manipulation, ce
magnétoscope verrouille toutes les touches.
Contrôle des conditions d’enregistrement
Vous pouvez vérifier l’image enregistrée en cours
d’enregistrement d’une simple pression sur une touche.
Vérification du défilement de la bande
Pour assurer un fonctionnement correct, ce
magnétoscope vérifie automatiquement le défilement
de la bande dès que vous introduisez la cassette.
Autres caractéristiques
•Avance rapide et rembobinage à haute vitesse
•Mécanisme de démarrage rapide qui réduit la durée
de lancement de l’enregistrement
•Mode d’économie d’énergie désactivant l’écran
d’affichage
•Le nombre de fois où la bande a été enregistrée sera
enregistré au début de la bande et affiché dans la
fenêtre d’affichage
71
Page 72

Emplacement des pièces et des commandes
Panneau frontal (Reportez-vous aux pages entre parenthèses pour plus de détails.)
123456
7 9 qa qjqhqgqfq;8qdqkqs wd wf wg wh wjwswaw;ql
1 Fenêtre d’affichage (73)
2 Compartiment à cassette
3 Touche EJECT Z (82)
4 Touche REC z
5 Touche REC CHECK (91)
6 Touche STOP x
7 Indicateur POWER
8 Indicateur SAVE
9 Indicateur REPEAT (88)
0 Commutateur POWER
qa Touche MENU RESET (89)
qs Touche CL (suppression)
qd Touche TIMER (94)
qf Commutateur POWER SAVE
Lorsque le commutateur est mis sur ON,
l’indication dans la fenêtre d’affichage s’éteint et
l’indicateur SAVE s’allume.
qg Commutateur COUNTER/REAL TIME (87, 107)
qh Commutateur S-VHS (82)
qj Commutateur ON-SCREEN (80)
qk Touche MENU (77)
ql Touches TRACKING –, + (109)
Touches MENU V, B (77)
w; Touches REC/PLAY SPEED –, + (86)
Touches MENU –, + (77)
wa Touche COUNTER RESET (107)
ws Touche SEARCH/AUDIO ON (77, 107)
wd Touche REV b
wf Touche REW m
wg Touche PLAY B
wh Touche FF M
wj Touche PAUSE X
72
Page 73

Panneau arrière (Reportez-vous aux pages entre parenthèses pour plus de détails.)
1 Borne TAPE END OUT (115)
15
26
37
4
9qd
qs
qj w; wf wg whwdwsqk ql wa
8
qfq;
qgqa
qh
2 Borne WARNING OUT (115)
3 Borne COM (commune) (115)
4 Borne EXT TIMER IN (96)
5 Borne SW OUT (116)
6 Borne COM (commune) (116)
7 Borne ALARM OUT (99)
8 Borne ALARM IN (99)
9 Borne CLOCK SET OUT (117)
0 Borne CLOCK SET IN (117)
qa Borne SERIES OUT (75)
qs Borne SERIES IN (75)
qd Borne ALARM RESET IN
qf Borne 1 SHOT IN (105)
qg Borne COM (commune)
qh Borne COM (commune) (105)
qj AC IN (entrée d’alimentation) (74)
qk Connecteurs RS-485 (RJ-11) (75, 119)
Remarque
Ne pas raccorder à une ligne téléphonique.
ql ADDRESS/Sélecteur RS-485/232C/Commutateurs
RS-485 TERMINATE (119)
w; Connecteur RS-232C (75, 119)
wa Prise REMOTE (118)
ws Prise MIC IN (74)
wd Prises AUDIO IN/OUT (type phono)
wf Prises VIDEO IN/OUT (type BNC) (74)
wg Prises S-VIDEO IN/OUT (74)
wh Compartiment pour la batterie rechargeable
Fenêtre d’affichage
132456
98qsqa qfqd qgq;7
1 Indicateurs de commande de cassettes
2 Indication de mode d’enregistrement
3 Indicateur de cassette
4 Indicateur de coupure d’alimentation
5 Indicateur AL (alarme)
6 Vitesse de bande/mode de recherche d’alarme/
mode de balayage d’alarme/heure/mode de
recherche de date/compteur de bande utilisee/
condensation d’humidite
7 Indication S-VHS
8 Indicateur de verrouillage de securite
9 Indicateur SUB (tete auxiliaire)
0 Indicateur de veille d’enregistrement par
programmateur
qa Indicateur REAL
qs Indicateur OFF (Ecran hors tension)
qd Indicateur de programmateur externe
qf Heure actuelle/Compteur temps réel/Voyant
d’enregistrement programmé
qg L’indicateur REC (s’allume pendant
l’enregistrement de la liste BANDE NOMBRE
UTIL. et de la liste DONNEE ARARME)
73
Page 74

Connexions
Mettez l’appareil hors tension avant d’effectuer les
connexions.
Branchez le cordon d’alimentation en dernier.
Raccordement d’une caméra, d’un
moniteur ou d’un microphone
Les connexions suivantes vous permettent de surveiller
l’image et le son.
S-VIDEO
IN/OUT
vers
VIDEO
OUT
vers
AC IN
Microphone
vers une prise
murale
vers MIC IN
vers VIDEO IN
Si l’equipement a raccorder est muni d’un
connecteur S-VIDEO
Vous pouvez vous raccorder aux prises S-VIDEO de
ce magnetoscope en utilisant un cable S-VIDEO.
Si les prises S-VIDEO et VIDEO IN sont utilisees
simultanement, l’equipement raccorde a la prise SVIDEO IN a priorite.
Pour raccorder un capteur d’alarme
Reportez-vous à la page 99.
Raccordement à un partageur
vers la sortie vidéo
Caméra vidéo
Utilisation d’un connecteur BNC
Alignez la broche sur la
découpe, introduisez-la, puis
tournez-la vers la droite pour la
bloquer en place.
Pour l’enlever, tournez-la vers la
gauche et tirez-la vers vous.
vers
l’entrée
vidéo
Moniteur
vers VIDEO INvers SW OUT
Moniteur
vers
Caméra vidéo
Remarque
EXT
TIMING
IN
vers MONITOR OUT
Partageur de caméras
Lorsque vous raccordez plusieurs caméras à un partageur,
synchronisez les caméras.
Sinon, l’image sera perturbée.
74
Page 75

appareil en série
Caméra vidéo
Raccordement d’un ordinateurRaccordement d’un autre
vers SERIES OUT
vers SERIES IN
vers SERIES OUT
vers SERIES IN vers COM
vers SERIES OUT
vers COM
vers COM
vers COM
vers COM
vers
VIDEO IN
vers
VIDEO
OUT
vers
VIDEO
IN
vers
VIDEO
OUT
vers
VIDEO
IN
vers
VIDEO
OUT
Connecteur RS-232C
(D-sub à 9 broches)
Câble D-sub à 9
broches (non fourni)
Contrôleur
RS-485
BA
vers RS-485 B
vers RS-485 A
vers RS-232C
Ordinateur
Câble de type croisé
vers RS-485 A
vers COMvers SERIES IN
vers VIDEO IN
Moniteur
vers
VIDEO
IN
vers VIDEO
OUT
Pour en connaître le fonctionnement, reportez-vous à
la page 88.
vers RS-485 B
vers RS-485 A
vers RS-485 B
vers RS-485 A
75
Page 76

Tableau des menus
<
MENU PRINCIPAL
>
LANGUE
REGL.HORL.
HEURE D' ETE
FRANCAIS
ENGLISH
ESPANOL
NON / OUI
REGL. AFFICHAGE
AVERTIS
SORTIE SW OUT
REGL. ALARME
1SHOT REC
JOUR MAR / ARR
HEURE MAR / ARR
VITESSE MAR / ARR
ALARME MAR / ARR
AVERTISSEMENT MAR / BLEU / ARR
ENT. ALARME MAR / ARR
FIN. BANDE MAR / ARR
ENTR. TOUCHE ARR / MAR
MODE TRAME / IMAGE
TEMPS 01 / 02 / 03 / 04 / 05 / 10 / 30 / 60
2H MODE MAR / ARR
2H MODE MAR / ARR
6H MODE MAR / ARR
8H MODE MAR / ARR
MODE ALARME A1 / A2 / A3 / ARR
VITESSE ALARME SP 2H / SP12H / SP24H / NC (T120)
SP 2H / SP16H / SP32H / NC (T160)
EP 6H / EP18H / EP30H / NC (T120)
EP 8H / EP24H / EP40H / NC (T160)
DUREE ALARME 20S / 40S / 1MIN / 2MIN / 3MIN / 4MIN / 5MIN / CC
ENR. DONNEE ALARME ARR / MAR
AVERTISSE FIN BANDE COMPT / FIN
DET. OBSTR. MAR / ARR
ENR. SERIE ARR / MAR
REC FIELD 01 / 02 / 03 / 04 / 05 / 10 / 30 / 60
INTERV. 1min / 2min / 3min
REGL. GENERAL
REGL. TIMER
REGL. CONGET
PANNE COURANT / PERTE CONDENS.
HEURE UTIL.
DONNEE ALARME
REC MODE SP / EP
BANDE T–120 / T–160
BANDE EN PLACE ARRET / ENREG
FIN BANDE ENR REMB / ARRET / REPET 1 / REPET 2
BANDE NOMBRE UTIL. ARR / MAR
REGL. DE L' HORLOGE 01 : 00
APC MAR / ARR
VERI. ENREG. ARR / MAR
RECHERCHE PAR J / H ANCIEN / NOUVEAU
PB S–VHS AUTO / ARR
BAUD TAUX 19200 / 2400 / 4800 / 9600
76
Page 77

Réglage de la langue
Choisissez le français, l’anglais ou l’espagnol comme
langue d’affichage.
12 4 5
3
1 Mettez l’appareil à utiliser sous tension.
2 Appuyez sur MENU.
Le MENU PRINCIPAL apparaît sur l’écran du
moniteur et “1” clignote.
<
1. LANGUE
2. REGL. AFFICHAGE
3. REGL. ALARME/1SHOT REC
REGL. GENERAL
4.
REGL. TI MER
5.
REGL. CONGE
6.
7. PANNE COURANT
8. DONNEE ALARME
CHOISIR :
MENU PRINCIPAL
REGL. HORL.
HEURE D' ETE
AVERTIS
SORTIE SW OUT
/
HEURE UTI L.
PERTE CONDENS.
SUIVANT : REVENIR : MENU
>
5 Appuyez sur SEARCH/AUDIO ON pour retourner
à l’affichage normal.
Pour retourner à l’écran de MENU PRINCIPAL
à partir du menu en cours
Appuyez de nouveau sur MENU.
Pour passer au menu suivant à partir du menu
en cours
Appuyez sur MENU V jusqu’à ce que “SUIVANT
POUSSER B” clignote et appuyez sur MENU B.
Remarque
Lorsque vous désirez de nouveau modifier la langue, répétez
les étapes 2 à 5 après l’étape 5.
3 Appuyez sur MENU B.
Le menu LANGUE/REGL. HORL./HEURE
D’ETE apparaît.
LANGUE
REGL. HORL.
HEURE D' ETE
MAR
ARR
<
CHOISIR : REGL. DONNEE : +/–REVENIR : MENU
SUI VANT POUSSER
/
FRANCAIS
01–01– 2000 00:00:00
NON
HEURE
SEM.
1ER–DIM
DER–DIM
MOIS
04
10
02:00
02:00
>
4 Appuyez sur MENU + ou – pour sélectionner la
langue.
LANGUE
REGL. HORL.
ENGLISH
01–01– 2000 00:00:00
77
Page 78

Réglage de l’horloge
REGL. HORL.
10–01– 2000 00:00:00
HEURE D' ETE
1ER–DIM
SEM.
NON
DER–DIM
04
MOIS
10
02:00
HEUR
02:00
CHOISIR : REGL. DONNEE : +/–REVENIR : MENU
<
SUI VANT POUSSER
>
/
MAR
ARR
REGL. HORL.
10–15– 2000 00:00:00
HEURE D' ETE
1ER–DIM
SEM.
NON
DER–DIM
04
MOIS
10
02:00
HEUR
02:00
CHOISIR : REGL. DONNEE : +/–REVENIR : MENU
<
SUI VANT POUSSER
>
/
MAR
ARR
REGL. HORL.
10–15– 2000 00:00:00
HEURE D' ETE
1ER–DIM
SEM.
NON
DER–DIM
04
MOIS
10
02:00
HEUR
02:00
CHOISIR : REGL. DONNEE : +/–REVENIR : MENU
<
SUI VANT POUSSER
>
/
MAR
ARR
REGL. HORL.
10–15– 2000 15:00:00
HEURE D' ETE
1ER–DIM
SEM.
NON
DER–DIM
04
MOIS
10
02:00
HEUR
02:00
CHOISIR : REGL. DONNEE : +/–REVENIR : MENU
<
SUI VANT POUSSER
>
/
MAR
ARR
REGL. HORL.
10–15– 2000 15:20:00
HEURE D' ETE
1ER–DIM
SEM.
NON
DER–DIM
04
MOIS
10
02:00
HEUR
02:00
CHOISIR : REGL. DONNEE : +/–REVENIR : MENU
<
SUI VANT POUSSER
>
/
MAR
ARR
Réglez l’horloge en fonction de l’heure et de la date
actuelles sur l’écran du moniteur. Pour régler l’heure
d’été, passez d’abord aux étapes du “Réglage de
l’heure d’été” à la page 79.
1 2 3-10 11
Exemple:
Réglez la date et l’heure sur 15:20 le octobre 15 2000.
1 Mettez l’appareil à utiliser sous tension.
2 Appuyez sur MENU.
Le MENU PRINCIPAL apparaît sur l’écran du
moniteur et “1” clignote.
5 Réglez le mois en appuyant sur MENU + ou –,
puis appuyez sur MENU B.
6 Réglez le jour en appuyant sur MENU + ou –, puis
appuyez sur MENU B.
7 Réglez l’année en appuyant sur MENU + ou –,
puis appuyez sur MENU B.
<
1. LANGUE
2. REGL. AFFICHAGE
3. REGL. ALARME/1SHOT REC
REGL. GENERAL
4.
REGL. TI MER
5.
REGL. CONGE
6.
7. PANNE COURANT
8. DONNEE ALARME
CHOISIR :
MENU PRINCIPAL
REGL. HORL.
HEURE D' ETE
AVERTIS
SORTIE SW OUT
HEURE UTI L.
/
SUIVANT : REVENIR : MENU
PERTE CONDENS.
3 Appuyez sur MENU B.
Le menu LANGUE/REGL. HORL./HEURE
D’ETE apparaît.
Le premier affichage indique le 1er janvier 2000.
LANGUE
REGL. HORL.
HEURE D' ETE
MAR
ARR
<
CHOISIR : REGL. DONNEE : +/–REVENIR : MENU
SUI VANT POUSSER
/
FRANCAIS
01–01– 2000 00:00:00
SEM.
1ER–DIM
DER–DIM
4 Appuyez sur MENU V pour faire clignoter 01.
78
MOIS
04
10
>
8 Réglez l’heure en appuyant sur MENU + ou –, puis
appuyez sur MENU B.
9 Réglez les minutes en appuyant sur MENU + ou –,
puis appuyez sur MENU B.
NON
HEURE
02:00
02:00
>
10
Appuyez sur MENU – en même temps que le
HeureMois-Jour-Année
signal horaire.
Vous pouvez régler l’horloge à 00 seconde précise.
11
Appuyez sur SEARCH/AUDIO ON pour revenir à
l’affichage normal.
Page 79

Pour rectifier le réglage de l’horloge
REGL. HORL.
15:20:00
HEURE D' ETE
1ER–DIM
SEM.
OUI
DER–DIM
10–15– 2000
04
MOIS
10
02:00
HEURE
02:00
CHOISIR : REGL. DONNEE : +/–REVENIR : MENU
<
SUI VANT POUSSER
>
/
MAR
ARR
REGL. HORL.
10–15– 2000 15:20:00
HEURE D' ETE
1ER–DIM
SEM.
NON
DER–DIM
04
MOIS
10
02:00
HEURE
02:00
CHOISIR : REGL. DONNEE : +/–REVENIR : MENU
<
SUI VANT POUSSER
>
/
MAR
ARR
Appuyez sur MENU B pour déplacer le clignotement
sur le paramètre à rectifier et réglez-le en appuyant sur
MENU + ou –.
Pour retourner à l’écran de MENU PRINCIPAL
à partir du menu en cours
Appuyez de nouveau sur MENU.
4 Appuyez sur MENU + ou – pour mettre HEURE
D’ETE sur NON ou OUI.
Pour passer au menu suivant à partir du menu
en cours
Appuyez sur MENU V jusqu’à ce que “SUIVANT
POUSSER B” clignote et appuyez sur MENU B.
Réglage de l’heure d’été
Vous pouvez régler l’heure d’été lorsque la saison
change.
1 Appuyez sur MENU.
Le MENU PRINCIPAL apparaît sur l’écran du
moniteur et “1” clignote.
<
1. LANGUE
2. REGL. AFFICHAGE
3. REGL. ALARME/1SHOT REC
REGL. GENERAL
4.
REGL. TI MER
5.
REGL. CONGE
6.
7. PANNE COURANT
8. DONNEE ALARME
CHOISIR :
MENU PRINCIPAL
REGL. HORL.
HEURE D' ETE
AVERTIS
SORTIE SW OUT
HEURE UTI L.
/
SUIVANT : REVENIR : MENU
PERTE CONDENS.
>
2 Appuyez sur MENU B.
Le menu LANGUE/REGL. HORL./HEURE
D’ETE apparaît.
NON: aucun réglage de l’heure d’été n’est effectué
OUI: le réglage de l’heure d’été est effectué
5 Appuyez sur MENU V et réglez la date et l’heure
au moment où le passage à l’heure d’été s’effectue.
SEM. MAR
Appuyez sur MENU + ou – pour déterminer le
jour où s’effectue le passage à l’heure d’été:
1ER, 2EM, 3EM, 4EM ou DER pour la
première, la deuxième, la troisième, la quatrième
ou la dernière semaine.
Appuyez ensuite sur MENU B, puis sur MENU
+ ou – pour sélectionner le jour de la semaine:
DIM, LUN, MAR, MER, JEU, VEN ou SAM
MOIS MAR
Appuyez sur MENU B et MENU + ou – pour
déterminer le mois où s’effectue le passage à
l’heure d’été: 01, 02, 03, 04...11, 12 pour
janvier, février ..... décembre
HEURE MAR
Appuyez sur MENU B et MENU + ou – pour
déterminer l’heure à laquelle s’effectue le
passage à l’heure d’été. L’heure ne peut se
régler qu’entre 01 et 22.
Appuyez ensuite sur MENU B, puis sur MENU
+ ou – pour régler les minutes.
LANGUE
REGL. HORL.
HEURE D' ETE
MAR
ARR
<
CHOISIR : REGL. DONNEE : +/–REVENIR : MENU
SUI VANT POUSSER
/
FRANCAIS
10–15– 2000 15:20:00
SEM.
1ER–DIM
DER–DIM
3 Appuyez sur MENU V pour faire clignoter le
réglage de HEURE D’ETE.
MOIS
04
10
NON
>
HEURE
02:00
02:00
En suivant la même procédure que pour SEM.
MAR, MOIS MAR et HEURE MAR, réglez SEM.
ARR, MOIS ARR et HEURE ARR lorsqu’il faut
passer de l’heure d’été à l’heure normale.
6 Appuyez sur SEARCH/AUDIO ON pour retourner
à l’affichage normal.
Pour retourner à l’écran de MENU PRINCIPAL
à partir du menu en cours
Appuyez de nouveau sur MENU.
Pour passer au menu suivant à partir du menu
en cours
Appuyez sur MENU V jusqu’à ce que “SUIVANT
POUSSER B” clignote et appuyez sur MENU B.
79
Page 80

Réglage de l’horloge
Réglage de l’affichage de
l’heure/date
Vous pouvez afficher cinq éléments d’information
(date, heure, vitesse d’enregistrement/lecture, nombre
d’enregistrements d’alarme et affichage
d’avertissement) et désactiver chaque élément que
vous ne désirez pas afficher.
1 Mettez l’appareil à utiliser sous tension.
2 Appuyez sur MENU et MENU V jusqu’à ce que
“2” du MENU PRINCIPAL clignote sur l’écran du
moniteur.
<
1. LANGUE
2. REGL. AFFICHAGE
3. REGL. ALARME/1SHOT REC
REGL. GENERAL
4.
REGL. TI MER
5.
REGL. CONGE
6.
7. PANNE COURANT
8. DONNEE ALARME
CHOISIR :
MENU PRINCIPAL
REGL. HORL.
HEURE D' ETE
AVERTIS
SORTIE SW OUT
HEURE UTI L.
/
SUIVANT : REVENIR : MENU
PERTE CONDENS.
>
3 Appuyez sur MENU B.
Le menu REGL. AFFICHAGE/AVERTIS/
SORTIE SW OUT apparaît.
REGL. AFFICHAGE JOUR MAR
AVERTIS ENT. ALARME MAR
SORTIE SW OUT MODE TRAME
CHOISIR : REGL. DONNEE : +/–REVENIR : MENU
HEURE MAR
VITESSE MAR
ALARME MAR
AVERTISSEMENT MAR
FIN. BANDE MAR
ENTR. TOUCHE ARR
TEMPS 01
2H MODE MAR
<
SUI VANT POUSSER
>
4 Appuyez sur MENU V pour faire clignoter le
réglage de JOUR, HEURE, VITESSE, ALARME
et AVERTISSEMENT et choisissez MAR ou ARR
en appuyant sur MENU + ou –.
Exemple: Lorsque vous choisissez ARR pour
l’affichage de la date.
5 Appuyez sur SEARCH/AUDIO ON pour retourner
à l’affichage normal.
15-06-2000 000
15:20:00 SP 72
Comptage d’alarme
Vitesse d’enregistrement/
lecture
Mode d’enregistrement
Heure actuelle
Pour retourner à l’écran de MENU PRINCIPAL
à partir du menu en cours
Appuyez de nouveau sur MENU.
Pour passer au menu suivant à partir du menu
en cours
Appuyez sur MENU V jusqu’à ce que “SUIVANT
POUSSER B” clignote et appuyez sur MENU B.
Pour désactiver l’affichage sur écran
Mettez le commutateur ON-SCREEN sur OFF.
Modification de la position de
l’affichage de la date et de l’heure
Vous pouvez modifier la position de l’affichage de
l’heure et de la date qui apparaît sur l’écran du
moniteur.
1 Mettez l’appareil à utiliser sous tension.
L’affichage normal apparaît.
Date
10-15-2000 000
15:20:00 SP 72
Comptage d’alarme
Vitesse
d’enregistrement/
lecture
Heure actuelle
2 Modifiez la position d’affichage comme suit.
Pour déplacer l’affichage vers le bas, appuyez
sur MENU V. (Lorsque l’affichage atteint le bas
de l’écran, l’affichage revient en haut de l’écran.)
Pour déplacer l’affichage vers la droite, appuyez
sur MENU B. (Lorsque l’affichage atteint
l’extrémité droite de l’écran, l’affichage revient au
bord gauche de l’écran.)
REGL. AFFICHAGE JOUR ARR
AVERTIS ENT. ALARME MAR
80
HEURE MAR
VITESSE MAR
ALARME MAR
AVERTISSEMENT MAR
FIN. BANDE MAR
10-15-2000 000
15:20:00 SP 72
Remarque
Appuyez sur MENU B.
Appuyez sur MENU V.
Cette fonction n’est pas disponible pendant l’enregistrement.
Page 81

Réglage des bips sonores
Vous pouvez activer/désactiver trois types de bips
sonores:
•Bip ENT. ALARME: émet un bip sonore lorsqu’un
signal d’alarme est reçu. (Voir “Enregistrement
d’alarme” à la page 99 pour plus d’informations.)
•Bip FIN. BANDE: émet un bip sonore lorsque la
cassette arrive en fin de bande.
•Bip ENTR. TOUCHE: émet un bip sonore lorsque
vous appuyez sur une touche.
1 2-4 5
1 Mettez l’appareil à utiliser sous tension.
2 Appuyez sur MENU et MENU V jusqu’à ce que
“2” du MENU PRINCIPAL clignote sur l’écran du
moniteur.
4 Appuyez sur MENU V pour faire clignoter le
réglage de chacune des options ENT. ALARME,
FIN. BANDE et ENTR. TOUCHE, et choisissez
MAR ou ARR en appuyant sur MENU + ou –.
REGL. AFFICHAGE JOUR MAR
AVERTIS ENT. ALARME MAR
SORTIE SW OUT MODE TRAME
HEURE MAR
VITESSE MAR
ALARME MAR
AVERTISSEMENT MAR
FIN. BANDE MAR
ENTR. TOUCHE M A R
TEMPS 01
5 Appuyez sur SEARCH/AUDIO ON pour retourner
à l’affichage normal.
Pour retourner à l’écran de MENU PRINCIPAL
à partir du menu en cours
Appuyez de nouveau sur MENU.
Pour passer au menu suivant à partir du menu
en cours
Appuyez sur MENU V jusqu’à ce que “SUIVANT
POUSSER B” clignote et appuyez sur MENU B.
<
1. LANGUE
2. REGL. AFFICHAGE
3. REGL. ALARME/1SHOT REC
REGL. GENERAL
4.
REGL. TI MER
5.
REGL. CONGE
6.
7. PANNE COURANT
8. DONNEE ALARME
CHOISIR :
MENU PRINCIPAL
REGL. HORL.
HEURE D' ETE
AVERTIS
SORTIE SW OUT
/
HEURE UTI L.
PERTE CONDENS.
SUIVANT : REVENIR : MENU
>
3 Appuyez sur MENU B.
Le menu REGL. AFFICHAGE/AVERTIS/
SORTIE SW OUT apparaît.
REGL. AFFICHAGE JOUR MAR
AVERTIS ENT. ALARME MAR
SORTIE SW OUT MODE TRAME
CHOISIR : REGL. DONNEE : +/–REVENIR : MENU
HEURE MAR
VITESSE MAR
ALARME MAR
AVERTISSEMENT MAR
FIN. BANDE MAR
ENTR. TOUCHE ARR
TEMPS 01
2H MODE MAR
<
SUI VANT POUSSER
>
81
Page 82

Manipulation d’une cassette vidéo
Cette section vous présente comment insérer une
cassette vidéo dans le magnétoscope.
Réglage du commutateur S-VHS
Vous pouvez utiliser des cassettes vidéo S-VHS ou
VHS. Lors de l’enregistrement sur une cassette S-VHS
en utilisant le format S-VHS ET ou sur une cassette
VHS en utilisant le format S-VHS ET, ruban adhésif le
commutateur S-VHS sur ON (indication lumineux SVHS en position haute dans la fenêtre de d’affichage).
Lors de l’enregistrement d’une cassette S-VHS en
utilisant le format VHS, ruban adhésif le commutateur
sur OFF.
Introduction d’une cassette
vidéo
Introduisez la cassette dans le compartiment à cassette
en appuyant délicatement au centre et en respectant le
sens de la flèche.
Lorsque la cassette est introduite, le magnétoscope
s’allume automatiquement et l’indicateur q s’allume
dans la fenêtre d’affichage.
Si vous insérez une cassette sans sa languette de
protection et si vous voulez lancer l’enregistrement, le
magnétoscope éjecte la cassette automatiquement.
Ejection d’une cassette vidéo
EJECT Z
Pour éjecter la cassette, appuyez sur EJECT Z du
magnétoscope.
Vous pouvez éjecter la cassette lorsque l’appareil est
hors tension.
Lorsque vous appuyez sur EJECT Z, le magnétoscope
se met automatiquement sous tension.
Après avoir éjecté la cassette, le magnétoscope se met
de nouveau hors tension.
Protection de votre cassette
contre l’effacement
Otez la languette de protection de la cassette au moyen
d’un tournevis ou d’un objet similaire comme illustré
ci-dessous. Cette opération protègera vos cassettes
contre un enregistrement accidentel.
82
Compartiment à cassette
Languette de
protection
Si vous désirez réenregistrer sur une cassette
dépourvue de sa languette, couvrez simplement
l’orifice au moyen de ruban adhésif.
Page 83

Réglage du mode d’enregistrement
Vous pouvez enregistrer et lire des cassettes en modes
SP (lecture normale) et EP (lecture étendue).
1 2-4 5
1 Mettez l’appareil à utiliser sous tension.
2 Appuyez sur MENU et MENU V jusqu’à ce que
“4” du MENU PRINCIPAL clignote sur l’écran du
moniteur.
<
1. LANGUE
2. REGL. AFFICHAGE
3. REGL. ALARME/1SHOT REC
REGL. GENERAL
4.
REGL. TI MER
5.
REGL. CONGE
6.
7. PANNE COURANT
8. DONNEE ALARME
CHOISIR :
MENU PRINCIPAL
REGL. HORL.
HEURE D' ETE
AVERTIS
SORTIE SW OUT
HEURE UTI L.
/
SUIVANT : REVENIR : MENU
PERTE CONDENS.
>
Pour retourner à l’écran de MENU PRINCIPAL
à partir du menu en cours
Appuyez de nouveau sur MENU.
Pour passer au menu suivant à partir du menu
en cours
Appuyez sur MENU V jusqu’à ce que “SUIVANT
POUSSER B” clignote et appuyez sur MENU B.
3 Appuyez sur MENU B.
Le menu REGL. GENERAL apparaît et “SP ” de
REC MODE se met à clignoter.
REGL. GENERAL
REC MODE SP
BANDE
PLACE
BANDE EN
FI N BANDE ENR
BANDE NOMBRE UTI L.
REGL. DE L' HORLOGE
APC
VERI . ENREG.
RECHERCHE PAR J
PB S-VHS AUTO
CHOISIR : REGL. DONNEE : +/–REVENIR : MENU
/
H
<
SUI VANT POUSSER
T–120
ARRET
REMB
ARR
01:00
MAR
ARR
ANCIEN
19200BAUD TAUX
>
4 Choisissez SP ou EP en appuyant sur MENU + ou
–.
5 Appuyez sur SEARCH/AUDIO ON pour retourner
à l’affichage normal.
83
Page 84

Sélection de la bande
Ce magnétoscope est conçu et calibré pour des
cassettes 120 minutes ou 160 minutes (T-120 ou T-
160). Pour garantir un fonctionnement stable et une
qualité d’image optimale, nous recommandons
l’utilisation d’une cassette Sony 120 minutes pour les
longs enregistrements en mode SP.
1 2-5 6
1 Mettez l’appareil à utiliser sous tension.
2 Appuyez sur MENU et MENU V jusqu’à ce que
“4” du MENU PRINCIPAL clignote sur l’écran du
moniteur.
<
1. LANGUE
2. REGL. AFFICHAGE
3. REGL. ALARME/1SHOT REC
REGL. GENERAL
4.
REGL. TI MER
5.
REGL. CONGE
6.
7. PANNE COURANT
8. DONNEE ALARME
CHOISIR :
MENU PRINCIPAL
REGL. HORL.
HEURE D' ETE
AVERTIS
SORTIE SW OUT
HEURE UTI L.
/
SUIVANT : REVENIR : MENU
PERTE CONDENS.
>
6 Appuyez sur SEARCH/AUDIO ON pour retourner
à l’affichage normal.
Pour retourner à l’écran de MENU PRINCIPAL
à partir du menu en cours
Appuyez de nouveau sur MENU.
Pour passer au menu suivant à partir du menu
en cours
Appuyez sur MENU V jusqu’à ce que “SUIVANT
POUSSER B” clignote et appuyez sur MENU B.
3 Appuyez sur MENU B.
Le menu REGL. GENERAL apparaît.
REGL. GENERAL
REC MODE SP
BANDE
PLACE
BANDE EN
FI N BANDE ENR
BANDE NOMBRE UTI L.
REGL. DE L' HORLOGE
APC
VERI . ENREG.
RECHERCHE PAR J
PB S-VHS AUTO
CHOISIR : REGL. DONNEE : +/–REVENIR : MENU
/
H
<
SUI VANT POUSSER
T–120
ARRET
REMB
ARR
01:00
MAR
ARR
ANCIEN
19200BAUD TAUX
>
4 Appuyez sur MENU V pour faire clignoter le
réglage de BANDE.
5 Choisissez T-120 ou T-160 en appuyant sur
MENU + ou –.
84
Page 85

Réglage du mode de fonctionnement lors de
l’insertion d’une cassette
Vous pouvez régler le mode d’enregistrement dans le
menu REGL. GENERAL lorsqu’une cassette vidéo est
introduite.
1 2-4 5
1 Mettez l’appareil à utiliser sous tension.
2 Appuyez sur MENU et MENU V jusqu’à ce que
“4” du MENU PRINCIPAL clignote sur l’écran du
moniteur.
<
1. LANGUE
2. REGL. AFFICHAGE
3. REGL. ALARME/1SHOT REC
REGL. GENERAL
4.
REGL. TI MER
5.
REGL. CONGE
6.
7. PANNE COURANT
8. DONNEE ALARME
CHOISIR :
MENU PRINCIPAL
REGL. HORL.
HEURE D' ETE
AVERTIS
SORTIE SW OUT
HEURE UTI L.
/
SUIVANT : REVENIR : MENU
PERTE CONDENS.
>
3 Appuyez sur MENU B.
Le menu REGL. GENERAL apparaît.
4 Appuyez sur MENU V pour faire clignoter le
réglage de BANDE EN PLACE et choisissez
ARRET ou ENREG en appuyant sur MENU +
ou –.
REGL. GENERAL
REC MODE SP
BANDE
BANDE EN
FI N BANDE ENR
BANDE NOMBRE UTI L.
REGL. DE L' HORLOGE
APC
VERI . ENREG.
RECHERCHE PAR J
PB S-VHS AUTO
CHOISIR : REGL. DONNEE : +/–REVENIR : MENU
PLACE
/
H
<
SUI VANT POUSSER
T–120
ARRET
REMB
ARR
01:00
MAR
ARR
ANCIEN
19200BAUD TAUX
>
ARRET: le magnétoscope est en mode d’arrêt
même lorsqu’une cassette vidéo est insérée.
ENREG: le magnétoscope commence à
enregistrer lorsqu’une cassette vidéo est insérée.
5 Appuyez sur SEARCH/AUDIO ON pour retourner
à l’affichage normal.
Pour retourner à l’écran de MENU PRINCIPAL
à partir du menu en cours
Appuyez de nouveau sur MENU.
Pour passer au menu suivant à partir du menu
en cours
Appuyez sur MENU V jusqu’à ce que “SUIVANT
POUSSER B” clignote et appuyez sur MENU B.
REGL. GENERAL
REC MODE SP
BANDE
PLACE
BANDE EN
FI N BANDE ENR
BANDE NOMBRE UTI L.
REGL. DE L' HORLOGE
APC
VERI . ENREG.
RECHERCHE PAR J
PB S-VHS AUTO
CHOISIR : REGL. DONNEE : +/–REVENIR : MENU
/
H
<
SUI VANT POUSSER
T–120
ARRET
REMB
ARR
01:00
MAR
ARR
ANCIEN
19200BAUD TAUX
>
85
Page 86

Enregistrement
Cette section vous présente comment enregistrer le
signal d’une caméra vidéo en mode normal ou
accéléré, comment régler le verrouillage de sécurité,
comment enregistrer plusieurs fois sur la même
cassette et enregistrement en série.
STOP
12 43
PAUSE
x
X
1 Mettez l’appareil à utiliser sous tension.
2 Introduisez la cassette.
3 Réglez la vitesse d’enregistrement en appuyant sur
REC/PLAY SPEED + ou –.
La vitesse d’enregistrement change en fonction de
la cassette utilisée (T-120 ou T-160) et du réglage
du REC MODE dans le menu REGL. GENERAL.
Lors de l’utilisation d’une cassette T-120
(T-160) en mode SP
Vitesse Temps d’enregistrement Intervalle Enregistre- Déplaced’enregis- maximum ment ment de la
trement audio bande
2 (2) Mode SP 2 1/60
12 (16) 14 (18) 0,12 Possible Continu
24 (32) 26 (34) 0,22
48 (64) 50 (66) 0,42
72 (96) 74 (98) 0,62
96 (128) 98 (130) 0,82
120 (160) 122(162) 1,02
168 (224) 170(226) 1,42
240 (320) 242(322) 2,02
360 (480) 362(482) 3,02
480 (640) 482(642) 4,02
*000 une prise 7200 - 1, 2, 3
*Pour enregistrement d’une prise de vue (page 105)
Mode
accéléré
Impossible Intermittent
de vue 21600 min.
En mode accéléré, il est possible d’enregistrer 2
heures de plus que le temps d’enregistrement
affiché.
Lors de l’utilisation d’une cassette T-120
(T-160) en mode EP
Vitesse Temps d’enregistrement Intervalle Enregistre- Déplaced’enregis- maximum ment ment de la
trement audio bande
6 (8) Mode EP 6 (8) 1/60
18 (24) 18 (24) 1/20 Possible Continu
30 (40) 30 (40) 1/12
48 (64) 54 (72) 0,15
72 (96) 78 (104) 0,22
96 (128) 102 (134) 0,28
120 (160) 126(168) 0,35
168 (224) 174(232) 0,48
240 (320) 246(328) 0,68
360 (480) 366(488) 1,02
480 (640) 486(648) 1,35
*000 une prise 21600 - 1, 2, 3
*Pour enregistrement d’une prise de vue (page 105)
Mode
accéléré
Impossible Intermittent
de vue 64800 min.
En mode EP, lorsque vous utilisez une cassette T120 dans les modes 48H - 480H, il est possible
d’enregistrer 6 heures de plus que le temps
d’enregistrement affiché.
Lorsque vous utilisez une cassette T-160 dans les
modes 64H - 640H, il est possible d’enregistrer 8
heures de plus que le temps d’enregistrement
affiché.
Vitesse
d’enregistrement
Dans la fenêtre d’affichage
4 Appuyez sur REC z.
L’enregistrement débute.
Pour arrêter l’enregistrement
Appuyez sur STOP x.
Pour activer le mode de pause
d’enregistrement
Appuyez sur PAUSE X.
Pour reprendre l’enregistrement, appuyez de nouveau
sur cette touche. Si le mode de pause est actif pendant
plus de 5 minutes, le magnétoscope s’arrête.
86
Page 87

Si l’enregistrement ne démarre pas et que la
cassette est éjectée
La languette de la cassette a été retirée pour empêcher
tout enregistrement. Utilisez une cassette sa languette
de protection ou couvrez l’orifice au moyen de ruban
adhésif.
Affichage du temps réel (en mode
d’enregistrement et d’arrêt uniquement)
Mettez le commutateur COUNTER/REAL TIME sur
REAL TIME. Le temps réel apparaît dans la fenêtre
d’affichage. En mode de lecture, l’affichage montre le
compteur de bande quelle que soit la position du
commutateur.
Remarques
• Lors d’un enregistrement au format S-VHS ET, nous vous
recommandons d’utiliser des cassettes VHS portant la
mention HG (High Grade).
• Les cassettes enregistrées au format S-VHS ET peuvent
être reproduites sur les lecteurs suivants :
– lecteur S-VHS prenant en charge le format S-VHS ET ou
équivalent.
– lecteur vidéo doté de la fonction de lecture S-VHS.
• Lors de long enregistrements en mode SP, nous
recommandons l’utilisation d’une cassette T-120. Si vous
utilisez une cassette T-160, il est possible que le
magnétoscope ne fonctionne pas correctement.
• Chaque fois que vous introduisez une cassette et lancez
l’enregistrement, la fonction de contrôle adaptatif de
l’image (APC – Adaptive Picture Control) améliore
automatiquement la qualité de l’enregistrement en ajustant
le magnétoscope suivant l’état des têtes vidéo et de la
bande. Pour activer cette fonction, mettez APC sur MAR
dans le menu REGL. GENERAL (reportez-vous à la page
109). Il y a un délai d’environ 10 secondes avant que le
magnétoscope démarre effectivement l’enregistrement
lorsque la touche REC z est enfoncée. (“APC” apparaît
dans la fenêtre d’affichage ou sur l’écran du moniteur.)
• Ce magnétoscope est doté d’une fonction de détection de
perturbation. En mode accéléré, si l’enregistrement ne
s’effectue pas correctement, l’indicateur d’enregistrement
se mettra à clignoter dans la fenêtre d’affichage et un
signal d’avertissement sera émis par la borne WARNING
OUT. Dans ce cas, arrêtez l’enregistrement immédiatement
et vérifiez le magnétoscope.
• Si ENR. DONNEE ALARME dans le menu REGL.
ALARME et/ou BANDE NOMBRE UTIL. dans le menu
REGL. GENERAL est mis sur MAR, le magnétoscope
rembobinera la cassette et l’enregistrement débutera au
début de la cassette. Pendant que le magnétoscope
rembobine la cassette, “<ALARM DATA REC>” et/ou
“<TAPE USED COUNT>” clignote sur l’écran du
moniteur.
• Si les listes BANDE NOMBRE UTIL. et DONNEE
ALARME sont en cours d’enregistrement, le voyant REC
s’allume dans la fenêtre d’affichage (dans ce cas, le voyant
REC s’éteint momentanément entre les listes BANDE
NOMBRE UTIL. et DONNEE ALARME).
Verrouillage du mode d’enregistrement
— Fonction de verrouillage de sécurité
Le verrouillage du mode d’enregistrement est utile
pour empêcher une interruption accidentelle d’un
enregistrement lorsque le magnétoscope est utilisé à
des fins de surveillance.
Pour activer le verrouillage de sécurité
Tout en appuyant sur MENU B, appuyez sur
MENU +.
L’indicateur
La fonction de verrouillage de sécurité marche
également dans les modes d’enregistrement par
programmateur et de lecture.
Pour désactiver le verrouillage de sécurité
Tout en appuyant sur MENU B, appuyez sur MENU –.
L’indicateur s’éteint.
s’allume dans la fenêtre d’affichage.
MENU
MENU
MENU +
B
B
MENU –
87
Page 88

Enregistrement
Enregistrement répété sur une même
cassette — Enregistrement répété
Vous pouvez enregistrer plusieurs fois sur la même
cassette dans deux modes différents: REPET 1 et
REPET 2.
Indicateur
REPEAT
1 2-4 5 6
1 Mettez l’appareil à utiliser sous tension.
2 Appuyez sur MENU et MENU V jusqu’à ce que
“4” du MENU PRINCIPAL clignote sur l’écran du
moniteur.
3 Appuyez sur MENU B.
Le menu REGL. GENERAL apparaît.
4 Appuyez sur MENU V pour faire clignoter le
réglage de FIN BANDE ENR et choisissez REPET
1 ou REPET 2 en appuyant sur MENU + ou –.
L’indicateur REPEAT s’allume.
REGL. GENERAL
REC MODE SP
BANDE
BANDE EN
FI N BANDE ENR
BANDE NOMBRE UTI L.
REGL. DE L' HORLOGE
APC
VERI . ENREG.
RECHERCHE PAR J
PB S-VHS AUTO
CHOISIR : REGL. DONNEE : +/–REVENIR : MENU
PLACE
/
H
<
SUI VANT POUSSER
REPET 1: Si un signal d’alarme est reçu pendant
un enregistrement répété, le mode
d’enregistrement passe en enregistrement
d’alarme. Le voyant REPEAT s’éteint. Lorsque
la cassette arrive en fin de bande, elle est
automatiquement rembobinée et s’arrête au
début. L’indicateur OFF s’allume dans la fenêtre
d’affichage.
REPET 2: Si un signal d’alarme est reçu pendant
un enregistrement répété, le mode
d’enregistrement passe en enregistrement
d’alarme. L’enregistrement répété sera lancé à la
fin de l’enregistrement de l’alarme.
T–120
ARRET
REPET 1
ARR
01:00
MAR
ARR
ANCIEN
19200BAUD TAUX
>
5 Appuyez sur SEARCH/AUDIO ON pour retourner
à l’affichage normal.
6 Appuyez sur REC z.
L’enregistrement débute.
Pour retourner à l’écran de MENU PRINCIPAL
à partir du menu en cours
Appuyez de nouveau sur MENU.
Pour passer au menu suivant à partir du menu
en cours
Appuyez sur MENU V jusqu’à ce que “SUIVANT
POUSSER B” clignote et appuyez sur MENU B.
Enregistrement en série
Raccordez un autre SVT-S480ES pour un
enregistrement en série (pour plus de détails sur la
connexion, reportez-vous à la page 75) et réglez
chacun des appareils comme suit.
Option Appareil #1 Appareil #2 Appareil
ENR. SERIE dans le MAR MAR MAR
menu REGL.
ALARME
Positionnez le 0:00:00 0:00:00 0:00:00
commutateur
COUNTER/REAL
TIME sur COUNTER.
Cassette Chargée Chargée Chargée
Statut de
fonctionnement
Enregistement répété
Verrouillage de Verrouillé Verrouillé Verrouillé
sécurité
Enregistrement Déactivé Déactivé Déactivé
programmé
Enregistrement
Déactivé Déactivé Déactivé
Hors tension Hors tension
Lorsque tous les réglages sont effectués, mettez
l’appareil #1 en mode d’enregistrement et éteignez
l’appareil #2 ainsi que les suivants.
Lorsque l’enregistrement sur l’appareil #1 est terminé,
l’appareil #2 se met sous tension et l’enregistrement
débute.
L’appareil #1 rembobine la bande et se met hors
tension.
#3 et
suivants
88
Page 89

PANNE
PERTE
COURANT
COUPURE
RETOUR
CONDENS.
MAR
ARR
:
15002 12–20
015
07
:
3012–20 07
:
0012–10 11
:
0012–20 12
Remarque
Pour un enregistrement en série, mettez ENR. SERIE du
menu REGL. ALARME sur MAR. S’il est mis sur ARR,
l’enregistrement ne peut pas être effectué, même si un signal
est entré à la borne SERIES IN.
Enregistrement après une coupure de
courant ou de la condensation d’humidité
Si une coupure de courant a lieu, l’indicateur P
s’allume dans la fenêtre d’affichage et si de la
condensation d’humidité se dépose, l’indicateur
“dddd” se met à clignoter. Même si une coupure
d’alimentation se produit ou si de la condensation
d’humidité se dépose pendant l’enregistrement, les
batteries internes assurent une alimentation de secours
de la mémoire pendant au moins 30 jours.
Si la panne de courant a lieu pendant l’enregistrement,
l’enregistrement reprend automatiquement dès que
l’alimentation est rétablie.
Les batteries internes peuvent être rechargées en
environ 48 heures.
Voici un décompte du nombre de coupures de courant
et de dépôts de condensation d’humidité ainsi que la
période pendant laquelle le courant a été coupé.
Nombre de coupures de courant
Aucune période
d’enregistrement
Nombre de dépôts de condensation d’humidité
Pour retourner à l’écran de MENU PRINCIPAL
à partir du menu en cours
Appuyez de nouveau sur MENU.
Pour passer au menu suivant à partir du menu
en cours
Appuyez sur MENU V jusqu’à ce que “SUIVANT
POUSSER B” clignote et appuyez sur MENU B.
Pour faire disparaître l’indicateur P
Pour vérifier les interruptions de courant ou la
condensation d’humidité
12 43
1 Mettez l’appareil à utiliser sous tension.
2 Appuyez sur MENU et MENU V jusqu’à ce que
“7” du MENU PRINCIPAL clignote sur l’écran du
moniteur.
3 Appuyez sur MENU B.
Le menu PANNE COURANT/PERTE
CONDENS./HEURE UTIL. apparaît.
4 Appuyez sur SEARCH/AUDIO ON pour retourner
à l’affichage normal.
MENU RESET
Appuyez sur MENU RESET avec un objet pointu.
Pour effacer les données de coupure de
courant/condensation d’humidité
Appuyez sur MENU et MENU V et B jusqu’à ce que
le menu PANNE COURANT/PERTE CONDENS./
HEURE UTIL. apparaisse, puis appuyez sur MENU
RESET avec un objet pointu.
89
Page 90

Enregistrement
HEURE
TETES VIDEO
ALIMENTATION
H
H
ON
OFF
UTIL.
015
0010 12 11
:
0012–20
00000
00000
REVENIR : MENU
<
SUI VANT POUSSER
>
12
Vérification de la durée utilisée
1 Mettez l’appareil à utiliser sous tension.
2 Appuyez sur MENU et MENU V jusqu’à ce que
“7” du MENU PRINCIPAL clignote sur l’écran du
moniteur.
3 Appuyez sur MENU B.
Le menu PANNE COURANT/PERTE
CONDENS./HEURE UTIL. apparaît.
TETES VIDEO: le temps d’utilisation des têtes
vidéo.
ALIMENTATION: le temps de mise sous tension
de l’appareil.
4 Appuyez sur SEARCH/AUDIO ON pour retourner
à l’affichage normal.
Réglage du mode à la fin de la
cassette
1 Mettez l’appareil à utiliser sous tension.
2 Appuyez sur MENU et MENU V jusqu’à ce que
“4” du MENU PRINCIPAL clignote sur l’écran du
moniteur.
3 Appuyez sur MENU B.
Le menu REGL. GENERAL apparaît.
4 Appuyez sur MENU V pour faire clignoter le
réglage de FIN BANDE ENR et choisissez REMB
ou STOP en appuyant sur MENU + ou –.
REGL. GENERAL
REC MODE SP
BANDE
BANDE EN
FI N BANDE ENR
BANDE NOMBRE UTI L.
REGL. DE L' HORLOGE
APC
VERI . ENREG.
RECHERCHE PAR J
PB S-VHS AUTO
CHOISIR : REGL. DONNEE : +/–REVENIR : MENU
PLACE
/
H
<
SUI VANT POUSSER
REMB: lorsque la cassette arrive en fin de bande,
le magnétoscope rembobine la cassette et passe
en mode d’arrêt au début de la cassette.
ARRET: lorsque la cassette arrive en fin de bande,
le magnétoscope passe immédiatement en mode
d’arrêt.
T–120
ARRET
REMB
ARR
01:00
MAR
ARR
ANCIEN
19200BAUD TAUX
>
Vous pouvez régler le mode de fonctionnement de la
cassette lorsque la cassette arrive en fin de bande en
cours d’enregistrement dans le menu REGL.
GENERAL.
1 2-4 5
90
5 Appuyez sur SEARCH/AUDIO ON pour retourner
à l’affichage normal.
Remarque
Même si FIN BANDE ENR est mis sur ARRET, le
magnétoscope fonctionne selon les réglages de ENR.
DONNEE ALARME et/ou BANDE NOMBRE UTIL. si ces
réglages sont mis sur MAR.
Lorsque la cassette arrive en fin de bande
La cassette est rembobinée et arrêtée, puis l’indicateur
OFF s’allume dans la fenêtre d’affichage.
Appuyez sur EJECT Z, REC z, FF M, REW m,
PLAY B ou STOP x pour éteindre l’indicateur OFF.
Page 91

Contrôle des conditions
REGL. GENERAL
BANDE
REC MODE SP
T–120
PB S-VHS AUTO
BANDE EN
FI N BANDE ENR
PLACE
BANDE NOMBRE UTI L.
REGL. DE L' HORLOGE
APC
VERI . ENREG.
RECHERCHE PAR J
/
H
ARRET
REMB
ARR
01:00
MAR
MAR
ANCIEN
d’enregistrement
Vérification du défilement de la
bande
Vous pouvez vérifier les conditions d’enregistrement
en appuyant sur REC CHECK pendant
l’enregistrement en mode accéléré.
REC CHECK
Appuyez sur REC CHECK pendant l’enregistrement.
Après que la cassette a été rembobinée pendant
environ 3 secondes et lue pendant 4 secondes,
l’appareil repasse en mode d’enregistrement d’origine.
Remarque
Lorsque vous contrôlez les conditions d’enregistrement,
l’enregistrement est interrompu.
Pour assurer un fonctionnement correct, ce
magnétoscope vérifie automatiquement le défilement
de la bande dès que vous introduisez la cassette. Si une
erreur est décelée, le magnétoscope éjecte la cassette.
1 2-4 5
1 Mettez l’appareil à utiliser sous tension.
2 Appuyez sur MENU et MENU V jusqu’à ce que
“4” du MENU PRINCIPAL clignote sur l’écran du
moniteur.
3 Appuyez sur MENU B.
Le menu REGL. GENERAL apparaît.
4 Appuyez sur MENU V pour faire clignoter le
réglage de VERI. ENREG. et choisissez MAR
pour activer la fonction de vérification de
défilement de la bande en appuyant sur MENU +
ou –.
5 Appuyez sur SEARCH/AUDIO ON pour retourner
à l’affichage normal.
Pour retourner à l’écran de MENU PRINCIPAL
à partir du menu en cours
Appuyez de nouveau sur MENU.
Pour passer au menu suivant à partir du menu
en cours
Appuyez sur MENU V jusqu’à ce que “SUIVANT
POUSSER B” clignote et appuyez sur MENU B.
91
Page 92

REGL. GENERAL
BANDE
REC MODE SP
T–120
BANDE EN
FI N BANDE ENR
PLACE
BANDE NOMBRE UTI L.
REGL. DE L' HORLOGE
APC
ARRET
REMB
MAR
01:00
MAR
Enregistrement
Vérification du nombre
d’utilisations de la cassette
Vous pouvez vérifier le nombre de fois que la cassette
a été utilisée dans le menu REGL. GENERAL. Le
nombre de fois sera affiché dans la fenêtre d’affichage.
Le nombre de fois est enregistré au début de la
cassette.
Fenêtre
d’affichage
1 2-4 5
1 Mettez l’appareil à utiliser sous tension.
2 Appuyez sur MENU et MENU V jusqu’à ce que
“4” du MENU PRINCIPAL clignote sur l’écran du
moniteur.
3 Appuyez sur MENU B.
Le menu REGL. GENERAL apparaît.
4 Appuyez sur MENU V pour faire clignoter le
réglage de BANDE NOMBRE UTIL. et choisissez
MAR en appuyant sur MENU + ou –.
ARR: le magnétoscope ne vérifie pas le nombre
d’enregistrements ayant été effectués sur la
cassette, n’enregistre pas depuis le début de la
cassette, ne l’affiche pas dans la fenêtre
d’affichage (le magnétoscope ne rembobine pas
automatiquement la cassette a début).
5 Appuyez sur SEARCH/AUDIO ON pour retourner
à l’affichage normal.
Pour retourner à l’écran de MENU PRINCIPAL
à partir du menu en cours
Appuyez de nouveau sur MENU.
Pour passer au menu suivant à partir du menu
en cours
Appuyez sur MENU V jusqu’à ce que “SUIVANT
POUSSER B” clignote et appuyez sur MENU B.
Remarque
• Pendant l’enregistrement de BANDE NOMBRE UTIL.,
l’indicateur REC s’allume dans la fenêtre d’affichage.
• Lorsque le mode BANDE NOMBRE UTIL. est activé
(MAR), le magnétoscope enregistrera le nombre de fois
que la cassette a été utilisée au début de la cassette lorsque
vous arrêtez l’enregistrement et appuyez sur REW m.
Lorsque vous arrêtez l’enregistrement et éjectez la cassette,
le magnétoscope ne considère pas cette opération comme
une utilisation de la cassette.
MAR: lorsque la cassette est introduite, le
magnétoscope rembobine automatique la
cassette et le nombre d’enregistrements ayant
été effectués sur la cassette apparaît dans la
fenêtre d’affichage. Pendant que le
magnétoscope rembobine la cassette,
“<T-USED COUNT>” clignote sur l’écran du
moniteur.
<
T-USED COUNT
92
>
Page 93

ARR
ARR
ARR
ARR
ARR
ARR
:
:
:
:
:
:
:
:
:
:
:
:
––
REGL. TIMER
SEM.
DIM
LUN
MAR
MER
JEU
VEN
MARCHE ARRET
–––––
VIT.
–––––
–––––
–––––
–––––
–––––
––
––––
––––
––––
––––
––––
––––
––––
––––
––––
––––
––––
:
:
:
:
:
:
:
:
:
:
:
:
ARR
ARR
ARR
ARR
ARR
ARR
––
REGL. TIMER
SEM.
DIM
LUN
MAR
MER
JEU
VEN
MARCHE ARRET
–––––
VIT.
–––––
–––––
–––––
–––––
–––––
––
––––
––––
––08
––––
––––
––––
––––
––––
––––
––––
––––
:
:
:
:
:
:
:
:
:
:
:
:
ARR
ARR
ARR
ARR
ARR
ARR
––
REGL. TIMER
SEM.
DIM
LUN
MAR
MER
JEU
VEN
MARCHE ARRET
–––––
VIT.
–––––
–––––
–––––
–––––
–––––
––
––––
––––
0008
––––
––––
––––
––––
––––
––––
––––
––––
Enregistrement programmé
ARR
ARR
ARR
ARR
ARR
ARR
:
:
:
:
:
:
:
:
:
:
:
:
––
REGL. TIMER
SEM.
DIM
LUN
MAR
MER
JEU
VEN
MARCHE ARRET
–––––
VIT.
–––––
–––––
–––––
–––––
–––––
––
––––
––––
––––
––––
––––
––––
––––
––––
––––
––––
––––
Vous pouvez régler l’enregistrement programmé pour:
un enregistrement hebdomadaire ou quotidien.
Avant de commencer, assurez-vous que l’heure et la
date sont bien réglées. (Reportez-vous à la page 78.)
Le réglage de chaque ligne de SEM., sauf EXT (la
ligne inférieure), change comme suit à l’aide de
MENU +:
DIM t LUN t MAR t MER t JEU t VEN t
SAM t LUN-DIMt LUN-SAM t LUN-VENt
DIM....
Remarque
Après avoir configuré le programmateur et une fois que
l’indicateur apparaît dans la fenêtre d’affichage, seule la
touche TIMER sera opérante. Pour annuler l’enregistrement
programmé ou pour effectuer une autre opération, appuyez
sur TIMER de sorte que l’indicateur disparaisse de la
fenêtre d’affichage.
Enregistrement hebdomadaire
Exemple 1:
Enregistrement de 8:00 à 17:00 le mardi avec une
vitesse d’enregistrement réglée sur le mode 24 heures
en mode SP avec une cassette T-120.
3 Appuyez sur MENU B.
Le menu REGL. TIMER apparaît.
REGL. TIMER
MARCHE ARRET
SEM.
DIM
LUN
MAR
MER
JEU
VEN
SAM
LUN–DIM
EXT
CHOISIR : REGL. DONNEE : +/–REVENIR : MENU
:
––––
:
––––
:
––––
:
––––
:
––––
:
––––
:
––––
:
––––
:
<
SUI VANT POUSSER
/
:
:
:
:
:
:
:
:
:
––––
––––
––––
––––
––––
––––
––––
––––
VIT.
–––––
–––––
–––––
–––––
–––––
–––––
–––––
–––––
–––––
>
ARR
ARR
ARR
ARR
ARR
ARR
ARR
ARR
ARR
4 Appuyez sur MENU V pour faire clignoter la ligne
SEM. que vous désirez et réglez MAR en appuyant
sur MENU + ou –.
5 Appuyez sur MENU B pour faire clignoter la
position des heures de MARCHE.
MARCHE ARRET
SEM.
DIM
LUN
MAR
MER
JEU
VEN
SAM
LUN–DIM
EXT
VIT.
––
:
––
:
––––
:
0008
:
––––
:
––––
:
––––
:
––––
:
––––
:
:
:
:
:
:
:
:
:
:
––––
––––
0017
––––
––––
––––
––––
––––
–––––
–––––
SP 24
–––––
–––––
–––––
–––––
–––––
–––––
ARR
ARR
MAR
ARR
ARR
ARR
ARR
ARR
ARR
1 14 3 2-11 12
1 Mettez l’appareil à utiliser sous tension.
2 Appuyez sur MENU et MENU V jusqu’à ce que
“5” du MENU PRINCIPAL clignote sur l’écran du
moniteur.
DIM LUN MAR MER JEU VEN SAM
6 Réglez l’heure de départ en appuyant sur MENU +
ou –, puis appuyez sur MENU B.
7 Réglez la minute de départ en appuyant sur MENU
+ ou –, puis appuyez sur MENU B.
93
Page 94

Enregistrement programmé
:
:
:
:
:
:
:
:
:
:
:
:
ARR
ARR
ARR
ARR
ARR
ARR
––
REGL. TIMER
SEM.
DIM
LUN
MAR
MER
JEU
VEN
MARCHE ARRET
–––––
VIT.
–––––
SP 24
–––––
–––––
–––––
––
––––
––––
0008
––––
––––
––––
––––
––––
0017
––––
––––
:
:
:
:
:
:
:
:
:
:
:
:
ARR
ARR
MAR
ARR
ARR
ARR
––––
REGL. TIMER
SEM.
DIM
LUN
MAR
MER
JEU
VEN
MARCHE ARRET
–––––
VIT.
–––––
SP 24
–––––
–––––
–––––
––––
––––
0008
––––
––––
––––
––––
––––
0017
––––
––––
:
:
:
:
:
:
:
:
:
:
:
:
ARR
ARR
ARR
ARR
ARR
ARR
––
REGL. TIMER
SEM.
DIM
LUN
MAR
MER
JEU
VEN
MARCHE ARRET
–––––
VIT.
–––––
–––––
–––––
–––––
–––––
––
––––
––––
0008
––––
––––
––––
––––
––––
0017
––––
––––
:
:
:
:
:
:
:
:
:
:
:
:
ARR
ARR
ARR
ARR
ARR
ARR
––
REGL. TIMER
SEM.
DIM
LUN
MAR
MER
JEU
VEN
MARCHE ARRET
–––––
VIT.
–––––
–––––
–––––
–––––
–––––
––
––––
––––
0008
––––
––––
––––
––––
––––
––17
––––
––––
8 Réglez l’heure de fin en appuyant sur MENU + ou
–, puis appuyez sur MENU B.
9 Réglez la minute de fin en appuyant sur MENU +
ou –, puis appuyez sur MENU B.
10
Réglez la vitesse d’enregistrement en appuyant sur
MENU + ou –, puis appuyez sur MENU B.
Vous pouvez régler le programmateur pour effectuer
un enregistrement pendant 2 jours en utilisant les 7ème
et 8ème lignes de l’affichage REGL. TIMER.
Exemple 2:
Enregistrement de 17:20 le samedi à 07:50 le lundi
avec une vitesse d’enregistrement réglée sur le mode
72 heures en mode SP avec une cassette T-120.
Remarque
Pour effectuer un enregistrement pendant 2 jours, utilisez les
7ème et 8ème lignes uniquement.
SEM.
DIM
LUN
MAR
MER
JEU
VEN
SAM
LUN
EXT
MARCHE ARRET VI T.
––
:
:
––
––––
––––
:
:
––––
––––
:
:
––––
––––
:
:
––––
––––
:
:
––––
––––
:
:
––––
2017
:
:
:
:
5007
::–––––
DIM LUN MAR MER JEU VEN SAM
––––– ARR
––––– ARR
––––– ARR
––––– ARR
––––– ARR
––––– ARR
MAR
SP 72
ARR
11
Sélectionnez MAR pour exécuter l’enregistrement
programmé en appuyant sur MENU + ou –.
Si vous désirez présélectionner d’autres réglages,
répétez les étapes 4 à 11.
12
Appuyez sur SEARCH/AUDIO ON pour revenir à
l’affichage normal.
13
Introduisez la cassette.
14
Appuyez sur TIMER.
Le magnétoscope se met automatiquement hors
tension et passe en mode de veille
d’enregistrement programmé. L’indicateur
apparaît dans la fenêtre d’affichage.
Lorsqu’aucune cassette n’est introduite,
l’indicateur
clignote et un bip retentit.
1 16 15 2-13
14
1 Mettez l’appareil à utiliser sous tension.
2 Appuyez sur MENU et MENU V jusqu’à ce que
“5” du MENU PRINCIPAL clignote sur l’écran du
moniteur.
3 Appuyez sur MENU B.
Le menu REGL. TIMER apparaît.
REGL. TIMER
MARCHE ARRET
SEM.
DIM
LUN
MAR
MER
JEU
VEN
SAM
LUN–DIM
EXT
CHOISIR : REGL. DONNEE : +/–REVENIR : MENU
:
––––
:
––––
:
––––
:
––––
:
––––
:
––––
:
––––
:
––––
:
<
SUI VANT POUSSER
/
VIT.
:
–––––
––––
:
–––––
––––
:
–––––
––––
:
–––––
––––
:
–––––
––––
:
–––––
––––
:
–––––
––––
:
–––––
––––
:
–––––
ARR
ARR
ARR
ARR
ARR
ARR
ARR
ARR
ARR
>
Lorsque l’indicateur apparaît dans la fenêtre
d’affichage, les touches ne fonctionnent pas à
l’exception de TIMER.
94
Page 95

4 Appuyez sur MENU V pour faire clignoter la
:
:
:
:
:
:
:
:
:
:
JEU
VEN
SAM
LUN–DIM
EXT
–––––
–––––
–––––
–––––
–––––
/
CHOISIR : REGL. DONNEE : +/–REVENIR : MENU
<
SUI VANT POUSSER
>
––––
––––
––17
––––
––––
––––
––––
––––
ARR
ARR
ARR
ARR
ARR
ARR
ARR
ARR
ARR
ARR
:
:
:
:
:
:
:
:
:
:
JEU
VEN
SAM
LUN–DIM
EXT
–––––
–––––
–––––
–––––
–––––
/
CHOISIR : REGL. DONNEE : +/–REVENIR : MENU
<
SUI VANT POUSSER
>
––––
––––
––––
2017
––––
––––
––––
––––
ARR
ARR
ARR
ARR
ARR
:
:
:
:
:
:
:
:
JEU
VEN
SAM
DIM
EXT
–––––
–––––
–––––
–––––
/
CHOISIR : REGL. DONNEE : +/
– REVENIR : MENU
<
SUI VANT POUSSER
>
––––
––––
2017
––––
––––
––––
::
ARR
ARR
ARR
ARR
:
:
:
:
:
:
:
:
JEU
VEN
SAM
LUN
EXT
–––––
–––––
–––––
–––––
/
CHOISIR : REGL. DONNEE : +/
– REVENIR : MENU
<
SUI VANT POUSSER
>
––––
––––
2017
––––
––––
––––
::
ARR
ARR
ARR
:
:
:
:
:
:
:
:
ARR
JEU
VEN
SAM
LUN
EXT
–––––
–––––
–––––
–––––
/
CHOISIR : REGL. DONNEE : +/
– REVENIR : MENU
<
SUI VANT POUSSER
>
––––
––––
2017
––––
––––
––07
::
ARR
ARR
ARR
ARR
:
:
:
:
:
:
:
:
JEU
VEN
SAM
LUN
EXT
–––––
–––––
–––––
–––––
/
CHOISIR : REGL. DONNEE : +/
– REVENIR : MENU
<
SUI VANT POUSSER
>
––––
––––
2017
––––
––––
5007
::
ARR
ARR
ARR
ARR
:
:
:
:
:
:
:
:
JEU
VEN
SAM
LUN
EXT
–––––
–––––
SP 72
–––––
/
CHOISIR : REGL. DONNEE : +/
– REVENIR : MENU
<
SUI VANT POUSSER
>
––––
––––
2017
––––
––––
5007
::
ARR
ARR
–––––
–––––
SP 72
–––––
MAR
:
:
:
:
:
:
:
:
ARR
JEU
VEN
SAM
LUN
EXT
/
CHOISIR : REGL. DONNEE : +/
– REVENIR : MENU
<
SUI VANT POUSSER
>
––––
––––
2017
––––
––––
5007
::
7ème ligne, réglez SAM en appuyant sur MENU +
ou –, puis appuyez sur MENU B.
REGL. TIMER
MARCHE ARRET
SEM.
DIM
LUN
MAR
MER
JEU
VEN
SAM
LUN–DIM
EXT
CHOISIR : REGL. DONNEE : +/–REVENIR : MENU
:
––
––
:
––––
:
––––
:
––––
:
––––
:
––––
:
––––
:
––––
:
<
SUI VANT POUSSER
/
VIT.
:
–––––
––––
:
–––––
––––
:
–––––
––––
–––––
:
––––
–––––
:
––––
–––––
:
––––
–––––
:
––––
–––––
:
––––
–––––
:
ARR
ARR
ARR
ARR
ARR
ARR
ARR
ARR
ARR
>
5 Réglez l’heure de départ en appuyant sur MENU +
ou –, puis appuyez sur MENU B.
6 Réglez la minute de départ en appuyant sur MENU
+ ou –, puis appuyez sur MENU B.
10
Réglez l’heure de fin en appuyant sur MENU + ou
–, puis appuyez sur MENU B.
11
Réglez la minute de fin en appuyant sur MENU +
ou –, puis appuyez sur MENU B.
12
Réglez la vitesse d’enregistrement en appuyant sur
MENU + ou –, puis appuyez sur MENU B.
7 Appuyez sur MENU + ou sur - jusqu’à ce que les
marques
d’arrêts (ARRET), la vitesse d’enregistrement
(VIT.) et exécution par programmateur sur la 7ème
ligne et sur la position de démarrage (MARCHE)
sur la 8ème ligne.
Le jour de la semaine sur la 8ème ligne passe au
jour suivant sur la 7ème ligne.
apparaissent sur les positions de temps
*
8 Appuyez sur MENU V ou B.
DIM clignote.
9 Faites clignoter DIM à LUN en appuyant sur
MENU + ou –, puis appuyez sur MENU B pour
faire clignoter la position des heures d’arrêt
(ARRET).
13
Sélectionnez MAR pour exécuter l’enregistrement
programmé en appuyant sur MENU + ou –.
14
Appuyez sur SEARCH/AUDIO ON pour retourner
à l’affichage normal.
15
Introduisez la cassette.
16
Appuyez sur TIMER.
Le magnétoscope se met automatiquement hors
tension et passe en mode de veille
d’enregistrement programmé. L’indicateur
apparaît dans la fenêtre d’affichage.
Lorsqu’aucune cassette n’est introduite.
L’indicateur
clignote et le bip retentit.
Lorsque l’indicateur apparaît dans la fenêtre
d’affichage, les touches ne fonctionnent pas à
l’exception de TIMER.
95
Page 96

Enregistrement programmé
––––– ARR
––––– ARR
––––– ARR
––––– ARR
:
:
:
:
:
:
:
:
:
:
SP 24 ARR
JEU
VEN
SAM
LUN–DIM
EXT
/
CHOISIR : REGL. DONNEE : +/–REVENIR : MENU
<
SUI VANT POUSSER
>
––––
––––
––––
––––
––––
––––
––––
––––
––––– ARR
––––– ARR
––––– ARR
––––– ARR
:
:
:
:
:
:
:
:
:
:
SP 24 MAR
JEU
VEN
SAM
LUN–DIM
EXT
/
CHOISIR : REGL. DONNEE : +/
– REVENIR : MENU
<
SUI VANT POUSSER
>
––––
––––
––––
––––
––––
––––
––––
––––
–––––
VIT.
–––––
–––––
–––––
–––––
–––––
ARR
ARR
ARR
ARR
ARR
ARR
:
:
:
:
:
:
:
:
:
:
:
:
––
REGL. TIMER
SEM.
LUN–VEN
LUN
MAR
MER
JEU
VEN
MARCHE ARRET
––
––––
––––
––––
––––
––––
––––
––––
––––
––––
––––
––––
ARR
ARR
ARR
MAR
ARR
ARR
:
:
:
:
:
:
:
:
:
:
:
:
––
REGL. TIMER
SEM.
LUN–VEN
LUN
MAR
MER
JEU
VEN
MARCHE ARRET
SP 24
–––––
–––––
–––––
–––––
–––––
VIT.
––
––––
––––
––––
0017
––––
––––
––––
––––
––––
10T08
––––
Enregistrement quotidien
Vous pouvez prérégler le programmateur pour que
l’appareil enregistre du lundi au dimanche (LUNDIM), du lundi au samedi (LUN-SAM) ou du lundi au
vendredi (LUN-VEN).
1 Appuyez sur V pour faire clignoter la ligne de la
semaine que vous désirez (SEM.).
2 Réglez le jour en appuyant sur MENU + ou – avant
de régler la position des heures de démarrage
(MARCHE) à l’étape 5 sur page 93.
Répétez ensuite les étapes 6 à -14 des pages 93 et
94.
Lorsque l’heure réglée dans la section ARRET
est antérieure à l’heure réglée dans la section
MARCHE
L’heure d’arrêt (ARRET) est considérée comme étant
le jour suivant, et l’indicateur T (demain) s’affiche
devant l’heure d’arrêt.
Enregistrement à l’aide d’un
programmateur externe
Vous pouvez prérégler l’heure de départ et l’heure de
fin d’enregistrement en utilisant un programmateur
raccordé à la borne EXT TIMER à l’arrière du
magnétoscope. Réglez la vitesse d’enregistrement dans
le menu REGL. TIMER à l’écran.
1 Mettez l’appareil à utiliser sous tension.
2 Appuyez sur MENU et MENU V jusqu’à ce que
“5” du MENU PRINCIPAL clignote sur l’écran du
moniteur.
3 Appuyez sur MENU B.
Le menu REGL. TIMER apparaît.
4 Appuyez sur MENU V pour faire clignoter VIT. de
la ligne la plus basse (EXT) et appuyez sur
MENU B.
REGL. TIMER
MARCHE ARRET VIT.
SEM.
––
DIM
LUN
MAR
MER
JEU
VEN
SAM
LUN–DIM
EXT
<
SUI VANT POUSSER
CHOISIR : REGL. DONNEE : +/–REVENIR : MENU
/
:
:
––
:
––––
:
––––
:
––––
:
––––
:
––––
:
––––
:
––––
:
––––– ARR
––––
:
––––– ARR
––––
:
––––– ARR
––––
:
––––– ARR
––––
:
––––– ARR
––––
:
––––– ARR
––––
:
––––– ARR
––––
:
––––– ARR
––––
:
––––– ARR
>
L’enregistrement programmé est interrompu
lorsque l’alimentation est coupée
Lorsqu’une coupure de courant est plus courte que le
temps d’alimentation de secours (moins de 30 jours) et
a lieu avant l’heure de fin du programmateur,
l’enregistrement reprend dès que le courant est rétabli.
L’indicateur P s’allume dans la fenêtre d’affichage
pour montrer que l’enregistrement par programmateur
est interrompu. (Pour supprimer l’indicateur P,
appuyez sur MENU RESET du panneau avant.
Reportez-vous à la page 89.)
Pour arrêter l’enregistrement programmé
Appuyez sur TIMER pour supprimer l’indicateur
L’enregistrement s’arrête et l’appareil se met hors
tension.
96
5 Réglez la vitesse d’enregistrement en appuyant sur
MENU + ou –, puis appuyez sur MENU B.
6 Choisissez MAR pour exécuter l’enregistrement
programmé en appuyant sur MENU + ou –.
7 Appuyez sur SEARCH/AUDIO ON pour retourner
.
à l’affichage normal.
Page 97

8 Introduisez la cassette.
7 –––
REGL. CONGET
MJ MJ
1 –––––11
–––––2 –––––12
–––––3 –––––13
–––––4 –––––14
–––––5 –––––15
7 –14
REGL. CONGET
MJ MJ
1 –––––11
–––––2 –––––12
–––––3 –––––13
–––––4 –––––14
–––––5 –––––15
Réglage des vacances
9 Appuyez sur TIMER.
Le magnétoscope se met automatiquement hors
tension et passe en mode de veille
d’enregistrement programmé. L’indicateur
apparaît dans la fenêtre d’affichage.
Lorsqu’aucune cassette n’est introduite,
l’indicateur
Lorsque le signal d’entrée de la borne EXT TIMER
s’affaiblit, l’enregistrement commence et l’indicateur
EXT apparaît dans la fenêtre d’affichage.
Lorsque le signal d’entrée de la borne EXT TIMER
s’amplifie, l’enregistrement s’arrête et le
magnétoscope passe en mode de veille
d’enregistrement par programmateur.
Signal d’entrée à partir de la borne EXT TIMER
L’enregistrement
commence.
clignote et un bip retentit.
5 V
0 V
L’enregistrement
s’arrête.
Si vous entrez des dates de vacances, le magnétoscope
considérera que ces dates sont des dimanches et
enregistrera au même moment que vous réglez pour les
dimanches.
1 Appuyez sur MENU et MENU V jusqu’à ce que
“6” du MENU PRINCIPAL clignote sur l’écran du
moniteur.
2 Appuyez sur MENU B.
Le menu REGL. CONGET apparaît.
REGL. CONGET
MJ
–––––1
–––––2 –––––12
–––––3 –––––13
–––––4 –––––14
–––––5 –––––15
–––––6 –––––16
–––––7 –––––17
–––––8 –––––18
–––––9 –––––19
–––––10 –––––20
<
SUI VANT POUSSER
CHOISIR : REGL. DONNEE : +/–REVENIR : MENU
/
MJ
–––––11
>
3 Réglez le mois des vacances que vous désirez en
appuyant sur MENU + ou –, puis appuyez sur
MENU B.
Remarque
Lorsque plus d’un réglage de programmateur est fait en
même temps, le réglage avec l’heure de démarrage
(MARCHE) la plus tôt a priorité.
4 Choisissez le jour des vacances en appuyant sur
MENU + ou –.
Pour régler d’autres vacances, appuyez sur MENU
V pour passer à la rangée suivante et répétez les
étapes 2 et 3.
5 Appuyez sur SEARCH/AUDIO ON pour retourner
à l’affichage normal.
97
Page 98

Enregistrement programmé
Modification/Annulation des
réglages du programmateur
Lorsque l’indicateur s’allume dans la fenêtre
d’affichage, appuyez de nouveau sur TIMER pour le
faire disparaître.
Modification des réglages du
programmateur
1 Appuyez sur MENU et MENU V et B jusqu’à ce
que le menu REGL. TIMER apparaisse à l’écran.
2 Appuyez sur MENU V et B pour faire clignoter la
position que vous désirez modifier.
3 Appuyez sur MENU + ou – pour modifier le
réglage.
4 Appuyez sur SEARCH/AUDIO ON pour retourner
à l’affichage normal.
Annulation des réglages du
programmateur
1 Appuyez sur MENU et MENU V et B jusqu’à ce
que le menu REGL. TIMER apparaisse à l’écran.
2 Appuyez sur MENU V pour faire clignoter la
position que vous désirez annuler.
3 Appuyez sur MENU B pour faire clignoter
l’exécution du programmateur.
4 Appuyez sur MENU + ou – pour mettre
l’exécution du programmateur sur ARR.
5 Appuyez sur SEARCH/AUDIO ON pour retourner
à l’affichage normal.
Annulation de tous les réglages du
programmateur
1 Appuyez sur MENU et MENU V et B jusqu’à ce
que le menu REGL. TIMER apparaisse à l’écran.
2 Appuyez sur MENU RESET.
Tous les réglages du programmateur sont
supprimés.
3 Appuyez sur SEARCH/AUDIO ON pour retourner
à l’affichage normal.
98
Page 99

Enregistrement d’alarme
Vous pouvez utiliser un contacteur de porte ou un
détecteur d’alarme pour déclencher un enregistrement
d’alarme. Vous pouvez effectuer un enregistrement
d’alarme en mode d’enregistrement, en mode d’arrêt,
en mode d’extinction et enregistrement d’une prise de
vue avec la vitesse d’enregistrement sélectionnée.
Raccordement d’un détecteur
d’alarme
Module de commutation
disponible dans le
commerce, etc.
vers COM
vers COM
vers ALARM
OUT
vers
ALARM IN
3 Appuyez sur MENU B.
Le menu REGL. ALARME apparaît.
REGL. ALARME
MODE ALARME
VI TESSE ALARME
DUREE ALARME
ENR. DONNEE ALARME
AVERTISSE FIN BANDE
DET. OBSTR.
ENR. SERI E
1SHOT REC
REC FI ELD
INTERV.
<
CHOISIR : REGL. DONNEE : +/–REVENIR : MENU
SUI VANT POUSSER
A1
SP 2H
20S
ARR
COMPT
MAR
ARR
01
1min
>
4 Appuyez sur MENU V pour faire clignoter le
réglage de VITESSE ALARME et réglez-le en
appuyant sur MENU + ou –.
REGL. ALARME
MODE ALARME
VI TESSE ALARME
DUREE ALARME
ENR. DONNEE ALARME
AVERTISSE FIN BANDE
DET. OBSTR.
ENR. SERI E
1SHOT REC
REC FI ELD
INTERV.
<
CHOISIR : REGL. DONNEE : +/–REVENIR : MENU
SUI VANT POUSSER
A1
SP 2H
20S
ARR
COMPT
MAR
ARR
01
1min
>
Réglage de la vitesse d’alarme et
de la durée
1 2-5 6
1 Mettez l’appareil à utiliser sous tension.
2 Appuyez sur MENU et MENU V jusqu’à ce que
“3” du MENU PRINCIPAL clignote sur l’écran du
moniteur.
Lorsque l’option BANDE dans le menu REGL.
GENERAL est reglee sur T-120:
Vous pouvez choisir SP 2H (pour l’enregistrement
en mode 2 heures dans le mode d’enregistrement
SP), EP 6H (pour l’enregistrement en mode 6
heures en mode d’enregistrement EP), SP 12H, EP
18H, SP 24H, EP 30H et NC (pour un
enregistrement à la meme vitesse qu’avant que
l’alarme soit reçue).
Lorsque l’option BANDE dans le menu REGL.
GENERAL est reglee sur T-160:
Vous pouvez choisir SP 2H (pour l’enregistrement
en mode 2 heures dans le mode d’enregistrement
SP), EP 8H (pour l’enregistrement en mode 8
heures en mode d’enregistrement EP), SP 16H, EP
24H, SP 32H, EP 40H et NC (pour un
enregistrement à la meme vitesse qu’avant que
l’alarme soit reçue).
99
Page 100

Enregistrement d’alarme
5 Appuyez sur MENU V pour faire clignoter le
réglage de DUREE ALARME et choisissez 20S,
40S, 1min, 2min, 3min, 4min, 5min ou CC en
appuyant sur MENU + ou –.
REGL. ALARME
MODE ALARME
VI TESSE ALARME
DUREE ALARME
ENR. DONNEE ALARME
AVERTISSE FIN BANDE
DET. OBSTR.
ENR. SERI E
1SHOT REC
REC FI ELD
INTERV.
<
CHOISIR : REGL. DONNEE : +/–REVENIR : MENU
SUI VANT POUSSER
A1
SP 2H
40S
ARR
COMPT
MAR
ARR
01
1min
>
20S - 5min: pour enregistrer pendant 20 secondes,
40 secondes, 1 minute, 2 minutes, 3 minutes, 4
minutes ou 5 minutes
CC: pour enregistrer tant que le signal d’alarme est
émis
6 Appuyez sur SEARCH/AUDIO ON pour retourner
à l’affichage normal.
4 Mettez MODE ALARME sur A1, A2, A3 ou ARR
en appuyant sur MENU + ou –.
A (alarme)1: accepte toujours les alarmes.
A2: accepte les alarmes uniquement pendant
l’enregistrement par programmateur.
A3: accepte uniquement l’alarme lorsque
l’enregistrement par programmateur est en
veille.
ARR: n’accepte pas les alarmes, même si un
signal d’alarme est reçu.
5 Appuyez sur SEARCH/AUDIO ON pour retourner
à l’affichage normal.
Pour retourner à l’écran de MENU PRINCIPAL
à partir du menu en cours
Appuyez de nouveau sur MENU.
Pour passer au menu suivant à partir du menu
en cours
Appuyez sur MENU V jusqu’à ce que “SUIVANT
POUSSER B” clignote et appuyez sur MENU B.
Pour retourner à l’écran de MENU PRINCIPAL
à partir du menu en cours
Appuyez de nouveau sur MENU.
Pour passer au menu suivant à partir du menu
en cours
Appuyez sur MENU V jusqu’à ce que “SUIVANT
POUSSER B” clignote et appuyez sur MENU B.
Réglage du mode
d’enregistrement d’alarme
1 Mettez l’appareil à utiliser sous tension.
2 Appuyez sur MENU et MENU V jusqu’à ce que
“3” du MENU PRINCIPAL clignote sur l’écran du
moniteur.
3 Appuyez sur MENU B.
Le menu REGL. ALARME apparaît.
REGL. ALARME
MODE ALARME
VI TESSE ALARME
DUREE ALARME
ENR. DONNEE ALARME
AVERTISSE FIN BANDE
DET. OBSTR.
ENR. SERI E
1SHOT REC
REC FI ELD
INTERV.
<
CHOISIR : REGL. DONNEE : +/–REVENIR : MENU
SUI VANT POUSSER
A1
SP 2H
20S
ARR
COMPT
MAR
ARR
01
1min
>
Remarques
• Pendant un enregistrement d’alarme, d’autres modes sont
inopérants.
• Une fois que l’enregistrement d’alarme est terminé, le
magnétoscope revient à la situation telle qu’elle était avant
la réception du signal d’alarme.
• Si un signal d’alarme est reçu pendant que le
magnétoscope est en cours d’enregistrement répété
(reportez-vous à la page 88), l’enregistrement répété
s’arrête et l’indicateur REPEAT s’éteint. Une fois que la
cassette atteint la fin de bande, la cassette est rembobinée
et le magnétoscope s’arrête. L’indicateur OFF s’allume
dans la fenêtre d’affichage (uniquement lorsque REPET 1
est sélectionné pour FIN BANDE ENR dans le menu
REGL. GENERAL).
• Lorsque l’indicateur OFF s’allume, pour éviter un
effacement accidentel d’une cassette enregistrée,
l’enregistrement programmé et l’enregistrement d’alarme
ne peuvent pas avoir lieu.
Si vous appuyez sur REC z, FF M, REW m,
PLAY B, STOP x, l’indicateur OFF s’éteint.
• Si une autre alarme est reçue pendant que l’enregistrement
d’alarme est en cours, le second enregistrement d’alarme
commence et la durée d’enregistrement est allongée.
• Si le courant est coupé pendant l’enregistrement d’une
alarme et qu’il est restauré aussitôt, le fonctionnement
avant que l’enregistrement d’alarme n’ait lieu reprend.
100
 Loading...