

Sony SVT-168E User Manual

SVT-168E
3-203-543-12 (1)
T ime Lapse
V ideocassette
Recorder
Operating Instructions page 2
Before operating the unit, please read this manual
thoroughly, and retain it for future reference.
Mode d’emploi page 58
Avant de faire fonctionner cet appareil, lisez
attentivement le présent mode d’emploi et conservez-le
pour toute référence ultérieure.
Manual de instrucciones página 114
Antes de utilizar la unidad, lea este manual
detenidamente y consérvelo para futuras referencias.
SVT-168E
©2000 Sony Corporation
Owner’s Record
For the customers in the USA
The model and serial number of your set are located on the
rear. Record the serial number in the space provided below.
Refer to these numbers whenever you call upon your Sony
dealer regarding this product.
Model No. SVT-168E Serial No.___________________
W ARNING
To prevent fire or shock hazard, do not
expose the unit to rain or moisture.
To avoid electrical shock, do not open the
cabinet. Refer servicing to qualified
personnel only.
This equipment has been tested and found to comply with
the limits for a Class B digital device, pursuant to Part 15 of
the FCC Rules. These limits are designed to provide
reasonable protection against harmful interference in a
residential installation. This equipment generates, uses and
can radiate radio frequency energy and, if not installed and
used in accordance with the instructions, may cause harmful
interference to radio communications. However, there is no
guarantee that interference will not occur in a particular
installation. If this equipment does cause harmful
interference to radio or television reception, which can be
determined by turning the equipment off and on, the user is
encouraged to try to correct the interference by one or more
of the following measures:
— Reorient or relocate the receiving antenna.
— Increase the separation between the equipment and
receiver.
— Connect the equipment into an outlet on a circuit different
from that to which the receiver is connected.
— Consult the dealer or an experienced radio/TV technician
for help.
You are cautioned that any changes or modifications not
expressly approved in this manual could void your authority
to operate this equipment.
The shielded interface cable recommended in this manual
must be used with this equipment in order to comply with the
limits for a digital device pursuant to Subpart B of Part 15 of
FCC Rules.
This symbol is intended to alert the user to
the presence of uninsulated "dangerous
voltage" within the product's enclosure that
may be of sufficient magnitude to constitute
a risk of electric shock to persons.
This symbol is intended to alert the user to
the presence of important operating and
maintenance (servicing) instructions in the
literature accompanying the appliance.
Notice
Depending on the battery usage it may become necessary to
change it. For replacement and disposal of the old battery,
please contact your dealer.
CAUTION
The format used for time lapse recording in this
video cassette recorder differs from the regular VHS
video format. This VCR can play cassettes recorded
in SP or EP mode. Cassettes recorded in EP mode
on this unit can be viewed on a normal VHS video
cassette recorder. However, cassettes recorded in
time lapse modes may show some picture noise
when played on a normal VHS video cassette
recorder.
Declaration of Conformity
Trade Name: SONY
Model No.: SVT-168E
Responsible Party: Sony Electronics Inc.
Address: 1 Sony Drive, Park Ridge,
NJ.07656 USA
Telephone No.: 201-930-6972
This device complies with Part 15 of the FCC Rules.
Operation is subject to the following two conditions: (1)
This device may not cause harmful interference, and (2)
this device must accept any interference received,
including interference that may cause undesired
operation.
2

Table of Contents
English
Precautions.................................................................4
Features ......................................................................5
Location of Parts and Controls ................................6
Front Panel ...........................................................6
Rear Panel ............................................................7
Display Window...................................................7
Connections ................................................................8
Connecting a Camera, Monitor and Microphone.8
Connecting a Switcher .........................................8
Connecting Another Unit in Series ......................9
Connecting a Computer........................................9
Setting the Language ...............................................12
Setting the Clock......................................................13
Adjusting to Daylight Saving Time ...................14
Setting the Time/Date Display ...........................15
Changing the Display Position of the Time/Date
Display ..................................................... 15
Setting the Buzzers ..................................................16
Handling a Video Cassette......................................17
Inserting a Video Cassette..................................17
Ejecting a Video Cassette...................................17
Selecting the Tape ..............................................17
Protecting Your Cassette from Being Erased.....18
Setting the Operation Mode ................................... 19
Recording .................................................................20
Locking the Record Mode
— Security Lock Function....................... 21
Recording on the Same Cassette Repeatedly
— Repeat Recording................................ 21
Series Recording ................................................ 22
Recording after Power Interruption or Moisture
Condensation............................................23
Checking the Used Time ....................................24
Setting the Mode at the End of the Tape ............24
Monitoring the Recording Condition .................25
Checking the tape thread ....................................25
Checking the Number of Times the Tape Was
Used .........................................................26
Timer Recording......................................................27
Day-of-the-Week Recording ..............................27
Daily Recording .................................................30
Recording Using an External Timer...................30
Setting the Holiday.............................................31
Changing/Cancelling the Timer Settings ...........32
Alarm Recording .....................................................33
Connecting an Alarm Sensor..............................33
Setting the Alarm Speed and Duration...............33
Setting the Alarm Recording Mode ................... 34
Searching the Picture of the Alarm Recordings
— Alarm Search ...................................... 35
Scanning the Picture of the Alarm Recordings
— Alarm Scan..........................................36
Displaying the Alarm List — Alarm Recall.......36
Recording the Alarm Data on the Tape..............37
Playback ...................................................................39
Adjusting Pictures ..............................................40
Searching for the Time and Date
— Time/Date Search ........................................41
Selecting the Searching Interval.........................41
Searching for the Time and Date........................41
Various Playback Modes ........................................43
Picture Search.....................................................43
Still Picture .........................................................43
Field-by-Field Picture ........................................ 43
Reverse Playback ...............................................43
Maintenance .............................................................44
Cleaning Video Heads........................................44
Replacing Video Heads ......................................44
Checking the Video Heads Every 1000 Hours...44
Maintaining Mechanical Parts............................44
Servicing Periodically ........................................44
Terminals..................................................................45
WARNING OUT Terminal................................45
TAPE END OUT Terminal................................45
SW OUT Terminal .............................................46
CLOCK SET IN/OUT Terminals ...................... 47
REMOTE Jack ...................................................48
Command Reference ...............................................49
Data format.........................................................49
VCR Control Commands ...................................49
VCR Setup Commands ......................................51
Menu Setup Commands .....................................51
VCR Status Commands......................................51
Other Commands................................................52
Return Commands..............................................52
T/L STATUS SENSE (D6H) bit allocation .......52
STATUS SENSE (D7H) bit allocation ..............53
RS-232C Commands..........................................53
RS-485 Commands ............................................ 54
RS-485 Return Commands.................................54
Table of Commands ................................................ 55
Troubleshooting .......................................................56
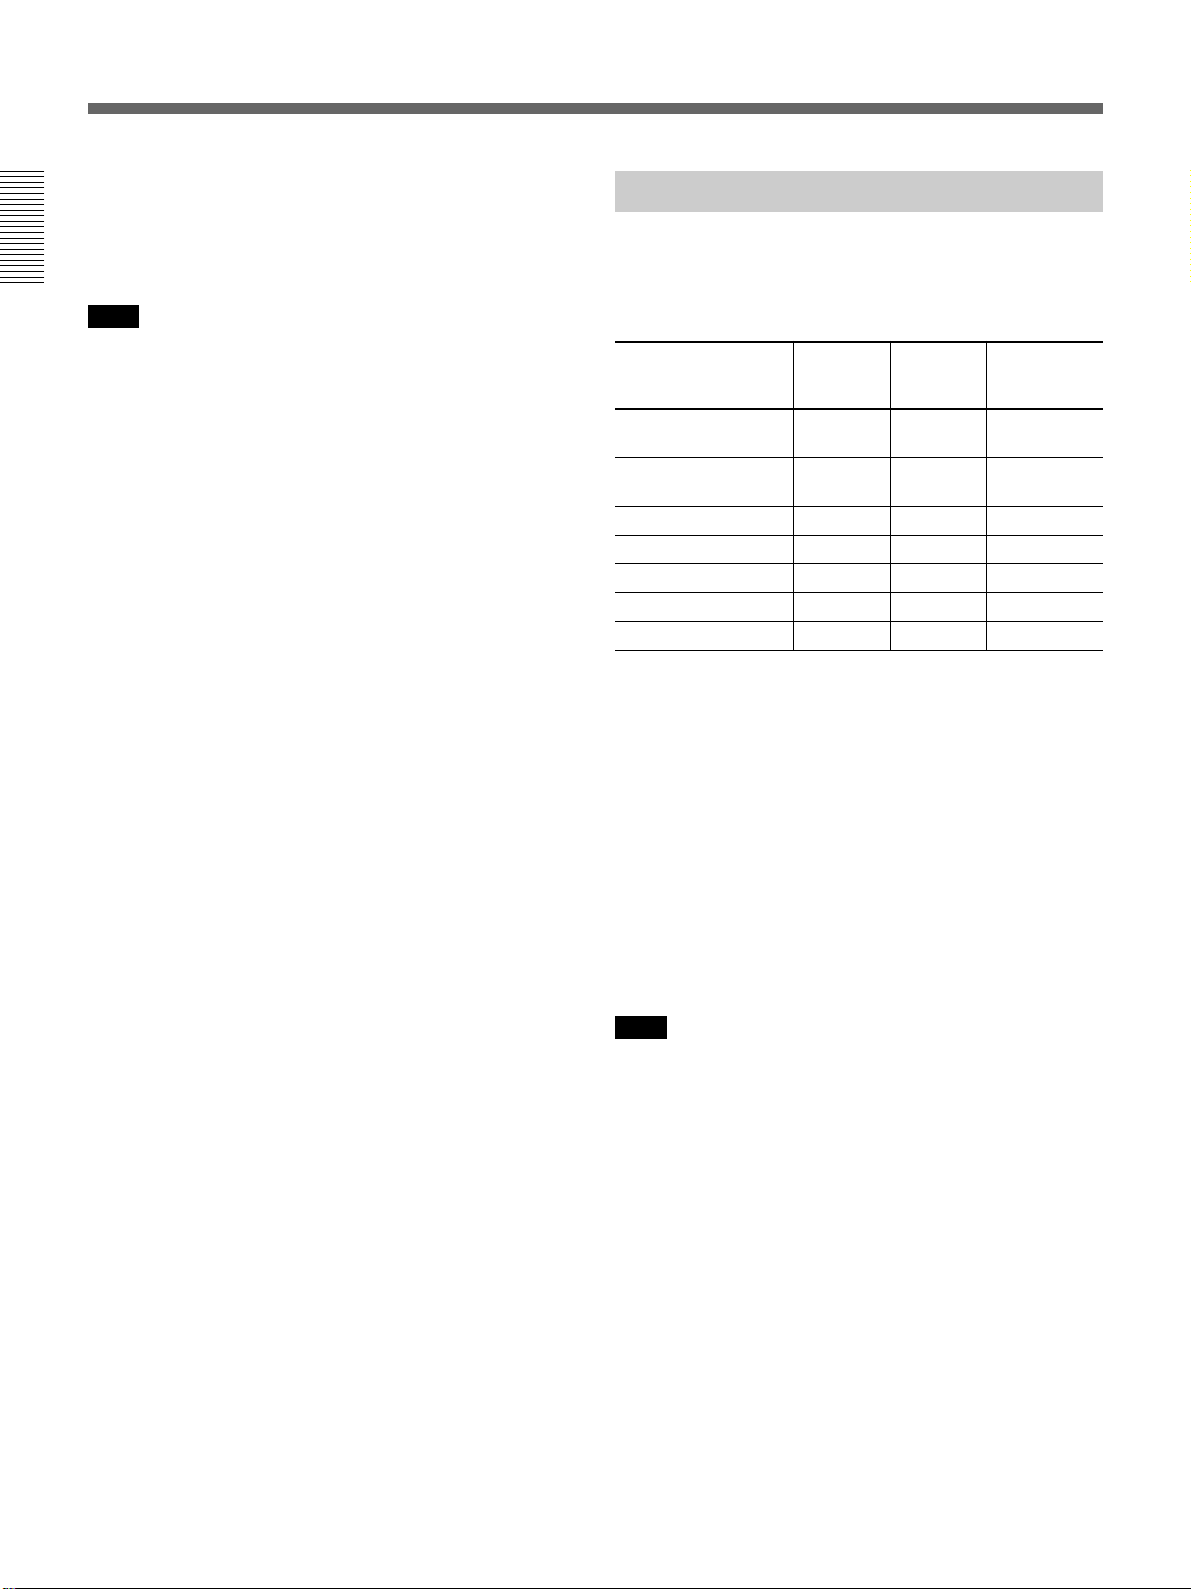
Specifications............................................................57
3

Precautions
On safety
•Operate the unit on 120 V AC, 60 Hz only.
•The nameplate indicating operating voltage, power
consumption, etc., is located on the rear of the unit.
•Should any solid object or liquid fall into the cabinet,
turn off the power, unplug the unit and have it
checked by qualified personnel before operating it
any further.
•Do not drop or place heavy objects on the power
cord. If the power cord is damaged, turn off the
power immediately. It is dangerous to use the unit
with a damaged power cord.
•Connect the power cord to the wall AC outlet.
For connecting the power source, see “Connecting a
Camera, Monitor and Microphone” on page 8.
•Unplug the unit from the wall outlet if it is not to be
used for several days or more.
•Disconnect the power cord from the wall AC outlet
by grasping the plug, not by pulling the cord.
On installation
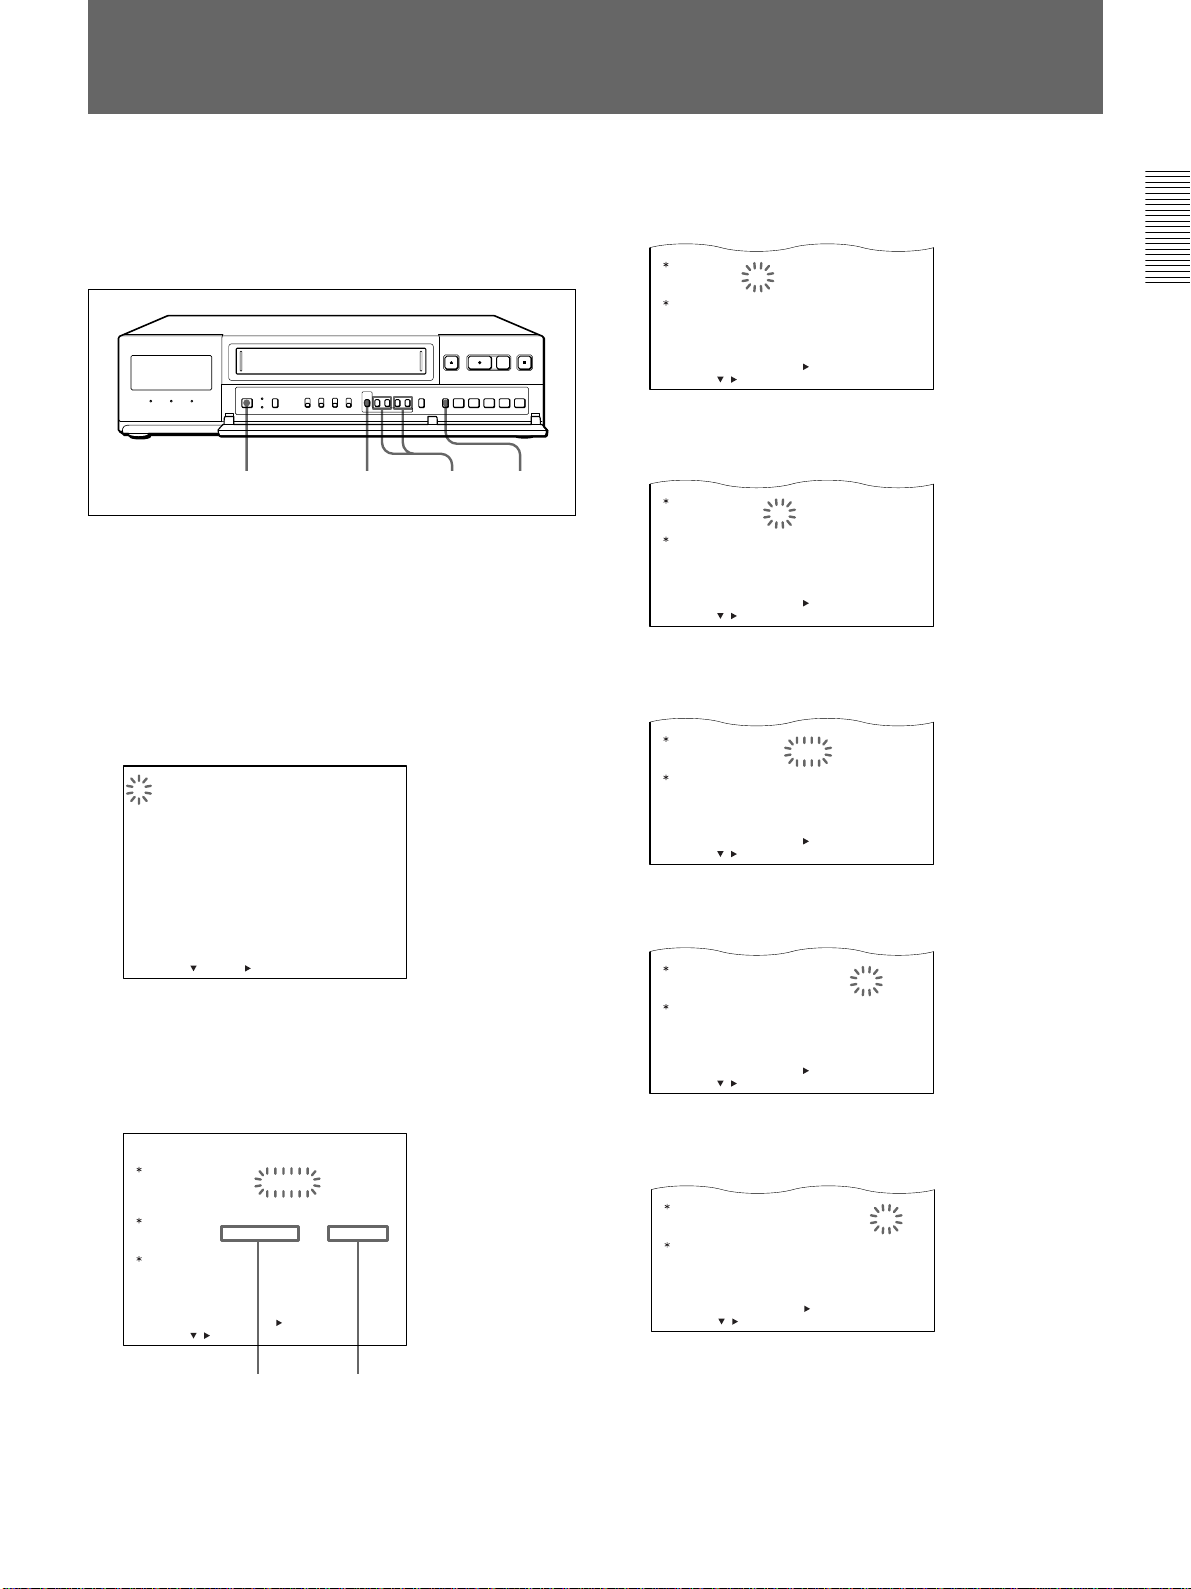
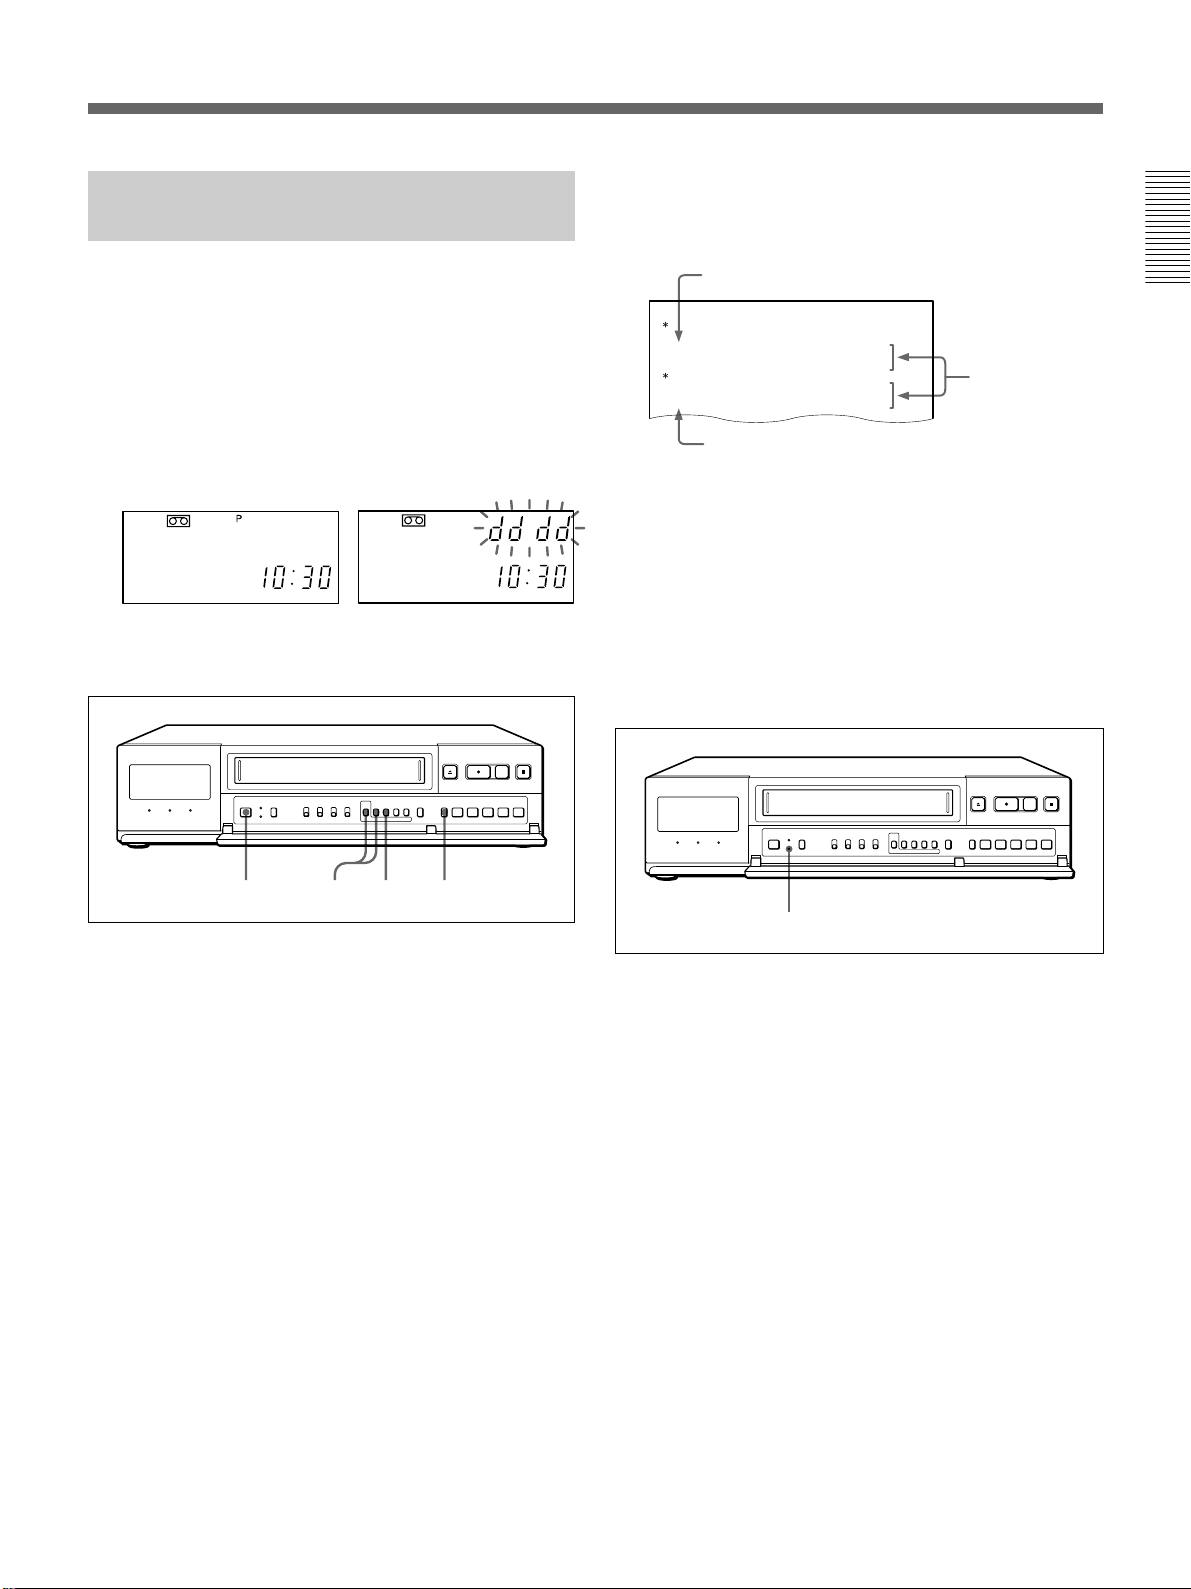
On moisture condensation
If the unit is brought directly from a cold to a warm
location, moisture may condense on the video head
drum. In this condition, the tape may adhere to the
head drum and cause serious damage to the head. To
avoid damage caused by moisture condensation, be
sure not to leave a cassette inside the compartment
when the unit will not be used. If moisture
condensation is present, the “dddd” indicator flashes in
the display window and the
unit will not operate. When
the “dddd” indicator
disappears, you can operate
the unit.
On video cassettes
Remove and store video cassettes after recording or
playback.
On cleaning
•Do not place a heavy object on the unit.
•Allow adequate air circulation to prevent internal heat
build-up.
Do not place the unit on surfaces (rugs, blankets, etc.)
or near materials (curtains, draperies) that may block
the ventilation slots.
•Do not install the unit in a location near heat sources
such as radiators or air ducts.
•Place the unit to avoid direct sunlight.
•Do not install the unit in a place subject to
mechanical vibration or shock.
•Do not put magnetic objects close to the unit and
cassette tape. Magnetic fields may affect the color
reproduction of the unit and cause distortion.
•The unit is designed for operation in a horizontal
position.
Do not install it in an inclined position.
On operation
When the unit is not in use, turn the power off to
conserve energy and to extend its life.
As a safety precaution, unplug the unit before cleaning
it.
•To keep the unit looking brand-new, periodically
clean it with a mild detergent solution. Never use
strong solvents such as thinner or benzine, or abrasive
cleaners since they will damage the cabinet.
When cleaning, keep liquid away from electrical
contacts and connectors.
•When there is a buildup of dust on air vents, use a
vacuum cleaner to remove it.
On repacking
•Before repacking, disconnect all cables and
connecting cords.
•Do not throw away the carton and packing materials.
They make an ideal container with which to transport
the unit. When shipping the unit to another location,
repack it.
On transportation
When transporting the unit, protect it from vibration
and impact.
If you have any questions about this unit, contact your
authorized Sony dealer.
4

Features
Field recording/field playback
Since this VCR uses the EP mode to record the picture
in shorter intervals, you can record more information
than the normal time lapse VCR.
Example: In 168H recording mode using T-120 tape:
This VCR can record about 2.1 fields per second,
while the normal time lapse VCR records 0.7 fields.
Because single fields can be recorded one by one in
time lapse mode and all fields can be viewed
separately during playback, you can record more
information.
Various recording functions
•Repeat recording: When the tape reaches the end,
the VCR rewinds the tape and starts recording again
from the beginning of the tape.
•Timer recording: You can set the timer on daily
recording or weekly recording.
•Alarm recording: If an externally connected alarm
sensor is triggered, you can make a complete
recording of the situation that triggered the alarm.
Mode settings on monitor
You can set the modes for all functions, such as the
internal timer setting, the alarm recording mode
settings, etc., on the monitor.
Series recording function
This function permits long-term continuous recording
using two or more time lapse VCRs.
Multiple recording modes
The time lapse intervals for recording can be set in 7
steps. At the longest interval setting, available
recording time is a full 168 hours with one 120-minute
tape.
Clear picture
This VCR uses the Reality Regenerator IC, which
makes it possible to produce a clear picture.
RS-232C/RS-485 connectors for computer
You can control this VCR from a personal computer or
a controller connected to the RS-232C or RS-485
connectors.
Recording the alarm data at the top of the tape
You can set to record up to 100 alarm data (count, date
and time) at the beginning of the tape. These data can
be displayed on the monitor screen.
Clog detection
The VCR always checks that the video signal is
recorded without problem (in time lapse mode only).
If the recording cannot be made properly because the
recording head has become clogged, the VCR will
give a warning and also switch to the sub-head to
continue the recording.
Time and date retrieval function
Because this unit uses a high-performance VASS,
recordings made in time lapse mode can be searched
by date and time (hour and minute up to every 10
minutes), a valuable type of search function in time
lapse VCRs.
Forward/reverse field advance
This VCR offers improved search functions with the
ability to move both forwards and backwards between
fields.
Real time display
The real time can be displayed even in time lapse
mode.
Clock operation backup
When a power interruption occurs, the built-in
rechargeable battery will provide backup power for the
clock for up to 30 days.
Essential data, such as data setting, internal timer
settings, recording time, and mode settings, and alarm
recording mode settings are also retained.
Security lock
To guard against operation errors, this VCR locks all
of the buttons.
Monitoring the recording condition
You can check the recorded image during recording by
pressing a single button.
Checking the tape threading
To ensure correct operation, the VCR automatically
checks the tape threading whenever you insert a tape.
Other features
•Fast-forward and rewind with high speed
•Quick-start mechanism
•Power saving mode which turns off the display
window
•The number of times of recording is recorded and
displayed on the display window
5
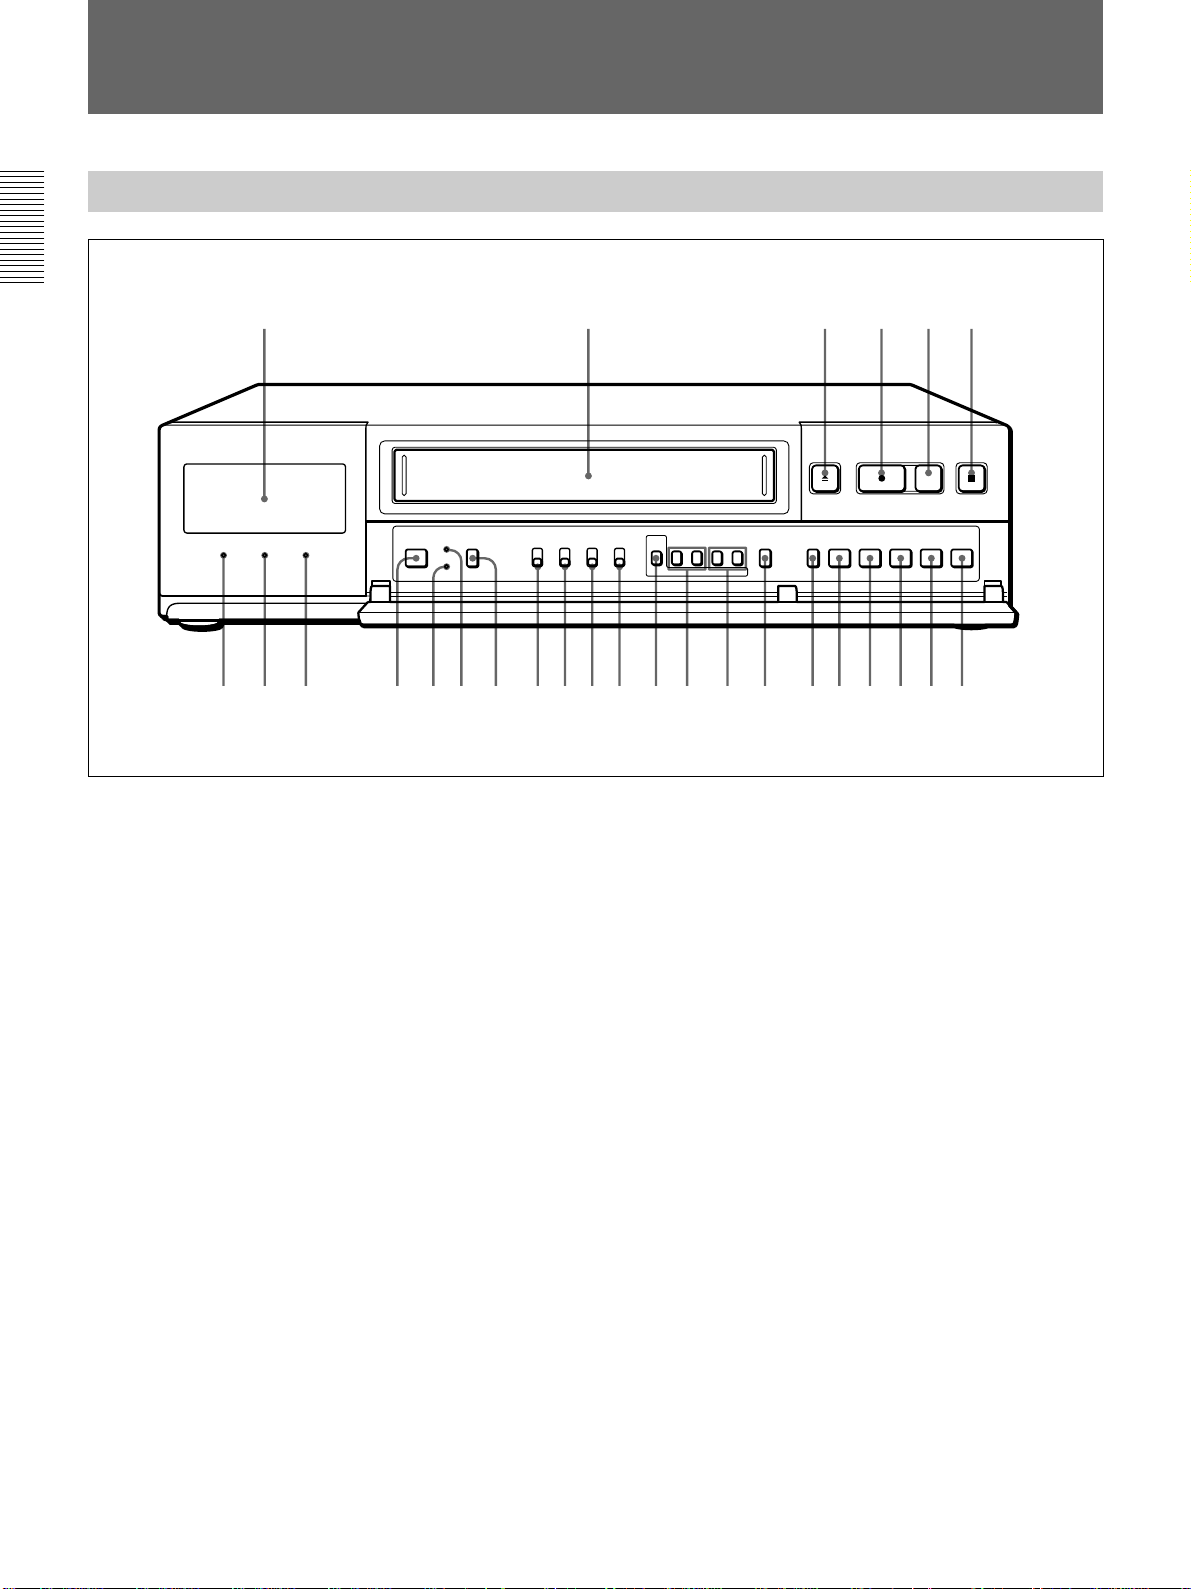
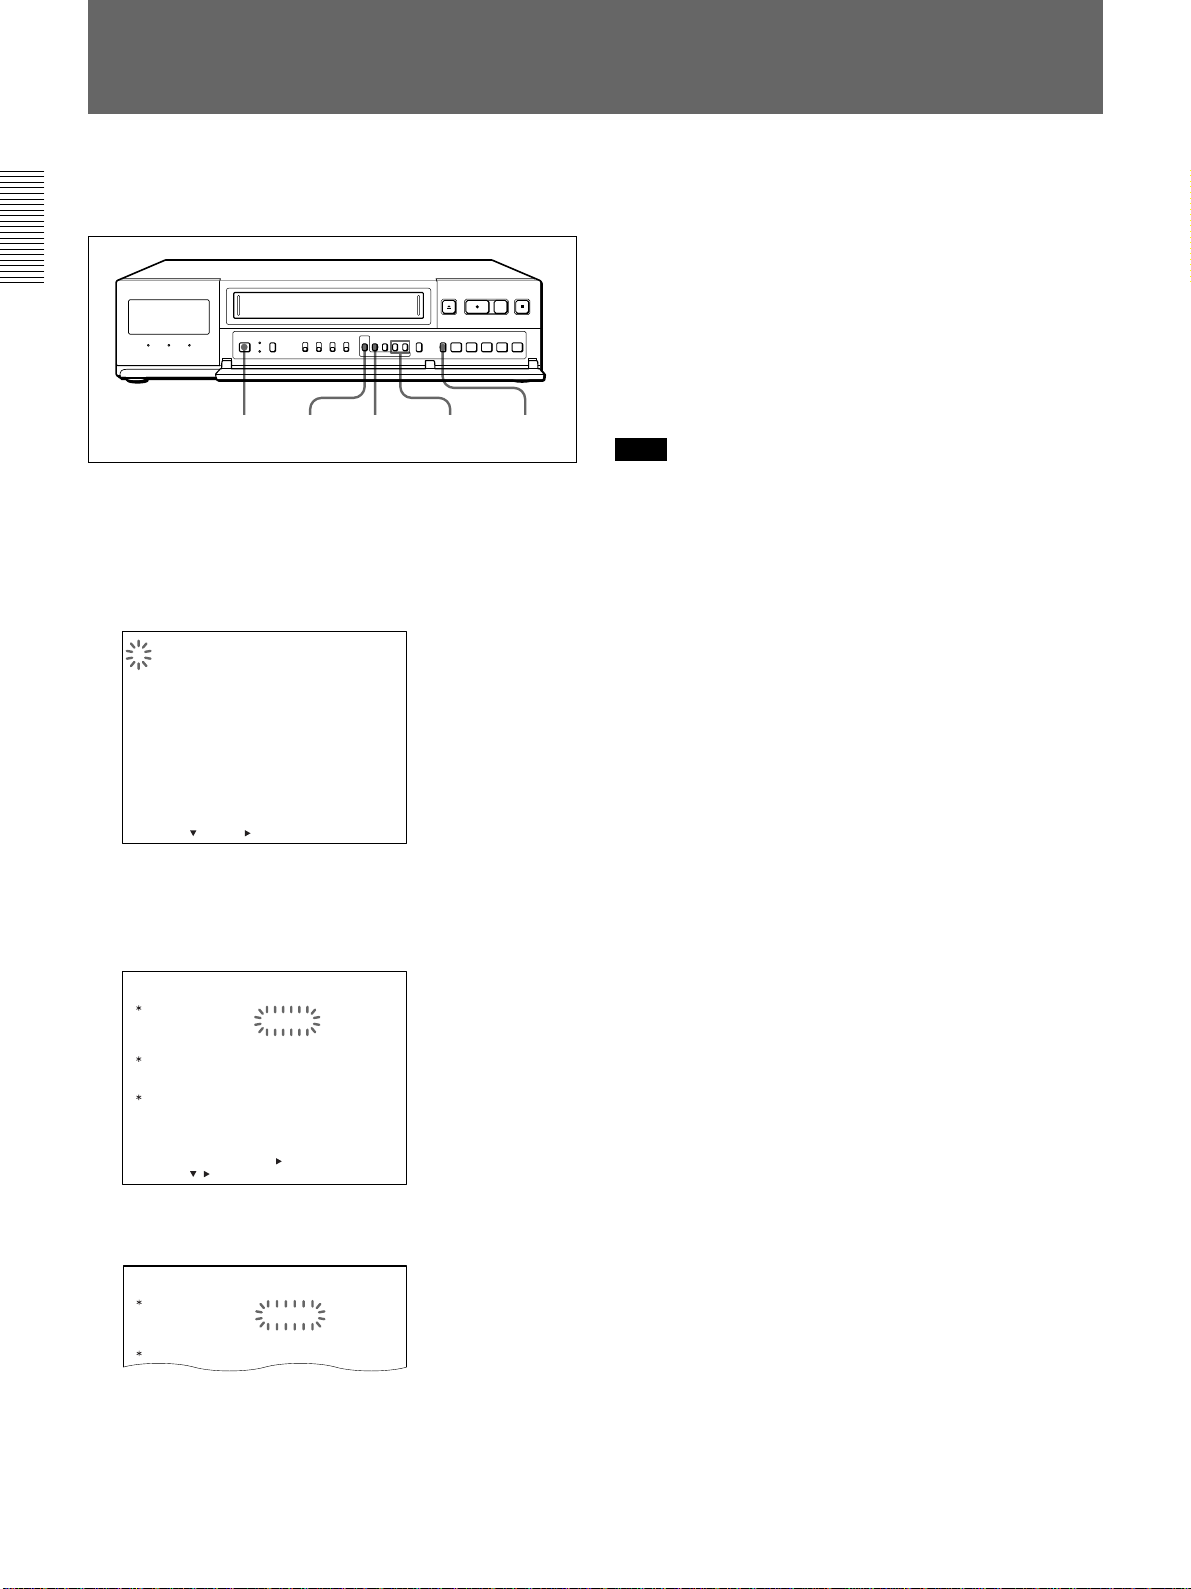
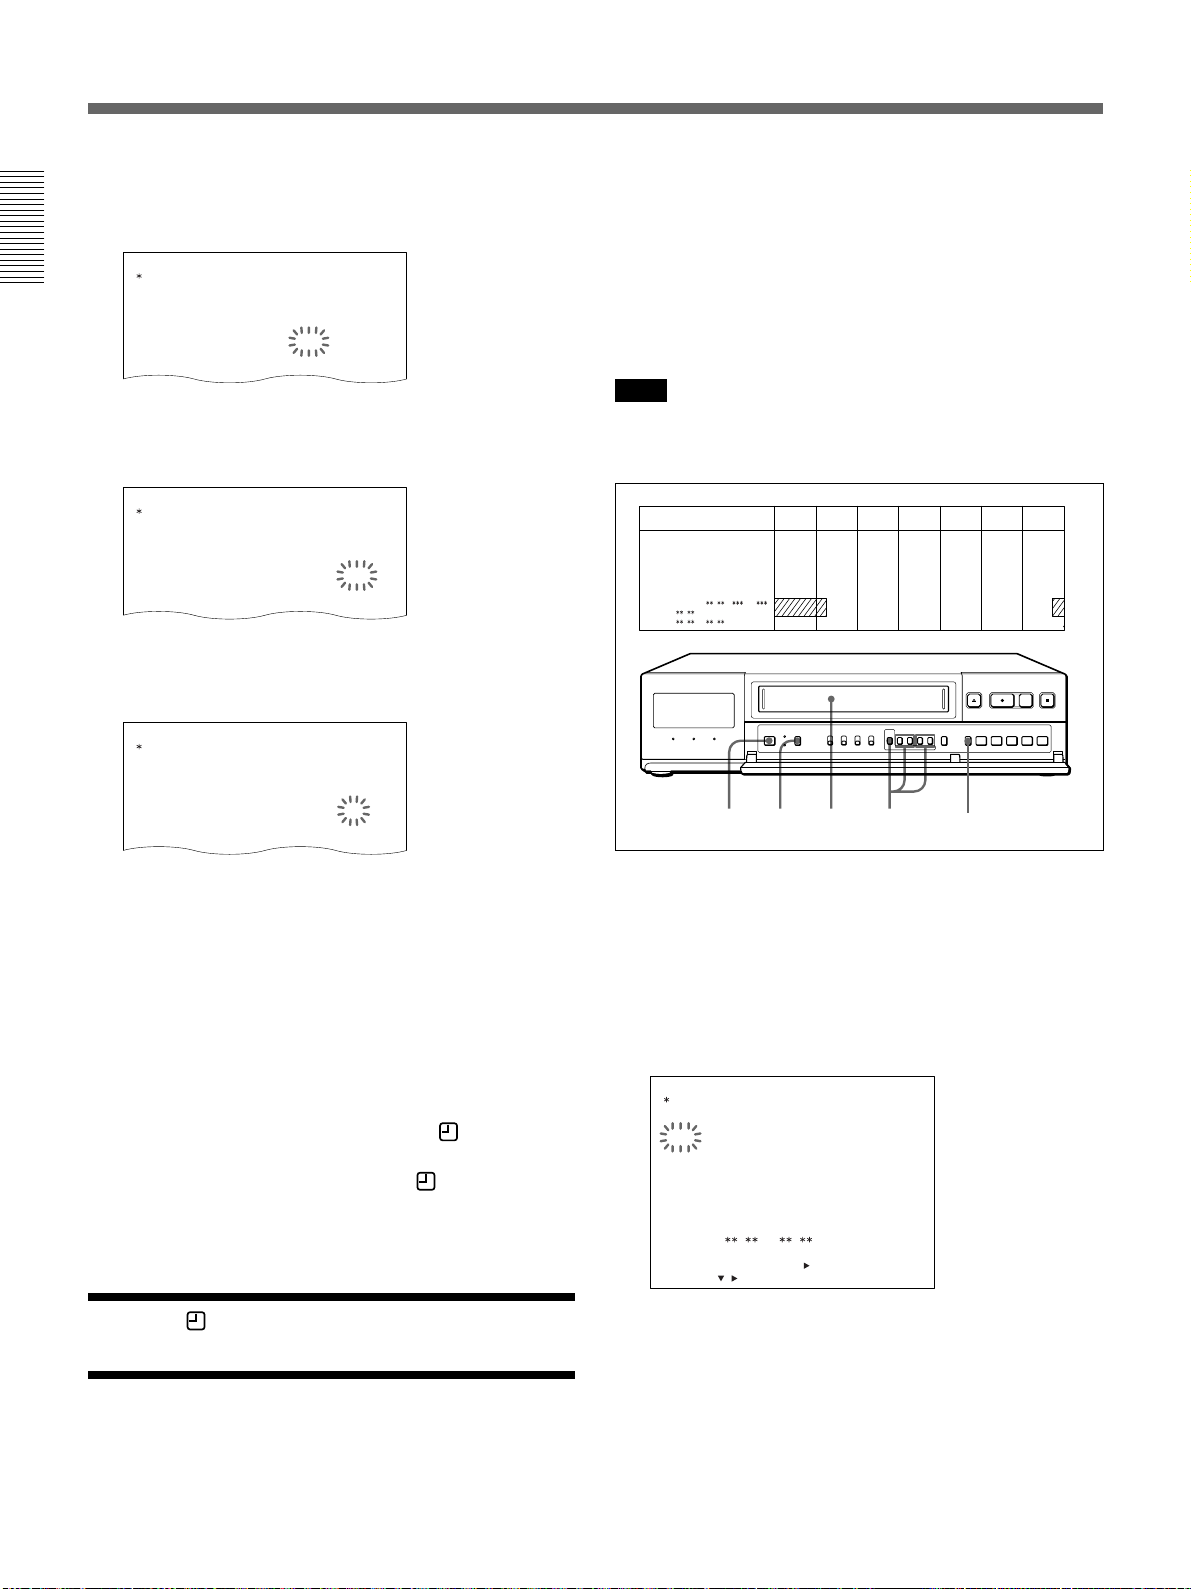
Location of Parts and Controls
Front Panel (Refer to pages in parentheses for details.)
123456
7 9 qa qjqhqgqfq;8qdqkqs wd wf wg wh wjwswaw;ql
1 Display window (7)
2 Cassette compartment
3 EJECT Z button (17)
4 REC z button
5 REC CHECK button (25)
6 STOP x button
7 POWER indicator
8 SAVE indicator
9 REPEAT indicator (21)
0 POWER switch
qa MENU RESET button (23)
qs CL (clear) button
To clear all the settings, press the button with
pointed object. The settings will return to the initial
setting.
qd TIMER button (28)
qf POWER SAVE switch
When the switch is set to ON, the indication in the
display window goes off and the SAVE indicator
lights up.
qg REAL TIME/COUNTER switch (20, 39)
qh REPEAT REC switch (21)
qj ON-SCREEN switch (15)
qk MENU button (12)
ql TRACKING –, + buttons (40)
MENU V, B buttons (12)
w; REC/PLAY SPEED –, + buttons (20)
MENU –, + buttons (12)
wa COUNTER RESET button (39)
ws SEARCH button (12)
wd REV b button
wf REW m button
wg PLAY B button
wh FF M button
wj PAUSE X button
6
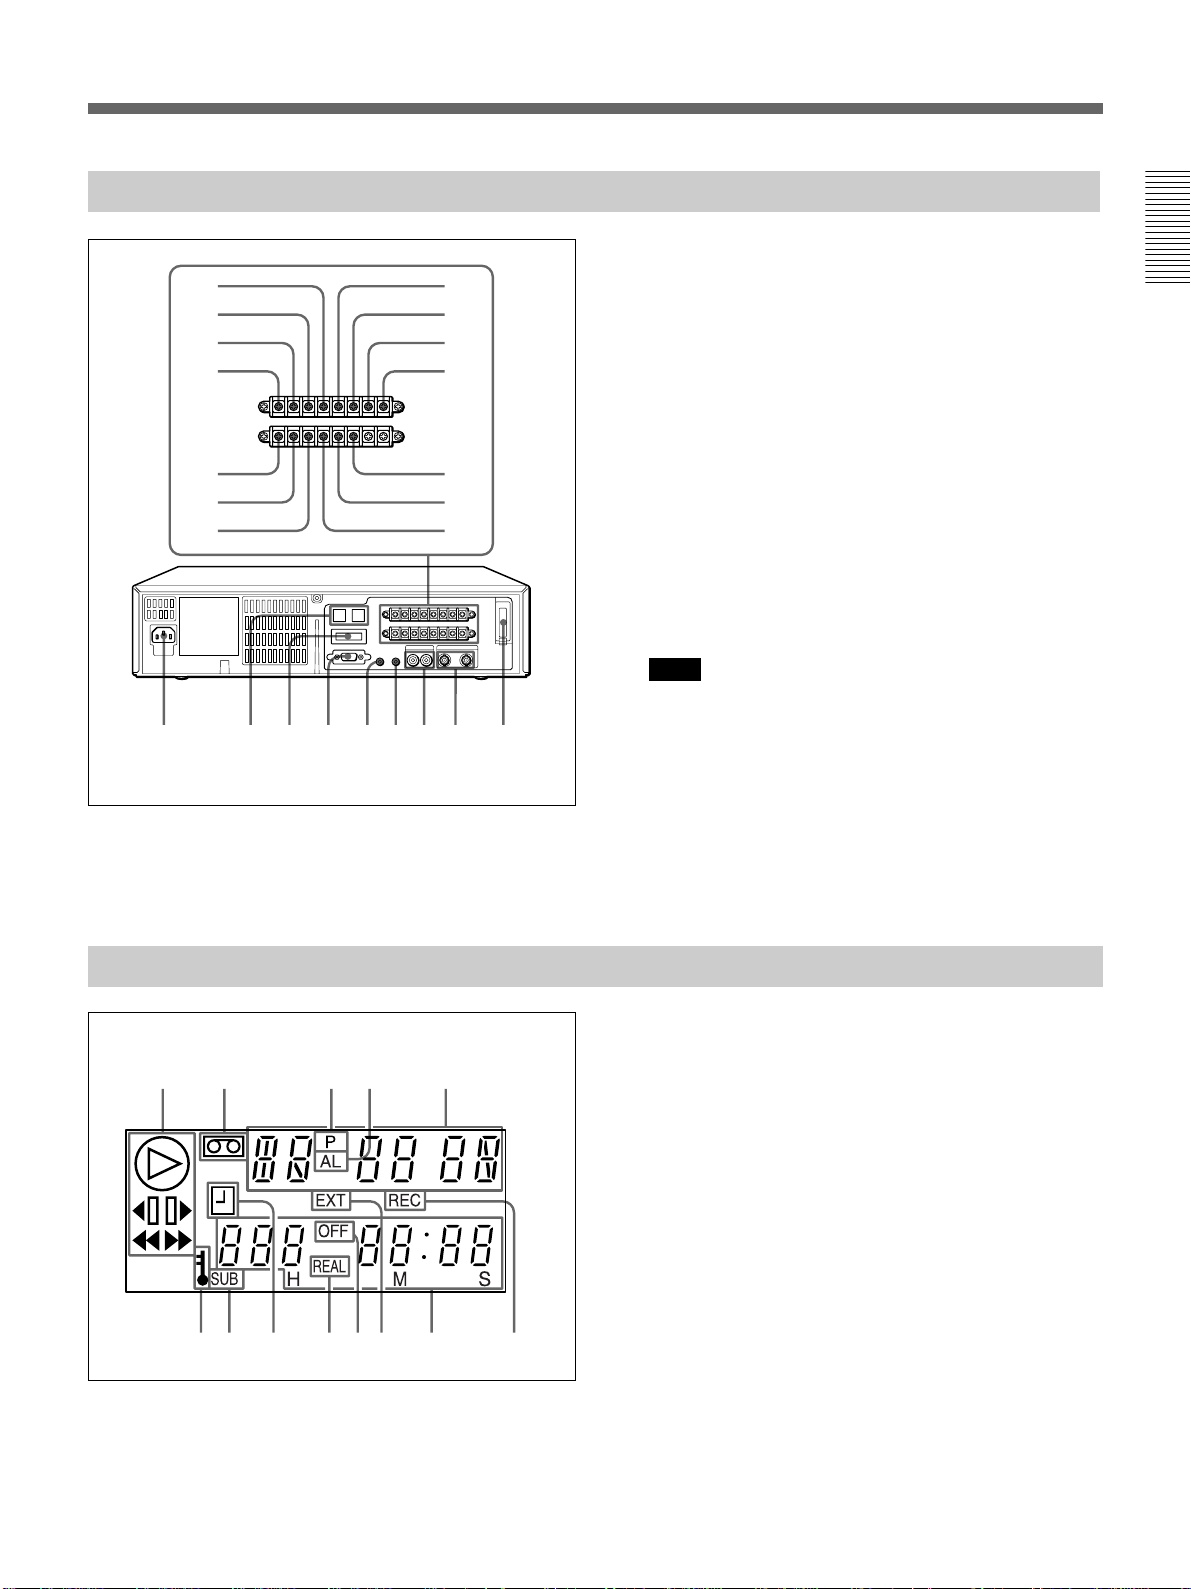
Rear Panel (Refer to pages in parentheses for details.)
15
26
37
4
9
q; qd
qa qf
qg qk ws wdwaw;qh qj ql
8
qs
1 TAPE END OUT terminal (45)
2 WARNING OUT terminal (45)
3 COM (common) terminal (45)
4 EXT TIMER IN terminal (30)
5 SW OUT terminal (46)
6 COM (common) terminal (45)
7 ALARM OUT terminal (33)
8 ALARM IN terminal (33)
9 CLOCK SET OUT terminal (47)
0 CLOCK SET IN terminal (47)
qa SERIES OUT terminal (9)
qs COM (common) terminal
qd COM (common) terminal (9)
qf SERIES IN terminal (9)
qg AC IN (inlet) (8)
qh RS-485 connectors (RJ-11) (9, 10)
Note
Do not connect to phone line.
qj ADDRESS/RS-485/232C selector/
RS-485 TERMINATE switches (10)
qk RS-232C connector (9, 10)
ql REMOTE jack (48)
w; MIC IN jack (8)
wa AUDIO IN/OUT jacks (phono type)
ws VIDEO IN/OUT jacks (BNC type) (8)
wd Back-up battery compartment
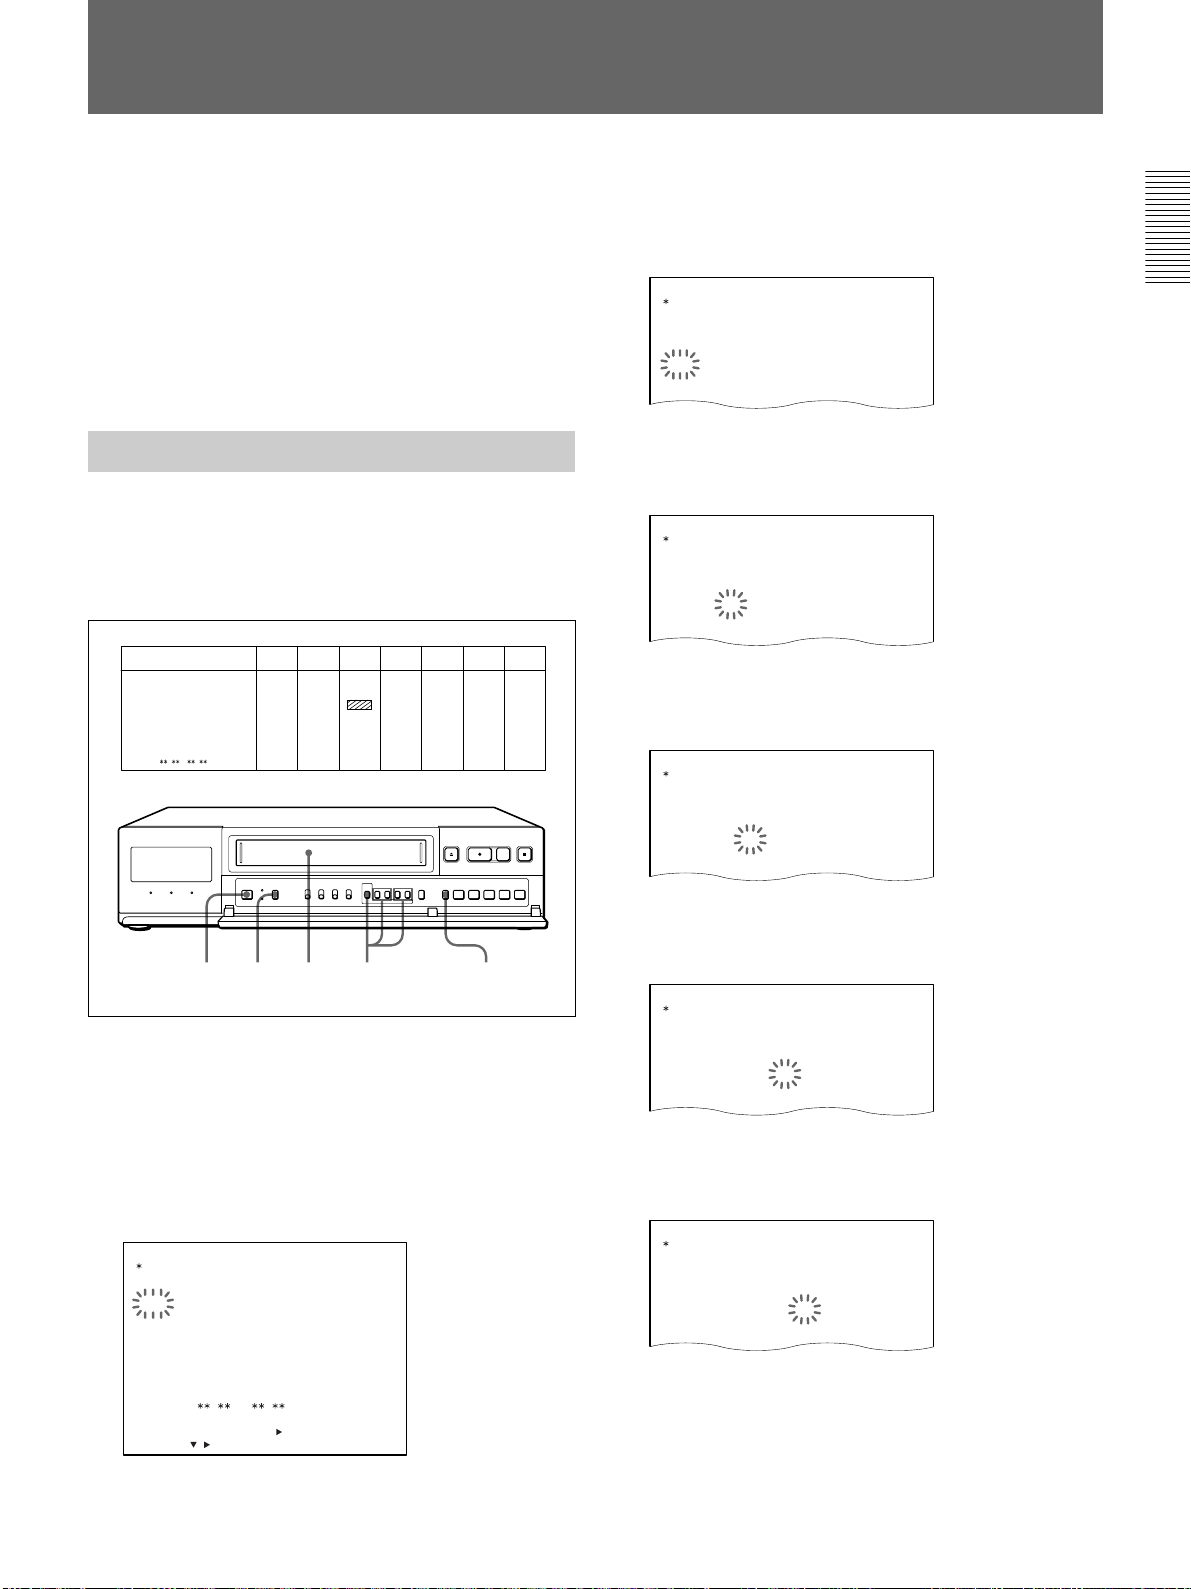
Display Window
12 34 5
76q;9qsqa qd8
1 Tape operation indicators
2 Cassette indicator
3 Power interruption indicator
4 AL (alarm) indicator
5 Tape speed/Alarm search mode/Alarm scan mode/
Time/date search mode/Tape used count/Moisture
condensation
6 Security lock indicator
7 SUB-head indicator
8 Timer recording standby indicator
9 REAL indicator
0 OFF indicator
qa External timer indicator
qs Linear time counter/Timer recording indicator
qd REC indicator for Tape used count/Alarm data list
7
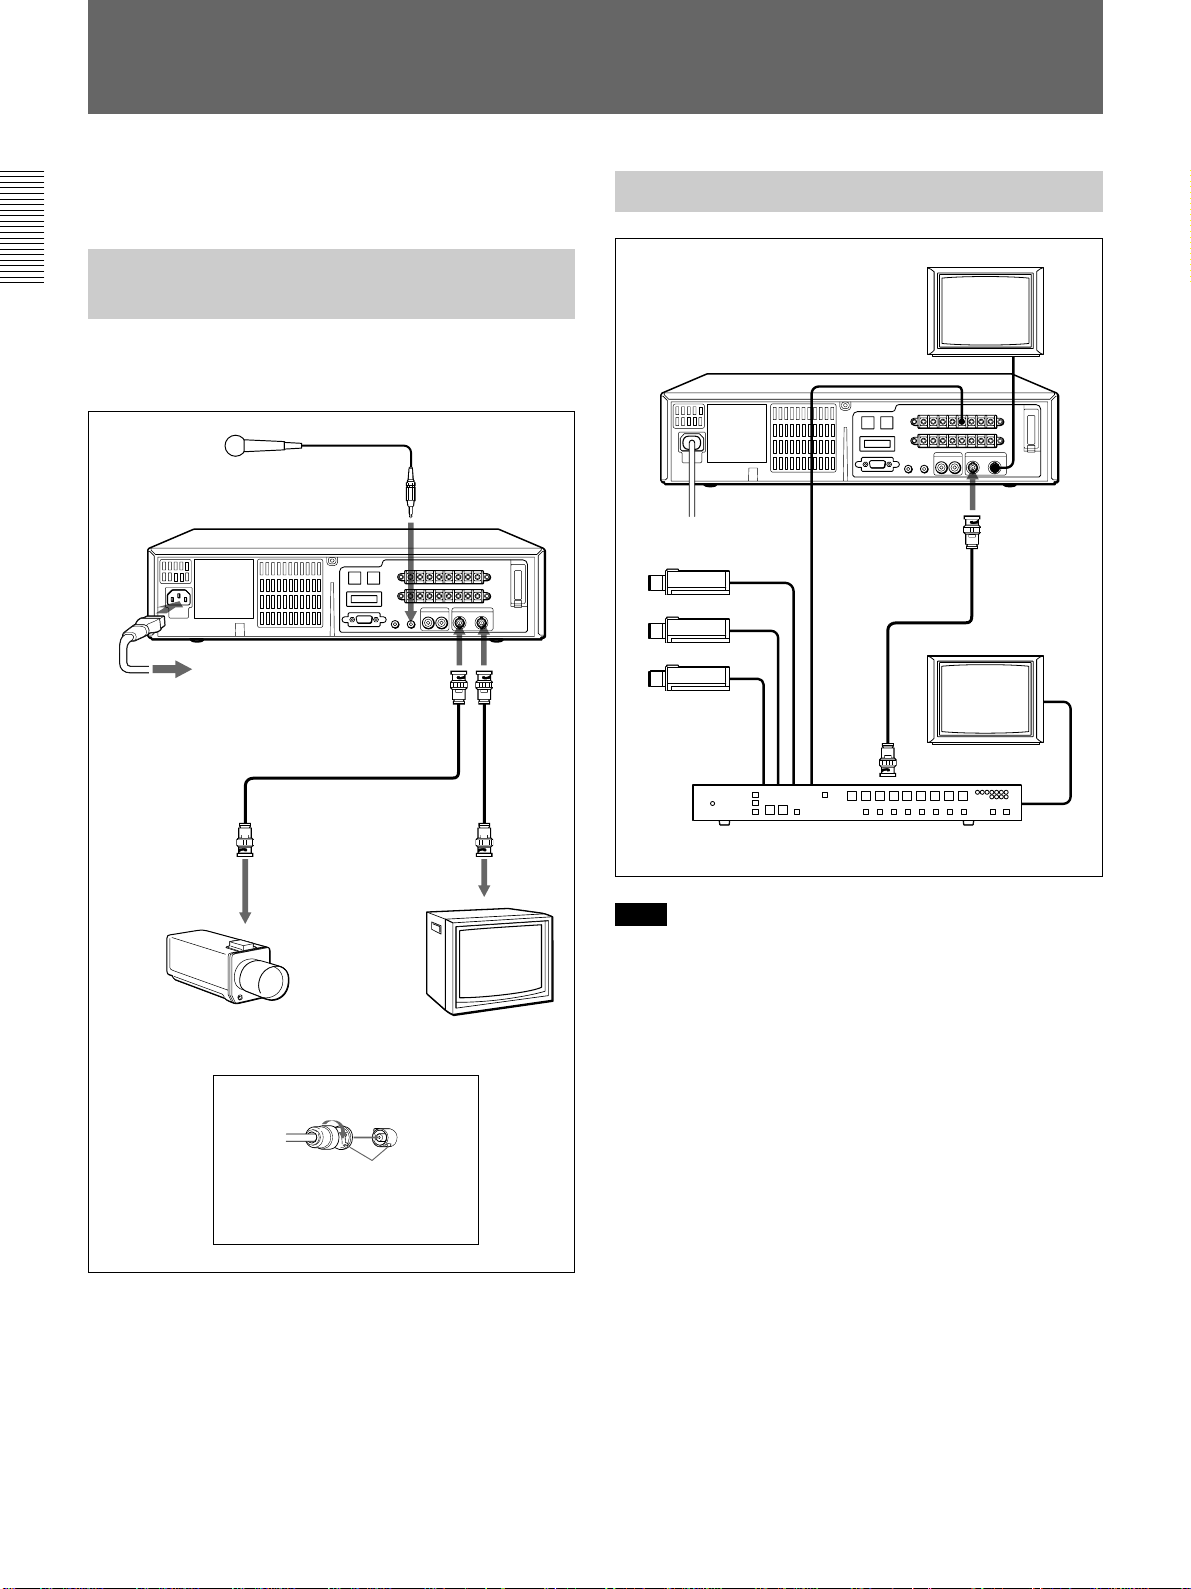
Connections
Turn all the power off before making connections.
Connect the AC power cord last.
Connecting a Camera, Monitor and Microphone
With the following connections, you can monitor the
picture and sound.
Microphone
to MIC IN
to AC
IN
to a wall outlet
to VIDEO IN
to
VIDEO
OUT
Connecting a Switcher
to SW OUT
Video camera
to EXT
TIMING
IN
to VIDEO
IN
to MONITOR OUT
Monitor
to video output
Video camera Monitor
Use of BNC connector
Align pin with cutout, insert and
turn right to lock.
To remove, turn left and pull out.
To connect an alarm sensor
Refer to page 33.
Camera switcher
to video
input
Note
When you connect several cameras to a switcher,
synchronize the cameras.
If not, the picture will be disturbed.
8
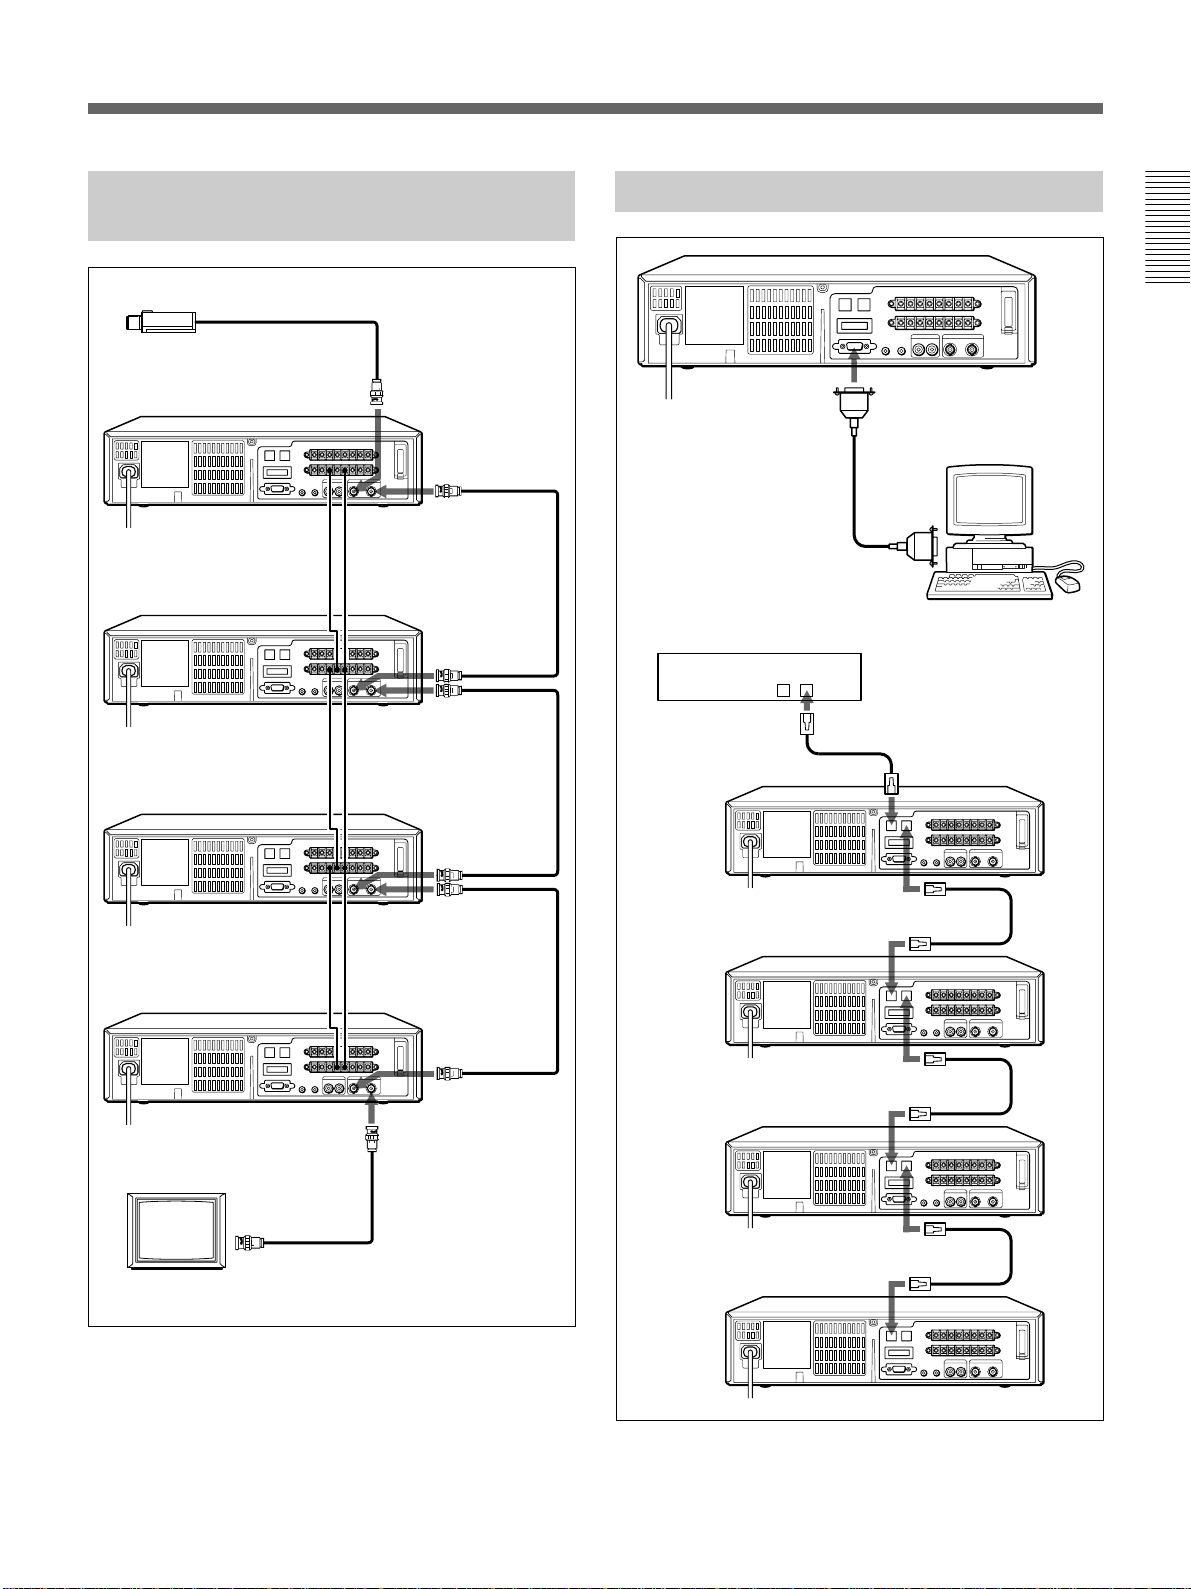
Series
Video Camera
Connecting a ComputerConnecting Another Unit in
to SERIES
OUT
to SERIES IN
to SERIES
OUT
to SERIES IN to COM
to SERIES
OUT
to COM
to COM
to COM
to COM
to VIDEO
IN
to
VIDEO
OUT
to
VIDEO
IN
to
VIDEO
OUT
to
VIDEO
IN
to
VIDEO
OUT
RS-232C connector
(9-pin D-sub type)
9-pin D-sub type cable
(not supplied)
Contoller
RS-485
BA
to RS-485 B
to RS-485 A
to RS-232C
Computer
Cross-type cable
to RS-485 A
to VIDEO IN
Monitor
For operation, refer to page 22.
to COMto SERIES IN
to
VIDEO
IN
to VIDEO
OUT
to RS-485 B
to RS-485 A
to RS-485 B
to RS-485 A
9
Connections
ADDRESS
10987654ON321
TERMINA TERS-485
RS-232C
ON
OFF OFF
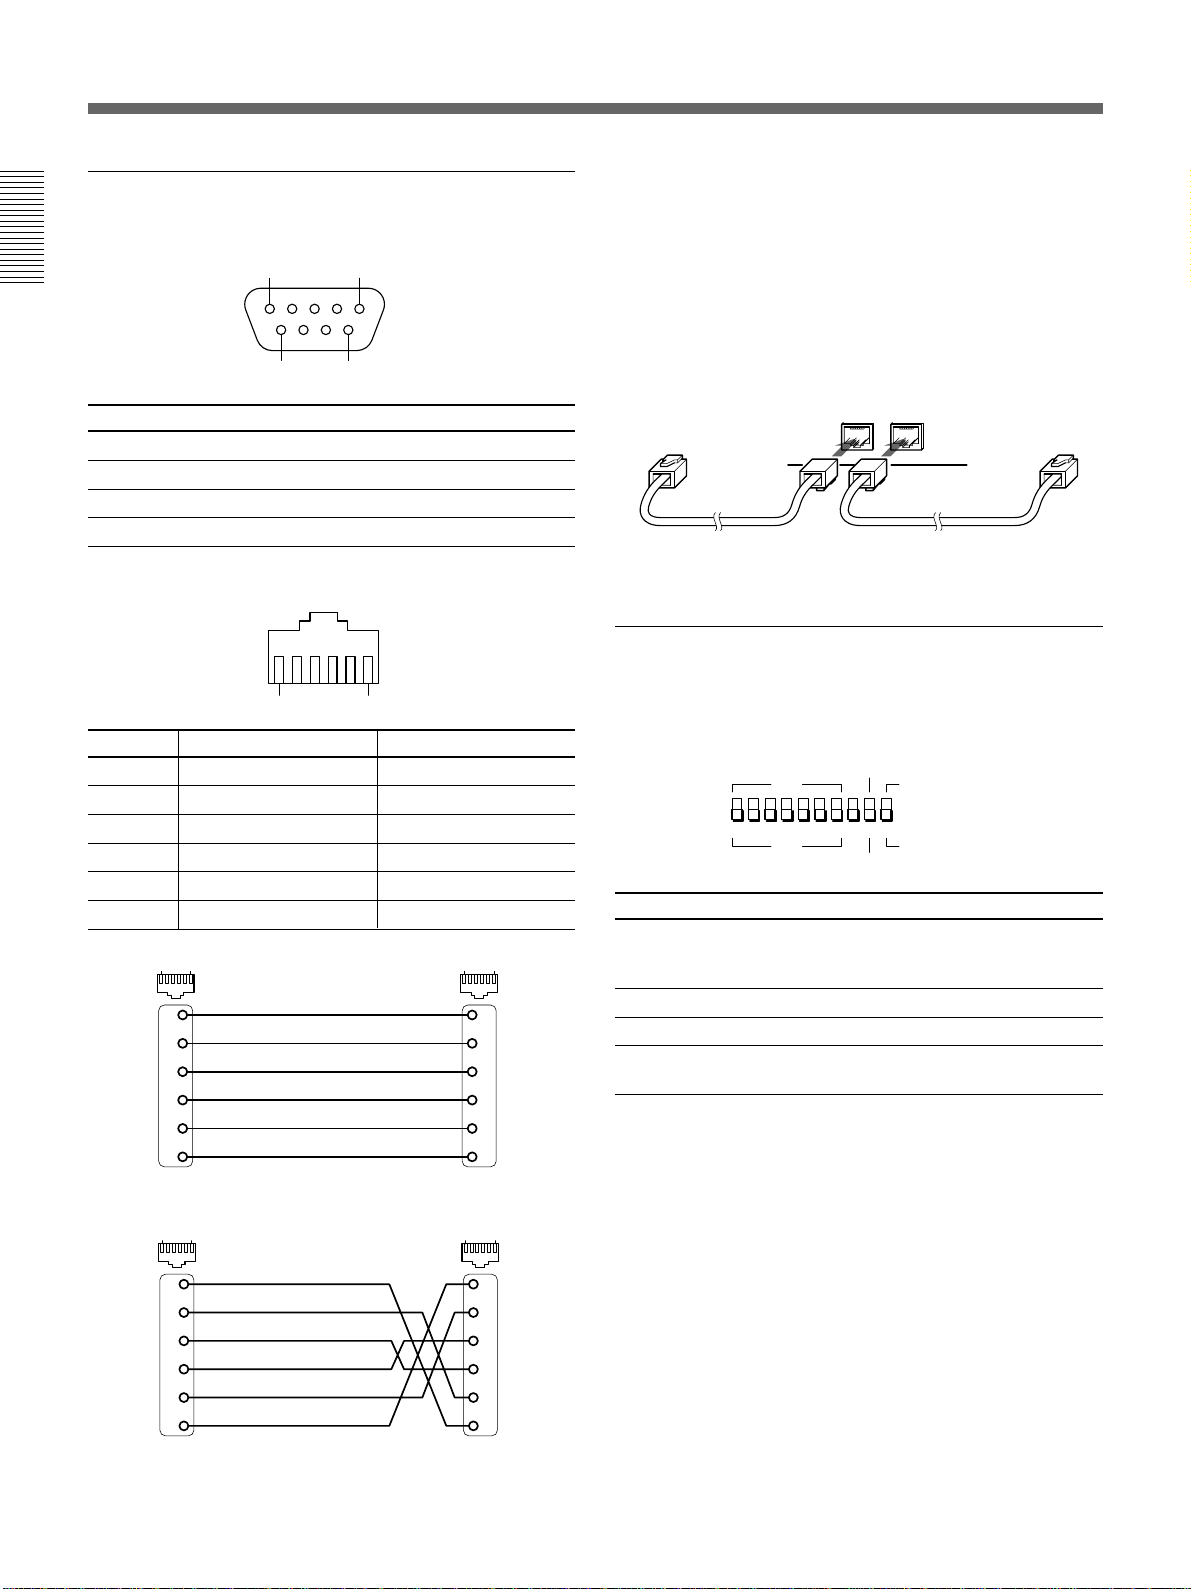
Pin assignment
RS-232C connector (D-sub 9-pin, female)
1 5
6
Pin No. Signal Operation Signal Direction
2 RXD Receive data VCR T Computer
3 TXD Send data VCR t Computer
7 RTS Request to send VCR t Computer
5 GND Singnal ground
RS-485 connector (RJ-11)
1 6
Pin No. A terminal signal B terminal signal
1 Not used Not used
2 Not used Not used
3 A signal B signal
4 B signal A signal
5 Not used Not used
6 Not used Not used
16
not used
1
not used
2
3
4
not used
5
not used
6
Straight type
9
16
1
2
3
4
5
6
Make the connection to the RS-485 control terminal
using a modular cable (not supplied).
•If using a straight type cable, connect it between the
A terminals, or between the B terminals (see
illustration below).
•If using a crossed type cable, connect it from the A
terminal to the B terminal, or from the B terminal to
the A terminal (see illustration below).
RS-485
AB
To terminal A
Straight-type cable
Cross-type cable
To terminal A
ADDRESS
RS-485/RS-232C selector
RS-485 TERMINATE switches
(DIP switches)
Switch No. Operation
1 - 7 Set address (1 is lowest bit and 7 is
highest) (ON:1, OFF:0)
7 is effective when using RS-485 connector
8 Not used
9 Select RS-485 or RS-232C
10 Terminate on/off when using RS-485
connector
10
16
not used
1
not used
2
3
4
not used
5
not used
6
Cross type
16
1
2
3
4
5
6
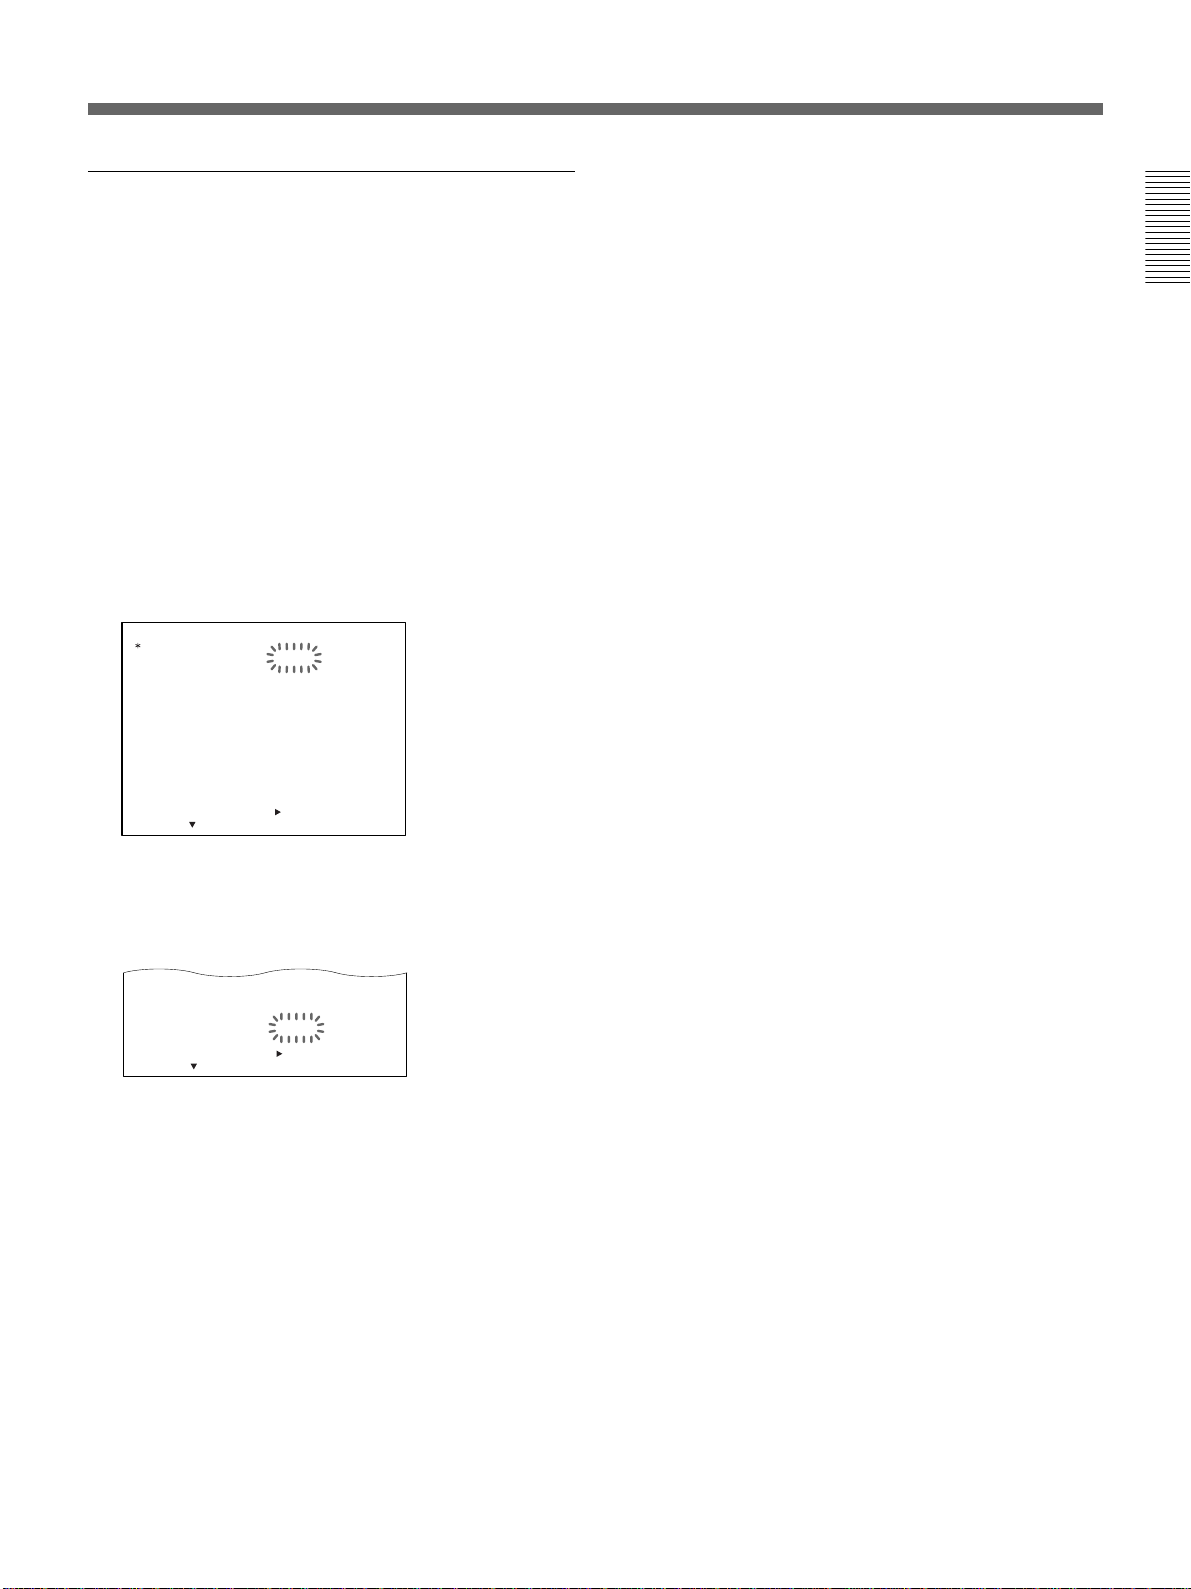
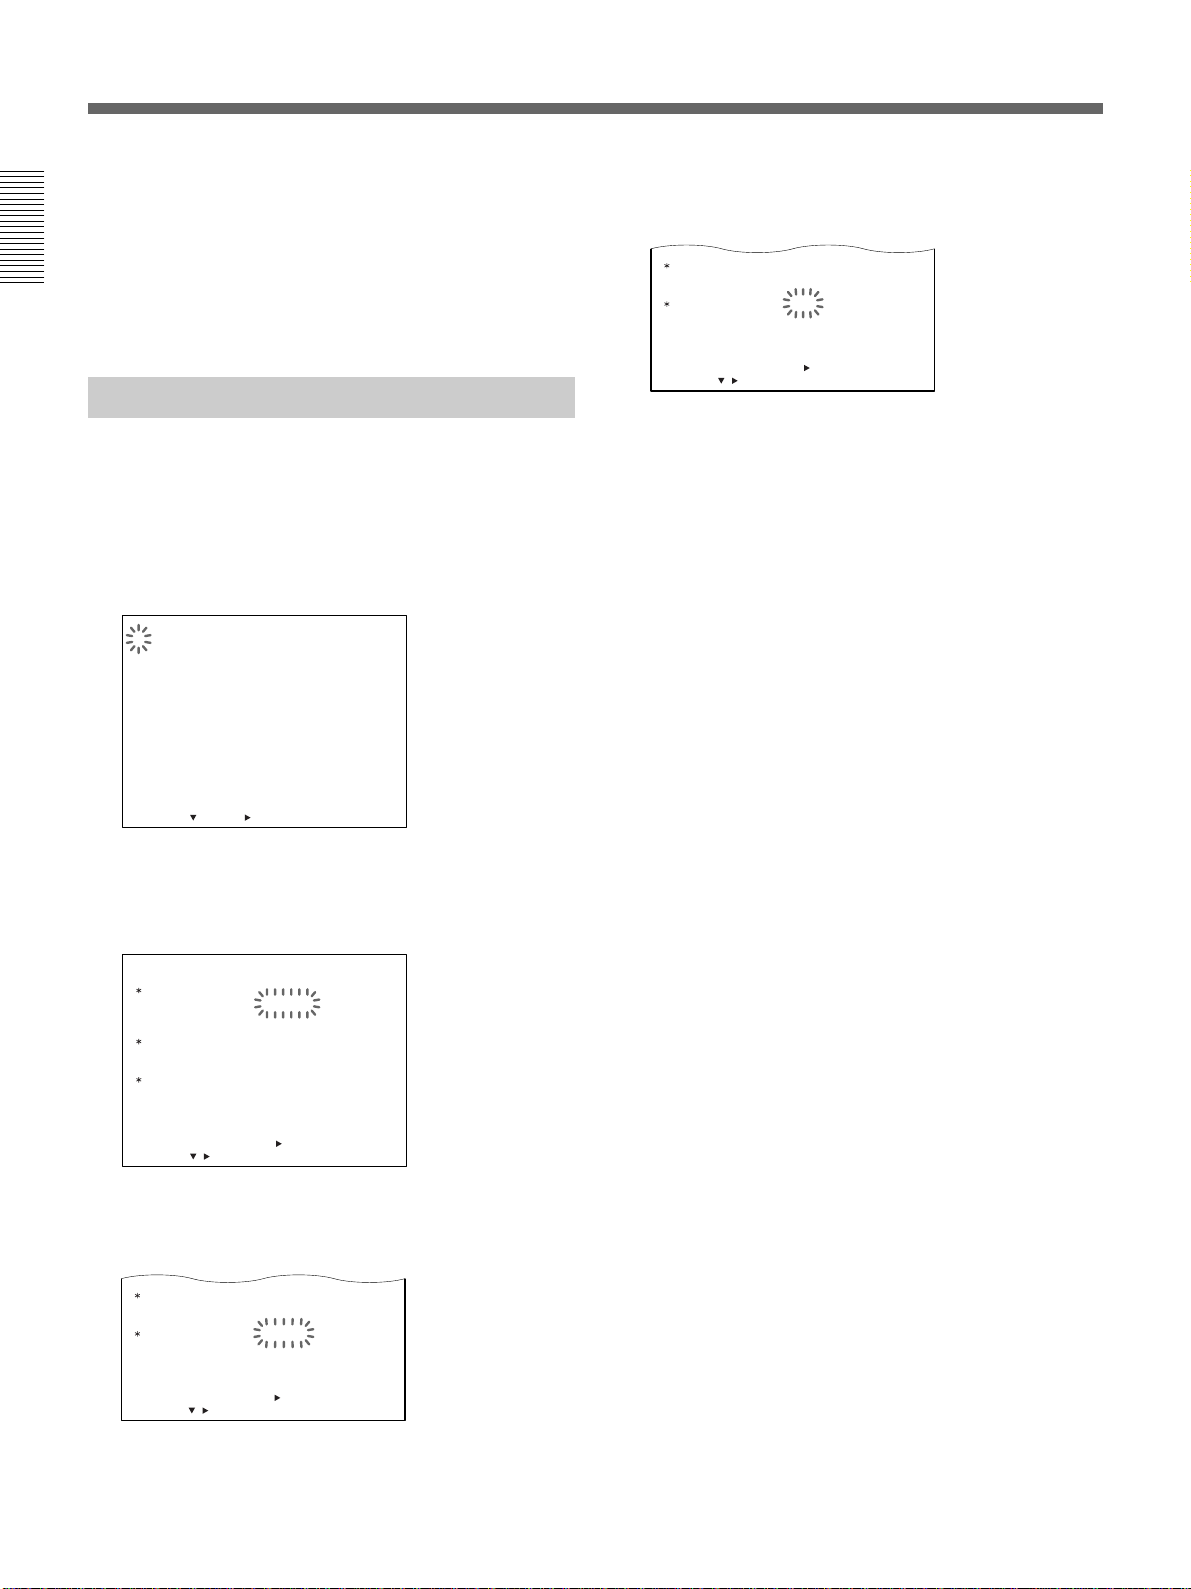
RS-232C/RS-485 Interface
APC
ON
When the personal computer is connected to the RS232C or RS-485 connector, the transmission speed
(baud rate) can only be set using the GENERAL SET
menu.
1 Select the RS-232C or RS-485 connector to be
used using the RS-485/RS-232C switch at the rear.
2 Turn on the power of the equipment to be used.
3 Press MENU and MENU
V
until “4” of the MAIN
MENU flashes on the monitor screen.
4 Press MENU
B
.
The GENERAL SET menu appears.
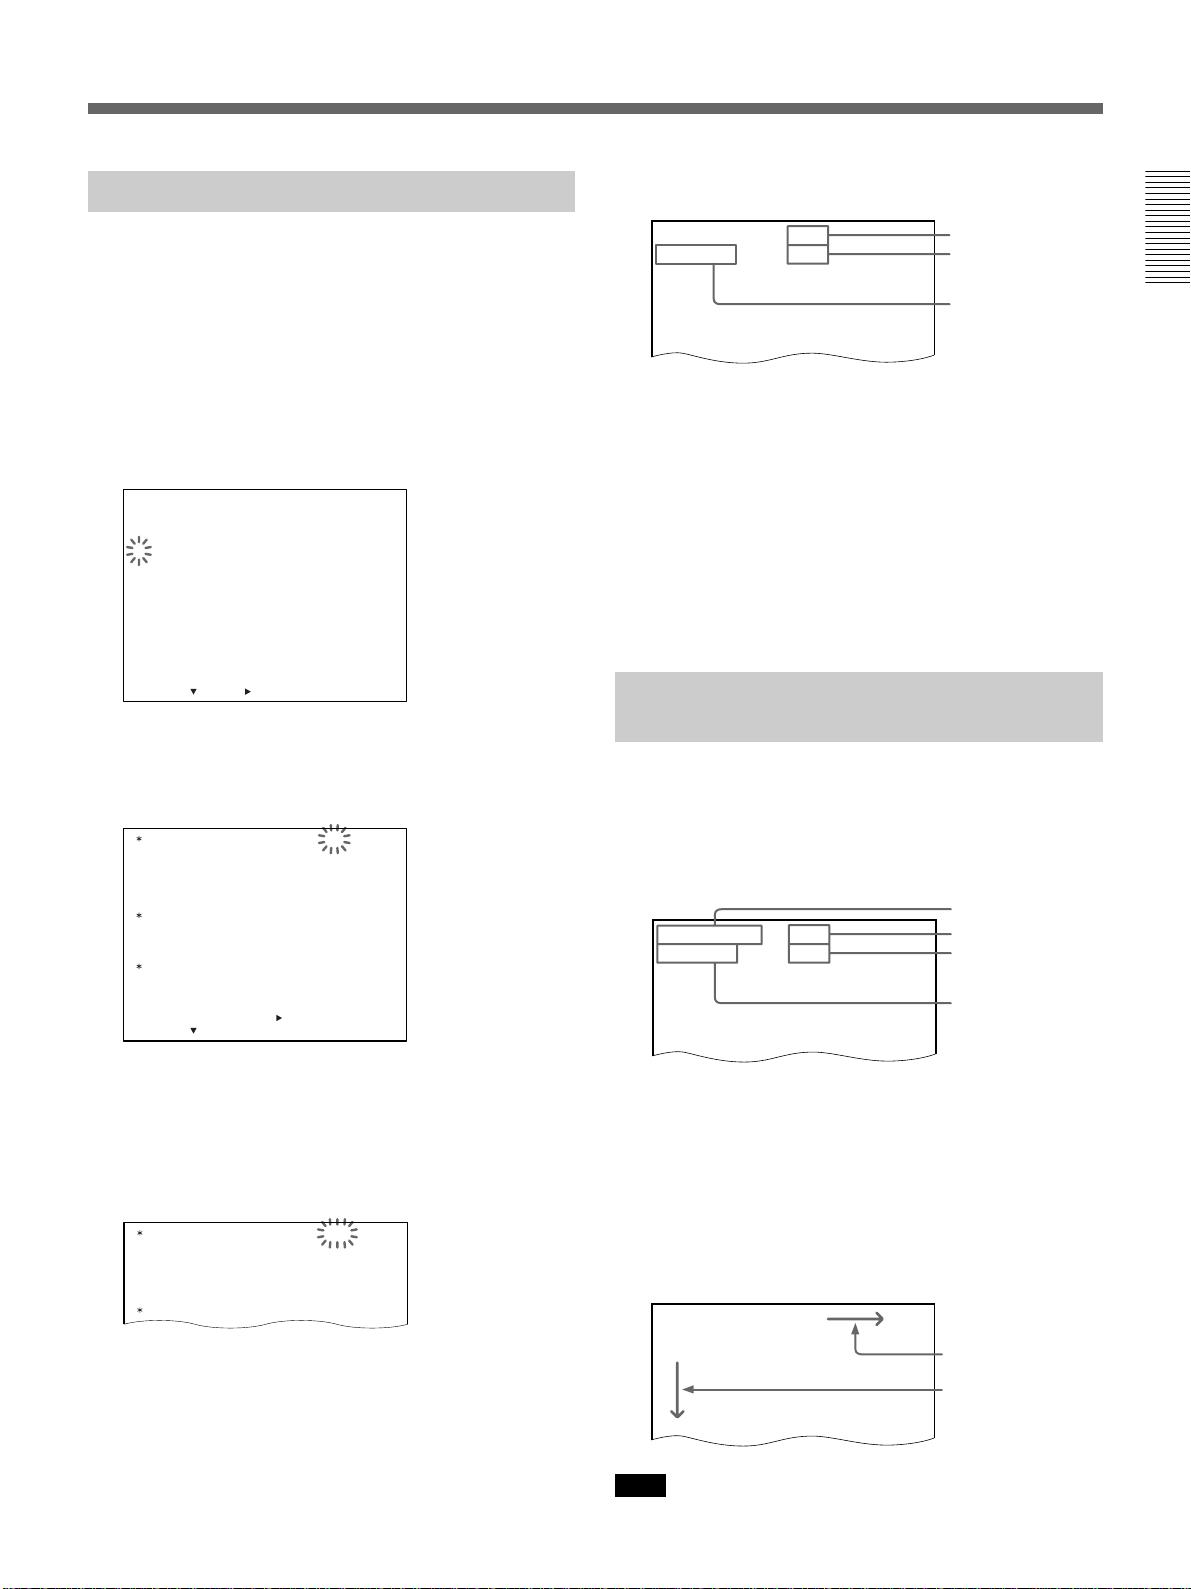
GENERAL SET
TAPE
TAPE IN
TAPE END
TAPE USED COUNT
CLOCK ADJUST
APC
THREAD CHECK
T
BAUD RATE
SELECT : DATA SET : +/–RETURN : MENU
5 Press
/
D SEARCH
<
MENU V
MODE
MODE
NEXT PUSH
T–160
STOP
REW
OFF
01:00
ON
OFF
CONVENTION
19200
>
to move the flashing to BAUD
RATE and set the baud rate (19200, 2400, 4800 or
9600 bps) by pressing
THREAD CHECK
T
/
D SEARCH
<
SELECT : DATA SET : +/–RETURN : MENU
NEXT PUSH
MENU + or –
OFF
CONVENTION
19200BAUD RATE
>
.
6 Press SEARCH to return to the normal display.
11
Setting the Language
Select either English, French or Spanish for the display
language.
12 4 5
3
1 Turn on the power of the equipment to be used.
2 Press MENU.
The MAIN MENU appears on the monitor screen
and “1” flashes.
<
1. LANGUAGE
CLOCK SET
DAYLIGHT SET
2. DISPLAY SET
BUZZER
SW OUT
3. ALARM SET
4. GENERAL SET
5. TIMER SET
6. HOLIDAY SET
7. POWER FAILURE
USED HOUR
8. ALARM DATA
SELECT : NEXT : RETURN : MENU
MAIN MENU
/
DEW
>
5 Press SEARCH to return to the normal display.
To return to the MAIN MENU screen from the
current menu
Press MENU again.
To go to the next menu from the current menu
V
Press MENU
press MENU
Note
When you want to change the language again, repeat steps 2
to 5 after step 5.
until “NEXT PUSH B” flashes and
B
.
3 Press MENU
B
.
The LANGUAGE/CLOCK SET/DAYLIGHT SET
menu appears.
LANGUAGE
CLOCK SET
DAYLIGHT SET
ON
OFF
<
/
SELECT : DATA SET :
ENGLISH
01–01–2000 00:00:00
NO USE
WEEK
1ST–SUN
LST–SUN
NEXT PUSH
>
+
/–RETURN : MENU
MONTH
04
10
TIME
02:00
02:00
4 Press MENU + or – to select the language.
LANGUAGE
CLOCK SET
FRANCAIS
01–01–00 00:00:00
12
Setting the Clock
CLOCK SET
06–01–2000 00:00:00
DAYLIGHT SET
SELECT : DATA SET :
+
/–RETURN : MENU
/
ON
OFF
1ST–SUN
WEEK
NO USE
LST–SUN
04
MONTH
10
02:00
TIME
02:00
<
NEXT PUSH
>
CLOCK SET
06–15–2000 00:00:00
DAYLIGHT SET
SELECT : DATA SET :
+
/–RETURN : MENU
/
ON
OFF
1ST–SUN
WEEK
NO USE
LST–SUN
04
MONTH
10
02:00
TIME
02:00
<
NEXT PUSH
>
CLOCK SET
06–15–2000 00:00:00
DAYLIGHT SET
SELECT : DATA SET :
+
/–RETURN : MENU
/
ON
OFF
1ST–SUN
WEEK
NO USE
LST–SUN
04
MONTH
10
02:00
TIME
02:00
<
NEXT PUSH
>
CLOCK SET
06–15–2000 15:00:00
DAYLIGHT SET
SELECT : DATA SET :
+
/–RETURN : MENU
/
ON
OFF
1ST–SUN
WEEK
NO USE
LST–SUN
04
MONTH
10
02:00
TIME
02:00
<
NEXT PUSH
>
CLOCK SET
06–15–2000 15:20:00
DAYLIGHT SET
SELECT : DATA SET :
+
/–RETURN : MENU
/
ON
OFF
1ST–SUN
WEEK
NO USE
LST–SUN
04
MONTH
10
02:00
TIME
02:00
<
NEXT PUSH
>
Set the clock to the current time and date on the
monitor screen. To adjust to Daylight saving Time,
proceed the steps in “Adjusting to Daylight saving
Time” on page 14 first.
1 2 3-10 11
Example:
Set the date and time to 15:20 on June 15, 2000.
1 Turn on the power of the equipment to be used.
2 Press MENU.
The MAIN MENU appears on the monitor screen
and “1” flashes.
5
Set the
month
by pressing MENU + or –, then press
MENU B.
6 Set the
MENU
day
by pressing
B
.
7 Set the year by pressing
B
MENU
.
MENU + or –
MENU + or –
, then press
, then press
<
MAIN MENU
/
DEW
B
>
.
1. LANGUAGE
CLOCK SET
DAYLIGHT SET
2. DISPLAY SET
BUZZER
SW OUT
3. ALARM SET
4. GENERAL SET
5. TIMER SET
6. HOLIDAY SET
7. POWER FAILURE
USED HOUR
8. ALARM DATA
SELECT : NEXT : RETURN : MENU
3 Press MENU
The LANGUAGE/CLOCK SET/DAYLIGHT SET
menu appears.
The first display shows 1 January, 2000.
LANGUAGE
CLOCK SET
DAYLIGHT SET
ON
OFF
SELECT : DATA SET :
<
/
ENGLISH
01–01–2000 00:00:00
NO USE
WEEK
1ST–SUN
LST–SUN
NEXT PUSH
>
+
/–RETURN : MENU
MONTH
04
10
TIME
02:00
02:00
TimeMonth-Day-Year
8 Set the hour by pressing
B
MENU
.
9 Set the minutes by pressing
B
press MENU
10Press
MENU –
.
simultaneously with a time signal.
MENU + or –
MENU + or –
You can set the clock at the 00 second point.
, then press
, then
4
Press MENU V to move the flashing to 01.
11Press SEARCH to return to the normal display.
13
CLOCK SET
06–15–2000 15:20:00
DAYLIGHT SET
SELECT : DATA SET :
+
/–RETURN : MENU
/
ON
OFF
1ST–SUN
WEEK
USE
LST–SUN
04
MONTH
10
02:00
TIME
02:00
<
NEXT PUSH
>
CLOCK SET
06–15–2000 15:20:00
DAYLIGHT SET
SELECT : DATA SET :
+
/–RETURN : MENU
/
ON
OFF
1ST–SUN
WEEK
NO USE
LST–SUN
04
MONTH
10
02:00
TIME
02:00
<
NEXT PUSH
>
Setting the Clock
To return to the MAIN MENU screen from the
current menu
Press MENU again.
To go to the next menu from the current menu
V
Press MENU
press MENU
Adjusting to
until “NEXT PUSH B” flashes and
B
.
Daylight Saving
Time
You can adjust to Daylight saving Time when the
season changes.
1 Press MENU.
The MAIN MENU appears on the monitor screen
and “1” flashes.
<
1. LANGUAGE
CLOCK SET
DAYLIGHT SET
2. DISPLAY SET
BUZZER
SW OUT
3. ALARM SET
4. GENERAL SET
5. TIMER SET
6. HOLIDAY SET
7. POWER FAILURE
USED HOUR
8. ALARM DATA
SELECT : NEXT : RETURN : MENU
MAIN MENU
2 Press MENU
The LANGUAGE/CLOCK SET/DAYLIGHT SET
menu appears.
LANGUAGE
CLOCK SET
DAYLIGHT SET
SELECT : DATA SET :
3
Press MENU V to move the flashing to the setting
DAYLIGHT
of
06–15–2000 15:20:00
WEEK
ON
1ST–SUN
LST–SUN
OFF
<
NEXT PUSH
/
/
DEW
B
.
ENGLISH
NO USE
>
+
/–RETURN : MENU
SET.
>
MONTH
04
10
TIME
02:00
02:00
4 Press
MENU + or –
to set DAYLIGHT SET to NO
USE or USE.
NO USE: no Daylight saving Time adjustment is
made
USE: Daylight saving Time adjustment is made
5 Press MENU
V
and set the date and time the
Daylight saving Time adjustment is made.
WEEK ON
MENU + or –
Press
to set which day the
Daylight saving Time adjustment is made:
1ST, 2ND, 3RD, 4TH or LST for first, second,
third, fourth or last week.
Then press MENU
, and press
MENU + or –
B
select the day of the week:
SUN, MON, TUE, WED, THU, FRI or SAT.
MONTH ON
Press MENU
MENU + or –
to set which
B
, and
month the Daylight saving Time adjustment is
made: 01, 02, 03, 04...11, 12 for January,
February .....December.
TIME ON
Press MENU
MENU + or –
to set the
B
, and
time the Daylight saving Time adjustment is
made. The time can only be set between 01 and
22. Then press MENU
to set the minutes.
–
, and press
MENU + or
B
Following the same procedures as WEEK ON,
MONTH ON and TIME ON, set WEEK OFF,
MONTH OFF and TIME OFF when the time is
changed back from the Daylight saving Time to
standard time.
6 Press SEARCH to return to the normal display.
to
14
To return to the MAIN MENU screen from the
current menu
Press MENU again.
To go to the next menu from the current menu
V
Press MENU
press MENU
until “NEXT PUSH B” flashes and
B
.
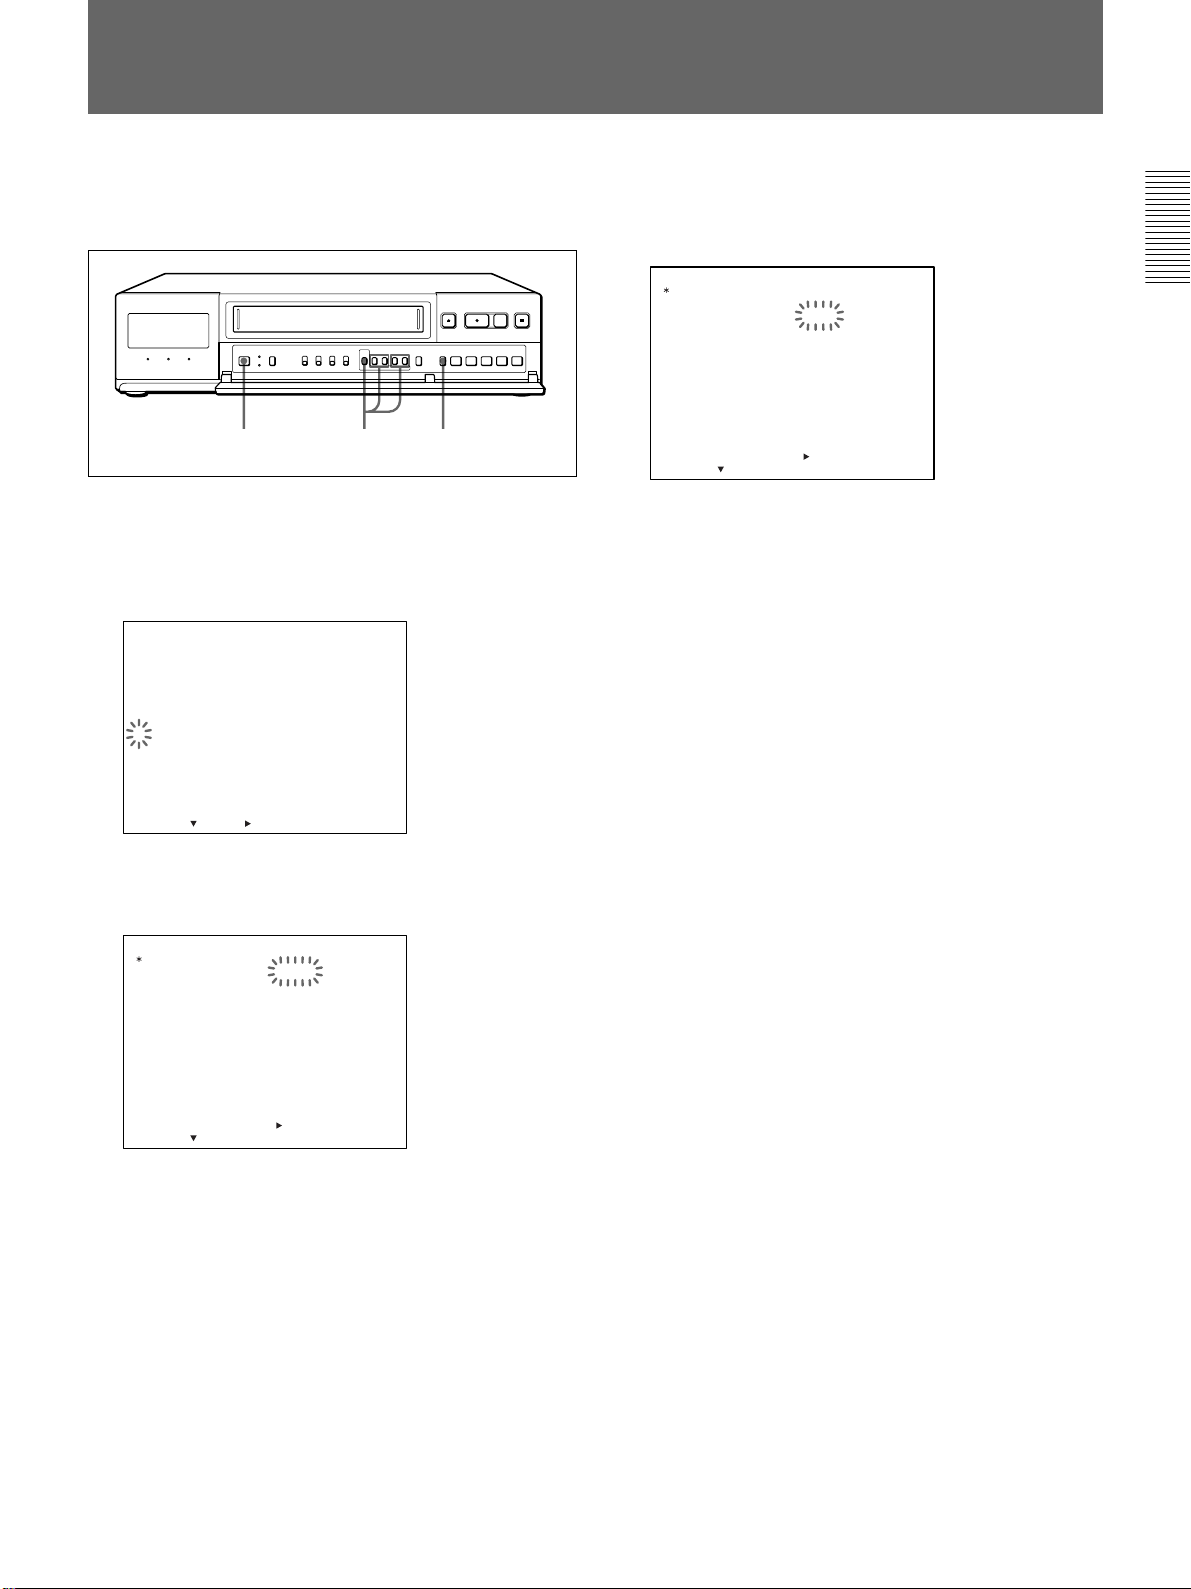
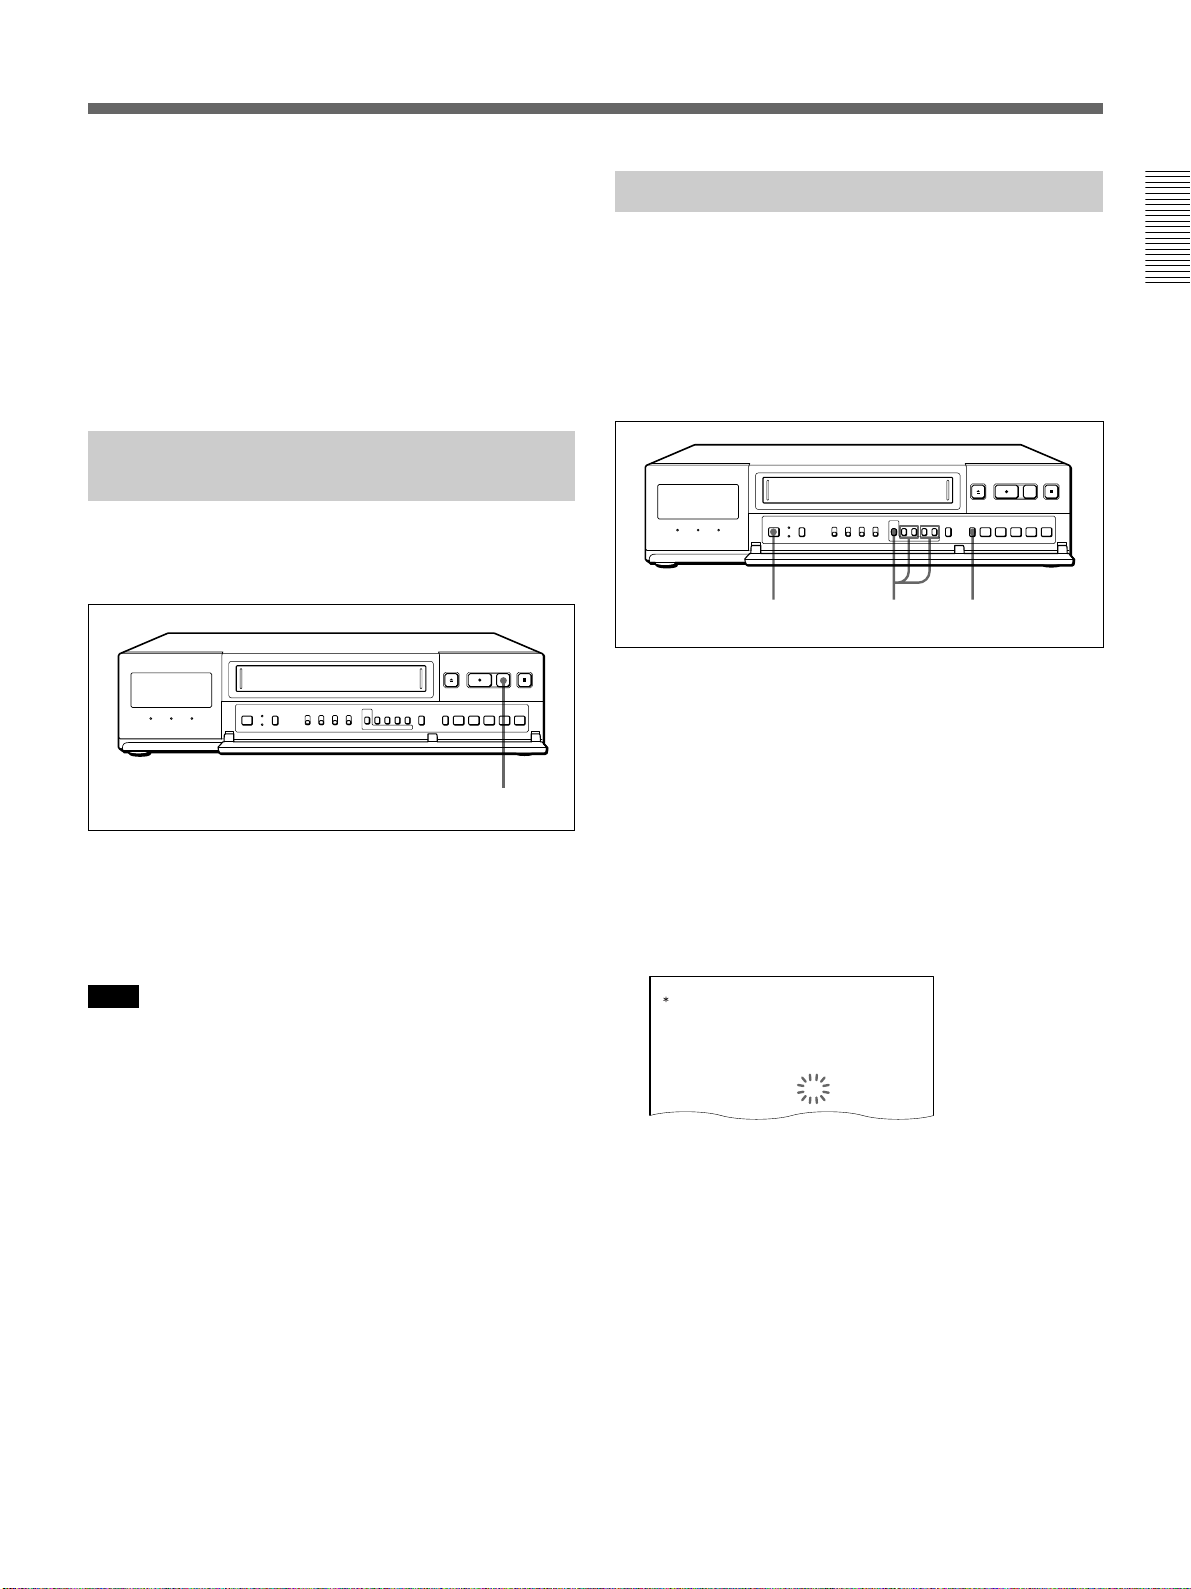
Setting the Time/Date Display
5 Press SEARCH to return to the normal display.
You can display five items of information (date, time,
recording/playback speed, number of alarm recordings
and warning display) and turn off each item which you
do not want to display.
1 Turn on the power of the equipment to be used.
2 Press MENU and MENU
MENU flashes on the monitor screen.
<
1. LANGUAGE
CLOCK SET
DAYLIGHT SET
2. DISPLAY SET
BUZZER
SW OUT
3. ALARM SET
4. GENERAL SET
5. TIMER SET
6. HOLIDAY SET
7. POWER FAILURE
USED HOUR
8. ALARM DATA
SELECT : NEXT : RETURN : MENU
3 Press MENU
The DISPLAY SET/BUZZER/SW OUT menu
appears.
DISPLAY SET DATE ON
BUZZER ALARM IN ON
SW OUT MODE FIELD
SELECT : DATA SET : +/–RETURN : MENU
MAIN MENU
/
DEW
B
.
TIME ON
SPEED ON
ALARM ON
WARNING ON
TAPE END ON
KEY IN OFF
TIMING 01
6H MODE ON
<NEXT PUSH >
V
until “2” of the MAIN
>
15-06-2000 000
15:20:00 72
Alarm count
Recording/playback
speed
Current time
To return to the MAIN MENU screen from the
current menu
Press MENU again.
To go to the next menu from the current menu
V
Press MENU
press MENU
until “NEXT PUSH B” flashes and
B
.
To turn off the screen display
Set the ON-SCREEN switch to OFF.
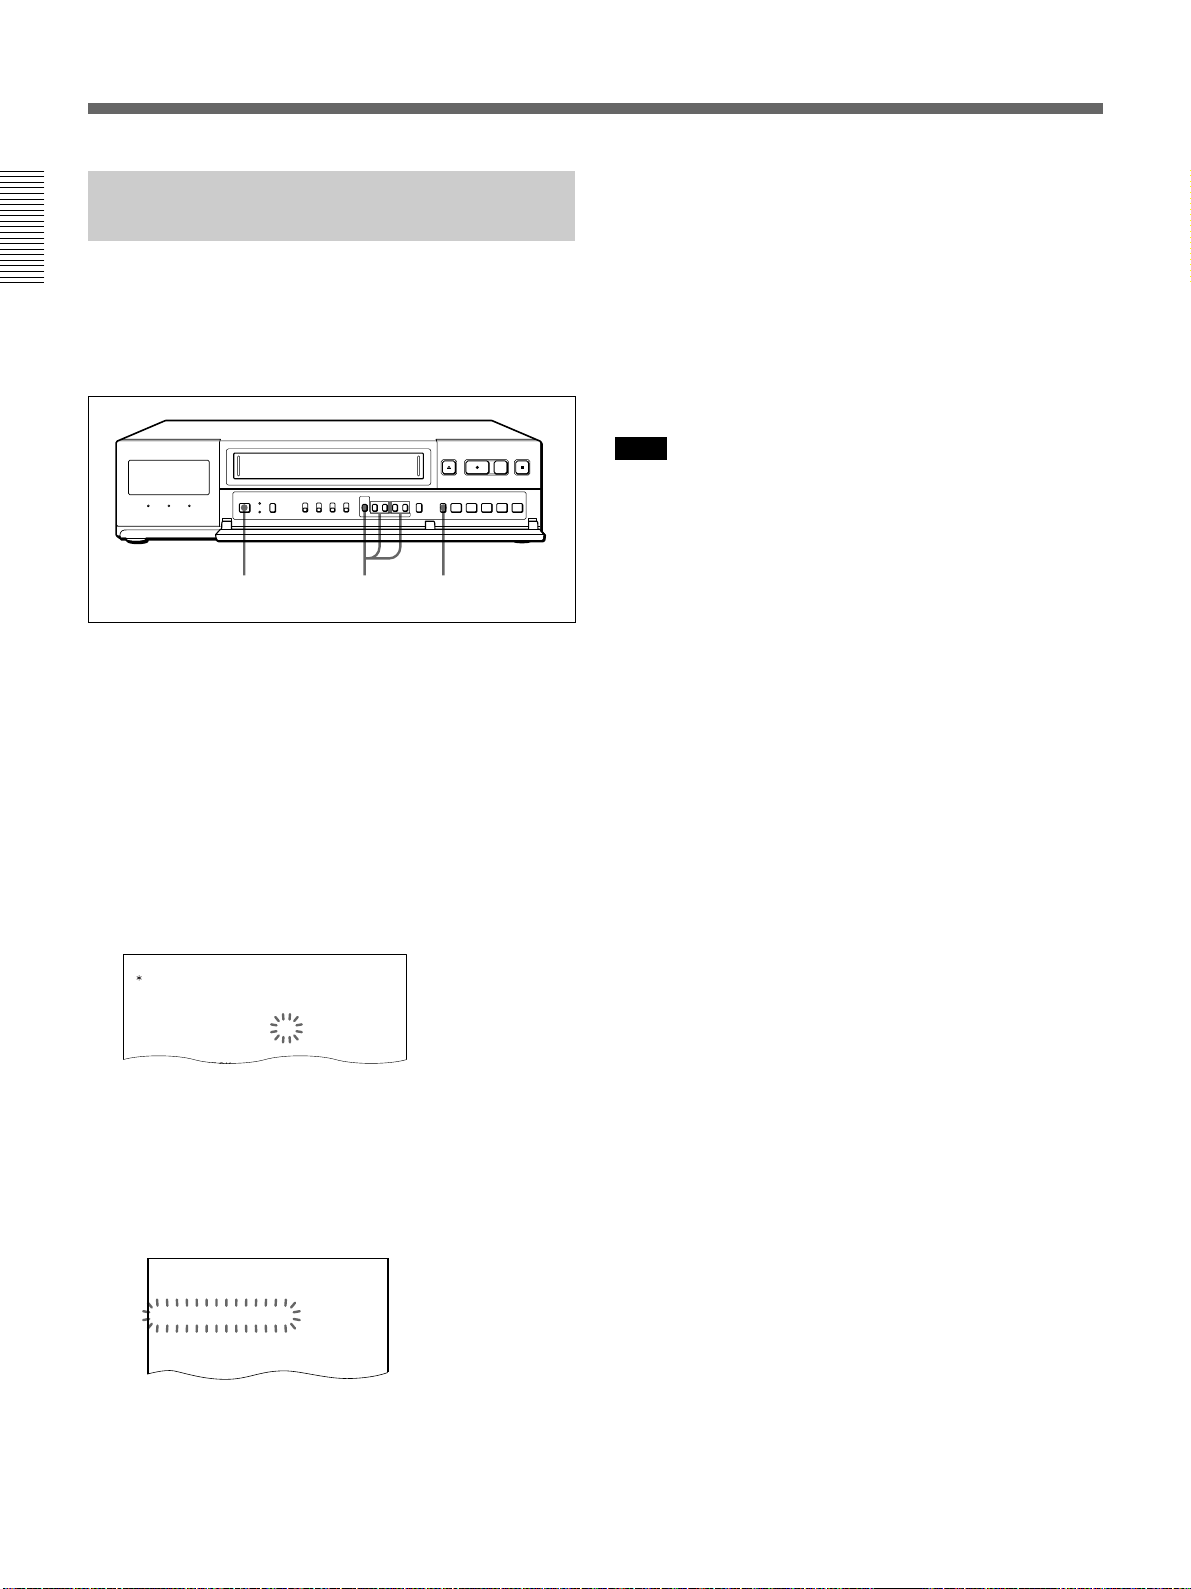
Changing the Display Position of the Time/Date Display
You can change the position of the time/date display
that appears on the monitor screen.
1 Turn on the power of the equipment to be used.
The normal display appears.
Date
06-15-2000 000
15:20:00 72
Alarm count
Recording/
playback speed
Current time
4
Press MENU V to move the flashing to the setting
each DATE, TIME, SPEED, ALARM and
of
WARNING,
MENU + or –
and set to ON or OFF by
.
pressing
Example: When you set the date display to OFF.
DISPLAY SET DATE OFF
BUZZER ALARM IN ON
TIME ON
SPEED ON
ALARM ON
WARNING ON
TAPE END ON
2 Change the display position as follows.
To move the display downwards, press MENU V.
(When the display reaches the bottom of the
screen, the display returns to the top of the screen.)
To move the display rightwards, press MENU B.
(When the display reaches the right-hand edge of
the screen, the display returns to the left-hand edge
of the screen.)
06-15-2000 000
15:20:00 72
Note
While recording, this function does not work.
Press MENU B.
Press MENU V.
15

Setting the Buzzers
You can turn on/off three types of buzzers:
•ALARM IN buzzer: beeps while it receives an
alarm signal. (See “Alarm Recording” for more
information on page 33.)
•TAPE END buzzer: beeps when the tape reaches its
end.
•KEY IN buzzer: beeps when you press a button.
1 2-4 5
1 Turn on the power of the equipment to be used.
2 Press MENU and MENU
MENU flashes on the monitor screen.
<
1. LANGUAGE
CLOCK SET
DAYLIGHT SET
2. DISPLAY SET
BUZZER
SW OUT
3. ALARM SET
4. GENERAL SET
5. TIMER SET
6. HOLIDAY SET
7. POWER FAILURE
USED HOUR
8. ALARM DATA
SELECT : NEXT : RETURN : MENU
MAIN MENU
/
DEW
V
until “2” of the MAIN
>
4
Press MENU V to move the flashing to the setting
each ALARM IN, TAPE END and KEY IN,
of
set to ON or OFF by
DISPLAY SET DATE ON
BUZZER ALARM IN ON
SW OUT MODE FIELD
pressing MENU + or –
TIME ON
SPEED ON
ALARM ON
WARNING ON
TAPE END ON
KEY IN ON
TIMING 01
and
.
5 Press SEARCH to return to the normal display.
To return to the MAIN MENU screen from the
current menu
Press MENU again.
To go to the next menu from the current menu
V
Press MENU
press MENU
until “NEXT PUSH B” flashes and
B
.
3 Press MENU
B
.
The DISPLAY SET/BUZZER/SW OUT menu
appears.
DISPLAY SET DATE ON
BUZZER ALARM IN ON
SW OUT MODE FIELD
SELECT : DATA SET : +/–RETURN : MENU
TIME ON
SPEED ON
ALARM ON
WARNING ON
TAPE END ON
KEY IN OFF
TIMING 01
6H MODE ON
<NEXT PUSH >
16
Handling a Video Cassette
This section shows you how to insert a video cassette
into the VCR.
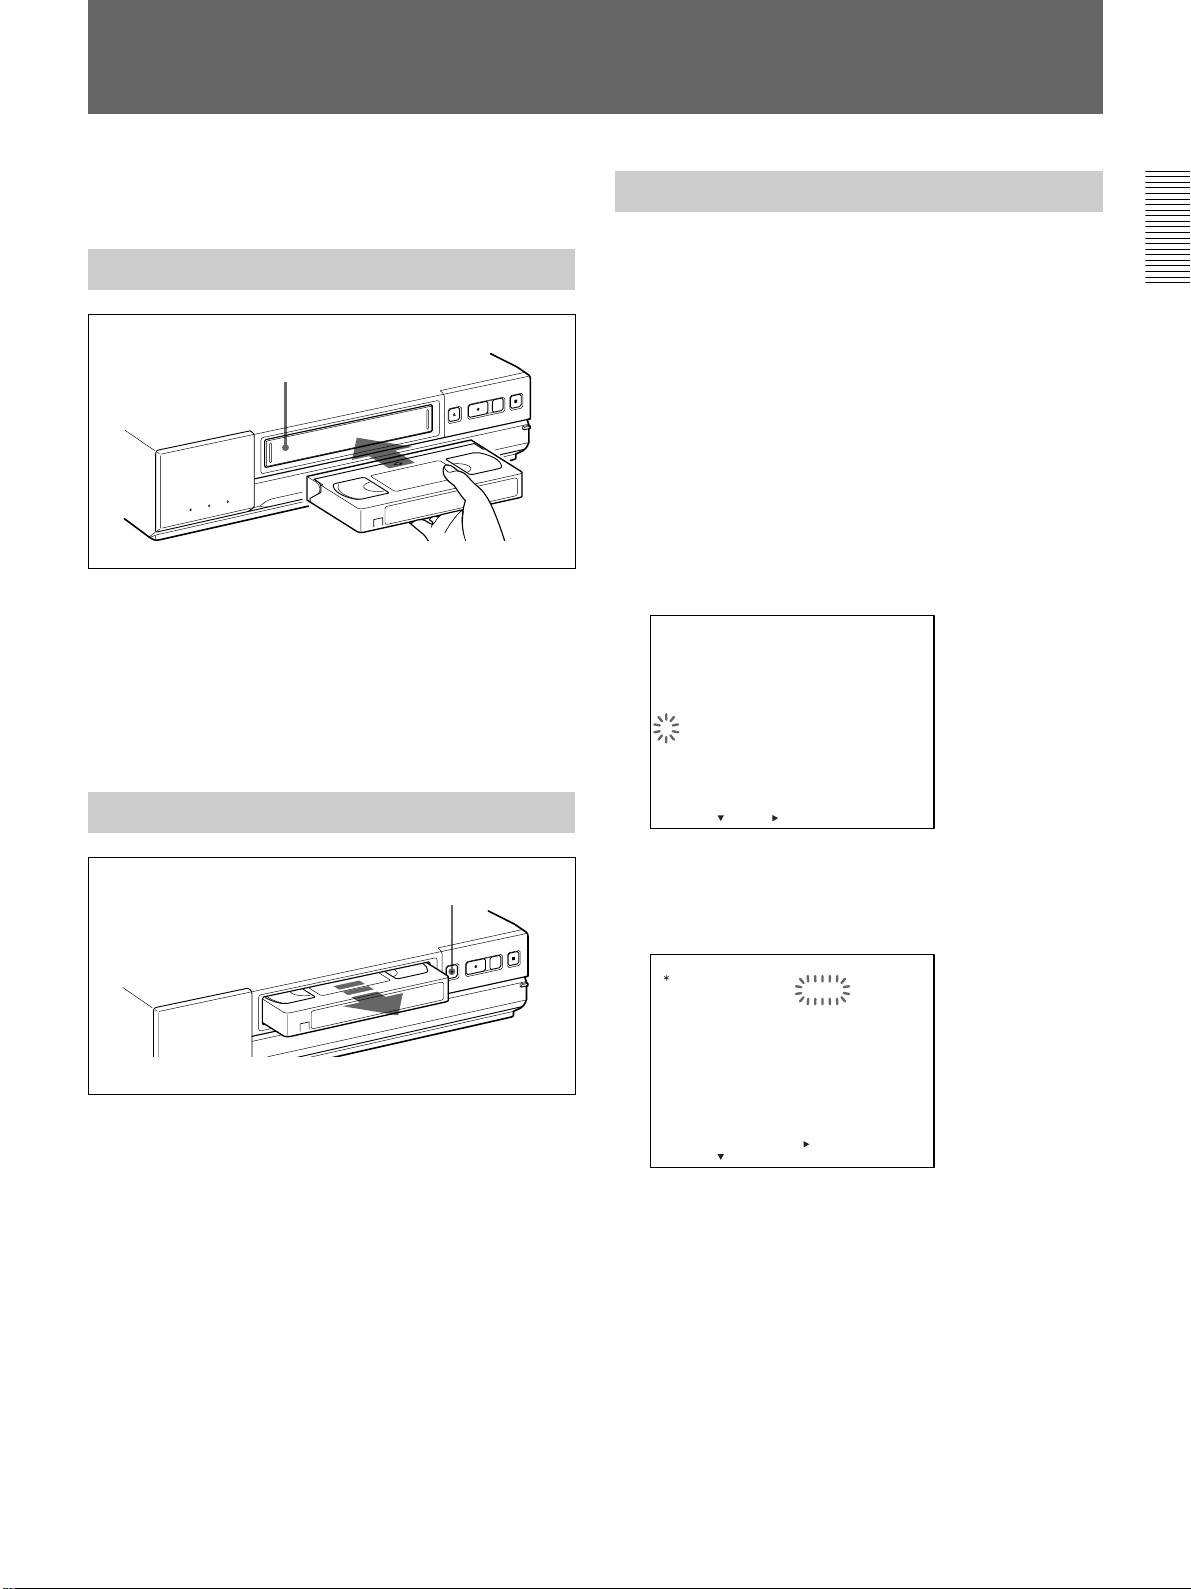
Inserting a Video Cassette
Cassette compartment
Insert the cassette into the cassette compartment by
slowly pressing its center with the arrow on the top.
When the cassette is inserted, the VCR automatically
turns on and the q indicator lights in the display
window.
If you insert the cassette without its safety tab for
recording, the VCR ejects the cassette automatically.
Ejecting a Video Cassette
Selecting the Tape
This VCR is designed and calibrated with 120-mimute
or 160-minute tape (T-120 or T-160). To ensure stable
operation and optimum picture quality, we recommend
that you use a Sony 120-minute tape for recording for
more than 40-hour recording mode.
To select the tape
You can select either T-120 tape or T-160 tape on the
GENERAL SET menu.
1 Turn on the power of the equipment to be used.
2 Press MENU and MENU
MENU flashes on the monitor screen.
<
1. LANGUAGE
CLOCK SET
DAYLIGHT SET
2. DISPLAY SET
BUZZER
SW OUT
3. ALARM SET
4. GENERAL SET
5. TIMER SET
6. HOLIDAY SET
7. POWER FAILURE
USED HOUR
8. ALARM DATA
SELECT : NEXT : RETURN : MENU
MAIN MENU
/
DEW
V
until “4” of the MAIN
>
EJECT Z
To eject the cassette, press EJECT Z on the VCR.
You can eject the cassette even when the power is off.
When you press EJECT Z, the VCR turns on
automatically.
After ejecting the cassette, the VCR turns off again.
3 Press MENU
B
.
The GENERAL SET menu appears and “T-160 ”
of TAPE flashes.
GENERAL SET
TAPE
TAPE IN
TAPE END
TAPE USED COUNT
CLOCK ADJUST
APC
THREAD CHECK
T
BAUD RATE
SELECT : DATA SET : +/–RETURN : MENU
/
D SEARCH
<
MODE
MODE
NEXT PUSH
4 Set to T-160 or T-120 by pressing
T–160
STOP
REW
OFF
01:00
ON
OFF
CONVENTION
19200
>
MENU + or –.
5 Press SEARCH to return to the normal display.
To return to the MAIN MENU screen from the
current menu
Press MENU again.
To go to the next menu from the current menu
V
Press MENU
press MENU
until “NEXT PUSH B” flashes and
B
.
17
Handling a Video Cassette
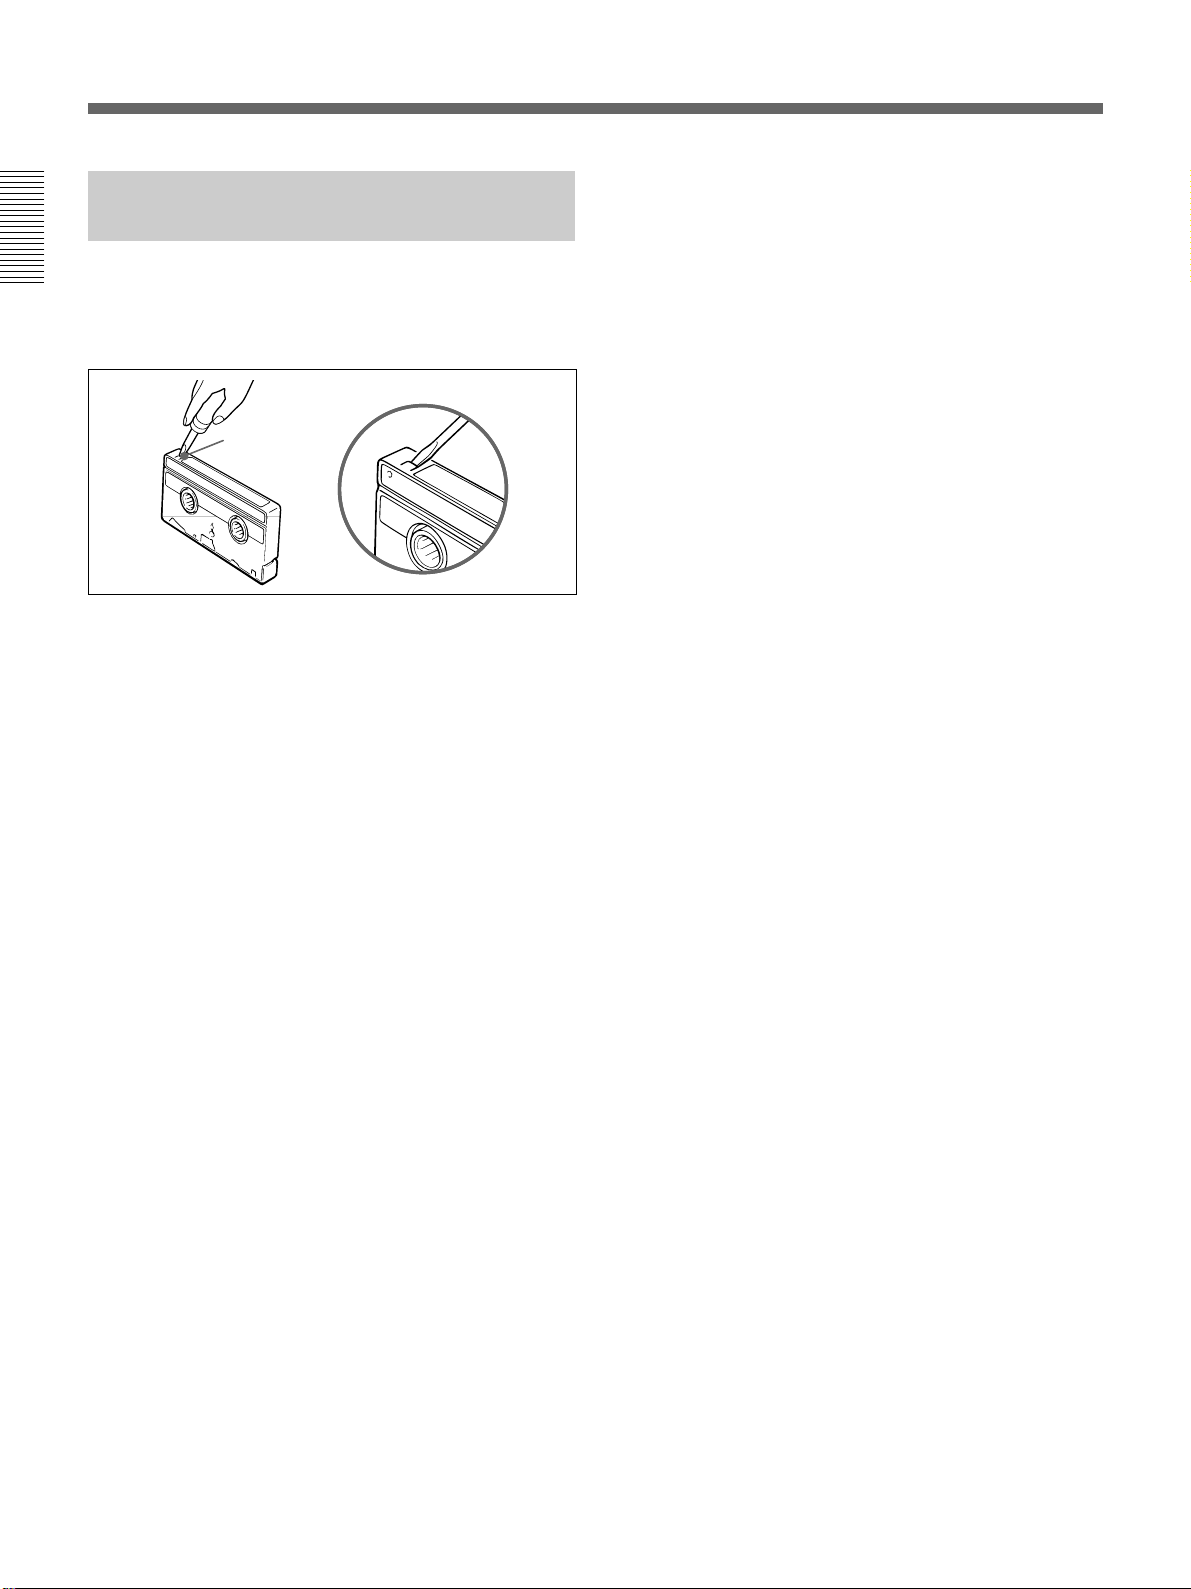
Protecting Your Cassette from Being Erased
Remove the tab on the cassette with a screwdriver or a
similar tool as shown below. This protects your
cassette against an accidental recording.
Safety
tab
If you want to record again on the cassette without its
safety tab, simply cover the safety tab hole with a
piece of plastic tape.
18
Setting the Operation Mode
You can set the mode for the VCR when a video
cassette is inserted on the GENERAL SET menu.
1 2-4 5
1 Turn on the power of the equipment to be used.
2 Press MENU and MENU
MENU flashes on the monitor screen.
<
1. LANGUAGE
CLOCK SET
DAYLIGHT SET
2. DISPLAY SET
BUZZER
SW OUT
3. ALARM SET
4. GENERAL SET
5. TIMER SET
6. HOLIDAY SET
7. POWER FAILURE
USED HOUR
8. ALARM DATA
SELECT : NEXT : RETURN : MENU
3 Press MENU
The GENERAL SET menu appears.
MAIN MENU
/
DEW
B
.
V
until “4” of the MAIN
>
4 Press MENU V
to move the flashing to the setting
of TAPE IN MODE and set STOP or REC by
pressing MENU + or –.
GENERAL SET
TAPE
TAPE IN
TAPE END
TAPE USED COUNT
CLOCK ADJUST
APC
THREAD CHECK
T
BAUD RATE
SELECT : DATA SET : +/–RETURN : MENU
/
D SEARCH
<
MODE
MODE
NEXT PUSH
T–160
STOP
REW
OFF
01:00
ON
OFF
CONVENTION
19200
>
STOP: the VCR enters stop mode when a video
cassette is inserted.
REC: the VCR enters recording mode when a
video cassette is inserted.
5 Press SEARCH to return to the normal display.
To return to the MAIN MENU screen from the
current menu
Press MENU again.
To go to the next menu from the current menu
V
Press MENU
press MENU
until “NEXT PUSH B” flashes and
B
.
GENERAL SET
TAPE
TAPE IN
TAPE END
TAPE USED COUNT
CLOCK ADJUST
APC
THREAD CHECK
T
BAUD RATE
SELECT : DATA SET : +/–RETURN : MENU
/
D SEARCH
<
MODE
MODE
NEXT PUSH
T–160
STOP
REW
OFF
01:00
ON
OFF
CONVENTION
19200
>
19
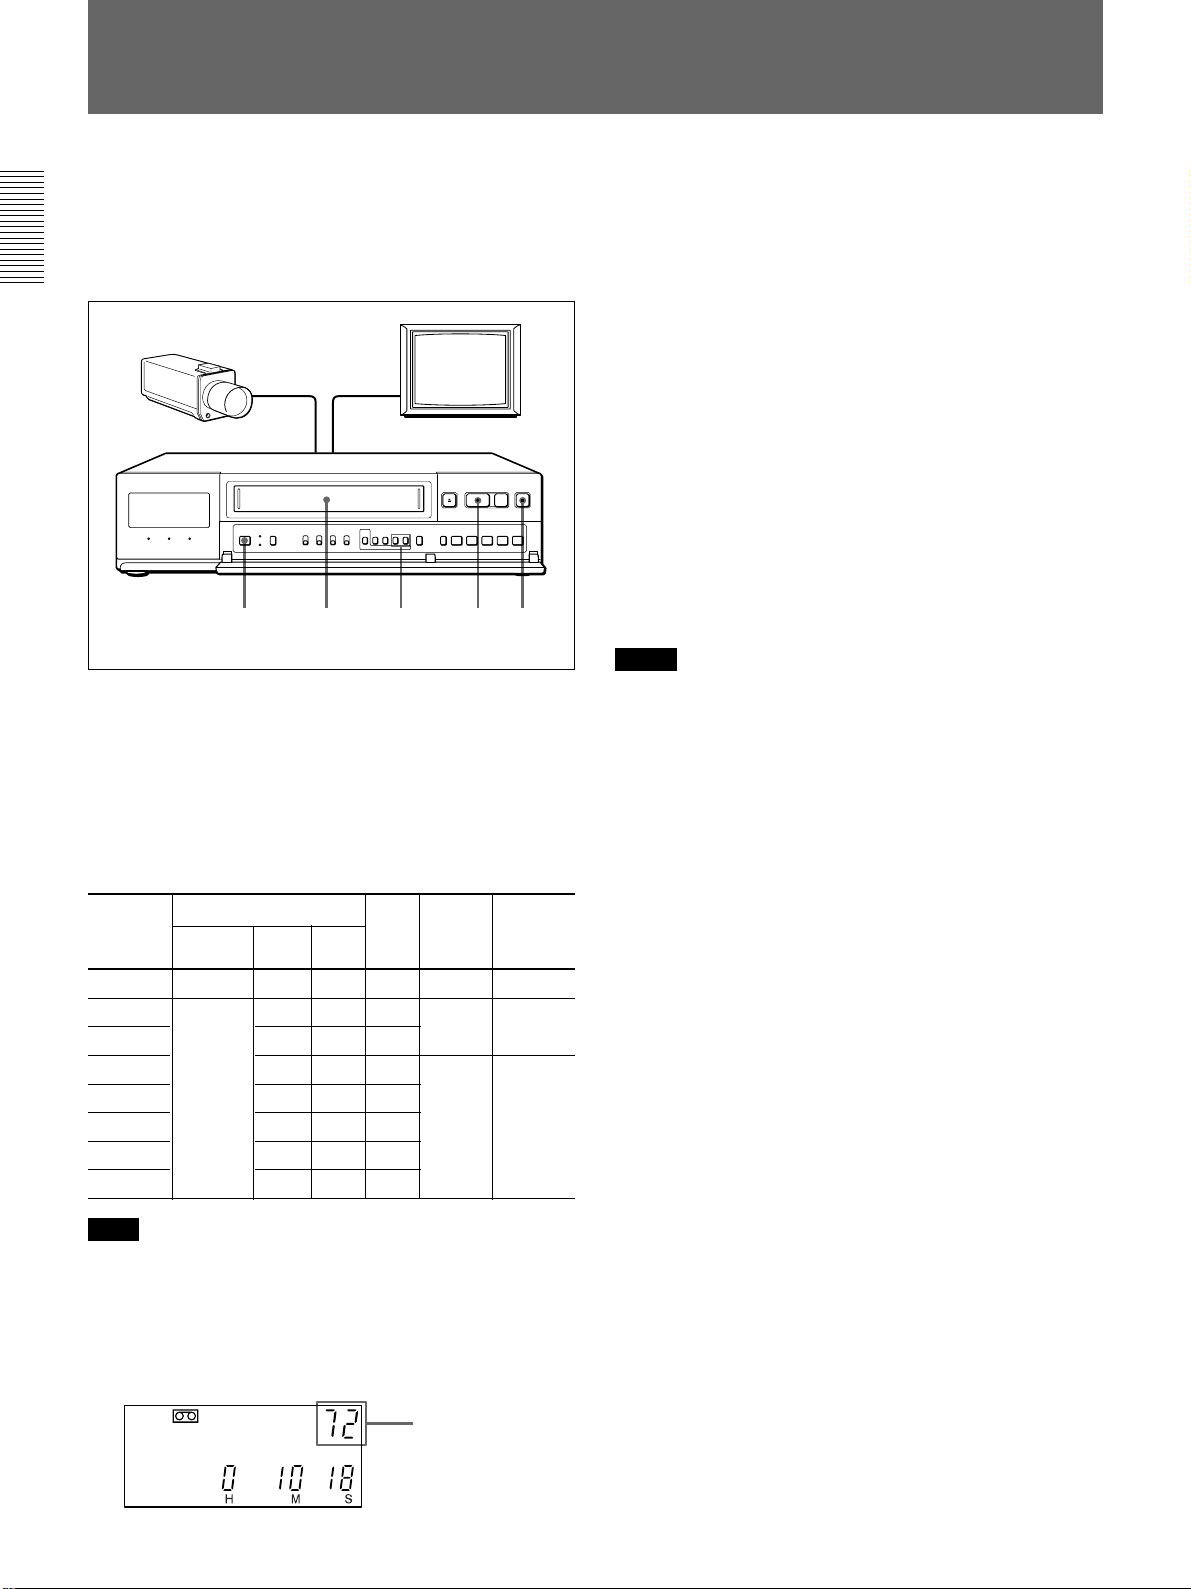
Recording
This section shows you how to record the signal from
the video camera in the normal or time lapse mode, to
set the security lock and to record repeatedly on the
same cassette.
12 43
STOP
x
1 Turn on the power of the equipment to be used.
2 Insert the cassette.
3 Set the recording speed by pressing REC/PLAY
SPEED + or –.
The recording speed changes depending on the
tape used (T-120 or T-160 tape).
Recording Maximum recording time Interval Audio Tape
speed recording motion
6 (8) EP mode 6 8 1/60
18 (24) 18 24 1/20
30 (40) 30 40 1/12
48 (64) 54 72 0.15
72 (96) 78 104 0.22
96 (128) 102 136 0.28
120 (160) 126 168 0.35
168 (224) 174 232 0.48
Note
When using a T-120 tape in 48H, 72H, 96H, 120H and
168H modes, it is possible to record additionally 6 hours
longer than the displayed recording time.
When using a T-160 tape in 64H, 96H, 128H, 160H and
244H modes, it is possible to record additionally 8 hours
longer than the displayed recording time.
Time
lapse
mode
T-120
tape
T-160
tape
Possible
Impossible
Continuous
Intemittent
4 Press REC z.
Recording starts.
To stop recording
Press STOP x.
If recording does not start and the cassette is
ejected
The tab on the cassette is removed to protect against
accidental recording.
Displaying the real time (in recording or stop
mode only)
Set the REAL TIME/COUNTER switch to REAL
TIME. The real time will be displayed in the display
window. In playback mode, the display shows the tape
counter regardless of the switch position.
Notes
• This VCR records the picture in the EP mode even if you
set the recording speed to “6H” or “8H”.
This VCR cannot record in the SP mode.
• Whenever you insert a tape and first start recording,
Adaptive Picture Control (APC) automatically improves
recording quality by adjusting the VCR to the condition of
the video heads and tape. To activate this function, set
APC in the GENERAL SET menu to ON (see page 40).
There is about a 6-second delay before the VCR actually
starts recording when REC z is pressed.
• This VCR is provided with a clog detection function. In
time lapse mode, if recording is not made properly, the
recording indicator will flash on the display window and a
warning signal will be output from the WARNING OUT
terminal. In this case, stop recording immediately and
check the VCR.
• If ALARM DATA REC in the ALARM SET menu and/or
TAPE USED COUNT in the GENERAL SET menu is set
to ON, the VCR will rewind the tape and recording will
start from the beginning of the tape. While the VCR is
rewinding the tape, “<ALARM DATA REC>” and/or
“<TAPE USED COUNT>” flashes on the monitor screen.
• While both TAPE USED COUNT and ALARM DATA
list are being recorded, the REC indicator in the display
window goes out momentarily.
20
Recording speed
In the display window
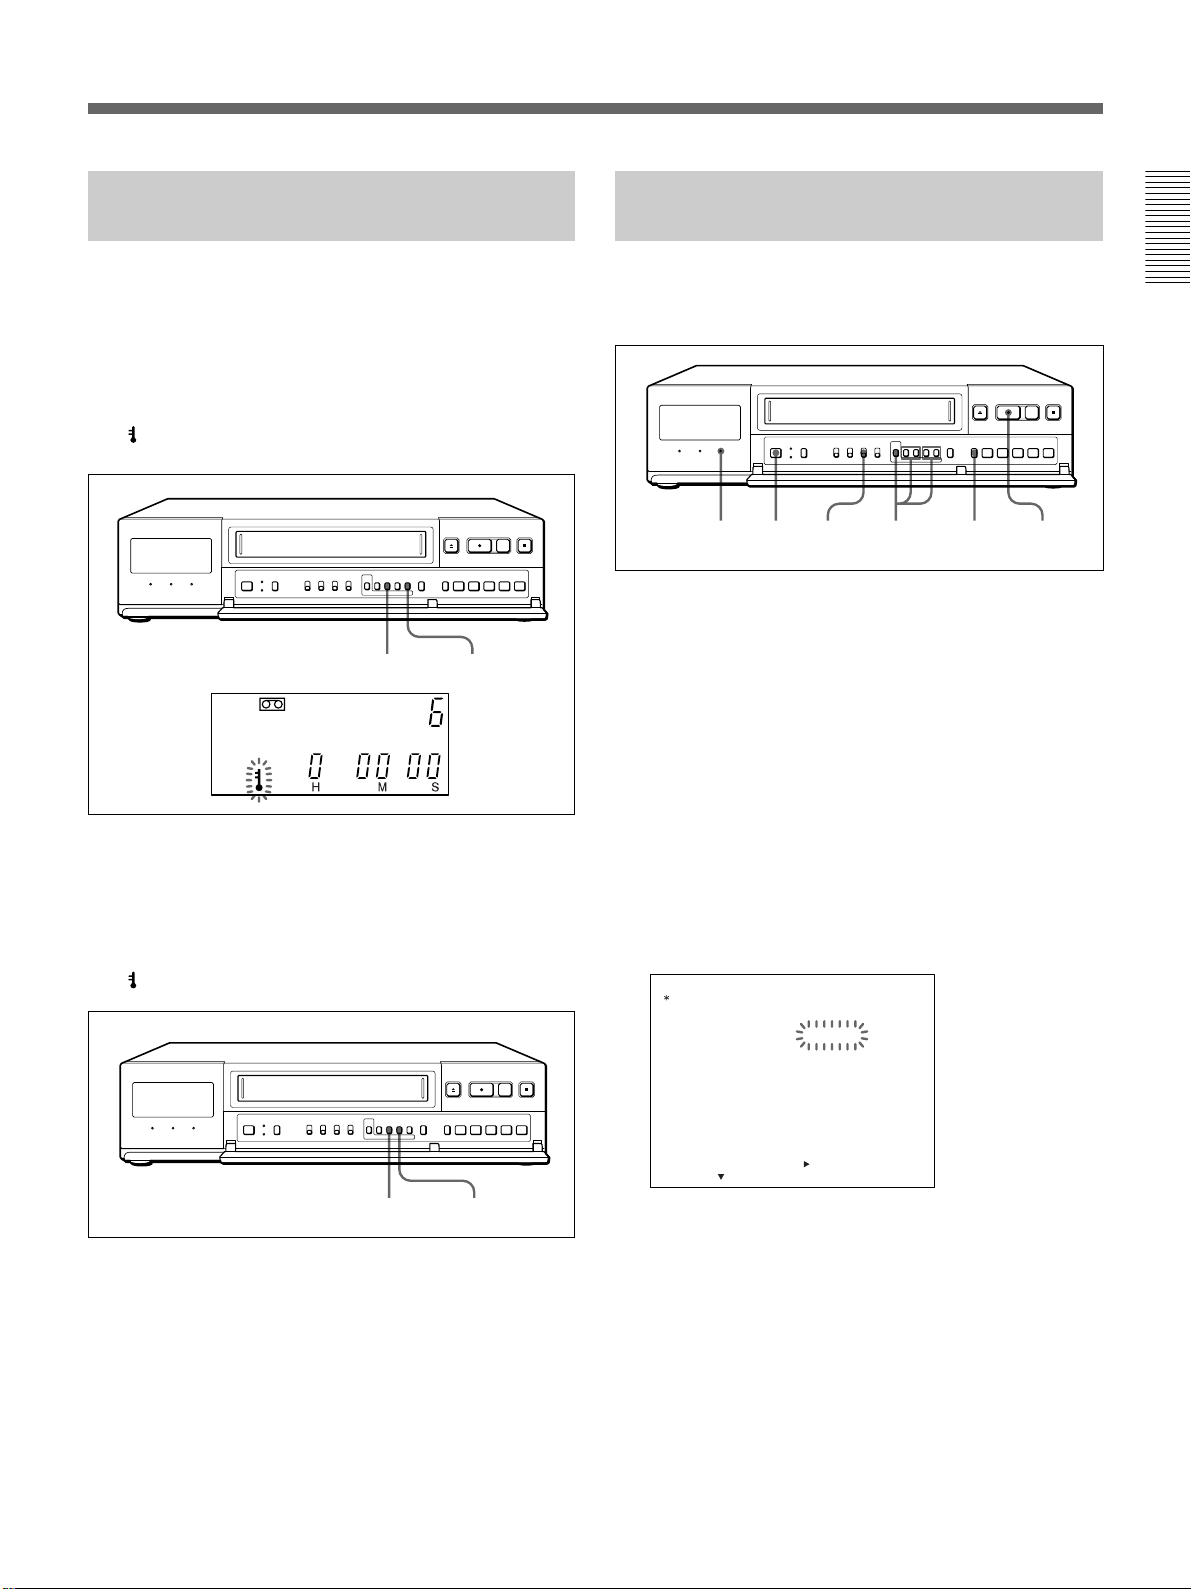
Locking the Record Mode — Security Lock Function
Recording on the Same Cassette Repeatedly — Repeat Recording
Locking the record mode is useful to guard against
accidental recording interruptions when the VCR is
used for surveillance or monitoring purposes.
To set the security lock
B
While pressing MENU
indicator lights in the display window.
The
, press MENU +.
MENU
B
MENU +
The security lock function also works in timer
recording and playback modes.
To release the security lock
B
While pressing MENU
indicator turns off.
The
, press MENU –.
You can record on the same cassette repeatedly in two
different modes: REPEAT 1 and REPEAT 2.
REPEAT
indicator
2
1 3-5 6 7
1 Turn on the power of the equipment to be used.
2 Set REPEAT REC to ON.
The REPEAT indicator lights.
3 Press MENU and MENU
MENU flashes on the monitor screen.
4 Press MENU
The GENERAL SET menu appears.
5
Press MENU V to move the flashing to the setting
TAPE END MODE
of
REPEAT 2 by
GENERAL SET
TAPE
TAPE IN
TAPE END
TAPE USED COUNT
CLOCK ADJUST
APC
THREAD CHECK
/
D SEARCH
T
B
.
pressing MENU + or –
MODE
MODE
T–160
STOP
REPEAT 1
OFF
01:00
ON
OFF
CONVENTION
V
until “4” of the MAIN
and set to REPEAT 1 or
.
MENU BMENU –
BAUD RATE
<
SELECT : DATA SET : +/–RETURN : MENU
NEXT PUSH
19200
>
REPEAT 1: If an alarm input is received during
repeat recording, the recording mode switches to
alarm recording. After the end of the tape is
reached, the tape is automatically rewound and
stops at the beginning. The OFF indicator lights
in the display window.
REPEAT 2: If an alarm input is received during
repeat recording, the recording mode switches to
alarm recording. Repeat recording is performed
regardless of whether an alarm input is received
or not.
21
Recording
6 Press SEARCH to return to the normal display.
7 Press REC z.
Recording begins.
Note
If the REPEAT REC switch is set to OFF while repeat
recording is in progress, recording proceeds until the end of
the tape is reached and then stops automatically after the
tape is rewound to the beginning. The OFF indicator lights
in the display window.
To return to the MAIN MENU screen from the
current menu
Press MENU again.
To go to the next menu from the current menu
V
Press MENU
press MENU
until “NEXT PUSH B” flashes and
B
.
Series Recording
Connect another SVT-168E for series recording (for
details on connection, see page 9) and set each of the
units as follows.
Item Unit #1 Unit #2 Unit #3 and
subsequent
unit
SERIES REC on ON ON ON
ALARM SET menu
TAPE END WARN. on COUNTER COUNTER COUNTER
ALARM SET menu
Cassette tape Loaded Loaded Loaded
Operating status Recording Turned off Turned off
REPEAT REC OFF OFF OFF
Security lock Locked Locked Locked
Timer recording
When all of the settings are complete, set unit #1 in
recording mode and turn off the power of unit #2 and
subsequent unit.
When recording on unit #1 is complete, the power for
unit #2 turn on and recording begins (The recording
cannot be done for about 11 seconds.).
The unit #1 rewinds its tape and turns off.
Deactivated Deactivated Deactivated
When a T-120 or T-160 tape is used and TAPE END
WARN. is set to COUNTER, the unit #2 starts
recording before the unit #1 stops so that recording is
continued without stop.
Note
For series recording, set SERIES REC in the ALARM SET
menu to ON. If it is set to OFF, recording cannot be done
even if a signal is input to the SERIES IN terminal.
22
Recording after Power Interruption
POWER
DEW
FAI LUER
FAI LUE
RESUME
ON
OFF
:
15002 12–20
015
07
:
3012–20 07
:
0012–10 11
:
0012–20 12
or Moisture Condensation
This shows a count of the power interruption and
moisture condensation and the period when the
recording was interrupted.
If a power interruption occurs, the P indicator lights in
the display window and if a moisture condensation
occurs, the “dddd” indicator flashes. Even if a power
interruption or moisture condensation occurs while
recording, the internal batteries provide backup power
for memory for at least 30 days. The internal batteries
can be charged in about 48 hours.
If the power is interrupted during recording, the
recording starts automatically after power is restored.
To check power interruptions or moisture
condensation
Count of power interruption
No recording
periods
Count of moisture condensation
To return to the MAIN MENU screen from the
current menu
Press MENU again.
To go to the next menu from the current menu
V
Press MENU
press MENU
until “NEXT PUSH B” flashes and
B
.
To clear the P indicator
12 43
1 Turn on the power of the equipment to be used.
2 Press MENU and MENU
MENU flashes on the monitor screen.
3 Press MENU
The POWER FAILURE/DEW/USED HOUR
menu appears.
B
.
V
until “7” of the MAIN
4 Press SEARCH to return to the normal display.
MENU RESET
Press MENU RESET.
To clear the power interruption/moisture
condensation data
V/B
Press MENU and MENU
until the POWER
FAILURE/DEW/USED HOUR menu appears and
press MENU RESET with pointed object.
23

Recording
USED HOUR
VI DEO HEAD
POWER ON
H
H
ON
OFF
RETURN : MENU
<
NEXT PUSH
>
015
:
0010 12 11
:
0012–20
00000
00000
12
Checking the Used Time
1 Turn on the power of the equipment to be used.
2 Press MENU and MENU
MENU flashes on the monitor screen.
3 Press MENU
The POWER FAILURE/DEW/USED HOUR
menu appears.
VIDEO HEAD: the amount of time the video head
has been used.
POWER ON: the amount of time the power has
been on.
B
.
V
until “7” of the MAIN
4 Press SEARCH to return to the normal display.
Setting the Mode at the End of the Tape
You can set the mode of the tape operation when the
tape comes to the end during recording in the
GENERAL SET menu.
When the REPEAT REC switch is set to OFF
1 2-4 5
1 Turn on the power of the equipment to be used.
2 Press MENU and MENU
MENU flashes on the monitor screen.
V
until “4” of the MAIN
3 Press MENU
B
.
The GENERAL SET menu appears.
4
Press MENU V to move the flashing to the setting
TAPE END MODE
of
pressing MENU + or –
GENERAL SET
TAPE
TAPE IN
TAPE END
TAPE USED COUNT
CLOCK ADJUST
APC
THREAD CHECK
T
BAUD RATE
SELECT : DATA SET : +/–RETURN : MENU
/
D SEARCH
<
MODE
MODE
NEXT PUSH
and set to REW or STOP by
.
T–160
STOP
REW
OFF
01:00
ON
OFF
CONVENTION
19200
>
REW: when the tape comes to the end, the VCR
rewinds the tape automatically and enters stop
mode at the beginning of the tape.
STOP: when the tape comes to the end, the VCR
enters stop mode at once.
5 Press SEARCH to return to the normal display.
24
Note
Even if TAPE END MODE is set to STOP, the VCR
operates according to the settings of ALARM DATA REC
and/or TAPE USED COUNT if those settings are set to ON.
When the tape reaches the end
GENERAL SET
TAPE
TAPE IN
TAPE END
MODE
MODE
TAPE USED COUNT
CLOCK ADJUST
APC
THREAD CHECK
T
/
D SEARCH
T–160
STOP
REW
OFF
01:00
ON
ON
CONVENTION
The OFF indicator lights in the display window.
Press EJECT Z, REC z, FF M, REW m or
PLAY B to turn off the OFF indicator.
When the REPEAT REC switch is set to ON
Follows the steps 2 through 6 in “Recording on the
Same Cassette Repeatedly — Repeat Recording” on
page 21.
Monitoring the Recording Condition
You can check the recording condition by pressing
REC CHECK while recording in time lapse mode.
Checking the tape thread
To ensure correct operation, the VCR automatically
checks the tape threading whenever you insert a tape,
and it takes about 5 seconds. If an error is detected, the
VCR ejects the tape.
If you consider it necessary to check the tape
threading, you can set it in the GENERAL SET menu.
1 2-4 5
1 Turn on the power of the equipment to be used.
REC CHECK
Press REC CHECK while recording.
After the tape is rewound for about three seconds and
played back for about two seconds, the unit returns to
the original recording mode.
Note
While monitoring the recording condition, recording is
interrupted.
2 Press MENU and MENU
V
until “4” of the MAIN
MENU flashes on the monitor screen.
3 Press MENU
B
.
The GENERAL SET menu appears.
4
Press MENU V to move the flashing to the setting
THREAD CHECK
of
thread check function by
and set to ON to activate the
pressing MENU + or –
.
5 Press SEARCH to return to the normal display.
To return to the MAIN MENU screen from the
current menu
Press MENU again.
To go to the next menu from the current menu
V
Press MENU
press MENU
until “NEXT PUSH B” flashes and
B
.
25
GENERAL SET
TAPE
TAPE IN
TAPE END
MODE
MODE
TAPE USED COUNT
CLOCK ADJUST
APC
T–160
STOP
REW
ON
01:00
ON
Recording
Checking the Number of Times the Tape Was Used
You can check how many times the tape has been used
in the GENERAL SET menu. The number of times
will be displayed on the display window. The number
of times is recorded on the beginning of the tape.
1 2-4 5
1 Turn on the power of the equipment to be used.
2 Press MENU and MENU
MENU flashes on the monitor screen.
V
until “4” of the MAIN
5 Press SEARCH to return to the normal display.
To return to the MAIN MENU screen from the
current menu
Press MENU again.
To go to the next menu from the current menu
V
Press MENU
press MENU
Note
While recording of the TAPE USED COUNT is in progress,
the REC indicator lights in the display window.
until “NEXT PUSH B” flashes and
B
.
3 Press MENU
B
.
The GENERAL SET menu appears.
4
Press MENU V to move the flashing to the setting
TAPE USED COUNT
of
MENU + or –
.
and set to ON by
ON: when the tape is inserted, the VCR
automatically rewinds the tape and the number
of times the tape was used will appear on the
display window. While the VCR is rewinding
the tape, “<T-USED COUNT>” flashes on the
monitor screen.
<
T-USED COUNT
>
pressing
OFF: the VCR starts recording from the point the
26
tape is at when it is inserted.
Timer Recording
You can set the timer recording to either: day-of-the-
week recording or daily recording.
Before starting, make sure that the time and date are
set properly. (See page 13.)
The setting of each line of WEEK except EXT (the
lowest line) changes as follows using MENU +:
SUN t MON t TUE t WED t THU t FRI t
SAT t MON-SUN t MON-SAT t MON-FRI t
SUN....
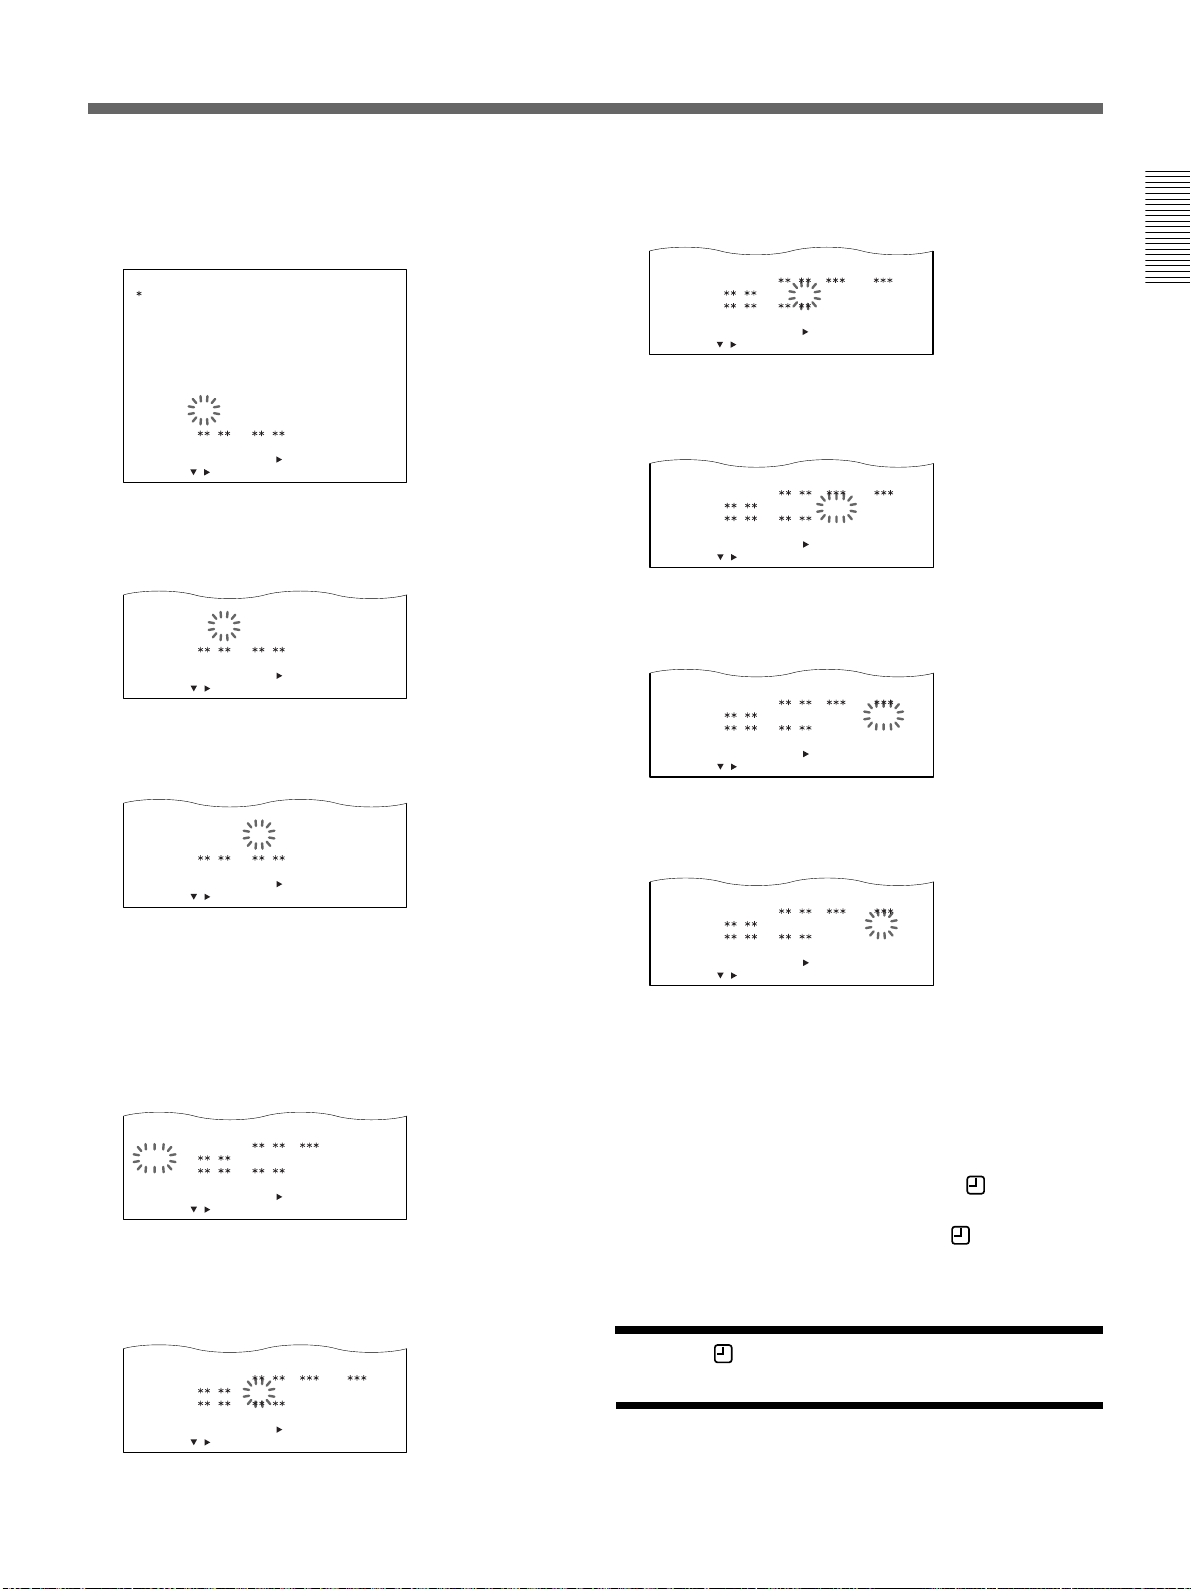
Day-of-the-Week Recording
Example 1:
Making a recording from 8:00 on Tuesday to 17:00 the
same day with the recording speed set to 24-hour mode
using an T-160 tape.
WEEK STRAT
STOP SPEED
––––
––––
:
:
SUN
––––
––––
:
:
MON ––– OFF
0008
0017
:
:
TUE
––––
W
ED
THU ––– OFF
FRI –– – OFF
SAT ––– OFF
MON–SUN ––– OFF
EXT
:
––––
:
––––
––––
:
:
––––
––––
:
:
––––
:
––––
:
––––
:
––––
:
:
:
SUN MON TUE WED THU FRI SAT
––– OFF
24 ON
––– OFF
––– OFF
4 Press
MENU V
to move the flashing to the line of
WEEK you want and set TUE by pressing MENU
+ or –.
TIMER SET
START STOP SPEED
WEEK
SUN
MON
TUE
W
ED
THU
FRI
5 Press MENU
:
:
––––
:
––––
––––
:
––––
:
––––
:
––––
:
––– OFF
––––
:
––– OFF
––––
:
––– OFF
––––
:
––– OFF
––––
:
––– OFF
––––
:
––– OFF
––––
B
to move the flashing to the hour
position of START.
TIMER SET
WEEK
START STOP SPEED
SUN
MON
TUE
W
ED
THU
FRI
SAT
:
––––
:
––––
––––
:
––––
:
––––
:
––––
:
––––
:
:
––––
:
––––
:
––––
:
––––
:
––––
:
––––
:
––––
––– OFF
––– OFF
––– OFF
––– OFF
––– OFF
––– OFF
––– OFF
6 Set the start hour by pressing MENU + or – and
B
press MENU
TIMER SET
WEEK
START STOP SPEED
SUN
MON
TUE
W
ED
THU
FRI
.
:
:
––––
:
––––
:
––08
:
––––
:
––––
:
––––
––––
––––
:
––––
:
––––
:
––––
:
––––
:
––––
––––
––– OFF
––– OFF
––– OFF
––– OFF
––– OFF
––– OFF
–––
1 14 5 2-11 12
1 Turn on the power of the equipment to be used.
2 Press MENU and MENU
MENU flashes on the monitor screen.
3 Press MENU
The TIMER SET menu appears.
TIMER SET
WEEK
SUN
MON
TUE
W
ED
THU
FRI
SAT
MON–SUN
EXT
SELECT : DATA SET :
B
.
START STOP SPEED
<
/
:
:
––––
––––
:
:
––––
––––
:
––––
:
––––
:
––––
:
––––
:
––––
:
––––
:
––––
:
––––
:
––––
:
––––
:
––––
:
––––
:
:
NEXT PUSH
>
+
/–RETURN : MENU
V
–––
OFF
––– OFF
––– OFF
––– OFF
––– OFF
––– OFF
––– OFF
––– OFF
––– OFF
until “5” of the MAIN
7 Set the start minute by pressing MENU + or – and
B
press MENU
TIMER SET
START STOP SPEED
WEEK
SUN
MON
TUE
W
ED
THU
FRI
SAT
.
:
:
––––
:
––––
:
0008
:
––––
:
––––
:
––––
:
––––
––––
:
––––
:
––––
:
––––
:
––––
:
––––
:
––––
––– OFF
––– OFF
––– OFF
––– OFF
––– OFF
––– OFF
––– OFF
8 Set the stop hour by pressing MENU + or – and
B
press MENU
TIMER SET
START STOP SPEED
WEEK
SUN
MON
TUE
W
ED
THU
FRI
.
:
:
––––
:
––––
:
0008
:
––––
:
––––
:
––––
––––
––––
:
––––
:
––17
:
––––
:
––––
:
––––
––––
––– OFF
––– OFF
––– OFF
––– OFF
––– OFF
––– OFF
–––
27
Timer Recording
9 Set the stop minute by pressing MENU + or – and
B
:
––––
:
––––
:
0008
:
––––
:
––––
:
––––
––––
:
––––
:
––––
:
0008
:
––––
:
––––
:
––––
––––
STOP SPEED
:
––––
:
––––
:
0008
:
––––
:
––––
:
––––
:
––––
.
:
––––
:
––––
:
0017
:
––––
:
––––
:
––––
––––
:
––––
:
––––
:
0017
:
––––
:
––––
:
––––
––––
:
––––
:
––––
:
0017
:
––––
:
––––
:
––––
:
––––
––– OFF
––– OFF
––– OFF
––– OFF
––– OFF
––– OFF
–––
B
.
––– OFF
––– OFF
24 OFF
––– OFF
––– OFF
––– OFF
–––
––– OFF
24 ON
––– OFF
press MENU
TIMER SET
WEEK
START STOP SPEED
SUN
MON
TUE
W
ED
THU
FRI
10
Set the recording speed by pressing MENU + or –
and press MENU
TIMER SET
WEEK
START STOP SPEED
SUN
MON
TUE
W
ED
THU
FRI
11
Select ON to execute the timer recording by
pressing MENU + or –.
TIMER SET
WEEK START
SUN
MON –– – OFF
TUE
W
ED
THU –– – OFF
FRI –– – OFF
SAT ––– OFF
If you want to preset other settings, repeat steps 4
to 11.
12
Press SEARCH to return to the normal display.
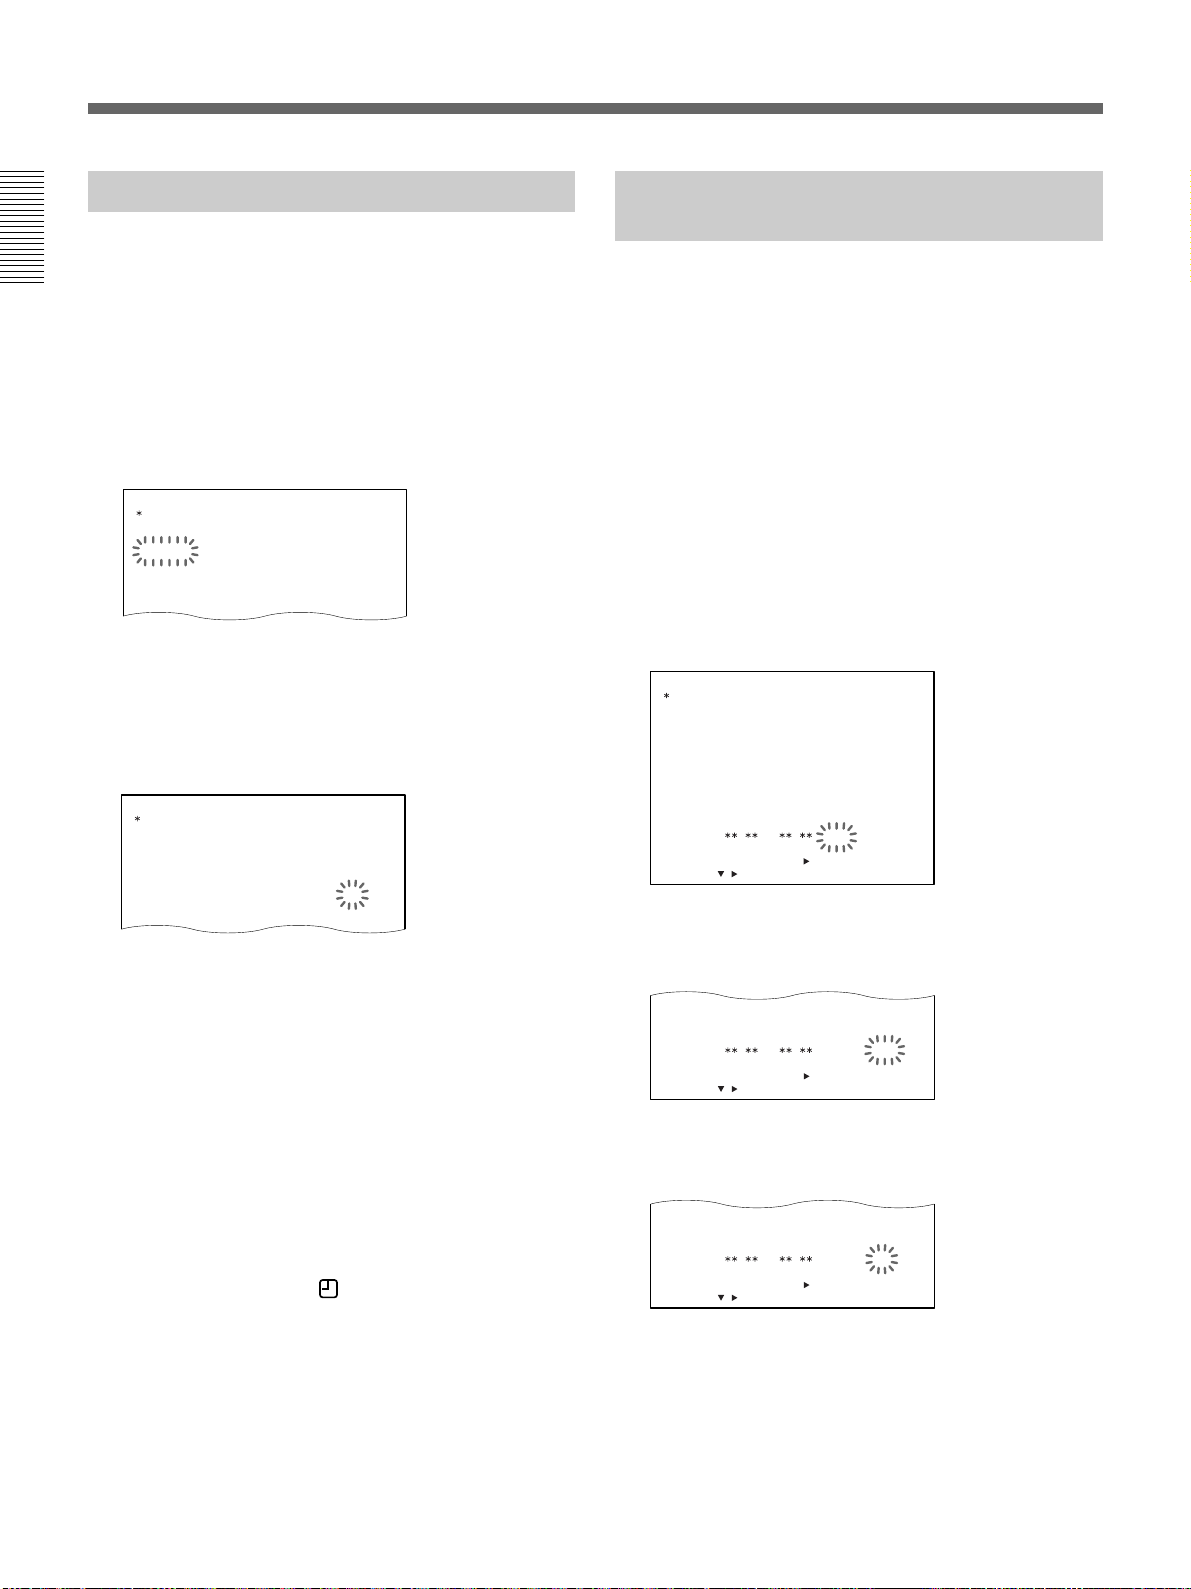
You can set the timer to make a recording for 2 days
using the 7th and 8th lines on the TIMER SET display.
Example 2:
Making a recording from 17:20 on Saturday to 7:50 on
Monday with the recording speed set to 96-hour mode
using an T-160 tape.
Note
To make a recording for 2 days, use the 7th and 8th lines
only.
WEEK START
SUN
MON
TUE
W
ED
THU
FRI
SAT
MON
EXT
STOP SPEED
:
:
––––
––––
:
:
––––
––––
:
:
––––
––––
:
:
––––
––––
:
:
––––
––––
:
:
––––
––––
:
:
2017
:
: 96
5007
::–––
1 15 14 2-12
SUN MON TUE WED THU FRI SAT
––– OFF
––– OFF
––– OFF
––– OFF
––– OFF
––– OFF
ON
OFF
13
1 Turn on the power of the equipment to be used.
2 Press MENU and MENU
MENU flashes on the monitor screen.
V
until “5” of the MAIN
13
Insert the cassette.
14
Press TIMER.
The VCR turns off automatically, and enters the
timer recording standby mode. The
indicator
appears in the display window.
When no cassette is inserted, the
indicator
flashes and a beep sounds.
When the indicator appears in the display
window, the buttons except TIMER does not work.
28
3 Press MENU
B
.
The TIMER SET menu appears.
TIMER SET
START STOP SPEED
WEEK
SUN
MON
TUE
W
ED
THU
FRI
SAT
MON–SUN
EXT
SELECT : DATA SET :
<
/
:
:
––––
––––
:
:
––––
––––
:
––––
:
––––
:
––––
:
––––
:
––––
:
––––
:
––––
:
––––
:
––––
:
––––
:
––––
:
––––
:
:
NEXT PUSH
>
+
/–RETURN : MENU
–––
––– OFF
––– OFF
––– OFF
––– OFF
––– OFF
––– OFF
––– OFF
––– OFF
OFF
TUE
––– OFF
:
:
––––
––––
TUE
OFF
:
:
W
ED
OFF
TUE
OFF
:
:
TUE
OFF
:
:
TUE
––– OFF
:
:
––––
––––
TUE
OFF
:
:
4 Press MENU
V
to move the flashing to the 7th
line, set SAT by pressing MENU + or – and press
B
MENU
TIMER SET
WEEK START
SUN
MON
TUE
W
ED
THU
FRI
SAT
MON–SUN
EXT
SELECT : DATA SET :
.
STOP SPEED
:
––––
:
––––
––––
:
––––
:
––––
:
––––
:
––––
:
––––
:
:
<
NEXT PUSH
/
:
–––
––––
:
––––
:
––––
:
––––
:
––––
:
––––
:
––––
:
––––
:
>
+
/–RETURN : MENU
OFF
––– OFF
––– OFF
––– OFF
––– OFF
––– OFF
––– OFF
––– OFF
––– OFF
5 Set the start hour by pressing MENU + or – and
B
press MENU
W
ED
THU
FRI
SAT
MON–SUN
EXT
SELECT : DATA SET :
/
.
:
:
––––
––––
:
:
––––
––––
:
:
––––
––––
:
:
––17
––––
:
:
––––
––––
:
:
<
NEXT PUSH
+
––– OFF
––– OFF
––– OFF
––– OFF
––– OFF
––– OFF
>
/–RETURN : MENU
6 Set the start minute by pressing MENU + or – and
B
press MENU
W
ED
THU
FRI
SAT
MON–SUN
EXT
SELECT : DATA SET :
/
7 The
marks appear on the stop time (STOP),
*
recording speed (SPEED) and timer execution
.
:
:
––––
––––
:
:
––––
––––
:
:
––––
––––
:
:
2017
––––
:
:
––––
––––
:
:
<
NEXT PUSH
+
––– OFF
––– OFF
––– OFF
OFF–––
–––
OFF
––– OFF
>
/–RETURN : MENU
positions in the 7th line and on the start time
(START) position in the 8th line.
The day of the week in the 8th line changes to the
day after the day in the 7th line.
––––
W
ED
THU
FRI
SAT
MON
EXT
<
NEXT PUSH
/
SELECT : DATA SET :
––––
:
––––
:
––––
:
2017
:
:
::–––
––– OFF
:
––––
––– OFF
:
––––
––– OFF
:
:
–––
:
––––
>
+
/–RETURN : MENU
OFF
OFF
OFF
8 Set flashing SUN to MON by pressing MENU + or
B
– and press MENU
hour position of STOP.
:
––––
THU
FRI
SAT
MON
EXT
SELECT : DATA SET :
:
––––
:
––––
:
2017
:
::–––
<
NEXT PUSH
/
to move the flashing to the
:
–––
––––
:
––– OFF
––––
:
––– OFF
––––
:
:
––––
>
+
/–RETURN : MENU
–––
OFF
OFF
9 Set the stop hour by pressing MENU + or – and
B
press MENU
W
ED
THU
FRI
SAT
MON
EXT
/
SELECT : DATA SET :
10
Set the stop minute by pressing MENU + or – and
press MENU
W
ED
THU
FRI
SAT
MON
EXT
/
SELECT : DATA SET :
11
Set the recording speed by pressing MENU + or –
and press MENU
W
ED
THU
FRI
SAT
MON
EXT
SELECT : DATA SET :
/
12
Select ON to execute the timer recording by
pressing MENU + or –.
W
ED
THU
FRI
SAT
MON
EXT
SELECT : DATA SET :
/
13
Press SEARCH to return to the normal display.
14
Insert the cassette.
15
Press TIMER.
The VCR turns off automatically, and enters the
timer recording standby mode. The
appears in the display window.
When no cassette is inserted. The
flashes and a beep sounds.
When the indicator appears in the display
window, the buttons except TIMER does not work.
.
––––
:
:
––––
––––
:
:
––––
––––
:
:
––––
2017
:
:
:
:
::–––
<
NEXT PUSH
<
NEXT PUSH
––07
>
+
/–RETURN : MENU
B
.
––––
:
:
––––
––––
:
:
––––
––––
:
:
––––
2017
:
:
:
:
5007
::–––
>
+
/–RETURN : MENU
B
:
:
––––
––––
:
:
––––
––––
:
:
––––
––––
:
:
2017
:
:
5007
::–––
<
NEXT PUSH
:
––––
:
––––
:
––––
:
2017
:
::–––
<
NEXT PUSH
>
+
/–RETURN : MENU
:
––––
:
––––
:
––––
:
:
5007
>
+
/–RETURN : MENU
––– OFF
––– OFF
––– OFF
–––
OFF
OFF
––– OFF
––– OFF
––– OFF
–––
OFF
OFF
.
––– OFF
––– OFF
––– OFF
OFF
96
OFF
––– OFF
––– OFF
––– OFF
ON
96
OFF
indicator
indicator
29
Timer Recording
W
ED
THU
FRI
SAT
MON–SUN
EXT
SELECT : DATA SET :
+
/–RETURN : MENU
/
<
NEXT PUSH
>
OFF
––– OFF
––– OFF
––– OFF
––– OFF
:
:
:
:
:
:
:
:
:
:
:
:
30 OFF
––––
––––
––––
––––
––––
––––
––––
––––
W
ED
THU
FRI
SAT
MON–SUN
EXT
SELECT : DATA SET :
+
/–RETURN : MENU
/
<
NEXT PUSH
>
OFF
––– OFF
––– OFF
––– OFF
––– OFF
:
:
:
:
:
:
:
:
:
:
:
:
30 ON
––––
––––
––––
––––
––––
––––
––––
––––
TIMER SET
WEEK START
MON–FRI
MON
TUE
W
ED
THU
FRI
STOP SPEED
––– OFF
––– OFF
––– OFF
––– OFF
30 ON
––– OFF
:
:
:
:
:
:
:
:
:
:
:
:
––––
––––
––––
––––
0017
––––
––––
––––
––––
––––
10T08
––––
Daily Recording
You can preset the timer to record Monday through
Sunday (MON-SUN), Monday through Saturday
(MON-SAT) or Monday through Friday (MON-FRI).
1 Press
V
to move the flashing to the line of WEEK
you want.
2 Set the day by pressing MENU + or – before
setting the hour position of START in step 5.
TIMER SET
WEEK START
MON–FRI
MON
TUE
W
ED
THU
FRI
When the time set in the STOP section is
earlier than the time set in the START section
The STOP time is assumed to be for the next day, and
the T (tomorrow) indicator is displayed before the stop
time.
STOP SPEED
:
––––
:
––––
––––
:
––––
:
––––
:
––––
:
:
––––
:
––––
:
––––
:
––––
:
––––
:
––––
––– OFF
––– OFF
––– OFF
––– OFF
––– OFF
––– OFF
Recording Using an External Timer
You can preset the time to start and end recording by
using a timer connected to the EXT TIMER terminal
on the rear of the VCR. Set the recording speed on the
TIMER SET menu on screen.
1 Turn on the power of the equipment to be used.
2 Press MENU and MENU
MENU flashes on the monitor screen.
3 Press MENU
The TIMER SET menu appears.
4 Press MENU
the lowest line (EXT) and press MENU
TIMER SET
WEEK START
SUN
MON
TUE
W
ED
THU
FRI
SAT
MON–SUN
EXT
SELECT : DATA SET :
B
.
V
to move the flashing to SPEED of
STOP SPEED
––––
:
––––
:
––––
:
––––
:
––––
:
––––
:
––––
:
––––
:
:
<
NEXT PUSH
/
––––
:
––––
:
––––
:
––––
:
––––
:
––––
:
––––
:
––––
:
:
>
+
/–RETURN : MENU
V
–––
OFF
––– OFF
––– OFF
––– OFF
––– OFF
––– OFF
––– OFF
––– OFF
––– OFF
until “5” of the MAIN
B
.
Timer recording is interrupted when the power
is interrupted
When a period of the power interruption is shorter than
the power backup time (within 30 days) and within the
timer end time, the recording is resumed after the
power is restored.
The P indicator lights in the display window to show
that the timer recording is interrupted. (To clear the P
indicator, press MENU RESET on the front panel. See
page 23.)
To stop the timer recording
Press TIMER to clear the
stops and the power is turned off.
30
indicator. The recording
5 Set the recording speed by pressing MENU + or –
B
and press MENU
.
6 Set ON to execute the timer recording by pressing
MENU + or –.
7 Press SEARCH to return to the normal display.
 Loading...