

Page 1
VAIO User Guide VAIO Duo 11 SVD1121 Series Back | Back to Top
undefined
Troubleshooting
Read This First
How to Use
Windows 8: The Basics
Parts Description
Setup
Network / Internet
Connections
Settings
Backup / Recovery
Security
Other Operations
Notifications
Congratulations on your purchase of this VAIO(R) computer.
About your VAIO computer’s configuration
To find out about the configuration of your VAIO computer, visit the Sony online support
website. [Details]
Some features, options, and supplied items may not be available on your VAIO computer.
Features
Available features vary depending on the model or options you selected. Not all features
described in this manual are available depending on your model.
Illustrations
Illustrations, photos, or screenshots in this manual may look slightly different depending on
the model or options you selected.
Apps
The preinstalled apps may vary depending on the model or options you selected. The apps
described in this manual may not be preinstalled on your VAIO computer.
Supplied manuals
The following manuals are supplied with your VAIO computer.
On-screen documentation
User Guide - Introduction Version [Details]
A preinstalled manual with limited information of your VAIO computer, focused on
support and Internet connection. The User Guide - Introduction Version is replaced
with a complete version of the User Guide (this manual), after update.
User Guide (this manual)
General information and operation instructions about your VAIO computer including
support and troubleshooting information
Printed documentation
Quick Start Guide
An overview of how to set up and get started with your VAIO computer
Recovery, Backup and Troubleshooting Guide
Information on how to recover and back up your VAIO computer, as well as
troubleshooting information
Safety Regulations
Read carefully before activating the wireless functions such as the wireless LAN and
BLUETOOTH technology.
Other references
Windows Help and Support [Details]
A comprehensive resource for practical advice, tutorials, and demonstrations to help you
learn to use your VAIO computer.
App help files
App help files may be included with the preinstalled apps on your VAIO computer. You
may be able to access the help files from the help menu.
Notice
Copyright 2012 Sony Corporation. All rights reserved.
This manual and the software described herein, in whole or in part, may not be
reproduced, translated, or reduced to any machine-readable form without prior written
approval.
Sony Corporation provides no warranty with regard to this manual, the software, or other
information contained herein and hereby expressly disclaims any implied warranties or
merchantability or fitness for any particular purpose with regard to this manual, the
software, or such other information. In no event shall Sony Corporation be liable for any
Page 2

incidental, consequential, or special damages, whether based on tort, contract, or
© 2012 Sony Corporation
otherwise, arising out of or in connection with this manual, the software, or other
information contained herein or the use thereof.
In the manual, the (TM) or (R) marks are not specified.
Sony Corporation reserves the right to make any modification to this manual or the
information contained herein at any time without notice.
The software described herein is governed by the terms of a separate user license
agreement.
Sony Corporation is not liable and will not compensate for any lost recordings made to
your VAIO computer, external recording media, or recording devices or any relevant
losses, including when recordings are not made due to reasons including the computer
failure, or when the contents of a recording are lost or damaged as a result of the
computer failure or repair undertaken to the computer. Sony Corporation will not restore,
recover, or replicate the recorded contents made to the computer, external recording
media, or recording devices under any circumstances.
Features and specifications are subject to change without notice.
Related Topic
About Online Support Website
Page 3
VAIO User Guide VAIO Duo 11 SVD1121 Series Back | Back to Top
undefined
Troubleshooting
Welcome
How to Use
Windows 8: The Basics
Parts Description
Setup
Network / Internet
Connections
Settings
Backup / Recovery
Security
Other Operations
Notifications
Congratulations on the purchase of this VAIO computer.
This User Guide - Introduction Version provides you with limited information about your
VAIO computer. To update this file to the complete version of the User Guide, see Updating
the User Guide to the Latest Version [Details] for more information.
Your VAIO computer does not support touch screen operations depending on the model you
purchased. In such a case, use a mouse for computer operations.
Read this first
Updating the User Guide to the Latest Version
Connecting to the Internet
Updating Your VAIO Computer
Solving Problems on Your VAIO Computer Using VAIO Care
Finding Support Information
Windows 8 : How to Start
About the Start Screen and Menu
Opening the Charms
Searching/Starting Apps, Files, or Settings
Checking Currently Running Apps
Switching Apps
Opening the App Menus
Closing Apps
Downloading Apps from Windows Store
Opening Windows Help and Support
Activating Sleep Mode or Shutting Down/Restarting Your VAIO Computer
Read This First
Updating the User Guide to the Latest Version
By updating this User Guide - Introduction Version through the Internet, you can get the
complete version of the User Guide with detailed information on your VAIO computer.
Once the User Guide is updated to the complete version, you can access it anytime even if
you are offline.
With the complete version of the User Guide, you can view information about:
Parts description
Feature and operating instructions
Precautions
Troubleshooting information
Windows 8 basic operations
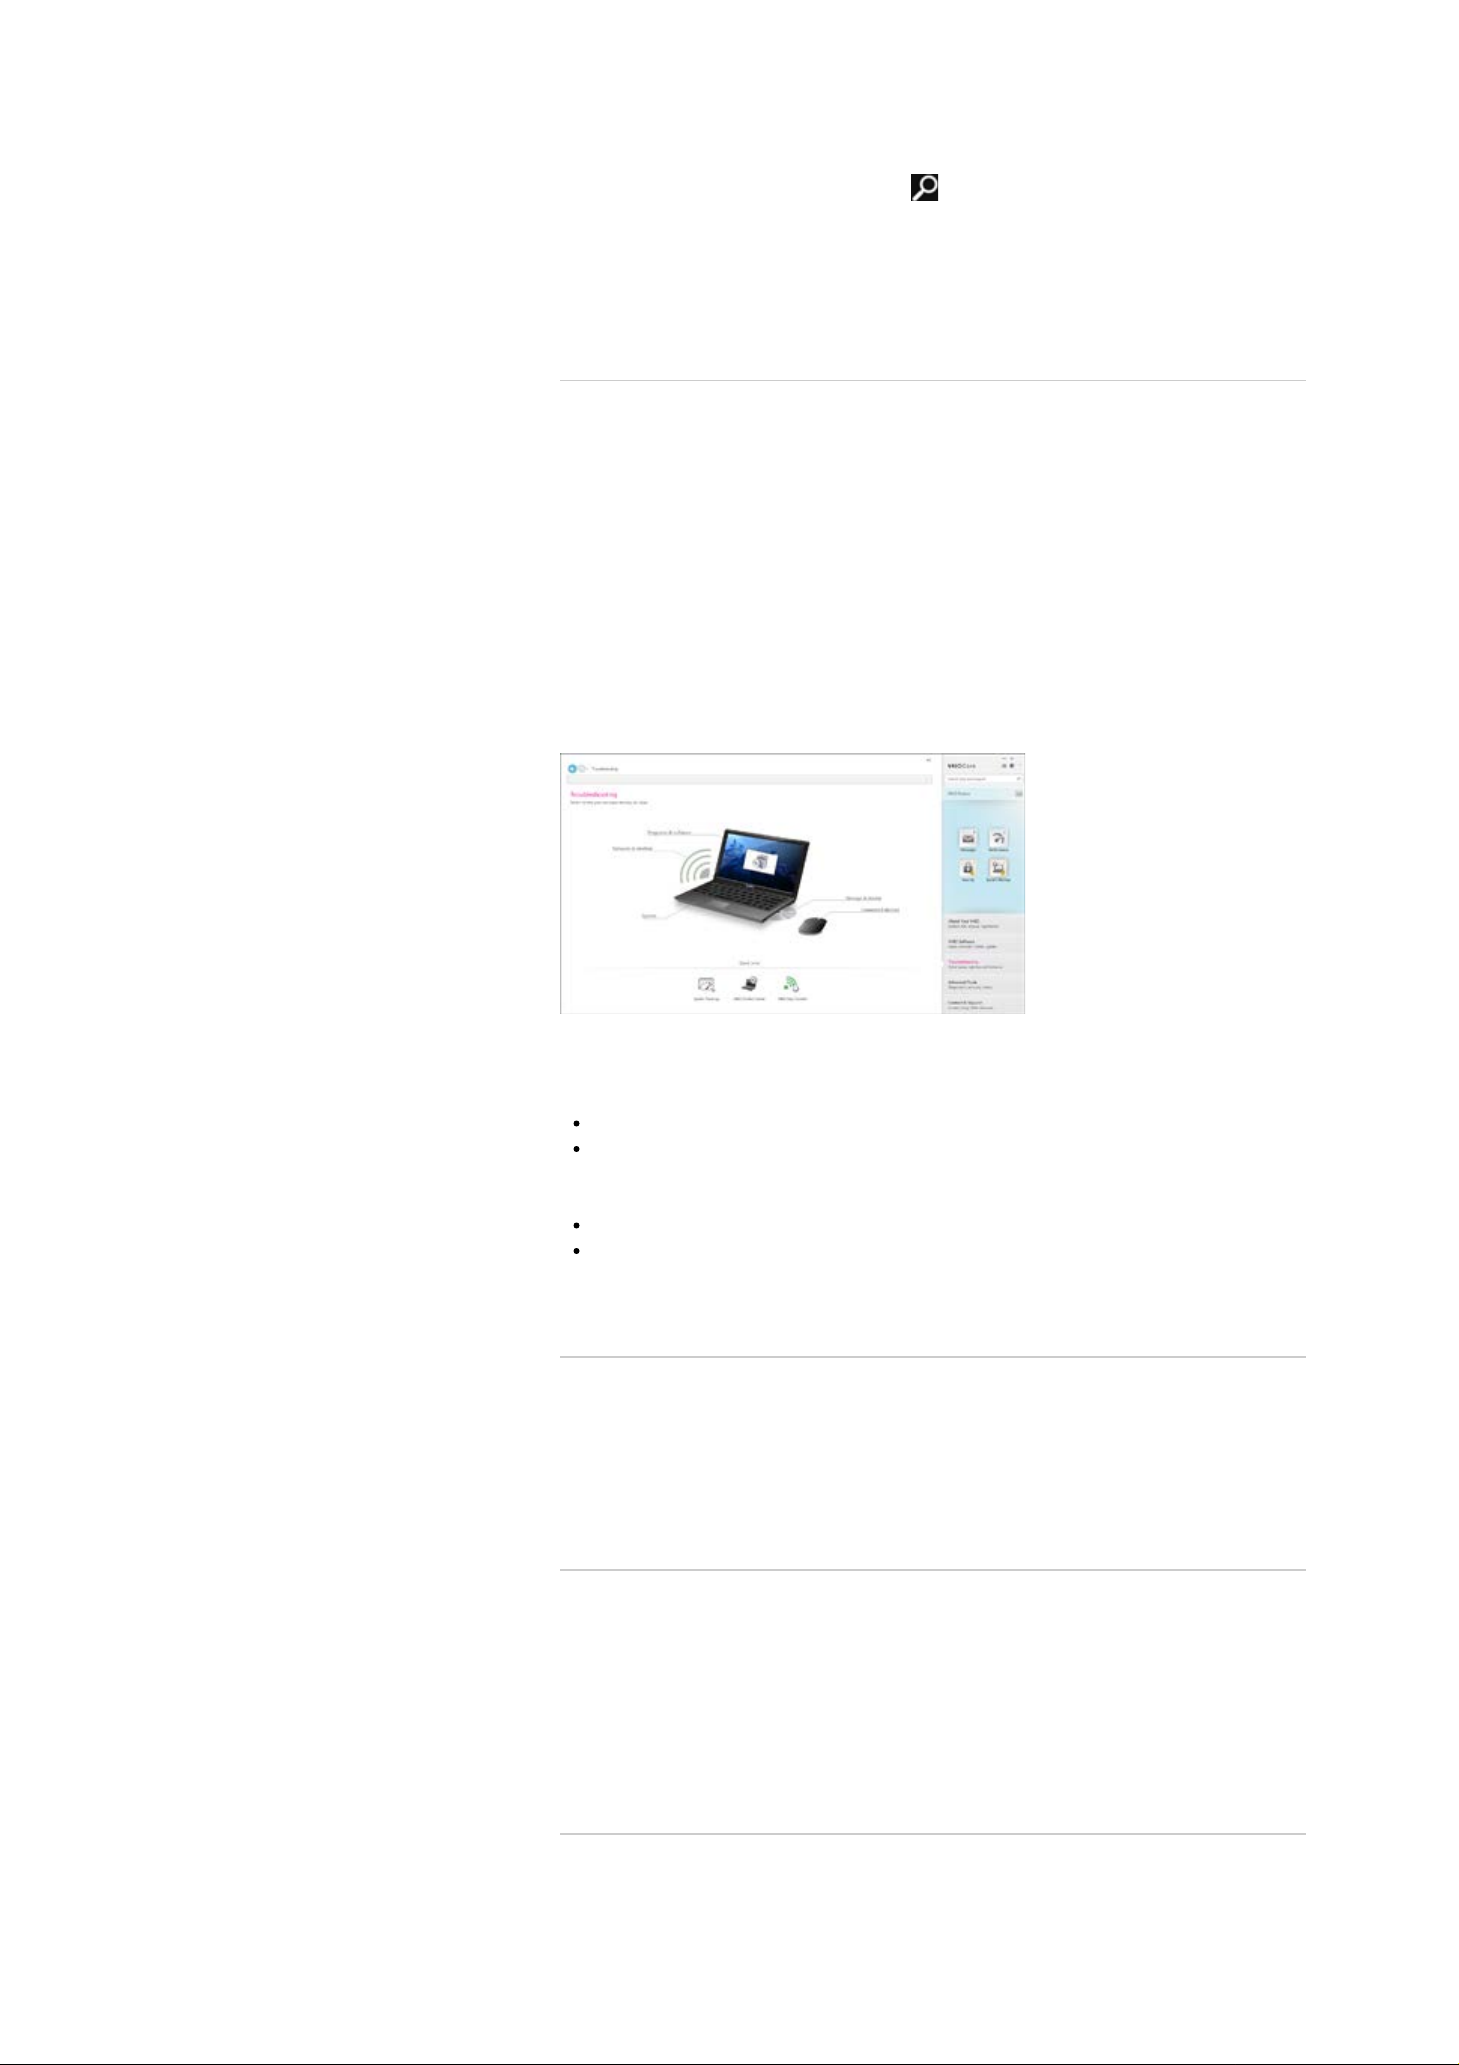
Below is an example of a screenshot in English.
Page 4
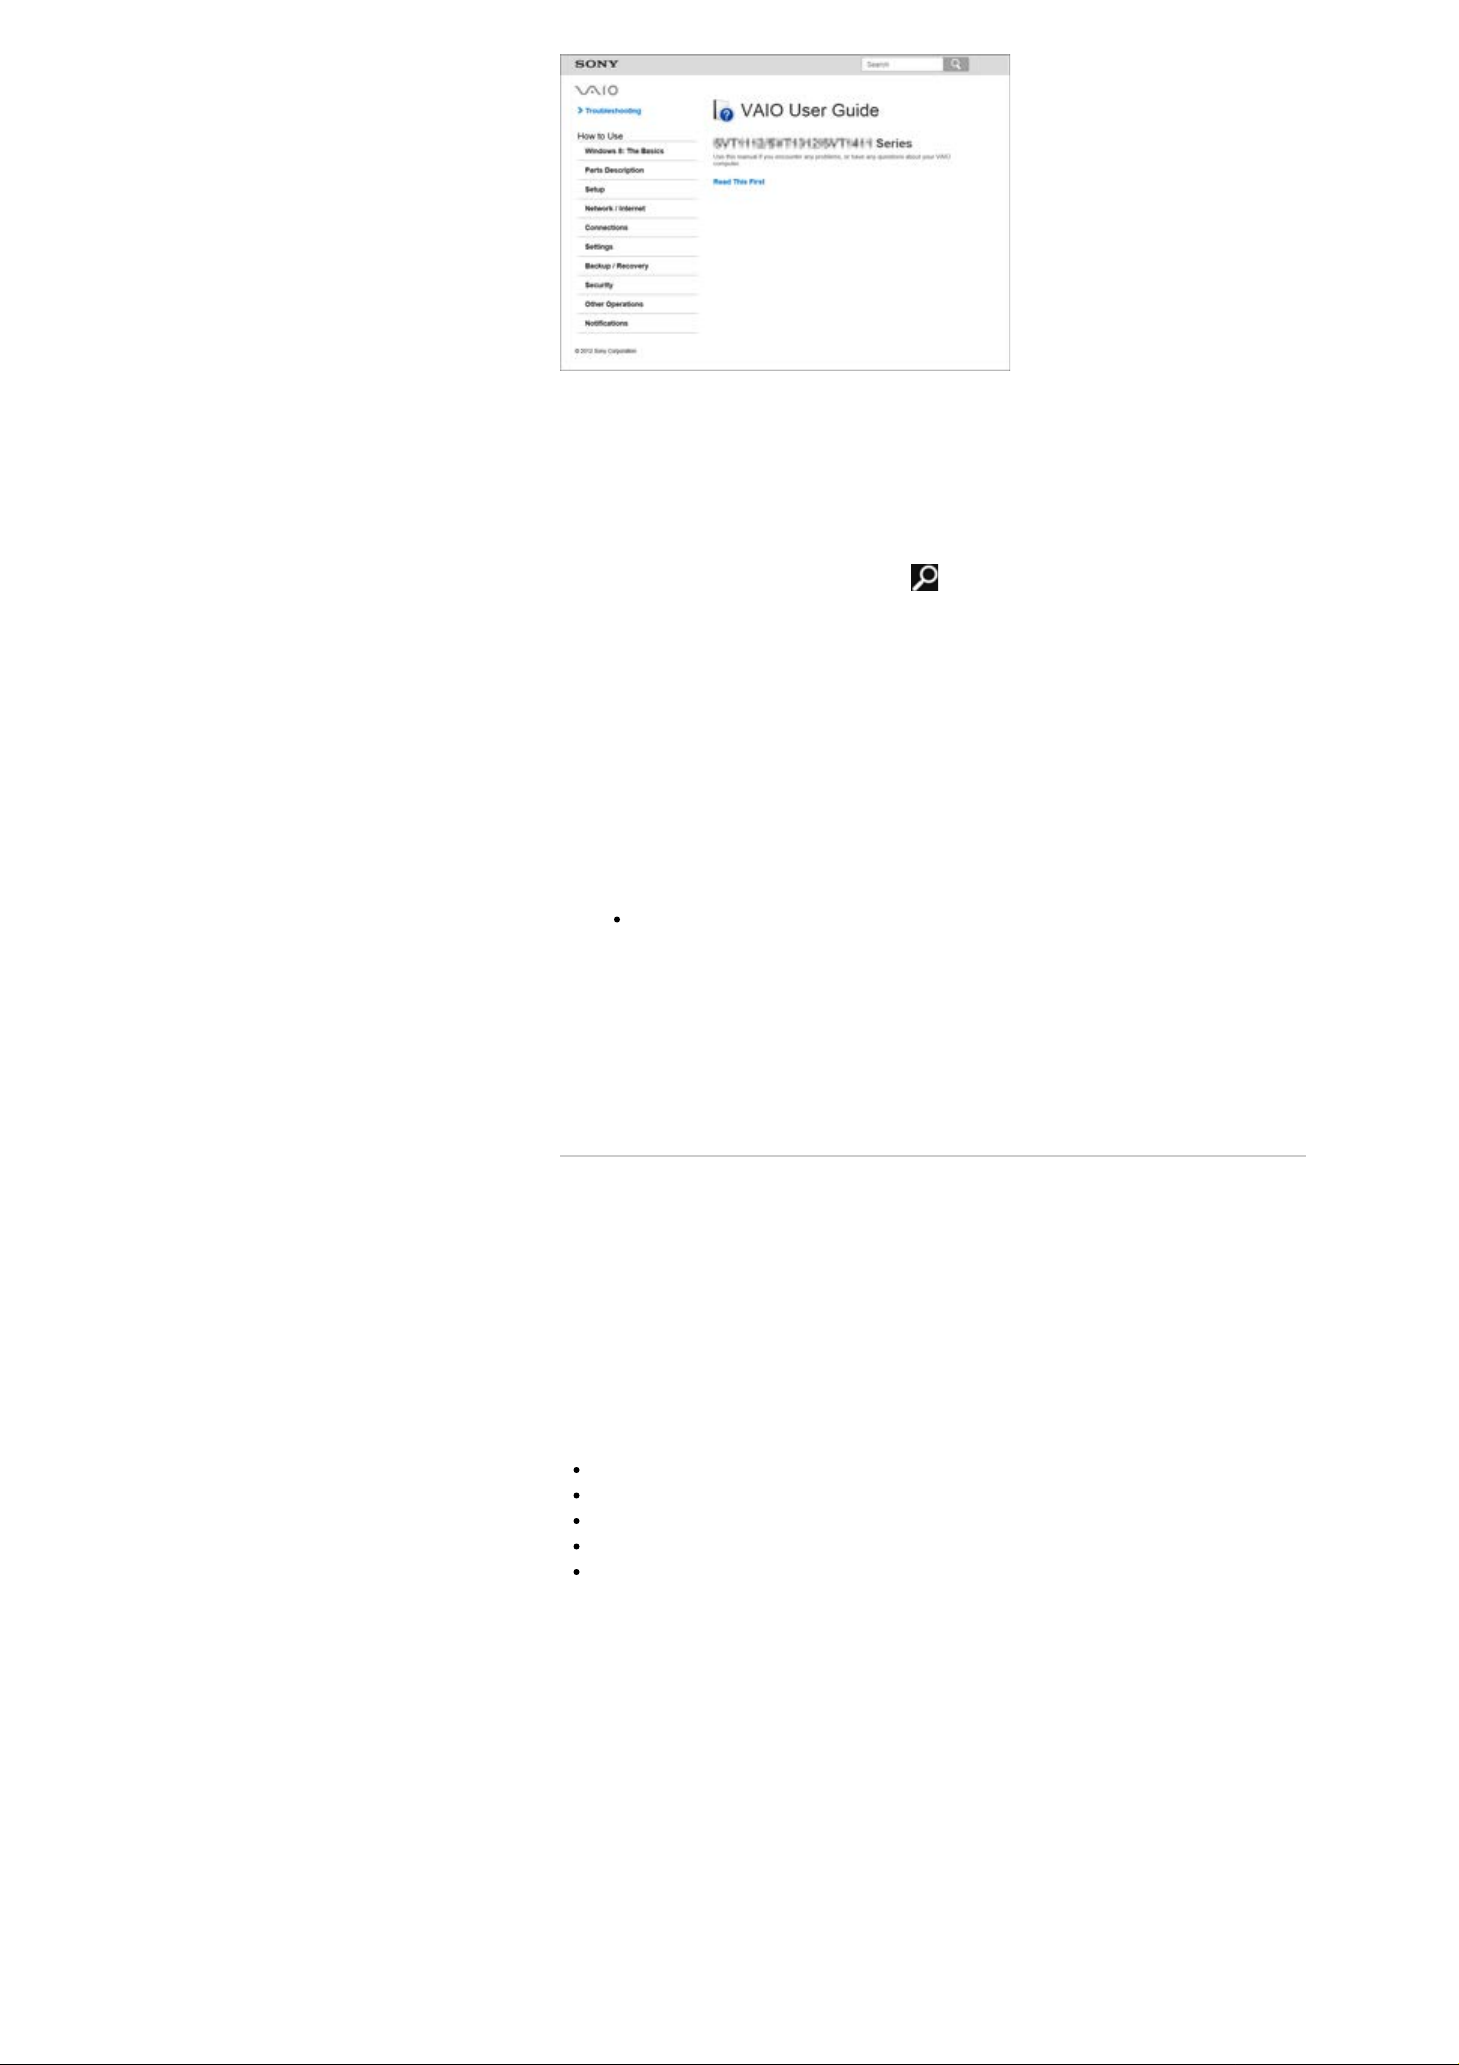
* Design and content of the screen are subject to change.
To get the complete version of the User Guide
1. Connect your VAIO computer to the Internet. [Details]
2. Exit this User Guide - Introduction Version.
3. Open the charms [Details] and select (Search).
4. Select Apps.
5. Enter “VAIO Manual” in the Search box.
6. Select VAIO Manual from the list.
7. After a window prompting you to update the manual appears, follow the on-screen
instructions to complete the updates.
This file will automatically update to the complete version of the User Guide.
If the window prompting you to update the User Guide does not appear, make sure
your VAIO computer is connected to the Internet and repeat the above steps.
If the update window still does not appear, start VAIO Update [Details] so you can find
and download the User Guide manually.
Hint
It may take some time to complete the update.
To view help files for Windows OS and app operations
When you have trouble operating your VAIO computer, try referring to Windows Help and
Support or help files included with your apps.
To access Windows Help and Support, open the charms and enter “Help and Support” in
the Search box. [Details]
^ Go to top
Connecting to the Internet
You will need to connect your VAIO computer to the Internet before updating to the complete
version of the User Guide.
Before connecting to the Internet
Before using the Internet, you will need to sign up with an Internet Service Provider (ISP)
and set up devices required for connecting your VAIO computer to the Internet.
The following types of Internet connection services may be available from your ISP:
Fiber to the Home (FTTH)
Digital Subscriber Line (DSL)
Cable modem
Satellite
Dial-up
For more information on devices required for Internet access and how to connect your VAIO
computer to the Internet, ask your ISP.
The following is one of the Internet connection methods as an example.
Page 5
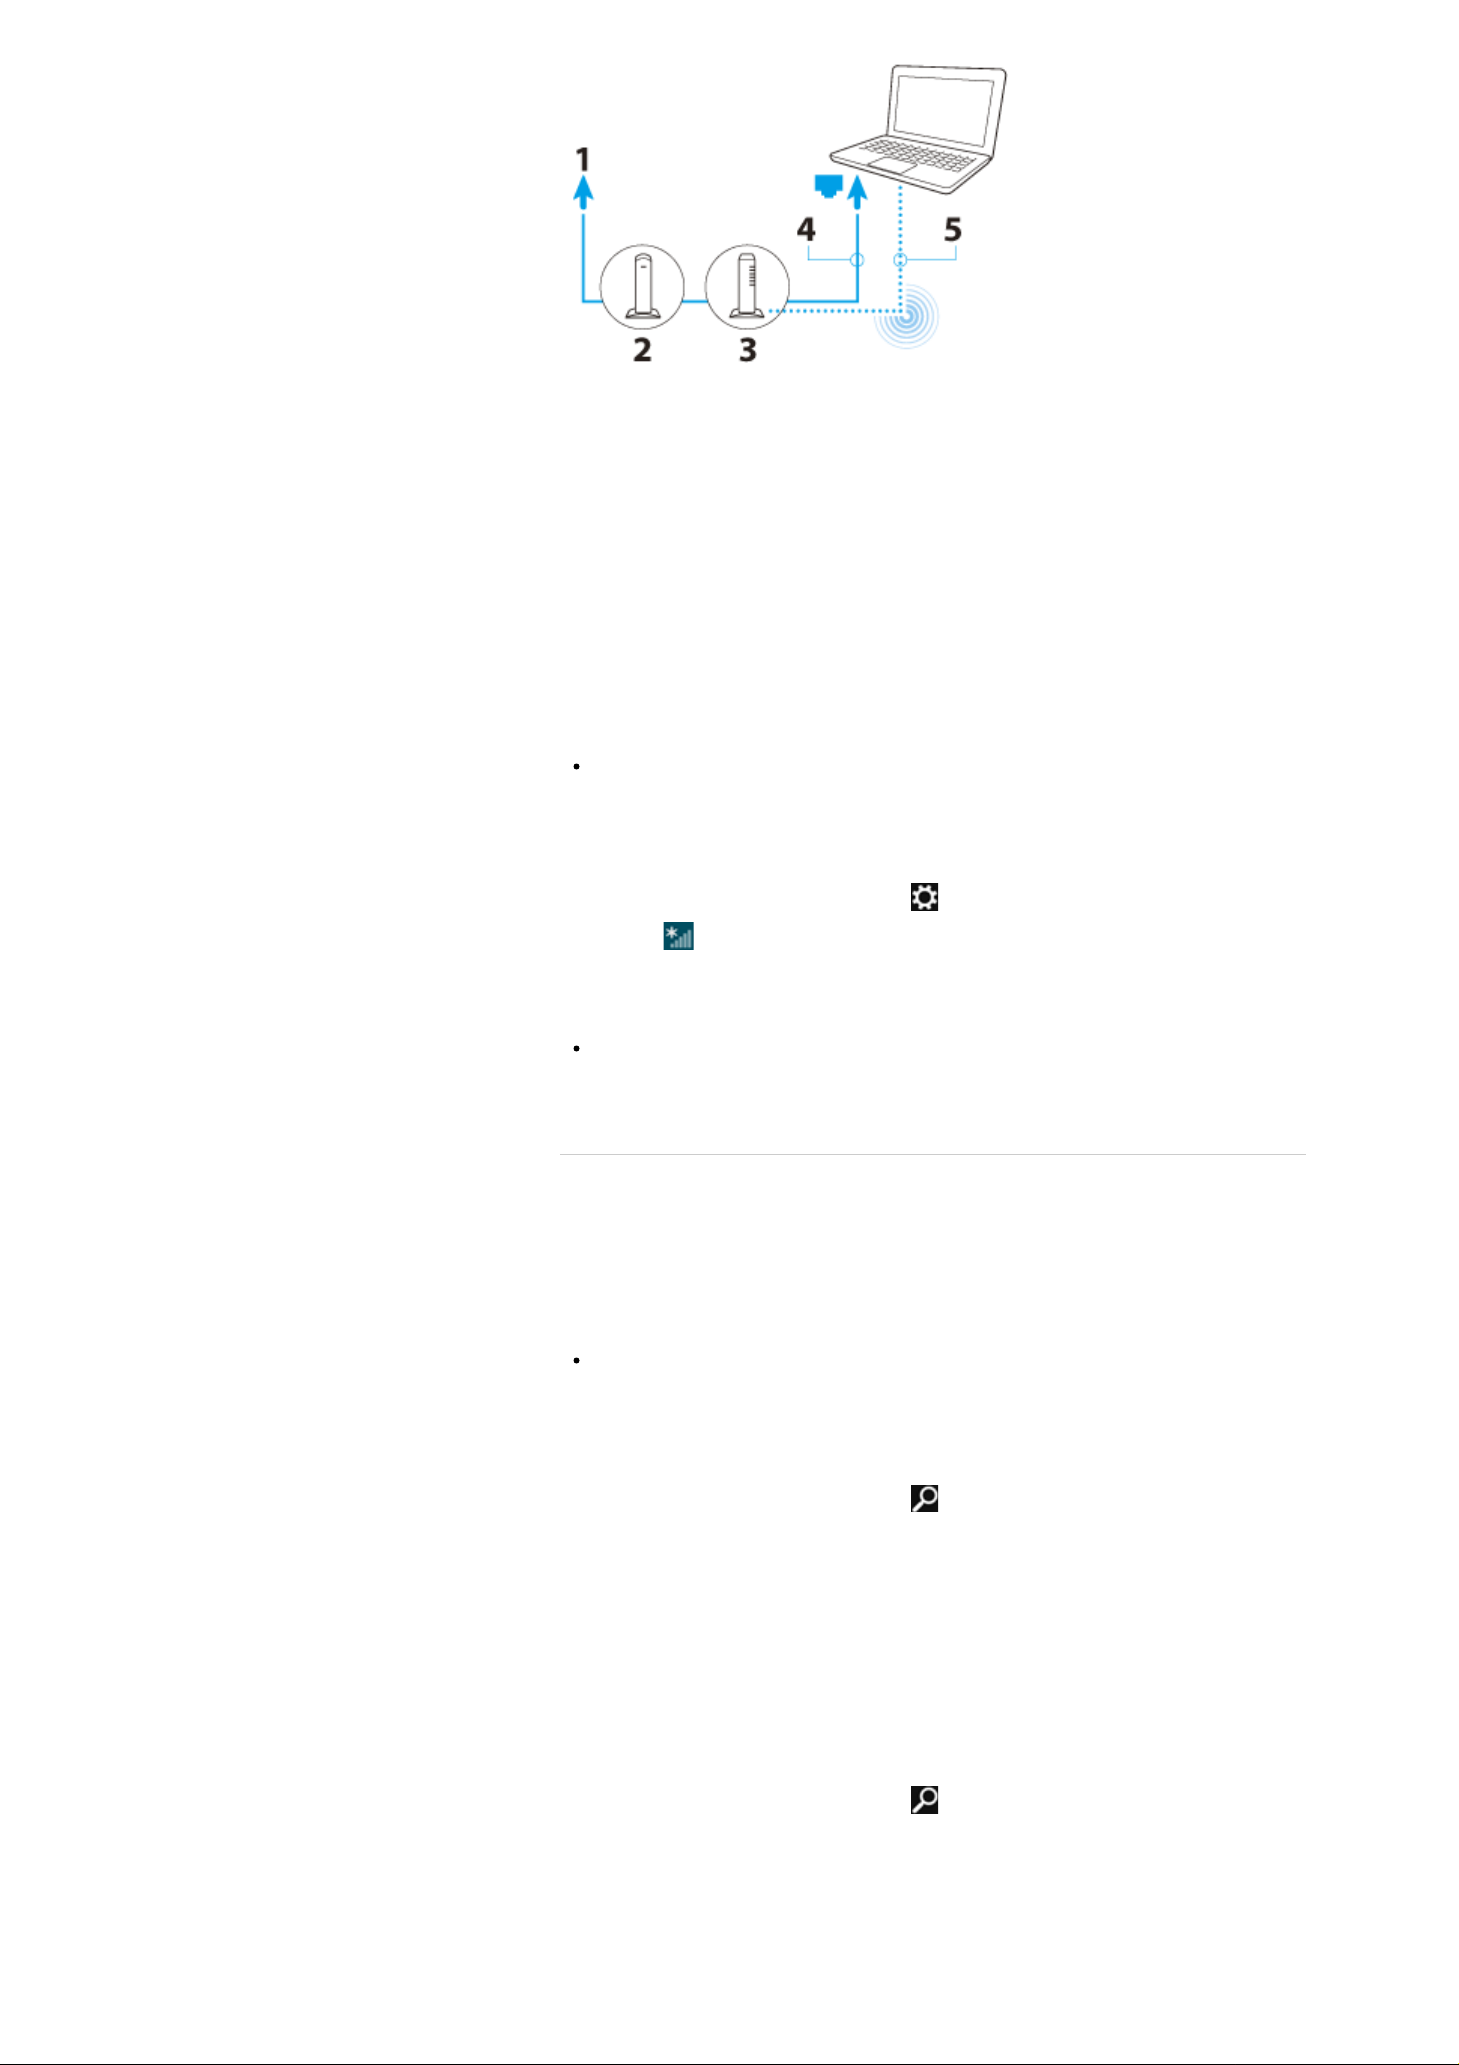
1. Internet
2. Modem
3. Router/access point
4. LAN cable (not supplied)
5. Wi-Fi(R) (Wireless LAN)
To use the network (LAN)
You can connect your VAIO computer to networks with a LAN cable. Connect one end of a
LAN cable to the LAN port on the computer and the other end to your network. For detailed
settings and devices required for LAN access, ask your network administrator.
Note
The connection, setting method, or required devices may vary depending on your
network environment.
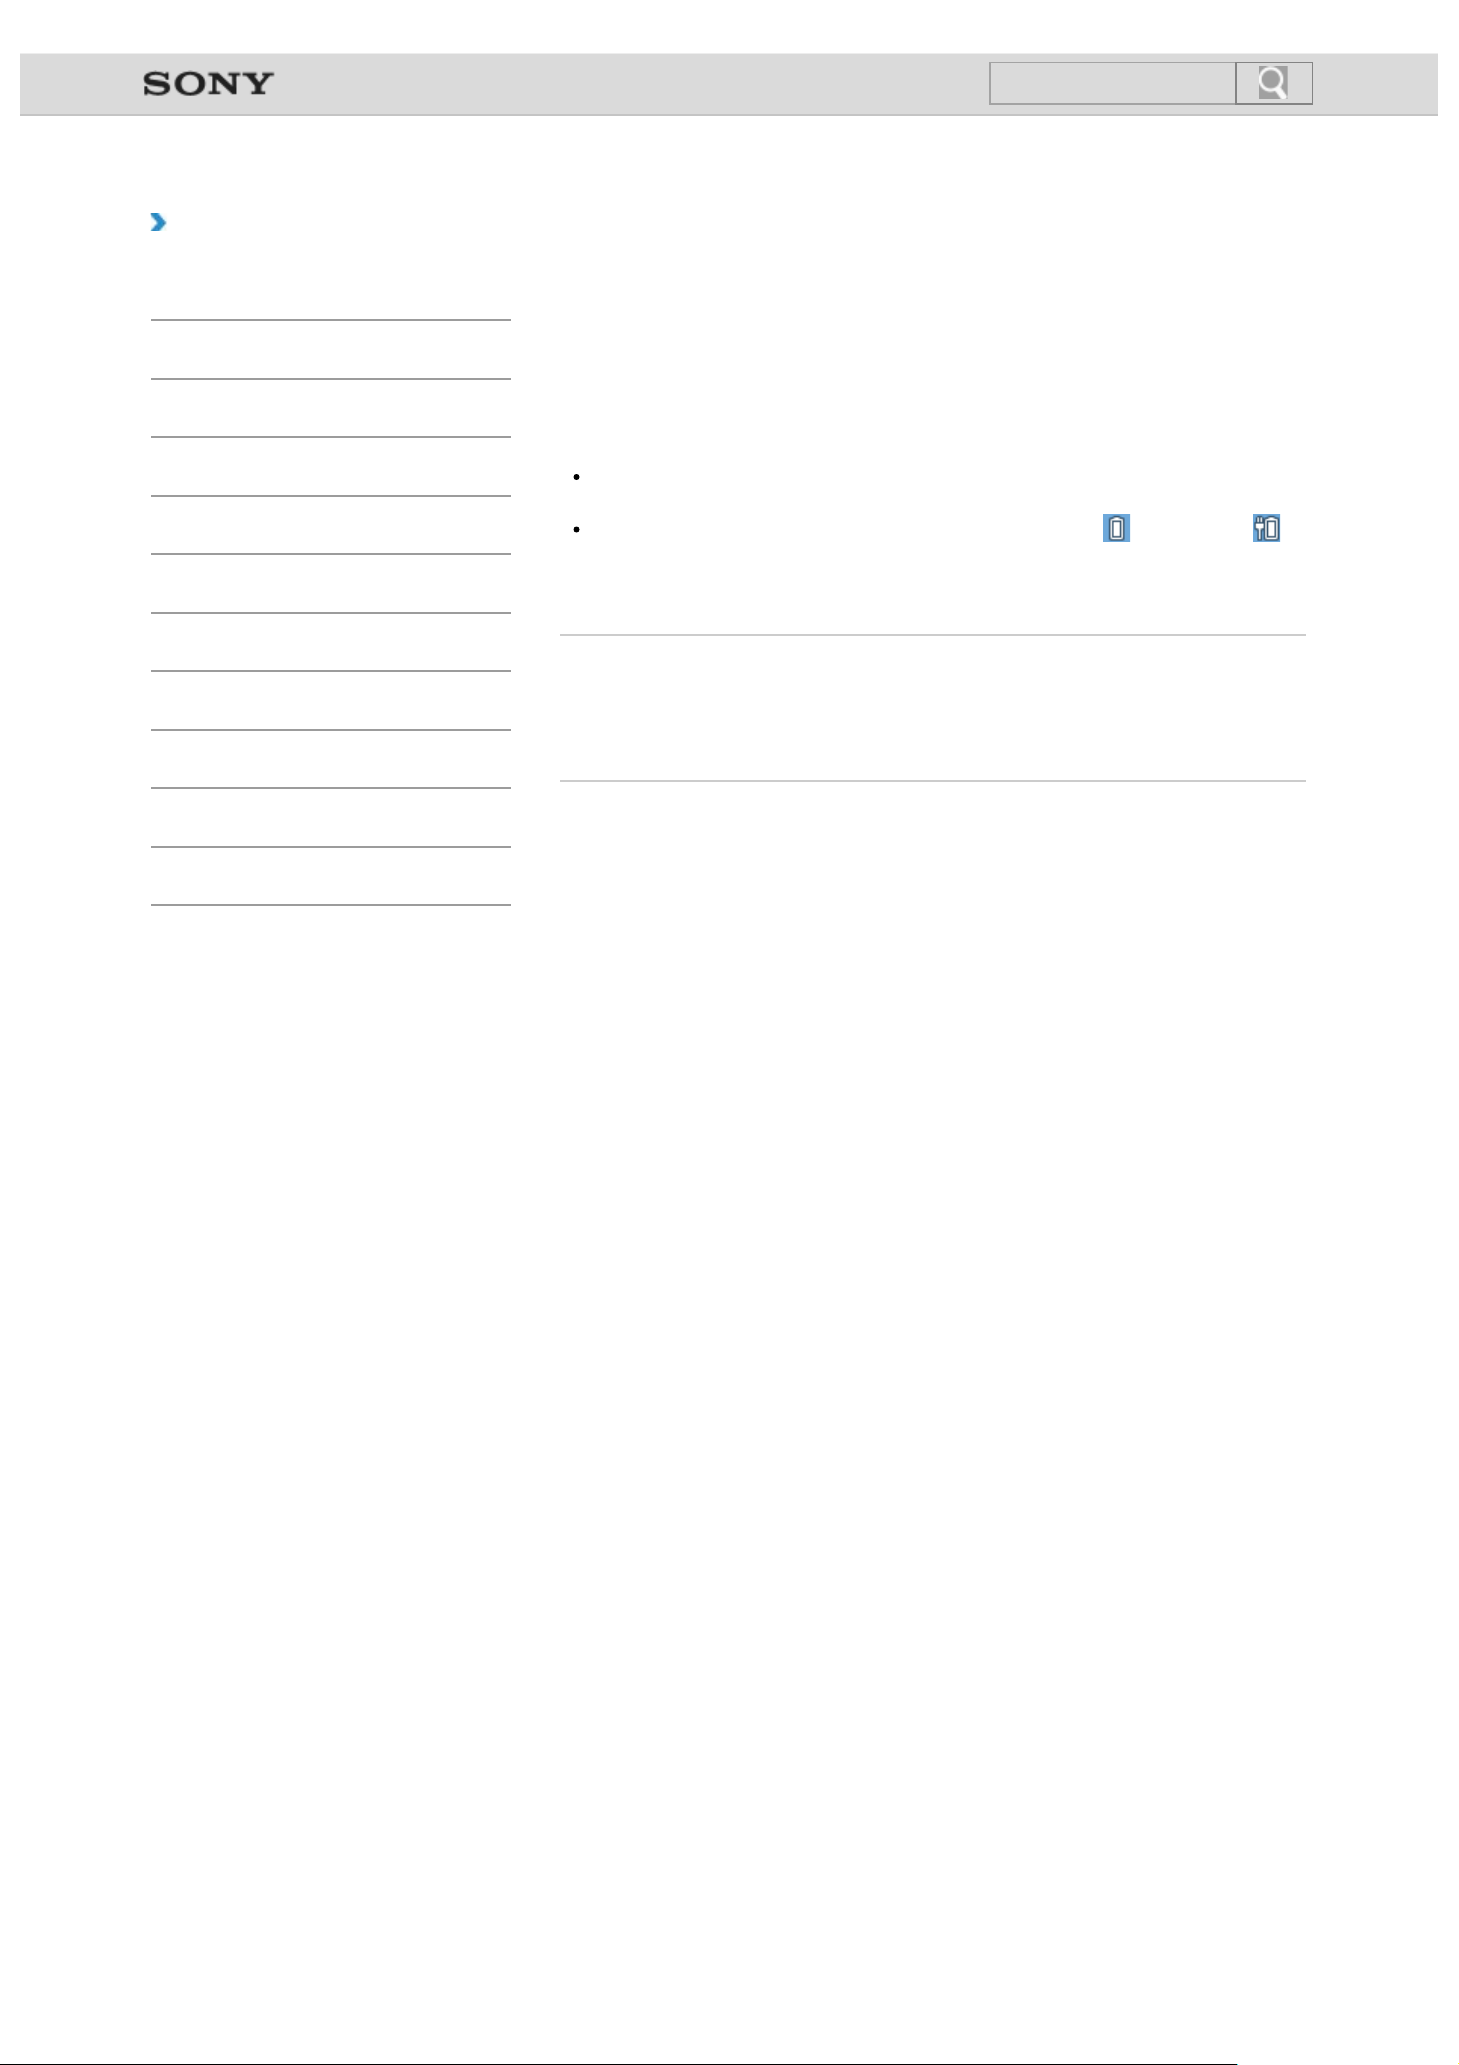
To use the Wi- Fi network
1. Open the charms [Details] and select (Settings).
2. Select
3. Select your desired network (SSID) from the list and Connect.
Note
For detailed information on network settings and devices, refer to the information from
your Internet Service Provider (ISP) or the manuals that came with your network
devices.
(the network icon).
^ Go to top
Updating Your VAIO Computer
Be sure to update your VAIO computer to enhance the computer’s efficiency, security, and
functionality.
Note
Your VAIO computer must be connected to the Internet to download the updates.
To use Windows Update
Windows Update enables you to make your VAIO computer more stable.
1. Open the charms [Details] and select
(Search).
2. Select Settings.
3. Enter “Windows Update” in the Search box.
4. Select Windows Update from the list.
5. Follow the on-screen instructions to complete the updates.
To use VAIO Update
VAIO Update automatically notifies you of new updates available on the Internet then
downloads and installs them on your VAIO computer.
1. Open the charms [Details] and select
2. Select Apps.
3. Enter “VAIO Update” in the Search box.
4. Select VAIO Update from the list.
5. Follow the on-screen instructions to complete the updates.
(Search).
Page 6
To update the antivirus app
The antivirus app helps protect your VAIO computer against security threats by keeping the
app current with the latest updates. You can download and install the updates from the
website of the manufacturer.
1. Open the charms [Details] and select
2. Select Apps.
3. Enter the antivirus app name in the Search box.
4. Select the antivirus app from the list.
5. Follow the on-screen instructions to complete the updates.
(Search).
^ Go to top
Solving Problems on Your VAIO Computer Using VAIO
Care
With VAIO Care, you can regularly conduct performance checks and system tune-ups on
your VAIO computer to keep it running at optimum level. Start VAIO Care whenever a
problem arises. VAIO Care will provide appropriate measures and support information to
solve the problem.
To start VAIO Care
Press the ASSIST button while your VAIO computer is on.
Below is an example of a screenshot in English.
* Design and content of the screen are subject to change.
Hint
Alternatively, search for VAIO Care on the Search charm to start VAIO Care. [Details]
The functions you can use are different from ones of VAIO Care that you can start from
the VAIO Care tile on the Start screen. The tile may not be displayed on the Start
screen.
Refer to the help file included with VAIO Care for more information.
Pressing the ASSIST button while your VAIO computer is off displays the VAIO Care
Rescue Mode screen. You can recover the computer by selecting Recover or maintain
your system in case of emergency, for example, when Windows does not start.
^ Go to top
Finding Support Information
The Sony online support website provides instant access to information on commonly
encountered problems. You can find support information such as the support website URL in
Contact & Support on VAIO Care or the supplied Quick Start Guide. [Details]
^ Go to top
Windows 8 : How to Start
About the Start Screen and Menu
You can place the shortcuts to apps, the desktop, and websites that you use the most.
Page 7
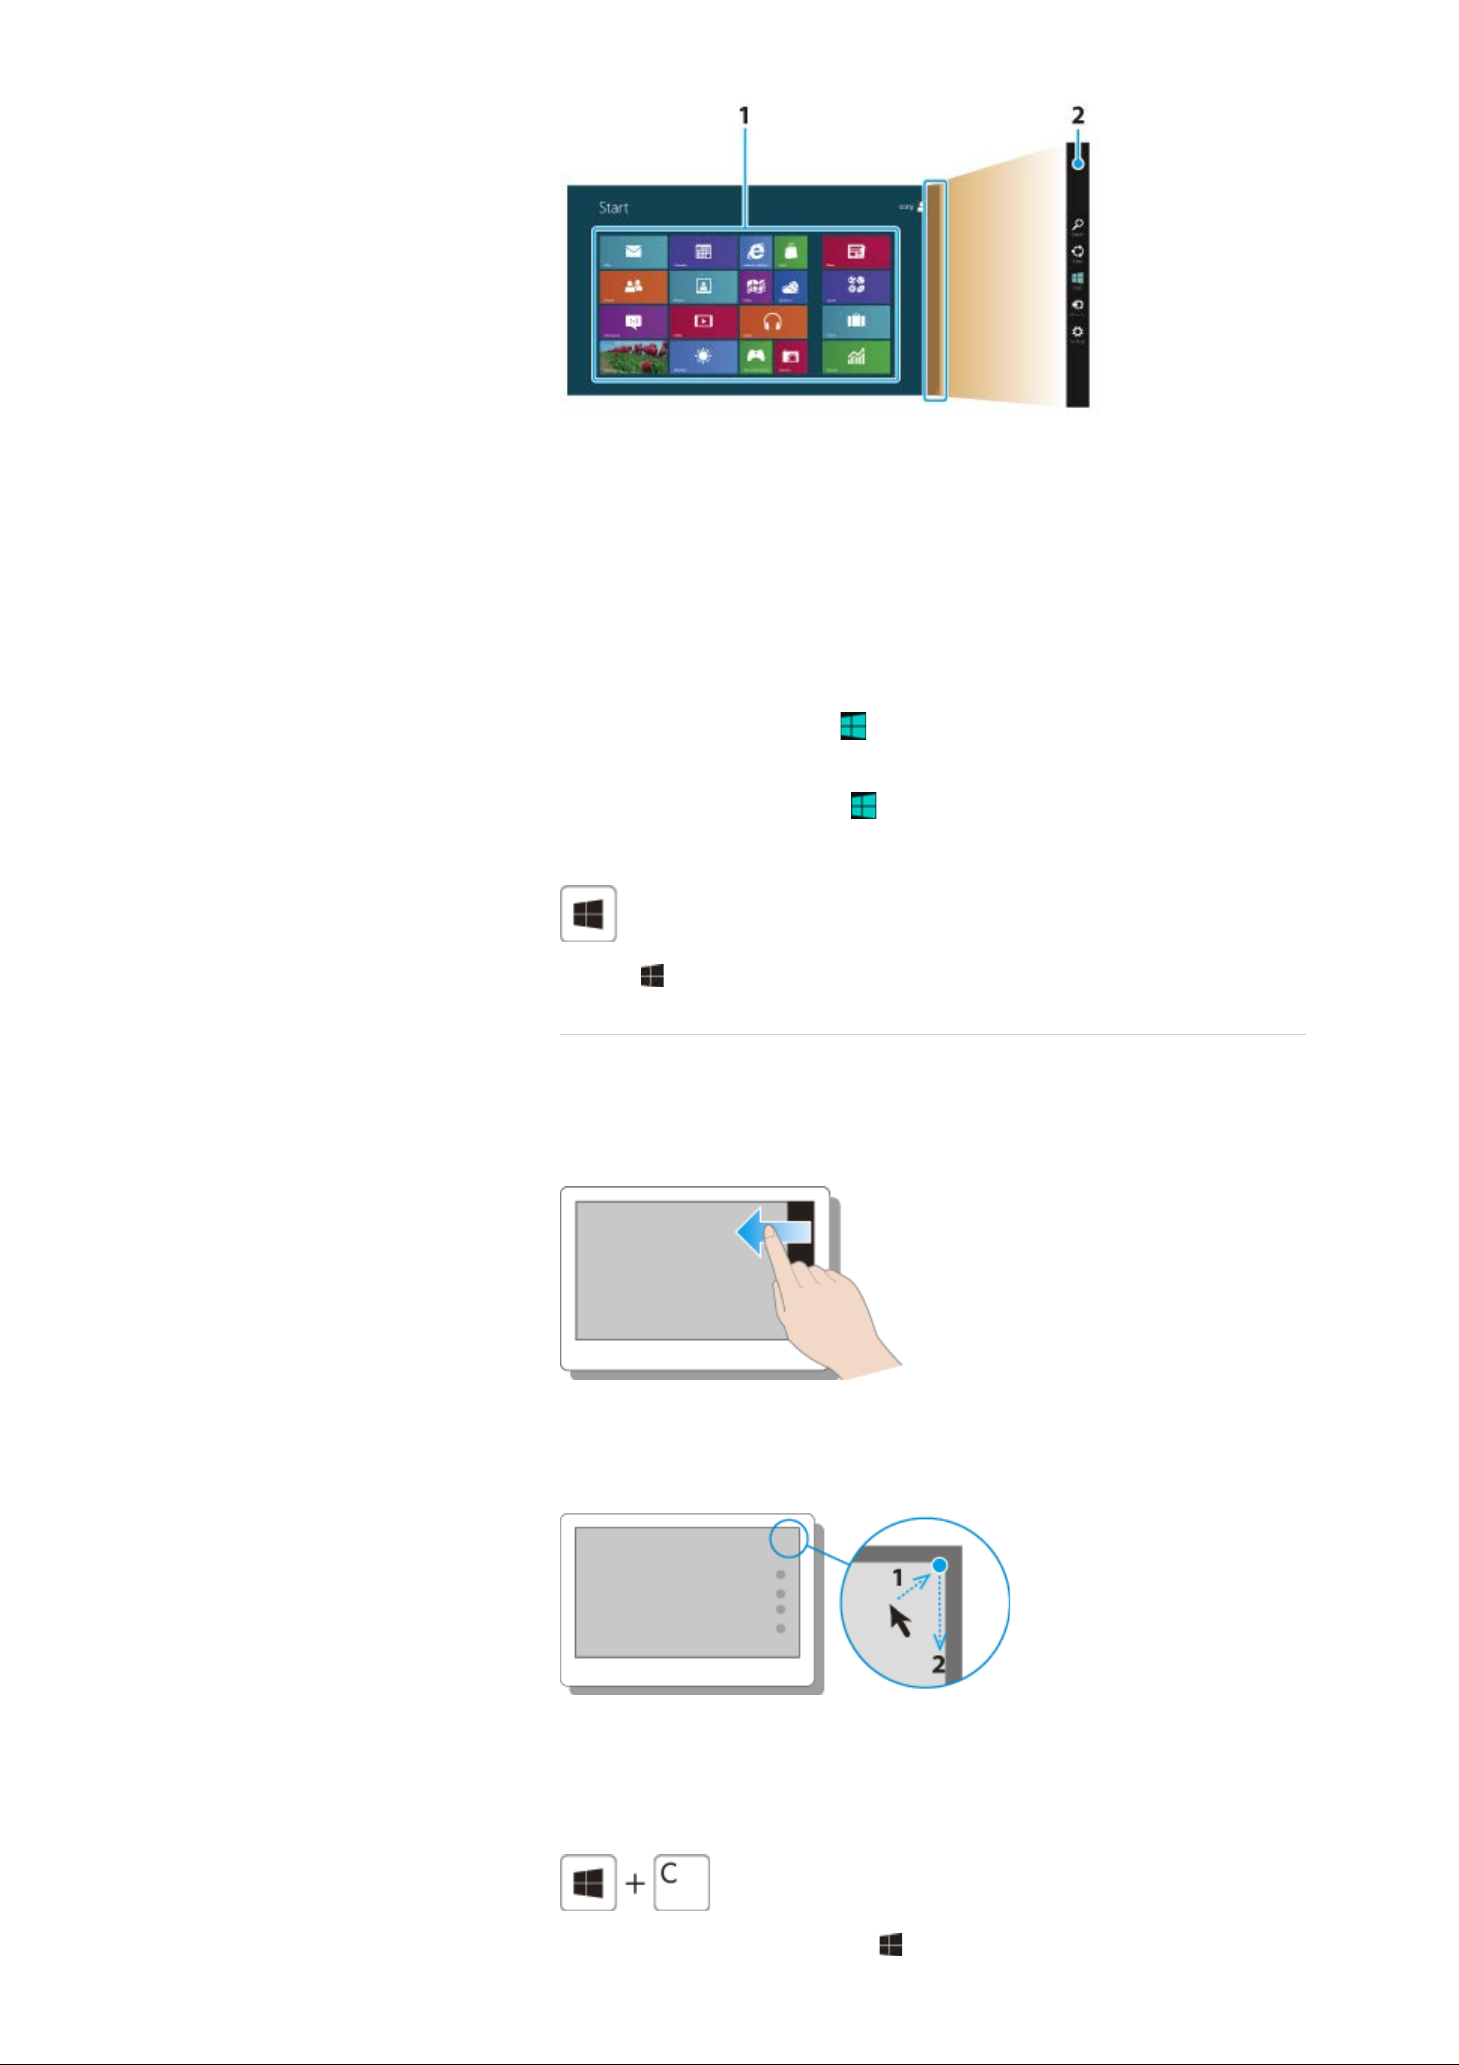
Overview
1. Tiles
Select tiles to start apps, etc.
You can add and arrange tiles to suit your preference.
2. Charms [Details]
Search apps, files, and various computer settings including devices and wireless
related items.
To show the Start screen
Touch operation
Open the charms [Details] and tap (Start).
Mouse operation
Open the charms [Details] and click
Keyboard operation
Press the (Windows) key.
Opening the Charms
Touch operation
(Start).
^ Go to top
Swipe in from the right edge.
Mouse operation
Place the pointer at the upper-right corner, then move the pointer down when the charms
appear.
Keyboard operation
Press the C key while holding down the (Windows) key.
Page 8
^ Go to top
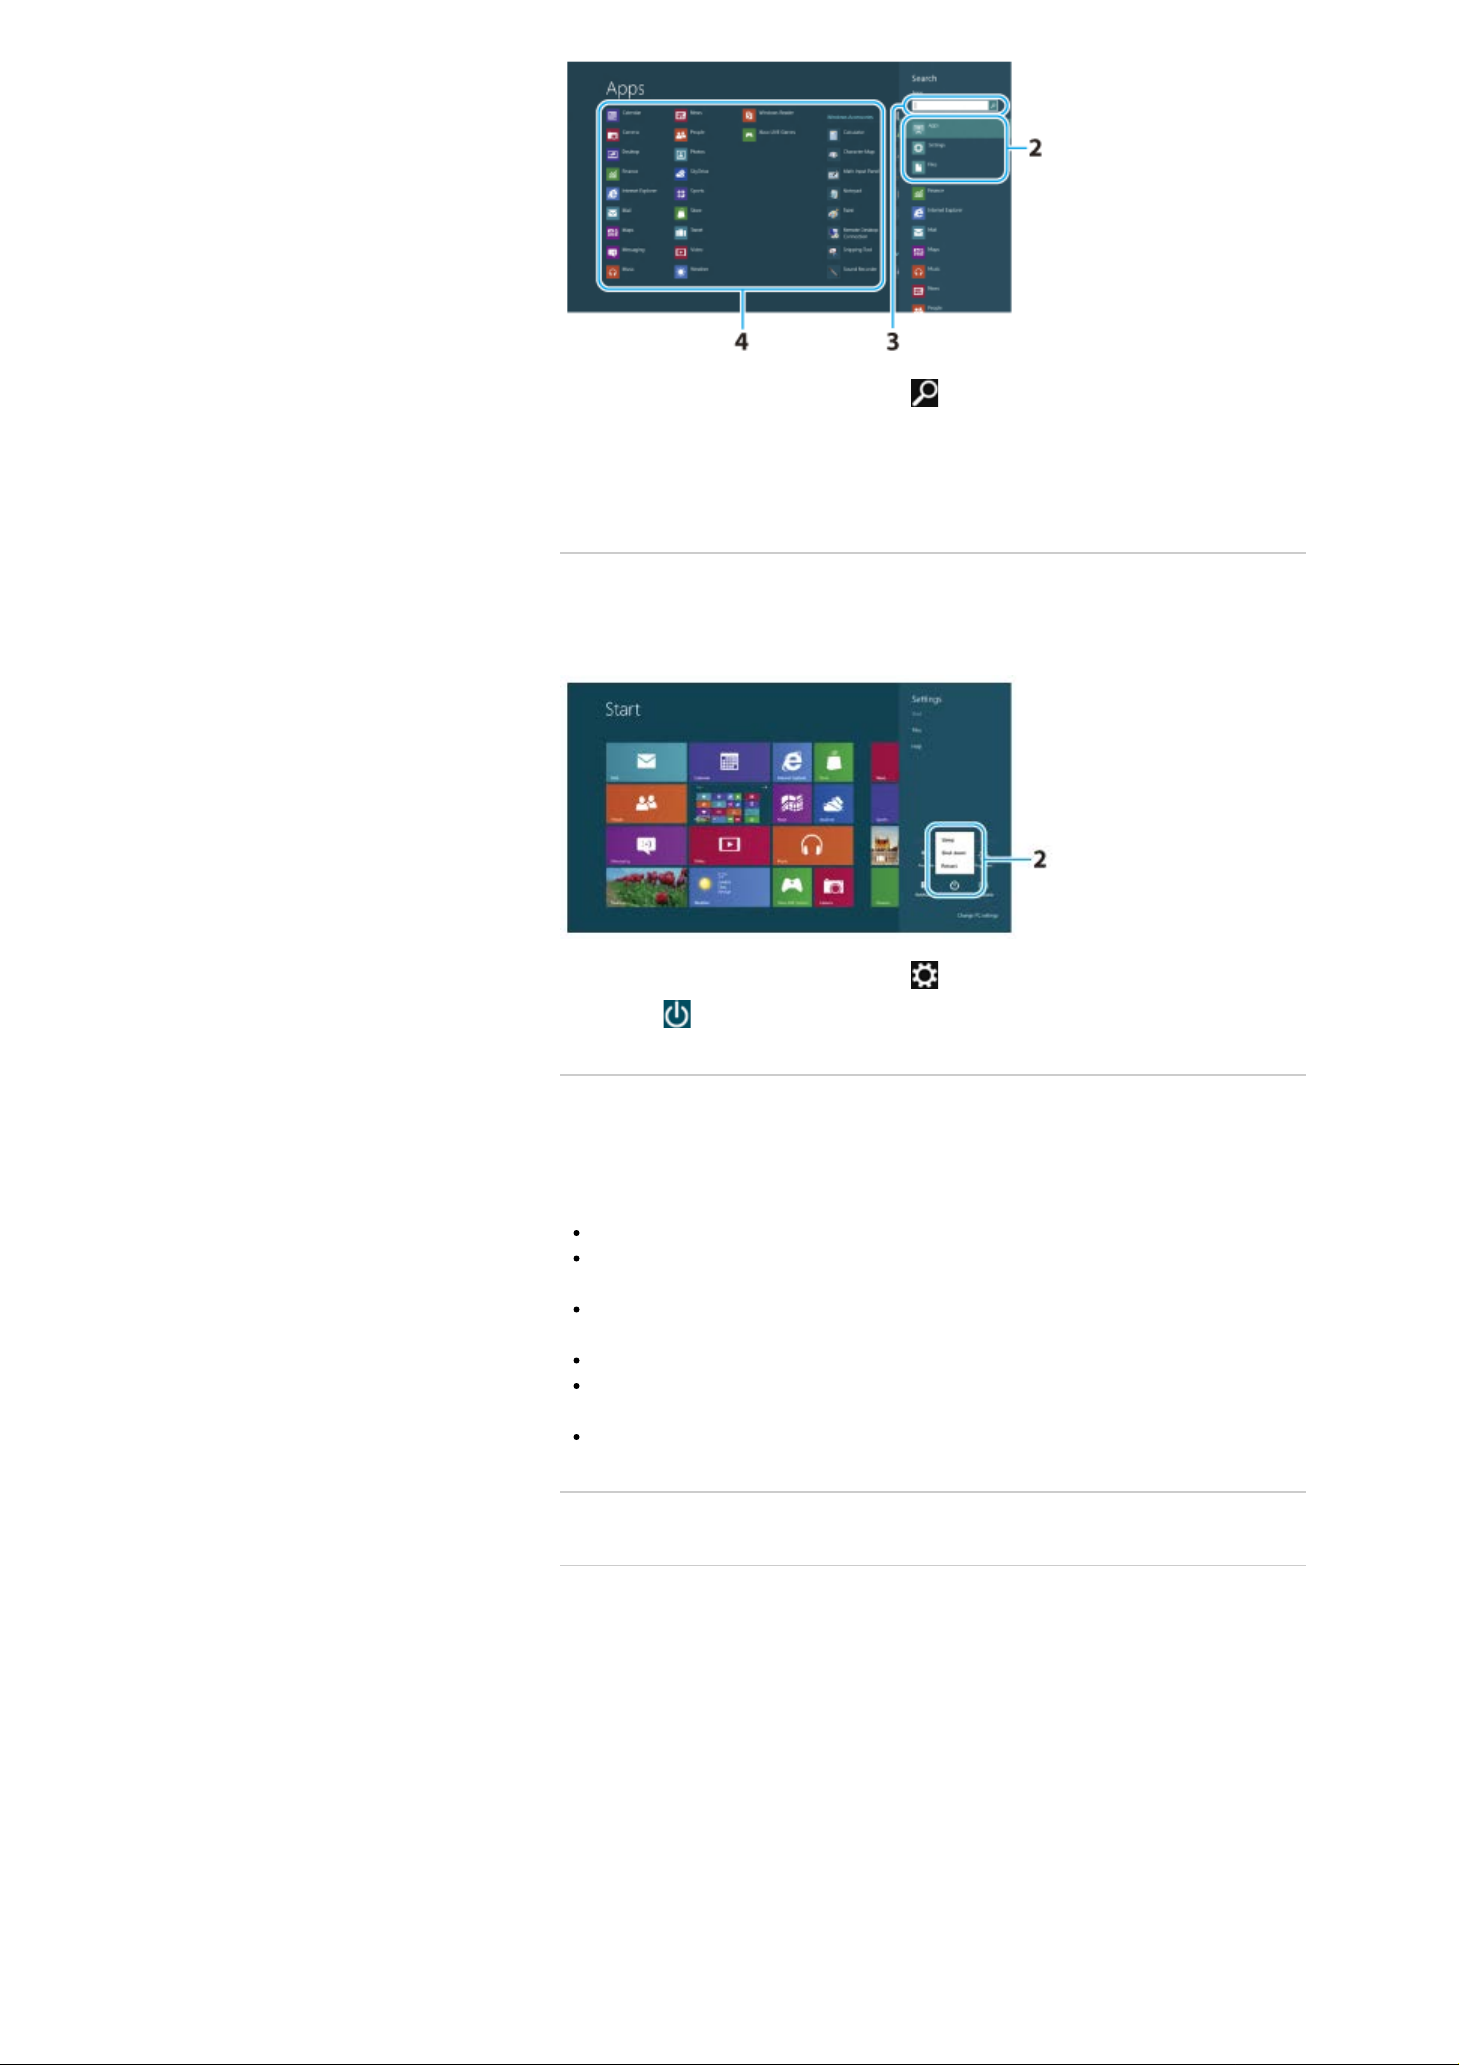
Searching/Starting Apps, Files, or Settings
1. Open the charms [Details] and select (Search).
2. Select Apps, Files, or Settings.
3. Enter a keyword in the Search box.
4. Select your desired app or file.
^ Go to top
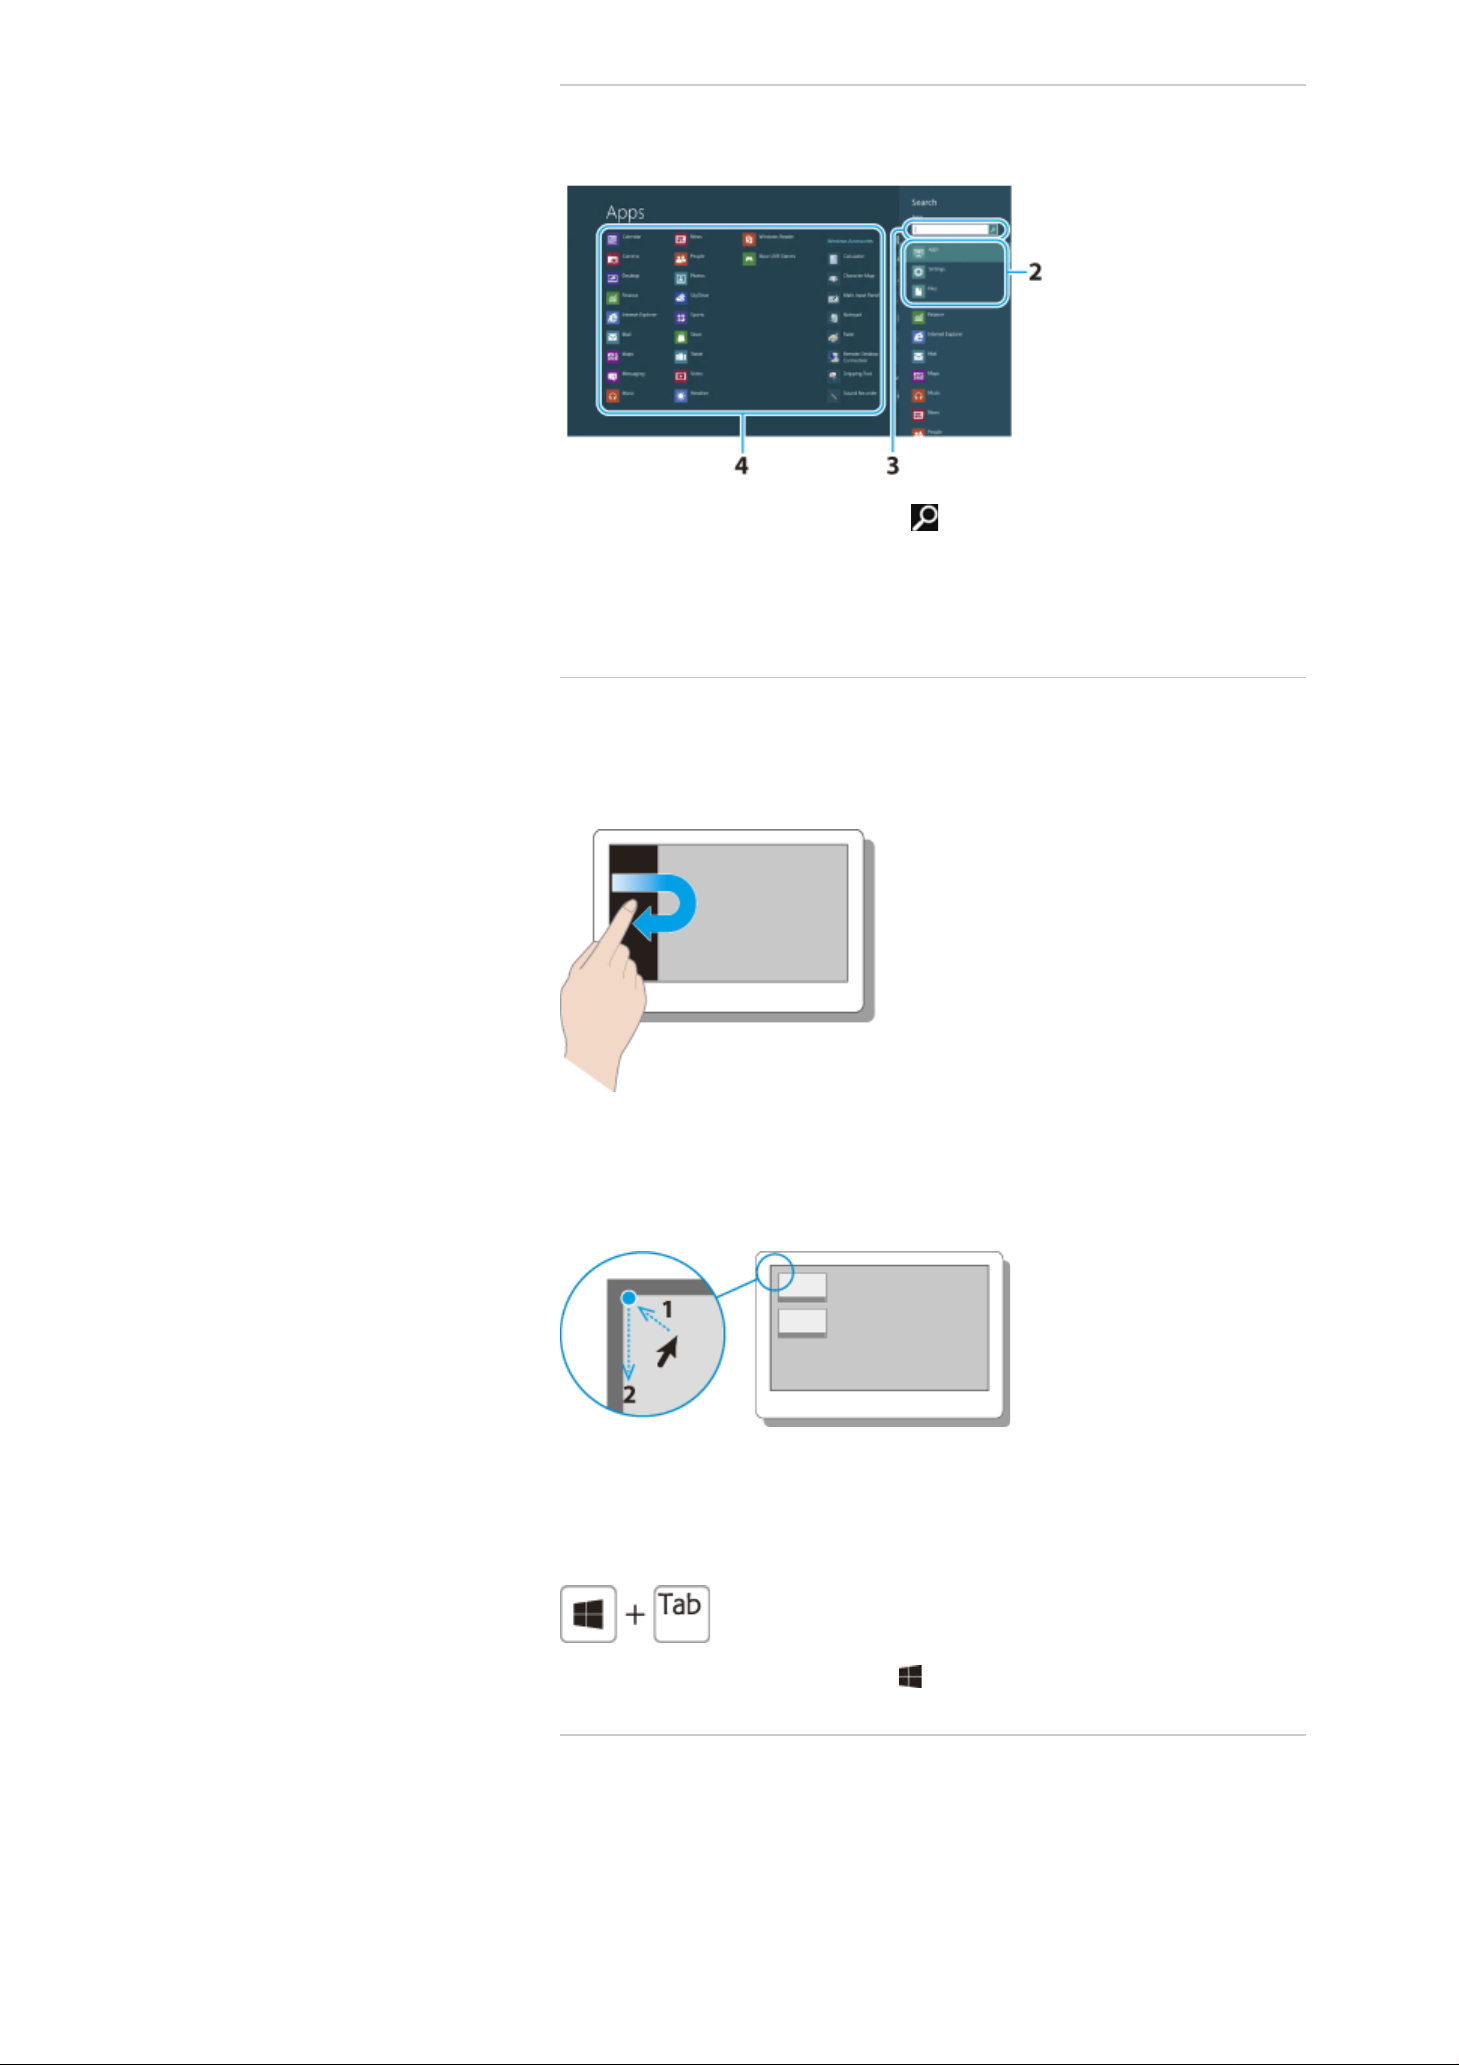
Checking Currently Running Apps
Touch operation
Swipe in from the left edge until a small app icon appears, then drag the icon back towards
the left edge.
Mouse operation
Place the pointer at the upper-left corner to show an app icon(s), then move the pointer
down.
Keyboard operation
Press the Tab key while holding down the (Windows) key.
^ Go to top
Switching Apps
You can switch currently running apps.
Page 9
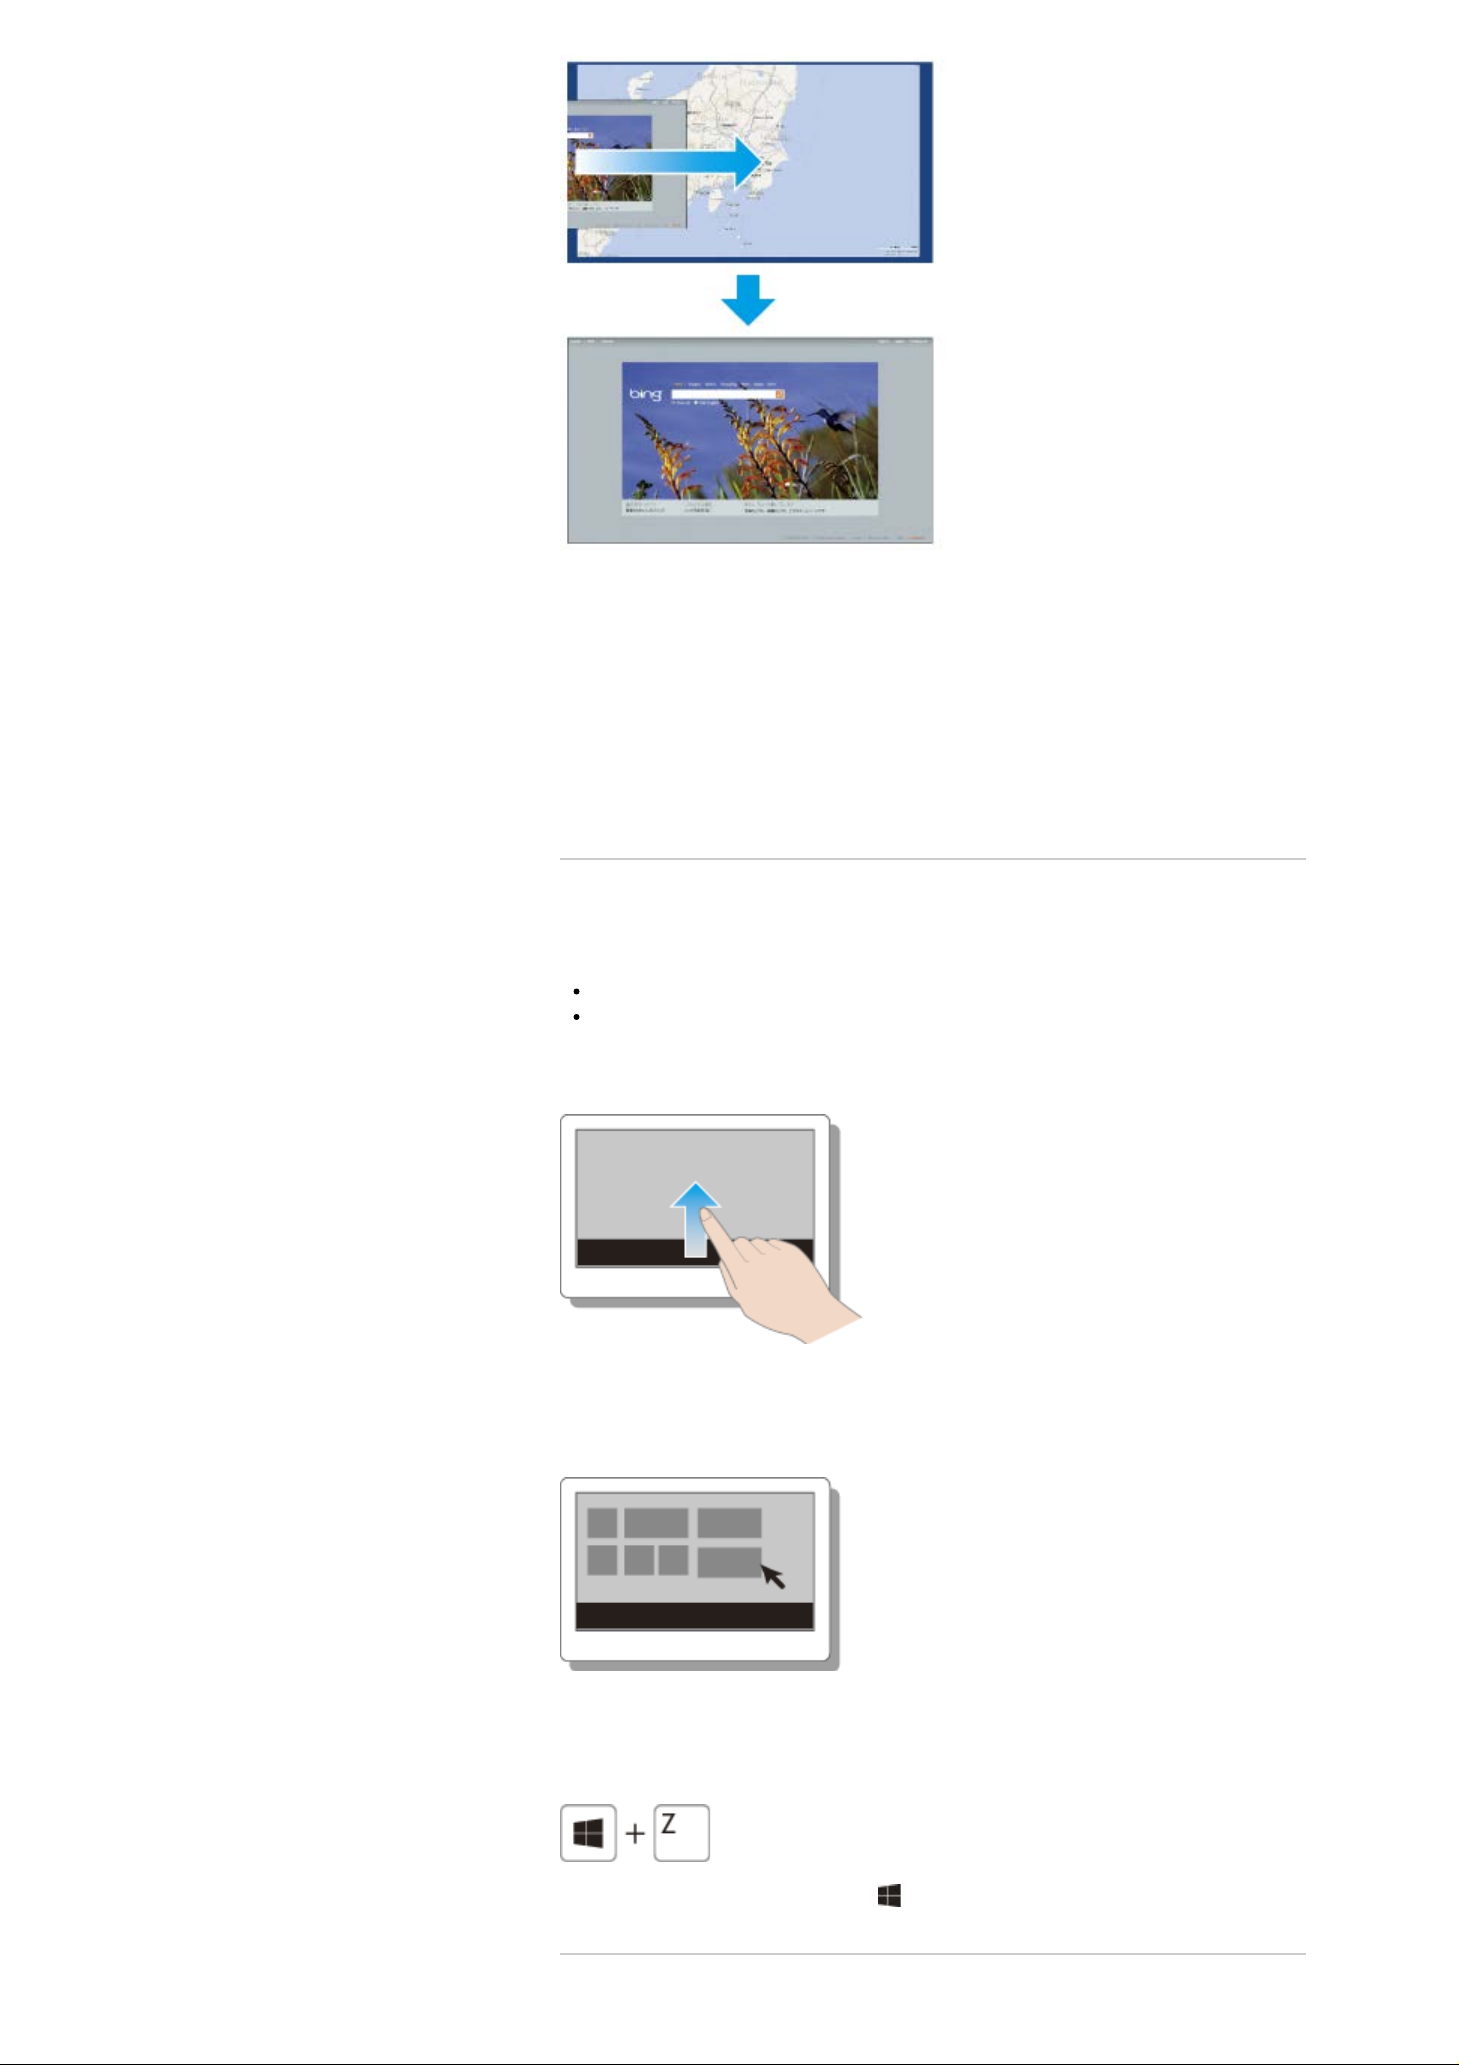
Touch operation
Display currently running apps [Details], touch your desired app icon, and swipe in from the
left edge.
Mouse operation
Display currently running apps [Details] and drag your desired app icon from the left edge to
the center.
^ Go to top
Opening the App Menus
Hint
Open the app menus when an app is displayed on the computer screen.
App commands vary depending on apps displayed on the computer screen.
Touch operation
Swipe up from the bottom edge.
Mouse operation
Right-click on the computer screen.
Keyboard operation
Press the Z key while holding down the (Windows) key.
^ Go to top
Page 10
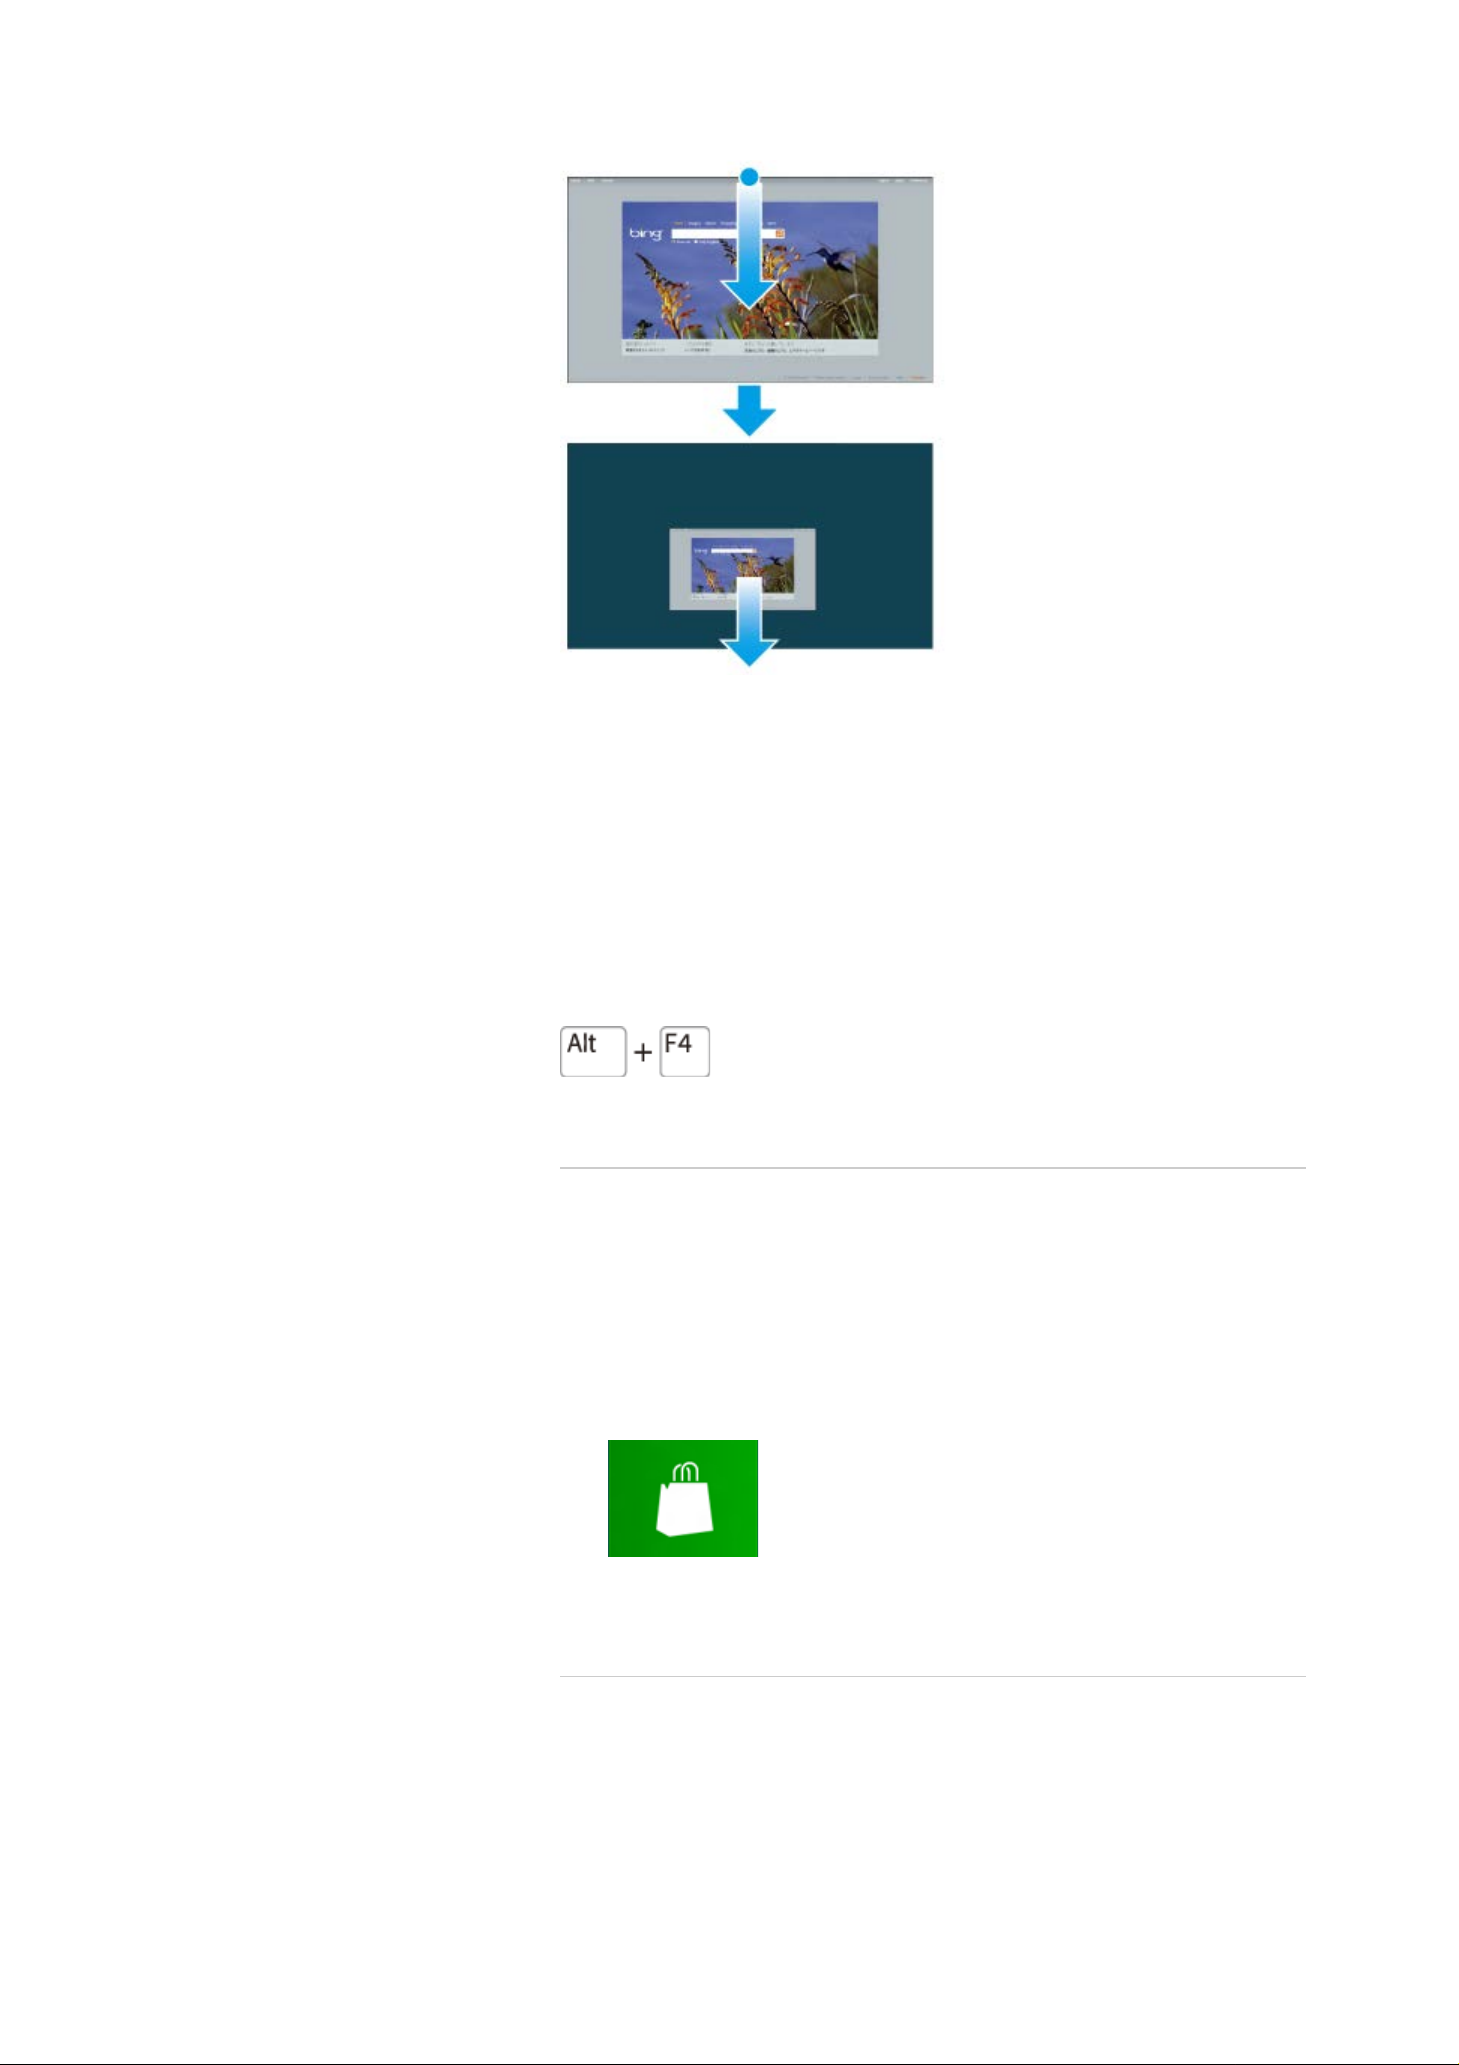
Closing Apps
You can close currently running apps by following the instruction below.
Touch operation
Display your desired app on the computer screen and swipe your finger from the top-center
edge to the bottom edge.
Mouse operation
Display your desired app on the computer screen, place the pointer at the top-center edge to
change the pointer into the hand pointer, and drag the app to the bottom-center edge.
Keyboard operation
Press the F4 key while holding down the Alt key.
^ Go to top
Downloading Apps from Windows Store
You can add apps from Windows Store.
Internet connection is necessary to access Windows Store. You also need to sign in with a
Microsoft account.
On how to create and what you can do with the Microsoft account, refer to Windows Help
and Support. [Details]
1. Show the Start screen [Details] and select the Store tile.
2. Select your desired app.
3. Follow the on-screen instructions to download and install the app.
Opening Windows Help and Support
You can open Windows Help and Support by following these steps.
^ Go to top
Page 11
1. Open the charms [Details] and select (Search).
2. Select Apps.
3. Enter “Help and Support” in the Search box.
4. Select Help and Support.
^ Go to top
Activating Sleep Mode or Shutting Down/Restarting Your
VAIO Computer
1. Open the charms [Details] and select (Settings).
2. Select
(Power) and Sleep, Shut down, or Restart.
Trademarks
SONY and the SONY logo are registered trademarks of Sony Corporation.
VAIO, the VAIO logo, and other Sony product or service names are trademarks or
registered trademarks of Sony Corporation or any of its affiliates.
Windows and the Windows logo are either registered trademarks or trademarks of
Microsoft Corporation in the United States and/or other countries.
Wi-Fi is a trademark or registered trademark of Wi-Fi Alliance.
All other names of system, products, and services are trademarks of their respective
owners.
In the manual, the TM or (R) marks are not specified.
Copyright 2012 Sony Corporation
^ Go to top
^ Go to top
© 2012 Sony Corporation
Page 12

VAIO User Guide VAIO Duo 11 SVD1121 Series Back | Back to Top
undefined
Troubleshooting
Checking Supplied Items
How to Use
Windows 8: The Basics
Parts Description
Setup
Network / Internet
Connections
Settings
Backup / Recovery
Security
Other Operations
Notifications
Check all items packed with the product before use.
AC adapter
Power cord
Digitizer stylus*
Extended battery pack*
Noise canceling headphones *
* Not supplied with all models. Availability depends on your computer’s specifications.
Hint
No Recovery Media is included because your VAIO computer can be recovered using
data stored in the hard disk drive or SSD. See Recovering from the Recovery Area for
more information. [Details]
© 2012 Sony Corporation
Page 13
VAIO User Guide VAIO Duo 11 SVD1121 Series Back | Back to Top
undefined
Troubleshooting
Parts and Controls on the Front
How to Use
Windows 8: The Basics
Parts Description
Setup
Network / Internet
Connections
Settings
Backup / Recovery
Security
Other Operations
Notifications
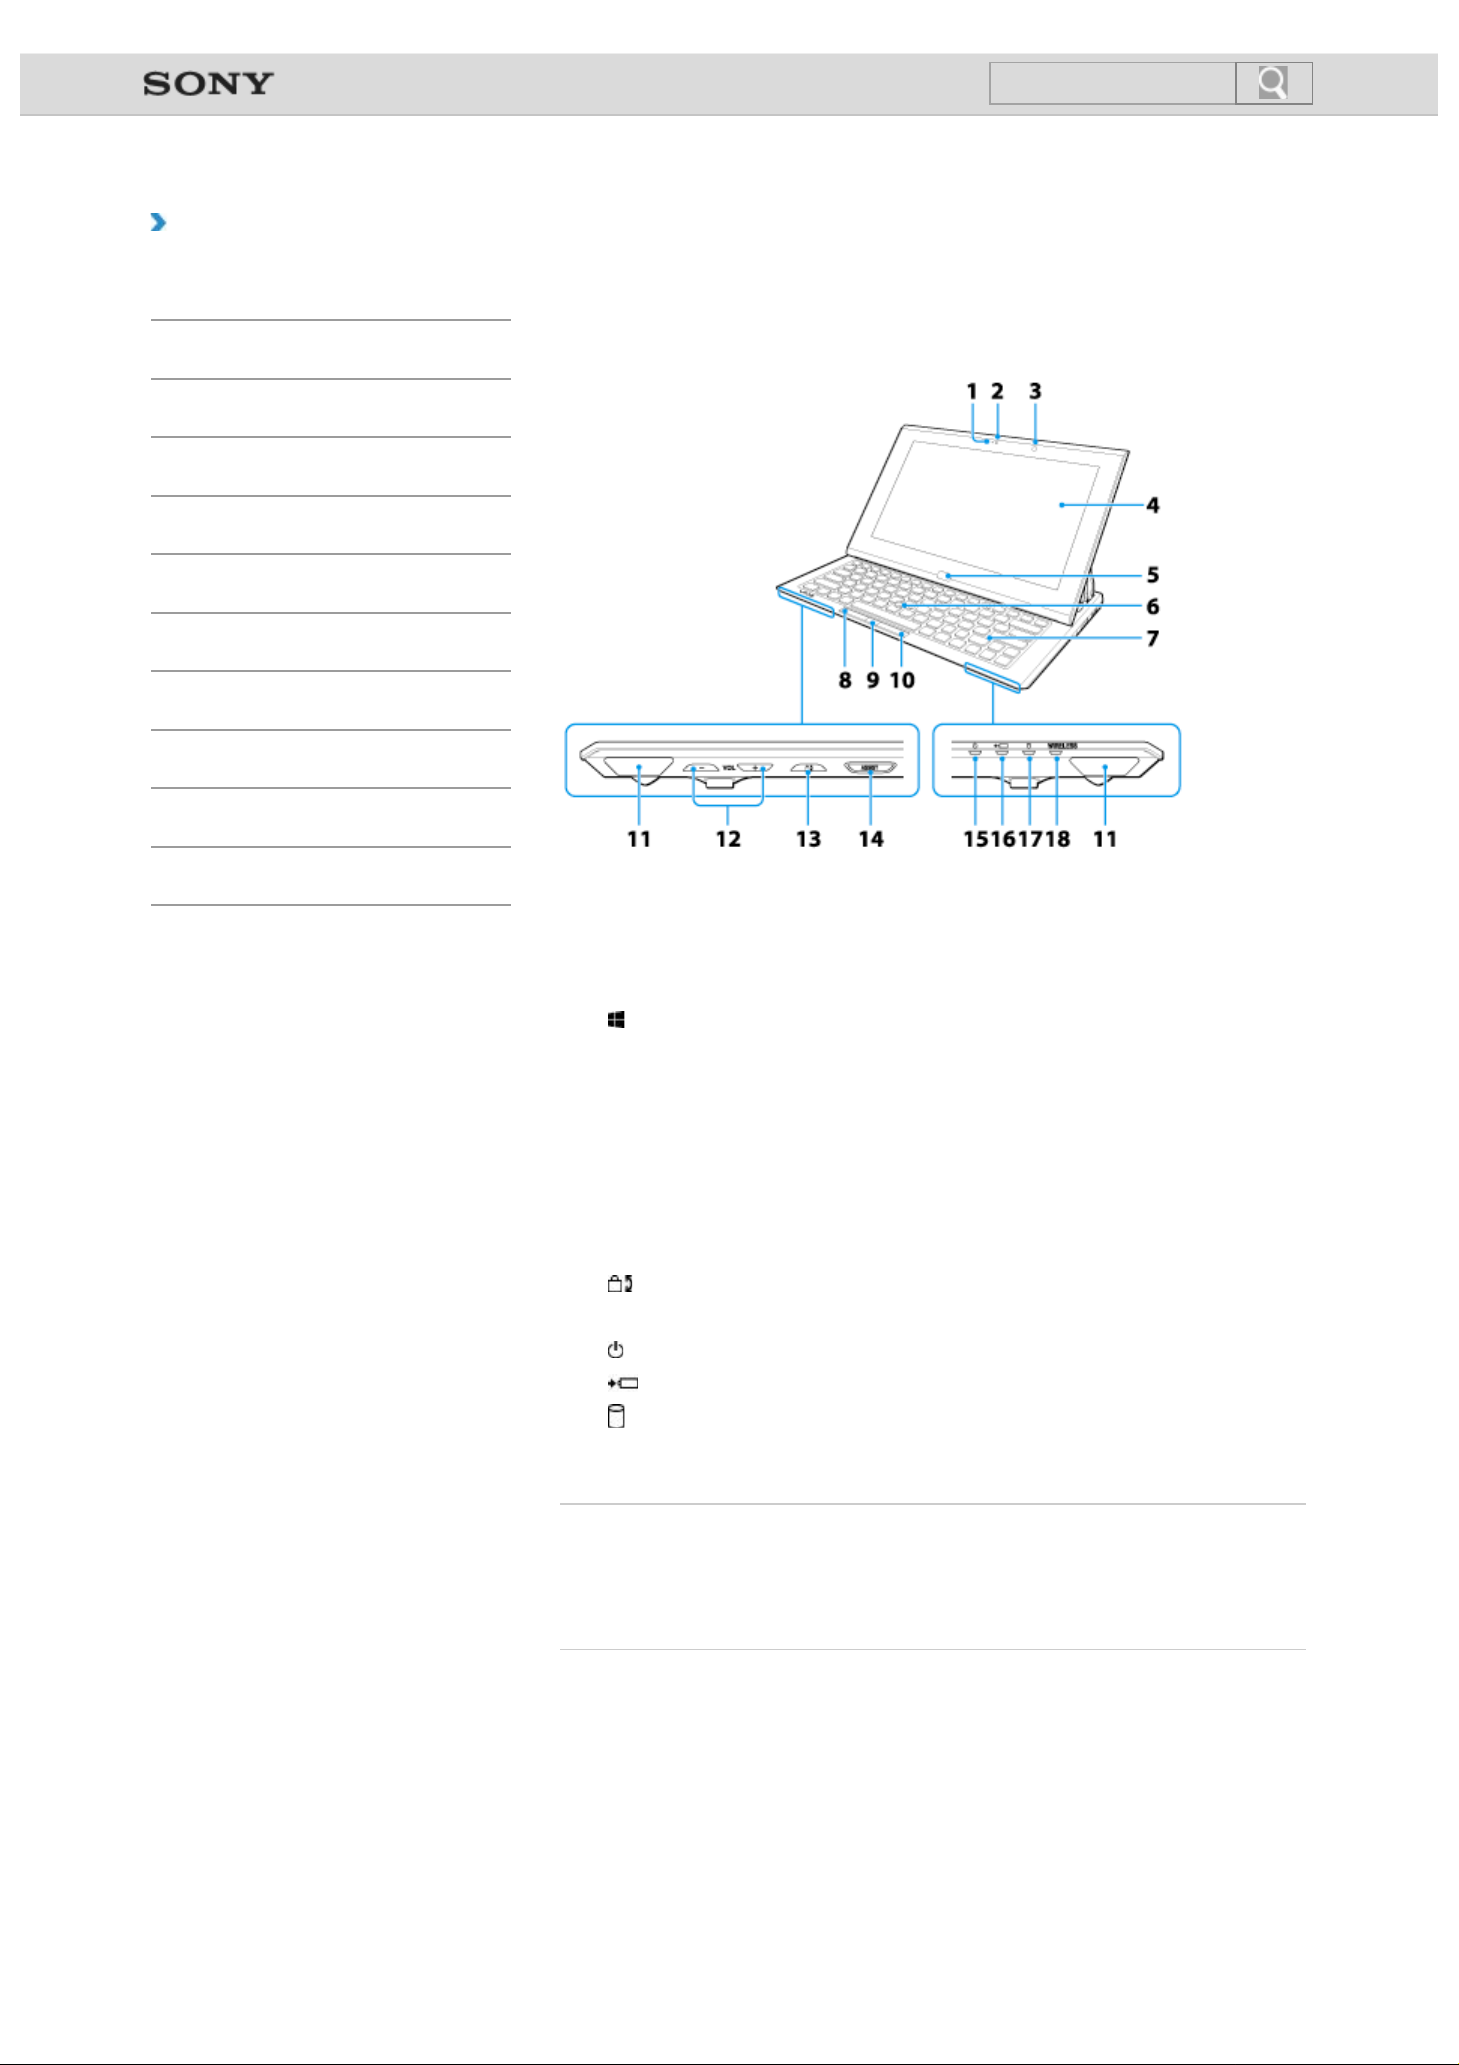
Describes the features on the front of the VAIO computer, such as buttons and indicator
lights.
1. Built-in front camera indicator [Details]
2. Built-in front camera [Details]
3. Ambient light sensor [Details]
4. LCD screen or touch screen [Details]
5.
Windows button
6. Optical Trackpad [Details]
7. Keyboard
8. Left button [Details]
9. Center button [Details]
10. Right button [Details]
11. Built-in speakers (stereo)
12. VOL (Volume) buttons
13.
14. ASSIST button [Details]
15.
16.
17.
Rotation lock button
Power indicator [Details]
Charge indicator [Details]
Disc drive indicator
© 2012 Sony Corporation
18. WIRELESS indicator [Details]
Related Topic
Parts and Controls on the Sides
Parts and Controls on the Bottom
Parts and Controls on the Back
Page 14
VAIO User Guide VAIO Duo 11 SVD1121 Series Back | Back to Top
undefined
Troubleshooting
Parts and Controls on the Sides
How to Use
Windows 8: The Basics
Parts Description
Setup
Network / Internet
Connections
Settings
Backup / Recovery
Security
Other Operations
Notifications
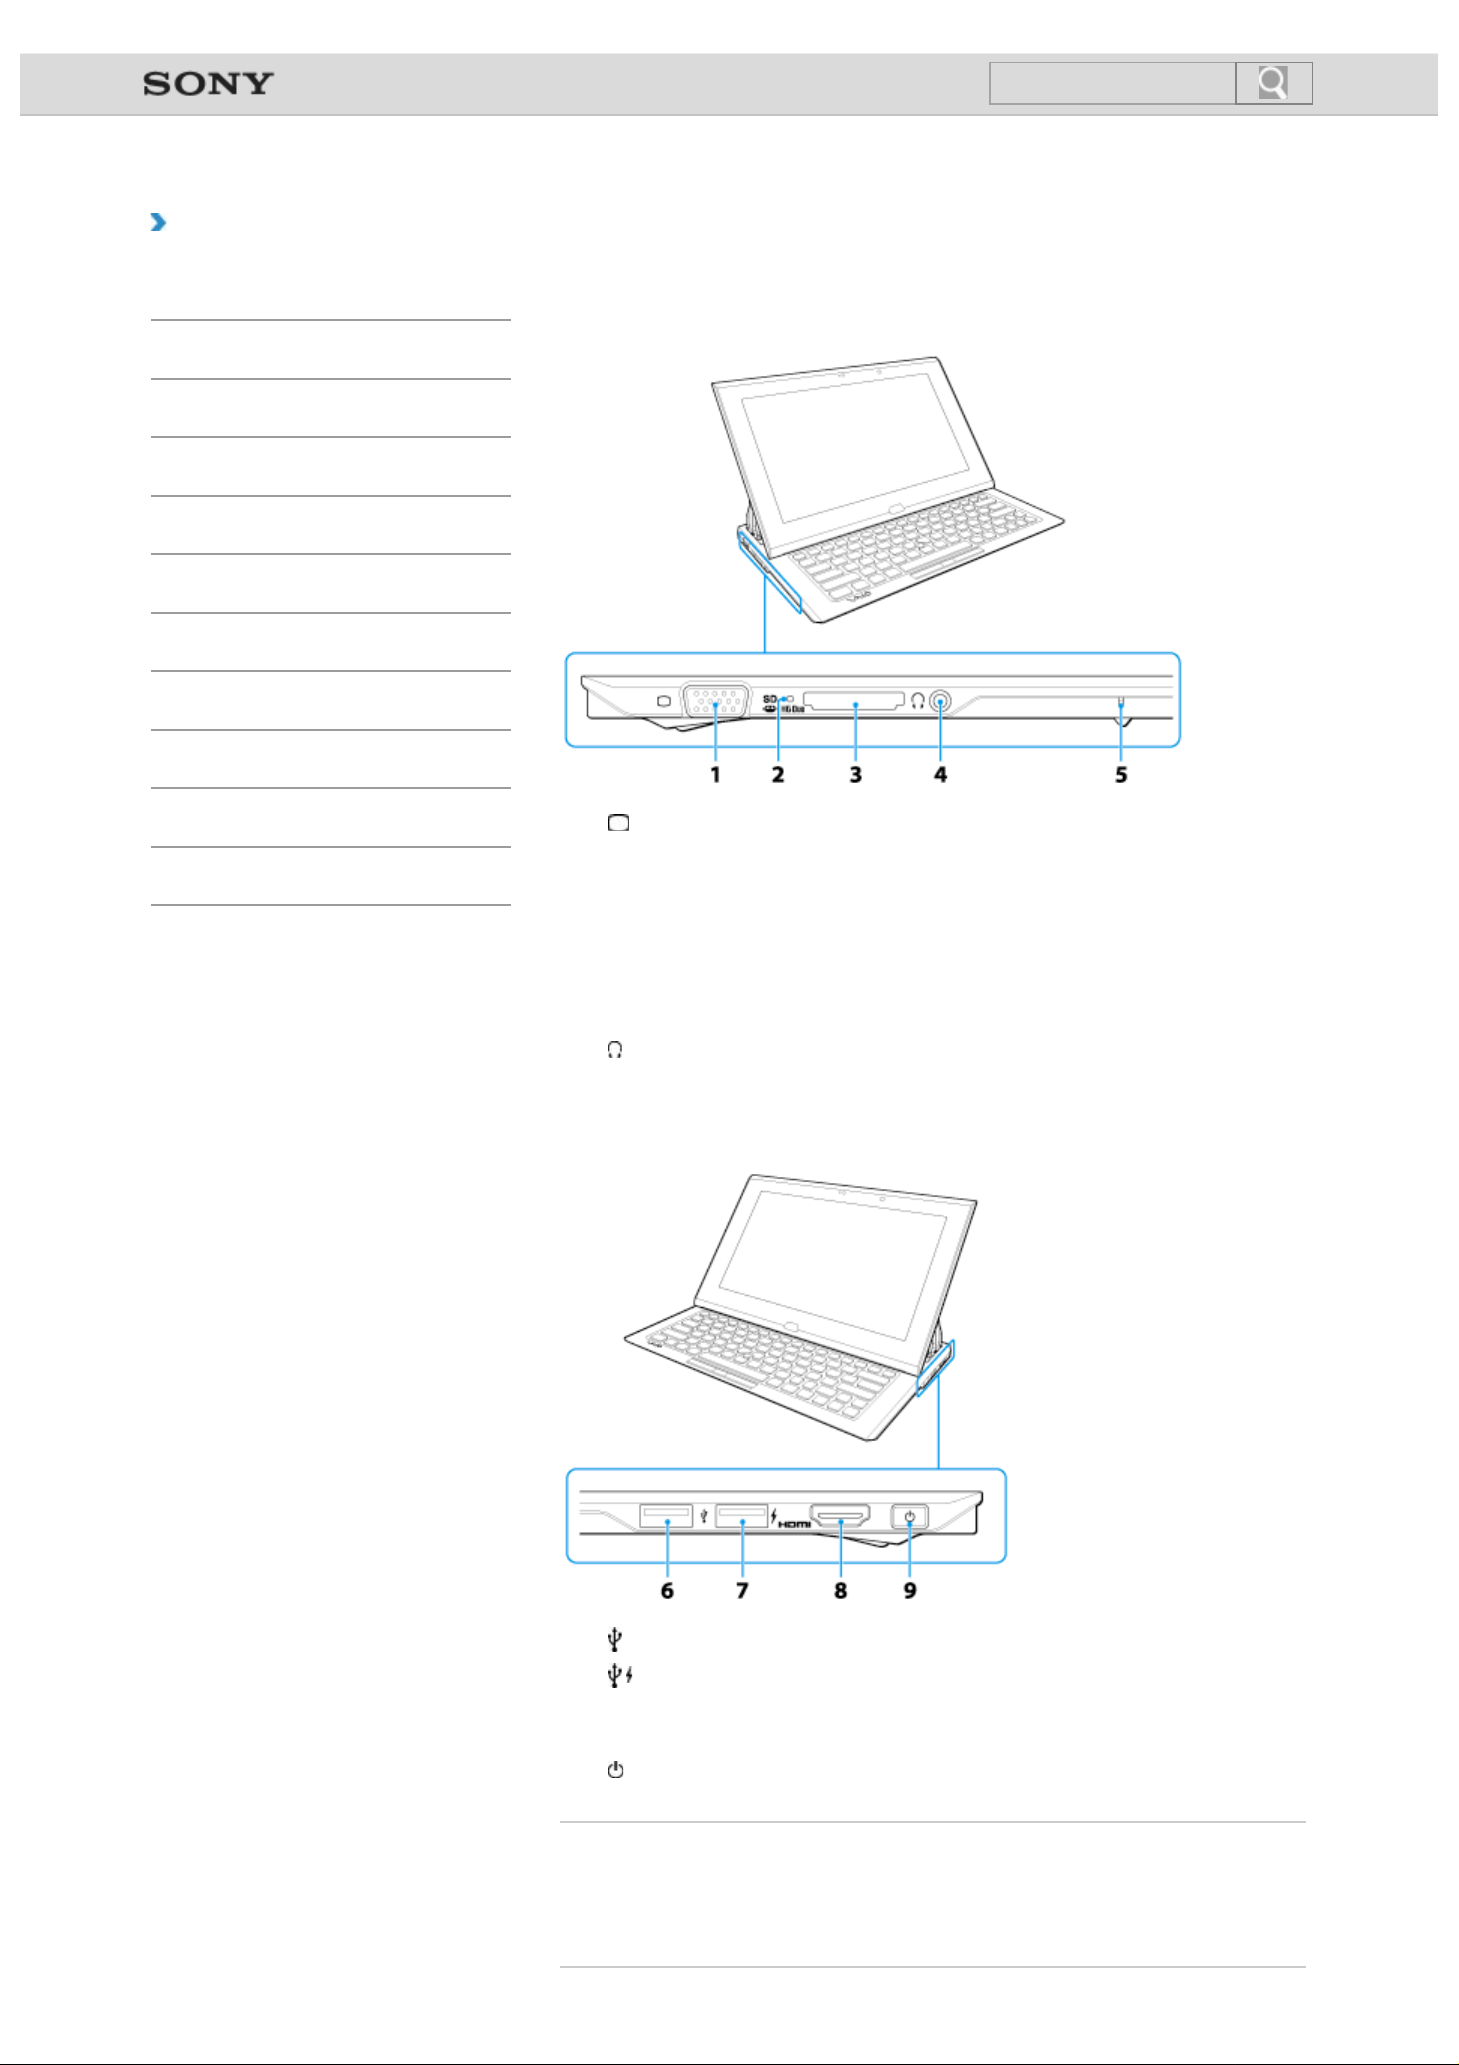
Describes the features on the sides of the VAIO computer, such as connection ports.
1. Monitor port [Details]
Before connecting the cable to the monitor port, unfold the tilt feet on the bottom of the
computer. [Details]
2. Media access indicator (“Memory Stick Duo” [Details], SD memory card [Details])
3. “Memory Stick Duo” / SD memory card combined slot (“Memory Stick Duo” [Details],
SD memory card [Details])
“Memory Stick Duo” and an SD memory card cannot be inserted into the slot
simultaneously.
Headphones jack [Details]
4.
5. Built-in microphone (monaural)
6. USB port [Details]
7. USB port [Details]
This USB port supports USB charging. [Details]
8. HDMI output port [Details]
9.
Power button [Details]
Related Topic
Parts and Controls on the Front
Parts and Controls on the Bottom
Parts and Controls on the Back
Page 15

© 2012 Sony Corporation
Page 16
VAIO User Guide VAIO Duo 11 SVD1121 Series Back | Back to Top
undefined
Troubleshooting
Parts and Controls on the Bottom
How to Use
Windows 8: The Basics
Parts Description
Setup
Network / Internet
Connections
Settings
Backup / Recovery
Security
Other Operations
Notifications
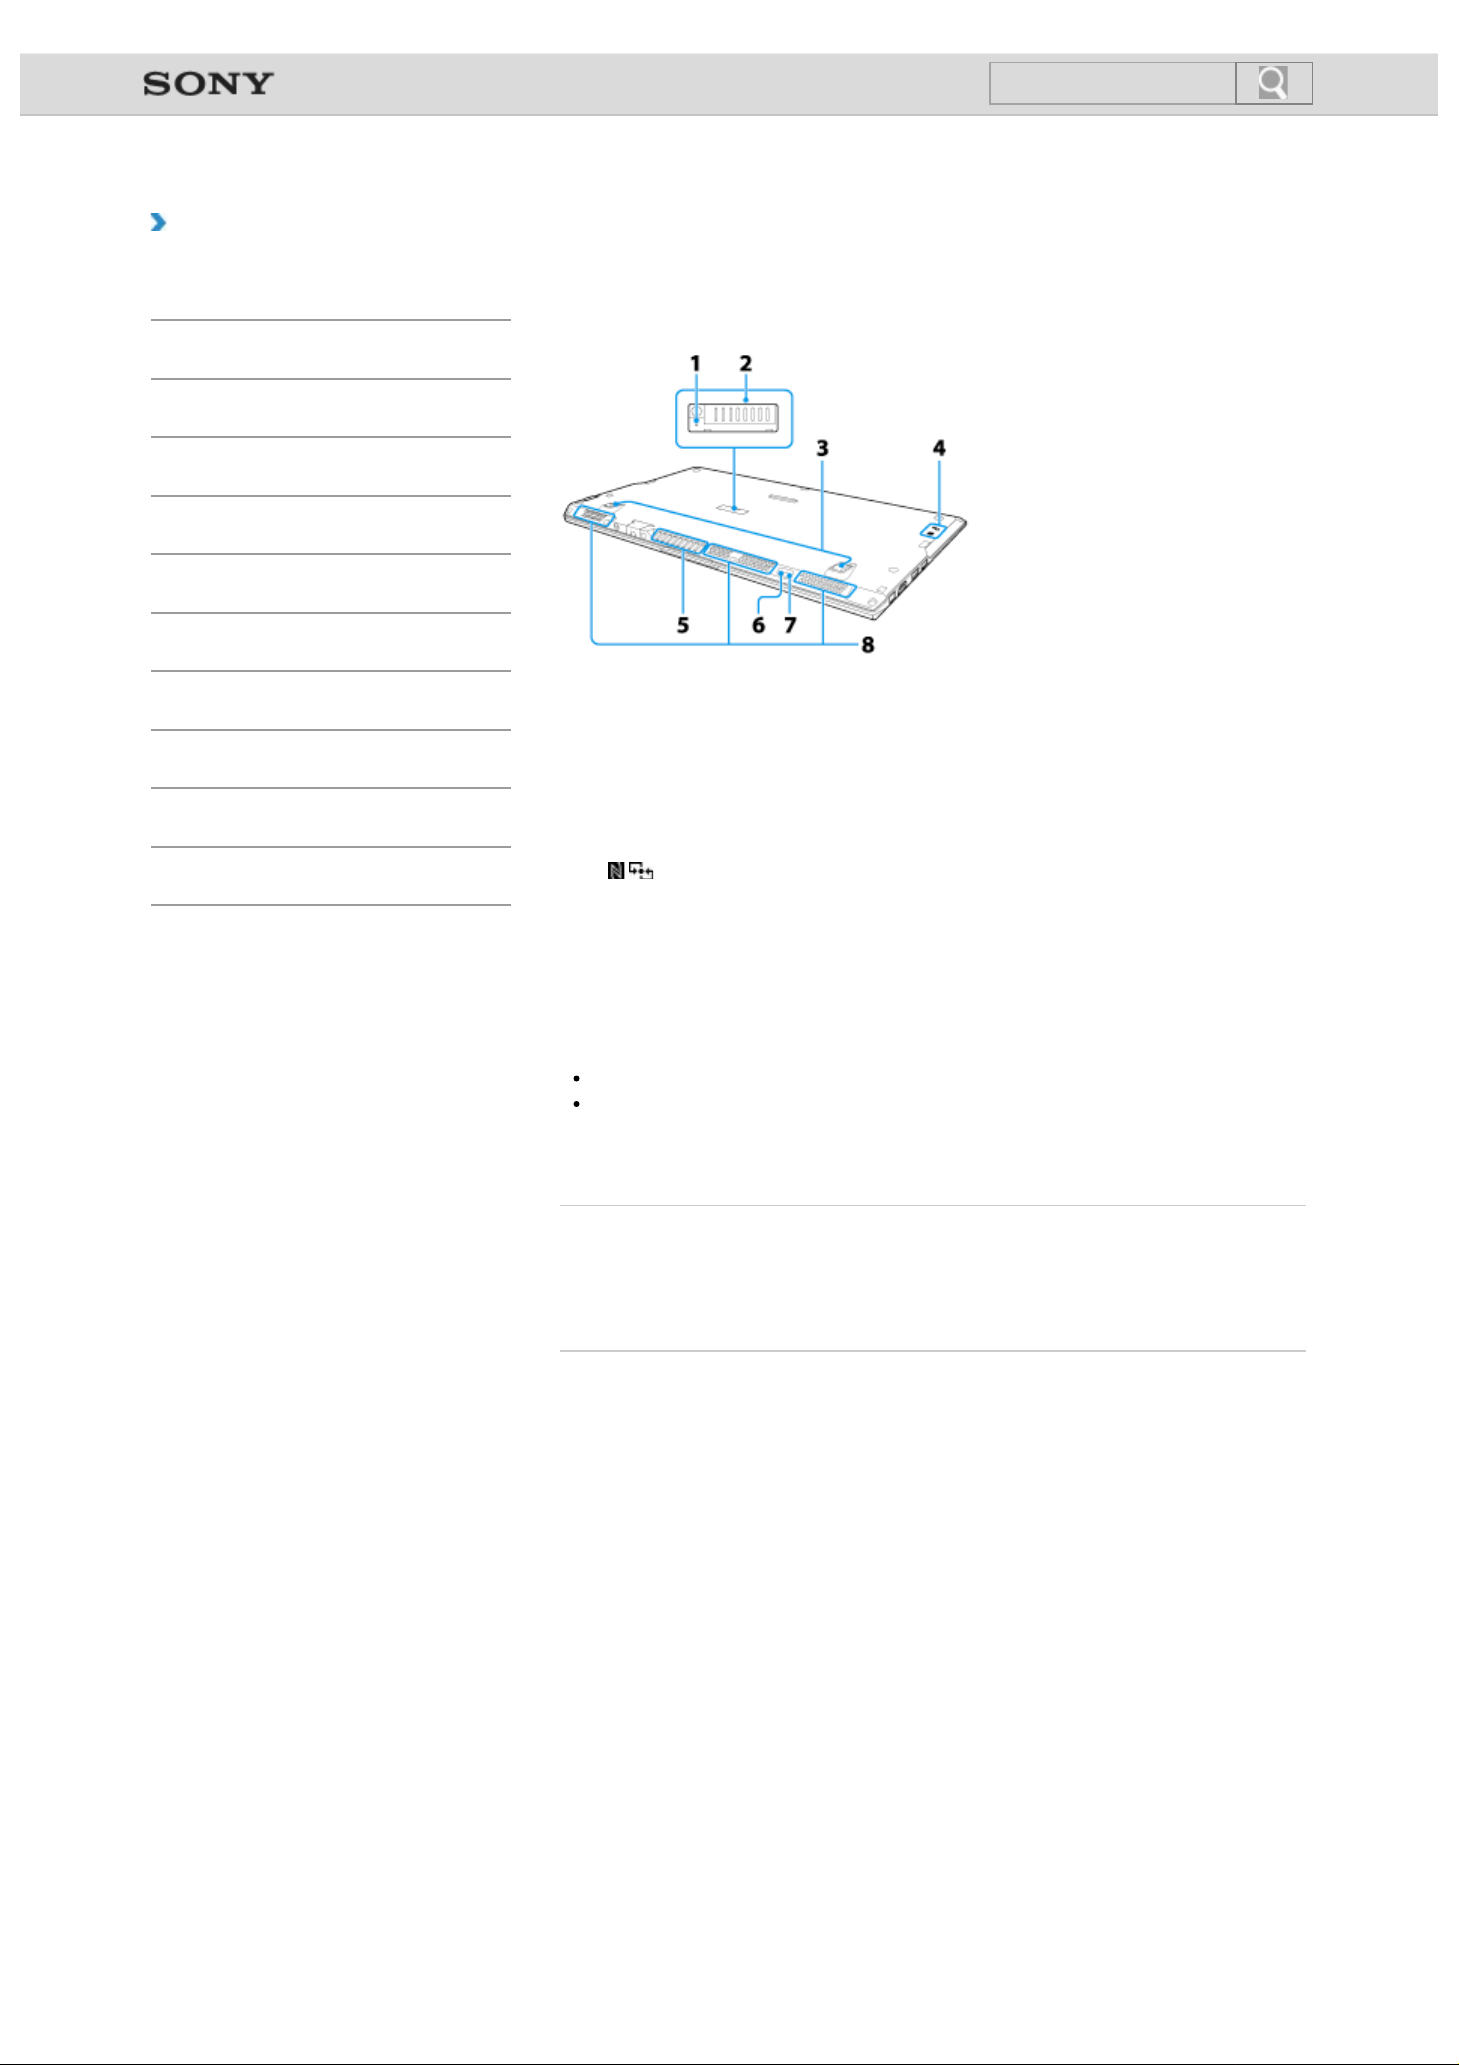
Describes the features on the bottom of the VAIO computer.
1. Battery off button
2. Extended battery pack connector
Remove the extended battery pack connector cover and connect an extended battery
pack to the connector. Attach the removed connector cover to the extended battery
pack to keep the cover for future use.
3. Tilt feet [Details]
4. Touch mark [Details]
5. Air exhaust vent
6. Built-in rear camera indicator (Rear camera equipped models) [Details]
7. Built-in rear camera (Rear camera equipped models) [Details]
8. Air intake vents
© 2012 Sony Corporation
Note
The memory of your VAIO computer cannot be replaced.
If the battery off button is pressed while the VAIO computer is running, unsaved data
may be lost. Be sure to save your working data and turn off the VAIO computer before
pressing the battery off button.
Related Topic
Parts and Controls on the Front
Parts and Controls on the Sides
Parts and Controls on the Back
Page 17
VAIO User Guide VAIO Duo 11 SVD1121 Series Back | Back to Top
undefined
Troubleshooting
Parts and Controls on the Back
How to Use
Windows 8: The Basics
Parts Description
Setup
Network / Internet
Connections
Settings
Backup / Recovery
Security
Other Operations
Notifications
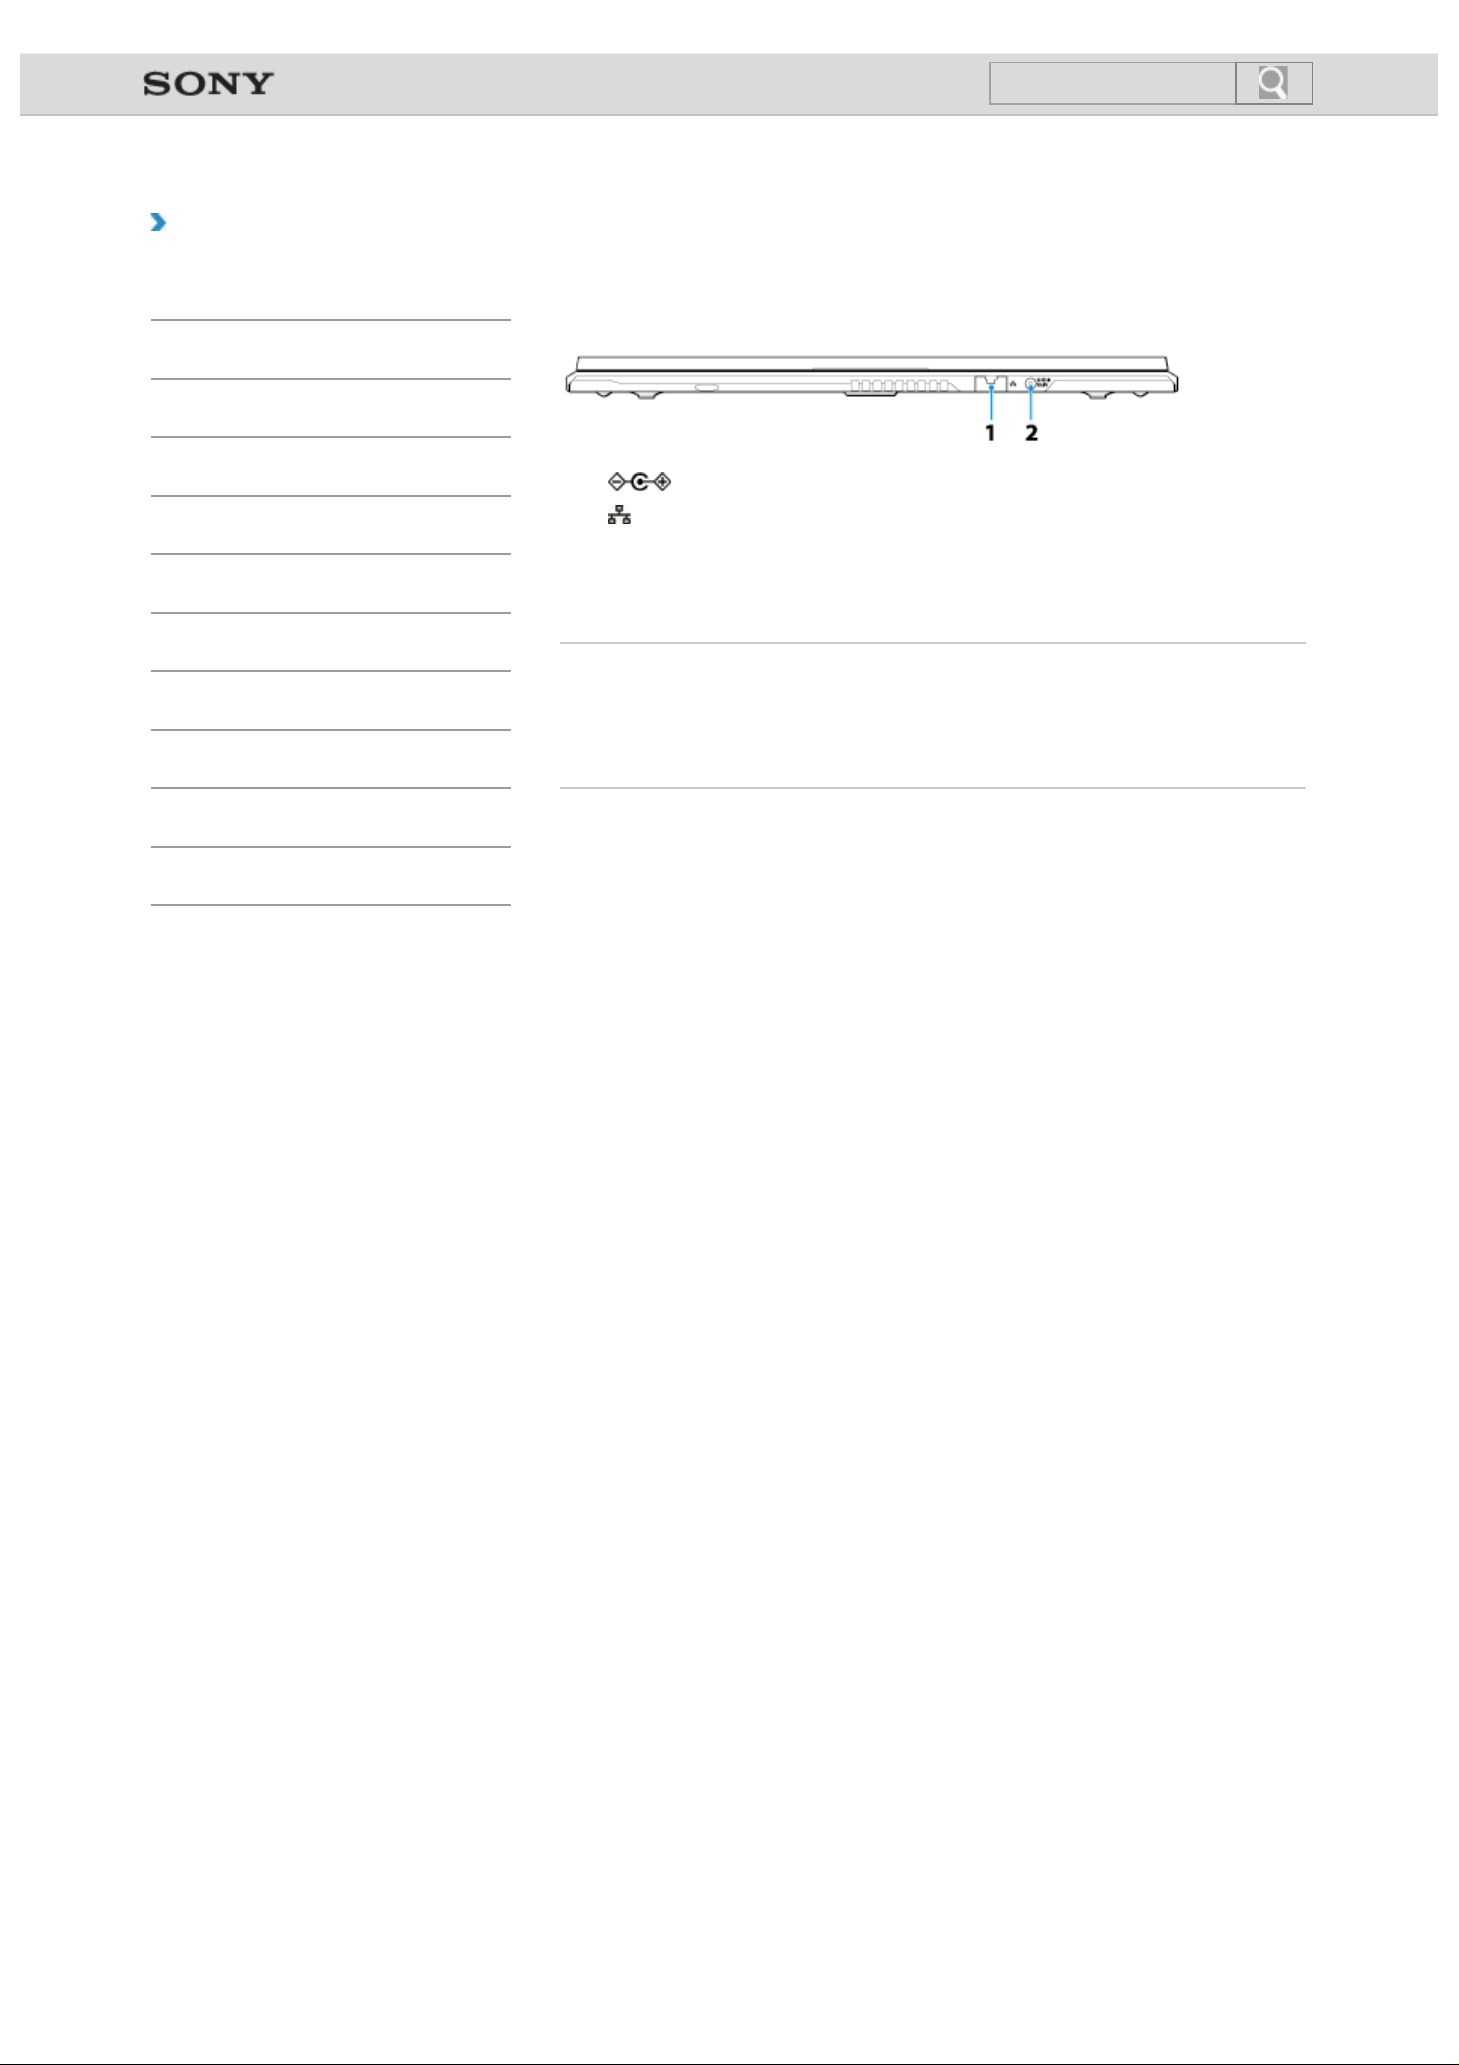
Describes the features on the back of the VAIO computer, such as connection ports.
1. DC IN port [Details]
2.
LAN port [Details]
For details on the LAN port, see “Using the LAN Port” [Details].
Before connecting the cable to the LAN port, unfold the tilt feet on the bottom of the
computer. [Details]
Related Topic
Parts and Controls on the Front
Parts and Controls on the Sides
Parts and Controls on the Bottom
© 2012 Sony Corporation
Page 18
VAIO User Guide VAIO Duo 11 SVD1121 Series Back | Back to Top
undefined
Troubleshooting
Using the LAN Port
How to Use
Windows 8: The Basics
Parts Description
Setup
Network / Internet
Connections
Settings
Backup / Recovery
Security
Other Operations
Notifications
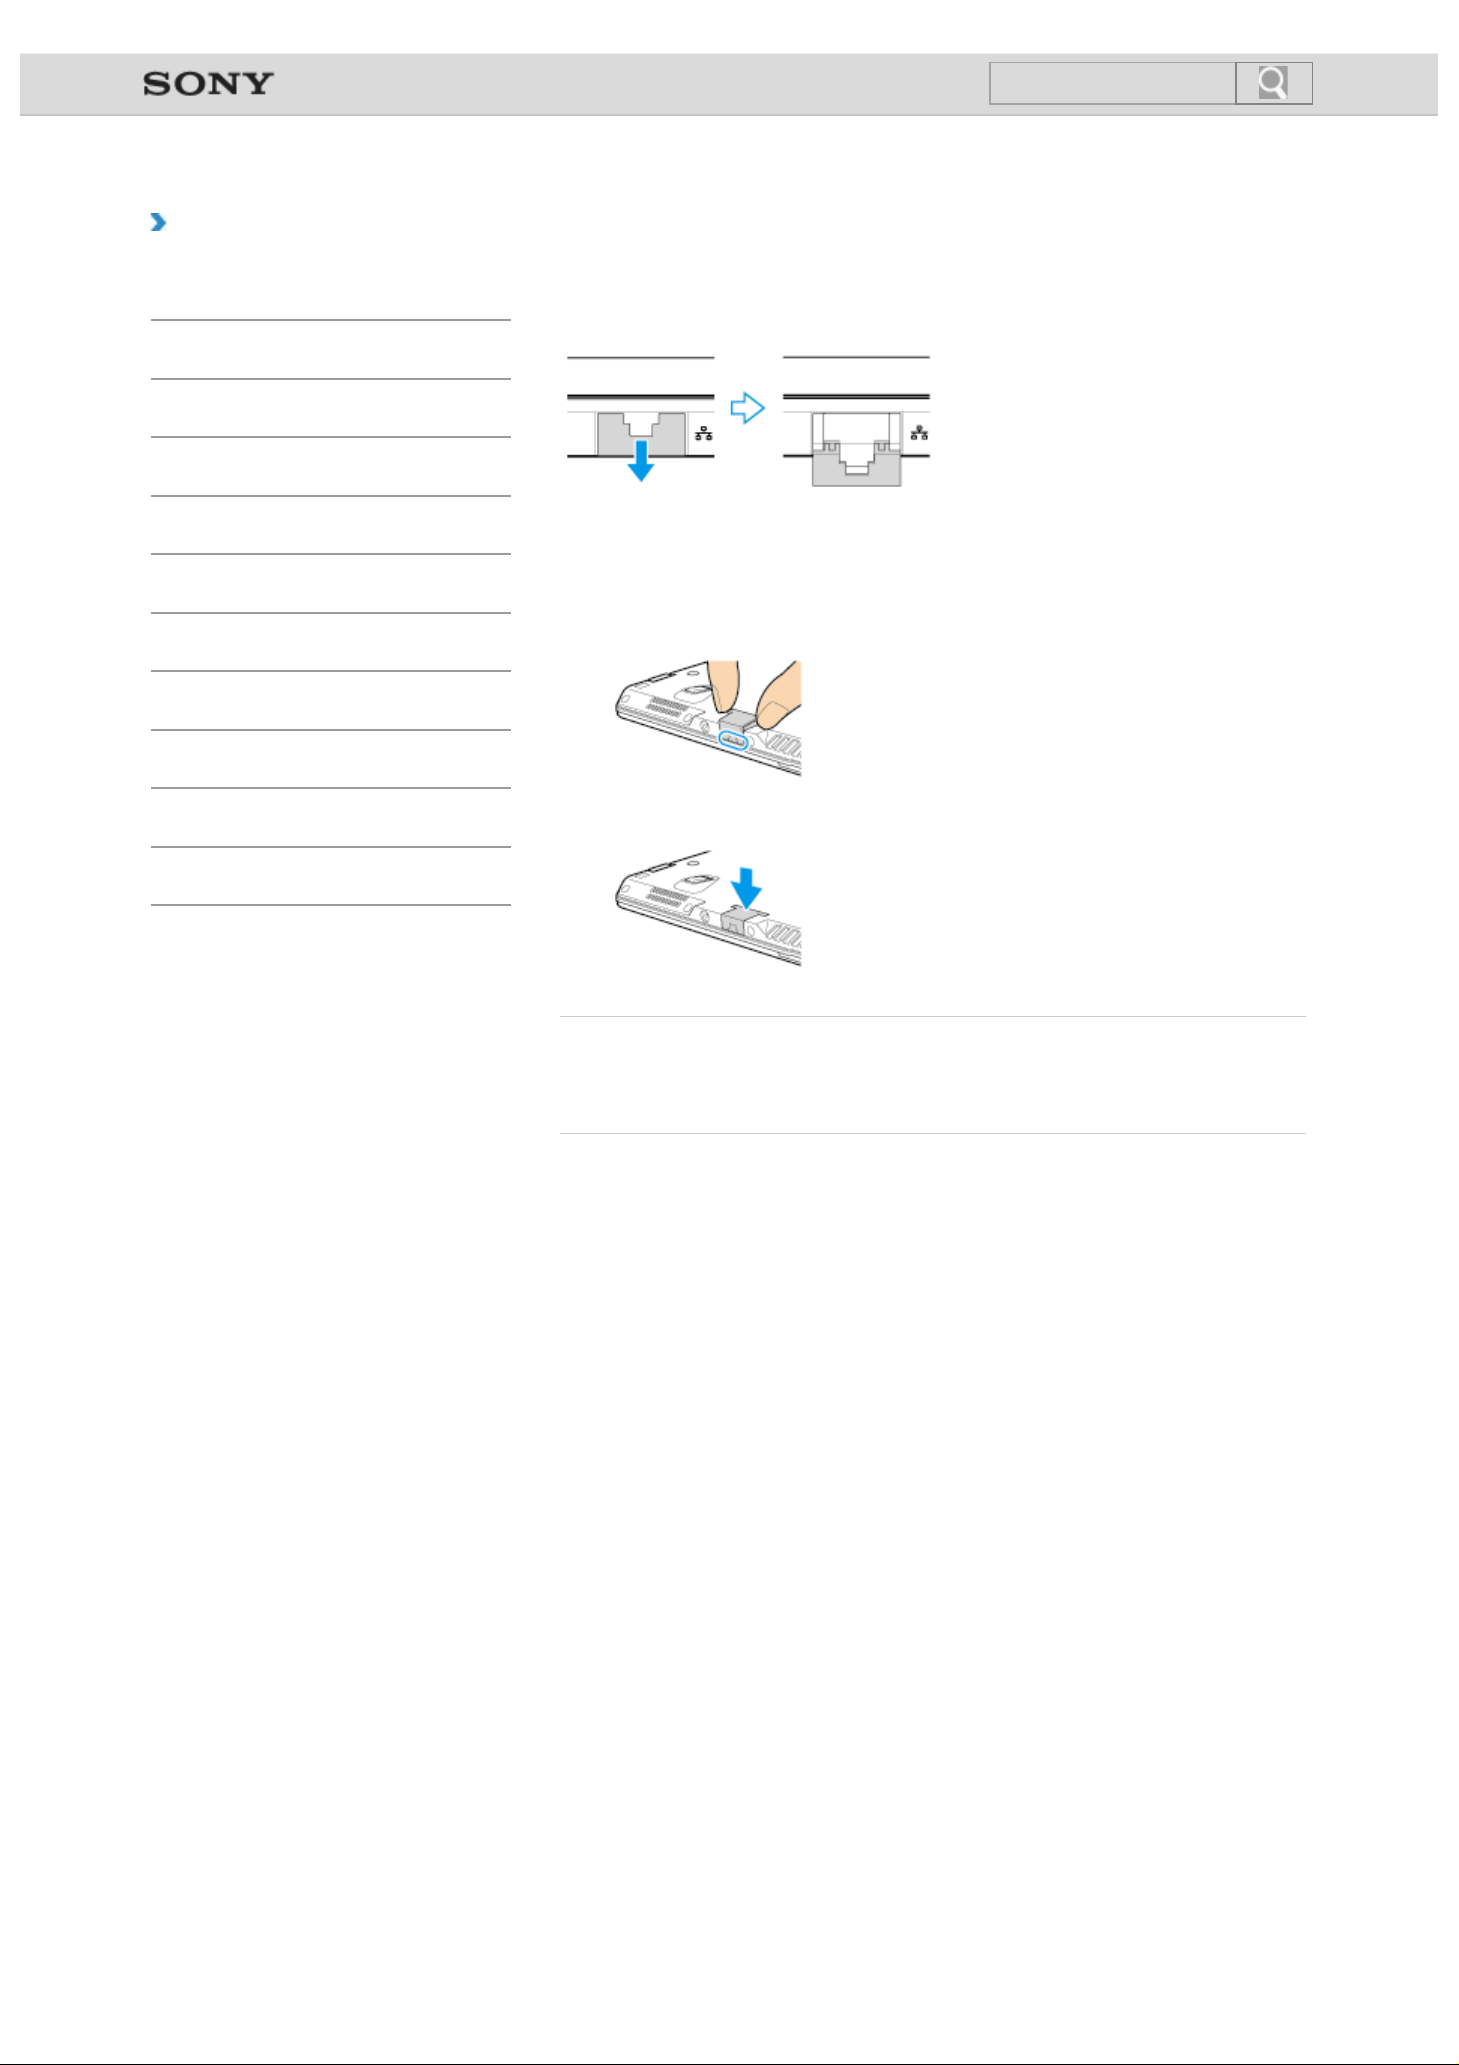
Before connecting a LAN cable to the LAN port, pull the port cover down as illustrated below.
If the port cover has disengaged:
If the port cover has disengaged, follow the instruction below to re-attach it.
1. Align the cover with the edge of the port.
2. Push the cover down until it clicks into place.
© 2012 Sony Corporation
Related Topic
Parts and Controls on the Back
Connecting to the Internet with a Wired Connection
Page 19
VAIO User Guide VAIO Duo 11 SVD1121 Series Back | Back to Top
undefined
Troubleshooting
Using the Tilt Feet
How to Use
Windows 8: The Basics
Parts Description
Setup
Network / Internet
Connections
Settings
Backup / Recovery
Security
Other Operations
Notifications
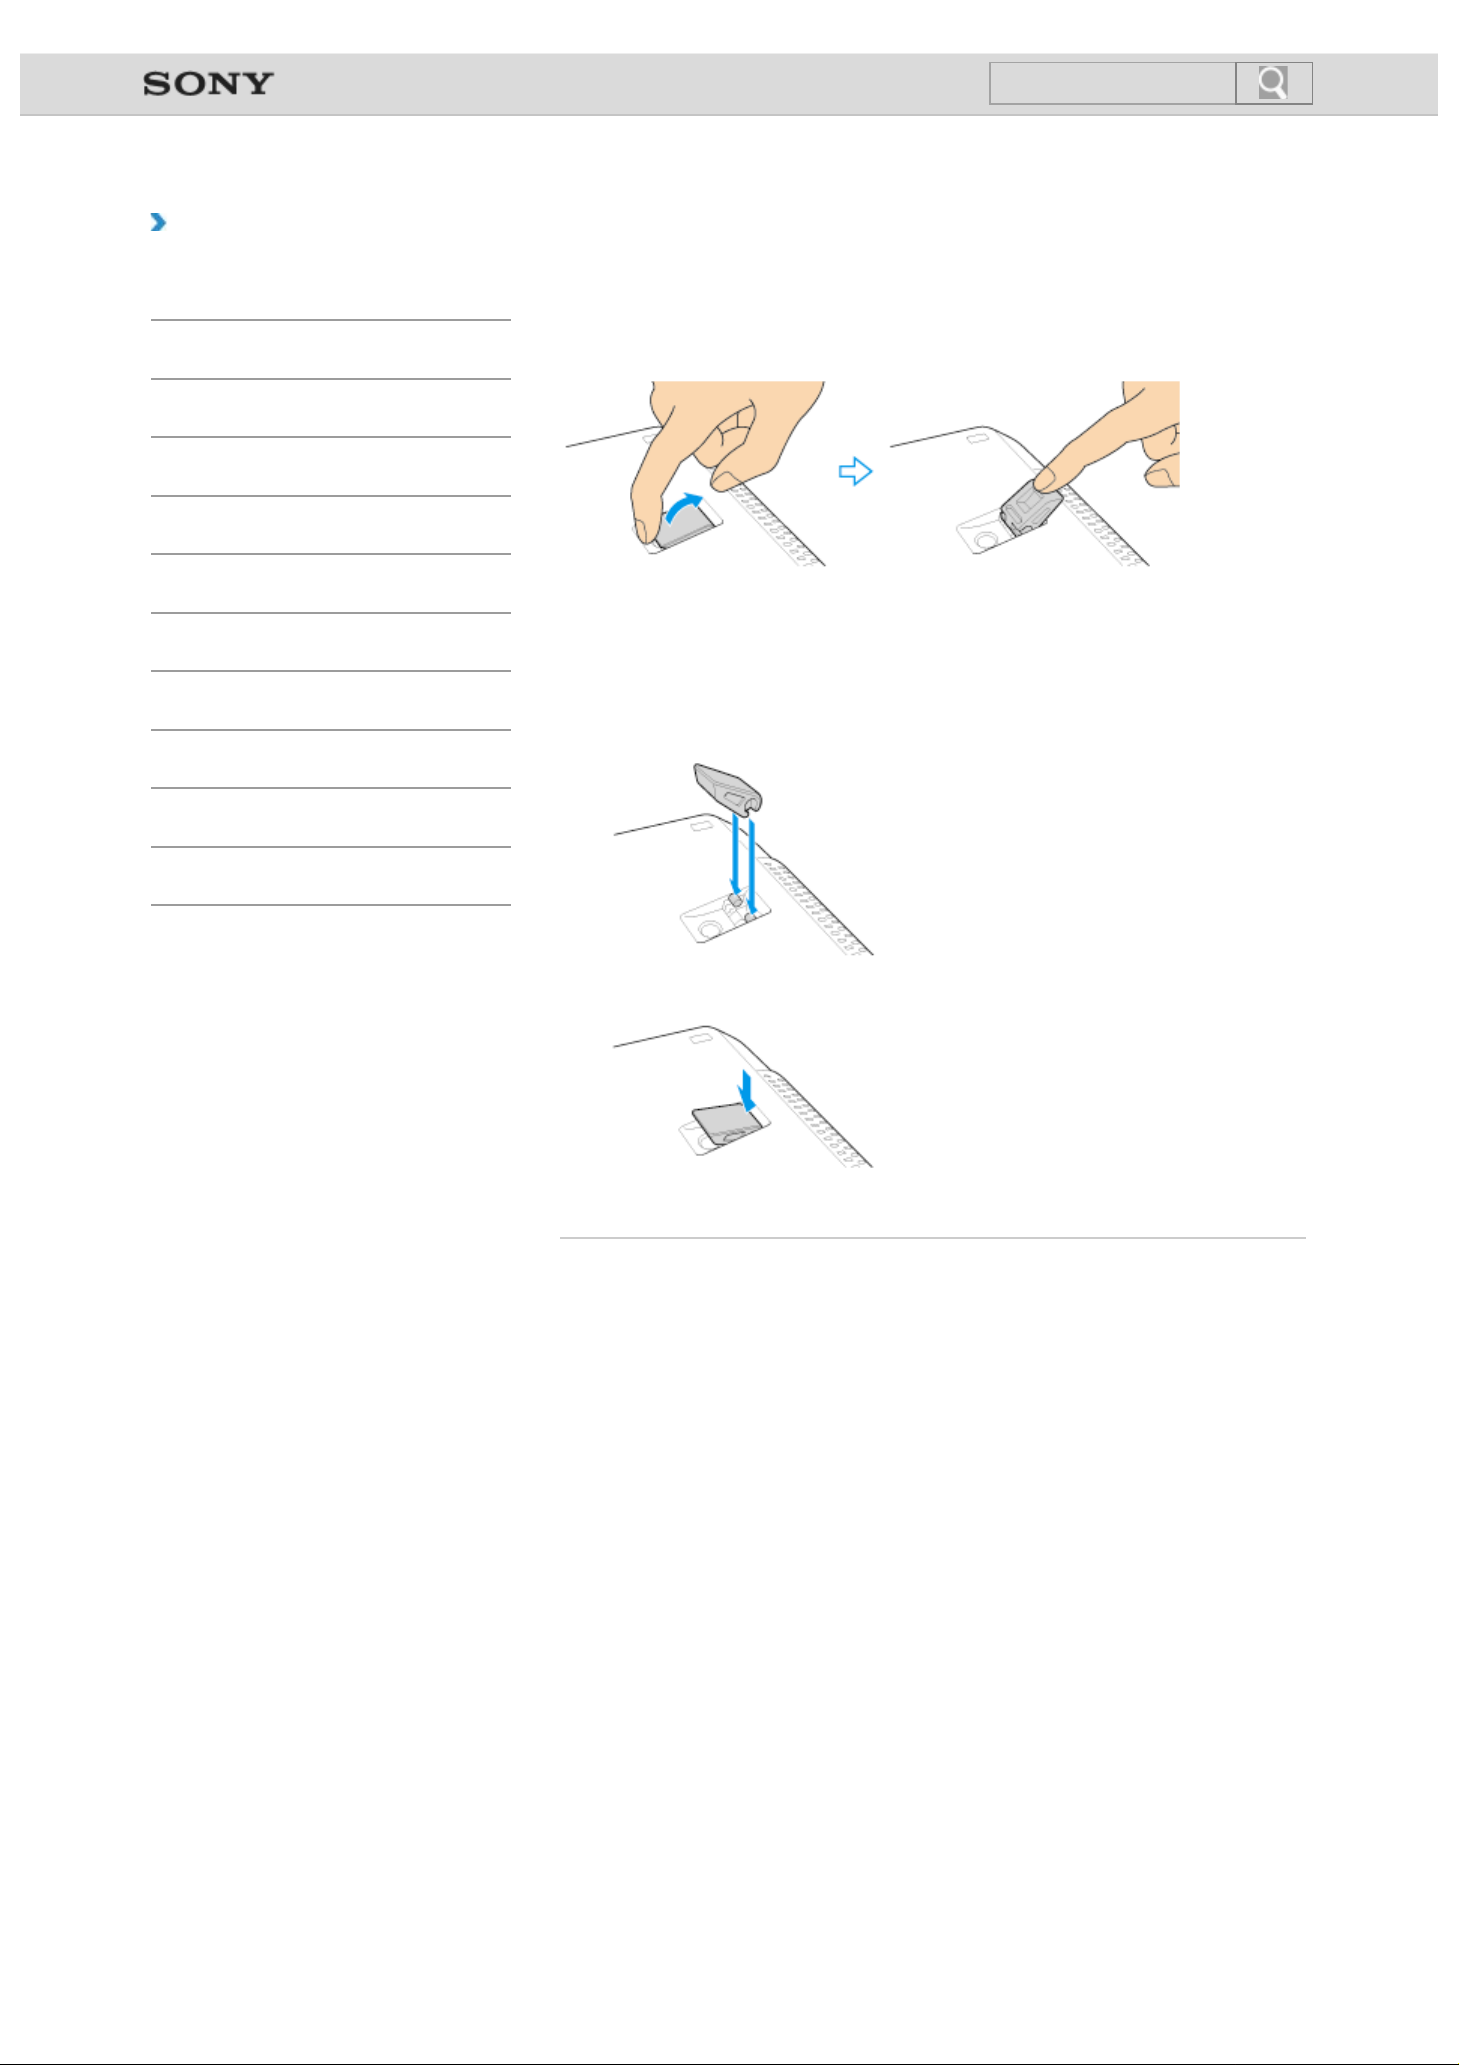
When using a LAN port [Details] or monitor port [Details], unfold the tilt feet.
With your fingertip, pull up gently in the direction of the arrow, as shown below.
If the tilt feet are detached
Re-attach the tilt feet as described below.
1. Position the tilt feet so that the convex side will be flush with the bottom of the
computer.
© 2012 Sony Corporation
2. Push the tilt feet onto the hinges.
Page 20
VAIO User Guide VAIO Duo 11 SVD1121 Series Back | Back to Top
Press and hold down the lower button of the pen, gently place the pen on the first character
undefined
Troubleshooting
How to Use the Pen
How to Use
<Digitizer stylus supplied models>
Windows 8: The Basics
Parts Description
Setup
Network / Internet
Connections
Settings
Backup / Recovery
Security
Other Operations
Notifications
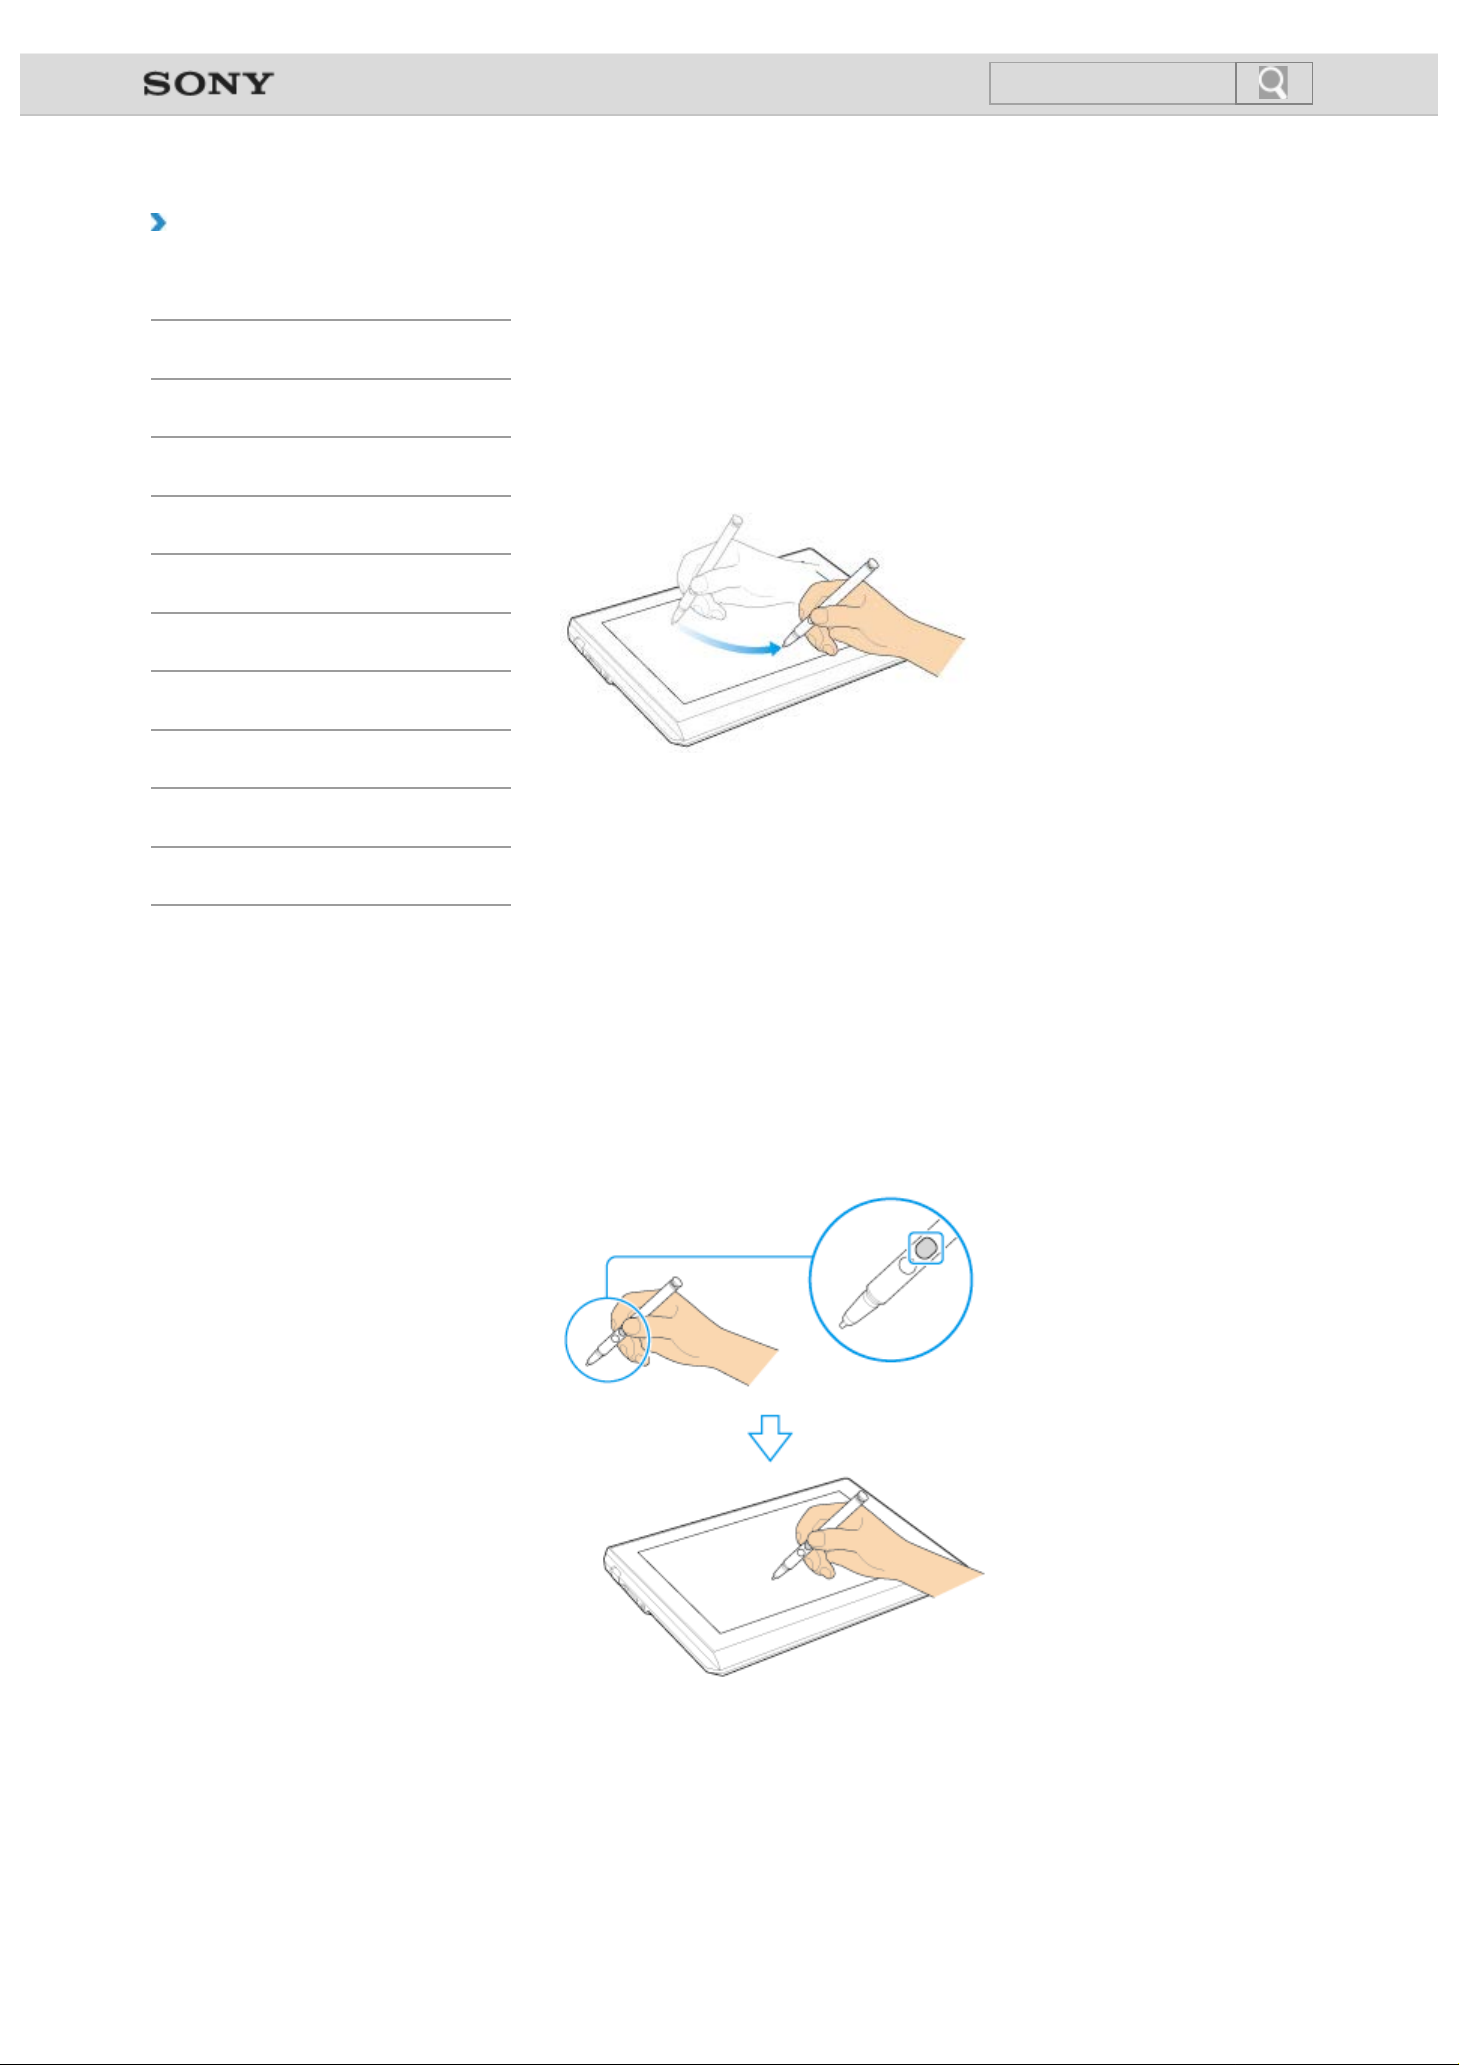
Using the supplied pen (digitizer stylus), you can operate your VAIO computer intuitively, by
touching the screen softly or tracing something on the screen.
To move the pointer on the screen
Move the pen on the screen.
To click (tap)
Tap the desired point on the screen with the pen.
This is used to select an option, such as OK or Cancel, to select a menu item, etc.
To double -click (double-tap)
Tap the desired point on the screen twice promptly with the pen.
You can start an app, such as a word processor or a spreadsheet program, or open a file by
double-tapping its icon.
To right-click (press and hold down)
Press and hold down the upper button of the pen, then tap at the desired point once. Dropdown menus appear, depending on where you tapped the screen.
You can also do the same operation by holding the pen at the desired point for a few
seconds.
To drag
Gently place the pen on the item to be moved, then trace on the screen to move it.
To erase text
Depending on the app, you can erase text.
Page 21
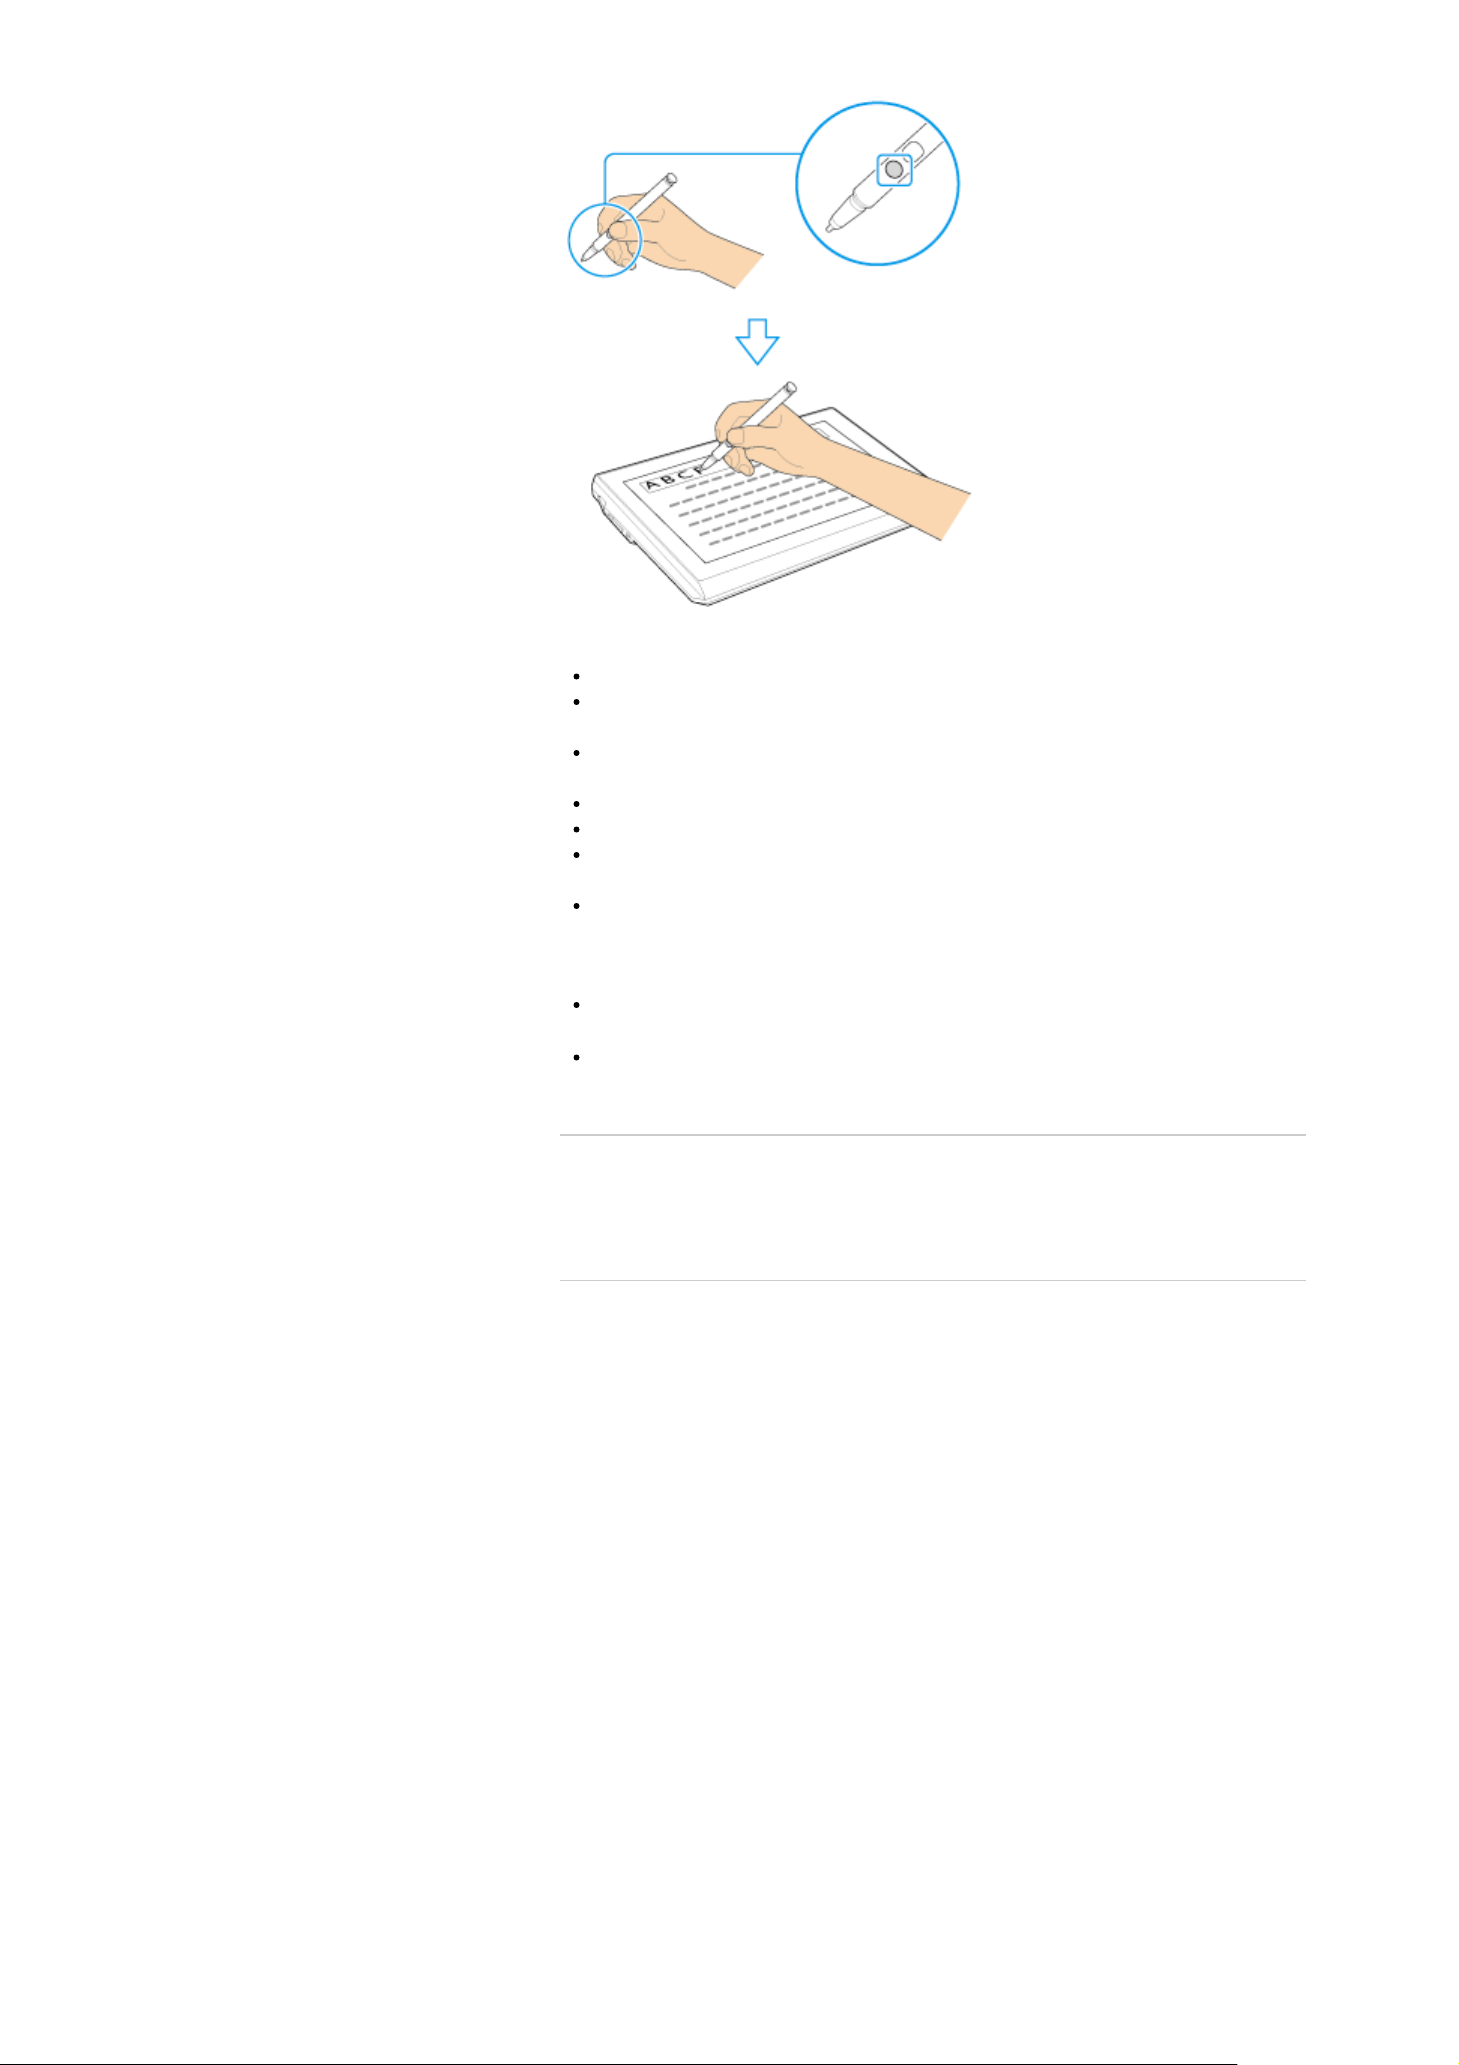
to be erased, then trace the pen over the text to the last character to be erased.
Note
Use the supplied pen or an optionally specified pen.
This pen does not have a power supply switch. Insert the necessary battery in the pen to
operate.
You can use the pen with your hand resting on the screen. If you move the pen towards
the touch panel, you cannot control the touch panel with fingers.
Depending on the screen, you can use the pen to scroll the screen.
If the pen does not function correctly, replace the battery. [Details]
Replace the pen's nib if the writing is not smooth, or you wish to try another shape nib.
[Details]
To prevent them from being swallowed, keep the pen’s nib and cap out of children’s
reach.
© 2012 Sony Corporation
Hint
Some apps sense the pressure of the pen and will change the thickness of the line
accordingly.
Push the button of the pen near the screen to start an app. (Active Crip[Details], Note
Anytime for VAIO[Details])
Related Topic
How to Use the Touch Screen<Touch screen equipped models>
Clipping an Image Displayed on the Computer Screen (Active Clip)
Making a Note (Note Anytime for VAIO)
Page 22

VAIO User Guide VAIO Duo 11 SVD1121 Series Back | Back to Top
undefined
Troubleshooting
Replacing the Battery of the Pen
How to Use
<Digitizer stylus supplied models>
Windows 8: The Basics
Parts Description
Setup
Network / Internet
Connections
Settings
Backup / Recovery
Security
Other Operations
Notifications
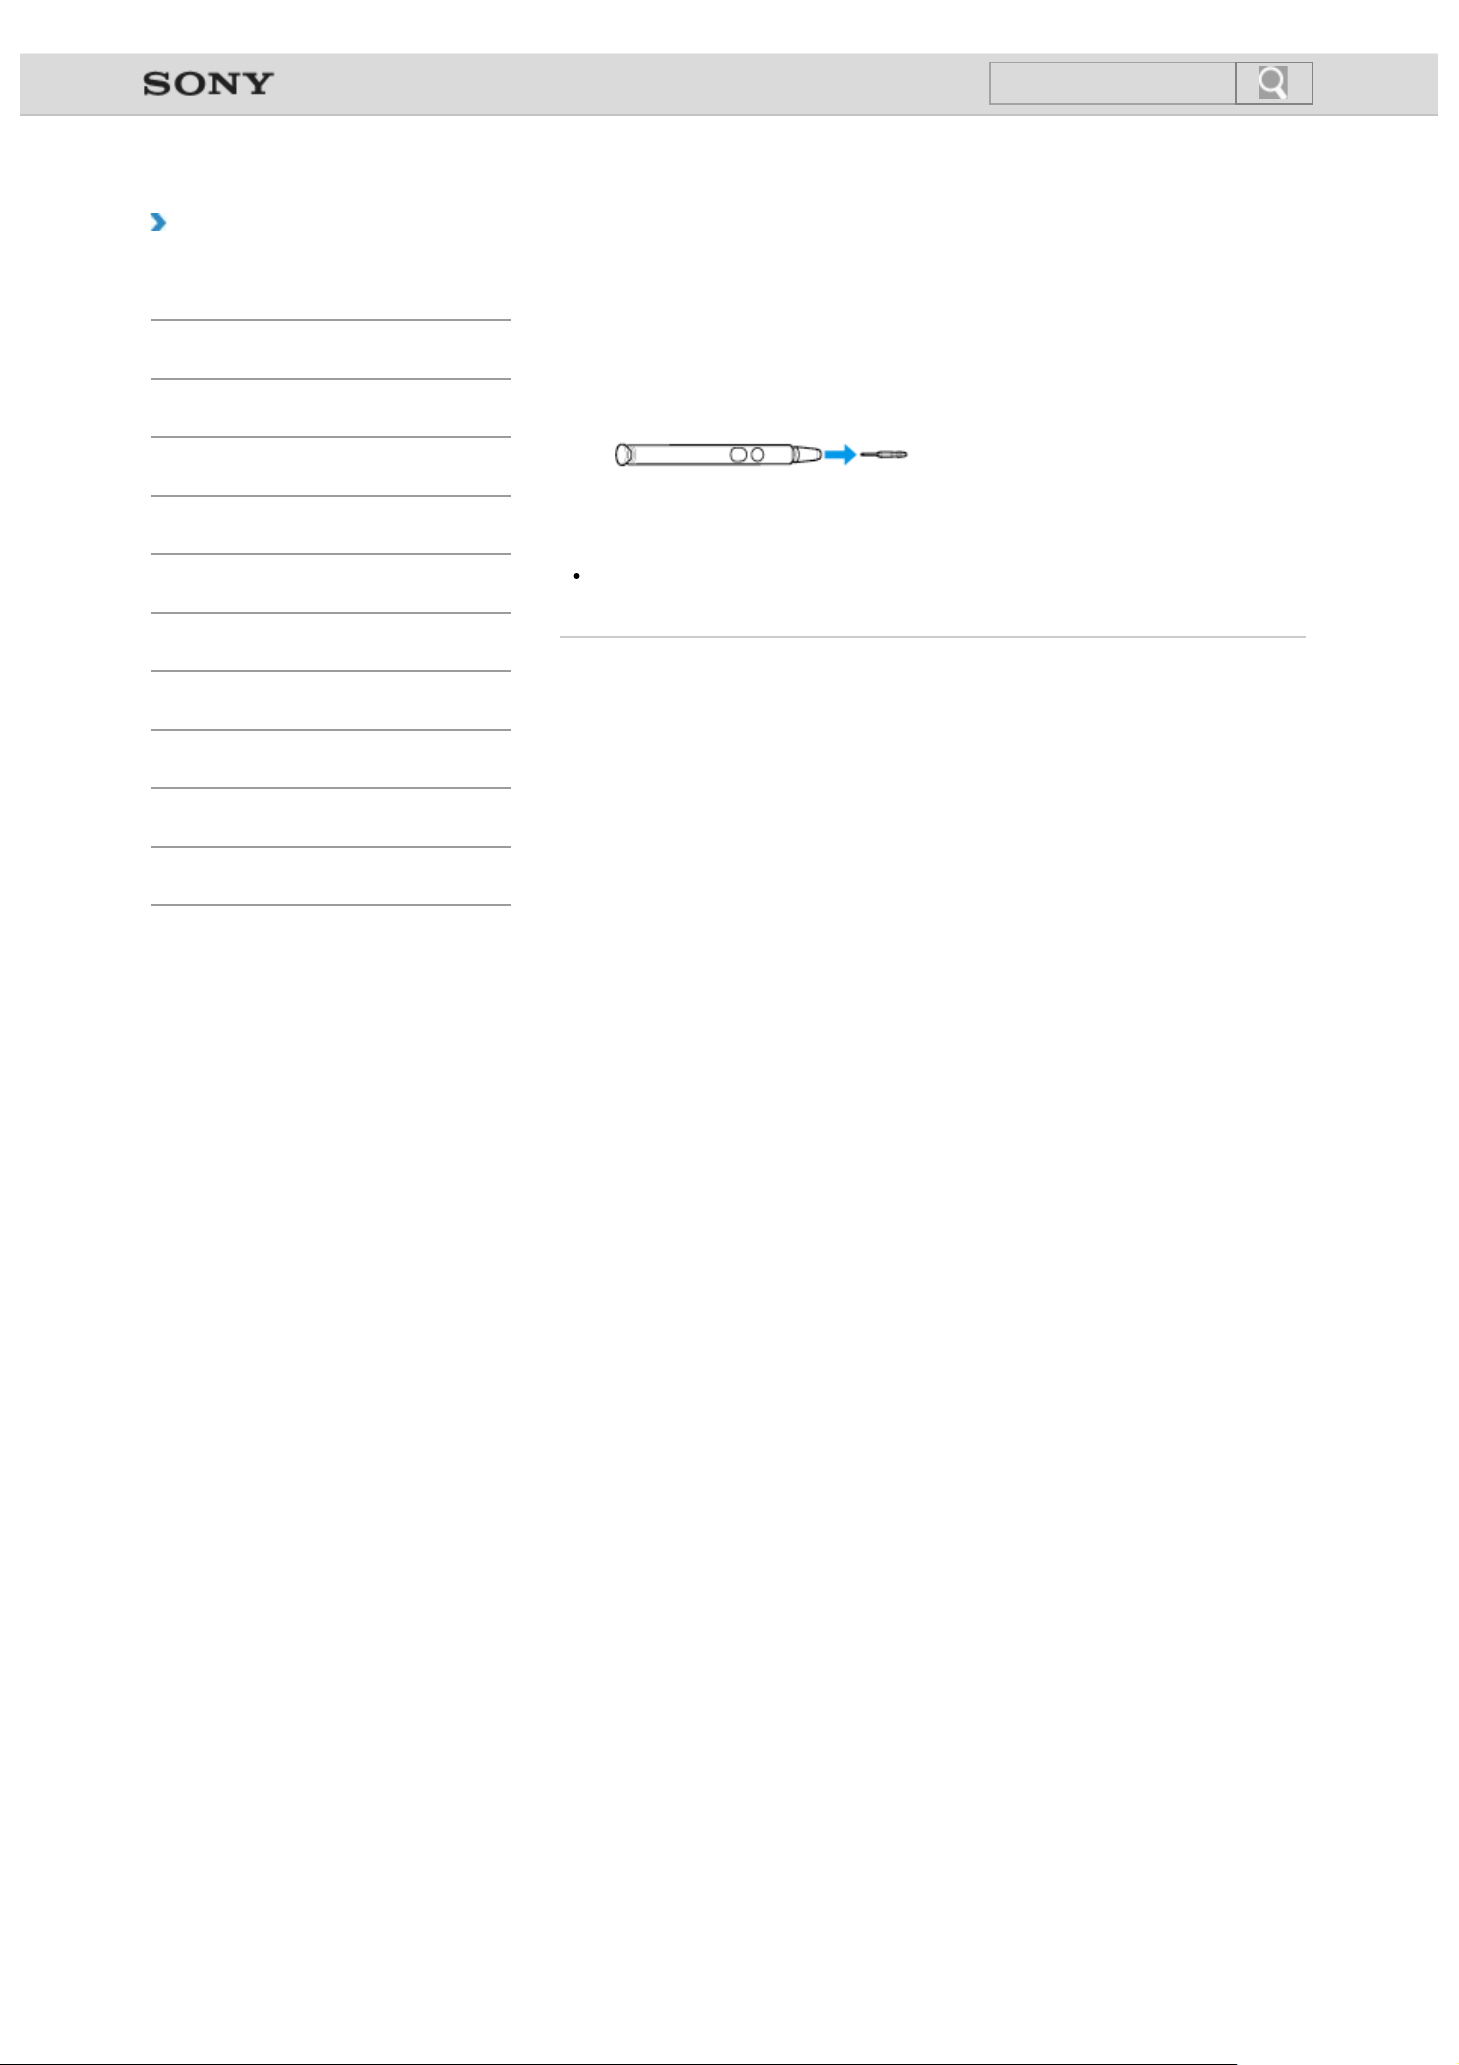
Replace the battery when the pen (digitizer stylus) begins to function incorrectly.
Based on usage of approximately 4 hours a day, expect to replace the battery every 18
months.
1. Remove the cap from the barrel of the pen, then pull out the battery.
2. Insert the battery, + side first, into the pen.
3. Reattach the cap.
© 2012 Sony Corporation
Note
Do not remove the cap except for replacing the battery.
If you do not intend to use the pen for a while, remove the battery.
The pen should not be used with a commercially available rechargeable battery. Using a
rechargeable battery may result in battery leakage and malfunction.
When the battery power becomes low, replace with a new battery promptly. Keeping a
depleted battery in the pen may cause battery leakage.
Do not attempt to recharge a battery.
Refer to the supplied safety information manual.
Page 23
VAIO User Guide VAIO Duo 11 SVD1121 Series Back | Back to Top
undefined
Troubleshooting
Replacing the Nib
How to Use
<Digitizer stylus supplied models>
Windows 8: The Basics
Parts Description
Setup
Network / Internet
Connections
Settings
Backup / Recovery
Security
Other Operations
Notifications
Replace with a new nib (supplied) if the writing is not smooth, or you wish to try another
shape nib.
1. Grasp the tip of the pen, then pull out straight.
2. Check the direction of the new nib and insert it into the barrel of the pen.
Note
For replacement nibs, contact an authorized Sony service/support center.
© 2012 Sony Corporation
Page 24
VAIO User Guide VAIO Duo 11 SVD1121 Series Back | Back to Top
undefined
Troubleshooting
Charging the Battery Pack
How to Use
Windows 8: The Basics
Parts Description
Setup
Network / Internet
Connections
Settings
Backup / Recovery
Security
Other Operations
Notifications
The battery pack can be charged even while you are using your VAIO computer when the
computer is connected to a power source. The charging time may vary depending on
operating conditions.
1. Plug your VAIO computer into an AC outlet. [Details]
Hint
The charging time varies depending on ambient temperature.
Note that at a low ambient temperature, it takes longer time to charge the battery pack.
Open the desktop [Details] and select the battery icon, such as (on battery) or
(plugged in), in the desktop notification area to check the built-in battery status of your
VAIO computer.
Related Topic
Charge Indicator Status List
Checking the Battery Charge Capacity
Extending the Battery Life
© 2012 Sony Corporation
Page 25

VAIO User Guide VAIO Duo 11 SVD1121 Series Back | Back to Top
undefined
Troubleshooting
Extending the Battery Life
How to Use
Windows 8: The Basics
Parts Description
Setup
Network / Internet
Connections
Settings
Backup / Recovery
Security
Other Operations
Notifications
When your VAIO computer is running on battery power, you can extend the battery life using
the following methods.
Use Sleep mode. [Details]
When you do not need to use your VAIO computer temporarily, you can use Sleep
mode. To extend the battery life, use Sleep mode frequently. If you do not intend to use
the computer for an extended period of time, turn off the computer.
Resuming the computer from Sleep mode is faster than from booting up the computer.
Decrease the LCD brightness of the computer screen. [Details]
Turn down the volume of the speakers and headphones. [Details]
Disconnect peripheral devices that are not in use.
Related Topic
Checking the Battery Charge Capacity
Charging the Battery Pack
Notes on Using the Battery Pack
Using Sleep Mode
© 2012 Sony Corporation
Page 26
VAIO User Guide VAIO Duo 11 SVD1121 Series Back | Back to Top
undefined
Troubleshooting
Notes on Using the Battery Pack
How to Use
Windows 8: The Basics
Parts Description
Setup
Network / Internet
Connections
Settings
Backup / Recovery
Security
Other Operations
Notifications
Before using the battery pack, read the following precautions for correct use.
About the battery pack
The battery pack built in your VAIO computer is not removable.
For safety reasons, battery charging may be suspended at higher or lower temperatures.
While your VAIO computer is connected to an AC outlet with the AC adapter, it runs on
AC power.
The battery pack is not fully charged at the time of delivery.
While the battery pack is in use or being charged, heat builds up in the battery pack.
This is normal and is not cause for concern.
About battery discharge
After battery charge, the battery pack will gradually discharge over time even while not in
use. If it is left unused for an extended period of time, the battery power may be depleted. It
is recommended that you recharge the battery pack before use.
About battery life
Battery life varies depending on usage and settings.
About battery deterioration and replacement
© 2012 Sony Corporation
The battery pack is consumable. The capacity gradually declines through repeated
cycles of recharging and discharging. As a result, the battery life becomes short even if it
is fully charged and eventually the battery pack reaches the end of its life.
If the battery pack quickly runs out of power after being fully charged or it has reached
the end of its life, replace it with a new one.
Contact an authorized Sony service/support center and replace the battery pack with a
new one specified by Sony.
When the battery pack is running out of power
If the battery pack runs out during your absence, power will be cut off and any data you are
working on will be lost.
While your VAIO computer is running on battery power, save data frequently.
Related Topic
Notes on Using the Power Source
Page 27
VAIO User Guide VAIO Duo 11 SVD1121 Series Back | Back to Top
undefined
Troubleshooting
Notes on an Extended Battery Pack
How to Use
Windows 8: The Basics
Parts Description
Setup
Network / Internet
Connections
Settings
Backup / Recovery
Security
Other Operations
Notifications
This topic explains battery charging behavior when an extended battery pack (not supplied)
is attached to your VAIO computer in addition to the installed battery pack (the primary
battery pack).
With the extended battery pack attached, the battery packs charge in the following sequence.
(When the battery care function is disabled)
1. The primary battery pack charges to about 80% of its battery capacity, then the
extended battery pack starts charging.
2. The extended battery pack charges to about 80% of its battery capacity, then the
primary battery pack starts charging to 100%.
3. The extended battery pack starts charging to 100%.
The battery power of the extended battery pack is used first.
Note
When the extended battery pack is attached to your VAIO computer with the remaining
battery power low, the extended battery pack status may not be displayed on the
computer screen or the charge indicator light status may be a battery error. In such a
case, detach the extended battery pack and charge the extended battery pack with the
AC adapter.
© 2012 Sony Corporation
Page 28

VAIO User Guide VAIO Duo 11 SVD1121 Series Back | Back to Top
undefined
Troubleshooting
Connecting a Power Source
How to Use
Windows 8: The Basics
Parts Description
Setup
Network / Internet
Connections
Settings
Backup / Recovery
Security
Other Operations
Notifications
Connect your VAIO computer to an AC power source. Carefully read the precautions in
Notes on Using the Power Source before connection. [Details]
1. Plug one end of the power cord (1) into the AC adapter (3).
2. Plug the other end of the power cord into an AC outlet (2).
3. Plug the cable from the AC adapter (3) into the DC IN port (4) on your VAIO computer.
Note
Do not plug more than one device into the same AC outlet.
The shape of the AC adapter varies depending on the model you purchased.
Make sure that the power plug is firmly plugged into your VAIO computer.
Hint
You can purchase a power strip with a surge protector to help prevent damage to your
VAIO computer caused by sudden power surges (in an electrical storm, for example).
Related Topic
Charging the Battery Pack
Notes on Using the Battery Pack
Turning on Your VAIO Computer
Shutting Down Your VAIO Computer
Notes on Using the Power Source
© 2012 Sony Corporation
Page 29

VAIO User Guide VAIO Duo 11 SVD1121 Series Back | Back to Top
undefined
Troubleshooting
Turning on Your VAIO Computer
How to Use
Windows 8: The Basics
Parts Description
Setup
Network / Internet
Connections
Settings
Backup / Recovery
Security
Other Operations
Notifications
Turn on your VAIO computer to start Windows. Carefully read the precautions in Notes on
Using the Power Source before turning on. [Details]
1. Plug your VAIO computer into an AC outlet. [Details]
2. Press and hold down the
green.
Your VAIO computer is turned on, and Windows starts after a while.
Note
If you press and hold down the (Power) button for more than four seconds, your VAIO
computer will not turn on.
Press the
light turns on.
Hint
By default, your VAIO computer automatically enters Sleep mode after a certain period
of inactivity while the computer is connected to an AC outlet. [Details]
Related Topic
Charging the Battery Pack
Notes on Using the Battery Pack
Connecting a Power Source
Shutting Down Your VAIO Computer
Restarting Your VAIO Computer
Notes on Using the Power Source
(Power) button lightly, and release it immediately when the power indicator
(Power) button until the power indicator light turns on in
© 2012 Sony Corporation
Page 30
VAIO User Guide VAIO Duo 11 SVD1121 Series Back | Back to Top
undefined
Troubleshooting
Shutting Down Your VAIO Computer
How to Use
Windows 8: The Basics
Parts Description
Setup
Network / Internet
Connections
Settings
Backup / Recovery
Security
Other Operations
Notifications
Shut down your VAIO computer properly to avoid losing unsaved data.
1. Turn off any peripherals connected to your VAIO computer.
2. Save your data and close all running apps.
3. Open the charms [Details] and select
4. Select
After a short time, your VAIO computer automatically turns off and the green power
indicator light turns off.
Before closing the LCD screen lid, make sure the power indicator is off.
Note
An improper shutdown may cause loss of unsaved data or cause your VAIO computer
to malfunction.
To disconnect your VAIO computer completely from an AC power source, turn off the
computer and unplug the power cord from the AC outlet.
Related Topic
Turning on Your VAIO Computer
Restarting Your VAIO Computer
Using Sleep Mode
Notes on Using the Power Source
(Power) and Shut down.
(Settings).
© 2012 Sony Corporation
Page 31

VAIO User Guide VAIO Duo 11 SVD1121 Series Back | Back to Top
undefined
Troubleshooting
Restarting Your VAIO Computer
How to Use
Windows 8: The Basics
Parts Description
Setup
Network / Internet
Connections
Settings
Backup / Recovery
Security
Other Operations
Notifications
After changing the settings or installing an app on your VAIO computer, you may be required
to restart the computer.
1. Save your data and close all running apps.
2. Open the charms [Details] and select
3. Select
Your VAIO computer will restart.
Related Topic
Turning on Your VAIO Computer
Shutting Down Your VAIO Computer
(Power) and Restart.
(Settings).
© 2012 Sony Corporation
Page 32

VAIO User Guide VAIO Duo 11 SVD1121 Series Back | Back to Top
undefined
Troubleshooting
Charge Indicator Status List
How to Use
Windows 8: The Basics
Parts Description
Setup
Network / Internet
Connections
Settings
Backup / Recovery
Security
Other Operations
Notifications
The charge indicator light turns on or blinks differently according to conditions.
Lit in orange
The battery pack is charging. (Turns off when charging is completed.)
Blinks in orange along with the green power indicator
The battery pack is running out of power. (Normal mode)
Blinks fast in orange
A battery error has occurred due to a failed battery pack, etc.
Related Topic
Charging the Battery Pack
Checking the Battery Charge Capacity
Extending the Battery Life
© 2012 Sony Corporation
Page 33

VAIO User Guide VAIO Duo 11 SVD1121 Series Back | Back to Top
undefined
Troubleshooting
Using Sleep Mode
How to Use
Windows 8: The Basics
Parts Description
Setup
Network / Internet
Connections
Settings
Backup / Recovery
Security
Other Operations
Notifications
In Sleep mode, all unnecessary devices of your VAIO computer are turned off, though some
devices stay on to retain the computer’s state including data you are working on. Sleep
mode is useful when you take a short rest, for example.
With the default Sleep mode settings, Rapid Wake is enabled and the computer’s state is
saved to the built-in storage device.
To activate Sleep mode
1. Open the charms [Details] and select (Settings).
2. Select
The power indicator light turns off when your VAIO computer enters Sleep mode.
Hint
By default, your VAIO computer enters Sleep mode automatically after about 30
minutes of inactivity while running on AC power.
The operations below also place your VAIO computer into Sleep mode.
Press the
Note that if you press and hold down the
seconds, your VAIO computer will turn off automatically. Doing this will erase all
unsaved data.
Close the LCD screen lid and leave the computer unused for a few seconds.
(Power) and Sleep.
(Power) button (with the default setting).
(Power) button for more than four
To return to Normal mode
1. Press the (Power) button.
Note
Your VAIO computer does not return to Normal mode with the (Windows) button.
By default, your VAIO computer automatically enters Hibernate mode when the battery
pack is running out of power. However, depending on the operating conditions, the
computer may fail to enter Hibernate mode.
If this occurs and the battery pack is running out of power, the computer will be turned
off, resulting in loss of unsaved data.
While the computer is running on battery power, save data frequently.
Before moving your VAIO computer, make sure that the power indicator light is off to
avoid impact or vibration to the running hard disk drive.
Hint
If you press and hold down the (Power) button for more than four seconds, your VAIO
computer will turn off automatically. Doing this will erase all unsaved data.
You can restore your VAIO computer from Sleep mode to Normal mode by raising the
slide-up display. Start VAIO Control Center [Details] and change the settings in Power
and Battery.
Related Topic
Notes on Using the Power Source
Notes on Sleep Mode
Extending the Battery Life
Changing the Rapid Wake (Sleep Mode) Settings
© 2012 Sony Corporation
Page 34

VAIO User Guide VAIO Duo 11 SVD1121 Series Back | Back to Top
undefined
Troubleshooting
Selecting a Power Plan
How to Use
Windows 8: The Basics
Parts Description
Setup
Network / Internet
Connections
Settings
Backup / Recovery
Security
Other Operations
Notifications
Power management helps you set up power plans to suit your requirements for power
consumption.
1. Open Control Panel. [Details]
2. Select Hardware and Sound and Power Options.
3. Select your desired power plan.
4. If you want to change the power plan settings, select Change plan settings on the
right of your desired power plan in the Power Options window.
By selecting Change advanced power settings, you can change the advanced
settings.
Refer to Windows Help and Support for more information on the power plan settings.
[Details]
Hint
The power status icon indicates what kind of power source your VAIO computer is
currently using, and you can see the computer’s power status by selecting this icon.
© 2012 Sony Corporation
Page 35

VAIO User Guide VAIO Duo 11 SVD1121 Series Back | Back to Top
undefined
Troubleshooting
Notes on Using the Power Source
How to Use
Windows 8: The Basics
Parts Description
Setup
Network / Internet
Connections
Settings
Backup / Recovery
Security
Other Operations
Notifications
Read the following precautions before plugging your VAIO computer into an AC power
source.
If you leave your VAIO computer without connecting it to an AC power source for an
extended period of time, turn off the computer.
Notes on the AC adapter
Use the AC adapter supplied with your VAIO computer or with genuine Sony products.
Do not use any other AC adapter as it may cause a malfunction.
Do not connect the AC adapter to a power conversion device such as a travel power
converter. It may cause overheating or a malfunction.
If the AC adapter cable becomes damaged or broken, do not use it.
Notes on turning on your VAIO computer
Because your VAIO computer contains magnetic components, keep magnetic storage
media, such as floppy disks, away from the computer, as it may cause data corruption.
Your VAIO computer will automatically enter Sleep mode (with the default settings)
when you move magnetic devices closer to the computer. Keep magnetic devices away
from the computer.
Related Topic
Connecting a Power Source
Turning on Your VAIO Computer
Shutting Down Your VAIO Computer
Restarting Your VAIO Computer
© 2012 Sony Corporation
Page 36

VAIO User Guide VAIO Duo 11 SVD1121 Series Back | Back to Top
undefined
Troubleshooting
Notes on Sleep Mode
How to Use
Windows 8: The Basics
Parts Description
Setup
Network / Internet
Connections
Settings
Backup / Recovery
Security
Other Operations
Notifications
Read the following precautions before using Sleep mode.
Some apps may not support Sleep mode. When running such apps, exit them before
placing your VAIO computer into Sleep mode.
Some USB devices may not support Sleep mode. When your VAIO computer resumes
from Sleep mode, the computer may not recognize such USB devices, depending on the
type and number of connected USB devices.
If you cannot place the computer into Sleep mode, disconnect all USB devices and try
again.
If your VAIO computer enters Sleep mode when Windows or the computer is unstable, it
may not resume from Sleep mode. The following operations are recommended:
Before placing your VAIO computer into Sleep mode, save your files and exit all
running apps.
Shut down your VAIO computer periodically.
Depending on the condition of Windows, your VAIO computer cannot enter Sleep mode.
If your VAIO computer enters Sleep mode while running a task, such as DVD writing,
the task may be suspended.
Related Topic
Using Sleep Mode
Notes on Using the Power Source
Notes on Using the Battery Pack
© 2012 Sony Corporation
Page 37

VAIO User Guide VAIO Duo 11 SVD1121 Series Back | Back to Top
undefined
Troubleshooting
Using the Optical Trackpad
How to Use
Windows 8: The Basics
Parts Description
Setup
Network / Internet
Connections
Settings
Backup / Recovery
Security
Other Operations
Notifications
By moving your finger on the Optical Trackpad, you can move the pointer on the computer
screen.
With the pointer on your desired item or object, press the left button or the right button to
execute various commands or display menus.
To click
With the pointer on your desired item or object, press the left button (2) once.
Alternatively, tap on the Optical Trackpad (1) once.
To double-click
With the pointer on your desired item or object, press the left button twice quickly.
Alternatively, tap on the Optical Trackpad twice quickly.
To right-click
With the pointer on your desired item or object, press the right button (4) once.
Depending on the location of the pointer, you can display various shortcut menus.
To drag
With the pointer on your desired item or object, press the left button once, and while holding
down the button, move your finger on the Optical Trackpad.
To drag and drop
Drag an icon, such as a file, to your desired location and release your finger from the left
button.
To scroll
Move your finger back and forth on the Optical Trackpad while pressing the center button (3)
to scroll vertically.
Note
The scroll function may not work depending on the operating condition of your VAIO
computer or the Optical Trackpad settings.
Related Topic
Disabling the Tapping Function on the Optical Trackpad
Enabling/Disabling the Optical Trackpad
Adjusting the Optical Trackpad Sensitivity
© 2012 Sony Corporation
Page 38

VAIO User Guide VAIO Duo 11 SVD1121 Series Back | Back to Top
undefined
Troubleshooting
Disabling the Tapping Function on the Optical Trackpad
How to Use
Windows 8: The Basics
Parts Description
Setup
Network / Internet
Connections
Settings
Backup / Recovery
Security
Other Operations
Notifications
You can disable the tapping function to avoid unintentional clicks caused by a light touch on
the Optical Trackpad during the keyboard operations.
1. Start VAIO Control Center [Details] and select Mouse and Keyboard.
2. Select Details under Built-in Pointing Devices.
3. Select the Button tab.
4. Clear the Enable Tapping check box.
5. Select OK.
Related Topic
Using the Optical Trackpad
Enabling/Disabling the Optical Trackpad
Adjusting the Optical Trackpad Sensitivity
© 2012 Sony Corporation
Page 39

VAIO User Guide VAIO Duo 11 SVD1121 Series Back | Back to Top
undefined
Troubleshooting
Adjusting the Optical Trackpad Sensitivity
How to Use
Windows 8: The Basics
Parts Description
Setup
Network / Internet
Connections
Settings
Backup / Recovery
Security
Other Operations
Notifications
You can change the pointer speed by adjusting the Optical Trackpad sensitivity according to
your preference.
The more you decrease the sensitivity, the slower the pointer speed becomes.
The more you increase the sensitivity, the faster the pointer speed becomes.
1. Start VAIO Control Center [Details] and select Mouse and Keyboard.
2. Select Details under Built-in Pointing Devices.
3. Select the Pointer tab.
4. Drag the POINTER SPEED slider to adjust the speed.
5. Select OK.
Related Topic
Using the Optical Trackpad
Disabling the Tapping Function on the Optical Trackpad
Enabling/Disabling the Optical Trackpad
© 2012 Sony Corporation
Page 40

VAIO User Guide VAIO Duo 11 SVD1121 Series Back | Back to Top
undefined
Troubleshooting
Enabling/Disabling the Optical Trackpad
How to Use
Windows 8: The Basics
Parts Description
Setup
Network / Internet
Connections
Settings
Backup / Recovery
Security
Other Operations
Notifications
You can enable/disable the Optical Trackpad on your VAIO computer.
1. Press and hold down the Fn key and press the F1 key.
Each time you press the keys, the Optical Trackpad is enabled/disabled.
Related Topic
Using the Optical Trackpad
Disabling the Tapping Function on the Optical Trackpad
Adjusting the Optical Trackpad Sensitivity
© 2012 Sony Corporation
Page 41

VAIO User Guide VAIO Duo 11 SVD1121 Series Back | Back to Top
undefined
Troubleshooting
About the Touch Screen
How to Use
<Touch screen equipped models>
Windows 8: The Basics
Parts Description
Setup
Network / Internet
Connections
Settings
Backup / Recovery
Security
Other Operations
Notifications
The touch screen enables direct interaction with your VAIO computer using your finger(s).
You can perform various gestures on the touch screen.
Your VAIO computer supports multi-touch input.
Note
Your VAIO computer is equipped with a capacitive touch screen. When using it, note the
following characteristics of the capacitive touch screen.
The touch screen will not work if you touch it with fingernails, or if you wear gloves.
If tapping triggers an unintentional operation, make sure that no other parts of your
body are in contact with the touch screen.
The surface of the touch screen may get hot. This is normal and does not indicate a
malfunction.
Even though the surface of the touch screen is tempered glass, it could still become
damaged. Treat it with adequate care. If it breaks, small granular shards may scatter
and cause injury.
Do not drop the touch screen or subject it to a strong impact. Do not scratch the
surface. A surface flaw may cause the glass to break.
A protection sheet may be attached to the LCD screen frame at the factory. Remove
the sheet before use; otherwise the touch screen may not work correctly.
Some apps do not accept touch screen operations.
Related Topic
How to Use the Touch Screen<Touch screen equipped models>
© 2012 Sony Corporation
Page 42

VAIO User Guide VAIO Duo 11 SVD1121 Series Back | Back to Top
undefined
Troubleshooting
How to Use the Touch Screen
How to Use
<Touch screen equipped models>
Windows 8: The Basics
Parts Description
Setup
Network / Internet
Connections
Settings
Backup / Recovery
Security
Other Operations
Notifications
You can tap the touch screen or make a simple motion with your fingers to operate your
VAIO computer.
Basic operations
To click (tap)
Tap on the touch screen once with a finger. You can select a button, such as OK and
Cancel, or an item in a menu by tapping it.
To double-click (double-tap)
Tap on the touch screen twice in quick succession with a finger. You can start an app, such
as a word processor or a spreadsheet program, or open a file by double-tapping its icon.
To drag
Put a finger on the desired point on the touch screen and slide the finger. You can move a
file or change the window size with this motion.
To drag and drop
Touch the desired file icon, slide to another folder, window or app icon, and then lift your
finger off the screen. You can move or copy a file with this motion.
Advanced operations
You can make a simple motion (gesture) with your fingers on the touch screen to operate
your VAIO computer.
The response to a gesture varies depending on the apps.
To right-click (touch and hold)
Touch and hold the desired point on the touch screen for a few seconds and lift your finger
off the screen. Depending on the point you touch, you can display various menus.
To scroll
Touch and slide a scrollable area of a window, such as an Internet Explorer window. You
can also drag the slider on the vertical scroll bar of the selected window to scroll the window.
To zoom in or out on an image such as a photo (zoom)
Pinch on the touch screen with two fingers for zooming on an image, such as a photo on
Photo. Pinch open to zoom in or pinch close to zoom out.
To rotate an image such as a photo (rotate)
Put two fingers on the touch screen and slide them in circles to rotate an image, such as a
photo. You cannot rotate images depending on the apps you are using.
Page 43

To select by swiping
Slide your finger in short distance in the direction that the screen does not scroll.
You can select an item, such as an app tile or a picture.
Related Topic
How to Use the Pen<Digitizer stylus supplied models>
© 2012 Sony Corporation
Page 44

VAIO User Guide VAIO Duo 11 SVD1121 Series Back | Back to Top
undefined
Troubleshooting
Enlarging the Text Size (DPI)
How to Use
<Touch screen equipped models>
Windows 8: The Basics
Parts Description
Setup
Network / Internet
Connections
Settings
Backup / Recovery
Security
Other Operations
Notifications
Changing the DPI to enlarge the text and icon size enables you to operate the touch screen
easier.
1. Open Control Panel [Details] and select Customize Desktop and Make text and
other items larger or smaller.
2. Select the desired settings from the options on the screen and Apply.
3. If a message appears and recommends signing out, select Log off now.
4. Sign in again.
The text font size for Windows changes.
© 2012 Sony Corporation
Page 45

VAIO User Guide VAIO Duo 11 SVD1121 Series Back | Back to Top
undefined
Troubleshooting
Notes on Using the Touch Screen
How to Use
<Touch screen equipped models>
Windows 8: The Basics
Parts Description
Setup
Network / Internet
Connections
Settings
Backup / Recovery
Security
Other Operations
Notifications
Before using the touch screen, read the following precautions for correct use.
Do not push the touch screen roughly.
Gentle touches always work as your VAIO computer is equipped with a capacitive touch
screen.
Keep the touch screen clean for good touch sensitivity. Dirt may cause damage or a
malfunction.
© 2012 Sony Corporation
Page 46

VAIO User Guide VAIO Duo 11 SVD1121 Series Back | Back to Top
undefined
Troubleshooting
Changing the Resolution (Size) of the Screen Image
How to Use
Windows 8: The Basics
Parts Description
Setup
Network / Internet
Connections
Settings
Backup / Recovery
Security
Other Operations
Notifications
You can change the screen resolution to adjust the size of the characters and images on the
computer screen.
Refer to Windows Help and Support [Details] for more information.
1. Right-click on the desktop [Details] and select Screen resolution.
2. Select the current screen resolution next to Resolution and move the slider to change
the screen resolution.
Note
You may not be able to play high-resolution videos depending on the amount of video
memory on your VAIO computer. In such a case, lower the screen resolution.
Do not change the display resolution while using video/image apps or playing DVDs, as
it may cause unsuccessful playback/display or unstable system operations.
Related Topic
Connecting an External Display or Projector
Connecting a TV with an HDMI Input Port
Notes on the LCD screen
© 2012 Sony Corporation
Page 47

VAIO User Guide VAIO Duo 11 SVD1121 Series Back | Back to Top
undefined
Troubleshooting
Connecting a TV with an HDMI Input Port
How to Use
Windows 8: The Basics
Parts Description
Setup
Network / Internet
Connections
Settings
Backup / Recovery
Security
Other Operations
Notifications
You can connect a TV with an HDMI input port to your VAIO computer with an HDMI cable
(not supplied).
Refer to the manual that came with your TV for more information on installation and use.
1. Plug the power cord of your TV into an AC outlet and turn it on.
2. Connect one end of an HDMI cable to the HDMI output port [Details] on your VAIO
computer and the other end to the TV.
3. Set the TV input to the external input.
The screen image of your VAIO computer is displayed on the TV.
Note
If a device driver other than the one provided by Sony is used, the image will not be
displayed and audio will not be heard. Always use the device driver provided by Sony
for updates.
To hear sound from a device connected to the HDMI output port, you need to change
the sound output device. For detailed instructions, see Changing the Sound Output
Device. [Details]
© 2012 Sony Corporation
Hint
The HDMI output port on your VAIO computer is compliant with the High-bandwidth
Digital Content Protection (HDCP) standard and capable of encrypting the transmission
channel of digital video signals for the purpose of copyright protection, which enables
you to view a wide variety of copyright protected and high-quality content.
You can display images on your external display and TV at the same time using the
HDMI output port and the monitor port on your VAIO computer.
To display images, right-click on the desktop [Details], select Graphics Properties, and
change the multiple display settings in the Intel graphics control panel.
Refer to the help file of the Intel graphics for more information.
Related Topic
Selecting Display Modes
Using the Multiple Monitors Function
Changing the Resolution (Size) of the Screen Image
Changing the Resolution (Size) of the Screen Image on an HDMI-Connected Device
Connecting an External Display or Projector
Page 48

VAIO User Guide VAIO Duo 11 SVD1121 Series Back | Back to Top
undefined
Troubleshooting
Connecting an External Display or Projector
How to Use
Windows 8: The Basics
Parts Description
Setup
Network / Internet
Connections
Settings
Backup / Recovery
Security
Other Operations
Notifications
You can connect an external display (such as a computer display or a projector) to your
VAIO computer with a display cable (not supplied).
Refer to the manual that came with your external display or projector for more information on
installation and use.
1. Plug the power cord (1) of your external display or the projector into an AC outlet and
turn it on.
2. Connect the external display or the projector to the monitor port [Details] on your VAIO
computer (2) with a display cable (3) (not supplied).
3. Press the Fn+F7 keys several times to select the external display or the projector, and
then press the Enter key. [Details]
The screen image of the computer is displayed on the external display or the projector.
4. If necessary, connect the external display or the projector to the headphones jack on
your VAIO computer (5) with a speaker cable (4) (not supplied).
© 2012 Sony Corporation
Note
Some external displays and projectors may not support some of the resolutions your
VAIO computer can use. If your computer display does not support the selected
resolution, lower the resolution setting of the computer [Details].
Hint
You can display images on your external display and TV at the same time using the
HDMI output port and the monitor port on your VAIO computer.
To display images, right-click on the desktop [Details], select Graphics Properties, and
change the multiple display settings in the Intel graphics control panel.
Refer to the help file of the Intel graphics for more information.
Related Topic
Selecting Display Modes
Using the Multiple Monitors Function
Connecting a TV with an HDMI Input Port
Page 49

VAIO User Guide VAIO Duo 11 SVD1121 Series Back | Back to Top
undefined
Troubleshooting
Selecting Display Modes
How to Use
Windows 8: The Basics
Parts Description
Setup
Network / Internet
Connections
Settings
Backup / Recovery
Security
Other Operations
Notifications
You can switch the display output between the computer screen and an external display
connected to your VAIO computer.
1. Turn on an external display.
2. Press the Fn+F7 keys several times to select your desired display output, and then
press the Enter key.
Note
If you disconnect a display cable (not supplied) while only an external display is selected
as the display output, it is hard to operate your VAIO computer because the computer
screen is blank.
To switch the display output to the computer screen, press the Fn+F7 keys twice, then
the Enter key.
The display switch may become unavailable or your VAIO computer may become
unstable during video playback. Exit the video playback app before switching the display
output.
The display switch may not be available depending on the type of external display or
projector.
Related Topic
Using the Multiple Monitors Function
Connecting a TV with an HDMI Input Port
Connecting an External Display or Projector
© 2012 Sony Corporation
Page 50

VAIO User Guide VAIO Duo 11 SVD1121 Series Back | Back to Top
undefined
Troubleshooting
Using the Multiple Monitors Function
How to Use
Windows 8: The Basics
Parts Description
Setup
Network / Internet
Connections
Settings
Backup / Recovery
Security
Other Operations
Notifications
The Multiple Monitors function allows you to distribute portions of your desktop across
separate displays.
For example, if you have an external display connected to the monitor port, the computer
screen and the external display can function as a single desktop.
1. Right-click on the desktop [Details] and select Screen resolution.
2. Select Extend these displays from the drop-down list next to Multiple Displays and
OK.
The setting options vary depending on the number of the connected external displays.
Note
If you set different colors on each display, do not expand a single window across two
displays, or your app may not work properly.
Your external display may not support the Multiple Monitors function.
Certain apps may not be compatible with the Multiple Monitors settings.
High screen resolution and high color depth may not be displayed correctly. Set fewer
colors or a lower resolution for each display.
Do not change the display settings while using video/image apps or playing DVDs, as it
may cause unsuccessful playback/display or unstable system operations.
Change the display settings after you exit the video/image app.
Hint
You can set the screen resolution for each display used for the Multiple Monitors
function.
© 2012 Sony Corporation
Related Topic
Changing the Resolution (Size) of the Screen Image
Selecting Display Modes
Connecting a TV with an HDMI Input Port
Connecting an External Display or Projector
Page 51

VAIO User Guide VAIO Duo 11 SVD1121 Series Back | Back to Top
undefined
Troubleshooting
Raising the LCD Screen
How to Use
Windows 8: The Basics
Parts Description
Setup
Network / Internet
Connections
Settings
Backup / Recovery
Security
Other Operations
Notifications
To use the keyboard, you need to raise the LCD screen.
1. Place your VAIO computer with the
edge of the computer with your hand.
2. Grasp the top-center edge of the LCD screen with the other hand and raise the LCD
screen.
(Windows) button (1) on your side and hold the
© 2012 Sony Corporation
To fold the LCD screen
1. Grasp the top-center edge of the LCD screen with your hand and gently push it down
to the end.
Note
Observe the following when raising or folding the LCD screen.
Be careful not to catch your finger in the LCD screen.
Make sure other people and objects are out of range of slide motion.
Do not exert excessive pressure on the LCD screen.
Do not fold the LCD screen by pushing the VAIO logo stand behind the LCD screen.
Do not raise the LCD screen forcibly from the bottom edge of the LCD screen.
The LCD screen may unfold abruptly if you lift your VAIO computer with the back side
up.
Be sure to hold the computer from both the front and back sides with your hands when
lifting the computer.
Page 52

VAIO User Guide VAIO Duo 11 SVD1121 Series Back | Back to Top
undefined
Troubleshooting
Notes on the LCD screen
How to Use
Windows 8: The Basics
Parts Description
Setup
Network / Internet
Connections
Settings
Backup / Recovery
Security
Other Operations
Notifications
Read the following precautions for correct use of the LCD screen.
The LCD screen is manufactured using high-precision technology. You may, however,
see tiny black points and/or bright points (red, blue, or green) that continuously appear
on the LCD screen. This is a normal result of the manufacturing process and does not
indicate a malfunction.
Do not scratch the surface of the LCD screen or exert pressure on it. This could cause
damage.
Do not exert pressure on the LCD screen lid with the lid closed as it may scratch the
LCD screen or soil it.
The LCD screen may become warm during operation. This is normal and does not
indicate a malfunction.
Due to the mechanical design of your VAIO computer’s LCD screen/touch screen, the
screen surface may become warm while you are using the computer for an extended
period of time. This is normal and does not indicate a malfunction. (Touch screen
equipped models)
The LCD screen/touch screen is made of reinforced glass to implement high durability,
however, treat the screen with care as it is not 100% unbreakable. In case the screen
breaks into small pieces, be careful not to cut yourself on the pieces of broken glass.
(Touch screen equipped models)
Do not leave the LCD screen facing the sun. This could damage the LCD screen. Be
sure to block direct sunlight when using your VAIO computer near a window.
Do not exert pressure on the LCD screen or its edges when opening the LCD screen lid
or lifting your VAIO computer. The LCD screen may be sensitive to pressure or added
stress, and exerting pressure may damage the screen or cause it to malfunction. When
opening the computer, hold the base with one hand and gently lift the LCD screen lid
with the other. To carry the computer with the lid open, be sure to hold the computer
with both hands.
Using your VAIO computer in low temperature conditions may produce a residual image
on the LCD screen. This does not indicate a malfunction. When the computer returns to
normal temperature, the screen returns to normal.
A residual image may appear on the LCD screen if the same image is displayed for an
extended period of time. The residual image disappears after a while. You can use a
screen saver to prevent residual images.
© 2012 Sony Corporation
Page 53

VAIO User Guide VAIO Duo 11 SVD1121 Series Back | Back to Top
undefined
Troubleshooting
Adjusting the Speakers Volume
How to Use
Windows 8: The Basics
Parts Description
Setup
Network / Internet
Connections
Settings
Backup / Recovery
Security
Other Operations
Notifications
You can change the volume level of the speakers and headphones.
To reduce the volume using the Fn key
1. Press the F3 key while holding down the Fn key.
The volume is turned down.
To increase the volume using the Fn key
1. Press the F4 key while holding down the Fn key.
The volume is turned up.
Hint
You can press the Fn+F2 keys to turn off the speakers and headphones. Press the
Fn+F2 keys once more to turn on the volume.
You can also press the Fn+F4 keys to turn on the volume.
Related Topic
Adjusting the Volume in Windows
Connecting External Speakers or Headphones
© 2012 Sony Corporation
Page 54

VAIO User Guide VAIO Duo 11 SVD1121 Series Back | Back to Top
undefined
Troubleshooting
Connecting External Speakers or Headphones
How to Use
Windows 8: The Basics
Parts Description
Setup
Network / Internet
Connections
Settings
Backup / Recovery
Security
Other Operations
Notifications
You can connect external sound output devices (such as speakers or headphones) to your
VAIO computer.
1. Connect external speakers to the headphones jack [Details] with a speaker cable
(not supplied).
Note
Turn down the volume of the speakers before turning them on.
The noise canceling function is not effective for sound output through external speakers
or third-party headphones.
© 2012 Sony Corporation
Hint
Refer to the manual that came with your speakers or headphones.
Related Topic
Adjusting the Speakers Volume
Changing the Sound Output Device
Adjusting the Volume in Windows
Page 55

VAIO User Guide VAIO Duo 11 SVD1121 Series Back | Back to Top
undefined
Troubleshooting
Changing the Sound Output Device
How to Use
Windows 8: The Basics
Parts Description
Setup
Network / Internet
Connections
Settings
Backup / Recovery
Security
Other Operations
Notifications
If there is no sound coming from an external device connected to your VAIO computer, you
need to change the device for sound output.
1. Open Control Panel [Details] and select Hardware and Sound.
2. Select Sound.
3. Select the Playback tab.
4. Ensure there is a check mark next to the icon of the device you intend to output
computer sound from.
If there is no check mark next to the icon, select it and Set Default.
5. Select OK.
To change the sound rate and bit depth
The sound rate and bit depth of the digital audio output signal should be set according to
your digital audio device. Follow these steps.
1. Open Control Panel [Details] and select Hardware and Sound.
2. Select Sound.
3. Select the Playback tab.
4. Select the HDMI device or OPTICAL OUT (optical digital audio output) icon and
Properties.
5. Select the Advanced tab.
6. Select the sample rate and bit depth (for example, 16 bit, 48000 Hz (DVD quality))
which the device supports.
7. Select OK.
© 2012 Sony Corporation
Related Topic
Connecting External Speakers or Headphones
Connecting a High-Quality Digital Sound Output Device between Your VAIO Computer and a
TV
Page 56

VAIO User Guide VAIO Duo 11 SVD1121 Series Back | Back to Top
undefined
Troubleshooting
Adjusting the Volume in Windows
How to Use
Windows 8: The Basics
Parts Description
Setup
Network / Internet
Connections
Settings
Backup / Recovery
Security
Other Operations
Notifications
You can adjust the volume on each device and app from Control Panel.
1. Open Control Panel [Details] and select Hardware and Sound.
2. Select Adjust system volume under Sound.
3. Move the slider under Device or Applications up and down to your desired volume
level.
When the volume is turned off (
volume (
Related Topic
Adjusting the Speakers Volume
Connecting External Speakers or Headphones
). When the volume is low, turn the volume up with the slider.
), select (Deactivate muting) to turn on the
© 2012 Sony Corporation
Page 57

VAIO User Guide VAIO Duo 11 SVD1121 Series Back | Back to Top
undefined
Troubleshooting
Connecting a High-Quality Digital Sound Output Device
How to Use
between Your VAIO Computer and a TV
Windows 8: The Basics
Parts Description
Setup
Network / Internet
Connections
Settings
Backup / Recovery
Security
Other Operations
Notifications
You can connect a high-quality home theater receiver or other surround sound decoder
devices between your VAIO computer and a TV using an HDMI connection.
1. Make sure the HDMI connection has been set up between the TV and the home
theater receiver or surround sound decoder device.
2. Change the device for sound output to the HDMI output. [Details]
3. Turn on the TV and set its input to the HDMI input.
4. Turn on the home theater receiver or surround sound decoder device and set its input
to the HDMI input.
5. Plug one end of an HDMI cable to the HDMI input port on the home theater receiver or
surround sound decoder device and the other end to the HDMI output port on your
VAIO computer.
Hint
You can adjust the screen resolution of the connected TV with your VAIO computer.
[Details]
With the HDMI connection, the volume can be adjusted by the connected audio device
only. Your VAIO computer has no control over the output volume of any connected
devices.
Related Topic
Changing the Sound Output Device
Changing the Resolution (Size) of the Screen Image
Connecting a TV with an HDMI Input Port
© 2012 Sony Corporation
Page 58

VAIO User Guide VAIO Duo 11 SVD1121 Series Back | Back to Top
undefined
Troubleshooting
Playing Powerful and High-Quality Sound Using
How to Use
xLOUD/Clear Phase
Windows 8: The Basics
Parts Description
Setup
Network / Internet
Connections
Settings
Backup / Recovery
Security
Other Operations
Notifications
With xLOUD/Clear Phase, you can enjoy high-quality sound which is not only powerful but
natural and clear.
1. Start VAIO Control Center [Details] and select Sound Quality.
2. Select xLOUD/Clear Phase in Sound Effects.
Note
xLOUD/Clear Phase works only on sound output from the built-in speakers.
Simultaneous use of xLOUD/Clear Phase and Dolby Home Theater v4 is not possible.
Related Topic
Adjusting the Speakers Volume
Adjusting the Volume in Windows
© 2012 Sony Corporation
Page 59

VAIO User Guide VAIO Duo 11 SVD1121 Series Back | Back to Top
undefined
Troubleshooting
Connecting the Noise Canceling Headphones
How to Use
<Noise canceling headphones supplied models>
Windows 8: The Basics
Parts Description
Setup
Network / Internet
Connections
Settings
Backup / Recovery
Security
Other Operations
Notifications
You can enjoy music by connecting the noise canceling headphones which reduce ambient
noise to your VAIO computer.
1. Plug the supplied noise canceling headphones into the headphones jack . [Details]
A balloon message pops up from the desktop notification area.
When
Right-click
function.
Hint
When the noise canceling function does not seem to be working, unplug the noise
canceling headphones and then plug them back again.
If you feel that the noise canceling function is less effective, you can adjust the effect of
the function.
Right-click
settings window.
You can pick up mainly your voice and sounds coming from your front and rear using
the built-in microphones on the noise canceling headphones.
Right-click
directivity function in the settings window.
(off) is displayed in the message, the noise canceling function is disabled.
(off) in the desktop notification area, and enable the noise canceling
(on) in the desktop notification area, and adjust the effect in the
(on) in the desktop notification area, and enable the microphone
© 2012 Sony Corporation
Related Topic
Notes on Using the Noise Canceling Headphones<Noise canceling headphones supplied
models>
Page 60

VAIO User Guide VAIO Duo 11 SVD1121 Series Back | Back to Top
undefined
Troubleshooting
Notes on Using the Noise Canceling Headphones
How to Use
<Noise canceling headphones supplied models>
Windows 8: The Basics
Parts Description
Setup
Network / Internet
Connections
Settings
Backup / Recovery
Security
Other Operations
Notifications
Before using the noise canceling headphones, read the following precautions for correct use.
The noise canceling function does not work on sound output through speakers, standard
headphones, and devices via BLUETOOTH communication.
The noise canceling function is less effective unless you properly wear the noise
canceling headphones. Be sure to fit the headphones snugly into your ears by replacing
the earbuds or adjusting the position of the headphones.
The noise canceling function is to mainly reduce low-frequency noise in the ambient
environment but not high-frequency noise.
Nor is it to implement a 100% noise-free audio environment.
Do not cover the built-in microphones (1) on the noise canceling headphones with your
hands, etc., as it may cause the microphone directivity function to be less effective.
You may hear a slight hissing noise while the noise canceling function is enabled. This is
the operating noise of the noise canceling function and does not indicate a malfunction.
You may feel that the noise canceling function is less effective or that ambient noise is
even louder, depending on the type of noise or the degree of quietness in your
environment.
In such a case, disable the noise canceling function.
Use of a mobile phone may cause radio interference to the noise canceling headphones.
When using the headphones, keep mobile phones away from the headphones.
Be sure to take off the noise canceling headphones from your ears before plugging or
unplugging the headphones.
Plugging or unplugging the headphones generates noise. This is normal and does not
indicate a malfunction.
If you configure the noise canceling headphones settings to pick up sounds using the
built-in microphones on the noise canceling headphones and output them through the
headphones, the sound will be amplified. Be careful of the volume when changing the
settings.
In certain situations, such as when ambient noise is loud, the microphone directivity
function may be less effective or the volume level of the noise may fluctuate at short
intervals.
If the earbuds do not fit in your ears, you may not hear the bass sound. To enjoy better
quality sound, fit the earbuds snugly into your ears by adjusting their position or pushing
them deep into the ears.
A pair of medium-size earbuds is attached to the headphones at the time of delivery. If
you feel that the earbuds do not fit in your ears, replace them with an extra pair in small
or large size.
Related Topic
Connecting the Noise Canceling Headphones<Noise canceling headphones supplied
models>
© 2012 Sony Corporation
Page 61

VAIO User Guide VAIO Duo 11 SVD1121 Series Back | Back to Top
undefined
Troubleshooting
Connecting an External Drive
How to Use
Windows 8: The Basics
Parts Description
Setup
Network / Internet
Connections
Settings
Backup / Recovery
Security
Other Operations
Notifications
Connect an external disc drive or hard disk drive to a USB port on your VAIO computer.
1. Plug the power cord of your external drive into an AC outlet (1).
2. Plug one end of a USB cable (3) (not supplied) into the USB port (2), and the other
end to the external drive. [Details]
Note
Be sure to connect an external drive to a power source with an AC adapter (if supplied).
Hint
You may need to install a driver depending on the external drive you use.
In addition, procedures to connect and use an external drive vary depending on the
drive you use. Refer to the manual that came with your external drive for more
information.
© 2012 Sony Corporation
Related Topic
Connecting a USB Device
Page 62

VAIO User Guide VAIO Duo 11 SVD1121 Series Back | Back to Top
undefined
Troubleshooting
Using the Built-in Camera
How to Use
<Built-in camera equipped models>
Windows 8: The Basics
Parts Description
Setup
Network / Internet
Connections
Settings
Backup / Recovery
Security
Other Operations
Notifications
You can make a video call through the Internet using the built-in camera and communication
apps.
The built-in camera indicator light is on while the built-in camera is in use.
Hint
The apps installed on your VAIO computer vary depending on the computer’s
configurations.
Front
1. Front camera indicator
2. Front camera
3. Built-in microphone (monaural)
Bottom
1. Rear camera indicator (Rear camera equipped models)
2. Rear camera (Rear camera equipped models)
Note
Using the front camera and the rear camera at the same time may limit the resolution.
Related Topic
Notes on the Built-in Camera<Built-in camera equipped models>
© 2012 Sony Corporation
Page 63

VAIO User Guide VAIO Duo 11 SVD1121 Series Back | Back to Top
undefined
Troubleshooting
Notes on the Built-in Camera
How to Use
<Built-in camera equipped models>
Windows 8: The Basics
Parts Description
Setup
Network / Internet
Connections
Settings
Backup / Recovery
Security
Other Operations
Notifications
Do not scratch or soil the area on and around the built-in camera, as it may cause poorquality images.
Do not let direct sunlight enter the lens of the built-in camera regardless of your VAIO
computer’s power state, as it may cause the camera to malfunction.
Care and cleaning of the built-in camera
If the area on and around the built-in camera is soiled, gently wipe it with a soft cloth, such
as a lens cleaning cloth. Do not rub the area too hard, as it can be easily scratched.
Related Topic
Using the Built-in Camera<Built-in camera equipped models>
© 2012 Sony Corporation
Page 64

VAIO User Guide VAIO Duo 11 SVD1121 Series Back | Back to Top
undefined
Troubleshooting
About the Network (LAN)
How to Use
Windows 8: The Basics
Parts Description
Setup
Network / Internet
Connections
Settings
Backup / Recovery
Security
Other Operations
Notifications
The network (LAN) enables you to connect your VAIO computer to the Internet and transfer
data between the computer and other devices.
You can connect your VAIO computer to 1000BASE-T/100BASE-TX/10BASE-T type
networks with a LAN cable (not supplied). Connect one end of a LAN cable to the LAN port
on the computer and the other end to your network.
For information on peripheral devices required for LAN access, ask your Internet Service
Provider (ISP) or refer to the manual that came with your modem.
For information on how to connect your VAIO computer to the network, refer to your ISP’s
instructions or the manual that came with the modem and other peripheral devices. If you
require information on the network settings at your workplace, ask the network administrator.
Related Topic
About the Internet Connection Services
Starting Wi-Fi(R) (Wireless LAN) Communications
© 2012 Sony Corporation
Page 65

VAIO User Guide VAIO Duo 11 SVD1121 Series Back | Back to Top
undefined
Troubleshooting
About the Internet Connection Services
How to Use
Windows 8: The Basics
Parts Description
Setup
Network / Internet
Connections
Settings
Backup / Recovery
Security
Other Operations
Notifications
The following types of Internet connection services are available.
You can select from among the services according to your preference, for example,
communication speed or a usage fee. For detailed information on a variety of connection
services, contact Internet Service Providers (ISPs).
Fiber to the Home (FTTH)
Cable modem
Digital Subscriber Line (DSL)
Satellite
Dial-up
Related Topic
Connecting to the Internet with a Wired Connection
Starting Wi-Fi(R) (Wireless LAN) Communications
© 2012 Sony Corporation
Page 66

VAIO User Guide VAIO Duo 11 SVD1121 Series Back | Back to Top
undefined
Troubleshooting
Connecting to the Internet with a Wired Connection
How to Use
Windows 8: The Basics
Parts Description
Setup
Network / Internet
Connections
Settings
Backup / Recovery
Security
Other Operations
Notifications
Before using the Internet, you need to sign up with an Internet Service Provider (ISP) and
set up devices required for connecting your VAIO computer to the Internet.
Connect one end of a LAN cable (not supplied) to the LAN port on your VAIO computer and
the other end to your network.
Note
For detailed information on devices required for Internet access and how to connect
your VAIO computer to the Internet, ask your ISP.
When connecting your VAIO computer to the Internet, be sure to use a cable with
“Network” or “Ethernet” writing on it.
You cannot access LAN networks if Disabled is selected for the LAN port in the BIOS
setup screen. In such a case, change the BIOS setting. [Details]
Do not plug a telephone cable into the LAN port on your VAIO computer.
If the LAN port is connected to the following networks or telephone lines, high electric
current to the port may cause damage, overheating, or fire.
Any network, except 1000BASE-T/100BASE-TX/10BASE-T type networks
Public telephone subscriber line
Private branch exchange (PBX)
Home (intercom speakerphone) or business-use telephone lines (multi-line business
telephone)
© 2012 Sony Corporation
Hint
To connect your VAIO computer to the Internet using the Wi-Fi(R) (Wireless LAN)
function, you need to set up the Wi-Fi settings. [Details]
Related Topic
About the Internet Connection Services
About the Network (LAN)
Starting Wi-Fi(R) (Wireless LAN) Communications
Page 67

VAIO User Guide VAIO Duo 11 SVD1121 Series Back | Back to Top
undefined
Troubleshooting
About the Wi-Fi(R) (Wireless LAN) Standards
How to Use
Windows 8: The Basics
Parts Description
Setup
Network / Internet
Connections
Settings
Backup / Recovery
Security
Other Operations
Notifications
Wi-Fi allows your VAIO computer to connect to a network through a wireless connection.
Wi-Fi uses the following IEEE 802.11a/b/g/n standard, which specifies the type of technology
used.
Refer to the specifications to find out about the configuration of the computer.
IEEE 802.11a (Frequency band:5 GHz)
Exclusive to models compliant with the IEEE 802.11a/b/g/n standard.
IEEE 802.11b/g (Frequency band:2.4 GHz)
The IEEE 802.11g standard provides higher-speed communications than the IEEE 802.11b.
IEEE 802.11n (Frequency band:2.4 GHz/5 GHz)
For models compliant with the IEEE 802.11b/g/n standard, only 2.4 GHz band can be used.
Related Topic
Starting Wi-Fi(R) (Wireless LAN) Communications
Stopping Wi-Fi(R) (Wireless LAN) Communications
Notes on Using the Wi-Fi(R) (Wireless LAN) Function
© 2012 Sony Corporation
Page 68

VAIO User Guide VAIO Duo 11 SVD1121 Series Back | Back to Top
undefined
Troubleshooting
Starting Wi-Fi(R) (Wireless LAN) Communications
How to Use
Windows 8: The Basics
Parts Description
Setup
Network / Internet
Connections
Settings
Backup / Recovery
Security
Other Operations
Notifications
You can establish Wi-Fi communications between your VAIO computer and an access point
(not supplied).
Before using Wi-Fi, make sure a Wi-Fi access point is on and operating.
1. Connect an access point to your VAIO computer.
Refer to Windows Help and Support [Details] and the manual that came with the
access point for more information.
2. Open the charms [Details] and select
3. Select Change PC settings in the lower right corner.
4. Select Wireless in the left pane of the PC settings screen.
5. Change Airplane mode to Off and the Wi-Fi setting under Wireless devices to On.
Hint
Refer to Windows Help and Support for more information on Airplane mode.
[Details]
6. Open the charms [Details] and select
7. Select
8. Select the desired access point and Connect.
After the connection is established, Connected appears in the selected wireless
access point field.
If a security key [Details] entry window appears, enter the security key as required and
select OK.
Note that security keys are case-sensitive.
(the network icon).
(Settings).
(Settings).
Note
On IEEE 802.11a/b/g/n equipped models, when only the 2.4 GHz Wi-Fi function is
enabled, your VAIO computer cannot connect to a 5 GHz Wi-Fi access point. Also, when
only the 5 GHz Wi-Fi function is enabled, the computer cannot connect to a 2.4 GHz WiFi access point.
On IEEE 802.11b/g/n equipped models, when the 2.4 GHz Wi-Fi function is disabled, the
computer cannot connect to an access point. Also, the computer cannot connect to a 5
GHz Wi-Fi access point.
It may take some time to find and connect to a Wi-Fi access point before starting
communications via Wi-Fi.
Hint
Once you connect your VAIO computer to the access point by entering the security key,
the access point will be registered in the computer. You do not have to enter the security
key for subsequent connections.
To check Wi -Fi connection status
Open the desktop [Details] and move the mouse pointer over (the Network icon) in the
desktop notification area to check the Wi-Fi connection status, such as the access point
currently connected to your VAIO computer.
Related Topic
About the Wi-Fi(R) (Wireless LAN) Standards
Stopping Wi-Fi(R) (Wireless LAN) Communications
Notes on Using the Wi-Fi(R) (Wireless LAN) Function
About a Security Key for Wi-Fi(R) (Wireless LAN)
© 2012 Sony Corporation
Page 69

VAIO User Guide VAIO Duo 11 SVD1121 Series Back | Back to Top
undefined
Troubleshooting
Stopping Wi-Fi(R) (Wireless LAN) Communications
How to Use
Windows 8: The Basics
Parts Description
Setup
Network / Internet
Connections
Settings
Backup / Recovery
Security
Other Operations
Notifications
You can stop Wi-Fi communications by following these steps.
1. Open the charms [Details] and select
2. Select
3. Select the desired access point and Disconnect.
Note
Do not disable the Wi-Fi function while accessing remote documents, files, or resources,
as it may result in data loss.
Related Topic
About the Wi-Fi(R) (Wireless LAN) Standards
Starting Wi-Fi(R) (Wireless LAN) Communications
Notes on Using the Wi-Fi(R) (Wireless LAN) Function
Disabling the Wi-Fi(R) (Wireless LAN) Function
(the network icon).
(Settings).
© 2012 Sony Corporation
Page 70

VAIO User Guide VAIO Duo 11 SVD1121 Series Back | Back to Top
undefined
Troubleshooting
Disabling the Wi-Fi(R) (Wireless LAN) Function
How to Use
Windows 8: The Basics
Parts Description
Setup
Network / Internet
Connections
Settings
Backup / Recovery
Security
Other Operations
Notifications
You can disable the Wi-Fi function by following these steps.
1. Open the charms [Details] and select
2. Select Change PC settings in the lower right corner.
3. Select Wireless in the left pane of the PC settings screen.
4. Change the Wi-Fi setting under Wireless devices to Off.
Hint
To enable the Wi-Fi function, turn off Airplane mode and change the Wi-Fi setting
under Wireless devices to On.
To disable all wireless functions, turn on Airplane mode.
The wireless function(s) whose setting is on will be enabled when you turn off Airplane
mode. When any wireless function is enabled, the WIRELESS indicator light turns on.
Refer to Windows Help and Support for more information on Airplane mode. [Details]
Related Topic
About the Wi-Fi(R) (Wireless LAN) Standards
Starting Wi-Fi(R) (Wireless LAN) Communications
Notes on Using the Wi-Fi(R) (Wireless LAN) Function
(Settings).
© 2012 Sony Corporation
Page 71

VAIO User Guide VAIO Duo 11 SVD1121 Series Back | Back to Top
undefined
Troubleshooting
About a Security Key for Wi-Fi(R) (Wireless LAN)
How to Use
Windows 8: The Basics
Parts Description
Setup
Network / Internet
Connections
Settings
Backup / Recovery
Security
Other Operations
Notifications
A security key is a security protocol for Wi-Fi that encrypts data transmitted on Wi-Fi. It is
also referred to as an encryption key or a WEP (Wired Equivalent Privacy) key.
The security key allows wireless devices that have the same key, such as a Wi-Fi access
point and a computer, to communicate with each other on Wi-Fi.
The security key is assigned to each access point by default. (Make sure the default security
key has been changed to protect data from unauthorized use.) If you cannot find the default
security key, refer to the manual that came with your access point.
If you enter a wrong security key, follow these steps to re-enter the security key.
1. Open the charms [Details] and select
2. Select
3. Right-click the desired network and select View connection property.
4. Select the Security tab.
5. Enter a security key in the Network security key field and select OK.
Related Topic
About the Wi-Fi(R) (Wireless LAN) Standards
Starting Wi-Fi(R) (Wireless LAN) Communications
Notes on Using the Wi-Fi(R) (Wireless LAN) Function
(the network icon).
(Settings).
© 2012 Sony Corporation
Page 72

VAIO User Guide VAIO Duo 11 SVD1121 Series Back | Back to Top
undefined
Troubleshooting
Notes on Using the Wi-Fi(R) (Wireless LAN) Function
How to Use
Windows 8: The Basics
Parts Description
Setup
Network / Internet
Connections
Settings
Backup / Recovery
Security
Other Operations
Notifications
Before using the Wi-Fi function, read the following precautions for correct use.
In some countries or regions, using the Wi-Fi products may be restricted by the local
regulations.
Wi-Fi devices work on the 2.4 GHz band, which is used by a variety of devices. They
use the technology to minimize radio interference from other devices that use the same
band; however, radio interference may still slow communication speeds, reduce
communication range, or cause communication failure.
If both the BLUETOOTH function and the 2.4 GHz Wi-Fi function of your VAIO computer
are enabled, interference may occur and cause slower communication speeds or other
problems.
To communicate via Wi-Fi while you are on the road, you may need to contract with a
Wi-Fi connection service provider.
If your VAIO computer is equipped with the IEEE 802.11a/b/g/n standard, outdoor use of
the 5 GHz Wi-Fi function is prohibited by law.
The communication speed and range may vary depending on the following conditions:
Distance between devices
Existence of obstacles between devices
Device configuration
Radio conditions
Ambient environment (including wall material, etc.)
Apps in use
Communications may be cut off depending on radio conditions.
The data transfer rate specified in the specification is the theoretical maximum, and may
not reflect actual data transfer rate.
Actual communication speed may not be as fast as the one displayed on your VAIO
computer.
The 2.4 GHz and 5 GHz Wi-Fi frequency bands are not communicable with one another.
The data transfer rate of IEEE 802.11g and IEEE 802.11n (2.4 GHz) may be affected by
interference when used with an IEEE 802.11b product. Also, IEEE 802.11g and IEEE
802.11n automatically lower the transfer rate to maintain compatibility with an IEEE
802.11b product. The transfer rate may be regained by changing the channel settings of
your access point.
To stop the Wi-Fi function abruptly, turn off your VAIO computer.
The WLAN standard includes the encryption methods: Wired Equivalent Privacy (WEP),
which is a security protocol, Wi-Fi Protected Access 2 (WPA2), and Wi-Fi Protected
Access (WPA). Proposed jointly by the IEEE and Wi-Fi Alliance, both WPA2 and WPA
are specifications of standards based on interoperable security enhancements that
increase the level of data protection and access control for existing Wi-Fi networks.
WPA is designed to be forward compatible with the IEEE 802.11i specification. It utilizes
the enhanced data encryption Temporal Key Integrity Protocol (TKIP) in addition to user
authentication using 802.1X and Extensible Authentication Protocol (EAP). Data
encryption protects the vulnerable wireless link between clients and access points.
Besides that, there are other typical LAN security mechanisms to ensure privacy, such
as: password protection, end-to-end encryption, virtual private networks, and
authentication. WPA2, the second generation of WPA, provides stronger data protection
and network access control and is also designed to secure all versions of 802.11
devices, including 802.11b, 802.11a, 802.11g, and 802.11n standards, multi-band and
multi-mode. In addition, based on the ratified IEEE 802.11i standard, WPA2 provides
government grade security by implementing the National Institute of Standards and
Technology (NIST) FIPS 140-2 compliant AES encryption algorithm and 802.1X-based
authentication. WPA2 is backward compatible with WPA.
Related Topic
About the Wi-Fi(R) (Wireless LAN) Standards
Starting Wi-Fi(R) (Wireless LAN) Communications
Stopping Wi-Fi(R) (Wireless LAN) Communications
Notes on Using the BLUETOOTH(R) Function
© 2012 Sony Corporation
Page 73

VAIO User Guide VAIO Duo 11 SVD1121 Series Back | Back to Top
undefined
Troubleshooting
About the BLUETOOTH(R) Function
How to Use
Windows 8: The Basics
Parts Description
Setup
Network / Internet
Connections
Settings
Backup / Recovery
Security
Other Operations
Notifications
You can establish wireless communications between your VAIO computer and other
BLUETOOTH devices, such as another computer, a smartphone, a mobile phone, a headset,
or a mouse.
You can transfer data between these devices without cables at a range of up to 33 feet / 10
meters in an open area.
One BLUETOOTH device can connect with up to seven devices via wireless network to
exchange data.
When a device requires connection to another device, it sends out an inquiry to neighboring
BLUETOOTH devices. If any device responds to the inquiry, the two devices can connect
with each other.
© 2012 Sony Corporation
Related Topic
Communicating with Another BLUETOOTH(R) Device such as a Mouse
Stopping BLUETOOTH(R) Communications
Notes on Using the BLUETOOTH(R) Function
About BLUETOOTH(R) Security
Page 74

VAIO User Guide VAIO Duo 11 SVD1121 Series Back | Back to Top
undefined
Troubleshooting
Communicating with Another BLUETOOTH(R) Device
How to Use
such as a Mouse
Windows 8: The Basics
Parts Description
Setup
Network / Internet
Connections
Settings
Backup / Recovery
Security
Other Operations
Notifications
You can connect BLUETOOTH devices to your VAIO computer.
For details on BLUETOOTH communication, see About the BLUETOOTH Function.
[Details]
1. Open the charms [Details] and select
2. Select Change PC settings in the lower right corner.
3. Select Wireless in the left pane of the PC settings screen.
4. Change Airplane mode to Off and the Bluetooth setting to On.
Hint
If your VAIO computer is compliant with BLUETOOTH high speed technology and
you intend to use it for high-speed communications, change the Wi-Fi setting under
Wireless devices to On, too.
Make sure that the WIRELESS indicator light on your VAIO computer is on.
5. Select Devices in the left pane of the PC settings screen.
6. When connecting a BLUETOOTH mouse, turn it on and press the button to connect
the mouse.
Hint
Refer to the manual that came with your BLUETOOTH device for the procedure to
ready the device for connection.
7. Select Add a device.
Your VAIO computer searches for devices and displays a device list. Follow the onscreen instructions to register your device.
(Settings).
Note
Depending on the BLUETOOTH device, it may take some time for your VAIO computer
to find the device. If your device does not appear in the list, repeat the procedure to
ready the device for connection (for example, pressing the button for connection).
Depending on the BLUETOOTH device, the procedure to establish connection may
vary. Refer to the manual that came with the device for the procedure.
Hint
For details on the operations, open Windows Help and Support [Details], and enter
“BLUETOOTH” in the search box.
A window appears for passcode input if a BLUETOOTH device is requesting
authentication to establish connection. Follow the on-screen instructions to share the
passcode between the BLUETOOTH device and your VAIO computer. If you do not wish
to connect, select the Cancel button in the window.
A passcode is a secret number that is entered by a user to use for the authentication
process to allow two BLUETOOTH devices to communicate with each other. Enter
the same alphanumeric string (case-sensitive) for both devices to allow them to
communicate with each other. You can change the passcode every time you perform
authentication, providing you enter the same passcode for both devices during the
authentication process. For details on the passcode of a BLUETOOTH device, refer
to the manual that came with the device. If no BLUETOOTH passcode is entered for
a certain time, the connection process will be terminated for security. In this case, try
again.
Related Topic
About the BLUETOOTH(R) Function
Stopping BLUETOOTH(R) Communications
Notes on Using the BLUETOOTH(R) Function
About BLUETOOTH(R) Security
© 2012 Sony Corporation
Page 75

VAIO User Guide VAIO Duo 11 SVD1121 Series Back | Back to Top
undefined
Troubleshooting
Stopping BLUETOOTH(R) Communications
How to Use
Windows 8: The Basics
Parts Description
Setup
Network / Internet
Connections
Settings
Backup / Recovery
Security
Other Operations
Notifications
You can stop BLUETOOTH communications by following these steps.
1. Open the charms [Details] and select
2. Select Change PC settings in the lower right corner.
3. Select Wireless in the left pane of the PC settings screen.
4. Change the Bluetooth setting under Wireless devices to Off.
Hint
When Airplane mode is Off, the WIRELESS indicator light on your VAIO computer
stays on.
Related Topic
About the BLUETOOTH(R) Function
Communicating with Another BLUETOOTH(R) Device such as a Mouse
Notes on Using the BLUETOOTH(R) Function
(Settings).
© 2012 Sony Corporation
Page 76

VAIO User Guide VAIO Duo 11 SVD1121 Series Back | Back to Top
undefined
Troubleshooting
About BLUETOOTH(R) Security
How to Use
Windows 8: The Basics
Parts Description
Setup
Network / Internet
Connections
Settings
Backup / Recovery
Security
Other Operations
Notifications
The BLUETOOTH wireless technology has an authentication function, which allows you to
control communication with other devices.
The authentication function helps you prevent unwanted anonymous BLUETOOTH devices
from accessing your VAIO computer. The first time two BLUETOOTH devices communicate,
a common passcode (a password required for authentication) should be identified to register
both devices. Once a device is registered, there is no need to re-enter the passcode.
For details, open Windows Help and Support [Details], and enter “BLUETOOTH” in the
search box.
Related Topic
About the BLUETOOTH(R) Function
Communicating with Another BLUETOOTH(R) Device such as a Mouse
Stopping BLUETOOTH(R) Communications
Notes on Using the BLUETOOTH(R) Function
© 2012 Sony Corporation
Page 77

VAIO User Guide VAIO Duo 11 SVD1121 Series Back | Back to Top
undefined
Troubleshooting
Notes on Using the BLUETOOTH(R) Function
How to Use
Windows 8: The Basics
Parts Description
Setup
Network / Internet
Connections
Settings
Backup / Recovery
Security
Other Operations
Notifications
Before using the BLUETOOTH function, read the following precautions for correct use.
In some countries or regions, using the BLUETOOTH function may be restricted by the
local regulations.
The BLUETOOTH function may not work with some devices, depending on the
manufacturer or the app version employed by the manufacturer. Check the system
requirements of the BLUETOOTH device before purchasing.
For information on BLUETOOTH devices, visit the VAIO Support website.
Some BLUETOOTH devices require authentication (pairing) before establishing
connection with another device. Perform the authentication process before connecting to
such devices.
BLUETOOTH devices work on the 2.4 GHz band, which is used by a variety of devices.
BLUETOOTH devices use the technology to minimize radio interference from other
devices that use the same band; however, radio interference may still cause slower
communication speeds, reduce communication range, or in some cases, cause
communication failure.
Communication speed and range may vary depending on the following conditions:
Distance between communication devices
Existence of obstacles between devices
Ambient environment that includes existence of walls and materials of such walls
Device configuration
Apps in use
Radio conditions
Communications may be cut off depending on radio conditions.
If your VAIO computer is compliant with BLUETOOTH high speed technology and you
intend to use it for high-speed communications, enable both the wireless LAN and
BLUETOOTH functions on the computer.
Large files may occasionally be corrupted during continuous transfer due to limitations of
the BLUETOOTH standard and electromagnetic interference in the environment.
Connecting multiple BLUETOOTH devices to your VAIO computer may cause channel
congestion, resulting in poor device performance. This is normal with BLUETOOTH
technology and does not indicate a malfunction.
Video and audio may not be synchronized if you play videos on your VAIO computer
with audio output from a connected BLUETOOTH device. This is a frequent occurrence
with BLUETOOTH technology and does not indicate a malfunction.
All BLUETOOTH devices must be certified through the procedure stipulated by
Bluetooth SIG to ensure that they are compliant with the BLUETOOTH standard.
Even if the BLUETOOTH devices are compliant with the BLUETOOTH standard,
individual device performance, specifications, and operation procedures may vary. Data
exchange may not be possible in all situations.
Not all BLUETOOTH devices are guaranteed of compatibility with your VAIO computer.
If you urgently need to disable the BLUETOOTH function, turn off your VAIO computer.
© 2012 Sony Corporation
Related Topic
About the BLUETOOTH(R) Function
Communicating with Another BLUETOOTH(R) Device such as a Mouse
Stopping BLUETOOTH(R) Communications
About BLUETOOTH(R) Security
Notes on Using the Wi-Fi(R) (Wireless LAN) Function
Page 78

VAIO User Guide VAIO Duo 11 SVD1121 Series Back | Back to Top
undefined
Troubleshooting
About Built-In Sensors
How to Use
Windows 8: The Basics
Parts Description
Setup
Network / Internet
Connections
Settings
Backup / Recovery
Security
Other Operations
Notifications
A built-in accelerometer, digital compass (magnetometer), and gyro sensor enable you to
use the following functions.
Screen rotation using the built-in accelerometer
When you rotate your VAIO computer, the built-in accelerometer automatically detects the
movement and rotates the computer screen to portrait or landscape orientation depending
on the computer orientation.
Navigation assistance using the built -in digital compass
The built-in digital compass provides navigation assistance on compatible apps by detecting
the direction your VAIO computer is facing.
App operation using the built -in gyro sensor
The built-in gyro sensor detects angular movement of your VAIO computer, which allows
you to perform actions with apps, such as a game app.
Hint
You need to calibrate the built-in digital compass when the app does not show the
current location or direction correctly.
© 2012 Sony Corporation
Page 79

VAIO User Guide VAIO Duo 11 SVD1121 Series Back | Back to Top
undefined
Troubleshooting
Notes on Built-In Sensors
How to Use
Windows 8: The Basics
Parts Description
Setup
Network / Internet
Connections
Settings
Backup / Recovery
Security
Other Operations
Notifications
Before using built-in sensors, read the following precautions for correct use.
Notes on using the built-in accelerometer
If you change the computer screen orientation without exiting the running apps, such as
a video playback app, all unsaved data may be lost.
You cannot change the computer screen orientation while your VAIO computer is
connected to an external display. If you connect the computer to an external display
while using the computer in portrait orientation, the computer screen automatically
changes to landscape (horizontal) orientation.
The computer screen may become distorted if you change the computer screen
orientation while the screen saver is activated.
Some apps do not support portrait orientation and not work correctly. In this case, use
your VAIO computer in landscape orientation.
Notes on using the built-in digital compass
The built-in digital compass works by detecting a magnetic direction. Do not rely solely
on the location information the built-in digital compass provides.
Especially at the following locations, the accuracy of the digital compass can be easily
affected by magnetic interference and it may not work correctly.
Inside an elevator or a room built with ferrous materials, such as iron frames or
reinforced concrete
Near a reinforced concrete structure, such as a footbridge or an airport or a train
station concourse
Near or inside a train or a car
Near a transformer on the ground or high-voltage power lines
Near a metallic product, such as a metal frame desk or metallic furniture
Near a material that has a high level of magnetic interference, such as a magnet, a
magnetic holder, or speakers
Adjusting the angle of the LCD screen may reduce the accuracy of the built-in digital
compass; however, this is normal and does not indicate a malfunction. Open VAIO
Control Center [Details] and calibrate the digital compass.
© 2012 Sony Corporation
Page 80

VAIO User Guide VAIO Duo 11 SVD1121 Series Back | Back to Top
undefined
Troubleshooting
About One Touch (NFC)
How to Use
<NFC supported models>
Windows 8: The Basics
Parts Description
Setup
Network / Internet
Connections
Settings
Backup / Recovery
Security
Other Operations
Notifications
ワンタッチとは、NFC(近距離無線通信技術)機能を利用した機器接続機能です。
ワンタッチに対応したソニー製品を指定の場所にタッチするだけで、手軽にデータ通信がで
きます。
ワンタッチを使って、ヘッドホンやスピーカー、携帯電話、スマートフォンなどのさまざま
な機器とVAIOを手軽に接続できます。
© 2012 Sony Corporation
Page 81

VAIO User Guide VAIO Duo 11 SVD1121 Series Back | Back to Top
undefined
Troubleshooting
Connecting Headphones with One Touch (NFC)
How to Use
<NFC supported models>
Windows 8: The Basics
Parts Description
Setup
Network / Internet
Connections
Settings
Backup / Recovery
Security
Other Operations
Notifications
ワンタッチ(NFC)対応機器をVAIOにタッチするだけで、手軽に機器を接続できます。
★★手順未定★★
© 2012 Sony Corporation
Page 82

VAIO User Guide VAIO Duo 11 SVD1121 Series Back | Back to Top
undefined
Troubleshooting
Disabling One Touch (NFC)
How to Use
<NFC supported models>
Windows 8: The Basics
Parts Description
Setup
Network / Internet
Connections
Settings
Backup / Recovery
Security
Other Operations
Notifications
VAIOはお買い上げ時の設定では、ワンタッチ(NFC)が有効になっています。
次の方法でNFC機能を無効にすることができます。
1. チャームを表示し[Details]、
2. 画面右下の[PC 設定の変更]を選択する。
3. 「PC 設定」画面左側の[ワイヤレス]を選択する。
4. 「ワイヤレス デバイス」の「NFC」を「オフ」にする。
ヒント
ワンタッチ(NFC)を使用するには、「機内モード」の「ワイヤレス通信を停止する場
合はオンにします」を「オフ」、「ワイヤレス デバイス」の「NFC」を「オン」にしま
す。
「機内モード」の「ワイヤレス通信を停止する場合はオンにします」を「オフ」にする
と、ワイヤレス機能の設定が有効になり、WIRELESSランプが点灯します。
「機内モード」について詳しくは、「Windows ヘルプとサポート」をご覧くださ
い。[Details]
(設定)を選択する。
© 2012 Sony Corporation
Page 83

VAIO User Guide VAIO Duo 11 SVD1121 Series Back | Back to Top
undefined
Troubleshooting
Notes on One Touch (NFC)
How to Use
<NFC supported models>
Windows 8: The Basics
Parts Description
Setup
Network / Internet
Connections
Settings
Backup / Recovery
Security
Other Operations
Notifications
In some countries or regions, using the NFC function may be restricted by the local
regulations.
緊急でNFC機能を停止させる必要がある場合には、VAIOの電源を切ってください。
© 2012 Sony Corporation
Page 84

VAIO User Guide VAIO Duo 11 SVD1121 Series Back | Back to Top
undefined
Troubleshooting
Combinations and Functions with the Fn Key
How to Use
Windows 8: The Basics
Parts Description
Setup
Network / Internet
Connections
Settings
Backup / Recovery
Security
Other Operations
Notifications
Press and hold down the Fn key and another key simultaneously to perform a keyboard
shortcut action.
For example, to turn off the sound: Fn+F2 → Press and hold down the Fn key, then press
the F2 key.
Some keyboard functions can only be used while Windows is running.
Fn +
Disables and enables the Optical Trackpad. [Details]
Fn +
Turns on and off the built-in speakers or the headphones.
Fn +
Press the button repeatedly to adjust the volume level of the built-in speakers and the
headphones. [Details]
To decrease the volume, press the Fn+F3 keys.
To increase the volume, press the Fn+F4 keys.
Fn +
Press the button repeatedly to adjust the LCD brightness of your computer screen. [Details]
To decrease lighting intensity, press the Fn+F5 keys.
To increase lighting intensity, press the Fn+F6 keys.
Fn +
Switches the display output to an external display.
Press the Fn+F7 keys several times to select the desired display output destination, and
then press the Enter key to confirm. [Details]
(F1)
(F2)
/ (F3/F4)
/ (F5/F6)
(F7)
Fn + 1
Starts Active Clip. [Details]
Fn + Scr Lk (Scroll Lock)
Works differently depending on the apps you use. Refer to the help file included with the app
for more information.
Fn + Pg Up (Page Up)
Goes to the previous page.
Fn + End (End)
Moves the cursor to the end of a line or page.
Fn + Pg Dn (Page Down)
Goes to the next page.
Fn + Home (Home)
Moves the cursor to the top of a line or page.
For information on shortcut keys combined with the (Window) key, etc., refer to
Windows Help and Support. [Details]
© 2012 Sony Corporation
Page 85

VAIO User Guide VAIO Duo 11 SVD1121 Series Back | Back to Top
undefined
Troubleshooting
Changing the LCD Brightness
How to Use
Windows 8: The Basics
Parts Description
Setup
Network / Internet
Connections
Settings
Backup / Recovery
Security
Other Operations
Notifications
You can adjust the LCD brightness.
1. Press the Fn+F5 key or Fn+F6 keys.
To decrease lighting intensity, keep pressing the Fn+F5 keys. To increase lighting
intensity, keep pressing the Fn+F6 keys.
Hint
The LCD brightness setting is retained even after your VAIO computer is turned off and
restarted.
Related Topic
Adjusting the LCD Brightness Automatically
Combinations and Functions with the Fn Key
© 2012 Sony Corporation
Page 86

VAIO User Guide VAIO Duo 11 SVD1121 Series Back | Back to Top
undefined
Troubleshooting
About the ASSIST Button
How to Use
Windows 8: The Basics
Parts Description
Setup
Network / Internet
Connections
Settings
Backup / Recovery
Security
Other Operations
Notifications
Press the ASSIST button to perform regular maintenance of your VAIO computer or to solve
problems you might encounter when using the computer.
While the computer is on, the ASSIST button starts VAIO Care.
While the computer is off, the ASSIST button starts VAIO Care Rescue Mode.
VAIO Care (Rescue Mode) : Recover or maintain your system can be used to recover
the computer in case of emergency, for example, when Windows does not start.
Note
If the VAIO Care Rescue Mode screen is displayed and five minutes pass without any
operation, your VAIO computer automatically turns off.
Related Topic
Keeping Your VAIO Computer in Optimum Condition (VAIO Care)
Recovering from the Recovery Area
Backing Up Your Data when You cannot Start Windows
Restoring Your Data with VAIO Data Restore Tool
© 2012 Sony Corporation
Page 87

VAIO User Guide VAIO Duo 11 SVD1121 Series Back | Back to Top
undefined
Troubleshooting
Customizing Your VAIO Computer
How to Use
Windows 8: The Basics
Parts Description
Setup
Network / Internet
Connections
Settings
Backup / Recovery
Security
Other Operations
Notifications
VAIO Control Center allows you to access system information and to change settings of
various kinds of functions such as display and sounds.
1. Start VAIO Control Center. [Details]
2. Select your desired item and change the settings.
Hint
Some of the items will not be visible if you sign in as a user without administrative rights.
© 2012 Sony Corporation
Page 88

VAIO User Guide VAIO Duo 11 SVD1121 Series Back | Back to Top
undefined
Troubleshooting
Changing the Resolution (Size) of the Screen Image on
How to Use
an HDMI-Connected Device
Windows 8: The Basics
Parts Description
Setup
Network / Internet
Connections
Settings
Backup / Recovery
Security
Other Operations
Notifications
You can change the screen resolution or size of your VAIO computer’s screen image
displayed on an external display, such as a TV, connected to the computer with an HDMI
cable (not supplied).
1. Connect your VAIO computer to an HDMI equipped TV with an HDMI cable. [Details]
2. Turn on the TV.
3. Start VAIO Control Center [Details] and select Image Quality.
4. Select Details in External Display Resolution.
5. On the Select Resolution tab, select the desired resolution and Apply.
After a few seconds, the selected resolution is applied.
6. If the computer image does not fit the displayable region of the TV, select the Adjust
Resolution tab to adjust the display size.
Note
Some resolution options may not be available, depending on the model or the HDMIconnected device.
The function to adjust the screen resolution may be disabled depending on the selected
resolution.
Related Topic
Connecting a TV with an HDMI Input Port
Selecting Display Modes
© 2012 Sony Corporation
Page 89

VAIO User Guide VAIO Duo 11 SVD1121 Series Back | Back to Top
undefined
Troubleshooting
Viewing the System Information
How to Use
Windows 8: The Basics
Parts Description
Setup
Network / Internet
Connections
Settings
Backup / Recovery
Security
Other Operations
Notifications
You can view the system information of your VAIO computer.
1. Start VAIO Care (Desktop). [Details]
2. Select About Your VAIO and System information.
The system information of your VAIO computer is displayed.
© 2012 Sony Corporation
Page 90

VAIO User Guide VAIO Duo 11 SVD1121 Series Back | Back to Top
undefined
Troubleshooting
Adjusting the LCD Brightness Automatically
How to Use
Windows 8: The Basics
Parts Description
Setup
Network / Internet
Connections
Settings
Backup / Recovery
Security
Other Operations
Notifications
Your VAIO computer measures ambient light intensity to adjust the LCD brightness
automatically.
1. Start VAIO Control Center [Details] and select Image Quality.
2. Enable/disable the automatic adjustment setting in Display Brightness.
Hint
During the setup or recovery process, the automatic brightness adjustment function may
not work and the LCD brightness may change regardless of ambient light intensity.
Ambient light intensity is measured by the ambient light sensor. Blocking the ambient
light sensor may decrease the LCD brightness.
Related Topic
Parts and Controls on the Front
Changing the LCD Brightness
© 2012 Sony Corporation
Page 91

VAIO User Guide VAIO Duo 11 SVD1121 Series Back | Back to Top
undefined
Troubleshooting
Checking the Battery Charge Capacity
How to Use
Windows 8: The Basics
Parts Description
Setup
Network / Internet
Connections
Settings
Backup / Recovery
Security
Other Operations
Notifications
The battery pack is consumable. The capacity gradually declines through repeated cycles of
recharging and discharging. As a result, the battery life becomes short even if it is fully
charged and eventually the battery pack reaches the end of its life.
If the battery life has become short, replace the battery pack with a new one specified by
Sony. Refer to the help file for more information on battery charge status and capacity
decrease.
1. Start VAIO Control Center [Details] and select Power and Battery.
2. Select Details in Battery.
Detailed battery pack information, such as charging capacity, is displayed.
Hint
Enable the battery care function to maximize the battery lifespan. With this function, you
can reduce battery degradation by limiting the maximum charging capacity.
Related Topic
Extending the Battery Life
Notes on Using the Battery Pack
Charging the Battery Pack
© 2012 Sony Corporation
Page 92

VAIO User Guide VAIO Duo 11 SVD1121 Series Back | Back to Top
undefined
Troubleshooting
Changing the Keyboard Backlight Settings
How to Use
<Keyboard backlight equipped models>
Windows 8: The Basics
Parts Description
Setup
Network / Internet
Connections
Settings
Backup / Recovery
Security
Other Operations
Notifications
You can turn on and off the keyboard backlight by changing the keyboard backlight settings.
1. Start VAIO Control Center [Details] and select Mouse and Keyboard.
2. Change the keyboard backlight settings in Keyboard Backlight.
The settings window appears. Follow the on-screen instructions to change the settings.
Hint
You can set the keyboard backlight to automatically turn on and off according to
ambient light intensity.
If you enable this function, you can also set a time period to turn off the keyboard
backlight after inactivity of keyboard operations.
Ambient light intensity is measured by the ambient light sensor. Blocking the ambient
light sensor may turn on the keyboard backlight.
Related Topic
Parts and Controls on the Front
© 2012 Sony Corporation
Page 93

VAIO User Guide VAIO Duo 11 SVD1121 Series Back | Back to Top
undefined
Troubleshooting
Charging a USB Device
How to Use
Windows 8: The Basics
Parts Description
Setup
Network / Internet
Connections
Settings
Backup / Recovery
Security
Other Operations
Notifications
You can charge a USB device even while your VAIO computer is off, in Hibernate mode, or
Sleep mode by enabling the USB charging settings.
Change the settings while the USB device is disconnected from the USB port that supports
USB charging.
1. Start VAIO Control Center [Details] and select Hardware.
2. Enable the USB Charging setting.
3. Connect a USB device to the USB port with the mark printed around it.
If charging does not start even when you connect a USB device to the USB port that
supports USB charging, disconnect and connect the device.
Note
With the USB charging settings enabled, power consumption when your VAIO computer
is off or in Hibernate mode or Sleep mode increases because the computer supplies
power to the USB port even when a USB device is not connected to the port.
When the USB charging settings are enabled, you cannot use the remote wake-up
function on the USB device connected to the USB port that supports USB charging.
Hint
The USB charging settings are disabled by default.
© 2012 Sony Corporation
Page 94

VAIO User Guide VAIO Duo 11 SVD1121 Series Back | Back to Top
undefined
Troubleshooting
Entering Characters with Touch Screen Operations
How to Use
<Touch screen equipped models>
Windows 8: The Basics
Parts Description
Setup
Network / Internet
Connections
Settings
Backup / Recovery
Security
Other Operations
Notifications
You can operate the on-screen Touch Keyboard with touch screen operations for text entry.
1. Open the desktop [Details] and select
notification area.
Hint
The on-screen Touch Keyboard appears automatically when you touch a text field.
(the Touch Keyboard icon) in the desktop
© 2012 Sony Corporation
Page 95

VAIO User Guide VAIO Duo 11 SVD1121 Series Back | Back to Top
undefined
Troubleshooting
Changing the Rapid Wake (Sleep Mode) Settings
How to Use
Windows 8: The Basics
Parts Description
Setup
Network / Internet
Connections
Settings
Backup / Recovery
Security
Other Operations
Notifications
You can change the Rapid Wake settings in VAIO Control Center.
Rapid Wake is enabled by default. With this function, you can keep your VAIO computer in
Sleep mode without risk of data loss because the computer enters Sleep mode after your
working data is saved on the built-in storage device.
For models that support Rapid Wake + ECO, you can conserve more battery power by
reducing power consumption when the computer is in Sleep mode.
1. Start VAIO Control Center [Details] and select Hardware.
2. Enable/disable the setting in Rapid Wake.
Note
With Rapid Wake disabled, your working data is not saved on the built-in storage device
when the computer enters Sleep mode. Therefore, if the computer is turned off during
Sleep mode because, for example, the battery pack runs out of power or the computer is
disconnected from an AC power source, the working data will be lost and cannot be
restored. To avoid data loss, be sure to save the data before the computer enters Sleep
mode. With Rapid Wake disabled, the power indicator light blinks slowly in orange during
Sleep mode, and the charge and power indicator lights blink simultaneously when the
battery pack runs out of power during Sleep mode.
When you use the Hibernate mode, you need to disable Rapid Wake.
Related Topic
Using Sleep Mode
Notes on Sleep Mode
© 2012 Sony Corporation
Page 96

VAIO User Guide VAIO Duo 11 SVD1121 Series Back | Back to Top
undefined
Troubleshooting
Connecting a USB Device
How to Use
Windows 8: The Basics
Parts Description
Setup
Network / Internet
Connections
Settings
Backup / Recovery
Security
Other Operations
Notifications
You can connect a Universal Serial Bus (USB) device such as a mouse, floppy disk drive,
speaker or printer to your VAIO computer.
Installation of the device driver supplied with the USB device may be required when
connecting.
Refer to the manual that came with the device for more information.
1. Choose the USB port (1) you prefer to use.
2. Plug the USB device cable (2) (not supplied) into the USB port.
Note
You may need to install the driver supplied with your USB device before use. Refer to
the manual that came with the USB device for more information.
In order to print documents, be sure the USB printer is compatible with your version of
Windows.
Before disconnecting USB speakers from your VAIO computer, stop DVD or music
playback or turn off the computer. If you disconnect the USB speakers during playback, it
may cause a malfunction.
For information on how to remove a USB device, refer to the manual that came with the
device.
To protect your VAIO computer and/or USB devices from damage, observe the
following:
When moving your VAIO computer with USB devices connected, avoid exposing the
USB ports to shock or impact.
Do not put your VAIO computer in a bag or carrying case with USB devices
connected.
© 2012 Sony Corporation
Hint
The USB ports on your VAIO computer are compliant with the USB 2.0 standard and
USB 3.0 standard. USB ports that are compliant with the USB 3.0 standard are
identifiable by their blue color.
In addition to the USB 2.0 standard transfer modes, the USB 3.0 standard specifies the
following transfer mode:
SuperSpeed: Transfer rate of 5 Gbps.
Related Topic
Connecting an External Drive
Page 97

VAIO User Guide VAIO Duo 11 SVD1121 Series Back | Back to Top
undefined
Troubleshooting
About “Memory Stick”
How to Use
Windows 8: The Basics
Parts Description
Setup
Network / Internet
Connections
Settings
Backup / Recovery
Security
Other Operations
Notifications
“Memory Stick” is a compact, portable, and versatile IC recording media especially designed
for exchanging and sharing digital data with compatible products, such as digital cameras
and other devices. Because it is removable, it can be used for external data storage.
For the latest information about “Memory Stick”, visit http://www.sony.net/memorycard/.
Related Topic
Compatible “Memory Stick”
Inserting/Removing “Memory Stick”
Formatting “Memory Stick”
Notes on Using “Memory Stick”
© 2012 Sony Corporation
Page 98

VAIO User Guide VAIO Duo 11 SVD1121 Series Back | Back to Top
undefined
Troubleshooting
Compatible “Memory Stick”
How to Use
Windows 8: The Basics
Parts Description
Setup
Network / Internet
Connections
Settings
Backup / Recovery
Security
Other Operations
Notifications
The “Memory Stick” slot on your VAIO computer can accommodate the following sizes and
types of media:
“Memory Stick Duo”
“Memory Stick PRO Duo”
“Memory Stick PRO-HG Duo”
“Memory Stick Micro”
About “MagicGate”
“MagicGate” refers to copyright protection technology developed by Sony. An authentication
process is performed between the “MagicGate” compatible device and “Memory Stick” to
check whether they can correctly store and play back data, and the data will be encrypted.
The authentication is also performed before the data is played back, and only when they are
properly authenticated, the data is decrypted and played back. The copyright protected data
can be played back by authenticated devices only.
Note
Your VAIO computer supports only Duo-size “Memory Stick”, and does not support
standard-size “Memory Stick”.
Before using “Memory Stick Micro” (“M2”), be sure to insert it into an “M2” Duo adaptor.
If you insert the media directly into the “Memory Stick Duo” slot without the adaptor, you
may not be able to remove it from the slot.
Your VAIO computer has been tested and found compatible with any Sony branded
“Memory Stick” of up to 32 GB, available as of May 2012. However, “Memory Stick”
compatibility is not guaranteed in all cases.
Except for personal use, it is against copyright law to use any audio and/or image data
you record without prior consent from the respective copyright holder(s). Accordingly,
“Memory Stick” with such copyrighted data can be used only within the law.
Use “Memory Stick” with the “MagicGate” logo to take advantage of this technology.
The “Memory Stick” slot on your VAIO computer does not support “MagicGate”
technology of “Memory Stick” with capacity of up to 256 MB.
If you use “Memory Stick” in a place subject to static electricity or electrical noise, stored
data may be lost.
The maximum possible size for a file on “Memory Stick PRO Duo” or “Memory Stick
PRO-HG Duo” is less than 4 GB, as defined in the file system specification.
© 2012 Sony Corporation
Related Topic
About “Memory Stick”
Inserting/Removing “Memory Stick”
Formatting “Memory Stick”
Notes on Using “Memory Stick”
Page 99

VAIO User Guide VAIO Duo 11 SVD1121 Series Back | Back to Top
undefined
Troubleshooting
Inserting/Removing “Memory Stick”
How to Use
Windows 8: The Basics
Parts Description
Setup
Network / Internet
Connections
Settings
Backup / Recovery
Security
Other Operations
Notifications
You can use “Memory Stick” to save data or transfer images between a digital camera and
your VAIO computer. To insert/remove “Memory Stick”, follow these steps.
To Insert “Memory Stick”
1. Locate the “Memory Stick” slot.
Hint
The “Memory Stick” slot on your computer also works as an SD memory card slot.
2. Hold “Memory Stick” [Details] with the arrow pointing toward the slot, and carefully
slide it into the slot until it clicks into place.
“Memory Stick” is automatically detected by your system and the contents of “Memory Stick”
are displayed*. If nothing appears on the desktop, open Computer [Details] and double-click
the “Memory Stick” icon*.
* The drive letter for the “Memory Stick” slot, such as “E:”, may vary depending on the
system configuration of your VAIO computer.
Note
The “Memory Stick” icon will appear in the Computer window [Details] after you insert
“Memory Stick” into the slot.
If “Memory Stick” cannot be inserted easily, remove it gently, and verify you are inserting
it in the proper direction. Be sure to hold “Memory Stick” with the arrow pointing in the
correct direction as you insert it into the slot. To avoid damaging your VAIO computer or
the media, do not force “Memory Stick” into the slot if you cannot insert it smoothly.
Hint
When you insert “Memory Stick” into the slot for the first time, you may be prompted to
install a driver. If prompted, follow the on-screen instructions to install the driver.
To remove “Memory Stick”
1. Locate the “Memory Stick” slot.
Hint
The “Memory Stick” slot on your computer also works as an SD memory card slot.
2. Check that the Media Access indicator light is off.
3. Push in “Memory Stick” toward your VAIO computer and release.
4. Pull “Memory Stick” out of the slot.
Note
Do not remove “Memory Stick” while the Media Access indicator light is on. If you do,
you may lose data. Large volumes of data may take time to load, so make sure the
indicator light is off before removing “Memory Stick”.
Be sure to remove “Memory Stick” gently, or it may pop out unexpectedly.
Related Topic
About “Memory Stick”
Compatible “Memory Stick”
Formatting “Memory Stick”
Notes on Using “Memory Stick”
© 2012 Sony Corporation
Page 100

VAIO User Guide VAIO Duo 11 SVD1121 Series Back | Back to Top
undefined
Troubleshooting
Formatting “Memory Stick”
How to Use
Windows 8: The Basics
Parts Description
Setup
Network / Internet
Connections
Settings
Backup / Recovery
Security
Other Operations
Notifications
“Memory Stick” is formatted in the specific FAT format by default and is ready for use.
Be sure to use the device that is designed to format the media and supports “Memory Stick”
when formatting the media.
If you want to reformat the media with your VAIO computer, follow these steps.
Note
Formatting “Memory Stick” erases the entire data stored on the media. Be sure to make
a backup copy of important data to avoid erasing it.
Do not remove “Memory Stick” from the slot while formatting. This could cause a
malfunction.
1. Locate the “Memory Stick” slot.
Hint
The “Memory Stick” slot on your computer also works as an SD memory card slot.
2. Carefully slide “Memory Stick” into the slot until it clicks into place. [Details]
3. Open Computer. [Details]
4. Right-click the “Memory Stick” icon and select Format.
The Format Memory Stick window appears.
5. Select Restore device defaults.
The size of the allocation unit and file system will change to default settings.
Note
Do not select NTFS from the File system drop-down list as it may cause a
malfunction.
Hint
The formatting process will be completed more quickly if you select Quick Format
in Format options.
6. Select Start.
Follow the on-screen instructions.
Note
It may take time to format “Memory Stick” depending on the media type.
© 2012 Sony Corporation
Related Topic
About “Memory Stick”
Compatible “Memory Stick”
Inserting/Removing “Memory Stick”
Notes on Using “Memory Stick”
 Loading...