

Page 1
Page 2

Page 3
Thank you for purchasing this product.
For customers
This product should be installed only by qualified Sony service representatives,
as it requires at least two people, special care, safety, and technique.
WARNING
If the safety precautions are not observed or the product is used incorrectly, it may
result in serious injury or fire.
This instruction manual shows the correct handling of the product and important
precautions necessary to prevent accidents. Be sure to read this manual thoroughly
and use the product correctly. Keep this manual available for future reference.
US
For Sony dealers
Installation of a Display Unit requires two or more people, special care, and
technique. When installing a Display Unit, refer to this manual carefully. Sony is
not liable for any accidents or damages caused by incorrect installation or
handling. Please instruct the customer to retain this manual for future use.
Page 4
On Safety
Sony products are designed with safety in mind.
If the products are used incorrectly, however, it may
result in a serious situation like fire, electric shock, the
product toppling over, or the product dropping. Be
sure to observe the precautions for safety to prevent
such accidents.
Be sure to place the stand on a
stable shelf.
Do not place the Table-Top Stand
on an unstable shelf, or on a shelf
which is smaller than the Display
Unit, or on the edge of the shelf. If
you do so, the stand may topple over, or the Display
Unit may fall. This may cause injury or property
damage.
For Customers
WARNING
If the following precautions are not observed,
serious injury or death through fire, electric
shock, the product toppling over, or the product
dropping can result.
This product should only be installed
by qualified Sony service
representatives.
Installation by other, non-qualified persons may result
in serious injury, as the Display Unit is very heavy.
Be sure to take measures to prevent
the Display Unit from toppling over.
If you fail to do so, the Display Unit may topple over
and cause injury. Anchor the Display Unit to a wall,
pillar, etc., to prevent it from toppling over.
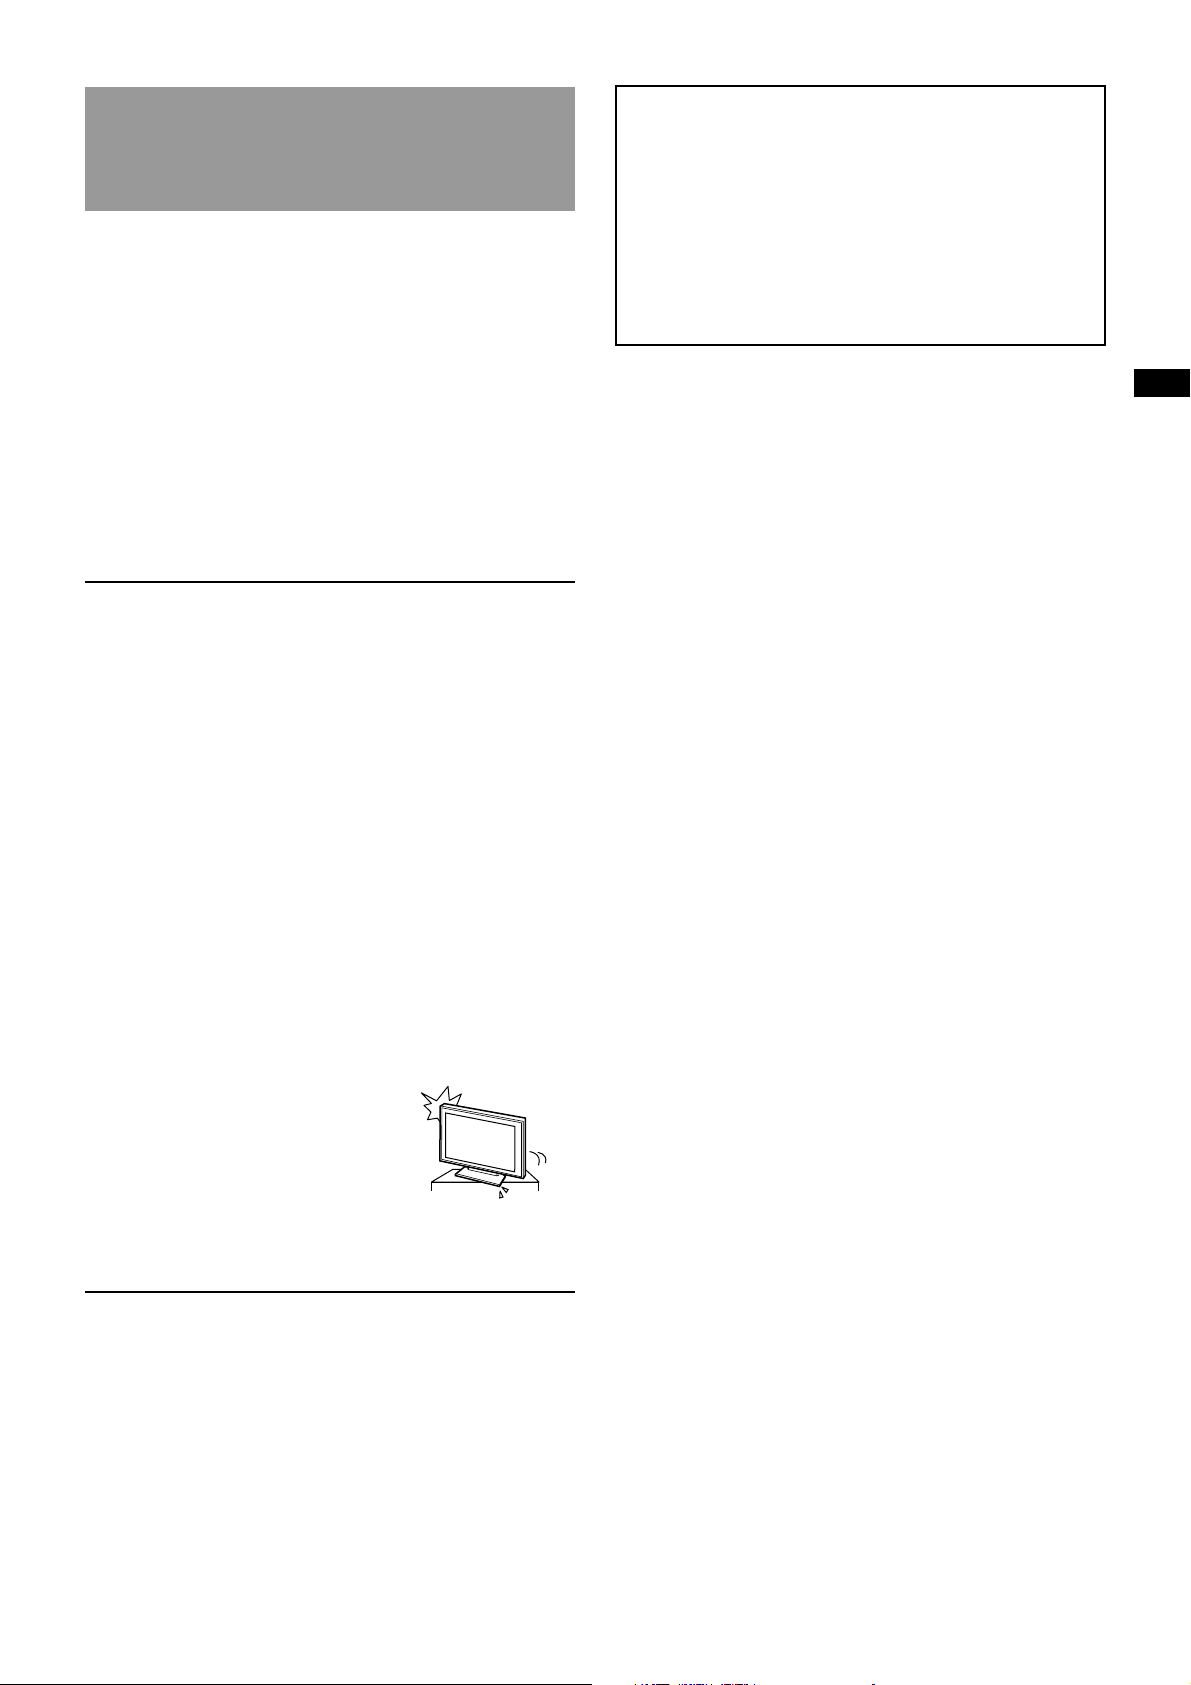
Be sure to place the stand on a solid
and level floor.
Do not place the Table-Top
Stand so that it leans in one
direction. If you do so, the stand
may topple over, or the Display
Unit may fall. This may cause
injury or property damage.
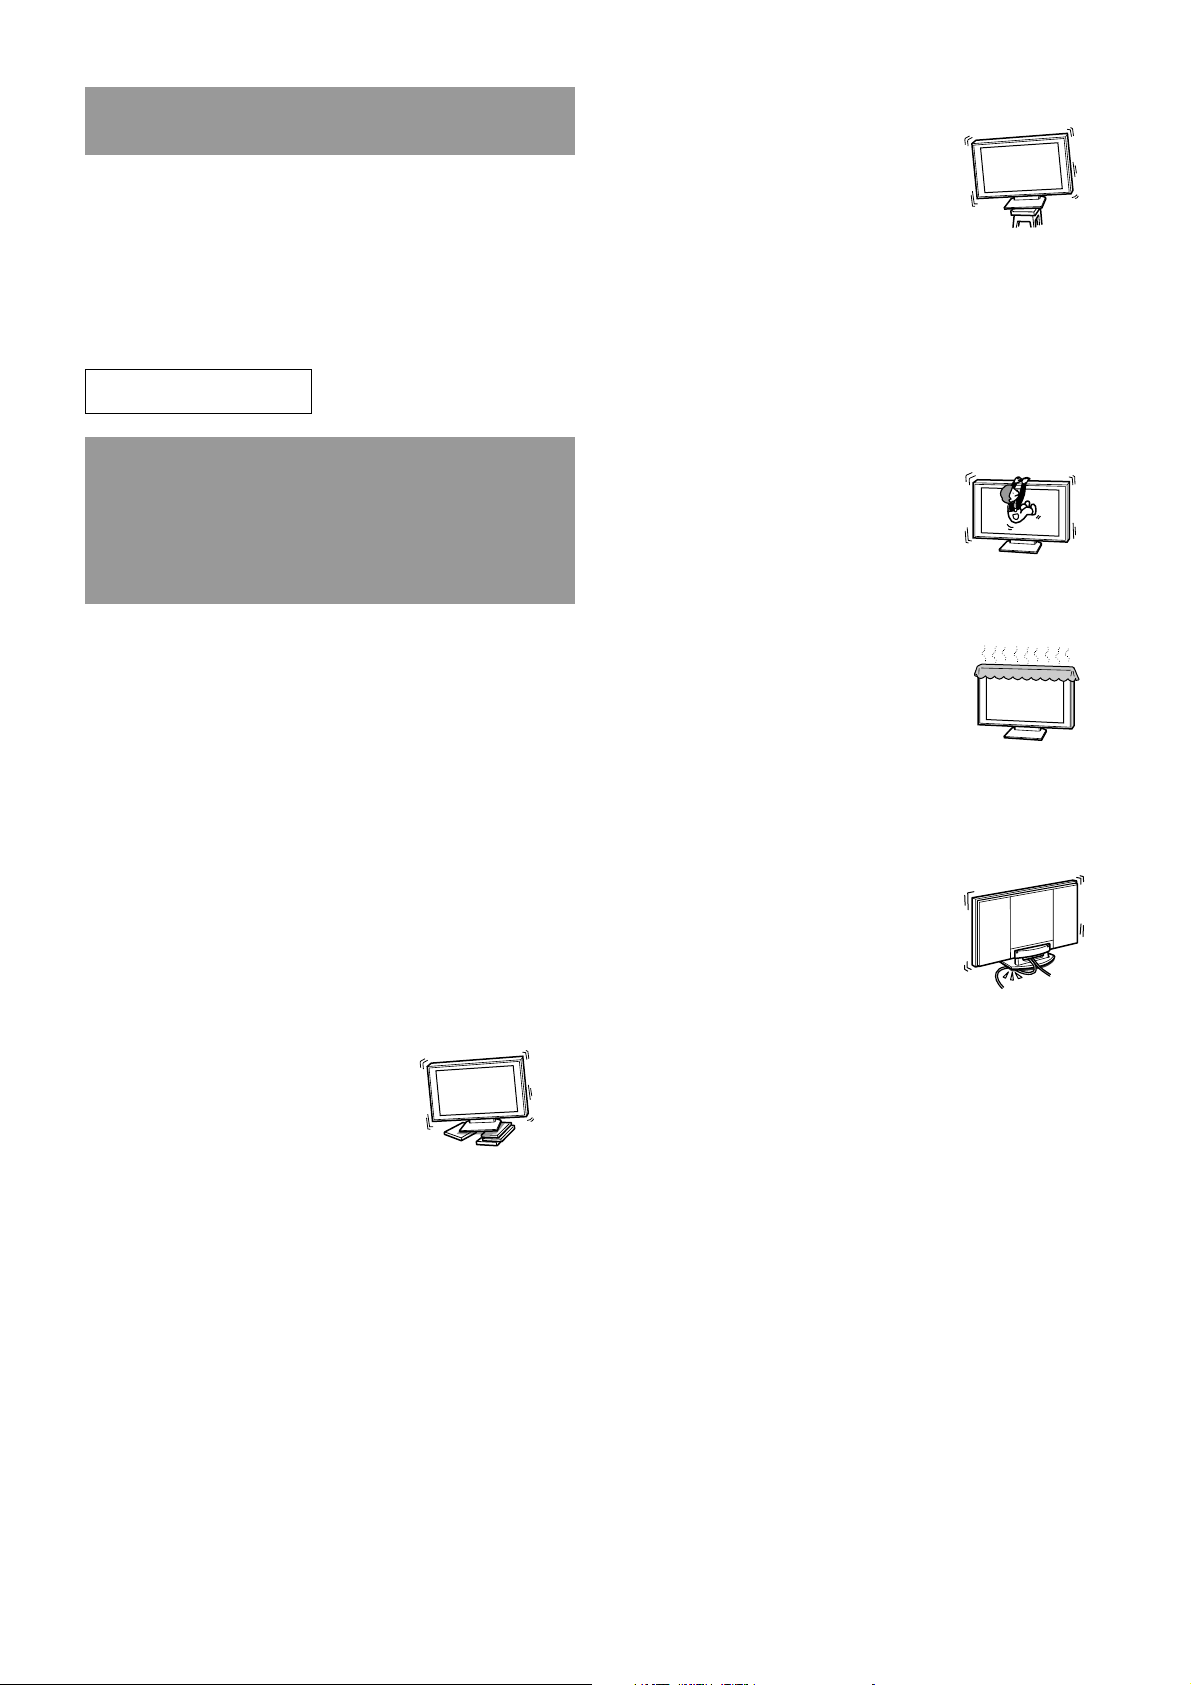
Do not lean on or hang from the
Display Unit when it is attached to
the Table-Top Stand.
The Table-Top Stand may
topple over, or the Display Unit
may fall and cause injury.
Do not cover the ventilation holes of
the Display Unit.
If you cover the ventilation
holes (with a cloth, etc.), heat
build up inside may cause fire.
Do not allow the AC power cord or
the display interface cable to be
pinched.
• Do not allow the AC power
cord or the display interface
cable to be pinched when
you attach the Display Unit
to the Table-Top Stand. If the
AC power cord or the display
interface cable is damaged,
this may result in fire or
electric shock.
• Do not step on the AC power cord or the display
interface cable when you carry the Table-Top Stand.
The AC power cord or the display interface cable
may be damaged, and this may result in fire or
electric shock.
2 (US)
Do not stumble over the AC power
cord or the display interface cable.
The Table-Top Stand may topple over and cause injury.
Page 5
CAUTION
If the following precautions are not observed,
injury or property damage may occur.
Do not install any equipment other
than the specified product.
This stand is designed for the use with the specified
product only. If you install equipment other than
specified, it may fall or break, and cause injury.
Be sure to secure the Display Unit.
Secure the Display Unit to the Table-Top Stand using
the supplied screws. If the Display Unit is not installed
securely, it may fall, or the stand may topple over, and
cause injury.
For Sony dealers
Be sure to thoroughly read the
safety precautions described on the
previous pages and pay special
attention to safety during the
installation, maintenance, checking,
and repair of this product.
Be sure that two or more persons do
the installation work.
Be sure that two or more persons install the Display
Unit on the Table-Top Stand. If necessary, include
another person to support the rear of the Display Unit.
Do not attempt to install the stand by yourself. If you
do so, it may lead to an accident or injury.
US
Notes on installation
• Install the stand on a solid and level floor. Be sure
the stand is placed where it will not be deformed or
inclined. To avoid this, observe the following
precautions.
– If you install the stand on a soft surface such as a
mat or a carpet, lay a board over the designated
location beforehand.
– Do not install the stand in a place subject to direct
sunlight or near a heater.
– Do not install the stand in a hot or humid place, or
outdoors.
• The Table-Top Stand swivels 18 degrees to the left
and right. The stand swivels on a turntable at the
bottom of the stand. If you place the stand on a
narrow shelf, a part of the stand will protrude from
the front edge, or the Display Unit will hit the wall.
This may cause serious injury or damage by falling
down. Observe the following.
– Place the stand at least
8 cm (3 1/4 inches) back
from the front edge of the
shelf.
– Place the stand at least
10 cm (4 inches) away
from the wall.
Be sure to install the Display Unit
securely by following the
instructions.
Tighten the screws securely. If the Display Unit is not
installed securely, it may fall and cause injury.
Be careful not to injure your hands or
fingers during installation.
Be careful not to injure your hands or fingers when
attaching the Display Unit to the Table-Top Stand.
Note on use
Cleaning
To keep the stand clean, occasionally wipe the stand
with a dry soft cloth. Stubborn stains may be removed
with a cloth slightly dampened with diluted detergent.
Then wipe the area with a dry soft cloth. Do not use
chemicals, such as thinner or benzine, as they damage
the finish of the stand.
3 (US)
Page 6
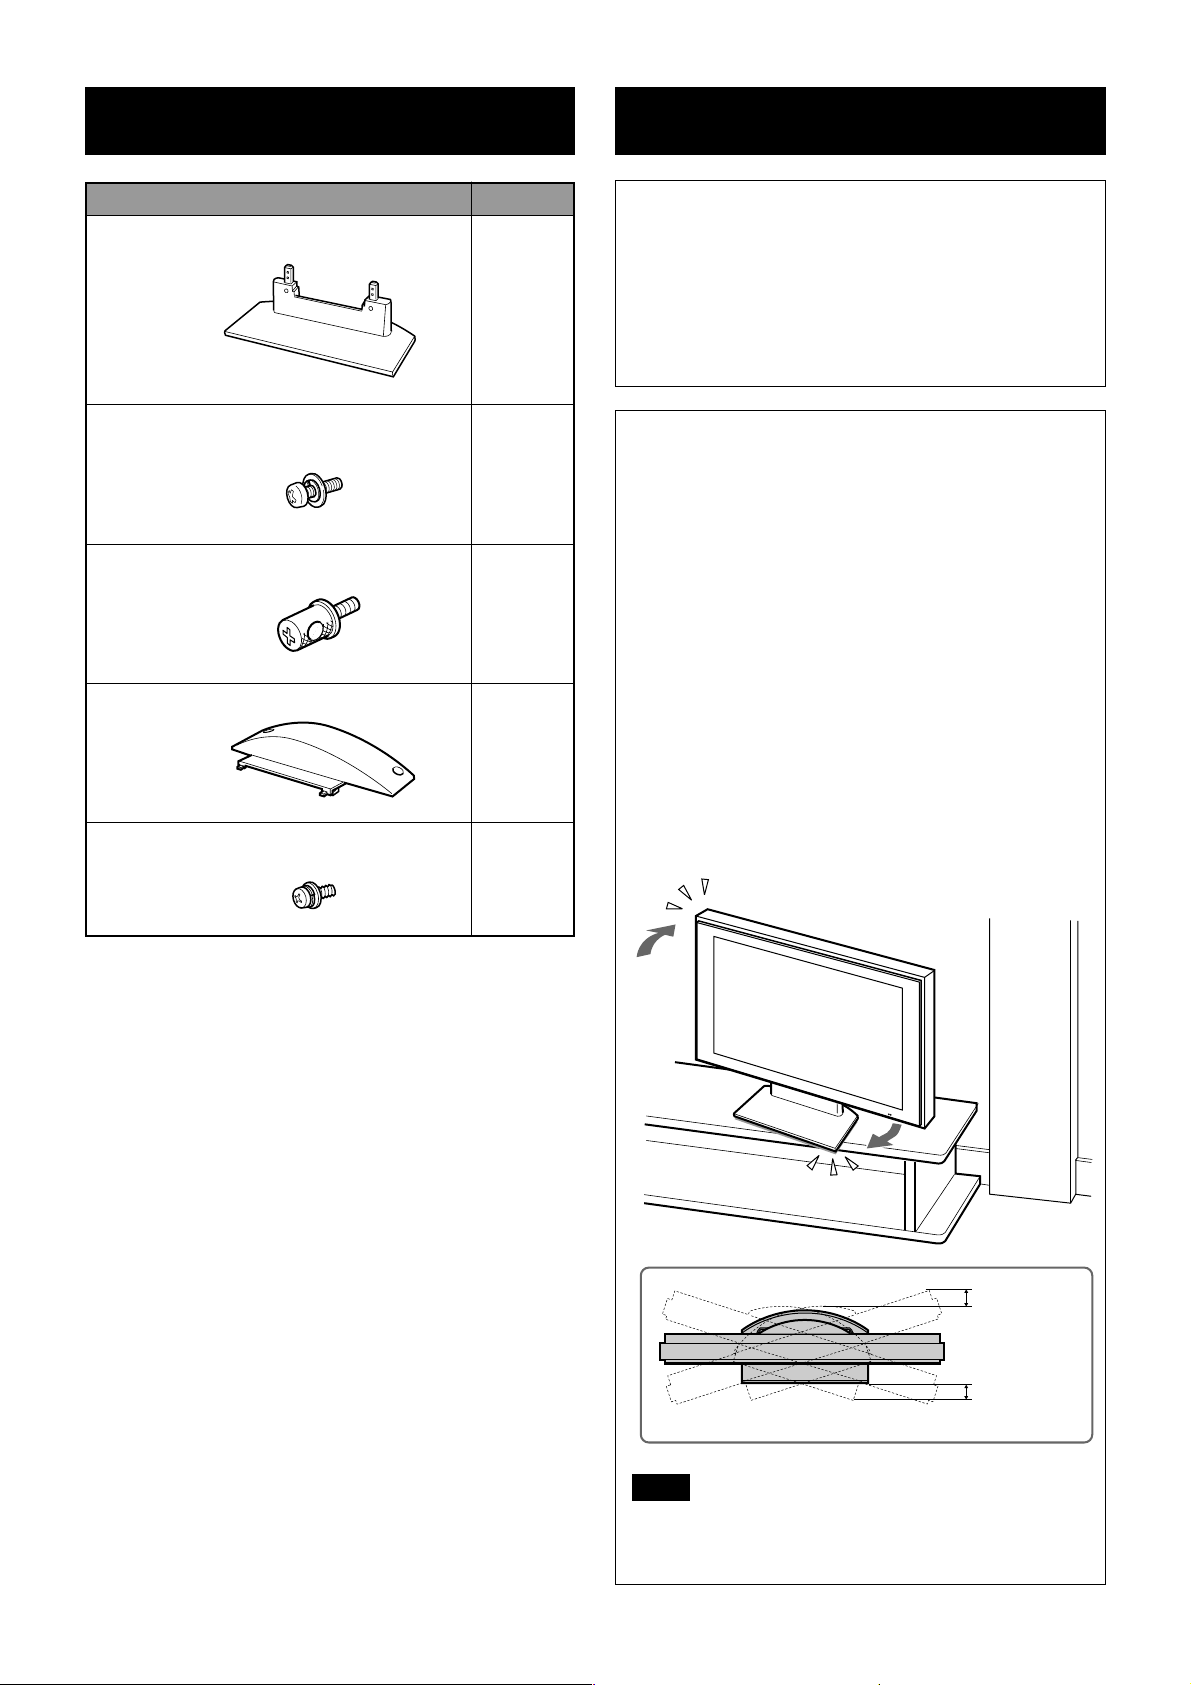
Check the parts
Assembling the stand
Name Quantity
Table-Top Stand
1
Display securing screw
M5×L16
4
Anchor attachment
2
Cable cover
1
Cable cover securing screw
M4×L12
2
WARNING
A short circuit or an electric shock may result if the
AC power cord is pinched under the footing of the
stand or between other equipment.
If you stumble over the AC power cord or the
display interface cable, the stand may topple over
and cause injury.
Decide on the installation location and lay the
stand down before installing the Display Unit.
Since the Display Unit is heavy, it is recommended
that you decide on the installation location first,
and then lay the stand down before installing the
Display Unit.
Place the stand at least 8 cm (3 1/4 inches) back
from the front edge of the shelf, and at least
10 cm (4 inches) away from the wall.
The Table-Top Stand swivels 18 degrees to the left
and right. The stand swivels on a turntable at the
bottom of the stand. If you place the stand on a
narrow shelf, a part of the stand will protrude from
the front edge, or the Display Unit will hit the wall.
This may cause serious injury or damage by falling
down.
Be sure to have appropriate sized Phillips screwdrivers
on hand for the various sized screws used for
assembly.
At least
10 cm
(4 inches)
At least
8 cm
(3 1/4 inches)
Note
Do not drag the Table-Top Stand while it is on the floor.
The rubber footings on the base of the Table-Top Stand
may come off.
4 (US)
Page 7

Ensure that the turntable located at the bottom
of the Table-Top Stand is placed correctly. You
will hear a light click when the turntable is
placed correctly.
Install the Display Unit
Bottom of Table-Top Stand
Turntable
Turntable stops
once at this point.
Note
Incorrect placement of the turntable may cause the
wrong viewing angle.
1 Attach the Display Unit to the
Table-Top Stand.
Use the screw alignment holes on the rear of the
Display Unit as guides. Gently lower the Display
Unit to align the holes of the screws over the
joints of the Table-Top Stand.
US
Rear of Display Unit
Bottom of Display Unit
Holes for display
securing screws
Joint
This Display Unit
has finger slots on
both sides at the
bottom for holding.
z Hint
There are finger slots located at the bottom of the
Display Unit on both sides for holding. When
attaching the Display Unit to the stand, use the slot to
support the bottom and hold the top with your other
hand.
Guides
5 (US)
Page 8
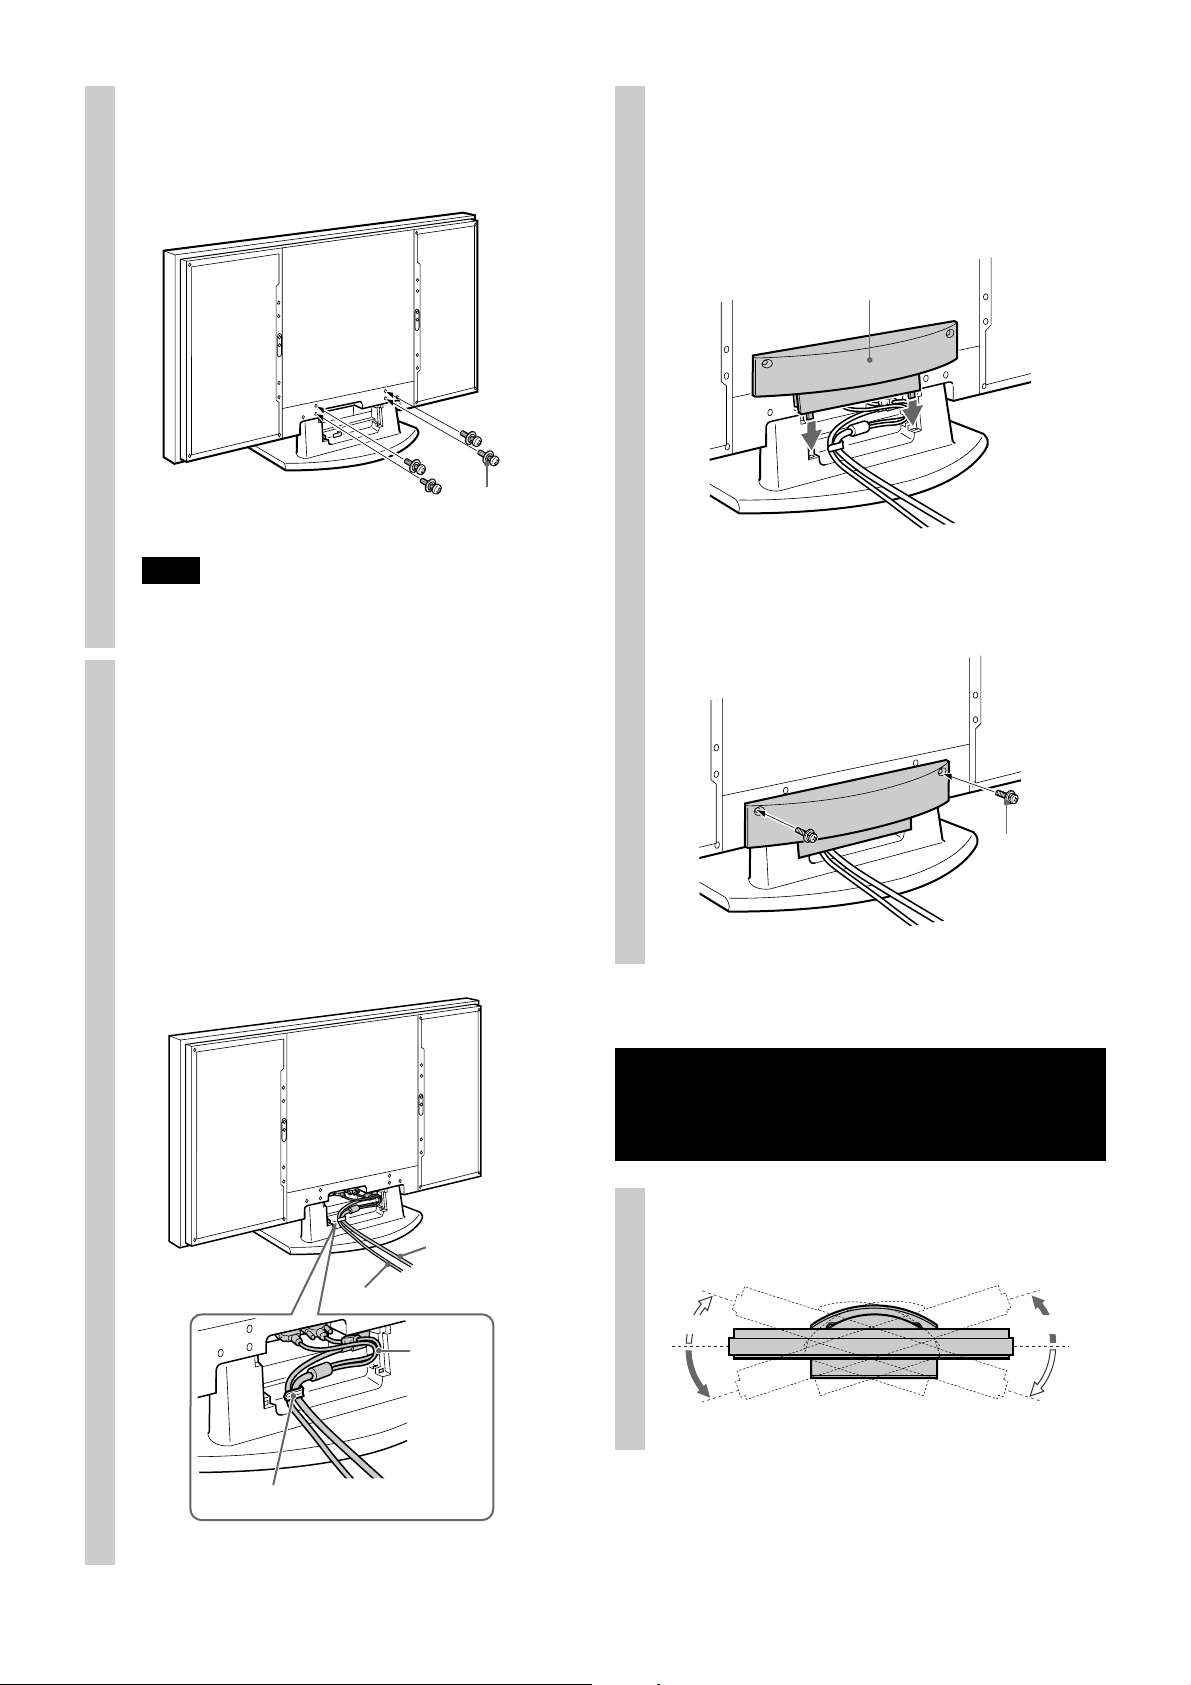
2 Secure the Display Unit to the
Table-Top Stand with the four
display securing screws.
Display
securing screw
M5×L16
Note
When using an electric screwdriver, set the torque
setting to about 1.5 N·m.
3 Connect the AC power cord and
the display interface cable to the
Display Unit.
4 Attach the cable cover.
1 Push any excess of cable inside the cable
compartment, and slide the cable cover down
until the four tabs of the cable cover snap into
place.
Cable cover
2 Affix the cable cover with the two screws for
the cable cover.
Do not forcefully pull on the cables. Leave some
slack at the connected end as you thread the
cables through the cable holder.
z Hint
See the Operating Instructions supplied with the
Display Unit for details on connecting the AC power
cord and the display interface cable.
Display
interface cable
AC power cord
Slacken
the cables.
Cable cover
securing screw
M4×L12
Adjusting the viewing angle (swivel)
Adjust for the most comfortable viewing angle.
The TV swivels 18 degrees to the left and right.
18°18°
6 (US)
Cable holder
Page 9
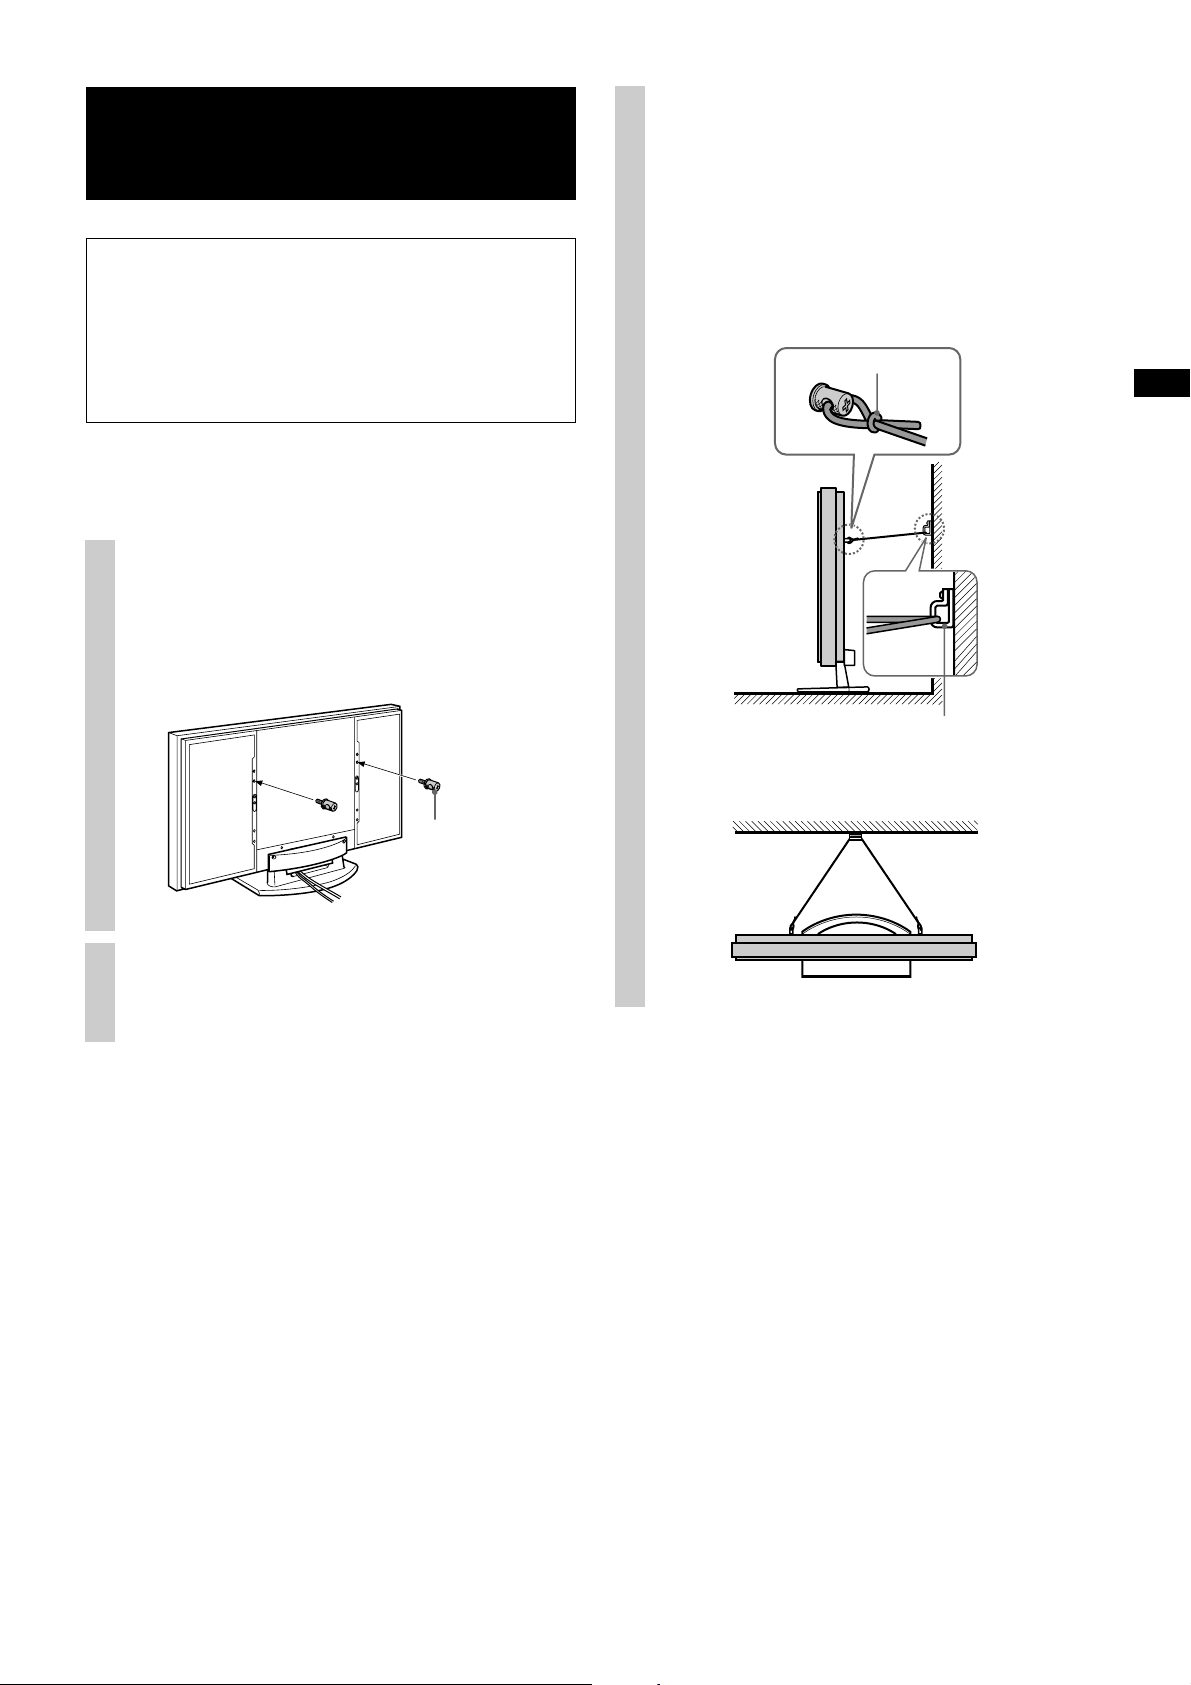
Safety measures to prevent toppling over
WARNING
Be sure to take measures to prevent the Display
Unit from toppling over.
If you fail to do so, the Display Unit may topple
over and cause injury. Anchor the Display Unit to a
wall, pillar, etc., to prevent it from toppling over.
Prepare a commercially available strong rope or chain
and wall anchor bracket beforehand.
1 Attach the two anchor
attachments to the upper free
screw holes on the rear of the
Display Unit.
3 Thread the rope or chain
through both holes of the
anchor attachments and then
tighten the other end of the
rope or chain to the wall anchor
bracket.
Side view
Tighten strongly.
US
Anchor attachment
2 Secure the wall anchor bracket
to a solid wall or pillar.
Wall anchor bracket
Top view
7 (US)
Page 10

Stand specifications
Unit: mm (inches)
Weight: 6.6 kg (14 lb 9 oz)
316.4
(12 1/2)
550 (21 3/4)
290
(11 1/2)
141
(5 5/8)
Design and specifications are subject to change without
notice.
198.4
(7 7/8)
8 (US)
Page 11

Nous vous remercions d’avoir fait l’acquisition de ce produit.
À l’attention des clients
Ce produit doit être installé uniquement par des représentants du service
technique Sony, car il exige la présence d’au moins deux personnes, une
attention particulière, l’application de mesures de sécurité et des connaissances
techniques.
AVERTISSEMENT
Le non-respect des consignes de sécurité ou l’utilisation incorrecte de ce produit
peut provoquer un incendie ou des blessures graves.
Ce mode d’emploi indique comment manipuler le produit correctement et contient
des précautions essentielles à prendre pour éviter tout accident. Lisez
attentivement ce mode d’emploi et veillez à utiliser le produit correctement.
Conservez ce mode d’emploi pour toute référence ultérieure.
À l’attention des détaillants Sony
L’installation de l’écran nécessite au moins deux personnes spécialisées et une
attention particulière. Lors de l’installation de l’écran, reportez-vous au présent
mode d’emploi. Sony décline toute responsabilité en cas d’accident ou de
dommages provoqués par une installation ou une utilisation incorrecte. Veuillez
demander au client de bien vouloir conserver ce manuel pour toute référence
ultérieure.
FR
Page 12

Sécurité
Les produits Sony sont conçus pour vous offrir le
maximum de sécurité. Toutefois, si les produits sont
utilisés de façon incorrecte, ils peuvent entraîner des
blessures graves en provoquant un incendie ou une
électrocution, ou la chute de l’appareil hors de son
support. Veillez à observer les consignes de sécurité
préconisées pour éviter de tels accidents.
À l’attention des clients
AVERTISSEMENT
Le non-respect des consignes suivantes peut
être fatal ou entraîner des blessures graves en
provoquant un incendie ou une électrocution,
ou la chute de l’appareil hors de son support.
L’installation de ce produit ne doit
être effectuée que par les
représentants du service technique
Sony.
L’installation par d’autres personnes non qualifiées
peut entraîner des blessures graves car l’écran est très
lourd.
Prenez toutes les mesures
nécessaires afin d’éviter que l’écran
ne bascule.
Dans le cas contraire, l’écran risque de tomber et de
provoquer des blessures. Ancrez l’écran à un mur, un
pilier etc., afin d’éviter qu’il ne bascule.
Veillez à installer le support sur une
surface plane et solide.
Lors de l’installation du support
de table, veillez à ce qu’il ne
penche pas d’un côté. En pareil
cas, le support risque de basculer
ou l’écran risque de tomber. Ceci
pourrait provoquer des blessures
ou le matériel pourrait être
endommagé.
Veillez à installer le support sur une
étagère stable.
Ne placez pas le support de table
sur une étagère instable ou sur une
étagère de taille inférieure à l’écran
ou encore sur le bord d’une étagère.
En pareil cas, le support risque de basculer ou l’écran
risque de tomber. Ceci pourrait provoquer des
blessures ou le matériel pourrait être endommagé.
Ne vous appuyez pas sur l’écran ou
ne vous y suspendez alors qu’il est
installé sur le support de table.
Le support de table risque de
basculer ou l’écran de tomber
de provoquer des blessures.
Ne bouchez pas les orifices de
ventilation de l’écran.
Si vous couvrez les orifices de
ventilation (avec du tissu ou un
autre matériau), l’appareil
pourrait surchauffer et
provoquer un incendie.
Veillez à ce que le cordon
d’alimentation CA ou le câble
d’interface de l’écran ne soit pas
coincé.
•Veillez à ne pas coincer le
cordon d’alimentation CA ou
le câble d’interface de l’écran
lorsque vous installez l’écran
sur le support de table. Si le
cordon d’alimentation CA ou
le câble d’interface de l’écran
est endommagé, cela peut
provoquer un incendie ou
une électrocution.
•Ne marchez pas sur le cordon d’alimentation CA ou
le câble d’interface de l’écran lorsque vous
transportez le support de table. Le cordon
d’alimentation CA ou le câble d’interface de l’écran
pourrait être endommagé et cela peut provoquer un
incendie ou une électrocution.
Veillez à ne pas trébucher sur le
cordon d’alimentation CA ou sur le
câble d’interface de l’écran.
Le support de table risque de basculer et de causer des
blessures.
2 (FR)
Page 13

ATTENTION
Le non-respect des consignes suivantes peut
entraîner des blessures ou des dommages
matériels.
N’installez pas d’autre équipement
que le produit spécifié.
Ce support est conçu pour être utilisé uniquement avec
le produit spécifié. Si vous installez un autre
équipement que celui spécifié, il risque de tomber ou
de se briser et de causer des blessures.
Veillez à bien fixer l’écran.
Fixez l’écran au support de table à l’aide des vis
fournies. Si l’écran n’est pas installé correctement, il
risque de tomber ou le support risque de basculer et de
provoquer des blessures.
Remarques à propos de l’installation
•
Installez le support sur une surface plane et solide.
Veillez à ce que le support se trouve à un endroit qui ne
risque pas de se déformer ou de s’incliner. Pour éviter
cette situation, respectez les précautions suivantes.
– Si vous montez le support sur une surface moelleuse
comme un tapis ou une moquette, posez au
préalable une plaque sur l’emplacement concerné.
–N’installez pas le support dans un endroit exposé
à la lumière directe du soleil ou à proximité d’une
source de chaleur.
–N’installez pas le support dans un endroit exposé
à la chaleur ou à l’humidité, ou à l’extérieur.
• Le support de table s’incline de 18 degrés vers la
gauche et la droite. Le support pivote sur un plateau
tournant situé à la base du support. Si vous placez le
support sur une étagère étroite, une partie du support
risque de dépasser du bord avant ou l’écran risque de
toucher le mur. Ceci pourrait provoquer des blessures
graves ou le matériel pourrait être endommagé en cas
de chute. Respectez les points suivants.
– Placez le support à au
moins 8 cm (3 1/4 pouces)
en retrait par rapport au
bord avant de l’étagère.
– Placez le support à au moins
10 cm (4 pouces) du mur.
À l’attention des
détaillants Sony
Lisez attentivement les consignes de
sécurité énoncées aux pages
précédentes et soyez particulièrement
attentifs lors de l’installation, de la
maintenance, du contrôle et de la
réparation de ce produit.
Le travail d’installation doit être
effectué par au moins deux personnes.
L’installation de l’écran sur le support de table doit être
effectuée par au moins deux personnes. Si nécessaire,
placez une autre personne à l’arrière de l’écran afin de
le soutenir. N’essayez surtout pas d’installer le support
vous-même. En pareil cas, vous risqueriez un accident
ou vous pourriez vous blesser.
Installez correctement l’écran en
respectant les instructions.
Serrez les vis correctement. Si l’écran n’est pas
correctement installé, il risque de tomber et de
provoquer des blessures.
Faites attention à ne pas vous
blesser les mains ou les doigts lors
de l’installation.
Prenez garde à ne pas vous blesser les mains ou les
doigts pendant l’installation de l’écran sur le support.
FR
Remarque à propos de l’utilisation
Nettoyage
Pour maintenir le support propre, nettoyez-le de temps
en temps avec un chiffon doux et sec. Les tâches
tenaces peuvent être nettoyées avec un chiffon
légèrement imprégné de détergent dilué. Essuyez
ensuite la surface avec un chiffon doux et sec.
N’utilisez pas de produits chimiques tels qu’un diluant
ou de l’essence car ils endommagent la surface du
support.
3 (FR)
Page 14

Vérification des pièces
Montage du support
Nom Quantité
Support de table
1
Vis de fixation de l’écran
M5×L16
4
Ancrage
2
Enveloppe des câbles
1
Vis de fixation de l’enveloppe des câbles
M4×L12
2
AVERTISSEMENT
Ne laissez pas le cordon d’alimentation CA se
coincer sous les pieds du support ou sous d’autres
équipements, car ceci pourrait provoquer un courtcircuit ou une électrocution.
Si vous trébuchez sur le cordon d’alimentation CA
ou sur le câble d’interface de l’écran, le support
risque de basculer et de provoquer des blessures.
Choisissez l’emplacement d’installation et posez
le support sur le sol avant d’installer l’écran.
Comme l’écran est lourd, il est recommandé de
choisir l’emplacement d’installation en premier lieu,
puis d’y poser le support avant d’installer l’écran.
Placez le support à au moins 8 cm (3 1/4 pouces)
en retrait par rapport au bord avant de l’étagère
et à au moins 10 cm (4 pouces) du mur.
Le support de table s’incline de 18 degrés vers la
gauche et la droite. Le support pivote sur un
plateau tournant situé à la base du support. Si vous
placez le support sur une étagère étroite, une partie
du support risque de dépasser du bord avant ou
l’écran risque de toucher le mur. Ceci pourrait
provoquer des blessures graves ou le matériel
pourrait être endommagé en cas de chute.
Vous devez disposer d’un tournevis cruciforme
correspondant aux diverses tailles de vis utilisées pour
l’assemblage.
Au moins
10 cm
(4 pouces)
Au moins
8cm
(3 1/4 pouces)
Remarque
Ne tirez pas sur le support de table lorsqu’il est sur le sol.
Les patins en caoutchouc situés à la base du support de
table risqueraient de s’enlever.
4 (FR)
Page 15

Assurez-vous que le plateau tournant situé à la
base du support de table est placé correctement.
En pareil cas, vous entendrez un léger clic.
Base du support de table
Plateau tournant
Le plateau
tournant s’arrête
une fois à ce
point.
Installation de l’écran
1 Installez l’écran sur le support
de table.
Utilisez les orifices d’alignement des vis de
fixation situés à l’arrière de l’écran comme des
guides. Abaissez doucement l’écran afin
d’aligner les orifices des vis sur les jointures du
support de table.
Arrière de l’écran
Remarque
Si le plateau tournant est mal installé, l’angle de vue
peut être incorrect.
Dessous de l’écran
Orifices destinés aux vis
de fixation de l’écran
Jointure
Cet écran dispose de
fentes permettant
d’y glisser les doigts
de chaque côté de la base pour le tenir.
z Conseil
Cet écran dispose de fentes permettant d’y glisser les
doigts de chaque côté de la base pour le tenir. Pour
installer l’écran sur le support, utilisez l’une des fentes
pour supporter la base et tenez le haut avec l’autre
main.
Guides
FR
5 (FR)
Page 16

2 Fixez l’écran sur le support de
table à l’aide des quatre vis de
fixation de l’écran.
Vis de fixation
de l’écran
M5×L16
Remarque
Si vous utilisez une visseuse électrique, réglez le
couple à 1,5 N·m environ.
3 Branchez le cordon
d’alimentation CA et le câble
d’interface de l’écran à l’écran.
4 Fixez l’enveloppe des câbles.
1 Poussez tout câble ressortant vers l’intérieur
du compartiment des câbles et faites glisser
l’enveloppe des câbles vers le bas jusqu’à ce
que les quatre onglets de l’enveloppe des
câbles s’encliquettent.
Enveloppe des câbles
2 Fixez l’enveloppe des câbles avec les deux vis
de fixation prévues à cet effet.
N
e forcez pas pour tirer les câbles. Laissez du
mou au niveau de l’extrémité raccordée lorsque
vous passez les câbles par le collier des câbles.
z Conseil
Consultez le Mode d’emploi fourni avec l’écran pour
obtenir des détails sur le branchement du cordon
d’alimentation CA et du câble d’interface de l’écran.
Câble d’interface
de l’écran
Cordon d’alimentation CA
Laissez du
mou au
niveau des
câbles.
Vis de fixation
de l’enveloppe
des câbles
M4×L12
Ajustement de l’angle de vue (inclinaison)
Ajustez le support afin de déterminer l’angle de
vue le plus confortable. Le téléviseur pivote de
18 degrés vers la gauche et vers la droite.
18°18°
6 (FR)
Collier des câbles
Page 17

Mesures de sécurié pour éviter le basculement
AVERTISSEMENT
Prenez toutes les mesures nécessaires afin d’éviter
que l’écran ne bascule.
Dans le cas contraire, l’écran risque de tomber et de
provoquer des blessures. Ancrez l’écran à un mur,
un pilier etc., afin d’éviter qu’il ne bascule.
Préparez préalablement une chaîne ou une corde
solide, ainsi qu’un support d’ancrage mural
disponibles dans le commerce.
1 Fixez les fixations d’ancrage sur
les deux orifices de vis libres
supérieurs à l’arrière de l’écran.
3 Passez la corde ou la chaîne dans
les deux orifices de fixation
d’ancrage, puis serrez l’autre
extrémité de la corde ou de la
chaîne au niveau du support
d’ancrage mural.
Vue latérale
Serrez fortement.
FR
Support de fixation mural
Ancrage
2 Fixez le support d’ancrage sur
un mur ou un pilier solide.
Vue du dessus
7 (FR)
Page 18

Caractéristiques techniques du support
Unité : mm (pouces)
Poids : 6,6 kg (14 lb 9 oz)
316,4
(12 1/2)
550 (21 3/4)
290
(11 1/2)
141
(5 5/8)
La conception et les caractéristiques techniques du produit
sont sujettes à modification sans préavis.
198,4
(7 7/8)
8 (FR)
Page 19

Gracias por comprar este producto.
Información para los clientes
Únicamente representantes de servicio Sony cualificados deben instalar este
producto, ya que se requieren al menos dos personas, además de cuidado,
medidas de seguridad y conocimientos técnicos especiales.
ADVERTENCIA
Si no se siguen las medidas de seguridad o el producto se utiliza incorrectamente,
pueden provocarse lesiones graves o incendios.
Este manual de instrucciones muestra la manera correcta de manipular el
producto, así como precauciones importantes necesarias para evitar accidentes. Lea
este manual atentamente y utilice el producto correctamente. Conserve este
manual para consultarlo en el futuro.
Información para los distribuidores de Sony
La instalación de un monitor requiere al menos dos personas, además de cuidado y
conocimientos técnicos especiales. Al instalar un monitor, consulte detenidamente
este manual. Sony no se responsabiliza de los accidentes o daños que se produzcan
debido a la instalación o manejo incorrectos. Explique al cliente que debe conservar
este manual para consultarlo en el futuro.
ES
Page 20

Sobre la seguridad
Los productos Sony se diseñaron pensando en la
seguridad. Sin embargo, si los productos se utilizan
incorrectamente, pueden provocar situaciones
peligrosas como un incendio, una descarga eléctrica,
que el producto vuelque o que se caiga. Para evitar
tales accidentes, asegúrese de cumplir las precauciones
de seguridad.
Información para los clientes
ADVERTENCIA
Si no se tienen en cuenta las precauciones
siguientes, pueden provocarse lesiones graves o
incluso la muerte a raíz de un incendio, una
descarga eléctrica o tras volcar o caerse el
producto.
Únicamente representantes de
servicio Sony cualificados deben
instalar este producto.
La instalación por parte de personas no cualificadas
podría ocasionar lesiones graves debido al peso del
monitor.
Tome las debidas precauciones para
evitar que el monitor se vuelque.
De lo contrario, el monitor podría volcarse y provocar
daños personales. Fije el monitor a una pared, un pilar,
etc. para evitar que esto suceda.
Asegúrese de colocar el soporte en
una superficie nivelada y sólida.
No coloque el soporte de
escritorio de modo que se
incline en cualquier dirección.
En caso contrario, el soporte
podría volcarse o el monitor
podría caerse y provocar daños
personales o materiales.
Asegúrese de colocar el soporte en
un estante estable.
No coloque el soporte de escritorio
en un estante inestable, más
pequeño que el monitor o en el
borde de un estante. De lo contrario,
el soporte podría volcarse o el monitor podría caerse y
provocar daños personales o materiales.
No se apoye en el monitor ni se
agarre a él cuando esté instalado en
el soporte de escritorio.
El soporte de escritorio podría
volcarse o el monitor podría
caerse y provocar lesiones.
No obstruya los orificios de
ventilación del monitor.
Si cubre los orificios de
ventilación (con un paño, etc.),
el monitor podría
sobrecalentarse y provocar un
incendio.
Evite que el cable de alimentación de
ca o el cable de interfaz del monitor
queden aplastados.
• Evite que el cable de
alimentación de ca o el cable
de interfaz del monitor
queden aplastados al instalar
el monitor en el soporte de
escritorio. Si alguno de estos
cables resultara dañado,
podría producirse un
incendio o una descarga
eléctrica.
•No pise el cable de alimentación de ca ni el cable de
interfaz del monitor al trasladar el soporte de
escritorio. Podría dañar alguno de estos cables y
provocar un incendio o una descarga eléctrica.
Evite tropezar con el cable de
alimentación de ca o el cable de
interfaz del monitor.
El soporte de escritorio podría volcarse y provocar
lesiones.
2 (ES)
Page 21

PRECAUCIÓN
Si no se tienen en cuenta las precauciones
siguientes, pueden provocarse daños personales
o materiales.
No instale equipos que no sean el
producto especificado.
Este soporte se diseñó para ser utilizado únicamente
con el producto especificado. Si instala equipos que no
sean los especificados, pueden caerse o dañarse y
provocar lesiones.
Asegúrese de fijar bien el monitor.
Utilice los tornillos suministrados para fijar el monitor
al soporte de escritorio. Si no instala el monitor
correctamente, éste podría caerse o el soporte podría
volcarse y provocar lesiones.
Notas sobre la instalación
Glosario de terminología
Texto en el manual Españal
Table-Top Stand Soporte de escritorio
for QUALIA 005 para QUALIA 005
Información para los
distribuidores de Sony
Procure leer detenidamente las
precauciones de seguridad descritas
en las páginas anteriores y poner
especial atención a la seguridad
durante las tareas de instalación,
mantenimiento, comprobación y
reparación del producto.
• Instale el soporte sobre un piso sólido y nivelado.
Asegúrese de instalar el soporte en un lugar en el
que no pueda deformarse ni inclinarse. Para ello,
respete las precauciones siguientes.
–
Si instala el soporte en una superficie blanda,
como un tapete o una alfombra, cubra primero
dicha zona con un panel.
–No instale el soporte en un lugar expuesto a la luz
solar directa ni cerca de un calefactor.
–No instale el soporte en un lugar caluroso o
húmedo, ni al aire libre.
•El soporte de escritorio puede girar 18 grados a la
izquierda y a la derecha, y lo hace sobre una base
giratoria situada en la parte inferior del mismo. Si
coloca el soporte sobre un estante estrecho, parte del
mismo sobresaldrá por el borde frontal del estante o
el monitor tocará la pared. En ese caso, el monitor
podría caerse y provocar lesiones o daños graves.
Cumpla las indicaciones siguientes.
– Coloque el soporte a una
distancia mínima de 8 cm
del borde frontal del
estante.
–
Coloque el soporte a una
distancia mínima de 10 cm
de la pared.
Asegúrese de que al menos dos
personas realizan el trabajo de
instalación.
Asegúrese de que al menos dos personas instalan el
monitor en el soporte de escritorio. Si fuera necesario,
haga que otra persona sostenga la parte posterior del
monitor. No intente instalar el soporte usted mismo.
De lo contrario, podría provocar un accidente o
lesionarse.
Asegúrese de seguir las instrucciones
para instalar firmemente el monitor.
Apriete firmemente los tornillos. Si no instala
firmemente el monitor, éste podría caerse y provocar
lesiones.
Tenga cuidado de no lastimarse las
manos o los dedos durante la
instalación.
Tenga cuidado de no lastimarse las manos o los dedos
al instalar el monitor en el soporte de escritorio.
ES
Nota sobre el uso
Limpieza
Para mantener el soporte limpio, utilice un paño suave
y seco. Las manchas resistentes pueden eliminarse con
un paño ligeramente humedecido con detergente
diluido. A continuación, seque la zona con un paño
suave y seco. No utilice productos químicos, como
disolventes o bencina, ya que pueden dañar el acabado
del soporte.
3 (ES)
Page 22

Comprobación de las piezas
Nombre Cantidad
Soporte de escritorio
1
Tornillo de fijación del monitor
M5×L16
4
Montaje del soporte
ADVERTENCIA
Si el cable de alimentación de ca queda aplastado
bajo el soporte o entre otros equipos, puede
producirse un cortocircuito o una descarga eléctrica.
Si tropieza con el cable de alimentación de ca o con
el cable de interfaz del monitor, el soporte puede
volcarse y provocar lesiones.
Elija la ubicación de instalación y coloque el
soporte en el suelo antes de instalar el monitor.
Debido al peso del monitor, es recomendable que
elija primero la ubicación de la instalación y que
coloque el soporte en el piso antes de instalar el
monitor.
Aditamento de fijación
2
Cubierta de cables
1
Tornillo de fijación de la cubierta de
cables
M4×L12
Asegúrese de tener a mano destornilladores Phillips
del tamaño adecuado para los distintos tipos de
tornillos necesarios para la instalación.
2
Coloque el soporte a una distancia mínima de
8 cm del borde frontal del estante y a 10 cm
como mínimo de la pared.
El soporte de escritorio puede girar 18 grados a la
izquierda y a la derecha, y lo hace sobre una base
giratoria que se encuentra en la parte inferior del
mismo. Si coloca el soporte sobre un estante
estrecho, parte del mismo sobresaldrá por el borde
frontal del estante o el monitor tocará la pared. En
ese caso, el monitor podría caerse y provocar
lesiones o daños graves.
4 (ES)
10 cm como
mínimo
8 cm como
mínimo
Nota
No arrastre el soporte de escritorio cuando esté en el piso.
De lo contrario, podrían desprenderse las almohadillas de
goma de la base del soporte de escritorio.
Page 23

Asegúrese de que la base giratoria de la parte
inferior del soporte de escritorio está colocada
correctamente. Si lo está, oirá un ligero clic.
Parte inferior del soporte de escritorio
Base giratoria
La base
giratoria se
detiene en este
punto.
Instalación del monitor
1 Ajuste el monitor al soporte de
escritorio.
Utilice los orificios de alineación de los tornillos
de la parte posterior del monitor como guías.
Baje suavemente el monitor para alinear los
orificios de los tornillos por encima de las juntas
del soporte de escritorio.
Parte posterior del monitor
Nota
Si no coloca bien la base giratoria, el ángulo de visión
podría ser incorrecto.
Parte inferior del monitor
Orificios para los tornillos de
fijación del monitor
Junta
El monitor dispone
de ranuras para
los dedos a ambos
lados de la parte inferior para sujetarlo.
z Sugerencia
Existen ranuras para los dedos situadas a ambos lados
de la parte inferior del monitor para sujetarlo. Cuando
ajuste el monitor al soporte, utilice las ranuras para
sujetar la parte inferior y sostenga la superior con la
otra mano.
Guías
ES
5 (ES)
Page 24

2 Utilice los cuatro tornillos de
fijación para ajustar el monitor
al soporte de escritorio.
To rnillo de
fijación del
monitor
M5×L16
Nota
Al utilizar el destornillador eléctrico, establezca el
ajuste de par en 1,5 N·m aproximadamente.
3 Conecte el cable de alimentación
de ca y el cable de interfaz del
monitor al monitor.
4 Ajuste la cubierta de cables.
1 Introduzca los cables que sobresalgan en el
compartimiento para cables y deslice la
cubierta de cables hasta que las cuatro
lengüetas de la cubierta de cables queden
firmemente cerradas.
Cubierta de cables
2 Fije la cubierta de cables con sus dos tornillos.
No fuerce los cables al tirar de ellos. Deje
holgado el extremo conectado al pasar los cables
por el sujetacables.
z Sugerencia
Para obtener información detallada acerca de la
conexión del cable de alimentación y del cable de
interfaz del monitor, consulte el manual de
instrucciones suministrado con el monitor.
Cable de interfaz
del monitor
Cable de alimentación de ca
Afloje los
cables.
To rnillo de
fijación de la
cubierta de
cables
M4×L12
Ajuste del ángulo de visión (giro)
Ajuste el ángulo de visión que le resulte más
cómodo. El televisor puede girar 18 grados hacia
la izquierda y hacia la derecha.
18°18°
6 (ES)
Sujetacables
Page 25

Medidas de seguridad para evitar el vuelco
ADVERTENCIA
Asegúrese de tomar las medidas adecuadas para
evitar que el monitor se vuelque.
De lo contrario, el monitor podría volcarse y
provocar lesiones. Fije el monitor a una pared,
pilar, etc. para evitar que se vuelque.
Tenga preparados de antemano una cuerda resistente o
una cadena y una ménsula de anclaje para pared
disponibles en el mercado.
1 Ajuste los dos aditamentos de
fijación a los dos orificios de
tornillos superiores que quedan
libres de la parte posterior del
monitor.
3 Haga pasar la cuerda o la cadena
por los dos orificios de los
aditamentos de fijación y tense
el otro extremo de la cuerda o
cadena a la ménsula de anclaje
para pared.
Vista lateral
Tense firmemente.
Ménsula de anclaje para pared
Aditamento de
fijación
2 Fije la ménsula de anclaje para
pared a una pared o a un pilar
sólidos.
Vista superior
ES
7 (ES)
Page 26

Especificaciones del soporte
Unidad: mm
Peso: 6,6 kg
316,4
550
290
141
El diseño y las especificaciones están sujetos a cambios sin
previo aviso.
198,4
8 (ES)
Page 27

Page 28

2005 Sony Corporation Printed in Japan
“SONY” is a registered trademark of Sony Corporation.
“QUALIA” and “QUALIA” logotype are trademarks of Sony Corporation.
2-541-809-11 (2)
Printed on 100% recycled paper.
 Loading...