

Page 1
For Customers and Sony Dealers
in North and Central America
Wall-Mount Bracket
2-179-718-12 (1)
Instructions
Mode d’emploi
Instrucciones
US
FR
ES
SU-PW3M
© 2004 Sony Corporation
Page 2
Thank you for purchasing this product.
To Customers
Sufficient expertise is required for installing this
product. Be sure to subcontract the installation to
Sony dealers or contractors and pay special
attention to safety during the installation. Sony is
not liable for any damages or injury caused by
mishandling or improper installation.
CAUTION
This Wall-Mount Bracket is intended for use only with
the following products. Use with other apparatus is
capable of resulting in instability causing possible
injury.
Specified products (As of September 2004)
Flat-panel Color KDE-37XS955
Television KDE-42XS955
KDE-50XS955
WARNING
If the safety precautions are not observed or the
product is used incorrectly, it may result in serious
injury or fire.
This instruction manual shows the correct handling of
the product and important precautions necessary to
prevent accidents. Be sure to read this manual
thoroughly and use the product correctly. Keep this
manual available for future reference.
For Sony dealers
Sufficient expertise is required for installing this
product. Be sure to read this instruction manual
thoroughly to do the installation work safely. Sony is
not liable for any damages or injury caused by
mishandling or improper installation. Please give this
manual to the customer after installation.
On Safety
When installing the TV on the Wall-Mount Bracket,
make sure that the woofer speaker is securely
connected to the TV.
If the woofer speaker is not connected securely, an
error message will appear on the TV screen when
turned on.
If an error message appears on the TV screen, the
connector is not connected properly. Check that the
connector is not damaged, and then reconnect the
woofer speaker to the TV.
If the woofer speaker joint is not connected securely, no
sound will be heard from the speaker resulting in
possible damage to the TV. (An error message will
appear on the TV screen if not connected securely.)
Products by Sony are designed with safety in mind.
If the products are used incorrectly, however, it may
result in a serious injury through fire, electric shock,
the product toppling over, or the product dropping. Be
sure to observe the precautions for safety to prevent
such accidents.
2 (US)
Page 3
For Customers
WARNING
If the following precautions are not observed,
serious injury or death through fire, electric
shock, the product toppling over, or the product
dropping can result.
Be sure to subcontract the
installation to qualified contractors
and keep small children away during
the installation.
If the Wall-Mount Bracket or the TV is not installed
correctly, the following accidents may occur. Be sure
qualified contractors carry out installation.
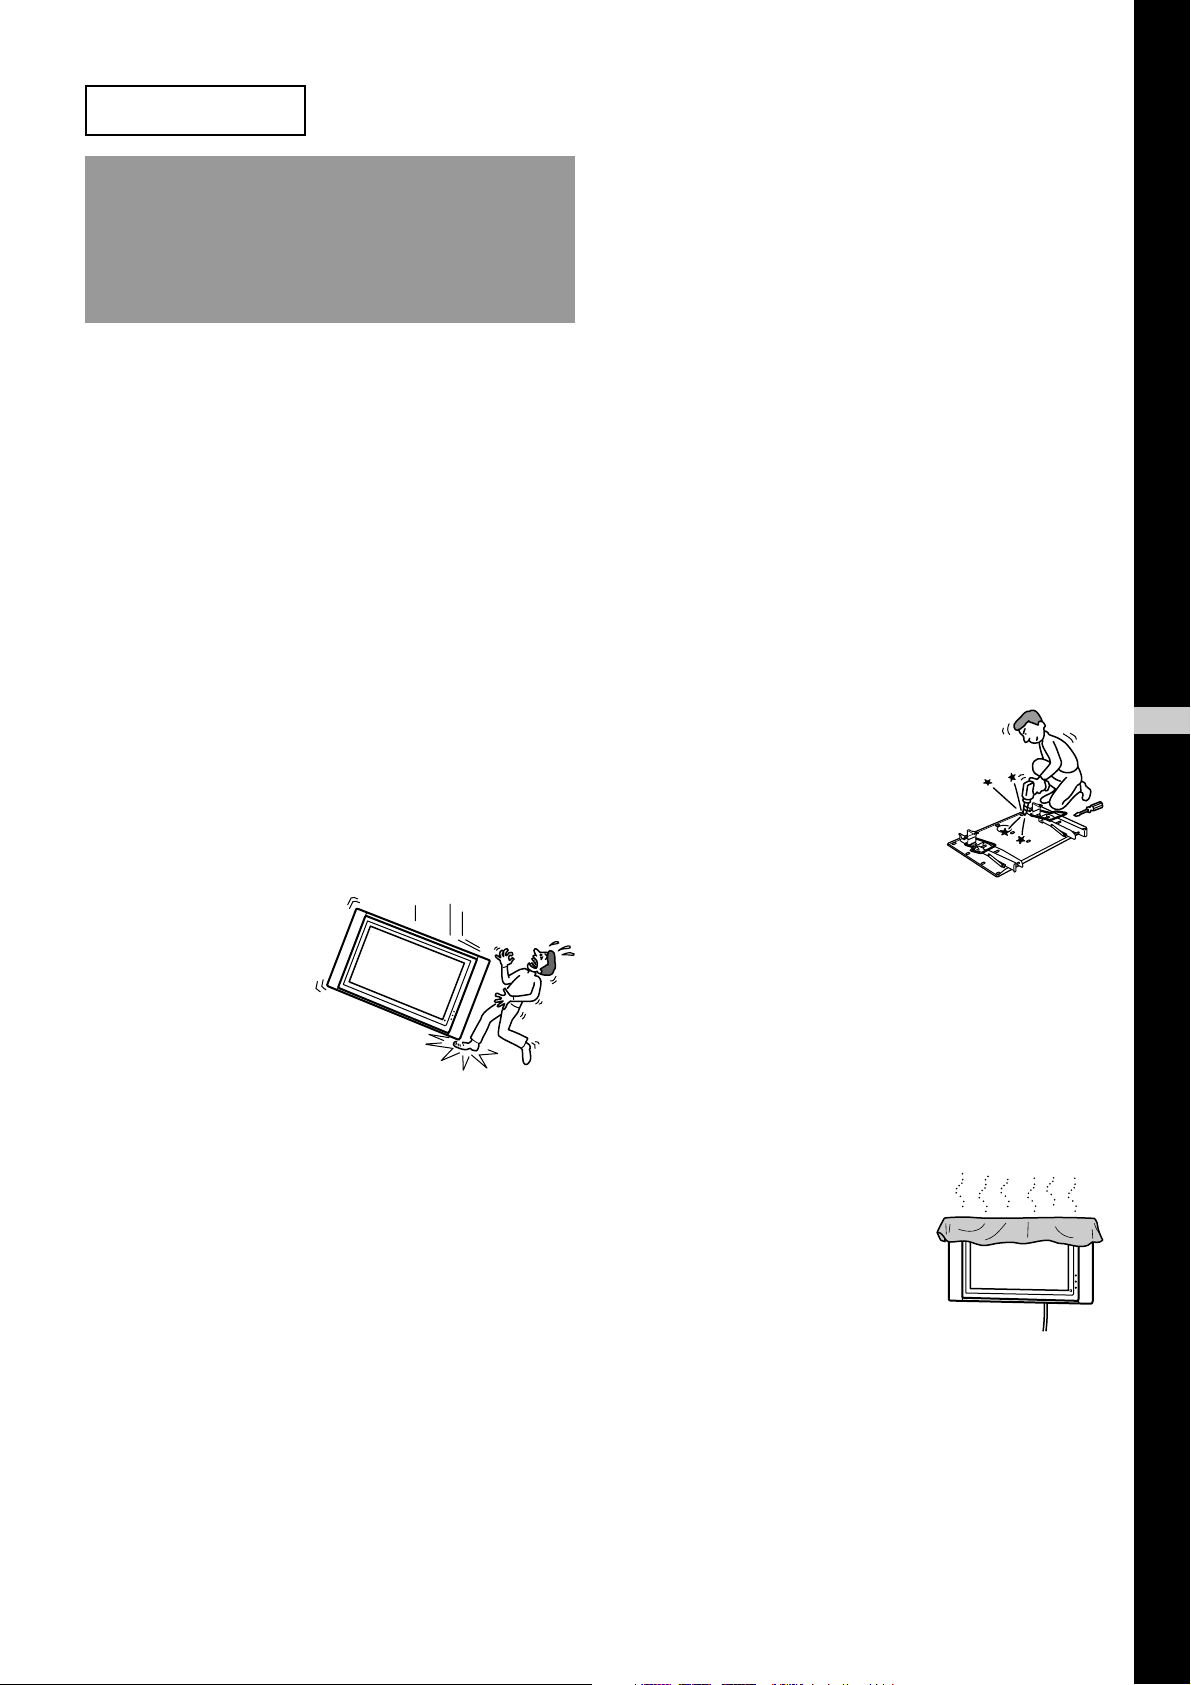
• The TV may fall and cause a serious injury such as a
bruise or a fracture.
• If the wall on which the Wall-Mount Bracket is
installed is unstable, uneven, or not perpendicular to
the floor, the unit may fall and cause injury or
property damage. The wall should be capable of
supporting a weight of at least four times the TV
weight. (See the TV installing dimensions table on
page 16 for the weight of each TV.)
• If the installation of the Wall-Mount Bracket on the
wall is not sufficiently sturdy, the unit may fall and
cause injury or property damage.
Be sure to subcontract moving or
dismounting of the TV to qualified
contractors.
If persons other than qualified contractors transport or
dismount the TV, it may fall and cause injury or
property damage. Be sure that two or more persons
carry or dismount the TV.
Do not spill liquid of any kind on the
TV.
If you allow the TV to get wet, this may result in a fire
or an electric shock.
Do not remove screws, etc., after
mounting the TV.
If you do so, the TV may fall and cause injury or
property damage.
Do not disassemble or make
alterations to the parts of the WallMount Bracket.
If you do so, the Wall-Mount
Bracket may fall and cause
injury or property damage.
US
English
Do not mount any equipment other
than the specified product.
This Wall-Mount Bracket is designed for use with the
specified product only. If you mount equipment other
than specified, it may fall or break, and cause injury or
property damage.
Do not cover the ventilation hole of
the TV.
If you cover the ventilation hole
(with a cloth, etc.), heat may
build up inside and cause fire.
3 (US)
Page 4

Do not apply any load other than
the TV on the Wall-Mount Bracket.
If you do so, the TV may fall
and cause injury or property
damage.
Do not lean on or hang from the TV.
Do not lean on or hang from the
TV as it may fall on you and
cause serious injury.
Do not expose the TV to rain or
moisture.
It may cause a fire or an electric shock.
Never place the TV in hot, humid or
excessively dusty places, or in the
place where the TV is subjected to
mechanical vibrations.
If you do so, it may cause a fire or an electric shock.
CAUTION
If the following precautions are not observed,
injury or property damage may occur.
Do not install the Wall-Mount
Bracket on wall surfaces where the
corners or the sides of the TV
protrude away from the wall
surface.
Do not install the Wall-Mount
Bracket on wall surfaces such as
a pillar, where the corners or the
sides of the TV protrude away
from the wall surface. If a
person or object happens to hit
the protruded corner or side of
the TV, it may cause injury or
property damage.
Do not handle the product with
excessive force during cleaning or
maintenance.
Do not apply excessive force on the topside of the TV.
If you do so, the TV may fall and cause injury or
property damage.
Keep flammable objects or open
flames (e.g. candles) away from the
TV.
To prevent a fire, keep flammable objects or open
flames (e.g. candles) away from the TV.
Do not install the TV over or under an
air-conditioner.
If the TV is exposed to water leaks or air current from
an air-conditioner for a long time, it may cause a fire,
an electric shock or a malfunction of the TV.
4 (US)
Page 5
Precautions
Install the Wall-Mount
• If you use the TV installed on the Wall-Mount
Bracket for a long time, the wall behind or above the
TV may become discolored or the wallpaper may
come unstuck, depending on the material of the
wall.
• If the Wall-Mount Bracket is removed after installing
it on the wall, the screw holes are left.
• If you have routed 300-ohm feeder cables behind the
wall, we recommend that you change them to 75ohm coaxial cables.
If it is necessary to continue to use 300-ohm feeder
cables, be sure there is sufficient space available
between the TV and the feeder cables behind the
wall before installing. Consult your contractor
regarding an appropriate location (free from radio
noise, etc.) before installing.
•Magnet influence
This TV contains a strong magnet in the speaker unit
which generates magnetic influence. Keep any items
that are susceptible to magnetic influence away from
the TV speaker.
Bracket
For Sony Dealers
WARNING
To Sony Dealers
The following instructions are for Sony Dealers
only. Be sure to read safety precautions described
above and pay special attention to safety during
the installation, maintenance and checking of this
product.
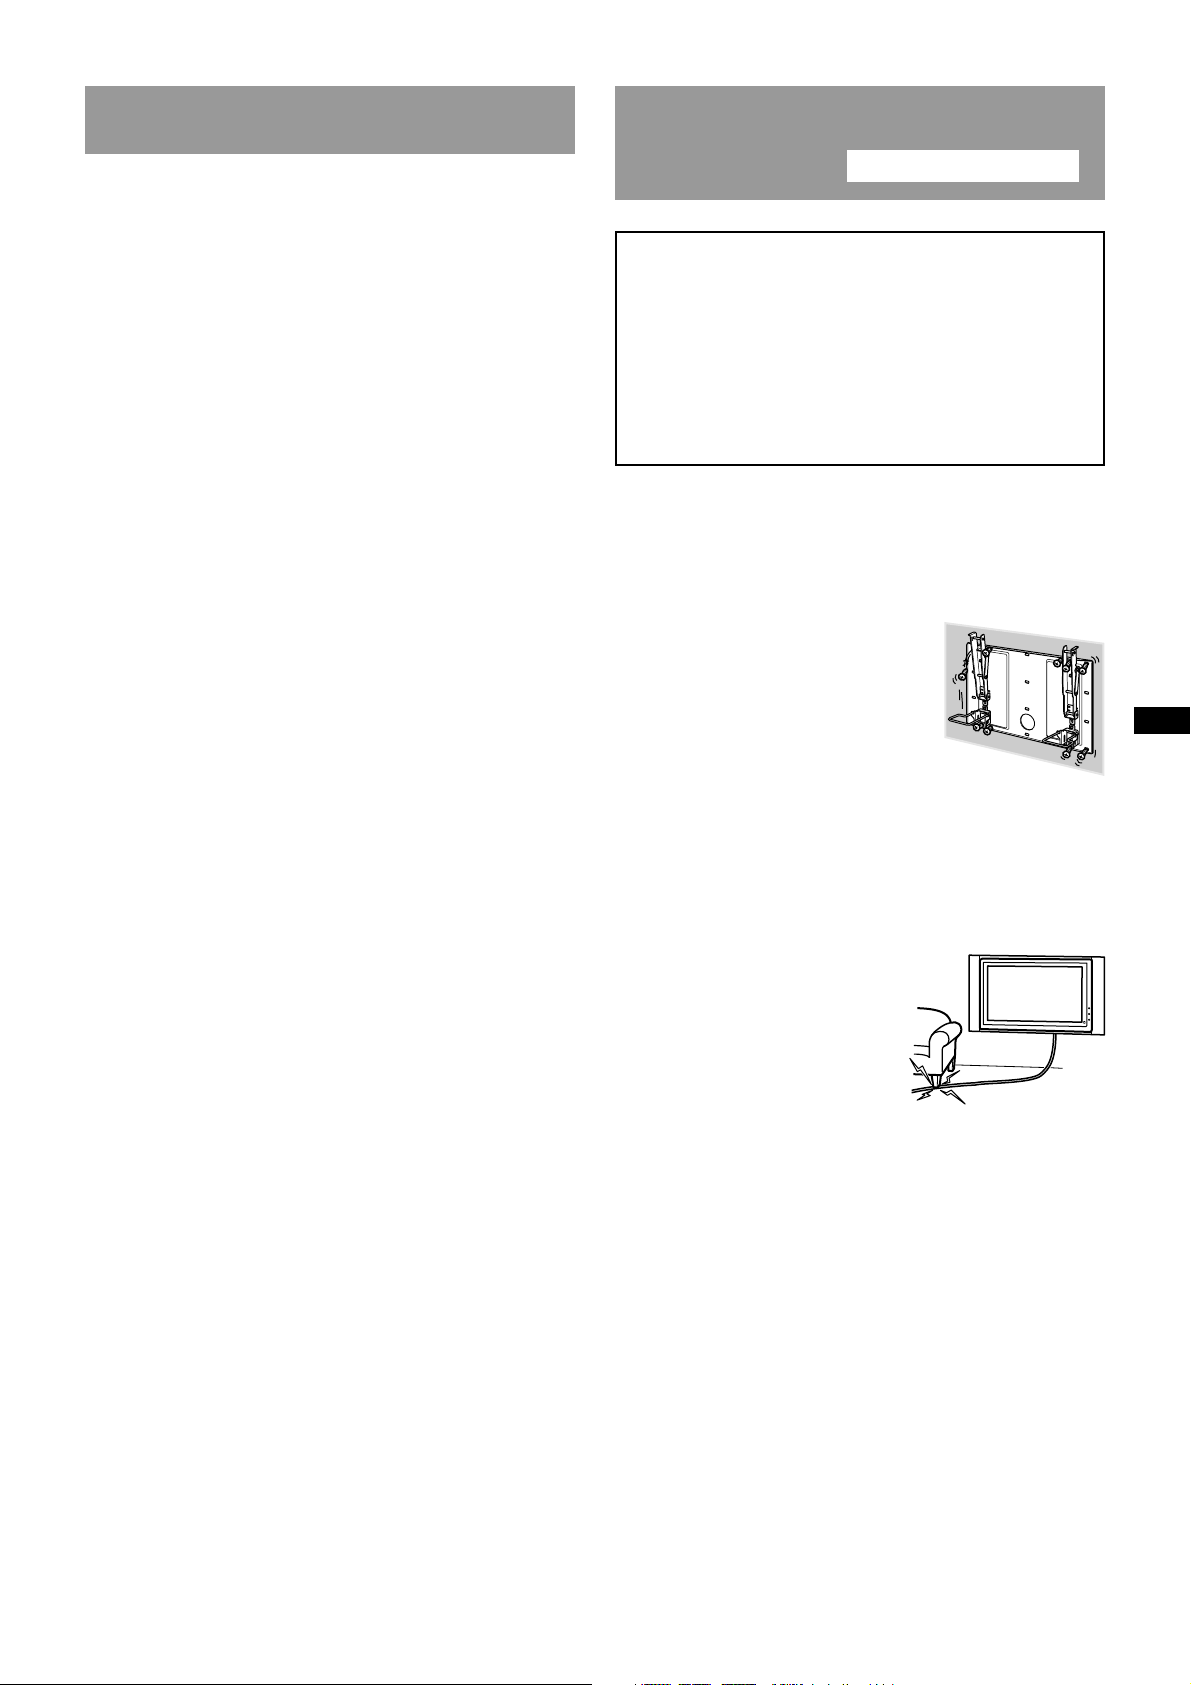
Be sure to install the Wall-Mount
Bracket securely to the wall
following the instructions in this
instruction manual.
If any of the screws are loose or
fall out, the Wall-Mount Bracket
may fall and cause injury or
property damage. Be sure to use
the appropriate screws for the
material of the wall and install
the unit securely, using four or
more M8 (or equivalent) screws.
Do not allow the AC power cord or
the connecting cable to be pinched.
If the AC power cord or the
connecting cable is pinched
between the unit and the wall
or is bent or twisted by force,
the internal conductors may
become exposed and cause a
short circuit or an electrical
break. This may cause a fire or
an electric shock.
5 (US)
Page 6

Be sure to use the supplied screws
and attachment parts properly
following the instructions given in
this instruction manual. If you use
substitute items, the TV may fall,
and cause bodily injury to someone
or damage to the TV.
Be sure to assemble the bracket
properly following the instructed
procedure explained in this
instruction manual.
If any of the screws are loose or fall out, the TV may
fall, and cause bodily injury to someone or damage to
the TV.
Be sure to tighten the screws
securely in the designated position.
If you fail to do so, the TV may fall, and cause bodily
injury to someone or damage to the TV.
After proper installation of the TV,
secure the cables properly.
If people or objects get tangled in the cables, this may
result in injury or damage to the TV.
Be careful not to hurt your hands or
fingers during the installation.
Be careful not to hurt your hands or fingers when
installing the Wall-Mount Bracket or the TV.
The screws needed to secure the
Wall-Mount Bracket to the wall are
not supplied.
Use the appropriate screws for the wall material and
structure when mounting the Wall-Mount Bracket.
Be careful not to subject the TV to
shock during installation.
If the TV is exposed to shock, it may fall or break apart.
This may cause injury.
Be sure to install the TV on a wall
that is both perpendicular and flat.
If you fail to do so, the TV may fall and cause injury.
6 (US)
Page 7
Step 1:
Step 2:
Check the parts
required for the
installation
1 Prepare a Phillips screwdriver
and the appropriate screws (four
or more M8 (or equivalent)
screws, not supplied),
depending on the material of
the wall, beforehand.
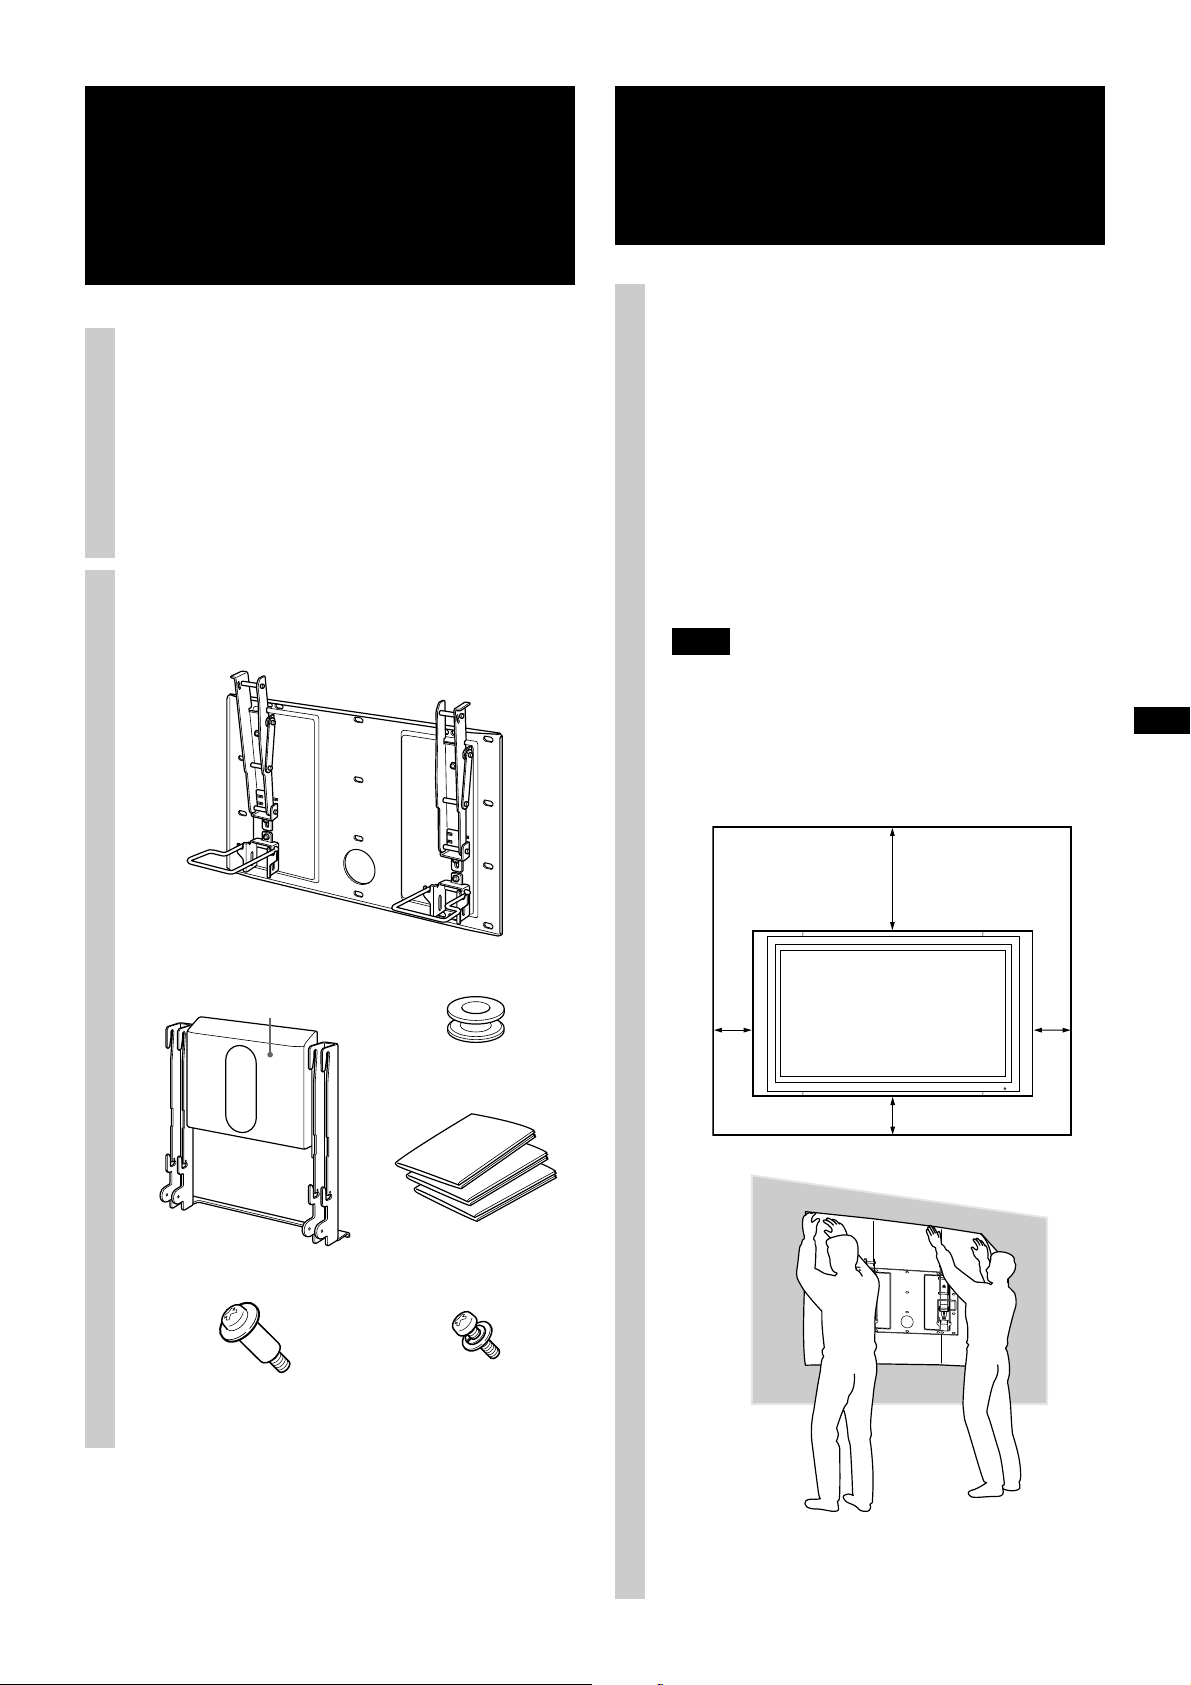
2 Open the package and check the
parts.
Decide on the
installation location
1 Place the paper template on a
perpendicular, flat wall and
decide on the installation
location.
Tape the supplied 3 sheets of the paper template
together with commercially available adhesive
tape. For details, refer to the instructions printed
on the paper template.
Allow for suitable clearance between the TV and
the ceiling and protruding parts of the wall as
shown in the diagram below.
Note
If you intend to route the cables in a wall, make a hole
in the wall beforehand to make sure that the cables
can be drawn into the wall. The position for the cable
hole is printed on the paper template and on page 17.
Plate Unit (1)
Woofer Speaker
Mounting Rack (1)
Hook (4)
Paper Template
(1 set of 3 sheets)
Unit: mm (inches)
100
15
(3
⁄16)
300
100
)
16
⁄
13
(11
100
15
(3
⁄16)
)
16
⁄
15
(3
Screw (+PSW5 × L14) (6)Screw (+B6 × L20) (4)
7 (US)
Page 8
2 Referring to the paper template
and on page 17, determine the
positions of the screws and the
cable hole (if you intend to
route the cables in the wall), and
work on the wall.
Step 3:
Install the Plate Unit on
the wall
WARNING
The wall that the TV will be installed on should be
capable of supporting a weight of at least four times
that of the TV (page 16).
Make sure of the strength of the wall the TV will be
installed on. Reinforce the wall sufficiently, if
necessary.
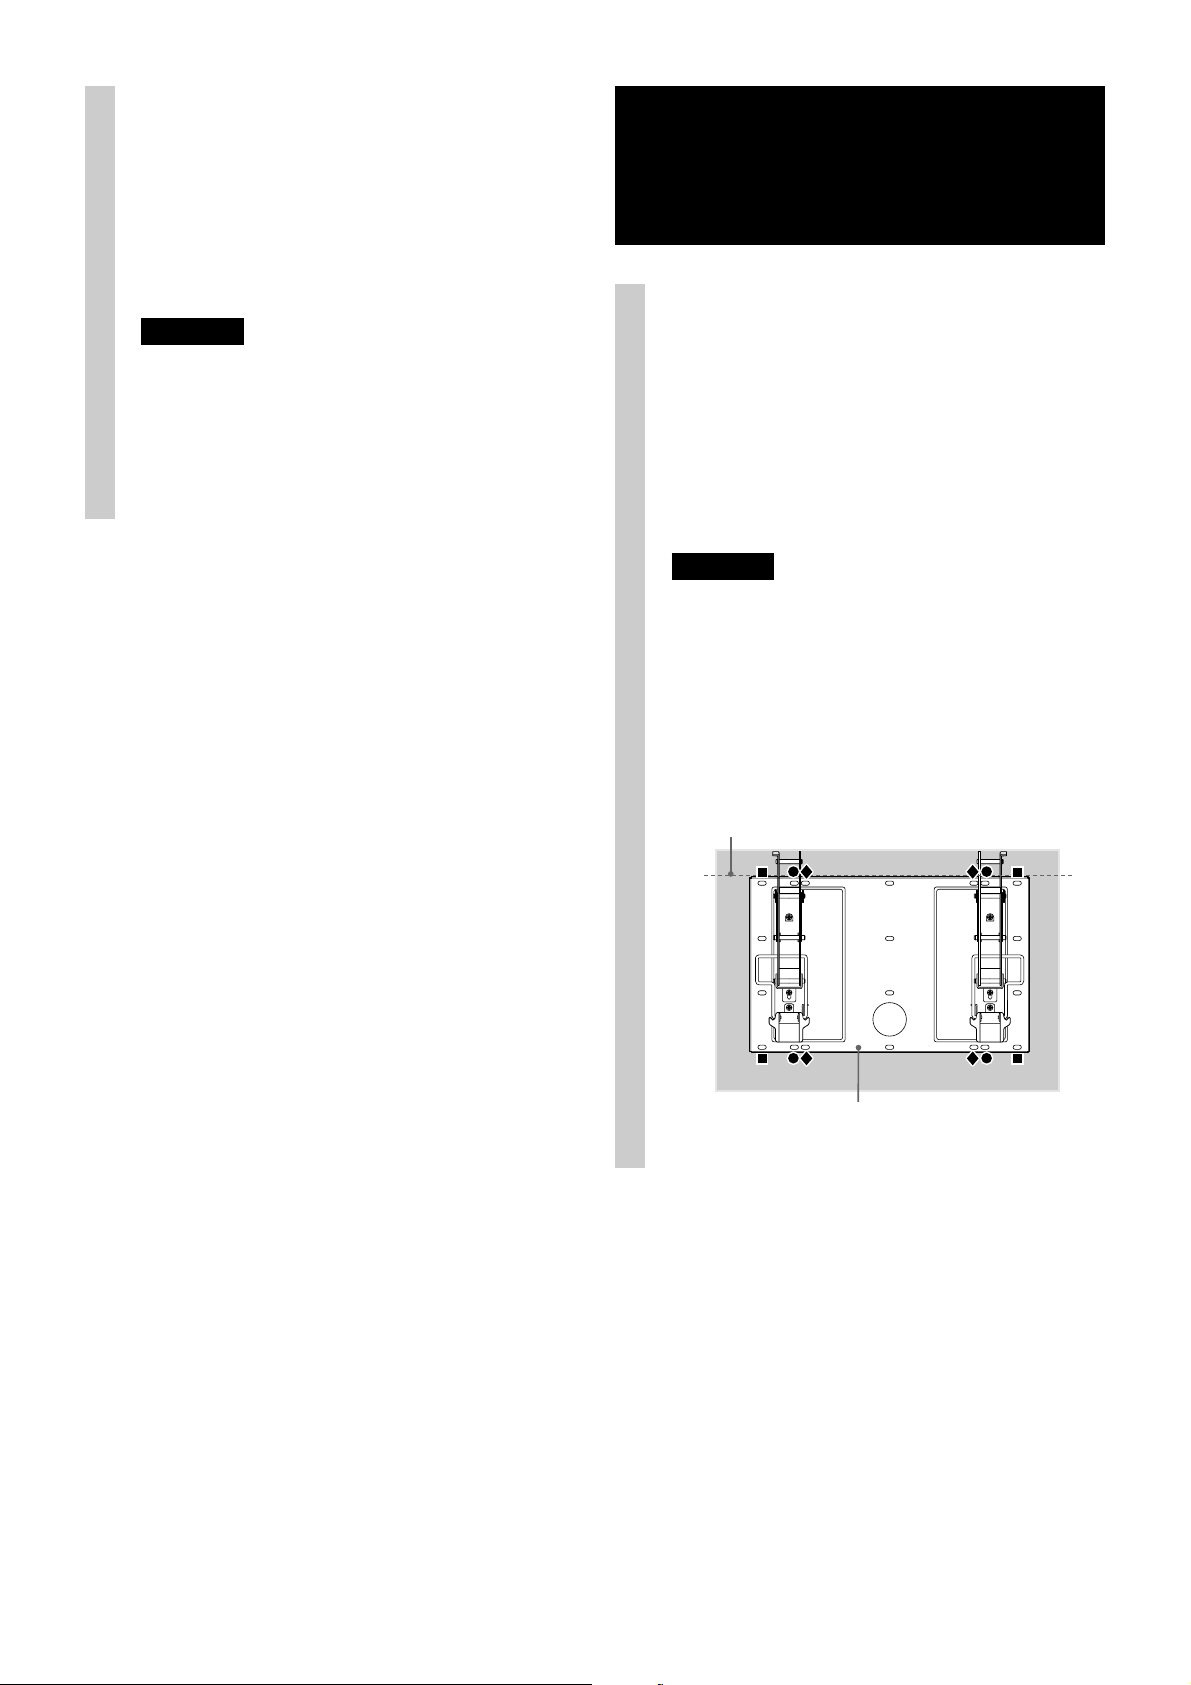
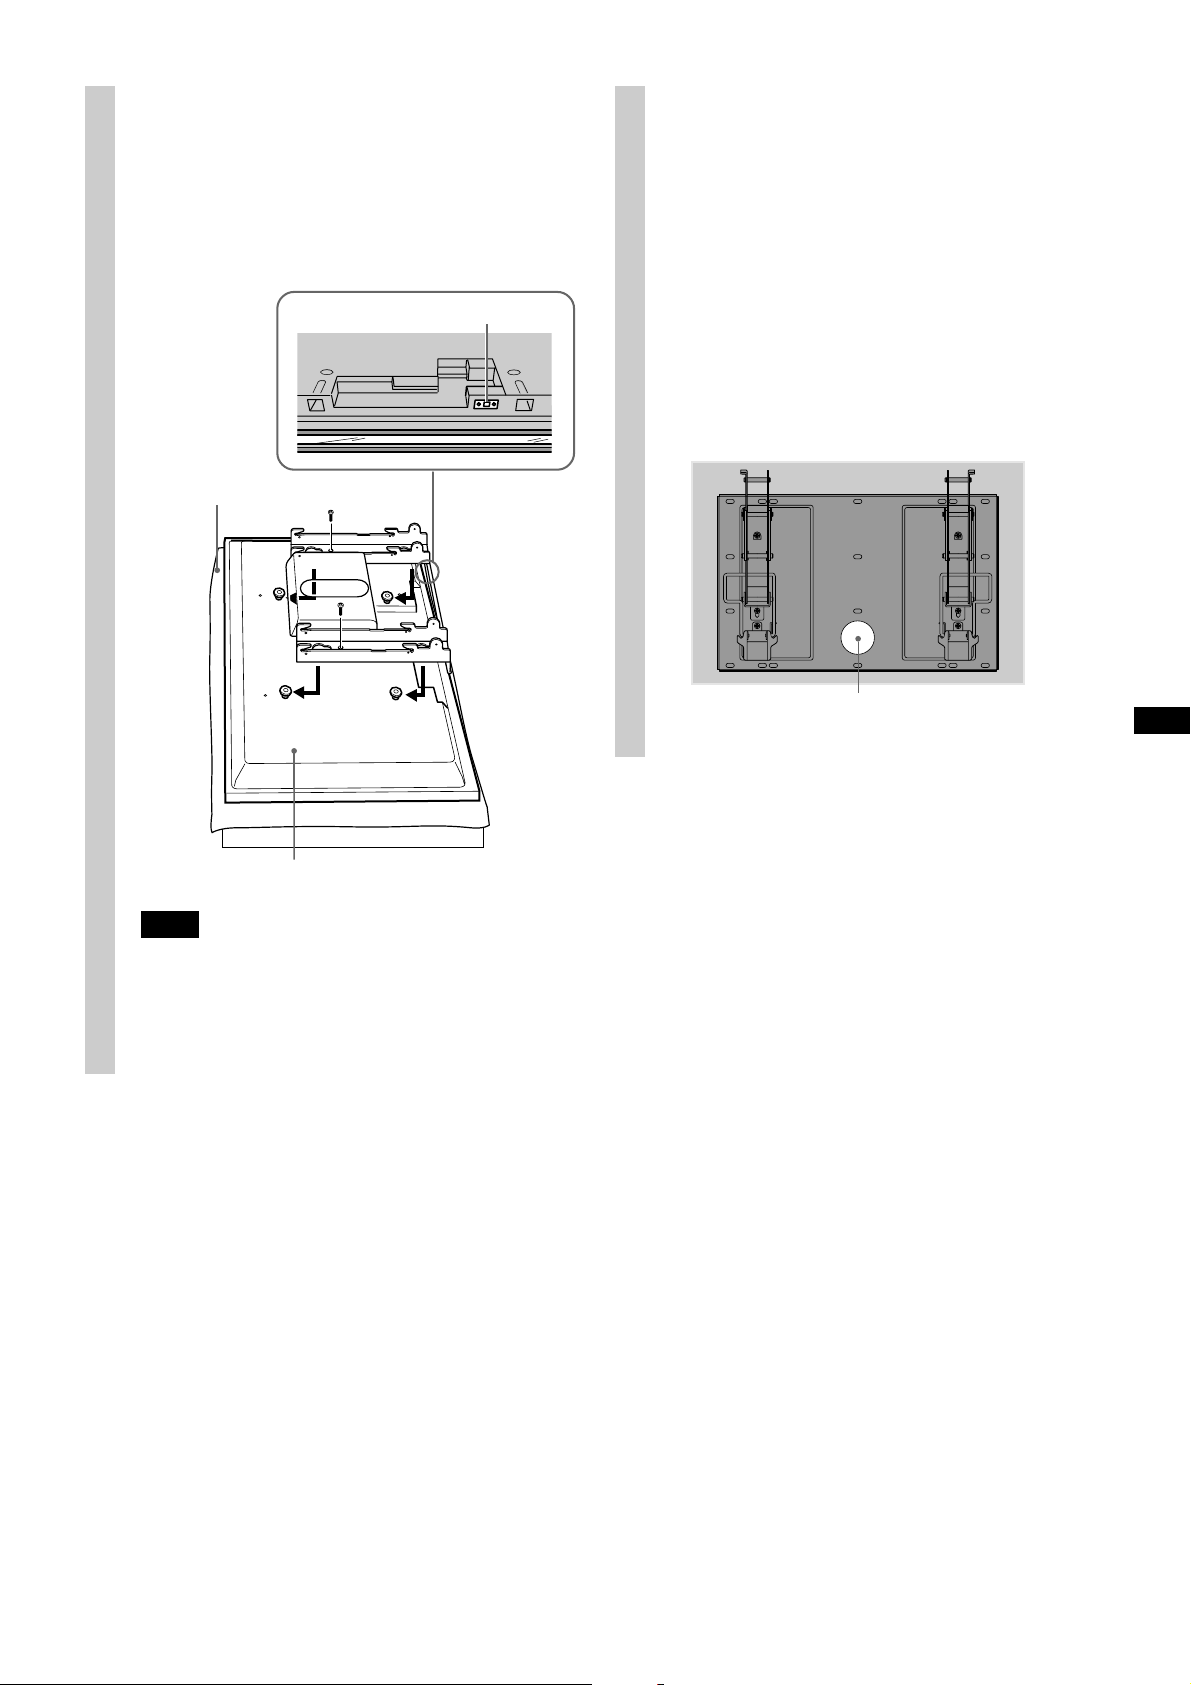
1 Fix the Plate Unit to the wall
using four or more M8 (or
equivalent) screws (not
supplied).
Select at least four screw holes with the same
mark shown in the diagram below, and tighten
the screws securely so that they will not come
loose.
WARNING
• The screws securing the Wall-Mount Bracket to the
wall are not supplied.
• Be sure to use the appropriate screws, depending on
the material and structure of the wall.
• If the Plate Unit cannot be attached securely
enough, use additional screws.
• Be sure to confirm that the Plate Unit is securely
fixed to the wall.
Align the unit so that it is exactly level.
8 (US)
Plate Unit
Page 9
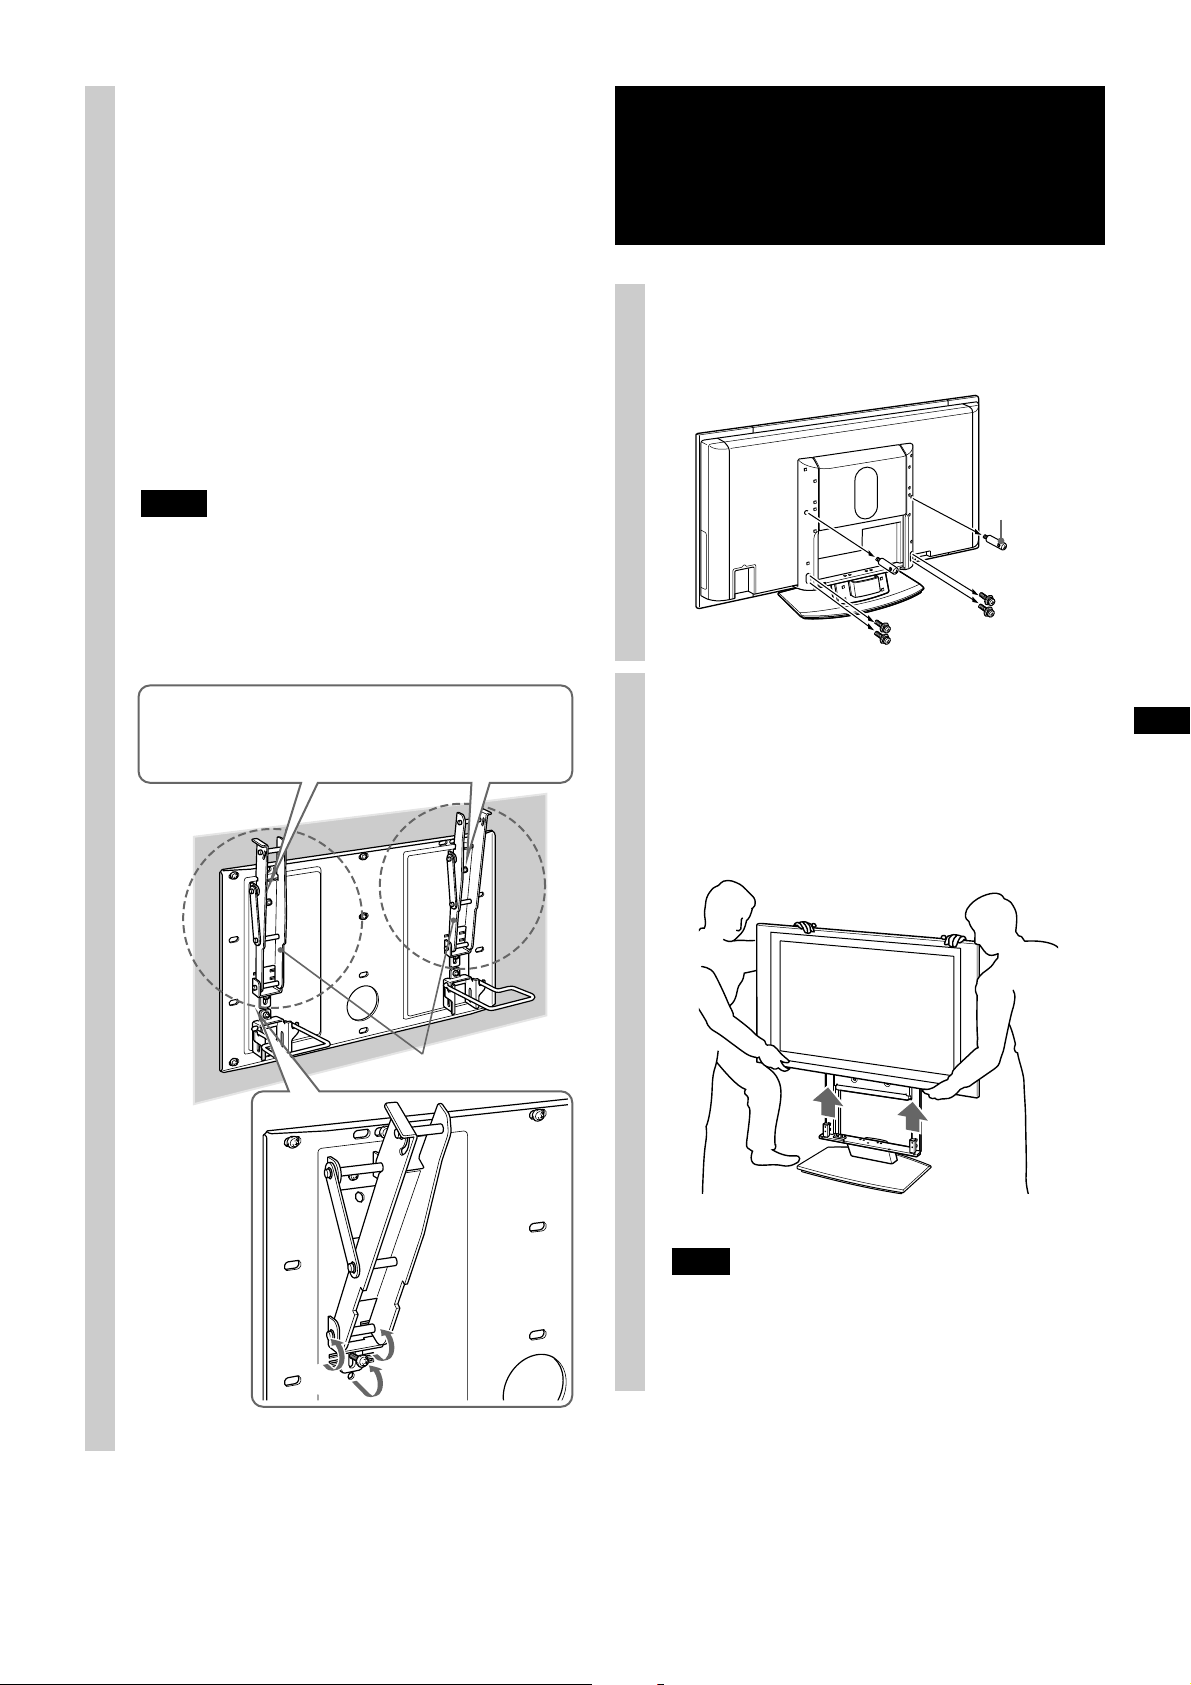
2 Adjust the angle of the stabilizer
arms.
When installing the TV perpendicularly (0
degrees), adjustment of the arms angle
(Procedure 1 and 2 below) is not necessary.
Make sure that each stabilizer arm is screwed in
securely.
1 Remove the screws that are at the top and
bottom center of the both stabilizer arms.
Then choose the notch corresponding to the
desired angle (5,10,15 or 20 degrees) and fit
the stabilizer arm to it.
2 Firmly secure each stabilizer arm using the
screws removed in Procedure 1.
Step 4: Prepare for the installation of the TV
1 Remove the screws that hold the
TV to the Tabletop Stand.
Notes
• Be sure to adjust the angles of the right and left
arms to the same angle.
• Be careful not to pinch your fingers when adjusting
the angle of arms.
• When using an electric screwdriver, set the torque
setting to approximately 2 N·m.
•0 degrees: Leave the white screws tightened as they
are.
• Other than 0 degrees: Remove the white screws.
Stabilizer arm
Clamp screw
2 Detach the TV from the Tabletop
Stand, and place the TV, with its
screen facing down on a Stable,
cloth-covered work surface, at
least 20 cm (8 in.) off the floor.
1
Note
Be sure that two or more persons hold the TV when
carrying it. Do not hold the transparent parts at either
the top or bottom of the TV.
2
9 (US)
Page 10
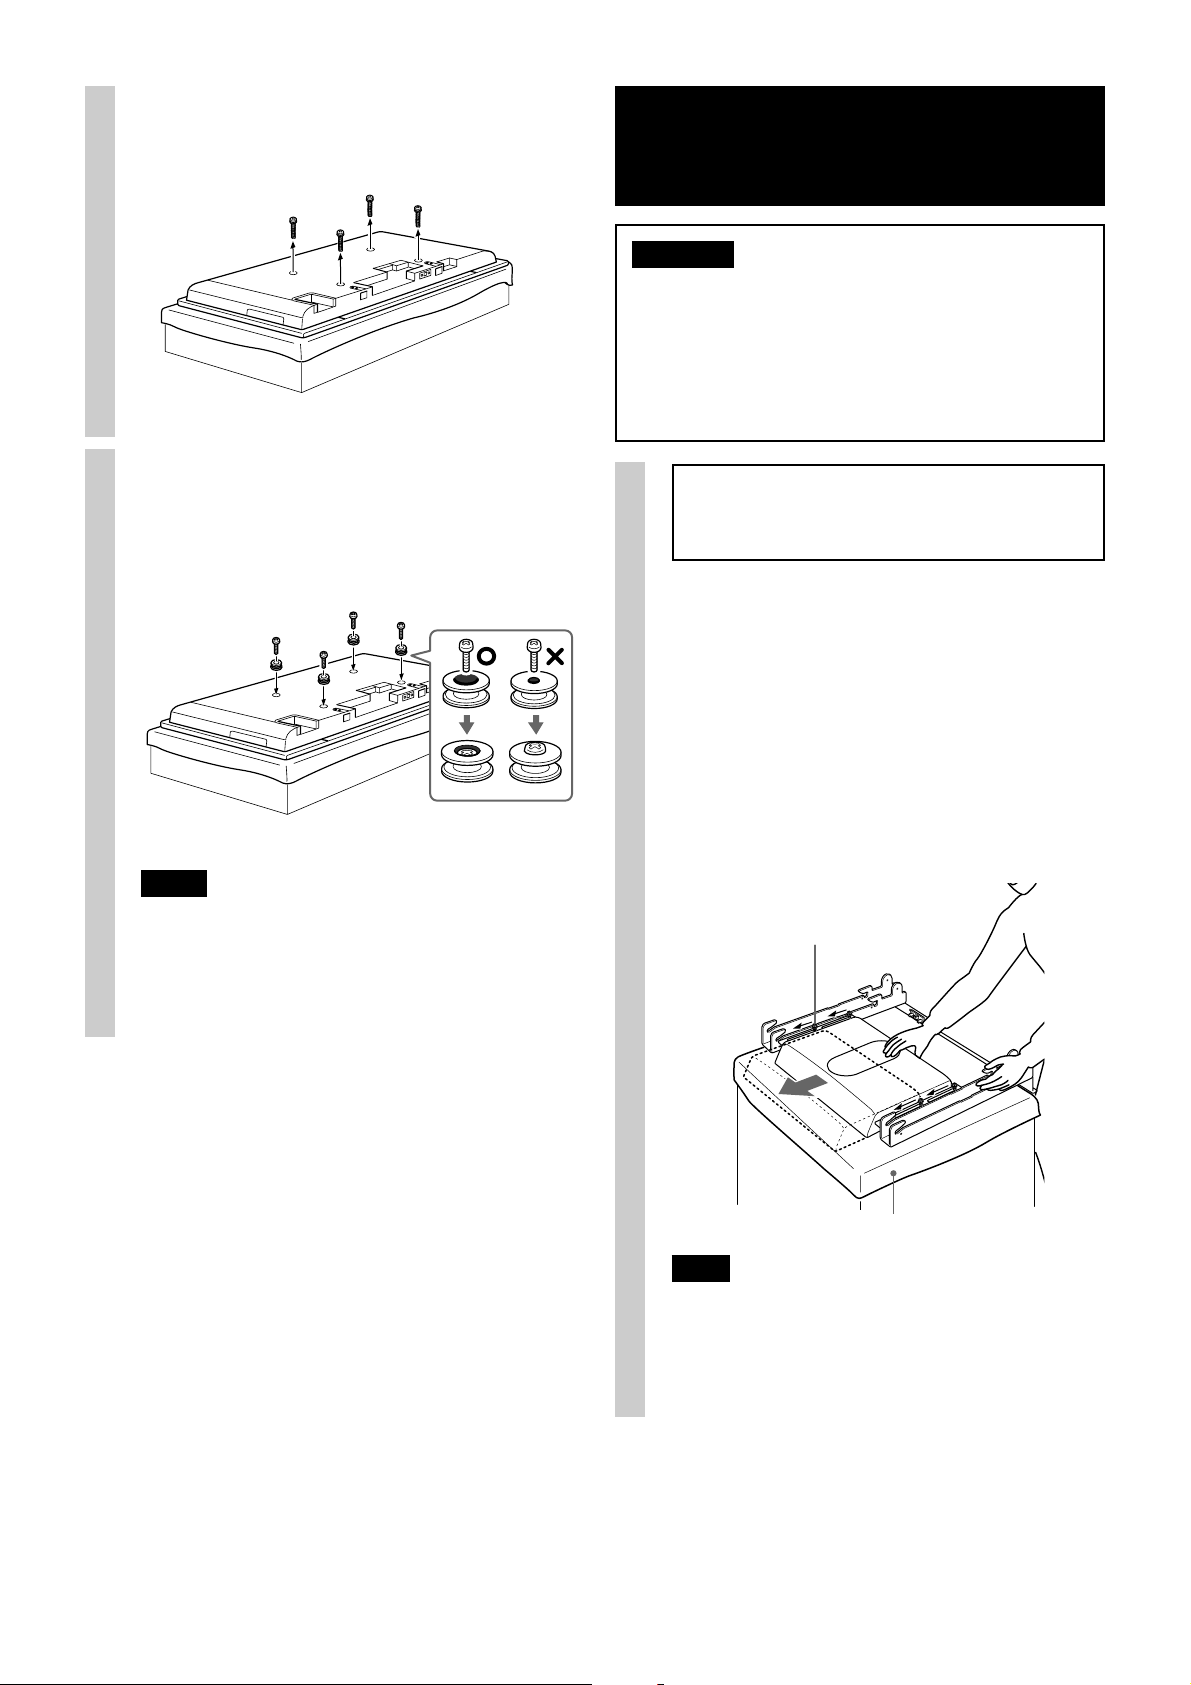
3 Remove four screws on the rear
side of the TV.
Step 5: Install the TV
WARNING
Be sure to complete the installation before connecting the
AC power cord to the wall outlet. If you allow the AC
power cord to be pinched under or between pieces of
equipment, this may result in a short circuit or an electric
shock.
Be careful not to stumble over the AC power cord or the
TV, as you may hurt yourself.
4 Attach the supplied four hooks
with the four supplied screws
(+PSW5 × L14).
Notes
• When using an electric screwdriver, set the torque
setting to approximately 2 N·m.
• Do not place the TV face down for an extended
period as damage may occur to the front surface.
1
When installing a 50-inch TV on the WallMount Bracket SU-PW3M, you need to
change the position of the woofer speaker.
Changing the position of the
woofer speaker.
1 Loosen the four screws (two on each side of
the strut arms) used to secure the woofer
speaker in place about three turns.
2 Slide the woofer speaker upward completely
as shown below.
3 Retighten the four screws (loosened in step
1) to secure the woofer speaker.
Loosen (but do not
remove) the screws.
10 (US)
Soft rag
Note
If you fail to slide the woofer speaker completely in
step 2, the woofer speaker joint locating at the center
bottom of the rear side of the TV and ventilation holes
will be blocked resulting in product damage.
Page 11
2 Hitch the Mounting Rack on the
hooks on the rear side of the TV.
Then slide the Mounting Rack
and fix it using the supplied
screws (+PSW5 × L14).
Woofer speaker joint
Soft rag
3 Connect the AC power cord and
the connecting cable(s) supplied
with the TV to the TV.
Connect the AC power cord and the connecting
cable(s) to the connectors on the rear side of the
TV. For details on connecting the AC power cord
and the connecting cable(s), refer to the
instruction manual of the TV.
When you route the cable and the cord in the
wall, feed them through the hole you bored
(page 17).
Rear side of the TV
Note
The woofer speaker joint is located on the lower right
part of the Mounting Rack. When sliding the
Mounting Rack, make sure that the woofer speaker is
securely connected to the TV.
Hole for cable routing
11 (US)
Page 12
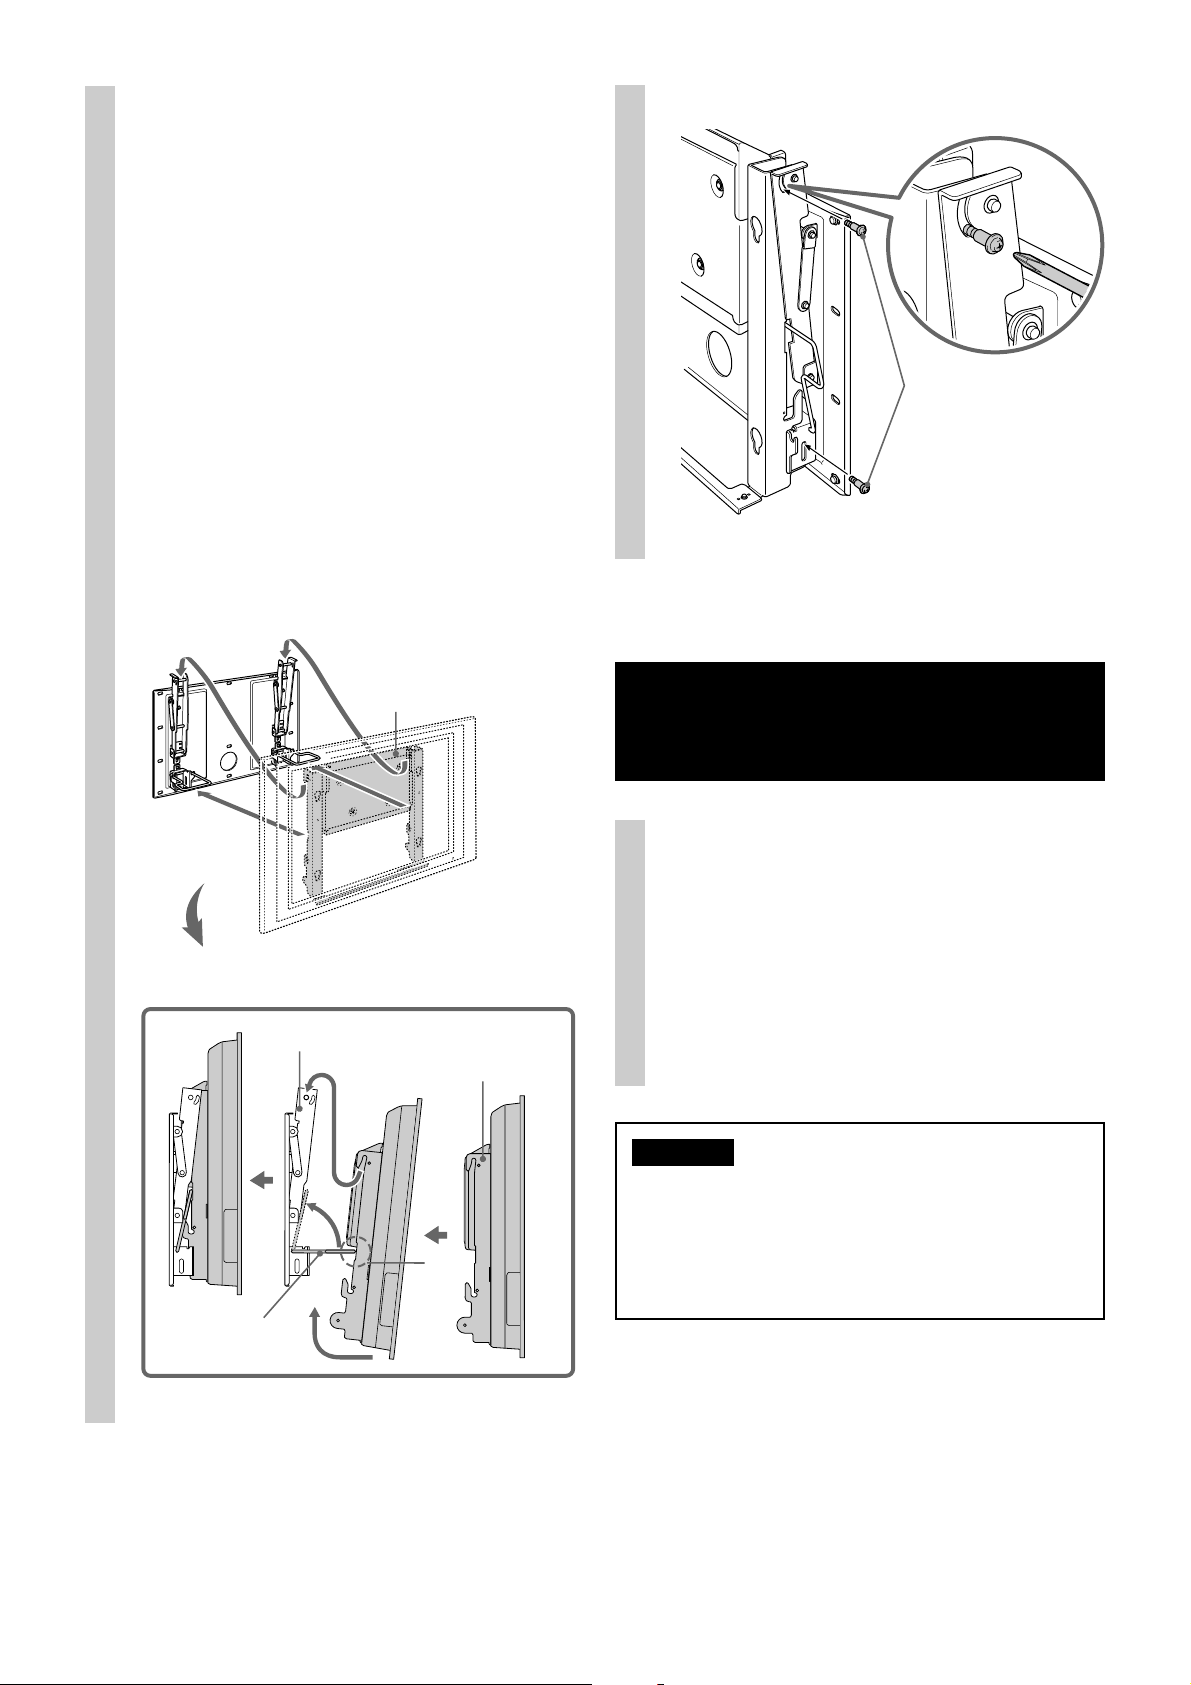
4 Install the Mounting Rack (with
4
the TV) onto the Plate Unit.
1 Hold the Mounting Rack so that the two
center notches on either side touch the
support braces of the Plate Unit.
2 Gradually lift the Mounting Rack and TV
upward keeping the center notches engaged
with the support braces of the Plate Unit.
Hitch the upper left and right hooks of the
Mounting Rack onto the anchor bars at the
top of the left and right stabilizer arms of the
Plate Unit.
3 Confirm the four upper hooks are firmly
hooked onto the two anchor bars of the Plate
Unit and that the support braces are secured
in the center notches of the Mounting Rack.
4 Firmly tighten all four upper and lower
screws (+B6 × L20, supplied) on each side of
the Mounting Rack.
2
Right side
Screws
(+B6 × L20, supplied)
1
Side view
Plate Unit
Mounting Rack
2
Mounting Rack
with the TV
1
Confirm the completion of the installation
Check the following points.
• Four upper hooks of the Mounting Rack are
firmly hooked onto the two anchor bars of
the Plate Unit.
• The cord and the cable are not twisted or
pinched.
• All the securing screws (+B6 × L20, supplied)
are tightened.
WARNING
Incomplete installation may cause the product falling
and result in injury or product damage. Also, improper
placement of the AC power cord, etc., may cause fire or
electric shock through a short circuit.
Be sure to confirm the completion of the installation for
safety.
12 (US)
Support brace
Page 13
Check the operation of
Remove the TV
the woofer speaker
This Wall-Mount Bracket is equipped with a
woofer speaker. After installing the Mounting
Rack (with the TV) onto the Plate Unit, turn on
the power switch of the TV and check if the
woofer speaker is operating properly. If the TV is
not installed on the Mounting Rack properly, no
sound will be heard from the woofer speaker, or
an error message will appear on the TV screen
after a while.
Note
Depending on the environment where you install
the Wall-Mount Bracket, the woofer speaker may
produce a strong bass sound. If the bass sound is
too strong, adjust the sound quality to your
preference in woofer level setting from the TV's
menu option. See the instruction manual of the TV
for more details on adjusting the sound quality.
For Sony Dealers
1 Unplug the AC power cord from
the wall outlet.
2 Remove all four securing screws
secured in step 4 of procedure
4 on page 12.
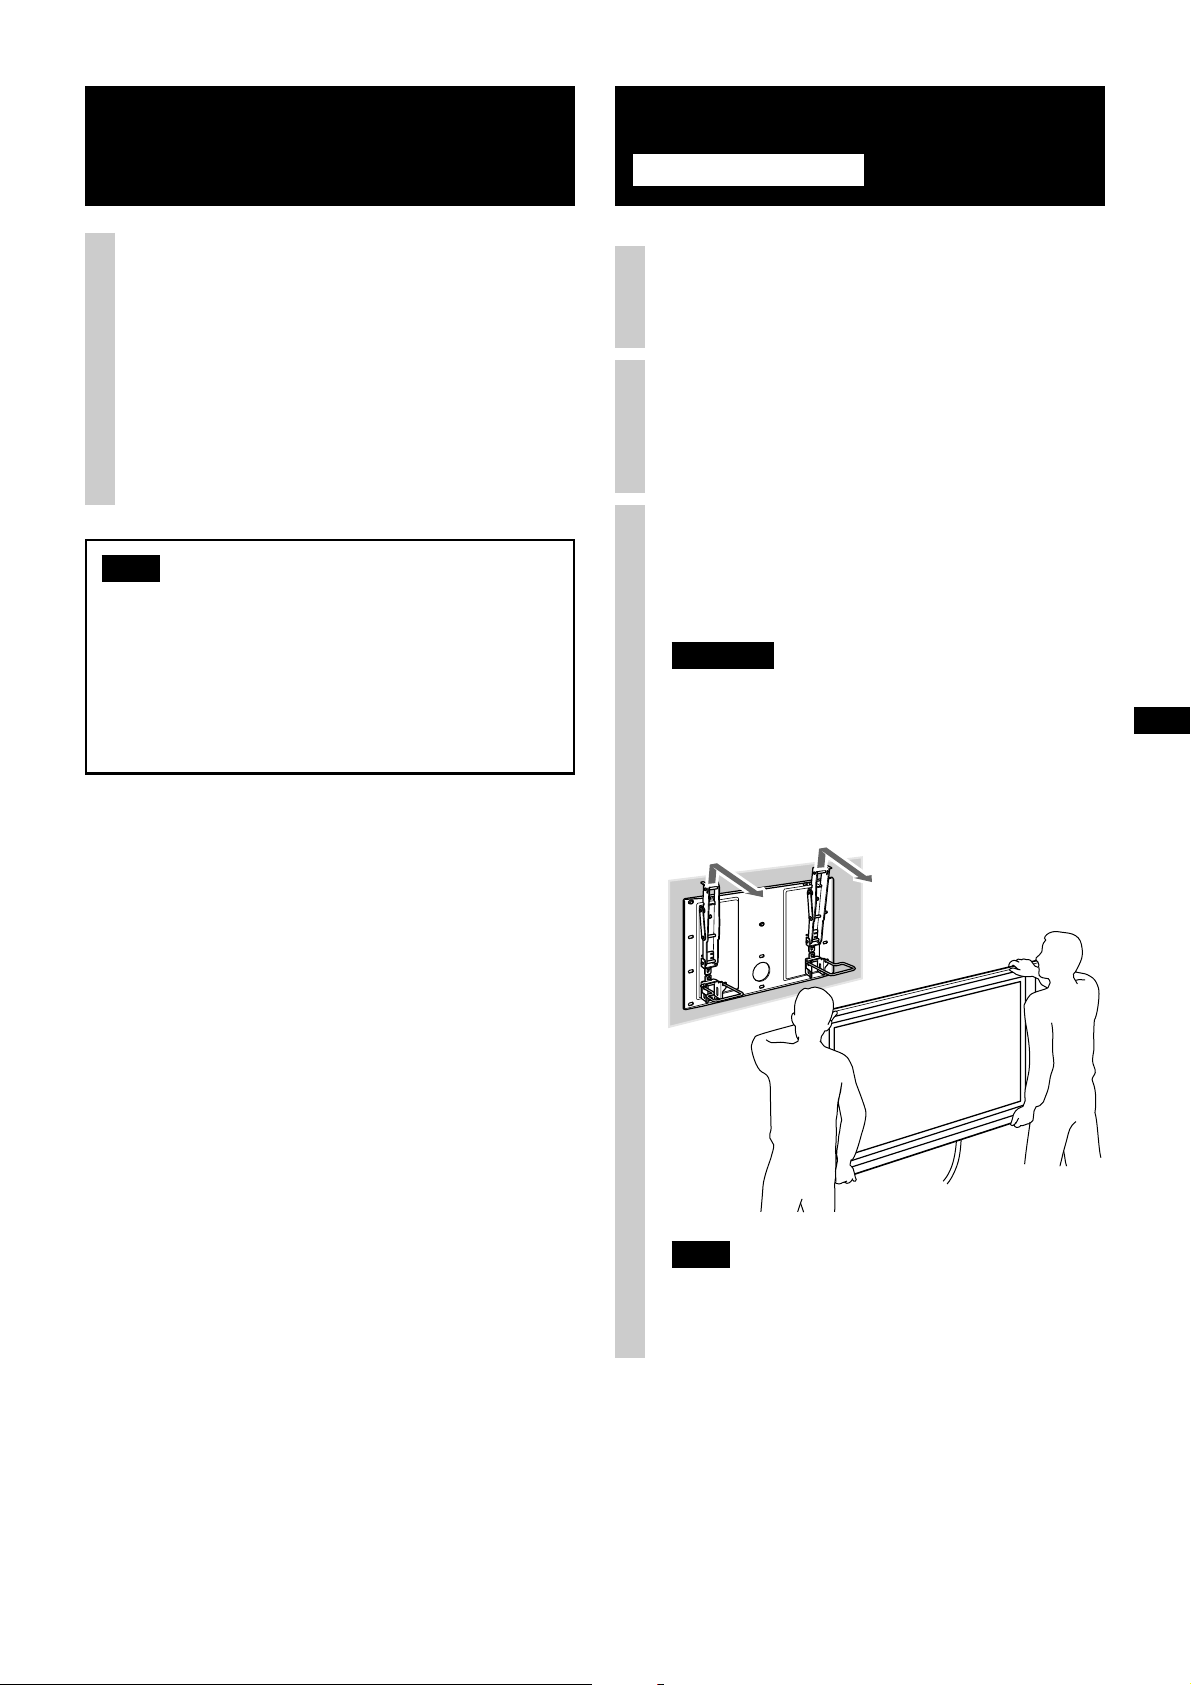
3 Be sure that two or more
persons hold the TV and slide it
upward to remove the TV.
WARNING
• Be sure that two or more persons hold the TV
when carrying it.
• Be careful not to allow the cords and cables to
get hung up when removing the TV.
• Be careful not to hurt your hands or fingers
when removing the TV.
Note
Always hold the TV by the non-transparent parts at
the top and bottom of the TV when carrying it.
13 (US)
Page 14
Connect the external
equipment cables to the
2 Connect external equipment
cables to the TV.
TV after installation
For Customers, Sony Dealers
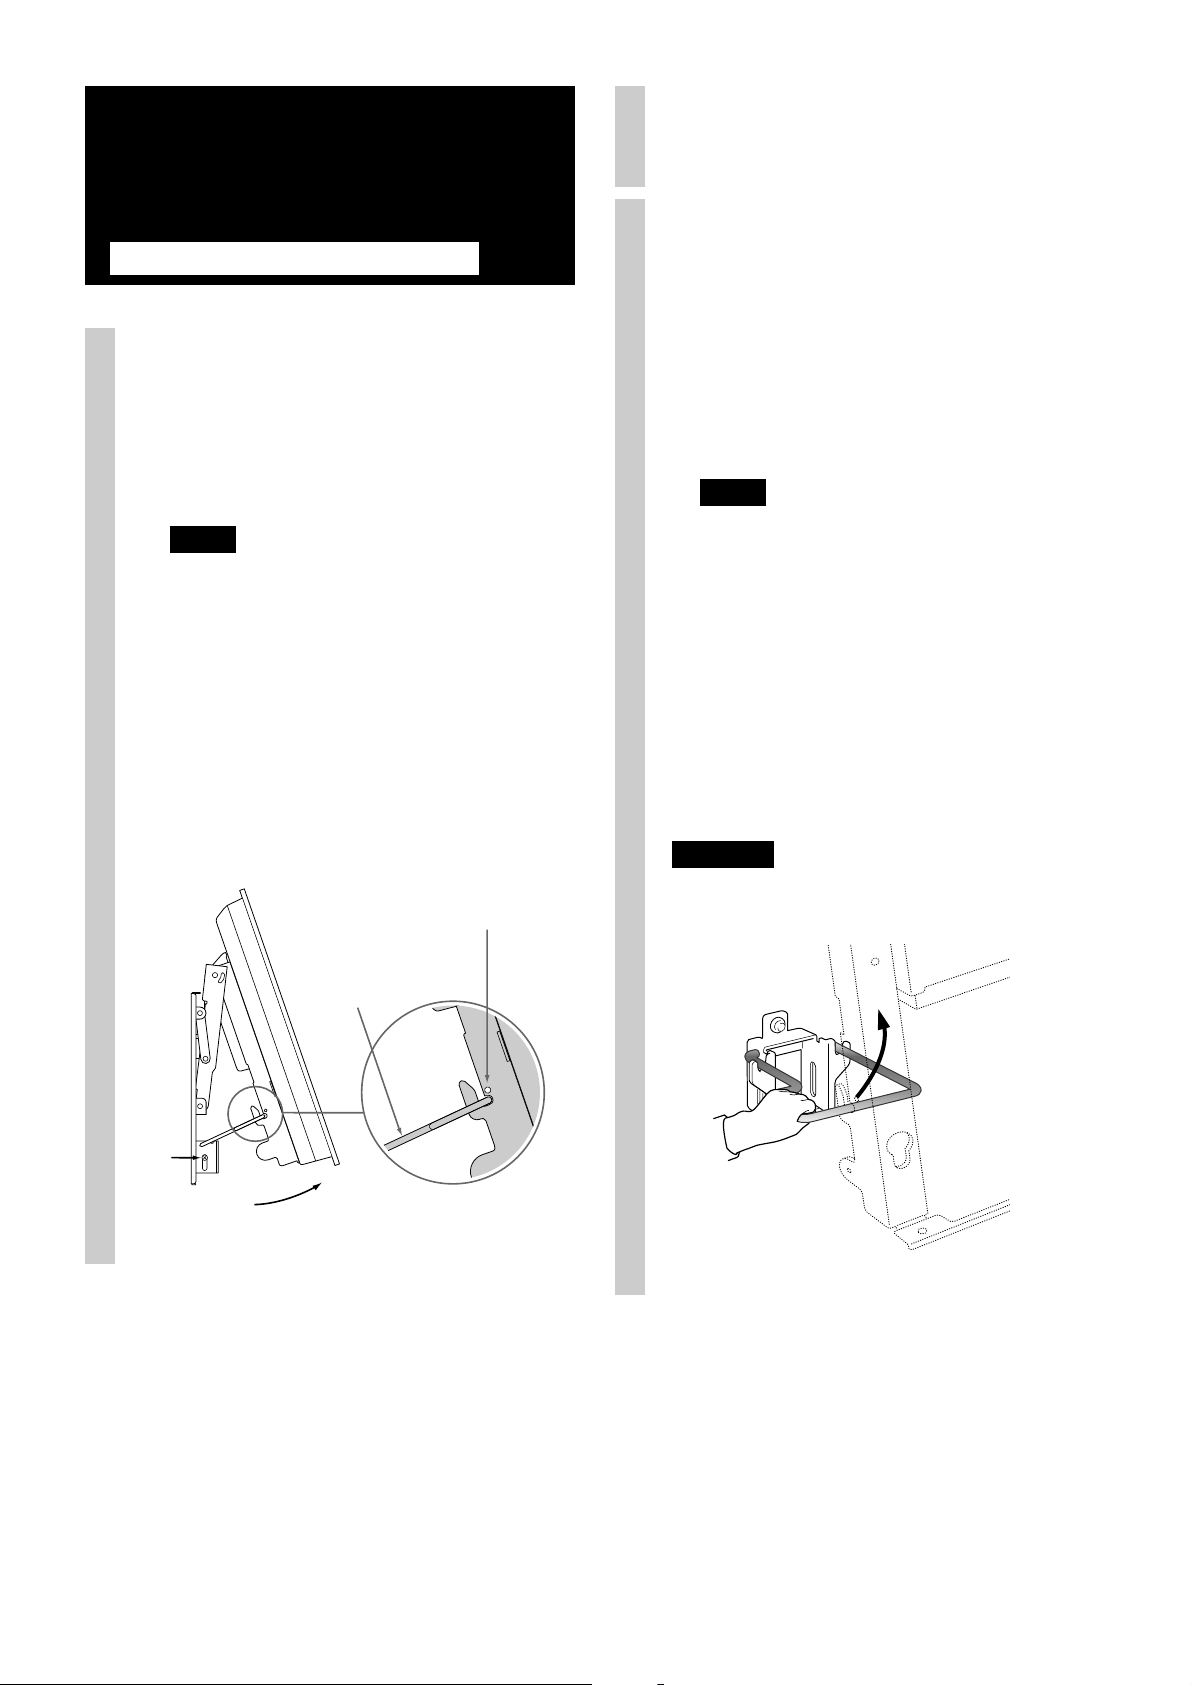
1 Tilt the TV upward.
1 Unplug the AC power cord.
2 Unfasten the two securing screws at the
bottom of the Mounting Rack (page 12).
3 Hold the bottom left and right of the TV and
gradually lift it upward.
Notes
• Do not hold the transparent part of the TV.
• Do not let go of the TV while lifting it, otherwise
the TV may hit the wall and cause damage.
4 Confirm the two support braces of the Plate
Unit are locked into the bottom left and right
hooks on either side of the Mounting Rack.
5 Insert the screws removed in the step 2 into
the screw holes on the outer sides of the
bottom left and right hooks of the Mounting
Rack and tighten firmly to lock the support
braces.
Screw hole for fixing the
support braces
3 Restore the TV to the non-tilted
position.
1 Unfasten the screws tighten at the outer sides
of the bottom left and right hooks of the
Mounting Rack in step 5 of procedure 1.
2 Hold the bottom left and right of the TV and
pull it out toward you so that the support
braces are unlocked from the bottom hooks
on the Mounting Rack.
Notes
• Do not hold the transparent part of the TV.
• Do not let go of the TV while lifting it, otherwise
the TV may hit the wall and cause damage.
3 Grasp the protruding part of the support
braces with your other hand and slide it
upward so that the support braces and the
TV are restored in the untilted position.
4 Tighten the securing screws.
5 Confirm that all the cables connected to the
TV are not twisted or pinched, and then plug
in the AC power cord.
WARNING
• Be sure two or more people do this work.
• Be careful not to pinch your hands or fingers.
2
Support
braces
3
3
14 (US)
Page 15
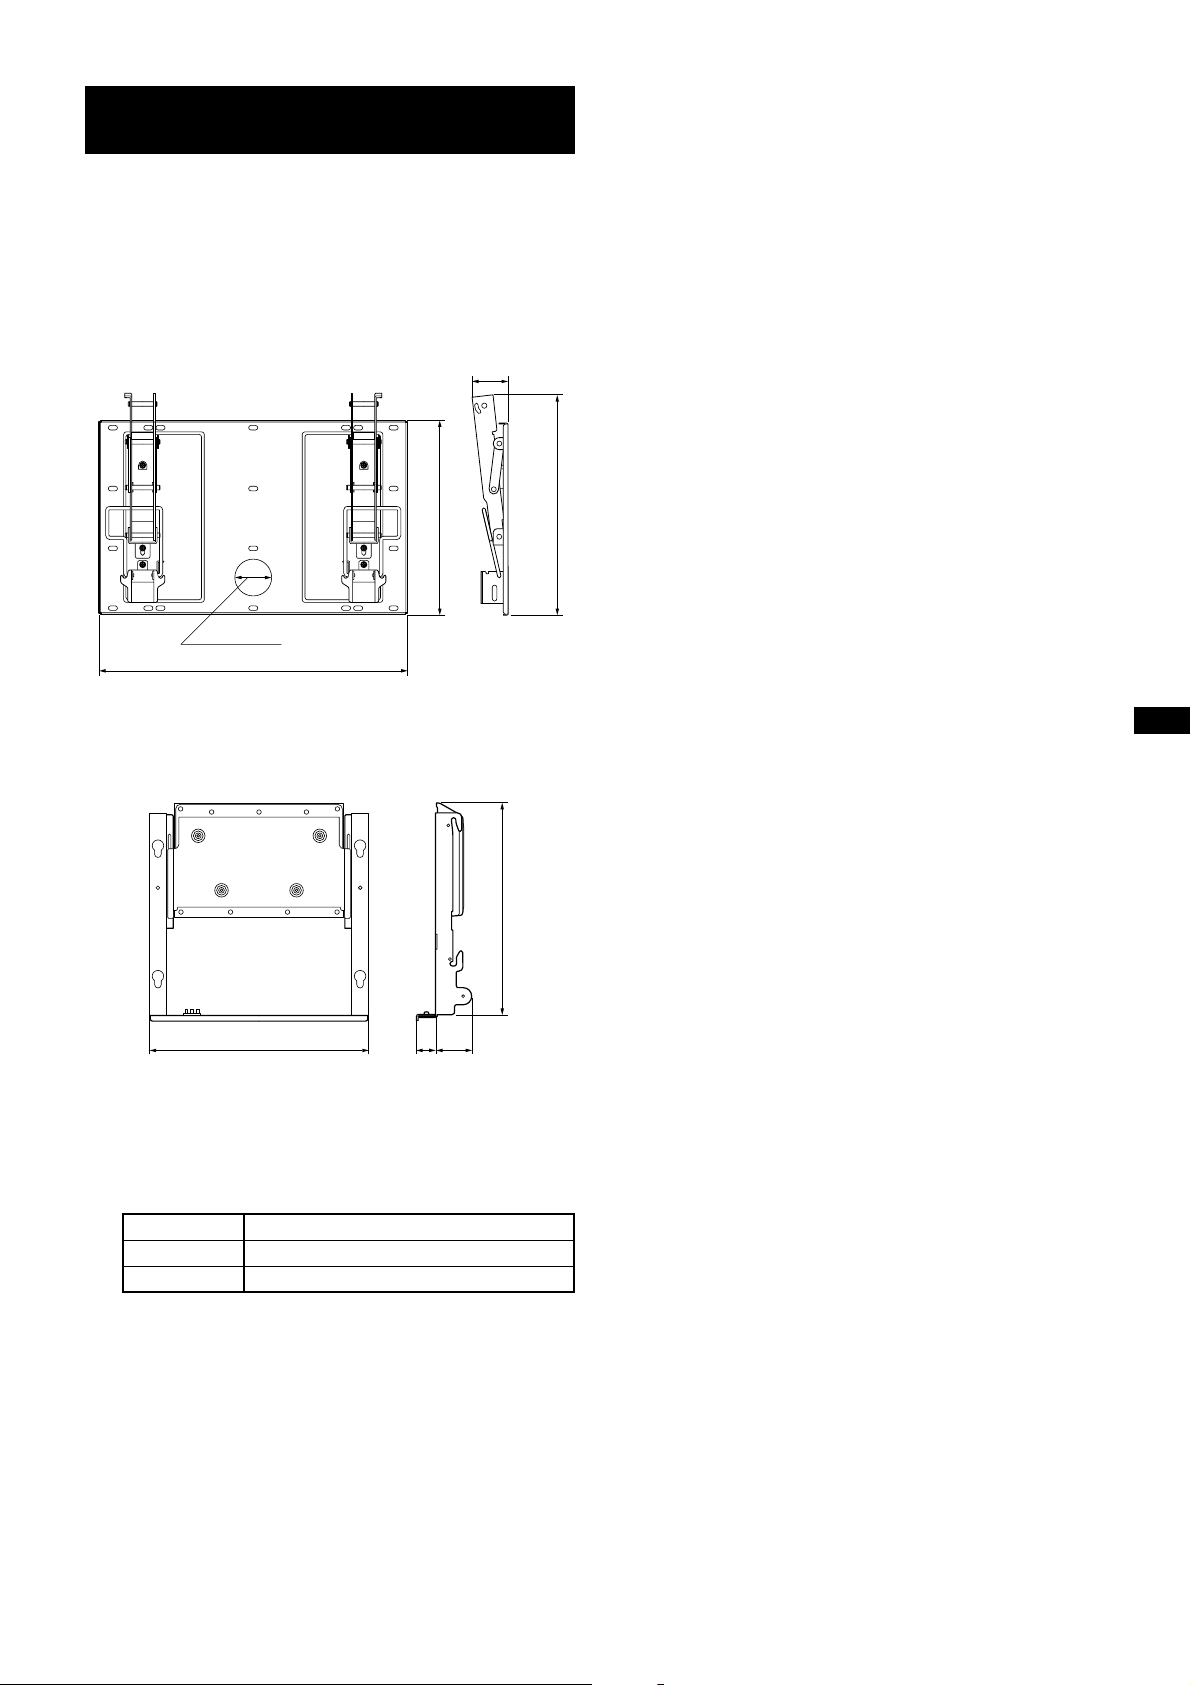
Specifications
Unit: mm (inches)
Weight: 15.0 kg (33 lb 1 oz)
Design and specifications are subject to change without
notice.
PLATE UNIT
79
(3 1⁄8)
)
32
⁄
17
)
32
⁄
29
MOUNTING RACK
ø 90 (3 5⁄8)
670 (26 3⁄8)
520 (20 1⁄2)
(1 3⁄4)
420 (16
44
85.5
(3 3⁄8)
)*
32
⁄
29
505 (19
480 (18
* When changing the position of the woofer speaker for
installing a 50-inch TV: 590 (23 1/4)
SPEAKER
Speaker unit 10 cm (2)
Impedance 4 Ω
Max. power 50 W
15 (US)
Page 16
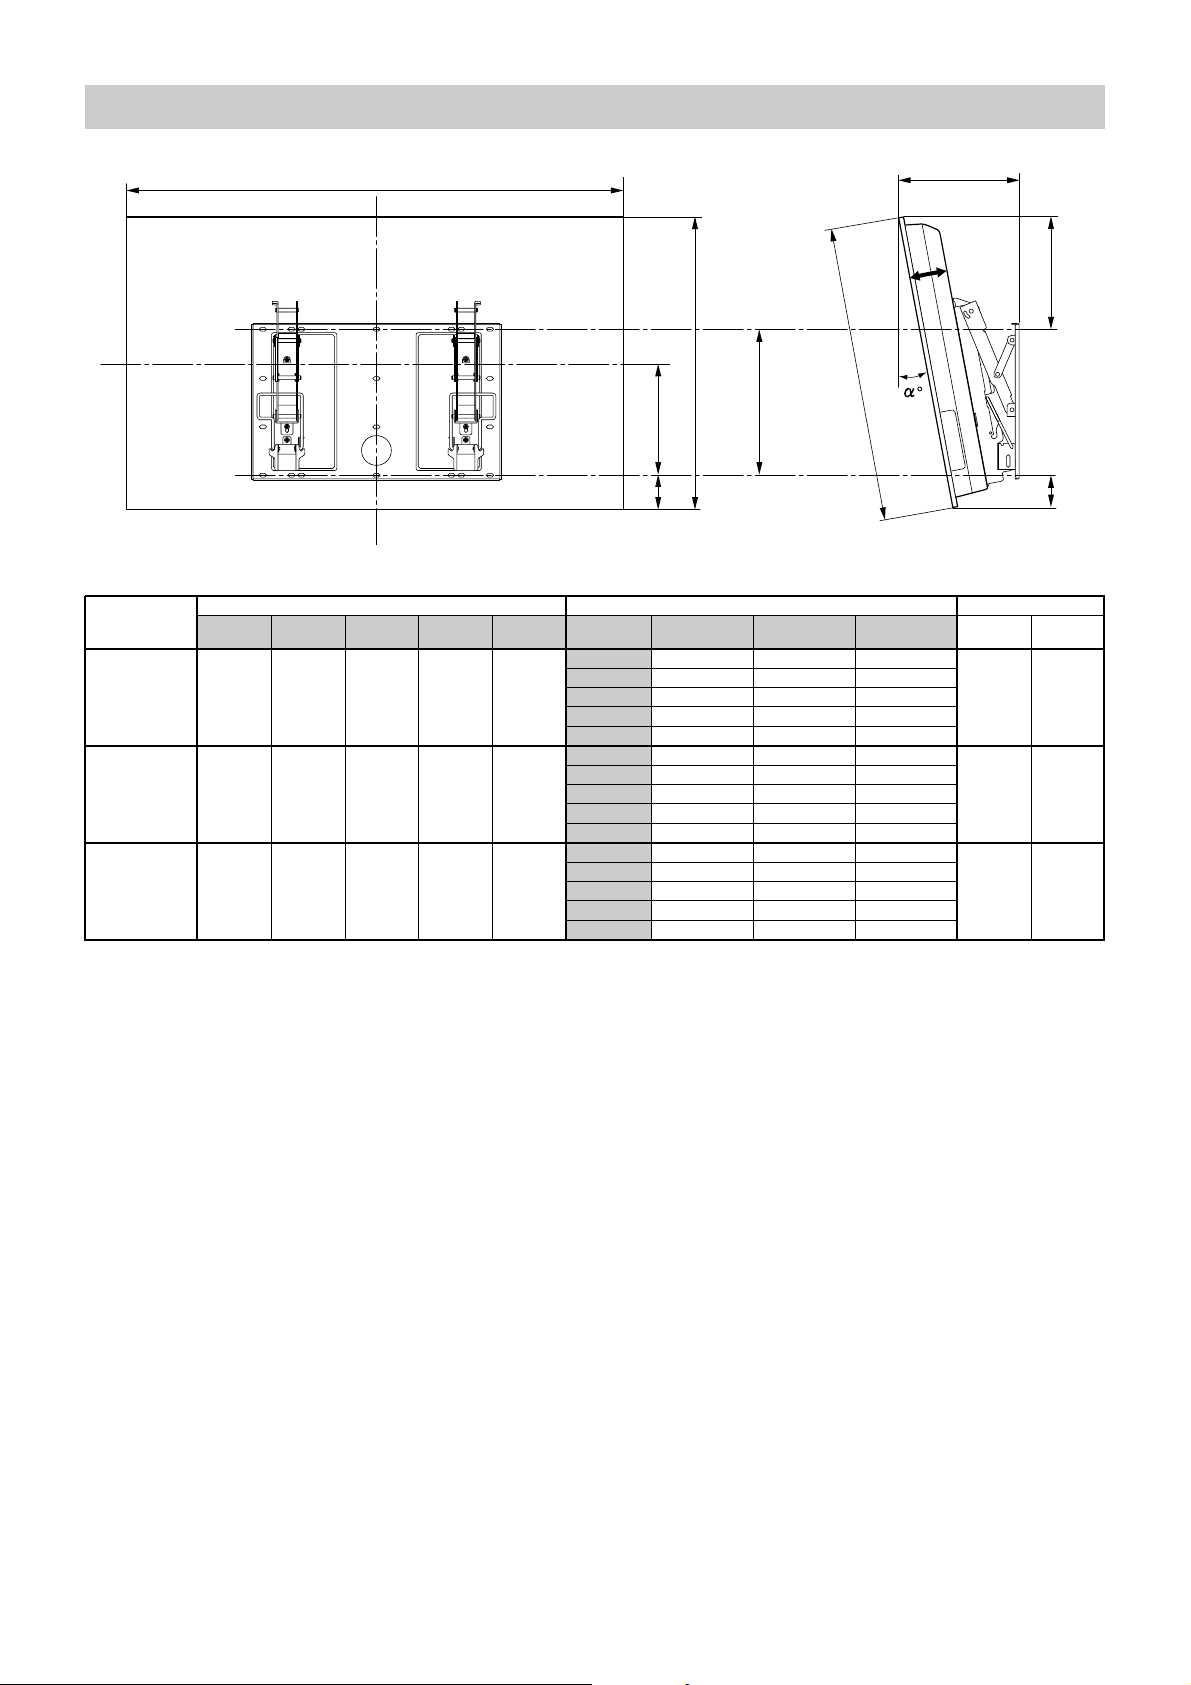
TV installing dimensions table
A
B
B
D
393 ± 0.5
(15 15/32 ± 5/256)
E
TV Model
KDE-37XS955 10º 270 (10 21/32) 122 (4 13/16) 76 (3)
KDE-42XS955 10º 282 (11 1/8) 194 (7 21/32) 76 (3)
KDE-50XS955 10º 303 (11 15/16) 310 (12 7/32) 74 (2 15/16)
TV Dimensions unit: mm (inches) Length for each mounting angle Unit: mm (inches) Weight
ABCDE
1048 599 89 246 58
(41 9/32) (23 19/32) (3 1/2) (9 23/32) (2 5/16)
1139 672 89 283 58
(44 27/32) (26 15/32) (3 1/2) (11 5/32) (2 5/16)
1336 789 89 343 56
(52 5/8) (31 1/16) (3 1/2) (13 1/2) (2 7/32)
Mounting
angle (αº)
0º 185 (7 5/16) 148 (5 27/32) 58 (2 5/16)
5º 228 (9) 136 (5 3/8) 68 (2 11/16)
15º 309 (12 3/16) 106 (4 3/16) 82 (3 1/4)
20º 346 (13 5/8) 88 (3 15/32) 84 (3 5/16)
0º 185 (7 5/16) 221 (8 23/32) 58 (2 5/16)
5º 235 (9 9/32) 209 (8 1/4) 68 (2 11/16)
15º 328 (12 15/16) 176 (6 15/16) 82 (3 1/4)
20º 371 (14 5/8) 157 (6 3/16) 84 (3 5/16)
0º 185 (7 5/16) 340 (13 13/32) 56 (2 7/32)
5º 245 (9 21/32) 327 (12 7/8) 66 (2 5/8)
15º 359 (14 5/32) 291 (11 15/32) 80 (3 5/32)
20º 412 (16 1/4) 268 (10 9/16) 83 (3 9/32)
FGHWeight (× 4)*
F
C
36kg 144kg
72lb 5oz 317lb 3oz
42kg 168kg
92lb 8oz 370lb 1oz
54kg 216kg
119lb 1oz 476lb 4oz
G
H
* The wall that the TV will be installed on should be capable of supporting a weight of at least four times that of the TV.
16 (US)
Page 17

Wall processing dimensions diagram
Unit: mm (inches)
420 (16 17/32)
670 (26 3/8)
610 (24)
455 (17 15/16)
406 (16)
65.5
(2 37/64)
ø 75 (3)
Hole for cable routing
20 – 9 × 20 (23/64 × 5/6)
Slot hole
393 ± 0.5 (15 15/32 ± 5/256)
131 (5 5/32) 131 (5 5/32)
13.5
(17/32)
17 (US)
Page 18

Nous vous remercions d’avoir fait
l’acquisition de ce produit.
ATTENTION
À l’attention des clients
Une certaine expérience est requise pour installer
ce produit. Confiez l’installation à un détaillant
Sony ou à un autre professionnel et portez une
attention particulière aux consignes de sécurité
pendant l’installation. Sony ne saurait être tenue
responsable de tout dommage ou de toute blessure
découlant d’une mauvaise utilisation ou d’une
installation incorrecte.
AVERTISSEMENT
Le non-respect des consignes de sécurité ou
l’utilisation incorrecte de ce produit peut provoquer un
incendie ou des blessures graves.
Ce mode d’emploi indique comment manipuler le
produit correctement et contient des précautions
essentielles à prendre pour éviter tout accident. Lisez
attentivement ce mode d’emploi et veillez à utiliser le
produit correctement. Conservez ce mode d’emploi
pour toute référence ultérieure.
À l’attention des détaillants Sony
Une certaine expérience est requise pour installer ce
produit. Lisez ce mode d’emploi attentivement afin de
procéder à l’installation en toute sécurité. Sony ne
saurait être tenue responsable de tout dommage ou de
toute blessure découlant d’une mauvaise utilisation ou
d’une installation incorrecte. Une fois l’installation
terminée, veuillez remettre ce manuel d’installation au
client.
Ce support de fixation murale est conçu pour être
utilisé exclusivement avec les produits suivants.
D’autres appareils utilisés avec ce support peuvent être
instables et entraîner des blessures.
Produits spécifiés (à compter de septembre 2004)
Téléviseur couleur KDE-37XS955
à écran plat KDE-42XS955
KDE-50XS955
Lorsque vous installez le téléviseur sur le support de
fixation murale, assurez-vous que le haut-parleur
d’extrêmes graves est bien raccordé au téléviseur.
Si le haut-parleur d’extrêmes graves n'est pas raccordé
correctement au téléviseur, un message d’erreur
s'affiche sur l’écran du téléviseur lors de la mise sous
tension de celui-ci.
Si un message d’erreur s’affiche sur l'écran du
téléviseur, le connecteur n’est pas raccordé
correctement. Assurez-vous qu’il n’est pas
endommagé, puis rebranchez le haut-parleur
d’extrêmes graves au téléviseur.
Si le connecteur du haut-parleur d’extrêmes graves
n'est pas correctement branché, aucun son n’est
audible depuis ce dernier et le téléviseur risque d’être
endommagé. (Un message d'erreur s'affiche sur l'écran
du téléviseur si le raccordement est incorrect.)
Sécurité
Les produits Sony sont conçus pour vous offrir le
maximum de sécurité.
Toutefois, si les produits sont utilisés de façon
incorrecte, ils peuvent entraîner des blessures graves
en provoquant un incendie ou l’électrocution, ou la
chute de l’appareil hors de son support. Veillez à
observer les consignes de sécurité préconisées pour
éviter de tels accidents.
2 (FR)
Page 19

À l’attention des clients
AVERTISSEMENT
Le non-respect des consignes suivantes peut
être fatal ou entraîner des blessures graves en
provoquant un incendie ou l’électrocution, ou la
chute de l’appareil hors de son support.
Confiez le déplacement ou le
démontage du téléviseur à des
professionnels qualifiés.
Si des personnes autres que des professionnels
qualifiés transportent ou démontent le téléviseur, celuici peut tomber et provoquer des blessures ou des
dommages matériels. Deux personnes au moins
doivent porter ou démonter le téléviseur.
Confiez l’installation à des
professionnels qualifiés et tenez les
enfants à l’écart pendant
l’installation.
Si le support de fixation murale ou le téléviseur n’est
pas installé correctement, les accidents suivants
peuvent se produire. Confiez l’installation à des
professionnels qualifiés.
• Le téléviseur peut tomber et causer des blessures
graves comme des hématomes ou des fractures.
• Si le mur sur lequel le support de fixation murale est
fixé est instable, inégal ou non perpendiculaire au
sol, l’appareil risque de tomber et de provoquer des
blessures ou des dommages matériels. Le mur doit
pouvoir supporter un poids équivalent à au moins
quatre fois le poids du téléviseur. (Reportez-vous au
tableau des dimensions d’installation du téléviseur à
la page 16 pour obtenir le poids de chaque
téléviseur.)
• Si l’installation du support de fixation murale n’est
pas assez solide, l’appareil risque de tomber et de
provoquer des blessures ou des dommages
matériels.
Ne renversez aucun liquide sur le
téléviseur.
Si le téléviseur est mouillé, un incendie ou
l’électrocution pourrait se produire.
Ne retirez pas les vis, etc. après
l’installation du téléviseur.
Dans ce cas, le téléviseur pourrait tomber et provoquer
des blessures ou des dommages matériels.
Ne démontez pas et ne modifiez pas
les pièces du support de fixation
murale.
Dans ce cas, le support de
fixation murale pourrait tomber
et provoquer des blessures ou
des dommages matériels.
N’installez aucun appareil autre que
ceux spécifiés.
Ce support de fixation murale est conçu pour être
utilisé avec les produits spécifiés uniquement. Si vous
installez un appareil autre que ceux qui sont spécifiés,
il pourrait tomber ou se briser et provoquer des
blessures ou des dommages matériels.
FR
Français
Ne couvrez pas les orifices de
ventilation du téléviseur.
Si vous couvrez les orifices de
ventilation (avec du tissu ou
autre matériau), l’appareil
pourrait surchauffer et
provoquer un incendie.
3 (FR)
Page 20

N’installez aucune charge autre que
le téléviseur sur le support de
fixation murale.
Dans ce cas, le téléviseur
pourrait tomber et provoquer
des blessures ou des dommages
matériels.
Ne vous appuyez pas sur le
téléviseur et ne vous y suspendez
pas.
Ne vous appuyez pas sur le
téléviseur et ne vous y
suspendez pas, car il risque de
tomber et de causer des
blessures graves.
N’exposez pas le téléviseur à la pluie
ou à l’humidité.
Dans ce cas, un incendie ou l’électrocution pourrait se
produire.
N’installez jamais le téléviseur dans
un endroit extrêmement chaud,
humide ou poussiéreux ou dans un
endroit où il serait soumis à des
vibrations mécaniques.
Dans ce cas, un incendie ou l’électrocution pourrait se
produire.
Tenez les objets inflammables et les
flammes nues (bougie, etc.) à l’écart
du téléviseur.
Pour éviter les risques d’incendie, ne placez pas
d’objets inflammables ni de corps incandescents (une
bougie, par exemple) à proximité du téléviseur.
ATTENTION
Le non-respect des consignes suivantes peut
entraîner des blessures ou des dommages
matériels.
N’installez pas le support de fixation
murale sur une surface où les coins
ou les côtés du téléviseur
dépasseraient.
N’installez pas le support de
fixation murale sur une surface
verticale telle qu’une colonne,
où les coins ou les côtés du
téléviseur dépasseraient de la
surface murale. Si une personne
ou un objet venait à heurter le
coin ou les côtés du téléviseur,
ceci risquerait de provoquer des
blessures ou des dommages
matériels.
N’appliquez aucune force excessive
sur le produit au cours de l’entretien
ou du nettoyage de l’appareil.
N’exercez aucune pression excessive sur le dessus du
téléviseur. Dans ce cas, le téléviseur pourrait tomber et
provoquer des blessures ou des dommages matériels.
N’installez pas le téléviseur sur ou
sous un climatiseur.
L’exposition prolongée du téléviseur à des fuites d’eau
ou à des courants d’air provenant du climatiseur
pourrait provoquer un incendie, l’électrocution ou des
problèmes de fonctionnement du téléviseur.
4 (FR)
Page 21

Précautions
Installation du support
• Si vous utilisez le téléviseur fixé au support de
fixation murale pendant une longue période, le mur
situé derrière le téléviseur ou au-dessus de celui-ci
peut se décolorer, ou encore le papier peint peut se
décoller, selon le matériau du mur.
• Les trous des vis restent apparents si vous démontez
le support de fixation murale après son installation.
• Si vous avez fait passer des câbles d’alimentation de
300 ohms dans les parois murales, nous vous
recommandons de les remplacer par des câbles
coaxiaux de 75 ohms.
Toutefois, s’il est nécessaire de continuer à utiliser
des câbles d’alimentation de 300 ohms, un espace
suffisamment important doit être prévu entre le
téléviseur et les câbles d’alimentation dans les parois
murales avant de procéder à l’installation. Avant de
procéder à l’installation, consultez votre installateur
pour choisir un emplacement approprié (où le
téléviseur ne subira aucune interférence radio, etc.).
• Champ magnétique
Cet appareil comporte un aimant puissant installé
dans le haut-parleur et qui génère un fort champ
magnétique. Tenez tout objet sensible aux champs
magnétiques à l’écart du haut-parleur du téléviseur.
de fixation murale
À l’attention des détaillants Sony
AVERTISSEMENT
À l’attention des détaillants Sony
Les instructions suivantes concernent les
détaillants Sony uniquement. Lisez attentivement
les consignes de sécurité ci-dessus et accordez une
attention particulière à la sécurité lors de
l’installation, de l’entretien et de la vérification de
ce produit.
Veillez à installer le support de
fixation murale solidement en
suivant les instructions de ce mode
d’emploi.
S’il manque des vis ou si elles
sont desserrées, le support de
fixation murale pourrait tomber
et provoquer des blessures ou
des dommages matériels.
Veillez à utiliser les vis
appropriées selon le matériau
du mur et installez l’appareil
solidement en utilisant au
moins quatre vis M8 (ou
équivalentes).
Veillez à ce que le cordon
d’alimentation CA ou le câble de
raccordement ne soit pas coincé ni
écrasé.
Si le cordon d’alimentation CA
ou le câble de raccordement est
coincé entre l’appareil et le mur,
ou s’il est plié ou tordu, les
conducteurs internes peuvent
être exposés et provoquer un
court-circuit ou une coupure
électrique. Un incendie ou
l’électrocution pourrait en
résulter.
5 (FR)
Page 22

Veillez à utiliser correctement les vis
et les pièces de fixation fournies
conformément aux instructions du
mode d’emploi. Si vous utilisez
d’autres éléments de fixation, le
téléviseur pourrait tomber et causer
des blessures corporelles ou être
endommagé.
Veillez à monter le support
correctement en suivant la procédure
décrite dans ce mode d’emploi.
S’il manque des vis ou si elles sont desserrées, le
téléviseur pourrait tomber et causer des blessures
corporelles ou être endommagé.
Veillez à serrer les vis solidement
dans la position indiquée.
Sinon, le téléviseur pourrait tomber et causer des
blessures corporelles ou être endommagé.
Une fois le téléviseur installé
correctement, fixez solidement les
câbles.
Si des personnes ou des objets se prennent dans les
câbles, ceci risque de provoquer des blessures ou
d’endommager le téléviseur.
Faites attention afin de ne pas vous
blesser les mains ou les doigts au
cours de l’installation.
Prenez garde à ne pas vous blesser les mains ou les
doigts pendant l’installation du support de fixation
murale ou du téléviseur.
Les vis nécessaires à l’installation du
support de fixation murale au mur
ne sont pas fournies.
Utilisez les vis appropriées selon le matériau et la
structure du mur lors du montage du support de
fixation murale.
Veillez à ne pas soumettre le
téléviseur à des chocs pendant
l’installation.
Si le téléviseur subit des chocs, il pourrait tomber ou se
briser. Ceci pourrait causer des blessures.
Veillez à installer le téléviseur sur un
mur parfaitement vertical et plat.
Dans le cas contraire, le téléviseur pourrait tomber et
provoquer des blessures.
6 (FR)
Page 23

Étape 1 :
Étape 2 :
Vérification des pièces
requises pour
l’installation
1 Préparez un tournevis
cruciforme et les vis appropriées
(au moins quatre vis M8 ou
équivalentes, non fournies),
selon le matériau du mur.
2 Ouvrez l’emballage et vérifiez
les pièces.
Choix de l’emplacement
d’installation
1 Placez le schéma sur un mur
parfaitement vertical et plat et
choisissez l’emplacement.
Fixez les trois feuilles du schéma ensemble à
l’aide de ruban adhésif. Pour plus de détails,
reportez-vous aux instructions imprimées sur le
schéma.
Laissez un espace suffisant entre le téléviseur et
le plafond et les parties saillantes du mur, tel
qu’indiqué dans l’illustration ci-dessous.
Remarque
Si vous comptez faire passer les câbles dans la paroi
murale, percez un trou dans le mur au préalable pour
vous assurer que les câbles peuvent passer dans le
mur. L’emplacement du trou d’acheminement des
câbles est indiqué sur le schéma et à la page 17.
Plaque (1)
Haut-parleur
d’extrêmes graves
Châssis (1)
Crochet (4)
Schéma (3 feuilles)
Unités : mm (pouces)
100
15
(3
⁄16)
300
100
)
16
⁄
13
(11
100
15
(3
⁄16)
)
16
⁄
15
(3
Vis (+PSW5 × L14) (6)Vis (+B6 × L20) (4)
7 (FR)
Page 24

2 Selon le schéma au mur et
l’illustration de la page 17,
déterminez les emplacements
des vis et du trou
d’acheminement des câbles (si
vous souhaitez faire passer les
câbles dans la paroi murale) et
marquez-les sur le mur.
AVERTISSEMENT
Le mur sur lequel vous installez le téléviseur doit
pouvoir supporter un poids équivalent à au moins
quatre fois le poids du téléviseur (page 16).
Vérifiez la solidité du mur sur lequel vous installez le
téléviseur. Au besoin, renforcez le mur.
Étape 3 :
Installation de la plaque
sur le mur
1 Fixez la plaque au mur à l’aide
de quatre vis (ou plus) de type
M8 (ou équivalentes), non
fournies.
Choisissez au moins quatre trous de vis portant
la même marque dans le schéma ci-dessous et
vissez-y solidement les vis afin qu’elles ne se
desserrent pas.
AVERTISSEMENT
• Les vis nécessaires à la fixation du support de
fixation murale au mur ne sont pas fournies.
•Veillez à utiliser les vis appropriées selon le
matériau et la structure du mur.
• Si la plaque n’est pas fixée assez solidement, utilisez
des vis supplémentaires.
• Vérifiez que la plaque est fixée solidement au mur.
Alignez la plaque afin qu’elle soit parfaitement
horizontale.
Plaque
8 (FR)
Page 25

2 Réglez l’angle des bras
stabilisateurs.
Lors de l’installation du téléviseur en position
perpendiculaire (0 degré), le réglage de l’angle
des bras stabilisateurs (étapes 1 et 2 cidessous) n’est pas nécessaire. Vérifiez que
chaque bras stabilisateur est vissé solidement.
1 Retirez les vis situées dans la partie centrale
supérieure et inférieure des deux bras
stabilisateurs. Choisissez le cran d’arrêt
correspondant à l’angle souhaité (0, 5, 10, 15
ou 20 degrés) et fixez-y chacun des bras
stabilisateurs.
2 Fixez solidement chaque bras stabilisateur à
l’aide des vis retirées à l’étape 1.
Remarques
•Veillez à régler les bras stabilisateurs droit et gauche
au même angle.
• Faites attention à ne pas vous pincer les doigts lors
du réglage de l’angle des bras.
• Si vous utilisez un tournevis électrique, réglez le
couple à environ 2 N·m.
Étape 4 :
Préparation pour
l’installation du
téléviseur
1 Retirez les vis retenant le
téléviseur au support de table.
Vis de serrage
•0 degré : laissez les vis blanches bien serrées.
• Plus de 0 degré : retirez les vis blanches.
Bras stabilisateur
2 Retirez le téléviseur du support
de table et placez le téléviseur
face vers le bas sur une surface
stable et recouverte d’une pièce
de tissu, à au moins 20 cm (8 po)
du sol.
1
2
Remarque
Au moins deux personnes doivent tenir le téléviseur
pour le transporter. Ne pas saisir le téléviseur par ses
parties transparentes, au haut ou au bas.
9 (FR)
Page 26

3 Retirez les quatre vis situées à
l’arrière du téléviseur.
4 Fixez les quatre crochets fournis
avec les quatre vis fournies
(+PSW5 × L14).
Étape 5 :
Installation du
téléviseur
AVERTISSEMENT
Terminez d’abord l’installation avant de brancher le
cordon d’alimentation CA dans la prise de courant. Ne
laissez pas le cordon d’alimentation CA se coincer entre
des pièces de l’appareil ou sous l’appareil, ce qui
pourrait provoquer un court-circuit ou l’électrocution.
Prenez garde à ne pas trébucher sur le cordon
d’alimentation CA ni à heurter le téléviseur, afin d’éviter
les blessures.
1
Lors de l’installation d’un téléviseur de 50
pouces sur le support de fixation murale SUPW3M, il est nécessaire de modifier la
position du haut-parleur d’extrêmes graves.
Remarques
• Si vous utilisez un tournevis électrique, réglez le
couple à environ 2 N·m.
• Ne pas poser le téléviseur sur la face écran pendant
longtemps car il pourrait être endommagé.
Modification de la position du
haut-parleur d’extrêmes graves.
1 Dévissez partiellement (environ trois tours)
les quatre vis retenant le haut-parleur
d’extrêmes graves (deux vis de chaque côté
sur les barres de soutien).
2 Faites glisser le haut-parleur d’extrêmes
complètement en haut du téléviseur, tel
qu’illustré ci-dessous.
3 Revissez les quatre vis desserrées à l’étape 1
afin de fixer le haut-parleur d’extrêmes
graves.
Desserrez les vis (mais ne
les retirez pas).
10 (FR)
Pièce de tissu
Remarque
Si le haut-parleur d’extrêmes graves n’est pas déplacé
jusqu’au bout vers le haut du téléviseur à l’étape 2, la
pièce de connexion du haut-parleur situé au bas de
l’arrière du téléviseur et les orifices de ventilation sont
bloqués, ce qui peut endommager le produit.
Page 27

2 Fixez le châssis aux crochets
situés à l’arrière du téléviseur.
Puis, faites glisser le châssis et
fixez-le à l’aide des vis fournies
(+PSW5 × L14).
Raccordement du hautparleur de graves
Pièce de tissu
3 Branchez au téléviseur le cordon
d’alimentation CA et le(s)
câble(s) de raccordement fournis
avec le téléviseur.
Branchez le cordon d’alimentation CA et le(s)
câble(s) de raccordement aux connecteurs situés
à l’arrière du téléviseur. Pour plus de détails sur
le raccordement du cordon d’alimentation CA et
du(des) câble(s) de raccordement, reportez-vous
au mode d’emploi du téléviseur.
Si vous faites passer le câble et le cordon dans le
mur, faites-les passer par le trou que vous avez
percé (page 17).
Arrière du téléviseur
Remarque
La raccordement du haut-parleur de graves est située
dans le coin inférieur droit du châssis. Lorsque vous
faites glisser le châssis, assurez-vous que le hautparleur d’extrêmes graves est solidement branché au
téléviseur.
Orifice d’acheminement des câbles
11 (FR)
Page 28

4 Installez le châssis (portant le
4
téléviseur) sur la plaque.
1 Tenez le châssis afin que les deux encoches de
chaque côté touchent les bras support de la
plaque.
2 Soulevez graduellement le châssis et le
téléviseur, en maintenant les deux encoches
engagées sur les bras support de la plaque.
Fixez les crochets de droite et de gauche du
haut du châssis sur les barres d’ancrage
situées dans le haut des deux bras
stabilisateurs de la plaque.
3 Assurez-vous que les quatre crochets sont
bien accrochés aux deux barres d’ancrage de
la plaque et que les bras support sont bien
fixés dans les encoches centrales de la plaque.
4 Serrez fermement les quatre vis (+B6 × L20,
fournies) du haut et du bas, sur chaque côté
du châssis.
2
Côté droit
Vis (+B6 × L20, fournies)
1
Vue latérale
Bras support
Plaque
2
Châssis
1
Châssis avec
téléviseur
Vérification de
l’installation
Vérifiez les points suivants.
• Les quatre crochets supérieurs du châssis
sont solidement fixés aux deux barres
d’ancrage de la plaque.
• Le cordon et le câble ne sont pas tordus ni
coincés.
•Toutes les vis (+B6 × L20, fournies) sont
solidement vissées.
AVERTISSEMENT
Si l’installation est incomplète, le produit pourrait
tomber et provoquer des blessures ou être endommagé.
En outre, si le cordon d’alimentation CA ou autre n’est
pas correctement installé, un court-circuit pourrait
survenir et provoquer un incendie ou l’électrocution.
Pour votre sécurité, vérifiez que l’installation est
effectuée complètement.
12 (FR)
Page 29

Vérification du
Retrait du téléviseur
fonctionnement du
haut-parleur d’extrêmes
graves
Ce support de fixation murale est équipé d’un
haut-parleur d’extrêmes graves. Après avoir
installé le châssis (portant le téléviseur) sur la
plaque, mettez le téléviseur sous tension et
vérifiez que le haut-parleur d’extrêmes graves
fonctionne correctement. Si le téléviseur n’est
pas installé correctement sur le châssis, aucun
son ne provient du haut-parleur d’extrêmes
graves, ou encore un message d’erreur s’affiche à
l’écran du téléviseur après quelques instants.
Remarque
Selon l’emplacement du support de fixation
murale, le haut-parleur d’extrêmes graves peut
produire un son plus ou moins fort. Si le son des
graves est trop fort, ajustez la qualité sonore en
réglant le niveau des graves dans le menu de
réglage du son de votre téléviseur. Pour plus de
détails sur le réglage de la qualité sonore, reportezvous au mode d’emploi du téléviseur.
À l’attention des détaillants Sony
1 Débranchez le cordon
d’alimentation CA de la prise de
courant.
2 Retirez les quatre vis de fixation
à l’étape 4 de la procédure 4,
page 12.
3 En vous assurant qu’au moins
deux personnes tiennent le
téléviseur, faites-le glisser vers le
haut pour le retirer.
AVERTISSEMENT
•Veillez à ce qu’au moins deux personnes
tiennent le téléviseur lors du déplacement.
•Prenez garde à ne pas accrocher le cordon
d’alimentation et les câbles lors du retrait du
téléviseur.
• Faites attention à ne pas vous blesser les
mains ou les doigts pendant le retrait du
téléviseur.
Remarque
Toujours saisir le téléviseur par les parties qui ne sont
pas transparentes au haut et au bas pour le
transporter.
13 (FR)
Page 30

Raccordement
d’équipement externe
au téléviseur après
2 Raccordez les câbles de
l’équipement externe au
téléviseur.
l’installation
À l’attention des clients, détaillants Sony
1 Faites pivoter le téléviseur.
1 Débranchez le cordon d’alimentation CA.
2 Retirez les deux vis de fixation situées au bas
du châssis (page 12).
3 En tenant le téléviseur par sa partie inférieure
à droite et à gauche, faites-le pivoter
graduellement vers le haut.
Remarques
• Ne tenez pas le téléviseur par sa partie
transparente.
• Ne laissez pas tomber le téléviseur en le faisant
pivoter, car il pourrait frapper le mur et causer
des dommages.
4 Assurez-vous que les deux bras support de la
plaque sont bien fixés dans les crochets de
droite et de gauche au bas du châssis.
5 Insérez les vis retirées à l’étape 2 dans les
trous de vis sur les côtés extérieurs des
crochets de droite et de gauche au bas du
châssis et vissez-les solidement pour
verrouiller les bras support.
Trou de vis pour la
fixation des bras support
3 Replacez le téléviseur dans sa
position normale.
1 Retirez les deux vis de fixation que vous avez
fixées à l’étape 5 de la procédure 1 des côtés
externes des crochets de droite et de gauche
au bas du châssis.
2 En tenant le téléviseur par sa partie inférieure
à droite et à gauche, faites-le pivoter vers
vous afin que les bras support se dégagent
des crochets inférieurs du châssis.
Remarques
• Ne tenez pas le téléviseur par sa partie
transparente.
• Ne laissez pas tomber le téléviseur en le faisant
pivoter, car il pourrait frapper le mur et causer
des dommages.
3 En tenant la partie saillante de chacun des
bras support d’une main, faites-le pivoter
vers le haut et rétablissez les bras support et
le téléviseur à la position normale.
4 Serrez les vis de fixation.
5 Vérifiez qu’aucun câble raccordé au
téléviseur n’est tordu ou coincé, puis
branchez le cordon d’alimentation CA.
AVERTISSEMENT
• Assurez-vous qu’au moins deux personnes
effectuent ce travail.
• Faites attention de ne pas vous pincer les mains ou
les doigts.
14 (FR)
2
Bras support
3
3
Page 31

Spécifications
Unités : mm (pouces)
Poids : 15,0 kg (33 lb 1 oz)
La conception et les caractéristiques techniques du produit
sont sujettes à modification sans préavis.
PLAQUE
79
(3 1⁄8)
)
32
⁄
17
)
32
⁄
29
420 (16
ø 90 (3 5⁄8)
670 (26 3⁄8)
CHÂSSIS
520 (20 1⁄2)
85,5
44
(3 3⁄8)
(1 3⁄4)
* Lorsque la position du haut-parleur d’extrêmes graves est
modifiée pour l’installation d’un téléviseur de 50 pouces : 590
(23 1/4)
)*
32
⁄
29
505 (19
480 (18
HAUT-PARLEUR
Élément haut-parleur 10 cm (2)
Impédance 4 Ω
Puissance max. 50 W
15 (FR)
Page 32

Tableau des dimensions d’installation du téléviseur
A
B
B
D
393 ± 0,5
(15 15/32 ± 5/256)
E
Modèle de
téléviseur
KDE-37XS955 10º 270 (10 21/32) 122 (4 13/16) 76 (3)
KDE-42XS955 10º 282 (11 1/8) 194 (7 21/32) 76 (3)
KDE-50XS955 10º 303 (11 15/16) 310 (12 7/32) 74 (2 15/16)
Dimensions du téléviseur Unités: mm (pouces) Mesure par angle de fixation Unités: mm (pouces) Poids
ABCDE
1048 599 89 246 58
(41 9/32) (23 19/32) (3 1/2) (9 23/32) (2 5/16)
1139 672 89 283 58
(44 27/32) (26 15/32) (3 1/2) (11 5/32) (2 5/16)
1336 789 89 343 56
(52 5/8) (31 1/16) (3 1/2) (13 1/2) (2 7/32)
Angle de
montage (αº)
0º 185 (7 5/16) 148 (5 27/32) 58 (2 5/16)
5º 228 (9) 136 (5 3/8) 68 (2 11/16)
15º 309 (12 3/16) 106 (4 3/16) 82 (3 1/4)
20º 346 (13 5/8) 88 (3 15/32) 84 (3 5/16)
0º 185 (7 5/16) 221 (8 23/32) 58 (2 5/16)
5º 235 (9 9/32) 209 (8 1/4) 68 (2 11/16)
15º 328 (12 15/16) 176 (6 15/16) 82 (3 1/4)
20º 371 (14 5/8) 157 (6 3/16) 84 (3 5/16)
0º 185 (7 5/16) 340 (13 13/32) 56 (2 7/32)
5º 245 (9 21/32) 327 (12 7/8) 66 (2 5/8)
15º 359 (14 5/32) 291 (11 15/32) 80 (3 5/32)
20º 412 (16 1/4) 268 (10 9/16) 83 (3 9/32)
FGHPoids (× 4)*
F
C
36kg 144kg
72lb 5oz 317lb 3oz
42kg 168kg
92lb 8oz 370lb 1oz
54kg 216kg
119lb 1oz 476lb 4oz
G
H
* Le mur sur lequel le téléviseur est installé doit pouvoir supporter un poids équivalent à au moins quatre fois le poids du
téléviseur.
16 (FR)
Page 33

Schéma des dimensions d’installation au mur
Unités : mm (pouces)
420 (16 17/32)
670 (26 3/8)
610 (24)
455 (17 15/16)
406 (16)
65,5
(2 37/64)
ø 75 (3)
Orifice d’acheminement des câbles
20 – 9 × 20 (23/64 × 5/6)
Trou de vis
393 ± 0,5 (15 15/32 ± 5/256)
131 (5 5/32) 131 (5 5/32)
13,5
(17/32)
17 (FR)
Page 34

Muchas gracias por la adquisición de
este producto.
PRECAUCIÓN
Información para los clientes
Para instalar este producto se requieren suficientes
conocimientos técnicos. Asegúrese de contratar la
instalación a un distribuidor o contratista Sony y
preste especial atención a la seguridad durante la
instalación. Sony no se responsabiliza de ningún
daño o lesión provocados por una manipulación o
instalación incorrectas.
ADVERTENCIA
Si no se siguen las medidas de seguridad o si el
producto se utiliza incorrectamente, se correrá el
peligro de sufrir lesiones graves o de incendio.
Este manual de instrucciones muestra la manera
correcta de manipular el producto, así como
precauciones importantes necesarias para evitar
accidentes. Lea detenidamente ese manual y utilice el
producto correctamente. Conserve este manual para
poder consultarlo en el futuro.
Este soporte de montaje mural ha sido diseñado para
ser utilizado sólo con los productos siguientes. Si se
utiliza con otros equipos podría desequilibrarse y
provocar daños personales.
Productos especificados
(en fecha de septiembre de 2004)
Televisor en color KDE-37XS955
de panel plano KDE-42XS955
KDE-50XS955
Al instalar el televisor sobre el soporte de montaje
mural, asegúrese de que el altavoz de graves esté
firmemente conectado al televisor.
Si el altavoz de graves no está conectado firmemente,
aparecerá un mensaje de error en la pantalla del
televisor cuando lo encienda.
Si aparece un mensaje de error en la pantalla del
televisor, el conector no está conectado correctamente.
Compruebe que el conector no esté dañado y, a
continuación, vuelva a conectar el altavoz de graves al
televisor.
Información para los distribuidores de Sony
Para instalar este producto se requieren suficientes
conocimientos técnicos. Lea detenidamente este
manual de instrucciones para realizar la instalación de
manera segura. Sony no se responsabiliza de ningún
daño o lesión provocados por una manipulación o
instalación incorrectas. Entregue este manual al cliente
después de la instalación.
Seguridad
Los productos de Sony están diseñados pensando en la
seguridad.
Sin embargo, si los productos se utilizan
incorrectamente, pueden provocar lesiones graves a
raíz de un incendio, una descarga eléctrica, que el
producto vuelque o que se caiga. Para evitar tales
accidentes, asegúrese de observar las precauciones de
seguridad.
Si el conector del altavoz de graves no está conectado
firmemente, el altavoz no emitirá ningún sonido, lo
que podría ocasionar daños al televisor. (Aparecerá un
mensaje de error en la pantalla del televisor si no está
conectado firmemente.)
2 (ES)
Page 35

Información para los clientes
ADVERTENCIA
Si no se tienen en cuenta las siguientes
precauciones, se correrá el peligro de sufrir
lesiones graves o incluso de muerte a raíz de un
incendio, una descarga eléctrica, que el
producto vuelque o que se caiga.
Asegúrese de contratar la instalación
a contratistas cualificados y
mantenga a los niños alejados
durante la instalación.
Si el soporte de montaje mural o el televisor no están
instalados correctamente, pueden ocurrir los accidentes
siguientes. Asegúrese de que la instalación la realizan
contratistas cualificados.
• El televisor podría caerse y provocar lesiones graves
como contusiones o fracturas.
• Si la pared en la que se instala el soporte de montaje
mural es inestable, desigual o no es perpendicular
con el piso, la unidad puede caerse y provocar daños
personales o materiales. La pared debe ser capaz de
soportar un peso de al menos cuatro veces el peso
del televisor. (Consulte la tabla de dimensiones de
instalación del televisor en la página 16 para ver el
peso de cada televisor.)
• Si la instalación del soporte de montaje mural en la
pared no es lo suficientemente resistente, es posible
que la unidad se caiga y provoque daños personales
o materiales.
Asegúrese de contratar el traslado o
el desmontaje del televisor a
contratistas cualificados.
Si otras personas que no son contratistas cualificados
transportan o desmontan el televisor, éste puede caerse
y provocar daños personales y materiales. Asegúrese
de que transportan o desmontan el televisor dos o más
personas.
No vierta ningún tipo de líquido
sobre el televisor.
Si el televisor se moja, se correrá el peligro de incendio
o de descargas eléctricas.
No quite los tornillos, etc., una vez
montado el televisor.
Si lo hace, el televisor puede caerse y provocar daños
personales o materiales.
No desmonte ni modifique las piezas
del soporte de montaje mural.
Si lo hace, el soporte de montaje
mural puede caerse y provocar
daños personales o materiales.
No monte ningún otro equipo que
no sea el producto especificado.
Este soporte de montaje mural ha sido diseñado para
ser utilizado sólo con el producto especificado. Si
monta un equipo distinto del especificado, puede
caerse o romperse y provocar daños personales o
materiales.
ES
Español
No obstruya el orificio de ventilación
del televisor.
Si cubre el orificio de
ventilación (con un paño, etc.),
el televisor podría
sobrecalentarse y provocar un
incendio.
3 (ES)
Page 36

No aplique ningún peso que no sea
el propio del televisor en el soporte
de montaje mural.
Si lo hace, el televisor puede
caerse y provocar daños
personales o materiales.
No se apoye en el televisor ni se
cuelgue del mismo.
No se apoye ni se cuelgue del
televisor porque podría caerle
encima y provocarle lesiones
graves.
No exponga el televisor a la lluvia ni
a la humedad.
Podría originarse un incendio o producirse descargas
eléctricas.
No coloque nunca el televisor en
lugares muy calientes, húmedos, o
excesivamente polvorientos, ni en
lugares en los que se produzcan
vibraciones.
Si lo hace, podría originarse un incendio o producirse
descargas eléctricas.
Mantenga el televisor alejado de
objetos inflamables y de llamas de
fuego (como por ejemplo, de velas).
Para evitar incendios, mantenga el televisor alejado de
objetos inflamables y de llamas de fuego (como por
ejemplo, de velas).
PRECAUCIÓN
Si no se tienen en cuenta las precauciones
siguientes, se correrá el peligro de sufrir daños
personales o materiales.
No instale el soporte de montaje
mural en superficies de paredes en
las que puedan sobresalir las
esquinas o los lados del televisor.
No instale el soporte de montaje
mural en superficies de paredes,
tales como una columna, en las
que puedan sobresalir las
esquinas o los lados del
televisor. Si una persona o un
objeto se golpea con la esquina
o el lado saliente del televisor,
pueden producirse daños
personales so materiales.
No manipule el producto con fuerza
excesiva cuando realice su limpieza o
mantenimiento.
No aplique fuerza excesiva en la parte superior del
televisor. Si lo hace, el televisor puede caerse y
provocar daños personales o materiales.
No instale el televisor encima ni
debajo de un aparato de aire
acondicionado.
Si el televisor queda expuesto a goteo o corriente de
aire procedentes del aparato de aire acondicionado
durante mucho tiempo, se correrá el peligro de
incendio o de descargas eléctricas, o de que el televisor
no pueda funcionar correctamente.
4 (ES)
Page 37

Precauciones
Instalación del soporte
• Si utiliza el televisor instalado en el soporte de
montaje mural durante un largo período de tiempo,
es posible que la pared que quede detrás o encima
del televisor se descolore o que, si la pared está
empapelada, se desenganche el papel, dependiendo
del material de la pared.
• Si se quita el soporte de montaje mural después de
haber estado instalado en la pared, quedarán los
orificios de los tornillos.
• Si ha dispuesto cables de antena de 300 ohmios
detrás de la pared, se recomienda que los cambie por
cables coaxiales de 75 ohmios.
Si es necesario seguir utilizando los cables de antena
de 300 ohmios, asegúrese de que haya suficiente
espacio disponible entre el televisor y los cables de
antena detrás de la pared antes de realizar la
instalación. Póngase en contacto con el contratista
para decidir la ubicación ideal (sin interferencias
radioeléctricas, etc.) antes de realizar la instalación.
• Influencia magnética
Este televisor contiene un potente imán en el altavoz
que genera flujo magnético. Mantenga apartados del
altavoz del televisor todos los artículos que sean
susceptibles a la influencia magnética.
de montaje mural
Información para los distribuidores de Sony
ADVERTENCIA
Información para los distribuidores
de Sony
Las instrucciones siguientes están destinadas
únicamente a los distribuidores de Sony. Asegúrese
de leer las precauciones de seguridad descritas
anteriormente y preste especial atención a la
seguridad durante la instalación, el mantenimiento
y la comprobación de este producto.
Asegúrese de instalar el soporte de
montaje mural firmemente en la
pared siguiendo las instrucciones de
este manual.
Si alguno de los tornillos queda
suelto o se desprende, el
soporte de montaje mural
puede caerse y provocar daños
personales o materiales.
Asegúrese de utilizar los
tornillos adecuados para el
material de la pared e instale la
unidad firmemente, utilizando
cuatro o más tornillos M8 (o
equivalentes).
Evite que el cable de alimentación de
CA o el cable de conexión queden
atrapados.
Si el cable de alimentación de
CA o el cable de conexión
quedan atrapados entre la
unidad y la pared o si se doblan
o tuercen con fuerza, es posible
que los conductores internos
queden expuestos y que
provoquen un cortocircuito o
corte eléctrico. Esto podría
originar un incendio o producir
descargas eléctricas.
5 (ES)
Page 38

Asegúrese de utilizar correctamente
los tornillos y las piezas de sujeción
suministrados siguiendo las
instrucciones que se describen en
este manual. Si utiliza artículos
sustitutivos, el televisor podría
caerse y dañarse o provocar daños
personales.
Efectúe correctamente el montaje
del soporte siguiendo el
procedimiento descrito en este
manual.
Si algunos de los tornillos queda suelto o se desprende,
el televisor podría caerse y dañarse o provocar daños
personales.
Asegúrese de apretar bien los
tornillos en la posición
correspondiente.
Si no lo hace así, el televisor podría caerse y dañarse o
provocar daños personales.
Una vez haya instalado
correctamente el televisor, fije
adecuadamente los cables.
Si alguna persona u objeto se enreda con los cables,
correrá el peligro de sufrir heridas personales o de
dañarse el televisor.
Tenga cuidado para no herirse las
manos o los dedos durante la
instalación.
Tenga cuidado para no herirse las manos o los dedos
cuando instale el soporte de montaje mural o el
televisor.
Los tornillos necesarios para fijar el
soporte de montaje mural a la pared
no están incluidos.
Utilice los tornillos adecuados para el material y la
estructura de la pared en la que se proponga montar el
soporte de montaje mural.
Procure que el televisor no reciba
golpes durante la instalación.
Si el televisor recibe algún golpe, puede caerse o
romperse. Tales percances podrían causar heridas
personales.
Asegúrese de instalar el televisor en
una pared que sea perpendicular y
plana.
De lo contrario, el televisor podría caerse y provocar
daños personales.
6 (ES)
Page 39

Paso 1:
Paso 2:
Comprobar las piezas
necesarias para la
instalación
1 Prepare un destornillador de
cabeza en cruz y los tornillos
adecuados (cuatro o más del
tipo M8 o equivalentes, no
suministrados), según el
material de la pared.
2 Abra el embalaje y compruebe
las piezas.
Decidir la ubicación de
instalación
1 Coloque la plantilla de papel en
una pared perpendicular y
plana, y decida la ubicación de
instalación.
Pegue las tres hojas suministradas de la plantilla
de papel, una junto a otra, con cinta adhesiva de
venta en las tiendas del ramo. Para obtener
información detallada, consulte la información
impresa en la platilla de papel.
Deje un espacio adecuado entre el televisor y el
techo y las partes salientes de la pared, como se
muestra en la ilustración siguiente.
Nota
Si desea instalar los cables en la pared, haga un
orificio de antemano en la pared para asegurarse de
que los cables se pueden pasar por la pared. La
posición del orificio para el cable está impresa en la
plantilla de papel y en la página 17.
Placa (1)
Altavoz de graves
Bastidor de montaje (1)
Unidad: mm
300
100 100
Gancho (4)
100
Plantilla de papel
(1 conjunto de 3 hojas)
To rnillo (+PSW5 × L14) (6)To rnillo (+B6 × L20) (4)
7 (ES)
Page 40

2 Consultando la plantilla de
papel y la página 17, determine
las posiciones de los tornillos y
del orificio para el cable (si se
propone instalar los cables en la
pared), y efectúe el trabajo en la
pared.
ADVERTENCIA
La pared en la que se proponga instalar el televisor
deberá ser capaz de soportar un peso al menos cuatro
veces mayor que el peso del televisor (página 16).
Confirme la resistencia de la pared en la que se
propone instalar el televisor. Si es necesario, refuerce
la pared.
Paso 3:
Instalar la placa en la
pared
1 Fije la placa en la pared
utilizando cuando o más
tornillos M8 (o equivalentes) (no
suministrados).
Seleccione por lo menos cuatro orificios de
tornillo con la misma marca que se muestra en la
ilustración siguiente, y fije los tornillos con
seguridad para que no se aflojen.
ADVERTENCIA
• Los tornillos para fijar el soporte de montaje mural
a la pared no están incluidos.
• Asegúrese de utilizar los tornillos adecuados, según
el material y la estructura de la pared.
• Si la placa no queda fijada con suficiente seguridad,
utilice más tornillos.
• Confirme que la placa haya quedado fijada con
seguridad a la pared.
Alinee la unidad de modo que quede
perfectamente nivelada.
Placa
8 (ES)
Page 41

2 Ajuste el ángulo de los brazos
estabilizadores.
Cuando instale el televisor perpendicularmente
(0 grados), no es necesario realizar el ajuste del
ángulo de los brazos (procedimientos 1 y 2
siguientes). Asegúrese de que cada brazo
estabilizador queda fijado con seguridad.
1 Extraiga los tornillos de la parte superior
central y de la parte inferior central de ambos
brazos estabilizadores. A continuación, elija la
muesca correspondiente al ángulo deseado
(5, 10, 15, ó 20 grados) y acople el brazo
estabilizador en la muesca.
2 Fije con seguridad cada brazo estabilizador
utilizando los tornillos que ha extraído en el
procedimiento 1.
Notas
• Asegúrese de ajustar los ángulos de los brazos
derecho e izquierdo al mismo ángulo.
•Tenga cuidado de no pillarse los dedos al ajustar el
ángulo de los brazos.
• Si utiliza un destornillador eléctrico, ajuste el par de
apriete aproximadamente a 2 N·m.
•0 grados: Deje los tornillos blancos apretados tal y
como están.
• Distinto de 0 grados: Extraiga los tornillos blancos.
Paso 4:
Preparar la instalación
del televisor
1 Extraiga los tornillos que fijan el
televisor al soporte de
sobremesa.
To rnillo de la
abrazadera
2 Separe el televisor del soporte
de sobremesa, y coloque el
televisor, con la pantalla abajo,
sobre una superficie de trabajo
estable cubierta con un paño, a
20 cm del suelo como mínimo.
1
Brazo estabilizador
Nota
Asegúrese de que al menos dos personas sujetan el
televisor durante el transporte. No sujete las partes
transparentes de la parte superior ni inferior del
televisor.
2
9 (ES)
Page 42

3 Extraiga los cuatro tornillos del
lado posterior del televisor.
4 Fije los cuatro ganchos
suministrados utilizando los
cuatro tornillos suministrados
(+PSW5 × L14).
Paso 5: Instalar el televisor
ADVERTENCIA
Asegúrese de haber completado la instalación antes de
enchufar el cable de alimentación de CA a la toma de
corriente. Si el cable de alimentación de CA queda
atrapado debajo de componentes del equipo o entre los
mismos, correrá el peligro de cortocircuito o de
descargas eléctricas.
Tenga cuidado de no tropezar con el cable de
alimentación de CA o el televisor, porque podría hacerse
daño.
1
Si instala un televisor de 50 pulgadas en el
soporte de montaje mural SU-PW3M, deberá
cambiar la posición del altavoz de graves.
Cambio de la posición del
altavoz de graves.
Notas
• Si utiliza un destornillador eléctrico, ajuste el par de
apriete aproximadamente a 2 N·m.
• No coloque el televisor boca abajo durante un
tiempo prolongado ya que podría dañar la
superficie frontal.
1 Afloje unas tres vueltas los cuatro tornillos
(dos en cada lado de los brazos de los
puntales) utilizados para fijar el altavoz de
graves en su lugar.
2 Deslice completamente hacia arriba el altavoz
de graves como se muestra a continuación.
3 Vuelva a apretar los cuatro tornillos
(aflojados en el paso 1) para fijar el altavoz
de graves.
Afloje (pero no retire) los tornillos.
10 (ES)
Paño suave
Nota
Si no desliza por completo el altavoz de graves en el
paso 2, la ubicación de la parte de conexión del
altavoz de graves, situada en la parte inferior central
del lado posterior del televisor, y los orificios de
ventilación se bloquearían, produciendo daños en el
aparato.
Page 43

2 Enganche el bastidor de montaje
en los ganchos del lado
posterior del televisor. A
continuación, desliza el bastidor
de montaje y fíjelo utilizando los
tornillos suministrados (+PSW5 ×
L14).
Junta del altavoz
potenciador de graves
Paño suave
3 Conecte al televisor el cable de
alimentación de CA y el(los)
cable(s) suministrado(s) con el
televisor.
Conecte el cable de alimentación de CA y el(los)
cable(s) de conexión a los conectores del lado
posterior del televisor. Para ver los detalles sobre
la conexión del cable de alimentación de CA y
del(los) cable(s) de conexión, consulte el manual
de instrucciones del televisor.
Cuando coloque los cables en la pared, páselos
por el orificio que usted había taladrado (página
17).
Lado posterior del televisor
Nota
El junta del altavoz potenciador de graves está
situado en la parte inferior derecha del bastidor de
montaje. Cuando deslice el bastidor de montaje,
asegúrese de que el altavoz de graves esté firmemente
conectado al televisor.
Orificio para el paso de cables
11 (ES)
Page 44

4 Instale el bastidor de montaje
4
(con el televisor) en la placa.
1 Sostenga el bastidor de montaje de modo que
las dos muescas centrales de cada lado se
pongan en contacto con los tirantes de
soporte de la placa.
2 Levante gradualmente el bastidor de montaje
y el televisor en sentido vertical manteniendo
las muescas centrales acopladas con los
tirantes de soporte de la placa. Enganche los
ganchos izquierdo y derecho de la parte
superior del bastidor de montaje en las barras
de anclaje que hay en la parte superior de los
brazos estabilizadores izquierdo y derecho de
la placa.
3 Confirme que los cuatro ganchos superiores
hayan quedado firmemente enganchados a
las dos barras de anclaje de la placa y que los
tirantes de soporte estén fijados en las
muescas centrales del bastidor de montaje.
4 Apriete firmemente los cuatro tornillos (+B6
× L20, suministrados) superiores e inferiores
de cada lado del bastidor de montaje.
Lateral derecho
To rnillos (+B6 × L20,
suministrados)
Confirme que haya
2
1
Vista lateral
Los tirantes de
soporte
Placa
2
Bastidor de
montaje
Bastidor de
montaje con el
televisor
1
finalizado la instalación
Compruebe los puntos
siguientes:
• Que los cuatro ganchos superiores del
bastidor de montaje estén firmemente
enganchados a las dos barras de anclaje de la
placa.
• Que los cables no estén retorcidos ni
atrapados.
• Que todos los tornillos de fijación (+B6 × L20,
suministrados) estén bien apretados.
ADVERTENCIA
Una instalación incompleta puede causar la caída del
aparato y ocasionar daños materiales o personales.
Además, la colocación inadecuada del cable de
alimentación de CA, etc. puede ser causa de un incendio
o de descargas eléctricas debidas a un cortocircuito.
Por razones de seguridad, no se olvide de confirmar que
haya finalizado la instalación.
12 (ES)
Page 45

Compruebe el
Cómo separar el
funcionamiento del
altavoz de graves
Este soporte de montaje mural está provisto de
un altavoz de graves. Después de haber
instalado el bastidor de montaje (con el televisor)
en la placa, conecte el interruptor de
alimentación del televisor y compruebe que el
altavoz de graves funcione correctamente. Si el
televisor no está instalado correctamente en el
bastidor de montaje, no saldrá sonido por el
altavoz de graves, o después de cierto tiempo
aparecerá un mensaje de error en la pantalla del
televisor.
Nota
Dependiendo del entorno en el que instale el
soporte de montaje mural, es posible que el altavoz
de graves produzca un fuerte sonido de graves. Si
el sonido de los graves es demasiado fuerte, ajuste
el sonido según sus preferencias en el ajuste del
nivel del altavoz de graves que encontrará en la
opción del menú del televisor. Consulte el manual
de instrucciones del televisor para encontrar más
detalles sobre el ajuste del sonido.
televisor
Información para los distribuidores de Sony
1 Desenchufe el cable de
alimentación de CA de la toma
de corriente.
2 Extraiga los cuatro tornillos de
fijación del paso 4 del
procedimiento 4 que se
encuentra en la página 12.
3 Haga que dos o más personas
sujeten el televisor y deslícelo
hacia arriba para extraerlo.
ADVERTENCIA
• Asegúrese de que sujetan el televisor dos o
más personas para transportarlo.
•Tenga cuidado para que los cables no queden
colgando cuando extraiga el televisor.
•Tenga cuidado para no herirse las manos o
los dedos al extraer el televisor.
Nota
Sujete siempre el televisor por las partes no
transparentes de la parte superior e inferior del
televisor durante el transporte.
13 (ES)
Page 46

Conecte los cables del
equipo externo al
2 Conecte los cables del equipo
externo al televisor.
televisor después de
haber terminado la
instalación
Información para los clientes, distribuidores de Sony
1 Incline el televisor hacia arriba.
1 Desenchufe el cable de alimentación de CA.
2 Afloje los dos tornillos de fijación que hay en
la parte inferior del bastidor de montaje
(página 12).
3 Sujete el televisor por las partes inferiores
izquierda y derecha y levántelo poco a poco.
Notas
• No sujete la parte transparente del televisor.
• No suelte el televisor mientras lo levanta,
porque el televisor podría golpear la pared y
ocasionar daños.
4 Confirme que los dos tirantes de soporte de
la placa estén enganchados en los ganchos
izquierdo y derecho de la parte inferior
izquierda de uno de los lados del bastidor de
montaje.
5 Inserte los tornillos extraídos en el paso 2 en
los orificios de tornillo de los lados exteriores
de los ganchos izquierdo y derecho de la
parte inferior del bastidor de montaje, y
apriételos con seguridad para fijar los tirantes
de soporte.
3 Vuelva a colocar el televisor en
la posición no inclinada.
1 Afloje los tornillos apretados en los lados
exteriores de los ganchos izquierdo y derecho
de la parte inferior del bastidor de montaje en
el paso 5 del procedimiento 1.
2 Sujete las partes inferiores izquierda y
derecha del televisor y sepárelo tirando del
mismo hacia usted de modo que los tirantes
de soporte salgan de los ganchos inferiores
del bastidor de montaje.
Notas
• No sujete la parte transparente del televisor.
• No suelte el televisor mientras lo levanta,
porque el televisor podría golpear la pared y
ocasionar daños.
3 To me la parte saliente de los tirantes de
soporte con la otra mano y deslícela hacia
arriba de modo que los tirantes de soporte y
el televisor queden otra vez ajustados en la
posición no inclinada.
4 Apriete los tornillos de fijación.
5 Confirme que todos los cables conectados al
televisor no estén retorcidos ni atrapados, y
desenchufe entonces el cable de alimentación
de CA.
ADVERTENCIA
• Asegúrese de realizar este trabajo entre dos o más
personas.
•Tenga cuidado para no pillarse las manos o los
dedos.
14 (ES)
Orificio de tornillo para fijar
los tirantes de soporte
Los tirantes de
soporte
3
2
3
Page 47

Especificaciones
Unidad: mm
Peso: 15,0 kg
Diseño y especificaciones sujetos a cambios sin previo aviso.
PLACA
79
ø 90
670
BASTIDOR DE MONTAJE
520
420
85,5
44
480
505*
* Cuando se cambia la posición del altavoz de graves para
instalar un televisor de 50 pulgadas: 590
ALTAVOZ
Altavoz 10 cm (2)
Impedancia 4 Ω
Potencia máx. 50 W
15 (ES)
Page 48

Tabla de dimensiones para la instalación del televisor
A
F
C
G
B
B
D
E
Modelo del
televisor
KDE-37XS955 1048 599 89 246 58 10º 270 122 76 36kg 144kg
KDE-42XS955 1139 672 89 283 58 10º 282 194 76 42kg 168kg
KDE-50XS955 1336 789 89 343 56 10º 303 310 74 54kg 216kg
Dimensiones del televisor Unidad: mm Longitud para cada ángulo de montaje Unidad: mm Peso
ABCDE
Ángulo de
montaje (αº)
0º 185 148 58
5º 228 136 68
15º 309 106 82
20º 346 88 84
0º 185 221 58
5º 235 209 68
15º 328 176 82
20º 371 157 84
0º 185 340 56
5º 245 327 66
15º 359 291 80
20º 412 268 83
FGHPeso (× 4)*
393 ± 0,5
H
* La pared en la que se proponga instalar el televisor deberá ser capaz de soportar un peso al menos cuatro veces mayor que el
peso del televisor.
16 (ES)
Page 49

Diagrama de dimensiones para preparar la pared
Unidad: mm
670
610
455
406
420
65,5
ø 75
Orificio para el paso de cables
20 – 9 × 20
Orificio de ranura
131
131
393 ± 0,5
13,5
17 (ES)
Page 50

Page 51

Page 52

Printed on 100% recycled paper using VOC
(Volatile Organic Compound)-free vegetable oil
based ink.
Printed in Japan
 Loading...