

Page 1
For Customers and Sony Dealers
in North and Central America
Tabletop Stand
4-092-986-12 (2)
Instructions
Mode d’emploi
Instrucciones
US
FR
ES
SU-P42T1/SU-P50T1
© 2002 Sony Corporation
Page 2
Thank you for purchasing this product.
WARNING
If the safety precautions are not observed and the product is used incorrectly, it may result in a fire or serious
injury.
This instruction manual shows the important precautions necessary to prevent accidents and to promote the correct
handling of the product. Be sure to read this manual thoroughly and use the product correctly. Be sure to keep this
manual available for future reference.
This Tabletop Stand is designed for use with the Sony Flat Panel Color Television. Do not use this stand with
equipment other than the following product.
Specified product
Tabletop Stand SU-P42T1 SU-P50T1
Flat Panel Color Television KE-42XBR900 KE-50XBR900
On Safety
Products by Sony are designed with safety in mind. If the product is used incorrectly, however, it may result in a
serious injury through a fire, an electric shock or by causing the product to topple over. Be sure to observe the
precautions for safety to prevent accidents.
For Customers
WARNING
If the following precautions are not observed, there is a possibility of either death or serious injury
through a fire, an electric shock or by causing the product to topple over or fall.
Do not allow the Power Cord or the Display Interface Cable to be pinched.
• Do not allow the Power Cord or the Display Interface Cable to be pinched when
you install the Display Unit on the Tabletop Stand. If the Power Cord or the
Display Interface Cable is damaged, this may result in a fire or an electric shock.
• Do not step on the Power Cord or the Display Interface Cable when you carry
the Tabletop Stand. The Power Cord or the Display Interface Cable may be
damaged, and this may result in a fire or an electric shock.
Be sure to use the securing screws.
If the securing screws are not used, the Display Unit may fall and cause injury when the Tabletop Stand is being
carried.
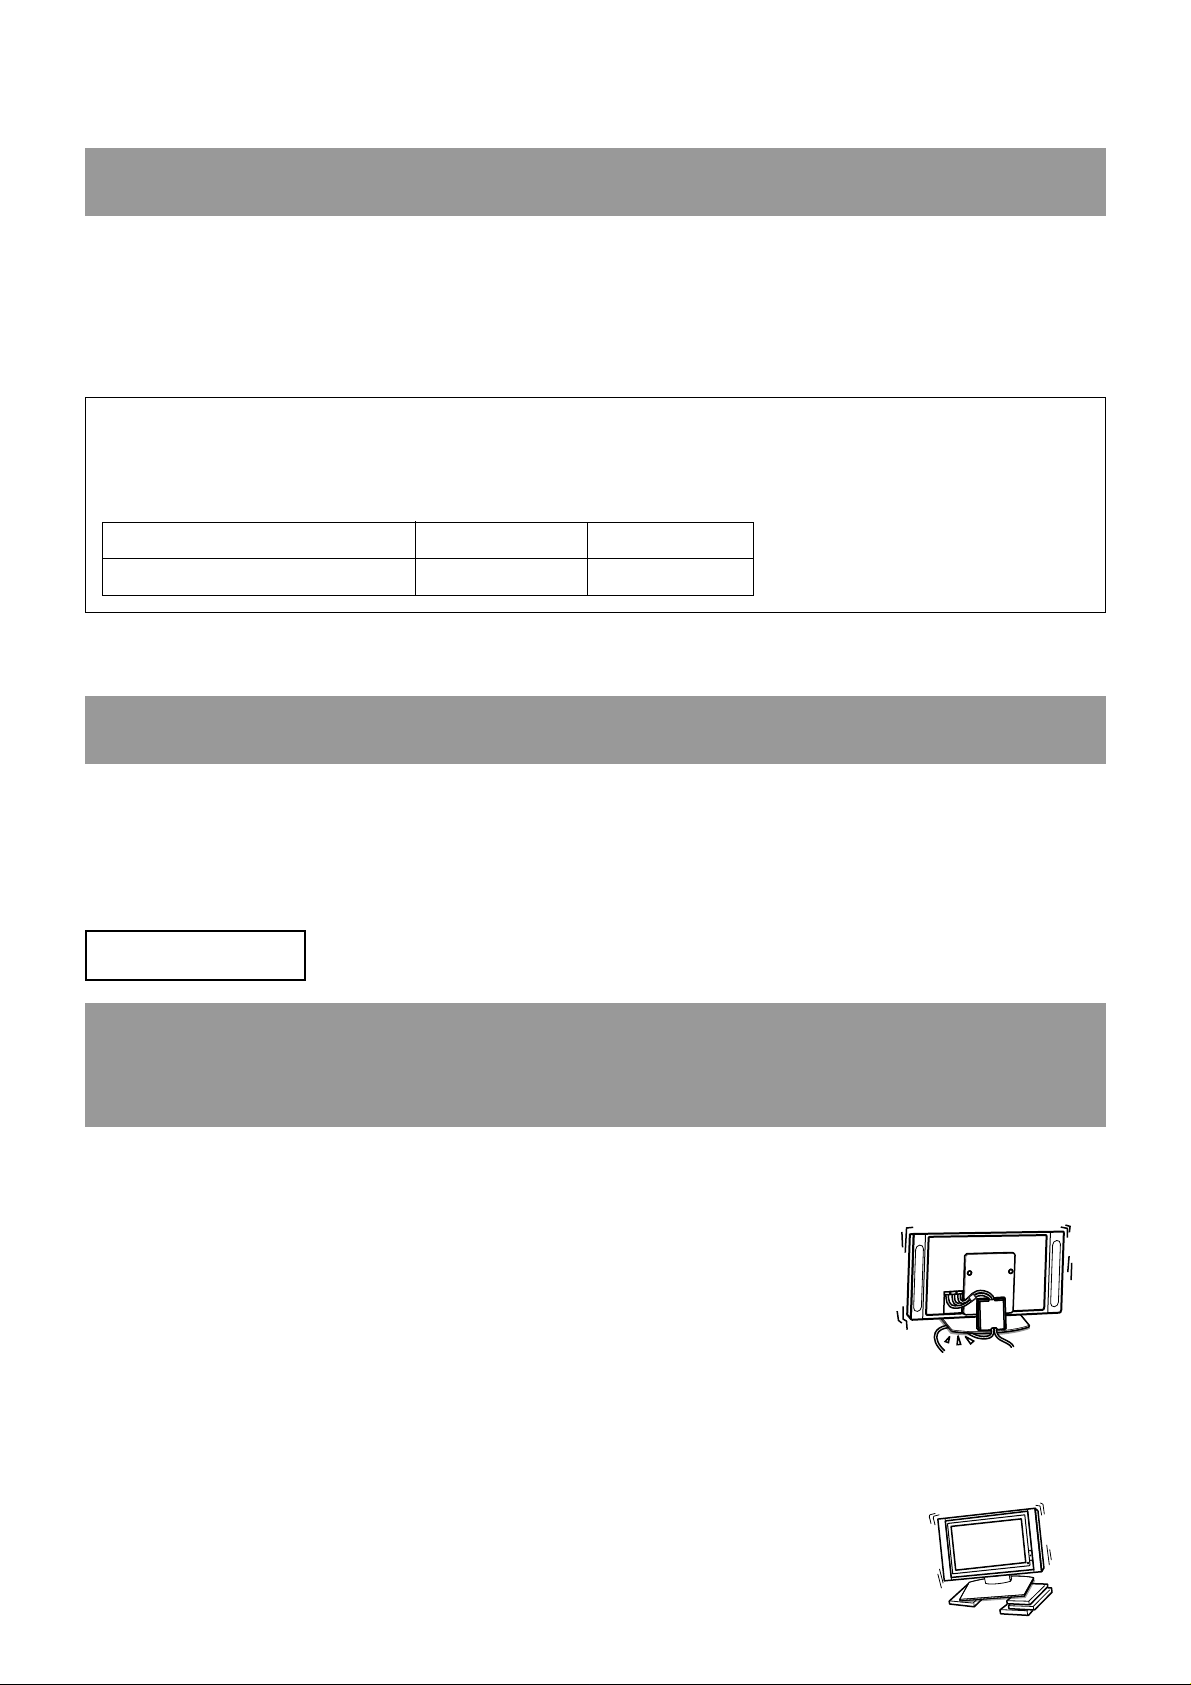
Be sure to install the Tabletop Stand on a flat place.
If the Tabletop Stand is installed at an angle, it may topple over and cause injury or
property damage.
2 (US)
Page 3
Be sure to install the Tabletop Stand on a stable surface.
If you install the Tabletop Stand on an unstable surface, it may lose its balance and
topple over or fall off. This may cause injury or property damage.
Be sure to take measures to prevent the stand from toppling over.
If you fail to do so, the Tabletop Stand may topple over during an earthquake and cause injury or property
damage. Draw a wire or the like through the holes of the Security Attachments located on the upper part of the
Main Bracket and fix the other ends of the wires to the wall to anchor the Tabletop Stand and prevent it from
toppling over.
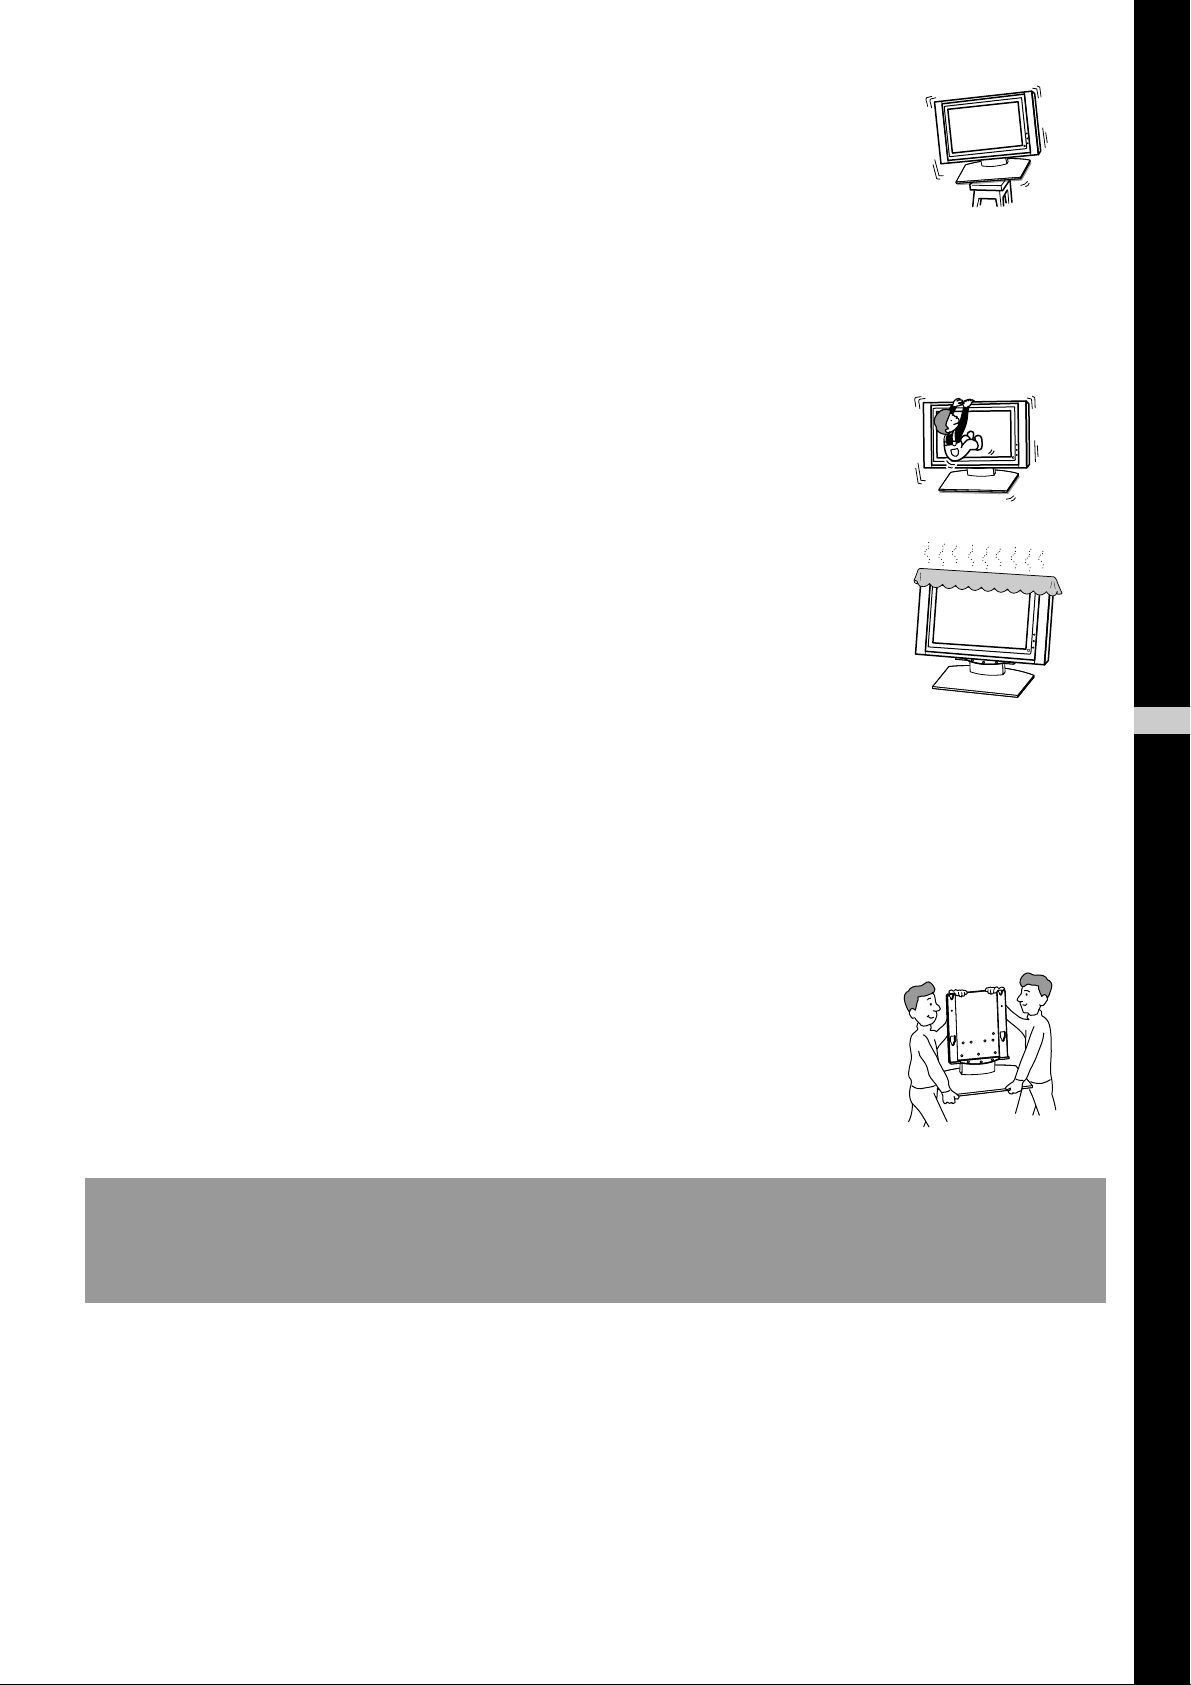
Do not lean on or hang from the Tabletop Stand.
The Tabletop Stand may topple over and cause injury.
Do not block the ventilating holes on the Display Unit.
If you block the ventilating holes on the Display Unit by covering the top of the
Tabletop Stand with a cloth or the like, the Display Unit may become overheated
and this may cause a fire.
Be sure to carry the stand in the manner shown in this manual.
If the Tabletop Stand is carried incorrectly, it may topple over and cause injury.
Do not stumble over the Power Cord or the Display Interface Cable.
If you stumble over the Power Cord or the Display Interface Cable, the Tabletop Stand may topple over and cause
injury.
Do not carry the Tabletop Stand with Display Unit installed on it.
Be sure to remove the Display Unit before attempting to carry the Tabletop Stand.
If you fail to do so, the Display Unit may fall and cause bodily injury.
CAUTION
If the following precautions are not observed, there is a possibility that the user will suffer injury or that
property damage will occur.
US
English
Do not install equipment other than the specified product.
This Tabletop Stand is designed for use with the specified product. If you install equipment other than the specified
product, it may fall and cause injury or property damage.
3 (US)
Page 4
Precautions
To keep the stand clean, occasionally wipe the stand with a dry soft cloth. Stubborn stains may be removed with a
cloth slightly dampened with watered-down dishwashing detergent. Then wipe the area with a dry soft cloth. Do
not use any type of chemicals, such as thinner or benzene, as they may damage the finish of the stand.
Assemble the Tabletop Stand
For Sony Dealers
To Sony Dealers
The following instructions are for Sony Dealers only. Be sure to read safety precautions described above and
pay adequate attention to safety during the installation, maintenance and checking of this product.
Be sure that two or more persons do the installation work.
Be sure that two or more persons do the installation work when installing the Display Unit on the Tabletop Stand.
If one person does the installation work alone, this may result in an accident or an injury.
Be sure to assemble the Tabletop Stand securely following the instructions in
this manual.
If any of the screws are loose or fall out, the Tabletop Stand may lean and topple
over, or the Display Unit may fall. This may cause injury or property damage.
Be sure to install the Display Unit securely, following the proper procedure.
Be sure to tighten the screws firmly.
If the Display Unit is not installed securely, it may fall and cause injury.
Be careful not to hurt your hands or fingers when assembling the Tabletop
Stand.
Be careful not to hurt your hands or fingers when assembling the Tabletop Stand or when installing the Display
Unit.
Precautions on the installation
• Be sure to spread packing materials or the like over the floor beforehand when assembling the Tabletop Stand.
• Install the stand on a solid and flat floor. Do not allow the stand to be installed at an angle or leaning in one
direction. To avoid this, observe the following precautions.
– If you install the stand on a soft surface such as a mat or a carpet, lay a board on the designated location
beforehand.
– Do not install the stand in a place subject to direct sunlight or near a heater.
– Do not install the stand in a hot or humid place, or outdoors.
4 (US)
Page 5
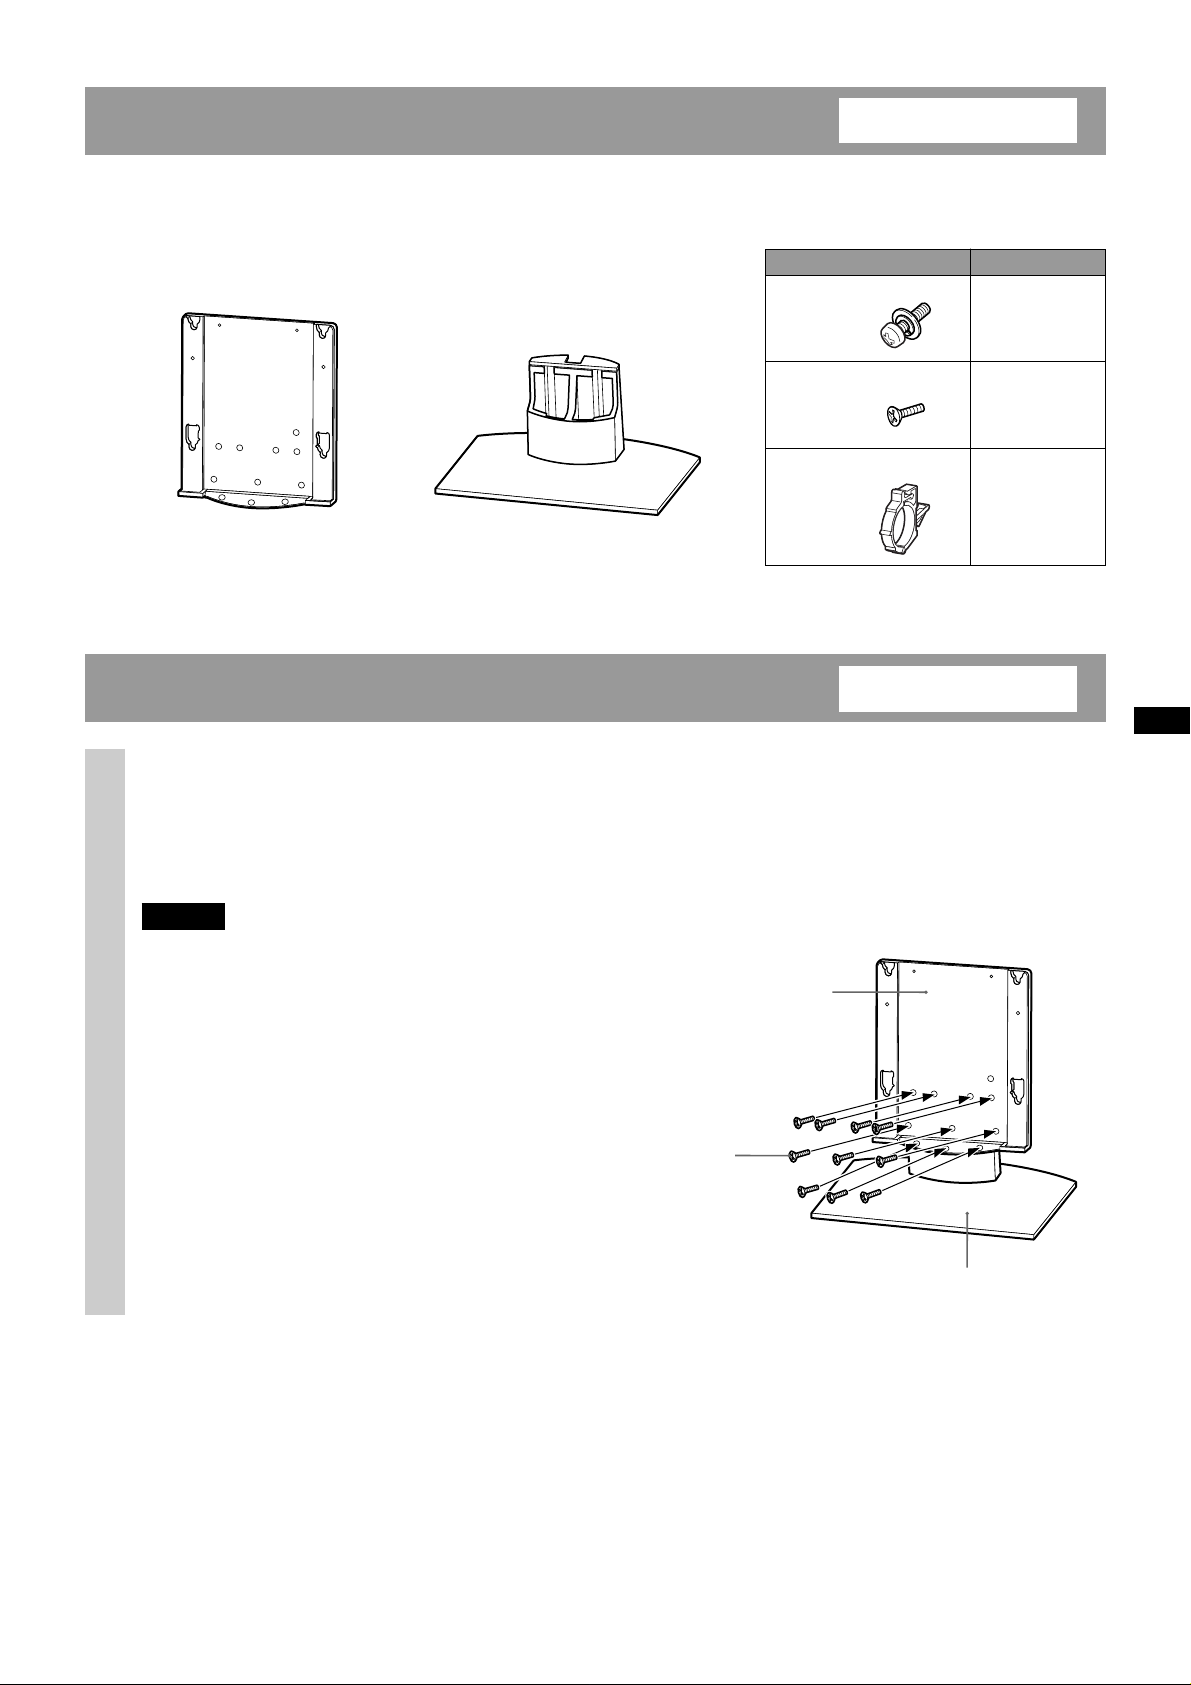
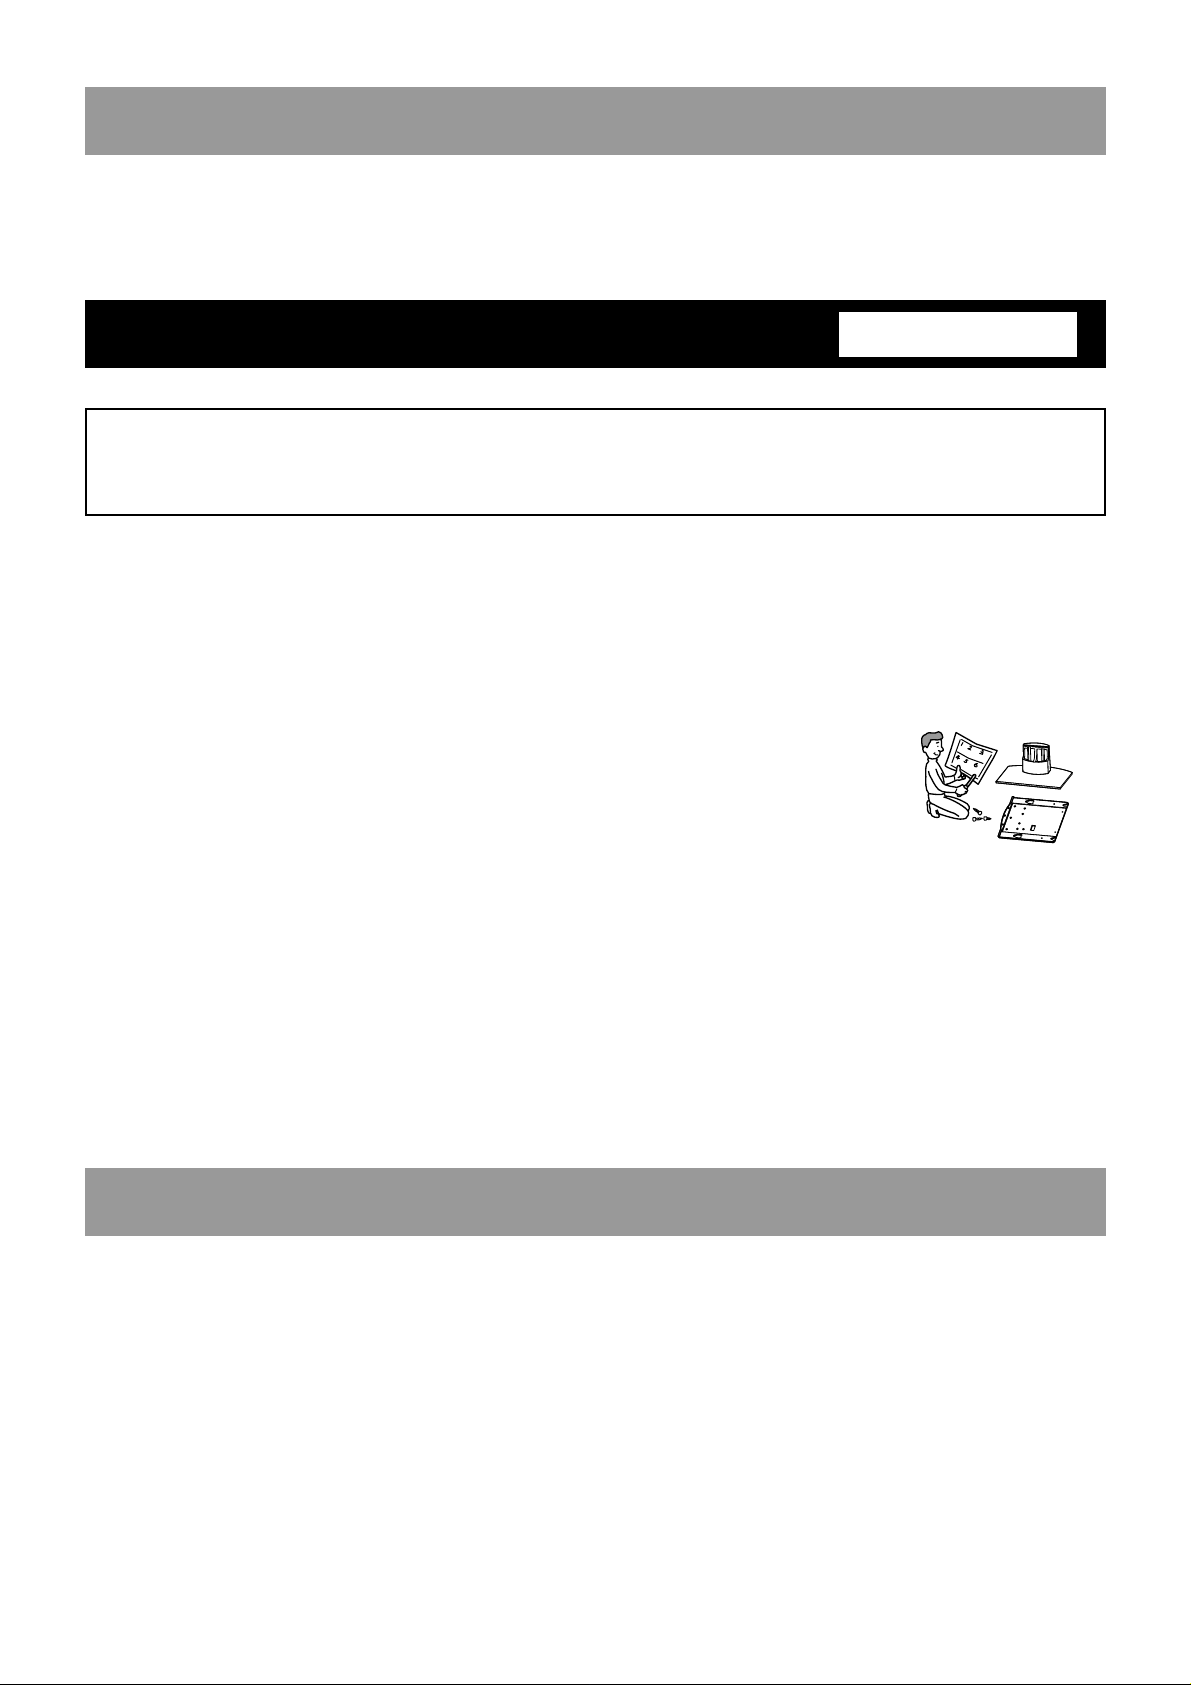
Step 1: Check the parts
•Prepare a Phillips screwdriver beforehand.
• Exercise extreme care to avoid injury when installing the Main Bracket.
For Sony Dealers
Main Bracket (1 piece) Stand (1 piece)
Step 2: Install the Main Bracket
Align the Main Bracket over the screw holes on the stand. Then fasten
1
Name Quantity
Securing screw 2
Countersink screw 10
Cable clamper 1
For Sony Dealers
the Main Bracket to the stand using 10 countersink screws.
Be sure that two or more persons hold the parts during this procedure.
Tighten the 10 countersink screws once again after screwing them temporarily.
Caution
• Be sure to hold the stand firmly and keep it stable.
•When you use an electric driver to tighten screws,
tightening torque must be approx. 1.81 Ft·lbs
(2.45N·m). Do not use impact drivers.
If you use impact drivers or electric drivers
with the tightening torque other than 1.81
Ft·lbs (2.45N·m), you will overtighten the
screws. This may destroy parts or screws, cause
the Main Bracket to drop off from the stand,
leading to any injury.
Main Bracket
Countersink
screws
Stand
5 (US)
Page 6
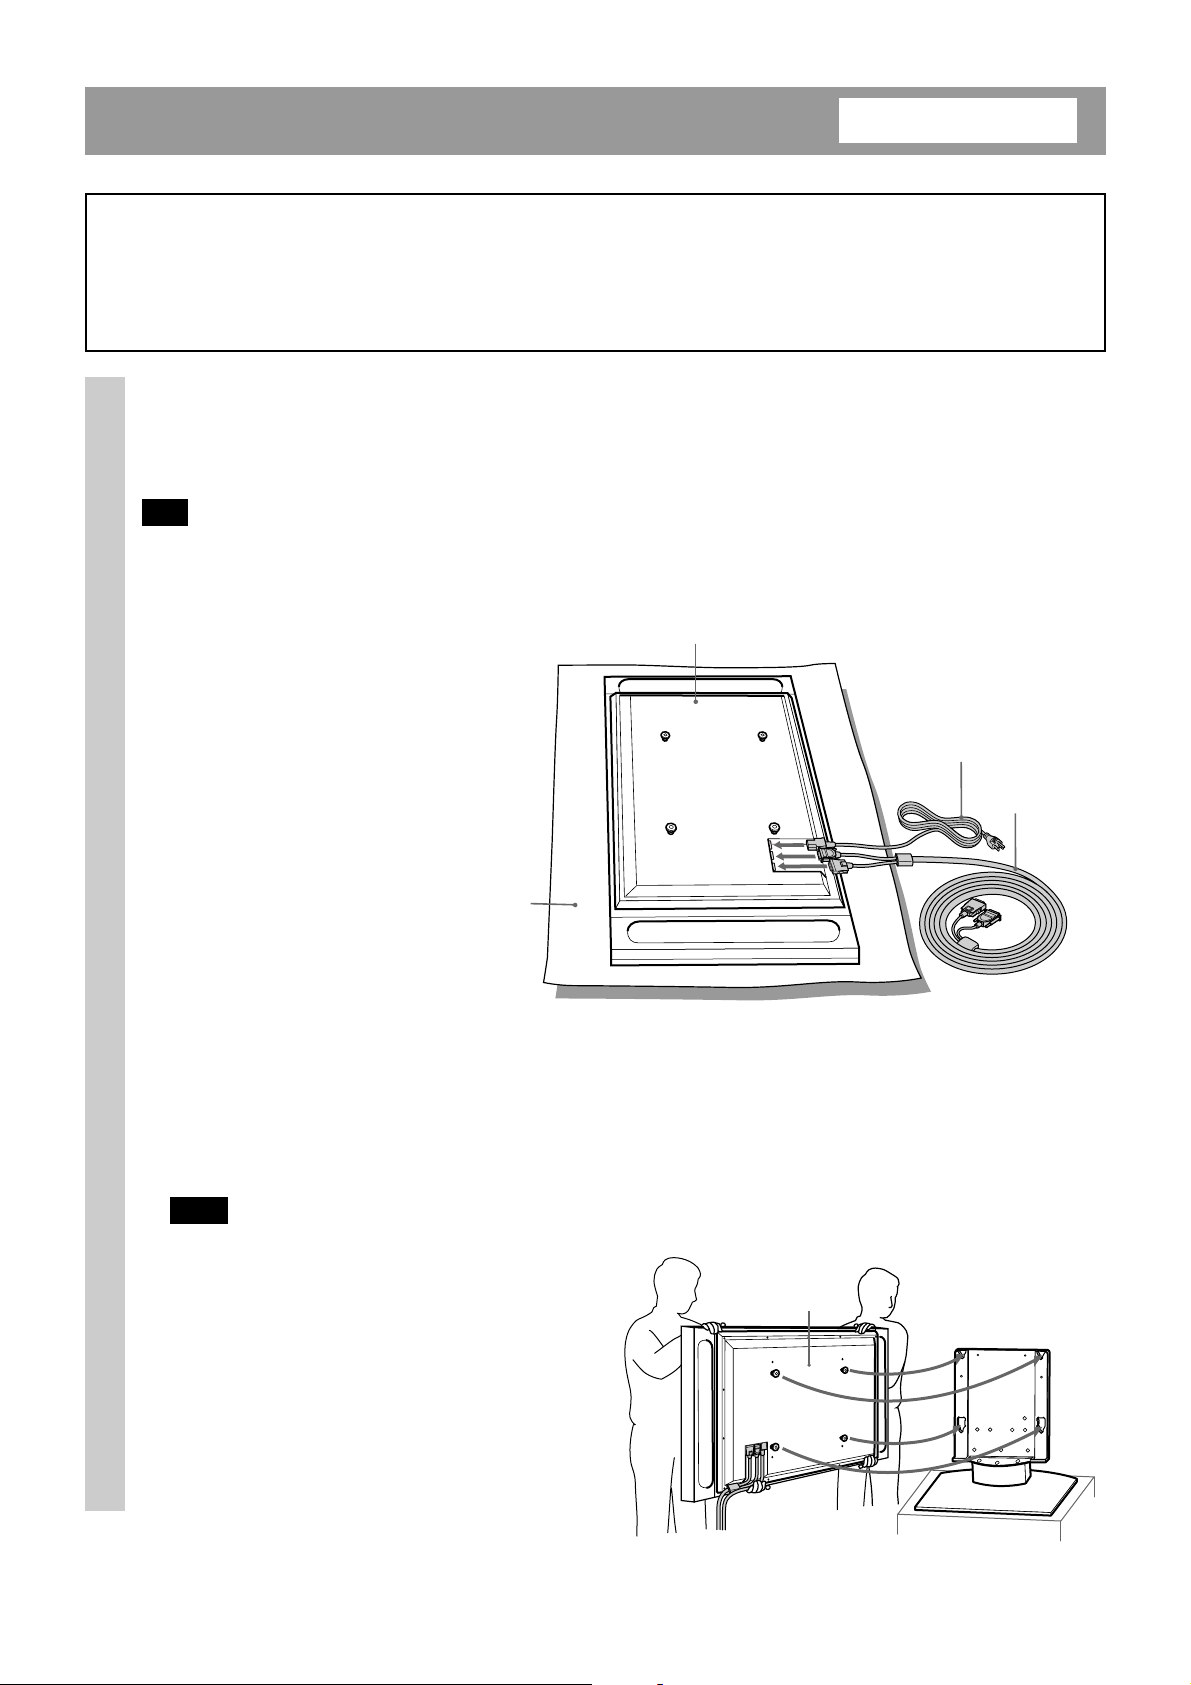
Step 3: Install the Display Unit
For Sony Dealers
WARNING
Be sure to complete the installation before connecting the Power Cord to the wall outlet. If you allow the Power
Cord to be pinched under or between pieces of equipment, this may result in a short circuit or an electric shock.
If you stumble over the Power Cord or the Display Interface Cable, the stand may topple over, and this may
result in injury.
Install the Display Unit on the Tabletop Stand.
1
1 Connect the Power Cord and the Display Interface cable to the Display Unit.
Tip
See the instruction manual of the Sony Flat
Panel Color Television (KE-42XBR900/KE50XBR900) for more details on connecting the
Power Cord and the Display Interface Cable.
1
Rear side of the Display Unit
Power Cord
Display Interface
Cable
Soft rag such as a blanket
2 Be sure that two or more persons hold the right and left edges of the top and the under sides of the
Display Unit while fitting the hooks on the rear of the Display Unit into the holes on the fixtures of the
stand. Then confirm that the hooks on the rear of the Display Unit are completely inserted into the four
holes of the fixtures.
Note
Do not stumble over the Power Cord or the
Display Interface Cable.
2
Rear side of the
Display Unit
6 (US)
Page 7
3 Slide the Display Unit straight downward until it snaps on.
Notes
• Slide the Display Unit completely down
to the bottom. Confirm that the Display
Unit is installed on the stand
horizontally.
• Be sure to keep the Tabletop Stand stable
while installing the Display Unit.
3
Hook
Attach the Display Unit to the stand with the two securing screws.
2
Side View
Securing screws
7 (US)
Page 8
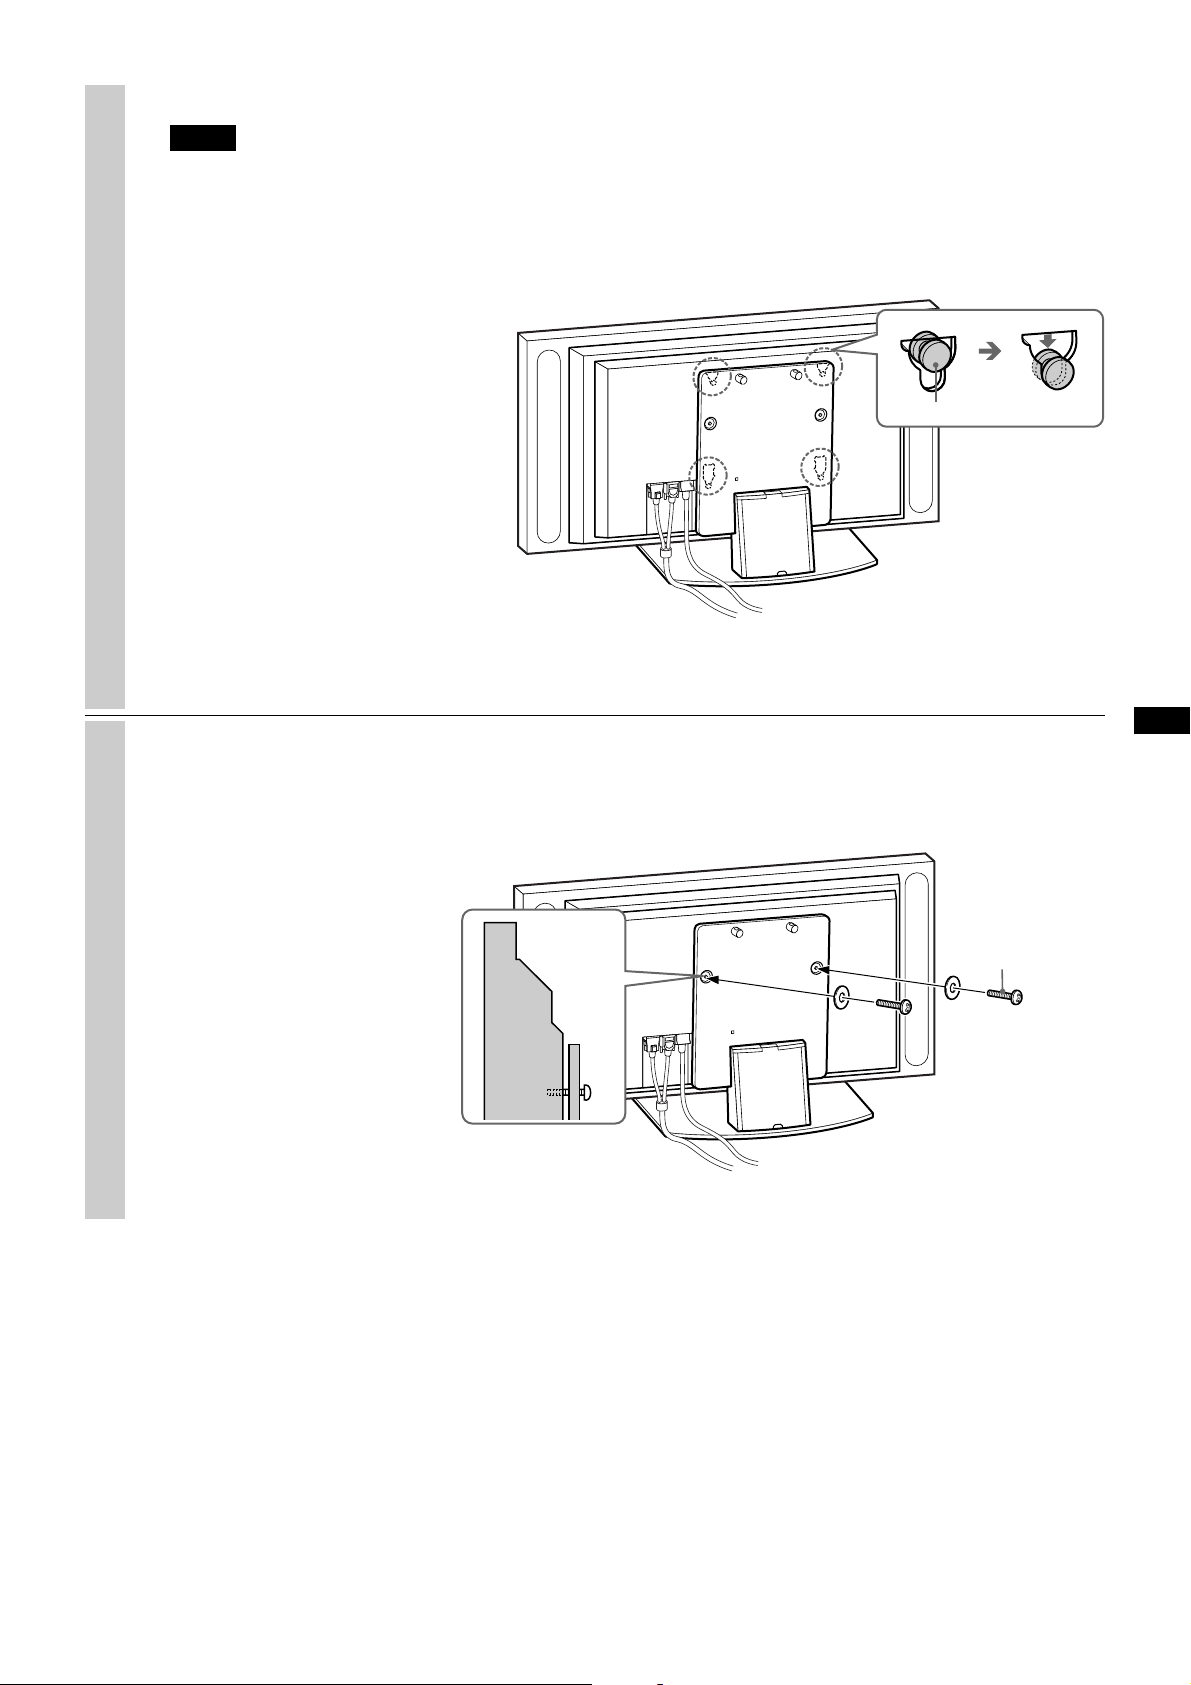
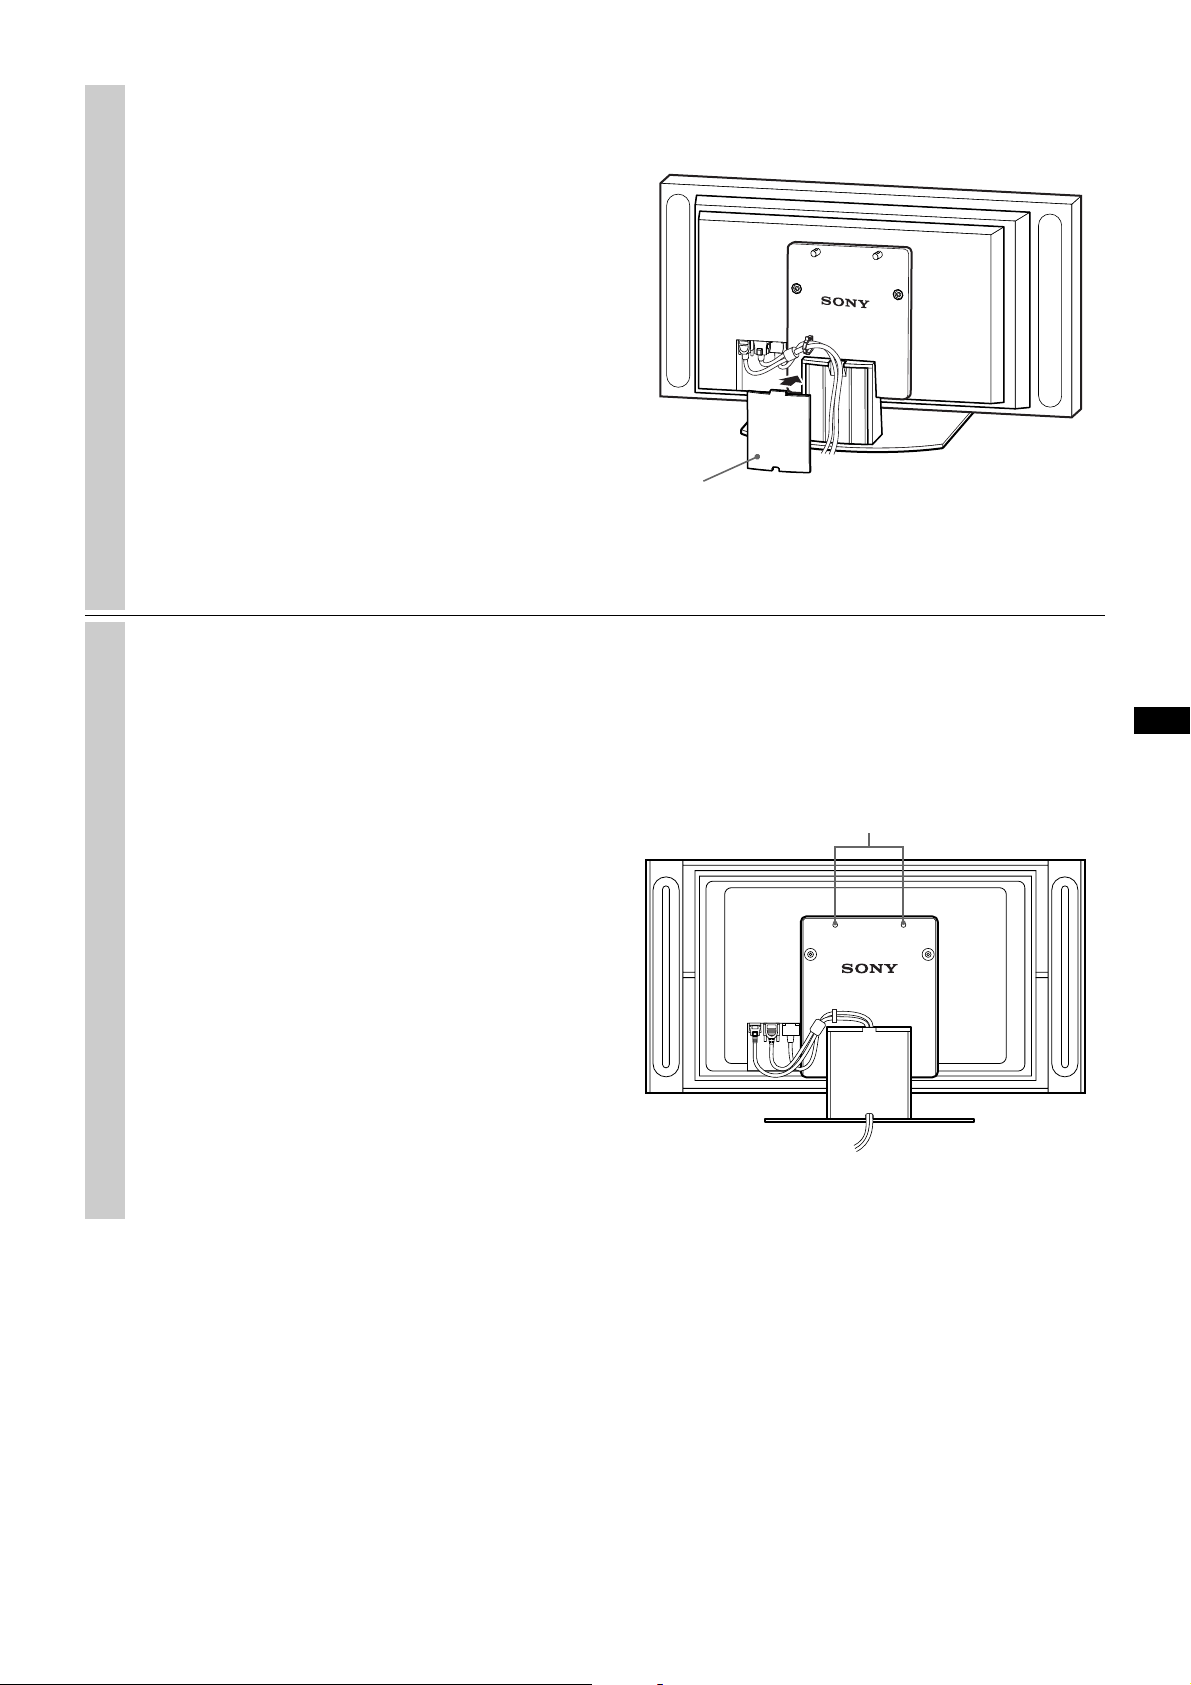
Route the Power Cord and the Display Interface Cable through the stand.
3
1 Attach the cable clamper to the Main Bracket.
1
Cable clamper
2 Draw the Power Cord and the Display Interface Cable through the cable clamper and fix them.
2
3 Remove the Cable Cover from the stand and route the Power Cord and the Display Interface Cable inside
the stand.
3
Cable Cover
8 (US)
Page 9
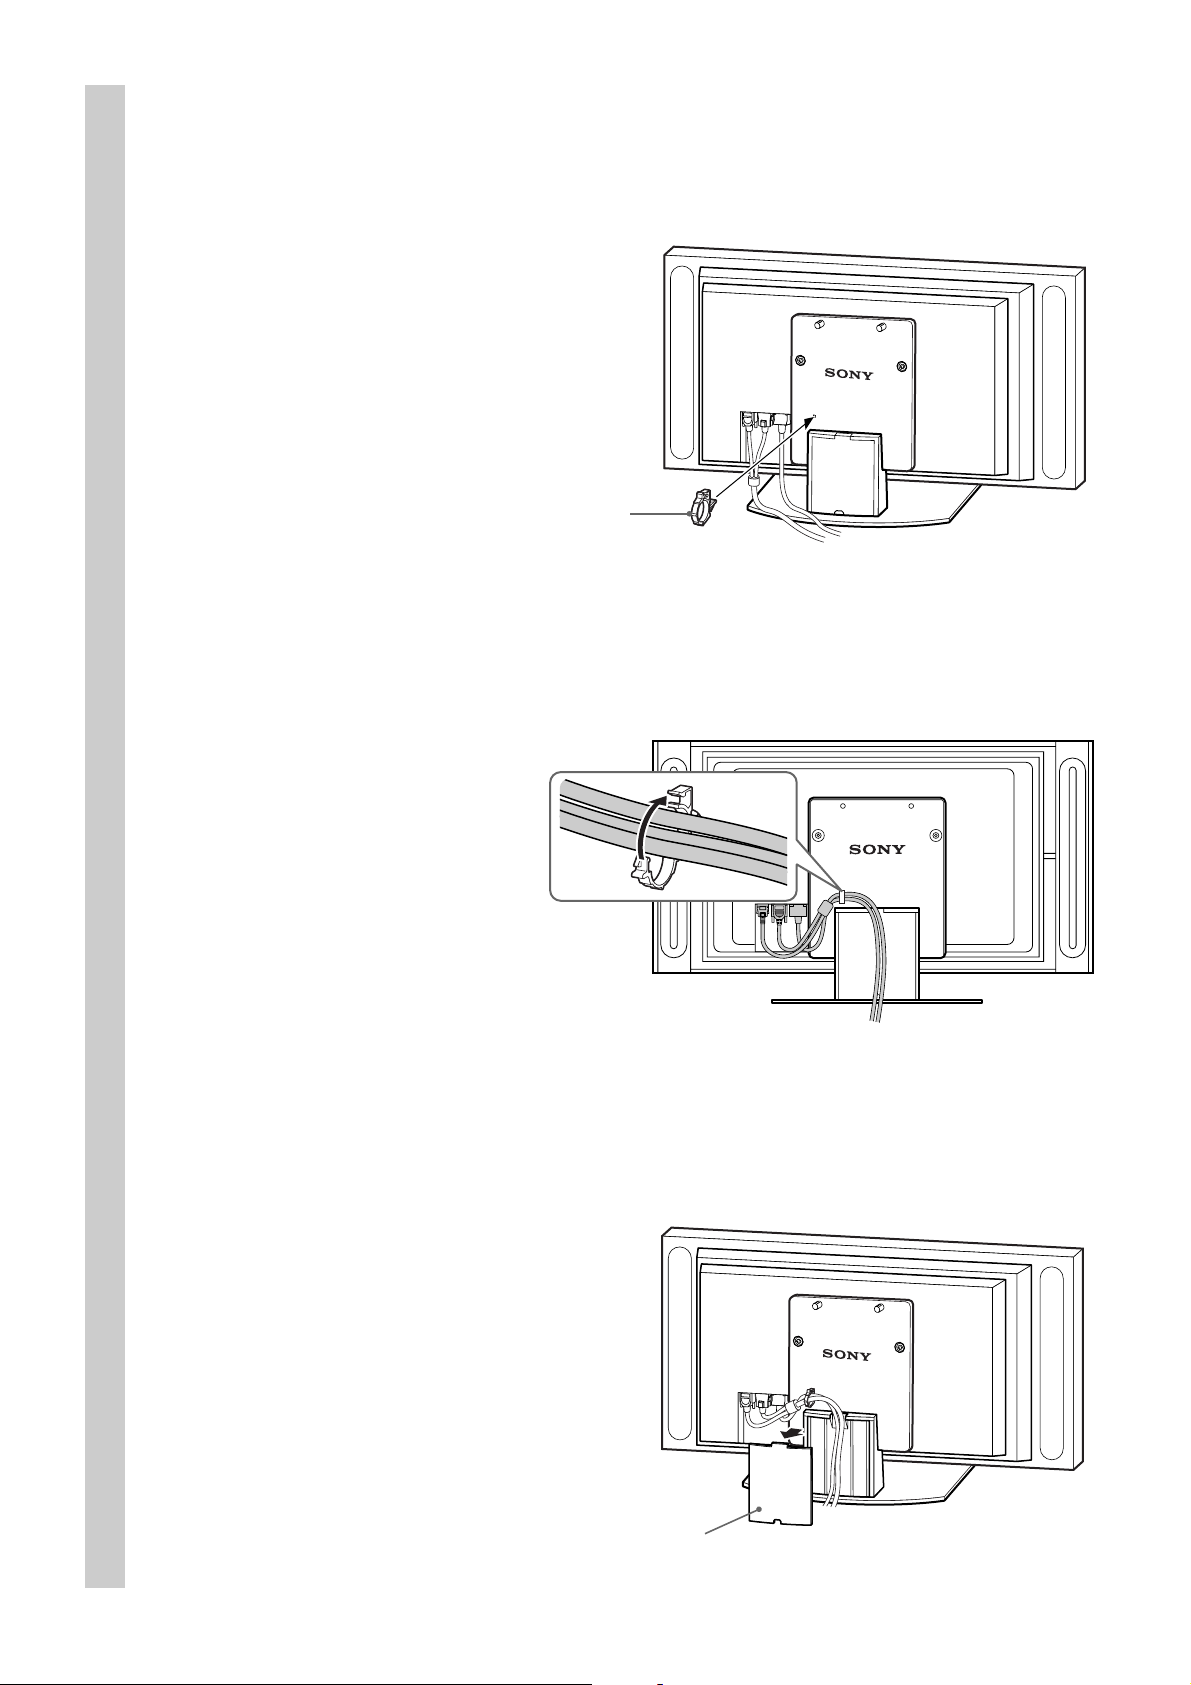
4 Reattach the Cable Cover to the stand.
4
Cable Cover
Take measures to prevent the stand from toppling over.
4
Draw a wire or the like through the holes of the security attachments located on the upper part of the Main
Bracket and fix the other ends of the wires to the wall to anchor the Tabletop Stand and prevent it from
toppling over.
WARNING
Be sure to take measures to prevent the stand
from toppling over. If you fail to do so, the
Tabletop Stand may topple over during an
earthquake and cause injury or property
damage. Draw a wire or the like through the
holes of the security attachments located on the
upper part of the Main Bracket and fix the other
ends of the wires to the wall to anchor the
Tabletop Stand and prevent it from toppling
over.
Security Attachments
9 (US)
Page 10
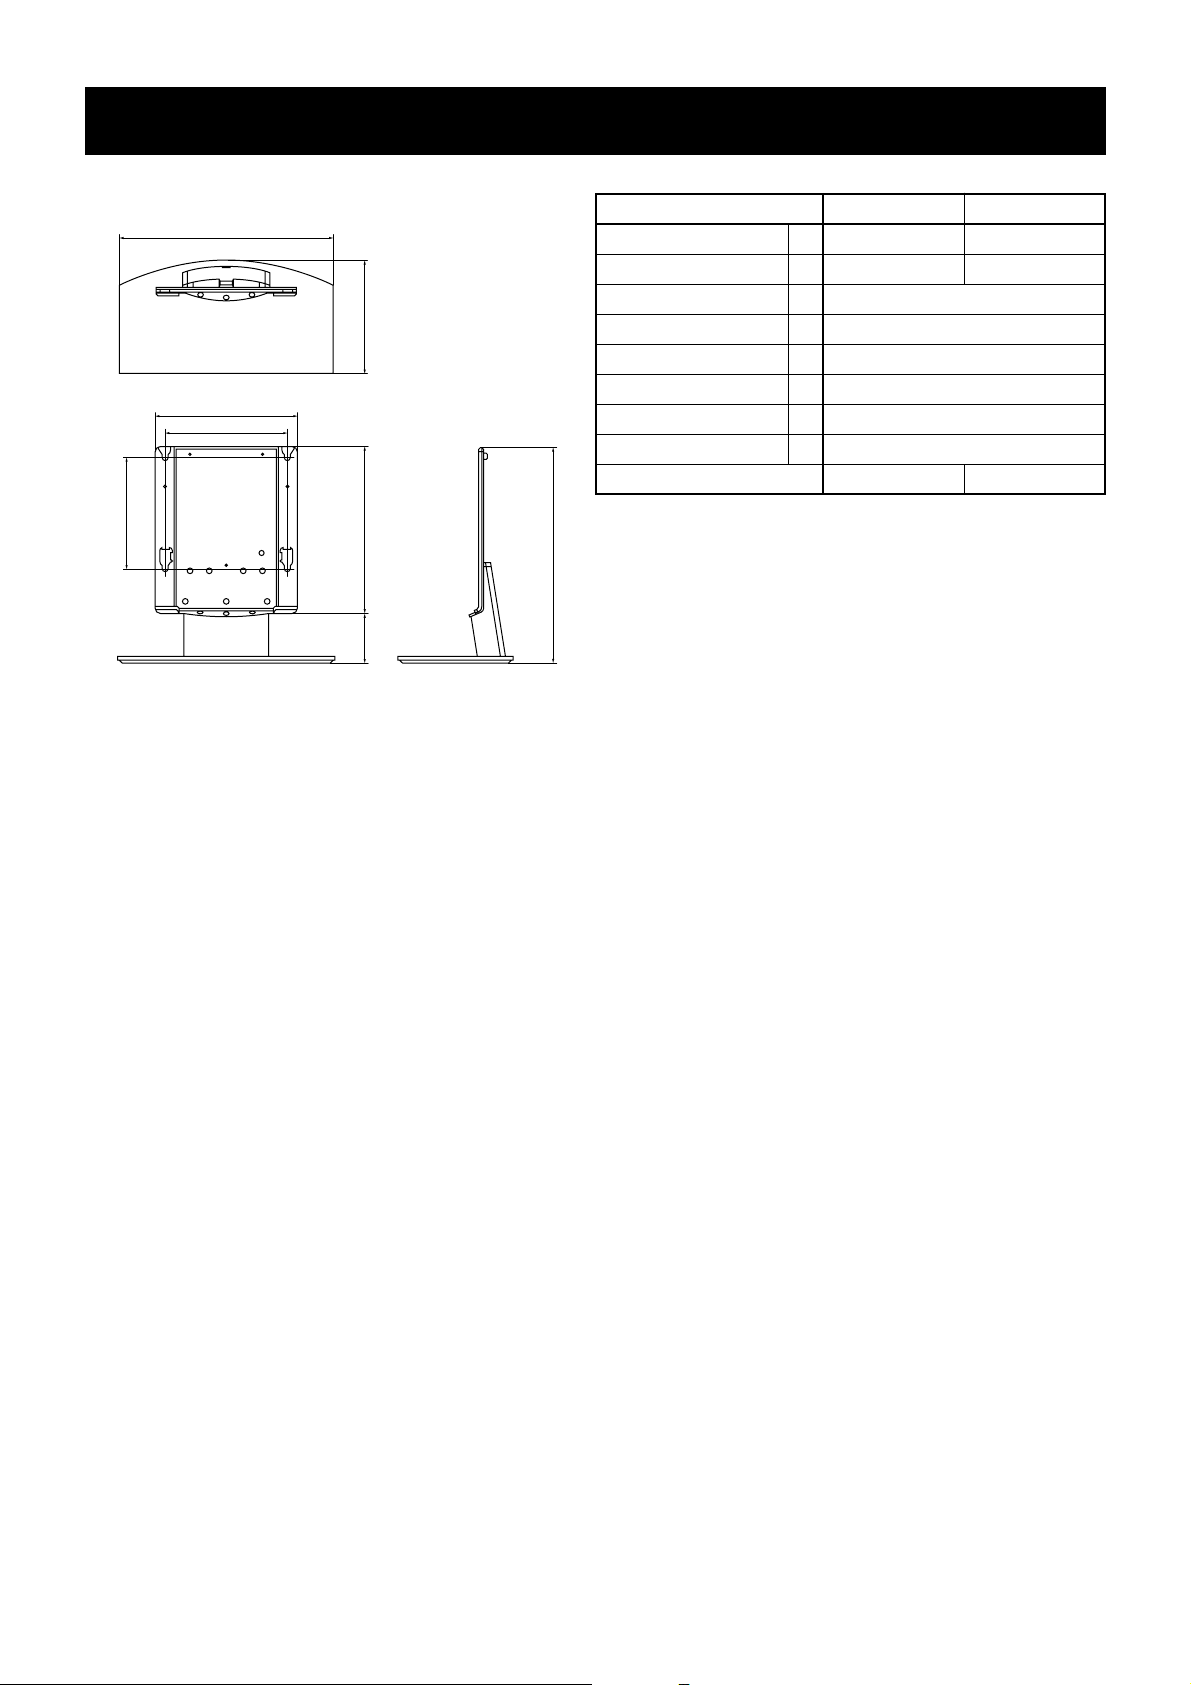
Specifications
E
A
C
D
B
F
G
H
SU-P42T1 SU-P50T1
Unit: (mm/inches) A 500 (19 11⁄16) 600 (23 5⁄8)
B 295 (11 5⁄8) 321 (12 5⁄8)
C 392 (15 7⁄16)
D 340 (13 3⁄8)
E 310 (12 7⁄32)
F 461 (18 5⁄32)
G 141 (5 9⁄16)
H 602 (23 11⁄16)
Weight: (kg/lb)
16.0 (35 lb 4 oz) 19.0 (41 lb 14 oz)
Design and specifications are subject to change without notice.
10 (US)
Page 11

S
*FOR RESIDENTS OF THE UNITED STATES / POUR LES HABITANTS DES ETATS-UNIS /
PARA RESIDENTES DE LOS ÉSTADOS UNIDOS
LIMITED W ARRANTY
Sony Electronics, Inc. (“Sony”) warrants this product against defects in material or workmanship, subject to any conditions set forth as follow:
1. This warranty is expressly limited to the replacement of Sony Table-Top Stand parts and components.
2. For a period of 30 days from the date of purchase, Sony will supply parts that are determined to be defective or missing, at no charge, to
the original purchaser. After the warranty period, you will be charged for all orders.
This warranty does not cover damages which occur in shipment or failures due to acts of God, accident, misuse, abuse, negligence, faulty
installation, misapplication, setup, improper maintenance, commercial use, or modification of, or to any part of the product. This warranty does not
cover Products sold AS IS or WITH ALL FAULTS. This warranty is valid only in the United States.
Proof of purchase in the form of a bill of sale or receipted invoice, which is evidence that the unit is within the warranty period, must be presented
to obtain the replacement parts.
REPLACEMENT PARTS AS PROVIDED UNDER THIS WARRANTY ARE THE EXCLUSIVE REMEDY OF THE CONSUMER SONY
SHALL NOT BE LIABLE FOR ANY INCIDENTAL OR CONSEQUENTIAL DAMAGES FOR BREACH OF ANY EXPRESS OR IMPLIED
WARRANTY ON THIS PRODUCT. EXCEPT TO THE EXTENT PROHIBITED BY APPLICABLE LAW, ANY IMPLIED WARRANTY OF
MERCHANTABILITY OR FITNESS FOR A PARTICULAR PURPOSE ON THIS PRODUCT IS LIMITED IN DURATION TO THE DURATION OF THIS WARRANTY.
Some states do not allow the exclusion or limitation of incidental or consequential damages, or allow limitations on how long an implied warranty
lasts, so the above limitations or exclusions may not apply to you. This warranty gi
which vary from state to state.
ves you specific legal rights, and you may ha
ve other rights
In order to obtain replacement parts, you must provide a PROOF OF PURCHASE and complete the information on this warranty card.
Fax or mail these to:
Name: ______________________________________________________________________________________________
Address: ____________________________________________________________________________________________
City: _____________________________ State: _____________ Zip Code: ______________ Phone: __________________
Model: __________________________________
Part No. Description Quantity Reason
____________ ________________________________ ___________ _____________________________________
____________ ________________________________ ___________ _____________________________________
____________ ________________________________ ___________ _____________________________________
____________ ________________________________ ___________ _____________________________________
C
•
*FOR RESIDENTS OF CANADA / POUR LES HABITANTS DU CANADA / PARA RESIDENTES DE CANADIENSES
Please examine all packaging
materials before discarding.
If any parts are missing or damaged,
please review the parts list found
in the assembly manual,
identify the missing or damaged part,
and call the Sony Customer
Service Center at
1-877-779-9929
Veuillez examiner tout l’emballage
avant de le jeter. Si des pièces sont
manquantes ou endommagées,
veuillez vérifier les pèces qui se trouvent
dans le manual de montage,
identifier les pieces manquantes ou
endommagées, et appeler
le service client de Sony Au numéro”
1-877-779-9929
Por favor examine todo el material
de empaque antes de tirario.
Si cualquier parte resulta
faltante o está dañada, por favor
revise la lista de partes que se
encuentra en el manual de ensamble,
identifique la parte dañada of faltante,
y llame al centro servicio
al cliente de Sony al
1-877-779-9929
Page 12

Nous vous remercions d’avoir fait l’acquisition de ce produit.
AVERTISSEMENT
Le non-respect des règles de sécurité et l’utilisation incorrecte de ce produit peuvent provoquer un incendie ou des
blessures graves.
Ce mode d’emploi énumère les précautions essentielles pour éviter tout accident et pour garantir une bonne
utilisation du produit. Veuillez lire ce manuel attentivement et utiliser ce produit de manière adéquate. Conservez
ce manuel à portée de main pour toute référence ultérieure.
Ce porte-téléviseur est conçu pour être utilisé avec le téléviseur couleur à écran plat Sony. Ne l’utilisez pas avec
un autre appareil.
Produits spécifiés
Porte-téléviseur SU-P42T1 SU-P50T1
Téléviseur couleur à écran plat KE-42XBR900 KE-50XBR900
A propos des mesures de sécurité
Les produits Sony sont conçus dans le respect des normes de sécurité. Toutefois, une utilisation incorrecte risque de
provoquer des blessures graves à la suite d’un incendie, d’une électrocution ou d’une chute du produit. Respectez
bien toutes les règles de sécurité afin d’éviter les accidents.
A l’attention des clients
AVERTISSEMENT
La non observation des précautions suivantes peut entraîner la mort ou une blessure grave, en raison
d’un incendie, d’une électrocution ou d’une chute du produit.
Veillez à ne pas coincer le cordon d’alimentation ou le câble d’interface vidéo.
•Prenez garde de ne pas coincer le cordon d’alimentation ou le câble d’interface
vidéo lorsque vous installez l’écran sur le porte-téléviseur. Si le cordon
d’alimentation ou le câble d’interface vidéo est endommagé, ceci risque de
provoquer un incendie ou un choc électrique.
•Ne marchez pas sur le cordon d’alimentation ou le câble d’interface radio
lorsque vous transportez le porte-téléviseur. Si le cordon d’alimentation ou le
câble d’interface vidéo est endommagé, ceci risque de provoquer un incendie ou
un choc électrique.
Utilisez les vis de fixation.
Si vous n’utilisez pas les vis de fixation, l’écran risque de tomber et de provoquer des blessures lors du transport
du porte-téléviseur.
Installez le porte-téléviseur sur une surface plane.
Si le porte-téléviseur est installé dans un angle, il risque de tomber et de provoquer
des dommages corporels ou matériels.
2 (FR)
Page 13

Installez le porte-téléviseur sur une surface stable.
Si vous installez le porte-téléviseur sur une surface instable, il risque de ne pas être
en équilibre et de basculer ou de tomber. Ceci risque de provoquer des dommages
corporels ou matériels.
Prenez toutes les mesures nécessaires afin d’éviter la chute du support.
Dans le cas contraire, le porte-téléviseur risque de tomber lors d’un tremblement de terre et de provoquer des
dommages corporels ou matériels. Faites passer un câble métallique ou équivalent dans les orifices des éléments de
sécurité situés sur la partie supérieure de la console principale et fixez les extrémités de ce câble au mur pour y
ancrer le porte-téléviseur et éviter qu’il ne tombe.
Ne vous appuyez pas sur le porte-téléviseur et ne vous pendez pas après.
Le porte-téléviseur risque de tomber et de provoquer des blessures.
N’obstruez pas les orifices de ventilation de l’écran.
Si vous obstruez les orifices de ventilation de l’écran en couvrant le dessus du
porte-téléviseur avec un chiffon ou équivalent, l’écran risque de surchauffer et de
provoquer un incendie.
Transportez le support comme indiqué dans ce manuel.
Si le porte-téléviseur est transporté de manière incorrecte, il risque de tomber et de provoquer des blessures.
Evitez d’accrocher le cordon d’alimentation ou le câble d’interface vidéo.
Si vous accrochez le cordon d’alimentation ou le câble d’interface vidéo, le porte-téléviseur risque de tomber et de
provoquer des blessures.
Ne transportez pas le porte-téléviseur lorsque l’écran du téléviseur se trouve
dessus.
Retirez l’écran avant de transporter le porte-téléviseur. Sinon, l’écran risque de
tomber et de provoquer des blessures.
ATTENTION
Le non-respect des précautions suivantes risque de provoquer des dommages corporels ou matériels.
FR
Français
N’utilisez pas d’autre appareil que celui spécifié.
Ce porte-téléviseur est conçu pour être utilisé avec les produits spécifiés. Si vous y installez un autre équipement, il
risque de tomber et de provoquer des dommages corporels ou matériels.
3 (FR)
Page 14

Précautions
Pour maintenir le support propre, nettoyez-le de temps en temps avec un chiffon doux et sec. Les taches tenaces
peuvent être ôtées à l’aide d’un chiffon légèrement imprégné de liquide vaisselle dilué à l’eau. Essuyez ensuite la
surface avec un chiffon doux et sec. N’utilisez pas de produit chimique, tel qu’un diluant ou de l’essence, car vous
risquez d’endommager la surface du support.
A l’attention des
Assemblage du porte-téléviseur
A l’attention des revendeurs Sony
Les instructions suivantes concernent les revendeurs Sony uniquement. Lisez attentivement les consignes de
sécurité décrites ci-dessus et accordez une attention particulière à la sécurité lors de l’installation, de l’entretien
et de la vérification de ce produit.
L’installation doit être réalisée par au moins deux personnes.
Assurez-vous qu’au moins deux personnes effectuent l’installation de l’écran sur le porte-téléviseur. Si une seule
personne s’en charge, elle risque de se blesser ou de provoquer un accident.
revendeurs Sony
Montez le porte-téléviseur solidement en suivant attentivement les
instructions de ce mode d’emploi.
Si l’une des vis est desserrée ou tombe, le porte-téléviseur risque de pencher et de
basculer ou l’écran du téléviseur risque de tomber. Ceci risque de provoquer des
dommages corporels ou matériels.
Montez l’écran solidement, en suivant la procédure appropriée.
Serrez les vis à fond.
Si l’écran n’est pas monté solidement, il risque de tomber et de provoquer des blessures.
Prenez garde de ne pas vous blesser à la main ou aux doigts lors de
l’assemblage du porte-téléviseur.
Prenez garde de ne pas vous blesser à la main ou aux doigts lors de l’assemblage du porte-téléviseur ou de
l’installation de l’écran.
Précautions lors de l’installation
• Etalez les matériaux d’emballage sur le sol avant d’assembler le porte-téléviseur.
•Montez le support sur une surface plane et solide. N’installez pas le support dans un angle ou penché dans une
direction. Pour éviter cela, observez les précautions suivantes.
– Si vous montez le support sur une surface moelleuse telle qu’un tapis ou une moquette, posez au préalable
une plaque sur l’emplacement concerné.
–Ne montez pas le support dans un endroit exposé à la lumière directe du soleil ou à proximité d’une source de
chaleur.
–Ne montez pas le support dans un endroit chaud ou humide ou à l’extérieur.
4 (FR)
Page 15

A l’attention des
Etape 1 : Vérification des pièces
• Préparez au préalable un tournevis cruciforme.
• Faites extrêmement attention afin d’éviter tout accident lors du montage de la console principale.
revendeurs Sony
Console principale (1 pièce) Support (1 pièce)
Etape 2 : Montage de la console
principale
Alignez la console principale sur les orifices des vis du support. Fixez
1
Nom Quantité
Vis de fixation 2
Vis à tête fraisée 10
Attache-fils 1
A l’attention des
revendeurs Sony
ensuite la console principale sur le support à l’aide de dix vis à tête
fraisée.
Deux personnes au moins doivent maintenir les pièces lors de cette procédure.
Après les avoir vissées temporairement, vissez de nouveau les 10 vis à tête fraisée.
Attention
• Le support doit être maintenu fermement et de
façon stable.
• Si vous utilisez un tournevis électrique pour
serrer les vis, le couple de serrage doit être
d’environ 1,81 Ft·lbs (2,45 N·m). N’utilisez
jamais de tournevis à frapper.
Si vous utilisez un tournevis à frapper ou un
tournevis électrique avec un autre couple
de serrage que 1,81 Ft·lbs (2,45 N·m),
les vis seront trop serrées. Vous risquez
d’endommager des pièces ou les vis, voire
de faire tomber la console principale de son
support, et de provoquer des blessures.
Console principale
Vis à tête
fraisée
Support
5 (FR)
Page 16

A l’attention des
Etape 3 : Installation de l’écran
revendeurs Sony
AVERTISSEMENT
Vous devez avoir terminé l’installation avant de connecter le cordon d’alimentation sur la prise secteur. Si vous coincez le
cordon d’alimentation sous ou entre des pièces de l’appareil, cela risque de provoquer un court-circuit ou une
électrocution. Si vous accrochez le cordon d’alimentation ou le câble d’interface vidéo, le support risque de tomber et de
provoquer des blessures.
Installez l’écran sur le porte-téléviseur.
1
1 Raccordez le cordon d’alimentation et le câble d’interface vidéo sur l’écran.
Conseil
Pour davantage d’informations sur la
connexion du cordon d’alimentation et du câble
d’interface vidéo, reportez-vous au mode
d’emploi du téléviseur couleur à écran plat
Sony (KE-42XBR900/KE-50XBR900).
1
Face arrière de l’écran
Cordon d’alimentation
Câble d’interface
vidéo
Chiffon doux tel
qu’une couverture
2 Au moins deux personnes doivent tenir les bords gauche et droit de la partie supérieure et les parois
latérales inférieures de l’écran au moment de fixer les crochets à l’arrière de l’écran dans les orifices du
support. Assurez-vous ensuite que les crochets à l’arrière de l’écran sont entièrement insérés dans les
quatre orifices prévus à cet effet.
Remarque
Evitez de marcher sur le cordon
d’alimentation ou le câble d’interface vidéo.
2
Face arrière
de l’écran
6 (FR)
Page 17

3 Faites glisser l’écran vers le bas jusqu’à ce qu’il s’encliquette.
Remarques
• Faites glisser l’écran jusqu’en bas.
Vérifiez que l’écran est bien installé à
l’horizontale sur le support.
• Lors de l’installation de l’écran,
maintenez le porte-téléviseur pour qu’il
reste stable.
3
Crochet
Fixez l’écran sur le support à l’aide des deux vis de fixation.
2
Vue latérale
Vis de fixation
7 (FR)
Page 18

Faites passer le cordon d’alimentation et le câble d’interface vidéo à
3
travers le support.
1
1 Fixez l’attache-fils sur la console principale.
Attache-fils
2 Faites passer le cordon d’alimentation et le câble d’interface vidéo dans l’attache-fils et fixez-les.
2
3 Retirez la protection des câbles du support et faites passer le cordon d’alimentation et le câble d’interface
vidéo à l’intérieur du support.
3
Protection des câbles
8 (FR)
Page 19

4 Replacez la protection des câbles sur le support.
4
Protection des câbles
Prenez toutes les mesures nécessaires afin d’éviter que le support ne
4
tombe.
Faites passer un câble métallique ou équivalent dans les orifices des éléments de sécurité situés sur la partie
supérieure de la console principale et fixez les extrémités de ce câble au mur pour y ancrer le porte-téléviseur
et éviter qu’il ne tombe.
AVERTISSEMENT
Prenez toutes les mesures nécessaires afin
d’éviter la chute du support. Sinon, le portetéléviseur risque de tomber lors d’un
tremblement de terre et de provoquer des
dommages corporels ou matériels. Faites passer
un câble métallique ou équivalent dans les
orifices des éléments de sécurité situés sur la
partie supérieure de la console principale et
fixez les extrémités de ce câble au mur pour
ancrer le porte-téléviseur et éviter qu’il ne
tombe.
Fixations de sécurité
9 (FR)
Page 20

Spécifications
E
A
C
D
B
F
G
H
SU-P42T1 SU-P50T1
Unité: (mm/pouces) A 500 (19 11⁄16) 600 (23 5⁄8)
B 295 (11 5⁄8) 321 (12 5⁄8)
C 392 (15 7⁄16)
D 340 (13 3⁄8)
E 310 (12 7⁄32)
F 461 (18 5⁄32)
G 141 (5 9⁄16)
H 602 (23 11⁄16)
Poids: (kg/lb)
16.0 (35 lb 4 oz) 19.0 (41 lb 14 oz)
La conception et les caractéristiques sont sujettes à modification sans préavis.
10 (FR)
Page 21

S
*FOR RESIDENTS OF THE UNITED STATES / POUR LES HABITANTS DES ETATS-UNIS /
PARA RESIDENTES DE LOS ÉSTADOS UNIDOS
LIMITED W ARRANTY
Sony Electronics, Inc. (“Sony”) warrants this product against defects in material or workmanship, subject to any conditions set forth as follow:
1. This warranty is expressly limited to the replacement of Sony Table-Top Stand parts and components.
2. For a period of 30 days from the date of purchase, Sony will supply parts that are determined to be defective or missing, at no charge, to
the original purchaser. After the warranty period, you will be charged for all orders.
This warranty does not cover damages which occur in shipment or failures due to acts of God, accident, misuse, abuse, negligence, faulty
installation, misapplication, setup, improper maintenance, commercial use, or modification of, or to any part of the product. This warranty does not
cover Products sold AS IS or WITH ALL FAULTS. This warranty is valid only in the United States.
Proof of purchase in the form of a bill of sale or receipted invoice, which is evidence that the unit is within the warranty period, must be presented
to obtain the replacement parts.
REPLACEMENT PARTS AS PROVIDED UNDER THIS WARRANTY ARE THE EXCLUSIVE REMEDY OF THE CONSUMER SONY
SHALL NOT BE LIABLE FOR ANY INCIDENTAL OR CONSEQUENTIAL DAMAGES FOR BREACH OF ANY EXPRESS OR IMPLIED
WARRANTY ON THIS PRODUCT. EXCEPT TO THE EXTENT PROHIBITED BY APPLICABLE LAW, ANY IMPLIED WARRANTY OF
MERCHANTABILITY OR FITNESS FOR A PARTICULAR PURPOSE ON THIS PRODUCT IS LIMITED IN DURATION TO THE DURATION OF THIS WARRANTY.
Some states do not allow the exclusion or limitation of incidental or consequential damages, or allow limitations on how long an implied warranty
lasts, so the above limitations or exclusions may not apply to you. This warranty gi
which vary from state to state.
ves you specific legal rights, and you may ha
ve other rights
In order to obtain replacement parts, you must provide a PROOF OF PURCHASE and complete the information on this warranty card.
Fax or mail these to:
Name: ______________________________________________________________________________________________
Address: ____________________________________________________________________________________________
City: _____________________________ State: _____________ Zip Code: ______________ Phone: __________________
Model: __________________________________
Part No. Description Quantity Reason
____________ ________________________________ ___________ _____________________________________
____________ ________________________________ ___________ _____________________________________
____________ ________________________________ ___________ _____________________________________
____________ ________________________________ ___________ _____________________________________
C
•
*FOR RESIDENTS OF CANADA / POUR LES HABITANTS DU CANADA / PARA RESIDENTES DE CANADIENSES
Please examine all packaging
materials before discarding.
If any parts are missing or damaged,
please review the parts list found
in the assembly manual,
identify the missing or damaged part,
and call the Sony Customer
Service Center at
1-877-779-9929
Veuillez examiner tout l’emballage
avant de le jeter. Si des pièces sont
manquantes ou endommagées,
veuillez vérifier les pèces qui se trouvent
dans le manual de montage,
identifier les pieces manquantes ou
endommagées, et appeler
le service client de Sony Au numéro”
1-877-779-9929
Por favor examine todo el material
de empaque antes de tirario.
Si cualquier parte resulta
faltante o está dañada, por favor
revise la lista de partes que se
encuentra en el manual de ensamble,
identifique la parte dañada of faltante,
y llame al centro servicio
al cliente de Sony al
1-877-779-9929
Page 22

Gracias por adquirir este producto.
ADVERTENCIA
Si no se respetan las medidas de seguridad y se usa el producto de forma incorrecta, puede producirse un incendio
o lesiones graves.
Este manual de instrucciones describe las precauciones que deben tomarse para evitar accidentes y fomentar el uso
adecuado del producto. Léalo detenidamente para utilizar el producto de forma correcta y consérvelo para
consultarlo en el futuro.
Este soporte de sobremesa se ha diseñado para el televisor en color de pantalla plana de Sony. No lo utilice con
otros productos.
Producto especificado
Soporte de sobremesa SU-P42T1 SU-P50T1
Televisor en color de pantalla plana KE-42XBR900 KE-50XBR900
Seguridad
Los productos Sony se diseñan para garantizar su uso seguro. Sin embargo, si se utilizan de forma inadecuada,
pueden volcarse, o provocar un incendio o una descarga eléctrica y producir lesiones graves. Respete las
precauciones de seguridad para evitar accidentes.
Para los clientes
ADVERTENCIA
Si no se respetan las medidas de seguridad siguientes, el usuario puede sufrir lesiones graves o fatales
derivadas de un incendio, una descarga eléctrica o la caída del producto.
Evite que el cable de alimentación o el cable de la interfaz de la pantalla
queden atrapados.
• Evite que el cable de alimentación o el cable de la interfaz de la pantalla queden
atrapados cuando instale el monitor en el soporte de sobremesa. Si alguno de
estos dos cables se daña, puede producirse un incendio o una descarga eléctrica.
•No pise el cable de alimentación ni el cable de la interfaz de la pantalla cuando
transporte el soporte de sobremesa, ya que podría dañarlos y provocar un
incendio o una descarga eléctrica.
Utilice los tornillos de fijación.
Si no los utiliza, al transportar el soporte de sobremesa el monitor puede caerse y provocar daños personales.
Instale el soporte de sobremesa en una superficie plana.
Si lo coloca en un ángulo, puede volcarse y provocar daños personales o materiales.
2 (ES)
Page 23

Instale el soporte de sobremesa en una superficie estable.
Si lo instala en una superficie inestable, puede desequilibrarse o caerse y provocar
daños personales o materiales.
Tome las debidas precauciones para evitar que el soporte vuelque.
De lo contrario, puede desequilibrarse durante un terremoto y provocar daños personales o materiales. Pase un
alambre o similar a través de los orificios de fijación de seguridad situados en la parte superior de la abrazadera
principal y fije los otros extremos de dichos alambres a la pared para sujetar el soporte de sobremesa y evitar que se
caiga.
No se apoye en el soporte de sobremesa ni se agarre a él,
ya que puede caerse y provocar daños personales.
No obstruya los orificios de ventilación del monitor.
Si cubre la parte superior del soporte de sobremesa con un paño o similar y
obstruye los orificios de ventilación del monitor, éste puede sobrecalentarse y
provocar un incendio.
Transporte el soporte siguiendo las indicaciones de este manual.
Si lo transporta de forma incorrecta, puede volcarse y provocar daños personales.
No tropiece con el cable de alimentación ni el cable de la interfaz de la
pantalla,
ya que el soporte de sobremesa puede volcarse y provocar daños personales.
No transporte el soporte de sobremesa con el monitor instalado encima.
Antes de transportar el soporte de sobremesa, retire el monitor. De lo contrario,
éste puede caerse y causar daños personales.
PRECAUCIÓN
Si no se respetan las precauciones siguientes, el usuario puede sufrir daños personales o el producto
puede resultar dañado.
ES
Español
No instale ningún equipo distinto al producto especificado.
Sony ha diseñado este soporte de sobremesa para utilizarlo con el producto especificado. Si lo utiliza con otros
productos, puede caerse y provocar daños personales o materiales.
3 (ES)
Page 24

Precauciones
Para mantener el soporte limpio, utilice un paño suave y seco. Las manchas difíciles pueden eliminarse limpiando
la zona afectada con un paño ligeramente humedecido con lavavajillas diluido y, posteriormente, secándola con un
paño suave y seco. No utilice ningún producto químico, como diluyentes o bencina, ya que pueden dañar el
acabado del soporte.
Para distribuidores
Montaje del soporte de sobremesa
Para distribuidores Sony
Las instrucciones siguientes van destinadas únicamente a distribuidores Sony. Procure leer las instrucciones de
seguridad descritas anteriormente y poner especial atención a la seguridad durante la instalación,
mantenimiento y comprobación del producto.
Se recomienda que sean dos o más las personas que lleven a cabo la
instalación de la unidad.
Asegúrese de que al menos dos personas realicen la instalación del monitor en el soporte de sobremesa. Si lo hace
sólo una persona, puede producirse un accidente o daños personales.
Sony
Monte el soporte de sobremesa correctamente siguiendo las instrucciones de
este manual.
Si algún tornillo queda flojo o se cae, el soporte de sobremesa puede decantarse y
volcarse, o el monitor puede caerse y provocar daños personales o materiales.
Instale el monitor firmemente siguiendo el procedimiento adecuado.
Apriete los tornillos con firmeza.
De lo contrario, el monitor puede caerse y provocar daños personales.
Tenga cuidado de no pillarse las manos o los dedos cuando monte el soporte
de sobremesa.
Tenga cuidado de no pillarse las manos o los dedos cuando monte el soporte de sobremesa o instale el monitor.
Precauciones a tener en cuenta durante la
instalación
• Antes de montar el soporte de sobremesa, cubra el suelo con el material de embalaje o similar.
• Instale el soporte en una superficie plana y sólida. No lo instale en un ángulo ni inclinado. Para instalarlo
correctamente, tome las precauciones siguientes.
– Si instala el soporte en una superficie blanda, como un felpudo o una alfombra, cubra primero dicha zona con
un panel.
–No instale el soporte cerca de un calefactor ni en un lugar expuesto a la luz solar directa.
–No instale el soporte en un lugar cálido o húmedo, ni al aire libre.
4 (ES)
Page 25

Para distribuidores
Paso 1: Compruebe las piezas
•Tenga preparado un destornillador Phillips.
• Cuando instale la abrazadera principal, extreme las precauciones para evitar dañarse.
Sony
Abrazadera principal (1) Soporte (1)
Paso 2: Instale la abrazadera
principal
Haga coincidir la abrazadera principal con los orificios para los tornillos
1
Nombre Cantidad
Tornillo de fijación 2
Tornillo avellanado 10
Pieza de sujeción del cable 1
Para distribuidores
Sony
del soporte. A continuación, fije la abrazadera principal al soporte
mediante diez tornillos avellanados.
Durante este procedimiento, se recomienda que dos personas como mínimo sujeten las piezas.
Vuelva a apretar firmemente los diez tornillos avellanados tras ajustarlos provisionalmente.
Precaución
• Sujete el soporte con firmeza y manténgalo estable.
• Si utiliza un destornillador eléctrico para apretar
los tornillos, el par de fijación debe ser como
máximo de unos 1,81 Ft·lbs (2,45 N·m). No utilice
destornilladores de percusión.
Si utiliza destornilladores de percusión o
destornilladores eléctricos con un par de
fijación distinto a 1,81 Ft·lbs (2,45 N·m),
los tornillos quedarán demasiado apretados,
con lo que puede dañar las piezas o los propios
tornillos, provocar que la abrazadera principal se
separe del soporte y causar todo tipo de lesiones.
Abrazadera principal
Tornillos
avellanados
Soporte
5 (ES)
Page 26

Para distribuidores
Paso 3: Instale el monitor
Sony
ADVERTENCIA
Antes de conectar el cable de alimentación a la toma de corriente, compruebe que la instalación ha finalizado.
Si el cable de alimentación queda atrapado debajo o entre las piezas del equipo, puede producirse un
cortocircuito o una descarga eléctrica. Si tropieza con el cable de alimentación o con el cable de la interfaz de la
pantalla, el soporte puede caerse y provocar daños personales.
Instale el monitor en el soporte de sobremesa.
1
1 Conecte el cable de alimentación y el cable de la interfaz de la pantalla en el monitor.
Sugerencia
Consulte el manual de instrucciones del
televisor en color de patalla plana de Sony (KE42XBR900/KE-50XBR900) para obtener más
información acerca de la conexión del cable de
alimentación y el cable de la interfaz de la
pantalla.
1
Parte posterior del monitor
Cable de alimentación
Cable de la interfaz
de la pantalla
Paño suave tipo manta
2 Cuando introduzca los ganchos de la parte posterior del monitor en los orificios de las unidades de
fijación del soporte, asegúrese de que dos personas como mínimo sujetan los ángulos derecho e izquierdo
de la parte superior e inferior del monitor. A continuación, compruebe que los ganchos de la parte
posterior del monitor estén completamente introducidos en los cuatro orificios de las unidades de
fijación.
Nota
No tropiece con el cable de alimentación ni
el cable de la interfaz de la pantalla.
2
Parte posterior
del monitor
6 (ES)
Page 27

3 Deslice el monitor hacia abajo hasta que quede fijado.
Notas
• Deslice el monitor hacia abajo
completamente. Compruebe que el
monitor queda instalado en el soporte en
sentido horizontal.
• Asegúrese de que el soporte de
sobremesa no se tambalea cuando instale
el monitor.
3
Gancho
Fije el monitor en el soporte mediante los dos tornillos de fijación.
2
Vista lateral
Tornillos de fijación
7 (ES)
Page 28

Pase el cable de alimentación y el cable del monitor a través del soporte.
3
1 Fije la pieza de sujeción del cable a la
abrazadera principal.
Pieza de sujeción
del cable
2 Pase el cable de alimentación y el cable de la interfaz de la pantalla por la pieza de sujeción del cable y
fíjelos.
1
2
3 Retire la cubierta del cable del soporte y pase el cable de alimentación y el cable de la interfaz de la
pantalla por el interior del soporte.
3
Cubierta del cable
8 (ES)
Page 29

4 Vuelva a colocar la cubierta del cable en el soporte.
4
Cubierta del cable
Tome las debidas precauciones para evitar que el soporte vuelque.
4
Pase un alambre o similar a través de los orificios de fijación de seguridad situados en la parte superior de la
abrazadera principal y fije los otros extremos de dichos alambres a la pared para sujetar el soporte de
sobremesa y evitar que se caiga.
ADVERTENCIA
Tome las debidas precauciones para evitar que
el soporte vuelque. De lo contrario, puede
desequilibrarse durante un terremoto y
provocar daños personales o materiales. Pase
un alambre o similar por los orificios de las
fijaciones de seguridad situados en la parte
superior de la abrazadera principal y fije los
otros extremos de dichos alambres a la pared
para sujetar el soporte de sobremesa y evitar
que se caiga.
Dispositivos adicionales de seguridad
9 (ES)
Page 30

Especificaciones
E
A
C
D
B
F
G
H
Unidad:
(mm/pulgadas)
Peso: (kg/lb)
SU-P42T1 SU-P50T1
A 500 (19 11⁄16) 600 (23 5⁄8)
B 295 (11 5⁄8) 321 (12 5⁄8)
C 392 (15 7⁄16)
D 340 (13 3⁄8)
E 310 (12 7⁄32)
F 461 (18 5⁄32)
G 141 (5 9⁄16)
H 602 (23 11⁄16)
16,0 (35 lb 4 oz) 19,0 (41 lb 14 oz)
El diseño y las especificaciones están sujetos a cambios sin previo aviso.
10 (ES)
Page 31

S
*FOR RESIDENTS OF THE UNITED STATES / POUR LES HABITANTS DES ETATS-UNIS /
PARA RESIDENTES DE LOS ÉSTADOS UNIDOS
LIMITED W ARRANTY
Sony Electronics, Inc. (“Sony”) warrants this product against defects in material or workmanship, subject to any conditions set forth as follow:
1. This warranty is expressly limited to the replacement of Sony Table-Top Stand parts and components.
2. For a period of 30 days from the date of purchase, Sony will supply parts that are determined to be defective or missing, at no charge, to
the original purchaser. After the warranty period, you will be charged for all orders.
This warranty does not cover damages which occur in shipment or failures due to acts of God, accident, misuse, abuse, negligence, faulty
installation, misapplication, setup, improper maintenance, commercial use, or modification of, or to any part of the product. This warranty does not
cover Products sold AS IS or WITH ALL FAULTS. This warranty is valid only in the United States.
Proof of purchase in the form of a bill of sale or receipted invoice, which is evidence that the unit is within the warranty period, must be presented
to obtain the replacement parts.
REPLACEMENT PARTS AS PROVIDED UNDER THIS WARRANTY ARE THE EXCLUSIVE REMEDY OF THE CONSUMER SONY
SHALL NOT BE LIABLE FOR ANY INCIDENTAL OR CONSEQUENTIAL DAMAGES FOR BREACH OF ANY EXPRESS OR IMPLIED
WARRANTY ON THIS PRODUCT. EXCEPT TO THE EXTENT PROHIBITED BY APPLICABLE LAW, ANY IMPLIED WARRANTY OF
MERCHANTABILITY OR FITNESS FOR A PARTICULAR PURPOSE ON THIS PRODUCT IS LIMITED IN DURATION TO THE DURATION OF THIS WARRANTY.
Some states do not allow the exclusion or limitation of incidental or consequential damages, or allow limitations on how long an implied warranty
lasts, so the above limitations or exclusions may not apply to you. This warranty gi
which vary from state to state.
ves you specific legal rights, and you may ha
ve other rights
In order to obtain replacement parts, you must provide a PROOF OF PURCHASE and complete the information on this warranty card.
Fax or mail these to:
Name: ______________________________________________________________________________________________
Address: ____________________________________________________________________________________________
City: _____________________________ State: _____________ Zip Code: ______________ Phone: __________________
Model: __________________________________
Part No. Description Quantity Reason
____________ ________________________________ ___________ _____________________________________
____________ ________________________________ ___________ _____________________________________
____________ ________________________________ ___________ _____________________________________
____________ ________________________________ ___________ _____________________________________
C
•
*FOR RESIDENTS OF CANADA / POUR LES HABITANTS DU CANADA / PARA RESIDENTES DE CANADIENSES
Please examine all packaging
materials before discarding.
If any parts are missing or damaged,
please review the parts list found
in the assembly manual,
identify the missing or damaged part,
and call the Sony Customer
Service Center at
1-877-779-9929
Veuillez examiner tout l’emballage
avant de le jeter. Si des pièces sont
manquantes ou endommagées,
veuillez vérifier les pèces qui se trouvent
dans le manual de montage,
identifier les pieces manquantes ou
endommagées, et appeler
le service client de Sony Au numéro”
1-877-779-9929
Por favor examine todo el material
de empaque antes de tirario.
Si cualquier parte resulta
faltante o está dañada, por favor
revise la lista de partes que se
encuentra en el manual de ensamble,
identifique la parte dañada of faltante,
y llame al centro servicio
al cliente de Sony al
1-877-779-9929
Page 32

Printed on 100% recycled paper using VOC
(Volatile Organic Compound)-free vegetable oil
based ink.
Printed in Japan
 Loading...