

Page 1
Projector Stand
4-085-351-01 (1)
組み立て説明書
Mounting Instructions page 4
Instructions de montage page 5
Montageanleitung Seite 6
Instrucciones de montaje página 7
Istruzioni per il montaggio pagina 8
安装说明书 第 9 页
お買い上げいただきありがとうございます。
この組み立て説明書には、事故を防ぐための重要な注意事項と製品の取
り扱いかたを示してあります。この組み立て説明書をよくお読みのう
え、製品を安全にお使いください。お読みになったあとは、いつでも見
られるところに必ず保管してください。
ページ
3
安全のための注意事項を守らないと、人身事故に
なることがあります。
SU-HS1
2001 Sony Corporation
Page 2
安全のために
ソニー製品は安全に充分配慮して設計されています。
しかし、まちがった使いかたをすると、転倒などによ
り死亡や大けがなど人身事故につながることがあり危
険です。事故を防ぐために次のことを必ずお守りくだ
さい。
下記の注意を守らないと、
けがをしたり周辺の物品に損
を与えることがあります。
害
設置は、2人以上で行う
設置は、大人2人以上で行ってください。1人で行う
と、腰を痛めたり、けがの原因になることがありま
す。
●安全のための注意事項を守る。
警告表示の意味
組み立て説明書および製品では、次のような表示を
しています。表示の内容をよく理解してから本文を
お読みください。
この表示の注意事項を守らないと、
事故などにより死亡や大けがなど
につながることがあります。
この表示の注意事項を守らないと、
けがをしたり周辺の物品に損害を
与えたりすることがあります。
行為を禁止する記号
注意を促す記号
不安定な場所に設置しない
次のような場所に設置すると、倒れたり落ちたりし
て、けがの原因となることがあります。
• ぐらついた台の上
• 傾いたところ
• 振動や衝撃のかかるところ
また、設置・取り付け場所の強度を充分にお確かめく
ださい。
組み立てる際は必ず付属のねじを使う
違うねじを使用すると、ゆるんだり、はずれたりして
けがの原因になることがあります。
設置は、手順に従って行う
組み立て説明書の手順以外の方法で設置を行うと転倒
して、けがの原因となります。
SU-HS1はLCD
ビデオプロジェク
ター用のプロジェクタースタンドです
指定以外の機器を取り付けると落下、転倒してけがの
原因となることがあります。
SU-HS1
は据え置き専用のスタンド
です
これ以外の目的で使用すると、落下、転倒してけがの
原因になることがあります。
スタンドにつまづかない
スタンドは機能上、台座部分からケーブルが出ていま
す。ケーブルの引き出し方向に注意して、つまづかな
いようご注意ください。
けがの原因となることがあります。
移動するときはプロジェクター本体を
持たない
プロジェクターを持って運ぶと落下してケガの原因と
なります。本体の支柱部分を持って運んでください。
製品の上に乗らない、重いものを乗せ
ない
倒れたり、落ちたり、壊れたりして、けがの原因とな
ることがあります。
2
Page 3
A
1
3
支柱下部
台座
4
2
支柱上部
固定金具
日本語
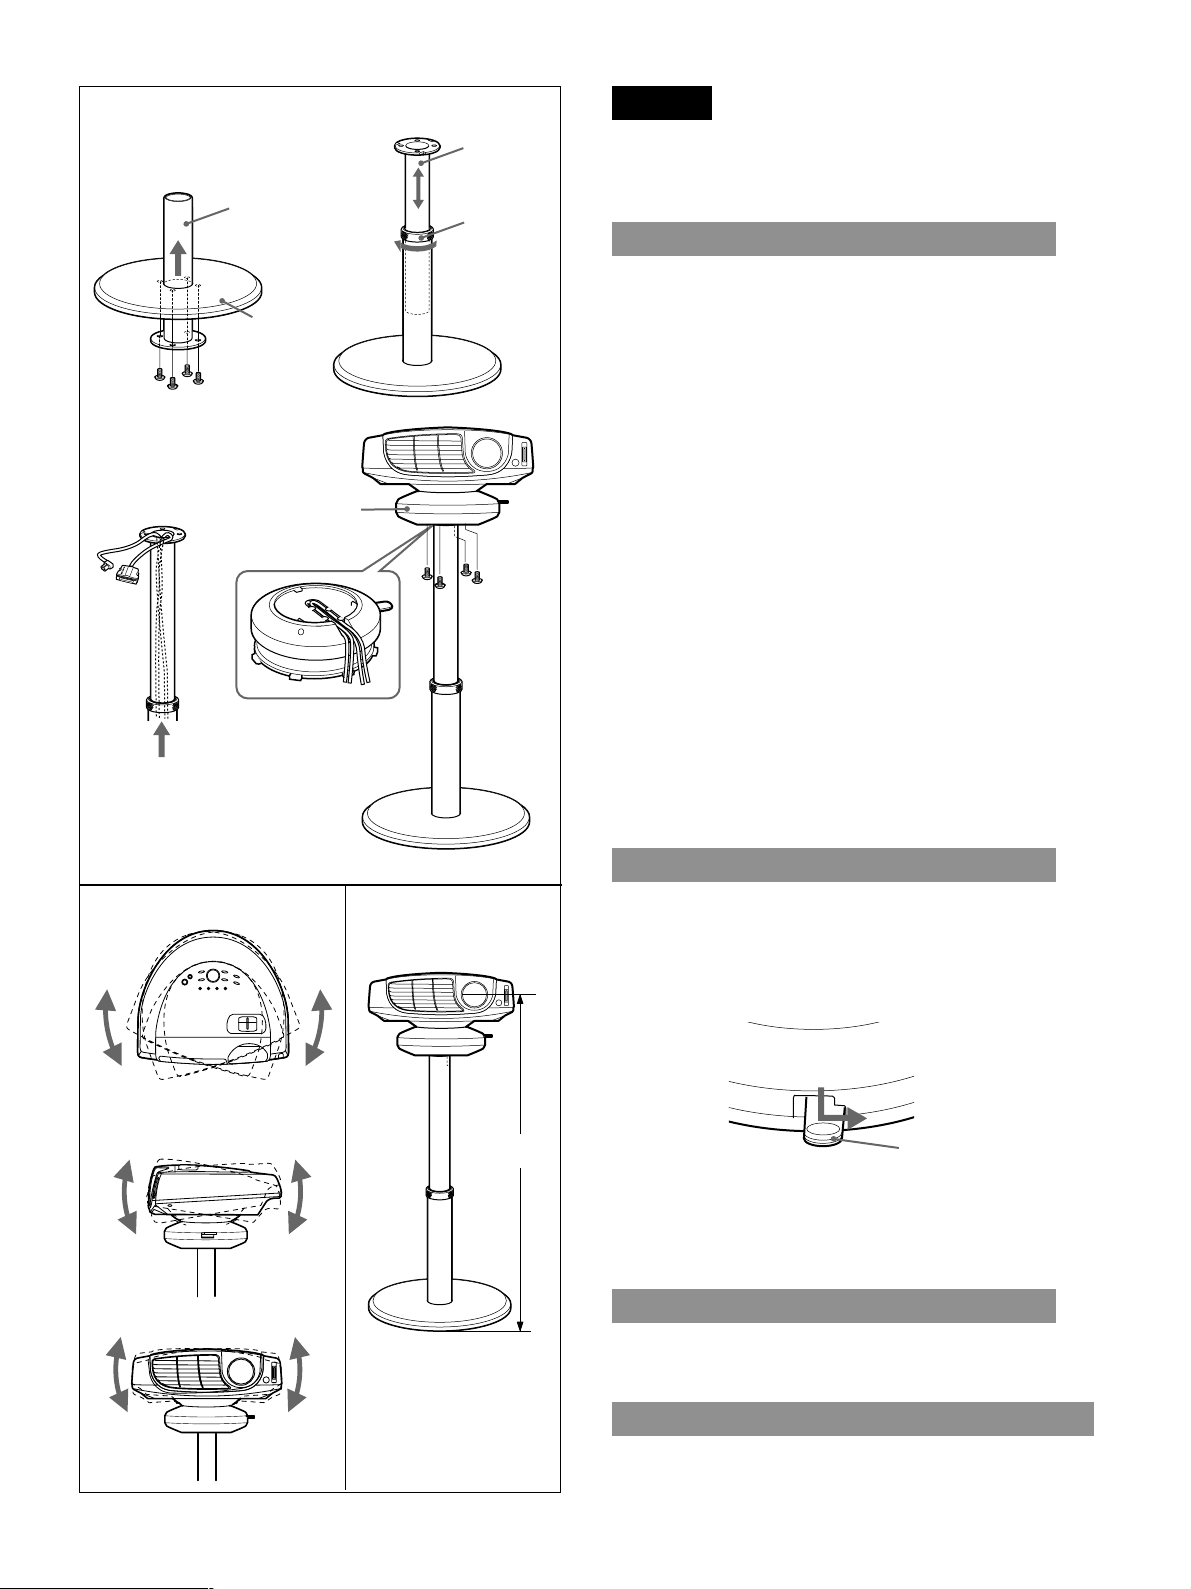
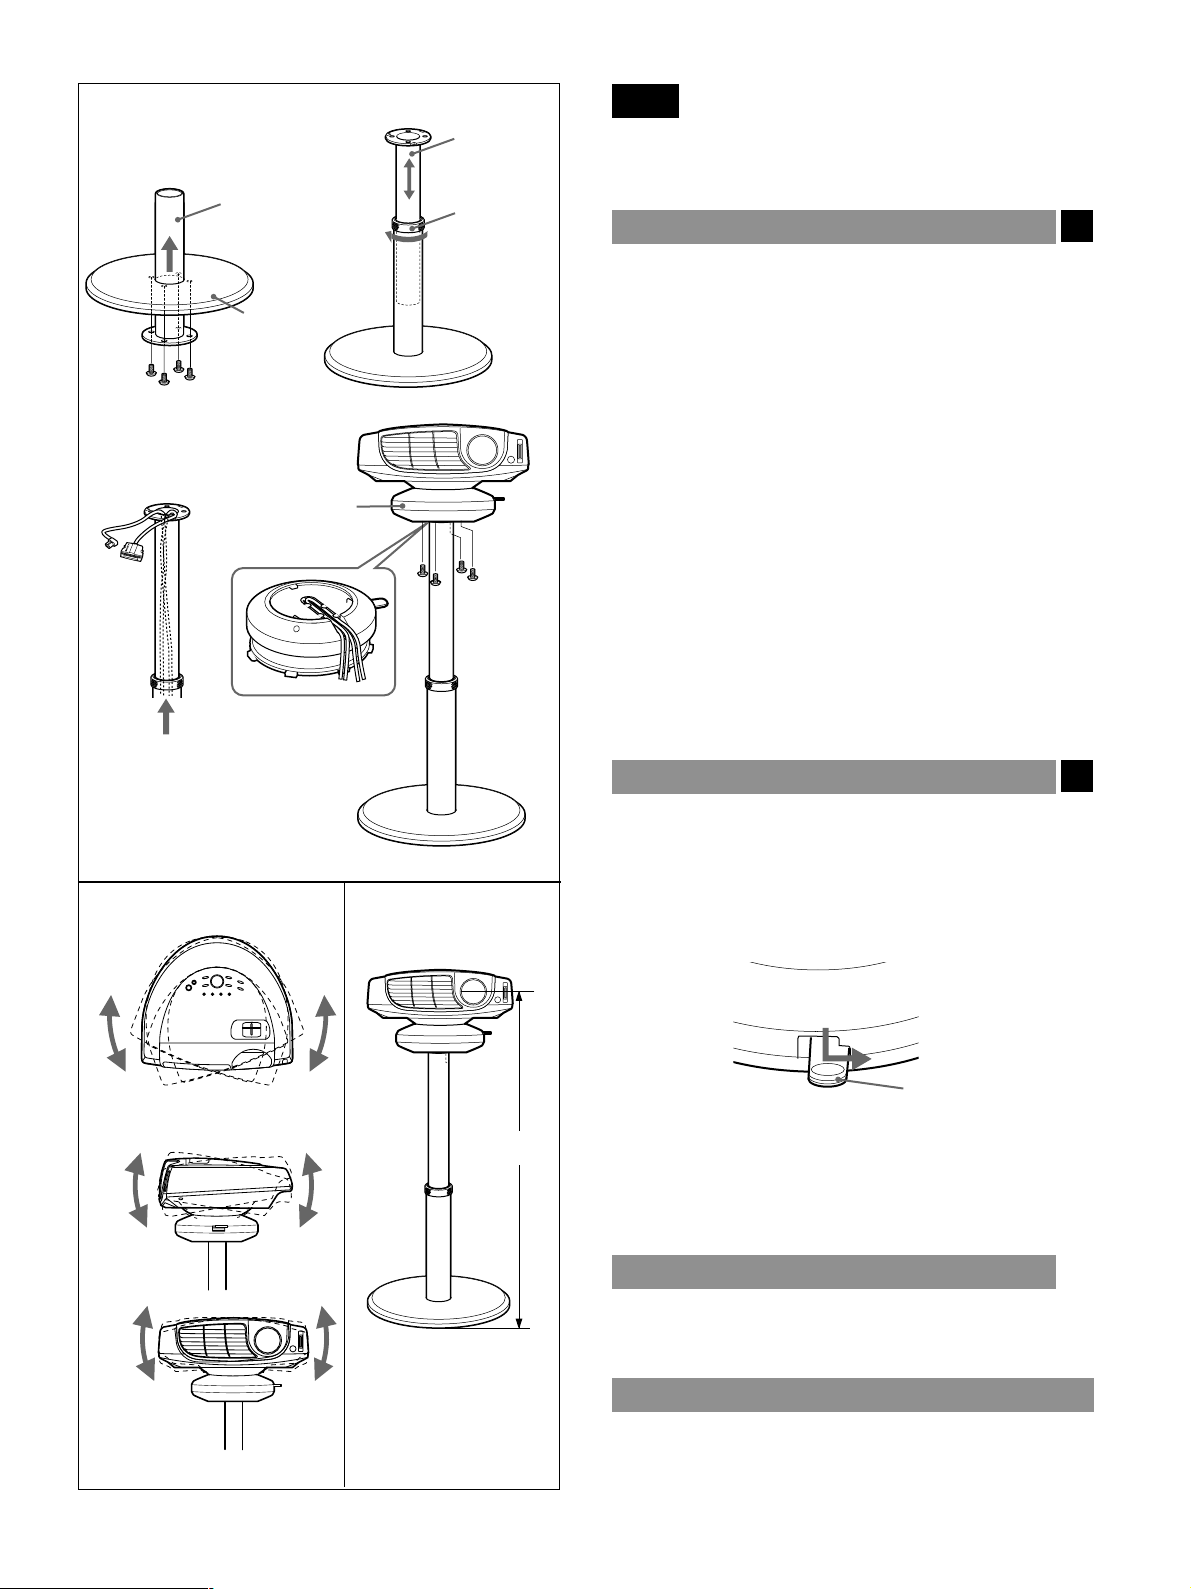
SU-HS1は、LCDビデオプロジェクター 用のプロジェクタースタンド
です。以下の手順に従って、組み立てと調整を行ってください。
プロジェクタースタンドの組み立てかた
組み立ての前に
プロジェク ターに取り付けてあるアジャスタ−を外してください。外
しかたは、プロジェクター本体の取扱説明書をご覧ください。
A
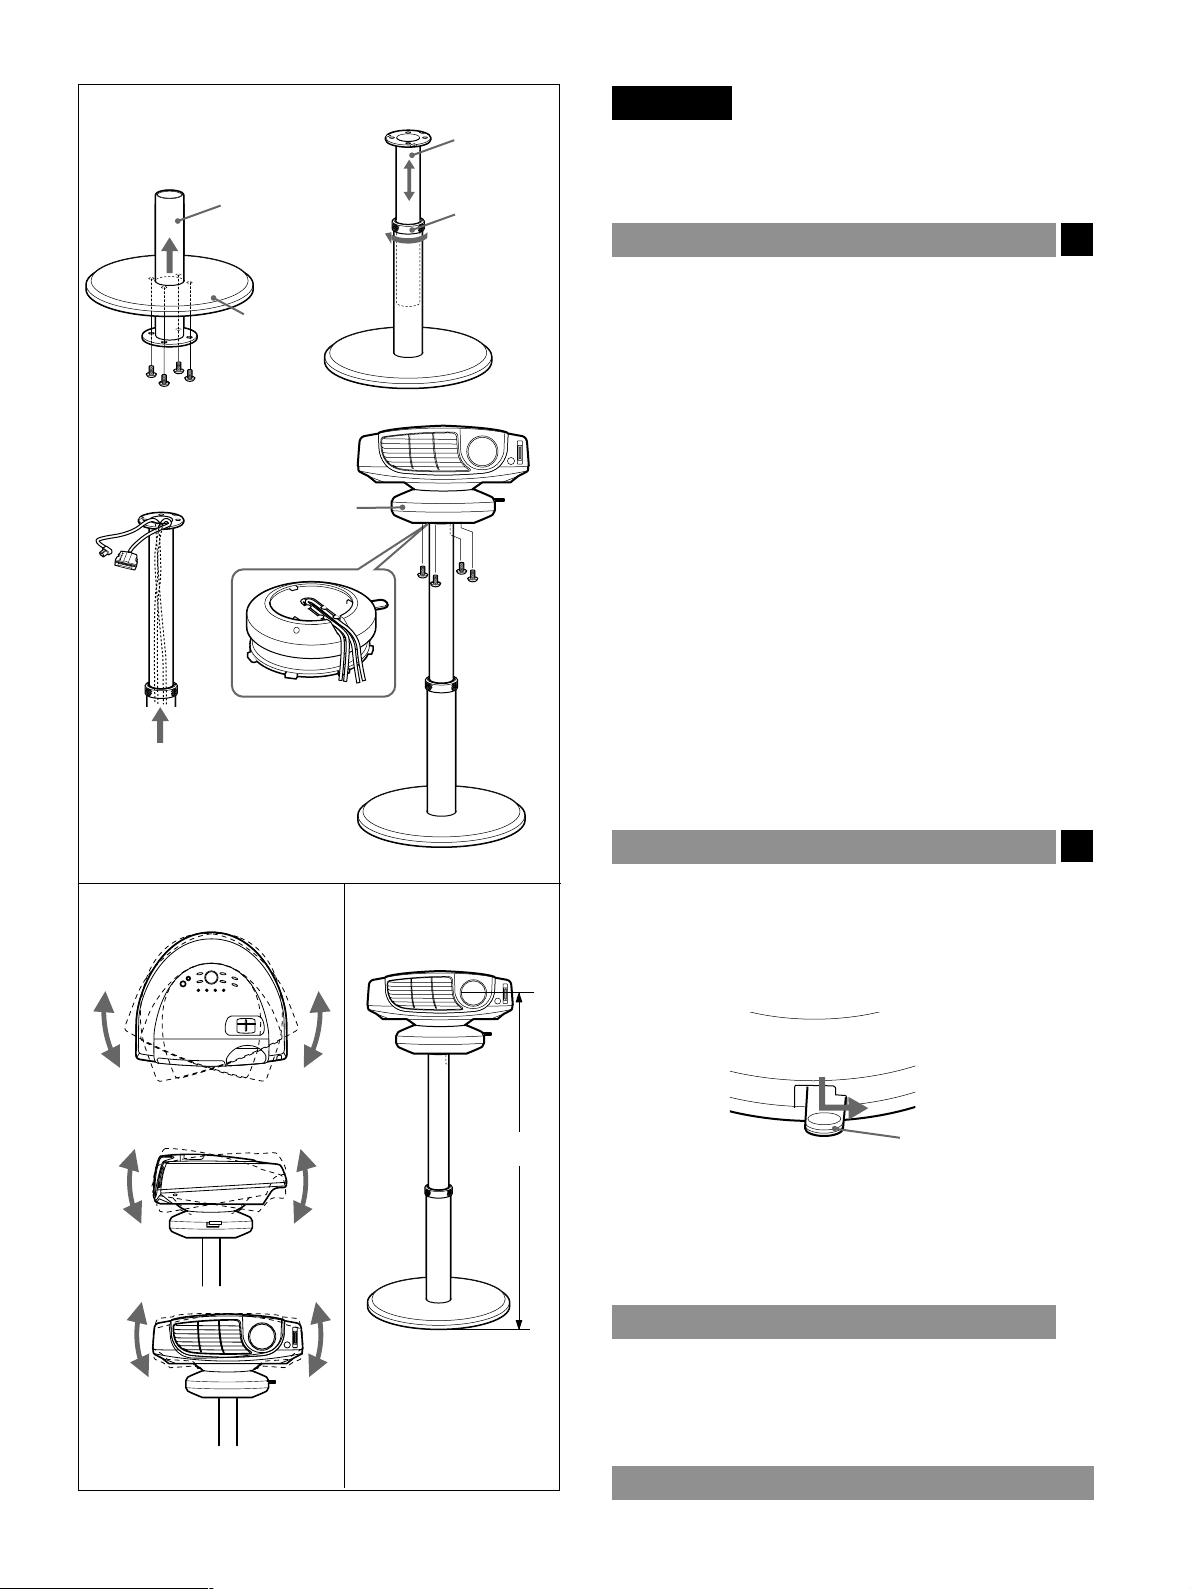
1 支柱下部を下から台座の穴に通し、付属のネジ(長、4個 ) で
固定する。
B
A
アジャスター
C
2 固定金具と支柱上部を支柱下部に取り付け、支柱上部の高
さを決めて固定する。
3 電源ケーブルとPJマルチケーブルを下から支柱に通す。
ケーブルはプロジェクターに接続しやすいように、支柱上部
から20〜30cm位引き出しておいてください。
4 アジャスタ−の裏側の溝にケーブルを収納し、付属のネジ
(短、4 個) でアジャスタ−を支柱にネジ止めする。
5 支柱に通したケーブルをプロジェクターに接続する。
アジャスタ−の調節のしかた
スタン ドのアジャスターを使って、プロジェクターで映す画面の位
置を調節する こ とができます。
アジャスタ−固定レバー を押し下げ、右にロッ クしてか らプロ ジ ェク
タ ーを動かし、アジ ャス タ−固定 レバーを元に戻し ま す。
B
B
C
55 - 80 cm
アジャスタ−固定レバー
以下の範囲で調節できます。
A 左右に最大約20°まで
B 上下に最大約10°まで
C 左右の傾き最大約2°まで
支柱の高さ調節
以下の範囲で調節できます。
55〜80cm(レンズ中心から床まで)
仕様
最大外形寸法:420×420×750mm(幅×奥行き×高さ)
質量: 約5.5kg
C
3
Page 4
A
1
3
Lower
support
Pedestal
4
2
Upper
support
Stopper
English
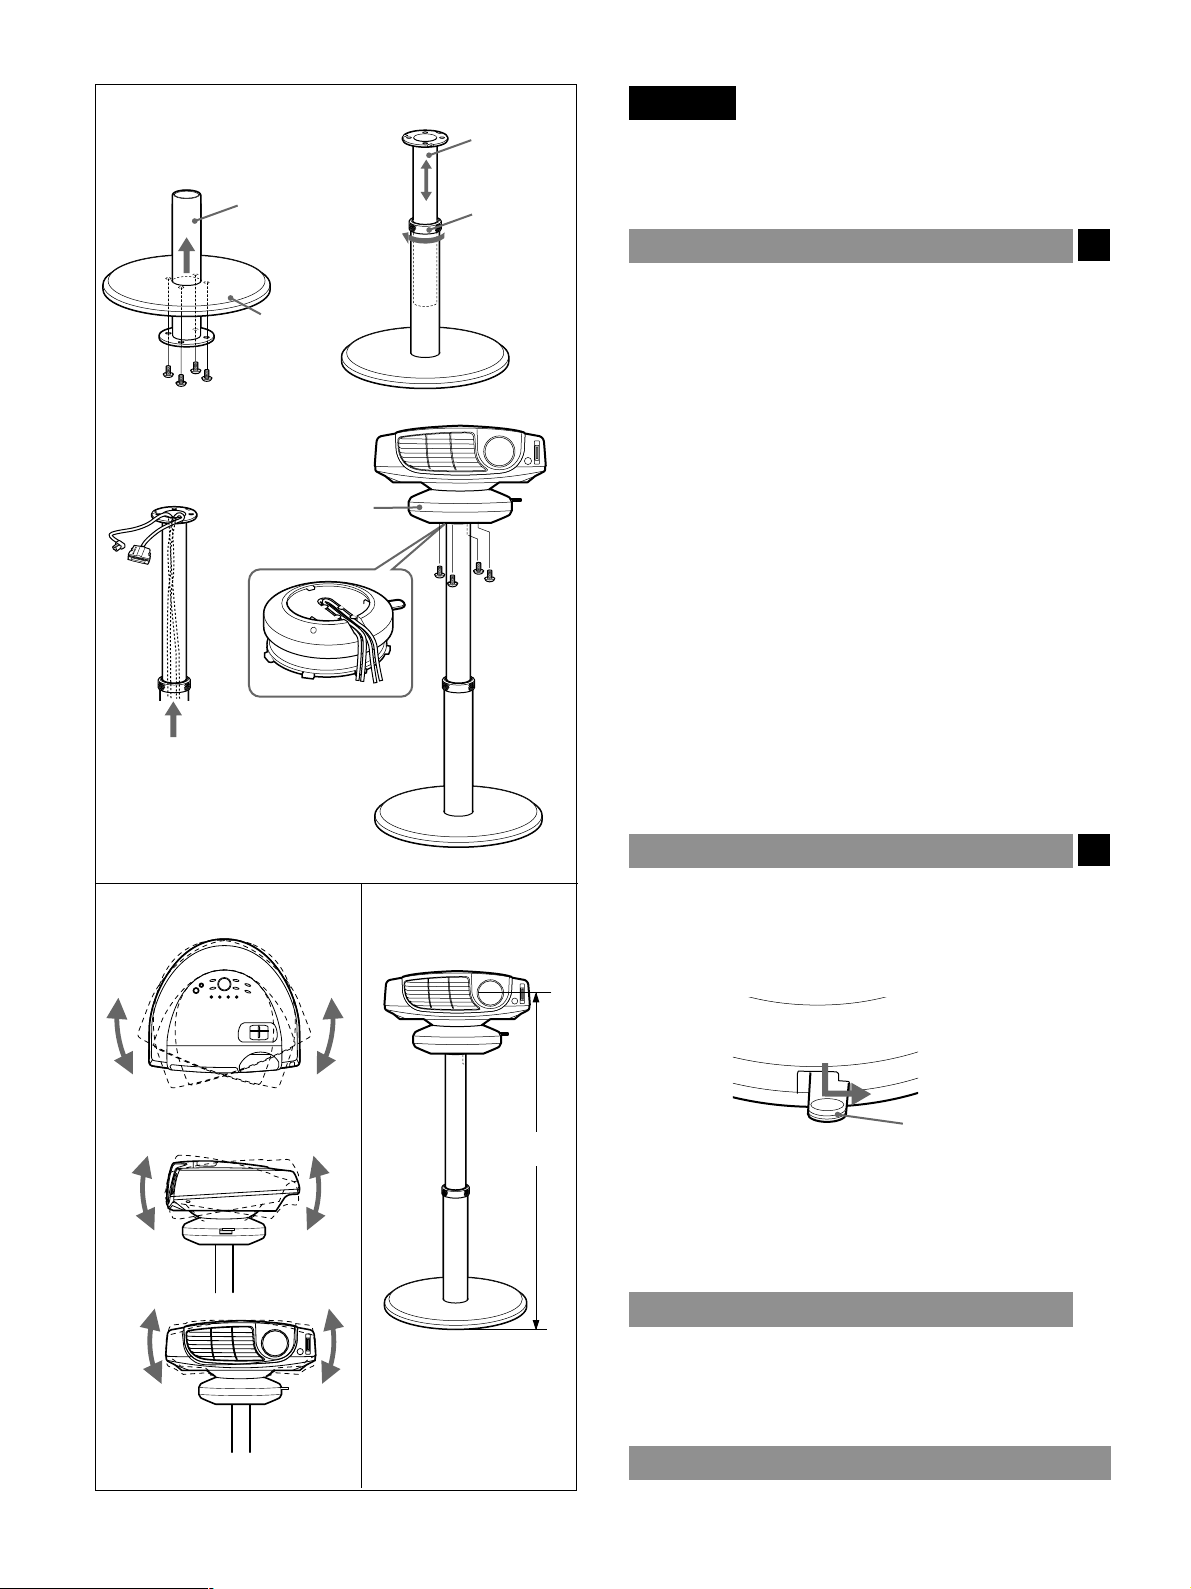
The SU-HS1 is a Projector Stand for the LCD Video
Projector only. Assemble the Projector Stand and
adjust it as follows:
Assembling the Projector Stand
Before assembling
Remove the adjuster mounted on the LCD Video
Projector. To remove it, refer to the Video Projector
Operating Instructions.
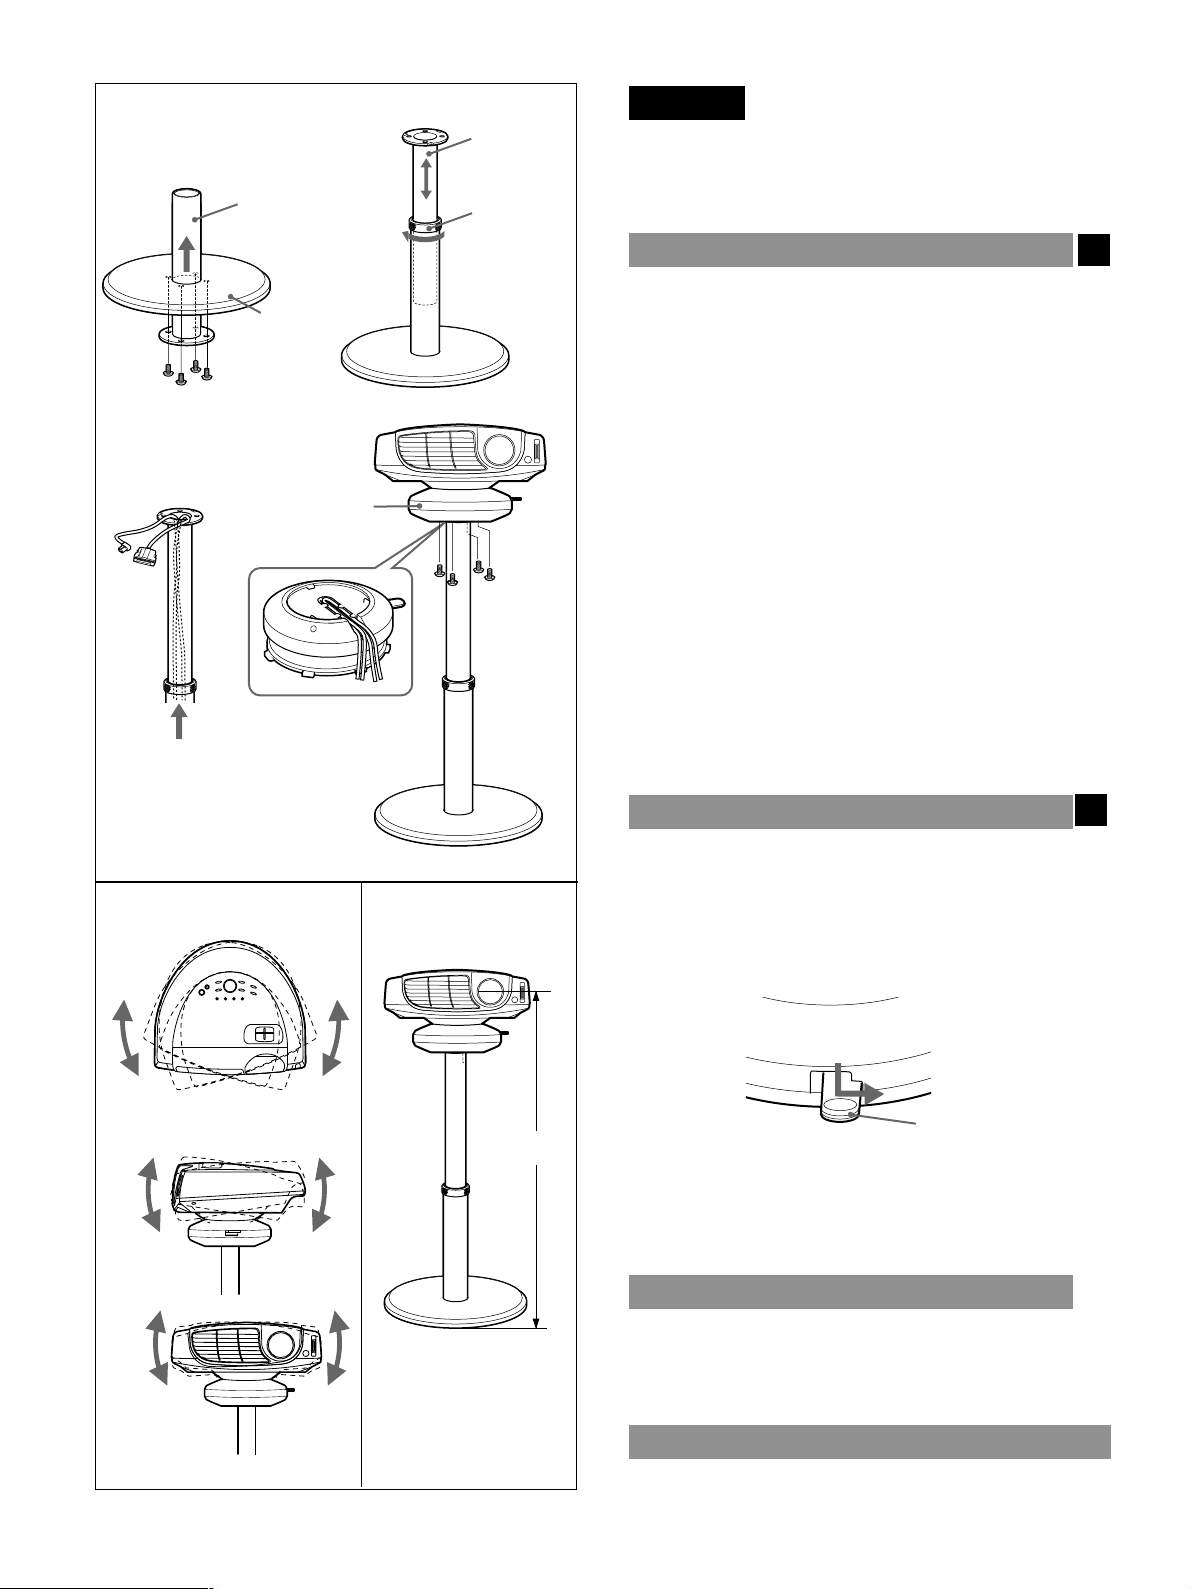
1 Pass a lower support part through the hole of a
pedestal, then fix it with the supplied 4 long
screws.
A
B
A
Adjuster
C
2 Mount a upper support part and stopper to the
lower support part and adjust it height, then fix it.
3 Pass a AC power cord and PJ Multi cable through
the supports.
Pull out the cables from the top of the upper
support for 20 to 30 cm so that they reach to the
projector.
4 Store the cables into the groove at the back of the
adjuster, and fix the adjuster to the support with
the four short screws.
5 Connect the cables passed through the supports to
the projector.
Adjusting the adjuster
Using the adjuster of the projector stand, you can
adjust the projecting picture position.
Hold down and slide the adjuster stopper to the right,
move the projector, then replace the stopper.
B
4
B
C
55 - 80 cm
Adjuster stopper
You can move the projector vertically and
horizontally within the following ranges:
A Up to 20° each for horizontal angle
B Up to 10° each for vertical angle
C Up to 2° each for tilting angle
Adjusting the height of the supports
You can adjust the height of the supports within the
following range:
55 to 80 cm (Distance between the center of the lens
and the floor)
Specifications
Dimensions: 420 × 420 × 750mm (W × D × H)
Mass: Approx. 5.5 kg (13 lb)
C
Page 5
A
1
3
Support
inférieur
Socle
4
Dispositif
de réglage
2
Support
supérieur
Butée
Français
Le SU-HS1 est un support de projecteur utilisé
uniquement pour le vidéo-projecteur LCD. Montez le
support du projecteur et réglez-le comme suit :
Montage du support de projecteur
Avant le montage
Otez le dispositif de réglage monté sur le vidéo-
projecteur LCD. Pour ce faire, reportez-vous au mode
d'emploi du vidéo-projecteur.
A
1 Faites passer la partie inférieure du support dans
l'orifice du socle, puis fixez-la avec les 4 longues
vis fournies.
2 Montez la partie supérieure du support et la butée
dans la partie inférieure du support, puis réglez la
hauteur.
3 Faites passer le cordon d'alimentation secteur et
un câble Multi PJ dans les supports.
Tirez les câbles de 20 à 30 cm à partir du haut du
support supérieur pour qu'ils aillent jusqu'au
projecteur.
B
A
B
C
55 - 80 cm
4 Réservez les câbles dans la rainure dispositif du
réglage et fixez le dispositif au support avec les
quatre vis courtes.
5 Raccordez les câbles passés dans les supports au
projecteur.
Réglage du dispositif de réglage
A l'aide du dispositif de réglage du support de
projecteur, vous pouvez régler la position de l'image
projetée.
Maintenez et faites glissez la butée du dispositif de
réglage vers la droite, déplacez le projecteur, puis
remettez la butée en place.
Butée du dispositif de
réglage
Vous pouvez déplacer le projecteur verticalement et
horizontalement dans les plages suivantes :
A Jusqu'à 20 degrés sur le plan horizontal
B Jusqu'à 10 degrés sur le plan vertical
C Jusqu'à 2 degrés sur le plan d'inclinaison
B
C
Réglage de la hauteur des supports
Vous pouvez régler la hauteur des supports dans la
plage suivante :
de 55 à 80 cm (Distance entre le centre de l'objectif et
le sol)
Spécifications
Dimensions : 420 × 420 × 750 mm (l × p × h)
Masse : 5,5 kg environ (13 livres)
C
5
Page 6
A
1
Unteres Rohr
2
Oberes
Rohr
Stopper
Deutsch
Der Projektorständer SU-HS1 ist ausschließlich für
den LCD-Videoprojektor geeignet. Bauen Sie den
Projektorständer zusammen, und stellen Sie ihn
folgendermaßen ein:
B
A
3
Ständer
4
Einstellvorrichtung
C
Zusammenbauen des Projektorständers
Vorbereitung
Entfernen Sie die Einstellvorrichtung am LCDVideoprojektor. Informationen dazu finden Sie in der
Bedienungsanleitung zum Videoprojektor.
A
1 Stecken Sie das untere Rohr in die Bohrung am
Ständer, und befestigen Sie es mit den
mitgelieferten 4 langen Schrauben.
2 Setzen Sie das obere Rohr mit dem Stopper in das
untere Rohr ein, stellen Sie die Höhe ein, und
arretieren Sie das Rohr.
3 Führen Sie ein Netzkabel und ein PJ-Multikabel
durch die Rohre.
Ziehen Sie die Kabel oben um 20 bis 30 cm
heraus, so daß sie bis zum Projektor reichen.
4 Verlegen Sie die Kabel in der Kerbe an der
Rückseite der Einstellvorrichtung, und befestigen
Sie die Einstellvorrichtung mit den vier kurzen
Schrauben am oberen Rohr.
5 Schließen Sie die durch die Rohre geführten Kabel
an den Projektor an.
Einstellen der Einstellvorrichtung
Mit Hilfe der Einstellvorrichtung am Projektorständer
können Sie die Position des projizierten Bildes
einstellen.
Halten Sie den Stopper an der Einstellvorrichtung
nach unten gedrückt, und schieben Sie ihn nach
rechts. Verschieben Sie den Projektor, und bringen
Sie den Stopper dann wieder in die Ausgangsposition.
B
6
B
C
55 - 80 cm
Stopper an der
Einstellvorrichtung
Sie können den Projektor vertikal und horizontal
innerhalb des folgenden Bereichs verschieben:
A Bis zu je 20° horizontal
B Bis zu je 10° vertikal
C Bis zu je 2° Neigung
Einstellen der Höhe der Rohre
Sie können die Höhe der Rohre im folgenden Bereich
einstellen:
55 bis 80 cm (Abstand zwischen der Mitte des
Objektivs und dem Boden)
Technische Daten
Abmessungen: 420 × 420 × 750 mm (B × T × H)
Gewicht: ca. 5,5 kg
C
Page 7
A
1
3
Soporte
inferior
Pedestal
4
Ajustador
2
Soporte
superior
Freno
Español
SU-HS1 es un soporte de proyector sólo para el
Proyector de vídeo LCD. Monte el soporte del
proyector y ajústelo como se indica:
Montaje del soporte del proyector
Antes del montaje
Quite el ajustador montado en el Proyector de vídeo
LCD. Para quitarlo, consulte las instrucciones de
funcionamiento del proyector de vídeo.
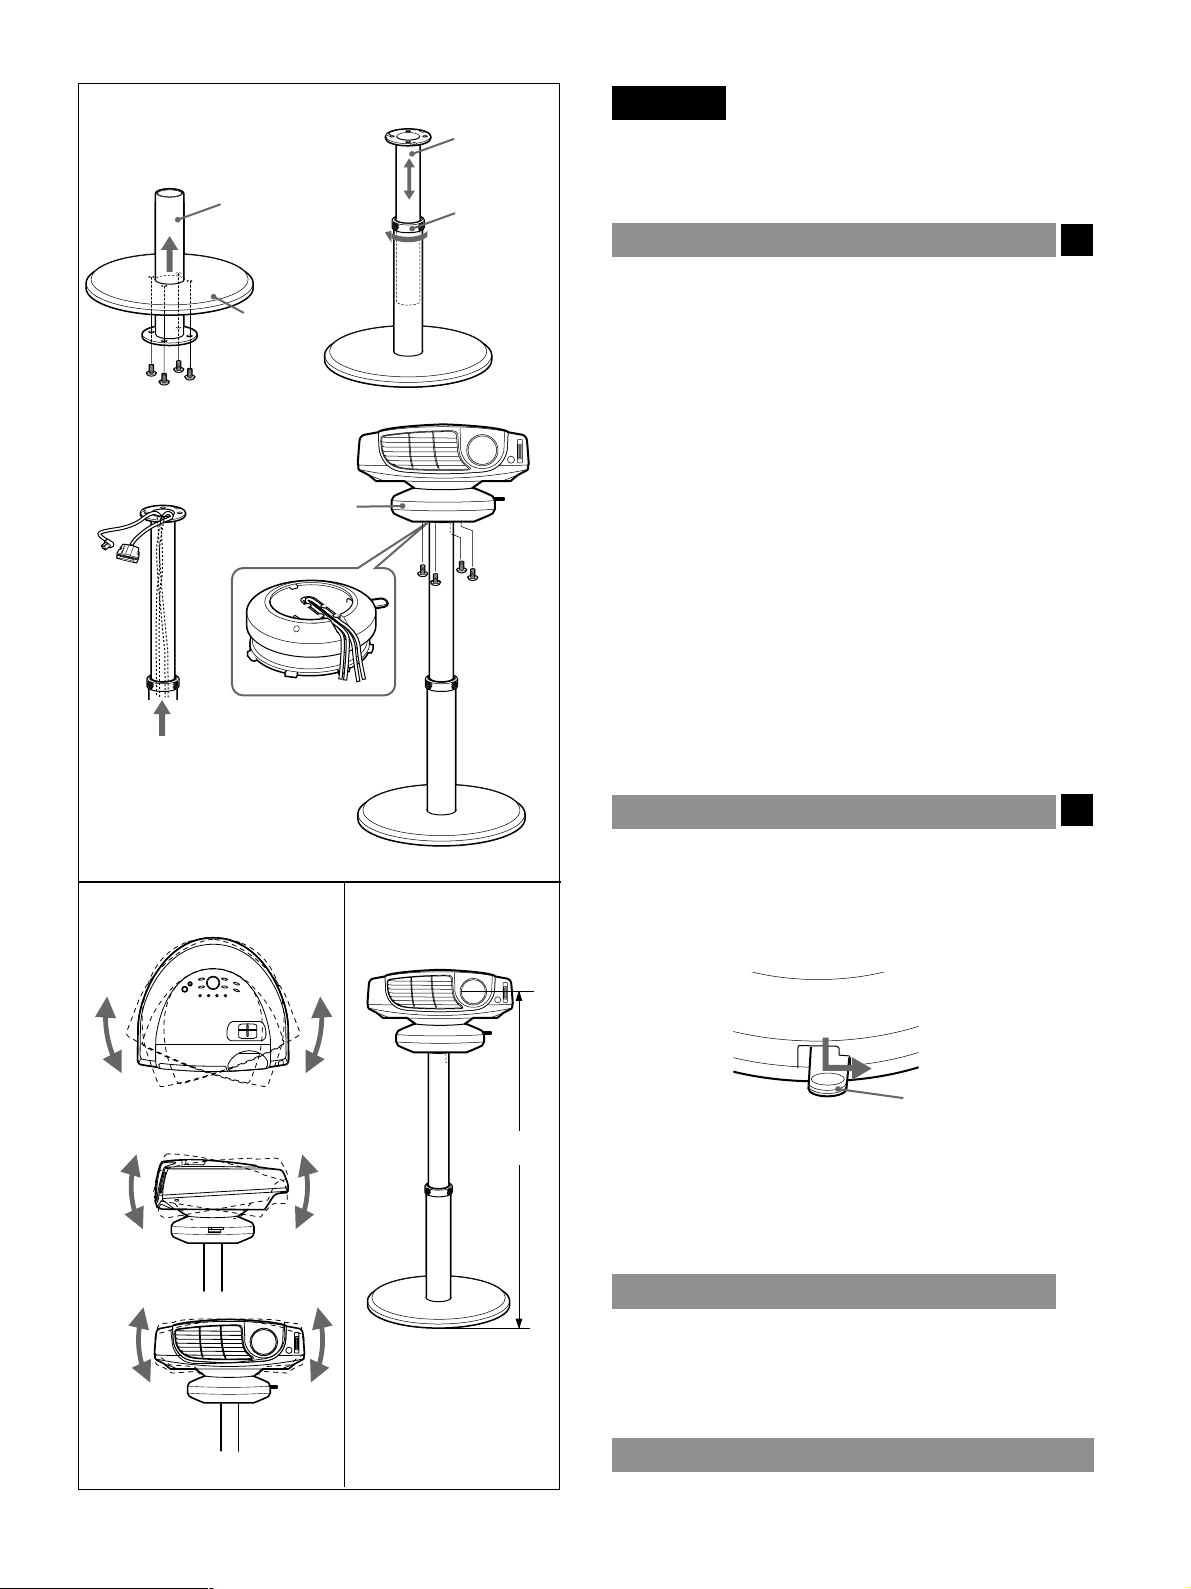
1 Pase el soporte inferior a través del orificio del
pedestal y fíjelo con los 4 tornillos largos que se
suministran.
2 Monte el soporte superior y el freno en el soporte
inferior y ajuste la altura, a continuación fíjelo.
3 Pase un cable de alimentación de CA y un
multicable a través de los soportes.
Tire de los cables por encima del soporte superior
unos 20 ó 30 cm para que lleguen al proyector.
4 Agrupe los cables en la ranura trasera del
ajustador y fije el soporte con los cuatro tornillos
cortos.
A
B
A
B
C
C
55 - 80 cm
5 Conecte los cables pasados a través de los
soportes al proyector.
Ajuste del ajustador
Utilizando el ajustador del soporte del proyector podrá
ajustar la posición de la imagen proyectada.
Presione hacia abajo y deslice el freno del ajustador
hacia la derecha, mueva el proyector y luego vuelva a
colocar el freno en la posición inicial.
Freno del ajustador
Puede mover el proyector vertical y horizontalmente
dentro de los siguientes rangos:
A Hasta 20° cada uno para el ángulo horizontal
B Hasta 10° cada uno para ángulo vertical
C Hasta 2° cada uno para el ángulo de inclinación
Ajuste de la altura de los soportes
Puede ajustar la altura de los soporte dentro de los
siguientes rangos:
de 55 a 80 cm (Distancia entre el centro del objetivo y
el suelo)
B
C
Especificaciones
Dimensiones: 420 × 420 × 750 mm (An × Prf × Al)
Peso: Aprox. 5,5 kg (13 lb)
7
Page 8
A
1
3
Supporto
inferiore
Piedistallo
Dispositivo di
regolazione
4
2
Supporto
superiore
Fermo
Italiano
SU-HS1 è un supporto esclusivo per videoproiettore a
cristalli liquidi (LCD). Assemblare il supporto per
proiettori e regolarlo come segue:
Assemblaggio del supporto per proiettori
Operazioni preliminari
Rimuovere il dispositivo di regolazione montato sul
videoproiettore LCD. Per rimuovere tale dispositivo,
consultare le istruzioni per l'uso del videoproiettore.
A
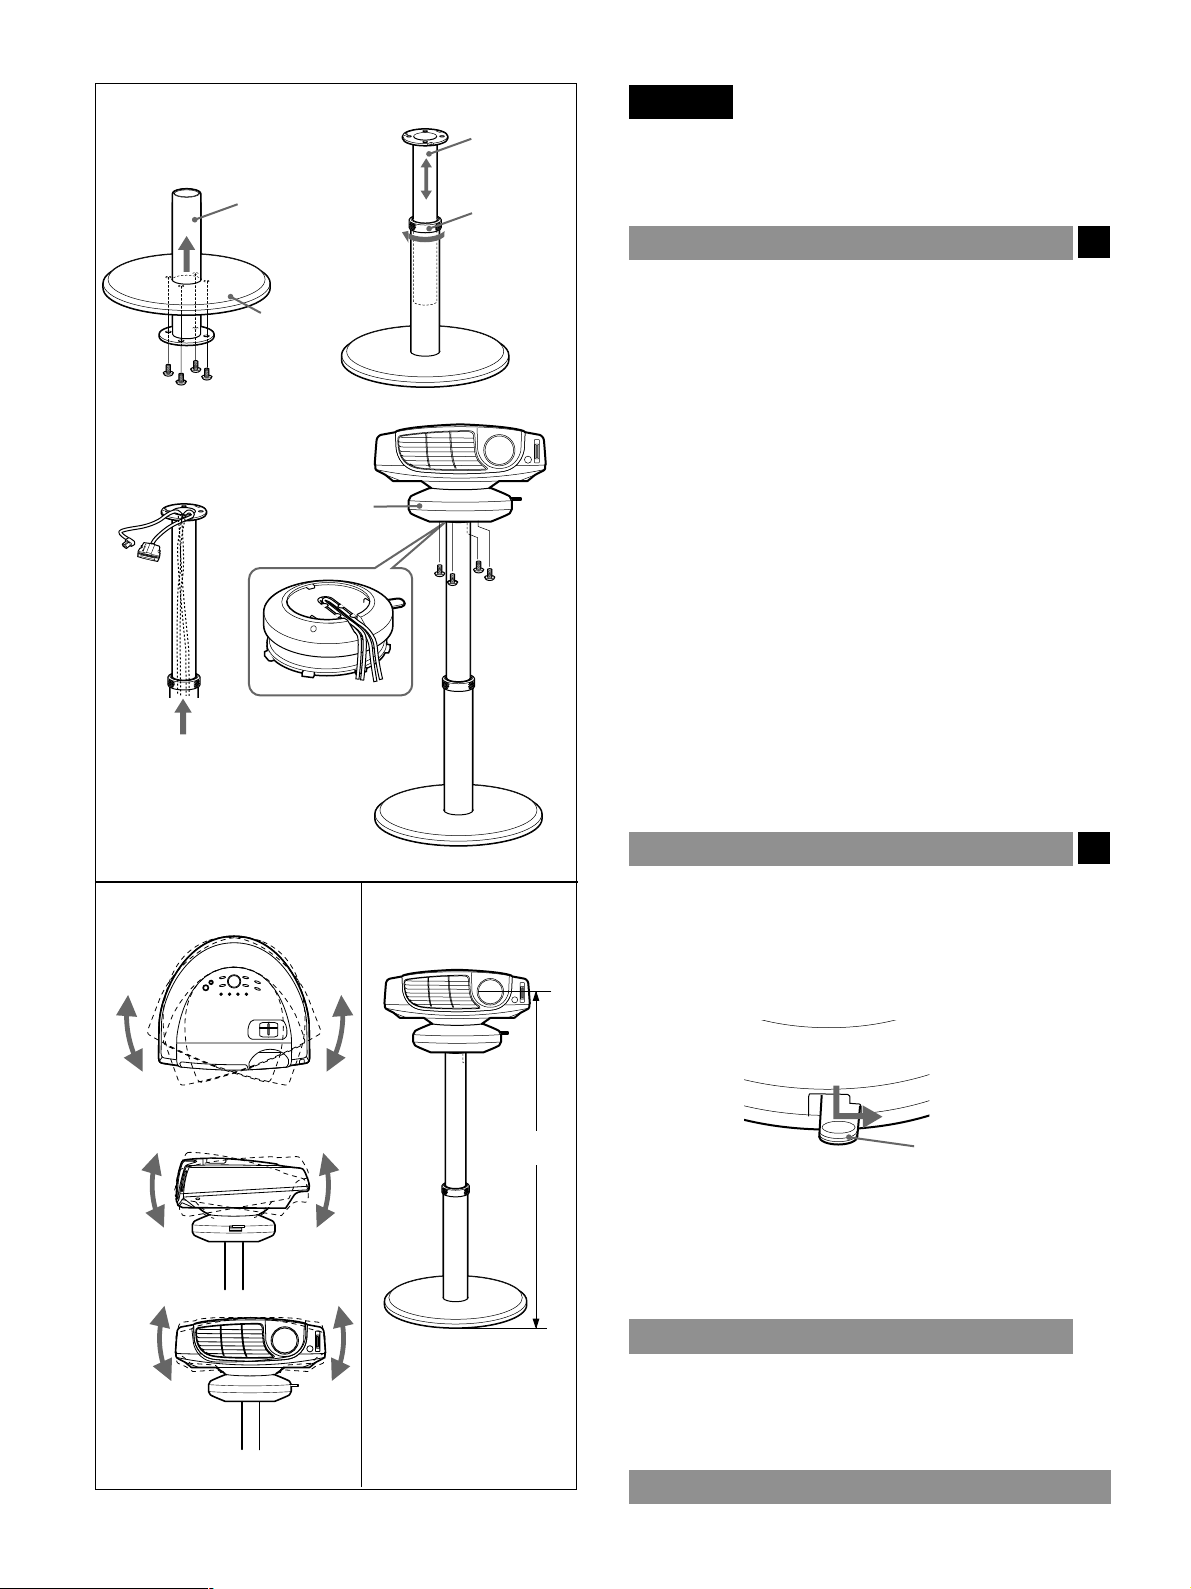
1 Inserire la parte inferiore del supporto nelforo del
piedistallo, quindi fissarla con le 4 viti lunghe in
dotazione.
2 Montare la parte superiore del supporto e il fermo
sulla parte inferiore del supporto e regolarne
l'altezza, quindi fissarla.
3 Passare un cavo di alimentazione CA e un cavo
multiplo PJ attraverso i supporti.
Estrarre i cavi dalla parte superiore del supporto
superiore per 20 - 30 cm in modo da farli arrivare
fino al proiettore.
4 Sistemare i cavi all'interno della scanalatura nella
parte posteriore del dispositivo di regolazione,
quindi fissare il dispositivo di regolazione al
supporto con le quattro viti corte.
5 Collegare al proiettore i cavi passati attraverso i
supporti.
B
A
B
C
C
55 - 80 cm
Regolazione del dispositivo di regolazione
È possibile regolare la posizione dell'immagine da
proiettare utilizzando il dispositivo di regolazione del
supporto del proiettore.
Tenere premuto e fare scorrere verso destra il fermo
del dispositivo di regolazione, spostare il proiettore,
quindi riportare il fermo in posizione.
Fermo del dispositivo
di regolazione
È possibile spostare il proiettore verticalmente e
orizzontalmente entro la gamma di valori seguente:
A Fino a 20° ciascuno per l'angolo orizzontale
B Fino a 10° ciascuno per l'angolo verticale
C Fino a 2° ciascuno per l'angolo di inclinazione
Regolazione dell'altezza dei supporti
È possibile regolare l'altezza dei supporti entro la
gamma di valori seguente:
da 55 a 80 cm (distanza tra il centro dell'obiettivo e il
pavimento)
B
C
Caratteristiche tecniche
Dimensioni: 420 × 420 × 750mm mm (L × P × A)
8
Peso: Circa 5,5 kg
Page 9
A
1
3
下方支点
轴架
4
调节部件
2
上方支点
制动部件
中文
SU-HS1 是投影仪的支架,仅适于 LCD 资料投影
仪。请按如下步骤装配和调节投影仪支架。
装配投影仪支架
装配之前
将装配在 LCD 资料投影仪上的调节部件卸除。具
体方法请参见视频投影仪操作说明书。
A
1 将下支架部分穿入轴架中心的孔洞,然后用 4 颗
长螺钉将其固定住。
2 将上支架部分和制动部件安装到下支架上并调
整其高度,然后再固定住。
3 将交流电源线和 PJ 多芯电缆穿过支架。
将电缆自上支架的顶端拉出约 20 至 30 厘米,
使其能够到投影仪。
4 将电缆保存于调整部件背面的槽内,并用 4 颗
短螺钉将调节部件固定在支架上。
B
A
B
C
C
55 - 80 cm
5 将穿过支架的电缆连接至投影仪。
调节调节部件
使用投影仪的调节部件,您就能调节投影的图片位
置。
压紧调节部件的制动器并将其滑动至右边,移动投
影仪,然后再将该制动器返回原位。
调节部件的制动器
您可以在下述范围内垂直和水平地移动投影仪:
A 对于水平角度,每次至多 20°
B 对于垂直角度,每次至多 10°
C 对于倾斜角度,每次至多 2°
调节支架的高度
您可以在下述范围内调节支架的高度:
55 至 80 厘米(镜头中心与地面之间的距离)
B
C
规格
尺寸: 420 × 420 × 750 厘米(宽 × 深 × 高)
毛重: 约 5.5 公斤
9
Page 10

Page 11

Page 12
Printed in Japan
 Loading...