

Page 1
3-866-247-62(1)
FM Ster eo
FM-AM Receiver
Operating instructions
Инструкция по эксплуатации
Instrukcja obsługi
GB
RU
PL
STR-DE435
© 1999 by Sony Corporation
Page 2

Getting Started
WARNING
To prevent fire or shock
hazard, do not expose
the unit to rain or
moisture.
To avoid electrical shock, do not open
the cabinet. Refer servicing to qualified
personnel only.
Do not install the appliance in a
confined space, such as a bookcase or
build-in cabinet.
Precautions
On safety
• Should any solid object or liquid fall
into the cabinet, unplug the receiver
and have it checked by qualified
personnel before operating it any
further.
On power sources
• Before operating the receiver, check
that the operating voltage is identical
with your local power supply. The
operating voltage is indicated on the
nameplate at the rear of the receiver.
• The unit is not disconnected from the
AC power source (mains) as long as it
is connected to the wall outlet, even if
the unit itself has been turned off.
• If you are not going to use the
receiver for a long time, be sure to
disconnect the receiver from the wall
outlet. To disconnect the mains lead,
grasp the plug itself; never pull the
cord.
• AC power cord must be changed only
at the qualified service shop.
• The mains switch is located on the
front exterior.
On placement
• Place the receiver in a location with
adequate ventilation to prevent heat
build-up and prolong the life of the
receiver.
• Do not place the receiver near heat
sources, or in a place subject to direct
sunlight, excessive dust or
mechanical shock.
• Do not place anything on top of the
cabinet that might block the
ventilation holes and cause
malfunctions.
On operation
• Before connecting other components,
be sure to turn off and unplug the
receiver.
On cleaning
• Clean the cabinet, panel and controls
with a soft cloth slightly moistened
with a mild detergent solution. Do
not use any type of abrasive pad,
scouring powder or solvent such as
alcohol or benzine.
If you have any question or problem
concerning your receiver, please
consult your nearest Sony dealer.
GB
2
Page 3

Getting Started
About This Manual
This instructions in this manual is for
model STR-DE435. Check your model
number by looking at the upper right
corner of the front panel.
Conventions
The instructions in this manual describe
the controls on the receiver. You can
also use the controls on the remote if
they have the same or similar names as
those on the receiver.
For details on the use of your remote,
refer to the separate operating
instructions supplied with the remote.
• A “Quick Reference Guide” is
supplied on page 32.
• The following icons are used in this
manual:
Indicates that you can use only
the remote to do the task.
Indicates hints and tips for
making the task easier.
This receiver contains a Dolby Pro Logic
Surround decoder.
Manufactured under license from Dolby
Laboratories Licensing Corporation.
“DOLBY”, “PRO LOGIC” and the
double-D symbol a are trademarks of
Dolby Laboratories Licensing
Corporation.
TABLE OF CONTENTS
Getting Started
Unpacking 4
Hookup Overview 4
Aerial Hookups 5
Audio Component Hookups 5
Video Component Hookups 6
Speaker System Hookups 7
AC Hookups 9
Before You Use Your Receiver 9
Dolby Surround Setup 10
Location of Parts and Basic Amplifier Operations
Front Panel Parts Description 12
Receiver Operations
Receiving Broadcasts 16
Presetting Radio Stations 17
Storing FM Stations Automatically in Alphabetical Order
(“Auto-betical”) 18
Using the Radio Data System (RDS) 18
Using Surround Sound
Enjoying Surround Sound 21
Selecting a Sound Field 22
Customizing Sound Fields 23
Other Operations
Indexing Preset Stations and Programme Sources 25
Recording 25
Using the Sleep Timer 26
GB
Additional Information
Troubleshooting 27
Specifications 28
Glossary 29
Index 30
Rear Panel Descriptions 31
Quick Reference Guide 32
GB
3
Page 4
Getting Started
Unpacking Hookup Overview
Check that you received the following items with the
receiver:
• FM wire aerial (1)
• AM loop aerial (1)
• Remote commander (remote) (1)
• Operating instruction for remote commander (1)
• Size AA (R6) batteries (2)
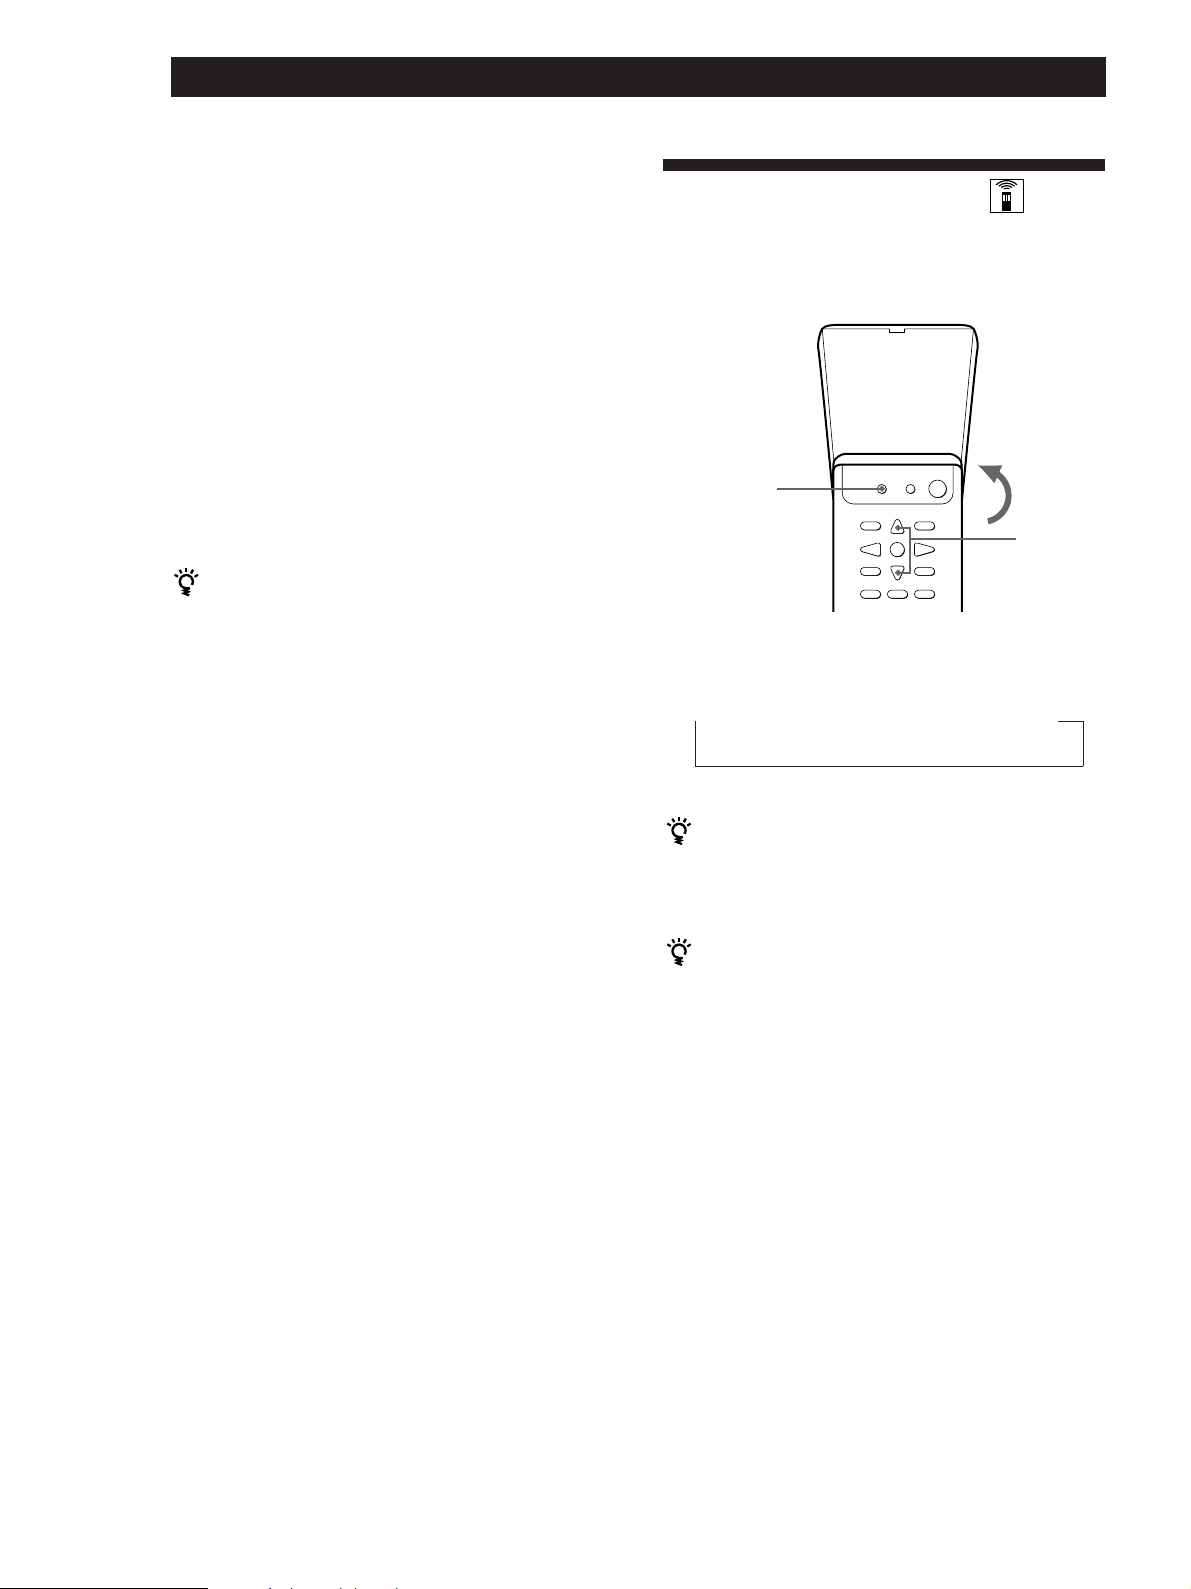
Inserting batteries into the remote
Insert two size AA (R6) batteries in accordance with
the + and – markings on the battery compartment.
When using the remote, point it at the remote sensor g
on the receiver.
For details, refer to the operating instructions supplied
with your remote.
When to replace batteries
Under normal use, the batteries should last for about 6
months. When the remote no longer operates the
receiver, replace both batteries with new ones.
You cannot operate the following buttons on the
RM-PP402 remote
• VIDEO2
• VIDEO3
• DVD
• PHONO
• SOUND FIELD A.F.D.
Notes
• Do not leave the remote in an extremely hot or humid
place.
• Do not use a new battery with an old one.
• Do not expose the remote sensor to direct sunlight or
lighting apparatuses. Doing so may cause a malfunction.
• If you don’t use the remote for an extended period of time,
remove the batteries to avoid possible damage from
battery leakage and corrosion.
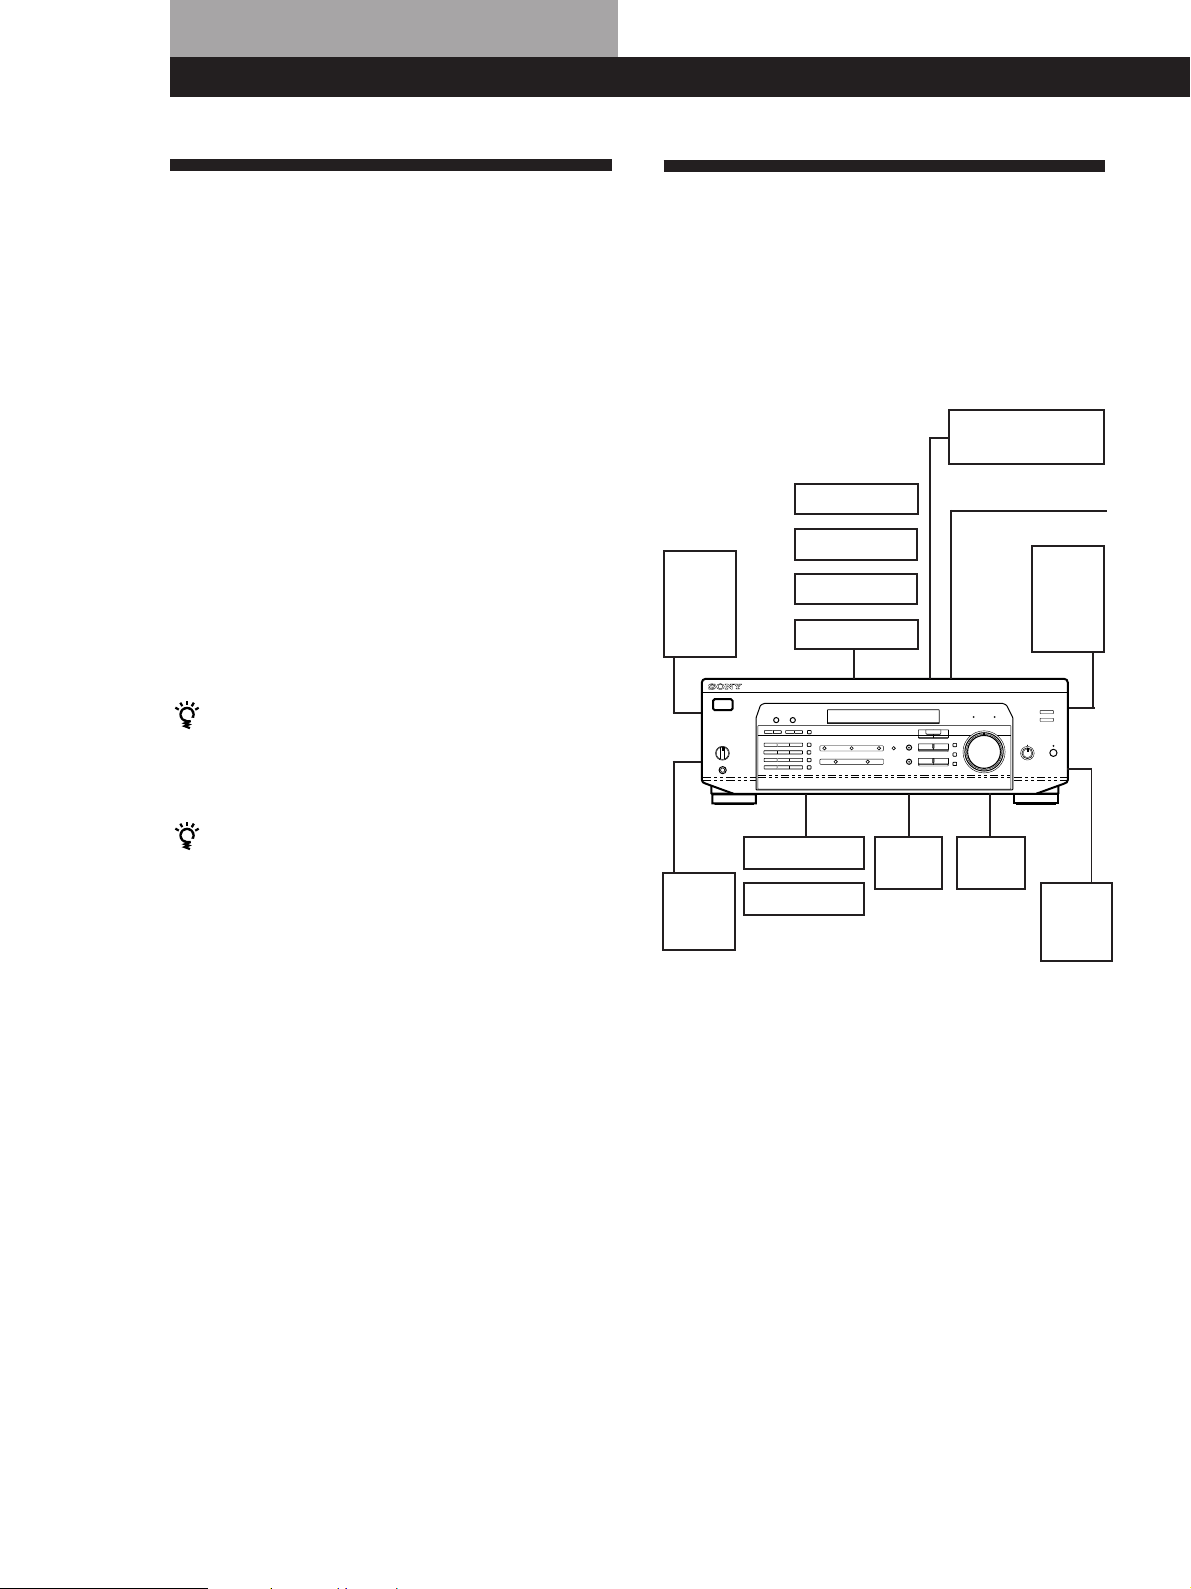
The receiver allows you to connect and control the
following audio/video components. Follow the
hookup procedures for the components that you want
to connect to the receiver on the pages specified. To
learn the locations and names of each jack, see “Rear
Panel Descriptions” on page 31.
DVD player/AC-3
decoder
Aerial Hookups (5)
AM/FM aerial
Front
speaker
(R)
Active
woofer
Rear
speaker
(R)
Speaker
System
Hookups (7)
Front
speaker
(L)
Rear
speaker
(L)
Video Component
Hookups (6)
TV monitor
TV tuner
LD player
VCR
CD player
MD/TAPE deck
Audio Component
Hookups (5)
Centre
speaker
Before you get started
• Turn off the power to all components before making
any connections.
• Do not connect the mains lead until all of the
connections are completed.
• Be sure to make connections firmly to avoid hum
and noise.
• When connecting an audio/video cable, be sure to
match the color-coded pins to the appropriate jacks
on the components: Yellow (video) to Yellow; White
(left, audio) to White; and Red (right, audio) to Red.
GB
4
Page 5
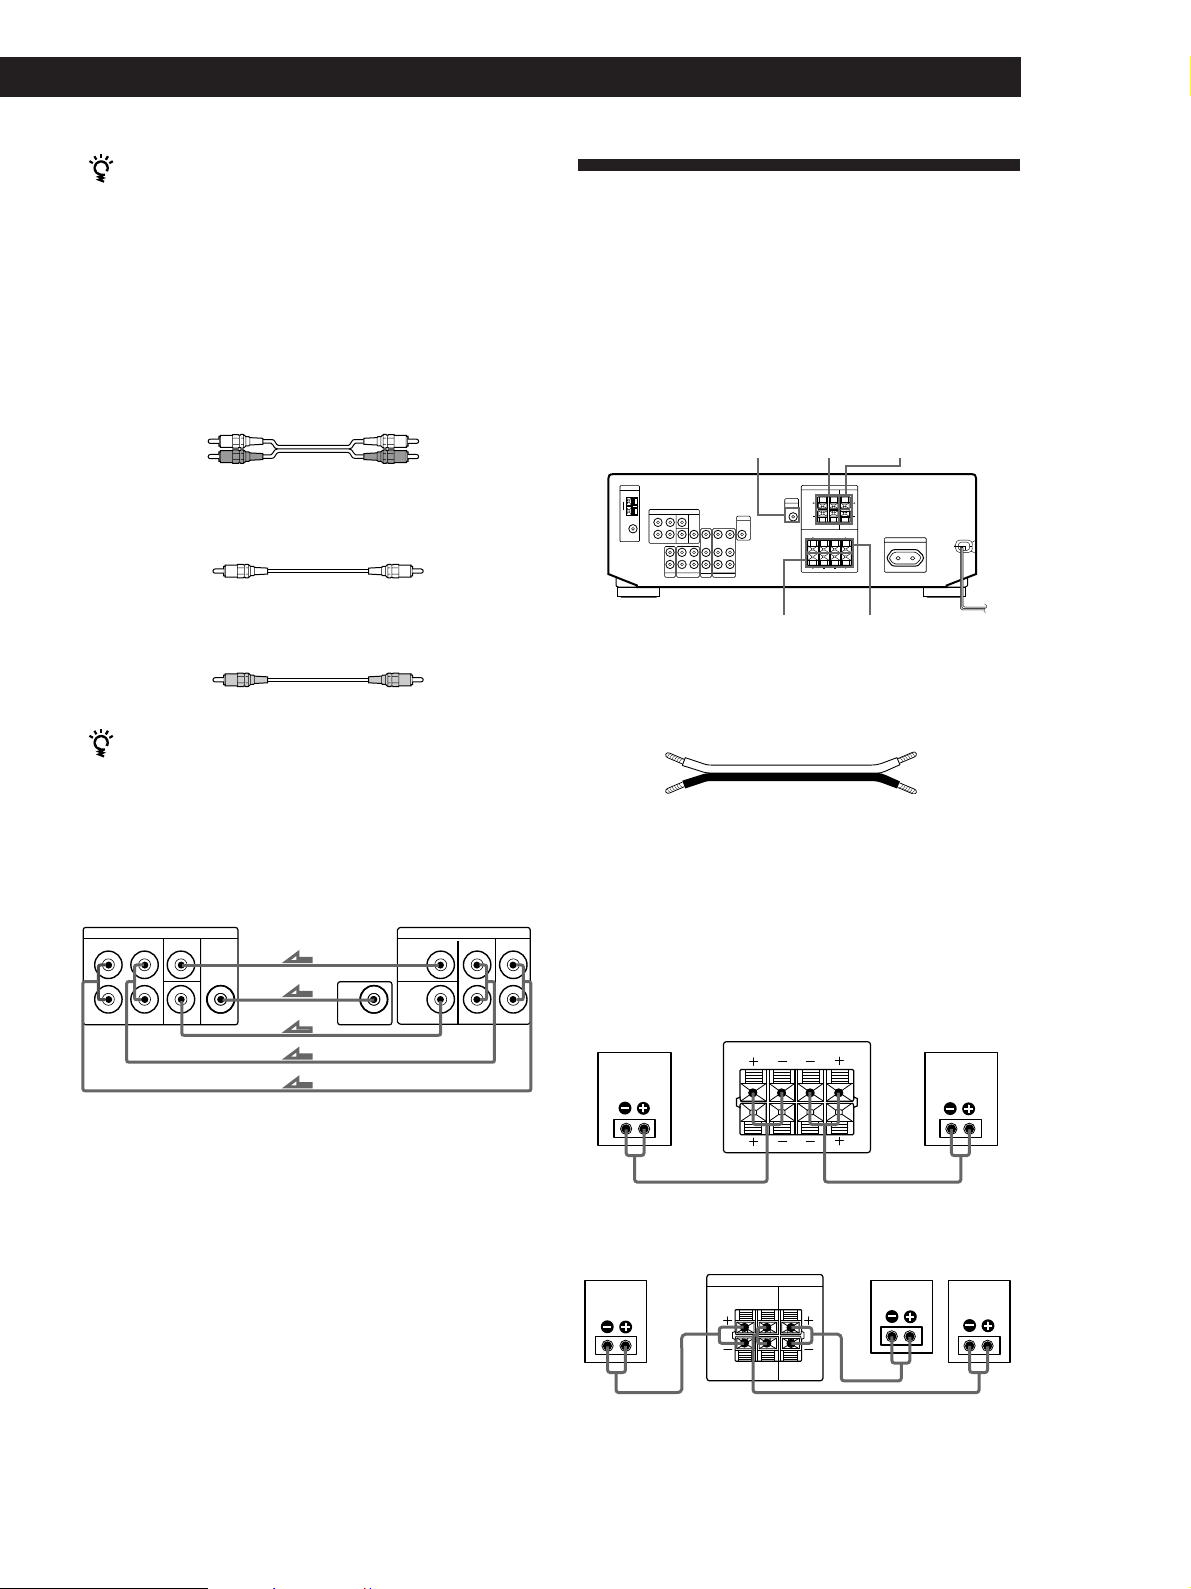
Aerial Hookups
Overview
This section describes how to connect AM and FM
aerials to the receiver. If you want to receive radio
broadcasts with the receiver, complete these
connections first, then go to the following pages.
For specific locations of the terminals, see the
illustration below.
ANTENNA
Getting Started
Connecting a ground wire
If you connect the receiver to an outdoor aerial, ground
it against lightning as shown in the illustration in the
left column. To prevent a gas explosion, do not connect
the ground wire to a gas pipe.
Where do I go next?
If you want to connect other components, go on to the next
section. If you’re only planning to use the receiver to listen
to the radio, go to “Speaker System Hookups” on pages 7
and 8.
Audio Component Hookups
Overview
What aerials will I need?
• FM wire aerial
(supplied) (1)
• AM loop aerial
(supplied) (1)
Hookups
FM wire aerial
After connecting
the wire aerial,
keep it as
horizontal as
possible.
If you have poor FM reception
Use a 75-ohm coaxial cable (not supplied) to connect the
receiver to an outdoor FM aerial as shown below.
Receiver
ANTENNA
AM
y
COAXIAL
FM
75Ω
Receiver
ANTENNA
AM
AM loop aerial
FM outdoor aerial
This section describes how to connect your audio
components to the receiver. If you want to use the
receiver as an amplifier, complete these connections.
For specific locations of the jacks, see the illustration
below.
CD
MD/TAPE
What cords will I need?
Audio cords (not supplied) (1 for CD player; 2 for each MD
deck or tape deck)
White (L)
Red (R)
White (L)
Red (R)
Ground wire
(not supplied)
y
COAXIAL
FM
75Ω
To ground
If you have poor AM reception
Connect a 6 to 15-meter (20 to 50 ft.) insulated wire (not
supplied) to the AM aerial terminal in addition to the
AM loop aerial. Try to extend the wire outdoors and
keep it horizontal.
(continued)
GB
5
Page 6
Getting Started
AUDIO IN
L
R
TV/LD
VIDEO IN
AUDIO
OUTPUT
VIDEO
L
R
MONITOR
VIDEO
OUT
INPUT
VIDEO
Hookups
The arrow ç indicates signal flow.
CD player
Receiver
AUDIO IN
CD
L
R
CD player
OUTPUT
LINE
L
R
MD deck or Tape deck
Receiver
REC OUT
MD/TAPE
L
R
IN
MD deck or Tape deck
OUTPUT
INPUT
LINE
LINE
L
R
Where do I go next?
Go on to the next section to connect video components to
enjoy surround sound when watching/listening to TV
programmes or video tapes.
• Video cable (not supplied) (1 for TV monitor)
Yellow Yellow
Hookups
The arrow ç indicates signal flow.
You can listen to the sound from VCR or TV/LD by
connecting the audio signal from VCR or TV/LD to the
receiver.
TV/LD
Receiver
MONITOR
Receiver TV monitor
TV tuner or LD player
Video Component Hookups
Overview
This section describes how to connect video
components to the receiver. For specific locations of the
jacks, see the illustration below.
5.1 CH/DVD
TV/LD
What cables will I need?
• Audio/video cable (not supplied) (1 for each TV tuner or
LD player; 2 for VCR)
Yellow (video)
White (L/audio)
Red (R/audio)
MONITOR
VIDEO
Yellow (video)
White (L/audio)
Red (R/audio)
VCR
Receiver VCR
VIDEO IN
VIDEO OUT
L
R
AUDIO IN
AUDIO OUT
VIDEO
OUTPUT
VIDEO
AUDIO
INPUT
VIDEO
AUDIO
L
R
GB
6
Page 7
Use the function buttons (TV/LD, CD, MD/TAPE etc)
to select the VIDEO AUDIO OUT signal.
You can record this audio signal by connecting a
recording component such as a cassette deck (to the
VIDEO AUDIO OUT jack)
Getting Started
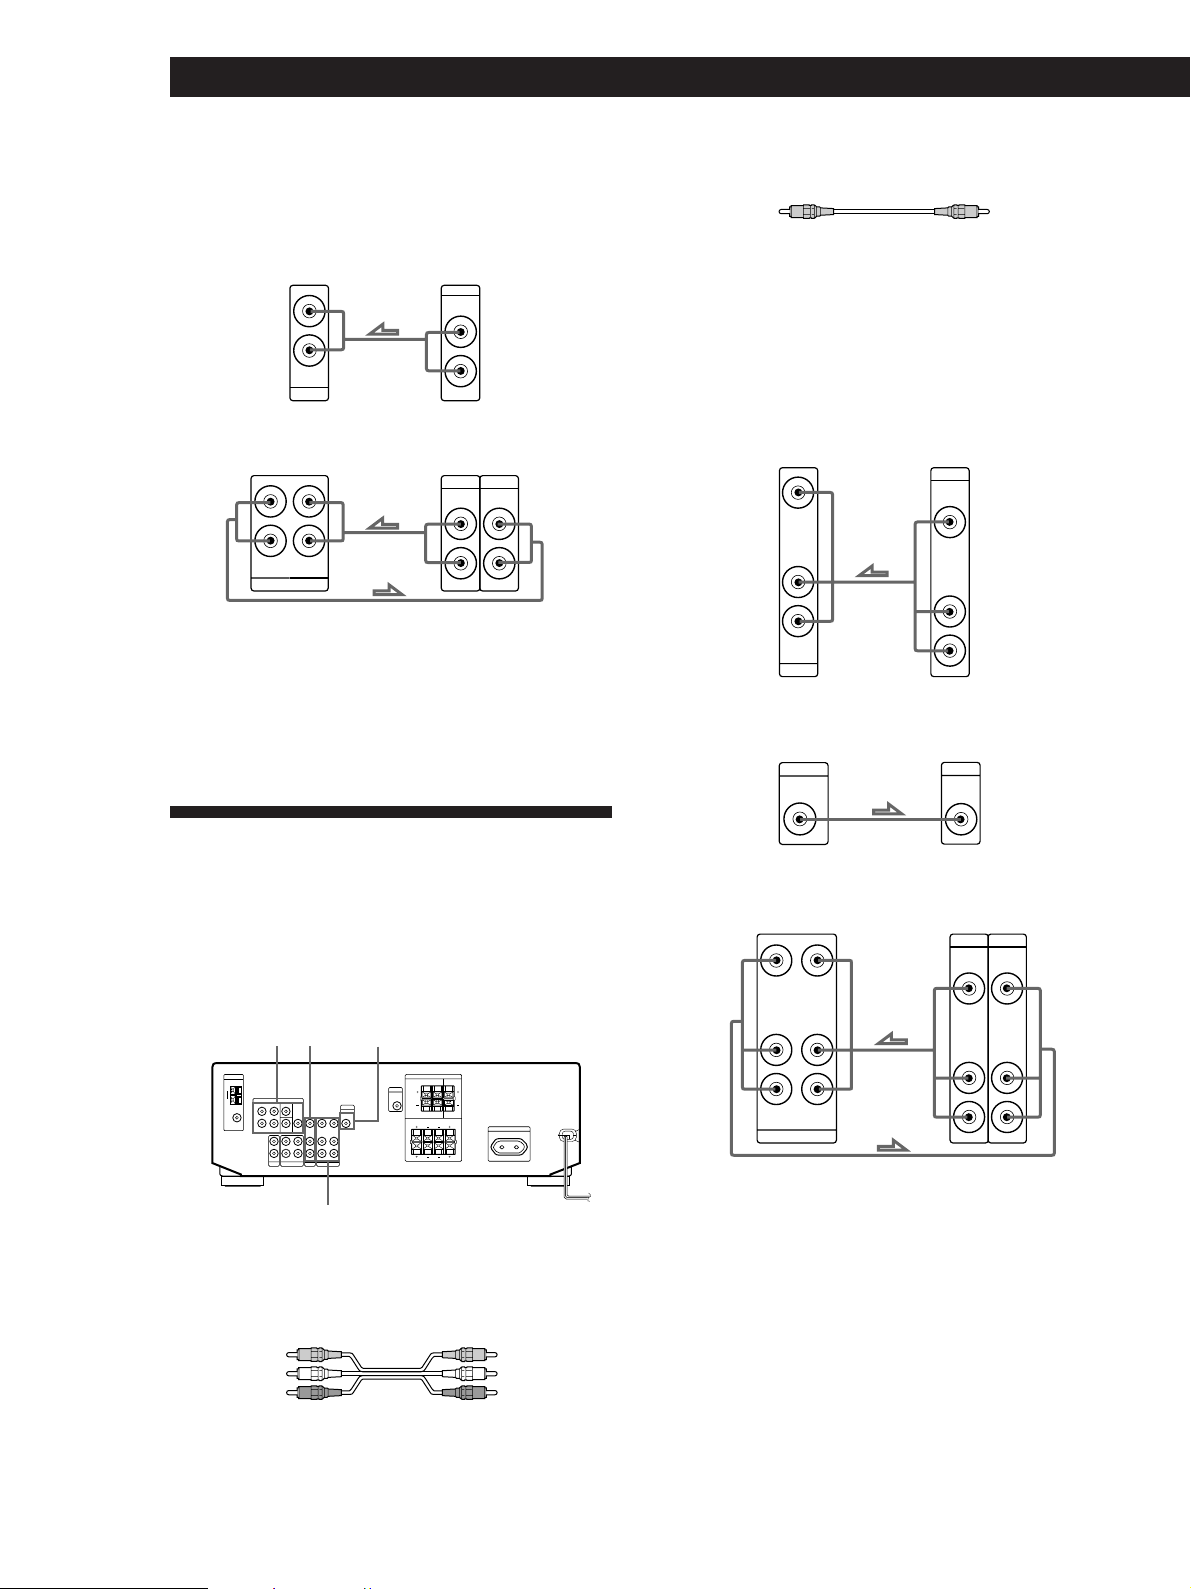
Speaker System Hookups
Overview
DVD player/AC-3 decoder
What cables will I need?
• Audio cable (not supplied) (1 for each 5.1 CH/DVD
FRONT and REAR jacks)
White (L) White (L)
Red (R) Red (R)
• Monaural audio cable (not supplied) (1 for each 5.1 CH/
DVD CENTER and WOOFER jacks)
Black Black
• Video cable (not supplied) (1 for the 5.1 CH/DVD VIDEO
IN jack)
Yellow Yellow
You can play decoded Dolby Digital AC-3
soundtracks through the speakers connected to the
amplifier.
If you have a Dolby Digital AC-3 decoder you can
amplify a decoded Dolby Digital AC-3 soundtrack with
the following connections.
Receiver
5.1 CH / DVD
FRONT FRONTREAR REARCENTER
L
R
WOOFER
VIDEO IN
Dolby Digital AC-3
decoder, etc.
CENTER
WOOFER
VIDEO
PRE OUT
This section describes how to connect your speakers to
the receiver. To enjoy surround effects, centre and rear
speakers and an active woofer are required. For
specific locations of the terminals, see the illustration
below.
WOOFER
SPEAKERS
FRONT B
SPEAKERS
REAR
SPEAKERS CENTER
SPEAKERS
FRONT A
What cords will I need?
Speaker cord (not supplied) (1 for each speaker)
(+)
(–)
(+)
(–)
Twist the stripped ends of the cord about 15 mm (2/3 inch).
Be sure to match the speaker cord to the appropriate
terminal on the components: + to + and – to –. If the cords
are reversed, the sound will be distorted and will lack bass.
Hookups
Front speakers
Front speaker
(R)
Receiver
FRONT
R
L
Front speaker
(L)
AA
Where do I go next?
Go on to the next section to connect the speakers.
Rear and centre speakers
Rear speaker
(R)
Receiver
SPEAKERS
REAR
BB
L
R
Centre speaker
CENTER
LR
LR
Rear speaker
(L)
(continued)
GB
7
Page 8

Getting Started
REAR
+
–
R
R
L
–
To avoid short-circuiting the speakers
Short-circuiting of the speakers may damage the
receiver. To prevent this, make sure to take the
following precautions when connecting the speakers.
Make sure the stripped ends of each speaker cord does
not touch another speaker terminal or the stripped end
of another speaker cord.
Examples of poor conditions of the speaker cord:
Stripped speaker cord is touching another speaker
terminal
REAR
R
R
L
+
Active woofer
Receiver
WOOFER
AUDIO
OUT
Active woofer
INPUT
Note
Do not connect any other component.
If you have an additional front speaker system
Connect them to the SPEAKERS FRONT B terminals.
If your TV monitor uses separate speakers
You can connect one of them to the SPEAKERS
CENTER terminals for use with Dolby Pro Logic
Surround sound (see page 10).
Where do I go next?
To complete your system, go to “AC Hookups” on page 9.
Stripped cords are touching each other due to excessive
removal of insulation.
After connecting all the components, speakers, and AC
power cord, output a test tone to check that all the
speakers are connected correctly. For details on
outputting a test tone, refer to “Adjusting the speaker
volume” on page 10.
If you have connected rear speakers, be sure to press
the 5.1 CH/DVD button and turn off sound field on the
receiver before outputting a test tone so that the tone is
output individually from the left and right rear
speakers.
If no sound is heard from a speaker while outputting a
test tone or a test tone is output from a speaker other
than the one whose name is currently displayed on the
receiver, the speakers may be short-circuited. If this
happens, check the speaker connection again.
GB
8
Page 9
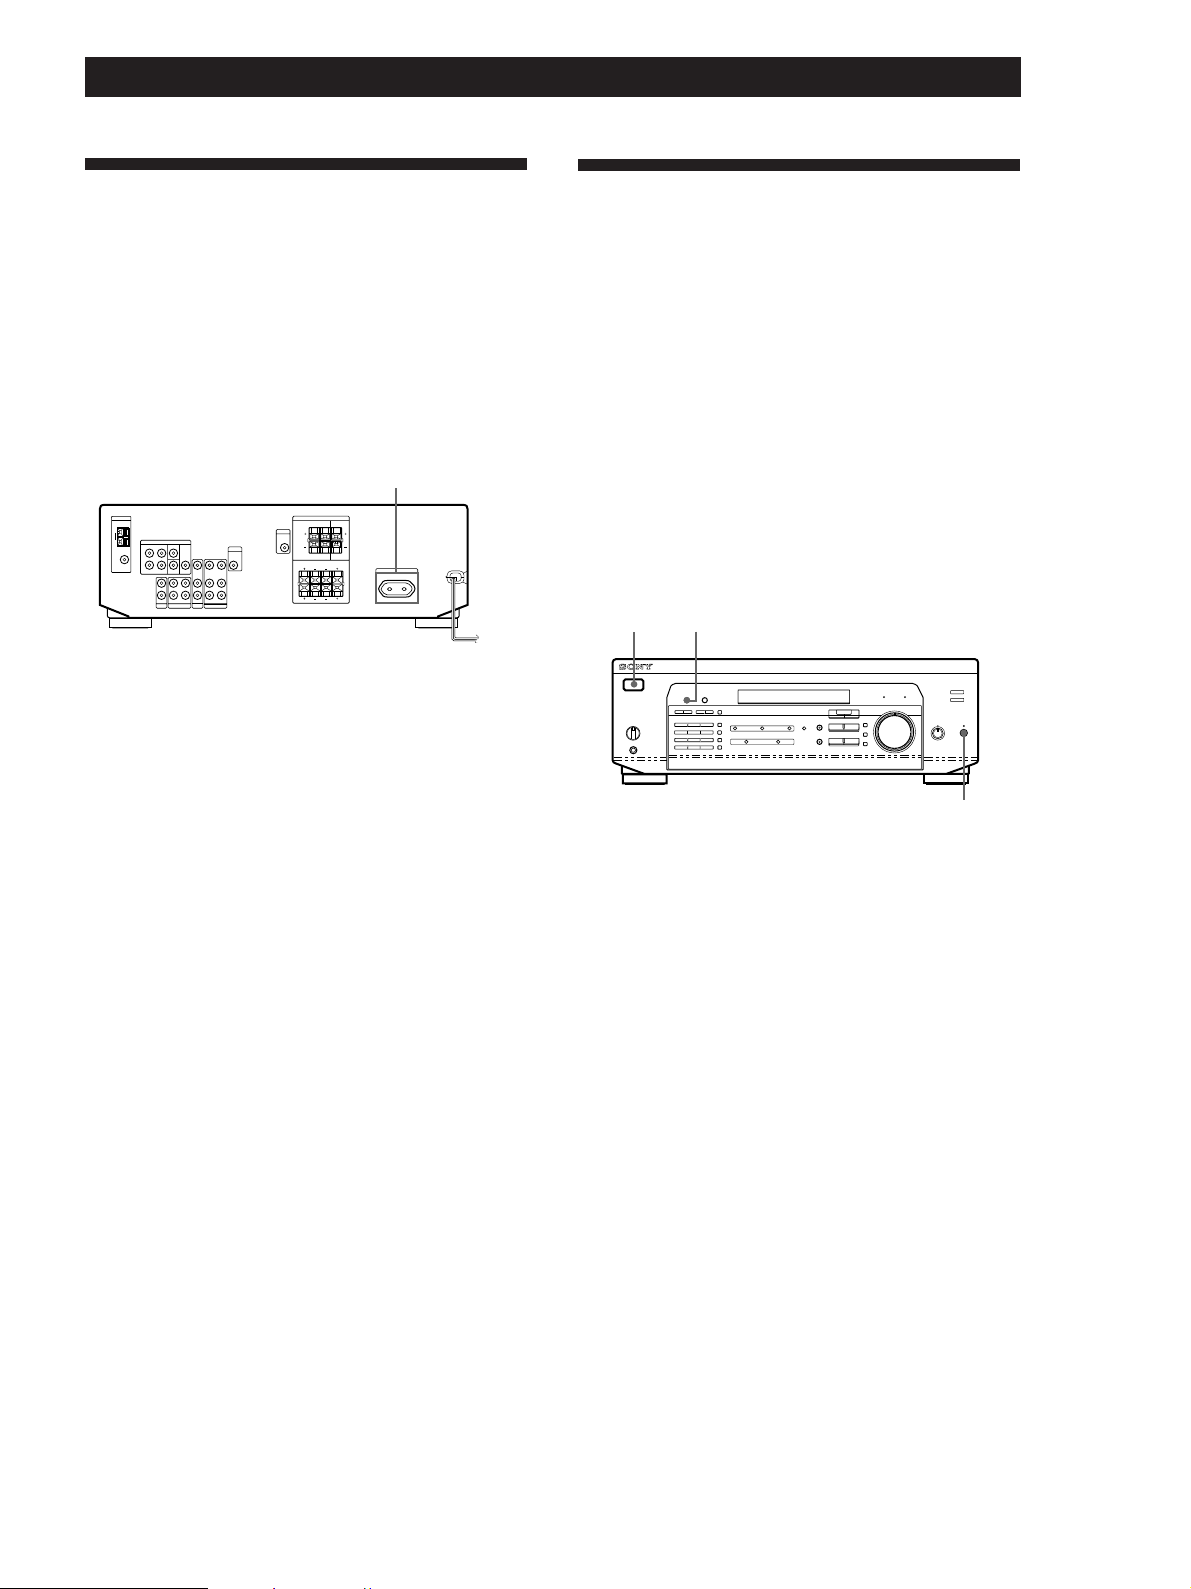
Getting Started
AC Hookups
Connecting the mains lead
Connect the mains lead from this receiver and from
your audio/video components to a wall outlet.
If you connect other audio components to the
SWITCHED AC OUTLET on the receiver, the receiver
can supply power to the connected components so you
can turn on/off the whole system when you turn on/
off the receiver.
SWITCHED AC OUTLET
/
to a wall outlet
Caution
Make sure that the power consumption of the component
connected to the receiver’s AC outlet does not exceed 100
watts. Do not connect high-wattage electrical home
appliances such as electric irons, fans, or TVs to this outlet.
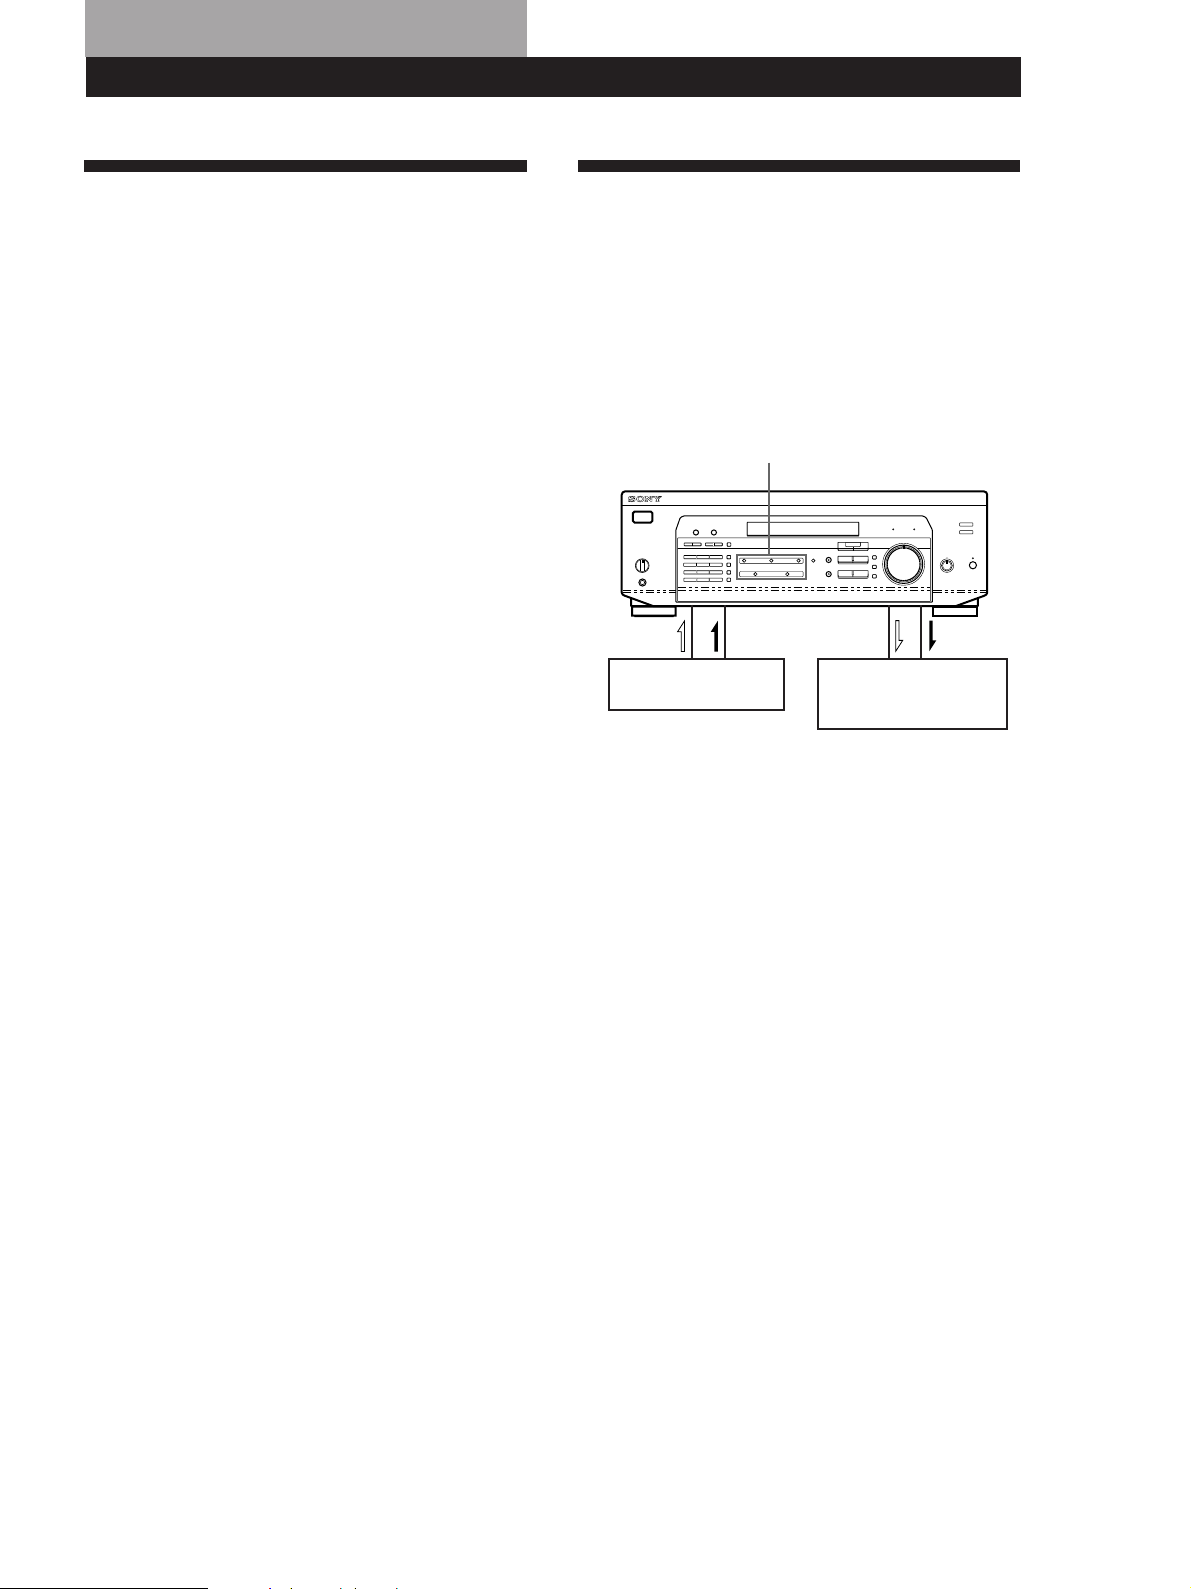
Before You Use Your Receiver
Before turning on the receiver
Make sure that you have:
• Turned MASTER VOLUME to the leftmost
position (0).
• Selected the appropriate front speakers (see “Front
Panel Parts Description” on page 12).
• Set BALANCE to the centre position.
Clearing the receiver's memory
Before you use your receiver for the first time or when
you want to clear the receiver's memory, do the
procedure below:
1/u (power)
DIMMER
MUTING
Where do I go next?
Before you use the receiver, go to the next section to make
sure that all the controls are set to the appropriate positions.
1 Turn off the receiver.
2 Press 1/u (power) for more than 4 seconds.
“ALL CLEAR” appears in the display and the
items including the following are reset or cleared:
• All preset stations are reset to their factory
settings.
• All sound field parameters are reset to their
factory settings.
• All index names (of preset stations and
programme sources) are cleared.
• All adjustments made with the SET UP button are
reset to their factory settings.
• The sound field memorized for each programme
source and preset station is cleared.
After turning on the receiver
Check the following indicator:
• Press MUTING or MUTING on the remote if the
MUTING indicator turns on.
• Press DIMMER to set the display at any of four levels
of brightness.
GB
9
Page 10
Getting Started
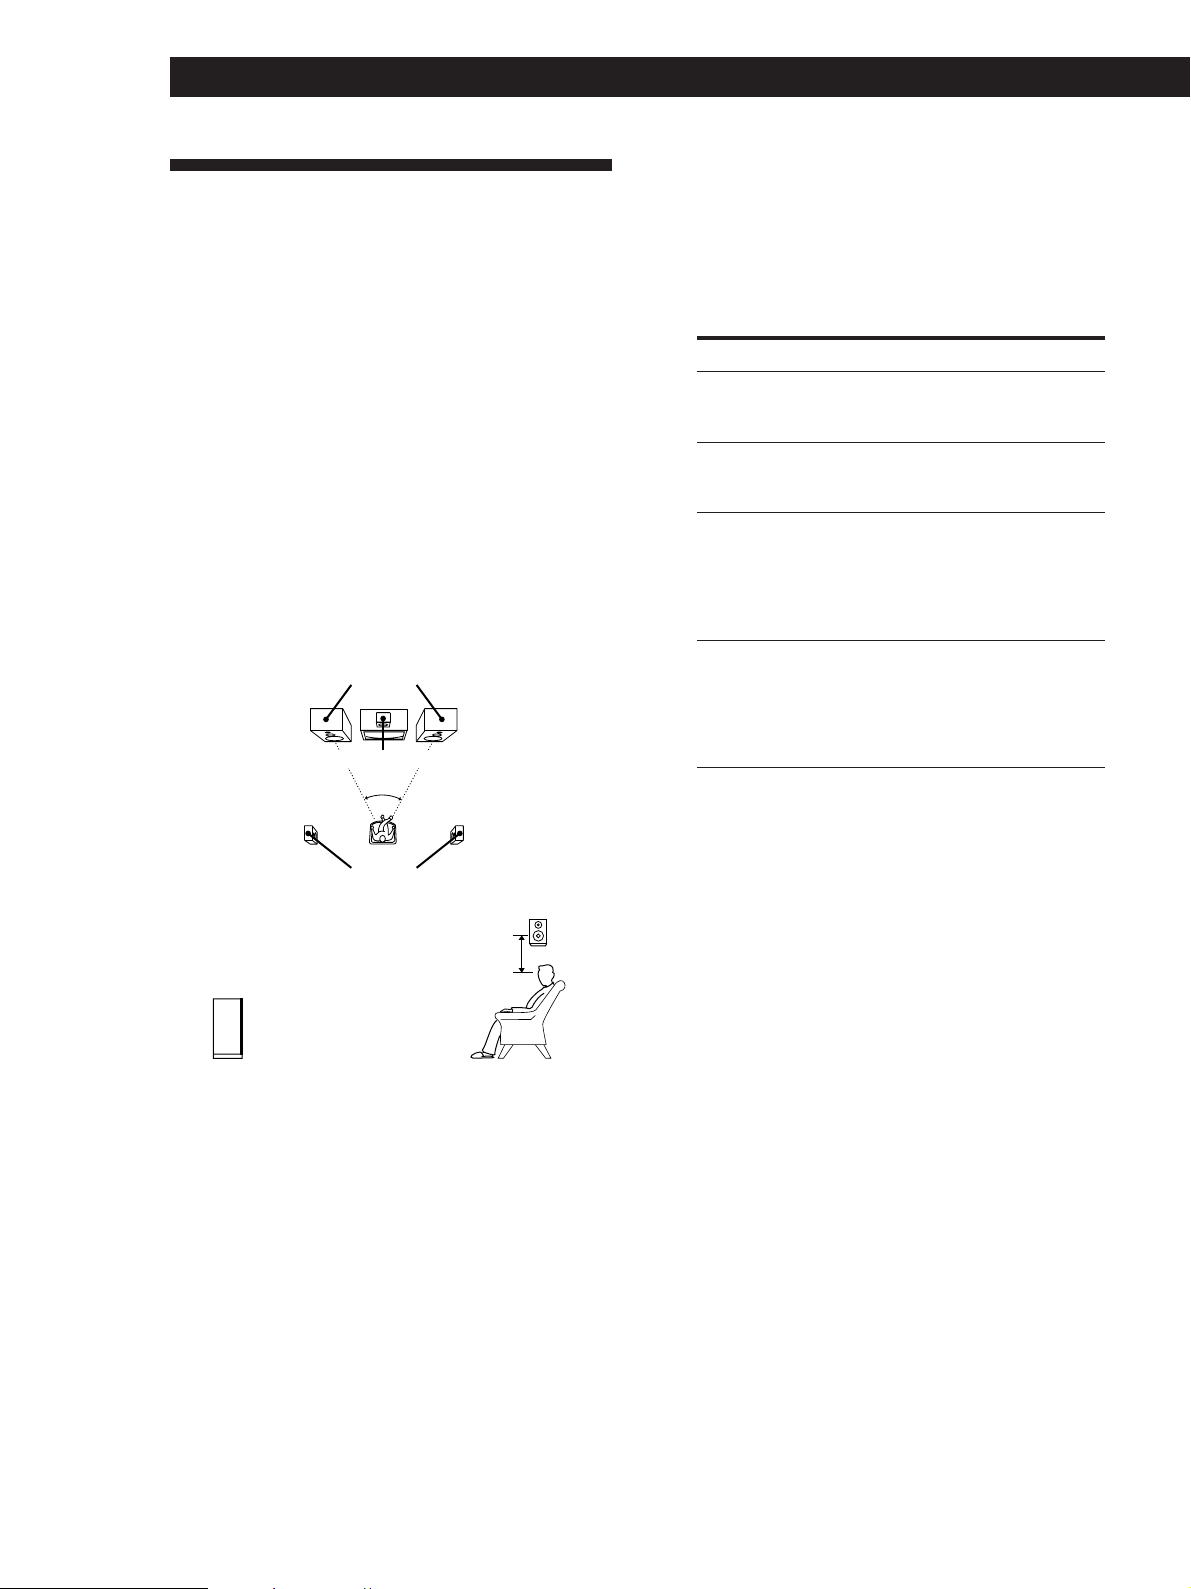
Dolby Surround Setup
Dolby Pro Logic Surround is a system for decoding
Dolby Surround sound that is standardized for TV
programmes and movies. By selecting the proper
centre mode and adjusting the speaker volume, you
can reproduce highly precise localization and dynamic
panning of sounds of Dolby Surround encoded
software.
To obtain the best possible surround effect, you will
require at least one additional pair of speakers and/or
a centre speaker.
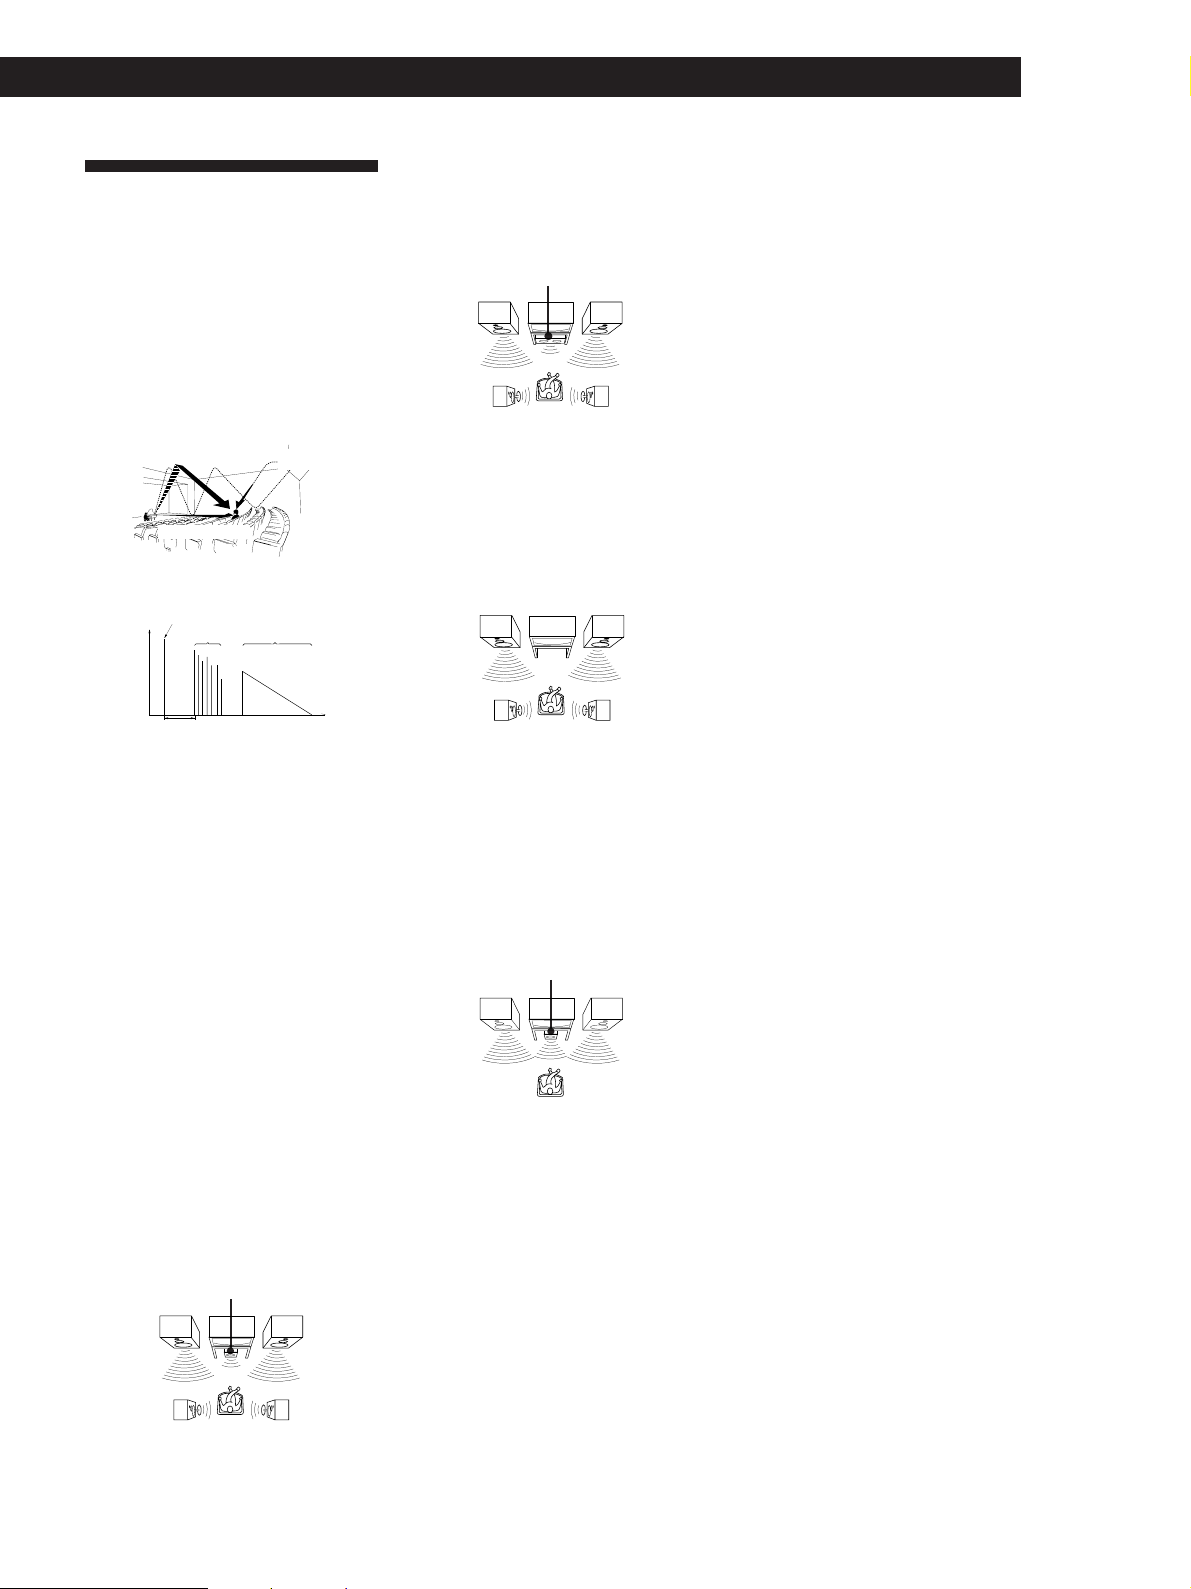
Locating the speakers
For optimum Dolby Pro Logic Surround sound, locate
your speakers as shown below.
Front speakers
Centre speaker
45°
1 Press SET UP.
2 Press MENU < or > repeatedly until “CTR
MODE” (centre mode) appears in the display.
3 Use + or – to select the centre mode you want.
A description of each centre mode is as follows:
If you have
Front and rear
speakers, but no
centre speaker
Front and centre
speakers, but no
rear speaker
Front and rear
speakers, and a
small centre
speaker
Front and rear
speakers, and a
centre speaker
that is equivalent
to your front
speakers
Select
PHANTOM
3 STEREO
(3-CH LOGIC)
NORMAL
WIDE
So that
The sound of the centre
channel is output from
the front speakers
The sound of the rear
channel is output from
the front speakers
The bass sound of the
centre channel is output
from the front speakers
(because a small
speaker cannot produce
enough bass)
The centre channel
fully reproduces the
entire audio spectrum
Rear speakers
Rear speaker
2 to 3 ft.
(60 - 90 cm)
Front speaker
Selecting the centre mode
The receiver offers you four centre modes:
PHANTOM, 3 STEREO, NORMAL, and WIDE. Each
mode is designed for a different speaker configuration.
Select the mode that best suits the speakers you use.
Adjusting the speaker volume
The test tone feature lets you set the volume of your
rear speakers and/or centre speaker to the same level
as that of the front speakers to maximize the Dolby Pro
Logic Surround effect. (If all of your speakers are equal
in performance, you don't have to adjust the speaker
volume.)
Using the controls on the remote, you can adjust the
volume level from wherever you're listening.
1 Make sure that the centre mode is correctly set
(see the table on this page).
2 Press SOUND FIELD ON/OFF to turn on the
sound field.
3 Press SOUND FIELD MODE +/– repeatedly to
select “PRO LOGIC”.
4 Press TEST TONE on the supplied remote.
You will hear a test tone (see next page) from each
speaker sequentially.
10
GB
Page 11
Getting Started
5 Adjust the volume level so that the volume of the
test tone from each speaker sounds the same from
where you are listening.
• To adjust the balance of the front right and front
left speakers, use the BALANCE control on the
front of the main unit.
• To adjust the volume level of the centre speaker,
press the LEVEL CENTER +/– buttons on the
remote.
• To adjust the volume level of the rear speakers,
press the LEVEL REAR +/– buttons on the
remote.
6 Press TEST TONE on the remote again to turn off
the test tone.
You can adjust the volume level of all speakers at
the same time
Rotate MASTER VOLUME on the main unit or press
MASTER VOL(UME) +/– on the remote.
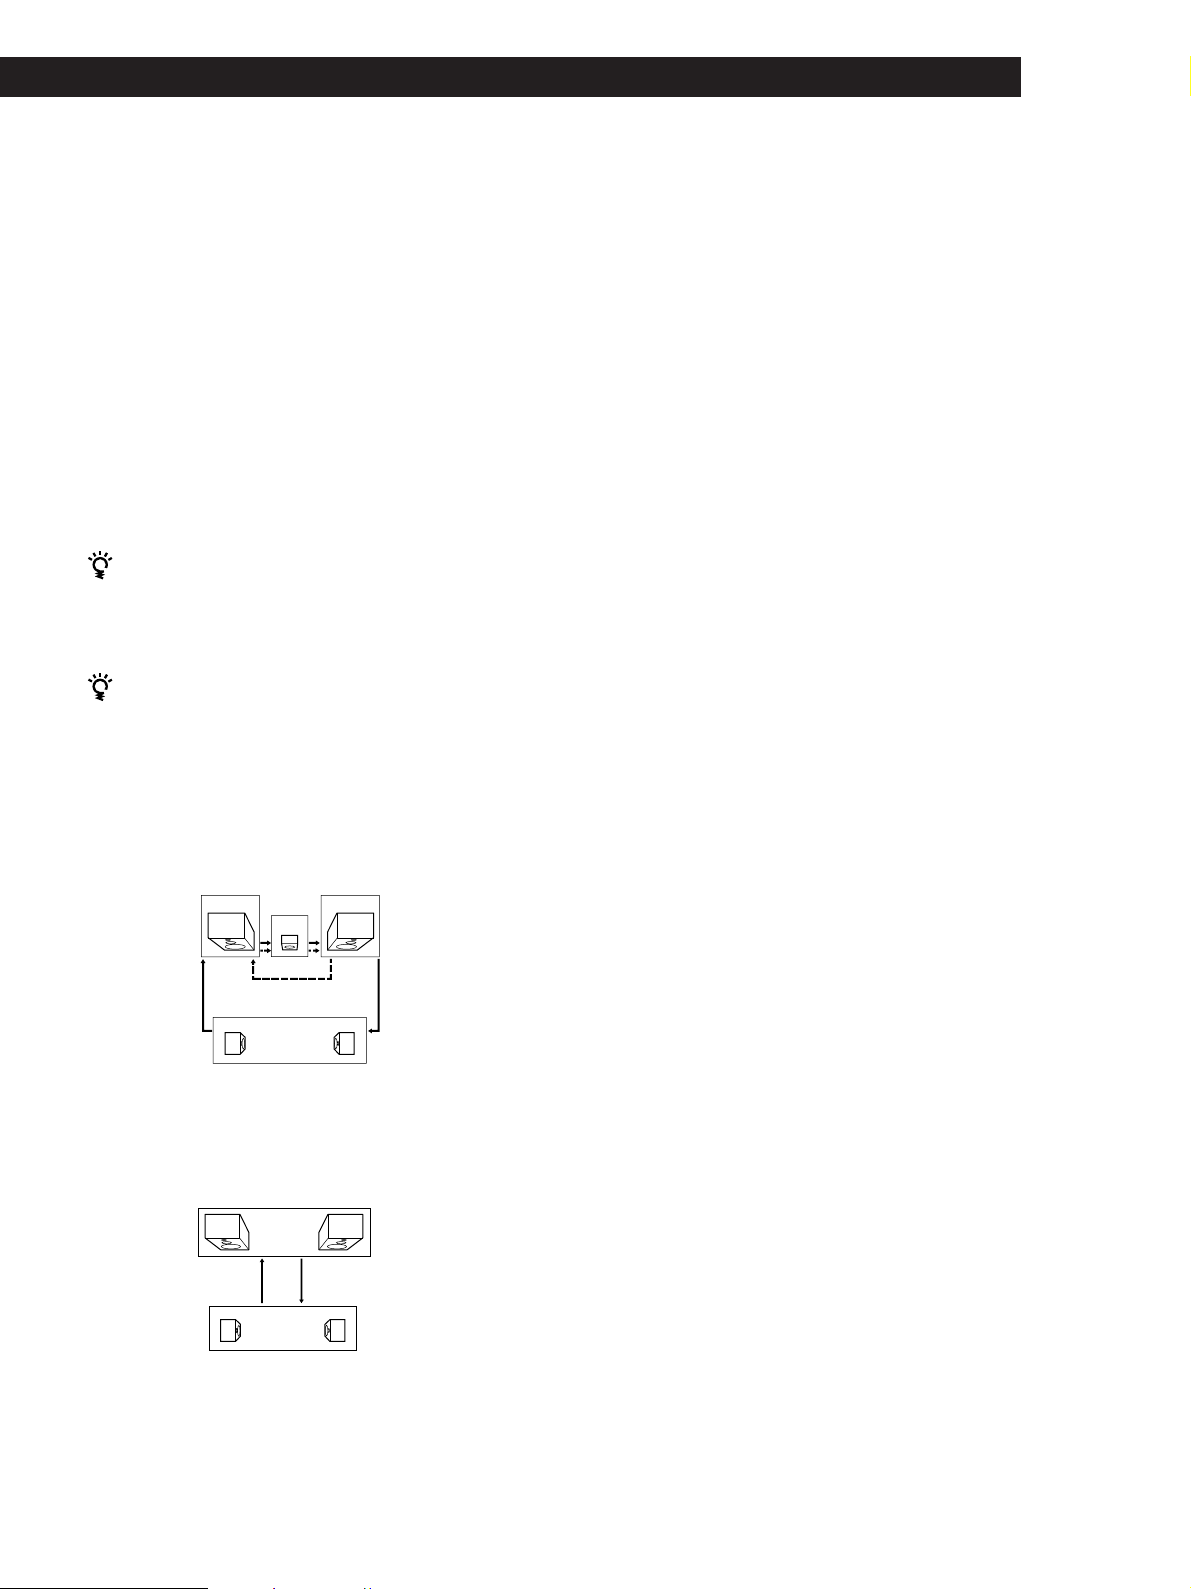
What is a test tone?
A test tone is a signal that is produced by the receiver
and used to adjust speaker volume. The test tone is
output from speakers in the following two ways:
• When NORMAL, WIDE, or 3 STEREO mode is selected
The test tone is output from the front L (left), centre,
front R (right), and rear speakers (except for 3 STEREO
mode) in succession.
Increasing the output level of the rear
speaker by 5dB
The adjustment range of the rear speakers is preset
from –15 to + 10, but you can shift the range up 5 levels
(– 10 to + 15).
1 Press SET UP.
2 Press MENU < or > repeatedly until “REAR
GAIN” appears in the display.
3 Press + or – to select “GAIN UP”.
Note
The value for the rear level remain fixed at –15 to +10 in the
display, but you will be able to hear the difference in the
actual output.
To restore the normal output level
Repeat the procedure above, selecting “GAIN NORM”
in step 2.
Front (L) Front (R)
Centre
3 STEREO
Rear (L, R)
NORMAL/WIDE
• When PHANTOM mode is selected
The test tone is output from the front and the rear
speakers alternately.
Front (L, R)
Test tone
Rear (L, R)
PHANTOM
See the table on page 24 for information on the output of
the test tone for sound fields other than PRO LOGIC.
Test tone
11
GB
Page 12
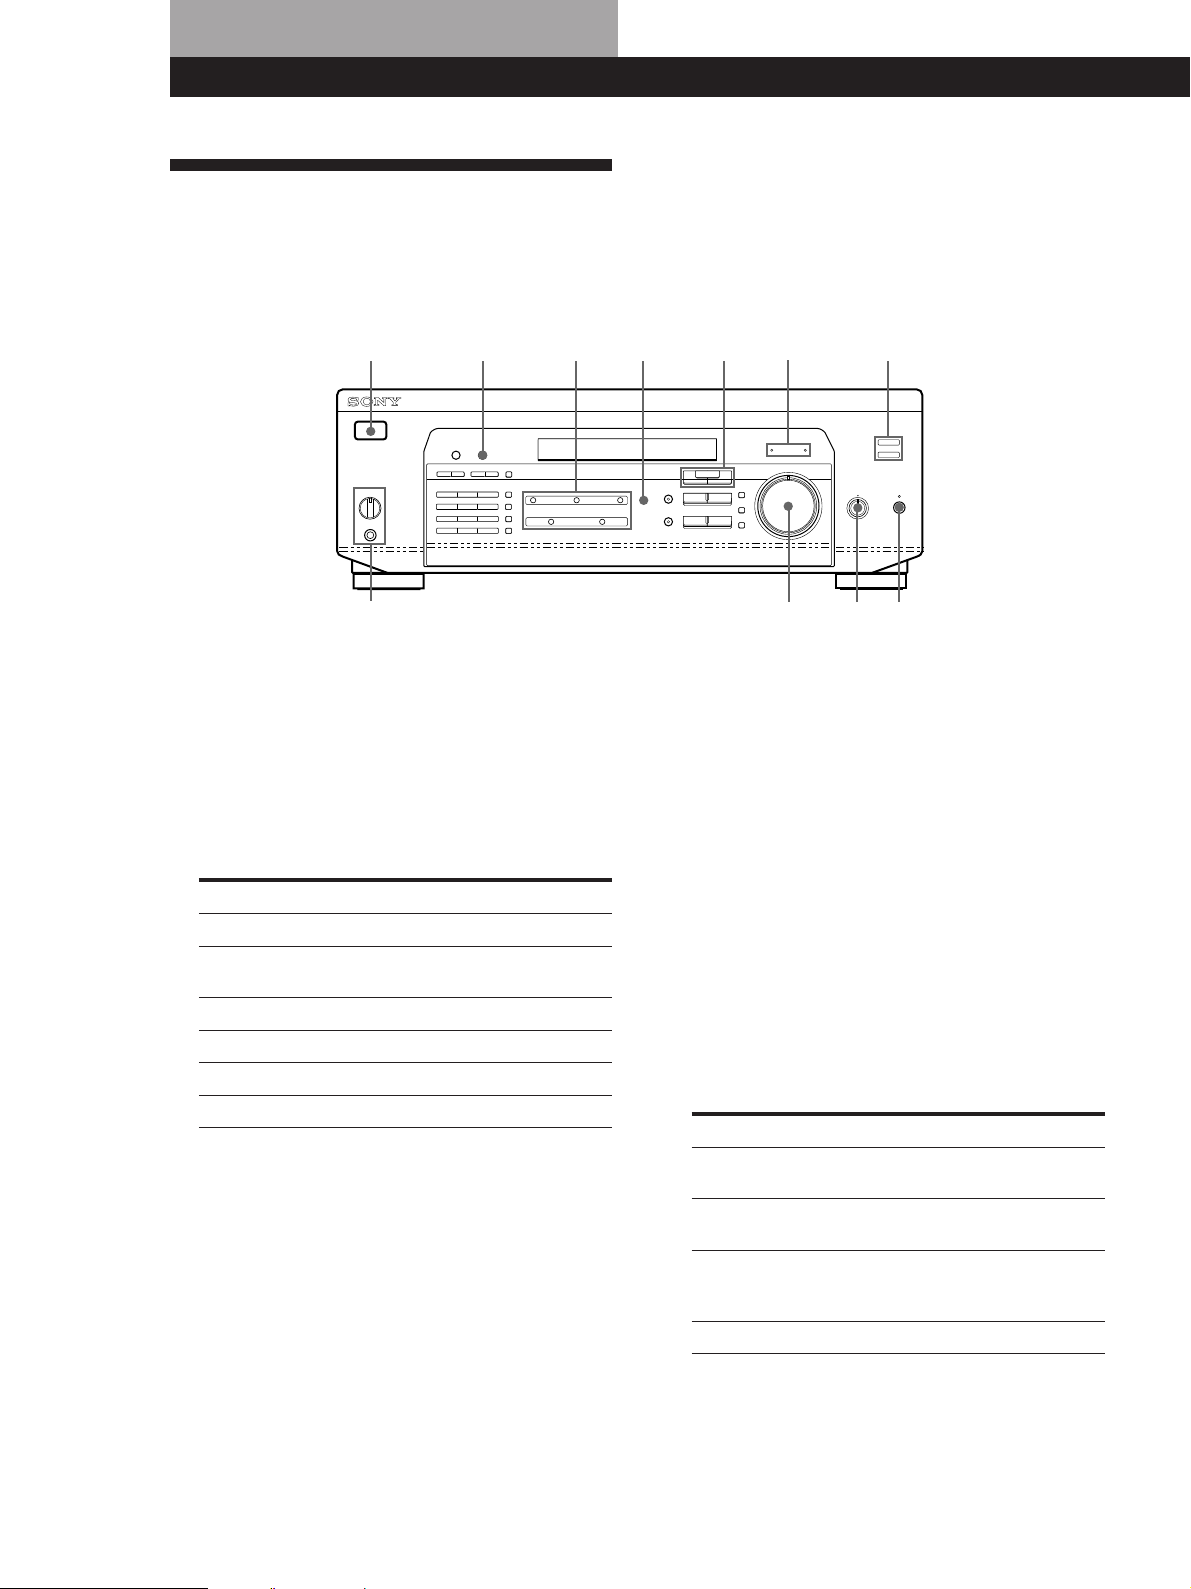
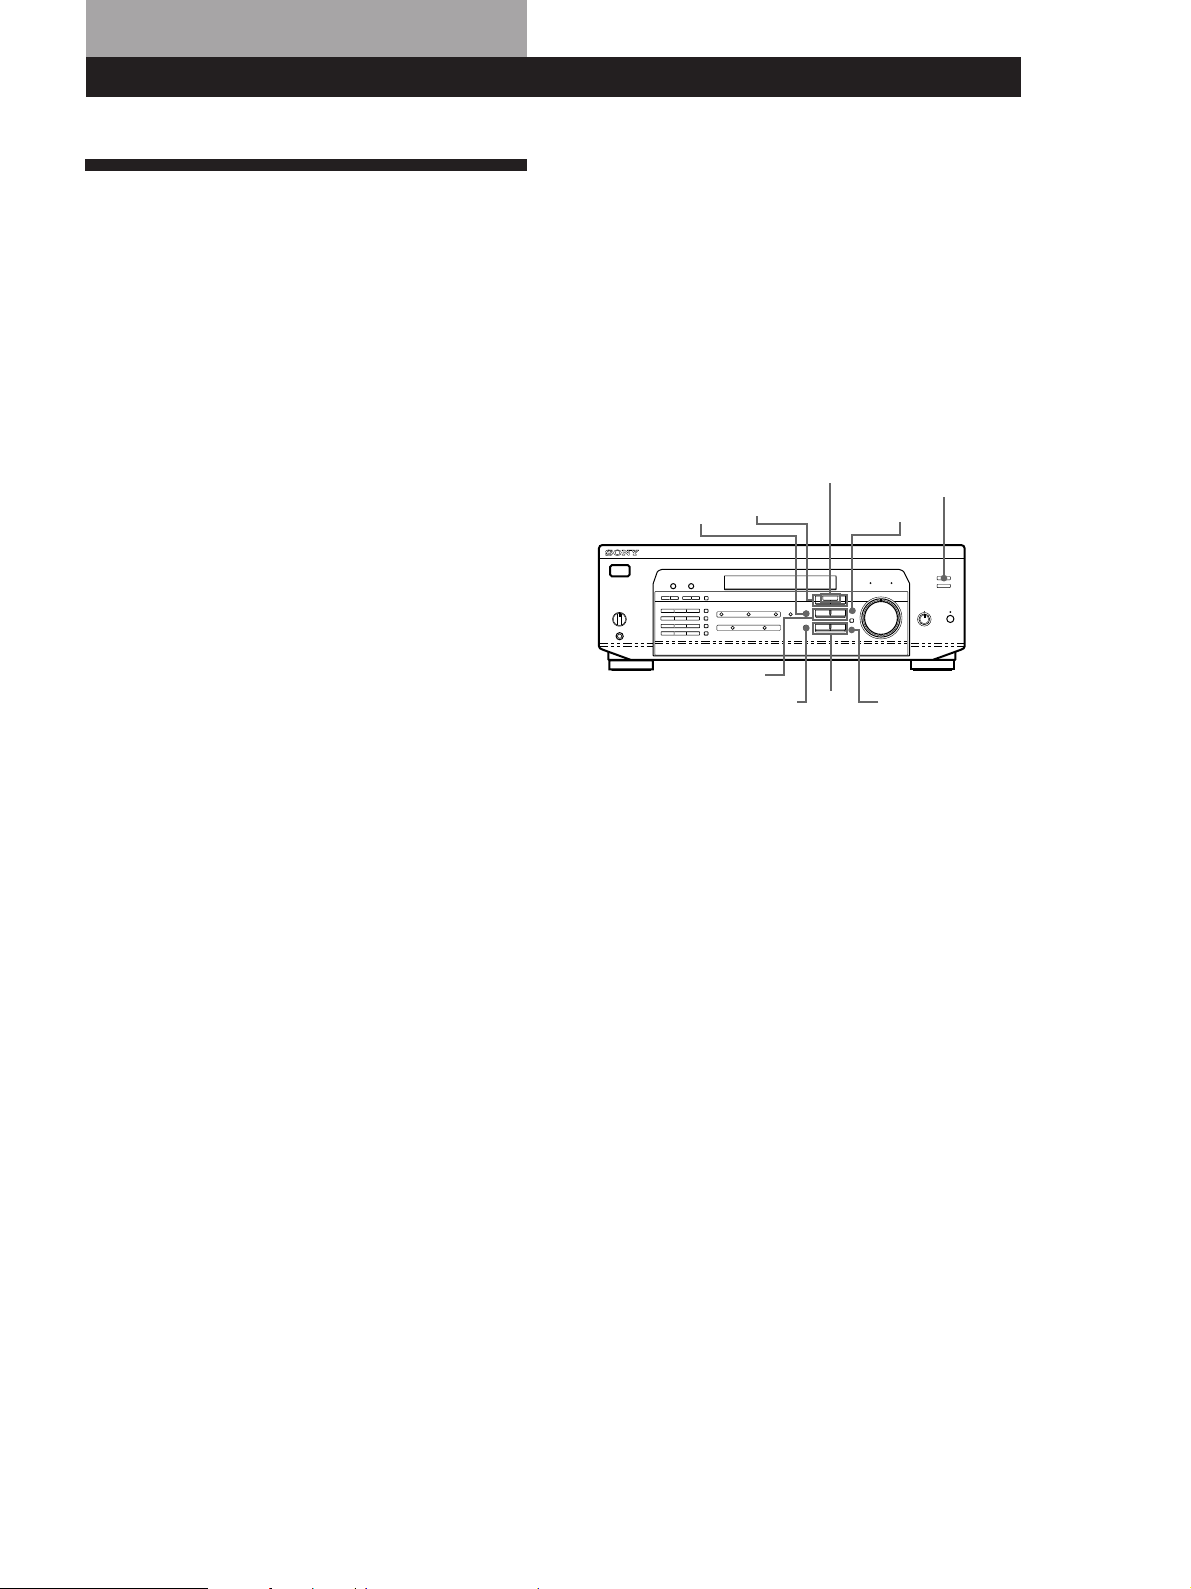
Location of Parts and Basic Amplifier Operations
!
Front Panel Parts Description
This chapter gives you the information on the location
and function of the buttons and controls on the front
panel and explains basic amplifier operations.
1
823 !º
7
1 1/u switch
Press to turn the receiver on and off.
Note
Before you turn on the receiver, make sure that you have
turned the MASTER VOLUME control to the leftmost
position to avoid damaging your speakers.
2 Function buttons
Press to select the component you want to use.
To listen to or watch
Video tapes
TV programmes or
Laser discs
MiniDiscs or audio tapes
Compact discs (CD)
Radio programmes
DVD player/AC-3 decoder
Press
VIDEO
TV/LD
MD/TAPE
CD
TUNER
5.1 CH/DVD
After selecting the component, turn on the
component you selected and play the program
source.
4
¡
56
9
3 5.1 CH/DVD button
Press to select the component connected to the 5.1
CH/DVD jacks. The 5.1 CH/DVD indicator lights
up when the component is selected.
4 MASTER VOLUME control
After turning on the component you selected, rotate
to adjust the volume.
5 MUTING button
Press to mute the sound. The MUTING indicator
lights up when the sound is muted.
6 BALANCE control
Rotate to adjust the balance of the front speakers.
7 SPEAKERS selector
Set according to the front speakers you want to
drive.
To select
Speakers connected to the SPEAKERS
FRONT A terminals
Speakers connected to the SPEAKERS
FRONT B terminals
Speakers connected to both the SPEAKERS
FRONT A and B terminals (parallel
connection)
No front speaker output
Set to
A + B*
A
B
OFF
12
GB
Do not set to A+B when a sound field is turned on.
*
Be sure to connect the front speakers with nominal
impedance of 8 ohms or higher if you want to select both
sets of front speakers.
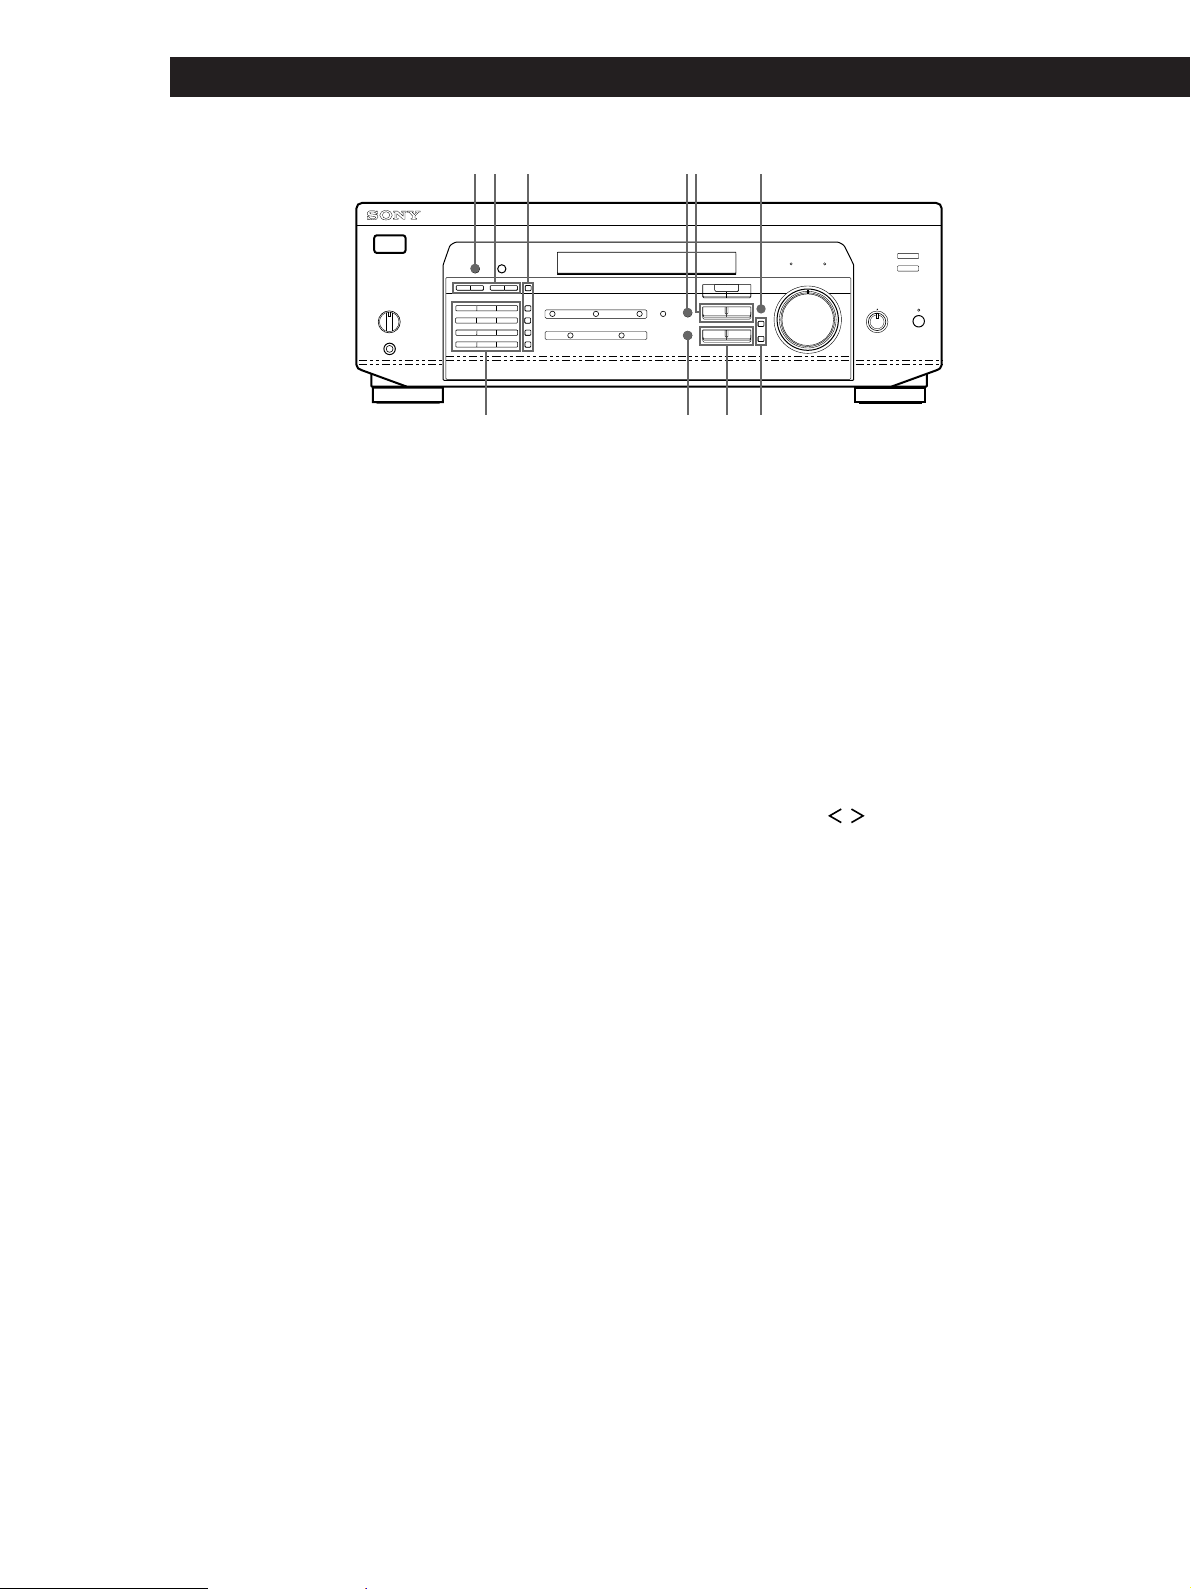
Page 13

Location of Parts and Basic Amplifier Operations
PHONES jack
Connects headphones.
Note
To use the headphones, set the SPEAKERS selector to OFF
to output sound to the headphones.
8 DISPLAY button
Press repeatedly to change the information on the
display window as follows:
When a component other than tuner is selected
v
Index name of the component*
v
Selected component
v
Sound field applied to the component
When the tuner is selected
v
Index name of the preset station* or
programme station name**
v
Frequency
v
Programme type indication**
v
Radio text**
v
Current time**
v
Sound field applied to the band or the preset
station
9 Use the following buttons to enjoy surround sound.
For details, see “Enjoying Surround Sound”
starting from page 21.
SOUND FIELD ON/OFF button
Press to turn the sound field on or off.
SOUND FIELD MODE +/– button
Press to select a sound field from the group you
selected.
0 TONE button
Press to turn the tone effect on or off. The TONE
indicator lights up while the tone effect is turned
on.
Note that if you have adjusted the tone using the
MENU </> and +/– buttons, the adjusted tone will
be produced whenever you turn on the tone effect.
BASS BOOST button
Press to increase the bass of the front speakers. The
BASS BOOST indicator lights up when the function
is turned on.
!¡ TONE indicator
Lights up while the tone effect is turned on.
BASS BOOST indicator
Lights up while the bass boost is turned on.
When you want to enjoy high quality sound
Do the procedure below to bypass the sound control
circuits.
1 Set SOUND FIELD ON/OFF to off.
2 Set TONE to off.
3 Set BASS BOOST to off.
Index name appears only when you have assigned one to the
*
component or the preset station (see page 25).
These indications appear only during RDS reception (see page
**
18).
The result will be a two-channel stereo sound output
from the front speakers that is highly faithful to the
programme source.
(continued)
13
GB
Page 14
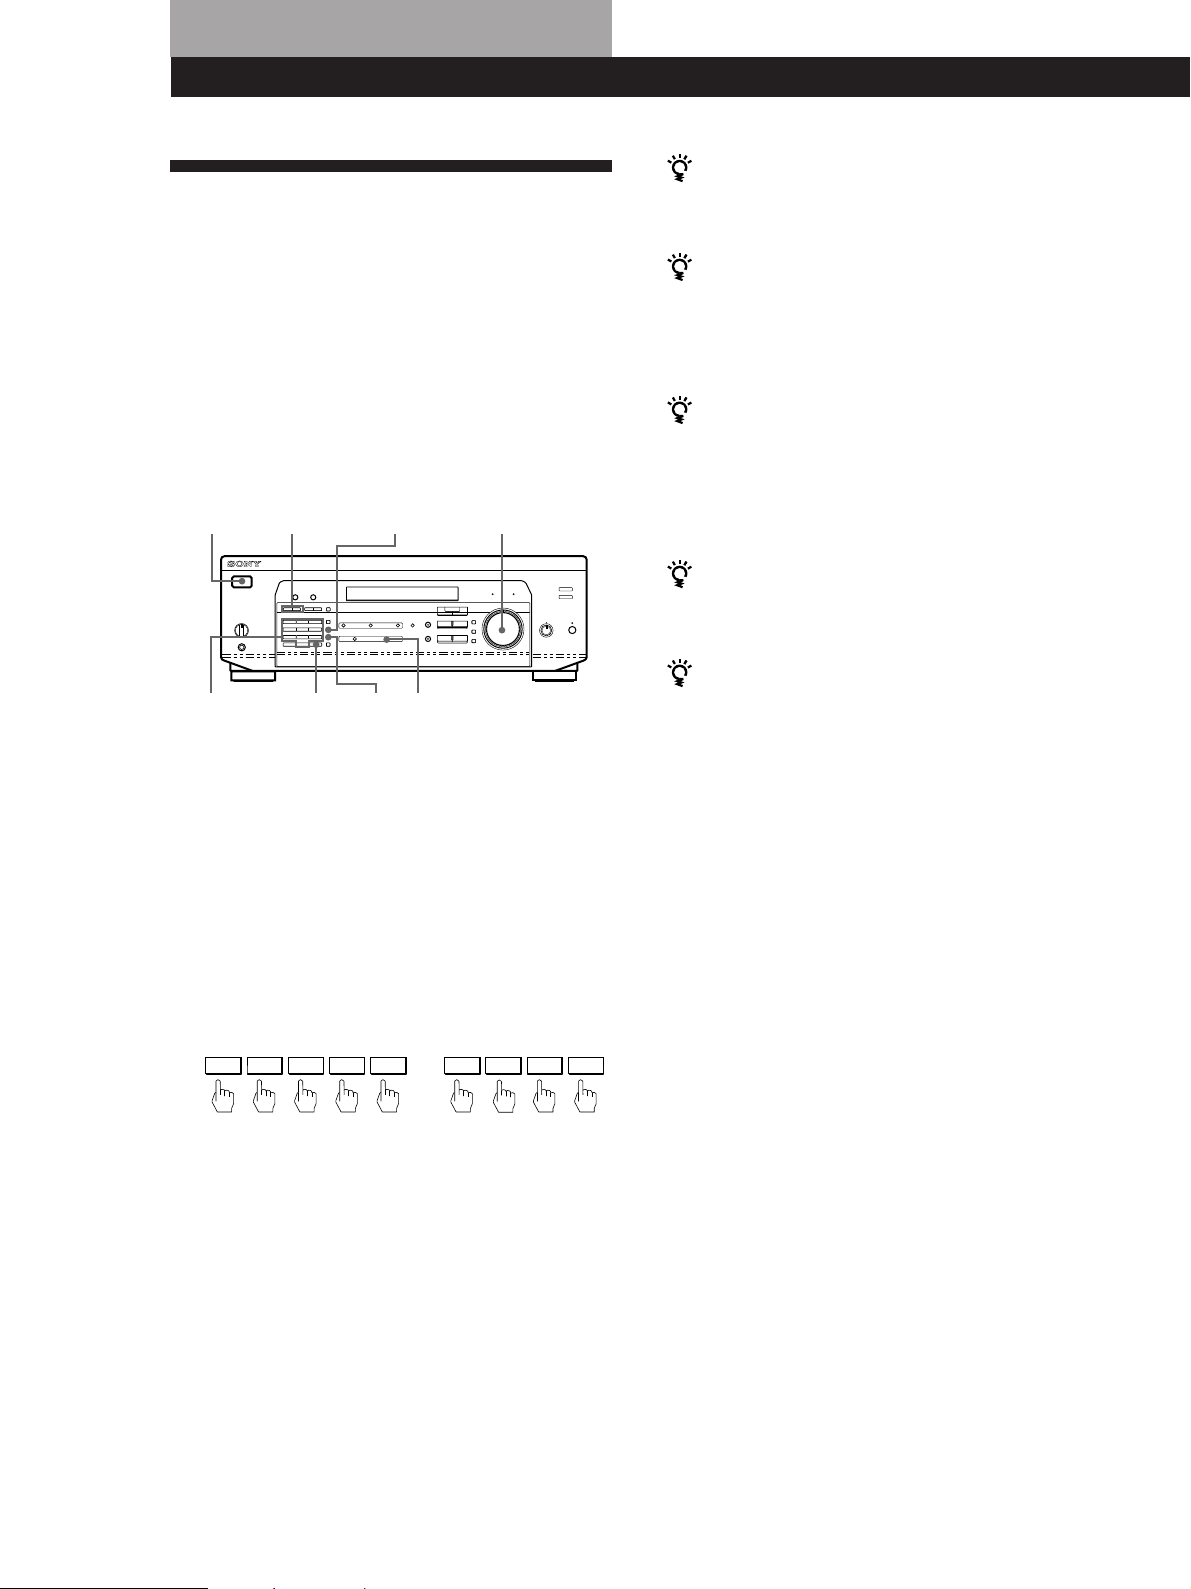
Location of Parts and Basic Amplifier Operations
@
¡
!™ !£ !ª!∞ !¶
!¢ @º !§ !•
!™ The following buttons operate the built-in tuner.
For details, see “Receiving Broadcasts” starting
from page 16. Note that these buttons are operable
only when the tuner is selected.
PRESET/PTY SELECT +/– buttons
Press to scan the stations by programme type or to
scan all preset stations.
TUNING +/– buttons
Press to scan all the available radio stations.
!£ The following buttons operate the built-in tuner.
For details, see “Receiving Broadcasts” starting
from page 16. Note that the PTY button is operable
only when the tuner is selected.
RDS PTY button
Press to start or to scan stations by programme
type.
RDS EON button
Press to automatically switch to a station currently
broadcasting traffic announcements, news, or
information programme. The RDS EON button
does not function during AM reception.
!¢ The following buttons operate the built-in tuner.
For details, see “Receiving Broadcasts” starting
from page 16. Note that these buttons are operable
only when the tuner is selected.
Numeric buttons (1 to 0)
Inputs the numeric value.
SHIFT button
Selects a memory page for preset stations.
DIRECT button
Press to enter a station's frequency directly.
!∞ MENU buttons (
After pressing the SUR, NAME, BASS/TREBLE or
SET UP button, use these buttons to make specific
settings (see pages 11, 23 and 25).
!§ +/– buttons
After pressing MENU buttons, use these buttons to
make specific settings (see pages 11, 23 and 25).
/ )
14
FM/AM button
Selects the FM or AM band.
FM MODE button
If “STEREO” flashes in the display and the FM
stereo reception is poor, press this button. You will
not have the stereo effect but the sound is
improved.
MEMORY button
Press to perform Auto-betical Select (see page 18) or
to memorize a preset station.
GB
Page 15

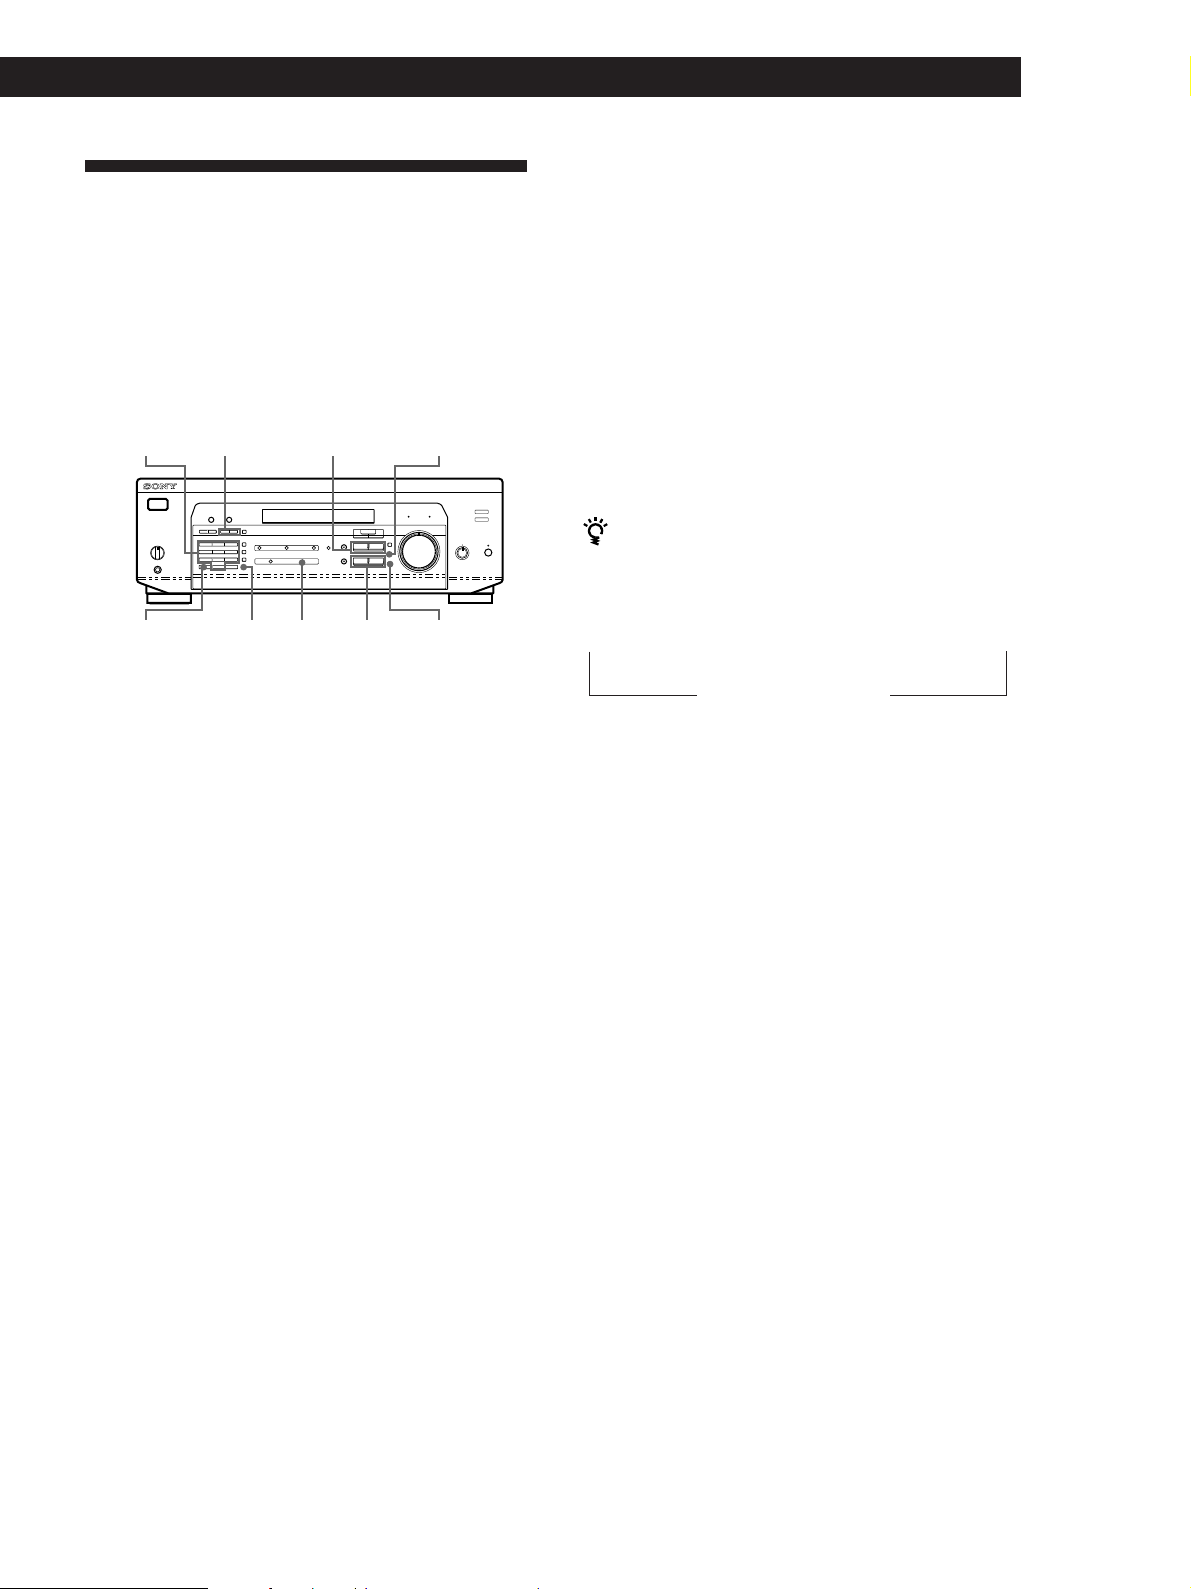
Location of Parts and Basic Amplifier Operations
!¶ SET UP button
Press this button repeatedly to select any of the
following two indications. The selected indication
appears in the display and you will be able to make
various settings using the cursor buttons.
When you've
displayed
CTR MODE
REAR GAIN
!• Press the following buttons to name preset stations
or programme sources. For details, see “Indexing
Preset Stations and Programme Sources” on page
25.
NAME button
Press to enter a name for preset stations and
programme sources (except 5.1 CH/DVD).
ENTER button
Press to store the names.
!ª SUR button
Press this button to adjust sound parameters (see
page 23).
@º BASS/TREBLE button
Press this button to adjust the tone (see page 23).
You can
Select any one of the four centre
modes (page 10)
Increase the range of rear speakers by
5 dB (page 11)
@¡ DIMMER button
Press this button to set the display at any of four
levels of brightness.
15
GB
Page 16
Receiver Operations
Receiving Broadcasts
This receiver lets you enter a station’s frequency
directly by using the numeric buttons (direct tuning). If
you don’t know the frequency of the station you want,
see “Receiving broadcasts by scanning stations
(automatic tuning)”.
Before you begin, make sure you have:
• Connected an FM/AM aerial to the receiver as
indicated on page 5.
• Selected the appropriate speaker system. (See “Front
Panel Parts Description” on page 12.)
1/u (power)
TUNING +/–
FM/AM
MASTER VOLUME
If the STEREO indicator remains off
Press FM MODE when an FM stereo broadcast is
received.
If an FM stereo programme is distorted
The STEREO indicator flashes. Press FM MODE to
change to monaural (MONO). You will not have the
stereo effect but the distortion will be reduced. To
return to stereo mode, press this button again.
If you cannot tune in a station and the entered
numbers are flashing
Make sure you’ve entered the right frequency. If not,
press DIRECT and re-enter the frequency you want.
If the entered numbers still flash, the frequency is not
used in your area.
To watch FM simulcast TV programmes
Make sure that you tune in the simulcast programme
both on the TV (or the VCR) and on the receiver.
Numeric
buttons
DIRECT
FM
MODE
TUNER
1 Press 1/u (power) to turn on the receiver.
2 Press TUNER.
The last received station is tuned in.
3 Press FM/AM to select FM or AM stations.
4 Press DIRECT.
5 Press the numeric buttons to enter the frequency.
Example 1: FM 102.50 MHz Example 2: AM 1350 kHz
1 0 2 5 0
1 3 5 0
6 When you tune in AM stations, adjust the
direction of the AM loop aerial for optimum
reception.
To receive other stations
Repeat Steps 3 to 5.
If you enter a frequency not covered by the tuning
interval
The entered value is automatically rounded up or down
to the closest covered value.
Tuning intervals for direct tuning are:
FM: 50 kHz intervals
AM: 9 kHz intervals
Receiving broadcasts by scanning stations
(automatic tuning)
If you don’t know the frequency of the radio station
you want, you can have the receiver scan all the
receivable stations to locate the one you want.
1 Press TUNER.
The last received station is tuned in.
2 Press FM/AM to select FM or AM.
3 Press TUNING + or –.
Press the + button for a higher frequency; press
the – button for a lower one. When you tune past
either end of the band, the receiver automatically
jumps to the opposite end. Every time a station is
received, the receiver stops scanning. To continue
scanning, press the button again.
16
GB
Page 17
Presetting Radio Stations
You’ll most likely want to preset the receiver with the
radio stations you listen to often so that you don’t have
to tune in the station every time. The receiver can store
a total of 30 FM or AM stations. You can store the
stations on preset numbers combining 3 characters (A,
B, C) and numbers (0 - 9). For example, you can store a
station as preset number A1, B6 or C9, etc.
Numeric
button
SHIFT TUNER
1 Press TUNER.
The last received station is tuned in.
PRESET/PTY
SELECT +/–
MEMORY
MENU </>
NAME
ENTER+/–
Receiver Operations
Tuning preset stations (preset tuning)
You can tune directly to a preset station by entering its
preset number. If you don’t know which stations are
preset on which numbers, you can tune by scanning
the preset stations.
1 Press TUNER.
The last received station is tuned in.
2 Press SHIFT to select a character (A, B or C), then
press the number.
For example, select A and then press 7 to tune in
the station preset as A7.
You can tune by scanning the preset stations
First press TUNER and then press PRESET/PTY
SELECT + or – to select the station you want. Each time
you press the buttons, the preset numbers change as
follows:
n A1 ˜ A2 ˜… ˜ A0 ˜ B1 ˜ B2 ˜ … ˜ B0 N
n C0 ˜ … ˜ C2 ˜ C1 N
2 Tune in the station you want.
If you are not familiar with how to tune in a
station, see “Receiving Broadcasts” on the
previous page.
3 Press MEMORY.
“MEMORY” appears for a few seconds.
Do steps 4 and 5 before “MEMORY” goes out.
4 Press SHIFT to select a character (A, B or C).
Each time you press SHIFT, the letter “A,” “B” or
“C” appears in the display.
If “MEMORY” disappears, start again from step 3.
5 While MEMORY is displayed, press the number
you want to use (0 to 9).
6 Repeat Steps 2 to 5 to preset other stations.
To change a preset station
Preset a new station on the number you want to change.
Note
If the mains lead is disconnected for about one week, the
preset stations will be cleared from the receiver’s memory,
and you will have to preset the stations again.
17
GB
Page 18

Receiver Operations
Storing FM Stations
Automatically in Alphabetical
Order (“Auto-betical”)
With “Auto-betical select” you can automatically store
up to 30 FM and FM RDS stations in alphabetical order
without redundancy. Additionally, “Auto-betical
select” only stores the stations with the clearest signals.
If you want to store FM or AM (MW) stations one by
one, see “Presetting Radio Stations” on page 17.
FM RDS stations are stored first, in alphabetical order
by their Station Name, followed by regular FM stations
in order of frequency.
1 Press 1/u (power) to turn off the receiver.
2 Hold down MEMORY and press 1/u (power) to
turn the receiver on.
”AUTOBETICAL SELECT” appears and the
receiver scans and stores all the FM and FM RDS
stations in the broadcast area.
“FINISH” appears when the receiver has finished
storing the FM and FM RDS stations.
Using the Radio Data System
(RDS)
What you can do with the Radio Data
System
Radio Data System (RDS) is a broadcasting service that
allows radio stations to send additional information
along with the regular radio programme signal. This
receiver offers you three convenient RDS features:
Displaying the RDS information; Monitoring of traffic,
news, or information programmes; and Locating a
station by programme type. RDS is available only on
FM stations.*
Note
RDS may not work properly if the station you are tuned to is
not transmitting the RDS signal properly or if the signal
strength is weak.
* Not all FM stations provide RDS service, nor do they
provide the same types of services. If you are not familiar
with the RDS system, check with your local radio stations
for details on RDS services in your area.
To change a preset code to another station
See “Presetting Radio Stations” on page 17.
To stop Auto-betical before storing all the stations
Press 1/u (power) to turn the receiver off.
Stations currently stored in the preset memory are
shifted to the rear (toward C0) and may be erased,
depending on the number of stations received by
Auto-betical select.
Notes
• If you move to another area, repeat this procedure to store
stations in your new area.
• For details on tuning to the preset stations, see page 17.
• Once “FINISH” appears, all the previous preset memories
are cleared. Preset AM stations again if necessary.
Receiving RDS broadcasts
Simply select a station from the FM band.
When you tune in a station that provides RDS services,
the RDS indicator lights up and the station name
appears in the display.
Displaying the RDS Information
Press DISPLAY repeatedly to change the information
on the display window as follows:
PS (Programme Station name)
PTY (Programme Type) indication
RT (Radio Text) indication
CT (Current Time) indication (in 24-hours system)
Sound field currently applied
v
v
Frequency
v
v
v
v
a)
a)
b)
c)
a)
18
a) This information also appears for non-RDS FM stations.
b) Type of programme being broadcast (See page 20).
c) Text messages sent by the RDS station.
GB
Page 19

Receiver Operations
Notes
• If there is an emergency announcement by government
authorities, ALARM flashes in the display.
• The following messages appear if a station is not
providing a particular RDS service:
“NO PTY” (the selected programme type is not available)
“NO TEXT” (text data is not available)
“NO TIME” (clock time data is not available)
• Depending on the method used by the radio station to
send the text, some text messages may be incomplete.
Monitoring traffic, news, or information
programmes (EON)
The EON (Enchanced Other Network) function allows
the receiver to switch automatically to a station
broadcasting traffic annoucements, news or
information programmes. When such a programme
starts on a station networking with the preset FM RDS
station, the receiver automatically tunes in the station.
After the programme ends, the receiver switches back
to the original preset station or the programme source
you were originally listening to.
1 Tune to an FM station.
To stop monitoring the programme
Press RDS EON once.
Turn off the EON feature when you want to record a
programme without interruptions, especially when you
want to do timer recording.
Notes
• To use this function, be sure to store the RDS stations
beforehand.
• When the selected station has a weak signal, “WEAK SIG”
appears and then, the receiver returns to the previous
station or programme source.
2 Press RDS EON to select the programme you
want to monitor.
Each time you press RDS EON, the indicators
light as follows:
/
TA (Traffic Announcement)
.
NEWS
.
INFO (information)
.
OFF (No indication lights up)
The receiver enters EON standby mode.
“NO TA”, “NO NEWS”, or “NO INFO” appears if you
press RDS EON before tuning to an RDS station.
When a station starts broadcasting the programme you
selected, the receiver switches to the station, a message
(e.g., “NOW TA”) appears and the respective indicator
(e.g.,“TA”) flashes. After the programme ends, the
receiver switches back to the station you were listening
to (or the function you were using).
(continued)
19
GB
Page 20

Receiver Operations
Locating a station by programme type
(PTY)
You can locate a station you want by selecting a
programme type. The receiver tunes in the type of
programmes currently being broadcast from the RDS
stations stored in the receiver's preset memory.
1 Press RDS PTY to display the current PTY type.
Press PRESET/PTY SELECT + or – until the
programme type you want appears in the display.
See the following table for the programme types
you can select.
2 Press RDS PTY while the programme type
appears in the display.
The tuner starts searching the preset RDS stations
for the programme (“SEARCH” and the
programme type are displayed alternately).
When the receiver finds the programme you are
looking for, it stops searching. The preset number
of the preset station currently broadcasting the
selected programme type flashes, and the receiver
receives the station.
Note
“NO PTY” appears when the programme type that you've
selected is not being broadcast and the receiver returns to
the original station.
You can select the following programme types:
Programme
type
NONE
NEWS
AFFAIRS
INFO
SPORT
EDUCATION
DRAMA
CULTURES
SCIENCE
VARIED
POP MUSIC
ROCK MUSIC
EASY MUSIC
What you hear
Any programmes not defined below.
News programmes.
Topical programmes that expand on
current news.
Programmes about consumer affairs and
professional advice (eg. medical advice).
Sports programmes.
Educational programmes, such as a “how-
to” programme and advice.
Radio plays and serials.
Programmes about national or regional
culture, such as religion, language, and
societal concerns.
Programmes about the natural sciences.
Programmes containing celebrity
interviews, panel games, and comedy.
Popular music programmes.
Rock music programmes.
Easy listening (middle of the road music).
Programme
type
LIGHT M
CLASSICS
OTHER M
WEATHER
FINANCE
CHILDREN
SOCIAL AFF
RELIGION
PHONE IN
TRAVEL
LEISURE
JAZZ MUSIC
COUNTRY M
NATIONAL M
OLDIES M
FOLK MUSIC
DOCUMENT
What you hear
Classical music, such as instrumental,
vocal, and choral.
Performances of major orchestras,
chamber music, opera, etc.
Music that does not fit into any of the
above categories, such as rhythm & blues
and reggae.
Programmes about the weather report.
Stock Market reports, commerce, trading
etc.
Programmes targeted at young audience
for entertainment and interest.
Programmes on sociology, history,
geography, psychology and society.
Aspect of beliefs and faiths.
Expression of views by phone or at a
public forum.
Programmes on package tours,
destinations, travel ideas and opportunity.
Programmes on recreational activities
which listeners might participate.
Polyphonic, syncopated music.
Songs originating from American
Southern States.
Current popular music of the Nation or
Region.
“Golden age” music.
Music which has roots in the musical
culture of a particular nation.
Programme concerning factual matters.
20
GB
Page 21
Using Surround Sound
Enjoying Surround Sound
You can take advantage of surround sound simply by
selecting one of the pre-programmed “sound fields”
that your receiver provides. You can enjoy the sound of
a movie theatre or concert hall in your own home. You
can even customize a sound field by adjusting its
parameters.
Sound field are classified into three types.
Using Surround Sound
Using Surround SoundUsing Surround Sound
The third type is “MUSIC”. When a sound field in this
type is selected, the receiver adds the reverberation to
the normal 2-channel stereo sound. You can apply
these sound fields when playing a CD or watching TV
programmes to obtain the surround effects of concert
hall or a jazz club.
To enjoy Dolby Pro Logic Surround sound fully, do the
procedure on “Dolby Surround Setup” starting from
page 10 to select the centre mode and adjust the
speaker volume.
One type is “CINEMA”. The CINEMA type sound
fields are designed for enjoying movies recorded on
videos or laser discs. Four sound fields are included in
the CINEMA type and they are grouped into two
types. PRO LOGIC sound field can be used to
reproduce plain surround sound. When you select the
PRO LOGIC sound field, the receiver obtains full
surround sound by using Dolby Pro Logic to decode
Dolby Surround encoded software. The surround
sound is reproduced in the exact way that the sound
engineer of the software intended. Other sound fields
in the CINEMA type are designed to add more
reverberation effects by incorporating Digital Cinema
Sound technology. When you select these sound fields,
the receiver adds the reflection and reverberation
effects that are typical in movie theatres to the decoded
Dolby Pro Logic Surround sound. You can enjoy the
sound that you would experience in the movie theatre.
Another type is “VIRTUAL”. Virtual mode allows you
to enjoy the surround sound environment using a
minimum of two front speakers to create non-existent
‘virtual’ speakers. The listener would be able to feel the
surround effects using only front speakers.
SOUND FIELD
MODE +/–
SUR
MENU </>
SOUND FIELD
ON/OFF
SET UP
+/–
ENTERBASS/TREBLE
TONE
21
GB
Page 22

Using Surround Sound
Selecting a Sound Field
You can enjoy surround sound simply by selecting one
of the pre-programmed sound fields according to the
programme you want to listen to.
1 Press SOUND FIELD ON/OFF to turn on the
sound field.
The current sound field is indicated in the
display.
2 Press SOUND FIELD MODE +/– repeatedly to
select the sound field you want.
See the table on this page for information on each
sound field.
The receiver memorizes the last sound field selected
for each programme source (Sound Field Link)
Whenever you select a programme source, the sound
field that was last applied is automatically applied
again. For example, if you listen to CD with HALL as
the sound field, change to different programme source,
then return to CD, HALL will be applied again. In the
case of the tuner, the sound fields for AM or FM band
and for all the preset stations are memorized separately.
You can identify Dolby Surround-encoded software
by looking at the packaging
Some videos and laser discs, however, may be encoded
with Dolby Surround sound even if it’s not indicated on
the package.
Note
When using sound fields, do not select both speakers (A+B)
with the SPEAKERS selector.
Description of sound fields
Type MODE (sound field) Effects
CINEMA PRO LOGIC Decodes programmes
processed with Dolby
Pro Logic Surround.
C(inema) STUDIO Reproduces the sound
characteristics of a
movie theatre. Good for
watching standard
movies.
N(ight) THEATER Adjust the tone for
watching a movie at
low volume at
nighttime.
MONO MOVIE Creates a theatre-like
environment when
watching movies with
monaural soundtracks.
VIRTUAL V DOLBY Uses front speakers to
create surround sound
effects.
V SURROUND* Uses front speakers and
centre speaker to create
surround sound effects.
MUSIC HALL Reproduces the
acoustics of a
rectangular concert hall.
Ideal for soft acoustic
sounds.
JAZZ CLUB Reproduces the
acoustics of a jazz club.
LIVE HOUSE Reproduces the
acoustics of a 300-seat
live house.
GAME Obtains maximum
audio impact from
video game software.
Be sure to set the game
machine to stereo mode
for game software with
stereo sound capablity.
22
* When using 5.1 CH/DVD only.
GB
Page 23

Customizing Sound Fields
Using Surround Sound
Using Surround SoundUsing Surround Sound
Adjusting the volume of the rear and centre
speakers (REAR/CENTER)
By adjusting some of the sound parameters, you can
customize sound fields to suit your particular listening
situation.
Once you customize a sound field, the changes are
stored in memory indefinitely (unless the receiver is
unplugged for about one week). You can change a
customized sound field any time by making new
adjustments to the parameters.
See the table on page 24 for adjustable parameters for
each sound field.
To get the most from Dolby Pro Logic
Surround sound
Do the procedures “Selecting the centre mode” and
“Adjusting the speaker volume” on page 10 before you
customize a sound field.
Changing the delay time (DELAY) (PRO
LOGIC Sound Field only)
If you feel the volume of the rear or centre speaker is
inadequate (even after adjusting the speaker volume
for Dolby Pro Logic Surround), do the procedure
below to adjust the volume.
Note that the speaker volume adjustment is applied to
all sound fields.
1 Press SUR.
2 Press MENU </> to select “REAR xxdB” or
“CENTER xxdB.”
3 Press +/– to adjust the speaker volume.
You can select a volume level of –15 dB to +10 dB
in 1-dB steps.
Adjusting the tone (BASS/TREBLE)
Adjust the tone (bass or treble) of the front speakers for
optimum sound. You can adjust the tone for each
separate sound field.
1 Press BASS/TREBLE.
You can enhance the Dolby Pro Logic Surround sound
even more by delaying the sound output from the rear
speakers (delay time). You can select a delay time of 15,
20, or 30 ms. Set a short delay time when the rear
speakers are located in a large room or far from where
you are listening.
1 Start playing a programme source encoded with
Dolby Surround sound.
2 Press SUR.
3 Press MENU </> to select “DELAY xxms.”
The current delay time appears in the display.
4 Press +/– to change the delay time.
Changing the level of effect (EFFECT)
(all sound fields except PRO LOGIC)
You can specify the amount of the surround effect (i.e.,
its overall presence) in six levels.
1 Press SUR.
2 Press MENU </> to select “EFFECT xx.”
The current effect level appears in the display.
2 Press MENU </> to select “BASS xxdB” or
“TREBLE xxdB.”
3 Press +/– to adjust the tone level.
You can select a tone level of –10 dB to +10 dB in
2-dB steps.
4 Press TONE so that the TONE indicator lights up.
You can turn off the tone adjustments without
erasing them
The tone adjustments are stored separately for each
sound field. Press the TONE button to turn the TONE
indicator off.
Resetting customized sound fields to the
factory settings
1 If the power is on, press 1/u (power) to turn off
the power.
2 Hold down SOUND FIELD ON/OFF and press
1/u (power).
“SUR CLEAR” appears in the display and all
sound fields are reset at once.
3 Press +/– to change the effect level.
23
GB
Page 24

Using Surround Sound
Adjustable parameters for each sound field when selecting programme source
Sound field mode
Off
On
Type
––
CINEMA
VIRTUAL
MUSIC
MODE
––
PRO LOGIC
C STUDIO
N THEATRE
MONO MOVIE
V DOLBY
HALL
JAZZ CLUB
LIVE HOUSE
GAME
DELAY EFFECT REAR CENTER TONE
rr
Parameters
a)
rra)r
rr r
rr r
rr
rr r
rr r
rr r
rr r
b)
r
b)
Adjustable parameters for each sound field when using 5.1 CH/DVD
Sound field mode
Off
On
Type
––
CINEMA
VIRTUAL
MODE
––
C STUDIO
N THEATRE
MONO MOVIE
V SURROUND
DELAY EFFECT REAR CENTER TONE
Parameters
rrr
rr rr
rr rr
rr rr
rrr
Test tone output
r
No sound
Depends on centre mode (see
r
page 10)
r
From the front and the rear
speakers alternately
No sound
From the front and the rear
speakers alternately
Test tone output
In the following order: front
(L), centre, front (R), rear (R)
and rear (L)
From the front and centre
speakers alternately
a) Adjustable only when the centre mode is set to PHANTOM,
NORMAL, or WIDE (see page 10).
b) Adjustable only when the centre mode is set to 3 STEREO,
NORMAL, or WIDE (see page 10).
Note
To adjust the speaker volume using a test tone as described
on page 10, select the PRO LOGIC sound field. The test tone
output in all other sound fields is used for verifying whether
there is output from speakers or not.
24
GB
Page 25
Receiver OperationsOther Operations
Indexing Preset Stations and
Programme Sources
You can enter a name of up to 8 characters for preset
stations (station index) and programme sources. These
index names (for example, “VHS”) appear in the
receiver's display when a station or programme source
is selected. This function is useful for distinguishing
components of the same kind. It is also handy for
identifying components connected to jacks meant for
another type of component, for example, a second CD
player connected to the MD/TAPE jacks.
Notes
• Not more than one name can be entered for each preset
station or programme source.
• You cannot index FM RDS stations or components
connected to the 5.1 CH/DVD jacks.
1 To index a preset station.
Tune to the preset station you want to name.
To index a programme source.
Select the programme source (component) to be
named, then go to Step 2.
Recording
This receiver makes it easy to record to and from the
components connected to the receiver. You don’t have
to connect playback and recording components
directly: once you select a programme source on the
receiver, you can record and edit as you normally
would using the controls on each component.
Before you begin, make sure you’ve connected all
components properly.
Function buttons
Playback component
(programme source)
ç: Audio signal flow
c: Video signal flow
Recording component
(MD deck, Tape deck,
VCR)
2 Press NAME.
The cursor blinks in the display.
3 Use + or – to select the character you desire.
4 Press MENU < or > to move the cursor into
position for the next character or previous
character.
5 Repeat Steps 3 and 4 to enter up to 8 characters.
6 Press ENTER to store the names.
If you make a mistake
Press MENU < or > repeatedly so that the character you
want to change blinks in the display, then use +
or – to select the desired character.
To assign index names to other stations
Repeat Steps 2 to 4.
To clear programme source name
Press NAME and then press the same programme source
button. Press ENTER to delete the name (except TUNER).
Recording on a MiniDisc or audio tape
You can record on a MiniDisc or cassette tape using the
receiver. See the instruction manual of your MD deck
or tape deck if you need help.
1 Press one of the function buttons to select the
programme source.
2 Set the component to be ready for playing.
For example, insert a CD into the CD player.
3 Insert a blank disc or tape into the recording deck
and adjust the recording level, if necessary.
4 Start recording on the recording deck and then
start playing the component.
(continued)
25
GB
Page 26
Receiver Operations
Other Operations
Recording on a video tape
You can record from a TV or a LD player using the
receiver. You can also add audio from a variety of
audio sources when editing a video tape. See your
VCR’s instruction manual if you need help.
1 Press TV/LD to select the programme source.
2 Set the component to be ready for playing.
For example, turn on the TV and TV tuner.
3 Insert a blank video tape into the VCR for
recording.
Using the Sleep Timer
Using the controls on the remote, you can set the
amplifier to turn off automatically at a time you
specify.
SLEEP
4 Start recording on the VCR.
You can replace audio while editing a video tape
At the point you want to start adding different sound,
press another function button (for example, CD) and
start playback. The sound from the selected component
will be recorded over the original audio.
To resume recording the original sound, press the TV/
LD function button.
Note
You cannot record the audio and video signal during
5.1 CH/DVD mode.
>/.
Press SLEEP on the remote while the power is on.
Each time you press SLEEP, the time changes as shown
below.
n 2:00:00 n 1:30:00 n 1:00:00 n 0:30:00 n OFF
The display dims after you specify the time.
You can freely specify the time
Press SLEEP on the remote first, then specify the time
you want using the cursor buttons (> or .).
The sleep time changes in 1 minute intervals. You can
specify up to 5 hours.
You can check the time remaining before the
amplifier turns off
Press SLEEP on the remote. The remaining time appears
in the display.
26
GB
Page 27

Additional Information
Troubleshooting
If you experience any of the following difficulties while
using the receiver, use this troubleshooting guide to
help you remedy the problem. Should any problem
persist, consult your nearest Sony dealer.
There’s no sound or only a very low-level sound is heard.
/ Check that the speakers and components are
connected securely.
/ Make sure you select the correct component
on the receiver.
/ Make sure you set the SPEAKERS selector
correctly (see page 12).
/ Press MUTING or MUTING on the remote if
the MUTING indicator turns on.
/ The protective device on the receiver has been
activated because of a short circuit
(“PROTECTOR” flashes). Turn off the
receiver, eliminate the short-circuit problem
and turn on the power again.
The left and right sounds are unbalanced or reversed.
/ Check that the speakers and components are
connected correctly and securely.
/ Adjust the BALANCE control.
Severe hum or noise is heard.
/ Check that the speakers and components are
connected securely.
/ Check that the connecting cords are away
from a transformer or motor, and at least 3
meters (10 feet) away from a TV set or
fluorescent light.
/ Place your TV away from the audio
components.
/ Make sure you connect a ground wire to the
aerial ground terminal.
/ The plugs and jacks are dirty. Wipe them
with a cloth slightly moistened with alcohol.
RDS isn’t working.
/ Make sure you're tuning an FM station.
/ Select a stronger FM station.
The appropriate display or information does not appear.
/ Contact the radio station and find out
whether or not they actually provide the
service in question. If so, the service may be
temporarily out of service.
The station, or programme source, was interrupted by
another station / the tuner automatically starts searching
stations.
/ The EON function is working. Turn off EON
when you don't want the current programme
interrupted.
Additional Information
Additional Information
The station name does not appear in the display.
/ Press DISPLAY until the station name
appears.
Radio stations cannot be tuned in.
/ Check that the aerials are connected securely.
Adjust the aerials and connect an outdoor
aerial if necessary.
/ The signal strength of the stations is too weak
(when you tune in with automatic tuning).
Use direct tuning.
/ No stations have been preset or the preset
stations have been cleared (when you tune in
with scanning preset stations). Preset the
stations (see page 17).
No sound or only a very low-level sound is heard from
the rear speakers.
/ Select the appropriate centre mode (see page
10).
/ Adjust the speaker volume appropriately (see
page 10).
/ Make sure you turn on the sound field
surround mode function.
No sound is heard from the centre speaker.
/ Select the appropriate centre mode (see page
10).
/ Adjust the speaker volume appropriately (see
page 10).
Surround effect cannot be obtained.
/ Make sure you turn on the sound field
function.
/ Make sure that the front speakers are
connected to the SPEAKERS A terminal.
/ Make sure that SPEAKERS A and B buttons
are depressed when two sets of front speakers
are used.
No picture or an unclear picture is seen on the TV screen.
/ Select the approriate function on the receiver.
/ Place your TV away from the audio
components.
Recording cannot be made.
/ Check that the components are connected
correctly.
/ You cannot record audio from a programme
source connected to the 5.1 CH/DVD jacks.
The remote does not function.
/ Point the remote at the remote sensor g on
the receiver.
/ Remove the obstacles in the path of the
remote and the receiver.
/ Replace both batteries in the remote with new
ones if they are weak.
/ Make sure you select the correct function on
the remote.
27
GB
Page 28

Additional Information
Specifications
Amplifier section
Power output
Stereo mode
Surround mode
5.1 CH/DVD
mode
Frequency
response
Inputs
CD,
5.1 CH/
DVD,
MD/TAPE,
TV/LD,
VIDEO
Outputs
(DIN 1 kHz, 4 ohms)
100 W + 100 W
(DIN 1 kHz, 4 ohms)
Front: 100 W/ch
Centre*: 100 W
(only in PRO LOGIC
Rear*: 100 W/ch
(DIN 1 kHz, 4 ohms)
Front: 100 W/ch
Centre*: 100 W
Rear*: 100 W/ch
TV/LD, CD, MD/TAPE,
VIDEO, 5.1 CH/DVD:
10 Hz - 50 kHz ±1 dB
Sensitivity
150 mV
MD/TAPE REC OUT:
Voltage: 150 mV,
Impedance: 10 kilohms
VIDEO AUDIO OUT:
Voltage: 150 mV,
Impedance: 10 kilohms
WOOFER:
Voltage: 2 V
Impedance: 1 kilohms
PHONES: Accepts low
and high impedance
headphones
mode)
Impedance
50
kilohms
S/N
96 dB
Muting
BASS BOOST
TONE
Full mute
+8 dB at 70 Hz
±8 dB at 100 Hz and
10 kHz
Tuner section
FM Stereo, FM/AM superheterodyne tuner
FM tuner section
Tuning range
Aerial terminals
Intermediate
frequency
Sensitivity
Usable sensitivity
S/N
Harmonic
distortion at
1 kHz
Separation
Frequency
response
Selectivity
87.5 - 108.0 MHz
75 ohms, unbalanced
10.7 MHz
Mono: 18.3 dBf,
2.2 µV/75 ohms
Stereo: 38.3 dBf,
22.5 µV/75 ohms
11.2 dBf,
1 µV /75 ohms (IHF)
Mono: 76 dB
Stereo: 70 dB
Mono: 0.3 %
Stereo: 0.5 %
45 dB at 1 kHz
30 Hz - 15 kHz dB
60 dB at 400 kHz
+0.5
–2
AM tuner section
Tuning range
Aerial
Intermediate
frequency
Usable sensitivity
531 - 1602 kHz
Loop aerial
450 kHz
50 dB/m (at 999 kHz)
Video section
Inputs
Outputs
VIDEO, TV/LD, 5.1 CH/
DVD:
1 Vp-p 75 ohms
VIDEO, MONITOR:
1 Vp-p 75 ohms
General
System
Power
requirements
Power
consumption
AC outlets
Dimensions
Mass (Approx.)
Supplied
accessories
Specifications indicated are measured at
230 VAC, 50 Hz.
* Depending on the sound field setting
and the source, there may be no
sound output.
Design and specifications are subject to
change without notice.
Tuner section: PLL
quartz-locked digital
synthesizer system
Preamplifier section:
Low-noise NF type
equalizer
Power amplifier section:
Pure-complimentary
SEPP
230 V AC, 50/60 Hz
195 W
Switched 100 W max
430 x 157 x 366 mm
10.8 kg
FM wire aerial (1)
AM loop aerial (1)
Remote commander
(remote) (1)
Operating instruction for
remote commander (1)
Size AA (R6) batteries (2)
28
GB
S/N
Harmonic
distortion
Selectivity
54 dB (at 50 mV/m)
0.5 % (50 mV/m,
400 Hz)
35 dB
Page 29
Additional Information
Additional Information
Glossary
Surround sound
Sound that consists of three elements: direct
sound, early reflected sound (early
reflections) and reverberative sound
(reverberation). The acoustics where you hear
the sound affect the way these three sound
elements are heard. These sound elements are
combined in such a way that you can actually
feel the size and the type of a concert hall.
• Types of sound
Early reflections
Direct sound
• Transition of sound from rear speakers
Direct sound
Level
Early reflection time
Early
reflections
Dolby Pro Logic Surround
As one method of decoding Dolby Surround,
Dolby Pro Logic Surround produces four
channels from two-channel sound. Compared
with the former Dolby Surround system,
Dolby Pro Logic Surround reproduces left-toright panning more naturally and localizes
sounds more precisely. To take full
advantage of Dolby Pro Logic Surround, you
should have one pair of rear speakers and a
centre speaker. The rear speakers output
monaural sound.
Centre mode
Setting of speakers to enhance Dolby Pro
Logic Surround mode. To obtain the best
possible surround sound, select one of the
following four centre modes according to
your speaker system.
Reverberation
Reverberation
Time
• WIDE mode
Select WIDE mode if you have front and
rear speakers and a large centre speaker.
With the WIDE mode, you can take full
advantage of Dolby Surround sound.
Front
speaker (L)
Rear
speaker (L)
Centre
speaker
Front
speaker (R)
Rear
speaker (R)
• PHANTOM mode
Select PHANTOM mode if you have front
and rear speakers but no centre speaker.
The sound of the centre channel is output
from the front speakers.
Front
speaker (L)
Rear
speaker (L)
Front
speaker (R)
Rear
speaker (R)
• 3 STEREO mode
Select 3 STEREO mode if you have front
and centre speakers but no rear speaker.
The sound of the rear channel is output
from the front speakers to let you
experience some of the surround sound
without using rear speakers.
Front
speaker (L)
Centre
speaker
Front
speaker (R)
Dolby Digital (AC-3)
This sound format for movie theatres is more
advanced than Dolby Pro Logic Surround. In
this format, the rear speakers output stereo
sound with an expanded frequency range
and a subwoofer channel for deep bass is
independently provided. This format is also
called “5.1” because the subwoofer channel is
counted as 0.1 channel (since it functions only
when a deep bass effect is needed). All six
channels in this format are recorded
separately to realize superior channel
separation. Furthermore, since all the signals
are processed digitally, less signal
degradation occurs. The name “AC-3” comes
from the fact that it is the third audio coding
method to be developed by the Dolby
Laboratories Licensing Corporation.
5.1 CH/DVD jacks
These jacks are used to input decoded Dolby
Digital (AC-3) audio signals, allowing you to
enjoy 5.1 channel surround sound. Use these
jacks to connect a Dolby Digital (AC-3)
decoder or a DVD player with a built-in AC-3
decoder.
Preset station
A radio broadcasting station that is stored in
memory of the receiver. Once you “preset”
stations, you no longer have to tune in the
stations. Each preset station is assigned its
own preset number, which lets you tune
them in quickly.
• NORMAL mode
Select NORMAL mode if you have front
and rear speakers and a small centre
speaker. Since a small speaker cannot
produce enough bass, the bass sound of
the centre channel is output from the front
speakers.
Front
speaker (L)
Rear
speaker (L)
Centre
speaker
Front
speaker (R)
Rear
speaker (R)
Delay time
Time lag between the surround sound output
from front speakers and rear speakers. By
adjusting the delay time of the rear speakers,
you can obtain the feeling of presence. Make
the delay time longer when you have placed
the rear speakers in a small room or close to
your listening position, and make it shorter
when you have placed them in a large room
or apart from your listening position.
29
GB
Page 30

Index
A, B
Adjusting
brightness of the display 9
delay time 23, 29
effect level 23
speaker volume 10
volume 12
Aerial hookups 5
Audio component hookups 5
Auto-betical select 18
Automatic tuning 16
C
Centre mode 10, 29
NORMAL mode 10, 29
PHANTOM mode 10, 29
3 STEREO mode 10, 29
WIDE mode 10, 29
Connecting. See Hookups
D
Delay time 23, 29
Direct tuning 16
Display 13
Dolby Pro Logic
Surround 10, 21
centre mode 10, 29
Dubbing. See Recording
E, F, G
Editing. See Recording
Effect level 23
EON 19
H, I, J, K, L, M
Hookups
aerials 5
audio components 5
mains lead 9
overview 4
speakers 7
video component 6
N, O
Naming preset stations 25
NORMAL mode 10, 29
P
PHANTOM mode 10, 29
Preset station 17
Presetting
radio stations 17
Preset tuning 17
Programme source
selecting 12
PTY 20
Q
Quick reference guide 32
R
RDS 18
Rear panel 5, 6, 7, 9, 31
Receiving broadcasts
directly 16
using preset stations 17
Recording on a tape 25
S
Scanning
preset stations 17
radio stations 16
Selecting a programme source
12
Sound field
Customizing 23
Selecting 22
Speakers
connection 7
placement 10
selecting speaker
system 12
Storing radio stations. See
Presetting
Surround sound 21
T
Test tone 10
3 STEREO mode 10, 29
Troubleshooting 27
Tuning. See Receiving
broadcasts
U
Unpacking 4
V
Video component hookups 6
W, X, Y, Z
WIDE mode 10, 29
30
GB
Page 31

14567 89!
Rear Panel Descriptions
º
!¡
1 ANTENNA (AM/FM)
2 CD
3 MD/TAPE
4 5.1 CH/DVD
5 TV/LD
32
6 VIDEO
7 MONITOR
8 WOOFER
9 SPEAKERS REAR
!™!£
!º SPEAKERS CENTER
!¡ Mains lead
!™ SWITCHED AC OUTLET
!£ SPEAKERS FRONT (A/B)
31
GB
Page 32

Quick Reference Guide
TV/LD
Select PRO
LOGIC.
SOUND FIELD
SOUND FIELD
ON/OFF
–
MODE
+
MODE
Turn on the LD player.
Start playing.
Receiving Broadcasts
(direct tuning)
Example: Receiving FM
102.50 MHz
TUNER
FM/AM
Select FM.
DIRECT
10250
Display
MHz
Presetting Radio
Stations
Example: Presetting a
station as A7
TUNER
Tune in the station you want.
MEMORY
SHIFT
Select A.
7
Selecting a
Component
Example 1:Playing a CD
CD
Turn on the CD player.
Start playing.
Example 2:Watching a video
tape
VIDEO
Turn on the VCR.
Start playing.
Scanning Radio
Stations
Example: Scanning FM
(automatic tuning)
stations
TUNER
FM/AM
–+
TUNING
–+
TUNING
Select FM.
To continue
scanning.
Receiving Preset
Stations
Example: Receiving the
station number A7
TUNER
SHIFT
Select A.
7
Scanning Preset
Stations
TUNER
Using Pre-programmed
Sound Fields
Example: Watching the laser
disc of a Dolby
Surround-encoded
movie
32
GB
PRESET/
–
PTY SELECT
+
Page 33

Подготовка к пользованию
ВНИМАНИЕ!
Во избежание
возгорания или
поражения
электрическим током
не допускайте
попадания аппарата
под дождь и берегите
его от сырости.
Во избежание поражения
электрическим током не вскрывайте
корпус аппарата. Его техническое
обслуживание должно производиться
только специалистами.
Не устанавливайте аппарат в тесных
замкнутых пространствах, таких как
книжные полки или встроенные
шкафы.
Сдепaно в Мапайзии
Изготовитель: Сони Корпорейшн
Адрес: 6-7-35 Kитaшинaгaвa,
Шинaгaвa-ку, Toкиo 141-0001, Япoния
Меры
предосторожности
Безопасность при
эксплуатации
• При попадании внутрь корпуса
каких-либо твердых предметов или
жидкостей отключите приемник от
сети и не пользуйтесь им до тех
пор, пока его не проверит
специалист.
Источники питания
• Перед началом пользования
убедитесь в том, что рабочее
напряжение аппарата
соответствует параметрам Вашей
электросети. Табличка с указанием
рабочего напряжения расположена
на задней стенке корпуса.
• Питание не отключено до тех пор,
пока сетевой провод остается
присоединенным к розетке, даже
если сам аппарат при этом
выключен.
• Если Вы в течение долгого
времени не собираетесь
пользоваться приемником, не
забудьте отключить его от сетевой
розетки. Для этого потяните за
вилку сетевого провода; никогда не
тяните за шнур.
• Замену сетевого провода можно
производить только в
специализированной мастерской.
• Выключатель сетевого питания
находится на передней панели
аппарата.
Размещение
• Во избежание перегрева и для
продления срока службы
приемника его следует
устанавливать в местах, где
обеспечивается достаточная
циркуляция воздуха.
• Не устанавливайте приемник
поблизости от источников тепла
или там, где возможны прямое
попадание солнечных лучей,
скопления пыли или резкие
сотрясения.
• Не следует класть или ставить на
приемник каких-либо предметов,
способных перекрыть
вентиляционные отверстия, так как
это может вывести его из строя.
Эксплуатация
• Перед подключением
дополнительной аппаратуры
обязательно выключайте приемник
и отключайте его от сети.
Чистка
• Корпус и панель управления
следует протирать мягкой
материей, слегка смоченной
слабым раствором моющего
средства. Не пользуйтесь для
этого жесткими терками,
абразивными порошками или
растворителями типа спирта или
бензина.
Если при пользовании
приемником у Вас возникнут
какие-либо вопросы или
проблемы, просим обратиться к
ближайшему дилеру фирмы Sony.
RU
2
Page 34

Подготовка к пользованию
Пояснения к
настоящей
инструкции
Перед Вами руководство по
зксплуатации модели STR-DE435.
Проверьте номер модели Ващего
аппарата, указанный в верхней части
передней панели справа.
Обозначения
В инструкции указан порядок
пользования органами управления на
панели приемника. Вы можете, кроме
того, пользоваться кнопками на
пульте дистанционного управления,
имеющими те же или сходные
обозначения.
Подробности об использовании
пульта дистанционного управления
см. в отдельной инструкции по
эксплуатации, прилагаемой к пульту
дистанционного управления.
• Краткое схематическое
руководство приводится на стр. 32.
• В тексте инструкции используются
следующие графические символы:
обозначает операции, которые
можно выполнить только при
помощи пульта дистанционного
управления.
обозначает советы о том, как
удобнее пользоваться той или
иной функцией.
Данный приемник оснащен
декодером Dolby Pro Logic
Surround.
Произведено по лицензии Dolby
Laboratories Licensing Corporation.
“DOLBY”, “PRO LOGIC” и символ
двойного D являются торговыми
марками Dolby Laboratories
Licensing Corporation.
Содержание
Подготовка к пользованию
Распаковка 4
Общая схема соединений 4
Подключение антенн 5
Подключение аудиоаппаратуры 5
Подключение видеоаппаратуры 6
Подключение акустических систем 7
Подключение к сети питания 9
Перед началом эксплуатации 9
Настройка системы Dolby Surround 10
Расположение органов управления и основные
операции усилителя
Описание органов управления передней панели 12
Эксплуатация радиоприемника
Прием радиопередач 16
Ввод радиостанций в память 17
Автоматический ввод в память станций диапазона FM в
алфавитном порядке (“автоалфавитная настройка”) 18
Пользование cистемoй трансляции текстовых данных (RDS) 18
Использование объемного звука
Использование объемного звука 21
Выбор режима звука (звукового поля) 22
Установка звуковых полей 23
Прочие операции
Обозначение предустановленных станций и источников
программ 25
Запись 25
Использование таймера засыпания 26
Дополнительная информация
Устранение неполадок 27
Технические xapaктeриcтики 28
Глоссарий 29
GB
RU
PL
Алфавитный указатель 30
Задняя панель 31
Краткое схематическое руководство 32
RU
3
Page 35

Подготовка к пользованию
Распаковка
Проверьте наличие в комплекте радиоприемника
следующих принадлежностей:
• Проволочная FM-антенна (1)
• Рамочная АМ-антенна (1)
• Пульт дистанционного управления (1)
• Инструкция по эксплуатации пульта
дистанционного управления (1)
• Батарейки R6 (размер АА) (2)
Установка батареек в пульт
дистанционного управления
Установите в пульт две батарейки R6 (размер АА),
соблюдая полярность, указанную значками + и –
внутри отделения для батареек.
При пользовании пультом дистанционного
управления направляйте его в сторону
дистанционного сенсора g, имеющегося на панели
приемника.
Подробности см. в инструкции по эксплуатации,
прилагаемой к пульту дистанционного управления.
Общая схема соединений
На рисунке ниже показаны типы аудио/
видеоаппаратуры, которые можно подключать к
радиоприемнику и эксплуатировать совместно с
ним. На нем указаны номера страниц, где
приводятся указания по подключению
соответствующего аппарата. Местоположение и
названия соединительных гнезд см. в разделе
“Задняя панель” на стр. 31.
Подключение
видеоаппаратуры (6)
Телевизионный
Телевизионный
Проигрыватель
Подключение
акустических
систем (7)
Передний
громкоговоритель (L)
лазерных дисков
Видеомагнитофон
монитор
приемник
DVD-проигрыватель/
AC-3-декодер
Подключение
антенн (5)
АМ/FM-антенна
Передний
громкоговоритель (R)
Когда следует заменять батарейки
При нормальной эсплуатации батареек должно
хватать примерно на 6 месяцев. Когда приемник
перестанет реагировать на команды с пульта
дистанционного управления, замените обе
батарейки новыми.
Управление следующими кнопками с пульта
дистанционного управления RM-PP402
невозможно
• VIDEO2
• VIDEO3
• DVD
• PHONO
• SOUND FIELD A.F.D.
Примечания
• Не оставляйте пульт в местах, где он может
подвергаться воздействию слишком высокой
температуры или влажности.
• Не устанавливайте в пульт новую батарейку вместе со
старой.
• Не допускайте попадания на дистанционный сенсор
прямых солнечных лучей или сильного света
осветительных приборов. Это может нарушить работу
дистанционного управления.
• Если Вы в течение долгого времени не собираетесь
пользоваться пультом дистанционного управления,
извлеките из него батарейки во избежание
повреждений, которые могут быть вызваны их
протеканием и коррозией.
Компакт-
проигрыватель
Магнитофон/
минйдиск-дека
Подключение
аудиоаппаратуры (5)
Задний
громкоговоритель
(L)
Центральный
громкоговоритель
Активный
низкочастотный
громкоговоритель
Задний
громкоговоритель
(R)
Прежде всего
• Прежде, чем подсоединять что-либо, выключите
всю аппаратуру.
• До завершения всех соединений не включайте
провод питания в сеть.
• Во избежание шумового фона или помех следите
за надежностью контактов.
• При подключении соединительного аудио/
видеокабеля цвет штекеров должен
соответствовать цвету гнезд, к которым они
подключаются: Желтый (видео) к желтому;
белый (левый стереоканал) - к белому. а
красный (правый стереоканал) - к красному.
RU
4
Page 36

Подключение антенн
Введение
В данном разделе указано, как подключать к
приемнику АМ- и FM-антенны. Если Вы хотите
пользоваться приемником для прослушивания
радиопередач, произведите эти соединения
прежде, чем переходить к последующим разделам
инструкции. Местоположение входных гнезд для
антенн показано на рисунке ниже.
ANTENNA
Какие потребуются антенны?
Подготовка к пользованию
Улучшение качества приема в диапазоне АМ
В дополнение к рамочной АМ-антенне подсоедините
к гнезду АМ кусок изолированного провода длиной
6-15 метров (в комплект не входит). По
возможности вытяните провод горизонтально за
пределами помещения.
Заземление
При подсоединении приемника к внешней антенне
заземлите его на случай удара молнии, как
показано на иллюстрации в левой колонке. Для
предотвращения взрыва газа не подсоединяйте
провод заземления к трубе газопровода.
Что дальше?
Если Вы собираетесь подключать другую
аппаратуру, переходите к следующему разделу.
Если Вы будете пользоваться приемником только
для прослушивания радиопередач, обратитесь к
разделу “Подключение акустических систем” на
стр. 7.
• Проволочная FM-антенна
(прилагается) (1)
• Рамочная АМ-антенна
(прилагается) (1)
Соединения
Проволочная FMантенна
Подключив
проволочную
антенну, вытяните
ее по возможности
в горизонтальном
направлении.
Улучшение качества приема в диапазоне FM
Используйте 75-омный коаксиальный кабель (в
комплект не входит) для подсоединения приемника
к внешней FM-антенне, как показано ниже.
Приемник
ANTENNA
AM
y
COAXIAL
FM
75Ω
Приемник
ANTENNA
Рамочная АМантенна
Внешняя
FM-антенна
Подключение
аудиоаппаратуры
Введение
В данном разделе указано, как подключать к
радиоприемнику аудио аппаратуру. Сделав это,
приемником можно пользоваться в качестве
усилителя.
Местоположение гнезд показано на рисунке ниже.
CD
MD/TAPE
Какие нужны кабели?
Аудио кабели (в комплект не входят) (по 1
соответственно для компакт-проигрывателя; по 2 для
магнитофона и МД-деки).
Провод заземления
(в комплект не
входит)
к земле
AM
y
COAXIAL
FM
75Ω
Белый (L)
Красный (R)
Белый (L)
Красный (R)
(продолжение следует)
RU
5
Page 37

Подготовка к пользованию
AUDIO IN
L
R
TV/LD
VIDEO IN
AUDIO
OUTPUT
VIDEO
L
R
MONITOR
VIDEO
OUT
INPUT
VIDEO
Соединения
Стрелка ç указывает направление потока
сигнала.
Компакт-проигрыватель
Компакт-
Приемник
L
R
AUDIO IN
CD
проигрыватель
OUTPUT
LINE
L
R
МД-дека или Магнитофон
Приемник
IN
REC OUT
MD/TAPE
МД-дека или Магнитофон
OUTPUT
L
R
LINE
INPUT
LINE
L
R
Что дальше?
Перейдите к следующему разделу подсоединения
видео компонентов для того, чтобы насладиться
объемным звуком при просмотре или
прослушивании программ телевидения или
видеокассет.
• Видео кабель (в комплект не входит) (по 1 для
ТВ монитора)
Желтый Желтый
Соединения
Стрелка ç указывает направление потока
сигнала.
Вы можете прослушивать звук с
видеомагнитофона или телевизора/проигрывателя
лазерных видеодисков, подав аудиосигнал с
видеомагнитофона или телевизора/проигрывателя
лазерных видеодисков на приемник.
TV/LD
Приемник
MONITOR
Телевизионный
приемник или Цифровая
система радиовещания
Подключение
видеоаппаратуры
Введение
Данный раздел описывает подключение
видеоаппаратуры к приемнику. Для нахождения
гнезд обращайтесь к иллюстрации ниже.
TV/LD5.1 CH/DVD
VIDEO
Какие нужны кабели?
• Аудио/видео кабели (в комплект не входят) (по 1
для каждого телеприемника или цифровой
системы радиовещания; по 2 для VCR)
MONITOR
Телевизионный
Приемник
монитор
VCR
Приемник
VIDEO IN
VIDEO OUT
L
R
AUDIO IN
AUDIO OUT
VIDEO
Используйте функциональные клавиши (TV/LD, CD,
MD/TAPE и т.д.) для выбора сигнала VIDEO AUDIO
OUT. Вы можете записать этот аудиосигнал,
подключив записывающую аппаратуру, такую как
кассетная дека (к гнезду VIDEO AUDIO OUT).
Видеомагнитофон
OUTPUT
INPUT
VIDEO
VIDEO
AUDIO
AUDIO
L
R
RU
6
Желтый
Белый (L)
Красный (R)
Желтый
Белый (L)
Красный (R)
Page 38

DVD-проигрыватель/AC-3-декодер
Какие нужны кабели?
• Аудио кабель (в комплект не входит) (1 для
разъемов 5.1 СН/DVD FRONT и REAR)
Подготовка к пользованию
Подключение
акустических систем
Белый (L)
Красный (R)
Белый (L)
Красный (R)
• Аудио кабель монофонического звучания (в
комплект не входит) (по 1 для каждого из
разъемов 5.1 CH/DVD CENTER и WOOFER)
Черный
Черный
• Видео кабель (в комплект не входит) (1 для
разъемов 5.1 CH/DVD VIDEO IN)
Желтый
Вы можете воспроизводить декодированный
звук дорожки Dolby Digital AC-3 через
подсоединенные к усилителю громкоговорители.
Если у Вас есть декодер Dolby Digital AC-3, Вы
можете усилить декодированную звуковую дорожку
Dolby Digital AC-3, сделав следующие соединения.
Приемник
5.1 CH / DVD
FRONT FRONTREAR REARCENTER
L
R
WOOFER
VIDEO IN
VIDEO
Желтый
декодер Dolby
Digital AC-3, etc.
PRE OUT
CENTER
WOOFER
Введение
Этот раздел описывает подключение
акустических систем к приемнику. Для
использоваиня объемных эффектов необходимы
центральный и задний громкоговорители и один
активный низкочастотный громкоговоритель. Для
нахождения гнезд обращайтесь к иллюстрации
ниже.
WOOFER
SPEAKERS
REAR
SPEAKERS
FRONT B
Какие нужны кабели?
Провода громкоговорителей (в комплект не входят): по
1 на каждый громкоговоритель.
(+)
(–)
SPEAKERS
CENTER
SPEAKERS
FRONT A
(+)
(–)
Что дальше?
Для подключения громкоговорителей перейдите к
следующему разделу.
Скрутите плотнее оголенные концы проводов (длиной
около 15 мм). Следите за тем, чтобы провода
громкоговорителей были правильно подключены к
выходным гнездам: “+” к “+”, а “—” к “—”. Если
перепутать их местами, это будет вызывать искажения
звука и ослабление басовых частот.
(продолжение следует)
RU
7
Page 39

Подготовка к пользованию
REAR
+
–
R
R
L
–
Соединения
Передние громкоговорители
Передний
громкоговоритель
(R)
Приемник
FRONT
R
R
L
AA
BB
L
Задний громкоговоритель и Центральный
громкоговоритель
Задний
громкоговоритель
(R)
Приемник
SPEAKERS
REAR
Центральный
громкоговоритель
CENTER
LR
LR
Во избежание короткого замыкания
громкоговорителей
Короткое замыкание громкоговорителей может
повредить приемник. Для предотвращения этого
обратите внимание на следующие меры
предосторожности при подключении
громкоговорителей. Убедитесь в том, чтобы
оголенные концы проводов каждого
громкоговорителя не касались выхода другого
громкоговорителя или оголенного конца провода
другого громокоговорителя.
Примеры плохого состояния провода
громкоговорителя:
Передний
громкоговоритель
(L)
Задний
громкоговоритель
(L)
После подсоединения всех компонентов,
громкоговорителей и шнура сетевого питания
дайте пробный тон для проверки правильности
подключения всех громкоговорителей. Подробнее
о подаче пробного тона см. в разделе “Подстройка
уровня громкости громкоговорителей” на стр. 10.
Если Вы подсоединили задние громкоговорители,
не забудьте нажать кнопку 5.1 CH/DVD и
поворотом регулятора на приемнике отключить
звуковое поле до подачи пробного тона так, чтобы
был отдельно слышен звук из левого и правого
задних громкоговорителей.
Если при подаче пробного тона громкоговорители
не работают или звук раздается не из того
громкоговрителя, название которого выводится в
настоящий момент на дисплей приемника, вполне
возможно, что имеет место замыкание
громкоговорителя. Если это так, проверьте еще
раз подключение громкоговорителя.
Активный низкочастотный громкоговоритель
Активный
низкочастотный
громкоговорительПриемник
WOOFER
AUDIO
OUT
INPUT
Примечание
Не подсоединяйте никакие другие компоненты.
Если у Вас есть дополнительные передние
громковорители
Подключите их к гнездам SPEAKERS FRONT B.
Если в мониторе Вашего телевизора
имеются отдельные громкоговорители
Вы можете подсоединить один из них к гнездам
SPEAKERS CENTER для создания эффекта
объемного звука (Dolby Pro Logic Surround) (см. стр.
10).
Оголенный провод громокоговорителя касается выхода
другого громкоговорителя.
REAR
R
R
L
+
RU
8
Оголенные провода соприкасаются друг с другом из-за
того, что срезано много изоляции.
Что дальше?
Для завершения подготовительных операций
Вашей системы перейдите теперь к этапу
“Подключение к сети питания” на стр. 9.
Page 40

Подключение к сети
питания
Подготовка к пользованию
Стирание памяти приемника
До пользования приемником в первый раз или если
Вы хотите “почистить” память приемника,
проделайте следующее:
Подключение сетевого провода
Подключите сетевые провода данного приемника
и аудио/видеоаппаратуры к сетевой розетке. Если
Вы подключите другие аудиокомпоненты к гнезду
SWITCHED AC OUTLET на приемнике, приемник
будет подавать питание к подключенного
аппаратуре, так что Вы сможете включать/
выключать всю систему при включении/
выключении приемника.
SWITCHED AC OUTLET
/
к сетевой розетке
Предостережение
Убедитесь, что потребляемая мощность подключаемой к
сетевому гнезду приемника аппаратуры не превышает
100 Вт. Не подключайте электрические бытовые
приборы большой мощности, такие как электрические
утюги, вентиляторы или телевизоры к данному гнезду.
Что дальше?
Прежде чем пользоваться приемником,
обратитесь к следующему разделу и
удостоверьтесь, что все переключатели и
рукоятки управления находятся в правильном
положении.
DIMMER1/u (питание)
MUTING
1 Отключите приемник.
2 Держите нажатой кнопку 1/u (питание) в
течение более четырех секунд.
На дисплее появляется надпись “ALL CLEAR”
и все параметры, включая следующий, либо
устанавливаются вновь либо стираются:
• Все предустановленные станции
возвращаются к заводской установке.
• Все параметры режима звука (объемного
звукового поля) возвращаются к их заводской
установке.
• Все индексные названия (предустановленных
станций и источников прогроамм) стираются.
• Все виды настройки, произведенные с
помощью кнопки SET UP, возвращаются к их
заводской установке.
• Параметр режима звука,
запрограммированный для каждого
источника программ и для каждой
предустановленной станции, стирается.
После включения приемника
Перед началом
эксплуатации
До включения приемника
Убедитесь в том, что:
• рукоятка MASTER VOLUME находится в крайнем
левом положении (0);
• правильно выбраны громкоговорители, на
которые будет подаваться звук (см. на стр. 12
раздел “Описание органов управления передней
панели”).
• регулятор BALANCE установлен в среднее
положение.
Проверьте следующий индикатор:
• Нажмите кнопку MUTING или MUTING на пульте
дистанционного управления, когда индикатор
MUTING включится.
• Нажмите кнопку DIMMER для установки дисплея
в один из четырех режимов яркости.
RU
9
Page 41

Подготовка к пользованию
Hacтpoйka cиcтembi Dolby
Surround
3 Для выбора необходимого Вам центрального
режима пользуйтесь + или – .
Описание каждого центрального режима
выглядит следующим образом:
Dolby Pro Logic Surround является системой,
используемой для раскодирования звука Dolby
Surround, который является стандартным для
программ телевидения и кино. Выбрав
необходимый центральный режим и настроив
громкость громкоговорителя, можно с высокой
точностью воспроизводить локализацию и
динамическую панораму звуков программ
записанных с использованием системы Dolby
Surround.
Для получения наилучшего возможного объемного
эффекта надо иметь по крайней мере одну
дополнительную пару громкоговортилей и/или
один центральный громкоговоритель.
Расположение громкоговорителей
Для получения оптимального звука Dolby Pro Logic
Surround расположите громкоговорители, как
показано ниже.
Передний громкоговоритель
Центральный громкоговоритель
45°
Если у Вас
Передние и
задние
громког
оворители,
центрального
громкоговорителя
нет
Передние и
центральные
громкоговорители,
но нет заднего
громкоговорителя
Передние и
задние
громкоговорители
и маленький
центральный
громкоговоритель
Передние и
задние
громокоговорители
и один
центральный
громкоговоритель
равный
передним
громкоговорителям
Выберите
PHANTOM
3 STEREO
(3-CH LOGIC)
NORMAL
WIDE
Так чтобы
Звук центрального
канала подавался на
передние
громкоговорители.
Звук заднего канала
подавался на
передние
громкоговорители.
Басовый звук
центрального канала
подавался на
передние
громкоговорители
(поскольку маленький
громкоговоритель не
сможет
воспроизвести
достаточно сильный
бас).
Центральный канал
полностью
воспроизводит весь
звуковой спектр.
Подстройка уровня громкости
громкоговорителей
10
RU
Задний громкоговоритель
Задний громкоговоритель
2 пo 3 ft
Передний
громкоговоритель
(60-90 см)
Выбор центрального режима
Приемник имеет четыре центральных режима:
PHANTOM, 3 STEREO, NORMAL и WIDE. Каждый
режим предназнечен для различной конфигурации
громкоговорителй. Выберите режим, котрый
наилучшим образом соответствует используемым
Вами громкоговорителям.
1 Нажмите кнопку SET UP.
2 Нажимайте повторно MENU < или > до
появления на дисплее “CTR MODE”
(центрального режима).
Параметр пробного тона дает возможность
настроить громкость задних громкоговоритлей и/
или центрального громкоговорителя до того же
уровня, что и громкость передних
громкоговорителй, чтобы достичь максимального
эффекта Dolby Pro Logic Surround. (Если все
громкоговорители имеют одинаковые
характеристики, нет необходимости подстраивать
уровень громкости громкоговорителей.)
Пользуясь кнопками на пульте дистанционного
управления, громкость можно настраивать с
любого места прослушивания.
1 Убедитесь в том, что центральный режим
настроен правильно (см. таблицу на этой
странице).
2 Для включения режима звука нажмите кнопку
SOUND FIELD ON/OFF.
3 Для выбора “PRO LOGIC” нажмите
многократно кнопку SOUND FIELD MODE +/–.
4 Нажмите клавишу TEST TONE на входящем в
комплект пульте дистанционного управления.
Из каждого громкоговорителя
последовательно слышится пробный тон (см.
следующую страницу).
Page 42

Подготовка к пользованию
5 Настройте уровень громкости таким образом,
чтобы громкость пробного тона на каждом
громокоговорителе была одинаковой
независимо от того, с какого места Вы
слушаете.
• Для настройки баланса переднего правого и
переднего левого громкоговорителей
пользуйтесь регулятором BALANCE на
передней панели основного приемника.
• Для настройки уровня громкости
центрального громкоговорителя нажмите
клавиши LEVEL CENTER +/– на пульте
дистанционного управления.
• Для настройки уровня громкости задних
громкоговорителей нажмите клавиши LEVEL
REAR +/– на пульте дистанционного
управления.
6 Для отключения пробного тона нажмите еще
раз клавишу TEST TONE на пульте
дистанционного управления.
Одновременная настройка уровня
громкости всех громкоговорителей
Поверните ручку MASTER VOLUME на основном
приемнике или нажмите клавишу MASTER VOL(UME)
+/– на пульте дистанционного управления.
Передний (L, R)
Пробный тон
Задний
(L, R)
PHANTOM
ворителей пИнформацию о подаче пробного тона для
звуковых полей отличных от PRO LOGIC, см. в таблице
на стр. 24.
Увеличение уровня мощности
заднего громкоговорителя на 5 дБ
Диапазон настройки задних громкоговорителей
предустановлен в пределе от –15 до +10, но
диапазон может быть смещен на 5 уровней (от –10
до +15).
1 Haжмите кнопку SET UP.
2 Нажмайте повторно MENU < или > до
появления на дисплее “REAR GAIN”.
3 Для выбора “GAIN UP” нажмите + или –.
Что такое пробный тон?
Пробный тон это сигнал подаваемый приемником
для подстройки уровня громкости
громкоговорителей. Пробный тон подается с
громкоговорителей следующими двумя путями:
• При выборе режима NORMAL, WIDE или 3
STEREOz
Пробный тон подается с переднего L (левого),
центрального, переднего R (правого) и с задних
громкоговорителей (за исключением режима 3
STEREO) последовательно.
Передний (L) Передний (R)
• При выборе режима PHANTOM
Пробный тон подается с переднего и заднего
громкоговорителей поочередно.
Центральный
3 STEREO
Задний
(L, R)
NORMAL/WIDE
Пробный тон
Примечание
Величина для заднего уровня остается на дисплее
установленной в пределе от –15 до +10, но в
фактической громкости слышится разница.
Восстановление нормального уровня
громкости
Повторите вышеописанную процедуру, выбрав
“GAIN NORM” в операцции 2.
11
RU
Page 43

Рaсположеhиe opгahob yпpabлehия и ochobhbie oпepaции ycилиteля
!
Описание органов
управления передней
панели
В настоящей главе приводится информация о
расположении и функциях клавиш и
переключателей на передней панели и объяснение
основных операций усилителя.
1
823 !º
7
1 Переключатель 1/u
Нажать для включения и выключения
приемника.
Примечание
Во избежание повреждения громкоговорителей
убедитесь до включения приемника в том, что
регулятор MASTER VOLUME выведен в крайнее
левое положение.
2 Кнопкu ceпekтopa cитнaлa
Нажмите для выбора компонента, который Вы
хотите использовать.
Для прослушивания или
Нажмите
просмотра
Видеокассеты
Телевизионные
программы или лазерные диски
Мини-дисков (MD) или
Магнитофонных эаписей
Компакт-дисков
Радиопередач
DVD-проигрыватель/
AC-3-декодер
VIDEO
TV/LD
MD/TAPE
CD
TUNER
5.1 CH/DVD
После выбора компонента включите этот
компонент и начните воспроизведение
источника программы.
4
¡
56
9
4 Регулятор MASTER VOLUME
После включения выбранного Вами
компонента, поверните регулятор для
настройки громкости.
5 Кнопка MUTING
Нажмите для приглушения (выключения)
звука. При приглушениии звука загорается
индикатор MUTING.
6 Регулятор BALANCE
Поворачивайте для настройки баланса
передних громкоговорителей.
7 SPEAKERS selector (регулятор выбора
громкоговорителей)
Установите согласно тем передним
громкоговорителям, которые Вы хотите
слышать.
Чтобы выбрать
Громкоговорители, подсоединенные к
выходам SPEAKERS FRONT A
Громокговорители, подсоединенные к
выходам SPEAKERS FRONT B
Громкоговорители, подсоединенные к
обоим выходам SPEAKERS FRONT A и В
(параллельное подсоединение)
Передний громкоговоритель не работал
Установите в положение
A
B
A + B*
OFF
12
RU
3 Кнопка 5.1 CH/DVD
Нажмите для выбора компонента
подсоединенного к разъемам 5.1 CH/DVD.
Когда компонент выбран, загорается
индикатор 5.1 CH/DVD.
Не устанавливайте в положение А+В, когда
*
включено звуковое поле. Не забудьте
подсоединить громкоговорители с номинальным
сопротивлением от 8 Ом или выше, если Вы
захотите выбрать обе пары передних
громкоговорителй.
Page 44

Рaсположеhиe opгahob yпpabлehия и ochobhbie oпepaции ycилиteля
Разъем PHONES
Для подсоединения головных телефонов.
Примечание
Для пользования головными телефонами установите
переключатель SPEAKERS в положение OFF для
того, чтобы направить звук в головные телефоны.
8 Кнопка DISPLAY
Нажмите несколько раз для того, чтобы
информация в окне дисплея изменилась
следующим образом:
Когда выбран не приемник, а другой
компонент
v
Индексное название компонента*
v
Выбранный компонент
v
Звуковое поле применительно к
данному компоненту
Когда выбран приемник
v
Индексное название предустановленной
станции* или название
запрограммированной станции**
v
Частота
v
Указатель типа программы**
v
Радиотекст**
v
Текущее время**
9 Для получения объемного звука
пользуйтесь следующими клавишами.
Подробности см. в разделе “Пользование
объемным звуком”, начиная со стр. 21.
Кнопка SOUND FIELD ON/OFF
Нажмите для включения или выключения
звукового поля.
Кнопка SOUND FIELD MODE +/–
Нажмите для выбора звукового поля из
выбранной Вами группы.
0 Кнопка TONE
Нажмите для включения или выключения
звукового эффекта. При включенном звуковом
эффекте загорается индикатор TONE.
Обратите внимание, если Вы настроили звук,
пользуясь клавишами MENU </> и +/–,
настроенный звук будет звучать всякий раз,
когда Вы будете включать звуковой эффект.
Кнопка BASS BOOST
Нажмите для увеличения низких тонов
передних громкоговорителей. При включенной
функции загорается индикатор BASS BOOST.
!¡ Индикатор TONE
Загорается при включенном звуковом
эффекте.
Индикатор BASS BOOST
Загорается при включении усиления низких
тонов.
Для получения звука высокого качества
Проделайте нижеописанную процедуру для обхода
контуров звукового контроля.
v
Звуковое поле применительно
к данному диапазону или к
предустановленной станции
Индексное название появляется лишь в том случае,
*
когда Вы присвоили его компоненту или
предустановленной станции (см. стр. 25).
** Эти названия появляются лишь во время приема в
системе RDS (см. стр. 18).
1 Установите переключатель SOUND FIELD ON/
OFF в положение выключено (off).
2 Установите переключатель TONE в положение
выключено (off).
3 Установите переключатель BASS BOOST в
положение выключено (off).
В результате с передних громкоговорителей будет
слышен двухканальный стереозвук весьма точно
воспроизводящий источник программы.
(продолжение следует)
13
RU
Page 45

Рaсположеhиe opгahob yпpabлehия и ochobhbie oпepaции ycилиteля
@
¡
!™ !£ !ª!∞ !¶
!¢ @º !§ !•
!™ При помощи следующих кнопок
осуществляется управление встроенным
приемником. Подробности см. в разделе
“Прием радиопередач”, начиная со стр.
Клавиши PRESET/PTY SELECT +/–
Нажмите для сканирования станций по типу
программы или для сканирования всех
предустановленных станций.
Клавиши TUNING +/–
Нажмите для сканирования всех имеющихся
радиостанций.
!£ При помощи следующих кнопок
осуществляется управление встроенным
приемником. Более подробно см. в разделе
“Прием радиопередач”, начиная со стр. 16.
Обратите внимание, что кнопка PTY работает
лишь в том случае, когда выбран приемник.
Кнопка RDS PTY
Нажмите для начала работы или для
сканирования станций по типу программ.
Кнопка RDS EON
Нажмите для автоматической настройки на
станцию, передающую в настоящий момент
дорожные сообщения, новости или
информационную программу. Во врмея приема
станций в диапазоне АМ кнопка RDS EON не
работает.
Кнопка FM/AM
Выберите диапазон FM или АМ.
Кнопка FM MODE
Если на дисплее мигает “STEREO”, а прием
программ в режиме стерео плохой, нажмите
эту кнопку. Эффекта стерео не будет, но
качество звука улучшится.
Кнопка MEMORY
Нажмите для выбора функции
“автоалфавитной настройки” (см. стр. 18) или
для введения в память запрограммированных
станций.
!¢ С помощью следующих клавиш можно
управлять встроенным приемником. Более
подробно см. раздел “Прием радиопередач”,
начиная со стр. 16. Обратите внимание, что эти
клавиши работают лишь в том случае, когда
выбран приемник.
Homepнble клавиши (oт 1 д 0)
Вводят цифры.
Кнопка SHIFT
Выбирает запрограммированную страницу для
предустановленных станций.
Кнопка DIRECT
Нажмите для прямого введения частоты
станции.
!∞ Клавиши MENU (
После нажатия SUR, NAME, BASS/TRBLE или
клавиши SET UP, используйте эти клавиши для
выполненеия соответствующих установок (см.
стр. 11, 23 и 25).
!§ Клавиши +/–
После нажатия клавиш MENU используйте эти
клавиши для выполнения соответствующих
установок (см. стр. 11, 23 и 25).
/ )
14
RU
Page 46

Рaсположеhиe opгahob yпpabлehия и ochobhbie oпepaции ycилиteля
!¶ Кнопка SET UP
Для выбора одного из следующих двух
названий нажмите несколько раз эту клавишу.
На дисплее появляется выбранное название и
с помощью клавиш курсора могут быть
выполнены различные установки.
После вывода
Можно
на дисплей
CTR MODE
REAR GAIN
Выбрать один из четырех
центральных режимов (стр. 10)
Увеличить диапазон задних
громкоговорителей на 5 дБ
(стр. 11)
!• Нажмите следующие клавиши для присвоения
названия предустановленным станциям или
источникам программ. Более подробно см.
“Индексирование предустановленных станций
и источников программ” на стр. 25.
Кнопка NAME
Нажмите для введения названия
предустановленных станций и источников
программ (кроме 5.1 CH/DVD).
Кнопка ENTER
Нажмите для введения в память названий.
!ª Кнопка SUR
Нажмите эту клавишу для настройки
параметров звука (см. стр. 23).
@º Кнопка BASS/TREBLE
Нажмите эту клавишу для настройки тона
(см. стр. 23).
@¡ Кнопка DIMMER
Нажмите эту клавишу для установки дисплея в
одном из четырех режимов яркости.
15
RU
Page 47

Эксплуатация радиоприемника
Прием радиопередач
Данный приемник позволяет Вам вводить частоту
станций напрямую, с использованием номерных
клавиш (прямая настройка). Если Вы не знаете
частоту желаемой станции, см. раздел “Поиcк
радиоcтанций путем сканирования частот
(автоматическая настройка)”.
Для начала убедитесь в том, что:
• к приемнику в соответствии с указаниями,
приведенными на стр. 5, подсоединена FM/АМантенна;
• правильно выбраны громкоговорители, на
которые будет подаваться звук (см. на стр. 12
раздел “Описание органов управления передней
панели”).
FM/AM
FM
MODE
Номерные
клавиши
TUNING +/–1/u (питание)
DIRECT
1 Включите приемник нажатием кнопки
1/u (питание).
2 Нажмите TUNER.
Приемник настраивается на радиостанцию,
принимавшуюся последней.
3 С помощью кнопок FМ/AМ выберите FM- или
АМ-диапазон.
4 Нажмите DIRECT.
5 Пользуясь цифровыми кнопками, введите
нужную частоту.
Пример 1: FM 102,50 МГц Пример 2: АМ 1350 кГц
1 0 2 5 0
MASTER VOLUME
TUNER
1 3 5 0
Если индикатор STEREO не загорается
Во время приема стереопрограммы диапазона FM
нажмите кнопку FM MODE.
Если FM-стереопрограмма принимается с
помехами
Мигает индикатор STEREO. Нажмите кнопку FM
MODE, чтобы перейти в монофонический режим
(MONO). Стереоэффекта не будет, но помех станет
меньше. Для восстановления стереоэффекта
нажмите ту же кнопку повторно.
Приемник не может настроиться на нужную
станцию, а цифры, показывающие заданную
частоту, мигают
Убедитесь, что частота введена правильно. Если Вы
допустили ошибку, нажмите кнопку DIRECT и введите
нужную частоту повторно. Если введенные цифры
продолжают мигать, это значит, что данная частота
не используется для вещания в Вашем районе.
Просмотр телепередач, звуковое
сопровождение которых дублируется по
радио в FM-диапазоне
Не забудьте настроить на программу с
дублированием звукового сопровождения не только
телевизор (или видеомагнитофон), но и
радиоприемник.
Если Вы ввели значение частоты, не
укладывающееся в интервал настройки
Введенное значение автоматически округляется в
сторону увеличения или уменьшения до ближайшей
частоты, соответствующей интервалу настройки.
Интервал при прямой настройке составляет:
В диапазоне FM: 50 кГц
В диапазоне АМ: 9 кГц
Поиcк радиоcтанций путем
сканирования частот
(автоматическая настройка)
Если Вы не знаете, на какой частоте работает
интересующая Вас радиостанция, приемник может
найти ее, просканировав все частоты,
используемые для вещания в данной местности.
16
RU
6 При настройке в диапазоне АМ качество
приема можно улучшить, изменяя положение
рамочной АМ-антенны.
Настройка на другие радиостанции
Повторите операции с 3 по 5.
1 Нажмите кнопку TUNER.
Приемник настраивается на радиостанцию,
принимавшуюся последней.
2 Нажатием кнопки FМ/АМ выберите диапазон
FМ или АМ.
Page 48

Эксплуатация радиоприемника
Эксплуатация радиоприемника
3 Нажмите TUNING + или –.
При нажатии кнопки + приемник
переключается на следующую по порядку
радиостанцию; при нажатии кнопки – он
возвращается к предыдущей станции. Выходя
за пределы диапазона, аппарат автоматичски
переходит к его противоположному краю. При
приеме очередной радиостанции сканирование
останавливается. Чтобы продолжить его,
кнопку следует нажать повторно.
Ввод радиостанций в
память
Вероятно, Вы сочтете для себя удобным ввести в
память приемника частоты станций, которые
слушаете регулярно, чтобы на них не приходилось
каждый раз настраиваться заново. В памяти
приемника может храниться в общей сложности до
30 станций в диапазонах FМ и АМ. При вводе в
память их можно обозначать индексами,
состоящими из буквы (А, В или С) и цифры (0-9),
например: А1, В6, С9 и т.д.
Номерные
клавиши
PRESET/PTY
SELECT +/–
MENU </>
NAME
5 Пока на дисплее видно слово “MEMORY”,
нажмите кнопку с нужной Вам цифрой (от 0 до
9).
6 Для ввода в память других радиостанций
повторите операции 2-5.
Замена введенных в память радиостанций
Введите в память под соответствующим номером новую
радиостанцию.
Примечание
Если сетевой провод отсоединен примерно в течение
недели, предустановленные станции стираются из
памяти приемника, и Вам нужно будет снова произвести
настройку.
Включение запрограммированных
радиостанций (настройка по
памяти)
Введенную в память радиостанцию можно
включить непосредственно путем указания ее
индекса. Если Вы не знаете, под каким индексом
хранится в памяти нужная Вам радиостанция, ее
можно найти путем сканирования
запрограммированных частот.
MEMORY ENTERSHIFT TUNER
+/–
1 Нажмите кнопку TUNER.
Включается радиостанция, принимавшаяся
последней.
2 Настройтесь на нужную станцию.
Если Вы не знаете, как производится
настройка, обратитесь к разделу “Прием
радиопередач” на предыдущей странице.
3 Нажмите кнопку MEMORY.
На дисплее на несколько секунд появляется
слово “MEMORY”. Операции 4 и 5 следует
проделать, пока оно не исчезло с дисплея.
4 Нажатием кнопки SHIFT выберите букву (А,В
или С). Каждый раз, когда Вы нажимаете
SHIFT, на дисплее появляется одна из этих
букв — “А”, “В”, или “С”.
1 Нажмите кнопку TUNER.
Включается радиостанция, принимавшаяся
последней.
2 Нажатием кнопки SHIFT выберите нужную
букву (А, В или С) и нажмите кнопку с
соответствующей цифрой.
Например, чтобы включить станцию с
индексом А7, необходимо выбрать букву А и
нажать кнопку 7.
Настройку можно производить путем
сканирования введенных в память
радиостанций
Нажав сначала кнопку TUNER, а затем кнопку
PRESET/PTY SELECT + или –, выберите нужную Вам
станцию. При последовательном нажатии этих
кнопок индексы запрограммированных станций
сменяют друг друга в следующем порядке:
n A1 ˜ A2 ˜… ˜ A0 ˜ B1 ˜ B2 ˜ … ˜ B0 N
n C0 ˜ … ˜ C2 ˜ C1 N
Если слово “MEMORY” исчезло, начните
заново с операции 3.
17
RU
Page 49

Эксплуатация радиоприемника
18
RU
Автоматический ввод в
память станций диапазона FM
в алфавитном порядке
(“автоалфавитная настройка”)
Функция “автоалфавитной настройки” позволяет
Вам автоматически запрограммировать аппарат на
прием до 30 радиостанций FM-диапазона, в том
числе радиостанций, использующих систему RDS,
избегая при этом повторного ввода в память одной
и той же радиостанции. При этом приемник
отбирает станции с наиболее четким сигналом. О
том, как настраиваться на станции диапазонов FM
или АМ (СВ) по отдельности, см. в разделе “Ввод
радиостанций в память” на стр. 17. При
автоалфавитной настрйке первыми в память
вводятся радиостанции FM, использующие систему
RDS, в алфавитном порядке по их названиям, а
затем остальные FM-станции по порядку частоты.
1 Выключите приемник нажатием кнопки
1/u (питание).
2 Удерживая в нажатом положении кнопку
MEMORY, вновь включите приемник кнопкой
1/u (питание).
При этом на дисплее появляется надпись
“AUTOBETICAL SELECT”, и приемник начинает
поиск принимаемых в данном районе
радиостанций FM-диапазона, включая те,
которые используют систему RDS. Все
найденные станции автоматически вводятся в
память.
По окончании поиска и ввода в память FMрадиостанций и радиостанций, использующих
систему RDS, на дисплее появляется слово
“FINISH”.
Изменение предустановленного кода на другую
станцию
См. “Ввод радиостанций в память” на стр. 17.
Как остановить автоалфавитную натройку до
окончания ввода в память всех станций
Выключите приемник нажатием кнопки 1/u (питание).
Радиостанции, частоты которых запрограммированы
ранее, сдвигаются в конец перечня (в направлении
С0) и могут быть стерты из памяти, если число
станций, обнаруженных системой автоалфавитной
настройки, окажется слишком большим.
Примечание
• Изложенную выше процедуру необходимо повторить
при переезде в другой район для настройки на
местные станции.
• Подробности о настройке на запрограммированные
станции см. на стр. 17.
• Появление на дисплее слова “FINISH” означает, что
все ранее внесенные в память параметры стерты. При
необходимости введите вновь в память станции
диапазона АМ.
Пользование системой
трансляции текстовых
данных (RDS)
Что представляет собой система
трансляции текстовых данных
Система трансляции текстовых данных (Radio Data
System, RDS) используется радиостанциями для
наложения на передаваемый ими радиосигнал
дополнительной информации. Данный приемник
оснащен тремя удобными функциями, основанными
на системе RDS: вывод текстовой информации на
дисплей, отслеживание сообщений о дорожном
движении, выпусков новостей или
информационных передач и тематический поиск
радиопрограмм. Система RDS работает только в
диапазоне FМ
Примечание
Функционирование системы RDS может быть нарушено,
если принимаемая станция неправильно передает сигнал
RDS или если этот сигнал слишком слаб.
* Систему RDS используют не все станции диапазона
FМ, а те из них, которые делают это, не обязательно
передают однотипную информацию. Если Вы
недостаточно знакомы с тем, как работает система
RDS, свяжитесь с местными радиостанциями, чтобы
подробнее узнать об использовании системы RDS в
Вашем районе.
Прием радиопередач, в которых
используется система RDS
Выберите одну из радиостанций диапазона FМ.
При настройке на станцию, работающую в системе
RDS, на дисплее загорается индикатор RDS и на
дисплее появляется название станции.
*
.
Page 50

Эксплуатация радиоприемника
Эксплуатация радиоприемника
Вывод информации RDS на
дисплей
Нажмите клавишу DISPLAY несколько раз, чтобы
изменить информацию в окне дисплея следующим
образом:
PS (название запрограммированной станции)
PTY индикация (типа программы)
RT индикация (радиотекста)
СТ индикация (текущего времени)
(по 24-часовой системе)
Звуковое поле, применяемое в настоящий момент
а) Эта информация появляется также для станций
диапазона FM, работающих не в режиме RDS.
b) Тип транслируемой программы (см. стр. 20).
c) Текстовые сообщения, передаваемые станцией
работающей в режиме RDS.
v
v
Частота
v
v
v
v
a)
c)
Примечания
• При приеме экстренных сообщений официальных
органов на дисплее появляется мигающее слово
ALARM.
• Если принимаемая радиостанция не передает какого-
либо из видов информации RDS, на дисплее
появляются следующие сообщения:
“NO PTY” (отсутствуют передачи по выбранной
тематике)
“NO TEXT” (отсутствуют текстовые данные)
“NO TIME” (отсутствует информация о текущем
времени)
• В зависимости от метода используемого
радиостанцией для трансляции текста некоторые
передачи текста могут быть неполными.
a)
b)
a)
1 Настройтесь на радиостанцию диапазона FМ.
2 Нажатием кнопки RDS EON выберите вид
программ, которые Вы хотите отслеживать.
При последовательном нажатии на кнопку
RDS EON индикаторы типов программ
переключаются в следующем порядке:
/
TA (сообщения о дорожном движении)
.
NEWS (новости)
.
INFO (информация)
.
OFF (Не загораются никакие индикаторы)
Приемник переходит в режимr EON.
Если нажать кнопку RDS EON, не настроившись
предварительно на радиостанцию, использующую
систему RDS, то на дисплее появляется надпись
“NO TA”, “NO NEWS” или “NO INFO”.
Как только та или иная радиостанция начинает
передавать программу выбранного Вами типа,
приемник переключается на эту станцию, на
дисплее появляется соответствующее сообщение
(например, “NOW TA”), а один из индикаторов
(например, “TA”) начинает мигать. По окончании
программы приемник возвращается к передаче,
которую Вы слушали до этого (или к другим
функциям, которыми Вы пользовались).
Чтобы прекратить отслеживание,
нажмите один раз кнопку RDS EON.
Функцию EON следует отключать в случаях,
когда Вы хотите записать ту или иную
радиопередачу без перерывов, и особенно при
записи по таймеру.
Отслеживание сообщений о
дорожном движении, выпусков
новостей или информационных
программ (система EON)
Функция EON (Система приоритетного
переключения программ) позволяет приемнику
автоматически переключаться на станцию
передающую дорожные сообщения, новости или
информационные программы. Когда такая
программа начинается на станции настроенной на
станцию FM с запрограммированной функцией
RDS, приемник автоматически настраивается на
эту станцию. По окончании таких передач
приемник возвращается к изначально
запрограммированной станции или к источнику
программы, который Вы слушали до этого.
Примечания
• Прежде чем пользоваться данной функцией, не
забудьте ввести в память частоты радиостанций,
использующих систему RDS.
• Если сигнал выбранной станции слишком слаб, на
дисплее появляется сообщение “WEAK SIG”. После
этого приемник переключается на предыдущую
радиостанцию (или функцию).
(продолжение следует)
19
RU
Page 51

Эксплуатация радиоприемника
Тематический поиск
радиопрограмм (PTY)
Нужную Вам станцию можно найти по тематике
передаваемых ею программ. При этом приемник
настраивается на те из введенных в его память
радиостанций RDS, которые в данный момент
транслируют передачи на выбранную тему.
1 Нажмите RDS PTY для вывода на дисплей
актуального типа PTY. Нажмите PRESET/PTY
SELECT + или –, пока нужная программа не
появится на дисплее.
Тематический перечень программ приведен в
таблице слрава.
2 Пока на дисплее высвечивается указание
выбранной тематики, нажмите кнопку RDS
PTY .
Приемник начинает поиск передач на нужную
тему из числа программ, передаваемых
радиостанциями RDS (при этом на дисплее
попеременно появляются слово “SEARCH” и
искомая тематика передачи).
При нахождении нужной программы поиск
прекращается, и приемник начинает принимать
найденную станцию, индекс которой
появляется на дисплее.
Примечание
Если передачи на выбранную Вами тему в эфире
отсутствуют, на дисплее появляется надпись “NO PTY”, и
приемник возвращается к радиостанции, которая
принималась до этого.
Вы можете находить в эфире передачи на
любую из следующих тем:
Тематика
NONE
NEWS
AFFAIRS
INFO
SPORT
EDUCATION
DRAMA
CULTURES
SCIENCE
Содержание
Любые передачи, не входящие ни в одну
из перечисленных ниже тематических
категорий.
Выпуски новостей.
Актуальные коммментарии текущих
событий.
Программы для потребителей, передачи о
здоровье и погоде.
Спортивные программы.
Образовательные программы, полезные
советы.
Радиопостановки и сериалы.
Передачи о культурной жизни страны или
региона, программы на религиозные,
языковые или социальные темы.
Научно-популярные программы.
Тематика
VARIED
POP MUSIC
ROCK MUSIC
EASY MUSIC
LIGHT M
CLASSICS
OTHER M
WEATHER
FINANCE
CHILDREN
SOCIAL AFF
RELIGION
PHONE IN
TRAVEL
LEISURE
JAZZ MUSIC
COUNTRY M
NATIONAL M
OLDIES M
FOLK MUSIC
DOCUMENT
Содержание
Интервью знаменитостей, радиоигры,
юмористические программы.
Программы популярной музыки.
Программы рок-музыки.
Легкая (дорожная) музыка.
Классическая музыка: инструментальные
композиции, вокал, хоровое пение.
Выступления симфонических оркестров,
камерная музыка, опера и т.д.
Музыка, не входящая ни в одну из
вышеперечисленных категорий, такая как
ритм & блюз и регги.
Программы по прогнозу погоды.
Биржевые и коммерческие репортажи,
торговля, пр.
Развлекательные программы для
молодежи.
Программы на социологические,
исторические, географические,
психологические и общественные темы.
Аспекты Веры и Вероисповеданий.
Обмен мнениями по телефону или на
общественном форуме.
Программы, дающие информацию о
раззличных турах, поездках, идеи и
возможности путешествий.
Развлекающие программы, в которых
могут участвовать слушатели.
Полифоническая, синкопическая музыка.
Песни штатов Южной Америки.
Современная популярная национальная
или региональная музыка.
Музыка “Золотых веков”.
Музыка, корни которой берут свое начало
в музыкальной культуре определенных
наций.
Программа, освещающая текущие
события.
20
RU
Page 52

Дополнительная информация Использование объемного звукаИспользование объемного звука
Использование объемного звука
Третий тип - “MUSIC”. При выборе звукового поля
Использование объемного
звука
Объемным звуком можно воспользоваться выбрав
просто одно из запрограммированных “звуковых
полей”, которые имеются на Вашем приемнике.
Можно наслаждаться звуком кинотеатра или
концертного зала, сидя у себя дома. Звуковое поле
может даже быть подогнано под собственный вкус
путем подстройки его параметров.
Звуковое поле классифицируется
по трем типам.
Первый тип - “CINEMA”. Звуковые поля типа
CINEMA предназначены для просмотра
кинофильмов, записанных на видео или лазерные
диски. В тип CINEMA включаются четыре
звуковых поля и они сгруппированы по двум типам.
Звуковое поле PRO LOGIC может использоваться
для воспроизведения простого объемного звука.
При выборе звукового поля PRO LOGIC приемник
декодирует закодированную c помощью функции
Dolby Surround программу, используя систему Dolby
Pro Logic для получения объемного звучания.
Объемный звук воспроизводится точно таким
образом, каким его задумал звукооператор,
готовивший программу. Другие звуковые поля типа
CINЕMA предназначены для увеличения эффектов
ревибрации с использованием цифровой
технологии звука кино. При выборе этих звуковых
полей приемник добавляет эффекты отражения и
ревибрации, характерные для кинотеатров, к
декодированному звуку Dolby Pro Logic Surround.
Вы можете наслаждаться таким же звуком, каким
Вы обычно наслаждаетесь в кинотеатре.
в этом типе приемник добавляет эффект
ревибрации к нормальному двухканальному
стереозвуку. Эти звуковые поля могут
применяться при воспроизведении компакт-дисков
или при просмотре телевизионных программ для
получения объемных эффектов концертного зала
или джаз-клуба.
Чтобы полностью насладиться звуковым
эффектом системы Dolby Pro Logic Surround,
проделайте операцию “Dolby Surround Setup”,
начиная со стр. 10, для выбора центрального
режима и настройки громкости громкоговорителя.
SOUND FIELD
SOUND FIELD
MODE +/–
SUR
MENU </>
ON/OFF
+/–
TONE
SET UP
ENTERBASS/TREBLE
Второй тип - “VIRTUAL”. Виртуальный режим
позволяет наслаждаться обстановкой объемного
звука, используя как минимум два предних
громкоговорителя для воссоздания
несуществующих “виртуальных”
громкоговорителей. Слушатель сможет
почувствовать объемные эффекты, пользуясь
лишь передними громкоговорителями.
21
RU
Page 53

Использование объемного звука
Выбор режима звука
(звукового поля)
Объемным звуком можно наслаждаться, выбрав
просто одно из запрограммированных звуковых
полей согласно программе, которую Вы хотите
слушать.
1 Для включения режима звука нажмите кнопку
SOUND FIELD ON/OFF.
Текеущее звуковое поле указывается на
дисплее.
2 Для выбора нужного Вам звукового поля
нажмите повторно SOUND FIELD MODE +/–.
Для получения информации по каждому
звуковому полю см. таблицу на этой странице.
Приемник заносит в память последний
режим звука выбранный для каждого
источника программы (Sound Field Link связь режима звука)
Каждый раз при выборе источника программы
режим звука, применявшийся до этого, применяется
автоматически вновь. Например, если Вы слушали
компакт-диск (CD) с эффектом HALL (зала) в качестве
режима звука, переключались на различные источники
программ и возвращаетесь снова к компакт-диску
(CD), приемник вновь использует функцию HALL. В том
что касается тюнера, то режимы звука для диапазонов
AM или FM и для всех запрограммированных
станций заносятся в память отдельно.
Программные продукты в формате Dolby
Surround можно определить по упаковке
Однако некоторые видеокассеты и лазерные диски
могут использовать Dolby Surround и тогда, когда
это не указано на упаковке.
Примечание
При использовании звуковых полей не выбирайте оба
громкоговорителя (А + В) при помощи регулятора
SPEAKERS selector.
Описание звуковых полей
Tип
CINEMA PRO LOGIC Для декодирования
VIRTUAL V DOLBY Для создания
MUSIC HALL Воспроизводит
MODE (Режим звука)
C(inema) STUDIO Для воспроизводения
N(ight) THEATER При просмотре
MONO MOVIE Создает обстановку
V SURROUND* Для создания
JAZZ CLUB Воспроизводит
LIVE HOUSE Воспроизводит
GAME Создает
Эффекты
программ формата
Dolby Pro Logic
Surround.
звуковых эффектов
кинозала. Для
просмотра
стандартных
фильмов.
фильмов в вечернее и
ночное время
настройте звук на
малую громкость.
подобную обстановке
кинотеатра при
просмотре фильмов с
монофоническими
звуковыми
дорожками.
эффектов объемного
звука используются
передние
громкоговорители.
эффектов объемного
звука используются
передние и
центральный
громкоговорители.
акустику
прямоугольного
концертного зала, что
является идеальным
для мягких
акустических звуков.
акустику джаз-клуба.
акустику зрительного
зала на 300 мест.
максимальное
звуковое
впечатление от
компьютерной
программы
видеоигры. Не
забудьте установить
игровую машину в
режим стерео для
компьютерных игр со
стереозвуковым
эффектом.
22
* Только при использовании 5.1 CH/DVD.
RU
Page 54

Дополнительная информация Использование объемного звукаИспользование объемного звука
Настройка громкости заднего и
Установка звуковых полей
При настройке некоторых звуковых параметров
можно отрегулировать звуковые поля так, чтобы
они соответствовали Вашей конкретной
обстановке прослушивания.
Изменения произведенные один раз при
регулировке звукового поля, хранятся в памяти
бесконечно (если приемник не был выключен из
сети примерно в течение одной недели).
Изменения в звуковое поле могут вноситься в
любое время путем настройки новых параметров.
См. таблицу на стр. 24 параметров регулировки
для каждого звукового поля.
Максимальное использование
центрального громкоговорителей
(REAR/CENTER)
Если Вы чувствуете, что громкость заднего и
центрального громкоговорителя неадекватна
(даже после настройки громкости
громкоговорителя на Dolby Pro Logic Surround)
проделайте нижеприводимые операции для того,
чтобы настроить громкость.
Обратите внимание на то, что настройка громкости
громкоговорителя применяется ко всем звуковым
полям.
1 Нажмите кнопку SUR.
2 Нажмите MENU </> для выбора “REAR xxдБ”
или “CENTER хх дБ”.
звука Dolby Pro Logic Surround
До регулирования звукового поля выполните
операции “Выбор центрального режима” и
“Настройка громкости громкоговорителя” на стр.
10.
Изменение времени задержки
(DELAY - задержка) (касается
только Звукового поля PRO LOGIC)
Объемный звук Dolby Pro Logic Surround может
быть сделан белее эффектным путем определения
задержки выходного сигнала с задних
громкоговорителей (время задержки). Время
задержки может быть выбрано в дипазоне 15, 20
или 30 мс. Установите более короткое время
задержки, если задние громкоговорители
размещены в большой комнате или далеко от того
места, откуда Вы слушаете.
1 Начните воспроизведение программного
источника с закодированным звуком Dolby
Surround.
2 Нажмите кнопку SUR.
3 Нажмите MENU </> для выбора “DELAY xxмс.
На дисплей выводится текущее время
задержки.
4 Нажмите +/– для изменения времени
задержки.
3 Нажмите +/– для настройки громкости
громкоговорителя.
Вы можете выбрать уровень громкости в
пределах от –15 дБ до + 10 дБ в несколько
шагов по 1 дБ.
Настройка тона (BASS/TREBLE)
Настройте тон (bass или treble) передних
громкоговорителй для получения оптимального
звука. Тон может быть настроен для каждого
отдельного звукового поля.
1 Нажмите кнопку BASS/TREBLE.
2 Нажмите MENU </> для выбора “BASS xxдБ”
или “TREBLE хх дБ”.
3 Нажмите +/– для настройки уровня тона.
Уровень тона может быть выбран в пределах
от –10 дБ до + 10 дБ при шаге в 2 дБ.
4 Нажимайте TONE до тех пор, пока не
загорится индикатор TONE.
Параметры настройки тона могут быть
отключены без их стирания
Параметры настройки тона хранятся в памяти
отдельно для каждого звукового поля. Нажмите
кнопку TONE для отключения индикатора TONE.
Изменение уровня эффекта
(EFFECT) (все звуковые поля кроме
PRO LOGIC)
Количество объемного эффекта (т.е. его общее
присутствие) может быть определено шестью
уровнями.
1 Нажмите SUR.
2 Нажмите MENU</> для выбора “EFFECT хх”.
На дисплей выводится текущий уровень
эффекта.
3 Нажмите +/– для изменения уровня эффекта.
Переустановка отрегулированных
звуковых полей на заводскую
установку
1 Если сетевое питание включено, нажмите 1/u
(сеть) для того, чтобы отключить сетевое
питание.
2 Удерживайте в нажатом положении клавишу
SOUND FIELD ON/OFF и нажмите 1/u (сеть).
На дисплее появляется надпись “SUR CLEAR”
и все звуковые поля сразу устанавливаются
сразу.
(продолжение следует)
23
RU
Page 55

Использование объемного звука
Параметры подстройки для каждого режима звука при выборе источника
программы
Режим звукового поля
Выкл
Вкл
Tип
––
CINEMA
VIRTUAL
MUSIC
MODE
––
PRO LOGIC
C STUDIO
N THEATRE
MONO MOVIE
V DOLBY
HALL
JAZZ CLUB
LIVE HOUSE
GAME
Параметры
DELAY EFFECT REAR CENTER TONE
rr
rra)r
rr r
rr r
rr
rr r
rr r
rr r
rr r
a)
b)
r
b)
Подача проверочного звука
r
Нет звука
Зависит от центрального
r
режима (См. стр. 10)
r
Попеременно от переднего и
заднего громкоговорителей
Нет звука
Попеременно от переднего и
заднего громкоговорителей
Параметры подстройки для каждого режима звука (звукового поля) при
использовании 5.1-канального CH/DVD проигрывателя
Режим звукового поля
Выкл
Вкл
Tип
––
CINEMA
VIRTUAL
MODE
––
C STUDIO
N THEATRE
MONO MOVIE
V SURROUND
Параметры
DELAY EFFECT REAR CENTER TONE
rrr
rr rr
rr rr
rr rr
rrr
Подача проверочного звука
В следующем порядке:
передний (L левый),
центральный, передний
(R правый), задний
(R правый), задний (L левый)
Попеременно от переднего и
центрального
громкоговорителей
24
a) Настройка выполняется лишь в том случае, когда
центральный режим установлен в положение
PHANTOM, NORMAL или WIDE (см. стр. 10).
b)Настройка выполняется лишь в том случае, когда
центральный режим установлен в положение 3
STEREO, NORMAL или WIDE (см. стр. 10).
Примечание
Для настройки громкости громокоговорителя с
использованием проверочного звука, как это описано на
стр. 10, выберите звуковое поле (режим звука) PRO
LOGIC. Подача проверочного звука на все другие
звуковые поля используется для того, чтобы проверить,
подается ли на громкоговорители звук или нет.
RU
Page 56

Пpoчиe oпepaции
Эксплуатация радиоприемника
Пpoчиe oпepaции
Other operations
Можно ввести название до
8 знаков для
предустановленных
станций
Yиндекс станции) и источников программ. Эти
наименования индексов (напр., “VHS”) появляются
на дисплее приемника, когда выбрана станция или
источник программы. Эта функция нужна для для
различения сходных компонентов. Она также
удобна для определения компонентов
подсоединенных к разъемам, предназначенным
для другого типа компонентов, например, второго
проигрывателя компакт-дисков, подсоединенного
к разъемам MD/TAPE.
Примечания
• Для каждой предустановленной станции или источника
программы может быть введено не более одного
наименования.
• Станции FM RDS или компоненты, подсоединенные к
разъемам 5.1 CH/DVD, не могут быть обозначены
индексами.
1 Обозначение индексом предустановленной
станции.
Настройтесь на предустановленную станцию,
которой Вы хотите присвоить название.
Для обозначения индексом источника
программы.
Выберите источник программы (компонент),
который должен быть обозначен, затем
вернитесь к операции 2.
2 Нажмите кнопку NAME.
На дисплее мигает курсор.
3 С помощью кнопок + или – выберите нужную
букву.
4 Нажмите MENU < или > , чтобы переместить
курсор в положение для вывода нового знака
или для возвращения к предыдущему знаку.
5 Повторяя операции 3 и 4, введите в общей
сложности до 8 букв названия.
6 Для введения в память названий нажмите
ENTER.
Если Вы допустили ошибку
Нажимайте кнопку MENU < или > до тех пор, пока на
дисплее не начнет мигать буква, которую необходимо
исправить, а затем введите вместо нее нужную букву,
пользуясь кнопками + или –.
Для присвоения индексных названий другим
станциям
Повторите операции с 2 по 4.
Чтобы стереть название источников программ,
нажмите кнопку NAME
A затем нажмите ту же самую кнопку источников
программ. Нажмите ENTER, чтобы стереть название (за
исключением тюнера /ТUNER).
Запись
Пользование радиоприемником облегчает Вам
запись сигнала, выдаваемого или принимаемого
подключенной к нему электронной аппаратурой.
При этом нет необходимости непосредственно
соединять между собой воспроизводящие и
записывающие компоненты: выбрав на панели
приемника соответствующий источник сигнала, Вы
можете после этого вести запись или перезапись в
обычном порядке, пользуясь органами управления
каждого из соответствующих компонентов. Перед
началом записи убедитесь, что вся необходимая
аппаратура подключена правильно.
Кнопки переключения функций
Воспроизводящая
аппаратура
(источник сигнала)
ç: Направление звукового сигнала
c: Направление видеосигнала
Запись на мини-диск или на аудио
пленку
Пользуясь приемником, можно выполнять запись
на мини-диск или на аудио кассету. В случае
необходимости обращайтесь к инструкции по
эксплуатации Вашего проигрывателя мини-дисков
или кассетной деки.
1 Нажатием одной из кнопок переключения
функций выберите источник сигнала.
2 Подготовьте к работе воспроизводящую
аппаратуру. Например, установите в
проигрыватель компакт-диск.
3 Вставьте чистую кассету или чистый диск в
записывающую деку и, в случае
необходимости, отрегулируйте уровень записи.
4 Начните запись на записывающей деке, а
затем — воспроизведение на
воспроизводящей аппаратуре.
Записывающая
аппаратура
(МД-дека, магнитофон,
видеомагнитофон)
(продолжение следует)
25
RU
Page 57

Пpoчиe oпepaции
Запись на видеокассету
Пользуясь приемником, можно производить запись
с телевизора или с проигрывателя LD. Если у Вас
возникают вопросы, обращайтесь за помощью к
инструкции по эксплуатации Вашего
видеомагнитофона.
1 Нажмите клавишу TV/LD для выбора
источника программы.
2 Приведите компонент в готовое для
воспроизведения состояние. Например,
включите телевизор и телевизионную антенну.
3 Вставьте чистую видеокассету в
видеомагнитофон для произведения записи.
4 Начните запись на видеомагнитофоне.
Вы можете заменить акустическое
сопровождение на другое во время
редактирования видеокассеты.
В момент, с которого Вы хотите добавить другой
звук, нажмите другую функциональную кнопку
(например, КД) и начните воспроизведение. Звук из
выбранного компонента будет записан на
оригинальный звук.
Использование таймера
засыпания
Пользуясь кнопками на пульте дистанционного
управления, можно установить режим
автоматического отключения усилителя в нужное
время.
SLEEP
Нажмите кнопку SLEEP на пульте дистанционного
управления при включенном питании.
Каждый раз при нажатии кнопки SLEEP время
изменяется как показано ниже.
n 2:00:00 n 1:30:00 n 1:00:00 n 0:30:00 n OFF
>/.
Чтобы вернуть записи оригинальный звук, нажмите
функциональную кнопку TV/LD.
Примечание
Вы не можете записывать аудио- и видеосигналы при
использовании режима 5.1 CH/DVD.
Дисплей тускнеет после установки времени.
Установка нужного времени
Нажмите сначала кнопку SLEEP на пульте
дистанционного управления, затем установите
нужное время, пользуясь кнопками курсора
(> или .).
Время засыпания меняется в интервалах в одну
минуту. Таким образом может быть установлено до 5
часов.
Вы можете проверить оставшееся до
выключения усилителя время
Нажмите кнопку SLEEP на пульте дистанционного
управления. Оставшееся время появится на
дисплее.
26
RU
Page 58

Дополнительная информация Дополнительная информация
Дополнительная информация
На дисплей не выводится название
Устранение неполадок
Если при пользовании радиоприемником у Вас
возникнут какие-либо затруднения из тех, которые
перечислены ниже, то приведенное здесь
руководство поможет Вам справиться c ними.
Если же это не удастся, просим обратиться к
ближайшему дилеру фирмы.
Нет звука или звук слышен очень слабо
/
Проверьте, надежно ли подключены
громкоговорители и дополнительная
аппаратура.
/ Убедитесь, что на панели приемника
правильно выбран источник сигнала.
/ Убедитесь, что переключатель SPEAKERS
находится в правильном положении (см. стр.
12).
/ Нажмите кнопку MUTING или MUTING на
пульте дистанционного управления, когда
индикатор MUTING включится.
/ Из-за короткого замыкания сработало
защитное устройство радиоприемника (на
дисплее мигает слово “PROTECTOR”).
Выключите приемник, устраните короткое
замыкание и вновь включите приемник.
Нарушен стереобаланс или перепутаны левый
и правый стереоканалы
Сильный гудящий фон или помехи
Не работает система RDS
На дисплее не появляется нужная Вам
информация
Принимаемая радиопрограмма или звук из
внешнего источника были прерваны другой
Проверьте правильность и надежность
/
подключения громкоговорителей и
дополнительной аппаратуры.
/ Установите в нужное положение регулятор
BALANCE.
/
Проверьте, надежно ли подключены
громкоговорители и дополнительная
аппаратура.
/ Убедитесь, что рядом с соединительными
проводами нет трансформатора или мотора,
и что телевизор или флюорисцентная лампа
находятся на расстоянии как минимум 10
(3 метра) футов.
/ Отодвиньте телевизор от аудиоаппаратуры.
/ Проверьте, подключено ли заземление
антенны.
/ Возможно, загрязнены соединительные
разъемы. Очистите их тканью, слегка
смоченной спиртом.
/
Убедитесь в том, что Вы слушаете
радиостанцию диапазона FМ.
/ Выберите в диапазоне FМ радиостанцию с
более сильным сигналом.
/
Свяжитесь с радиостанцией и выясните,
транслируют ли они подобную информацию.
Если да, то ее отсутствие может быть
временным.
принимаемой радиостанции
/ Нажимайте кнопку DISPLAY до тех пор, пока
название не появится на дисплее.
Приемник не настраивается на радиостанции
/
Проверьте, правильно ли подключены
антенны.
При необходимости измените их положение
и подключите наружную антенну.
/ Принимаемый радиосигнал слишком слаб
(для автоматической настройки).
Воспользуйтесь прямой настройкой.
/ В память аппарата не были введены частоты
радиостанций или они были стерты из
памяти (при этом невозможна настройка
путем сканирования запрограммированных
станций). Введите частоты станций в память
(см. стр. 17).
Уровень звука с задних громкоговорителей
очень низок, или звук не слышен совсем.
/ Выберите соответствующий центральный
режим (см. стр. 10).
/ Подстройте уровень громкости надлежащим
образом (см. стр. 10).
/ Убедитесь, что Вы включили функцию
режима объемного звукового поля.
Нет звука из центрального громкоговорителя.
Выберите соответствующий центральный
/
режим (см. стр. 10).
/ Подстройте уровень громкости надлежащим
образом (см. стр. 10).
Объемный эффект не возникает.
/
Убедитесь, что Вы включили функцию
режима объемного звукового поля.
/ Убедитесь, что передние громкоговорители
подключены к гнезду SPEAKERS A.
/ Если используются два комплекта передних
громкоговорителей, убедитесь, что клавиши
SPEAKERS A и B отжаты.
На экране телевизора отсутствует или неясное
изображение.
/ Выберите соответствующую функцию на
приемнике.
/ Отодвиньте Ваш телевизор от
аудиокомпонентов.
Запись не производится.
/ Проверьте правильно ли подсоеденены
компоненты.
/ Вы не можете записывать аудио с
программного источника, подключенного к
гнездам 5.1 CH/DVD.
Не работает пульт дистанционного управления
/
Направьте пульт дистанционного управления
на дистанционный сенсор g на панели
приемника.
/ Устраните препятствия между приемником и
пультом дистанционного управления.
/ Если в пульте садятся батарейки, замените
их обе на новые.
/ Убедитесь в том, что Вы правильно выбрали
нужную функцию на пульте дистанционного
управления.
радиопередачей/приемник автоматически
начал сканирование станций
/
Сработала функция EON. Если Вы не
хотите, чтобы прием текущей программы
прерывался, отключите функцию EON.
27
RU
Page 59

Дополнительная информация
Технические
характеристики
Секция усилителя
Выходная мощность
Стерео
режим
Объемный
режим
5.1 CH/DVD
режим
Полоса
частот
Входы
Чувствительность
CD,
5.1 CH/
DVD,
MD/
TAPE,
TV/LD,
VIDEO
Выходы
Подавление
BASS BOOST
TONE
(DIN, 1 кГц, 4 Ом)
100 Вт + 100 Вт
(DIN, 1 кГц, 4 Ом)
Передние:
Центр*: 100 Вт
(только в режиме
PRO LOGIC)
Задние*: 100 Вт/
(DIN, 1 кГц, 4 Ом)
Передние: 100
Центр*: 100
Задние*: 100
TV/LD, CD, MD/TAPE,
VIDEO, 5.1 CH/DVD:
10 Гц - 50 кГц ± 1 дБ
Сопротивление
150 мВ
MD/TAPE REC OUT:
VIDEO AUDIO OUT:
WOOFER
PHONES: Для
Полное подавление
+8 дБ при 70 Гц
±8 дБ при 100 Гц и 10 кГц
50
кОм
Напряжение: 150 мВ,
Сопротивление: 10 кОм
Напряжение: 150 мВ,
Сопротивление: 10 кОм
Напряжение: 2 В,
Сопротивление: 1 кОм
подключения
наушников с
высоким и низким
сопротивлением
100 Вт/кан
Вт/кан
Вт
Вт/кан
кан
S/N
96 дБ
Блок усилителя
FM cтерео, cупергетородинный
усилитель FM/AM
Секция приемника FM
Диапазон
настройки
Антенные
терминалы
Промежуточная
частота
Чувствительность
Полезная
чувствительность
S/N
Гармоническое
искажение
при 1 кГц
Разделение
Полоса частот
Избирательность
87,5 - 108,0 МГц
75 Ом,
несбалансированные
10,7 MГz
Моно: 18,3 дБф,
2,2 µВ/75 Ом
Стерео: 38,3 дБф,
22,5 µВ /75 Ом
11,2 дБф,
1 µВ/75 Ом (IHF)
Моно: 76 дБ
Стерео: 70 дБ
Моно: 0,3 %
Стерео: 0,5 %
45 дБ при 1 кГц
30 Гц - 15 кГц дБ
60 дБ при 400 кГц
Секция приемника AM
Диапазон
настройки
Антенна
Промежуточная
частота
Полезная
чувствительность
S/N
Гармоническое
искажение
Избирательность
531 - 1602 кГц
Рамочная антенна
450 кГц
50 дБ/м (при 999 кГц)
54 dB (at 50 mV/m)
0,5% (при 50 мВ/м,
400 Гц)
35 дБ
+0.5
–2
Видеосекция
Входы
Выходы
VIDEO,TV/LD, 5.1 CH/
DVD:
1 Vp-p 75 Ом
VIDEO MONITOR:
1 Vp-p 75 Ом
Общие
Система
Требования
к питанию
Потребляемая
мощность
Выходы перем.
тока
Габариты
Масса (Прибл.)
Входящие в
комплект
принадлежности
Показанные характеристики измерены
при 230 В переменного тока, 50 Гц.
* В зависимости от установки звукового
поля и источника может
отсутствовать выход звука.
Дизайн и технические характеристики
могут быть изменены без оповещения.
Секция приемника:
цифровой PLL-
синтезатор с
кварцевой
фиксацией
Предварительный
усилитель:
Эквалайзер типа
NF с пониженным
фоном
Усилитель мощности:
SEPP
комплементарного
типа
230 В перем. ток, 50/
60 Гц
195 Вт
Переключатель 100 Вт
max
430 x 157 x 366 мм
(17 x 6 1/8 x 14 5/8
дюймов)
10,8 кг
Проволочная антенна
FM (1)
Рамочная антенна AM
(1)
Пульт
дистанционного
управления (1)
Инструкция по
эксплуатации
пульта
дистанционного
управления (1)
Батарейки размера
AA (R6) (2)
28
RU
Page 60

Дополнительная информация Дополнительная информация
Глоссарий
Объемный звук
Звук, содержащий три элемента:
непосредственный звук, ранее отраженный
звук (ранние отражения) и ревибрационный
звук (ревибрация). Акустика помещений, в
которых Вы слушаете звук, определяет
способ соединения этих трех звуковых
элементов. Эти звуковые элементы
комбинируются таким способом, что Вы
можете почувствовать размер и тип
концертного зала.
• Типы звука
Ранние отражения
• Распространение звука с задних
громкоговорителей
Непосредственный звук
Уровень
Время раннего
отражения
Dolby Pro Logic Surround
Как метод декодирования Dolby Surround,
система Dolby Pro Logic Surround создает
четыре канала из двухканального звука.
По сравнению с предыдущей системой
Dolby Surround система Dolby Pro Logic
Surround создает более естественную
панораму звука слева направо и более
точно локализует звуки. Для того чтобы
полнее использовать систему Dolby Pro
Logic Surround необходимо иметь как
минимум одну пару задних
громкоговорителя и один цетнральный
громкоговоритель. Задние
громкоговорители дают монофонический
звук.
Центральный режим
Установка громкоговорителей для режима
Dolby Pro Logic Surround. Для получения
лучшего объемного звука выберите один из
следующих четырех центральных режимов
в соответствии с Вашей акустической
системой.
• Режим NORMAL
Выберите режим NORMAL, если у Вас
передние, задние громкоговорители и
маленький центральный
громкоговоритель. Поскольку
маленький громкоговоритель не может
воспроизводить достаточно сильный
бас, басовый звук центрального канала
подается на передние
громкоговорители.
Непосредственный звук
Ревибрация
Ранние
отражения
Ревибрация
Время
Центральный
(L)
Задний
(L)
громкоговоритель
громкоговоритель
Передний
громкоговоритель
громкоговоритель
• Режим WIDE
Выберите режим WIDE, если у Вас
передние, задние громкоговорители
и большой центральный
громкоговоритель. В режиме WIDE
Вы можете полностью использовать
звук Dolby Surround.
Центральный
Передний
громкоговоритель
громкоговоритель
громкоговоритель
(L)
Задний
(L)
громкоговоритель
• Режим PHANTOM
Выберите режим PHANTOM, если у Вас
передние, задние громкоговорители, но
нет центрального громкоговорителя.
Звук центрального канала подается на
передние громкоговорители.
Передний
громкоговоритель
(L)
Задний
громкоговоритель
(L)
громкоговоритель
громкоговоритель
• Режим 3 STEREO
Выберите режим 3 STEREO, если у Вас
передние и центральный
громкоговорители, но нет задних
громкоговорителей. Звук заднего
канала подается на передние
громкоговорители, чтобы дать Вам
возможность объемного звука без
использования задних
громкоговорителей.
Центральный
Передний
громкоговоритель
(L)
громкоговоритель
Передний
громкоговоритель
(R)
Задний
(R)
Передний
громкоговоритель
(R)
Задний
(R)
Передний
(R)
Задний
(R)
Передний
громкоговоритель
(R)
Время задержки
Временной лаг между выходом объемного
звука с передних и задних
громкоговорителей. С помощью подстройки
времени задержки задних
громкоговорителей Вы можете получить
ощущение присутствия при происходящих
событиях. Выберите более длительную
задержку, если Вы установили задние
громкоговорители в маленькой комнате
или близко к месту, где Вы сидите;
выберите более короткую задержку, если
Вы установили их в большой комнате или
далеко от места, где Вы сидите.
Dolby Digital (АC-3)
Этот звуковой формат для кинотеатров
имеет более совершенные характеристики,
чем Dolby Pro Logic Surround. В этом
формате задние громкоговорители подают
стереозвук с диапазоном расширенной
частоты и имеется независимый канал
гипербасового громкоговорителя для
низких басов. Этот формат называется
также “5.1” потому, что гипербасовый
канал считается каналом 0.1 (поскольку он
действует лишь тогда, когда необходим
эффект низкого баса). Все шесть каналов в
этом формате записываются отдельно для
того, чтобы ощутить особое разделение
каналов. Кроме того, поскольку все
сигналы преобразуются в цифровые,
наблюдается меньшее искажение
сигналов. Название “АС-3” означает, что
это третий аудио кодирующий метод,
разработанный компанией Dolby
Laboratories Licensing Corporation.
5.1 CH/DVD
Эти гнезда используются для ввода
декодированных аудио сигналов Dolby
Digital (AC-3), позволяющих Вам
насладиться 5.1- канальным объемным
звуком. Пользуйтесь этими гнездами для
подсоединения декодера Dolby Digital (АС-
3) проигрывателя DVD с встроенным
декодером АС-3.
Предустановленная станция
Радиостанция, которая занесена в память
приемника. Однажды “предустановив”
станцию, Вам уже не нужно настраиваться
на нее. Каждая предустановленная
станция имеет свой предустановочный
номер, который позволяет Вам быстро
настраиваться на нее.
29
RU
Page 61

Алфавитный указатель
А,Б
Автоматическая настройка
16
В
Время задержки 23, 29
Выбор программного источника
12
Г
Громкоговорители
выбор акустической
системы 12
подключение 7
размещение 10
Д
Дисплей 13
Dolby Pro Logic
Surround 10, 21
центральный режим
10, 29
Е,Ж,З,И
EON 19
Задняя панель 5, 6, 7, 9, 31
Запись
на ленту 25
Звук Dolby Surround 21
К,Л,М
Краткое схематическое
руководство 32
Монтаж см. Запись
Н,О
Наименование
предустановленных станций
25
Настройка см. Прием
радиопрограмм
Объемный звук 21
П
Перезапись. см. Запись
Подключение
антенн 5
аудиокомпонентов 5
видеокомпонентов 6
громкоговорителей 7
общее 4
питания 9
Подключение антенны 5
Подключение аудиокомпонентов
5
Подключение видеокомпонентов 6
Подстройка
времени задержки 23, 29
громкости 12
громкости
громкоговорителей 10
получения наибольшего
эффекта 23
яркости дисплея 9
Получение наибольшего эффекта
23
Предустановка радиостанций 17
Предустановленная станция 17
Предустановочная настройка 17
Прием радиопрограмм
прямой 16
с использованием
предустановленных станций
17
Пробный тон 10
Программирование
радиостанций,
см. Предустановка
Программный источник
выбор 9, 12
Прямая настройка 16
PTY 20
Р
Распаковка 4
Режим NORMAL 10, 29
Режим PHANTOM 10, 29
Режим 3 STEREO 10, 29
Режим WIDE 10, 23
Режим звука (звуковое поле)
выбор 22
установка звуковых
полей 23
RDS 18
C,T
Сканирование
предустановленных станций
17
радиостанций 16
Cоединение см. Подключение
У,Ф,Х,Ц,Ч,Ш,Э,Ю,Я
Устранение неисправностей 27
Функция “автоалфавитной
настройки” 18
Центральный режим 10, 29
режим NORMAL 10, 29
режим PHANTOM 10, 29
режим 3 STEREO
10, 29
режим WIDE 10, 29
30
RU
Page 62

Задняя панель
14567 89!
º
!¡
1 ANTENNA (AM/FM)
2 CD
3 MD/TAPE
4 5.1 CH/DVD
5 TV/LD
32
6 VIDEO
7 MONITOR
8 WOOFER
9 SPEAKERS REAR
!™!£
0 SPEAKERS CENTER
!¡ Сетевой провод
!™ SWITCHED AC OUTLET
!£ SPEAKERS FRONT (A/B)
31
RU
Page 63

Краткое схематическое руководство
руководство
Прием
радиопередач
(прямая настройка)
Пример: настройка на
частоту FM
102,50 МГц
TUNER
FM/AM
Select FM.
Bыбрать FM.
DIRECT
10250
Дисплей
MHz
Ввод
радиостанций в
память
Пример: ввод
радиостанции
в память под
индексом А7
TUNER
Tune in the station you want.
Настроиться на нужную стнцию.
MEMORY
SHIFT
7
Bыбрать A.
Select A.
Выбор
подключенной
аппаратуры
Пример 1:
воспроизведение
компакт-диска
CD
Turn on the CD player.
Включить компакт-проигрыватель.
Начать воспроизведение.
Start playing.
Пример 2:
Просмотр
видеоленты
VIDEO
Turn on the VCR.
Bключитe видeoмaгнитoфoн.
Нaчaть вocпpoизвeдeниe.
Сканирование
радиостанций
(автоматическая
настройка)
Пример: сканирование
радиостанций
диапазона FМ
TUNER
FM/AM
Bыбрать FM.
–+
TUNING
Для пpoдoлжeния
cканивания.
–+
TUNING
Прием введенных
в память
радиостанций
Пример: прием
радиостанции
с индексом А7
TUNER
SHIFT
7
Bыбрать A.
Select A.
Сканирование
введенных в
память
радиостанций
TUNER
Использование
предварительно
запрограммированных
звуковых пол
Пример:
Bключитe Проигрыватель
Turn on the LD player.
лазерных видеодисков
Просмотр
лазерного диска
с фильмом,
закодированным
в Dolby Surround
TV/LD
SOUND FIELD
ON/OFF
SOUND FIELD
–
MODE
ей
Bыбрать PRO
Select PRO
+
MODE
LOGIC.
LOGIC.
32
RU
PRESET/
–
PTY SELECT
Нaчaть вocпpoизвeдeниe.
+
Page 64

Przygotowania wstępne
OSTRZEŻENIE
Aby zapobiec powstaniu
pożaru lub porażeniu
prądem, nie narażać
sprzętu na działanie
deszczu lub wilgoci.
Aby uniknąć porażenia prądem
elektrycznym, nie otwierać obudowy.
Sprzęt należy oddawać do naprawy i
serwisu wyłącznie wykwalifikowanemu
personelowi.
Sprzętu nie należy ustawiać na
powierzchniach takich jak zabudowane
regały lub szafki.
Środki ostrożności
Dotyczące bezpieczeństwa
• Jeżeli do wnętrza obudowy zestawu
dostanie się ciało obce lub
jakakolwiek ciecz, należy przed
dalszym użytkowaniem sprzętu,
odłączyć zestaw od źródła zasilania,
a dany komponent oddać do
sprawdzenia wykwalifikowanymu
przedstawicielowi serwisu.
Dotyczące źródeł mocy
• Przed uruchomieniem sprzętu,
proszę się upewnić, że napięcie
robocze zestawu jest identyczne z
miejscowym napięciem sieci.
Niezbędne napięcie robocze podano
na tabliczce umieszczonej na tylnej
ściance sprzętu.
• Dopóki kabel zasilania jest
podłączony do gniazdka ściennego,
wyłączony sprzęt znajduje się nadal
pod napięciem.
• Sprzęt należy odłączyć od zasilania
jeżeli nie będzie on użytkowany przez
dłuższy czas. Aby odłączyć kabel
zasilania sieciowego, proszę
wyciągnąć wtyczkę. Nie należy nigdy
ciągnąć za kabel.
• Wymianę kabla zasilania należy
zlecać wyłącznie wykwalifikowanej
osobie w punkcie obsługi.
• Włącznik mocy znajduje się na
przedniej, zewnętrznej części
sprzętu.
Dotyczące miejsca ustawienia
sprzętu
• Zestaw stereo należy ustawić w
miejscu zapewniającym odpowiednią
wentylację, zapobiegając w ten
sposób szkodliwemu dla sprzętu,
narastaniu wewnętrznego ciepła.
• Nie umieszczać sprzętu w pobliżu
źródeł ciepła, lub w miejscach gdzie
może być narażony na bezpośrednie
działanie promieni słonecznych,
dużych ilości kurzu lub wstrząsów
mechanicznych.
• Nie umieszczać żadnych
przedmiotów na górnej powierzchni
sprzętu blokujących otwory
wentylacyjne a w następstwie
powodujących nieprawidłowe
działanie sprzętu.
Dotyczące działania sprzętu
• Przed podłączenie dodatkowego
sprzętu, proszę wyłączyć dopływ
mocy i odłączyć odbiornik.
Dotyczące czyszczenia
• Proszę czyścić przy pomocy miękkiej
ściereczki, lekko zwilżonej w
rozczynie łagodnego detergentu. Nie
należy używać żadnych gąbek
szorujących, proszków do
czyszczenia, lub zawierających
benzynę, rozpuszczalników.
W przypadku ewentualnych pytań
lub trudności związanych z
użytkowaniem sprzętu, proszę
skonsultować się z najbliższym
punktem sprzedaży produktów
Sony.
PL
2
Page 65

Przygotowania wstępne
Uwagi dotyczące
Instrukcji Obsługi
Instrukcje podane w tym podręczniku
dotyczą modelu STR-DE435. Proszę
sprawdzić numer nabytego modelu,
umieszczony w prawym, górnym
narożniko przedniego panela.
Uzgodnienia
Instrukcje zawarte w tym podręczniku
stanowią opis kontrolek nabytego
odbiornika. To samo zastosowanie
mają również odpowiednie kontrolki
pilota zdalnego sterowania pod
warunkiem, że posiadają identyczne lub
podobne nazwy.
Szczegóły dotyczące posługiwania się
pilotem zdalnego sterowania podano w
oddzielnych instrukcjach obsługi,
dostarczanych wraz pilotem.
• “Szybki Przewodnik Orientacyjny”
umieszczono na stronie 33.
• W podręczniku wykorzystano
następujące oznakowania:
Informuje, że daną czynność
można wykonać wyłącznie przy
pomocy pilota zdalnego
sterowania.
Informuje o wskazówkach i
poradach ułatwiających niektóre
czynności.
Odbiornik jest wyposażony w dekoder
systemu akustyki Dolby Pro Logic
Surround.
Wyprodukowano w ramach licencji
uzyskanej od firmy Dolby Laboratories
Licensing Corporation. Znaki “DOLBY”,
“PRO LOGIC” i symbol podwójnej litery
D są znakami towarowymi firmy Dolby
Laboratories Licensing Corporation.
SPIS TREŚCI
Przygotowania wstępne
Rozpakowanie elementów zestawu 4
Ogólny opis montażu 4
Podłączenie anten 5
Montaż komponentów dźwiękowych 5
Montaż komponentów wizualnych 6
Montaż systemu głośników 7
Montaż obiegu zasilania 9
Przed rozpoczęciem użytkowania odbiornika 9
Konfiguracja systemu Dolby Surround 10
Umiejscowienie Części Składowych Sprzętu oraz
Podstawowe Operacje Wzmacniacza
Opis Elementów Płyty Czołowej 12
Operacje Odbiornika
Odbiór audycji radiowych 16
Kodowanie radiowych stacji nadawczych pod przyciskami
numerycznymi 17
Automatyczne i alfabetyczne zapisywanie radiowych stacji
nadawczych w pamięci sprzętu (funkcja “Auto-betical”) 18
Korzystanie z serwisu Radiowego Systemu Danych (RDS) 18
Korzystanie z funkcji Surround
Korzystanie z Systemu Dźwiękowego Surround 21
Wybór Pola Akustycznego 22
Przystosowanie Pól Akustycznych do Wymogów Użytkownika 23
Pozostałe Operacje
Indeksacja Zapisanych w Pamięci Sprzętu Radiowych Stacji
Nadawczych oraz Źródeł Programu 25
Wykonywanie nagrań 25
Korzystanie z timera wyłączania się 26
GB
RU
PL
Informacje Dodatkowe
Usuwanie usterek 27
Dane techniczne 29
Słowniczek 30
Indeks 31
Opis tylnego panela 32
Szybki Przewodnik Orientacyjny 33
PL
3
Page 66

Przygotowania wstępne
Rozpakowanie elementów
zestawu
Proszę sprawdzić otrzymanie następujących
elementów:
• Anteny przewodowej FM (1)
• Anteny ramowej AM (1)
• Pilota zdalnego sterowania (dalej zwanego “pilotem”) (1)
• Instrukcje Posługiwania się Pilotem (1)
• Baterii rozmiaru AA (R6) (2)
Montaż baterii pilota
Proszę zamontować dwie baterie rozmiaru AA (R6)
zgodnie z czerownym oznakowaniem + i - wewnątrz
obsady na baterie.
Sterując sprzęt przy pomocy pilota, należy skierować
go na czujnik sprzętu g.
Szczegóły podano w oddzielnych instrukcjach obsługi,
dostarczanych wraz pilotem.
Kiedy należy wymienić baterie
W normalnych warunkach baterie powinny wystarczyć
na około 6 miesięcy. W momencie kiedy pilot przestaje
sterować operacjami odbiornika należy wymienić obie
baterie.
Ogólny opis montażu
Do odbiornika można podłączyć i przy jego pomocy
sterować następujące, dodatkowe urządzenia
dźwiękowe/wizualne. Odpowiednie instrukcje
montażowe podano na oznaczonych stronach
Instrukcji Obsługi. Informacji na temat lokalizacji i nazw
właściwych gniazdek, należy szukać w rozdziale “Opis
tylnego panela” na stronie 32.
Odtwarzacz DVD/
Dekoder AC-3
Podłączenie Anteny (5)
Antena AM/FM
Prawy
głośnik
przedni
(R)
Montaż
Systemu
Głośnikowego
(7)
Lewy
głośnik
przedni
(L)
Montaż komponentów
wizualnych (6)
Monitor TV
Odbiornik TV
Odwarzacz płyt
laserowych LD
Magnetowid
Nie można operować następującymi
przyciskami pilota RM-PP402
• VIDEO2
• VIDEO3
• DVD
• PHONO
• SOUND FIELD A.F.D.
Uwagi
• Pilota nie należy przechowywać w miejscach o skrajnie
wysokiej temperaturze lub w wilgotnych
pomieszczeniach.
• Nie należy używać jednocześnie starych i nowych baterii.
• Czujnika pilota nie narażać na bezpośrednie działanie
promieni słonecznych lub źródeł silnego oświetlenia. W
przeciwnym przypadku pilot nie będzie działał
prawidłowo.
• Celem uniknięcia uszkodzenia pilota, spowodowanego
ewentualnym wyciekiem elektrolitu i wynikającej z tego
korozji, podczas dłuższej przerwy w użytkowaniu, należy
usunąć baterie.
Tylny
głośnik
(L)
Odtwarzacz
dysków CD
Odtwarzacz
dysków MD/
Magnetofon
Montaż komponentów
dźwiękowych (5)
Środkowy
głośnik
Aktywne
głośniki
niskotonowy
Tylny
głośnik
(R)
Przed rozpoczęciem montażu
• Przed wykonaniem podłączeń, proszę odłączyć
zasilanie komponentów.
• Nie podłączać kabla zasilania sieciowego przed
zakończeniem montażu wszystkich
komponentów.
• Celem uniknięcia ewentualnych zakłóceń dźwięku
podczas użytkowania sprzętu, należy wszystkie
kable i komponenty dokładnie podłączyć.
• Podłączając kable urządzeń dźwiękowych, proszę
się upewnić, że dopasowano kolorowo oznaczone
wtyki do właściwych komponentów sprzętu: Żółty
(video) do żółtego; Białe (lewe, dźwiękowe) do
Białego; Czerwone (prawe, dźwiękowe) do
Czerwonego.
PL
4
Page 67

Podłączenie Anten
Wstęp
Ten rozdział zawiera opis podłączenia anten AM oraz
FM do odbiornika. Chcąc odbierać audycje radiowe,
należy niżej opisane podłączenia wykonać w pierwszej
kolejności i następnie przejść do dalszych instrukcji.
Lokalizację poszczególnych przyłączy, proszę
sprawdzić na ilustracji poniżej.
ANTENNA
Jakie anteny będą mi potrzebne?
Przygotowania wstępne
W przypadku złej jakości odbioru pasma AM
Proszę podłączyć 6 do 15 m (20 do 50 stóp)
izolowanego kabla (nie dostarczony) to gniazdka anteny
AM, dodatkowo do podłączonej tam anteny ramowej
AM. Kabel proszę rozciągnąć i w miarę możliwości
umieścić na zewnątrz, w pozycji horyzontalnej.
Podłączenie przewodu uziemiającego
Jeżeli odbiornik zostanie podłączony do zewnętrznej
anteny, należy również wykonać uziemienie
piorunochronne, zgodnie z ilustracją w lewej rubryce.
Z względu na niebezpieczeństwo eksplozji, nie
uziemiać przez podłączenie do rury gazowej.
Co dalej?
Jeżeli zostaną podłączone komponenty dodatkowe,
proszę przejść do następnego rozdziału. Jeżeli
odbiornik będzie użytkowany wyłącznie jako radio,
proszę teraz przejść do rozdziału “Montaż Systemu
Głośnikowego” na stronach 7 i 8.
• Antena przewodowa
FM (dostarczona) (1)
• Antena ramowa AM
(dostarczona) (1)
Montaż
Antena
przewodowa FM
Po podłączeniu
anteny
przewodowej,
proszę w miarę
możliwości,
Odbiornik
ANTENNA
AM
y
COAXIAL
FM
75Ω
pozostawić ją w
lini horyzontalnej.
W przypadku złej jakości odbioru pasma FM
75-ohmowym kablem koncentrycznym (nie załączony),
podłączyć odbiornik do zewnętrznej anteny FM, jak
zilustrowano poniżej.
Odbiornik
ANTENNA
AM
y
Przewód
uziemiający
(nie załączony)
COAXIAL
FM
75Ω
Antena
ramowa AM
Zewnętrzna
antena FM
Montaż Komponentów
Dźwiękowych
Wstęp
Ten rozdział zawiera opis podłączeń komponentów
dźwiękowych do odbiornika. Jeżeli odbiornik będzie
spełniał funkcję wzmacniacza, proszę przeprowadzić
wszystkie połączenia.
Lokalizację poszczególnych gniazdek podano na
ilustracji poniżej.
CD
MD/TAPE
Jakie przewody będą mi potrzebne?
Przewody audio (nie załączone) (1 dla każdego z
odtwarzaczy płyt CD, 2 dla każdego z odtwarzaczy płyt MD
lub dla magnetofonu)
Biały (L=lewy)
Czerwony
(R=prawy)
Biały (L=lewy)
Czerwony
(R=prawy)
do uziemienia
(ciąg dalszy na następnej stronie)
PL
5
Page 68

Przygotowania wstępne
AUDIO IN
L
R
TV/LD
VIDEO IN
AUDIO
OUTPUT
VIDEO
L
R
MONITOR
VIDEO
OUT
INPUT
VIDEO
Montaż
Strzałka ç ilustruje przepływ sygnałów.
Odtwarzacz CD
Odtwarzacz
Odbiornik
AUDIO IN
CD
L
R
dysków CD
OUTPUT
LINE
L
R
Odtwarzacz dysków MD lub Magnetofon
Odbiornik
IN
REC OUT
MD/TAPE
Odtwarzacz dysków MD lub
L
R
Magnetofon
OUTPUT
INPUT
LINE
LINE
L
R
Co dalej?
Przejść do następnego rozdziału aby wykonać
podłączenie komponentów wideo, umożliwijących
korzystanie z dźwięku surround podczas oglądania/
słuchania transmisji telewizyjnych lub taśm wideo.
Jakie kable będą mi potrzebne?
• Kabel audio/wideo (nie załączony) (1 dla każdego z
tunerów TV lub cyfrowych systemów transmisyjnych; 2
dla każdego z podłączonych magnetowidów)
Żółty
Biały (L)
Czerwony (P)
Żółty
Biały (L)
Czerwony (P)
• Kabel wideo (nie załączony) (1 dla każdego z monitorów
TV)
Żółty
Żółty
Montaż
Strzałka ç ilustruje przepływ sygnałów.
Można słuchać dźwięk z magnetowidu lub z
odbiornika TV/LD poprzez podłączenie sygnału
dźwiękowego z magnetowidu lub z odbiornika TV/LD
do odbiornika.
TV/LD
Odbiornik TV lub cyfrowy
Odbiornik
system nadawczo-
odbiorczy audycji
Montaż Komponentów
Wizualnych
Wstęp
Ten rozdział zawiera opis sposobu podłączenia
komponetów wizualnych do odbiornika.
Lokalizacja poszczególnych gniazdek jest zilustrowana
na rysunku poniżej.
TV/LD5.1 CH/DVD
VIDEO
6
PL
MONITOR
MONITOR
VCR
L
R
Monitor TV
OUTPUT
VIDEO
AUDIO
Odbiornik
Odbiornik Magnetowid
VIDEO IN
VIDEO OUT
AUDIO IN
AUDIO OUT
VIDEO
INPUT
VIDEO
AUDIO
L
R
Page 69

Korzystaj z przycisków funkcyjnych (TV/LD, CD, MD/
TAPE, itd.) w celu wybrania sygnału VIDEO AUDIO
OUT. Ten sygnał dźwiękowy może zostać nagrany,
jeżeli podłączysz sprzęt nagrywający, przykładowo
magnetofon (do gniazda VIDEO AUDIO OUT).
Przygotowania wstępne
Montaż Systemu
Głośnikowego
Odtwarzacz DVD/Dekoder AC-3
Jakie kable będą mi potrzebne?
• Kabel audio (nie załączony) (1 dla gniazdek 5.1 CH/DVD
FRONT oraz REAR)
Biały (L)
Czerwony (P)
Biały (L)
Czerwony (P)
• Monofoniczny kabel audio (nie załączony) (1 dla gniazdek
5.1 CH/DVD CENTER oraz WOOFER)
Czarny
Czarny
• Kabel Wideo (nie załączony) (po 1 dla gniazdek
wejściowych 5.1 CH/DVD VIDEO IN)
Żółty Żółty
Poprzez głośniki podłączone do wzmacniacza
można odtwarzać nagrania dekodowane w
systemie Dolby Digital AC-3
Jeżeli posiadacie Państwo dekoder cyfrowego systemu
Dolby Digital AC-3, możecie, wykorzystując
następujące podłączenia, wzmacniać nagrania
zakodowane w systemie Dolby Digital AC-3.
Odbiornik
5.1 CH / DVD
FRONT FRONTREAR REARCENTER
L
R
WOOFER
VIDEO IN
Dolby Digital AC-3
decode, etc.
CENTER
WOOFER
VIDEO
PRE OUT
Wstęp
Ten rozdział zawiera opis sposobu podłączenia
głośników do odbiornika. Aby w pełni wykorzystać
efekty dźwięku surround, niezbędne są głośniki
środkowe i tylne oraz aktywny głośnik niskotonowy,
typu woofer. Lokalizacja poszczególnych gniazd
podłączeniowych jest zilustrowana poniżej.
SPEAKERS
WOOFER
REAR
SPEAKERS
FRONT B
Jakie przewody będą mi potrzebne?
Przewód głośnikowy (nie dostarczony) (1 dla każdego
głośnika)
(+)
(–)
Proszę skręcić końcówki przewodów, z których uprzednio
usunięto izolację na długości około 15 mm (2/3 cala).
Proszę się upewnić, że dopasowano przewody głośników
do odpowiednich gniazdek na poszczególnych elementach
zestawu: + do + oraz – do –. Odwrotne połączenie
spowoduje zniekształcenia dźwięku oraz brak basów.
SPEAKERS CENTER
SPEAKERS
FRONT A
(+)
(–)
Co dalej?
Przejść do następnego rozdziału aby wykonać
podłączenia głośników.
Montaż
Przednie głośnik
Przedni głośnik
(R=prawy)
Odbiornik
FRONT
R
R
L
L
Przedni głośnik
(L=lewy)
AA
BB
(ciąg dalszy na następnej stronie)
PL
7
Page 70

Przygotowania wstępne
REAR
+
–
R
R
L
–
Tylne i środkowe głośniki
Tylny głośniki
(R)
Odbiornik
SPEAKERS
REAR
CENTER
LR
LR
Środkowe
głośniki
Tylny głośniki
(L)
Aby uniknąć zwarcia w głośnikach
Wystąpienie zwarcia w głośnikach może spowodować
uszkodzenie odbiornika. Aby temu zapobiec, należy
przy podłączaniu głośników przestrzegać
następujących środków ostrożności. Upewnić się, że
odizolowane końcówki przewodów głośnikowych nie
dotykają pozostałych gniazdek głośnikowych lub
odizolowanych końcówek pozostałych przewodów
głośnikowych.
Przykłady nieprawidłowego stanu przewodu
głośnikowego:
Jeżeli podłączono tylne głośniki, pamiętać o
naciśnięciu przycisku 5.1 CH/DVD i wyłączyć pole
akustyczne na odbiorniku przed przeprowadzeniem
próby dźwiękowej, celem indywidualnego sprawdzenia
tonu wyjściowego z lewego i prawego głośnika
tylnego.
Brak dźwięku z głośnika podczas próby lub w
przypadku, gdy dźwięk próbny jest przekazywany
poprzez głośnik inny od sygnalizowanego na
odbiorniku, może oznaczać wystąpienie zwarcia w
głośniku. W takim przypadku, ponownie sprawdzić
podłączenia głośnika.
Aktywne głośniki niskotonowe
Aktywne głośniki
niskotonoweOdbiornik
WOOFER
AUDIO
OUT
INPUT
Uwaga
Nie należy podłączać żadnego innego komponentu.
Odizolowana końcówka przewodu głośnikowego dotyka
gniazdka innego głośnika.
REAR
R
R
L
+
Kontakt odizolowanych końcówek przewodów,
spowodowany usunięciem zbyt dużego odcinka izolacji.
Po podłączeniu wszystkich komponentów, głośników
oraz przewodu prądu zmiennego AC, przeprowadzić
próbę dźwięku celem sprawdzenia prawidłowości
podłączeń głośników. Szczegóły dotyczące
przeprowadzenia próby dźwiękowej, sprawdzić w
rozdziale “Regulacja głośności głośników” na stronie
10.
Jeżeli posiadacie Państwo dodatkowy zestaw
głośników przednich
proszę je podłączyć do gniazd wejściowych głośników
przednich SPEAKERS FRONT B.
Jeżeli Państwa odbiornik TV korzysta z
osobnych głośników
można podłączyć jeden z nich do gniazd głośników
otoczeniowych SPEAKERS CENTER, aby używać ich
podczas korzystania z funkcji dźwięku Dolby Pro Logic
Surround (patrz str. 10).
Co dalej?
Aby skompletować zestaw, przejść do akapitu
“
Montaż Obiegu Zasilania” na stronach 9.
PL
8
Page 71

Montaż Obiegu Zasilania
Podłączenie głównego kabla zasilania
Podłącz główny kabel zasilania tego odbiornika i
pozostałych komponentów dżwiękowych/wizualnych
do gniazda wtyczkowego ściennego.
Jeżeli podłączysz pozostałe komponenty dźwiękowe
do SWITCHED AC OUTLET na odbiorniku (za
wyjątkiem modeli przeznaczonych dla Wielkiej
Brytanii), odbiornik będzie zasilał podłączone
komponenty, dzięki czemu będziesz mógł włączać i
wyłączać cały zestaw, gdy będziesz włączał lub
wyłączał odbiornik.
SWITCHED AC OUTLET
/
do gniazdka ściennego
OSTRZEŻENIE
Upewnij się, że zużycie mocy pobieranej przez komponenty
podłączone do odbiornika nie przekracza 100 watów. Nigdy
nie podłączaj do tego gniazda sprzętu gospodarstwa
domowego pracującego pod wysokim napięciem, jak np.
elektryczne żelazka, wentylatory lub telewizory.
Co dalej?
Przed rozpoczęciem użytkowania odbiornika, proszę
przejść do następnego rozdziału i upewnić się, że
wszystkie kontrolki znajdują się we właściwej pozycji.
Przygotowania wstępne
Zerowanie pamięci odbiornika
Przed pierwszym uruchomieniem odbiornika lub w
celu wymazania pamięci odbiornika, należy wykonać
następujące operacje:
1/u (zasilanie)
DIMMER
MUTING
1 Wyłączyć zasilanie odbiornika.
2 Naciskać 1/u (zasilanie) przed ponad 4 sekundy.
Włącza się wskaźnik “ALL CLEAR” i wszystkie
pozycje, łącznie z następującymi są anulowane:
• Wszystkie wstępnie zakodowane stacje
nadawcze zostają wyzerowane na nastawy
fabryczne.
• Wszystkie parametry pola akustycznego zostają
przestawione na wstępne nastawy fabryczne.
• Wszystkie nazwy indeksowe (wstępnie
zakodowanych stacji nadawczych oraz źródeł
programów) zostają anulowane.
• Wszystkie regulacje przeprowadzone
przyciskiem SET UP zostają przestawione na
wstępne nastawy fabryczne.
• Pole akustyczne zarejestrowane w pamięci dla
poszczególnych źródeł programowych i dla
wstępnie zakodowanych stacji nadawczych, jest
anulowane.
Po włączeniu sprzętu
Przed Rozpoczęciem
Użytkowania Odbiornika
Przed włączeniem odbiornika
Upewnić się, że:
• Regulator MASTER VOLUME (poziom głośności)
znajduje się w skrajnej, lewej pozycji (0).
• Wybór właściwego systemu głośnikowego.
(Szczegóły patrz rozdział “Opis Elementów Płyty
Czołowej” na stronie 12).
• BALANCE (równowaga) znajduje się na pozycji
środkowej.
Skontrolować niżej podany wskaźnik:
• Proszę nacisnąć przycisk MUTING lub przycisk
MUTING, będący na pilocie zdalnego sterowania,
jeżeli zaświeci się wskaźnik MUTING.
• Naciskać DIMMER aby nastawić jeden z czterech
poziomów luminacji wyświetlacza.
PL
9
Page 72

Przygotowania wstępne
Konfiguracja systemu Dolby
Surround
3 Przyciskami + lub – wybrać odpowiedni tryb
środkowy.
Poniższa tabela opisuje poszczególne tryby
środkowe:
System Dolby Pro Logic Surround dekoduje dźwięk
Dolby Surround, stanowiący normę dźwiękową
stosowaną w ścieżkach dźwiękowych programów
telewizyjnych oraz w kinematografii. Wybór
właściwego trybu środkowego oraz regulacja
natężenia dźwięku wyjściowego głośników,
umożliwiają wysoce precyzyjną reprodukcję lokalizacji
i dynamicznej panoramy akustycznej dla
oprogramowania zakodowanego w systemie Dolby
Surround.
Aby zapewnić otrzymanie optymalnego efektu dźwięku
surround, niezbędne jest podłączenie przynajmniej
jednej, dodatkowej pary głośników oraz/lub głośnika
środkowego.
Umiejscowienie głośników
Celem optymalizacji akustyki Dolby Pro Logic
Surround, należy głośniki umiejscowić zgodnie z
poniższą ilustracją.
Przedni głośnik
Jeżeli
posiadasz
Przednie i tylne
głośniki, brak
środkowego
głośnika
Przednie i
środkowe
głośniki, brak
głośnika tylnego
Przednie i tylne
głośniki oraz
mały głośnik
środkowy
Przednie i tylne
głośniki, oraz
głośnik środkowy
ekwiwalentny
do posiadanych
głośników przednich
Wybierz
wariant
PHANTOM
3 STEREO
(3-CH LOGIC)
NORMAL
WIDE
Aby
Dźwięk z tego
środkowego kanału był
oddawany przez
przednie głośniki
Dźwięk z tych tylnich
głośników był
oddawany przez
przednie głośniki
Tony niskie tego
środkowego kanału
były oddawane przez
przednie głośniki
(ponieważ mały głośnik
nie może wytworzyć
wystarczających tonów
niskich)
Środkowy kanał wiernie
reprodukuje kompletne
spektrum aukustyki
10
Regulacja głośności głośników
Środkowe głośniki
45°
Tylny głośniki
Tylny głośniki
2 do 3 ft.
(60 - 90 cm)
Przedni głośnik
Zdolność testowania tonu umożliwia dopasowanie
natężenia dźwięku głośników tylnych oraz/lub głośnika
środkowego do poziomu głośników przednich, w celu
maksymalizacji efektu Dolby Pro Logic Surround.
(Jeżeli wydajność wszystkich głośników jest
równomierna, nie ma potrzeby regulacji natężenia
dźwięku dla poszczególnych głośników z osobna.)
Regulację natężenia dźwięku można przeprowadzić
odpowiednimi kontrolkami pilota, z dowolnego miejsca
w pomieszczeniu.
1 Skontrolować właściwe nastawienie trybu
środkowego (patrz tabela powyżej).
Wybór środkowego ustawienia
2 Nacisnąć SOUND FIELD ON/OFF aby włączyć
Odbiornik dysponuje czterema trybami środkowymi:
PHANTOM, 3 STEREO, NORMAL, oraz WIDE. Każdy z
trybów odpowiada specyficznej konfiguracji
głośników. Wyboru trybu należy dokonać w zależności
od rodazju używanych głośników
pole akustyczne.
3 Kilkakrotnie naciskać SOUND FIELD MODE +/–
aby wybrać funkcję “PRO LOGIC”.
4 Na dostarczonym ze sprzętem pilocie, nacisnąć
1 Proszę nacisnąć przycisk SET UP.
2 Kilkakrotnie naciskać MENU < lub > do
wyświetlenia wskaźnika “CTR MODE”
(Ustawienie środkowe)
PL
TEST TONE Kolejno rozlega się ton próbny
dźwięku z poszczególnych głośników (patrz
następna strona).
Page 73
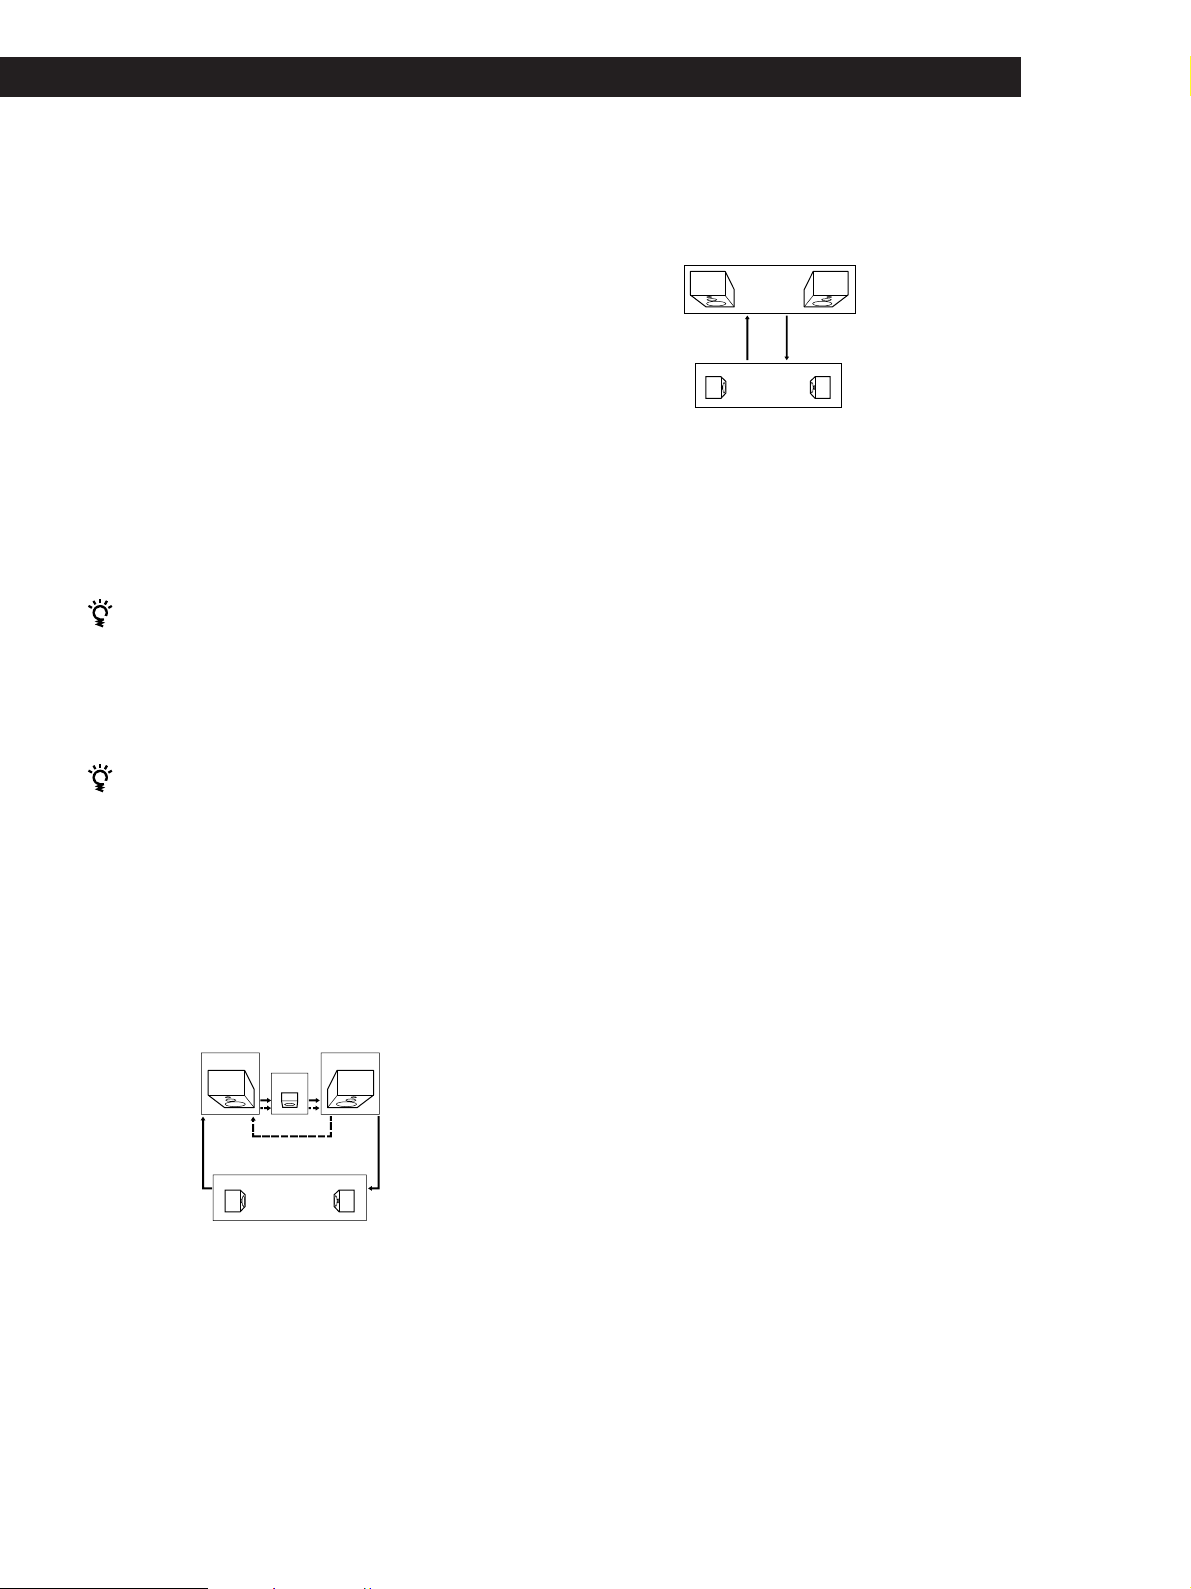
Przygotowania wstępne
5 Natężenie dźwięku należy wyregulować w taki
sposób, aby poziomy wyjściowego tonu
próbnego poszczególnych głośników, w danym
miejscu odbioru dźwięku, były takie same.
• Regulację równowagi dźwięku prawego i
lewego głośnika przedniego należy
przeprowadzić kontrolką BALANCE,
umieszczoną na płycie czołowej sprzętu.
• Regulację natężenia dźwięku głośnika
środkowego przeprowadzić przez naciskanie
przycisków LEVEL CENTER +/– na pilocie.
• Regulację natężenia dźwięku głośników tylnych
przeprowadzić przez naciskanie przycisków
LEVEL REAR +/– na pilocie.
6 Aby wyłączyć ton próbny, ponownie nacisnąć
przycisk TEST TONE na pilocie.
Regulację natężenia dźwięku można
przeprowadzić jednocześnie dla wszystkich
głośników
Przekręcać gałkę MASTER VOLUME na głównym
sprzęcie lub nacisnąć przycisk MASTER VOL(UME) +/–
na pilocie.
• Jeżeli wybrano tryb PHANTOM
Ton próbny jest przekazywany na zmianę przez
głośniki przednie i tylne.
Przedni (L, R)
Ton próbny
Tylny (L, R)
PHANTOM
Dane dotyczące przekazywania tonu próbnego dla
innych niż PRO LOGIC pól akustycznych, podano w
tabeli na stronie 24.
Zwiększenie poziomu wyjściowego
tylnych głośników o 5dB
Wstępnie ograniczony zakres regulacji poziomów dla
tylnych głośników wynosi od -15 do +10, lecz istnieje
możliwość zmiany o maksymalnie 5 poziomów (-10 do
+15).
1 Proszę nacisnąć przycisk SET UP.
Co to jest ton próbny?
Ton próbny jest sygnałem przekazywanym przez
odbiornik, umożliwiającym regulację natężenia
wyjściowego dźwięku głośników. Ton próbny jest
przekazywany przez głośniki dwoma, niżej opisanymi
sposobami:
• Jeżeli wybrano tryb NORMAL, WIDE lub 3
STEREO
Ton próbny jest kolejno przekazywany przez lewy (L)
głośnik przedni, środkowy, prawy (R) głośnik przedni
i głośniki tylne (z wyjątkiem trybu 3 STEREO).
Przedni (L) Przedni (R)
Środkowe
3 STEREO
Tylny (L, R)
NORMAL/WIDE
Ton próbny
2 Kilkakrotnie naciskać MENU < lub > do
wyświetlenia wskaźnika “REAR GAIN”
3 Nacisnąć + lub – aby wybrać nastawienie “GAIN
UP”.
Uwaga
Podane na wyświetlaczu wskaźniki wartości poziomów dla
tylnych głośników, nastawione na -15 do +10, nie zmienią
się, lecz faktyczna różnica w poziomie natężenia dźwięku
wyjściowego, będzie wyraźnie uchwytna dla ucha
słuchacza.
Aby przywrócić normalny poziom wyjściowy
Powtórzyć wyżej opisane czynności, w etapie 2
wybierając nastawienie “GAIN NORM”.
11
PL
Page 74

Umiejscowienie Części Składowych Sprzętu oraz Podstawowe Operacje Wzmacniacza
!
Opis Elementów Płyty
Czołowej
Ten rozdział zawiera informacje dotyczące lokalizacji
oraz funkcji, umieszczonych na płycie czołowej
przycisków i kontrolek, oraz wyjaśnienie
podstawowych operacji wzmacniacza.
1
823 !º
7
1 Przełącznik 1/u
Nacisnąć aby włączyć lub wyłączyć odbiornik.
Uwaga
Przed włączeniem odbiornika, upewnić się, że kontrolkę
głośności MASTER VOLUME przekręcono do oporu w
lewo aby uniknąć ewentualnego uszkodzenia głośników.
2 Przyciski Funkcji
Naciskać w celu wybrania odpowiedniego
komponentu.
Aby słuchać
Taśmy wideo
Programy TV lub
Dyski laserowe
Minidysków (MD) lub
Taśm magnetofonowych
Płyt kompaktowych (CD)
Audycji radiowych
Odtwarzacz DVD/
Dekoder AC-3
Proszę nacisnąć
VIDEO
TV/LD
MD/TAPE
CD
TUNER
5.1 CH/DVD
Po dokonaniu wyboru, włączyć komponent i
rozpocząć odtwarzanie ze źródła programu.
3 Przycisk 5.1 CH/DVD
Nacisnąć aby wybrać komponent podłączony do
gniazdek 5.1 CH/DVD. Po wybraniu komponentu,
włącza się wskaźnik świetlny 5.1 CH/DVD.
4
¡
56
9
4 Kontrolka poziomu głośności MASTER
VOLUME
Po włączeniu wybranego komponentu, przekręcać
kontrolkę aby wyregulować poziom głośności.
5 Przycisk MUTING
Nacisnąć aby wyciszyć dźwięk. Po wyciszeniu
dźwięku, włącza się wskaźnik świetlny MUTING.
6 Kontrolka poziomu głośności BALANCE
Przekręcać kontrolkę aby wyregulować równowagę
poziomu dźwięku przednich głośników.
7 Selektor SPEAKERS
Nastawić zgodnie z wybranymi głośnikami
przednimi.
Aby wybrać
Głośniki podłączone do przyłączy
SPEAKERS FRONT A
Głośniki podłączone do przyłącz
SPEAKERS FRONT B
Głośniki podłączone do przyłączy
SPEAKERS FRONT A i B (podłączenie
równoległe)
Brak dźwięku wyjściowego z głośników
przednich
Nie nastawiać na pozycję A+B jeżeli włączone pole
*
akustyczne. Aby wybrać oba zestawy głośników
przednich, upewnić się, że nomialna impedancja
podłączonych głośników wynosi przynajmniej 8
ohmów lub powyżej
.
Nastawić na
A + B*
A
B
OFF
12
PL
Page 75

Umiejscowienie Części Składowych Sprzętu oraz Podstawowe Operacje Wzmacniacza
Gniazdko PHONES
Podłączyć słuchawki.
Uwaga
Chcąc korzystać ze słuchawek, nastawić selektor
SPEAKERS na pozycję OFF aby dźwięk wyjściowy był
przekazywany przez słuchawki.
8 Przycisk DISPLAY
Kilkakrotnie naciskać aby w następujący sposób
zmienić wskaźniki informacyjne na wyświetlaczu:
Jeżeli wybrano inny komponent niż tuner
v
Nazwa indeksacyjna komponentu*
v
Wybrany komponent
v
Pole akustyczne odpowiadające
wybranemu komponentowi
Jeżeli wybrano tuner
v
Nazwa indeksacyjna wstępnie zapisanej stacji
radiowej* lub nazwa stacji programowej**
v
Częstotliwość
9 Następujące przyciski umożliwiają korzystanie z
efektu dźwięku surround. Szczegóły podano w
rozdziale pod tytułem “Korzystanie z Efektu
Dźwięku Surround”, rozpoczynającym się na
stronie 21.
Przycisk SOUND FIELD ON/OFF
Nacisnąć aby włączyć lub wyłączyć pole
akustyczne.
Przycisk SOUND FIELD MODE +/–
Nacisnąć aby wybrać odpowiednie pole
akustyczne w danej grupie.
0 Przycisk TONE
Nacisnąć aby włączyć lub wyłączyć efekty barwy
dźwięku. Wskaźnik świetlny TONE jest widoczny
dopóki włączony jest efekt barwy dźwięku.
Proszę pamiętać, że jeżeli barwę dźwięku
wyregulowano przyciskami MENU </> oraz +/–,
wybrana w ten sposób barwa dźwięku, będzie
automatycznie nastawiana każdorazowo po
włączeniu tego efektu.
Przycisk BASS BOOST
Nacisnąć aby zwiększyć basy przednich głośników.
Po włączeniu tej funkcji, zostaje wyświetlony
wskaźnik informacyjny BASS BOOST.
v
Wskaźnik typu programu**
v
Radio tekst**
v
Aktualna godzina**
v
Pole akustyczne przypisane wybranemu
pasmu lub wstępnie zapisanej stacji radiowej
Nazwa indeksacyjna wyświetlana jest tylko w takim
*
przypadku, jeżeli została uprzednio wprowadzona do
pamięci dla danego komponentu lub dla danej, wstępnie
zakodowanej stacji radiowej (patrz strona 25).
Wskaźniki wyświetlane wyłącznie podczas odbioru
**
serwisu RDS (patrz strona 18).
!¡ Wskaźnik TONE
Jest wyświetlany dopóki włączony jest efekt barwy
dźwięku.
Wskaźnik BASS BOOST
Jest wyświetlany dopóki włączony jest efekt
wzmacniania basów.
Aby korzystać w pełni z dźwięku o optymalnej
jakości
Przeprowadzić niżej opisane operacje, omijając w ten
sposób obiegi kontroli dźwięku.
1 Funkcję SOUND FIELD ON/OFF nastawić na pozycję
off (nie).
2 Funkcję TONE nastawić na pozycję off (nie).
3 Funkcję BASS BOOST nastawić na pozycję off (nie).
W wyniku tej operacji, użytkownik otrzyma dwukanałowy dźwięk z głośników przednich o wysokiej
wierności reprodukcji akustyki z odtwarzanego źródła.
(ciąg dalszy na następnej stronie)
13
PL
Page 76

Umiejscowienie Części Składowych Sprzętu oraz Podstawowe Operacje Wzmacniacza
@
¡
!™ !£ !ª!∞ !¶
!¢ @º !§ !•
!™ Niżej opisane przyciski sterują pracą
zintegrowanego ze sprzętem tunera. Szczegóły
podano w rodziale “Odbiór Audycji Radiowych”
rozpoczynającym się od strony 16. Przyciski
funkcjonują tylko w przypadku wybrania
komponentu tuner.
Przyciski PRESET/PTY SELECT +/–
Nacisnąć aby przeszukać stacje radiowe według
typu transmitowanych programów lub aby
przeszukać wszystkie, wstępnie zakodowane
stacje radiowe.
Przyciski TUNING +/–
Nacisnąć aby przeszukać wszystkie dostępne
stacje radiowe.
!£ Niżej opisane przyciski sterują pracą
zintegrowanego ze sprzętem tunera. Szczegóły
podano w rodziale “Odbiór Audycji Radiowych”,
rozpoczynającym się od strony 16. Przycisk PTY
funkcjonuje wyłącznie w przypadku wybrania
komponentu tuner.
Przycisk RDS PTY
Nacisnąć aby rozpocząć odbiór lub aby
przeszukać stacje radiowe według typu
transmitowanych programów.
Przycisk RDS EON
Nacisnąć aby automatycznie przełączyć na stację
aktualnie transmitującą migawki o ruchu
drogowym, wiadomości lub programy
informacyjne. Przycisk RDS EON nie funkcjonuje
podczas odbioru audycji pasma AM.
Przycisk FM/AM
Wybrać pasmo FM lub AM.
Przycisk FM MODE
Nacisnąć przycisk w przypadku gdy na
wyświetlaczu pulsuje wskaźnik “STEREO” przy
jednocześnie złej jakości stereofonii aktualnie
odbieranej audycji pasma FM. Efekt stereofoniczny
zostanie wyłączony, lecz poprawi się jakość
dźwięku.
Przycisk MEMORY
Nacisnąć aby przeprowadzić operację Auto-betical
Select (patrz strona 18) lub aby zapisać w pamięci
wstępnie zakodowaną stację nadawczą.
!¢ Niżej opisane przyciski sterują pracą
zintegrowanego ze sprzętem tunera. Szczegóły
podano w rodziale “Odbiór Audycji Radiowych”,
rozpoczynającym się od strony 16. Przyciski
funkcjonują wyłącznie w przypadku wybrania
komponentu tuner.
Przyciski Numeric (1 to 0)
Wprowadzają wartość numeryczną.
Przycisk SHIFT
Wybiera stronę pamięciową dla wstępnie
zakodowanych stacji.
Przycisk DIRECT
Nacisnąć aby bezpośrednio wprowadzić
częstotliwość stacji.
!∞ Przyciski MENU (
Po naciśnięciu przycisków SUR, NAME, BASS/
TREBLE lub SET UP, korzystać z przycisków menu
aby przeprowadzić specyficzne nastawy. (patrz
strony 11, 23 i 25).
!§ Przyciski +/–
Po naciśnięciu przycisków MENU, korzystać z
wyżej podanych przycisków aby przeprowadzić
specyficzne nastawy. (patrz strony 11, 23 i 25).
/ )
14
PL
Page 77

Umiejscowienie Części Składowych Sprzętu oraz Podstawowe Operacje Wzmacniacza
!¶ Przycisk SET UP
Kilkakrotnie naciskać przycisk aby wybrać jeden z
niżej podanych wskaźników. Wybrany wskaźnik
ukazuje się na wyświetlaczu umożliwiając
wykonanie różnych nastawów przy pomocy
przycisków kursora.
Wyświetlenie
wskaźnika
CTR MODE
REAR GAIN
!• Nacisnąć jeden z niżej opisanych przycisków aby
nadać nazwy wstępnie zakodowanym stacjom lub
źródłom programów. Szczegóły podano w
rozdziale “Indeksacja Zapisanych w Pamięci
Sprzętu Radiowych Stacji Nadawczych oraz Źródeł
Programów” na stronie 25.
Przycisk NAME
Nacisnąć aby wprowadzić nazwę dla wstępnie
zakodowanej stacji lub źródła programu.
(z wyjątkiem 5.1 CH/DVD).
Przycisk ENTER
Nacisnąć aby zakodować nazwę w pamięci
sprzętu.
!ª Przycisk SUR
Nacisnąć ten przcisk aby wyregulować parametry
akustyki. (patrz strona 23).
Umożliwia
Wybranie jednego z czterech trybów
środkowych (strona 10)
Zwiększenie zakresu tylnych
głośników o 5 dB (strona 11)
@º Przycisk BASS/TREBLE
Nacisnąć ten przycisk aby wyregulować barwę
dźwięku (patrz strona 23).
@¡ Przycisk DIMMER
Nacisnąć ten przycisk aby nastawić luminację
wyświetlacza na jeden z czterech możliwych
poziomów jasności.
15
PL
Page 78
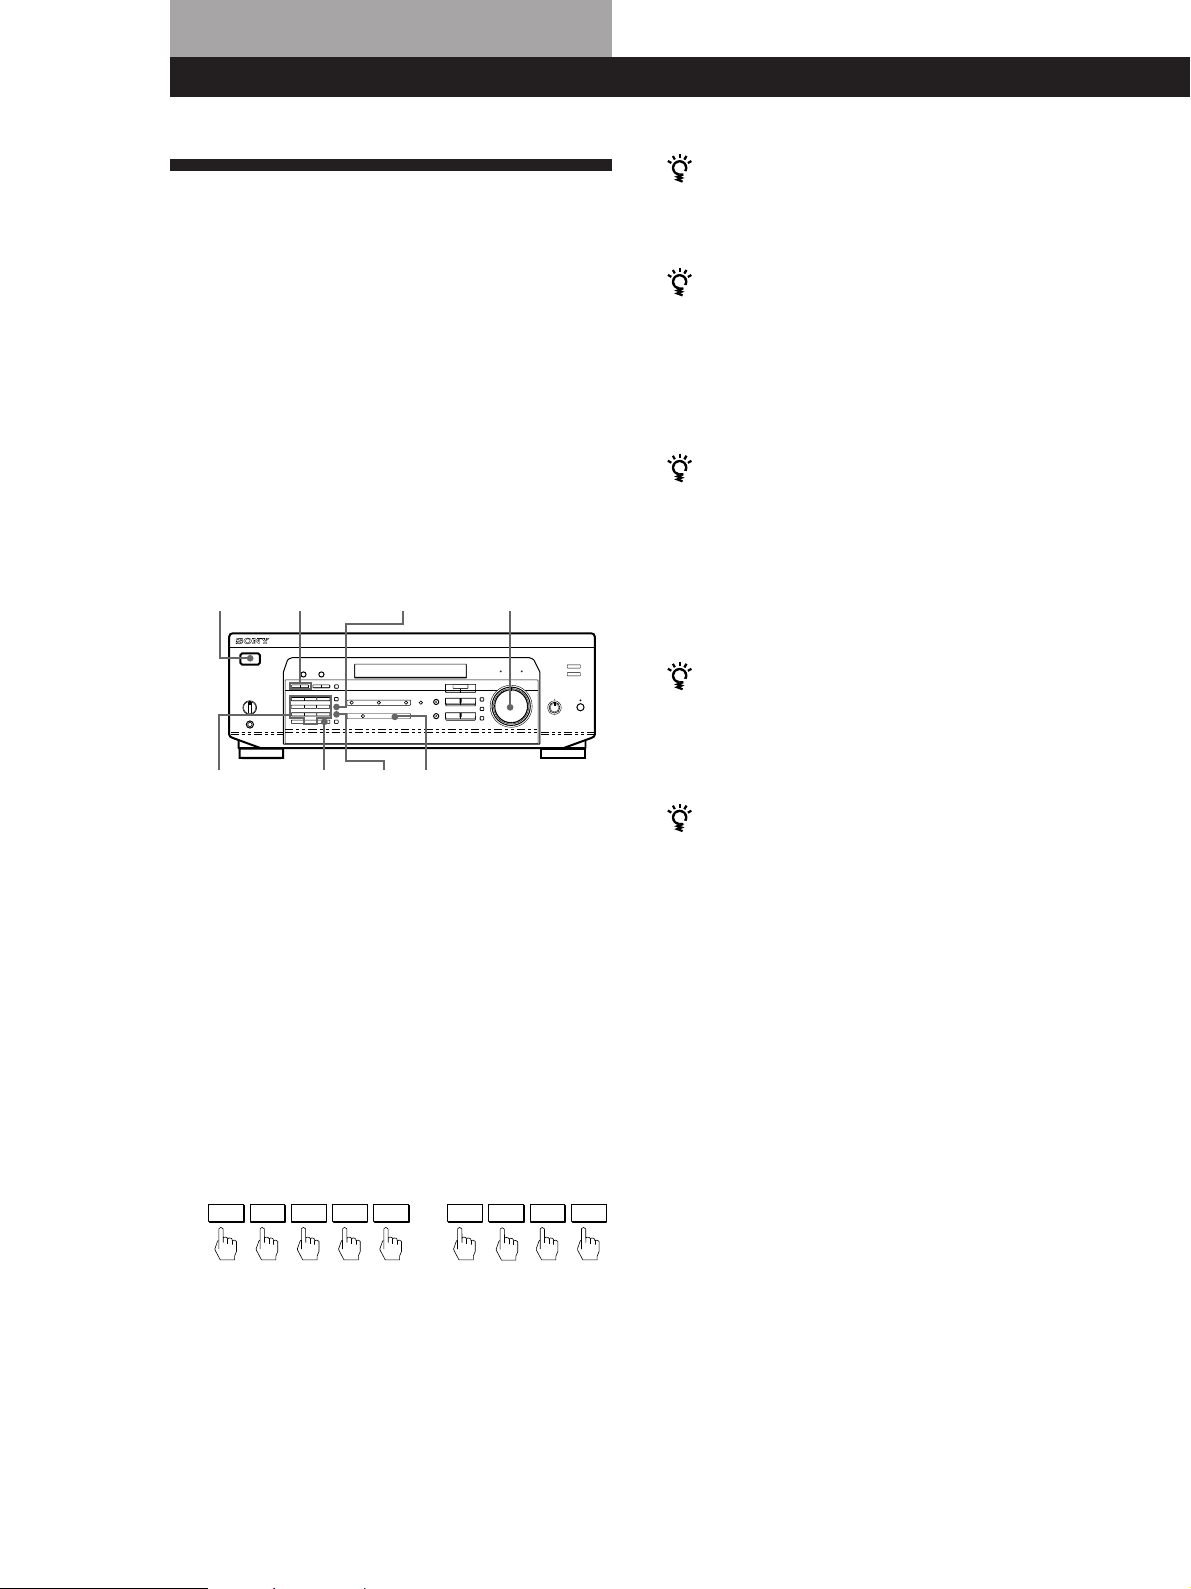
Operacje Odbiornika
Odbiór Audycji Radiowych
Ten odbiornik posiada funkcję pozwalającą na
bezpośrednie wprowadzenie częstotliwości stacji
radiowych przy pomocy przycisków numerycznych
(bezpośrednie strojenie). Jeżeli nie znasz
częstotliwości wybranej stacji radiowej, znajdziesz
dodatkowe informacje w rozdziale “Odbiór audycji
radiowych przy wykorzystaniu funkcji przeszukiwania
stacji nadawczych (automatyczne strojenie)”.
Jeżeli wskaźnik STEREO nie zostaje
wyświetlony
Proszę nacisnąć przycisk FM MODE przy odbiorze
audycji stereofonicznej na paśmie FM.
Jeżeli podczas odbioru programu stereo na
paśmie FM występują zniekształcenia dźwięku
Wskaźnik STEREO miga. Proszę nacisnąć przycisk FM
MODE zmieniający odbiór na tryb monofoniczny.
Odbiór będzie pozbawiony efektu stereo lecz jakość
ulegnie poprawie. Aby przywrócić efekt stereo, proszę
ponownie nacisnąć ten sam przycisk.
Przed rozpoczęciem, proszę upewnić się, że:
• do odbiornika podłączono antenę FM/AM zgodnie z
instrukcjami na stronie 5.
• Wybrano odpowiedni system głośnikowy. (patrz
“Opis Elementów Ptyty Czotowej” na stronie 12).
1/u (zasilanie)
Przysciski
numeryczne
TUNING +/–
DIRECT
FM/AM
FM
MODE
MASTER VOLUME
TUNER
1 Proszę nacisnąć przycisk 1/u (zasilanie) by
włączyć odbiornik.
2 Proszę nacisnąć przycisk TUNER.
Dostrojenie ostatnio odbieranej stacji nadawczej.
3 Proszę nacisnąć przycisk FM/AM celem wybrania
stacji nadawczej pasma FM lub AM.
Jeżeli dostrojenie stacji nadawczej nie udaje
się a zapisane cyfry migają
Proszę sprawdzić, że zakodowano właściwą
częstotliwość. Jeżeli popełniono pomyłkę, proszę
nacisnąć przycisk DIRECT i zakodować prawidłową
częstotliwość. Jeżeli zakodowane cyfry nadal migają,
oznacza to, że w danym rejonie nie ma transmisji
audycji radiowych w tym zakresie częstotliwości.
Oglądanie programów TV przy jednoczesnym
odbiorze audycji pasma FM (simulcast)
Proszę się upewnić, że nastrojono współbieżny
program na radioodbiorniku oraz na odbiorniku TV (lub
magnetowidzie).
Jeżeli zakodowano częstotliwość nie
obejmowaną przez odstęp strojenia
Zakodowana wartość zostaje automatycznie
zaokrąglona w górę lub w dół do najbliższej, odbieranej
częstotliwości.
Odstępy strojenia dla funkcji bezpośredniego
dostrajania:
FM: odstępy 50 kHz
AM: odstępy 9 kHz
16
4 Proszę nacisnąć przycisk DIRECT (bezpośrednio).
Odbiór audycji radiowych przy
5 Proszę nacisnąć odpowiedni przycisk
numeryczny celem zakodowania częstotliwości.
Przykład 1: FM 102.50MHz Przykład 2: AM 1350kHz
1 0 2 5 0
1 3 5 0
wykorzystaniu funkcji przeszukiwania
stacji nadawczych (automatyczne
strojenie)
Jeżeli częstotliwość wybranej stacji nadawczej jest
niewiadoma, odbiornik można nastawić na
przeszukanie wszystkich odbieranych stacji
nadawczych celem znalezienia wybranej stacji.
6 Strojąc stacje nadawcze pasma AM, proszę
odpowiednio zmienić pozycję anteny ramowej
AM celem uzyskania optymalnej jakości odbioru.
Odbiór dalszych stacji nadawczych
Proszę powtórzyć etapy od 3 do 5 włącznie.
PL
1 Proszę nacisnąć przycisk TUNER.
Ostatnio odbierana stacja nadawcza zostaje
nastrojona.
2 Proszę nacisnąć FM lub AM by wybrać
odpowiednie pasmo.
Page 79

Operacje Odbiornika
3 Proszę nacisnąć przycisk TUNING + lub –.
Proszę nacisnąć przycisk + dla stacji o wyższym
numerze; proszę nacisnąć – dla stacji o niższym
numerze. Jeżeli zostanie dostrojona stacja
transmitująca poza jednym lub drugim skrajnym
końcem pasma, odbiornik automatycznie
przełączy na przeciwny koniec pasma.
Przeszukiwanie zostaje każdorazowo przerwane
w momencie odbioru stacji nadawczej. Celem
kontynuowania przeszukiwania, proszę ponownie
nacisnąć ten sam przycisk.
Kodowanie Radiowych Stacji
Nadawczych pod
Przyciskami Numerycznymi
Sprzęt oferuje możliwość kodowania najczęściej
słuchanych stacji nadawczych zamiast ich
każdorazowego dostrajania. Zakodować można
maksymalnie 30 stacji nadawczych pasm FM i AM.
Stacje zapisuje się pod przyciskami numerycznymi
kombinując 3 litery (A,B,C) oraz cyfry (0-9). Na
przykład, stację można zakodować pod symbolem A1,
B6 lub C9, itd.
Przysciski
numeryczne
PRESET/PTY
SELECT +/–
MENU </>
NAME
4 Proszę nacisnąć przycisk SHIFT i wybrać
odpowiednią literę alfabetu (A,B, lub C).
Każdorazowe naciśnięcie przycisku SHIFT
kolejno zmienia litery “A”, “B” lub “C”,
wyświetlane w okienku konsoli.
Jeżeli wskaźnik “MEMORY” zgaśnie, proszę
powtórzyć czynności od etapu 3 począwszy.
5 Podczas wyświetlania wskaźnika MEMORY, proszę
nacisnąć wybrany przycisk numeryczny (0 do 9).
6 Proszę powtórzyć czynności od etapu 2 do 5
włącznie, celem zakodowania dalszych stacji
nadawczych.
Zmienianie zakodowanej w pamięci stacji
nadawczej
Proszę zakodować nową stację nadawczą pod numerem,
który ma ulec zmianie.
Uwaga
Jeżeli kabel zasilania prądem nie jest podłączony do
kontaktu przez mniej więcej tydzień, zakodowane radiowe
stacje nadawcze zostaną wymazane z pamięci odbiornika i
będziesz je ponownie musiał zakodować.
Strojenie zakodowanaych w pamięci
stacji nadawczych (strojenie w trybie
“preset”)
Zakodowaną w pamięci sprzętu stację nadawczą
można bezpośrednio dostroić przez naciśnięcie
przycisku numerycznego, pod którym została ona
uprzednio zakodowana. Jeżeli numer kodu jest
niewiadomy, strojenie można przeprowadzić metodą
przeszukiwania wszystkich, zakodowanych w pamięci,
stacji nadawczych.
MEMORY ENTERSHIFT TUNER
+/–
1 Proszę nacisnąć przycisk TUNER.
Ostatnio odbierana stacja zostaje dostrojona.
2 Proszę dostroić wybraną stację.
Dokładne informacje dotyczące strojenia stacji
nadawczych podano w rozdziale “Odbiór Audycji
Radiowych” na poprzedniej stronie.
3 Proszę nacisnąć przycisk MEMORY.
Wskaźnik “MEMORY” zostaje wyświetlony przez
parę sekund. Proszę wykonać czynności opisane
pod etapami 4 i 5 przed wygaśnięciem wskaźnika
“MEMORY”.
1 Proszę nacisnąć przycisk TUNER.
Ostatnio odbierana stacja zostaje nastrojona.
2 Celem wybrania litery alfabetu (A,B, lub C) proszę
nacisnąć przycisk SHIFT a następnie jeden z
przycisków numerycznych.
Na przykład, proszę wybrać A i nacisnąć przycisk
numeryczny 7 aby dostroić stację zakodowaną
pod symbolem A7.
Dostrajanie trybem przeszukiwania stacji
nadawczych, zakodowanych w pamięci
sprzętu
Proszę nacisnąć przycisk TUNER a następnie przycisk
PRESET/PTY SELECT + lub – celem wybrania
właściwej stacji nadawczej. Każdorazowe naciśnięcie
w/w przycisków powoduje następujące zmiany w
kolejności wyświetlania zakodowanych numerów:
n A1 ˜ A2 ˜ ... ˜ A0 ˜ B1 ˜ B2 ˜ ... ˜ B0 N
n C0 ˜ ... ˜ C2 ˜ C1N
17
PL
Page 80

Operacje Odbiornika
18
Automatyczne i alfabetyczne
zapisywanie radiowych stacji
nadawczych w pamięci
Korzystanie z Serwisu
Radiowego Systemu Danych
(RDS)
sprzętu (funkcja “Autobetical”)
Funkcja “Auto-betical select” umożliwia automatyczne,
alfabetyczne, zapisanie w pamięci sprzętu
maksymalnie 30 radiowych stacji nadawczych pasma
FM oraz FM RDS, bez rozwlekłości. Dodatkowo,
funkcja “Auto-betical select” koduje wyłącznie stacje
nadawcze o najwyraźniejszym sygnale. Celem
indywidualnego, kolejnego zakodowania stacji
nadawczych pasma FM lub AM (MW), proszę
sprawdzić szczegóły w rozdziale “Kodowanie
radiowych stacji nadawczych pod przyciskami
numerycznymi” na stronie 17.
Jako pierwsze, kodowane są stacje FM RDS w
porządku alfabetycznym, wedłu Nazw Stacji
Radiowych, następnie pozostałe stacje pasma FM
według emitowanych częstotliwości.
1 Proszę nacisnąć przycisk 1/u (zasilanie) celem
wyłączenia odbiornika.
2 Naciskając przycisk MEMORY (pamięć), proszę
równocześnie nacisnąć przycisk 1/u (zasilanie)
celem włączenia odbiornika.
Zostaje wyświetlony wskaźnik “AUTOBETICAL
SELECT” informujący, że odbiornik rozpoczął
przeszukiwanie i zapisywanie wszystkich stacji
pasma FM oraz FM RDS danego zakresu emisyjnego.
Wskaźnik “FINISH” zostaje wyświetlony po
zakończeniu zapisywania stacji FM oraz FM RDS.
Realokacja wstępnie zarejstrowanego kodu dla
innej stacji nadawczej
Patrz “Kodowanie radiowych stacji nadawczych pod
przyciskami numerycznymi” na stronie 17.
Wyłączenie funkcji Auto-betical przed
zakończeniem zapisywania stacji
Proszę nacisnąć przycisk 1/u (zasilanie) celem wyłączenia
odbiornika.
Aktualnie zapisywane w pamięci stacje nadawcze
zostają przesunięte na tyły pamięci (w kierunku C0) i
mogą zostać wymazane z pamięci, w zależności od
ilości stacji odbieranych przez funkcję “Auto-betical
select”.
Uwagi
• W przypadku przeprowadzki, proszę powtórzyć zapis
stacji dla nowego rejonu.
• Szczegóły strojenia wstępnie zakodowanych stacji
nadawczych podano na stronie 17.
• Ukazanie się wskaźnika “FINISH”, sygnalizuje wymazanie
z pamięci sprzętu wszystkich, poprzednio zakodowanych,
stacji nadawczych. Jeżeli konieczne, powtórnie
PL
zakodować stacje pasma AM.
Jakie korzyści dla użytkownika oferuje
Radiowy System danych
Radio Data System (RDS) jest serwisem usługowym
rozgłośni radiowych, umożliwijący stacjom nadawczym
emitowanie dodatkowych informacji, równolegle z
normalnym sygnałem ich programów. Nasz tuner oferuje
trzy wygodne cechy RDS: Wyświetlanie informacji
serwisu RDS, Migawki o ruchu drogowym, wiadomości
lub audycje informacyjne, lub też lokalizowanie stacji
nadawczych według rodzaju nadawanych przez nie
programów. Serwis RDS jest dostępny wyłącznie na
stacjach nadawczych pasma FM.*
Uwaga
Funkcja RDS może nie działać prawidłowo, jeżeli nastrojona
stacja emituje sygnał RDS nieprawidłowo, lub jeżeli
emitowany sygnał jest zbyt słaby.
* Nie wszystkie stacje nadawcze pasma FM oferują serwis
RDS i nie wszystkie oferują te sam rodzaj serwisu. Jeżeli
system RDS nie jest Państwu znany, radzimy
skontaktować się z lokalną stacją nadawczą, celem
zaznajomienia się ze szczegółami oferowanych przez nią
usług RDS, w danym rejonie kraju.
Odbiór audycji RDS
Proszę wybrać dowolną stację nadawczą na paśmie FM.
Po nastrojeniu stacji nadawczej oferującej serwis
RDS, włącza się wskaźnik RDS i nazwa stacji ukazuje
się na wyświetlaczu.
Wyświetlanie Informacji Serwisu RDS
Kilkakrotnie nacisnąć DISPLAY aby w następujący
sposób zmienić wyświetlanie wskaźników
informacyjnych:
PS (Nazwa Stacji Programu = Programme Station)
PTY (Wskaźnik Typu Programu)
RT (Wskaźnik Radio Tekst)
CT (Wskaźnik Aktualnej Godziny = Current Time)
(w systemie 24-godzinnym)
Aktualnie przypisane pole akustyczne
a) Ta informacja zostaje wyświetlona również dla innych niż
RDS-FM stacji nadawczych.
b) Typ transmitowanego programu (Patrz strona 20).
c) Wiadomości tekstowe przekazywane przez stację RDS.
v
v
Częstotliwość
v
v
v
v
a)
b)
c)
a)
a)
Page 81

Operacje Odbiornika
Uwagi
• Wskaźnik “ALARM” miga jeżeli jest właśnie nadawane
ważne oznajmienie władz państwowych.
• Następujące wskaźniki informują o typach serwisu nie
oferowWanego przez daną stację nadawczą:
“NO PTY” (wybrany typ programu nie jest emitowany)
“NO TEXT” (informacje radiotekstu nie są emitowane)
“NO TIME” (nie ma serwisu zegarynki)
• Niektóre wiadomości tekstowe mogą okazać się
niekompletne, co zależy od metody służącej
przekazywaniu tekstu, stosowanej przez stację nadawczą.
Migawki o ruchu drogowym,
wiadomości lub programy
informacyjne (EON)
Serwis Enhanced Other Networks (EON=Wzmocnienie
Innych Sieci) umożliwia automatyczne przełączenie
odbiornika na stację nadawczą transmitującą migawki
o ruchu, wiadomości lub programy informacyjne. W
momencie rozpoczęcia transmisji jednego z tych
programów przez stację współpracującą ze wstępnie
zakodowaną stacją nadawczą RDS, pasma FM, stacja
ta zostanie automatycznie dostrojona. Po zakończeniu
programu, poprzednio odbierana stacja nadawcza
zostanie ponownie automatycznie dostrojona lub
włączy się poprzednio nastawione źródło programu.
1 Proszę dostroić stację pasma FM.
2 Proszę nacisnąć przycisk RDS EON celem
wybrania odpowiedniego typu serwisu
programowego.
Każdorazowe naciśnięcie przycisku RDS EON,
powoduje kolejne wyświetlenie następujących
wskaźników:
/
TA (Migawki o ruchu drogowym)
.
NEWS
.
INFO (information)
.
OFF (Nie włącza się żaden wskaźnik)
Odbiornik zostaje przełączony w tryb gotowości.
Następujące wskaźniki zostaną wyświetlone, jeżeli nie
naciśnięto przycisku RDS EON przed nastrojeniem
stacji o serwisie RDS: “NO TA”, “NO NEWS” lub “NO
INFO”.
W momencie rozpoczęcia transmisji wybranego typu
serwisu, odbiornik przełącza na odpowiednią stację
nadawczą, zostaje wyświetlona właściwa informacja
(np. “NOW TA”) a dany wskaźnik (np. “TA”) miga w
okienku konsoli. Po zakończeniu programu, odbiornik
powraca do poprzednio odbieranej stacji nadawczej
(lub poprzedniej funkcji).
Aby wyłączyć sterowanie programów
Proszę ponownie nacisnąć przycisk RDS EON.
Wyłączenie funkcji EON przed rozpoczęciem
nieprzerywanego nagrywania programu,
szczególnie nagrywania w trybie timer.
Uwagi
• Aby umożliwić korzystanie z wyżej opisanej funkcji,
proszę upewnić się, że odpowiednia stacja RDS została
uprzednio zakodowana w pamięci sprzętu.
• Wskaźnik “WEAK SIG” (słaby sygnał) zostaje
wyświetlony, jeżeli sygnał wybranej stacji jest za słaby.
Odbiornik powraca do poprzednio odbieranej stacji
nadawczej (lub funkcji).
Lokalizacja stacji nadawczej według
typu transmitowanego programu
(funkcja PTY)
Poszukiwaną stację nadawczą można zlokalizować
przez wybranie typu programu. Sprzęt dostraja
aktualnie nadawane typy programów tych stacji
nadawczych RDS, które zakodowano w pamięci
sprzętu.
1 Proszę nacisnąć przycisk RDS PTY w celu
wyświetlenia aktualnego typu PTY. Proszę
naciskać przycisk PRESET/PTY SELECT + lub –
do momentu wyświetlenia w okienku konsoli
żądanego typu programu.
Patrz poniższa tabela typów programu.
2 Proszę nacisnąć przycisk RDS PTY, gdy w
okienku konsoli wyświetlany jest typ programu.
Odtwarzacz rozpoczyna szukanie
zaprogramowanych wstępnie stacji z sygnałem
RDS dla danego programu (w okienku konsoli
wyświetlane są na zmianę symbol “SEARCH” i
typ programu).
W momencie odebrania odpowiedniego
programu, numer zakodowanej w pamięci stacji
nadawczej aktualnie transmitującej wybrany typ
programu zostaje wyświetlony i odbiór
rozpoczyna się.
Uwaga
Jeżeli wybrany program nie jest aktualnie nadawany, w
okienku konsoli zostaje wyświetlony wskaźnik “NO PTY” i
odbiornik powraca do poprzednio odbieranej stacji
nadawczej.
(ciąg dalszy na następnej stronie)
19
PL
Page 82

Operacje Odbiornika
Wybrać można następujące typy programów:
Typ Programu
NONE
NEWS
AFFAIRS
INFO
SPORT
EDUCATION
DRAMA
CULTURES
SCIENCE
VARIED
POP MUSIC
ROCK MUSIC
EASY MUSIC
LIGHT M
CLASSICS
OTHER M
WEATHER
FINANCE
CHILDREN
SOCIAL AFF
RELIGION
Transmitujący
Programy, które nie zostały zdefiniowane
poniżej.
Aktualne wiadomości.
Programy publicystyczne na tematy
bieżące.
Programy dotyczące wiadomości dla
konsumentów, porady lekarskie,
prognozy pogody.
Programy sportowe.
Programy edukacyjne, np. o haśle “jak
należy” oraz porady.
Słuchowiska i seriale radiowe.
Audycje na tematy dotyczące spraw
narodowej lub regionalnej kultury, takich
jak języki regionalne, sprawy o
charakterze społecznym.
Programy przyrodniczo-naukowe.
Programy nadające wywiady z ważnymi
lub sławnymi osobistościami, gry
zespołowe (np. zgaduj-zgadule),
komedie.
Programy muzyki typu “pop”.
Programy muzyki “Rock”.
Muzyka łatwa (middle of the road music =
popularna muzyka).
Muzyka klasyczna, utwory
instrumentalne, wokalne lub chóralne.
Występy sławnych orkiestr, muzyka
kameralna, opera, itp.
Muzyka nie pasująca do żadnej z
opisanych powyżej kategorii, na przykład
rythm&blues i reggae.
Programy z prognozami pogody.
Raporty giełdowe, handel, obroty
towarami itp.
Programy z audycjami przeznaczonymi
dla młodzieży o charakterze
rozrywkowym i obejmującym różne
zainteresowania.
Programy z audycjami socjologicznymi,
historycznymi, geograficznymi,
psychologicznymi i społecznymi.
Aspekty wiary i przekonań.
Typ Programu
PHONE IN
TRAVEL
LEISURE
JAZZ MUSIC
COUNTRY M
NATIONAL M
OLDIES M
FOLK MUSIC
DOCUMENT
Transmitujący
Opinie wyrażane poprzez telefon lub
przed publicznością.
Programy o zorganizowanych podróżach,
krajach docelowych, ideach wyjazdów i
okazyjnych ofertach.
Programy oferujące czynności
rekreacyjne, w których słuchacze mogą
brać udział.
Polifoniczna, synkopatyczna muzyka.
Piosenki pochodzące z południowych
stanów Ameryki.
Aktualnie popularna muzyka w danym
kraju lub regionie.
Muzyka “golden age”.
Muzyka, która jest zakorzeniona w
kulturze muzycznej określonego narodu.
Program zajmujący się faktycznymi
kwestiami.
20
PL
Page 83

Korzystanie z funkcji Surround
Korzystanie z Systemu
Dźwiękowego Surround
Z dźwięku surround można korzystać przez wybranie
jednego ze wstępnie zakodowanych “pól
akustycznych”, oferowanych przez odbiornik.
Użytkownik może we własnych ścianach domowych
odtworzyć akustykę sali kinowej lub koncertowej. Lub
nawet, przez wyregulowanie parametrów, dostosować
pole akustyczne do własnych preferencji.
Pola akustyczne zostały
zaklasyfikowane według trzech
głównych typów.
Jednym z nich jest “CINEMA”. Pola akustyczne typu
CINEMA są przeznaczone do odbioru filmowej ścieżki
dźwiękowej nagranej na taśmach wideo lub na
dyskach laserowych. Typ CINEMA dysponuje
czterema polami akustycznymi w dwóch grupach. Z
pola akustycznego PRO LOGIC można korzystać
chcąc reprodukować zwykłą akustykę surround.
Wybranie pola akustycznego PRO LOGIC, umożliwia
odbiornikowi osiągnięcie pełnego efektu akustyki
surround przez wykorzystanie systemu Dolby Pro
Logic do odkodowania oprogramowania
zakodowanego w systemie Dolby Surround. Dźwięk
surround jest reprodukowany zgodnie z oryginalmy
przeznaczeniem, dokładnie według danych zawartych
w oprogramowaniu. Pozostałe pola akustyczne typu
CINEMA mają na celu dodanie efektów pogłosu przez
wykorzystanie technologii Digital Cinema Sound.
Wybranie tych pól akustycznych umożliwia dodanie
typowych dla sal kinowych efektów odbicia i pogłosu,
do akustyki zakodowanej w systemie Dolby Pro Logic
Surround. Tym sposobem, użytkownik może stworzyć
atmosferę i akustykę sali kinowej.
Korzystanie z funkcji Surround
Korzystanie z funkcji Surround
Trzecim typem akustyki jest tryb “MUSIC”. Wybranie
pola akustycznego tego typu umożliwia dodanie
pogłosu do normalnego, 2-kanałowego dźwięku
stereofonicznego. Pola akustyczne oferowane przez
ten tryb, nadają się do odtwarzania płyt CD lub
oglądania programów TV, stwarzając efekty surround
istniejące na sali koncertowej lub w klubie jazzowym.
Aby w pełni wykorzystać możliwości akustyki Dolby
Pro Logic Surround, należy wykonać operacje według
instrukcji podanych w rozdziale “Konfiguracja systemu
Dolby Surround”, rozpoczynającym się na stronie 10,
w celu wybrania trybu środkowego i regulacji
natężenia dźwięku głośnika.
SOUND FIELD
SOUND FIELD
MODE +/–
SUR
MENU </>
ON/OFF
+/–
TONE
SET UP
ENTERBASS/TREBLE
Drugim typem jest akustyka “VIRTUAL”. Tryb wirtualny,
umożliwia wytworzenie środowiska akustyki surround
przez wykorzystanie przynajmniej dwóch głośników
przednich, odgrywających rolę nieistniejących w
rzeczywistości głośników “wirtualnych”. Użytkownik
odbiera dźwięk o efekcie surround, korzystając
wyłącznie z głośników przednich.
21
PL
Page 84

Korzystanie z funkcji Surround
Wybór Pola Akustucznego
Z funkcji akustyki surround można korzystać przez
wybranie jednego ze wstępnie zaprogramowanych pól
akustycznych, w zależności od rodzaju odtwarzanego
źródła programu.
1 Nacisnąć SOUND FIELD ON/OFF aby włączyć
pole akustyczne.
Aktualnie włączone pole akustyczne jest
sygnalizowane odpowiednim wskaźnikiem na
wyświetlaczu.
2 Kilkakrotnie nacisnąć przycisk SOUND FIELD
MODE +/– aby wybrać odpowiednie pole
akustyczne.
Informacje dotyczące poszczególnych pól
akustycznych podano w tabeli obok.
Ostatnio dla danego źródła programu wybrane
pole akustyczne jest kodowane w pamięci
sprzętu (Sound Field Link = Dostęp do Pola
Akustycznego)
Każdorazowe wybranie źródła programu,
automatycznie dobiera ostatnio stosowane pole
akustyczne. Na przykład, słuchając płyty CD z efektem
HALL jako pole akustyczne, zmienić źródło programu,
następnie powrócić do odtwarzania płyty CD, efekt
HALL zostanie automatycznie dobrany. W przypadku
tunera, pola akustyczne dla pasm AM lub FM oraz dla
wszystkich wstępnie zakodowanych stacji nadawczych,
są oddzielnie kodowane.
Oprogramowania zakodowane w systemie
Dolby Surround można zidentyfikować
sprawdzając napisy na opakowaniu
Należy jednak dodać, że niektóre taśmy wideo lub
dyski laserowe mogą być zakodowane w systemie
akustycznym Dolby Surround, choć na opakowaniu
brak odpowiedniego identyfikatora.
Uwaga
Korzystając z pól akustycznych, nie posługiwać się
selektorem SPEAKERS przy wyborze obu głośników (A+B).
Opis pól akustycznych
Typ MODE
CINEMA PRO LOGIC Dekoduje programy
VIRTUAL V DOLBY Wykorzystuje przednie
MUSIC HALL Reprodukuje akustykę
(pole akustyczne)
C(inema) STUDIO Reprodukuje
N(ight) THEATER Wyregulować barwę
MONO MOVIE Stwarza efekt sali
V SURROUND* Korzystać z przednich
JAZZ CLUB Reprodukuje akustykę
LIVE HOUSE Reprodukuje akustykę
GAME Udostępnia
Efekty
opracowane w
systemie Dolby Pro
Logic Surround.
charakterystyki dźwięku
dużego kina. Nadaje się
do oglądania
standardowych filmów.
dźwięku oglądając filmy
przy niskim poziomie
głośności, np. nocą
kinowej podczas
oglądaniu filmów o
monofonicznej ścieżce
dźwiękowej.
głośniki aby stworzyć
efekty dźwięku
surround.
głośników oraz z
głośnika środkowego
aby otrzymać efekty
dźwięku surround.
prostokątnej sali
koncertowej. Idealne
dla wyciszonych,
miękkich dźwięków.
klubu jazzowego.
odbieranego na żywo
przedstawienia na 300miejscowej widowni.
maksymalne
oddziaływanie
dźwiękowe przy
odtwarzaniu
oprogramowania gier
wideo. Należy pamiętać
o nastawieniu konsoli
gry na tryb
stereofoniczny dla
oprogramowania o
odpowiedniej zdolności
dźwiękowej.
22
* Wyłącznie podczas korzystania z funkcji 5.1 CH/DVD.
PL
Page 85

Przystosowanie Pól
Akustycznych do Wymogów
Uźytkownika
Przez odpowiednią regulację parametrów
akustycznych, można dostosować pola akustyczne do
bieżącej sytuacji odtwarzania dźwięku.
Przystosowane w ten sposób pole akustyczne można
wprowadzić do pamięci sprzętu na czas
nieograniczony (chyba, że odbiornik był przez około
tydzień odłączony od zasilania). Przystosowane przez
użytkownika pole akustyczne można każdej chwili
ponownie naregulować przez zmianę parametrów.
Parametry dowolnego pola akustycznego, które
użytkownik może zmienić we własnym zakresie,
podano w tabeli na stronie 24.
Aby optymalnie wykorzystać
możliwości oferowane przez system
akustyki Dolby Pro Logic Surround
Należy wykonać operacje opisane w rozdziałach
“Wybór środkowego ustawienia” oraz “Regulacja
natężenia akustyki głośnika” na stronie 10 przed
zmianą parametrów pola akustycznego.
Zmiana czasu opóźnienia (DELAY)
(tylko dla funkcji Pola akustycznego
PRO LOGIC)
Akustykę Dolby Pro Logic Surround można
dodatkowo wzmocnić przez opóźnienie przekazu
dźwięku z tylnych głośników (czas opóźnienia). Czas
opóźnienia można nastawić na 15, 20, lub 30 minut.
Jeżeli tylne głośniki umieszczono w dużym
pomieszczeniu lub w dużej odległości od miejsca
odbierania dźwięku, należy nastawić krótszy czas
opóźnienia.
1 Rozpocznij odtwarzanie utworu zakodowanego w
systemie Dolby Surround Sound.
2 Proszę nacisnąć przycisk SUR.
3 Nacisnąć MENU </> aby wybrać funkcję “DELAY
xxms.”
Wskaźnik bieżącego czasu opóźnienia ukazuje
się na wyświetlaczu.
4 Nacisnąć +/– aby zmienić czas opóźnienia.
Zmiana poziomu efektów
akustycznych (EFFECT)
(wszystkie pola akustyczne z
wyjątkiem PRO LOGIC)
Natężenie efektu surround (np. jego ogólną obecność)
można zmienić na sześciu poziomach.
1 Proszę nacisnąć przycisk SUR.
2 Nacisnąć MENU </> aby wybrać funkcję
“EFFECT xx.”
Wskaźnik bieżącego poziomu efektu ukazuje się
na wyświetlaczu.
3 Nacisnąć +/– aby zmienić poziom efektu.
Korzystanie z funkcji Surround
Korzystanie z funkcji Surround
Regulacja natężenia dźwięku tylnych
głośników i środkowego głośnika.
(REAR/CENTER)
Jeżeli natężenie dźwięku tylnego lub środkowego
głośnika wydaje się niewystarczające (nawet po
wyregulowaniu natężenia dla systemu Dolby Pro Logic
Surround), należy wykonać niżej opisane operacje aby
przeprowadzić nową regulację.
Proszę pamiętać, że regulacja natężenia dźwięku
głośnika dotyczy wszystkich pól akustycznych.
1 Proszę nacisnąć przycisk SUR.
2 Nacisnąć MENU </> aby wybrać funkcję “REAR
xxdB”Ó lub “CENTER xxdB.”
3 Nacisnąć +/– aby wyregulować natężenie
dźwięku głośnika.
Użytkownik może wybrać poziom natężenia
dźwięku pomiędzy –15 dB do +10 dB, w
odstępach 1-dB.
Regulacja barwy dźwięku (BASS/
TREBLE)
Aby otrzymać optymalnej jakość dźwięk, należy
wyregulować barwę tonu (basy lub tony wysokie).
Barwę tonu można wyregulować dla każdego pola
akustycznego z osobna.
1 Proszę nacisnąć przycisk BASS/TREBLE.
2 Nacisnąć MENU </> aby wybrać funkcję “BASS
xxdB” lub “TREBLE xxdB.”
3 Nacisnąć +/– aby wyregulować poziom barwy
dźwięku.
Użytkownik może wybrać poziom barwy dźwięku
pomiędzy –10 dB do +10 dB w odstępach 2-dB.
4 Naciskać przycisk TONE do wyświetlenia
wskaźnika TONE.
Funkcję regulacji barwy dźwięku można
dowolnie wyłączyć nie anulując nowych
nastawów
Nowe nastawy barwy dźwięku zostają zapisane w
pamięci sprzętu, dla każdego pola akustycznego z
osobna. Nacisnąć przycisk TONE aby wyłączyć
wskaźnik TONE.
Zerowanie dostosowanych przez
użytkownika nastawów pól
akustycznych, na wstępne wartości
fabryczne.
1 Jeżeli zasilanie jest włączone, nacisnąć przycisk
1/u (moc) aby wyłączyć zasilanie.
2 Naciskając przycisk SOUND FIELD ON/OFF
jednocześnie nacisnąć przycisk 1/u (moc).
Wskaźnik “SUR CLEAR” ukazuje się na
wyświetlaczu i wszystkie pola akustyczne zostają
jednocześnie wyzerowane.
23
PL
Page 86

Korzystanie z funkcji Surround
Zmienne parametry dla każdego pola akustycznego przy wyborze źródła
programu
Tryb pola akustycznego
Wyłączony
Włączony
Typ
—
CINEMA
VIRTUAL
MUSIC
MODE
—
PRO LOGIC
C STUDIO
N THEATRE
MONO MOVIE
V DOLBY
HALL
JAZZ CLUB
LIVE HOUSE
GAME
Parametery
DELAY EFFECT REAR CENTER TONE
rr
rra)r
rr r
rr r
rr
rr r
rr r
rr r
rr r
a)
b)
r
b)
Wyjściowy dźwięk próbny
Brak dźwięku
r
W zależności od trybu
r
środkowego nagłośnienia
r
(patrz strona 10)
Poprzez głośniki przednie lub
tylne, na zmianę
Brak dźwięku
Poprzez głośniki przednie lub
tylne, na zmianę
Parametry, które można regulować dla poszczególnych pól akustycznych, przy
jednoczesnym korzystaniu z funkcji 5.1 CH/DVD
Tryb pola akustycznego
Wyłączony
Włączony
Typ
—
CINEMA
VIRTUAL
MODE
—
C STUDIO
N THEATRE
MONO MOVIE
V SURROUND
Parametery
DELAY EFFECT REAR CENTER TONE
rrr
rr rr
rr rr
rr rr
rrr
Wyjściowy dźwięk próbny
W następującej kolejnoŚci:
przedni (L), środkowy, przedni
(P), tylny (P), tylny (L)
Poprzez głośniki przednie lub
środkowego, na zmianę
24
a) Z możliwością regulacji, wyłącznie w przypadku gdy tryb
nagłaśniania środkowego nastawiono na pozycję
PHANTOM, NORMAL lub WIDE (patrz strona 10).
b) Z możliwością regulacji, wyłącznie w przypadku gdy tryb
nagłaśniania środkowego nastawiono na pozycję 3
STEREO, NORMAL lub WIDE (patrz strona 10).
Uwaga
Aby wyregulować poziom głośnika przeprowadzając próbę
dźwięku według opisu na stronie 10, wybrać pole
akustyczne PRO LOGIC. Dźwięk próbny przekazywany we
wszystkich innych pola akustycznych służy wyłącznie
weryfikacji zdolności przekazywania dźwięku przez głośniki.
PL
Page 87

Pozostate Operacje
Pozostate Operacje
Indeksacja Zapisanych w
Pamięci Sprzętu Radiowych
Stacji Nadawczych oraz
Źródel programu
Dla wstępnie zakodowanych stacji radiowych oraz dla
źródeł programu, użytkownik może wprowadzić nazwy
składające się z maksymalnie 8 znaków (indeksacja
stacji nadawczych). Nadane w ten sposób nazwy
indeksacyjne (np.“VHS”) ukazują się na wyświetlaczu
po wybraniu danej stacji lub źródła programu. Funkcja
ta ułatwia szybkie zidentyfikowanie komponentów tego
samego typu. Jest ona również praktyczna dla
szybkiej identyfikacji komponentów podłączonych do
gniazdek przeznaczonych dla innych typów urządzeń,
na przykład jeśli dodatkowy odtwarzacz płyt CD
podłączono do gniazdka MD/TAPE.
Uwagi
• Dla każdej stacji nadawczej lub dla każdego źródła
programu można wprowadzić tylko jedną nazwę.
• Nie można indeksować stacji radiowych FM RDS lub
komponentów podłączonych do gniazdek 5.1 CH/DVD.
1 Indeksacja wstępnie zakodowanej stacji
nadawczej.
Dostroić wybraną stację nadawczą.
Indeksacja źródła programu.
Wybrać źródło programu (komponent), przejść do
etapu 2.
2 Proszę nacisnąć przycisk NAME.
Kursor miga w okienku konsoli.
3 Celem wybrania odpowiednich znaków, proszę
naciskać przycisk + lub –.
4 Nacisnąć MENU < lub > aby przesunąć kursor na
pozycję następnego w kolejności znaku lub
poprzedniego znaku.
5 Proszę powtórzyć etapy 3 oraz 4 celem
zakodowania pełnej nazwy stacji składającej się z
maksymalnie 8 znaków.
6 Nacisnąć ENTER aby zarejestrować nazwy w
pamięci sprzętu.
Wykonywanie nagrań
Nabyty odbiornik oferuje duże ułatwienie nagrywania
na oraz z podłączonych do niego komponentów
dodatkowego sprzętu. Nie ma potrzeby
bezpośredniego łączenia sprzętu odtwarzjącego z
nagrywającym: po wybraniu źródła programu na
odbiorniku, można wykonać nagrywanie oraz
redagowanie tak jak przy normalnym korzystaniu z
odpowiednich kontrolek, każdego z komponentów.
Przed rozpoczęciem nagrywania, proszę upewnić się,
że odpowiednie komponenty zostały prawidłowo
podłączone.
Przyciski funkcji
Komponent
odtwarzjący (źródło
programu)
ç: Przepływ sygnałów dźwiękowych (Audio)
c: Przepływ sygnałów wizji
Nagrywanie na MiniDisc lub na taśmę
dźwiękową
Korzystając z odbiornika można również wykonywać
nagrania na MiniDiscach lub taśmach kasetowych.
Ewentualnych wskazówek należy szukać w
instrukcjach obsługi odtwarzacza MD lub
magnetofonu.
1 Proszę nacisnąć jeden z przycisków funkcji,
celem wybrania odpowiedniego źródła programu.
2 Proszę odpowiednio przygotować komponent
odtwarzający. Na przykład dysk CD włożyć do
odtwarzacza CD.
Komponent nagrywający
(Odtwarzacz dysków MD,
Magnetofon, Magnetowid)
Jeżeli popełniono pomyłkę
Proszę kilkakrotnie nacisnąć przycisk MENU < lub > do
rozpoczęcia migania znaku, który zostanie zmieniony,
następnie, korzystając z przycisku + lub – wybrać nowy
znak.
Nadawanie nazw pozostałym stacjom nadawczym
Proszę powtórzyć etapy od 2 do 4 włącznie.
Aby anulować nazwę źródła programu
Nacisnąć NAME a następnie przycisk danego źródła
programu. Nacisnąć ENTER aby wymazać nazwę (z
wyjątkiem TUNER).
3 Wsunąć nienagrany dysk lub taśmę do sprzętu
nagrywającego i rozpocząć odtwarzanie na
odpowiednim komponencie zestawu.
4 Proszę rozpocząć nagrywanie na komponencie
nagrywającym a następnie odtwarzanie na
odpowiednim komponencie odtwarzającym.
(ciąg dalszy na następnej stronie)
25
PL
Page 88

Pozostate Operacje
Nagrywanie na kasetę wideo
Wykorzystując odbiornik możecie Państwo nagrać
program telewizyjny lub audycję nadawaną w systemie
cyfrowym. Możecie także dodać ścieżkę dźwiękową,
korzystając z wielu źródeł fonii, podczas montażu
taśmy wideo. Instrukcja obsługi magnetowidu zawiera
szczegółowe informacje na ten temat.
1 Proszę nacisnąć przycisk TV/LD w celu wybrania
źródła programu.
2 Proszę przestawić komponent na gotowość do
odtwarzania. Na przykład proszę włączyć
odbiornik TV oraz tuner TV.
3 Proszę włożyć czystą kasetę wideo do
magnetowidu w celu wykonania nagrania.
4 Proszę rozpocząć nagrywanie na magnetowidzie.
Korzystanie z timera
wyłączania się
Korzystając z kontrolek pilota, użytkownik może
nastawić porę automatycznego wyłączenia
wzmacniacza.
SLEEP
>/.
Możecie Państwo zastąpić ścieżkę dźwiękową
podczas montażu taśmy wideo
W miejscu, w którym chcecie Państwo rozpocząć
dodawanie innej ścieżki dźwiękowej, proszę nacisnąć
inny przycisk funkcyjny (na przykład przycisk CD) i
rozpocząć odtwarzanie. Dźwięk z wybranego
komponentu będzie nagrywany w miejsce oryginalnej
ścieżki dźwiękowej.
W celu wznowienia nagrywania oryginalnej ścieżki
dźwiękowej proszę nacisnąć przycisk funkcyjny TV/LD.
Uwaga
Podczas korzystania z trybu wejściowego 5.1 CH/DVD nie
można nagrywać ani sygnałów fonii, ani sygnałów wizji.
Przy włączonym zasilaniu, nacisnąć SLEEP na pilocie.
Każde naciśnięcie przycisku SLEEP powoduje zmianę
czasu przed wyłączeniem się sprzętu, zilustrowaną
poniżej.
n 2:00:00 n 1:30:00 n 1:00:00 n 0:30:00 n OFF
Po zaprogramowaniu czasu do momentu wyłączenia się
sprzętu oświetlenie okienka konsoli powoli gaśnie.
Porę wyłączenia można dowolnie określić
W pierwszej kolejności nacisnąć przycisk SLEEP na
pilocie, następnie przyciskami kursora (> lub .).
określić porę
Czas spania zmienia się w odstępach 1-minutowych.
Określić można maksymalnie 5 godzin.
Możecie Państwo skontrolować czas
pozostały przed wyłączeniem się
wzmacniacza
Na pilocie nacisnąć SLEEP. Pozostały czas jest
wyświetlany w okienku konsoli.
26
PL
Page 89

Informacje Dodatkowe
Usuwanie usterek
W razie ewentualnych trudności związanych z
użytkowaniem sprzętu, proszę sprawdzić możliwość
usunięcia ich w poniższym spisie. Jeżeli ewentualnej
usterki nie uda się usunąć, należy skontaktować się z
najbliższym punktem usługowym lub punktem
sprzedaży produktów Sony.
Brak dźwięku lub niski poziom dźwięku.
/ Proszę sprawdzić połączenia głośników i
poszczególnych komponentów.
/ Proszę się upewnić, że na odbiorniku
wybrano właściwy komponent.
/ Proszę sprawdzić pozycję przełącznika
SPEAKERS (patrz strona 12).
/ Proszę nacisnąć przycisk MUTING lub
przycisk MUTING, będący na pilocie
zdalnego sterowania, jeżeli zaświeci się
wskaźnik MUTING.
/ Urządzenie zabezpieczające odbiornika
zostało uaktywnione z powodu zwarcia.
(Wskaźnik “PROTECTOR” miga). Proszę
wyłączyć odbiornik, usunąć powody zwarcia i
ponownie włączyć zasilanie.
Dźwięki lewego i prawego kanału są
niezrównoważone lub odwrócone.
/ Proszę sprawdzić połączenia głośników i
komponentów.
/ Proszę wyregulować kontrolkę BALANCE.
Silny przydźwięk lub szum.
/ Proszę sprawdzić połączenia głośników i
poszczególnych komponentów.
/ Proszę się upewnić, że łącza przebiegają z
dala od transformatorów lub silników i w
przynajmniej 3 m odległości (10 stóp) od
odbiornika TV lub oświetlenia
fluorescencyjnego.
/ Odbiornik TV proszę ustawić z dala od
komponentów sprzętu dźwiękowego.
/ Proszę się upewnić, że przewód uziemiający
został podłączony do gniazdka
uziemiającego anteny.
/ Gniazdka oraz wtyczki są zanieczyszczone.
Proszę oczyścić przy pomocy ściereczki
lekko zwilżonej alkoholem.
Funkcja RDS nie działa.
/ Proszę się upewnić, że nastrojono stacje
pasma FM.
/ Proszę wybrać stację nadawczą pasma FM o
silniejszym sygnale transmisyjnym.
Informacje DodatkoweInformacje Dodatkowe
Additional Information
Informacje Dodatkowe
Brak odpowienich wskaźników lub informacji.
/ Proszę zasięgnąć informacji bezpośrednio od
stacji nadawczej czy oferuje kwestionowany
serwis. Jeżeli serwis jest zazwyczaj
oferowany, mógł on zostać tymczasowo
przerwany.
Zakłócenia odbioru stacji przez inną stację
nadawczą lub przerwany dopływ ze źródła
programu/tuner automatycznie rozpoczyna
przeszukiwanie stacji nadawczych.
/ Funkcja EON nie działa. Proszę wyłączyć
funkcję EON aby uniknąć przerywania
aktualnie odbieranego programu.
Nazwa stacji nadawczej nie zostaje wyświetlona w
okienku konsoli.
/ Proszę naciskać przycisk DISPLAY do
momentu wyświetlenia właściwego
wskaźnika stacji nadawczej.
Stacje nadawcze nie zostają dostrojone.
/ Proszę sprawdzić łącza anten. Proszę
wyregulować pozycje anten i ewentualnie
podłączyć antenę zewnętrzną.
/ Niedostateczna siła odbieranego sygnału
(przy automatycznym strojeniu). Proszę
stację dostroić bezpośrednio.
/ Stacje nie zostały zakodowane lub w
międzyczasie wymazane z pamięci sprzętu
(może się zdarzyć przy strojeniu metodą
przeszukiwania zakodowanych stacji).
Proszę ponownie zakodować stacje (patrz
strona 17).
Brak dźwięku lub z głośników tylnych jest
słyszalny jedynie dźwięk o bardzo niskim
poziomie.
/ Wybierz odpowiednie ustawienie środkowe
(patrz str. 10)
/ Wyreguluj odpowiednio głośność głośnika
(patrz str. 10)
/ Upewnij się, że włączyłeś funkcję efektu
Surround.
Brak dźwięku ze środkowego głośnika.
/ Wybierz odpowiednie ustawienie środkowe
(patrz str. 10)
/ Wyreguluj odpowiednio głośność głośnika
(patrz str. 10)
(ciąg dalszy na następnej stronie)
27
PL
Page 90

Informacje Dodatkowe
Nie można uzyskać efektu Surround.
/ Upewnij się, że włączyłeś funkcję efektu
Surround.
/ Upewnij się, że przednie głośniki są
podłączone do gniazda SPEAKERS A.
/ Upewnij się, że przyciski SPEAKERS A i B są
wciśnięte, gdy korzystasz z dwóch zestawów
głośników.
Na ekranie telewizora nie ma obrazu lub obraz jest
niewyraźny.
/ Proszę wybrać prawidłową funkcję na
odbiorniku.
/ Proszę ustawić telewizor dalej od innych
komponentów fonicznych.
Funkcja nagrywania nie działa.
/ Proszę sprawdzić prawidłowość połączeń.
/ Nie można nagrać ścieżki dźwiękowej
poprzez źródło programu, które jest
podłączone do gniazd 5.1 CH/DVD.
Pilot nie działa.
/ Proszę skierować pilot, na umieszczony na
odbiorniku, czujnik zdalnego sterowania g.
/ Proszę usunąć ewentualne przeszkody na
drodze pomiędzy pilotem a odbiornikiem.
/ Proszę wymienić baterie pilota jeżeli ich moc
znacznie spadła.
/ Proszę się upewnić, że wybrano odpowiednią
funkcję na pilocie.
28
PL
Page 91

Informacje DodatkoweInformacje Dodatkowe
Additional Information
Informacje Dodatkowe
Dane Techniczne
Wzmacniacz
Moc wyjściowa
Tryb
stereofoniczny
Tryb
Surround
Tryb 5.1 CH/
DVD
Odpowiedź
częstotliwościowa
Wejścia
CD,
5.1 CH/
DVD,
MD/
TAPE,
TV/LD,
VIDEO
Wyjścia
Wyciszanie
BASS BOOST
(DIN 1 kHz, 4 omów)
100 W + 100 W
(DIN 1 kHz, 4 omów)
Przednie: 100 W/ch
Środkowe*: 100 W
(tylko dla efektu
PRO LOGIC)
Tylne*: 100 W/ch
(DIN 1 kHz, 4 omów)
Przednie: 100 W/ch
Środkowe*: 100 W
Tylne*: 100 W/ch
TV/LD, CD, MD/TAPE,
VIDEO, 5.1 CH/DVD:
10 Hz - 50 kHz ±1 dB
Czułość
150 mV
Impedancja
kilohmów
MD/TAPE REC OUT:
Napięcie: 150 mV,
Impendancja
kilohmów
VIDEO AUDIO OUT:
Napięcie: 150 mV,
Impendancja
kilohmów
WOOFER
Napięcie: 2 V
Impendancja
kilohmów
PHONES: przyjmuje
słuchawki o niskiej i
wysokiej imnpendancji
Pełne wyciszanie
+8 dB przy 70 Hz
50
96 dB
: 10
: 10
: 1
S/N
Tuner
FM stereo, tuner superheterodyczny
FM/AM
Tuner FM
Zakres strojenia
Gniazdka
antenowe
Częstotliwość
pośrednia
Czułość
Czułość
używalna
S/N
Dystorcja
harmoniczna
przy 1 kHz
Rozdzielczość
Odpowiedź
częstotliwościowa
Wyborczość
87,5 - 108,0 MHz
75 ohmów,
niezrównoważone
10,7 MHz
monofoniczna:
18,3 dBf,
2,2 µV/75 ohmów
stereofoniczna:
38,3 dBf,
22,5 µV/75 ohmów
11,2 dBf,
1 µV/75 ohmów (IHF)
monofoniczna: 76 dB
stereofoniczna: 70 dB
monofoniczna: 0,3 %
stereofoniczna: 0,5 %
45 dB przy 1 kHz
30 Hz - 15 kHz dB
60 dB przy 400 kHz
+0.5
–2
Tuner AM
Zakres strojenia
Antena
Częstotliwość
pośrednia
Czułość używalna
S/N
Dystorcja
harmoniczna
Wyborczość
531 - 1602 kHz
Loop aerial
450 kHz
50 dB/m (przy 999 kHz)
54 dB (przy 50 mV/m)
0,5 % (50 mV/m, 400 Hz)
35 dB
Wideo
Wejścia
Wyjścia
VIDEO, TV/LD, 5.1 CH/
DVD:
1 Vp-p 75 ohmów
VIDEO, MONITOR:
1 Vp-p 75 ohmów
Ogólne
System
Zapotrzebowanie
mocy
Zużycie mocy
Kontakty AC
Wymiary:
Waga (około)
Załączony
osprzęt
Podane dane techniczne zostały
uzyskane w następujących warunkach:
230 VAC, 50 Hz.
* W zależności od nastawu pola
akustycznego oraz źródła, może
nastąpić wyłączenie dźwięku.
Wygląd oraz dane techniczne mogą
ulec zmianie bez uprzedzenia.
Tunera: PLL syntezator o
zamkniętym systemie
cyfrowo- kwarcowym
Wzmacniacz wstępny:
Korektor typu NF o
niskim stopniu
zakłóceń
Wzmacniacz mocy:
czysto-uzupełniający
SEPP
230 V AC, 50/60 Hz
195 W
Komutowane 100 W max
430 x 157 x 366 mm
10,8 kg
Antena przewodowa FM (1)
Antena ramowa AM (1)
Pilot zdalnego sterowania
(pilot) (1)
Instrukcje Postugiwania się
Pilotem (1)
Baterie, rozmiar AA (R6) (2)
TONE
±8 dB przy 100 Hz i
10 kHz
29
PL
Page 92

Informacje Dodatkowe
Słowniczek
Efekt Surround
Dźwięk łączący w sobie trzy elementy:
bezpośredni dźwięk, wcześnie reflektowany
dźwięk (wczesne odbicie) i rewerberacyjny
dźwięk (pogłos). Akustyka pomieszczenia, w
którym słuchasz muzyki wpływa na to, jak są
słyszalne te trzy elementy- Te elementy są
skombinowane w taki sposób, że możesz się
tak czuć, jak gdybyś był w sali koncertowej.
• Rodzaje dźwięku
Wczesne odbicie
Bezpośredni
dźwięk
• Przemiana dźwięku z tylnych
głośników
Bezpośredni dźwięk
Poziom
Okres wczesnego odbicia
Wczesne
odbicie
Dolby Pro Logic Surround
Jako jedną z metod dekodowania Dolby
Surround, Dolby Pro Logic Surround
produkuje cztery kanały z dwu-kanałowego
dźwięku. W porównaniu z poprzednim
systemem Dolby Surround, Dolby Pro Logic
Surround reprodukuje dźwięk panoramiczny
z lewej-do-prawej strony w sposób bardziej
naturalny i dokładniej lokalizuje każde źródło
dźwięku. Aby w pełni wykorzystać system
Dolby Pro Logic Surround, należy
dysponować dwoma głośnikami tylnymi i
jednym głośnikiem środkowym. Głośniki tylne
przekazują dźwięk monofoniczny.
Ustawienie środkowe
Ustawienie głośników w celu polepszenia
efektu Dolby Pro Logic Surround. Aby
uzyskać optymalny efekt Surround wybierz
jedną z czterech poniższych możliwości
ustawienia, odpowiadającą Twojemu
systemowi głośników.
• Ustawienie NORMAL
Wybierz ustawienie NORMAL, jeżeli masz
przednie głośniki i tylne głośniki oraz mały
głośnik środkowy. Ponieważ mały głośnik
środkowy nie jest w stanie wytworzyć
wystarcząco tonów niskich, tony niskie ze
środkowego kanału są przekazywane na
wyjście poprzez głośniki przednie.
Pogłos
Pogłos
Czas
Przedni
głośnik (L)
Tylny głośnik
(L)
Środkowy
głośnik
Przedni
głośnik (R)
Tylny głośnik
(R)
• Ustawienie WIDE
Wybierz ustawienie WIDE, jeżeli masz
przednie głośniki i tylne głośniki oraz duży
głośnik środkowy. Wybierając ustawienie
WIDE możesz w pełni korzystać z
doskonałego dźwięku w systemie Dolby
Surround.
Przedni
głośnik (L)
Tylny głośnik
(L)
Środkowy
głośnik
Przedni
głośnikr (R)
Tylny głośnik
(R)
• Ustawienie PHANTOM
Wybierz ustawienie PHANTOM, jeżeli
masz przednie głośniki i tylne głośniki i nie
masz żadnego głośnika środkowego.
Dźwięk z kanału środkowego jest
przekazywany na wyjście poprzez głośniki
przednie.
Przedni
głośnik (L)
Tylny głośnik
(L)
Przedni
głośnik (R)
Tylny głośnik
(R)
• Ustawienie 3 STEREO
Wybierz ustawienie 3 STEREO, jeżeli masz
przednie głośniki i tylne głośniki i nie masz
żadnego głośnika środkowego. Dźwięk z
kanału środkowego jest przekazywany na
wyjście poprzez głośniki przednie, dzięki
czemu możesz w pewnym stopniu
rozkoszować się efektem Surround nawet
nie posiadając głośników tylnych.
Przedni
głośnik (L)
Środkowy
głośnik
Przedni
głośnik (R)
Czas opóźnienia
Czas opóźnienia pomiędzy dźwiękiem z
efektem Surround z przednich głośników i
dźwiękiem z efektem Surround z tylnich
głośników. Poprzez wyregulowanie czasu
opóźnienia dla tylnich głośników możesz
uzyskać wrażenie bycia “w centrum
zdarzeń”. Przedłuż trochę czas opóźnienia,
jeżeli ustawiłeś tylnie głośniki w małym
pomieszczeniu lub w pobliżu miejsca, w
którym słuchasz muzyki, albo skróć go, jeżeli
ustawiłeś te głośniki w dużym pomieszczeniu
lub w dużym odstępie od miejsca, w którym
słuchasz muzyki.
Dolby Digital (AC-3)
Ten format ścieżki dźwiękowej dla sal
kinowych jest systemem bardziej
zaawansowanym od Dolby Pro Logic
Surround. W tym formacie, tylne głośniki
przekazują dźwięk stereofoniczny o
poszerzonym zakresie częstotliwości i
dysponują niezależnym kanałem subwoofer
dla głębokich basów. Format ten jest również
znany pod określeniem “5.1” ponieważ kanał
subwoofer liczy się jako 0.1 (jego funkcja
polega wyłącznie na przekazywaniu efektu
głębokich basów). W tym formacie,
nagrywanie wszystkich sześciu kanałów
następuje z osobna aby umożliwić uzyskanie
optymalnego rozdzielenia kanałów. Ponadto,
ponieważ sygnały są przetwarzane cyfrowo,
obniża się możliwość degradacji sygnałów.
Nazwa “AC-3” pochodzi od trzeciej w
kolejności rozwoju technologicznego,
metody kodowania dźwięków rozwiniętej
przez Dolby Laboratories Licensing
Corporation.
5.1 CH/DVD
Te gniazdka służą wejściowym,
dekodowanym sygnałom audio, systemu
Dolby Digital (AC-3), umożliwiając
korzystanie z dźwięku surround kanału 5.1.
Do gniazdek można podłączyć Dolby Digital
(AC-3) dekoder odtwarzacza DVD ze
zintegrowanym dekoderem AC-3.
Zakodowane stacje radiowe
Radiowe stacje nadawcze, które mogą
zostać zapisane w pamięci odbiornika. Po
“zakodowaniu” stacji radiowej, nie musisz jej
ponownie dostrajać. Każda z zakodowanych
stacji jest przyporządkowana do oddzielnego
zaprogramowanego numeru, dzięki czemu
możesz ją szybko przywołać.
30
PL
Page 93

Indeks
A, B, C, D
Funkcja Auto-betical select 18
Automatyczne strojenie 16
Czas opóźnienia 23, 30
Dolby Pro Logic
Surround 10, 21
ustawienie środkowe 10, 30
Ton próbny 10
,
E, F, G, H, I
Efekt Surround 21
EON 19
Głośniki
montaż 7
ustawienie 10
wybór systemu głośników 12
K, L, M
Kodowanie nadawczych stacji
radiowych 17
Kopiowanie. Patrz: Nagrywane
Montaż
anten 5
głośników 7
głównego kabla zasilania 9
komponentów
dźwiękowych 5
komponentów wizualnych 6
opis wstępny 4
Montaż anten 5
Montaż komponentów
dźwiękowych 5
Montaż komponentów
wizualnych 6
Montaż nagrania. Patrz:
Nagrywanie
N, O
Nadawanie nazw
zakodowanym w pamięci
stacjom 25
Nagrywanie
na taśmę magnetofonową
25
Odbiór audycji
bezpośrednio 16
korzystając z kodu
pamięciowego 17
P, Q, R
Podłączanie. Patrz: Montaż
Pole akustyczne
Przystosowanie do potrzeb
użytkownika 23
Wybór pola 22
Poziom efektów 23
PTY 20
RDS 13
Regulacja
czasu opóźnienia 23, 30
głośności 12
luminacji wyświetlacza 9
natężenia dźwięku
głośników 10
poziomu efektu
akustycznego 23
Rozpakowanie 4
S, T
Strojenie. Patrz: Odbiór audycji
Strojenie bezpośrednie 16
Strojenie zakodowanaych w
pamięci stacji nadawczych
12
Szybki przewodnik orientacyjny
32
Tryb NORMAL 10, 30
Tryb PHANTOM 10, 30
Tryb 3 STEREO 10, 30
Tryb WIDE 10, 30
Tylny panel 5, 6, 7, 9, 31
U, V
Ustawienie środkowe 10, 30
ustawienie NORMAL 10, 30
ustawienie PHANTOM 10,
30
ustawienie 3 STEREO 10, 30
ustawienie WIDE 10, 30
Usuwanie usterek 27
W, X, Y
Wyszukiwanie
radiowych stacji nadawczych
16
zakodowanych w pamięci
stacji 17
Wyświetlacz 13
Z, Ź, Ż
Zapisywanie pozycji stacji
radiowych w pamięci. Patrz:
Kodowanie
Źródło audycji wybór 12
31
PL
Page 94

Opis Tylnego Panela
14567 89!
º
!¡
1 ANTENNA (AM/FM)
2 CD
3 MD/TAPE (Dysk MD/Taśma)
4 5.1 CH/DVD
5 TV/LD
32
6 VIDEO
7 MONITOR
8 WOOFER
9 SPEAKERS REAR
!™!£
0 SPEAKERS CENTER
!¡ Główny kabel zasilania
!™ SWITCHED AC OUTLET
!£ SPEAKERS FRONT (A/B)
PL
32
Page 95

Szybki Przewodnik Orientacyjny
Odbiór Audycji
(bezpośrednie strojenie)
Przykład: Odbiór pasma
FM 102.50 MHz
TUNER
FM/AM
Wybrać FM.
Select FM.
DIRECT
10250
Wskáznik
MHz
Zapisywanie
Radiowych Stacji
Nadawczych
Przykład: Zapisanie
Stacji jako A7
TUNER
Tune in the station you want.
Dostroić odpowiednią stację.
MEMORY
SHIFT
Wybrać A.
Select A.
7
Wybór
odpowiedniego
komponentu
Przykład 1: Odtwarzanie
dysku CD
CD
Włączyć odtwarzacz dysków CD.
Turn on the CD player.
Rozpocząć odtwarzanie.
Start playing.
Przykład 2: Oglądanie
taśmy video
VIDEO
Włącz magnetowid.
Turn on the VCR.
Rozpocząć odtwarzanie.
Przeszukiwanie
Stacji Nadawczych
(Automatyczne strojenie)
Przykład: Przeszukiwanie
stacji FM
TUNER
FM/AM
–+
TUNING
–+
TUNING
Select FM.
Wybrać FM.
To continue
Kontunuacja
scanning.
przeszukiwania.
Odbiór Zapisanych
w Pamięci Stacji
Przykład: Odbiór stacji o
numerze A7
TUNER
SHIFT
Wybrać A.
Select A.
7
Przeszukiwanie
Zapisanych w
Pamięci Stacji
TUNER
Wykorzystanie
wstępnie
zakodowanych
pozycji
dźwiękowych
Przykład: Oglądanie filmu
nagranego na
dysku
laserowym w
systemie Dolby
Surround
TV/LD
SOUND FIELD
ON/OFF
SOUND FIELD
–
MODE
Select PRO
+
Wybierz
MODE
LOGIC.
PRO LOGIC.
Sony Corporation Printed in Malaysia
PRESET/
–
PTY SELECT
Włącz odbiornik LD.
Turn on the LD player.
+
Rozpocząć odtwarzanie.
33
PL
 Loading...