

FM Ster eo
FM-AM Tuner
3-810-504-22(1)
Operating Instructions
Mode d’emploi
Manual de Instrucciones
EN
F
E
C
EN
1
ST-JX661
ST-SE200
©1996 by Sony Corporation

WARNING
Precautions
Welcome!
To prevent fire or shock
hazard, do not expose
the unit to rain or
moisture.
To avoid electrical shock,
do not open the cabinet.
Refer servicing to
qualified personnel only.
- For ST-JX661 IMPORTANT: Never connect two mains
leads into a single mains plug.
If the power switch is kept depressed,
you can turn on and off the components
by only pressing the SYSTEM POWER
switch on TA-AV561 or TA-AV661.
On safety
• Should any liquid or solid object fall
into the unit, unplug the unit and
have the unit checked by qualified
personnel before operating it any
further.
On power sources
• Before operating the unit, be sure that
the operating voltage of your unit is
identical with that of your local
power supply.
• Unplug the unit from the wall outlet
if it is not to be used for an extended
period of time. To disconnect the
cord, pull it out by grasping the plug.
Never pull the cord itself.
• The unit is not disconnected from the
AC power source (mains) as long as it
is connected to the wall outlet, even if
the unit itself has been turned off.
• AC power cord must be changed only
at the qualified service shop.
On placement
• Place the unit in a location with
adequate ventilation to prevent heat
buildup and prolong the life of its
components.
• Do not place the unit near heat
sources, or in a place subject to direct
sunlight, excessive dust or
mechanical shock.
• Do not place anything on top of the
cabinet which might block the
ventilation holes and cause
malfunctions.
Thank you for purchasing the Sony FM
Stereo FM/AM Tuner. Before operating
the unit, please read this manual
thoroughly and retain it for future
reference.
Convention
The following icon is used in this
manual:
Indicates hints and tips for
making the task easier.
On cleaning the cabinet
• Clean the cabinet, panels and controls
with a soft cloth lightly moistened
with a mild detergent solution. Do
not use any type of abrasive pad,
scouring powder or solvent such as
alcohol or benzine.
On repacking
• Do not throw away the carton and the
packing material. This makes an
ideal container when transporting the
unit. When shipping the unit, repack
it as it was packed at the factory.
If you have any question or problem
concerning your unit that is not covered
in this manual, please consult your
EN
2
nearest Sony dealer.

TABLE OF CONTENTS
Getting Started
Unpacking 4
Hooking up the System 4
Tuner Operations
Receiving Broadcasts 6
Presetting Radio Stations 6
Recalling Preset Radio Stations 7
Additional Information
Troubleshooting 8
Specifications 8
Index 8
EN
EN
3
Getting Started
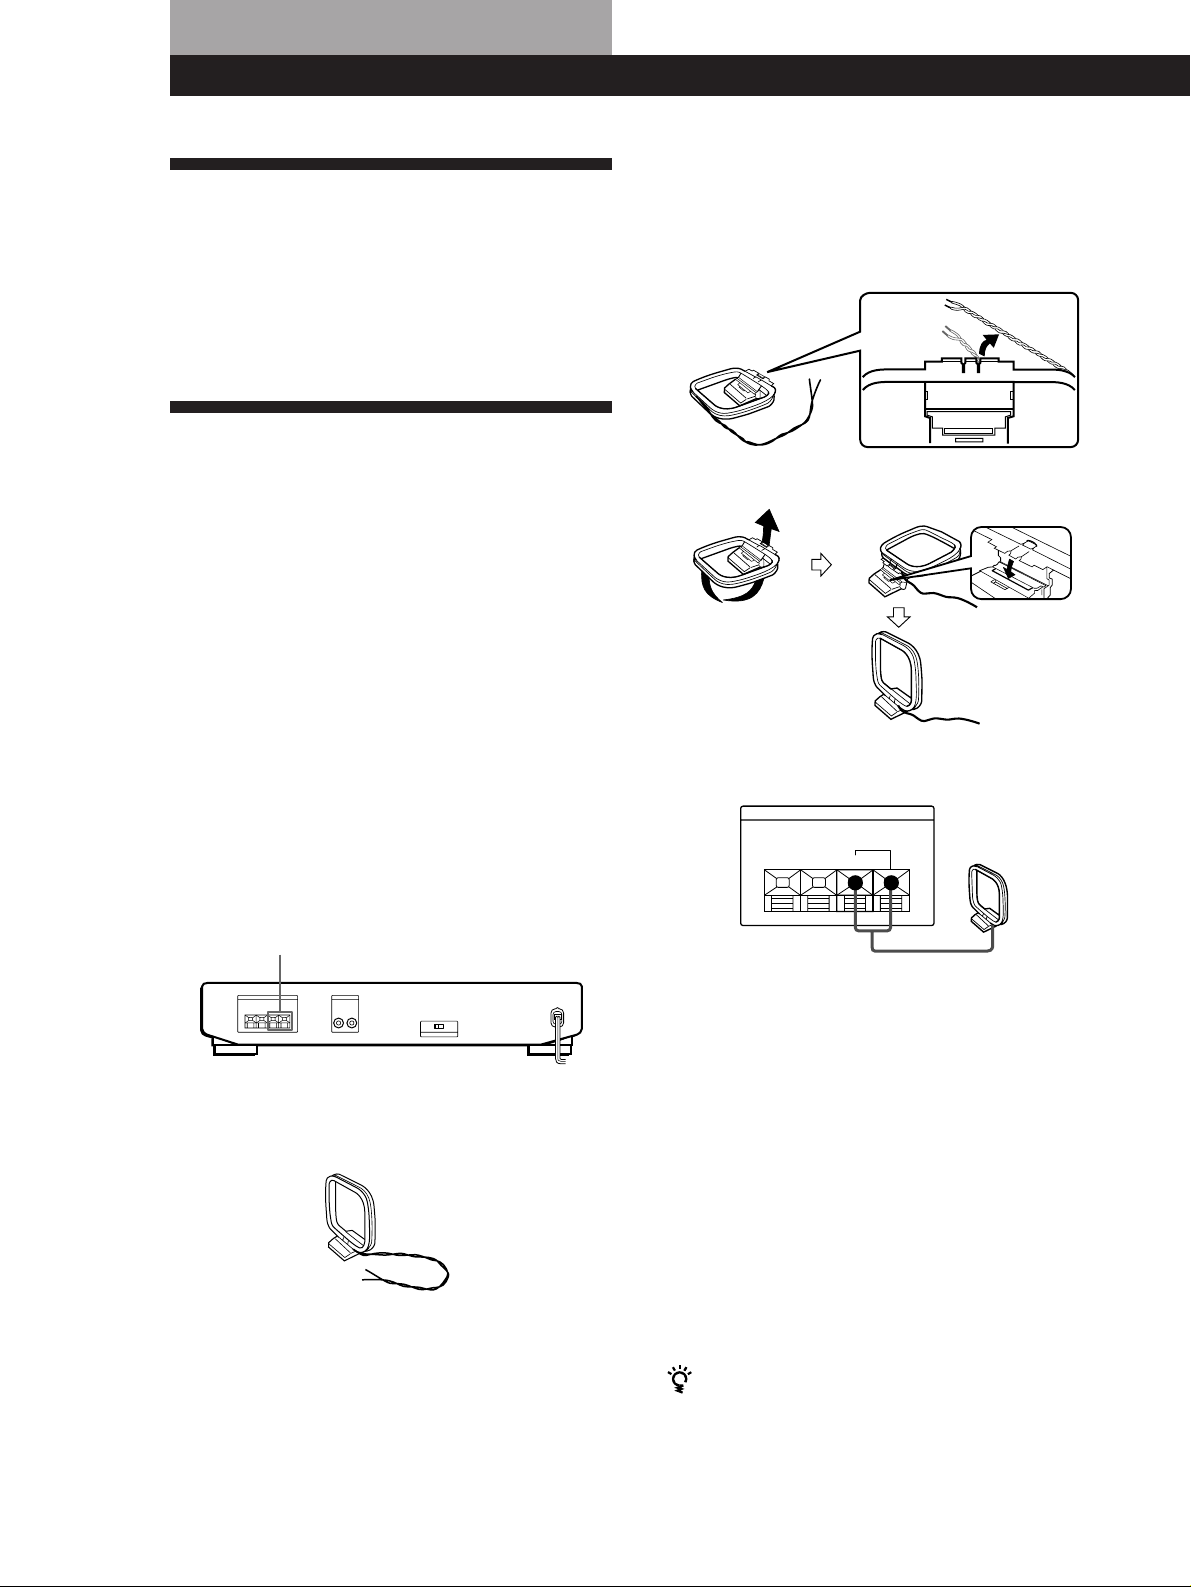
Unpacking
Check that you received the following items with the
tuner:
• Audio cord (1)
• AM loop aerial (1)
• FM wire aerial (1)
Hooking up the System
Before you get started
• Turn off the power to all components before making
any connections.
• Do not connect the mains lead until all of the
connections are completed.
• Be sure to make connections firmly to avoid hum
and noise.
• When connecting an audio cord, be sure to match the
color-coded pins to the appropriate jacks: White (left)
to White; and Red (right) to Red.
2 Unwrap 3 lengths of the braided lead wire from
around the frame of the aerial. Be careful to
unwrap only the braided section of the lead wire.
Do not unwrap more than 3 lengths of the lead
wire. Also, be careful not to unbraid the lead wire.
3 Assemble the supplied aerial as shown below.
4 Connect the AM loop aerial to the AM terminals
on the back of this unit.
AM aerial hookups
This section describes how to connect the supplied AM
loop aerial. For the specific location of the AM
ANTENNA terminals, see the illustration below.
AM ANTENNA
What will I need?
• AM loop aerial (supplied) (1)
1 Before assembling the supplied aerial, pull the
lead wire out from the slot in the aerial frame.
ANTENNA
AM
y
AM loop aerial
5 Adjust the aerial direction for the best reception.
The AM loop aerial has a directivity which detects
the signal from some angles more strongly than
others. Set the aerial to the orientation which
provides the best receiving condition.
If a high pitched noise (beat noise) occurs when
recording AM broadcasts, adjust the position of
the AM loop aerial so that the noise disappears.
If you live in a building constructed of reinforced
concrete, or with a steel frame, you may not be
able to achieve good reception since the radio
waves become weaker indoors. In this case, we
recommend connecting an optional aerial such as
the Sony AN-1.
For stations that are difficult to receive
Try repositioning the loop aerial while tuning. Placing
the supplied AM loop aerial near a window will help
improve reception quality.
EN
4
Getting Started
TUNER
RL
RL
LINE OUT
FM aerial hookups
With an FM outdoor aerial, you can obtain a higher FM
broadcast sound quality. We recommend that you use
the supplied FM wire aerial only temporarily until you
install an FM outdoor aerial. For the specific location of
the FM ANTENNA terminals, see the illustration
below.
FM ANTENNA
What will I need?
• FM wire aerial (supplied) (1)
• FM outdoor aerial (not supplied) (1) and 75-ohm coaxial
cable (not supplied) (1)
Connect the supplied FM wire aerial or an FM outdoor
aerial (not supplied) to the FM terminals on the back of
this unit.
Amplifier hookups
Connect the tuner to an amplifier. Be sure to turn off
the power to both components before connection. For
the specific location of the terminals, see the illustration
below.
LINE OUT
What cables will I need?
• Audio cord (supplied) (1)
White (L)
Red (R)
Connect the white plugs to the white (L) jacks and the red
plugs to the red (R) jacks. Insert the plugs completely into
the jacks; incomplete connections may cause noise.
Tuner
Amplifier
White (L)
Red (R)
FM wire aerial
ANTENNA
FM
75Ω
y
FM outdoor aerial
ANTENNA
FM
75Ω
y
Connecting a ground wire
If you connect an outdoor aerial, be sure to connect a
ground wire (not supplied) to the AM ANTENNA y
terminal (in addition to the AM loop aerial) for
lightning protection.
Setting the voltage selector
Check that the voltage selector on the rear panel of the tuner
is set to the local power line voltage. If not, set the selector
to the correct position using a screwdriver before connecting
the mains lead.
110-120 V 220-240 V
Mains lead hookups
ST-JX661:
Connect the mains lead to an AC OUTLET on the rear panel
of TA-AV561 or TA-AV661 after completing all of the
previous connections.
ST-SE200:
Connect the mains lead to a wall outlet after completing all
of the previous connections.
to an AC OUTLET on TA-AV561
or TA-AV661 (ST-JX661)
to a wall outlet (ST-SE200)
/
EN
5
Tuner Operations
Receiving Broadcasts
This section describes various ways to tune in AM and
FM broadcasts. Before tuning, be sure to connect the
supplied AM and FM aerials.
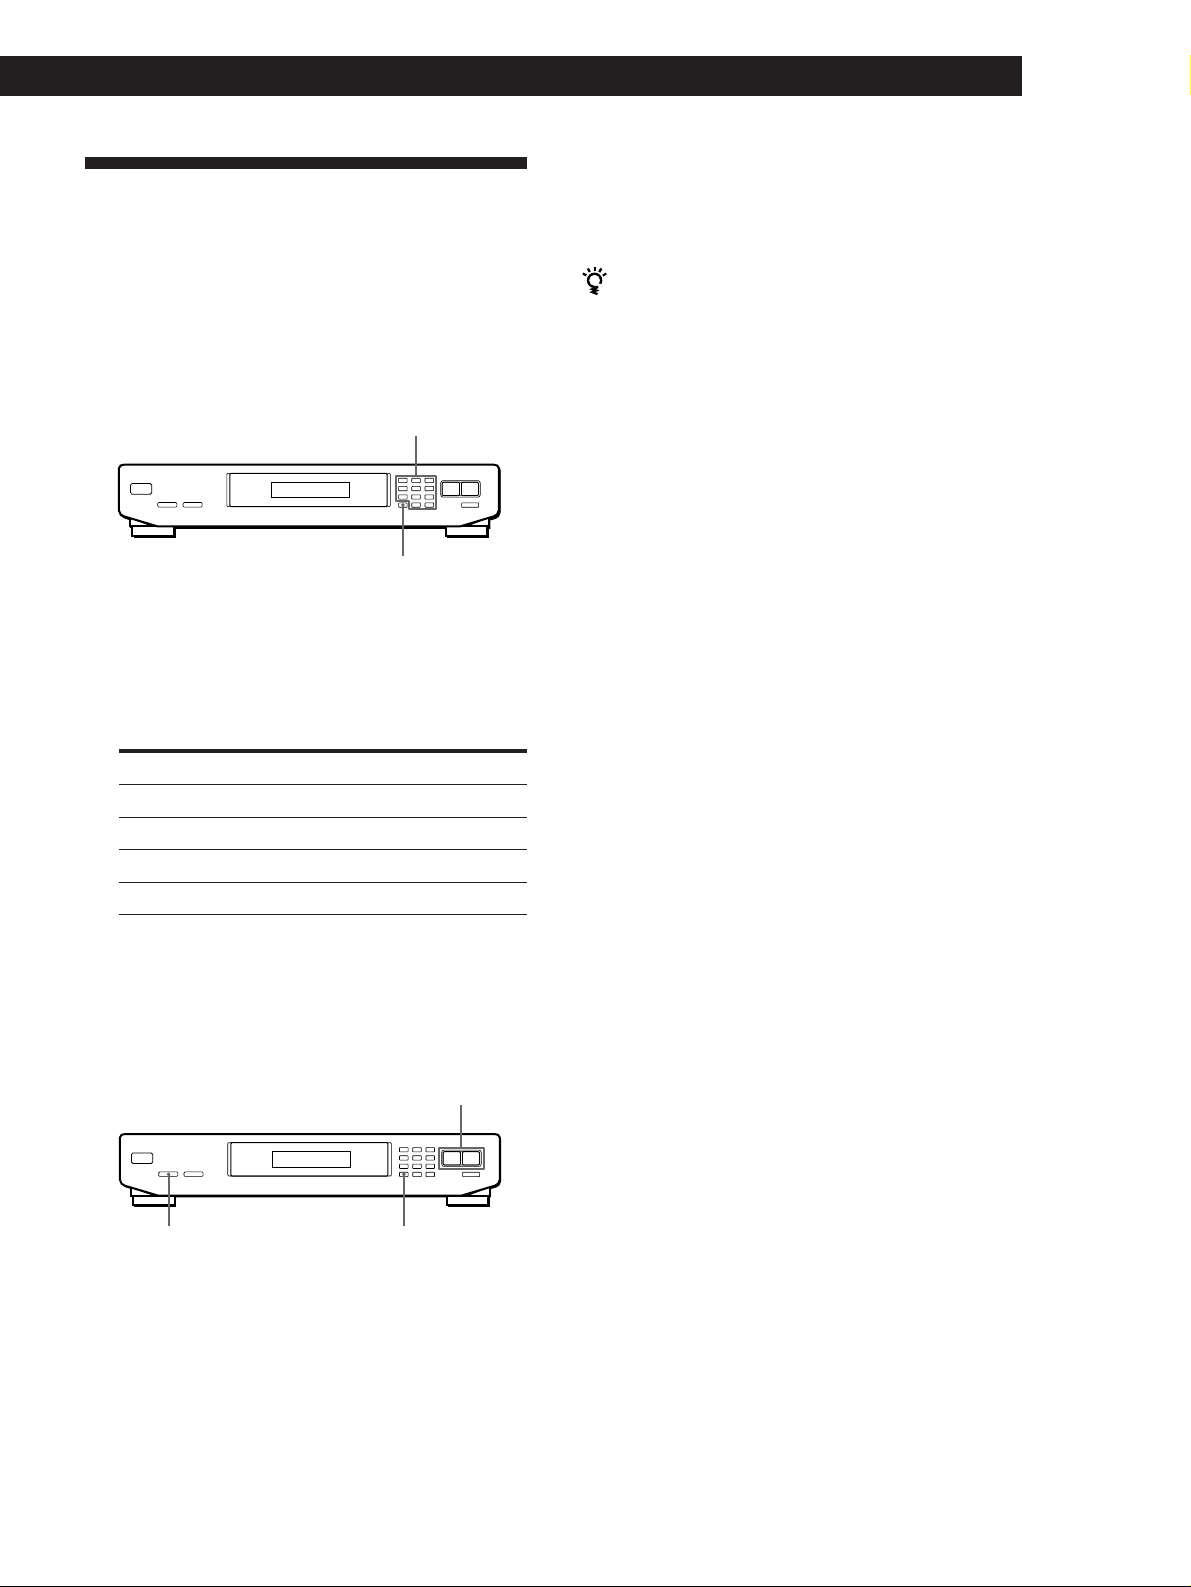
TUNING (+/–)POWER
STEREO/MONO
1 Turn on the amplifier and select the TUNER
mode.
2 Press POWER to turn on the tuner.
3 Press BAND to select FM or AM.
4 Press TUNING + or –.
Press + for a higher frequency
Press – for a lower frequency
For automatic tuning
Hold down TUNING + or – for about 1 second and
release it when the frequency numbers start changing.
When the tuner locates a station, it stops automatically
and “TUNED” appears in the display.
BAND
Presetting Radio Stations
You can store up to 20 FM and 10 AM stations.
Number buttons
MEMORY
1 Tune in the FM or AM station you wish to store.
2 Press MEMORY.
“MEMORY” and the last memorized number
appear in the display.
3 Use the number buttons (1-9, 0/10 and >10) to
select a preset number.
To select press
55
10 0/10
15 >10 / 1 / 5
20 >10 / 2 / 0/10
The tuner stores the station at the preset number
you specified.
To stop automatic tuning before a station is located
Press TUNING + or –.
For manual tuning
Press TUNING + or – repeatedly to select the frequency
you desire. "TUNED" appears when a station is tuned
in.
4 Repeat steps 1 through 3 to store other stations.
If “MEMORY” goes out from the display before you
select the preset number
Press MEMORY again.
5 Repeat step 4 until the desired station is received.
When an FM stereo program is noisy
When the tuner receives an FM stereo program, the
STEREO indicator lights in the display window. If the
stereo program is noisy, press STEREO/MONO to
change the tuning mode over to MONO. This eliminates
the stereo effect, but the noise will be greatly reduced.
When you tune in AM stations
Adjust the direction of the AM loop aerial for optimum
reception.
EN
6
Tuner Operations
Recalling Preset Radio Stations
This tuner lets you recall preset stations directly, by
entering the number of the preset you desire, or by
scanning the preset memory.
Recalling a preset station directly
Number buttons
BAND
1 Press BAND to select either FM or AM.
2 Use the number buttons (1-9, 0/10 and >10) to
select the preset number you desire.
4 Press MEMORY SCAN again as soon as the
station you desire is tuned in.
This stops the memory scan.
If a certain preset station cannot be tuned by
scanning
Preset stations with weak signals may be skipped.
Tune in the station manually.
To select press
55
10 0/10
15 >10 / 1 / 5
20 >10 / 2 / 0/10
3 Repeat steps 1 and 2 to recall other stations.
Scanning the preset memory
TUNING (+/–)
MEMORY SCAN
BAND
1 Press BAND to select FM or AM.
2 Press MEMORY SCAN.
A preset number flashes in the display.
3 Press TUNING + or –.
Press + to scan higher preset numbers.
Press – to scan lower preset numbers.
Each station received will be heard for about four
seconds.
EN
7

Additional Information
Troubleshooting
If you experience any of the
following difficulties while using the
tuner, use this troubleshooting
guide to help you remedy the
problem. Should any problem
persist, consult your nearest Sony
dealer.
There’s no sound.
/ Connect the aerials.
/ Set the source setting on
the amplifier to TUNER.
You cannot tune in a frequency.
/ Adjust the position of the
aerial.
/ Connect an external aerial
for FM broadcasts.
/ Preset the stations again if
you've moved.
There is severe hum and/or
background noise.
/ Adjust the position or
direction of the aerial.
/ Tune to a correct
frequency.
/ Connect an external aerial
for FM broadcasts.
/ Move the tuner away from
the source of the noise.
Intermediate frequency
Sensitivity
Usable sensitivity (IHF)
S/N
Harmonic distortion
Frequency response
Separation
Selectivity
Output
AM tuner section
Frequency range
Intermediate frequency
Usable Sensitivity
S/N
Harmonic distortion
10.7 MHz
at 50 dB quieting
(mono) 22.1 dBf,
7 µV/75Ω
(stereo) 42.1 dBf,
70 µV/75Ω
19.5 dBf, 5 µV/75Ω
at 75 kHz deviation
80 dB (mono),
75 dB (stereo)
at 1 kHz
0.3% (mono),
0.5% (stereo)
30 Hz - 15 kHz
(+0.5/–2.0 dB)
35 dB at 1 kHz
55 dB at 400 kHz
at 75 kHz deviation
775 mV, 4.7 kilohms
531 - 1,602kHz
(9 kHz step)
530 - 1,710 kHz
(10 kHz step)*
450 kHz
(with AM loop
aerial)
500 µV/m
54 dB (50 mV/m,
999 kHz)
0.5% (50 mV/m,
400 Hz)
Design and specifications are subject to
change without notice.
* You can change the AM tuning interval
to 10 kHz. After tuning in any AM
station, turn off the tuner once. While
holding down the MEMORY button,
press the POWER button. All preset
stations will be erased when you change
the interval. To reset the interval to
9 kHz, repeat the same procedure.
Index
A, B
Aerial hookups
AM 4
FM 5
Amplifier hookups 5
Automatic tuning 6
C, D, E, F, G
Connecting. See Hookups
H, I, J, K, L
Hookups
AM aerial 4
amplifier 5
FM aerial 5
Mains lead 5
M, N, O
Manual tuning 6
Memory 6, 7
The appropriate display or
information does not appear.
/ Turn the power off. After
turning the power back on,
press MEMORY SCAN and
>10 simultaneously. This
empties any frequencies
stored in the preset
memory.
Specifications
Selectivity
General
Power requirements
Power consumption
Dimensions
50 dB
Australian model:
240 V AC,
50 Hz
Other models:
110–120 V or
220–240 V AC,
50/60 Hz
Adjustable with the
voltage selector
7 W
430 x 82 x 295 mm
(w/h/d)
P, Q
Presetting 6
Preset tuning 7
R
Receiving broadcasts 6
Receiving preset stations 7
S
Storing radio stations 6
T, U
Troubleshooting 8
Tuning. See Receiving
FM tuner section
Frequency range
Aerial terminals
EN
8
87.5 - 108 MHz
75 ohms,
unbalanced
Mass
Supplied accessories
Approx.2.3 kg
Audio cord (1)
AM loop aerial (1)
FM wire aerial (1)
broadcasts
V, W, X, Y, Z
Voltage selector 5
 Loading...