

Page 1
4-097-468-01(1)
Speaker System
取扱説明書
Operating Instructions
Mode d’emploi
Bedienungsanleitung
Istruzioni per I’uso
Manual de instrucciones
使用说明书
お買い上げいただきありがとうございます。
電気製品は、安全のための注意事項を守らないと、
火災や人身事故になることがあります。
この取扱説明書には、事故を防ぐための重要な注意事項と製品の
取り扱いかたを示してあります。この取扱説明書をよくお読みの
うえ、製品を安全にお使いください。お読みになったあとは、
いつでも見られるところに必ず保管してください。
SS-SP20B
2003 Sony Corporation
Page 2
安全のために
ソニー製品は安全に充分配慮して設計されています。しか
し、電気製品は、まちがった使 いかた を すると、火災などに
より死 亡や大けがなど人身事故につながることがあり、危
険です。
事故を防ぐために次のことを必ずお守りください。
安全のための注意事項を守る
4ページの注意事項をよくお読みください。製品全般の注
意事項が記されています。
6ページの「本機の性能を保持するために」もあわせてお
読みください。
定期点検をする
1年に1度は、スピーカーコードに傷みがないか、接 続し て
いるディスプレイ またはアンプなどのスピー カー端子にホコ
リがたまって いないか、など を点検 してください。
故障したら使わない
すぐに、お買い上げ店にご連絡ください。
警告表示の意味
取扱説明書および製品で
は、次のような表示をして
います。表示の内容をよく
理解してから本文をお読
みく ださい。
この表示の注意事項を守
らないと、火災などにより
死亡や大けがなど人身事
故につながることがありま
す。
この表示の注意事項を守
らないと、火災やその他
の事故に よりけがを したり
周辺の物品に損害を与え
たりするこ とがあり ます。
注意を促す記号
万一、異常が起きたら
・ 煙が出たら
・ 異常な音、においが
したら
・ 内部に水、異物が
入ったら
・ 製品を落としたり、
キャビネットを破損
したときは
2
1 接続しているディス
プレイ またはアンプ
などの電源を切る。
2 スピーカーコードをス
b
ピーカーから抜く 。
3 お買い上げ店に連
絡する。
行為を禁止する記号
Page 3

目次/Table of Contents/Table des matières/Inhalt/
Indice/Indice/目录
日本語
........................................................... 4
........................................................... 4
本機の性能を保持するために......................... 6
本機の特長 ..................................................... 10
付属部品表 ..................................................... 11
各部の名称 ..................................................... 12
スピーカーを接続する..................................... 13
アフターサービス............................................. 20
仕様 ................................................................. 21
English
WARNING................................................5
Precautions ................................................ 6
Features ...................................................10
Table of Accessories................................11
Parts Identification...................................12
Attaching the Speakers ............................13
Specifications .......................................... 21
Français
AVERTISSEMENT ..................................5
Précautions ................................................ 6
Caractéristiques .......................................10
Table des accessoires............................... 11
Identification des composants .................12
Montage des haut-parleurs ...................... 13
Spécifications .......................................... 21
Deutsch
ACHTUNG ...............................................5
Sicherheitsmaßnahmen..............................6
Merkmale und Funktionen ...................... 10
Zubehör-Tabelle ......................................11
Lage und Funktion der Teile und
Bedienelemente........................... 12
Anbringen der Lautsprecher .................... 13
Technische Daten ....................................21
Español
ADVERTENCIA....................................... 5
Precauciones .............................................. 6
Características..........................................10
Tabla de accesorios..................................11
Identificación de los componentes ..........12
Fijación de los altavoces.......................... 13
Especificaciones ......................................21
Italiano
AVVERTENZA ........................................5
Precauzioni ................................................6
Caratteristiche..........................................10
Elenco degli accessori .............................11
Identificazione delle parti ........................ 12
Fissaggio dei diffusori ............................. 13
Caratteristiche tecniche ........................... 21
中文
警告 ............................................................... 5
注意事项 ........................................................6
特点 ............................................................. 10
附件表..........................................................11
部件名称 ......................................................12
安装扬声器 ..................................................13
规格 ............................................................. 21
3
Page 4
スピーカーコードの配線に注意する
火災
下記の注意を守らないと、
火災などにより死亡や大けが
につながることがあります。
内部を開けない
内部には電圧の高い部分があ
り、キャビネットや裏ぶたを開け
たり改造したりすると、火災や
感電の原因となることがありま
す。内部の調整や設定、点検、
修理はお買い上げ店またはソ
ニーのサービス窓口にご依頼く
ださい。
下記の注意を守らないと、
けがをしたり周辺の物品に損害
を与えることがあります。
指定のソニー機器以外に取り付けない
指定以外の機器に取り付ける
と、倒れたり落ち たりしてけが
の原因とな ることがあります。
スピーカーの設置 場所によって
は、床にはわ せ たスピーカー
コー ドに足を引っかけ、つまず
いたりス ピ ー カーを回した りして
けがの原因となることがありま
す。歩行 のじゃまにならないよう
スピーカーコー ドの配線には注
意してく ださい。
取り付け時にネジを確実にしめる
ネジのしめ付けを確認してくださ
い。ネジのしめ付けが不充分な
場合、スピーカーが落下してけ
がの原因になることがあります。
大音量で長時間つづけて聞きすぎない
耳を刺激するような大きな音量
で長時間つづけて聞くと、聴 力
に悪い影響 を 与え ることがありま
す。呼びかけられて返事ができ
るくらいの音量で聞きましょう。
内部に水や異物を落とさない
水や異物が入ると火災や感電
の原因となります。万一、水や
異物が入ったときは、すぐに接
続しているアンプの電源スイ ッ
チを切り 、 スピーカ ーコードをス
ピーカー端子から抜き、お買い
上げ店また はソニーサービス窓
口にご相談ください。
4
Page 5
スピーカーコードを傷つけない
スピーカーコー ドを傷つけると、
火災や感電の原因となることが
あります。
・ 設置時に、製品と壁や棚
との間にはさみ込んだり し
ない。
・ 設置時に、スピーカー 本 体
やディスプレイ などの下に
はさみ込んだりしない。
万一、スピーカーコードが傷ん
だら、お買い 上げ店またはソ
ニーサー ビス窓口に交換を ご依
頼く ださい。
Français
Transport
Lorsque que vous transportez l’écran, tenez-le
par l’appareil lui-même et non par les hautparleurs. Dans le cas contraire, ces derniers
peuvent se détacher et l’appareil risque de
tomber. Ceci pourrait entraîner des blessures.
Deutsch
Transport
Wenn Sie den Bildschirm transportieren,
halten Sie ihn nicht an den Lautsprechern,
sondern halten Sie das Gerät selbst.
Andernfalls könnten sich die Lautsprecher
vom Gerät lösen und das Gerät könnte
herunterfallen. Dadurch kann es zu
Verletzungen kommen.
本体を持って運搬する
ディ スプレイを運ぶときは、ス
ピーカー部分を持たず、必ず本
体を持ってください。スピ ーカー
がディスプレイ からはずれて落
下し、けがの原因となることが
あります。
WARNING/AVERTISSEMENT/
ACHTUNG/ADVERTENCIA/
AVVERTENZA/
警告
Español
Durante el transporte
Cuando transporte el monitor, sostenga la
unidad, no los altavoces. Si no lo hace, los
altavoces podrían separarse de la unidad y
ésta podría caerse. Esto podría causar daños.
Italiano
Trasporto
Durante il trasporto del display, tenere
l’apparecchio stesso, non i diffusori.
Diversamente, è possibile che i diffusori
fuoriescano dall’apparecchio e che
quest’ultimo cada provocando ferite.
English
On transportation
When you carry the display unit, hold the unit
itself, not the speakers. If you fail to do so,
the speakers may come out of the unit and the
unit may fall. This can cause injury.
中文
关于搬运
搬运本机时请抓住显示器本身,切勿抓住扬
声器。否则,扬声器可能会脱落,而本机也
可能随之落下。这会导致受伤。
5
Page 6

本機の性能を保持するために/Precautions/
Précautions/Sicherheitsmaßnahmen/
Precauciones/Precauzioni/注意事项
日本語
使用・保管場所
次のような場所での使用および保管は避け
てください。
極端に暑い所や寒いところ
•
直射日光が長時間あたる場所や暖房器具の
•
近く
湿気、ほこりの多いところ
•
雨のあたるところ
•
激しく振動するところ
•
お手入れ
キャビネットやパネルの汚れは、乾いたや
•
わらかい布でふきとってください。汚れが
ひどいときは、中性洗剤のうすめ液を含ま
せた布でふきとった後、からぶきしてくだ
さい。
アルコール、ベンジン、シンナーなど揮発
•
性のものは使わないでください。表面の仕
上げをいためたり、表示が消えたりするこ
とがあります。
放熱
動作中は布などで包まないでください。内部の
温度が上がり、故障や事故の原因となります。
その他
燃えやすいもの、金属片、水などを内部に
•
入れないでください。故障や事故の原因と
なります。
輸送するときは、付属のカートンとクッ
•
ション、もしくは同等品で梱包し、強い衝
撃を与えないようにしてください。
本機の最大入力を超える入力で連続使用し
•
ないでください。
本機とディスプレイ本体をつなぐ前に、
•
ディスプレイ本体の電源を切ってくださ
い。スピーカーの故障の原因となります。
−は正しくつないでください。+/−を
•+/
間違ってつなぐと、低音が聞こえなかった
り、スピーカーから出る音がおかしくなっ
たりします。
English
Operating and storage locations
Avoid operating or storing the product in the
following locations.
• Extremely hot or cold places
• In direct sunlight for long periods, or close
to heating equipment
• Damp or dusty places
• Where it is exposed to rain
• Locations subject to strong vibration
Care
• Clean the cabinet with a soft, dry cloth. If it
is very dirty, use a cloth dampened with a
small quantity of neutral detergent, then
wipe dry.
• Avoid the use of volatile solvents such as
alcohol, benzene, and thinners. They may
damage the surface finish, or impair the
operation of the shutter adaptor.
Ventilation
Do not wrap the unit in a cloth, etc., during
operation. This may cause the internal
temperature to rise excessively and the unit
to malfunction.
Miscellaneous
• Be careful not to spill water or other liquids
on the unit or allow combustible or metallic
objects inside the body. If used with foreign
objects inside, the unit is liable to fail or
cause a fire or an electric shock.
• If the product is transported or shipped,
repack it as originally packed at the
factory, or in materials equal in quality.
•
Avoid driving the speaker system
continuously with an input exceeding the
maximum input power of this speaker
system.
• Before connecting, turn off the display to
avoid damaging the speaker system.
6
Page 7

• Connect the + and – terminals correctly. If
the +/– connection is incorrect, the bass
tones seem to be missing and the position
of the instruments becomes obscure.
In the event of any problems with the
operation of the unit, contact your Sony
service representative.
Français
Lieu d’utilisation et de stockage
Evitez d’utiliser ou de stocker l’unité dans
des endroits :
• extrêmement chauds ou froids;
• soumis au rayonnement direct du soleil
durant de longues périodes ou à proximité
d’un système de chauffage;
• humides ou poussiéreux;
• exposés à la pluie;
• soumis à de fortes vibrations;
Entretien
• Nettoyez le châssis avec un chiffon doux
et sec. S’il est fortement souillé, utilisez un
chiffon légèrement imprégné d’une solution
détergente neutre et essuyez-le ensuite.
• N’utilisez pas de solvants volatiles comme
de l’alcool, du benzène ou des diluants. Ils
risquent de ternir le fini du châssis ou de
perturber le bon fonctionnement de
l’adaptateur d’obturation.
Ventilation
N’enveloppez pas l’unité dans du tissu, etc.,
en cours de fonctionnement. Cela risque
d’entraîner une augmentation excessive de
la température intérieure et un
dysfonctionnement de l’unité.
Divers
• Veillez à ne pas répandre d’eau ou un
autre liquide sur l’unité; prévenez toute
pénétration éventuelle de matériaux
combustibles ou métalliques dans le
châssis. En cas de pénétration d’un corps
étranger à l’intérieur du châssis, l’unité est
susceptible de tomber en panne, de
prendre feu ou de provoquer une
électrocution.
• Si l’unité doit être transportée ou expédiée,
remballez-la dans son conditionnement
d’origine ou dans des matériaux de qualité
équivalente.
• Evitez de faire fonctionner les enceintes de
manière continue avec une entrée qui
excède la puissance d’entrée maximum de
ce système.
• Avant d’effectuer les connexions, mettez
l’amplificateur hors tension pour éviter
d’endommager les enceintes.
• Si les bornes +/– ne sont pas raccordées
correctement, les tonalités basses
sembleront absentes et la position des
instruments sera confuse.
Si vous rencontrez des problèmes
d’utilisation avec cet appareil, consultez un
représentant du service après-vente Sony.
Deutsch
Geeignete Umgebungen für Betrieb
und Lagerung
Benutzen und lagern Sie das System nicht
an Orten, an denen es folgenden
Bedingungen ausgesetzt ist:
• Extremer Hitze oder Kälte
• Direktem Sonnenlicht über einen längeren
Zeitraum hinweg oder dem Einfluß von
Wärmequellen wie z. B. Heizungen
• Feuchtigkeit oder Staub
• Regen
• Starken Vibrationen
Pflege des Systems
• Reinigen Sie das System mit einem
weichen, trockenen Tuch. Hartnäckige
Verschmutzungen entfernen Sie mit einem
Tuch, das Sie leicht mit etwas neutralem
Reinigungsmittel angefeuchtet haben.
Wischen Sie das Gehäuse anschließend
trocken.
• Verwenden Sie keine flüchtigen
Lösungsmittel wie Alkohol, Benzin oder
Verdünner. Diese könnten die
Gehäuseoberfläche angreifen.
Luftzufuhr
Wickeln Sie das System während des
Betriebs nicht in Tücher o. ä. ein. Dies
könnte zu einer Überhitzung und damit zu
Fehlfunktionen führen.
Sonstiges
• Verschütten Sie kein Wasser oder sonstige
Flüssigkeiten auf dem System. Achten Sie
darauf, daß keine brennbaren oder
7
Page 8

metallenen Objekte in das System
hineingelangen. Wenn Sie das System
benutzen, nachdem Fremdkörper
hineingelangt sind, besteht die Gefahr
einer Fehlfunktion, eines elektrischen
Schlags oder eines Brands.
• Verpacken Sie das System für einen
Transport wieder in der Original- oder in
einer gleichwertigen Verpackung.
• Steuern Sie das Lautsprechersystem nicht
über längere Zeit mit einer über der
Belastbarkeit liegenden Leistung an.
• Schalten Sie vor dem Anschließen den
Verstärker aus, um eine Beschädigung des
Lautsprechersystems zu vermeiden.
• Wenn + und – nicht korrekt angeschlossen
sind, fehlen scheinbar die Bässe, und die
Raumposition der Instrumente ist nicht
mehr auszumachen.
Sollten an Ihrem System Probleme
auftreten, wenden Sie sich bitte an Ihren
Sony-Kundendienst.
Español
Lugares de almacenamiento y
funcionamiento
Evite utilizar o almacenar la unidad en los
siguientes lugares:
• Extremadamente calurosos o fríos
• Expuestos a la luz solar directa durante
largos períodos de tiempo, o cercanos a
equipos térmicos
• Húmedos o polvorientos
• Expuestos a la lluvia
• Sujetos a vibraciones intensas
Ventilación
No cubra la unidad con un paño, etc.,
durante el funcionamiento, ya que puede
producirse un considerable aumento de la
temperatura interna y causar fallos de
funcionamiento.
Varios
• Procure no salpicar la unidad con agua u
otros líquidos, ni permita que se
introduzcan objetos metálicos o
combustibles en dicha unidad. Si la utiliza
con objetos extraños en su interior, la
unidad puede presentar fallos de
funcionamiento o causar incendios o
descargas eléctricas.
• Si va a transportar la unidad, embálela
como la recibió de fábrica o con materiales
de la misma calidad.
• Evite excitar continuamente el sistema de
altavoces con una entrada de potencia que
sobrepase la potencia máxima de entrada
del mismo.
• Antes de realizar las conexiones,
desconecte el amplificador a fin de evitar
dañar el sistema de altavoces.
• Si la conexión de +/– es incorrecta, los
tonos bajos parecerán perderse, y la
ubicación de los instrumentos se volverá
obscura.
Si surgen problemas al utilizar la unidad,
póngase en contacto con un representante
de servicio técnico Sony.
Italiano
Cuidados
•Limpie el exterior con un paño seco y
suave. Si está muy sucio, utilice un paño
humedecido con una pequeña cantidad de
detergente neutro y, a continuación,
séquelo.
• Evite utilizar disolventes volátiles, como
alcohol, bencina o diluyentes, ya que
pueden dañar el acabado o perjudicar el
funcionamiento del adaptador de
obturación.
8
Luoghi di esercizio e di deposito
Evitare di far funzionare o di depositare
l’apparecchio nei seguenti luoghi.
• Luoghi estremamente caldi o freddi
• Luoghi esposti alla luce solare diretta per
lunghi periodi o vicino a fonti di calore quali
radiatori
• Luoghi umidi o polverosi
• Luoghi esposti alla pioggia
• Luoghi soggetti a forti vibrazioni
Page 9

Manutenzione
• Pulire il rivestimento con un panno
morbido e asciutto. In caso di sporco
insistente, usare un panno leggermente
inumidito con detergente neutro, quindi
riasciugare.
• Evitare l’uso di solventi infiammabili quali
alcol, benzene o trementina, in quanto
potrebbero danneggiare le finiture del
rivestimento o deteriorare il funzionamento
dell’adattatore dell’otturatore.
Ventilazione
Durante il funzionamento non avvolgere
l’apparecchio in panni o coperte. Ciò
potrebbe causare un aumento eccessivo
della temperatura interna e un conseguente
funzionamento difettoso dell’apparecchio.
Varie
• Fare attenzione a non versare acqua o altri
liquidi sull’apparecchio e di non far
penetrare oggetti metallici al suo interno.
Se utilizzato con oggetti estranei
all’interno, l’apparecchio potrebbe rompersi
o causare un incendio o scosse elettriche.
• Per trasportare o spedire l’apparecchio,
reimballarlo con il materiale d’imballaggio
originale o con materiali di qualità
equivalente.
• Evitare di pilotare il sistema di diffusori in
continuazione con un ingresso superiore
alla potenza massima di ingresso di questo
sistema di diffusori.
• Prima di eseguire i collegamenti, spegnere
l’amplificatore per evitare di danneggiare il
sistema di diffusori.
• Se il collegamento +/– è scorretto, i bassi
sembreranno assenti e la posizione degli
strumenti sarà confusa.
Nel caso di problemi durante il
funzionamento dell’apparecchio, contattare il
proprio rivenditore Sony.
中文
使用与保管场所
避免在以下场所使用或者保管本产品。
• 极热或者极冷的场所
• 长时间的阳光直射或者靠近加热设备的场所
• 潮湿或者多尘的场所
• 会遭受雨淋的场所
• 有剧烈震动的场所
保养
• 用柔软的干布清洁机壳,若机壳很脏,用布
蘸取少量中性清洁剂擦拭,然后擦干。
• 请勿使用挥发性溶剂,比如乙醇、苯以及稀
释剂。这些物质可能损坏表层光泽,或者影
响闸门式适配器的使用
通风
不要在使用中用布之类的东西擦拭本设备。
这可能导致内部温度过高,使本设备失灵。
其它事项
• 请小心不要将水或者其它液体洒在本设备
上,或者把易燃或金属的物件留在设备内。
使用时若本设备内部有异物,则可能失灵或
者导致火灾或触电事故。
• 在搬运或装运本产品时,应按照出厂时的规
格进行包装,或用相同质量的材料进行包
装。
• 避免连续使用大于本扬声器系统最大输入功
率值的输入。
• 在连接设备之前,关闭显示器以避免损坏扬
声器系统。
• 正确连接+/—端子。若错误连接+/—端
子,低音很难听见,声音的方位将变得模
糊。
在使用本机时若产生任何问题,请与 Sony
服务代表联系。
9
Page 10

本機の特長/Features/Caractéristiques/Merkmale und
Funktionen/Características/Caratteristiche/特点
日本語
SS-SP20Bは、コーン型ウーファーおよびツ
イーターを採用した2ウェイバスレフ方式で、
PFM-42V1フラットパネルディスプレイ用のス
ピーカーシステム です。高音質 のステレオサ
ウン ドをお 楽しみください。
English
The SS-SP20B is a two-way bass reflex
speaker system which adopts a cone-type
woofer and tweeter. This speaker system is
designed for use with the PFM-42V1 series
flat panel display. You can enjoy the high
quality stereo sound.
Français
Le SS-SP20B est un système de haut-parleurs
bass reflex à deux voies intégrant un woofer et
un tweeter en cône. Ce système est destiné à
être utilisé avec l’écran plasma de série PFM-
42V1. Vous pouvez de ce fait pleinement
exploiter une haute qualité sonore stéréo.
Deutsch
Das SS-SP20B ist ein 2-Wege-Baßreflex-
Lautprechersystem mit Konustief- und
hochtöner. Dieses Lautsprechersystem kann
an Flachbildschirme der Serie PFM-42V1
angeschlossen werden. So wird Stereoton in
optimaler Qualität wiedergegeben.
Español
El SS-SP20B es un sistema de altavoces de
dos vías de reflejo de graves que incorpora un
altavoz potenciador de agudos y uno de
graves de tipo cónico. Este sistema de
altavoces está diseñado para ser utilizado con
los monitores de panel plano de la serie PFM42V1. Disfrutará de sonido estéreo de alta
calidad.
Italiano
SS-SP20B è un sistema diffusori bass reflex a
due vie che dispone di un tweeter e di un
woofer di tipo a cono. Questo sistema
diffusori è stato progettato per l’uso con il
display a schermo piatto della serie PFM42V1. Con questo apparecchio è possibile
ottenere un audio stereo di qualità elevata.
中文
SS-SP20B 为 2 路低音反射扬声器系统,它
采用了锥型低音扬声器与高频扬声器。该扬
声器系统专为与 PFM-42V1 系列平面监视
器配套使用。您可尽享高品质的立体声效
果。
10
Page 11
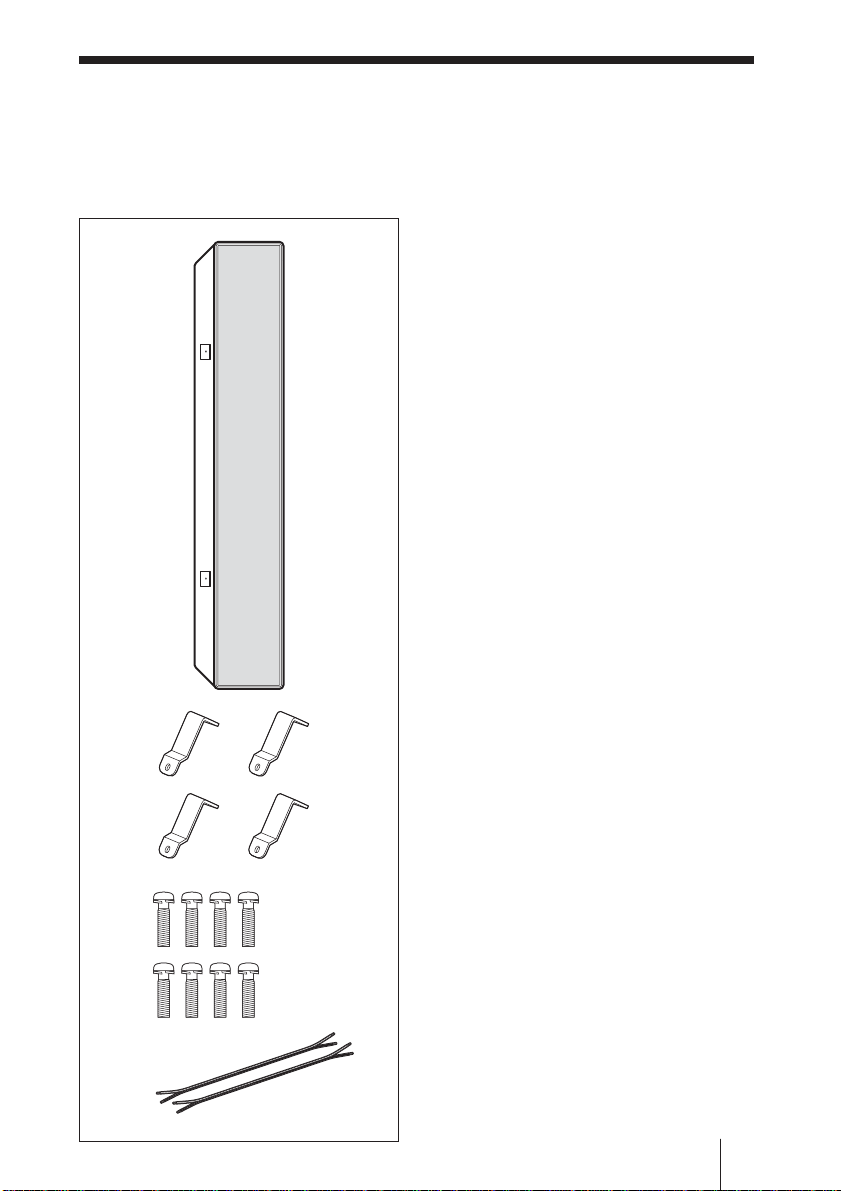
付属部品表/Table of Accessories/Table des accessoires/
Zubehör-Tabelle/Tabla de accesorios/Elenco degli
accessori/附件表
a
b
a スピーカー(2)/Speaker (2)/Haut-parleur
(2)/Lautsprecher (2)/Altavoz (2)/Diffusore
(2)/扬声器 (2)
b スピーカー取付用金具(4)/Bracket (4)/
Support (4)/Halterung (4)/Soporte (4)/
Staffa (4)/托架 (4)
c スピーカー取付用ネジ( 8 )/Speaker
attachment screw (8)/Vis de fixation de
haut-parleur (8)/
Lautsprechermontageschraube (8)/Tornillo
de fijación de los altavoces (8)/Vite per il
montaggio dei diffusori (8)/扬声器安装螺
钉 (8)
d スピーカーコー ド0.2m(2)/Speaker cord
0.2 m (2)/Cordon de haut-parleur 0,2 m
(2)/Lautsprecherkabel 0,2 m (2)/Cable de
altavoz de 0,2 m (2)/Cavi diffusori 0,2 m
(2)/扬声器电缆 0.2 m (2)
c
d
11
Page 12
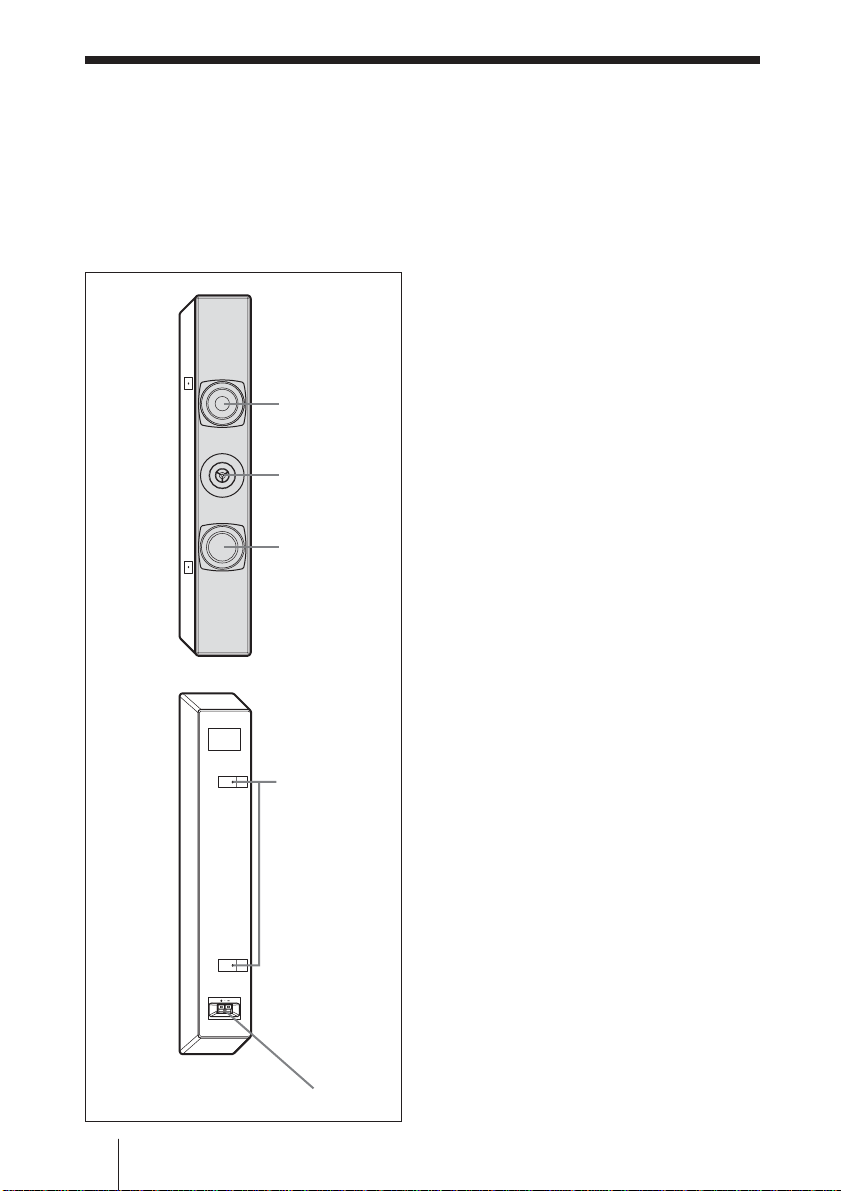
各部の名称/Parts Identification/Identification des
composants/Lage und Funktion der Teile und
Bedienelemente/Identificación de los componentes/
Identificazione delle parti/部件名称
スピーカー前面/Speaker Front/Hautparleur avant/Vorderseite/Parte
frontal/Parte anteriore/扬声器前面
1 ウーフ ァー (低音用)/Woofer/Woofer/
1
2
3
4
Tieftöner/Altavoz de graves/Woofer/低声
扬声器
2 ツイ ーター (高音用)/Tweeter/Tweeter/
Hochtöner/Altavoz de agudos/Tweeter/高
频扬声器
3 パッ シブラジエーター (低音用)/Passive
radiator/Elment passif d’antenne/Passiver
Radiator/Radiador pasivo/Radiatore
passivo/无源辐射器
スピーカー後面/Speaker Rear/Hautparleur arrièr/Rückseite/Parte
posterior/Parte posteriore/扬声器后面
4 スピーカー 固 定 用ネジ 穴 /Speaker
attachment hole/Orifices de fixation de
haut-parleur/Lautsprecher-montagebohrungen/Orificios de fijación de altavoz/
Fori per il montaggio dei diffusori/扬声器
安装孔
5 スピーカー 端 子 /Speaker terminal/Borne
de l’enceinte/Lautsprecheranschluss/
Terminal de altavoz/terminale del
diffusore/扬声器端子
12
5
Page 13
スピーカーを接続する/Attaching the Speakers/
Montage des haut-parleurs/Anbringen der
Lautsprecher/Fijación de los altavoces/Fissaggio
dei diffusori/安装扬声器
日本語
1
b
1
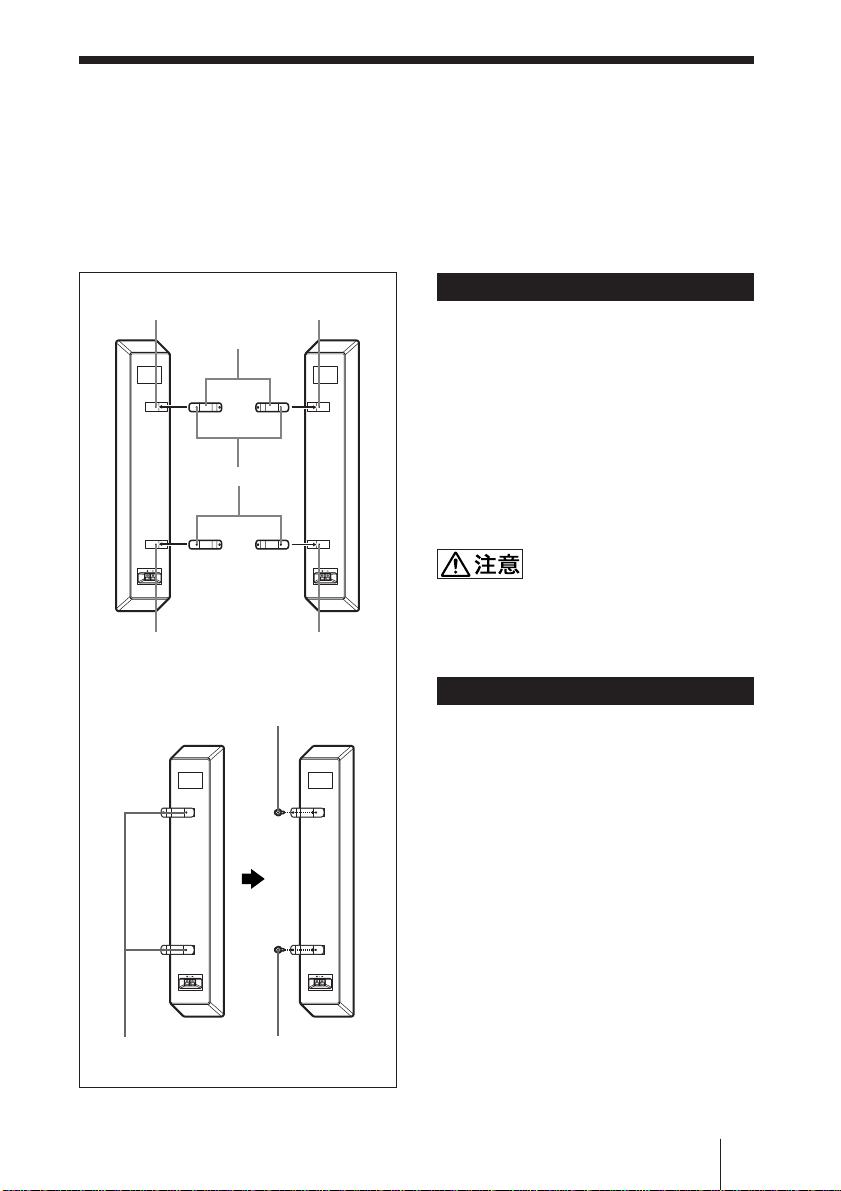
以下の手順で、スピーカーを取り付けます。
1 スピーカーにスピーカー取付用金具を
取り付ける。
スピーカー側 のス ピー カ ー固定用ネジ
穴1とスピー カー取付用金具(b)側
のスピー カ ー固定用ネジ穴2とを 合
わせて、付属のスピーカー取付用ネ
ジ( c)(左右スピーカー2か所ずつ)
を締めます。
ネジの締め付けを確認してください。ネジの締
め付けが不充分な場合、スピーカーが 落 下し
てけがの原因になることが あります。
1
2
1
2
English
c
Follow the procedure below to attach the
speakers:
1 Attach the speaker brackets to the
speaker.
Align the speaker attachment holes 1
in the speakers with the speaker
attachment holes 2 in the speaker
brackets (b), and fasten the supplied
attachment screws (c) (at two locations
each in the left and right speakers).
Caution
Make sure that the screws are tightened. If
c
they are not tightened enough, the speaker
may fall and cause injury.
13
Page 14

Français
Procédez de la manière indiquer ci-dessous
pour monter les haut-parleurs:
Español
Siga el procedimiento a continuación para
fijar los altavoces:
1 Fixez les supports sur les haut-
parleurs.
Alignez les orifices de fixation des
haut-parleurs 1 avec les perçages de
fixation 2 des supports (b), puis
serrez les vis de fixation fournies (c)
(aux deux emplacements dans chacun
des haut-parleurs droit et gauche).
Attention
Assurez-vous que les vis sont correctement
serrées. Dans le cas contraire, le haut-parleur
risque de tomber et de vous blesser.
Deutsch
Zum Anbringen der Lautsprecher gehen Sie
wie nachfolgend beschrieben vor:
1 Bringen Sie die
Lautsprecherhalterungen an den
Lautsprechern an.
Richten Sie die
Lautsprechermontagebohrungen 1 in
den Lautsprechern an den
Lautsprechermontagebohrungen 2 in
den Lautsprecherhalterungen aus (b),
und bringen Sie die mitgelieferten
Montageschrauben (c) an (am linken
und rechten Lautsprecher an je zwei
Stellen).
Vorsicht
Achten Sie darauf, die Schrauben gut
festzuziehen. Wenn sie nicht ausreichend
festgezogen sind, kann der Lautsprecher
herunterfallen. Dabei besteht
Verletzungsgefahr.
1 Fije los soportes del altavoz a este
último.
Haga coincidir los orificios de fijación
1 de los altavoces con los orificios de
fijación de altavoz 2 de los soportes
de altavoz (b) y apriete los tornillos de
fijación (c) suministrados (ubicados en
dos puntos de cada uno de los
altavoces izquierdo y derecho).
Precaución
Asegúrese de que los tornillos están
apretados. Si no están lo suficientemente
apretados, el altavoz podría caerse y producir
daños.
Italiano
Per il fissaggio dei diffusori si prega di
seguire la seguente procedura:
1 Fissaggio delle staffe ai diffusori.
Allineare i fori di fissaggio 1 presenti
sui diffusori ai fori di fissaggio 2
presenti sulle staffe (b), quindi
stringere le apposite viti fornite in
dotazione (c) (in due punti per ciascun
diffusore, destro e sinistro).
Attenzione
Assicurarsi che le viti siano serrate in modo
corretto. Diversamente, è possibile che i
diffusori cadano provocando ferite alle
persone.
14
Page 15

中文
请遵照以下步骤安装扬声器:
1 将扬声器托架装在扬声器上。
将扬声器上的安装孔 1 对准扬声器
托架(b)上的扬声器安装孔 2,并
拧紧附带的安装螺钉(c)(左置和
右置扬声器各两个安装部位)。
注意
请务必拧紧螺丝。否则,扬声器可能会掉落
并导致受伤。
15
Page 16
21
日本語
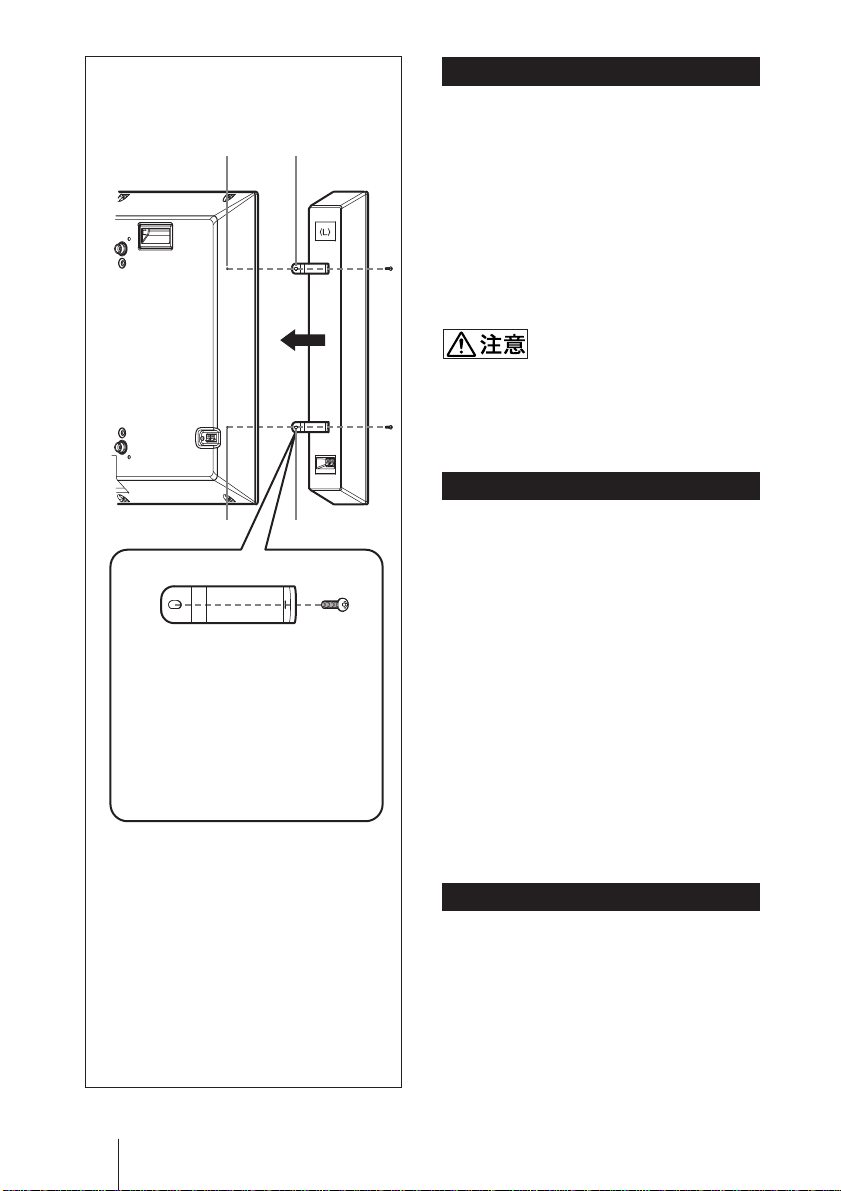
2 ディ スプレイ にスピーカーを取 り 付け
る。
スピーカー取付用金具側のディスプレ
イ固定用ネジ穴1とディ スプレイ側の
スピーカー固定用ネジ穴2を合わせ
て、付属のスピーカー取付用ネジ(c)
(左右スピーカー2か所ずつ)を締め
ます。 このと き 、 ス ピーカー端子が下
になる よう に取り 付けて ください。
ネジの締め付け を 確認してください。ネジ
の締め付けが不充分な場合、スピーカー
が落下してけがの原因になることがありま
す。
English
21
スピーカー取付用金具/Bracket/
Support/Halterung/Soporte/Staffa/
托架
2 Attach the speaker to the display.
Align the display attachment holes 1
in the speaker brackets with the
speaker attachment holes 2 in the
display, and fasten the supplied
attachment screws (c) (at two locations
each in the left and right speakers). At
this time, attach the speakers so that
the speaker terminals are on the
bottom.
Caution
Make sure that the screws are tightened. If
they are not tightened enough, the speaker
may fall and cause injury.
Français
2 Montez le haut-parleur sur l’écran.
Alignez les orifices de fixation des
haut-parleurs 1 avec les perçages de
fixation des haut-parleurs 2 de
l’écran, puis serrez les vis de fixation
fournies (c) (aux deux emplacements
dans chacun des haut-parleurs droit et
gauche). Montez ensuite les haut-
16
Page 17

parleurs de sorte que les bornes des
haut-parleurs soient situées dans la
partie inférieure.
Attention
Assurez-vous que les vis sont correctement
serrées. Dans le cas contraire, le haut-parleur
risque de tomber et de vous blesser.
Precaución
Asegúrese de que los tornillos están
apretados. Si no están lo suficientemente
apretados, el altavoz podría caerse y producir
daños.
Italiano
Deutsch
2 Bringen Sie den Lautsprecher am
Display an.
Richten Sie die
Displaymontagebohrungen 1 in den
Lautsprecherhalterungen an den
Lautsprechermontagebohrungen 2 am
Display aus, und bringen Sie die
mitgelieferten Montageschrauben (c)
an (am linken und rechten
Lautsprecher an je zwei Stellen).
Bringen Sie die Lautsprecher so am
Bildschirm an, daß sich die
Lautsprecheranschlüsse unten
befinden.
Vorsicht
Achten Sie darauf, die Schrauben gut
festzuziehen. Wenn sie nicht ausreichend
festgezogen sind, kann der Lautsprecher
herunterfallen. Dabei besteht
Verletzungsgefahr.
Español
2 Fije el altavoz al monitor.
Alinee los orificios de fijación del
monitor 1 de los soportes de altavoz
con los orificios de fijación de altavoz
2 del monitor y apriete los tornillos
de fijación (c) suministrados (ubicados
en dos puntos de cada uno de los
altavoces izquierdo y derecho). En este
punto, coloque los altavoces de modo
que los terminales altavoz estén en el
fondo.
2 Fissaggio dei diffusori al display.
Allineare i fori di fissaggio 1 presenti
sulle staffe ai fori di fissaggio 2
presenti nel display, quindi stringere le
apposite viti fornite in dotazione (c)
(in due punti per ciascun diffusore,
destro e sinistro). A questo punto
fissare i diffusori in modo che i relativi
terminali risultino nella parte inferiore.
Attenzione
Assicurarsi che le viti siano serrate in modo
corretto. Diversamente, è possibile che i
diffusori cadano provocando ferite alle
persone.
中文
2 将扬声器安装在显示器上。
将扬声器托架上的显示器安装孔 1
与显示器上的扬声器安装孔 2 对
准,并拧紧附带的安装螺钉(c)
(左置和右置扬声器各两个安装部
位)。此时,安装扬声器以使扬声器
端子位于底部。
注意
请务必拧紧螺丝。否则,扬声器可能会掉落
并导致受伤。
17
Page 18
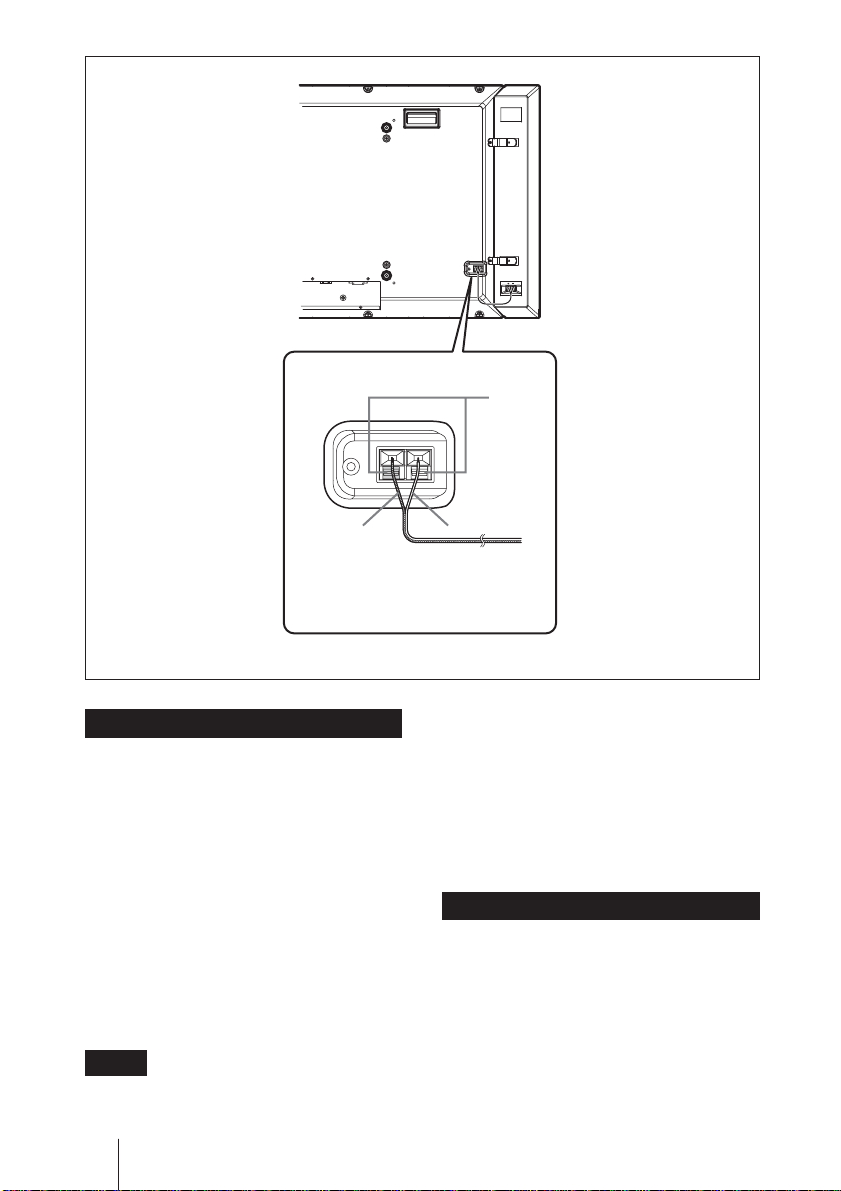
1
23
日本語
3 スピーカーコードをディ スプレイ とス ピー
カーに接続する。
ボタ ン1を押 し な がらスピーカーコ ード
を差 し込み、ボタン1を放すと 接続で
きます。
このと き、 グレーのコード2 は+端子
へ、 黒いコード3は−端子へ差し込ん
でく ださい。また、ディ スプレイ のスピー
カー端 子 Rに差し込んだコー ドは右ス
ピーカーに、スピーカー端子 Lに差し込
んだコードは左スピーカーに接続してく
ださい。
ご注意
• スピ ーカーをディ スプレイに接続したまま、
スピーカーおよびディスプレイ を動か さない
18
でく ださい。スピーカーやス ピーカ ーコー ド
がディスプレイから突然はずれる場合があ
り、危 険 です。
• スピ ーカーをディスプレイ に接続し たまま、
ディ スプレイ をス タン ドに取り付けないでく
ださい。ス ピーカーコー ドがス タ ンドの支柱
に引っかかり、危険です。
English
3 Connect the speaker cords to the display
and speakers.
Connect the speaker cords to the speaker
terminals located at the bottom on the
rear of the display, and to the speaker
terminals at the bottom of the speakers.
The speaker cords can be connected by
inserting the cord while pressing button
Page 19

1 and then releasing button 1 after
inserting. At this time, insert the gray
cord 2 into the + terminal and the black
cord 3 into the – terminal. In addition,
connect the cord inserted into the R
terminal of the display to the right
speaker, and the cord inserted into the L
terminal of the display to the left speaker.
CAUTION
• Do not move the speakers or display with
the speakers connected to the display. This
is potentially dangerous because the
speakers or speaker cords may suddenly
become disconnected from the display.
•Do not attach the display to the stand with
the speakers connected to the display. This
is potentially dangerous because the speaker
cords may become caught on the stand
support columns.
Français
3 Reliez les câbles d’enceinte à l’écran et
aux enceintes.
Reliez les câbles d’enceinte d’une part
aux bornes d’enceinte placées en bas et à
l’arrière de l’écran, et d’autre part aux
bornes d’enceintes placées au bas des
enceintes. Les câbles d’enceinte peuvent
être connectés en insérant le câble tout en
appuyant sur le bouton 1 puis en
relâchant ce bouton 1 une fois que le
câble est inséré. Cela fait, insérez le
câble gris 2 dans la borne + et le câble
noir 3 dans la borne –. Par ailleurs,
reliez le câble inséré dans la borne R de
l’écran à l’enceinte droite et le câble
inséré dans la borne L de l’écran à
l’enceinte gauche.
dangereux parce que les câbles d’enceinte
peuvent être coincés par les colonnes de
soutien des supports.
Deutsch
3 Schließen Sie die Lautsprecherkabel an
Display und Lautsprecher an.
Schließen Sie die Lautsprecherkabel an
die Lautsprecheranschlüsse unten an der
Rückseite des Displays und an die
Lautsprecheranschlüsse unten an den
Lautsprechern an. Die Lautsprecherkabel
werden angeschlossen, indem sie unter
Drücken der jeweiligen Taste 1
eingeführt werden. Nach vollständigem
Einschieben läßt man die Taste 1 los.
Hierbei wird das graue Kabel 2 mit dem
positiven + Anschluß, das schwarze
Kabel 3 mit dem negativen – Anschluß
verbunden. Außerdem schließen Sie das
mit dem R-Anschluß des Displays
verbundene Kabel an den rechten
Lautsprecher, das mit dem L-Anschluß
des Displays verbundene Kabel an den
linken Lautsprecher an.
VORSICHT
• Bewegen Sie die Lautsprecher bzw. den
Bildschirm nicht, wenn die Lautsprecher mit
dem Bildschirm verbunden sind. Dies kann
gefährlich sein, da die Lautsprecher oder die
Lautsprecherkabel plötzlich vom Bildschirm
abgetrennt werden könnten.
• Bringen Sie den Bildschirm nicht an der
Stütze an, wenn die Lautsprecher mit dem
Bildschirm verbunden sind. Dies kann
gefährlich sein, da sich die
Lautsprecherkabel an den Stützensäulen
verfangen können.
ATTENTION
• Ne déplacez pas les enceintes ou l’écran
avec quand les enceintes sont connectées à
l’écran. C’est dangereux parce que les
enceintes ou les câbles d’enceinte peuvent
être brusquement déconnectés de l’écran.
• N’attachez pas l’écran au support avec les
enceintes connectées à l’écran. C’est
Español
3 Conecte los cables de altavoz al monitor
y altavoces.
Conecte los cables de altavoz a los
terminales de altavoz ubicados en la
parte inferior atrás del monitor, y a los
19
Page 20

terminales de altavoz en la parte inferior
de los altavoces. Los cables de altavoz
pueden conectar por la inserción del
cable mientras se presiona el botón 1 y
soltando el botón 1 tras la inserción. En
este punto, inserte el cable gris 2 en el
terminal + y el cable negro 3 en el
terminal –. Además, conecte el cable
insertado en el terminal R del monitor al
altavoz derecho, y el cable insertado al
terminal L del monitor al altavoz
izquierdo.
PRECAUCIÓN
• No mueva los altavoces o monitor con los
altavoces conectados al monitor. Esto es
potencialmente peligroso ya que los
altavoces o cables de los altavoces puede
desconectarse repentinamente del monitor.
• No fije el monitor al soporte con los
altavoces conectados al monitor. Esto es
potencialmente peligroso ya que los cables
de los altavoces pueden agarrarse en las
columnas del soporte.
infatti, potenzialmente pericoloso, poiché i
diffusori stessi o i suoi cavi potrebbero
improvvisamente scollegarsi dal display.
• Non fissate al supporto il display mentre a
quest’ultimo sono collegati i cavi dei
diffusori. Ciò sarebbe, infatti,
potenzialmente pericoloso, poiché i cavi dei
diffusori potrebbero rimanere impigliati
nelle colonne del supporto.
中文
3 将扬声器电缆连接至显示器和扬声
器。
使用扬声器电缆将显示器背面底部的
扬声器端子与扬声器底部的扬声器端
子相连接。按按钮 1 即可插入扬声
器电缆,插入后释放按钮 1。请将
灰色电缆 2 插入+端子,将黑色电
缆 3 插入—端子。此外,请将插入
显示器 R 端子的电缆连接至右置扬声
器,将插入显示器 L 端子的电缆连接
至左置扬声器。
Italiano
3 Collegamento dei cavi dei diffusori ai
diffusori stessi e al display.
Collegate i cavi dei diffusori ai relativi
terminali situati sul lato inferiore
posteriore del display, quindi ai terminali
situati sul fondo dei diffusori. I cavi dei
diffusori vanno collegati inserendoli
mentre si tiene premuto il pulsante 1, il
quale va rilasciato ad inserzione
effettuata. Il cavo grigio 2 deve essere
inserito nel terminale +, mentre il cavo
nero 3 deve essere inserito nel terminale
–. Inoltre, il cavo inserito nel terminale R
del display va collegato al diffusore
destro, mentre quello inserito nel
terminale L va collegato al diffusore
sinistro.
ATTENZIONE
• Non spostate i diffusori o il display mentre
questi sono collegati fra loro. Ciò sarebbe,
20
注意
• 当扬声器与显示器连接时,请勿移动扬声
器或显示器。因为扬声器或扬声器电缆可
能会突然从显示器上脱落,引起危险。
• 当扬声器与显示器连接时,请勿将显示器
安装在支架上。因为扬声器电缆可能会挂
住支架支撑柱,引起危险。
アフターサービス
アフターサービスについて
調子が悪いときはまずチェックを
この説明書をもう1 度ご覧になってお調べく
ださい。
Page 21

仕様/Specifications/Spécifications/Technische Daten/
Especificaciones/Caratteristiche tecniche/
日本語
スピーカーシステム
ウーファ ー (低音用)×1、防磁型
パッシブラジエーター (低音用)×1
ツイ ーター(高音用)×1、防磁型
使用スピーカー
8cm、コーン型
8cm、パッシブラジエーター型
2.5cm、ドーム型
形式 2WAYパッシブラジエーター型
定格インピーダンス
6Ω
最大入力(JEITA*)
7W
出力音圧レベル
83dB(1W、1m)
実効周波数帯域
100〜20,000Hz
動作条件
温度 0〜+35℃
湿度 0〜90%(結露のないこと)
気圧 700〜1,060hPa
保存・輸送条件
温度 −10〜+40℃
湿度 0〜90%(結露のないこと)
気圧 700〜1,060hPa
最大外形寸法
質量 約1kg(1台、スピーカー部)
付属品 スピーカーコード(2、各0.2m)
* JEITA(電子情報技術産業協会)規格による
測定値です。
仕様および外観は、改良のため予告なく変更する
ことが ありますが、 ご了承ください。
(幅×高さ×奥行き、グリル ネット含む)
約126×631×47mm
スピーカー 取付用ネジ(8)
スピーカー取付用金具(4)
取扱説明書(1)
(スピー カーのみ)
English
Speaker system
Woofer × 1, magnetically shielded
Passive radiator × 1
Tweeter × 1, magnetically shielded
Speaker unit 8 cm (3 1/4 inches), corn type
8 cm (3 1/4 inches), Passive radiator
type
2.5 cm (1 inch), dome type
Enclosure type 2 way Passive radiator type
Rated impedance
6 ohms
Power handling capacity
Maximum input power: 7 W
Characteristic sensitivity level
83 dB (1 W, 1 m)
Effective frequency range
100 Hz to 20,000 Hz
Operating conditions
Temperature 0 °C to +35 °C
(23 °F to 95 °F)
Humidity 0% to +90% (no
condensation)
Pressure 700 hPa to 1,060 hPa
Transport and storage conditions
Temperature –10 °C to +40 °C
(14 °F to 104 °F)
Humidity 0% to +90% (no
condensation)
Pressure 700 hPa to 1,060 hPa
Dimensions Approx. 126 × 631 × 47 mm (4 31/32 ×
24 27/32 × 1 27/32 inches) (w/h/d),
including front grille (net per
speaker)
Mass Approx. 1 kg ( 2 lb 3 oz) (net per
speaker)
Supplied accessories
Speaker cord (2, 0.2 m)
Speaker attachment screw (8)
Bracket (4)
Operating instructions (1)
Design and specifications are subject to
change without notice.
规格
21
Page 22

Français
Système de haut-parleur
Woofer × 1, blindage magnétique
Radiateur passif × 1
Tweeter × 1, blindage magnétique
Haut-parleur 8 cm (3 1/4 pouces), en cône
8 cm (3 1/4 pouces), type radiateur
passif
2,5 cm (1 pouce), en dôme
Type d’enceinte
Type radiateur passif à 2 voies
Impédance nominale
6 ohms
Charge nominale efficace
Puissance d’entrée maximum: 7 W
Niveau de sensibilité caractéristique
83 dB (1 W, 1 m)
Plage de fréquence effective
100 Hz à 20,000 Hz
Conditions d’utilisation
Température 0°C à +35°C (23°F à
95°F)
Humidité 0 % à +90 % (sans
condensation)
Pression atmosphérique
700 hPa à 1.060 hPa
Conditions de transport et de stockage
Température –10°C à +40°C (14°F
à 104°F)
Humidité 0 % à +90 % (sans
condensation)
Pression atmosphérique
700 hPa à 1.060 hPa
Dimensions Approx. 126 × 631 × 47 mm (4 31/32 ×
24 27/32 × 1 27/32 inches) (l/h/p), grille
frontale comprise (nettes par hautparleur)
Masse Approx. 1 kg (2 lb 3 oz) (nette par
haut-parleur)
Accessoires fournis
Cordon de haut-parleur (2, 0,2 m)
Vis de fixation de haut-parleur (8)
Support (4)
Mode d’emploi (1)
Deutsch
Lautsprechersystem
Tieftöner × 1, mit
Magnetabschirmung
Passivstrahler × 1
Hochtöner × 1, mit
Magnetabschirmung
Lautsprechereinheit
8 cm, Konus
8 cm, Passivstrahlertyp
2,5 cm, Kalotte
Gehäusetyp Zweiwege-Passivstrahlertyp
Nennimpedanz 6 Ohm
Belastbarkeit Maximale Eingangsleistung: 7 W
Typischer Schalldruckpegel
83 dB (1 W, 1 m)
Frequenzbereich
100 Hz bis 20,000 Hz
Betriebsbedingungen
Temperatur 0 °C bis +35 °C
Luftfeuchtigkeit 0 % bis +90 %
(nicht kondensierend)
Druck 700 hpa bis 1.060 hpa
Bedingungen bei Lagerung und Transport
Temperatur –10 °C bis +40 °C
Luftfeuchtigkeit 0 % bis +90 %
(nicht kondensierend)
Druck 700 hpa bis 1.060 hpa
Abmessungen ca. 126 × 631 × 47 mm (B/H/T),
einschließlich Frontgitter (netto pro
Lautsprecher)
Gewicht ca. 1 kg (netto pro Lautsprecher)
Mitgeliefertes Zubehör
Lautsprecherkabel (2, 0,2 m)
Lautsprechermontageschraube (8)
Halterung (4)
Bedienungsanleitung (1)
Änderungen, die dem technischen
Fortschritt dienen, bleiben vorbehalten.
La conception et les spécifications sont
sujettes à modifications sans préavis.
22
Page 23

Español
Sistema de altavoz
Altavoz de graves × 1, protección
magnética
Radiador pasivo × 1
Altavoz de agudos × 1, protección
magnética
Unidad de altavoz
8 cm (3 1/4 pulgadas), tipo cónico
8 cm (3 1/4 pulgadas), tipo radiador
pasivo
2,5 cm (1 pulgada), tipo cúpula
Tipo de alojamiento
Tipo radiador pasivo de 2 vías
Impedancia nominal
6 ohmios
Capacidad de potencia máxima
Potencia máxima de entrada: 7 W
Nivel de sensibilidad característica
83 dB (1 W, 1 m)
Margen efectivo de frecuencias
100 Hz a 20,000 Hz
Condiciones de funcionamiento
Temperatura 0°C a +35°C (23°F a
95°F)
Humeda 0 % a +90 % (sin
condensación)
Presión 700 hPa a 1.060 hPa
Condiciones de transporte y almacenamiento
Temperatura –10°C a +40°C (14°F
a 104°F)
Humedad 0% a +90% (sin
condensación)
Presión 700 hPa a 1.060 hPa
Dimensiones Aprox. 126 × 631 × 47 mm (4 31/32
× 24 27/32 × 1 27/32 pulgadas) (an/al/
prf), incluida la rejilla frontal (neto
por altavoz)
Peso Aprox. 1 kg (2 lb 3 oz) (neto por
altavoz)
Accesorios suministrados
Cable de altavoz (2, 0,2 m)
Tornillo de fijación de los altavoces
(8)
Soporte (4)
Manual de instrucciones (1)
Italiano
Sistema dei diffusori
Woofer × 1, con schermatura
magnetica
Radiatori passivo, 1 pezzo
Tweeter × 1, con schermatura
magnetica
Diffusore 8 cm, tipo a cono
Del tipo a radiatore passivo da 8 cm
2,5 cm, tipo a cupola
Tipo di chiusura
Del tipo a radiatore passivo a due vie
Impedenza nominale
6 ohm
Potenza nominale
Potenza massima di ingresso: 7 W
Livello di sensibilità caratteristico
83 dB (1 W, 1 m)
Gamma di frequenza effettiva
da 100 Hz a 20,000 Hz
Condizioni di funzionamento
Temperatura da 0°C a +35°C
Umidità da 0% a +90% (senza
condensa)
Pressione da 700 hPa a 1.060 hPa
Condizioni per il trasporto e il deposito
Temperatura da –10°C a +40°C
Umidità da 0% a +90% (senza
condensa)
Pressione da 700 hPa a 1.060 hPa
Dimensioni Circa 126 × 631 × 47 mm (l/a/p),
inclusa la griglia anteriore (netto
per diffusore)
Peso Circa 1 kg (netto per diffusore)
Accessori in dotazione
Cavi diffusori (2, 0,2 m)
Vite per il montaggio dei diffusori
(8)
Staffa (4)
Istruzioni per l’uso (1)
Il design e le caratteristiche tecniche sono
soggetti a modifiche senza preavviso.
Diseño y especificaciones sujetos a cambios
sin previo aviso.
23
Page 24

中文
扬声器系统 低音扬声器 × 1,磁屏蔽式
无源辐射器 × 1
高频扬声器 × 1,磁屏蔽式
扬声器组件 8 cm,普通型
8 cm,无源辐射器型
2.5 cm,球顶型
密封型 2 路无源辐射器型
额定阻抗 6 欧
容许功率 最大输入功率: 7W
特性灵敏度 83 dB(1 W, 1 m)
有效频率范围 100 Hz 至 20,000 Hz
工作条件 温度 0°C 至+35°C(23°F 至
运输和保管条件
尺寸 约 126 × 631 × 471mm(宽/高 /
重量 约 1 kg(各扬声器净重)
附件 扬声器电缆 (2,0.2 m)
95°F)
湿度 0% 至+90%(无结露)
气压 700hPa 至 1,060hPa
温度—10°C 至+40°C(14°F 至
104°F)
湿度 0% 至+90%(无结露)
气压 700hPa 至 1,060hPa
深),包括前网栅(各扬声器净
值)
扬声器安装螺钉 (8)
托架 (4)
使用说明书 (1)
设计和规格如有变更,恕不另行通知。
Printed in Korea
 Loading...