

Sony SPK-WA User Manual
2-662-139-12(1)
English
Français
Sports Pack
Operating Instructions
Mode d’emploi
Manual de instrucciones
Gebruiksaanwijzing
SPK-WA
© 2006 Sony Corporation Printed in Japan
Owner’s Record
The model and serial numbers are located inside of the unit.
Record the serial number in the space provided below.
Refer to them whenever you call upon your Sony dealer regarding this
product.
Model No. SPK-WA Serial No.
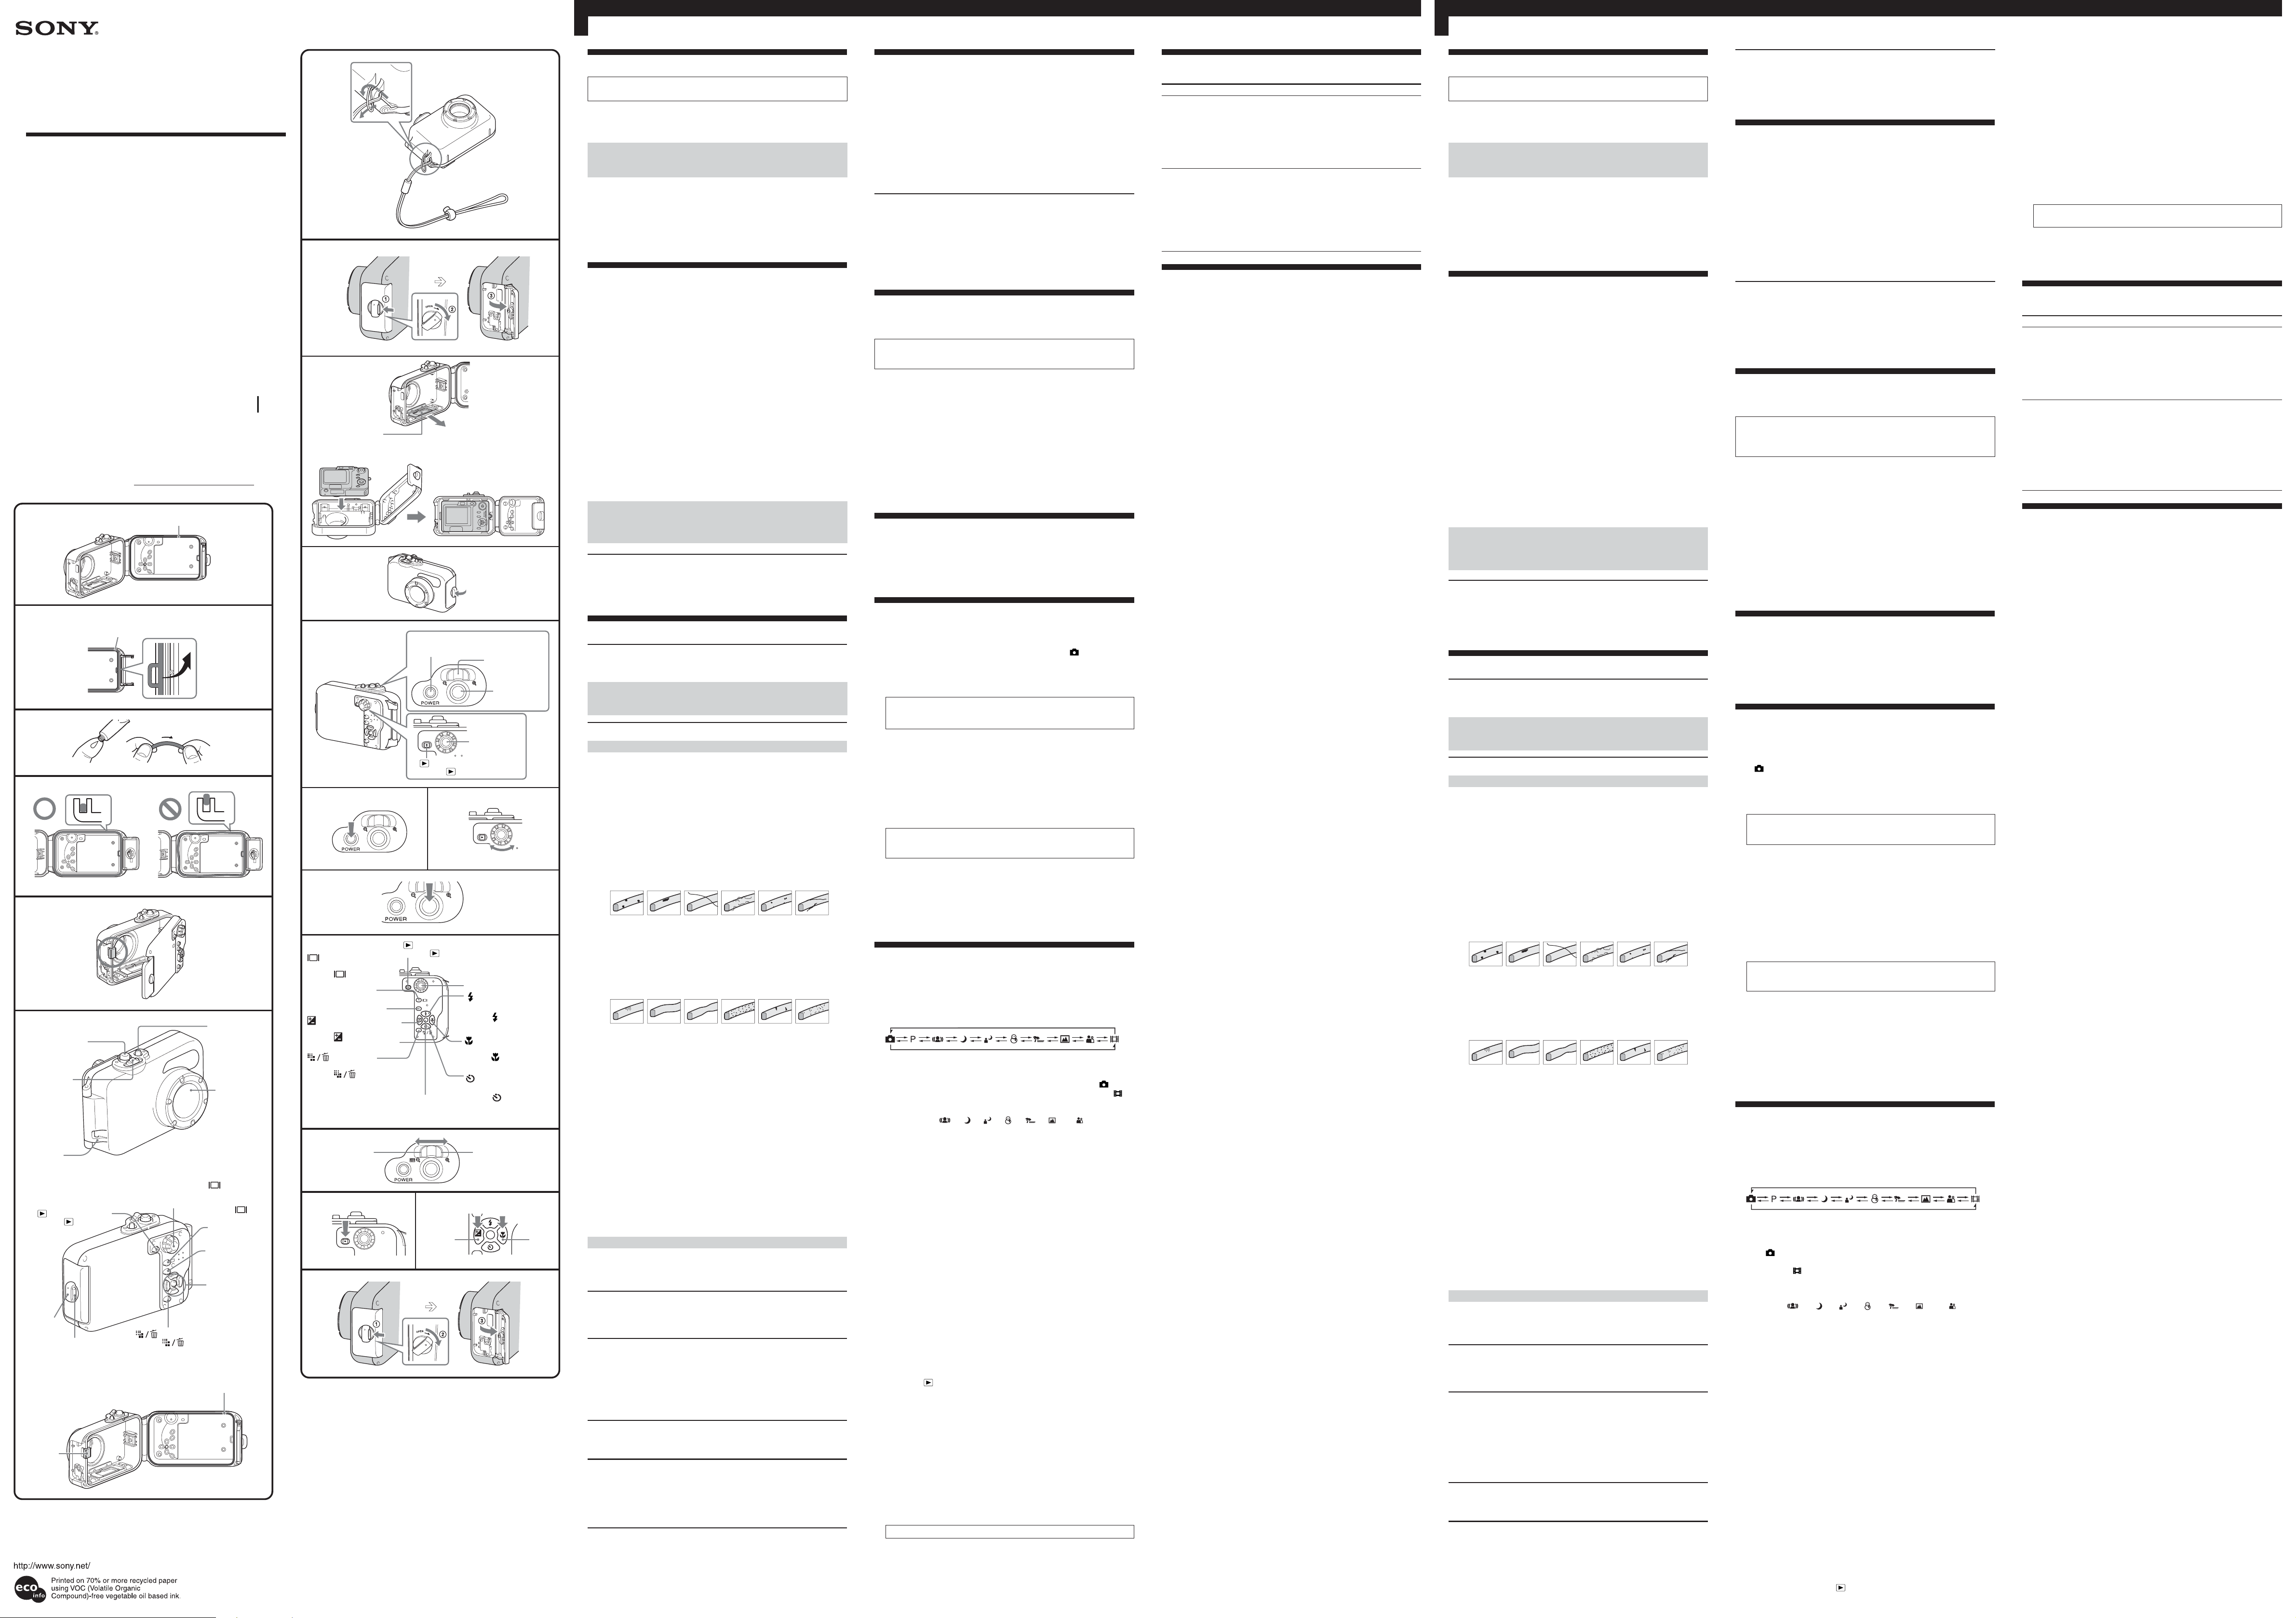
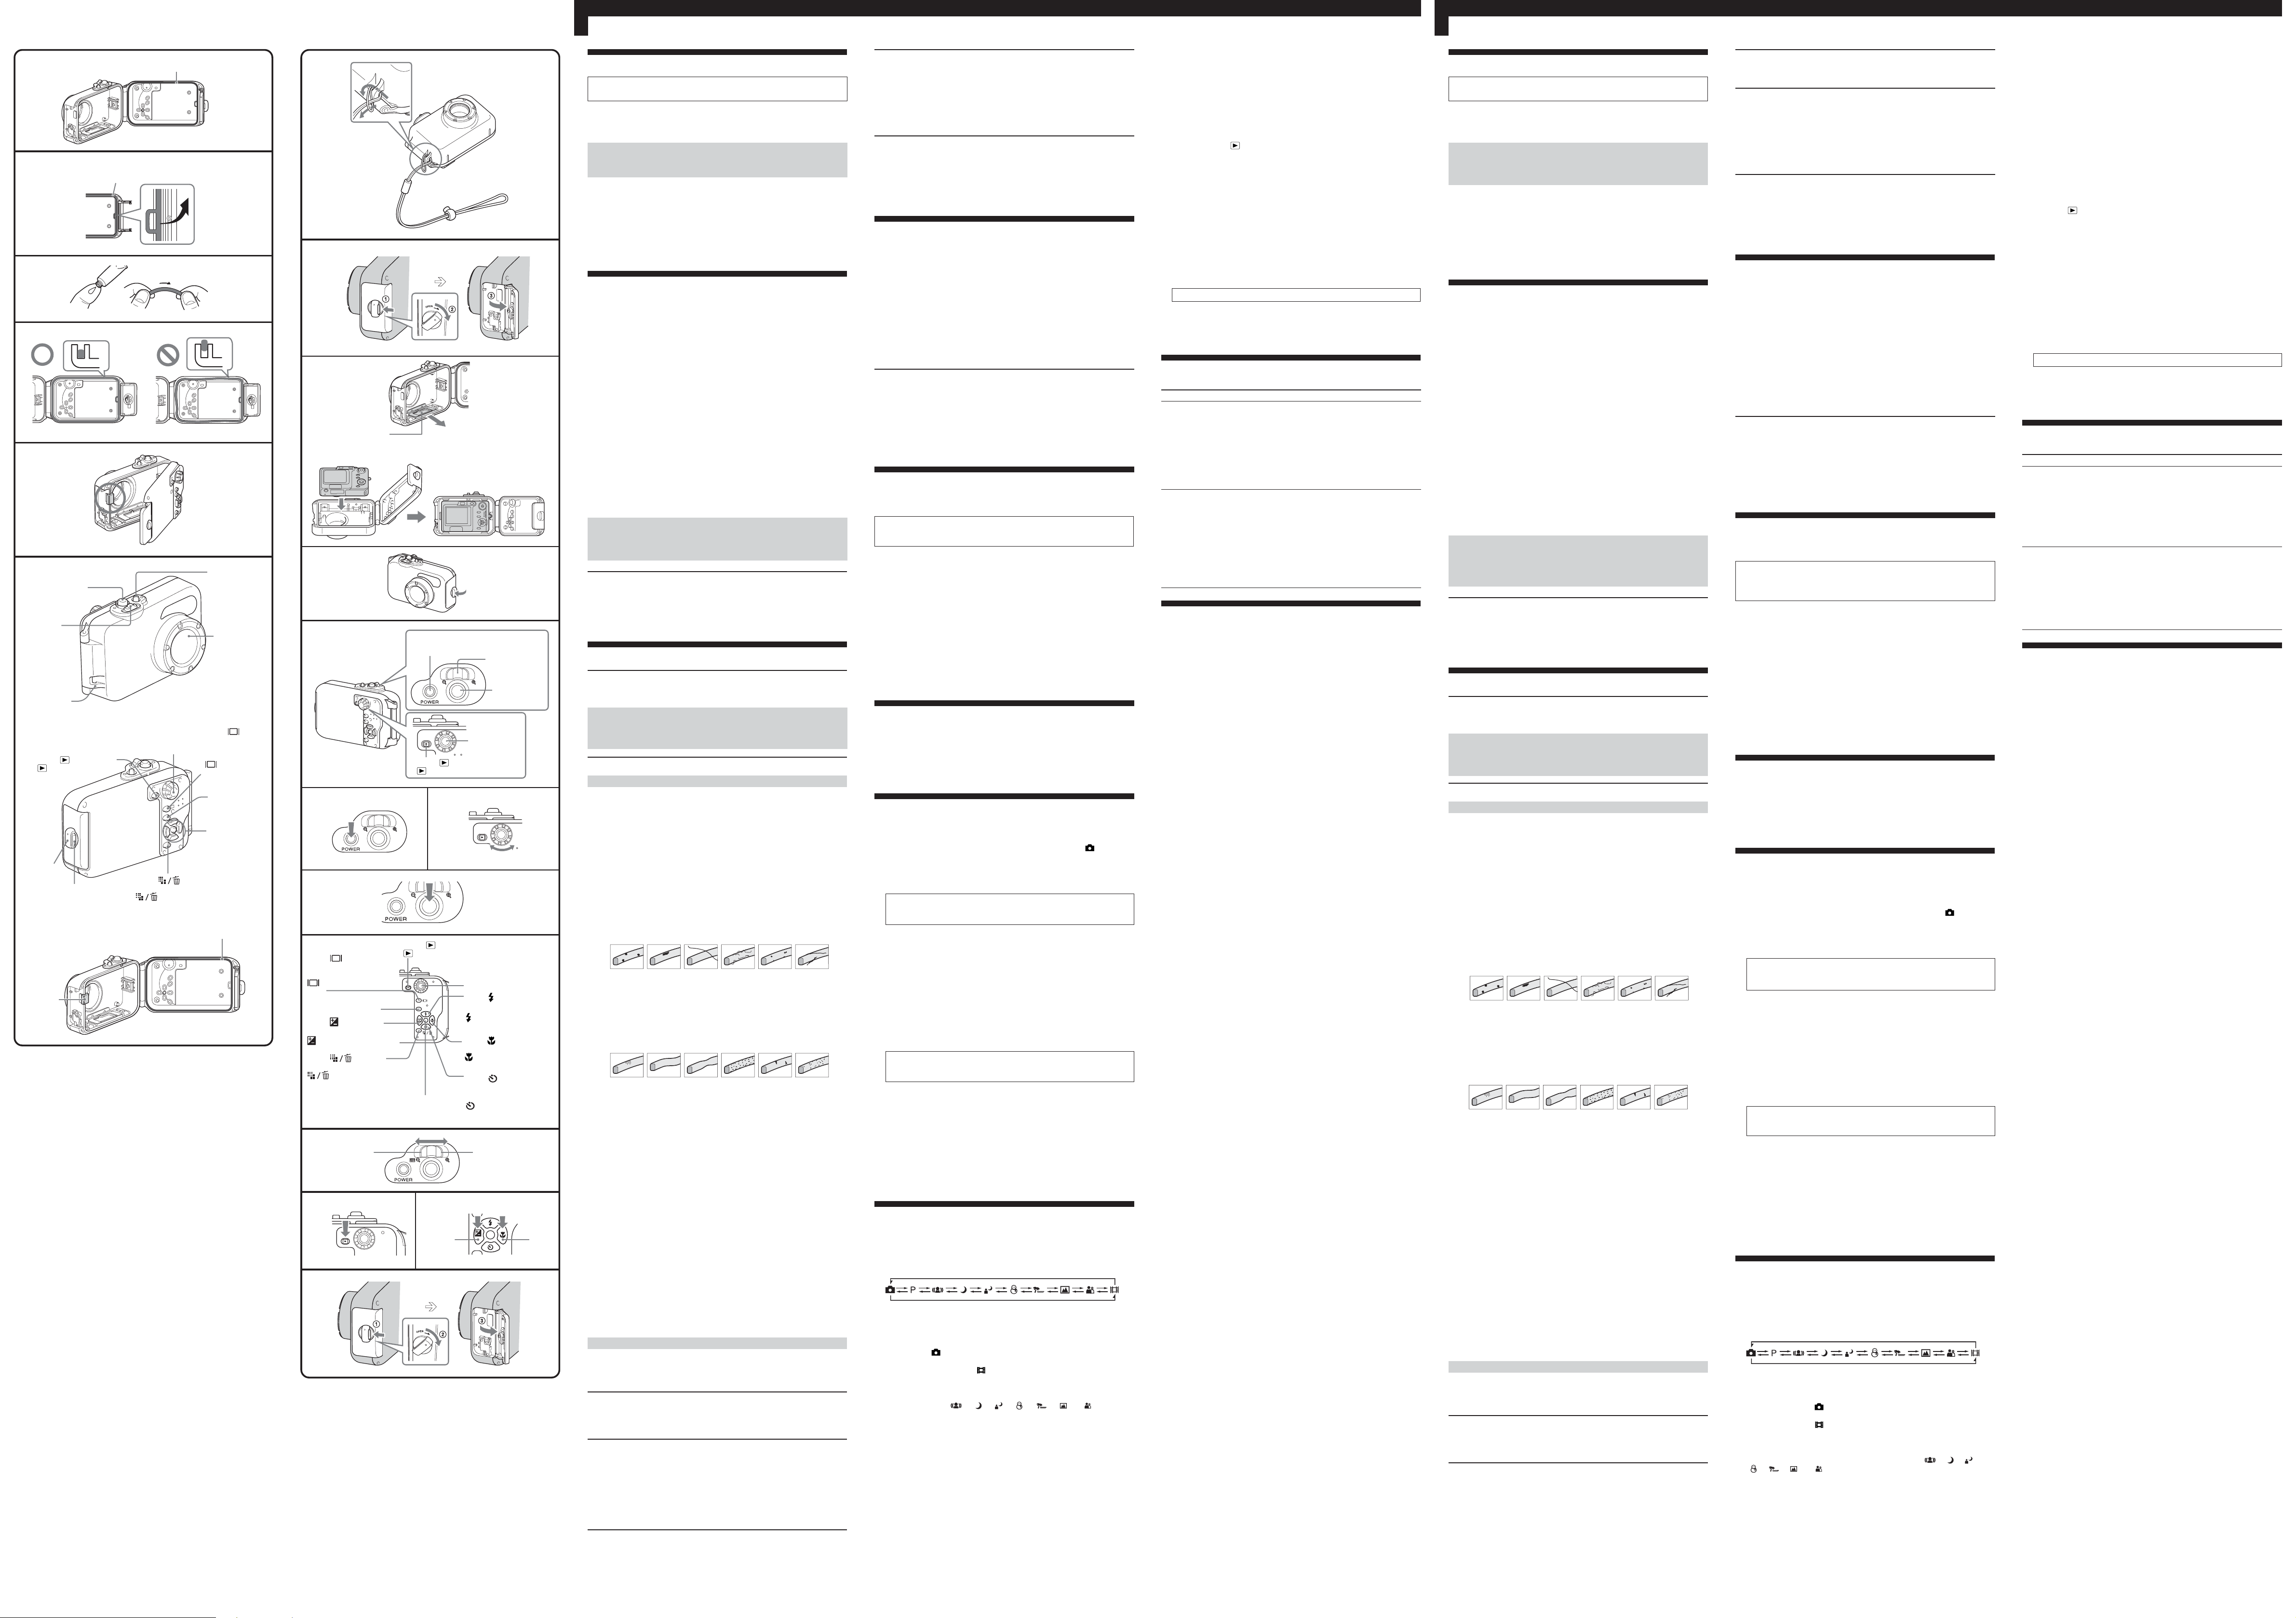
Waterproof gasket
Joint d’étanchéité
B
C
D
E
Shutter button
Déclencheur
Zoom button
Touche de
zoom
Hook for
hand strap
Crochet pour
dragonne
(Playback) button
Touche (Lecture)
Buckle dial
Molette à
boucle
Spacer
Entretoise
Waterproof gasket
Joint d’étanchéité
Lock release
button
Touche de
déverrouillage
POWER button
Touche POWER
Mode dial
Sélecteur de mode
(Image Size/Delete) button
Touche (Taille de l’image/
Suppression)
Waterproof gasket
Joint d’étanchéité
display switch)
button
Touche
(Commutateur
d’affichage
d’écran)
MENU button
Touche MENU
Control button
Touche de
commande
Front glass
Verre avant
(Screen
G
1
2
Mounting shoe
Support de
montage
3
H
POWER button
1
Touche POWER
W T
(Playback) button
Touche (Lecture)
Zoom button
Touche de zoom
Shutter button
Déclencheur
Mode dial
Sélecteur de
mode
23
WT
4
I
(Screen display
switch) button
Touche
(Commutateur
d’affichage d’écran)
MENU button
Touche MENU
(Image Brightness (EV))
button/Control button
Touche (Luminosité
image (EV))
(Image Size/
Delete) button
Touche (Taille
de l’image/
Suppression)
Enter/Control button
Validation/Touche de
commande
WT
(Playback) button
Touche (Lecture)
MENU
Mode dial
Sélecteur de mode
(flash)button/
Control button
Touche (flash)/
Touche de commande
(Macro)button/
Control button
Touche (macro)/
Touche de commande
(Self-timer) button/
Control button
Touche (Retardateur)/
Touche de commande
J
1
WT
2
K
1
2
21
L
Main Feature
Useable at a depth of up to 3 m (10 feet) underwater.
•This sports pack SPK-WA is exclusively for use with the Sony Digital Still
Camera DSC-W70/W55/W50/W40/W35/W30.
•This sports pack is water-resistant, enabling the digital still camera to be
used in the rain, snow or at the beach.
A loose or nipped waterproof gasket, sand or dirt on the waterproof
gasket may cause water leaks under water. Be sure to check the
waterproof gasket before use.
Notice
•For using your digital still camera with this pack, refer to the operating
instructions of the digital still camera.
•In the unlikely event that a malfunction of the sports pack causes damage
due to water leakage, Sony does not guarantee against damages to the
equipment contained in it (digital still camera, battery pack, etc.) and the
recorded contents, nor expenses entailed in the photography.
Precautions
•Do not subject the front glass to strong shock, as it may crack.
•Avoid opening the sports pack at the beach or on the water. Preparation
such as installing the digital still camera and changing the “Memory Stick
Duo” should be done in a place with low humidity and no salty air.
•Do not throw the sports pack into the water.
•Avoid using the sports pack in places with strong waves.
•Avoid using the sports pack under the following situations:
– in a very hot or humid place.
– in water hotter than 40 ˚C (104 ˚F).
– at temperatures lower than 0 ˚C (32 ˚F).
In these situations moisture condensation or water leakage may occur and
damage the equipment.
•Use the sports pack for no longer than 30 minutes at a time in
temperatures above 35 ˚C (95 ˚F).
•Be careful not to let the digital still camera fall when removing it from or
putting it in the sports pack.
•Do not leave the sports pack under direct sunlight in a very hot and
humid place for a long period of time. If you cannot avoid leaving the
sports pack under direct sunlight, be sure to cover the pack with a towel
or other protection.
•The digital still camera heats up if it is used inside the sports pack for a
long time. Before removing the digital still camera from the sports pack,
leave the sports pack in the shade or other cool place for a while to cool
down.
If sun oil is on the sports pack, be sure to wash it off thoroughly using
lukewarm water. If the sports pack is left with sun oil on its body, the
surface of the sports pack may become discolored or damaged (such as
cracks on the surface).
Water leakage
If water happens to leak in, stop exposing the sports pack to water
immediately.
If the digital still camera gets wet, take it to the nearest Sony dealer
immediately. Repair costs must be borne by the customer.
Handling the waterproof gasket
What is the waterproof gasket?
The waterproof gasket ensures the waterproof qualities of the sports pack
or other equipment. (See illustration A)
Waterproof gasket maintenance is very important. Failure to carry
out waterproof gasket maintenance according to the instructions
may lead to water leakage and cause the sports pack to sink.
Handling the waterproof gasket
Fit the waterproof gasket
Avoid fitting the waterproof gasket in dusty or sandy locations.
1 Remove the waterproof gasket. (See illustration B)
•You can easily remove the waterproof gasket by lifting it in the
direction of the arrow as illustrated.
Be careful not to scratch the waterproof gasket with your fingernail.
•Do not use a pointed or metal object to remove the waterproof gasket.
This kind of object may scratch or damage the sports pack groove or
waterproof gasket.
2 Inspect the waterproof gasket.
•Check carefully for the following. If found, wipe off with a soft cloth or
tissue paper.
– Is there any dirt, sand, hair, dust, salt, thread scraps, etc. on the
waterproof gasket?
– Is there any old grease on the waterproof gasket?
v Dirt v Sand v Hair v Dust v Salt
•Lightly run your fingertip around the waterproof gasket to check for
any invisible dirt.
•Be careful not to leave any cloth or tissue paper fibers on the
waterproof gasket after wiping it.
•Check the waterproof gasket for cracks, skewing, distortion, fine
splitting, scratches, sand inclusion, etc. Replace the waterproof gasket
if it is cracked or scratched.
v Cracksv Skewingv Distortion
v Fine
Splitting
v Scratches
3 Inspect the waterproof gasket groove.
Grains of sand or hardened salt sometimes get into the groove. Carefully
remove them by blowing with an air spray or by wiping them with a
cotton wool bud. Be careful not to leave any fibers from the cotton wool
bud inside.
4 Inspect the contact surface on the other side of the waterproof
gasket in the same way.
5 Apply a coating of grease to the waterproof gasket.
•Use your fingertips to thinly coat the entire surface of the waterproof
gasket with a small drop of grease. (See illustration C)
•Do not use paper or cloth as fibers may stick to the waterproof gasket.
•Make sure there is always a thin coating of grease on the surface of the
waterproof gasket. Grease protects the waterproof gasket and prevents
wear.
•Fit the waterproof gasket immediately after coating it with grease. Do
not leave the greased waterproof gasket on a table or other surface.
6 Fit the waterproof gasket into the groove of the sports pack.
Fit the waterproof gasket evenly into the groove paying attention to the
following points:
– Check for dirt on the waterproof gasket.
– Check the waterproof gasket is not twisted. (See illustration D)
How to check for water leakage
After replacing the waterproof gasket, close the sports pack without
inserting the equipment you are going to use. Immerse the sports pack in
water to a depth of about 15 cm for about three minutes and check that no
water leaks in.
Maintenance
If the sports pack is allowed to dry with sea water still in the waterproof
gasket groove, salt crystals form which may impair the waterproof gasket’s
functions.
Waterproof gasket serviceable life
The serviceable life of the waterproof gasket varies with frequency of use of
the sports pack and conditions. Generally, it is about one year.
Even if the waterproof gasket is not cracked or scratched, deformation or
wear reduces its waterproof qualities. Replace the waterproof gasket with a
new one if you find cracks, skewing, distortion, fine splitting, scratches,
sand inclusion, etc.
After replacing, check that no water leaks in.
Grease
Use the grease supplied. Using other manufacturer’s grease will damage
the waterproof gasket, and cause water leaks.
Anti-fogging lens solution
Coat the surface of the glass with the supplied anti-fogging lens solution.
This is effective in preventing from fogging.
How to use the anti-fogging lens solution
Apply 2 or 3 drops of the liquid to the front glass and wipe evenly to spread
the liquid out by using the swabs, a soft cloth or tissue paper.
Waterproof gasket, grease and anti-fogging lens solution
You can obtain the waterproof gasket and grease at the nearest Sony dealer.
Waterproof gasket (model No. 2-591-534-01)
Grease (model No. 2-582-620-01)
Anti-fogging lens solution (model No. 3-072-039-01)
v Thread
scraps
v Sand
inclusion
Maintenance
•After recording in a location with a sea breeze, wash the sports pack
thoroughly in fresh water with the buckles fastened to remove salt and
sand, then wipe with a soft dry cloth. It is recommended that you
submerge the sports pack in fresh water for about 30 minutes. If it is left
with salt on it, metal portions may be damaged or rust may form and
cause water leakage.
•If sun oil is on the sports pack, be sure to wash it off thoroughly using
lukewarm water.
•Clean the inside of the sports pack with a soft dry cloth. Do not wash the
inside of the sports pack.
Be sure to perform the above maintenance each time you use the sports
pack. Do not use any type of solvent such as alcohol, benzine or thinner for
cleaning, as this might damage the surface finish of the sports pack.
When storing the sports pack
•Attach the spacer supplied with your sports pack to prevent wear of the
waterproof gasket. (See illustration E)
•Close the pack without fastening the buckles to prevent wear of the
waterproof gasket.
•Prevent dust from collecting on the waterproof gasket.
•Avoid storing the sports pack in a cold, very hot or humid place, or
together with naphthalene or camphor, as these conditions might damage
the unit.
Preparation
Preparing the digital still camera
Install the digital still camera in a low-humidity room or a similar
environment. Opening or closing the sports pack in hot or humid
locations may result in fogging of the front glass.
For details, refer to the operating instructions supplied with the digital still
camera.
1 Remove the strap from the digital still camera.
2 Insert the battery pack.
Be sure to use a fully charged battery pack.
3 Insert the “Memory Stick Duo.”
4 Turn on the power of the digital still camera.
5 Set the LCD screen of the digital still camera to “ON.”
6 Set each of the settings on the digital still camera to “AUTO”
mode.
7 Set the AF illuminator on the digital still camera to “OFF.”
This disables use of the AF illuminator.
8 Check the digital still camera’s lens and LCD screen for any dirt.
F Attach the hand strap
We recommend attaching the hand strap (supplied) before using the sports
pack. (See illustration F)
Note
Be careful not to pinch the hand strap when you close the sports pack body.
If the hand strap is caught it causes water to leak into the sports pack.
G Installing the digital still camera
inside the sports pack
1 Set the POWER button of the digital still camera to “OFF.”
2 Set the mode dial of the digital still camera to “
.”
3 Open the sports pack. (G-1)
Keep the lock release button 1 pressed down, turn the buckle dial 2
and open the buckle in the direction of the arrow 3.
4 Prepare the sports pack.
Be sure to read the separate “Handling the waterproof gasket”.
Important details regarding maintenance and handling of the
waterproof gasket are described in this manual.
1 Remove the waterproof gasket.
2 Coat the waterproof gasket with grease.
Clean off any sand or dirt on the waterproof gasket, in the seating
groove, or on the sports pack’s body where it touches the waterproof
gasket. Coat the waterproof gasket with a light, even layer of grease.
3 Fit the waterproof gasket.
Note
The sports pack’s body may be scratched or water may leak if the
cover is closed with sand or dirt on the waterproof gasket.
5 Install the digital still camera inside the sports pack. (G-2)
Always be sure to turn off the power when installing or
removing the digital still camera. The lens may be damaged if the
power is on.
When using DSC-W40/W35/W30
Remove the mounting shoe by sliding it in the direction of the arrow
prior to attaching the sports pack to the DSC-W40/W35/W30. (G-2)
(The mounting shoe need not be removed for the DSC-W70/W55/W50)
Check that the digital still camera is placed correctly.
6 Close the sports pack’s body and fasten the buckle. (G-3)
Secure the sports pack’s body, and fasten the buckle until it clicks.
Using the Sports Pack
H Recording (See illustration H-1)
1 Turn on the power. (H-2)
Check that the Mode dial operates normally. (H-3)
The mode is switched in the following order by turning the Mode
dial:
For details of each mode, check in the LCD screen.
2 Set the Mode dial to the desired mode.
You can record pictures while looking at the LCD screen.
To record still images, set the Mode dial of the sports pack to “ ”.
To record moving images, set the Mode dial of the sports pack to “ ”.
Sound cannot be recorded while recording moving images.
To record pictures in the various scene, set the Mode dial of the digital
still camera to “ ,” “ ,” “ ,” “ ,” “ ,” “ ” or “ ,” and select
the desired mode.
For details, refer to the operating instructions supplied with the digital
still camera.
3 Press the shutter button. (H-4)
I Using/Setting various functions (See illustration I)
You can use the various functions of the digital still camera installed in the
sports pack.
J Using the zoom function (See illustration J)
1 Press on the W side of the zoom button for wide-angle. (Subject
appears farther away.)
2 Press on the T side of the zoom button for telephoto. (Subject appears
closer.)
Notes
•When using the flash with the sports pack attached, the shooting distance
may decrease or the right edge of the screen may darken.
•If you do not operate the digital still camera with the power on for a
certain time, the digital still camera turns off automatically to prevent the
battery pack from wearing down. To use the digital still camera again,
turn on the power again. For details, refer to the operating instructions
supplied with the digital still camera.
K Playing back with the control button
You can play back images on the LCD screen using the control button. You
cannot hear the sound.
1 Turn on the power.
2 Press the
3 Select the desired image with the control button. (K-2)
K-2 1 To previous image
K-2 2 To next image
L Removing the digital still camera
(See illustration L)
1 Turn off the power.
2 Open the sports pack.
Keep the lock release button 1 pressed down, turn the buckle dial 2
and open the buckle in the direction of the arrow 3.
3 Remove the digital still camera from the sports pack.
When the digital still camera has been used for a long time, the digital
still camera heats up. Turn off the power and leave for a while to cool
down before removing the digital still camera from the sports pack.
Be careful not to drop the digital still camera when removing it.
Note
Carefully wipe any water off the sports pack and your body before opening
the sports pack so that no drops get onto the digital still camera.
(playback) button. (K-1)
Troubleshooting
Symptom
There are drops of water
inside the sports pack.
The recording function does
not work.
Cause/Corrective Actions
•There are scratches or cracks on the
waterproof gasket.
b Replace the waterproof gasket with a new
one.
•The waterproof gasket is not set correctly.
b Place the waterproof gasket evenly in the
groove.
•The buckle is not fastened.
b Fasten the buckle until it clicks.
•The battery pack has run out.
b Charge the battery pack fully.
•The “Memory Stick Duo” is full.
b Insert another “Memory Stick Duo” or
erase unneeded data from the “Memory
Stick Duo.”
•The write-protect tab on the “Memory Stick
Duo” is set to LOCK.
b Set the tab to the recording position or
insert a new “Memory Stick Duo.”
Specifications
Material
Plastic (PC, ABS), stainless steel, glass
Water-resistance
Waterproof gasket, buckle
Pressure-resistance
To a depth of up to 3 m (10 feet) underwater
Switches that can be externally operated
Power, Mode, Shutter, Zoom, Control (Flash, Macro, Self-timer, Image
Brightness (EV), Enter), MENU, Image Size/Delete, Screen display switch,
Playback
Dimension
Approx. 130 × 82 × 64 mm (5 1/8 × 3 1/4 × 2 5/8 inches) (w/h/d)
(excluding projecting parts)
Mass
Approx. 160 g (5.7 oz.) (sports pack only)
Included items
Sports pack (1)
Mounting shoe (1)
Hand strap (1)
Grease (1)
Anti-fogging lens solution (1)
Spacer (1)
Set of printed documentation
Design and specifications subject to change without notice.
Caractéristique principale
Utilisable jusqu’à une profondeur de 3 mètres (10 pieds) sous l’eau.
•Le caisson étanche SPK-WA est conçu spécialement pour l’appareil photo
numérique Sony DSC-W70/W55/W50/W40/W35/W30.
•Ce caisson est étanche à l’eau, ce qui permet d’utiliser l’appareil photo
numérique sous la pluie, la neige ou au bord de la plage.
Un joint d’étanchéité relâché ou pincé ou la présence de sable ou de
saletés sur le joint peut entraîner des infiltrations d’eau. Vérifiez le joint
d’étanchéité avant d’utiliser l’équipement.
Avertissement
•Pour utiliser votre appareil photo numérique avec ce caisson, reportezvous au mode d’emploi de l’appareil photo.
•Dans le cas très improbable où une anomalie du caisson causerait des
dommages dus à une infiltration d’eau, notez que la garantie Sony ne
couvre pas les dommages subis par le matériel (appareil photo
numérique, batterie, etc.) à l’intérieur du caisson, le contenu enregistré ou
les frais encourus pour la prise de vues.
Précautions
•Ne soumettez pas le verre avant à des chocs importants, car il pourrait se
craqueler.
•N’ouvrez pas le caisson sur la plage ou dans l’eau. Les opérations
préparatoires, telles que la mise en place de l’appareil photo numérique et
le changement de « Memory Stick Duo », doivent être effectuées à l’abri
de l’humidité et de l’air salin.
•Ne jetez pas le caisson dans l’eau.
•N’utilisez pas le caisson par fortes vagues.
•N’utilisez pas le caisson dans les conditions suivantes :
– dans un endroit très chaud ou humide.
– dans de l’eau chaude à plus de 40 °C (104 °F).
– à des températures inférieures à 0 °C (32 °F).
Dans de telles conditions, le matériel pourrait être endommagé par une
condensation ou une infiltration d’eau.
•N’utilisez pas le caisson plus de 30 minutes d’affilée par une température
supérieure à 35°C (95 °F).
•Prenez garde à ne pas faire tomber l’appareil photo numérique lorsque
vous le retirez et que vous le remettez dans le caisson.
•Ne laissez pas le caisson en plein soleil ou dans un endroit très chaud et
humide pendant une longue période. Si vous n’avez pas d’autre choix que
de le laisser en plein soleil, recouvrez-le d’une serviette ou d’une autre
protection.
•L’appareil photo numérique s’échauffe s’il est utilisé pendant longtemps à
l’intérieur du caisson. Avant de retirer l’appareil photo numérique du
caisson, laissez temporairement le caisson à l’ombre ou dans un endroit
frais pour qu’il se refroidisse.
S’il y a de la crème solaire sur le caisson, prenez soin de l’éliminer
convenablement avec de l’eau tiède. Si la surface du boîtier du caisson
est souillée avec de la crème solaire, elle risque de se décolorer et de
s’endommager (craquelures sur la surface).
Infiltration d’eau
Si de l’eau s’infiltre dans le caisson, arrêtez immédiatement de l’exposer à
l’eau.
Si l’appareil photo numérique est mouillé, portez-le immédiatement chez le
revendeur Sony le plus proche. Les frais de réparation seront à la charge de
l’utilisateur.
Manipulation du joint d’étanchéité
Qu’est-ce qu’un joint d’étanchéité ?
Le joint d’étanchéité garantit l’étanchéité du caisson ou de tout autre
équipement. (Voir illustration A)
L’entretien du joint d’étanchéité est très important. Le non-respect
des instructions d’entretien du joint d’étanchéité peut entraîner des
infiltrations d’eau et faire couler le caisson.
Manipulation du joint d’étanchéité
Fixation du joint d’étanchéité
N’installez pas le joint d’étanchéité dans des endroits sablonneux ou
poussiéreux.
1 Retirez le joint d’étanchéité. (Voir illustration B)
•Vous pouvez facilement retirer le joint d’étanchéité en le soulevant
dans le sens de la flèche indiquée sur l’illustration.
Prenez garde à ne pas érafler le joint d’étanchéité avec vos ongles.
•N’utilisez pas d’objet pointu ou métallique pour retirer le joint
d’étanchéité.
Ce type d’objet risque d’érafler ou d’endommager la rainure du
caisson ou le joint d’étanchéité.
2 Inspectez le joint d’étanchéité.
•Vérifiez les points suivants. En cas d’anomalie, nettoyez le joint à l’aide
d’un chiffon doux ou d’un mouchoir en papier.
– Présence de saletés, de sable, de cheveux, de poussière, de sel, de
particules, etc.
– Présence de graisse.
v Saletés v Sable v
•Passez légèrement votre doigt sur le joint d’étanchéité pour détecter
d’éventuelles saletés invisibles.
•Assurez-vous de ne pas laisser de fibres de vêtement ou de papier sur
le joint d’étanchéité après l’avoir nettoyé.
•Assurez-vous que le joint d’étanchéité n’est pas craquelé, déformé,
tordu, coupé, éraflé, incrusté de sable. Remplacez-le s’il est fendu ou
éraflé.
v
Craquelures
v Torsion v
3 Inspectez la rainure du joint d’étanchéité.
Des grains de sable ou de sel s’incrustent parfois dans la rainure.
Retirez-les soigneusement à l’aide d’un pulvérisateur à air ou d’un
disque de coton. Prenez garde à ne pas laisser de fibres de coton à
l’intérieur.
4 Inspectez de la même manière la surface de contact de l’autre
côté du joint d’étanchéité.
5 Appliquez une couche de graisse sur le joint d’étanchéité.
•Avec les doigts, enduisez légèrement toute la surface du joint
d’étanchéité d’une petite goutte de graisse. (Voir illustration C)
•N’utilisez pas de mouchoir en papier ni de tissus, car les fibres risquent
de coller au joint d’étanchéité.
•Veillez à ce qu’il y ait toujours une fine couche de graisse sur la surface
du joint d’étanchéité. La graisse protège le joint et prévient l’usure.
•Fixez le joint d’étanchéité immédiatement après l’avoir enduit de
graisse. Ne posez pas le joint enduit de graisse sur une table ou une
autre surface.
6 Fixez le joint d’étanchéité dans la rainure du caisson.
Fixez le joint uniformément dans la rainure, en respectant les points
suivants :
– Vérifiez qu’il n’y a pas de saletés sur le joint d’étanchéité.
– Vérifiez que le joint d’étanchéité n’est pas tordu. (Voir illustration D)
Vérification de l’absence de défauts d’étanchéité
Après avoir replacé le joint d’étanchéité, fermez le caisson sans insérer
l’équipement que vous allez utiliser. Plongez le caisson dans l’eau à une
profondeur d’environ 15 cm pendant trois minutes environ et assurez-vous
que l’eau ne pénètre pas.
Entretien
Si vous faites sécher le caisson alors que la rainure du joint d’étanchéité
contient encore de l’eau de mer, des cristaux de sel vont se former et
peuvent diminuer l’étanchéité.
Durée de service du joint d’étanchéité
La durée de service du joint d’étanchéité varie selon la fréquence
d’utilisation du caisson et les conditions d’entreposage. Elle est
généralement d’une année environ.
Même si le joint d’étanchéité n’est pas craquelé ni éraflé, la déformation ou
l’usure réduit ses qualités d’étanchéité. Remplacez le joint d’étanchéité par
un neuf s’il est craquelé, déformé, tordu, coupé, éraflé, incrusté de sable.
Une fois le remplacement effectué, vérifiez qu’il n’y a aucune infiltration
d’eau.
Graisse
Utilisez la graisse fournie. L’emploi de la graisse d’un autre fabricant
endommagerait le joint d’étanchéité et entraînerait des infiltrations d’eau.
Solution anti-buée
Enduisez la surface du verre avec la solution anti-buée fournie.
Elle est conçue pour empêcher la buée de se former.
Utilisation de la solution anti-buée
Appliquez 2 ou 3 gouttes du liquide sur le verre avant et étalez
uniformément pour répandre le liquide à l’aide de disques de coton, d’un
chiffon doux ou d’un mouchoir en papier.
Cheveuxv Poussière
Déformation
v Fine
coupure
v Sel v
v
Erafluresv Incrustation
Particules
de sable
Joint d’étanchéité, graisse et solution anti-buée
Vous pouvez vous procurer des joints d’étanchéités et de la graisse chez
votre revendeur Sony le plus proche.
Joint d’étanchéité (N° de modèle : 2-591-534-01)
Graisse (N° de modèle : 2-582-620-01)
Solution anti-buée (N° de modèle : 3-072-039-01)
Entretien
•Après une prise de vues dans un endroit exposé à la brise marine, lavez
soigneusement le caisson à l’eau douce avec les fermoirs correctement
verrouillés pour en retirer le sel et le sable, puis essuyez-le avec un chiffon
doux et sec. Il est recommandé de plonger le caisson dans de l’eau douce
pendant 30 minutes environ. Ne laissez pas de sel dessus, car il pourrait
attaquer les parties métalliques et de la rouille risquerait de se former et
de causer une infiltration d’eau.
•S’il y a de la crème solaire sur le caisson, prenez soin de l’éliminer
convenablement avec de l’eau tiède.
•Nettoyez l’intérieur du caisson avec un chiffon doux et sec. Ne lavez pas
l’intérieur du caisson.
Effectuez les opérations d’entretien ci-dessus après chaque utilisation du
caisson. N’utilisez aucune sorte de solvant, comme de l’alcool, de la benzine
ou du diluant pour le nettoyage, car ces substances peuvent attaquer la
finition du caisson.
Stockage du caisson
•Fixez l’entretoise fournie avec votre caisson pour protéger le joint
d’étanchéité contre l’usure. (Voir illustration E)
•Fermez le caisson sans verrouiller les fermoirs pour protéger le joint
d’étanchéité contre l’usure.
•Empêchez l’accumulation de poussière sur le joint d’étanchéité.
•Ne rangez pas le caisson dans un endroit froid, très chaud ou humide ou
avec de la naphtaline ou du camphre. Ceci pourrait l’endommager.
Préparation
Préparation de l’appareil photo numérique
Installez l’appareil photo numérique autant que possible dans un
endroit peu humide. En effet, l’ouverture ou la fermeture du caisson
dans un endroit chaud ou humide peut provoquer la formation de
buée sur le verre avant.
Pour plus d’informations, reportez-vous au mode d’emploi fourni avec
l’appareil photo numérique.
1 Retirez la dragonne de l’appareil photo numérique.
2 Insérez la batterie.
Utilisez une batterie complètement rechargée.
3 Insérez le « Memory Stick Duo ».
4 Mettez l’appareil photo numérique sous tension.
5 Réglez l’écran LCD de l’appareil photo sur « ON ».
6 Réglez toutes les fonctions de l’appareil photo numérique en
mode « AUTO ».
7 Réglez l’éclairage AF de l’appareil photo numérique sur « OFF ».
Ceci désactive l’éclairage AF.
8 Assurez-vous que l’objectif et l’écran de l’appareil photo
numérique ne sont pas souillés.
F Attachez la dragonne
Il est recommandé d’attacher la dragonne (fournie) avant d’utiliser le
caisson. (Voir illustration F)
Remarque
Faites attention à ne pas coincer la dragonne lorsque vous fermez le caisson
étanche. Si la dragonne est coincée, de l’eau risque de pénétrer dans le
caisson.
G Mise en place de l’appareil photo
numérique dans le caisson
1 Réglez la touche POWER de l’appareil photo sur « OFF ».
2 Réglez le sélecteur de mode de l’appareil photo numérique sur
».
«
3 Ouvrez le caisson. (G-1)
Laissez la touche d’ouverture 1 enfoncée, tournez la molette à boucle
2 et ouvrez la boucle dans le sens de la flèche 3.
4 Préparez le caisson.
Veillez à lire la section « Manipulation du joint d’étanchéité », car
elle renferme des informations importantes sur l’entretien et la
manipulation du joint d’étanchéité.
1 Retirez le joint d’étanchéité.
2 Enduisez le joint d’étanchéité de graisse.
Enlevez le sable et autres saletés présents sur le joint d’étanchéité, sur
la rainure du joint ou sur la surface du boîtier entrant en contact avec
le joint d’étanchéité. Enduisez le joint d’étanchéité d’une légère
couche uniforme de graisse.
3 Fixation du joint d’étanchéité.
Remarque
Le boîtier du caisson risque d’être éraflé et de l’eau pourrait s’infiltrer
si le couvercle est refermé alors que du sable ou de la saleté se trouve
sur le joint d’étanchéité.
5 Installez l’appareil photo numérique dans le caisson. (G-2)
N’oubliez pas de mettre l’appareil photo hors tension lorsque
vous l’installez ou retirer. L’objectif peut être endommagé si vous
laissez l’appareil photo sous tension.
Utilisation du DSC-W40/W35/W30
Retirez le support de montage en le faisant glisser dans le sens de la
flèche avant de fixer le caisson étanche sur le DSC-W40/W35/W30.
(G-2)
(Il n’est pas nécessaire de retirer le support de montage du DSC-W70/
W55/W50.)
Assurez-vous que l’appareil photo numérique est correctement installé.
6 Fermez le boîtier du caisson et bouclez le fermoir. (G-3)
Tenez bien le boîtier du caisson et bouclez le fermoir jusqu’à ce qu’il
s’encliquette.
Utilisation du caisson
H Prise de vues (Voir illustration H-1)
1 Mettez l’appareil sous tension. (H-2)
Assurez-vous que le sélecteur de mode fonctionne normalement. (H-3)
Lorsque vous tournez le sélecteur de mode, le mode change dans
l’ordre suivant :
Pour plus d’informations sur chaque mode, consultez l’écran LCD.
2 Réglez le sélecteur de mode sur le mode souhaité.
Vous pouvez enregistrer des images tout en regardant l’écran LCD.
Pour enregistrer des images fixes, réglez le sélecteur de mode du caisson
sur « ».
Pour enregistrer des images animées, réglez le sélecteur de mode du
caisson sur « ».
Il est impossible d’enregistrer des sons en même temps que des images
animées.
Pour filmer des scènes variées, réglez la molette de mode de l’appareil
photo sur « », « », « », « », « », « » ou « » et
sélectionnez le mode souhaité.
Pour plus d’informations, reportez-vous au mode d’emploi fourni avec
l’appareil photo numérique.
3 Appuyez sur le déclencheur. (H-4)
I Utilisation/Réglage des diverses fonctions
(Voir illustration I)
Vous pouvez utiliser les diverses fonctions de l’appareil photo numérique
lorsqu’il est installé dans le caisson.
J Utilisation de la fonction Zoom (Voir illustration J)
1 Appuyez sur le côté W de la touche de zoom pour une prise de vue
grand angle. (Le sujet apparaît plus lointain.)
2 Appuyez sur le côté T de la touche de zoom pour une prise de vue au
téléobjectif. (Le sujet apparaît plus proche.)
Remarques
•Lorsque vous utilisez le flash avec le caisson, la distance de prise de vue
peut être réduite ou le côté droit de l’écran peut s’assombrir.
•Si vous n’utilisez pas l’appareil photo un certain temps après l’avoir mis
sous tension, il s’éteindra automatiquement pour empêcher la batterie de
s’user. Pour utiliser de nouveau l’appareil photo numérique, remettez-le
sous tension. Pour plus d’informations, reportez-vous au mode d’emploi
fourni avec l’appareil photo numérique.
K Lecture à l’aide de la touche de commande
Vous pouvez visionner des images sur l’écran LCD à l’aide de la touche de
commande. Le son n’est pas audible.
1 Mettez l’appareil sous tension.
2 Appuyez sur la touche
. (K-1)
3 Sélectionnez l’image souhaitée à l’aide de la touche de
commande. (K-2)
K-2 1 Vers l’image précédente
K-2 2 Vers l’image suivante
L Retrait de l’appareil photo numérique
(Voir illustration L)
1 Mettez l’appareil hors tension.
2 Ouvrez le caisson.
Laissez la touche d’ouverture 1 enfoncée, tournez la molette à boucle
2 et ouvrez la boucle dans le sens de la flèche 3.
3 Retirez l’appareil photo numérique du caisson.
Lorsque l’appareil photo numérique a fonctionné pendant une longue
période, il est relativement chaud. Mettez l’appareil photo numérique
hors tension et laissez-le refroidir pendant un certain temps avant de le
retirer du caisson.
Veillez à ne pas faire tomber l’appareil photo numérique en le
retirant.
Remarque
Essuyez soigneusement le caisson et séchez-vous avant d’ouvrir le caisson
pour qu’aucune goutte d’eau ne pénètre à l’intérieur de l’appareil photo
numérique.
En cas de problème
Symptôme
Présence de gouttes d’eau à
l’intérieur du caisson
La fonction d’enregistrement
ne fonctionne pas
Cause/Remèdes
•Le joint d’étanchéité est éraflé ou craquelé.
b Remplacez-le par un neuf.
•Le joint d’étanchéité n’est pas correctement
disposé.
b Disposez-le uniformément dans la
rainure.
•Le fermoir n’est pas verrouillé.
b Verrouillez-le jusqu’à ce qu’il
s’encliquette.
•La batterie est épuisée.
b Rechargez-la complètement.
•Le « Memory Stick Duo » est saturé.
b Insérez un autre « Memory Stick Duo » ou
effacez les données inutiles du « Memory
Stick Duo ».
•Le taquet de protection en écriture du
« Memory Stick Duo » est réglé sur LOCK.
b Réglez le taquet sur la position
d’enregistrement ou insérez un « Memory
Stick Duo » neuf.
Spécifications
Matière
Plastique (PC, ABS), acier inoxydable, verre
Etanchéité à l’eau
Joint d’étanchéité, fermoir
Résistance à la pression
Jusqu’à une profondeur de 3 m (10 pieds) sous l’eau
Commutateurs pouvant être commandés de l’extérieur
Alimentation, Mode, Déclencheur, Zoom, Commande (Flash, Macro,
Retardateur, Luminosité image (EV), Validation), MENU, Taille de l’image/
Suppression, Commutateur d’affichage d’écran, Lecture
Dimensions
environ 130 × 82 × 64 mm (5 1/8 × 3 1/4 × 2 5/8 po.) (l/h/p)
(parties saillantes non comprises)
Poids
environ 160 g (5,7 on.) (caisson uniquement)
Articles inclus
Caisson (1)
Support de montage (1)
Dragonne (1)
Graisse (1)
Solution anti-buée (1)
Entretoise (1)
Jeu de documents imprimés
La conception et les spécifications sont sujettes à modification sans préavis.
Español Nederlands
B
C
D
E
Disparador
Sluitertoets
Botón de
zoom
Zoomtoets
Gancho para la
correa de
muñeca
Bevestigingsoog
voor polsband
Botón (Reproducir)
(afspelen) toets
Vidrio frontal
Sluitklemdraaiknop
Espaciador
Tussenstuk
Junta impermeable
Waterdichte pakking
Vidrio frontal
Sluitklemdraaiknop
Junta impermeable
Waterdichte pakking
Botón POWER
POWER toets
Cristal frontal
Glas aan
voorkant
Botón
Selector de modo
Functieknop
Botón (tamaño de imagen/
eliminar)
(beeldformaat/verwijderen)
toets
(interruptor de
visualización de la
pantalla)
(schermweergave)
toets
Botón MENU
MENU toets
Botón de
control
Regelknop
Junta impermeable
Waterdichte pakking
G
1
2
Cuña de montaje
Montageschoen
3
H
Botón POWER
1
POWER toets
W T
Botón (Reproducir)
(afspelen) toets
Botón de zoom
Zoomtoets
Disparador
Sluitertoets
Selector de
modo
Functieknop
23
WT
4
I
Botón (interruptor
de visualización de la
pantalla)
(schermweergave)
toets
Botón MENU
MENU toets
Botón (Brillo imag
(EV))
(Beeldhelderheid (EV))
toets
Botón (tamaño
de imagen/eliminar)
(beeldformaat/
verwijderen) toets
Botón Introducir/
Control
Bevestigen/regelknop
WT
Botón (Reproducir)
(afspelen) toets
Selector de modo
Functieknop
MENU
Botón (flash)/botón
de control
Botón (MACRO)/
botón de control
regelknop
Botón (temporizador
automático)/botón de
control
regelknop
(flitser)/regelknop
(Macroknop)/
(zalfontspanner)/
J
1
WT
2
K
1
2
21
L
Características principales
Utilizable bajo agua a una profundidad de hasta 3 metros.
•Este portacámara deportivo SPK-WA es para uso exclusivo con la cámara
digital de imágenes fijas DSC-W70/W55/W50/W40/W35/W30 de Sony.
•Este portacámara deportivo es resistente al agua, lo que permite utilizar la
cámara digital de imágenes fijas bajo la lluvia, la nieve o en la playa.
Una junta impermeable floja, atrapada, con arena o sucia puede causar
la infiltración de agua. Asegúrese de comprobar la junta impermeable
antes de su uso.
Aviso
•Para utilizar la cámara digital de imágenes fijas con este portacámara,
consulte el manual de instrucciones de la cámara digital de imágenes fijas.
•En el caso improbable de que un mal funcionamiento del portacámara
deportivo ocasione daños debidos a una infiltración de agua, Sony no se
responsabilizará de los daños ocasionados al equipo alojado en él (cámara
digital, batería, etc.) ni del contenido grabado, ni tampoco de los gastos
relacionados con la fotografía.
Precauciones
•No someta el cristal frontal a golpes fuertes ya que podría agrietarse.
•Evite abrir el portacámara deportivo en la playa o en el agua. Los
preparativos tales como la instalación de la cámara digital y el cambio del
“Memory Stick Duo” deberán realizarse en un lugar de poca humedad y
sin aire salino.
•No arroje el portacámara deportivo al agua.
•Evite utilizar el portacámara deportivo en lugares con fuertes olas.
•Evite utilizar el portacámara deportivo en las situaciones siguientes:
– en un lugar muy cálido o húmedo.
– en agua más caliente de 40 ºC.
– a temperaturas inferiores a 0 ºC.
En estas situaciones podría producirse condensación de humedad o
infiltraciones de agua y dañarse el equipo.
•No utilice el portacámara deportivo durante más de 30 minutos con
temperaturas superiores a los 35 ºC.
•No permita que se caiga la cámara digital de imágenes fijas al extraerla o
colocarla dentro del portacámara deportivo.
•No deje el portacámara deportivo bajo la luz solar directa en un lugar
muy cálido y húmedo durante largo tiempo. Si no puede evitar dejarlo
bajo la luz solar directa, asegúrese de cubrirlo con una toalla u otro tipo de
protección.
•La cámara digital de imágenes fijas se calentará si se utiliza dentro del
portacámara deportivo durante mucho tiempo. Antes de extraer la cámara
digital del portacámara deportivo, deje éste a la sombra o en otro lugar
fresco durante algún tiempo para que se enfríe.
Si hay aceite solar en el portacámara deportivo, asegúrese de lavarlo
completamente utilizando agua tibia. Si dejase el portacámara deportivo
con aceite solar en su cuerpo, la superficie del mismo podría decolorarse
o dañarse (como rajas en la superficie).
Infiltración de agua
En caso de producirse una infiltración de agua en el interior, deje de
exponer el portacámara deportivo al agua inmediatamente.
Si se moja la cámara digital de imágenes fijas, llévela inmediatamente al
distribuidor Sony más cercano. Los costes de reparación tendrá que
abonarlos el usuario.
Manejo de la junta impermeable
¿Qué es la junta impermeable?
La junta impermeable asegura la calidad impermeable del portacámara
deportivo y de otros equipos. (Consulte la ilustración A)
El mantenimiento de la junta impermeable es muy importante. Si no
realiza el mantenimiento de la junta impermeable siguiendo las
instrucciones, podría provocar infiltraciones de agua y hacer que se
inunde el portacámara deportivo.
Manejo de la junta impermeable
Ajuste la junta impermeable
Evite fijar la junta impermeable en lugares polvorientos o con arena.
1 Retire la justa impermeable. (Consulte la ilustración B)
•Puede extraer la junta impermeable con facilidad levantándola en el
sentido que indica la flecha en la ilustración.
Procure no arañar la junta impermeable con las uñas.
•No utilice ningún objeto de metal ni punzante para extraer la junta
impermeable.
Este tipo de objetos podría arañar o dañar la ranura del portacámara
deportivo o la junta impermeable.
2 Inspeccione la junta impermeable.
•Compruebe la junta para detectar la presencia de los siguientes
elementos. Si se encontrara alguno de estos elementos, límpielo con un
paño suave o un pañuelo de papel.
– ¿Contiene la junta impermeable suciedad, arena, cabellos, polvo, sal,
virutas de metal, etc.?
– ¿Contiene la junta impermeable grasa antigua?
v
v
Suciedad
•Pase ligeramente la yema del dedo alrededor de la junta impermeable
para comprobar si hubiera algo de suciedad no visible.
•Procure no dejar ninguna fibra del paño ni del pañuelo de papel en la
junta impermeable después de limpiarla.
•Compruebe la junta impermeable por si tuviera grietas, torceduras,
deformaciones, rajas finas, rasguños, restos de arena, etc. En caso de
que esté agrietada o rasgada, cambie la junta impermeable.
v Grietas v
v Arena v
Torceduras v
Cabellos
Deformaciones
v Polvo vSal
v Rajas
finas
v
Rasguños
3 Inspeccione la ranura de la junta impermeable.
Es posible que en ocasiones se introduzcan granos de arena o sal sólida
en la ranura. Retírelos con cuidado soplando con un aerosol de aire y
frotándolos con una bola de algodón. Tenga cuidado de no dejar dentro
ninguna fibra de la bola de algodón.
4 Explore la superficie de contacto del otro lado de la junta
impermeable de la misma forma.
5 Aplique una capa protectora de grasa a la junta impermeable.
•Utilice la yema de los dedos para esparcir una capa delgada por toda la
superficie de la junta impermeable con una gotita de grasa.
(Consulte la ilustración C)
•No utilice papel ni paños de fibras que pudieran adherirse a la junta
impermeable.
•Asegúrese de que la junta impermeable cuente siempre con una capa
protectora delgada de grasa en su superficie. La grasa protege la junta
impermeable y evita el desgaste.
•Ajuste la junta impermeable inmediatamente después de recubrirla
con la grasa. No deje la junta impermeable recubierta de grasa sobre la
mesa ni sobre ninguna otra superficie.
6 Ajuste la junta impermeable a la ranura del portacámara
deportivo.
Ajuste la junta impermeable uniformemente en la ranura, prestando
atención a los siguientes puntos:
– Compruebe si la junta impermeable presenta suciedad.
– Compruebe que la junta impermeable no esté torcida.
(Consulte la ilustración D)
Cómo comprobar si existe infiltración de agua
Una vez sustituida la junta impermeable, cierre el portacámara deportivo
sin insertar el equipo que va a utilizar. Sumerja el portacámara deportivo en
agua a una profundidad de unos 15 cm durante aproximadamente tres
minutos y compruebe que no se haya infiltrado agua.
Mantenimiento
Si se deja secar el portacámara deportivo cuando todavía hay agua del mar
en la ranura de la junta impermeable, se formarán cristales salinos que
podrían dañar el funcionamiento de la junta impermeable.
Vida útil de la junta impermeable
La vida útil de la junta impermeable varía según las condiciones y la
frecuencia de uso del portacámara deportivo. Por lo general, es de
aproximadamente un año.
Aunque la junta impermeable no esté agrietada ni rasgada, la deformación
o el desgaste reducen sus cualidades de impermeabilidad. Sustituya la junta
impermeable por una nueva si encuentra grietas, torceduras,
deformaciones, rajas finas, rasguños, restos de arena, etc.
Una vez sustituida, compruebe que no se infiltra agua.
Grasa
Utilice la grasa suministrada. La utilización de grasa de otros fabricantes
podría dañar la junta impermeable y causar la infiltración de agua.
Virutas
de metal
v Restos
de arena
Solución antiempañante para el objetivo
Recubra la superficie del cristal con la solución antiempañante suministrada
para el objetivo.
Resulta efectiva para evitar el empañamiento.
Utilización de la solución antiempañante para el objetivo
Aplique 2 ó 3 gotas del líquido en el cristal frontal y frote firmemente para
esparcir el líquido utilizando un bastoncillo de algodón, un paño suave o
un pañuelo de papel.
Junta impermeable, grasa y solución antiempañante
para el objetivo
Puede adquirir la junta impermeable y la grasa en su distribuidor Sony más
cercano.
Junta impermeable (nº modelo 2-591-534-01)
Grasa (nº modelo 2-582-620-01)
Solución antiempañante para el objetivo (nº modelo 3-072-039-01)
Mantenimiento
•Después de grabar en un lugar expuesto a brisas marinas, lave el
portacámara deportivo con agua fresca y con las hebillas perfectamente
abrochadas para retirar la sal y la arena y, a continuación, frótelo con un
paño suave y seco. Se recomienda sumergir el portacámara deportivo en
agua dulce durante unos 30 minutos. Si se deja sal en él, podrían dañarse
las partes metálicas o formarse óxido y ocasionar infiltraciones de agua.
•Si hay aceite solar en el portacámara deportivo, lávelo completamente
utilizando agua tibia.
•Limpie el interior del portacámara deportivo con un paño suave y seco.
No lave el interior del portacámara deportivo.
Asegúrese de realizar el mantenimiento indicado cada vez que utilice el
portacámara. No use ningún disolvente, como alcohol, bencina o diluyente
para limpiarlo, ya que podría dañar el acabado de la superficie del
portacámara deportivo.
Cuando vaya a almacenar el portacámara deportivo
•Coloque el espaciador suministrado con el portacámara deportivo para
evitar el desgaste de la junta impermeable. (Consulte la ilustración E)
•Cierre el portacámara sin apretar las hebillas para evitar el desgaste de la
junta impermeable.
•Evite que se acumule polvo en la junta impermeable.
•Evite almacenar el portacámara deportivo en un lugar frío, muy cálido o
húmedo, ni junto a naftalina ni alcanfor, ya que estas condiciones podrían
dañar la unidad.
Preparación
Preparación de la cámara digital
Instale la cámara digital en una sala con baja humedad o un entorno
similar. Si abre o cierra el portacámara deportivo en un lugar cálido o
húmedo, se podría empañar el cristal frontal.
Para obtener más información, consulte el manual de instrucciones
suministrado con la cámara digital.
1 Retire la correa de la cámara digital.
2 Inserte la batería.
Asegúrese de utilizar una batería completamente cargada.
3 Inserte el “Memory Stick Duo”.
4 Encienda la cámara digital.
5 Ajuste la pantalla LCD de la cámara digital a “ON”.
6 Ajuste todas las opciones de la cámara digital a “AUTO”.
7 Ajuste el iluminador de enfoque automático (AF) de la cámara
digital en “OFF“.
De este modo se inhabilitará la utilización del iluminador AF.
8 Compruebe si hay suciedad en el objetivo de la cámara digital o
en la pantalla LCD.
F Fije la correa de muñeca
Se recomienda fijar la correa de muñeca (suministrada) antes de utilizar el
portacámara deportivo. (Consulte la ilustración F)
Nota
Procure no enganchar la correa de muñeca al cerrar el portacámara
deportivo. Si la correa de muñeca quedase atrapada, podría infiltrarse agua
dentro del portacámara deportivo.
G Instalación de la cámara digital
dentro del portacámara deportivo
1 Ponga el selector POWER de la cámara digital en “OFF”.
2 Ajuste el selector de modo de la cámara digital en “
”.
3 Abra el portacámara deportivo. (G-1)
Mantenga pulsado el botón de desbloqueo 1, gire el dial de la hebilla 2
y abra ésta en el sentido de la flecha 3.
4 Prepare el portacámara deportivo.
Asegúrese de leer el apartado “Manejo de la junta impermeable”.
Los detalles importantes relacionados con el mantenimiento y
manejo de la junta impermeable se describen en este manual.
1 Retire la junta impermeable.
2 Recubra la junta impermeable con grasa.
Limpie la arena o la suciedad de la junta impermeable, de la ranura
de ajuste o de la parte del cuerpo del portacámara deportivo que esté
en contacto con dicha junta. Recubra la junta impermeable con una
capa ligera y uniforme de grasa.
3 Ajuste la junta impermeable.
Nota
El cuerpo del portacámara deportivo puede rayarse o puede
producirse infiltración de agua si se cierra la cubierta con arena o
suciedad en la junta impermeable.
5 Instale la cámara digital en el interior del portacámara
deportivo. (G-2)
Antes de instalar o extraer la cámara digital, desconecte su
alimentación. Si dejase la alimentación conectada, el objetivo
podría dañarse.
Al utilizar la DSC-W40/W35/W30
Antes de fijar el portacámaras deportivo a la DSC-W40/W35/W30,
extraiga la cuña de montaje deslizándola en la dirección que indica la
flecha. (G-2)
(En el modelo DSC-W70/W55/W50, no es necesario extraer la cuña de
montaje).
Compruebe que la cámara digital esté correctamente instalada.
6 Cierre el cuerpo del portacámara deportivo y abroche la hebilla.
(G-3)
Asegure el cuerpo del portacámara deportivo y abroche la hebilla hasta
que se oiga un clic.
Utilización del portacámara deportivo
H Grabación (Consulte la ilustración H-1)
1 Conecte la alimentación. (H-2)
Compruebe que el selector de modo funciona correctamente. (H-3)
Al girar el selector de modo, el modo cambia en el siguiente orden:
Para obtener más información acerca de cada modo, compruebe la
pantalla LCD.
2 Ajuste el selector de modo al modo deseado.
Usted podrá grabar imágenes observando la pantalla LCD.
Para grabar imágenes fijas, ajuste el mando de modo del portacámara
deportivo a “ ”.
Para grabar imágenes móviles, ajuste el selector de modo del
portacámara deportivo a “ ”.
Durante la grabación de imágenes en movimiento no podrá grabarse
sonido.
Para grabar imágenes en varias escenas, ponga el selector de modo de la
cámara digital en “ ”, “ ”, “ ”, “ ”, “ ”, “ ” o “ ”, y
seleccione el modo deseado.
Para obtener más información, consulte el manual de instrucciones
suministrado con la cámara digital.
3 Pulse el botón del disparador. (H-4)
I Utilización/Ajuste de varias funciones
(Consulte la ilustración I)
Podrá utilizar varias funciones de la cámara digital instalada en el
portacámara deportivo.
J Uso de la función de zoom (Consulte la ilustración J)
1 Pulse el lado W del botón de zoom para gran angular. (El sujeto
aparecerá más lejos).
2 Pulse el lado T del botón de zoom para telefoto. (El sujeto aparecerá
más cerca).
Notas
•Si utiliza el flash con el portacámaras deportivo colocado, la distancia de
disparo puede disminuir o puede que el borde derecha de la pantalla
quede oscuro.
•Cuando no utilice la cámara digital con la alimentación conectada durante
cierto tiempo, dicha alimentación se desconectará automáticamente para
evitar que se descargue la batería. Para volver a utilizar la cámara digital,
vuelva a conectar su alimentación. Para obtener más información,
consulte el manual de instrucciones suministrado con la cámara digital.
K Reproducción con el botón de control
Puede reproducir imágenes en la pantalla LCD utilizando el botón de
control. No podrá oír el sonido.
1 Conecte la alimentación.
2 Pulse el botón
(Reproducir). (K-1)
3 Seleccione la imagen deseada con el botón de control. (K-2)
K-2 1 A la imagen anterior
K-2 2 A la imagen siguiente
L Extracción de la cámara digital
(Consulte la ilustración L)
1 Desconecte la alimentación.
2 Abra el portacámara deportivo.
Mantenga pulsado el botón de desbloqueo 1, gire el dial de la hebilla 2
y abra ésta en el sentido de la flecha 3.
3 Extraiga la cámara digital del portacámara deportivo.
Cuando haya utilizado la cámara digital durante mucho tiempo, se
calentará. Desconecte la alimentación de la cámara digital y deje que se
enfríe durante un tiempo antes de extraerla del portacámara deportivo.
Procure que no se caiga la cámara digital cuando la extraiga.
Nota
Antes de abrir el portacámara deportivo, limpie con cuidado cualquier resto
de agua que hubiera en éste y en su cuerpo para evitar que entren gotas en
la cámara digital.
Solución de problemas
Síntoma
Hay gotas de agua dentro del
portacámara deportivo.
La función de grabación no
se activa.
Causa/acciones correctivas
•La junta impermeable presenta rasguños o
grietas.
b Sustituya la junta impermeable por otra
nueva.
•La junta impermeable no está colocada
correctamente.
b Coloque la junta impermeable
uniformemente en la ranura.
•La hebilla no está abrochada.
b Abroche la hebilla hasta que se oiga un
clic.
•La batería se ha agotado.
b Cargue completamente la batería.
•El “Memory Stick Duo” está lleno.
b Inserte otro “Memory Stick Duo” o borre
datos que no necesite del “Memory Stick
Duo”.
•La lengüeta de protección contra escritura
del “Memory Stick Duo” está ajustada en
LOCK.
b Ajuste la lengüeta en la posición de
grabación o inserte un “Memory Stick
Duo” nuevo.
Especificaciones
Material
Plástico (PC, ABS), acero inoxidable, cristal
Estanqueidad
Justa impermeable, hebilla
Resistencia a la presión
Hasta una profundidad de 3 metros bajo el agua
Interruptores que se pueden accionar externamente
Alimentación, Modo, Disparador, Zoom, Control (Flash, Macro,
Autodisparador, Brillo imag (EV), Introducir), MENU, Tamaño de imagen/
eliminar, Interruptor de visualización de la pantalla, Reproducir
Dimensiones
Aprox. 130 × 82 × 64 mm (an/al/prf)
(excluyendo partes salientes)
Peso
Aprox. 160 g (solamente el portacámara deportivo)
Elementos incluidos
Portacámara deportivo (1)
Cuña de montaje (1)
Correa de muñeca (1)
Grasa (1)
Solución antiempañante para el objetivo (1)
Espaciador (1)
Juego de documentación impresa
El diseño y las especificaciones están sujetos a cambios sin previo aviso.
Belangrijkste kenmerk
Te gebruiken tot op een diepte van maximaal 3 meter onder water.
•Deze sportbehuizing SPK-WA is uitsluitend bestemd voor gebruik met de
digitale fotocamera DSC-W70/W55/W50/W40/W35/W30 van Sony.
•Deze sportbehuizing is waterbestendig, zodat u de digitale fotocamera
kunt gebruiken in de regen of sneeuw of aan het strand.
Als de waterdichte pakking loszit of beschadigd is of als er zand of vuil
in de waterdichte pakking is terechtgekomen, kan dit lekkage onder
water tot gevolg hebben. Controleer de waterdichte pakking voordat u
deze gebruikt.
Opmerking
•Raadpleeg de gebruiksaanwijzing van de digitale fotocamera voordat u
de digitale fotocamera gebruikt met deze behuizing.
•In het onwaarschijnlijke geval dat er bij een defect aan de sportbehuizing
schade wordt veroorzaakt door waterlekkage, aanvaardt Sony geen
aansprakelijkheid voor beschadiging van de apparatuur in de behuizing
(digitale fotocamera, batterij, enzovoort) en de gemaakte opnamen en
evenmin voor de kosten die verbonden zijn aan het fotograferen.
Voorzorgsmaatregelen
•Stel het glas aan de voorkant niet bloot aan sterke trillingen. Het glas kan
hierdoor barsten.
•Open de sportbehuizing niet aan het strand of op het water. U moet de
voorbereiding, zoals het installeren van de digitale fotocamera en het
wijzigen van de "Memory Stick Duo", uitvoeren op een plaats met een
lage vochtigheid en geen zoute lucht.
•Gooi de sportbehuizing niet in het water.
•Gebruik de sportbehuizing niet op plaatsen met een sterke golfslag.
•Gebruik de sportbehuizing niet onder de volgende omstandigheden:
– op zeer warme of vochtige plaatsen.
– in water met een temperatuur van boven 40 °C.
– bij temperaturen beneden 0 °C.
Onder deze omstandigheden kan vochtcondensatie of waterlekkage
optreden en kan de apparatuur worden beschadigd.
•Bij temperaturen boven 35 °C mag u de sportbehuizing niet langer dan 30
minuten achtereen gebruiken.
•Laat de digitale fotocamera niet vallen als u deze verwijdert uit of plaatst
in de sportbehuizing.
•Laat de sportbehuizing niet langere tijd in direct zonlicht op een zeer
warme en vochtige plaats liggen. Als u de sportbehuizing toch in direct
zonlicht moet laten liggen, moet u de behuizing bedekken met een
handdoek of andere bescherming.
•De digitale fotocamera wordt warm na langdurig gebruik in de
sportbehuizing. Voordat u de digitale fotocamera uit de sportbehuizing
haalt, moet u de sportbehuizing met de camera een tijdje in de schaduw of
op een andere locatie leggen, zodat de camera kan afkoelen.
Als er zonnebrandolie op de sportbehuizing terechtkomt, moet u de
behuizing goed reinigen met lauw water. Als u de zonnebrandolie niet
van de sportbehuizing verwijdert, kan de buitenkant van de
sportbehuizing verkleuren of beschadigen (er kunnen scheurtjes in het
oppervlak ontstaan).
Waterlekkage
Als er waterlekkage optreedt, moet u de sportbehuizing niet langer aan
water blootstellen.
Als de digitale fotocamera nat wordt, moet u de camera direct naar de
dichtstbijzijnde Sony-handelaar brengen. De klant moet eventuele
reparatiekosten betalen.
De waterdichte pakking gebruiken
Wat is de waterdichte pakking?
sportbehuizing of andere apparatuur tegen water wordt beschermd.
(Zie afbeelding A)
Het is erg belangrijk dat u de waterdichte pakking goed
onderhoudt. Als u de waterdichte pakking niet goed onderhoudt
zoals in de gebruiksaanwijzing wordt aangegeven, kan er water in
de behuizing lekken en kan de sportbehuizing zinken.
De waterdichte pakking gebruiken
De waterdichte pakking aanbrengen
Breng de waterdichte pakking niet aan op locaties met veel stof of zand.
1 Verwijder de waterdichte pakking. (Zie afbeelding B)
•U kunt de waterdichte pakking gemakkelijk verwijderen door deze in
de richting van de pijl te trekken, zoals in de afbeelding wordt
aangegeven.
Zorg dat u met uw nagel geen krassen op de waterdichte pakking
maakt.
•Verwijder de waterdichte pakking niet met een puntig of metalen
voorwerp.
U kunt hiermee krassen op de groef van de sportbehuizing of de
waterdichte pakking maken of deze beschadigen.
2 Controleer de waterdichte pakking.
•Controleer zorgvuldig of er vuil aanwezig is. Is dit het geval, dan moet
u het vuil verwijderen met een zachte doek of een papieren zakdoekje.
– Bevinden er zich vuil, zand, haren, stof, zout, draadjes, enzovoort op
de waterdichte pakking?
– Bevinden er zich resten smeervet op de waterdichte pakking?
v Vuil v Zand v Haren v Stof v Zout v Draden
•Ga voorzichtig met uw vingertop over de waterdichte pakking om te
controleren op vuil dat niet zichtbaar is.
•Zorg dat er geen resten van een doek of papieren zakdoekje
achterblijven op de waterdichte pakking nadat u de pakking hebt
schoongemaakt.
•Controleer de waterdichte pakking op barstjes, onregelmatigheid,
vervorming, haarscheurtjes, zand, enzovoort. Vervang de waterdichte
pakking als deze is gebarsten of bekrast.
v Barstjesv Onregelmatigheid
3 Controleer de groef van de waterdichte pakking.
Zandkorrels of opgedroogd zout kunnen soms in de groef
terechtkomen. Blaas het zand en zout weg met een verstuiver of veeg het
weg met een wattenstaafje. Zorg dat er geen resten van het wattenstaafje
achterblijven.
4 Controleer op dezelfde manier het contactgedeelte aan de
andere kant van de waterdichte pakking.
5 Smeer een laagje smeervet op de waterdichte pakking.
•Breng met uw vingertoppen een dun laagje smeervet aan op het gehele
oppervlak van de waterdichte pakking. (Zie afbeelding C)
•Gebruik geen papier of stof omdat vezels op de waterdichte pakking
kunnen achterblijven.
•Zorg dat er altijd een dun laagje smeervet op het oppervlak van de
waterdichte pakking zit. Het smeervet beschermt de waterdichte
pakking en voorkomt slijtage.
•Breng de waterdichte pakking direct aan nadat u een laagje smeervet
hebt aangebracht. Laat de ingevette waterdichte pakking niet op een
tafel of ander oppervlak liggen.
6 Plaats de waterdichte pakking in de groef van de
sportbehuizing.
Plaats de waterdichte pakking gelijkmatig in de groef en let met name
op de volgende punten:
– Controleer op stof op de waterdichte pakking.
– Controleer of de waterdichte pakking niet is gedraaid.
(Zie afbeelding D)
Controleren op waterlekkage
Nadat u de waterdichte pakking hebt vervangen, sluit u de sportbehuizing
zonder de apparatuur die u wilt gebruiken, in de behuizing te plaatsen.
Houd de sportbehuizing ongeveer drie minuten 15 cm onder water en
controleer of er geen water in de behuizing lekt.
Onderhoud
Als u de sportbehuizing laat opdrogen met zout water in de groef van de
waterdichte pakking, kan er zout kristalliseren waardoor de functies van de
waterdichte pakking kunnen verminderen.
Gebruiksduur van de waterdichte pakking
De gebruiksduur van de waterdichte pakking verschilt, afhankelijk van hoe
vaak en onder welke omstandigheden u de sportbehuizing gebruikt. De
gebruiksduur is over het algemeen één jaar.
Zelfs als de waterdichte pakking niet is gebarsten of bekrast, neemt de
waterdichtheid van de pakking toch af door vervorming en slijtage.
Vervang de waterdichte pakking door een nieuwe als u barstjes,
onregelmatigheid, vervorming, haarscheurtjes, krassen of zand aantreft.
Als u de pakking hebt vervangen, controleert u of er geen water in lekt.
v Vervorming v
Haarscheurtjes
v Krassen v Zand
Smeervet
Gebruik het bijgeleverde smeervet. Smeervet van een andere fabrikant kan
de waterdichte pakking beschadigen en waterlekkage veroorzaken.
Vloeistof tegen het beslaan van de lens
Breng een laagje vloeistof tegen het beslaan van de lens aan op het
oppervlak van het glas.
U voorkomt zo dat het glas beslaat.
De vloeistof tegen het beslaan van de lens gebruiken
Breng 2 of 3 druppels vloeistof aan op het glas aan de voorkant en verdeel
de vloeistof gelijkmatig met een wattenstaafje, een zachte doek of een
papieren zakdoekje.
Waterdichte pakking, smeervet en vloeistof tegen het
beslaan van de lens
U kunt de waterdichte pakking en het smeervet verkrijgen bij de
dichtstbijzijnde Sony-handelaar.
Waterdichte pakking (modelnummer 2-591-534-01)
Smeervet (modelnummer 2-582-620-01)
Vloeistof tegen het beslaan van de lens (modelnummer 3-072-039-01)
Onderhoud
•Wanneer u opnamen hebt gemaakt in een omgeving met zeewind, moet u
de sportbehuizing goed uitwassen met zoet water om zout en zand te
verwijderen. Hierbij moeten de sluitklemmen gesloten zijn. Veeg de
behuizing af met een zachte, droge doek. U kunt het beste de
sportbehuizing ongeveer 30 minuten onderdompelen in zoet water. Als er
zout op de sportbehuizing achterblijft, kunnen metalen delen worden
beschadigd of kan er roest ontstaan waardoor de behuizing kan gaan
lekken.
•Als er zonnebrandolie op de sportbehuizing komt, moet u de behuizing
goed reinigen met lauw water.
•Reinig de binnenkant van de sportbehuizing met een zachte, droge doek.
Maak de binnenkant van de sportbehuizing niet nat.
Voer het bovenstaande onderhoud altijd uit als u de sportbehuizing
gebruikt. Gebruik geen oplosmiddelen, zoals alcohol, benzine of thinner,
omdat deze het oppervlak van de sportbehuizing kunnen beschadigen.
De sportbehuizing opbergen
•Bevestig het tussenstuk dat bij de sportbehuizing wordt geleverd om
slijtage van de waterdichte pakking te voorkomen. (Zie afbeelding E)
•Sluit de behuizing zonder de sluitklemmen vast te maken om slijtage van
de waterdichte pakking te voorkomen.
•Zorg dat er geen stof op de waterdichte pakking komt.
•Bewaar de sportbehuizing niet op een koude, zeer hete of vochtige plaats
of samen met naftaleen of kamfer. Hierdoor kan de behuizing worden
beschadigd.
Voorbereiding
De digitale fotocamera voorbereiden
Installeer de digitale fotocamera in een ruimte met een lage
luchtvochtigheid of een vergelijkbare omgeving. Als u de behuizing
in een zeer warme of vochtige omgeving opent, kan het glas aan de
voorkant beslaan.
Raadpleeg de gebruiksaanwijzing bij de digitale fotocamera voor meer
informatie.
1 Maak de riem los van de digitale fotocamera.
2 Plaats de batterij.
Zorg ervoor dat u altijd een volledig opgeladen batterij gebruikt.
3 Plaats de "Memory Stick Duo".
4 Schakel de stroom van de digitale fotocamera in.
5 Zet het LCD scherm van de digitale fotocamera aan ("ON").
6 Zet elk van de instellingen van de digitale fotocamera in de
"AUTO" stand.
7 Stel de AF-verlichting op de camera in op "OFF".
Hierdoor wordt het gebruik van de AF-verlichting uitgeschakeld.
8 Controleer of de lens van de digitale fotocamera en het LCD-
scherm vuil zijn.
F De polsband bevestigen
U kunt het beste de polsband (bijgeleverd) bevestigen voordat u de
sportbehuizing gebruikt. (Zie afbeelding F)
Opmerking
Zorg dat de polsband niet beklemd raakt wanneer u de sportbehuizing
sluit. Als de polsband beklemd raakt, kan er water in de sportbehuizing
lekken.
G De digitale fotocamera in de
sportbehuizing plaatsen
1 Schakel de digitale fotocamera uit door de POWER schakelaar
op "OFF" te zetten.
2 Zet de functieknop van de digitale fotocamera op "
".
3 Open de sportbehuizing. (G-1)
Houd de ontgrendelknop 1 omlaag gedrukt, draai aan de draaiknop
van de sluitklem 2 en open de sluitklem in de richting van de pijl 3.
4 Maak de sportbehuizing gereed voor gebruik.
Lees ook het gedeelte "De waterdichte pakking gebruiken".
In dit gedeelte wordt informatie gegeven over het onderhoud en
gebruik van de waterdichte pakking.
1 Verwijder de waterdichte pakking.
2 Vet de waterdichte pakking in met smeervet.
Verwijder zand en vuil van de waterdichte pakking, uit de groef of
van het hoofdgedeelte van de sportbehuizing waar deze de
waterdichte pakking raakt. Bedek de waterdichte pakking met een
dun, gelijkmatig laagje smeervet.
3 De waterdichte pakking aanbrengen.
Opmerking
Het hoofdgedeelte van de sportbehuizing kan worden bekrast of kan
gaan lekken als de klep wordt gesloten met zand of vuil op de
waterdichte pakking.
5 Plaats de digitale fotocamera in de sportbehuizing. (G-2)
Zet voor het aanbrengen of verwijderen van de digitale
fotocamera die altijd eerst uit. Met de camera ingeschakeld zou
de lens beschadigd kunnen worden.
Bij gebruik van de DSC-W40/W35/W30
Verwijder de montageschoen door deze in de richting van de pijl te
schuiven voordat u de DSC-W40/W35/W30 in de sportbehuizing
plaatst. (G-2)
(Voor de DSC-W70/W55/W50 hoeft u de montageschoen niet te
verwijderen.)
Controleer of de digitale fotocamera juist is geplaatst.
6 Sluit het hoofdgedeelte van de sportbehuizing en maak de
sluitklem vast. (G-3)
Maak het hoofdgedeelte van de sportbehuizing vast en maak de
sluitklem vast tot deze klikt.
De sportbehuizing gebruiken
H Opnemen (Zie afbeelding H-1)
1 Schakel de stroom in. (H-2)
Controleer of de functieknop normaal werkt. (H-3)
Wanneer u de functieknop draait, wordt de functie als volgt
gewijzigd:
Meer informatie over de functies kunt u in het LCD-scherm lezen.
2 Zet de functieknop op de gewenste functie.
U kunt beelden opnemen terwijl u naar het LCD-scherm kijkt.
Als u stilstaande beelden wilt opnemen, zet u de functieknop van de
sportbehuizing op " ".
Als u bewegende beelden wilt opnemen, zet u de functieknop van de
sportbehuizing op " ".
U kunt geen geluid opnemen wanneer u de bewegende beelden
opneemt.
Voor het maken van opnamen onder allerlei omstandigheden zet u de
functiekeuzeknop van de digitale fotocamera in de " ", " ", " ",
" ", " ", " " of " " stand en dan kiest u de gewenste
opnamefunctie.
Raadpleeg de gebruiksaanwijzing bij de digitale fotocamera voor meer
informatie.
3 Druk op de sluitertoets. (H-4)
I Verschillende functies gebruiken/instellen
(Zie afbeelding I)
U kunt de verschillende functies gebruiken van de digitale fotocamera die
in de sportbehuizing is geplaatst.
J De zoomfunctie gebruiken (Zie afbeelding J)
1 Druk op de W-zijde van de zoomtoets voor groothoekopnamen. (Het
onderwerp lijkt verder weg.)
2 Druk op de T-zijde van de zoomtoets voor tele-opnamen. (Het
onderwerp lijkt dichterbij.)
Opmerkingen
•Wanneer u de flitser gebruikt als de fotocamera in de sportbehuizing is
geplaatst, kan de opnameafstand afnemen of kan de rechterkant van het
scherm donkerder worden.
•Als u de digitale fotocamera geruime tijd niet gebruikt, maar wel aan laat
staan, wordt de digitale fotocamera na een tijdje automatisch
uitgeschakeld, om onnodig uitputten van het batterijpak te voorkomen.
Als u de digitale fotocamera opnieuw wilt gebruiken, schakelt u deze
weer in. Raadpleeg de gebruiksaanwijzing bij de digitale fotocamera voor
meer informatie.
K Afspelen met de regelknop
U kunt beelden weergeven op het LCD-scherm met de regelknop. U hoort
hierbij geen geluid.
1 Schakel de stroom in.
2 Druk op
(afspelen). (K-1)
3 Selecteer het gewenste beeld met de regelknop. (K-2)
K-2 1 Naar het vorige beeld
K-2 2 Naar het volgende beeld
L De digitale fotocamera verwijderen
(Zie afbeelding L)
1 Schakel de stroom uit.
2 Open de sportbehuizing.
Houd de ontgrendelknop 1 omlaag gedrukt, draai aan de draaiknop
van de sluitklem 2 en open de sluitklem in de richting van de pijl 3.
3 Verwijder de digitale fotocamera uit de sportbehuizing.
Als u de digitale fotocamera lange tijd hebt gebruikt, wordt deze warm.
Schakel de stroom uit en laat de camera enige tijd afkoelen voordat u de
digitale fotocamera uit de sportbehuizing verwijdert.
Laat de digitale fotocamera niet vallen wanneer u deze verwijdert.
Opmerking
Veeg het water van de sportbehuizing en uw lichaam voordat u de
sportbehuizing opent zodat er geen druppels op de digitale fotocamera
kunnen vallen.
Problemen oplossen
Probleem
Er zijn waterdruppels in de
sportbehuizing
terechtgekomen.
De opnamefunctie werkt niet.
Oorzaak/oplossing
• De waterdichte pakking is bekrast of
gescheurd.
b Vervang de waterdichte pakking door een
nieuwe.
•De waterdichte pakking is niet juist
aangebracht.
b Plaats de waterdichte pakking gelijkmatig
in de groef.
• De sluitklem is niet vastgemaakt.
b Maak de sluitklem vast tot deze klikt.
•De batterij isµ leeg.
b Laad de batterij volledig op.
• De "Memory Stick Duo" is vol.
b Plaats een andere "Memory Stick Duo" in
de camera of verwijder ongewenste
gegevens van de "Memory Stick Duo".
• Het wispreventienokje op de "Memory Stick
Duo" is ingesteld op LOCK.
b Zet het nokje in de opnamepositie of
plaats een nieuwe "Memory Stick Duo".
Specificaties
Materiaal
Plastic (PC, ABS), roestvrij staal, glas
Waterbestendig
Waterdichte pakking, sluitklem
Drukbestendig
Tot op een diepte van 3 meter onder water
Bedieningselementen die vanaf de buitenkant kunnen worden bediend
POWER toets, functieknop, sluitertoets, zoomtoets, regelknop (flitser, macro,
zelfontspanner, beeldhelderheid (EV), bevestigen), MENU toets,
beeldformaat/verwijderen, schermweergavetoets, afspelen
Afmetingen
Ongeveer 130 × 82 × 64 mm (b/h/d)
(exclusief uitstekende delen)
Gewicht
Ongeveer 160 g (alleen sportbehuizing)
Bijgeleverd toebehoren
Sportbehuizing (1)
Montageschoen (1)
Polsband (1)
Smeervet (1)
Vloeistof tegen het beslaan van de lens (1)
Tussenstuk (1)
Hadleiding en documentatie
Wijzigingen in ontwerp en technische gegevens voorbehouden zonder
voorafgaande kennisgeving.
 Loading...