

Page 1
Sports Pack
1
2
3-867-132-12(1)
D
POWER
1
VTR
OFF
CAMERA
MEMORY
C
O
K
L
Operating Instructions
Mode d’emploi
Manual de instrucciones
Gebruiksaanwijzing
SPK-PC2
Sony Corporation ©1999 Printed in Japan
A
mounting shoe
sabot de montage
A
B
model
modèle
DCR-PC3/PC3E/PC2E/PC1
DCR-PC10/PC7
B
Mounting shoe A
Sabot de montage A
Tripod screw plate
Plaquette à vis du trépied
2
Use metal parts of
shoulder belt.
Utilisez les éléments
métalliques de la
bandoulière.
34
R
E
Y
A
L
P
F
F
O
C
A
M
E
R
A
5
Mounting shoe A
Sabot de montage A
Mounting shoe B
Sabot de montage B
Mounting shoe B
Sabot de montage B
To disassemble after using
Pour le démontage après utilisation
C
4
Tripod screw plate
Plaquette à vis du trépied
7
8
English
Owner’s Record
The model and serial numbers are located on
the bottom. Record the serial number in the
space provided below. Refer to these numbers
whenever you call upon your Sony dealer
regarding this product.
Model No. SPK-PC2 Serial No.
This mark indicates that this
products is a genuine accessory
for Sony video products. When
purchasing Sony video
products, Sony recommends
that you purchase accessories
with this “GENUINE VIDEO
ACCESSORIES” mark.
Usable at the depth as low as 2 meters (6.5
feet) under water.
For using your video camera recorder with this
pack, refer to the operating instructions of the
recorder.
The splash-proof sports pack SPK-PC2 is waterand moisture- resistant, making it possible to
use the Sony Digital Handycam camcorder such
as DCR-PC3/PC3E/PC2E/PC1, in the rain or at
the beach.
Notice
• Before you start recording, make sure that
the camcorder is working correctly and
there is no water leakage.
• Sony does not accept liability for damage
to the camcorder, battery, etc., when using
the sports pack or for the cost of recording
if water leakage occurs as a result of
incorrect use.
Precaution
• Do not subject the front glass to strong shock,
as it may crack.
• Avoid opening the sports pack in the sea or at
the beach. Preparation such as installing and
changing a cassette tape should be done in a
place with low humidity and no salty air.
• Do not throw the sports pack into the water.
• Avoid using the sports pack under the
following situations:
– in a very hot or humid place.
– in water hotter than 40˚C (104˚F).
– at temperatures lower than 0˚C.
In these situations moisture condensation or
water leakage may occur and damage the
equipment.
• Use the sports pack for no longer than one
hour at a time in temperatures above 35˚C
(95˚F).
• Do not leave the sports pack under direct
sunlight for a long period of time. If you
cannot avoid leaving the sports pack under
direct sunlight, be sure to cover the pack with
a towel or other protection.
Before You Begin
To make sure that you do not miss good
shooting opportunities, go over the following
checklist before installing your camcorder into
the sports pack.
Notes
• When using DCR-PC10 or DCR-PC7, prepare
the VMC-LM7 adaptor (not supplied).
• When recording with this pack, we
recommend you to use the battery pack of
larger capacity, such as NP-FS31/FS21/F30/
F20/F300/F200.
Battery pack
Cassette tape
Waterproof
gasket
Fully charged.
• The tape length will cover
the planned recording time.
• The tape is wound to the
point where you want to
start recording.
• The safety tab on the
cassette is in the correct
position. (The red portion is
not visible.)
• No scratches or cracks. No
dust, sand or hair around
the gasket.
• Correctly set in the groove.
(See “Note on the
Waterproof gasket” for
details.)
Maintenance and
Precautions
Water Leakage
If water happens to leak in, stop exposing the
sports pack to water immediately.
If the camcorder gets wet, take it to the nearest
Sony service facility immediately.
Note on the Waterproof Gasket
• Check that there are no scratches or cracks on
the waterproof gasket as they may allow
water to leak in. If there are scratches or
cracks, replace the damaged waterproof
gasket with a new one.
Do not remove the waterproof gasket with a
metal tool or a tool with a sharp point.
• Put the waterproof gasket in the grooves
evenly, with the tapering side up. Never twist
it. (See illustration L)
• Remove foreign materials such as dust, sand
or hair from the waterproof gasket, the groove
and from any surface the gasket touches.
If the body is closed with such materials
present, these areas may be damaged and
water may leak in.
• After checking that there are no cracks or dust
on the waterproof gasket, coat it slightly with
the supplied grease using your finger. This
will prevent wearing.
While applying the grease, recheck for cracks
or dust.
Never use cloth or paper for greasing as the
fibers may cling.
Do not use any type of grease other than that
supplied, as it may damage the waterproof
gasket.
• The useful life of the waterproof gasket
depends upon the maintenance and the
frequency of use, but we recommend
changing it once a year. To replace the
waterproof gasket, please consult the nearest
Sony dealer. Be sure to check the water
leakage after replacing the waterproof gasket.
Checking for the water leakage
after replacing the waterproof
gasket
Check for the water leakage before installing the
camcorder.
Close the sports pack without installing the
camcorder, and keep the sports pack submerged
under water at a depth of about 15 cm (6 inches)
for about 3 minutes and then check for water
leakage.
After Recording
After recording in a location subject to sea
breezes, wash the sports pack with fresh water
with the buckles fastened thoroughly, then wipe
with a soft dry cloth. If water remains on the
sports pack, the metal parts may rust.
Clean the inside of the pack with a soft dry
cloth. Do not wash the inside of the pack. Do
not use any type of solvent such as alcohol,
benzine or shinner for cleaning, as this might
damage the finish.
Preventing the surface of the glass
from fogging up
Coat the surface of the glass with the supplied
anti-fogging lens solution. This is effective in
preventing from fogging.
How to use the glass cleaner
Apply 1 or 2 drops of cleaner liquid to the front
glass and the glass of the eye cup and wipe
evenly to spread the liquid out by using swabs,
a soft cloth or tissue paper.
When storing the sports pack
• Close the pack without fastening the buckles
to prevent wear of the waterproof gasket.
• Prevent dust from collecting on the
waterproof gasket.
• Avoid storing the sports pack in a cold, very
hot or humid place, or together with
naphthalene or camphor, as these conditions
might damage the unit.
Specifications
Material
Plastic (PC, ABS), glass
Waterproof
Waterproof gasket, buckle
Built-in microphone
Stereo
Dimension
Approx. 150 x 170 x 110 mm (w / h / d)
Mass
Approx. 550 g (only sports pack)
Supplied accessories
Shoulder strap (1)
Camera mounting shoe
A(1)/B(1)
Tripod screw plate (1, pre-installed on the
camera mounting shoe A)
Reflex prevention ring (2)
Grease (1)
Anti-fogging lens solution (1)
Operating Instructions (1)
Design and specifications subject to change
without notice.
Preparing
For details, please refer to the operating
instructions supplied with your camcorder.
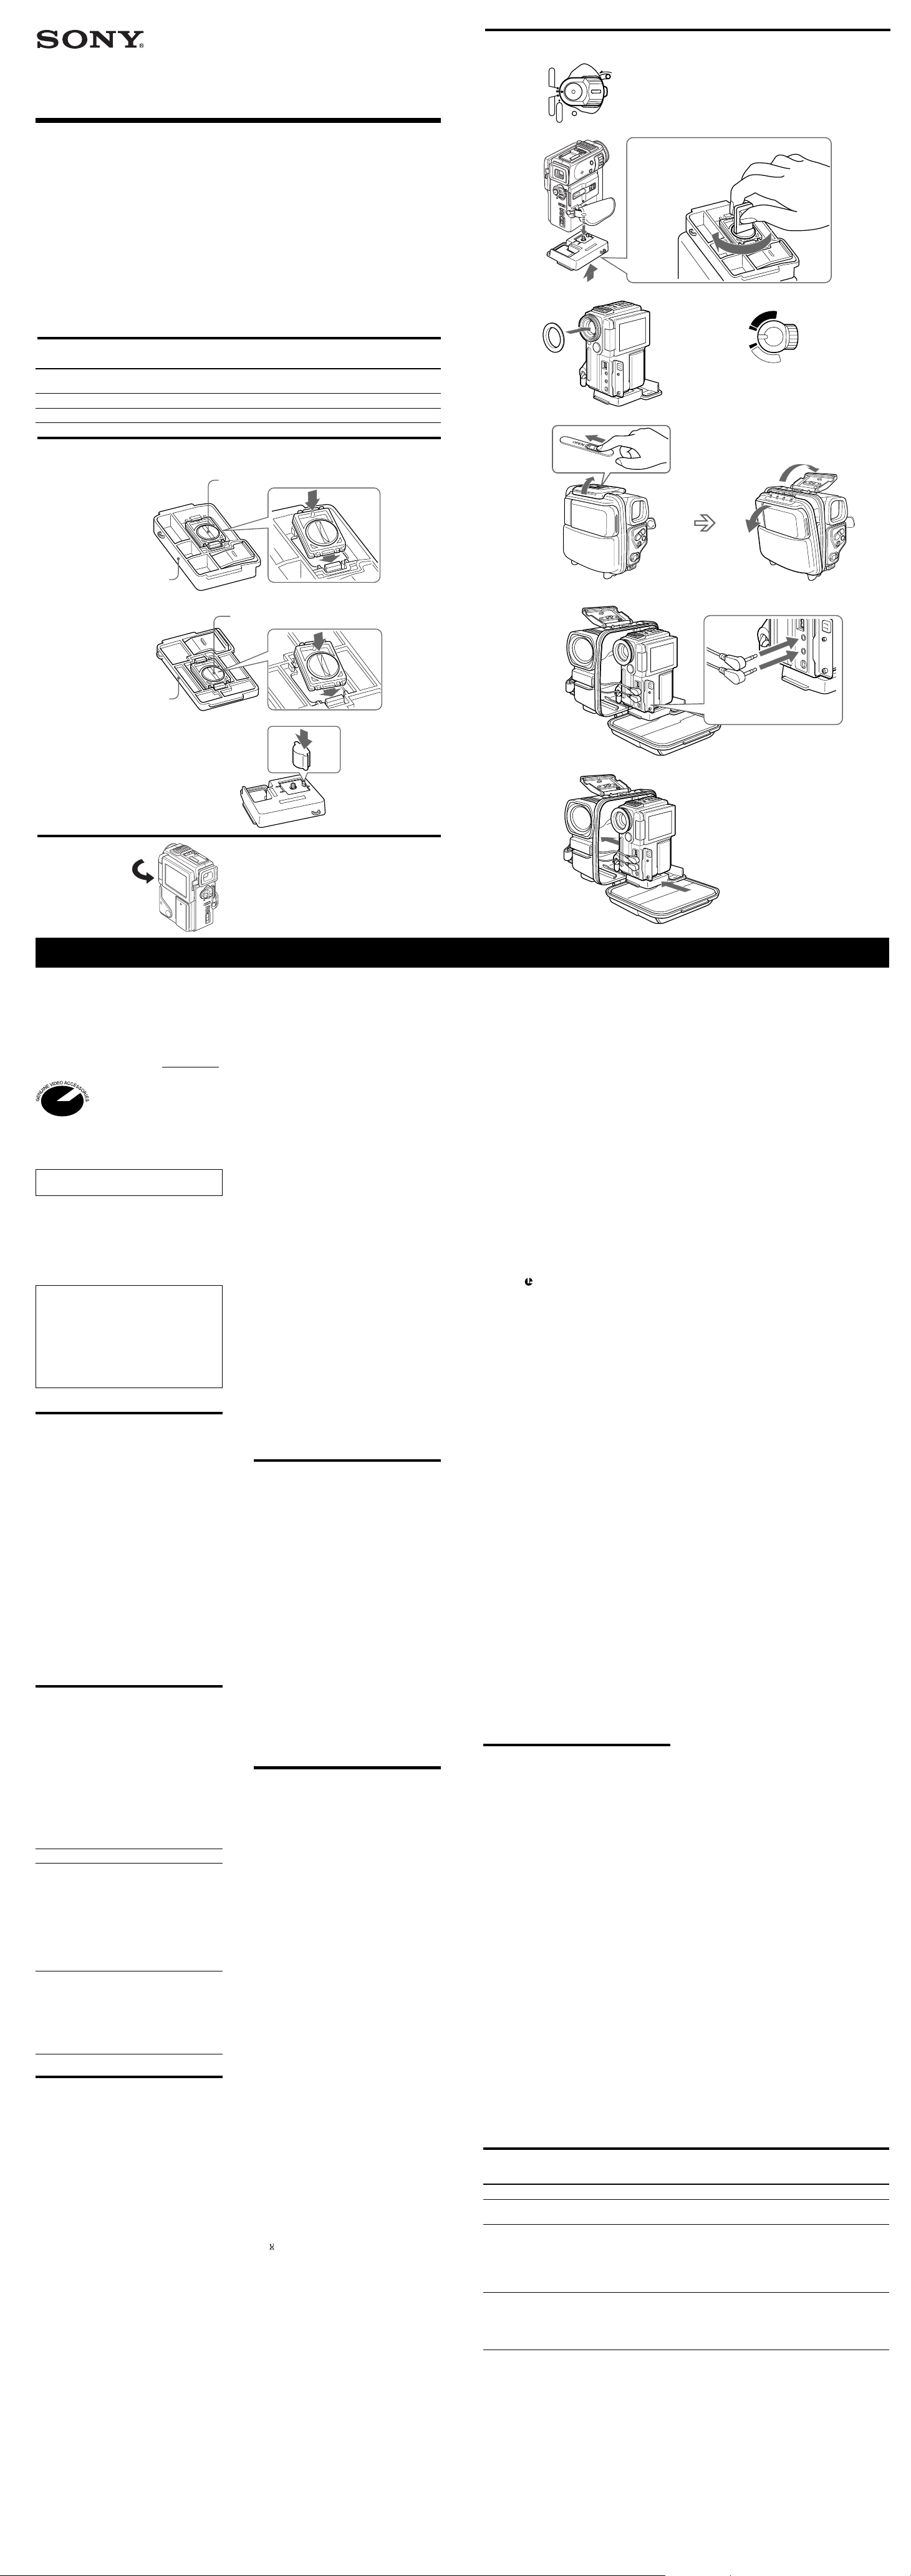
ASelecting the Camera
Mounting Shoe
Depending on the location of the screw hole for
attaching the camera mounting shoe of your
camcorder, you have a choice of two types of
camera mounting shoe.
Check list A to identify the appropriate
mounting shoe.
BPreparing the Camera
Mounting Shoe
Align the tripod screw plate to the notch of the
mounting shoe A or B.
The tripod screw plate is pre-installed on the
camera mounting shoe A.
CPreparing the Camcorder
For details, please refer to the operating
instructions supplied with your camcorder.
1 Remove the shoulder strap, lens cap,
filter or conversion lens from the
camcorder.
2 Install the battery pack.
Be sure to use a fully charged battery pack.
3 Insert the cassette tape.
4 When shooting with the LCD screen,
turn the LCD panel over and move
back to the camcorder with the LCD
screen facing out.
5 Set all the adustments of the
camcorder to automatic mode.
6 Set the FOCUS switch to AUTO.
7 Set the finder power save function to
OFF in the menu.
8 Set the START/STOP MODE switch to
.
9 When using DCR-PC10 or DCR-PC7,
attach the VMC-LM7 adaptor (not
supplied).
10 When shooting with the viewfinder
using DCR-PC3/PC3E/PC2E/PC1 pull out
the viewfinder to its fullest.
Note
You cannot change the battery pack after
attaching the mounting shoe (DCR-PC3/PC3E/
PC2E/PC1 only).
DInstalling the Camcorder
1 Set the POWER switch of the
camcorder to OFF.
2 Attach the camera mounting shoe.
Use the metal parts of shoulder strap as
shown in the illustration.
3 Attach the reflex prevention ring.
For DCR-PC3/PC3E/PC2E/PC1 (mounting
shoe A):
Use the small ring with 30 mm in filter
diameter.
For DCR-PC10/PC7 (mounting shoe B):
Use the large ring with 37 mm in filter
diameter.
4 Check the POWER switch of the sports
pack is set to OFF.
5 Release the buckle.
1 Slide the unlock button in the direction
of the arrow, and release the buckle.
2 Open the side body.
6 Remove the sand or dust.
Check there are no dust, sand or cracks on
the waterproof gasket or the surface where
it touches, and grease them slightly.
7 Connect the remote control plug to
LANC (remote) jack sliding the
camera mounting shoe a short way
into the sports pack (1), and the
microphone plug to MIC (plug in
power) jack (2).
When using DCR-PC10 or DCR-PC7,
connect the plugs to the VMC-LM7 adaptor
(not supplied).
8 Install the camcorder.
Check the lens and the LCD screen is clean
before installing the camcorder.
Push the camera mounting shoe until it
clicks.
9 Close the side body.
Secure the side body, and fasten the buckle
until it clicks.
Note
When closing the side body, be careful not to
pinch the cable. Otherwise, these parts may be
damaged or water may leak in.
When using DCR-PC3/PC3E/PC2E, fit the jack
cover rightly to S video jack before installing the
camcorder. Otherwise, the jack cover may rotate
and be pinched.
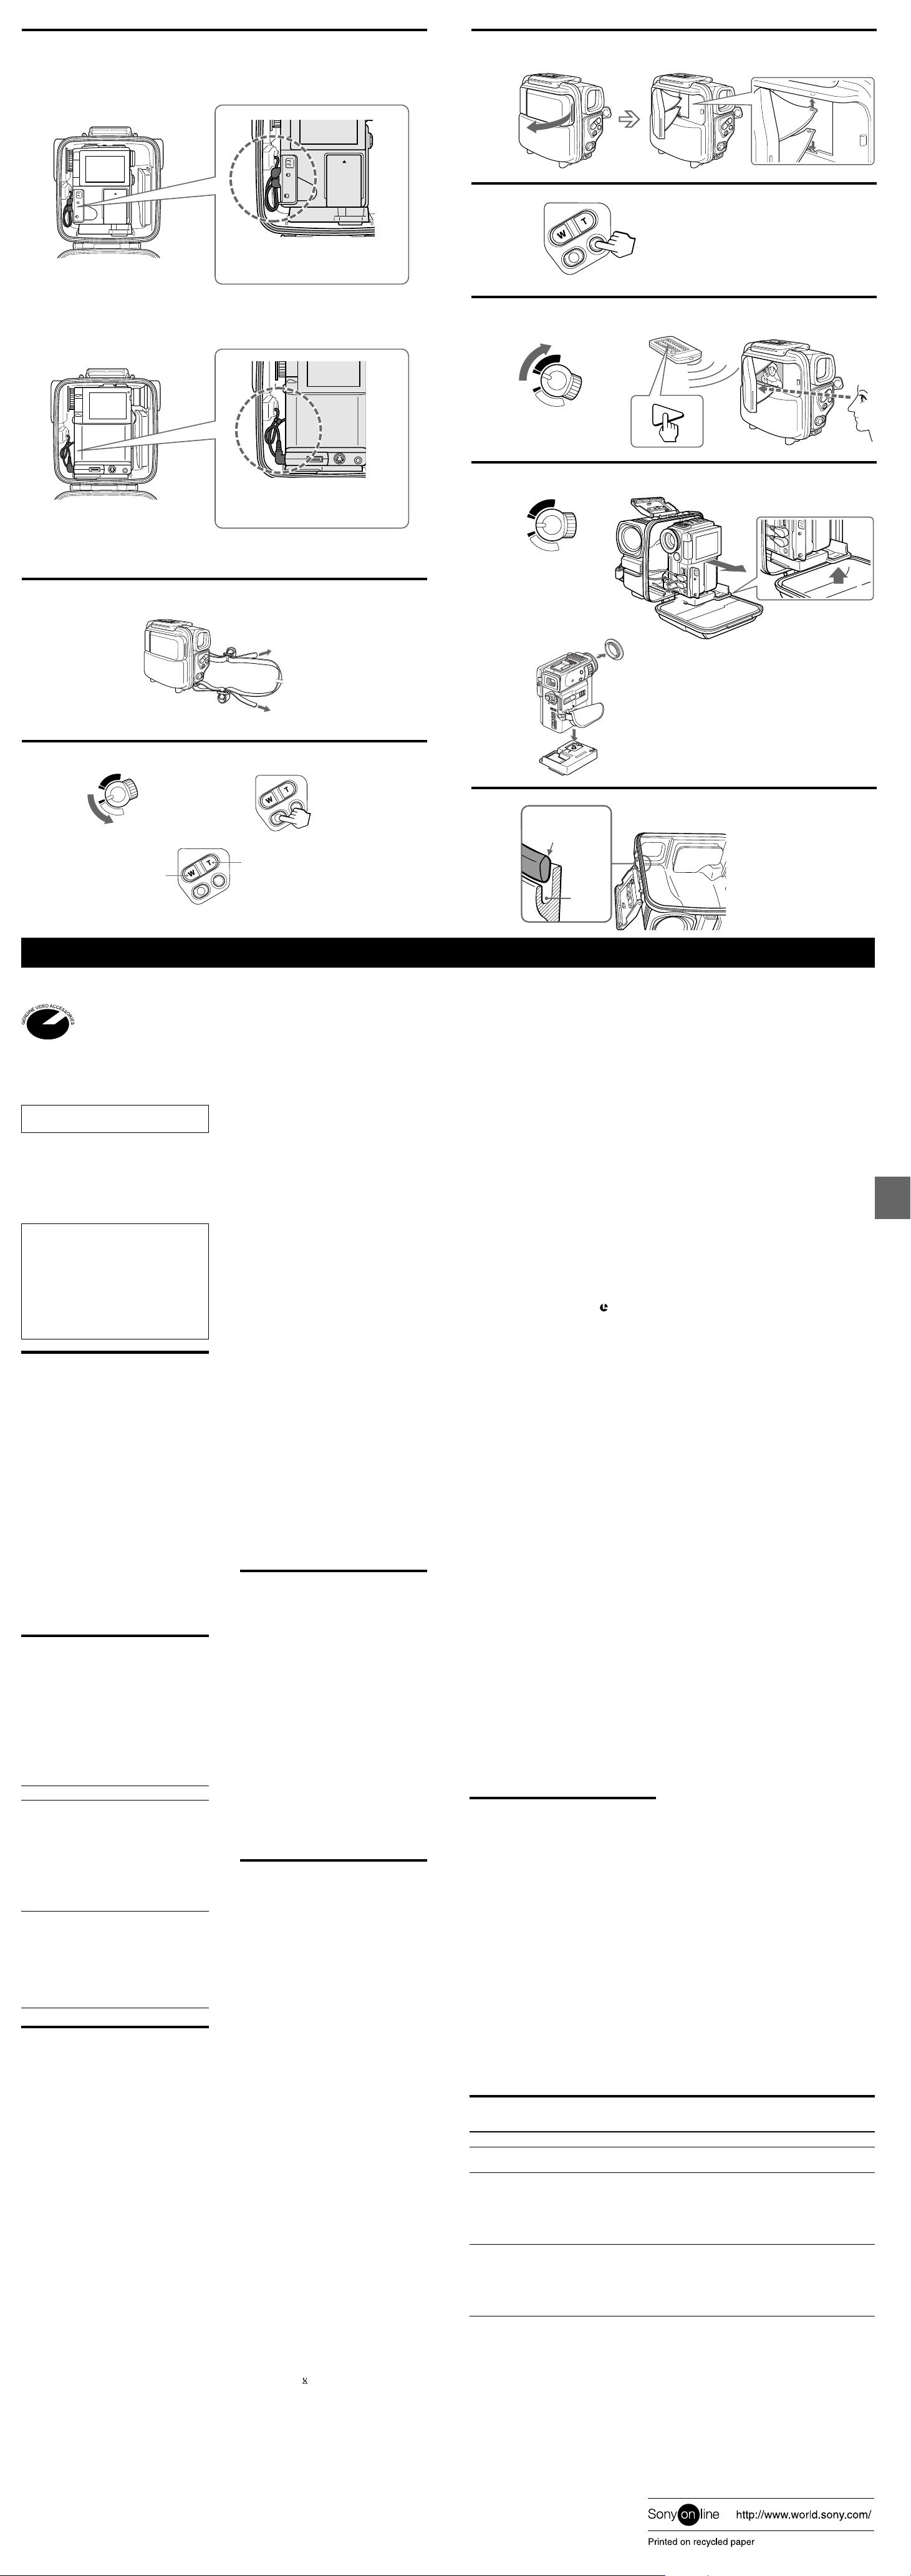
EHow to place the connecting
cord
If the connecting cord is not placed correctly
when closing the side body, water leakage may
occur. Place the cord correctly. (see illustration
E)
FPreparing the Sports Pack
1 Adjust the grip strap.
Holding the sports pack so that the tips of
your finger can easily touch the POWER
switch, START/STOP button and ZOOM
button, pull the strap to adjust its length.
2 Attach the shoulder strap.
The Sony mark should be on the outside.
Using the Sports Pack
Recording
G
1 Turn the POWER switch to CAMERA.
2 Press START/STOP button to start
recording.
To stop recording
Press START/STOP. Press again to resume
recording.
To finish recording
Press START/STOP button then turn the
POWER switch to OFF.
Zooming
• Keep the W side pressed for wide-angle.
• Keep the T side pressed for telephoto.
Press it gently for a relatively slow zoom.
Notes on recording
• If you leave the camcorder for 5 minutes or
more with a cassette inserted in Standby
mode, the camcorder goes off automatically.
This prevents battery and tape wear. To
resume Standby mode, turn the POWER
switch to OFF and then turn it to CAMERA
again.
• During recording when the LCD screen is
facing out, the counter does not appear.
• The POWER switch of the sports pack has
priority over the POWER switch of the
camcorder.
• If a drop of water sticks to the front glass,
press the zoom button to adjust the focus.
Trouble Check
Symptom
The sound is not
recorded.
There are drops of
water inside of the
sports pack.
The recording and
playing back function
does not work.
Cause
The microphone plug is not
connected.
• The buckles are not fastened.
• The waterproof gasket is not set
correctly .
• There are scratches or cracks on
the waterproof gasket.
• The battery pack is run out.
• The tape has run out.
• The safety tab on the cassette is
set to unrecordable position.
HWhen Shooting with the LCD
Screen
1 Open the mirror hood.
2 Open the wings and insert the
projections into each hole.
To close the mirror hood
Close the lower wing first.
Note
Do not hold the mirror hood directly for
shooting.
IRecording a Still Picture
– Photo Recording
You can record a still picture like a photograph.
1 Turn the POWER switch to CAMERA.
2 Press PHOTO button.
The still picture is recorded.
Notes
• You cannot check the still pictures by pressing
PHOTO button of the sports pack lightly.
• When using DCR-PC10/PC7, you cannot
record the still pictures with the sports pack.
• When using DCR-PC3/PC3E with the sports
pack, memory photo recording does not work.
• When using DCR-PC3/PC3E/PC2E with the
sports pack, you cannot use the NightShot
function.
JPlaying Back with the
Remote Commander
You can play back pictures on the LCD screen,
using the Remote Commander (supplied with
your camcorder).
1 Set the mirror hood.
See “H When Shooting with the LCD
Screen”.
2 Turn the POWER switch to PLAYER.
3 Press N PLAY on the remote.
Use the remote commander for all other
functions including STOP, REW and FF.
Note
The picture on the mirror looks turned
sideways.
KRemoving the Camcorder
Before opening the sports pack, wipe moisture
off the sports pack and yourself. Do not allow
water on the camcorder.
1 Set the POWER switch to OFF.
2 Release the buckle and open the side
body, with mirror hood side up.
3 Take out the camcorder and disconnect
the plugs.
1 Unlock the camera mounting shoe by
picking up the knob.
2 Take out the camcorder.
3 Disconnect the remote control plug and
the MIC plug.
After removing the camcorder, put the
plugs in the plug holder inside of the sports
pack.
4 Detach the camera mounting shoe and
the reflex prevention ring.
Note
• Be sure to disconnect the plugs before taking
out the camcorder. Otherwise, the plugs may
be damaged.
• After using the sports pack, read Maintenance
and Precautions for storing.
Corrective Actions
Connect it to MIC (plug in power)
jack on the camcorder.
• Fasten the buckles until they
click.
• Put the gasket in the groove
evenly.
• Replace the gasket with a new
one.
• Charge the battery pack fully.
• Rewind the tape or use a new
one.
• Slide the safety tab or install a
new cassette tape.
Page 2
E
C
A
M
E
O
F
F
P
L
A
Y
E
R
R
A
H
When DCR-PC3/PC3E/PC2E/PC1 is attached
Quand le DCR-PC3/PC3E/PC2E/PC1 est attaché
Place the cord in the hollow.
Placez le cordon dans le
creux.
When DCR-PC/10/PC7 is attached
Quand le DCR-PC10/PC7 est attaché
12
I
PHOTO
START/
STOP
J
23
Place the cord in the hollow.
Placez le cordon dans le
creux.
F
2
G
R
E
1 2
Zooming
Zoom
Y
A
L
P
F
F
O
C
A
M
E
R
A
Wide-angle
Grand angle
START/
STOP
PHOTO
Telephoto
Télé
START/
STOP
PHOTO
K
1 4
5
L
P
F
F
O
C
A
L
Tapering side up
Côté effilé vers le
haut
R
E
Y
A
M
E
R
A
3
2
1
Groove
Rainure
Français
Ce symbole indique que ce
produit est un accessoire
d’origine conçu pour les
appareils vidéo Sony. Lorsque
vous faites l’acquisition de
produits vidéo Sony, Sony vous
conseille d’acheter des
accessoires identifiés par la
mention “GENUINE VIDEO
ACCESSORIES”.
Utilisable à une profondeur de 2 mètres
(6,5 pieds) sous l’eau.
Pour pouvoir utiliser votre caméscope avec ce
caisson, consultez le mode d’emploi de votre
caméscope.
Le caisson étanche aux projections SPK-PC2 est
résistant à l’eau et à l’humidité, ce qui permet
d’utiliser un caméscope Sony Digital Handycam
tel qu’un DCR-PC3/PC3E/PC2E/PC1 sous la
pluie ou à la plage.
Attention
•Avant d’entamer une prise de vues,
assurez-vous que le caméscope fonctionne
correctement et qu’il n’y a pas de fuite
d’eau.
•Sony décline toute responsabilité pour les
dommages au caméscope, à la batterie, etc.,
lorsque vous utilisez le caisson ou pour la
perte des prises de vues si une fuite d’eau
survient en conséquence d’un emploi
incorrect.
Précautions
• Ne soumettez pas la vitre frontale à des chocs
violents, car elle pourrait se briser.
• N’ouvrez pas le caisson lorsque vous vous
trouvez dans la mer ou à la plage. Les
préparatifs tels que l’installation et le
remplacement de la cassette doivent être
réalisés dans un endroit à l’abri de l’humidité
et de l’air salin.
• Ne laissez pas le caisson dans l’eau.
• Evitez d’utiliser le caisson dans les conditions
suivantes :
- dans un endroit très chaud ou très humide;
- dans de l’eau à plus de 40˚C (104˚F).
- sous des températures inférieures à 0˚C.
Dans ces situations de l’humidité risque en
effet de se condenser ou des fuites d’eau de se
produire, ce qui peut endommager l’appareil.
• N’utilisez pas le caisson pendant plus d’une
heure à la fois lorsque la température est
supérieure à 35˚C (95˚F).
• N’exposez pas le caisson au rayonnement
direct du soleil pendant une période
prolongée. Si vous ne pouvez éviter de laisser
le caisson en plein soleil, recouvrez-le d’une
serviette ou de toute autre protection.
Avant de commencer
Pour être certain de ne manquer aucune
occasion de bonnes prises de vues, passez en
revue la liste de contrôle suivante avant
d’installer votre caméscope dans le caisson.
Remarques
• Si vous utilisez un DCR-PC10 ou DCR-PC7,
préparez l’adaptateur VMC-LM7 (non fourni).
• Lors des prises de vue avec ce caisson, nous
vous conseillons d’utiliser une batterie de plus
grande capacité comme une NP-FS31/FS21/
F30/F20/F300/F200.
Batterie
Cassette
Joint
d’étanchéité
Complètement chargée.
• La longueur de bande doit
être supérieure à la durée
de prise de vues envisagée.
• La cassette est rembobinée à
l’endroit où vous souhaitez
démarrer l’enregistrement.
• Le taquet de sécurité de la
cassette se trouve dans la
bonne position. (La partie
rouge n’est pas visible.)
• Pas de griffes ni de
craquelures. Pas de
poussière ni de sable ou de
cheveux au niveau du joint
d’étanchéité.
• Correctement engagé dans
la rainure. (Pour plus de
détails, voir “Remarque sur
le joint d’étanchéité”.)
Entretien et précautions
Fuites d’eau
Si de l’eau s’infiltre à l’intérieur du caisson,
cessez immédiatement d’exposer le caisson à
l’eau.
Si le caméscope devient mouillé, présentez-le
immédiatement au centre de service après-vente
Sony le plus proche.
Remarque sur le joint d’étanchéité
• Vérifiez s’il n’y a pas d’égratignures ni de
craquelures sur le joint d’étanchéité, car de
l’eau pourrait sinon s’infiltrer dans le caisson.
Si le joint d’étanchéité est égratigné ou
craquelé, remplacez-le.
Ne retirez pas le joint d’étanchéité au moyen
d’un ustensile en métal ou pointu.
• Insérez le joint d’étanchéité uniformément
dans la rainure avec la partie effilée vers le
haut. Ne le torsadez en aucun cas. (Voir
illustration L.)
• Eliminez les corps étrangers tels que la
poussière, le sable ou les cheveux du joint
d’étanchéité, de la rainure et de toutes les
surfaces en contact avec le joint d’étanchéité.
Si le caisson est refermé en présence de tels
corps étrangers, il se peut que les zones en
question risquent d’être endommagées et de
l’eau de s’infiltrer.
• Après avoir vérifié s’il n’y a aucune fissure ni
de la poussière sur le joint d’étanchéité,
recouvrez-le avec le doigt d’une légère couche
de la graisse fournie, de façon à le protéger
contre l’usure.
Lorsque vous appliquez la graisse, revérifiez
la présence éventuelle de craquelures ou de
poussière.
N’utilisez pas de chiffon ou de papier pour
graisser le joint d’étanchéité parce que des
fibres risquent sinon d’adhérer au joint.
N’utilisez aucun autre type de graisse que la
graisse fournie, car vous risqueriez sinon
d’endommager le joint d’étanchéité.
• La durée de vie utile du joint d’étanchéité
dépend de l’entretien et de la fréquence
d’utilisation, mais nous vous conseillons de le
remplacer une fois par an. Pour le
remplacement du joint d’étanchéité, veuillez
vous adresser à votre revendeur Sony.
Vérifiez la présence éventuelle de fuites d’eau
après le remplacement du joint d’étanchéité.
Vérification de la présence
éventuelle de fuites d’eau après le
remplacement du joint d’étanchéité
Vérifiez la présence éventuelle de fuites d’eau
avant d’installer le caméscope.
Refermez le caisson étanche sans installer le
caméscope à l’intérieur et laissez le caisson
étanche immergé dans l’eau à une profondeur
d’environ 15 cm (6 pouces) pendant
approximativement 3 minutes et vérifiez ensuite
la présence éventuelle de fuite d’eau.
Après la prise de vue
Après une prise de vue dans un endroit soumis
à la brise marine, rincez le caisson étanche à
l’eau douce avec les boucles soigneusement
fermées, et essuyez-le ensuite à l’aide d’un
chiffon doux et sec. Si de l’eau reste sur le
caisson étanche, les éléments métalliques
risquent de se corroder.
Nettoyez l’intérieur du caisson au moyen d’un
chiffon doux et sec. Ne rincez pas l’intérieur du
caisson étanche. N’utilisez aucun type de
solvant tel que de l’alcool, du benzène ou un
produit à polir pour le nettoyage, car ils
risqueraient de ternir le fini du caisson.
Pour empêcher la formation de
buée sur la vitre
Appliquez à la surface de la vitre un peu de la
solution antibuée pour objectif fournie. Cette
solution est un moyen efficace pour éviter la
formation de buée sur la vitre.
Comment utiliser le nettoyant pour
vitres
Appliquez 1 ou 2 gouttes de liquide de
nettoyage sur la vitre frontale et sur le verre de
l’oculaire. Etalez uniformément le liquide à
l’aide d’un coton-tige, d’un chiffon doux ou
d’un mouchoir en papier.
Rangement du caisson étanche
• Refermez le caisson sans serrer les boucles de
façon à éviter toute usure intempestive du
joint d’étanchéité.
• Evitez l’accumulation de poussière sur le joint
d’étanchéité.
• Ne rangez pas le caisson étanche dans un
endroit froid, très chaud ou humide ou encore
en présence de naphtaline ou de camphre, car
cela risque d’occasionner des dommages au
caisson.
Spécifications
Matériau
Plastique (PC, ABS), verre
Etanchéité
Joint d’étanchéité, boucles
Microphone intégré
Stéréo
Dimensions
Approx. 150 x 170 x 110 mm (l / h / p)
Masse
Approx. 550 g (caisson seul)
Accessoires fournis
Bandoulière (1)
Sabot de montage de caméra A(1)/B(1)
Plaquette à vis du trépied (1, préinstallée
sur le sabot de montage de caméra A)
Bague antireflet (2)
Graisse (1)
Solution antibuée pour objectif (1)
Mode d’emploi (1)
La conception et les spécifications sont sujettes à
modifications sans préavis.
Préparation
Pour plus de détails, consultez le mode
d’emploi fourni avec votre caméscope.
ASélection du sabot de
montage de caméra
Suivant l’emplacement de l’orifice de vissage
pour la fixation du sabot de montage de caméra
de votre caméscope, vous avez le choix entre
deux types de sabots de montage de caméra.
Consultez la liste A pour identifier le sabot de
montage de caméra approprié.
BPréparation du sabot de
montage de caméra
Alignez la plaquette à vis du trépied sur
l’encoche du sabot de montage de caméra A ou
B.
La plaquette à vis du trépied est préinstallée sur
le sabot de montage de caméra A.
CPréparation du caméscope
Pour plus de détails, consultez le mode
d’emploi fourni avec votre caméscope.
1 Retirez la bandoulière, le bouchon
d’objectif, le filtre ou le convertisseur
du caméscope.
2 Installez la batterie.
Utilisez une batterie complètement chargée.
3 Introduisez la cassette.
4 Pour les prises de vue avec l’écran LCD,
retournez le panneau de l’écran LCD et
ramenez-le contre le caméscope avec
l’écran LCD orienté vers l’extérieur.
5 Réglez tous les paramètres du
caméscope en mode automatique.
6 Réglez le commutateur FOCUS sur
AUTO.
7 Réglez la fonction d’économie
d’énergie du viseur sur OFF dans le
menu.
8 Réglez le commutateur START/STOP
MODE sur .
9 Si vous utilisez un DCR-PC10 ou DCR-
PC7, montez l’adaptateur VMC-LM7
(non fourni).
10 Lors de la prise de vues avec le viseur
avec le DCR-PC3/PC3E/PC2E/PC1,
déployez complètement le viseur.
Remarque
Vous ne pouvez pas changer la batterie après
avoir installé le sabot de montage (DCR-PC3/
PC3E/PC2E/PC1 uniquement).
DInstallation du caméscope
1 Réglez le commutateur POWER du
caméscope sur OFF.
2 Fixez le sabot de montage du
caméscope.
Utilisez les éléments métalliques de la
bandoulière comme indiqué dans
l’illustration.
3 Installez la bague antireflet.
DCR-PC3/PC3E/PC2E/PC1 (sabot de
montage A):
Utilisez la petite bague d’un diamètre de
filtre de 30 mm.
DCR-PC10/PC7 (sabot de montage B):
Utilisez la grande bague d’un diamètre de
filtre de 37 mm.
4 Vérifiez si le commutateur POWER du
caisson étanche est réglé sur OFF.
5 Desserrez la boucle.
1 Faites glisser le bouton de déverrouillage
dans le sens de la flèche et ouvrez la
boucle.
2 Ouvrez le corps latéral.
6 Enlevez le sable ou la poussière.
Vérifiez s’il n’y a pas de sable, poussière ou
craquelures sur le joint étanche ou sur la
surface en contact et graissez-les légèrement.
7 Branchez la fiche de commande à
distance sur la prise LANC
(télécommande) (1) en installant le
sabot de montage du caméscope un
peu dans le caisson étanche et la fiche
du microphone sur MIC (alimentation
intégrée) (2).
Si vous utilisez un DCR-PC10 ou DCR-PC7,
branchez les fiches sur l’adaptateur VMCLM7 (non fourni).
8 Installation du caméscope.
Vérifiez si l’objectif et l’écran LCD sont
propres avant d’installer le caméscope.
Appuyez sur le sabot de montage jusqu'à ce
qu’il s’encliquette.
9 Refermez le corps latéral.
Fixez-le et fermez les boucles de sorte
qu’elles s’encliquettent.
Remarque
Lorsque vous refermez le corps latéral, veillez à
ne pas coincer le câble. Vous risquez sinon de
les endommager ou que de l’eau s’infiltre dans
le caisson.
Lorsque vous utilisez le DCR-PC3/PC3E/PC2E,
insérez le capuchon de prise à fond dans la prise
S vidéo avant d’installer le caméscope, sinon le
capuchon risque de tourner et d’être coincé.
EComment placer le câble de
connexion
Si le câble de connexion n’est pas correctement
placé lorsque vous refermez l’élément latéral, de
l’eau peut s’infiltrer. Placez correctement le
câble (voir illustration E).
FPréparation du caisson
1 Ajustez la sangle de maintien.
Saisissez le caisson étanche de façon à ce que
vos doigts atteignent facilement le
commutateur POWER, la touche START/
STOP et la touche ZOOM. Tirez sur la
sangle pour l’ajuster à la longueur adéquate.
2 Fixez la sangle de maintien.
La marque Sony doit être orientée vers
l’extérieur.
Utilisation du caisson
Réalisation de prises de vue
G
1 Réglez le commutateur POWER sur
CAMERA.
2 Appuyez sur la touche START/STOP
pour démarrer l’enregistrement.
Pour arrêter l’enregistrement
Appuyez sur START/STOP. Appuyez à
nouveau sur la touche pour reprendre
l’enregistrement.
Pour terminer l’enregistrement
Appuyez sur la touche START/STOP et réglez
ensuite le commutateur POWER sur OFF.
Zoom
• Maintenez le côté “W” de la touche enfoncé
pour élargir l’angle de prise de vue.
• Maintenez le côté “T” de la touche enfoncé
pour les prises de vue au téléobjectif.
Appuyez légèrement sur la touche pour un
zoom relativement lent.
Dépannage
Symptôme
Le son n’est pas
enregistré.
Il y a des gouttes à
l’intérieur du caisson
étanche.
La fonction de
lecture/
enregistrement est
inopérante.
Cause
La fiche du microphone n’est pas
branchée.
• Les boucles ne sont pas serrées.
• Le joint d’étanchéité n’est pas
correctement installé.
• Le joint d’étanchéité est égratigné
ou craquelé.
• La batterie est épuisée.
• La cassette est en fin de bande.
• Le taquet de sécurité de la cassette
est mal réglé.
Remarques sur la prise de vue
• Si vous laissez le caméscope pendant 5
minutes ou plus en mode de veille avec une
cassette à l’intérieur, le caméscope s’arrête
automatiquement de façon à prévenir l’usure
de la batterie et de la bande magnétique. Pour
réactiver le mode de veille, réglez le
commutateur POWER sur OFF et puis ensuite
à nouveau sur CAMERA.
• Durant les prises de vue réalisées avec l’écran
LCD orienté vers l’extérieur, le compteur
n’apparaît pas.
• Le commutateur POWER du caisson a la
priorité sur le commutateur POWER du
caméscope.
• Si une goutte d’eau colle sur la vitre frontale,
appuyez sur la touche zoom pour ajuster la
mise au point.
HRéalisation de prises de vue
avec l’écran LCD
1 Ouvrez le viseur à miroir.
2 Ouvrez les volets et insérez les saillies
dans chaque orifice.
Pour refermer le viseur à miroir
Refermez d’abord le volet inférieur.
Remarque
Ne pas tenir le viseur à miroir directement pour
la prise de vues.
IEnregistrement d’une image
fixe - Enregistrement de
photos
Vous pouvez enregistrer une image fixe comme
une photographie.
1 Réglez le commutateur POWER sur
CAMERA.
2 Appuyez sur la touche PHOTO.
L’image fixe est enregistrée.
Remarques
• Vous ne pouvez pas contrôler les images fixes
par une légère pression sur la touche PHOTO
du caisson.
• Si vous utilisez un DCR-PC10/PC7, vous ne
pouvez enregistrer d’images fixes avec le
caisson.
• Lorsque vous utilisez le DCR-PC3/PC3E dans
le cassion étanche, l´enregistrement de photos
en mémoire n´est pas possible.
• Lorsque vous utilisez le DCR-PC3/PC3E/
PC2E dans le cassion étanche, vous ne pouvez
pas utiliser la fonction NightShot.
J
Lecture avec la télécommande
Vous pouvez commander la lecture des images
sur l’écran LCD à l’aide de la télécommande
(fournie avec votre caméscope).
1 Préparez le viseur à miroir.
Voir “HRéalisation de prises de vue avec
l’écran LCD”.
2 Réglez le commutateur POWER sur
PLAYER.
3 Appuyez sur la touche N PLAY de la
télécommande.
Utilisez la télécommande pour toutes les
autres fonctions, y compris STOP, REW et FF.
Remarque
Sur le miroir, l’image apparaît inversée.
KRetrait du caméscope
Avant d’ouvrir le caisson étanche, essuyez les
traces d’humidité sur le caisson étanche et vos
mains. Veillez à ne pas mouiller le caméscope.
1 Réglez le commutateur d’alimentation
sur OFF.
2 Desserrez la boucle et ouvrez le corps
latéral, avec le viseur à miroir en haut.
3 Extrayez le caméscope et débranchez
les fiches.
1 Déverrouillez le sabot de montage de la
caméra en relevant le bouton.
2 Extrayez le caméscope.
3 Débranchez la fiche de télécommande et
la fiche MIC.
Après avoir extrait le caméscope, placez les
fiches dans le porte-fiches à l’intérieur du
caisson.
4 Retirez le sabot de montage de
caméra et la bague antireflet.
Remarque
• N’oubliez pas de déconnecter les fiches avant
d’extraire le caméscope du caisson. Vous
risquez sinon d’endommager les fiches.
• Après avoir utilisé le caisson étanche, lisez
Entretien et précautions avant de le ranger.
Mesures correctives
Branchez-la sur la prise MIC (autoalimentée) du caméscope.
• Serrez les boucles jusqu’à ce qu’elles
s’encliquettent.
• Insérez correctement le joint d’étanchéité
dans la rainure.
• Remplacez le joint d’étanchéité.
• Chargez complètement la batterie.
• Rembobinez la cassette ou utilisez-en une
autre.
• Faites coulisser le taquet de sécurité de la
cassette ou utilisez-en une autre.
Page 3

A
1
2
zapata de montaje
montageschoen
A
B
modelo
model
DCR-PC3/PC3E/PC2E/PC1
DCR-PC10/PC7
D
POWER
1
VTR
OFF
CAMERA
MEMORY
C
O
K
L
B
Zapata de montaje A
Montageschoen A
Zapata de montaje A
Montageschoen A
Zapata de montaje B
Montageschoen B
Placa de tornillo de trípode
Statiefbevestigingsplaat
Placa de tornillo de trípode
Statiefbevestigingsplaat
2
Utilice los componentes
metálicos de la correa de
hombro.
Gebruik de metalen
onderdelen van de
schouderband.
34
R
E
Y
A
L
P
F
F
O
C
A
M
E
R
A
5
Zapata de montaje B
Montageschoen B
Para el desmontaje después del empleo
Om te demonteren na gebruik
C
4
7
8
Español
Esta marca indica que este
producto es un accesorio
genuino para los productos de
vídeo Sony. Al adquirir
productos de vídeo Sony, Sony
recomienda que éstos presenten
la marca “GENUINE VIDEO
ACCESSORIES”.
Utilizable a una profundidad máxima de 2
metros bajo el agua.
Para utilizar la videocámara con este
portacámara, consulte el manual de
instrucciones de ésta.
El portacámara deportivo SPK-PC2 es resistente
al agua y a la humedad, permitiendo utilizar las
videocámaras de Sony Digital Handycam, como
los modelos DCR-PC3/PC3E/PC2E/PC1, bajo
la lluvia y en la playa.
Aviso
• Antes de comenzar a grabar, compruebe
que la videocámara funciona
correctamente y que no se filtra agua.
• Sony no se responsabiliza de daños a la
videocámara, batería, etc., mientras se
utiliza el portacámara, ni por el coste de
grabación si se producen filtraciones de
agua como resultado de uso incorrecto.
Precauciones
• No exponga el vidrio frontal a golpes fuertes,
ya que puede romperse.
• Evite abrir el portacámara en el mar o en la
playa. Los preparativos, como la instalación y
el cambio de videocassettes, deben realizarse
en un lugar con poca humedad y sin aire
salino.
• No arroje el portacámara al agua.
• Evite utilizar el portacámara en las siguientes
situaciones:
- en lugares muy cálidos o muy húmedos.
- en aguas con temperatura superior a 40˚C
(104˚F).
- con temperaturas inferiores a 0˚C.
En estas situaciones, es posible que se
produzca condensación de humedad o
filtraciones de agua y dañarse el equipo.
• No utilice el portacámara durante más de una
hora seguida con temperaturas superiores a
35˚C (95˚F).
• No deje el portacámara bajo la luz solar
directa durante mucho tiempo. Si no puede
evitar dejar el portacámara bajo la luz solar
directa, cúbralo con una toalla u otro tipo de
protección.
Antes de comenzar
Para garantizar la realización de filmaciones,
consulte la siguiente lista de comprobaciones
antes de instalar la videocámara en el
portacámara.
Notas
• Para utilizar DCR-PC10 o DCR-PC7, prepare
el adaptador VMC-LM7 (no suministrado).
• Para grabar con este portacámara instalado,
recomendamos el uso de un paquete de
batería de mayor capacidad, como NP-FS31/
FS21/F30/F20/F300/F200.
Paquete de
batería
Videocassette
Junta tórica
Completamente cargado.
• La longitud de la cinta debe
cubrir el tiempo de grabación
planeado.
• La cinta debe estar bobinada
hasta el punto donde desee
iniciar la grabación.
• La lengüeta de seguridad del
videocassette debe encontrarse
en la posición correcta. (Parte
roja no visible.)
• No hay ralladuras ni grietas.
No hay polvo, arena ni pelos
alrededor de la junta.
• Correctamente ajustada en la
ranura. (Consulte “Notas sobre
la junta tórica” para más
información.)
Mantenimiento y
precauciones
Filtración de agua
Si se filtra agua, deje inmediatamente de
exponer el portacámara al agua.
Si la videocámara se moja, llévela
inmediatamente al centro de servicio técnico
Sony más próximo.
Notas sobre la junta tórica
• Compruebe que no hay grietas en la junta
tórica, ya que pueden producir filtraciones de
agua. Si las hay, sustituya la junta tórica
dañada por otra nueva.
No extraiga la junta tórica con una
herramienta metálica u otra puntiaguda.
• Coloque la junta tórica uniformemente en las
ranuras, con la parte de unión hacia arriba. No
la retuerza nunca (consulte la ilustración L).
• Elimine materiales extraños, como polvo,
arena o pelos, de la junta tórica, de la ranura y
de cualquier otra superficie que toque la junta.
Si cierra el cuerpo con tales materiales en el
interior, dichas partes pueden dañarse y
puede filtrarse agua.
• Después de comprobar que no hay grietas ni
polvo en la junta tórica, aplique con los dedos
una ligera capa de la grasa suministrada. De
esta forma se evitará el desgaste.
Mientras aplica la grasa, vuelva a comprobar
que no hay grietas ni polvo.
No utilice nunca un paño ni papel para aplicar
la grasa, ya que pueden adherirse las fibras.
No utilice ningún tipo de grasa que no sea la
suministrada, ya que puede dañar la junta
tórica.
• Aunque la duración útil de la junta tórica
depende del mantenimiento y de la frecuencia
de uso, se recomienda sustituirla una vez al
año. Cuando vaya a sustituirla, consulte con el
proveedor Sony más próximo. Asegúrese de
comprobar posibles filtraciones de agua
después de sustituir la junta tórica.
Comprobación de filtraciones de
agua después de sustituir la junta
tórica
Compruebe posibles filtraciones de agua antes
de instalar la videocámara.
Cierre el portacámara sin instalar la
videocámara y manténgalo sumergido bajo
agua a una profundidad de aproximadamente
15 cm durante unos 3 minutos. A continuación,
compruebe si se ha filtrado agua.
Después de grabar
Después de grabar en lugares expuestos a brisa
marina, lave el portacámara con agua dulce con
las hebillas bien abrochadas. A continuación,
pásele un paño seco y suave. Si queda agua en
el portacámara, es posible que los componentes
metálicos se oxiden.
Limpie el interior del portacámara con un paño
seco y suave. No lave el interior de dicho
portacámara. No utilice ningún tipo de
disolvente, como alcohol, bencina o
abrillantador de limpieza, ya que pueden dañar
el acabado.
Para evitar que la superficie del
vidrio se empañe
Aplique una capa sobre la superficie del vidrio
con la solución desempañadora suministrada.
Esto resulta efectivo para evitar que se empañe.
Cómo utilizar el limpiador de vidrio
Aplique 1 o 2 gotas de líquido limpiador en el
vidrio frontal y en el del ocular, y extienda el
líquido uniformemente con un bastoncillo de
algodón, un paño suave o un pañuelo de papel.
Cuando guarde el portacámara
• Ciérrelo sin apretar las hebillas para evitar el
desgaste de la junta tórica.
• Evite la acumulación de polvo en la junta
tórica.
• Evite guardar el portacámara en lugares fríos,
muy cálidos o húmedos, o junto con naftalina
o alcanfor, ya que la unidad podría dañarse.
Especificaciones
Material
Plástico (PC, ABS), vidrio
Resistencia al agua
Junta tórica, hebillas
Micrófono incorporado
Estéreo
Dimensiones
Aprox. 150 x 170 x 110 mm (an / al / prf)
Peso
Aprox. 550 g (sólo el portacámara)
Accesorios suministrados
Asa de hombro (1)
Zapata de montaje de cámara A(1)/B(1)
Placa de tornillo de trípode
(1, preinstalado en la zapata de
montaje de cámara A)
Anillo antirreflejos (2)
Grasa (1)
Solución desempañadora para objetivos
(1)
Manual de instrucciones (1)
Diseño y especificaciones sujetos a cambios sin
previo aviso.
Preparativos
Para más información, consulte el manual de
instrucciones suministrado con la videocámara.
ASelección de la zapata de
montaje de cámara
En función de la ubicación del orificio de
tornillo para fijar la zapata de montaje de la
videocámara, podrá utilizar dos tipos de zapata
de montaje de cámara.
Consulte la lista A para identificar la zapata de
montaje apropiada.
BPreparación de la zapata de
montaje de cámara
Alinee la placa de tornillo de trípode con la
muesca de la zapata de montaje A o B.
La placa de tornillo de trípode está preinstalada
en la zapata de montaje A.
CPreparación de la
videocámara
Para más información, consulte el manual de
instrucciones suministrado con la videocámara.
1 Retire el asa de hombro, la cubierta del
objetivo, el filtro o el objetivo de
conversión de la videocámara.
2 Instale el paquete de batería.
Asegúrese de utilizar un paquete de batería
completamente cargado.
3 Inserte el videocassette.
4 Si filma con la pantalla LCD, dele la
vuelta al panel LCD y desplácelo hacia
la videocámara con dicha pantalla
orientada hacia fuera.
5 Defina todos los ajustes de la
videocámara en el modo automático.
6 Ajuste el interruptor FOCUS en AUTO.
7 Ajuste la función de ahorro de energía
del visor electrónico en OFF en el
menú.
8 Ajuste el interruptor START/STOP
MODE en .
9 Al utilizar el modelo DCR-PC10 o DCR-
PC7, conecte el adaptador VMC-LM7
(no suministrado).
10 Cuando filme con el visor utilizando
DCR-PC3/PC3E/PC2/PC1, extienda el
visor electrónico por completo.
Nota
No es posible cambiar el paquete de batería
después de conectar la zapata de montaje (sólo
DCR-PC3/PC3E/PC2E/PC1).
DInstalación de la
videocámara
1 Ponga el interruptor POWER de la
videocámara en OFF.
2 Fije la zapata de montaje de cámara.
Utilice los componentes metálicos del asa de
hombro como se muestra en la ilustración.
3 Instale el anillo antirreflejos.
Para DCR-PC3/PC3E/PC2E/PC1
(zapata de montaje A):
Utilice el anillo pequeño con diámetro para
filtro de 30 mm.
Para DCR-PC10/PC7
(zapata de montaje B):
Utilice el anillo grande con diámetro para
filtro de 37 mm.
4 Compruebe que el interruptor POWER
del portacámara deportivo se
encuentra en la posición OFF.
5 Suelte la hebilla.
1 Deslice el botón de desbloqueo en el
sentido de la flecha y suelte la hebilla.
2 Abra el cuerpo lateral.
6 Elimine la arena o el polvo.
Compruebe que no haya polvo, arena, ni
grietas en la junta impermeable ni en la
superficie de contacto de la misma, y
engrase ligeramente estas partes.
7 Conecte el enchufe de control remoto
a LANC (control remoto) (1)
instalando ligeramente la zapata de
montaje de la videocámara en el
portcámara deportivo y el enchufe de
micrófono a la toma MIC (alimentación
a través de la clavija) (2).
Al utilizar DCR-PC10 o DCR-PC7, conecte
los enchufes al adaptador VMC-LM7 (no
suministrado).
8 Instale la videocámara.
Compruebe que el objetivo y la pantalla
LCD están limpios antes de instalar la
videocámara.
Empuje la zapata de montaje de la
videocámara hasta que chasquee.
9 Ciere el cuerpo lateral.
Asegure el cuerpo lateral y apriete la hebilla
hasta que chasquee.
Nota
Al cerrar el cuerpo lateral, tenga cuidado para
no pillar el cable. De lo contrario, estos
componentes podrían dañarse o podría entrar
agua.
Cuando utilice el DCR-PC3/PC3E/PC2E, fije
firmemente la cubierta en la toma de vídeo S
antes de instalar la videocámara. De lo
contrario, la cubierta de la toma podría girar y
quedar pillada.
ECómo colocar el cable de
conexión
Si el cable de conexión no está correctamente
colocado al cerrar el cuerpo lateral, es posible
que se filtre agua. Coloque el cable
correctamente (consulte la ilustración E).
FPreparación del portacámara
1 Ajuste la correa de fijación.
Agarrando el portacámara de forma que sea
posible tocar fácilmente el interruptor
POWER y los botones START/STOP y
ZOOM con la punta de los dedos, tire de la
correa para ajustar su longitud.
2 Fije el asa de hombro.
La marca Sony debe quedar en el exterior.
Uso del portacámara
G
Grabación
1 Ajuste el interruptor POWER en
CAMERA.
2 Pulse el botón START/STOP para iniciar
la grabación.
Para detener la grabación
Pulse START/STOP. Vuelva a pulsarlo para
reanudar la grabación.
Para finalizar la grabación
Pulse el botón START/STOP y, a continuación,
ajuste el interruptor POWER en OFF.
Zoom
•
Mantenga pulsado el lado W para gran angular.
• Mantenga pulsado el lado T para telefoto.
Púlselo ligeramente para obtener un zoom
relativamente lento.
Solución de problemas
Problema
El sonido no se graba.
Hay agua dentro del
portacámara.
Las funciones de
grabación y
reproducción no se
activan.
Causa
El enchufe del micrófono no está
conectado.
•No ha apretado las hebillas.
• No ha colocado correctamente la
junta tórica.
• Hay grietas en la junta tórica.
• El paquete de batería está
agotado.
• La cinta ha llegado al final.
• La lengüeta de seguridad del
videocassette está ajustada para
evitar grabaciones.
Notas sobre la grabación
• Si deja la videocámara durante 5 minutos o
más con un videocassette insertado en el
modo de espera, dicha videocámara se
apagará automáticamente. De esta forma se
evita el desgaste de la batería y de la cinta.
Para reanudar el modo de espera, ajuste el
interruptor POWER en OFF y, a continuación,
de nuevo en CAMERA.
• Durante la grabación con la pantalla LCD
orientada hacia fuera, el contador no aparece.
• El interruptor POWER del portacámara tiene
prioridad sobre el de la videocámara.
• Si cae una gota de agua sobre el vidrio frontal,
pulse el botón de zoom para ajustar el enfoque.
HCuando filme con la pantalla
LCD
1 Abra la cubierta del espejo.
2 Abra las alas e inserte las proyecciones
en cada orificio.
Para cerrar la cubierta del espejo
Cierre primero el ala inferior.
Nota
No sujete la visera del espejo cuando filme.
IGrabación de imágenes fijas
– Grabación fotográfica
Es posible grabar una imagen fija como una
fotografía.
1 Ajuste el interruptor POWER en
CAMERA.
2 Pulse el botón PHOTO.
La imagen fija se graba.
Notas
• No es posible comprobar las imágenes fijas
pulsando ligeramente el botón PHOTO del
portacámara.
• Si utiliza la unidad DCR-PC10/PC7, no podrá
grabar imágenes fijas con el portacámara.
• Cuando utilice una DCR-PC3/PC3E con el
portacámara deportivo, la función de
grabación de fotografías en memoria no
trbajará.
• Cuando utilice una DCR-PC3/PC3E/PC2E
con el portacámara deportivo, no es posible
utilizar la función de filmación nocturna
(NightShot).
JReproducción con el mando
a distancia
Es posible reproducir imágenes en la pantalla
LCD mediante el mando a distancia
(suministrado con la videocámara).
1 Ajuste la cubierta del espejo.
Consulte “H Cuando filme con la pantalla
LCD”.
2 Ajuste el interruptor POWER en
PLAYER.
3 Pulse N PLAY en el mando a
distancia.
Utilice el mando a distancia para el resto de
funciones, incluidas STOP (parada), REW
(rebobinado) y FF (avance rápido).
Nota
La imagen del espejo aparece oblicuamente.
KExtracción de la
videocámara
Antes de abrir el portacámara, elimine la
humedad del mismo y de usted. No permita
que la videocámara entre en contacto con el
agua.
1 Ajuste el interruptor de alimentación
en OFF.
2 Suelte la hebilla y abra el cuerpo
lateral, con la cubierta del espejo hacia
arriba.
3 Extraiga la videocámara y desconecte
los enchufes.
1 Tire del mando para desbloquear la
zapata de montaje de la cámara.
2 Extraiga la videocámara.
3 Desconecte el enchufe de control remoto
y el enchufe MIC.
Después de sacar la videocámara,
introduzca los enchufes en el portaenchufes
del interior del portacámara deportivo.
4 Extraiga la zapata de montaje de la
cámara y el anillo antirreflejos.
Notas
• Asegúrese de desconectar los enchufes antes
de extraer la videocámara. En caso contrario,
dichos enchufes podrían dañarse.
• Después de haber utilizado el portacámara
deportivo, con respecto al almacenamiento,
lea Mantenimiento y Precauciones.
Acciones correctivas
Conéctelo a la toma MIC
(alimentación por enchufe) de la
videocámara.
• Apriételas hasta que chasqueen.
• Coloque la junta tórica
uniformemente en la ranura.
• Sustituya la junta tórica por otra
nueva.
• Cárguelo por completo.
• Rebobínela o utilice una nueva.
• Deslícela a la otra posición o
instale un videocassette nuevo.
Page 4

E
C
A
M
E
O
F
F
P
L
A
Y
E
R
R
A
H
Cuando está fijada la DCR-PC3/PC3E/PC2E/PC1
Met de DCR-PC3/PC3E/PC2E/PC1 bevestigd
Guarde el cordón dentro del
hueco.
Plaats het snoer in de uitsparing.
Cuando está fijada la DCR-PC10/PC7
Met de DCR-PC10/PC7 bevestigd
12
I
PHOTO
START/
STOP
J
23
Guarde el cordón dentro del
hueco.
Plaats het snoer in de uitsparing.
F
2
G
R
E
Y
A
L
1 2
Zoom
In-/uitzoomen
P
F
F
O
C
A
M
E
R
A
Gran angular
Groothoek
START/
STOP
PHOTO
Telefoto
Telefoto
START/
STOP
PHOTO
K
1 4
5
L
L
P
F
F
O
C
A
Parte de unión hacia
arriba
Afgeschuinde kant
boven
R
E
Y
A
M
E
R
A
3
Ranura
Groef
2
1
Nederlands
Dit teken geeft aan dat dit
product een origineel accessoire
is voor Sony video-apparatuur.
Bij aankoop van accessoires voor
Sony video-apparatuur wordt
aanbevolen accessoires te kopen
die zijn voorzien van dit
“GENUINE VIDEO
ACCESSORIES” teken.
Bruikbaar tot op een diepte van 2 meter
onder water.
Als u uw camcorder wil gebruiken met dit
sport-camerahuis, raadpleeg dan de
gebruiksaanwijzing van de camcorder.
Het sportcamerahuis SPK-PC2 is water- en
vochtbestendig zodat Sony Digital Handycam
camcorders zoals de DCR-PC3/PC3E/PC2E/
PC1 hiermee in de regen of op het strand
kunnen worden gebruikt.
Opmerking
•Alvorens u video-opnamen gaat maken,
moet u controleren of de camcorder naar
behoren functioneert en zich geen lekken
hebben voorgedaan.
•Sony aanvaardt geen aansprakelijkheid
voor schade aan de camcorder, de batterij
e.d. bij gebruik van dit sport-camerahuis,
noch voor de kosten van verloren gegane
video-opnamen als er waterlekkage is
opgetreden door onoordeelkundig
gebruik.
Voorzorgsmaatregel
• Stel het frontglas niet bloot aan zware
schokken om te voorkomen dat het barst.
• Open het sport-camerahuis niet onder water
of op het strand. Voorbereidingen, zoals het
plaatsen of verwisselen van een cassette,
dienen te gebeuren op een plaats met een lage
vochtigheidsgraad en vrij van zilte zeelucht.
• Laat het sport-camerahuis niet in het water
vallen.
• Gebruik het sport-camerahuis niet in de
volgende omstandigheden:
- op een zeer warme of vochtige plaats.
- in water met een temperatuur van meer dan
40˚C.
- bij temperaturen lager dan 0˚C.
In deze omstandigheden kan condensatie of
waterlekkage optreden, waardoor de
apparatuur beschadigd kan raken.
• Gebruik het sport-camerahuis niet langer dan
een uur ononderbroken bij temperaturen van
meer dan 35˚C.
• Stel het sport-camerahuis niet gedurende
lange tijd bloot aan directe zonnestraling. Als
u geen directe zonnestraling kunt vermijden,
dek het sport-camerahuis dan af met een
handdoek of iets dergelijks.
Voor u begint
Om te vermijden dat belangrijke opnamen
mislukken, overloopt u best het volgende
controlelijstje alvorens de camcorder in het
sport-camerahuis te installeren.
Opmerkingen
• Gebruik de DCR-PC10 of DCR-PC7 in
combinatie met de VMC-LM7 adapter (niet
meegeleverd).
• Wij raden u aan om voor opname met deze
behuizing gebruik te maken van een accu met
grotere capaciteit zoals de NP-FS31/FS21/
F30/F20/F300/F200.
Batterijpak
Cassette
Waterdichte
pakking
Volledig opgeladen?
• Volstaat de bandlengte voor de
geplande opnameduur?
• Achteruit of vooruit gespoeld
naar het punt waar de opname
kan beginnen?
• Wispreventienokje op de cassette
in de juiste stand? (Rode gedeelte
niet zichtbaar)
• Zitten er geen scheurtjes of
barsten in? Is de pakking vrij van
stof, zand of haren?
• Zit de pakking overal goed in de
groef? (Zie “Opmerking
betreffende de waterdichte
pakking” voor meer details.)
Onderhoud en
voorzorgsmaatregelen
Waterlekkage
Als er water in het sport-camerahuis
terechtkomt, dient u de blootstelling aan water
of vocht zo snel mogelijk stop te zetten.
Als de camcorder nat is geworden, moet u die
meteen naar de dichtstbijzijnde Sony
onderhoudsdienst brengen.
Opmerking betreffende de
waterdichte pakking
• Controleer of de waterdichte pakking geen
scheurtjes of barstjes vertoont. De kleinste
scheurtjes of barstjes kunnen immers water
doorlaten. Als de pakking scheurtjes of
barstjes vertoont, dient u de beschadigde
pakking door een nieuwe te vervangen.
Verwijder de pakking nooit met een metalen
of scherp voorwerp.
• Plaats de waterdichte pakking zorgvuldig en
gelijkmatig in de groef, met de afgeschuinde
kant naar boven. Verdraai ze niet. (Zie
afbeelding L)
• Verwijder alle stof, zand of haar van de
waterdichte pakking, de groef en alle andere
oppervlakken die in contact komen met de
pakking.
Als het sport-camerahuis gesloten wordt
terwijl dergelijk vuil aanwezig is, kunnen de
raakvlakken worden beschadigd, waardoor
waterlekkage kan ontstaan.
• Nadat u hebt gecontroleerd of de waterdichte
pakking vrij is van barsten en vuil, moet u die
lichtjes invetten (meegeleverd vet) met uw
vinger. Dit dient om slijtage te voorkomen.
Let bij het invetten nogmaals op barstjes of
vuil.
Gebruik voor het invetten geen doekjes of
papier, omdat er dan vezeltjes of pluisjes
kunnen achterblijven.
Gebruik geen ander smeermiddel dan het
meegeleverde vet omdat de pakking hierdoor
kan worden aangetast.
• De levensduur van de waterdichte pakking is
afhankelijk van hoe regelmatig en zorgvuldig
het apparaat onderhouden wordt en hoe
intensief het sport-camerahuis gebruikt wordt.
Toch is het raadzaam de pakking eens per jaar
te vervangen. Neem voor het vervangen van
de waterdichte pakking contact op met uw
dichtstbijzijnde Sony handelaar. Na het
vervangen van de waterdichte pakking dient
u het sport-camerahuis eerst nog eens te
controleren op waterlekkage.
Controleren op waterlekkage na
het vervangen van de waterdichte
pakking.
Controleer altijd eerst op lekkage alvorens de
camcorder in het sport-camerahuis te plaatsen.
Sluit het sport-camerahuis zonder de camcorder
erin, hou het ongeveer 3 minuten lang op een
diepte van zowat 15 cm onder water en kijk dan
of er enig spoor van lekkage te zien is.
Na het opnemen
Na het maken van video-opnamen aan zee moet
u het sport-camerahuis grondig wassen met
kraantjeswater terwijl de sluitklemmen nog
stevig dicht zitten. Droog daarna de binnenkant
van het camerahuis met een zachte, droge doek.
Als er water op het sport-camerahuis
achterblijft, kunnen de metalen delen gaan
roesten.
Droog daarna de binnenkant van het sportcamerahuis met een zachte, droge doek. Reinig
nooit de binnenkant van het camerahuis met
water. Gebruik voor het schoonmaken geen
oplosmiddelen zoals alcohol, benzine of thinner,
omdat deze het sport-camerahuis kunnen
beschadigen.
Voorkomen dat het frontglas
beslaat
Wrijf het frontglas in met de meegeleverde
ontwasemingsvloeistof. Zo kunt u voorkomen
dat het beslaat.
Gebruik van het
glasreinigingsproduct
Breng 1 of 2 druppeltjes reinigingsvloeistof aan
op het voorglas en op het glas van het oogkapje.
Spreid de vloeistof gelijkmatig uit met een
wattenstokje, een zachte doek of een tissue.
Opbergen van het sport-camerahuis
• Sluit het sport-camerahuis zonder de
sluitklemmen vast te maken om slijtage van
de waterdichte pakking te voorkomen.
• Zorg ervoor dat er geen stof op de waterdichte
pakking terecht kan komen.
• Bewaar het sport-camerahuis niet op een
koude, zeer warme of vochtige plaats of
samen met naftaleen of kamfer, omdat het
sport-camerahuis hierdoor kan worden
beschadigd.
Technische gegevens
Materiaal
Plastic (PC, ABS), glas
Waterdicht
Waterdichte pakking, sluitklemmen
Ingebouwde microfoon
Stereo
Afmetingen
Ong. 150 x 170 x 110 mm (b / h / d)
Gewicht
Ong. 550 g (alleen sport-camerahuis)
Meegeleverde toebehoren
Schouderband (1)
Cameramontageschoen A(1)/B(1)
Statiefbevestigingsplaat
(1, voorgemonteerd op
cameramontageschoen A)
Antireflectiering (2)
Vet (1)
Ontwasemingsvloeistof (1)
Gebruiksaanwijzing (1)
Wijzigingen in ontwerp en technische gegevens
voorbehouden zonder voorafgaande
kennisgeving.
Voorbereiding
Meer details vindt u in de gebruiksaanwijzing
van uw camcorder.
AKeuze van de
cameramontageschoen
Afhankelijk van waar zich het schroefgat
bevindt voor het bevestigen van de
cameramontageschoen van uw camcorder, kunt
u kiezen tussen twee soorten
cameramontageschoen.
Bepaal de juiste montageschoen aan de hand
van lijst A.
BKlaarmaken van de
cameramontageschoen
Plaats de statiefbevestigingsplaat recht voor de
inkeping van montageschoen A of B.
De statiefbevestigingsplaat is voorgemonteerd
op cameramontageschoen A.
CKlaarmaken van de
camcorder
Meer details vindt u in de gebruiksaanwijzing
van uw camcorder.
1 Verwijder de schouderriem, de
lensdop, het filter of de lens van de
camcorder.
2 Breng de accu aan.
Controleer of de accu volledig is opgeladen.
3 Plaats de cassette.
4 Als u met het LCD scherm wilt
opnemen, klap dan het LCD paneel om
en plaats het terug naar de camcorder
met het LCD scherm naar buiten
gekeerd.
5 Zet alle instellingen van de camcorder
op de automatische mode.
6 Zet de FOCUS schakelaar op AUTO.
7 Zet de stroombesparingsfunctie van de
zoeker in het menu op OFF.
8 Zet de START/STOP MODE schakelaar
op .
9 Gebruik de DCR-PC10 of DCR-PC7 in
combinatie met de VMC-LM7 adapter
(niet meegeleverd).
10 Gebruikt u voor het opnemen de
beeldzoeker van de DCR-PC3/PC3E/
PC2E/PC1, trek dan de beeldzoeker zo
ver mogelijk uit.
Opmerking
De accu kan niet worden verwisseld na het
bevestigen van de montageschoen (alleen DCRPC3/PC3E/PC2E/PC1).
DInstalleren van de camcorder
1 Zet de POWER schakelaar op de
camcorder op OFF.
2 Breng de cameramontageschoen aan.
Gebruik de metalen onderdelen van de
schouderband zoals de afbeelding laat zien.
3 Bevestig de antireflectiering.
Voor DCR-PC3/PC3E/PC2E/PC1
(montageschoen A):
Gebruik de kleine ring, met een
filterdiameter van 30 mm.
Voor DCR-PC10/PC7
(montageschoen B):
Gebruik de grote ring, met een
filterdiameter van 37 mm.
4 Controleer of de POWER schakelaar
van het sportcamerahuis op OFF staat.
5 Maak de sluitklem los.
1 Schuif de ontgrendelingsknop in de
richting van het pijltje en maak de
sluitklem los.
2 Open het zijpaneel.
6 Verwijder eventueel aanklevend zand
of stof.
Maak de waterdichte pakkingsring zand- en
stofvrij en controleer of er geen barsten of
scheurtjes in zitten; reinig en controleer ook
de rand waar de pakkingsring tegenaan sluit
en vet beide oppervlakken licht in.
7 Sluit de afstandsbedieningsstekker aan
op LANC (afstandsbediening) terwijl
u de camera-montageschoen voorlopig
in het sport-camerahuis plaatst (1) en
de microfoonstekker op MIC
(stekkervoeding) (2).
Bij de DCR-PC10 of DCR-PC7 sluit u de
stekkers aan op de VMC-LM7 adapter (niet
meegeleverd).
8 De camcorder installeren.
Controleer of de lens en het LCD scherm
proper zijn alvorens de camcorder te
installeren.
Druk de camera-montageschoen aan tot
deze vastklikt.
9 Sluit het zijpaneel.
Zorg dat het zijpaneel goed afsluit en druk
dan de sluitklem aan tot deze vastklikt.
Opmerking
Zorg ervoor dat de kabel niet klem raakt bij het
sluiten van het zijpaneel. Hierdoor kunnen deze
onderdelen immers worden beschadigd of kan
er water binnensijpelen.
Voor het plaatsen van de DCR-PC3/PC3E/
PC2E dient u het aansluitdekseltje stevig op de
S-video aansluitbus te drukken alvorens u de
camcorder installeert. Anders kan het
aansluitdekseltje draaien en klem raken.
EDe verbindingskabel
aanbrengen.
Als de verbindingskabel niet goed is
aangebracht kan er een waterlek ontstaan
wanneer de zijkant van de behuizing wordt
gesloten. Breng de verbindingskabel correct aan
(zie afbeelding E).
FKlaarmaken van het sport-
camerahuis
1 Regel de handgreepband.
Hou het sport-camerahuis zo vast dat u met
de vingertoppen makkelijk bij de POWER
schakelaar, de START/STOP en de ZOOM
knop kan, en stel de handgreepband dan in
op de juiste lengte.
2 Bevestig de schouderband.
Zorg ervoor dat het Sony merkje aan de
buitenkant zit.
Gebruik van het sportcamerahuis
G
Opnemen
1 Zet de POWER schakelaar op CAMERA.
2 Druk op de START/STOP knop om de
opname te starten.
Even stoppen met opnemen
Druk op START/STOP. Druk er nogmaals op
om de opname te hervatten.
Definitief stoppen met opnemen
Druk op de START/STOP knop en zet de
POWER schakelaar op OFF.
In- en uitzoomen
• Hou de W kant ingedrukt om uit te zoomen
naar de groothoek-stand.
• Hou de T ingedrukt om in te zoomen naar de
tele-stand.
Druk zachtjes op de toets om traag te zoomen.
Opmerkingen betreffende het
Verhelpen van storingen
Symptoom
Er wordt geen geluid
opgenomen.
Er zijn waterdruppels
in het sportcamerahuis
terechtgekomen.
Opnemen en
weergeven lukt niet.
Oorzaak
De microfoonstekker is niet
aangesloten.
• De sluitklemmen zijn niet dicht.
• De waterdichte pakking is niet
goed aangebracht.
• De waterdichte pakking is gekrast
of gebarsten.
• De accu is uitgeput.
• De cassette is ten einde.
• Het wispreventienokje van de
cassette is uitgeschoven.
opnemen
• Als u de camcorder met een videocassette erin
langer dan 5 minuten in de
opnamepauzestand laat staan, wordt de
camcorder automatisch uitgeschakeld om de
batterij en de videoband te sparen. Om in dit
geval de opnamepauzestand weer in te
schakelen, zet u de POWER schakelaar even
op OFF en vervolgens terug op CAMERA.
• Tijdens het opnemen met het LCD scherm
uitgeklapt, verschijnt de teller niet.
• De POWER schakelaar op het sportcamerahuis heeft voorrang op de POWER
schakelaar op de camcorder.
• Wanneer er een waterdruppel op het voorglas
kleeft, druk dan op de zoomtoets om scherp te
stellen.
HFilmen met het LCD scherm
1 Open de spiegelkap.
2 Open de kleppen en steek de nokjes in
elke opening.
Het spiegelkapje sluiten
Sluit eerst de onderklep.
Opmerking
Houd de spiegelkap bij het opnemen niet vast.
IOpnemen van stilstaand
beeld – Foto-opname
U kunt een stilstaand beeld opnemen als een
foto.
1 Zet de POWER schakelaar op CAMERA.
2 Druk op de PHOTO toets.
Het stilstaand beeld wordt opgenomen.
Opmerkingen
• U kunt stilstaande beelden niet controleren
door lichtjes op de PHOTO toets op het sportcamerahuis te drukken.
• Indien u de DCR-PC10/PC7 gebruikt, kunt u
geen stilstaande beelden opnemen met het
sport-camerahuis.
• Bij gebruik van de DCR-PC3/PC3E in het
sport-camerahuis kunt u de functie voor
geheugenfoto-opname niet gebruiken.
• Bij gebruik van de DCR-PC3/PC3E/PC2E met
het sport-camerahuis, kunt u de NightShot
functie niet gebruiken.
JWeergeven met behulp van
de afstandsbediening.
U kunt de opname bekijken op het LCD scherm
met behulp van de afstandsbediening
(meegeleverd met de camcorder).
1 Stel het spiegelkapje in.
Zie “H Filmen met het LCD scherm”.
2 Zet de POWER schakelaar op PLAYER.
3 Druk op N PLAY op de
afstandsbediening.
Gebruik de afstandsbediening voor alle
andere functies zoals STOP, REW en FF.
Opmerking
Het beeld op de spiegel lijkt opzij gedraaid.
KVerwijderen van de
camcorder
Voordat u het sport-camerahuis opent, moet u
het sport-camerahuis en uzelf goed afdrogen.
Zorg ervoor dat er geen water op de camcorder
terechtkomt.
1 Zet de POWER schakelaar op OFF.
2 Maak de sluitklem los en open het
zijpaneel met de spiegelkap omhoog.
3 Verwijder de camcorder en trek de
stekkers uit.
1 Ontgrendel de cameramontageschoen
door aan de knop te trekken.
2 Verwijder de camcorder.
3 Trek de afstandsbedieningsstekker en de
MIC stekker uit.
Plaats de stekkers in de stekkerhouder in het
sportcamerahuis nadat u de camcorder hebt
verwijderd.
4 Maak de cameramontageschoen en de
antireflectiering los.
Opmerking
• Maak de stekkers los voor u de camcorder
uitneemt, anders kunnen de stekkers
beschadigd raken.
• Zie na het gebruik van het sport-camerahuis
het hoofdstukje Onderhoud en
voorzorgsmaatregelen voor de juiste opslag
ervan.
Oplossing
Sluit de stekker aan op MIC (met voeding)
op de camcorder.
• Druk de sluitklemmen aan tot ze
vastklikken.
• Breng de pakking gelijkmatig aan in de
groef.
• Vervang de pakking.
• Laad het batterijpak volledig op.
• Spoel de cassette terug of plaats een
nieuwe.
• Verschuif het wispreventienokje of plaats
een nieuwe cassette.
 Loading...