

Sony SPK-HCA User Manual
2-580-990-12(1)
Sports Pack
Operating Instructions
Mode d’emploi
Bedienunganleitung
Manual de instrucciones
SPK-HCA
© 2005 Sony Corporation Printed in Japan
Owner’s Record
The model and serial numbers are located inside of the unit. Record the serial number
in the space provided below. Refer to them whenever you call upon your Sony dealer
regarding this product.
Model No. SPK-HCA Serial No.
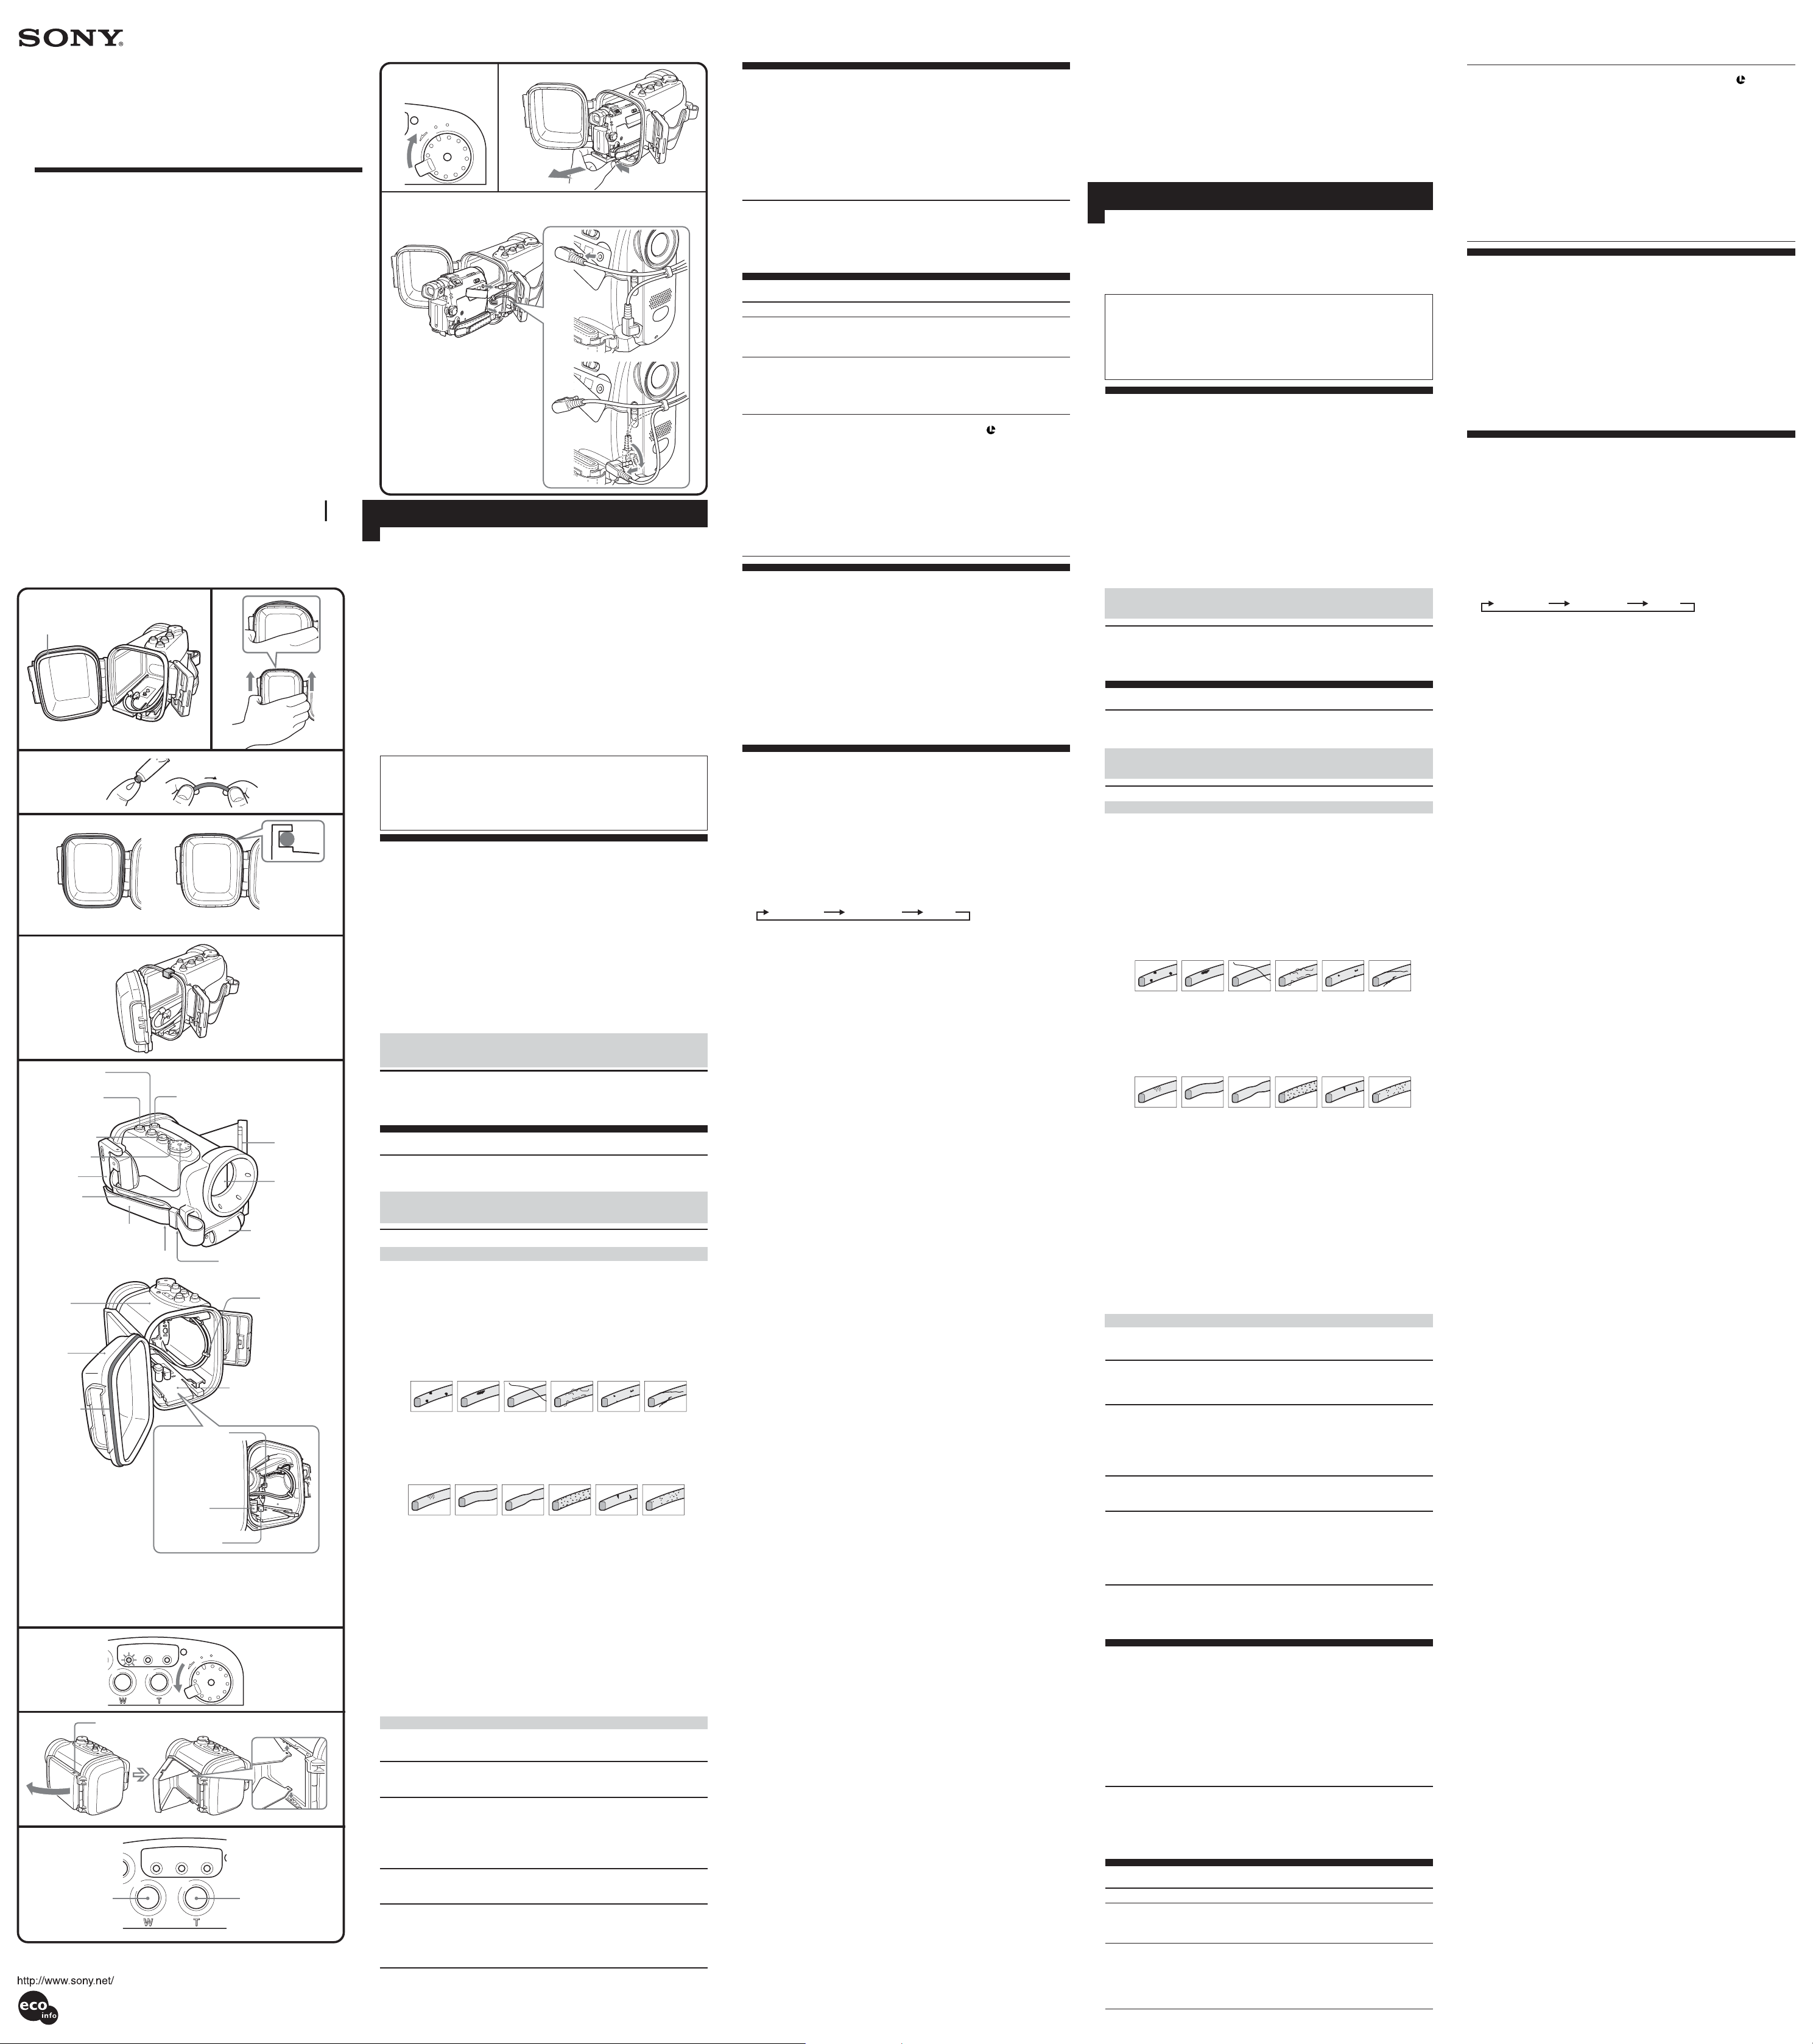
B
O-ring
Joint torique
C
D
Bad example
Mauvais exemple
E
Wide button
Touche Grand angle
START/STOP button
Touche START/STOP
Telephoto button
Touche Téléphoto
Mode lamp
Voyant de mode
Buckle
Fermoir
POWER switch
Commutateur
POWER
Grip strap
Sangle
Tripod mounting hole
Filetage de trépied
Front body
Partie avant
Rear body
Partie arrière
O-ring
Joint torique
Microphone plug
Fiche de
microphone
Audio plug
Fiche audio
Remote plug
Fiche de
télécommande
* Remove the spacer when the unit is in use.
The audio plug is for inputting the signal from the sports pack’s stereo microphone
to the video camera recorder.
* Retirez l’entretoise lorsque vous utilisez l’unité.
La fiche audio permet de transmettre le signal du microphone stéréo du caisson
vers le caméscope.
F
1
G
OPEN
VCR
MEMORY CAMERA
H
VCRMMEMORY CAMERA
Wide button
Touche Grand
angle
Printed on 100% recycled paper using
VOC (Volatile Organic Compound)-free
vegetable oil based ink.
Good example
Bon exemple
PHOTO button
Touche PHOTO
Hook for shoulder strap
Crochet de bandoulière
OFF
ON
MODE
Retractable
mirror
Miroir
rétractable
Front glass
Vitre avant
Stereo microphone
Microphone stéréo
Cord holder
Support de
cordon
Camera mounting shoe
Sabot de montage du
caméscope
Telephoto button
Touche Téléphoto
13
OFF
ON
MODE
When using DCR-HC40/HC30/HC20/HC18/HC16
4
Lors de l’utilisation de l’un des modèles suivants : DCR-HC40/
HC30/HC20/HC18/HC16
1
English
NOTICE FOR THE CUSTOMERS IN THE U.S.A
CAUTION
You are cautioned that any changes or modifications not expressly approved in this manual
could void your authority to operate this equipment.
NOTE:
This equipment has been tested and found to comply with the limits for a Class B digital
device, pursuant to Part 15 of the FCC Rules. These limits are designed to provide reasonable
protection against harmful interference in a residential installation. This equipment
generates, uses, and can radiate radio frequency energy and, if not installed and used in
accordance with the instructions, may cause harmful interference to radio communications.
However, there is no guarantee that interference will not occur in a particular installation. If
this equipment does cause harmful interference to radio or television reception, which can be
determined by turning the equipment off and on, the user is encouraged to try to correct the
interference by one or more of the following measures:
– Reorient or relocate the receiving antenna.
– Increase the separation between the equipment and receiver.
– Connect the equipment into an outlet on a circuit different from that to which the receiver
is connected.
– Consult the dealer or an experienced radio/TV technician for help.
• This Sports Pack SPK-HCA is exclusively for use with the Sony digital video camera
recorder DCR-HC90/HC43/HC42/HC40/HC39/HC33/HC32/HC30/HC22/
HC21/HC20/HC19/HC18/HC17/HC16/DVD803/DVD703/DVD653/DVD602/
DVD403/DVD203/DVD202/DVD201/DVD103/DVD101/DVD92/DVD91.
• The sports pack SPK-HCA is water- and moisture- resistant, making it possible to
use the Sony digital video camera recorder.
• Usable at the depth as low as 5 meters (16.4 feet) under water.
• For using your video camera recorder with this pack, refer to the operating
instructions of the recorder.
• Before you start recording, make sure that the video camera recorder is working
correctly and there is no water leakage.
• Sony does not accept liability for damage to the video camera recorder, battery,
etc., when using the sports pack or for the cost of recording if water leakage
occurs as a result of incorrect use.
Precautions on Use
• Do not subject the front glass to strong shock, as it may crack.
• Avoid opening the sports pack in the sea or at the beach. Preparation such as
installing and changing the cassette tape, the “Memory Stick Duo” and the disc
should be done in a place with low humidity and no salty air.
• Do not throw the sports pack into the water.
• Avoid using the sports pack in places with storong waves.
• Avoid using the sports pack under the following situations:
– in a very hot or humid place.
– in water hotter than 40 ˚C (104 ˚F).
– at temperatures lower than 0 ˚C (32 ˚F).
In these situations moisture condensation or water leakage may occur and damage
the equipment.
• Avoid installing the video camera recorder in a humid place. Installing in a humid
place will lead to condensation.
• Use the sports pack for no longer than one hour at a time in temperatures above 35
˚C (95 ˚F).
• Do not leave the sports pack under direct sunlight for a long period of time. If you
cannot avoid leaving the sports pack under direct sunlight, be sure to cover the pack
with a towel or other protection.
If sun oil is on the sports pack, be sure to wash it off thoroughly using lukewarm
water. If the sports pack is left with sun oil on its body, the surface of the sports
pack may become discolored or damaged. (such as cracks on the surface)
Water Leakage
If water happens to leak in, stop exposing the sports pack to water immediately.
If the video camera recorder gets wet, take it to the nearest Sony service facility
immediately.
Repair costs must be borne by the customer.
Handling the O-ring
What is the O-ring?
The O-ring ensures the waterproof qualities of the sports pack or other equipment.
(See illustration A)
O-ring maintenance is very important. Failure to carry out O-ring maintenance
according to the instructions may lead to water leakage and cause the sports
pack to sink.
Handling the O-ring
Fit the O-ring
Avoid fitting the O-ring in dusty or sandy locations.
1 Remove the O-ring. (See illustration B)
• To remove the O-ring, press it and slide it in the direction of the arrow as
illustrated. The O-ring has enough slack to be able to be removed easily.
Be careful not to scratch the O-ring with your fingernail.
• Do not use a pointed or metal object to remove the O-ring. This kind of object may
scratch or damage the sports pack groove or O-ring.
2 Inspect the O-ring.
• Check carefully for the following. If found, wipe off with a soft cloth or tissue
paper.
– Is there any dirt, sand, hair, dust, salt, thread scraps, etc. on the O-ring?
– Is there any old grease on the O-ring?
v Dirt v Sand v Hair v Dust v Salt
• Lightly run your fingertip around the O-ring to check for any invisible dirt.
• Be careful not to leave any cloth or tissue paper fibers on the O-ring after wiping
it.
• Check the O-ring for cracks, skewing, distortion, fine splitting, scratches, sand
inclusion, etc. Replace the O-ring if it is cracked or scratched.
v Cracksv Skewingv Distortion
v Fine
Splitting
v Scratches
3 Inspect the O-ring groove.
Grains of sand or hardened salt sometimes get into the groove. Carefully remove
them by blowing with an air spray or by wiping them with a cotton wool bud. Be
careful not to leave any fibers from the cotton wool bud inside.
4 Inspect the contact surface on the other side of the O-ring in the same
way.
5 Apply a coating of grease to the O-ring.
• Use your fingertips to thinly coat the entire surface of the O-ring with a small
drop of grease. (See illustration C)
• Do not use paper or cloth as fibers may stick to the O-ring.
• Make sure there is always a thin coating of grease on the surface of the O-ring.
Grease protects the O-ring and prevents wear.
• Fit the O-ring immediately after coating it with grease. Do not leave the greased
O-ring on a table or other surface.
6 Fit the O-ring into the groove of the sports pack.
Fit the O-ring evenly into the groove paying attention to the following points:
– Check for dirt on the O-ring.
– Check the O-ring is not twisted. (See illustration D)
How to check for water leakage
After replacing the O-ring, close the sports pack without inserting the equipment you
are going to use. Immerse the sports pack in water to a depth of about 15 cm for about
three minutes and check that no water leaks in.
Maintenance
If the sports pack is allowed to dry with sea water still in the O-ring groove, salt
crystals form which may impair the O-ring’s functions.
O-ring serviceable life
The serviceable life of the O-ring varies with frequency of use of the sports pack and
conditions. Generally, it is about one year.
Even if the O-ring is not cracked or scratched, deformation or wear reduces its
waterproof qualities. Replace the O-ring with a new one if you find cracks, skewing,
distortion, fine splitting, scratches, sand inclusion, etc.
After replacing, check that no water leaks in.
Grease
Use the grease supplied. Using other manufacturer’s grease will damage the O-ring,
and cause water leaks.
Anti-fogging lens solution
Coat the surface of the front glass with the supplied anti-fogging lens solution. This is
effective in preventing from fogging.
How to use the anti-fogging lens solution
Apply 2 or 3 drops of the liquid to the front glass and wipe evenly to spread the liquid
out by using the swabs, a soft cloth or tissue paper.
O-ring, grease and anti-fogging lens solution
You can obtain the O-ring and grease at the nearest Sony dealer.
O-ring (model No. 2-580-982-01), Grease (model No. 2-582-620-01)
Anti-fogging lens solution (model No. 3-072-039-01)
v Thread
scraps
v Sand
inclusion
Maintenance
• After recording in a location with a sea breeze, wash the sports pack thoroughly in
fresh water with the buckles fastened to remove salt and sand, then wipe with a soft
dry cloth. It is recommended that you submerge the sports pack in fresh water for
about 30 minutes. If it is left with salt on it, metal portions may be damaged or rust
may form and cause water leakage.
• If sun oil is on the sports pack, be sure to wash it off thoroughly using lukewarm
water.
• Clean the inside of the sports pack with a soft dry cloth. Do not wash the inside of
the sports pack.
Be sure to perform the above maintenance each time you use the sports pack. Do not
use any type of solvent such as alcohol, benzine or thinner for cleaning, as this might
damage the surface finish of the sports pack.
When storing the sports pack
• Attach the
illustration E)
• Close the pack without fastening the buckles to prevent wear of the O-ring.
• Prevent dust from collecting on the O-ring.
• Avoid storing the sports pack in a cold, very hot or humid place, or together with
naphthalene or camphor, as these conditions might damage the unit.
spacer
supplied with your sports pack to prevent wear of the O-ring. (See
Troubleshooting
Symptom
The sound is not
recorded.
There are drop of
water inside of
the sports pack.
The recording
and playing back
function does not
work.
Cause
The microphone plug or
audio plug is not connected.
• The buckles are not
fastened.
• The O-ring is not set
correctly.
• There are scratches or
cracks on the O-ring.
• The battery pack is run out.
• The remote plug is not
connected.
• The tape has run out.
• The “Memory Stick Duo” is
full.
• The safety tab on the
cassette and the “Memory
Stick Duo” is set to
unrecordable position.
• The disc has run out of
space.
• The disc has been finalized.
Corrective Actions
Connect the microphone plug to the
MIC (PLUG IN POWER) jack or the
audio plug to the A/V jack on the
video camera recorder.
• Fasten the buckles until they click.
• Put the O-ring in the groove
evenly.
• Replace the O-ring with a new one.
• Charge the battery pack fully.
• Connect it to
remote jack on the video camera
recorder.
• Rewind the tape or use a new one.
• Insert another “Memory Stick
Duo” or erase unneeded data from
the “Memory Stick Duo.”
• Slide the safety tab or install a new
cassette tape and a new “Memory
Stick Duo.”
• Use a new disc or format the disc
(DVD-RW only).
• Unfinalize the disc (DVD-RW only)
or use a new disc.
LANC jack or
Specifications
Material
Plastic (PC, ABS), glass
Waterproof
O-ring, buckles
Built-in microphone
Stereo
Dimension
Approx. 136 × 142 × 201 mm (w / h / d) (5 3/8 × 5 5/8 × 8 inches)
Mass
Approx. 800 g (1 lb 12 oz) (only sports pack)
Included items
Sports pack (1), Shoulder strap (1), Camera mounting shoe (A (1)/B (1)), Tripod
screw plate (1), Reflex prevention ring (Ø 25 mm (1)/Ø 30 mm (1)), Grease (1),
Spacer (1), Anti-fogging lens solution (1), Set of printed documentation
Design and specifications subject to change without notice.
Using the Sports Pack
F Selecting the mode
1 Turn on the sports pack.
Turn the POWER switch to “ON.”
Note
If the video camera recorder is left in Standby mode for five minutes or more, it
switches off automatically. This is to preserve the battery.
You can change the “A.SHUT OFF” setting of this function to [Never] using the
video camera recorder. For details, refer to the operating instructions of your video
camera recorder.
To return to Standby mode, turn the POWER switch to “ON” again.
2 Select the desired mode.
Change the mode in the following sequence by sliding the POWER switch to
“MODE.”
CAMERA MEMORY VCR
Check the selected mode with the mode lamp on the sports pack.
When using DCR-HC90/HC43/HC42/HC40/HC39/HC33/HC32/
HC30/HC22/HC21/HC20/HC19/HC18/HC17/HC16
To shoot moving pictures, select CAMERA mode or MEMORY mode.
To record still pictures, select CAMERA mode or MEMORY mode.
To play back the pictures, select VCR mode.
Note
When using a video camera recorder not compatible with “Memory Stick Duo,” the
video camera recorder operates in CAMERA mode even if the SPK-HCA is in
MEMORY mode.
When using DCR-DVD803/DVD703/DVD653/DVD602/
DVD403/DVD203/DVD202/DVD201/DVD103/DVD101/
DVD92/DVD91
To shoot moving pictures, select CAMERA mode.
To record still pictures, select MEMORY mode.
To play back the pictures, select VCR mode.
Note
The POWER switch of the sports pack has priority over the POWER switch of the
video camera recorder.
G Open the retractable mirror
You can shoot while watching the reflection in the retractable mirror.
1 Open the retractable mirror.
2 Open the wings and insert the projections into their holes.
To close the retractable mirror
Release the projections on both wings, and close the lower wing first.
H Recording
Recording moving pictures
When in CAMERA mode, moving pictures are recorded onto a cassette tape or a disc
and when in MEMORY mode, moving pictures are recorded on to a “Memory Stick
Duo.”
Press the START/STOP button.
Recording starts.
To stop recording
Press the START/STOP button.
If you press the START/STOP button once more, recording will start again.
To turn off the power
Stop recording before turning the POWER switch to “OFF.”
Note
When using the DCR-DVD803/DVD703/DVD653/DVD602/DVD403/DVD203/
DVD202/DVD201/DVD103/DVD101/DVD92/DVD91, you cannot record moving
pictures in MEMORY mode.
Zooming (See illustration H)
• Press the wide button to zoom out.
• Press the telephoto button to zoom in.
Press gently to zoom more slowly.
Recording still pictures
MEMORY mode
Still pictures are recorded onto a “Memory Stick Duo” or a disc.
1 Lightly press the PHOTO button.
The green mark at the top of the LCD screen stops flashing and remains on. You can
now record a still picture.
* No image is recorded yet.
2 Firmly press the PHOTO button.
The image shown on the screen is recorded.
CAMERA mode
Still pictures are recorded onto a “Memory Stick Duo.”
1 Lightly press the PHOTO button.
The word “Capture” appears at the top right of the LCD screen, and the image on
the screen stops.
*No image is recorded yet.
2 Firmly press the PHOTO button.
The image shown on the screen is recorded.
When using the DCR-DVD803/DVD703/DVD653/DVD602/DVD403/DVD203/
DVD202/DVD201/DVD103/DVD101/DVD92/DVD91, you cannot record still
pictures in CAMERA mode.
When using the video camera recorder not compatible with “Memory Stick Duo,” still
pictures are recorded onto a cassette tape.
Note
1 You cannot use Nightshot or other function for shooting in the dark with the sports
pack.
2 You cannot use a video camera recorder’s flash or tele-macro functions with the
sports pack.
I Playing back
You can play back the image by pointing the remote commander toward the remote
sensor (located on the front center of the sports pack). You cannot hear sound.
Use the remote commander for all other functions. For details, refer to the operating
instructions supplied with your video camera recorder.
Note
If “Remote Commander” in the menu of your video camera recorder is set to “OFF,”
change it to “ON.”
You cannot control the PB Zoom by two-stage variable speed.
When using the DCR-HC40/HC30/HC20/HC18/HC16/DVD201/DVD101/DVD91,
the picture appears mirror-reversed.
J Removing the Video Camera Recorder
Before opening the sports pack, wipe moisture off the sports pack and yourself. Do not
allow water on the video camera recorder.
1 Turn the POWER switch to “OFF.” (See illustration J-1)
2 Release the buckles, and open the rear body.
Note
For details, refer to step 2 of “Installing the Video Camera Recorder” in the Sports
Pack Preparation Guide.
3 Pull out the camera mounting shoe. (See illustration J-3)
Holding the camera mounting shoe by the knobs on one side of it, press the knobs
and extract the video camera recorder slowly.
4 Stop taking out the video camera recorder at the point where the plugs
connected to the video camera recorder come out from the sports pack.
Then, disconnect the plugs from the video camera recorder.
When using DCR-HC90/HC43/HC42/HC39/HC33/HC32/HC22/HC21/HC19/
HC17/DVD803/DVD703/DVD653/DVD602/DVD403/DVD203/DVD202/
DVD103/DVD92
1 Remove the audio plug.
2 Remove the remote plug.
When using DCR-HC40/HC30/HC20/HC18/HC16
(See illustration J-4)
1 Remove the remote plug.
2 Turn the microphone plug in the direction shown in the illustration and remove it.
When using DCR-DVD201/DVD101/DVD91
1 Remove the remote plug.
2 Remove the microphone plug.
Note
Be sure to disconnect the audio plug, remote plug and microphone plug by holding
the plug part, not the cord part before taking out the video camera recorder.
Otherwise, the plugs and the video camera recorder may be damaged.
5 Detach the camera mounting shoe.
Français
• Le caisson SPK-HCA est exclusivement destiné aux modèles de caméscope
numérique de Sony suivants : DCR-HC90/HC43/HC42/HC40/HC39/HC33/
HC32/HC30/HC22/HC21/HC20/HC19/HC18/HC17/HC16/DVD803/DVD703/
DVD653/DVD602/DVD403/DVD203/DVD202/DVD201/DVD103/DVD101/
DVD92/DVD91.
• Le caisson SPK-HCA est résistant à l’eau et à l’humidité, ce qui permet d’utiliser le
caméscope numérique Sony dans ce type d’environnement.
• Vous pouvez l’utiliser sous l’eau jusqu’à 5 mètres (16,4 pieds) de profondeur.
• Pour utiliser votre caméscope avec ce caisson, reportez-vous au mode d’emploi
du caméscope.
• Avant de commencer un enregistrement, assurez-vous que le caméscope
fonctionne correctement et qu’il n’y a pas d’infiltration d’eau.
• Sony décline toute responsabilité pour tout dommage provoqué sur le
caméscope, la batterie, etc., lors de l’utilisation du caisson ou pour la perte d’un
enregistrement en cas d’infiltration d’eau du fait d’une utilisation incorrecte du
produit.
Précautions d’emploi
• Ne soumettez pas la vitre avant à des chocs importants, car elle pourrait se fissurer.
• Evitez d’ouvrir le caisson dans la mer ou sur la plage. Les opérations préparatoires,
telles que la mise en place et le remplacement d’une cassette, du « Memory Stick
Duo » et du disque, doivent être effectuées à l’abri de l’humidité et de l’air salin.
• Ne jetez pas le caisson dans l’eau.
• N’utilisez pas le caisson en cas de fortes vagues.
• N’utilisez pas le caisson dans les conditions suivantes :
– dans un endroit très chaud ou humide ;
– dans une eau à plus de 40 °C (104 °F) ;
– sous des températures inférieures à 0 °C (32 °F).
Dans de telles conditions, le matériel pourrait être endommagé par une
condensation ou une infiltration d’eau.
• Evitez d’installer le caméscope dans un endroit humide. De la condensation
risquerait de se former à l’intérieur.
• N’utilisez pas le caisson plus d’une heure lorsque la température est supérieure à 35
°C (95 °F).
• Evitez d’exposer le caisson à la lumière directe du soleil pendant une période
prolongée. Si ce n’est pas possible, veillez à le couvrir d’une serviette ou d’une autre
protection.
Si de la crème solaire est tombée sur le caisson, prenez soin de l’éliminer
convenablement avec de l’eau tiède. A défaut, la surface du caisson risque d’être
décolorée ou endommagée (craquelures).
Infiltration d’eau
Si de l’eau s’infiltre dans le caisson, arrêtez immédiatement de l’exposer à l’eau.
Si le caméscope numérique est mouillé, portez-le immédiatement chez le revendeur
Sony le plus proche.
Les frais de réparation seront à la charge de l’utilisateur.
Entretien du joint torique
Qu’est-ce que le joint torique ?
Le joint torique garantit l’étanchéité du caisson ou de tout autre équipement. (Voir
illustration A)
L’entretien du joint torique est très important. Le non-respect des instructions
d’entretien du joint torique peut provoquer des infiltrations d’eau et faire
couler le caisson.
Entretien du joint torique
Fit the O-ring
Evitez de fixer le joint torique si vous vous trouvez dans un lieu sablonneux ou
poussiéreux.
1 Retirez le joint torique. (Voir illustration B)
• Pour retirer le joint torique, appuyez légèrement dessus, puis faites-le glisser dans
le sens de la flèche, comme indiqué sur l’illustration. Le joint torique est
suffisamment lâche pour permettre un retrait aisé.
Prenez garde à ne pas érafler le joint torique avec vos ongles.
• N’utilisez pas d’objet pointu ou métallique pour retirer le joint. Ce type d’objet
risque, en effet, d’érafler ou d’endommager la rainure du caisson ou le joint
torique.
2 Inspectez le joint torique.
• Vérifiez attentivement la présence éventuelle des éléments ci-dessous. Le cas
échéant, nettoyez le joint à l’aide d’un chiffon doux ou d’un mouchoir en papier.
– Saletés, sable, cheveux, poussière, sel, particules, etc.
– Substances graisseuses.
v Saleté v Sable v Cheveux v Poussière v Sel
• Passez légèrement votre doigt sur le joint torique pour détecter d’éventuelles
saletés invisibles.
• Assurez-vous de ne pas laisser de fibres de tissu ou de papier sur le joint torique
après l’avoir nettoyé.
• Assurez-vous que le joint torique ne comporte aucune craquelure, déformation,
distorsion, coupure, éraflure, incrustation de sable. Remplacez-le s’il est fendu ou
éraflé.
v Craquelure
v Déformation
v Distorsion
v Coupures v
Eraflures
v Particules
v Incrustations
de sable
3 Inspectez la rainure du joint torique.
Des grains de sable ou de sel s’incrustent parfois dans la rainure. Retirez-les
soigneusement à l’aide d’un pulvérisateur à air ou d’un disque de coton. Prenez
garde à ne pas laisser de fibres de coton à l’intérieur.
4 Inspectez de la même manière la surface de contact de l’autre côté du
joint torique.
5 Appliquez une couche de graisse sur le joint torique.
• Avec les doigts, appliquez légèrement une
surface du joint torique. (Voir illustration C)
• N’utilisez pas de mouchoir en papier ni de tissu, car les fibres risquent de coller
au joint.
• Assurez-vous qu’une fine couche de graisse recouvre en permanence la surface
du joint. La graisse protège le joint et prévient l’usure.
• Fixez le joint immédiatement après l’avoir enduit de graisse. Ne posez pas le joint
enduit de graisse sur une table ou une autre surface.
petite
goutte de graisse sur toute la
6 Fixez le joint torique dans la rainure du caisson.
Fixez le joint uniformément dans la rainure, en respectant les points suivants :
– Vérifiez qu’il n’y a pas de saleté sur le joint.
– Vérifiez que le joint n’est pas tordu. (Voir illustration D)
Vérification de l’absence de défauts d’étanchéité
Après avoir replacé le joint torique, fermez le caisson sans insérer l’équipement que
vous allez utiliser. Plongez le caisson dans l’eau à une profondeur d’environ 15 cm
pendant trois minutes environ et assurez-vous que l’eau ne pénètre pas.
Entretien
Si vous faites sécher le caisson alors que la rainure du joint d’étanchéité contient
encore de l’eau de mer, des cristaux de sel vont se former et peuvent réduire
l’étanchéité.
Durée de vie du joint torique
La durée de vie du joint torique varie selon la fréquence et les conditions d’utilisation
du caisson. Elle est généralement d’un an environ.
Même si le joint n’est pas craquelé ni éraflé, la déformation ou l’usure réduit ses
qualités d’étanchéité. Remplacez le joint par un nouveau s’il est craquelé, déformé,
tordu, coupé, éraflé, incrusté de sable, etc.
Une fois le remplacement effectué, vérifiez qu’il n’y a aucune infiltration d’eau.
Graisse
Utilisez la graisse fournie. L’emploi de la graisse d’un autre fabricant endommagerait
le joint torique et provoquerait des infiltrations d’eau.
Solution antibuée
Enduisez la surface de la vitre avant avec la solution antibuée fournie. Elle est conçue
pour empêcher la buée de se former.
Utilisation de la solution antibuée
Appliquez 2 ou 3 gouttes du liquide sur le verre et étalez uniformément pour répandre
le liquide à l’aide d’un disque de coton, d’un chiffon doux ou d’un mouchoir en
papier.
Joint torique, graisse et solution antibuée
Vous pouvez vous procurer des joints toriques et de la graisse chez votre revendeur
Sony le plus proche.
Joint torique (référence : 2-580-982-01), Graisse (référence : 2-582-620-01)
Solution antibuée (référence : 3-072-039-01)
Entretien
• Après avoir effectué un enregistrement dans un endroit exposé à la brise marine,
lavez soigneusement le caisson à l’eau douce avec les fermoirs correctement
verrouillés pour en retirer le sel et le sable, puis essuyez-le avec un chiffon doux et
sec. Il est recommandé de plonger le caisson dans de l’eau douce pendant 30 minutes
environ. Ne laissez pas de sel dessus, car il pourrait attaquer les parties métalliques
et de la rouille risquerait de se former et de causer une infiltration d’eau.
• Si de la crème solaire est tombée sur le caisson, prenez soin de l’éliminer
convenablement avec de l’eau tiède.
• Nettoyez l’intérieur du caisson avec un chiffon doux et sec. Ne lavez pas l’intérieur
du caisson.
Effectuez les opérations d’entretien ci-dessus après chaque utilisation du caisson.
N’utilisez aucune sorte de solvant, comme de l’alcool, de la benzine ou du diluant
pour le nettoyage, car ces substances peuvent attaquer la finition du caisson.
Stockage du caisson
• Fixez l’entretoise fournie avec votre caisson pour protéger le joint torique contre
l’usure. (Voir illustration E)
• Fermez le caisson sans verrouiller les fermoirs pour limiter l’usure du joint.
• Eviter d’exposer le joint à la poussière.
• Ne rangez pas le caisson dans un endroit froid, très chaud ou humide ou à proximité
de naphtaline ou de camphre. Cela pourrait l’endommager.
Résolution de problèmes
Symptôme
Le son n’est pas
enregistré.
Présence de
gouttes d’eau à
l’intérieur du
caisson.
Cause
La fiche du microphone ou
la fiche audio n’est pas
raccordée.
• Les fermoirs ne sont pas
verrouillés.
• Le joint torique n’est pas
correctement mis en place.
• Le joint torique comporte
des craquelures ou des
éraflures.
Mesures correctives
Raccordez la fiche du microphone à la
prise MIC (PLUG IN POWER) ou la
fiche audio à la prise A/V du
caméscope.
• Verrouillez les fermoirs jusqu’à
entendre un clic.
• Placez le joint torique uniformément
sur la rainure.
•Remplacez le joint torique par un
nouveau.
Les fonctions
d’enregistrement
et de lecture ne
fonctionnent pas.
• La batterie est épuisée.
• La fiche de télécommande
n’est pas raccordée.
• Toute la bande est utilisée.
•Le « Memory Stick Duo »
est saturé.
• Le taquet de sécurité de la
cassette et celui du
« Memory Stick Duo »
sont placés en position de
non-enregistrement.
• Le disque est saturé.
• Le disque a été clôturé.
• Rechargez complètement la batterie.
•Branchez-la à la prise
la prise de la télécommande du
caméscope.
•Rembobinez la cassette ou utilisez-en
une autre.
•Insérez un autre « Memory Stick
Duo » ou effacez les données inutiles
du « Memory Stick Duo ».
•Faites glisser le taquet de sécurité ou
installez une nouvelle bande et un
nouveau « Memory Stick Duo ».
•Formatez le disque (DVD-RW
uniquement) ou utilisez-en un
nouveau.
•Annulez la clôture du disque (DVDRW uniquement) ou utilisez-en un
nouveau.
LANC ou à
Spécifications
Matériau
Plastique (PC, ABS), verre
Etanchéité
Joint torique, fermoirs
Microphone intégré
Stéréo
Dimensions
Approx. 136 × 142 × 201 mm (l/h/p) (5 3/8 × 5 5/8 × 8 pouces)
Poids
Approx. 800 g (1 lb 12 on) (caisson uniquement)
Articles inclus
Caisson (1), Bandoulière (1), Sabot de montage du caméscope (A (1)/B (1)), Plaque
de fixation du trépied (1), Bague antireflet (Ø 25 mm (1)/Ø 30 mm (1)), Graisse (1)
Entretoise (1), Solution antibuée (1), Jeu de documents imprimés
La conception et les spécifications peuvent faire l’objet de modifications sans préavis.
Utilisation du caisson
F Sélection du mode
1 Mettez le caisson sous tension.
Placez le commutateur POWER en position « ON ».
Remarque
Si le caméscope reste en mode veille pendant plus de 5 minutes, il s’éteint
automatiquement. Cette fonction permet de préserver la batterie.
Vous pouvez paramétrer la fonction « A.SHUT OFF » sur [Never], à partir du
caméscope. Pour plus d’informations, reportez-vous au mode d’emploi fourni avec
le caméscope.
Pour revenir en mode veille, placez de nouveau le commutateur POWER en
position « ON ».
2 Sélectionnez le mode de votre choix.
Changez de mode en positionnant le commutateur POWER sur MODE.
CAMERA MEMORY VCR
Vérifiez le mode sélectionné à l’aide du voyant correspondant qui figure sur le
caisson.
Lors de l’utilisation de l’un des modèles suivants : DCRHC90/HC43/HC42/HC40/HC39/HC33/HC32/HC30/HC22/HC21/
HC20/HC19/HC18/HC17/HC16
Pour filmer des scènes en mouvement, sélectionnez le mode CAMERA ou
MEMORY.
Pour enregistrer des images fixes, sélectionnez le mode CAMERA ou MEMORY.
Pour visionner les images, sélectionnez le mode VCR.
Remarque
Lors de l’utilisation d’un caméscope non compatible avec la fonction « Memory
Stick Duo », il fonctionne en mode CAMERA, même si le caisson SPK-HCA est en
mode MEMORY.
Lors de l’utilisation de l’un des modèles suivants : DCRDVD803/DVD703/DVD653/DVD602/DVD403/DVD203/
DVD202/DVD201/DVD103/DVD101/DVD92/DVD91
Pour filmer des scènes, sélectionnez le mode CAMERA.
Pour enregistrer des images fixes, sélectionnez le mode MEMORY.
Pour visionner les images, sélectionnez le mode VCR.
Remarque
Le commutateur POWER du caisson prévaut sur celui du caméscope.
G Ouverture du miroir rétractable
Vous pouvez filmer tout en regardant la réflexion des images dans le miroir
rétractable.
1 Ouvrez le miroir rétractable.
2 Ouvrez les volets et insérez les parties saillantes dans les orifices
correspondants.
Pour refermer le miroir rétractable
Détachez les parties saillantes des deux volets et fermez d’abord le volet inférieur.
H Enregistrement
Enregistrement d’images en mouvement
En mode CAMERA, les scènes sont enregistrées sur une cassette ou un disque. En
mode MEMORY, elles sont enregistrées sur un « Memory Stick Duo ».
Appuyez sur la touche START/STOP.
L’enregistrement commence.
Pour arrêter l’enregistrement
Appuyez sur la touche START/STOP.
Si vous appuyez de nouveau sur la touche START/STOP, l’enregistrement est
réactivé.
Pour mettre l’appareil hors tension
Arrêtez l’enregistrement avant de placer le commutateur POWER en position « OFF ».
Remarque
Lors de l’utilisation de l’un des modèles suivants : DCR-DVD803/DVD703/DVD653/
DVD602/DVD403/DVD203/DVD202/DVD201/DVD103/DVD101/DVD92/DVD91,
vous ne pouvez pas filmer en mode MEMORY.
Zoom (voir illustration H)
• Appuyez sur la touche Grand angle (W) pour effectuer un zoom arrière.
• Appuyez sur la touche Téléphoto (T) pour effectuer un zoom avant.
Appuyez légèrement sur la touche pour manœuvrer le zoom plus doucement.
Enregistrement d’images fixes
Mode MEMORY
Les images fixes sont enregistrées sur un « Memory Stick Duo » ou sur un disque.
1 Appuyez légèrement sur la touche PHOTO.
La marque verte en haut de l’écran LCD arrête de clignoter et s’affiche en continu.
Vous pouvez à présent enregistrer une image fixe.
* Aucune image n’est encore enregistrée.
2 Appuyez à fond sur la touche PHOTO.
L’image apparaissant à l’écran est enregistrée.
Mode CAMERA
Les images fixes sont enregistrées sur un « Memory Stick Duo ».
1 Appuyez légèrement sur la touche PHOTO.
Le mot « Capture » apparaît dans le coin supérieur droit de l’écran LCD. L’image
sur l’écran est alors capturée.
* Aucune image n’est encore enregistrée.
2 Appuyez à fond sur la touche PHOTO.
L’image apparaissant à l’écran est enregistrée.
Lors de l’utilisation de l’un des modèles suivants : DCR-DVD803/DVD703/DVD653/
DVD602/DVD403/DVD203/DVD202/DVD201/DVD103/DVD101/DVD92/DVD91,
vous ne pouvez pas enregistrer d’image fixe en mode CAMERA.
Lors de l’utilisation d’un caméscope ne prenant pas en charge la fonction « Memory
Stick Duo », les images fixes sont enregistrées sur une cassette.
Remarque
1 Vous ne pouvez pas utiliser le caisson lors de prises de vue nocturnes.
2 Vous ne pouvez pas utiliser les fonctions flash ou télé-macro avec le caisson.
I Lecture
Vous pouvez visionner les images en dirigeant la télécommande vers le capteur situé
au centre de la partie avant du caisson. Vous n’avez pas accès aux données audio.
Vous pouvez utiliser la télécommande pour toutes les autres fonctions. Pour plus
d’informations, reportez-vous au mode d’emploi fourni avec le caméscope.
Remarque
Si la fonction de télécommande est paramétrée sur « OFF » dans le menu du
caméscope, sélectionnez « ON ».
Vous ne pouvez pas contrôler le zoom PB à deux vitesses.
Lors de l’utilisation de l’un des modèles suivants : DCR-HC40/HC30/HC20/HC18/
HC16/DVD201/DVD101/DVD91, l’image apparaît inversée sur le miroir.
J Retrait du caméscope
Avant d’ouvrir le caisson, séchez-le bien et essuyez-vous. Evitez de laisser tomber de
l’eau sur le caméscope.
1 Placez le commutateur POWER en position « OFF ». (Voir illustration J-1)
2 Déverrouillez les fermoirs et ouvrez la partie arrière.
Remarque
Pour plus de détails, reportez-vous à l’étape 2 « Installation du caméscope » du
guide de préparation du caisson.
3 Détachez le sabot de montage du caméscope. (Voir illustration J-3)
Maintenez les boutons du sabot de montage enfoncés, puis retirez lentement le
caméscope.
4 Au moment du retrait du caméscope du caisson, interrompez l’opération
lorsque vous êtes sur le point de sortir du caisson les fiches reliées au
caméscope. Débranchez les fiches du caméscope.
Lors de l’utilisation de l’un des modèles suivants : DCR-HC90/HC43/HC42/
HC39/HC33/HC32/HC22/HC21/HC19/HC17/DVD803/DVD703/DVD653/
DVD602/DVD403/DVD203/DVD202/DVD103/DVD92
1 Retirez la fiche audio.
2 Retirez la fiche de la télécommande.
Lors de l’utilisation de l’un des modèles suivants : DCR-HC40/HC30/HC20/
HC18/HC16 (voir l’illustration J-4)
1 Retirez la fiche de la télécommande.
2 Tournez la fiche du microphone dans le sens indiqué sur l’illustration et retirez-la.
Lors de l’utilisation de l’un des modèles suivants : DCR-DVD201/DVD101/
DVD91
1 Retirez la fiche de la télécommande.
2 Retirez la fiche du microphone.
Remarque
Veillez à débrancher les fiches audio, de la télécommande et du microphone en
tenant les fiches et non le cordon avant de retirer le caméscope. A défaut, les fiches
et le caméscope risquent d’être endommagés.
5 Détachez le sabot de montage du caméscope.
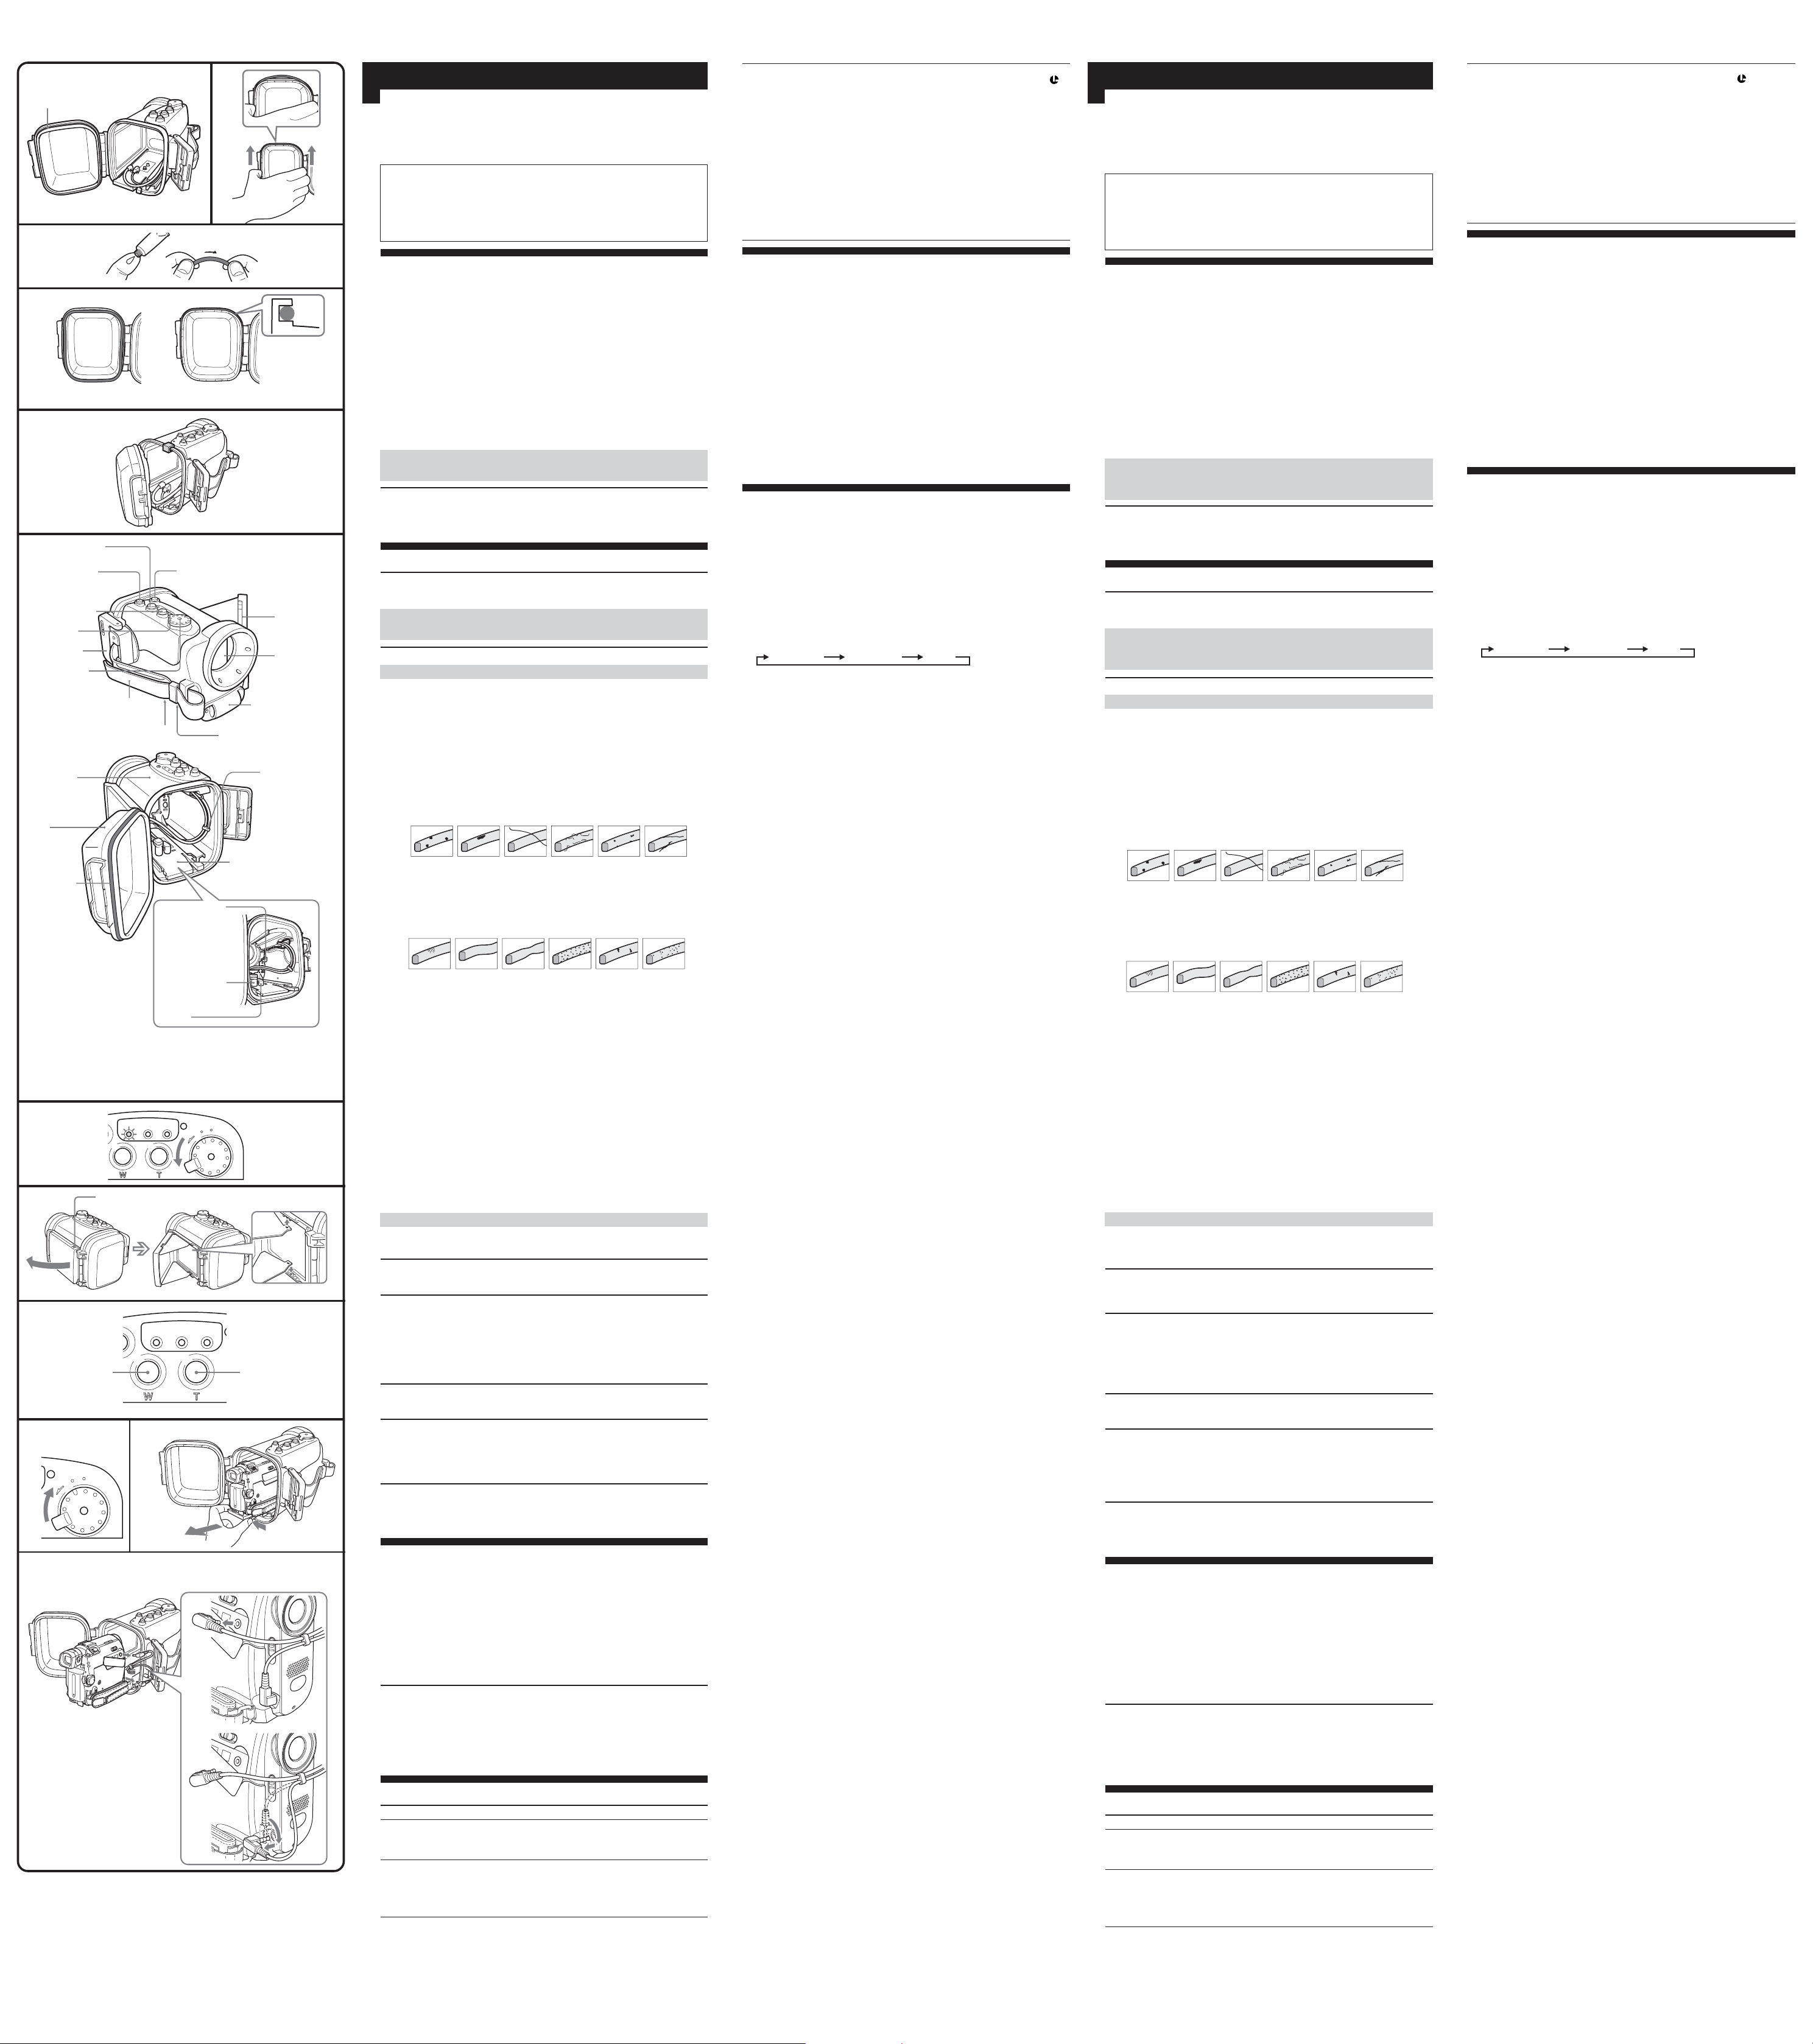
B
O-Ring
Junta tórica
C
D
Falsch
Mal ejemplo
Richtig
Buen ejemplo
E
Weitwinkeltaste
Botón de gran angular
START/STOP-Taste
Botón START/STOP
Teletaste
Botón de telefoto
Modus-Lampe
Lámpara de
modo
Schnalle
Hebilla
POWER-Schalter
Selector POWER
Griffband
Correa de la empuñadura
Stativmontagebohrung
Orificio de montaje en trípode
Vorderes
Gehäuseteil
Parte frontal
del cuerpo
Hinteres
Gehäuseteil
Parte
posterior del
cuerpo
O-Ring
Junta tórica
* Nehmen Sie beim Betrieb das Distanzstück ab.
Der Audiostecker überträgt das Stereomikrofonsignal des Sports Pack zum
Camcorder.
* Antes de utilizar la unidad, quite el separador.
La clavija de audio es para aplicar la señal procedente del micrófono estéreo del
portacámara deportivo a la videocámara.
F
1
G
OPEN
VCR
MEMORY CAMERA
PHOTO-Taste
Botón PHOTO
Mikrofonstecker
Clavija de
micrófono
Audiostecker
Clavija de audio
Fernsteuerstecker
Clavija de control
remoto
OFF
ON
MODE
Klappspiegel
Espejo
retráctil
Frontglas
Vidrio frontal
Stereomikrofon
Micrófono estéreo
Haken für Schulterriemen
Gancho para la correa para el
hombro
Kabelhalter
Soporte del
cable
Kameramontageschuh
Zapata de montaje de la
videocámara
H
VCRMMEMORY CAMERA
Weitwinkeltaste
Botón de gran
angular
Teletaste
Botón de telefoto
J
13
OFF
ON
MODE
Bei Verwendung der DCR-HC40/HC30/HC20/HC18/HC16
4
Cuando utilice los modelos DCR-HC40/HC30/HC20/HC18/HC16
1
Deutsch
• Das Sports Pack SPK-HCA ist ausschließlich für die Sony Digital-Camcorder DCRHC90/HC43/HC42/HC40/HC39/HC33/HC32/HC30/HC22/HC21/HC20/
HC19/HC18/HC17/HC16/DVD803/DVD703/DVD653/DVD602/DVD403/
DVD203/DVD202/DVD201/DVD103/DVD101/DVD92/DVD91 bestimmt.
• Das Sports Pack SPK-HCA schützt den eingesetzten Sony Digital-Camcorder vor
Spritzwasser und Feuchtigkeit
• Verwendbar bis zu einer Wassertiefe von 5 m.
• Zur Bedienung des Camcorders siehe die bei ihm mitgelieferte Anleitung.
• Vergewissern Sie sich vor dem Aufnehmen, dass der Camcorder einwandfrei
funktioniert und kein Wasser eindringt.
• Sony übernimmt keine Haftung für Beschädigungen des im Sports Pack
eingesetzten Camcorders, des Akkus usw. und erstattet keine Kosten für Verlust
von Aufnahmen, wenn aufgrund einer falschen Verwendung ein Wasserleck
aufgetreten ist.
Vorsichtsmaßnahmen
• Stoßen Sie mit dem Frontglas nirgends an, da es sonst beschädigt werden kann.
• Öffnen Sie das Sports Pack nicht im Meer und nicht am Strand. Alle vorbereitenden
Schritte wie Einlegen und Wechseln der Cassette, des „Memory Stick Duo“ und der
Disc sollten an einem Ort ausgeführt werden, der keiner Feuchtigkeit und keiner
salzhaltigen Luft ausgesetzt ist.
• Werfen Sie das Sports Pack nicht ins Wasser.
• Verwenden Sie das Sports Pack nicht bei starkem Wellengang.
• Meiden Sie Folgendes:
– Heiße und feuchte Plätze.
– Wassertemperaturen über 40 °C.
– Wassertemperaturen unter 0 °C.
Ansonsten kann sich Kondenswasser bilden, Wasser eindringen und das Gerät
beschädigt werden.
• Setzen Sie den Camcorder nicht an feuchten Plätzen in das Sports Pack ein.
Ansonsten kann sich Kondenswasser bilden.
• Verwenden Sie das Sports Pack nicht länger als eine Stunde bei Temperaturen über
35 °C.
• Lassen Sie das Sports Pack nicht längere Zeit in prallem Sonnenlicht liegen. Schützen
Sie es gegebenenfalls mit einem Handtuch vor direktem Sonnenlicht.
Wenn Sonnenöl auf das Sports Pack gelangt ist, waschen Sie es mit lauwarmem
Wasser ab. Sonnenöl kann dazu führen, dass sich das Gehäuse verfärbt oder
beschädigt wird (beispielsweise durch Risse).
Bei einem Wasserleck
Wenn Wasser eingedrungen ist, nehmen Sie das Sports Pack sofort aus dem Wasser.
Wenn der Camcorder nass geworden ist, bringen Sie ihn zur nächsten SonyKundendienststelle.
Reparaturen sind kostenpflichtig.
Handhabung des O-Rings
Was ist ein O-Ring?
Ein O-Ring stellt den wasserdichten Abschluss von Sports Packs und anderen
Gehäusen sicher. (Siehe Abbildung A.)
Der O-Ring muss richtig gewartet werden. Wird der O-Ring nicht
entsprechend den Anweisungen gewartet, kann Wasser eindringen und das
Sports Pack sinken.
Handhabung des O-Rings
Einpassen des O-Rings
Setzen Sie den O-Ring nicht an Orten ein, die Staub und Sand ausgesetzt sind.
1 Nehmen Sie den O-Ring heraus. (Siehe Abbildung B.)
• Zum Herausnehmen des O-Rings drücken Sie auf den Ring und schieben Sie ihn
in Pfeilrichtung, wie in der Abbildung gezeigt. Der O-Ring hat dann genug Spiel
und kann leicht herausgenommen werden.
Achten Sie sorgfältig darauf, den O-Ring nicht mit den Fingernägeln zu
verkratzen.
• Verwenden Sie zum Herausnehmen des O-Rings keine spitzen Gegenstände und
keine Metallgegenstände. Ansonsten kann die Nut des Sports Pack oder der ORing verkratzt und beschädigt werden.
2 Überprüfen Sie den O-Ring.
• Überprüfen Sie den Ring sorgfältig. Falls Fremdkörper vorhanden sind, wischen
Sie sie mit einem weichen Tuch oder Papier ab.
– Sind Schmutzpartikel, Sand, Haare, Staub, Salz, Fäden usw. am O-Ring?
– Befindet sich altes Fett auf dem O-Ring?
v Schmutz v Sand v Haar v Staub v Salz
• Ziehen Sie den O-Ring vorsichtig durch Ihre Fingerspitzen, um ihn auf
unsichtbare Schmutzpartikel zu überprüfen.
• Vergewissern Sie sich nach dem Reinigen, dass keine Fasern vom Tuch oder
Papier auf dem O-Ring haften.
• Vergewissern Sie sich, dass der O-Ring keine Risse, keine Absplitterungen, keine
Abschabungen und keine Sandeinschlüsse usw. enthält und nicht verdreht oder
verzogen ist. Falls erforderlich, wechseln Sie den O-Ring aus.
v
Risse v verdreht v verzogen v
feine
Absplitterungen
v
Kratzer
v Fäden
v
SSandeinschlüsse
3 Überprüfen Sie die O-Ring-Nut.
Manchmal können Sandkörner oder Salzkristalle in die Nut gelangen. Entfernen Sie
solche Fremdkörper mit einem Luftspray oder wischen Sie sie mit einem
Wattestäbchen ab. Achten Sie sorgfältig darauf, dass keine Fasern vom
Wattestäbchen zurückbleiben.
4 Überprüfen Sie auf gleiche Weise die Kontaktfläche gegenüber dem O-
Ring.
5 Fetten Sie den O-Ring ein.
• Fetten Sie die ganze Oberfläche des O-Rings dünn ein, indem Sie einen Tropfen
Fett mit den Fingerspitzen verteilen. (Siehe Abbildung C.)
• Verwenden Sie zum Einfetten kein Papier und kein Tuch, da sonst Fasern auf
dem O-Ring hängenbleiben können.
• Achten Sie sorgfältig darauf, dass die Oberfläche des O-Rings stets dünn
eingefettet ist. Das Fett schützt den O-Ring und verhindert eine vorzeitige
Abnutzung.
• Setzen Sie den O-Ring nach dem Einfetten direkt ein. Legen Sie den eingefetteten
O-Ring nicht auf einen Tisch usw.
6 Setzen Sie den O-Ring in die Nut des Sports Pack ein.
Setzen Sie den O-Ring gleichmäßig unter Beachtung der folgenden Punkte in die
Nut ein:
– Der O-Ring darf nicht verschmutzt sein.
– Der O-Ring darf nicht verdreht sein. (Siehe Abbildung D.)
Überprüfen auf Wasserlecks
Nachdem Sie den O-Ring eingesetzt haben, schließen Sie das Sports Pack, ohne den
Camcorder einzusetzen. Tauchen Sie das Sports Pack dann etwa 3 Minuten lang ca. 15
cm in Wasser ein und überprüfen Sie, ob Wasser eindringt.
Wartung
Wenn sich Meereswasser in der O-Ring-Nut befindet, können sich beim Trocknen des
Sports Pack Salzkristalle bilden und die Funktion des O-Rings beeinträchtigen.
Lebensdauer des O-Rings
Die Lebensdauer des O-Rings hängt von der Verwendungshäufigkeit und den
Einsatzbedingungen des Sports Pack ab. Im allgemeinen hält er etwa ein Jahr.
Auch wenn der O-Ring keine Risse und Kratzer aufweist, kann der wasserdichte
Abschluss nach längerem Betrieb beeinträchtigt sein, da der O-Ring sich verformt hat
oder abgenutzt ist. Wenn der O-Ring Risse, Abschürfungen, Kratzer, Sandeinschlüsse
usw. aufweist oder wenn er verdreht oder verzogen ist, muss er ausgewechselt
werden.
Überprüfen Sie nach dem Auswechseln, dass kein Wasser eindringt.
Einfetten
Verwenden Sie das mitgelieferte Fett. Durch Fette anderer Hersteller kann der O-Ring
beschädigt werden und Wasser eindringen.
Antigeschlagflüssigkeit
Behandeln Sie das Frontglas mit der mitgelieferten Antibeschlagflüssigkeit. Die
Flüssigkeit verhindert ein Beschlagen des Frontglases.
So wird die Antibeschlagflüssigkeit verwendet
Bringen Sie 2 bis 3 Tropfen der Flüssigkeit auf das Frontglas auf und verteilen Sie die
Flüssigkeit dann mit einem Wattestäbchen, weichen Tuch oder Papier.
O-Ring, Fett und Antibeschlagflüssigkeit
O-Ring, Fett und Antibeschlagflüssigkeit erhalten Sie bei Ihrem Sony-Händler.
O-Ring (Modell-Nr. 2-580-982-01)
Fett (Modell-Nr. 2-582-620-01)
Antibeschlagflüssigkeit (Modell-Nr. 3-072-039-01)
Wartung
• Nachdem Sie in Meeresluft aufgenommen haben, waschen Sie das Sports Pack
sorgfältig mit geschlossenen Schnallen mit Süßwasser ab, um Salz und Sand zu
entfernen. Trocknen Sie anschließend das Sports Pack mit einem weichen Tuch ab.
Wir empfehlen, das Sports Pack etwa 30 Minuten im Süßwasser einzutauchen.
Salzrückstände können Beschädigungen der Metallteile und Rosten verursachen, so
dass kein wasserdichter Abschluss mehr gewährleistet ist.
• Wenn Sonnenöl auf das Sports Pack gelangt ist, waschen Sie es sorgfältig mit
lauwarmem Wasser ab.
• Reinigen Sie das Innere des Sports Pack mit einem weichen, trocknen Tuch.
Verwenden Sie hierbei kein Wasser.
Die obigen Wartungsarbeiten müssen nach jedem Einsatz des Sports Pack ausgeführt
werden. Verwenden Sie zum Reinigen keine Lösungsmittel wie Alkohol, Benzin oder
Verdünner, da diese Materialien die Oberfläche des Sports Pack angreifen.
Aufbewahren des Sports Pack
• Bringen Sie das mitgelieferte Distanzstück am
des O-Rings zu verhindern. (Siehe Abbildung E.)
• Klappen Sie das Sports Pack zu. Lassen Sie jedoch die Schnallen offen, um eine
Abnutzung des O-Rings zu verhindern.
• Sorgen Sie dafür, dass der O-Ring nicht verstaubt.
• Bewahren Sie das Sports Pack nicht an sehr kalten, sehr warmen oder feuchten
Plätzen und auch nicht an Plätzen auf, die Naphthalin oder Kamphor ausgesetzt
sind, da sonst das Gehäuse angegriffen werden.
Sports
Pack an, um eine Abnutzung
Fehlersuche
Symptom
Der Ton wird
nicht
aufgenommen.
Wassertropfen im
Inneren des
Sports Pack.
Ursache
Der Mikrofon- oder
Audiostecker ist nicht
eingesteckt.
• Die Schnallen sind nicht
geschlossen.
• Der O-Ring ist nicht richtig
eingesetzt.
• Der O-Ring ist verkratzt
oder spröde.
Abhilfe
Stecken Sie den Mikrofonstecker in
die MIC (PLUG IN POWER)-Buchse
bzw. den Audiostecker in die A/VBuchse des Camcorders.
• Schließen Sie die Schnallen, so dass
sie einrasten.
• Ersetzen Sie den O-Ring
gleichförmig in die Nut ein.
• Ersetzen Sie den O-Ring durch
einen neuen.
Es kann nicht
aufgenommen
und nicht
wiedergegeben
werden.
• Der Akku ist leer.
• Der Fernsteuerstecker ist
nicht eingesteckt.
• Das Band hat das Ende
erreicht.
• Der „Memory Stick Duo“
ist voll.
• Die Schutzlasche an der
Cassette oder „Memory
Stick Duo“ ist aktiviert.
• Die Disc ist voll.
• Die Disc ist finalisiert.
• Laden Sie den Akku auf.
• Stecken Sie den Stecker in die
LANC-Buchse bzw.
Fernsteuerbuchse am Camcorder.
• Spulen Sie das Band zurück oder
verwenden Sie eine andere
Cassette.
• Setzen Sie einen anderen „Memory
Stick Duo“ ein oder löschen Sie
nicht verwendete Daten.
• Deaktivieren Sie die Lasche oder
setzen Sie eine andere Cassette
bzw. einen anderen „Memory Stick
Duo“ ein.
• Verwenden Sie eine andere Disc
oder formatieren Sie die Disc (nur
DVD-RW).
• Entfinalisieren Sie die Disc (nur
DVD-RW) oder verwenden Sie
eine neue Disc.
Technische Daten
Material
Plastik (PC, ABS), Glas
Wasserdichtigkeit durch
O-Ring, Schnallen
Eingebautes Mikrofon
Stereo
Abmessungen
ca. 136 × 142 × 201 mm (B/H/T)
Gewicht
ca. 800 g (nur Sports Pack)
Mitgeliefertes Zubehör
Sports Pack (1)
Schulterriemen (1)
Kameramontageschuh (A (1)/B (1))
Stativschraubenplatte (1)
Reflexionsschutzring (Ø 25 mm (1)/Ø 30 mm (1))
Fett (1)
Distanzstück (1)
Antigeschlagflüssigkeit (1)
Anleitungen
Änderungen, die dem technischen Fortschritt dienen, bleiben vorbehalten.
Verwendung des Sports Pack
F Wahl des Betriebsmodus
1 Schalten Sie das Sports Pack ein.
Drehen Sie den POWER-Schalter auf „ON“.
Hinweis
Wenn der Camcorder länger als fünf Minuten auf Standby geschaltet bleibt, schaltet
er sich automatisch aus, um den Akku zu schonen.
Am Camcorder kann von „A.SHUT OFF“ auf [Never] umgeschaltet werden.
Einzelheiten entnehmen Sie bitte der Bedienungsanleitung des Camcorders.
Um auf Standby zurückzuschalten, drehen Sie den POWER-Schalter erneut auf
„ON“.
2 Wählen Sie den gewünschten Modus.
Indem Sie den POWER-Schalter auf „MODE“ schieben, können Sie nacheinander
folgende Modi wählen.
CAMERA MEMORY VCR
Die Lampe am Sports Pack zeigt den momentanen Modus an.
Im Falle der Modelle DCR-HC90/HC43/HC42/HC40/HC39/
HC33/HC32/HC30/HC22/HC21/HC20/HC19/HC18/HC17/HC16
Wenn Sie Bewegtbilder aufnehmen wollen, wählen Sie den CAMERA-Modus oder
MEMORY-Modus.
Wenn Sie Standbilder aufnehmen wollen, wählen Sie den CAMERA-Modus oder
MEMORY-Modus.
Wenn Sie Bilder wiedergeben wollen, wählen Sie den VCR-Modus.
Hinweis
Ein nicht „Memory Stick Duo“-kompatibler Camcorder arbeitet im CAMERAModus, selbst wenn am SPK-HCA auf den MEMORY-Modus geschaltet ist.
Im Falle der Modelle DCR-DVD803/DVD703/DVD653/
DVD602/DVD403/DVD203/DVD202/DVD201/DVD103/
DVD101/DVD92/DVD91
Wenn Sie Bewegtbilder aufnehmen wollen, wählen Sie den CAMERA-Modus.
Wenn Sie Standbilder aufnehmen wollen, wählen Sie den MEMORY-Modus.
Wenn Sie Bilder wiedergeben wollen, wählen Sie den VCR-Modus.
Hinweis
Der POWER-Schalter am Sports Pack besitzt Priorität gegenüber dem POWERSchalter am Camcorder.
G Öffnen des Klappspiegels
Im Spiegel können Sie das Aufnahmebild kontrollieren.
1 Öffnen Sie den Klappspiegel.
2 Klappen Sie die Flügel auf und stecken Sie die Vorsprünge in die
Öffnungen.
Schließen des Klappspiegels
Lösen Sie die Vorsprünge an beiden Flügeln und schließen Sie zuerst den unteren
Flügel.
H Aufnahme
Aufnahme von Bewegtbildern
Im CAMERA-Modus werden Bewegtbilder auf die Cassette oder Disc und im
MEMORY-Modus auf den „Memory Stick Duo“ aufgenommen.
Drücken Sie die START/STOP-Taste.
Die Aufnahme beginnt.
So stoppen Sie die Aufnahme
Drücken Sie die START/STOP-Taste.
Durch erneutes Drücken der START/STOP-Taste kann die Aufnahmen wieder
fortgesetzt werden.
So schalten Sie den Camcorder aus
Stoppen Sie zunächst die Aufnahme und stellen Sie dann den POWER-Schalter auf
„OFF“.
Hinweis
Mit den Modellen DCR-DVD803/DVD703/DVD653/DVD602/DVD403/DVD203/
DVD202/DVD201/DVD103/DVD101/DVD92/DVD91 können keine Bewegtbilder im
MEMORY-Modus aufgenommen werden.
ZOOMEN (siehe Abbildung H)
• Drücken Sie die Weitwinkeltaste, um zurückzuzoomen.
• Drücken Sie die Teletaste, um vorzuzoomen.
Bei leichtem Drücken wird langsamer gezoomt.
Aufnehmen von Standbildern
MEMORY-Modus
Standbilder werden auf einen „Memory Stick Duo“ oder eine Disc aufgenommen.
1 Drücken Sie leicht auf die PHOTO-Taste.
Die grüne Marke oben auf dem LCD-Schirm hört auf zu blinken; sie erscheint nun
ständig. Das Gerät ist nun zum Aufnehmen von Standbildern bereit.
* Die Aufnahme wird jedoch noch nicht ausgeführt.
2 Drücken Sie fest auf die PHOTO-Taste.
Das auf dem Schirm angezeigte Bild wird aufgenommen.
CAMERA-Modus
Standbilder werden auf einen „Memory Stick Duo“ aufgenommen.
1 Drücken Sie leicht auf die PHOTO-Taste.
„Capture“ erscheint oben rechts auf dem LCD-Schirm, und das Bild auf dem
Schirm wird eingefroren.
* Die Aufnahme wird jedoch noch nicht ausgeführt.
2 Drücken Sie fest auf die PHOTO-Taste.
Das auf dem Schirm angezeigte Bild wird aufgenommen.
Mit den Modellen DCR-DVD803/DVD703/DVD653/DVD602/DVD403/DVD203/
DVD202/DVD201/DVD103/DVD101/DVD92/DVD91 können keine Standbilder im
CAMERA-Modus aufgenommen werden.
Wenn der Camcorder nicht mit dem „Memory Stick Duo“ kompatibel ist, werden die
Standbilder auf die Cassette aufgenommen.
Hinweis
1 Mit dem Sports Pack stehen die Nightshot-Funktion und andere
Nachtaufnahmefunktionen nicht zur Verfügung.
2 Der Blitz des Camcorders und die Tele-Macro-Funktion können nicht verwendet
werden.
I Wiedergabe
Mit der Fernbedienung können Sie die Wiedergabe starten. Richten Sie sie auf den
Sensor (vorne in der Mitte des Sports Pack). Auch die anderen Funktionen können mit
der Fernbedienung gesteuert werden. Der Ton ist jedoch nicht zu hören.
Einzelheiten entnehmen Sie bitte der Bedienungsanleitung des Camcorders.
Hinweis
Wenn der Menüparameter „Remote Commander“ des Camcorders auf „OFF“
eingestellt ist, ändern Sie die Einstellung zu „ON“.
Die zwei PB-Zoom-Geschwindigkeiten können nicht gesteuert werden.
Bei den Modellen DCR-HC40/HC30/HC20/HC18/HC16/DVD201/DVD101/DVD91
erscheint das Bild spiegelbildlich.
J Herausnehmen des Camcorders
Trocknen Sie sich selbst und das Sports Pack ab, bevor Sie es öffnen. Achten Sie
sorgfältig darauf, dass der Camcorder nicht nass wird.
1 Drehen Sie den POWER-Schalter auf „OFF“. (Siehe Abbildung J-1.)
2 Lösen Sie die Schnallen und öffnen Sie das hintere Gehäuseteil.
Hinweis
Einzelheiten siehe Schritt 2 des Abschnitts „Einsetzen des Camcorders“ im
Handbuch „Sports Pack Vorbereitungen“.
3 Ziehen Sie den Kameramontageschuh heraus. (Siehe Abbildung J-3.)
Fassen Sie den Kameramontageschuh an den seitlichen Knöpfen an, drücken Sie auf
die Knöpfe, und ziehen Sie den Camcorder langsam heraus.
4 Ziehen Sie den Camcorder so weit heraus, bis die am Camcorder
angeschlossenen Stecker aus dem Sports Pack herauskommen. Trennen
Sie dann die Stecker vom Camcorder ab.
Im Falle der Modelle DCR-HC90/HC43/HC42/HC39/HC33/HC32/HC22/
HC21/HC19/HC17/DVD803/DVD703/DVD653/DVD602/DVD403/DVD203/
DVD202/DVD103/DVD92
1 Trennen Sie den Audiostecker ab.
2 Trennen Sie den Fernsteuerstecker ab.
Im Falle der Modelle DCR-HC40/HC30/HC20/HC18/HC16 (siehe Abbildung
J-4)
1 Trennen Sie den Fernsteuerstecker ab.
2 Drehen Sie den Mikrofonstecker in die in der Abbildung gezeigte Pfeilrichtung
und trennen Sie den Stecker ab.
Im Falle der Modelle DCR-DVD201/DVD101/DVD91
1 Trennen Sie den Fernsteuerstecker ab.
2 Trennen Sie den Mikrofonstecker ab.
Hinweis
Fassen Sie beim Abziehen des Audiosteckers, Fernsteuersteckers und
Mikrofonsteckers am Stecker und nicht am Kabel an. Ansonsten können Stecker
und Camcorder beschädigt werden.
5 Nehmen Sie den Kameramontageschuh ab.
Español
• Este portacámara deportivo SPK-HCA ha sido diseñado para utilizarse
exclusivamente con las videocámaras digitales DCR-HC90/HC43/HC42/HC40/
HC39/HC33/HC32/HC30/HC22/HC21/HC20/HC19/HC18/HC17/HC16/
DVD803/DVD703/DVD653/DVD602/DVD403/DVD203/DVD202/DVD201/
DVD103/DVD101/DVD92/DVD91 Sony.
• El SPK-HCA es portacámara deportivo es resistente al agua y a la humedad para
videocámaras digitales Sony.
• Utilizable hasta una profundidad de 5 metros bajo el agua.
• Antes de utilizar su videocámara con este portacámara deportivo, consulte el
manual de instrucciones de su videocámara.
• Antes de iniciar la videofilmación, cerciórese de que la videocámara funcione
correctamente y de que no haya infiltración de agua.
• Sony no se hará responsable por ningún daño de la videocámara, la batería, etc.,
ocurrido al utilizar el portacámara deportivo, ni por el coste de la grabación si se
infiltra agua debido a la utilización inadecuada.
Precauciones en la utilización
• No someta el vidrio frontal a golpes fuertes, ya que podría rajarse.
• Evite abrir el portacámara deportivo en el mar o en una playa. Los preparativos,
tales como la inserción o el cambio de videocasete, el “Memory Stick Duo”, y el
disco, deberán realizarse en un lugar con poca humedad y sin aire salado.
• No arroje el portacámara deportivo al agua.
• Evite utilizar el portacámara deportivo en lugares con mucho oleaje.
• Evite utilizar el portacámara deportivo en las situaciones siguientes:
– en lugares muy cálidos y húmedos
– en agua con temperatura superior a 40 °C.
– en lugares con temperaturas inferiores a 0 °C.
En estas situaciones podría condensarse humedad o infiltrarse agua, y el equipo
podría dañarse.
• Evite instalar la videocámara en un lugar húmedo. La instalación en un lugar
húmedo podría provocar la condensación de humedad.
• Utilice el portacámara deportivo durante menos de una hora cada vez a
temperaturas superiores a 35 °C.
• No deje el portacámara deportivo bajo la luz solar directa durante mucho tiempo. Si
no puede evitar el dejarlo al solo, cerciórese de cubrirlo con una toalla u otro tipo de
material protector.
Si el portacámara deportivo entra en contacto con aceite bronceador, lávelo a bien
con agua cálida. Si dejase el portacámara deportivo con aceite bronceador en su
cuerpo, la superficie del mismo podría decolorar o dañarse (podrían producirse
rajas, etc., en la superficie).
Infiltración de agua
Si se infiltra agua, deje inmediatamente de exponer el portacámara deportivo al agua.
Si el portacámara deportivo se humedece, llévelo inmediatamente al centro de
reparaciones Sony más cercano.
El coste de las reparaciones tendrá que abonarlo el usuario.
Manejo de la junta tórica
¿Qué es la junta tórica?
La junta tórica asegura las propiedades de impermeabilidad del portacámara
deportivo y otros equipos. (Consulte la ilustración A)
El mantenimiento de la junta tórica es muy importante. Si no realizase el
mantenimiento de la junta tórica de acuerdo con las instrucciones, podría
producirse la infiltración de agua y hacer que el portacámara deportivo se
hundiese.
Manejo de la junta tórica
Fijación de la junta tórica
Evite fijar la junta tórica en lugares polvorientos o arenosos.
1 Quite la junta tórica. (Consulte la ilustración B)
• Para quitar la junta tórica, presione y deslícela en el sentido de la flecha, como se
muestra en la ilustración. La junta tórica tiene holgura suficiente como para poder
quitarse con facilidad.
Tenga cuidado de no rayar la junta tórica con sus dedos.
• No utilice objetos puntiagudos ni metálicos para quitar la junta tórica. Este tipo de
objetos podría rayar o dañar la ranura del portacámara deportivo o la junta tórica.
2 Inspeccione la junta tórica.
• Compruebe cuidadosamente lo siguiente. Si encuentra algo, limpie la junta tórica
con un paño suave o un pañuelo de papel.
– ¿Hay suciedad, arena, pelos, polvo, sal, rebabas de las roscas, etc., en la junta
tórica?
– ¿Hay grasa vieja en la junta tórica?
v
v
Suciedad
• Pase ligeramente la punta de sus dedos por la junta tórica para poder detectar
suciedad invisible.
• Tenga cuidado de no dejar ninguna hilacha ni fibras de papel en la junta tórica
después de haberla limpiado.
• Compruebe que la junta tórica no esté rajada, sesgada, distorsionada, con cortes
finos, rayada, con arena incrustada, etc. Si estás rajada o rayada, reemplácela.
v
Rajas v
v Arena v Pelos v Polvo v Sal
Sesgamientov Distorsión
v Cortes
finos
v
Rayazos
Rebabas de las
roscas
v Arena
incrustada
3 Inspeccione la ranura de la junta tórica.
Es posible que en la ranura entren granos de arena o que se solidifique sal. Elimine
estas materias soplando con un aerosol o frotando con un palillo de cabeza de
algodón. Tenga cuidado de no dejar fibras del palillo de cabeza de algodón en el
interior de la ranura.
4 Inspeccione, de la misma forma, la superficie de contacto de la otra parte
de la junta tórica.
5 Aplique grasa a la junta tórica.
• Utilice la punta de sus dedos para engrasar suavemente toda la superficie de la
junta tórica con una gota de grasa. (Consulte la ilustración C)
• No utilice papel ni un paño ya que podrían quedar fibras en la junta tórica.
• Cerciórese de que haya siempre una ligera capa de grasa en la junta tórica. La
grasa protegerá la junta tórica contra el desgaste.
• Fije la junta tórica inmediatamente después de haberla engrasado. No deje la junta
tórica engrasado sobre una mesa ni otra superficie.
6 Fije la junta tórica en la ranura del portacámara deportivo.
Fije uniformemente la junta tórica en la ranura prestando atención a los puntos
siguientes
– Compruebe que no haya suciedad en la junta tórica.
– Compruebe que la junta tórica no esté retorcida. (Consulte la ilustración D)
Cómo comprobar la infiltración de agua
Después de haber reemplazado la junta tórica, cierre el portacámara deportivo sin
insertarle el equipo que vaya a utilizar. Sumerja el portacámara deportivo en agua
hasta una profundidad de unos 15 cm durante aproximadamente tres minutos, y
compruebe si se infiltra agua.
Mantenimiento
Si dejase que el portacámara deportivo se seque con agua en salada en la ranura de la
junta tórica, los cristales de sal formados podría desvirtuar las funciones de dicha
junta tórica.
Duración útil de la junta tórica
La duración útil de la junta tórica variará con la frecuencia de utilización del
portacámara deportivo y las condiciones. En general, durará aproximadamente un
año.
Aunque la junta tórica no esté rajada ni rayada, la deformación o el desgaste reducirá
las características de impermeabilidad. Reemplace la junta tórica por otra nueva si
encuentra en ella rajas, sesgamiento, distorsión, cortes finos, incrustación de arena, etc.
Después de haberla reemplazado, compruebe que no haya infiltración de agua.
Grasa
Utilice la grasa suministrada. La utilización de grasa de otros fabricantes podría dañar
la junta tórica y causar la infiltración de agua.
Solución antiniebla para objetivos
Recubra la superficie del vidrio frontal con la solución antiniebla para objetivos
suministrada. Esto será muy efectivo para evitar que se empañe el vidrio.
Forma de utilizar la solución antiniebla para objetivos
Aplique 2 o 3 gotas de la solución antiniebla para objetivos suministrada en el vidrio
frontal y espárzalas uniformemente utilizando palillos de cabeza de algodón, un paño
suave, o un pañuelo de papel.
Junta tórica, grasa, y solución antiniebla para objetivos
Usted podrá obtener juntas tóricas y grasa en su proveedor Sony.
Junta tórica (Núm. de modelo 2-580-982-01)
Grasa (Núm. de modelo 2-582-620-01)
Solución antiniebla para objetivos (Núm. de modelo 3-072-039-01)
Mantenimiento
• Después de haber videofilmado en un lugar con brisa del mar, lave bien el
portacámara deportivo con agua corriente, con las hebillas cerradas para eliminar la
sal y la arena, y después frótelo con un paño suave y seco. Se le recomienda que
sumerja el portacámara deportivo en agua durante 30 minutos. Si lo dejase con sal,
las partes metálicas podrían dañar u oxidarse y provocar la infiltración de agua.
• Si el portacámara deportivo está manchado con aceite bronceador, lávelo bien con
agua cálida.
• Limpie el interior del portacámara deportivo con un paño suave y seco. No lave el
interior del portacámara deportivo.
Cerciórese de realizar el mantenimiento indicado arriba cada vez que utilice el
portacámara deportivo. No utilice ningún tipo de disolvente, como alcohol, bencina, ni
diluyente de pintura para la limpieza, ya que podría dañar el acabado de la superficie
del portacámara deportivo.
Para almacenar el portacámara deportivo
• Fije el separador suministrado con su portacámara deportivo para evitar el desgaste
de la junta tórica. (Consulte la ilustración E)
• Cierre el portacámara deportivo sin abrochar las hebillas para evitar el desgaste de la
junta tórica.
• Evite que se acumule polvo en la junta tórica.
• Evite almacenar el portacámara deportivo en un lugar frío, muy cálido o húmedo, o
junto con naftalina o alcanfor, ya que en estas condiciones podría dañarse.
Solución de problemas
Problema
El sonido no se
grabó.
En el interior del
portacámara
deportivo hay
gotas de agua.
Causa
La clavija del micrófono o la
clavija de audio no está
conectada.
• Las hebillas no están
cerradas.
• La junta tórica no está
correctamente colocada.
• La junta tórica está rayada
o rajada.
Soluciones
Conecte la clavija del micrófono a la
toma MIC (PLUG IN POWER) o a la
clavija de audio a la toma A/V de la
videocámara.
• Apriete las hebillas hasta que
chasqueen.
• Coloque uniformemente la junta
tórica en la ranura.
• Reemplace la junta tórica por otra
nueva.
Las funciones de
grabación y
reproducción no
trabajan.
• La batería está agotada.
• La clavija de control remoto
no está conectada.
• La cinta se ha acabado.
• El “Memory Stick Duo”
está lleno.
• La lengüeta de seguridad
del videocasete y del
“Memory Stick Duo” están
en posición de prohibición
de grabación.
• El disco ya no tiene espacio
libre.
• El disco está finalizado.
• Cargue completamente la batería.
• Conéctela a la toma
toma de control remoto de la
videocámara.
• Rebobine la cinta o utilice un
videocasete nuevo.
• Inserte otro “Memory Stick Duo” o
borre los datos innecesarios del
mismo.
• Deslice la lengüeta de seguridad o
instale un nuevo videocasete y un
nuevo “Memory Stick Duo”.
• Utilice un nuevo disco o
formatéelo (DVD-RW solamente).
• Desfinalice el disco (DVD-RW
solamente) o utilice otro nuevo.
LANC o a la
Especificaciones
Material
Plástico (PC, ABS), vidrio
Impermeabilidad
Junta tórica, hebillas
Micrófono incorporado
Estéreo
Dimensiones
Aprox. 136 × 142 × 201 mm (an/al/prf)
Masa
Aprox. 800 g (portacámara deportivo solamente)
Elementos incluidos
Portacámara deportivo (1)
Correa para el hombro (1)
Zapata para montaje de la videocámara (A (1)/B (1))
Placa roscada para trípode (1)
Anillo de prevención de reflejos (Ø 25 mm (1)/Ø 30 mm (1))
Grasa (1)
Separador (1)
Solución antiniebla para objetivos (1)
Juego de documentación impresa
El diseño y las especificaciones están sujetos a cambio sin previo aviso.
Utilización del portacámara deportivo
F Selección del modo
1 Conecte la alimentación del portacámara deportivo.
Ponga el selector POWER en “ON”.
Nota
Si deja la videocámara en el modo de espera durante cinco minutos o más, su
alimentación se desconectará automáticamente. Esto es para conservar la energía de
la batería.
Usted podrá cambiar el ajuste “A.SHUT OFF” de esta función a [Never] utilizando
la videocámara. Con respecto a los detalles, consulte el manual de instrucciones de
su videocámara.
Para volver al modo de espera, ponga el selector POWER de nuevo en “ON”.
2 Seleccione el modo deseado.
Cambie el modo en la secuencia siguiente deslizando el selector POWER hasta
“MODE”.
CAMERA MEMORY VCR
Compruebe el modo seleccionado con la lámpara indicadora de modo del
portacámara deportivo.
Cuando utilice los modelos DCR-HC90/HC43/HC42/HC40/
HC39/HC33/HC32/HC30/HC22/HC21/HC20/HC19/HC18/HC17/
HC16
Para videofilmar imágenes móviles, seleccione el modo CAMERA o el modo
MEMORY.
Para tomar imágenes fijas, seleccione el modo CAMERA o el modo MEMORY.
Para reproducir las imágenes, seleccione el modo VCR.
Nota
Cuando utilice una videocámara no compatible con “Memory Stick Duo,” ésta
funcionará en el modo CAMERA incluso aunque el SPK-HCA esté en el modo
MEMORY.
Cuando utilice los modelos DCR-DVD803/DVD703/
DVD653/DVD602/DVD403/DVD203/DVD202/DVD201/
DVD103/DVD101/DVD92/DVD91
Para videofilmar imágenes móviles, seleccione el modo CAMERA.
Para tomar imágenes fijas, seleccione el modo MEMORY.
Para reproducir las imágenes, seleccione el modo VCR.
Nota
El selector POWER del portacámara deportivo tiene prioridad sobre el selector
POWER de la videocámara.
G Apertura del espejo retráctil
Usted podrá videofilmar observando la reflexión en el espejo retráctil.
1 Abra el espejo retráctil.
2 Abra las aletas e inserte los salientes en sus orificios.
Cerrado del espejo retráctil
Suelte los salientes de ambas aletas, y cierre en primer lugar la aleta inferior.
H Videofilmación
Videofilmación de imágenes móviles
En el modo CAMERA, las imágenes móviles se grabarán en un videocasete o en un
disco, y en el modo MEMORY, se grabarán en un “Memory Stick Duo.”
Presione el botón START/STOP.
Se iniciará la grabación.
Para parar la grabación
Presione el botón START/STOP.
Si vuelve a presionar el botón START/STOP, la grabación se reanudará.
Para desconectar la alimentación
Pare la grabación antes de poner el selector POWER en “OFF”.
Nota
Cuando utilice los modelos DCR-DVD803/DVD703/DVD653/DVD602/DVD403/
DVD203/DVD202/DVD201/DVD103/DVD101/DVD92/DVD91, no podrá videofilmar
imágenes móviles en el modo MEMORY.
Utilización del zoom (Consulte la ilustración H)
• Presione el botón de gran angular para alejarse del motivo.
• Presione el botón de telefoto para acercarse al motivo.
Presione el botón de gran angular para alejarse del motivo.
Toma de imágenes fijas
Modo MEMORY
Las imágenes fijas se grabarán en un “Memory Stick Duo” o en un disco.
1 Presione ligeramente el botón PHOTO.
La marca verde de la parte superior de la pantalla LCD dejará de parpadear y
permanecerá encendida. Usted podrá tomar ahora una imagen fija.
* No se grabará todavía ninguna imagen.
2 Presione a fondo el botón PHOTO.
La imagen mostrada en la pantalla se grabará.
Modo CAMERA
Las imágenes fijas se grabarán en un “Memory Stick Duo”.
1 Presione ligeramente el botón PHOTO.
La palabra “Capture” aparecerá en la parte superior derecha de la pantalla LCD, y
la imagen de la pantalla se parará.
* No se grabará todavía ninguna imagen.
2 Presione a fondo el botón PHOTO.
La imagen mostrada en la pantalla se grabará.
Cuando utilice los modelos DCR-DVD803/DVD703/DVD653/DVD602/DVD403/
DVD203/DVD202/DVD201/DVD103/DVD101/DVD92/DVD91, no podrá tomar
imágenes fijas en el modo CAMERA.
Cuando utilice una videocámara no compatible con “Memory Stick Duo,” las
imágenes fijas se grabarán en el videocasete.
Nota
1 Usted no podrá utilizar la función de escena nocturna, ni ninguna otra para
videofilmar en la oscuridad con el portacámara deportivo.
2 Usted no podrá utilizar el flash de la videocámara ni las funciones de tele-macro con
el portacámara deportivo.
I Reproducción
Usted podrá reproducir imágenes apuntando con el mando a distancia hacia el sensor
de control remoto (situado en el centro de la parte frontal del portacámara deportivo.
Usted no podrá escuchar el sonido.
Utilice el mando a distancia para todas las demás funciones. Con respecto a los
detalles, consulte el manual de instrucciones suministrado con su videocámara.
Nota
Si “Remote Commander” del menú de su videocámara está ajustado a “OFF”,
cámbielo a “ON”.
Usted no podrá controlar el zoom PB con velocidad variable de dos etapas.
Cuando utilice los modelos DCR-HC40/HC30/HC20/HC18/HC16/DVD201/
DVD101/DVD91, la imagen aparecerá invertida como en un espejo.
J Extracción de la videocámara
Antes de abrir el portacámara deportivo, seque la humedad del mismo y la de su
propio cuerpo. No permita que entre agua dentro de la videocámara.
1 Ponga el selector POWER en “OFF”. (Consulte la ilustración J-1)
2 Suelte las hebillas, y abra la parte posterior del cuerpo.
Nota
Con respecto a los detalles, consulte el paso 2 de “Instalación de la videocámara” de
la Guía de preparación del portacámara deportivo.
3 Extraiga la zapata de montaje de la videocámara. (Consulte la ilustración
J-3)
Sujetando la zapata de montaje de la videocámara por las perillas de un lado de la
misma, presione tales perillas y extraiga lentamente la videocámara.
4 Deje de extraer la videocámara en el punto en el que las clavijas
conectadas a la videocámara salgan del portacámara deportivo. Después,
desconecte las clavijas de la videocámara.
Cuando utilice los modelos DCR-HC90/HC43/HC42/HC39/HC33/HC32/
HC22/HC21/HC19/HC17/DVD803/DVD703/DVD653/DVD602/DVD403/
DVD203/DVD202/DVD103/DVD92
1 Desconecte la clavija de audio.
2 Desconecte la clavija de control remoto.
Cuando utilice los modelos DCR-HC40/HC30/HC20/HC18/HC16 (Consulte la
ilustración J-4)
1 Desconecte la clavija de control remoto.
2 Gire la clavija en el sentido mostrado en la ilustración y extráigala.
Cuando utilice los modelos DCR-DVD201/DVD101/DVD91
1 Desconecte la clavija de control remoto.
2 Desconecte la clavija del micrófono.
Nota
Cerciórese de desconectar la clavija de audio, la clavija de control remoto, y la
clavija del micrófono sujetándolas por las clavijas, no por los cables, antes de extraer
la videocámara. De lo contrario, las clavijas y la videocámara podrían dañarse.
5 Desmonte la zapata de montaje de la videocámara.
 Loading...