

Sony Xperia Z5, SOV32 Settings Manual
Setting Guide
Thank you for buying the "XperiaTM Z5" (simply called the "product" from here
on).
In this guide, settings and precautions for using the product are described.
● Basic operation
Describes the basic operations.
● Initial settings
Make initial settings when you turn
the power on for the first time.
● E-mail setting
Make initial settings for @ezweb.
ne.jp etc.
● Making a call
Describes how to make a call.
● Transferring data from au
Setting Menu
Import/export data to/from the
product using microSD memory card
or au Smart Pass server.
● Sending contacts
Send contacts to another phone.
● Saving battery power
Save battery power using the quick
setting panel or the quick setting
tools.
Introduction
● Receiving a call
Describes how to receive a call.
Company names and product names referred to in this manual are trademarks or
registered trademarks of respective companies.
The TM, ® marks may be omitted in this manual.
Screen illustrations shown in this manual may look different from the actual screens.
In some cases, upper or lower part of a screen may be omitted.
October2015,1stEdition
Soldby:KDDICORPORATION,OKINAWACELLULAR
TELEPHONECOMPANY
1299-0026.1
Manufacturedby:SonyMobileCommunicationsInc.
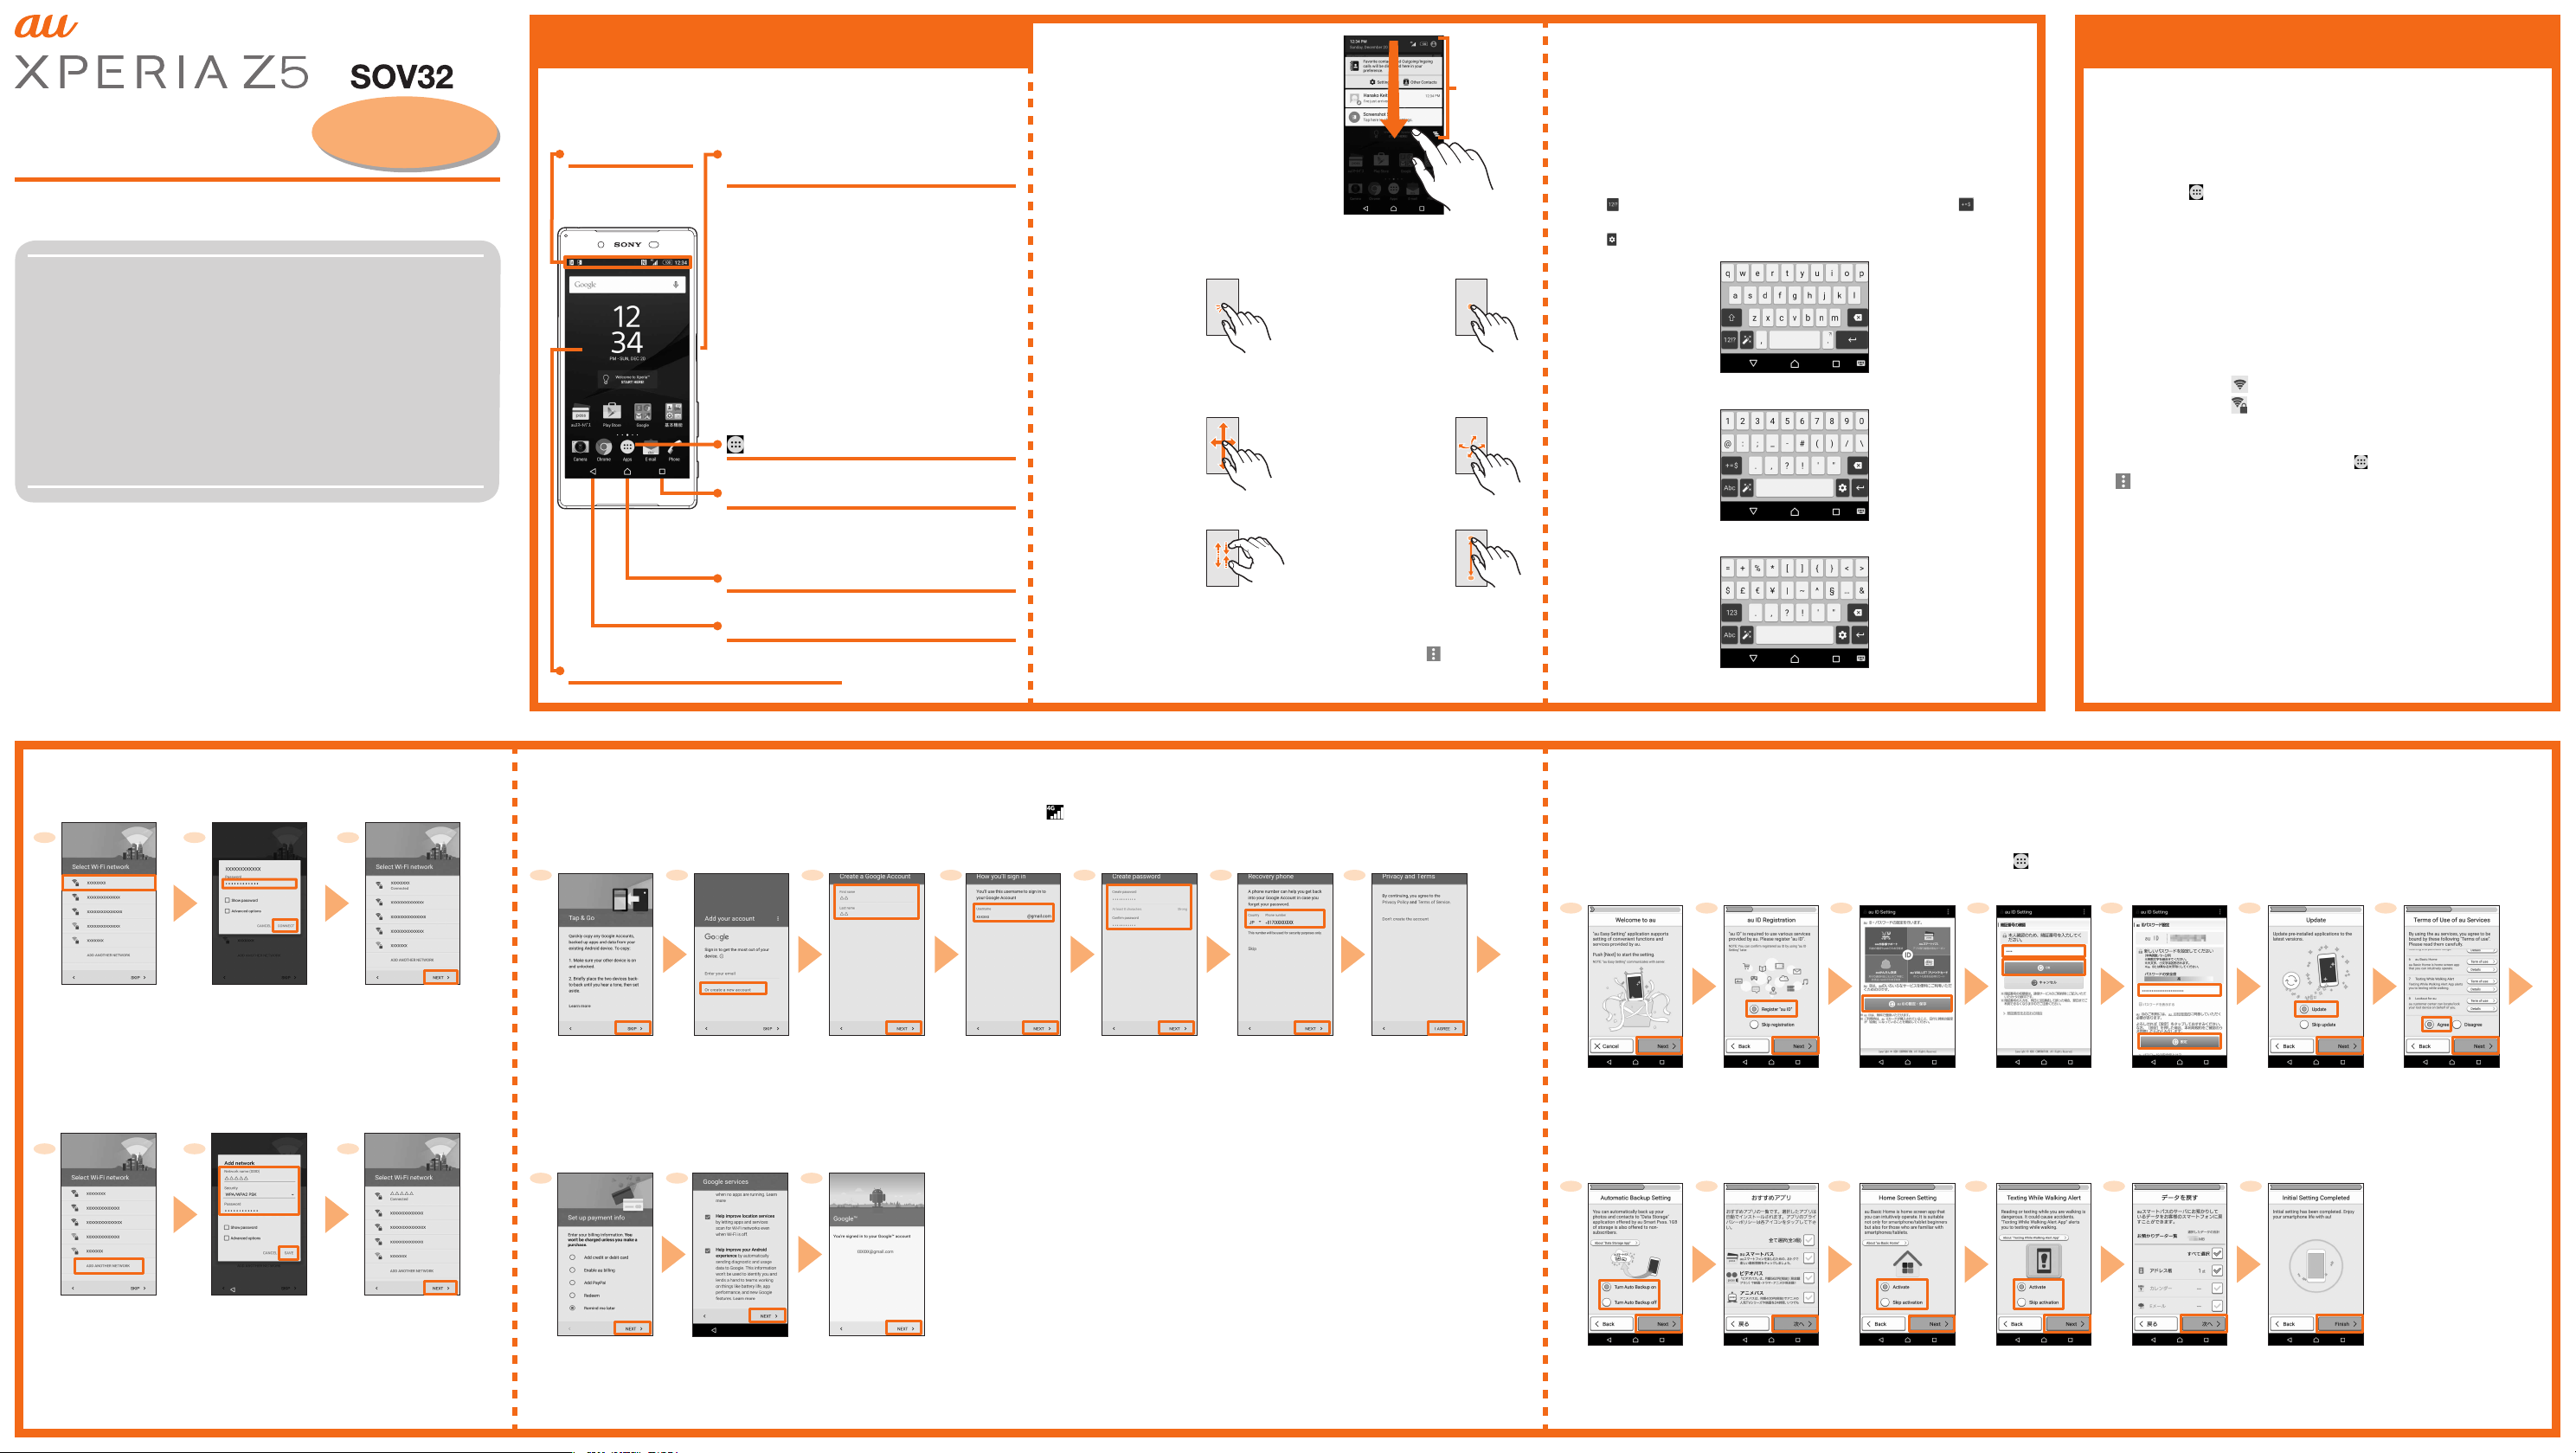
Basic operation
For detailed descriptions of operations, refer to the "Basic Manual"
(Japanese) app installed on the product or "取扱説明書(詳細版) (Full
Instruction Manual)" (Japanese) available on the au homepage.
Status bar
Current status and
notification icons
are displayed.
Display (Touch panel)
Operate directly touching with your finger.
OPower key/Power Lock key/
Fingerprint sensor
Power ON
Press and holdOfor over 1 second.
Screen Lock
PressOwhile the screen displayed. The
backlight turns off and screen lock is activated
(avoiding the keys or touch screen from false
operations).
Unlocking Screen Lock
The lock screen appears when turning the power
on or the backlight on by pressing
(flick) the screen up to cancel the screen lock.
Register fingerprints to cancel the screen lock
by touching
O.
O.
Swipe
App key
Tap to display the apps screen.
n
Recently used apps
Tap to display recently-used apps in the
thumbnail list and activate or end them from
the list. You can use small apps, too.
h
Home key
Tap to display the Home screen.
b
Back key
Tap to return to the previous screen.
■ Opening Notification panel
If any notification icons are displayed on the left
side of the status bar, slide down the status bar
to open the Notification panel. You can check
details of notification icons, start corresponding
apps, etc.
Slide the status bar down with two fingers or slide
the Notification panel down to display the quick
setting panel. You can set on/off of the functions.
Notification
panel
■ Touch panel operations
Tap/Double-tap
Tap: Gently touch
a screen and then
immediately release
your finger.
Double tap: Touch the
same position twice.
Slide
While your finger is
gently touching the
screen, trace it to the
desired direction to
move over.
Pinch
Touch the screen with
two fingers and widen
(pinch-out) or narrow
(pinch-in) the fingers
distance.
Long-touch
Keep touching an item
with your finger.
Flick (swipe)
Operate the screen
by quickly moving
(flicking) your finger
up/down or right/left.
Drag
Keep touching an item
or icon, trace it to the
desired direction to
move.
■ Displaying menu
There are two types for displaying the screen menu; tapping " " and long-
touching an input field or item.
■ Character entry
Use software keyboard to enter characters.
The software keyboard appears when you tap the entry field for registering
a contact, composing a mail, etc.
Software keyboard
With "International keyboard", you can use QWERTY keyboard to enter
characters, Numeric keypad to enter numbers and symbols, and Symbol
keypad for more symbols.
●Tap " " to display Numeric keypad. For Symbol keypad, tap " " on the
Numeric keypad.
●Tap " " to display the keyboard setting menu.
《QWERTY keyboard》
《Numeric keyboard》
《Symbol keyboard》
Initial settings
When you turn on the product for the first time, follow the onscreen
instructions to set the language, functions, services, etc.
■ STEP START: Setting language
Select "English (United States)" and tap "START".
●Alternatively, after the initial setting is complete, from the Home
screen, tap [ ] → [設定 (Settings)] → [言語と入力 (Language &
input)] → [地域/言語 (Language)] to set the language.
■ STEP 1: Starting basic settings
When "Welcome" appears, tap "NEXT".
■ STEP 2: Setting Wi-Fi® connection
Use home wireless LAN (Wi-Fi®) or public wireless LAN to connect
Internet service. Operate in a place where signal of Wi-Fi® network can
be received.
Tap "SEARCH FOR NETWORKS".
●Wi-Fi® network with is open network.
●Wi-Fi® network with is protected by security. To connect, enter
password (security key).
●To detect Wi-Fi® network manually or make Wi-Fi® advanced settings,
after the initial setting is complete, tap [ ] → [Settings] → [Wi-Fi] →
[ ] → [Refresh]/[Advanced].
Using Wi-Fi® network selection settings
Select from detected Wi-Fi® network to set.
To select a protected Wi-Fi
1
Select Wi-Fi®
network
Setting Wi-Fi® network manually
Add Wi-Fi
Check network SSID, authentication type, etc. in advance.
If security is set, you need to enter a security key.
®
network manually.
®
network, you need to enter a security key.
2 3
Enter a password
(security key) →
[CONNECT]
1 2 3
[ADD ANOTHER
NETWORK]
Select network SSID
and security type →
Enter a password
(security key) as
required → [SAVE]
Connect Wi-Fi® network
→ [NEXT] → [NEXT]
Connect Wi-Fi® network
→ [NEXT] → [NEXT]
■ STEP 3: Setting up an Google account
Set up a Google account so that you can synchronize with Gmail or contacts or calendar, etc. of online service.
●To set online service, make sure that data communication is enabled. Check that appears on the status bar or the product is connected to a Wi-Fi® network.
● If you set up a Google account, you can use Google apps such as "Gmail", "Google Play" or "Hangouts". Gmail's mail address "(user name) @gmail.com" is automatically created from
the user name set with a Google account. To create an account, you are required to register "First name" and "Last name".
1 2 3 4 5 6
[GET STARTED] →
[SKIP]
*
To copy a Google
account from the other
device using Tap & Go,
follow the onscreen
instructions.
8 9
Set purchase
settings for Google
Play as required
→ [NEXT]
[Or create a new
account]
*
If you have Google
account, enter the
mail address and then
follow the onscreen
instructions.
Confirm the Google
services settings →
[NEXT]
Enter "First name",
"Last name"
→ [NEXT]
10
[NEXT]
Enter a user
name → [NEXT]
* After step 4,
checking registration
of username starts.
If the entered user
name is unavailable,
an entry screen for
prompting another
user name appears.
* When you enter
another phone
number in step 6,
enter the notified
Verification code and
then tap "NEXT".
Enter a password
→ [NEXT]
■ STEP 4: Completion of setup
When the setup completion screen appears, tap "FINISH".
When Data disclaimer screen appears, confirm the content and tap
"OK".
Recovery phone →
[NEXT] → [VERIFY]
*
The phone number of
your au Nano IC Card 04
is entered automatically.
7
[I AGREE] →
[NEXT]
■ au Easy Setting
Set au convenient functions or services.
●By setting au ID, you can use various services provided by au such as auスマートパス (au Smart Pass) or "au Kantan Kessai", which allows you to purchase
apps from Google Play.
* au ID which is already used by another user cannot be set.
● Alternatively, after the initial setting is complete, from the Home screen, tap [
1
[Next]
8 9
Select "Turn Auto
Backup on" or
"Turn Auto Backup
off" → [Next]
2 3 4 5 6 7
Select "Register
"au ID"" → [Next]
[au IDの設定・
保存 (Set/save
au ID)]
11 1310 12
Mark apps to
install →
[次へ (Next)]
Select "Activate" or
"Skip activation"
→ [Next]
] → [Settings] → [au Settings Menu] → [au Easy Setting], you can set au
Enter a password
number → [OK]
* Default value is four-
digit number set at
subscription.
Select "Activate" or
"Skip activation"
→ [Next]
Set password
→ [設定 (Set)]
→ [終了 (Exit)]
Mark data to be
restored →
[次へ (Next)]
Select "Update"
→ [Next]
[Finish]
*
When the use
confirmation screen
appears, follow the
onscreen instructions.
service.
Confirm contents
Select "Agree" →
[Next] → [Agree]
* The screens of the step 8
and from 10 to 12 appear
only if "Agree" is selected in
the step 7.
* If there are apps to be
recovered, a recovery
screen for applications
appears before the step
10. Follow the onscreen
instructions.
* Select "Agree" in step 7 to
complete pre-configuration
of Lookout for au.
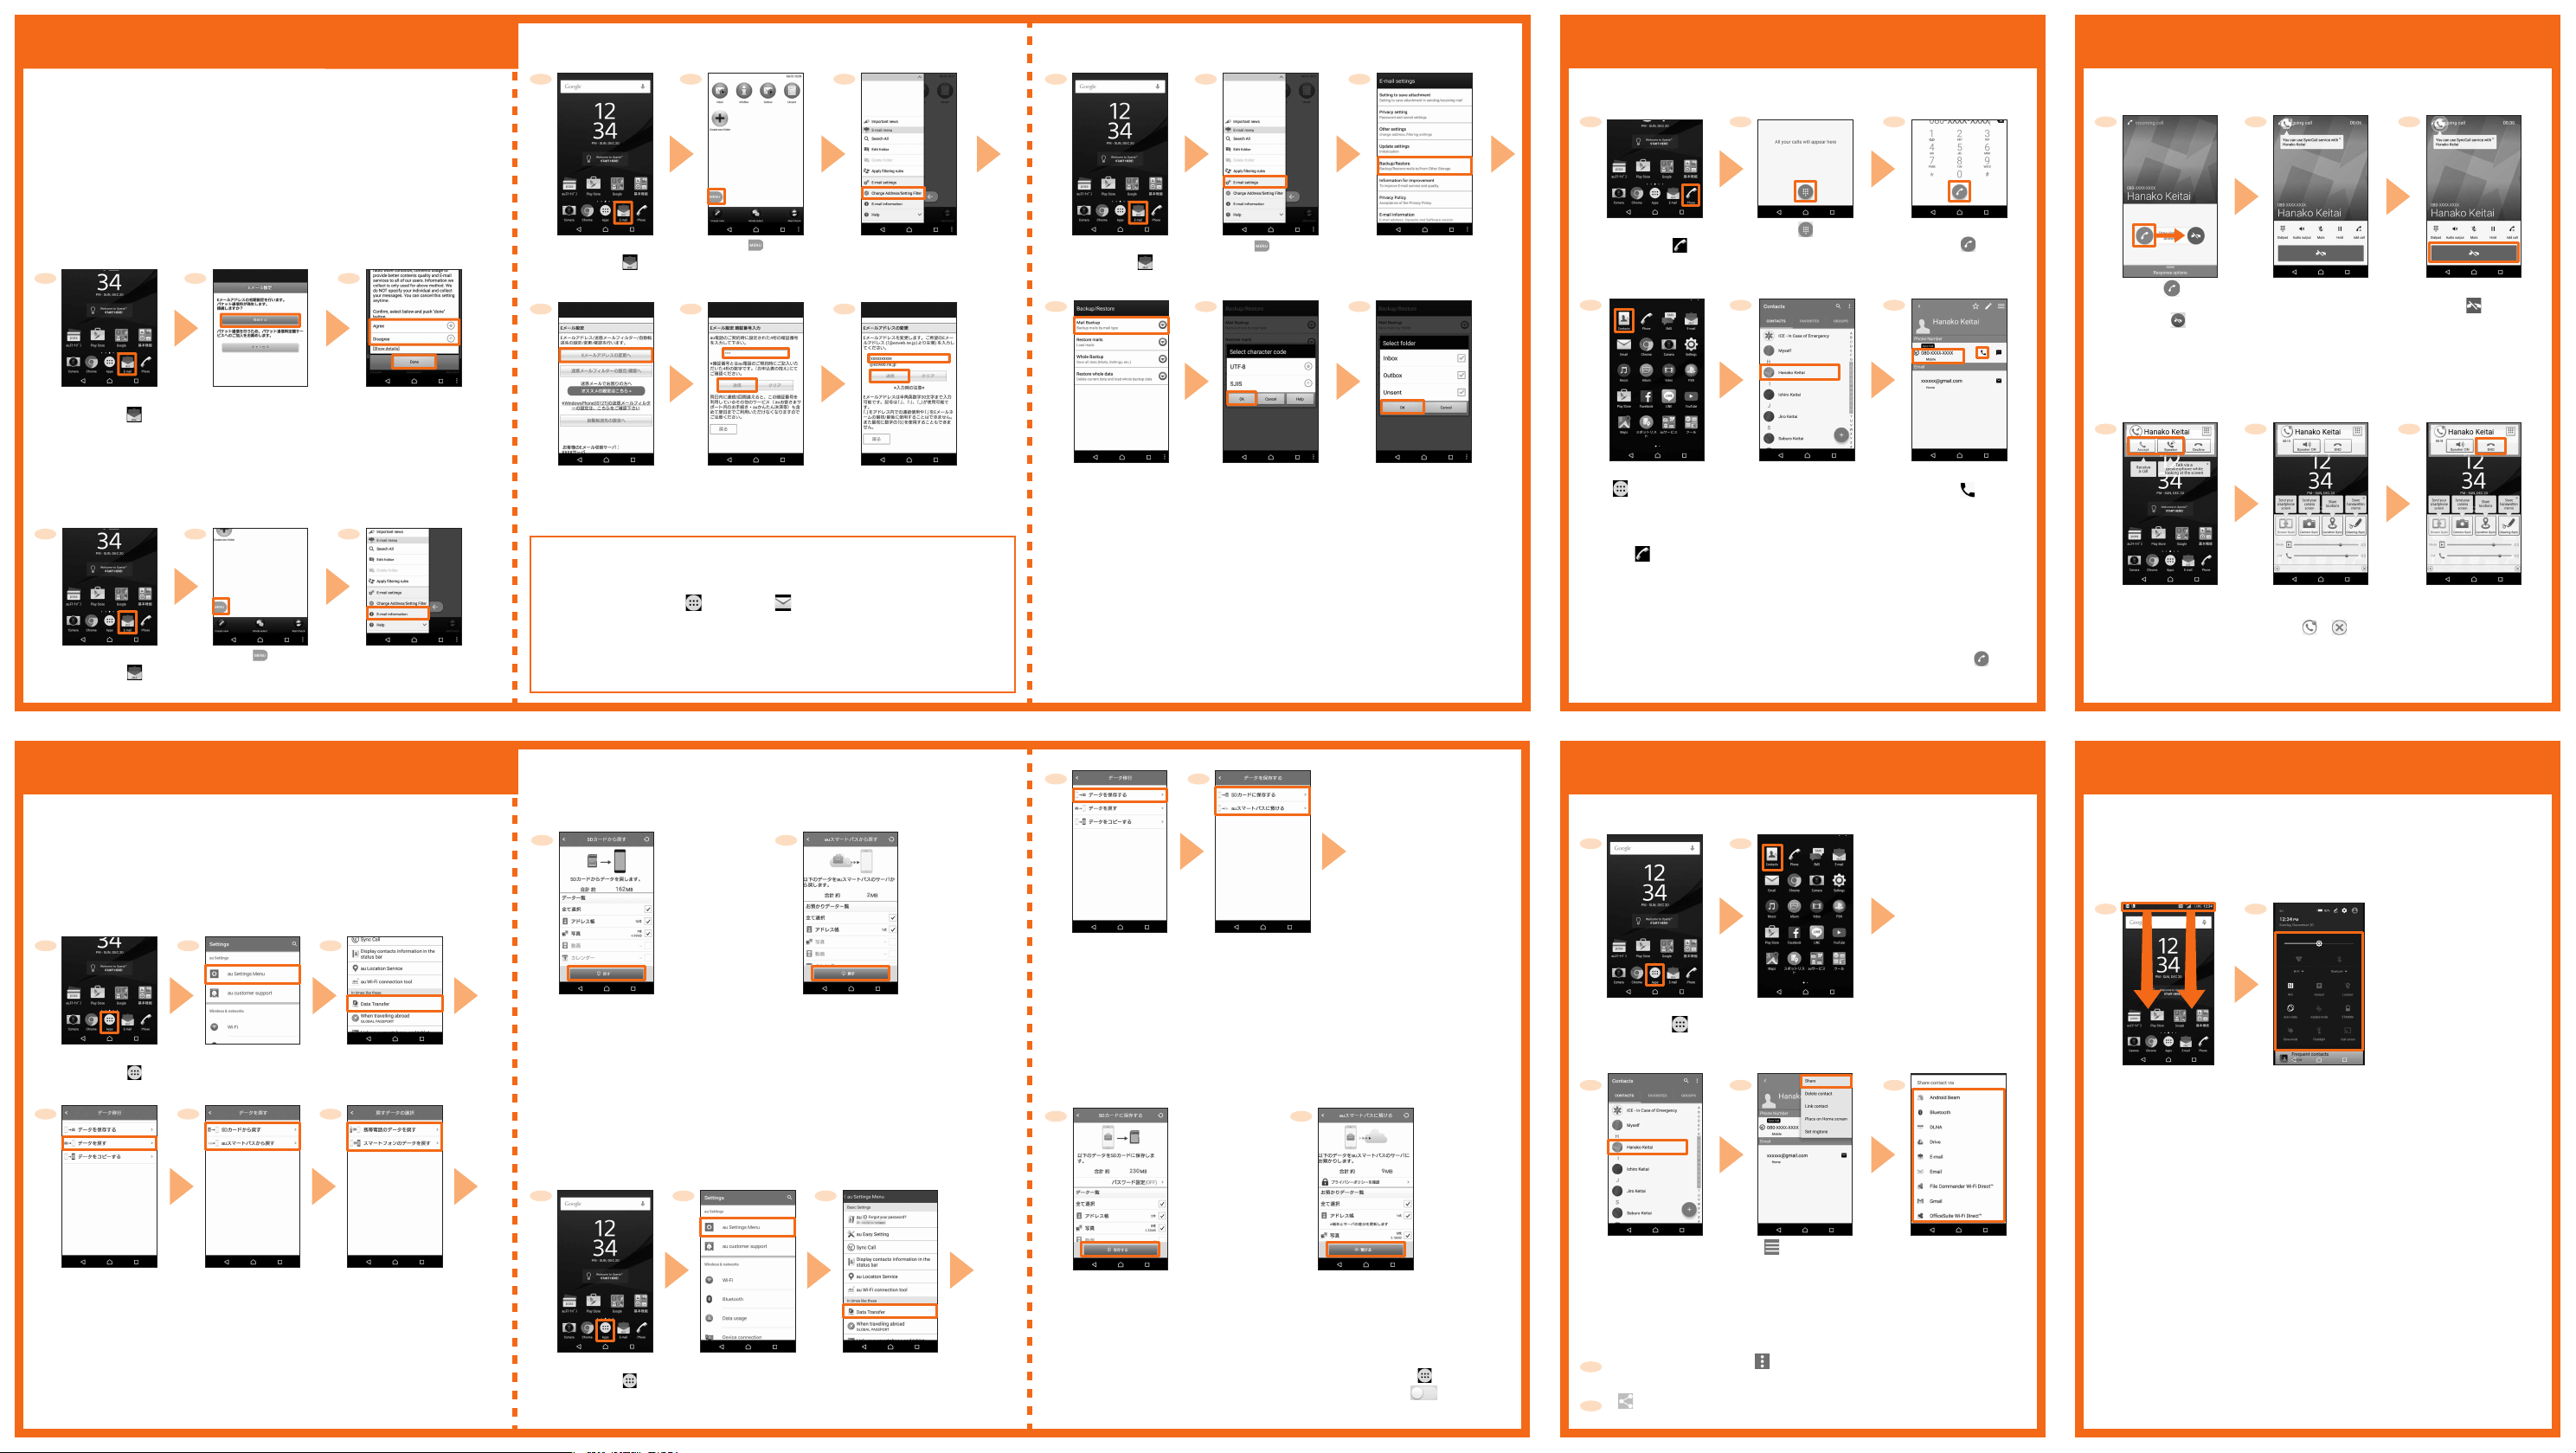
E-mail setting
To use E-mail (@ezweb.ne.jp), subscription to LTE NET is required. If you
did not subscribe it when you purchased the product, contact an au shop
or Customer Service Center.
This is a service with which you can send/receive mails using E-mail
(@ezweb.ne.jp). Your E-mail address is determined automatically after
initial setting. You can change the E-mail address later.
* For model change from au cell phone, E-mail address used on the previous model
can be used continuously after initial settings.
■ Initial settings
1
2 3
■ Changing E-mail address
1
From the Home
screen, [ ]
2 3 1 2 3
[
]
Filter] → Confirm the content
4 5 6
[Change Address/Setting
→ [接続する (Connect)]
■ Backing up Email
From the Home
screen, [ ]
[
] →
[E-mail settings]
4 5 6
[Backup/Restore]
Making a call
■ Direct input calling
1
From the Home
screen, [ ]
■ Calling from Contacts
1 2 3
2 3 1
[ ]
Enter a phone number
→ [
]
Receiving a call
■ Answering a call
2
Drag " " right
*
To reject an incoming
call, drag "
the receiving screen
" left on
Start a call
3
To end the call,
* You can add/display
contacts, create a SMS
or make a call on call
end screen.
]
[
From the Home
screen, [ ]
Check the contents →
[接続する (Connect)]
→ Confirm your
E-mail address →
[閉じる (Close)]
Confirm the content →
[Agree]/[Disagree] →
[Done] → Confirm the
content → [Agree] → Check
the content → [Close]
■ Checking E-mail address
1 2 3
From the Home
screen, [ ]
]
[
[E-mail information]
→ Check your E-mail
address
Transferring data from au Settings Menu
Import or export data between this product and your previous au cell
phone using microSD memory card or au Smart Pass
● To import or export data using au Smart Pass server, set au ID.
● To import data using microSD memory card, save data to microSD memory
card using your previous au cell phone in advance.
■ Importing data from au Settings Menu
1
From the Home
screen, [
4 5 6
[データを戻す
(Import data)]
2 3
[Settings] → [au
]
Settings Menu]
Select an import
method
* To import data from
[auスマートパスか
ら戻す (Import from
au Smart Pass)]
(exported data
on au Smart Pass
server), set au ID.
[Data Transfer]
When [SDカードか
ら戻す (Import from
SD card)] is selected,
select your previous
au phone type
* Does not appear if you
select "auスマートパ
スから戻す (Import
from au Smart Pass)"
in step 5.
[Eメールアドレス
の変更へ (To change
E-mail address)]
Enter the security
code → [送信 (Send)]
→ Confirm the content
→ [承諾する (I agree)]
Enter E-mail
address → [送信
(Send)] → [OK]
PC-mail
You can use mail addresses except for E-mail (@ezweb.ne.jp).
To use PC-mail, set up PC-mail account. For the first time use, set up as follows.
From the Home screen, [
address → [NEXT] → Enter a password → [NEXT] → Select the sync option →
[NEXT] → Select the notification option → [NEXT] → Enter account name and
name as sender → [FINISH SETUP]
*
For details, refer to the "Basic Manual" (Japanese) app installed on the product or "取扱
説明書(詳細版) (Full Instruction Manual)" (Japanese) available on the au homepage.
When "SDカードから戻す
(Import from SD card)" is
selected
7
Mark data to import, then
[戻す (Import)] →
[完了 (Done)]
* It is a screen for selecting
"スマートフォンのデータを戻す
(Import smartphone data)".
* When a confirmation screen
appears, follow the onscreen
instructions.
] → [Email (
)] → [GET STARTED] → Enter Email
When "auスマートパスから
戻す (Import from au Smart
Pass)" is selected
7
Mark data to be imported,
then [戻す (Import)] →
Check the content →
Follow the onscreen
instructions →
[完了 (Done)]
■ Saving data from au Settings Menu
1 2 3
From the Home
screen, [
]
[Settings] → [au
Settings Menu]
[Data Transfer]
[Mail Backup] →
[OK]
●Mail data is saved in the internal storage (/storage/emulated/0/private/au/
email/BU).
If a microSD memory card is attached, data is saved in the microSD card
(/storage/sdcard1/private/au/email/BU).
●To back up mail data or mail settings (notification settings, filtering
settings etc.) all at once, back up from "Whole Backup".
Select character
code for backup
data → [OK]
* For character code,
tap [Help] to check.
Mark to back up
mails → [OK]
4 5
[データを保存する
(Save data)]
When "SDカードに保存する
(Save to SD card)" is
selected
Select a saving
location
* When saving from [au
スマートパスに預け
る (Export to au Smart
Pass)], set au ID.
When "auスマートパスに
預ける (Export to au Smart
Pass)" is selected
6 6
Mark data to save →
[保存する (Save)] →
[完了 (Done)]
● To back up photos and contacts to au Smart Pass server automatically
using "Data Storage" application, from the Home screen, [
[Settings] → [au Settings Menu] → [Backup Setting] → [
に自動で預ける (Export automatically on a regular basis)"
Mark data to export and
[預ける (Export)] → Check the
content → Follow the onscreen
instructions → [完了 (Done)].
] →
] for "定期的
From the Home screen,
[ ] → [Contacts]
Tap a party to
call
Tap a phone number
or [ ]
■ Calling from call log
Tap the party from "Top Contacts" or "Recent calls" that is displayed when
tapping
[ ]
in the Home screen.
■ Calling overseas from au cell phones
(au International Call Service)
You can make international calls without any special procedure from the product.
On the phone number input screen → Enter an access code, country
code, area code*, and the phone number of the other party → [ ]
* If the area code starts with "0", Enter it without including the "0". (There are some
exceptions such as fixed-line phones in Italy or Moscow).
Sending contacts
You can send contacts to another phone.
1
From the Home
screen, [ ]
Sending one contact
3
Tap a contact to
send
Sending several contacts
Contact list screen → [ ] → [Mark several] → Mark contacts to
3
send
] → Select an app → Follow the onscreen instructions
[
4
* Operation differs depending on the app you selected.
2
[Contacts]
4 5
[
] → [Share]
* Operation differs depending
Select how to send a
contact → Follow the
onscreen instructions
on the app you selected.
■ Answering a call (pop-up display)
1
[Accept]/[Speaker]
* To reject an incoming
call, tap [Decline]
2
Start a call
* Show/hide pop-ups
]/[
with [
3
To end the call,
[END]
].
Saving battery power
Use the quick setting panel or the quick setting tools to set Wi-Fi® function,
Bluetooth® function, NFC function, STAMINA® mode etc. Switching the
settings frequently can reduce the battery power consumption.
■ Opening the quick setting panel
1 2
Slide down the
status bar with
two fingers
■ Quick settings tools
Brightness: Adjust screen brightness
Wi-Fi: Wi-Fi
Bluetooth: Bluetooth
NFC: NFC On/Off
Hotspot: Wi-Fi
Location: Location On/Off
Auto-rotate: Auto rotate On/Off
Airplane mode: Airplane mode On/Off
STAMINA: STAMINA mode On/Off
Glove mode: Glove mode On/Off
Flashlight: Flash/Photo light On/Off
Cast screen: Display screens of the product on Google Cast device
®
On/Off
®
hotspot On/Off
®
On/Off
Set each item
 Loading...