

Page 1
BasicManual
・ Xperia™ Z5
*1
・ Sony Mobile TV antenna cable 02
(02SOHSA)
*1 Including warranty
・ 取扱説明書 (Instruction Manual) (Japanese)
・ Xperia
™
Z5のご利用にあたっての注意事項 (Cautions on using
Xperia
™
Z5) (Japanese)
・ 設定ガイド (Setting Guide) (Japanese)
c d ef
i
j
k
a b
g
h
v w
IC (metal) part
Front Back
au Nano IC Card 04
Tray
Projection
Tra y
Slide PinchFlick (swipe)
a
b
d
c
c
f
e
c
g
SOV32
Preface
Thank you for buying "Xperia™ Z5" (simply called the "product"
from here on).
Before using the product, read "Basic Manual" (this manual)
and "取扱説明書(詳細版) (Full Instruction Manual)"
(Japanese) to ensure safe use and handling.
Packaged items
Before your start using the product, make sure that you have
all the following packaged with the product.
The following items are not included in the package.
・ microSD memory card
・ AC adapter
・ Earphones
・ Desktop holder
・ microUSB cable
a
❖Information
・ Purchase a specified charger (sold separately).
・ The battery is built into the product.
・ Illustrations used in this manual are just images for explanations.
They may be different from actual ones.
About Operating Instructions
■ Basic Manual (this manual)
Handles only basic operations for main features.
For detailed descriptions on various functions, refer to the
"Basic Manual" (Japanese) app installed on the product or "取
扱説明書(詳細版) (Full Instruction Manual) (Japanese)"
available on the au homepage.
http://www.au.kddi.com/support/mobile/guide/manual/
・ Company names and product names referred to in this
manual are trademarks or registered trademarks of
respective companies. The TM, ® marks may be omitted in
this manual.
■ "Basic Manual" (Japanese) app
This product allows you to use the "Basic Manual" (Japanese)
app on the product to confirm detailed operational
procedures.
Certain functions can be directly activated from the app
screens on which their operations are described.
From the Home screen, [ ][お客さまサポート
(Customer support)][Basic Manual] (Japanese)
・ When you activate for the first time, follow the onscreen
instructions to download and install app.
bcdef
■ For Those Requiring an English Instruction Manual
You can download the English version of the instruction
manual from the au homepage (available in approximately
one month after the product is released).
Download URL:
http://www.au.kddi.com/english/support/manual/
Regarding notations used in this document
・ In this manual, keys (key icons) are represented by
simplified illustrations such as b, h, n, O,
k.
・ Operations of tapping menu items/icons/buttons on the
screen etc. are indicated as [(name of the item etc.)].
・ Screen illustrations shown in this manual may look different
from the actual screens. In some cases, minor details or a
part of a screen may be omitted.
・ In this manual, "microSD
memory card" and "microSDXC
abbreviated as "microSD memory card" or "microSD".
・ All of the indicated amounts exclude tax unless otherwise
specified.
・ "The Company" as appears in the manual refers to the
following companies:
Sold by: KDDI CORPORATION, OKINAWA CELLULAR
TELEPHONE COMPANY
Manufactured by: Sony Mobile Communications Inc.
Using au
It is an app which allows you to use
Message Board) service,
Mail) service that distributes
Warn ing),
災害対策
災害・避難情報
™
memory card", "microSDHC™
™
memory card" are
(au Disaster Countermeasure)
緊急速報メール
(Disaster and Evacuation Information)
災害用伝言板
緊急地震速報
(Disaster
(Emergency Rapid
(Earthquake Early
and
津波警報
(Disaster Voice Messaging Service), and
related information).
1
From the Home screen,
support)]
au災害対策 (au Disaster Countermeasure) menu appears.
An agreement screen regarding the use or an initial setting
screen appears for the first time you activate this program.
Follow the onscreen instructions.
■ Using 災害用伝言板 (Disaster Message Board)
Disaster Message Board service enables you to register information of
well-being from an area of distress via LTE NET in case of large-scale
disaster such as earthquake with a seismic intensity of over 6 lower.
(Tsunami Warning),
[au
災害対策
災害用音声お届けサービス
災害関連情報
[][お客さまサポート
(au Disaster Countermeasure)]
(Disaster
(Customer
1 au災害対策 (au Disaster Countermeasure) menu[災害
用伝言板 (Disaster Message Board)]
❖Information
・ To register information of well-being, E-mail address
(〜ezweb.ne.jp) is required. Set up E-mail address beforehand.
■ Using 緊急速報メール (Emergency Rapid Mail)
Emergency Rapid Mail is a service that distributes Earthquake
Early Warning or Tsunami Warning delivered from the
meteorological bureau or Disaster and Evacuation Information
delivered from the government or local public organization to all
au cell phones in specified areas simultaneously.
When you receive Earthquake Early Warning, ensure your
safety and take proper action according to the situation
around you. When you receive a Tsunami Warning, draw away
from sea coast immediately and evacuate to safe place such
as upland or well-built high building.
1 au災害対策 (au Disaster Countermeasure) menu[緊急
速報メール (Emergency Rapid Mail)]
❖Information
・
Reception of Emergency Rapid Mail is notified by a special warning
tone and vibration. It is not possible to change the warning tone.
*Earthquake Early Warning is notified by warning tone and voice
sound ("地震です" (It is an earthquake)), and vibration.
・ The warning tone does not sound when receiving
Emergency Rapid Mail during a call.
・ Earthquake Early Warning may not arrive before strong
tremors in areas near the epicenter.
・ Tsunami Warning is a major tidal wave/seismic sea wave
notification delivered from the meteorological bureau to the
area including target coast.
・ Disaster and Evacuation Information is a service that
distributes bulletins concerning residents' safety including
evacuation advisories, evacuation orders and other
warnings issued by the national and local governments.
The service is available only in Japan (it cannot be used overseas).
・
・ No information fee or communication charge is required for
receiving Emergency Rapid Mail.
・ KDDI is not liable for damages suffered by customers
resulting from the service's information, lack or delay in the
information caused by transmission or system breakdowns,
or other events that are outside the responsibility of KDDI.
・ Refer to the Japan Meteorological Agency web page for details
about distribution of Earthquake Early Warning.
http://www.jma.go.jp/
・ You cannot receive Emergency Rapid Mail when your cell
phone is turned off.
・ Emergency Rapid Mail may not be received if you are in a
place where signal does not reach even in the service area
(e.g. in a tunnel, basement) or in a place with a poor reception.
・ You cannot receive the Emergency Rapid Mail that the
reception is failed.
・ This delivery system is different from Earthquake Early
Warning provided through TV, radio, or other communication
procedures, which means that the time the Earthquake Early
Warning arrives may vary.
・ Information from someplace other than your current location
may be received.
■ Using 災害用音声お届けサービス (Disaster Voice
Messaging Service)
Disaster Voice Messaging Service is a service which allows
you to record your voice using smartphone and send
someone you want to inform your well-being in case of a
large-scale disaster.
1
au
災害対策
音声お届けサービス
❖Information
・ To u se W i - F i®, initial settings via 4G (LTE/WiMAX 2+) network
is required.
・ Voice message can be recorded for up to 30 seconds.
・ Voice messages cannot be saved or played if the product
does not have available memory.
■
Using
You can check history of Disaster and Evacuation Information
delivered by local government, disaster related information
portal, etc.
1
au
連情報
onscreen instructions
(au Disaster Countermeasure) menu[
(Disaster Voice Messaging Service)]
災害関連情報
災害対策
(au Disaster Countermeasure) menu[
(Disaster related information)]Follow the
(Disaster related information)
災害用
災害関
Getting Ready
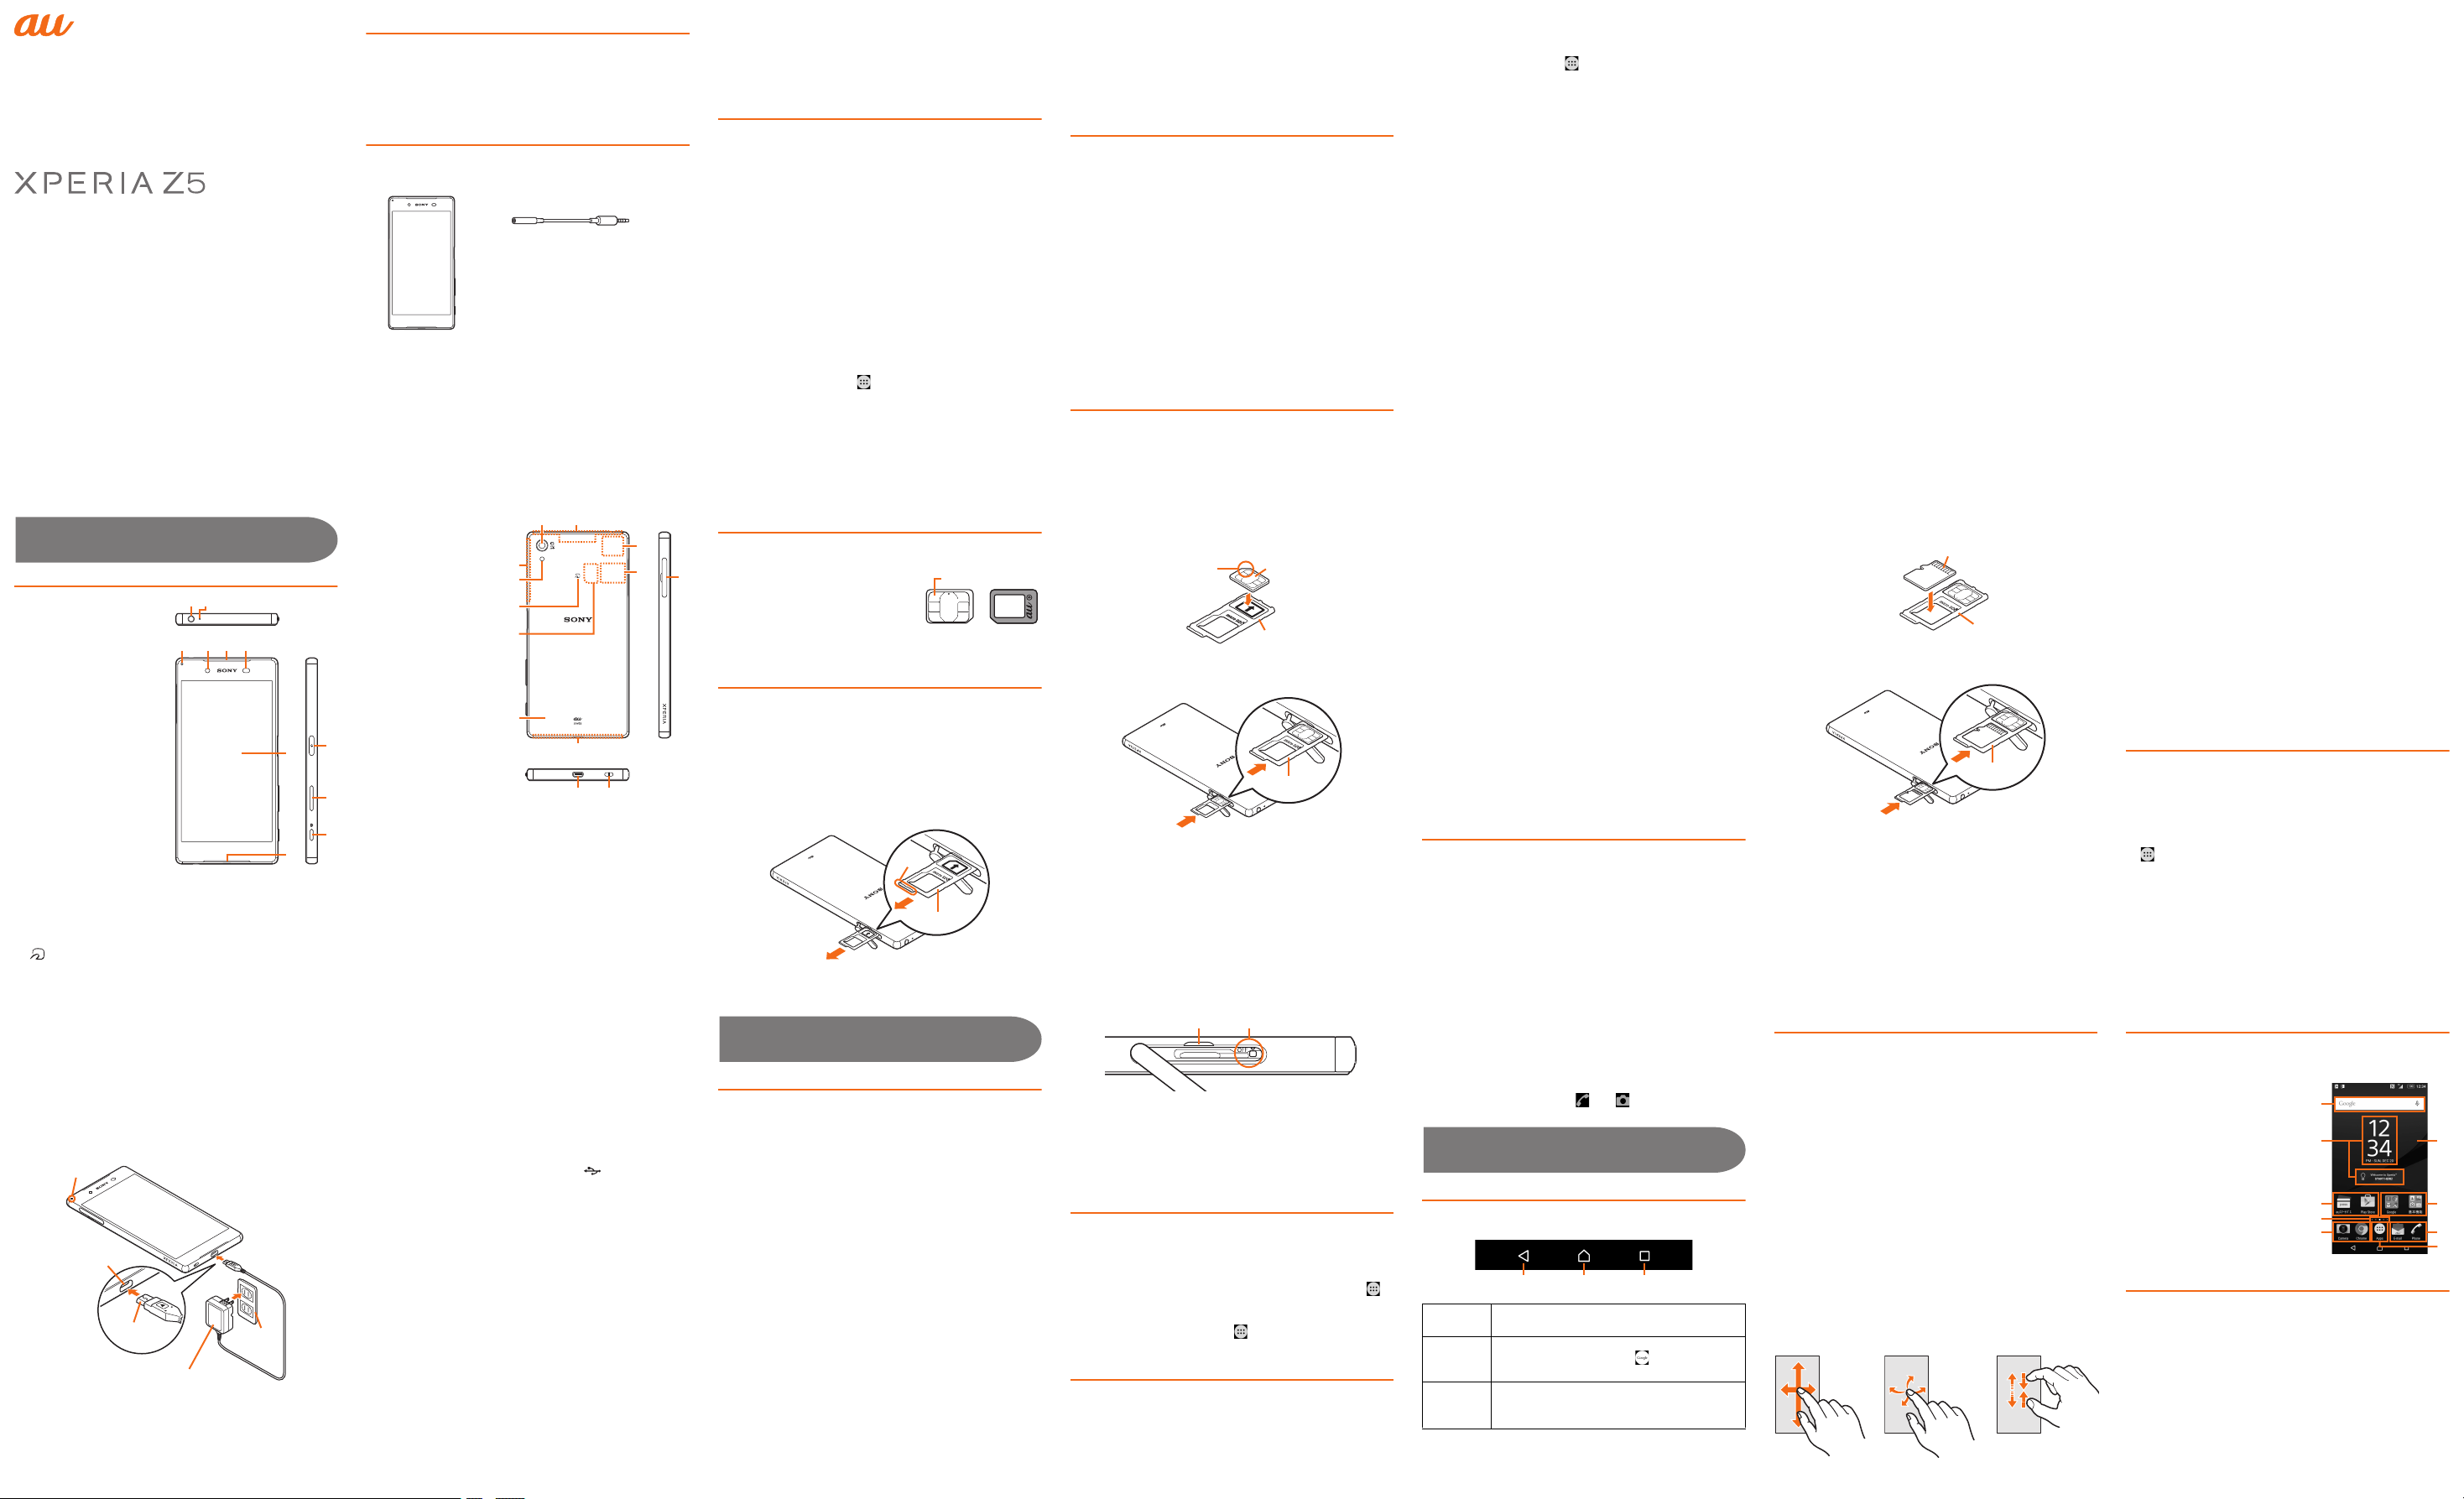
Names and functions of parts
a Headset connection
terminal
b Second microphone
Reduces noise to make
easy to listen
c Notification LED
d Front camera
e Earpiece/Speaker
f Proximity/Light sensor:
Switches touch panel on
and off to prevent from
erroneous operation
during a call/Auto-control
for display brightness
g Display (Touch panel)
h Microphone/speaker
i OPower key/Screen
lock key/Fingerprint
sensor
j Volume key/Zoom key
k kCamera key
l Camera lens
m GPS/Built-in antenna
n Wi-Fi®/Bluetooth® antenna part
o Flash/Photo light
p mark
*1
:
*2
*2
q au Nano IC Card 04
r Back cover
s Wi-Fi® antenna
t Nameplate
u Built-in antenna
v Strap hole
w microUSB connection
terminal
x microSD memory
card/au Nano IC Card
04 slot
*1 Do not jab with a sharp object such as a needle. Doing so may
cause a fault.
*2 The antenna is built in. Covering around the antenna by the
hand may affect the quality of call/communication.
*3 Back cover is not removable. Removing so forcibly might cause
damage or a fault. Also, battery is built into the main unit and
not removable by customers.
*4 Do not remove the nameplate with stickers of CE mark, FCC ID
and IMEI information printed.
*3
*2
*4
*2
l
m
s
n
o
p
q
r
u
t
au Nano IC Card 04
Your phone number etc. is recorded in the au Nano IC Card 04.
The product is compatible only
with au Nano IC Card 04. You
x
cannot use the product with an IC
card other than au Nano IC Card
04.
Attaching/removing the au Nano IC Card 04
Before attaching/removing the microSD memory card, make
sure to turn off the product.
■ Attaching the au Nano IC Card 04
1 Open the microSD memory card/au Nano IC Card 04 slot
cover while hooking the groove with your fingernail
2 Hook the projection of the tray with your fingernail to
slide the tray straight out, then remove the tray from the
product
3 Set au Nano IC Card 04 into the tray with IC (metal) part
facing up
Pay attention to the orientation of notch.
Notch
IC
Tray
4 Insert the tray with the card into the main unit and then
press it all the way
Pay attention to the direction of inserting tray.
Tra y
5 Close the microSD memory card/au Nano IC Card 04
slot cover, press it firmly to ensure that there are no
gaps between the cover and the main unit
■ Removing au Nano IC Card 04
1 Open the cover while hooking the groove of microSD
memory card/au Nano IC Card 04 slot cover with your
fingernail
2
Hook the projection of the tray with your fingernail to
slide the tray straight out, then remove the tray from the
main unit
3 Remove au Nano IC Card 04 out of the tray, insert the
tray into the main unit and then press it all the way
Pay attention to the direction of pushing the tray.
4 Close the microSD memory card/au Nano IC Card 04
slot cover, press it firmly to ensure that there are no
gaps between the cover and the main unit
❖Information
・ Note the following points, otherwise handling the au Nano IC
Card 04 may cause malfunction or damage.
・ Do not touch the IC (metal) part of the au Nano IC Card 04.
・ Insert in the correct direction.
・ Do not use force to attach or remove.
・ Do not lose the au Nano IC Card 04 after it has been
removed.
・ Do not insert au Nano IC Card 04 with conversion adapter
attached. Doing so may cause a fault.
Attaching/Removing microSD memory card
Before attaching/removing the microSD memory card, make
sure to turn off the product.
■ Attaching microSD memory card
1 Open the microSD memory card/au Nano IC Card 04 slot
cover while hooking the groove with your fingernail
2
Hook the projection of the tray with your fingernail to slide
the tray straight out, then remove the tray from the product
3 Set microSD memory card into the tray with IC (metal)
part facing up
IC (metal) part of microSD memory card
Tray
4 Insert the tray with the cards into the main unit and
press it all the way
Pay attention to the direction of inserting the tray.
5 Close the microSD memory card/au Nano IC Card 04
slot cover, press it firmly to ensure that there are no
gaps between the cover and the main unit
❖Information
・ Insert a microSD memory card in the appropriate direction.
Inserting a microSD memory card forcefully into the slot
could result in failure to remove the microSD memory card
or damage.
・ Do not touch the terminal of the microSD memory card.
■ Removing microSD memory card
1 Open the microSD memory card/au Nano IC Card 04
slot cover while hooking the groove with your finger
2 Hook the projection of the tray with your fingernail to
slide the tray straight out, then remove the tray from the
product
3 Remove the microSD memory card out of the tray,
insert the tray into the main unit and then press it all the
way
Pay attention to the direction of inserting the tray.
4 Close the microSD memory card/au Nano IC Card 04
slot cover, press it firmly to ensure that there are no
gaps between the cover and the main unit
Charging
When you purchase your product, the internal battery is not
fully charged. Charge the battery before use.
❖Information
・ When the charging starts, notification LED lights according to
the battery level. To check the battery level, see the status bar in
the top of the Home screen. Alternatively, from the Home screen,
[][Settings][About phone][Status] and see "Battery
level".
・ When you start charging with the product powered off, the
power turns on even though operation is not available. Follow
the instructions of each airline or medical facility for the use of
cell phones on their premises.
・ It may take longer to complete for charging with a PC or
while using the camera function.
ijklmgh
■ Charging with the AC Adapter
Charging with Common AC Adapter 05 (sold separately) is
explained.
1
Insert the microUSB plug of Common AC Adapter 05 (sold
separately), with the engraved side (
into the microUSB connection terminal of the product
▲
) facing up, straight
2 Insert the power plug of Common AC Adapter 05 (sold
separately) into an outlet
Notification LED lights on the product.
Notification
LED
3 When charging is complete, remove the microUSB plug of
4 Remove the power plug of Common AC Adapter 05
microUSB
connection
terminal
Common AC Adapter 05 (sold separately) from the product
(sold separately) from the outlet
microUSB
plug
Common AC adapter 05
(sold separately)
100V AC
outlet
■ Charging with the DC Adapter
You can charge from cigarette lighter socket in a car by using
Common DC Adapter 03 (sold separately). For details, refer to
instruction manual of Common DC Adapter 03 (sold
separately).
■ Charging with a PC
The followings describe charging procedure by connecting
the product to chargeable USB port on a PC using microUSB
cable 01 (sold separately).
1 Insert the microUSB plug of microUSB cable 01 (sold
separately), with the engraved side ( ) facing up,
straight into the microUSB connection terminal of the
product
2 Insert the USB plug of microUSB cable 01 (sold
separately) into the USB port of a PC
Notification LED lights on the product.
When a confirmation screen for software installation
appears on the product, tap "SKIP" or "INSTALL".
3 When charging is complete, remove the microUSB plug
of microUSB cable 01 (sold separately) from the
product and close the microUSB connection terminal
cover firmly
4 Remove the USB plug of microUSB cable 01 (sold
separately) from the USB port of the PC
Turning on (Initial settings)
Turning the power on
1 O (over 1 sec)
The product vibrates and after a while the lock screen
appears.
When you turn on the product for the first time, follow the
onscreen instructions to set the initial settings.
2 Swipe (flick) the screen up
■ Turning the power off
1 O (over 1 sec)
2 [Power off]
❖Information
・ Press O (over 1 sec) u Long-touch "Power off" u [OK]
to restart the product in safe mode (a function that enables
to start the product in a status equivalent to the status at the
time of purchase).
■ Force-quitting
1
Open the microSD memory card/au Nano IC Card 04 slot
cover while hooking the groove with your fingernail,
press the OFF button (yellow) with a fine-tipped object
for approximately three seconds, and release your finger
after it vibrates three times
pqrstno
Groove
❖Information
・
Pressing the OFF button (yellow) by a sharp object such as
needle may cause malfunction.
・
Alternatively, press and hold O and upper part of the
volume key at the same time for approximately three
seconds, and release your finger after it vibrates three times.
OFF button (yellow)
Initial settings
When you turn on the product for the first time, follow the
onscreen instructions to set language, functions, service, etc.
For details, refer to "Setting Guide".
❖Information
・ To change the language later, from the Home screen, [ ]
[設定 (Settings)][言語と入力 (Language & input)]
[地域/言語 (Language)]. To make settings for au service
etc., from the Home screen, [ ][Settings]
[au Settings Menu][au Easy Setting].
Setting Screen lock
When the screen lock is set, the backlight turns off to avoid
the keys and touch panel from false operations.
When the specified time elapses, the product's screen
backlight turns off automatically and screen lock is activated.
1 While the screen is displayed, O
■ Unlocking screen
The lock screen appears when turning the power on or the
screen backlight on by pressing O.
1 Swipe (flick) the screen up on the lock screen
❖Information
・ On the lock screen, swipe " " or " " to activate "Phone"
app or "Camera" app, respectively.
Basic Operation
Key icons
The followings are the main functions of b, h, n
keys located at the bottom of the screen.
b
Back
h
Home
n
Recently
used apps
b h
Return to the previous screen. Close a dialog
box, menu, or the Notifications panel.
Display the Home screen.
Long-touch and drag it to " " to activate
"Google" app.
Display recently used apps on a list and
activate or end them from the list. Also, you can
use small apps.
n
Using the touch panel
The display of the product is a touch panel operated by
touching it with your finger.
■ Tap/Double-tap
Tap: Gently touch a screen and then immediately release your
finger. Double tap: Touch the same position twice.
■ Long-touch
Keep touching an item with your finger.
■ Slide
While your finger is gently touching the screen, trace it to the
desired direction to move over.
■ Flick (swipe)
Operate the screen by quickly moving (flicking) your finger
up/down or left/right.
■ Pinch
Touch the screen with two fingers and widen (pinch-out) or
narrow (pinch-in) the fingers' distance.
■ Drag
Keep touching an item or icon, trace it to the desired direction
to move.
Home screen
Home screen consists of multiple screens. Slide or flick left or
right to move to the adjacent screen. Tap h to return to the
Home screen any time.
a Google Search
b Widgets
c Shortcuts (Apps)
d Home screen position
Indicates which screen of the
several Home screens you are
in.
e Wallpapers
f Folders (Google, 基本機能
(Basic functions))
g Apps key
Adding to Home screen/Editing Home screen
You can change wallpaper or theme of the Home screen and
add/delete/move shortcuts of apps, widgets, folders, etc. on
the Home screen.
1 Long-touch an area of the Home screen where no icons
are displayed
Page 2
Forinquiries,call:CustomerServiceCenter
Forgeneralinformation,chargesandoperationinformation
(tollfree)
Forlossortheft(tollfree)
Businesshours:24hourslivesupport
Incaseabovenumbersarenotavailable(tollfree)
0120-977- 033
(exceptOkinawa)
0120-977- 699
(Okinawa)
Fromaucellphones:
113
withoutareacode
Fromfixed -linephones:
0077-7-113
Fromfixed -linephones:
007 7-7-111
Fromaucellphones:
157
withoutareacode
October2015,1stEdition
1299-0021.1
KeitaiGuaranteeServiceCenter
Forloss,theft,damage
(tollfree)
Fromfixed-linephones/aucellphones,
0120-925-919
Businesshours9:00−21:00(7daysaweek)
Businesshours9:00−20:00(7daysaweek)
CellphoneandPHSoperatorscollectandrecycleunusedtelephones,
batteriesandbatterychargersatstoresbearingthelogoregardless
ofbrandandmanufacturertoprotecttheenvironmentandreuse
valuableresources.
Soldby:KDDICORPORATION,
OKINAWACELLULARTELEPHONECOMPANY
Manufacturedby:SonyMobileCommunicationsInc.
PRESSI NGZEROWI LLCONN ECTYOUTOANOPERATOR
AFTERC ALLIN G157ONYOURauCEL LPHON E.
濡れた状態での充電は、
異常な発熱・焼損などの原因となり
大変危険です。
2 Widgets & Apps Add shortcuts of widgets or
apps.
Wallpapers Album Select an image from albums
Live
Wallpapers
Photos Select an image from photos
(Xperia
Wallpaper)
Themes Set the wallpapers etc. for the
Home Settings Set size of icons on the Home
to set as a wallpaper.
・ To set image range, adjust
cropping area by dragging,
etc.
Select a content from albums
to set as a wallpaper.
to set as a wallpaper.
™
's
Select an image to set as a
wallpaper.
・ Images displayed to the
right of "Photos"/"Live
Wallpapers" are "Xperia
Wallpaper".
Home screen or the lock
screen.
screen or app screen.
■ Adding a folder
1 From the Home screen, long-touch an icon
2 Drag the icon onto another icon
■ Deleting shortcuts/widgets/folders
1 From the Home screen, long-touch an icon or a folder
you want to delete
2 Drag the icon or the folder to "Remove from Home
screen"
To delete a folder, then tap "DELETE". It also deletes
shortcuts etc. in the folder.
❖Information
・ Long-touch a shortcut, widget, or folder icon to move.
Using the Apps screen
You can call up functions from the Apps screen. App icons
installed to the product are also displayed.
・
You may incur communication charges depending on the
™
's
function.
■ Starting an app
■ Downloading apps
You can download and install apps or games, etc. by using Google
Play.
・ To use Google Play, you need to set a Google account. For
details, refer to "Setting Guide".
■ Deleting (uninstalling) apps
Before deleting installed apps, back up contents related to
the app that you want to save including data saved in the app.
・ Some apps may not be deleted.
Knowing the status of the product
■ Status bar
The status bar is located at the top of the product screen. On the
left of the status bar, notification icons appear to inform missed
calls, new mails, operations in progress, etc., and on the right,
status icons appear to indicate the status of the product.
1 From the Home screen, [ ]
Slide or flick left or right to switch the Apps screen.
2 Tap an app to use
Some apps are stored in a folder.
■ Main apps
, Phone, Contacts Play Store
, E-mail, SMS , Camera, Album
Chrome Maps
Settings ,
Calendar Basic Manual
Google, Voice Search
uv
■ Examples of notification icon
New Gmail message
New PC mail message
New E-mail (@ezweb.ne.jp) message
New SMS/Receiving notification service message,
New Receiving notification
Talking*1/Calling
*1
Missed call
USB connecting
Wi-Fi® open network available
*1 Appears when switched to another screen such as the Home screen.
■ Main status icons
, Signal level (Level 4, Out of service area)
, 4G (LTE/WiMAX 2+) data communication
, Battery level (100%, Charging)
,Wi-Fi
*1 Two types of network, "LTE" and "WiMAX 2+" can be used. "4G"
appears on the screen for both networks.
The company determines which network is less busy
depending on the condition of the line to connect.
*1
status
(Available, data transferring or
downloading)
Silent mode (Vibrate) is set
Silent mode (Mute) is set
Airplane mode is activated
®
connected, Wi-Fi® communicating
■ Notification panel
If any notification icons are displayed, slide down the status
bar to open the Notification panel. You can check details of
notification icons or start corresponding apps.
❖Information
・ To delete a notification, flick the notification left or right.
・
Some notifications may not be deleted depending on the content.
・ Alternatively, you can check notifications by swiping
(flicking) down on the lock screen. Or set to hide or keep
showing notifications on the lock screen.
■ Notification LED
Notification LED informs charging prompt, battery level while
charging, missed calls, new mails, etc. by turning on or
flashing.
Status Description
Red The battery is charging when the remaining
Orange The battery is charging when the remaining
Green The battery is charging when the remaining
Flashing
red
Flashing
white
*1 Notification LED flashes while backlight is turned off.
❖Information
・ Flashing of Notification LED three times in red when
pressing O with the power off indicates that the
remaining battery is not sufficient.
・ When you start charging with the product powered off, the
notification LED turns in red. When the status of battery
appears on the display, however, the notification LED lights
in color that indicates the battery level.
battery level is 14% or lower.
battery level is 15% - 89%.
battery level is 90% or higher.
The remaining battery level is 14% or lower.
Indicates missed call, new Gmail message, new
SMS message.
*1
■ Checking own phone number
1 From the Home screen, [ ][Settings]
2 [About phone][Status][SIM status]
The phone number of the product is shown under "My
phone number".
❖Information
・ Alternatively, from the Home screen, [ ][Contacts]
[Myself] to check your phone number.
■ Setting the silent mode (Vibrate)
1 Press the volume up key or down key
2 []
The icon for the volume adjusting bar changes to .
Tap " " to adjust volume of ringtone, media sound or
alarm.
■ Setting the silent mode (Mute)
1 Press the volume up key or down key
2 [][]
The icon on the volume adjusting bar turns to .
❖Information
・ When the "silent mode" is set, sounds for shutter, shooting
start/end sound when shooting videos, alarm, playback of
video, or music, etc. are not muted.
・ Raising the volume by pressing the volume up key in the
silent mode, or adjusting volume of "Ring volume" of "Sound
& notification" in the silent mode (Vibrate) cancels the silent
mode.
■ Setting Airplane mode
When airplane mode is set, all wireless functions (phone,
packet communication, Wi-Fi
NFC Reader/Writer, P2P function) are turned off.
®
function, Bluetooth® function,
1 From the Home screen, [ ] u[Settings] u[More]
2 [ ] of "Airplane mode"
Entering characters
Use software keyboard to enter characters.
To display the software keyboard, tap a character input box
on the character entry screen for adding contacts, creating a
message, etc.
■ Switching software keyboards
With "International keyboard", you can use QWERTY keyboard
to enter characters, Numeric keypad to enter numbers and
symbols, and Symbol keypad for more symbols.
1 Tap a character input box
QWERTY keyboard appears.
2 Tap [ ] to display Numeric keypad
For Symbol keypad, tap " " on the Numeric keypad.
❖Information
・ Tap " " at the bottom of the screen to hide the software
keyboard.
・ Tap " " to delete the character before the cursor.
・ Switch between lower-case " ", upper-case " " and
caps " " on QWERTY keyboard.
・ When using QWERTY keyboard, touch and hold a character
to select a character variant.
wxyzA
Support
Introduction of related accessories
For details, refer to the instruction manual for each device.
・ Sony Mobile TV antenna cable 02 (02SOHSA)
・ Sony Mobile Desktop Holder 01 (01SOPUA) (sold
separately)
・ Common AC Adapter 05 (0501PWA) (sold separately)
・ Common DC Adapter 03 (0301PEA) (sold separately)
・ microUSB cable 01 (0301HVA) (sold separately)
・ microUSB cable 01 Navy (0301HBA) (sold separately)
・ microUSB cable 01 Green (0301HGA) (sold separately)
・ microUSB cable 01 Pink (0301HPA) (sold separately)
・ microUSB cable 01 Blue (0301HLA) (sold separately)
・ au Carrying Case G Black (0106FCA) (sold separately)
❖Information
・
For the latest information on accessories, visit the au homepage
(http://www.au.kddi.com/) or contact the Customer Service
Center.
・ Accessories described above can be purchased from the
au Online Shop. Some accessories may not be purchased
due to the availability.
http://auonlineshop.kddi.com/
Troubleshooting
Before you assume that the product is malfunctioning, check
the following:
Symptom What you should check
Power is not turned
on even though
O is pressed
The power goes off Is the internal battery charged?
The power turns off
while activation
screen is displayed
The screen freezes
and the power
cannot be turned off
(Out of service
area) appears
Is the internal battery charged?
Is O pressed for over 1 second?
Is the internal battery charged?
Open the microSD memory card/au
Nano IC Card 04 slot cover while hooking
the groove with your fingernail, press the
OFF button (yellow) with a fine-tipped
object for approximately three seconds
Release your finger after it vibrates three
times. Alternatively, press and hold
and upper part of volume key at the
same time for approximately three
seconds, and release your finger after it
vibrates three times.
Is the product out of the service area
or in an area where the signal is weak?
Is the built-in antenna covered with
hand?
Is au Nano IC Card 04 inserted?
O
Cannot charge the
battery (Notification
LED does not light,
the battery icon
does not change
into charging one)
Cannot operate key/
touch panel
Cannot operate touch
panel as intended
Charging is not
complete
A message such as
u
"charge the battery"
appears
Battery usage time
is short
The screen
backlight turns off
in a short while
Symptom What you should check
Is the specified charging equipment
(sold separately) attached properly?
Is the power turned on?
Is "Screen lock" set?
Turn off the power and then turn it on
again.
Are you operating with a fingernail or
foreign object on the operating screen?
Is the temperature of the product
raised or very low?
The battery is almost dead.
Is the battery fully charged?
Charge until the notification LED turns
green.
Is the internal battery end-of-life?
Is the product used for a long period
at places where (Out of service
area) appears?
Is set "Sleep" period too short?
Symptom What you should check
The display is dark Is "Brightness level" set to dark?
Is the proximity/light sensor blocked
or covered by sticker?
Screen response is
slow when you tap
on the screen/press
the keys
Cannot recognize a
microSD memory
card
For more details, visit au Customer Support site of au homepage.
http://www.au.kddi.com/support/mobile/trouble/repair
When a large amount of data is saved
in the product or transferring largesize data between the product and
microSD memory card, the screen
response may be delayed.
Is the microSD memory card inserted
properly?
Is the microSD memory card unmounted?
Updating Software
You can update the product to the most recent software for
optimal performance and to get the latest enhancements.
・ You are charged for data communications when connecting to
the Internet from the product by using packet communication.
・ You are recommended to back up your data before
updating software.
・ For details, visit http://www.sonymobile.co.jp/support/ or
refer to the "Basic Manual" (Japanese) app or
"取扱説明書(詳細版) (Full instruction manual)" (Japanese)
available on au homepage.
■ Downloading and updating software
Update files can be downloaded from the Internet web site
into the product directly.
・ Note that when Wi-Fi
packet communication takes the place automatically, which
may apply communication fees.
®
communication becomes unstable,
1 From the Home screen, [ ][Settings][About
phone][Software update]
2 [][Refresh]
After-sales service
■ When asking for repair
For repair, contact Keitai Guarantee Service Center.
During the
warranty
period
Outside the
warranty
period
❖Information
・ Before handing in the product for repair, make a backup of
the contents of memory since they may disappear during
repair. Note that the Company shall not be liable for any
damages and loss of income should the contents of
memory be altered or lost.
・ Recycled parts that meet the Company's quality standards
are sometimes used for repair.
Repairs will be done based on the terms of
services of the free-of-charge repair warranty
described on the warranty card.
We shall repair the product for a charge as
requested by the customer if repair renders it
usable.
・ Collected au cell phones by Replacement cell phone
delivery service which you used before are recycled to cell
phones for replacement after repairs. Also replaced parts
by au after-sales service are collected and recycled by
KDDI. They are not returned to customers.
・ The product which is processed, remodeled, analyzed
(including by modifying or analyzing the software (including
by rooting etc.), reverse engineering, decompiling), or
repaired by an unauthorized repair office is not covered by
the warranty and repair may be refused.
■ Performance parts for repair
The Company retains performance parts for repair of the
™
Xperia
Z5 main unit and its peripherals for four years after
discontinuation of production. "Performance parts for repair"
refers to parts required for maintaining the functions of the
product.
■ Warranty card
At the store of purchase, thoroughly check and read the name
of the retailer, date of purchase and other necessary details
filled in on the warranty card, and be sure to keep it in a safe
place.
■ Keitai Guarantee Service Plus LTE
An after-sales service membership program on a monthly
basis called "Keitai Guarantee Service Plus LTE" (monthly fee:
380 yen tax excluded) is available for using your au cell
phone for a long time without worries. This service expands
coverage for many troubles including malfunction, theft and
loss. For details of this service, refer to au homepage or
contact Keitai Guarantee Service Center.
❖Information
・ You can apply for membership only at the time of
purchasing your au cell phone.
・ Once you cancel the membership, you cannot reapply for it
until you purchase an au cell phone next time.
・ Note that when changing the model or purchasing an extra
cell phone, this service only covers the most recently
purchased au cell phone.
・ When an au cell phone is handed over to you or someone
else, the Keitai Guarantee Service Plus LTE membership is
also handed over to the successor of the cell phone.
・ When you get a new au cell phone by changing the model or
purchasing an extra cell phone, the "Keitai Guarantee Service
Plus"/"Keitai Guarantee Service Plus LTE" membership for the
old au cell phone is automatically canceled.
・ Service contents are subject to change without notice.
■ au Nano IC Card 04
The au Nano IC Card 04 is lent to you by au. In case of loss or
damage, the card will be replaced at your expense. When a
malfunction is suspected, or in case of theft or loss, contact
an au shop or PiPit.
■ After-sales service
If you are unsure about anything regarding after-sales service,
contact the following service contact.
Customer Service Center (for service canceling procedure
in case of loss or theft)
From a land-line phone, 0077-7-113 (toll free)
From an au mobile phone,
Business hours : 24 hours live support
113
without area code (toll free)
DEFGHBC
Keitai Guarantee Service Center (for loss, theft, damage)
From a land-line phone/From an au cell phone,
Business hours 9:00 – 21:00 (7 days a week)
Online Repair Desk (24 hours a day over the Internet)
* Reception only from PC or smartphone
https://cs.kddi.com/support/n_login.html
・ The App for the Internet acceptance, if "damage", "wet",
"theft" and "loss" are eligible. In the case of spontaneous
failure (not the cause damage, such as water wet, but does
not power on, the screen does not function or other), it will
be accepted by phone for interview is required.
・ To apply for the Internet, you need the e-mail address.
0120-925-919 (toll free)
■ au after-sales service information
Replacement cell phone delivery service
Keitai Guarantee Service Plus LTE members
Spontaneous failure 1st year
Spontaneous failure 2nd
year or later
Partially damage, water
soak, irreparable damage,
theft or loss
Free of charge
Customer charge
1st: 5,000 yen
2nd: 8,000 yen
Longtime au users receive a
2,000 yen discount
*1
I
Non-Keitai Guarantee Service Plus LTE members
Spontaneous failure 1st year
Spontaneous failure 2nd
year or later
Partially damage, water
soak, irreparable damage,
theft or loss
Holding over and repair
Keitai Guarantee Service Plus LTE members
Spontaneous failure 1st year
Spontaneous failure 2nd
year or later
Partially damage
Water soak, irreparable
damage
Theft, loss No recompense
Non-Keitai Guarantee Service Plus LTE members
Spontaneous failure 1st year
Spontaneous failure 2nd
year or later
Water soak, irreparable
damage
Theft, loss
* Charge amounts are all tax excluded
No recompense
Free of charge
Free of charge (three-year
warranty)
Customer charge
Upper limit: 5,000 yen
Customer charge
10,000 yen
Free of charge
Actual costPartially damage
No recompense
(model change)
*1 This discount applies to customers who have used au for 3
years (25 months) or more, and all the lines within that
customer's Family Discount. For customers using a data
communication device or tablet, this discount applies to
customers who are subscribed to a set discount (WIN Single
Set Discount or Smartphone Set Discount) and have been
under the contract of the line eligible for the set discount for 3
years or more.
❖Information
Replacement cell phone delivery service
・
When you have trouble with your au cell phone, replacement
cell phone (same model, same color
calling to. Return your damaged cell phone within 14 days
after the replacement cell phone is delivered.
*1 If the same model in the same color is difficult to provide, a
replacement mobile phone of a model and a color that are
specified by KDDI is provided.
・ Available up to twice in a year from the day you use this
service as a start day. If you do not use this service in the
past year for the subscription to this service, it will be 1st
and if you use, it will be the 2nd.
* For details, refer to au homepage.
Holding over and repair
・ Damages and malfunctions intentionally caused by the
customer as well as those due to modification (e.g.
disassembly, change of parts, painting, etc.) by the
customer are not covered by this service.
・ You cannot receive a refund for the replacement of the outer
casing due to stains, scratches, paint removal, etc. on the
outer casing.
*1
) is delivered by
SIM unlock
The product supports SIM unlock. By unlocking SIM lock, you
can use non-au SIM cards.
・ The SIM unlock service is provided at the au homepage and
au shops.
・
Some services, functions, etc. may be unavailable when using
non-au SIM card. The Company is not liable for any operations.
・ For settings after SIM unlock, operate from the Home screen,
[][Settings][About phone][Status][SIM status]
[SIM card status].
・ For details, refer to the au homepage.
https://cs.kddi.com/support/simcard/
Main specifications
Display Approx. 5.2 inches
TRILUMINOS
mobile Approx. 16.77
million colors
1,080 x 1,920 dots
Weigh t Approx. 154 g (with internal
battery)
Dimension (W x H x T) Approx. 72 mm x 146 mm x
7.3 mm
Internal memory ROM: Approx. 32GB
RAM: Approx. 3GB
®
Display for
Image pickup device (type) Camera: Backside-
Camera pixels Camera: Effective pixels
Continuous
call time
Continuous
stand-by
time
Charging time Using Common AC Adapter
Continuous Full Seg
watching time
Continuous 1Seg viewing
time
Continuous tethering time Approx. 430 min.
Wi-Fi
connection number
In Japan Approx. 1,250 min.
Overseas (GSM) Approx. 740 min.
In Japan Approx. 500 hours
Overseas (GSM) Approx. 560 hours
®
tethering maximum
illumination layered CMOS
Front camera: Backsideilluminated CMOS
Approx. 23 million pixels
Front camera: Effective
pixels Approx. 5.1 million
pixels
05 (sold separately):
Approx. 130 min.
Approx. 6 hours 30 min.
Approx. 8 hours 40 min.
10
Bluetooth®Communication
*1 Varies by obstruction between communication devices or radio
wave reception status.
*2 It is a specification according to purpose of use of Bluetooth
device and is defined by Bluetooth
*3 Some contacts data may not be displayed correctly on the other
party's device.
*4 Only suppor ted to a part of car navigation systems. For use,
refer to the au homepage.
❖Information
・ The continuous call time, continuous stand-by time,
continuous Full Seg watching time, continuous 1Seg
viewing time and continuous tethering time may drop to less
than half depending on the battery charging status, usage
environment such as temperature, reception condition at the
location where the product is used, and the function
settings.
type
Output Compliant with Bluetooth
Communication
coverage
*1
distance
Supported
Bluetooth
*2
profile
Radio frequency
band
Compliant with Bluetooth®
standard Ver.4.1
standard Power Class 1
Within 10 m with good
visibility
HSP, HFP, PBAP*3, A2DP,
®
AV RC P, SP P, O P P, H ID ,
PAN, HOGP, MAP, DUN
2.4 GHz band (2,400 MHz 2,483.5 MHz)
®
standard.
®
*4
®
JKLMN
 Loading...