

Page 1

After the Sound Forge software is installed and you start it for the first time, the registration wizard appears.
This wizard offers easy steps that allow you to register the software online with Sony Pictures Digital Media
Software and Services. Alternatively, you may register online at http://www.sony.com/mediasoftware at any
time.
Registering your product will provide you with exclusive access to a variety of technical support options,
notification of product updates, and special promotions exclusive to Sound Forge registered users.
Registration assistance
If you do not have access to the Internet, registration assistance is available during normal weekday business
hours. Please contact our Customer Service Department by dialing one of the following numbers:
Telephone/Fax Country
1-800-577-6642 (toll-free) US, Canada, and Virgin Islands
+608-204-7703 for all other countries
1-608-250-1745 (Fax) All countries
Customer service/sales
For a detailed list of Customer Service options, we encourage you to visit
http://mediasoftware.sonypictures.com/support/custserv.asp. Use the following numbers for telephone
support during normal weekday business hours:
Telephone/Fax Country
1-800-577-6642 (toll-free) US, Canada, and Virgin Islands
+608-204-7703 for all other countries
1-608-250-1745 (Fax) All countries
Technical support
For a detailed list of Technical Support options, we encourage you to visit
http://mediasoftware.sonypictures.com/support/default.asp. To listen to your support options, please call 608-
256-5555.
About your rights in Sound Forge software
Sound Forge software is licensed to you under the terms of the End User License Agreement. The End User
License Agreement is first presented to you when you install the software. Please review the End User
License Agreement carefully as its terms affect your rights with respect to the software. For your reference, a
copy of the End User License Agreement for Sound Forge software is located at
http://www.sony.com/mediasoftware.
About your privacy
Sony Pictures Digital respects your privacy and is committed to protecting personal information. Your use of
the software is governed by the Software Privacy Policy. A copy of this policy is incorporated into the
registration process and you are asked to agree to its terms prior to accepting the terms of the End User
License Agreement. Please review its contents carefully as its terms and conditions affect your rights with
respect to the information that is collected by the software. For your reference, a copy of the Software
Privacy Policy is located at http://mediasoftware.sonypictures.com/corporate/privacy.asp.
Page 2

Proper use of software
Sound Forge software is not intended and should not be used for illegal or infringing purposes, such as the
illegal copying or sharing of copyrighted materials. Using Sound Forge software for such purposes is, among
other things, against United States and international copyright laws and contrary to the terms and
conditions of the End User License Agreement. Such activity may be punishable by law and may also subject
you to the breach remedies set forth in the End User License Agreement.
Legal notices
Vegas, Vegas+DVD, DVD Architect, Vegas Movie Studio, Vegas Movie Studio+DVD, DVD Architect Studio, ACID, Music Studio, ACIDized,
Sony Sound Series, Groove Mapping, Groove Cloning, Media Manager, CD Architect, Sound Forge, and Audio Studio are trademarks or registered
trademarks of Sony Pictures Digital Inc. or its affiliates in the United States and other countries. All other trademarks or registered trademarks are the
property of their respective owners in the United States and other countries.
Thomson Fraunhofer MP3
MPEG Layer-3 audio coding technology licensed from Fraunhofer IIS and Thomson.
Supply of this product does not convey a license nor imply any right to distribute content created with this product in revenue generating broadcast
systems (terrestrial, satellite, cable and/or other distribution channels), streaming applications (via internet, intranets and/or other networks), other
content distribution systems (pay-audio or audio on demand applications and the like) or on physical media (compact discs, digital versatile discs,
semiconductor chips, hard drives, memory cards and the like).
An independent license for such use is required. For details, please visit: http://www.mp3licensing.com.
Microsoft DirectX programming interface
Portions utilize Microsoft® DirectX® technologies. Copyright © 1999 – 2004 Microsoft Corporation. All rights reserved.
Microsoft Windows Media 9
Portions utilize Microsoft Windows Media® technologies. Copyright © 1999 – 2004 Microsoft Corporation. All rights reserved.
Real, RealMedia, RealAudio, and RealVideo applications
2004 RealNetworks, Inc. Patents Pending. All rights reserved. Real®, Real Media®, RealAudio®, RealVideo®, and the Real logo are trademarks or
registered trademarks of RealNetworks, Inc. in the United States and other countries.
PNG file format
Copyright © 2004. World Wide Web Consortium (Massachusetts Institute of Technology, European Research Consortium for Informatics and
Mathematics, Keio University). All rights reserved. This work is distributed under the W3C Software License in the hope that it will be useful, but
WITHOUT ANY WARRANTY; without even the implied warranty of MERCHANTIBILITY or FITNESS FOR A PARTICULAR PURPOSE.
http://www.w3.org/Consortium/Legal/2002/copyright-software-20021231.
Apple QuickTime
Apple® QuickTime® application is a trademark of Apple, Inc. in the United States and other countries.
Apple Macintosh Audio Interchange File Format (AIFF) file format.
Apple® Macintosh® Audio Interchange™ File Format (AIFF) is a trademark of Apple, Inc. in the United States and other countries.
Targa file format
The Targa™ file format is a trademark of Pinnacle Systems, Inc.
Tagged Image File Format (TIFF)
Adobe Tagged Image™ File Format is a registered trademark of Adobe Systems Incorporated in the United States and other countries. All rights
reserved.
Steinberg Media Technologies AG.
VST is a registered trademark of Steinberg Media Technologies AG.
ASIO is a trademark of Steinberg Media Technologies AG.
Page 3

Sony Pictures Digital Inc.
Media Software and Services
1617 Sherman Avenue
Madison, WI 53704
USA
The information contained in this manual is subject to change without notice and does not represent a
guarantee or commitment on behalf of Sony Pictures Digital Inc. in any way. All updates or additional
information relating to the contents of this manual will be posted on the Sony Pictures Digital Media
Software web site, located at http://www.sony.com/mediasoftware. The software is provided to you under the
terms of the End User License Agreement and Software Privacy Policy, and must be used and/or copied in
accordance therewith. Copying or distributing the software except as expressly described in the End User
License Agreement is strictly prohibited. No part of this manual may be reproduced or transmitted in any
form or for any purpose without the express written consent of Sony Pictures Digital Inc.
Copyright 2005. Sony Pictures Digital Inc.
Program Copyright 2005. Sony Pictures Digital Inc. All rights reserved.
Page 4

Page 5

Table of Contents
Introduction. . . . . . . . . . . . . . . . . . . . . . . . . . . . . . . . . . . . . . . . . . . . . 17
Introducing Sound Forge software . . . . . . . . . . . . . . . . . . . . . . . . . . . . . . . . . . . . . . . . 17
Sample files. . . . . . . . . . . . . . . . . . . . . . . . . . . . . . . . . . . . . . . . . . . . . . . . . . . . . . . . . . . . .17
Using this manual . . . . . . . . . . . . . . . . . . . . . . . . . . . . . . . . . . . . . . . . . . . . . . . . . . . . . . . 17
Shortcuts . . . . . . . . . . . . . . . . . . . . . . . . . . . . . . . . . . . . . . . . . . . . . . . . . . . . . . . . . . . . . . .17
System requirements . . . . . . . . . . . . . . . . . . . . . . . . . . . . . . . . . . . . . . . . . . . . . . . . . . . .18
Installing Sound Forge software. . . . . . . . . . . . . . . . . . . . . . . . . . . . . . . . . . . . . . . . . . . 18
1
Getting help. . . . . . . . . . . . . . . . . . . . . . . . . . . . . . . . . . . . . . . . . . . . . . . . . . . . . . . . . . . . .18
Online help . . . . . . . . . . . . . . . . . . . . . . . . . . . . . . . . . . . . . . . . . . . . . . . . . . . . . . . . . . . . . . . . . . . . . . . . . 18
What’s This? help . . . . . . . . . . . . . . . . . . . . . . . . . . . . . . . . . . . . . . . . . . . . . . . . . . . . . . . . . . . . . . . . . . . . 19
Help on the Web . . . . . . . . . . . . . . . . . . . . . . . . . . . . . . . . . . . . . . . . . . . . . . . . . . . . . . . . . . . . . . . . . . . . . 19
About your rights in Sound Forge software . . . . . . . . . . . . . . . . . . . . . . . . . . . . . . . . 20
About Your Privacy . . . . . . . . . . . . . . . . . . . . . . . . . . . . . . . . . . . . . . . . . . . . . . . . . . . . . . . . . . . . . . . . . . 20
Proper Use of Software . . . . . . . . . . . . . . . . . . . . . . . . . . . . . . . . . . . . . . . . . . . . . . . . . . . . . . . . . . . . . . 20
Optimizing for Sound Forge Software . . . . . . . . . . . . . . . . . . . . . 21
Defragmenting your hard drive . . . . . . . . . . . . . . . . . . . . . . . . . . . . . . . . . . . . . . . . . . . 21
Increasing total buffer size. . . . . . . . . . . . . . . . . . . . . . . . . . . . . . . . . . . . . . . . . . . . . . . .21
Turning off the playback cursor and record counter . . . . . . . . . . . . . . . . . . . . . . . . . 21
Turning off the play (output) meters . . . . . . . . . . . . . . . . . . . . . . . . . . . . . . . . . . . . . . . 22
Turning on passive updating for video and time displays . . . . . . . . . . . . . . . . . . . . 22
Turning on passive updating for time displays . . . . . . . . . . . . . . . . . . . . . . . . . . . . . . . . . . . . . . . . . .22
Turning on passive updating for video displays . . . . . . . . . . . . . . . . . . . . . . . . . . . . . . . . . . . . . . . . .22
Synchronizing audio and video . . . . . . . . . . . . . . . . . . . . . . . . . . . . . . . . . . . . . . . . . . . 22
Learning the Sound Forge Workspace. . . . . . . . . . . . . . . . . . . . . 23
Using the mouse . . . . . . . . . . . . . . . . . . . . . . . . . . . . . . . . . . . . . . . . . . . . . . . . . . . . . . . .23
Using the mouse wheel . . . . . . . . . . . . . . . . . . . . . . . . . . . . . . . . . . . . . . . . . . . . . . . . . . 23
TABLE OF CONTENTS
Page 6

2
The main screen . . . . . . . . . . . . . . . . . . . . . . . . . . . . . . . . . . . . . . . . . . . . . . . . . . . . . . . . 24
Main screen components . . . . . . . . . . . . . . . . . . . . . . . . . . . . . . . . . . . . . . . . . . . . . . . . . . . . . . . . . . . . 24
Floating and docking windows . . . . . . . . . . . . . . . . . . . . . . . . . . . . . . . . . . . . . . . . . . . . . . . . . . . . . . . . 24
The data window. . . . . . . . . . . . . . . . . . . . . . . . . . . . . . . . . . . . . . . . . . . . . . . . . . . . . . . . 26
Displaying data window components . . . . . . . . . . . . . . . . . . . . . . . . . . . . . . . . . . . . . . . . . . . . . . . . . 27
Arranging data windows . . . . . . . . . . . . . . . . . . . . . . . . . . . . . . . . . . . . . . . . . . . . . . . . . . . . . . . . . . . . . 27
Playbar . . . . . . . . . . . . . . . . . . . . . . . . . . . . . . . . . . . . . . . . . . . . . . . . . . . . . . . . . . . . . . . . . . . . . . . . . . . . . 28
Toolbars. . . . . . . . . . . . . . . . . . . . . . . . . . . . . . . . . . . . . . . . . . . . . . . . . . . . . . . . . . . . . . . . 28
Docking a toolbar . . . . . . . . . . . . . . . . . . . . . . . . . . . . . . . . . . . . . . . . . . . . . . . . . . . . . . . . . . . . . . . . . . . . 28
Floating a toolbar . . . . . . . . . . . . . . . . . . . . . . . . . . . . . . . . . . . . . . . . . . . . . . . . . . . . . . . . . . . . . . . . . . . . 28
Displaying a toolbar . . . . . . . . . . . . . . . . . . . . . . . . . . . . . . . . . . . . . . . . . . . . . . . . . . . . . . . . . . . . . . . . . 29
Customizing a toolbar . . . . . . . . . . . . . . . . . . . . . . . . . . . . . . . . . . . . . . . . . . . . . . . . . . . . . . . . . . . . . . . . 29
Standard toolbar . . . . . . . . . . . . . . . . . . . . . . . . . . . . . . . . . . . . . . . . . . . . . . . . . . . . . . . . . . . . . . . . . . . . 29
Transport bar . . . . . . . . . . . . . . . . . . . . . . . . . . . . . . . . . . . . . . . . . . . . . . . . . . . . . . . . . . . . . . . . . . . . . . . 30
Navigation toolbar . . . . . . . . . . . . . . . . . . . . . . . . . . . . . . . . . . . . . . . . . . . . . . . . . . . . . . . . . . . . . . . . . . . 31
Views toolbar . . . . . . . . . . . . . . . . . . . . . . . . . . . . . . . . . . . . . . . . . . . . . . . . . . . . . . . . . . . . . . . . . . . . . . . 31
Status/Selection toolbar. . . . . . . . . . . . . . . . . . . . . . . . . . . . . . . . . . . . . . . . . . . . . . . . . . 31
Regions/Playlist toolbar . . . . . . . . . . . . . . . . . . . . . . . . . . . . . . . . . . . . . . . . . . . . . . . . . . . . . . . . . . . . . . 32
Process toolbar . . . . . . . . . . . . . . . . . . . . . . . . . . . . . . . . . . . . . . . . . . . . . . . . . . . . . . . . . . . . . . . . . . . . . . 33
Process toolbar . . . . . . . . . . . . . . . . . . . . . . . . . . . . . . . . . . . . . . . . . . . . . . . . . . . . . . . . . . . . . . . . . . . . . . 33
Effects toolbar . . . . . . . . . . . . . . . . . . . . . . . . . . . . . . . . . . . . . . . . . . . . . . . . . . . . . . . . . . . . . . . . . . . . . . . 34
Tools toolbar . . . . . . . . . . . . . . . . . . . . . . . . . . . . . . . . . . . . . . . . . . . . . . . . . . . . . . . . . . . . . . . . . . . . . . . . 35
Levels toolbar . . . . . . . . . . . . . . . . . . . . . . . . . . . . . . . . . . . . . . . . . . . . . . . . . . . . . . . . . . . . . . . . . . . . . . . 35
ACID Loop Creation Tools toolbar . . . . . . . . . . . . . . . . . . . . . . . . . . . . . . . . . . . . . . . . . . . . . . . . . . . . . 35
Play Device toolbar . . . . . . . . . . . . . . . . . . . . . . . . . . . . . . . . . . . . . . . . . . . . . . . . . . . . . . . . . . . . . . . . . . 36
Scripting toolbar . . . . . . . . . . . . . . . . . . . . . . . . . . . . . . . . . . . . . . . . . . . . . . . . . . . . . . . . . . . . . . . . . . . . . 36
ToolTips. . . . . . . . . . . . . . . . . . . . . . . . . . . . . . . . . . . . . . . . . . . . . . . . . . . . . . . . . . . . . . . . 36
Turning off ToolTips . . . . . . . . . . . . . . . . . . . . . . . . . . . . . . . . . . . . . . . . . . . . . . . . . . . . . . . . . . . . . . . . . 36
Command descriptions . . . . . . . . . . . . . . . . . . . . . . . . . . . . . . . . . . . . . . . . . . . . . . . . . . 36
Keyboard shortcuts. . . . . . . . . . . . . . . . . . . . . . . . . . . . . . . . . . . . . . . . . . . . . . . . . . . . . . 37
Meters . . . . . . . . . . . . . . . . . . . . . . . . . . . . . . . . . . . . . . . . . . . . . . . . . . . . . . . . . . . . . . . . . 37
Resetting clipping indicators . . . . . . . . . . . . . . . . . . . . . . . . . . . . . . . . . . . . . . . . . . . . . . . . . . . . . . . . . . 37
Scaling meters . . . . . . . . . . . . . . . . . . . . . . . . . . . . . . . . . . . . . . . . . . . . . . . . . . . . . . . . . . . . . . . . . . . . . . 38
Displaying VU/PPM meters . . . . . . . . . . . . . . . . . . . . . . . . . . . . . . . . . . . . . . . . . . . . . . . . . . . . . . . . . . . 38
Showing labels . . . . . . . . . . . . . . . . . . . . . . . . . . . . . . . . . . . . . . . . . . . . . . . . . . . . . . . . . . . . . . . . . . . . . . 38
Holding peaks and valleys . . . . . . . . . . . . . . . . . . . . . . . . . . . . . . . . . . . . . . . . . . . . . . . . . . . . . . . . . . . . 38
Controls. . . . . . . . . . . . . . . . . . . . . . . . . . . . . . . . . . . . . . . . . . . . . . . . . . . . . . . . . . . . . . . . 39
Faders and sliders . . . . . . . . . . . . . . . . . . . . . . . . . . . . . . . . . . . . . . . . . . . . . . . . . . . . . . . . . . . . . . . . . . . 39
Envelope graphs . . . . . . . . . . . . . . . . . . . . . . . . . . . . . . . . . . . . . . . . . . . . . . . . . . . . . . . . . . . . . . . . . . . . 39
Displaying the waveform on an envelope graph . . . . . . . . . . . . . . . . . . . . . . . . . . . . . . . . . . . . . . . . 41
Stereo files . . . . . . . . . . . . . . . . . . . . . . . . . . . . . . . . . . . . . . . . . . . . . . . . . . . . . . . . . . . . . 42
TABLE OF CONTENTS
Page 7

Working with stereo files . . . . . . . . . . . . . . . . . . . . . . . . . . . . . . . . . . . . . . . . . . . . . . . . . . . . . . . . . . . . . 42
Selecting data in stereo files . . . . . . . . . . . . . . . . . . . . . . . . . . . . . . . . . . . . . . . . . . . . . . . . . . . . . . . . . . 42
Getting Started. . . . . . . . . . . . . . . . . . . . . . . . . . . . . . . . . . . . . . . . . . 45
Creating a project. . . . . . . . . . . . . . . . . . . . . . . . . . . . . . . . . . . . . . . . . . . . . . . . . . . . . . . .45
Getting media files. . . . . . . . . . . . . . . . . . . . . . . . . . . . . . . . . . . . . . . . . . . . . . . . . . . . . . .46
Using the Open dialog . . . . . . . . . . . . . . . . . . . . . . . . . . . . . . . . . . . . . . . . . . . . . . . . . . . . . . . . . . . . . . . 46
Using the Explorer window . . . . . . . . . . . . . . . . . . . . . . . . . . . . . . . . . . . . . . . . . . . . . . . . . . . . . . . . . . . 47
Peak files . . . . . . . . . . . . . . . . . . . . . . . . . . . . . . . . . . . . . . . . . . . . . . . . . . . . . . . . . . . . . . . . . . . . . . . . . . . 48
Working with video files. . . . . . . . . . . . . . . . . . . . . . . . . . . . . . . . . . . . . . . . . . . . . . . . . . 48
Playing a file . . . . . . . . . . . . . . . . . . . . . . . . . . . . . . . . . . . . . . . . . . . . . . . . . . . . . . . . . . . . 49
Viewing the current position . . . . . . . . . . . . . . . . . . . . . . . . . . . . . . . . . . . . . . . . . . . . . . . . . . . . . . . . . . 49
Playing a file from a specified point . . . . . . . . . . . . . . . . . . . . . . . . . . . . . . . . . . . . . . . . . . . . . . . . . . . . 49
Playing in Loop Playback mode . . . . . . . . . . . . . . . . . . . . . . . . . . . . . . . . . . . . . . . . . . . . . . . . . . . . . . . 50
Playing a selection . . . . . . . . . . . . . . . . . . . . . . . . . . . . . . . . . . . . . . . . . . . . . . . . . . . . . . . . . . . . . . . . . . . 50
Viewing selection status . . . . . . . . . . . . . . . . . . . . . . . . . . . . . . . . . . . . . . . . . . . . . . . . . . . . . . . . . . . . . . 50
Viewing selection statistics . . . . . . . . . . . . . . . . . . . . . . . . . . . . . . . . . . . . . . . . . . . . . . . . . . . . . . . . . . . 51
Creating a new data window. . . . . . . . . . . . . . . . . . . . . . . . . . . . . . . . . . . . . . . . . . . . . . 52
3
Active data windows vs. inactive data windows . . . . . . . . . . . . . . . . . . . . . . . . . . . . . . . . . . . . . . . . . 52
Copying data to a new file . . . . . . . . . . . . . . . . . . . . . . . . . . . . . . . . . . . . . . . . . . . . . . . . . . . . . . . . . . . . 52
Working with files . . . . . . . . . . . . . . . . . . . . . . . . . . . . . . . . . . . . . . . . . . . . . . . . . . . . . . .53
Saving a file . . . . . . . . . . . . . . . . . . . . . . . . . . . . . . . . . . . . . . . . . . . . . . . . . . . . . . . . . . . . . . . . . . . . . . . . . 53
Using the Save As/Render As dialog . . . . . . . . . . . . . . . . . . . . . . . . . . . . . . . . . . . . . . . . . . . . . . . . . . . 53
Creating custom templates . . . . . . . . . . . . . . . . . . . . . . . . . . . . . . . . . . . . . . . . . . . . . . . . . . . . . . . . . . . 55
Creating custom rendering settings . . . . . . . . . . . . . . . . . . . . . . . . . . . . . . . . . . . . . . . . . . . . . . . . . . . . 55
Saving all open audio files . . . . . . . . . . . . . . . . . . . . . . . . . . . . . . . . . . . . . . . . . . . . . . . . . . . . . . . . . . . . 56
Saving files as a workspace . . . . . . . . . . . . . . . . . . . . . . . . . . . . . . . . . . . . . . . . . . . . . . . . . . . . . . . . . . . 56
Working with projects. . . . . . . . . . . . . . . . . . . . . . . . . . . . . . . . . . . . . . . . . . . . . . . . . . . . 56
Saving the project . . . . . . . . . . . . . . . . . . . . . . . . . . . . . . . . . . . . . . . . . . . . . . . . . . . . . . . . . . . . . . . . . . . 56
Saving the project path in the rendered file . . . . . . . . . . . . . . . . . . . . . . . . . . . . . . . . . . . . . . . . . . . . . 57
Editing a media file’s source project . . . . . . . . . . . . . . . . . . . . . . . . . . . . . . . . . . . . . . . . . . . . . . . . . . . 57
Editing audio . . . . . . . . . . . . . . . . . . . . . . . . . . . . . . . . . . . . . . . . . . . . . . . . . . . . . . . . . . .58
Copying . . . . . . . . . . . . . . . . . . . . . . . . . . . . . . . . . . . . . . . . . . . . . . . . . . . . . . . . . . . . . . . . . . . . . . . . . . . . 58
Pasting . . . . . . . . . . . . . . . . . . . . . . . . . . . . . . . . . . . . . . . . . . . . . . . . . . . . . . . . . . . . . . . . . . . . . . . . . . . . . 59
Cutting . . . . . . . . . . . . . . . . . . . . . . . . . . . . . . . . . . . . . . . . . . . . . . . . . . . . . . . . . . . . . . . . . . . . . . . . . . . . . 60
Deleting . . . . . . . . . . . . . . . . . . . . . . . . . . . . . . . . . . . . . . . . . . . . . . . . . . . . . . . . . . . . . . . . . . . . . . . . . . . . 61
Trimming/Cropping . . . . . . . . . . . . . . . . . . . . . . . . . . . . . . . . . . . . . . . . . . . . . . . . . . . . . . . . . . . . . . . . . . 61
Mixing . . . . . . . . . . . . . . . . . . . . . . . . . . . . . . . . . . . . . . . . . . . . . . . . . . . . . . . . . . . . . . . . . . . . . . . . . . . . . . 62
Using undo and redo . . . . . . . . . . . . . . . . . . . . . . . . . . . . . . . . . . . . . . . . . . . . . . . . . . . . 63
Using the Undo/Redo History window . . . . . . . . . . . . . . . . . . . . . . . . . . . . . . . . . . . . . . . . . . . . . . . . . 63
Selecting status formats. . . . . . . . . . . . . . . . . . . . . . . . . . . . . . . . . . . . . . . . . . . . . . . . . .65
TABLE OF CONTENTS
Page 8

4
Experimenting with status formats . . . . . . . . . . . . . . . . . . . . . . . . . . . . . . . . . . . . . . . . . . . . . . . . . . . . 66
Configuring the Measures & Beats format . . . . . . . . . . . . . . . . . . . . . . . . . . . . . . . . . . . . . . . . . . . . . 67
Publishing to the Web . . . . . . . . . . . . . . . . . . . . . . . . . . . . . . . . . . . . . . . . . . . . . . . . . . . 67
Exporting to CD Architect software . . . . . . . . . . . . . . . . . . . . . . . . . . . . . . . . . . . . . . . . 67
Exporting a single audio file . . . . . . . . . . . . . . . . . . . . . . . . . . . . . . . . . . . . . . . . . . . . . . . . . . . . . . . . . . 67
Exporting all audio files . . . . . . . . . . . . . . . . . . . . . . . . . . . . . . . . . . . . . . . . . . . . . . . . . . . . . . . . . . . . . . 68
Exporting to Net MD devices . . . . . . . . . . . . . . . . . . . . . . . . . . . . . . . . . . . . . . . . . . . . . 68
Recovering files after a crash . . . . . . . . . . . . . . . . . . . . . . . . . . . . . . . . . . . . . . . . . . . . . 68
Recovering files . . . . . . . . . . . . . . . . . . . . . . . . . . . . . . . . . . . . . . . . . . . . . . . . . . . . . . . . . . . . . . . . . . . . . 69
Deleting recovered files . . . . . . . . . . . . . . . . . . . . . . . . . . . . . . . . . . . . . . . . . . . . . . . . . . . . . . . . . . . . . . 69
Navigating, Zooming, and Selecting . . . . . . . . . . . . . . . . . . . . . . . 71
Setting the cursor position . . . . . . . . . . . . . . . . . . . . . . . . . . . . . . . . . . . . . . . . . . . . . . . 71
Previewing audio with pre-roll . . . . . . . . . . . . . . . . . . . . . . . . . . . . . . . . . . . . . . . . . . . . 71
Using the overview bar . . . . . . . . . . . . . . . . . . . . . . . . . . . . . . . . . . . . . . . . . . . . . . . . . . 72
Understanding the overview bar . . . . . . . . . . . . . . . . . . . . . . . . . . . . . . . . . . . . . . . . . . . . . . . . . . . . . . 72
Navigating in the overview bar . . . . . . . . . . . . . . . . . . . . . . . . . . . . . . . . . . . . . . . . . . . . . . . . . . . . . . . . 73
Playing audio in the overview bar . . . . . . . . . . . . . . . . . . . . . . . . . . . . . . . . . . . . . . . . . . . . . . . . . . . . . 74
Scrubbing . . . . . . . . . . . . . . . . . . . . . . . . . . . . . . . . . . . . . . . . . . . . . . . . . . . . . . . . . . . . . . . . . . . . . . . . . . 74
Zooming and magnifying . . . . . . . . . . . . . . . . . . . . . . . . . . . . . . . . . . . . . . . . . . . . . . . . 75
Zooming the time ruler (horizontal) . . . . . . . . . . . . . . . . . . . . . . . . . . . . . . . . . . . . . . . . . . . . . . . . . . . . 75
Zooming the level ruler (vertical) . . . . . . . . . . . . . . . . . . . . . . . . . . . . . . . . . . . . . . . . . . . . . . . . . . . . . . 77
Using custom zoom settings . . . . . . . . . . . . . . . . . . . . . . . . . . . . . . . . . . . . . . . . . . . . . . . . . . . . . . . . . . 78
Using zooming shortcuts . . . . . . . . . . . . . . . . . . . . . . . . . . . . . . . . . . . . . . . . . . . . . . . . . . . . . . . . . . . . . 79
Using the Magnify tool . . . . . . . . . . . . . . . . . . . . . . . . . . . . . . . . . . . . . . . . . . . . . . . . . . . . . . . . . . . . . . . 79
Selecting audio using start and end values. . . . . . . . . . . . . . . . . . . . . . . . . . . . . . . . . 81
Using the Set Selection dialog . . . . . . . . . . . . . . . . . . . . . . . . . . . . . . . . . . . . . . . . . . . . . . . . . . . . . . . . 81
Selecting audio during playback . . . . . . . . . . . . . . . . . . . . . . . . . . . . . . . . . . . . . . . . . . 82
Fine-tuning a selection. . . . . . . . . . . . . . . . . . . . . . . . . . . . . . . . . . . . . . . . . . . . . . . . . . . 82
Adjusting a selection with the mouse . . . . . . . . . . . . . . . . . . . . . . . . . . . . . . . . . . . . . . . . . . . . . . . . . . 82
Adjusting a selection with the keyboard . . . . . . . . . . . . . . . . . . . . . . . . . . . . . . . . . . . . . . . . . . . . . . . . 83
Restoring a selection . . . . . . . . . . . . . . . . . . . . . . . . . . . . . . . . . . . . . . . . . . . . . . . . . . . . . . . . . . . . . . . . . 83
Understanding snapping. . . . . . . . . . . . . . . . . . . . . . . . . . . . . . . . . . . . . . . . . . . . . . . . . 83
Snapping to time divisions . . . . . . . . . . . . . . . . . . . . . . . . . . . . . . . . . . . . . . . . . . . . . . . . . . . . . . . . . . . 83
Snapping to zero-crossings . . . . . . . . . . . . . . . . . . . . . . . . . . . . . . . . . . . . . . . . . . . . . . . . . . . . . . . . . . . 83
Snapping the current selection to time divisions or zero-crossings . . . . . . . . . . . . . . . . . . . . . . . . 83
Disabling Auto Snap to Zero at high magnifications . . . . . . . . . . . . . . . . . . . . . . . . . . . . . . . . . . . . . 83
Creating and using views . . . . . . . . . . . . . . . . . . . . . . . . . . . . . . . . . . . . . . . . . . . . . . . . 83
Displaying the Views toolbar . . . . . . . . . . . . . . . . . . . . . . . . . . . . . . . . . . . . . . . . . . . . . . . . . . . . . . . . . . 85
Creating views . . . . . . . . . . . . . . . . . . . . . . . . . . . . . . . . . . . . . . . . . . . . . . . . . . . . . . . . . . . . . . . . . . . . . . 85
TABLE OF CONTENTS
Page 9

Changing File Attributes and Formats . . . . . . . . . . . . . . . . . . . . . 87
Editing file attributes . . . . . . . . . . . . . . . . . . . . . . . . . . . . . . . . . . . . . . . . . . . . . . . . . . . . .87
Editing attributes in the Properties dialog . . . . . . . . . . . . . . . . . . . . . . . . . . . . . . . . . . . . . . . . . . . . . . . 87
Editing attributes in the status bar . . . . . . . . . . . . . . . . . . . . . . . . . . . . . . . . . . . . . . . . . . . . . . . . . . . . . 87
Changing the sample rate . . . . . . . . . . . . . . . . . . . . . . . . . . . . . . . . . . . . . . . . . . . . . . . .88
Changing the bit depth. . . . . . . . . . . . . . . . . . . . . . . . . . . . . . . . . . . . . . . . . . . . . . . . . . . 88
Increasing bit depth . . . . . . . . . . . . . . . . . . . . . . . . . . . . . . . . . . . . . . . . . . . . . . . . . . . . . . . . . . . . . . . . . . 88
Decreasing bit depth . . . . . . . . . . . . . . . . . . . . . . . . . . . . . . . . . . . . . . . . . . . . . . . . . . . . . . . . . . . . . . . . . 89
Understanding dither and noise shaping . . . . . . . . . . . . . . . . . . . . . . . . . . . . . . . . . . . . . . . . . . . . . . . 89
Minimizing quantization error . . . . . . . . . . . . . . . . . . . . . . . . . . . . . . . . . . . . . . . . . . . . . . . . . . . . . . . . . 90
Converting mono/stereo channels. . . . . . . . . . . . . . . . . . . . . . . . . . . . . . . . . . . . . . . . . 91
Converting from mono to stereo . . . . . . . . . . . . . . . . . . . . . . . . . . . . . . . . . . . . . . . . . . . . . . . . . . . . . . 91
Converting from stereo to mono . . . . . . . . . . . . . . . . . . . . . . . . . . . . . . . . . . . . . . . . . . . . . . . . . . . . . . 92
Using the Channel Converter . . . . . . . . . . . . . . . . . . . . . . . . . . . . . . . . . . . . . . . . . . . . . . . . . . . . . . . . . 92
Converting file formats. . . . . . . . . . . . . . . . . . . . . . . . . . . . . . . . . . . . . . . . . . . . . . . . . . . 92
Save as type . . . . . . . . . . . . . . . . . . . . . . . . . . . . . . . . . . . . . . . . . . . . . . . . . . . . . . . . . . . . . . . . . . . . . . . . 92
Template . . . . . . . . . . . . . . . . . . . . . . . . . . . . . . . . . . . . . . . . . . . . . . . . . . . . . . . . . . . . . . . . . . . . . . . . . . . 93
Adding summary information . . . . . . . . . . . . . . . . . . . . . . . . . . . . . . . . . . . . . . . . . . . .93
5
Viewing and editing summary information . . . . . . . . . . . . . . . . . . . . . . . . . . . . . . . . . . . . . . . . . . . . .93
Viewing extended summary information . . . . . . . . . . . . . . . . . . . . . . . . . . . . . . . . . . . . . . . . . . . . . .93
Editing extended summary information . . . . . . . . . . . . . . . . . . . . . . . . . . . . . . . . . . . . . . . . . . . . . . . . 94
Saving summary information . . . . . . . . . . . . . . . . . . . . . . . . . . . . . . . . . . . . . . . . . . . . . . . . . . . . . . . . . 94
Including additional embedded information . . . . . . . . . . . . . . . . . . . . . . . . . . . . . . . . . . . . . . . . . . . .94
Using Markers, Regions, and the Playlist/Cutlist . . . . . . . . . . . . 97
Why use markers, regions, and the playlist?. . . . . . . . . . . . . . . . . . . . . . . . . . . . . . . . 97
Rapid navigation . . . . . . . . . . . . . . . . . . . . . . . . . . . . . . . . . . . . . . . . . . . . . . . . . . . . . . . . . . . . . . . . . . . . 97
Added effects for streaming media . . . . . . . . . . . . . . . . . . . . . . . . . . . . . . . . . . . . . . . . . . . . . . . . . . . . 97
Multiple versions of edits . . . . . . . . . . . . . . . . . . . . . . . . . . . . . . . . . . . . . . . . . . . . . . . . . . . . . . . . . . . . . 97
MIDI synchronization and triggering . . . . . . . . . . . . . . . . . . . . . . . . . . . . . . . . . . . . . . . . . . . . . . . . . . .97
Using markers . . . . . . . . . . . . . . . . . . . . . . . . . . . . . . . . . . . . . . . . . . . . . . . . . . . . . . . . . .98
Inserting markers . . . . . . . . . . . . . . . . . . . . . . . . . . . . . . . . . . . . . . . . . . . . . . . . . . . . . . . . . . . . . . . . . . . . 98
Naming markers . . . . . . . . . . . . . . . . . . . . . . . . . . . . . . . . . . . . . . . . . . . . . . . . . . . . . . . . . . . . . . . . . . . . 98
Changing the marker position . . . . . . . . . . . . . . . . . . . . . . . . . . . . . . . . . . . . . . . . . . . . . . . . . . . . . . . . . 99
Detecting and marking clipping . . . . . . . . . . . . . . . . . . . . . . . . . . . . . . . . . . . . . . . . . . . . . . . . . . . . . . 100
Using markers to create regions . . . . . . . . . . . . . . . . . . . . . . . . . . . . . . . . . . . . . . . . . . . . . . . . . . . . . . 100
Using command markers in streaming media files. . . . . . . . . . . . . . . . . . . . . . . . .101
Defining streaming media commands . . . . . . . . . . . . . . . . . . . . . . . . . . . . . . . . . . . . . . . . . . . . . . . .101
Defining Scott Studios data commands . . . . . . . . . . . . . . . . . . . . . . . . . . . . . . . . . . . . . . . . . . . . . . .102
Inserting command markers . . . . . . . . . . . . . . . . . . . . . . . . . . . . . . . . . . . . . . . . . . . . . . . . . . . . . . . . .102
TABLE OF CONTENTS
Page 10

6
Editing command properties . . . . . . . . . . . . . . . . . . . . . . . . . . . . . . . . . . . . . . . . . . . . . . . . . . . . . . . . 103
Saving command properties as a custom template . . . . . . . . . . . . . . . . . . . . . . . . . . . . . . . . . . . . 103
Moving the cursor to a command marker . . . . . . . . . . . . . . . . . . . . . . . . . . . . . . . . . . . . . . . . . . . . . 103
Deleting command markers . . . . . . . . . . . . . . . . . . . . . . . . . . . . . . . . . . . . . . . . . . . . . . . . . . . . . . . . . 103
Using regions . . . . . . . . . . . . . . . . . . . . . . . . . . . . . . . . . . . . . . . . . . . . . . . . . . . . . . . . . 103
Inserting regions . . . . . . . . . . . . . . . . . . . . . . . . . . . . . . . . . . . . . . . . . . . . . . . . . . . . . . . . . . . . . . . . . . . 103
Inserting regions automatically . . . . . . . . . . . . . . . . . . . . . . . . . . . . . . . . . . . . . . . . . . . . . . . . . . . . . . 105
Editing regions . . . . . . . . . . . . . . . . . . . . . . . . . . . . . . . . . . . . . . . . . . . . . . . . . . . . . . . . . . . . . . . . . . . . . 107
Creating new files from regions . . . . . . . . . . . . . . . . . . . . . . . . . . . . . . . . . . . . . . . . . . . . . . . . . . . . . . 108
Using the Regions List . . . . . . . . . . . . . . . . . . . . . . . . . . . . . . . . . . . . . . . . . . . . . . . . . . 108
Displaying the Regions List . . . . . . . . . . . . . . . . . . . . . . . . . . . . . . . . . . . . . . . . . . . . . . . . . . . . . . . . . . 109
Working with the Regions List . . . . . . . . . . . . . . . . . . . . . . . . . . . . . . . . . . . . . . . . . . . . . . . . . . . . . . . 109
Using the playlist. . . . . . . . . . . . . . . . . . . . . . . . . . . . . . . . . . . . . . . . . . . . . . . . . . . . . . . 110
Displaying the playlist . . . . . . . . . . . . . . . . . . . . . . . . . . . . . . . . . . . . . . . . . . . . . . . . . . . . . . . . . . . . . . . 110
Adding regions to the playlist . . . . . . . . . . . . . . . . . . . . . . . . . . . . . . . . . . . . . . . . . . . . . . . . . . . . . . . . 111
Arranging the playlist . . . . . . . . . . . . . . . . . . . . . . . . . . . . . . . . . . . . . . . . . . . . . . . . . . . . . . . . . . . . . . . 111
Editing a playlist/cutlist region . . . . . . . . . . . . . . . . . . . . . . . . . . . . . . . . . . . . . . . . . . . . . . . . . . . . . . . 112
Using stop points . . . . . . . . . . . . . . . . . . . . . . . . . . . . . . . . . . . . . . . . . . . . . . . . . . . . . . . . . . . . . . . . . . . 112
Playing from the playlist . . . . . . . . . . . . . . . . . . . . . . . . . . . . . . . . . . . . . . . . . . . . . . . . . . . . . . . . . . . . . 113
Creating a new file from the playlist . . . . . . . . . . . . . . . . . . . . . . . . . . . . . . . . . . . . . . . . . . . . . . . . . . 113
Configuring the playlist as a cutlist . . . . . . . . . . . . . . . . . . . . . . . . . . . . . . . . . . . . . . . . . . . . . . . . . . . 114
Saving a playlist/cutlist file . . . . . . . . . . . . . . . . . . . . . . . . . . . . . . . . . . . . . . . . . . . . . . . . . . . . . . . . . . . 115
Opening a playlist/cutlist file . . . . . . . . . . . . . . . . . . . . . . . . . . . . . . . . . . . . . . . . . . . . . . . . . . . . . . . . . 115
Copying the playlist/cutlist to the clipboard . . . . . . . . . . . . . . . . . . . . . . . . . . . . . . . . . . . . . . . . . . . . 115
Recording, Extracting, and Burning. . . . . . . . . . . . . . . . . . . . . . . 117
Recording audio . . . . . . . . . . . . . . . . . . . . . . . . . . . . . . . . . . . . . . . . . . . . . . . . . . . . . . . 117
Specifying recording and playback options . . . . . . . . . . . . . . . . . . . . . . . . . . . . . . . . . . . . . . . . . . . .117
Recording manually . . . . . . . . . . . . . . . . . . . . . . . . . . . . . . . . . . . . . . . . . . . . . . . . . . . . . . . . . . . . . . . . 117
Recording automatically . . . . . . . . . . . . . . . . . . . . . . . . . . . . . . . . . . . . . . . . . . . . . . . . . . . . . . . . . . . . 119
Recording a specific length (punch-in) . . . . . . . . . . . . . . . . . . . . . . . . . . . . . . . . . . . . . . . . . . . . . . . . 122
Choosing a recording mode . . . . . . . . . . . . . . . . . . . . . . . . . . . . . . . . . . . . . . . . . . . . . . . . . . . . . . . . . 123
Adjusting for DC offset . . . . . . . . . . . . . . . . . . . . . . . . . . . . . . . . . . . . . . . . . . . . . . . . . . . . . . . . . . . . . . 126
Playing back recorded audio . . . . . . . . . . . . . . . . . . . . . . . . . . . . . . . . . . . . . . . . . . . . . . . . . . . . . . . . . 126
Using remote recording mode . . . . . . . . . . . . . . . . . . . . . . . . . . . . . . . . . . . . . . . . . . . . . . . . . . . . . . . 127
Synchronizing with other devices . . . . . . . . . . . . . . . . . . . . . . . . . . . . . . . . . . . . . . . . . . . . . . . . . . . . 128
Viewing input levels . . . . . . . . . . . . . . . . . . . . . . . . . . . . . . . . . . . . . . . . . . . . . . . . . . . . . . . . . . . . . . . . 129
Inserting markers while recording . . . . . . . . . . . . . . . . . . . . . . . . . . . . . . . . . . . . . . . . . . . . . . . . . . . . 130
Configuring gap detection . . . . . . . . . . . . . . . . . . . . . . . . . . . . . . . . . . . . . . . . . . . . . . . . . . . . . . . . . . . 130
Automatically labeling windows and regions . . . . . . . . . . . . . . . . . . . . . . . . . . . . . . . . . . . . . . . . . . 130
Changing blinking status . . . . . . . . . . . . . . . . . . . . . . . . . . . . . . . . . . . . . . . . . . . . . . . . . . . . . . . . . . . . 130
Extracting audio from CDs . . . . . . . . . . . . . . . . . . . . . . . . . . . . . . . . . . . . . . . . . . . . . . 131
TABLE OF CONTENTS
Page 11

Previewing CD tracks . . . . . . . . . . . . . . . . . . . . . . . . . . . . . . . . . . . . . . . . . . . . . . . . . . . . . . . . . . . . . . .132
Refreshing the Extract Audio from CD dialog . . . . . . . . . . . . . . . . . . . . . . . . . . . . . . . . . . . . . . . . . .132
Burning CDs . . . . . . . . . . . . . . . . . . . . . . . . . . . . . . . . . . . . . . . . . . . . . . . . . . . . . . . . . . .132
Correcting the sample rate for CD burning . . . . . . . . . . . . . . . . . . . . . . . . . . . . . . . . . . . . . . . . . . . .132
Writing mono tracks to a CD . . . . . . . . . . . . . . . . . . . . . . . . . . . . . . . . . . . . . . . . . . . . . . . . . . . . . . . . . 132
Adding tracks to a CD . . . . . . . . . . . . . . . . . . . . . . . . . . . . . . . . . . . . . . . . . . . . . . . . . . . . . . . . . . . . . . . 132
Closing a CD . . . . . . . . . . . . . . . . . . . . . . . . . . . . . . . . . . . . . . . . . . . . . . . . . . . . . . . . . . . . . . . . . . . . . . . 134
Proper use of software . . . . . . . . . . . . . . . . . . . . . . . . . . . . . . . . . . . . . . . . . . . . . . . . . .134
Editing, Repairing, and Synthesizing Audio . . . . . . . . . . . . . . . 135
Crossfading, overwriting, and replicating. . . . . . . . . . . . . . . . . . . . . . . . . . . . . . . . . .135
Crossfading . . . . . . . . . . . . . . . . . . . . . . . . . . . . . . . . . . . . . . . . . . . . . . . . . . . . . . . . . . . . . . . . . . . . . . . .135
Overwriting . . . . . . . . . . . . . . . . . . . . . . . . . . . . . . . . . . . . . . . . . . . . . . . . . . . . . . . . . . . . . . . . . . . . . . . .135
Replicating . . . . . . . . . . . . . . . . . . . . . . . . . . . . . . . . . . . . . . . . . . . . . . . . . . . . . . . . . . . . . . . . . . . . . . . . . 136
Repeating an operation . . . . . . . . . . . . . . . . . . . . . . . . . . . . . . . . . . . . . . . . . . . . . . . . .137
Using drag-and-drop. . . . . . . . . . . . . . . . . . . . . . . . . . . . . . . . . . . . . . . . . . . . . . . . . . . .138
Dragging mono selections into stereo destinations . . . . . . . . . . . . . . . . . . . . . . . . . . . . . . . . . . . . .138
Snapping to events in drag-and-drop operations . . . . . . . . . . . . . . . . . . . . . . . . . . . . . . . . . . . . . . . 138
Pasting, mixing, and crossfading with drag-and-drop . . . . . . . . . . . . . . . . . . . . . . . . . . . . . . . . . .138
Creating new windows with drag-and-drop . . . . . . . . . . . . . . . . . . . . . . . . . . . . . . . . . . . . . . . . . . . 140
Finding and repairing audio glitches. . . . . . . . . . . . . . . . . . . . . . . . . . . . . . . . . . . . . .140
7
Locating glitches . . . . . . . . . . . . . . . . . . . . . . . . . . . . . . . . . . . . . . . . . . . . . . . . . . . . . . . . . . . . . . . . . . . 140
Repairing audio . . . . . . . . . . . . . . . . . . . . . . . . . . . . . . . . . . . . . . . . . . . . . . . . . . . . . . . . . . . . . . . . . . . .141
Synthesizing audio . . . . . . . . . . . . . . . . . . . . . . . . . . . . . . . . . . . . . . . . . . . . . . . . . . . . .143
Generating DTMF/MF tones . . . . . . . . . . . . . . . . . . . . . . . . . . . . . . . . . . . . . . . . . . . . . . . . . . . . . . . . . 143
Generating audio with frequency modulation . . . . . . . . . . . . . . . . . . . . . . . . . . . . . . . . . . . . . . . . . 144
Generating simple waveforms . . . . . . . . . . . . . . . . . . . . . . . . . . . . . . . . . . . . . . . . . . . . . . . . . . . . . . .146
Processing Audio. . . . . . . . . . . . . . . . . . . . . . . . . . . . . . . . . . . . . . . 149
Applying presets . . . . . . . . . . . . . . . . . . . . . . . . . . . . . . . . . . . . . . . . . . . . . . . . . . . . . . .149
Using presets . . . . . . . . . . . . . . . . . . . . . . . . . . . . . . . . . . . . . . . . . . . . . . . . . . . . . . . . . . . . . . . . . . . . . . 149
Creating presets . . . . . . . . . . . . . . . . . . . . . . . . . . . . . . . . . . . . . . . . . . . . . . . . . . . . . . . . . . . . . . . . . . . . 150
Deleting presets . . . . . . . . . . . . . . . . . . . . . . . . . . . . . . . . . . . . . . . . . . . . . . . . . . . . . . . . . . . . . . . . . . . .150
Resetting parameters . . . . . . . . . . . . . . . . . . . . . . . . . . . . . . . . . . . . . . . . . . . . . . . . . . . . . . . . . . . . . . . 150
Managing presets . . . . . . . . . . . . . . . . . . . . . . . . . . . . . . . . . . . . . . . . . . . . . . . . . . . . . . . . . . . . . . . . . .150
Previewing processed audio . . . . . . . . . . . . . . . . . . . . . . . . . . . . . . . . . . . . . . . . . . . . .150
Setting custom preview parameters . . . . . . . . . . . . . . . . . . . . . . . . . . . . . . . . . . . . . . . . . . . . . . . . . . 151
Preview parameters . . . . . . . . . . . . . . . . . . . . . . . . . . . . . . . . . . . . . . . . . . . . . . . . . . . . . . . . . . . . . . . .151
Bypassing a process while previewing . . . . . . . . . . . . . . . . . . . . . . . . . . . . . . . . . . . . . . . . . . . . . . . .152
Sound Forge processes . . . . . . . . . . . . . . . . . . . . . . . . . . . . . . . . . . . . . . . . . . . . . . . . . 152
TABLE OF CONTENTS
Page 12

8
Auto Trim/Crop . . . . . . . . . . . . . . . . . . . . . . . . . . . . . . . . . . . . . . . . . . . . . . . . . . . . . . . . 152
Using Auto Trim/Crop . . . . . . . . . . . . . . . . . . . . . . . . . . . . . . . . . . . . . . . . . . . . . . . . . . . . . . . . . . . . . . . 152
Auto Trim/Crop controls . . . . . . . . . . . . . . . . . . . . . . . . . . . . . . . . . . . . . . . . . . . . . . . . . . . . . . . . . . . . . 153
Bit-Depth Converter . . . . . . . . . . . . . . . . . . . . . . . . . . . . . . . . . . . . . . . . . . . . . . . . . . . . 154
Converting a file’s bit depth . . . . . . . . . . . . . . . . . . . . . . . . . . . . . . . . . . . . . . . . . . . . . . . . . . . . . . . . . . 154
Channel Converter . . . . . . . . . . . . . . . . . . . . . . . . . . . . . . . . . . . . . . . . . . . . . . . . . . . . . 155
Using the Channel Converter . . . . . . . . . . . . . . . . . . . . . . . . . . . . . . . . . . . . . . . . . . . . . . . . . . . . . . . . 156
Channel Converter controls . . . . . . . . . . . . . . . . . . . . . . . . . . . . . . . . . . . . . . . . . . . . . . . . . . . . . . . . . . 156
DC Offset . . . . . . . . . . . . . . . . . . . . . . . . . . . . . . . . . . . . . . . . . . . . . . . . . . . . . . . . . . . . . . 157
Estimating DC Offset . . . . . . . . . . . . . . . . . . . . . . . . . . . . . . . . . . . . . . . . . . . . . . . . . . . . . . . . . . . . . . . . 157
DC Offset controls . . . . . . . . . . . . . . . . . . . . . . . . . . . . . . . . . . . . . . . . . . . . . . . . . . . . . . . . . . . . . . . . . . 157
EQ . . . . . . . . . . . . . . . . . . . . . . . . . . . . . . . . . . . . . . . . . . . . . . . . . . . . . . . . . . . . . . . . . . . . 158
Fade - Graphic fade. . . . . . . . . . . . . . . . . . . . . . . . . . . . . . . . . . . . . . . . . . . . . . . . . . . . . 158
Creating a graphic fade . . . . . . . . . . . . . . . . . . . . . . . . . . . . . . . . . . . . . . . . . . . . . . . . . . . . . . . . . . . . . . 158
Creating a custom graphic fade . . . . . . . . . . . . . . . . . . . . . . . . . . . . . . . . . . . . . . . . . . . . . . . . . . . . . . 159
Graphic Fade Controls . . . . . . . . . . . . . . . . . . . . . . . . . . . . . . . . . . . . . . . . . . . . . . . . . . . . . . . . . . . . . . 159
Fade - Fade In . . . . . . . . . . . . . . . . . . . . . . . . . . . . . . . . . . . . . . . . . . . . . . . . . . . . . . . . . . 160
Fade - Fade Out . . . . . . . . . . . . . . . . . . . . . . . . . . . . . . . . . . . . . . . . . . . . . . . . . . . . . . . . 160
Insert Silence . . . . . . . . . . . . . . . . . . . . . . . . . . . . . . . . . . . . . . . . . . . . . . . . . . . . . . . . . . 160
Inserting silence into a file . . . . . . . . . . . . . . . . . . . . . . . . . . . . . . . . . . . . . . . . . . . . . . . . . . . . . . . . . . . 160
Invert/Flip. . . . . . . . . . . . . . . . . . . . . . . . . . . . . . . . . . . . . . . . . . . . . . . . . . . . . . . . . . . . . . 161
Mute. . . . . . . . . . . . . . . . . . . . . . . . . . . . . . . . . . . . . . . . . . . . . . . . . . . . . . . . . . . . . . . . . . 161
Muting an audio selection . . . . . . . . . . . . . . . . . . . . . . . . . . . . . . . . . . . . . . . . . . . . . . . . . . . . . . . . . . . 161
Normalize . . . . . . . . . . . . . . . . . . . . . . . . . . . . . . . . . . . . . . . . . . . . . . . . . . . . . . . . . . . . . 162
Normalizing Audio . . . . . . . . . . . . . . . . . . . . . . . . . . . . . . . . . . . . . . . . . . . . . . . . . . . . . . . . . . . . . . . . . 162
Normalize Controls . . . . . . . . . . . . . . . . . . . . . . . . . . . . . . . . . . . . . . . . . . . . . . . . . . . . . . . . . . . . . . . . . 163
Pan/Expand. . . . . . . . . . . . . . . . . . . . . . . . . . . . . . . . . . . . . . . . . . . . . . . . . . . . . . . . . . . . 165
Creating a pan . . . . . . . . . . . . . . . . . . . . . . . . . . . . . . . . . . . . . . . . . . . . . . . . . . . . . . . . . . . . . . . . . . . . . 165
Creating a custom pan . . . . . . . . . . . . . . . . . . . . . . . . . . . . . . . . . . . . . . . . . . . . . . . . . . . . . . . . . . . . . . 165
Pan/Expand controls . . . . . . . . . . . . . . . . . . . . . . . . . . . . . . . . . . . . . . . . . . . . . . . . . . . . . . . . . . . . . . . . 166
Resample . . . . . . . . . . . . . . . . . . . . . . . . . . . . . . . . . . . . . . . . . . . . . . . . . . . . . . . . . . . . . 167
Downsampling audio . . . . . . . . . . . . . . . . . . . . . . . . . . . . . . . . . . . . . . . . . . . . . . . . . . . . . . . . . . . . . . . 167
Upsampling audio . . . . . . . . . . . . . . . . . . . . . . . . . . . . . . . . . . . . . . . . . . . . . . . . . . . . . . . . . . . . . . . . . . 167
Resample controls . . . . . . . . . . . . . . . . . . . . . . . . . . . . . . . . . . . . . . . . . . . . . . . . . . . . . . . . . . . . . . . . . . 168
Reverse . . . . . . . . . . . . . . . . . . . . . . . . . . . . . . . . . . . . . . . . . . . . . . . . . . . . . . . . . . . . . . . 168
Smooth/Enhance. . . . . . . . . . . . . . . . . . . . . . . . . . . . . . . . . . . . . . . . . . . . . . . . . . . . . . . 169
Swap Channels . . . . . . . . . . . . . . . . . . . . . . . . . . . . . . . . . . . . . . . . . . . . . . . . . . . . . . . . 169
Time Stretch . . . . . . . . . . . . . . . . . . . . . . . . . . . . . . . . . . . . . . . . . . . . . . . . . . . . . . . . . . . 169
TABLE OF CONTENTS
Page 13

Volume. . . . . . . . . . . . . . . . . . . . . . . . . . . . . . . . . . . . . . . . . . . . . . . . . . . . . . . . . . . . . . . .169
Increasing the volume of a selection . . . . . . . . . . . . . . . . . . . . . . . . . . . . . . . . . . . . . . . . . . . . . . . . . .169
Volume control . . . . . . . . . . . . . . . . . . . . . . . . . . . . . . . . . . . . . . . . . . . . . . . . . . . . . . . . . . . . . . . . . . . . .170
Working with Effects. . . . . . . . . . . . . . . . . . . . . . . . . . . . . . . . . . . . 171
Adding effects. . . . . . . . . . . . . . . . . . . . . . . . . . . . . . . . . . . . . . . . . . . . . . . . . . . . . . . . . .171
Applying an effect . . . . . . . . . . . . . . . . . . . . . . . . . . . . . . . . . . . . . . . . . . . . . . . . . . . . . . . . . . . . . . . . . .171
Saving effect settings as a custom preset . . . . . . . . . . . . . . . . . . . . . . . . . . . . . . . . . . . . . . . . . . . . .172
Using the Plug-In Chainer . . . . . . . . . . . . . . . . . . . . . . . . . . . . . . . . . . . . . . . . . . . . . . .172
Creating a plug-in chain . . . . . . . . . . . . . . . . . . . . . . . . . . . . . . . . . . . . . . . . . . . . . . . . . . . . . . . . . . . . . 173
Adding a plug-in to a chain . . . . . . . . . . . . . . . . . . . . . . . . . . . . . . . . . . . . . . . . . . . . . . . . . . . . . . . . . . 174
Removing a plug-in from a chain . . . . . . . . . . . . . . . . . . . . . . . . . . . . . . . . . . . . . . . . . . . . . . . . . . . . . 174
Arranging plug-ins on a chain . . . . . . . . . . . . . . . . . . . . . . . . . . . . . . . . . . . . . . . . . . . . . . . . . . . . . . . .174
Configuring chained plug-ins . . . . . . . . . . . . . . . . . . . . . . . . . . . . . . . . . . . . . . . . . . . . . . . . . . . . . . . .175
Bypassing effects . . . . . . . . . . . . . . . . . . . . . . . . . . . . . . . . . . . . . . . . . . . . . . . . . . . . . . . . . . . . . . . . . . . 175
Selecting the processing mode for audio tail data . . . . . . . . . . . . . . . . . . . . . . . . . . . . . . . . . . . . . .176
Saving plug-in chains . . . . . . . . . . . . . . . . . . . . . . . . . . . . . . . . . . . . . . . . . . . . . . . . . . . . . . . . . . . . . . . 176
Saving individual plug-in settings as a custom preset . . . . . . . . . . . . . . . . . . . . . . . . . . . . . . . . . .176
Loading plug-in chains or plug-in presets . . . . . . . . . . . . . . . . . . . . . . . . . . . . . . . . . . . . . . . . . . . . .177
Using the Plug-In Manager . . . . . . . . . . . . . . . . . . . . . . . . . . . . . . . . . . . . . . . . . . . . . .178
9
Applying a plug-in or chain to a media file . . . . . . . . . . . . . . . . . . . . . . . . . . . . . . . . . . . . . . . . . . . . .178
Renaming a plug-in . . . . . . . . . . . . . . . . . . . . . . . . . . . . . . . . . . . . . . . . . . . . . . . . . . . . . . . . . . . . . . . . .179
Hiding a plug-in . . . . . . . . . . . . . . . . . . . . . . . . . . . . . . . . . . . . . . . . . . . . . . . . . . . . . . . . . . . . . . . . . . . . 179
Organizing effects in the FX Favorites menu . . . . . . . . . . . . . . . . . . . . . . . . . . . . . . . . . . . . . . . . . . .180
Using the Preset Manager . . . . . . . . . . . . . . . . . . . . . . . . . . . . . . . . . . . . . . . . . . . . . . .180
Automating Effect Parameters . . . . . . . . . . . . . . . . . . . . . . . . . . . . . . . . . . . . . . . . . . .180
Adding an effect automation envelope . . . . . . . . . . . . . . . . . . . . . . . . . . . . . . . . . . . . . . . . . . . . . . . .181
Adding a volume or panning envelope . . . . . . . . . . . . . . . . . . . . . . . . . . . . . . . . . . . . . . . . . . . . . . . 181
Adjusting effect parameters with envelopes . . . . . . . . . . . . . . . . . . . . . . . . . . . . . . . . . . . . . . . . . . .181
Previewing effect automation . . . . . . . . . . . . . . . . . . . . . . . . . . . . . . . . . . . . . . . . . . . . . . . . . . . . . . . . 182
Applying effects automation . . . . . . . . . . . . . . . . . . . . . . . . . . . . . . . . . . . . . . . . . . . . . . . . . . . . . . . . .182
Showing or hiding effect automation envelopes . . . . . . . . . . . . . . . . . . . . . . . . . . . . . . . . . . . . . . . 182
Enabling or bypassing effect automation envelopes . . . . . . . . . . . . . . . . . . . . . . . . . . . . . . . . . . . .182
Removing effect automation envelopes . . . . . . . . . . . . . . . . . . . . . . . . . . . . . . . . . . . . . . . . . . . . . . . 182
Adjusting envelopes . . . . . . . . . . . . . . . . . . . . . . . . . . . . . . . . . . . . . . . . . . . . . . . . . . . .182
Adding envelope points . . . . . . . . . . . . . . . . . . . . . . . . . . . . . . . . . . . . . . . . . . . . . . . . . . . . . . . . . . . . .183
Flipping an envelope . . . . . . . . . . . . . . . . . . . . . . . . . . . . . . . . . . . . . . . . . . . . . . . . . . . . . . . . . . . . . . . . 183
Setting fade properties . . . . . . . . . . . . . . . . . . . . . . . . . . . . . . . . . . . . . . . . . . . . . . . . . . . . . . . . . . . . . . 183
Cutting, copying, and pasting envelope points . . . . . . . . . . . . . . . . . . . . . . . . . . . . . . . . . . . . . . . . .183
Copying an envelope to another data window . . . . . . . . . . . . . . . . . . . . . . . . . . . . . . . . . . . . . . . . . 184
TABLE OF CONTENTS
Page 14

10
Using Acoustic Mirror and Wave Hammer . . . . . . . . . . . . . . . . 185
What are the Acoustic Mirror effects?. . . . . . . . . . . . . . . . . . . . . . . . . . . . . . . . . . . . . 185
The acoustic signature . . . . . . . . . . . . . . . . . . . . . . . . . . . . . . . . . . . . . . . . . . . . . . . . . . . . . . . . . . . . . . 185
Adding an acoustic signature to an audio file. . . . . . . . . . . . . . . . . . . . . . . . . . . . . . 185
Adjusting the acoustic signature . . . . . . . . . . . . . . . . . . . . . . . . . . . . . . . . . . . . . . . . . . . . . . . . . . . . . 186
General tab controls . . . . . . . . . . . . . . . . . . . . . . . . . . . . . . . . . . . . . . . . . . . . . . . . . . . . . . . . . . . . . . . . 187
Envelope tab controls . . . . . . . . . . . . . . . . . . . . . . . . . . . . . . . . . . . . . . . . . . . . . . . . . . . . . . . . . . . . . . . 188
Summary tab controls . . . . . . . . . . . . . . . . . . . . . . . . . . . . . . . . . . . . . . . . . . . . . . . . . . . . . . . . . . . . . . 189
Recover tab controls . . . . . . . . . . . . . . . . . . . . . . . . . . . . . . . . . . . . . . . . . . . . . . . . . . . . . . . . . . . . . . . . 190
Creating impulse files . . . . . . . . . . . . . . . . . . . . . . . . . . . . . . . . . . . . . . . . . . . . . . . . . . . 191
What you need to create custom impulses . . . . . . . . . . . . . . . . . . . . . . . . . . . . . . . . . . . . . . . . . . . . 191
Recording the impulse in an acoustic space . . . . . . . . . . . . . . . . . . . . . . . . . . . . . . . . . . . . . . . . . . .192
Recording the impulse through an electronic device . . . . . . . . . . . . . . . . . . . . . . . . . . . . . . . . . . . 192
Recovering the impulse . . . . . . . . . . . . . . . . . . . . . . . . . . . . . . . . . . . . . . . . . . . . . . . . . . . . . . . . . . . . . 193
Trimming the impulse file . . . . . . . . . . . . . . . . . . . . . . . . . . . . . . . . . . . . . . . . . . . . . . . . . . . . . . . . . . . 194
Adding summary information to your impulse file . . . . . . . . . . . . . . . . . . . . . . . . . . . . . . . . . . . . . 194
Using the new impulse file . . . . . . . . . . . . . . . . . . . . . . . . . . . . . . . . . . . . . . . . . . . . . . . . . . . . . . . . . . 195
Using impulse files in creative ways . . . . . . . . . . . . . . . . . . . . . . . . . . . . . . . . . . . . . . 195
Processing individual audio elements . . . . . . . . . . . . . . . . . . . . . . . . . . . . . . . . . . . . . . . . . . . . . . . . 195
Adding realistic stereo to mono recordings . . . . . . . . . . . . . . . . . . . . . . . . . . . . . . . . . . . . . . . . . . . . 195
Creating special effects . . . . . . . . . . . . . . . . . . . . . . . . . . . . . . . . . . . . . . . . . . . . . . . . . . . . . . . . . . . . . . 195
Recreating spaces for foley effects and dialog replacement . . . . . . . . . . . . . . . . . . . . . . . . . . . . . 196
Panning with head-related transfer functions . . . . . . . . . . . . . . . . . . . . . . . . . . . . . . . . . . . . . . . . . .196
Troubleshooting the Acoustic Mirror effect. . . . . . . . . . . . . . . . . . . . . . . . . . . . . . . . 197
Stuttering during real-time previewing . . . . . . . . . . . . . . . . . . . . . . . . . . . . . . . . . . . . . . . . . . . . . . . . 197
Impulses do not recover properly . . . . . . . . . . . . . . . . . . . . . . . . . . . . . . . . . . . . . . . . . . . . . . . . . . . . 197
Recovered impulse is too noisy . . . . . . . . . . . . . . . . . . . . . . . . . . . . . . . . . . . . . . . . . . . . . . . . . . . . . . 198
Error message explanations . . . . . . . . . . . . . . . . . . . . . . . . . . . . . . . . . . . . . . . . . . . . . . . . . . . . . . . . . 198
What is the Wave Hammer plug-in? . . . . . . . . . . . . . . . . . . . . . . . . . . . . . . . . . . . . . . 198
Displaying the Wave Hammer plug-in . . . . . . . . . . . . . . . . . . . . . . . . . . . . . . . . . . . . . . . . . . . . . . . . 198
The Wave Hammer dialog . . . . . . . . . . . . . . . . . . . . . . . . . . . . . . . . . . . . . . . . . . . . . . 199
Compressor tab . . . . . . . . . . . . . . . . . . . . . . . . . . . . . . . . . . . . . . . . . . . . . . . . . . . . . . . . . . . . . . . . . . . . 199
Volume Maximizer tab . . . . . . . . . . . . . . . . . . . . . . . . . . . . . . . . . . . . . . . . . . . . . . . . . . . . . . . . . . . . . . 200
Utlilizing the Scripting Feature . . . . . . . . . . . . . . . . . . . . . . . . . . . 203
Scripting references . . . . . . . . . . . . . . . . . . . . . . . . . . . . . . . . . . . . . . . . . . . . . . . . . . . . 203
Sample scripts . . . . . . . . . . . . . . . . . . . . . . . . . . . . . . . . . . . . . . . . . . . . . . . . . . . . . . . . . . . . . . . . . . . . . 203
Additional scripting information . . . . . . . . . . . . . . . . . . . . . . . . . . . . . . . . . . . . . . . . . . . . . . . . . . . . . . 203
Opening the Script Editor window . . . . . . . . . . . . . . . . . . . . . . . . . . . . . . . . . . . . . . . 203
Opening and running a script. . . . . . . . . . . . . . . . . . . . . . . . . . . . . . . . . . . . . . . . . . . . 204
TABLE OF CONTENTS
Page 15

Running a script from the Script Editor window . . . . . . . . . . . . . . . . . . . . . . . . . . . . . . . . . . . . . . . . 204
Running a script from the Scripting menu . . . . . . . . . . . . . . . . . . . . . . . . . . . . . . . . . . . . . . . . . . . . .205
Adding scripts to the Scripting menu . . . . . . . . . . . . . . . . . . . . . . . . . . . . . . . . . . . . . . . . . . . . . . . . .205
Creating a script . . . . . . . . . . . . . . . . . . . . . . . . . . . . . . . . . . . . . . . . . . . . . . . . . . . . . . . . 205
Editing an existing script . . . . . . . . . . . . . . . . . . . . . . . . . . . . . . . . . . . . . . . . . . . . . . . .206
Using the Scripting toolbar . . . . . . . . . . . . . . . . . . . . . . . . . . . . . . . . . . . . . . . . . . . . . .206
Adding or removing toolbar buttons . . . . . . . . . . . . . . . . . . . . . . . . . . . . . . . . . . . . . . . . . . . . . . . . . .206
Creating custom button images . . . . . . . . . . . . . . . . . . . . . . . . . . . . . . . . . . . . . . . . . . . . . . . . . . . . . . 207
Running a script . . . . . . . . . . . . . . . . . . . . . . . . . . . . . . . . . . . . . . . . . . . . . . . . . . . . . . . . . . . . . . . . . . . . 207
Using the Batch Converter script . . . . . . . . . . . . . . . . . . . . . . . . . . . . . . . . . . . . . . . . .208
Converting using an existing batch job . . . . . . . . . . . . . . . . . . . . . . . . . . . . . . . . . . . . . . . . . . . . . . . .208
Creating or editing a batch job . . . . . . . . . . . . . . . . . . . . . . . . . . . . . . . . . . . . . . . . . . . . . . . . . . . . . . . 209
Working with MIDI/SMPTE . . . . . . . . . . . . . . . . . . . . . . . . . . . . . . 213
What is MIDI? . . . . . . . . . . . . . . . . . . . . . . . . . . . . . . . . . . . . . . . . . . . . . . . . . . . . . . . . . .213
MIDI triggers . . . . . . . . . . . . . . . . . . . . . . . . . . . . . . . . . . . . . . . . . . . . . . . . . . . . . . . . . . .213
11
Playback versus triggered playback . . . . . . . . . . . . . . . . . . . . . . . . . . . . . . . . . . . . . . . . . . . . . . . . . . . 213
Triggering file playback . . . . . . . . . . . . . . . . . . . . . . . . . . . . . . . . . . . . . . . . . . . . . . . . . . . . . . . . . . . . . 214
Triggering region playback . . . . . . . . . . . . . . . . . . . . . . . . . . . . . . . . . . . . . . . . . . . . . . . . . . . . . . . . . .215
Triggering playback from additional internal/external MIDI devices . . . . . . . . . . . . . . . . . . . . . . 216
Advantages of external MIDI controllers . . . . . . . . . . . . . . . . . . . . . . . . . . . . . . . . . . . . . . . . . . . . . .217
Sound Forge software and MIDI timecode synchronization . . . . . . . . . . . . . . . . .217
Playing regions using MTC from a sequencer . . . . . . . . . . . . . . . . . . . . . . . . . . . . . . . . . . . . . . . . . 218
Playing regions using MTC from an external device . . . . . . . . . . . . . . . . . . . . . . . . . . . . . . . . . . . . 219
Using Sound Forge software to generate MTC for a MIDI sequencer . . . . . . . . . . . . . . . . . . . . . 219
Using Sound Forge software to generate MTC for an external device . . . . . . . . . . . . . . . . . . . . 220
Sampling. . . . . . . . . . . . . . . . . . . . . . . . . . . . . . . . . . . . . . . . . . . . . . 221
Samplers . . . . . . . . . . . . . . . . . . . . . . . . . . . . . . . . . . . . . . . . . . . . . . . . . . . . . . . . . . . . . .221
External samplers . . . . . . . . . . . . . . . . . . . . . . . . . . . . . . . . . . . . . . . . . . . . . . . . . . . . . . . . . . . . . . . . . . 221
Internal samplers . . . . . . . . . . . . . . . . . . . . . . . . . . . . . . . . . . . . . . . . . . . . . . . . . . . . . . . . . . . . . . . . . . . 221
Configuring the Sampler Tool. . . . . . . . . . . . . . . . . . . . . . . . . . . . . . . . . . . . . . . . . . . .222
Creating a sampler configuration. . . . . . . . . . . . . . . . . . . . . . . . . . . . . . . . . . . . . . . . .222
Open loop versus closed loop . . . . . . . . . . . . . . . . . . . . . . . . . . . . . . . . . . . . . . . . . . . . . . . . . . . . . . . . 224
Saving sampler configurations. . . . . . . . . . . . . . . . . . . . . . . . . . . . . . . . . . . . . . . . . . .224
Sending and receiving samples . . . . . . . . . . . . . . . . . . . . . . . . . . . . . . . . . . . . . . . . . .225
Sending a sample . . . . . . . . . . . . . . . . . . . . . . . . . . . . . . . . . . . . . . . . . . . . . . . . . . . . . . . . . . . . . . . . . .225
Receiving a sample . . . . . . . . . . . . . . . . . . . . . . . . . . . . . . . . . . . . . . . . . . . . . . . . . . . . . . . . . . . . . . . . . 225
MIDI unity note and Fine tune . . . . . . . . . . . . . . . . . . . . . . . . . . . . . . . . . . . . . . . . . . . . . . . . . . . . . . . . 225
TABLE OF CONTENTS
Page 16

12
Using the MIDI Keyboard . . . . . . . . . . . . . . . . . . . . . . . . . . . . . . . . . . . . . . . . . . . . . . . 226
Displaying the MIDI Keyboard . . . . . . . . . . . . . . . . . . . . . . . . . . . . . . . . . . . . . . . . . . . . . . . . . . . . . . . 226
Turning on the MIDI Keyboard . . . . . . . . . . . . . . . . . . . . . . . . . . . . . . . . . . . . . . . . . . . . . . . . . . . . . . . 226
Configuring the MIDI Keyboard output port and channel . . . . . . . . . . . . . . . . . . . . . . . . . . . . . . . 226
Troubleshooting the MIDI Keyboard . . . . . . . . . . . . . . . . . . . . . . . . . . . . . . . . . . . . . . . . . . . . . . . . . . 226
Specifying instruments . . . . . . . . . . . . . . . . . . . . . . . . . . . . . . . . . . . . . . . . . . . . . . . . . . . . . . . . . . . . . . 227
Generating chords . . . . . . . . . . . . . . . . . . . . . . . . . . . . . . . . . . . . . . . . . . . . . . . . . . . . . . . . . . . . . . . . . . 227
Setting up MIDI/SDS hardware . . . . . . . . . . . . . . . . . . . . . . . . . . . . . . . . . . . . . . . . . . 227
Troubleshooting MIDI/SDS with open loop . . . . . . . . . . . . . . . . . . . . . . . . . . . . . . . 227
Setting up SCSI/SMDI hardware . . . . . . . . . . . . . . . . . . . . . . . . . . . . . . . . . . . . . . . . . 227
Troubleshooting SCSI/SMDI. . . . . . . . . . . . . . . . . . . . . . . . . . . . . . . . . . . . . . . . . . . . . 228
Conflicting SCSI IDs . . . . . . . . . . . . . . . . . . . . . . . . . . . . . . . . . . . . . . . . . . . . . . . . . . . . . . . . . . . . . . . . . 228
Periodic transfer failures . . . . . . . . . . . . . . . . . . . . . . . . . . . . . . . . . . . . . . . . . . . . . . . . . . . . . . . . . . . . . 228
Sampler is recognized but does not transfer reliably . . . . . . . . . . . . . . . . . . . . . . . . . . . . . . . . . . . 228
Looping . . . . . . . . . . . . . . . . . . . . . . . . . . . . . . . . . . . . . . . . . . . . . . . 231
Loops . . . . . . . . . . . . . . . . . . . . . . . . . . . . . . . . . . . . . . . . . . . . . . . . . . . . . . . . . . . . . . . . . 231
Sustaining and release loops . . . . . . . . . . . . . . . . . . . . . . . . . . . . . . . . . . . . . . . . . . . . . . . . . . . . . . . . 231
Creating a sustaining loop . . . . . . . . . . . . . . . . . . . . . . . . . . . . . . . . . . . . . . . . . . . . . . . . . . . . . . . . . . . 232
Creating a sustaining loop with a release loop . . . . . . . . . . . . . . . . . . . . . . . . . . . . . . . . . . . . . . . . .232
Looping techniques . . . . . . . . . . . . . . . . . . . . . . . . . . . . . . . . . . . . . . . . . . . . . . . . . . . . 233
Match endpoint amplitudes . . . . . . . . . . . . . . . . . . . . . . . . . . . . . . . . . . . . . . . . . . . . . . . . . . . . . . . . . 233
Match endpoint waveform slope . . . . . . . . . . . . . . . . . . . . . . . . . . . . . . . . . . . . . . . . . . . . . . . . . . . . . 234
Match endpoint sound levels . . . . . . . . . . . . . . . . . . . . . . . . . . . . . . . . . . . . . . . . . . . . . . . . . . . . . . . . 234
Avoid very short loops . . . . . . . . . . . . . . . . . . . . . . . . . . . . . . . . . . . . . . . . . . . . . . . . . . . . . . . . . . . . . . 234
Editing loops. . . . . . . . . . . . . . . . . . . . . . . . . . . . . . . . . . . . . . . . . . . . . . . . . . . . . . . . . . . 234
Editing a loop without the Loop Tuner . . . . . . . . . . . . . . . . . . . . . . . . . . . . . . . . . . . . . . . . . . . . . . . . 235
Editing a loop with the Loop Tuner . . . . . . . . . . . . . . . . . . . . . . . . . . . . . . . . . . . . . . . . . . . . . . . . . . . 235
Crossfading loops . . . . . . . . . . . . . . . . . . . . . . . . . . . . . . . . . . . . . . . . . . . . . . . . . . . . . . 237
Using the Crossfade Loop tool . . . . . . . . . . . . . . . . . . . . . . . . . . . . . . . . . . . . . . . . . . . . . . . . . . . . . . . 237
Creating loops for ACID software . . . . . . . . . . . . . . . . . . . . . . . . . . . . . . . . . . . . . . . . 238
Creating an ACID one-shot file . . . . . . . . . . . . . . . . . . . . . . . . . . . . . . . . . . . . . . . . . . . . . . . . . . . . . . . 238
Creating an ACID loop file . . . . . . . . . . . . . . . . . . . . . . . . . . . . . . . . . . . . . . . . . . . . . . . . . . . . . . . . . . . 239
Creating an ACID 2.0 disk-based file . . . . . . . . . . . . . . . . . . . . . . . . . . . . . . . . . . . . . . . . . . . . . . . . . . 239
Creating an ACID beatmapped file . . . . . . . . . . . . . . . . . . . . . . . . . . . . . . . . . . . . . . . . . . . . . . . . . . . . 240
Using the ACID Loop Creation Tools toolbar . . . . . . . . . . . . . . . . . . . . . . . . . . . . . . 240
Editing loops for ACID software. . . . . . . . . . . . . . . . . . . . . . . . . . . . . . . . . . . . . . . . . . 241
Halving or doubling a loop . . . . . . . . . . . . . . . . . . . . . . . . . . . . . . . . . . . . . . . . . . . . . . . . . . . . . . . . . . 241
Shifting a selection left or right . . . . . . . . . . . . . . . . . . . . . . . . . . . . . . . . . . . . . . . . . . . . . . . . . . . . . . . 241
Rotating audio . . . . . . . . . . . . . . . . . . . . . . . . . . . . . . . . . . . . . . . . . . . . . . . . . . . . . . . . . . . . . . . . . . . . . 241
TABLE OF CONTENTS
Page 17

Setting loop tempo . . . . . . . . . . . . . . . . . . . . . . . . . . . . . . . . . . . . . . . . . . . . . . . . . . . . . . . . . . . . . . . . . 242
Saving loop points. . . . . . . . . . . . . . . . . . . . . . . . . . . . . . . . . . . . . . . . . . . . . . . . . . . . . .243
Working with Video. . . . . . . . . . . . . . . . . . . . . . . . . . . . . . . . . . . . . 245
Viewing video . . . . . . . . . . . . . . . . . . . . . . . . . . . . . . . . . . . . . . . . . . . . . . . . . . . . . . . . . .245
Using the video strip . . . . . . . . . . . . . . . . . . . . . . . . . . . . . . . . . . . . . . . . . . . . . . . . . . . . . . . . . . . . . . . . 245
Previewing files with video . . . . . . . . . . . . . . . . . . . . . . . . . . . . . . . . . . . . . . . . . . . . . . . . . . . . . . . . . .247
Using an external monitor . . . . . . . . . . . . . . . . . . . . . . . . . . . . . . . . . . . . . . . . . . . . . . . . . . . . . . . . . . . 248
Attaching video to an audio file . . . . . . . . . . . . . . . . . . . . . . . . . . . . . . . . . . . . . . . . . .249
Detaching video from an audio file . . . . . . . . . . . . . . . . . . . . . . . . . . . . . . . . . . . . . . .249
Setting video options . . . . . . . . . . . . . . . . . . . . . . . . . . . . . . . . . . . . . . . . . . . . . . . . . . .250
Video file properties . . . . . . . . . . . . . . . . . . . . . . . . . . . . . . . . . . . . . . . . . . . . . . . . . . . . . . . . . . . . . . . . . 250
Configuring your video settings . . . . . . . . . . . . . . . . . . . . . . . . . . . . . . . . . . . . . . . . . . . . . . . . . . . . . . 250
Saving a video file . . . . . . . . . . . . . . . . . . . . . . . . . . . . . . . . . . . . . . . . . . . . . . . . . . . . . . 251
Using Spectrum Analysis . . . . . . . . . . . . . . . . . . . . . . . . . . . . . . . 253
13
Working in the frequency domain . . . . . . . . . . . . . . . . . . . . . . . . . . . . . . . . . . . . . . . . 253
Fast Fourier Transform . . . . . . . . . . . . . . . . . . . . . . . . . . . . . . . . . . . . . . . . . . . . . . . . . . . . . . . . . . . . . . 254
Using a spectrum graph. . . . . . . . . . . . . . . . . . . . . . . . . . . . . . . . . . . . . . . . . . . . . . . . .254
Displaying a spectrum graph . . . . . . . . . . . . . . . . . . . . . . . . . . . . . . . . . . . . . . . . . . . . . . . . . . . . . . . . 254
Monitoring an input and output source . . . . . . . . . . . . . . . . . . . . . . . . . . . . . . . . . . . . . . . . . . . . . . .255
Displaying frequency and amplitude values, notes and statistics . . . . . . . . . . . . . . . . . . . . . . . . . 255
Navigating a spectrum graph . . . . . . . . . . . . . . . . . . . . . . . . . . . . . . . . . . . . . . . . . . . . . . . . . . . . . . . . 256
Changing the graph type . . . . . . . . . . . . . . . . . . . . . . . . . . . . . . . . . . . . . . . . . . . . . . . . . . . . . . . . . . . .256
Changing the zoom level . . . . . . . . . . . . . . . . . . . . . . . . . . . . . . . . . . . . . . . . . . . . . . . . . . . . . . . . . . . .256
Working with stereo files . . . . . . . . . . . . . . . . . . . . . . . . . . . . . . . . . . . . . . . . . . . . . . . . . . . . . . . . . . . .257
Updating a spectrum graph . . . . . . . . . . . . . . . . . . . . . . . . . . . . . . . . . . . . . . . . . . . . . . . . . . . . . . . . . . 257
Viewing multiple spectrum graphs . . . . . . . . . . . . . . . . . . . . . . . . . . . . . . . . . . . . . . . . . . . . . . . . . . .257
Creating and comparing snapshots of the Spectrum Analysis window . . . . . . . . . . . . . . . . . . . 258
Printing the graph . . . . . . . . . . . . . . . . . . . . . . . . . . . . . . . . . . . . . . . . . . . . . . . . . . . . . . . . . . . . . . . . . . 258
Using a sonogram. . . . . . . . . . . . . . . . . . . . . . . . . . . . . . . . . . . . . . . . . . . . . . . . . . . . . .259
Displaying a sonogram . . . . . . . . . . . . . . . . . . . . . . . . . . . . . . . . . . . . . . . . . . . . . . . . . . . . . . . . . . . . . .259
Displaying frequency and amplitude values, notes and statistics . . . . . . . . . . . . . . . . . . . . . . . . . 259
Updating a sonogram . . . . . . . . . . . . . . . . . . . . . . . . . . . . . . . . . . . . . . . . . . . . . . . . . . . . . . . . . . . . . . . 260
Monitoring an input and output source . . . . . . . . . . . . . . . . . . . . . . . . . . . . . . . . . . . . . . . . . . . . . . .260
Tuning a sonogram . . . . . . . . . . . . . . . . . . . . . . . . . . . . . . . . . . . . . . . . . . . . . . . . . . . . . . . . . . . . . . . . . 260
Returning to a spectrum graph . . . . . . . . . . . . . . . . . . . . . . . . . . . . . . . . . . . . . . . . . . . . . . . . . . . . . . . 261
Printing the sonogram . . . . . . . . . . . . . . . . . . . . . . . . . . . . . . . . . . . . . . . . . . . . . . . . . . . . . . . . . . . . . . 261
Adjusting Spectrum Analysis settings . . . . . . . . . . . . . . . . . . . . . . . . . . . . . . . . . . . .262
Saving spectrum graph settings . . . . . . . . . . . . . . . . . . . . . . . . . . . . . . . . . . . . . . . . . . . . . . . . . . . . . . 263
TABLE OF CONTENTS
Page 18

14
Customizing Sound Forge . . . . . . . . . . . . . . . . . . . . . . . . . . . . . . . 265
Setting preferences. . . . . . . . . . . . . . . . . . . . . . . . . . . . . . . . . . . . . . . . . . . . . . . . . . . . . 265
General tab . . . . . . . . . . . . . . . . . . . . . . . . . . . . . . . . . . . . . . . . . . . . . . . . . . . . . . . . . . . . . . . . . . . . . . . . 265
Display tab . . . . . . . . . . . . . . . . . . . . . . . . . . . . . . . . . . . . . . . . . . . . . . . . . . . . . . . . . . . . . . . . . . . . . . . . . 267
Editing tab . . . . . . . . . . . . . . . . . . . . . . . . . . . . . . . . . . . . . . . . . . . . . . . . . . . . . . . . . . . . . . . . . . . . . . . . . 268
Labels tab . . . . . . . . . . . . . . . . . . . . . . . . . . . . . . . . . . . . . . . . . . . . . . . . . . . . . . . . . . . . . . . . . . . . . . . . . . 269
File Types tab . . . . . . . . . . . . . . . . . . . . . . . . . . . . . . . . . . . . . . . . . . . . . . . . . . . . . . . . . . . . . . . . . . . . . . 270
MIDI/Sync tab . . . . . . . . . . . . . . . . . . . . . . . . . . . . . . . . . . . . . . . . . . . . . . . . . . . . . . . . . . . . . . . . . . . . . . 270
Previews tab . . . . . . . . . . . . . . . . . . . . . . . . . . . . . . . . . . . . . . . . . . . . . . . . . . . . . . . . . . . . . . . . . . . . . . . 271
Status tab . . . . . . . . . . . . . . . . . . . . . . . . . . . . . . . . . . . . . . . . . . . . . . . . . . . . . . . . . . . . . . . . . . . . . . . . . . 272
Toolbars tab . . . . . . . . . . . . . . . . . . . . . . . . . . . . . . . . . . . . . . . . . . . . . . . . . . . . . . . . . . . . . . . . . . . . . . . 273
Audio tab . . . . . . . . . . . . . . . . . . . . . . . . . . . . . . . . . . . . . . . . . . . . . . . . . . . . . . . . . . . . . . . . . . . . . . . . . . 273
Video tab . . . . . . . . . . . . . . . . . . . . . . . . . . . . . . . . . . . . . . . . . . . . . . . . . . . . . . . . . . . . . . . . . . . . . . . . . . 275
VST Effects tab . . . . . . . . . . . . . . . . . . . . . . . . . . . . . . . . . . . . . . . . . . . . . . . . . . . . . . . . . . . . . . . . . . . . . 275
Keyboard tab . . . . . . . . . . . . . . . . . . . . . . . . . . . . . . . . . . . . . . . . . . . . . . . . . . . . . . . . . . . . . . . . . . . . . . 275
Shortcuts . . . . . . . . . . . . . . . . . . . . . . . . . . . . . . . . . . . . . . . . . . . . . . 277
Keyboard shortcuts. . . . . . . . . . . . . . . . . . . . . . . . . . . . . . . . . . . . . . . . . . . . . . . . . . . . . 277
Project file commands . . . . . . . . . . . . . . . . . . . . . . . . . . . . . . . . . . . . . . . . . . . . . . . . . . . . . . . . . . . . . . 277
Magnification and view commands . . . . . . . . . . . . . . . . . . . . . . . . . . . . . . . . . . . . . . . . . . . . . . . . . . 277
Data window edit commands . . . . . . . . . . . . . . . . . . . . . . . . . . . . . . . . . . . . . . . . . . . . . . . . . . . . . . . . 278
Cursor movement . . . . . . . . . . . . . . . . . . . . . . . . . . . . . . . . . . . . . . . . . . . . . . . . . . . . . . . . . . . . . . . . . . 280
Selecting data . . . . . . . . . . . . . . . . . . . . . . . . . . . . . . . . . . . . . . . . . . . . . . . . . . . . . . . . . . . . . . . . . . . . . . 281
Navigation and playback . . . . . . . . . . . . . . . . . . . . . . . . . . . . . . . . . . . . . . . . . . . . . . . . . . . . . . . . . . . . 282
Record dialog keyboard shortcuts . . . . . . . . . . . . . . . . . . . . . . . . . . . . . . . . . . . . . . . . . . . . . . . . . . . . 282
Plug-In Chainer . . . . . . . . . . . . . . . . . . . . . . . . . . . . . . . . . . . . . . . . . . . . . . . . . . . . . . . . . . . . . . . . . . . . . 283
Regions List . . . . . . . . . . . . . . . . . . . . . . . . . . . . . . . . . . . . . . . . . . . . . . . . . . . . . . . . . . . . . . . . . . . . . . . 283
Playlist . . . . . . . . . . . . . . . . . . . . . . . . . . . . . . . . . . . . . . . . . . . . . . . . . . . . . . . . . . . . . . . . . . . . . . . . . . . . 283
Script Editor . . . . . . . . . . . . . . . . . . . . . . . . . . . . . . . . . . . . . . . . . . . . . . . . . . . . . . . . . . . . . . . . . . . . . . . . 283
Mouse wheel shortcuts . . . . . . . . . . . . . . . . . . . . . . . . . . . . . . . . . . . . . . . . . . . . . . . . . 285
Additional mouse shortcuts . . . . . . . . . . . . . . . . . . . . . . . . . . . . . . . . . . . . . . . . . . . . . . . . . . . . . . . . . 285
Microsoft Audio Compression Manager . . . . . . . . . . . . . . . . . . 287
Audio data compression and decompression . . . . . . . . . . . . . . . . . . . . . . . . . . . . . 287
Transparent playback and recording of non-hardware supported audio files . 287
SMPTE Timecode . . . . . . . . . . . . . . . . . . . . . . . . . . . . . . . . . . . . . . 289
SMPTE 25 EBU (25 fps, Video) . . . . . . . . . . . . . . . . . . . . . . . . . . . . . . . . . . . . . . . . . . . 289
SMPTE Drop Frame (29.97 fps, Video) . . . . . . . . . . . . . . . . . . . . . . . . . . . . . . . . . . . . 289
SMPTE Non-Drop Frame (29.97 fps, Video) . . . . . . . . . . . . . . . . . . . . . . . . . . . . . . . 289
TABLE OF CONTENTS
Page 19

SMPTE 30 (30 fps, Audio). . . . . . . . . . . . . . . . . . . . . . . . . . . . . . . . . . . . . . . . . . . . . . . .290
SMPTE Film Sync (24 fps) . . . . . . . . . . . . . . . . . . . . . . . . . . . . . . . . . . . . . . . . . . . . . . .290
Using CSOUND, MTU, IRCAM, BICSF, and EBICSF Files. . . . 291
About IRCAM files . . . . . . . . . . . . . . . . . . . . . . . . . . . . . . . . . . . . . . . . . . . . . . . . . . . . . . 291
About BICSF and EBICSF files. . . . . . . . . . . . . . . . . . . . . . . . . . . . . . . . . . . . . . . . . . . .291
Opening files. . . . . . . . . . . . . . . . . . . . . . . . . . . . . . . . . . . . . . . . . . . . . . . . . . . . . . . . . . .291
BICSF and EBICSF files . . . . . . . . . . . . . . . . . . . . . . . . . . . . . . . . . . . . . . . . . . . . . . . . . . . . . . . . . . . . . .291
IRCAM, CSOUND and MTU files . . . . . . . . . . . . . . . . . . . . . . . . . . . . . . . . . . . . . . . . . . . . . . . . . . . . . 291
Saving files . . . . . . . . . . . . . . . . . . . . . . . . . . . . . . . . . . . . . . . . . . . . . . . . . . . . . . . . . . . .292
Index. . . . . . . . . . . . . . . . . . . . . . . . . . . . . . . . . . . . . . . . . . . . . . . . . . . . . i
15
TABLE OF CONTENTS
Page 20

16
TABLE OF CONTENTS
Page 21

CHAPTER
Introduction
1
1
Introducing Sound Forge software
Thank you for purchasing Sound Forge® software and for your continued support of the Sony Pictures
Digital family of products. The software provides you with the powerful features you have come to expect, as
well as a number of new features designed to make digital audio editing quick and easy.
Sample files
Throughout the manual, you will find references to six sample audio files. The manual directs you to use
these files as you experiment with different Sound Forge features. These files are installed in the same folder
as the application:
17
•Drumhit.pca
• Fill.pca
• Loop.pca
• Musicbed.pca
• Saxriff.pca
• Voiceover.pca
The files are in Perfect Clarity Audio® (PCA) format, a Sony Pictures Digital proprietary lossless audio
compression format.
Using this manual
This manual is provided to assist users of the full version of Sound Forge software as well as Sound Forge
Audio Studio users. For this reason, product features exclusive to the Sound Forge full version are identified
throughout the manual using the following icon:
In addition, Sound Forge Audio Studio-only issues are identified and described where appropriate.
Shortcuts
As experienced users of Sound Forge products know, there are often several methods of executing a
command, including menus, shortcut menus, and keystrokes. Throughout this manual, the typical method of
executing a command is identified in the procedure, and alternate methods are identified in a section
indicated by the following icon:
CHP. 1 INTRODUCTION
Page 22
18
A full list of keyboard and mouse shortcuts appears in the first appendix to this manual. For more information,
see Shortcuts on page 277.
System requirements
The following lists the minimum system requirements for using Sound Forge and Sound Forge Audio Studio
products:
• 500 MHz processor
• 128 MB RAM, 256 MB recommended
• 150 MB hard-disk space for program installation
• Microsoft Windows® 2000, XP Home or XP Professional
• Microsoft Windows®-compatible sound card
• CD-ROM drive (for installation from a CD only)
• Supported CD-Recordable drive (for CD burning only)
• DirectX® Media 8.0 or later (version 8.0 included on CD-ROM)
• Microsoft® Internet Explorer 5.1 or later to view online help (included on CD-ROM)
Installing Sound Forge software
The install utility, setup.exe, located on the Sound Forge CD-ROM, creates the necessary folders and copies
all files required to operate Sound Forge software.
Note:
The Sound Forge application requires Microsoft
DirectX 8.0 or later and Internet Explorer 5.1 or later. The
setup program alerts you if either is not detected on your
system and prompts their installation from the Sound Forge
CD-ROM.
1.
Place the Sound Forge CD-ROM in your system’s CD-ROM drive. AutoPlay launches the Setup menu.
Note:
and choose
If AutoPlay is not turned on, click the Start button
Run. Type “D:\setup.exe”, where D is the drive
letter of your CD-ROM drive.
2.
Click Install, and follow the instructions in the dialogs to complete the installation.
Getting help
You can access two varieties of help within the software:
• Online help
• What’s This? help (also referred to as context-sensitive help)
Online help
To access online help, choose Contents and Index from the Help menu.
Press .
Note:
INTRODUCTION CHP. 1
F1
To view online help, Internet Explorer 5.1 or later
Page 23
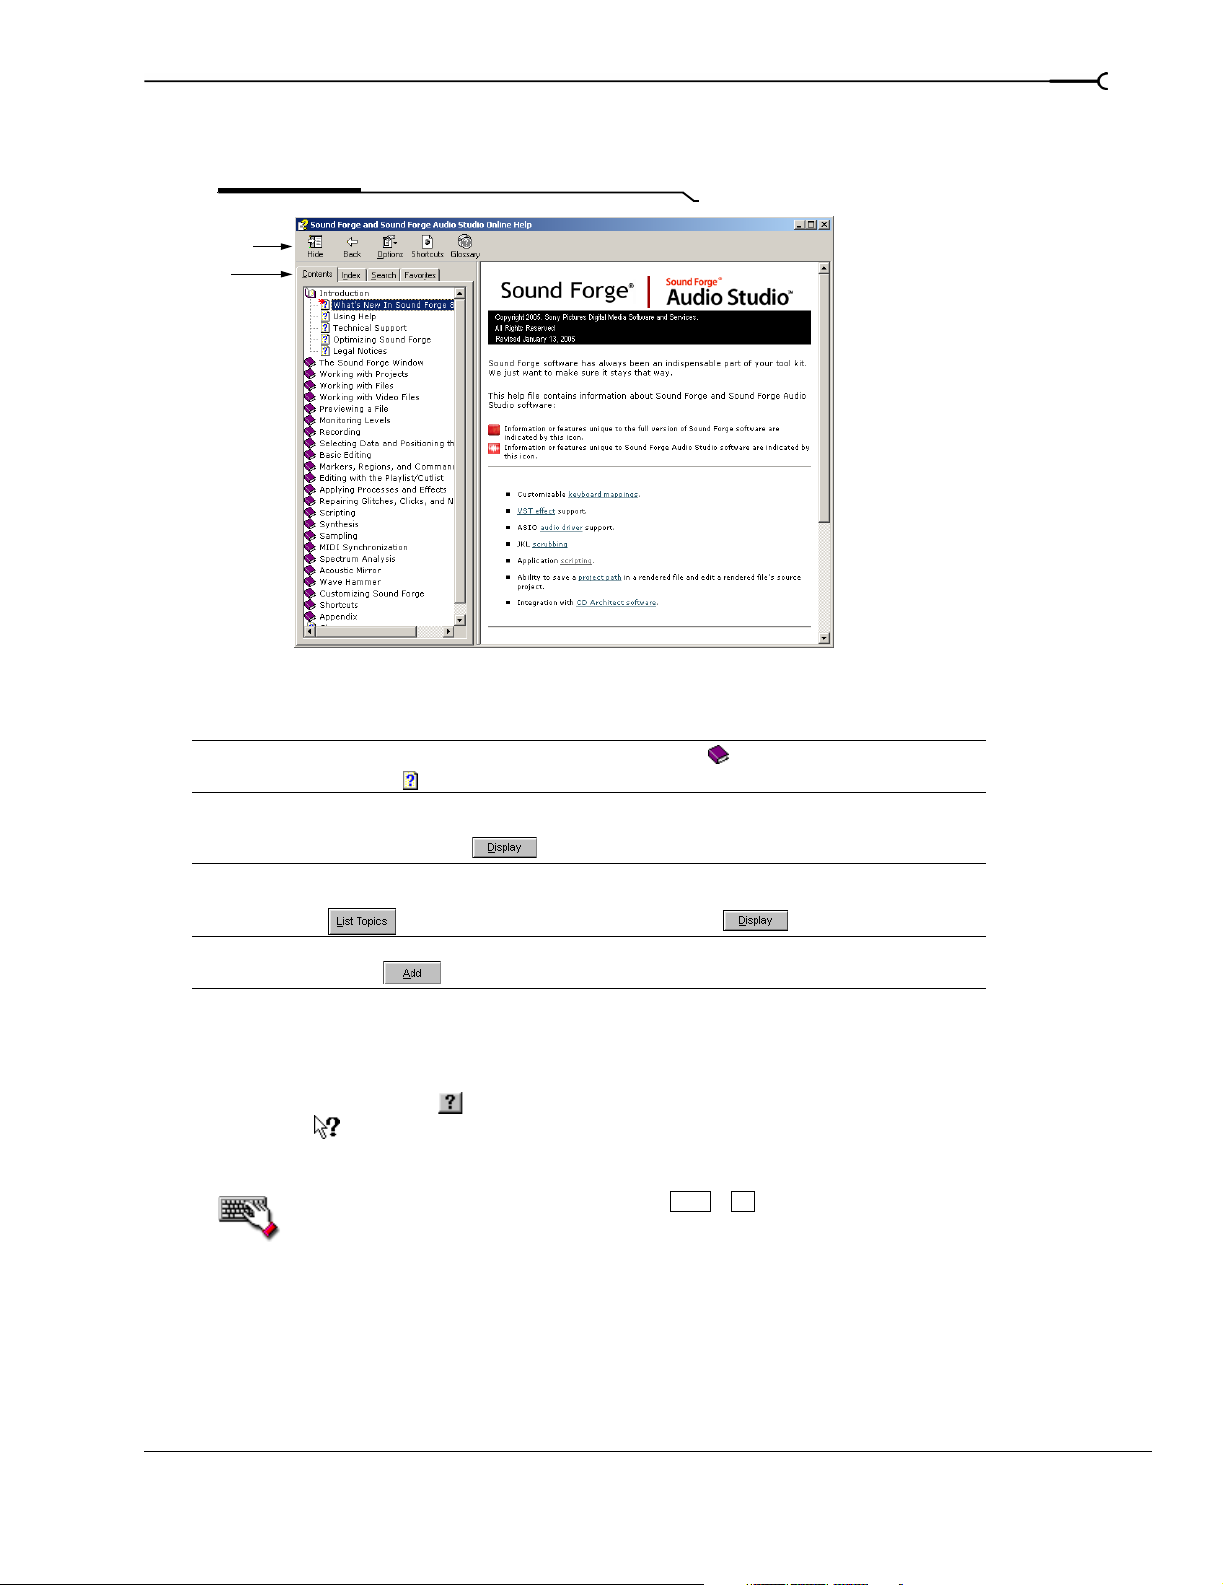
must be installed on your system. If you purchased the Sound
Forge boxed version, Internet Explorer version 5.1 is
included on your CD-ROM.
Toolbar
Tabs
Information
pane
19
The following table describes the four tabs of the Online Help window.
Tab Description
Contents
Index Provides a complete listing of the help topics available. Scroll through the list of available topics or type
Search Allows you to enter a keyword and display all of the topics in the online help that contain the keyword
Favorites Allows you to keep topics that you revisit often in a separate folder. To add a topic to your favorites,
Provides a list of available help topics. Click a closed book ( ) to open the pages, and then click on a
topic page ( ).
a word in the Type in the keyword to find box to quickly locate topics related to that word. Select
the topic and click the
you have entered. Type a keyword in the Type in the word(s) to search for box and click the
button. Select the topic from the list and click the button.
click the
button on the Favorites tab.
button.
What’s This? help
What’s This? help allows you to view pop-up descriptions of controls in dialog boxes.
1.
Click the question mark in the upper-right corner of the dialog box. The cursor changes to a question
mark icon .
2.
Click a control in the dialog box. A pop-up description of the item appears.
Click a control in the dialog box and press + .
Shift F1
Help on the Web
Additional Sound Forge information is available on the Sony Pictures Digital Media Software Web site.
From the
software starts your system’s Web browser and attempts to connect to the appropriate page on the Sony Web
site.
CHP. 1 INTRODUCTION
Help menu, choose Sony on the Web, and choose the desired location from the submenu. The
Page 24

20
About your rights in Sound Forge software
Sound Forge software is licensed to you under the terms of the End User License Agreement. The End User
License Agreement is first presented to you when you install the software. Please review the End User
License Agreement carefully as its terms affect your rights with respect to the software. For your reference, a
copy of the End User License Agreement for Sound Forge software is located at http://www.sony.com/
mediasoftware.
About Your Privacy
Sony Pictures Digital respects your privacy and are committed to protecting personal information. Your use
of the software is governed by the Software Privacy Policy. A copy of this policy is incorporated into the
registration process and you are asked to agree to its terms prior to accepting the terms of the End User
License Agreement. Please review its contents carefully as its terms and conditions affect your rights with
respect to the information that is collected by the software. For your reference, a copy of the Software
Privacy Policy is located at http://www.sony.com/mediasoftware.
Proper Use of Software
The Sound Forge software is not intended for, and should not be used for, illegal or infringing purposes, such
as the illegal copying or sharing of copyrighted materials. Using Sound Forge software for such purposes is,
among other things, against United States and international copyright laws and contrary to the terms and
conditions of the End User License Agreement. Such activity may be punishable by law and may also subject
you to the breach remedies set forth in the End User License Agreement.
INTRODUCTION CHP. 1
Page 25

CHAPTER
Optimizing for
Sound Forge
2
2
Software
This chapter contains information on configuring your system to optimize the performance of Sound Forge®
software.
Defragmenting your hard drive
The Sound Forge application is a disk-based digital audio editor that allows editing operations to be
performed on the system’s hard drive rather than in memory. Because of this, you are able to edit large files as
well as retain extensive undo/redo information and clipboard data.This also means that the hard drive
specified for temporary storage must have sufficient free space to store large quantities of data.
With time and usage, hard drives become fragmented, leading to discontiguous files and slow access. This is
particularly true for older hard drives. Since the software is hard drive intensive, faster disk access equates
better performance. Therefore, the initial step in improving system performance is hard drive
defragmentation. The computer’s operating system is typically equipped with a defragmenting program that
should be run prior to using Sound Forge software.
21
Increasing total buffer size
The total buffer size value determines the amount of RAM used for recording to/playing from the hard drive.
A total buffer size of 512 KB is recommended, but increased buffering may be necessary if you detect gaps
during playback.
Increasing the total buffer size
result in a delay when starting and stopping playback.
1.
From the Options menu, choose Preferences. The Preferences dialog appears.
2.
Click the Audio tab.
3.
Use the Playback buffering slider to configure an appropriate buffer size value and click OK.
Turning off the playback cursor and record counter
The playback cursor and record counter options determine whether these displays are updated during
recording and playback. If you detect dropouts and skipping at high sample rates (greater than 44,100 Hz),
turn these displays off to minimize processing overhead.
1.
From the Options menus, choose Preferences. The Preferences dialog appears.
2.
Click the General tab.
3.
Clear the Show the position of the playback cursor and Show the record counter while recording check boxes and
click
OK.
requires additional memory. Combined with a large preload size, this may
CHP. 2 OPTIMIZING FOR SOUND FORGE SOFTWARE
Page 26

22
Turning off the play (output) meters
Sound Forge play meters use a small amount of processing overhead during playback. However, if you detect
dropouts during playback and previous fixes have failed, try turning off these meters.
From the
that the play meters are turned off.
View menu, choose Play Meters. The check mark adjacent to the command is cleared, indicating
Turning on passive updating for video and time displays
Passive update options lower the priority of redrawing the video and time displays during playback. When
these options are turned on, the displays update only if there is ample time. Frequently this goes unnoticed,
and enabling these options minimizes playback overhead with little or no inconvenience.
Turning on passive updating for time displays
From the Options menu, choose Time Display, and choose Passive Update from the submenu. A check mark
appears next to the command to indicate that this option is turned on.
Turning on passive updating for video displays
From the Options menu, choose Video, and choose Passive Update from the submenu. A check mark appears
next to the command to indicate that this option is turned on.
Synchronizing audio and video
If your video has been opened from a slow device, such as a CD-ROM or network drive, Sound Forge
software may have trouble accurately playing back the audio and video in sync. You should always copy your
video files to a fast hard drive. Listed below are a few tips that can help when trying to synchronize the audio
and video:
• After assembling or editing the audio you wish to use with your video, place markers during video
playback to correspond to any major synchronization points. You can locate a particular frame by dragging
the cursor along the audio if the Video Preview window is open or the Animate Video Strip option is
enabled. After primary locations have been identified, drag your audio to these markers to mix, paste, and
crossfade audio.
• Features such as Insert Silence, Delete/Clear, and Time Stretch are commonly used to correct
synchronization. Another useful trick is to create a region representing the offset between a video frame
and audio event. Then you can enable Lock Loop/Region Length and drag the offset region to a preceding
silent section. Use the region as a template for adjusting the audio stream length—either copying and
pasting to insert time or deleting to remove time.
OPTIMIZING FOR SOUND FORGE SOFTWARE CHP. 2
Page 27

CHAPTER
Learning the Sound Forge Workspace
3
3
This chapter provides a detailed overview of Sound Forge® toolbars and controls.
Using the mouse
The following table defines the mouse-related terms used throughout this manual.
Mouse Term Description
Pointing Moving the mouse pointer over an item.
Clicking Pointing to an item and quickly pressing and releasing the left mouse button. If there is no left or
right specification, left-clicking is implied.
Right-clicking Pointing to an item and quickly pressing and releasing the right mouse button. Right-clicking is
frequently used to display shortcut menus.
Double-clicking Identical to clicking, but instead of pressing and releasing the mouse button once, it is done twice
in quick succession. Double-clicking always indicates the left mouse button.
Triple-clicking Identical to clicking, but instead of pressing and releasing the mouse button once, it is done three
times in quick succession. Triple-clicking always indicates the left mouse button.
Toggle-clicking Clicking the right mouse button while holding down the left mouse button. This is used to toggle
options and is a shortcut for drag-and-drop editing and using the Magnify tool.
Shift-clicking Holding down the Shift key while clicking the mouse. Shift-clicking is typically used to skip
dialogs and quickly repeat operations.
Ctrl-clicking Holding down the Ctrl key while clicking the mouse. Ctrl-clicking is used to modify the operation
of a normal click.
Dragging Holding down the left mouse button while moving the mouse pointer and releasing the mouse at
the desired location. Dragging is used to quickly move sections of data between windows, as well
as to adjust sliders, scrollbars, and faders.
Slow-dragging Holding down the right and left mouse buttons while adjusting sliders and faders increases the
resolution of the movement. This is useful when making fractional adjustments to parameters.
23
Tip:
Once you are familiar with Sound Forge basics, you
may want to use mouse and keyboard shortcuts. For more
information, see Shortcuts on page 277.
Using the mouse wheel
The Sound Forge software allows you to use your mouse wheel to navigate audio files. The following table
briefly describes the available mouse wheel functionality.
Mouse Functionality Description
Wheel Up Zoom in horizontally
Wheel Down Zoom out horizontally
Ctrl+Wheel Up Zoom in vertically
Ctrl+Wheel Down Zoom out vertically
Shift+Wheel Up Scroll left (in 10ths of screen width)
CHP. 3 LEARNING THE SOUND FORGE WORKSPACE
Page 28

24
Mouse Functionality Description
Shift+Wheel Down Scroll right (in 10ths of screen width)
Ctrl+Shift+ Wheel Up Cursor left or current selection point left (if there is a selection)
Ctrl+Shift+ Wheel Down Cursor right or current selection point right (if there is a selection)
The main screen
When you start the application, the main screen appears. The main screen’s workspace is where you perform
all audio editing.
Menu bar
Standard toolbar
Transport bar
Play Meters
(docked)
Workspace
Status bar
Main screen components
The following table describes the major components of the main screen.
Component Description
Menu bar Displays the menu headings for the available functions.
Standard toolbar Provides quick access to some of the most common tasks in the application (pg. 29).
Transport bar Provides quick access to basic audio transport functions (pg. 30).
Status bar Help and processing information appears on the left side. The boxes on the right side display the
Workspace This is the area located behind the data windows. Audio selections dragged to the workspace
Play Meters Displays the level of the output audio signal. These meters can be toggled on/off by choosing
playback sample rate, bit depth, channel configuration (mono/stereo), length of the active data
window, and total free storage space (pg. 87). With the exception of the free storage space box,
you can edit these boxes by double-clicking or right-clicking them. When no data windows are
open, only the free storage space box contains a value.
automatically become new data windows. Windows such as the Regions List and Playlist can be
docked along the edges of the workspace.
Play Meters from the View menu. Right-clicking the play meters displays a shortcut menu
that allows you to precisely configure the appearance of the meters.
Floating and docking windows
With the many features in Sound Forge software, it is easy for the workspace to become cluttered. Docking
windows allows you to keep more windows open while maintaining a greater degree of organization. You can
choose to float or dock the windows listed in the
only in the Sound Forge full version), and Time Display (available only in the Sound Forge full version)
windows.
View menu, including the Regions List, Playlist (available
LEARNING THE SOUND FORGE WORKSPACE CHP. 3
Page 29
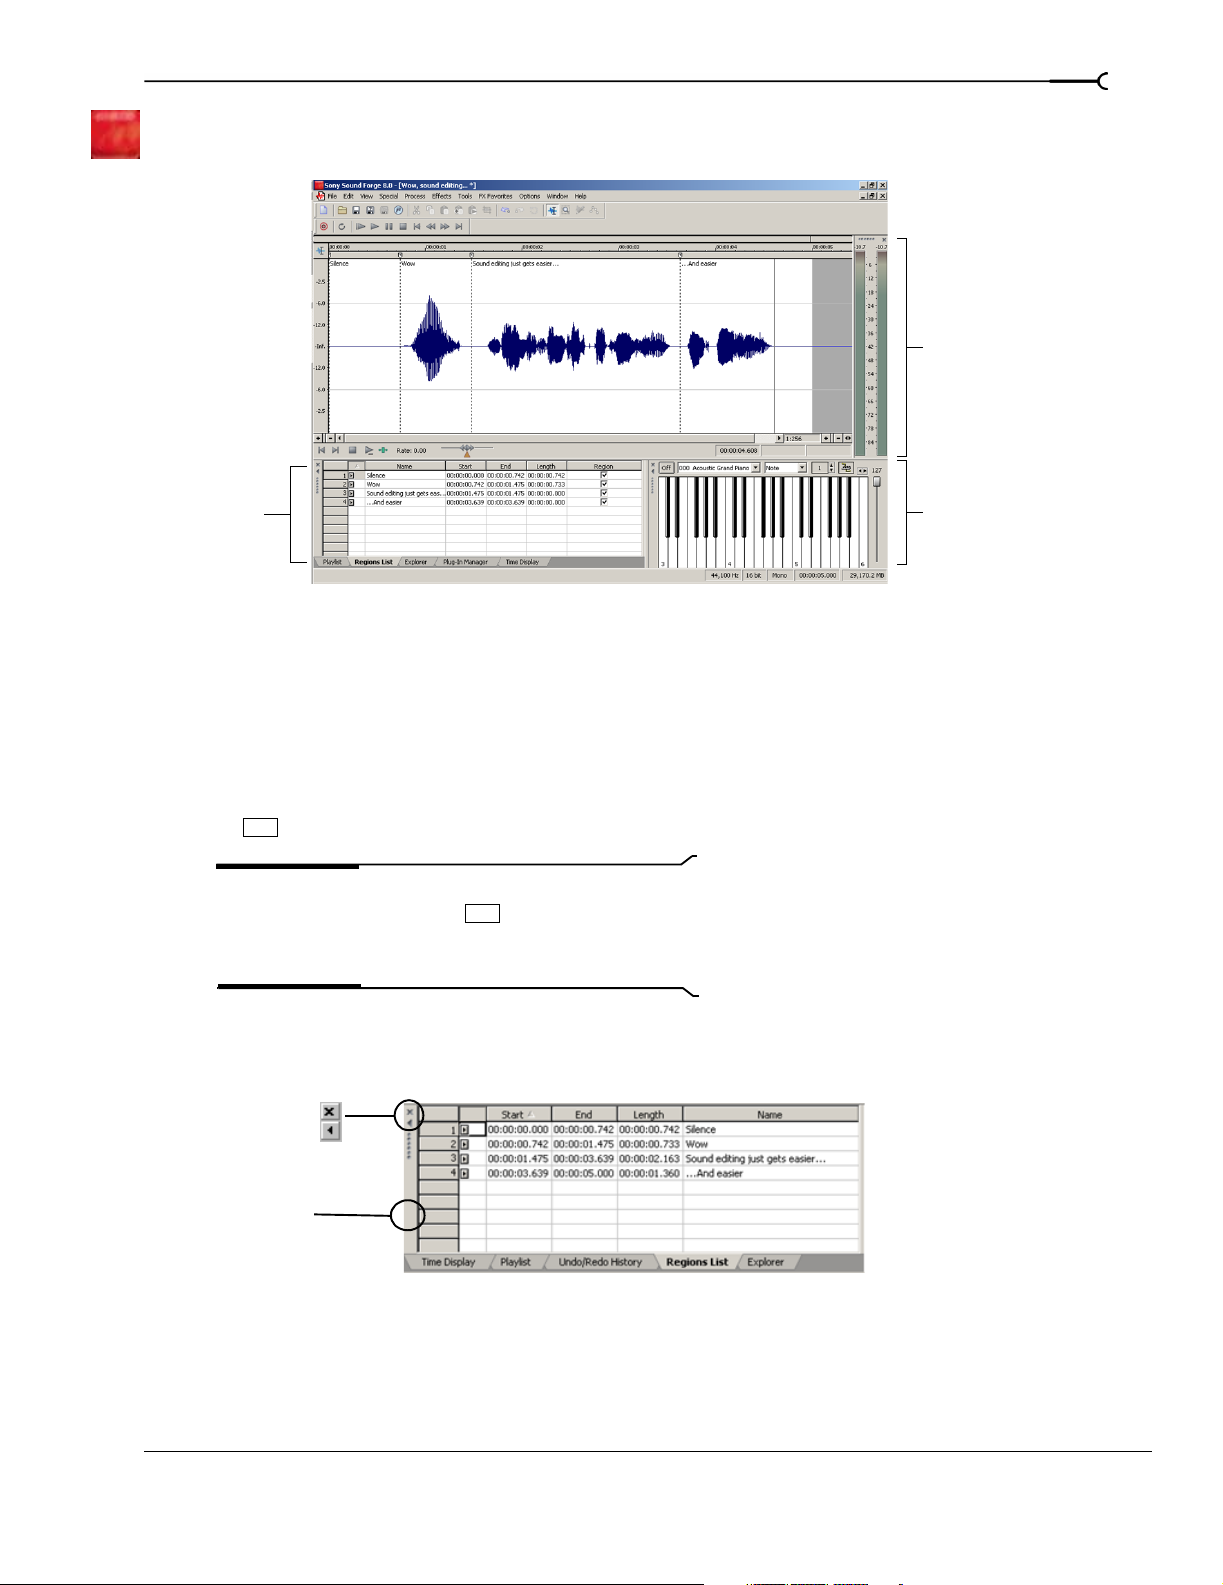
25
You can dock windows individually or in a stack. When stacked, each window has a tab at the bottom with
its name on it. Click the window’s tab to bring it to the top.
Docked Play Meters
Docked Keyboard
Stacked
windows
with tabs
Docking a window
Drag a window to the edge of the workspace. The outline of the window changes shape as you approach
1.
the edge.
2.
Release the mouse. The window docks against the edge of the workspace.
Preventing a window from docking
Ctrl
Press while dragging a window to prevent it from docking in the workspace.
Tip:
You can choose to reverse this behavior so that windows
will not dock unless you press . From the
menu, choose
windows to dock check box on the General tab.
Preferences, and clear the Allow floating
Ctrl
Options
Floating a window
Drag the handle of a docked window away from the edge of the workspace so that it is a floating window.
Close window
Expand window
Handle
CHP. 3 LEARNING THE SOUND FORGE WORKSPACE
Page 30
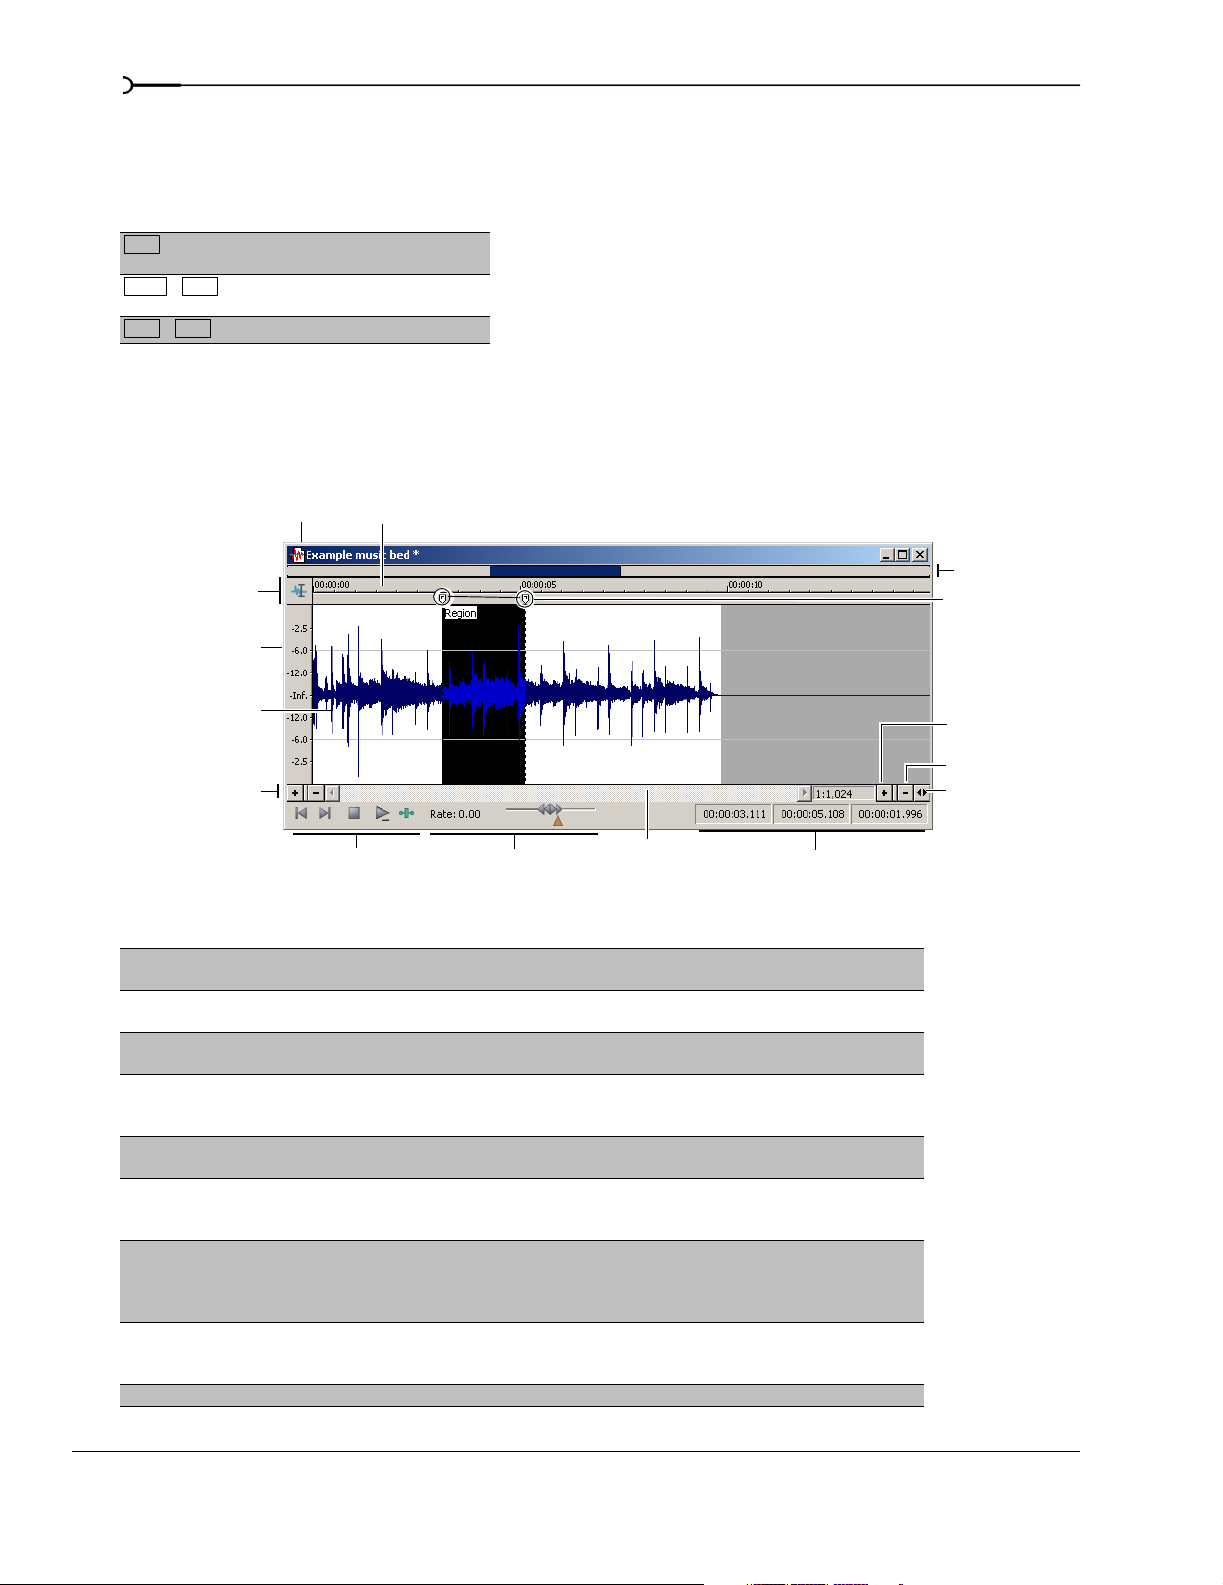
26
Hiding the window docking area
You can double-click the separator between the workspace and window docking area to hide the docking
area. You can also use shortcut keys to manage the workspace.
Shortcut key Description
F11
Shift F11
+
Ctrl F11
+
Show/hide window docking area at
bottom of workspace.
Show/hide windows docked on left/
right sides of workspace.
Show/hide all docked windows.
The data window
Data windows contain audio data (as a waveform) as well as a number of controls and commands used to edit
and process audio.
Title bar
Edit Tool Selector
Level ruler
Waveform display
Level zoom in/out
Time ruler
Playbar
Scrub control
Position
scroll bar
Selection status boxes
Component Description
Title bar Displays the file name. If title information is included in the summary of a file, it appears here
Level ruler Displays the amplitude of the waveform. Right-click to display the level ruler shortcut menu.
Time ruler Displays the current location in the data window as well as ruler tags. Right-click to display the
Ruler tags Indicates the position of region end points, loop end points, and markers. Right-click a tag to
Edit Tool Selector Toggles through the Edit, Magnify, and Pencil tools. Right-click to display a shortcut menu that
Playbar Contains audio transport buttons, including Go to Start, Go to End, Stop, Play Normal, Open/
Selection status boxes Displays the beginning, end, and length of a selection. If no selection exists, only the cursor
Waveform display Displays a graphical representation of an audio file. The horizontal axis represents time, and the
Scrub control Scrolls playback of your project at varying speeds.
instead of the file name. Double-click to maximize and restore the window.
Drag to shift the view up/down when zoomed in vertically.
time ruler shortcut menu. Drag to scroll the data window.
display the ruler tag shortcut menu. Drag to edit a tag’s position. Double-click anywhere within a
region to select it.
allows you to display or hide data window elements.
Play Plug-In Chainer (available only in the Sound Forge full version), Play as Cutlist, and Play as
Sample. For more information on the playbar, please see page 28.
position displays. Double-click the leftmost box to display the Go To dialog. Double-click either of
the other two boxes to display the Set Selection dialog. Right-click to display the status format
shortcut menu.
vertical axis represents amplitude. Right-click within this display to open the waveform display
shortcut menu.
Overview bar
Ruler tags
Time zoom
resolution
Time zoom in/out
Maximize width
LEARNING THE SOUND FORGE WORKSPACE CHP. 3
Page 31

Component Description
Position scroll bar Scrolls forward/backward through an audio file to display sections of the file not visible in the
current area of the waveform display.
Overview bar Allows for quick navigation and playback of any part of an audio file. The overview bar also
indicates the portion of the waveform currently depicted in the waveform display, as well as the
selected region. Click to move the cursor. Double-click to center the cursor in the waveform
display. Right-click to start or pause playback. Drag to activate the audio event locator.
Time zoom resolution Specifies the number of samples of data represented by each horizontal point on the screen. This
Time zoom in/out Changes the zoom resolution for the time (horizontal) axis.
Level zoom in/out Changes the zoom resolution for the level (vertical) axis.
Maximize width Resizes the data window to maximize its size within the workspace.
determines the length of time displayed in the data window. Smaller resolution values display
less time.
Displaying data window components
You can customize the appearance of individual data windows.
Alt
1.
From the File menu, choose Properties or press + . The current file’s Properties dialog appears.
2.
Click the Display tab.
3.
Display/hide specific components by selecting/clearing the corresponding check boxes.
4.
Select the Save as the default for all new windows check box if you want to set the new configuration as the
default data window display.
Enter
27
5.
Click OK.
Right-click the Edit Tool Selector (upper-left corner of data window) to display or hide
components for the selected data window.
Arranging data windows
You can use the commands on the Window menu to arrange data windows in the Sound Forge workspace.
Tip:
windows, or press + + to switch backward
through the open windows.
Command Description
New Window Creates a new data window
Cascade Arranges all open data windows so they overlap with the title bar of each
Tile Horizontally Arranges all open data windows top to bottom with no overlapping.
Tile Vertically Arranges all open data windows left to right with no overlapping.
Arrange Icons Arranges minimized data windows at the bottom of the workspace.
Minimize All Minimizes all open data windows.
Restore All Restores all minimized windows to their previous window size and position.
Close All Closes all open data windows.
Window List Switches focus to another data window.
Ctrl Tab
Press + to switch forward through the open
Ctrl Shift Tab
window remaining visible.
Note: This command affects only non-minimized windows.
Note: This command affects only non-minimized windows.
CHP. 3 LEARNING THE SOUND FORGE WORKSPACE
Page 32

28
Playbar
The playbar is located in the bottom-left corner of a data window. You can use the playbar to navigate and
play audio files in a variety of ways.
Go to Start: moves the cursor to
the start of the file.
Go to End: moves the cursor to
the end of the file.
Stop: stops playback and
returns the cursor to its position
prior to playback.
Play Normal: plays from the
cursor to the end of the file.
If there is a selection, plays from
the beginning of the selection to
the end of the selection.
Play Plug-In Chainer: previews the audio processed through
plug-ins when the Plug-In Chainer window is open.
If there is a selection, plays from the beginning of the
selection to the end of the selection.
If the Plug-In Chainer window is not open, the Open Plug-In
Chainer button ( ) appears instead.
Play as Cutlist: plays the file with the regions in the cutlist
omitted. This button appears only if you treat the playlist as a
cutlist.
Play as Sample: plays the file with the sustaining and release
loops repeating the specified number of times. This button
appears only if you have defined a sample loop.
Current playback mode
When you play a file from the playbar, a small horizontal line appears beneath the selected Play button’s icon
. This indicates the current playback mode, which is the mode used when you click the transport bar
Play
button. For more information, see Transport bar on page 30.
Changing the current playback mode
To change the current playback mode, click a playbar button or press .
X
Optional Backward and Forward buttons
You can choose to display Rewind and For ward shuttle controls on the playbar. From the Options
menu, choose
General tab.
Preferences, and select the Show shuttle controls on Data Window transport check box on the
To o l b a r s
Sound Forge toolbars contain buttons used to quickly execute many of the program’s commands and
functions. Toolbars can be dragged throughout the workspace, docked, resized, hidden, and customized.
Perform either of the following actions to display this tab:
• Choose
• From the
Docking a toolbar
When you drag a floating toolbar to any edge of the main screen, the toolbar docks on that edge.
Floating a toolbar
When you drag a docked toolbar away from an edge, the toolbar becomes a floating toolbar.
Preferences from the Options menu and click the Toolbars tab.
View menu, choose Toolbars.
LEARNING THE SOUND FORGE WORKSPACE CHP. 3
Page 33

Displaying a toolbar
1.
From the View menu, choose Toolbars. The Preferences dialog appears with a list of available toolbars.
2.
To display a toolbar, select the corresponding check box and click OK.
Select a check box to
display a toolbar.
Click Customize to add, remove,
or rearrange buttons on a toolbar.
29
Note:
The dialog box pictured above is from the Sound
Forge full version software. If you have Sound Forge Audio
Studio software, you will not have all of the tabs and options
pictured above available to you.
Customizing a toolbar
1.
From the View menu, choose Toolbars. The Preferences dialog appears with a list of available toolbars.
2.
Select the check box and the toolbar name for the toobar that you want to customize.
3.
Click Customize. The Customize Toolbar dialog appears.
4.
Use the controls in the Customize Toolbar dialog to add, remove, or rearrange the buttons on the selected
toolbar. Click
5.
Click the OK button.
Reset to restore the toolbar to its default setting.
Standard toolbar
The Standard toolbar displays by default when you start the application. The buttons on this toolbar provide
quick access to many common commands.
New: creates a new data window. Play Clipboard: plays the audio on the
Open: displays the Open dialog. Trim/Crop: removes all data from the file that
clipboard.
is not currently selected. This command has no
effect if there is no selected data. This
command does not copy data to the clipboard.
CHP. 3 LEARNING THE SOUND FORGE WORKSPACE
Page 34

30
Save: saves the current audio data. Undo: reverses the last edit operation.
Save As: saves the current file with a new
name or format.
Render As: renders the current project file to a
media file.
Publish: opens the Publish Setup wizard so you
can upload your media file to the Web.
Cut: removes selected audio data and places it
on the clipboard. This command has no effect
if there is no selection.
Copy: copies selected audio data to the
clipboard. This command has no effect if there
is no selection.
Paste: inserts a copy of the clipboard data at
the current insertion point. If there is a
selection, this command replaces the selected
data with the clipboard data.
Mix: mixes a copy of the clipboard data with
the current audio file. The mix start point is
either the cursor point or the start or end of
the selection in the destination data window.
Redo: reverts the previously undone edit
operation.
Repeat: repeats the last operation. This
command can be used with most processing
functions. The previous operation’s parameters
are repeated. To specify new parameters, hold
Shift and click this button.
Edit Tool: selects the Editing tool.
Magnify Tool: selects the Magnify tool.
Pencil Tool: selects the Pencil tool.
Envelope Tool: selects the Envelope tool.
Transport bar
The transport bar also displays by default and contains basic audio transport buttons.
Record: records data to a new or existing data
window.
Loop Playback: toggles Loop Playback mode on
and off.
Play All: plays the entire file from beginning to
end, regardless of cursor position, selection, or
playlist.
Play: plays the file in current playback mode
(Play Normal, Play Plug-In Chainer, Play as
Cutlist, or Play as Sample).
Pause: pauses playback and maintains the
cursor at its current position.
Stop: stops playback and returns the cursor to
its prior position.
Go to Start: moves the cursor to the start of
the file.
Rewind: moves the cursor backward in the
current file.
Forward: moves the cursor forward in the
current file.
Go to End: moves the cursor to the end of the
file.
LEARNING THE SOUND FORGE WORKSPACE CHP. 3
Page 35

Navigation toolbar
The Navigation toolbar contains buttons used to navigate within the current data window.
31
Zoom In Full: magnifies the selected area to a
24:1 ratio.
Zoom Normal: resets the audio data to its
original magnification.
Zoom Selection: maximizes the selection
vertically and horizontally.
Custom Zoom 1: sets the audio data to a
custom time magnification level.
Custom Zoom 2: sets the audio data to a
custom time magnification level.
Insert Marker: drops a marker at the current
cursor position.
Mark In: marks the “in” point of a new
selection.
Mark Out: marks the “out” point of a new
selection.
Go To: displays the Go To dialog and allows
you to quickly move the cursor to a specific
point in a file.
Cursor Center: centers the display with the
cursor displayed in the center of the data
window.
Cursor to Selection Start: moves the cursor to
the beginning of the selection.
Cursor to Selection End: moves the cursor to
the end of the selection.
Center Sustaining Start: moves the cursor to
the beginning of the sustaining loop.
Center Sustaining End: moves the cursor to the
end of the sustaining loop.
Center Release Start: moves the cursor to the
beginning of the release loop.
Center Release End: moves the cursor to the
end of the release loop.
Views toolbar
The Views toolbar contains buttons used to store and retrieve data window views.
Toggles views 1-8 between setting and
restoring.
Stores and recalls specific selection views.
Status/Selection toolbar
The Status/Selection toolbar contains buttons used to specify a file’s status format and control snapping
functions.
Samples: changes the status format to
Samples.
Time: changes the status format to Time. SMPTE Non-Drop: changes the status format
Seconds: changes the status format to
Seconds.
Time and Frames: changes the status format to
Time and Frames.
Absolute Frames: changes the status format to
Absolute Frames.
Measures and Beats: changes the status format
to Measures and Beats.
SMPTE EBU: changes the status format to
SMPTE EBU (25 fps). Available only in the
Sound Forge full version.
to SMPTE Non-Drop (29.97 fps, Video).
Available only in the Sound Forge full version.
SMPTE Drop: changes the status format to
SMPTE Drop (29.97 fps, Video). Available only
in the Sound Forge full version.
SMPTE 30: changes the status format to
SMPTE 30 (30 fps, Audio). Available only in
the Sound Forge full version.
Auto Snap to Zero: forces the ends of
selections to the nearest zero-crossing.
Available only in the Sound Forge Audio Studio
software.
Auto Snap to Time: forces the ends of
selections to the nearest whole time division on
the time ruler. Available only in the Sound
Forge Audio Studio software.
CHP. 3 LEARNING THE SOUND FORGE WORKSPACE
Page 36

32
SMPTE Film Sync (24 fps): changes the status
format to SMPTE Film Sync (24 fps). Available
only in the Sound Forge full version.
Regions/Playlist toolbar
The Regions/Playlist toolbar contains the Regions List and Playlist buttons as well as buttons corresponding to
synchronization commands and status displays.
Regions List: displays the Regions List. Generate MIDI Timecode: configures the
Playlist: displays the playlist. Pre-Queue for MIDI Timecode: opens the wave
Trigger from MIDI Timecode: configures the
software to be triggered by MIDI commands
received through the MIDI input port. The
MIDI input port is specified on the MIDI/Sync
tab in the Preferences dialog. For more
information, see Turning on MIDI input
synchronization on page 214.
software to send MIDI timecode through the
MIDI output port. The MIDI output port is
specified on the MIDI/Sync tab of the
Preferences dialog.
device and preloads data for the next region to
be played from the playlist.
Playlist Position display
Displays the current playback position of an audio file being played from the playlist. Right-clicking this box
displays a shortcut menu that allows you to specify a new format.
Sync Status display
Allows you to monitor the status of incoming/outgoing MIDI commands.
LEARNING THE SOUND FORGE WORKSPACE CHP. 3
Page 37

Process toolbar
Process toolbar
The Process toolbar contains buttons corresponding to all commands located in the Process menu.
The Process toolbar contains buttons corresponding to all commands located in the Process menu.
33
Auto Trim/Crop: removes silence and
Auto Trim/Crop: removes silence and
automatically fades in/out the end-points of
automatically fades in/out the end-points of
each phrase.
each phrase.
Bit-Depth Converter: converts a file to a
Bit-Depth Converter: converts a file to a
different bit depth.
different bit depth.
Channel Converter: converts between mono
Channel Converter: converts between mono
and stereo formats. Can also intermix the left
and stereo formats. Can also intermix the left
and right channels of a stereo file to create
and right channels of a stereo file to create
panning effects.
panning effects.
DC Offset: changes the baseline of an audio
DC Offset: changes the baseline of an audio
file.
file.
Graphic EQ: opens Sony Pictures Digital’s XFX
Graphic EQ: opens Sony Pictures Digital’s XFX
Graphic EQ.
Graphic EQ.
Paragraphic EQ: opens Sony Pictures
Paragraphic EQ: opens Sony Pictures
Digital’s XFX Paragraphic EQ.
Digital’s XFX Paragraphic EQ.
Parametric EQ: opens Sony Pictures Digital’s
Parametric EQ: opens Sony Pictures Digital’s
XFX Parametric EQ.
XFX Parametric EQ.
Graphic Fade: creates user-configurable fades. Smooth/Enhance: opens Sony Pictures Digital’s
Graphic Fade: creates user-configurable fades. Smooth/Enhance: opens Sony Pictures Digital’s
Fade In: fades-in the selection. Time Stretch: opens Sony Pictures Digital’s XFX
Fade In: fades-in the selection. Time Stretch: opens Sony Pictures Digital’s XFX
Fade Out: fades-out the selection. Volume: adjusts the volume of an audio file.
Fade Out: fades-out the selection. Volume: adjusts the volume of an audio file.
Insert Silence: inserts user-configurable silence
Insert Silence: inserts user-configurable silence
into audio files.
into audio files.
Invert/Flip: inverts (or flips) the polarity of the
Invert/Flip: inverts (or flips) the polarity of the
current selection.
current selection.
Mute: mutes the current selection.
Mute: mutes the current selection.
Normalize: normalizes the loudness of an audio
Normalize: normalizes the loudness of an audio
file.
file.
Pan/Expand: creates custom pans, expands,
Pan/Expand: creates custom pans, expands,
and mixes.
and mixes.
Resample: creates a copy of the audio file with
Resample: creates a copy of the audio file with
a new sample rate.
a new sample rate.
Reverse: reverses the current selection.
Reverse: reverses the current selection.
XFX Smooth/Enhance tool.
XFX Smooth/Enhance tool.
Time Stretch tool.
Time Stretch tool.
CHP. 3 LEARNING THE SOUND FORGE WORKSPACE
Page 38

34
Effects toolbar
If you are using the full version of Sound Forge software, the Effects toolbar contains buttons corresponding
to all Sound Forge built-in XFX™ plug-ins.
Acoustic Mirror: adds environmental coloration
to your existing recordings.
Amplitude Modulation: applies a sinusoidal or
square-shaped periodic gain to the input signal.
Chorus: simulates multiple audio sources from
a single sound.
Multi-Tap Delay: creates a delay with up to
eight delay-taps spaced anywhere within 2.5
seconds of the original sound.
Simple Delay: adds a delayed copy of the audio
signal to the file.
Distortion: simulates the overloading of an
amplifier.
Graphic Dynamics: applies compression,
expansion, and limiting to affect the dynamic
range of an audio file.
Multi-Band Dynamics: allows compression and
limiting to be placed on up to four different
frequency bands.
Envelope: forces the amplitude envelope of a
waveform to match a specified envelope shape.
Flange/Wah-Wah: mixes a modulated delay
signal with the original signal.
Gapper/Snipper: removes/inserts sections of
silence at regular intervals to create unusual
effects.
Noise Gate: removes signals below a set
amplitude threshold.
Pitch Bend: creates a modified sound envelope
that corresponds to increasing or decreasing
the pitch of a sound file over time.
Pitch Shift: changes the pitch of a selection
with or without preserving the duration of the
file.
Reverb: simulates the acoustics of different
environments.
Vibrato: creates periodic pitch modulation in an
audio file.
Wave Hammer: acts as a classic compressor
and volume maximizer.
LEARNING THE SOUND FORGE WORKSPACE CHP. 3
Page 39

Tools toolbar
The Tools toolbar contains buttons corresponding to commands in the Tools menu.
35
Extract Audio from CD: extracts audio from CD
and opens for editing.
Burn CD: writes the selected audio track to CD. Crossfade Loop: mixes audio occurring before
Auto Region: creates regions in an audio file
according to rapid sound attacks or a specified
time interval.
Extract Regions: extracts all file regions and
saves them as individual files.
Clip Detect: performs clip detection on the
current file or selection. Note: clip detection is
available only in the Sound Forge full version.
Find: searches for clicks and pops, volume
levels, or silent breaks in an audio signal.
Interpolate: replaces selected audio with
interpolated audio data based on the selection’s
beginning and end samples.
Replace: replaces selected audio data with
previous adjacent data.
Copy Other Channel: replaces selected audio
with a corresponding selection from the
opposite channel.
Audio Restoration: removes clicks and
background noise associated with vinyl
records.
the loop start point into the end of the loop to
smooth transitions.
Sampler: allows you to transfer samples to/
from the Sound Forge application.
DTMF/MF Tones Synthesis: generates dial
tones used by telephone companies.
FM Synthesis: uses frequency modulation and
additive synthesis to create complex sounds
from simple waveforms. Note: FM synthesis is
available only in the Sound Forge full version.
Simple Synthesis: generates a simple
waveform of a given shape, pitch, and length.
Statistics: displays statistics corresponding to
the current file or selection.
Preset Manager: backs up and transfers userconfigured presets from effects, processes,
and plug-ins.
Levels toolbar
The Levels toolbar displays the audio levels in the left and right channels in the user-specified format. You
can right-click to choose the format from a shortcut menu.
Left Right
channel level channel level
ACID Loop Creation Tools toolbar
The ACID Loop Creation Tools toolbar contains buttons corresponding to commands used when creating
audio loops for Sony Pictures Digital’s ACID® family of products. For more information, see Creating loops for
ACID software on page 238.
Edit ACID Properties: displays the Edit ACID
Properties dialog.
Edit Tempo: calculates the musical tempo
(beats per minute) based upon the current
selection.
Double Selection: doubles the size of the
current selection.
Halve Selection: divides the current selection in
half.
Shift Selection Left: shifts the current selection
to the left so the current start point becomes
the end point.
Shift Selection Right: shifts the current
selection to the right so the current end point
becomes the start point.
Rotate Audio: moves the current selection to
the opposite end of the file.
Selection Grid Lines: toggles the selection grid
line display on/off.
CHP. 3 LEARNING THE SOUND FORGE WORKSPACE
Page 40

36
Tempo window
The ACID Loop Creation Tools toolbar also contains a Tempo window that appears to the right of the
toolbar buttons. This window calculates and displays the ACID project’s tempo as if the current selection
represents a complete measure.
Play Device toolbar
The Play Device toolbar allows you to choose a playback device on the fly.
Play Device drop-down list
Choose a playback device from the drop-down list. Use the Audio device type drop-down list as a shortcut for
choosing
Play Device drop-down list
Preferences from the Options menu and choosing a Default playback device on the Audio tab.
Scripting toolbar
The Scripting toolbar allows you to show, hide, or activate the Script Editor and display the Batch
Converter window.
Script Editor: Allows you to create, edit,
or run scripts.
Batch Converter: Allows you to modify and
manipulate multiple audio files without having to
process each file individually.
To o l T i p s
Hovering the mouse pointer over a button or status bar box for longer than one second displays a small text
box adjacent to the pointer. This text, called a ToolTip, is a brief description of the item’s function. Using
ToolTips is an effective way to quickly familiarize yourself with features.
ToolTip
Turning off ToolTips
1.
From the View menu, choose Toolbars. The Preferences dialog appears.
2.
Clear the Show ToolTips check box and click OK.
Command descriptions
When you click and hold a menu item or a button in a toolbar, a brief description of the command appears in
the lower-left corner of the status bar. If you release the mouse button outside of the menu item or toolbar,
the command is not executed.
LEARNING THE SOUND FORGE WORKSPACE CHP. 3
Page 41

Keyboard shortcuts
The Keyboard tab allows you to customize the keyboard shortcuts available in the Sound Forge interface.
You can access the Keyboard tab by choosing
Preferences from the Options menu. For more information, see
Keyboard tab on page 275.
Meters
Meters display audio levels in a number of different places in Sound Forge software: the Play Meters show
audio file levels; meters in the Record dialog help you adjust levels for recording; and meters in the Wave
Hammer® dialog help you adjust levels when applying this effect. Regardless of where the meters appear,
you can control them in much the same way.
The Sound Forge full version software provides peak and VU/PPM (peak program) meters that you can use
to monitor your audio levels.
• The peak meters display instantaneous levels during playback to help you determine the loudest level in
your audio signal and whether the signal is clipping.
• Volume unit (VU) and peak program (PPM) meters help you determine the perceived loudness of your
audio signal (peak program meters provide faster response times to volume increases than VU meters).
VU/PPM meters are especially helpful when you’re mastering: comparing two audio files’ VU/PPM
readings will help take the guesswork out of matching levels.
VU/PPM readings should fall near the 0 (or reference) mark. 0 VU is merely a reference level, and your
signal may exceed 0 VU. To prevent clipping, keep an eye on your peak meters. Peak levels should never
exceed 0 dB. To accommodate louder or softer intensity material, you can use the
Preferences dialog to calibrate the VU/PPM meters to their associated levels on the peak meters and adjust
the VU meters’ sensitivity (to access the Preferences dialog, choose Preferences from the
Status tab in the
Options menu).
37
Resetting clipping indicators
When audio levels are too high, clipping can occur. A red indicator appears at the top of the meter to show
when audio is clipping. Click to reset the indicator, or right-click the meters and choose
shortcut menu.
Clipping
indicator
Click the clipping
indicator to reset it.
You can also detect and mark clipped audio using the detect clipping tool. For more information, see Detecting
and marking clipping on page 100.
Reset Clip from the
CHP. 3 LEARNING THE SOUND FORGE WORKSPACE
Page 42

38
Scaling meters
Meters can display a peak range and a VU (volume unit)/PPM (peak program)
scale. To change the meter’s display levels, right-click the meter and do one of the
following:
• Choose
Pea k Rang e from the shortcut menu, followed by the desired range from
the submenu.
• Choose
VU/PPM Scale from the shortcut menu, followed by the desired scale
from the submenu.
VU and PPM scales are most useful for displaying the average volume of the signal:
the meter represents the RMS average level during playback, and their attack and
decay are not as sensitive as the peak meter.
PPM scales are useful for monitoring peak levels. The meters use a fixed
integration time (5 or 10 ms) that is sensitive to increases in volume, but the
meters are less sensitive to decreases in volume than the VU scales, which
produces less meter activity and decreased eyestrain.
Displaying VU/PPM meters
Sound Forge peak and VU/PPM (peak program) meters allow you to monitor your audio levels.
You can toggle the display of the meter’s VU/PPM scale on and off. Right-click the meter and choose
VU/PPM
Adjusting the VU meters’ sensitivity
Unlike peak meters — which read instantaneous changes in your audio signal — the VU/PPM meters read a
portion of the signal and calculate the average level. The size of the signal that the meters read is determined
by the meters’ integration time.
from the shortcut menu.
Show
To set the amount of data surrounding the cursor that will be used to calculate levels in the VU meters,
specify a value in the
Preferences dialog, choose
VU meter integration time box on the Status tab of the Preferences dialog (to access the
Preferences from the Options menu).
The PPM scales use a fixed integration time:
Scale Integration time
UK PPM 10 ms
EBU PPM 10 ms
DIN PPM 5 ms
Nordic PPM 5 ms
Showing labels
Right-click the meters and choose Show Labels from the shortcut menu to toggle the meter dB markings on
and off.
Holding peaks and valleys
Right-click the meters to access the Hold Peaks and Hold Valleys commands in the shortcut menu.
• Choose
• Choose
Hold Peaks to display a marker on the meters indicating the highest reading.
Hold Valleys to display a marker on the meters indicating the lowest reading.
LEARNING THE SOUND FORGE WORKSPACE CHP. 3
Page 43

Controls
A major step in mastering Sound Forge software is becoming familiar with the controls used to set and adjust
feature parameters, including faders, sliders, and envelope graphs.
Faders and sliders
Faders and sliders are frequently used to edit effect and process parameters. To use either control, drag the
control to the desired position and release.
Fader
Drag to set value
Slider
Resetting fader and slider values
Double-click to return the control to its default value.
Fader and slider shortcuts
39
There are numerous keyboard shortcuts available when using faders and sliders.
If you want to Then use the following shortcuts
Change the value in small increments
Change the value in larger increments
Set the control to its maximum and minimum values
respectively
, , , and
-or-
Hover the mouse over the fader or slider control and
Ctrl
press
Page Up Page Down
-or-
Hover the mouse over the fader or slider control and
move the mouse wheel.
Home
while moving the mouse wheel.
and
End
and
Envelope graphs
Envelope graphs are used to configure the shape of frequency or amplitude envelopes applied to audio
waveforms.
CHP. 3 LEARNING THE SOUND FORGE WORKSPACE
Page 44

40
Envelope point
Envelope
Time axis
Amplitude or frequency axis
Understanding the envelope graph
To use the envelope graph, you must first understand what it represents. In the previous example, the
horizontal axis represents time, with the leftmost point representing the start of the selection and the
rightmost point representing the end of the selection. The vertical axis represents either amplitude or
frequency, depending upon the operation.
Moving an envelope point
Drag an envelope point to a new position.
1.
2.
Release the mouse button. The point is repositioned and the envelope adjusts.
Moving multiple envelope points
Starting in an unused area of the envelope graph, drag the mouse to create a selection box containing all
1.
points to be moved.
Select the envelope points
2.
Release the button. The selected envelope points are displayed with a white square center.
3.
Drag any of the selected envelope points to the desired position. The pointer displays as a multidirectional arrow and the selected points move together.
LEARNING THE SOUND FORGE WORKSPACE CHP. 3
Page 45

41
4.
Release the mouse button. The entire envelope graph adjusts.
Reposition multiple envelope points
Changing the fade curve between two points
To change the type of fade between two envelope points, right-click an envelope segment and choose a fade
type (Linear Fade, Fast Fade, Slow Fade, Smooth Fade, Sharp Fade, and Hold) from the shortcut menu.
Selecting or clearing all envelope points
Ctrl + A
Press to select or clear all envelope points.
Adding an envelope point
Hover over the envelope.
1.
Place the pointer on the envelope
and double-click to add a point.
2.
Double-click the mouse. A point is added to the envelope graph and can be positioned as needed. For
more information, see Moving an envelope point on page 40.
Deleting an envelope point
Right-click the point to be deleted and choose Delete from the shortcut menu. The point is deleted and the
envelope adjusts.
Delete all points
Delete all envelope points by clicking the Reset Envelope button.
Displaying the waveform on an envelope graph
Certain envelope graphs (such as in the Graphic Fade dialog) allow you to view the audio waveform on the
graph. If the selection is small, the waveform automatically displays. Otherwise, selecting an option from the
Show wave drop-down list displays the waveform.
CHP. 3 LEARNING THE SOUND FORGE WORKSPACE
Page 46

42
Displaying stereo waveforms
The Show Wave drop-down list allows you to specify how stereo files display in the envelope graph.
Specify the channel
to be displayed
Stereo files
When a data window displays a stereo file, the upper half of the data window shows the left channel and the
lower half shows the right channel.
Working with stereo files
When playing, editing, or processing stereo files, you can select the left channel, the right channel, or both
channels. However, certain processing tasks cannot be performed on an individual channel of a stereo file.
For more information, see Single-channel editing on page 44.
Selecting data in stereo files
When editing a stereo file, the waveform display is divided into three sections. The mouse pointer location
determines which channel (or channels) is selected.
• The upper quarter of the data window selects the left channel (shown in yellow).
• The lower quarter of the data window selects the right channel (show in blue.
• The middle half of the data window selects both channels.
Both channels
1.
Open a stereo file.
2.
Select the Edit tool by choosing To ol from the Edit menu and Edit from the submenu.
Press + or click the
LEARNING THE SOUND FORGE WORKSPACE CHP. 3
Ctrl D
Edit Tool button on the Standard toolbar.
Page 47

3.
Position the tool near the top of the left channel and notice its appearance. The tool displays as . This
indicates that only audio data in the left channel will be selected.
4.
Position the tool in the middle portion of the data window and notice its appearance. The tool displays as
a standard cursor. This indicates that it will select a mono file or both channels of a stereo file.
5.
Position the tool near the bottom of the right channel and notice its appearance. The tool displays as .
This indicates that only audio data in the right channel will be selected.
43
Cursor selects only the
left channel
Cursor selects
both channels
Cursor selects only the
right channel
Toggling channel selections
Once you place the cursor or create a selection in a stereo file, you can cycle through channel options (left,
right, both) by pressing .
Tab
Previewing channels
The single channel selection option allows you to preview channels in a stereo file individually.
1.
Open a stereo file and select all data.
2.
Click the Play Normal button . The file plays in stereo.
3.
4.
5.
6.
CHP. 3 LEARNING THE SOUND FORGE WORKSPACE
Tab
Press . The left channel is selected.
Click the Play Normal button . Only the mono left channel plays.
Tab
Press . The right channel is selected.
Click the Play Normal button . Only the mono right channel plays.
Page 48

44
Single-channel editing
Stereo files are held together by the nature of their stereo format. Because of this, you cannot perform certain
editing operations (such as cut or paste) on a single channel of a stereo file.
Channel lengths must remain equal in stereo files. Frequently, this issue can be side-stepped by copying a
single channel of a stereo file to the clipboard. Once this mono selection is located on the clipboard, you can
do any of the following:
• Paste it into a mono file.
• Paste it into both channels of a stereo file.
• Mix it into a single channel of a stereo file.
• Mix it into both channels of a stereo file.
Note:
When mixing mono clipboard data to a stereo file, the
Mono to Stereo dialog prompts you to mix it to the right, left,
or both channels.
LEARNING THE SOUND FORGE WORKSPACE CHP. 3
Page 49

CHAPTER
Getting Started
4
4
The Sound Forge® digital audio editing tool is for users from all musical backgrounds. It is an extremely deep
program, containing features that may only be required by the most advanced or specialized users.
Nonetheless, a firm grasp of Sound Forge basics is essential. This chapter is designed to provide you with
information on Sound Forge fundamentals.
Creating a project
You can use Sound Forge project files to organize and work with your media files nondestructively. When
you save a project file, two things are created: a .frg file and a subfolder that contains your media file and all
of the temporary files created while working on your project. This file is not a multimedia file, but is used to
render the final file after editing is finished. When you copy, cut, paste, and otherwise edit your project, the
process is nondestructive—meaning you can edit without worrying about corrupting your source files.
Within the project file, you can also undo any past operations, including those occurring before your last
save. Once you are finished working with a project file, you can save your work to a media file using the
Render As option on the File menu.
45
Note:
To use the advanced undo/redo capabilities mentioned
above, you must have the
selected on the
access the Preferences dialog, choose
Options menu.
1.
From the File menu, choose Save As to save the current data window to a project file. The Save As dialog
appears.
2.
Using the Save in drop-down list, locate the folder where you want to save the project.
3.
From the Save as type drop-down list, choose Sound Forge Project File (*.frg).
4.
In the File name box, enter a name for the file.
5.
Click the Save button.
A .frg file is created with the name you specified, and a folder with a similar name (
example) is created in the same location for the temporary files.
Important:
process should not be deleted, as this will cause your project
file to be unusable.
General tab of the Preferences dialog. To
The associated project folder created by this
Allow Undo past Save check box
Preferences from the
projectname_frg, for
CHP. 4 GETTING STARTED
Page 50

46
Getting media files
The software can open a variety of audio and video files. There are two main methods for locating,
previewing, and opening media files:
• From the
• From the
File menu, choose Open to display the Open dialog.
View menu, choose Explorer to display the Explorer window.
These methods are explained in greater detail in the following sections.
Note:
To have pulldown fields automatically removed when
opening 24 fps progressive-scan DV video files, select the
Allow pulldown removal when opening 24p DV check box on
the
Video tab of the Preferences dialog. To open your 24p DV
video files as 29.97 fps interlaced video (60i), clear this check
box.
Using the Open dialog
1.
From the File menu, choose Open. The Open dialog appears.
Click the
Open button .
Select to automatically
File Information Display
preview files
The Open dialog contains several features that allow you to locate and open audio files. These features are
detailed below.
Feature Description
Files of type Use this drop-down list to specify the file format displayed in the system. A
Recent Use this drop-down list to locate recently accessed folders.
Auto play Select this check box to automatically preview files as you select them in the
Merge L/R to stereo Select this check box to merge two mono files to left and right channels of a
GETTING STARTED CHP. 4
variety of file formats are supported.
Tip: Choose the CD Audio (*.cda) option from this list to extract audio tracks
from a CD.
Open dialog.
stereo file when opening.
Page 51

2.
Locate and select a media file using the Look in drop-down list at the top of the dialog.
3.
To preview the file before adding it to your project, click the Play button.
Note:
If you have the Auto play check box selected, your file
will automatically begin previewing when you select it.
4.
Click Open. The file is opened and a data window containing the waveform is displayed.
47
Using the Explorer window
In addition to using the Explorer window for locating, previewing and opening media, you can drag files or
regions from the Explorer window to an open data window to paste, mix, or crossfade the data. Click the
right mouse button while dragging to toggle mix, crossfade, and paste drag-and-drop modes. You can also
extract audio from a CD.
Previewing media
The Explorer window allows you to easily preview files before you open them. The Explorer window has a
mini-transport bar with
sent to the play meters on the main workspace (for audio files) or to the Video Preview window (for video
files).
Note:
To preview video files, you must have the Video
Preview window open. To display the Video Preview
window, choose Video Preview from the View menu.
1.
Select a file in the Explorer window.
2.
Click the Play button to listen to the file.
3.
Click the Stop button or select a different file to stop previewing the file.
Tip:
To automatically preview selected files, click the Auto
Preview button on the Explorer window’s transport bar.
Play, Stop, and Auto Preview buttons . When you preview a file, its stream is
Opening media
To open a media file into a new data window from the Explorer window, double-click the file. To open a
media file in a specific data window, drag the media file from the Explorer window to the data window.
CHP. 4 GETTING STARTED
Page 52

48
Extracting audio from CD
The Explorer window allows you to easily extract audio from a CD into a data window. Each audio track on
the CD is extracted into a separate data window.
1.
Use the Explorer window to browse to and select your CD drive. The CD’s audio tracks display in the
right pane of the Explorer window.
2.
Select the track(s) you want to extract.
3.
Drag the track(s) to the main Sound Forge workspace. The software begins extracting the selected tracks
into individual data windows.
4.
To stop the extraction process, you can click the Cancel button on the status bar to stop the whole process
or on the individual data windows to stop extracting a specific track.
Tip:
To extract a single audio track into a new data window,
double-click the track in the right pane of the Explorer
window.
Using Explorer views
You can control the information that is displayed in the Explorer window by clicking the Views button
and selecting a view. These options are explained below:
Item Description
Tree View Displays all of the available drives and folders that you may choose
from to find files.
Region View Displays any regions that have been defined in the selected media file.
Summary View Displays a short description of the selected media file at the bottom of
the Explorer window.
Details Displays the file size, date and when the file was last created or last
modified.
All Files Displays all file types in the active folder.
Peak files
When you first open a file, the entire file is scanned and a peak file is created. The peak file is stored with the
same name and in the same location as the audio file, but it is given an .sfk extension. This peak file is
automatically updated whenever the original file is edited.
If you modify a file in another application, you can regenerate the peak file by choosing
from the
Special menu.
Rebuild Peak Data
Working with video files
The Sound Forge application has the ability to open and save many video file formats. The video files cannot
be edited within the software, but this functionality allows you to attach, detach, and edit audio for the
video. Once you’ve edited the audio, you can preview the audio and video together.
When you open a media file containing video, the data window displays the video portion in a video strip
above the audio.
GETTING STARTED CHP. 4
Page 53

For more information, see Working with Video on page 245.
Playing a file
After you open a file, you can play it by clicking the Play All button on the transport bar. For more
information, see Transport bar on page 30.
Viewing the current position
49
As a file plays, the current playback position is indicated in the data window in three ways:
• A cursor travels across the visible portion of the data window.
• The current playback position in relation to the entire file appears in the overview bar.
• The first selection status box in the playbar displays the current position in the user-specified format. For
more information, see Selecting status formats on page 65.
Cursor position
Overview bar current position
Status box value
Playing a file from a specified point
You can begin playback from any point in a file.
1.
Click to position the cursor in the data window. A flashing cursor (spanning the height of the waveform
display) displays.
2.
Click the Play button on the transport bar. The file plays from the cursor position.
If you do not hear playback, you may have inadvertently created a small selection. To determine if you
created a selection, examine the status boxes in the bottom-right corner of the data window.
CHP. 4 GETTING STARTED
Page 54

50
Status boxes
• If only the first box contains a value, there is no selection.
• If all three boxes contain values, a selection has been created. Clear the selection by clicking anywhere
in the data window.
For more information, see Viewing selection status on page 50.
Playing in Loop Playback mode
You can play an entire file or a selection in Loop Playback mode. In Loop Playback mode, the audio is played
in a continuous loop.
Click the
Loop Playback button on the transport bar to turn Loop Playback mode on and off.
Press .
Q
Playing a selection
You can play specific portions of audio data by creating selections in the waveform display.
1.
Drag the mouse within the data window. Notice that the waveform is selected as the mouse is dragged.
2.
Click the Play button . Only the selection plays.
Selection status boxes
Create a selection on the waveform
Viewing selection status
When a selection exists, the selection status boxes in the bottom-right corner of the data window contain
values. These values indicate the start, end, and length of the selection.
No selection Selection
Cursor Position
Selecting the status format
Beginning Value End Value Selection Length
You can display status values in any supported format. For more information, see Selecting status formats on page
65.
GETTING STARTED CHP. 4
Page 55

Viewing selection statistics
Choosing Statistics from the Tools menu displays a Statistics dialog showing information about the current
selection or, if there is no selection, on the entire file.
The following table describes all statistical categories displayed in the Statistics dialog.
Statistical Category Description
Ruler Format Choose a setting from the drop-down list to determine the format you would like to use
Level Format Choose a setting from the drop-down list to specify how the left- and right-channel levels
Cursor position The cursor position (in samples) from the start of the audio file.
Sample value at cursor The actual number stored by a single sample. The maximum allowed sample value is
Maximum/minimum
sample position and
sample value
RMS level The Root Mean Square of the sample values relative to the RMS value of a maximum-
Average value The sum of all sample values in the selected region divided by the number of samples. If
Zero crossings The number of times per second that the waveform fluctuates from a negative to a
Copy to Clipboard Copies all contents of the Statistics window to the clipboard. This can be useful if you
for the Cursor position, Minimum sample poition, and Maximum sample position.
For more information, see Selecting status formats on page 65.
at the cursor position will display.
• Values - Displays as an integer. The range is from -8388608 to 8388607 in 24bit audio, -32768 to 32767 in 16-bit audio and -128 and 127 in 8-bit audio.
• Decibels - Displays as decibels. A value of 0 dB corresponds to maximum
absolute amplitude and negative infinity (-Inf.) corresponds to complete
silence. In 16-bit audio, -90.3 dB is the lowest possible dB value (sample value
of 1).
• Percentages - Displays as a percentage ranging from -100 to 100 percent.
often referred to as 100% or 0 dB.
The maximum and minimum sample values and the locations (in samples) where they
occur.
These values may help determine if clipping will occur in the audio file. These values can
also be used to determine the noise level of a signal for use with Noise Gate (a built-in
XFX plug-in installed with the Sound Forge full version). For example, to determine the
noise amplitude of a file, run Statistics on a region of noisy silence.
amplitude square wave (the loudest possible recording).
On short intervals, this value relates to the volume level of the audio file. If used on a
large selection with large volume variation, this value becomes less meaningful.
this value is not zero, it usually indicates a DC offset in the recording process.
positive value.
This value can be used as a rough estimate of the frequency of the audio data for very
simple waveforms.
want to compare statistics of multiple files in a spreadsheet.
Note: To copy specific data or cell, select the cells that you want to copy and press
Ctrl + C
.
51
CHP. 4 GETTING STARTED
Page 56

52
Creating a new data window
1.
From the File menu, choose New. The New Window dialog appears.
2.
Complete the New Window dialog:
• From the
• From the
• Select the desired
Sample rate drop-down list, choose a sample rate.
Bit-depth drop-down list, choose a bit depth.
Channels radio button.
For more information, see Editing file attributes on page 87.
3.
Click OK. A new data window with the specified attributes appears.
Tip:
New windows are automatically named for you. You
can customize this automatic naming feature to suit your
needs. For more information, see Customizing automatic
labeling on page 98.
Active data windows vs. inactive data windows
When multiple data windows are displayed on the workspace, only the window currently being edited is
active, and all operations affect this window exclusively.
Activating a window
To activate a data window, click anywhere within it. The title bar changes to the color defined as the active
window color and the previously active window is deactivated.
Note:
Choosing Focus to Data Window from the View menu
also results in the focus being returned to the current data
window.
Copying data to a new file
You can create new audio files by copying data to a new data window.
1.
Open an audio file and create a selection.
2.
From the Edit menu, choose Copy. The selection is copied to the clipboard.
Click the
3.
Create a new data window. For more information, see Creating a new data window on page 52.
4.
From the Edit menu, choose Paste. The selected data is pasted in the new data window.
GETTING STARTED CHP. 4
Copy button in the Standard toolbar.
Page 57

Click the Paste button in the Standard toolbar.
Working with files
You can save a file in a variety of formats, including popular audio formats such as WAV and AIFF, and
streaming media formats such as Windows Media® Audio and RealMedia™. You can save a file using a
standard template, or you can customize the settings to suit your needs. Once you create custom settings, you
can save those settings as a template.
You have the option to save all open files at once or to save all open files as a workspace file.
Saving a file
1.
Click anywhere in the data window to select it.
2.
From the File menu, choose Save.
Note:
When saving a new file, the Save As dialog appears.
If the file was previouslly saved, choosing
saves the file without your input.
Save automatically
53
Using the Save As/Render As dialog
The Save As dialog allows you to save an audio file with a new name, in an alternate format, or with new
attributes.
The Render As dialog allows you to render a file using a standard template, or you can customize the settings
to suit your needs. Once you create custom settings, you can save those settings as a template.
Select file type
Select recent directories
Select template
Template description
Select saving metadata option
Select video options
1.
Click anywhere in the data window to select it.
2.
From the File menu, choose Save As to display the Save As dialog.
CHP. 4 GETTING STARTED
Page 58

54
If you’re working with a Sound Forge project file, you can use the Save As dialog to save your project to a
different name or location. Choose
3.
Select the folder where you want to save the file:
a.
From the Save in drop-down list, choose a drive and foler.
Render As to save your project as a media file.
--or--
b.
From the Recent drop-down list, choose a folder where you have previously saved files.
4.
In the File name box, enter a name for the file or select a file in the browse window to replace the exisitng
file.
5.
From the Save as type drop-down list, choose a file format.
If the selected file type supports it, you can choose an encoding template from the
list, or click
Custom to create a new template. For more information, see Creating custom rendering settings on
Te mp l a te drop-down
page 55.
If you know that the file format is unsupported, select
Raw Audio and click the Custom button to display
the Custom Template dialog, where you can specify format parameter. For more information, see Creating
custom templates on page 55.
6.
In the Tem pl at e drop-down list, choose a setting that will be used to save your file, or clikc the Custom
button to create a new template. For more information, see Creating custom templates on page 55.
Note:
When you convert from mono to stereo, the data will
be stored in both channels. When converting from stereo to
mono, the data from both channels will be mixed to a single
channel.
Note:
When determining bit rates, 1K=1024.
7.
If you want to preserve metadata (such as embedded data from other applications, regions, markers,
commands, playlist, and sampler information) in your file, select the
Save metadata with file checkbox. For
more information see Using Markers, Regions, and the Playlist/Cutlist on page 97, Adding summary
information on page 93, and Saving loop points on page 243.
If the check box is not selected, the data will be ignored when you save the file.
Note:
If the file type selected in the Save as type drop-down
list doesn’t support metadata, you are prompted to save the
metadata in an external file with an .sfl extension (using the
same name as your media file). Metadata can be saved
internally for the following file formats: MP3, Windows
Media Format (WMA and WMV), WAV, WAV64, SFA,
PCA, Scott Studios.
8.
If you are saving to a format with a different aspect ration than your source media settings, then select the
Stretch video to fill output frame (do not letterbox) check box.
Note:
When this check box is not selected, black bars may
appear at the top and bottom (letterboxing) or sides
(pillarboxing) of the frame to preserve the aspect ration. For
GETTING STARTED CHP. 4
Page 59

more information, see Saving a video file on page 251.
9.
If you see unacceptable video artifacts in the rendered video (these artifacts are most obvious with MPEG
and streaming formats), then clear the
Note:
Turning this option off can correct the artifacts, but
Fast video resizing check box.
your rendering times will increase significantly. For more
information, see Saving a video file on page 251.
10.
Click the Save button.
Creating custom templates
If the file type you select supports it, you can create custom settings for saving files by clicking the Custom
button.
Note:
If a file type supports custom templates, a Custom
button displays next to the
choose the file type.
Te mp l a te drop-down list after you
55
When you click the
template properties as needed. For help on the different settings, click the
click a control, or click a control and press + .
When you are finished editing the template properties, click the
Saving custom templates
Custom button, a Custom Template dialog appears. Adjust the settings for the different
What’s This Help button and
F1
Shift
OK button.
You can save a custom template to use again by entering a template name in the Tem pl at e box (in the Custom
Template dialog) and clicking the
Deleting custom templates
Save Template button .
You can delete a custom template by selecting the template from the Te mp la t e drop-down list (in the Custom
Settings dialog) and clicking the
Delete Template button .
Creating custom rendering settings
The Custom Template dialog apperas when you click Custom in the Render As dialog. You can use the
Custom Template dialog to create custom encoding templats for many of the file formats available in the
software.
1.
From the File menu, choose Render As. The Render As dialog appears.
2.
Choose your preferred file format from the Save as type drop-down list. If the format allows you to create
custom settings, the
3.
Click Custom. The Custom Template dialog appears.
Custom button becomes active.
4.
Make the appropriate setting changes for the chosen file format. For help on individual settings, click the
What’s This? Help button and click a setting.
Tip:
To save the custom settings for future use, enter a name
for the template in the
Te mp l a te button.
CHP. 4 GETTING STARTED
Te mp l a te box and click the Save
Page 60

56
5.
Click OK. The Custom Template dialog closes.
Saving all open audio files
Choosing Save All from the File menu automatically prompts you to save all open audio files on the current
workspace.
Note:
Pressing while choosing the Save All command
Shift
automatically saves all open files without prompting you to
approve each save.
Saving files as a workspace
To accommodate complex editing scenarios, you can save the entire workspace as an alternative to saving
individual files. Workspaces are saved as Sound Forge Workspace (SFW) files. When you open a workspace
file, all files are restored to their previous sizes, positions, and magnification. In addition, each file’s current
cursor position, custom views, and plug-ins in the Plug-In Chainer are restored. For more information, see
Creating and using views on page 83 and Using the Plug-In Chainer on page 172.
Saving the current workspace
1.
From the File menu, choose Workspace, and choose Save As from the submenu. The Save Workspace
dialog appears.
2.
Browse to the folder where the file will be saved.
3.
Enter a name for the file in the File name box and click Save.
Opening a workspace
From the File menu, choose Workspace, and choose Open from the submenu. The Open Workspace dialog
1.
appears.
2.
Browse to the folder containing the desired SFW file.
3.
Select the desired file and click Open.
Working with projects
Projects are new to Sound Forge software; however, if you’ve used ACID or Vegas software, then you’ll be
quite familiar with how to use Sound Forge projects. You should note that Sound Forge projects do function
slightly differen than ACID and Vegas projects.
A project file is not a multimedia file. It contains pointers to the original source files, so you can edit your
project nondestructively without changing your source files. When you edit a Sound Forge project, you can
undo edit operations even past your last save. For more information, see Using undo and redo on page 63.
Saving the project
1.
Click anywhere in the data window to select it.
2.
From the File menu, choose Save As to display the Save as dialog.
3.
Select the folder where you want to save the file:
a.
From the Save in drop-down list, choose a drive and foler.
--or--
b.
From the Recent drop-down list, choose a folder where you have previously saved files.
GETTING STARTED CHP. 4
Page 61

4.
In the File name box, enter a name for the file or select a file in the browse window to replace the exisitng
file.
5.
From the Save as type drop-down list, choose Sound Forge Project File (*.frg).
Sound Forge software creates a .frg file in the folder you specified and creates a subfolder to store your
sounca nd temporary files.
Note:
Since a Sound Forge project contains all your original
sound data plus all PCM temporary files, they can take some
time to create.
57
Warning:
Deleting a project’s [filename]_frg folder will
break the project.
Saving the project path in the rendered file
1.
Save your Sound Forge project. The project must be saved before you can embed the project reference in
the rendered file.
2.
Follow the steps in Using the Save As/Render As dialog on page 53 to choose the file type and location for
rendering your files and also select the
Note: This check box will be unavailable if you did not save
your project or if you are rendering using a third-party fileformat plug-in.
3.
Click Ye s if you would like to open the file in a new window or click No if you would like to close the
dialog and return to the Sound Forge window.
Note:
If you modify the project file after rendering, the
project data will no longer match the rendered file. To edit a
project using a path reference, the project file and all media
must be available on your computer.
Save project as path reference in rendered media check box.
Editing a media file’s source project
When your Sound Forge project uses source media files that are rendered with an embedded project path
reference, you can easily open the source project in the associated application if you need to edit the media.
By saving your project path reference when you render files in ACID 5.0, Sound Forge 8.0, or Vegas 6.0, you
can quickly access the media from Sound Forge via the
Note
: The project information in the rendered file is only a
reference to a project file. If you modify the source project file
after rendering, the project data will no longer match the
rendered file. To edit a project using a path reference, the
project file and all media must be available on your computer.
1.
Right-click one of the following:
• the waveform in a data window
CHP. 4 GETTING STARTED
Edit Source Project shortcut menu.
Page 62

58
• a media file in the Explorer window
2.
From the shortcut menu, choose Edit Source Project. An ACID, Vegas, or Sound Forge window will open
with the source project.
If Then
You are editing a source project using a
computer other than the computer where the
project was created
3.
Edit the project as necessary.
The editing computer must meet the following
requirements:
• The software that was used to create the
project must be installed and the project file
extension (.acd, .acd-zip, .veg, or .frg) must be
registered on the editing computer.
• The editing computer must have the same
version (or later) of the software as the
computer where the project was created.
• The project file must exist on the editing
computer using the same file path as on the
computer where the project was created.
• The project’s source media must exist on the
editing computer. If the media files do not use
the same file path as on the computer where
the project was created, you will be prompted
to choose a new folder or replacement files.
4.
Render the edited project using the same name as the original media file and close the editing application.
Note
: If you are editing an existing track, your project will
automatically be updated with the latest rendered media file.
Editing audio
New Sound Forge users should remember that even the most complex editing is derived from a few simple
operations: copy, paste, cut, delete (clear), trim/crop, and mix. The following table provides a brief
description of the basic editing operations.
Editing Operation Description
Copy Copies data from the window to the clipboard.
Paste Inserts the contents of the clipboard into the window at the current cursor position. If a
selection exists in the data window, the pasted data replaces the current selection.
Cut Deletes data from the window and copies it to the clipboard.
Delete (Clear) Deletes data from the window, but does not copy it to the clipboard.
Tri m/C rop Deletes all data in the window with the exception of the selection.
Mix Mixes data from the clipboard with the data in the current window, starting at the
current cursor position or the start of the current selection.
Copying
You can copy audio data from a data window to the clipboard without changing the original file. Once audio
data is on the clipboard, you can paste it into existing files or use it to create new files.
Copying data to the clipboard
Open the Voiceover.pca file.
1.
Note:
This file is located in the same folder as the
GETTING STARTED CHP. 4
Page 63

application.
2.
Create a selection containing “Wow.”
3.
From the Edit menu, choose Copy. The selected data is copied to the clipboard, but the waveform is
unchanged.
59
Click the
Previewing clipboard contents
Copy button or press .
Ctrl + C
To preview the contents of the clipboard, choose Clipboard from the View menu, and choose Play from the
submenu.
Tip:
You can display detailed information on the size and
attributes of the clipboard contents by choosing
Clipboard from
the View menu and Contents from the submenu.
Recycling clipboard contents
Once audio data is on the clipboard, you can paste or mix it into an infinite number of windows. Data
remains on the clipboard until you replace it with new data.
Pasting
Once audio data is on the clipboard, you can paste or mix it into an existing data window or use it to create
a new data window.
Pasting data in an existing data window
Move the cursor to the beginning of the Voiceover.pca file by clicking the Go To Start button in the
1.
playbar. For more information, see Playbar on page 28.
2.
From the Edit menu, choose Paste. The clipboard data is inserted into the file and the data for “Wow”
appears on the left side of the waveform.
Click the
CHP. 4 GETTING STARTED
Paste button or press .
Ctrl + V
Page 64

60
Clipboard contents are pasted Into the data window
3.
To confirm that the data has been pasted into the file, click the Play All button . “Wow. Wow. Sound
editing just gets easier and easier” plays back.
Pasting in a new data window
To use data from the clipboard to create a new data window, go to the Edit menu, choose Paste Special, and
choose
Paste to New from the submenu. A new window containing the clipboard data in a single step is
created.
Cutting
Cutting allows you to remove a section of audio data from a data window and store it on the clipboard until
you paste or mix it into another file. When deciding between cut and copy, consider the following:
• Copying data has no effect on the original file.
• Cutting data modifies the original file.
Cutting data from a window
Create a selection containing the second “Wow” (there should be two if you are following the examples)
1.
in Voiceover.pca.
2.
From the Edit menu, choose Cut. The selected data is removed from the file and places it on the clipboard.
Click the
Cut button or press .
Ctrl + X
3.
Click the Play All button . “Wow. Sound editing just gets easier and easier” plays back.
GETTING STARTED CHP. 4
Page 65

Previewing a cut
You can preview cuts prior to performing the edit. This option allows you to determine if you made the
selection accurately and if the results are desirable.
1.
Create a selection anywhere in Voiceover.pca.
2.
From the Edit menu, choose Preview Cut/Cursor. The selection is ignored and the audio before and after the
selection is played to allow you to preview the cut.
Ctrl K
Press + .
Configuring cut pre-roll and post-roll lengths
Frequently, the default pre-roll and post-roll lengths are insufficient to evaluate the accuracy of an edit. For
this reason, you can configure pre-roll and post-roll lengths.
1.
From the Options menu, choose Preferences. The Preferences dialog appears.
2.
Click the Previews tab.
3.
Configure the Pre-roll and Pos t -roll values in the Cut preview configuration area of the dialog and click OK.
Deleting
Deleting a selection permanently removes it without replacing the data currently residing on the clipboard.
To delete data, choose
Delete (Clear) from the Edit menu.
61
Delete
Press .
Note:
Special menu, Playlist/Cutlist submenu) is selected, deleting
If the Treat as Cutlist command (available in the
a selection creates a region in the Cutlist window, but does
not remove the selection. For more information, see
Configuring the playlist as a cutlist on page 114.
Trimming/Cropping
Trimming allows you to retain a selection while deleting all surrounding data.
1.
Create a selection containing “Wow, sound editing just gets easier” in Voiceover.pca, but do not select
the second “and easier.”
2.
From the Edit menu, choose Trim/Crop. Only “Wow, sound editing just gets easier” remains in the data
window.
CHP. 4 GETTING STARTED
Page 66

62
Click the Cut button or press .
Ctrl + T
Mixing
Mixing is a powerful editing function that allows two sounds to be combined into a single waveform.
1.
Open and play the Drumhit.pca file. The file contains a snare drum and crash cymbal sound.
2.
Verify that the Drumhit.pca window is active and choose Select All from the Edit menu. The entire
waveform is selected.
3.
From the Edit menu, choose Copy.
Click the
Copy button or press .
Ctrl + C
4.
Activate the Voiceover.pca data window and click the Go To Start button on the playbar. The cursor
moves to the start of the file.
5.
From the Edit menu, choose Paste Special, and choose Mix from the submenu. The Mix dialog appears.
Click the
6.
Verify that the Source and Destination volume faders are set to 0 dB and click OK. The drum hit is mixed
Mix button .
Set both faders to 0dB
equally with the spoken passage.
Both waveforms are combined
GETTING STARTED CHP. 4
Page 67

Preview the file and notice that, unlike pasting, mixing does not change the length of the file.
Using undo and redo
You can easily undo/redo edit operations, even prior to your last save operation.
63
• You can undo any edit operation by choosing
• You can redo any undone edit operation by choosing
Important:
The ability to undo past save is available only in
Undo from the Edit menu.
Redo from the Edit menu.
the Sound Forge full version, and is disabled by default. To
enable this functionality, choose
Options menu, click the File tab, and select the Allow Undo
past Save
check box. When this option is enabled, your undo/
Preferences from the
redo history is retained until you close the file or exit the
software.
Click the
Click the
Undo button on the Standard toolbar or press .
Redo button on the Standard toolbar or press .
Ctrl + Z
Ctrl + Shift + Z
Using the Undo/Redo History window
The Undo/Redo History window may seem confusing at first, but you will find it invaluable once you have
mastered it. This window allows the audio file to be auditioned in various versions by undoing/redoing
multiple operations.
To display the Undo/Redo History window, choose
Alt + 7
Press .
Undo/Redo History from the View menu.
Note:
The undo/redo history for an audio file is retained
until you close the file or exit the software. If you want to
retain undo/redo history indefinitely, you should work with a
Sound Forge project (.frg) file.
Play
buttons
Performed operations
Undone operations
CHP. 4 GETTING STARTED
Page 68

64
Undoing and redoing
Verify that the Voiceover.pca data window is active and choose Undo/Redo History from the View menu.
1.
The Undo/Redo History window appears. If you have performed the previous procedures, the window
should look like the figure below:
Notice that the
Mix operation appears at the top of the Undo pane. The most recent operations always
display at the top of the appropriate list.
In the
Undo pane, click the corresponding to the Mix operation. The audio file plays without the drum
track.
2.
Select the Mix operation and choose Undo from the Edit menu. The drum track is extracted from the
Voiceover.pca data window and the
Mix operation moves to the Redo pane.
3.
In the Redo pane, click the corresponding to the Mix operation. The audio file plays with the mixed
drum track.
4.
Select the Mix operation again and choose Redo from the Edit menu. The drum track is remixed into the
Voiceover.pca waveform and the
5.
Select the Tri m/ C r op operation in the Undo pane and click . Only the Mix operation is undone and
moved to the
Redo pane. This is due to the fact that operations can only be undone or redone in the order
Mix operation is returned to the Undo pane.
originally performed.
GETTING STARTED CHP. 4
Page 69

6.
Double-click the Cut operation in the Undo pane. The Cut and Tri m / Cr o p operations are both undone in the
waveform and moved to the
Redo pane.
65
To quickly undo/redo operations in the
Undo/Redo History window, double-click the operation.
Clearing the Undo/Redo History for the current file
Clearing the current file’s Undo/Redo History frees up disk space by deleting the file’s temporary undo/redo
files. However, deleting these temporary files prevents you from undoing changes made to the file since it
was last saved (or beyond, if you have the
Preferences dialog). To clear the undo/redo history for the current file, go to the
Redo History
Note:
, and choose Clear from the submenu.
A file’s undo/redo history is also automatically cleared
Allow Undo past Save check box enabled on the General tab of the
Special menu, choose Undo/
when you close the file or exit the software.
Clearing the Undo/Redo History for all open files
You can simultaneously clear the undo/redo history for all open files. Once again, however, you cannot undo
any previous changes once these histories are deleted. To clear the undo/redo history for all open files, go to
the
Special menu, choose Undo/Redo History, and choose Clear All from the submenu.
Selecting status formats
The status format determines how a file’s position and length information is displayed. The following table
briefly describes supported status formats (hh=hours, mm=minutes, ss=seconds, and ff=frames). For more
information, see SMPTE Timecode on page 289.
Format name Description Format
Samples Number of samples Numbered (starting with zero)
Time Hours, minutes, seconds, and milliseconds hh:mm:ss.sss
Seconds Seconds and fractions of seconds sssss.sss (to three decimal places)
Time & Frames Hours, minutes, seconds, and frames. hh:mm:ss.ff
Absolute Frames Frames and fractions of frames Numbered (starting with zero, to
three decimal places)
Measures & Beats Measures, beats, and quarter beats measures:beats.quarters
SMPTE Film Sync (24 fps) SMPTE at 24 frames per second for
synchronizing with film
SMPTE EBU (25 fps, Video) SMPTE at 25 frames per second for
European Broadcasting Union
SMPTE Non-Drop (29.97 fps, Video) SMPTE at 29.97 frames per second hh:mm:ss:ff
SMPTE Drop (29.97 fps, Video) SMPTE at 29.97 frames per second using
dropped frame numbers
SMPTE 30 (30 fps, Audio) SMPTE at 30 frames per second hh:mm:ss:ff
CHP. 4 GETTING STARTED
hh:mm:ss:ff
hh:mm:ss:ff
hh:mm:ss:ff
Page 70

66
Experimenting with status formats
You can experiment with the Voiceover.pca file to see how status formats affect values in the status display
boxes.
1.
Open the Voiceover.pca file.
2.
From the Options menu, choose Status Format, and choose Samples from the submenu.
3.
Select all data in the Voiceover.pca window by choosing Select All from the Edit menu. Notice the
selection status boxes.
• The first selected sample is sample 0.
• The last selected sample is 220,506.
• The total number of samples in the selection is 220,507.
4.
From the Options menu, choose Status Format, and choose Time from the submenu. Notice that status
values change from samples to hours, minutes, and seconds.
5.
From the Options menu, choose Status Format, and choose SMPTE Non-Drop (29.97 fps, Video) from the
submenu. Notice that status values change to hours, minutes, seconds, and frames.
6.
Experiment with each status format and make note of how each format displays.
Note:
Selecting a new format changes the status format for
the current data window only.
GETTING STARTED CHP. 4
Page 71

To quickly change a file’s status format, right-click any of the data window’s status display boxes
and choose a new format from the shortcut menu.
Configuring the Measures & Beats format
Choosing the Measures & Beats format allows you to specify the beats per minute and beats per measure
values used to calculate measures and beats.
Changing a file’s beat values
From the Special menu, choose Edit Tempo. The Edit Tempo dialog appears.
1.
2.
Enter an appropriate value in the Tempo in beats per minute box.
3.
Enter an appropriate value in the Number of beats in a measure box and click OK.
Alternately, you can make a selection in the file equal to one measure, and then enter the number of beats in
the sample measure in the
calculated based on the selection length and number of beats.
Changing the default beat values
The previous procedure changes the beat values for the current audio file only. Use the following steps to
change the Sound Forge default beat values.
Selection length in beats box. The Tempo in beats per minute value is automatically
67
1.
From the Options menu, choose Preferences. The Preferences dialog appears.
2.
Click the Status tab.
3.
Enter an appropriate value in the Default beats per measure box.
4.
Enter an appropriate value in the Default beats per minute box and click OK.
Publishing to the Web
You can share your media file with others by publishing it to the Web from within the software. You can
upload your file to ACIDplanet.com or another publishing provider. From the
File menu, choose Publish and
follow the instructions to set up your publishing provider(s) and upload your content.
Exporting to CD Architect software
You can export your Sound Forge audio files directly to CD Architect 5.2 software.
Exporting a single audio file
This feature allows you to add your Sound Forge audio files to the CD Architect timeline one file at a time.
1.
Open the file that you want to add to your CD Architect project.
2.
Click anywhere in the data window that you want to export to establish focus.
3.
From the File menu, choose Export to CD Architect.
• If CD Architect software is not running, the application will be started and the audio file will be added
to the timeline and Media Pool of a new project.
• If CD Architect software is running, the audio file will be added to the timeline and Media Pool of the
open project.
Note:
A separate CD track will be created for each region in
CHP. 4 GETTING STARTED
Page 72

68
the media file.
4.
Use CD Architect software to edit your CD project as needed.
Exporting all audio files
This feature allows you to add all of your open Sound Forge audio files to the CD Architect timeline.
1.
Open the file that you want to add to your CD Architect project.
2.
From the File menu, choose Export All to CD Architect.
• If CD Architect software is not running, the application will be started and all open audio files will be
added to the timeline and Media Pool of a new project.
• If CD Architect software is running, all open audio files will be added to the timeline and Media Pool of
the open project.
3.
Use CD Architect software to edit your CD project as needed.
Exporting to Net MD devices
You can export your Sound Forge audio files to your Net MD device.
1.
From the File menu, choose Export to Net MD.
2.
Type information about your project:
a.
In the Name of track box, type the name you want to use to identify your audio file on your Net MD
device.
b.
In the Name of artist box, type the artist name you want to associate with this track on your device.
c.
In the Name of genre box, type the genre you want to associate with this track on your device.
d.
In the Comment for track box, type any comments you want to associate with this track on your device.
3.
Click the Export button. Your project is converted to the appropriate format for your device and begins
transferring when conversion is complete.
Recovering files after a crash
If Sound Forge software terminates improperly, you can recover all open and unsaved audio files not opened
in read-only mode. When a file is opened, it automatically creates temporary files that it uses to save any
changes made to the file. The original file remains unchanged until it is saved. If the software terminates
improperly, the temporary files remain on your hard drive and can be used to recover any unsaved changes
made prior to the crash.
Tip:
You can specify the folder used to store temporary files
by choosing
designating a
General tab.
Preferences from the Options menu and
Temporary files and record folder location on the
GETTING STARTED CHP. 4
Page 73

Recovering files
Click the Recover button to restore the changes and undo history
for the files listed in the
Files that can be recovered list.
Deleting recovered files
Click the Cancel button to delete the temporary files. The original
media files remain unchanged.
69
CHP. 4 GETTING STARTED
Page 74

70
GETTING STARTED CHP. 4
Page 75

CHAPTER
Navigating,
Zooming, and
5
5
Selecting
This chapter introduces some of the Sound Forge® navigation and selection features.
Setting the cursor position
While you can click anywhere in the waveform to position the cursor, there are times when you may need to
position the cursor more precisely. You can use the Go To dialog to move the cursor to a specific point in an
audio file and center it in the data window.
Tip:
You can also use a variety of keyboard shortcuts to
position the cursor. For more information, see Cursor
movement on page 280.
71
1.
Choose Go To from the Edit menu.
You can also use the following methods:
•Right-click the waveform, choose
•Double-click the leftmost selection status box.
•Press .
2.
Set the cursor position using one of the following methods:
•From the
• From the
3.
Click OK. The cursor is placed at the specified position in the data window.
Previewing audio with pre-roll
Ctrl + G
Go To drop-down list, choose a preset.
Input format drop-down list, choose a format and enter an appropriate value in the Positio n box.
Cursor, and choose Go To from the submenu.
Many audio editing operations depend upon accurate placement of the cursor in the data window. The Pre-
roll to Cursor
command is extremely useful when recording punch-ins. For more information, see Recording a specific length
(punch-in) on page 122.
CHP. 5 NAVIGATING, ZOOMING, AND SELECTING
command allows you to preview audio data leading up to the current cursor position. This
Page 76

72
A 1.5 second pre-roll is automatically designated. However, you can change this value if necessary. For more
information, see Configuring cut pre-roll and post-roll lengths on page 61.
1.
Place the cursor anywhere in the data window.
2.
From the Edit menu, choose Pre-roll to Cursor. The Sound Forge software plays the audio leading up to the
cursor and stops at the cursor.
Ctrl + Shift + K
Press .
Using the overview bar
When navigating or editing a file, the overview bar changes to reflect the current position in the file.
Title bar
Overview bar
Time ruler
The overview bar represents the length of the entire file zoomed out to its maximum position. By observing
the overview bar, you can determine the following:
• The section of the audio file currently displayed in the data window.
• The location and size of a selection in relation to the audio file and data window.
• The current cursor location.
Understanding the overview bar
1.
Open the Voiceover.pca file and verify that the waveform display is zoomed completely out (1:512 in this
case).
The entire overview bar is bracketed
Notice that the entire overview bar is bracketed, indicating that the entire file appears in the data
window.
NAVIGATING, ZOOMING, AND SELECTING CHP. 5
Page 77

2.
Place the mouse pointer over the word “Wow,” and click. A small vertical marker, representing the
cursor, appears in the overview bar.
3.
Create a selection containing the word “Wow.” A shaded block, sized in relation to the size of the
selection within the entire audio file, appears in the overview bar.
73
4.
Click the Zoom In button twice. The bracketed area in the overview bar becomes incrementally smaller
as less of the waveform appears in the data window.
Zooming in on a selection decreases the size of the bracketed area
However, the selection remains the same size and does not move. This allows you to quickly locate a
selection, even when another section of an audio file is displayed.
Navigating in the overview bar
1.
Open the Voiceover.pca file.
2.
Click the Zoom In button until you reach a 1:32 zoom ratio.
3.
Click outside the bracketed region in the overview bar. The cursor position changes, but the cursor is
located beyond the scope of the data window.
CHP. 5 NAVIGATING, ZOOMING, AND SELECTING
Page 78

74
4.
Double-click anywhere in the overview bar. The cursor position updates and centers in the data window.
Playing audio in the overview bar
To make navigating a file from the overview bar easier, you can start audio playback from the overview bar.
1.
Open the Voiceover.pca file.
2.
Right-click the overview bar. Playback of the file begins from the cursor location.
3.
Right-click the overview bar again. Playback pauses.
4.
Right-click the overview bar once more and immediately left-click at several random positions in the
overview bar. Each time you click the mouse in the overview bar during playback, the cursor jumps to the
new location and playback continues. The feature is useful for quickly navigating a file and locating
general events.
Scrubbing
Scrubbing is a type of timeline playback that gives you precise control over the speed and direction of
playback. Both linear and logarithmic scale scrubbing are allowed.
Tip:
Choose a setting from the JKL/shuttle speed drop-down
list on the
scrub speed and range when using the keyboard or multimedia
controllers.
Scrubbing with the scrub control slider
The scrub control slider , located at the bottom of the data window, can be dragged back and forth. The
farther from the center that the slider is dragged, the faster the playback, both forward and in reverse.
Note:
is located below the scrub control, to adjust playback speed or
double-click Rate and type a playback rate.
Editing tab of the Preferences dialog to control the
You can also drag the Normal Rate indicator , which
NAVIGATING, ZOOMING, AND SELECTING CHP. 5
Page 79

Scrubbing on the timeline
You can scrub the project by using the timeline.
1.
Position the cursor on the timeline, hover the mouse pointer over the
cursor and press . The mouse pointer changes to a speaker icon.
2.
Left click and drag the mouse left or right to scrub the timeline. The cursor
Ctrl
changes again to a pan/scrub icon.
Scrubbing with the keyboard
Three letters (JKL) are used as a keyboard scrub control.
• Press for reverse playback. Press again to accelerate the playback
J
rate.
• Press for forward playback. Press again to accelerate the playback
L
rate.
• Press to pause playback.
K
There are several ways to adjust the playback speed:
Press Ctrl over
timeline cursor
Keyboard scrub letters
Left-click and
drag to scrub
JKL
Reverse
Pause
Forward
75
• Hold while pressing or to emulate a shuttle knob mode.
• Press + to turn the knob to the left or + to turn the knob to the left.
• Press again or to return to normal mode.
Scrubbing with the audio event locator
K J L
K J K L
K Space
Dragging the mouse within the overview bar initiates playback of small audio loops adjacent to the cursor
position. This is not technically a scrub function, but it serves a similar purpose. It allows you to audition
brief audio segments and quickly locate specific events within a file. Playback stops when the mouse button
is released.
Configuring the audio event locator
You can set the amout of pre-roll and loop duration for the audio event locator.
1.
From the Options menu, choose Preferences. The Preferences dialog appears.
2.
Click the Previews tab.
3.
In the Audio event locator section, edit the Pre-roll and Loop time values as desired and click OK.
Zooming and magnifying
Since there are considerably more samples in a sound file than horizontal points (pixels) on the screen, many
data samples must be represented by each horizontal point when audio data displays in the data window.
Depending upon the editing operation, you may want to view the entire file at once or a small portion of
data in greater detail. For this reason, you can utilize two varieties of zooming: time ruler zooming and level
ruler zooming.
Zooming the time ruler (horizontal)
The current time ruler magnification ratio appears in the lower-right corner of the data window above the
status boxes.
CHP. 5 NAVIGATING, ZOOMING, AND SELECTING
Page 80

76
Zoom ratio
Zoom Out
Zoom Spinner
Zoom In
Understanding the zoom ratio
The zoom ratio determines the number of samples represented by each horizontal point on the screen. The
zoom ratio is a value of X:Y, where X is the number of horizontal points and Y is the number of samples. If
the ratio is 1:1, each point on the screen represents one sample. At this zoom ratio, a brief but detailed
selection of time displays.
Waveform at 1:1 zoom ratio
Conversely, if the zoom ratio is 1:1024, 1,024 samples are represented by each point on the screen and a
greater length of time displays.
For very precise editing, you may want to zoom in more tightly than a 1:1 ratio. The Sound Forge full version
software allows up to a 24:1 ratio, where 24 points on the screen represent one sample. This high level of
zoom may be useful when editing with the Pencil tool. For more information, see Repairing audio glitches
manually with the Pencil tool on page 143.
Waveform at 24:1 zoom ratio
Changing the zoom ratio
To edit the zoom ratio, use the Zoom In/Out spin control located adjacent to the zoom ratio display.
• Clicking the plus/minus buttons increases/decreases the zoom ratio by single-step increments.
• Dragging the spin control increments the zoom ratio quickly in the corresponding direction.
NAVIGATING, ZOOMING, AND SELECTING CHP. 5
Page 81

77
Right-clicking the waveform display allows you to quickly access time ruler zoom commands from
the shortcut menu.
Using the time zoom shortcut
Note:
When a file is opened, the horizontal magnification is
set to the value specified by the
the
Display tab in the Preferences dialog. To access the
Preferences dialog, choose
Normal zoom ratio setting in
Preferences from the Options
menu.
Using zoom time commands
If you prefer using commands, you can control the time magnification from the View menu. The following
table briefly describes the available time zoom commands. You can access these commands from the
menu by choosing
Command Description
In Full If you are using the Sound Forge full version software, this command increases the zoom
Normal Returns the file to its default zoom ratio.
Out Full Changes the zoom ratio to display the entire file within the data window.
Selection Changes the zoom ratio to maximize the display and center the selection within the data
Custom Zoom X:Y Sets the zoom ratio to a custom setting. For more information, see Using custom zoom
Zoom Time and choosing the desired command from the submenu.
ratio to represent each audio sample with 24 screen pixels (24:1 zoom ratio). If you are
using Sound Forge Audio Studio software, this command increases the zoom ratio to
represent each audio sample with 1 screen pixel (1:1 zoom ratio).
window.
settings on page 78.
View
Zooming the level ruler (vertical)
Zooming along the level ruler displays a larger vertical waveform and allows for more precise editing at low
audio amplitudes.
Level ruler zooming controls
Zoom In
Zoom Spin Control
Changing the level zoom
To edit the level ruler zoom, use the Zoom In/Out spinner control located above the playbar.
• Clicking the plus/minus buttons increases/decreases the level ruler
CHP. 5 NAVIGATING, ZOOMING, AND SELECTING
Zoom Out
zoom by single-step increments.
Page 82

78
• Dragging the spin control increments the level ruler zoom quickly in the corresponding direction.
At high zoom levels, only low-level samples are visible because the peaks of the waveform move beyond the
vertical scope of the data window. Consider the following data windows.
Level zoom out maximum Level zoom in maximum
Both data windows display the same audio file at a 1:1 zoom ratio. The window on the left shows the level
ruler zoomed to its maximum out position. The window on the right shows the level ruler zoomed to its
maximum in position. Notice that wave peaks clearly visible in the left window are out of display range in
the right window.
Using zoom level commands
If you prefer using commands, you can control the level magnification from the View menu. The following
table briefly describes the three available zoom level commands. You can access these commands from the
View menu by choosing Zoom Level and choosing the desired command from the submenu.
Command Description
Out Full Decreases the zoom level to minimize the display of the file’s amplitude.
Window Changes the level zoom to display the entire waveform amplitude in the data window.
Selection Maximizes the display of the selection (vertically and horizontally) in the data window.
Formatting the level ruler
You can configure the level ruler to display in decibels or percent by right-clicking the ruler and choosing
Label in Percent or Label in dB from the shortcut menu.
Using custom zoom settings
You can create two custom time zoom settings for quick access to time magnification levels that you use
frequently.
Creating custom zoom settings
1.
From the Options menu, choose Preferences. The Preferences dialog appears.
2.
Click the Display tab.
3.
Select time magnification settings from the Custom zoom ratio 1 and Custom zoom ratio 2 drop-down lists.
4.
Click OK.
Zooming to custom settings
From the View menu, choose Zoom Time, and choose a custom zoom setting from the submenu.
Click a
Custom Zoom button or on the Navigation toolbar or press or on the numeric
1 2
keypad.
NAVIGATING, ZOOMING, AND SELECTING CHP. 5
Page 83

Using zooming shortcuts
Zooming to a selection
Create a selection. If no selection is created, this function is not available.
1.
2.
Right-click the waveform and choose Zoom Selection from the shortcut menu. The minimum zoom ratio
that allows the full selection to display in the window is calculated, and the selection is then zoomed and
centered in the data window.
Note:
To reverse this function, right-click the waveform,
choose Zoom, and choose Out Full from the submenu.
Zooming the window
Right-click the level ruler and choose Zoom Window from the shortcut menu. The maximum zoom level that
allows the loudest portion of the selection to display in the window is calculated and the entire sound file is
adjusted.
Note:
To reverse this function, right-click the level ruler and
choose Zoom Out Full from the shortcut menu.
79
Zooming out full
To quickly display all data in a data window, right-click the waveform, choose Zoom, and choose Out Full
from the submenu. This command sets the zoom ratio and zoom level to the lowest values required to display
all data in the window.
Note:
To reverse this function, go to the View menu,
choose Zoom Time, and choose Normal from the submenu.
Zooming in full
To quickly set the zoom factor to its maximum magnification, right-click the waveform and choose Zoom In
Full
from the shortcut menu. The maximum magnification available is 24:1 in the full version of Sound Forge
software and 1:1 in Sound Forge Audio Studio software.
Note:
To reverse this function, right-click the waveform and
choose Zoom Normal from the shortcut menu.
Optimizing time and level ruler scaling
To optimize both the time ruler and level ruler display of a selection, double-click the level ruler. Doubleclicking the level ruler a second time restores both displays to their default levels.
Using the Magnify tool
The Magnify tool provides an additional way to magnify a section of an audio file. You can access the
Magnify tool in three ways:
•From the
• Click the Magnify Tool button on the Standard toolbar.
• Click the Edit Tool Selector in the upper-left corner of the data window until the Magnify tool appears.
CHP. 5 NAVIGATING, ZOOMING, AND SELECTING
Edit menu, choose Too l, and choose Magnify from the submenu.
Page 84

80
To temporarily use the Magnify tool, hold while creating a selection.
Ctrl
When you select the Magnify tool, the cursor displays as . You can use this tool to create a selection box
indicating how audio data is magnified. By using the Magnify tool and toggle-clicking the mouse, you can
toggle between time zoom, level zoom, and simultaneous time/level zoom.
For more information, see Using the mouse on page 23.
Zooming the time ruler with the Magnify tool
1.
Drag the Magnify tool on the waveform to make a small selection box.
2.
Toggle-click the mouse until the selection box is the same height as the data window.
3.
Drag the Magnify tool to create a time zoom selection and release the mouse button. The zoom ratio of
the selection increases.
Selection box spans the height of the window The selection is time zoomed
Zooming the level ruler with the Magnify tool
Drag the Magnify tool on the waveform to make a small selection box.
1.
2.
Toggle-click the mouse until the selection box is the full width of the data window.
3.
Drag the Magnify tool to create a level zoom selection and release the mouse button. The zoom ratio of
the selection increases.
Selection box spans the width of the window The selection is level zoomed
Zooming both time and level with the Magnify tool
Drag the Magnify tool on the waveform to make a small selection box.
1.
2.
Toggle-click the mouse until the selection displays as a box.
3.
Drag the Magnify tool to create a time/level zoom selection and release the mouse button. The level zoom
and time zoom of the selection increase.
NAVIGATING, ZOOMING, AND SELECTING CHP. 5
Page 85

Selection displays as a box The selection time and level are zoomed
Selecting audio using start and end values
You can select audio by dragging the mouse or by using keyboard shortcuts (pg. 281). For the sake of accuracy,
however, it is often useful to create selections by entering specific start and end point values. The Set Selection
dialog allows you to create selections in this way or by choosing a preset selection from the
down list.
1.
For users of the Sound Forge full version software: from the Edit menu, choose Selection, and choose Set
from the submenu.
Selection drop-
81
For users of Sound Forge Audio Studio software: from the
Edit menu, choose Selection.
The Set Selection dialog appears.
Shift
Ctrl
Press + + .
2.
From the Input format drop-down list, choose the format to be used for creating the selection. The values in
the
Start, End, and Length boxes change to reflect the specified format.
3.
Configure the selection by entering appropriate values in the Start and End or the Start and Length boxes.
4.
If you are working with a stereo file, choose Left, Right, or Both from the Channel drop-down list.
5.
Click OK.
D
Using the Set Selection dialog
The following sections briefly describe additional controls located in the Set Selection dialog.
Set Selection dialog
Play
Clicking Play plays the current selection.
Play looped
Selecting the Play looped check box allows you to play the selection in Looped Playback mode.
CHP. 5 NAVIGATING, ZOOMING, AND SELECTING
Page 86

82
Snap Zero
Clicking Snap Zero forces the Start and End values of the selected area to the next zero-crossing.
Snap Time
Clicking Snap Time forces the Start and End values of the selected area to a whole time division as designated
by the markings on the data window’s time ruler.
Zero-crossing preference
When using a Snap-Zero command, you can configure the application to snap to positive slope, negative
slope, or either slope zero-crossings.
1.
From the Options menu, choose Preferences, and click the Editing tab.
2.
From the Snap to zero-crossing slope drop-down list, choose the desired slope and click OK.
Selecting audio during playback
You can create selections during playback using the Mark In and Mark Out commands. These commands place
temporary markers in the data window, which are then used to create the selection. While you can place
these markers by choosing
useful.
1.
Play the audio file in the current data window.
Mark In and Mark Out from the Special menu, the keyboard equivalents are more
2.
During playback, press where the selection will begin.
3.
O
Press where the selection will end. A selection is created using the in and out points you identified.
I
Fine-tuning a selection
After creating a selection, you may discover that the start or end point has not been positioned properly. In
cases like this, you can try to reselect the data, but it can be difficult to accurately create selection points. For
this reason, you have a number of tools designed to help you fine-tune selections.
If you find that the selection jumps unexpectedly as you fine-tune it, snapping may be turned on. For more
information, see Understanding snapping on page 83.
Adjusting a selection with the mouse
You can fine-tune selection start and end points by dragging the edge of the selection to a new location.
1.
Open a file and create a selection in the waveform.
2.
Position the mouse pointer over one of the selection edges. The pointer displays as a bi-directional arrow
.
3.
Drag the selection edge to a new position.
Drag the edge of the selection to a new position.
NAVIGATING, ZOOMING, AND SELECTING CHP. 5
Page 87

4.
Release the mouse button. The selection updates.
Adjusting a selection with the keyboard
Using the keyboard, you can quickly and accurately select data or update a selection. For more information,
see Selecting data on page 281.
Restoring a selection
If you lose a selection while editing, you can restore it by choosing Toggle Selection from the Special menu or
by pressing .
Backspace
Understanding snapping
If, when extending a selection, the end points seem to “jump” to a different position, an auto snap option is
turned on.
Snapping to time divisions
Auto Snap to Time ensures that all start and end points reside on whole time divisions. To turn this option on,
choose
indicate that the option is turned on.
Auto Snap to Time from the Options menu. A check mark appears adjacent to the command to
83
Snapping to zero-crossings
Auto Snap to Zero ensures that all start and end points reside on zero-crossings. To turn this option on, choose
Auto Snap to Zero from the Options menu. A check mark appears adjacent to the command to indicate that
the option is turned on.
To t u rn
Auto Snap to Zero on and off, press .
Ctrl + B
Snapping the current selection to time divisions or zero-crossings
You can force a selection to snap to time divisions or zero-crossings. From the Edit menu, choose Selection,
and choose either
(the edge where the cursor flashes), choose either
Snap to Time or Snap to Zero from the submenu. To snap just the active edge of a selection
Snap Edge to Time or Snap Edge to Zero from the submenu.
Disabling Auto Snap to Zero at high magnifications
When editing an audio file displayed at a high magnification, you may wish to turn off the Auto Snap to Zero
option. This allows you to position a selection’s start and end points exactly where you choose.
1.
From the Options menu, choose Preferences, and click the Editing tab.
2.
Select the Disable auto-snapping below 1:4 zoom ratios check box and click OK.
Creating and using views
Views are used to save and recall selections, zoom ratios, and waveform display positions. The Sound Forge
software can retain eight different views for any audio file, each containing any or all of the following
elements:
• Selection
• Cursor position
• Magnification
CHP. 5 NAVIGATING, ZOOMING, AND SELECTING
Page 88

84
• Position scroll bar placement
Tip:
Views are discarded when you close the file. To save
views with a file, save the file as part of a workspace. For
more information, see Saving files as a workspace on page 56.
NAVIGATING, ZOOMING, AND SELECTING CHP. 5
Page 89

Displaying the Views toolbar
1.
From the View menu, choose Toolbars.
2.
Select the Views check box and click OK. The Views toolbar appears.
Views toolbar
Creating views
1.
Open the Voiceover.pca file and create a selection containing “Wow.”
2.
Click the Set button on the Views toolbar. A view can now be created.
Click the Set button
3.
Click . The selection is saved as view 1 and is underscored to indicate that a view was created.
85
The 1 button is underscored
to indicate that a view was created.
4.
Create a new selection anywhere in the audio file, preferably at an increased magnification.
5.
Click the Set button followed by . The selection is saved as view 2.
6.
Click . The view 1 selection displays.
7.
Click . The view 2 selection displays.
CHP. 5 NAVIGATING, ZOOMING, AND SELECTING
Page 90

86
NAVIGATING, ZOOMING, AND SELECTING CHP. 5
Page 91

CHAPTER
Changing File
Attributes and
6
6
Formats
This chapter deals with the supported file attributes and formats in Sound Forge® software. This chapter
also discusses file summary information.
Editing file attributes
When you open or create a file, its attributes display in the first three boxes of the status bar at the bottom of
the main screen. The file attributes are sample rate, bit depth, and channels (mono or stereo).
File attributes in the status bar
87
Sample rate Bit Channels File length Free storage
You can edit audio file attributes in the Properties dialog or in the status bar.
Editing attributes in the Properties dialog
You can edit file attributes in the Properties dialog.
1.
From the File menu, choose Properties. The Properties dialog appears.
2.
Click the Format tab.
3.
Edit the file attributes as needed and click OK.
depth available
You can also access the Properties dialog by doing any of the following:
•Double-click a format box.
•Right-click the waveform display and choose
Enter
•Press + .
Alt
Properties.
Editing attributes in the status bar
You can quickly edit individual file attributes by right-clicking the status value to be changed and choosing a
new value from the shortcut menu.
CHP. 6 CHANGING FILE ATTRIBUTES AND FORMATS
Page 92

88
Changing the sample rate
The sample rate is the number of samples per second, measured in hertz (Hz), used to record audio. When
creating a new file in the Sound Forge full version software, you can specify sample rates from 2,000 Hz to
192,000 Hz. When creating a new file in Sound Forge Audio Studio software, you can specify sample rates
from 2,000 Hz to 48,000 Hz. Typical sample rates are stored as presets in the
addition, you can increase or decrease the sample rate of an existing audio file.
1.
Open and play the Voiceover.pca file.
Note:
This file is located in the same folder as the
application.
2.
Right-click the Sample Rate status box and choose 48,000 from the shortcut menu.
3.
Play the file. Notice that the pitch is higher and the duration is slightly shorter.
4.
Right-click the Sample Rate status box and choose 8,000 from the shortcut menu.
5.
Play the file. Notice that the pitch is lower and the duration is longer.
Changing the sample rate of a file also changes the pitch and duration. To change the sample rate of a file
while preserving its duration and pitch, use the
Resample command. For more information, see Resample on
page 167.
Sample rate drop-down list. In
Changing the bit depth
Bit depth refers to the number of bits used to represent a sound. You can increase or decrease a file’s bit
depth.
Increasing bit depth
Increasing the bit depth does not improve the quality of a
file, but it allows subsequent processing to be performed
with increased precision.
Note:
Sound Forge Audio Studio software is 16 bit.
1.
Open a file with a small bit depth.
2.
From the Process menu, choose Bit-Depth Converter. The
Bit-Depth Converter dialog appears.
3.
From the Bit depth drop-down list, choose a larger value
and click
Note:
Noise shaping controls should be set to None and Off,
respectively.
The maximum bit-depth allowed for a sound file in
OK.
When increasing a file’s bit depth, the Dither and
CHANGING FILE ATTRIBUTES AND FORMATS CHP. 6
Page 93

Decreasing bit depth
To maximize storage space, larger sound files (24- and 16-bit) are frequently converted to smaller (16- and 8bit) files. However, representing a sound file at a decreased bit depth results in audible distortion referred to
as quantization error.
89
Note:
The maximum bit-depth allowed for a sound file in
Sound Forge Audio Studio software is 16 bit.
1.
Open a 16-bit file.
2.
From the Process menu, choose Bit-Depth Converter. The Bit-Depth Converter dialog appears.
3.
From the Bit depth drop-down list, choose 8 bit.
4.
If desired, choose an option from the Dither drop-down list. For more information, see Dither on page 89.
5.
If desired, choose a Noise shaping type. For more information, see Noise shaping on page 89.
6.
Click OK.
Note:
quality when decreasing bit depth. Experiment with the
and
There are no rules regarding maintaining audio
Dither
Noise shaping controls to determine the optimum settings
for each audio file.
Understanding dither and noise shaping
You can adjust Dither and Noise shaping settings when decreasing a file’s bit depth.
Dither
The Dither value determines the randomness of the dither (generated noise) used to mask quantization
distortion resulting from conversion to a lower bit depth. This drop-down list requires you to select from
several shapes, each of which roughly describes the pattern that would be produced if you plotted a graph
with the dither amplitude on the X-axis and the probability of the dither values on the Y-axis.
As is frequently the case when working with audio, you should experiment with dither values to yield the
best results. However, keep the following information in mind:
Setting Description
Half Rectangular Eliminates distortion resulting from conversion to a lower bit depth, but the noise level is more likely to be
Rectangular Identical to Half Rectangular, but with a maximum dither noise amplitude of 1 LSB (least significant bit).
Triangular Eliminates distortion products as well as any noise floor modulation, but results in a slightly higher noise
Highpass Triangular Behaves like triangular dither, but shifts its noise into higher frequencies. This is typically the best option
Gaussian Does not perform as well as Rectangular and Triangular dither, but may be suitable for certain audio.
Noise shaping
dependent on the signal. This setting uses a maximum dither noise amplitude of 0.5 LSB (least
sugnificant bit).
level. The option typically works well in conjunction with noise shaping. For more information, see Noise
shaping on page 89.
when used in conjunction with noise shaping. For more information, see Noise shaping on page 89.
The Noise shaping value determines the aural positioning of quantization noise. Using this control, you can
shift the noise into audio registers that are less perceptible to human hearing. This lowers the perceived
noise floor and creates the illusion of cleaner audio.
High-pass contour noise shaping attempts to push all quantization noise and error into high frequencies.
•
•
Equal-loudness contour noise shaping attempts to push the noise under an equal-loudness type of curve.
CHP. 6 CHANGING FILE ATTRIBUTES AND FORMATS
Page 94

90
Noise shaping dangers
Noise shaping places quantization noise near the audio’s Nyquist frequency, a value equal to one-half of the
file’s sample rate. Consider the following:
• A file with a sample rate of 44.1 kHz has a Nyquist frequency of 22.05 kHz (at the high end of human
hearing). Applying noise shaping to this file results in audio perceived to be cleaner than it actually is.
• A file with a sample rate of 22 kHz has a Nyquist frequency of 11 kHz (well within the sensitive range of
human hearing). Applying noise shaping to this file results in audio that is perceived to be noisier than it
actually is. Ironically, this defeats the entire purpose of noise shaping.
For this reason, we do not recommend using noise shaping on files with sample rates less than 44.1 kHz.
Minimizing quantization error
There are at least three methods of minimizing quantization error when decreasing a file’s bit depth: noise
gating, compression, and normalization.
Noise gating
Frequently, low-level signals become noise when a file’s bit depth is decreased. For this reason, it is preferable
to have complete silence between sounds in an audio file.
1.
From the Effects menu, choose Noise Gate. The Noise Gate dialog appears.
Specify a noise gate
2.
Choose a noise gate preset from the Preset drop-down list and click OK. A noise gate is applied to the
audio, negating its low-level signals.
Compressing
Decreasing the dynamic range of a sound file makes it easier to represent with decreased bit depth.
1.
For users of the Sound Forge full version software: from the Effects menu, choose Dynamics, and
choose
For users of Sound Forge Audio Studio software: from the
Graphic from the submenu. The Graphic Dynamics dialog appears.
Effects menu, choose Dynamics. The
Dynamics dialog appears.
2.
Choose a preset with a small amount of compression (2:1 or less) from the Preset drop-down list and click
OK.
Normalizing
Normalizing a file prior to decreasing its bit depth ensures that the entire dynamic range is used. In addition,
normalization lowers the signal-to-noise ratio.
CHANGING FILE ATTRIBUTES AND FORMATS CHP. 6
Page 95

1.
From the Process menu, choose Normalize.
The Normalize dialog appears.
Note:
The Normalize dialog pictured here is from
the Sound Forge full version software. If you are
using Sound Forge Audio Studio software, not all
of the controls pictured here will be available to
you.
2.
Select the Pe a k level radio button.
3.
Set the Normalize to fader to 0 dB (peak) and
click
OK.
Applying compression and normalization simultaneously
1.
From the Process menu, choose Normalize. The Normalize dialog appears.
2.
Select the Aver age RMS l evel radio button.
3.
Specify Apply dynamic compression in the If clipping occurs drop-down list and click OK.
Converting mono/stereo channels
91
The channels setting indicates whether a file contains one (mono) or two (stereo) channels. You can
convert mono files to stereo or stereo files to mono.
Converting from mono to stereo
1.
Open the Voiceover.pca file.
Note:
This file is located in the same folder as the
application.
2.
Right-click the Channels status box and choose Stereo from the shortcut
menu. The Mono To Stereo dialog appears.
3.
Select the Left Channel radio button and click OK. The mono data is placed
in the upper half of the data window (left channel) and silence is placed in
the right channel.
For more information, see Specifying the audio destination on page 92.
4.
Play the file. “Wow, sound editing just gets easier and easier” plays in only
the left channel.
Tip:
If your sound card supports only mono data, stereo files
can be played by specifying the Sound Mapper as the
playback device. To do this, choose
Options menu. Click the Audio tab and specify Microsoft
Sound Mapper from the Audio device type drop-down list.
Preferences from the
CHP. 6 CHANGING FILE ATTRIBUTES AND FORMATS
Page 96

92
Specifying the audio destination
The Destination radio buttons in the Mono To Stereo dialog allow you to specify where the mono audio data
is placed in a stereo file. The following table describes the available data destinations.
Destination Description
Left Channel The mono data is placed in the left channel. The right channel is set to silence.
Right Channel The mono data is placed in the right channel. The left channel is set to silence.
Both Channels The mono data is copied into both channels.
Converting from stereo to mono
1.
Open the Saxriff.pca file.
Note:
This file is located in the same folder as the
application.
2.
Right-click the Channels status box (indicating Stereo) and choose Mono
from the shortcut menu. The Stereo To Mono dialog appears.
3.
Select the Mix Channels radio button and click OK. The left and right
channels combine into a mono channel.
For more information, see Specifying the audio source on page 92.
Specifying the audio source
The Source radio buttons in the Stereo To Mono dialog allow you to specify what stereo data is used to create
the mono file. The following table describes the available data sources.
Source Description
Left Channel Mono data is taken only from the left channel of the stereo file.
Right Channel Mono data is taken only from the right channel of the stereo file.
Mix Channels Mono data is created by mixing both channels of the stereo file.
Using the Channel Converter
You can also use the Channel Converter to convert files between mono and stereo formats. Using the
Channel Converter provides the added flexibility of independent level settings for each channel, thereby
allowing you to intermix the channels of a stereo file to create pan effects. To use this tool, choose
Converter
from the Process menu. For more information, see Channel Converter on page 155.
Channel
Converting file formats
The previous sections have described changing a file’s sample rate, bit depth, and channel configuration.
You can also convert a file’s format and compression settings.
To demonstrate this, open the Voiceover.pca file and choose
Ty pe
and Te m pl a te drop-down lists. For more information, see Using the Save As/Render As dialog on page 53.
Save as type
When the Save As dialog appears, the Save as type drop-down list defaults to the Sound Forge project file
(.frg) format. However, using the
CHANGING FILE ATTRIBUTES AND FORMATS CHP. 6
Save as type drop-down list, you can specify any supported file type.
Save As from the File menu. Notice the Save as
Page 97

Te m p l a te
The Te mp l at e drop-down list provides standard settings for saving your audio file. If the templates do not
match your particular needs, click the
Custom button to create custom settings.
Adding summary information
Specific audio file types allow you to store text fields of summary information in addition to the audio and
video data. File types offering this feature include WAV, AVI, ASF, and RealMedia™ file formats. You can
view and edit these text fields.
Viewing and editing summary information
The Summary tab is used to view and edit the summary
information stored in the file.
1.
From the File menu, choose Properties. The Properties dialog
appears.
2.
Click the Summary tab.
3.
Edit the summary information as needed and click OK.
Viewing extended summary information
93
1.
From the File menu, choose Properties. The Properties dialog
appears.
2.
Click the Summary tab. The Summary dialog appears.
3.
Click the Extended button. The Extended Summary dialog appears. The dialog is divided into two
sections: the
The Fields pane
Fields pane and the Contents pane.
The Fields pane displays the following components for each available field:
• A check box to turn the field on or off.
• The abbreviation of the field type.
• A short description of the field.
• An indication of the field’s current status.
Full field indicator
Field abbreviation
Field description
On/Off check box
Empty field indicator
The Contents pane
Located immediately below the Fields pane, the Contents pane displays the current contents of the selected
field.
CHP. 6 CHANGING FILE ATTRIBUTES AND FORMATS
Page 98

94
Editing extended summary information
1.
Select the field to be edited in the Fields pane. Its contents display in the Contents pane.
2.
Enter the new information in the Contents pane and click OK.
Turning summary fields on and off
Adjacent to each field in the Fields pane is a check box used to turn the corresponding field on and off when
saving files in applicable formats.
Note:
If a field is turned on but contains no information, it is
not saved with the file.
Setting new default summary information
Clicking the Default button in the Extended Summary dialog saves the text in the summary fields as a default
setting. This default summary information is used when you create a new file or when you click the
button in the Properties dialog for an existing file.
Load
Tip:
The Creation date field (ICRD) is always filled with the
current date for new files.
Saving summary information
You can save files containing summary information that have been edited in Sound Forge software with or
without summary information.
1.
From the File menu, choose Save As. The Save As dialog appears.
2.
Select the Save metadata with file check box and click OK.
Note:
If you save to a file type that doesn’t support
metadata, this check box is unavailable.
Including additional embedded information
Some file formats allow non-text data (such as embedded bitmaps and metafiles) to be embedded in files. If
you use the Sound Forge software to edit a file containing data created in another application, Sound Forge
software tracks the embedded data and places it back in the file when it is saved in its original format.
Saving additional embedded information
To save additional embedded information, choose Save As from the File menu and select the Save metadata
with file
external file with an .sfl extension.
check box. If the file type does not support metadata, you are prompted to save the metadata in an
CHANGING FILE ATTRIBUTES AND FORMATS CHP. 6
Page 99

95
Removing additional embedded information
To save a file without additional embedded information, choose Save As from the File menu and clear the
Save metadata with file check box.
CHP. 6 CHANGING FILE ATTRIBUTES AND FORMATS
Page 100

96
CHANGING FILE ATTRIBUTES AND FORMATS CHP. 6
 Loading...