


Sound Bar
Operating Instructions
HT-NT3

WARNING
Do not install the appliance in a
confined space, such as a bookcase or
built-in cabinet.
To reduce the risk of fire, do not cover
the ventilation opening of the appliance
with newspapers, tablecloths, curtains,
etc.
Do not expose the appliance to naked
flame sources (for example, lighted
candles).
To reduce the risk of fire or electric
shock, do not expose this appliance to
dripping or splashing, and do not place
objects filled with liquids, such as vases,
on the appliance.
Do not expose batteries or appliances
with battery-installed to excessive heat,
such as sunshine and fire.
To prevent injury, this apparatus must
be securely placed on the cabinet or
attached to the floor/wall in accordance
with the installation instructions.
Indoor use only.
On power sources
The unit is not disconnected from the
mains as long as it is connected to the
AC outlet, even if the unit itself has
been turned off.
As the main plug is us ed to disconnect
the unit from the mains, connect the
unit to an easily accessible AC outlet.
Should you notice an abnormality in
the unit, disconnect the main plug
from the AC outlet immediately.
Recommended cables
Properly shielded and grounded cables
and connectors must be used for
connection to host computers and/or
peripherals.
For customers in Europe
Disposal of waste
batteries and electrical
and electronic
equipment (applicable
in the European Union
and other European
countries with separate
collection systems)
This symbol on the product, the battery
or on the packaging indicates that the
product and the battery shall not be
treated as household waste. On certain
batteries this symbol might be used in
combination with a chemical symbol.
The chemical symbols for mercury (Hg)
or lead (Pb) are added if the battery
contains more than 0.0005% merc ury or
0.004% lead. By ensuring these
products and batteries are disposed of
correctly, you will help prevent
potentially negative consequences for
the environment and human health
which could otherwise be caused by
inappropriate waste handling. The
recycling of the materials will help to
conserve natural resources.
In case of products that for safety,
performance or data integrity reasons
require a permanent connection with an
incorporated battery, this battery
should be replaced by qualified service
staff only. To ensure that the battery
and the electrical and electronic
equipment will be treated properly,
hand over these products at end-of-life
to the applicable collection point for the
recycling of electrical and electronic
equipment. For all other batteries,
please view the section on how to
remove the battery from the product
safely. Hand the battery over to the
applicable collection point for the
recycling of waste batteries. For more
detailed information about recycling of
this product or battery, please contact
your local Civic Office, your household
waste disposal service or the shop
where you purchased the product or
battery.
GB
2
Notice for customers: the following
information is only applicable to
equipment sold in countries applying
EU directives.
This product has been manufactured by
or on behalf of Sony Corporation, 1-7-1
Konan Minato-ku Tokyo, 108-0075
Japan. Inquiries related to product
compliance based on European Union
legislation shall be addressed to the
authorized representative, Sony
Deutschland GmbH, Hedelfinger Strasse
61, 70327 Stuttgart, Germany. For any
service or guarantee matters, please
refer to the addresses provided in the
separate service or guarantee
documents.
Hereby, Sony Corp., declares that this
equipment is in compliance with the
essential requirements and other
relevant provisions of Directive
1999/5/EC.
For details, please access the following
URL: http://www.compliance.sony.de/
This product is intended to be used in
the following countries.
AT, BE, BG, HR, CY, CZ, DK, EE, FI, FR, DE,
GR, HU, IS, IE, IT, LV, LI, LT, LU, MT, NL,
NO, PL, PT, RO, SK, SI, ES, SE, CH, GB, AL,
BA, MK, MD, RS, ME, Kosovo
5.15 GHz – 5.35 GHz band is restricted to
indoor operations only.
This Sound Bar is intended for video/
sound playback from connected
devices, music streaming from an NFCcompatible smartphone or a
BLUETOOTH device. This system also
supports network streaming and Screen
mirroring.
This equipment has been tested and
found to comply with the limits set out
in the EMC regulation using a
connection cable shorter than 3 meters.
For customers in Australia and
New Zealand
This equipment should be installed and
operated with at least 20 cm and more
between the radiator and p erson’s body
(excluding extremities: hands, wrists,
feet and ankles).
For customers in Australia
Disposal of Old
Electrical & Electronic
Equipment (Applicable
in the European Union
and other European
countries with separate
collection systems)
For customers in Singapore
Copyrights and Trademarks
This system incorporates Dolby*
Digital and the DTS** Digital Surround
System.
* Manufactured under license from
Dolby Laboratories. Dolby and the
double-D symbol are trademarks of
Dolby Laboratories.
** For DTS patents, see
http://patents.dts.com.
Manufactured under license from
DTS Licensing Limited. DTS, DTS-HD,
the Symbol, & DTS and the Symbol
together are registered trademarks
of DTS, Inc. © DTS, Inc. All Rights
Reserved.
This system incorporates High-
Definition Multimedia Interface
(HDMI™) technology.
The terms HDMI and HDMI HighDefinition Multimedia Interface, and
the HDMI Logo are trademarks or
registered trademarks of HDMI
Licensing LLC in the United States and
other countries.
“BRAVIA” is a trademark of Sony
Corporation.
GB
3

“PlayStation” is a registered trademark
of Sony Computer Entertainment Inc.
Wi-Fi®, Wi-Fi Protected Access®, Wi-Fi
Alliance® and Wi-Fi CERTIFIED
Miracast® are registered trademarks of
Wi-Fi Alliance®.
Wi-Fi CERTIFIED™, WPA™, WPA2™,
Wi-Fi Protected Setup™ and
Miracast™ are trademarks of Wi-Fi
Alliance®.
The N Mark is a trademark or registered
trademark of NFC Forum, Inc. in the
United States and in other countries.
Android™ is a trademark of Google Inc.
Google Play™ is a trademark of Google
Inc.
Google Cast™ is a trademark of Google
Inc.
Google Cast™ Ready and the Google
Cast Ready badge are trademarks of
Google Inc.
“Xperia” is a trademark of Sony Mobile
Communications AB.
The BLUETOOTH® word mark and
logos are registered trademarks
owned by Bluetooth SIG, Inc. and any
use of such marks by Sony Corporation
is under license. Other trademarks and
trade names are those of their
respective owners.
LDAC™ and LDAC logo are trademarks
of Sony Corporation.
“DSEE HX” is a trademark of Sony
Corporation.
MPEG Layer-3 audio coding
technology and patents licensed from
Fraunhofer IIS and Thomson.
Windows Media is either a registered
trademark or trademark of Microsoft
Corporation in the United States and/
or other countries.
This product is protected by certain
intellectual property rights of Microsoft
Corporation. Use or distribution of
such technology outside of this
product is prohibited without a license
from Microsoft or an authorized
Microsoft subsidiary.
Opera® Devices SDK from Opera
Software ASA. Copyright 1995-2013
Opera Software ASA. All rights
reserved.
“ClearAudio+” is a trademark of Sony
Corporation.
“x.v.Colour” and “x.v.Colour” logo are
trademarks of Sony Corporation.
Apple, the Apple logo, iPhone, iPod,
iPod touch, and Retina are trademarks
of Apple Inc., registered in the U.S. and
other countries. App Store is a service
mark of Apple Inc.
“Made for iPod,” and “Made for
iPhone” mean that an electronic
accessory has been designed to
connect specifically to iPod or iPhone,
respectively, and has been certified by
the developer to meet Apple
performance standards. Apple is not
responsible for the operation of this
device or its compliance with safety
and regulatory standards. Please note
that the use of this accessory with iPod
or iPhone may affect wireless
performance.
Compatible iPod/iPhone models
The compatible iPod/iPhone models
are as follows. Update your iPod/
iPhone with the latest software before
using with the system.
BLUETOOTH technology works with:
iPhone
iPhone 6 Plus/iPhone 6/iPhone 5s/
iPhone 5c/iPhone 5/iPhone 4s/
iPhone 4/iPhone 3GS
iPod touch
iPod touch (5th generation)/iPod
touch (4th generation)
All other trademarks are trademarks of
their respective owners.
GB
4

Other system and product names are
generally trademarks or registered
trademarks of the manufacturers. ™
and marks are not indicated in this
document.
Notice on GNU GPL/LGPL applied
software and other Open Source
Softwares
This product contains software that is
subject to the GNU General Public
License (“GPL”) or GNU Lesser General
Public License (“LGPL”). These establish
that customers have the right to
acquire, modify, and redistribute the
source code of said software in
accordance with the terms of the GPL or
the LGPL.
For details of the GPL, LGPL and other
software licenses, please refer to
[Software License Information] in
[System Settings] of the [Setup] menu
on the product.
The source code for the software used
in this product is subject to the GPL and
LGPL, and is available on the Web. To
download, please access the following:
URL:
http://oss.sony.net/Products/Linux
Please note that Sony cannot answer or
respond to any inquiries regarding the
content of this source code.
About These Operating Instructions
The instructions in these Operating
Instructions describe the controls on
the remote control. You can also use
the controls on the Bar Speaker if they
have the same or similar names as
those on the remote control.
Some illustrations are presented as
conceptual drawings, and may be
different from the actual products.
The items displayed on the TV screen
may vary depending on the area.
The default setting is underlined.
The text enclosed in bracket ([--])
appears on the TV screen, and the text
enclosed in double quotation mark
(“--”) appears in the front panel
display.
GB
5

Table of Contents
Connecting Startup Guide (separate document)
About These Operating
Instructions ...........................5
Listening/Viewing
Enjoying video/sound from the
connected devices ...............8
Playing music/photo from a
USB device ............................8
Listening to music from a
BLUETOOTH device ..............9
Playing music/photo from
other devices via the
network function ..................9
Sound Adjustment
Enjoying sound effects ..............9
Using the DSEE HX function
(Reproducing audio codec
files with natural sound
quality) ................................ 10
BLUETOOTH Function
Listening to music from a
BLUETOOTH device .............11
Listening to sound by
transmitting to a
BLUETOOTH-compatible
receiver ............................... 13
Network Function
Connecting with a wired
network .............................. 15
Connecting with a wireless
network .............................. 16
Playing files on a Home
Network ...............................17
Enjoying various online
services ............................... 18
Using Screen mirroring ............ 19
Viewing Copyright-protected
4K Content
Connecting a 4K TV ..................20
Connecting 4K devices ............ 21
Settings and Adjustments
Using the Setup Display ........... 21
Using the Options menu ..........29
GB
6

Other Functions
Controlling the system using a
smartphone or tablet
(SongPal) ............................ 30
Using Google Cast™ ................. 31
Using the Control for HDMI
Function for “BRAVIA”
Sync .....................................31
Enjoying multiplex broadcast
sound (Dual Mono) .............33
Deactivating the buttons on
the Bar Speaker
(Child Lock) ........................ 34
Changing the brightness ......... 34
Saving power in Standby
Mode .................................. 34
Enabling the IR repeater
function (when you cannot
control the TV) ....................35
Further settings for the
wireless system ..................35
Modifying the angle of the Bar
Speaker ...............................37
Mounting the Bar Speaker on a
wall ......................................37
Additional Information
Precautions .............................. 38
Troubleshooting ...................... 40
Guide to Parts and Controls .... 48
Playable types of files ..............52
Supported audio formats .........53
Specifications ...........................53
On BLUETOOTH
communication ................. 56
Index .........................................57
END USER LICENSE
AGREEMENT ....................... 59
GB
7
Listening/Viewing
Enjoying video/sound from the connected devices
Playing music/photo from a USB device
You can play music/photo files on a
connected USB device.
For playable types of files, see “Playable
types of files” (page 52).
Press INPUT +/–.
You can also press HOME, then press
/// repeatedly and to select
the input you want.
[TV]
Device (TV, etc.) that is connected to the TV
(DIGITAL IN) jack, or a TV compatible with the
Audio Return Channel function that is
connected to the HDMI OUT (ARC) jack
[HDMI1]/[HDMI2]/[HDMI3]
Device that is connected to the HDMI IN 1/2/3
jack
[Bluetooth Audio]
“BT”
BLUETOOTH device that supports A2DP
[Analog]
“ANALOG”
Device (Digital media player, etc.) that is
connected to the ANALOG IN jack
[USB]
USB device that is connected to the (USB)
port
[Screen mirroring]
“SCR M”
Screen mirroring-compatible device (page 19)
[Home Network]
“H.NET”
Contents stored on a server (page 17)
[Music Services]
“M.SERV”
Contents of music services offered on the
Internet (page 18)
Tip
You can also press PAIRING and
MIRRORING o n the remote control to select
[Bluetooth Audio] and [Screen mirroring]
input respectively.
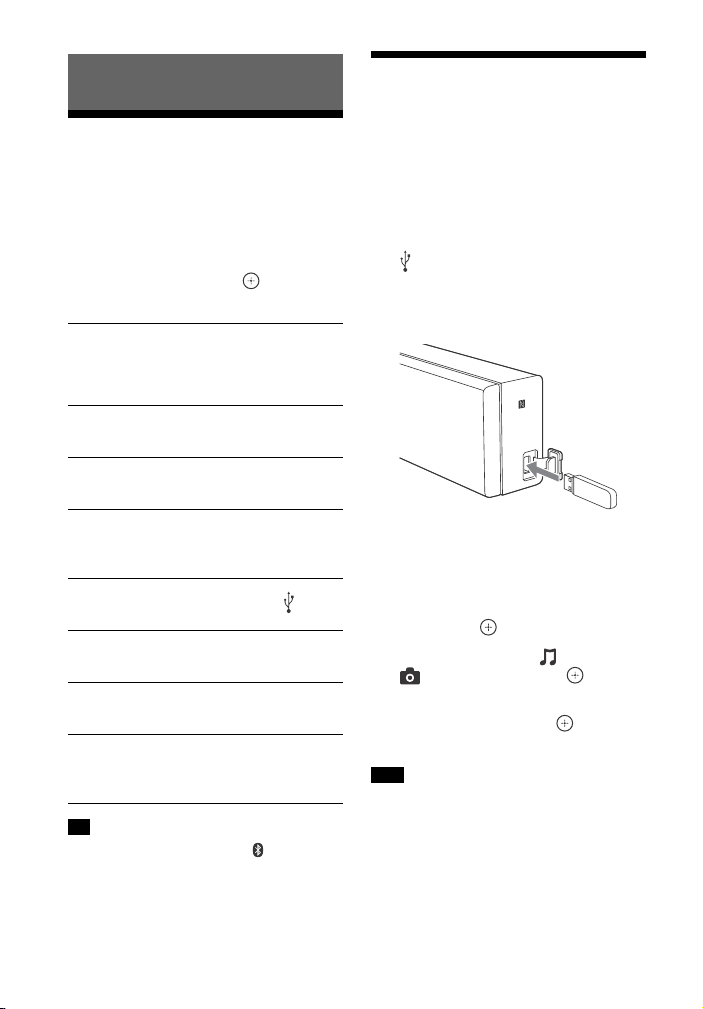
1 Connect the USB device to the
(USB) port.
Refer to the operating instructions
of the USB device before
connecting.
2 Press HOME.
The home screen appears on the TV
screen.
3 Press /// to select [USB],
then press .
4 Press / to select [Music] or
[Photo], then press .
5 Press / to select the content
you want, then press .
The selected content starts playing.
Note
Do not remove the USB device during
operation. To avoid data corruption or
damage to the USB device, turn the system
off before removing the USB device.
GB
8

Listening/Viewing / Sound Adjustment
Listening to music from a BLUETOOTH device
See “BLUETOOTH Function” (page 11).
Playing music/photo from other devices via the network function
See “Network Function” (page 15).
Sound Adjustment
Enjoying sound effects
You can easily enjoy pre-programmed
sound effects that are tailored to
different kinds of sound sources. They
bring exciting and powerful sound into
your home.
Note
You cannot select the sound effects when
the system is connected to a BLUETOOTH
receiver in transmitter mode.
Selecting the sound field
Press SOUND FIELD repeatedly during
playback.
[ClearAudio+]
You can enjoy the sound with Sonyrecommended sound field. Sound field is
automatically optimized according to
playback content and function.
[Movie]
The system provides the optimized sound for
watching movies.
[Music]
The system provides the optimized sound for
listening to music.
[Sports]
This system reproduces the feel of sports
broadcasting. Commentary is clear, cheers
are heard as surround sound, and sounds are
realistic.
[Game Studio]
The system provides the optimized sound for
playing video games.
[Standard]
The system provides the sound that
corresponds to every source.
Tip
You can also press CLEARAUDIO+ to
select [ClearAudio+].
You can also select [Sound Field] from the
Options menu (page 29).
9
GB

Using the Night mode
function
This function is useful when watching
movies late at night. You will be able to
hear the dialog clearly even at a low
volume level.
Press NIGHT.
Night mode function is activated. Press
again to cancel the function.
Tip
You can also select [Night] from the
Options menu (page 29).
Using the Clear Voice
function
This function helps make dialogues
clearer.
Press VOICE repeatedly.
[Voice : 1]: Standard
[Voice : 2]: Dialogue range is
enhanced.
[Voice : 3]: Dialogue range is
enhanced, and the parts of range
difficult to be discerned by the elderly
are boosted.
Tip
You can also select [Type 1], [Type 2] or
[Type 3] in [Voice] from the Options menu
(page 29).
Using the DSEE HX function (Reproducing audio codec files with natural sound quality)
DSEE HX upscales existing sound
sources to near hi-resolution sound
quality, and it makes you feel as if you
are really there at the recording studio
or concert.
This function only w orks when [Music] is
selected as sound field.
1 Press HOME.
The home screen appears on the TV
screen.
2 Press to select [Setup] at the
upper right corner, then press .
3 Press / to select [Audio
Settings], then press .
4 Press / to select [DSEE HX], then
press .
5 Press / to select [On], then
press .
Note
Only the fine sound restoration feature of
the DSEE HX function will be applied to
PCM audio sources with lossless
compression. The DSEE HX function does
not work for DSD (DSDIFF, DSF) format
files. The file is expanded to a maximum
96 kHz/24 bit equivalent.
This function works with 2-channel digital
input signals of 44.1 kHz or 48 kHz.
This function does not work when
[Analog] input is selected.
This function does not work when
[Bluetooth Mode] is set to [Transmitter]
(page 24).
10
GB

BLUETOOTH Function
BLUETOOTH Function
Listening to music from a BLUETOOTH device
Pairing this system with a
BLUETOOTH device
Pairing is an operation where
BLUETOOTH devices register with each
other beforehand. Once a pairing
operation is performed, it does not need
to be performed again.
Before you pair the device with this
system, be sure to set the [Bluetooth
Mode] to [Receiver] (page 24).
1 Place the BLUETOOTH device
within 1 meter from the Bar
Speaker.
2 Press PAIRING .
The blue LED indicator flashes and
the BLUETOOTH pairing screen
appears on the TV screen.
Tip
You can also select [Bluetooth Audio]
from home screen.
3 Set the BLUETOOTH device in
pairing mode.
For details on setting the
BLUETOOTH device in pairing mode,
refer to the operating instructions
supplied with the device.
4 Select “HT-NT3” on the device’s
display.
Perform this step within 5 minutes,
otherwise pairing mode will be
canceled.
When the BLUETOOTH connection
is established, device na me appears
on the TV screen and the blue LED
indicator lights up.
Note
If passkey is required on the
BLUETOOTH device, enter “0000”.
Passkey may be called “Passcode”,
“PIN code”, “PIN number” or
“Password”.
Tip
You can change the system’s name
that appears on your device by using
[Device Name] in [System Settings]
(page 27).
5 Start playback on the BLUETOOTH
device.
6 Adjust the volume.
Adjust the volume of the
BLUETOOTH device first, if the
volume level is still too low, adjust
the volume level on the Bar
Speaker.
Note
You can pair up to 9 BLUETOOTH devices. If
the 10th BLUETOOTH device is paired, the
least recently connected device will be
replaced by the new one.
To cancel pairing operation
Press HOME or INPUT +/–.
Connecting to a BLUETOOTH
device from this system
You can connect to the paired
BLUETOOTH device from this system.
Check the following before playing
music:
The BLUETOOTH function of the
BLUETOOTH device is turned on.
The pairing has been completed
(page 11).
The [Bluetooth Mode] is set to
[Receiver] (page 24).
GB
11
1 Press PAIRING .
Note
To connect to the most recent
connected BLUETOOTH device, press
. Then proceed to Step 5.
2 Press OPTIONS.
3 Select [Device List], then press .
A list of paired BLUETOOTH devices
appears.
4 Press / repeatedly to select the
device you want, then press .
5 Press to start playback.
6 Adjust the volume.
Adjust the volume of the
BLUETOOTH device first, if the
volume level is still too low, adjust
the volume level on the Bar
Speaker.
Note
Once the system and the BLUETOOTH
device are connected, you can control
playback by pressing , , , /
and /.
You can connect to the system from a
paired BLUETOOTH device even when the
system in standby mode, if you set the
[Bluetooth Standby] to [On] (page 24).
The audio playback on this system may
be delayed from that on the BLUETOOTH
device because of the characteristics of
the BLUETOOTH wireless technology.
Tip
You can enable or disable codec AAC or
LDAC from BLUETOOTH device (page 25).
To disconnect the BLUETOOTH
device
Perform any of the following items.
Press PAIRING again.
Disable the BLUETOOTH function on
the BLUETOOTH device.
When playback screen is displayed,
press OPTIONS, then select
[Disconnect].
Turn off the system or the BLUETOOTH
device.
To delete a paired BLUETOOTH
device from the device list
1 Follow Steps 1 to 3 above.
2 Press / repeatedly to select the
device, then press OPTIONS.
3 Press / repeatedly to select
[Remove], then press .
4 Press / repeatedly to select [OK],
then press .
Connecting to a remote
device by One-touch
listening function (NFC)
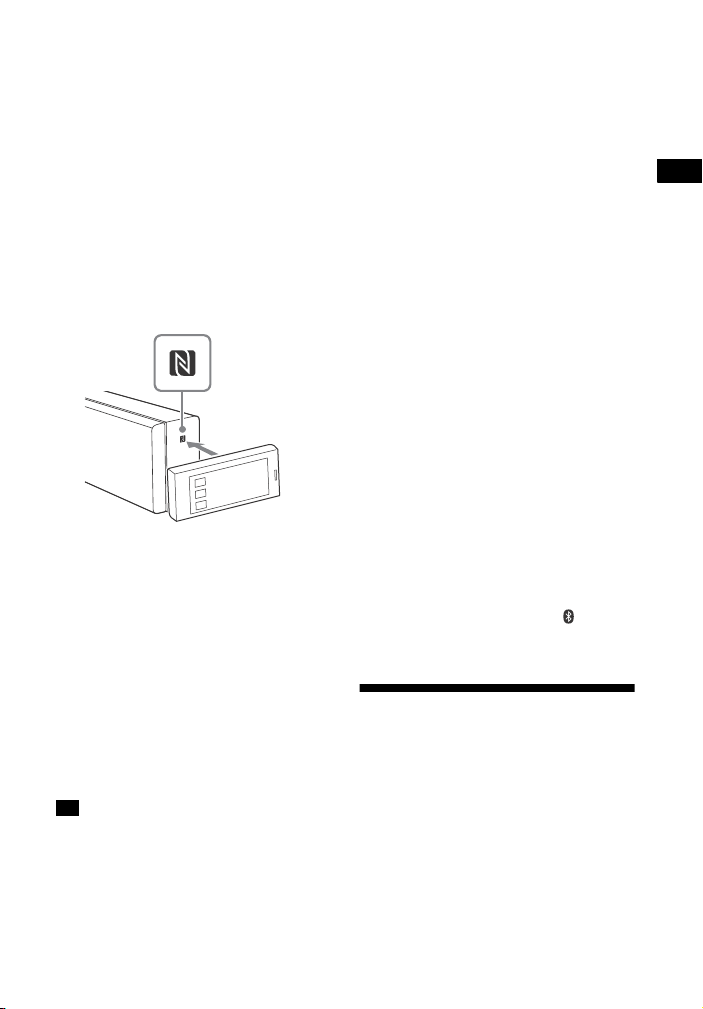
NFC (Near Field Communication) is a
technology enabling short-range
wireless communication between
various devices.
By holding an NFC-compatible remote
device near to the N-Mark on the Bar
Speaker, the system and remote device
proceed to complete pairing and the
BLUETOOTH connection automatically.
Compatible remote devices
Remote devices with a built-in NFC
function
(OS: Android 2.3.3 or later, excluding
Android 3.x)
This feature does not work with NFCcompatible receiver (such as
headphones).
Note
The system only can recognize and
connect to one NFC-compatible device at
a time.
Depending on your remote device, you
may need to perform the following items
on your remote device in advance.
12
GB
BLUETOOTH Function
Turn on the NFC function. For details,
refer to the ope rating instructions of the
remote device.
If your remote device is having an older
OS version than Android 4.1.x,
download and start the “NFC Easy
Connect” application. “NFC Easy
Connect” is a free application for
Android remote devices that can be
obtained from Google Play. (The
application may not be available in
some countries/regions.)
1 Hold the remote device near to
the N-Mark on the Bar Speaker
until the remote device vibrates.
Follow the on-screen instructions
displayed on the remote device,
and complete the procedure for
BLUETOOTH connection.
When the BLUETOOTH connection
is established, the blue LED
indicator on the front panel lights
up.
2 Start playback of audio source on
the remote device.
For details on playback operations,
refer to the operating instructions of
your remote device.
Tip
If pairin g and the BLUETO OTH connection
fail, do the following.
Hold the remote device near to the
N-Mark on the Bar Speaker again.
Remove the case from the remote
device if using a commercially available
remote device case.
Relaunch “NFC Easy Connect”
application.
Set the [Quick Start/Network Standby]
to [On] if you want to connect a
BLUETOOTH device when the system is
in standby mode.
If the volume level is low, adjust the
volume of the remote device first. If the
volume level is still too low, adjust the
volume level on the Bar Speaker.
If you hold the remote device near to the
N-Mark when the system is in transmitter
mode, the [Bluetooth Mode] is changed
to [Receiver] automatically. This feature
does not work with NFC-compatible
receiver.
To stop playback
The playback will be stopped when you
perform any of the following items.
Hold the remote device near to the
N-Mark on the Bar Speaker again.
Stop the music player of the remote
device.
Turn off the system or the remote
device.
Change the input.
Disable the BLUETOOTH function on
the remote device.
Press , HOME or PAIRING on the
remote control.
Listening to sound by transmitting to a BLUETOOTH-compatible receiver
You can listen to sound of the source
playing via this system using
BLUETOOTH-compatible receiver (such
as headphones).
13
GB

1 Turn on BLUETOOTH function on
the BLUETOOTH receiver.
2 Set [Bluetooth Mode] to
[Transmitter] in [Bluetooth
Settings] (page 24).
3 Press / to select [OK].
4 Press / to select the
BLUETOOTH receiver’s name from
[Device List] in [Bluetooth
Settings] (page 24), then press .
When the BLUETOOTH connection
is established, the blue LED
indicator lights up.
Note
If you cannot find your BLUETOOTH
receiver’s name in the list, select
[Scan].
5 Start playback the source via this
system.
The sound is output from the
BLUETOOTH receiver.
6 Adjust the volume.
Adjust the volume of the
BLUETOOTH receiver.
When connected to a BLUETOOTH
receiver, volume level of the Bar
Speaker cannot be controlled.
Volume buttons on the Bar Speaker
and remote control only works for
the BLUETOOTH receiver.
Note
You can register up to 9 BLUETOOTH
receivers. If the 10th BLUETOOTH receiver
is registered, the least recently connected
BLUETOOTH receiver will be replaced by
the new one.
The system can display up to 15 detected
BLUETOOTH receivers in the [Device List].
You cannot change the sound effects or
settings in Options menu during sound
transmitting.
Some contents cannot be output due to
content protection.
The audio output from the BLUETOOTH
receiver may be delayed from that on the
system because of the characteristics of
the BLUETOOTH wireless technology.
No sound is output from system’s
speakers and HDMI OUT (ARC) jack when
BLUETOOTH receiver is successfully
connected to the system.
[Screen mirroring] input, [Bluetooth
Audio] input and Home Theatre Control
function are disabled when the system is
in transmitter mode.
Tip
Once the system and BLUETOOTH
receiver are connected, you can control
playback by using playback operation
buttons on the BLUETOOTH receiver.
You can connect this system to the most
recently connected BLUETOOTH receiver
by pressing RX/TX repeatedly to
select [Transmitter]. Then, start playback
the source on the system.
To disconnect the BLUETOOTH
receiver
Perform any of the following items.
Disable the BLUETOOTH function on
BLUETOOTH receiver.
Set [Bluetooth Mode] to [Receiver] or
[Off] (page 24).
Turn off the system or the BLUETOOTH
receiver.
Perform the One-touch function (NFC).
To delete a registered
BLUETOOTH receiver
1 Select [Device List] in [Bluetooth
Settings] (page 24).
A list of paired and detected
BLUETOOTH receivers appears.
2 Press / to select the device, then
press OPTIONS.
3 Press / to select [Remove], then
press .
4 Press / to select [OK], then press
.
14
GB
Network Function
Network Function
LAN cable
(not supplied)
Server
Broadband
router
ADSL modem/
Cable modem
LAN cable
(not supplied)
Internet
Setting up a wired LAN
connection
Connecting with a wired network
Connecting the system to
the network using a LAN
cable
The following illustration is an example
configuration of a home network with
the system and a server.
You do not need to perform the
following set up if you have performed
the [Easy Network Settings].
1 Press HOME.
The home screen appears on the TV
screen.
2 Press to select [Setup] at the
upper right corner, then press .
3 Press / to select [Network
Settings], then press .
4 Press / to select [Internet
Settings], then press .
5 Press / to select [Wired Setup],
then press .
The screen for selecting the IP
address acquisition method
appears on the TV screen.
6 Press / to select [Auto], then
press .
7 Press / to browse information,
then press .
8 Press / to select [Save &
Connect], then press .
The system starts connecting to the
network. For details, refer to the
messages that appear on the TV
screen.
If using a fixed IP address
Select [Custom] in step 6, then follow
the on-screen instructions to select
[Specify IP address]. The IP address
input display appears on the TV screen.
Follow the on-screen instructions to
enter the value for [IP Address], then
press to confirm the values.
15
GB

Enter the values for [Subnet Mask],
[Default Gateway], [Primary DNS] and
[Secondary DNS], then press .
Connecting with a wireless network
Setting up a wireless LAN
connection
Before performing network
settings
When your wireless LAN router (access
point) is Wi-Fi Protected Setup (WPS)compatible, you can easily set the
network settings with the WPS button.
If not, you will be required to select or
enter the following information. Check
the following information in advance.
The network name (SSID)* of the
wireless LAN router/access point
The security key (password)** for the
network
* SSID (Service Set Identifier) is a name
that identifies a particular access point.
** This information should be available
from a label on your wireless LAN
router/access point, from the operating
instructions, from the person who set up
your wireless network, or from the
information provided by your Internet
service provider.
3 Press / to select the network
name (SSID) you want, then press
.
The security setting display appears
on the TV screen.
4 Enter the security key (WEP key,
WPA/WPA2 key) using the
software keyboard. Use ///
and to select the characters/
numbers, then select [Enter] to
confirm the security key.
The system starts connecting to the
network. For details, refer to the
messages that appear on the TV
screen.
If using a fixed IP address
Select [New connection registration] in
step 3, select [Man ual registration], then
follow the on-screen instructions to
select [Specify IP address]. The IP
address input display appears on the TV
screen.
Follow the on-screen instructions to
enter the value for [IP Address], then
press to confirm the values.
Enter the values for [Subnet Mask],
[Default Gateway], [Primary DNS] and
[Secondary DNS], then press .
Note
The security setting display in step 4 does
not appear if your network has not been
secured by encryption (using the security
key).
1 Follow Steps 1 to 4 of “Setting up a
wired LAN connection” (page 15).
2 Press / to select [Wireless
Setup(built-in)], then press .
A list of available SSIDs (access
points) appears on the TV screen.
GB
16

Network Function
Playing files on a Home
Player
(This system)
Server
Controller
Renderer
(This system)
Server
Network
You can play music/photo files on other
Home Network-compatible device by
connecting them to your home network.
This system can be used as a player and
renderer.
Server: Stores and shares digital
media contents
Player: Finds and plays digital media
content from the server
Renderer: Receives and plays files
from the server, and can be operated
by another device (controller)
Controller: Operates the renderer
device
Prepare for using the Home Network
function.
Connect the system to a network
(page 15).
Prepare other Home Network-
compatible device. For details, refer to
the operating instructions of the
device.
To play files stored on a server via
the system (Player)
Select [Home Network] from the home
screen, then select the server. Select the
file you want to play from [Music] or
[Photo].
To play remote files by operating
the system (Renderer) via a Home
Network Controller
You can operate the system with a
Home Network Controller-compatible
device (a mobile phone, etc.), when
playing files stored on a server.
For details on operation, refer to the
operating instructions of the Home
Network Controller-compatible device.
Note
Do not operate the system with the
supplied remote control and a controller at
the same time.
Tip
The system is compatible with the “Play
To” function of Windows Media® Player 12
that comes standard with Windows 7.
GB
17
Enjoying various online
Internet
Router This system
services
You can listen to music services offered
on the Internet with this system. To use
this function, the system must be
connected to the Internet.
Note
You may have to register your system
before using some music services. For
details on registration, visit the customer
support site of the service provider.
1 Press HOME.
The home screen appears on the TV
screen.
2 Press / to select [Music
Services], then press .
The service provider list appears on
the TV screen.
Note
Depending on the Internet content
connection status, the service provider
list may take some time to appear on
the TV screen.
Tip
You can update the service provider
list by pressing OPTIONS, then select
[Update List].
3 Press / to select the music
service you want, then press .
Press BACK to go to the previous
directory.
Registering a new music
service
You can enjoy listening to content from
a variety of music services offered on
the Internet.
Checking the registration code
You may be required to enter the
registration code of the system when
you enjoy a new music service.
1 Select [Music Services] from the home
screen.
The service provider list appears on
the TV screen.
2 Press / to select the music service
you want, then press .
The registration information
including the registration code
appears on the TV screen.
Note
You may see the registration
information on the TV screen when you
enter a music service. The timing this
information appears depend on the
music service.
GB
18

Network Function
Using Screen mirroring
“Screen mirroring” is a function to
display the screen of a mobile device on
the TV by Miracast technology.
The system can be connected directly
with a Screen mirroring-compatible
device (e.g. smartphone, tablet). You
can enjoy the display screen of the
device on your large TV screen. No
wireless router (or access point) is
required to use this feature.
1 Press MIRRORING.
2 Follow the on-screen instructions.
Activate the Screen mirroring
function from your device.
For details on how to activate the
function, refer to the operating
instructions supplied with your
device.
To connect to an Xperia
smartphone using One-touch
mirroring function (NFC)
Press MIRRORING, then hold the Xperia
smartphone near to the N-Mark on the
Bar Speaker.
To exit mirroring
Press HOME or INPUT +/–.
Note
When using Screen mirroring, the quality
of picture and sound may sometimes be
deteriorated due to interference from
other network.
Some network functions may not be
available during Screen mirroring.
Make sure that the device is compatible
with Miracast. Connectivity with all
Miracast compatible devices is not
guaranteed.
Depending on the usage environment,
the quality of the picture and sound may
deteriorate.
Tip
You can select your preference sound
effect during mirroring. Press the sound
effect buttons (page 51).
If the quality of the picture and sound
often deteriorates, you may improve the
quality by setting the [Screen mirroring RF
Setting] (page 27).
19
GB
Viewing Copyright-protected 4K
High Speed HDMI
cable**
HDCP 2.2compatible
HDMI jack
High Speed
HDMI cable*
Optical
digital
cable*
HDCP 2.2compatible
HDMI jack
Content
Connecting a 4K TV
To view copyright-protected 4K
content, connect the system and TV via
an HDCP 2.2-compatible HDMI jack. For
details on whether the TV is equipped
with HDCP 2.2-compatible HDMI jack,
refer to the operating instructions
supplied with the TV.
When the TV’s HDMI jack is
labeled with ARC* and
compatible with HDCP 2.2
When the TV’s HDMI jack is
labeled with ARC and not
compatible with HDCP 2.2
If your TV’s HDMI jack is labeled with
ARC and not compatible with HDCP 2.2,
connect the system to your TV’s HDMI
jack that is compatible with HDCP 2.2
using an HDMI cable. Then, connect an
optical digital cable to the optical
output jack of the TV to listen to digital
sound.
* The ARC (Audio Return Channel)
function sends digital sound from a TV
to this system using just an HDMI cable.
** Supplied only for certain areas.
GB
20
* Either High Speed HDMI cable or optical
digital cable is supplied depending on
area.
 Loading...