

Sony SONOMA, SONOMA AUDIO WORKSTATION User Manual

Sony Corporation of America
410 Townsend Street, San Francisco, California, 94107-1537, U.S.A.
SONOMA AUDIO WORKSTATION
USER GUIDE
Category: Public Document
Authors: Kobie Crawford and Andrew Demery
Date: 2003-09-05
Version: 1.6.1
Status: Working Document
© 2003 Sony Corporation of America
Sonoma Audio Workstation User Guide
Published by:
Sony Corporation of America
Copyright © 2003, Sony Corporation of America. All rights reserved.
This publication is protected by copyright and all rights are reserved. No part of it may be reproduced or
transmitted by any means or in any form, without prior written consent from Sony Corporation of America.
The information in this document has been carefully checked and is believed to be accurate. However,
Sony Corporation of America assumes no responsibility for any inaccuracies that may appear in this
manual. In no event will Sony Corporation of America be liable for direct, indirect, special, exemplary,
incidental or consequential damages resulting from any defect or omission in this manual, even if advised
of the possibility of such damages. The material contained herein is for informational purposes only.
DISCLAIMER: This document is a user guide for a system under development. Although Sony
Corporation of America will endeavor to keep customers apprised of changes, all aspects of this
specification are subject to change without notice.
Revision History
Version Date Description
1.5.0 3/14/01 First Compilation
1.5.1 3/20/01 Incorporate revisions from Oxford.
1.5.2 3/26/01 Incorporate Edit chapter, new block diagram of mixer.
1.5.3 3/27/01 Minor revisions, updates.
1.5.4 4/27/01 Minor revisions, updates. Sonoma release 1.4.4.2
1.5.5 5/11/01 Mixer Dynamics, Sonoma release 1.4.4.3
1.5.6 5/31/01 Sonoma release 1.4.4.5
1.5.7 6/25/01 Sonoma release 1.4.5.1
1.5.8 9/3/01 Sonoma release 1.4.5.5
1.5.9 11/9/01 Sonoma release 1.4.5.15
1.5.10 3/29/02 Sonoma release 1.4.7.8
1.5.11 7/29/02 Sonoma release 1.5.0.18
1.5.12 9/17/02 Sonoma release 1.5.1.5
1.5.13 12/19/02 Sonoma release 1.5.3.11
1.5.14 2/20/03 Sonoma release 1.5.4.0 (DSDIFF v1.4)
1.5.15 2/25/03 Sonoma release 1.5.4.2
1.5.16 2/25/03 Sonoma release 1.5.4.5
1.5.17 5/19/03 Sonoma release 1.5.4.13
1.6.1 2003-09-01 Sonoma Ver. 1.6.1 release to field
Copyright © 2003, Sony Corporation of America. All rights reserved.
Sonoma Audio Workstation User Guide
Document Change Record
Section Ver. 1.5.17 Ver. 1.6.1 Remarks
Title
Page
2.3.1 When an EDL window is opened, it is
2.3.1 Although you can zoom and scroll the EDL
2.3.2 -- The PageDown and PageUp keys work
2.3.8 A waveform for the audio is drawn within
2.3.8 Marks are used for navigation, annotating
2.4.1.1 The window size changes so that the
2.5 Unselected ingredients appear dark-green
2.5.1 The coloring of the rectangle indicates
2.7.1 If you are not sure about the state of the
2.7.2 Play Edit Region (Minus)
2.8.2.3 If you are switching a single channel at a
2.8.8.2 The longer recording also allows you the
-- Authors Responsibility for
When an EDL window is opened, it is
maximized by default. You can change this
behavior by setting or clearing the open
EDL window maximized checkbox in the
window tab of the preferences window. This
window is reached via the preferences item
in the window menu.
window to show any amount of time, the
usable area within which you can work is
the range from zero to 13.5 hours.
the rectangle when the PCM amplitude
envelope file exists.
events, and defining CD authoring
locations.
ingredients are centered and occupy 80%
of the window.
in color.
whether none (white), all (bright green), or
some (dull green) of the ingredients on that
channel are selected.
transport, use the stop command
(control+Q).
Play Around Edit Region (Shift+Minus)
time, using the buttons is not a problem, but
when you’d like to punch-in or out across
many channels simultaneously you’re in
trouble.
ability to change the fade length and move
the edit points beyond the original punch
positions.
maximized by default, but this is controlled
via a user preference.
The range of the viewable EDL window is
23:30:00 to 12:30:00, however, the usable
range in which you can work is from
00:00:00 to 12:00:00.
irrespective of the state of the transport;
however, you cannot enter the Splice Editor
with the transport running. For this reason,
the Splice Editor tab is skipped as you cycle
down/up the panels with the
PageDown/PageUp keys when the
transport runs.
A waveform for the audio is drawn within
the ingredient when an accompanying
envelope file exists.
Marks are used for navigation, annotating
events, and defining SACD authoring
locations.
The window size changes so that the
ingredients are centered and occupy 90%
of the window.
Unselected ingredients appear blue-grey in
color.
The coloring of the rectangle indicates
whether none (white), all (bright green), or
some (blue-grey) of the ingredients on that
channel are selected.
If you are not sure about the state of the
transport, use the stop command
(Ctrl+Spacebar).
Play Edit Region (-)
Play Around Edit Region (Shift+-)
If you want to punch-in on a single channel,
using that channel’s individual ready/safe
buttons is fine; however, this is inconvenient
when you want to punch-in across many
channels simultaneously.
This additional recording time also allows
you the ability to change the fade length
and move the edit points beyond the
original punch positions.
documentation passed to
K. Crawford and A. Demery
Editorial change.
Correction.
Footnote addition.
Correction.
Correction.
Correction.
Correction.
Correction.
Correction.
Editorial change.
Editorial change.
Editorial change.
Copyright © 2003, Sony Corporation of America. All rights reserved.

Sonoma Audio Workstation User Guide
Section Ver. 1.5.17 Ver. 1.6.1 Remarks
2.8.10 Since a takelist is a read-only file, when you
open a takelist a new editable EDL will be
created. You must decide how to handle the
foreground and background layers.
2.8.10 Punch the foreground into the background
and load - this is the same as the result of
the original recording.
2.8.11 This command performs an auto capture of
all the EDL channels that are in a
record-ready state.
2.10.2 The window menu contains commands to
bring the source and destination EDLs to
the front, and to tile the Sonoma window to
show only the source and destination.
2.10.2 If you hold the alt key down while selecting
an EDL in the windows menu, the selected
EDL will become the source window and
the tile source/destination command will be
performed.
2.10.2 Alignment alters the active window (source
or destination) so it displays the same
number of samples as its linear edit partner,
and then scrolls it so that one of its edit
cursors, or the Nowline are aligned. If you
align the boundaries, the active window will
view the same region as its partner. The
align commands will first force a source/
destination tiling if these EDLs are not
already tiled.
2.10.2 -- Shift+F7 = Make active EDL the Source
2.11.1 If more than one ingredient is selected in
the EDL, the four CD-like transport buttons
change the current ingredient, displaying
the first ingredient, the next ingredient (in
time-sorted order), the previous ingredient,
and the last ingredient.
2.11.1 When the zoom to ingredient checkbox is
enabled, the EDL is zoomed each time the
current ingredient is changed so that the
current ingredient is visible in the EDL.
2.11.4.3 Relative changes are performed by
pressing one of the plus or minus buttons
next to a number box:
When you open a takelist, you must decide
how to handle the foreground and
background layers.
Punch the foreground into the background
and load - the EDL will contain the new
material recorded during the recording pass
punched into the original background.
This command performs an auto recording
on all the EDL channels that are in a
record-ready state.
The window menu contains commands to
bring the source (F7) and destination (F8)
EDLs to the front, and to tile (F12) the
Sonoma window to show only the source
and destination.
If you hold the Alt-key down while selecting
an EDL in the Windows Menu, the selected
EDL will become the source window and
the tile source/destination command will be
performed, unless the chosen file is the
destination or already has focus.
Alignment alters the inactive window
(source or destination) so it displays the
same number of samples as its linear edit
partner, and then scrolls it so that one of its
edit cursors (Ctrl+F12 [left cursor]/
Shift+Ctrl+F12 [right cursor]), or the
Nowline (Shift+F12) are aligned. If you
align the boundaries (Alt+Ctrl+F12), the
active window will view the same region as
its partner. The align commands will first
force a source/destination tiling (F12) if
these EDLs are not already tiled.
Shift+F8 = Make active EDL the
Destination
F7 = Bring Source to front
F8 = Bring Destination to front
F12 = Tile Source/Destination
Ctrl+F12 = Align at Left Edit
Shift+Ctrl+F12 = Align at Right Edit
Shift+F12 = Align at Nowline
Alt+Ctrl+F12 = Align at boundaries
If more than one ingredient is selected in
the EDL, the four CD-like transport buttons
change the current ingredient, displaying
the first ingredient, the previous ingredient
(in time-sorted order), the next ingredient,
and the last ingredient.
-- Deletion
Relative changes are performed by
pressing one of the + or - buttons next to a
number box:
Correction.
Editorial change.
Correction.
Clarification.
Correction.
Correction and clarification.
Addition.
Correction.
Editorial change.
Copyright © 2003, Sony Corporation of America. All rights reserved.
Sonoma Audio Workstation User Guide
Section Ver. 1.5.17 Ver. 1.6.1 Remarks
2.11.4.4 A - Edit-in Minus
S - Edit-in to Nowline
D - Edit-in Plus
F - Edit-out Minus
G - Edit-out to Nowline
H - Edit-out Plus
2.11.5.1 Gains are displayed as positive dB but are
interpreted with a minus sign before them.
2.11.5.1 The in/out gains can be set absolutely by
typing and pressing enter. The plus/minus
buttons add/subtract the dB nudge amount
to each gain in the selection.
2.11.5.1 Shift+Z - Fade-in Gain Minus
Shift+X - Fade-in Gain Plus
Shift+C - Both Gains Minus
Shift+V - Both Gains Plus
Shift+B - Fade-out Gain Minus
Shift+N - Fade-out Gain Plus
2.11.6.1 The fade-in or fade-out length can be set
absolutely by typing in and pressing enter.
2.11.6.1 Z - Fade-in Minus
X - Fade-in Plus
B - Fade-out Minus
N - Fade-out Plus
2.11.7 Changing the channel number by typing
and pressing enter moves all the selected
ingredients to the same channel.
2.12.2 In order to select a sequence separately
you may unsplice the entire sync. group or
selectively remove a sequence’s aligned
splices using the splice editor.
2.13.1 -- Note: all these commands only work when
2.13.4 Next comes nudge registers for the relative
edit commands. Finally there are buttons for
changing the current channel and current
edit and for selectively unsplicing channels.
2.13.7.2 The outgoing or incoming edit points can be
set absolutely by clicking on an item, typing
in, and pressing enter.
2.13.7.2 The plus/minus buttons add/subtract the
nudge amount to the outgoing or incoming
edit points.
A = Edit-in Point - by nudge amount
S = Edit-in Point to Nowline
D = Edit-in Point + by nudge amount
F = Edit-out Point - by nudge amount
G = Edit-out Point to Nowline
H = Edit-out Point + by nudge amount
-- Deletion.
The in/out gains can be set directly by
entering numerical values and pressing
ENTER. The +/- buttons add/subtract the
dB nudge amount to each gain in the
selection.
Shift+Z = Fade-in Gain - by nudge
amount
Shift+X = Fade-in Gain + by nudge
amount
Shift+C = Both Gains - by nudge amount
Shift+V = Both Gains + by nudge amount
Shift+B = Fade-out Gain - by nudge
amount
Shift+N = Fade-out Gain + by nudge
amount
The fade-in (or fade-out) length can be set
to an absolute value by typing numbers in
the respective fade length box and then
pressing ENTER.
Z = Fade-in Length - by nudge amount
X = Fade-in Length to Nowline
C = Fade-in Length + by nudge amount
V = Fade-out Length - by nudge amount
B = Fade-out Length to Nowline
N = Fade-out Length + by nudge amount
Changing the channel number and pressing
ENTER moves all the selected ingredients
to the same channel.
In order to select a sequence separately
either unsplice the entire sync. group or
selectively remove a sequence’s aligned
splices using the splice editor.
the transport is idle.
These are followed by buttons for changing
the current channel and current edit, and,
finally, there are nudge registers for the
relative edit commands and a button for
selectively unsplicing channels.
The outgoing or incoming edit points can be
set absolutely by clicking on an item,
entering a numerical value and pressing
ENTER.
The +/- buttons add/subtract the nudge
amount to the outgoing or incoming edit
points.
Editorial change.
Editorial change.
Editorial change.
Editorial change.
Correction and Editorial
change.
Editorial change.
Editorial change.
Footnote addition.
Correction.
Editorial change.
Editorial change.
Copyright © 2003, Sony Corporation of America. All rights reserved.
Sonoma Audio Workstation User Guide
Section Ver. 1.5.17 Ver. 1.6.1 Remarks
2.13.7.2 A - Outgoing Minus
D - Outgoing Plus
F - Incoming Minus
H - Incoming Plus
2.13.7.2 -- Shift+A = Outgoing - by nudge amount
2.13.7.3 The plus/minus buttons add/subtract the
nudge amount to the mid-point or gap.
2.13.7.3 J - Mid-point Minus
L - Mid-point Plus
2.13.8 Gains are displayed as positive dB but are
interpreted with a minus sign before them.
2.13.8 The outgoing or incoming gains can be set
absolutely by typing in and pressing enter.
2.13.8 The plus/minus buttons add/subtract the
nudge amount to the outgoing or incoming
gain
2.13.8 Shift+Z - Outgoing Gain Minus
Shift+X - Outgoing Gain Plus
Shift+C - Both Gains Minus
Shift+V - Both Gains Plus
Shift+B - Incoming Gain Minus
Shift+N - Incoming Gain Plus
2.13.9 The plus and minus buttons are always
active, even if the numeric data can not be
displayed.
2.13.9.1 The outgoing or incoming fade lengths can
be set absolutely by clicking on an item,
typing in, and pressing enter.
2.13.9.1 The plus/minus buttons add/subtract the
nudge amount to the outgoing or incoming
fade length.
2.13.9.1 Z - Outgoing Fade Minus
X - Outgoing Fade Plus
C - Both Fades Minus
V - Both Fades Plus
B - Incoming Fade Minus
N - Incoming Fade Plus
A = Outgoing - by nudge amount
D = Outgoing + by nudge amount
F = Incoming - by nudge amount
H = Incoming + by nudge amount
[ingredient pinned]
Shift+S = Outgoing to Nowline
[ingredient pinned]
Shift+D = Outgoing + by nudge amount
[ingredient pinned]
Shift+F = Incoming - by nudge amount
[ingredient pinned]
Shift+G = Incoming to Nowline
[ingredient pinned]
Shift+H = Incoming + by nudge amount
[ingredient pinned]
The +/- buttons add/subtract the nudge
amount to the mid-point or gap.
J = Mid-point - by nudge amount
L = Mid-point + by nudge amount
-- Deletion
The outgoing or incoming gains can be set
directly by entering numerical values and
pressing ENTER.
The +/- buttons add/subtract the nudge
amount to the outgoing or incoming gain
Shift+Z = Outgoing Gain - by nudge
amount
Shift+X = Outgoing Gain + by nudge
amount
Shift+C = Both Gains - by nudge amount
Shift+V = Both Gains + by nudge amount
Shift+B = Incoming Gain - by nudge
amount
Shift+N = Incoming Gain + by nudge
amount
The + and - buttons are always active, even
if the numeric data can not be displayed.
The outgoing, incoming or both fade
lengths can be set directly by selecting the
appropriate radio button, entering numerical
values and pressing ENTER.
The +/- buttons add/subtract the nudge
amount to the outgoing or incoming fade
length.
Z = Outgoing Fade - by nudge amount
X = Outgoing Fade + by nudge amount
C = Both Fades - by nudge amount
V = Both Fades + by nudge amount
B = Incoming Fade - by nudge amount
N = Incoming Fade + by nudge amount
Editorial change.
Addition.
Editorial change.
Editorial change.
Editorial change.
Editorial change.
Editorial change.
Editorial change.
Editorial change.
Editorial change.
Editorial change.
Copyright © 2003, Sony Corporation of America. All rights reserved.
Sonoma Audio Workstation User Guide
Section Ver. 1.5.17 Ver. 1.6.1 Remarks
2.15.2 Index marks and End marks are optional. Index marks and End marks are optional
2.15.2.1 -- The word track here refers to an individual
2.15.2.1 -- The Scarlet Book actually defines Index
2.15.2.2 The minimum time permitted between two
consecutive authoring marks is 1/75 sec.
When an authoring mark is created or
moved its position is rounded to the closest
1/75 sec.
2.15.2.2 The minimum time between two
consecutive start marks is 1 second.
but a final End mark must be present to
indicate the end of the disc.
piece of music on an SACD disc defined by
Start and End marks, or two consecutive
Start marks.
Point 1 to equal the Track Start, therefore,
the first Index following a Track Start should
be Index N.2, where N is the number of the
Track.
Authoring marks must correspond to a
1/75 sec grid, and the marks are
automatically rounded to the closest
1/75 sec boundary when they are created
or moved.
The Scarlet Book defines certain minimum
times between authoring marks, those
times are defined as follows:
1. Minimum time between two consecutive
Start marks = 1 second
2. Minimum time between a Start mark and
an End mark = 1 second
3. Minimum time between two consecutive
Index marks = 1/75 second
4. Minimum time between a Start mark and
an Index mark = 1/75 second
5. Minimum time between an Index mark
and an End mark = 1/75 second
Correction.
Footnote addition.
Footnote addition.
Correction.
Correction and clarification.
Copyright © 2003, Sony Corporation of America. All rights reserved.

Sonoma Audio Workstation User Guide
Section Ver. 1.5.17 Ver. 1.6.1 Remarks
2.15.2.2 The interface allows start marks to be
placed closer than this minimum but such
marks are flagged as illegal (see below).
2.15.2.3 An asterisk is added to the type field of
illegal authoring marks so they appear as
type “CD*” rather than “CD” in the mark list.
2.15.2.3 - Start marks for tracks less than one
second in length (distance to next start
mark < 1 second)
2.15.5.8 Press ENTER first to close the info box or
use the Ctrl-Q shortcut, the stop button, or
the stop command on the transport menu.
2.15.5.11 The selected marks in the mark list are
deleted.
2.17 This version of the Sonoma application
contains an EDL-based DSD to IFF audio
export utility.
Several safeguards are in place to prevent
the setting of illegal marks; however, these
safeguards are not complete at this time.
The following responses can be expected in
the cases identified:
Start mark too close to another Start
mark
If you attempt to place two Start marks
closer than 1 second apart, you will see the
following dialogue appear: Track Start
mark not entered. Each track must be
greater than or equal to one second in
duration. [OK]
Index mark too close to a Start mark
If you attempt to place an Index mark closer
than 1/75 second from a Start mark, you will
see the following dialogue appear: An
authoring mark of type Start already
exists at this location. Change it to type
Index? [Yes/No]
Index mark too close to another Index
mark
If you attempt to place two Index marks
closer than 1/75 second apart, the
application will ignore the request and do
nothing.
End mark too close to a Start or Index
mark
The application will place the mark in the
EDL as a legal mark – This is a bug!
An asterisk is added to the type field of
illegal authoring marks so they appear as
type CD* rather than CD in the mark list and
the mark changes color in the EDL.
- Authoring marks closer than the minimum
times identified in § 2.15.2.2.
Press ENTER first to close the info box or
use the Esc-key, or the stop button on the
transport toolbar.
This button deletes the selected mark(s).
Multiple successive marks can be selected
by holding down the Shift-key and dragging
the cursor over the required list of marks.
Multiple independent marks can be
selected by holding down the Ctrl-key while
using the mouse to select each mark.
When a mark is deleted, the mark list does
not reset to the top of the list, it maintains
position, but with the deleted mark removed
from the list.
This version of the Sonoma application
contains an EDL-based DSD to DSD-IFF
(Direct Stream Digital-Interchange File
Format) audio export utility.
Correction and clarification.
Addition.
Correction.
Correction.
Correction and clarification.
Clarification.
Copyright © 2003, Sony Corporation of America. All rights reserved.
Sonoma Audio Workstation User Guide
Section Ver. 1.5.17 Ver. 1.6.1 Remarks
2.17 (While the export EDL will contain sufficient
leading silence, no disc marks appear in it.)
2.21.2 If you do not want to keep this material you
can use the delete last recording command
to remove it from the system (see section
2.8.9.4).
3.1 The Sonoma Mixer has eight full and eight
short channels for input, a center section,
and various meters including a set of
meters to check compliance with the Scarlet
Book Annex E recommendations.
3.3.1 -- Note: when using the combined Mixer and
3.3.1 When the editor and mixer are viewed
together (the second mode in the illustrated
sequence), the mixer’s channel section is
truncated and placed beneath the editor;
the center section appears on the right.
3.4.2 When changed, the internal clock usually
takes a second or two to establish lock once
the source is changed.
3.5.1 There are two types of meters: audio level
meters, and Annex E meters.
-- Deletion.
If you do not want to keep this material you
can use the undo recovery command from
the Undo pull-down menu.
The Sonoma Mixer has eight full and eight
short channels for input, a center section,
and various meters including a set of
meters to check compliance with the signal
requirements laid down in Annex D of the
Scarlet Book V1.2, Part 2 (Audio
Specification), and the recommendations
laid down in Annex E of the same
document. The final DSD stream, i.e., the
one that will be put onto an SACD, must
meet the signal requirements laid down in
Annex D. It is preferable that the signal also
meet Annex E requirements, though this is
not mandatory. If the signal requirements
laid down in Annex D are not met, a disc
replicator will not press the disc.
EDL views, care should be taken with
re-sizing of the EDL window(s) as this can
cause the Nowline to “disappear” behind
the Mixer Center Section for part of the
time. This problem can only be remedied at
this time by returning to the EDL-only
display and maximizing the EDL window
view.
There are two combined Mixer and EDL
views, one combines a small EDL window
with the channel faders and the center
section, the other combines a larger EDL
window on the left with just the center
section on the right side of the screen.
When the source is changed, the internal
clock usually takes a second or two to
re-establish lock.
There are two types of meters: Audio Level
meters, used for normal level monitoring,
and Annex Meters, which relate to the
specifications and recommendations laid
down in Annexes D and E of the Scarlet
Book Part 2 (Audio Signal Specification).
Correction.
Correction.
Footnote addition.
New feature addition.
Editorial change.
Correction.
Copyright © 2003, Sony Corporation of America. All rights reserved.
Sonoma Audio Workstation User Guide
Section Ver. 1.5.17 Ver. 1.6.1 Remarks
3.5.1 The Annex E meters are subdivided further
into four types, labeled from left-to-right as
DC, LF, Max Peak, and HF. These meters
are calibrated to display an overload if the
signal has exceeded the Annex E levels.
See Section 3.8, Sonoma Mixer
Specifications.
3.5.2 The snapshot SAVE, LOAD and DEFAULT
buttons are used to save or load a snapshot
of the mixer’s settings to or from a file.
3.5.9 Annex E Filter
The Annex E filter is a variable slope and
frequency low-pass filter provided to control
compliance with Scarlet Book Annex E
recommendations. By observing the Annex
E meter levels and using these controls, it is
possible to adjust how much energy above
20 kHz to remove, if required.
The Annex meters are subdivided into
4 types labeled from left-to-right as DC, LF,
MaxPeak, and HF. These meters are
calibrated to display an overload (red) if the
signal has exceeded the Annex D/E levels.
A brief description of each mode:
DC: Measures the DC offset of the DSD
signal. For SACD, the recommended
maximum DC offset level is -50dB SACD,
although this is not mandatory.
LF: This displays a zoomed-in version of
the main level meters around the 0dB
SACD point. In a previous version of the
Scarlet Book Part 2, Annex E, there was a
recommended maximum value for the LF
band, but this has been superseded by the
MaxPeak specification and, consequently,
the LF band can be ignored.
MaxPeak: This displays the maximum peak
level of the DSD signal. It is a requirement
for an SACD that the maximum specified
level of 3.10 dB SACD is not exceeded.
Failure to comply with this specification will
result in the master being rejected by the
disc replicator.
HF: This displays the maximum RMS level
of the DSD signal in the 40 kHz - 100 kHz
band. It is a requirement for an SACD that
the maximum specified level of -20 dB
SACD is not exceeded. Failure to comply
with this specification will result in the
master being rejected by the disc replicator.
See Section 3.9, Sonoma Mixer Specifications
for further details.
The snapshot SAVE and LOAD buttons are
used to save or load a snapshot of the
mixer’s settings to or from a file.
HF Control (Annex D.4 Filter)
The Annex D.4 filter is a variable slope and
frequency low pass filter provided to assist
with compliance with Annex D.4 of the
Scarlet Book Part 2 (Audio Specification),
which specifies the maximum High
Frequency Signal + Noise Level. Practically,
this filter can be used in conjunction with the
Annex D meter labeled HF to correct
signals which do not comply with Annex
D.4. If a DSD signal intended to be put on
SACD exceeds the HF specification
(meters will show an over condition) then
this filter may be used to attenuate some of
the level in the frequency ranges measured
by the HF meters. For best results, the
minimum amount of filtering should be used
to achieve Annex D.4 compliance. For
cases where the HF level is within
specification, this filter need not be used.
Correction.
Correction.
Correction.
Copyright © 2003, Sony Corporation of America. All rights reserved.

Sonoma Audio Workstation User Guide
Section Ver. 1.5.17 Ver. 1.6.1 Remarks
3.8 -- Sonoma Mixer Automation manual. New feature addition.
Copyright © 2003, Sony Corporation of America. All rights reserved.

Sonoma Audio Workstation User Guide
Copyright © 2003, Sony Corporation of America. All rights reserved.

Chapter 1: Introduction . . . . . . . . . . . . . . . . . . . . . . . . . . . 1
1.1 Introduction . . . . . . . . . . . . . . . . . . . . . . . . . . . . . . . . . . . . . . . . . . . . . . 1
1.2 The Sonoma Hardware . . . . . . . . . . . . . . . . . . . . . . . . . . . . . . . . . . . . . 1
1.2.1 Edit Card. . . . . . . . . . . . . . . . . . . . . . . . . . . . . . . . . . . . . . . . . . . . . . . . . . . . . . . . . . . . 1
1.2.2 Mixer Card . . . . . . . . . . . . . . . . . . . . . . . . . . . . . . . . . . . . . . . . . . . . . . . . . . . . . . . . . . 1
1.2.3 Converters . . . . . . . . . . . . . . . . . . . . . . . . . . . . . . . . . . . . . . . . . . . . . . . . . . . . . . . . . . 1
1.3 The Sonoma Software. . . . . . . . . . . . . . . . . . . . . . . . . . . . . . . . . . . . . . 2
1.3.1 The Sonoma Editor. . . . . . . . . . . . . . . . . . . . . . . . . . . . . . . . . . . . . . . . . . . . . . . . . . . . 2
1.3.2 The Sonoma Mixer . . . . . . . . . . . . . . . . . . . . . . . . . . . . . . . . . . . . . . . . . . . . . . . . . . . . 2
1.3.3 Installing Software Upgrades . . . . . . . . . . . . . . . . . . . . . . . . . . . . . . . . . . . . . . . . . . . . 2
1.4 Launching Sonoma . . . . . . . . . . . . . . . . . . . . . . . . . . . . . . . . . . . . . . . . 3
Chapter 2: Sonoma Editor . . . . . . . . . . . . . . . . . . . . . . . . 5
2.1 Introduction . . . . . . . . . . . . . . . . . . . . . . . . . . . . . . . . . . . . . . . . . . . . . . 5
Contents
2.2 The Sonoma Window . . . . . . . . . . . . . . . . . . . . . . . . . . . . . . . . . . . . . . 6
2.2.1 Menus . . . . . . . . . . . . . . . . . . . . . . . . . . . . . . . . . . . . . . . . . . . . . . . . . . . . . . . . . . . . . . 6
2.2.2 Keyboard Shortcuts and Toolbar Buttons. . . . . . . . . . . . . . . . . . . . . . . . . . . . . . . . . . . 6
2.2.3 Status Bar . . . . . . . . . . . . . . . . . . . . . . . . . . . . . . . . . . . . . . . . . . . . . . . . . . . . . . . . . . . 7
2.2.4 Debug Toolbar . . . . . . . . . . . . . . . . . . . . . . . . . . . . . . . . . . . . . . . . . . . . . . . . . . . . . . . 7
2.2.5 Clock Display and Timecode Format . . . . . . . . . . . . . . . . . . . . . . . . . . . . . . . . . . . . . . 7
2.2.6 Editing Timecode . . . . . . . . . . . . . . . . . . . . . . . . . . . . . . . . . . . . . . . . . . . . . . . . . . . . . 8
2.2.7 Preferences Window. . . . . . . . . . . . . . . . . . . . . . . . . . . . . . . . . . . . . . . . . . . . . . . . . . . 8
2.3 The EDL Window. . . . . . . . . . . . . . . . . . . . . . . . . . . . . . . . . . . . . . . . . . 8
2.3.1 Opening an EDL . . . . . . . . . . . . . . . . . . . . . . . . . . . . . . . . . . . . . . . . . . . . . . . . . . . . . . 8
2.3.2 Control Panels . . . . . . . . . . . . . . . . . . . . . . . . . . . . . . . . . . . . . . . . . . . . . . . . . . . . . . . 9
2.3.3 Channel Controls . . . . . . . . . . . . . . . . . . . . . . . . . . . . . . . . . . . . . . . . . . . . . . . . . . . . 10
2.3.4 Timeline . . . . . . . . . . . . . . . . . . . . . . . . . . . . . . . . . . . . . . . . . . . . . . . . . . . . . . . . . . . 12
2.3.5 Nowline and Edit Cursors . . . . . . . . . . . . . . . . . . . . . . . . . . . . . . . . . . . . . . . . . . . . . . 12
2.3.6 Lower Strip . . . . . . . . . . . . . . . . . . . . . . . . . . . . . . . . . . . . . . . . . . . . . . . . . . . . . . . . . 12
2.3.7 Upper Strips . . . . . . . . . . . . . . . . . . . . . . . . . . . . . . . . . . . . . . . . . . . . . . . . . . . . . . . . 12
2.3.8 Ingredients . . . . . . . . . . . . . . . . . . . . . . . . . . . . . . . . . . . . . . . . . . . . . . . . . . . . . . . . . 13
2.3.9 Marks . . . . . . . . . . . . . . . . . . . . . . . . . . . . . . . . . . . . . . . . . . . . . . . . . . . . . . . . . . . . . 15
2.4 Navigating the EDL . . . . . . . . . . . . . . . . . . . . . . . . . . . . . . . . . . . . . . . 15
2.4.1 Using the Navigation Menu. . . . . . . . . . . . . . . . . . . . . . . . . . . . . . . . . . . . . . . . . . . . . 15
2.4.2 Navigating with the Keypad . . . . . . . . . . . . . . . . . . . . . . . . . . . . . . . . . . . . . . . . . . . . 17
2.4.3 Navigating with the Transport Menu . . . . . . . . . . . . . . . . . . . . . . . . . . . . . . . . . . . . . . 17
2.4.4 Navigating with the EDL Bounds . . . . . . . . . . . . . . . . . . . . . . . . . . . . . . . . . . . . . . . . 17
xi

Sonoma Audio Workstation User Guide
2.5 Selecting Ingredients . . . . . . . . . . . . . . . . . . . . . . . . . . . . . . . . . . . . . . 18
2.5.1 Channel-based Selection . . . . . . . . . . . . . . . . . . . . . . . . . . . . . . . . . . . . . . . . . . . . . . 18
2.5.2 Selecting Ingredients with the Mouse . . . . . . . . . . . . . . . . . . . . . . . . . . . . . . . . . . . . . 18
2.5.3 Deselect/Select All Ingredients . . . . . . . . . . . . . . . . . . . . . . . . . . . . . . . . . . . . . . . . . . 18
2.5.4 Selecting Ingredients with respect to the Nowline . . . . . . . . . . . . . . . . . . . . . . . . . . . 19
2.5.5 Select Previous/Next ingredient . . . . . . . . . . . . . . . . . . . . . . . . . . . . . . . . . . . . . . . . . 19
2.5.6 Select Last Recording. . . . . . . . . . . . . . . . . . . . . . . . . . . . . . . . . . . . . . . . . . . . . . . . . 19
2.6 Manipulating Cursors. . . . . . . . . . . . . . . . . . . . . . . . . . . . . . . . . . . . . . 20
2.6.1 Working with the Nowline . . . . . . . . . . . . . . . . . . . . . . . . . . . . . . . . . . . . . . . . . . . . . . 20
2.6.2 Working with the Edit Cursors. . . . . . . . . . . . . . . . . . . . . . . . . . . . . . . . . . . . . . . . . . . 21
2.7 Playback . . . . . . . . . . . . . . . . . . . . . . . . . . . . . . . . . . . . . . . . . . . . . . . 22
2.7.1 Controlling the Transport . . . . . . . . . . . . . . . . . . . . . . . . . . . . . . . . . . . . . . . . . . . . . . 22
2.7.2 Auditioning Cursors and the Edit Region . . . . . . . . . . . . . . . . . . . . . . . . . . . . . . . . . . 23
2.7.3 Bottlenecks . . . . . . . . . . . . . . . . . . . . . . . . . . . . . . . . . . . . . . . . . . . . . . . . . . . . . . . . . 23
2.8 Recording . . . . . . . . . . . . . . . . . . . . . . . . . . . . . . . . . . . . . . . . . . . . . . 24
2.8.1 Overview. . . . . . . . . . . . . . . . . . . . . . . . . . . . . . . . . . . . . . . . . . . . . . . . . . . . . . . . . . . 24
2.8.2 Before Recording: The System Configuration . . . . . . . . . . . . . . . . . . . . . . . . . . . . . . 24
2.8.3 Before Recording: Channel Lock Controls and Disk Allocation . . . . . . . . . . . . . . . . . 27
2.8.4 Before Recording: Status Bar . . . . . . . . . . . . . . . . . . . . . . . . . . . . . . . . . . . . . . . . . . . 27
2.8.5 Before Recording: Record to Destination EDL . . . . . . . . . . . . . . . . . . . . . . . . . . . . . . 27
2.8.6 Before Recording: Fade Times. . . . . . . . . . . . . . . . . . . . . . . . . . . . . . . . . . . . . . . . . . 27
2.8.7 Before Recording: Error Preferences . . . . . . . . . . . . . . . . . . . . . . . . . . . . . . . . . . . . . 28
2.8.8 Making a Recording . . . . . . . . . . . . . . . . . . . . . . . . . . . . . . . . . . . . . . . . . . . . . . . . . . 28
2.8.9 After Recording. . . . . . . . . . . . . . . . . . . . . . . . . . . . . . . . . . . . . . . . . . . . . . . . . . . . . . 29
2.8.10 The Takelist . . . . . . . . . . . . . . . . . . . . . . . . . . . . . . . . . . . . . . . . . . . . . . . . . . . . . . . 30
2.8.11 Record Edit Region. . . . . . . . . . . . . . . . . . . . . . . . . . . . . . . . . . . . . . . . . . . . . . . . . . 30
2.9 Selection-Based Editing . . . . . . . . . . . . . . . . . . . . . . . . . . . . . . . . . . . 31
2.9.1 Clear/Cut/Copy/Paste . . . . . . . . . . . . . . . . . . . . . . . . . . . . . . . . . . . . . . . . . . . . . . . . . 31
2.9.2 Copy After Nowline . . . . . . . . . . . . . . . . . . . . . . . . . . . . . . . . . . . . . . . . . . . . . . . . . . . 32
2.9.3 Paste With Punch-in . . . . . . . . . . . . . . . . . . . . . . . . . . . . . . . . . . . . . . . . . . . . . . . . . . 32
2.9.4 Move Selection Before/After Nowline . . . . . . . . . . . . . . . . . . . . . . . . . . . . . . . . . . . . . 32
2.9.5 Nudge Selection Backward/Forward. . . . . . . . . . . . . . . . . . . . . . . . . . . . . . . . . . . . . . 32
2.9.6 Trim Selection Left/Right to Nowline. . . . . . . . . . . . . . . . . . . . . . . . . . . . . . . . . . . . . . 33
2.9.7 Slice Selection at Nowline. . . . . . . . . . . . . . . . . . . . . . . . . . . . . . . . . . . . . . . . . . . . . . 33
2.9.8 Unslice Selection . . . . . . . . . . . . . . . . . . . . . . . . . . . . . . . . . . . . . . . . . . . . . . . . . . . . 33
2.10 Region-Based Editing and Linear Editing. . . . . . . . . . . . . . . . . . . . . 33
2.10.1 Cut/Copy Edit Region and Insert Time . . . . . . . . . . . . . . . . . . . . . . . . . . . . . . . . . . . 34
2.10.2 Source and Destination EDLs. . . . . . . . . . . . . . . . . . . . . . . . . . . . . . . . . . . . . . . . . . 34
2.10.3 Linear Edit Commands . . . . . . . . . . . . . . . . . . . . . . . . . . . . . . . . . . . . . . . . . . . . . . . 35
xii

Sonoma Audio Workstation User Guide
2.11 The Ingredient Edit Control Panel . . . . . . . . . . . . . . . . . . . . . . . . . . . 37
2.11.1 Changing the Current Ingredient. . . . . . . . . . . . . . . . . . . . . . . . . . . . . . . . . . . . . . . . 37
2.11.2 Ingredient Polarity. . . . . . . . . . . . . . . . . . . . . . . . . . . . . . . . . . . . . . . . . . . . . . . . . . . 38
2.11.3 Absolute Changes and Nudging . . . . . . . . . . . . . . . . . . . . . . . . . . . . . . . . . . . . . . . . 38
2.11.4 Ingredient Edit Points Section. . . . . . . . . . . . . . . . . . . . . . . . . . . . . . . . . . . . . . . . . . 39
2.11.5 Ingredient Gain Section . . . . . . . . . . . . . . . . . . . . . . . . . . . . . . . . . . . . . . . . . . . . . . 40
2.11.6 Ingredient Fades Section . . . . . . . . . . . . . . . . . . . . . . . . . . . . . . . . . . . . . . . . . . . . . 40
2.11.7 Channel Number. . . . . . . . . . . . . . . . . . . . . . . . . . . . . . . . . . . . . . . . . . . . . . . . . . . . 41
2.11.8 Clip Info. and Ingredient Polarity. . . . . . . . . . . . . . . . . . . . . . . . . . . . . . . . . . . . . . . . 41
2.12 Splices . . . . . . . . . . . . . . . . . . . . . . . . . . . . . . . . . . . . . . . . . . . . . . . . 42
2.12.1 The Splice Command and Sequences . . . . . . . . . . . . . . . . . . . . . . . . . . . . . . . . . . . 42
2.12.2 Multi-channel Edits and Sync. Groups . . . . . . . . . . . . . . . . . . . . . . . . . . . . . . . . . . . 43
2.13 The Splice Editor Control Panel . . . . . . . . . . . . . . . . . . . . . . . . . . . . 44
2.13.1 Current Edit and Current Splice . . . . . . . . . . . . . . . . . . . . . . . . . . . . . . . . . . . . . . . . 44
2.13.2 EDL Splice Edit Mode. . . . . . . . . . . . . . . . . . . . . . . . . . . . . . . . . . . . . . . . . . . . . . . . 44
2.13.3 Resetting, Exiting, and Re-entering the Splice Editor. . . . . . . . . . . . . . . . . . . . . . . . 46
2.13.4 Splice Control Panel Overview . . . . . . . . . . . . . . . . . . . . . . . . . . . . . . . . . . . . . . . . . 46
2.13.5 Auditioning Splices . . . . . . . . . . . . . . . . . . . . . . . . . . . . . . . . . . . . . . . . . . . . . . . . . . 46
2.13.6 Editing a Splice . . . . . . . . . . . . . . . . . . . . . . . . . . . . . . . . . . . . . . . . . . . . . . . . . . . . . 48
2.13.7 Edit Points. . . . . . . . . . . . . . . . . . . . . . . . . . . . . . . . . . . . . . . . . . . . . . . . . . . . . . . . . 48
2.13.8 Gains. . . . . . . . . . . . . . . . . . . . . . . . . . . . . . . . . . . . . . . . . . . . . . . . . . . . . . . . . . . . . 49
2.13.9 Fades . . . . . . . . . . . . . . . . . . . . . . . . . . . . . . . . . . . . . . . . . . . . . . . . . . . . . . . . . . . . 49
2.13.10 Displaying Data: Next Channel, Next Edit . . . . . . . . . . . . . . . . . . . . . . . . . . . . . . . 50
2.13.11 Unsplicing . . . . . . . . . . . . . . . . . . . . . . . . . . . . . . . . . . . . . . . . . . . . . . . . . . . . . . . . 51
2.14 Undo . . . . . . . . . . . . . . . . . . . . . . . . . . . . . . . . . . . . . . . . . . . . . . . . . 51
2.15 Marks. . . . . . . . . . . . . . . . . . . . . . . . . . . . . . . . . . . . . . . . . . . . . . . . . 52
2.15.1 EDL Marks . . . . . . . . . . . . . . . . . . . . . . . . . . . . . . . . . . . . . . . . . . . . . . . . . . . . . . . . 52
2.15.2 Authoring Marks . . . . . . . . . . . . . . . . . . . . . . . . . . . . . . . . . . . . . . . . . . . . . . . . . . . . 52
2.15.3 Ingredient Marks . . . . . . . . . . . . . . . . . . . . . . . . . . . . . . . . . . . . . . . . . . . . . . . . . . . . 54
2.15.4 Error Marks . . . . . . . . . . . . . . . . . . . . . . . . . . . . . . . . . . . . . . . . . . . . . . . . . . . . . . . . 54
2.15.5 The Mark Control Panel . . . . . . . . . . . . . . . . . . . . . . . . . . . . . . . . . . . . . . . . . . . . . . 55
2.15.6 Auditioning an Authoring Mark . . . . . . . . . . . . . . . . . . . . . . . . . . . . . . . . . . . . . . . . . 58
2.15.7 Saving the Mark List . . . . . . . . . . . . . . . . . . . . . . . . . . . . . . . . . . . . . . . . . . . . . . . . . 58
2.16 Waveforms . . . . . . . . . . . . . . . . . . . . . . . . . . . . . . . . . . . . . . . . . . . . 58
2.16.1 Ingredient Waveforms. . . . . . . . . . . . . . . . . . . . . . . . . . . . . . . . . . . . . . . . . . . . . . . . 59
2.16.2 Metering Waveforms. . . . . . . . . . . . . . . . . . . . . . . . . . . . . . . . . . . . . . . . . . . . . . . . . 59
2.17 Exporting an SACD Mastering File . . . . . . . . . . . . . . . . . . . . . . . . . . 60
2.17.1 The Export to Master Command. . . . . . . . . . . . . . . . . . . . . . . . . . . . . . . . . . . . . . . . 60
2.17.2 DSD-IFF Meta Data . . . . . . . . . . . . . . . . . . . . . . . . . . . . . . . . . . . . . . . . . . . . . . . . . 61
2.17.3 Loudspeaker Configuration. . . . . . . . . . . . . . . . . . . . . . . . . . . . . . . . . . . . . . . . . . . . 62
xiii

Sonoma Audio Workstation User Guide
2.17.4 Export Output . . . . . . . . . . . . . . . . . . . . . . . . . . . . . . . . . . . . . . . . . . . . . . . . . . . . . . 63
2.18 Source Audio Mapper . . . . . . . . . . . . . . . . . . . . . . . . . . . . . . . . . . . . 64
2.19 User Preferences. . . . . . . . . . . . . . . . . . . . . . . . . . . . . . . . . . . . . . . . 65
2.19.1 Time Format Preferences . . . . . . . . . . . . . . . . . . . . . . . . . . . . . . . . . . . . . . . . . . . . . 65
2.19.2 Editing Preferences. . . . . . . . . . . . . . . . . . . . . . . . . . . . . . . . . . . . . . . . . . . . . . . . . . 66
2.19.3 Playback Preferences. . . . . . . . . . . . . . . . . . . . . . . . . . . . . . . . . . . . . . . . . . . . . . . . 67
2.19.4 Waveform Preferences . . . . . . . . . . . . . . . . . . . . . . . . . . . . . . . . . . . . . . . . . . . . . . . 67
2.19.5 Hardware Preferences . . . . . . . . . . . . . . . . . . . . . . . . . . . . . . . . . . . . . . . . . . . . . . . 67
2.19.6 DSD-IFF Preferences . . . . . . . . . . . . . . . . . . . . . . . . . . . . . . . . . . . . . . . . . . . . . . . . 67
2.19.7 Error Preferences . . . . . . . . . . . . . . . . . . . . . . . . . . . . . . . . . . . . . . . . . . . . . . . . . . . 67
2.19.8 Window Preferences. . . . . . . . . . . . . . . . . . . . . . . . . . . . . . . . . . . . . . . . . . . . . . . . . 68
2.20 The Monitor Control Panel. . . . . . . . . . . . . . . . . . . . . . . . . . . . . . . . . 68
2.20.1 The Console Window . . . . . . . . . . . . . . . . . . . . . . . . . . . . . . . . . . . . . . . . . . . . . . . . 68
2.20.2 The Disk Monitor. . . . . . . . . . . . . . . . . . . . . . . . . . . . . . . . . . . . . . . . . . . . . . . . . . . . 69
2.20.3 The Trimedia Monitor . . . . . . . . . . . . . . . . . . . . . . . . . . . . . . . . . . . . . . . . . . . . . . . . 69
2.21 Error Reporting and Recovery. . . . . . . . . . . . . . . . . . . . . . . . . . . . . . 69
2.21.1 Error Detection and Handling . . . . . . . . . . . . . . . . . . . . . . . . . . . . . . . . . . . . . . . . . . 69
2.21.2 Recovering from a System Crash. . . . . . . . . . . . . . . . . . . . . . . . . . . . . . . . . . . . . . . 70
2.21.3 Recording Invalid DSD Data. . . . . . . . . . . . . . . . . . . . . . . . . . . . . . . . . . . . . . . . . . . 70
2.22 Example: Making a Recording. . . . . . . . . . . . . . . . . . . . . . . . . . . . . . 70
2.23 Example: Making a Simple Edit. . . . . . . . . . . . . . . . . . . . . . . . . . . . . 71
Chapter 3: Sonoma Mixer. . . . . . . . . . . . . . . . . . . . . . . . 73
3.1 Overview . . . . . . . . . . . . . . . . . . . . . . . . . . . . . . . . . . . . . . . . . . . . . . . 73
3.2 Screen Controls. . . . . . . . . . . . . . . . . . . . . . . . . . . . . . . . . . . . . . . . . . 73
3.2.1 Push buttons. . . . . . . . . . . . . . . . . . . . . . . . . . . . . . . . . . . . . . . . . . . . . . . . . . . . . . . . 73
3.2.2 Dials . . . . . . . . . . . . . . . . . . . . . . . . . . . . . . . . . . . . . . . . . . . . . . . . . . . . . . . . . . . . . . 74
3.2.3 Faders. . . . . . . . . . . . . . . . . . . . . . . . . . . . . . . . . . . . . . . . . . . . . . . . . . . . . . . . . . . . . 74
3.2.4 Control Normalization . . . . . . . . . . . . . . . . . . . . . . . . . . . . . . . . . . . . . . . . . . . . . . . . . 74
3.2.5 Text Display and Type In . . . . . . . . . . . . . . . . . . . . . . . . . . . . . . . . . . . . . . . . . . . . . . 75
3.3 The Control Window . . . . . . . . . . . . . . . . . . . . . . . . . . . . . . . . . . . . . . 75
3.3.1 Screen Mode. . . . . . . . . . . . . . . . . . . . . . . . . . . . . . . . . . . . . . . . . . . . . . . . . . . . . . . . 75
3.3.2 Router Button . . . . . . . . . . . . . . . . . . . . . . . . . . . . . . . . . . . . . . . . . . . . . . . . . . . . . . . 76
3.3.3 Setup Button . . . . . . . . . . . . . . . . . . . . . . . . . . . . . . . . . . . . . . . . . . . . . . . . . . . . . . . . 76
3.3.4 Monitor Controls . . . . . . . . . . . . . . . . . . . . . . . . . . . . . . . . . . . . . . . . . . . . . . . . . . . . . 76
xiv

Sonoma Audio Workstation User Guide
3.3.5 Quit Button . . . . . . . . . . . . . . . . . . . . . . . . . . . . . . . . . . . . . . . . . . . . . . . . . . . . . . . . . 76
3.3.6 Play/Stop Buttons . . . . . . . . . . . . . . . . . . . . . . . . . . . . . . . . . . . . . . . . . . . . . . . . . . . . 76
3.4 The Setup Window . . . . . . . . . . . . . . . . . . . . . . . . . . . . . . . . . . . . . . . 76
3.4.1 Gain Trim . . . . . . . . . . . . . . . . . . . . . . . . . . . . . . . . . . . . . . . . . . . . . . . . . . . . . . . . . . 77
3.4.2 Mixer clock source . . . . . . . . . . . . . . . . . . . . . . . . . . . . . . . . . . . . . . . . . . . . . . . . . . . 77
3.5 Mixer Center Section . . . . . . . . . . . . . . . . . . . . . . . . . . . . . . . . . . . . . . 78
3.5.1 Meters. . . . . . . . . . . . . . . . . . . . . . . . . . . . . . . . . . . . . . . . . . . . . . . . . . . . . . . . . . . . . 78
3.5.2 Snapshot Controls . . . . . . . . . . . . . . . . . . . . . . . . . . . . . . . . . . . . . . . . . . . . . . . . . . . 80
3.5.3 Monitor Controls . . . . . . . . . . . . . . . . . . . . . . . . . . . . . . . . . . . . . . . . . . . . . . . . . . . . . 80
3.5.4 Oscillator. . . . . . . . . . . . . . . . . . . . . . . . . . . . . . . . . . . . . . . . . . . . . . . . . . . . . . . . . . . 81
3.5.5 LFE Filter . . . . . . . . . . . . . . . . . . . . . . . . . . . . . . . . . . . . . . . . . . . . . . . . . . . . . . . . . . 81
3.5.6 Program Insert . . . . . . . . . . . . . . . . . . . . . . . . . . . . . . . . . . . . . . . . . . . . . . . . . . . . . . 82
3.5.7 Program EQ . . . . . . . . . . . . . . . . . . . . . . . . . . . . . . . . . . . . . . . . . . . . . . . . . . . . . . . . 82
3.5.8 Program Dynamics . . . . . . . . . . . . . . . . . . . . . . . . . . . . . . . . . . . . . . . . . . . . . . . . . . . 82
3.5.9 HF Control (Annex D.4 Filter) . . . . . . . . . . . . . . . . . . . . . . . . . . . . . . . . . . . . . . . . . . . 82
3.5.10 Master Fader. . . . . . . . . . . . . . . . . . . . . . . . . . . . . . . . . . . . . . . . . . . . . . . . . . . . . . . 82
3.5.11 Aux Master . . . . . . . . . . . . . . . . . . . . . . . . . . . . . . . . . . . . . . . . . . . . . . . . . . . . . . . . 83
3.5.12 Max Peak Limit . . . . . . . . . . . . . . . . . . . . . . . . . . . . . . . . . . . . . . . . . . . . . . . . . . . . . 83
3.5.13 Controlling the Channel Faders and Signal Processing . . . . . . . . . . . . . . . . . . . . . . 83
3.6 Mixer Channel Section . . . . . . . . . . . . . . . . . . . . . . . . . . . . . . . . . . . . 84
3.6.1 Channel Input . . . . . . . . . . . . . . . . . . . . . . . . . . . . . . . . . . . . . . . . . . . . . . . . . . . . . . . 84
3.6.2 Channel EQ . . . . . . . . . . . . . . . . . . . . . . . . . . . . . . . . . . . . . . . . . . . . . . . . . . . . . . . . 84
3.6.3 Channel Dynamics . . . . . . . . . . . . . . . . . . . . . . . . . . . . . . . . . . . . . . . . . . . . . . . . . . . 85
3.6.4 Channel Filter . . . . . . . . . . . . . . . . . . . . . . . . . . . . . . . . . . . . . . . . . . . . . . . . . . . . . . . 85
3.6.5 Channel Delay . . . . . . . . . . . . . . . . . . . . . . . . . . . . . . . . . . . . . . . . . . . . . . . . . . . . . . 85
3.6.6 Channel Insert. . . . . . . . . . . . . . . . . . . . . . . . . . . . . . . . . . . . . . . . . . . . . . . . . . . . . . . 85
3.6.7 Channel Strip Ordering . . . . . . . . . . . . . . . . . . . . . . . . . . . . . . . . . . . . . . . . . . . . . . . . 85
3.6.8 Scribble Strip. . . . . . . . . . . . . . . . . . . . . . . . . . . . . . . . . . . . . . . . . . . . . . . . . . . . . . . . 86
3.6.9 Channel Faders . . . . . . . . . . . . . . . . . . . . . . . . . . . . . . . . . . . . . . . . . . . . . . . . . . . . . 86
3.6.10 Linking and Copying Channel Faders and Controls . . . . . . . . . . . . . . . . . . . . . . . . . 87
3.7 The Router Window. . . . . . . . . . . . . . . . . . . . . . . . . . . . . . . . . . . . . . . 89
3.8 Sonoma Mixer Automation . . . . . . . . . . . . . . . . . . . . . . . . . . . . . . . . . 90
3.8.1 Overview. . . . . . . . . . . . . . . . . . . . . . . . . . . . . . . . . . . . . . . . . . . . . . . . . . . . . . . . . . . 90
3.8.2 Automation Controls and Indicators . . . . . . . . . . . . . . . . . . . . . . . . . . . . . . . . . . . . . . 91
3.8.3 A Short Example Session . . . . . . . . . . . . . . . . . . . . . . . . . . . . . . . . . . . . . . . . . . . . . . 92
3.9 Sonoma Mixer Specifications . . . . . . . . . . . . . . . . . . . . . . . . . . . . . . . 94
xv

Sonoma Audio Workstation User Guide
xvi

1.1 Introduction
The Sonoma Audio Workstation is a hardware/software system that provides powerful and flexible
facilities for recording, editing, and mixing Direct Stream Digital (DSD) audio.
1.2 The Sonoma Hardware
In order to run the Sonoma application you must have a Sonoma Edit card installed in your PC. If you
wish to use the mixer, you must also install the Sonoma Mixer card. These cards are pre-installed in
the PC when the Sonoma Workstation is shipped. Please see the Sonoma
Hardware Installation Guide for more details.
1.2.1 Edit Card
The Sonoma Edit card controls the transmission of DSD data to and from the PC’s hard disks. It is
the record/playback engine. Although the workstation presents an 8-channel interface to the outside
world, each channel executes a 2-to-1 mix during playback while performing cross-fades at edit
points. The edit card supports this cross-fade activity.
Chapter 1: Introduction
Audio Workstation
1.2.2 Mixer Card
The Sonoma Mixer card can simultaneously perform 8-to-6 channel and 8-to-2 channel mixes. It is
connected directly to the Edit card by a flexibus cable. To route audio to and from the mixer and
external equipment, a special BNC breakout cable can be plugged into the Mixer card, providing an
additional eight inputs and outputs. All 16 inputs and outputs are fully assignable.
1.2.3 Converters
The analog audio interface to the edit card is an outboard pair of 8-channel A-to-D and D-to-A
converters. They are attached via fiber optic cables.
The illustration below shows the connections between the various hardware components of the
Sonoma Audio Workstation.
Chapter 1: Introduction 1
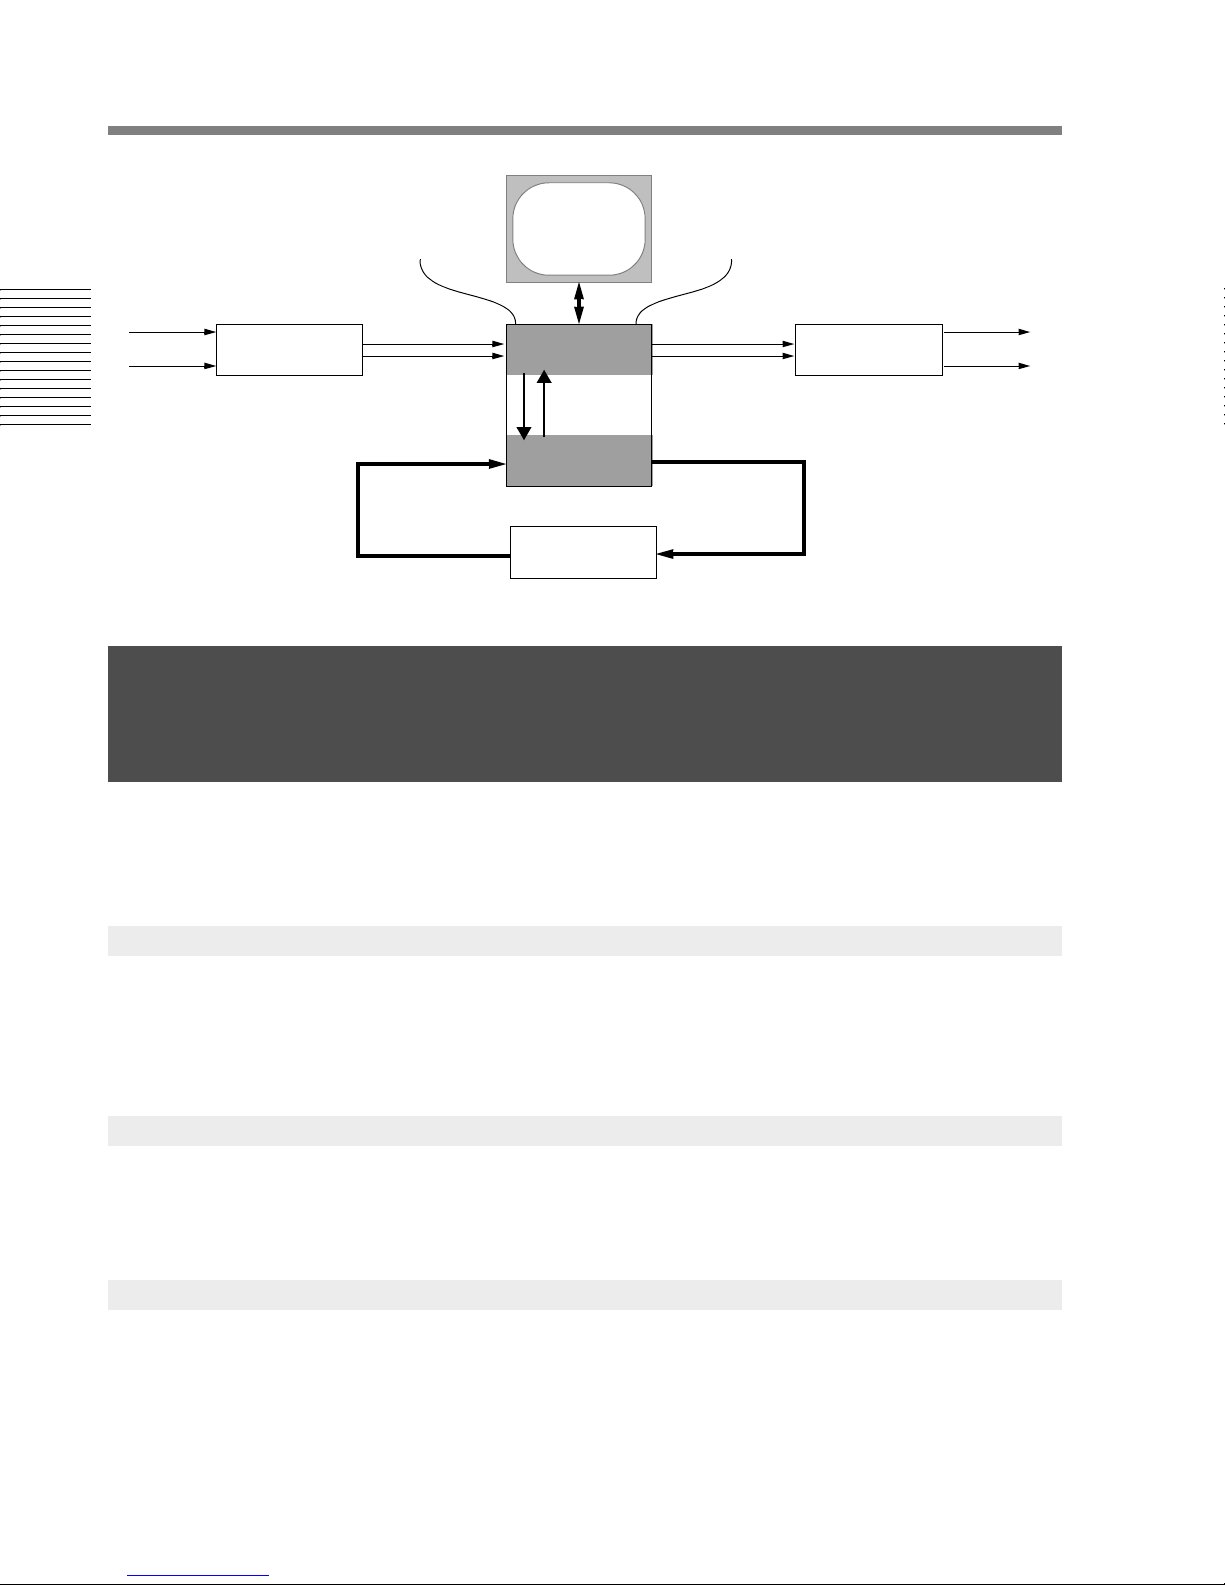
Figure 1-1 Overall system cabling and configuration
Monitor
Keyboard
+ Mouse
Sonoma Edit
PC
8 Analog
Inputs
...
Modem
2 Fiber-optic
ADC-8 DAC-8
Cables
Ethernet
8 Analog
Outputs
2 Fiber-optic
...
Cables
Chapter 1: Introduction
8 BNC
Cables In
1.3 The Sonoma Software
The Sonoma Audio Workstation contains two main components, an editor and a mixer. They run
concurrently and they are both accessed through the same program, Sonoma.exe. Each component
has its own set of windows.
1.3.1 The Sonoma Editor
The Sonoma Editor runs in a single window. It contains menus and toolbars that you will use to
create, save, record, and edit multi-channel audio documents called edit decision lists or EDLs. Each
EDL is a separate document and the editor can display multiple EDLs inside its window. Chapter
describes the Sonoma Editor.
Sonoma Mix
DSD Processor
8 BNC
Cables Out
2
1.3.2 The Sonoma Mixer
The Sonoma Mixer controls the signal routing in the system and the audio processing applied to the
signal path. The mixer contains three main windows: a patch bay (router), a set of channel strips, and
a metering/global control section. Chapter
1.3.3 Installing Software Upgrades
From time to time you may receive a CD-ROM with a Sonoma software upgrade. This CD will
contain an automatic installer. Insert the CD in your drive. Locate the CD on your desktop and click
on the installer file. The installer will be named SonomaXXX.exe, where XXX defines the version
number. The icon for the Sonoma installer is a picture of a PC with a box of floppy disks standing
2 Chapter 1: Introduction
3 describes the Sonoma Mixer.
next to it. The default behavior of the installer is to do a complete install. We recommend that you
perform the default install, unless you are instructed otherwise by our technical support staff.
1.4 Launching Sonoma
The Sonoma application can be run with or without the mixer. When you install Sonoma two shortcut
icons are placed on the desktop, and two items will appear in the start menu under
Start>Programs>Sonoma. Each pair are named “Sonoma” and “Sonoma No Mixer.” They all refer to
the same program. Launch the desired configuration by double clicking one of the shortcuts or
selecting the corresponding menu item. A splash screen will appear that monitors the initialization of
the editor.
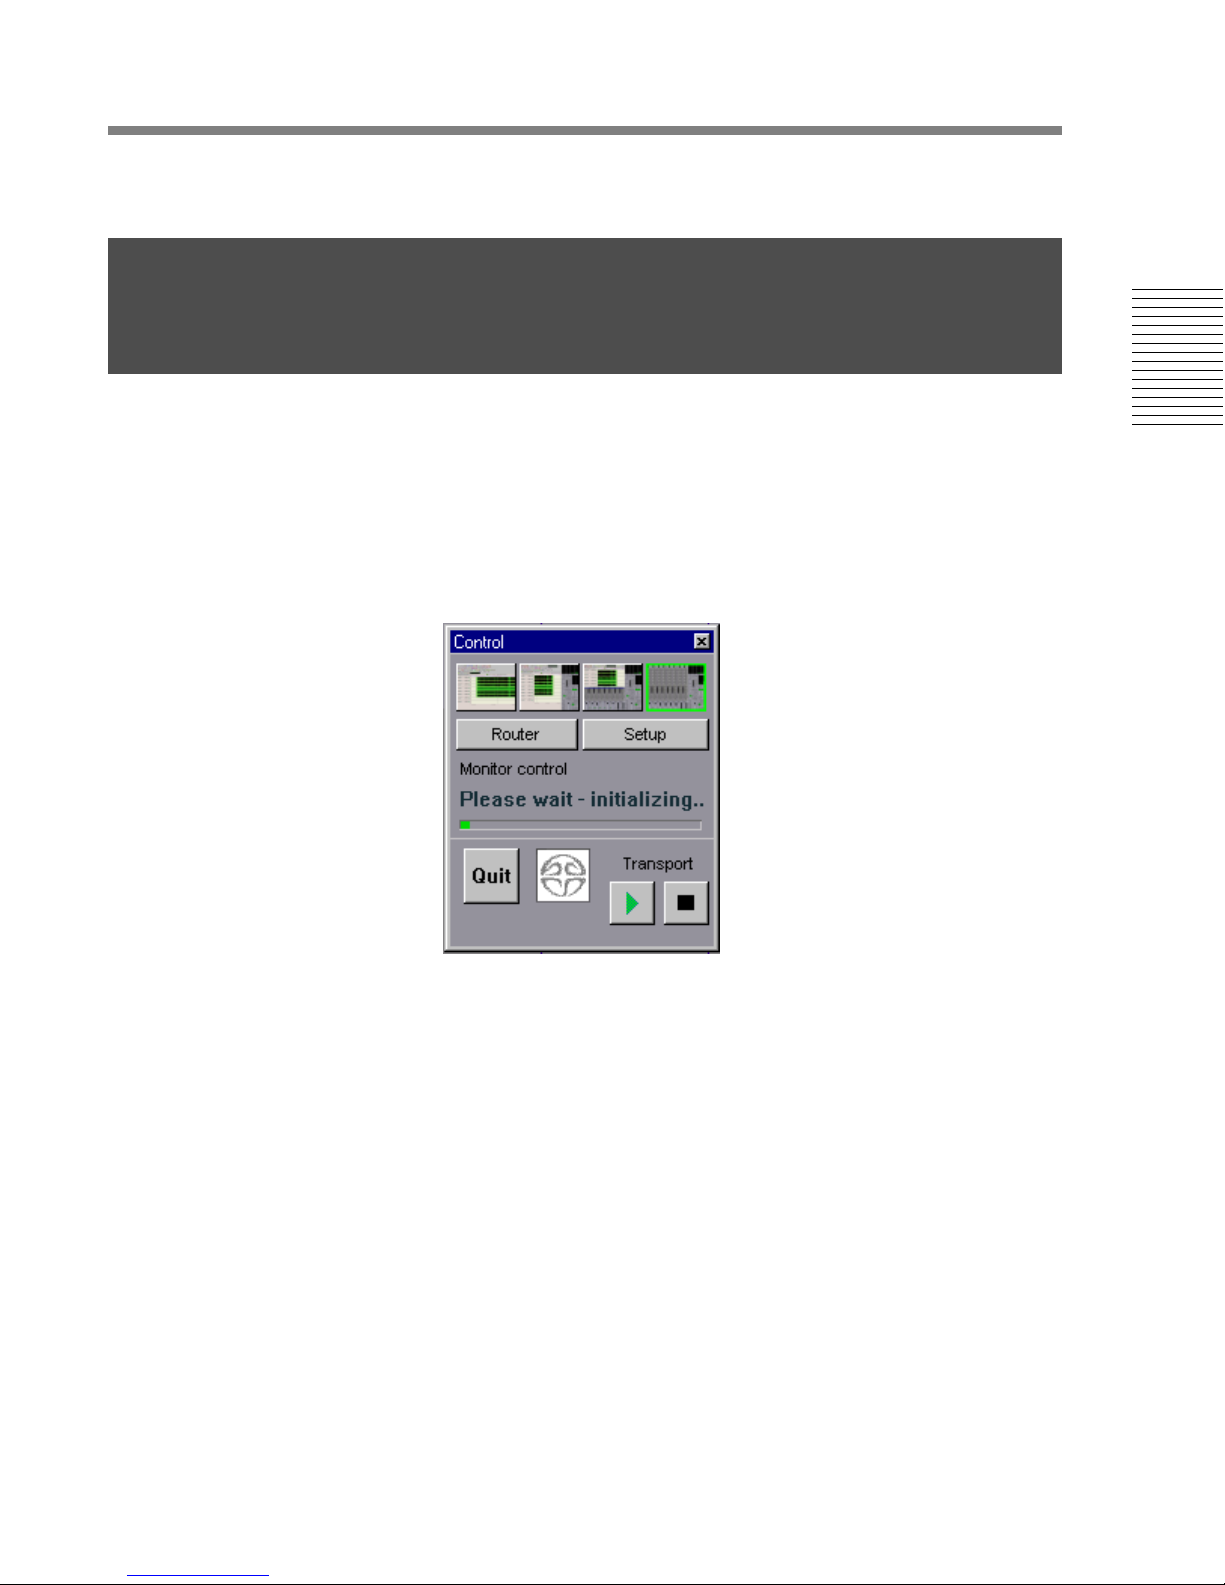
If you are using a mixer card, the mixer control window will also appear while the mixer card
acquires clock, and initializes.
Chapter 1: Introduction
When the initialization is complete, the Sonoma splash screen will disappear and you can begin to
work, using the editor and mixer windows which are explained in the next two chapters.
Chapter 1: Introduction 3

Chapter 1: Introduction
4 Chapter 1: Introduction
2.1 Introduction
The Sonoma editor window has a title bar labeled “Sonoma.” It contains menus and toolbars that you
will use to create, save, record, and edit multi-channel audio documents called edit decision lists or
EDLs. Each EDL is a separate document and is displayed in its own window within the Sonoma
editor window. You can open many EDLs at the same time, but all commands apply only to the
topmost, active EDL. The title bar of the Sonoma window also displays the name of the currently
active EDL document window. The main area of an EDL window contains a graphical representation
of edited excerpts of sound files arranged along a time axis. Strips above and below the EDL contain
cursor information and editing controls.
Chapter 2: Sonoma Editor
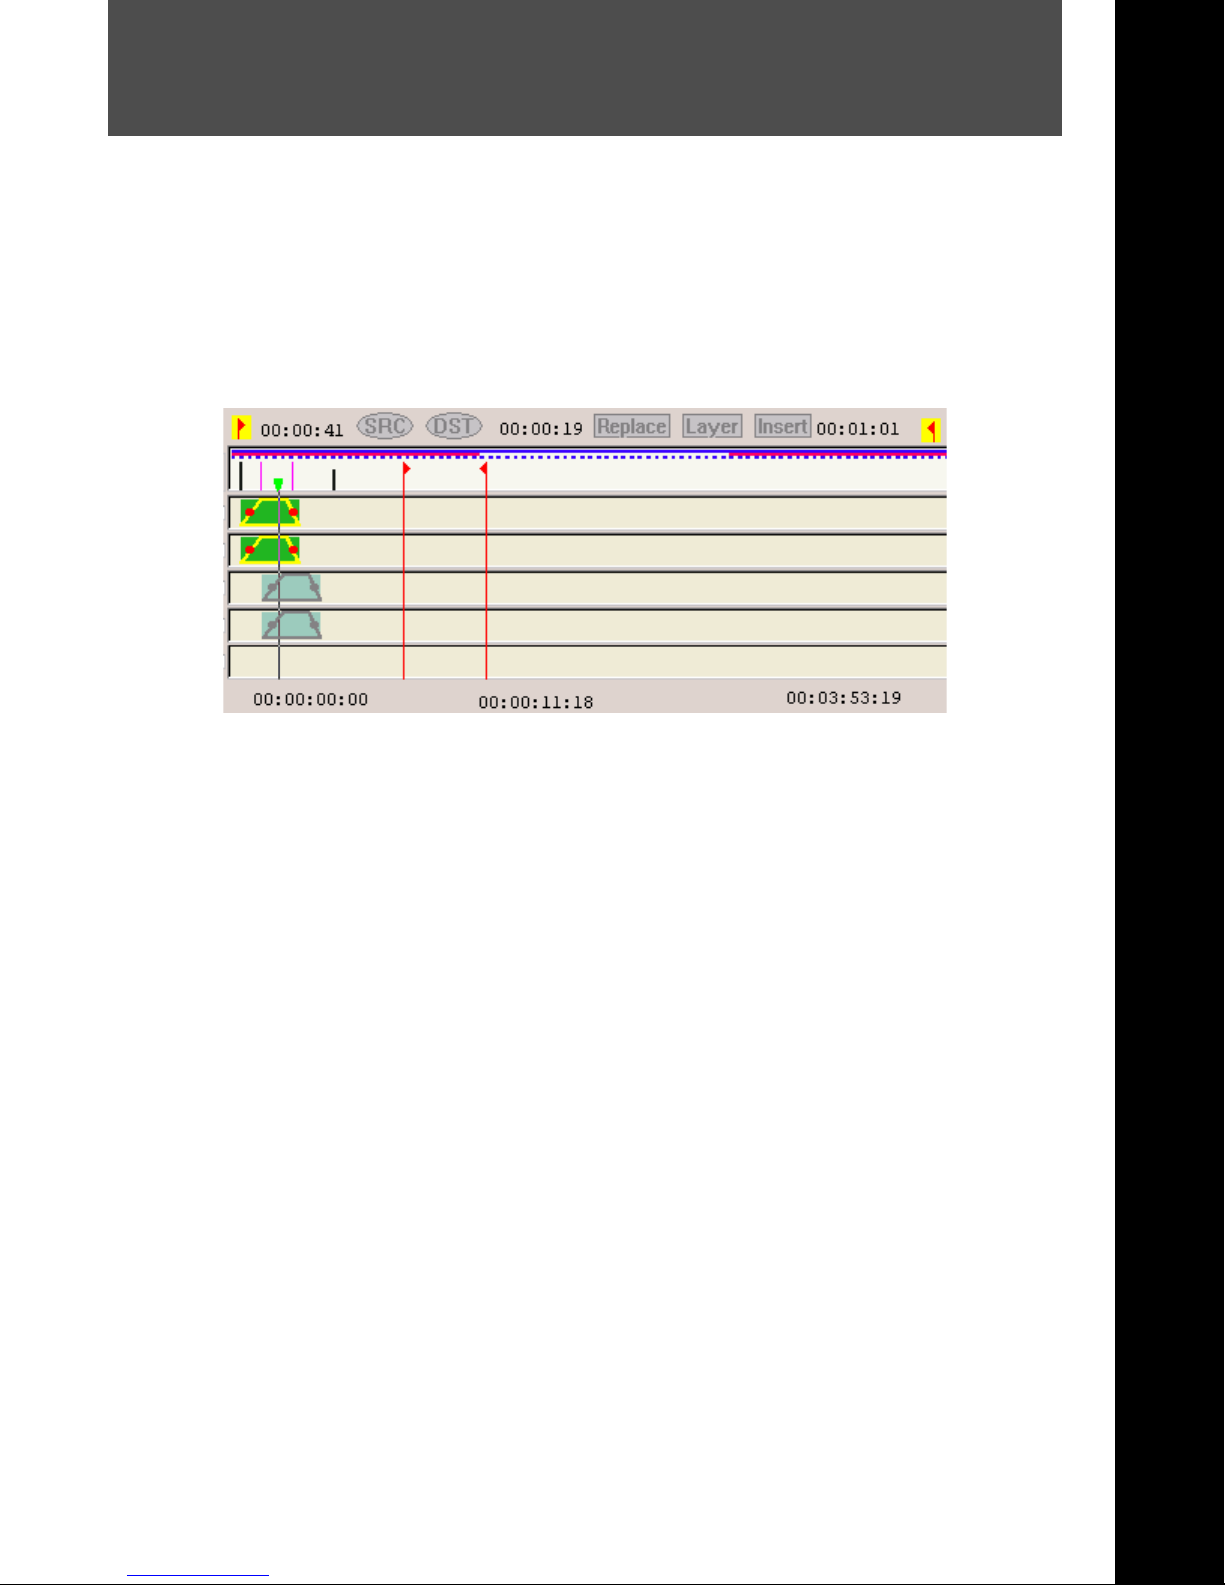
An EDL can hold up to 12 hours of sound. Each snippet of sound is called an ingredient. The
Nowline is a vertical black cursor with a green handle; it represents the current position of the
playback head and serves as a locator for editing functions. A pair of red edit cursors, called edit left
and edit right, are used for specifying an edit region. Marks in an EDL and its ingredients serve as
event locators and can include user annotations. EDL windows also contain a control panel area with
tabs that can be clicked to select different panels for performing various tasks. (The control panels are
not shown in the picture above.)
The Sonoma editor offers two different ways to perform audio edits. Selection, or object-based
editing, operates on selected ingredients. You begin by selecting one or more ingredients, and then
use edit commands to trim or slip them to the Nowline, or cut, copy and paste them. Region-based
editing ignores ingredient selection and uses the contiguous audio within the edit region - the interval
between the edit left and edit right cursors. Linear editing is an elaborate kind of region-based editing
where a single command moves material from the edit region in a source EDL to a different region in
a destination EDL.
This chapter describes the Sonoma and EDL windows, and explains how to use the cursors, menu
commands, and control panels to record, audition, edit, and prepare a Super Audio CD (SACD) edit
master file.
Chapter 2: Sonoma Editor 5

2.2 The Sonoma Window
2.2.1 Menus
Most functions in the Sonoma application are accessible via the menus in the menu bar:
Chapter 2: Sonoma Editor
File Menu
Creates, opens, and saves EDLs. The file menu also provides a command for exporting
EDLs in SACD mastering file format.
Edit Menu
Contains commands for editing the selected ingredients in an EDL.
Navigation Menu
Controls the zooming and scrolling of an EDL.
Selection Menu
Selects and deselects ingredients in an EDL.
Cursors Menu
Controls the movement of the Nowline.
Marks Menu
Controls the placement of marks in an EDL.
Transport Menu
Controls transport operation and monitor sourcing.
Record Menu
Configures the recording context and controls disk file handling/cleanup when a recording
has just been completed.
Waveforms Menu
Controls the display of ingredient and metering waveforms in an EDL.
Window Menu
Manages standard PC window arrangement of the open EDL windows inside the Sonoma
window and the display of other system windows (such as preferences and clock display).
2.2.2 Keyboard Shortcuts and Toolbar Buttons
Menu commands usually have keyboard shortcuts, and most menus have corresponding toolbars that
contain buttons for their commands. Some menus are linked to control panels rather than toolbars.
Control panels are windows with more elaborate interfaces for complex operations. When a menu
has an associated toolbar or control panel there is an item at the top of the menu for opening and
closing it. The window menu also includes a toolbars item that shows and hides each toolbar. In this
menu you will also find items that let you save and restore a default toolbar configuration. The
default configuration is stored in your computer’s registry so you can retrieve it again when you
install new versions of Sonoma.
6 Chapter 2: Sonoma Editor
Toolbars can be floating windows or they may be docked to the sides of the Sonoma window.
2.2.3 Status Bar
The status bar is the text area located along the bottom of the main Sonoma window. It shows the
name of the active EDL and also displays information that is useful when recording. Error messages
are also displayed in the left side of the status bar.
2.2.4 Debug Toolbar
Alt-Ctrl-D opens and closes a debugging toolbar. This toolbar should only be used under the
direction of a Sony field support engineer. If you open the debug toolbar by accident, be sure that all
of its buttons are in the released state before closing it.
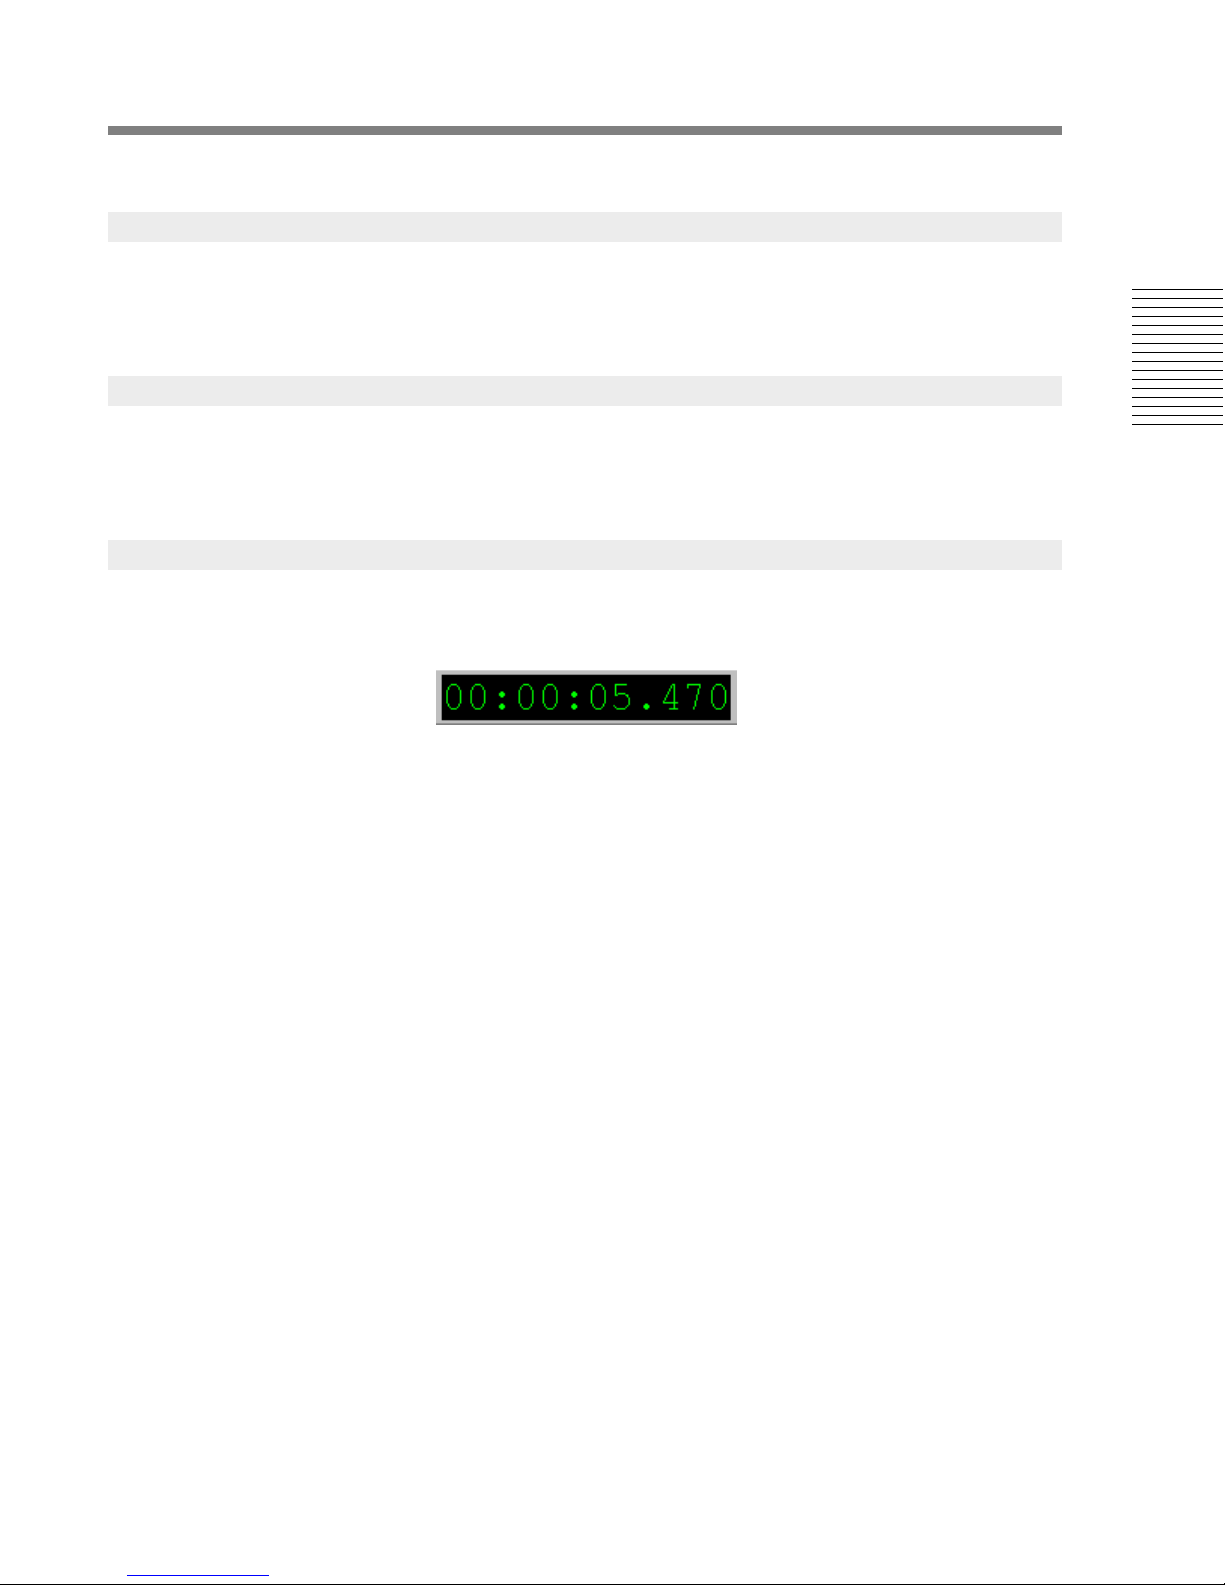
2.2.5 Clock Display and Timecode Format
The clock display is a special window that can be opened and closed by selecting its item in the
window menu. This window shows the current position of the Nowline in the active EDL.
The display can be a floating window or it can be docked to the Sonoma window by dragging it to the
top or bottom edge.
There are five timecode formats:
• Milliseconds (hours:minutes:seconds.milliseconds)
• 75 frames/second (hours:minutes:seconds:frames)
• 30 frames/second (hours:minutes:seconds:frames)
• Samples (44.1 kHz sample count)
• Samples (hex) (sample count in hexadecimal representation)
To change the timecode format, use the timecode tab in the Preferences Window. To bring up a menu
of timecode formats place the mouse inside the clock display or the EDL timeline and press the right
mouse button. When the transport is running, you can toggle through the timecode formats by
right-clicking in the clock display.
Chapter 2: Sonoma Editor
The current timecode format is used everywhere timecode is displayed. Wherever you enter a value
expressed in time units (e.g., in a Control Panel, Preference Window, or the clock display) you must
specify it in the current timecode format. Select a timecode field by double clicking or clicking and
dragging. You can select, copy, and paste timecodes between any timecode fields.
The rules for typing timecode are very simple: Timecode must begin with a number and must end
with a number or a decimal point. Leading zeros and leading zero fields can be omitted. Trailing
zeros can be omitted in the msec. field (in msec. format 1.2 is OK; so is 1. which is the same as 1.0).
Also, when in millisecond format, you can type a raw number of milliseconds into a timecode field
and they will be translated to the appropriate number of hours, minutes, and seconds.
The clock display itself accepts type in and paste in. The Nowline will move to the position you
enter. The color scheme of the timecode window and the function of the right mouse button depends
on its state. Normally, the window shows green numbers on a black background and a right mouse
click brings up the timecode format menu. To type into the window, click on it. The display changes
to black-on-white and right mouse-clicking brings up the edit menu (Cut/Copy/Paste).
Chapter 2: Sonoma Editor 7

2.2.6 Editing Timecode
A timecode editor is available when editing the following fields:
• Clock Display (Nowline)
• Left/Right Edit Cursors and Edit Region Width
• Left/Right EDL Window Bounds and Width
• Edit Point Fields in the Ingredient and Splice Editors
(All other timecode fields use simple unformatted string editing.)
The editor is invoked by clicking on a timecode field. The numeric keypad *-key selects the clock
display. Ctrl+* and Shift+Ctrl+* select the left and right edit cursor fields. When a time display is
Chapter 2: Sonoma Editor
selected its entire value is highlighted and becomes available for copy/paste or editing. Editing
begins when a valid character is typed. It ends upon typing Esc or one of the numeric keypad keys
ENTER, +, or -. Clicking elsewhere terminates editing as if the ENTER-key were pressed.
If you select a time field and begin typing, your numbers will be entered on top of the original value,
starting from the units seconds position and shifting to the left. To clear the original value before
typing, press the *-key again. The Backspace-key removes the most recent new digit and shifts your
entry to the right. To type into the sub-seconds (e.g., msec. or frames) field, press the numeric keypad
decimal point (.) key. To select and edit a single field, use the ← and → arrow keys or double click
on the field. When a single field is selected, you can use the ↑ and ↓ arrow keys to increment and
decrement the field. When incrementing (or decrementing) values are carried to (or borrowed from)
the next field on the left.
When you have completed your entry, press ENTER to submit the new value. Alternatively, press
or - to add or subtract your entry from the field's original value. The Esc-key will exit the editor
+
and revert back to the original value.
2.2.7 Preferences Window
The preferences item in the window menu opens the preferences window. This window is modal
(you must close it before continuing to work). It contains tabs for configuring different features. The
edit and recording menus contain commands that open their associated preferences.
2.3 The EDL Window
2.3.1 Opening an EDL
In order to do any playback, editing, or recording, you must open an EDL window. There are four
ways to open an EDL from the file menu:
• Use the open command to open an existing EDL
• Use the new EDL command to create a new EDL
• Use the new/import sound files command and select one or more sound files. A new EDL is
created and the sound files appear as ingredients in it.
• A special type of EDL called a takelist is created when you record. When you open a takelist
EDL you are presented with a dialog.
Section 2.8.10 describes takelists.
8 Chapter 2: Sonoma Editor

When an EDL window is opened, it is maximized by default, but this is controlled via a user
preference. You can change this behavior by setting or clearing the open EDL window maximized
checkbox in the window tab of the preferences window. This window is reached via the preferences
item in the window menu.
The range of the viewable EDL window is 23:30:00 to 12:30:00, however, the usable range in which
you can work is from 00:00:00 to 12:00:00.
When an EDL has been modified but not yet saved, an asterisk is appended to its name in the title bar
and the Sonoma window menu.
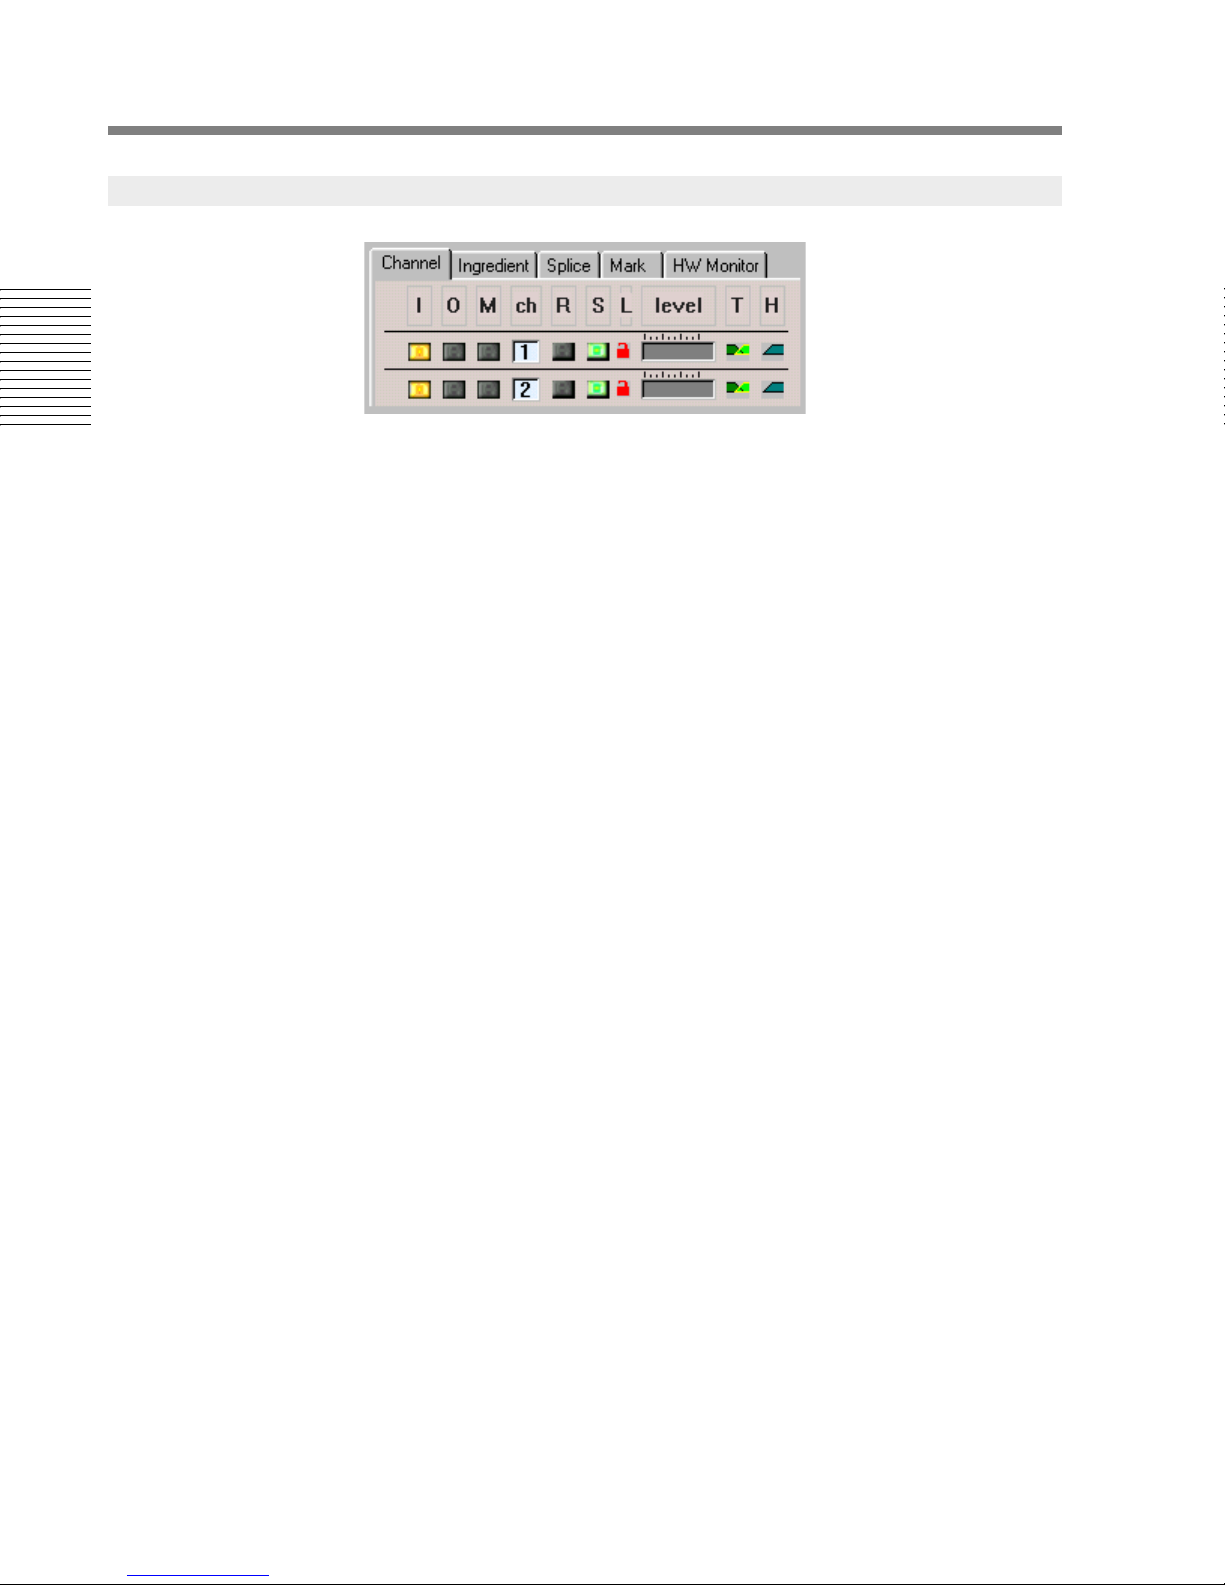
2.3.2 Control Panels
The area on the left side of an EDL consists of a set of control panels. Panels are selected by clicking
on a tab, or using the PageDown or PageUp keys to cycle through them.
Channel Controls
The channel control panel is used for recording and to control the appearance of the
ingredients in an EDL. You can bring up the channel control panel quickly by pressing
Ctrl+PageUp.
Ingredient Editor
The ingredient editor control panel is used to edit single ingredients and groups of
ingredients in an EDL. You can bring up the ingredient editor control panel quickly by
pressing Ctrl+Alt+I.
Splice Editor
The splice editor control panel is used to adjust cross-fades between ingredients that have
been spliced together. You can bring up the splice editor control panel quickly by pressing
Ctrl+Alt+L.
Mark Editor
The mark editor control panel is used to create and display marks in an EDL. You can bring
up the mark editor control panel quickly by pressing Ctrl+Alt+M.
marks and the mark editor.
HW Monitor
The hardware monitor control panel displays real time information about the status of the
machine. You will normally not need to view this panel. It can be useful for problem
diagnosis under the direction of a Sony field support engineer.
Section 2.11 describes the ingredient editor.
Section 2.13 describes the splice editor.
1
The control panels are:
Section 2.15 describes
Chapter 2: Sonoma Editor
The channel controls are used most of the time, so this panel is described fully in the next section.
The other control panels are used for special functions and will be described later in this chapter.
1. The PageDown and PageUp keys work irrespective of the state of the transport; however, you cannot enter the Splice
Editor with the transport running. For this reason, the Splice Editor tab is skipped as you cycle down/up the panels
with the PageDown/PageUp keys when the transport runs.
Chapter 2: Sonoma Editor 9
2.3.3 Channel Controls
Each row of the EDL represents one audio channel. The channel rows are numbered from the top
Chapter 2: Sonoma Editor
down, starting with channel one. There are a number of indicators and controls for each channel.
From left-to-right across each row, these are:
Processor status lights
These lights indicate the presence of digital audio clock for input (red) and output (green). If
all is well, there is one red and one green light to the left of every channel. If there is a
hardware problem the status lights may be black or may not appear at all.
Monitor source
Each channel's monitor source is either input or output (i.e., repro). The corresponding
columns of buttons are labeled I and O. Clicking on a monitor button sets a channel's
monitor to the corresponding source. Clicking on the column heading sets all channels to that
source with the following constraints: If one or more channel numbers are selected only the
selected channels will switch when you click on the column header. If you Ctrl-click on the
heading when one or more channel numbers are selected only those channels that are not
selected will switch. You can also switch the monitor source by using the commands and
buttons in the transport menu and toolbar (see §
2.8.8.1).
The monitor source may switch automatically during recording. You can control this
behavior by selecting one of the monitoring switching modes – see §
Also, be aware that the monitor source is locked to output and cannot be switched when you
are exporting a master file (see §
Mute
Each channel can be muted and unmuted individually by clicking on its mute button. The
M
column header toggles the mute state of all the channels whose channel numbers are
selected, or all the channels if no channel numbers are selected. Ctrl-clicking the header
toggles the mute on the channel numbers that are not selected. You can also toggle muting by
using the commands and buttons in the transport menu and toolbar (see §
Channel number
The color of each channel number box indicates if it is selected or unselected. The I/O
monitor switching commands and some edit commands are affected by the channel selection
state.
To select a channel, click on its channel number box. Clicking on the box toggles that
channel’s selection on and off. Other channels are unaffected.To toggle all the channels in
the system on and off click on the ch channel heading.
It is possible to define a subset of channels, a channel group, that can be selected
independently. Channels in the channel group appear with red channel numbers, other
channels are displayed in black. To add or remove a channel from the channel group,
2.17) or recording channel outputs (see § 2.8.2.2).
2.8.2.4 for details.
2.8.8.1).
10 Chapter 2: Sonoma Editor

Ctrl-click the channel number box. Adding or removing a channel from the channel group
does not change the selection state of the channel.
To select the channels in the channel group, Ctrl-click on the ch channel heading. (All other
channels will be deselected.) Repeated Ctrl-clicks on the heading will toggle the members
of the channel group on and off. To set the channel selection to the compliment of the
channel group (i.e., the channels that are not in the group) Alt-click on the ch channel
heading. Repeated Alt-clicks on the heading will toggle this complementary set of channels
on and off.
Channel recording state
The buttons labeled R and S stand for record ready and record safe. These buttons will
appear only when a channel is unlocked (see the next control). Clicking on the column
heading sets all the unlocked channels to that recording state. One of R and S is always
steadily illuminated, but not both. One button may be illuminated while the other one blinks,
indicating that the channel has been armed for a transition. The transition may occur when
the transport starts moving (in untriggered recording mode) or when the record trigger is
pressed (in triggered recording mode).
Section 2.8 describes the entire recording process.
Channel lock
When a channel is locked it is impossible to record on it; its recording mode is forced to safe
and its Ready/Safe buttons are hidden. The lock can only be changed when the transport is
idle. Clicking on the lock icon toggles the lock state of a channel. Clicking on the column
heading L first forces all the channels into locked state (if necessary), subsequent toggles
switch the lock state on all channels. Locking channels permits the system to assign the
available disk recording space to only those channels that need to record.
Chapter 2: Sonoma Editor
Peak Level Meter
The peak signal at each channel's monitor source is displayed in a horizontal meter. The
metering parameters (decay constant and headroom) can be adjusted in the metering tab of
the preferences window. Headroom is measured in dB between threshold and maximum
signal value. When the signal is above the threshold the meter turns red. The metering data
can also be displayed in the channel rows during playback (see §
2.16.2).
Track display mode
A group of ingredients assigned to the same channel is called a track. Sometimes ingredients
overlap. (The Sonoma editor can mix two overlapping ingredients in real time on every
channel.) The ingredients in a track can be displayed two ways. In overlapped mode all
ingredients appear in the same row so overlapping ingredients actually overlap. In
alternating mode the ingredients in a track occupy two rows; ingredients are placed in the top
and bottom rows alternately so that the overlapping material is lined up on adjacent rows.
The default mode is overlapped. To switch modes, click on the overlapping ingredient icon.
Clicking on the T column heading toggles the ingredient track display mode on all channels.
Channel height
Regardless of the track display mode, the height of ingredients (and the rows in which they
appear) can be large or small. Small is the default. To change the channel height click on the
single ingredient icon. Large channel height is useful for viewing ingredient waveforms at a
higher resolution. Clicking on the H column heading toggles the channel height on all
channels.
Chapter 2: Sonoma Editor 11

2.3.4 Timeline
The timeline is the row above channel one. A set of blue, pink, blue, and black lines at the top of the
timeline shows a time grid. The alternating lines mark durations of one hour, one minute, one second,
and a fraction of a second. The fractional scale depends on the timecode format you have selected.
The smallest black dashes are 10 msec. in length when displaying millisecond timecode format,
samples for sample format (hex or decimal), and one frame length at the appropriate rate for 75
16
and 30 frame/second formats. Depending on the amount of time displayed in the EDL window, you
may see all, or only some, of the dashed lines as the smaller scales only appear as you zoom in.
2.3.5 Nowline and Edit Cursors
Chapter 2: Sonoma Editor
The Nowline is a vertical cursor that shows the current position of the playback head; it moves when
the transport is running. You can reposition the Nowline by clicking and dragging its handle: the
green knob at the top of the Nowline in the timeline. The position of the Nowline is displayed in the
clock display window (if it is open) and also in the lower strip.
Every EDL contains two edit cursors named edit left, and edit right. The left/right edit cursors are
drawn as solid red lines and are topped with triangular handles for dragging. An edit cursor can be
visible (on) or hidden (off) independent of the state of the other cursor. The edit cursors can be
toggled on and off using the show/hide items in the cursors menu, or by Alt-clicking on the edit
cursor icons that appear in the upper strip, above the timeline. The edit cursors are explained in more
detail in §
2.6.2.
2.3.6 Lower Strip
The lower strip appears below the last channel row of the EDL, it shows three timecode numbers.
These numbers appear in the current timecode format. The leftmost and rightmost numbers are the
visible bounds of the EDL window. You can select any of these timecode fields and change their
values by typing into them. You can also copy and paste any of these timecodes to other timecode
fields.
The number in the center is the width of the EDL window currently visible. You can change the
zoom factor of the EDL by clicking and editing this number. The Nowline may be located outside the
visible range of the EDL. If the Nowline is not visible, an arrow on the left or right of the range field
shows in which direction the Nowline can be found. Clicking on these arrows will scroll the EDL so
that the window is centered around the Nowline.
2.3.7 Upper Strips
The upper strip appears above the EDL’s timeline, it shows three timecode numbers. These numbers
appear in the current timecode format. The leftmost and rightmost numbers are the position of the
edit cursors. The center number is the width of the edit region they define. You can select either edit
cursor’s timecode field (but not the region field) and change its value by typing into it. You can also
copy and paste these timecodes to other timecode fields.
The edit cursors may be located outside the visible range of the EDL. If a cursor is not visible, an
arrow on the left or right of its timecode number shows in which direction the Nowline can be found.
Clicking on these arrows will scroll the EDL so that the window is centered around the cursor.
The upper strip also contains controls for showing and hiding the edit cursors. Alt-clicking on the
edit cursor’s icon will toggle its display state. The strip also contains controls for linear editing: a pair
12 Chapter 2: Sonoma Editor
 Loading...