

Sony SLV-ED616MJ, SLV-ED616SG, SLV-ED818SG User Manual

3-065-581-E1 (1)
Video Cassette
Recorder
Operating Instructions
PAL NTSC
SLV-ED818SG
SLV-ED616MJ/SG
© 2001 Sony Corporation
01GB01COV-ED818.p65 12/3/01, 11:08 AM1
SLV-ED818_GB 3-065-581-E1 (1)
Connecting the VCR
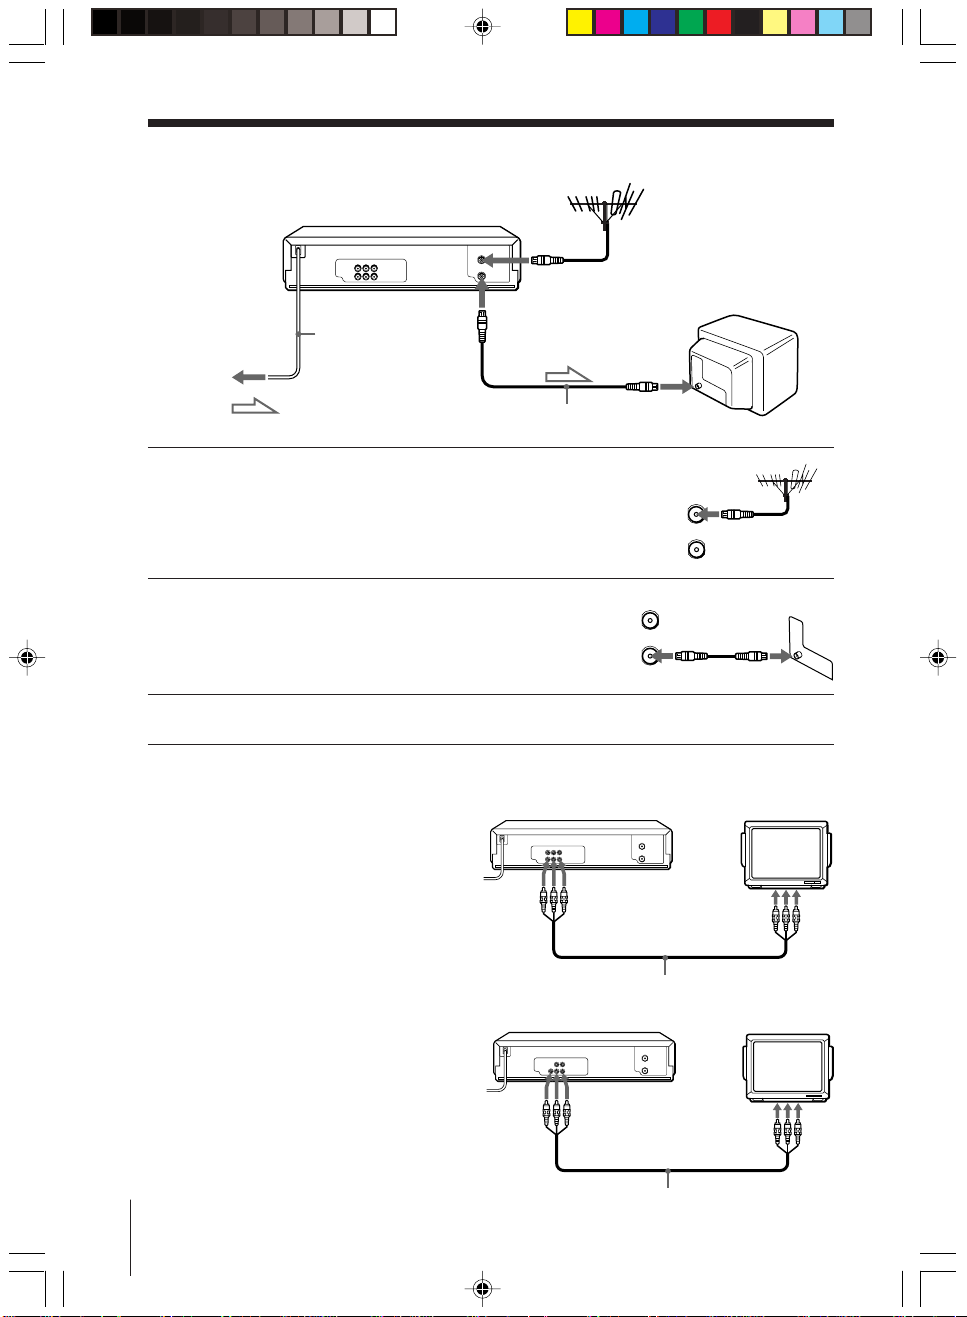
AERIAL OUT
Mains lead
AERIAL IN
to mains
: Signal flow
Aerial cable (supplied)
1 Disconnect the aerial cable from your TV
and connect it to AERIAL IN on the rear
panel of the VCR.
2 Connect AERIAL OUT of the VCR and
the aerial input of your TV using the
supplied aerial cable.
3 Connect the mains lead to the mains.
Additional connections
To a TV that has audio/video input
jacks
This additional connection improves
picture and sound quality. Connect the
TV as shown on the right.
For SLV-ED818SG only
LINE OUT
AERIAL IN
AERIAL
IN
OUT
AERIAL
IN
OUT
LINE IN
2
01GB02CNT-ED818.p65 12/3/01, 11:09 AM2
Audio/video cable (not supplied)
For SLV-ED616MJ/SG only
LINE OUT
LINE IN
Audio/video cable (not supplied)
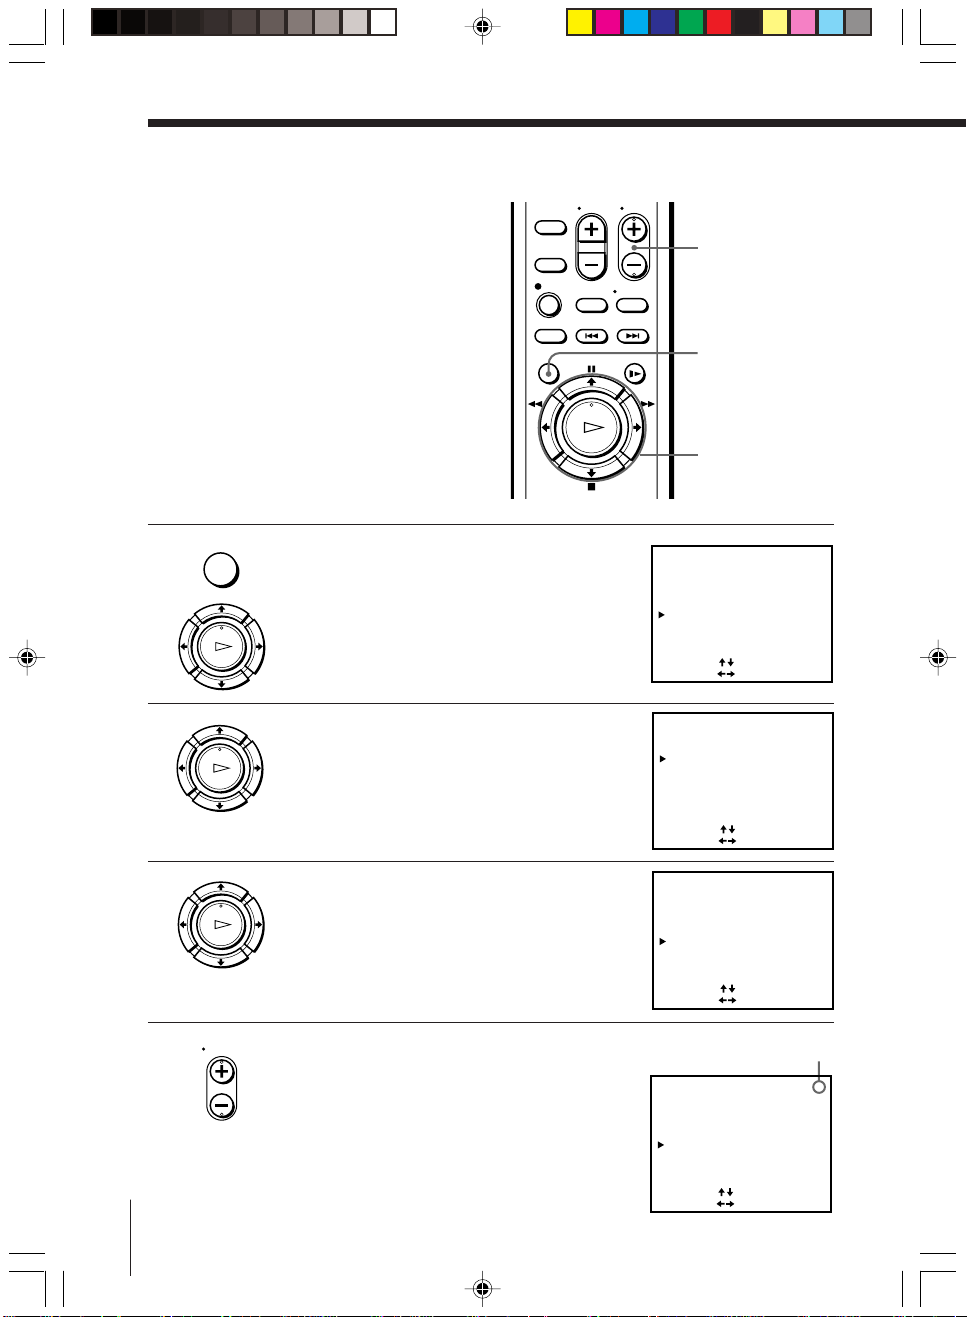
Setting the clock
CLOCK SET
2.1.200 0:0052
1
TUE
SELECT
SET
END:[ OK ]
:
[]
:
[
]
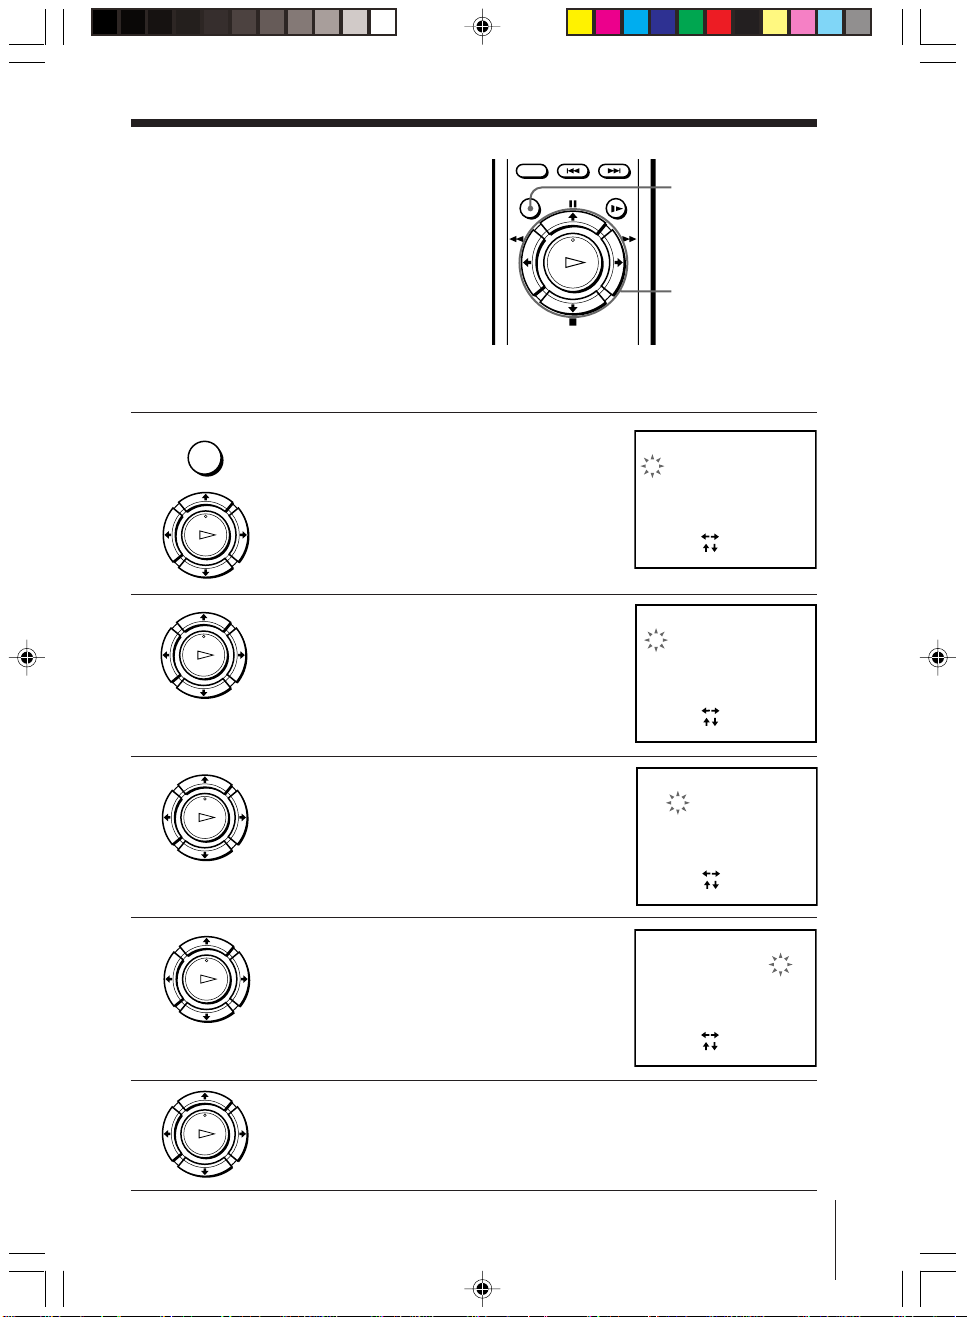
You must set the time and date on the
VCR to be able to use the timer
recording features properly.
Before you start…
• Turn on the VCR and the TV.
• Set the TV to the video channel.
MENU
OK
M/m/</,
MENU
1 Press MENU, then press M/m to move the
cursor (B) to CLOCK SET and press OK.
PLAY
OK
2 Press M/m to set the date.
PLAY
OK
The day of the week is set automatically.
3 Press , to select the month and set the
PLAY
OK
month using M/m.
4 Set the year, hour and minute in sequence,
PLAY
OK
using , to select the item to be set, and
M/m to select the digits.
CLOCK SET
1.1.2001 MON 0:00
[]
SELECT
:
[
SET
:
[]
:
[
:
]
]
END:[ OK ]
CLOCK SET
2 .1 . 2001 THU 0: 005
SELECT
SET
END:[ OK ]
CLOCK SET
2 . 1 . 20 01 TUE52 5:301
5 Press OK to start the clock.
01GB02CNT-ED818.p65 12/3/01, 11:09 AM3
PLAY
OK
[]
SELECT
:
[
SET
:
END:[ OK ]
]
3
Presetting channels
First, we recommend that you preset the receivable channels in your area
using the One Touch Tuning function or AUTO PRESET in the TUNER
PRESET menu. Then, if some channels cannot be preset automatically, set
them manually. If there are any unwanted channels among the preset ones,
you can disable the channels.
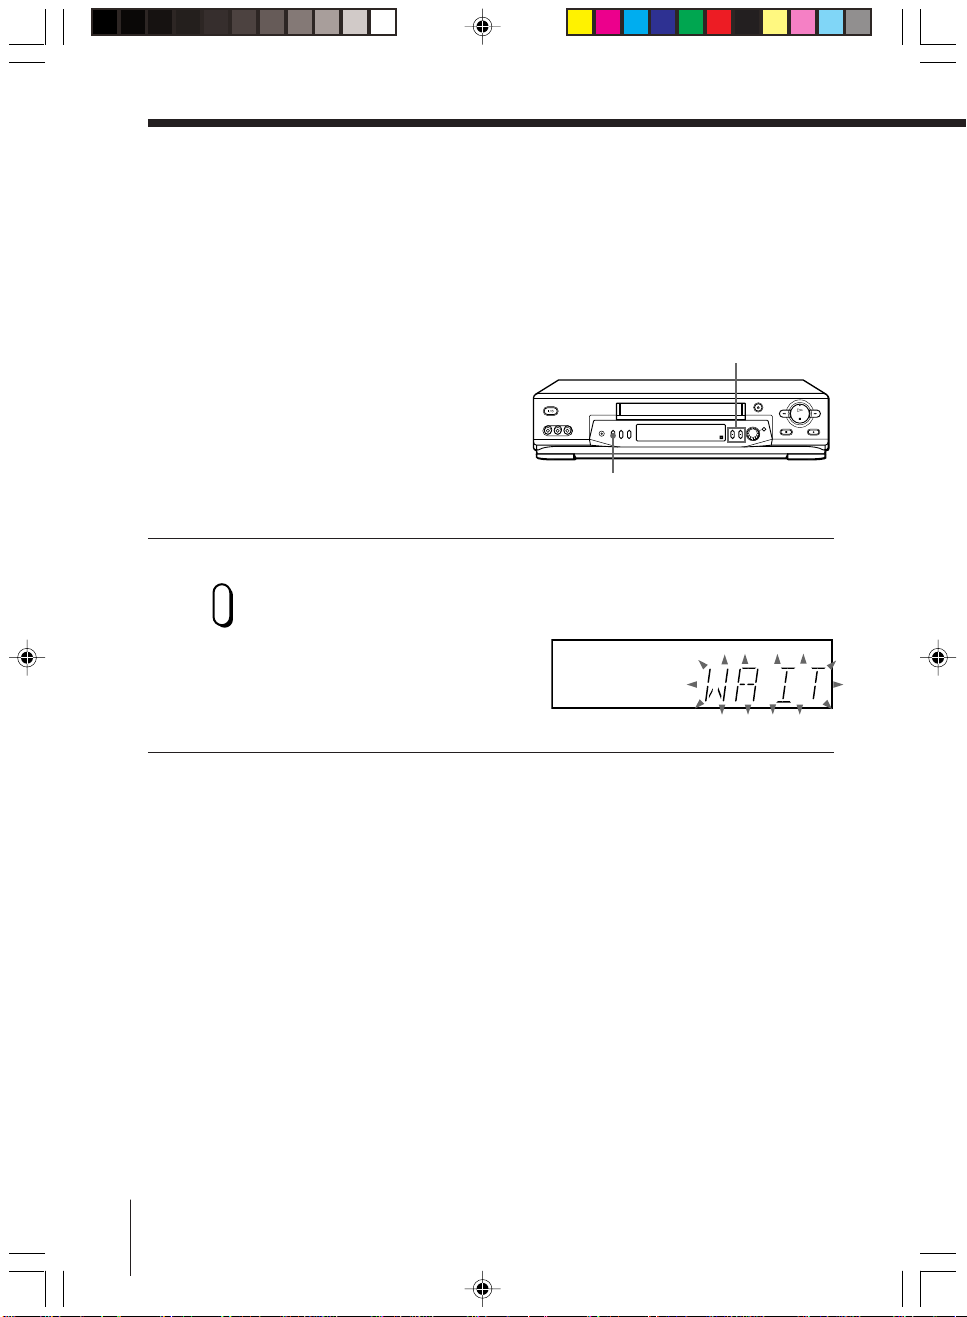
Presetting all receivable
channels using the One
Touch Tuning function
ONE TOUCH
TUNING
To check if the channels are preset correctly
Set the TV to the video channel and press PROGRAM +/– on the VCR.
If the TV screen changes to a different programme each time you press
PROGRAM +/–, the channels are preset correctly.
If the sound is distorted or noisy, the VCR is set to a TV system different
from your area’s system. Select the correct TV system and preset channels
using the TUNER PRESET menu as shown on the next page.
Press and hold ONE TOUCH TUNING on the VCR for more than
three seconds.
The VCR starts presetting the channels.
The WAIT indicator goes off when all receivable channels are preset.
ONE TOUCH
TUNING
SP
PROGRAM +/–
APC
Tip
• To stop the One Touch Tuning function, press ONE TOUCH TUNING or p STOP
on the VCR during the setting.
4
01GB02CNT-ED818.p65 12/3/01, 11:09 AM4
Presetting all receivable
TUNER PRESET PROG 1
NORMAL / CATV
SYSTEM
AUTO PRESET
CHANNEL SET
AFT
FINE TUNING
NORM
ON••
CATV
B / G
• D / K
I
OFF
1
SELECT
SET
:
[]
:
[
]
TUNER PRESET PROG 1
NORMAL / CATV
SYSTEM
AUTO PRESET
CHANNEL SET
AFT
FINE TUNING
NORM
ON••
CATV
B / G
• D / K
I
OFF
1
SELECT
SET
:
[]
:
[
]
channels automatically
This VCR is capable of receiving B/G,
D/K and I system channels. For
receivable channel details, see page 7.
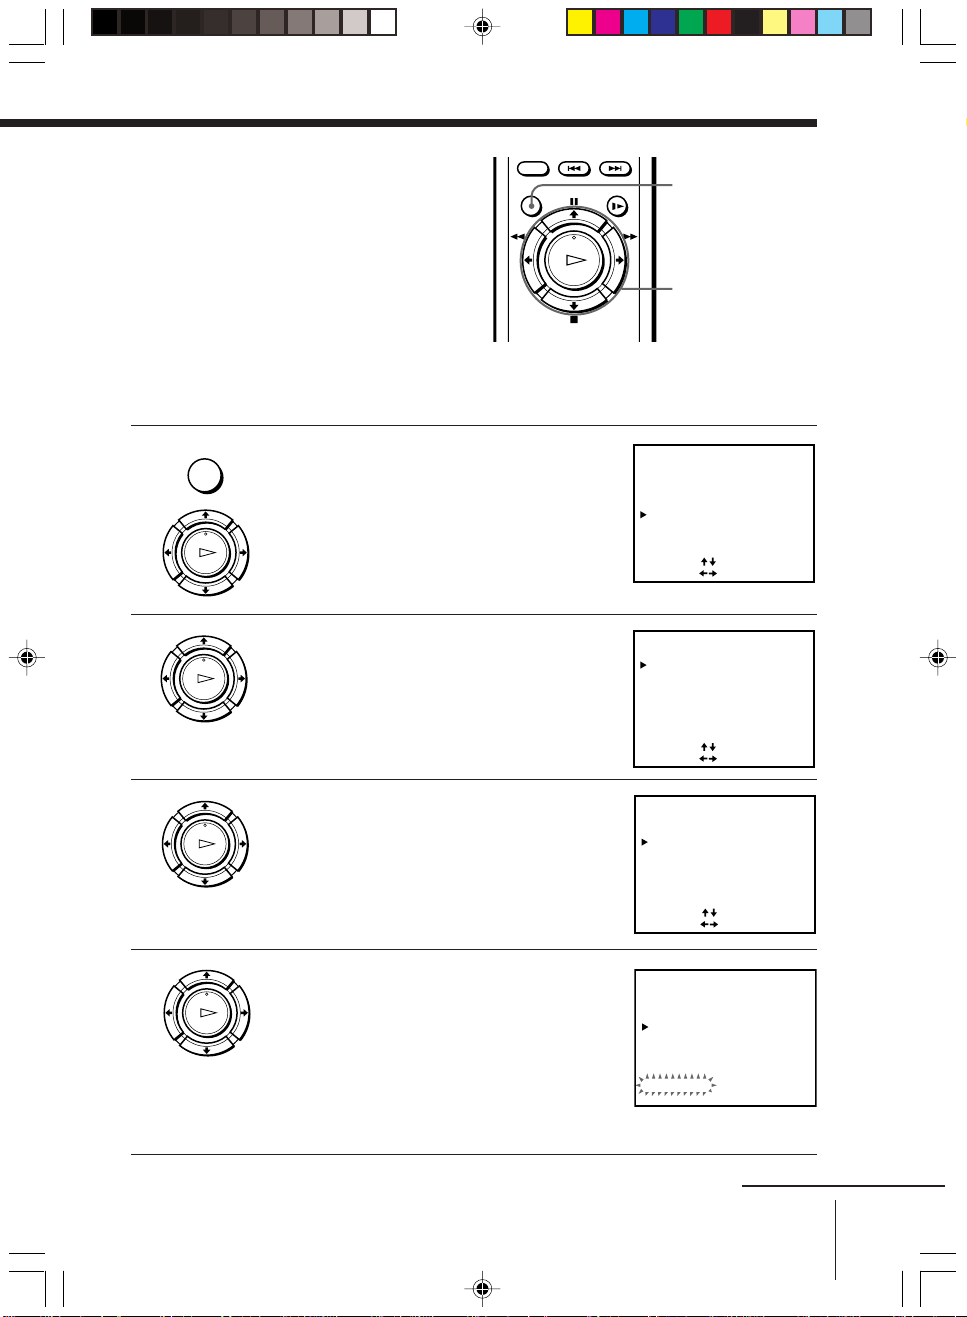
Before you start…
• Turn on the VCR and the TV.
• Set the TV to the video channel.
MENU
1 Press MENU, then press M/m to move the
cursor (B) to TUNER PRESET and press
OK.
PLAY
OK
2 Press M/m/</, to move the cursor (B)
PLAY
OK
to SYSTEM, then select B/G, D/K or I,
whichever is applicable in your area. If
SYSTEM is set to the wrong position, the
sound will be distorted or noisy.
MENU
OK
M/m/</,
3 Press M/m/</, to move the cursor
4 Press M/m to move the cursor (B) to
01GB02CNT-ED818.p65 12/3/01, 11:09 AM5
TUNER PRESET PROG 1
•
[]
:
[
:
]
•
B / G
B / G
NORM
ON••
NORM
•
ON
•
D / K I
1
D / K
1
CATV
OFF
CATV
OFF
I
PLAY
OK
PLAY
(B) to NORMAL/CATV, then select
NORM.
To preset CATV channels, select CATV.
AUTO PRESET, then press OK.
OK
All receivable channels are preset in
numerical sequence. When no more
receivable channels can be found,
presetting stops and the picture from the
SYSTEM
NORMAL / CATV
AUTO PRESET
CHANNEL SET
AFT
FINE TUNING
SELECT
SET
TUNER PRESET PROG 1
SYSTEM
NORMAL / CATV
AUTO PRESET
CHANNEL SET
AFT
FINE TUNING
PLEASE WAIT
lowest numbered channel is displayed on
the TV screen.
continued
5
Presetting channels (continued)
TUNER PRESET PROG10
NORMAL / CATV
SYSTEM
AUTO PRESET
CHANNEL SET
AFT
FINE TUNING
NORM
ON••
CATV
B / G
• D / K
I
OFF
2
1
SELECT
SET
:
[]
:
[
]
TUNER PRESET PROG10
NORMAL / CATV
SYSTEM
AUTO PRESET
CHANNEL SET
AFT
FINE TUNING
NORM
ON••
CATV
B / G
•
D / K
I
OFF
2
1
SELECT
SET
:
[]
:
[
]
TUNER PRESET PROG14
NORMAL / CATV
SYSTEM
AUTO PRESET
CHANNEL SET
AFT
FINE TUNING
NORM
ON••
CATV
B / G
• D / K
I
OFF
2
1
SELECT
SET
:
[]
:
[
]
Presetting channels
manually
MENU
1 Press MENU, then press M/m to move the
cursor (B) to TUNER PRESET and press
OK.
PLAY
OK
PROG +/–
MENU
OK
M/m/</,
2 Press M/m/</, to move the cursor (B)
3 Press >/. to move the cursor (B) to
4 Press PROG +/– to select the programme
6
01GB02CNT-ED818.p65 12/3/01, 11:09 AM6
TUNER PRESET PROG10
B / G
[]
:
[
:
• D / K
]
NORM
2
ON••
I
CATV
1
OFF
Selected programme
position
PLAY
OK
PLAY
OK
to NORMAL/CATV, then select NORM.
To preset CATV channels, select CATV.
CHANNEL SET.
SYSTEM
NORMAL / CATV
AUTO PRESET
CHANNEL SET
AFT
FINE TUNING
SELECT
SET
PROG
position.
 Loading...