

Sony SB-V40 - AV Selector - Dark, IFV-TR1K Operating Instructions Manual
DeutschFrançaisEnglish Español
3-859-271-21(1)
AV Cordless System
Operating Instructions
Mode d'emploi
Bedienungsanleitung
Manual de instrucciones
Sony Corporation © 1997 Printed in Japan
IFV-TR1K
Before operating the unit, please read this manual thoroughly and retain it for
future reference.
WARNING
To prevent fire or shock hazard, do not expose the
unit to rain or moisture.
Features
The IFV-TR1K is a AV cordless system which uses infrared rays. Connect the
transmitter to video equipment such as a camcorder or video game, and the
receiver to a TV. You can enjoy playing back your video tape on TV without
connecting between the TV and video equipment.
Note
To prevent the noise resulting from the interference of the infrared communications,
the IFV-TR1K system is not to be used with the existing cordless headphones, cordless
microphone or cordless speaker system.
Contents
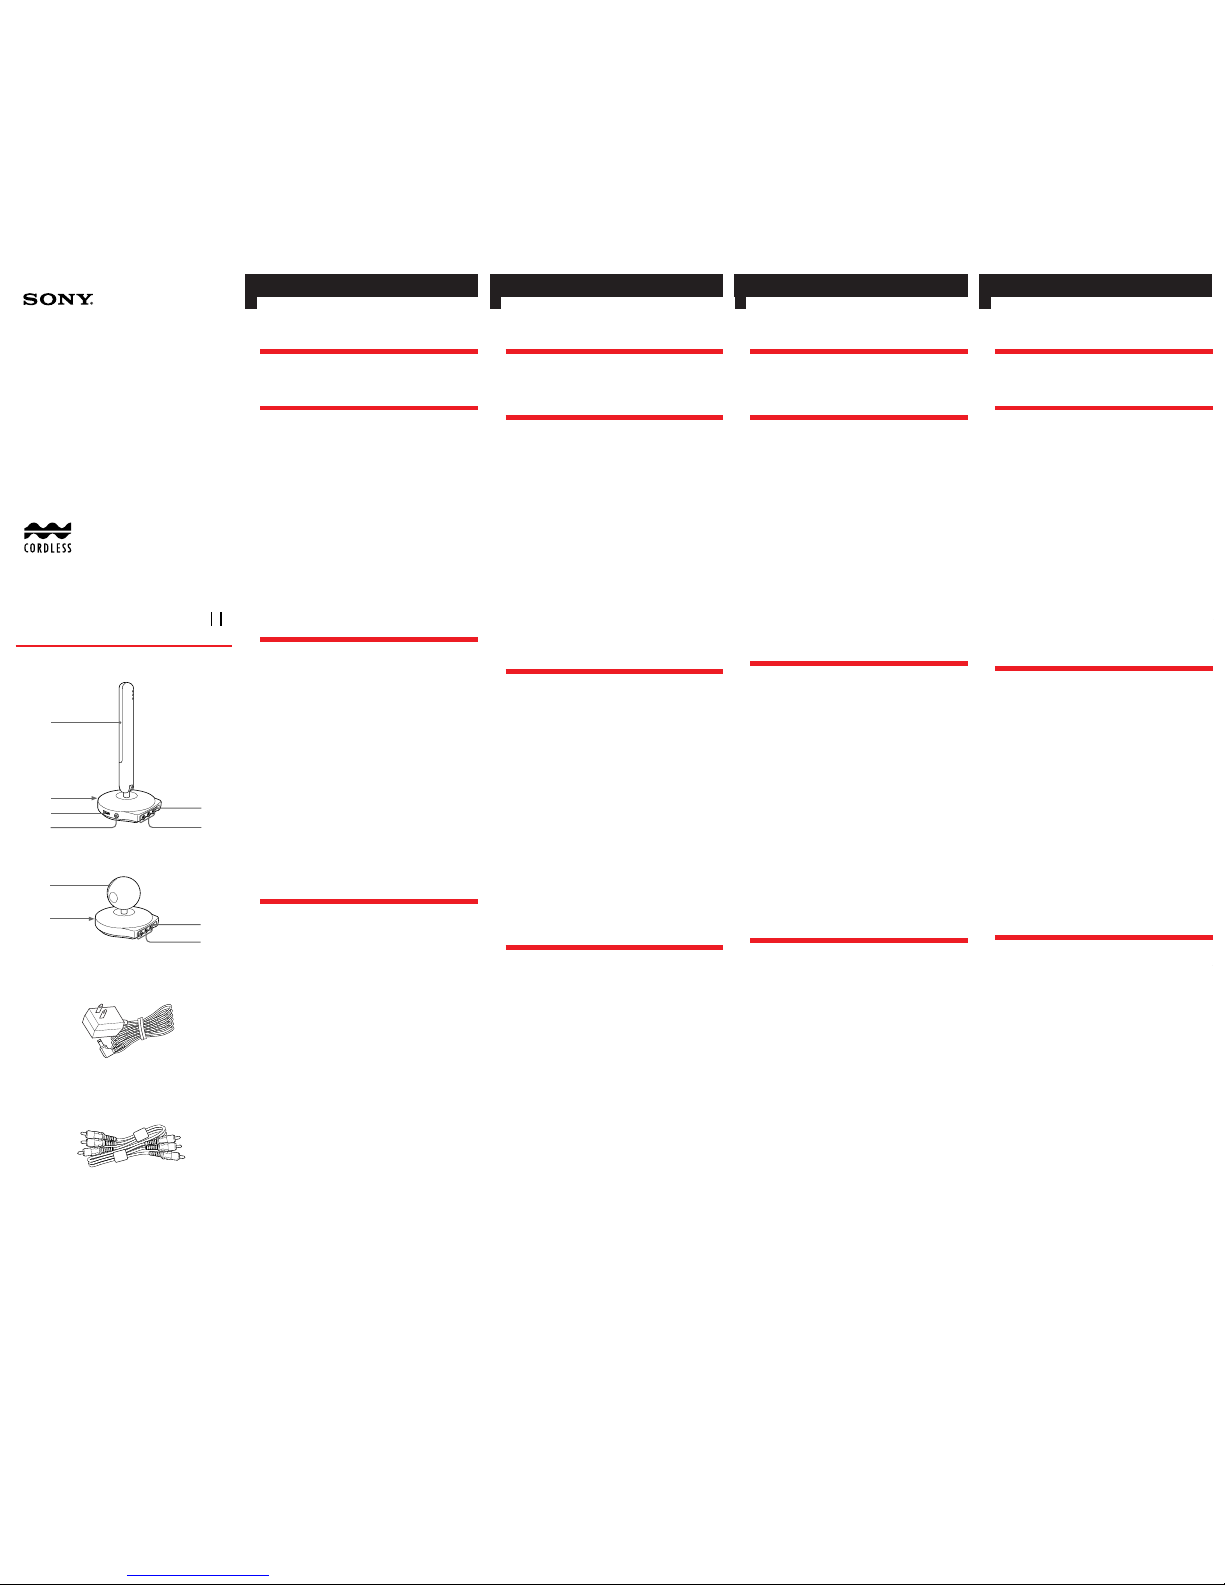
Transmitter (1) (See fig. A-a)
The transmitter emits infrared rays to the receiver.
Receiver (1) (See fig. A-b)
The receiver receives infrared rays from the transmitter.
AC power adaptors (2) (See fig. A-c)
These adaptors supply house current to the receiver and the transmitter.
AV connecting cord (1) (See fig. A-d)
Connecting the transmitter to video equipment such as a camcorder or video
game.
Connecting the receiver to a TV (or a monitor).
Precautions
On safety
•Unplug the AC power adaptor from the AC outlet when it will not be used for
a long period of time. To disconnect the AC power adaptor, pull it out by the
plug. Never pull the cord itself.
•Do not open the cabinet. Refer servicing to qualified personnel only.
•Be sure that nothing metallic comes into contact with the metal parts of the AC
power adaptor. If it does, a short circuit may occur and the unit may be
damaged.
Operation
•Do not place the units in a location where it is:
– Extremely hot or cold
– Dusty or dirty
– Very humid
– Vibrating
•Do not apply mechanical shock or drop the units.
•The units become warm during the use, but this does not indicate a
malfunction.
•Avoid exposing any part of the receiver’s light receiver to strong rays such as
direct sunlight or inverter fluorescent lamp rays or to another infrared ray
source such as a remote commander.
•Do not place any obstructions between the transmitter and receiver, or the
visual and sound will disappear.
•Do not use this system with another infrared ray transmitter such as cordless
headphones or two pairs of this system at the same time.
The signals may become mixed.
On cleaning and care
•Clean the units with a soft cloth slightly moistened with water or mild
detergent solution.
•Do not use alcohol, benzine or thinner to clean the units, as they may mar the
finish.
Specifications
Transmitter
Video input Pin jack (1): 1 Vp-p, 75 ohms, unbalanced, sync negative
Audio input Pin Jack (2: L, R): –10 dBs,
Input impedance: more than 47 kilohms
Audio output Stereo mini jack
Operating temperature
0°C to 40°C (32°F to 104°F)
Storage temperature –20°C to 60°C (–4°F to 140°F)
Dimensions Approx. 95 x 230 x 100 mm (3 3/4 x 9 1/8 x 4 inches) (w/h/d)
(jack and projected parts not included)
Mass Approx. 130 g (4.6 oz)
Receiver
Video output Pin jack (1): 1 Vp-p, 75 ohms, unbalanced, sync negative
(When POWER is ON)
Audio output Pin jack (2: L, R): –10 dBs,
Output impedance: less than
10 kilohms (When POWER is ON)
Operating temperature
0°C to 40°C (32°F to 104°F)
Storage temperature –20°C to 60°C (–4°F to 140°F)
Dimensions Approx. 95 x 95 x 100 mm (3 3/4 x 3 3/4 x4 inches) (w/h/d)
(jack and projected parts not included)
Mass Approx. 130 g (4.6 oz)
AC power adaptor
Operating voltage For models purchased in Europian countries
230 V AC, 50 Hz
For models purchased in other countries
220 – 230 V AC, 50/60 Hz or 120 V AC, 60 Hz
Output DC 9 V 600 mA
Supplied accessories AC power adaptor (2)
AV connecting cord (1)
Design and specifications are subject to change without notice.
A
b
Receiver / Récepteur / Empfangseinheit /
Receptor
c AC power adaptors / Adaptateurs secteur /
Netzadapter / Adaptadores de alimentación de
CA
d AV connecting cord / Cordon de liaison audio/
vidéo / A/V-Verbindungskabel / Cable conector
de audio/vídeo
a Transmitter / Emetteur / Sendeeinheit /
Transmisor
Avant de mettre le système en service, veuillez lire attentivement ce mode
d'emploi et le conserver pour toute référence future.
AVERTISSEMENT
Afin d’éviter tout risque d’incendie ou
d’électrocution, ne pas exposer cet appareil à la
pluie ou à l’humidité.
Caractéristiques
Le IFV-TR1K est un système de télécommande audiovisuelle utilisant les rayons
infrarouges. Raccordez l’émetteur à votre appareil vidéo tel qu’un camescope ou
une console de jeux vidéo, et le récepteur à un téléviseur. Vous pourrez regarder
confortablement votre cassette vidéo sur un téléviseur sans aucun raccordement
entre le téléviseur et l’appareil vidéo.
Remarque
Pour éviter le bruit résultant du brouillage des communications infrarouges, le
système IFV-TR1K ne doit pas être utilisé en même temps qu'un casque sans fil, un
microphone sans fil ou des enceintes sans fil déjà installés.
Contenu
Emetteur (1) (Voir l’illustration A-a)
L’émetteur transmet les rayons infrarouges au récepteur.
Récepteur (1) (Voir l’illustration A-b)
Le récepteur reçoit les rayons infrarouges de l’émetteur.
Adaptateurs secteur (2) (Voir l’illustration A-c)
Ces adaptateurs alimentent l’émetteur et le récepteur.
Cordon de liaison audio/vidéo (1) (Voir l’illustration A-d)
Raccorde l’émetteur à un appareil vidéo tel qu’un camescope ou une console de
jeux vidéo et le récepteur à un téléviseur (ou moniteur).
Précautions
Pour la sécurité
•Débranchez l’adaptateur secteur de la prise murale quand vous ne l’utilisez
pas pendant longtemps. Pour débrancher l’adaptateur secteur, tirez sur la fiche
et non sur le cordon proprement dit.
•Ne pas ouvrir le coffret. Ne confiez l’entretien de l’appareil qu’à un technicien
qualifié.
•Assurez-vous qu’aucun objet métallique n’entre en contact avec les parties
métalliques de l’adaptateur secteur. Dans le cas contraire, un court-circuit
risque de se produire et d’endommager l’appareil.
Fonctionnement
•Ne pas installer les éléments du système dans un endroit
– Extrêmement chaud ou froid
– Poussiéreux ou sale
– Très humide
– Soumis à des vibrations
•Ne pas appliquer de choc mécanique ni laisser tomber les éléments du système.
•Les éléments du système chauffent pendant le fonctionnement. Ce n’est pas un
signe de mauvais fonctionnement.
•Evitez d’exposer une partie quelconque du capteur du récepteur à des rayons
puissants tels que les rayons du soleil, les rayons d’une lampe fluorescente à
inverseur, ou à une autre source de rayons infrarouges telle qu’une
télécommande.
•Ne disposez aucune obstruction entre l’émetteur et le récepteur, sinon l’image
et le son disparaîtront.
•Ne pas utiliser ces appareils avec un autre émetteur infrarouge tel qu’un
casque sans fil ou avec un autre système identique en même temps.
Les signaux seraient mélangés.
Entretien et précautions
•Nettoyez le coffret avec un chiffon doux légèrement humide ou imbibé d’une
solution détergente douce.
•Ne pas utiliser d’alcool, de benzine ou de dissolvant qui risqueraient d’abîmer
la finition.
Spécifications
Emetteur
Entrée vidéo Jack miniature (1): 1 Vc-c, 75 ohms, asymétrique, sync
négatif
Entrée audio Jack miniature (2: G, D): -10 dBs, impédance d’entrée
supérieure à 47 kilohms
Sortie audio Minijack stéréo
Température de fonctionnement
0° C à 40° C
Température de stockage
–20°C à 60°C
Dimensions Env. 95 x 230 x 100 mm (l/h/p)
(Jacks et parties saillantes non compris)
Poids Env. 130 g
Récepteur
Sortie vidéo Jack miniature (1): 1 Vc-c, 75 ohms, asymétrique, sync
négatif (Quand POWER sur ON)
Sortie audio Jack miniature (2: G, D): -10 dBs, impédance de sortie
inférieure à 10 kilohms (Quand POWER sur ON)
Température de fonctionnement
0°C à 40°C
Température de stockage
–20°C à 60°C
Dimensions Env. 95 x 95 x 100 mm (l/h/p)
(Jacks et parties saillantes non compris)
Poids Env. 130 g
Adaptateur secteur
Tension de fonctionnement
Pour les modèles achetés dans les pays d’Europe
CA 230 V, 50 Hz
Pour les modèles achetés dans d’autres pays
CA 220 – 230 V, 50/60 Hz ou CA 120 V, 60 Hz
Sortie CC 9 V 600 mA
Accessoires fournis Adaptateur secteur (2)
Cordon de liaison audio/vidéo (1)
La conception et les spécifications sont sujettes à modifications sans préavis.
Lesen Sie vor der Inbetriebnahme diese Anleitung sorgfältig durch, und
bewahren Sie sie zum späteren Nachschlagen gut auf.
VORSICHT
Um Feuergefahr und die Gefahr eines elektrischen
Schlages zu vermeiden, darf das Gerät weder
Regen noch Feuchtigkeit ausgesetzt werden.
Besondere Merkmale
Das System IFV-TR1K ermöglicht eine drahtlose Infrarotübertragung von Audio/Videosignalen. Die Sendeeinheit wird an das Videogerät (Camcorder,
Videospiel usw.) und die Empfangseinheit an das TV-Gerät angeschlossen. Mit
dem System können Sie beispielsweise Ihre Videobänder auf dem TV-Gerät
wiedergeben, ohne daß das TV-Gerät an das Videogerät angeschlossen ist.
Hinweis
Betreiben Sie das IFV-TR1K nicht zusammen mit einem Infrarot-Kopfhörersystem,
einem Infrarot-Mikrofon oder einem Infrarot-Lautsprechersystem, da sich diese
System gegenseitig stören können.
Bestandteile
Sendeeinheit (1) (Siehe Abb. A-a)
Sendet die Infrarotstrahlen zur Empfangseinheit.
Empfangseinheit (1) (Siehe Abb. A-a)
Empfängt die Infrarotstrahlen von der Sendeeinheit.
Netzadapter (2) (Siehe Abb. A-a)
Versorgt die Empfangseinheit und die Sendeeinheit mit Strom.
A/V-Verbindungskabel (1) (Siehe Abb. A-a)
Zum Anschluß der Sendeeinheit an das Videogerät (Camcorder, Videospiel usw.)
sowie zum Anschluß der Empfangseinheit an das TV-Gerät (bzw. den Monitor).
Zur besonderen Beachtung
Sicherheit
•Trennen Sie vor einer längeren Nichtverwendung den Netzadapter von der
Wandsteckdose ab. Zum Abziehen fassen Sie stets am Stecker und niemals am
Kabel an.
•Öffnen Sie das Gehäuse nicht. Wartungsarbeiten dürfen nur vom Fachpersonal
ausgeführt werden.
•Achten Sie sorgfältig darauf, daß keine Metallgegenstände mit den
Metallkontakten des Netzadapters in Berührung kommen. Ansonsten kann es
zu Kurzschlüssen und Beschädigungen kommen.
Betrieb
•Stellen Sie die Einheiten nicht an:
– heiße oder sehr kalte Plätze
– staubige oder schmutzige Plätze
– sehr feuchte Plätze
– Plätze, die Vibrationen ausgesetzt sind
•Achten Sie darauf, daß die Einheiten keinen Stößen ausgesetzt werden, und
lassen Sie sie nicht fallen.
•Während des Betriebs erwärmen sich die Einheiten. Es handelt sich dabei nicht
um einen Defekt.
•Achten Sie darauf, daß der Infrarotsensor der Empfangseinheit keinem
direkten Sonnenlicht, keinem Licht von Leuchtstoffröhren und keinen
Infrarotstrahlen von einer Fernbedienung ausgesetzt ist.
•Zwischen Sendeeinheit und Empfangseinheit darf sich kein Hindernis
befinden, da sonst die Bild- und Tonübertragung unterbrochen wird.
•Verwenden Sie nicht gleichzeitig ein weiteres A/V-Infrarotübertragungssystem
und auch kein Infrarot-Kopfhörersystem, da sich die Signale gegenseitig
beeinflussen.
Reinigung und Pflege
•Reinigen Sie das Gehäuse mit einem weichen, leicht mit Wasser oder einem
milden Haushaltsreiniger angefeuchteten Tuch.
•Alkohol, Benzin oder Verdünner dürfen nicht zur Reinigung verwendet
werden, da diese Materialien das Gehäuse angreifen.
Technische Daten
Sendeeinheit
Videoeingang Stiftbuchse (1): 1 Vss, 75 Ohm, unsymmetrisch, negative
Synchronisation
Audioeingang Stiftbuchse (2/L,R): –10 dBs, Eingangsimpedanz: über 47
kOhm
Audioausgang Stereo-Minibuchse
Betriebstemperaturbereich
0°C bis 40°C
Lagertemperaturbereich
–20°C bis +60°C
Abmessungen ca. 95 x 230 x 100 mm (B/H/T), ausschl. Buchsen und
vorspringender Teile
Gewicht ca. 130 g
Empfangseinheit
Videoausgang Stiftbuchse (1): 1 Vss, 75 Ohm, unsymmetrisch, negative
Synchronisation
(bei auf ON stehendem POWER-Schalter)
Audioausgang Stiftbuchse (2/L,R): -10 dBs, Ausgangsimpedanz: unter 10
kOhm
(bei auf ON stehendem POWER-Schalter)
Betriebstemperaturbereich
0°C bis 40°C
Lagertemperaturbereich
–20°C bis +60°C
Abmessungen ca. 95 x 95 x 100 mm (B/H/T), ausschl. Buchsen und
vorspringender Teile
Gewicht ca. 130 g
Netzadapter
Betriebsspannung Europa-Modell
230 V Wechselspannung 50 Hz
Modelle für andere Länder
220 – 230 V Wechselspannung 50/60 Hz oder 120 V
Wechselspannung 60 Hz
Ausgang 9 V Gleichspannung, 600 mA
Mitgeliefertes Zubehör
Netzadapter (2)
A/V-Verbindungskabel (1)
Änderungen, die dem technischen Fortschritt dienen, bleiben vorbehalten.
Antes de utilizar la unidad, lea este manual detenidamente y consérvelo para
futuras referencias.
ADVERTENCIA
Para evitar incendios o el riesgo de electrocución,
no exponga la unidad a la lluvia ni a la humedad.
Características
El IFV-TR1K es un sistema inalámbrico de audio/vídeo que utiliza rayos
infrarrojos. Conecte el transmisor a un equipo de vídeo, como una videocámara
o un videojuego, y el receptor a un televisor. Usted podrá disfrutar
reproduciendo sus videocintas en un televisor sin necesidad de conectar el
televisor y el videoequipo.
Nota
Para evitar el ruido resultante de las interferencias de las comunicaciones por rayos
infrarrojos, el sistema IVF-TR1K no ha sido diseñado para utilizarse con otros
auriculares, micrófonos, ni sistemas de altavoces inalámbricos existentes.
Contenido
Transmisor (1)(Consulte la fig. A-a)
El transmisor emite rayos infrarrojos al receptor.
Receptor (1) (Consulte la fig. A-b)
El receptor recibe los rayos infrarrojos procedentes del transmisor.
Adaptadores de alimentación de CA (2) (Consulte la fig. A-c)
Estos adaptadores suministran alimentación de la red al receptor y al transmisor.
Cable conector para audio/vídeo (1) (Consulte la fig. A-d)
Utilícelo para conectar el transmisor a un equipo de vídeo, como una
videocámara o un videojuego.
Utilícelo también para conectar el receptor a un televisor (o monitor).
Precauciones
Seguridad
•Cuando no vaya a utilizar el adaptador de alimentación de CA durante mucho
tiempo, desconéctelo del tomacorriente de CA. Para desconectar el adaptador
de alimentación de CA, tire del enchufe. No tire nunca del propio cable.
•No abra la caja. En caso de avería, solicite los servicios de personal cualificado
solamente.
•Cerciórese de que no haya nada metálico en contacto con las partes metálicas
del adaptador de alimentación de CA. En caso contrario, podría producirse un
cortocircuito y las unidades se dañarían.
Operación
•No coloque las unidades en lugares:
– Extremadamente cálidos o fríos
– Polvorientos o sucios
– Muy húmedos
– Expuestos a vibraciones
•No golpee ni deje caer las unidades.
•Las unidades se calentarán cuando las esté utilizando, pero esto no significa
mal funcionamiento.
•Evite exponer el sensor del receptor a rayos intensos, como los de la luz solar
directa, de una lámpara fluorescente con inversor, o de otra fuente de rayos
infrarrojos, como un controlador remoto.
•No coloque ningún obstáculo entre el transmisor y el receptor, ya que las
señales de audio y vídeo desaparecerían.
•No utilice estas unidades con otro transmisor de rayos infrarrojos, como
auriculares inalámbricos o dos pares de estas unidades al mismo tiempo.
Las señales podrían mezclarse.
Limpieza y cuidados
•Limpie el exterior con un paño suave ligeramente humedecido en agua o en
una solución poco concentrada de detergente.
•No utilice alcohol, bencina, ni diluidor de pintura para limpiar el exterior,
porque podría dañar el acabado.
Especificaciones
Transmisor
Entrada de vídeo Toma fono (1): 1 Vp-p, 75 ohmios, desequilibrada,
sincronismo negativo
Entrada de audio Tomas fono (2, canales izquierdo y derecho): –10 dBs
Impedancia de entrada: Más de 47 kiloohmios
Salida de audio Minitoma estéreo
Temperatura de funcionamiento
0 a 40°C
Temperatura de almacenamiento
–20 a 60°C
Dimensiones Aprox. 95 x 230 x 100 mm (an/al/prf) (excluyendo las
tomas y las partes salientes)
Masa Aprox. 130 g
Receptor
Salida de vídeo Toma fono (1): 1 Vp-p, 75 ohmios, desequilibrada,
sincronismo negativo (Con POWER en ON)
Salida de audio Tomas fono (2, canales izquierdo y derecho): -10 dBs
Impedancia de salida: Más de 10 kiloohmios (Con POWER
en ON)
Temperatura de funcionamiento
0 a 40°C
Temperatura de almacenamiento
–20 a 60°C
Dimensiones Aprox. 95 x 95 x 100 mm (an/al/prf) (excluyendo las tomas
y las partes salientes)
Masa Aprox. 130 g
Adaptador de alimentación de CA
Tensión de alimentación
Para los modelos adquiridos en países europeos
230 V CA, 50 Hz
Para los modelos adquiridos en otros países
220 – 230 V CA, 50/60 Hz o 120 V CA, 60 Hz
Salida 9 V CA, 600 mA
Accesorios suministrados
Adaptador de alimentación de CA (2)
Cable conector de audio/vídeo (1)
Diseño y especificaciones sujetos a cambio sin previo aviso.
1 Light emitter
2 POWER ON/OFF switch
3 VOL control
4 PHONES jack
5 DC IN 9V jack
6 Visual/Audio input jack
7 Light receiver
8 POWER ON/OFF switch
9 DC IN 9V
0 Visual/Audio output jack
1 Emetteur de lumière
2 Interrupteur d’alimentation
(POWER ON/OFF)
3 Commande de réglage du
volume (VOL)
4 Prise de casque (PHONES)
5 Prise d’alimentation DC IN 9V
(CC 9V)
6 Prises d’entrée audio/vidéo
7 Capteur de lumière
8 Interrupteur d’alimentation
(POWER ON/OFF)
9 Prise d’alimentation DC IN 9V
(CC 9V)
0 Prises de sortie audio/vidéo
1 Infrarotstrahler
2 Ein/Aus-Schalter (POWER ON/
OFF)
3 Lautstärkeregler (VOL)
4 Kopfhörerbuchse (PHONES)
5 Stromversorgungsbuchse (DC IN
9V)
6 Audio/Video-Eingangsbuchse
7 Infrarotsensor
8 Ein/Aus-Schalter (POWER ON/
OFF)
9 Stromversorgungsbuchse (DC IN
9V)
0 Audio/Video-Ausgangsbuchse
1 Emisor de rayos infrarrojos
2 Interruptor de alimentación
(POWER ON/OFF)
3 Control de volumen (VOL)
4 Toma para auriculares (PHONES)
5 Toma de entrada de
alimentación externa (DC IN 9V)
6 Toma de entrada para audio/
vídeo
7 Receptor de rayos infrarrojos
8 Interruptor de alimentación
(POWER ON/OFF)
9 Toma de entrada de
alimentación externa (DC IN 9V)
0 Toma de salida para audio/vídeo
1
2
3
4
6
5
7
8
9
!º
x 2
DeutschFrançaisEnglish Español
C
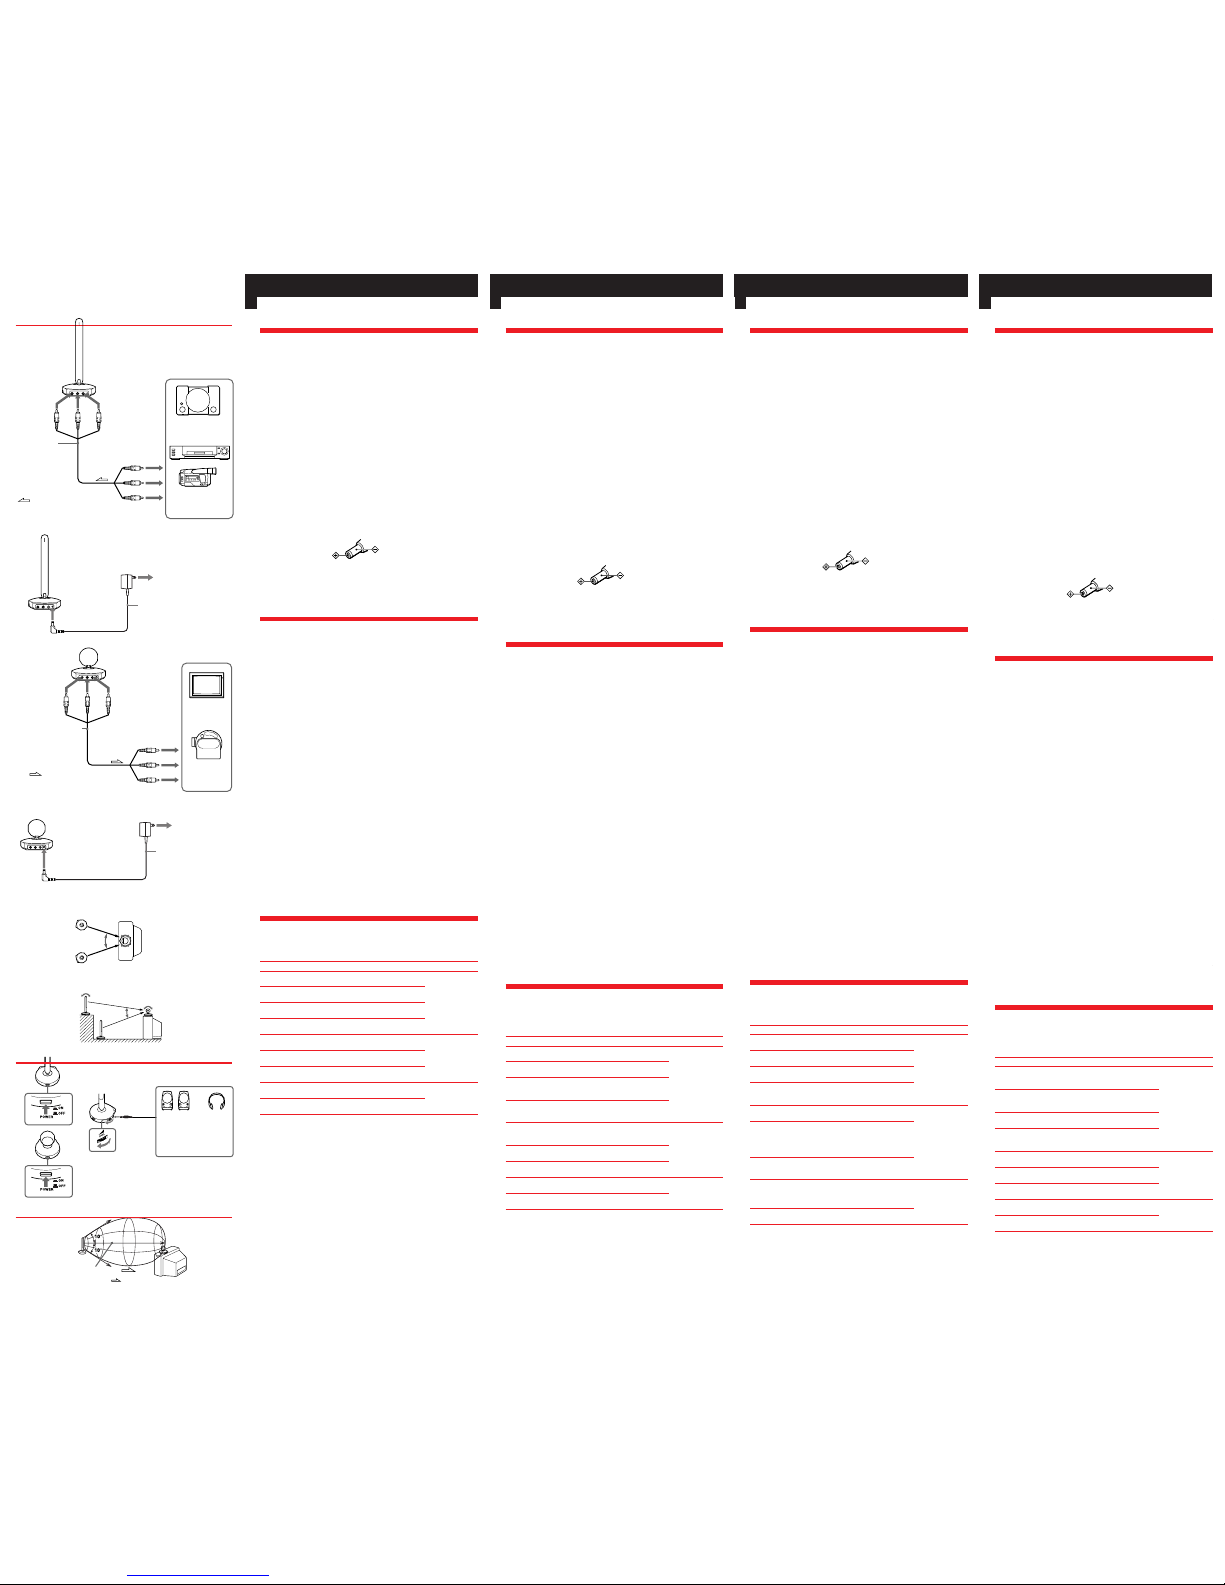
Preparations
Preparing the transmitter
1 Connect the transmitter to video equipment such as a camcorder or
video game with AV connecting cord. (See fig.B–a)
1 Red, 2 White, 3 Yellow
2 Connect the supplied AC power adaptor to DC IN 9V of the
transmitter. (See fig.B–b)
3 Connect the supplied AC power adaptor to mains.
Preparing the receiver
1 Connect the receiver to a TV with the supplied AV connecting cord.
(See fig.B–c)
1 Red, 2 White, 3 Yellow
2 Connect the supplied AC power adaptor to DC IN 9V of the receiver.
(See fig.B–d)
3 Connect the supplied AC power adaptor to an AC outlet.
The receiver can face up, down, left or right, and the transmitter
can face upwards as needed. (See fig.B–e, f)
If your TV or VCR is a monaural type
Connect the yellow plug for video and connect only the white plug for audio on
both the receiver and the TV or VCR. With this connection, the sound is
monaural.
Notes
• To connect the receiver to mains use only supplied AC power adaptor, because the
polarity of the supplied adaptor is opposite of conventional adaptors. Do not use the
supplied AC power adaptor for other electric appliances with a DC IN 9 V jack.
• To connect more than one appliance to the transmitter, use an AV selector such as the
SB-V30G, SB-V40, etc. (optional).
Using This System
The following example details the connection of the transmitter.
Please refer to the operation manual supplied with your video equipment such
as camcorder or video game.
1 Turn on the camcorder or the video game connected to the
transmitter.
2 Press POWER on the receiver to turn it on (OON). (See fig.C–a)
3 Turn the TV on.
4 Press POWER on the transmitter to turn it on (OON). (See fig.C–b)
5 Start the playback by turning on the camcorder or the video game.
6 Adjust the angle and direction of both the transmitter and receiver.
Make sure that the infrared receiver and the transmitter face each other
when you use the system.
Using a headphones (See fig.C–c)
Connect the Headphones to PHONES jack.
Adjust the volume with the VOL control.
After using this system
Press POWER on the transmitter and the receiver to turn them off (o OFF). The
POWER lamp goes off.
Coverage of the infrared rays (See fig.D)
The diagrams illustrate the approximate area covered by the infrared rays.
Position the transmitter and the receiver within the area so that the units operate
effectively.
Notes
• Select the input of the receiver with the input selector on the TV.
• If the angle of the transmitter or receiver is adjusted past the movable range as
illustrated, it can cause a malfunction.
• Do not cover the light emitter or receiver of the transmitter or the receiver with your
hand, etc.
• The infrared rays will not penetrate walls or opaque glass. Therefore, the infrared
receiver must be used within the “in sight” area of the transmitter.
• The brightness of the transmitter’s light emitter is not necessarily stabilized. This is
not a malfunction and does not affect the infrared coverage distance.
• Noise and beats appears when the transmitter and the receiver are positioned too
close.
Troubleshooting
If you run into any problem using the system, first check the power supply
source. Then use the following table for troubleshooting. Should the difficulty
persist, disconnect the power source and contact your Sony dealer or local
authorized Sony service facility.
Trouble Cause and/or remedy
The AC power adaptor is not connected to mains.
n Connect the AC power adaptor to mains.
AV connecting cord is not connected correctly.
n Connect the AV connecting cord correctly.
The POWER of the transmitter is turned off (OFF).
n Press the POWER button to turn on the transmitter (ON).
Direct sunlight is shining on the light receiver of the receiver.
n Avoid direct sunlight.
The POWER of the receiver is turned off (OFF).
n Press the POWER button to turn on the receiver (ON).
The transmitter and receiver are not facing each other.
n Adjust the position and angle of both units.
The receiver is positioned too far from the transmitter.
n Use the transmitter near the receiver.
The transmitter and receiver are not facing each other.
n Adjust the position and angle of both units.
Another infrared emitting appliance is operating.
n Stop operating it.
Polarity of the plug
No picture and
no sound at all.
The infrared
transmission
system does not
operate.
Background noise
and unclear picture.
B
Préparatifs
Préparation de l’émetteur
1 Raccordez l’émetteur à un appareil vidéo tel qu’un camescope ou
une console de jeux vidéo avec le cordon de liaison audio/vidéo.
(Voir l’illustration B–a)
1 Rouge, 2 Blanc, 3 Jaune
2 Branchez l’adaptateur secteur fourni sur DC IN 9V de l’émetteur.
(Voir l’illustration B–b)
3 Branchez l’adaptateur secteur fourni sur une prise murale.
Préparation du récepteur
1 Raccordez le récepteur à un téléviseur avec le cordon de liaison
audio/vidéo fourni. (Voir l’illustration B–c)
1 Rouge, 2 Blanc, 3 Jaune
2 Branchez l’adaptateur secteur fourni sur DC IN 9V du récepteur.
(Voir l’illustration B–d)
3 Branchez l’adaptateur secteur fourni sur une prise murale.
Le récepteur peut être tourné vers le haut, vers le bas, vers la
gauche ou vers la droite, et l’émetteur vers le haut selon la
situation. (Voir l’illustration B–e, f)
Si votre téléviseur ou votre magnétoscope est de type
monophonique
Branchez la fiche jaune pour le signal vidéo et la fiche blanche uniquement pour
le signal audio sur le récepteur et sur le téléviseur ou le magnétoscope. Avec ces
raccordements, le son est monophonique.
Remarques
•Pour raccorder le récepteur à une prise murale, utilisez seulement l’adaptateur
secteur fourni, car la polarité de l’adaptateur fourni est l’opposée de celle des
adaptateurs ordinaires. Ne pas utiliser l’adaptateur secteur fourni pour d’autres
appareils électriques avec prise de CC 9 V.
•Pour raccorder plus d’un appareil à l’émetteur, utilisez un sélecteur audiovisuel tel
que le SB-V30G, SB-V40, etc. (en option).
Utilisation du système
L’exemple suivant montre dans le détail le raccordement de l’émetteur à un
camescope.
Veuillez vous référer au mode d’emploi fourni avec votre appareil vidéo tel
qu’un camescope ou une console de jeux vidéo.
1 Mettez le camescope ou la console de jeux vidéo raccordés à
l’émetteur sous tension.
2 Appuyez sur POWER du récepteur pour le mettre sous tension.
(OON). (Voir l’illustration C–a)
3 Allumez le téléviseur.
4 Réglez l’interrupteur d’alimentation POWER de l’émetteur sur OON.
(Voir l’illustration C–b)
5 Commencez la lecture sur votre camescope ou lancez votre jeu
vidéo.
6 Ajustez l’angle et la direction de l’émetteur et du récepteur.
Assurez-vous que le récepteur et l’émetteur infrarouge se font face quand
vous utilisez le système.
Utilisation d’un casque (Voir l’illustration C–c)
Branchez le casque sur la prise de casque PHONES.
Ajustez le volume avec la commande de réglage VOL.
Après avoir utilisé le système
Appuyez sur POWER de l’émetteur et du récepteur pour les mettre hors tension
(oOFF). Le témoin d’alimentation s’éteint.
Zone de couverture des rayons infrarouges (Voir l’illustration D)
Le diagramme illustre la zone approximative couverte par les rayons
infrarouges. Orientez l’émetteur et le recepteur à l’intérieur des limites de cette
zone afin qu’ils fonctionnent correctement.
Remarques
•Sélectionnez l'entrée du récepteur avec le sélecteur d'entrée du téléviseur.
•Si l’angle de l’émetteur ou du récepteur dépasse les limites autorisées pour le
mouvement de ces éléments du système comme illustré, une anomalie de
fonctionnement risque de se produire.
•Ne pas recouvrir le capteur infrarouge du récepteur ou l’émetteur avec la main, etc.
•Les rayons infrarouges ne traversent pas les murs ou le verre opaque. Par
conséquent, le récepteur infrarouge doit être utilisé dans les limites de la zone
“visible” à partir de l’émetteur.
•L’intensité des rayons infrarouges transmis par l’émetteur n’est pas nécessairement
stabilisée. Ce n’est pas un mauvais fonctionnement et n’a pas d’influence sur la
portée des rayons infrarouges.
•Du bruit et des interférences apparaissent quand l’émetteur et le récepteur sont trop
proches l’un de l’autre.
Guide de dépannage
Si des problèmes surviennent pendant l’utilisation de ce système, vérifiez tout
d’abord la source d’alimentation. Puis, utilisez le tableau suivant pour la
recherche de la panne. Si le problème persiste, débranchez la source
d’alimentation et contactez votre revendeur Sony ou un service de réparations
agréé Sony.
Symptôme Cause et/ou solutions
L’adaptateur secteur n’est pas branché sur la prise murale
n Branchez l’adaptateur secteur sur la prise murale.
Le cordon de liaison audio/vidéo n’est pas raccordé correctement
n Raccordez le cordon de liaison audio/vidéo correctement.
L’émetteur est hors tension (OFF).
n Appuyez sur la touche POWER pour mettre l’émetteur sous
tension (ON).
La lumière directe du soleil frappe le capteur infrarouge du
récepteur.
n Evitez la lumière directe du soleil.
Le récepteur est hors tension (OFF).
n Appuyez sur la touche POWER pour mettre le récepteur sous
tension (ON).
L’émetteur et le récepteur ne se font pas face.
n Ajustez la position et l’angle de ces deux appareils.
Le récepteur est trop loin de l’émetteur.
n Utilisez l’émetteur près du récepteur infrarouge.
L’émetteur et le récepteur ne se font pas face.
n Ajustez la position et l’angle de ces deux appareils.
Un autre appareil émettant des rayons infrarouges fonctionne.
n Eteignez cet appareil.
Polarité de la fiche
Aucune image et
pas de son.
Le système de
transmission
infrarouge ne
fonctionne pas.
Des parasites et
une image floue.
e Top view / Vue de haut / Ansicht von oben /
Vista superior
f Side view / Vue de côté / Seitenansicht / Vista
lateral
Vorbereitung
Vorbereitung der Sendeeinheit
1 Schließen Sie die Sendeeinheit über das A/V-Verbindungskabel an
das Videogerät (Camcorder, Videospiel usw.) an. (Siehe Abb. B–a)
1 Rot, 2 Weiß, 3 Gelb
2 Schließen Sie den mitgelieferten Netzadapter an die DC IN 9V-
Buchse der Sendeeinheit an. (Siehe Abb. B–b)
3 Schließen Sie den mitgelieferten Netzadapter an die Steckdose an.
Vorbereitung der Empfangseinheit
1 Schließen Sie die Empfangseinheit über das mitgelieferte A/V-
Verbindungskabel an das TV-Gerät an. (Siehe Abb. B–c)
1 Rot, 2 Weiß, 3 Gelb
2 Schließen Sie den mitgelieferten Netzadapter an die DC IN 9V-
Buchse der Empfangseinheit an. (Siehe Abb. B–d)
3 Schließen Sie den mitgelieferten Netzadapter an die Steckdose an.
Die Empfangseinheit kann nach oben, unten, links oder rechts
und die Sendeeinheit nach oben gedreht werden. (Siehe Abb.
B–e, f)
Verwendung eines Mono-Fernsehers oder -Videorecorders
Schließen Sie außer dem gelben Stecker (Video) nur den weißen Stecker (Audio)
an die Empfangseinheit und den Fernseher bzw. Videorecorder an. Der Ton wird
dann in Mono wiedergegeben.
Hinweise
•Verwenden Sie nur den mitgelieferten Netzadapter; bei einem anderen Adapter ist
die Polarität möglicherweise umgekehrt. Beachten Sie auch, daß der mitgelieferte
Netzadapter nicht für andere elektrische Geräte verwendet werden darf, selbst wenn
diese für 9 V Gleichspannung ausgelegt sind.
•Wenn Sie mehrere Geräte an die Sendeeinheit anschließen wollen, verwenden Sie einen
A/V-Umschalter wie beispielsweise den SB-V30G oder SB-V40 (Sonderzubehör).
Betrieb
Im folgenden wird der Betrieb des Systems für den Fall erläutert, daß die
Sendeeinheit an einem Camcorder oder Videospiel angeschlossen ist.
Lesen Sie auch die Anleitung des angeschlossenen Videogeräts (Camcorder,
Videospiel usw.) durch.
1 Stellen Sie den POWER-Schalter am Videogerät (Camcorder,
Videospiel usw.) auf ON.
2 Stellen Sie den POWER-Schalter an der Empfangseinheit auf O ON.
(Siehe Abb. C–a)
3 Schalten Sie das TV-Gerät ein.
4 Stellen Sie den POWER-Schalter an der Sendeeinheit auf O ON.
(Siehe Abb. C–b)
5 Schalten Sie den Camcorder bzw. das Videospiel ein, und starten
Sie die Wiedergabe.
6 Stellen Sie den Winkel der Sende- und Empfangseinheit ein.
Achten Sie sorgfältig darauf, daß Sendeeinheit und Empfangseinheit richtig
aufeinander ausgerichtet sind.
Bei Anschluß eines Kopfhörers (Siehe Abb. C–c)
Schließen Sie einen Kopfhörer an die PHONES-Buchse an, und stellen Sie die
Lautstärke am VOL-Regler ein.
Nach dem Betrieb des Systems
Stellen Sie den POWER-Schalter an der Sendeeinheit und an der Empfangeinheit
auf oOFF. Die Kontrollampe erlischt.
Infrarotstrahlbereich (Siehe Abb. D)
Der ungefähre Infrarotstrahlbereich kann der Abbildung entnommen werden.
Stellen Sie die Sendeeinheit und die Empfangseinheit innerhalb dieses Bereiches
auf. Nur innerhalb dieses Bereichs ist eine einwandfreie Infrarotübertragung
gewährleistet.
Hinweise
•Wählen Sie am Eingangswahlschalter des TV-Geräts den Eingang, an dem die
Empfangseinheit angeschlossen ist.
•Stellen Sie den Winkel von Sendeeinheit und Empfangseinheit nur innerhalb des
zulässigen Bereichs (siehe Abbildung) ein, da es sonst zu Störungen kommen kann.
•Achten Sie darauf, daß weder der Infrarotstrahler der Sendeeinheit noch der
Infrarotsensor der Empfangseinheit durch Ihre Hand oder ein anderes Hindernis
abgeschattet wird.
•Infrarotstrahlen können Wände und Milchglas nicht durchdringen. Zwischen der
Empfangseinheit und der Sendeeinheit muß „Sichtkontakt” bestehen.
•Die Helligkeit der Infrarotstrahler kann schwanken. Es handelt sich dabei nicht um
eine Störung; die Reichweite wird dadurch nicht beeinflußt.
•Wenn Sendeeinheit und Empfangseinheit zu dicht beieinander stehen, kann es zu
Pfeif- und anderen Störgeräuschen kommen.
Störungsüberprüfungen
Überprüfen Sie bei einer Störung zuerst die Stromquelle, und gehen Sie dann die
folgende Liste durch. Wenn die Störung nicht behoben werden kann, trennen Sie
den Netzadapter ab, und wenden Sie sich an Ihren Sony Händler oder Ihr Sony
Service Center.
Störung Ursache und/oder Abhilfe
Der Netzadapter ist nicht an der Wandsteckdose angeschlossen.
n Den Netzadapter an die Wandsteckdose anschließen.
Das A/V-Verbindungskabel ist nicht richtig angeschlossen.
n Das A/V-Verbindungskabel richtig anschließen.
POWER an der Sendeeinheit steht auf OFF.
n POWER an der Sendeeinheit auf ON stellen.
Der Infrarotsensor der Empfangseinheit ist direktem Sonnenlicht
ausgesetzt.
n Den Sensor vor Sonnenlicht schützen.
POWER an der Empfangseinehit steht auf OFF.
n POWER an der Empfangseinheit auf ON stellen.
Sendeeinheit und Empfangseinheit sind nicht richtig aufeinander
ausgerichtet.
n Sendeeinheit und Empfangseinheit so aufstellen und den
Winkel so einstellen, daß die Einheiten aufeinander
ausgerichtet sind.
Die Empfangseinheit ist zu weit von der Sendeeinheit entfernt.
n Den Abstand zwischen Empfangseinheit und Sendeeinheit
verringern.
Das Bild ist verrauscht oder unklar.
n Sendeeinheit und Empfangseinheit so aufstellen und den
Winkel so einstellen, daß die Einheiten aufeinander
ausgerichtet sind.
In der Nähe wird eine andere Infraroteinheit betrieben.
n Die andere Einheit ausschalten.
Steckerpolarität
Kein Bild und kein
Ton.
Die
Infrarotübertragung
funktioniert nicht
einwandfrei.
Verrauschtes und
unklares Bild.
Preparativos
Preparación del transmisor
1 Conecte el transmisor al equipo de vídeo, como una videocámara o
un videojuego, con el cable conector de audio/vídeo. (Consulte la
fig. B–a)
1 Roja, 2 Blanca, 3 Amarilla
2 Conecte el cable de alimentación de CA suministrado a DC IN 9V del
transmisor. (Consulte la fig. B–b)
3 Conecte el adaptador de alimentación de CA suministrado a un
tomacorriente de la red.
Preparación del receptor
1 Conecte el receptor a un televisor con el cable conector de audio/
vídeo suministrado. (Consulte la fig. B–c)
1 Roja, 2 Blanca, 3 Amarilla
2 Conecte el adaptador de alimentación de CA suministrado a DC IN
9V del receptor. (Consulte la fig. B–d)
3 Conecte el adaptador de alimentación de CA suministrado a un
tomacorriente de la red.
El receptor podrá estar encarado hacia arriba, hacia abajo, hacia
la izquierda, o hacia la derecha, y el transmisor hacia arriba en
la forma necesaria. (Consulte la fig. B–e, f)
Si su televisor o videograbadora es de tipo monoaural
Conecte la clavija amarilla para vídeo, y solamente la clavija blanca para audio
tanto en el receptor como en el televisor o en la videograbadora. Con esta
conexión, el sonido será monoaural.
Notas
• Para conectar el receptor a un tomacorriente de la red, utilice solamente el adaptador
de alimentación de CA suministrado, porque la polaridad del adaptador
suministrado es opuesta a la de los adaptadores convencionales. No utilice el
adaptador de alimentación de CA suministrado para otros aparatos eléctricos con
toma DC IN 9V.
• Para conectar más de un dispositivo al transmisor, utilice un selector de audio/
vídeo, como el SB-V30G, SB-V40, etc. (opción).
Utilización de este sistema
En el ejemplo siguiente se explican los detalles sobre la conexión del transmisor a
una videocámara.
Consulte el manual de instrucciones suministrado con su equipo de vídeo, como
una videocámara o un videojuego.
1 Conecte la alimentación de la videocámara o del videojuego
conectado al transmisor.
2 Presione POWER del receptor para conectar su alimentación (O ON).
(Consulte la fig. C–a)
3 Conecte la alimentación del televisor.
4 Ponga el interruptor del transmisor en OON. (Consulte la fig. C–
b)
5 Inicie la reproducción conectando la alimentación de la
videocámara o del videojuego.
6 Ajuste el ángulo y la dirección del transmisor y del receptor.
Cuando utilice el sistema, cerciórese de que el receptor de rayos infrarrojos y
el transmisor estén encarados entre sí.
Utilización de unos auriculares (Consulte la fig. C–c)
Conecte los auriculares a la toma PHONES.
Ajuste el volumen con el control VOL.
Después de haber utilizado este sistema
Presione POWER del transmisor y del receptor para desconectar su alimentación
(o OFF). La lámpara POWER se apagará.
Cobertura de los rayos infrarrojos (Consulte la fig.D)
En los diagramas se muestra el parea aproximada cubierta por los rayos
infrarrojos.
Coloque el transmisor y el receptor dentro de este área a fin de que puedan
funcionar efectivamente.
Notas
• Seleccione la entrada del receptor con el selector de entrada del televisor.
• Si ajusta el ángulo del transmisor o del receptor más allá del margen de movimiento
mostrado en la ilustración, puede provocarse un mal funcionamiento.
• No cubra el sensor de rayos infrarrojos del transmisor ni del receptor con su mano,
etc.
• Los rayos infrarrojos no atravesarán paredes ni vidrios opacos. Por lo tanto, deberá
colocar el receptor de rayos infrarrojos en una lugar que esté “en la línea de visión”
del transmisor.
• El brillo del emisor de rayos infrarrojos del emisor no está necesariamente
estabilizado. Esto no significa mal funcionamiento y no afectará la distancia de
alcance de los rayos infrarrojos.
• Si coloca el transmisor y el receptor demasiado cerca, es posible que se produzcan
ruidos y batidos.
Solución de problemas
Si experimenta algún problema cuando utilice la unidad, compruebe en primer
lugar la fuente de alimentación. Después utilice la tabla de solución de
problemas siguiente.Si la dificultad persiste, desconecte la fuente de
alimentación y póngase en contacto con su proveedor Sony o con un centro de
reparaciones autorizado por Sony.
Problema Causa y/o solución
El adaptador de alimentación de CA no está conectado a un
tomacorriente de la red.
n Conéctelo.
El cable conector de audio/vídeo no está correctamente
conectado.
n Conéctelo.
La alimentación del transmisor está desconectada.
n Presione la tecla POWER para conectarla (ON).
La luz solar directa está incidiendo en el sensor de rayos
infrarrojos del receptor.
n Evítela.
La alimentación del receptor está desconectada.
n Presione la tecla POWER para conectarla (ON).
El transmisor y el receptor no están encarados.
n Ajuste la posición y el ángulo de ambas unidades.
El receptor está colocado demasiado lejos del transmisor.
n Acérquelo.
El transmisor y el receptor no están encarados.
n Ajuste la posición y el ángulo de ambas unidades.
Está utilizando otro dispositivo emisor de rayos infrarrojos.
n Deje de utilizarlo.
Polaridad de la clavija
No hay imágenes
ni sonido en
absoluto.
El sistema de
transmisión de
rayos infrarrojos
no funciona.
Ruido de fondo e
imágenes poco
claras.
d
c
a
b
a
b
c
D
Approx. 5 m (16 ft.)
Env. 5 m
ca. 5 m
Aprox. 5 m
Transmitter
Emetteur
Sendeeinheit
Transmisor
Receiver
Récepteur
Empfangseinheit
Receptor
Transmitter (rear side)
Emetteur (arrière)
Sendeeinheit (Rückseite)
Transmisor (parte posterior)
AC power adaptor (supplied)
Adaptateur secteur (fourni)
Netzadapter (mitgeliefert)
Adaptador de alimentación de CA
(suministrado)
to mains
à la prise secteur
an Steckdose
a un tomacorriente de CA
to DC IN 9V jack
à la prise DC IN 9 V
an DC IN 9V-Buchse
a la toma DC IN 9V
123
3
2
1
to Visual input
à la prise d’entrée vidéo
an Videoeingang
a la entrada para vídeo
to Visual output jack
à la prise de sortie vidéo
an Videoausgang
a la toma de salida para
vídeo
Receiver (rear side)
Récepteur (arrière)
Empfangseinheit (Rückseite)
Receptor (parte posterior)
TV
Téléviseur
TV-Gerät
Televisor
Projector
Vidéoprojecteur
Projektor
Proyector
to Audio output jack
aux prises de sortie
audio
an Audioausgang
a la toma de salida
de audio
to Audio input
aux prises d’entrée audio
an Audioeingang
a la entrada para audio
: Signal flow
Sens du signal
Signalfluß
Flujo de la señal
AV connecting cord (supplied)
Cordon de liaison audio/vidéo
(fourni)
A/V-Verbindungskabel
(mitgeliefert)
Cable conector para audio/
vídeo (suministrado)
AC power adaptor (supplied)
Adaptateur secteur (fourni)
Netzadapter (mitgeliefert)
Adaptador de alimentación de CA
(suministrado)
Receiver (rear side)
Récepteur (arrière)
Empfangseinheit (Rückseite)
Receptor (parte posterior)
to DC IN 9V jack
à la prise DC IN 9 V
an DC IN 9V-Buchse
a la toma DC IN 9V
to mains
à la prise secteur
an Steckdose
a un tomacorriente de CA
30°
Transmitter
Emetteur
Sendeeinheit
Transmisor
Receiver
Récepteur
Empfangseinheit
Receptor
30°
Transmitter
Emetteur
Sendeeinheit
Transmisor
Receiver
Récepteur
Empfangseinheit
Receptor
Active Speaker
Enceinte active
Aktivlautsprecher
Altavoces
activos
Headphones
Casque
Kopfhörer
Auriculares
to PHONES
à la prise
PHONES
an PHONES
a PHONES
: Signal flow
Sens du signal
Signalfluß
Flujo de la señal
123
3
2
1
to Visual output
à la prise de sortie vidéo
an Videoausgang
a la salida para vídeo
Transmitter (rear side)
Emetteur (arrière)
Sendeeinheit (Rückseite)
Transmisor (parte posterior)
to Visual input jack
à la prise d’entrée vidéo
an Videoeingang
a la toma de entrada
para vídeo
to Audio output
aux prises de sortie audio
an Audioausgang
a la salida para audio
to Audio input jack
aux prises d’entrée audio
an Audioeingang
a la toma de entrada
para audio
Video game
Console de jeux vidéo
Videospiel
Videojuego
Camcorder
Camescope
Camcorder
Videocámara
: Signal flow
Sens du signal
Signalfluß
Flujo de la señal
AV connecting cord
Cordon de liaison audio/
vidéo
A/V-Verbindungskabel
Cable conector para
audio/vídeo
 Loading...