

Page 1
Korean Model
SLV-ED212KR/ED717KR/
ED919KR/LF1KR
Taiwan Model
SLV-ED818TW/ED919TW
VIDEO CASSETTE RECORDER
• Refer to the SERVICE MANUAL of VHS MECHANICAL
ADJUSTMENTS VI for MECHANICAL ADJUSTMENTS.
(9-921-647-11)
* The abbreviations of ED212/ED717/ED818/ED919 and LF1 contained
in this service manual are indicated when these models are common to all
their corresponding models as given below.
ED212
Abbreviated
model name
All model
names
SLV-
ED717 ED818
ED919KR
ED919TW
ED919
ED818TW
RMT-V310/V312/V312A/V312B/V312C/V315
SLV-ED212/ED717/ED818/ED919/LF1
LF1KR
LF1
ED717KR
S MECHANISM
ED212KR
SLV-ED818
SERVICE MANUAL
123
456
789
0
VIDEO
g
Page 2

– 2 –
SAFETY CHECK-OUT
1. Check the area of your repair for unsoldered or poorly-soldered
connections. Check the entire board surface for solder splashes
and bridges.
2. Check the interboard wiring to ensure that no wires are “pinched”
or contact high-wattage resistors.
3. Look for unauthorized replacement parts, particularly transistors, that were installed during a previous repair. Point them
out to the customer and recommend their replacement.
After correcting the original service problem, perform the following
safety checks before releasing the set to the customer:
4. Look for parts which, though functioning, show obvious signs
of deterioration. Point them out to the customer and recommend their replacement.
5. Check the B+ voltage to see it is at the values specified.
SAFETY-RELATED COMPONENT WARNING!!
COMPONENTS IDENTIFIED BY MARK OR DOTTED
LINE WITH MARK ON THE SCHEMATIC DIAGRAMS
AND IN THE PARTS LIST ARE CRITICAL TO SAFE
OPERATION. REPLACE THESE COMPONENTS WITH
SONY PARTS WHOSE PART NUMBERS APPEAR AS
SHOWN IN THIS MANUAL OR IN SUPPLEMENTS
PUBLISHED BY SONY.
System
Format
VHS NTSC standard
Video recording system
Rotary head helical scanning FM system
Video heads
Double azimuth four heads
(SLV-ED717/ED818/ED919/LF1)
Double azimuth two heads
(SLV-ED212)
Video signal
NTSC color, EIA standards
Tape speed
SP: 33.35 mm/s (1
3/8
inches/s)
EP: 11.11 mm/s (
7/16
inches/s)
LP: 16.67 mm/s (
11/16
inches/s),
playback only
Maximum recording/playback time
8 hrs. in EP mode (with T-160 tape)
Fast-forward and rewind time
Approx. 3 min. (with T-20 tape)
Tuner Section
Channel coverage
VHF 2 to 13
UHF 14 to 69
CATV A-8 to A-1, A to W, W+1 to W+84
(SLV-ED212KR/ED717KR/
ED919KR/LF1KR)
CATV A-6 to A-1, A, B, C to W+1,
W+12 to W+84
(SLV-ED818TW/ED919TW)
Antenna
75-ohm antenna terminal for VHF/UHF
Inputs and Outputs
SLV-ED818/ED919/LF1:
LINE-1 IN and LINE-2 IN
VIDEO IN, phono jack (1 each)
Input signal: 1 Vp-p, 75 ohms,
unbalanced, sync negative
AUDIO IN, phono jack (2 each)
Input level: 327 mVrms
Input impedance: more than 47 kilohms
LINE OUT
VIDEO OUT, phono jack (1)
Output signal: 1 Vp-p, 75 ohms,
unbalanced, sync negative
AUDIO OUT, phono jack (2)
Standard output: 327 mVrms
Load impedance: 47 kilohms
Output impedance: less than 10 kilohms
SLV-ED212/ED717:
LINE-1 IN
VIDEO IN, phono jack (1)
Input signal: 1 Vp-p, 75 ohms,
unbalanced, sync negative
AUDIO IN, phono jack (1)
Input level: 327 mVrms
Input impedance: more than 47 kilohms
LINE-2 IN (SLV-ED717)
VIDEO IN, phono jack (1)
Input signal: 1 Vp-p, 75 ohms,
unbalanced, sync negative
AUDIO IN (MONO), phono jack (2)
Input level: 327 mVrms
Input impedance: more than 47 kilohms
LINE-OUT
VIDEO OUT, phono jack (1)
Output signal: 1 Vp-p, 75 ohms,
unbalanced, sync negative
AUDIO OUT, phono jack (1)
Standard output: 327 mVrms
Load impedance: 47 kilohms
Output impedance: less than 10 kilohms
Timer section
Clock
Quartz locked
SPECIFICATIONS
Timer indication
12-hour cycle
Timer setting
8 programs per month (max.)
Power back-up
Built-in self-charging capacitor
Back-up duration: up to 8 hours at a
time
General
Power requirements
100 V AC, 60 Hz
(SLV-ED818TW/ED919TW)
110 - 220 V AC, 60 Hz
(SLV-ED212KR/ED717KR/ED919KR/
LF1KR)
Power consumption
14 W (SLV-ED919KR/LF1KR)
13 W (SLV-ED818TW/ED919TW)
12 W (SLV-ED212KR/ED717KR)
Operating temperature
5°C to 40°C
Storage temperature
–20°C to 60°C
Dimensions
Approx. 430 x 97 x 292 mm (w/h/d)
including projecting parts and controls
Mass
Approx. 4.1 kg
Supplied accessories
Remote commander (1)
Size AA(R6) batteries (2)
75-ohm coaxial cable with F-type connectors (1)
Design and specifications are subject to change
without notice.
Page 3

– 3 –
TABLE OF CONTENTS
Section Title Page Section Title Page
Feature Difference.................................................................... 3
SERVICE NOTE ....................................................................... 5
1. GENERAL
Getting Started ............................................................... 1-1
Basic Operations........................................................... 1-5
Search Operations ........................................................ 1-9
Additional Operations .................................................... 1-10
Additional Information .................................................... 1-13
2. DISASSEMBLY
2-1. Case Front Panel Block Assembly ................................ 2-1
2-2. DM-98, DI-81 Board and FJ-31 Board .......................... 2-1
2-3. Rear Panel ..................................................................... 2-2
2-4. MA-402 Board ................................................................ 2-2
2-5. Mechanism Deck ........................................................... 2-3
2-6. Internal Views ................................................................. 2-4
2-7. Circuit Boards Location ................................................. 2-5E
3. BLOCK DIAGRAMS
3-1. Overall Block Diagram ................................................... 3-1
3-2. Video Block Diagram ..................................................... 3-3
3-3. Servo/System Control Block Diagram ........................... 3-5
3-4. Audio Block Diagram ..................................................... 3-7
3-5. Tuner Block Diagram ..................................................... 3-9
3-6. Mode Control Block Diagram ........................................ 3-11
3-7. Power Block Diagram ..................................................... 3-13
4. PRINTED WIRING BOARDS AND
SCHEMATIC DIAGRAMS
4-1. Frame Schematic Diagram ............................................ 4-3
4-2. Printed Wiring Boards and Schematic Diagrams ......... 4-5
• MA-402 Printed Wiring Board .................................. 4-5
• MA-402 (Video, Audio) Schematic Diagram ............ 4-9
• MA-402 (System Control) Schematic Diagram ....... 4-13
• MA-402 (Servo Control) Schematic Diagram .......... 4-17
• MA-402 (Hi-Fi Audio) Schematic Diagram............... 4-19
• MA-402 (Tuner) Schematic Diagram........................ 4-21
• MA-402 (I/O) Schematic Diagram ............................ 4-23
• MA-402 (Mode Control) Schematic Diagram........... 4-25
• MA-402 (Power Supply) Schematic Diagram .......... 4-27
• NK-11 Printed Wiring Board and
Schematic Diagram .................................................. 4-29
• FJ-31 Printed Wiring Boards and
Schematic Diagrams ................................................ 4-31
• DM-98 Printed Wiring Boards and
Schematic Diagrams ................................................ 4-31
• DI-81 Printed Wiring Board and
Schematic Diagrams ................................................ 4-33
• FJ-33 Printed Wiring Board and
Schematic Diagrams ................................................ 4-34E
5.
INTERFACE, IC PIN FUNCTION DESCRIPTION
5-1. System Control-Video Block Interface
(MA-402 BOARD IC101) ............................................... 5-1
5-2. System Control-Servo Peripheral Circuit Interface
(MA-402 BOARD IC101) ............................................... 5-1
5-3. System Control-Mechanism Block Interface
(MA-402 BOARD IC101) ............................................... 5-2
5-4. System Control-Audio Block Interface
(MA-402 BOARD IC101) ............................................... 5-3
5-5. Servo/System Control,
OSD Microprocessor Pin Function
(MA-402 BOARD IC101) ............................................... 5-4
5-6. NICAM Processor Pin Function
(NK-11 BOARD IC1) ..................................................... 5-5E
6. ERROR CODES ..................................................... 6-1E
7. ADJUSTMENTS
7-1. Mechanical Adjustments............................................... 7-1
7-2. Electrical Adjustments ................................................... 7-1
2-1. Pre-Adjustment Preparations ........................................ 7-1
2-1-1. Instruments to be Used ............................................ 7-1
2-1-2. Connection ................................................................ 7-1
2-1-3. Set-up of Adjustment ................................................ 7-1
2-1-4. Alingment Tapes ....................................................... 7-1
2-1-5. Specified I/O Level and Impedance ......................... 7-1
2-1-6. Adjusting Sequence .................................................. 7-2
2-2. Power Supply Adjustment.............................................. 7-2
2-2-1. Power Supply Check................................................. 7-2
2-3. Servo System Adjustment ............................................. 7-2
2-3-1. RF Switching Position Adjustment ........................... 7-2
2-4. Audio System Adjustments............................................ 7-3
2-4-1. Hi-Fi Audio System Adjustment ............................... 7-3
1. AF Switching Position Adjustment ........................... 7-3
2. Frequency Response Check .................................... 7-3
3. Overall Level Characteristic and
Distortion Factor Check ............................................ 7-4
4. Overall S/N Check .................................................... 7-4
2-4-2. Normal Audio System Adjustment ........................... 7-4
1. ACE Head Adjustment .............................................. 7-4
2. E-E Output Level Check ........................................... 7-4
3. Frequency Responce Check .................................... 7-4
4. Overall Level Characteristic and Distortion
Factor Check ............................................................. 7-5
5. Overall S/N Check .................................................... 7-5
2-5. Tuner System Adjustment.............................................. 7-5
2-5-1. Separation Adjustment ............................................. 7-5
2-6. Parts Arrangement Diagram for Adjustments ............... 7-6E
8. REPAIR PARTS LIST
8-1. Exploded Views .............................................................. 8-1
8-1-1. Front Panel and Upper Case Section ...................... 8-1
8-1-2. Chassis Section ........................................................ 8-3
8-1-3. Mechanism Deck Section-1...................................... 8-5
8-1-4. Mechanism Deck Section-2...................................... 8-6
8-1-5. Mechanism Deck Section-3...................................... 8-7
8-2. Electrical Parts List ........................................................ 8-8
Page 4
– 4 –
SERVICE NOTE
1. DISASSEMBLY
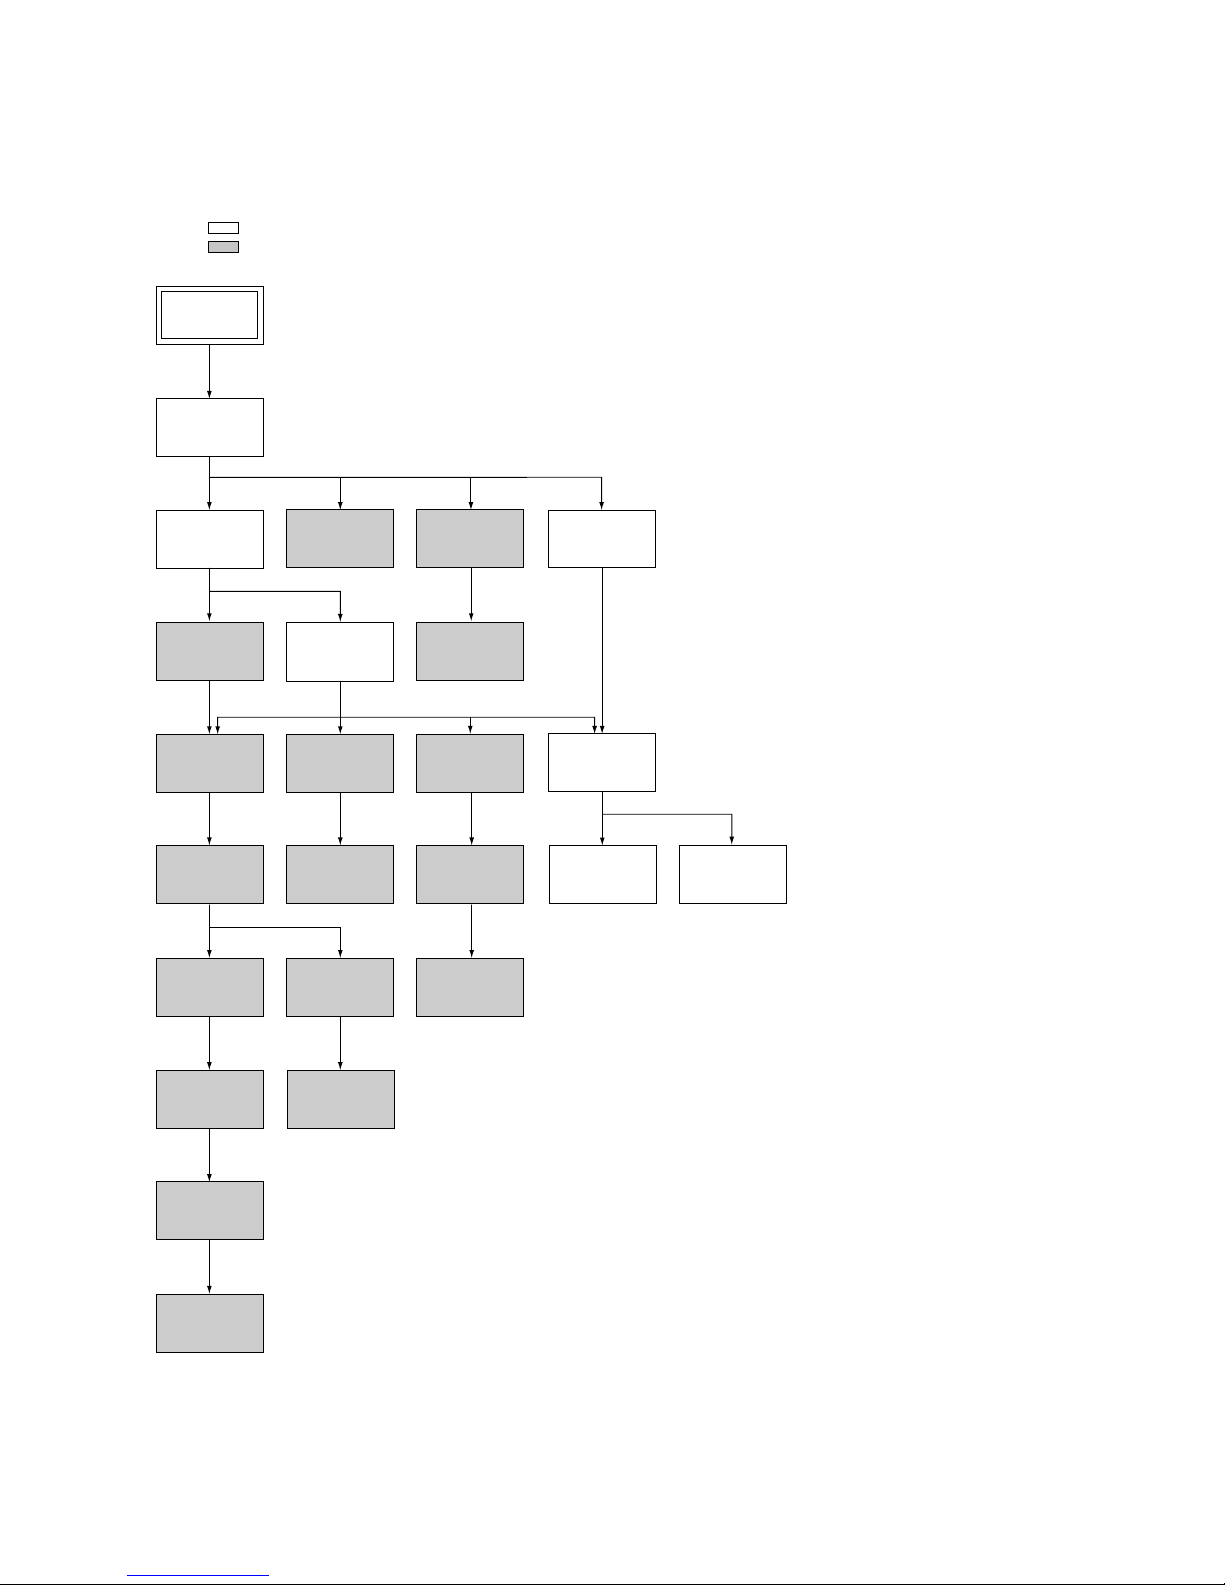
• This set can be disassembled in the order shown below.
Note: Pages in indicated pages in the SERVICE MANUAL.
Pages in indicated pages in the VHS MECHANICAL ADJUSTMENT MANUAL VI.
Set
Upper case
(Page 2-1)
Front Panel
Section
(Page 2-1)
Pinch Press
Block Ass’y
(Page 14)
Ground Shaft
Ass’y
(Page 13)
Mechanism
Deck
(Page 2-3)
FL Complete
Ass’y
(Page 13)
Drum
Ass’y
(Page 13)
Rear
Panel
(Page 2-2)
Rubber
Belt
(Page 15)
Rubber
Belt
(Page 15)
Slider
(Page 26)
Loading
Gear (T, S)
(Page 28)
Retainer
Plate
(Page 22)
Rubber
Belt
(Page 15)
Capstan
Motor
(Page 15)
FL Slider
Block Ass’y
(Page 22)
Pully Gear
Ass’y
(Page 29)
Cam Motor
Retainer
(Page 31)
Cam Gear
(Page 23)
Cam Motor
(Page 31)
Reel Direct
Ass’y
(Page 30)
MA-402
Board
(Page 2-2)
Rotary
Switch
(Page 2-3)
Tuner
Unit
Page 5
5
Getting Started
Getting Started
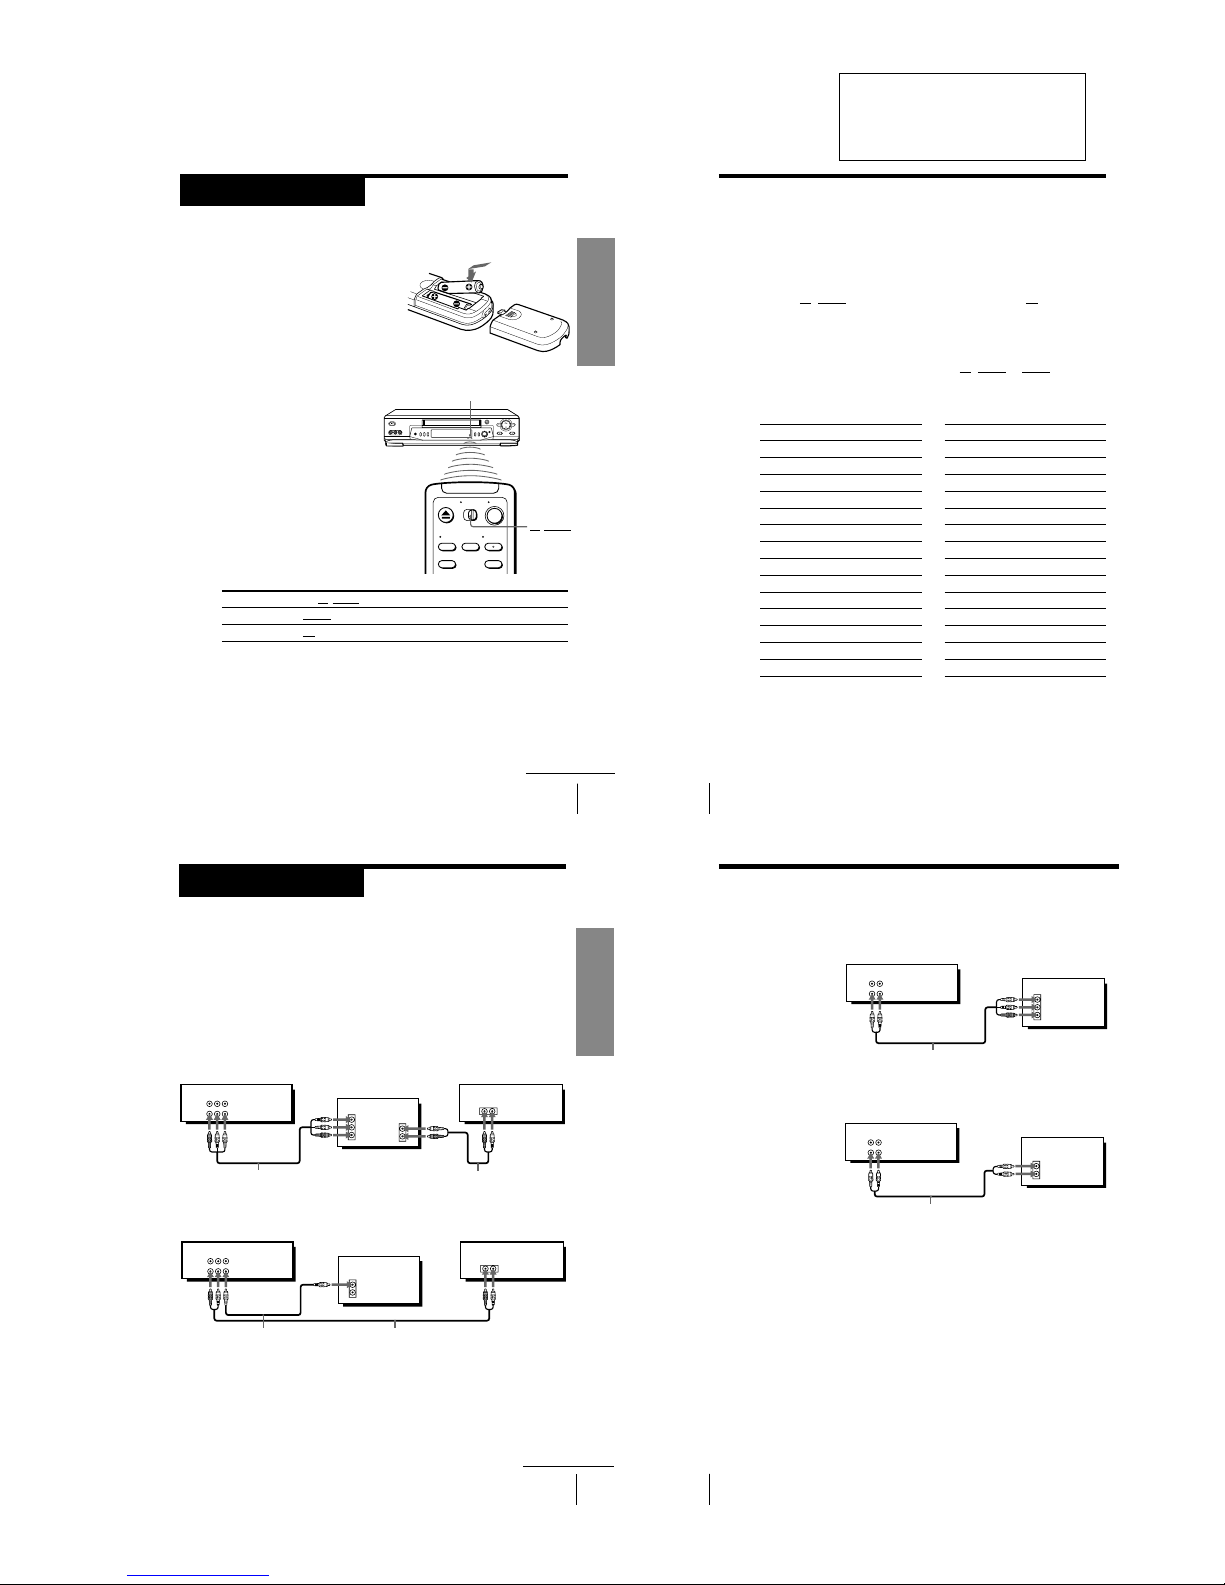
Inserting the batteries
Insert two size AA (R6) batteries by
matching the + and – on the batteries
to the diagram inside the battery
compartment.
Insert the negative (–) end first, then
push in and down until the positive
(+) end clicks into position.
Using the remote commander
You can use this remote
commander to operate this VCR
and a Sony TV. Buttons on the
remote commander marked with
a dot (•) can be used to operate
your Sony TV. If the TV does not
have the g symbol near the
remote sensor, this remote
commander will not operate the
TV.
Step 2
Setting up the remote commander
To operate
the VCR
a Sony TV
Set
TV/VIDEO
to
VIDEO
and point at the remote sensor on the VCR
T
V
and point at the remote sensor on the TV
Remote sensor
Notes
• With normal use, the batteries should last about three to six months.
• If you do not use the remote commander for an extended period of time, remove
the batteries to avoid possible damage from battery leakage.
• Do not use a new battery with an old one.
• Do not use different types of batteries.
continued
TV/VIDEO
Getting Started
6
Controlling other TVs with the remote commander
(SLV-ED919KR only)
The remote commander is preprogrammed to control non-Sony TVs. If your
TV is listed in the table below, set the appropriate manufacturer’s code
number.
1 Set
TV/VIDEO
at the top of the remote commander to
T
V
.
2 Hold ?/1 down, and enter your TV’s code number(s) using the number
buttons. Then release ?/1.
Now you can use the ?/1, VOL +/–, CH +/– and TV/VIDEO buttons to
control your TV. You can also use the buttons marked with a dot (•) to
control a Sony TV. To control the VCR, reset
TV/VIDEO
to
VIDEO
.
Code numbers of controllable TVs
If more than one code number is listed, try entering them one at a time until
you find the one that works with your TV.
Step 2: Setting up the remote commander (continued)
Notes
• If the TV uses a different remote control system from the one programmed to work
with the VCR, you cannot control your TV with the remote commander.
• You may not be able to use some buttons to control non-Sony TVs due to the remote
commander’s signal limitations.
• If you enter a new code number, the code number previously entered will be erased.
• When you replace the batteries of the remote commander, the code number may
automatically reset to 01 (Sony). If your TV is not a Sony, it is recommended to
manually set the appropriate code number every time you replace the batteries.
Manufacturer
Sony
Akai
AOC
Centurion
Colonad
Curis-Mathes
Emerson
Fisher
General Electric
Gold Star
Hitachi
JVC
Magnavoc
Marantz
Code number
01
04
04
12
03
12
03, 04, 14
11
06, 10
03, 04, 17
02
09
08
13
Manufacturer
MGA/Mitsubishi
Panasonic
Philips
Pioneer
Quasar
Radio Shack
RCA
Sanyo
Sears
Sharp
Sylvania
Teknika
Toshiba
Zenith
Code number
13
06, 19
08
16
06
05, 14
10
11
07, 11
05, 18
08
14
07
15
7
Getting Started
Getting Started
Step 3
Hookup
Audio/video (A/V) hookup
If your TV has audio/video (A/V) input jacks, you will get a better picture
and sound when you hook up your VCR using these connections. If your TV
doesn’t have A/V inputs, see the following page for antenna hookup.
For SLV-ED919KR only
For a true “home theater” experience, you should connect the audio outputs
of your VCR or TV to your stereo system.
A Use this hookup if your TV has stereo jacks
B Use this hookup if your TV doesn’t have stereo jacks
continued
VCR Stereo receiver
Audio/video cable (not supplied)
TV
Audio cable (not supplied)
IN
VIDEO
AUDIO
AUDIO OUT
AUX IN
AUDIO VIDEO
LINE-1
IN
LINE
OUT
TV
VCR Stereo receiver
Video cable (not supplied)
Audio cable (not supplied)
VIDEO
AUDIO
IN
AUX IN
AUDIO VIDEO
LINE-1
IN
LINE
OUT
Note
• To listen to playback sounds in stereo, you must use the A/V connection.
SECTION 1
GENERAL
This section is a translated
version of Instruction Manual
SLV-ED919KR model.
Part number: 3-066-368-11
Getting Started
8
Step 3: Hookup (continued)
For SLV-ED717KR and ED212KR only
A Use this hookup if your TV has stereo jacks
B Use this hookup if your TV doesn’t have stereo jacks
VCR
Audio/video cable (not supplied)
TV
IN
VIDEO
AUDIO
AUDIO VIDEO
LINE-1
IN
LINE
OUT
TV
VCR
Audio/video cable (not supplied)
VIDEO
AUDIO
IN
AUDIO VIDEO
LINE-1
IN
LINE
OUT
SLV-ED212/ED717/ED818/ED919/LF1
1-1
Page 6
9
Getting Started
Getting Started
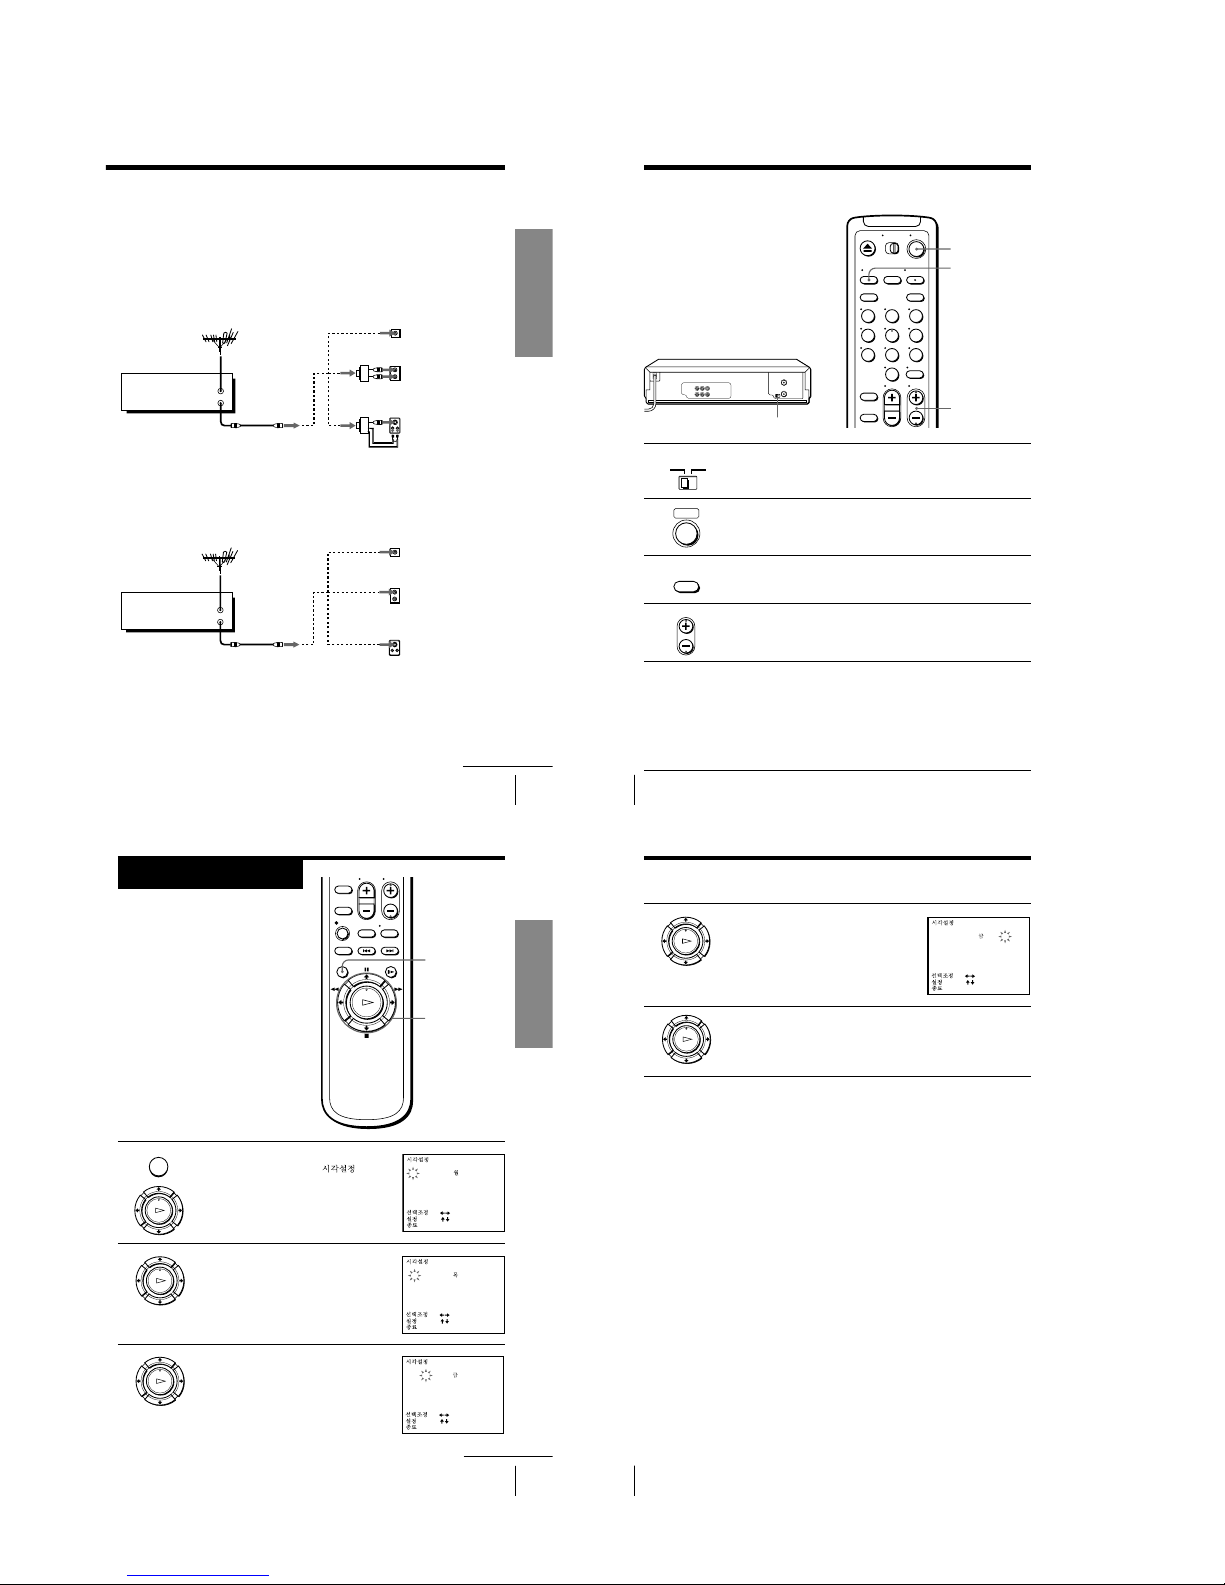
Antenna hookup
Make the following connections when you’re using an antenna.
A Use this hookup if you’re using:
• VHF/UHF antenna (you get channels 2–13 and channels 14 and higher)
• UHF-only antenna (you get channels 14 and higher)
• Separate VHF and UHF antennas
B Use this hookup if you’re using a VHF-only antenna (you get
channels 2–13 only)
If you cannot connect your antenna cable to the VCR directly
If your antenna cable is a flat cable (300-ohm twin lead cable), attach an external
antenna connector (not supplied) so you can connect the cable to the VHF/UHF IN
connector. If you have separate cables for VHF and UHF antennas, you should use a
U/V band mixer (not supplied). For details, see page 54.
continued
or
or
Match the type of
connector on your
TV: A, B, or C.
A
B
C
UHF
VHF
VCR
UHF
VHF
IN
OUT
VHF/UHF
Rear of TV
VHF/UHF
A
or
or
Match the type of
connector on your
TV: A, B, or C.
B
For connector
types B and C, no
UHF connection is
required.
C
UHF
VHF
VHF
UHF
VCR
Rear of TV
VHF/UHF
IN
OUT
VHF/UHF
Getting Started
10
TV/VIDEO
?/1
1 Set the RF UNIT switch on the rear of the VCR to CH3 or CH4,
whichever channel is not used in your area. If both are used, set the
switch to either channel.
2 Press ?/1 to turn on the VCR.
3 Press TV/VIDEO on the remote commander to turn on the VIDEO
indicator in the VCR’s display window.
4 Press CH +/– to display a channel number in the display window.
Select an active channel number in your area.
5 Turn on your TV and set it to the channel you selected in step 1
(channel 3 or 4).
The channel you selected in step 4 appears on the TV screen. If the
channels change when you press CH +/–, you have made the
correct setting.
Whenever you use the VCR, set the TV to the channel selected in
step 1.
Setting the RF unit
When connecting the VCR to the TV
using only the antenna cable, you must
set the RF UNIT switch on the rear of the
VCR so that the TV can receive the
correct signal from the VCR.
If you made A/V connections (pages 7
or 8) you can skip this step.
CH +/–
RF UNIT
CH3
RF UNIT
CH4
Step 3: Hookup (continued)
• ]/1
• CH
• TV/
VIDEO
123
456
789
0
11
Getting Started
Getting Started
1 Press MENU, then press M/m to move the
cursor (B) to CLOCK SET (
), then
press OK.
2 Press M/m to set the month.
3 Press , to select the day and press M/m
to set the day.
The day of the week is set automatically.
Step 4
Setting the clock
You must set the time and date on the
VCR to be able to use the timer
recording features properly.
Before you start...
• Turn on the VCR and the TV.
• Set the TV to the VCR channel
(channel 3 or 4). If your TV is
connected to the VCR using A/V
connections, set the TV to video input.
• Press TV/VIDEO to display the
VIDEO indicator in the VCR’s display
window.
MENU
OK
M/m/</,
continued
MENU
OK
PLAY
OK
PLAY
OK
PLAY
2
//
11
00
1
:000
AM
:
[
]
:
[]
:
[ OK ]
:000
AM
:
[
]
:
[]
:
[ OK ]
2
/
/
111
00
1
7
2
/
1
1
/
1
0
0
1
:000
AM
:
[
]
:
[]
:
[ OK ]
Getting Started
12
4 Set the year, hour and minutes in
sequence, using , to select the item to be
set, and M/m to select the digits.
5 Press OK to start the clock.
Tip
• To change the digits during setting, press < to return to the item to be changed,
and select the digits using M/m.
Note
• The menu disappears automatically if you don’t proceed for more than a few
minutes.
Step 4: Setting the clock (continued)
OK
PLAY
OK
PLAY
7
2
/
1
1
/
1
00
1
:
[
]
:
[]
:
[ OK ]
AM12
:30
1-2
Page 7

13
Getting Started
Getting Started
Step 5
Press and hold ONE TOUCH TUNING on the VCR for more than
three seconds.
The VCR starts presetting the channels.
The WAIT indicator goes off when all receivable channels are preset.
To check if the channels are preset correctly
Set the TV to the video channel and press CHANNEL +/– on the VCR.
If the TV screen changes to a different program each time you press
CHANNEL +/–, the channels are preset correctly.
Tip
• To stop the One Touch Tuning function, press ONE TOUCH TUNING or x STOP
on the VCR during the setting.
Presetting channels
First, we recommend that you preset the receivable channels in your area
using the One Touch Tuning function or the AUTO PRESET (
) in the
TUNER PRESET (
) menu. Then, if some channels could not be
preset automatically, set them manually; if there are any unwanted channels
among the preset ones, you can disable the channels.
Presetting all receivable
channels using the One
Touch Tuning function
continued
SP
APC
ONE TOUCH
TUNING
ONE TOUCH
TUNING
CHANNEL +/–
Getting Started
14
Presetting all receivable
channels automatically
Before you start…
• Turn on the VCR and the TV.
• Set the TV to the VCR channel
(channel 3 or 4). If your TV is
connected to the VCR using A/V
connections, set the TV to video input.
• Press TV/VIDEO to display the
VIDEO indicator in the VCR’s display
window.
1 Press MENU, then press M/m to move the
cursor (B) to TUNER PRESET (
) ,
then press OK.
2 Press M/m to select ANTENNA/CABLE
(
) .
Step 5: Presetting channels (continued)
MENU
OK
M/m/</,
MENU
OK
PLAY
OK
PLAY
1
ON
•
•
•
OFF
:
[
]
:
[]
21
ON
•
•
•
OFF
:
[
]
:
[]
15
Getting Started
Getting Started
3
• To preset cable TV channels:
Press </, to set ANTENNA/CABLE
(
) to CABLE ( ).
• To preset VHF and UHF channels:
Press </, to set ANTENNA/CABLE
( ) to ANT ( ).
4
Press M/m to move the cursor (B) to
AUTO PRESET (
), then press OK.
All receivable channels are preset in
numerical sequence. When no more
receivable channels can be found,
presetting stops and the picture from the
lowest numbered channel is displayed on
the TV screen.
Note
• Picture might disappear for a few seconds during One Touch Tuning and auto
presetting functions. This is for tuning procedures, and not a malfunction.
continued
OK
PLAY
21
ON
•
•
•
OFF
:
[
]
:
[]
21
ON
•
•
•
OFF
:
[
]
:
[]
21
ON
•
•
•
OFF
OK
PLAY
OK
PLAY
Getting Started
16
Presetting/disabling
channels manually
1 Press MENU, then press M/m to move the
cursor (B) to TUNER PRESET (
),
then press OK.
CH +/–
MENU
OK
M/m/</,
Number
buttons,
ENTER
Step 5: Presetting channels (continued)
123
456
789
0
MENU
OK
PLAY
1
ON
•
•
•
OFF
:
[
]
:
[]
1-3
Page 8
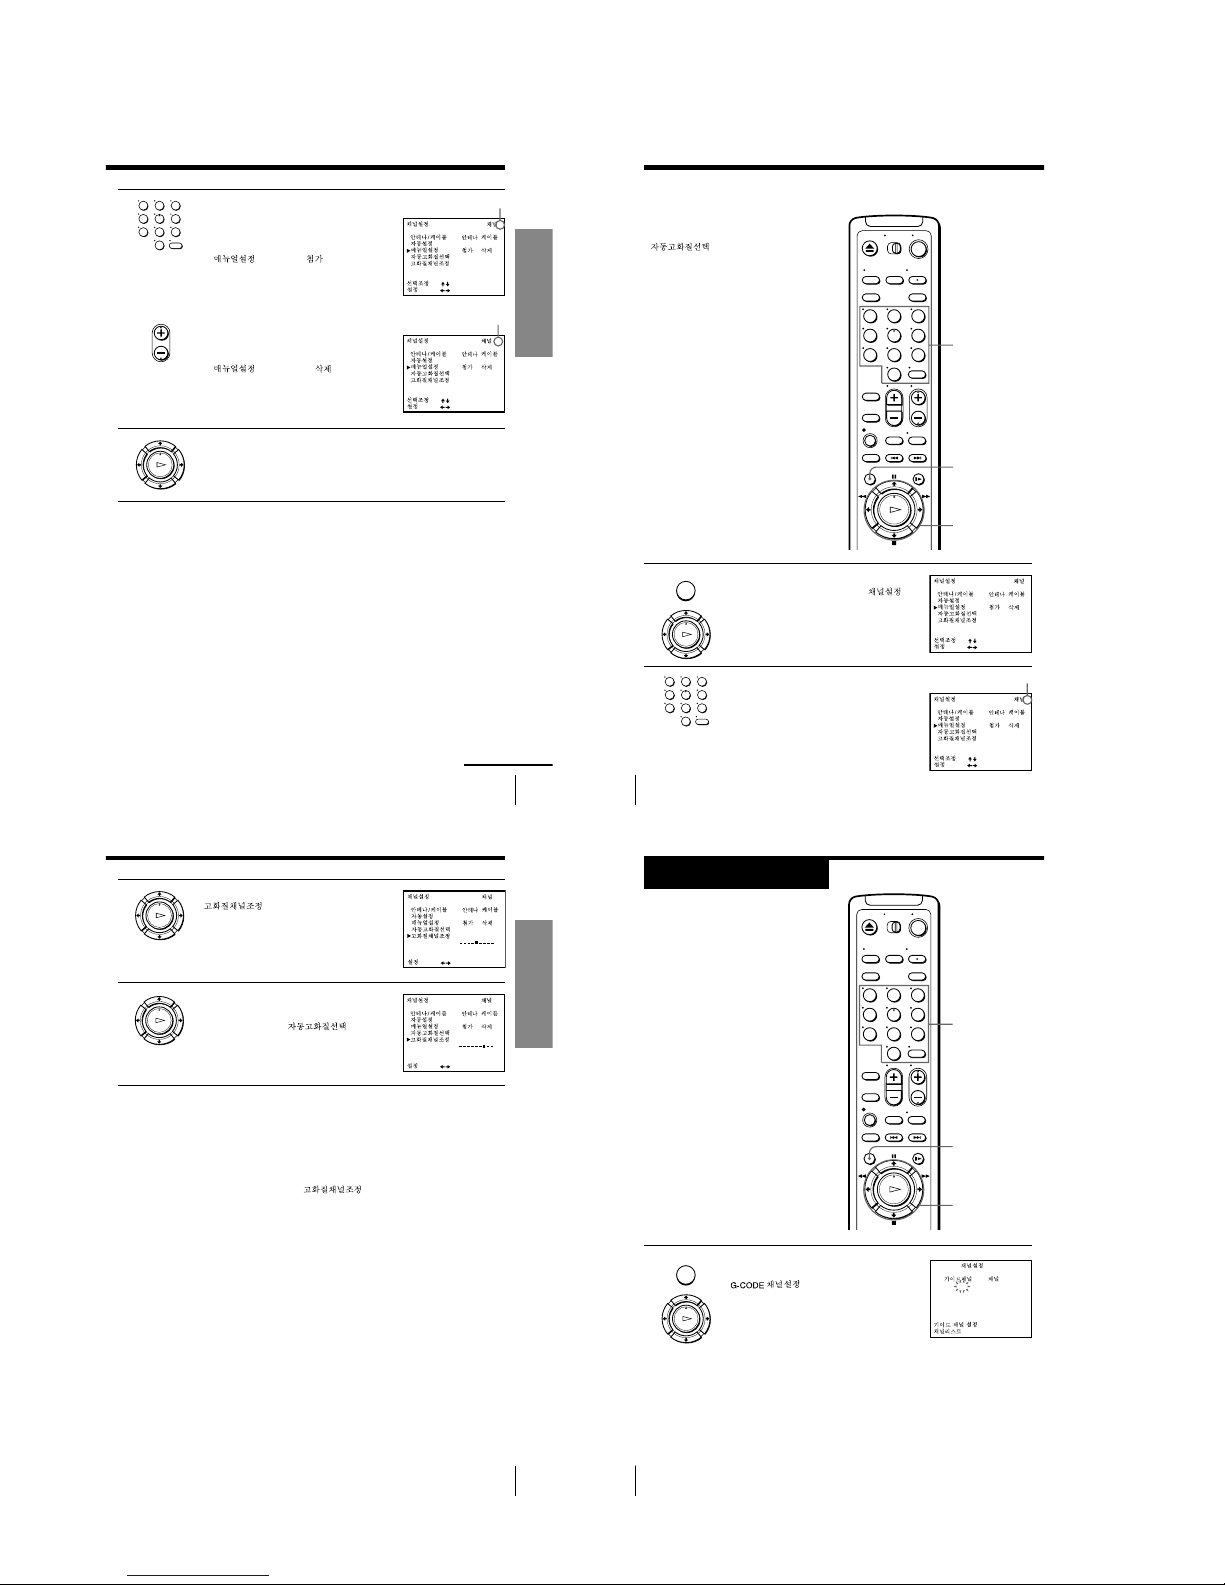
17
Getting Started
Getting Started
2
• To preset a channel:
1 Press the number buttons to enter the
channel number, then press ENTER.
2 Press </, to set MANUAL SET
(
) to ADD ( ).
• To disable a channel:
1 Press CH +/– to select the channel
number.
2 Press </, to set MANUAL SET
(
) to ERASE ( ).
3
Repeat step 2 to preset or disable channels as required, then press
OK.
Channel to be preset
Channel to be disabled
continued
• CH
123
456
789
0
OK
PLAY
5
ON
•
•
•
OFF
:
[
]
:
[]
21
ON
•
•
•
OFF
:
[
]
:
[]
Getting Started
18
If the picture is not clear
Normally, the Auto Fine Tuning (AFT)
(
) function automatically
tunes in channels clearly. If, however,
the picture of a channel is not clear, you
can also use the manual tuning function.
MENU
OK
M/m/</,
Number
buttons,
ENTER
1 Press MENU, then press M/m to move the
cursor (B) to TUNER PRESET (
),
then press OK.
2 Press the number buttons to select the
channel you want to fine-tune, then press
ENTER.
Step 5: Presetting channels (continued)
123
456
789
0
MENU
OK
PLAY
123
456
789
0
1
ON
•
•
•
OFF
:
[
]
:
[]
Selected channel
5
ON
•
•
•
OFF
:
[
]
:
[]
19
Getting Started
Getting Started
3
Press M/m to select FINE TUNING
(
).
The fine tuning meter appears.
4
Press </, to adjust to a clearer picture,
then press OK.
Note that the AFT (
) setting
switches to OFF.
Tip
• To select the channel in step 2 on page 18, you can also use the CH +/– buttons. In
this case, you do not need to press ENTER.
Notes
• The menu disappears automatically if you do not proceed for more than a few
minutes.
• When adjusting FINE TUNING ( ), the menu may become difficult to
read due to interference from the picture being received.
21
ON
•
•
•
OFF
:
[
]
21
ON
•
•
•
OFF
:
[
]
OK
PLAY
OK
PLAY
Getting Started
20
Step 6
Setting up the
G-CODE system
(SLV-ED919KR
only)
The G-CODE system is a feature in Sony
VCRs that simplifies programing the
VCR to make timer recording. To use the
G-CODE system, each TV channels
needs to be matched with its G-CODE
guide channel. To get the guide channel
numbers, look in the program guide for
your area that features G-CODE
numbers.
Before you start…
• Turn on the VCR and the TV.
• Set the TV to the video channel.
1 Press MENU, then press M/m to move the
cursor (B) to SET G-CODE CHANNELS
(
) and press OK.
MENU
OK
M/m/</,
Number
buttons,
ENTER
123
456
789
0
MENU
OK
PLAY
:
:
G-CODE
TV
––
[ 0 – 9 ]
[ OK ]
––
1-4
Page 9
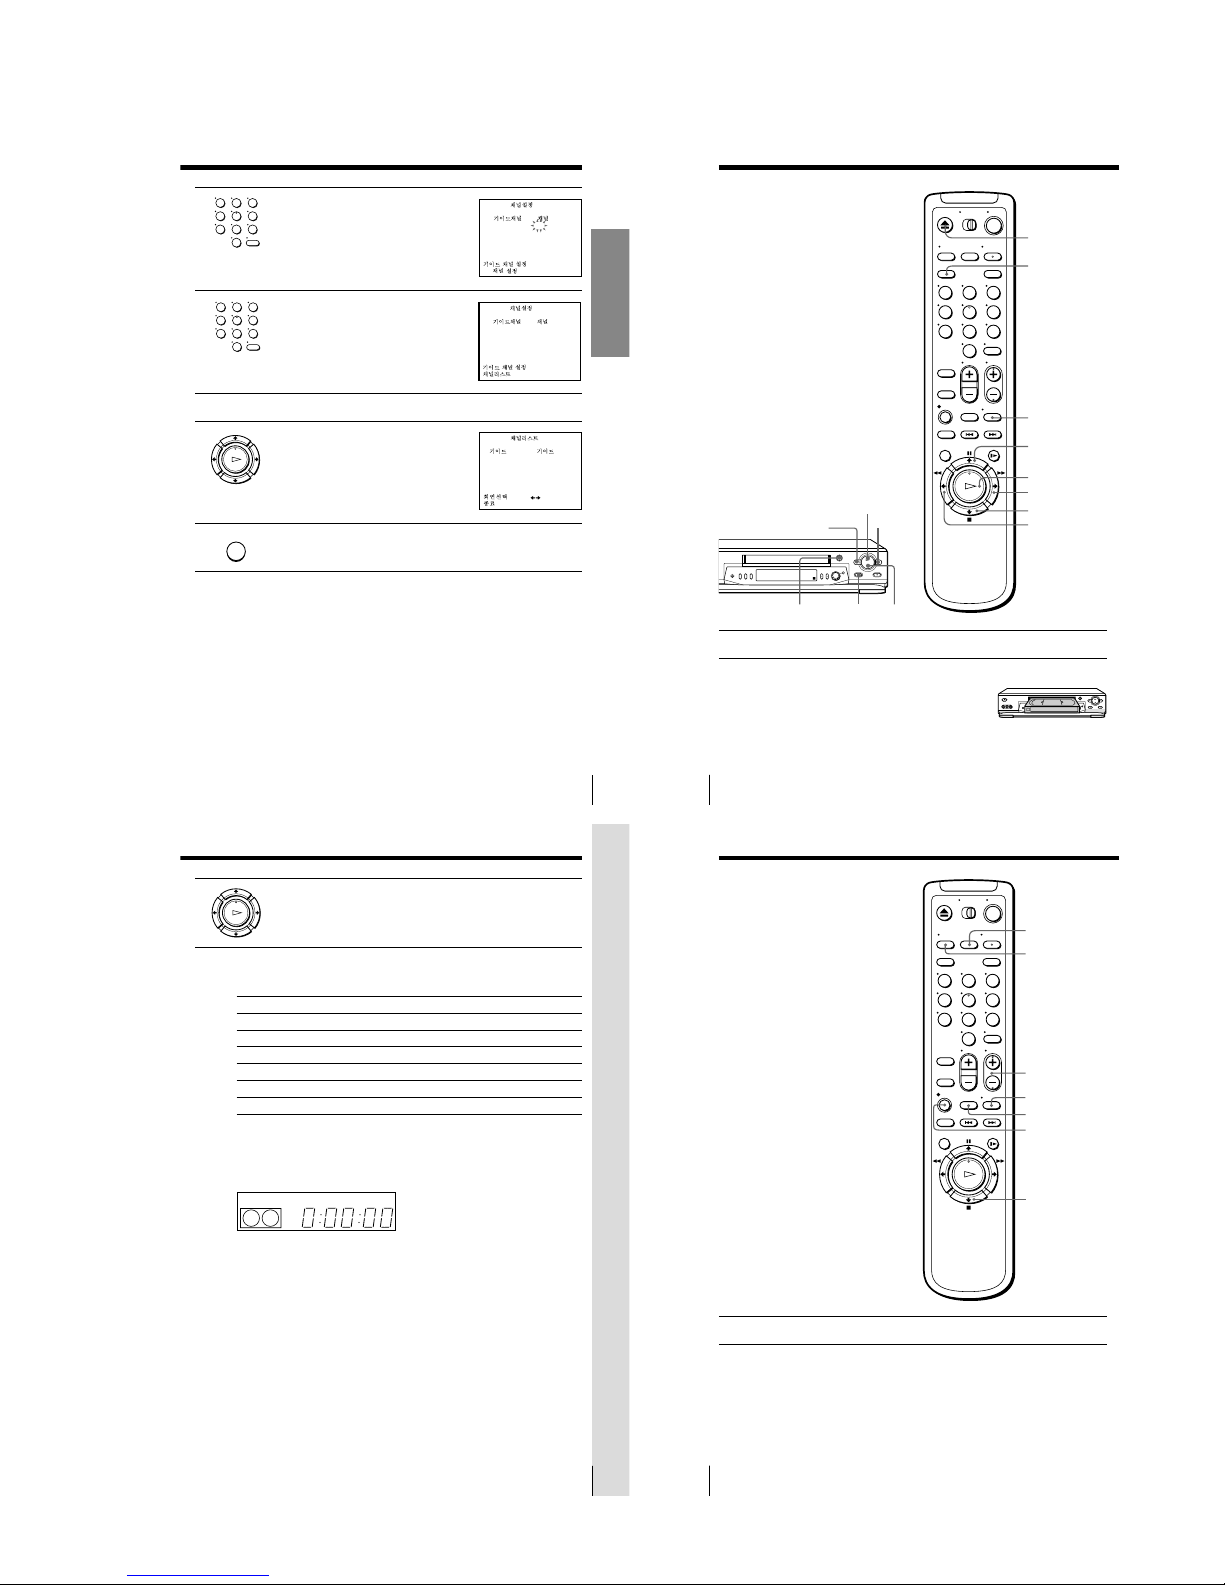
21
Getting Started
Getting Started
2 Enter the guide channel number assigned
in the program guide and press ENTER.
3 Enter the actual number on your TV (and
VCR) and press ENTER.
4 Repeat steps 2 and 3 for each channel whose numbers don’t match.
5 When you have set all channels, press OK
to confirm your channel settings.
6 After all settings are complete, press MENU to exit.
123
456
789
0
123
456
789
0
TV
25 –––
[ ENTER ]
:
:
G-CODE
TV
[ 0 – 9 ]
25 – 117
[ OK ]
:
:
G-CODE
TV
[ 0 – 9 ]
:
:
G-CODE
PAGE 1
TV TV
2 – 73 59 – 47
511
–
2
4
– – 486– –
96
7 – 55 77 – 35
8 – – 986– 210
3 – –1118 90 – 22
[ MENU ]
[
]
MENU
OK
PLAY
Basic Operations
22
Basic Operations
Playing a tape
Z EJECT
CLEAR
DISPLAY
H PLAY
M FF
x STOP
m REW
X PAUSE
1 Turn on your TV and set it to the video channel.
2 Insert a tape.
The VCR turns on and starts playing
automatically if you insert a tape with its
safety tab removed.
123
456
789
0
x STOP
H PLAY
M FF
m REW
A EJECT
X PAUSE
23
Basic Operations
Basic Operations
3 Press H PLAY.
When the tape reaches the end, it will rewind automatically.
Additional tasks
To
Stop play
Pause play
Resume play after pause
Fast-forward the tape
Rewind the tape
Eject the tape
Press
x STOP
X PAUSE
X PAUSE or H PLAY
M FF during stop
m REW during stop
Z EJECT
To use the time counter
At the point on the tape that you want to find later, press CLEAR. The
counter in the display window resets to “0:00:00.” Search for the point
afterwards by referring to the counter.
To display the counter on the TV screen, press DISPLAY.
Notes
• Tapes recorded in the LP mode on other VCRs can be played back on this VCR but
the picture quality cannot be guaranteed.
• While setting the menu on the TV screen, you cannot use the H PLAY, X PAUSE,
M FF, m REW, or x STOP buttons.
• The counter resets to “0:00:00” whenever a tape is reinserted.
• The counter stops counting when it comes to a portion with no recording.
EP
VIDEO
APC
OK
PLAY
Basic Operations
24
Recording TV
programs
1 Turn on your TV and set it to the video channel.
2 Insert a tape with its safety tab in place.
z REC
x STOP
DISPLAY
INPUT SELECT
CH +/–
TV/VIDEO
REC SPEED
123
456
789
0
1-5
Page 10
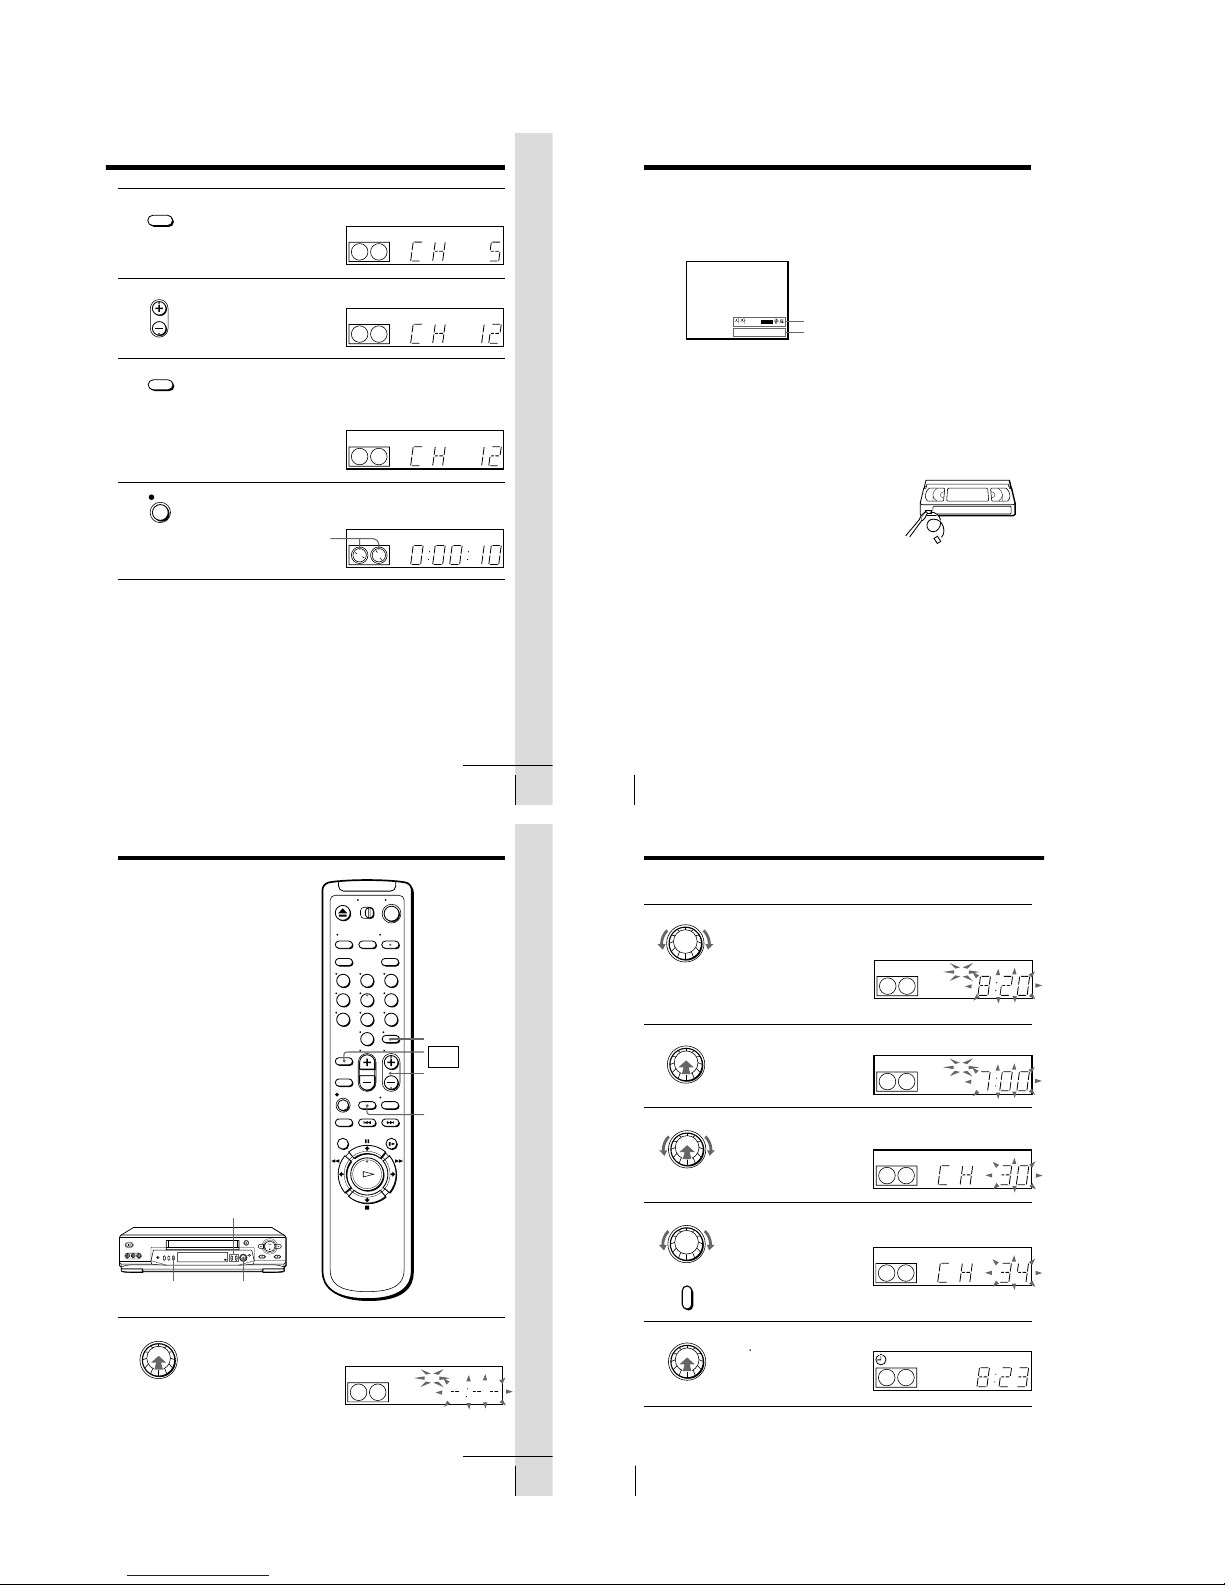
25
Basic Operations
Basic Operations
3
Press INPUT SELECT until a channel number appears in the display
window.
4
Press CH +/– to select the channel you want to record.
5
Press REC SPEED to select the tape speed, SP or EP.
EP (Extended Play) provides recording time three times as long as
SP (Standard Play). However, SP produces better picture and audio
quality.
6
Press z REC to start recording.
The recording indicator lights up red in the display window.
To stop recording
Press x STOP.
• CH
INPUT
SELECT
REC SPEED
REC
EP
VIDEO
APC
EP
VIDEO
APC
SP
VIDEO
APC
continued
Recording indicator
SP
VIDEO
APC
Basic Operations
26
To check the remaining tape length
Press DISPLAY. The white bar indicates the approximate length of tape
remaining.
To watch another TV program while recording
1 Press TV/VIDEO to turn off the VIDEO indicator in the display
window.
2 If the TV is connected to the VCR’s LINE OUT jacks, set the TV to TV
input; if not, skip this step.
3 Select another channel on the TV.
To save a recording
To prevent accidental erasure, break off the
safety tab as illustrated. To record on the tape
again, cover the tab hole with adhesive tape.
Tips
• To select a channel, you can use the number buttons on the remote commander.
Enter the channel number, then press ENTER.
• (SLV-ED919KR and ED717KR)
You can select a video source from the LINE-1 IN or LINE-2 IN jacks using INPUT
SELECT or CH +/– buttons.
• (SLV-ED212KR)
You can select a video source from the LINE-1 IN jacks using INPUT SELECT or CH
+/– buttons.
• The display appears on the TV screen indicating information about the tape, but the
information won’t be recorded on the tape.
• If you don’t want to watch TV while recording, you can turn off the TV.
Notes
• The display doesn’t appear during still (pause) mode or slow-motion playback.
• It may take up to one minute for the VCR to calculate and display the remaining
tape length after you press DISPLAY.
Time counter
Remaining tape length
::
22
–––
000
Safety tab
Recording TV programs (continued)
27
Basic Operations
Basic Operations
Recording TV
programs using
the Easy Timer
function
The Easy Timer function allows you to
make a timer recording of a program
without turning on your TV. Set the
recording timer to record only one
program that will be broadcast within
the next 24 hours using the EASY
TIMER knob. If the VCR clock has not
been set, you can also set the clock
before setting the timer recording.
Setting the Easy Timer
Before you start…
• Insert a tape with its safety tab in
place. Make sure the tape is longer
than the total recording time.
1 Push the EASY TIMER knob.
The START indicator appears in the display window.
If the clock has not been set,
“–:– –” appears. Go to step 2
in “Setting or changing the
Easy Clock” on page 29.
CH +/–
REC SPEED
ENTER (AM/PM)
123
456
789
0
EASY TIMER
SP
APC
START
AM
EASY
TIMER
EASY TIMER
knob
REC SPEED
SP/EP
CHANNEL +/–
continued
Basic Operations
28
Recording TV programs using the Easy Timer function (continued)
2 Set the recording start time by turning the EASY TIMER knob
clockwise or counterclockwise to increase or decrease the time by 15
minutes.
To increase or decrease the
time by one minute, press
CHANNEL +/–.
Press ENTER (AM/PM) to
change AM and PM.
3 Push the EASY TIMER knob to confirm the start time setting.
The STOP indicator appears.
4 Set the recording stop time in the same way as in step 2, then push
the EASY TIMER knob.
A channel number flashes.
5 Turn the EASY TIMER knob clockwise or counterclockwise to select
the channel you want to record.
To select the tape speed, press
REC SPEED.
6 Push the EASY TIMER knob to confirm the setting.
The
t
indicator appears in
the display window and the
VCR stands by for recording.
EASY TIMER
EASY TIMER
REC SPEED
SP
APC
START
AM
EASY TIMER
EASY TIMER
SP
APC
STOP
PM
SP
APC
AM
EP
APC
SP
EASY TIMER
1-6
Page 11
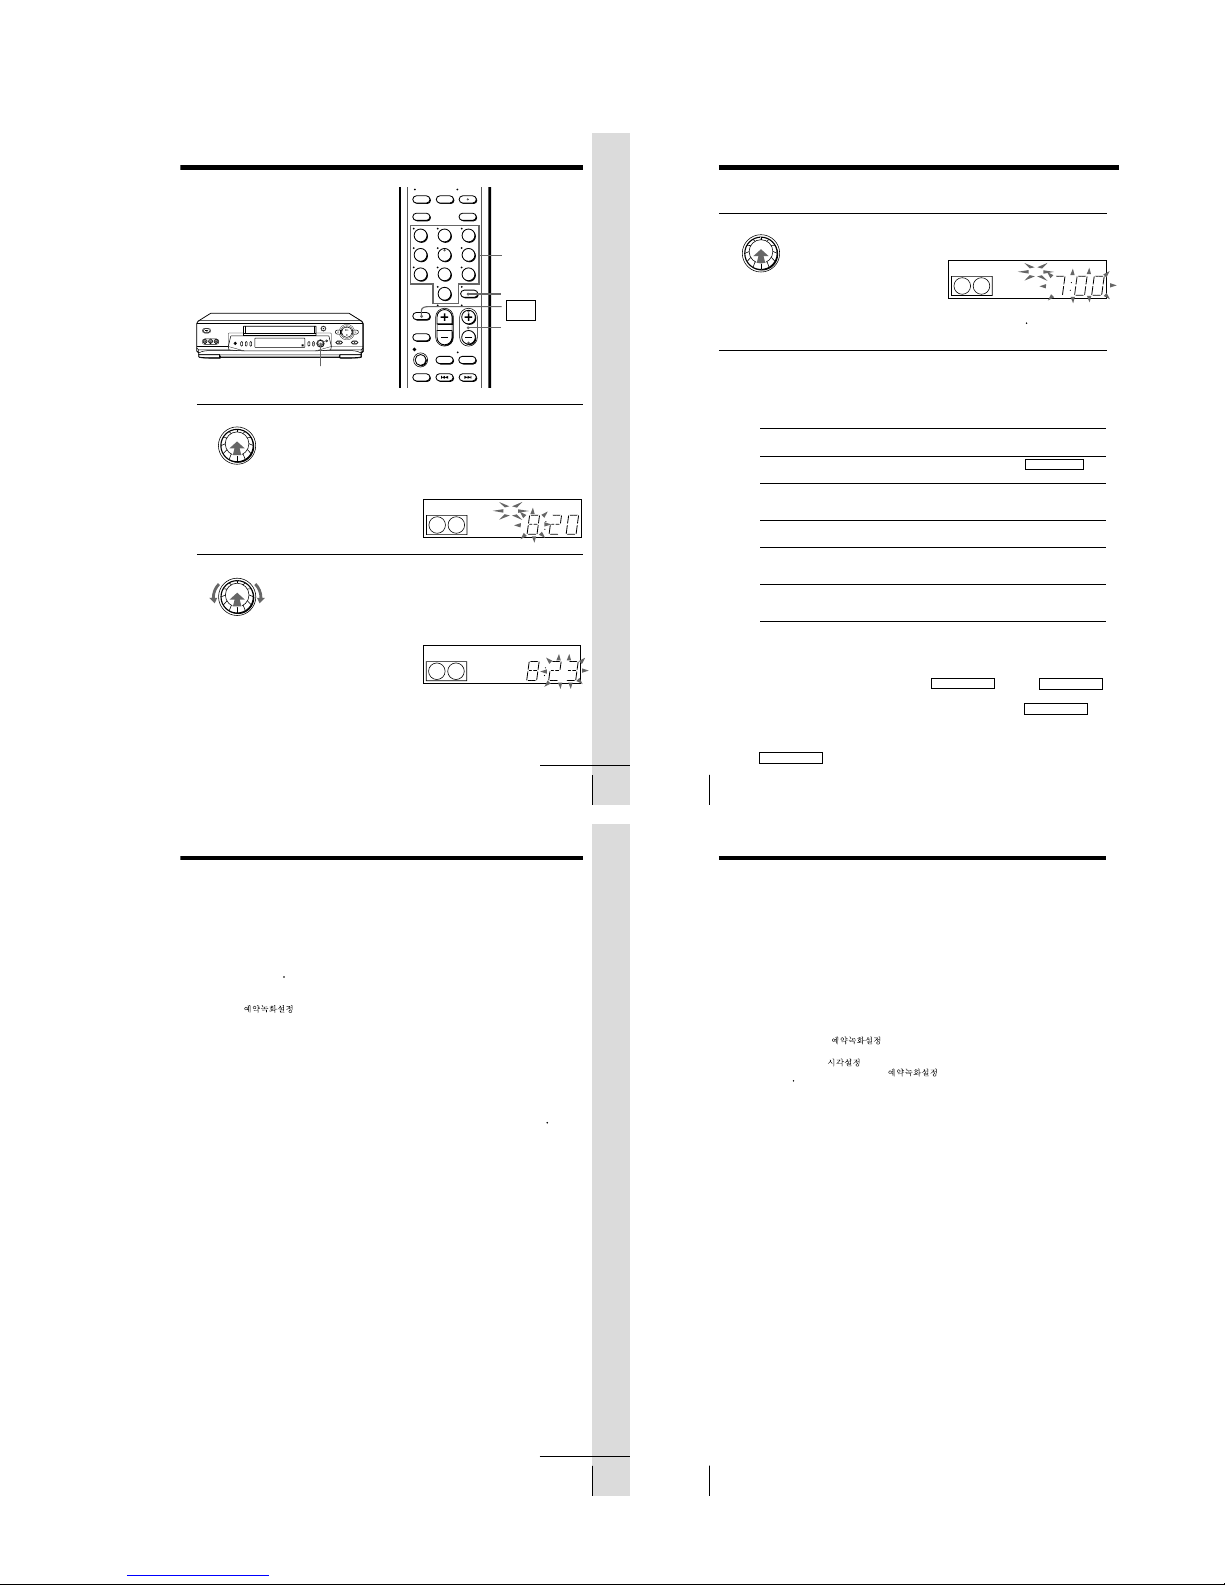
29
Basic Operations
Basic Operations
1
• When “–:– –” is displayed in the display window, push the
EASY TIMER knob.
• To change the clock setting, push and hold the EASY TIMER knob
on the VCR for more than three seconds.
The CLOCK indicator and the current clock setting appear in the
display window.
2
Set the current time using the EASY TIMER knob.
1 Turn the EASY TIMER knob clockwise or counterclockwise to
enter the current hour.
2 Push the EASY TIMER knob to confirm the hour setting.
3 Turn the EASY TIMER knob to increase or decrease the minutes
setting by a minute.
Press ENTER (AM/PM) to
change AM and PM.
Setting or changing the
Easy Clock
When “–:– –” is displayed in the VCR’s
display window, the VCR clock has not
been set. You need to set the clock using
the Easy Clock function before setting
the timer. You can also change the
current time using the Easy Clock
function.
CH +/–
Number
buttons
EASY
TIMER
ENTER (AM/PM)
EASY TIMER
EASY TIMER
123
456
789
0
EASY TIMER
knob
SP
APC
CLOCK
START
AM
SP
APC
CLOCK
START
AM
continued
Basic Operations
30
Recording TV programs using the Easy Timer function (continued)
3 Push the EASY TIMER knob to confirm the clock setting.
The VCR enters the timer recording setting mode.
To continue the Easy Timer
setting, go to step 2 in
“Setting the Easy Timer” on
page 27.
To quit the Easy Timer setting mode without changing any settings,
push the EASY TIMER knob repeatedly until the
t
indicator
appears in the display window.
To set the timer and clock setting using the remote commander
You can also use the remote commander to set the Easy Timer and Easy
Clock. The operations on the VCR and the remote commander correspond as
follows:
To
Confirm the setting and go to
the next setting
Change the time by 15 minutes
(in START/STOP mode)
Change the time by one minute
(in START/STOP mode)
Select the channel
Change the hour/minute by
one hour/minute (in CLOCK
mode)
Do this on the VCR
Push the EASY TIMER
knob
Turn the EASY TIMER
knob or hold
CHANNEL +/– down
Press CHANNEL +/–
Turn the EASY TIMER
knob or press
CHANNEL +/–
Turn the EASY TIMER
knob or press
CHANNEL+/–
Do this on the remote
commander
Press EASY TIMER
Hold CH +/– down
Press CH +/–
Press CH +/– or INPUT
SELECT
Press CH +/–
You can also use the number buttons to set the clock, start and stop times,
and the channel you want to record. Just press the number buttons to enter
the hours and minutes. For example:
• To set the clock to “8:20”, press 0, 8, EASY TIMER , 2, 0 and EASY TIMER
in sequence.
• To set the start or stop time to “8:20”, press 0, 8, 2, 0 and EASY TIMER in
sequence.
If you make a mistake, re-enter the correct digits before pressing
EASY TIMER .
EASY TIMER
SP
APC
START
PM
31
Basic Operations
Basic Operations
To stop recording
To stop the VCR while recording, press x STOP.
To check or change the timer setting
Push the EASY TIMER knob repeatedly until the setting you want to check
or change flashes. Then re-enter the new setting, if necessary. If you do not
want to change any of the settings, push the EASY TIMER knob repeatedly
until the
t
indicator appears in the display window.
You can also change the timer setting using the TIMER SET/CHECK
( ) menu. For details, see page 45.
To cancel the timer setting
To cancel the Easy Timer setting while doing the setting, press CLEAR on the
remote commander or press CHANNEL + and – on the VCR at the same
time.
To use the VCR after setting the timer
To use the VCR before a timer recording begins, just press ?/1. The
t
indicator turns off and the VCR switches on. Remember to press ?/1 to reset
the VCR after using the VCR.
You can also do the following tasks while the VCR is recording:
• Reset the counter.
• Display tape information on the TV screen.
• Check the timer settings.
• Watch another TV program.
To watch the recorded program right after the Easy Timer recording
The SEARCH MODE indicator starts flashing when the VCR finishes the
Easy Timer recording. To watch the recorded program, push the EASY
TIMER knob. The VCR turns on, starts searching, then automatically starts
playback from the beginning of the recording. For details, see page 37.
continued
Basic Operations
32
Tips
• (SLV-ED919KR and ED717KR)
To record from a source connected to LINE-1 IN or LINE-2 IN jacks, press INPUT
SELECT or CH +/– or turn the EASY TIMER knob to display “L1” or “L2” in the
display window.
• (SLV-ED212KR)
To record from a source connected to LINE-1 IN jacks, press INPUT SELECT or CH
+/– or turn the EASY TIMER knob to display “L” in the display window.
Notes
• You cannot set the Easy Timer if eight programs have already been set.
• You can set the timer for only one program using the Easy Timer function. If you
want to set the timer for other programs, use the G-CODE system or the TIMER
SET/CHECK ( ) menu. For details, see pages 33 and 35.
• You cannot set the date using the Easy Timer function. Set the date using the
CLOCK SET ( ) menu if you want to set the timer with the G-CODE system
or the TIMER SET/CHECK ( ) menu. For details, see page 11.
• The t indicator flashes in the display window when you complete the setting with
no tape inserted.
Recording TV programs using the Easy Timer function (continued)
1-7
Page 12
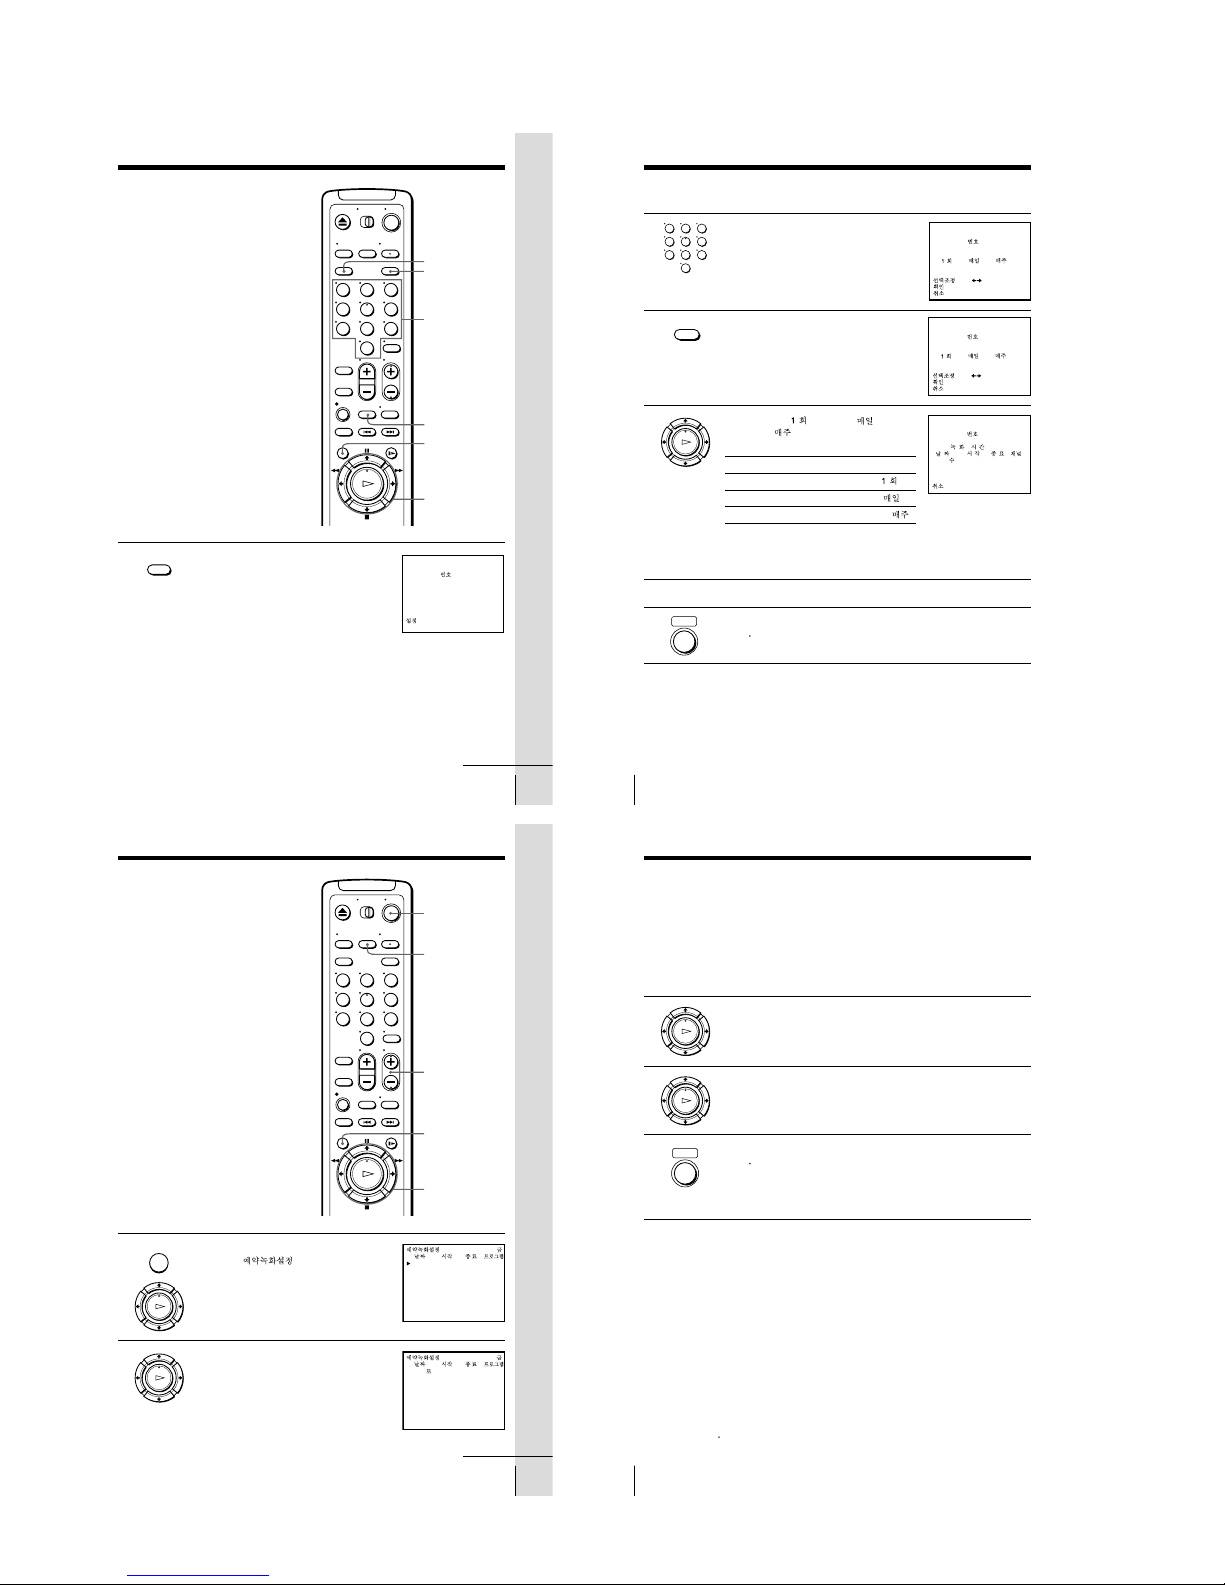
33
Basic Operations
Basic Operations
Recording TV
programs using
the G-CODE
system
(SLV-ED919KR
only)
Just enter the G-CODE number, listed in
the TV program guide for the program
you want to record. The date, times and
channel number of that program are set
automatically. You can preset up to eight
programs at a time.
Before you start…
• Check that the VCR clock is set to the
correct time.
• Insert a tape with its safety tab in
place. Make sure the tape is longer
than the total recording time.
• Turn on your TV and set it to the
video channel.
1 Press G-CODE.
REC SPEED
OK
</,
MENU
CLEAR
G-CODE
Number
buttons
123
456
789
0
G-CODE
G-CODE
[ –––––––– ]
SP / EP
[ SP ]
:
:
SP / EP
[ 0 – 9 ]
[ REC SPEED ]
G-CODE
continued
Basic Operations
34
2 Press the number buttons to enter the
G-CODE number for the program you
want to record.
If you make a mistake, press CLEAR and
re-enter the correct number.
3 Press REC SPEED to select SP or EP.
4 Select ONCE ( ), DAILY ( ) or
WEEKLY (
) by using </,, then
press OK:
The date, start and stop times, channel number, and tape speed
appear on the TV screen.
If the information is not correct, press CLEAR to cancel the setting.
5 To enter another setting, repeat steps 1 to 4.
6 Press ?/1 to turn off the VCR.
The
t
indicator lights up in the display window and the VCR
stands by for recording.
To stop recording
To stop the VCR while recording, press x STOP.
Tip
• To cancel the procedure, press G-CODE before pressing OK.
REC SPEED
• ]/1
123
456
789
0
G-CODE
SP / EP
[ SP ]
G-CODE
[ 82477691]
•
:
:
:
[ OK ]
[ CLEAR ]
[
]
G-CODE
SP / EP
[ EP ]
G-CODE
[ 82477691]
•
:
:
:
[ OK ]
[ CLEAR ]
[
]
G-CODE
G-CODE
/12
10
10 : 00
EP
85
:
[ 82477691 ]
SP / EP
[ SP ]
[ CLEAR ]
8 : 00
AM
AM
Recording TV programs using the G-CODE system (continued)
To record
Only once
Everyday Monday to Friday
Once a week
Select
ONCE ( )
DAILY ( )
WEEKLY ( )
OK
PLAY
35
Basic Operations
Basic Operations
Setting the timer
manually
You can preset up to eight programs at a
time.
Before you start…
• Check that the VCR clock is set to the
correct time.
• Turn on your TV and set it to the
video channel.
• Insert a tape with its safety tab in
place. Make sure the tape is longer
than the total recording time.
1 Press MENU and select TIMER SET/
CHECK (
) , then press OK.
2 Set the date, start and stop times, channel
number and tape speed:
1 Press , to select each item in turn.
2 Press M/m to set each item.
To correct a setting, press < to return to
that setting and reset.
?/1
INPUT SELECT
OK
M/m/</,
MENU
CH +/–
123
456
789
0
MENU
OK
PLAY
11/ 16
– / –– – :–– –: –– ––
– / –– – :–– –: –– ––
–
–
– / –– – :–– –: –– ––
– / –– – :–– –: –– ––
–
–
– / –– – :–– –: –– ––
– / –– – :–– –: –– ––
–
–
– / –– – :–– –: –– ––
– / –– – :–– –: –– ––
–
–
11/ 16
– / –– – :–– –: –– ––
– / –– – :–– –: –– ––
11
/17
–
–
– / –– – :–– –: –– ––
– / –– – :–– –: –– ––
–
–
– / –– – :–– –: –– ––
–
– / –– – :–– –: –– ––
– : –– – :–– ––
– / –– – :–– –: –– ––
–
–
SP
continued
OK
PLAY
Basic Operations
36
To record the same program every day or the same day every week,
press m while the date is flashing. For details, see “Daily/weekly
recording” on this page.
To record from a source connected to the line inputs jacks, press
INPUT SELECT or CH +/– to display “L1” (or “L” for SLVED212KR) or “L2” (SLV-ED919KR/ED717KR only) in the “CH”
position.
3 Press / to confirm the setting.
The cursor (B) appears at the beginning of the line. To enter another
setting, move the cursor to the next line and repeat step 2.
4 Press OK.
5 Press ?/1 to turn off the VCR.
The
t
indicator lights up in the display window and the VCR
stands by for recording.
To record from other equipment, leave the connected equipment
switched on.
To stop recording
To stop the VCR while recording, press x STOP.
Daily/weekly recording
In step 2 above, press m to select the recording pattern. Each time you press
m, the indication changes as shown below. Press M to change the indication
in reverse order.
Tips
• To set the channel, you can also use the CH +/– or number buttons.
• To set the tape speed, you can also use the REC SPEED button.
Note
• The t indicator flashes in the display window when you set the timer with no tape
inserted.
the current date t SUN-SAT t MON-SAT t MON-FRI t EVERY SAT t
..... t EVERY MON t EVERY SUN t 1 month later t (dates count down)
t the current date
Setting the timer manually (continued)
• ]/1
OK
PLAY
OK
PLAY
1-8
Page 13
37
Search Operations
Search Operations
Searching for the
beginning of an
Easy Timer
recorded
programme
If you record a programme using the
Easy Timer function, you can easily find
the beginning of the recording with the
SEARCH MODE function. The SEARCH
MODE indicator flashes when the VCR
finishes making an Easy Timer
recording.
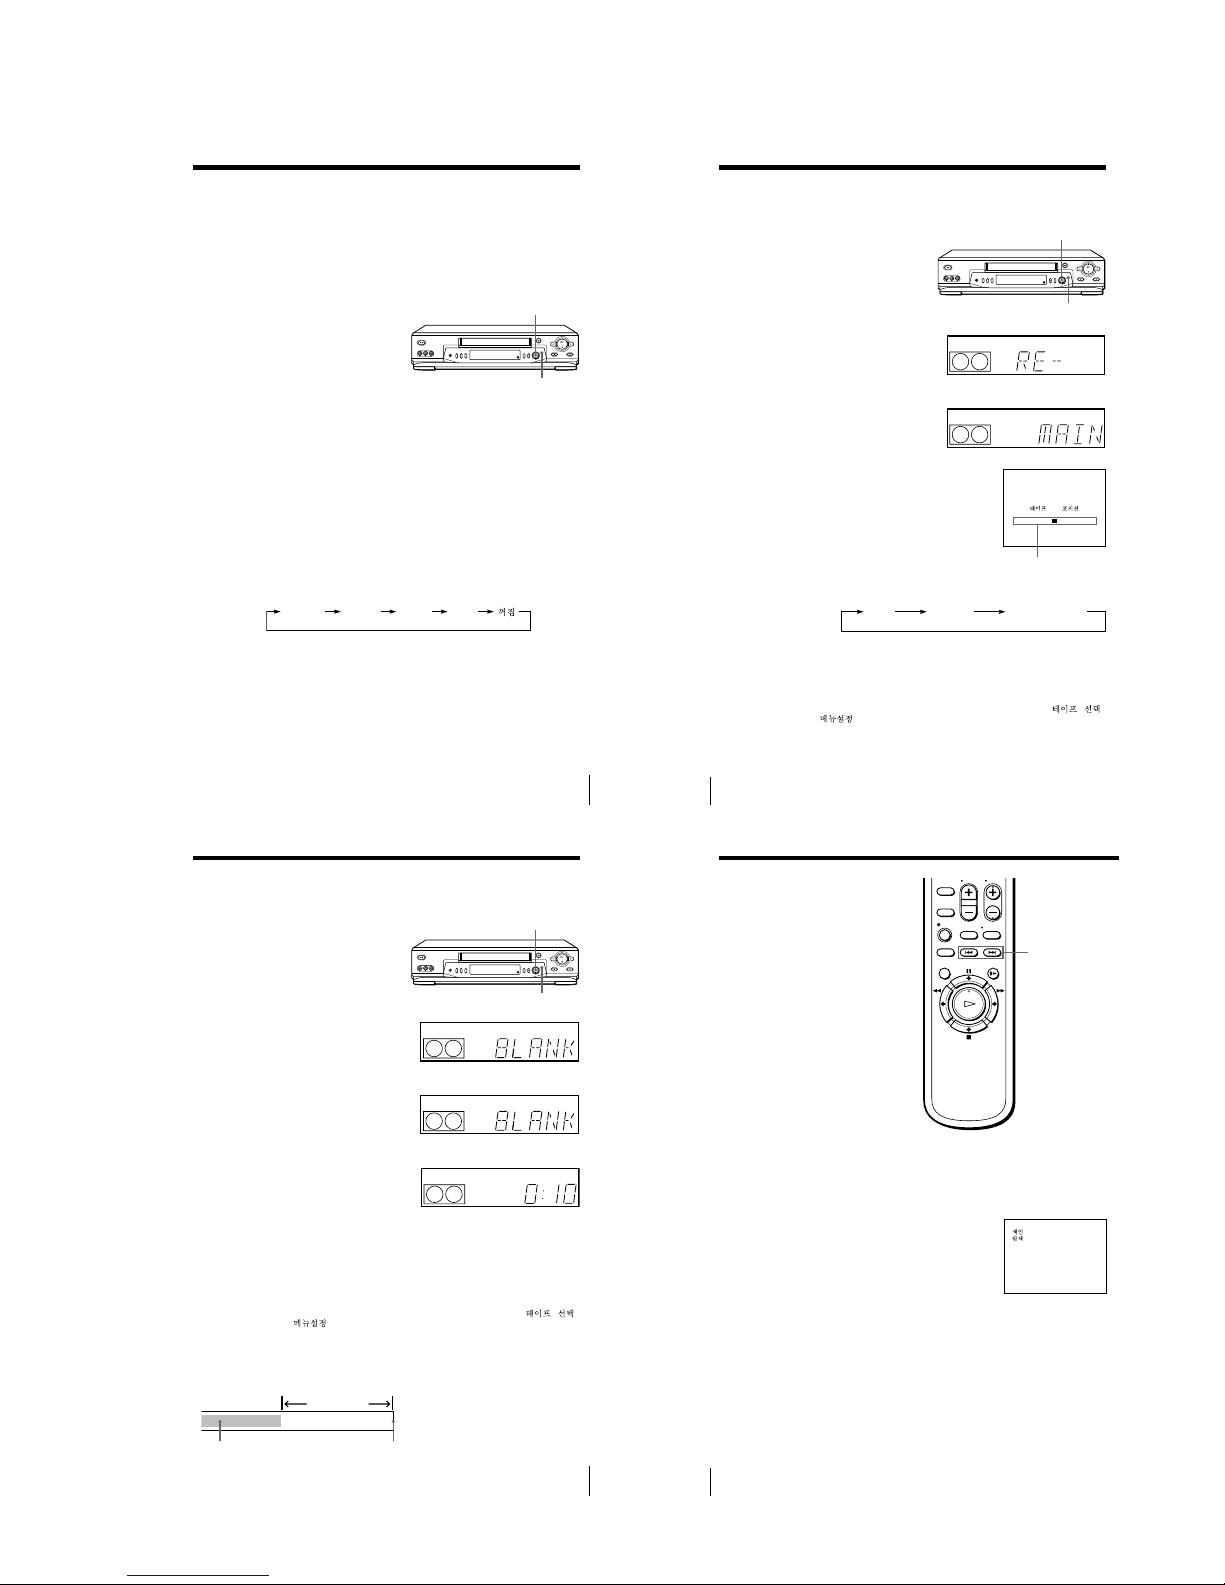
Push the EASY TIMER knob.
The VCR turns on, rewinds to the beginning of the recorded programme and
starts playback automatically. The SEARCH MODE indicator turns off.
Tip
• You can start the SEARCH MODE function after the flashing of the SEARCH
MODE indicator has been stopped. The flashing stops when you turn on the VCR
and press the SEARCH MODE button (Do not press any button at this point,
otherwise this SEARCH MODE function will be cancelled). To start the SEARCH
MODE function, press the SEARCH MODE button repeatedly until the SEARCH
MODE indicator flashes. Push the EASY TIMER knob. The VCR rewinds and starts
playback automatically.
If you continue to press the SEARCH MODE button while the SEARCH MODE
indicator is flashing, you can enter other search operations (For details, see the
following pages). Each press of the SEARCH MODE button changes the search
operations as follows:
Notes
• This SEARCH MODE function will be cancelled (the SEARCH MODE indicator
turns off) if:
– The VCR starts recording other programmes.
– You press the H PLAY, M FF, m REW or A EJECT button while the VCR is
on.
SEARCH MODE
EASY TIMER
knob
REMAIN BLANK INDEX TIME
38 Search Operations
Searching for the
current position
on a tape
This feature enables you to find the
current position on a tape as well as the
remaining time of the tape.
1 Press SEARCH MODE repeatedly until the
REMAIN indicator appears in the display
window as shown on the right.
The SEARCH MODE indicator lights up.
2 Push the EASY TIMER knob to display
the tape meter on the TV screen.
The SEARCH MODE indicator turns off.
A cursor (x) indicates the current position
on the tape.
“REMAIN” and the remaining time of the tape appear in the display window in
the following order:
To stop the Search function
Press x STOP.
Notes
• To display the remaining time correctly, you may have to select the TAPE SELECT ( )
in the SET UP MENU (
) according to the type of the tape that you are using. For details,
see page 51.
• In step 2, the VCR automatically rewinds and fast-forwards the tape only if you press the
SEARCH MODE button right after you insert a tape. This is so that the VCR can measure the
current position on the tape.
• You cannot use this function during any recording mode.
SEARCH MODE
EASY TIMER
knob
Tape meter
n
SP
APC
START
SP
APC
START
– – – – – – – – – – – – – – – –
RE- MAIN
0:15 (remaining
time of the tape)
39
Search Operations
Searching using
the Blank Search
function
This feature enables you to find a blank
section on your tape.
1 Press SEARCH MODE repeatedly until the
BLANK indicator appears in the display
window.
The SEARCH MODE indicator lights up.
2 Push the EASY TIMER knob on the VCR.
The SEARCH MODE indicator turns off.
The VCR fast-forwards to the end of the
tape. Then, the VCR rewinds the tape to
the last recorded programme. After a few
seconds, the VCR starts playback and
stops at the beginning of the blank
section.
“BLANK” and the remaining time of the
blank section appear alternately in the
display window for about one minute.
To stop searching
To stop the VCR while searching for a blank section, press x STOP.
Notes
• To display the remaining time correctly, you may have to select the TAPE SELECT ( )
in the SET UP MENU (
) according to the type of the tape that you are using. For details,
see page 51.
• In step 2, “FULL” will appear in the display window for about one minute, if:
– there is no blank section available on the tape.
– the remaining time of a blank section is less than one minute.
• The VCR can only detect the blank section between the end of the tape and the end of the last
recorded programme.
SEARCH MODE
EASY TIMER
knob
n
SP
APC
START
APC
SP
APC
START
Last recorded
programme
End of tape
Blank section
40
Search Operations
Searching using
the index
function
The VCR marks the tape with an index
signal at the point where each recording
begins. Use these signals as references to
find a specific recording. The VCR can
search up to 99 index signals ahead of or
behind the current position. You can
either use the INDEX SEARCH buttons
on the remote commander or the
SEARCH MODE button and EASY
TIMER knob on the VCR.
Using the INDEX SEARCH
buttons on the remote
commander
1
Insert an indexed tape into the VCR.
2
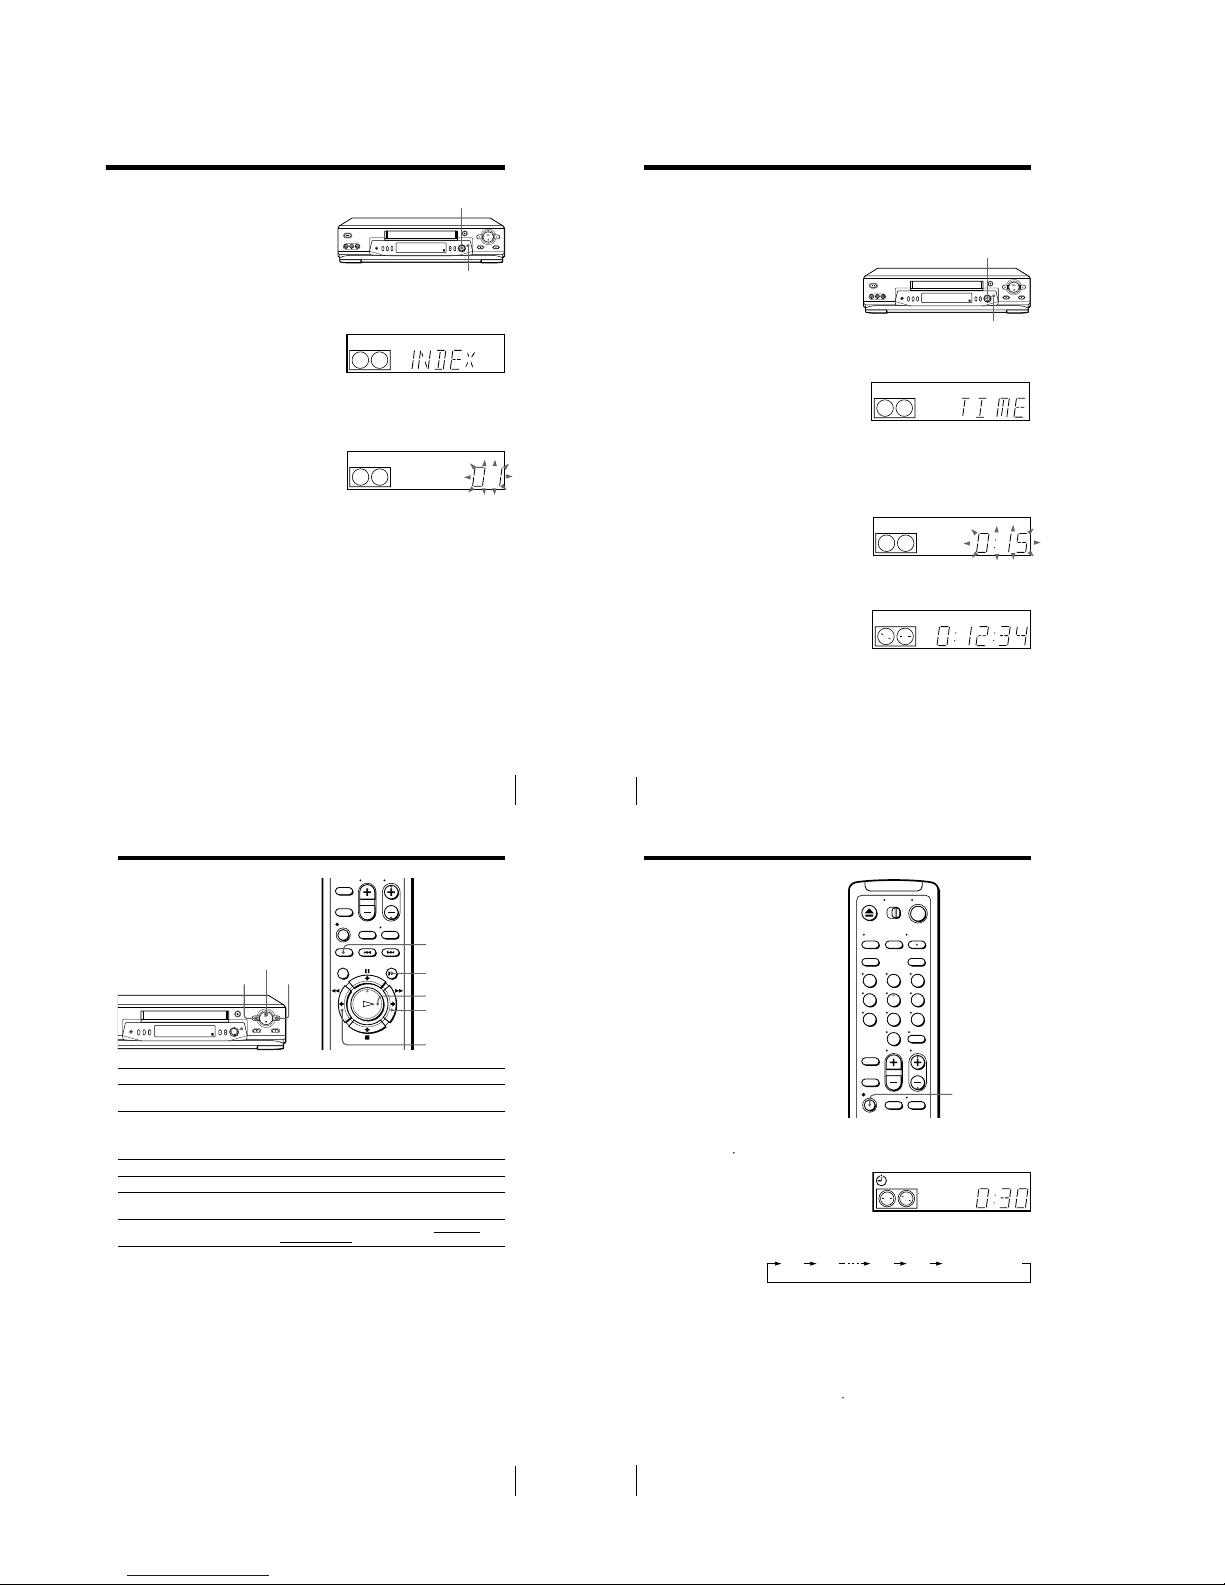
Press ./> INDEX SEARCH repeatedly to specify how many
index signals ahead or behind you want to search:
• To search ahead, press > INDEX
SEARCH.
• To search backwards, press .INDEX
SEARCH.
The VCR starts searching and the index
number on the TV screen counts down to
zero. The playback starts from the point
about five seconds ahead of the specified
index mark.
./>
INDEX
SEARCH
8
1-9
Page 14
41
Search Operations
Using the SEARCH MODE
button and EASY TIMER
knob on the VCR
1 Press SEARCH MODE on the VCR repeatedly until “INDEX” appears
in the display window (the SEARCH MODE indicator lights up).
2 Turn the EASY TIMER knob to specify how many index signals ahead
or behind you want to search:
• To search ahead, turn the EASY TIMER knob clockwise.
• To search backwards, turn the EASY TIMER knob counterclockwise.
3 Push the EASY TIMER knob.
The VCR starts searching. Playback starts (the SEARCH MODE
indicator turns off) from the point about five seconds ahead of the
specified index mark.
To stop searching
Press x STOP.
Note
• No index signal will be added when recording starts from recording pause.
However, an index signal will be marked if you change the channel during
recording pause.
SP
APC
SP
APC
START
SEARCH MODE
EASY TIMER
knob
42 Search Operations
Searching using
the Time Search
function
You can easily find a specific point on a
tape by using the Time Search function.
For example, you can find a recorded
section 15 minutes ahead of or behind
the current position of a tape by using
the Time Search function.
1 Press SEARCH MODE repeatedly until “TIME” appears in the display
window (the SEARCH MODE indicator lights up).
2 Turn the EASY TIMER knob clockwise or counterclockwise to set the
length of time you want the VCR to fast-forward or rewind the tape.
Each turn on the knob increases or decreases the duration by 15
minutes.
For example, if you want to watch a recorded section 15 minutes ahead
of the current position, turn the EASY TIMER knob once clockwise.
To change the time by one
minute, press PROGRAM
+/–.
3 Push the EASY TIMER knob.
The VCR starts searching and the tape counter starts counting until it
reaches the specified point.
The VCR starts playback automatically when the tape counter reaches
the specified point (the SEARCH MODE indicator turns off).
To stop searching
Press x STOP.
Tip
• The VCR can search up to three hours ahead of or behind the current position of a
tape.
SEARCH MODE
EASY TIMER
knob
SP
APC
SP
APC
SP
APC
43
Additional Operations
Playing/searching
at various speeds
Additional Operations
y SLOW
M FF
m REW
×2
H PLAY
Playback options
View the picture during
fast-forward or rewind
Play at high speed
Play at twice the normal speed
Play in slow motion
Play frame by frame
Rewind and start play
To resume normal playback
Press H PLAY.
Tips
• Adjust the picture using TRACKING +/– on the VCR if:
– streaks appear while playing in slow motion.
– the picture shakes while pausing.
To set tracking to the center position, press both buttons at the same time.
• If noise appears during pause or frame-by-frame playback, first switch to the slow
motion playback, then adjust the picture using TRACKING +/– on the VCR.
Notes
• The sound is muted during these operations.
• In EP mode, noise may appear or there may be no colour.
• Tapes recorded in the LP mode on other VCRs can be played back on this VCR but
the picture quality cannot be guaranteed.
• The picture may have snow when playing at high speed in reverse.
Operation
During fast-forward, hold M FF down. During rewind, hold
m REW down.
• During playback, press M FF or m REW on the remote
commander.
• During playback, hold M FF or m REW down. When you
release the button, normal playback resumes.
During playback or pause, press ×2.
During playback or pause, press y SLOW.
During pause, press M FF or m REW on the remote
commander. Hold the button down to play one frame each second.
While the tape is stopped, hold down 0 REW on the VCR and
press H PLAY on the VCR.
m REW
M FF
H PLAY
Additional Operations44
Setting the
recording
duration time
After you have started recording in the
normal way, you can have the VCR stop
recording automatically after a specified
duration.
z REC
1 While recording, press z REC.
The
t
indicator appears in the display window.
2 Press z REC repeatedly to set the duration.
Each press advances the time in increments of 30 minutes.
The tape counter decreases minute by minute to 0:00, then the VCR
stops recording and turns off automatically.
To extend the duration
Press z REC repeatedly to set to the new duration.
To cancel the duration
Press z REC repeatedly until the
t
indicator disappears and the VCR
returns to normal recording mode.
To stop recording
To stop the VCR while recording, press x STOP.
123
456
789
0
SP
APC
VIDEO
0:30 1:00 6:005:30 Normal recording
1-10
Page 15
45
Additional Operations
Checking/
changing/
canceling timer
settings
Before you start…
• Turn on your TV and set it to the
video channel.
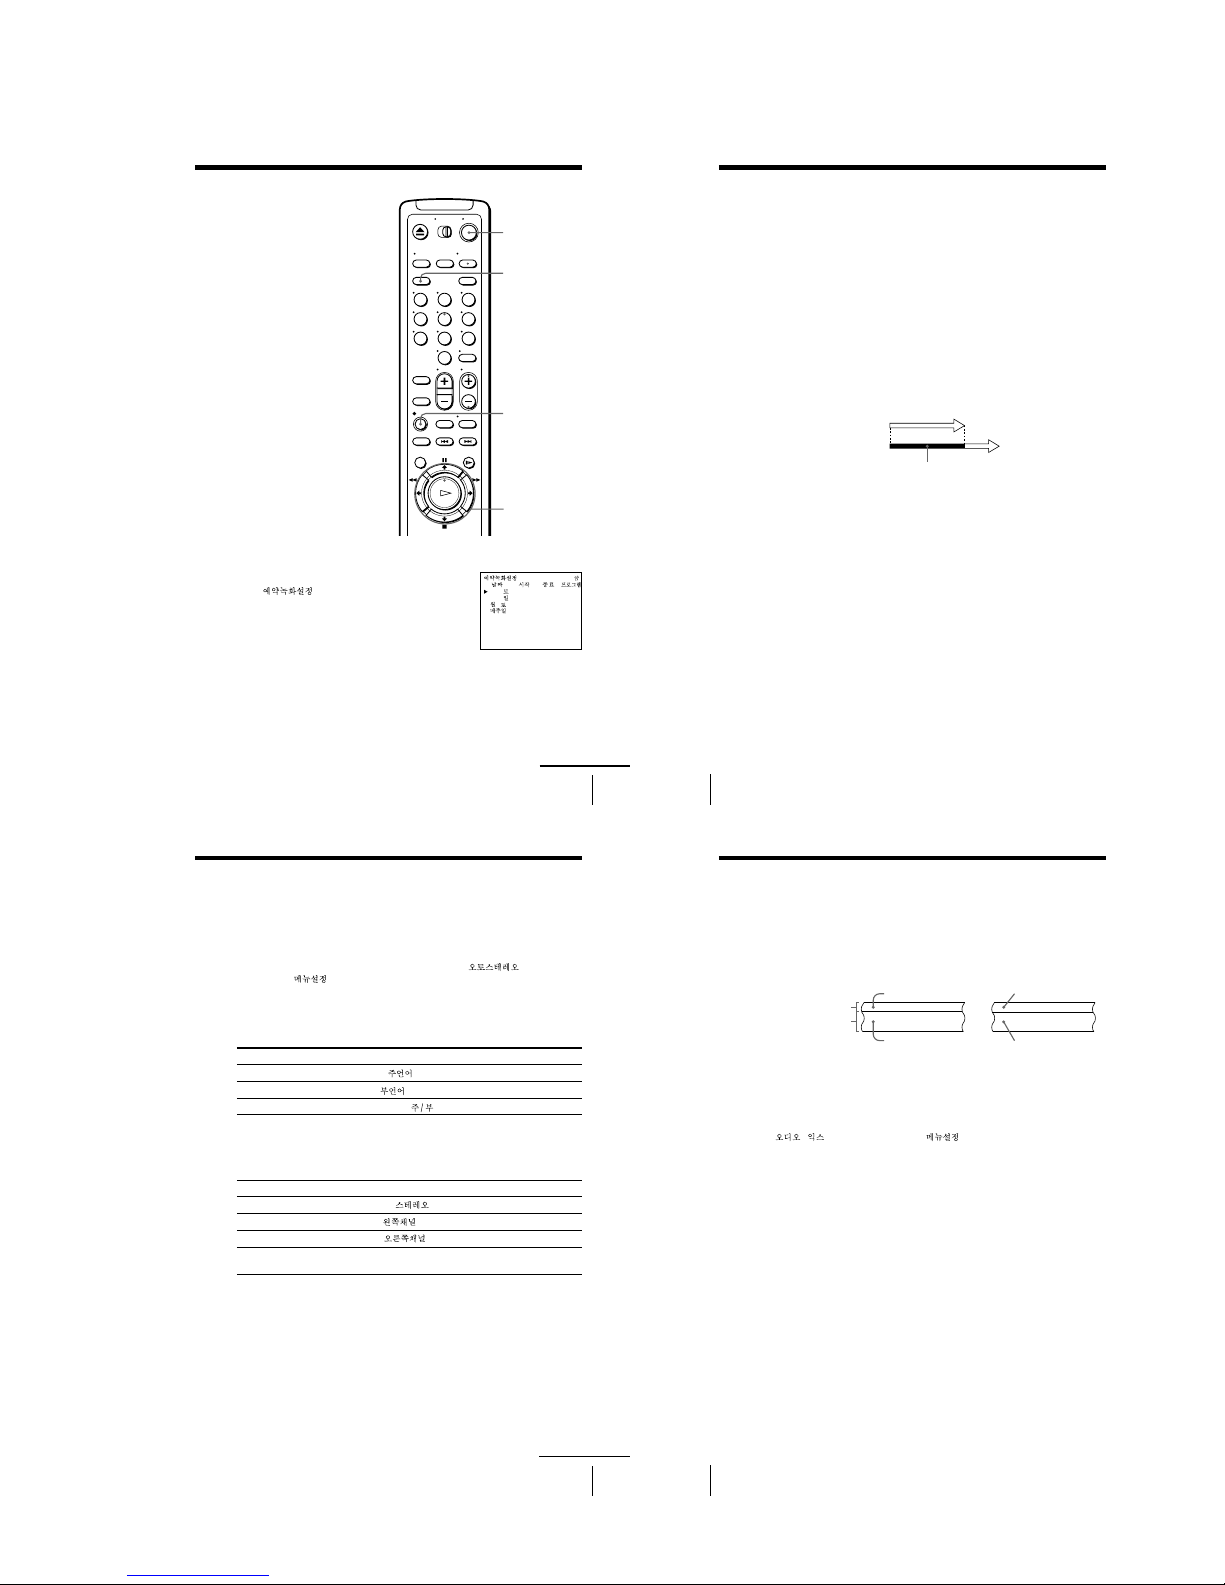
1 Press ?/1 to turn on the VCR.
2 Press MENU and select TIMER SET/CHECK
(
):
• If you want to change or cancel a setting,
go on to the next step.
• If you do not need to change the settings,
press OK, then turn off the VCR to return
to recording standby.
?/1
MENU
CLEAR
OK
M/m/</,
e.g. SLV-ED919KR/ED717KR
123
456
789
0
continued
11/ 16
12
:12 1 :00 27
11
:00 0 :00 L2
– / –––– : –– – :–– ––
– / –– – :–– –: –– ––
11
/17 7:00 8:00 6
11
/25 9:0012:00 50
EP
SP
–
–
– / –– – :–– –: –– ––
– / –– – :–– –: –– ––
–
–
SP
EP
AM
PM
AM
PM
AM
PM
AM
PM
Additional Operations46
3 Press M/m to select the setting you want to change or cancel:
• To change the setting, press </, to flash the item you want to
change, and press M/m to reset it. Then, press , repeatedly until the
cursor (B) appears at the beginning of the line.
• To cancel the setting, press CLEAR.
4 Press OK.
If any timer settings remain, turn off the VCR to return to recording
standby.
When the timer settings overlap
The program that starts first has priority and the second program starts
recording only after the first program has finished. If the programs start at
the same time, the program listed first in the menu has priority.
Checking/changing/canceling timer settings (continued)
Program 1
Program 2
Will be cut off
47
Additional Operations
To listen to
Stereo
Left channel
Right channel
Monaural sound on the
normal audio track*
* Usually the mixed sound of left and right channels (monaural)
Recording stereo and bilingual
programs (SLV-ED919KR only)
This VCR automatically receives and records stereo and bilingual programs.
When a stereo program is received, the STEREO indicator lights up. If there
is noise in the stereo program, set AUTO STEREO (
) in the SET
UP MENU (
) to OFF. The sound will be recorded in monaural (on
both hi-fi and normal audio tracks) but with less noise. For details, see page
51.
To select bilingual sound while recording
Press AUDIO MONITOR to select the sound you want.
On-screen display
STEREO ( )
L CH ( )
R CH ( )
No indicator
Display window
STEREO
STEREO
STEREO
No indicator
Selecting the sound during playback
Press AUDIO MONITOR to select the sound you want. (The sound being
recorded will not change.)
To listen to
Main
Sub
Main and sub
Display window
STEREO
STEREO
STEREO
On-screen display
MAIN ( )
SUB ( )
MAIN/SUB ( )
continued
Additional Operations48
Notes
• To listen to the playback sounds in stereo, you must use the A/V connections.
• When you play a tape recorded in monaural, the sound is heard in monaural
regardless of the AUDIO MONITOR setting.
• If the AUDIO MONITOR button does not function, check that AUDIO MIX
( ) in the SET UP MENU ( ) is set to OFF. For details, see page
51.
How sound is recorded on a video tape
The VCR records sound onto two separate tracks. Hi-fi audio is recorded
onto the main track along with the picture. Monaural sound is recorded onto
the normal audio track along the edge of the tape.
Recording stereo and bilingual programs (continued)
Normal audio track
Hi-fi audio track
(main track)
Stereo sound
(left/right channels)
Monaural sound
Bilingual
Main (left channel)
Sub (right channel)
Usually main sound
Stereo
1-11
Page 16
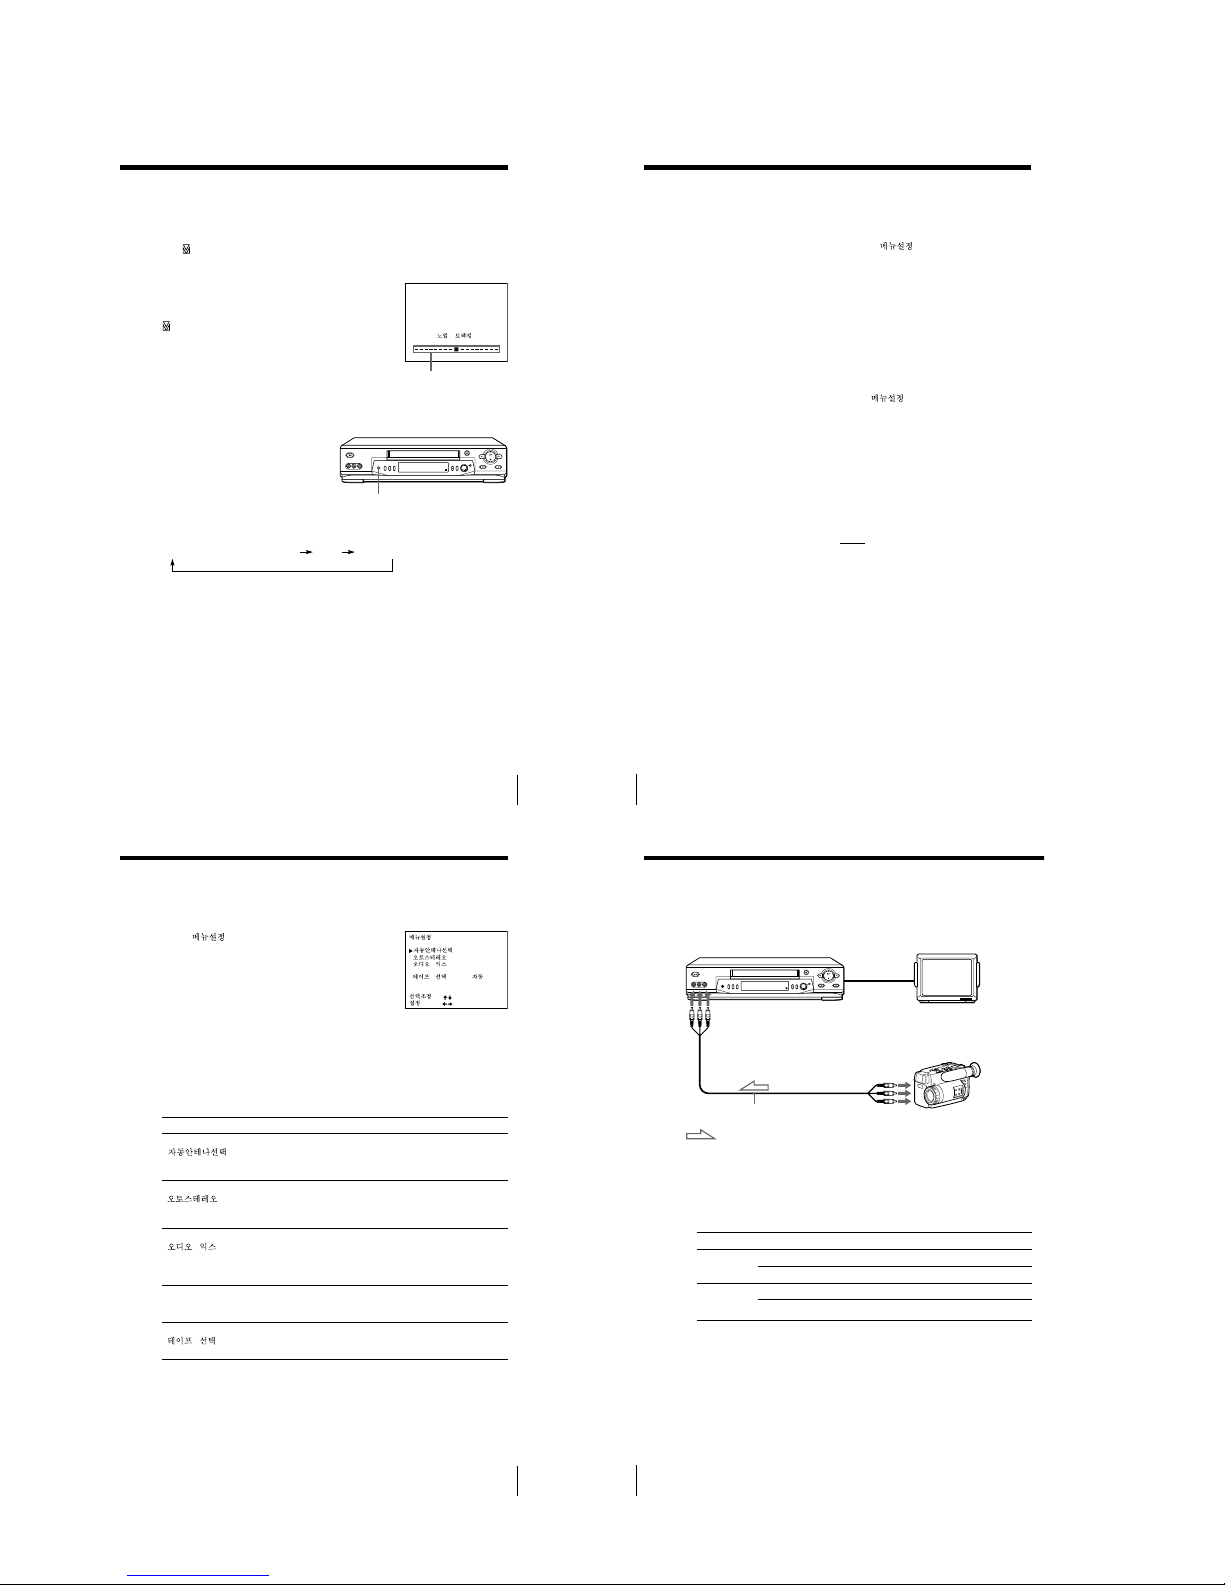
49
Additional Operations
Adjusting the picture
Adjusting the tracking
Although the VCR automatically adjusts the tracking when playing a tape
(the
indicator flashes in the display window, then turns off), distortion
may occur if the tape was recorded in poor condition. In this case, manually
adjust the tracking.
Press the TRACKING +/– buttons on the VCR to
display the tracking meter. The distortion should
disappear as you press one of the two buttons (the
indicator lights up). To resume automatic
tracking adjustment, eject the tape and reinsert it.
About the R2 (Reality Regenerator) function
(SLV-ED919KR/ED717KR only)
The R2 function automatically
adjusts the picture to the most
suitable quality during playback.
When playback starts, the R
2
function activates and the R
2
button lights up.
Each pressing of the button changes the effect and indication in the display
window as follows:
SOFTREAL (status of playback started) DYNA (dynamic)
R
2
Tracking meter
Additional Operations50
About the Adaptive Picture Control (APC) function
The Adaptive Picture Control (APC) function automatically improves
recording and playback quality by adjusting the VCR to the condition of the
video heads and tape. To maintain better picture quality, we recommend that
you set APC to ON in the SET UP MENU (
) (with the APC indicator
in the display window lit).
APC playback
The APC function automatically works on all types of tapes, including rental
tapes and tapes that were not recorded with APC.
APC recording
Whenever you insert a tape and start recording at the first time, the VCR
adjusts to the tape using the APC function (the APC indicator flashes
rapidly). This adjustment is retained until the tape is ejected.
To deactivate the APC function
Press MENU and select SET UP MENU (
), then set APC to OFF. The
APC indicator in the display window goes off.
Tip
• To set the tracking to the center position, press TRACKING + and – buttons at the
same time.
Notes
• The auto tracking adjustment cannot be guaranteed to work with tapes recorded in
the LP mode on other VCRs.
• There is a delay of a few seconds before the VCR actually starts recording while the
VCR analyzes the tape. To avoid the delay, first set the VCR to recording pause (the
APC indicator flashes slowly) and press z REC to have the VCR analyze the tape.
After the APC indicator stops flashing, press X PAUSE to start recording
immediately. If you press X PAUSE
before the APC indicator stops flashing, the
APC function is canceled.
51
Additional Operations
Changing menu options
1 Press MENU and select SET UP MENU
(
).
2 Press M/m to select the option to change, then press </, to change
the setting.
3 Press OK to return to the original screen.
Menu choices
Initial settings are indicated in bold print.
Menu option
AUTO ANT SEL
( )
AUTO STEREO
( )
(SLV-ED919KR
only)
AUDIO MIX
( )
(SLV-ED919KR
only)
APC
TAPE SELECT
( )
Set this option to
ON if your TV is connected only to VHF/UHF OUT on the VCR.
To play a tape, set the TV to the VCR channel (channel 3 or 4).
OFF if your TV is connected to both VHF/UHF OUT and LINE
OUT on the VCR. To play a tape, set the TV to the VCR input.
ON to receive stereo programs. OFF to reduce noise; the sound
changes to monaural.
ON to listen to the sound recorded on hi-fi and normal audio
tracks at the same time. The AUDIO MONITOR button will not
function.
OFF to listen to hi-fi and normal audio tracks separately. Select the
sound using the AUDIO MONITOR button.
ON to switch on the APC (Adaptive Picture Control) function and
improve picture quality.
OFF to switch off APC.
AUTO when using a T-160 length or any tape shorter than a T-140
length tape.
180 when using a T-140 or T-180 length tape.
e.g. SLV-ED919KR
ON• OFF
ON• OFF
ON•OFF
ON••OFF
180
APC
:
[
]
:
[]
Additional Operations
52
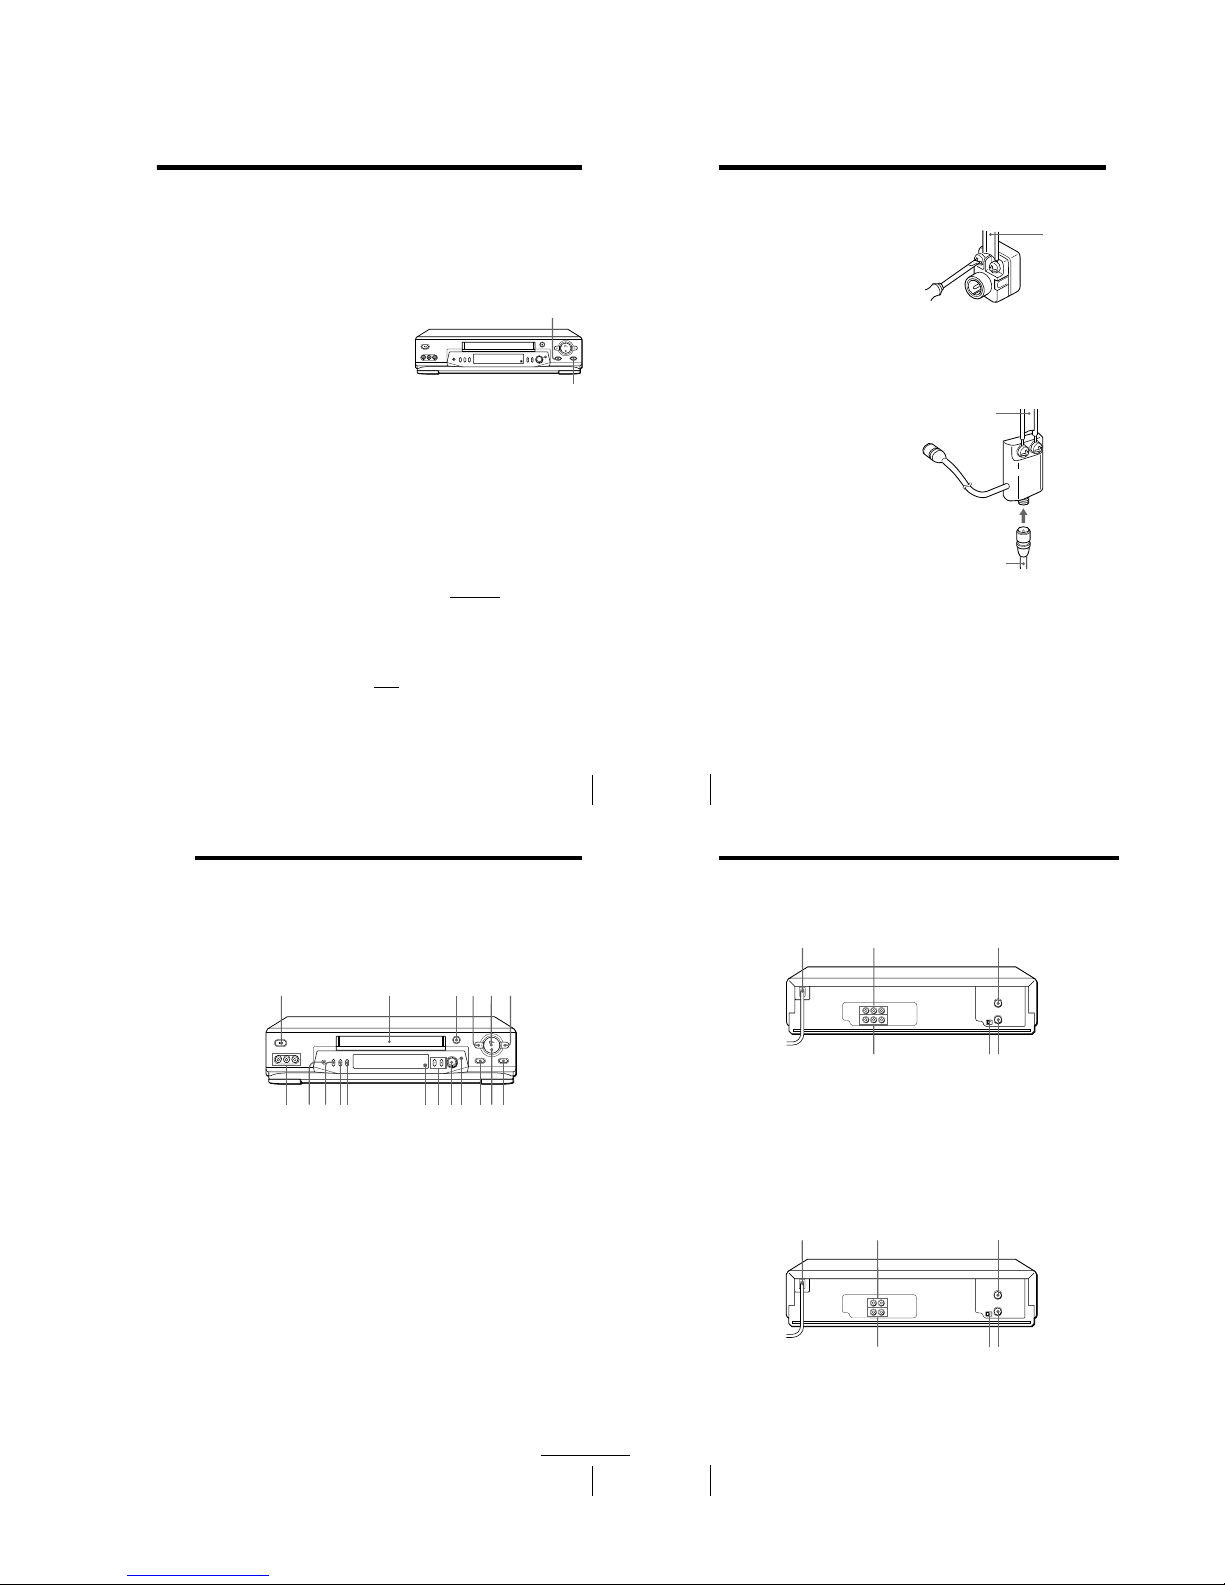
Hooking up to a VCR or stereo system
How to hook up to record on this VCR
: Signal flow
How to hook up to a stereo system (SLV-ED919KR only)
Connect LINE-2 IN AUDIO on this VCR to the audio output jacks on the
stereo system, using an audio cable (not supplied).
Tips
• (SLV-ED717KR and ED212KR)
Use the following audio/video cable according to the type of the other VCR.
• (SLV-ED919KR)
If the other VCR is a monaural type and connected to this VCR’s LINE-2 IN jacks,
connect the audio plug to the AUDIO L (white) jack. The sound is recorded on both
right and left channels. When connecting to the AUDIO R (red) jack, the sound is
recorded only on the right channel.
• You can also use the LINE-1 IN jacks instead. If the other VCR is a monaural type,
the sound is recorded only on the channel whose jack is connected to the audio
plug. To record on both right and left channels, connect the audio plugs to the
AUDIO R/L jacks using an audio/video cable (not supplied).
Notes
• Make sure you connect the plugs to jacks of the same color.
• If you connected this VCR to both the LINE IN and LINE OUT jacks of the other
VCR, select the input correctly to prevent a humming noise.
If the other VCR is: Use a cable such as:
Stereo type VMC-910HG (3-phono to 2-phono)
Monaural type VMC-710HG/720HG (2-phono to 2-phono)
Stereo type VMC-810HG (3-phono to 3-phono)
Monaural type VMC-910HG (3-phono to 2-phono)
Jack
LINE-1 IN
LINE-2 IN
(SLV-ED717KR
only)
This VCR (Recorder)
TV
Other VCR (Player)
LINE OUT
LINE-2 IN
VMC-810HG audio/video cable (not supplied)
e.g. SLV-ED919KR
1-12
Page 17
53
Additional Operations
Operation
(when recording on this VCR)
Before you start editing
• Turn on your TV and set it to the
video channel.
• (SLV-ED919KR/ED717KR)
Press INPUT SELECT or CH +/– to
display “L1” or “L2” in the display
window.
• (SLV-ED212KR)
Press INPUT SELECT or CH +/– to
display “L” in the display window.
• Press REC SPEED to select the tape
speed.
1 Insert a source tape with its safety tab removed into the other
(playback) VCR. Search for the point to start playback and set it to
playback pause.
2 Insert a tape with its safety tab in place into this (recording) VCR.
Search for the point to start recording and press X PAUSE.
3 Press z REC and set it to recording pause.
4 To start editing, press the X PAUSE buttons on both VCRs at the same
time.
To stop editing
Press the x STOP buttons on both VCRs.
Tips
• To edit more precisely, press the X PAUSE buttons
on the VCRs to release pause.
• To cut out unwanted scenes while editing, press X PAUSE on this VCR when an
unwanted scene begins. When it ends, press X PAUSE again to resume recording.
Note
• If you start recording following the procedure above, the VCR won’t start recording
with the APC function. To record a tape with the APC function, press z REC again
during recording pause in step 3 so that the VCR analyzes the tape. Then when you
start recording in step 4, press X PAUSE immediately after the APC indicator stops
flashing. If you press X PAUSE
before the APC indicator stops flashing, the APC
function is canceled.
z REC
X PAUSE
Additional Information54
Additional Information
General setup information
Attaching the external
antenna connector
When using a 300-ohm twin lead cable
for VHF/UHF antenna, use an antenna
connector (not supplied) to connect the
antenna to the VCR.
1 Loosen the screws on the antenna connector.
2 Wind the twin leads around the screws on the antenna connector.
3 Retighten the screws.
Attaching a UHF/VHF band
mixer
When using both 75-ohm coaxial cable
and 300-ohm twin lead cable for VHF/
UHF antenna, use a UHF/VHF band
separator/mixer (not supplied) to
connect the antenna to the VCR.
1 Loosen the screws on the mixer.
2 Wind the twin leads around the screws on the mixer.
3 Retighten the screws.
4 Connect the 75-ohm coaxial cable to the mixer.
300-ohm twin
lead cable
UHF/VHF
band
separator/
mixer (not
supplied)
300-ohm twin
lead cable
75-ohm coaxial
cable
Antenna
connector (not
supplied)
59
Additional Information
Index to parts and controls
Front panel
Refer to the pages indicated in parentheses ( ) for details.
1 ?/1 POWER switch (36)
2 Tape compartment
3 A EJECT button (23)
4 m REW (rewind) button (23, 43)
5 H PLAY button (23)
6 M FF (fast-forward) button
(23, 43)
7 z REC (record) button (25)
8 x STOP button (23)
9 X PAUSE button (23)
0 SEARCH MODE indicator (37, 38,
39, 41, 42)
qa EASY TIMER knob (27, 37, 38, 39,
41, 42)
qs CHANNEL/TRACKING +/–
buttons (25, 49)
qd Remote sensor (5)
qf REC SPEED SP (Standard Play)/EP
(Extended Play) button (28)
qg INPUT SELECT button (26)
qh ONE TOUCH TUNING button (13)
qj R
2
(Reality Regenerator) button
(SLV-ED919KR and ED717KR only)
(49)
qk LINE-2 IN VIDEO/AUDIO L/R
jacks (SLV-ED919KR and ED717KR
only) (52)
continued
!¶
!§
8!¢!∞ !º
1
3
4
5
2
6
7
9
!¡!™!£
!•
Additional Information
60
Index to parts and controls (continued)
Rear panel (SLV-ED919KR)
1 AC power cord
2 LINE-1 IN AUDIO R/L/VIDEO
jacks (7)
3 VHF/UHF IN connector (9)
4 VHF/UHF OUT connector (9)
5 RF (Radio Frequency) UNIT switch
(10)
6 LINE OUT AUDIO R/L/VIDEO
jacks (7)
1 AC power cord
2 LINE-1 IN AUDIO/VIDEO jacks
(52)
3 VHF/UHF IN connector (9)
4 VHF/UHF OUT connector (9)
5 RF (Radio Frequency) UNIT switch
(10)
6 LINE OUT AUDIO/VIDEO jacks
(8)
Rear panel (SLV-ED717KR and ED212KR)
213
6
54
213
546
1-13
Page 18
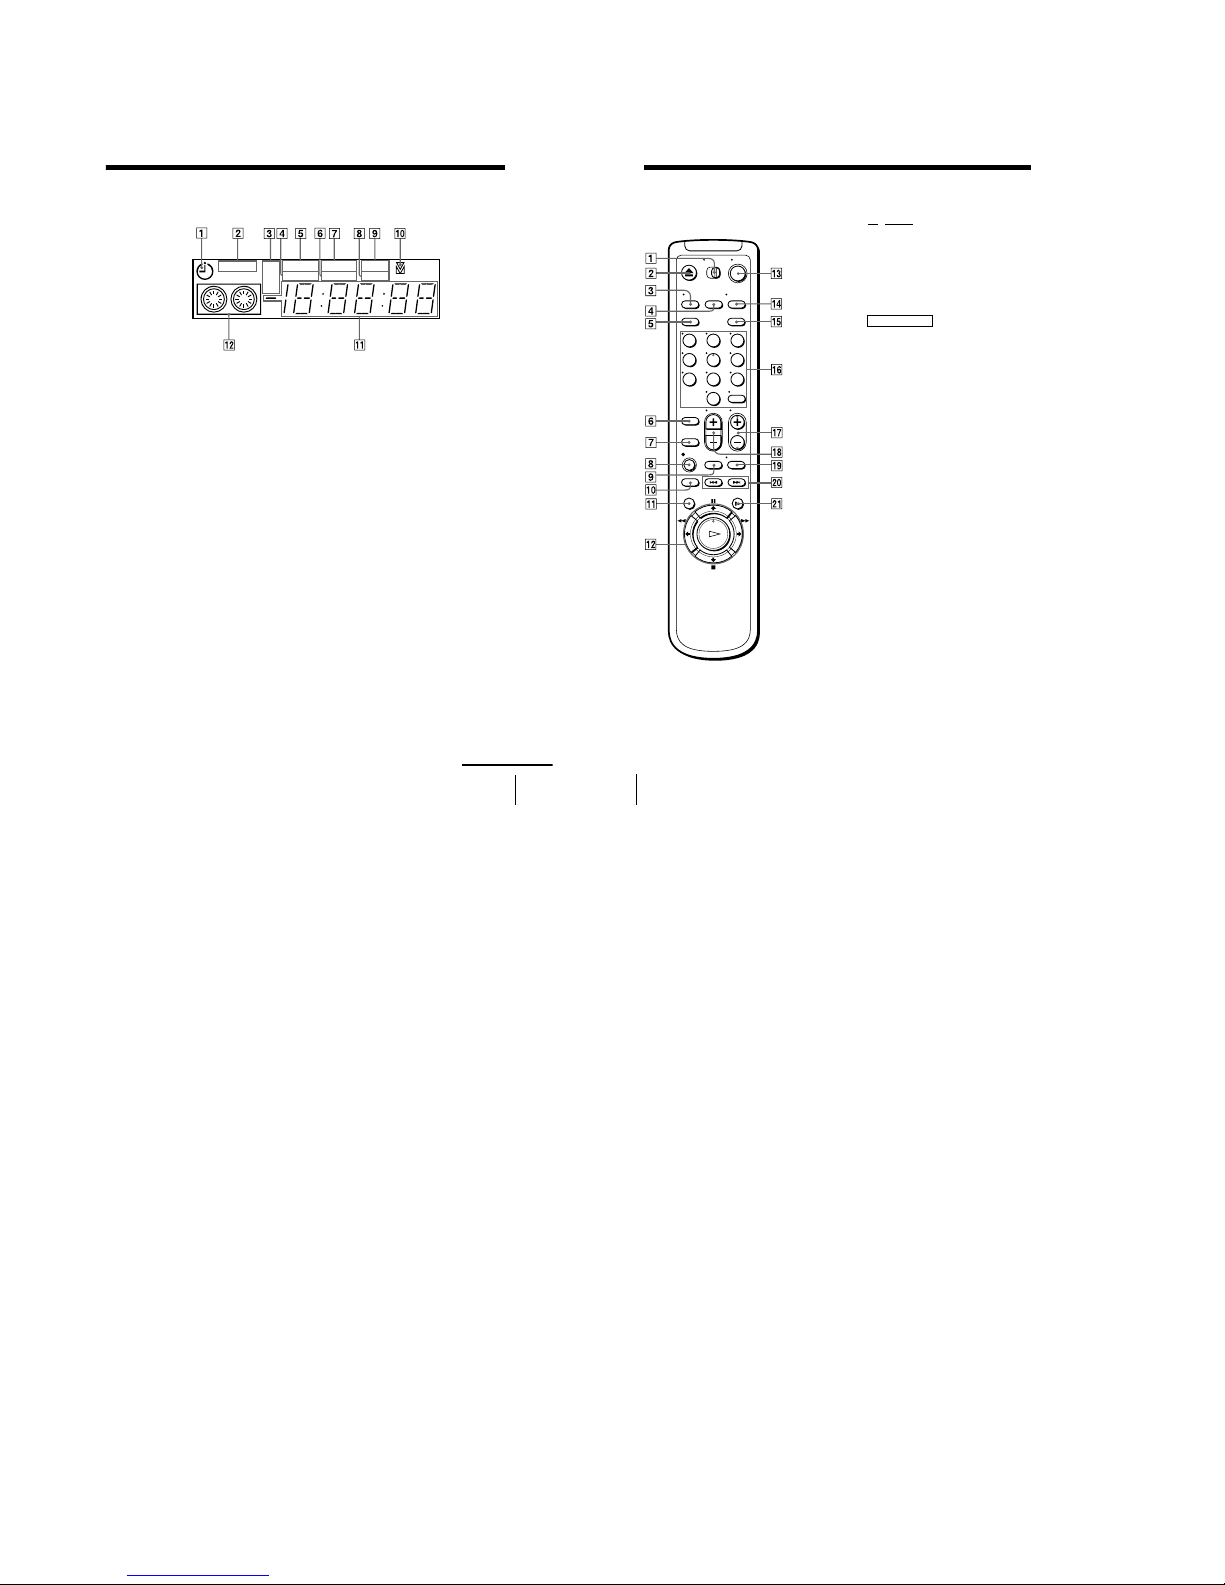
61
Additional Information
Display window
8 APC (Adaptive Picture Control)
indicator (50)
9 STOP indicator (28)
q; Tracking indicator (49)
qa Time counter/channel/clock/line
indicator (23, 25, 29, 53)
qs Tape/recording indicator (25)
1 Timer indicator (28)
2 STEREO indicator (47)
(SLV-ED919KR only)
3 Tape speed indicator (25)
4 VIDEO indicator (10, 26)
5 CLOCK indicator (29)
6 AM/PM indicator (28)
7 START indicator (27)
continued
STEREO
SAP
SP
LP
EP
CLOCK
VIDEO
START
STOP
APC
AMPM
Additional Information62
Remote commander
123
456
789
0
Index to parts and controls (continued)
1
TV/VIDEO
remote control switch
(5)
2 Z EJECT button (23)
3 TV/VIDEO button (for TV) (5)
4 INPUT SELECT button (26, 36)
5 CLEAR button (23, 34)
6 EASY TIMER button (27)
7 R
2
(Reality Regenerator) button (49)
(SLV-ED919KR and ED717KR only)
8 z REC button (25, 44)
9 REC SPEED button (25)
0 ×2 button (43)
qa MENU button (11, 51)
qs Tape/menu operation buttons
X PAUSE/M button (23)
x STOP/m button (23)
m REW (rewind)/< button
(23, 43)
M FF (fast-forward)/, button
(23, 43)
H PLAY/OK button (23)
qd ?/1 (power) switch (36)
qf AUDIO MONITOR button (47)
(SLV-ED919KR only)
qg G-CODE button (33)
(SLV-ED919KR only)
qh Number buttons and ENTER (AM/
PM) button (17, 28)
qj CH (channel) +/– buttons (25)
qk VOL (volume) +/– buttons (for TV)
ql DISPLAY button (26)
w; ./> INDEX SEARCH buttons
(40)
wa y SLOW button (43)
1-14E
Page 19
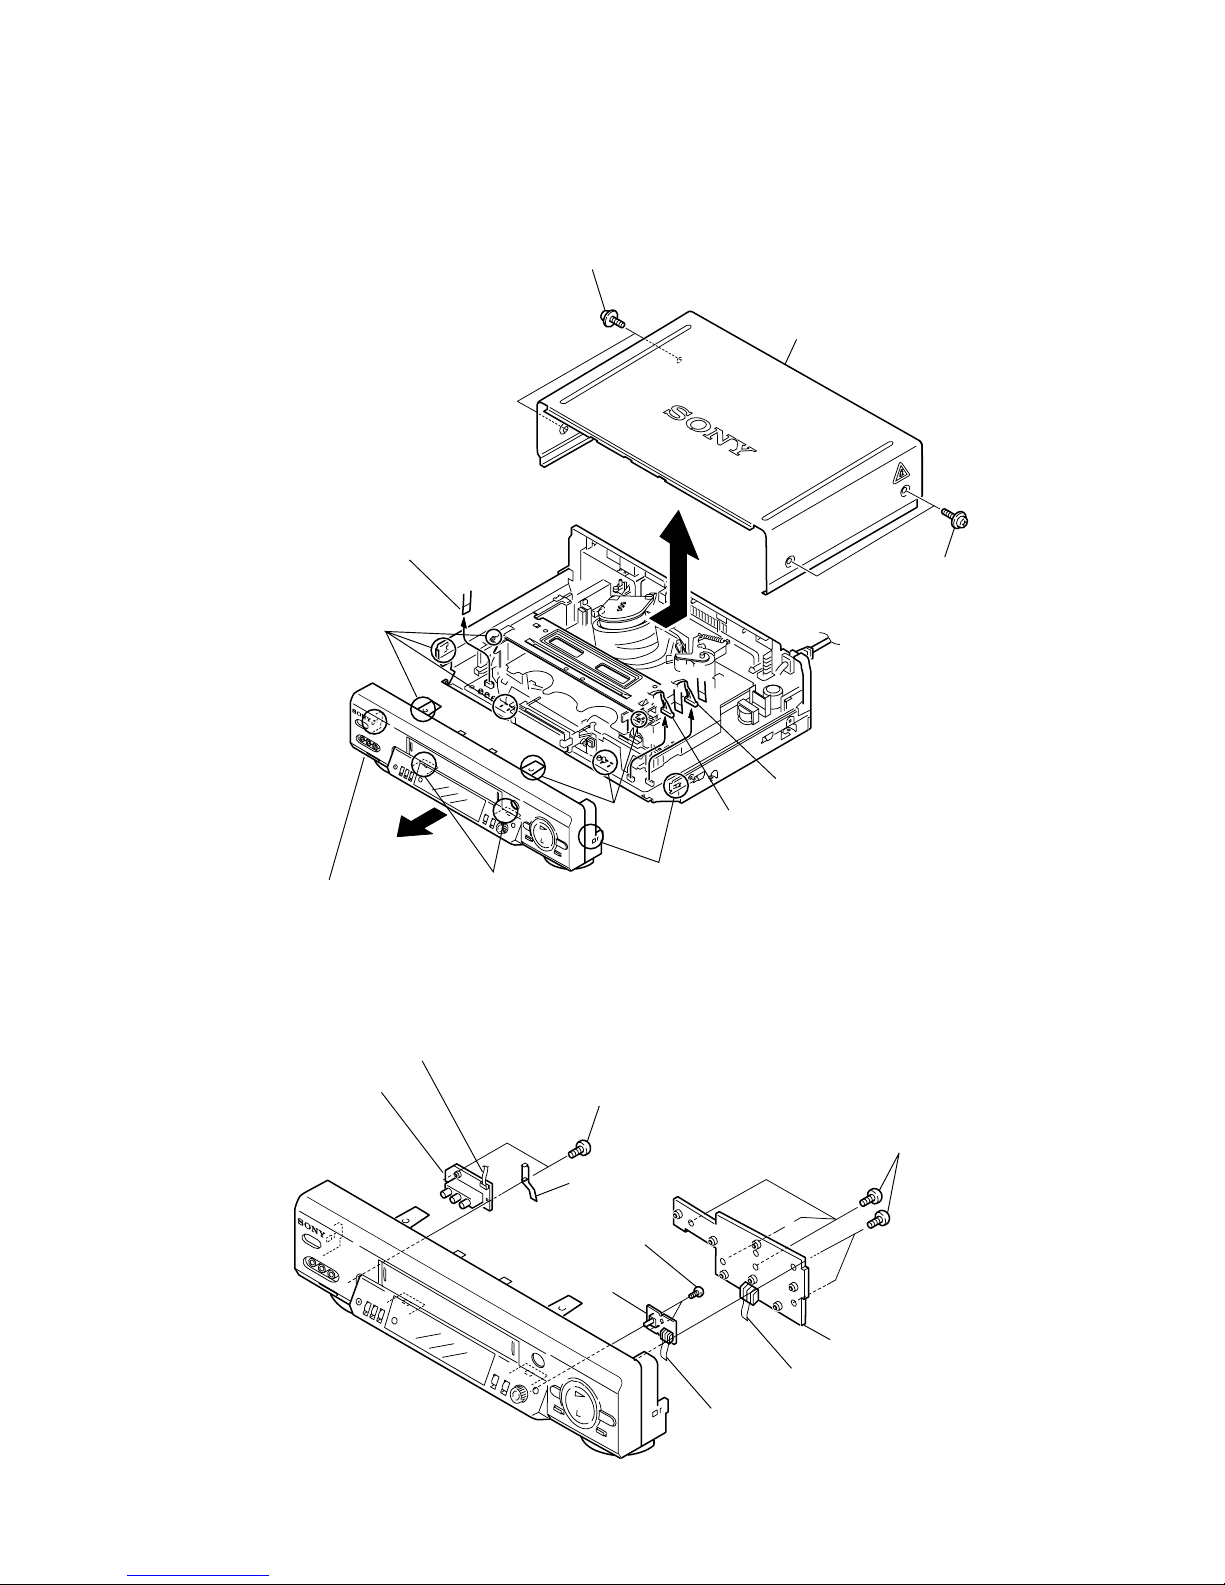
SECTION 2
DISASSEMBLY
NOTE: Follow the disassembly procedure in the numerical order given.
9 Earth Plate
1 Five screws
(B2.6 × 8)
2 DM-98 board
3 Flat Cable FDM-010
4 DI-81 board
6 FJ-31 board
7 Flat Cable FDI-002
Two screws
(B2.6 × 8)
0
Two screws
(B2.6 × 8)
8
5 Flat Cable FDI-002
2-2. DM-98 BOARD, DI-81 BOARD, FJ-31 BOARD
SLV-ED212/ED717/ED818/ED919/LF1
2-1. CASE, FRONT PANEL BLOCK ASSEMBLY
1 Two tapping screws
3 Upper case
2 Two tapping screws
5 Flat Cable FDM-010
6 Flat Cable FDI-002
4 Flat Cable FDI-002
7 Front panel
(Engaged by the six hooks)
Hooks
Hooks
Hooks
Hooks
2-1
Page 20

2 MA-402 board with
mechanism deck
1 Six screws
(Sumitite (B3) +BV)
Hooks
Hooks
Hooks
Hooks
2 Rear panel
(Engaged by the seven hooks)
1 POWER code stopper
2-4. MA-402 BOARD
2-3. REAR PANEL
2-2
Page 21

qa MA-402 board
7 MD base (M)
8 MD base (R)
0 MD base (R)
6 Two screws
(BVTP 3 × 12)
9 Screw
(BVTP 3 × 12)
2 Screw
(Sumitite (B3), +BV)
qs Mechanism deck
1 Flexible cable
5 Harness FE-141
3 Flat Cable FAC-009
4 Flat cable FMD-022/FMD-023
CN202
CN331
Note: When mounting the mechanism deck,
first align mark on the rotary switch.
2-5. MECHANISM DECK
2-3
Page 22
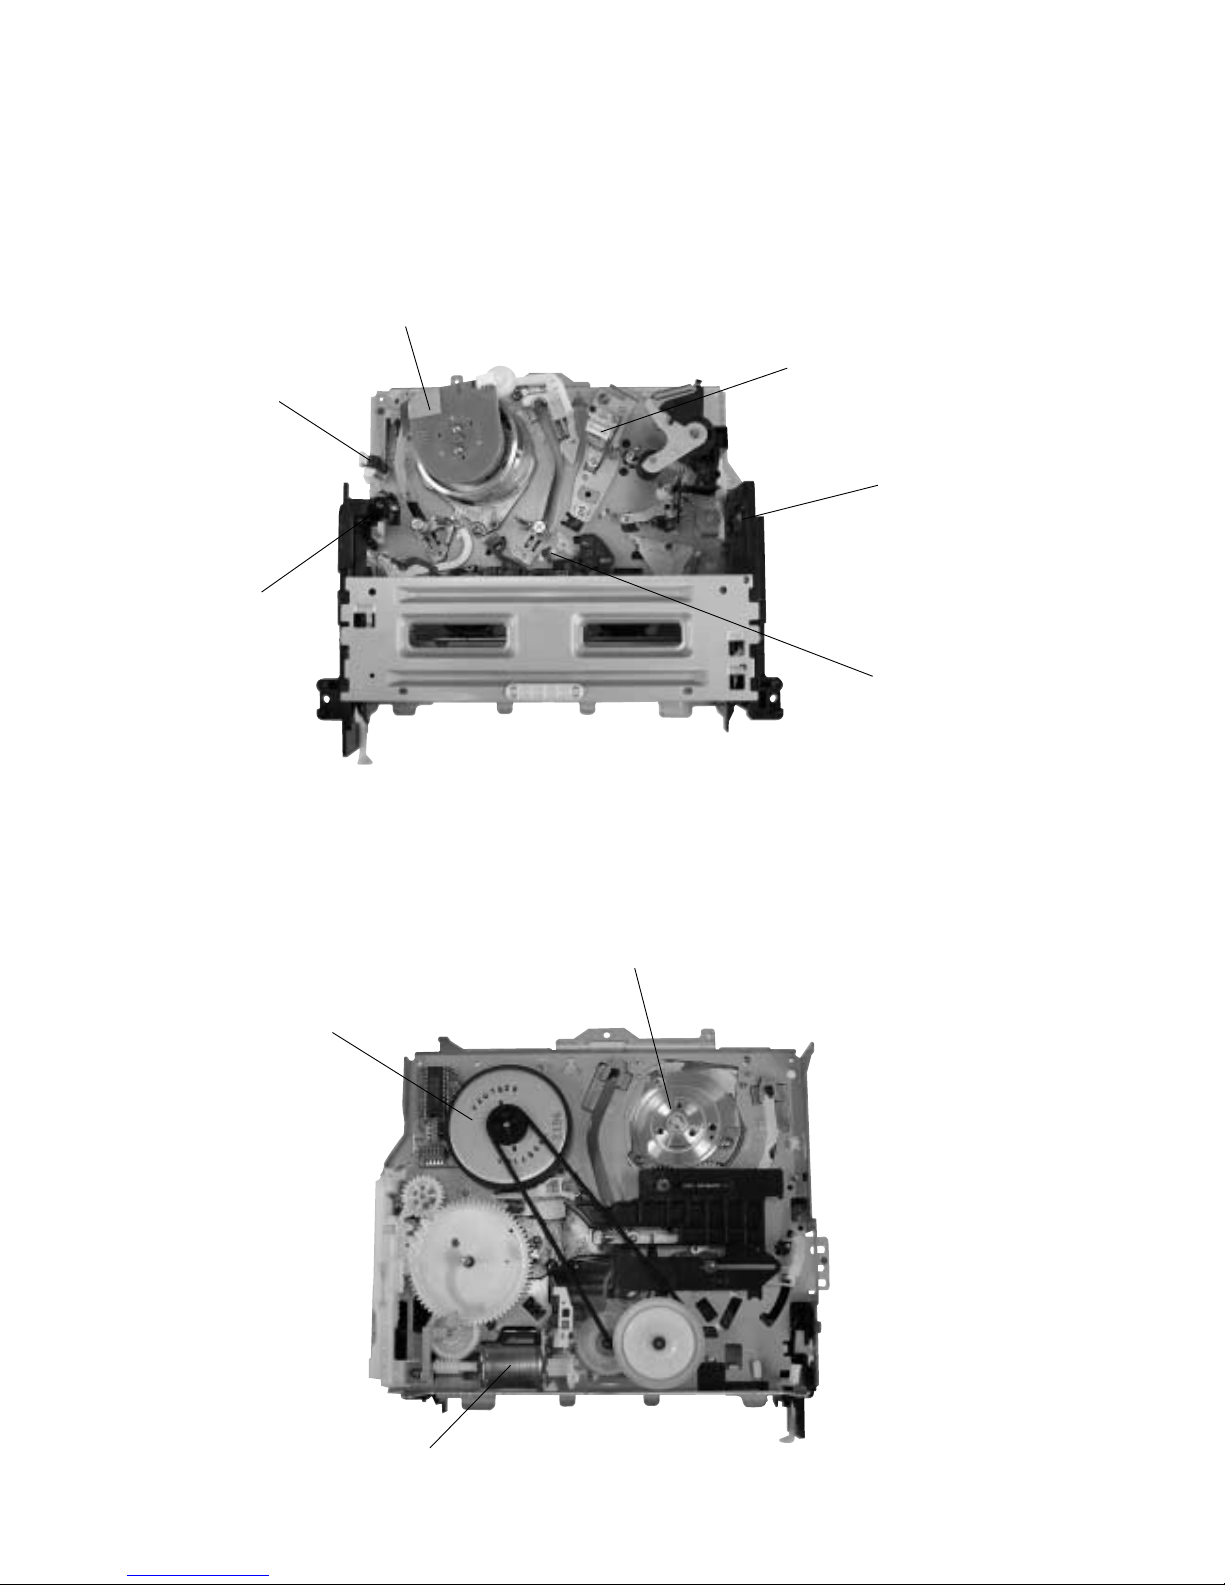
2-6. INTERNAL VIEWS
Drum assembly (M901) (DZH-71F-R)
1-772-358-11 (ED212)
Drum assembly (M901) (DZH-0B4A-R)
1-772-363-11 (ED717)
Drum assembly (M901) (DZH-0B7A-R)
1-772-366-11 (ED818/ED919/LF1)
Drum assembly (M901) (DZH-71F-R)
1-772-358-11 (ED212)
Drum assembly (M901) (DZH-0B4A-R)
1-772-363-11 (ED717)
Drum assembly (M901) (DZH-0B7A-R)
1-772-366-11 (ED818/ED919/LF1)
M903
Cam motor assembly
X-3950-970-1
M902
Capstan motor
1-763-572-11
ACE head assembly
A-6759-720-A
Q002
Tape top sensor
8-729-043-84
FE head
1-500-471-11
Q001
Tape end sensor
8-729-043-84
D001
Tape top/end LED
8-719-066-72
2-4
Page 23
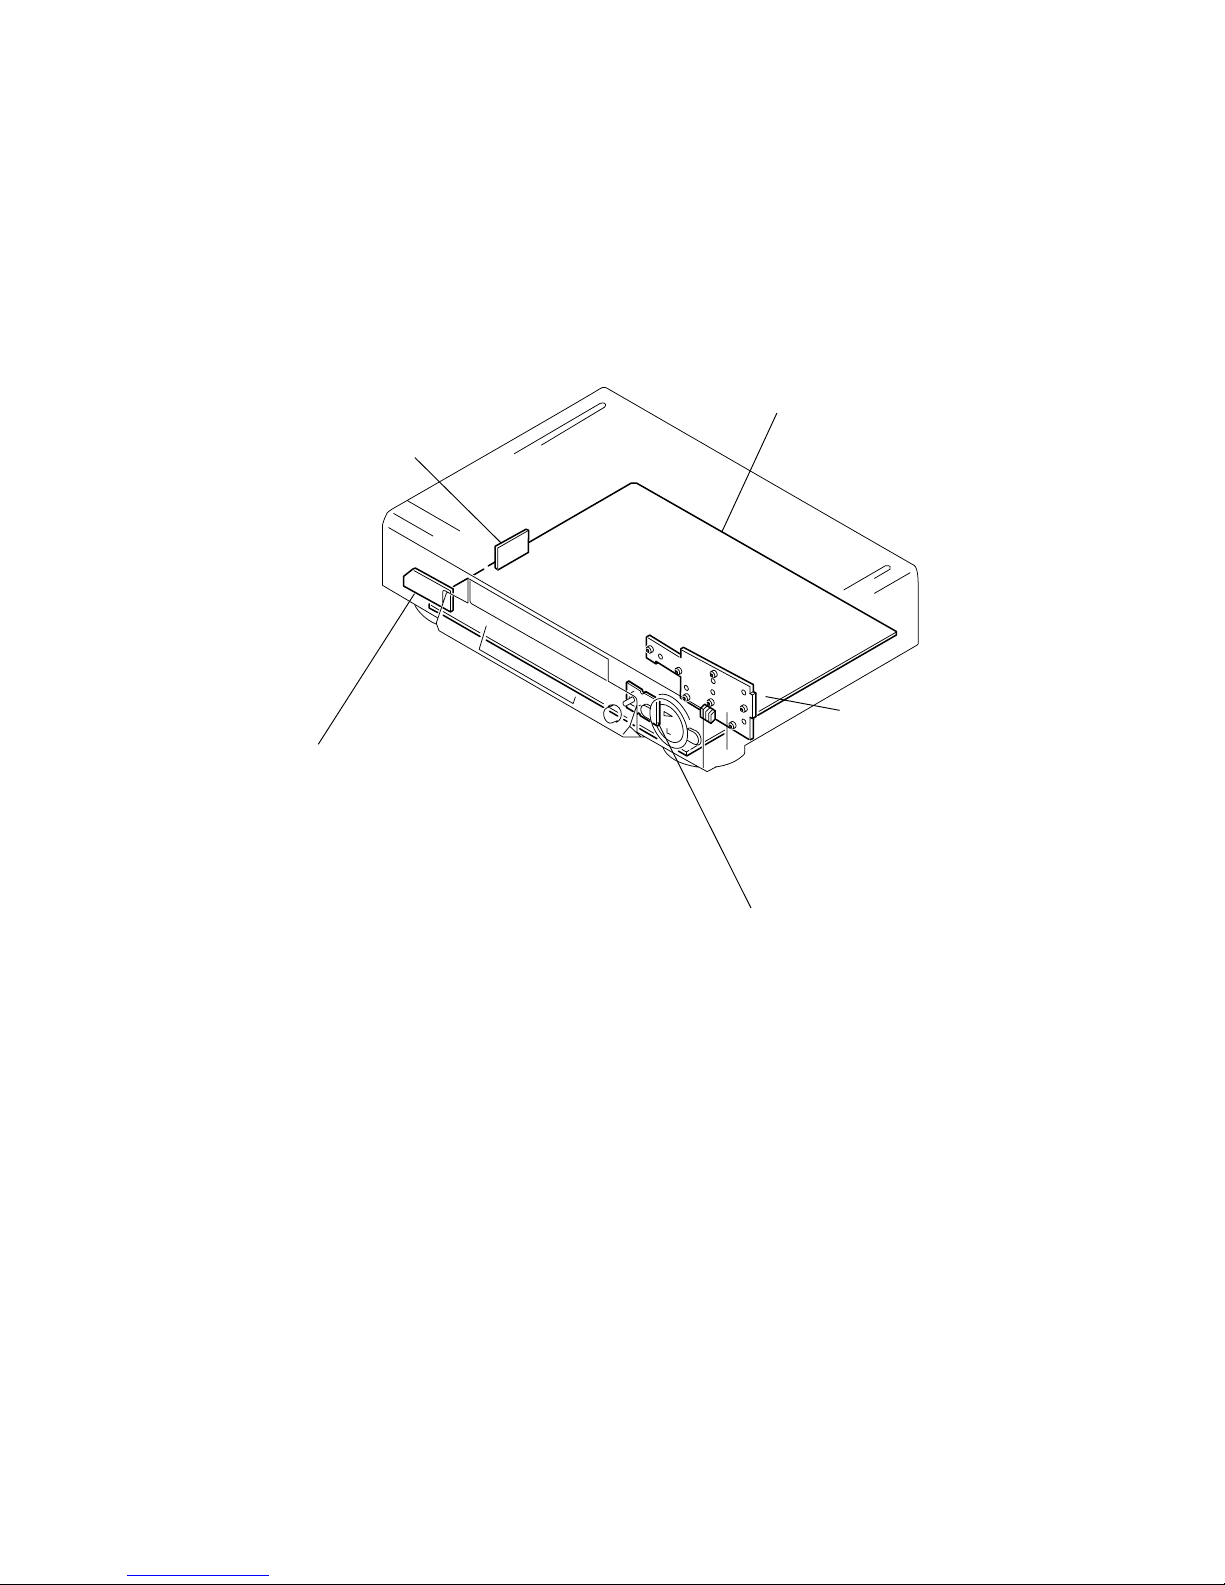
2-7. CIRCUIT BOARDS LOCATION
VIDEO, AUDIO, SERVO/SYSTEM CONTROL,
TUNER, I/O, MODE CONTROL,
POWER SUPPLY
FJ-31 (LINE 2 IN)
(ED212/ED717/ED818/ED919)
FJ-33 (POWER)
(LF1)
NK-11 (NICAM)
(ED919KR/LF1)
DI-81 (DIAL TIMER)
(ED212/ED717/ED818/ED919)
DM-98 (USER CONTROL)
MA-402
()
2-5E
Page 24
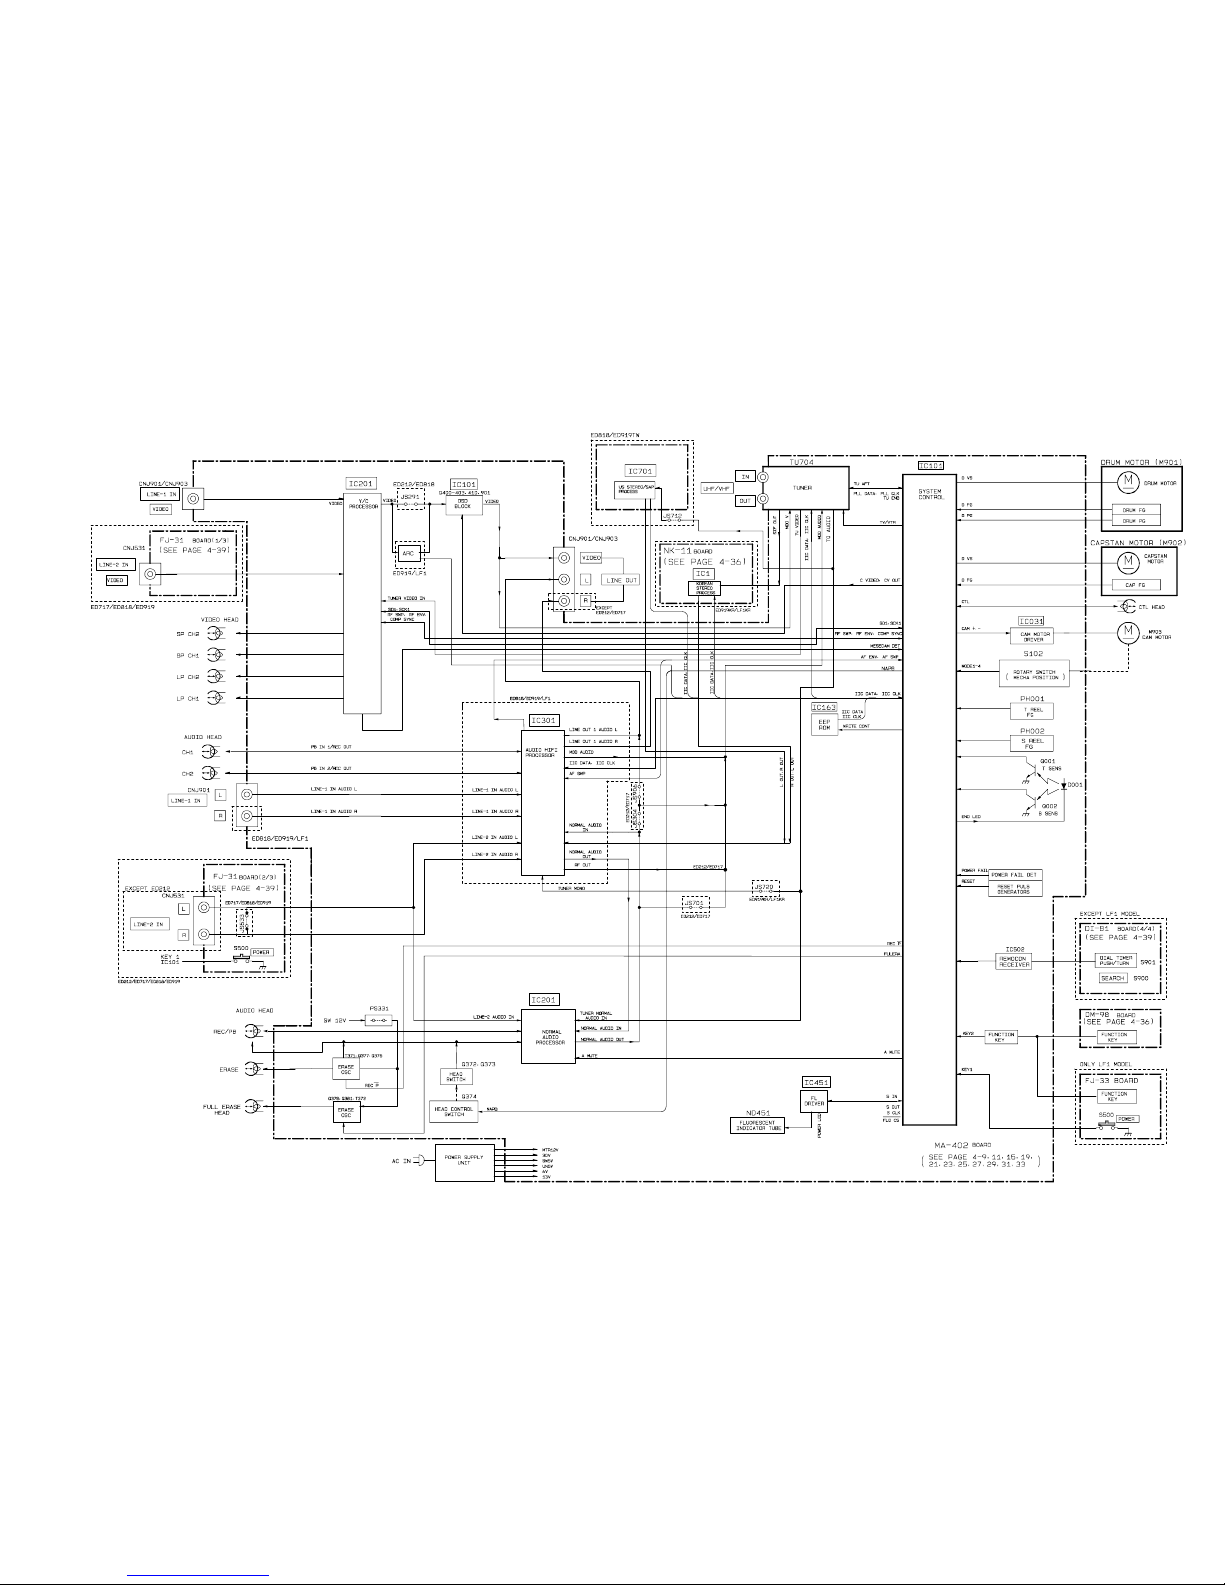
SLV-ED212/ED717/ED818/ED919/LF1
3-1 3-2
SECTION 3
BLOCK DIAGRAMS
3-1. OVERALL BL OCK DIAGRAM
Page 25
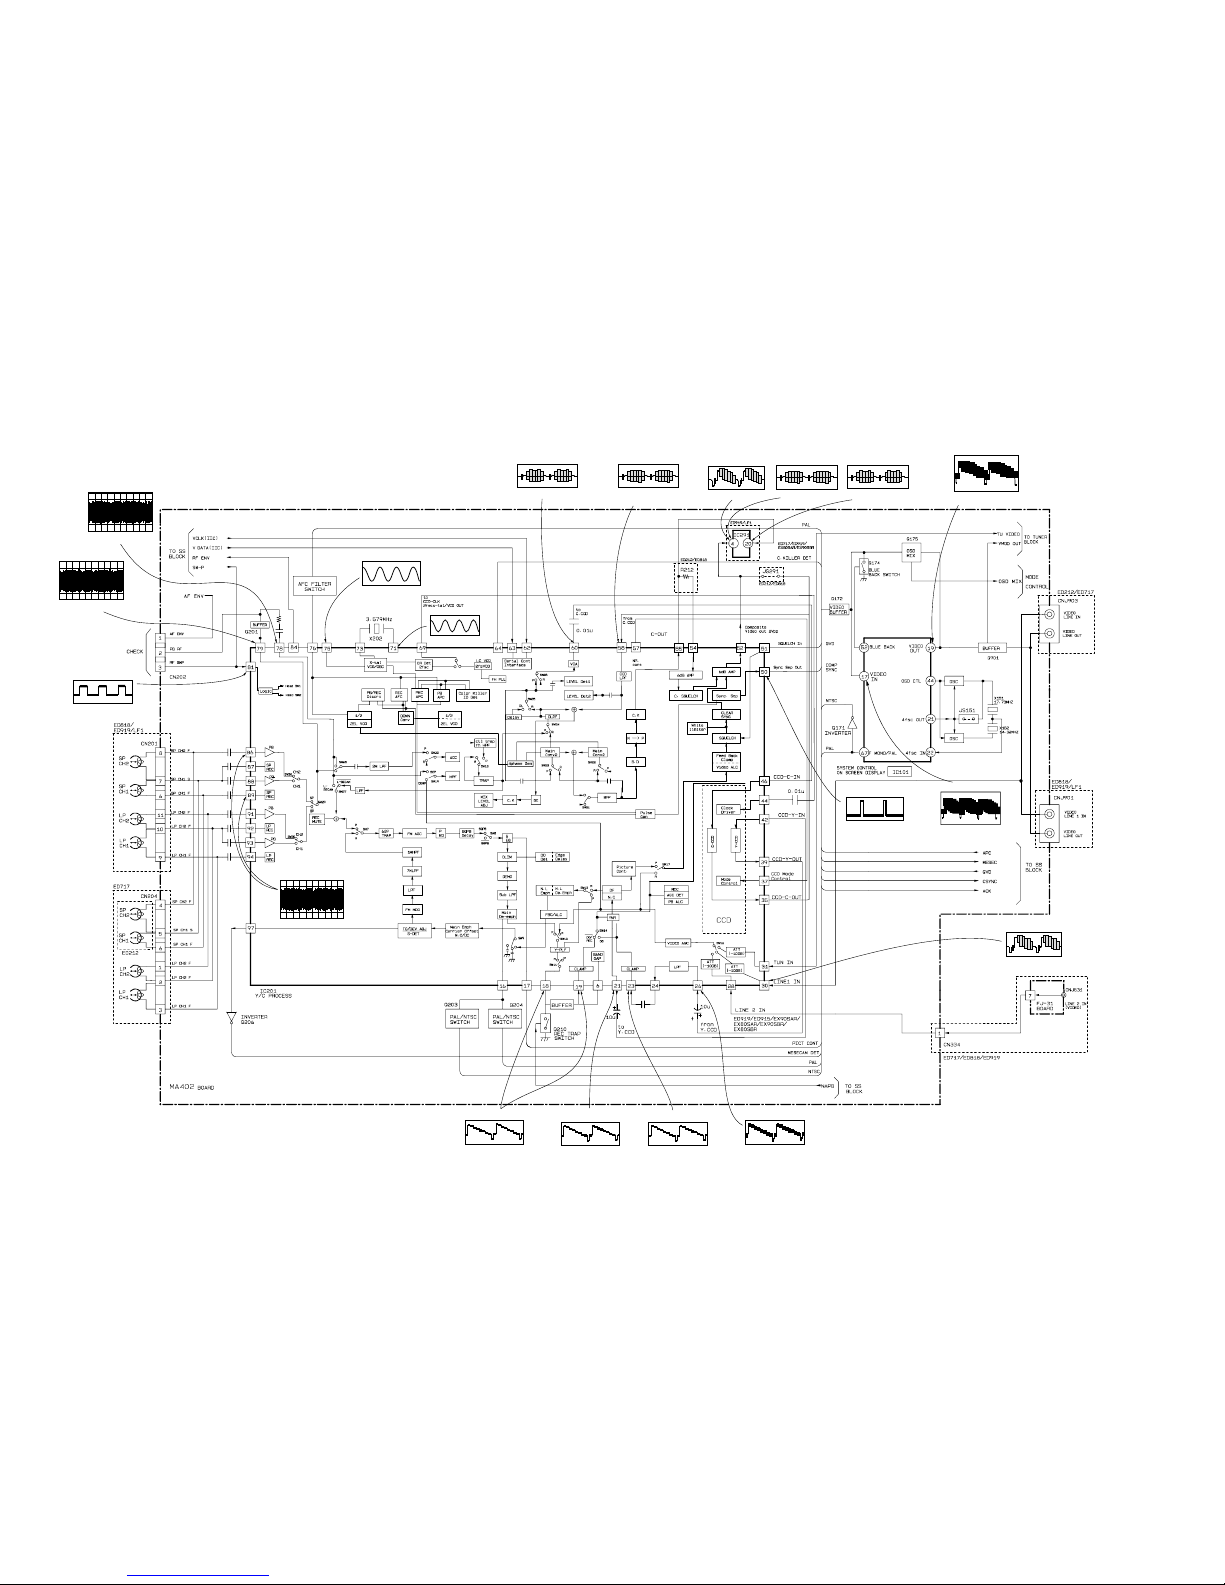
SLV - ED212/ED717/ED818/ED919/LF1
3-2. VIDEO BLOCK DIAGRAM
3-3 3-4
640mVp-p (H)
IC201ukPB
720mVp-p (H)
IC201ulPB
IC201iaREC/PB
5.3Vp-p (H)
40mVp-p (H)
IC201
ih,il
REC
IC201ugREC/PB
496mVp-p (4.43MHz)(PAL)
IC201uaREC/PB
608mVp-p
(3.58MHz)(NTSC)
320mVp-p (H)
IC201y;REC/PB
REC:512mVp-p (H)
PB :584mVp-p (H)
IC201tkREC/PB
IC2914PB
2.2Vp-p (H)
IC291w;PB
152mVp-p (H)
IC291
4
REC
2.1Vp-p (H)
2.36Vp-p (15.7KHz)
IC101qlREC/PB
2.16Vp-p (15.7KHz)
IC101qjREC/PB
IC201
t;
REC/PB
4.6Vp-p (H)
IC201e;REC/PB
1.1Vp-p (H)
IC201whREC/PB
REC:512mVp-p (H)
PB :584mVp-p (H)
IC201wdREC/PB
REC:472mVp-p (H)
PB :504mVp-p (H)
IC201waREC/PB
392mVp-p (H)
IC201
qk,ql
REC/PB
REC:472mVp-p (H)
PB :504mVp-p (H)
Page 26
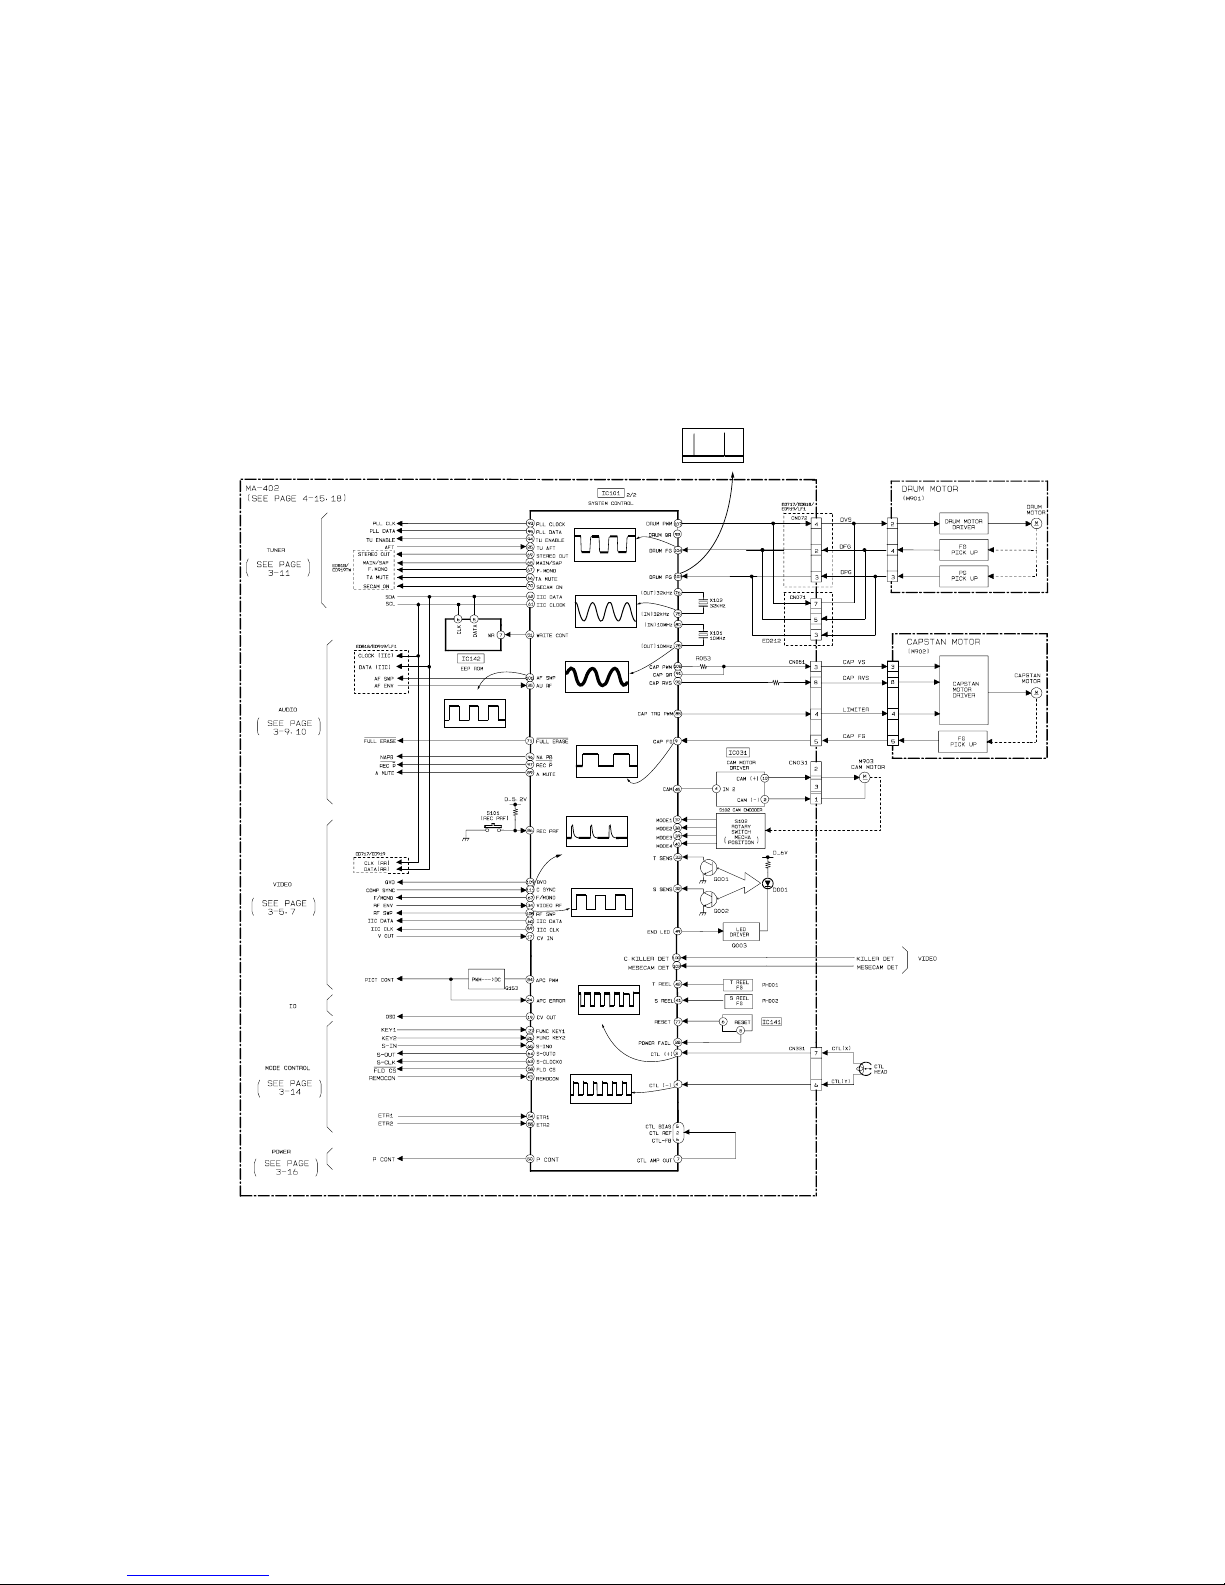
SLV-ED212/ED717/ED818/ED919/LF1
5.0Vp-p (30Hz)
IC101 REC/PB
<z/n
5.0Vp-p (30Hz)
IC101 REC
2.6Vp-p (32.768KHz)
IC101ugREC/PB
<z/v
2.6Vp-p (32.768KHz)
IC101ukREC/PB
3.8Vp-p
IC1019REC/PB
4.32Vp-p (15.7KHz)
IC101 REC/PB
5.0Vp-p (30Hz)
IC101 REC/PB
<z/n
<z/b
4.64Vp-p (30Hz)
IC1013REC
4.64Vp-p (30Hz)
IC1014REC
5.0Vp-p (30Hz)
IC101 REC/PB
<z/c
3-5 3-6
3-3. SERVO/SYSTEM CONTROL BLOCK DIAGRAM
Page 27
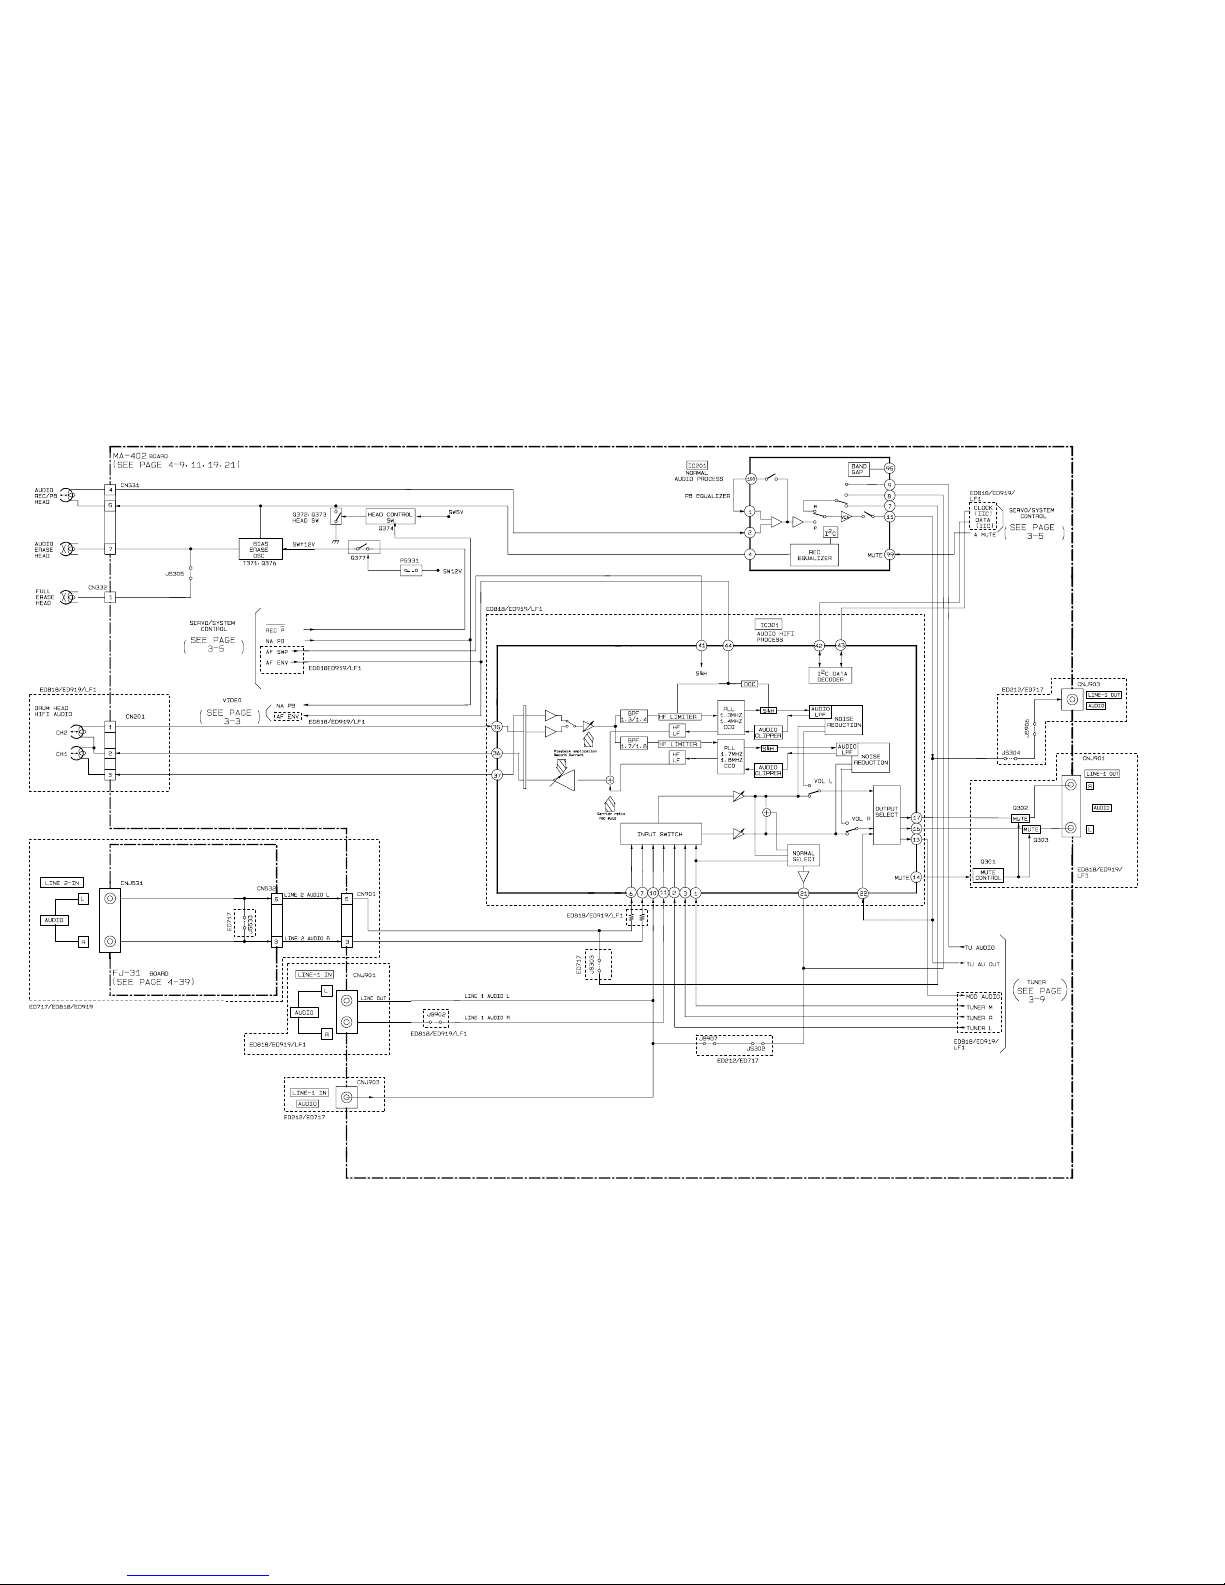
SLV - ED212/ED717/ED818/ED919/LF1
3-4. AUDIO BLOCK DIAGRAM
3-7 3-8
Page 28
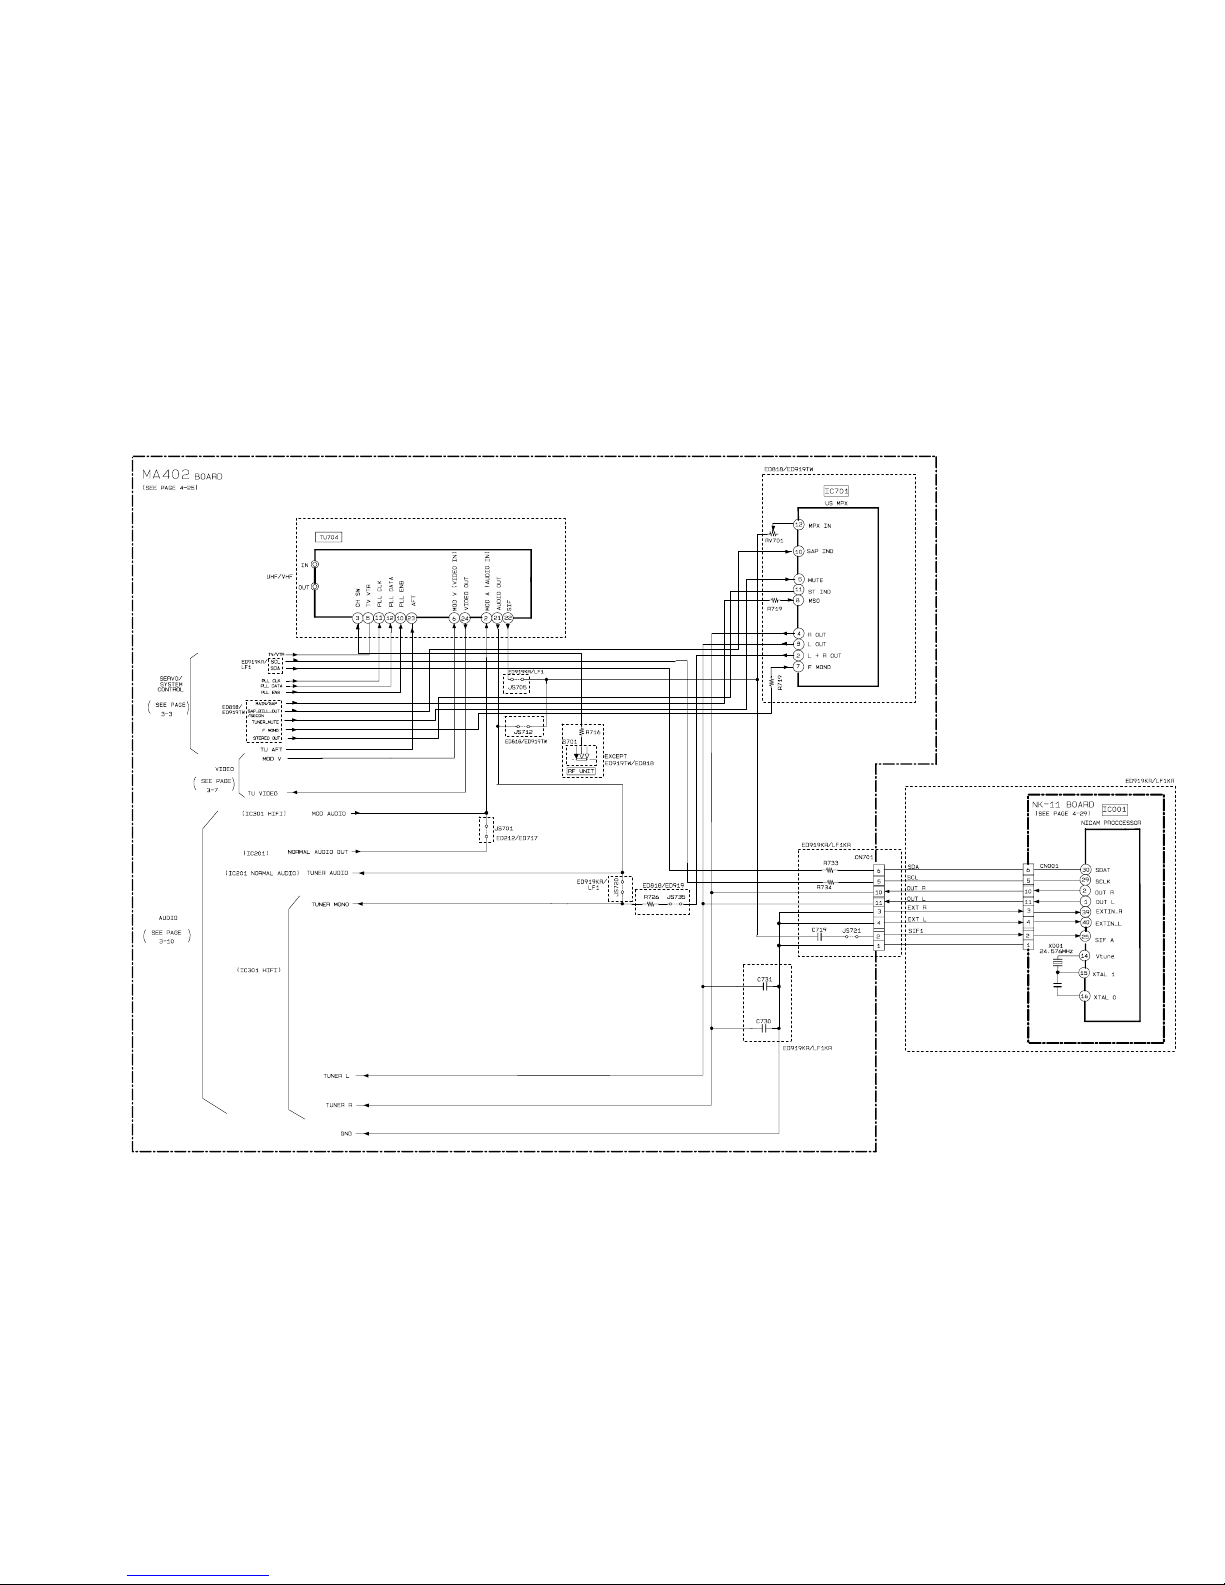
SLV-ED212/ED717/ED818/ED919/LF1
3-5. TUNER BLOCK DIAGRAM
3-9 3-10
Page 29
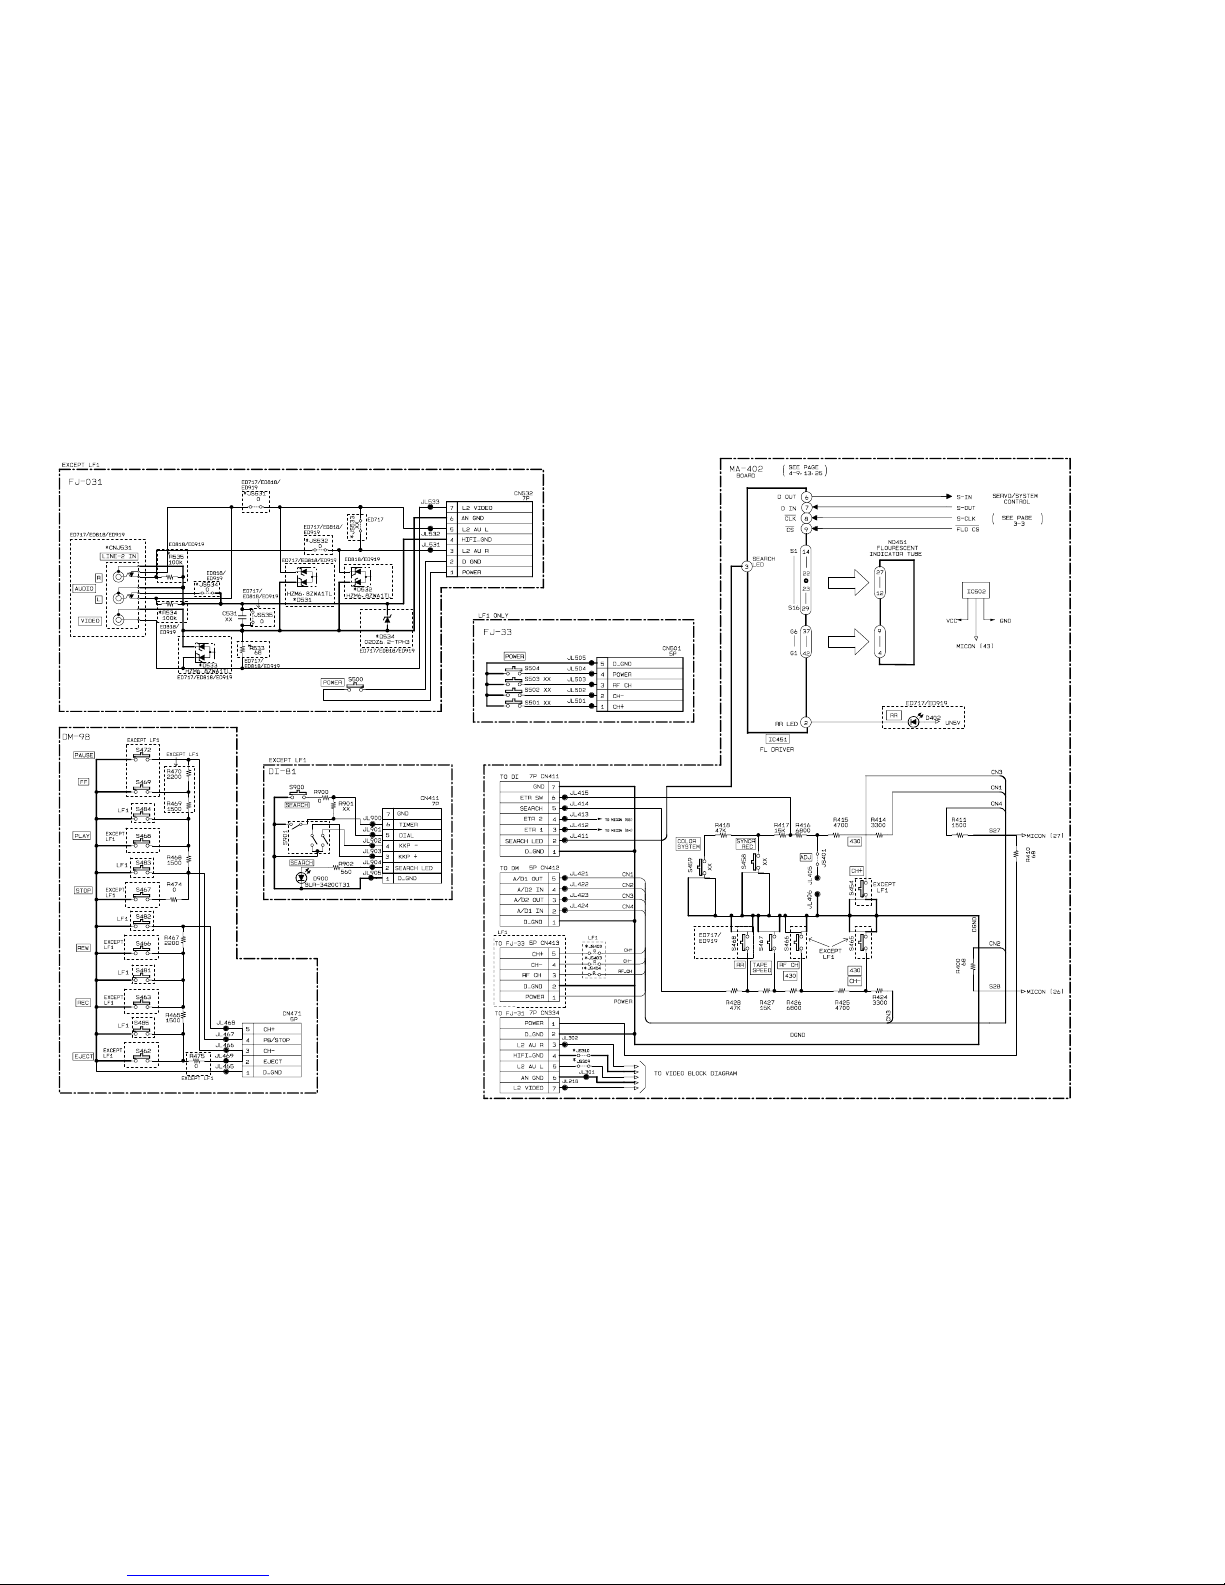
SLV - ED212/ED717/ED818/ED919/LF1
3-6. MODE CONTROL BLOCK DIAGRAM
3-11 3-12
Page 30
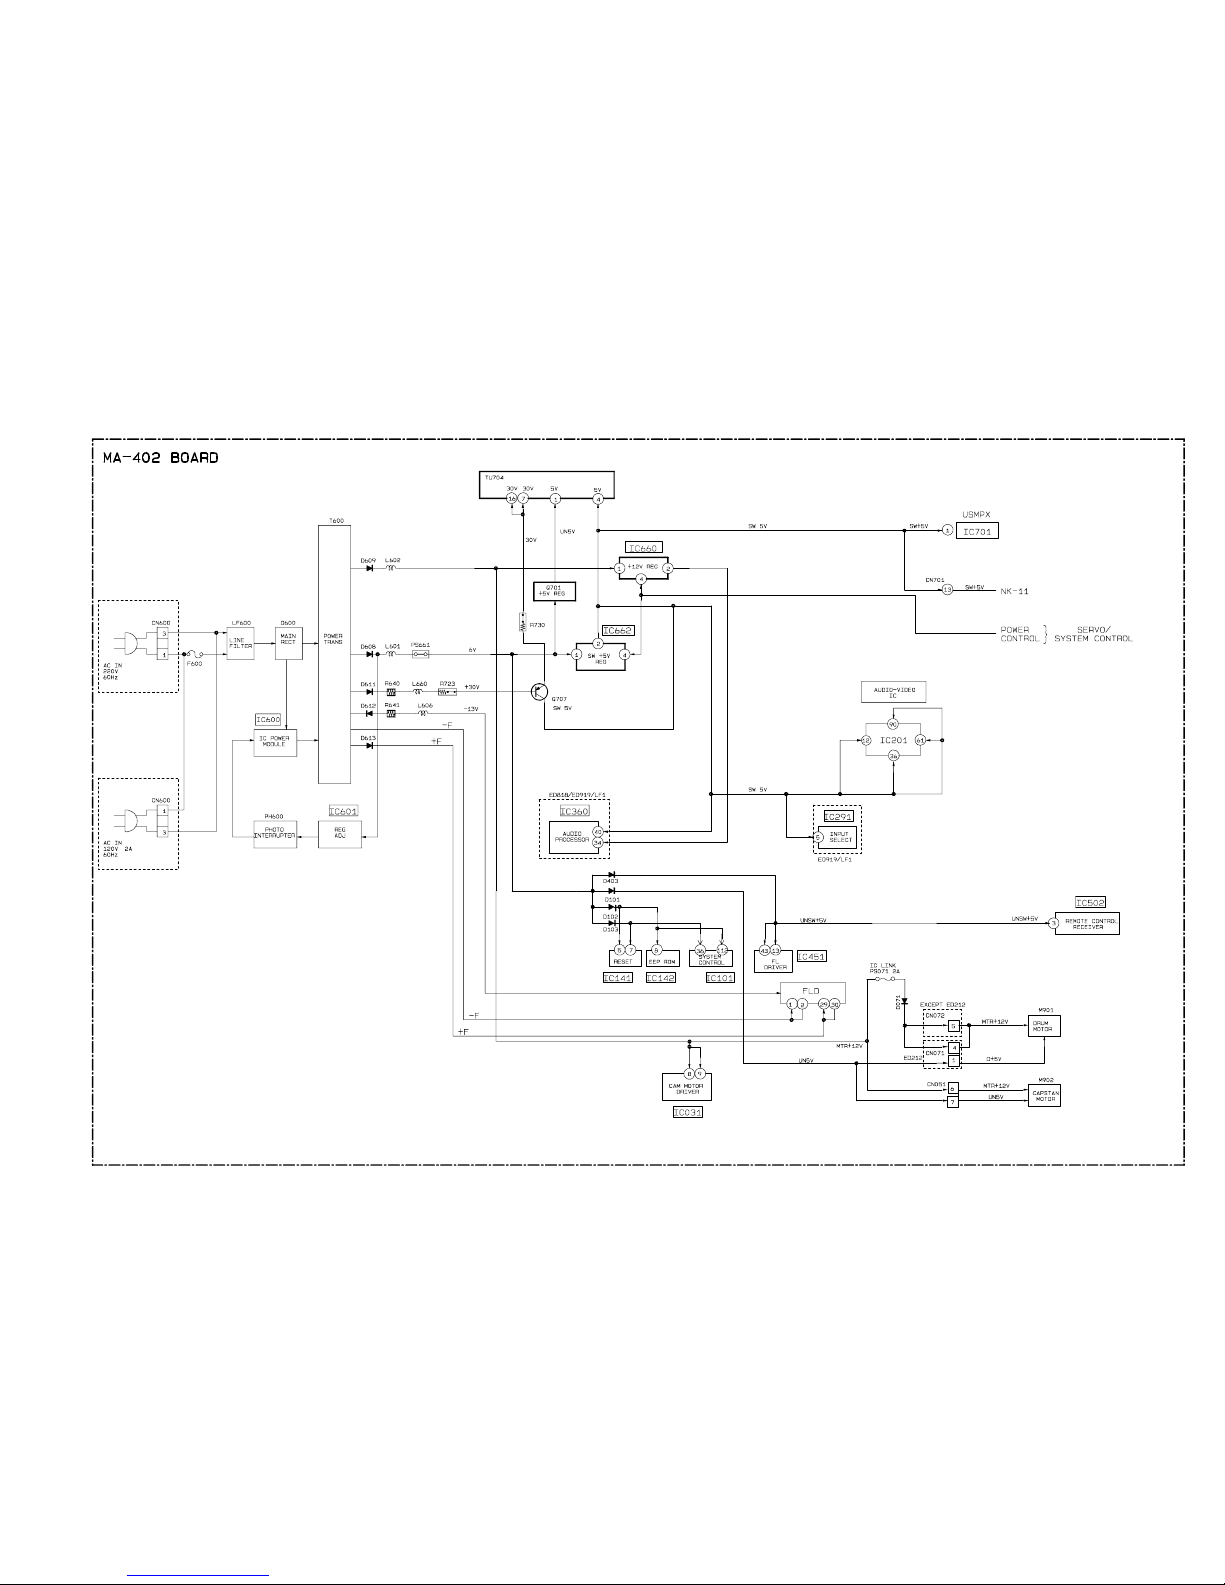
SLV-ED212/ED717/ED818/ED919/LF1
3-7. POWER BLOCK DIAGRAM
ED212/ED717/ED919KR/LF1
ED818/ED919TW
3-13 3-14E
Page 31
SLV - ED212/ED717/ED818/ED919/LF1
4-1
SECTION 4
PRINTED WIRING BOARDS AND SCHEMATIC DIAGRAMS
(For printed wiring boards)
• : Pattern from the side which enables seeing.
(The other layers' patterns are not indicated.)
• Through hole is omitted.
• Circled numbers refer to waveforms.
• There are few cases that the part printed on diagram
isn’t mounted in this model.
• Chip parts.
(For schematic diagrams)
• All capacitors are in µF unless otherwise noted. pF : µµF.
50V or less are not indicated except for electrolytics and
tantalums.
• Chip resistors are 1/10W unless otherwise noted.
kΩ=1000Ω, MΩ=1000kΩ.
• Caution when replacing chip parts.
New parts must be attached after removal of chip.
Be careful not to heat the minus side of tantalum capacitor, Because it is damaged by the heat.
• Some chip part will be indicated as follows.
Example C541 L452
22U 10UH
TA A 2520
• Constants of resistors, capacitors, ICs and etc with XX indicate
that they are not used.
In such cases, the unused circuits may be indicated.
• Parts with ★ differ according to the model/destination.
Refer to the mount table for each function.
• All variable and adjustable resistors have characteristic curve B,
unless otherwise noted.
• Signal name
XEDIT—> EDIT PB/XREC —> PB/REC
• : non flammable resistor
• : fusible resistor
• : panel designation
• : internal component.
•
B +
: B+ Line.
•
B –
: B– Line.
• Circled numbers refer to waveforms.
• Readings are taken with a color-bar signal input.
• Voltage are dc between ground and measurement points.
• Readings are taken with a digital multimeter (DC10MΩ).
• Voltage variations may be noted due to normal production
tolerances.
• : adjustment for repair.
• Circled numbers refer to waveforms.
THIS NOTE IS COMMON FOR PRINTED WIRING
BOARDS AND SCHEMATIC DIAGRAMS.
(In addition to this, the necessary note is
printed in each block.)
Transistor Diode
Kinds of capacitor
Temperature characteristics
External dimensions (mm)
When indicating parts by reference
number, please include the board name.
C
BE
5
64
2
13
5
46
2
31
45
2
31
12
4
53
3
21321321
Note :
The components identified by
mark
or dotted line with mark
are critical for safety.
Replace only with part number
specified.
Page 32
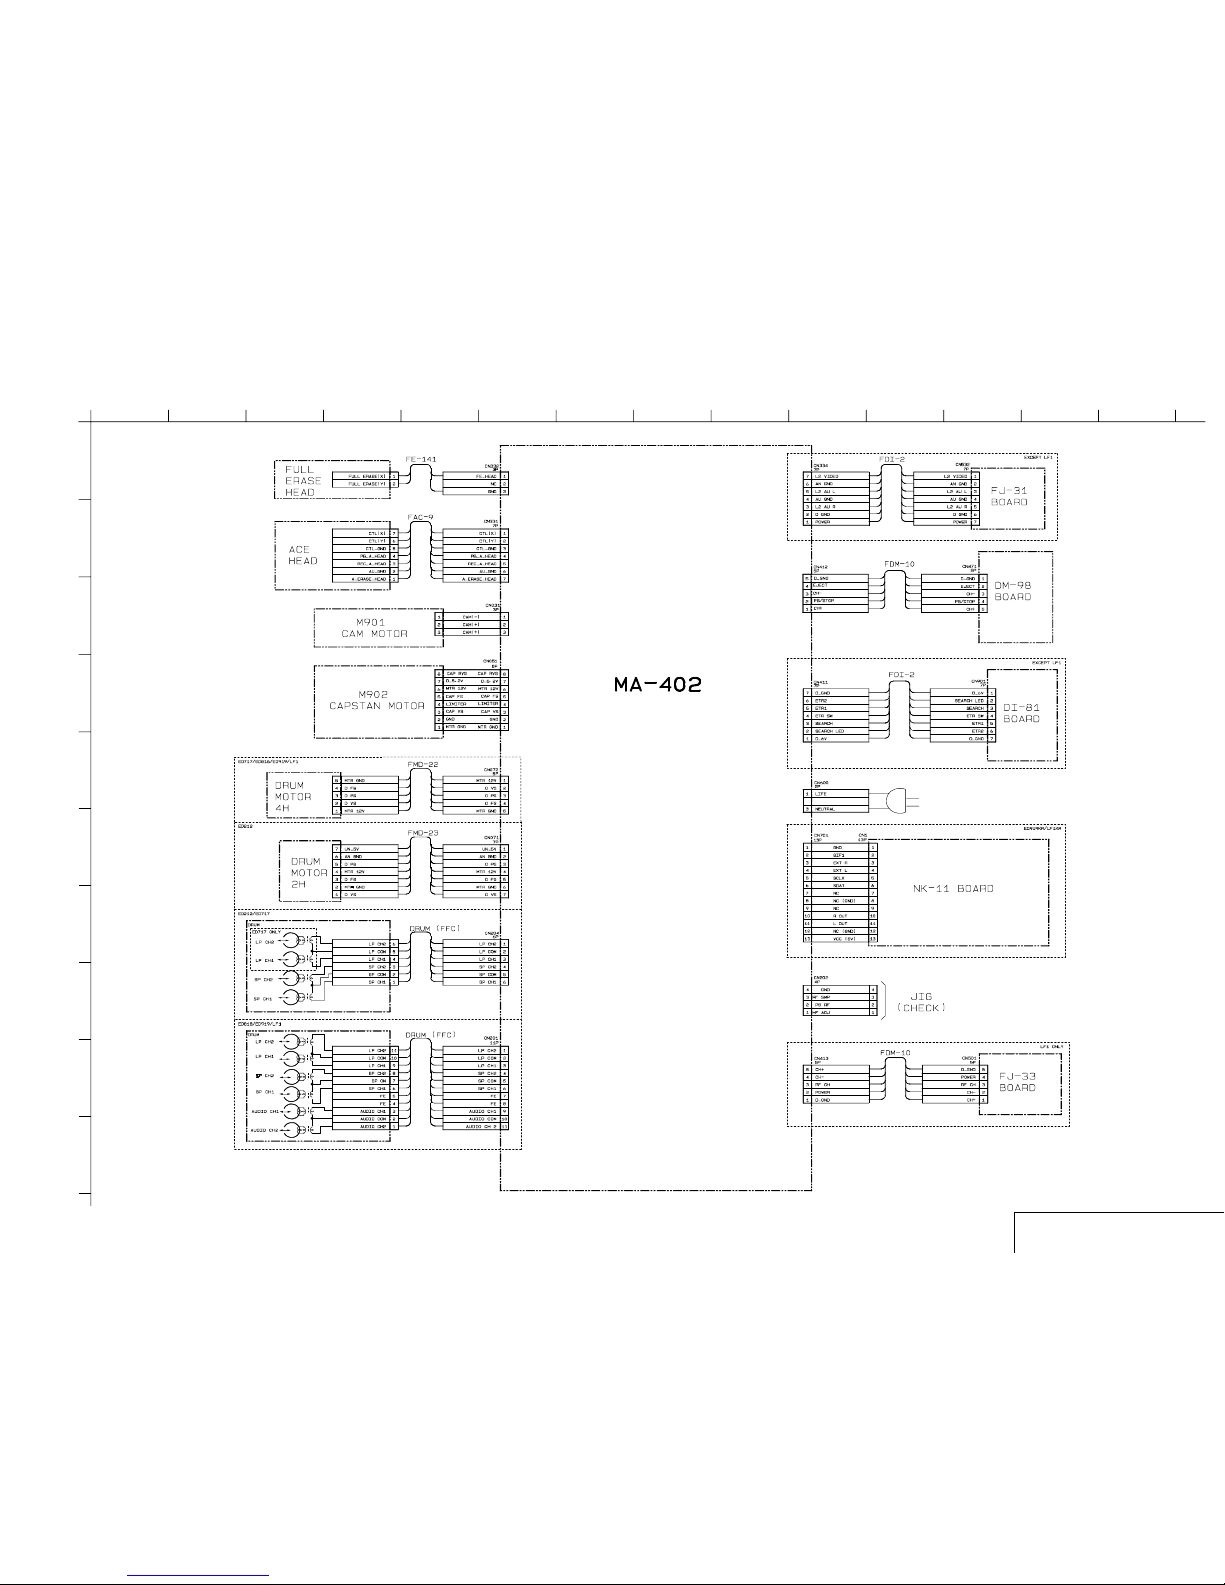
A
123456789101112
13 14
B
C
D
E
F
G
H
I
J
SLV - ED212/ED717/ED818/ED919/LF1
4-3 4-4
4-1. FRAME SCHEMATIC DIAGRAM
FRAME SCHEMATIC DIAGRAM
Page 33
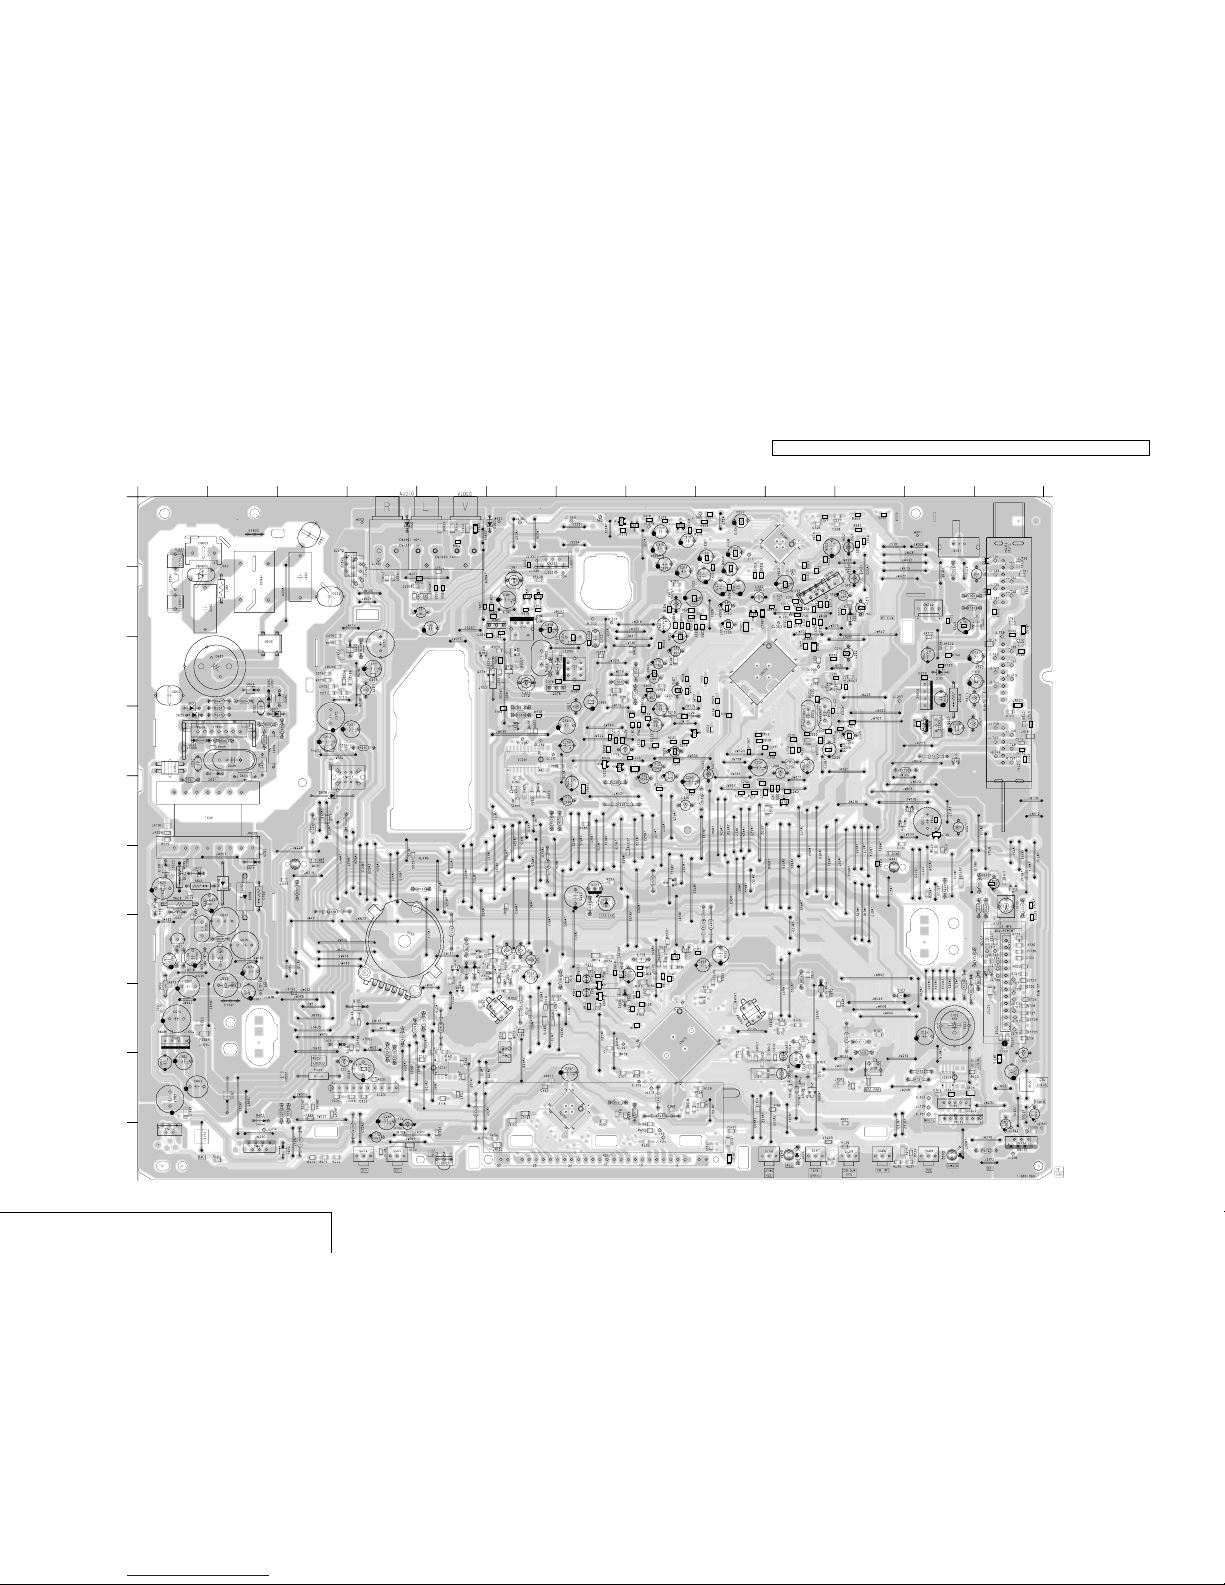
A
123456789101112
13 14
B
C
D
E
F
G
H
I
J
SLV - ED212/ED717/ED818/ED919/LF1
4-6
MA-402 (VIDEO, AUDIO, I/O, SERVO/SYSTEM CONTROL, TUNER, MODE CONTROL, POWER SUPPLY) PRINTED WIRING BOARD
— Ref. No. MA-402 Board:1,000 Series —
There are few cases that the part printed on this diagram isn’t mounted in this model.
4-2. PRINTED WIRING BOARDS AND SCHEMATIC DIAGRAMS
VIDEO, AUDIO, SERVO/SYSTEM CONTROL, TUNER, POWER
MA-402
A
123456789101112
13
B
C
D
E
F
G
H
I
J
MA-402 Board
Page 34
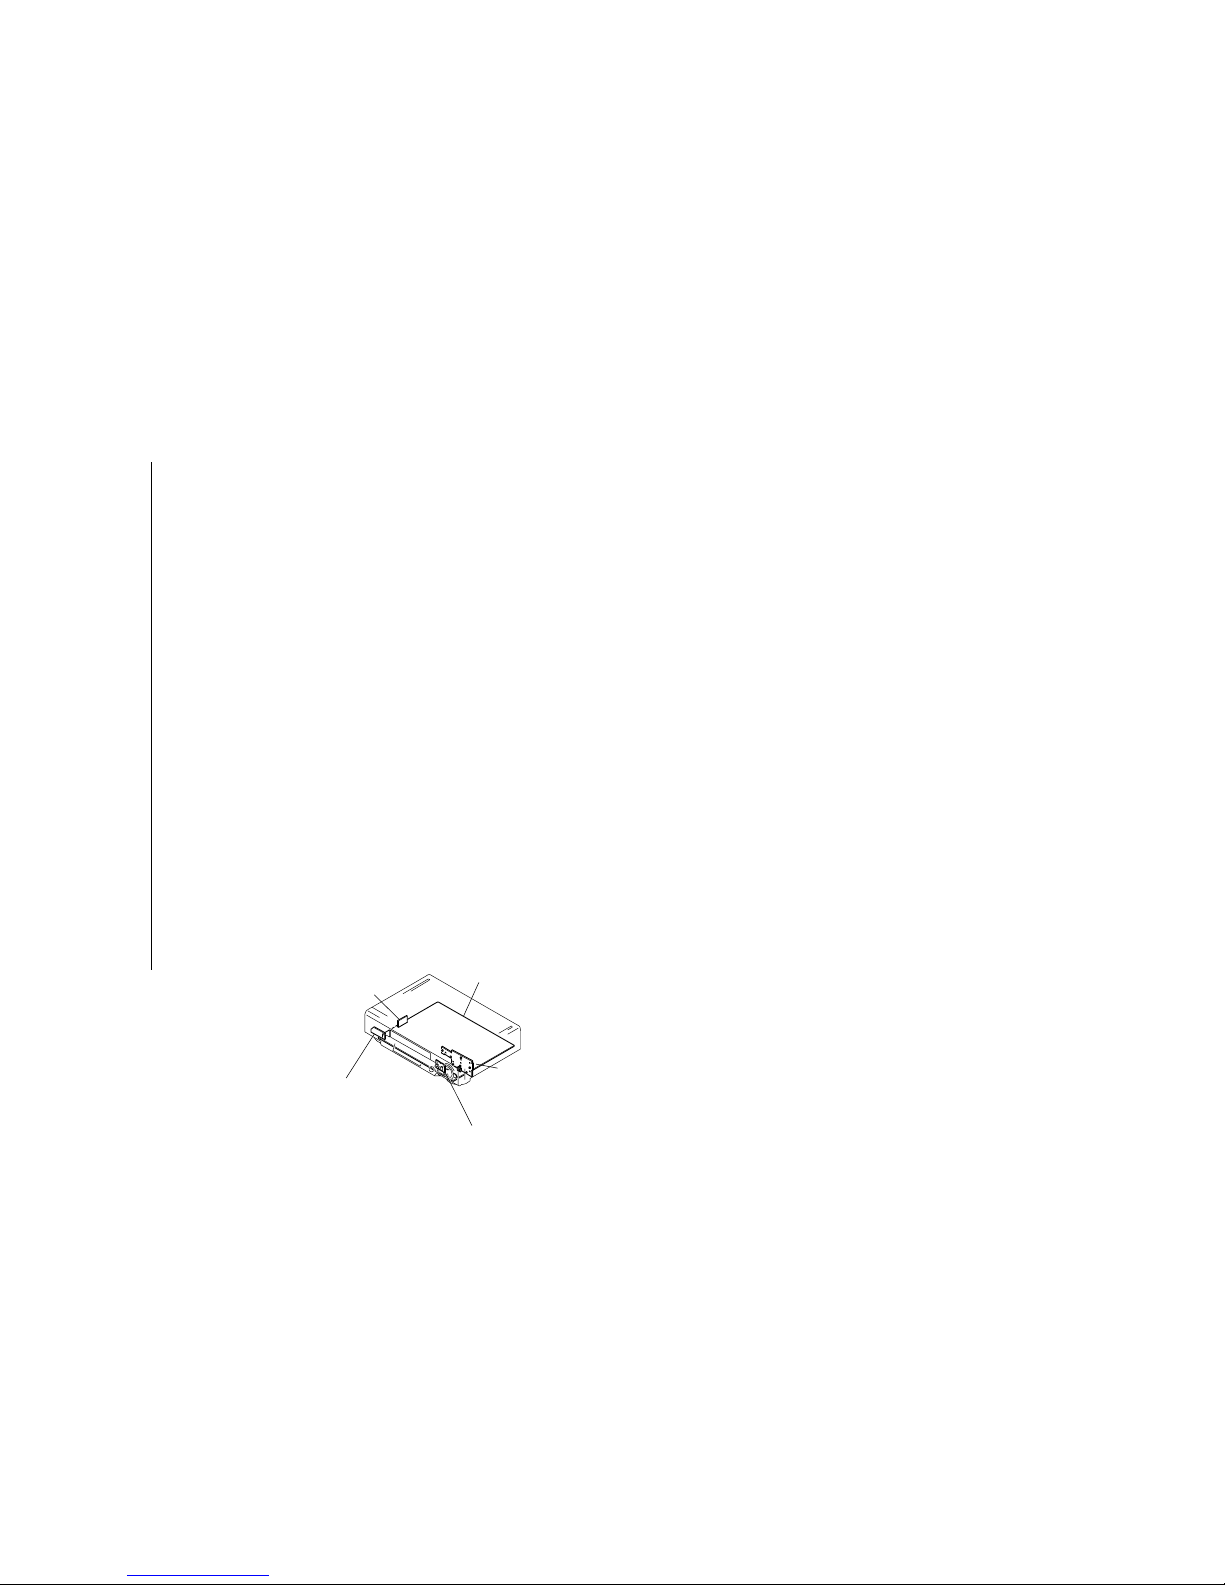
A
123456789101112
13 14
B
C
D
E
F
G
H
I
J
SLV - ED212/ED717/ED818/ED919/LF1
4-7 4-8
MA-402 BOARD
CN600 A1
CN412 J1
CN411 J2
CN072 A3
CN071 B4
CN051 E4
CN331 A6
CN031 H6
CN201 B10
CN204 B10
CN104 I1 2
CN105 I1 2
CN332 D12
CN202 B12
CN334 J13
CN413 J13
D623 C1
D625 D1
D613 F1
D612 F1
D403 I2
D614 I2
D608 F2
D609 F2
D611 F2
D601 E2
D604 E2
D603 D2
D607 D2
D605 C2
D624 C2
D600 C2
D602 C3
D626 E3
D103 H3
D404 J3
D901 A4
D071 C4
D101 H4
D171 G5
D172 G5
D902 A6
D001 F7
D100 H8
D401 J10
D151 H10
D102 H11
D201 B11
D701 C12
IC601 G1
IC660 H1
IC600 D2
IC031 I4
VIDEO, AUDIO,SERVO/SYSTEM CONTROL,
TUNER, I/O, MODE CONTROL, POWER SUPPLY
FJ-31 (LINE 2 IN)
(ED212/ED717/ED818/ED919)
FJ-33 (POWER)
(LF1)
NK-11 (NICAM)
(ED919KR/LF1)
DI-81 (DIAL TIMER)
(ED212/ED717/ED818/ED919)
DM-98 (USER CONTROL)
MA-402
(
)
IC502 J5
IC141 I5
IC291 D6
IC451 I7
IC101 H8
IC201 C9
IC301 A10
IC142 I12
IC662 C12
IC702 H13
Q001 F3
Q380 C5
Q378 C5
Q172 G5
Q171 H5
Q373 B6
Q372 B6
Q381 B6
Q374 B6
Q377 C6
Q376 C6
Q901 D6
Q174 G6
Q175 G6
Q151 H7
Q003 F7
Q203 D7
Q204 D7
Q375 C7
Q302 A7
Q303 A8
Q301 A8
Q205 F8
Q192 G8
Q191 G8
Q211 D8
Q206 B9
Q210 E1 0
Q153 I1 0
Q201 C10
Q202 D11
Q710 E1 1
Q701 D12
Q706 D12
Q709 E1 2
Q708 E1 2
Q701 B13
Q703 F13
Q704 G13
Page 35
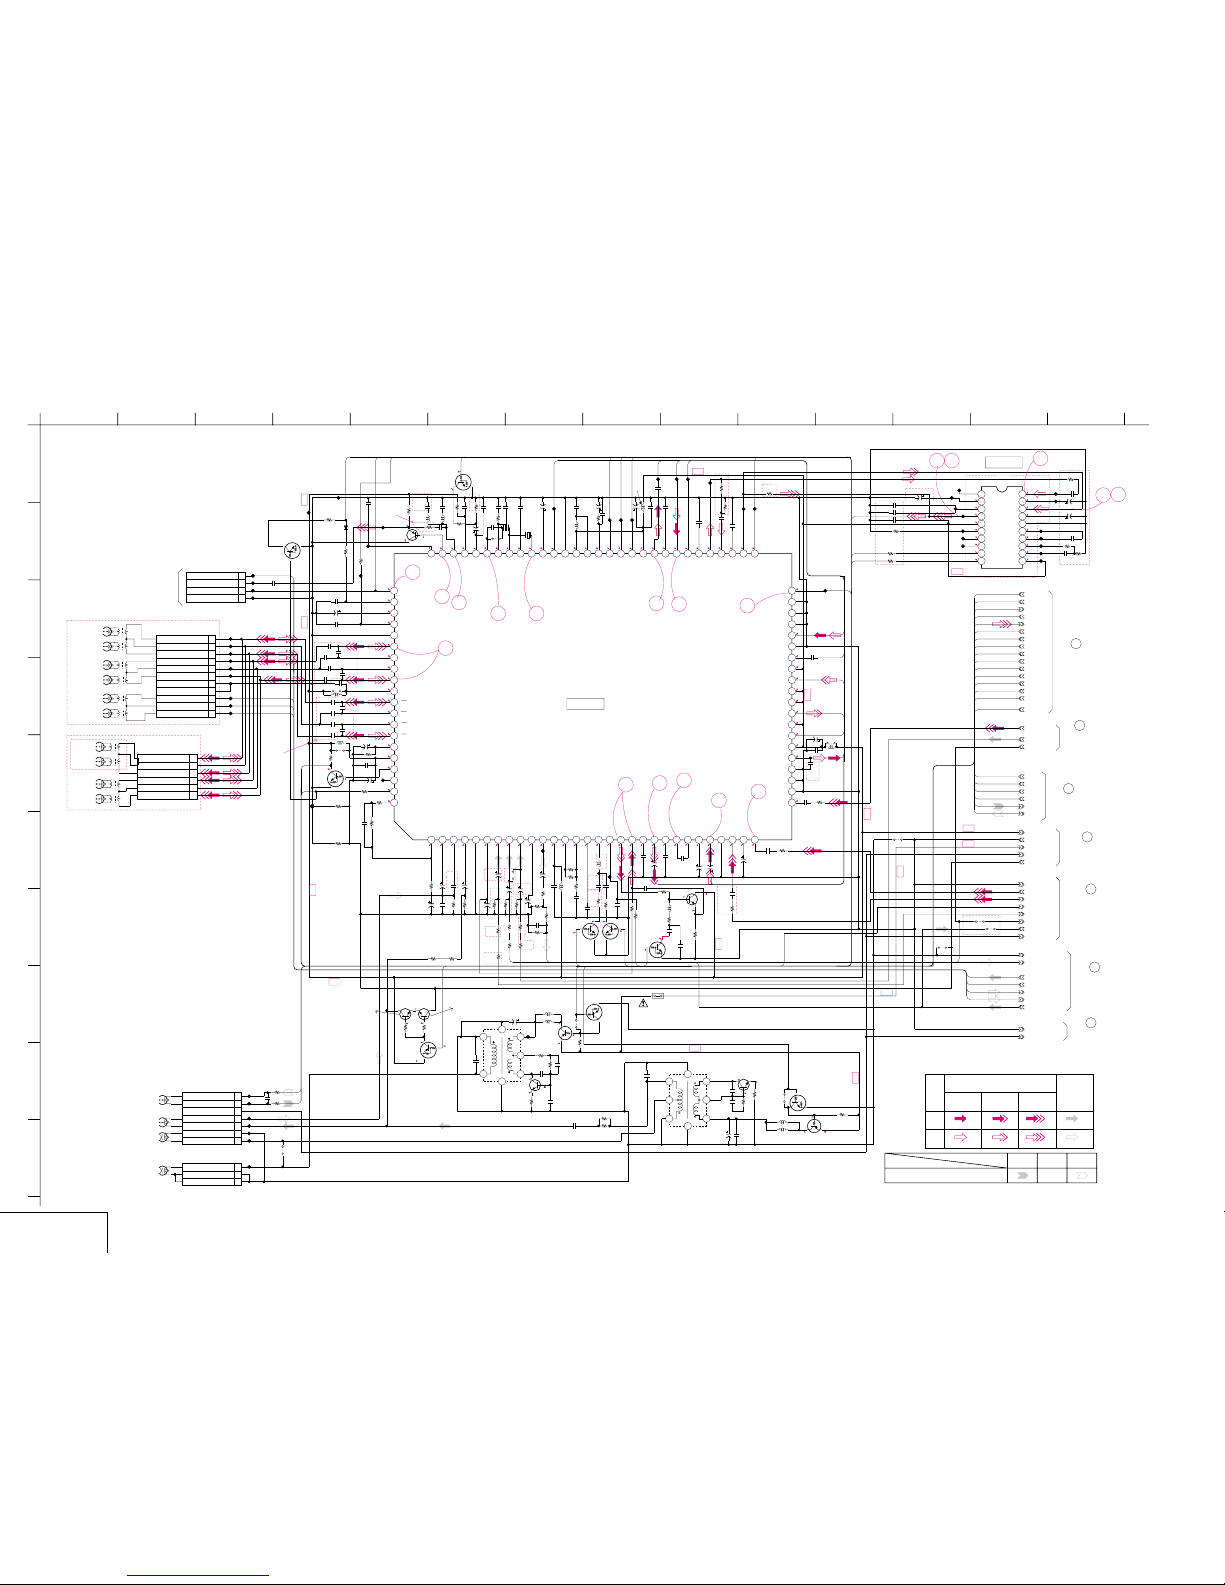
A
123456789101112
13 14
B
C
D
E
F
G
H
I
J
SLV - ED212/ED717/ED818/ED919/LF1
4-9 4-10
MA-402 (VIDEO, AUDIO) SCHEMATIC DIAGRAM
– Ref. No: MA-402 Board; 1000 series –
• See page 4-5 for printed wiring board.
CL297
1k
R289
*
JL234
50V
4.7u
C223
CL298
18k
R355
JS360
XX
XX
R383
UN2213-TX
Q203
10uH
L207
0.1u
F
C235
100
R294
*
47k
R370
LA7277M-TLM
IC291*
1
C OUT
2
YOUT
3
Y SYNC
4
Y OUT
5
VCC
6
FIL ADJ
7
MONI 1
8
MONI 2
9
CLK
10
DATA
11
MAIN OFF
12
SUB
13
SUB
14
SUB
15
SUB
16
GND
17
REG
18
Y IN
19
MCOR 3
20
C IN
XX
Q381
SW12V
16V 10u
C238
CL293
LINE1
27k
R204
0.01u
B
C295
*
0.22u
C247
AMUTE
4700p
C205
*
50V
3.3u
C209
1500p
C376
B
NA11
10uH
L205
L2_VIDEO
JL304
CL290
33p
CH
C262
16V
XX
C353
50V
4.7u
C290
*
NAPB
1u
B
C258
470
R366
0.022u
B
C221
B
C289
0.1u
*
2.2u
C225
F
16V
47u
C234
XX
R382
CL296
JL215
50V
2.2u
C218
CL292
XX
R227
XX
C384
1k
R201
JS291
*
0
2200
R387
0.01u
Y
C377
0.1u
C351
F
JL216
0
R357
HA22
0.1u
F
C242
VCLK
8200
R296*
10k
R208
*
POWER
JL336
JL210
Q211
2SD601A-QRS-TX
L2_AU_L
UN2213-TX
Q377
0.01u
C207
AU_GND
330p
CH
C252
220uH
L211
0.47u
B
C220
XX
Q380
2.2u
F
C251
HA21
JL208
3P
CN332
1FE HEAD
2NC
3GND
1k
R225
47k
R361
100
R215
1500p
B
C356
15k
R362
100uH
L203
*
XX
JS308
CL303
4P
CN202
1HF ADJ
2PB RF
3V.SWP
4GND
CL203
XX
R217
50V
2.2u
C248
JL221
CL294
POWER
B
C299
0.01u
*
JL211
R216
100
0.01u
C215
B
DGND
16V
22u
C363
PAL
XX
JS204
10u
C355
16V
22k
R379
CSYNC
0.1u
F
C208
33k
R354
4700
R207
2200p
C203*
2SD601A-QRS-TX
Q372
VDAT
2200p
C256
*
CL299
7P
CN331
1X CTL (X)
2Y CTL (Y)
3CTL GND
4PB A HEAD
5REC A HEAD
6BIAS GND
7A ERASE HEAD
JL204
CL230
50V
4.7u
C298
*
JL334
XX
JS205
150k
R352
XX
C381
SW5V
50V
1u
C361
6p
CH
C226
AFENV
SCK
120k
R226
Q374
UN2113-TX
2200
R386
0.1u
F
C233
220
R223
0.01u
B
C249
1500
R206
XX
T372
1
234
6
7
8
100
R353
CTL+
HC35
JL303
JL341
0.01u
B
C294*
0.60mm
JS302
*
XX
Q378
R211
0
*
VOUT
100uH
L372
15k
R358
*
VIDEO_RF_IN
0.01u
B
C244
SDA
4700
R365
FULERA
47uH
L215
BIAS_GND
2.2u
F
C292*
R364
0
2.2u
F
C201
JL207
CTL-
16V
10u
C350
27p
CH
C214
GND
2SC4040-TL2-Q
Q375
39p
CH
C230
*
JL201
0.01u
B
C237
}0.5%
10k
R291
*
12uH
L204
15k
R360
XXR377
XX
L381
XX
JS378
UN2213-TX
Q206
16V
10u
C296
*
XX
C382
APC
XX
D201
4700p
B
C217
JL236
100
R295
*
JL305
8200
R299
*
2SB709A-QRS-TX
Q201
1k
R228
0.1u
F
C240
10k
R350
470
R202
*
HC37
0.001u
C371
B
AUDIO_RF_IN
6800
R205
0.01u
C246
ACK
UN2115-QRS(TX)
Q376
1.5M
R368
150p
CH
C227
220
R222
XX
Q204
50V 4.7u
C364
R359*
47k
4700p
C202*
JL203
0.022u
C352
B
JL222
JL335
JL206
11P
CN201
*
1
AUDIO CH2
2
AUDIO COM
3
AUDIO CH1
4
FE
5
FE
6
SP CH1
7
SP COM
8
SP CH2
9
LP CH1
10
LP COM
11
LP CH2
CL295
XX
R381
RFENV
0.1u
F
C241
JL214
16V
47u
C250
0.1u
F
C228
10u
C359
16V
MESEC
QVD
XX
R292*
50V
1u
C362
1u
B
C253
JL333
XX
C232
PP
C375
150p
JL238
0.022u
C231
10k
R376
PB
CL231
JL337
0.60mm
JS304*
16V
10u
C245
JL225
0.60mm
JS306
JS379
0.01u
B
C365
330
R372
0.1u
C236
0.033u
C206
R378
10k
R351
3300
0.01u
C239
10uH
L214
JS201
JL220
47k
R363
PS331
0.1u
F
C222
JL213
XX
R384
HA22
XX
C380
2200p
C255
*
22u
C354
16V
SB-D3244
T371
1
2
3
4
5
6
7
8
22p
CH
C210*
D_GND
2700p
C357
CL291
NTSC
NA8
10k
R375
3579.545kHz
X202
27k
R356
0.1u
F
C379
0.22u B
C291
*
JL212
50V
3.3u
C243
JL332
R209
XX
XX
L380
*
50V
4.7u
C358
22p
CH
C211
*
XX
R212*
330
R371
PET
220p
C373
XX
JS307
2SD601A-QRS-TX
Q373
JS305
0.60mm
50V
4.7u
C229
XX
C263
JL224
UN2213-TX
Q210
XX
R367
50V
1u
C360*
XX
JS202
16V
47u
C378
XX
L371
JS203
JL235
4.7
R380
10uH
L206
JL223
100
R214*
4700p
C254
*
JL209
1u
B
C216
2200
R385*
22p
CH
C212*
JL205
2.2M
R219
4700
R218
JL331
10uH
L202
JL291
RFSWP
JL202
XX
Q202
XX
L351
0.001u
C219
GND
JL237
JL217
HC36
22p
CH
C213
*
RECP
4700p
C257
*
1u
B
C224
*
1k
R224
JL292
2200p
C204
*
XX
C383
150p
CH
C264
CN204*
6P
1LP CH2
2LP COM
3LP CH1
4SP CH2
5SP COM
6SP CH1
IC201
HA118217F
123456789101112131415161718192021222324252627282930
31 32 33 34 35 36 37 38 39 40 41 42 43 44 45 46 47 48 49 50
515253545556575859606162636465666768697071727374757677787980
81828384858687888990919293949596979899100
GND
D_GND
XX
X201
JS208
XX
C259
XX
*R203
XX
Q205
HT43
CN6
V81
V17
POWER
VV21
HC37
HT42
HC36
V82
CN7
VV46
V51
CN7
B34
V52
AFENV
VV21
HC35
B34
VV35
V97
V76
V16
POWER
V64
VR62
VV26
CN6
HC37
V50
HA21
A99
V64
V16
VR62
V84
VV37
VV35
HT42
HC36
V82
A4
VV26
HC35
AFENV
B33
V76
V97
HA22
V81
A99
V84
A4
VV37
AV-SS
HA21
VV44
VR63
B33
V76
V51
VV44
HT43
V50
VV46
HA22
V52
SW5V
A4
BIASGND
BIASGND
BIASGND
AUGND
DGND
DGND
V17
VR63
GND
GND
P 0.0
P 0.3
2.5
NAOUT
TO POWER
R-24.9
11.9V
2.5
ANGND
TO HIFI
P 4.9
P 0.3
MOD_AU
R11.8
TO IN/OUT
2.5
P 0.7
P11.9
NAOUT
2.5
R 0.1
R-24.8
BIAS ERASE
ANGND
OSC
R-20.6
0.315A
R 0.1
2.8
2.4
P11.9
P 0.0
11.9
P 0.5
R11.5
R 2.6/
P2.4
0.3
NAIN
R11.5
AUDIO REC
R-0.4
P 0.3
BIAS ERASE
P 0.3
AUDIO CH2
OSC
P 0.0
4.9
AUDIO CH1
R 0.3
R 4.9
2.5
NAIN
R11.4
LP CH1
SP CH1
AUDIO CH1
AUDIO CH2
LP CH2
SP CH2
LP CH1
LP CH2
SP CH1
SP CH2
CHECK
(JIG)
MA-402 (2/8)
(SEE PAGE 4-13)
MA-402 (5/8)
(SEE PAGE 4-21)
MA-402 (2/8)
(SEE PAGE 4-13)
MA-402 (8/8)
(SEE PAGE 4-27)
MA-402 (6/8)
(SEE PAGE 4-23)
MA-402 (4/8)
(SEE PAGE 4-19)
2.2
1.3
2.4
R0/P3.8
2.4
2.4
2.5
2.4
4.9
R0.1/P2.2
0.3
R0.1/P2.2
R0.1/P2.2
R0.1/P2.2
4.9
0.1
R0/P1.7
2.5
2.4
4.9
0
R1.9/P1.3
R1.9/P1.3
R2.6/P3
R3.3/P0.6
2
2.3
3
2.7
2.2
1.9
3
2.1
1.4
2
2.8
1.9
2.8
2.8
3
4.9
0.1
4.9
3
4.9
4.9
2
4.9
2.5
2
0.4
2.9
2.3
1.8
4.9
1.1
0.2
0.2
4.6
4.6
2.6
2.5
2.3
4.1
1.9
1.8
2.7
2.5
4.9
R0.3
P 0.0
IC291
IC201
B+
B+
B+
B+
B+
B+
B+
B+
B+
1
2
3
4
5
6
78
9
10
11
12
13
12
15
14
17
15
16
1
2
3
4
5
6
VIDEO REC/PB AMP
VIDEO INPUT SELECT
Y/C PROCESS
NORMAL AUDIO PROCESS
B+
B+
B+
B+
B+
B+
DRUM FF IN
CK DET
DISCRI
ENV OUT
GND
SP CH2(+)
SP CH2(-)
SP CH1(-)
SP CH1(+)
VCC
SP CH1(+)
SP CH1(-)
SP CH2(-)
SP CH2(+)
AUDIO ALC FILTER
AUDIO VCC
S/VHS
REC Y+C OUT
MUTE
AUDIO PB
EQ OUT
AUDIO PB IN (-)
AUDIO PB IN (+)
AUDIO PB EP SW
AUDIO REC OUT
AUDIO GND
B.G.
AUDIO LINE IN3
AUDIO LINE IN2
AUDIO LINE IN1
AUDIO BYPASS
AUDIO LINE OUT
VCC
MAIN EM OUT(REC)
MAIN DEEM IN(PB)
MAIN EM IN(REC)
MAIN DEEM OUT(PB)
S-DET
E-PEAK
G-EQ
CLAMP DRIVE
Y-CCD DRIVE
ME ALC/PB FM AGC
MAIN CLAMP IN
ME FBC(REC)
APL(PB)
Y-CCD CLMAP
Y-CCD LPF OUT
CCD ADJ
FROM Y-CCD
GND
LINE IN3
AGC DET
LINE IN2
LINE IN1
AV TAB
AV TAB
AV TAB
CCD C-OUT
CCD VCC
CCD MODE COUNT IN
CCD TAB
CCD Y-OUT
CCD TAB
CCD Y-IN
CCD TAB
CCD TAB
CCD CLK IN
CCD GND
CCD C-IN
AV TAB
AV TAB
AV TAB
SYMC SEP OUT
SP/EP
PB C OUT
SEP C IN
MESECAM DET
PB APC/REC APC
3.58/4.43 X'tal IN
REC APC
X'tal OSD OUT
ACC DET
3.58 X'tal IN
CR-DET
CCD SIG 2fsc OUT
GND
DO OUT
LC-VCP
2fsc VCO DET
KILLER OUT
IIC DATA
IIC CLK
VCC
C-CCD DRIVE
LEVEL DET
C-CCD FB-IN
CCD CONT
VIDEO OUT ALC
PB C-OUT
COLOR IN
VIDEO OUT FBC
Y OUT
SQ IN
AU GND
MA-402 (7/8)
(SEE PAGE 4-25)
7
CTL HEAD
AUDIO REC/PB
HEAD
AUDIO ERASE
HEAD
FULL ERASE
HEAD
CHROMA Y Y/CHROMA
AUDIO
SIGNAL
REC
PB
VIDEO SIGNAL
0
R3.6/
P2.1
2.7
4.5
2.4
2.1
R2.7
/P1
1.8
2.3
2.1
2.8
2.8
4.7
4.7
R1/
P2.6
0
4.7
4.7
4.7
2.1
3.130.1
2.3
2.1
1.9
2.8
2.4
0.1
BUFFER
AFC FILTER
SWITCH
INVERTER
Q203,Q204
PAL/NTSC SWITCH
4.9
2.3
1.6
0
5
5
0
1.2
0
4.9
0.1
R3.6/P2.1
R4/P1.5
4.9
0
5
BUFFER
REC TRAP
SWITCH
Q372,Q373
HEAD SWITCH
HEAD CONTROL
SWITCH
SWITCH
BIAS ERASE
OSC
SWITCH
EXCEPT ED212
EXCEPT ED212
EXCEPT
ED212
EXCEPT
ED212
EXCEPT
ED212
EXCEPT
ED212
EXCEPT
ED919KR
EXCEPT
ED212
ED212KR/
ED919TW/LF1
EXCEPT
ED212/ED818
EXCEPT ED818
EXCEPT
ED212/ED818
ED919/LF1
EXCEPT
ED212
ED717
EXCEPT
ED818/
ED919TW
ED818/ED919/LF1
ED212/ED717
ED717
ED212/ED818
ED212/
ED717/ED818
ED212/
ED919TW/LF1
REC/PBREC
SIGNAL PATH
Ref.signal
PB
ED717/
ED919/LF1
ED717
ED717
EXCEPT ED818/
ED919TW
ED717
MA-402 BOARD(1/8)
XX MARK:NO MOUNT
NO MARK:REC/PB MODE
R :REC MODE
P :PB MODE
VIDEO, AUDIO
MA-402 (1/8)
Page 36
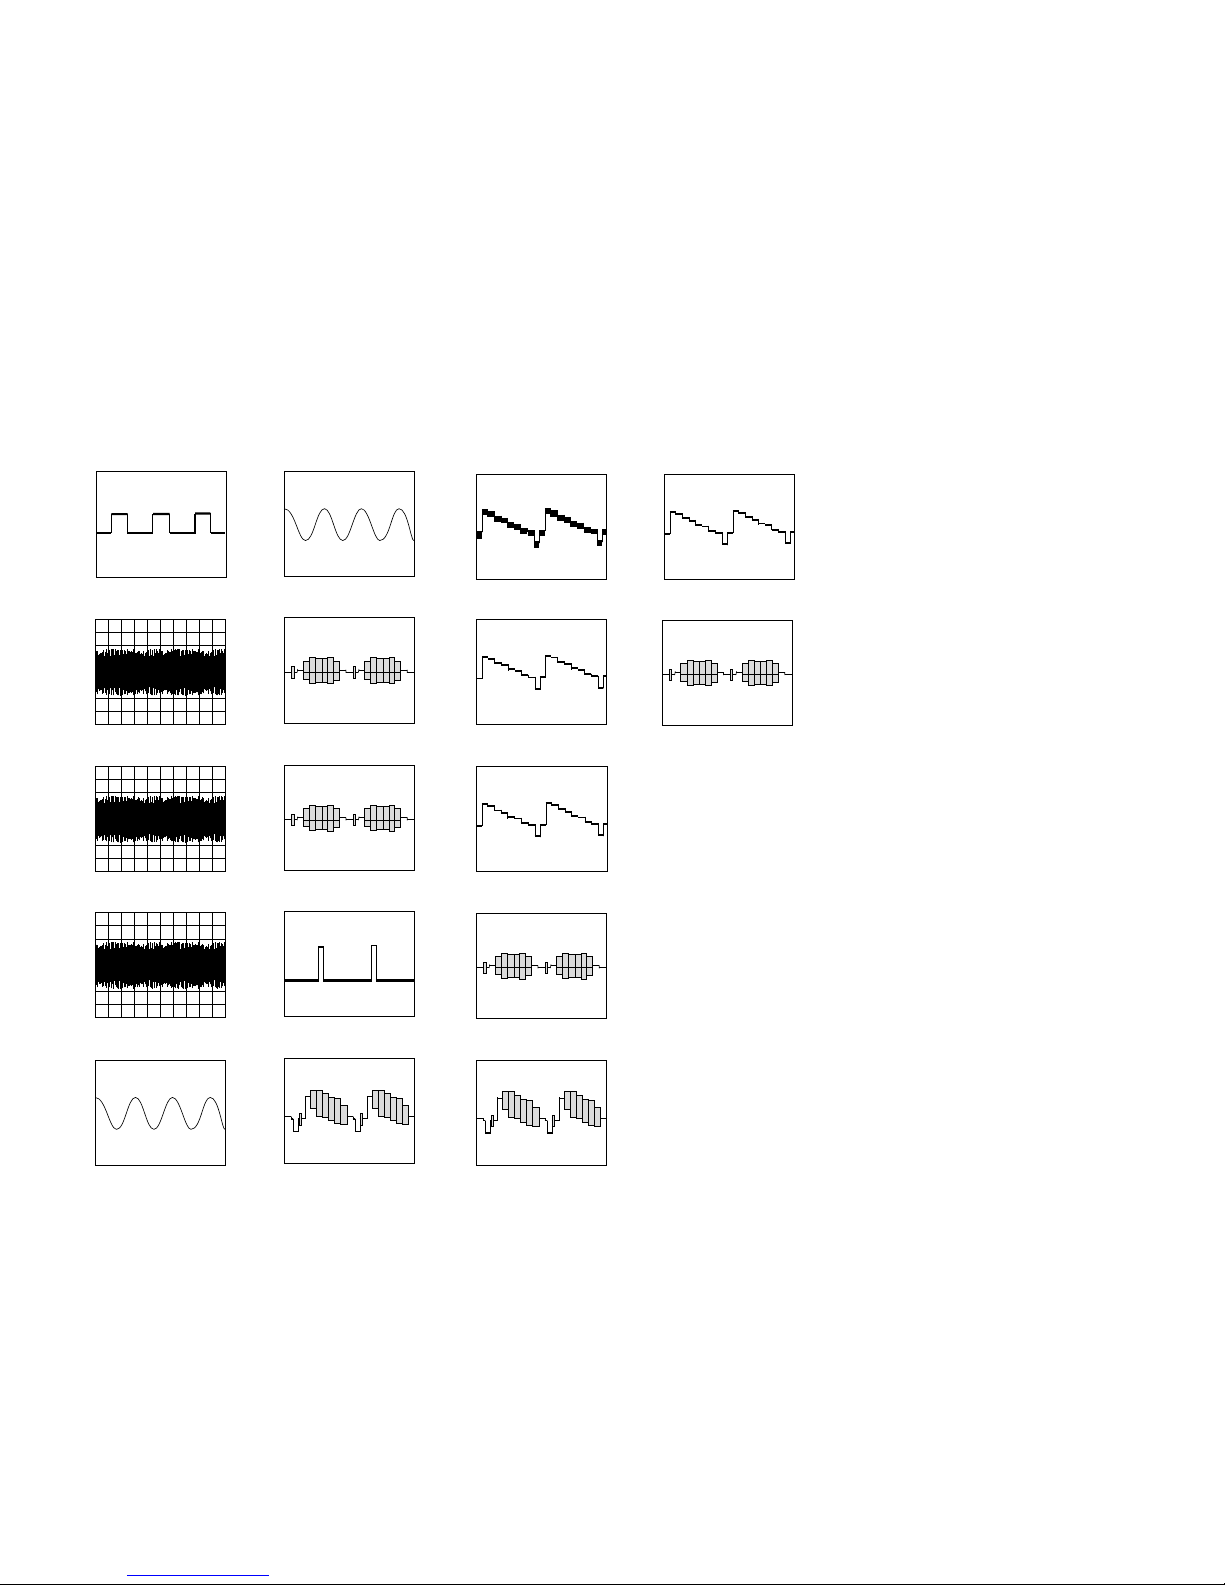
A
123456789101112
13 14
B
C
D
E
F
G
H
I
J
SLV - ED212/ED717/ED818/ED919/LF1
1 IC201 ia REC/PB
5.3 Vp-p (H)
2 IC201 ih, il REC
40 mVp-p (H)
3 IC201 ul PB
720 mVp-p (H)
4 IC201 uk PB
640 mVp-p (H)
5 IC201 ug REC/PB
496 mVp-p (4.43 MHz) (PAL)
6 IC201 ua REC/PB
608 mVp-p (3.58 MHz) (NTSC)
7 IC201 y; REC/PB
320 mVp-p (H)
8 IC201 tk REC/PB
REC: 512 mVp-p (H)
PB : 584 mVp-p (H)
9 IC201 t; REC/PB
4.6 Vp-p (H)
q; IC201 e; REC/PB
1.1 Vp-p (H)
qa IC201 wh REC/PB
REC: 512 mVp-p (H)
PB : 584 mVp-p (H)
qs IC201 qk, ql, wd REC/PB
REC: 472 mVp-p (H)
PB : 504 mVp-p (H)
qd IC201 wa REC/PB
392 mVp-p (H)
qf IC291 w; PB
152 mVp-p (H)
qg IC291 4, qk REC
2.1 Vp-p (H)
qh IC291 qk PB
1.9 Vp-p (H)
qj IC291 4 PB
2.2 Vp-p (H)
MA-402 BOARD (1/8)
(VIDEO, AUDIO BLOCK)
4-11 4-12
Page 37
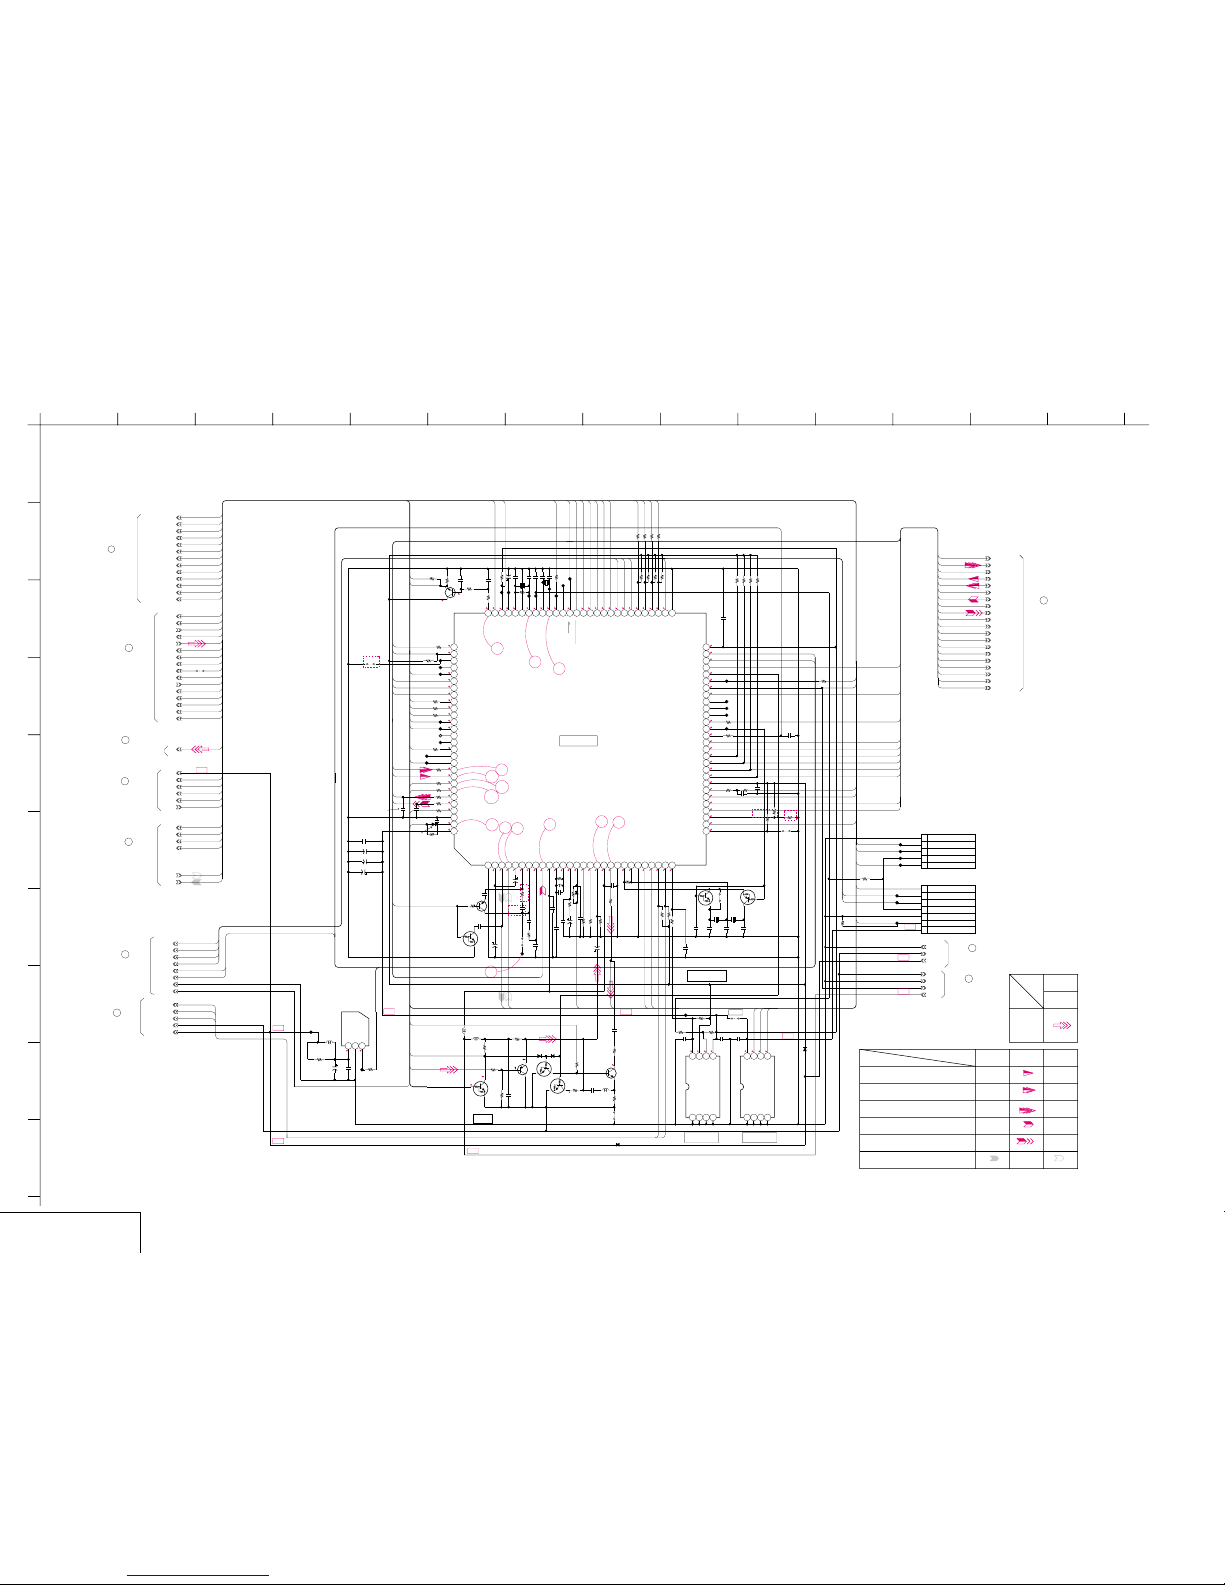
A
123456789101112
13 14
B
C
D
E
F
G
H
I
J
SLV - ED212/ED717/ED818/ED919/LF1
4-13 4-14
SYSTEM CONTROL
MA-402 (2/8)
MA-402 BOARD(2/8)
XX MARK:NO MOUNT
NO MARK:REC/PB MODE
R :REC MODE
P :PB MODE
MA-402 (SYSTEM CONTROL) SCHEMATIC DIAGRAM
– Ref. No: MA-402 Board; 1000 series –
• See page 4-5 for printed wiring board.
JL119
0.01u
C160
25V
47u
C114
JL126
100
R172
XX
R176
32.768kHz
X102
10k
R108
470
R175
7p
C163
2.2u
F
C151
JL118
470
R112
JL136
RFENV
JS191
XX
JS103
XX
X152
0.22u
C167
0.1u
B
C143
CTL+
C102
XX
470
R160
UN5V
0.1uC105
10k
R124
680
R174
XX
CN104
1 MD0
2 SO1
3SI1
4 RESET
5 GND
6 FLASH WRITE ENABLE
7 VCC
FULERA
TV/VTR
XX
Q152
L173
15uH
1SS119-25TD
D151
XX
C197
JL139
3300p
C107
PLLDAT
AMUTE
10k
R192
F.MONO
JL117
1k
R109
JL503
470
R451
SW2/MAIN/SAP
TUNER_MUTE
JL125
DGND
2SB709A-QRS-TX
Q172
0
JS151
SFH5110-40
IC502
1
OUT2GND3VCC
10k
R162
0.068u
C053
JL129
NTSC
SAP_BILL_OUT/SECON
10k
R132
0.1u
F
C169
XX
C166
NAPB
SDA
470
R115
XX
R191
MPG06D-6052PKG3
D403
XX
Q151
100k
R154
50V4.7u
C154
1M
R155
MESEC
0.1u
B
C113
VDAT
POWER
JL132
PLLCLK
UN2211-TX
Q171
0.60mm
JS102
SW1/STEREO_OUT
0.01u
C155
OSD
10k
R194
1kR163
10k
R131
0.60mm
R106
10k
R110
JL134
4700
R177
20p
CH
C110
1/4W
47k
R526
0.22u
B
C112
JL130
0.1u
C193
JL110
10k
R123
R103
XX
0.01u
B
C164
22uH
L151
0.22
C103
JL123
XX
Q175
50V
4.7u
C152
JL113
1k
R107
JL131
1SS119-25TD
D100
0.01u
B
C142
1k
R171
VOUT
MPG06D-6052PKG3
D103
JL122
MM1256AFBE
IC141
1
GND2NC3NC4NC
5
VCC 2
6
OUT 2
7
VCC 1
8
OUT 1
100kR129
0.1u
F
C171
47k
R119
22p
C100
220k
R142
PB
JL124
1500p
C192
0.01u
B
C456
470k
R143
JL128
33k
R100
RFSWP
PAL
1k
R126
JL137
X151
14.318MHz
XX
D172
12p
CH
C161
SCK
1k
R130
100
R152
JS101
JL133
0.22u
B
C072
1k
R164
10k
R158
22uH
L171
10k
R102*
2SD601A-QRS-TX
Q153
470k
R151
IC142
M24C08-WMN6T(A)
NC1NC2NC3NC
4
DATA
5
CLK
6
WRITE CONT
7
VCC
8
CSYNC
JL140
AFT
SW5V
CTL-
XX
R173
10MHz
X101
ACK
AFENV
20p
CH
C111
VCLK
JL135
XX
D171
RECP
10k
R101
*
XX
Q192
47k R118
56p
CH
C172
0.01u
B
C141
10k
R193
16V
47u
C194
10k
R105
XX
L174
7p
CH
C162
XX
Q191
*
0.1u
C101
F
0.60mm
JS171
10k
R165
0
R166
UN5V
XX
Q173
APC
0
R167
XX
R178
JL138
JL115
47k
R120
1k
R159
22uH
L172
47k
R125
5P
CN105
1 GND
2 DATA
3 CLK
4 RESET
5 WRITE CONT
470
R113
15p
CH
C109
R153
4700
4700
R161
JL501
UN2211-TX
Q174
QVD
10V
100u
C455
33k
R156
0.01u
C106
B
0.1u
C168
15p
CH
C108
GND
1M
R133
JL120
JL192
XX
C173
47k
R116
JL121
220k
R144
R122
1M
10k
R127
XX
C159
ENABLE
AF_REC_P
JL116
10p
C165
16V
22u
C195
1k
R117
10k
R157
10V
470u
C104
JL127
R057
10k
AFSWP
470
R114
1k
R121
10k
R128
JL100
22k
R111
XX
C191
JL452
1500p
C196
JS104
0.60mm
100
R104
GND
CAM
DRUM_PWM
DRUM_QR
DRUM_PG
CAP_RVS
CAP_FG
CAP_QR
CAP_PWM
CAP_TRQ_PWM
REC_PROOF
MODE4
MODE3
MODE2
MODE1
T_REEL
S_REEL
END_LED
S_SENS
DRUM_FG
T_SENS
FUNC_KEY_1
FUNC_KEY_2
PCO
FLD_CS
SCK1
SO1
SI1
ETR1
ETR2
POWER_FAIL
PCO
D_5.2V
SDA
SCK
D_GND
POWER
GND
D_GND
SDA
SCK
IC101
12345678910111213141516171819202122232425262728
29 30 31 32 33 34 35 36 37 38 39 40 41 42 43 44 45 46 47 48 49 50 51 52 53 54 55 56
57585960616263646566676869707172737475767778798081828384
858687888990919293949596979899100101102103104105106107108109110111112
M103
T83
HT62
HT61
FL65
FL63
FL58
V59
V102
V100
FL64
M38
M39
S43
M9
M104
V18A
A96
V109
V111
A89
V105
V60
V59
A72
A71
V34
V84
H106
H35
V19
C3
C4
V102
V100
V60
T68
T93
T69
T25
T83
T95
T94
HT61
HT62
H106
V109
V67
V18A
V17
C4
T66
V67
T66
V70
HT51
HT61
C3
T95
T94
T93
T25
M33
M37
M42
M92
M49
M91
M90
M45
A71
A72
HT51
T66
V34
T68
V70
A89
M86
V105
H35
V67
V24
V24
HT62
T69
V84
V19
C53
C53
A96
V17
V97
V97
V67
S27
POWER
M40
M41
S28
S54
S55
M108
V30
V30
M107
HT61
HT62
FL65
FL64
HT82
M85
M45
M103
M90
M9
M91
M108
M85
M86
M40
M39
M33
M38
M37
M42
M41
M49
M32
M92
M104
M33
V50
K1
S28
S27
M107
FL65
FL64
FL63
FL58
S55
S54
UN5VBCAP
UN5VBCAP
UN5VBCAP
UN5VBCAP
CN2
HT42
HT43
V111
HT74
V111
HT56
HT57
POWER
UN5V
V50
HT51
HT74
GND
GND
DGND
DGND
DGND
DGND
DGND
DGND
HT82
OSD
SYSCON
RESET
CTL(-)
SVSS
FLD CS
C.KILLER DET
Vss
TU AFT
CAM
MDO
CAP TRQ PWM
CAP FG
AFCosc
SECAM DET
AF SWP
32kHz X'tal
ETR 2
CVin2
CVout
REC PROOF
CAP QR
Vss
SAP\BILL OUT\SECAM ON
T REEL
OSD CTL
RF SWP
SCL0
POWER CONT
APC PWM
32kHz X'tal
4fsc out
AUDIO DUB
10MHz X'tal
DEST1
SCL1
TV / VTR
CAP PWM
CTL SMT
CTL FB
RESET
sO1
SCK1
AVcc
DRUM PG
HEAD CLOG LED
REMOTE CON
PB
Cap Connect to Vss
MODE 1
AVSS
AFC LPF
RR LED
TA MUTE\OSD MIX
AUDIO RF
Vcc
REC P
FULL ERASE
POWER FAIL
Flash Write Enable
SDA0
PLL DATA
QVD
SEARCH LED
APC Error
10MHz X'tal
MODE 4
F.MONO\PAL
NA PB
Drum QR
MAIN\SAP\SW2
AFCpc
CAP RVS
MESECAM DET
CVin1
Csync/Hsync
Func. Key 2
SVCC
CTL(+)
SAT. SYNC. LED
ETR 1
IN SELEC
VIDEO RF
PLL CLOCK
BLUE BACK
CTL AMP(0)
A Mute
Vss
Vcc
4fsc in
STEREO OUT\SW1
S REEL
WRITE CONT
SDA1
OSDVcc
CTL BIAS
DRUM FG
END LED
S SENS
SI1
AF REC P
T SENS
DEST2
VLPF/Vsync
TU ENABLE
CSync
MODE 2
DRUM PWM
OSDVss
Func. Key 1
MODE 3
CTL REF
HD642917Y
MA-402 (5/8)
(SEE PAGE 4-21)
MA-402 (1/8)
(SEE PAGE 4-9)
MA-402 (6/8)
(SEE PAGE 4-23)
MA-402 (4/8)
(SEE PAGE 4-19)
MA-402 (1/8)
(SEE PAGE 4-9)
MA-402 (8/8)
(SEE PAGE 4-27)
MA-402 (3/8)
(SEE PAGE 4-17)
MA-402 (3/8)
(SEE PAGE 4-17)
MA-402 (7/8)
(SEE PAGE 4-25)
2.5
2.5
2.5
2.5
2.5
2.6
2.4
4.4
4.9
1.9
1.9
2.1
1.7
0.2
2.6
1.7
4.9
2.1
2.5
2.4
0.2
4.6
5.3
5.3
5.3
5.2
2.7
3.7
2.5
2.5
0
3.1
5.4
4.7
4.7
5.1
5.2
2.3
2.6
5.2
5.2
5.2
5.0
5.0
5.2
3.9
5.1
5.1
5.0
5.0
4.6
0.4
5.2
5.1
1.5
1.9
2.1
4.8
2.6
2.5
3.3
5.1
3.8
5.0
0.1-5
0.1-5
0
0
000
5
R0.1/
P11.8
0
2.7
0
4.4
2.7
2.6
0.2
0.5
4.8
0
4.1
0.1
5.1
1.8
5.2
0.1
R5/P0
2.8
3
2.7
2.7
5.3
5.4
4.1
5.2
5.2
5.2
5.0
5.0
0.4
2.5
1.2
1.7
5.1
4.8
5.2
7.0
2.4
5.4
0
IC101
IC141
IC142
POWER FAIL DET
RESET PULSE GENERATOR
EEP ROM
SERVO/SYSTEM CONTROL
OSD
8
1
9
10
3
MA-402 (7/8)
(SEE PAGE 4-25)
11
12
14
15
13
B+
B+
B+
B+
B+
B+
B+
B+
B+
B+
INVERTER
VIDEO
BUFFER
BLUE BACK
SWITCH
OSD MIX
8
7
6
9
10
11
12
13
1
2
3
4
5
14
REC REC/PB PB
DRUM SPEED SERVO
DRUM PHASE SERVO
DRUM SERVO(SPEED AND PHASE)
CAPSTAN SPEED SERVO
CAPSTAN SERVO (SPEED AND PHASE)
REF. SIGNAL
PB
VIDEO
SIGNAL
Y/CHROMA
SIGNAL PATH
ED717/
ED818/
ED919
ED212
LF1
EXCEPT
LF1
EXCEPT ED212
Page 38
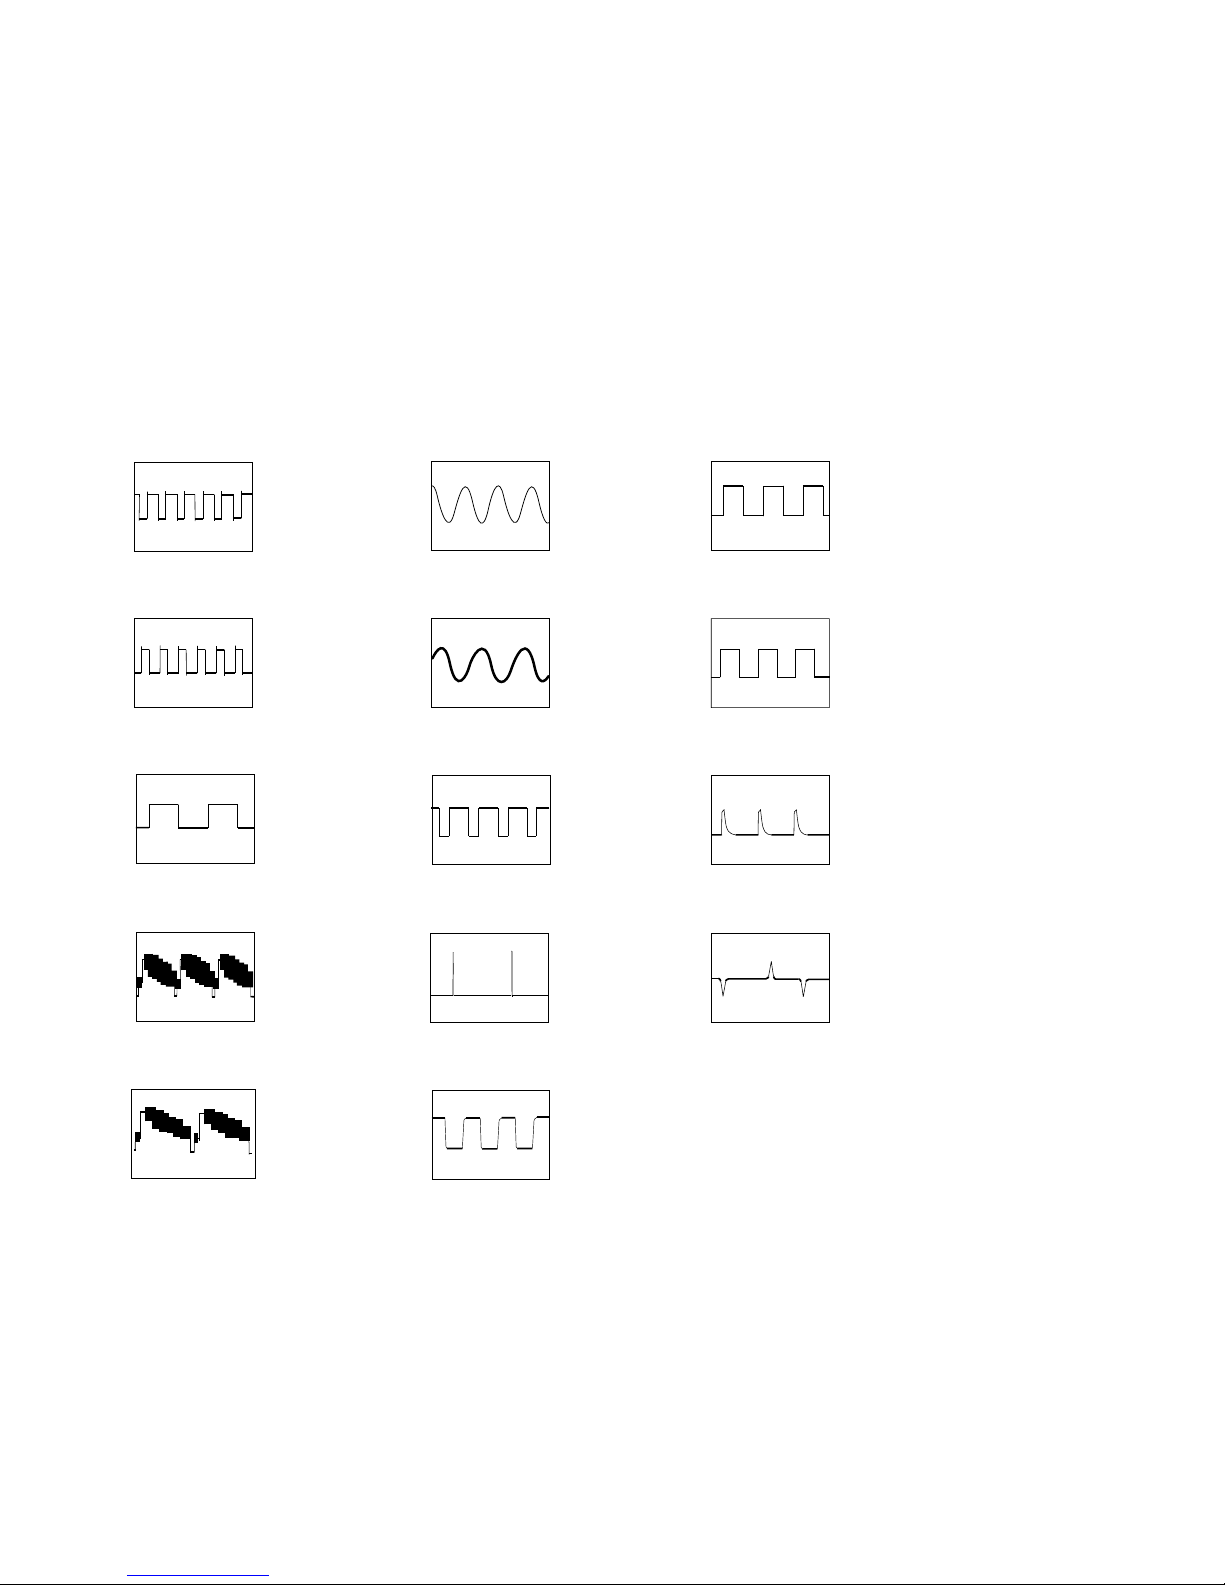
A
123456789101112
13 14
B
C
D
E
F
G
H
I
J
SLV - ED212/ED717/ED818/ED919/LF1
MA-402 BOARD (2/8)
(SYSTEM CONTROL)
4-15 4-16
6 IC101 ug REC/PB
2.6 Vp-p (32.768KHz)
3 IC101 9 REC/PB
3.8 Vp-p
0 IC101 <z/v REC/PB
5.0 Vp-p (360Hz)
qs IC101 <z/n REC/PB
5.0 Vp-p (30Hz)
qd IC101 <zzz REC/PB
4.3 Vp-p (15.7KHz)
qf JL 192 PB
4.64 Vp-p (30Hz)
qa IC101 <z/b REC/PB
5.0 Vp-p (30Hz)
1 IC101 3 REC
4.64 Vp-p (30Hz)
2 IC101 4 REC
4.64 Vp-p (30Hz)
4 IC101 qj REC/PB
2.36 Vp-p (15.7 KHz)
5 IC101 ql REC/PB
2.16 Vp-p (15.7 KHz)
7 IC101 uk REC/PB
4.3 Vp-p (10MHz)
8 IC101 if REC/PB
5.0 Vp-p (30Hz)
9 IC101 <z/c REC/PB
5.0 Vp-p (30Hz)
Page 39
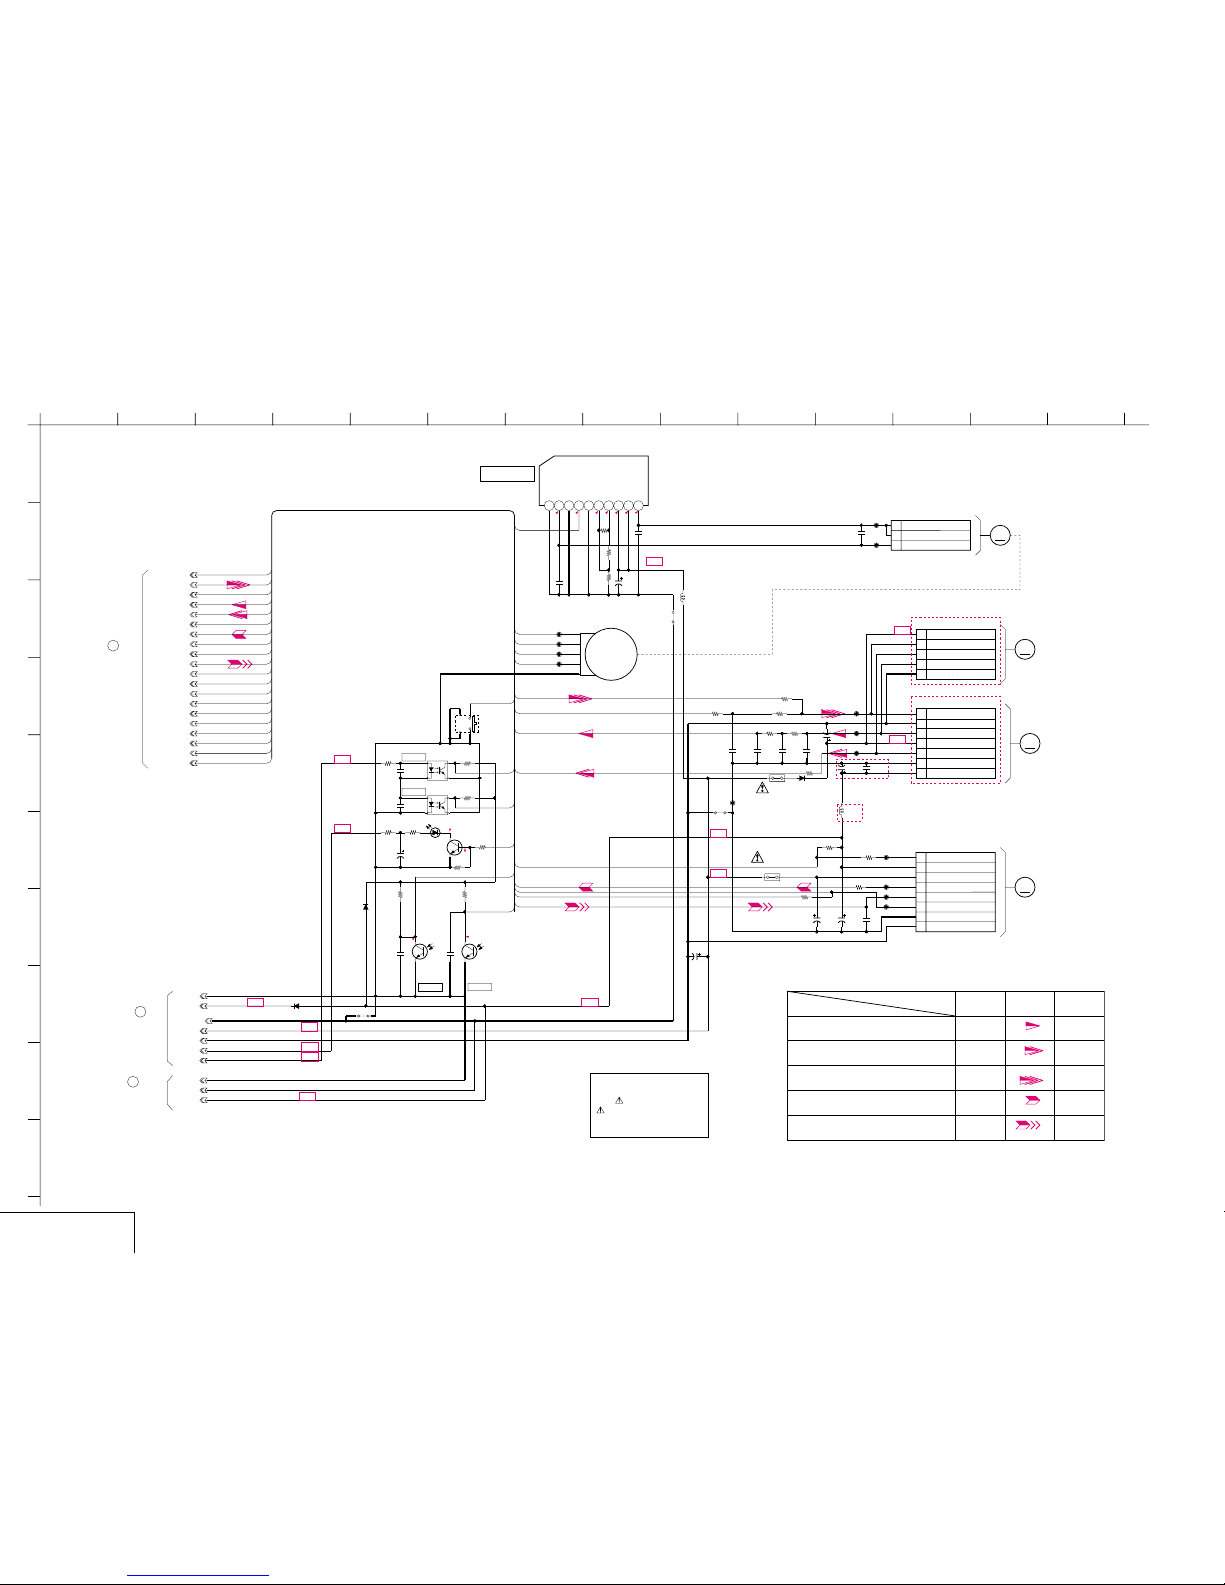
A
123456789101112
13 14
B
C
D
E
F
G
H
I
J
SLV - ED212/ED717/ED818/ED919/LF1
D5.2V
22k
R009
JS605
*S101
39k
R034
0.001u
B
C004
LB1943N
IC031
MTRGND1CAM(-)2IN13IN24VCL5VCH6V REF7VCC 18VCC 29CAM(+)
10
1/4W
47
R006
T_REEL
DRUM_QR
22k
R010
4700
R051
0.01u
B
C034
M
PT380F3
Q001
S102
DRUM_FG
2200
R003
D_GND
D_5.2V
1k
R073
5P
*
CN072
1 MTR 12V
2 D VS
3 D PG
4 D FG
5 MTR GND
JL109
47k
R072
0.1u
F
C054
1k
R074
16V
XX
C052
0.1u
F
*
C078
PT380F3
Q002
16V
220u
C031
SW_12V
CAP_PWM
3300
R053
1/4W
47
R005
2.3A
PS072
MODE2
MTR_GND
MODE3
0.001u
B
Q002
MTR_12V
220p
CH
C075
16V
47u
C051
M
0.001u
B
C002
* L071
22uH
JL054
JL052
JL053
39k
R035
D_6V
16V
47u
*
C077
GND
T_SENS
2.3A
PS071
MODE1
END_LED
2SC1815GR-TPE2
Q003
GND
XX
B
C033
3P
CN031
1 CAM (-)
2 CAM (+)
3 CAM (+)
4700
R056
CAP_TRQ_PWM
S_SENS
0.01u
B
C073
MPG06D-6052PKG3
D101
DRUM_PWM
GP3S120
PH002
M
JL001
GL528V1
D001
JL071
180k
R071
8P
CN051
1 MTR GND
2 GND
3 CAP VS
4 LIMITER
5 CAP FG
6 MTR 12V
7 D_5.2V
8 CAP RVS
S_REEL
GP3S120
PH001
47k
R007
0.001u
B
C074
GND
JL015
JL032
JS152
1k
R075
MPG06D-6052PKG3
D102
JL051
6.3V
330u
C005
4700
R052
2200
R004
JS153
47k
R008
CAP_QR
JL003
*
CN071
7P
1 D VS
2 MTR GND
3 D FG
4 MTR 12V
5 D PG
6 GND
7 UN5V
M
CAM
JL031
0.001u
B
C001
REC_PROOF
0.01u
B
C032
JL073
DRUM_PG
JL002
CAP_FG
470
R001
16V
1000u
C076
MPG06D-6052PKG3
D071
2.2uH
L072
0.047u
B
C071
MODE4
JL072
47k
R032
1kR076
25V
XX
C457
CAP_RVS
M108
M91
MTR_GND
MTR_12V
M92
M86
M42
M38
M32
M104
M103
M38
M107
M33
M39
M32
GND_3
GND_3
M85
M40
M107
M41
M49
M90
M108
M37
M45
M9
M39
M9
SW_12V
SW_12V
M33
M45
K2
M104
M103
M41
M40
MTRGND2
M49
M85
M86
M91
M37
M42
M90
M92
DGND
GND
D_5.2V
REC REC/PB PB
DRUM SPEED SERVO
DRUM PHASE SERVO
DRUM SERVO(SPEED AND PHASE)
CAPSTAN SPEED SERVO
CAPSTAN SERVO (SPEED AND PHASE)
SIGNAL PATH
0.3
14
M901
DRUM MOTOR
B+
B+
M901
DRUM MOTOR
5
B+
B+
MA-402 (2/8)
(SEE PAGE 4-13)
MA-402 (2/8)
(SEE PAGE 4-13)
13.5
B+
16
(CAM ENCODER)
B+
B+
T SENS
2.2
6.3
M902
CAPSTAN MOTOR
S REEL
2.2
B+
B+
4.8
B+
0.4
IC031
M903
CAM MOTOR
0.3
S SENS
MA-402 (8/8)
(SEE PAGE 4-27)
CAM MOTOR DRIVER
T REEL
B+
5
13
B+
13.5
B+
ED212
ED212
ED717/818/ED919/LF1
ED212
MA-402 BOARD(3/8)
XX MARK:NO MOUNT
NO MARK:REC/PB MODE
R :REC MODE
P :PB MODE
MA-402 (SERVO CONTROL) SCHEMATIC DIAGRAM
– Ref. No: MA-402 Board; 1000 series –
• See page 4-5 for printed wiring board.
4-17 4-18
SERVO CONTROL
MA-402 (3/8)
Note :
The components identified by
mark
or dotted line with mark
are critical for safety.
Replace only with part number
specified.
Page 40
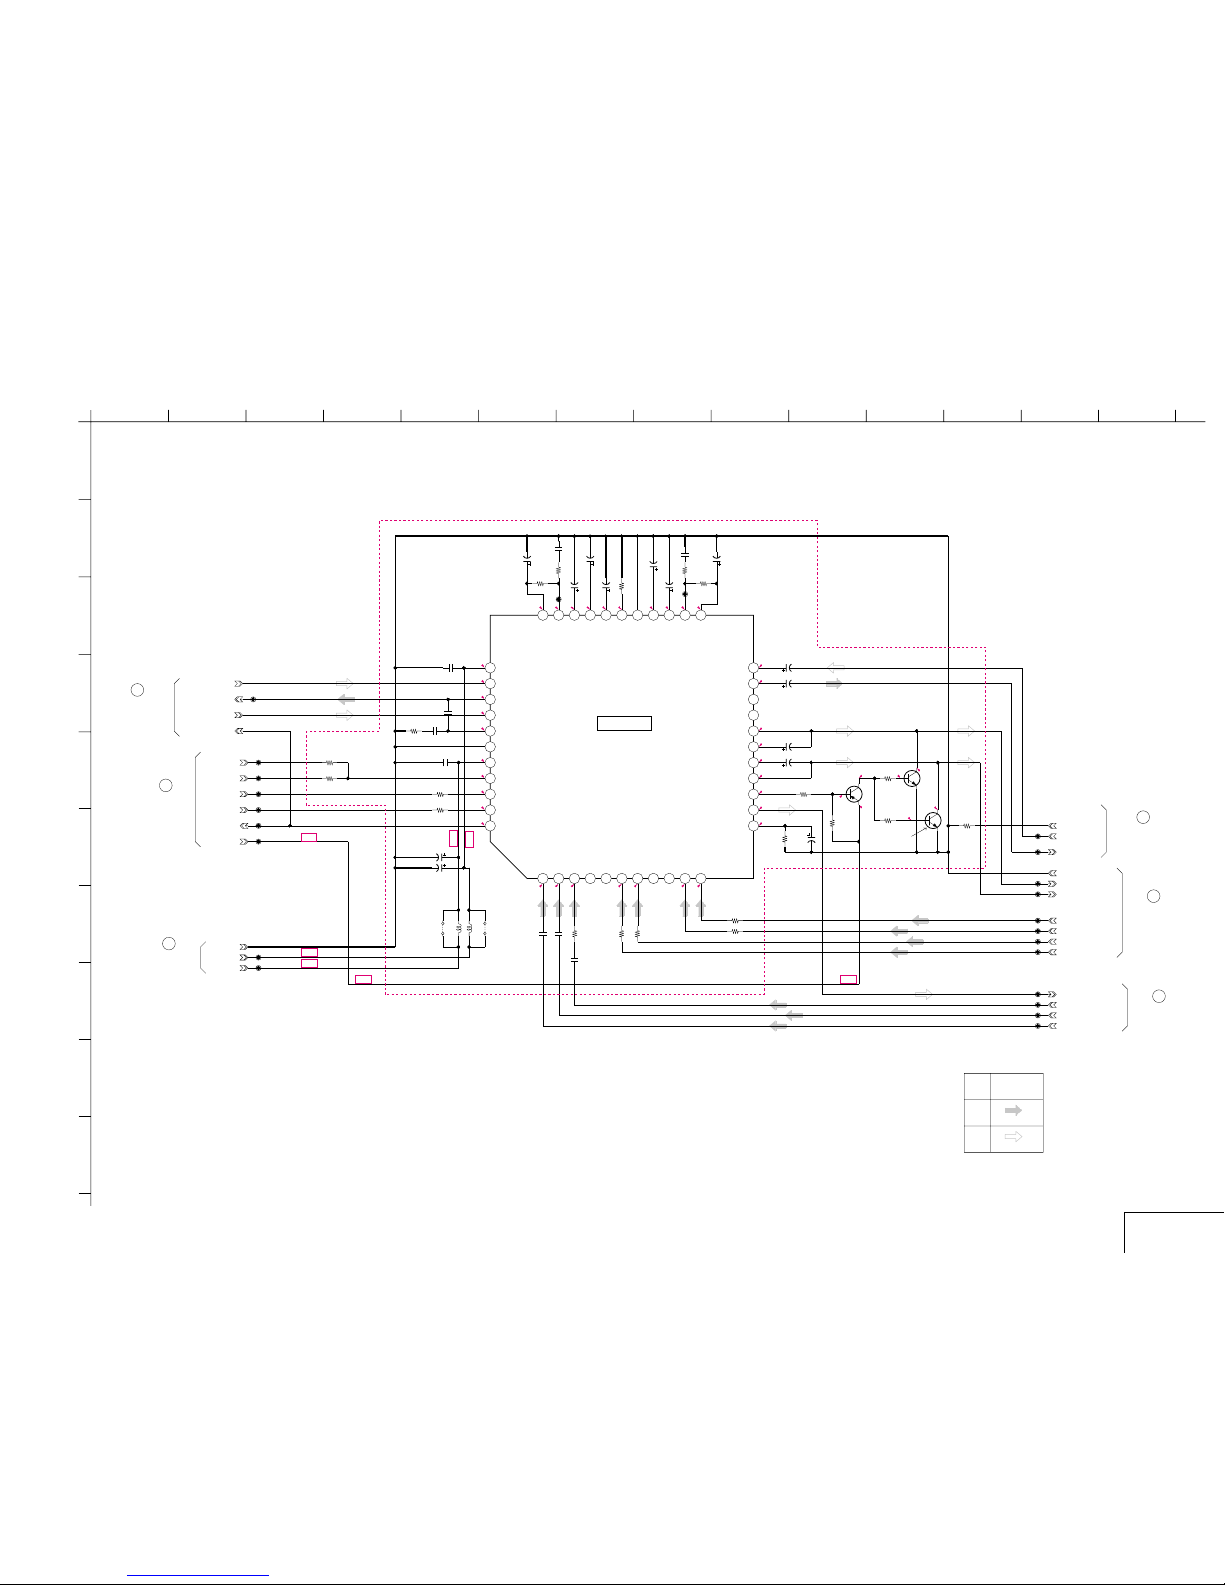
A
123456789101112
13 14
B
C
D
E
F
G
H
I
J
SLV - ED212/ED717/ED818/ED919/LF1
Hi-Fi AUDIO
MA-402 (4/8)
MA-402 BOARD(4/8)
XX MARK:NO MOUNT
NO MARK:REC/PB MODE
R :REC MODE
P :PB MODE
MA-402 (Hi-Fi AUDIO) SCHEMATIC DIAGRAM
– Ref. No: MA-402 Board; 1000 series –
• See page 4-5 for printed wiring board.
IC301
TDA9605H/N2,557
*
1234567891011
12 13 14 15 16 17 18 19 20 21 22
2324252627282930313233
3435363738394041424344
0.22u
B
C326
0.22u
B
C327
50V
1u
C317
50V
10u
C318
50V
10u
C319
50V
10u
C320
50V
10u
C322
50V
10u
C308
50V
10u
C311
50V
2.2u
C312
50V
10u
C313
50V
10u
C316
25V
47u
C310
25V
47u
C314
16V
47u
C307
0.01u
B
C304
2.2u
F
C303
0.01u
B
C324
8200p
B
C309
8200p
B
C315
27k
R306
2200
R307
39k
R308
2200
R311
27k
R312
470
R329
10k
R301
18k
R302
3.3M
R313
1k
R304
1k
R305
470
R309
470
R327
10k
R314
3300
R317
1k
R318
1k
R319
2SA1162Y-TE85L
Q301
2SC2712Y-TE85L
Q302
2SC2712Y-TE85L
Q303
HA17
HA16
HA11
HA10
HA7
HA6
HT2
HT3
HT13
AFSWP
SDA
SCK
AFENV
HIFI_GND
SW12V
SW5V
0.1u
F
C323
UN5V
HC35
HC37
JL361
JL360
JL362
JL363
JL364
JL365
JL366
JL367
JL369
JL370
JL372
JL373
JL374
JL375
AFENV
HC36
JL376
JL377
HA21
HA22
XX
L301
0.60mm
JS361
XX
L302
0.60mm
JS362
JL378
0
R322
0.22u
B
C328
HT1
JL379
JL382
JL383
CL301
JL384
AF_REC_P
JL385
470
R328
HIFI_GND
16V
XX
C306
BIAS_GND
XX
JS301
470
R310
NA IN
NA OUT
AUDIO R OUT
AUDIO L OUT
L1 AUDIO R
L1 AUDIO L
L2 AUDIO R
L2 AUDIO L
RF OUT
TU AUDIO R
TU AUDIO L
Vcc 12V
PB IN2
REC OUT
PB IN1
HM SW
Vss D
Vcc 5V
AF SWP
SDA
SCL
AF ENV
TU L
TU R
L2 L
L2 R
L1 L
L1 R
ALC
RF OUT
L1 OUT L
NA OUT
NA IN
L2 OUT R
MUTE
MUTE
L2 OUT L
L1 OUT R
MUTE
AUDIO CH2
AUDIO REC
AUDIO CH1
AF ENV
TU AUDIO MOD
TU M
L3 R
L3 L
MA 402 (1/8)
(SEE PAGE 4-9)
0
-0.6
0
-0.6
5
-0.4
4.9
3.8
3.8
3.8
3.8
3.8
3.8
3.8
0
3.9
4.5
0
6.1
6.1
0
4.6
3.8
3.9
3.9
3.9
0.8
3.9
3.9
0.8
3.9
3.9
3.9
11.7
R4.1/
P0.6
R4/
P0.6
R4.1/
P0.6
R4/P0
4.8
0.8
4.6
4.6
R0.2/
P3
MA 402 (2/8)
(SEE PAGE 4-13)
MA 402 (8/8)
(SEE PAGE 4-27)
MA 402 (5/8)
(SEE PAGE 4-21)
MA 402 (6/8)
(SEE PAGE 4-23)
MA 402 (1/8)
(SEE PAGE 4-9)
B+
B+
B+
B+
6
10
17
19
18
6
IC301
B+
B+ B+
MUTE
MUTE
MUTE CONTROL
DCFBR
EMPHR
DCR
DETR
VREF
IREF
GND
DETL
DCL
EMPHL
DCFBL
PB
REC
AUDIO
SIGNAL
SIGNAL PATH
HI-FI AUDIO
PROCESS
NO MARK:REC/PB MODE
R:REC MODE
P:PB MODE
ED818/ED919/LF1
4-19 4-20
Page 41
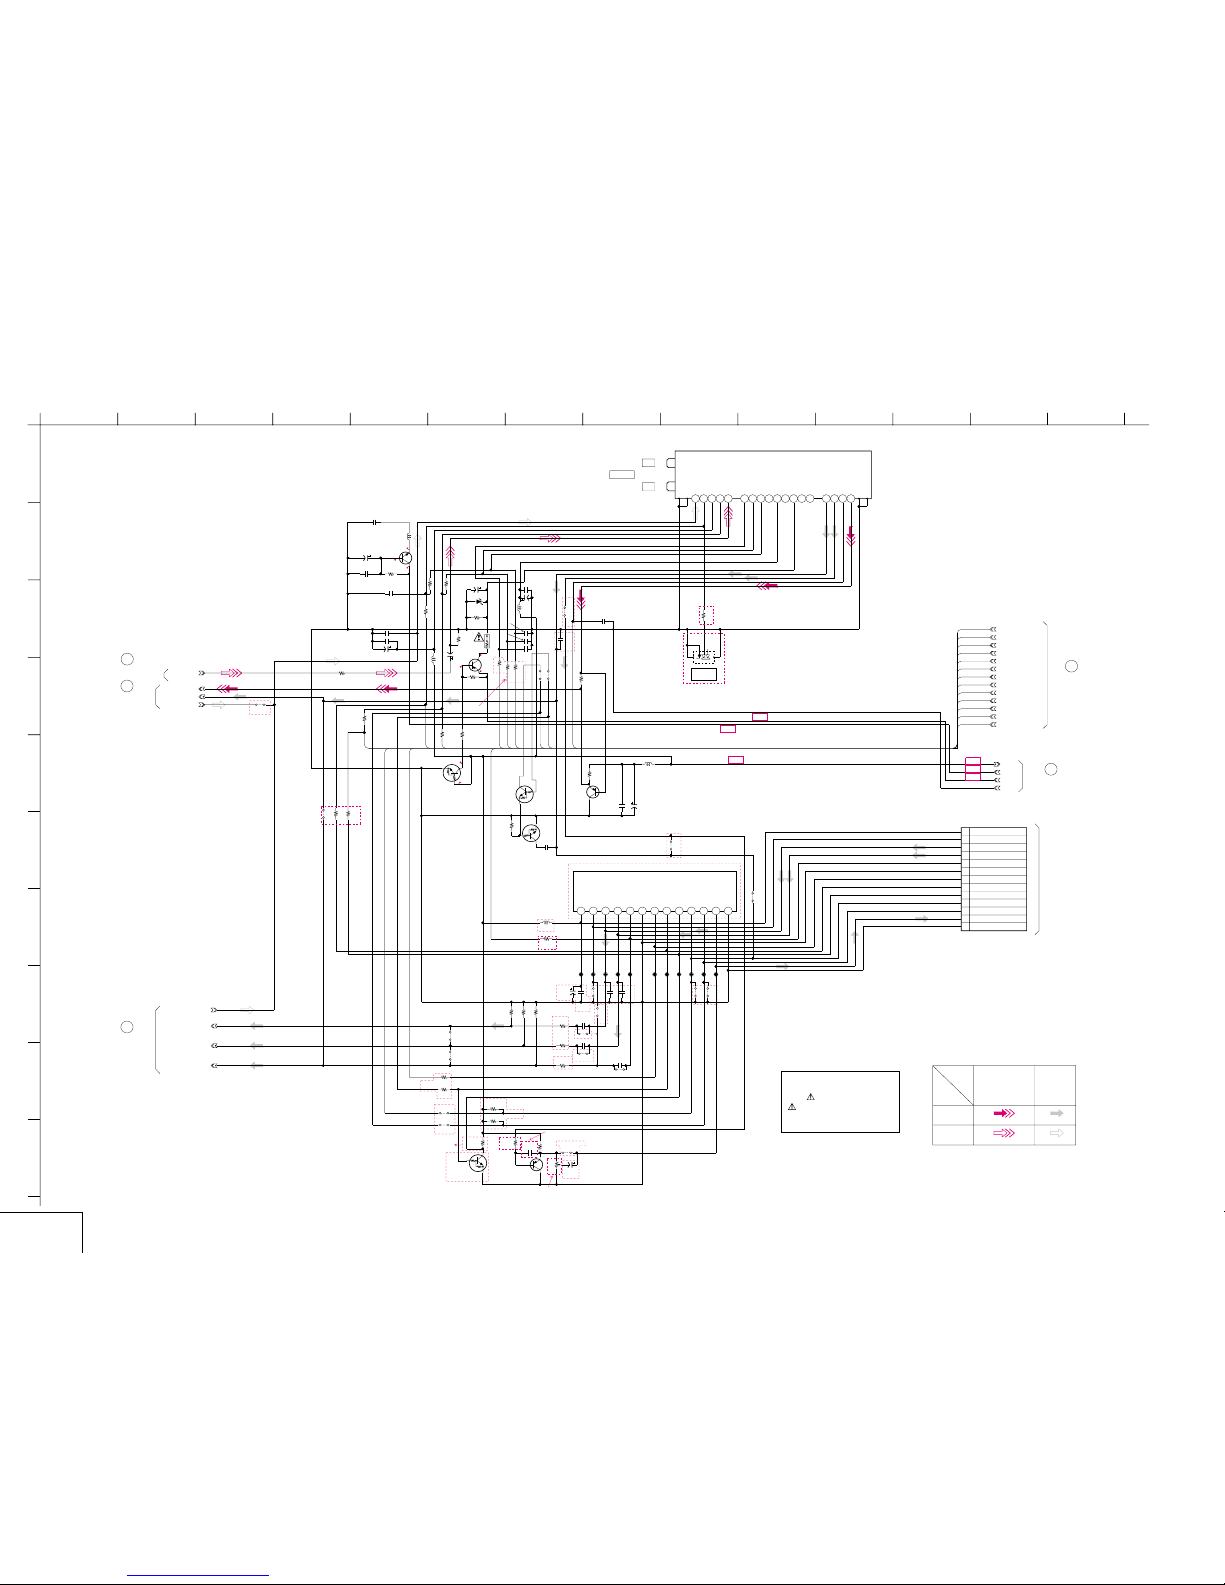
A
123456789101112
13 14
B
C
D
E
F
G
H
I
J
SLV - ED212/ED717/ED818/ED919/LF1
F.MONO
C715*
0.033u
+30V
470k
R709
TUNER_MUTE
XX
Q701
PLLCLK
XX
R701
CN701
*
XX
GND
1
SIF1
2
EXT R
3
EXL L
4
SCLK
5
SDA
6
NC
7
NC
8
NC
9
R OUT
10
L OUT
11
GND
12
VCC(5V)
13
XX
JS718
JL706
RV701*
XX
0.01u
C723*
RD33ES-T1B3
D701
0.001u
C704
SDA
XX
JS719
JL702
JL712
10uH
L700
25V
47u
C707
10uH
L705
*
XX
C701
PLLDAT
JL713
0.001u
C731*
16V
100u
C706
JL707
SCK
0
R705
XX
R717
JL710
XX
C703
R719*
XX
JL704
0.1u
C719*
SW5V
JL705
0.01u
B
C705
SW1/STEREO_OUT
0
JS723*
JL709
470
R704*
R731*
XX
50V
4.7u
C708
16V
C720*
10u
TV/VTR
0.001u
C730*
16V
100u
C722*
XX
L701
JL703
0
JS721
*
AFT
XX
Q703*
R706*
0
D_6V
SW2/MAIN/SAP
ENABLE
XX
C702
JL711
XX
R707*
JS725*
0.60mm
JS726*
0
R729*
XX
Q704*
UN2213-TX
R720
*
XX
R721
*
XX
SAP_BILL_OUT/SECON
UN2213-TX
Q706
2SA1309A-QRSTA
Q707
100k
R710
22k
R711
0
JS705*
C709
0.001u
C710
0.001u
0.001u
C711
16V
100u
C712
0.01u
C713
10uH
L702
XX
C721
XX
R725
C714
0.22u
R718
*
XX
XX
R722
XX
R723
XX
R724
C725
XX
R726*
XX
C726
XX
0
R727
*
0
R728*
C727
XX
1/4W
560
R730
0
JS734
*
JS735*
0
0
JS738
*
0
JS737*
VIDEO_OUT
HA22
XX
R702
MOD_V
XX
JS709
XX
JS711
XX
JS713
AUDIO_OUT
HT2
HT3
HT1
0
JS712*
HT13
JS701*
0.60mm
0
JS722*
0
JS720*
XX
R703
0
R708
470
R734*
470
R733*
XX
L707
16V
XX
C733
XX
C734
0
R738
XX
Q709*
XX
Q710*
XX
R739
*
XX
B
C735*
270
R740
*
XX
Q708
XX
R741*
XX
JS736
820
R742
GND
SCK
IC701*
SBX1837-51
1
VCC
2
L+R OUT3L OUT
4
R OUT
5
MUTE
6
F SAP
7
F MONO
8
MS0
9
MS1
10
SAP IND
11
ST IND
12
MPX IN
13
GND
TU704*
AUDIO IN
2
CH SW3MB 5V
4
TV/VTR
5
VIDEO IN
6
ENABLE
10
CLOCK
11
DATA
12NC13
+B 5V
14
LOCK
15
TU 32V
16NC17
IF OUT
18
AUDIO OUT
21
SIF OUT
22
AFT
23
VIDEO OUT
24
R716*
0.60mm
S701*
21
3
4
5
47
R743
T69
T25
T95
T68
T66
T94
T95
T93
T94
T83
T83
V67
T93
V70
AN5V
T66
HT56
HT57
HT56
30V
V67
V70
HT57
T68
T69
SW5V
PB
T25
AUDIO_L_OUT
AUDIO_R_OUT
AUDIO_M_OUT
AUDIO RF IN
MOD_AU
MA-402 (1/8)
(SEE PAGE 4-9)
MA-402 (6/8)
(SEE PAGE 4-23)
MA-402 (4/6)
(SEE PAGE 4-19)
MA-402 (2/8)
(SEE PAGE 4-13)
MA-402 (8/8)
(SEE PAGE 4-27)
20
2
19
21
8
B+
B+
B+
B+
B+
B+
SWITCH
32.3
31.6
32.3
SWITCH
+5V REG
5.1
5.8
5.8
IN
OUT
AERIAL
0.1
4.9
VIDEO SIGNAL
Y/CHROMA
AUDIO
SIGNAL
REC
PB
ED212/
ED717
ED818/
ED919/LF1
ED818/
ED919TW
ED818/
ED919/LF1
ED919KR/LF1
ED818/ED919TW
ED212/ED717
ED919KR/LF1
ED818/
ED919TW
ED919KR/LF1
ED919KR/LF1
ED919KR/
LF1
ED818/
ED919TW
ED818/
ED919TW
ED818/
ED919/LF1
ED818/
ED919/
LF1
ED818/
ED919/LF1
ED818/ED919TW
ED818/
ED919/LF1
ALPS AR/BR/TW/KR
CH4
CH3
RF SW
ED212/ED717/
ED919KR/LF1
ED818/
ED919TW
ED818/
ED919TW
ED818/
ED919TW
ED818/
ED919/
LF1
ED212/ED717/
ED919KR/LF1
ED212/ED717/
ED919KR/LF1
ED919KR/
LF1
ED818/
ED919TW
EXCEPT ED818/ED919TW
NK-11 BOARD
CN001
(SEE PAGE 4-29)
4-21 4-22
TUNER
MA-402 (5/8)
MA-402 BOARD(5/8)
TUNER (TU BLOCK)
XX MARK:NO MOUNT
NO MARK:REC/PB MODE
MA-402 (TUNER) SCHEMATIC DIAGRAM
– Ref. No: MA-402 Board; 1000 series –
• See page 4-5 for printed wiring board.
Note :
The components identified by
mark
or dotted line with mark
are critical for safety.
Replace only with part number
specified.
Page 42
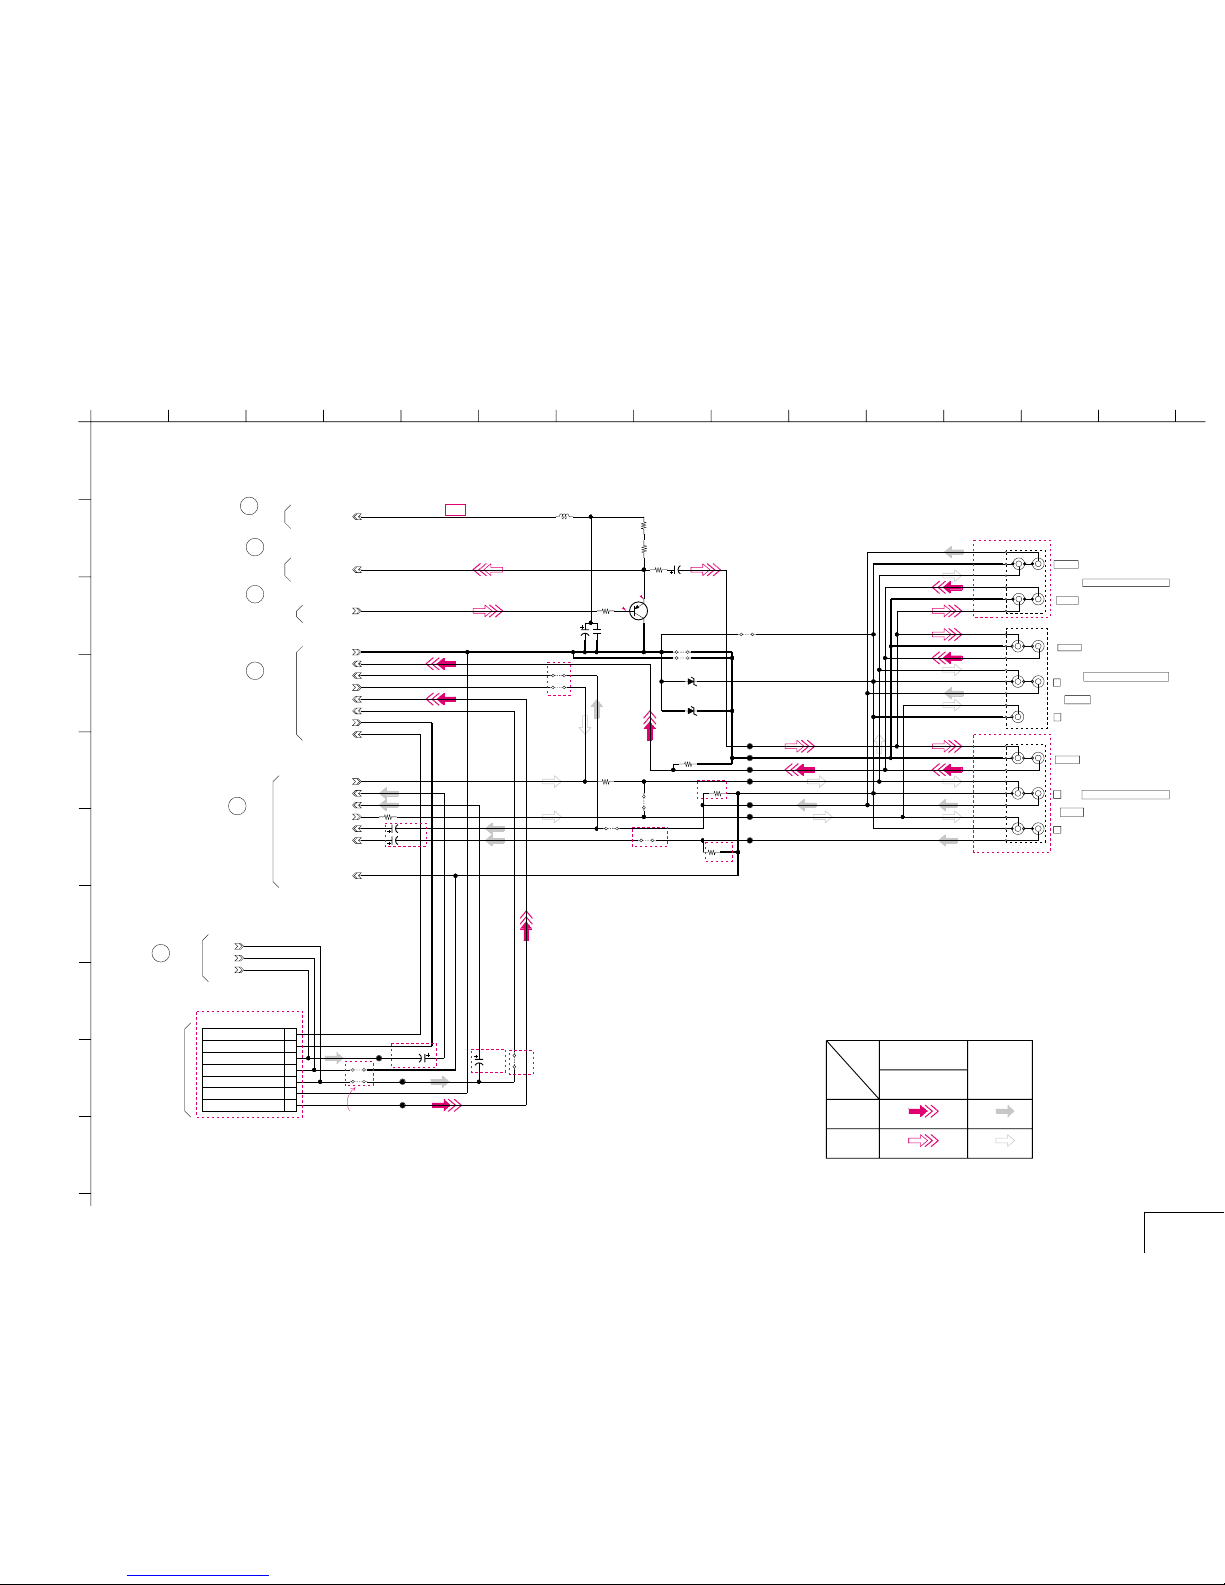
A
123456789101112
13 14
B
C
D
E
F
G
H
I
J
SLV - ED212/ED717/ED818/ED919/LF1
MA-402 (I/O) SCHEMATIC DIAGRAM
– Ref. No: MA-402 Board; 1000 series –
• See page 4-5 for printed wiring board.
JL905
100k
R901
JL906
0
JS901
470
R905
CNJ903
2
1MONO
5
1V
1
MGND
3
2MONO
4
VGND
6
2V
JL902
JS904
XX
XX
CNJ902
7
1MONO
5
3MONO
4
2MONO
8
1MGND
3
VGND
2
2V
1
1V
6
2MGND
JL907
68
R914
100k
R902
0
JS902
JL901
JL904
50V1u
C902
JL903
CNJ901
7
1R
4
1L
8
2R
9
RGND
2
2V
3
VGND
1
1V
5
2L
6
LGND
82
R908
2SB709A-QRS-TX
Q901
1/4W
180
R913
1/4W
150
R909
100
R910
16V
47u
C907
100uH
L901
XX
C906
0
JS905
HA10
HA11
HA17
HA16
JS906
0
NA11
50V
1u
C901
OSD
MOD_V
SW12V
LINE1
HIFI_GND
0
JS907
NA8
GND
470
R906
10V
470u
C903
RD6.2ES-T1B2
D902
RD6.2ES-T1B2
D901
JS908
XX
JS909
7P
CN334
1POWER
2D GND
3L2 AU R
4HIFI_GND
5L2 AU L
6AN GND
7L2 VIDEO
JS309
JS310
JL218
JL301
JL302
50V
1u
C386
50V
1u
C385
JS303
POWER
D_GND
L2_AU_R
L2_VIDEO
AN_GND
L2_AU_L
CH+
CH-
RF_CH
IO_GND
IO_GND
HIFI_GND
GND
IN
IN
OUT
INOUT
LINE OUT AUDIO
OUT
L1 OUT
AUDIO LOUT
AUDIO ROUT
L1 AUDIOL
L1 AUDIOR
NAOUT
VIDEO
VIDEO
VIDEO
NAIN
ANGND
MA-402 (8/8)
(SEE PAGE 4-27)
MA-402 (5/8)
(SEE PAGE 4-21)
MA-402 (2/8)
(SEE PAGE 4-13)
MA-402 (1/8)
(SEE PAGE 4-9)
MA-402 (4/8)
(SEE PAGE 4-19)
BUFFER
3
3.7
22
20
9
5
18
AUDIO
L
R
AUDIO
L
R
AUDIO
LINE-1 IN/LINE-1 OUT
LINE-1 IN/LINE-1 OUT
LINE-1 IN/LINE-1 OUT
VIDEO SIGNAL
Y/CHROMA
AUDIO
SIGNAL
REC
PB
SIGNAL PATH
NO MARK:REC/PB MODE
B+
MA-402 (7/8)
(SEE PAGE 4-25)
23
ED818/
ED919/LF1
ED818/ED919/LF1
ED212/ED717
ED818/
ED919LF1
ED212/
ED717
ED818/
ED919/LF1
ED818/
ED919/
LF1
ED212/ED717/ED818/ED919
FJ-31 BOARD
CN532
(SEE PAGE 4-31)
ED818/
ED919
ED818/ED919
ED717/
ED818
ED212/ED717/
ED818/ED919
MA-402 BOARD(6/8)
DISPLAY CONTROL(FRONT BLOCK)
XX MARK:NO MOUNT
NO MARK:REC/PB MODE
I/O
MA-402 (6/8)
4-23 4-24
Page 43
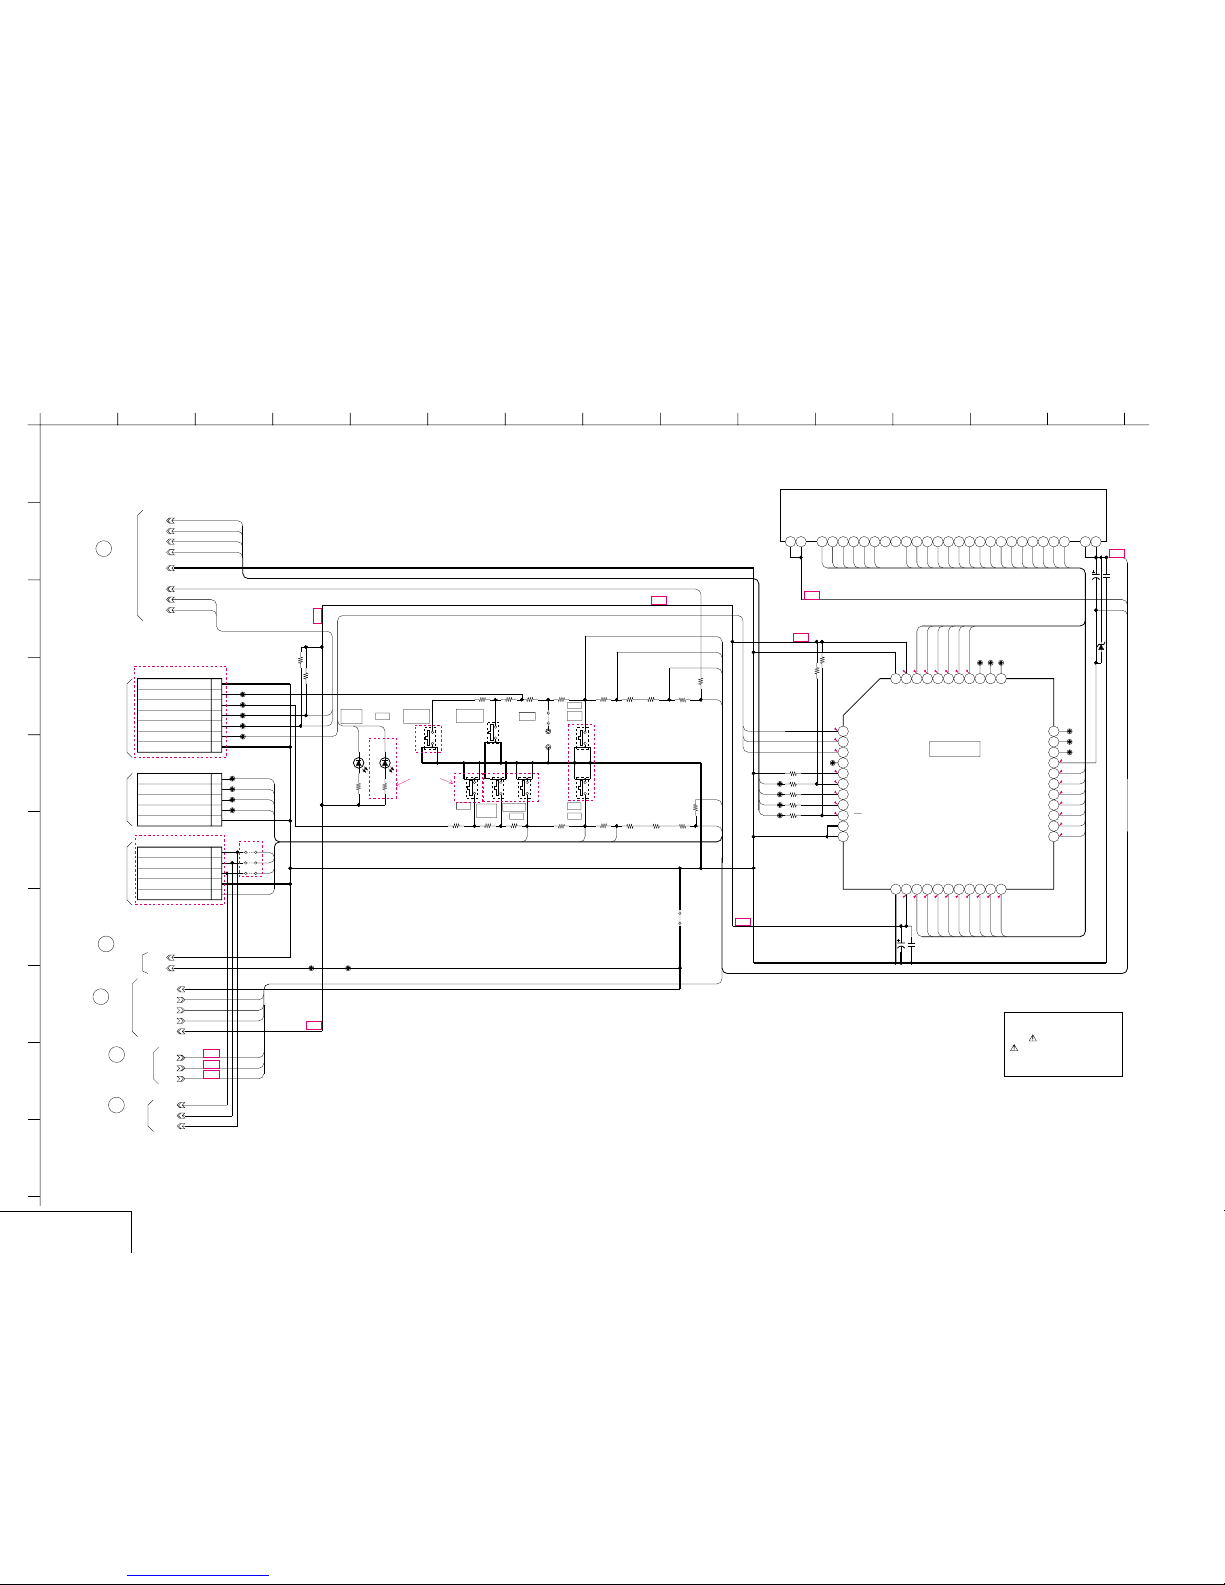
A
123456789101112
13 14
B
C
D
E
F
G
H
I
J
SLV - ED212/ED717/ED818/ED919/LF1
MA-402 (MODE CONTROL) SCHEMATIC DIAGRAM
– Ref. No: MA-402 Board; 1000 series –
• See page 4-5 for printed wiring board.
33k
R459
JL450
JL421
JL451
1k
R453
0.1u
C454
F
XX
R413
JL423
S467
S466
JL458
XX
R401
S465
0.01u
C452
B
JL415
JL461
JS172
SLR-342DCT31
D402*
4700
R425
4700
R458
1k
R452
JL462
RD5.6ES-T1B2
D404
JL413
JL424
S458
XX
R423
47k
R428
S468*
6800
R416
XX
R412
JS401
JL456
JL414
4700
R415
R411
1500
15k
R417
XX
R422
JL460
7P
CN411
1D_GND
2SEARCH LED
3ETR 1
4ETR 2
5SEARCH
6ETR SW
7GND
JL406
XX
D401
3300
R414
S454
JL405
1k
R455
47k
R405
47k
R404
UN5V
6800
R426
UPD16315GB-3BS
IC451
1
SYNCHRO REC LED
2
RR LED
3
SEARCH LED
4
LED4
5
OSC
6
DOUT
7
DIN
8
CLK
9
CS
10
KEY1
11
KEY2
12
VSS
13
VDD
14S115S216S317S418S519S620S721S822
S9
23
S10
24
S11
25
S12
26
S13
27
S14
28
S15
29
S16
30
VEE
31
S17
32
S18
33
G10
34
G935G836G737G638G539G440G341G242G1
43
VDD44VSS
S459
68
R410
16V
10u
C453
XX
R421
JL412
JL411
4700
R457
GND
47k
R418
3300
R424
ND451
2F-4G15G26G37G48G59G610NC11NC12
P1613P1514P1415P1316P1217P1118P10
19P920P821P722P623P524P425P326P227P129F+30
F+
1
F-
5P
CN412
1D_GND
2A/D1 IN
3A/D2 OUT
4A/D2 IN
5A/D1 OUT
10V
100u
C451
JL422
JL455
1k
R454
JL454
JL453
180
R402*
DGND
JL457
68
R400
15k
R427
W001 W002
FLD_CS
SCK1
SO1
SI1
ETR1
ETR2
POWER
FUNC_KEY1
FUNC_KEY2
F+
F-
-13V
POWER_FAIL
GND
D_GND
_CH+
0
JS403
*
JS402
*
0
0
JS404
*
_RF_CH
_CH-
CN413*
5P
1POWER
2D_GND
3RF CH
4CH-
5CH+
F29
F28
F27
F26
F25
F24
F23
F22
F21
F20
F19
F18
F17
F16
F15
F14
F29
F28
F27
F26
F25
F24
F23
F14
F15
F16
F17
F18
F19
F20
F21
FL64
FL65
F37
F38
F39
F40
F41
F42
F42
F41
F40
F39
FL1
F1
F1
F2
F3
F38
F37
F22
F2
S28
CN1
CN4
CN2
FL30
S54
CN2
CN3
CN4
S55
RF_CH
CH-
CH+
S54
S55
FL63
FL64
FL65
UN5V
UN5V
FL29
S27
FL30
FL1
FL29
S28
S27
F3
GND
CN2
FL58
FL63
FL58
CH+
_CH-
_CH+
CH-
_RF_CH
RF_CH
POWER
CN1
DGND
DGND
DGND
DGND
DGND
DGND
DGND
CN3
COLOR
SYSTEM
CH+ADJ
CH-
RF CH
TAPE
SPEED
SYNCRO
REC
RR
SYNCR
REC
RR
430
430430
TO DM
TO DI
MA-402 (1/8)
(SEE PAGE 4-9)
MA-402 (2/8)
(SEE PAGE 4-13)
MA-402 (8/8)
(SEE PAGE 4-27)
MA-402 (2/8)
(SEE PAGE 4-13)
5.2
5.2
5
4.6
4.1
0.4
4.6
4.1
5.2
-12.7
-10.3
-12.7
12.7
-12.7
-12.6
-5.7
-5.7
-12.7
-12.6
-12.6
-12.6
-12.6
-12.6
-7.9
-12.6
-12.9
-10.7
-1.6
-10.6
-10.6
-10.6
-1.5
5
11
7
12
24
B+
B+
B+
B+
B+
B-
B+
B+
B-
B-
IC451
FLUORESCENT INDICATOR TUBE
FL DRIVER
NO MARK:REC/PB MODE
R:REC MODE
P:PB MODE
TO FJ
MA-402 (6/8)
(SEE PAGE 4-23)
23
ED212/ED717/ED818/ED919
LF1
DI-81 BOARD
CN901
(SEE PAGE 4-33)
DM-98 BOARD
CN471
(SEE PAGE 4-31)
FJ-33 BOARD
CN501
(SEE PAGE 4-33)
ED717/ED818/
ED919/LF1
LF1
ED212/ED717/
ED818/ED919
ED212/ED717/
ED818/ED919
ED212/ED717/
ED818/ED919
MODE CONTROL
MA-402 (7/8)
4-25 4-26
MA-402 BOARD(7/8)
MODE CONTROL BLOCK
XX MARK:NO MOUNT
NO MARK:REC/PB MODE
Note :
The components identified by
mark
or dotted line with mark
are critical for safety.
Replace only with part number
specified.
Page 44
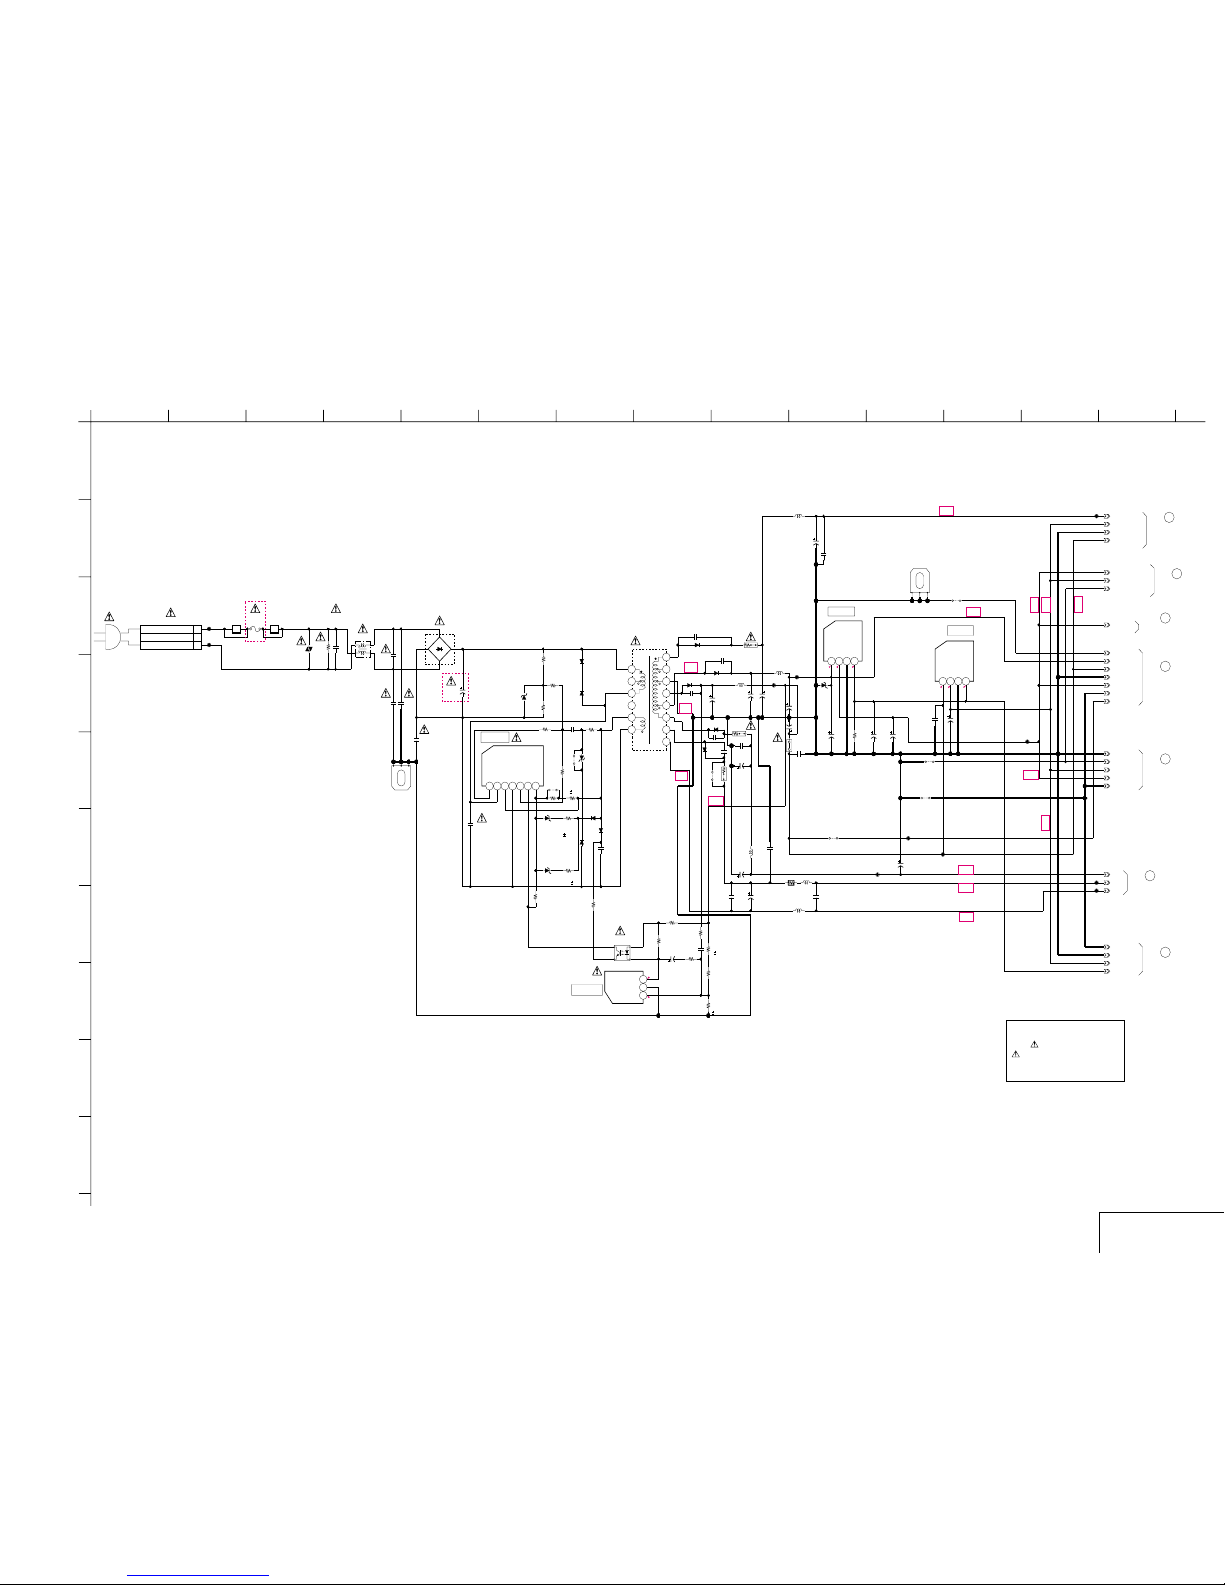
A
123456789101112
13 14
B
C
D
E
F
G
H
I
J
SLV - ED212/ED717/ED818/ED919/LF1
1/4W
R602
150k
C605
200V
120u
*
R605
1500
1/4W
D602
XX
C601
0.1u
C600
250V
0.1u
FH601
FH600
JL601
JL602
ET600
2P
CN600
1
3
1/2W
3.3M
R601
1/4W
330k
R603
1/4W
12k
R604
D1NL20U-TA2
D601
560p
C607
1/4W
8200
R607
1/4W
1%
9100
R606
C608
2200p
800V
IC600
1234567
820p
C606
F600*
2A
250V
1M
R611
1/2W
D600
DF06M-6031
LF600
RD5.6ES-T1B2
D607
XX
D603
XX
D604
XX
D605
VDR600
250V
470p
C602
C603
250V
470p
C604
250V
470p
68k
R647
1/4W
1%
1/10W
2200
R648
JS601*
1/4W
47
R649
JL618
SW12V
B
0.01u
C669
MTR_12V
JL615
R642
SW12V
C662
220u
25V
SW5V
AU02A-V0
D611
B
0.01u
C661
SW12V
-13V
AU02A-V0
D612
JL604
22uH
L601
0
JS664
GND
D614
RD16F-T8B1
GND
22u
50V
C671
D_6V
SW5V
47u
16V
C664
F-
XX
C614
470u
16V
C611
JS625
L602
22uH
JL611
JL612
47u
50V
C626
XX
C625
GND
1uH
L606
C610
10V
1500u
10
R640
1/4W
JL614
PS661
AU_GND
470u
25V
C616
R668
10k
GND
B
0.01u
C627
D609
31DQ06-FA7
JL625
C615
820u
25V
68uH
L660
F+
16V
22u
C665
PQ12RD08
IC660
1234
AU_GND
MTRGND
JL619
D608
D2S4MF
AK04V0
D613
XX
C628
DGND
JL613
R641
10
1/4W
+30V
XX
C617
47u
50V
C624
DGND
SW5V
XX
C632
1uH
L604
C630
0.01u
B
R643
1W
2.2
1uH
L603
470u
10V
C629
0.01u
B
C631
0.5%
2k
R612
50V
1u
C612
1/4W
47
R616
1/10W
2200
R615
PC123FY2
PH600
1500
R614
0.5%
120
R613
1/4W
IC601
AN1431T-TA
123
ET601
47u
50V
C636
1/4W
1k
R617
0.12u
C613
220
1/4W
R618
PQ05RD11
IC662
1
6V(IN)
2
5V(OUT)
3
GND
4
P.CONT
0.01u
C673
16V
100u
C674
0.01u
C633
T600
3
4
6
7
8
10
11
14
13
12
15
16
17
5
D_6V
D_5.2V
JS665
JS666
RD6.2ES-T1B2
D623
D1NL20U-TA2
D624
1%
39k
R651
MTZJ-T-77-18B
D625
XX
R650
JS667
25V
470u
C663
JS668
D_GND
SW5V
PCO
SW12V
-13V
-13V
AN_GND
AN_GND
AN_GND
AN_GND
LIVE
NEUTRAL
P.CONT
P CONT
13V (IN )
GND
12V (OUT)
2.3A
PET
B-
B+
B+
HIFI GND
AN_GND
AN_GND
AN_GND
AN_GND
TYPE:5G
MA-402 (5/8)
(SEE PAGE 4-21)
21
17
16
4
MA-402 (4/8)
(SEE PAGE 4-19)
MA-402 (3/8)
(SEE PAGE 4-17)
MA-402 (1/8)
(SEE PAGE 4-9)
24
MA-402 (7/8)
(SEE PAGE 4-25)
15
MA-402 (2/8)
(SEE PAGE 4-13)
B+
B+
B+
B+
B+
B+
B+
B+
B+
B-
4.7
2.4
13.5
11.7
4.9
TERMINAL
GROUND
B+
TERMINAL
GROUND
5
5
5.25
MA-402(6/8)
(SEE PAGE 4-23)
22
ED818/
ED919TW
ED212/ED717/
ED919KR/LF1
MA-402 (POWER SUPPLY) SCHEMATIC DIAGRAM
– Ref. No: MA-402 Board; 1000 series –
• See page 4-5 for printed wiring board.
MA-402 BOARD(8/8)
XX MARK:NO MOUNT
NO MARK:REC/PB MODE
POWER SUPPLY
MA-402 (8/8)
4-27 4-28
Note :
The components identified by
mark
or dotted line with mark
are critical for safety.
Replace only with part number
specified.
Page 45
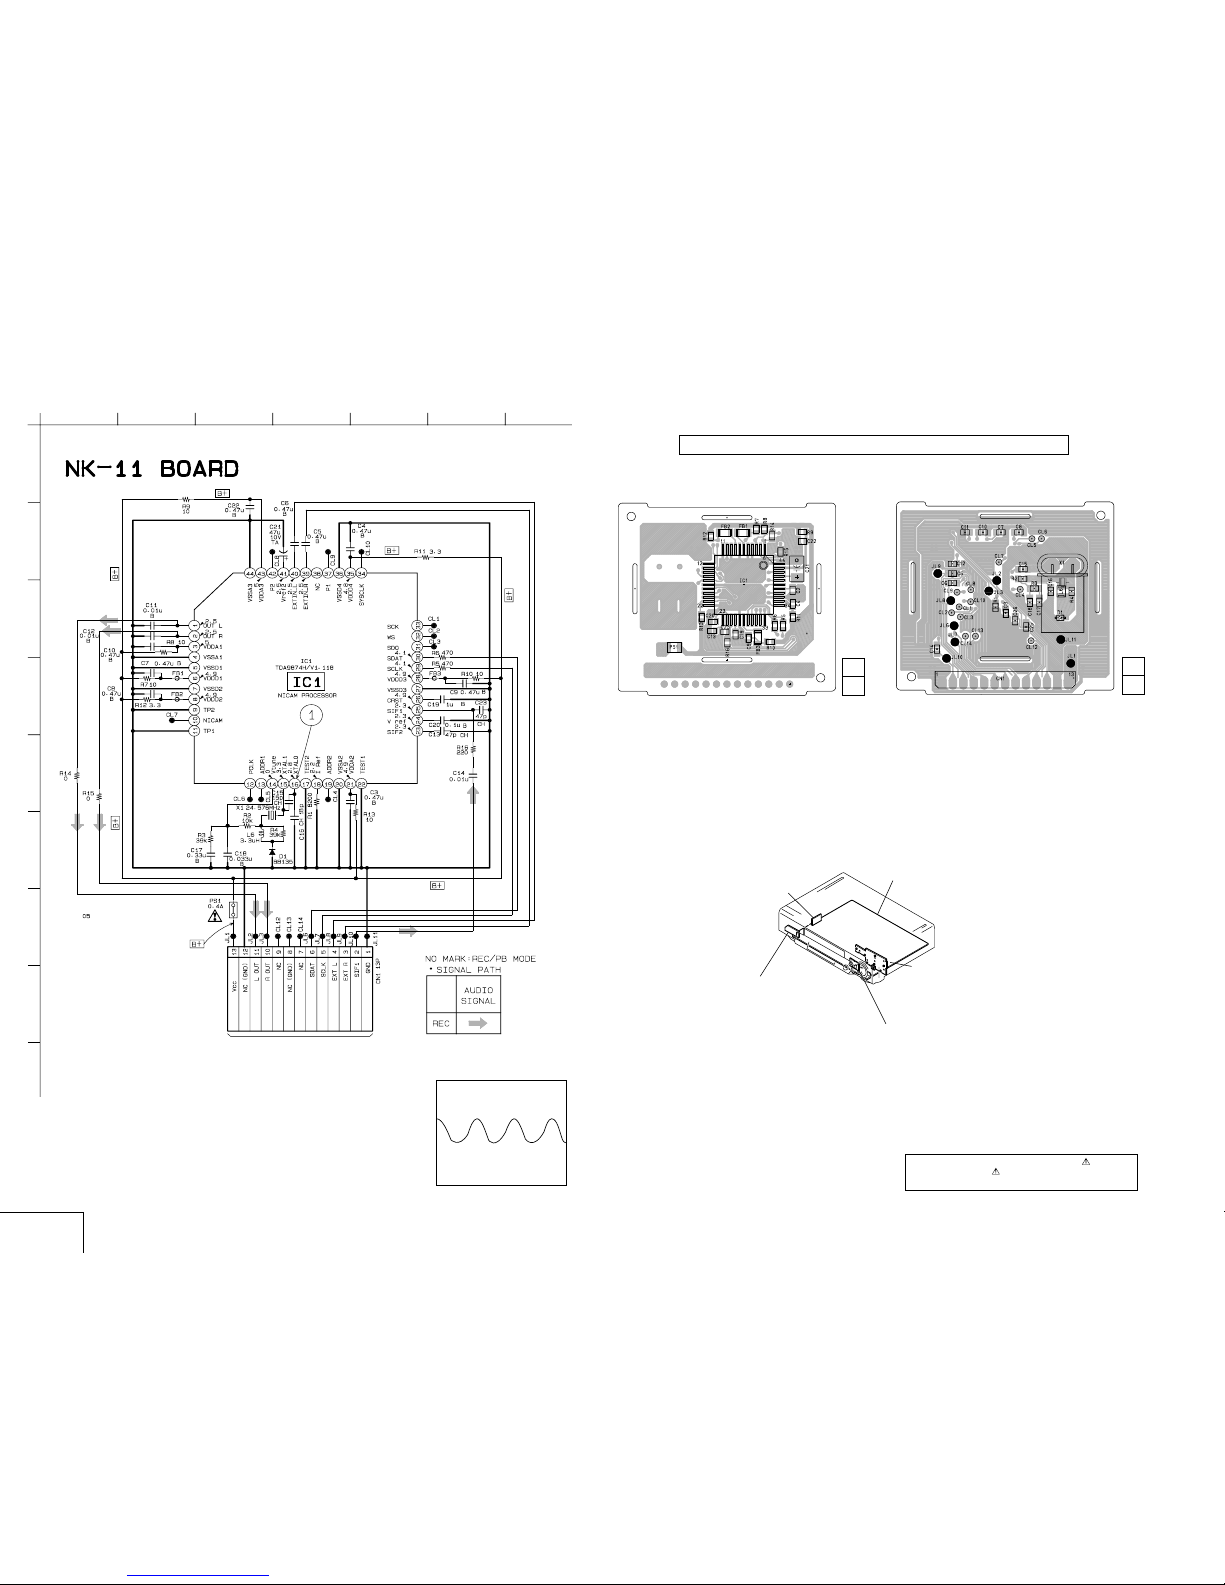
A
123456789101112
13 14
B
C
D
E
F
G
H
I
J
SLV - ED212/ED717/ED818/ED919/LF1
NK-11 (NICAM) PRINTED WIRING BOARD AND SCHEMATIC DIAGRAM
– Ref. No.: NK-11 board; 3,000 series –
– SLV-ED919KR/LF1 –
There are few cases that the part isn't mounted in this model is printed on this diagram.
740 mVp-p (24.576 MHz)
NK-11 BOARD(SIDE A)
1-669-815-
12
(12)
05
NK-11
BOARD(SIDE B)
1-669-815-
12
(12)
05
MA-402 BOARD (5/8)
CN701
(SEE PAGE 4-21)
NICAM
NK-11
4-29
4-30
VIDEO, AUDIO,SERVO/SYSTEM CONTROL,
TUNER, I/O, MODE CONTROL, POWER SUPPLY
FJ-31 (LINE 2 IN)
(ED212/ED717/ED818/ED919)
FJ-33 (POWER)
(LF1)
NK-11 (NICAM)
(ED919KR/LF1)
DI-81 (DIAL TIMER)
(ED212/ED717/ED818/ED919)
DM-98 (USER CONTROL)
MA-402
(
)
Note:The components identified by mark or dotted
line with mark are critical for safety.
Replace only with part number specified.
• Waveform
1 IC1 qh REC/PB
Page 46
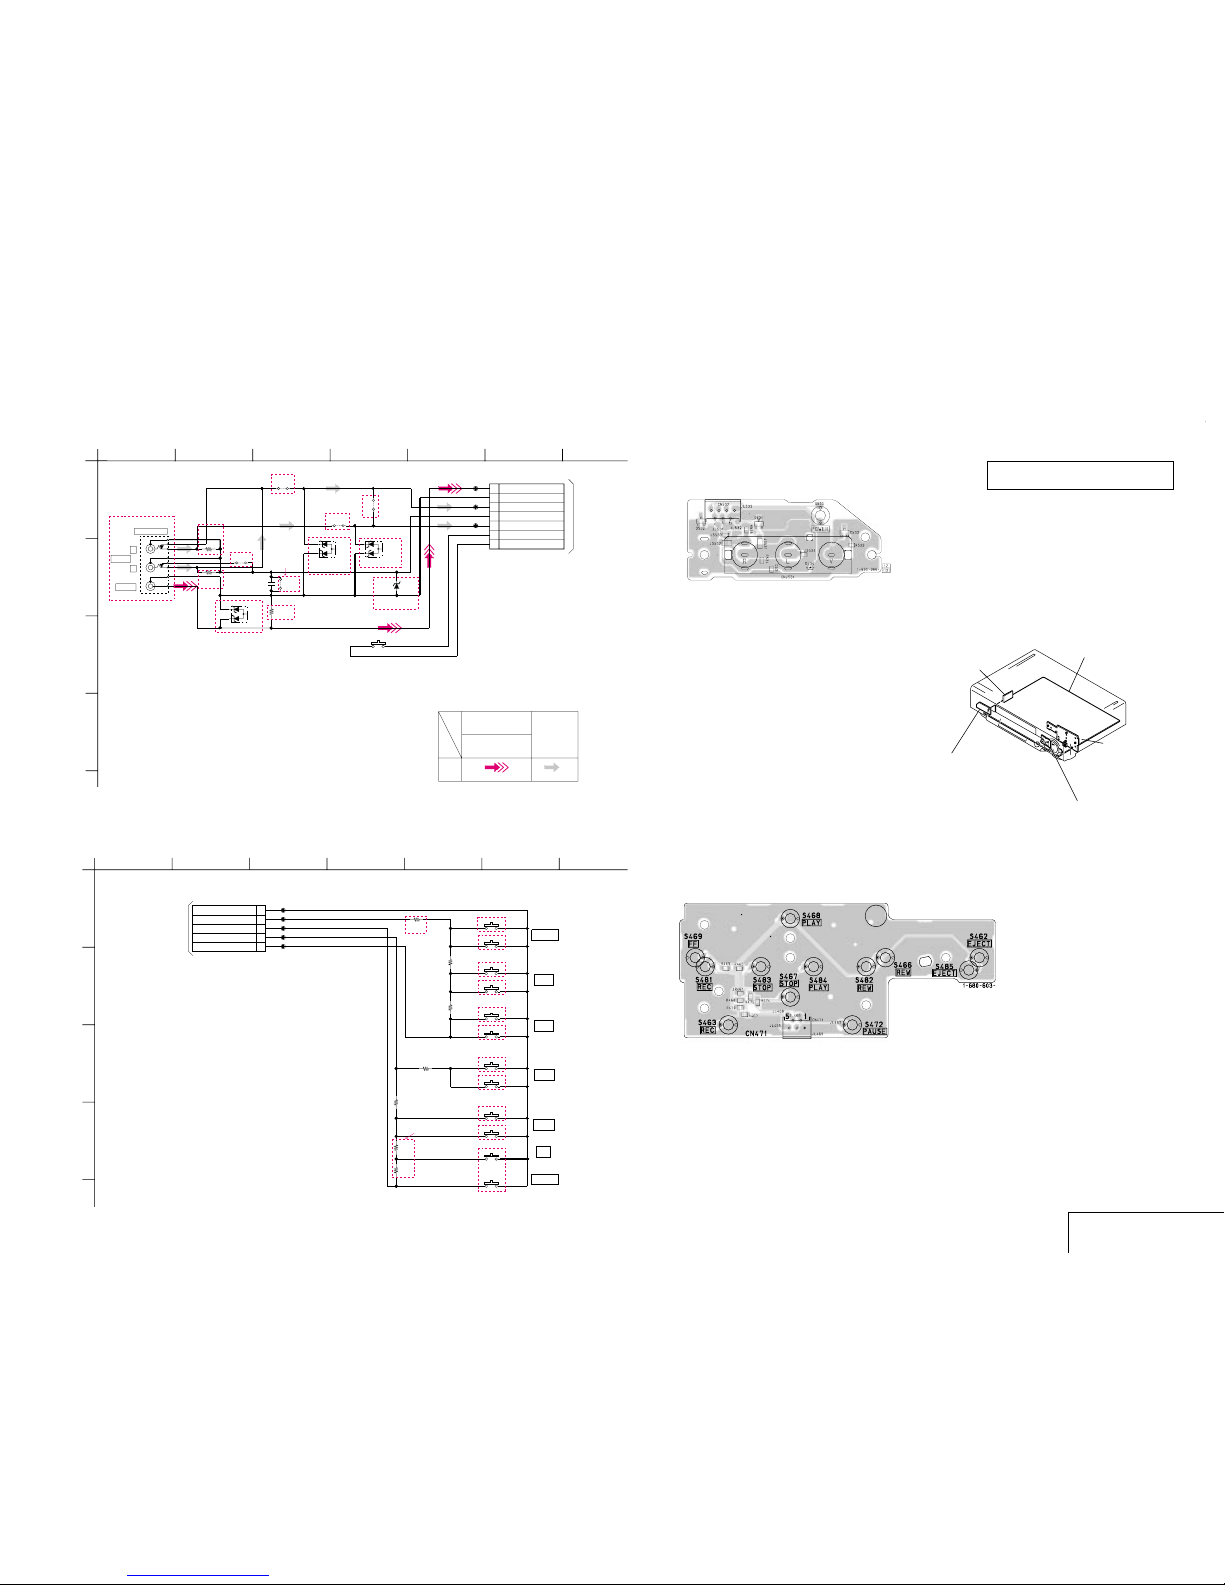
A
123456789101112
13 14
B
C
D
E
F
G
H
I
J
SLV - ED212/ED717/ED818/ED919/LF1
LINE-2 IN, FUNCTION
FJ-31, DM-98
4-31 4-32
FJ-31 (LINE 2 IN) AND DM-98 (FUNCTION) PRINTED WIRING BOARDS AND SCHEMATIC DIAGRAMS
— Ref. No. FJ-31 Board:1,000 Series —
– SLV-ED212/ED717/ED818/ED919 –
— Ref. No. DM-98 Board:2,000 Series —
A
12345 6 7
B
C
D
A
12345 6 7
B
C
D
JL533
HZM6.8ZWA1TL
D533*
100k
R535
*
0
JS534*
02DZ6.2-TPH3
D534*
JL532
JS5320*
R534
100k
*
S500
JL531
CNJ531*
HZM6.8ZWA1TL
D532*
C531
XX
7P
CN532
1 POWER
2 D GND
3 L2 AU R
4
HIFI_GND
5 L2 AU L
6
AN GND
7 L2 VIDEO
HZM6.8ZWA1TL
D531*
0
JS531*
XX
JS533*
68
R533
*
0
JS535
LINE-2 IN
R
L
AUDIO
VIDEO
REC
VIDEO SIGNAL
Y/CHROMA
AUDIO
SIGNAL
SIGNAL PATH
MA-402(6/8)
CN334
(SEE PAGE 4-23)
ED717/ED818/ED919
ED717/ED818/ED919
ED818/ED919
ED717/ED818/ED919
ED717/ED818/ED919
ED717/ED818/
ED919
ED717/ED818/
ED919
ED717
ED818/
ED919
ED717/
ED818/ED919
ED717/
ED818/ED919
ED818/
ED919
ED818/ED919
FJ-31 (LINE 2 IN)
DM-98 (FUNCTION)
JL468
S462
*
JL465
S466*
S468*
JL466
2200
R470
*
S463*
1500
R469
*
S467*
1500
R468
2200
R467
1500
R465
S472*
S469*
JL467
0
R474
CN471
5P
D_GND 1
EJECT 2
CH- 3
PB/STOP 4
CH+ 5
JL469
0
R475*
S481*
S482*
S483*
S484*
S485*
EJECT
REC
REW
STOP
PLAY
FF
PAUSE
LF1
LF1
LF1
LF1
LF1
EXCEPT
LF1
EXCEPT
LF1
EXCEPT
LF1
EXCEPT LF1
EXCEPT
LF1
EXCEPT
LF1
EXCEPT LF1
EXCEPT LF1
MA-402(7/8)
CN412
(SEE PAGE 4-25)
There are few cases that the part printed
on this diagram isn’t mounted in this model.
DM-98 BOARD
VIDEO, AUDIO,SERVO/SYSTEM CONTROL,
TUNER, I/O, MODE CONTROL, POWER SUPPLY
FJ-31 (LINE 2 IN)
(ED212/ED717/ED818/ED919)
FJ-33 (POWER)
(LF1)
NK-11 (NICAM)
(ED919KR/LF1)
DI-81 (DIAL TIMER)
(ED212/ED717/ED818/ED919)
DM-98 (USER CONTROL)
MA-402
(
)
FJ-31 BOARD
Page 47
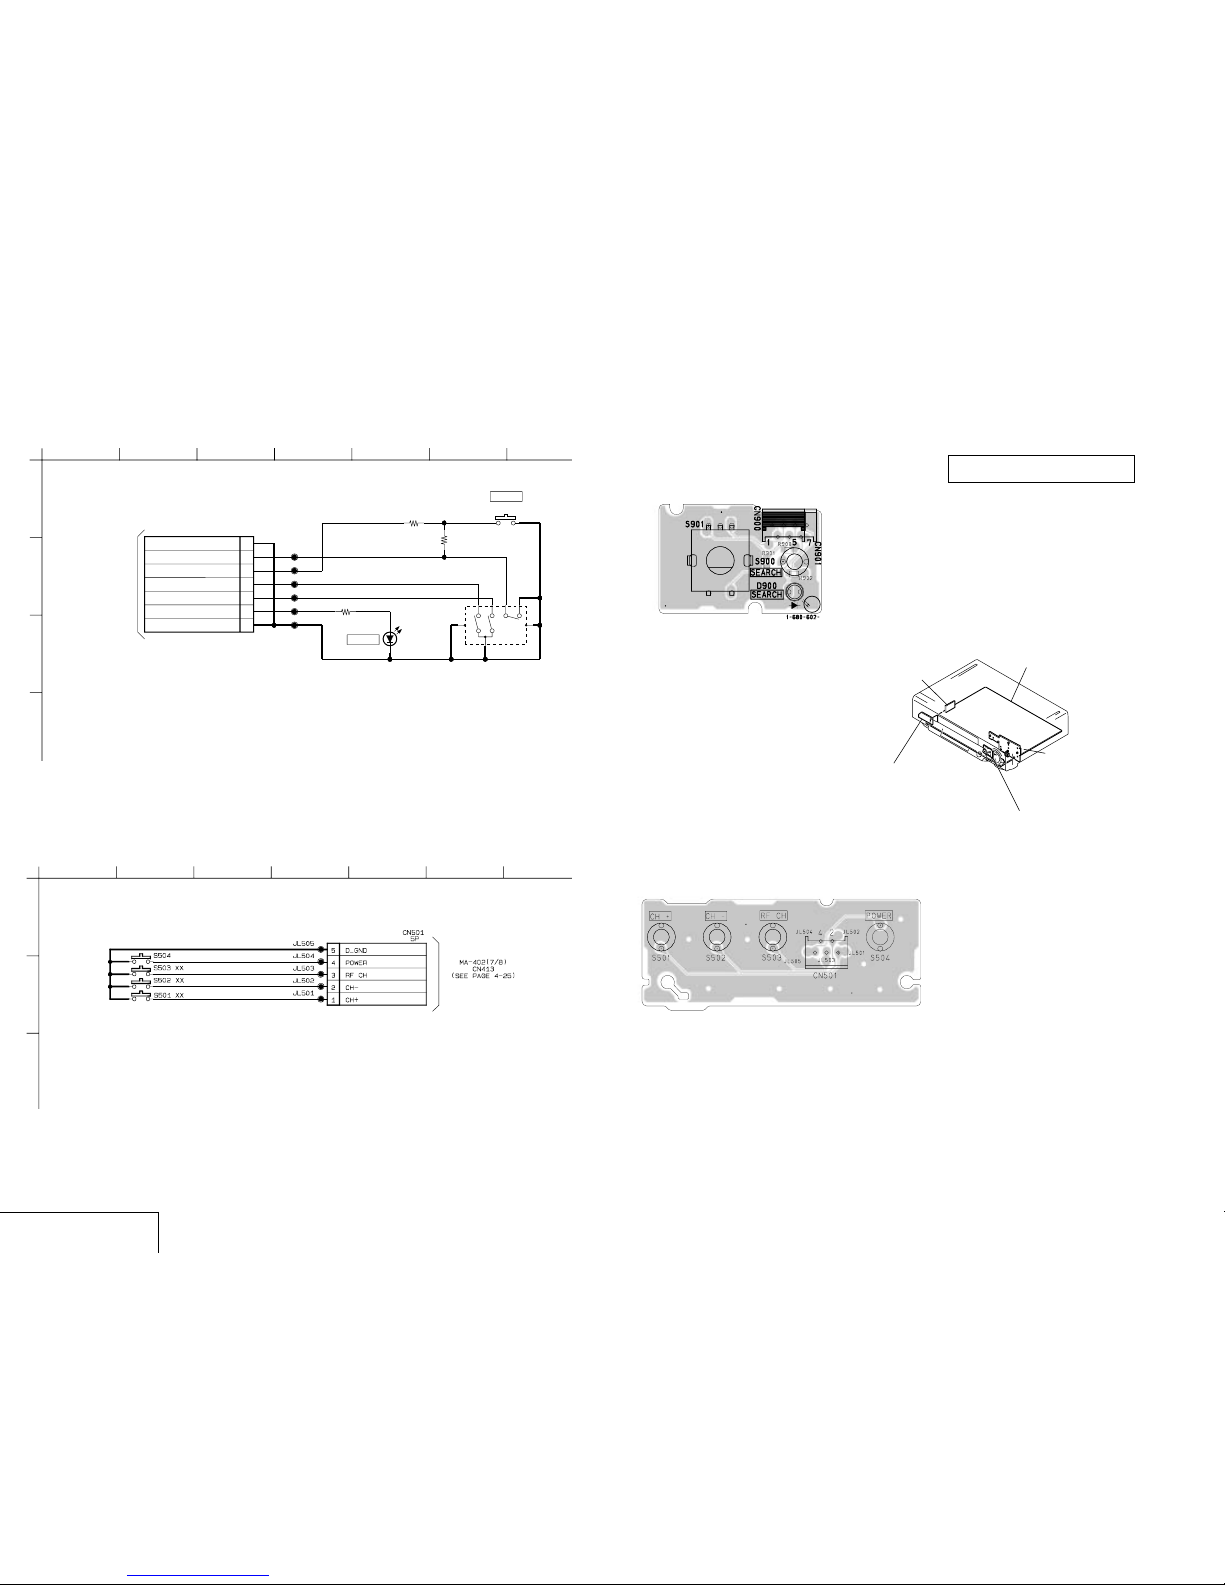
A
123456789101112
13 14
B
C
D
E
F
G
H
I
J
SLV - ED212/ED717/ED818/ED919/LF1
A
12345 6 7
B
C
DI-81 (DIAL TIMER) AND FJ-33 (POWER) PRINTED WIRING BOARDS AND SCHEMATIC DIAGRAMS
— Ref. No. DI-81 Board:2,000 Series —
– SLV-ED212/ED717/ED818/ED919 –
— Ref. No. FJ-33 Board:2,000 Series —
– SLV-LF1 –
There are few cases that the part printed
on this diagram isn’t mounted in this model.
A
12345 6 7
B
C
D
FJ-33 (POWER)
VIDEO, AUDIO,SERVO/SYSTEM CONTROL,
TUNER, I/O, MODE CONTROL, POWER SUPPLY
FJ-31 (LINE 2 IN)
(ED212/ED717/ED818/ED919)
FJ-33 (POWER)
(LF1)
NK-11 (NICAM)
(ED919KR/LF1)
DI-81 (DIAL TIMER)
(ED212/ED717/ED818/ED919)
DM-98 (USER CONTROL)
MA-402
(
)
4-33 4-34E
DIAL TIMER, POWER
DI-81, FJ-33
XX
R901
JL901
JL904
JL902
S900
JL900
SLR-342DCT31
D900
JL903
560
R902
JL905
S901
0
R900
CN901
7P
D-GND 1
SEARCH LED 2
KKP+ 3
KKP- 4
DIAL 5
TIMER 6
GND 7
SEARCH
SEARCH
MA-402 (7/8)
CN411
(SEE PAGE 4-25)
DI-81 BOARD (DIAL TIMER)
DI-81 BOARD
FJ-33 BOARD
Page 48
SLV-ED212/ED717/ED818/ED919/LF1
5-1
SECTION 5
INTERFACE, IC PIN FUNCTION DESCRIPTION
Signal
RF SWP
QVD
C SYNC
Pin No.
MA-402
IC101
105
MA-402
IC101
109
MA-402
IC101
111
I/O
O
O
I
*1
L
*4
*1
L
*4
TAPE
THREADING
PB
STOP/
FF/REW
*1
L
*4
TAPE
UNTHREAD-
ING
*1
*2
*4
*1
*3
*4
PB •
PAUSE
*1
*3
*4
SLOW x 2
*1
*3
*4
*1
*3
*4
CUE
*1
*3
*4
REVIEW
*1
*3
*4
RECORD
*1
*3
*4
REC •
PAUSE
5-1. SYSTEM CONTROL – VIDEO BLOCK INTERFACE (MA-402 BOARD IC101)
*1 25 Hz pulse with 50% duty cycle. Synchronized with rotation of drum.
*2 Normal PB “L”. V period “H” pulse when x1.
*3 V period “H” pulse.
*4 Composite sync signal (positive polarity).
Signal
CAP QR
DRUM PG
DRUM FG
CAP FG
CAP PWM
DRUM PWM
Pin No.
MA-402
IC101
91
MA-402
IC101
104
MA-402
IC101
103
I/O
O
I
I
I
O
O
Hi-Z
*4
*4
*4
*7
*9
TAPE
THREADING
PB
Hi-Z
*4
*4
*4
*7
*9
TAPE
UNTHREAD-
ING
Hi-Z
*1
*6
*5
*8
*9
Hi-Z
*1
*6
H/L
*7
*9
PB •
PAUSE
*2
*1
*6
*5
*7
*9
SLOW x 2
Hi-Z
*1
*6
*5
*8
*9
Hi-Z
*1
*6
*5
*8
*9
CUE
Hi-Z
*1
*6
*5
*8
*9
REVIEW
Hi-Z
*1
*6
*5
*8
*9
RECORD
Hi-Z
*1
*6
H/L
*7
*9
REC •
PAUSE
5-2. SYSTEM CONTROL – SERVO PERIPHERAL CIRCUIT INTERFACE (MA-402 BOARD IC101)
*1. 25 Hz (PAL), 30 Hz (NTSC) pulse.
*2. Pulse at tape running.
*3. “L” when drum rotation stop.
*4. Unstable period pulse.
*5. Pulse of period in proportion to tape speed.
*6. 300 Hz (PAL), 360 Hz (NTSC) pulse.
*7. Pulse at tape running.
*8. Approx. 2 msec period “H” or “L” pulse.
*9. Approx. 1.5 msec period “H” or “L” pulse.
STOP
Hi-Z
*3
*3
H/L
*7
*9
FF
Hi-Z
*1
*6
*5
*7
*9
REW
Hi-Z
*1
*6
*5
*7
*9
MA-402
IC101
9
MA-402
IC101
108
MA-402
IC101
107
Page 49
5-2
Signal
CAM
MODE 1
MODE 2
MODE 3
MODE 4
REC PRF
T REEL
S RELL
END-LED
CAP PVS
T SENS
S SENS
Pin No.
MA-402
IC101
45
MA-402
IC101
37
MA-402
IC101
38
MA-402
IC101
39
MA-402
IC101
40
MA-402
IC101
86
MA-402
IC101
42
MA-402
IC101
41
MA-402
IC101
49
MA-402
IC101
90
MA-402
IC101
33
MA-402
IC101
32
O
(O.D)
CASSETTE
LOADING
CASSETTE
UNLOADING
TAPE
THREAD-
ING
TAPE
UNTHREAD-
ING
STOP FF REW PB
PB
PAUSE
SLOW x 2 CUE REVIEW REC
REC •
PAUSE
H
*1
*1
*1
*1
*2
H/L
*3
*4
H
*6
*6
I/O
EJECTED
O
I
I
I
I
I
I
I
I
I
I
Hi-Z
H
H
L
L
H
H/L
H/L
*4
L
*4
*4
H
L
L
L
H
*2
H/L
H/L
*4
*4
*4
L
L
L
L
H
*2
H/L
H/L
*4
*4
*4
L
*1
*1
*1
*1
*2
H/L
*3
*4
L
*6
*6
H
L
L
L
H
*2
H/L
H/L
*4
H/L
*4
*4
*7
H
H
L
H
*2
*3
*3
*4
H
*6
*6
*7
H
H
L
H
*2
*3
*3
*4
L
*6
*6
*7
H
H
L
H
*2
*3
*3
*4
H
*6
*6
*7
H
H
L
H
*2
H/L
H/L
*4
H
*6
*6
*7
H
H
L
H
*2
*3
*3
*4
H
*6
*6
*7
H
L
L
L
*2
*3
*3
*4
H
*6
*6
*7
H
L
L
L
*2
*3
*3
*4
H
*6
*6
*7
L
L
H
L
*2
*3
*3
*4
L
*6
*6
*7
H
L
L
L
*2
*3
*3
*4
H
*6
*6
*7
H
L
L
L
*2
H/L
H/L
*4
H
*6
*6
5-3. SYSTEM CONTROL – MECHANISM BLOCK INTERFACE (MA-402 BOARD IC101)
*1. Uncertainty.
*2. “L” when erasing protection tab is bent, “H” when not bent.
*3. Pulse of period in proportion to reel rotating speed.
*4. Approx.2 msec period “H” pulse.
*5. Pulse at tape running.
*6. Normally “L”. 2 msec period “H” pulse when tape top or tape end is detected.
*7. When transition to UNLOADING direction: L.
When Transition to LOADING direction: H.
When CAM motor is stopped: Hi-Z.
Page 50
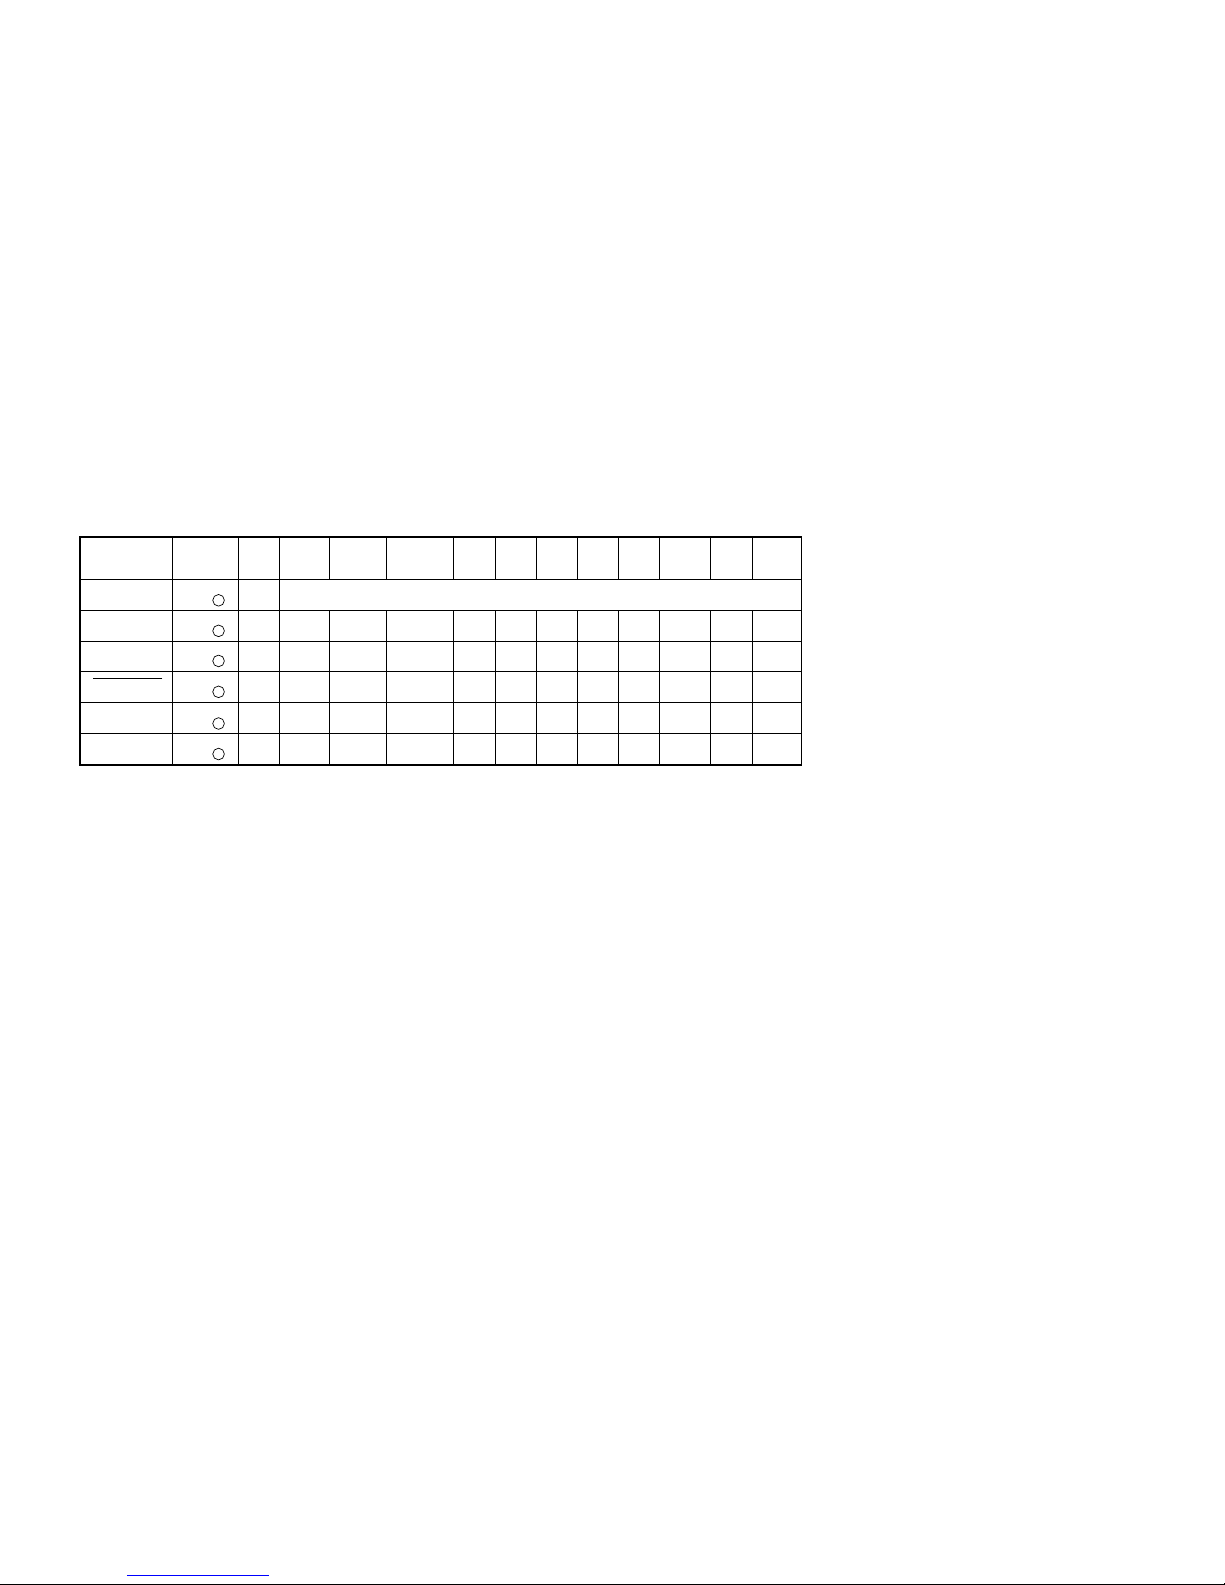
5-3
Signal
AU RF
A MUTE
AF SWP
FULL ERASE
REC P
NAPB
Pin No.
MA-402
IC101
35
MA-402
IC101
89
MA-402
IC101
106
MA-402
IC101
71
MA-402
IC101
72
MA-402
IC101
96
O
(O.D)
TAPE
THREAD-
ING
TAPE
UNTHREAD-
ING
PB SLOW x 2 CUE REVIEW REC
Hi-Z
*1
H
L
L
I/O
O
O
O
O
Hi-Z
*1
H
L
L
Hi-Z
*1
H
L
L
5-4. SYSTEM CONTROL – AUDIO BLOCK INTERFACE (MA-402 BOARD IC101)
*1. 25Hz (PAL), 30Hz (NTSC) 50% duty pulse approx. 5 msec delayed from RF SW P.
O
(O.D)
STOP/
FF/
REW
PB •
PAUSE
REC •
PAUSE
Hi-Z
*1
H
L
L
H
*1
H
L
L
H
*1
H
L
L
H
*1
H
L
L
H
*1
H
L
L
H
*1
H
L
L
H
*1
L
H
H
H
*1
H
L
L
AF RF envelope signal input terminal for automatic tracking.
Page 51
5-4
1
2
3
4
5
6
7
8
9
10
11
12
13
14
15
16
17
18
19
20
21
22
23
24
25
26
27
28
29
30
31
32
33
34
35
36
37
38
39
40
41
42
43
44
45
46
47
48
49
50
51
52
53
54
55
56
–
–
I/O
I/O
I
I
O
I
I
–
I/O
I/O
I/O
I/O
I
I
I
O
–
O
I
–
I
I
I
I
I
I
–
I
I
I
I
I
–
I
I
I
I
I
I
I
I/O
O
–
–
–
O
O
O
O
O
I
I
I
Servo ground
Analog ground
CTL Head signal input/output (REC mode)
CTL Head signal input/output (REC mode)
CTL amp. control signal input (gain set)
CTL amp. control signal input (gain set)
CTL amp. control signal input (for check)
CTL amp. control signal input (gain set)
Capstan FG schmitt input
Power supply unswitch 5V
AFC oscillation signal
AFC oscillation signal
AFC LPF signal
Sync input
VLPF input
Composite video signal input 2
Composite video signal input 1
Power supply OSD 5V
Composite video signal output
OSD ground
OSC 4fsc oscillator terminal signal output
OSC 4fsc oscillator terminal signal input
Analog ground
APC error voltage signal input
Auto tuning signal input
Function key analog voltage signal input 2
Function key analog voltage signal input 2
Power failure detect signal input
Destination set signal input 1
Not used
Destination set signal input 2
Take up end sensor signal input
Supply end sensor signal input
Video RF envelope signal
Audio RF envelope signal
Analog power supply
Mechanism Section CAM encoder data input 1
Mechanism Section CAM encoder data input 2
Mechanism Section CAM encoder data input 3
Mechanism Section CAM encoder data input 4
S side reel FG input
T side reel FG input
Remote Control (SIRCS) signal input
CTL amp. signal input/output (OSD)
CAM motor signal output
Not used
Not used
Not used
Top/end LED on/off control signal output
Power supply control signal output
EEP ROM write timing control signal output
OSD block control output
To 'on' the audio dub filter
Easy Timer knob pulse 1 signal input
Easy Timer knob pulse 2 signal input
Power supply
VSS (SERVO)
AN GND
CTL(+)
CTL (–)
CTL-BIAS
CTL-FB
CTL-AMP(O)
CTL-SMT
CAP FG
VCC (SERVO)
AFC PC
AFC OSC
AFCLPF
CSYNC
VLPF
C V IN 2
C V IN 1
OSDVSS
VIDEO OUT (CV OUT)
OSD VSS
4FSC OUT
4Ffsc IN
AVSS
APC Error
TU AFT
FUNCTION Key 2
FUNCTION Key 1
POWER FAIL
DEST 1
PB
DEST 2
T SENS
S SENS
VIDEO RF
AUDIO RF
AVCC
MODE1
MODE2
MODE3
MODE4
S REEL
T REEL
REMOCON
CTL-OSD
CAM
SAT SYNC LED
RR LED
SEARCH LED
END LED
POWER CONT
WRITE CONT
BLUE BACK
AUDIO DUB
ETR 1
ETR 2
VCC
Pin No. Pin Name I/O Function
57
58
59
60
61
62
63
64
65
66
67
68
69
70
71
72
73
74
75
76
77
78
79
80
81
82
83
84
85
86
87
88
89
90
91
92
93
94
95
96
97
98
99
100
101
102
103
104
105
106
107
108
109
110
111
112
–
–
I/O
I/O
I/O
I/O
I/O
O
I
O
O
O
O
–
O
O
O
I
O
I
I
I
–
O
–
I
–
O
O
I
–
–
O
O
O
O
O
O
O
O
O
–
–
I
–
I
I
I
O
O
O
O
O
–
I
–
Ground
FLD ground
Clock signal input/output
Data input/output for IIC
Clock input/output for IIC bus interface
Data input/output for IIC bus interface
SCI clock input/output
Serial communication data signal output
Serial communication data signal input
Tuner audio mute
Force mono
Bilingual select
Stereo/mono control
Not used (only for secam model)
Full erase head on/off control signal
"L" : output when REC pause
Line-input selection control signal output
Enables flash write
Timer clock terminal (32khz) output
Timer clock terminal (32khz) input
Reset signal output
System clock terminal (10MHz) input
Ground
System clock terminal (10MHz) input
Smoothing capacitor connection
Sets operating mode
Not used
APC PWM signal output
Capstan TRQ PWM signal output
Erasing protection tab. Cassette in detection signal input
Not used
Not used
"H" : audio mute signal output
Capstan reverse control signal "H": when reverse
Capstan step driving signal output
Drum motor step driving signal output
Tuner PLL clock signal output
Tuner PLL chip select signal output
Tuner PLL data signal output
Normal audio PB signal output
"L": output when Hi-Fi audio REC pause (not used)
Not used
Not used
To detect type of color system
Not used
To detect mesecam signal
Drum FG schmitt amp. input
Drum FG schmitt amp. put
RF switching pulse signal output
AF switching pulse signal output
Drum motor error signal output
Capstan error signal output
Quasi VD pulse signal output
Ground
Composite sync signal input
Power supply unswitch 5V
VSS
FLD VSS
SCL0
SDA0
SCL1
SDA1
SCK1
SO1
SI1
TA MUTE
F MONO
MAIN SAP
STEREO OUT
SECAM ON
FULL ERASE
REC P
IN SELECT
FLASH WRITE ENABLE
32KHZ (OUT)
32KHZ (IN)
RESET
10MHZ (IN)
VSS
10MHZ (OUT)
CAP CONNET TO VSS
MDO
TV/VTR
APC PWM
CAP TRQ PWM
REC PROOF
NIL
NIL
A MUTE
CAP RVS
CAP QR
DRUM QR
PLL CLOCK
TU ENABLE
PLL DATA
NA PB
AF REC P
EX CTL
SECAM DET
C. KILLER DET
HEAD CLOG LED
MESECAM DET
DRUM PG
DRUM FG
RF SWP
AF SWP
DRUM PWM
CAP PWM
QVD
VSS
CSYNC
VCC
Pin No. Pin Name I/O Function
5-5. SERVO/SYSTEM CONTROL, OSD MICROPROCESSOR PIN FUNCTION (MA-402 BOARD IC101)
Page 52
5-5E
5-6. NICAM PROCESSOR PIN FUNCTION (NK-11 BOARD IC1)
Pin. No. Pin Name I/O Function
1 OUT L O Analog signal output left
2 OUT R O Analog signal output right
3 VDD A1 – Analog power supply 5V; DAC circuitry
4 VSS A1 – Analog ground; DAC circuitry
5 VSS D1 – Digital ground; DAC circuitry
6 VDD D1 – Digital power supply 5V; DAC circuitry
7 VSS D2 – Digital ground; DSP part
8 VDD D2 – Digital power supply 5V; DSP part
9 TP2 I Additional test pin 2; connected to ground for normal operation
10 N.C. – Not used
11 TP1 I Additional test pin 1; connected to ground for normal operation
12 N.C. – Not used
13 N.C. – Not used
14 V TUNE O Tuning voltage output for crystal oscillator
15 XTAL I I Crystal oscillator input
16 XTAL O O Crystal oscillator output
17 TEST2 I Test pin 2; connected to ground for normal operation
18 I REF I Resistor for reference current generation; front end circuitry
19 N.C. – Not used
20 VSS A2 – Analog ground; analog front end circuitry
21 VDD A2 – Analog power supply 5V; analog front end circuitry
22 TEST1 I Test pin 1; connected to ground for normal operation
23 SIF2 I Sound IF input 2
24 V REF1 I Reference voltage; analog front end circuitry
25 SIF1 I Sound IF input 1
26 C RST Capacitor for power-on reset
27 VSS D3 – Digital ground; front end circuitry
28 VDD D3 – Digital power supply 5V; front end circuitry
29 SCL I Serial communication clock signal input
30 SDA I Serial communication data signal input
31 N.C. – Not used
32 N.C. – Not used
33 N.C. – Not used
34 N.C. – Not used
35 VDD D4 – Digital power supply 5V; demodulator circuitry
36 VSS D4 – Digital ground; demodulator circuitry
37 N.C. – Not used
38 N.C. – Not used
39 EXTI R I External audio input right channel
40 EXTI L I External audio input left channel
41 V REF2 I Analog reference voltage digital-to-analog converter and operational amplifiers
42 N.C. – Not used
43 VDD A3 – Analog power supply 5V; operational amplifiers
44 VSS A3 – Analog ground; operational amplifiers
Page 53
SLV-ED212/ED717/ED818/ED919/LF1
6-1E
SECTION 6
ERROR CODE
This set displays an error code, and a mode code in case of
error on the display tube, if the operation stopped by error.
The following provides description concerned.
A: Error code ....................................................... Table 6-1
B: Mode code in case of error ............................ Table 6-2
These codes are displayed at lower 5-digit positions of display
tube.
In this case, “ : ” between digits is not displayed.
Table 6-1. Error Codes
Table 6-2. Mode Codes in Case of Error
Display tube (lower 5 digits)
AB
Code Description
0 NO ERROR
1 CAM ENCODER ERROR, LOAD DIRECTION
2 CAM ENCODER ERROR, UNLOAD DIRECTION
3 T REEL ERROR
4 S REEL ERROR
5 CAPSTAN ERROR
6 DRUM ERROR
7 INITIALIZE ERROR
8 CASSETTE UNLOADING ERROR
9 RESERVED
Code Description
0 EJECT (POWER ON)
1 EJECT (POWER OFF)
2 UNLOAD STOP
3 STOP (POWER ON)
4 POWER OFF (CASSETTE IN)
5 F. FWD
6 REW
7 LOW SPEED F. FWD
8 LOW SPEED REW
9 STANDBY
10 REC
11 REC (VISS)
12 REC PAUSE
13 PLAY
14 A. DUB
15 A. DUB PAUSE
16 CUE
17 REV
18 STILL (MECHA FWD)
19 FWD FRAME BY FRAME (FWD SLOW)
20 STILL (MECHA RVS)
21 RVS FRAME BY FRAME (RVS SLOW)
Page 54
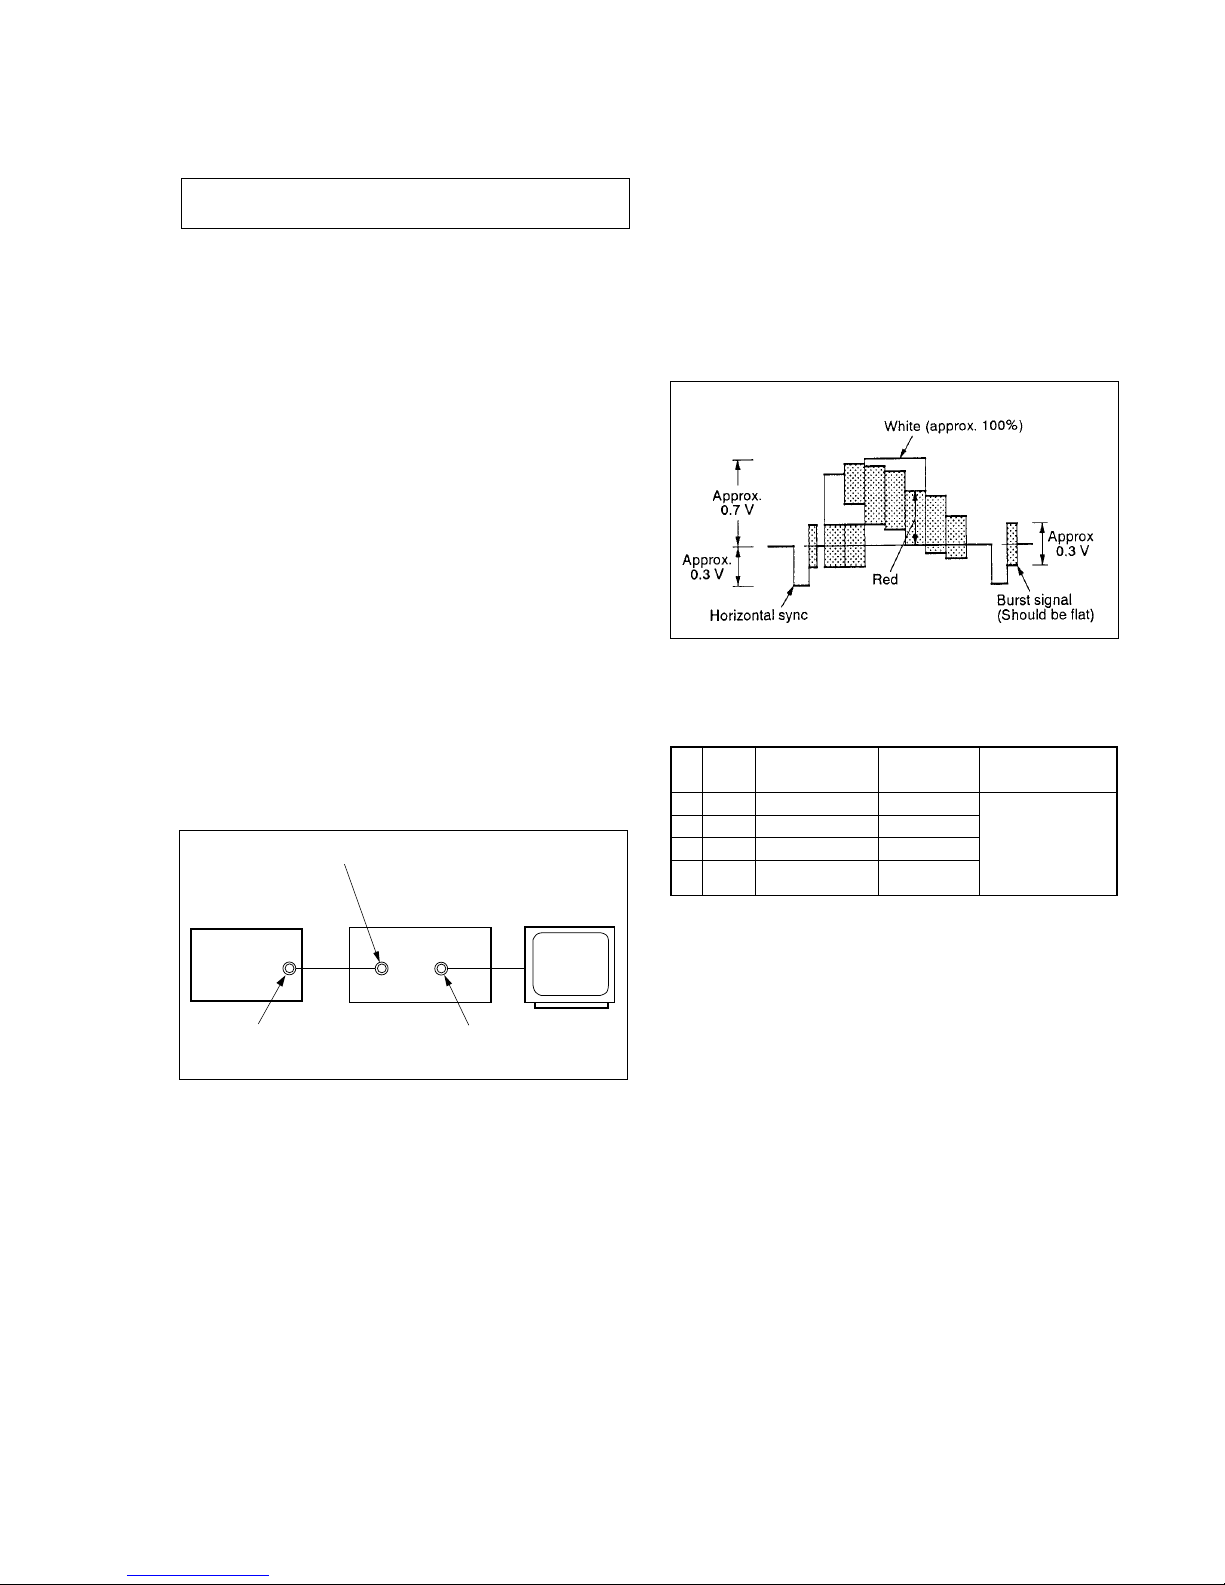
7-1
SECTION 7
ADJUSTMENTS
1
2
3
4
Mode
SP
SP
EP
EP
Video signal
Color bar
Monoscope
Color bar
Monoscope
Audio signal
(HiFi/Normal)
400 Hz
Time
Seven minutes
Three minutes
Seven minutes
Three minutes
7-1. MECHANICAL ADJUSTMENTS
Refer to the SERVICE MANUAL of VHS MECHANICAL
ADJUSTMENT VI.
7-2. ELECTRICAL ADJUSTMENTS
2-1. PRE-ADJUSTMENT PREPARATIONS
Necessary items and indications for total adjustment of electric
circuit of this machine will be described in this chapter.
2-1-1. Instruments to be Used
1) Color TV
2) Oscilloscope 1 or 2 phenomena, band more than 30 MHz, delay
mode, as provided.
3) NTSC pattern generator
4) Digital voltmeter
5) Audio level meter
6) Audio noise meter
7) Audio generator
8) Attenuator
9) Alignment tape
Part Code: 8-192-605-32 KRV-51N2
2-1-2. Connection
Unless otherwise specified, connect and adjust the measuring
instruments as shown in the following diagram.
Fig. 7-2-1
During the adjustment, see the Parts Arrangement
Diagram for Adjustments on Page 7-6.
Fig. 7-2-2
2-1-4. Alingment Tapes
[Alignment Tape (KRV-51N2/KRV-51P)]
2-1-3. Set-up of Adjustment
In this adjustment, NTSC pattern generator is connected with LINE
input signal terminal. When checking with tuner, connected AERIAL
terminal. Check that the amplitudes of video signal SYNC signal, of
picture portions, and of burst signals are flat at approximately 0.3,
0.7 and 0.3 V, respectively, and that the level ratio of the burst signal
and “red” signal are 0.30: 0.66. Fig. 7-2-2. shows video signals (color
bars) used in adjusting the video section.
NTSC
2-1-5. Specified I/O Level and Impedance
Input/output terminal
Video inputs LINE IN : phono jack
1 Vp-p, 75 Ω, unbalanced, sync negative
Audio inputs LINE IN : phono jacks
47 kW, –7.5 dBs (0 dBs = 0.775 Vrms)
More than 10 kW, –4 dBs
Video outputs LINE OUT : phono jack
1 Vp-p, 75 Ω, unbalanced, sync negative
Audio outputs LINE OUT : phono jacks
–7.5 dBs at load impedance 47 kΩ
Output impedance : less than 10 Ω
SLV-ED212/ED717/ED818/ED919/LF1
Video output
(75 Ω)
Pattern generator VCR
VIDEO LINE IN
Monitor TV
VIDEO LINE OUT
Page 55
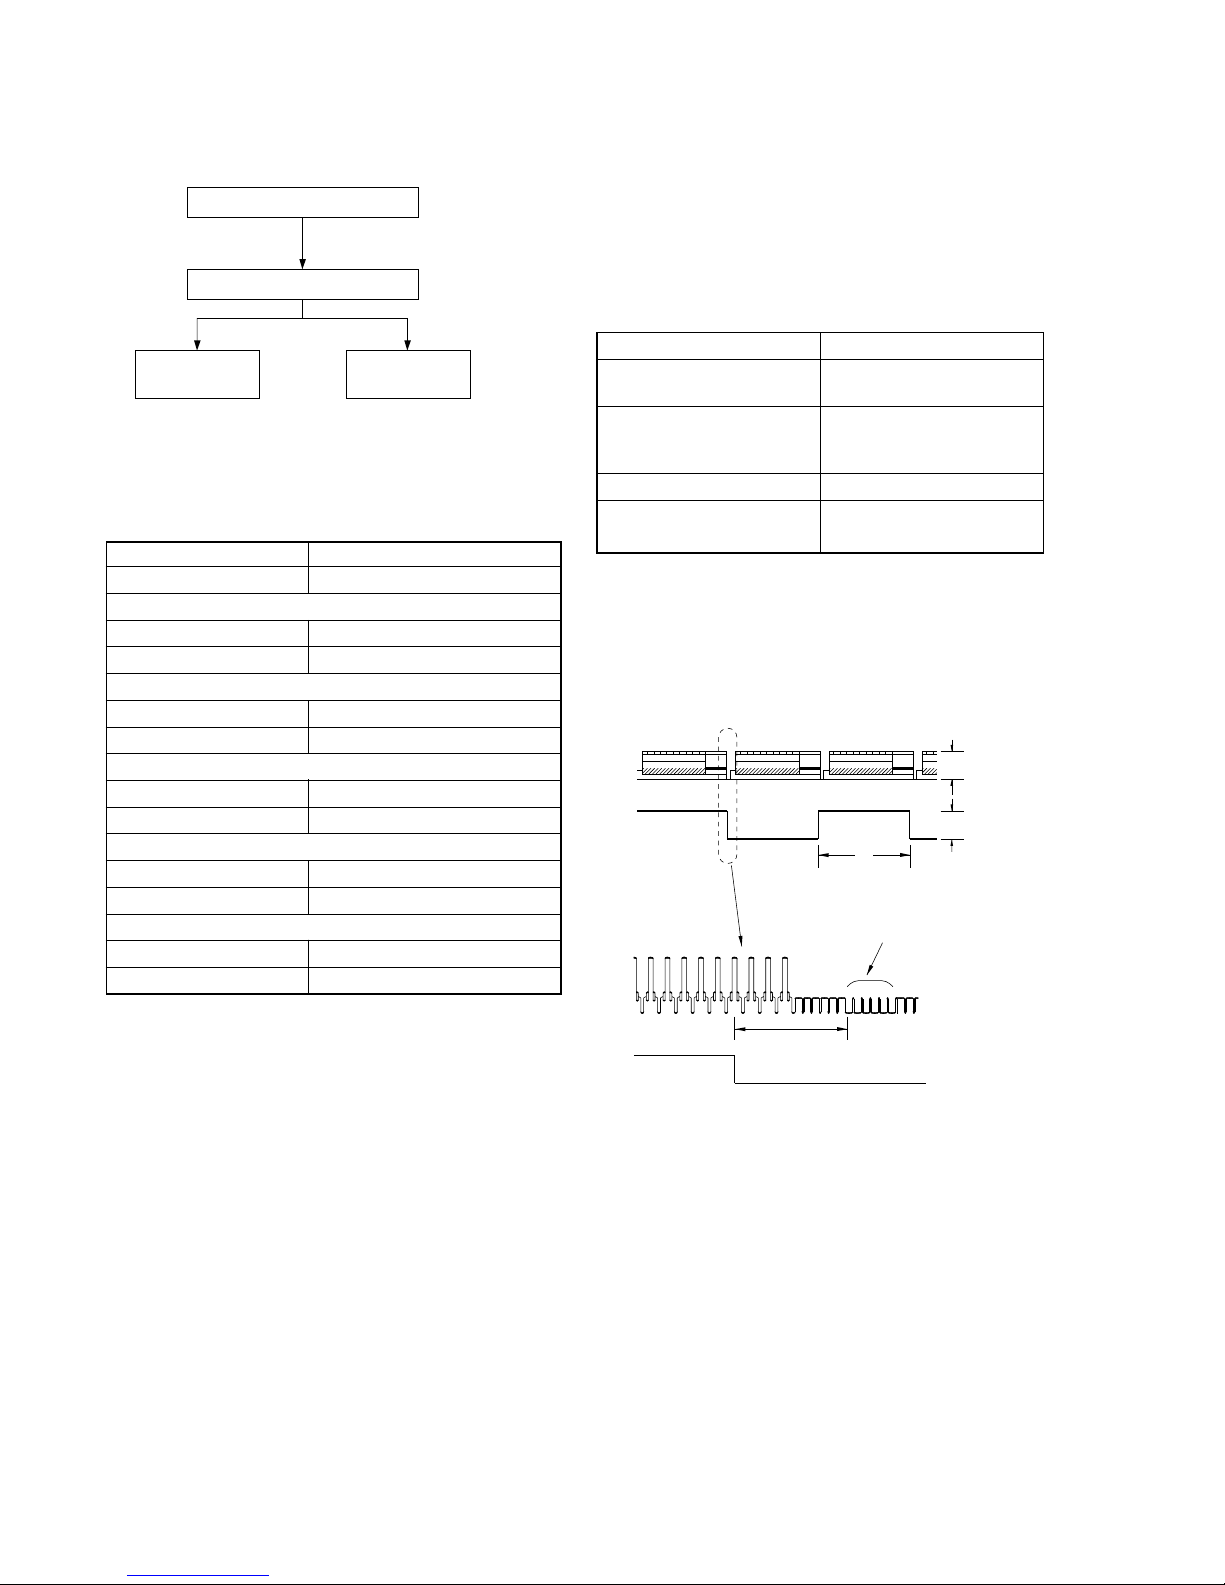
Approx. 1 Vp-p
Approx. 5 Vp-p
V
enlargement
CH2
CH1
CH2
CH1
Vertical sync. signal
6.5 ± 0.5 H
(410 ± 32 µsec) NTSC
7-2
2-1-6. Adjusting Sequence
Make the electrical adjustment in the following sequence.
2-3. SERVO SYSTEM ADJUSTMENT
2-3-1. RF Switching Position Adjustment
(MA-402 BOARD)
Purpose:
Adjust the interval between A ch and B ch of tape playback output.
Improve the interchangeability with other tapes and sets.
When it is out of order, the interval appears on the screen, the screen
is disturbed.
Mode PB
Signal Alignment tape SP mode
color bar
Measurement Point CH1: Pin 2 of CN202
CH2: Pin 3 of CN202
(RF SWP)
Measuring Instrument Oscilloscope
Specified Value 6.5 ± 0.5 H (410 ± 32 µsec)
NTSC
Adjusting Method:
1) Connect MA-402 board JS401 to the GND for about 1 second
to activate the RF switching position adjustment mode.
2) Check appear “A P” on FL display.
3) Using the channel + and – buttons, adjust to 6.5 ± 0.5 H.
4) Press the pause button.
Fig. 7-2-3.
Mode E-E
Measuring Instrument Digital voltmeter
+F, –F check
Measurement Point
Between JL 615 (IF) and JL 614 (-F)
Specified Value 3.0 ± 1.0 V
–13 V check
Measurement Point JL 625
Specified Value –11.0 ± 1.5 V
+6 V check
Measurement Point JL 611
Specified Value 5.95 ± 0.3 V
+13 V check
Measurement Point JL 604
Specified Value 13.5 ± 1.0 V
+38 V check
Measurement Point JL 618
Specified Value 32.0 ± 4.0 V
2-2. POWER SUPPLY ADJUSTMENT
2-2-1. Power Supply Check
Checking Method:
1) Confirm that each voltage meets its specified value.
Power supply adjustment
Servo system adjustment
Audio system
adjustment
Tuner system
adjustment
Page 56
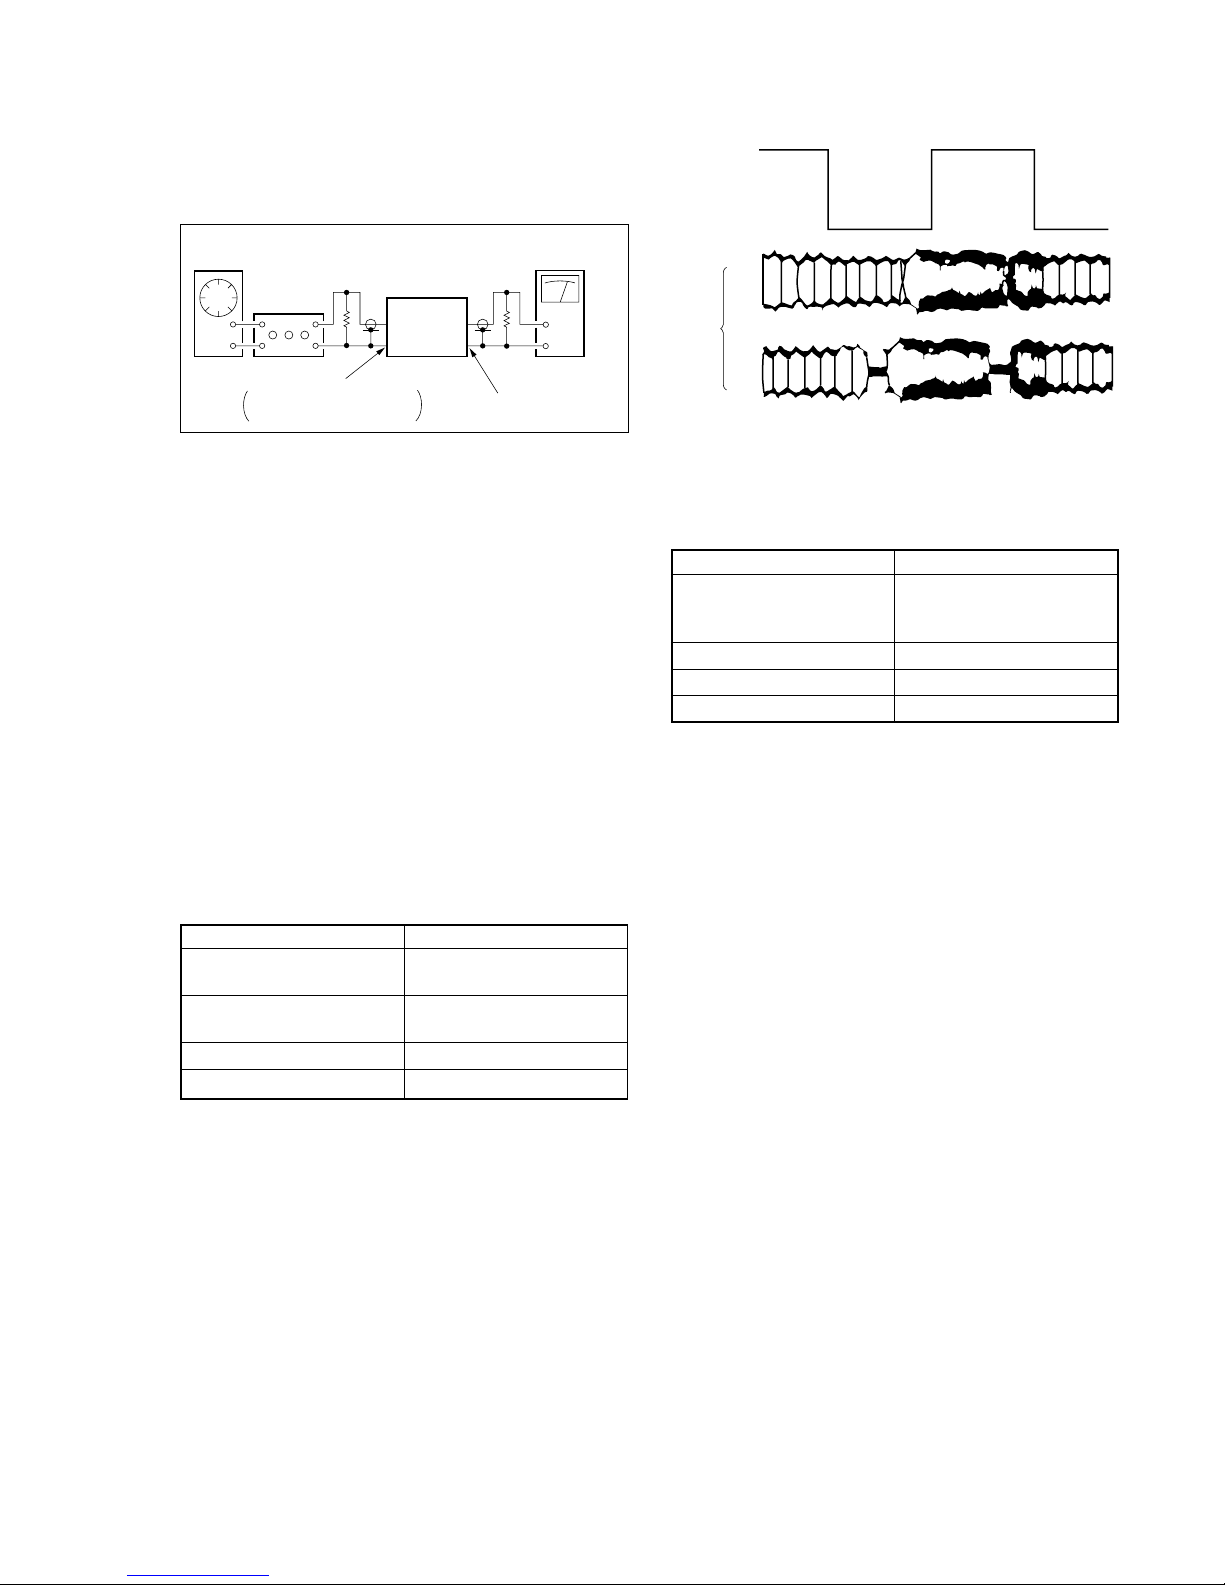
7-3
2-4. AUDIO SYSTEM ADJUSTMENTS
• Adjust both Lch and Rch.
[Connection]
Fig. 7-2-4.
2-4-1. Hi-Fi Audio System Adjustment
(SLV-ED818/ED919/LF1)
• Set switches and knobs to the following positions to make
adjustment unless otherwise specified.
INPUT SELECT switch ................... LINE
AUDIO MONITOR.......................... STEREO
[Adjustment Sequence]
1. AF Switching Position Adjustment
2. Frequency Response Check
3. Overall Level Characteristic and Distortion Factor
Check
4. Overall S/N Check
1. AF Switching Position Adjustment
(MA-402 BOARD)
Purpose:
Adjust the interval between A CH and B CH of tape playback output.
Improve the interchangeability with other tapes and sets.
When it is out of order, noisy sound is increased and big noise is
heard.
Mode PB
Signal Alignment tape SP mode
color bar
Measurement point CH1: Pin 3 of CN202
CH2: Pin 1 of CN202
Measuring Instrument Oscilloscope
Specified Value Fig. 7-2-5
Adjusting Method:
1) Connect MA-402 board JS401 to the GND for about 1 second
to activate the RF switching position adjustment mode.
2) Press the PLAY button to activate the AF switching position
adjustment mode.
3) Check appear “A H” on FL display.
4) Using the channels + and – buttons, minimize a chipped portion.
At this time, confirm that a noisy sound is not heard.
5) Press the pause button.
Fig. 7-2-5.
2. Frequency Response Check
Purpose:
Confirm that the frequency characteristic is within the specification.
Mode REC and PB (SP, EP mode)
Signal 400 Hz, –17.5 dBs
20 Hz, –17.5 dBs
20 kHz, –17.5 dBs
Measurement point Audio output terminal
Measurement equipment Audio level meter
Specified value 0 ± 2 dB
Note: Tape path adjustment must have been completed.
Confirmation Method:
1) Supply a signal of 400 Hz, –17.5 dBs to both L and R channels
of Audio Line Input.
2) Connect the audio level meter to the Audio Line Output.
3) Adjust the attenuator so that the audio level meter will indicate
–17.5 dBs.
4) Make recording.
5) Set an audio line input signal to 20 Hz and make recording.
6) Set an audio line input signal to 20 kHz and make recording.
7) Playback a recorded portion, and measure output levels at 400
Hz and 20 Hz and 20 kHz.
8) Confirm that the 20 Hz and 20 kHz playback output level within
a range of the 400 Hz playback output level 0 ± 2 dB.
CH2
CH1
RF SWP
OK
NG
Audio
generator
Attenuator
600 Ω
47 kΩ
VCR
Audio level meter or
distortion meter
AUDIO LINE OUT
AUDIO LINE IN
Feed signal both
channelssimultaneously.
Page 57
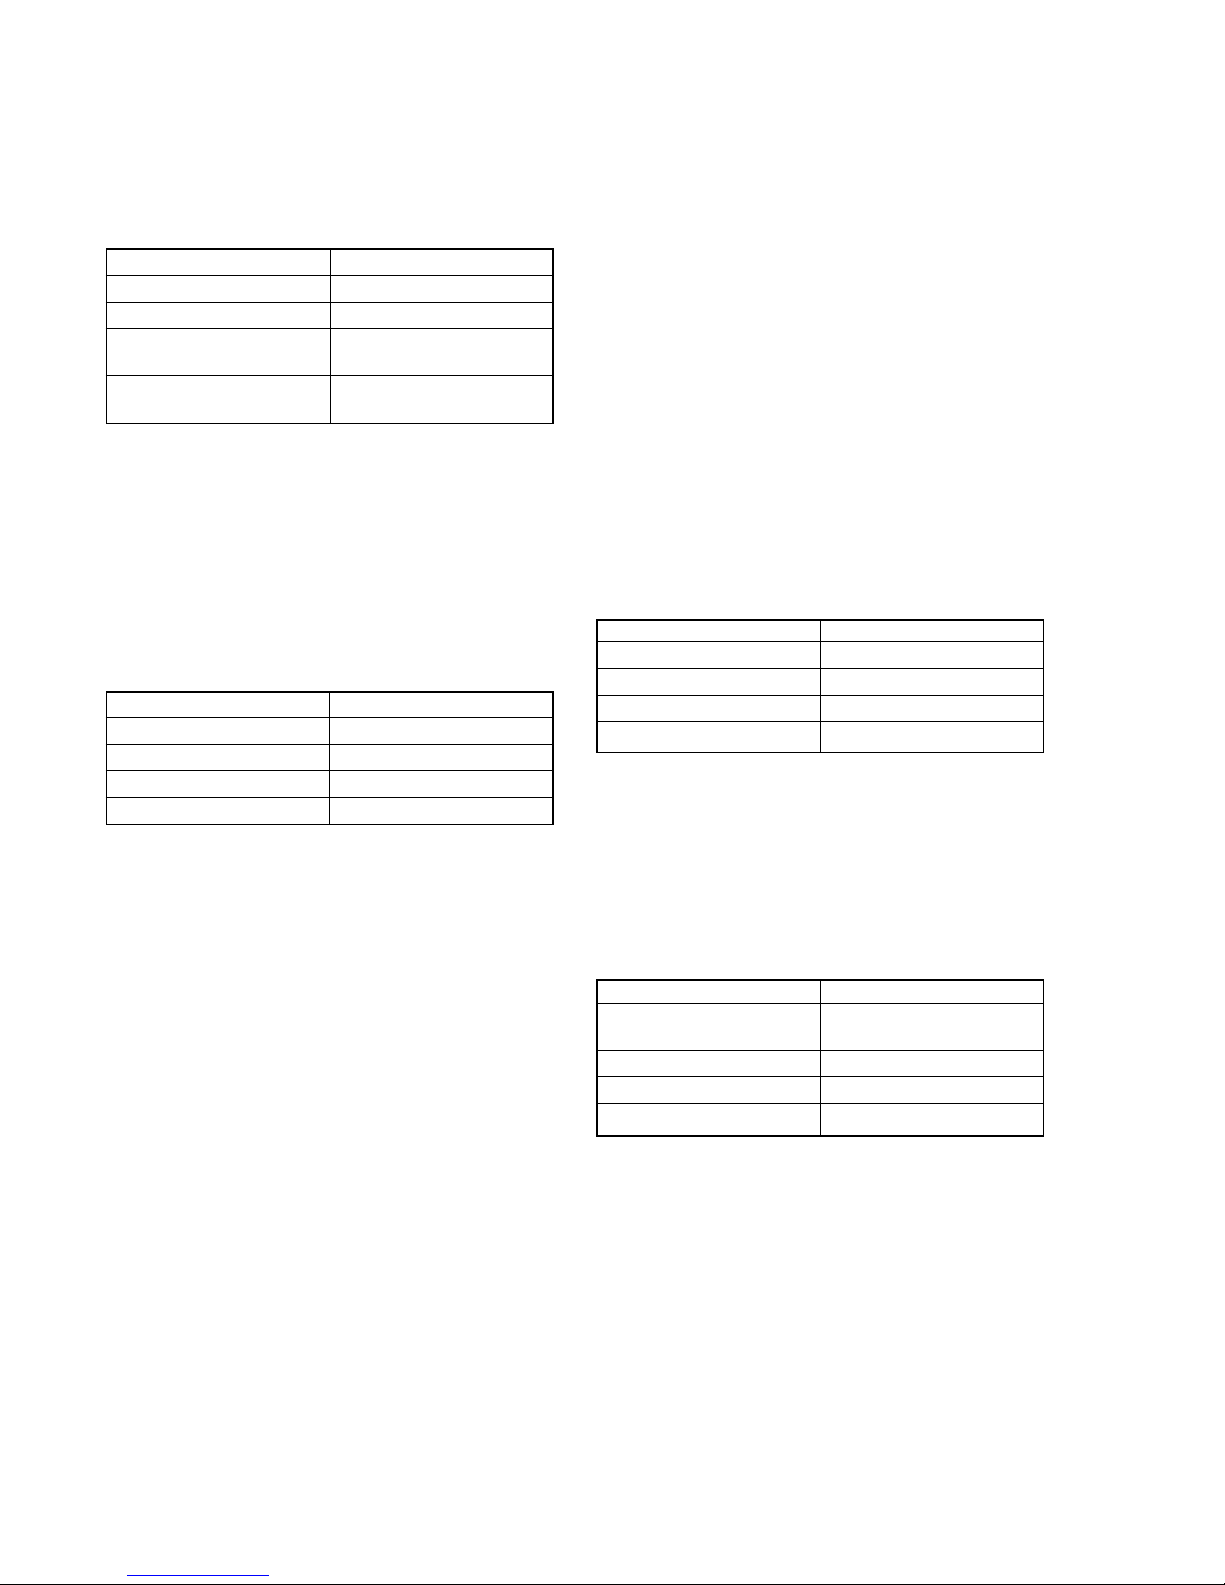
7-4
3. Overall Level Characteristic and Distortion Factor
Check
Purpose:
Check the record level, play level, and distortion factor against the
reference input.
Mode REC and PB (SP mode)
Signal 400 Hz, –7.5 dBs
Measurement point Audio output terminal
Measurement equipment Audio level meter and
distortion factor meter
Specified value Playback level: –7.5 ± 2.0 dBs
Distortion factor: 1% or less
Confirmation Method:
1) Supply an audio signal of 400 Hz, –7.5 dBs simultaneously to
both L and R channels of Audio Line Input.
2) Make recording
3) Play back a recorded portion.
4) Confirm that a playback level is –7.5 ±2.0 dBs.
5) Confirm that a distortion factor is within 1%.
4. Overall S/N Check
Purpose:
Confirm that the S/N is within the specification.
Mode REC and PB (SP mode)
Signal Short
Measurement point Audio output terminal
Measurement equipment Audio noise meter
Specified value –67.5 dBs or less
Confirmation Method:
1) Connect both L and R channels of audio line input to the GND.
2) Start recording.
3) Play the recorded part to confirm that the noise is below –67.5
dBs.
2-4-2. Normal Audio System Adjustment
• Make adjustment in the SP mode, unless otherwise specified. Use
a normal VHS cassette for an adjustment tape.
• Set AUDIO MONITOR to normal.
[Adjustment Sequence]
1. ACE Head Adjustment
2. E-E Output Level Check
3. Frequency Response Check
4. Overall Level Characteristic and Distortion Factor
Check
5. Overall S/N Check
1. ACE Head Adjustment
Refer to the SERVICE MANUAL of VHS MECHANICAL
ADJUSTMENT VI.
2. E-E Output Level Check
(SLV-ED212/ED717)
Purpose:
Confirm that the output level against the reference input is within the
specification.
Mode E-E
Signal L, R: 400 Hz, –7.5 dBs
Measurement point Audio output terminal
Measurement equipment Audio level meter
Specified value –7.5 ± 2.0 dBs
Confirmation Method:
1) Simultaneously input a signal of 400 Hz, –7.5 dBs to both L
and R channels of Audio Line Input.
2) Confirm that the audio output level is –7.5 ± 3.0 dBs.
(This level only can appear with mono models)
3. Frequency Response Check
Purpose:
Confirm that the frequency characteristic is within the specification.
Mode REC and PB (SP mode)
Signal 400 Hz, –17.5 dBs
7 kHz, –17.5 dBs
Measurement point Audio output terminal
Measurement equipment Audio level meter
Specified value 0 ± 4 dB
Tape path adjustment must have been completed.
Confirmation Method:
1) Supply a signal of 400 Hz, –17.5 dBs to both L and R channels
of Audio Line Input.
2) Connect the audio level meter to the Audio Line Output.
3) Adjust the attenuator so that the audio level meter will indicate
–17.5 dBs.
4) Make recording in the SP mode.
5) Set an audio line input signal to 7 kHz and make recording.
6) Playback a recorded portion, and measure output levels at 400
Hz and 7 kHz.
7) Confirm that the 7 kHz playback output level within a range of
the 400 Hz playback output level 0 ± 4 dB.
Page 58
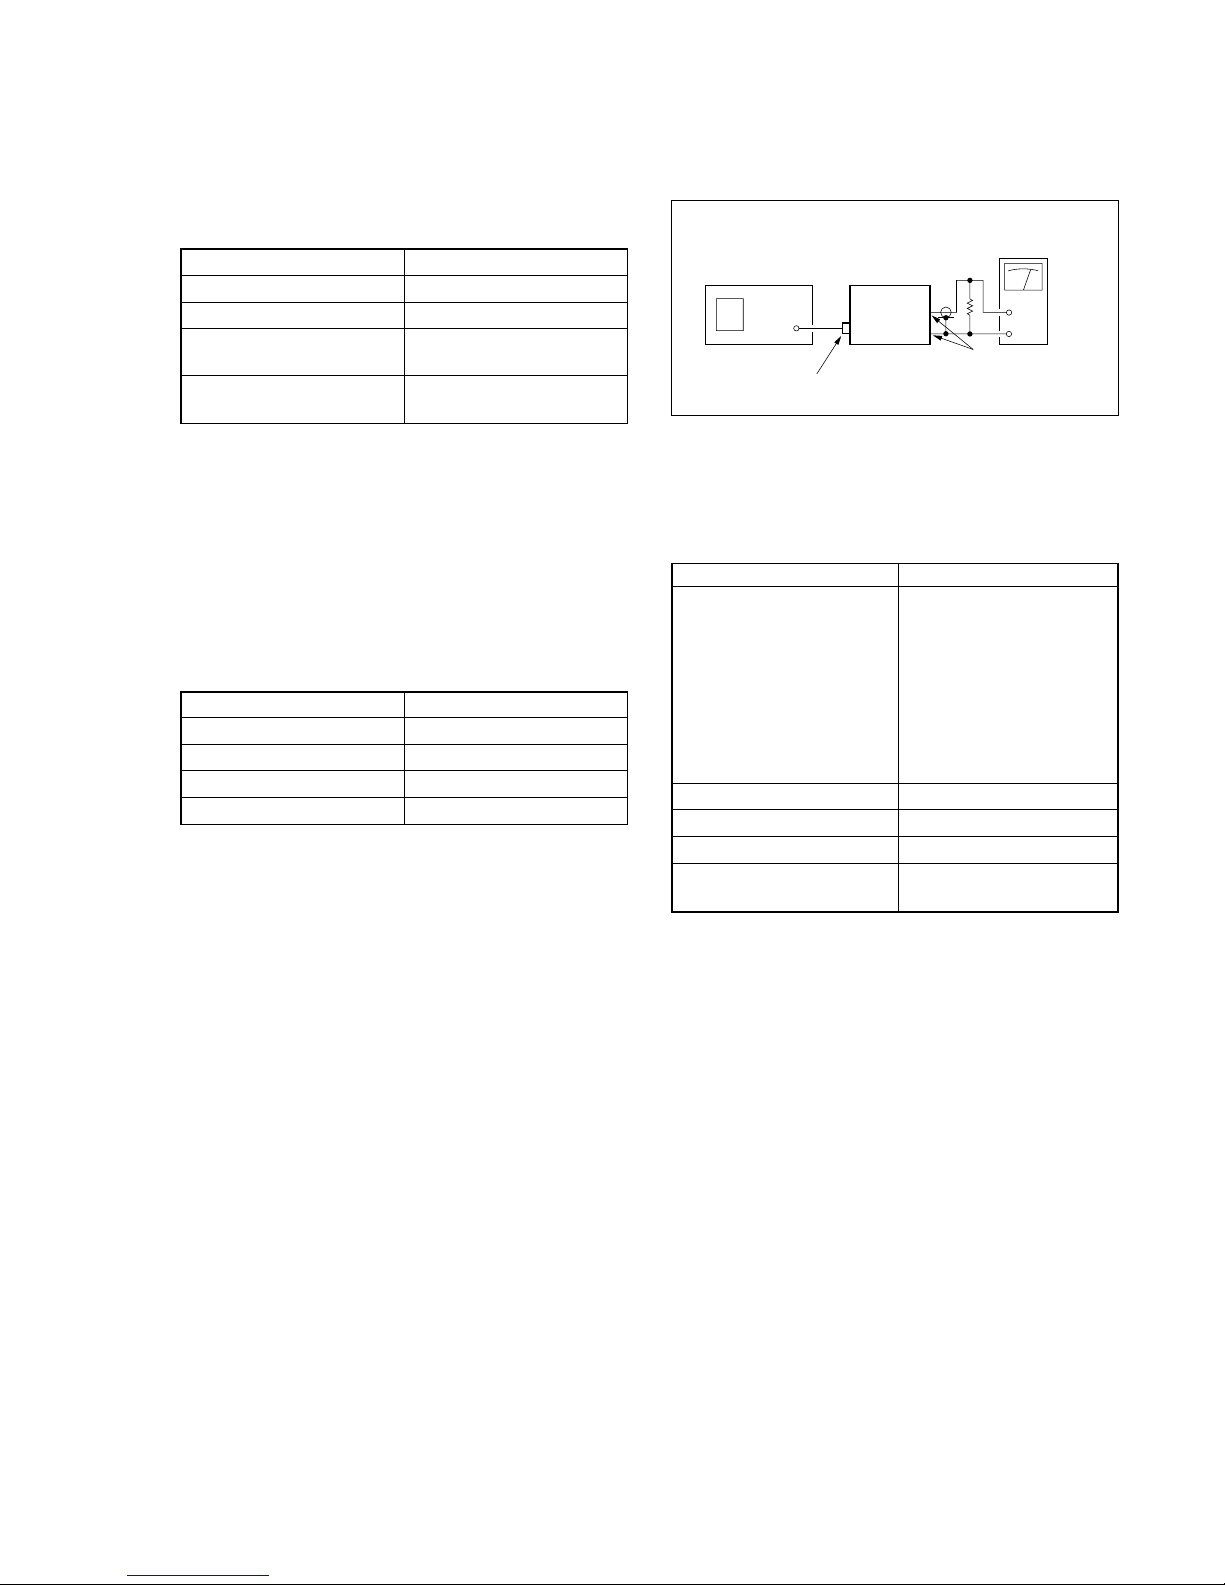
7-5
4. Overall Level Characteristic and Distortion Factor
Check
Purpose:
Check the record level, play level, and distortion factor against the
reference input.
Mode REC and PB (SP mode)
Signal 400 Hz, –7.5 dBs
Measurement point Audio output terminal
Measurement equipment Audio level meter and
distortion factor meter
Specified value Playback level: –7.5 ± 4.0 dBs
Distortion factor: 4% or less
Confirmation Method:
1) Supply an audio signal of 400 Hz, –7.5 dBs simultaneously to
both L and R channels of Audio Line Input.
2) Make recording
3) Play back a recorded portion.
4) Confirm that a playback level is –7.5 ± 4.0 dBs. (mono audio)
5) Confirm that a distortion factor is less than 4%.
5. Overall S/N Check
Purpose:
Confirm that the S/N is within the specification.
Mode REC and PB (SP mode)
Signal Short
Measurement point Audio output terminal
Measurement equipment Audio noise meter
Specified value –46.0 dBs or less
Confirmation Method:
1) Connect both L and R channels of audio line input to the GND.
2) Start recording.
3) Play the recorded part to confirm that the noise is below –46.0
dBs.
2-5. TUNER SYSTEM ADJUSTMENT
[Connection]
Fig. 7-2-6
2-5-1. Separation Adjustment
(SLV-ED818/ED919TW)
Purpose:
Mixed audio signal separate Lch and Rch.
Mode E-E
Signal VIDEO:
color bar
(White 100% modulation)
AUDIO:
L NONE
R 1 kHz 60% modulation
ELECTRIC FIELD:
60–80 dBs/75 Ω Term
Measurement point Pin qx of IC701
Measurement equipment Audio level meter
Adjusting Element RV701 (MA-402 Board)
Specified value minimum -9.9 ± 0.2 dBm
(700 ± 14mVp-p)
47 kΩ
VCR
Audio level
meter
Up channel
convertor
RF IN
AUDIO LINE OUT
L
R
Page 59
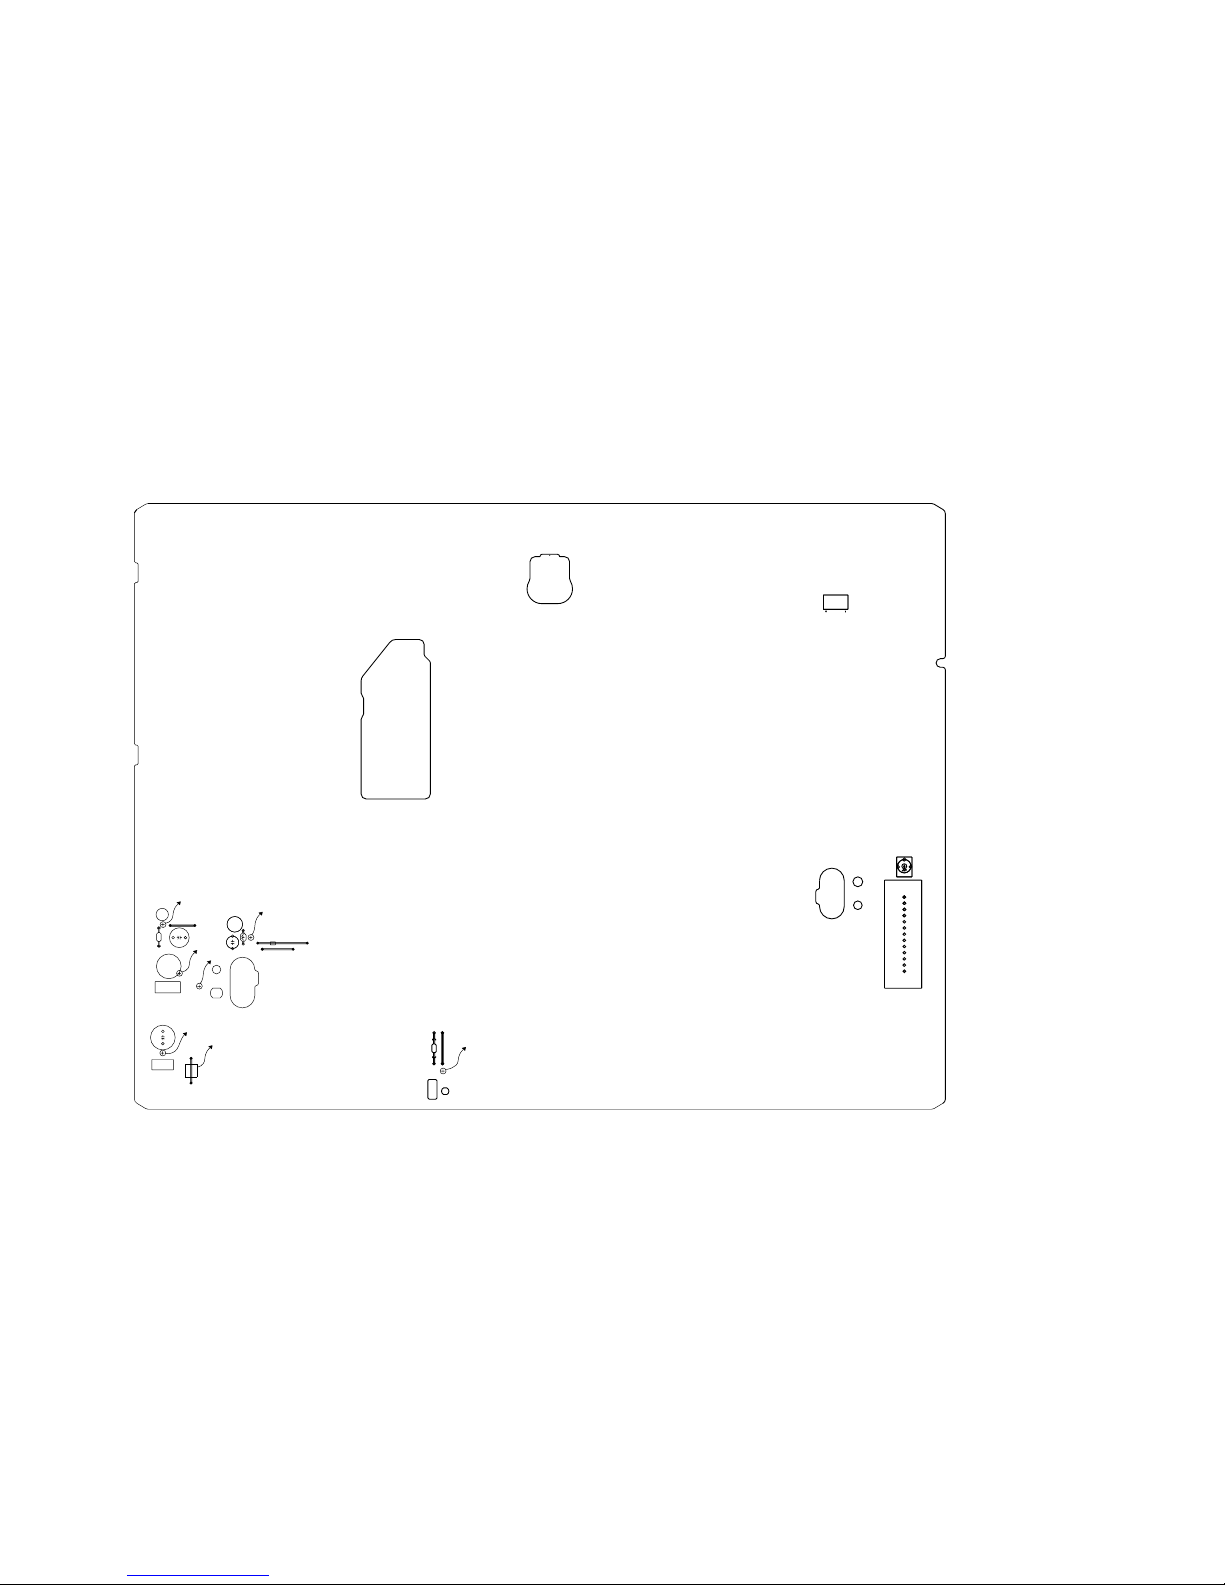
2-6. PARTS ARRANGEMENT DIAGRAM FOR ADJUSTMENTS
MA-402 BOARD (Side A)
JL625
JL614
JL615
JL604
JL611
JL618
JS401
IC701
RV701
CN202
CN412
7-6E
Page 60
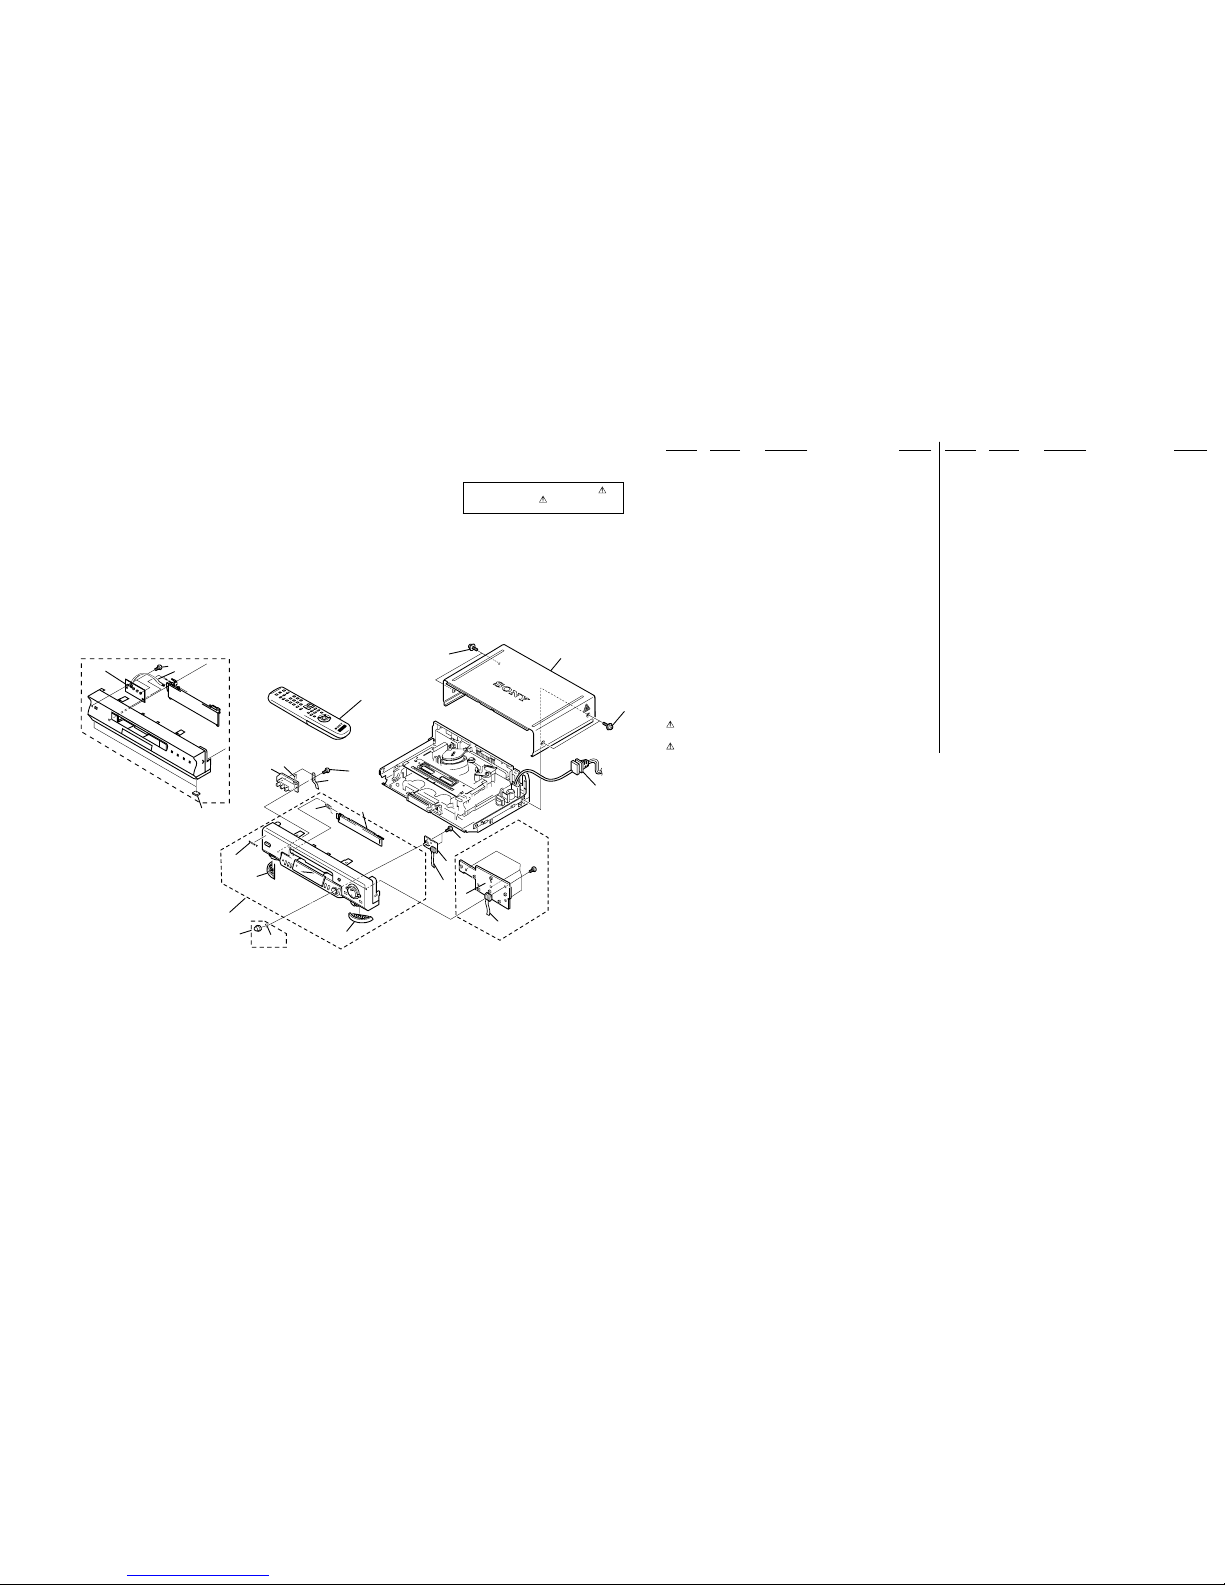
SLV-ED212/ED717/ED818/ED919/LF1
8-1 8-2
SECTION 8
REPAIR PARTS LIST
8-1. EXPLODED VIEWS
NOTE:
• -XX, -X mean standardized parts, so they may
have some differences from the original one.
• Items marked “*” are not stocked since they
are seldom required for routine service. Some
delay should be anticipated when ordering these
items.
• The mechanical parts with no reference number
in the exploded views are not supplied.
8-1-1. FRONT PANEL AND UPPER CASE SECTION
Ref. No. Part No. Description Remarks Ref. No. Part No. Description Remarks
V
ID
E
O
1
14
15
2
3
3
3
5
5
4
6
7
8
7
11
12
10
12
13
17
17
16
not supplied
not supplied
LF1
ED212/ED717/
ED818/ED919
ED212/ED717/
ED919/LF1
not supplied
3
9
1 X-3951-331-2 PANEL ASSY, FRONT (LF1)
1 X-3951-339-1 PANEL ASSY, FRONT (ED919KR)
1 X-3951-341-1 PANEL ASSY, FRONT (ED717)
1 X-3951-343-1 PANEL ASSY, FRONT (ED212)
1 X-3951-344-1 PANEL ASSY, FRONT (ED919TW)
1 X-3951-345-1 PANEL ASSY, FRONT (ED818)
2 3-953-432-01 SPRING (GE), FL
(ED212/ED717/ED818/ED919)
3 4-921-277-41 SCREW (B2.6 x 8), TAPPING, BIND
* 4 A-6713-876-A DM-098 COMPLETE PWB
(ED212/ED717/ED818/ED919)
* 4 A-6713-988-A DM-098 COMPLETE PWB (LF1)
5 1-757-552-12 FLAT CABLE FDM-010
* 6 A-6713-877-A DI-081 COPLETE PWB
(ED212/ED717/ED818/ED919)
7 1-757-553-11 FLAT CABLE FDI-002
(ED212/ED717/ED818/ED919)
* 8 A-6713-870-A FJ-031 COMPLETE PWB (ED212)
* 8 A-6713-889-A FJ-031 COMPLETE PWB (ED717)
* 8 A-6713-878-A FJ-031 COMPLETE PWB (ED818/ED919)
* 9 A-6713-968-A FJ-033 COMPLETE PWB (LF1)
10 1-782-752-41 CORD, POWER
(ED212/ED717/ED919KR/LF1)
10 1-777-852-33 CORD, POWER (ED818/ED919TW)
The components identified by mark or
dotted line with mark
are critical for safety.
Replace only with part number specified.
Les composants identifiés par une marque
! sont critiques pour la sécurité.
Ne les remplacer que par une pièce portant
le numéro spécifié.
11 3-064-641-41 CASE, UPPER
(ED212/ED717/ED818/ED919)
11 3-066-121-11 CASE, UPPER (LF1)
12 3-710-901-61 SCREW, TAPPING
13 1-476-475-71 COMMANDER, STANDARD (RMT V-312)
(ED212)
13 1-476-475-81 COMMANDER, STANDARD (RMT V-312A)
(ED717)
13 1-476-533-11 COMMANDER, STANDARD (RMT V-312C)
(ED818)
13 1-476-474-11 COMMANDER, STANDARD (RMT V-310)
(ED919KR)
13 1-476-475-91 COMMANDER, STANDARD (RMT V-312B)
(ED919TW)
13 1-476-687-11 COMMANDER, STANDARD (RMT V-315)
(LF1)
14 3-943-995-31 EMBLEM (NO.5), SONY
(ED212/ED717/ED818/ED919)
15 X-3951-233-1 KNOB ASSY, ETR
(ED212/ED717/ED818/ED919)
16 3-055-077-01 SPRING, ETR (P5)
(ED212/ED717/ED818/ED919)
17 3-057-164-11 INSULATOR
(ED212/ED717/ED818/ED919)
Page 61
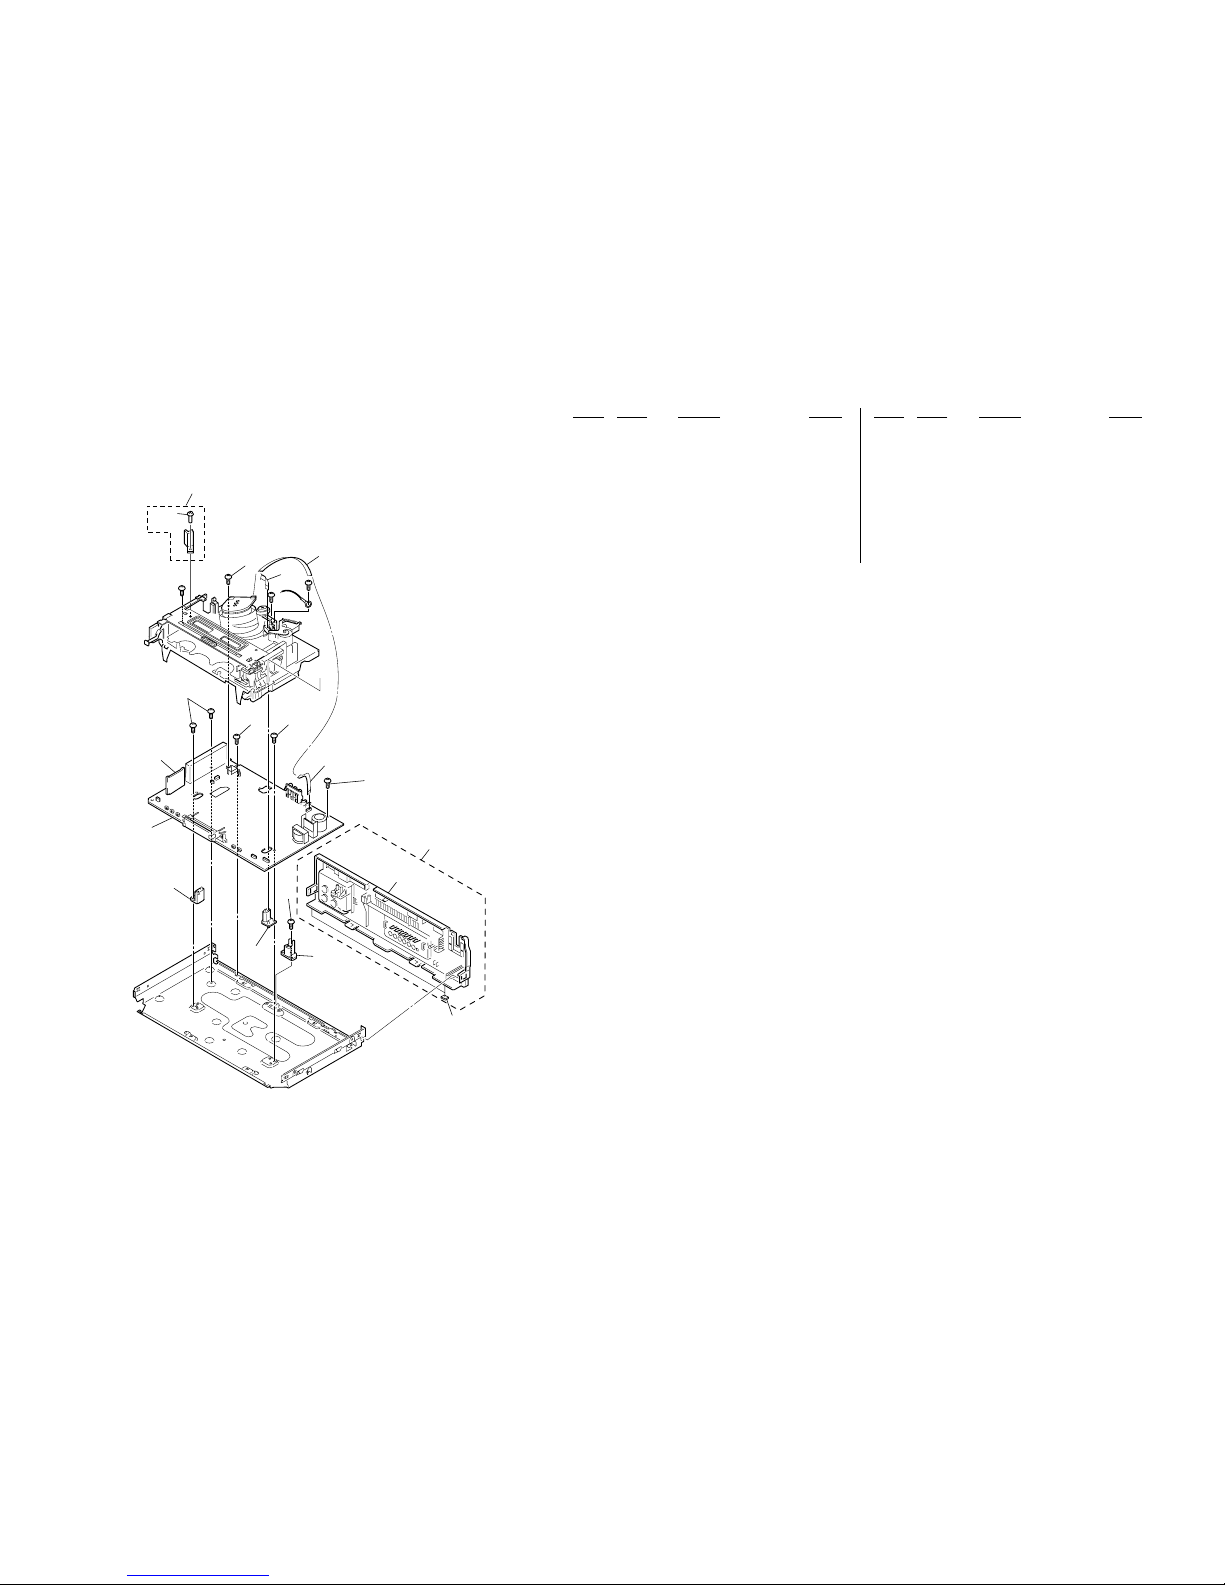
SLV-ED212/ED717/ED818/ED919/LF1
8-3 8-4
56
60
55
51
58
57
51
#1
#1
#1
52
53
53
53
53
53
54
53
59
not
supplied
not
supplied
not supplied
8-1-2. CHASSIS SECTION
Ref. No. Part No. Description Remarks
51 3-959-383-01 BASE (R), MD
* 52 A-6713-944-A MA-402 COMPLETE PWB (ED212)
* 52 A-6713-951-A MA-402 COMPLETE PWB (ED717)
* 52 A-6713-938-A MA-402 COMPLETE PWB (ED818)
* 52 A-6713-950-A MA-402 COMPLETE PWB (ED919KR)
* 52 A-6713-939-A MA-402 COMPLETE PWB (ED919TW)
* 52 A-6713-937-A MA-402 COMPLETE PWB (LF1)
53 3-970-608-21 SUMITITE (B3), +BV
54 1-757-690-11 CABLE, FLAT (FMD-022)
(ED717/ED818/ED919/LF1)
54 1-757-691-11 CABLE, FLAT (FMD-023) (ED212)
Ref. No. Part No. Description Remarks
55 1-757-551-11 CABLE, FLAT (FAC-009)
* 56 A-6713-875-A NK-11 COMPLETE PWB (ED919KR/LF1)
57 X-3951-408-1 PANEL ASSY, REAR (ED212/ED717)
57 X-3951-409-1 PANEL ASSY, REAR (ED818/ED919TW)
57 X-3951-407-1 PANEL ASSY, REAR (ED919KR/LF1)
58 3-064-638-41 PANEL, REAR (ED212/ED717)
58 3-064-638-51 PANEL, REAR (ED818/ED919TW)
58 3-064-638-31 PANEL, REAR (ED919KR/LF1)
59 X-3950-969-1 TC(N17S) ASSY (SL)
60 3-342-512-21 SCREW (B1.7 X 3.5), TAPPING
#1 7-685-648-79 SCREW + BVTP 3 X 12 TYPE 2 IT-3
Page 62
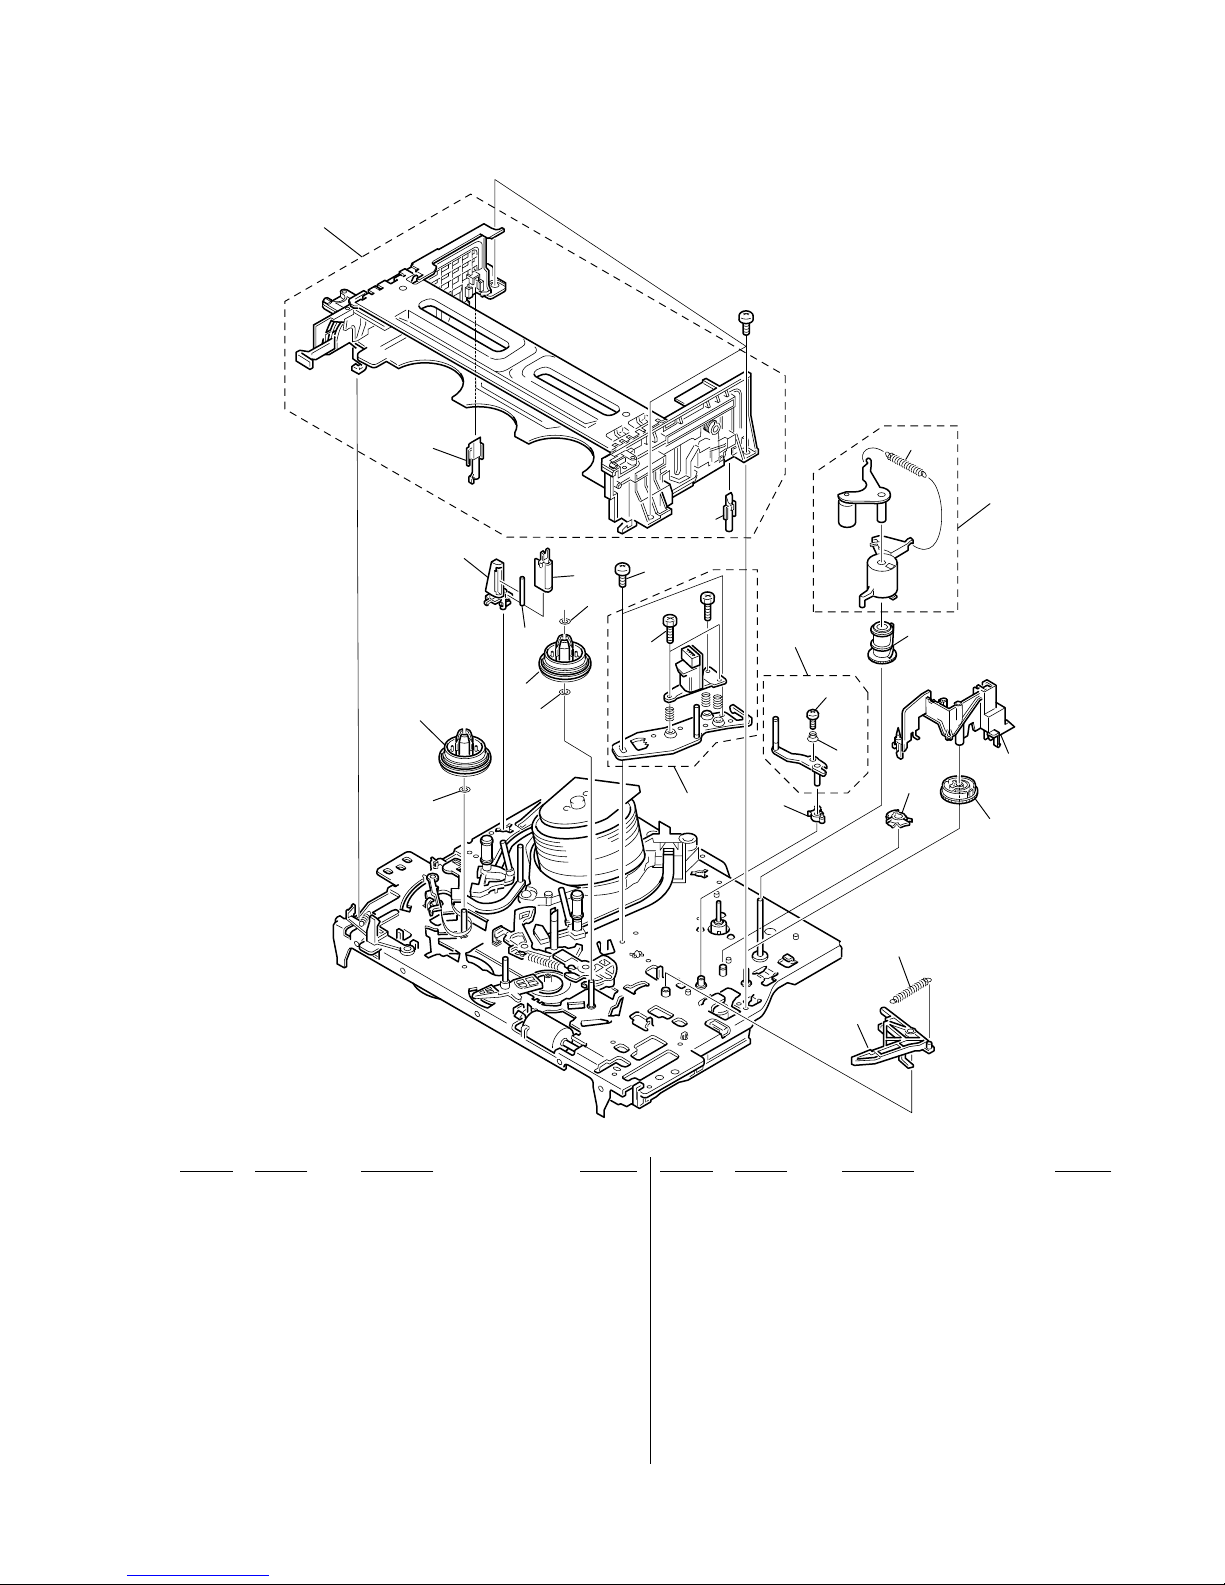
SLV-ED212/ED717/ED818/ED919/LF1
8-5
8-1-3. MECHANISM DECK SECTION-1
701
702
703
704
710
705
723
722
720
724
725
721
706
707
712
711
713
714
715
716
717
719
718
709
708
701
#2
Ref. No. Part No. Description Remarks Ref. No. Part No. Description Remarks
701 3-977-509-01 WASHER, THRUST
702 3-977-507-01 TABLE, REEL (S)
703 3-977-508-01 TABLE, REEL (T)
704 1-500-471-11 HEAD, FE
705 3-977-495-01 SHAFT, TG2
706 3-977-494-01 HOLDER, FEH
707 A-6776-359-C FL, COMPLETE ASSY (SL)
708 3-977-535-01 PLATE, LUMINOUS (END SENSOR)
709 3-977-536-01 PLATE, LUMINOUS (TOP SENSOR)
710 3-977-443-01 WASHER, STOPPER
711 A-6759-863-B PRESS BLOCK ASSY, PINCH
712 3-958-455-01 SPRING (PINCH), TENSION
713 3-977-447-01 GEAR, ELEVATOR
714 3-063-773-02 OPENER, LID (SL)
715 3-977-441-03 GEAR, PINCH PRESSING
716 3-977-445-02 GEAR, TG8 ARM DRIVING
717 3-062-763-01 SPRING, EXTENSION (RVS BRAKE)
718 X-3950-964-1 ARM ASSY, RVS BRAKE (SL)
719 3-063-756-01 GEAR, TG8 ARM H/R
720 X-3947-590-1 TG8 ASSY
721 A-6759-620-A HEAD BLOCK ASSY, ACE (TDK) FFC
722 3-974-556-11 + HEXA TT 2.6 x 9 (TAPER)
723 3-979-508-01 SCREW + HEXA TP SW 3 x 8
724 3-059-958-01 SPRING, TG8
725 3-051-300-03 LOCK ACE SCREW
#2 7-685-646-79 SCREW + BVTP 3 x 8 TYPE2
Page 63
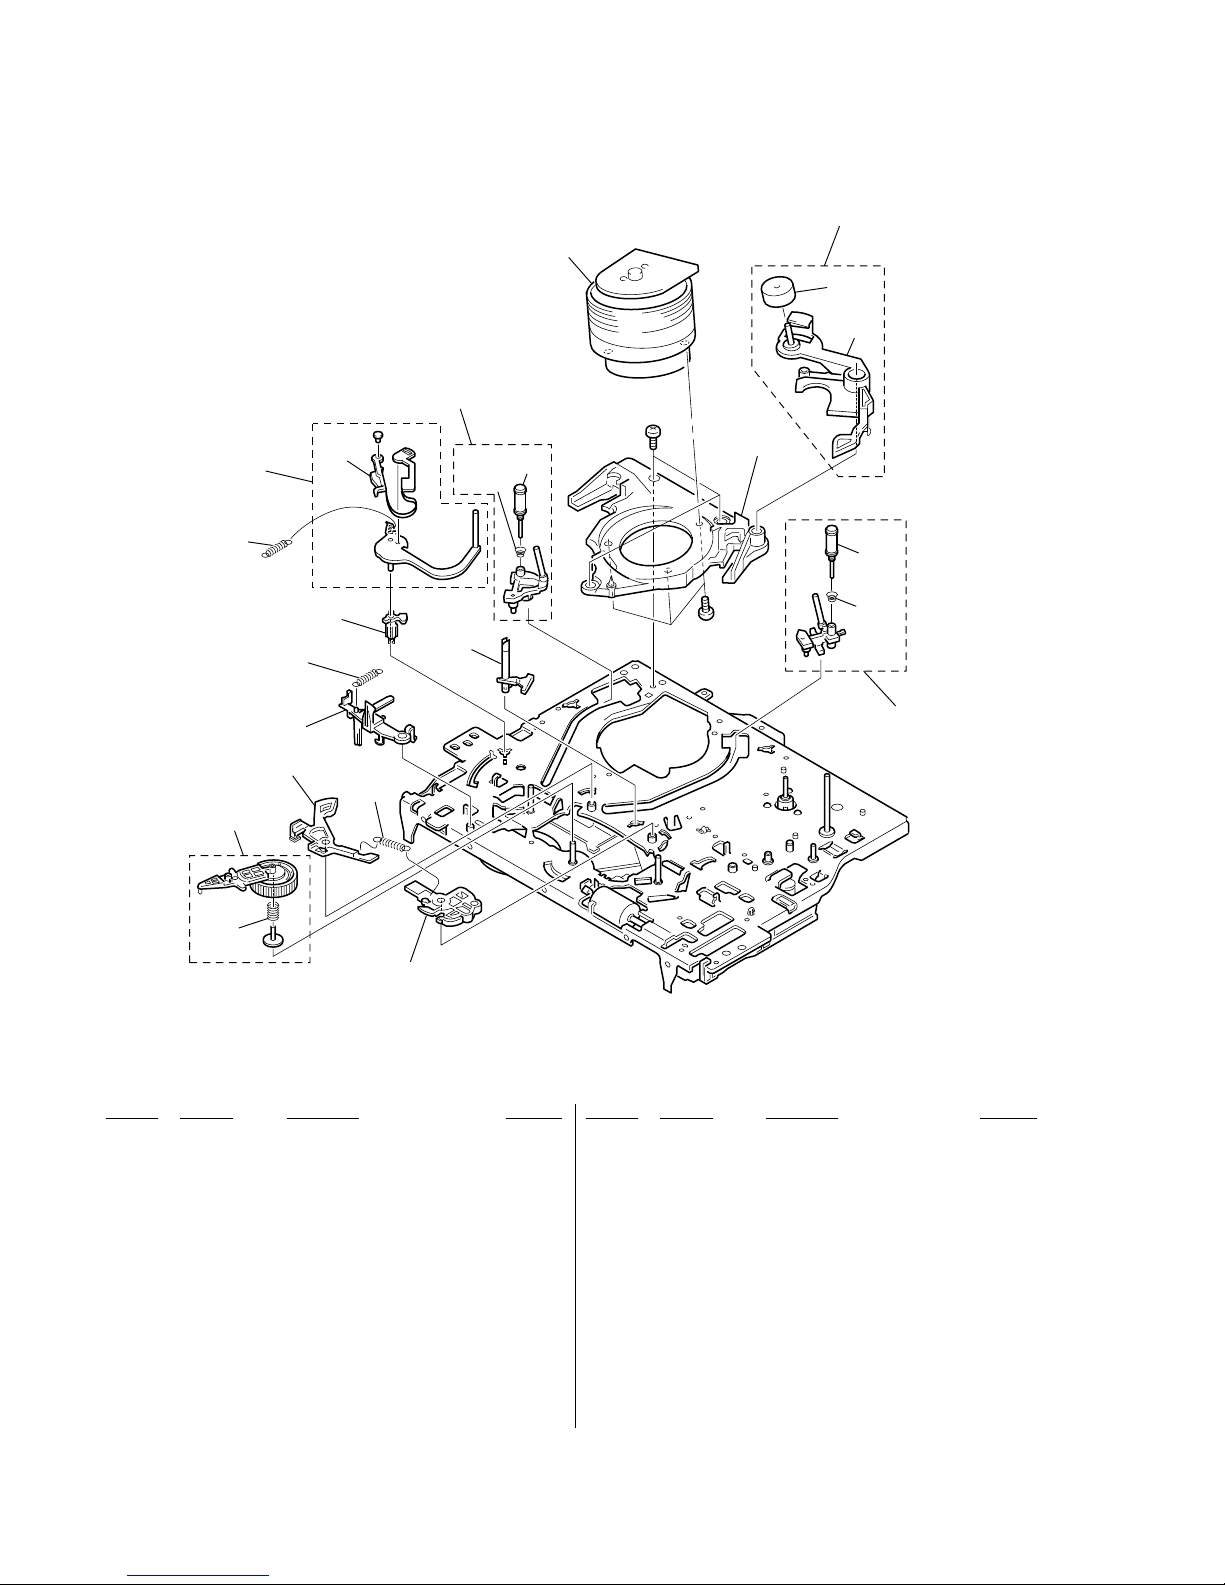
SLV-ED212/ED717/ED818/ED919/LF1
8-6
770
772
763
765
768
767
769
761
757
756
766
755
754
752
751
753
759
763
762
760
758
771
#2
#3
764
8-1-4. MECHANISM DECK SECTION-2
Ref. No. Part No. Description Remarks Ref. No. Part No. Description Remarks
751 X-3949-363-1 BRAKE ASSY, MAIN (T)
752 3-053-882-01 SPRING, TENS (MAIN BRAKE)
753 X-3947-573-1 ARM ASSY, PENDULUM
754 X-3951-005-1 BRAKE ASSY, MAIN (S)
755 3-063-772-01 LEVER, REC PROOF (SL)
756 3-976-767-01 SPRING, TENS. (REC PROOF)
757 3-977-487-01 BOSS, TG1 FULCRUM
758 X-3950-966-1 TG1 ASSY (SL)
759 3-063-958-01 SPRING,COMP (SL PEND)
760 3-977-488-01 SPRING, EXTENSION (POWER TENSION)
761 A-6775-922-A SHUTTLE (S) BLOCK ASSY
762 X-3949-910-2 G. ROLLER ASSY
763 3-965-178-01 SPRING
764 3-062-687-01 BASE DRUM, K (UPPER MOTOR)
765 A-6750-328-E SHUTTLE (T) BLOCK ASSY
766 3-977-501-01 PLATE, LUMINOUS
767 A-6746-074-G ROLLER BLOCK ASSY, HC
768 X-3947-255-1 ROLLER ASSY, HC
769 3-975-724-07 ARM, HC
770 1-772-358-11 DRUM ASSY DZH-71F-R (ED212)
770 1-772-363-11 DRUM ASSY DZH-0B4A-R (ED717)
770 1-772-366-11 DRUM ASSY DZH-0B7A-R
(ED818/ED919/LF1)
771 X-3950-968-1 BAND, ASSY TG1 (SL)
772 X-3948-050-1 ROLLER ASSY GUIDE
#2 7-685-646-79 SCREW + BVTP 3 x 8 TYPE 2
#3 7-682-647-09 SCREW + P3 x 6
Page 64
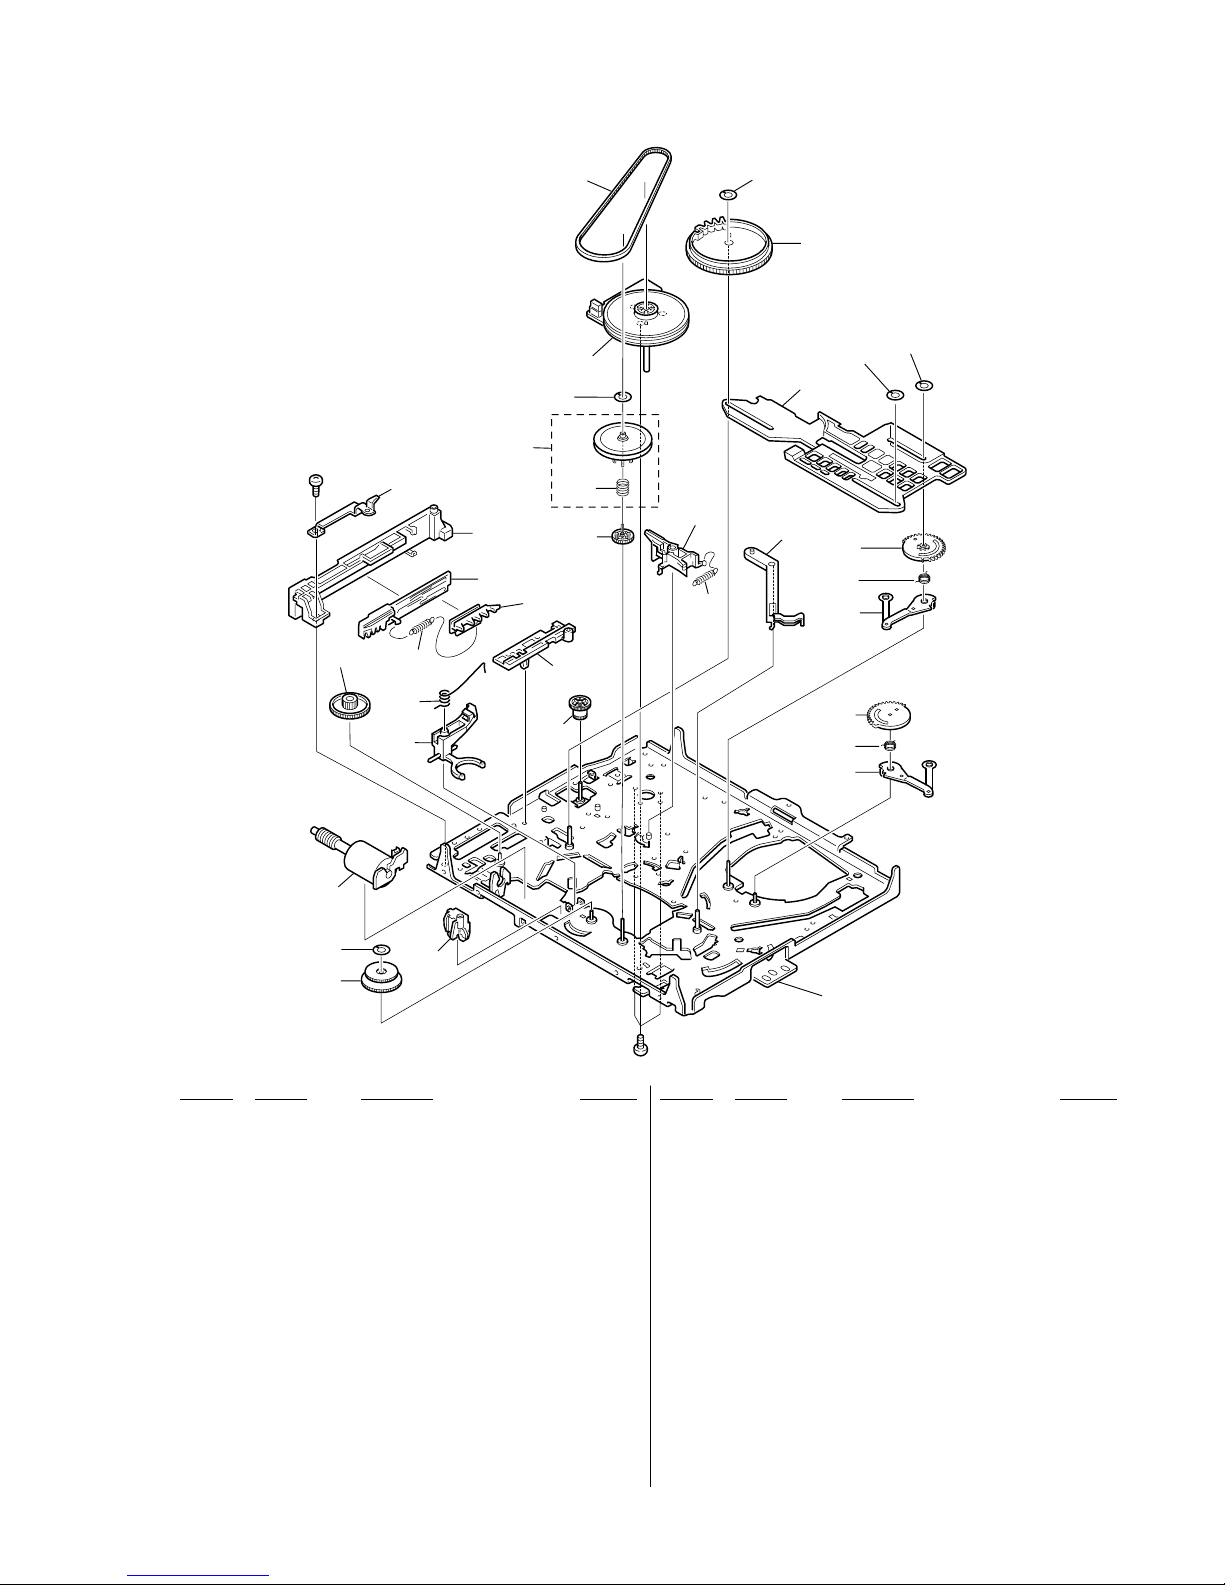
SLV-ED212/ED717/ED818/ED919/LF1
8-7
820
821
822
823
824
801
804
806
808
807
813
829
827
828
825
814
803
815
809
810
811
812
802
803
805
817
818
803
816
819
#4
#2
826
830
M902
M903
not
supplied
Ref. No. Part No. Description Remarks Ref. No. Part No. Description Remarks
801 3-977-437-01 RETAINER, CAM MOTOR
802 X-3949-364-1 ASSY, REEL DIRECT SELECT (B)
803 3-977-443-01 WASHER, STOPPER
804 3-063-785-01 WORM - WHEEL (SL)
805 3-056-952-11 WASHER, STOPPER
806 3-977-444-01 GEAR, PINCH TRANSMISSION
807 3-977-515-01 GUIDE, FL SLIDER
808 3-977-517-01 PLATE, SLIDE, FL
809 3-977-519-01 SPRING, TENS. (LIMIT, FL)
810 3-977-518-02 PLATE, LIMITTER, FL
811 3-977-516-01 HOLDER, FL SLIDER
812 3-977-877-01 PLATE, RETAINER
813 3-977-504-01 GEAR, CLUTCH
814 X-3947-365-1 GEAR, ASSY, PULLEY (B)
815 3-977-510-01 BELT RUBBER
816 3-056-824-01 WASHER, STOPPER
817 3-063-439-01 GEAR, CAM
818 3-063-768-01 SLIDER (SL)
819 3-063-757-01 GEAR, LOADING (T) H/R
820 3-977-456-03 SPRING, TORSION (LOAD T)
821 X-3948-132-2 LEVER ASSY, LOADING (T)
822 3-063-783-01 GEAR, LOADING (S) H/R
823 3-977-452-01 SPRING, TORSION (LOAD S)
824 X-3948-131-1 LEVER ASSY LOADING (S)
825 3-977-489-01 ARM, TG1 DRIVING
826 3-063-777-01 BASE DIRECT SELECT (SL)
827 3-977-467-02 SPRING, CAP BRAKE
828 X-3950-965-1 BRAKE ASSY, CAPSTAN (SL)
829 3-063-823-01 SPRING, COMP (LIMITTER LOW K)
830 3-063-778-02 SPRING TOR. (BASE, D. S SL)
M902 1-763-572-11 MOTOR, DC
M903 X-3950-970-1 MOTOR ASSY, CAM (SL)
#2 7-685-646-79 SCREW + BVTP 3 x 8 TYPE 2 IT-3
#4 7-685-133-19 SCREW + P2.6 x 6 TYPE2 NON-SLIT
8-1-5. MECHANISM DECK SECTION-3
Page 65
SLV-LX80S
Ref. No. Part No. Description Remarks Ref. No. Part No. Description Remarks
8-8
8-2. ELECTRICAL PARTS LIST
A-6713-877-A DI-081 BOARD, COMPLETE
(SLV-ED212/ED717/ED818/ED919)
*********************
<CONNECTOR>
CN901 1-695-368-31 CONNECTOR, FFC/FPC 7P
CN901 1-784-449-11 CONNECTOR, FFC/FPC 7P
<DIODE>
D900 8-719-056-06 DIODE SLR-342DCT31
<RESISTOR>
R900 1-216-295-00 SHORT 0
R902 1-216-043-91 RES-CHIP 560 5 % 1/10W
<SWITCH>
S900 1-762-196-21 SWITCH, TACT
S901 1-418-059-22 ENCODER, ROTARY
A-6713-876-A DM-098 BOARD, COMPLETE
(SLV-ED212/ED717/ED818/ED919)
A-6713-988-A DM-098 BOARD, COMPLETE (SLV-LF1)
***********************
<CONNECTOR>
CN471 1-770-514-31 CONNECTOR, FFC/FPC 5P
CN471 1-784-447-11 CONNECTOR, FFC/FPC 5P
<CHIP CONDUCTOR>
JR461 1-216-295-00 SHORT 0
<RESISTOR>
R465 1-216-053-00 RES-CHIP 1.5K 5% 1/10W
R467 1-216-057-00 RES-CHIP 2.2K 5% 1/10W
R468 1-216-053-00 RES-CHIP 1.5K 5% 1/10W
R469 1-216-053-00 RES-CHIP 1.5K 5% 1/10W
(SLV-ED212/ED717/ED818)
R470 1-216-057-00 RES-CHIP 2.2K 5% 1/10W
(SLV- ED212/ED717/ED818)
R474 1-216-295-00 SHORT 0
R475 1-216-295-00 SHORT 0
(SLV-ED212/ED717/ED818)
R475 1-216-053-00 RES-CHIP 1.5K 5% 1/10W
(SLV-LF1)
<SWITCH>
S462 1-762-196-21 SWITCH, TACT (AEJECT)
(SLV-ED212/ED717/ED818)
S463 1-762-196-21 SWITCH, TACT (zREC)
(SLV-ED212/ED717/ED818)
S466 1-762-196-21 SWITCH, TACT (mREW)
(SLV-ED212/ED717/ED818)
S467 1-762-196-21 SWITCH, TACT (xSTOP)
(SLV-ED212/ED717/ED818)
S468 1-762-196-21 SWITCH, TACT (HPLAY)
(SLV-ED212/ED717/ED818)
S469 1-762-196-21 SWITCH, TACT (MFF)
(SLV-ED212/ED717/ED818)
S472 1-762-196-21 SWITCH, TACT (XPAUSE)
(SLV-ED212/ED717/ED818)
S481 1-762-196-21 SWITCH, TACT (mREW) (SLV-LF1)
S482 1-762-196-21 SWITCH, TACT (xSTOP) (SLV-LF1)
S483 1-762-196-21 SWITCH, TACT (HPLAY) (SLV-LF1)
S484 1-762-196-21 SWITCH, TACT (MFF) (SLV-LF1)
S485 1-762-196-21 SWITCH, TACT (zREC) (SLV-LF1)
A-6713-870-A FJ-031 BOARD, COMPLETE (SLV-ED212)
A-6713-889-A FJ-031 BOARD, COMPLETE (SLV-ED717)
A-6713-878-A FJ-031 BOARD, COMPLETE
(SLV-ED818/ED919)
*********************
<CONNECTOR>
CN532 1-695-368-31 CONNECTOR, FFC/FPC 7P
CN532 1-784-449-11 CONNECTOR, FFC/FPC 7P
<JACK>
CNJ531 1-770-021-11 JACK, PIN 3P
(EXCEPT SLV-ED818/ED919/ED717)
CNJ531 1-794-162-11 JACK, PIN 3P (SLV-ED717)
DI-81 DM-98 FJ-31
Ref. No. Part No. Description Remarks Ref. No. Part No. Description Remarks
NOTE:
• Due to standardization, replacements in the
parts list may be different from the parts
specified in the diagrams or the components
used on the set.
• -XX, -X mean standardized parts, so they may
have some difference from the original one.
• Items marked “*” are not stocked since they
are seldom required for routine service. Some
delay should be anticipated when ordering these
items.
• CAPACITORS:
uF: µF
• RESISTORS
All resistors are in ohms.
METAL: metal-film resistor
METAL OXIDE: Metal Oxide-film resistor
F: nonflammable
• COILS
uH: µH
• SEMICONDUCTORS
In each case, u: µ, for example:
uA...: µA... , uPA... , µPA... ,
uPB... , µPB... , uPC... , µPC... ,
uPD..., µPD...
When indicating parts by reference number,
please include the board name.
The components identified by mark or
dotted line with mark
are critical for safety.
Replace only with part number specified.
Page 66
SLV-LX80S
Ref. No. Part No. Description Remarks Ref. No. Part No. Description Remarks
8-9
MA-402
FJ-33
<DIODE>
D531 8-719-071-15 DIODE HZM6.8ZWA1TL
(SLV-ED717/ED818/ED919)
D532 8-719-071-15 DIODE HZM6.8ZWA1TL
(SLV-ED717/ED818/ED919)
D533 8-719-071-15 DIODE HZM6.8ZWA1TL
(SLV-ED717/ED818/ED919)
D534 8-719-017-09 DIODE 02DZ6.2-TPH3
(SLV-ED717/ED818/ED919)
<JUMPER SELECTOR>
JS531 1-216-296-00 SHORT 0
(SLV-ED717/ED818/ED919)
JS532 1-216-296-00 SHORT 0
(SLV-ED717/ED818/ED919)
JS533 1-216-295-00 SHORT 0 (SLV-ED717)
JS534 1-216-295-00 SHORT 0 (SLV-ED818/ED919)
<RESISTOR>
R533 1-216-021-00 RES-CHIP 68 5% 1/10W
(SLV-ED717/ED818/ED919)
R534 1-216-097-11 RES-CHIP 100K 5% 1/10W
(SLV-ED818/ED919)
R535 1-216-097-11 RES-CHIP 100K 5% 1/10W
(SLV-ED818/ED919)
<SWITCH>
S500 1-762-196-21 SWITCH, TACT
A-6713-968-A FJ-033 BOARD, COMPLETE (SLV-LF1)
********************
<CONNECTOR>
CN501 1-691-064-31 HOUSING, CONNECTOR 5P
<SWITCH>
S504 1-762-196-21 SWITCH, TACT (?/1 POWER)
A-6713-944-A MA-402 BOARD, COMPLETE
(SLV-ED212)
A-6713-951-A MA-402 BOARD, COMPLETE
(SLV-ED717)
A-6713-938-A MA-402 BOARD, COMPLETE
(SLV-ED818)
A-6713-950-A MA-402 BOARD, COMPLETE
(SLV-ED919KR)
A-6713-939-A MA-402 BOARD, COMPLETE
(SLV-ED919TW)
A-6713-937-A MA-402 BOARD, COMPLETE (SLV-LF1)
*********************
3-064-645-01 HOLDER, FL
3-065-718-01 SINK, HEAT
3-960-273-11 SPACER, TOP END
3-960-274-01 SPACER, LED
<CAPACITOR>
C001 1-163-009-11 CERAMIC CHIP 0.001UF 10% 50V
C002 1-163-009-11 CERAMIC CHIP 0.001UF 10% 50V
C003 1-107-823-11 CERAMIC CHIP 0.47UF 10% 16V
C003 1-163-009-11 CERAMIC CHIP 0.001UF 10% 50V
C004 1-107-823-11 CERAMIC CHIP 0.47UF 10% 16V
C004 1-163-009-11 CERAMIC CHIP 0.001UF 10% 50V
C005 1-107-823-11 CERAMIC CHIP 0.47UF 10% 16V
C005 1-128-057-11 ELECT 330UF 20% 6.3V
C006 1-107-823-11 CERAMIC CHIP 0.47UF 10% 16V
C007 1-107-823-11 CERAMIC CHIP 0.47UF 10% 16V
C008 1-107-823-11 CERAMIC CHIP 0.47UF 10% 16V
C009 1-107-823-11 CERAMIC CHIP 0.47UF 10% 16V
C010 1-107-823-11 CERAMIC CHIP 0.47UF 10% 16V
C011 1-164-232-11 CERAMIC CHIP 0.01UF 10% 50V
C012 1-164-232-11 CERAMIC CHIP 0.01UF 10% 50V
C013 1-163-243-11 CERAMIC CHIP 47PF 5% 50V
C014 1-164-232-11 CERAMIC CHIP 0.01UF 10% 50V
C015 1-163-231-11 CERAMIC CHIP 15PF 5% 50V
C016 1-163-233-91 CERAMIC CHIP 18PF 5% 50V
C017 1-110-501-11 CERAMIC CHIP 0.33UF 10% 16V
C018 1-163-989-11 CERAMIC CHIP 0.033UF 10% 25V
C019 1-109-982-11 CERAMIC CHIP 1UF 10% 10V
C020 1-164-004-11 CERAMIC CHIP 0.1UF 10% 25V
C021 1-113-642-11 TANTAL. CHIP 47UF 10% 10V
C022 1-107-823-11 CERAMIC CHIP 0.47UF 10% 16V
C023 1-163-243-11 CERAMIC CHIP 47PF 5% 50V
C031 1-128-499-11 ELECT 220UF 20% 16V
C032 1-164-232-11 CERAMIC CHIP 0.01UF 10% 50V
C034 1-164-232-11 CERAMIC CHIP 0.01UF 10% 50V
C051 1-124-589-11 ELECT 47UF 20% 16V
C053 1-164-344-11 CERAMIC CHIP 0.068UF 10% 25V
C054 1-163-038-00 CERAMIC CHIP 0.1UF 25V
C071 1-163-809-11 CERAMIC CHIP 0.047UF 10% 25V
C072 1-164-489-11 CERAMIC CHIP 0.22UF 10% 16V
C073 1-164-232-11 CERAMIC CHIP 0.01UF 10% 50V
C074 1-163-009-11 CERAMIC CHIP 0.001UF 10% 50V
C075 1-163-259-91 CERAMIC CHIP 220PF 5% 50V
C076 1-126-941-11 ELECT 470UF 20% 25V
C077 1-124-589-11 ELECT 47UF 20% 16V
(SLV-ED212)
C078 1-163-038-00 CERAMIC CHIP 0.1UF 25V
(SLV-ED212)
C100 1-163-235-11 CERAMIC CHIP 22PF 5% 50V
C101 1-163-038-00 CERAMIC CHIP 0.1UF 25V
C103 1-104-905-11 CAPACITOR 0.22F 5.5V
C104 1-126-935-11 ELECT 470UF 20% 10V
C105 1-164-004-11 CERAMIC CHIP 0.1UF 10% 25V
C106 1-164-232-11 CERAMIC CHIP 0.01UF 10% 50V
C107 1-164-182-11 CERAMIC CHIP 0.0033UF 10% 50V
C108 1-163-231-11 CERAMIC CHIP 15PF 5% 50V
C109 1-163-231-11 CERAMIC CHIP 15PF 5% 50V
C110 1-163-234-11 CERAMIC CHIP 20PF 5% 50V
FJ-31
Page 67

SLV-LX80S
Ref. No. Part No. Description Remarks Ref. No. Part No. Description Remarks
8-10
MA-402
C111 1-163-234-11 CERAMIC CHIP 20PF 5% 50V
C112 1-164-489-11 CERAMIC CHIP 0.22UF 10% 16V
C113 1-164-004-11 CERAMIC CHIP 0.1UF 10% 25V
C114 1-104-664-11 ELECT 47UF 20% 25V
C141 1-164-232-11 CERAMIC CHIP 0.01UF 10% 50V
C142 1-164-232-11 CERAMIC CHIP 0.01UF 10% 50V
C143 1-164-004-11 CERAMIC CHIP 0.1UF 10% 25V
C151 1-164-505-11 CERAMIC CHIP 2.2UF 16V
C152 1-126-163-11 ELECT 4.7UF 20% 50V
C154 1-126-163-11 ELECT 4.7UF 20% 50V
C155 1-164-232-11 CERAMIC CHIP 0.01UF 10% 50V
C160 1-164-232-11 CERAMIC CHIP 0.01UF 10% 50V
C161 1-163-096-00 CERAMIC CHIP 13PF 5% 50V
C162 1-163-096-00 CERAMIC CHIP 13PF 5% 50V
C163 1-163-224-11 CERAMIC CHIP 7PF 0.25PF 50V
C164 1-164-232-11 CERAMIC CHIP 0.01UF 10% 50V
C165 1-163-227-11 CERAMIC CHIP 10PF 0.50PF 50V
C167 1-164-489-11 CERAMIC CHIP 0.22UF 10% 16V
C168 1-164-004-11 CERAMIC CHIP 0.1UF 10% 25V
C169 1-163-038-00 CERAMIC CHIP 0.1UF 25V
C171 1-163-038-00 CERAMIC CHIP 0.1UF 25V
C172 1-163-245-11 CERAMIC CHIP 56PF 5% 50V
C192 1-163-145-00 CERAMIC CHIP 0.0015UF 5% 50V
C193 1-164-004-11 CERAMIC CHIP 0.1UF 10% 25V
C194 1-124-589-11 ELECT 47UF 20% 16V
C195 1-124-234-00 ELECT 22UF 20% 16V
C196 1-163-145-00 CERAMIC CHIP 0.0015UF 5% 50V
(SLV-ED717/ED818/ED919/LF1)
C196 1-163-263-11 CERAMIC CHIP 330PF 5% 50V
C201 1-164-505-11 CERAMIC CHIP 2.2UF 16V
C202 1-163-017-00 CERAMIC CHIP 0.0047UF 10% 50V
(SLV-ED717/ED818/ED919/LF1)
C202 1-164-232-11 CERAMIC CHIP 0.01UF 10% 50V
(SLV-ED212)
C203 1-164-161-11 CERAMIC CHIP 0.0022UF 10% 50V
(SLV-ED717/ED818/ED919/LF1)
C203 1-164-232-11 CERAMIC CHIP 0.01UF 10% 50V
(SLV-ED212)
C204 1-164-161-11 CERAMIC CHIP 0.0022UF 10% 50V
(SLV-ED717/ED818/ED919/LF1)
C204 1-164-232-11 CERAMIC CHIP 0.01UF 10% 50V
(SLV-ED212)
C205 1-163-017-00 CERAMIC CHIP 0.0047UF 10% 50V
(SLV-ED717/ED818/ED919/LF1)
C205 1-164-232-11 CERAMIC CHIP 0.01UF 10% 50V
(SLV-ED212)
C206 1-163-989-11 CERAMIC CHIP 0.033UF 10% 25V
C207 1-164-232-11 CERAMIC CHIP 0.01UF 10% 50V
C208 1-163-038-00 CERAMIC CHIP 0.1UF 25V
C209 1-126-162-11 ELECT 3.3UF 20% 50V
C210 1-163-235-11 CERAMIC CHIP 22PF 5% 50V
(SLV-ED717/ED818/ED919/LF1)
C210 1-163-239-11 CERAMIC CHIP 33PF 5% 50V
(SLV-ED212)
C211 1-163-235-11 CERAMIC CHIP 22PF 5% 50V
(SLV-ED717/ED818/ED919/LF1)
C211 1-163-239-11 CERAMIC CHIP 33PF 5% 50V
(SLV-ED212)
C212 1-163-235-11 CERAMIC CHIP 22PF 5% 50V
(SLV-ED717/ED818/ED919/LF1)
C212 1-164-232-11 CERAMIC CHIP 0.01UF 10% 50V
(SLV-ED212)
C213 1-163-235-11 CERAMIC CHIP 22PF 5% 50V
(SLV-ED717/ED818/ED919/LF1)
C213 1-164-232-11 CERAMIC CHIP 0.01UF 10% 50V
(SLV-ED212)
C214 1-163-237-11 CERAMIC CHIP 27PF 5% 50V
(SLV-ED717/ED818/ED919/LF1)
C214 1-163-243-11 CERAMIC CHIP 47PF 5% 50V
(SLV-ED212)
C215 1-164-232-11 CERAMIC CHIP 0.01UF 10% 50V
C216 1-109-982-11 CERAMIC CHIP 1UF 10% 10V
C217 1-163-017-00 CERAMIC CHIP 0.0047UF 10% 50V
C218 1-124-257-00 ELECT 2.2UF 20% 50V
C219 1-163-275-11 CERAMIC CHIP 0.001UF 5% 50V
C220 1-107-823-11 CERAMIC CHIP 0.47UF 10% 16V
C221 1-163-037-11 CERAMIC CHIP 0.022UF 10% 50V
C222 1-163-038-00 CERAMIC CHIP 0.1UF 25V
C223 1-126-163-11 ELECT 4.7UF 20% 50V
C224 1-109-982-11 CERAMIC CHIP 1UF 10% 10V
(SLV-ED717/ED818/ED919/LF1)
C225 1-164-505-11 CERAMIC CHIP 2.2UF 16V
C226 1-163-089-00 CERAMIC CHIP 6PF 0.50PF 50V
C227 1-163-255-11 CERAMIC CHIP 150 PF 5% 50V
C228 1-163-038-00 CERAMIC CHIP 0.1UF 25V
C229 1-126-163-11 ELECT 4.7UF 20% 50V
C230 1-163-241-11 CERAMIC CHIP 39PF 5% 50V
(SLV-ED717/ED818/ED919/LF1)
C230 1-163-234-11 CERAMIC CHIP 20PF 5% 50V
(SLV-ED212)
C231 1-163-037-11 CERAMIC CHIP 0.022UF 10% 50V
C233 1-163-038-00 CERAMIC CHIP 0.1UF 25V
C234 1-124-589-11 ELECT 47UF 20% 16V
C235 1-163-038-00 CERAMIC CHIP 0.1UF 25V
C236 1-163-038-00 CERAMIC CHIP 0.1UF 25V
C237 1-164-232-11 CERAMIC CHIP 0.01UF 10% 50V
C238 1-126-157-11 ELECT 10UF 20% 16V
C239 1-164-232-11 CERAMIC CHIP 0.01UF 10% 50V
C240 1-163-038-00 CERAMIC CHIP 0.1UF 25V
C241 1-163-038-00 CERAMIC CHIP 0.1UF 25V
C242 1-163-038-00 CERAMIC CHIP 0.1UF 25V
C243 1-126-162-11 ELECT 3.3UF 20% 50V
C244 1-164-232-11 CERAMIC CHIP 0.01UF 10% 50V
C245 1-126-157-11 ELECT 10UF 20% 16V
C246 1-164-232-11 CERAMIC CHIP 0.01UF 10% 50V
C247 1-164-489-11 CERAMIC CHIP 0.22UF 10% 16V
C248 1-124-257-00 ELECT 2.2UF 20% 50V
C249 1-164-232-11 CERAMIC CHIP 0.01UF 10% 50V
C250 1-124-589-11 ELECT 47UF 20% 16V
C251 1-164-505-11 CERAMIC CHIP 2.2UF 16V
C252 1-163-263-11 CERAMIC CHIP 330 PF 5% 50V
(SLV-ED212/ED919TW/LF1)
C252 1-163-127-00 CERAMIC CHIP 270 PF 5% 50V
(SLV-ED717/ED818/ED919KR)
C253 1-109-982-11 CERAMIC CHIP 1UF 10% 10V
C254 1-163-017-00 CERAMIC CHIP 0.0047UF 10% 50V
(SLV-ED717/ED818/ED919/LF1)
C255 1-164-161-11 CERAMIC CHIP 0.0022UF 10% 50V
(SLV-ED717/ED818/ED919/LF1)
C256 1-164-161-11 CERAMIC CHIP 0.0022UF 10% 50V
(SLV-ED717/ED818/ED919/LF1)
C257 1-163-017-00 CERAMIC CHIP 0.0047UF 10% 50V
(SLV-ED717/ED818/ED919/LF1)
Page 68
SLV-LX80S
Ref. No. Part No. Description Remarks Ref. No. Part No. Description Remarks
8-11
MA-402
C258 1-109-982-11 CERAMIC CHIP 1UF 10% 10V
C262 1-163-239-11 CERAMIC CHIP 33PF 5% 50V
C264 1-163-255-11 CERAMIC CHIP 150PF 5% 50V
C289 1-164-004-11 CERAMIC CHIP 0.1UF 10% 25V
(SLV-ED717/ED919/LF1)
C290 1-126-163-11 ELECT 4.7UF 20% 50V
(SLV-ED717/ED919/LF1)
C291 1-164-489-11 CERAMIC CHIP 0.22UF 10% 16V
(SLV-ED717/ED919/LF1)
C292 1-164-505-11 CERAMIC CHIP 2.2UF 16V
(SLV-ED717/ED919/LF1)
C294 1-164-232-11 CERAMIC CHIP 0.01UF 10% 50V
(SLV-ED717/ED919/LF1)
C295 1-164-232-11 CERAMIC CHIP 0.01UF 10% 50V
(SLV-ED717/ED919/LF1)
C296 1-126-157-11 ELECT 10UF 20% 16V
(SLV-ED717/ED919/LF1)
C298 1-126-163-11 ELECT 4.7UF 20% 50V
(SLV-ED717/ED919/LF1)
C299 1-164-232-11 CERAMIC CHIP 0.01UF 10% 50V
(SLV-ED717/ED919/LF1)
C303 1-164-505-11 CERAMIC CHIP 2.2UF 16V
(SLV-ED818/ED919/LF1)
C304 1-164-232-11 CERAMIC CHIP 0.01UF 10% 50V
(SLV-ED818/ED919/LF1)
C307 1-124-589-11 ELECT 47UF 20% 16V
(SLV-ED818/ED919/LF1)
C308 1-126-964-11 ELECT 10UF 20% 50V
(SLV-ED818/ED919/LF1)
C309 1-163-020-00 CERAMIC CHIP 0.0082UF 10% 50V
(SLV-ED818/ED919/LF1)
C310 1-104-664-11 ELECT 47UF 20% 25V
(SLV-ED818/ED919/LF1)
C311 1-126-964-11 ELECT 10UF 20% 50V
(SLV-ED818/ED919/LF1)
C312 1-124-257-00 ELECT 2.2UF 20% 50V
(SLV-ED818/ED919/LF1)
C313 1-126-964-11 ELECT 10UF 20% 50V
(SLV-ED818/ED919/LF1)
C314 1-104-664-11 ELECT 47UF 20% 25V
(SLV-ED818/ED919/LF1)
C315 1-163-020-00 CERAMIC CHIP 0.0082UF 10% 50V
(SLV-ED818/ED919/LF1)
C316 1-126-964-11 ELECT 10UF 20% 50V
(SLV-ED818/ED919/LF1)
C317 1-126-160-11 ELECT 1UF 20% 50V
(SLV-ED818/ED919/LF1)
C318 1-126-964-11 ELECT 10UF 20% 50V
(SLV-ED818/ED919/LF1)
C319 1-126-964-11 ELECT 10UF 20% 50V
(SLV-ED818/ED919/LF1)
C320 1-126-964-11 ELECT 10UF 20% 50V
(SLV-ED818/ED919/LF1)
C322 1-126-964-11 ELECT 10UF 20% 50V
(SLV-ED818/ED919/LF1)
C323 1-163-038-00 CERAMIC CHIP 0.1UF 25V
(SLV-ED818/ED919/LF1)
C324 1-164-232-11 CERAMIC CHIP 0.01UF 10% 50V
(SLV-ED818/ED919/LF1)
C326 1-164-489-11 CERAMIC CHIP 0.22UF 10% 16V
(SLV-ED818/ED919/LF1)
C327 1-164-489-11 CERAMIC CHIP 0.22UF 10% 16V
(SLV-ED818/ED919/LF1)
C328 1-164-489-11 CERAMIC CHIP 0.22UF 10% 16V
(SLV-ED818/ED919/LF1)
C350 1-126-157-11 ELECT 10UF 20% 16V
C351 1-163-038-00 CERAMIC CHIP 0.1UF 25V
C352 1-163-037-11 CERAMIC CHIP 0.022UF 10% 50V
C354 1-124-234-00 ELECT 22UF 20% 16V
C355 1-126-157-11 ELECT 10UF 20% 16V
C356 1-163-011-11 CERAMIC CHIP 0.0015UF 10% 50V
C357 1-163-014-00 CERAMIC CHIP 0.0027UF 10% 50V
(SLV-ED717/ED818/ED919/LF1)
C357 1-163-011-11 CERAMIC CHIP 0.0015UF 10% 50V
(SLV-ED212)
C358 1-126-163-11 ELECT 4.7UF 20% 50V
C359 1-126-157-11 ELECT 10UF 20% 16V
C360 1-126-160-11 ELECT 1UF 20% 50V
(SLV-ED717)
C361 1-126-160-11 ELECT 1UF 20% 50V
C362 1-126-160-11 ELECT 1UF 20% 50V
(SLV-ED212/ED717/ED919KR/LF1)
C363 1-124-234-00 ELECT 22UF 20% 16V
C364 1-126-163-11 ELECT 4.7UF 20% 50V
C365 1-164-232-11 CERAMIC CHIP 0.01UF 10% 50V
C371 1-163-009-11 CERAMIC CHIP 0.001UF 10% 50V
C373 1-137-505-11 MYLAR 220PF 5% 50V
C375 1-104-696-11 FILM 0.015UF 5% 100V
C376 1-163-011-11 CERAMIC CHIP 0.0015UF 10% 50V
C377 1-162-306-11 CERAMIC 0.01UF 20% 16V
C378 1-124-589-11 ELECT 47UF 20% 16V
C379 1-163-038-00 CERAMIC CHIP 0.1UF 25V
C385 1-126-160-11 ELECT 1UF 20% 50V
(SLV-ED818/ED919)
C386 1-126-160-11 ELECT 1UF 20% 50V
(SLV-ED818/ED919)
C451 1-124-584-00 ELECT 100UF 20% 10V
C452 1-164-232-11 CERAMIC CHIP 0.01UF 10% 50V
C453 1-126-157-11 ELECT 10UF 20% 16V
C454 1-163-038-00 CERAMIC CHIP 0.1UF 25V
C455 1-124-584-00 ELECT 100UF 20% 10V
C456 1-164-232-11 CERAMIC CHIP 0.01UF 10% 50V
C457 1-126-941-11 ELECT 470UF 20% 25V
C458 1-163-251-11 CERAMIC CHIP 100PF 5% 50V
(SLV-ED818/ED919)
C600 1-104-705-11 MYLAR 0.1UF 20% 250V
C601 1-104-705-11 MYLAR 0.1UF 20% 250V
C602 1-113-900-11 CERAMIC 470PF 10% 250V
C603 1-113-900-11 CERAMIC 470PF 10% 250V
C604 1-113-900-11 CERAMIC 470PF 10% 250V
C605 1-107-405-11 ELECT(BLOCK) 68UF 20% 400V
(SLV-ED212/ED717/ED919KR/LF1)
C605 1-119-882-51 ELECT(BLOCK) 120UF 20% 200V
(SLV-ED818/ED919TW)
C606 1-130-470-00 MYLAR 820PF 5% 50V
C607 1-107-737-11 MYLAR 560PF 5% 50V
C608 1-131-974-11 FILM 2200PF 5% 800V
C610 1-137-921-11 ELECT 1500UF 20% 10V
C611 1-126-935-11 ELECT 470UF 20% 16V
C612 1-126-960-11 ELECT 1UF 20% 50V
Note :
The components identified by
mark
or dotted line with mark
are critical for safety.
Replace only with part number
specified.
Page 69
SLV-LX80S
Ref. No. Part No. Description Remarks Ref. No. Part No. Description Remarks
8-12
MA-402
C613 1-130-496-00 MYLAR 0.12UF 5% 50V
C615 1-131-976-21 ELECT 820UF 20% 25V
C616 1-126-941-11 ELECT 470UF 20% 25V
C624 1-126-967-11 ELECT 47UF 20% 50V
C626 1-126-967-11 ELECT 47UF 20% 50V
C627 1-164-232-11 CERAMIC CHIP 0.01UF 10% 50V
C629 1-135-372-31 ELECT 470UF 20% 10V
C630 1-164-232-11 CERAMIC CHIP 0.01UF 10% 50V
C631 1-164-232-11 CERAMIC CHIP 0.01UF 10% 50V
C633 1-164-232-11 CERAMIC CHIP 0.01UF 10% 50V
C636 1-126-967-11 ELECT 47UF 20% 50V
C661 1-164-232-11 CERAMIC CHIP 0.01UF 10% 50V
C662 1-104-666-11 ELECT 220UF 20% 25V
C663 1-126-941-11 ELECT 470UF 20% 25V
C664 1-124-589-11 ELECT 47UF 20% 16V
C665 1-124-234-00 ELECT 22UF 20% 16V
C669 1-164-232-11 CERAMIC CHIP 0.01UF 10% 50V
C671 1-126-965-91 ELECT 22UF 20% 50V
C673 1-164-232-11 CERAMIC CHIP 0.01UF 10% 50V
C674 1-126-933-11 ELECT 100UF 20% 16V
C704 1-163-009-11 CERAMIC CHIP 0.001UF 10% 50V
C705 1-164-232-11 CERAMIC CHIP 0.01UF 10% 50V
C706 1-126-933-11 ELECT 100UF 20% 16V
C707 1-104-664-11 ELECT 47UF 20% 25V
C708 1-126-163-11 ELECT 4.7UF 20% 50V
C709 1-163-009-11 CERAMIC CHIP 0.001UF 10% 50V
C710 1-163-009-11 CERAMIC CHIP 0.001UF 10% 50V
C711 1-163-009-11 CERAMIC CHIP 0.001UF 10% 50V
C712 1-126-933-11 ELECT 100UF 20% 16V
C713 1-164-232-11 CERAMIC CHIP 0.01UF 10% 50V
C714 1-164-489-11 CERAMIC CHIP 0.22UF 10% 16V
C719 1-163-038-00 CERAMIC CHIP 0.1UF 25V
(SLV-ED818/ED919/LF1)
C720 1-126-157-11 ELECT 10UF 20% 16V
(SLV-ED818/ED919TW)
C722 1-126-933-11 ELECT 100UF 20% 16V
(SLV-ED818/ED919/LF1)
C723 1-164-232-11 CERAMIC CHIP 0.01UF 10% 50V
(SLV-ED818/ED919/LF1)
C730 1-163-009-11 CERAMIC CHIP 0.001UF 10% 50V
(SLV-ED919KR/LF1)
C731 1-163-009-11 CERAMIC CHIP 0.001UF 10% 50V
(SLV-ED919KR/LF1)
C901 1-126-160-11 ELECT 1UF 20% 50V
(SLV-ED818/ED919/LF1)
C902 1-126-160-11 ELECT 1UF 20% 50V
(SLV-ED818/ED919/LF1)
C903 1-126-935-11 ELECT 470UF 20% 10V
C907 1-124-589-11 ELECT 47UF 20% 16V
<CONNECTOR>
CN001 1-750-152-11 PIN, CONNECTOR 13P
CN031 1-766-716-11 CONNECTOR, BOARD TO BOARD 3P
CN051 1-794-861-11 CONNECTOR, BOARD TO BOARD 8P
CN071 1-766-980-71 CONNECTOR, FFC/FPC 7P (SLV-ED212)
CN071 1-784-486-11 CONNECTOR, FFC/FPC 7P (SLV-ED212)
CN072 1-766-978-31 CONNECTOR, FFC/FPC 5P
(SLV-ED717/ED818/ED919/LF1)
CN072 1-784-484-11 CONNECTOR, FFC/FPC 5P
(SLV-ED717/ED818/ED919/LF1)
CN105 1-506-470-11 PIN, CONNECTOR 5P
CN201 1-766-984-41 CONNECTOR, FFC/FPC 11P
(SLV-ED818/ED919/LF1)
CN201 1-784-490-11 CONNECTOR, FFC/FPC 11P
(SLV-ED818/ED919/LF1)
CN202 1-560-892-00 PIN, CONNECTOR 4P
CN204 1-691-038-31 HOUSING, CONNECTOR 6P
(SLV-ED212/ED717)
CN331 1-766-980-71 CONNECTOR, FFC/FPC 7P
CN331 1-784-486-11 CONNECTOR, FFC/FPC 7P
CN332 1-506-468-11 PIN, CONNECTOR 3P
CN332 1-506-468-11 PIN, CONNECTOR 3P
CN334 1-766-980-71 CONNECTOR, FFC/FPC 7P
(SLV-ED212/ED717/ED818/ED919)
CN334 1-784-486-11 CONNECTOR, FFC/FPC 7P
(SLV-ED212/ED717/ED818/ED919)
CN411 1-766-980-71 CONNECTOR, FFC/FPC 7P
(SLV-ED212/ED717/ED818/ED919)
CN411 1-784-486-11 CONNECTOR, FFC/FPC 7P
(SLV-ED212/ED717/ED818/ED919)
CN412 1-766-978-31 CONNECTOR, FFC/FPC 5P
CN412 1-784-484-11 CONNECTOR, FFC/FPC 5P
CN413 1-766-978-31 CONNECTOR, FFC/FPC 5P (SLV-LF1)
CN413 1-784-484-11 CONNECTOR, FFC/FPC 5P (SLV-LF1)
CN600 1-580-230-11 PIN, CONNECTOR (PC BOARD) 2P
<JACK>
CNJ901 1-793-001-21 JACK, PIN (6P) (SLV-ED818/ED919/LF1)
CNJ903 1-779-010-11 JACK, PIN 4P (SLV-ED212/ED717)
<DIODE>
D001 8-719-048-26 DIODE GL528V1
D001 8-719-066-72 DIODE BB135
D071 8-719-200-82 DIODE MPG06D-6052PKG3
D100 8-719-911-19 DIODE 1SS119-25TD
D101 8-719-200-82 DIODE MPG06D-6052PKG3
D102 8-719-200-82 DIODE MPG06D-6052PKG3
D103 8-719-200-82 DIODE MPG06D-6052PKG3
D151 8-719-911-19 DIODE 1SS119-25TD
D402 8-719-056-06 DIODE SLR-342DCT31
(SLV-ED717/ED818/ED919)
D403 8-719-200-82 DIODE MPG06D-6052PKG3
D404 8-719-109-89 DIODE RD5.6ES-T1B2
D600 8-719-051-93 DIODE DF06M-6031
D601 8-719-063-70 DIODE D1NL20U-TA2
D607 8-719-109-89 DIODE RD5.6ES-T1B2
D608 8-719-022-97 DIODE D2S4MF
D609 8-719-083-43 DIODE 31DQ06-FA7
D611 8-719-313-17 DIODE AU02A-V0
D612 8-719-313-17 DIODE AU02A-V0
D613 8-719-043-76 DIODE AK04V0
D614 8-719-160-64 DIODE RD16F-T8B1
D623 8-719-109-93 DIODE RD6.2ES-T1B2
D624 8-719-063-70 DIODE D1NL20U-TA2
Note :
The components identified by
mark
or dotted line with mark
are critical for safety.
Replace only with part number
specified.
Page 70
SLV-LX80S
Ref. No. Part No. Description Remarks Ref. No. Part No. Description Remarks
8-13
MA-402
D625 8-719-110-49 DIODE MTZJ-T-77-18B
D701 8-719-150-92 DIODE RD33ES-T1B3
D901 8-719-109-93 DIODE RD6.2ES-T1B2
D902 8-719-109-93 DIODE RD6.2ES-T1B2
<GROUND TERMINAL BOARD>
ET600 1-537-771-21 TERMINAL BOARD, GROUND
ET601 1-537-771-21 TERMINAL BOARD, GROUND
<FUSE>
F600 1-532-203-00 FUSE
<FERRITE BEAD>
FB001 1-543-813-21 FERRITE 0UH
FB002 1-543-813-21 FERRITE 0UH
FB003 1-543-813-21 FERRITE 0UH
<FUSE HOLDER>
FH600 1-533-217-31 HOLDER, FUSE
FH601 1-533-217-31 HOLDER, FUSE
<IC>
IC001 8-759-526-43 IC TDA9874H/V1,118
IC031 8-759-645-07 IC LB1943N
IC101 8-759-831-30 IC HD6432197A33FY
IC141 8-759-580-62 IC MM1256AFBE
IC142 8-759-575-72 IC M24C08-WMN6T(A)
IC201 8-759-589-32 IC HA118217NF
IC291 8-759-566-07 IC LA7277M-TLM
(SLV-ED717/ED919/LF1)
IC301 8-759-638-56 IC TDA9605H/N2,557
(SLV-ED818/ED919/LF1)
IC451 8-759-643-83 IC UPD16315GB-3BS
IC502 8-749-015-48 IC RPM6940
IC600 8-749-018-38 IC MA8910
IC601 8-759-420-19 IC AN1431T-TA
IC660 8-759-438-18 IC PQ12RD08
IC662 8-759-471-81 IC PQ05RD11
IC701 8-742-037-00 HYB IC SBX1837-51
(SLV-ED818/ED919TW)
<CHIP CONDUCTOR>
JR001 1-216-295-00 SHORT 0
JR002 1-216-295-00 SHORT 0
JR003 1-216-295-00 SHORT 0
JR004 1-216-295-00 SHORT 0
JR005 1-216-295-00 SHORT 0
JR006 1-216-295-00 SHORT 0
JR007 1-216-295-00 SHORT 0
JR008 1-216-295-00 SHORT 0
JR009 1-216-295-00 SHORT 0
JR010 1-216-295-00 SHORT 0
JR011 1-216-295-00 SHORT 0
JR012 1-216-295-00 SHORT 0
JR013 1-216-295-00 SHORT 0
JR014 1-216-295-00 SHORT 0
JR015 1-216-295-00 SHORT 0
JR016 1-216-295-00 SHORT 0
JR017 1-216-295-00 SHORT 0
JR018 1-216-295-00 SHORT 0
JR019 1-216-295-00 SHORT 0
JR020 1-216-295-00 SHORT 0
JR021 1-216-295-00 SHORT 0
JR022 1-216-295-00 SHORT 0
JR023 1-216-295-00 SHORT 0
JR024 1-216-295-00 SHORT 0
JR025 1-216-295-00 SHORT 0
JR026 1-216-295-00 SHORT 0
JR028 1-216-295-00 SHORT 0
JR029 1-216-295-00 SHORT 0
JR030 1-216-295-00 SHORT 0
JR031 1-216-295-00 SHORT 0
JR032 1-216-295-00 SHORT 0
JR033 1-216-295-00 SHORT 0
JR034 1-216-295-00 SHORT 0
JR035 1-216-295-00 SHORT 0
JR036 1-216-295-00 SHORT 0
JR037 1-216-295-00 SHORT 0
JR038 1-216-295-00 SHORT 0
JR039 1-216-295-00 SHORT 0
JR040 1-216-295-00 SHORT 0
JR041 1-216-295-00 SHORT 0
JR042 1-216-295-00 SHORT 0
JR043 1-216-295-00 SHORT 0
JR044 1-216-295-00 SHORT 0
JR045 1-216-295-00 SHORT 0
JR046 1-216-295-00 SHORT 0
JR047 1-216-295-00 SHORT 0
JR101 1-216-296-00 SHORT 0
JR102 1-216-296-00 SHORT 0
JR103 1-216-296-00 SHORT 0
JR104 1-216-296-00 SHORT 0
JR105 1-216-296-00 SHORT 0
JR106 1-216-296-00 SHORT 0
JR107 1-216-296-00 SHORT 0
JR108 1-216-296-00 SHORT 0
JR109 1-216-296-00 SHORT 0
JR110 1-216-296-00 SHORT 0
JR111 1-216-296-00 SHORT 0
JR112 1-216-296-00 SHORT 0
JR113 1-216-296-00 SHORT 0
JR114 1-216-296-00 SHORT 0
JR115 1-216-296-00 SHORT 0
JR116 1-216-296-00 SHORT 0
JR117 1-216-296-00 SHORT 0
JR118 1-216-296-00 SHORT 0
JR119 1-216-296-00 SHORT 0
JR120 1-216-296-00 SHORT 0
JR121 1-216-296-00 SHORT 0
JR122 1-216-296-00 SHORT 0
Note :
The components identified by
mark
or dotted line with mark
are critical for safety.
Replace only with part number
specified.
Page 71
SLV-LX80S
Ref. No. Part No. Description Remarks Ref. No. Part No. Description Remarks
8-14
MA-402
JR123 1-216-296-00 SHORT 0
JR124 1-216-296-00 SHORT 0
JR125 1-216-296-00 SHORT 0
JR126 1-216-296-00 SHORT 0
JR127 1-216-296-00 SHORT 0
JR128 1-216-296-00 SHORT 0
JR129 1-216-296-00 SHORT 0
JR130 1-216-296-00 SHORT 0
JR131 1-216-296-00 SHORT 0
JR132 1-216-296-00 SHORT 0
<JUMPER SELECTOR>
JS103 1-216-295-00 SHORT 0
JS151 1-216-295-00 SHORT 0
JS152 1-216-295-00 SHORT 0
JS203 1-216-296-00 SHORT 0
JS204 1-216-296-00 SHORT 0
JS208 1-216-295-00 SHORT 0
JS291 1-216-296-00 SHORT 0 (SLV-ED212/ED818)
JS309 1-216-295-00 SHORT 0
(SLV-ED212/ED717/ED818/ED919)
JS360 1-216-295-00 SHORT 0
(SLV-ED818/ED919TW)
JS379 1-216-295-00 SHORT 0
JS402 1-216-295-00 SHORT 0 (SLV-LF1)
JS403 1-216-295-00 SHORT 0 (SLV-LF1)
JS404 1-216-296-00 SHORT 0 (SLV-LF1)
JS664 1-216-295-00 SHORT 0
JS705 1-216-295-00 SHORT 0 (SLV-ED919KR/LF1)
JS712 1-216-295-00 SHORT 0
(SLV-ED818/ED919TW)
JS720 1-216-296-00 SHORT 0 (SLV-ED919KR/LF1)
JS721 1-216-295-00 SHORT 0 (SLV-ED919KR/LF1)
JS722 1-216-295-00 SHORT 0 (SLV-ED919KR/LF1)
JS723 1-216-295-00 SHORT 0 (SLV-ED919KR/LF1)
JS726 1-216-295-00 SHORT 0
(SLV-ED818/ED919TW)
JS734 1-216-295-00 SHORT 0 (SLV-ED919KR/LF1)
JS735 1-216-295-00 SHORT 0
(SLV-ED818/ED919TW)
JS737 1-216-295-00 SHORT 0
(SLV-ED818/ED919/LF1)
JS738 1-216-295-00 SHORT 0
(SLV-ED818/ED919/LF1)
JS901 1-216-295-00 SHORT 0
JS902 1-216-295-00 SHORT 0
(SLV-ED818/ED919/LF1)
JS905 1-216-296-00 SHORT 0
JS906 1-216-295-00 SHORT 0 (SLV-ED212/ED717)
JS907 1-216-295-00 SHORT 0 (SLV-ED212/ED717)
<COIL>
L006 1-412-945-11 INDUCTOR 3.3UH
L071 1-414-185-51 INDUCTOR 22UH (SLV-ED212)
L072 1-414-179-51 INDUCTOR 2.2UH
L151 1-414-185-51 INDUCTOR 22UH
L171 1-414-185-51 INDUCTOR 22UH
L172 1-414-185-51 INDUCTOR 22UH
L173 1-410-511-11 INDUCTOR 15UH
L202 1-414-856-51 INDUCTOR 10UH
L203 1-414-857-51 INDUCTOR 100UH
(SLV-ED717/ED818/ED919/LF1)
L203 1-410-520-11 INDUCTOR 82UH (SLV-ED212)
L204 1-410-510-11 INDUCTOR 12UH
L205 1-414-856-51 INDUCTOR 10UH
L206 1-414-856-51 INDUCTOR 10UH
L207 1-414-856-51 INDUCTOR 10UH
L211 1-414-193-51 INDUCTOR 220UH
L214 1-414-856-51 INDUCTOR 10UH
L215 1-414-187-51 INDUCTOR 47UH
L372 1-414-857-51 INDUCTOR 100UH
L601 1-403-588-11 INDUCTOR 22UH
L602 1-403-588-11 INDUCTOR 22UH
L603 1-414-142-11 INDUCTOR 1UH
L604 1-414-142-11 INDUCTOR 1UH
L606 1-414-142-11 INDUCTOR 1UH
L660 1-410-519-11 INDUCTOR 68UH
L700 1-414-856-51 INDUCTOR 10UH
L702 1-414-856-51 INDUCTOR 10UH
L705 1-414-856-51 INDUCTOR 10UH
(SLV-ED818/ED919/LF1)
L901 1-414-857-51 INDUCTOR 100UH
<FILTER>
LF600 1-416-929-11 FILTER, LINE
<FLUORESCENT TUBE INDICATOR>
ND451 1-517-734-11 TUBE, FLUORESCENT INDICATOR
<PHOTO COUPLER>
PH001 8-749-013-23 PHOTO INTERRUPTER GP3S120
PH002 8-749-013-23 PHOTO INTERRUPTER GP3S120
PH600 8-749-010-64 PHOTO COUPLER PC123FY2
<IC LINK>
PS001 1-576-122-21 LINK, IC
PS031 1-533-593-51 LINK, IC
PS071 1-576-384-21 LINK, IC
PS072 1-576-384-21 LINK, IC
PS331 1-533-586-51 LINK, IC
PS661 1-576-384-21 LINK, IC
<TRANSISTOR>
Q001 8-729-043-84 TRANSISTOR PT380F3
Q002 8-729-043-84 TRANSISTOR PT380F3
Q003 8-729-281-53 TRANSISTOR 2SC1815GR-TPE2
Q153 8-729-422-27 TRANSISTOR 2SD601A-QRS-TX
Q171 8-729-421-22 TRANSISTOR UN2211-TX
Q172 8-729-424-02 TRANSISTOR 2SB709A-QRS-TX
Q174 8-729-421-22 TRANSISTOR UN2211-TX
Q201 8-729-424-02 TRANSISTOR 2SB709A-QRS-TX
Note :
The components identified by
mark
or dotted line with mark
are critical for safety.
Replace only with part number
specified.
Page 72
SLV-LX80S
Ref. No. Part No. Description Remarks Ref. No. Part No. Description Remarks
8-15
MA-402
Q203 8-729-421-19 TRANSISTOR UN2213-TX
Q206 8-729-421-19 TRANSISTOR UN2213-TX
Q210 8-729-421-19 TRANSISTOR UN2213-TX
Q211 8-729-422-27 TRANSISTOR 2SD601A-QRS-TX
Q301 8-729-216-21 TRANSISTOR 2SA1162Y-TE85L
(SLV-ED818/ED919/LF1)
Q302 8-729-230-49 TRANSISTOR 2SC2712Y-TE85L
(SLV-ED818/ED919/LF1)
Q303 8-729-230-49 TRANSISTOR 2SC2712Y-TE85L
(SLV-ED818/ED919/LF1)
Q372 8-729-422-27 TRANSISTOR 2SD601A-QRS-TX
Q373 8-729-422-27 TRANSISTOR 2SD601A-QRS-TX
Q374 8-729-424-18 TRANSISTOR UN2113-TX
Q375 8-729-012-31 TRANSISTOR 2SC4040-TL2-Q
Q376 8-729-900-51 TRANSISTOR UN2115-QRS(TX)
Q377 8-729-421-19 TRANSISTOR UN2213-TX
Q704 8-729-421-19 TRANSISTOR UN2213-TX
(SLV-ED818/ED919TW)
Q706 8-729-421-19 TRANSISTOR UN2213-TX
Q707 8-729-119-76 TRANSISTOR 2SA1309A-QRSTA
Q901 8-729-424-02 TRANSISTOR 2SB709A-QRS-TX
<RESISTOR>
R001 1-216-071-00 RES-CHIP 8.2K 5% 1/10W
R001 1-249-413-11 CARBON 470 5% 1/4W
R002 1-216-073-00 RES-CHIP 10K 5% 1/10W
R003 1-216-689-11 RES-CHIP 39K 5% 1/10W
R003 1-249-421-11 CARBON 2.2K 5% 1/4W
R004 1-216-057-00 RES-CHIP 2.2K 5% 1/10W
R004 1-216-689-11 RES-CHIP 39K 5% 1/10W
R005 1-216-041-00 RES-CHIP 470 5 % 1/10W
R005 1-249-401-11 CARBON 4 7 5% 1/4W
R006 1-216-041-00 RES-CHIP 470 5 % 1/10W
R006 1-249-401-11 CARBON 4 7 5% 1/4W
R007 1-216-001-00 RES-CHIP 10 5% 1/10W
R007 1-249-437-11 CARBON 47K 5 % 1/4W
R008 1-216-001-00 RES-CHIP 10 5% 1/10W
R008 1-249-437-11 CARBON 47K 5 % 1/4W
R009 1-216-001-00 RES-CHIP 10 5% 1/10W
R009 1-249-433-11 CARBON 22K 5 % 1/4W
R010 1-216-001-00 RES-CHIP 10 5% 1/10W
R010 1-249-433-11 CARBON 22K 5 % 1/4W
R011 1-216-304-11 RES-CHIP 3.3 5% 1/10W
R012 1-216-304-11 RES-CHIP 3.3 5% 1/10W
R013 1-216-001-00 RES-CHIP 10 5% 1/10W
R014 1-216-295-00 SHORT 0
R015 1-216-295-00 SHORT 0
R016 1-216-033-00 RES-CHIP 220 5 % 1/10W
R032 1-216-089-00 RES-CHIP 47K 5% 1/10W
R034 1-216-689-11 RES-CHIP 39K 5% 1/10W
R035 1-216-689-11 RES-CHIP 39K 5% 1/10W
R051 1-249-425-11 CARBON 4.7K 5% 1/4W
R052 1-216-065-00 RES-CHIP 4.7K 5% 1/10W
R053 1-247-843-11 CARBON 3.3K 5% 1/4W
R056 1-249-425-11 CARBON 4.7K 5% 1/4W
R057 1-216-073-00 RES-CHIP 10K 5% 1/10W
R071 1-216-103-00 RES-CHIP 180K 5% 1/10W
R072 1-216-089-00 RES-CHIP 47K 5% 1/10W
R073 1-216-049-00 RES-CHIP 1K 5% 1/10W
R074 1-216-049-00 RES-CHIP 1K 5% 1/10W
R075 1-216-049-00 RES-CHIP 1K 5% 1/10W
R076 1-249-417-11 CARBON 1K 5% 1/4W
R100 1-216-085-91 RES-CHIP 33K 5% 1/10W
R101 1-216-073-91 RES-CHIP 10K 5% 1/10W
(SLV-LF1)
R101 1-216-069-00 RES-CHIP 6.8K 5% 1/10W
(SLV-ED919KR)
R101 1-216-059-00 RES-CHIP 2.7K 5% 1/10W
(SLV-ED717/ED818)
R101 1-216-051-00 RES-CHIP 1.2K 5% 1/10W
(SLV-ED212)
R101 1-216-065-00 RES-CHIP 4.7K 5% 1/10W
(SLV-ED919TW)
R102 1-216-049-00 RES-CHIP 1K 5% 1/10W
(SLV-LF1)
R102 1-216-073-00 RES-CHIP 10K 5% 1/10W
(SLV-ED212/ED717/ED818/ED919)
R104 1-247-807-31 CARBON 100 5% 1/4W
R105 1-249-429-11 CARBON 10K 5% 1/4W
R107 1-216-049-00 RES-CHIP 1K 5% 1/10W
R108 1-216-073-00 RES-CHIP 10K 5% 1/10W
R109 1-216-049-00 RES-CHIP 1K 5% 1/10W
R110 1-249-429-11 CARBON 10K 5% 1/4W
R111 1-216-081-00 RES-CHIP 22K 5% 1/10W
R112 1-216-041-00 RES-CHIP 470 5% 1/10W
R113 1-216-041-00 RES-CHIP 470 5% 1/10W
R114 1-216-041-00 RES-CHIP 470 5% 1/10W
R115 1-216-041-00 RES-CHIP 470 5% 1/10W
R116 1-216-089-00 RES-CHIP 47K 5% 1/10W
R117 1-249-417-11 CARBON 1K 5% 1/4W
R118 1-216-089-00 RES-CHIP 47K 5% 1/10W
R119 1-216-089-00 RES-CHIP 47K 5% 1/10W
R120 1-216-089-00 RES-CHIP 47K 5% 1/10W
R121 1-216-049-00 RES-CHIP 1K 5% 1/10W
R122 1-216-121-11 RES-CHIP 1 M 5 % 1/10W
R123 1-249-429-11 CARBON 10K 5% 1/4W
R124 1-249-429-11 CARBON 10K 5% 1/4W
R125 1-249-437-11 CARBON 47K 5% 1/4W
R126 1-216-049-00 RES-CHIP 1K 5% 1/10W
R127 1-216-073-00 RES-CHIP 10K 5% 1/10W
R128 1-216-073-00 RES-CHIP 10K 5% 1/10W
R129 1-249-441-11 CARBON 100K 5% 1/4W
R130 1-216-049-00 RES-CHIP 1K 5% 1/10W
R131 1-249-429-11 CARBON 10K 5% 1/4W
R132 1-249-429-11 CARBON 10K 5% 1/4W
R133 1-216-121-11 RES-CHIP 1 M 5 % 1/10W
R142 1-247-887-00 CARBON 220K 5% 1/4W
R143 1-216-113-00 RES-CHIP 470K 5% 1/10W
R144 1-216-105-91 RES-CHIP 220K 5% 1/10W
R151 1-216-113-00 RES-CHIP 470K 5% 1/10W
R152 1-216-025-11 RES-CHIP 100 5% 1/10W
R153 1-216-073-00 RES-CHIP 10K 5% 1/10W
R154 1-216-097-11 RES-CHIP 100K 5% 1/10W
R155 1-216-121-11 RES-CHIP 1 M 5 % 1/10W
R156 1-249-435-11 CARBON 33K 5% 1/4W
R157 1-216-073-00 RES-CHIP 10K 5% 1/10W
R158 1-216-073-00 RES-CHIP 10K 5% 1/10W
Page 73

SLV-LX80S
Ref. No. Part No. Description Remarks Ref. No. Part No. Description Remarks
8-16
R159 1-216-049-00 RES-CHIP 1K 5% 1/10W
R160 1-216-041-00 RES-CHIP 470 5 % 1/10W
R161 1-216-065-00 RES-CHIP 4.7K 5% 1/10W
R162 1-216-073-00 RES-CHIP 10K 5% 1/10W
R163 1-216-049-00 RES-CHIP 1K 5% 1/10W
R164 1-216-049-00 RES-CHIP 1K 5% 1/10W
R165 1-249-429-11 CARBON 10K 5 % 1/4W
R166 1-216-295-00 SHORT 0
R167 1-216-295-00 SHORT 0
R171 1-216-049-00 RES-CHIP 1K 5% 1/10W
R172 1-247-807-31 CARBON 100 5% 1/4W
R174 1-216-045-00 RES-CHIP 680 5 % 1/10W
R175 1-216-041-00 RES-CHIP 470 5 % 1/10W
R177 1-216-065-00 RES-CHIP 4.7K 5% 1/10W
R192 1-216-073-00 RES-CHIP 10K 5% 1/10W
(SLV-ED717/ED818/ED919/LF1)
R192 1-216-689-11 RES-CHIP 39K 5% 1/10W
(SLV-ED212)
R193 1-216-073-00 RES-CHIP 10K 5% 1/10W
R194 1-216-073-00 RES-CHIP 10K 5% 1/10W
R201 1-216-049-00 RES-CHIP 1K 5% 1/10W
R202 1-216-041-00 RES-CHIP 470 5 % 1/10W
(SLV-ED717/ED818/ED919/LF1)
R202 1-216-033-00 RES-CHIP 220 5 % 1/10W
(SLV-ED212)
R204 1-216-083-00 RES-CHIP 27K 5% 1/10W
R205 1-216-069-00 RES-CHIP 6.8K 5% 1/10W
R206 1-216-053-00 RES-CHIP 1.5K 5% 1/10W
R207 1-216-065-00 RES-CHIP 4.7K 5% 1/10W
R208 1-216-073-00 RES-CHIP 10K 5% 1/10W
(SLV-ED212/ED818/ED919TW/LF1)
R208 1-216-069-00 RES-CHIP 6.8K 5% 1/10W
(SLV-ED717/ED919KR)
R211 1-216-295-00 SHORT 0
(SLV-ED717/ED919/LF1)
R212 1-216-063-91 RES-CHIP 3.9K 5% 1/10W
(SLV-ED212)
R212 1-216-051-00 RES-CHIP 1.2K 5% 1/10W
(SLV-ED818)
R214 1-216-025-11 RES-CHIP 100 5 % 1/10W
(SLV-ED717/ED818/ED919/LF1)
R215 1-216-025-11 RES-CHIP 100 5 % 1/10W
R216 1-247-807-31 CARBON 100 5% 1/4W
R218 1-216-065-00 RES-CHIP 4.7K 5% 1/10W
R219 1-259-880-11 CARBON 2.2M 5% 1/4W
R222 1-216-041-00 RES-CHIP 470 5% 1/10W
R223 1-216-041-00 RES-CHIP 470 5 % 1/10W
R224 1-216-049-00 RES-CHIP 1K 5% 1/10W
R225 1-249-417-11 CARBON 1K 5% 1/4W
R226 1-216-099-00 RES-CHIP 120K 5% 1/10W
R228 1-216-049-00 RES-CHIP 1K 5% 1/10W
(SLV-ED212/ED919TW/LF1)
R228 1-216-041-00 RES-CHIP 470 5 % 1/10W
(SLV-ED717/ED818/ED919KR)
R289 1-216-049-00 RES-CHIP 1K 5% 1/10W
(SLV-ED717/ED919/LF1)
R291 1-208-806-11 METAL CHIP 10K 0.5% 1/10W
(SLV-ED717/ED919/LF1)
R294 1-247-807-31 CARBON 100 5% 1/4W
(SLV-ED717/ED919/LF1)
R295 1-247-807-31 CARBON 100 5% 1/4W
(SLV-ED717/ED919/LF1)
R296 1-249-428-11 CARBON 8.2K 5% 1/4W
(SLV-ED717/ED919/LF1)
R299 1-216-071-00 RES-CHIP 8.2K 5% 1/10W
(SLV-ED717/ED919/LF1)
R301 1-216-073-00 RES-CHIP 10K 5% 1/10W
(SLV-ED818/ED919/LF1)
R302 1-216-079-00 RES-CHIP 18K 5% 1/10W
(SLV-ED818/ED919/LF1)
R304 1-216-049-00 RES-CHIP 1K 5% 1/10W
(SLV-ED818/ED919/LF1)
R305 1-216-049-00 RES-CHIP 1K 5% 1/10W
(SLV-ED818/ED919/LF1)
R306 1-216-083-00 RES-CHIP 27K 5% 1/10W
(SLV-ED818/ED919/LF1)
R307 1-216-057-00 RES-CHIP 2.2K 5% 1/10W
(SLV-ED212/ED717)
R308 1-208-820-11 METAL CHIP 39K 0.5% 1/10W
(SLV-ED818/ED919/LF1)
R309 1-216-041-00 RES-CHIP 470 5 % 1/10W
(SLV-ED212/ED717)
R310 1-216-041-00 RES-CHIP 470 5 % 1/10W
(SLV-ED212/ED717)
R311 1-216-057-00 RES-CHIP 2.2K 5% 1/10W
(SLV-ED212/ED717)
R312 1-216-083-00 RES-CHIP 27K 5% 1/10W
(SLV-ED818/ED919/LF1)
R313 1-216-133-91 RES-CHIP 3.3M 5% 1/10W
(SLV-ED818/ED919/LF1)
R314 1-216-073-00 RES-CHIP 10K 5% 1/10W
(SLV-ED818/ED919/LF1)
R317 1-216-061-91 RES-CHIP 3.3K 5% 1/10W
(SLV-ED212/ED717)
R318 1-216-049-00 RES-CHIP 1K 5% 1/10W
(SLV-ED818/ED919/LF1)
R319 1-216-049-00 RES-CHIP 1K 5% 1/10W
(SLV-ED818/ED919/LF1)
R322 1-216-295-00 SHORT 0
(SLV-ED212/ED717)
R327 1-216-041-00 RES-CHIP 470 5 % 1/10W
(SLV-ED212/ED717)
R328 1-216-041-00 RES-CHIP 470 5 % 1/10W
(SLV-ED212/ED717)
R329 1-216-041-00 RES-CHIP 470 5 % 1/10W
(SLV-ED212/ED717)
R350 1-216-073-00 RES-CHIP 10K 5% 1/10W
R351 1-216-061-91 RES-CHIP 3.3K 5% 1/10W
R352 1-216-101-00 RES-CHIP 150K 5% 1/10W
R353 1-216-025-11 RES-CHIP 100 5 % 1/10W
R354 1-216-085-91 RES-CHIP 33K 5% 1/10W
R355 1-216-079-00 RES-CHIP 18K 5% 1/10W
R356 1-216-083-00 RES-CHIP 27K 5% 1/10W
R357 1-216-295-00 SHORT 0
R358 1-216-077-91 RES-CHIP 15K 5% 1/10W
(SLV-ED717)
R359 1-249-437-11 CARBON 47K 5% 1/4W
(SLV-ED717)
R360 1-216-077-91 RES-CHIP 15K 5% 1/10W
R361 1-249-437-11 CARBON 47K 5% 1/4W
R362 1-216-077-91 RES-CHIP 15K 5% 1/10W
(SLV-ED212/ED717/ED919KR/LF1)
R363 1-249-437-11 CARBON 47K 5% 1/4W
(SLV-ED212/ED717/ED919KR/LF1)
R364 1-216-295-00 SHORT 0
MA-402
Page 74
SLV-LX80S
Ref. No. Part No. Description Remarks Ref. No. Part No. Description Remarks
8-17
R365 1-216-065-00 RES-CHIP 4.7K 5% 1/10W
R366 1-216-041-00 RES-CHIP 470 5% 1/10W
R368 1-216-125-00 RES-CHIP 1.5M 5% 1/10W
R370 1-216-089-00 RES-CHIP 47K 5% 1/10W
R371 1-249-411-11 CARBON 330 5% 1/4W
R372 1-249-411-11 CARBON 330 5% 1/4W
R375 1-216-073-00 RES-CHIP 10K 5% 1/10W
R376 1-216-073-00 RES-CHIP 10K 5% 1/10W
R378 1-216-073-00 RES-CHIP 10K 5% 1/10W
R379 1-249-433-11 CARBON 22K 5 % 1/4W
R380 1-216-308-00 RES-CHIP 4.7 5% 1/10W
R385 1-216-057-00 RES-CHIP 2.2K 5% 1/10W
(SLV-ED717)
R386 1-216-057-00 RES-CHIP 2.2K 5% 1/10W
R387 1-216-057-00 RES-CHIP 2.2K 5% 1/10W
(SLV-ED212/ED717/ED919KR/LF1)
R400 1-216-021-00 RES-CHIP 68 5% 1/10W
R402 1-249-408-11 CARBON 180 5% 1/4W
(SLV-ED717/ED818/ED919)
R404 1-249-437-11 CARBON 47K 5 % 1/4W
R405 1-249-437-11 CARBON 47K 5 % 1/4W
R410 1-249-403-11 CARBON 6 8 5% 1/4W
R411 1-249-419-11 CARBON 1.5K 5% 1/4W
R414 1-216-061-91 RES-CHIP 3.3K 5% 1/10W
R415 1-216-065-00 RES-CHIP 4.7K 5% 1/10W
R416 1-249-427-11 CARBON 6.8K 5% 1/4W
R417 1-249-431-11 CARBON 15K 5 % 1/4W
R418 1-216-089-00 RES-CHIP 47K 5% 1/10W
R424 1-216-061-91 RES-CHIP 3.3K 5% 1/10W
R425 1-216-065-00 RES-CHIP 4.7K 5% 1/10W
R426 1-216-069-00 RES-CHIP 6.8K 5% 1/10W
R427 1-216-077-91 RES-CHIP 15K 5% 1/10W
R428 1-216-089-00 RES-CHIP 47K 5% 1/10W
R451 1-249-413-11 CARBON 470 5% 1/4W
R452 1-216-049-00 RES-CHIP 1K 5% 1/10W
R453 1-216-049-00 RES-CHIP 1K 5% 1/10W
R454 1-216-049-00 RES-CHIP 1K 5% 1/10W
R455 1-249-417-11 CARBON 1K 5% 1/4W
R457 1-216-065-00 RES-CHIP 4.7K 5% 1/10W
R458 1-216-065-00 RES-CHIP 4.7K 5% 1/10W
R459 1-216-085-91 RES-CHIP 33K 5% 1/10W
R526 1-249-437-11 CARBON 47K 5 % 1/4W
R601 1-214-949-21 METAL 3.3M 1% 1/2W
R602 1-247-883-00 CARBON 150K 5% 1/4W
R603 1-247-891-00 CARBON 330K 5% 1/4W
R604 1-249-430-11 CARBON 12K 5 % 1/4W
R605 1-249-419-11 CARBON 1.5K 5% 1/4W
R606 1-215-444-00 METAL 9.1K 1% 1/4W
R607 1-249-428-11 CARBON 8.2K 5% 1/4W
R611 1-260-364-11 CARBON 1 M 5% 1/2W
R612 1-208-789-11 METAL CHIP 2K 0.5% 1/10W
R613 1-249-406-11 CARBON 120 5% 1/4W
R614 1-216-655-11 METAL CHIP 1.5K 0.5% 1/10W
R615 1-216-057-00 RES-CHIP 2.2K 5% 1/10W
R616 1-249-401-11 CARBON 4 7 5% 1/4W
R617 1-249-417-11 CARBON 1K 5% 1/4W
R618 1-249-409-11 CARBON 220 5% 1/4W
R640 1-219-153-11 FUSIBLE 10 5% 1/4W
R641 1-219-153-11 FUSIBLE 1 0 5% 1/4W
R643 1-216-353-00 METAL OXIDE 2.2 5% 1W
R647 1-215-465-00 METAL 68K 1% 1/4W
R648 1-216-057-00 RES-CHIP 2.2K 5% 1/10W
R649 1-249-401-11 CARBON 47 5% 1/4W
R651 1-215-459-00 METAL 39K 1% 1/4W
R668 1-216-073-00 RES-CHIP 10K 5% 1/10W
R705 1-216-295-00 SHORT 0
R706 1-216-295-00 SHORT 0
R707 1-216-295-00 SHORT 0
R709 1-216-113-00 RES-CHIP 470K 5% 1/10W
R710 1-216-097-11 RES-CHIP 100K 5% 1/10W
R711 1-249-433-11 CARBON 22K 5% 1/4W
R717 1-216-049-00 RES-CHIP 1K 5 % 1/10W
R718 1-249-417-11 CARBON 1K 5% 1/4W
(SLV-ED818/ED919TW)
R719 1-249-417-11 CARBON 1K 5% 1/4W
(SLV-ED818/ED919TW)
R720 1-249-433-11 CARBON 22K 5% 1/4W
(SLV-ED818/ED919TW)
R721 1-249-433-11 CARBON 22K 5% 1/4W
(SLV-ED818/ED919TW)
R726 1-216-295-00 SHORT 0
(SLV-ED818/ED919TW)
R727 1-216-295-00 SHORT 0
(SLV-ED818/ED919/LF1)
R728 1-216-295-00 SHORT 0
(SLV-ED818/ED919/LF1)
R729 1-249-429-11 CARBON 10K 5% 1/4W
(SLV-ED818/ED919TW)
R730 1-240-307-81 FUSIBLE 560 5% 1/4W
R731 1-249-429-11 CARBON 10K 5% 1/4W
(SLV-ED818/ED919TW)
R733 1-249-413-11 CARBON 470 5% 1/4W
(SLV-ED919KR/LF1)
R734 1-249-413-11 CARBON 470 5% 1/4W
(SLV-ED919KR/LF1)
R738 1-216-295-00 SHORT 0
R742 1-216-051-00 RES-CHIP 1.2K 5% 1/10W
R743 1-249-401-11 CARBON 47 5% 1/4W
(SLV-ED919KR/LF1)
R901 1-216-097-11 RES-CHIP 100K 5% 1/10W
(SLV-ED818/ED919/LF1)
R902 1-216-097-11 RES-CHIP 100K 5% 1/10W
(SLV-ED818/ED919/LF1)
R905 1-216-041-00 RES-CHIP 4 70 5% 1/10W
(SLV-ED818/ED919/LF1)
R906 1-216-041-00 RES-CHIP 4 70 5% 1/10W
R908 1-216-023-00 RES-CHIP 8 2 5% 1/10W
R909 1-249-407-11 CARBON 150 5% 1/4W
R910 1-216-025-11 RES-CHIP 1 00 5% 1/10W
R913 1-249-408-11 CARBON 180 5% 1/4W
R914 1-216-021-00 RES-CHIP 6 8 5% 1/10W
<VARIABLE RESISTOR>
RV701 1-241-766-11 RES, ADJ, CERMET 47K
(SLV-ED818/ED919TW)
MA-402
Note :
The components identified by
mark
or dotted line with mark
are critical for safety.
Replace only with part number
specified.
Page 75
SLV-LX80S
Ref. No. Part No. Description Remarks Ref. No. Part No. Description Remarks
8-18
<SWITCH>
S101 1-571-958-11 SWITCH, PUSH (1 KEY) REC PROOF
S102 1-771-155-11 SWITCH, ROTARY CAM ENCODER
S454 1-771-574-21 SWITCH, TACTILE CHANNEL/TRACKING +
(SLV-ED212/ED717/ED818/ED919)
S459 1-771-574-21 SWITCH, TACTILE COLOR SYSTEM
(SLV-ED212/ED717/ED818/ED919)
S465 1-771-574-21 SWITCH, TACTILE CHANNEL/TRACKING -
S466 1-771-574-21 SWITCH, TACTILE ONE TOUCH TUNING/
RF CHANNEL
S467 1-771-574-21 SWITCH, TACTILE TAPE SPEED SP/LP
S468 1-771-574-21 SWITCH, TACTILE R
2
(SLV-ED717/ED818/ED919/LF1)
S701 1-571-588-11 SWITCH, SLIDE RF UNIT
(SLV-ED212/ED717/ED919KR/LF1)
<TRANSFORMER>
T371 1-423-414-11 TRANSFORMER, BIAS OSCILLATION
T600 1-435-790-11 TRANSFORMER, CONVERTER
<TUNER>
TU704 1-693-542-11 TUNER (BTF-3MK401)
(SLV-ED212/ED717/ED919KR/LF1)
TU704 1-693-541-11 TUNER, IF (BTF-3MG402)
(SLV-ED818/ED919TW)
<VARISTOR>
VDR6001-801-267-31 VARISTOR TNR10V431K660
<CRYSTAL>
X001 1-767-897-12 VIBRATOR, CRYSTAL 24.576MHz
X101 1-767-855-11 VIBRATOR, CRYSTAL 10MHz
X102 1-579-463-11 VIBRATOR, CRYSTAL 32.768KHz
X151 1-767-857-11 VIBRATOR, CRYSTAL 14.318MHz
X202 1-760-709-11 VIBRATOR, CRYSTAL 3579.545KHz
A-6713-875-A NK-11 BOARD COMPLETE
(SLV-ED919KR/LF1)
********************
<CAPACITOR>
C003 1-107-823-11 CERAMIC CHIP 0.47UF 10% 16V
C004 1-107-823-11 CERAMIC CHIP 0.47UF 10% 16V
C005 1-107-823-11 CERAMIC CHIP 0.47UF 10% 16V
C006 1-107-823-11 CERAMIC CHIP 0.47UF 10% 16V
C007 1-107-823-11 CERAMIC CHIP 0.47UF 10% 16V
C008 1-107-823-11 CERAMIC CHIP 0.47UF 10% 16V
C009 1-107-823-11 CERAMIC CHIP 0.47UF 10% 16V
C010 1-107-823-11 CERAMIC CHIP 0.47UF 10% 16V
C011 1-164-232-11 CERAMIC CHIP 0.01UF 10% 50V
C012 1-164-232-11 CERAMIC CHIP 0.01UF 10% 50V
NK-11
C013 1-163-243-11 CERAMIC CHIP 47PF 5% 50V
C014 1-164-232-11 CERAMIC CHIP 0.01UF 10% 50V
C015 1-163-231-11 CERAMIC CHIP 15PF 5% 50V
C016 1-163-233-91 CERAMIC CHIP 18PF 5% 50V
C017 1-110-501-11 CERAMIC CHIP 0.33UF 10% 16V
C018 1-163-989-11 CERAMIC CHIP 0.033UF 10% 25V
C019 1-109-982-11 CERAMIC CHIP 1UF 10% 10V
C020 1-164-004-11 CERAMIC CHIP 0.1UF 10% 25V
C021 1-113-642-11 TANTAL. CHIP 47UF 10% 10V
C022 1-107-823-11 CERAMIC CHIP 0.47UF 10% 16V
C023 1-163-243-11 CERAMIC CHIP 47PF 5% 50V
<CONNECTOR>
CN001 1-750-152-11 PIN, CONNECTOR 13P
<DIODE>
D001 8-719-066-72 DIODE BB135
<FERRITE BEAD>
FB001 1-543-813-21 FERRITE 0UH
FB002 1-543-813-21 FERRITE 0UH
FB003 1-543-813-21 FERRITE 0UH
<IC>
IC001 8-759-526-43 IC TDA9874H/V1,118
<COIL>
L006 1-412-945-11 INDUCTOR 3.3UH
<IC LINK>
PS001 1-576-122-21 LINK, IC
<RESISTOR>
R001 1-216-071-00 RES-CHIP 8.2K 5% 1/10W
R002 1-216-073-00 RES-CHIP 10K 5% 1/10W
R003 1-216-689-11 RES-CHIP 39K 5% 1/10W
R004 1-216-689-11 RES-CHIP 39K 5% 1/10W
R005 1-216-041-00 RES-CHIP 47 0 5% 1/10W
R006 1-216-041-00 RES-CHIP 47 0 5% 1/10W
R007 1-216-001-00 RES-CHIP 10 5% 1/10W
R008 1-216-001-00 RES-CHIP 10 5% 1/10W
R009 1-216-001-00 RES-CHIP 10 5% 1/10W
R010 1-216-001-00 RES-CHIP 10 5% 1/10W
R011 1-216-304-11 RES-CHIP 3.3 5% 1/10W
R012 1-216-304-11 RES-CHIP 3.3 5% 1/10W
R013 1-216-001-00 RES-CHIP 10 5% 1/10W
R014 1-216-295-00 SHORT 0
R015 1-216-295-00 SHORT 0
R016 1-216-033-00 RES-CHIP 22 0 5% 1/10W
MA-402
Note :
The components identified by
mark
or dotted line with mark
are critical for safety.
Replace only with part number
specified.
Page 76
SLV-LX80S
Ref. No. Part No. Description Remarks Ref. No. Part No. Description Remarks
8-19
<CRYSTAL>
X001 1-767-897-12 VIBRATOR, CRYSTAL 24.576MHz
*******
MISCELLANEOUS
**************
1-782-752-41 CORD, POWER (SLV-ED212/
ED717/ED818/ED919KR/LF1)
1-777-852-33 CORD, POWER
(SLV-ED818/ED919TW)
1-757-690-11 FLAT CABLE FMD-022
(SLV-ED717/ED818/ED919)
1-757-691-11 FLAT CABLE FMD-023 (SLV-ED212)
1-696-592-41 CORD, CONNECTION (NTSC)
1-757-552-12 FLAT CABLE FDM-010
1-757-553-11 FLAT CABLE FDI-002
1-500-471-11 FE HEAD
A-6759-620-A HEAD BLOCK ASSY, ACE
1-763-572-11 MOTOR, DC
X-3950-970-1 MOTOR ASSY, CAM (SL)
1-772-358-11 DRUM ASSY, DZH-71F-R (ED212)
1-772-363-11 DRUM ASSY, DZH-0B4A-R
(ED717)
1-772-366-11 DRUM ASSY, DZH-0B7A-R
(ED818/ED919/LF1)
ACCESSORIES
************
3-067-160-11 MANUAL, INSTRUCTION (SLV-LF1)
3-066-368-11 MANUAL, INSTRUCTION
(SLV-ED212/ED717/ED919KR)
3-066-369-11 MANUAL, INSTRUCTION
(SLV-ED818/ED919TW)
1-476-475-71 COMMANDER, STANDARD (RMT-V312)
(SLV-ED212)
1-476-475-81 COMMANDER, STANDARD(RMT-V312A)
(SLV-ED717)
1-476-533-11 COMMANDER, STANDARD(RMT-V312C)
(SLV-ED818)
1-476-474-11 COMMANDER, STANDARD (RMT-V310)
(SLV-ED919KR)
1-476-475-91 COMMANDER, STANDARD(RMT-V312B)
(SLV-ED919TW)
HARDWARE LIST
**************
3-710-901-61 SCREW, TAPPING
3-970-608-21 SUMITITE (B3), +BV
3-979-112-01 SCREW SW(+)BVTP 3X10
3-342-512-21 SCREW (B1.7X3.5), TAPPING
3-979-112-01 SCREW SW(+)BVTP 3X10
4-921-277-41 SCREW (B2.6X8), TAPPING, BIND
#1 7-685-648-79 SCREW +BVTP 3X12 TYPE2 IT-3
#2 7-685-646-79 SCREW +BVTP 3X8 TYPE2 IT-3
#3 7-682-647-09 SCREW +PS 3X6
#4 7-685-133-19 SCREW +P2.6X6 TYPE2 NON-SLIT
NK-11
Page 77

SLV-LX80S
Ref. No. Part No. Description Remarks Ref. No. Part No. Description Remarks
8-20
SLV-ED212/ED717/ED818/ED919/LF1
– 103 –
2001D0800-1
2001. 6
Published by Quality Assurance Dept.
Sony Corporation
Home Video Company
9-921-796-11
 Loading...