

Sony RDR-GX330, RMT-D229A Service Manual
SERVICE MANUAL
DVD RECORDER
SPECIFICATIONS
RDR-GX330
RMT-D229A
US Model
Canadian Model
System
Laser: Semiconductor laser
Channel coverage:
NTSC
VHF: 2 to 13
UHF: 14 to 69
CATV: A-8 to A-1, A to W, W+1 to
W+84
Video reception: Frequen cy synthe sizer
system
Audio reception: Inter carrier system
Antenna: 75-ohm antenna terminal for
VHF/UHF
Timer: Clock: Quartz locked/Ti mer
indication: 12-hour cycle (digital)/
Power back-up duration: 1 hour
Video recording format: MPEG-2,
MPEG-1
Audio recording format/applicable
bit rate: Dolby Digital 2 ch
256 kbps/128 kbps (in EP and SLP
mode)
Inputs and outputs
LINE OUT
(AUDIO): Phono jack/2 Vrms/10 kilohms
(VIDEO): Phono jack/1.0 Vp-p
(S VIDEO): 4-pin mini DIN/Y: 1.0 Vp-p,
C: 0.286 Vp-p
LINE 1 IN/LINE 2 IN
(AUDIO): Phono jack/2 Vrms/more than
22 kilohms
(VIDEO): Phono jack/1.0 Vp-p
(S VIDEO): 4-pin mini DIN/Y: 1.0 Vp-p,
C: 0.286 Vp-p
DV IN: 4-pin/i.LINK S100
DIGITAL OUT (COAXIAL): Phono jack/
0.5 Vp-p/75 ohms
COMPONENT VIDEO OUT (Y, P
B
,
P
R
):
Phono jack/Y: 1.0 Vp-p/
P
B
, PR: 0.7 Vp-p
General
Power requirements: 120 V AC, 60 Hz
Power consumption: 22 W
Dimensions (approx.):
430 × 58 × 291 mm
(17 × 2 × 11 in.) (width/height/
depth) incl. projecting parts
Mass (approx.): 3.1 kg (6.83 lb)
Operating temperature:
5ºC to 35ºC (41ºF to 95ºF)
Operating humidity: 25% to 80%
Supplied accessories:
Audio/video cord (1)
Power cord (1)
Antenna cable (1)
Remote commander (remote) (1)
Size AA (R6) batteries (2)
Specifications and design are subject to
change without notice.
3
8
1
2

— 2 —
SAFETY-RELATED COMPONENT WARNING!!
COMPONENTS IDENTIFIED BY MARK 0 OR DOTTED LINE WITH
MARK 0 ON THE SCHEMATIC DIAGRAMS AND IN THE PARTS
LIST ARE CRITICAL TO SAFE OPERATION. REPLACE THESE
COMPONENTS WITH SONY PARTS WHOSE PART NUMBERS
APPEAR AS SHOWN IN THIS MANUAL OR IN SUPPLEMENTS
PUBLISHED BY SONY.
1. Check the area of your repair for unsoldered or poorly-soldered
connections. Check the entire board surface for solder splashes
and bridges.
2. Check the interboard wiring to ensure that no wires are
"pinched" or contact high-wattage resistors.
3. Look for unauthorized replacement parts, particularly
transistors, that were installed during a previous repair . Point
them out to the customer and recommend their replacement.
4. Look for parts which, through functioning, show obvious signs
of deterioration. Point them out to the customer and
recommend their replacement.
5. Check the B+ voltage to see it is at the values specified.
6. Flexible Circuit Board Repairing
• Keep the temperature of the soldering iron around 270˚C
during repairing.
• Do not touch the soldering iron on the same conductor of the
circuit board (within 3 times).
• Be careful not to apply force on the conductor when soldering
or unsoldering.
SAFETY CHECK-OUT
After correcting the original service problem, perform the following
safety checks before releasing the set to the customer.
CAUTION
Use of controls or adjustments or performance of procedures
other than those specified herein may result in hazardous radiation
exposure.
WARNING!!
WHEN SERVICING, DO NOT APPROACH THE LASER EXIT WITH
THE EYE TOO CLOSELY. IN CASE IT IS NECESSARY TO
CONFIRM LASER BEAM EMISSION, BE SURE TO OBSERVE
FROM A DISTANCE OF MORE THAN 25 cm FROM THE SURFACE
OF THE OBJECTIVE LENS ON THE OPTICAL PICK-UP BLOCK.
CAUTION:
The use of optical instrument with this product will increase eye
hazard.
Unleaded solder
Boards requiring use of unleaded solder are printed with the leadfree mark (LF) indicating the solder contains no lead.
(Caution: Some printed circuit boards may not come printed with
the lead free mark due to their particular size.)
: LEAD FREE MARK
Unleaded solder has the following characteristics.
• Unleaded solder melts at a temperature about 40°C higher than
ordinary solder.
Ordinary soldering irons can be used but the iron tip has to be
applied to the solder joint for a slightly longer time.
Soldering irons using a temperature regulator should be set to
about 350°C.
Caution: The printed pattern (copper foil) may peel away if the
heated tip is applied for too long, so be careful!
• Strong viscosity
Unleaded solder is more viscous (sticky, less prone to flow) than
ordinary solder so use caution not to let solder bridges occur such
as on IC pins, etc.
• Usable with ordinary solder
It is best to use only unleaded solder but unleaded solder may
also be added to ordinary solder.

— 3 —
TABLE OF CONTENTS
SERVICE NOTE
1. DISK REMOVAL PROCEDURE IF THE TRAY
CANNOT BE EJECTED (FORCED EJECTION) ············ 5
1. GENERAL
WARNING ············································································1-1
Precautions·············································································1-1
Quick Guide to Disc Types ····················································1-2
Hookups and Settings ································································1-3
Hooking Up the Recorder ······················································1-3
Step 1: Connecting the Antenna Cable ··································1-3
Step 2: Connecting the Video Cords ······································1-4
Step 3: Connecting the Audio Cords ·····································1-4
Step 4: Connecting the AC Power Cord ································1-4
Step 5: Preparing the Remote ················································ 1-5
Step 6: Easy Setup ·································································1-5
Connecting a VCR or Similar Device····································1-6
Connecting to a Satellite or Digital Tuner ·····························1-6
Eight Basic Operations — Getting to Know Your DVD
Recorder ··········································································1-6
1. Inserting a Disc ··································································1-6
2. Recording a Program ·························································1-6
3. Playing the Recorded Program (Title List)························1-7
4. Displaying the Playing/Remaining Time and Play
Information ········································································1-7
5. Changing the Name of a Recorded Program ·····················1-8
6. Labeling and Protecting a Disc··········································1-8
7. Playing the Disc on Other DVD Equipment (Finalize) ·····1-8
8. Reformatting a disc····························································1-9
Timer Recording········································································1-9
Before Recording···································································1-9
Timer Recording ··································································1-10
Checking/Changing/Canceling Timer Settings (Timer List) ···
1-11
Recording From Connected Equipment ······························1-11
Playback ··················································································1-12
Playing ·················································································1-12
Searching for a Title/Chapter/Track, etc. ·····························1-13
Playing MP3 Audio Tracks or JPEG Image Files ················1-13
Erasing and Editing ·································································1-14
Before Editing······································································1-14
Erasing and Editing a Title ·················································· 1-15
Creating and Editing a Playlist ············································ 1-15
DV/Digital8 Dubbing ······························································1-16
Before DV/Digital8 Dubbing···············································1-16
Recording an Entire DV Format Tape (One Touch
Dubbing) ·········································································· 1-17
Program Edit ········································································1-17
Settings and Adjustments ························································ 1-17
Antenna Reception and Language Settings (Basic)·············1-17
Video Settings (Video) ·························································1-18
Audio Settings (Audio)························································1-19
Recording Settings (Recording) ··········································1-19
Disc Settings (DVD)····························································1-19
Remote Control Settings/Factory Settings (Others) ············ 1-20
Easy Setup (Resetting the Recorder) ···································1-20
Additional Information ····························································1-20
Troubleshooting ···································································1-20
Self-diagnosis Function (When letters/numbers appear in the
display)·············································································1-22
Notes About This Recorder ················································· 1-22
Specifications·······································································1-22
About i.LINK·······································································1-22
Guide to Parts and Controls ·················································1-23
Language Code List ·····························································1-23
Area Code ············································································1-23
2. DISASSEMBLY
2-1. UPPER CASE ·································································2-2
2-2. TRAY COVER ASSEMBLY ··········································2-2
2-3. FRONT PANEL SECTION ·············································2-3
2-4. FL-155 BOARD, FR-237 BOARD·································2-3
2-5. DVD drive ·······································································2-4
2-6. RD-60 BOARD ·······························································2-4
2-7. AV-100 BOARD ······························································2-5
2-8. Power block ·····································································2-6
2-9. D. C. FAN········································································2-6
2-10. CIRCUIT BOARDS LOCATION ···································2-7
3. BLOCK DIAGRAMS
3-1. OVERALL BLOCK DIAGRAM ····································3-1
3-2. AV-100 BLOCK DIAGRAM ··········································3-3
3-3. RD-060 BLOCK DIAGRAM··········································3-5
3-4. POWER BLOCK DIAGRAM·········································3-7
4. SCHEMATIC DIAGRAMS
4-1. FRAME SCHEMATIC DIAGRAM································ 4-1
4-2. SCHEMATIC DIAGRAMS ············································ 4-3
WAVEFORMS ································································4-4
• AV-100 (1/6) (POWER)
SCHEMATIC DIAGRAM ······························4-5
• AV-100 (2/6) (AUDIO IN)
SCHEMATIC DIAGRAM ······························4-7
• AV-100 (3/6) (AUDIO OUT)
SCHEMATIC DIAGRAM ······························4-9
• AV-100 (4/6) (TUNER)
SCHEMATIC DIAGRAM ····························4-11
• AV-100 (5/6) (IT CONTROLLER)
SCHEMATIC DIAGRAM ····························4-13
• AV-100 (6/6) (VIDEO IN/OUT)
SCHEMATIC DIAGRAM ····························4-15
• FL-155 (POWER SWITCH)
SCHEMATIC DIAGRAM ····························4-17
• FR-237 (FL DRIVE, LINE2 IN, FUNCTION SW)
SCHEMATIC DIAGRAM ····························4-19
• RD-060 (1/5) (RISM3)
SCHEMATIC DIAGRAM ····························4-21
• RD-060 (2/5) (FLASH ROM, SUPER AND)
SCHEMATIC DIAGRAM ····························4-23
• RD-060 (3/5) (AV-CN/POWER)
SCHEMATIC DIAGRAM ····························4-25
• RD-060 (4/5) (DV-PHY)
SCHEMATIC DIAGRAM ····························4-27
• RD-060 (5/5) (PLL/AUDIO-AD-DA)
SCHEMATIC DIAGRAM ····························4-29
SWITCHING REGULATOR (SRV-1854UC)
SCHEMATIC DIAGRAM ····························4-31
4-3. PRINTED WIRING BOARDS
• RD-060 (RISM3, VDEC, A/V INTERFACE,
AUDIO DAC/ADC)
PRINTED WIRING BOARD ·······················4-33
5. IC PIN FUNCTION DESCRIPTION
5-1. IT CONTROL IC (IC603: M306H5FGFP-302UO (AV-100
BOARD)) ········································································5-1
5-2. MAIN CONTROL IC (IC103: R8A34012BG (RD-060
BOARD)) ········································································5-4

— 4 —
6. SERVICE MODE
6-1. Checking Item ·································································6-1
6-2. Screen Transition in the Service Mode····························6-2
6-3. Service Mode Menu Items and Description ····················6-3
6-4. Device Check Menu (1/2) ··············································· 6-3
6-5. Device Check Menu (2/2) ··············································· 6-3
6-6. Path Check Menu ····························································6-3
6-7. Hard Disk Check Menu ···················································6-4
6-8. Path Individual Check (Pasted Screen Check (visual check)
and data check (digital video data auto-check)) Screen
Transition·········································································6-4
7. ADJUSTMENT
7-1. Video System Adjustment ···············································7-1
7-2. S-Video Output S-Y Check ·············································7-1
7-3. S-Video Output S-C Level Check ···································7-2
7-4. Component Video Output Y Check ·································7-2
7-5. Component Video Output B-Y Chec ·······························7-2
7-6. Component Video Output R-Y Check ·····························7-2
8. REPAIR PARTS LIST
8-1. EXPLODED VIEWS
8-1-1.OVERALL SECTION·····················································8-1
8-1-2.CHASSIS SECTION······················································· 8-2
8-2. ELECTRICAL PARTS LIST ··········································8-3
— 5 —
SERVICE NOTE
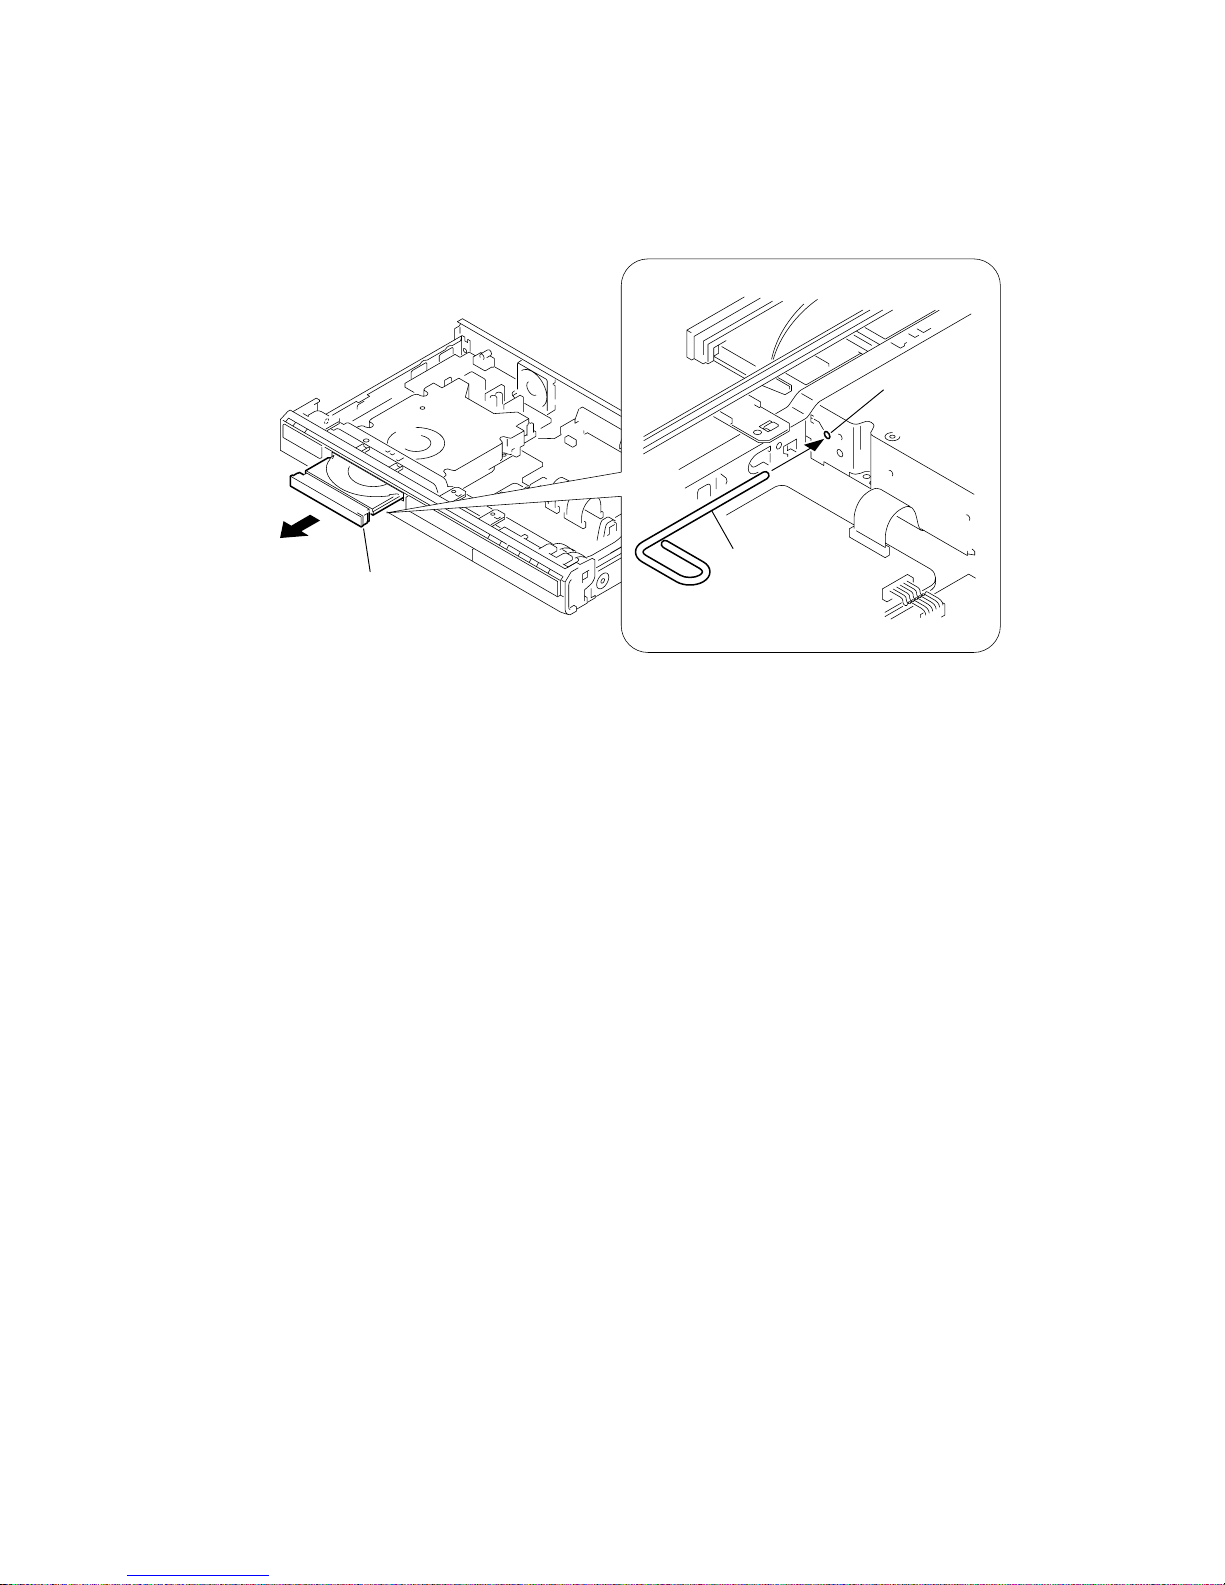
1. DISK REMOVAL PROCEDURE IF THE TRAY CANNOT BE EJECTED (FORCED EJECTION)
1. Remove the upper case.
2. Insert the stiff wire in the hole and eject the tray.
NOTES DURING THE FORCED EJECTION
1. If the forced ejection is executed while a blank disc media (DVD±RW , ±R) exists on the tray
• Insert a DVD-ROM (DVD test disc, DVD software available on the market, or the like) in the tray and then close the tray.
Note1: If you close the tray while it is empty, ejection of the tray becomes impossible.
Note2: If you close the tray with a CD disc inserted in it, the CD can be ejected. However, if you close the tray while it is empty, there can be a case that
ejection of the tray becomes impossible.
Note3: Even if you replace the DVD drive unit while the tray remains under the state as described above, the situation cannot be improved.
2. If the tray cannot be ejected while the disc is not inserted
• Execute the forced ejection.
• Insert a DVD-ROM (DVD test disc, DVD software available on the market, or the like) on the tray and try to close the tray.
(There are cases that it recovers the trouble.)
3. Contents of forcedly ejected blank disc media (DVD±RW, ±R) can be damaged. (There can be a case that initialization is also impossible.)
Stiff wire
Hole
Open the tray

MEMO
— 6 —

1-1
SECTION 1
GENERAL
RDR-GX330
This section is extracted from instruction manual.
(RDR-GX330 : 2-672-839-11(1))
2
WARNING
To reduce the risk of fire or electric
shock, do not expose this apparatus
to rain or moisture.
To avoid electrical shock, do not
open the cabinet. Refer servicing to
qualified personnel only.
The AC power cord must be
changed only at a qualified service
shop.
CAUTION
The use of optical instruments with
this product will increase eye
hazard. As the laser beam used in
this DVD recorder is harmful to
eyes, do not attempt to disassemble
the cabinet.
Refer servicing to qualified
personnel only.
This label is located on the laser
protective housing inside the
enclosure.
This symbol is
intended to alert the
user to the presence
of uninsulated
“dangerous voltage”
within the product’s
enclosure that may be
of sufficient
magnitude to
constitute a risk of
electric shock to
persons.
This symbol is
intended to alert the
user to the presence
of important
operating and
maintenance
(servicing)
instructions in the
literature
accompanying the
appliance.
For customers in the U.S.A
Owner’s Record
The model and serial numbers are
located at the rear of the unit.
Record the serial number in the space
provided below. Refer to them whenever
you call upon your Sony dealer
regarding this product.
Model No. RDR-GX330
Serial No.______________
CAUTION
You are cautioned that any
changes or modifications not
expressly approved in this manual
could void your authority to
operate this equipment.
b
Note
This equipment has been tested
and found to comply with the
limits for a Class B digital device,
pursuant to Part 15 of the FCC
Rules. These limits are designed to
provide reasonable protection
against harmful interference in a
residential installation. This
equipment generates, uses, and can
radiate radio frequency energy
and, if not installed and used in
accordance with the instructions,
may cause harmful interference to
radio communications. However,
there is no guarantee that
interference will not occur in a
particular installation. If this
equipment does cause harmful
interference to radio or television
reception, which can be
determined by turning the
equipment off and on, the user is
encouraged to try to correct the
interference by one or more of the
following measures:
– Reorien t or relo cate the
receiving antenna.
– Increase the separation between
the equipment and receiver.
– Connect the equipment into an
outlet on a circuit different from
that to which the receiver is
connected.
– Consult the dealer or an
experienced radio/TV technician
for help.
Precaution
Install this system so that the AC
power cord can be unplugged from
the wall socket immediately in the
event of trouble.
3
Precautions
This equipment has been tested
and found to comply with the
limits set out in the EMC
Directive using a connection
cable shorter than 3 meters.
On safety
Should any solid object or liquid
fall into the cabinet, unplug the
recorder and have it checked by
qualified personnel before
operating it any further.
On power sources
• The recorder is not
disconnected from the AC
power source as long as it is
connected to the wall outlet,
even if the recorder itself has
been turned off.
• If you are not going to use the
recorder for a long time, be
sure to disconnect the recorder
from the wall outlet. To
disconnect the AC power cord,
grasp the plug itself; never pull
the cord.
On placement
• Place the recorder in a location
with adequate ventilation to
prevent heat build-up in the
recorder.
• Do not place the recorder on a
soft surface such as a rug that
might block the ventilation
holes.
• Do not place the recorder in a
confined space such as a
bookshelf or similar unit.
• Do not place the recorder in a
location near heat sources, or
in a place subject to direct
sunlight, excessive dust, or
mechanical shock.
• Do not place the recorder in an
inclined position. It is
designed to be operated in a
horizontal position only.
• Keep the recorder and discs
away from equipment with
strong magnets, such as
microwave ovens, or large
loudspeakers.
• Do not place heavy objects on
the recorder.
• To prevent fire or shock
hazard, do not place objects
filled with liquids, such as
vases, on the apparatus.
On recording
Make trial recordings before
making the actual recording.
On compensation for lost
recordings
Sony is not liable and will not
compensate for any lost
recordings or relevant losses,
including when recordings are
not made due to reasons
including recorder failure, or
when the contents of a recording
are lost or damaged as a result of
recorder failure or repair
undertaken to the recorder. So ny
will not restore, recover, or
replicate the recorded contents
under any circumstances.
Copyrights
• Television programs, films,
video tapes, discs, and other
materials may be copyrighted.
Unauthorized recording of
such material may be contrary
to the provisions of the
copyright laws. Also, use of
this recorder with cable
television transmission may
require authorization from the
cable television transmitter
and/or program owner.
• This product incorporates
copyright protection
technology that is protected by
U.S. patents and other
intellectual property r ig hts.
Use of this copyright
protection technology must be
authorized by Macrovision,
and is intended for home and
other limited viewing uses
only unless otherwise
authorized by Macrovision.
Reverse engineering or
disassembly is prohibited.
Copy guard function
Since the recorder has a copy
guard function, programs
received through an external
tuner (not supplied) may contain
copy protection signals (copy
guard function) and as such may
not be recordabl e , de pe ndi n g on
the type of signal.
If you have any questions or
problems concerning your
recorder, please consult your
nearest Sony dealer .
IMPORTANT NOTICE
Caution: This recorder is
capable of holding a still
video image or on-screen
display image on your
television screen
indefinitely. If you leave the
still video image or onscreen display image
displayed on your TV for an
extended period of time you
risk permanent damage to
your television screen.
Plasma display panels and
projection televisions are
especially susceptible to this.
,continued
4
Important Safety
Instructions
1) Read these instructions.
2) Keep these instr u ctions.
3) Heed all warnings.
4) Follow all instructions.
5) Do not use this apparatus
near water.
6) Clean only with dry cloth.
7) Do not block any ventilation
openings. Install in
accordance with the
manufacturer’s instructions.
8) Do not install near any heat
sources such as radiators,
heat registers, stoves, or
other apparatus (including
amplifiers) that produce
heat.
9) Do not defeat the safety
purpose of the polarized or
grounding-type plug. A
polarized plug has two
blades with one wider than
the other. A grounding type
plug has two blades a nd a
third grounding prong. The
wide blade or the third prong
are provided for your safety.
If the provided plug does not
fit into your outlet, consult
an electrician for
replacement of the obsolete
outlet.
10)Protect the power cord from
being walked on or pinched
particularly at plugs,
convenience receptacles,
and the point where they exit
from the apparatus.
11)Only use attachments/
accessories specified by the
manufacturer.
12)Use only with the cart, stand,
tripod, bracket, or table
specified by the
manufacturer, or sold with
the apparatus. When a cart is
used, use caution when
moving the cart/apparatus
combination to avoid injury
from tip-over.
13)Unplug this apparatus during
lightning storms or when
unused for long periods of
time.
14)Refer all servicing to
qualified service personnel.
Servicing is required when
the apparatus has been
damaged in any way, such as
power-supply cord or plug is
damaged, liquid has been
spilled or objects have fallen
into the apparatus, the
apparatus has been exposed
to rain or moisture, does not
operate normally, or has
been dropped.
About this manual
• In this manual, “disc” is used
as a general reference for the
DVDs or CDs unless
otherwise specified by the text
or illustrations.
• Icons, such as , listed
at the top of each explanation
indicate what kind of media
can be used with the function
being explained.
• Instructions in this manual
describe the controls on the
remote. You can also use the
controls on the recorder if th ey
have the same or similar
names as those on the remote.
• The on-screen display
illustrations used in this
manual may not match the
graphics displayed on your TV
screen.
• The explanations regarding
DVDs in this manual refer to
DVDs created on this recorder.
The explanations do not apply
to DVDs that are created on
other recorders and played
back on this recorder.
DVD
1-2
8
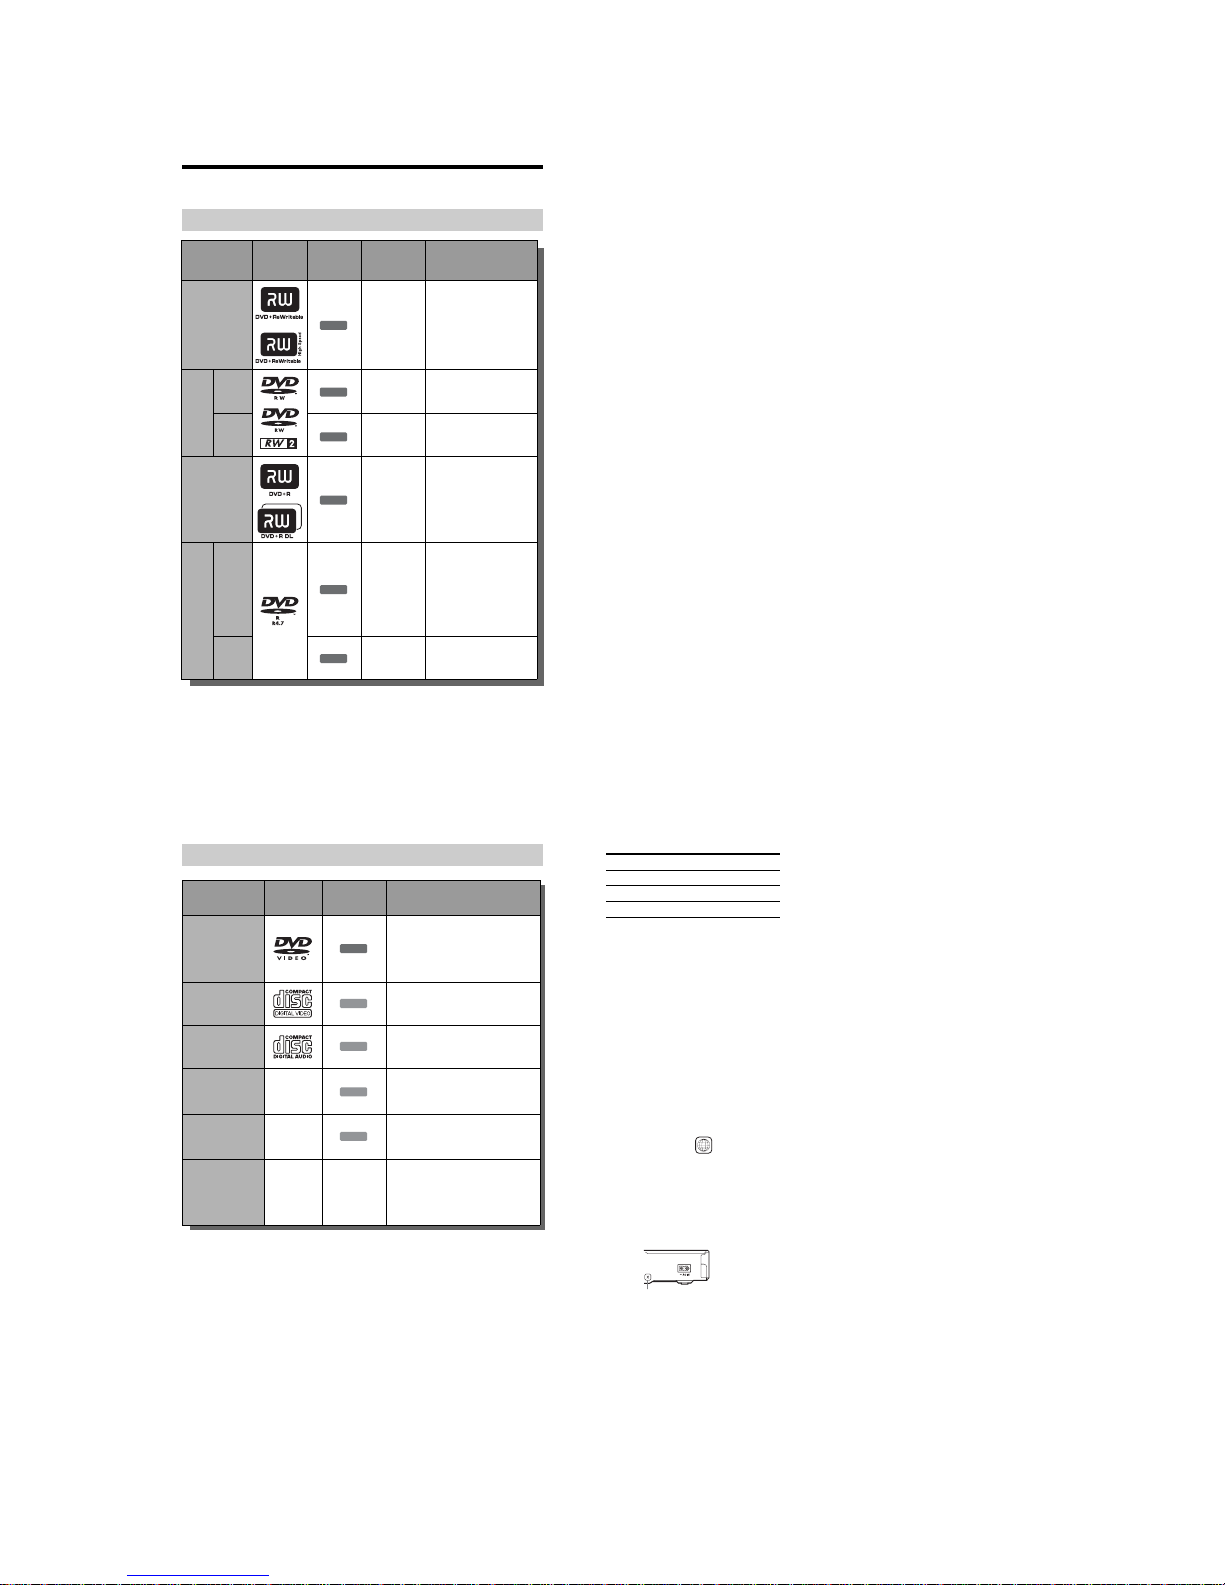
Quick Guide to Disc Types
Recordable and playable discs
Type Disc Logo
Icon used in
this manual
Formatting
(new discs)
Compatibility with other
DVD players (finalizing)
DVD+RW
Automatically
formatted in
+VR mode
(DVD+RW
VIDEO)
Playable on DVD+RW
compatible players
(automatically finalized)
DVDRW
VR
mode
Format in VR
mode
(page 27)
Playable only on VR mode
compatible players
(finalization unnecessary)
Video
mode
Format in
Video mode
(page 27)
Playable on most DVD
players (finalization
necessary) (page 35)
DVD+R
Automatically
formatted in
+VR mode
(DVD+R
VIDEO)
Playable on most DVD
players (finalization
necessary) (page 35)
DVD+R DL
DVD-R
VR
mode
Format in VR
mode
(page 27)
*1
Formatting is
performed
using the “Disc
Information”
display.
Playable only on DVD-R in
VR mode compatible
players (finalization
necessary) (page 35)
Video
mode
Automatically
formatted in
Video mode
Playable on most DVD
players (finalization
necessary) (page 35)
+
RW
-
RW
VR
-
RW
Video
+
R
-
R
VR
-
R
Video
9
Usable disc versions (as of March 2006)
• 8x-speed or slower DVD+RWs
• 6x-speed or slower DVD-RWs (Ver.1.1,
Ver.1.2 with CPRM
*2
)
• 16x-speed or slower DVD+Rs
• 16x-speed or slower DVD-Rs (Ver.2.0,
Ver.2.1 with CPRM
*2
)
• 8x-speed or slower DVD+R DL (Double
Layer) discs
“DVD+RW,” “DVD-RW,” “DVD+R,” “DVD+R
DL,” and “DVD-R” are trademarks.
*1
When an unformatted DVD-R is inserted into
this recorder, it is automatically formatted in
Video mode. To format a new DVD-R in VR
mode, format using the “Disc Information”
display (page 27).
*2
CPRM (Content Protection for Recordable
Media) is a coding technology that protects
copyrights for images.
Discs that cannot be reco rded on
• 8 cm discs
• DVD-R DL (Dual Layer) discs
,continued
10
“DVD VIDEO” and “CD” are trademarks.
Discs that cannot be played
• PHOTO CDs
• CD-ROMs/CD-Rs/CD-RWs that are
recorded in a format diff er ent from the
formats mentioned in the table above.
• Data part of CD-Extras
• DVD-ROMs/DVD+RWs/DVD-RWs/
DVD+Rs/DVD-Rs that do not contain
DVD Video or JPEG image files.
• DVD Audio discs
• DVD-RAMs
• HD layer on Super Audio CDs
• DVD VIDEOs with a different region code
(page 11).
• DVDs that were recorded on a different
recorder and not correctly finalized.
• A disc recorded in a color system other than
NTSC, such as PAL
Playable discs
Type Disc Logo
Icon used in
this manual
Characteristics
DVD VIDEO
Discs such as movies that can be
purchased or rented
This recorder also recognizes DVD-R
Dual Layer (Video mode) discs as DVD
Video compatible discs.
VIDEO CD
VIDEO CDs or CD-Rs/CD-RWs in
VIDEO CD/Super VIDEO CD format
CD
Music CDs or CD-Rs/CD-RWs in
music CD format
DATA DVD —
DVD+RWs/DVD+Rs/DVD-RWs/
DVD-Rs/DVD-ROMs containing
JPEG image files
DATA CD —
CD-ROMs/CD-Rs/CD-RWs
containing either MP3 audio tracks or
JPEG image files
8 cm DVD+RW/
DVD-RW/DVD-R
——
8 cm DVD+RW, DVD-RW, and
DVD-R recorded with a DVD video
camera
(Still images recorded with a DVD
video camera cannot be pla yed.)
DVD
VCD
CD
DATA DVD
DATA CD
11
Maximum recordable number of titles
* The maximum lengt h for one title is eight hours.
Note on playback opera tions of DVD
VIDEOs/VIDEO CDs
Some playback operations of DVD VIDEOs/
VIDEO CDs may be intentionally set by
software producers. Since this recorder plays
DVD VIDEOs/VIDEO CDs according to the
disc contents the software producers
designed, some playback features may not be
available. See the instructions supplied with
the DVD VIDEOs/VIDEO CDs.
Region code (DVD VIDEO only)
Your recorder has a region code p rint ed on
the rear of the unit and will only play DVD
VIDEOs (playback only) labeled with
identical region codes. This system i s used to
protect copyrights.
DVD VIDEOs labeled will also play on
this recorder.
If you try to play any other DVD VIDEO, the
message “Playback prohibited by region
code.” will appear on the TV scre en.
Depending on the DVD VIDEO, no region
code indication may be labeled even though
playing the DVD VIDEO is prohibited by
area restrictions.
Music discs encoded with copyr ight
protection technologies
This product is designed to play back discs
that conform to the Compact Disc (CD)
standard.
Recently, various music discs encoded with
copyright protection technol ogi es are being
marketed by some record companies. Please
be aware that among those discs, there are
some that do not conform to the CD standard
and may not be playable by this product.
Note on DualDiscs
A DualDisc is a two sided di sc produc t which
mates DVD recorded material on one side
with digital audio material on the othe r s id e.
However, since the audio material side does
not conform to the Compact Disc (CD)
standard, playback on this product is not
guaranteed.
b Notes
• Some DVD+RWs/DVD+Rs, DVD-RWs/DVDRs, or CD-RWs/CD-Rs cannot be played on this
recorder due to the recording quality or physical
condition of the disc, or the characteristics of the
recording device and authoring software. The
disc will not play if it has not been correctly
finalized. For more information, see the operating
instructions for the recording device.
• You cannot mix VR mode and Video mode on the
same DVD-RW. To change the disc’s format,
reformat the disc (page37). Note that the disc’s
contents will be erased after reformatting.
• You cannot shorten the time required for
recording even with high-speed discs.
• It is recommended that you use discs with “For
Video” printed on their pac kaging.
• You cannot add new recordings to DVD+Rs,
DVD-Rs, or DVD-RWs (Video mode) that
contain recordings made on other DVD
equipment.
• In some cases, you may not be able to add new
recordings to DVD+RWs that contain recordings
made on other DVD equipment. If you do add a
new recording, note that this recorder will rewrite
the DVD menu.
• You cannot edit recordings on DVD+RWs,
DVD-RWs (Video mode), DVD+Rs, or DVD-Rs
that are made on other DVD equipment.
• If the disc contains PC data unrecognizable by
this recorder, the data may be erased.
• You may not be able to record on some
recordable discs, depending on the disc.
Disc Number of titles*
DVD-RW/DVD-R 99
DVD+RW/DVD+R 49
DVD+R DL 49
ALL
Region code
1-3
12
Hookups and Settings
Hooking Up the Recorder
Follow steps 1 through 6 to hook up and adjust the settings of the recorder. Do not connect the
AC power cord until you reach “Step 4: Connecting the AC Power Cor d” on page 19.
b
Notes
• See “Specifications” (page89) for a list of supplied accessories.
• Plug in cords securely to prevent unwanted noise.
• Refer to the instructions supplied with the components to be connected.
• You cannot connect this recorder to a TV that does not have a video input jac k.
• Be sure to disconnect the AC power cord of each component before connecting.
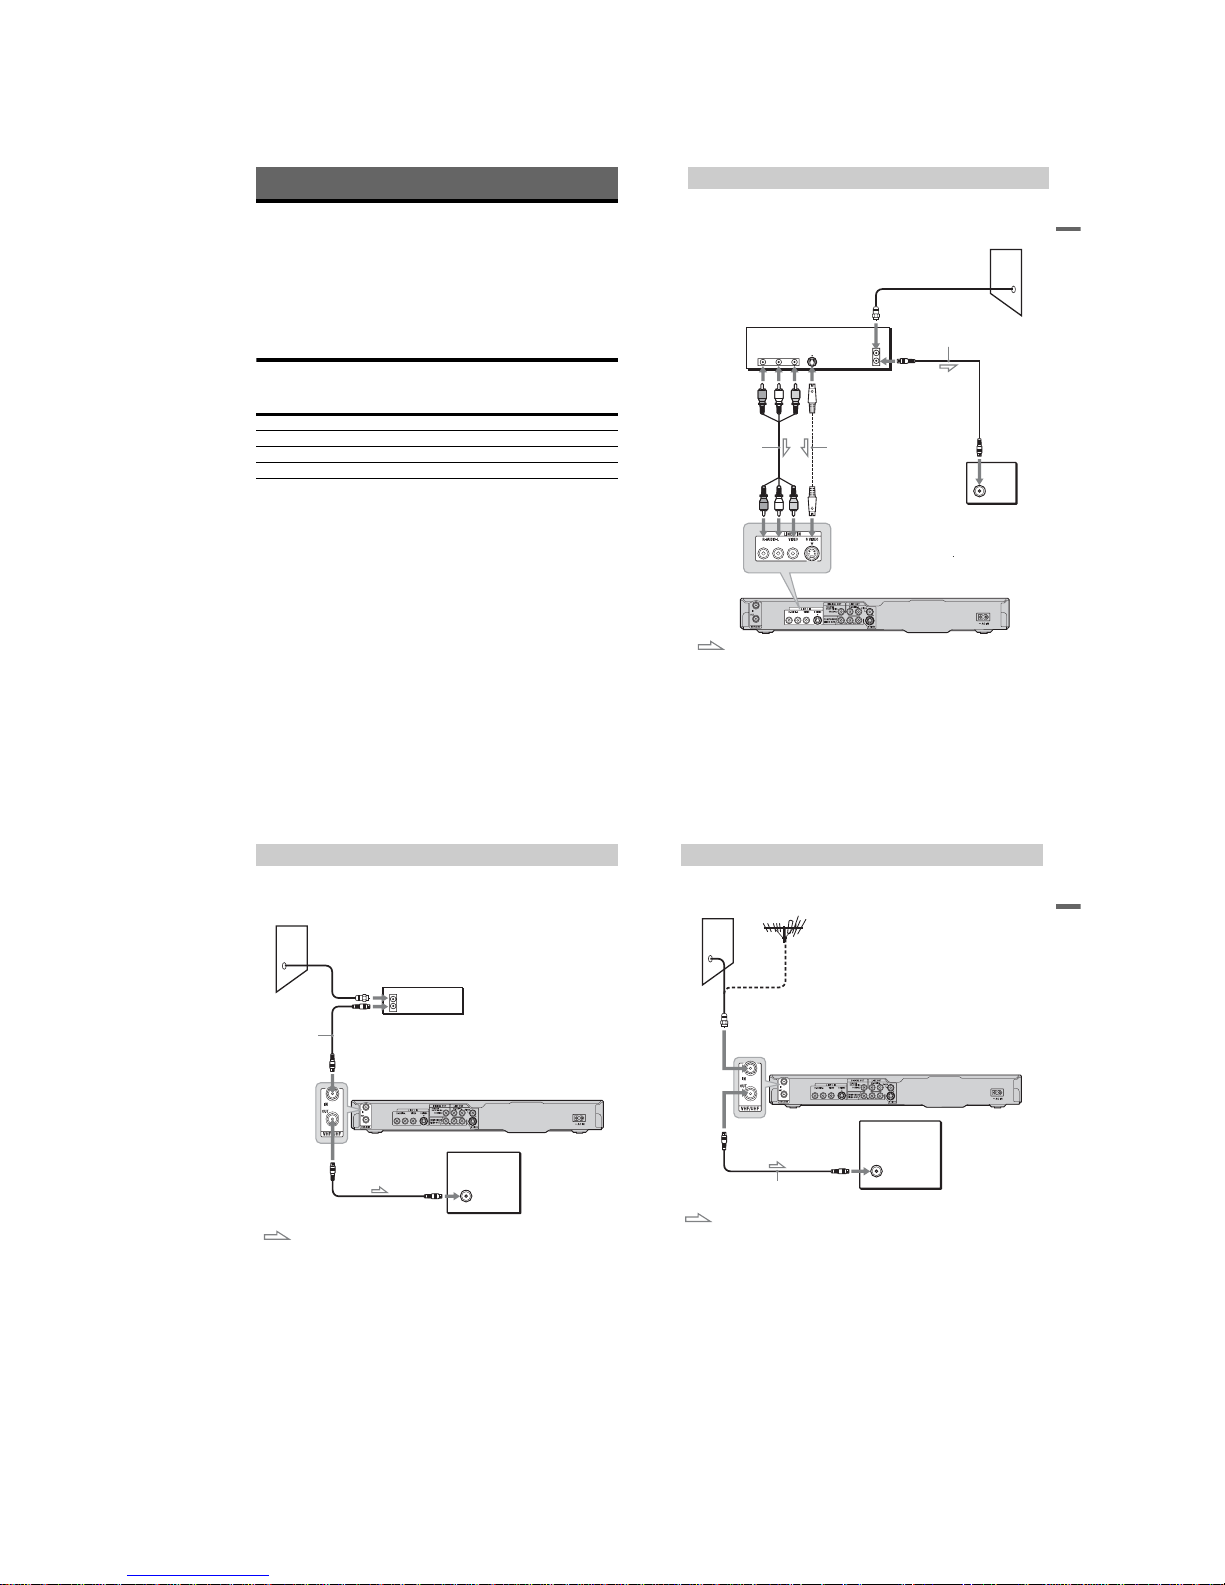
Step 1: Connecting the Antenna Cable
Select one of the following antenna hookups.
NOTE TO CATV SYSTEM INSTALLER (IN USA)
This reminder is provided to call the CATV system installer’s attention to Article 820- 40 of
the NEC that provides guid elines for prop er groundin g and, in part icular, speci fies that t he cable
ground shall be connected to the grounding system of the building, as close to the point of cable
entry as practical.
b
Notes
• If your antenna is a flat cable (300-ohm twin lead cable), use an external antenna connector (not supplied)
to connect the antenna to the recorder .
• If you have separate cables for VHF and UHF antennas, use a UHF/VHF band mixer (not supplied) to
connect the antenna to the recorder.
If you have Hookup
A: Cable box or satel li te rec ei ve r w it h a vi deo/audio output A (page 13)
B: Cable box w it h an antenna output only B (page 14)
C: Cable without cable box, or antenna only (no cable TV) C (page 15)
13
Hookups and Settings
With this hookup, you can record any channel on the cable box or satellite receiver. Be sure that
the satellite receiver or cable box is turned on.
To watch cable or satellite channel, you need to match the channel on the recorder (L1) to the
input jack connected to the cable box or satellite receiver (LINE 1 IN).
z Hints
• If your cable box or satellite receiver has an S-video jack, you can use an S-video co rd (not suppl ie d)
instead of the audio/video cord.
• If you connect an S-video cord to the LINE 1 IN jack, set “Line1 Input” of the “Line Input” to “S Video”
in the “Video” setup (page 75).
A: Cable box or satellite receiver with a video/audio output
ANT IN
RL
S VIDEO
AUDIO
OUT
VIDEO
OUT
TO TV
to LINE 1 IN
DVD recorder
Audio/video cord
(not supplied)
: Signal flow
Cable box/satellite receiver
Antenna cable
(supplied)
to antenna input
S-video cord
(not supplied)
Wall
TV
,continued
14
With this hookup, you can record any channel on the satellite receiver or cable box. Be sure that
the satellite receiver or cable box is turned on.
To watch cable programs, you need to match the channel on the recorder (2ch, 3ch, or 4ch) to
the antenna output channel on the ca bl e box (2ch, 3ch, or 4ch).
b Note
When using this connection, set “Antenna / Cable” of the “Tuner Preset” to “Antenna” in the “Basic” setup
(page 71).
B: Cable box with an antenna output only
ANT IN
TO TV
to VHF/UHF IN
Wall
to VHF/UHF OUT
to antenna input
Antenna cable
(supplied)
: Signal flow
TV
Cable box
DVD recorder
15
Hookups and Settings
.
Use this hookup if you watch cable channels without a cable box. Also use this hookup if you
are using a VHF/UHF antenna or separate VHF and UHF antennas.
With this hookup, you can recor d any channel by selecting the channe l o n th e recorder.
C: Cable without cable box, or antenna only (no cable TV)
DVD recorder
TV
to antenna input
to VHF/UHF IN
to VHF/UHF OUT
Antenna cable (supplied)
: Signal flow
Wall

1-4
16
Step 2: Connecting the Video Cords
Select one of the following pattern s, A through C, according to the input jack on your TV
monitor, projector, or AV amplifier (receiver). This will enable you to view pictures.
A Video input jack
You will enjoy standard qual ity images.
B S VIDEO input jack
You will enjoy high quality images.
C Component video input jacks (Y, PB,
P
R)
You will enjoy accurate color re pr oduction
and high quality images.
If your TV accepts progressiv e 480p format
signals, you must use this connecti on. Then
set “Progressive Outpu t” of “Video Output”
to “On” in the “Video” setup to send
progressive video signals. For details, see
“Progressive Output” on page74.
VIDEO
AUDIO
INPUT
L
R
INPUT
S VIDEO
P
R
P
B
Y
COMPONENT
VIDEO IN
C
B
A
Audio/video
cord (supplied)
Component video cord
(not supplied)
(yellow)
TV, projector, or AV
amplifier (receiver)
TV, projector, or AV
amplifier (receiver)
(green)
S-video cord
(not supplied)
TV, projector, or AV
amplifier (receiver)
(red)
(green)
(blue)
(red)
: Signal flow
to COMPONENT VIDEO OUT
to LINE OUT (VIDEO)
to LINE OUT (S VIDEO)
DVD recorder
(blue)
17
Hookups and Settings
When playing “wide scre en” images
Some recorded images may not fit your TV
screen. To change the picture si ze, see
page 74.
If you are connecting to a VCR
Connect your VCR to the LINE IN jack on
the recorder (page24).
b
Note
Do not connect more than one type of video cord
between the recorder and your TV at the same time.
18
Step 3: Connecting the Audio Cords
Select one of the following patterns, A or B, according to the input jack on your TV monitor,
projector, or AV amplifier (receiver). This will enable you to listen to sound.
* The yellow plug is used for video signal s (page 16).
A Digital audio input jack
If your AV amplifier (rec eiver) ha s a Dolby*1
Digital or DTS
*2
decoder and a digital input
jack, use this connection. You ca n enjoy
Dolby Digital (5.1ch) and DTS (5.1ch)
surround effects.
B Audio L/R (left/right) input jacks
This connection will use your TV’s or stereo
amplifier’s (receiver’s) two speakers for
sound.
VIDEO
AUDIO
INPUT
L
R
A
B
AV amplifier (receiver)
with a decoder
(white)
TV, projector, or AV
amplifier (receiver)
Audio/video cord
(supplied)
: Signal flow
Coaxial digital cord (not supplied)
to DIGITAL OUT (COAXIAL)
to LINE OUT (R-AUDIO-L)
Rear (L)
DVD recorder
(red)
(yellow)
(white)
(red)
[Speakers]
Front (L)
[Speakers]
to coaxial digital input
Rear (R)
Front (R)
Subwoofer
Center
(yellow)*
19
Hookups and Settings
z Hint
For correct speaker location, see the operating
instructions supplied with the connected
components.
b Notes
• Do not connect your TV’s audio output jacks to
the LINE IN (R-AUDIO-L) jacks at the same
time. This will cause unwanted noise to come
from your TV’s speakers.
• With connection B, do not connect the LINE IN
(R-AUDIO-L) and LINE OUT (R-AUDIO-L)
jacks to your TV’s audio output jacks at the same
time. This will cause unwanted noise to come
from your TV’s speakers.
• With connection A, after you have completed the
connection, make the appropriate settings under
“Easy Setup - Audio Connection” (page 23).
Otherwise, no sound or a loud noise will come
from your speakers.
*1
Manufactured under license from Dolby
Laboratories.
“Dolby” and the double-D symbol are
trademarks of Dolby Laboratories.
*2
“DTS” and “DTS Digital Out” are trademarks of
Digital Theater Systems, Inc.
Step 4: Connecting the
AC Power Cord
Connect the supplied AC power cord to the
AC IN terminal of the recorder. Then plug the
recorder and TV power cords into the AC
outlet. After you connect the AC power cord,
you must wait for a short while before
operating the recorder. You can operate
the recorder once the front panel display
lights up and the recorder enters standby
mode.
If you connect additional equipment to this
recorder (page 24), be sure to connect the AC
power cord after all connections are
complete.
to AC outlet
to AC IN
1
2
1-5
20
Step 5: Preparing the
Remote
You can control the recorder using the
supplied remote. Insert two Size AA (R6)
batteries by matching the 3 and # ends on
the batteries to the markings inside the
battery compartment. When using the
remote, point it at the remote sensor on the
recorder.
b
Notes
• If the supplied remote interferes your other Sony
DVD recorder or player, change the command
mode number for this recorder (page21).
• Use the batteries correctly to avoid possible
leakage and corrosion. Should leakage occur, do
not touch the liquid with bare hands. Observe the
following:
– Do not use a new battery with an old battery, or
batteries of different manufacturers.
– Do not attempt to recharge the batteries.
– If you do not intend to use the remote for an
extended period of time, remove the batteries.
– If battery leakage occurs, wipe out an y liquid
inside the battery compartment, and insert new
batteries.
• Do not expose the remote sensor (marked on
the front panel) to strong light, such as direct
sunlight or a lighting apparatus. The recorder may
not respond to the remote.
You can adjust the remote’s signal to con trol
your TV.
b
Notes
• Depending on the connected unit, you may not be
able to control your TV with some or all of the
buttons below.
• If you enter a new code number, the code number
previously entered will be erased.
• When you replace the batteries of the remote, the
code number may be reset to the default setting.
Set the appropriate code number again.
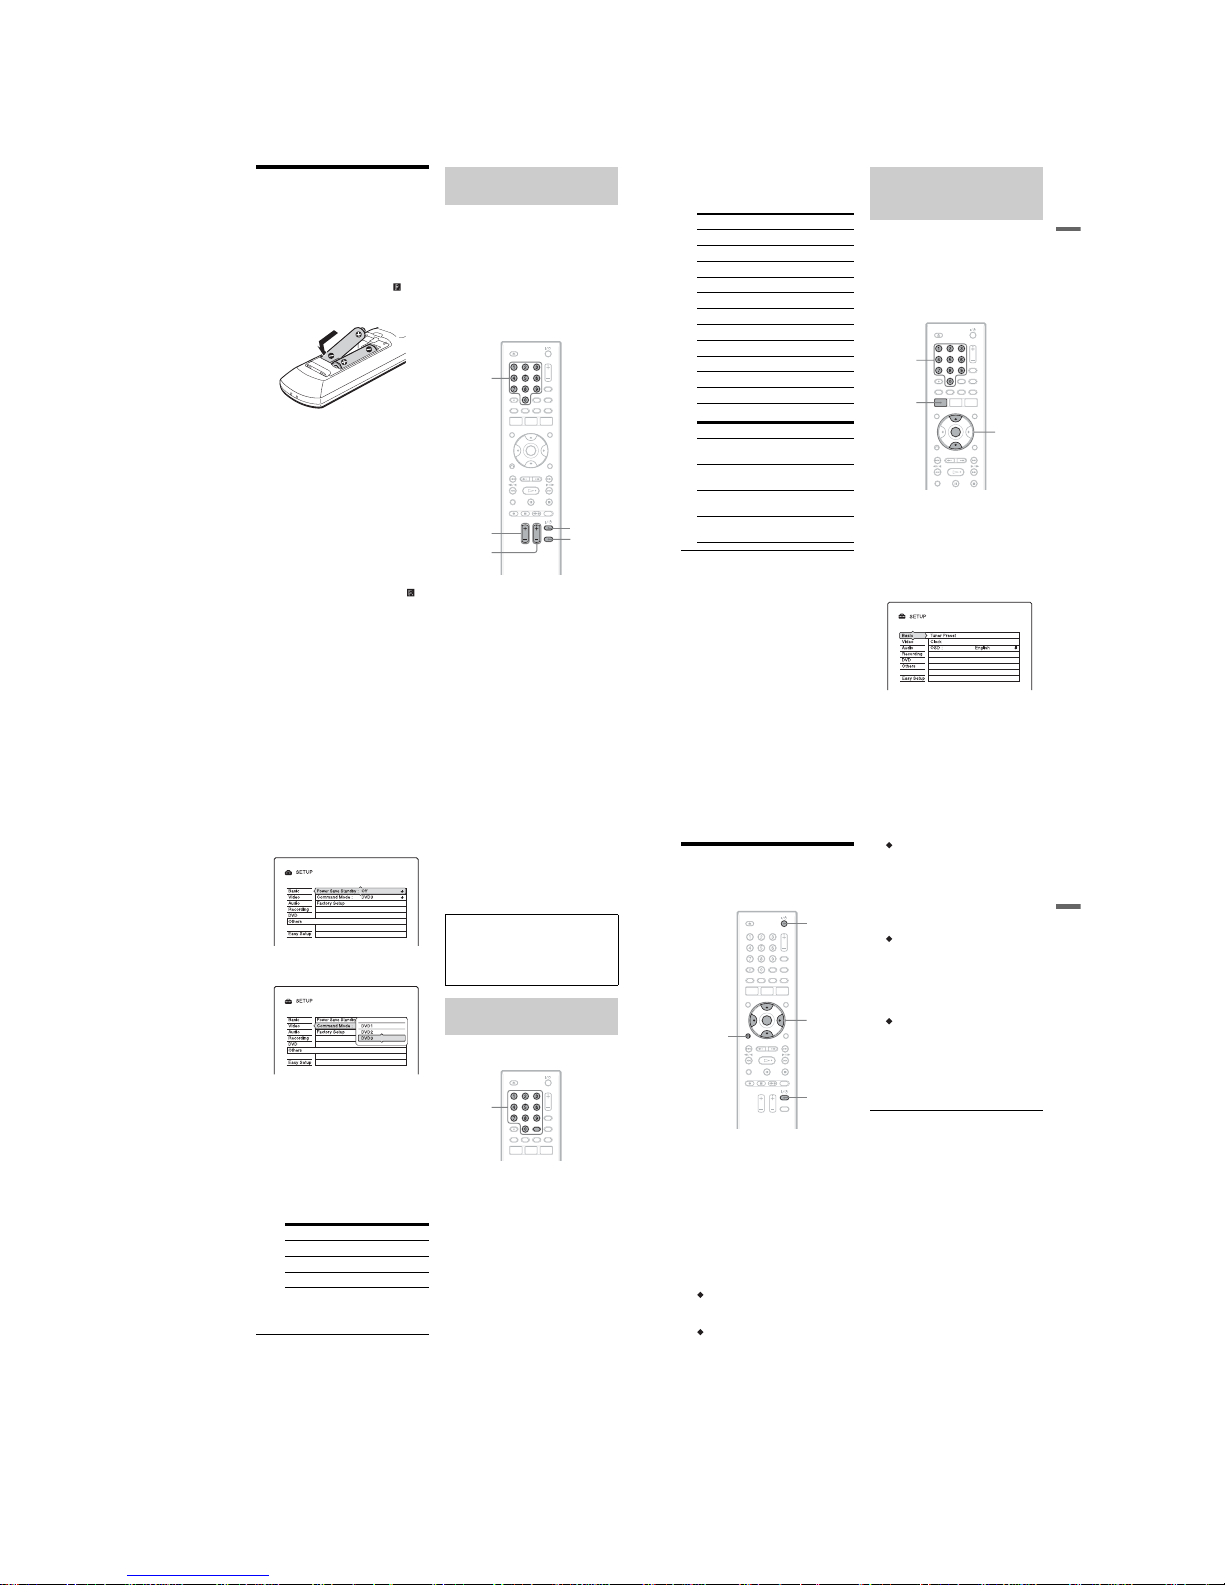
1 Hold down the TV [/1 button located
at the bottom of the remote.
Do not press the [/1 button at the top of
the remote.
2 With the TV [/1 button pressed down,
enter the TV’s manufacturer code
using the number buttons.
For instance, to enter “09,” press “0” then
“9.” After you enter the last number,
release the TV [/1 button.
Controlling TVs with the
remote
TV VOL +/–
Number
buttons
TV [/1
TV/VIDEO
TV CH +/–
21
Hookups and Settings
Code numbers of controllable TVs
If more than one code number is listed,
try entering them one at a time until you
find the one that works with your TV.
The remote performs the following:
If the supplied remote interferes with your
other Sony DVD recorder or play er , set th e
command mode number for this recorder and
the supplied remote to one that differs from
the other Sony DVD recorder or player after
you have completed “Step 6: Easy Setup.”
The default command mode setting for this
recorder and the supplied remote is DVD3.
1 Check that “Easy Setu p” (page 23)
has been finished. If “Easy Setup” has
not been finished, first perform “Easy
Setup.”
2 Press SYSTEM MENU.
The System Menu appears.
3 Select “SETUP,” and pres s ENTER.
Manufacturer Code number
Sony 01 (default)
Hitachi 02
MGA/Mitsubishi 13
NEC 04
Panasonic 19
Philips 21
Pioneer 16
RCA 10
Samsung 20
Sharp 18
Toshiba 07
Buttons Operations
TV [/1 Turns your TV on or
off
TV VOL +/– Adjusts the volume
of your TV
TV CH +/– Selects the channel
on your TV
TV/VIDEO Switches your TV’s
input source
If you have a Sony DVD player
or more than one Sony DVD
recorder
SYSTEM
MENU
M/m,
ENTER
Number
buttons
,continued
22
4 Select “Others,” and press ENTER.
5 Select “Command Mode,” and press
ENTER.
6 Select a Command M ode (DVD1,
DVD2, or DVD3), and press ENTER.
7 Set the Command Mode for the remote
so it matches the Co mmand Mode for
the recorder you set above.
Follow the steps below to set the
Command Mode on the remote.
1 Hold down ENTER.
2 While holding down ENTER, enter
the Command Mode code number
using the number buttons.
3 Hold down both the number and
ENTER buttons at the same time for
more than three seconds.
To check the Command Mode for the
recorder
Press x STOP on the recorder when the
recorder is turned off . T h e C ommand Mode
for the recorder appears in the front panel
display.
You can change channels of the recorder
using the number buttons.
Example: for channel 50
Press “5,” “0,” then press SET.
Command Mode Code number
DVD1 number button 1
DVD2 number button 2
DVD3 number button 3
If the Command Mode for t he recorder has
not been changed, set the Command Mode
for the remote to the default setting of
DVD3. If the Command Mode for the
remote is changed to DVD1 or DVD2, you
will be unable to operate this recorder.
Changing channels of the
recorder using the remote
Number
buttons,
SET
23
Hookups and Settings
Step 6: Easy Setup
Make the basic adjustments by foll owing the
on-screen instructions in “Easy Setup.”
1 Turn on the recorder and your TV.
Then switch the input selector on your
TV so that the signal from the recorder
appears on your TV screen.
The initial settings message appears.
• If this message does not appear, select
“Easy Setup” from “SETUP” in the
System Menu (“Settings and
Adjustments” on page 71).
2 Press ENTER.
Follow the on-screen instructions to
make the following settings.
Easy Setup - OSD
Select a language for the on-screen
displays.
Easy Setup - Clock
Select “Manual” and set the clock using
</M/m/,, then press ENTER. The
day of the week is set automatically.
If you used antenna hookup C (page 15),
you can select “Auto.” The reco rde r will
automatically search for a channe l that
carries a time signal when you turn off
the recorder after finishing Easy Setup.
Easy Setup - Tuner Preset
Select whether or not you have a cable
connection.
The Tuner Preset function automatically
searches for all of the receivable channels
and presets them.
To set the channels manually, see
page 71.
Easy Setup - TV Type (page 74)
If you have a wide-screen TV, select
“16:9.” If you have a stan dard T V, sele ct
either “4:3 Letter Box” (shrink to fit) or
“4:3 Pan Scan” (stretch to fit). This will
determine how “wide-screen” images are
displayed on your TV.
Easy Setup - Audio Connection
If you connected an AV amplifier
(receiver) using a coaxial cor d, select
“Yes : DIGITAL OUT” and set the
digital output signal (page 76).
3 Press ENTER when “Finish” appears.
“Easy Setup” is finished.
To return to the prev ious step
Press O RETURN.
z Hint
If you want to run “Easy Setup” again, select “Easy
Setup” from “SETUP” in the System Menu
(page 82).
b Notes
• If you use an S-video cord to connect your cable
box or satellite receiver, set “Line1 Input” of the
“Line Input” to “S Video” in the “Video” setup
(page 75).
• If there are only a few channels in your area that
carry time signals, setting the clock automatically
may take up to about 20 minutes after the recorder
turns off. If nothing happens even after you wait
about 20 minutes, set the clock manually in
“Clock” of “Basic” (page 72).
[/1
</M/m/,,
ENTER
O
RETURN
TV [/1
1-6
24
Connecting a VCR or Similar Device
After disconnecting the recorder’s AC power cord from the AC outlet, connect a VCR or
similar recording device to the LINE IN jacks of this recorder.
Use the DV IN jack on the front pa nel if th e equipment has a DV output jack (i.LIN K jack)
(page 66).
For details, refer to the instruction manual supplied with the connected equipment.
To record on this recorder , s ee “Recording from connected equipment without a timer” on
page 48.
Connect a VCR or similar recording device to the LINE 1 IN of this recorder. If the equipment
has an S-video jack, you can use an S-video cord instead of an audio/video cord.
Connecting to the LINE 1 IN jacks
OUTPUT
S VIDEO
AUDIO
LR
VIDEO
VCR, etc.
Audio/video cord
(not supplied)
S-video cord
(not supplied)
to LINE 1 IN
DVD recorder
: Signal flow
25
Hookups and Settings
b
Notes
• Pictures containing copy protection signals that prohibit any copying cannot be recorded.
• If you pass the recorder signals through a VCR, you may not receive a clear image on your TV screen.
Be sure to connect your VCR to the DVD recorder and to your TV in the order shown below. To watch
video tapes, watch the tapes through a second line input on your TV.
• If you disconnect the recorder’s AC power cord, you will no t be able to vie w the signals from the
connected VCR.
Connect a VCR or similar recording device to the LINE 2 IN jacks of this recorder. If the
equipment has an S-video jack, you can use an S-video cord instead of an au dio/video cord.
z Hint
When the connected equipment outputs only monaural sound, connect to just the L(MONO) and VIDEO
input jacks on the front of the recorder. Do not connect the R input jack.
b
Notes
• Do not connect the yellow LINE IN (VIDEO) jack when using an S-video cord.
• Do not connect the output jack of this recorder to another equipment’s input jack with the othe r
equipment’s output jack connected to the input jack of this recorder. This may cause noise (feedback).
• Do not connect more than one type of video cord between the recorder and your TV at the same time.
Connecting to the LINE 2 IN jacks on the front panel
VCRDVD recorder TV
Line input 1
Line input 2
DVD recorder
VCR TV
OUTPUT
S VIDEO
AUDIO
LR
VIDEO
VCR, etc.
Audio/video cord
(not supplied)
S-video cord
(not supplied)
to LINE 2 IN
DVD recorder
: Signal flow
26
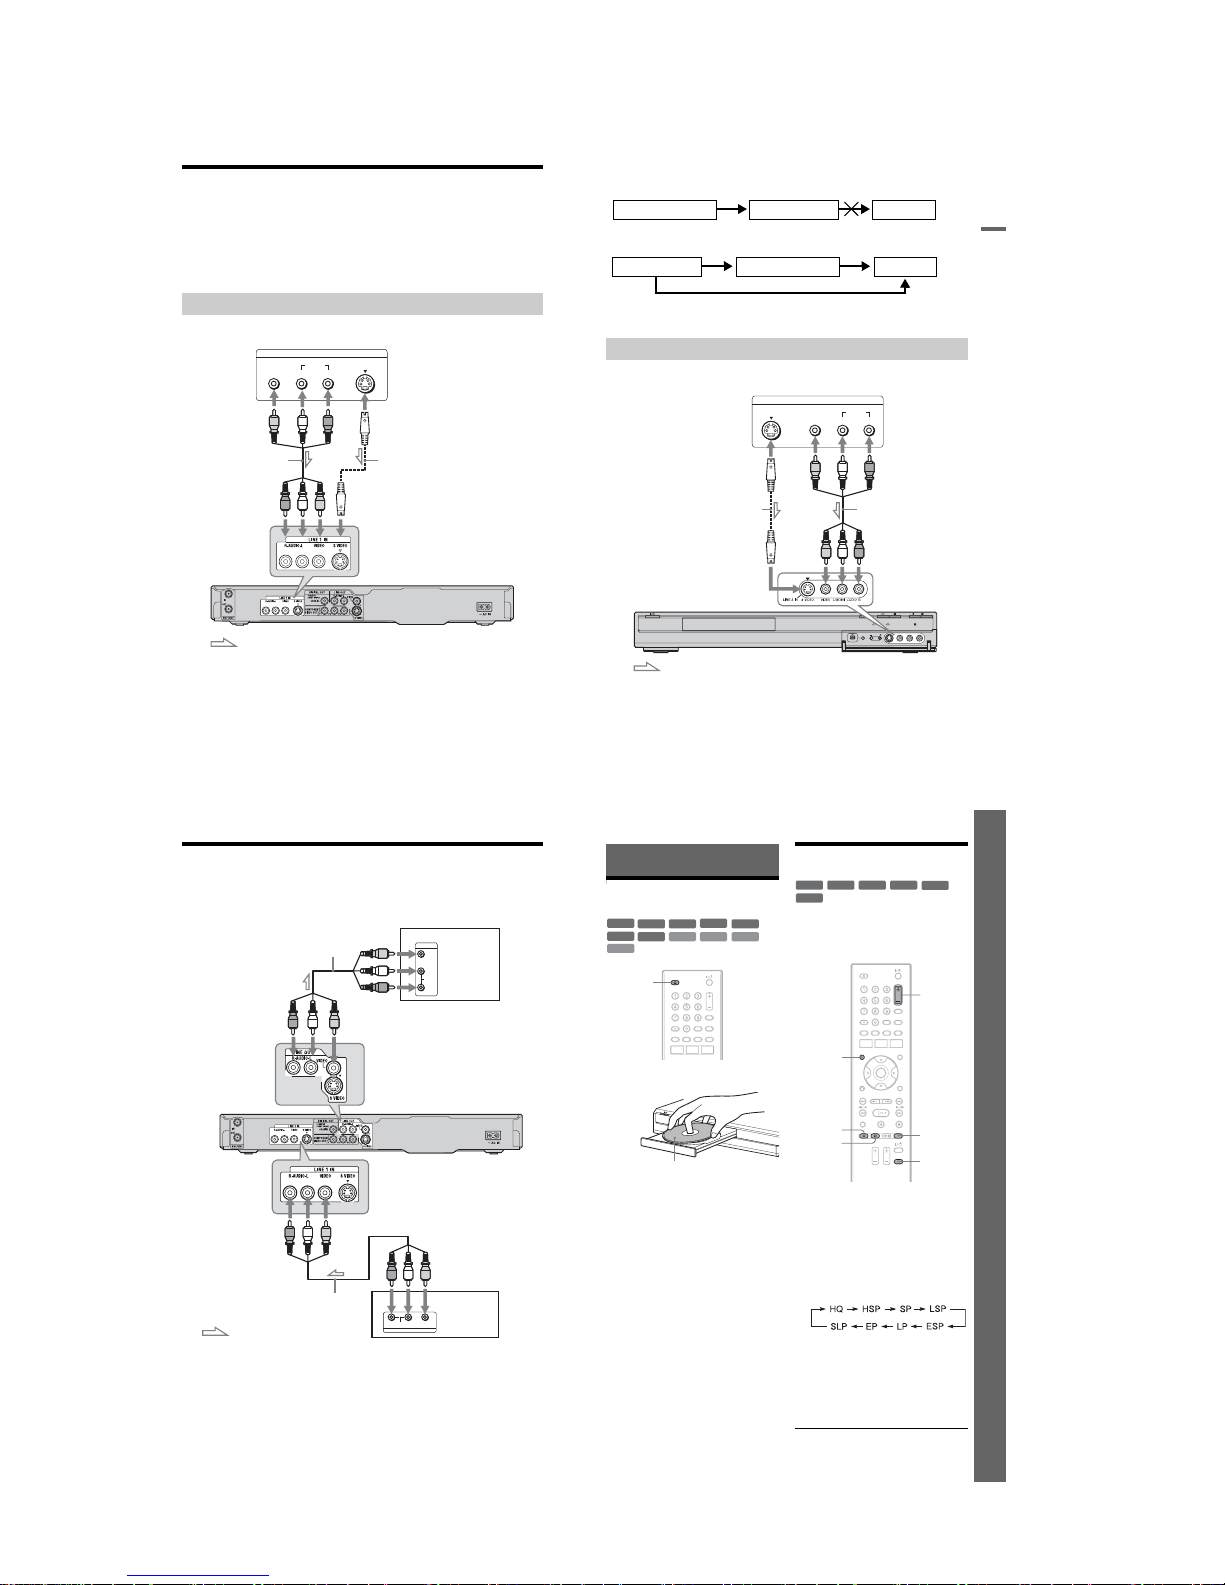
Connecting to a Satellite or Digital Tuner
Connect a satellite or digital tuner to this recorder using the LINE 1 IN jacks. Disconnect the
recorder’s AC power cord from the AC outlet when connecting the tuner.
To use the Synchro-Rec function, see below.
If you want to use t he Synchro Rec
function
This connection is necessary to use the
Synchro-Recording function. S ee
“Recording from connected equipment with a
timer (Synchro Rec)” on page 47.
b Notes
• Synchro-Recording does not work with some
tuners. For details, see the tuner’s operating
instructions.
• If you disconnect the recorder’s AC power cord,
you will not be able to view the signals from the
connected tuner.
AUDIO
OUTPUT
L
R
VIDEO
AUDIO
INPUT
L
R
VIDEO
TV
Satellite tuner, etc.
to LINE OUT
DVD recorder
to LINE 1 IN
: Signal flow
Audio/video cord
(supplied)
Audio/video cord
(not supplied)
27
Eight Basic Operations — Getting to Know Your DVD Recorder
Eight Basic Operations
— Getting to Know Your DVD Recorder
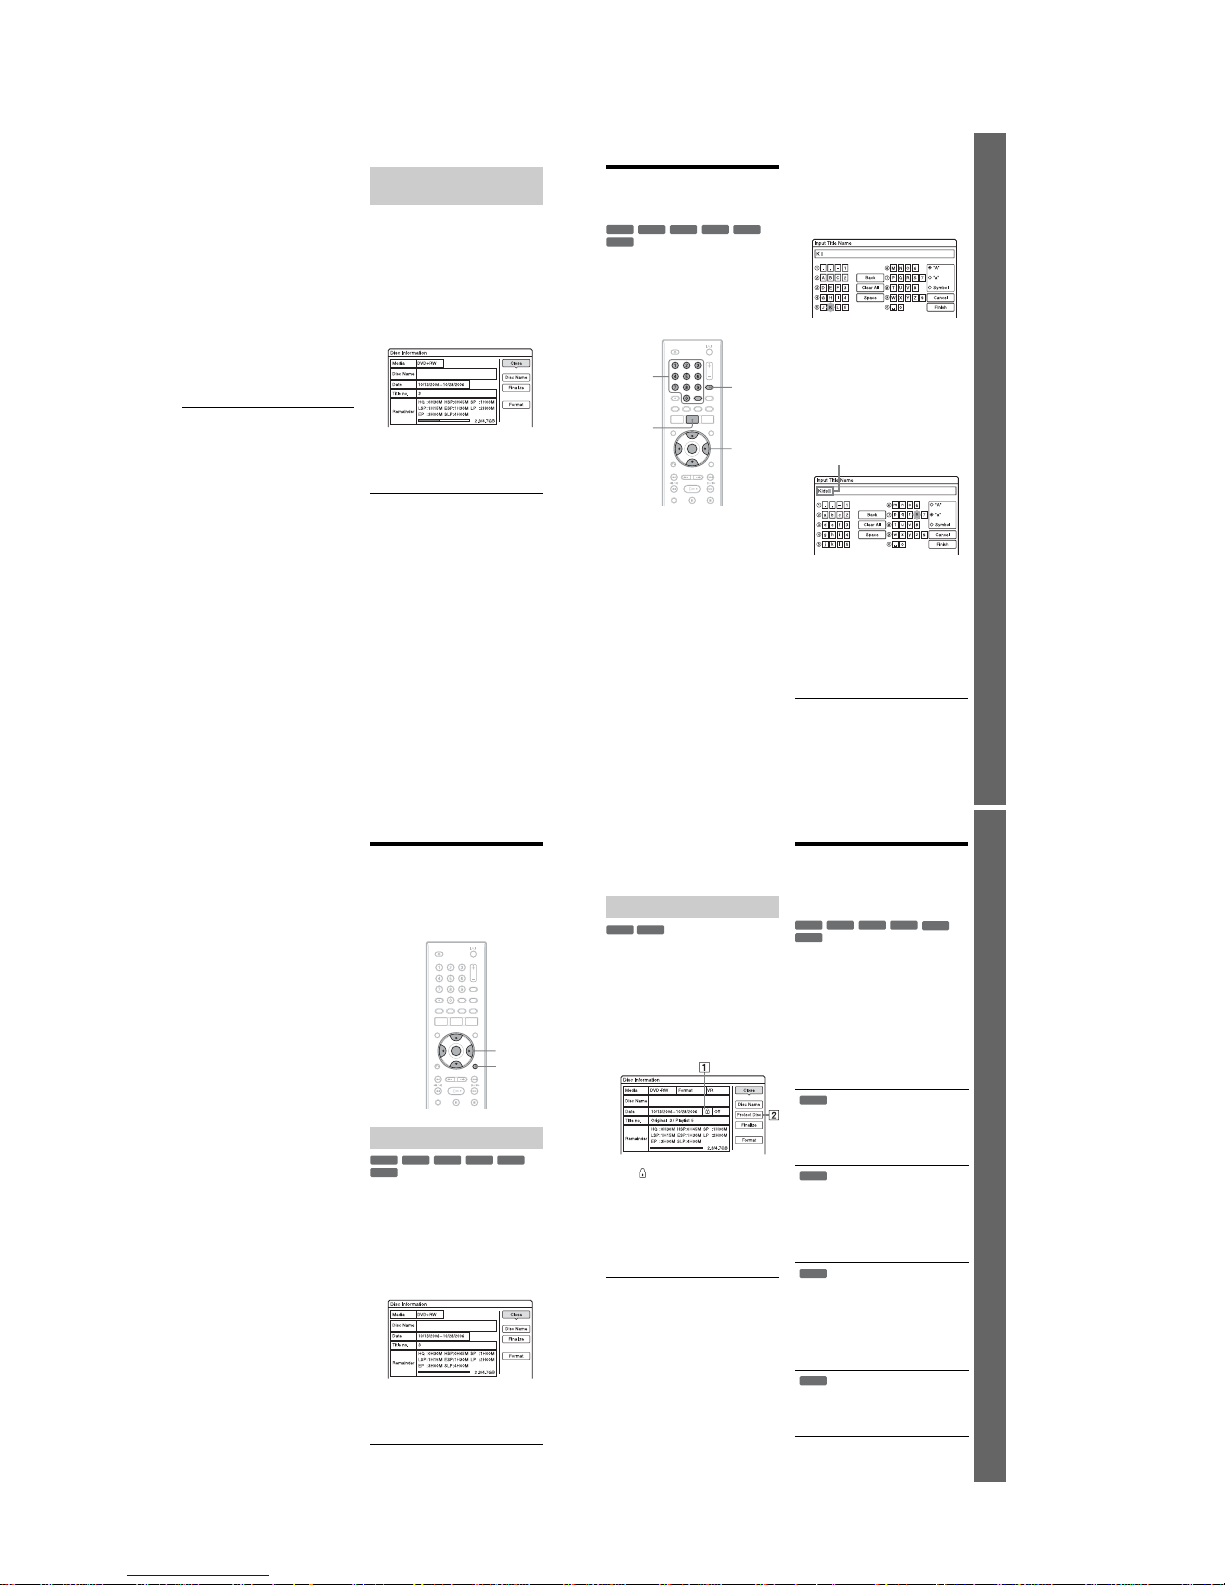
1. Inserting a Disc
1 Press Z OPEN/CLOSE, and place a
disc on the disc tray.
2 Press Z OPEN/CLOSE to close the
disc tray.
Wait until “LOAD” disappears from the
front panel display.
Unused DVDs are formatted
automatically.
• For DVD-RW discs
DVD-RWs are format ted in the
recording format (VR mode or Video
mode) set by “Format DVD-RW” in
the “DVD” setup.
• For DVD-R discs
DVD-Rs are automatical ly formatted in
Video mode. To format an unused
DVD-R in VR mode, format the disc
using the “Disc Information” display
(page 37) before you make a
recording.
If the disc is recordable on this recorde r,
you can manually re-format the di sc to
make a blank disc (page37).
2. Recording a Program
This section introduces the basic operation to
record a current TV program to a disc (DVD).
For an explanation of how to make timer
recordings, see page 39.
1 Insert a recordable DVD.
2 Press CH +/– to sele ct the channel or
input source you want to record.
3 Press REC MODE repeatedly to select
the recording mode.
Each time you press the button, the
display on the TV screen changes as
follows:
For more details about the recording
mode, see page 39.
4 Press z REC.
Recording starts.
Recording stops automatically after
8 hours of continuous recording or when
the DVD is full.
+
R
DVD
VCD CD
DATA CD
-
RWVR-RWVideo
+
RW
-
RVR
DATA DVD
-
RVideo
Z OPEN/
CLOSE
Recording/playing side facing down
+
RW
-
RWVR-RWVideo
-
RVR
+
R
-
RVideo
z REC
CH +/–
REC MODE
DISPLAY
TV/VIDEO
x REC
STOP
,continued

1-7
28
To stop recording
Press x REC STOP.
Note that it may tak e a few seconds for
recorder to stop recording.
To watch another TV program while
recording
Set your TV to the TV input using the TV/
VIDEO button (page20).
z Hint
If you do not want to watch TV while recording,
you can turn off the TV. When using a decoder,
make sure to leave it on.
b
Notes
• After pressing z REC, it may take a short while
to start recording.
• You cannot change the recording mode while
recording.
• If there is a power failure, the program you are
recording may be erased.
You can check the recording infor mation
such as recording time or disc type.
Press DISPLAY during recording.
The recording information appears.
A Disc type/format
B Recording status
C Recording mode
D Recording time
Press DISPLAY to turn off the display.
3. Playing the Recorded
Program (Title List)
To play a recorded title, select the title from
the Title List.
1 Insert a DVD.
See “1. Inserting a Disc” on page 27.
Playback starts automatically depending
on the disc.
Checking the disc status while
recording
+
RW
-
RW
VR
-
RW
Video
+
R
-
R
VR
-
R
Video
OPTIONS
x STOP
</M/m/,,
ENTER
TITLE LIST
CM
/
mc
29
Eight Basic Operations — Getting to Know Your DVD Recorder
2 Press TITLE LIST.
To show the extended Title List, pr ess
OPTIONS to select “Display List,” and
press ENTER.
Title List with Thumbnail Images
(Example: DVD+RW)
Extended Title List
A Title type:
Displays the title type (Original or
Playlist) for DVD-RWs/DVD-Rs (VR
mode).
B Disc space (remainder/total)
C Title information:
Displays the title number, title name, a nd
recording date. Title size is shown in the
Thumbnail title list.
z (red): Indicates that the title is
currently being record ed .
: Indicates the protected title.
D Scroll bar:
Appears when all of the titles do not fit
on the list. To view the hidden titles,
press M/m.
E Title’s thumbnail picture:
The still images for each title are
displayed.
3 Select a title, and press ENTER.
The sub-menu appears.
The sub-menu displays options
applicable only to the selected item. The
displayed options differ depending upon
the model, situation, and disc type.
4 Select “Play,” and press ENTER.
Playback starts from the selected title.
To stop playback
Press x STOP.
To scroll the list display by page (Page
mode)
Press REPLAY/ADVANCE while
the list display is turned on. Each time you
press REPLAY/ADVANCE , the
entire Title List changes to the next/previous
page of titles.
About the Title List for DVD-RWs/DVD-Rs
(VR mode)
You can switch the Title List to show
Original or Playlist titles.
While the Title List menu is turned on, press
</,.
To change the titl e order (Sort)
While the Title List menu is turned on, press
OPTIONS to select “Sort Titles.” Press M/m
to select the item, and press ENTER.
m
Order Sorted
By Date In order of when the titles
were recorded. The title that is
recorded most recently is
listed at the top.
By Title In al phabetical order.
By Number In order of rec orde d ti tle
number.
Sub-menu
,continued
30
To change a title thumbnail picture
(Thumbnail) (DVD-RW/DVD-R in VR mode
only)
You can select a favorite scene for the
thumbnail picture shown in the Title List
menu.
1 Press TITLE LIST.
Press </, to switch the Title Lis t s, if
necessary.
2 Select a title, and press ENTER.
The sub-menu appears.
3 Select “Set Thumbnail,” and press
ENTER.
The display for setting the thumbnail
point appears and the title starts to play.
4 While watching the playback picture,
press m/M to select the scene you
want to set for a thumbnail picture, and
press ENTER.
Playback pauses.
5 Press ENTER if the scene is correct.
If the scene is incorrect, press c/C to
select the scene you want to set for a
thumbnail picture, and press ENTER.
The display asks for confirmation.
• To change the thumbnail, press M.
6 Select “OK,” and press ENTER.
The scene is set for the title’s thumbnail
picture.
To turn off the Title List
Press TITLE LIST.
z Hints
• After recording, the first scene of the recor di n g
(the title) is automatically set as the thumbnail
picture.
• You can select “TITLE LIST” from the System
Menu.
b Notes
• The title names may not appear for DVDs created
on other DVD recorders.
• It may take a few seconds for th e thumbnail
pictures to be displayed.
• After editing, the title thumbnail picture may
change to the first scene of the recording (title).
4. Displaying the
Playing/Remaining Time
and Play Information
You can check the playing time an d
remaining time of the current title, chapter,
track, or disc. Also, you can check the disc
name recorded on the DVD/CD.
Press DISPLAY.
The displays differ depending on t he disc
type or playing status.
A Title number/name
(Shows either track number, track
name, scene number, or file name for
CDs, VIDEO CDs, DATA DVDs, or
DATA CDs.)
+
R
DVD
VCD
CD
DATA CD
-
RWVR-RWVideo
+
RW
DATA DVD
-
RVideo
-
RVR
ENTER
DISPLAY
TIME/TEXT
OPTIONS
31
Eight Basic Operations — Getting to Know Your DVD Recorder
B Available functions for DVD VIDEOs
( angle/ audio/ subtitle,
etc.), or playback data for DATA
DVDs and DATA CDs
C The current selected function or audio
setting (appears only temporarily)
Example: Dolby Digital 5.1 ch
D The current selected angle
E Disc type
*1
/format (page 8)
F Title type (
only appears for Playlists)
G Play mode
H Recording mode (page 39)
I Playing status bar
*2
J Title number (chapter number*3)
(page 54)
(Shows either track number, scene
number, album number
*3
, or file
number for CDs, VIDE O C Ds, DA TA
DVDs, or DATA CDs.)
K Album name appears for DATA DVDs
or DATA CDs.
For CDs with CD text, press TIME/
TEXT.
L Playing time (remaining time
*3
)
*1
Displays Super VIDEO CDs as “SVCD,” DATA
CDs as “CD” and DATA DVDs as “DVD.”
*2
Does not appear with VIDEO CDs, DATA
DVDs, and DATA CDs.
*3
Displayed when you press TIME/TEXT
repeatedly.
z Hints
• If “DTS” of “Audio Connection” is set to “Off” in
the “Audio” setup, the DTS track selection option
will not appear on the screen even if the disc
contains DTS tracks (page76).
• When “Auto Display” is set to “On” (default) in
the “Video” setup (page 75), information
automatically appears on the screen when the
recorder is operated.
b Note
Playing time of MP3 audio tracks may not be
displayed correctly.
You can view the playing or time information
displayed on the front panel displ ay.
Press TIME/TEXT repeatedly.
The displays differ depending on the disc
type or playing status.
Example: When playing a DVD
Example: When playing a VIDEO CD
Rear (L/R)
Front (L/R) +
Center
LFE (Low Frequency
Effect)
Checking the playing/
remaining time
Playing time and number of the
current title
Remaining time of the current title
Playing time and number of the
current chapter
Remaining time of the current chapter
Playing time and number of the cu rrent
scene or track
,continued
1-8
32
Example: When playing a CD
Track playing time and the current track/index
number
m
Remaining time of the current track
m
Playing time of the disc
m
Remaining time of the disc
m
CD text (when available)
Example: When playing an MP3 audio track
Playing time and number of t he current track
m
Current album number
Example: When viewing a JPEG image
Current file number and total number of file s in the
current album
m
Current album number and total number of
albums
b
Notes
• The recorder can only display the first level of a
CD’s text, such as the disc name.
• The letters or symbols that cannot be displayed
are replaced with “*.”
• Playing time of MP3 audio tracks may not be
displayed correctly.
You can check the remaining disc space
using the “Disc Information” display.
1 Insert a disc.
See “1. Inserting a Disc” on page 27.
2 Press OPTIONS to select “Disc
Information,” and press ENTER .
The “Disc Information” display appears.
Available settings differ depending on
the disc type.
Example: When a DVD+RW is inser t ed.
“Remainder” (approximate)
• The remaining recording time in each
of the recording modes
• Disc space bar
• Remaining disc space/total disc space
z Hint
To increase disc space, see “To open up disc space”
(page 59).
Checking the remaining disc
space
33
Eight Basic Operations — Getting to Know Your DVD Recorder
5. Changing the Name of
a Recorded Program
You can label a DVD, title, or program by
entering characters. You can enter up to 64
characters for a title o r di sc name, but the
actual number of characters di spl ayed in the
menus such as the Title List will vary. The
steps below explain how to change the name
of the recorded program.
1 Press TITLE LIST.
2 Select a title, and press ENTER.
The sub-menu appears.
3 Select “Title Name,” and press
ENTER.
The display for entering characters
appears.
4 Press </M/m/, to move the cursor
to the right of the display and select
“A” (upper-case), “a” (lower-case),
or “Symbol,” and press ENTER.
The characters for the sele cted type are
displayed.
5 Press </M/m/, to select the
character you want to enter, and press
ENTER.
The selected character appears at the top
of the display.
Example: Input Title Name
The type of characters will change
according to the language you sel ect in
“Easy Setup.” Some languages allow you
to enter an accent mark .
To enter a letter with an accent mark,
select an accent followed by the letter.
Example: Select “ ` ” and then “a” to
enter “à.”
To insert a space, select “Space.”
6 Repeat steps 4 and 5 to enter the
remaining characters.
To erase a character, move the cursor to
the right of the character at the input row.
Select “Back” and press ENTER.
To insert a character, move the cursor to
the right of the point where you want to
insert the character. Select the character
and press ENTER.
To erase all of the characters, sele ct
“Clear All” and press ENTER.
7 Select “Finish,” an d press ENTER.
To cancel the setting, select “Cancel.”
+
RW
-
RW
VR
-
RW
Video
-
R
VR
+
R
-
R
Video
</M/m/,,
ENTER
INPUT
SELECT
TITLE LIST
Number
buttons,
SET
Input row
,continued
34
To use the number bu ttons
You can also use the number buttons to enter
characters. Refer to the number next to each
row of letters on your TV screen.
1 In step 5 above, press a number button
repeatedly to select a character.
Example:
Press the number 3 button once to en t er
“D.”
Press the number 3 button three times to
enter “F.”
2 Press ENTER or SET and select the next
character.
3 Select “Finish” and press ENTER.
z Hint
You can switch between “A” (upper-case), “a”
(lower-case), or “Symbol” by pressing INPUT
SELECT.
6. Labeling and
Protecting a Disc
You can execute options effec tiv e for the
entire disc using the “Disc Information”
display.
1 Insert a disc.
See “1. Inserting a Disc” on page 27.
2 Press OPTIONS to select “Disc
Information,” and press ENTER .
The “Disc Information” display appears.
Available settings differ depending on
the disc type.
Example: When the inserte d disc is a
DVD+RW.
3 Select “Disc Na me,” and press
ENTER.
Enter the disc name in the “Input Disc
Name” display (page33).
Labeling a disc
OPTIONS
</M/m/,,
ENTER
+
RW
-
RWVR-RWVideo
-
RVR
+
R
-
RVideo
35
Eight Basic Operations — Getting to Know Your DVD Recorder
b Note
You can enter up to 64 characters for a DVD’s disc
name. The disc name ma y not a ppear when the disc
is played on other DVD equipment.
1 Insert a disc.
See “1. Inserting a Disc” on page 27.
2 Press OPTIONS to select “Disc
Information,” and press ENTER .
The “Disc Information” display appears.
Available settings differ depending on
the disc type.
Example: When the inserte d disc is a
DVD-RW (VR mod e).
A “On”/“Off”: Indicates whether
protection is set (DVD-RW/DVDR in VR mode only)
B “Protect Disc”
3 Select “Protect Disc,” and press
ENTER.
4 Select “Protect,” and press ENTER.
To cancel the protection
Select “Unprotected” in step 4.
z Hint
You can set protection for individual titles
(page 60).
7. Playing the Disc on
Other DVD Equipment
(Finalize)
Finalizing is necessary when yo u pl ay discs
recorded with this record er on other DVD
equipment.
When you finalize a DVD+RW, DVD-RW
(Video mode), DVD+R, or DVD-R (Video
mode), a DVD menu will be automatically
created, which can be displayed on other
DVD equipment.
Before finalizing, check the differences
between the disc ty p es in the table below.
Differences between the disc types
Protecting a disc
-
RWVR
-
RVR
Discs are automatically fi na lized
when removed from the recorder.
However, you may need to finalize
the disc for certain DVD
equipment, or if the recording time
is short. You can edit or record on
the disc even after finalizing.
Finalizing is unnecessary when
playing a disc on VR format
compatible equipment.
Even if your other DVD equipment
is VR format compatible, you may
need to finalize the disc, especially
if the recording time is short. You
can edit or record on the disc even
after finalizing.
Finalizing is necessary when
playing on any equipment other
than this recorder.
After finalizing, you cannot edit or
record on the disc. If you want to
record on it again, unfinalize
(page 37) or reformat the disc
(page 37). However, if you
reformat the disc, all recorded
contents will be erased.
Finalizing is necessary. The disc
can be played only on equipment
that supports DVD-R in VR mode.
After finalizing you cannot edit or
record on the disc using this
recorder.
+
RW
-
RWVR-RWVideo
-
RVR
+
R
-
RVideo
+
RW
-
RWVR
-
RWVideo
-
RVR
,continued
1-9
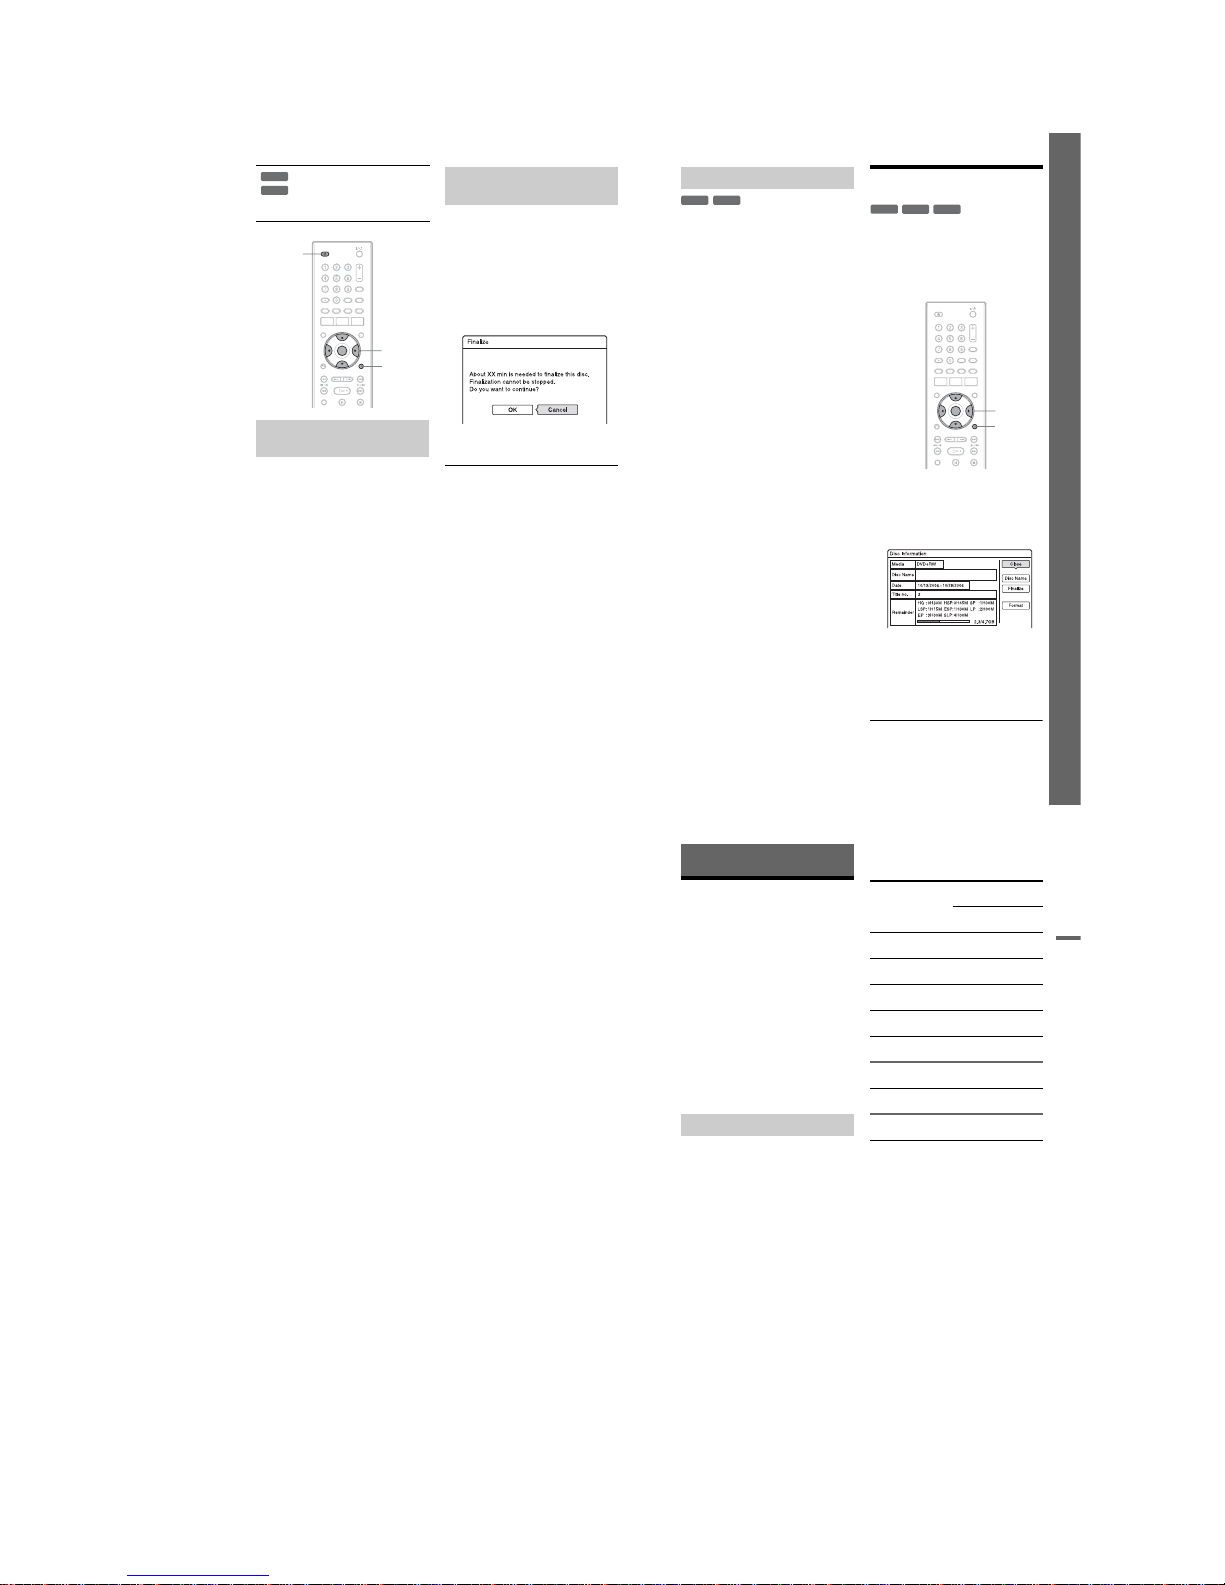
36
1 Make a recording.
See “2. Recording a Program” on
page 27.
2 Press Z OPEN/CLOSE.
The display shows the approxi m ate time
required for finalizing and asks for
confirmation.
For DVD+RWs, the recorder
automatically starts finalizing the disc.
After finalizing, the disc will be ejected
automatically.
3 Select “OK,” and press ENTER.
The recorder starts finalizing the disc.
After finalizing, the disc will be ejected
automatically.
1 Insert a disc.
See “1. Inserting a Disc” on page 27.
2 Press OPTIONS to select “Disc
Information,” and press ENTER .
The “Disc Information” display appears.
3 Select “Finalize,” and press ENTER.
The display shows the approximate time
required for finalizing and asks for
confirmation.
4 Select “OK,” and press ENTER.
The recorder starts finalizing the disc.
z Hint
You can check whether the disc has been finalized
or not. If you cannot select “Finalize” in step 3
above, the disc has already been finalized.
b
Notes
• Depending on the condition of the disc,
recording, or the DVD equipment, discs may not
play even if the discs are finalized.
• The recorder may not be able to finalize the disc
if it was recorded on another recorder.
Finalizing is necessary when
playing on any equipment other
than this recorder.
After finalizing, you cannot edit or
record on the disc.
Finalizing the disc
using Z OPEN/CLOSE button
+
R
-
R
Video
OPTIONS
</M/m/,,
ENTER
Z OPEN/
CLOSE
Finalizing the disc using “Disc
Information” display
37
Eight Basic Operations — Getting to Know Your DVD Recorder
For DVD-RWs (Video mode)
DVD-RWs (Video mode) that have been
finalized to prohibit additional recording or
editing can be unfinali ze d t o allow further
recording or editing.
For DVD-RWs (VR mode)
If you cannot record or edit on a DVD-RW
(VR mode) that has been finali zed with ot her
DVD equipment, unfinalize the disc.
b
Note
The recorder is not able to unfinalize DVD-RWs
(Video mode) that have been finalized on another
recorder.
1 Insert a disc.
See “1. Inserting a Disc” on page 27.
2 Press OPTIONS to select “Disc
Information,” and press ENTER .
The “Disc Information” display appears.
3 Select “Unfinalize ,” and press
ENTER.
The recorder starts unfinalizing the disc.
Unfinalizing may take several minutes.
8. Reformatting a disc
New discs are automatically format ted whe n
inserted. If necessary, you ca n m anually reformat a DVD+RW or DVD-RW disc to
make a blank disc. For DVD-RWs, you can
select a recording form at (VR mode or Video
mode) according to your needs (page59).
1 Insert a disc.
See “1. Inserting a Disc” on page27.
2 Press OPTIONS to select “D isc
Information,” and press ENTER.
Example: When a DVD+RW is inserted.
3 Select “Format,” and pre ss ENTER.
4 Select “OK,” and press ENT ER.
For DVD-RWs and unrecorded DVD-Rs
(Video mode), select “VR” or “Video,”
and press ENTER.
All contents on the disc are erased.
Unfinalizing a disc
-
RW
VR
-
RW
Video
+
RW
-
RW
VR
-
RW
Video
OPTIONS
</M/m/,,
ENTER
,continued
38
z Hint
By reformatting, you can change the recording
format on DVD-RWs, or record again on DVDRWs that have been finalized.
b Note
On this model, 1 GB (read “gigabyte”) is equivalent
to 1 billion bytes. The larger the number, the larger
the disc space.
39
Timer Recording
Timer Recording
Before Recording
Before you start recording…
• Check that the disc has enough available
space for the recording (page 32). For
DVD+RWs and DVD-RWs, you can free
up disc space by erasing titles (page59).
• Adjust the recording picture quality and
picture size if necessary (page 42).
z Hint
Timer recordings will be made regardless whether
or not the recorder is turned on. You can turn off the
recorder without affecting the recording even af ter
recording starts.
b Note
To play a recorded disc on other DVD equipment,
finalize the disc (page35).
Like the standard ×3 recording modes of
video tapes, you can select the desired
recording mode using the REC MODE
button.
Recording modes with higher quality provide
a more beautiful recording, but the lar ge data
volume also results in a shorter recording
time.
Conversely, a longer duration provides a
longer recording time, but the lower data
volume results in a coarser picture quality.
Press REC MODE repeatedly to switch the
recording modes.
b Notes
• The maximum continuous recording time for a
single title is eight hours.
• Situations below may cause slight inaccuracies
with the recording time.
– Recording a program with poor reception, or a
program or video source of low picture quality
– Recording on a disc that has already been edited
– Recording only a still pic ture or jus t sound
Recording mode
Recording
mode
Approx. recording
time (hours)
DVD DVD+R
DL
HQ (High quality) 1 1 hr.
48 min.
HSP R 1hr.
30 min.
2hr.
42 min.
SP (Standard mode) 2 3 hr.
37 min.
LSP r 2hr.
30 min.
4hr.
31 min.
ESP r 35hr.
25 min.
LP r 47hr.
14 min.
EP r 610hr.
51 min.
SLP (Long duration) 8 14 hr.
28 min.
,continued

1-10
40
The recorder can receive and record stereo/
SAP programs.
Recording stereo programs
If there is noise in the stereo program, set
“Auto Stereo” in the “Audio” setup to “Off”
(page 76). The sound will be recorded in
monaural but with less noise.
SAP (Second Audio Program)
When a SAP (Second Audio Program) is
received, the “SAP” indicator lig hts up on the
front panel display. To record only SA P
sound, set “Tuner Audio” in the “Audio”
setup to “SAP” (page 76).
Pictures with copy protection cann ot be
recorded on this recorder.
When the recorder receives a co py guard
signal, the recorder cont inues to record but
only a blank, grey colored screen will be
recorded.
* The recorded disc can be played only on CPRM
compatible equipment (page8).
Timer Recording
You can set the timer for a total of
40 program s, up to 30 days in advance.
Set the date, time, and channel of the program
manually.
b
Note
Do not operate your cable box or satellite receiver
just before or during a timer recording. This may
prevent the accurate recording of a program.
1 Press TIMER.
2 Press M/m to select the “Day an d
Time” or “Mode” row. Th en press
ENTER.
Recording a stereo/SAP
program
Unrecordable pictures
Copy control
signals
Recordable discs
Copy-Free
Copy-Once
(CPRM*)
(CPRM*)
Copy-Never None (a blank screen is
recorded)
+
RW
-
RW
VR
+
R
-
RW
Video
-
R
VR
-
R
Video
-
RW
VR
-
R
VR
+
RW
-
RW
VR
-
RW
Video
-
R
VR
+
R
-
R
Video
</M/m/,,
ENTER
TIMER
x REC
STOP
OPTIONS
z REC
41
Timer Recording
3 Select an item using </, and
adjust using M/m. Then press ENTER.
To make additional changes to items in
different rows, return to step 2. The
adjustable items are listed below.
“Day and Time”:
Sets the date, start time, and stop time,
and selects the channel or input so urce.
The date item changes as follo w s:
Today y …… y Sat 12/2 (30 days
later) y Sun (every Sunday) y ……
y Sat (every Saturday) y Mon - Fri
(Monday to Friday) y Mon - Sat
(Monday to Saturday) y Daily y
Today
“Mode”:
Selects the recording mode (page39).
“Extend Time”:
Sets the duration in increments of
10 minutes, for a maximum of
60 minutes when a timer recording is in
progress. If the program set to be
recorded daily or weekly is extended, the
manually extended time set here will be
added to the subsequent timer re cording
times.
• If you make a mistake, select the ite m
and change the setting.
4 Select “OK,” and press ENTER.
The “TIMER LIST” display (page 44)
appears. The TIMER REC indicator
lights up on the front panel and the
recorder is ready to start recording.
Unlike a VCR, there is no need to turn off
the recorder before the timer recording
starts.
To stop recording during timer recording
Press x REC STOP.
Note that it may take a few seconds for the
recorder to stop recording.
Rec Mode Adjust
If there is not enough available disc space for
the recording, the recorder automatical ly
adjusts the recording mod e to enable the
entire program to be recorded. Set “Rec
Mode Adjust” of the “Timer Settings” to
“On” in the “Recording” setup (page 78).
If the timer settings overlap
Overlapped timer settings are shown as
follows.
To store the setting as shown, select “OK.”
The program that does not have a mark
next to it has priority and the overlapped
programs start record ing only after the first
program has finished.
To cancel the overlapped setting, select
“Cancel.”
To confirm, change, o r cancel a timer
recording
See “Checking/Changing/Canceling Timer
Settings (Timer List)” on page 44.
To extend the recording duration time
while recording
1
Press OPTIONS during recordi ng to
select “Extend Rec Time,” and press
ENTER.
2
Press M/m to select the d uration time.
You can set the duration in increments of
10 minutes, for a maximum of 60 minutes.
3
Select “OK” and press ENTER.
z Hint
If you are recording to a DVD-RW (VR mode) at a
recording mode that is SP or lower and is a 2x speed
or higher disc, you can play the title as it is being
recorded by selecting the program title on the Title
List (page 53).
,continued
42
b Notes
• If a message indicating that the disc is fu ll appears
on the screen, change the disc, or m ak e available
space for the recording (DVD+RW/DVD-RW
only) (page 60).
• Check that the clock is corre ctly set b efore set ting
the timer recording. If not, the timer recording
cannot be made.
• To record a satellite program, turn on the satellite
tuner and select the satellite program you want to
record. Leave the satellite tuner turned on unti l
the recorder finishes recording. If you connect
equipment with a timer function, you can use the
Synchro Rec function (page 47) .
• Even if the timer is set for the same daily or
weekly program, the timer recording cannot be
made if it overlaps with a program that has
priority. “” will appear next to the overla ppe d
setting in the Timer List. Check the priority order
of the settings.
• Even if the timer is set, timer recordings cannot be
made while recording a program that has priority.
• The Rec Mode Adjust function only works with a
timer recording. It does not function with Quick
Timer or Synchro Rec.
You can set the recorder to record in
30 minute increments.
Press z REC repeatedly to set the
duration.
Each press advances the time in 30 minute
increments. The maximum duration is six
hours.
The time counter decreases minute by minute
to 0:00, then the recorder stops recording (the
power does not turn off) . Eve n if yo u tur n off
the recorder during recording, the recorder
continues to record until the time counter
runs out.
To cancel the Quick Tim er
Press z REC repeatedly until the counter
appears in the front panel display. The
recorder returns to normal recording mode.
You can adjust the recordin g pi cture quality
and picture size.
1 Before recording starts, press
OPTIONS to select “Rec Settings,”
and press ENTER.
2 Select the item you want to adjust,
and press ENTER.
The adjustment display appears.
Example: Rec NR
“Rec Mode”:
Selects the recording mode for the
desired recording time and picture
quality. For more information, see
“Recording mode” on page 39.
Using the Quick Timer function
(normal recording)
Adjusting the recording picture
quality and size
</M/m/,,
ENTER
OPTIONS
43
Timer Recording
“DVD Rec. Picture Size”:
Sets the picture size of the program to be
recorded.
• 4:3 (default): Sets the picture size to
4:3.
• 16:9: Sets the picture size to 16:9 (wide
mode).
“DVD Rec. Picture Size” works with
DVD-RWs/DVD-Rs (Video mode)
when the recording mode is set to HQ,
HSP, SP, LSP, or ESP. For all other
recording modes, the screen si ze is f ixed
at “4:3.”
For DVD-Rs/DVD-RWs (VR mode), the
actual picture size is recorded regardless
of the setting. For example, if a 16:9 size
picture is received, the disc records the
picture as 16:9 even if “DVD Rec.
Picture Size” is set to “4:3.”
For DVD+RWs/DVD+Rs, the screen
size is fixed at “4:3.”
“Rec NR” (noise reduction): Redu ces
noise contained in the video signal.
“Rec Video Equalizer”: Adjusts the
picture in greater detail.
Press M/m to select the item you want to
adjust, then press ENTER.
• Contrast: Changes the contrast.
• Brightness: Changes the overall
brightness.
• Color: Makes the colors deeper or
lighter.
• Hue: Changes the color balance.
3 Adjust the setting using </M/m/,,
and press ENTER.
The default setting is underlined.
“Rec NR”: (weak) Off 1 ~ 2 ~ 3
(strong)
“Rec Video Equalizer”:
• Contrast: (weak) –3 ~ 0
~ 3 (strong)
• Brightness : (d ar k) –3 ~ 0
~ 3 (bright)
• Color: (light) –3 ~ 0
~ 3 (deep)
• Hue: (red) –3 ~ 0
~ 3 (green)
Repeat steps 2 and 3 to adjust any other
items.
b Notes
• When playing a 16:9 size picture recorded as 4:3,
the image is fixed to 4:3 Letter Box regardless of
the setting in “TV Type” of “Video” setup
(page 74).
• Remnants of images may appear on your screen
when using “Rec NR.”
•“Rec Video Equalizer” does not affect the input
of the DV IN jack.
The recorder can automatically divide a
recording (a title) into chapters by inserting
chapter marks at approximately 6 minute
intervals during recording. To di sable this
function, set “Auto Chapter” in the
“Recording” setup to “Off” (page 78).
When recording to a DVD-R (VR mode) or
DVD-RW (VR mode), you can insert and
erase chapter marks man u ally (page 62).
Creating chapters in a title
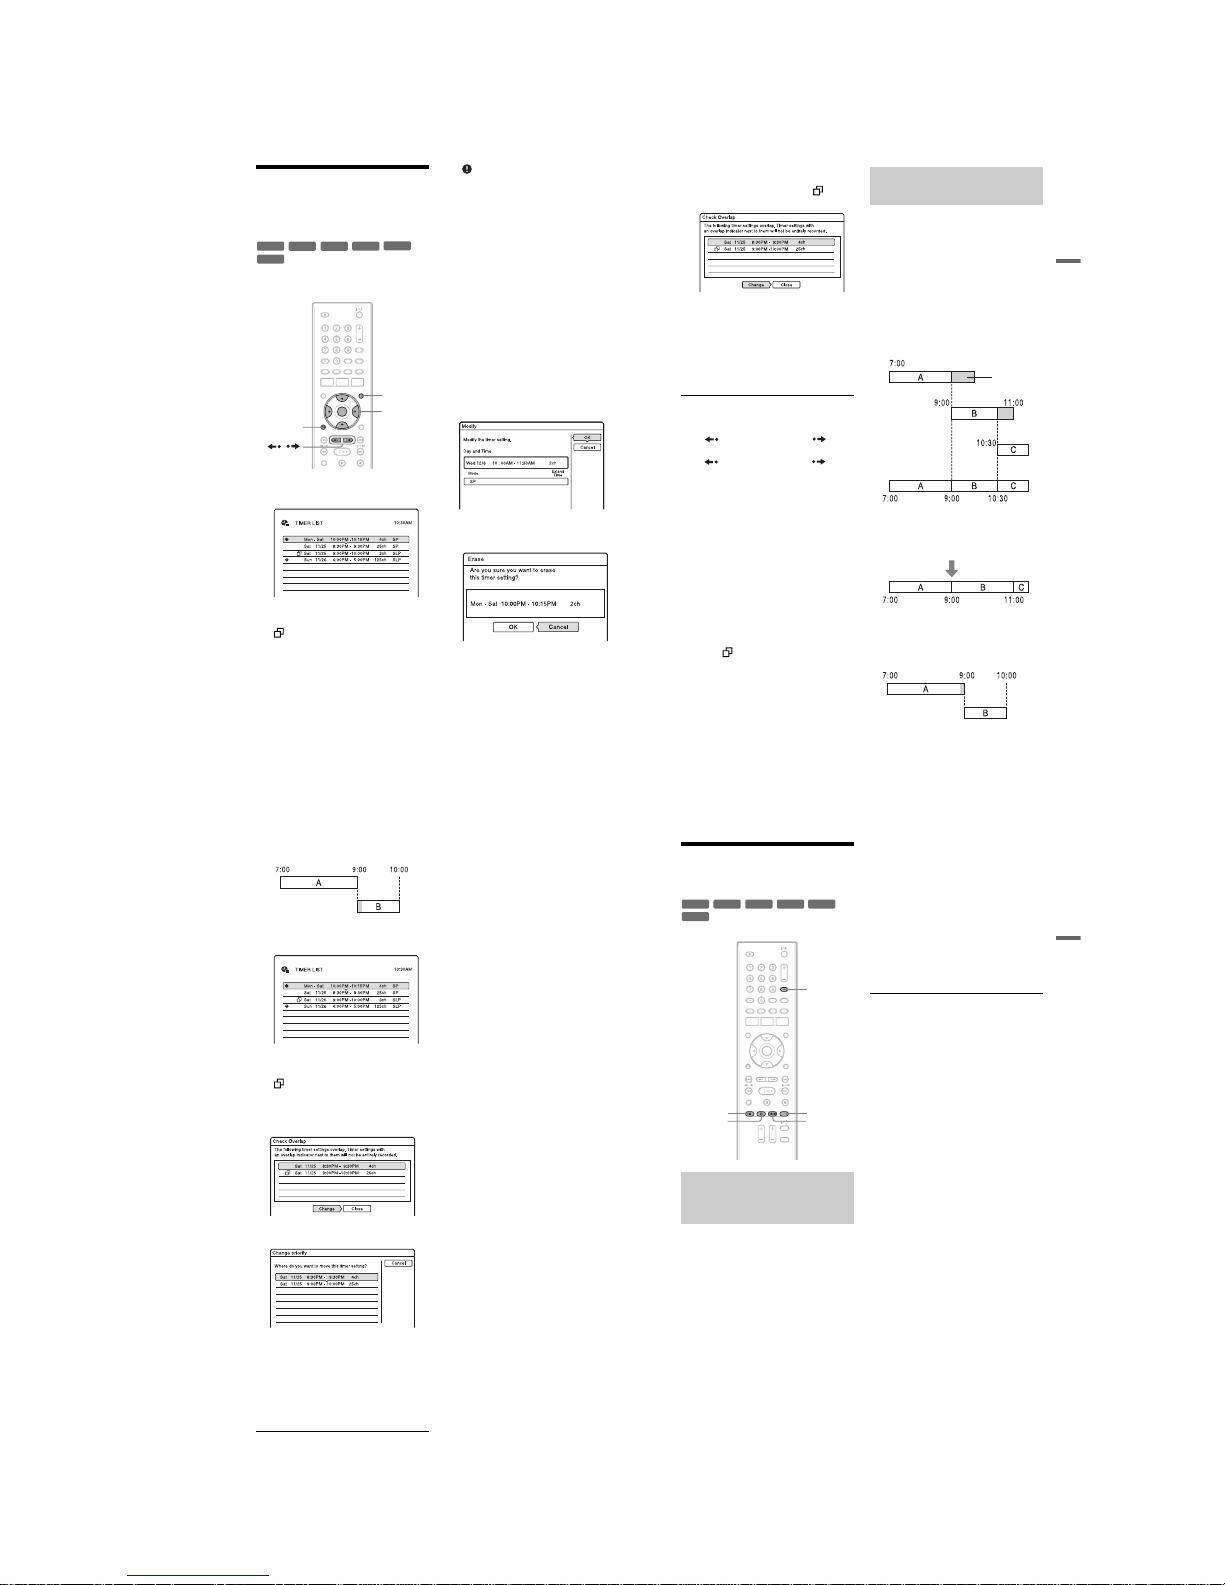
1-11
44
Checking/Changing/
Canceling Timer
Settings (Timer List)
You can check, change, or cancel t imer
settings using the Timer List.
1 Press TIMER LIST.
The Timer List appears.
Timer information displays the reco rding
date, time, recording mode, etc.
:
Indicates that the setting is overlapp ed by
another setting.
z
(red):
Indicates the setting is currently being
recorded.
:
Indicates that the timer recording cannot
be recorded as set, such as for a timer
recording that cannot be recorded in the
selected Rec mode.
When all of the timer settings do not fit
on the list, the scroll bar appears.
To view the hidden timer settings, press
M/m.
2 Select the timer setting you want to
check/change/cancel, and press
ENTER.
The sub-menu appears.
3 Select one of the options, and press
ENTER.
“Modify”:
Changes the timer setting.
Select an item using </, and adjust
using M/m. Select “OK,” and press
ENTER.
“Erase”:
Erases the timer setting. Select “OK,”
and press ENTER.
+
RW
-
RW
VR
-
RW
Video
-
R
VR
+
R
-
R
Video
</M/m/,,
ENTER
O
RETURN
TIMER LIST
/
45
Timer Recording
“Check Overlap”:
Checks for overlapped settings.
The timer setting without the mark
has priority over the othe r settings.
To change the priority of a program,
press </, to select “Change.” For
details, see “Changing the priority of
overlapped settings” on page 45.
Select “Close” to return to the Timer List.
To change or cancel the setting, repeat
steps 2 and 3 above.
To scroll the list display by page (Page
mode)
Press REPLAY/ADVANCE while
the list display is turned on. Each time you
press
REPLAY/ADVANCE , the
entire Timer List changes to the next/
previous page of timer settings.
To turn off the Timer List
Press TIMER LIST or O RETURN.
z Hint
While recording, you cannot modify the timer
setting for the current recording, but you can extend
the duration of the recording time (page 41).
b
Notes
• Even if the tim er is set , timer r ecording s cannot be
made while recording a program that has priority.
• Even if the timer is set for the same daily or
weekly program, the timer recording cannot be
made if it overlaps with a program that has
priority. “” will appear next to the overlapped
setting in the Timer List. Check the priority order
of the settings.
If the timer settings overlap, the p rogram that
was set last has priority and will be recorded.
A timer recording of lower priority may be
canceled, start from the middl e or stop
midway through the program.
You can change the priority of a program if
necessary.
When the timer settings overlap
The program set last has priority.
Example: You set the timer in order of A, B,
and C (setting C has first priority)
If you give setting B priority over setti ng C,
all of program B will be recorded and
program C is recorded only after program B
has ended.
If the end time of one recording and the
start time of another ar e the same
If program B has priority, the end of program
A will be cut off.
Changing the priority of
overlapped settings
will be cut off
Actual recording
,continued
46
If program A has priorit y, recording of
program B may be delayed.
1 Press TIMER LIST.
The Timer List appears.
2 Select an overlapped timer setting,
and press ENTER.
indicates that the timer setting is
overlapped by another timer setting.
3 Select “Check Overlap ,” and press
ENTER.
4 Select “Change,” and press E NTER.
5 Press M/m to change the timer
setting’s priority , and press ENTER.
The setting moves to its new location in
the list. A timer setting higher up in the
list has higher priority.
To return to the Timer List, select
“Cancel.”
z Hint
You can change the priority of a timer setting while
recording.
47
Timer Recording
Recording From
Connected Equipment
You can set the recorder to automatically
record programs from connected equipment
that has a timer function (such as a satellite
tuner). Connect the equipment to the LINE 1
IN jacks of the recorder (page 26).
When the connected equipment turns on, the
recorder starts recording a program from the
LINE 1 IN jacks.
1 Insert a recordable DVD.
See “1. Inserting a Disc” on page 27.
2 Press INPUT SELECT re peatedly to
select “L1.”
3 Press REC MODE repeatedly to select
the recording mode.
For details about the recording mode, see
page 39.
4 Set the timer on the connected
equipment to the time of the program
you want to record, and turn it off.
5 Press c z SYNCHRO REC.
The SYNCHRO REC indicator lights up
on the front panel. The recorder is ready
to start Synchro-Recording.
The recorder automatically starts
recording when it receives an input
signal from the connected equipment.
The recorder stops record ing when the
connected equipment turn s of f.
To stop recordin g
Press x REC STOP or c z SYNCHRO
REC.
To cancel Synchro Rec
Press c z SYNCHRO REC.
The SYNCHRO REC indicator on the
recorder turns off.
b Notes
• The recorder starts recording only after detecting
a video signal from the connected equipment. The
beginning of the program may not be recorded
regardless of whether or not the recorder’s power
is on or off.
• During Synchro-Recording, other operations,
such as normal recording, cannot be performed.
• To use the connected equipment while the
recorder is standing by for Synchro-Recording,
cancel Synchro-Recording by pressing
c z SYNCHRO REC. Be sure to turn off the
connected equipment and press c z SYNCHRO
REC to reset Synchro-Recording before the timer
recording starts.
• The Synchro Rec function does not work with
some tuners. For detail s, see th e tune r’s oper ating
instructions.
• While the recorder is standing by for SynchroRecording, the Auto Clock Set function (page 72)
does not work.
• To use the Synchro Rec function, you must first
set the recorder’s clock correctly.
Recording from connected
equipment with a timer
(Synchro Rec)
+
RW
-
RWVR-RWVideo
-
RVR
+
R
-
RVideo
INPUT
SELECT
REC MODE
z REC
c z
SYNCHRO
REC
x REC
STOP
,continued
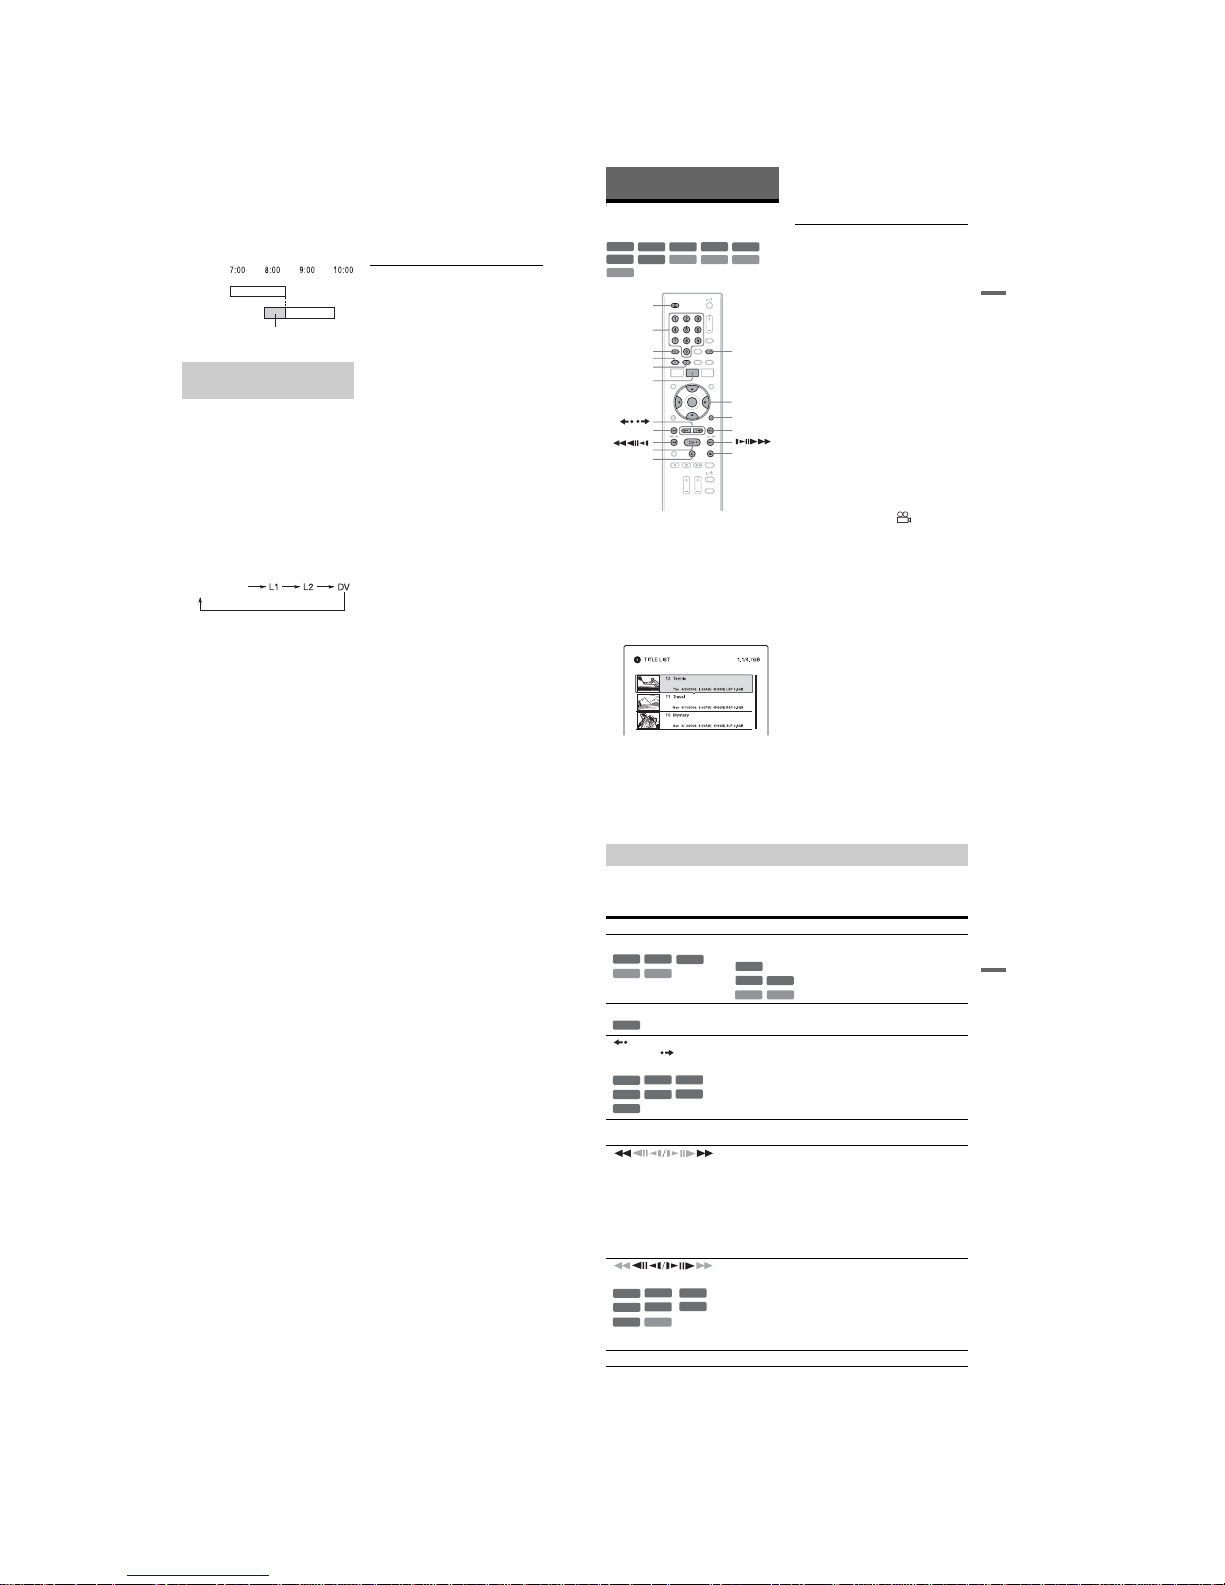
1-12
48
If the timer settings of a SynchroRecording and another timer recording
overlap
Regardless of whether or not the program is a
Synchro Rec program, the program that starts
first has priority and the second program
starts recording only after the first program
has finished.
You can record from a connec te d V C R or
similar device. To connect a VCR or similar
device, see “Connecting a VCR or Similar
Device” on page 24. Use the DV IN jack on
the front panel if the equipment ha s a DV
output jack (i.LINK jack).
1 Insert a recordable DVD.
See “1. Inserting a Disc” on page 27.
2 Press INPUT SELECT to sel ect an input
source according to the connection
you made.
The front panel display chan ges as
follows:
3 Press REC MODE repeate dly to select
the recording mode.
For details about the recording mode, see
page 39.
4 Insert the source tape into the
connected equipment and set to
playback pause.
5 Press z REC.
This recorder starts recording.
6 Press the pause (or p lay) button on the
connected equipment to cancel the
playback pause status.
The connected equipment starts playback
and the playback image is recorded by
this recorder.
To stop recording, press x REC STOP
on this recorder.
If you connect a digital video camera with
a DV IN jack
See “DV/Digital8 Dubbing” on page 66 for
an explanation of how to record from the DV
IN jack.
z Hint
You can adjust the settings for the record ing picture
before recording. See “Adjusting the recording
picture quality and size” on page 42.
b
Notes
• When recording a video game image, the screen
may not be clear.
• Any program that contains a Copy-Never copy
guard signal cannot be recorded. The recorder
continues to record, but a blank screen will be
recorded.
Recording from connected
equipment without a timer
First program
Second
program
will be cut off
channel
49
Playback
Playback
Playing
1
Insert a disc.
• See “1. Inserting a Disc” on page 27.
• If you insert a DVD VIDEO, VIDEO
CD, CD, DATA DVD, or DATA CD,
press H PLAY. Playback starts.
2 Press TITLE LIST.
For details about the Title List, see “3.
Playing the Recorded Program (Title
List)” on page 28.
Example: DVD+RW
3 Select the title, and press ENTER.
The sub-menu appears.
4 Select “Play,” and press ENTER.
Playback starts from the selected title.
To use the DVD’s Menu
When you play a DVD VIDEO, or a finalized
DVD+RW, DVD-RW (Video mode),
DVD+R, or DVD-R (Video mode), you can
display the disc’s menu by pressin g TO P
MENU or MENU.
To play VIDEO CDs with PBC functions
PBC (Playback Control) allows you to play
VIDEO CDs interactively using the menu on
your TV screen.
When you start playing a VIDEO CD with
PBC functions, the menu appears.
Select an item using the number buttons and
press ENTER. Then, follow the inst ructions
in the menu (press H PLAY when “Press
SELECT” appears).
The PBC function of Super VIDEO CDs does
not work with this recorder. Super VIDEO
CDs are played in continuous play mode
only.
To change the angle s
If various angles (multi-angles) for a scene
are recorded on the disc, “” appears in
the front panel display. Press OPTIONS
during playback to select “Ch ange Angle,”
and press ENTER.
To stop playback
Press x STOP.
+
R
DVD
VCD
CD
DATA CD
-
RW
VR
-
RW
Video
+
RW
-
R
VR
DATA DVD
-
R
Video
x STOP
Z OPEN/
CLOSE
TITLE LIST
</M/m/,,
ENTER
OPTIONS
SUBTITLE
TOP MENU
AUDIO
Number
buttons
/
H PLAY
X PAUSE
MENU
NEXT >
. PREV
,continued
50
To resume playback from the point where
you stopped (Resume Play )
When you press H PLAY again after you
stop playback, the recorder resumes playback
from the point where you presse d x STOP.
To start from the beg inni ng, pres s OPTI ONS
to select “Play Beginning,” and press
ENTER. Playback starts from the beginn i ng
of the title/track/scene.
The point where you stopped playing is
cleared when:
–you open the disc tray.
–you play another title.
–you switch the Title List menu to Original
or Playlist (DVD-RWs/DVD-Rs in VR
mode only).
–you edit the title after stopping playback.
–you change the settings on the recorder.
–you turn off the recorder (VIDEO CD/CD/
DATA DVD/DATA CD only).
–you make a recordin g (except for DVD-
RWs/DVD-Rs in VR mode).
–you disconnect the AC power cord.
To play restricted DVDs (Parental Control)
If you play a restricted DVD , th e message
“Do you want to temporarily change the
Parental Control level to *?” appears on your
TV screen.
1 Select “OK” and press ENTER.
The display for entering your password
appears.
2 Enter your four-digit password using the
number buttons.
3 Press ENTER to select “OK.”
The recorder starts playback.
To register or change the password, see
“Parental Control (DVD VIDEO only)” on
page 79.
To lock the disc tray (Child L ock)
You can lock the disc tray to prevent children
from ejecting the disc.
When the recorder is turned on, hold down
x STOP until “LOCKED” appears in the
front panel display. The Z OPEN/CLOSE
button does not work while the Child Lock is
set.
To unlock the disc tray, hold down x STOP
until “UNLOCKED” appears in the fro nt
panel display when the re corder is turned on.
z Hints
• You can also use the HPLAY button in step 3
(page 49) to start playback.
• Even if you select “Factory Setup” in the
“Others” setup (page81), the Child Lock remain s
set.
51
Playback
To check the position of the buttons below, see the illustration on page 49.
For MP3 or JPEG operations, see “P la yi ng MP3 Audio Tracks or JPEG Image File s” on
page 55.
To resume normal playback, press H PLAY.
Playback options
Buttons
Operations
AUDIO Selects one of the audio tracks recorded on the disc when pressed
repeatedly in normal playback mode.
: Selects the language.
: Selects the main or sub sound.
: Selects stereo or monau ral audio tracks.
SUBTITLE Selects a subtitle language when pressed repeatedly.
REPLAY/
ADVANCE (instant
replay/instant advance)
Replays the scene/briefly fast forwards the scene.
. PREV/NEXT > Goes to the beginning of the previous/next title/chapter/scene/
track.
(fast reverse/fast forward)
Fast reverses/fast forwards the disc when pressed during
playback.
Search speed changes as follows:
fast reverse fast forward
m1 T t 1M
m2 T T t t 2M
m3
*
T T T t t t 3M
*
When you press and hold the button, fast forward/fa st reverse
continues at the selected speed until you release the button.
*
m3 and 3M are only available for DVDs.
(slow, freeze frame)
* Playback direction only
Plays in slow motion when pressed for more than one second in
pause mode.
Plays one frame at a time when pressed briefly in pause mode .
X PAUSE Pauses playback.
-
RWVR
DVD
CDVCD
-
RVR
DVD
-
RWVR
-
RVR
CD
VCD
DVD
-
RWVR-RWVideo
-
RVR
+
R
-
RVideo
+
RW
DVD
-
RWVR
-
RWVideo
-
RVR
+
R
VCD
DVD
*
+
RW
-
RVideo
,continued
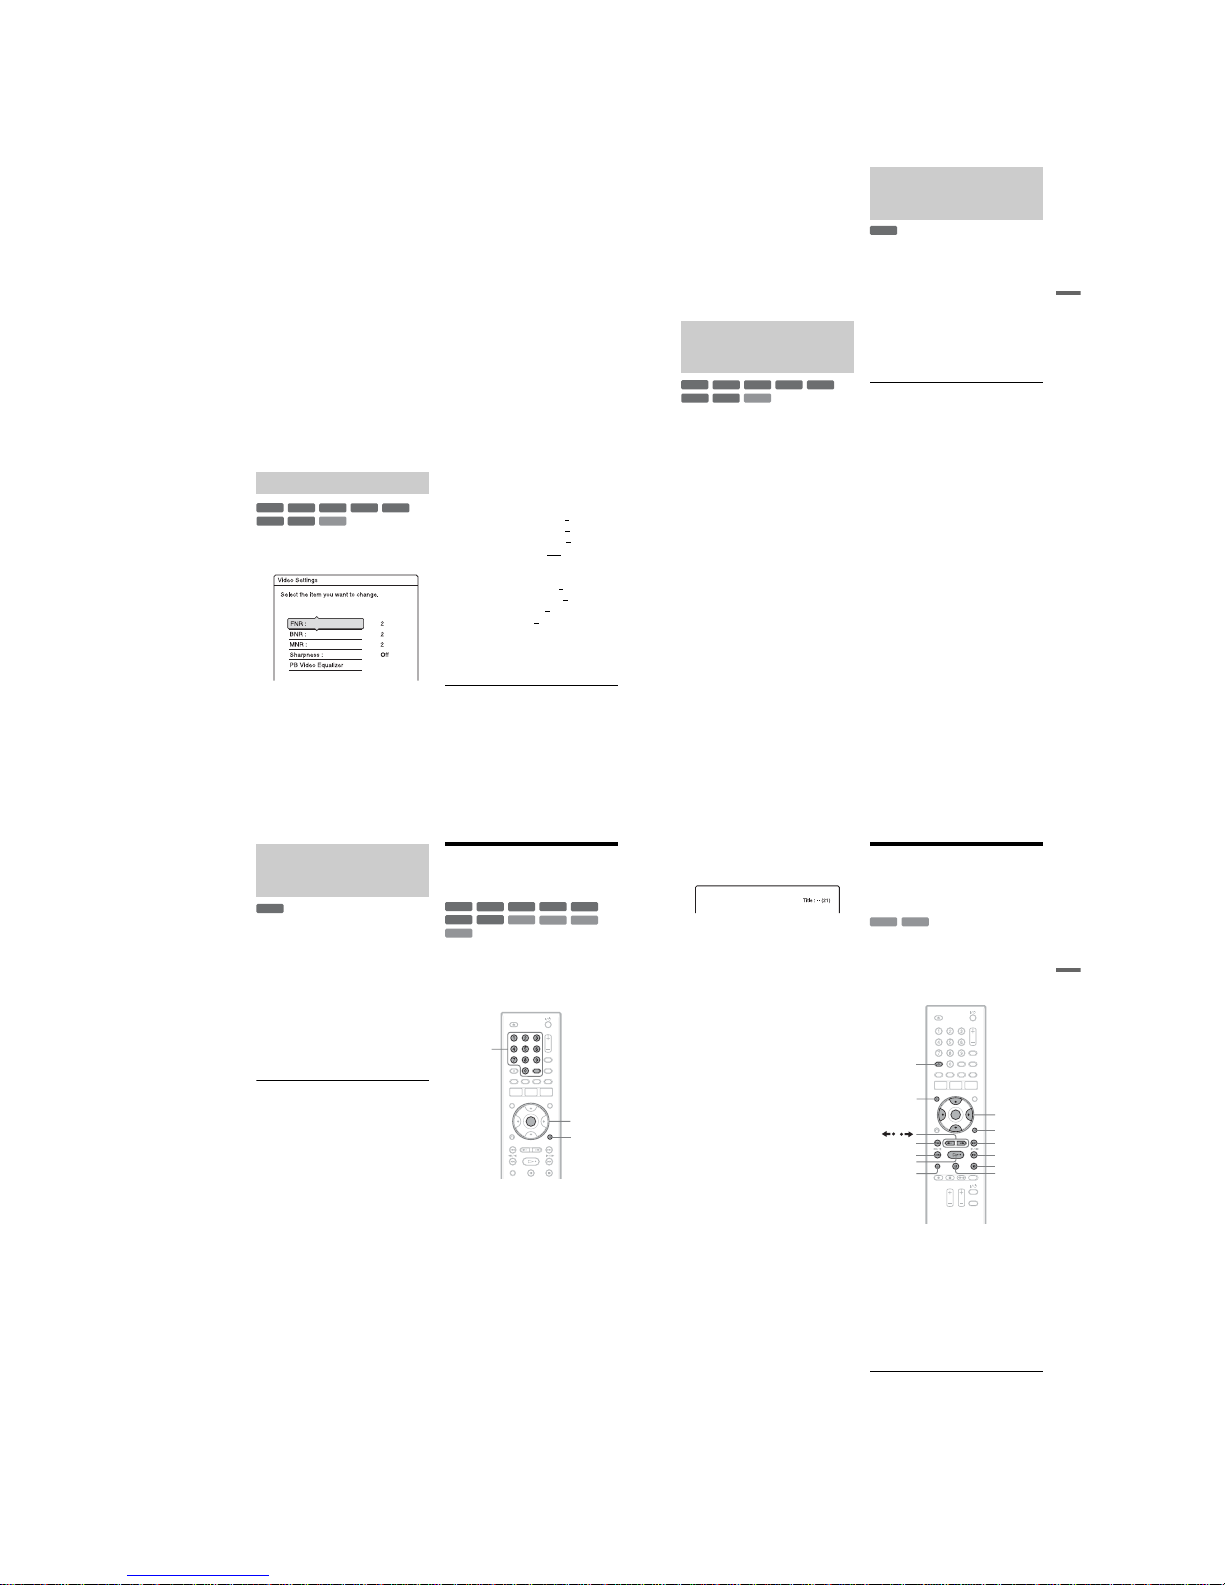
1-13
52
b
Notes
• Angles and subtitles cannot be changed with titles
recorded on this recorder.
• Slideshows made with a DVD camcorder can
only be played. Other play functions, such as fast
forward, cannot be used.
Notes on playing DT S sound tracks on a
CD
• When playing DTS-encoded CDs, excessive
noise will be heard from the analog stereo jacks.
To avoid possible damage to the audio system,
the consumer should take proper precautions
when the analog stereo jacks of the recorder are
connected to an amplification system. To enjoy
DTS Digital Surround™ playback, an external
DTS decoder must be connected to the DIGITAL
OUT jack of the recorder.
• Set the sound to “Stereo” using the AUDIO
button when you play DTS sound tracks on a CD
(page 51).
Notes on playing DVD s with a DTS sound
track
DTS audio signals are output only through the
DIGITAL OUT (COAXIAL) jack.
When you play a DVD with DTS sound tracks, set
“DTS” to “On” in the “Audio” setup (page 76).
1 Press OPTIONS duri ng playback to
select “Video Settings,” and press
ENTER.
2 Select an item, and press ENTER.
The adjustment display appears.
“FNR” (frame noise reduction):
Reduces noise contained in the
luminance element of the video si gnal.
“BNR” (block noise reduction):
Reduces “block noise” or mosaic like
patterns in the picture.
“MNR” (mosquito noise reduction):
Reduces the faint nois e appearing ar ound
the outlines of the images. The noise
reduction effects are autom atically
adjusted within each setting range
according to the video bit rate and other
factors.
“Sharpness”:
Sharpens the outlines of the images.
“PB Video Equalizer” (Playback video
equalizer):
Adjusts the picture in greater detail.
Select an item and press ENTER.
• Contrast: changes the contrast.
• Brightness: changes the overall
brightness.
• Color: makes the colors deeper or
lighter.
• Hue: changes the color balance.
3 Press </, to adjust the setting, and
press ENTER.
The default settings are underlin ed.
“FNR”: (weak) Off 1 2
3 (strong)
“BNR”: (weak) Off 1 2
3 (strong)
“MNR”: (weak) Off 1 2
3 (strong)
“Sharpness”*: (weak) Off
1 2 3
(strong)
“PB Video Equalizer”:
• Contrast: (weak) –3 ~ 0
~ 3 (strong)
• Brightness : (d ar k) –3 ~ 0
~ 3 (bright)
• Color: (light) –3 ~ 0
~ 3 (deep)
• Hue: (red) –3 ~ 0
~ 3 (green)
Repeat steps 2 and 3 to adjust any other
items.
* “1” softens the outlines of the images. “2”
enhances the outlines and “3” enhances them
more than “2.”
Adjusting the picture quality
+
R
DVD
VCD
-
RW
VR
-
RW
Video
+
RW
-
R
VR
-
R
Video
53
Playback
b
Notes
• If the outlines of the images on your screen
become blurred, set “BNR” and/or “MNR” to
“Off.”
• Depending on the disc or the scene being played,
the above BNR, MNR, or FNR effects may be
hard to discern. And, these functions may not
work with some screen sizes.
• When using the “Sharpness” function, noise
found in the title may become more apparent. In
this case, it is recommended th at you use the BNR
function with the “Sharpness” function. If the
condition still does not improve, set the
“Sharpness” level to “Off.”
1 Press OPTIONS during playback to
select “Audio Settings,” and press
ENTER.
2 Select “AV SYNC”, and press ENTER.
“AV SYNC”:
When the video is delayed, this function
delays the audio for synchroni zation wit h
the video (0 to 120 milliseconds). Larger
numbers indicate a longer audio delay for
synchronization with the video. W hen
dubbing to a VCR or other video
recording equipment, be sure to return
this setting to 0 ms (default).
3 Press </, to adjust the setting, and
press ENTER.
“Chasing Playback” allows you to vie w th e
recorded part of a program w h i l e the
recording is being made. You do not need to
wait until the recording finishes.
Press OPTIONS while recording to select
“Chasing Playback,” and press ENTER.
Playback starts from the beginning of th e
program you are recording.
When you fast forward to the point that you
are recording, Chasing Playbac k returns to
normal playback.
b
Notes
• For DVD-RWs (VR mode), this function does not
work when recording:
– on a 1x-speed DVD-RW.
– in the HQ or HSP recording mode.
• The DVD’s picture on your TV screen freezes for
a few seconds when you fast forward/fast reverse
or instant replay/advance the recording.
• Chasing Playback is possible from one minute or
more after recording starts.
• Even if you fast forward the recorded program,
there will always be a time difference of about
one minute or more between the recorded
program and the current TV broadcast.
Adjusting the delay between
the picture and sound (AV
SYNC)
+
R
DVD
VCD
-
RW
VR
-
RW
Video
+
RW
-
R
VR
-
R
Video
Playing from the beginning of
the program you are recording
(Chasing Playback)
-
RW
VR
,continued
54
You can play a previously recorded program
while recording another on the same disc.
Playback continues even if the recording is a
timer recording.
1 While recording, press TITLE LIST.
The Title List appears.
2 Select the title you want to play, and
press ENTER.
The sub-menu appears.
3 Select “Play”, and press ENTER.
Playback starts from the selected title.
b Notes
• This function does not work when recording:
– on a 1x-speed DVD-RW.
– in the HQ or HSP recording mode.
• When playing a title recor ded in the HQ or HSP
recording mode, picture noise may appear
depending upon the condition of the recording.
• Picture noise may appear depending upon the
condition of the recording, or when playing a title
recorded in the HQ or HSP recording mode. The
picture freezes for a few seconds when you use
fast forward/fast reverse or instant replay/
advance.
Searching for a Title/
Chapter/Track, etc.
You can search a disc by title, chapter, scene
or track. As titles and tracks are as si gned
individual numbers, select the tit le or track by
entering its number. You can also search for
a scene using the time code.
1 Press OPTIONS during playback to
select a search method, and press
ENTER.
“Title Search” (for DVDs)
“Chapter Search” (for DVDs)
“Track Search” (for CDs/DATA CDs)
“Search” (for VIDEO CDs)
“Album Search” (for DATA DVDs/
DATA CDs)
“Time Search” (for DVDs): Searches for
a starting point by entering the time code.
“File Search” (for DATA DVDs/DATA
CDs)
Playing a previous recording
while making another
(Simultaneous Rec and Play)
-
RWVR
+
R
DVD
VCD
CD
DATA CD
-
RWVR-RWVideo
+
RW
-
RVR
DATA DVD
-
RVideo
OPTIONS
Number
buttons,
SET
ENTER
55
Playback
The display for entering the number
appears.
Example: Title Search
The number in parentheses indi cates the
total number of titles, tracks, etc.
2 Press the number buttons to select the
number of the title, chapter, track,
time code, etc., you wa nt.
For example: Time Search
To find a scene at 2 hours, 10 minutes,
and 20 seconds, enter “21020.”
If you make a mistake, select anot her
number.
3 Press ENTER or SET.
The recorder starts playback from the
selected number.
Playing MP3 Audio
Tracks or JPEG Image
Files
You can play MP3 audio tracks and JPEG
image files on DATA CDs (CD-ROMs/CDRs/CD-RWs) or JPEG image files on DATA
DVDs (DVD-ROMs/DVD+RWs/DVD+Rs/
DVD-RWs/DVD-Rs).
1 Insert a disc.
See “1. Inserting a Disc” on page27.
2 Press H PLAY.
For MP3 discs, playback starts from the
first MP3 audio track on the disc.
For JPEG files, a slides how of the
pictures on the disc begins.
If the disc contains MP3 audio trac ks and
JPEG image files, only the JPEG image
files are played back when H PLAY is
pressed.
To stop playback or slideshow
Press x STOP.
To pause playback or s lideshow
Press X PAUSE.
DATA DVD
DATA CD
</M/m/,,
ENTER
OPTIONS
H PLAY
x STOP
m
/
M
AUDIO
. PREV
NEXT
>
X PAUSE
TIME/TEXT
DISPLAY
,continued
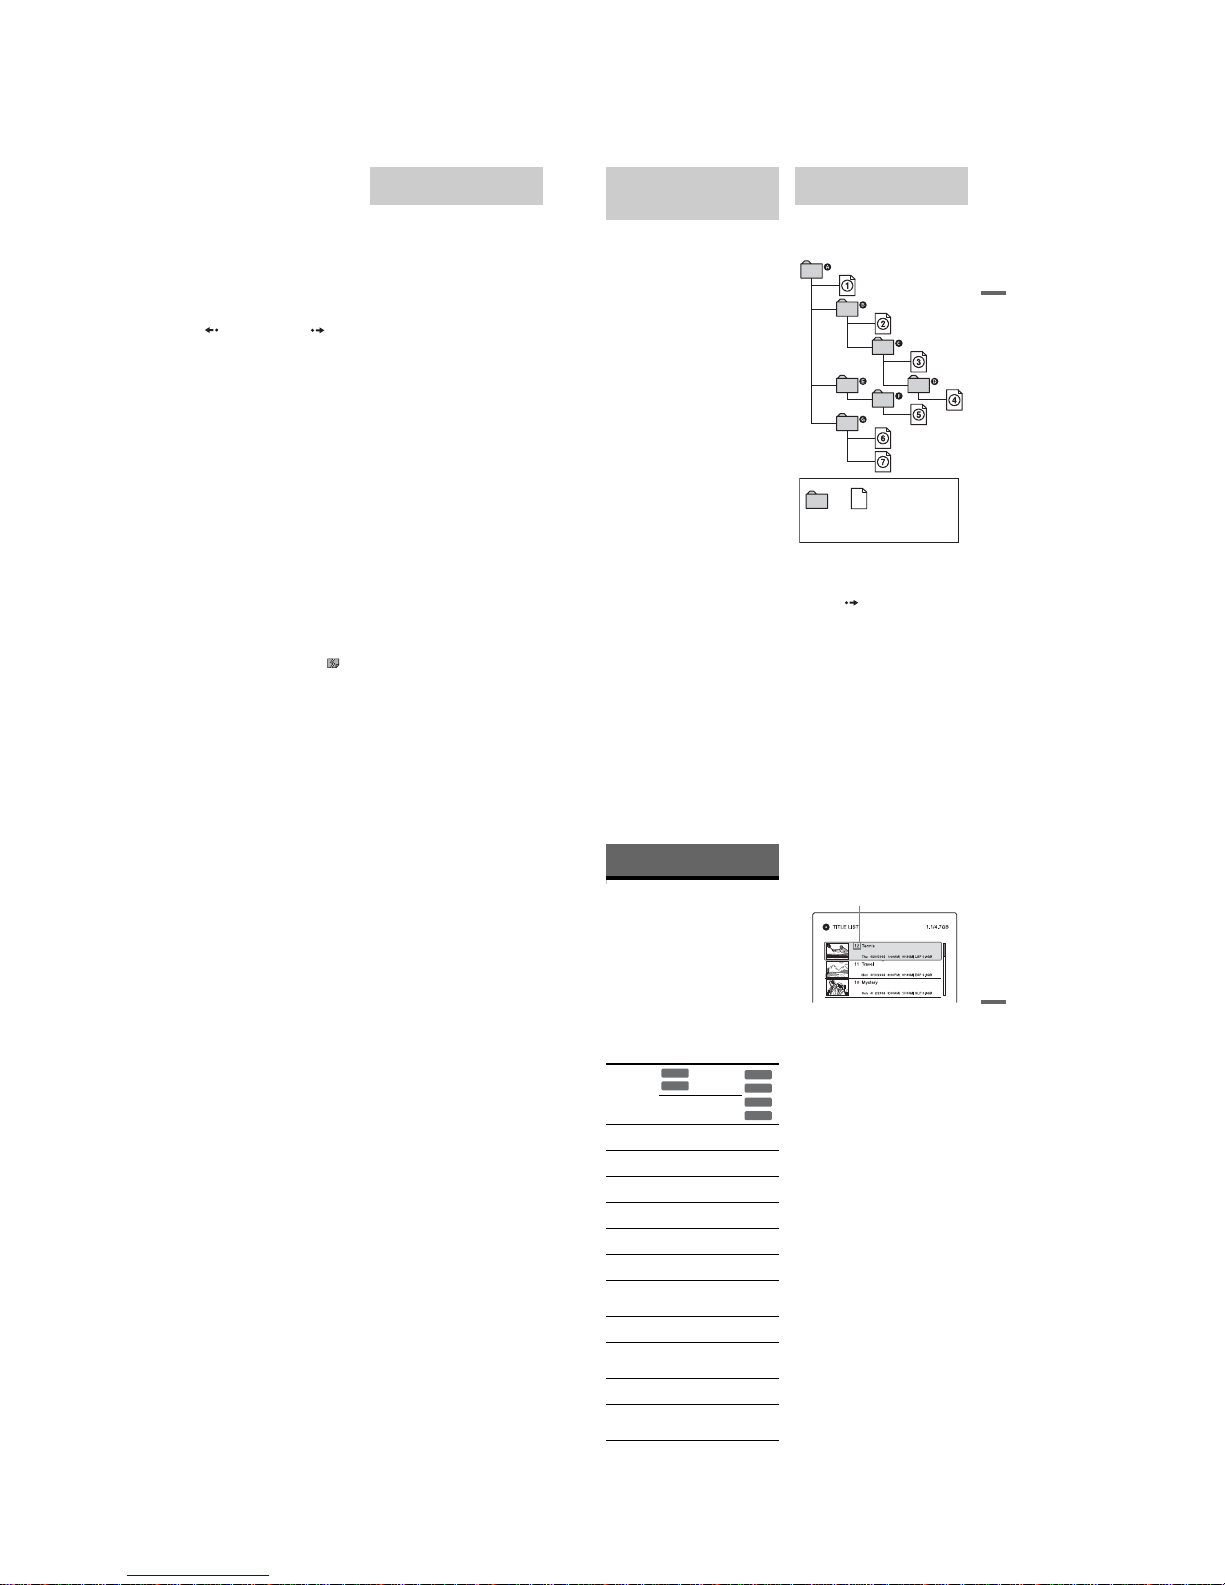
1-14
56
To play the beginning of the track
Press OPTIONS to select “Play Beginning,”
and press ENTER.
To fast forward or review a track
Press m/M during playback.
To go to the next or previous MP3 audio
track or JPEG image f ile
Press . PREV or NEXT> during
playback. If you repeat edly press .PRE V
or NEXT >, you will go to the next or
previous album. (MP3 audio track only)
To go to the next or previous album
Press REPLAY/ADVANCE during
playback or slideshow.
To rotate a picture
Press OPTIONS while the JPEG image is
displayed to select “Rotate Rig ht” or “Rotate
Left,” and press ENTER.
z Hints
• Press the AUDIO button
to switch between
stereo or monaural audio tr acks.
• You can rotate a JPEG image by using the </,
buttons when the image is displayed.
• Press DISPLAY repeatedly to show information
about the JPEG album or image on your TV
screen. Then press TIME/TEXT to toggle
between the current selected image number and
album number.
b
Notes
• Some JPEG files, especially files of three million
pixels or more, may lengthen the slideshow
interval.
• Rotated JPEG images will not be saved when you
switch to another folder.
• Images larger than 720 × 480 will be reduced to
720 × 480 when displayed.
• The following images are not displayed:
– progressive JPEG image files
– grayscale JPEG image files
– 4:1:1 JPEG image files
• When you attempt to play a broken file or a file
that does not satisfy the play conditions,
appears but the recorder cannot play the file.
MP3 is an audio compression technology that
satisfies certain ISO/MPEG regulations.
JPEG is an image compression technology.
You can play MP3 (MPEG1 Audio Layer 3)
format audio tracks and JPEG im age fi les on
DATA CDs (CD-ROMs/CD-Rs/CD-RWs)
or JPEG image files on DATA DVDs (DVDROMs/DVD+RWs/DVD+Rs/DVD-RWs/
DVD-Rs).
DATA CDs must be recorded according to
ISO9660 Level 1, Level 2 or Joli et format for
the recorder to recognize the MP3 tracks.
You can also play discs recorde d i n
MultiSession/Border.
See the instructions supplied with the disc
drives and the recording softw ar e (not
supplied) for details on the recording format.
Note on MultiSession/Border discs
If audio tracks and images in Musi c CD
format or Video CD format are recorded in
the first session/border, only the fi rs t sess ion/
border will be played back.
b
Note
The recorder may not be able to play some DATA
CDs created in the Packet Write format.
About MP3 audio tracks and
JPEG image files
57
Playback
The recorder can play the following tracks
and files:
–MP3 audio tracks with the exte nsion
“.mp3.”
–JPEG image files with the extension “.jpeg”
or “.jpg.”
–JPEG image files that co nform to the DC F*
image file format.
* “Design rule for Camera File system”: Image
standards for digital cameras regulated by JEITA
(Japan Electronics and Information Technology
Industries Association).
b
Notes
• The recorder wi ll play an y data wit h the exte nsion
“.mp3,” “.jpeg,” or “.jpg,” even if they are not in
MP3 or JPEG format. Playing these data may
generate a loud noise which could damage your
speaker system.
• The recorder does not conform to audio tracks in
mp3PRO format.
• Some files cannot be played.
• The letters that cannot be displayed are replaced
with “*.”
Albums play in the following order:
Structure of disc contents
When you insert a DATA CD/DATA DVD
and press H PLAY, the numbered tracks (or
files) are played sequentially, from 1
through 7. For JPEG image files, press
ADVANCE to go to the next album. (For
instance, when you want to go from 1 to
2.) Any sub-albums/ tracks (or files)
contained within a currently sel ected album
take priority over the next album in the same
tree. (Example: C contains D so 4 is
played before 5.)
z Hints
• If you add numbers (01, 02, 03, etc.) to the front
of the track/file names when you store the tracks
(or files) in a disc, the tracks and files will be
played in that order.
• Since a disc with many trees takes longer to start
playback, it is recommended that you create
albums with no more than two trees.
MP3 audio tracks or JPEG
image files that the recorder
can play
About playback order of
albums, tracks, and files
ROOT
Tree 1 Tree 2 Tree 3 Tree 4 Tree 5
Album
MP3 audio track/
JPEG image file
,continued
58
b Notes
• Depending on the software you use to create the
DATA DVD/DATA CD, the playback order may
differ from the above illustration.
• No more than a total of 999 individual folders can
be played. (Folders that do not contain JPEG/
MP3 files are counted as well.)
• No more than a total of 999 folders and 9999 files
can be played. (Files other than JPEG /M P3 fi les,
and folders that do not contain JPEG/MP3 files
are counted as well.)
• No more than 999 folders and files can be
recognized in a single folder. (Folders that do not
contain JPEG/MP3 files are counted as well.)
• Proceeding to the next or another album may take
some time.
• This recorder supports MP3 audio bit rates up to
320 kbps.
59
Erasing and Editing
Erasing and Editing
Before Editing
This recorder offers various edit options for
various disc types.
b Notes
• You may lose the edited contents if you remove
the disc or a timer recording starts while editing.
• DVD discs created by DVD video cameras
cannot be edited on this recorder.
• If a message appears and indicates that the disc’s
control information is full, erase or edit
unnecessary titles.
• When editing a DVD+R or DVD-R, finish all
editing before finalizing the disc. You cannot edit
a finalized disc.
* DVD+RW only
To open up disc space
To open up disc space on a DVD+RW or
DVD-RW (Video mode), erase the title with
the largest number in the title list.
For the DVD-RWs (VR mode), you can erase
any title.
For DVD-Rs and DVD+Rs, the available disc
space does not increase even if you erase
titles.
See “Erasing and Editing a Title” on page 60
or “Erasing multiple titles (Erase Titles)” on
page 60.
To switch between the Playlist and
Original Title List
You can display the Playlist titles in the Title
List (Playlist), or the Original titles in the
Title List (Original). To switch the two Title
Lists, press
</, while a Title List is
displayed. To create and edit a Playlist, see
page 62.
Edit
features
Original
title
Playlist
title
Erase
(page 60)
Yes Yes Yes
Protect Title
(page 60)
Yes No Yes
Title Name
(page 60)
Yes Yes Yes
A-B Erase
(page 61)
Yes Yes Yes*
Erase Titles
(page 60)
Yes Yes Yes
Divide Title
(page 65)
No Yes No
Set
Thumbnail
(page 60)
Yes Yes No
Chapter mark
(page 62)
Yes Yes No
Playlist
creation
(page 62)
Yes Yes No
Change Order
(page 64)
No Yes No
Combine
Titles
(page 64)
No Yes No
-
RWVR
-
RVR
+
RW
-
RWVideo
+
R
-
RVideo
Largest title number
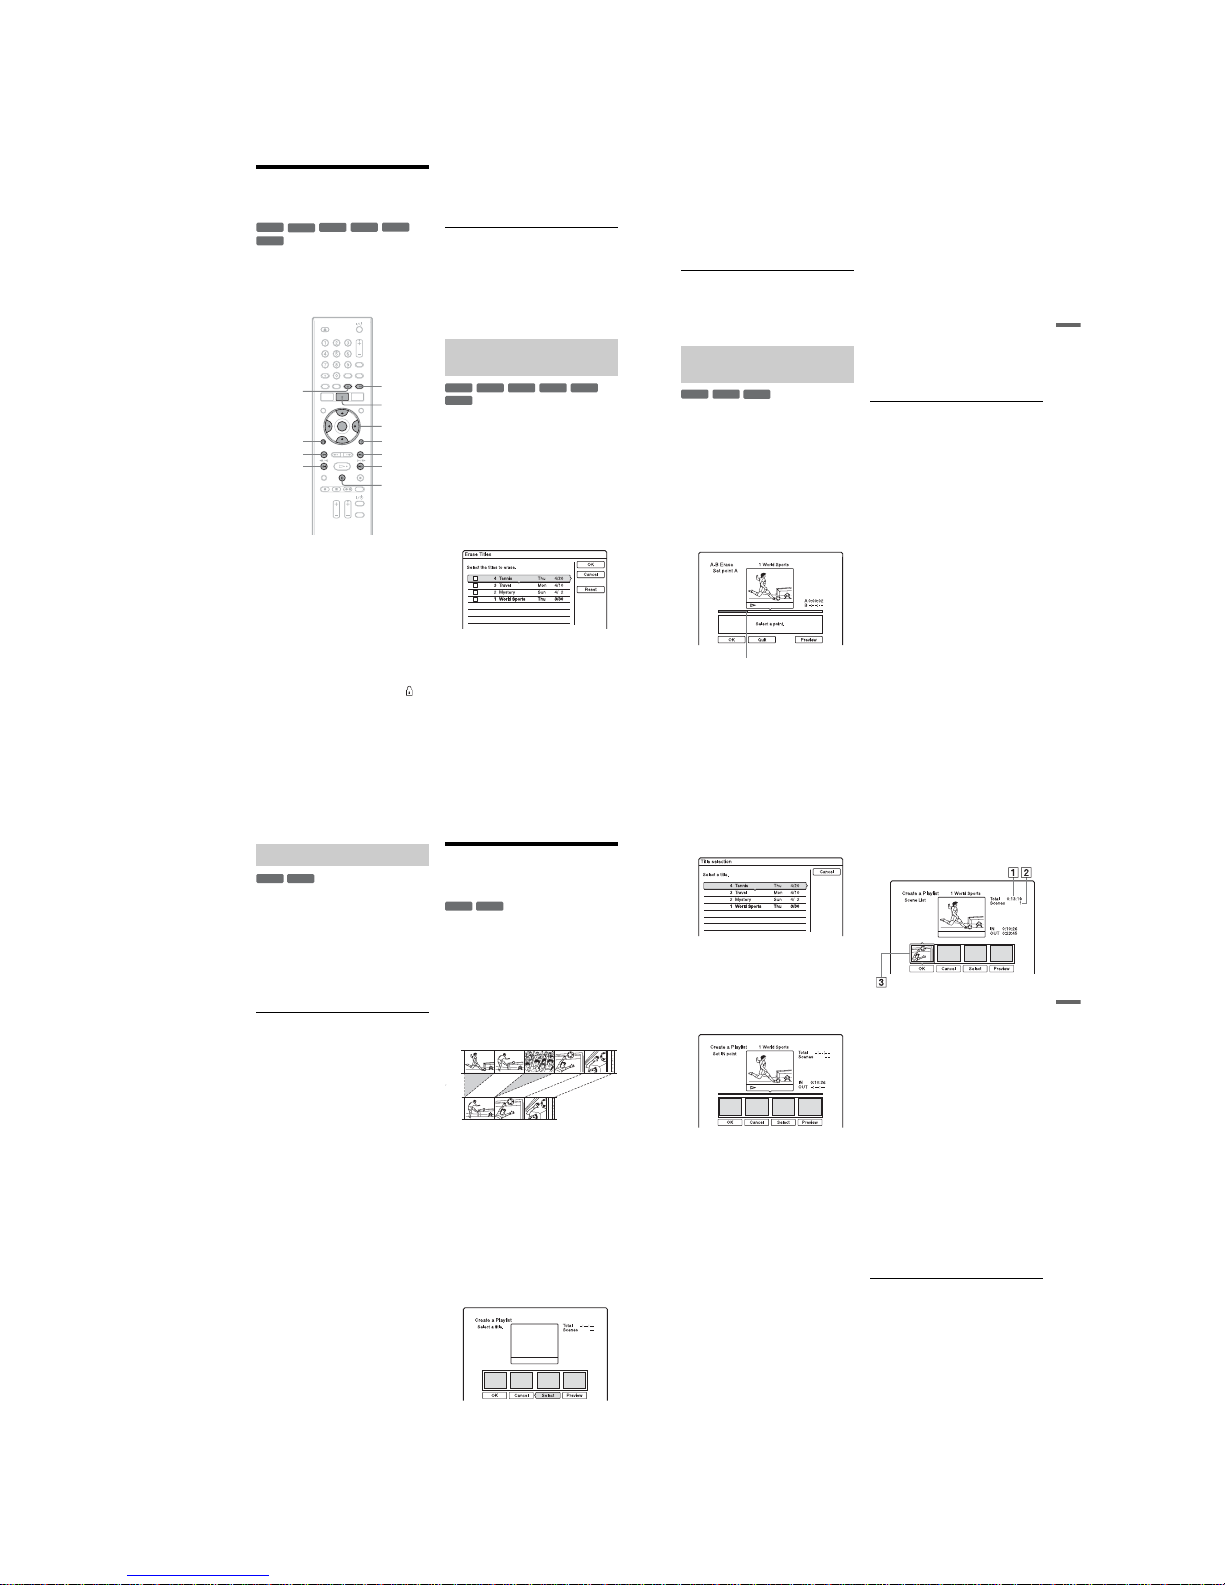
1-15
60
Erasing and Editing a
Title
This section explains the basic edit functi ons.
Note that editing is irreversible. To edit
DVD-RWs/DVD-Rs (VR mode) without
changing the original recordings, create a
Playlist title (page62).
1 Press TITLE LIST.
For DVD-RWs/DVD-Rs in VR mode,
press
</
, to switch the Title Lists, if
necessary.
2 Select a title, and press ENTER.
The sub-menu appears.
3 Select an option, and press ENTER.
You can make the following edits to the
title.
“Erase”: Erases the selected title . Sel ect
“OK” when asked for confirmation.
“Protect Title”: Protects the title. “”
appears next to the protected title.
“Title Name”: Allows you to enter or reenter a title name (page 33).
“A-B Erase”: Erases a section of the title
(page 61).
“Set Thumbnail”: Changes the title’s
thumbnail picture that appears in the
Title List (page 30).
“Make a Playlist”: Adds the entire title to
the Playlist title as one sc ene (page 64).
z Hints
• You can erase multiple titles at one time
(page 60).
• You can label or re-label DVDs (page34).
b
Note
DVD-RW/DVD-R (VR mode) playlist titles cannot
be protected.
You can select and erase more than one title
at one time using the OPTIONS menu.
1 Press TITLE LIST.
For DVD-RWs/DVD-Rs in VR mode,
press
</
, to switch the Title Lists, if
necessary.
2 Press OPTIONS to select “Erase
Titles,” and press ENTER .
The display for selecting titles to be
erased appears.
3 Select a title, and press ENTER.
A check mark appears in the chec k box
next to the selected title.
• To clear the check mark, press ENTE R
again.
• To clear all of check marks, select
“Reset.”
4 Repeat step 3 to select all of the titles
you want to erase.
-
RW
VR
-
RW
Video
+
RW
+
R
-
R
VR
-
R
Video
</M/m/,,
ENTER
OPTIONS
TITLE LIST
CHAPTER
MARK
ERASE
CHAPTER
MARK
. PREV
X PAUSE
mc
CM
O
RETURN
NEXT >
Erasing multiple titles (Erase
Titles)
-
RW
VR
-
RW
Video
+
RW
+
R
-
R
VR
-
R
Video
61
Erasing and Editing
5 When you finish selecting titles,
select “OK,” and press ENT ER.
The list of the titles to be erased appears
for confirmation.
• To change the selection, select
“Change,” and repeat from step 3.
6 Select “OK” and press ENTER.
The titles are erased.
To erase all titles on the disc
You can reformat a DVD+RW or DVD-RW
to make the disc blank.
See “8. Reformatting a disc” on page 37.
You can select a section ( scen e) in a title an d
erase it. Note that erasing scenes in a title
cannot be undone.
1 After step 2 of “Erasing and Editing a
Title,” select “A-B Erase” and press
ENTER.
The display for setting point A appears.
The title starts to play.
• To return to the beginning of the title,
press X PAUSE and then press
. PREV.
2 Select point A usi ng
m/M
, and
press ENTER.
Playback pauses.
3 Press ENTER if point A is correct.
If point A is incorrect, select point A
using c/C, and press ENTER. The
display for setting point B appears.
4 Select point B using
m/M
, and
press ENTER.
Playback pauses.
5 Press ENTER if point B is correct.
If point B is incorrect, select point B
using c/C, and press ENTER. The
display asks for confirmation.
• To reset point A, press M and
O RETURN, and go to st ep 2.
• To reset point B, press M and repeat
step 4.
• To preview the title without scenes to
be erased, select “Preview” (except for
DVD+RWs).
6 Select “OK,” and press ENT ER.
The scene is erased. The display for
setting point A appears.
• To continue, go to step 2.
• To finish, select “Quit.”
z Hint
A chapter mark is inserted after the scene was
erased. The chapter mark divides the title into
separate chapters on either side of the mark.
b
Notes
• Images or sound may be momentarily interrupted
at the point where you erase a section of a title.
• Sections shorter than five seconds may not be
erased.
• For DVD+RWs, the erased section may be
slightly different from the points you selected.
Erasing a section of a title
(A-B Erase)
+
RW
-
RW
VR
-
R
VR
Playback point
,continued
62
You can manually insert a chapter mark at
any point you like during playback or
recording.
Press CHAPTER MARK at the point where
you want to divide the title into chapters.
Each time you press the button, “Marking ...”
appears on the screen and the sc enes to the
left and right of the mark become sepa rate
chapters.
To erase chapter marks
You can combine two chapters by erasing the
chapter mark during playback.
Press .PREV/NEXT > to search for a
chapter number, and while displaying the
chapter containing the chapter mark you want
to erase, press CHAPTER MARK ERASE.
The current chapter combines with the
previous chapter.
b Note
To insert a chapter mark manually during
recording, set “Auto Chapter ” to “Off” in the
“Recording” setup.
Creating and Editing a
Playlist
Playlist edit allows you to edit or re-edit
without changing the actual recordings. You
can create up to 97 Playlist titles.
Example: You have recorded the f in al few
matches of a football tournament on a DVDRW/DVD-R (VR mode). You want to create
a digest with the goal scenes and other
highlights, but you also want to keep the
original recording.
In this case, you can compile highlight scenes
as a Playlist title. You can even re arra nge the
scene order within the Playlist title.
The Playlist title calls up data from the
original titles for playback. When an orig inal
title is used for a Playlist title, the original
title cannot be edited and erased.
1 Press TITLE LIST.
If the Title List (Ori ginal) appears, press
<.
2 Press OPTIONS to se lect “Create a
Playlist,” and press ENTER.
Creating chapters manually
-
RWVR-RVR
-
RWVR-RVR
Original
Playlist
63
Erasing and Editing
3 Select “Select,” and press ENTER.
4 Select the title you want to include in
the Playlist title, and press ENTER.
The display for setting the start point ( IN)
appears. The title starts to play.
• To return to the beginning of the title,
press X PAUSE and then press
. PREV.
5 Select the IN point using m/M,
and press ENTER.
Playback pauses.
6 Press ENTER if the IN point is correct.
If the IN point is incorrect, select the IN
point using c/C, and press ENTER.
The display for setting the end point
(OUT) appears.
7 Select the OUT point using m/M,
and press ENTER.
Playback pauses.
8 Press ENTER if the OUT point is
correct.
If the OUT point is incorrect, select the
OUT point using c/C, and press
ENTER.
The selected scene is added to the scene
list.
• To add more scenes, go to step 5.
9 When you finish adding scenes, press
m.
A Total duration of the selected
scene
B Total number of scenes
C Selected scene
10
Select the scene you want to re-edit,
and press ENTER.
The sub-menu appears.
“Move”: Changes the scene order using
</, and press ENTER.
“Erase”: Erases the scene. When asked
for confirmation, select “OK.”
• To add more scenes, press M and go to
step 5.
• To add more scenes from another title,
select “Select” and go to step 4.
• To preview all of the captured scenes in
the listed order, select “Preview.”
11
When you finish editing the scene list,
select “OK,” and press ENTER.
The title of the created Playlist is added
to the Title List (Playlist). The title name
is the title name of the first scene.
z Hint
When a Playlist title is created, the IN and OUT
points will become chapter marks, and each scene
will become a chapter.
b Note
The picture may pause when the edited scene is
played.
,continued
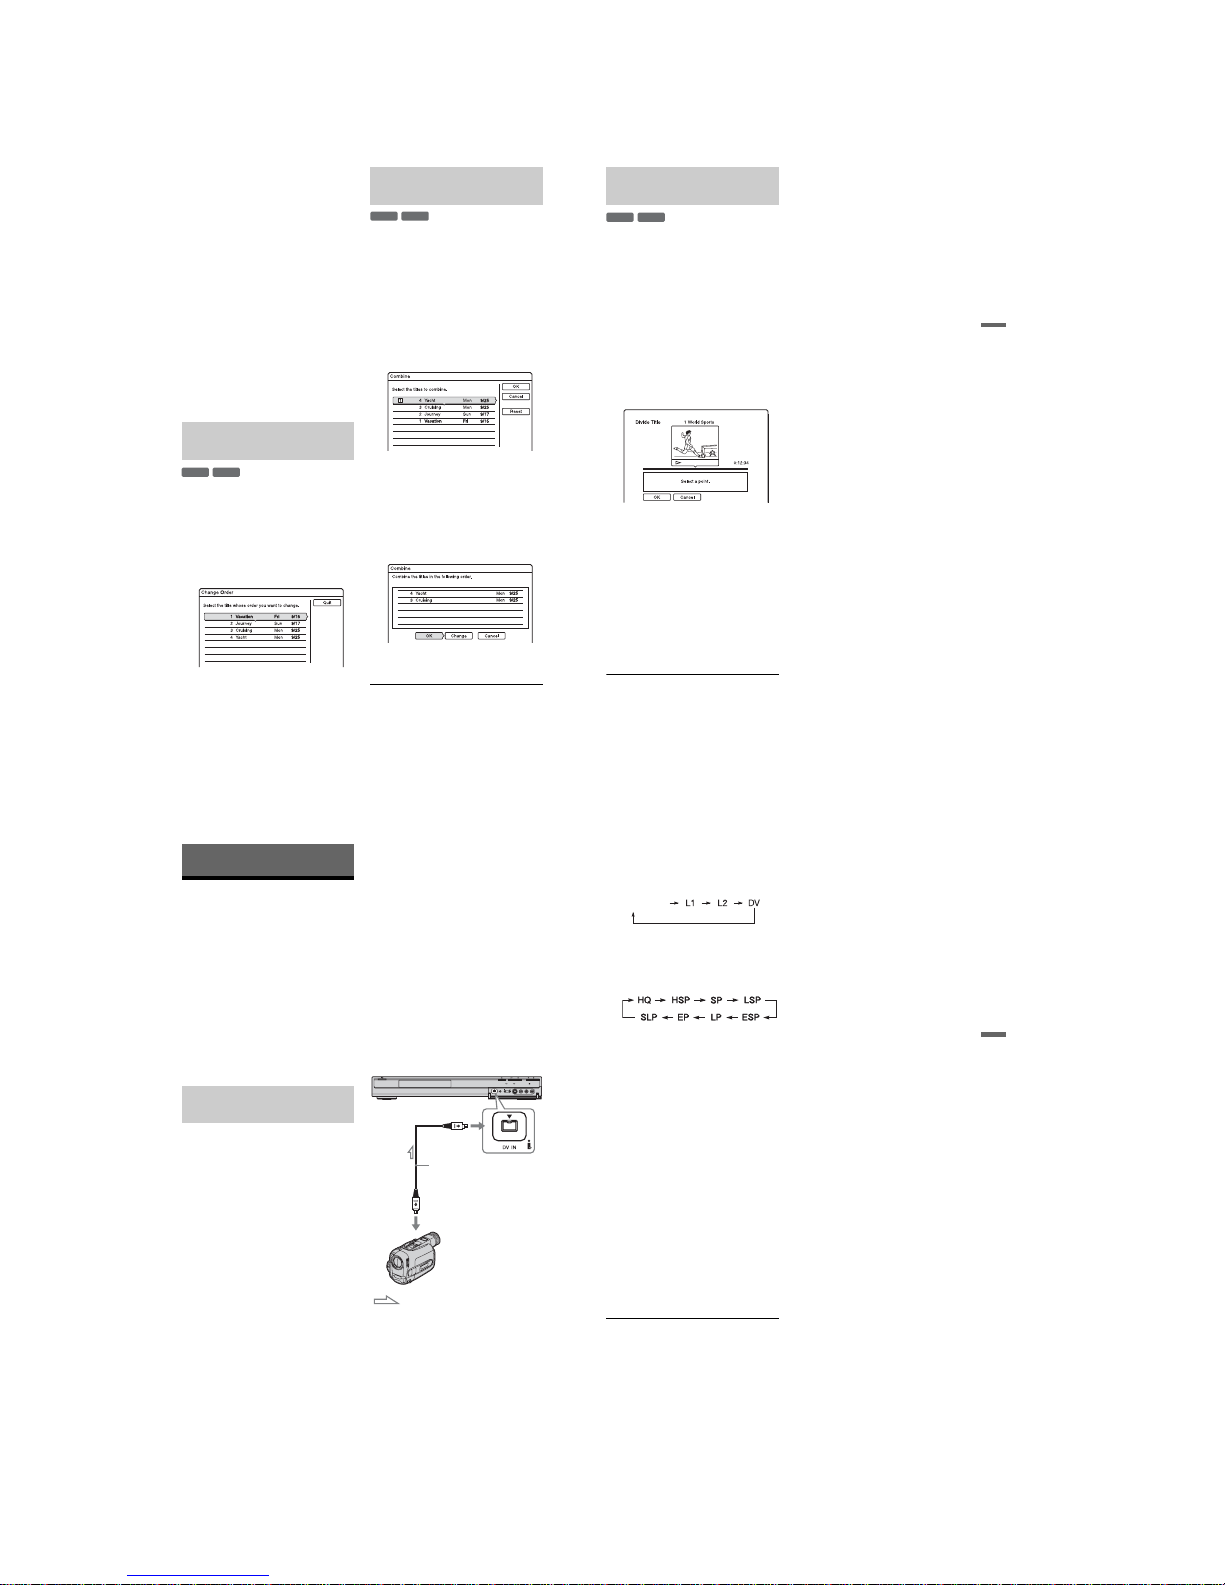
1-16
64
To add the entire title to the Playlist title
as one scene (Make a Playlist)
1
Press TITLE LIST. If the Title List
(Playlist) appears, press ,.
2
Select the title and press ENTER.
The sub-menu appears.
3
Select “Make a Playlist,” and press
ENTER.
The selected title is added to the Title List
(Playlist).
The title name is the same as the Original
title name.
To play the Playlist title
1
Press TITLE LIST. If the Title List
(Original) appears, press <.
2
Select a title, and press ENTER.
The sub-menu appears.
3
Select “Play,” and press ENTER.
You can change the Playlist title order within
the Title List (Playlist).
1 Press TITLE LIST.
If the Title List (Original) appears, press
<
.
2 Press OPTIONS to sel ect “Change
Order,” and press ENTER.
3 Select the title you want to move, and
press ENTER.
4 Select a new location for the title
using M/m, and press ENTER.
The title moves to the new locati o n.
• To move more titles, go to step 3.
• To finish, select “Quit,” and press
ENTER.
1 Press TITLE LIST.
If the Title List (Original) menu appears,
press
<
.
2 Press OPTIONS to se lect “Combine
Titles,” and press ENTER .
The display for selecting titles appears.
3 Select a title, and press ENTER.
A number indicating the order in which
you selected the title appears.
To cancel the selection, press ENTER
again.
4 Repeat step 3 to select all of the titles
you want to combine.
To cancel all of the selections, select
“Reset.”
5 Select “OK,” and press ENTER.
The list of titles to be combined appears.
To change the selection, select “Change”
and go to step 3.
6 Select “OK,” and press ENTER.
The titles are combined.
z Hint
After titles are combined, the title name is the title
name of the first title prior to combination.
b
Note
When the number of chapters in the title to be
combined exceeds the limit, the chapters at th e en d
are combined into a single chapter.
Moving a Playlist title (Change
Order)
-
RW
VR
-
R
VR
Combining multiple Playlist
titles (Combine Titles)
-
RW
VR
-
R
VR
65
Erasing and Editing
You can divide a Playlist title.
1 Press TITLE LIST.
If the Title List (Original) appears, press
<
.
2 Select a title, and press ENTER.
The sub-menu appears.
3 Select “Divide Title,” and press
ENTER.
The display for setting the dividing point
appears, and the title starts to pla y.
• To return to the beginning of the title,
press X PAUSE and then press
. PREV.
4 Select the dividing point by pressing
m/M, and press ENTER.
Playback pauses.
5 Press ENTER if the dividing poi nt is
correct.
If the dividing point is incorrect, select
the dividing point using c/C, and
press ENTER.
The display asks for confirmation.
• To change the dividing point, press M.
6 Select “OK,” and press ENTER.
The title is divided in two.
z Hint
After a title is divided, the title name pr ior to
division is assigned to both the first and second
parts.
Dividing a Playlist title (Divide
Title)
-
RW
VR
-
R
VR
66
DV/Digital8 Dubbing
Before DV/Digital8
Dubbing
This section explains dubbing with a digital
video camera via the DV I N jac k on the fron t
panel. If you want to dub by way of the LINE
IN jacks, see “Recording from connected
equipment without a timer” on page 48.
The DV IN jack on this recorder conforms to
the i.LINK standard.
Follow the instructions in “Preparing fo r DV/
Digital8 dubbing,” and then move on to the
section on dubbing. For more information
about i.LINK, see “About i.LINK” on
page 90.
You can connect a digit al video c amera to th e
DV IN jack on the recorder to record or edit
from a DV/Digital8 format tape. Operation is
straightforward because the recorder will fast
forward and rewind the t ape fo r you – you do
not need to operate your digital video camera.
Do the following to start using the “DV/D8
Edit” functions of this recorder.
See the instruction manual supplied with the
digital video camera as well before
connecting.
z Hint
If you plan to do additional editing on a disc after
the initial dub, use the DV IN jack and record on a
DVD-RW/DVD-R (VR mode).
b Notes
• You cannot make a recording while DV dubbing.
• The DV IN jack is for input only. It will not
output signals.
• You cannot use the DV IN jack when:
– signal input to the DV IN jack on the front panel
or recorder operation cannot be performed
correctly when using a digital video camera
(see “About i.LINK” on page 90). Connect the
camera to the LINE IN jack and follow the
instructions of “Recording from connected
equipment without a timer” on page 48.
– the input signal is not in DVC-SD format. Do
not connect a MICRO MV format digital video
camera even if it has an i.LINK jack.
– the images on the tape contain copy pr ote c ti on
signals, which limit recording.
• If you want to play the disc on other DVD
equipment, finalize the disc (page 35).
Hookups
1 Insert a disc.
See “1. Inserting a Disc” on page 27.
2 Insert the source DV/Digital8 format
tape into your digi tal video camera.
For the recorder to record or edit, your
digital video camer a mu st be set to vi deo
playback mode.
Preparing for DV/Digital8
dubbing
DVD recorder
to DV IN
i.LINK cable (not supplied)
DV output
Digital video camera
: Signal flow
67
DV/Digital8 Dubbing
3 Press INPUT SELECT on the remote
repeatedly to select “DV.”
The front panel display changes as
follows:
4 Press REC MODE on the remot e
repeatedly to select the recording
mode.
The recording mode changes as follows:
For details about the recording mode, see
page 39.
5 Press OPTIONS on the remote to
select “DV / D8 Audio Input,” and
press ENTER. Then, select the setting
for the audio input.
“Stereo1” (default): Records original
sound only. Norm ally select this when
dubbing a DV format tape.
“Mix”: Records both stereo 1 and 2.
“Stereo2”: Records additional audio
only.
Select “Mix” or “Stereo2” only if you
have added a second audio cha nnel when
recording with your di gita l video camera.
You are ready to start dubbing. Se lect
one of the dubbing methods on the
following pages.
6 Adjust the dubbing picture quality and
size.
Before dubbing starts, press OPTIONS
to select “Rec Settings,” and adjust the
recording settings (page42).
z Hint
You can turn off the recorder during dubbing. The
recorder completes dubbing even after being turned
off.
b Notes
• You cannot connect more than one piece of
digital video equipment to the recorder.
• You cannot control the recorder using another
device or another recorder of the same model.
• You cannot record date, time, or the contents of
the cassette memory onto th e disc.
• If you record from a DV/Digital8 format tape that
is recorded in multiple sound tracks, such as a
tape with multiple sampling frequencies (48 kHz,
44.1 kHz, or 32 kHz), no sound or an unnatural
sound will be output when playing back the
sampling frequency switch point on the disc.
• In order to use this recorder’s “Auto Chapter”
setting (page 68), be sure to correctly set the clock
on your digital video camera before shooting.
• The recorded picture may be momentarily
affected or the start and end points of a program
may be different from what you have set if the
source DV/Digital8 format tape is in any of the
following conditions. In this case, see “Recording
from connected equipment without a timer”
(page 48).
– There is a blank space in the recorded portion of
the tape.
– The tape’s time code is not sequential.
– If the picture size or the recording mode on the
tape being dubbed changes.
channel

1-17
68
Recording an Entire DV
Format Tape (One Touch
Dubbing)
You can record the entire cont ents of a DV/
Digital8 format tape onto a disc with a single
press of the ONE-TOUCH DUB butto n on
the recorder. The recorder controls the digital
video camera for the wh ole process, and
completes the recording.
How chapters are create d
The contents dubbed to DVD become a
single title. When “Auto Chapter” is set to
“On” in the “Recording” setup, this title is
divided into chapters. When dubbing a DVDRW/DVD-R (VR mode), each shooting
session on the tape becomes a chapter on the
disc. For other discs , t he re cord er di vide s the
title into chapters at approximately 6 minut e
intervals.
Follow steps 1 to 6 of “Pr eparing for DV/
Digital8 dubbing” on page 66, and press
ONE-TOUCH DUB on the recorder.
The recorder rewinds the t ap e an d t hen start s
recording the tape contents.
When the recording is finished, the record er
rewinds the tape in the digital video camera.
To stop during recording
Press x REC STOP.
Note that it may tak e a few seconds for the
recorder to stop recording.
z Hint
If you set “Finalize Disc” of “One Touch Dubbing”
to “Auto” in the “DVD” setup (page 80), the
recorded disc (except DVD-RW (VR mode)) will
automatically be finalized after recordin g is
finished.
b
Notes
• When a blank space between the recordings on
the tape continues for more than five minutes,
One Touch Dubbing ends automatically.
• The recorder records a blank for five minutes
before it stops dubbing. To stop the blank
recording, press x REC STOP.
Program Edit
You can select scenes from a DV / D igital8
format tape, and then automatically record
selected scenes to a DVD.
To use this functi o n, do the following:
m
Using the recorder’s remote contro l, fast
forward or rewind the tape to select the
scenes. At this point, the selecte d scenes are
not copied to the disc. The recorder only
remembers the IN and OUT points of the
scenes that you selected for dubbing. You can
also erase or change the order of the scenes.
m
After you have selected the scenes, the
recorder will fast forward and rewind the tape
automatically and record the s cenes to a
DVD.
How chapters are created
The contents dubbed to DVD become a
single title. When “Auto Chapter” is set to
“On” in the “Recording” setup, this title is
divided into chapters. When dubbing to a
DVD-RW/DVD-R (VR mode), each
shooting session on the tape and each
selected scene becomes a chap ter on the dis c.
For other discs, the recorder divides the title
into chapters at approximat ely 6 minute
intervals.
1 Follow steps 1 to 6 o f “Preparing for
DV/Digital8 dubbing” on page 66, and
press SYSTEM MENU.
+
RW
-
RW
VR
-
RW
Video
-
R
VR
+
R
-
R
Video
Connect your digital video cam era and
prepare for recording
Select and edit the scenes you want to dub
Dub the selected scenes
-
R
VR
-
RW
VR
-
RW
Video
+
RW
+
R
-
R
Video
69
DV/Digital8 Dubbing
2 Select “DV / D8 EDIT,” an d press
ENTER.
The display asks if you want to start
selecting scenes.
• If you have previously saved a
program, the display asks if you want to
edit an existing program or to create a
new program. To resume editing the
existing program, select “Saved Data,”
and go to step 9.
3 Select “Start,” and press ENTER.
The display for setting the IN point (start
of the scene) appears.
The scene starts to play.
4 Select the IN point using m/M,
and press ENTER.
Playback pauses.
5 Press ENTER if the IN point is correct.
If the IN point is incorrect, select the IN
point using c/C, and press ENTER.
The display for setting the OUT point
(end of the scene) appears.
6 Select the OUT point using m/M,
and press ENTER.
Playback pauses.
7 Press ENTER if the OUT point is
correct.
If the OUT point is incorrect, select the
OUT point using c/C, and press
ENTER.
The selected scene is added to the scene
information block.
• To add more scenes, go to step 4.
8 When you finish adding scenes, press
m.
The scene list is displayed.
A Total duration of the program
B Total number of scenes
C Scene information block
9 Select the scene information block
you want to edit using </,, and
press ENTER.
The sub-menu appears.
“Move”: Changes the scene order using
</, and ENTER.
“Erase”: Erases the scene. When asked
for confirmation, select “OK.”
“Preview”: Plays the selected scene.
• To add more scenes, press M and go to
step 4.
10
When you finish editing the scene list,
select “OK,” and press ENTER.
The display for entering the title name
appears. To enter a new name, select
“Enter,” and follow the explanations on
page 33.
,continued
70
11
Select “OK,” and press ENTER.
The title name is fixed, and the display
asks if you want to start recording.
To change the dubbing mode, select
“Dub Mode” and press M/m.
12
Select “Start,” and pr ess ENTER.
The recorder starts recording the tape
contents as programmed.
To stop during recording
Press x REC STOP.
Note that it may tak e a few seconds for the
recorder to stop recording.
To automatically adjust the dubbing mode
If there is not enough available space on the
target disc, the recorder automatically selec ts
a dubbing mode with lower picture quality
according to the availabl e space. The same
dubbing mode is set for all of the titles. If disc
space is insufficient for the selected dubbing
mode, the following display appears after
step 12.
Select “OK” and go to step 12.
If you do not want to change the dubbing
mode, select “Cancel.” However, note that
dubbing will end before the pr ogram is
finished.
b Notes
• If you set the beginning of the tape as the IN point
and the end point as the OUT point, the IN and
OUT points may move slightly during dubbing.
• You cannot set a scene to be shorter than one
second.
Data capacity required for the dubbin g.
This is displayed in red when the size
exceeds the available space on the
dubbing target media.
71
Settings and Adjustments
Settings and Adjustments
Antenna Reception and
Language Settings
(Basic)
The “Basic” setup helps you to make tuner,
clock, and channel settings fo r the recorder.
1 Press SYSTEM MENU while the
recorder is in stop mode.
2 Select “SETUP,” and press EN TER.
3 Select “Basic,” and press ENTER.
The options for “Basic” appear. The
default settings are underlined.
To turn off the display, press SYSTEM
MENU repeatedly.
b Note
You cannot preset channels for the conn ected cable
box or satellite receiver.
Auto Preset
Automatically presets the receivable
channels. The recorder can re ceive VHF
channels 2 to 13, UHF channels 14 to 69, and
unscrambled CATV channels 1 to 125. First,
we recommend that you pres et the receiv able
channels in your area using auto matic
presetting methods.
1 Select “Tu ner Preset” in “Basic,” and
press ENTER.
2 Select “Antenna / Cable,” and press
ENTER.
3 Select an opt io n, and press ENTER.
4 Select “Auto Preset,” and press ENTER.
All receivable channels are preset in
numerical sequence.
Manual Channel Setup
Presets or disables channels ma nually.
If some channels could not be set using the
“Auto Preset” or “Easy Setup” function, you
can set them manually.
1 Select “Tu ner Preset” in “Basic,” and
press ENTER.
Tuner Preset
Antenna Presets VHF and UHF
channels.
Cable
Presets cable TV
channels.
,continued

1-18
72
2
Select “Antenna / Cable,” and press
ENTER.
3
Select an option, and press ENTER.
4
Select “Manual Channel Setup,” and
press ENTER.
5
Press M/m to select the channel you want
to activate, and press ENTER.
6
Press </, to select “Activate
Channel,” and press ENTER.
The disabled channel will be skipped
when you press CH +/–.
7
Press M/m to select “Yes” to ac ti vate th e
channel.
8
Press , to select “AFT.”
9
Select “On” to turn on AFT, and press
ENTER.
• If the Auto Fine Tuning function does
not work effectively, select “Off” in
step 8 and press ,. Press M/m to
obtain a clearer picture, and press
ENTER.
10
To preset or disable another channel,
repeat from step 5.
Auto (Auto Clock Set)
Turns on the Auto Clock S et functi on when a
channel in your local area broadcasts a time
signal.
1
Select “Clock” in “Basic,” and press
ENTER.
2
Select “Auto,” and press ENTER.
Antenna Presets VHF and UHF
channels.
Cable
Presets cable TV
channels.
Yes
Activates the channels.
No Disables the channels.
On Turns on the Auto Fine
Tuning function.
Normally, select this.
Off Allow s you to adjust the
picture manually.
Clock
73
Settings and Adjustments
3
Select “Full Auto,” and press ENTER.
4
Select “Yes,” and press ENTER.
The recorder automatically sets the clock
by searching for a channel that carries a
time signal and sets your time zone and
Daylight Saving Time (if applica bl e) .
• If the clock does not activate, your
clock setting is incorrect. After
repeating steps 1 to 3 above, select
“No” in step 4 and press ENTER. Then
select “Clock Set CH,” “Time Zone,”
or “Daylight Saving” and press
ENTER. Adjust these settings by
pressing M/m and ENTER.
Clock Set CH
Select a channel tha t carri es a t ime sig nal
using the number buttons .
Use this option if you kn ow of a cha nn el
that carries a time signal. Most PBS
member stations broadcast a time signal.
For the fastest response s el ec t your local
PBS station. Leave the setting at “--” to
have the recorder automatically search
for a channel that carries a time signal.
To return to “--,” enter “0.”
Time Zone
Select the time zone for your area, or
select “Auto” to have the recorder
automatically set your time zone.
The options are:
Auto y Atlantic y Eastern y
Central y Mountain y Pacific y
Alaska y Hawaii y Auto
Daylight Saving
Select “On” or “Off” (standard time), or
select “Auto” to have the recorder
automatically set the daylight sa ving
time.
z Hint
If you set “Full Auto” to “Yes,” the Auto Clock Set
function is activated whenever the recorder is
turned off.
Manual (Manual Clock Set)
If the Auto Clock Set function did not set the
clock correctly for your local area, set the
clock manually.
1
Select “Clock” in “Basic,” and press
ENTER.
2
Select “Manual,” and press ENTER.
3
Press M/m to set the month, and press
,.
Set the day, year, hour, and minutes in
sequence. Press </, to select the item
to be set, then press M/m to set the
numbers. The day of the week is set
automatically.
4
Press ENTER to start the clock.
z Hint
To change the numbers in step 3, press < to return
to the item to be changed, and select the numbers by
pressing M/m.
Switches the display language o n the screen.
Yes Automatically sets your
time zone and Daylight
Saving Time (if
applicable).
No Allows you to adjust
your time zone and
Daylight Saving Time
manually, without
turning off the Auto
Clock Set function.
OSD (On-Screen Display)
74
Video Settings (Video)
Video settings will adjust items relate d to the
image, such as size and color.
Choose the settings accordin g to the type of
TV, tuner, or decoder connected to the DVD
recorder.
1 Press SYSTEM MENU w hile the
recorder is in stop mode.
2 Select “SETUP,” and p ress ENTER.
3 Select “Video,” and press ENTER.
The “Video” setup appears with the
following options. The default settings
are underlined.
Video Output
TV Type
Sets the picture size when playing back a title
recorded from 16:9 size video (page 42) or a
16:9 size commercial DVD video.
Select the playback picture size according to
the type of connected TV (wide-screen/wide
mode TV or conventional 4:3 screen TV).
b Note
Depending on the disc, “4:3 Letter Box” may be
selected automatically instead of “4:3 Pan Scan” or
vice versa.
Y/Pb/Pr Out Black Level
Selects the black level (setup level) for the
video signals output from the
COMPONENT VIDEO OUT jacks
(page 16).
This setting is not effective whe n the recorder
outputs progressive signals.
Progressive Output
If your TV accepts progressive (480p) format
signals, set “Progressive Output” to “On.”
You will enjoy accurate color re pr oduction
and high quality images.
1 Select “Progressive Output,” and press
ENTER.
2 Select “On,” and pr ess ENTER.
The display asks for confirmation.
3 Select “Start,” and press ENTER.
The video switches to a progressive
signal for 5 seconds.
4 If video signal appears OK, select “Yes,”
and press ENTER.
If picture is distorted , s elect “No,” and
press ENTER.
16:9 Select this when connecting
to a wide-screen TV or TV
with a wide mode function.
4:3 Letter
Box
Select this when connecting
to a 4:3 screen TV. Displays a
wide picture with bands on
the upper and lower portions
of the screen.
4:3 Pan
Scan
Select this when connecting
to a 4:3 screen TV.
Automatically displays a
wide picture on the entire
screen and cuts off the
portions that do not fit.
On Raises the standard black
level. Select this whe n the
picture appears too da rk .
Off
Sets the black level of the
output signal to the standard
level. Normally, select this.
16:9
4:3 Letter Box
4:3 Pan Scan
75
Settings and Adjustments
Progressive Mode
DVD software can be divided into two types:
film based software and vi deo based
software. Video based softw are is derived
from TV and displays images at 30 frames/60
fields per second. Film ba sed software is
derived from film and displays images at 24
frames per second. Some DVD software
contains both Video and Film.
In order for these images to appear natural on
your screen when output in progressive
mode, the progressive video signal needs to
be converted to match the type of DVD
software that you are watching.
You can fine-tune the progressive 480p video
signal that is output when you set
“Progressive Output” to “On.”
Note that you must connect to a progressive
format TV using the COMPONENT VIDEO
OUT jacks (page 16).
b Note
When picture noise appears after you set the
recorder to progressive format, hold down
x STOP, and press CHANNEL – (minus) on the
unit.
Line Input
Sets the method of inputting video signals
from the LINE IN jacks on the rear panel of
the recorder. Select an option for each of the
items below according to the combination of
jacks and methods that you are goi ng t o use.
Line1 Input
Selects a method of inputting video sig nals
for the LINE 1 IN jack on the rear panel of the
recorder.
Pause Mode (DVDs only)
Selects the picture quality in paus e m ode.
Auto Display
Screen Saver
The screen saver image appears when you do
not use the recorder for more than 10 minute s
while an on-screen displ ay, such as the
System Menu, is displayed on you r TV
screen. The screen saver image helps prevent
your display device from becoming damaged
(ghosting).
Auto Automatically detects the
software type (Film-based or
Video-based) and selects the
appropriate conversion mode.
Normally select this position.
Video Fixes the conversion mode to
the mode for Video-based
software.
Video
Inputs video signals.
S Video Inputs S video signals.
Auto The picture, including
subjects that move
dynamically, is output with
no jitter. Normally select this
position.
Frame The picture, including
subjects that do not move
dynamically, is output in high
resolution.
On
Automatically displays
information on the screen
when the recorder is turned
on, etc.
Off Displays information only
when DISPLAY is pressed.
On
Turns on the screen saver
function.
Off Turns off the function.
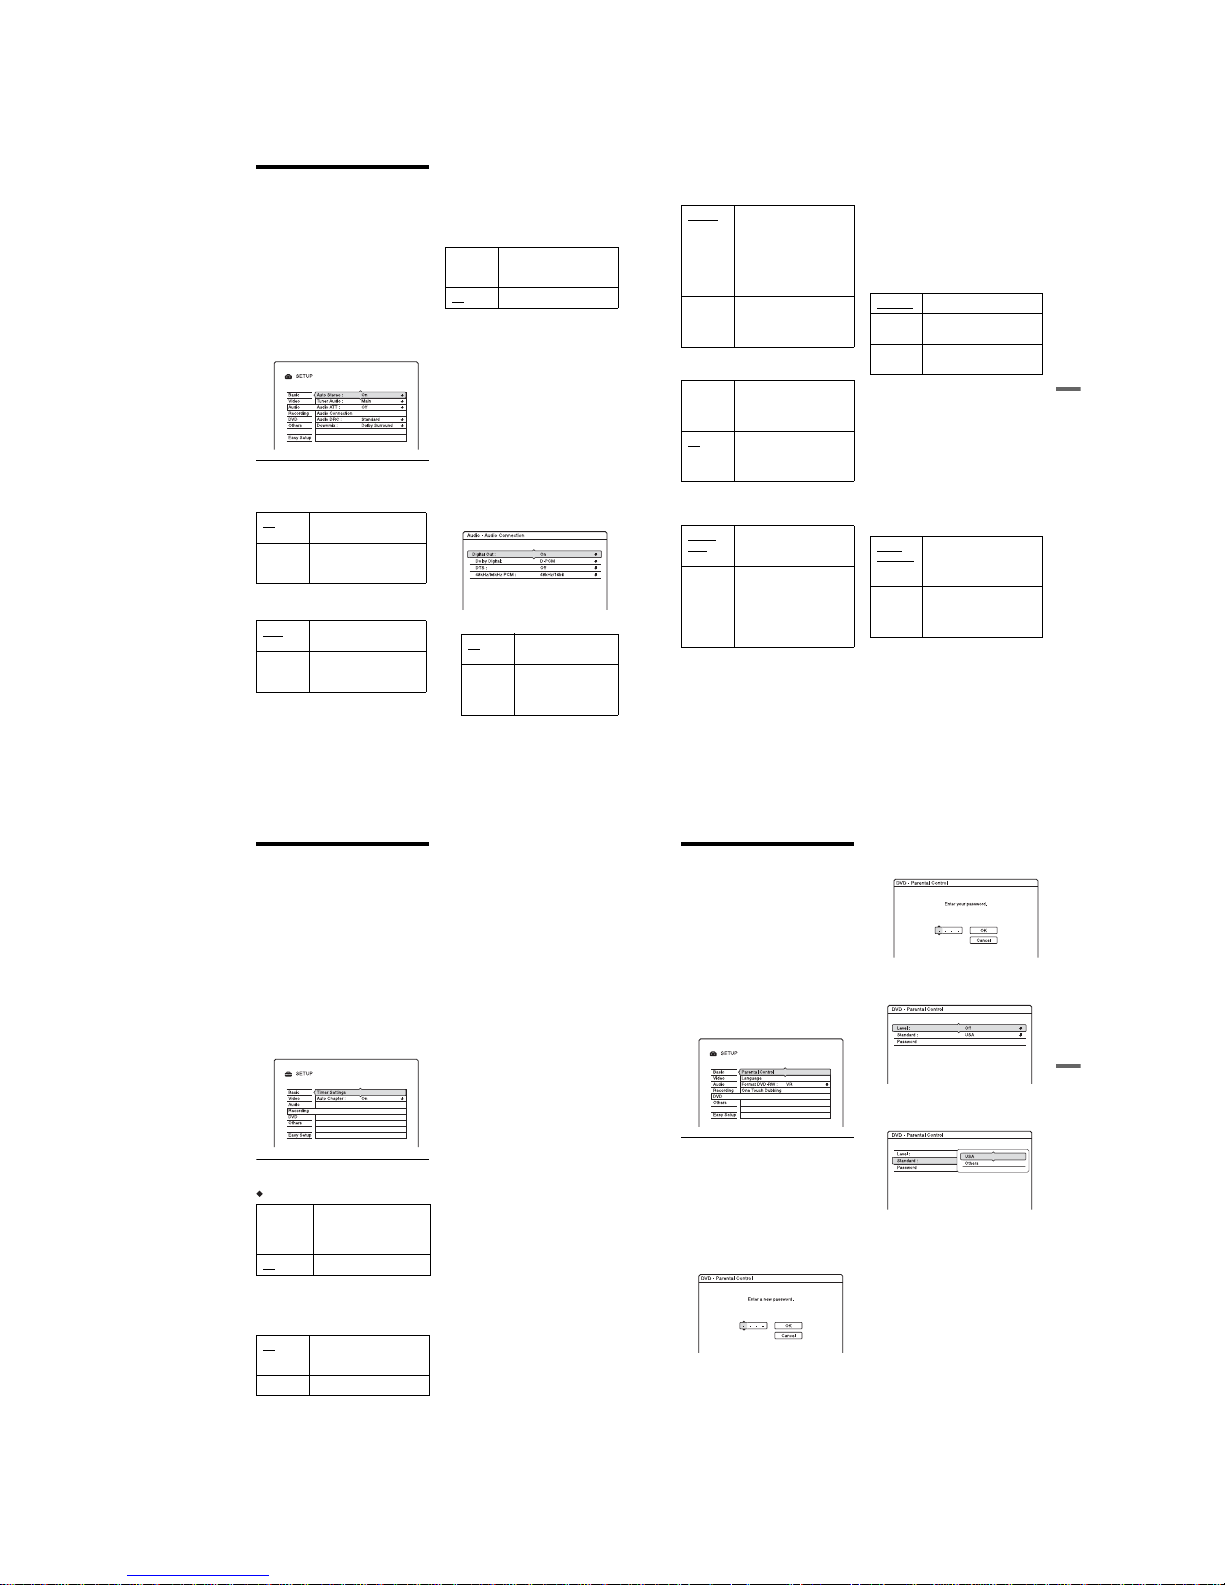
1-19
76
Audio Settings (Audio)
The “Audio” setup allows you to adjust the
sound according to the playb ack and
connection conditions.
1 Press SYSTEM MENU w hile the
recorder is in stop mode.
2 Select “SETUP,” and p ress ENTER.
3 Select “Audio,” and pr ess ENTER.
The “Audio” setup appears with the
following options. The default settings
are underlined.
Auto Stereo
This function is effe ct ive only when “Tuner
Audio” is set to “Main.”
Tuner Audio
Selects the sound to be recorded.
b
Note
If no SAP sound is received, the main sound is
recorded regardless of the setting.
Audio ATT (attenuation)
If the playback sound is distorted, set this
item to “On.” The recorder reduces the audio
output level.
This function affects the output of the
following jacks:
–LINE OUT R-AUDIO-L jacks
Audio Connection
The following setup items switch the method
of outputting audio signals when you connect
a component such as an amplifi er (receiver)
with a digital input jack.
For connection details, see “Step 3:
Connecting the Audio Co rds” on page 18.
Select “Dolby Digital,” “DTS,” and “48kHz/
96kHz PCM” after setting “Digital Out” to
“On.”
If you connect a component that does not
accept the selected audio signal, a loud noise
(or no sound) will come out from the
speakers, and may affect your ear s or cause
speaker damage.
1
Select “Audio Connection” in “Audio,”
and press ENTER.
2
Select “Digital Out,” and press ENTER.
3
Select “On,” and press ENTER.
On Receives stereo programs.
Normally select thi s.
Off Sele ct this to reduce noise.
The sound changes to
monaural.
Main
Records only the main
sound.
SAP
Records only the SAP
(Second Audio Program)
sound.
On Select this when the playback
sound from the speakers is
distorted.
Off
Normally select this position.
On
Normally select this
position.
Off The infl uence of the
digital circuit upon the
analog circuit is
minimal.
77
Settings and Adjustments
4
Set the digital output signal.
• Dolby Digital (DVDs only)
Selects the type of Dolby Digital signa l.
• DTS (DVD VIDEOs only)
Selects whether or not to output DTS signals.
• 48kHz/96kHz PCM (DVD VIDEOs only)
Selects the sampling frequency of th e audio
signal.
b
Note
“48kHz/96kHz PCM” setting has no effect when
audio signals are output from the LINE OUT (RAUDIO-L) jacks. If the sampling frequency is
96kHz, signals are simply converted to analog
signals and output.
Audio DRC (Dynamic Range Control)
(DVDs only)
Selects the dynamic range (difference
between soft and loud sounds) setting when
playing a DVD that conforms to Audio DRC.
This affects the output from the following
jacks:
– LINE OUT R-AUDIO-L jacks
– DIGITAL OUT (COAXIAL) jack only
when “Dolby Digital” is set to “D-PCM”
(page 76).
Downmix (DVDs only)
Switches the method for mixing down to two
channels when you play a DVD which has
rear sound elements (channels) or is recorded
in Dolby Digital format. For details on the
rear signal components, see “4. D is pl aying
the Playing/Remaining Time and Play
Information” on page 30. This function
affects the output of the following jacks:
– LINE OUT R-AUDIO-L jacks
– DIGITAL OUT (COAXIAL) jack when
“Dolby Digital” is set to “D-PCM”
(page 76).
D-PCM Select this when the recorder
is connected to an audio
component lacking a built-in
Dolby Digital decoder. The
surround effects of output
signals are determined by the
“Downmix” setting item in
the “Audio” setup.
Dolby
Digital
Select this when the recorder
is connected to an audio
component with a built-in
Dolby Digital decoder.
On Select this when the recorder
is connected to an audio
component with a built-in
DTS decoder.
Off
Select this when the recorder
is connected to an audio
component without a built-in
DTS decoder.
48kHz/
16bit
The audio signals of DVD
VIDEOs are converted to 48
kHz/16 bit and output.
96kHz/
24bit
All signals containing
96 kHz/24 bit ar e output
without conversion.
However, the signals are
output at 48 kHz/16 bit if
copyright-protected signals
are contained.
Standard Normally select this position.
TV Mode Makes low sounds clear even
if you turn the volume down.
Wide
Range
Gives you the feeling of
being at a live performance.
Dolby
Surround
Normally select this position.
Multi-channel audio sign als
are output to two channels for
enjoying surround sounds.
Normal Multi-channel audio signals
are downmixed to two
channels for use with your
stereo.
78
Recording Settings
(Recording)
The “Recording” setup allows you to adjust
recording settings.
1 Press SYSTEM MENU w hile the
recorder is in stop mode.
2 Select “SETUP,” and p ress ENTER.
3 Select “Recording,” a nd press
ENTER.
The “Recording” setup appears with the
following options. The default settings
are underlined.
Timer Settings
Rec Mode Adjust
Auto Chapter
Selects whether to automatically divide a
recording (a title) into chapters during
recording or dubbing.
b Notes
• The actual chapter mark interval may vary
depending on the amount of information
contained in the video to be recorded.
• Chapter marks are automatically inserted where
the recordings start on the tape when “Auto
Chapter” is set to “On” during DV/Digital8
dubbing to a DVD-RW/DVD-R (VR mode).
On A utomatically adjusts th e
recording mode to enable the
entire program to be
recorded (page 4 1).
Off Turns off the function.
On
Inserts chapter marks at
approximately 6 minute
intervals.
Off No chapter mark is insert ed.
79
Settings and Adjustments
Disc Settings (DVD)
The “DVD” setup allows you to adjust
parental control, language and other DVD
related settings.
1 Press SYSTEM MENU while the
recorder is in stop mode.
2 Select “SETUP,” and press EN TER.
3 Select “DVD,” and press ENTER.
The “DVD” setup appears with the
following options. The default settings
are underlined.
Parental Control (DVD VIDEO only)
Playback of some DVD VIDEOs can be
limited according to a predetermined level,
such as the age of the users. Scenes may be
blocked or replaced with differe n t sce nes.
1 Select “Parental Control” in “DVD,” and
press ENTER.
• If you have not entered a password, the
display for registering a new password
appears.
• When you have already registered a
password, the display for entering the
password appears.
2 Enter your four-digit password using the
number buttons, then select “OK” and
press ENTER.
3 Select “Standard,” and press ENTER.
The selection items for “Standard” are
displayed.
4 Select a geographic area as the pla yback
limitation level, and press ENTER.
The area is selected.
• When you select “Others,” press the
number buttons to select and enter an
area code in the table (page 95). Then
select “OK” and press ENTER.
,continued

1-20
80
5
Select “Level,” and press ENTER.
The selection items for “Level” are
displayed.
The lower the value, the stricter the
limitation.
Discs rated higher than the selected level
will be restricted.
6
Select the level, and press ENTER.
The Parental Control setting is complete.
To cancel the Parental Co ntrol setti ng for
the disc, set “Level” to “Off” in step 6.
To change the password, sel ect
“Password” in step 3, and press ENTER.
When the display for registering a
password appears, enter a new fou r-di git
password using the numbe r button s, then
select “OK” and press ENTER.
b
Notes
• If you forget your password, you will have to
reset it by selecting “Parental Control” of
“Factory Setup” in the “Others” setup (page 81).
• When you play discs which do not have the
Parental Control function, playback cannot be
limited on this recorder.
• Depending on the disc, you may be asked to
change the Parental Control level while playing
the disc. In this case, enter your password, then
change the level.
Language (DVD VIDEO only)
DVD Menu
Switches the language for the DVD menu.
Audio
Switches the language of the sound track.
When you select “Original,” the language
given priority in the disc i s selected.
Subtitle
Switches the language of the subtitles
recorded on the disc.
When you select “Audio Follow,” the subtitle
language changes accord ing to the language
you selected for the sound track.
z Hint
If you select “Others” in “DVD Menu,” “Subtitle,”
or “Audio,” select and enter a language code from
“Language Code List” on page 95 using the number
buttons.
b
Note
If you select a language in “DVD Menu,”
“Subtitle,” or “Audio” that is not recorded on the
DVD VIDEO, one of the recorded languages will
be automatically selected.
Format DVD-RW (DVD-RW only)
The recorder automatically starts formatting
in VR mode or Video mode, whichever is
selected below, when a new, un formatted
DVD-RW is inserted.
One Touch Dubbing
Displays the follo wing options for the O ne
Touch Dub function.
Finalize Disc (for all recordab le discs
except DVD-RW in VR mode)
Selects whether or not to finalize the disc
automatically foll owing One Touc h Dubbing
(page 68).
VR Automatically formats the
disc in VR mode.
Video Automatically formats the
disc in Video mode.
Auto Automatically finalizes the
disc following One Touch
Dubbing.
Manual
Allows you to finalize the
disc manually.
81
Settings and Adjustments
Remote Control Settings/
Factory Settings (Others)
The “Others” setup allows you to set up other
operational settings.
1 Press SYSTEM MENU while the
recorder is in stop mode.
2 Select “SETUP,” and press EN TER.
3 Select “Others,” and press ENTER.
The “Others” setup appears with the
following options. The default settings
are underlined.
Power Save Standby
Selects whether this recorder is in power save
mode and adjusts the lighting of the front
panel display.
Command Mode
Changes the Command Mode of the recorder
if other DVD equipment is assigned the same
Command Mode. For details, see “If you
have a Sony DVD player or more than one
Sony DVD recorder” on page 21.
Factory Setup
Allows you to select the setup settings by
group, and return them to their default
settings. Note that all of your previous
settings will be lost.
1
Select “Factory Setup” in “Others,” and
press , or ENTER.
The display for selecting a group of
settings appears.
2
Select the group of settings you wan t to
return to default from “Basic,” “Video,”
“Audio,” “Recording,” “DVD,”
“Others,” “Parental Control,” and “All,”
and press , or ENTER.
3
Select “Start,” and press ENTE R.
The selected setting s return to their
default settings.
4
Press ENTER when “Finish” appears.
On Sets to power save mode to
make the lighting dark.
Turn off the lighting when the
power is off.
Off
Does not set to power save
mode and make the lighting
bright.
82
Easy Setup
(Resetting the Recorder)
Select this to run the “Easy Setup” program.
1 Press SYSTEM MENU w hile the
recorder is in stop mode.
2 Select “SETUP,” and p ress ENTER.
3 Select “Easy Setup,” and press
ENTER.
4 Select “Start.”
5 Follow the instructions for “Easy
Setup” (page 23) from step 2.
83
Additional Infor mation
Additional Information
Troubleshooting
If you experience any of the foll ow i ng
difficulties while using the recorder, use this
troubleshooting guide to help remedy the
problem before requesting r epairs. Should
any problem persist, consult your nearest
Sony dealer.
The power does not t urn on.
, Check that the AC power cord is connected
securely.
There is no picture.
, Re-connect all connecting cords securel y.
, The connecting cords are damaged.
, Check the connection to your TV (page 12).
, Switch the input selector on your TV (such
as to “VCR”) so that the signal from the
recorder appears on the TV screen.
, When playing a double-layer DVD, the
video and audio may be momentar ily
interrupted at the point where the layers
switch.
Picture noise appears .
, If the picture output signa l from your
recorder passes through your VCR to get to
your TV, or if you are connected to a
combination TV/VIDEO pla y er, the copyprotection signal applied to some DVD
programs could affect picture quality. If you
still experience this problem even when you
connect your recorder directly to your T V,
try connecting your recorder to your TV’s S
VIDEO input.
, You have set the recorder to progressive
format even though your TV cannot accept
the progressive signal. In this case, hold
down x STOP, and press CHANNEL –
(minus) on the unit.
, Even if your TV is compatible with
progressive format (480p) signals, the
image may be affected when you set the
recorder to progressive format. In this case,
hold down x STOP, and press
CHANNEL – (minus) on the unit and the
recorder is set to normal (interlace) format.
, When playing a double-layer DVD, the
video and audio may be momentarily
interrupted at the poi n t where the layers
switch.
There is no picture or the picture noise
appears when connected to the DV IN
jack.
, Try the fo llowing:
1Turn the recorder off and on again.
2Turn the connected equi pment of f and on
again. 3Disconnect and then connect the
i.LINK cable again.
TV program reception does not fill the
screen.
, Set the channel manually in “Tuner Preset”
in the “Basic” setup (page 71).
, Select the correct source using the INP U T
SELECT button, or select a channel of any
TV program using the CH +/– buttons.
TV program pictures are distorted.
, Reorient the TV antenna.
, Adjust the picture (see the TV’s instruction
manual).
, Place the recorder and TV farther apart.
, Place the TV and any bu nc hed antenna
cables farther apart.
, The antenna cable is connected to the VHF/
UHF OUT jack on the recorder. Connect
the cable to the VHF/UHF IN jack.
TV channels cannot be chan ged.
, The channel i s disabled (page 71).
, A timer recording started, which changed
the channels.
Power
Picture
,continued

1-21
84
The picture from equipment connected to
the recorder’s input jack does not appear
on the screen.
, If the equipment is connected to the LINE 1
IN jack, select “L1” in the front panel
display by pressing CH +/– or INPUT
SELECT.
If the equipment is connected to the LINE 2
IN jacks, select “L2” in the front panel
display by pressing CH +/– or INPUT
SELECT.
If the equipment is connected to the DV IN
jack, (this is usually for a digital video
camera connection), select “DV” in the
front panel display by pressing INPUT
SELECT.
, When an S video cable is connected to the
recorder’s LINE 1 IN jack, set “Line1
Input” of the “Line Input” to “S Video” in
the “Video” setup (page75).
The playback picture or TV program from
the equipment connecte d through the
recorder is distorted.
, If the playback picture output from a DVD
player, VCR, or tuner goes through your
recorder before reaching your TV, the copyprotection signal applied to some programs
could affect picture quality. Disconnect the
playback equipment in question and
connect it directly to your TV.
The picture does not fill the screen.
, Set “TV Type” of the “Video Output” in the
“Video” setup in accordance with the
screen size of your TV (page 74).
The picture does not fill the screen, even
though the picture size is set in “TV Type”
of the “Video Out put” in the “Video”
setup.
, The picture size of the title is fixed.
There is no sound.
, Re-connect al l connections securely.
, The connecting cord is damaged.
, The input source setting on the amplifier or
the connection to the amplifier is incorrect.
, The recorder is in reverse play, fast-
forward, slow motion, or pause mode.
, If the audio signal does not come through
the DIGITAL OUT (COAXIAL) jack,
check the “Audio Connection” settings in
the “Audio” setup (page 76).
Sound distortion occurs.
, Set “Audio AT T” in the “Audio” setup to
“On” (page 76).
Sound is noisy.
, When playing a CD with DTS sound tracks,
noise will come from the LIN E OUT RAUDIO-L jacks (page 52).
The sound volume is low .
, The sound volume is low on some DVDs.
The sound volume may improve if you set
“Audio DRC” in the “Audio” setup to “TV
Mode” (page 77).
, Set “Audio AT T” in the “Audio” setup to
“Off” (page 76).
An alternate audio tra ck cannot be
recorded or played.
, Second Audio Program (SAP) is not
available for all programs. The program you
are recording does not have a second audio
program.
, You have set “Tuner Audio” in the “Audio”
setup to “Main” (page 76). Select “SAP” to
record alternate audio programs.
, If you have connecte d a n AV am pl ifier to
the DIGITAL OUT (COAXIAL) jack and
want to change the audio track for DVDRWs/DVD-Rs (VR mode) during playback,
set “Dolby Digital” of the “Audio
Connection” in the “Audio” setup to “DPCM” (page 76).
The recorder does not pl ay any type of
disc.
, The disc is upside down. Insert the disc with
the labeled side facing up.
, The disc is not correctly inserted.
, Moisture has condensed inside the recorder.
In this case, if the recorder is on, leave it on
(if it is off, leave it off) for about an hour
until the moisture evapor a tes.
Sound
Playback
85
Additional Infor mation
, If the disc was recorded on another recorder
and was not finalized (page 35), the
recorder cannot play the disc.
The recorder does not start playback from
the beginning.
, Resume play was activated (page 50).
, You have inserted a DVD whose Title menu
or DVD menu automatically appears on the
TV screen when it is first inserted. Use the
menu to start playback.
The recorder starts playing aut omatically.
, The DVD VIDEO features an auto
playback function.
Playback stops automatically.
, If the DVD has an auto pause signal, the
recorder stops playback at the auto pause
signal.
Some functions such as Stop, Search, or
Slow-motion Play cannot be performed.
, Depending on the DVD, you may not be
able to do some of the operations above. See
the instruction manual supplied with the
disc.
The language for the so und track cannot
be changed.
, Multilin g u al tracks are not recorded o n th e
DVD being played.
, The DVD VIDEO prohibits the changing of
the language for the sound track.
, Try changing th e l anguage using the DVD
VIDEO’s menu.
The subtitle language cannot be changed
or turned off.
, Multilingual subtitles are not r ecorded on
the DVD VIDEO.
, The DVD VIDEO prohibits changing of the
subtitles.
, Try changing the subtitle using the DVD
VIDEO’s menu.
, The subtitles cannot be changed for the
titles recorded on this recorder.
The angles cannot be ch anged.
, Multi-angles are not recorded on the DVD
VIDEO being played.
, You are trying t o change the angles when
“” does not appear on the TV screen
(page 49).
, The DVD VIDEO prohibits changing
angles.
, Try changing the angle using the DVD
VIDEO’s menu.
, The angles cann ot be changed for the titles
recorded on this recorder.
, The angles can not be changed during slow
motion playback or when playback is
paused.
The MP3 audio tracks do not play.
, The MP3 audio tracks are not recorded in a
format that the recorder can play (page55).
The JPEG image files do not play.
, The JPEG image files are not recorded in a
format that the recorder can play (page55).
, Progressive JPEG images cannot be played.
The channel cannot be chan ged from the
channel you are recording.
, Set the TV’s input source to “TV.”
Recording does not start immediately
after you press z REC.
, Operate the recorder only after “LOAD,”
“FORMAT,” or “INFOWRITE” disappears
from the front panel display.
Nothing was recorded even though you set
the timer setting correctly.
, There was a power failure during recording.
, The recorder’s internal clock stopped due to
a power failure that lasted for more than 1
hour. Reset the clock (page 72).
, The channel was disabled after the timer
recording was set. See “Tuner Preset” on
page 71.
, Disconnect the AC power cord from the AC
outlet, and connect it again.
, The program contains copy protection
signals that restrict copying.
, The timer setti ng overlapped another
setting that was set later.
, There is no DVD inside the recorder.
Recording/Timer recording/
Editing
,continued
86
, There is not enough disc spac e for t he
recording.
, A separate recording was in the pro ce ss of
being made without the use of the timer
(page 47).
, The recorder was in the process of DV/
Digital8 Dubbing.
Recording does not stop immediately
after you press xREC STOP.
, It will take a few seconds for the re corder to
input disc data before recording can stop.
Recording does not stop after you press
x STOP.
, Press x REC STOP.
Timer recording is not complete or did not
start from the beginning.
, There was a power failure during recording.
If the power recovers when ther e is a timer
recording, the recorder resumes recor ding.
Should the power failure continue for more
than 1 hour, reset the clock (page 72).
, Disc space was not enough.
Contents previously recor ded were
erased.
, Data that is not playable on this recorder but
was recorded on a DVD with a PC will be
erased from the disc when the disc is
inserted.
Nothing was recorded even though you set
the Synchro-Rec setting correctly.
, You forgot to turn off t he connected
equipment. Turn off the connected
equipment and set the recorder to SynchroRec standby mode (page 47).
, The recorder was not set to the Synchro-
Recording standby mode. Press
c z SYNCHRO REC to have the recorder
stand by for recording. Make sure the
SYNCHRO REC indicator lights up on the
front panel (page 47).
, The equipment is not connected to the LINE
1 IN jacks of the recorder.
, The recorder is connected to the TV output
jack of the connected equipment.
Synchro-Recording d oes not complete.
, The timer setting for the connected
equipment overlapped the recorde r’s timer
setting (page 48).
, There was a power failure during the
recording.
The recorder automatically starts
recording when the satellite receiver is
turned on.
, The Synchro-Rec functio n was a ctiva t ed.
Turn off the satellite receiv er and cancel the
Synchro-Rec function (page 47).
The clock has stopped.
, Set the clock agai n (pa ge 72).
, The clock stopped due to a power failure
that lasted for more than 1 hour. Reset the
clock (page 72) .
The TIMER REC indicator is flashing.
, The disc does not have enough space.
, Insert a recordable disc inside the recorder.
, The inserted DVD is protected (page 35).
The recording mode i ndication is
incorrect.
, When the recording or dubbing is less than
ten minutes, or if a picture with little
movement is displayed for more than ten
minutes, the recording mode indication may
be displayed incorrectly. Note that the
actual recording or dubbing itself was
correctly made in the selected recording
mode.
, After playing titles recorded in EP and SLP
mode, the recording mode indication may
change depending on the recorded program.
The clock does not appea r in the front
panel display when the recorder is turned
off.
, “Power Save Standby” in the “Others”
setup is set to “On” (page 81), and the
recorder is in standby mode.
Recording from the equipment
with a timer
Display
87
Additional Infor mation
The remote does not function.
, Batteries are weak.
, The remote is too far from the recorder.
, The remote’s manufacturer code returned to
the default setting when you replaced the
batteries. Reset the code (page 20).
, The remote is not pointed at the remote
sensor on the recorder.
, Different command mo des a re se t for t he
recorder and remote. Set the same
command mode (page21). The default
command mode setting for this recor der and
the supplied remote is DVD3.
, Press x STOP on the unit w hile the
recorder is turned off to check the current
command mode.
The recorder does not o perate properly.
, Restart the recorder. Press down [/1 on the
recorder for more than ten seconds until
“WELCOME” appears in the front panel
display.
, When static electricity, etc., causes the
recorder to operate abnormally, turn off the
recorder and wait until the clock appears in
the front panel display. Then, unplug the
recorder and after leaving it off for a while,
plug it in again.
Five numbers or letters are displayed in
the front panel display.
, The self-diagnosis function was activated
(see the table on page 88).
The disc tray does not open after you press
Z OPEN/CLOSE.
, It may take a few seconds for the disc tray
to open after you have recorded or ed ited a
DVD. This is because the recorder is adding
disc data to the disc.
The disc tray does not open and
“LOCKED” appears in the front panel
display.
, The disc tray is locked. Cancel the Child
Lock (page 50).
The disc tray does not open and “TRAY
LOCKED” appears in the front panel
display.
, Contact you r Sony dealer or local
authorized Sony service faci li ty.
The disc tray does not o pen and you
cannot remove the disc after you pre ss
Z OPEN/CLOSE.
, Turn off the recorder. Once the clock
appears in the front panel display,
disconnect the AC power cord. (If the
recorder does not turn off or if the clock
does not appear in the front panel display,
disconnect the AC power cord anyway.)
Connect the AC power cord again while
pressing down A on the recorder, and
release the button when the disc tray opens.
Then, keep [/1 on the recorder pressed for
about ten seconds until “WELCOME”
appears in the front panel display.
“RECOVERY” appears in the front panel
display.
, The recorder’s re covery function was
activated when the recorder was turned on
because the power was turned of f or failed
during recording. Leave the recorder on
until “RECOVERY” disappears from the
front panel display.
“FAN ERROR” appears in the front panel
display.
, Check that the vent on the rear of the
recorder is not blocked. Then, immediately
disconnect the AC power cord. Leave the
recorder off for a while, then re-connect the
AC power cord, and press [/1 on the
recorder.
Mechanical sound is he ard when the
recorder is off.
, While the recorder is adjusting the clock for
the Auto Clock Set function or during a
timer recording, operational noises (such as
the internal fan) may be heard, even when
the power is off. This is not a malfunction.
Remote control
Others

1-22
88
Self-diagnosis Function
(When letters/numbers
appear in the display)
When the self-diagnosis functi on is ac tivated
to prevent the recorder from malfunctioning,
a five-character service num ber (e.g., C 13
00) with a combination of a letter and four
numbers appears in the front panel display. In
this case, check the following table.
Notes About This
Recorder
On operation
• If the recorder is brought directly from a
cold to a warm location, or is placed in a
very damp room, moistu re may condense
on the lenses inside th e recorder. Should
this occur, the recorder may not operate
properly. In this case, if the recorder is on,
leave it on (if it is off, leave it off) for about
an hour until the moisture evaporates.
• When you move the recorder, take out any
discs. If you don’t, the disc may be
damaged.
On adjusting volume
Do not turn up the volume while listening to
a section with very low level inputs or no
audio signals. If you do, the speakers may be
damaged when a peak level sec tio n is play ed.
On cleaning
Clean the cabinet, panel, and control s w i th a
soft cloth slightly moistened with a mild
detergent solution. Do not use any type of
abrasive pad, scouring powder or solvent
such as alcohol or benzine .
On cleaning discs, disc/lens cleaners
Do not use a commercially available
cleaning disc or disc/lens cleaner (wet or
spray type). These may cause the recorder
to malfunction.
First three
characters of
the service
number
Cause and/or corrective
action
C 13 The DVD is dirty.
, Clean the disc with a soft
cloth.
C 31 The DVD/CD is not inserted
correctly.
, Re-insert the disc
correctly.
E XX
(xx is a number)
To prevent a malfunction, t h e
recorder has performed the
self-diagnosis function.
, Contact your neare st
Sony dealer or local
authorized Sony service
facility and give the fivecharacter service numb er.
Example: E 61 10
89
Additional Infor mation
Notes about the discs
• To keep the disc clean, handle the disc by its
edge. Do not touch the surface. Du st,
fingerprints, or scratches on the disc may
cause it to malfunction.
• Do not expose the disc to direct sunlight or
heat sources such as hot air ducts, or leave
it in a car parked in direct sunlight as the
temperature may rise consid erably inside
the car.
• After playing, store the disc in its case.
• Clean the disc with a cleaning cloth. Wipe
the disc from the center out.
• Do not use solvents such as benzine,
thinner, commercially available cleaners, or
anti-static spray intended for vinyl LPs.
• Do not use the following discs.
–A disc that has a non-standard shape (e.g.,
card, heart).
–A disc with a label or sticker on it.
–A disc that has cellophane tape or sticker
adhesive on it.
Specifications
System
Laser: Semiconductor laser
Channel coverage:
NTSC
VHF: 2 to 13
UHF: 14 to 69
CATV: A-8 to A-1, A to W, W+1 to
W+84
Video reception: Frequency synthe sizer
system
Audio reception: Inter carrier system
Antenna: 75-ohm antenna terminal for
VHF/UHF
Timer: Clock: Quartz locked/Timer
indication: 12-hour cycle (digital)/
Power back-up duration: 1 hour
Video recording format: MPEG-2,
MPEG-1
Audio recording format/applicable
bit rate: Dolby Digital 2 ch
256 kbps/128 kbps (in EP and SLP
mode)
Inputs and outputs
LINE OUT
(AUDIO): Phono jack/2 Vrms/10 kilohms
(VIDEO): Phono jack/1.0 Vp-p
(S VIDEO): 4-pin mini DIN/Y: 1.0 Vp-p,
C: 0.286 Vp-p
LINE 1 IN/LINE 2 IN
(AUDIO): Phono jack/2 Vrms/more than
22 kilohms
(VIDEO): Phono jack/1.0 Vp-p
(S VIDEO): 4-pin mini DIN/Y: 1.0 Vp-p,
C: 0.286 Vp-p
DV IN: 4-pin/i.LINK S100
DIGITAL OUT (CO AXIAL): Phono jack/
0.5 Vp-p/75 ohms
COMPONENT VIDEO OUT (Y, P
B
,
P
R
):
Phono jack/Y: 1.0 Vp-p/
P
B
, PR: 0.7 Vp-p
,continued
90
General
Power requirements: 120 V AC, 60 Hz
Power consumption: 22 W
Dimensions (approx.):
430 × 58 × 291 mm
(17 × 2 × 11 in.) (width/height/
depth) incl. projecting parts
Mass (approx.): 3.1 kg (6.83 lb)
Operating temperature:
5ºC to 35ºC (41ºF to 95ºF)
Operating humidity: 25% to 80%
Supplied accessories:
Audio/video cord (1)
Power cord (1)
Antenna cable (1)
Remote commander (remote) (1)
Size AA (R6) batteries (2)
Specifications and design are subject to
change without notice.
About i.LINK
The DV IN jack on this recorder is i.LINK compliant for digital video cameras. This
section describes the i.LINK standard and its
features.
What is i.LINK?
i.LINK is a digital serial interface for
handling digital video, digital audio and other
data in two directions between equipment
having the i.LINK jack, and for controlling
other equipment.
i.LINK-compatible equipment can be
connected by a single i.LINK cable. Possible
applications are operations an d data
transactions with various digital AV
equipment. When two or more i.LINKcompatible equipment are connected to this
recorder in a daisy chain, operations and data
transactions are possible with not only the
equipment that this record er is co nnected to
but also with other devices via the di rectly
connected equipment.
Note, however, that the method of operation
sometimes varies according to the
characteristics and specifications of the
equipment to be connected, and th at
operations and data transactio ns are
sometimes not possible on some connected
equipment.
b Note
Normally, only one piece of equipment can be
connected to this recorder by t he i. LINK cable (DV
connecting cable). When connecting this recorder
to i.LINK-compatible equipment having two or
more i.LINK jacks (DV jacks), see the inst r uc tion
manual of the equipment to be connected.
i.LINK is a more familiar term for IEEE 1394
data transport bus proposed by SONY, and is
a trademark approved by many corporations.
IEEE 1394 is an international standard
standardized by the Institu te of Elect rical and
Electronics Engineers.
381
2
About the name “i.LINK”
91
Additional Infor mation
i.LINK’s maximum baud rate varies
according to the equipment. Three maximum
baud rates are defined:
S100 (approx. 100 Mbps*)
S200 (approx. 200 Mbps)
S400 (approx. 400 Mbps)
The baud rate is listed under “Specifications”
in the instruction manual of each equipment.
It is also indicated near the i.LINK j ack on
some equipment.
The maximum baud rate of equipment on
which it is not in dicated such as th is unit is
“S100.”
When units are connected to equipment
having a different maximum b aud rate, the
baud rate sometimes differs from the
indicated baud rate.
* What is Mbps?
Mbps stands for megabits per second, or the
amount of data that can be sent or received in one
second. For example, a baud rate of 100 Mbps
means that 100 megabits of data can be sent in
one second.
For details on how to dub when this recorder
is connected to other video equipment having
DV jacks, see page 66.
The DV jack on this recorder can only in put
DVC-SD signals. It cannot output signals.
The DV jack will not accept MICRO MV
signals from equipment such a s a M ICRO
MV digital video camera with an i.LIN K
jack.
For further precautions, see the notes on
page 66.
For details on precautions when connecting
this recorder, also see the in struction ma nuals
for the equipment to be connected .
Use the Sony i.LINK 4-pin-to-4-pin cable
(during DV/Digital8 dubbing).
i.LINK and are trademarks.
i.LINK baud rate
i.LINK functions on this
recorder
Required i.LINK cable
 Loading...