

Page 1
Reader™ User Guide
Search
Print
Top page
Getting started
Basic Operations
Adding/Getting Content
Browsing Content Lists
Reading
Organizing
Other Applications
Settings
Other Information
Contents list
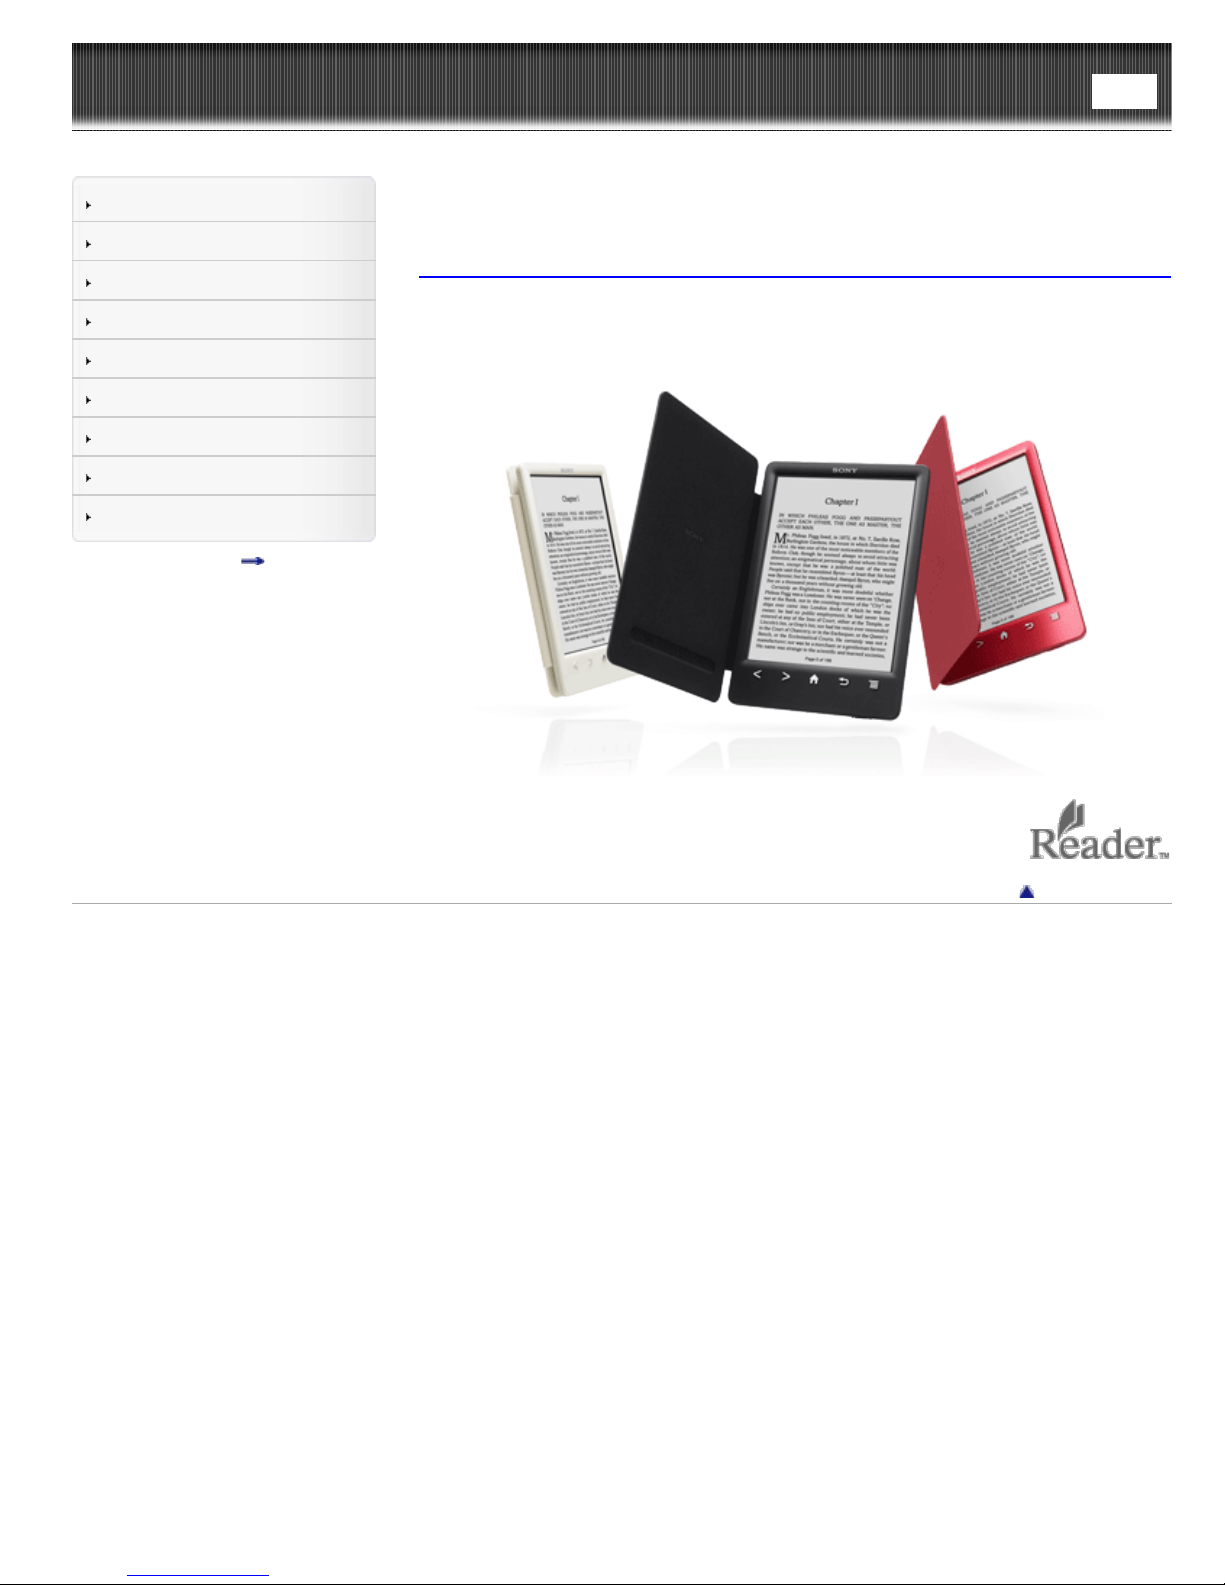
PRS-T3 Series
User Guide
Use this manual if you encounter any problems, or have any questions about your
Reader™.
Copyright 2013 Sony Corporation
Go to page top
Page 2
Reader™ User Guide
Search
Top page > Getting started
Print
Getting started
Basic Operations
Adding/Getting Content
Browsing Content Lists
Reading
Organizing
Other Applications
Settings
Other Information
Contents list
Getting started
Welcome!
About your Reader™
Reader Features and Functions
Wireless Connectivity
Join a Wi-Fi® Network
Battery
Charging the Reader
Maximizing Battery Life
Installing Reader application (Reader for PC/Mac)
Installing Reader application (Reader for PC/Mac)
Turning the Power On/Off
Turning the Power On/Off
Parts and Controls
Overview
Buttons
Removing/attaching the Standard Cover (PRS-T3)
Removing/attaching the Back Panel (PRS-T3S*)
microSD Card Slot
Copyright 2013 Sony Corporation
Go to page top
Page 3
Reader™ User Guide
Search
Top page > Basic Operations
Print
Getting started
Basic Operations
Adding/Getting Content
Browsing Content Lists
Reading
Organizing
Other Applications
Settings
Other Information
Contents list
Basic Operations
[Home] Screen
Applications and the [Home] Screen
Touchscreen Operations
On-Screen Keyboard
Go to page top
Copyright 2013 Sony Corporation
Page 4
Reader™ User Guide
Search
Top page > Adding/Getting Content
Print
Getting started
Basic Operations
Adding/Getting Content
Browsing Content Lists
Reading
Organizing
Other Applications
Settings
Other Information
Contents list
Adding/Getting Content
Adding Content
Adding Content
Buying eBooks and Periodicals* at Reader Store*
Go to page top
Copyright 2013 Sony Corporation
Page 5
Reader™ User Guide
Search
Top page > Browsing Content Lists
Print
Getting started
Basic Operations
Adding/Getting Content
Browsing Content Lists
Reading
Organizing
Other Applications
Settings
Other Information
Contents list
Browsing Content Lists
Content Lists
Browsing Content List Pages
Browsing in Thumbnail View and List View
Using the Page Jump Panel in Content List Pages
Finding Content with a Keyword
Posting Book information to Facebook
Tools
Using (Menu) Items
Go to page top
Copyright 2013 Sony Corporation
Page 6
Reader™ User Guide
Search
Top page > Reading
Print
Getting started
Basic Operations
Adding/Getting Content
Browsing Content Lists
Reading
Organizing
Other Applications
Settings
Other Information
Contents list
Reading
Reading eBooks
Opening a Book
Page Navigation
Appearance
Annotations
Uploading Highlighted Words on a Page to Evernote
Posting Highlighted Words on a Page to Facebook
Using the Dictionary
Finding Keywords in a Book
Changing Book Page Settings
Using (Menu) Items
Reading Periodicals
Opening a Periodical Issue*
Managing Periodicals*
Page Navigation
Copyright 2013 Sony Corporation
Go to page top
Page 7
Reader™ User Guide
Search
Top page > Organizing
Print
Getting started
Basic Operations
Adding/Getting Content
Browsing Content Lists
Reading
Organizing
Other Applications
Settings
Other Information
Contents list
Organizing
Organizing Your Content
Deleting a Single Item
Deleting Multiple Items at Once
Protecting a Single Item
Protecting Multiple Items at Once
Using Collections
Creating a Collection
Adding Items to a Collection
Removing Items from a Collection
Renaming a Collection
Deleting a Collection
Posting a Collection to Facebook
Using (Menu) Items
Go to page top
Copyright 2013 Sony Corporation
Page 8
Reader™ User Guide
Search
Top page > Other Applications
Print
Getting started
Basic Operations
Adding/Getting Content
Browsing Content Lists
Reading
Organizing
Other Applications
Settings
Other Information
Contents list
Other Applications
Public Libraries
Borrowing eBooks from Public Libraries*
Web Browsing
Browsing the Web
Browsing Tools
Downloads
Multiple Windows
Bookmarks and History
Uploading an Address of a Website to Evernote
Browser Settings
Using (Menu) Items
All Notes
Finding Annotations Across All Books and Periodicals
Uploading Annotations Across All Books and Periodicals to Evernote
Posting Annotations Across All Books and Periodicals to Facebook
Dictionary
Using the Dictionary
Changing the Dictionary
Listing Previously Looked-up Words
Using (Menu) Items
Handwriting
Creating a Drawing
Editing an Existing Drawing
Deleting/Protecting a Drawing
Capturing a Screenshot
Using (Menu) Items
Text Memo
Creating a Text Memo
Editing an Existing Memo
Deleting/Protecting a Memo
Using (Menu) Items
Pictures
Viewing Pictures
Changing the Orientation
Zooming in on a Picture
Viewing Pictures in a Slideshow
Uploading a Picture to Evernote
Page 9

Deleting Pictures
Using (Menu) Items
Evernote
Using Evernote
Creating a new account
Sign in to Evernote
Evernote Settings
Synchronizing in the Evernote list page
Facebook
Using Facebook
Log In to Facebook
Copyright 2013 Sony Corporation
Go to page top
Page 10
Reader™ User Guide
> Settings
Getting started
Basic Operations
Settings
Search
Top page
Print
Adding/Getting Content
Browsing Content Lists
Reading
Organizing
Other Applications
Settings
Other Information
Contents list
Changing the Settings
Changing the Settings
General Settings
Wireless Network Settings
Application Preferences
Date and Time Settings
System Management
Initialization
About
Device Shutdown
Go to page top
Copyright 2013 Sony Corporation
Page 11
Reader™ User Guide
Search
Top page > Other Information
Print
Getting started
Basic Operations
Adding/Getting Content
Browsing Content Lists
Reading
Organizing
Other Applications
Settings
Other Information
Contents list
Other Information
Troubleshooting
Troubleshooting Tips
Support PC Web Site
Reader Device
Wireless Connectivity
Reading Books and Periodicals
Viewing Pictures
Connecting to your Computer
microSD Card
Precautions
Safety Information
Applications on the Reader
About Pre-installed Sample Content
Reader Disposal Reference
Additional Information for Customers in the US/Canada
Notes on microSD Cards
Legal Notice
Legal Notice
Appendix
Specifications
Supported File Types
System Requirements
Copyright 2013 Sony Corporation
Go to page top
Page 12
Reader™ User Guide
Search
Top page > Contents list
Print
Getting started
Basic Operations
Adding/Getting Content
Browsing Content Lists
Reading
Organizing
Other Applications
Settings
Other Information
Contents list
Contents list
Getting started
Welcome!
About your Reader™
Reader Features and Functions
Wireless Connectivity
Join a Wi-Fi® Network
Battery
Charging the Reader
Maximizing Battery Life
Installing Reader application (Reader for PC/Mac)
Installing Reader application (Reader for PC/Mac)
Turning the Power On/Off
Turning the Power On/Off
Parts and Controls
Overview
Buttons
Removing/attaching the Standard Cover (PRS-T3)
Removing/attaching the Back Panel (PRS-T3S*)
microSD Card Slot
Basic Operations
[Home] Screen
Applications and the [Home] Screen
Touchscreen Operations
On-Screen Keyboard
Adding/Getting Content
Adding Content
Adding Content
Buying eBooks and Periodicals* at Reader Store*
Go to page top
Go to page top
Go to page top
Browsing Content Lists
Content Lists
Page 13

Browsing Content List Pages
Browsing in Thumbnail View and List View
Using the Page Jump Panel in Content List Pages
Finding Content with a Keyword
Posting Book information to Facebook
Tools
Using (Menu) Items
Reading
Reading eBooks
Opening a Book
Page Navigation
Appearance
Annotations
Uploading Highlighted Words on a Page to Evernote
Posting Highlighted Words on a Page to Facebook
Using the Dictionary
Finding Keywords in a Book
Changing Book Page Settings
Using (Menu) Items
Go to page top
Reading Periodicals
Opening a Periodical Issue*
Managing Periodicals*
Page Navigation
Organizing
Organizing Your Content
Deleting a Single Item
Deleting Multiple Items at Once
Protecting a Single Item
Protecting Multiple Items at Once
Using Collections
Creating a Collection
Adding Items to a Collection
Removing Items from a Collection
Renaming a Collection
Deleting a Collection
Posting a Collection to Facebook
Using (Menu) Items
Go to page top
Go to page top
Other Applications
Public Libraries
Page 14

Borrowing eBooks from Public Libraries*
Web Browsing
Browsing the Web
Browsing Tools
Downloads
Multiple Windows
Bookmarks and History
Uploading an Address of a Website to Evernote
Browser Settings
Using (Menu) Items
All Notes
Finding Annotations Across All Books and Periodicals
Uploading Annotations Across All Books and Periodicals to Evernote
Posting Annotations Across All Books and Periodicals to Facebook
Dictionary
Using the Dictionary
Changing the Dictionary
Listing Previously Looked-up Words
Using (Menu) Items
Handwriting
Creating a Drawing
Editing an Existing Drawing
Deleting/Protecting a Drawing
Capturing a Screenshot
Using (Menu) Items
Text Memo
Creating a Text Memo
Editing an Existing Memo
Deleting/Protecting a Memo
Using (Menu) Items
Pictures
Viewing Pictures
Changing the Orientation
Zooming in on a Picture
Viewing Pictures in a Slideshow
Uploading a Picture to Evernote
Deleting Pictures
Using (Menu) Items
Evernote
Using Evernote
Creating a new account
Sign in to Evernote
Evernote Settings
Synchronizing in the Evernote list page
Page 15

Facebook
Changing the Settings
Using Facebook
Log In to Facebook
Go to page top
Settings
Changing the Settings
General Settings
Wireless Network Settings
Application Preferences
Date and Time Settings
System Management
Initialization
About
Device Shutdown
Go to page top
Other Information
Troubleshooting
Troubleshooting Tips
Support PC Web Site
Reader Device
Wireless Connectivity
Reading Books and Periodicals
Viewing Pictures
Connecting to your Computer
microSD Card
Precautions
Safety Information
Applications on the Reader
About Pre-installed Sample Content
Reader Disposal Reference
Additional Information for Customers in the US/Canada
Notes on microSD Cards
Legal Notice
Legal Notice
Appendix
Specifications
Supported File Types
System Requirements
Go to page top
Copyright 2013 Sony Corporation
Page 16

Reader™ User Guide
Getting started
Search
Top page > Getting started > Welcome! > About your Reader™
Print
Basic Operations
Adding/Getting Content
Browsing Content Lists
Reading
Organizing
Other Applications
Settings
Other Information
Contents list
About your Reader ™
Enjoy the most natural and intuitive reading experience Sony has to offer. This is ereading.
Unplug and unwind. Wi-Fi
directly via your Reader™.
Superior touchscreen. Bookmark, highlight and take notes on the high-contrast epaper screen. Read clearly under direct sunlight.
Zoom. Easily adjust the font size, or zoom into images for a closer look.
Dictionary and Wikipedia
translate it or learn more from the Wikipedia Web site.
You can also:
Personalize the standby screen with either your favorite pictures or the cover of the
last-read book.
Create your own collections and organize your eBooks by bestsellers, favorites,
genre and more.
About this guide
Please read the Quick Start Guide and Important Product Information in this package to
help you get started.
This User Guide describes key features of your Reader. You can also find this guide in
[Books] on your Reader. You can find the User Guide in your language at the support
PC Web site.
USA:
http://www.sony.com/readersupport
Canada:
http://www.sony.ca/readersupport
Europe:
http://support.sony-europe.com/eBook/PRS
Australia:
http://www.sony.com.au/support
New Zealand:
http://www.sony.co.nz/support
®
functionality lets you download eBooks and periodicals
®
. Simply tap and hold a word to look up its definition,
Note
Screenshots in the User Guide may depict screens different from your Reader.
Searching for a specific topic in this User Guide
Use the [Table of Contents] feature of your Reader to search for topics, and then tap a
topic to jump to it.
While viewing this User Guide on your Reader, press the
[Navigate Page]
You can also tap the page number at the bottom of the screen
Contents].
[Table of Contents] to view the Table of Contents.
(Menu) button tap
tap [Table of
Jumping to a linked section in this User Guide
Tap the link to a chapter or section indicated with a highlight to open the page.
To return to the page you were previously viewing, while viewing a book or periodical,
tap
To hide the
after tapping a link.
/ icons, press the (Back) button.
Changing the font size
Page 17

You can adjust the font size to improve legibility. See Details.
Copyright 2013 Sony Corporation
Go to page top
Page 18
Reader™ User Guide
Getting started
Search
Top page > Getting started > Welcome! > Reader Features and Functions
Print
Basic Operations
Adding/Getting Content
Browsing Content Lists
Reading
Organizing
Other Applications
Settings
Other Information
Contents list
Reader Features and Functions
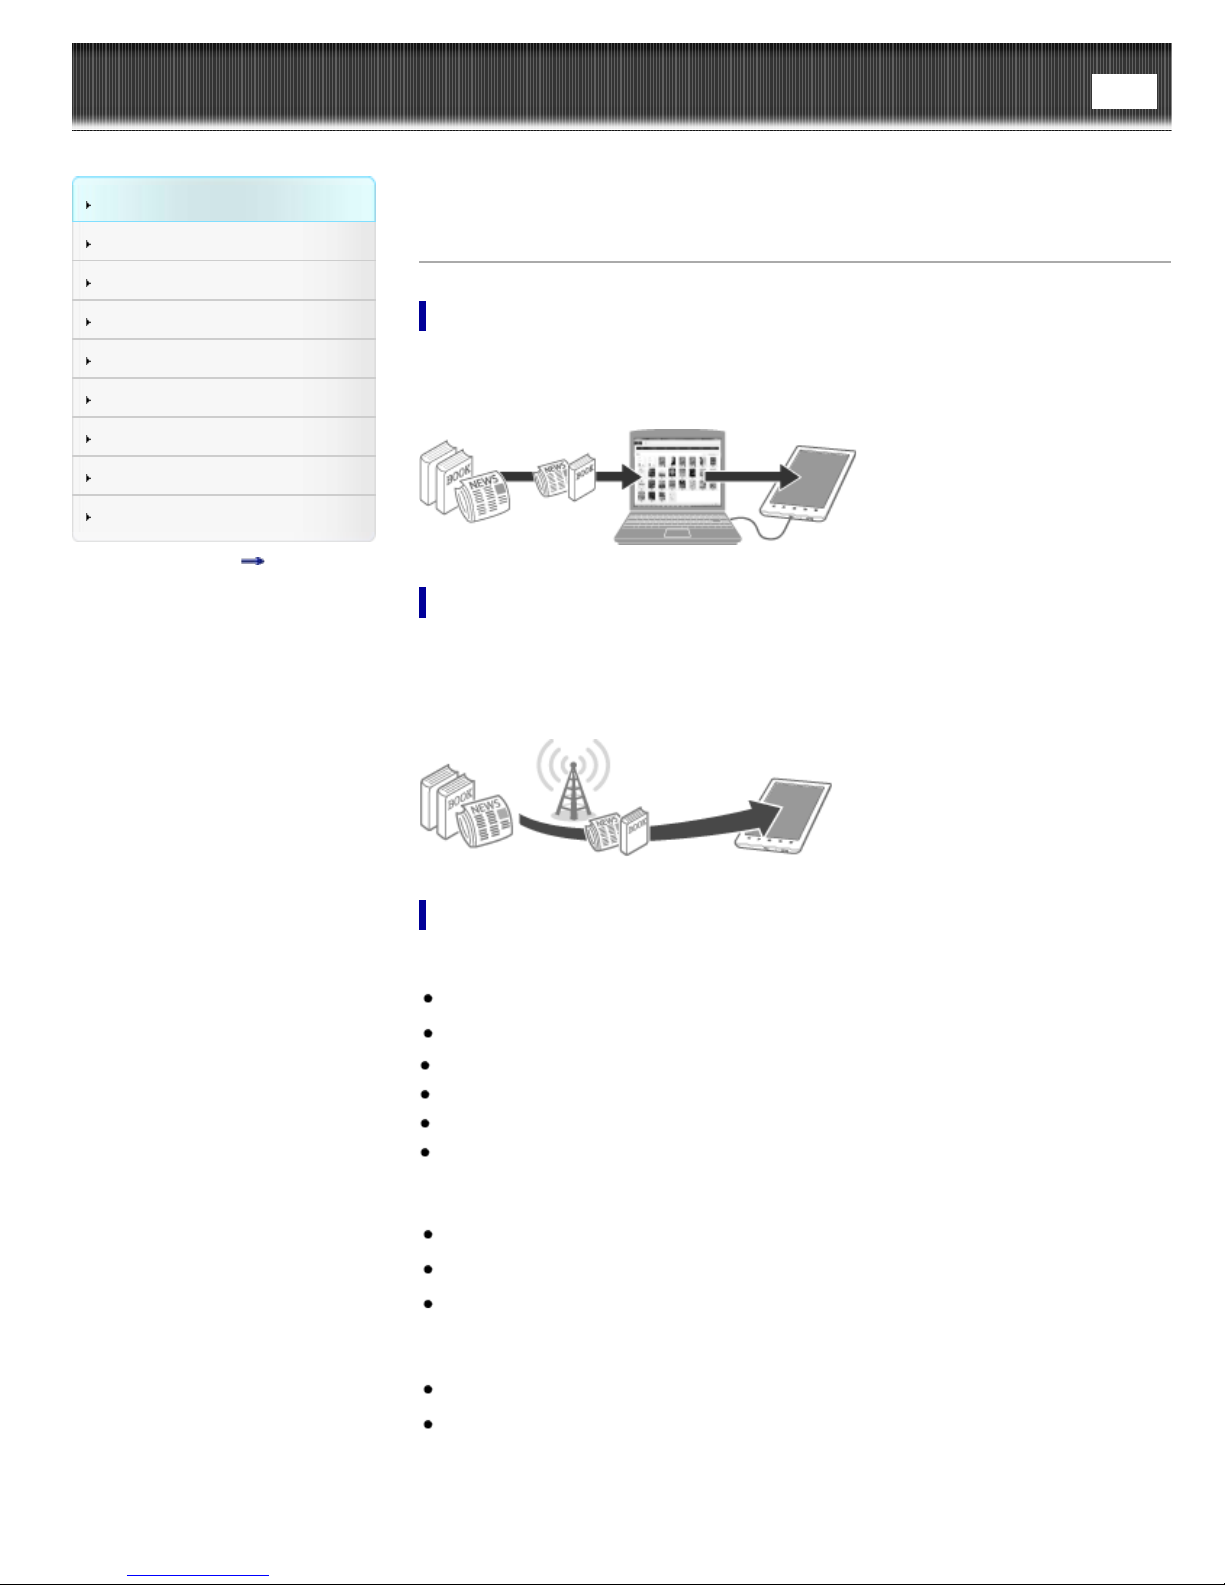
Transferring content from your computer
To enjoy eBooks and pictures on the Reader, download the Reader application to
transfer them from your computer to the Reader. See Details. You can also use the
Reader application to backup and manage the content on the Reader.
Shopping for eBooks at Reader™ Store
Visit Reader Store and find eBooks that you are interested in from a large variety of
titles and genres. The [Reader Store] application may be found on the [Home] screen.
The initial setup of the country/region of the Reader will determine if Reader Store is
available in your area. See Details.
Useful features
Wi-Fi network access Details
Access Reader Store Details
Wikipedia Details
Use the Web browser for internet access Details
Check out eBooks from public libraries for reading on the Reader Details
Use Evernote Details
Use Facebook Details
Annotation Details
Add bookmarks Details
Highlight words Details
Handwrite notes on a page Details
Resize
Adjust font size Details
Change the page view mode Details
Zoom in Details
Adjust content view Details
Page 19

Search
Find notes Details
Find pages with a keyword Details
Search content via keyword Details
Jump to pages Details
Dictionary Details
Look up words while reading Details
Look up words in a dictionary Details
List previously looked-up words Details
Read periodicals Details
Collections Details
Supplementary applications
Handwriting Details
Text memo Details
Picture viewer Details
Evernote Details
Facebook Details
Go to page top
Copyright 2013 Sony Corporation
Page 20
Reader™ User Guide
Getting started
Search
Top page > Getting started > Wireless Connectivity > Join a Wi -Fi® Network
Print
Basic Operations
Adding/Getting Content
Browsing Content Lists
Reading
Organizing
Other Applications
Settings
Other Information
Contents list
Join a Wi- Fi® Network
To shop at Reader Store or connect to the internet wirelessly, set up a wireless (Wi-
®
Fi
) internet connection with the following steps.
Preparing to set up a Wi-Fi connection
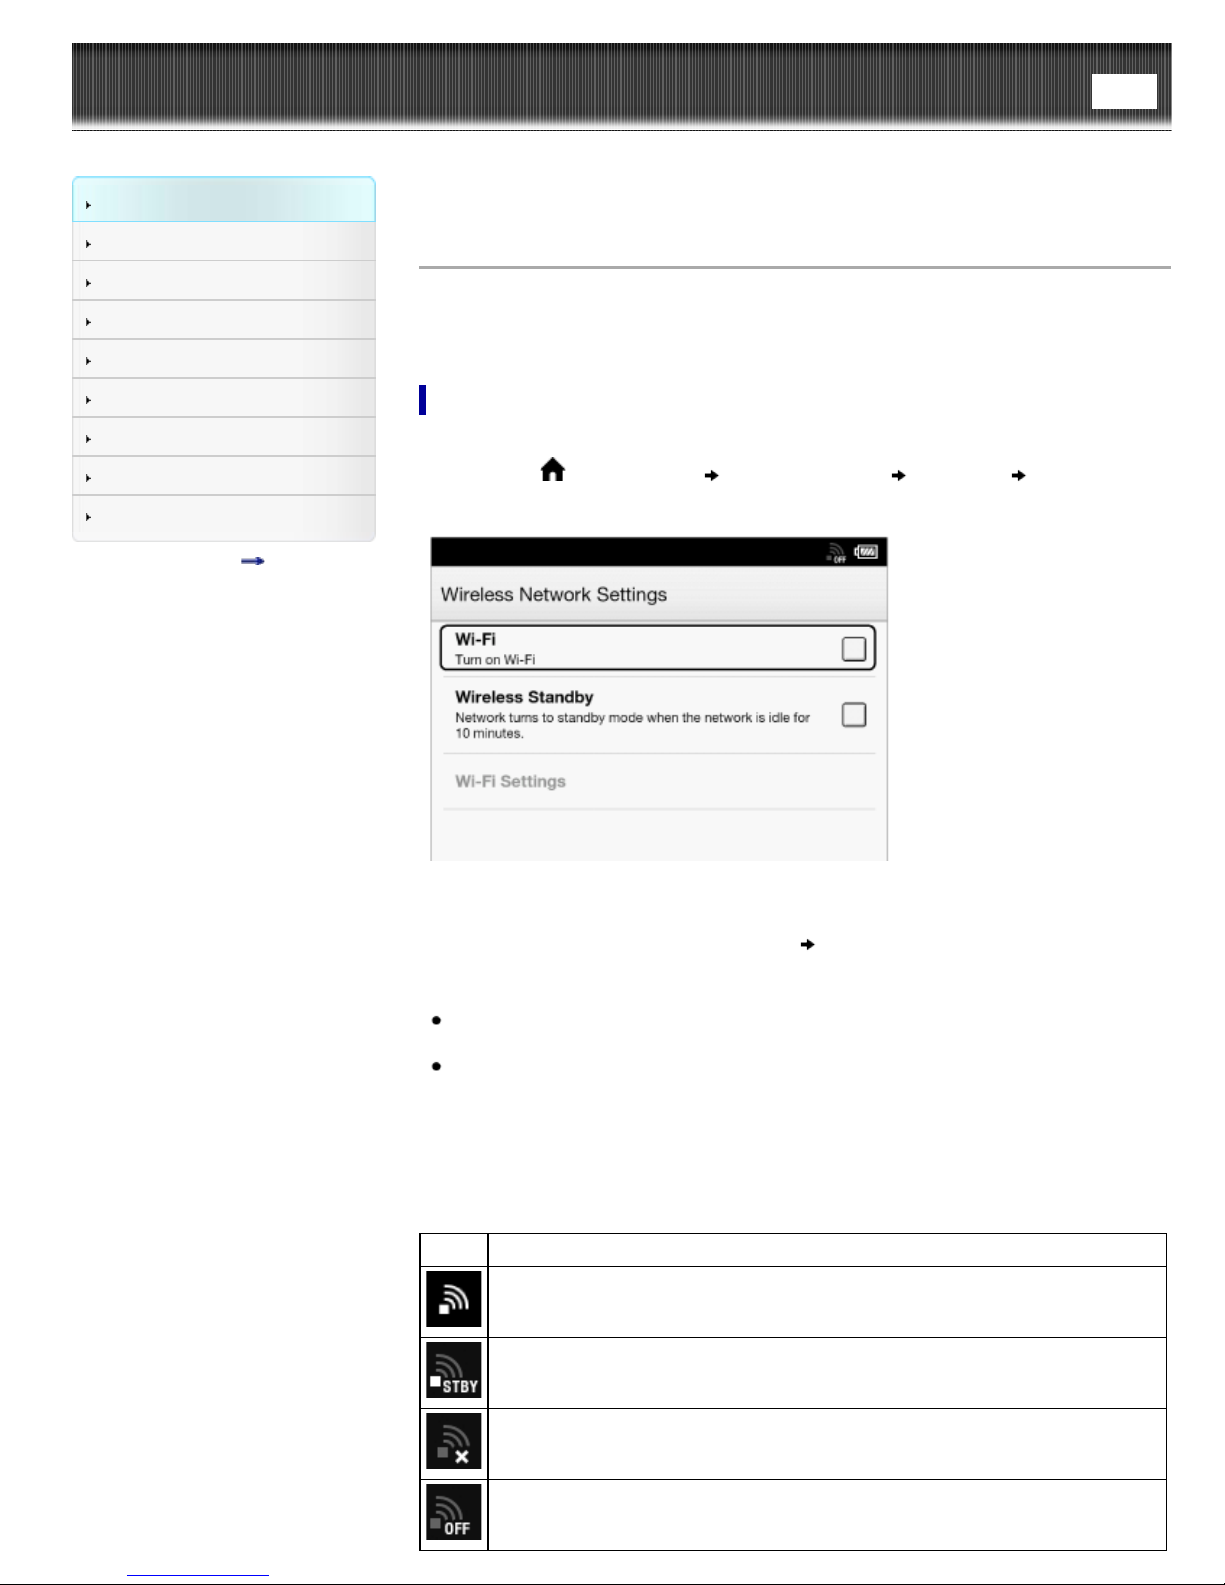
Before connecting to an access point, turn on [Wi-Fi] on the Reader.
1. Press the
Network Settings].
(Home) button tap [Applications] [Settings] [Wireless
2. Check the check box to the right of [Wi-Fi] to turn on the Wi - Fi network.
A check indicates that [Wi-Fi] is turned on. Wi -Fi is turned off by default.
Alternatively, you can tap the status bar
Tip
Turn off [Wi -Fi] when it is not in use in order to extend the battery life of the
Reader.
Turn on [Wireless Standby] when you want to extend the battery life. See Details.
[Wi-Fi]. See Details.
Wi-Fi status icons
The following icons in the status bar indicate the status of the Wi -Fi connection.
Icon Status
Wi-Fi is activated. The number of bars indicates the Wi -Fi signal strength.
The Wi-Fi network feature of the Reader is in standby mode. See Details.
There is no Wi- Fi access point. In this state, you cannot access Reader Store.
The [Wi-Fi] setting is turned off.
Page 21
Choosing a connection type
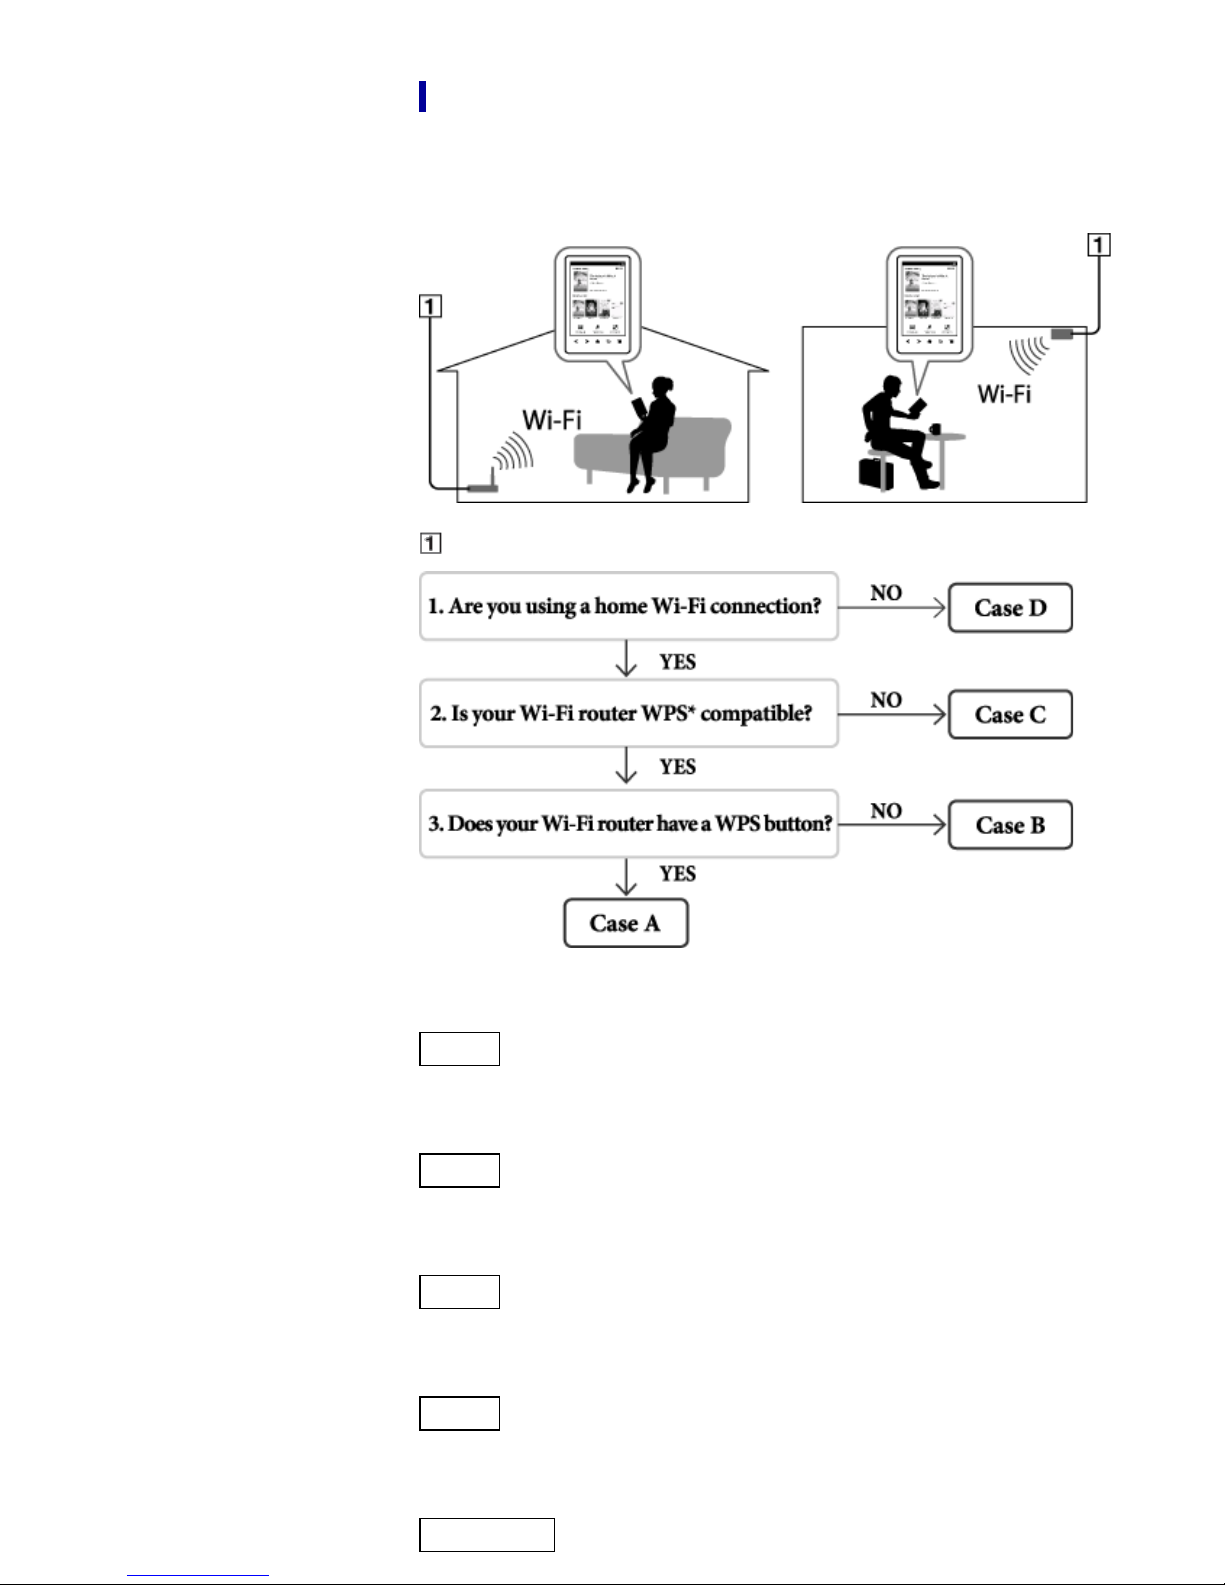
Depending on your Wi-Fi environment, connect to an access point via one of the
following methods.
The following questions will determine the most suitable case for setting the Reader’s
Wi-Fi network connection.
Internet
*WPS: Wi-Fi Protected Setup
Case A
A WPS-compatible Wi - Fi router with WPS button Details
Case B
A WPS-compatible Wi - Fi router with PIN input Details
Case C
Connecting to a Wi- Fi router without WPS support Details
Case D
Connecting to an available Wi- Fi network Details
Manual setup
Page 22
Set up a Wi-Fi network connection manually; connect to an access point for which the
SSID is set to be invisible. See Details.
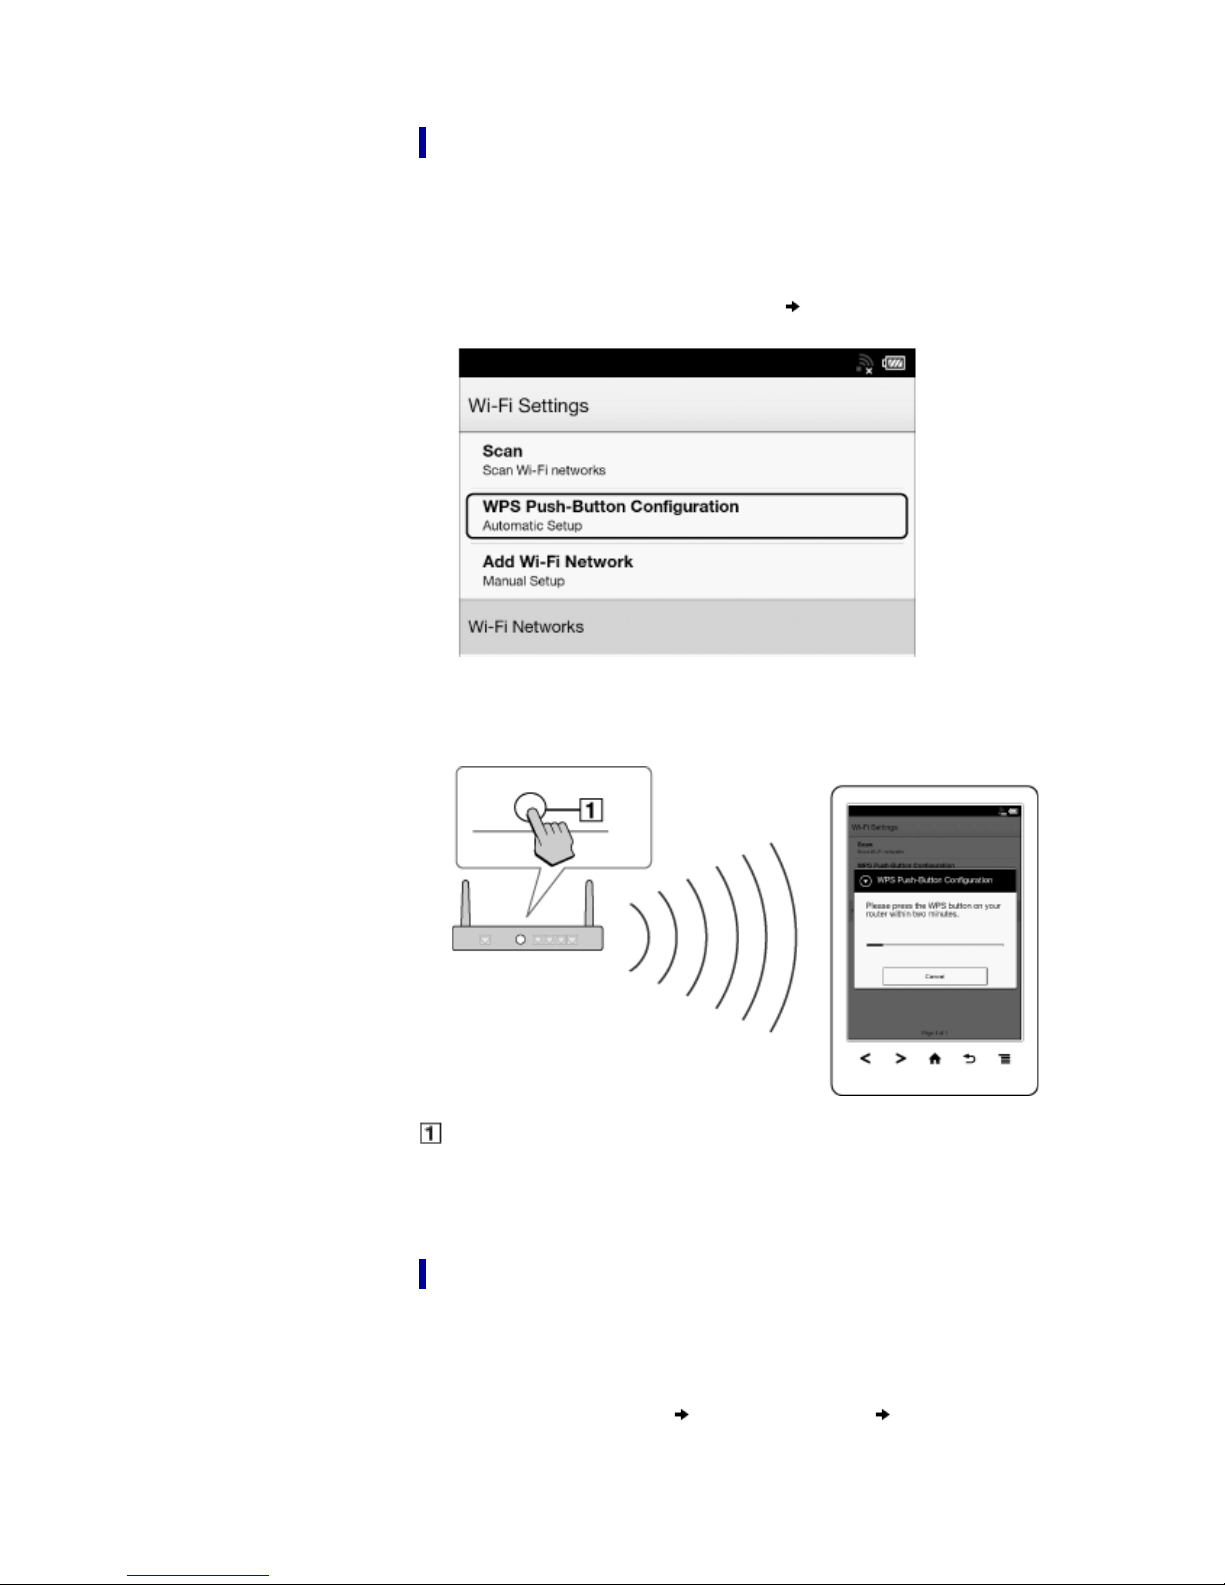
Case A: A WPS-compatible Wi-Fi router with WPS button
The Reader is compatible with WPS (Wi - Fi Protected Setup), which lets you easily
make a Wi-Fi connection using the “WPS” or “Connect” button on your WPS- compatible
Wi-Fi router. Make sure to turn on [Wi- Fi] and tap [Wi- Fi Settings] on the [Wireless
Network Settings] screen. Alternatively, you can turn on [Wi - Fi] by tapping the status bar
and tapping [Wi-Fi Settings].
1. Tap [WPS Push- Button Configuration]
[Start].
2. On your Wi-Fi router, press the “WPS” or “Connect” button within 2 minutes.*
The Reader automatically attempts to establish a Wi-Fi connection.
* The name of the button on your Wi - Fi router may vary.
“WPS” or “Connect” button
3. After the Reader screen shows the setup completion, tap [OK].
The wireless connection status is displayed in the status bar. See Details.
For more technical notes, see Details.
Case B: A WPS-compatible Wi-Fi router with PIN input
If your WPS- compatible Wi-Fi router does not support push - button configuration,
connect by using a PIN (Personal Identification Number). Make sure to turn on [Wi-Fi]
and tap [Wi -Fi Settings] on the [Wireless Network Settings] screen. Alternatively, you
can turn on [Wi -Fi] by tapping the status bar and tapping [Wi - Fi Settings].
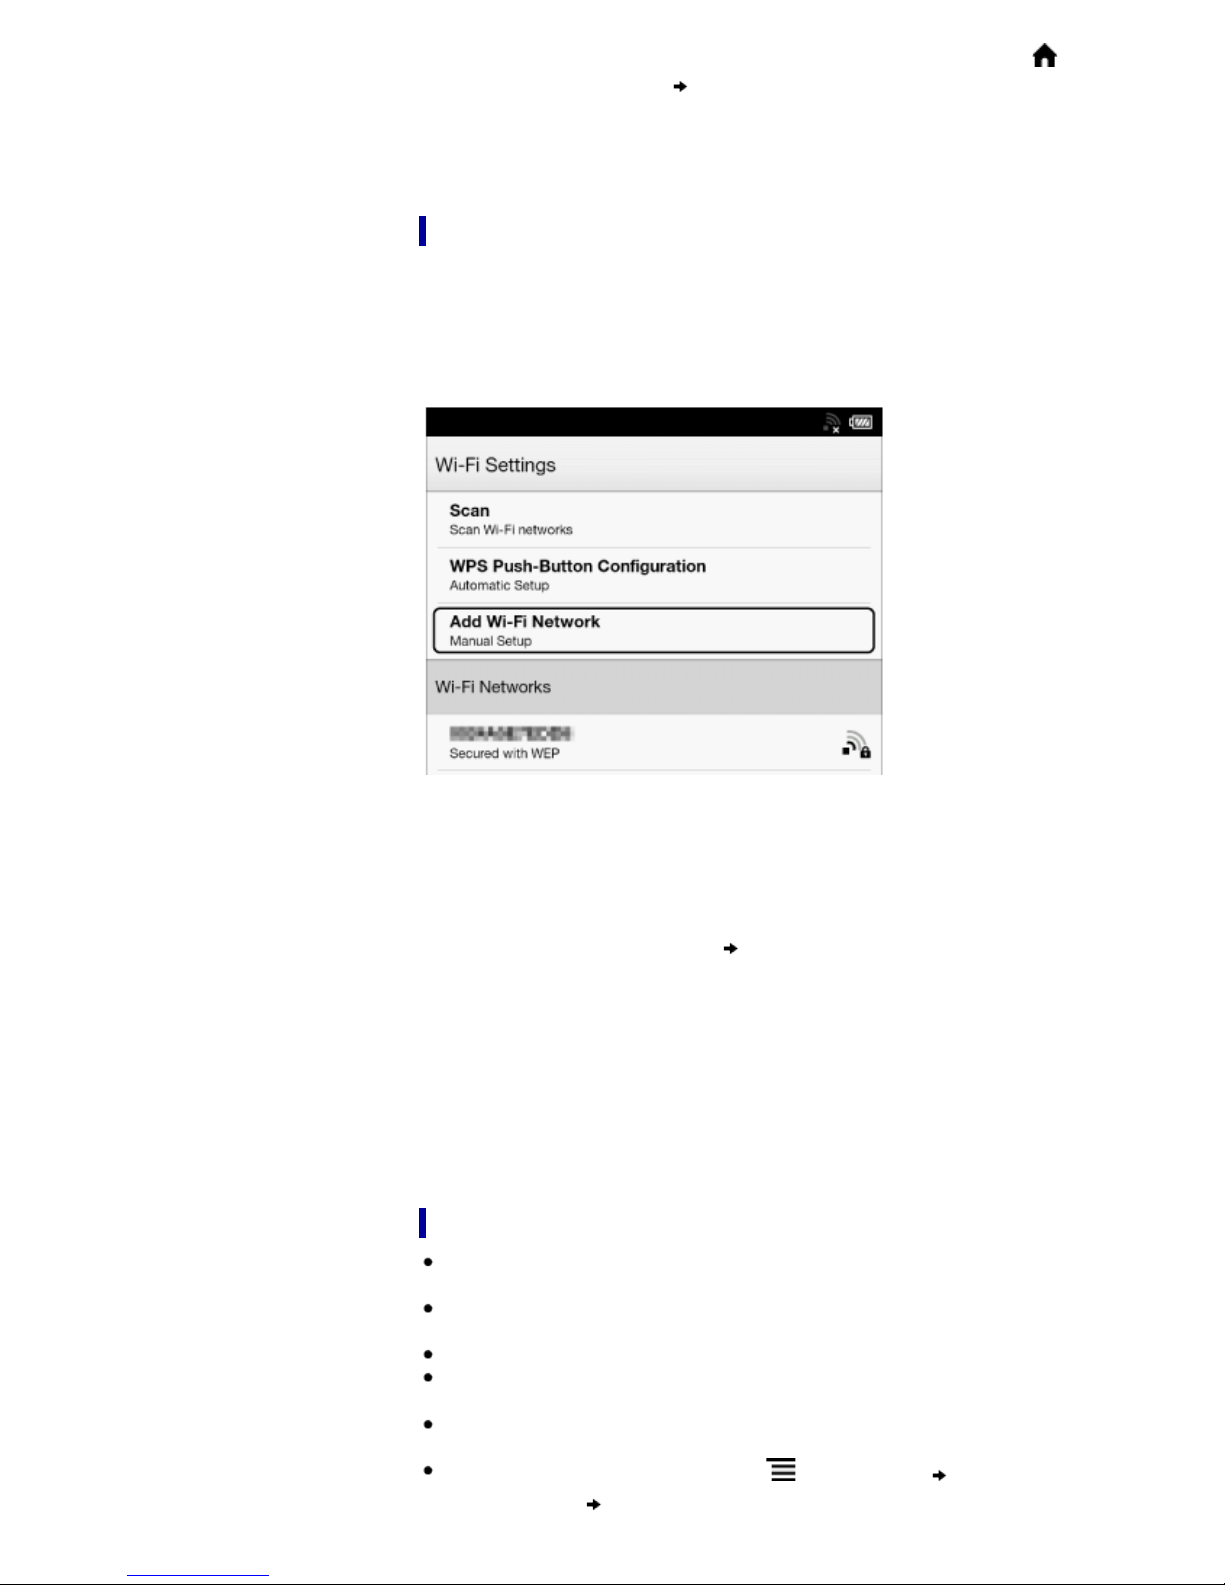
1. Tap [Add Wi- Fi Network]
[WPS PIN Method] [Start].
Page 23
A PIN will be shown on the screen of the Reader.
Wi-Fi is activated and the Reader detects a secured network. The Wi-Fi router
Enter the PIN into your Wi- Fi router. Refer to your Wi - Fi router’s instruction manual
for further details.
2. After entering the PIN, tap [OK] on the Reader.
After a moment, the Reader connects to the wireless network automatically.
The wireless connection status is displayed in the status bar. See Details.
For more technical notes, see Details.
Case C: Connecting to a Wi-Fi router without WPS support
Make sure to turn on [Wi- Fi] and tap [Wi- Fi Settings] on the [Wireless Network Settings]
screen. Alternatively, you can turn on [Wi- Fi] by tapping the status bar and tapping [WiFi Settings].
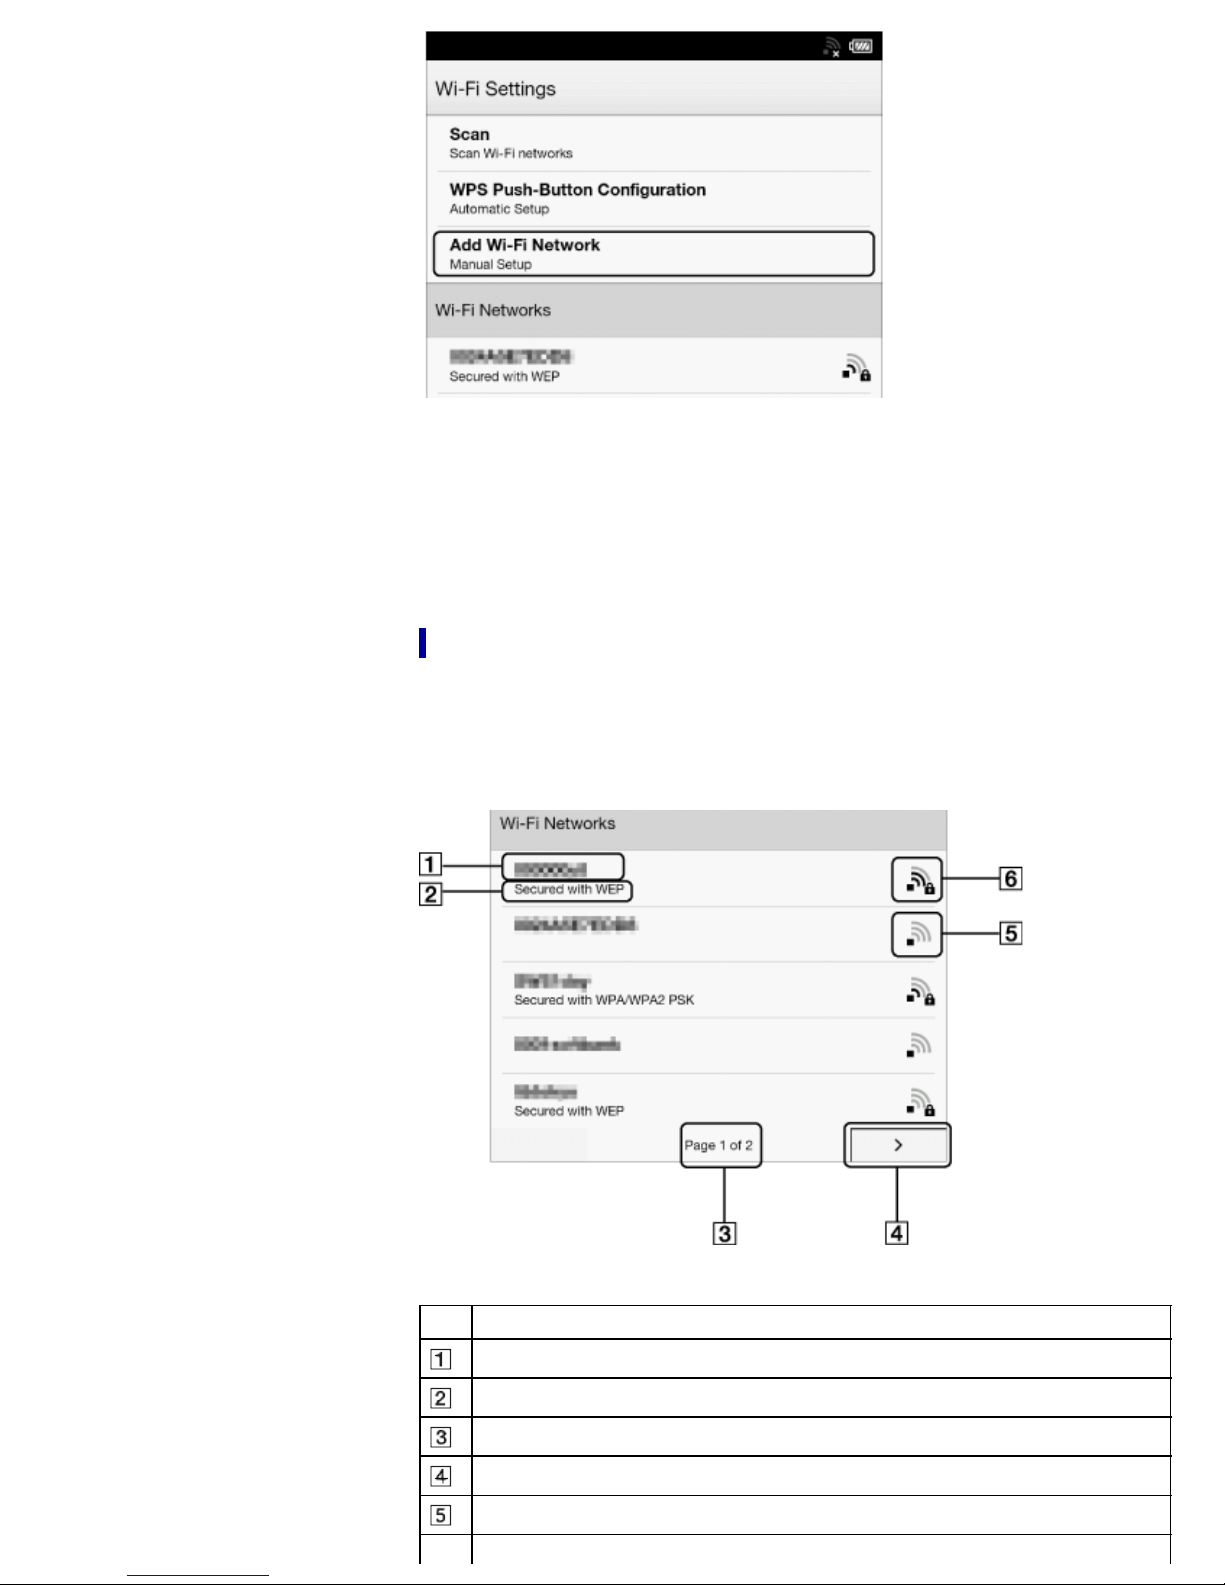
1. Tap [Scan].
The available access points are listed under [Wi- Fi Networks].
Item Description
Network SSID
Security type
Page indicator
Page turn icon
Wi-Fi is activated and the Reader detects an unsecured network.
Page 24
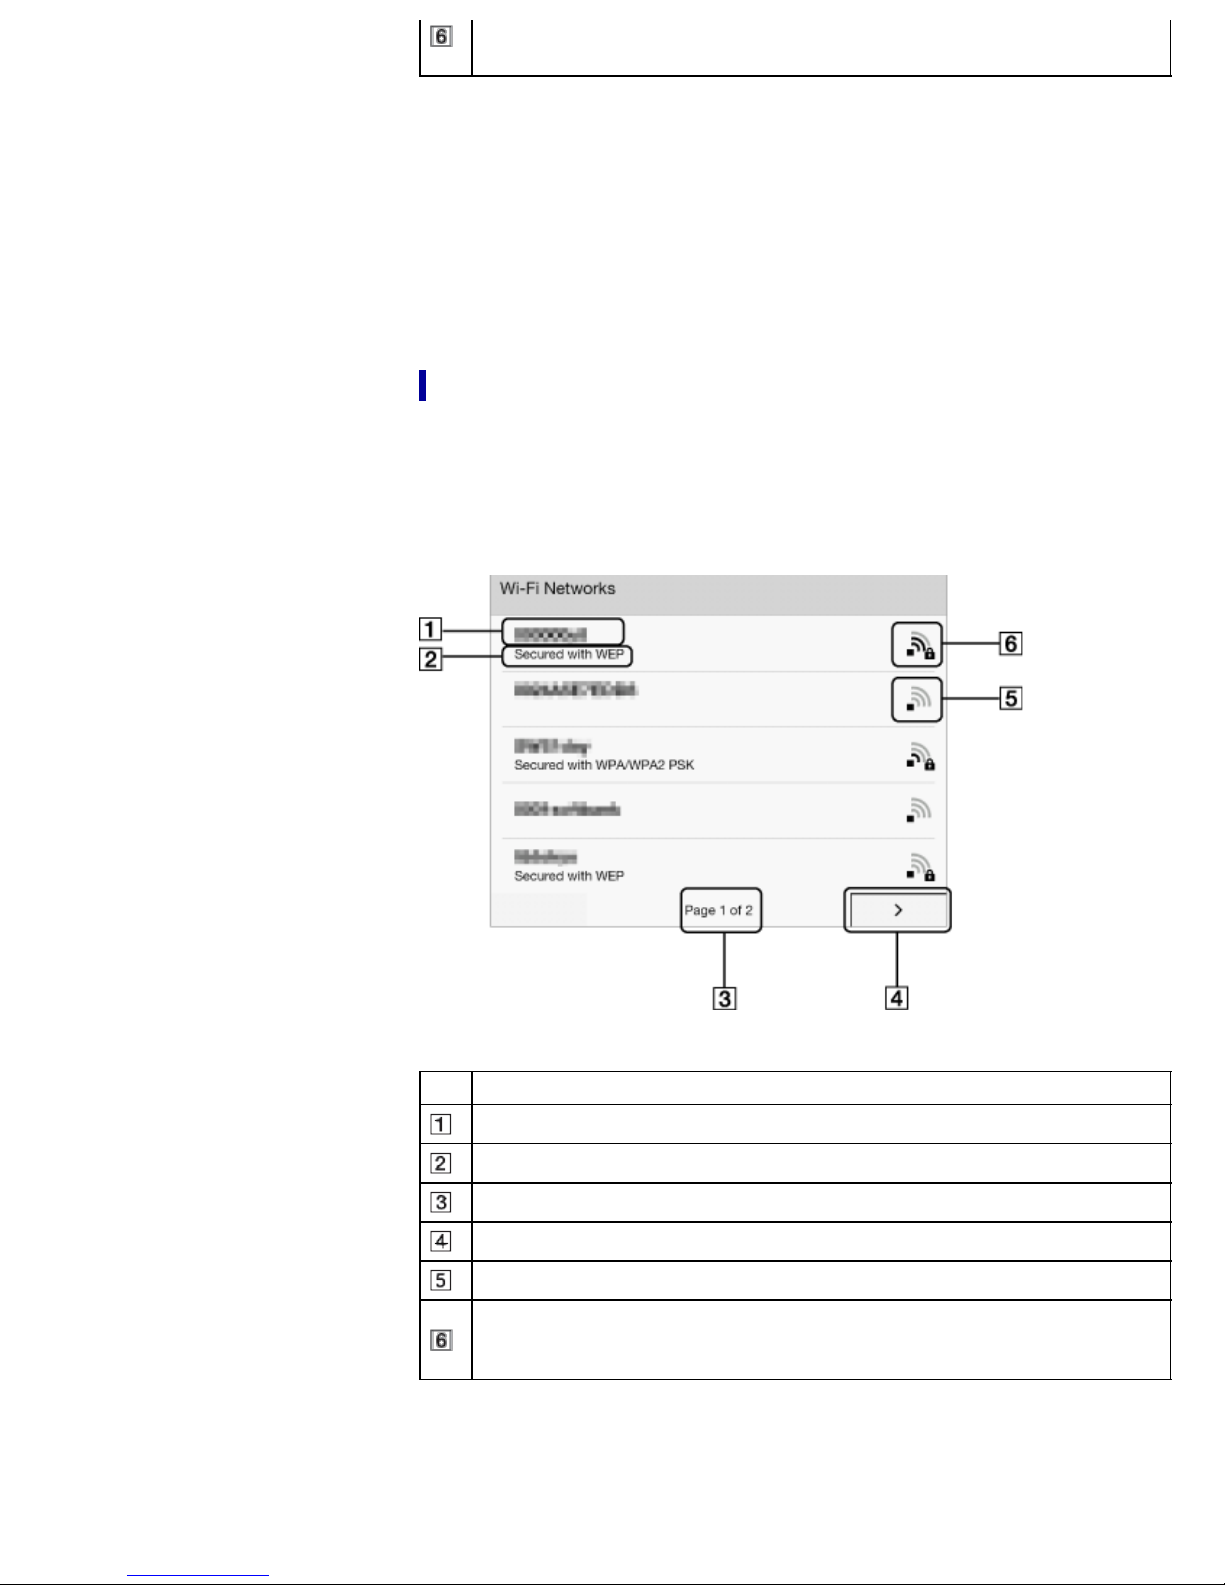
to which you want to connect requires a password. A password may also be
called a WEP key/WPA key/encryption key/network key, etc.
2. Tap your Wi-Fi router’s SSID (Service Set Identifier) in the [Wi- Fi Networks] list. For
details on determining your Wi-Fi router’s SSID, refer to your Wi-Fi router’s
instruction manual.
3. If prompted for a password, tap the input area and type in the password using the
on- screen keyboard.
4. Tap [Connect].
The Reader connects to the Wi- Fi network.
The wireless connection status is displayed in the status bar. See Details.
For more technical notes, see Details.
Case D: Connecting to an available Wi-Fi network
Some public wireless access points, or “hotspots”, are open and you can simply connect
to them. Make sure to turn on [Wi - Fi] and tap [Wi -Fi Settings] on the [Wireless Network
Settings] screen. Alternatively, you can turn on [Wi -Fi] by tapping the status bar and
tapping [Wi- Fi Settings].
1. Tap [Scan].
The available access points are listed under [Wi- Fi Networks].
Item Description
Network SSID
Security type
Page indicator
Page turn icon
Wi-Fi is activated and the Reader detects an unsecured network.
Wi-Fi is activated and the Reader detects a secured network. The Wi-Fi router
to which you want to connect requires a password. A password may also be
called a WEP key/WPA key/encryption key/network key, etc.
2. Tap your Wi-Fi router’s SSID (Service Set Identifier) in the [Wi- Fi Networks] list.
3. If prompted for a password, tap the input area and type in the password using the
on- screen keyboard.
4. Tap [Connect].
The wireless connection status is displayed in the status bar.
Page 25
5. The [Browser] application may start automatically to connect to a public access
established correctly.
point. Otherwise, start the [Browser] application manually; press the (Home)
button, tap [Applications]
6. The browser screen may show further information about completing the connection.
Follow any instruction(s) where applicable.
For more technical notes, see Details.
[Browser].
Manually setting a Wi-Fi connection
You can set up a Wi - Fi network connection manually by inputting the required
information for connection. Make sure to turn on [Wi - Fi] and tap [Wi-Fi Settings] on the
[Wireless Network Settings] screen. Alternatively, you can turn on [Wi-Fi] by tapping the
status bar and tapping [Wi -Fi Settings].
1. Tap [Add Wi- Fi Network].
2. Tap [Manual Registration].
3. Tap the [SSID] input area and type in using the on-screen keyboard.
4. Tap the [Security Method] menu (the default value is [Open]), and then tap the
supported security type.
5. Tap the [Password] input area and type in your password using the on- screen
keyboard, and then tap [Done]
6. Tap the saved network SSID in the [Wi -Fi Networks] list on the [Wi- Fi Settings]
screen.
7. If prompted for a password, tap the input area and type in the password using the
on- screen keyboard.
8. Tap [Connect].
The Reader connects to the Wi- Fi network.
The Wi-Fi connection status is displayed in the status bar. See Details.
For more technical notes, see Details.
[Save].
General notes on Wi-Fi connectivity
Tap and hold a network SSID in the [Wi- Fi Networks] list to display the access
point’s status and related information.
Before connecting to a wireless network, check all requirements, user name and/or
password details with the internet/Wi- Fi service provider.
You can configure up to 20 Wi-Fi network connections.
The Reader does not support certain custom Wi-Fi network security systems. For
details, contact the internet/Wi-Fi service provider.
If you edit the password of a Wi-Fi network to which you are currently connected, the
Reader will attempt to reconnect to the Wi-Fi network using the new password.
To use a static IP address, press the
[Wi-Fi Settings]
to by a network administrator, as the Wi -Fi network connection may not be
tap [Use Static IP]. Do not change this setting unless instructed
(Menu) button tap [Advanced] in the
Page 26

If an access point’s SSID (Service Set Identifier) is private, enter Wi- Fi connection
information manually.
The access point may filter access by MAC address. Check the MAC address by
pressing the
(Home) button tap [Applications] [Settings] [About]
[Device Information], then register the MAC address with the access point to
establish a Wi - Fi connection.
When you are connected to a Wi- Fi network, you can also display speed, security
and other Wi-Fi network details by pressing the
(Menu) button and tapping
[Connection Information] in the [Wi-Fi Settings] screen.
An access point, once configured, can be connected to again simply by tapping it in
the [Wi-Fi Networks] list and tapping [Connect].
Go to page top
Copyright 2013 Sony Corporation
Page 27
Reader™ User Guide
Getting started
Search
Top page > Getting started > Battery > Charging the Reader
Print
Basic Operations
Adding/Getting Content
Browsing Content Lists
Reading
Organizing
Other Applications
Settings
Other Information
Contents list
Charging the Reader
The charge/battery status icon at the right side of the status bar shows the battery level.
See Details.
If it is low, choose one of the methods in the following sections to charge the Reader.
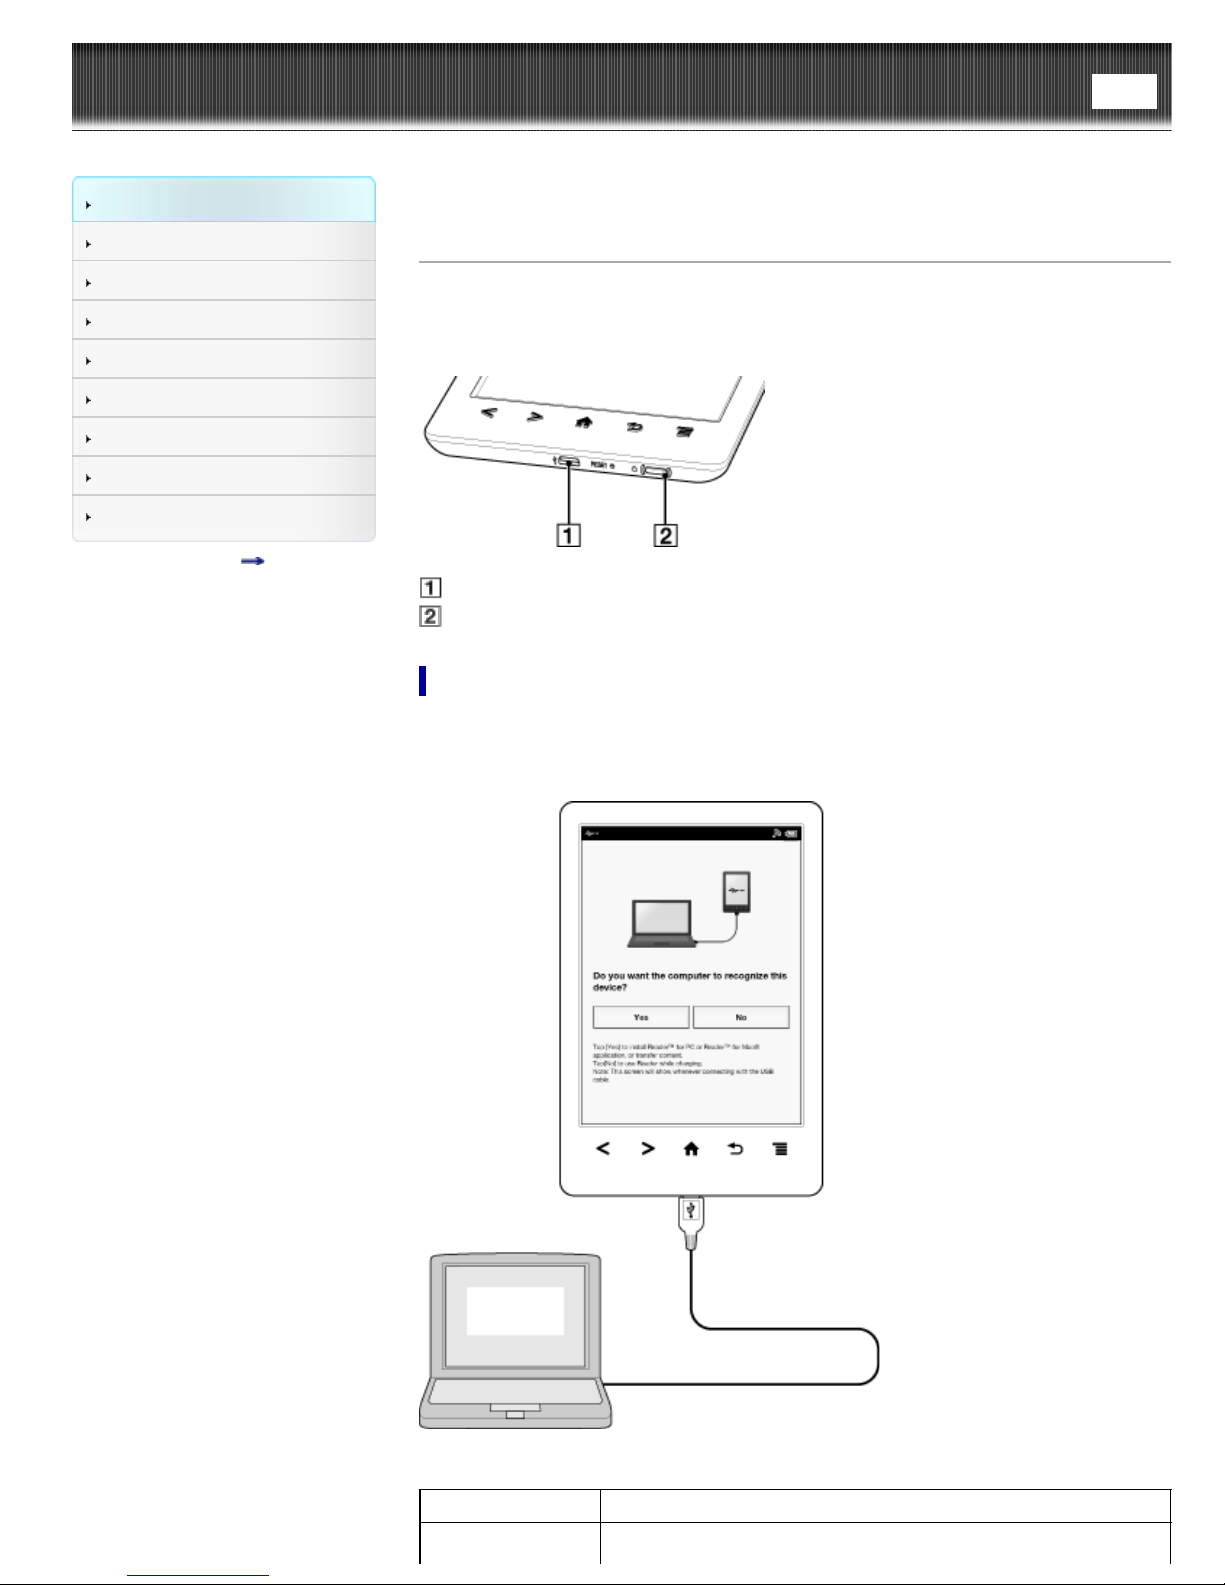
Micro USB connector
Charge indicator
Charging via your computer
1. Power on your computer.
2. Connect the Reader to your computer with the supplied USB cable.
Wait until the below screen is displayed.
To Description
Tap [Yes] to install the Reader application, or transfer files from
Page 28

your computer to the Reader while charging. The Reader cannot
Install the Reader
application, or
transfer data
be operated during transfer.
After the USB storage screen is displayed on the Reader, it is
detected on your computer, and the “READER” and “SETUP”
drives appear on your computer.
When the
When charging is complete, disconnect the USB cable from the
Reader and your computer.
After a short time, the [Home] screen will appear.
* This icon is only displayed when the Reader is in data transfer
mode.
icon* turns into the icon, charging is complete.
Tap [No], or press the
screen.
Alternatively, press the
Charge the
Reader
Note
Your computer must be turned on to charge the Reader. The Reader will not be
charged if your computer enters sleep mode or standby mode. Keep your computer
turned on with a stable and continuous power supply while charging the Reader.
(Power) button cannot be used when the Reader is connected to your
The
computer and charging.
If you turn off the Reader by tapping [Settings]
charging mode, the Reader will stop charging.
Tip
You can also charge the Reader using the AC Adapter (PRSA-AC10/PRSA-AC1A,
sold separately). This method of charging will take approximately 2 hours to fully
charge the battery.
If the battery is depleted, charging the Reader with the AC adapter for 3 minutes
will provide enough battery power to read up to approximately 600 pages.
To change from charge mode to data transfer mode, tap the status bar to display
the notification window
appears. When the
complete.
In this mode, the Reader is not detected by your computer*.
When charging is complete, disconnect the USB cable from the
Reader and your computer.
* This situation may vary, depending on the settings of your
computer.
tap [USB connected] [Yes].
(Back) button, to return to the previous
(Home) button. The [Home] screen
icon turns into the icon, charging is
[Device Shutdown] while in
Charge/Battery status icon
The charge/battery status icon shows the charging status or approximate remaining
charge of the battery.
Page 29
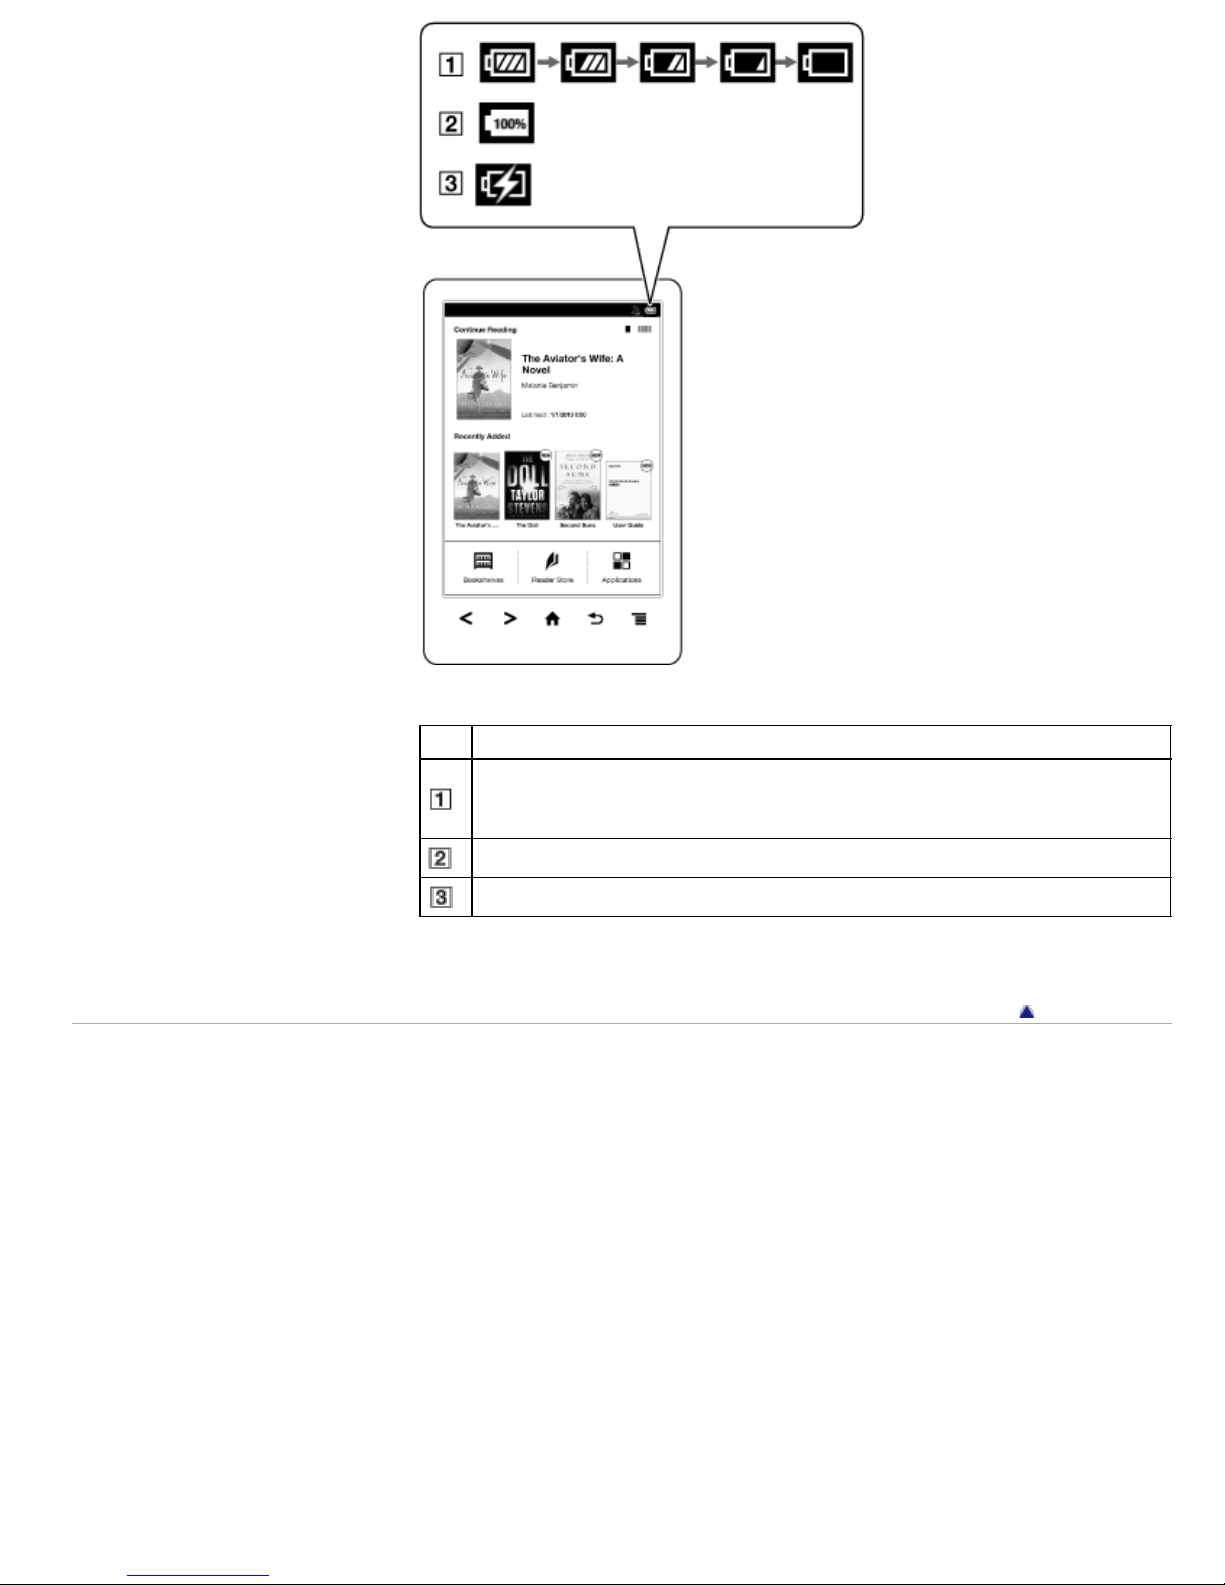
Icon Description
Four bars indicate a fully charged or almost-fully charged battery. The number
of bars decreases with the battery’s charge. Zero bars indicate that the battery
has almost no remaining charge.
The battery is fully charged.
The battery is charging.
Copyright 2013 Sony Corporation
Go to page top
Page 30

Reader™ User Guide
Getting started
Search
Top page > Getting started > Battery > Maximizing Battery Life
Print
Basic Operations
Adding/Getting Content
Browsing Content Lists
Reading
Organizing
Other Applications
Settings
Other Information
Contents list
Maximizing Battery Life
There are many ways to conserve battery power. To extend battery life:
If you have no plans to use the Reader, completely power off the Reader.
Do not leave the Reader with the battery depleted for a prolonged period of time.
Battery capacity may be affected.
Use and store the Reader at room temperature, or within the recommended
temperature range of 5°C to 35°C (41°F to 95°F).
Turn off Wi- Fi when no wireless communication is necessary.
Turn on [Wireless Standby] when you want to extend the battery life.
Power-consuming operations
The following may require more power than normal reading operations.
Wi-Fi communications
Constantly updating the [Wi- Fi Networks] list
Displaying graphic- intensive books, periodicals, files or Web sites
Displaying a slideshow with a short interval setting
Using a microSD card
Frequent insertion and removal of a microSD card
Having a large volume of content stored on a microSD card
Annotations, keyword searches and dictionary searches
The Wi-Fi network feature of the Reader is not in standby mode.
Go to page top
Copyright 2013 Sony Corporation
Page 31
Reader™ User Guide
Getting started
Basic Operations
Adding/Getting Content
Top page > Getting started > Installing Reader application (Reader for
PC/Mac) > Installing Reader application (Reader for PC/Mac)
Installing Reader application (Reader for PC/Mac)
Search
Print
Browsing Content Lists
Reading
Organizing
Other Applications
Settings
Other Information
Contents list
1. Turn on your computer, connect your computer to the internet, and then connect the
Reader to your computer using the supplied USB cable.
Make sure you have administrator access to your computer.
2. When [Do you want the computer to recognize this device?] appears, tap [Yes]. See
Details.
3. To install on Windows computers:
From your computer, click on the “Start” menu
double - click the “SETUP” drive double-click “Setup Reader for PC”.
To install on Mac computers:
When the Reader is connected to your Mac, the “SETUP” and “READER” drives will
appear on the desktop. Double-click the “SETUP” drive
Reader for Mac”.
4. Follow the on- screen instructions to complete the installation of the Reader
application.
For details on purchasing content via Reader Store, transferring content to the
Reader and syncing, refer to the [Help] menu of the Reader application.
5. When transfer is complete, click “Disconnect” on the Reader application, and then
disconnect the USB cable from the Reader. After a short time, the [Home] screen
will appear.
Content will be sent to its corresponding application based on the file format of the
content.
Personal documents other than pictures files will be sent to the [Books] application.
“Computer” or “My Computer”
double - click “Setup
Tip
When you transfer data to the microSD card, insert the microSD card to the Reader
in Step 2.
For details on the system requirements for the Reader application, see Details.
For details on supported file formats, see Details.
Go to page top
Copyright 2013 Sony Corporation
Page 32
Reader™ User Guide
Getting started
Search
Top page > Getting started > Turning the Power On/Off > Turning the Power On/Off
Print
Basic Operations
Adding/Getting Content
Browsing Content Lists
Reading
Organizing
Other Applications
Settings
Other Information
Contents list
Turning the Power On/Off
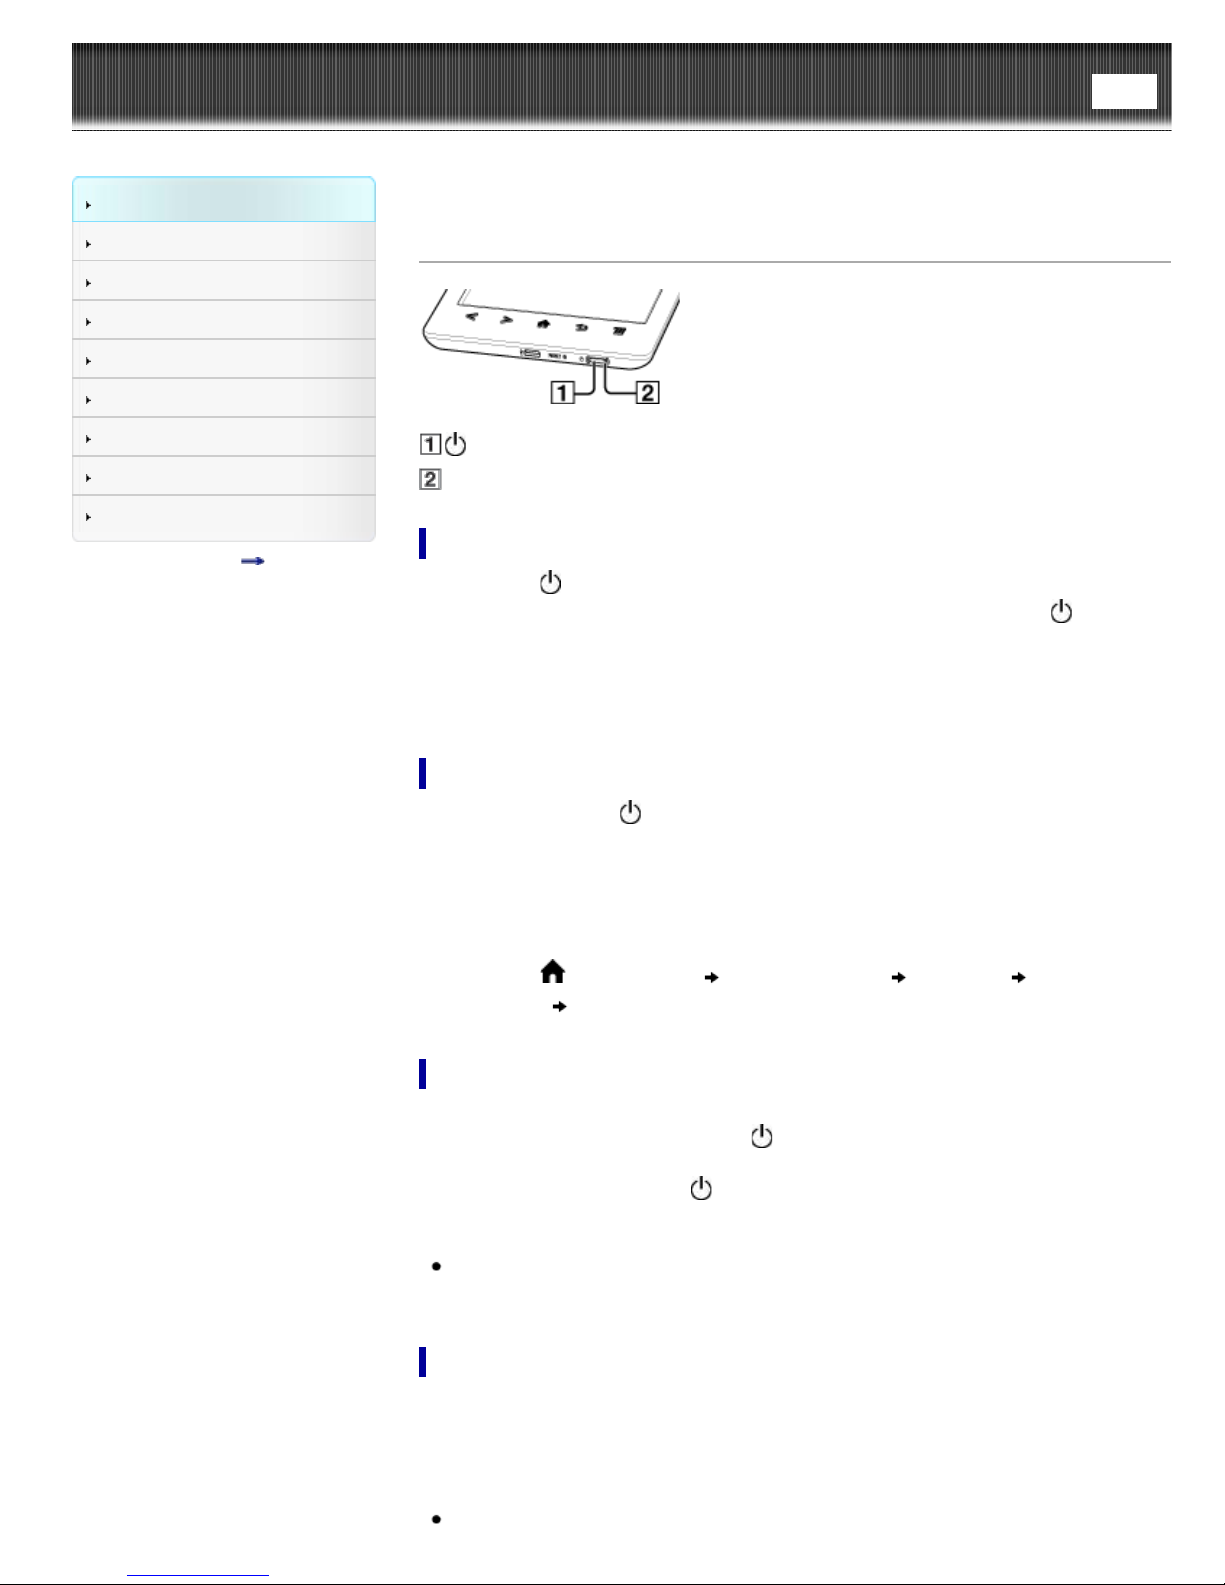
(Power) button
Charge indicator
Turning on the power
1. Press the (Power) button.
If the battery is completely depleted, power will not be supplied to the
button, and you may not be able to turn on the Reader. In this case, the Charge
indicator may blink red 3 times. Connect the Reader to your computer via the
supplied USB cable; the Reader will automatically turn on immediately. Wait until the
Reader turns on before trying to operate it.
Shutting down/turning off the power completely
1. Press and hold the (Power) button for about 3 seconds.
2. Tap [Yes] to turn off the Reader.
Completely turning off the Reader can preserve battery power longer than sleep
mode when you are not using the Reader for a prolonged period of time.
(Power)
The same operation can be done via [Settings].
1. Press the
Shutdown]
(Home) button tap [Applications] [Settings] [Device
[Yes].
Sleep mode
To save battery life and prevent unintentional operation of the touchscreen, set the
Reader to sleep mode by pressing the
You can personalize the standby screen. See Details.
To wake the Reader, press the
Tip
The Reader can also be set to sleep mode by closing the Standard Cover or Cover
with Light (sold separately).
(Power) button again.
(Power) button. The standby screen appears.
Automatic power-saving modes
The Reader will enter sleep mode after 10 minutes of inactivity. After 3 days in sleep
mode, the Reader will shut down/power off automatically. The automatic power-saving
modes cannot be turned off.
Tip
The Reader will not enter sleep mode if you tap the screen at least once every 10
minutes.
Page 33

Copyright 2013 Sony Corporation
Go to page top
Page 34
Reader™ User Guide
Getting started
Search
Top page > Getting started > Parts and Controls > Overview
Print
Basic Operations
Adding/Getting Content
Browsing Content Lists
Reading
Organizing
Other Applications
Settings
Other Information
Contents list
Overview
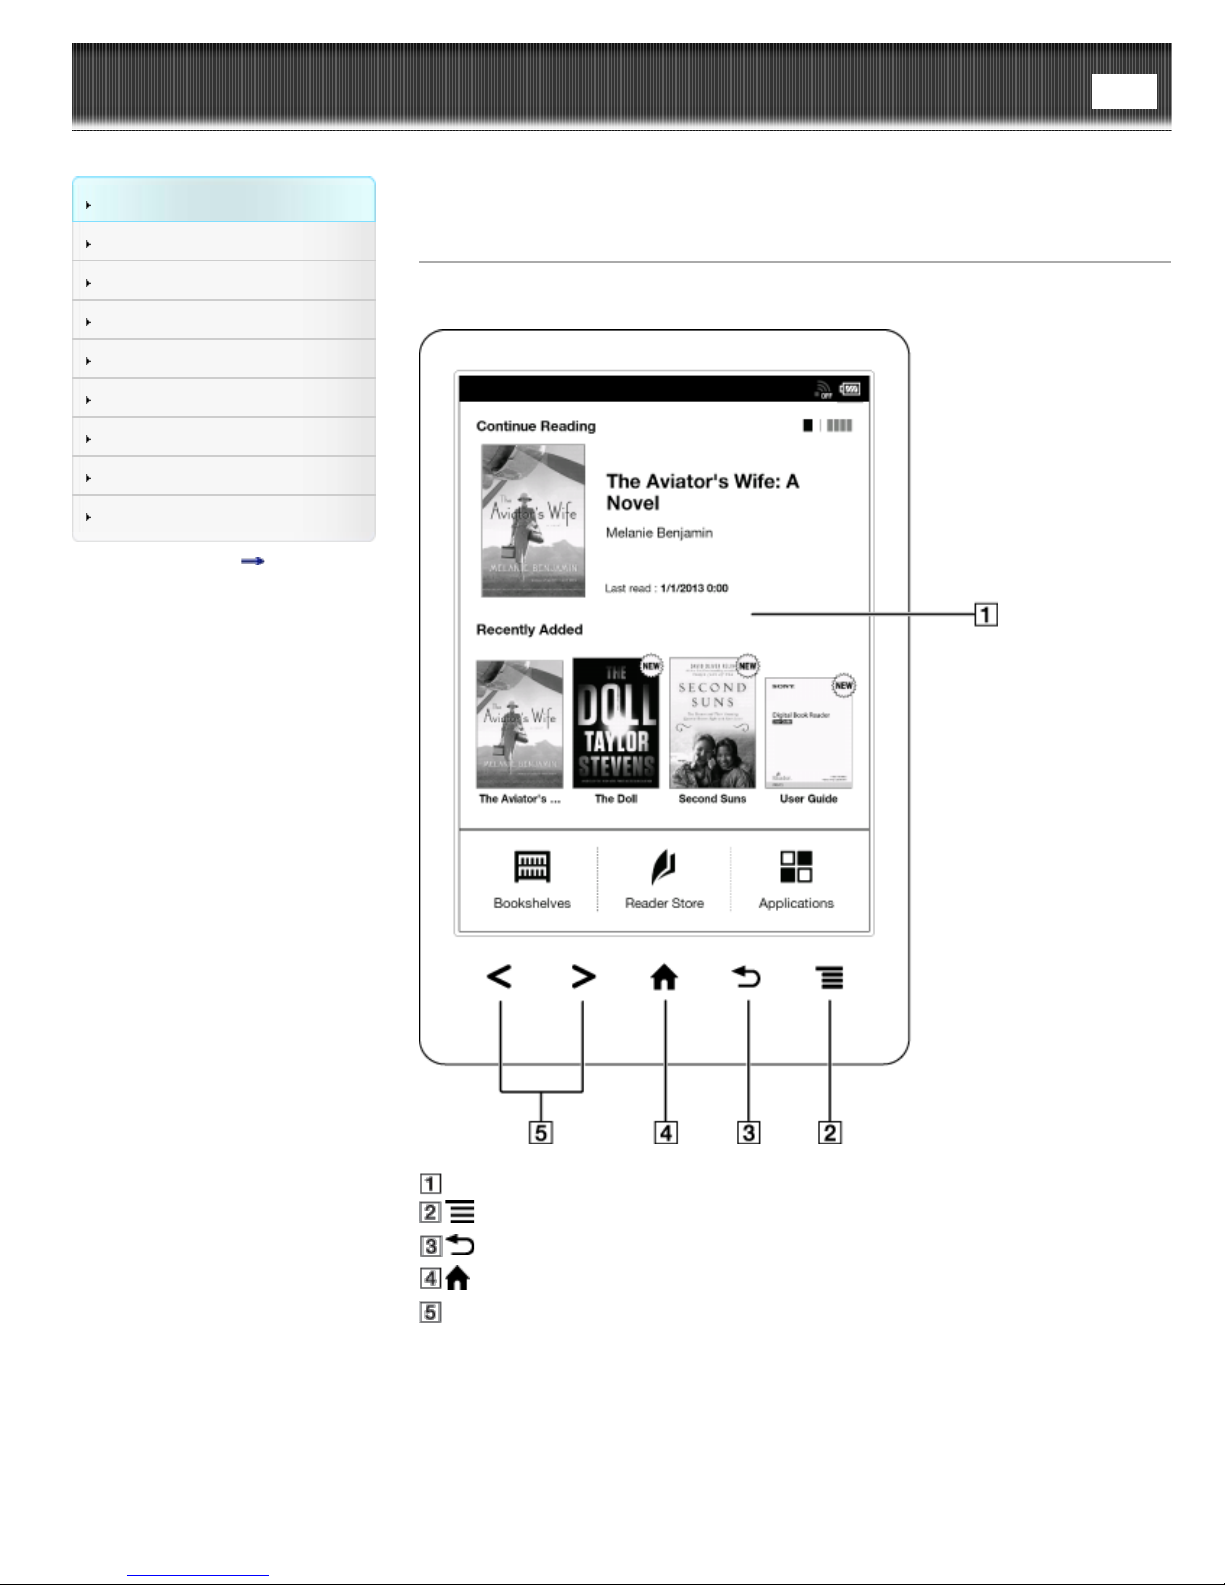
This section describes the features and controls of the Reader.
Touchscreen
(Menu) button
(Back) button
(Home) button
< > (Page turn) buttons
Page 35
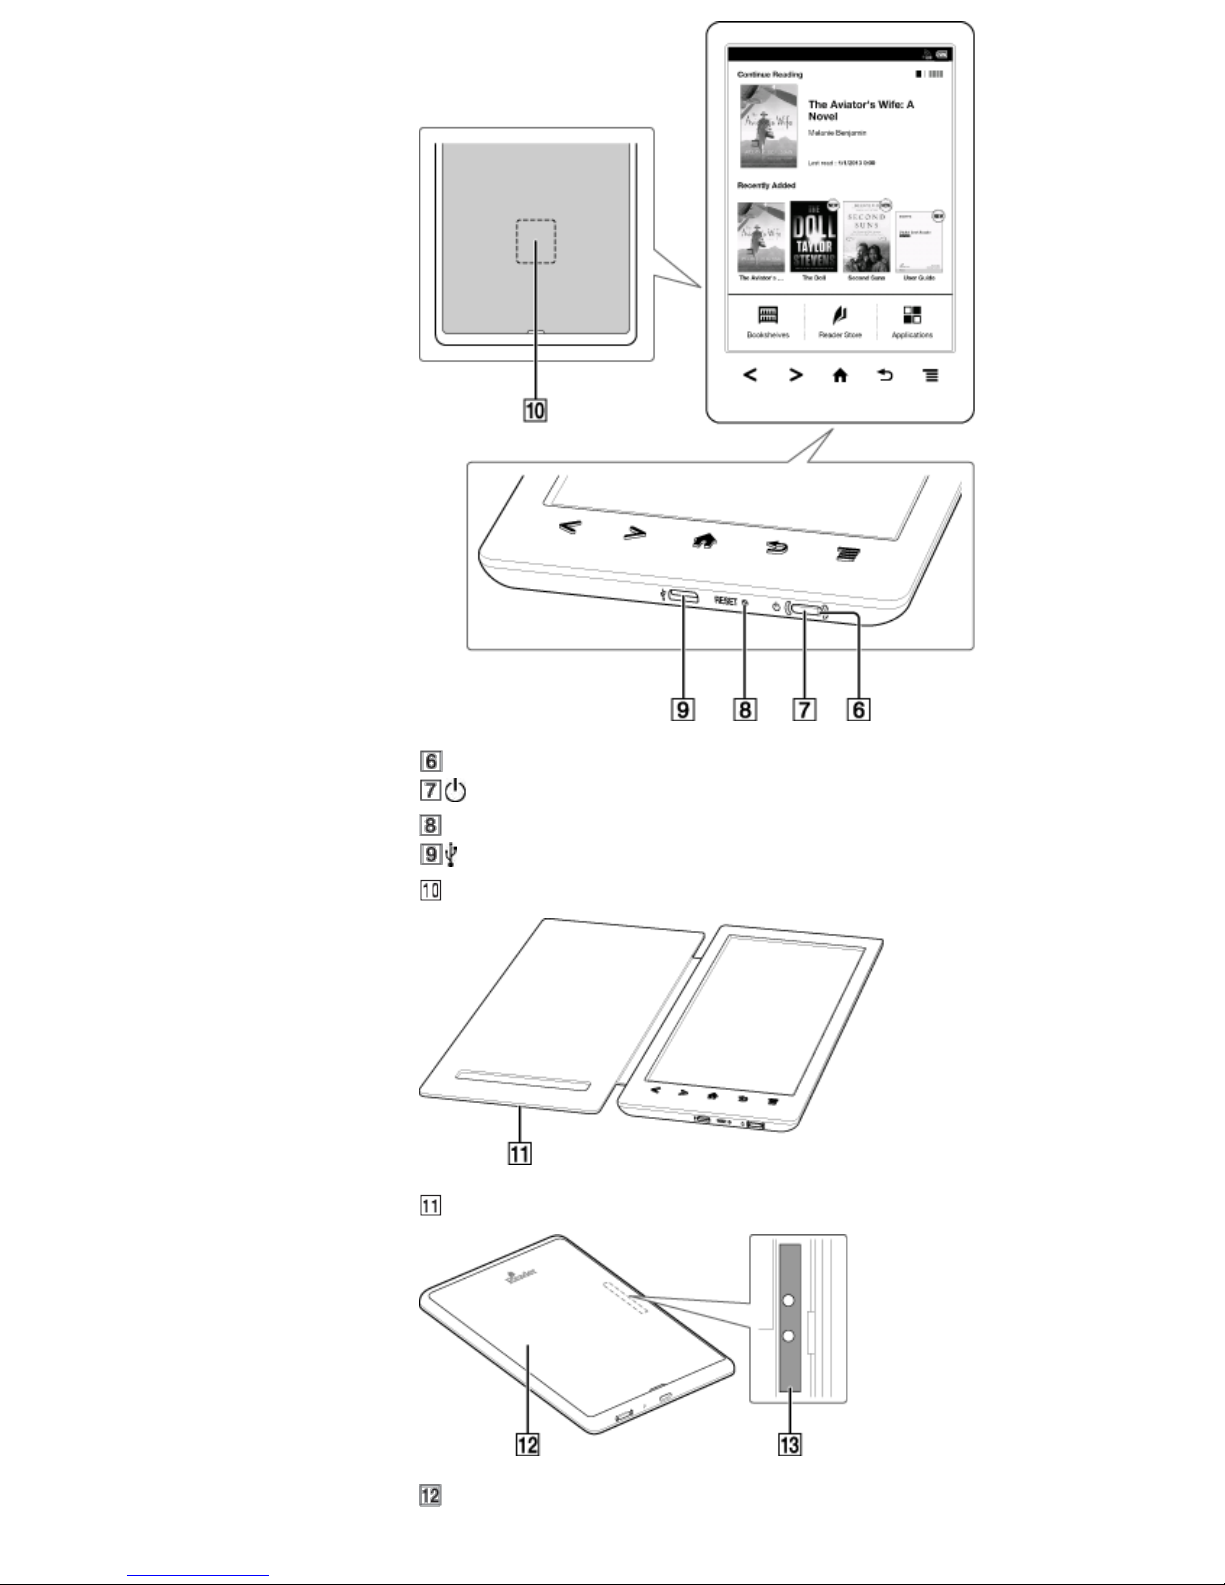
Charge indicator
(Power) button
RESET button
Micro USB connector
microSD card slot
Standard Cover (PRS-T3)
Back Panel (PRS- T3S*)
* Limited edition only.
Page 36

Note
For PRS-T3S, the Standard Cover is sold separately.
Power supply terminal
Note
The power supply terminal can be used to supply power to the Cover with Light
(PRSA- CL30, sold separately).
Supplied accessories
USB cable × 1
Standard Cover (PRS-T3)
Go to page top
Copyright 2013 Sony Corporation
Page 37
Reader™ User Guide
Getting started
Search
Top page > Getting started > Parts and Controls > Buttons
Print
Basic Operations
Adding/Getting Content
Browsing Content Lists
Reading
Organizing
Other Applications
Settings
Other Information
Contents list
Buttons
(Power)
Turns the Reader on/off, and sets it to sleep mode. See Details.
< > (Page turn)
When reading a book or periodical: Press either button to turn the page back or forward,
respectively. Press and hold either button to turn pages continuously.
When using the Web browser: Press either button to scroll the page up or down,
respectively.
(Home)
Displays the [Home] screen.
(Back)
Returns to the previous screen, or returns to the content list from a book. Also closes
the on -screen keyboard or a dialog box/navigation bar/tool bar.
(Menu)
Displays the available option items.
Copyright 2013 Sony Corporation
Go to page top
Page 38
Reader™ User Guide
Getting started
Basic Operations
Adding/Getting Content
Browsing Content Lists
Reading
Organizing
Other Applications
Settings
Other Information
Contents list
Search
Top page > Getting started > Parts and Controls > Removing/attaching the Standard
Cover (PRS -T3)
Removing/attaching the Standard Cover (PRS- T3)
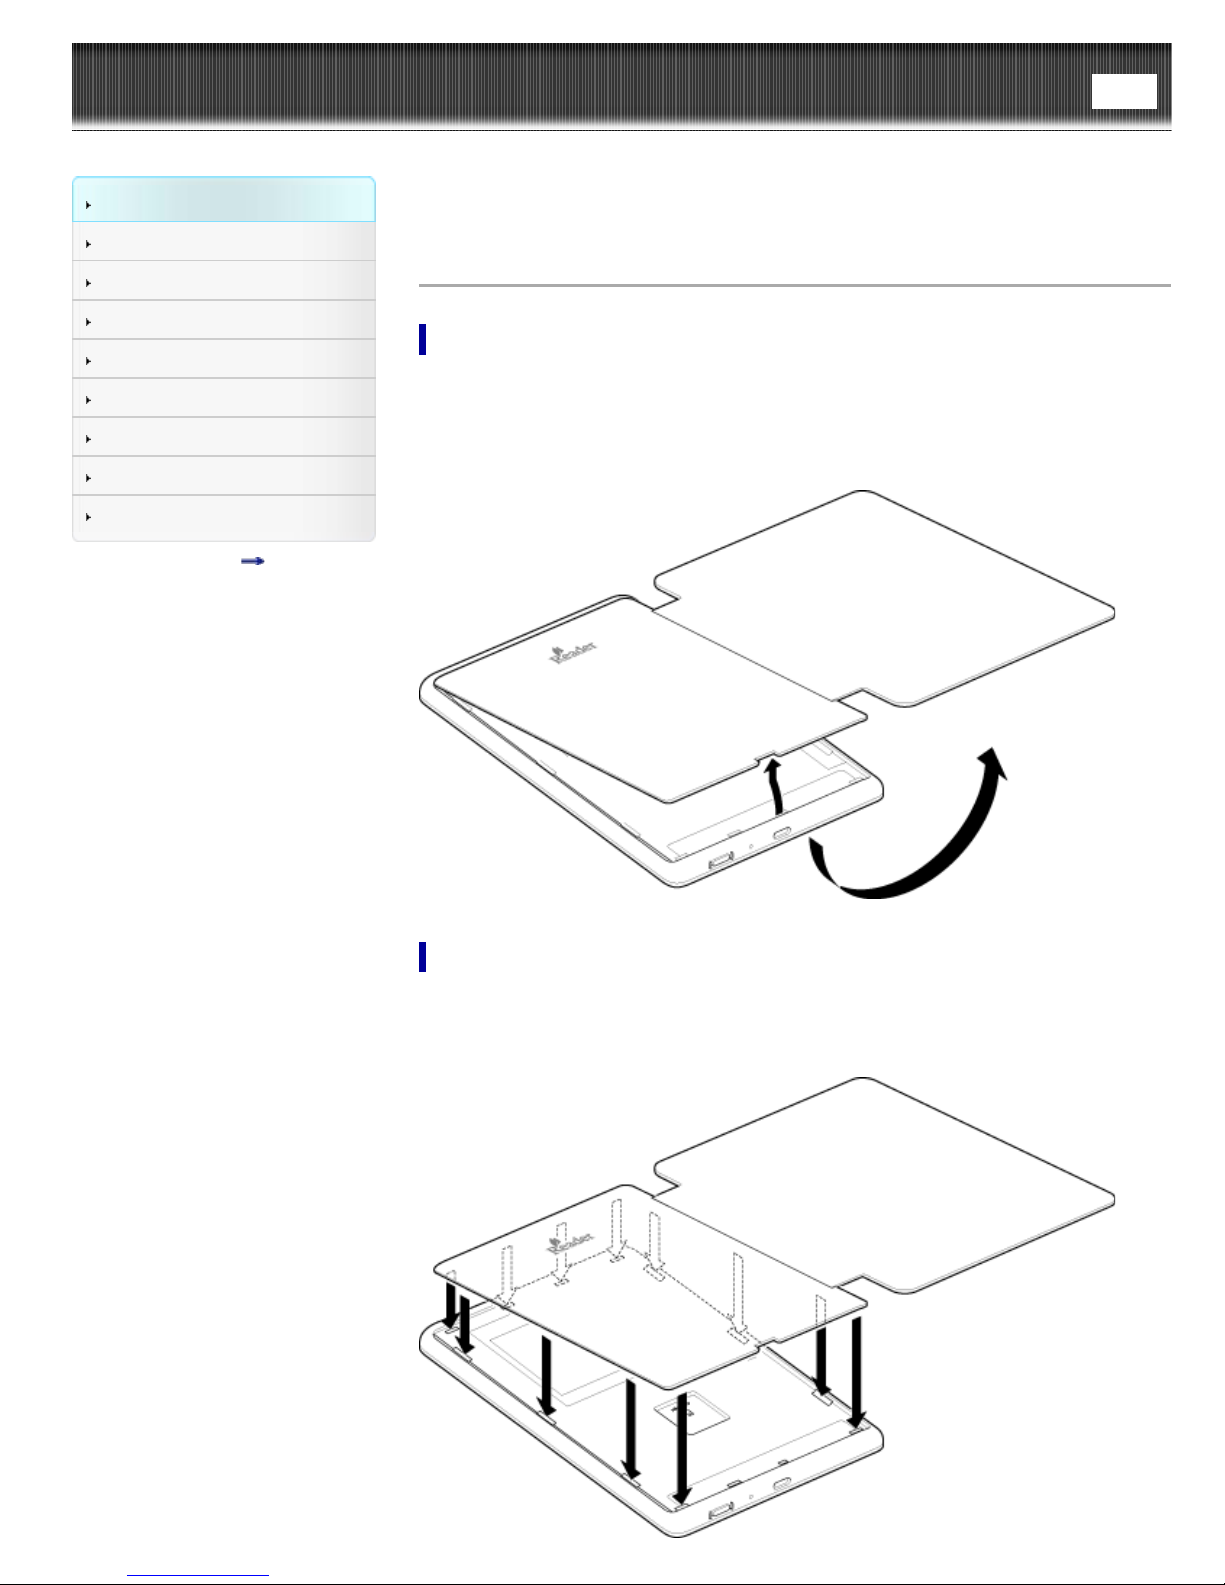
Removing the Standard Cover
1. Open the Standard Cover and turn over the Reader.
2. Hold the Reader firmly with one hand.
3. Place your fingernail or a pointed object into the slot on the bottom edge, then
carefully lift and remove the Standard Cover.
Print
Attaching the Standard Cover
1. Insert the top four tabs of the Standard Cover into the upper holes of the Reader.
2. Insert all the tabs in their holes (indicated by arrows), and push down the Standard
Cover firmly.
Page 39

Note
Do not remove the label on the battery.
Tip
The Standard Cover and Cover with Light (sold separately) include a magneticallyactivated wake/sleep feature, which automatically wakes/puts your Reader to sleep
when you open/close the cover.
Go to page top
Copyright 2013 Sony Corporation
Page 40
Reader™ User Guide
Getting started
Basic Operations
Adding/Getting Content
Search
Top page > Getting started > Parts and Controls > Removing/attaching the Back Panel
Print
(PRS-T3S*)
Removing/attaching the Back Panel (PRS-T3S*)
Browsing Content Lists
Reading
Organizing
Other Applications
Settings
Other Information
Contents list
* Limited edition only.
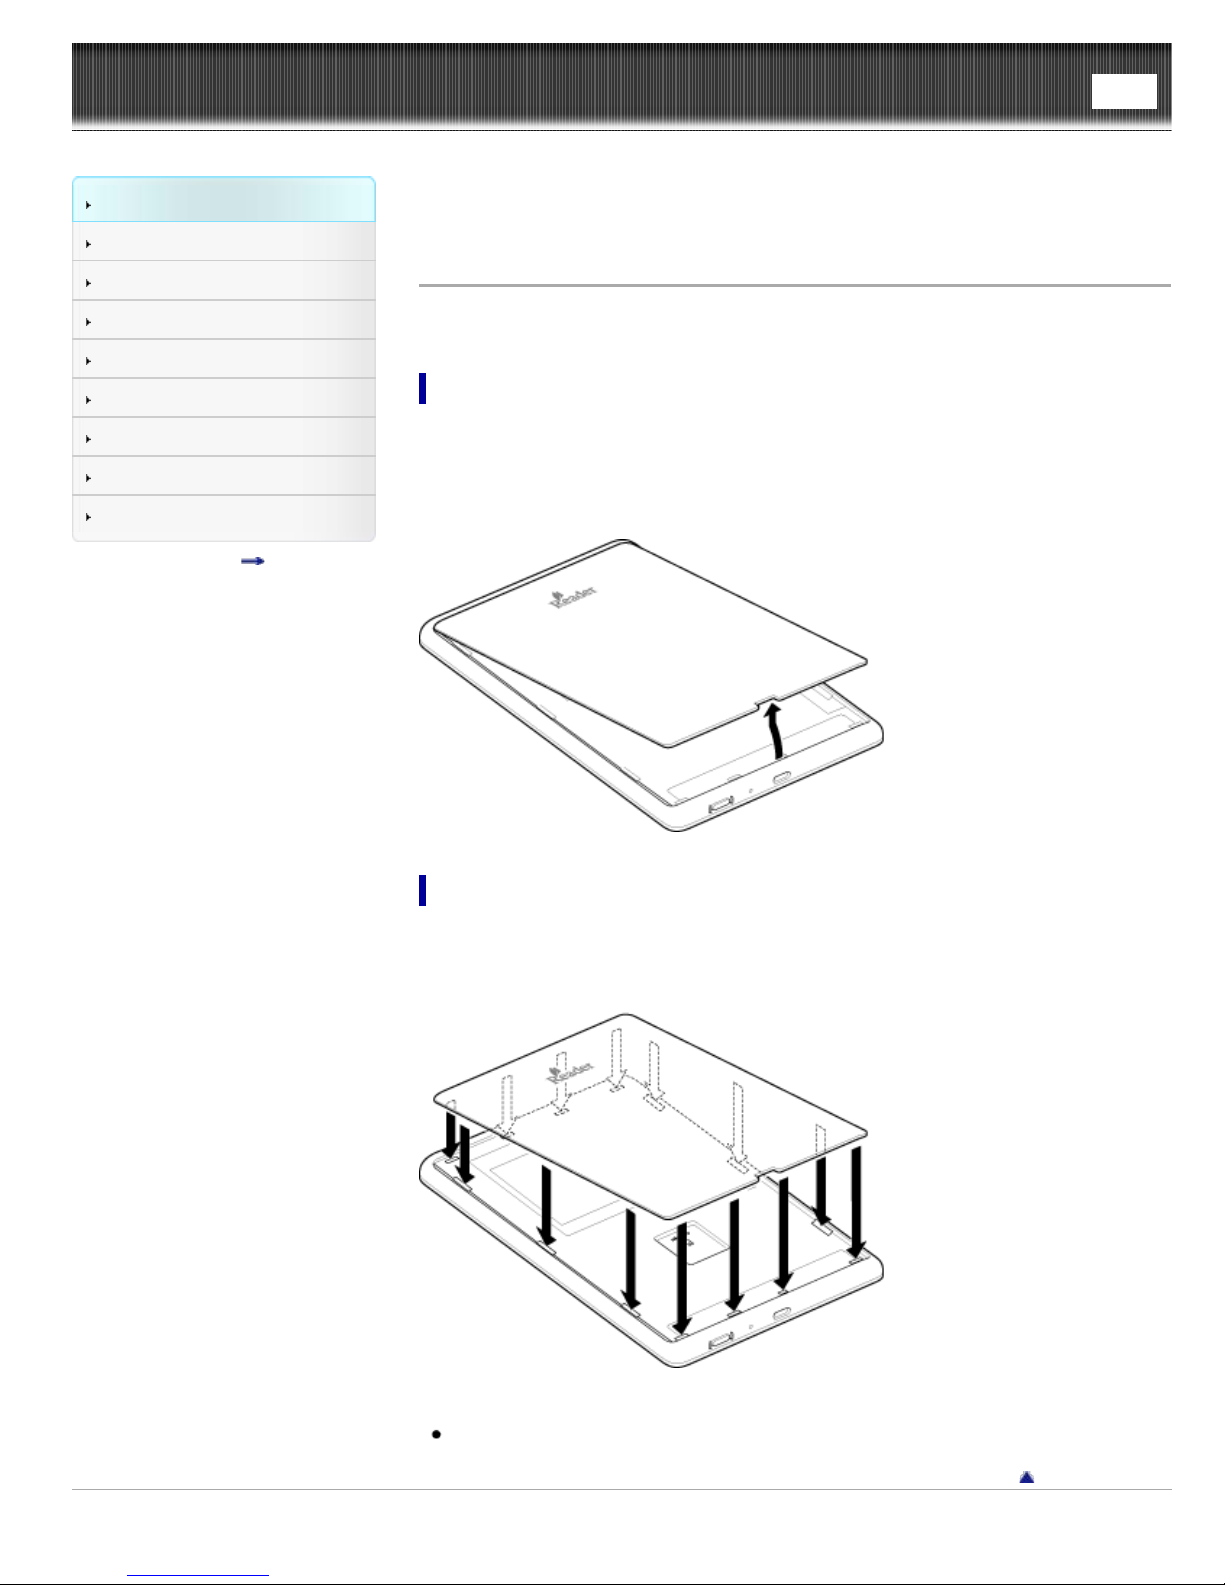
Removing the Back Panel
1. Turn over the Reader.
2. Hold the Reader firmly with one hand.
3. Place you fingernail or a pointed object into the slot on the bottom edge, then
carefully lift and remove the Back Panel.
Attaching the Back Panel
1. Insert the top four tabs of the Back Panel into the upper holes of the Reader.
2. Insert all the tabs in their holes (indicated by arrows), and push down the Back
Panel firmly.
Note
Do not remove the label on the battery.
Go to page top
Copyright 2013 Sony Corporation
Page 41
Reader™ User Guide
Getting started
Search
Top page > Getting started > Parts and Controls > microSD Card Slot
Print
Basic Operations
Adding/Getting Content
Browsing Content Lists
Reading
Organizing
Other Applications
Settings
Other Information
Contents list
microSD Card Slot
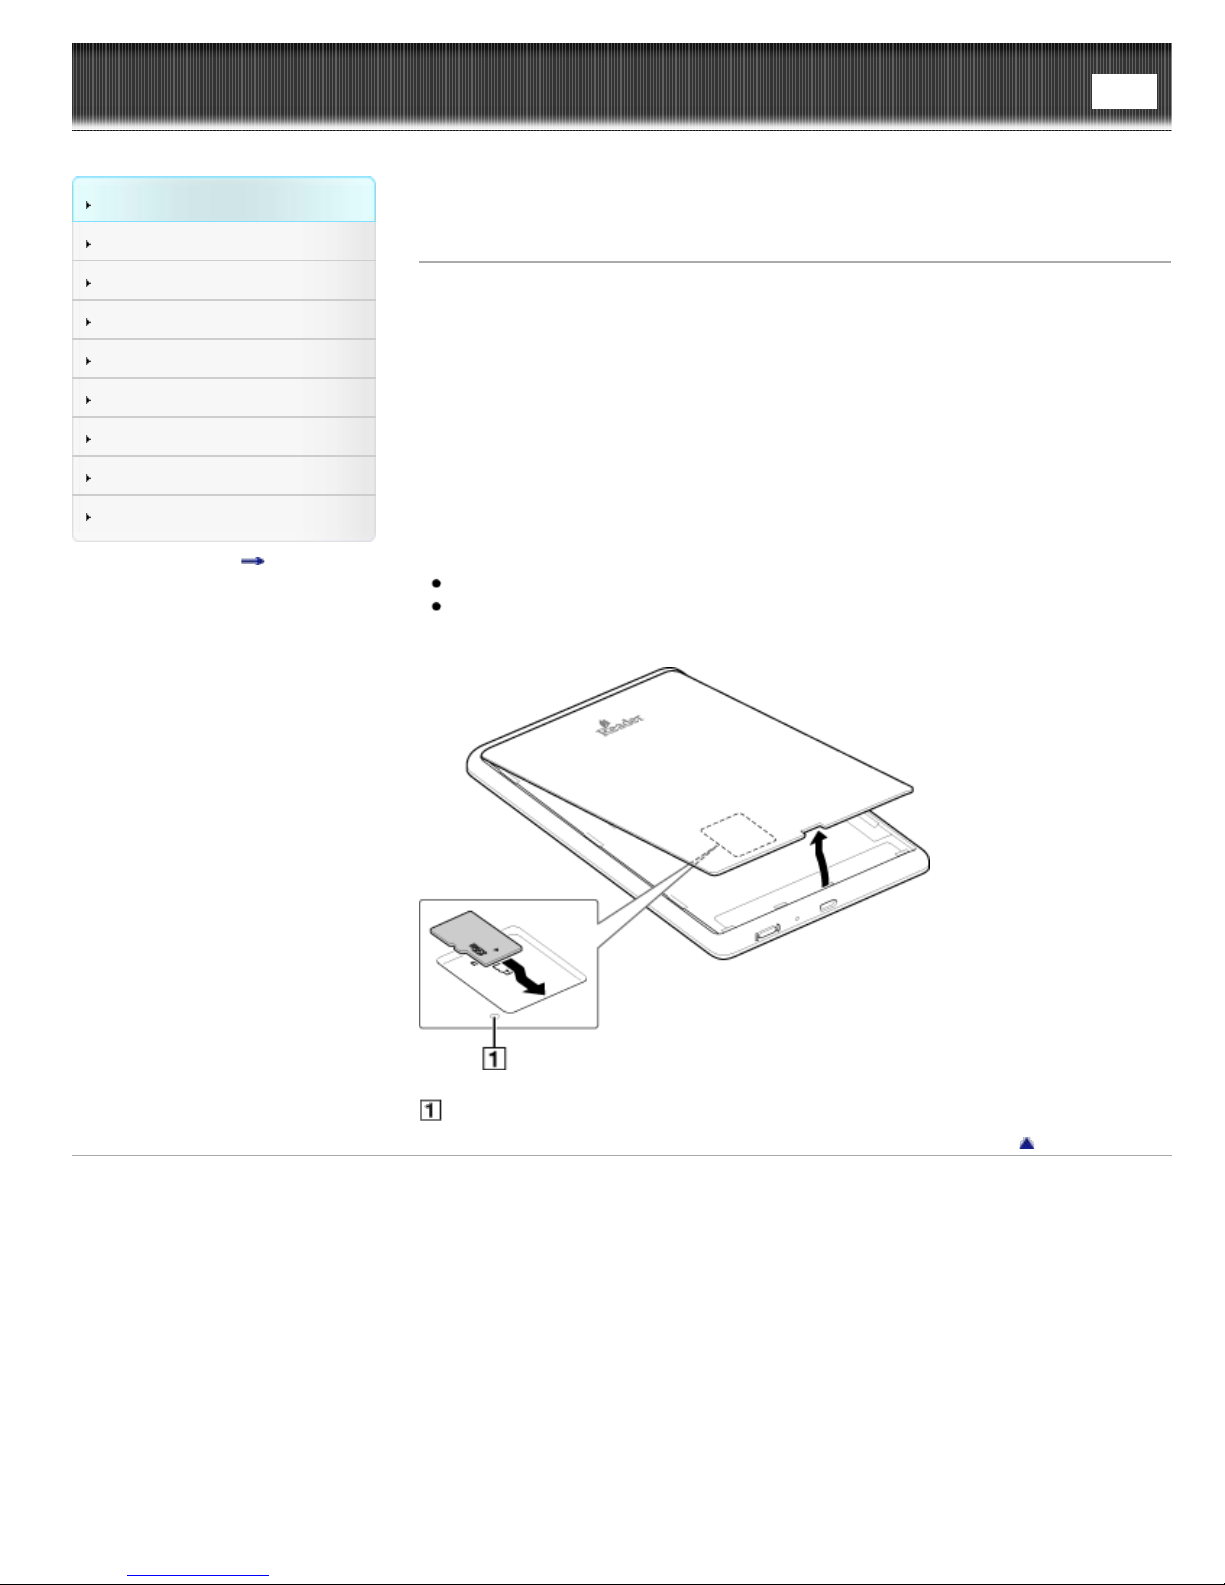
The microSD card slot is located on the back of the Reader.
1. Remove the Standard Cover (PRS- T3) or Back Panel (PRS -T3S*).
2. Hold the microSD card with its contacts facing down and the arrow pointing toward
the microSD card slot, then insert it until it clicks into place.
The access indicator lights up in orange while the Reader is accessing the microSD
card.
3. Attach the Standard Cover (PRS- T3) or Back Panel (PRS - T3S*).
* Limited edition only.
You can format the microSD card if necessary. See Details.
Note
Do not remove the microSD card while the access indicator is lit.
Push in the microSD card once, carefully slide the card out with your fingertip, then
release.
Access indicator
Go to page top
Copyright 2013 Sony Corporation
Page 42
Reader™ User Guide
Getting started
Search
Top page > Basic Operations > [Home] Screen > Applications and the [Home] Screen
Print
Basic Operations
Adding/Getting Content
Browsing Content Lists
Reading
Organizing
Other Applications
Settings
Other Information
Contents list
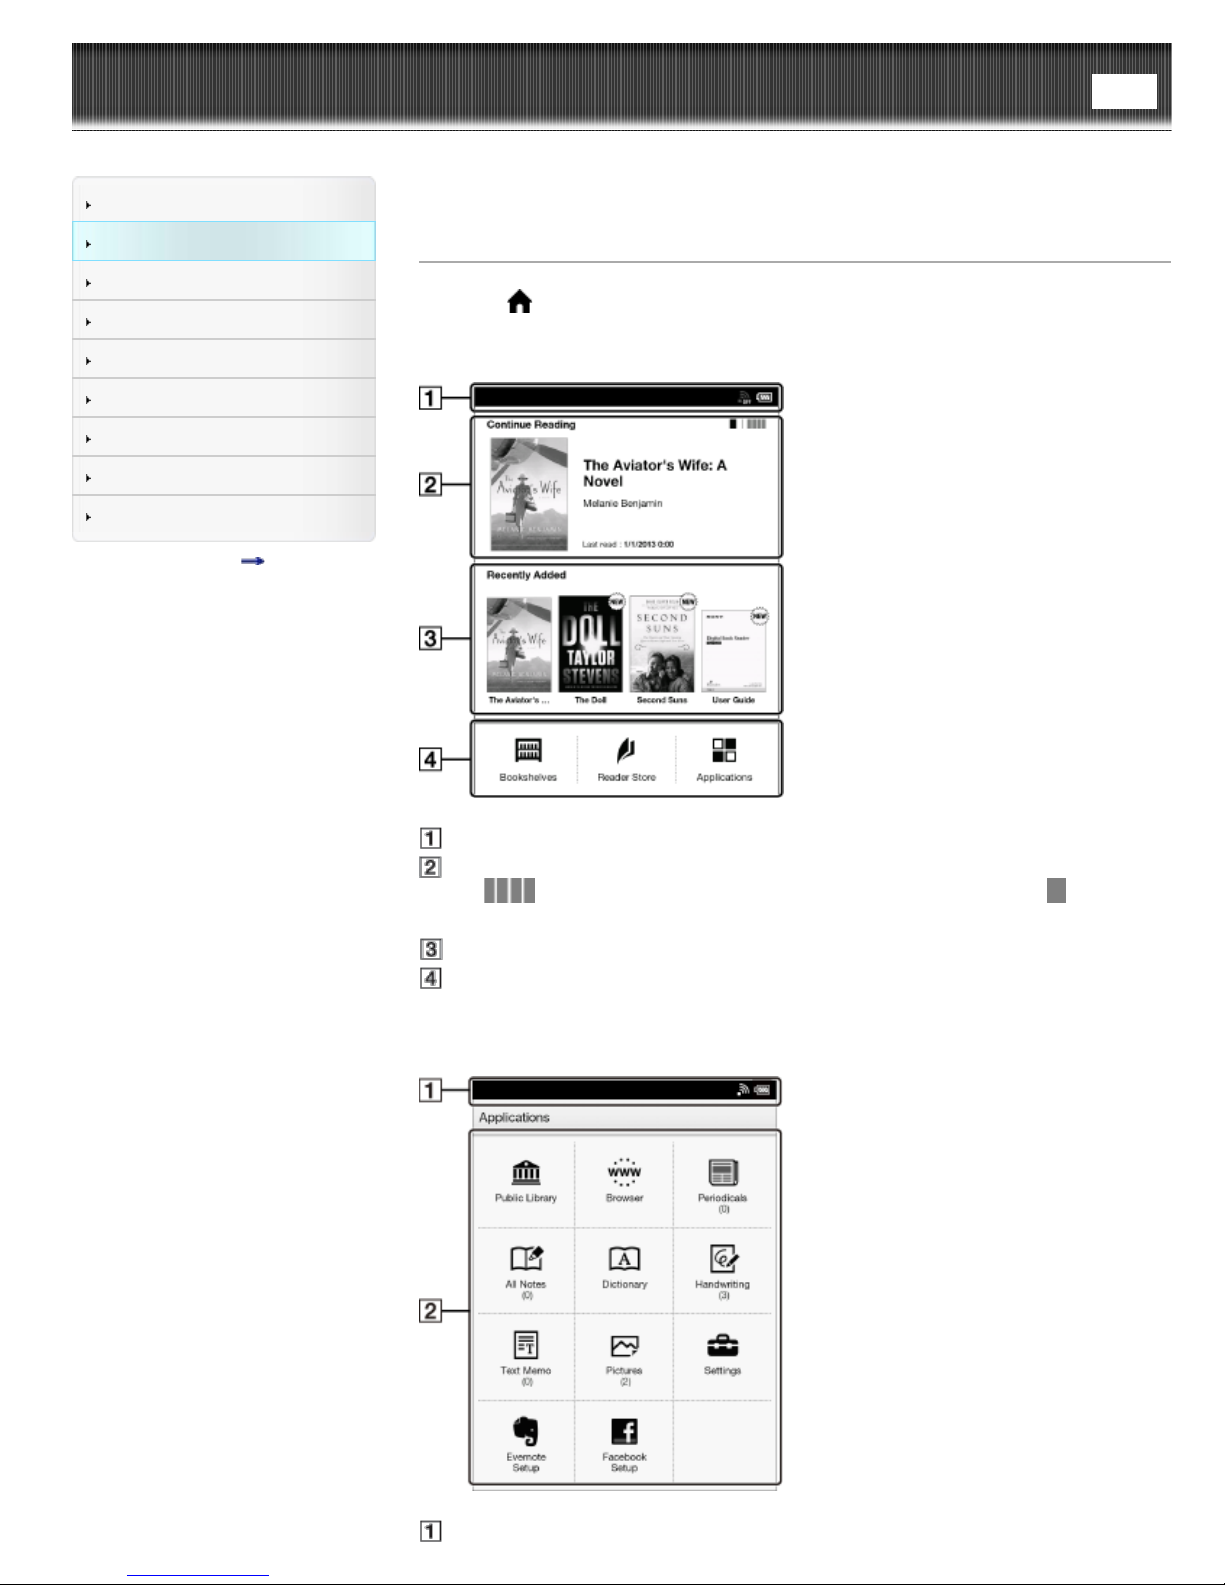
Applications and the [Home] Screen
Press the (Home) button to display the [Home] screen. The [Home] screen has the
following applications.
The displayed icons may vary depending on the country/region setting.
Status bar
Last read item
Tap
previous screen.
Recently added books/periodicals
Applications
Depending on the country/region selection up to four application icons will be
displayed.
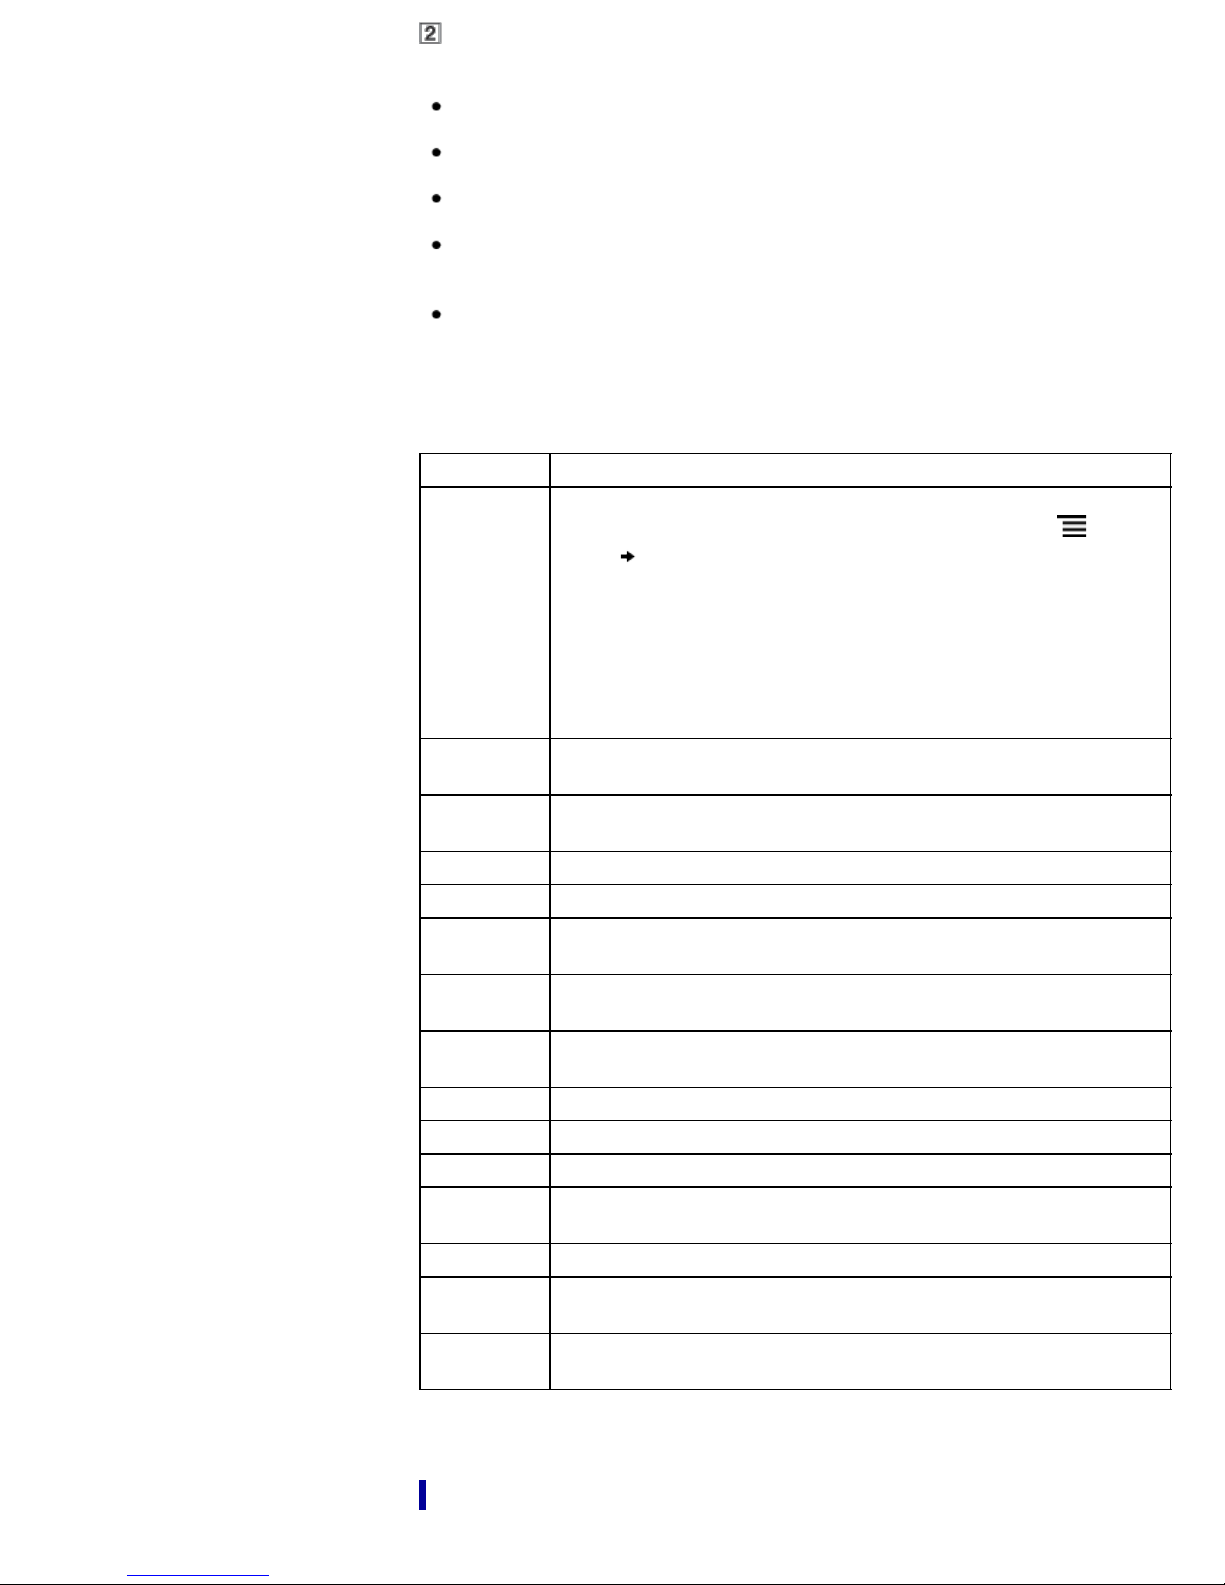
The [Applications] screen appears when you tap [Applications] on the [Home] screen.
to show the four most recently read books/periodicals. Tap to show the
Status bar
Page 43
Applications
Tip
The most recent item that you opened is shown under [Continue Reading] on the
[Home] screen. Tap it to continue reading where you previously left off.
The four most recently read books/periodicals are shown by changing the [Continue
Reading] on the [Home] screen.
The four most recent books/periodicals that have been added to the Reader are
displayed under [Recently Added] on the [Home] screen. Tap one to start reading it.
When you tap a tab for Reader Store recommendation(s), the top three
recommended books/periodicals from Reader Store will be shown under the tab.
Check the button to hide the recommendation(s).
Reader Store recommendation feature is available in certain countries/regions only.
Please visit your local Reader Store web page for more information. Features
described in this section only appears on your Reader if your local Reader Store
supports them.
Application Description
Tap [Bookshelves] to show the [Books] content list by factory default.
Alternatively, tap the top- left corner of the screen or press
button
[Books]
[Bookshelves]
[Reader
Store]*
[More
Content]*
[Applications] Lists the applications.
[Browser] Launches the Web browser. See Details.
[Public
Library]*
[Periodicals]*
[All Notes]
[Dictionary] Allows you to look up a word in the dictionary. See Details.
[Handwriting] Allows you to use a drawing pad for drawing. See Details.
[Text Memo] Allows you to use a notepad for typing memos. See Details.
[Pictures]
[Settings] Displays the items for setting the Reader. See Details.
[Evernote
Setup]
[Facebook
Setup]
[Collections]
[Purchased Content]*
[Evernote]
* If you have not logged in to Reader Store yet, [Purchased Content] is
not shown. The [Purchased Content] function only appears on your
Reader if your local Reader Store supports the feature.
Enters Reader Store. You can find featured titles, bestsellers, new
arrivals and more. See Details.
Open the Web browser and show the [More Content] page.
Helps you find public libraries where you can borrow eBooks for the
Reader. See Details.
Lists all the periodicals in the Reader and, if inserted, the microSD
card. See Details.
Lists the bookmarks/annotations made on the books and periodicals.
See Details.
Shows pictures in the Reader and, if inserted, the microSD card. See
Details.
Sign in to upload your highlights, pictures and handwritten notes to
Evernote cloud. See Details.
Log in or Log out to post book information, favourite passages and
collections with your comments to Facebook. See Details.
[Choose Bookshelf] to show the following pop -up menu.
(Menu)
* The availability of these applications varies depending on the country/region setting.
Status bar
The status bar shows the current status of the Reader, such as Wi-Fi status, the battery
Page 44
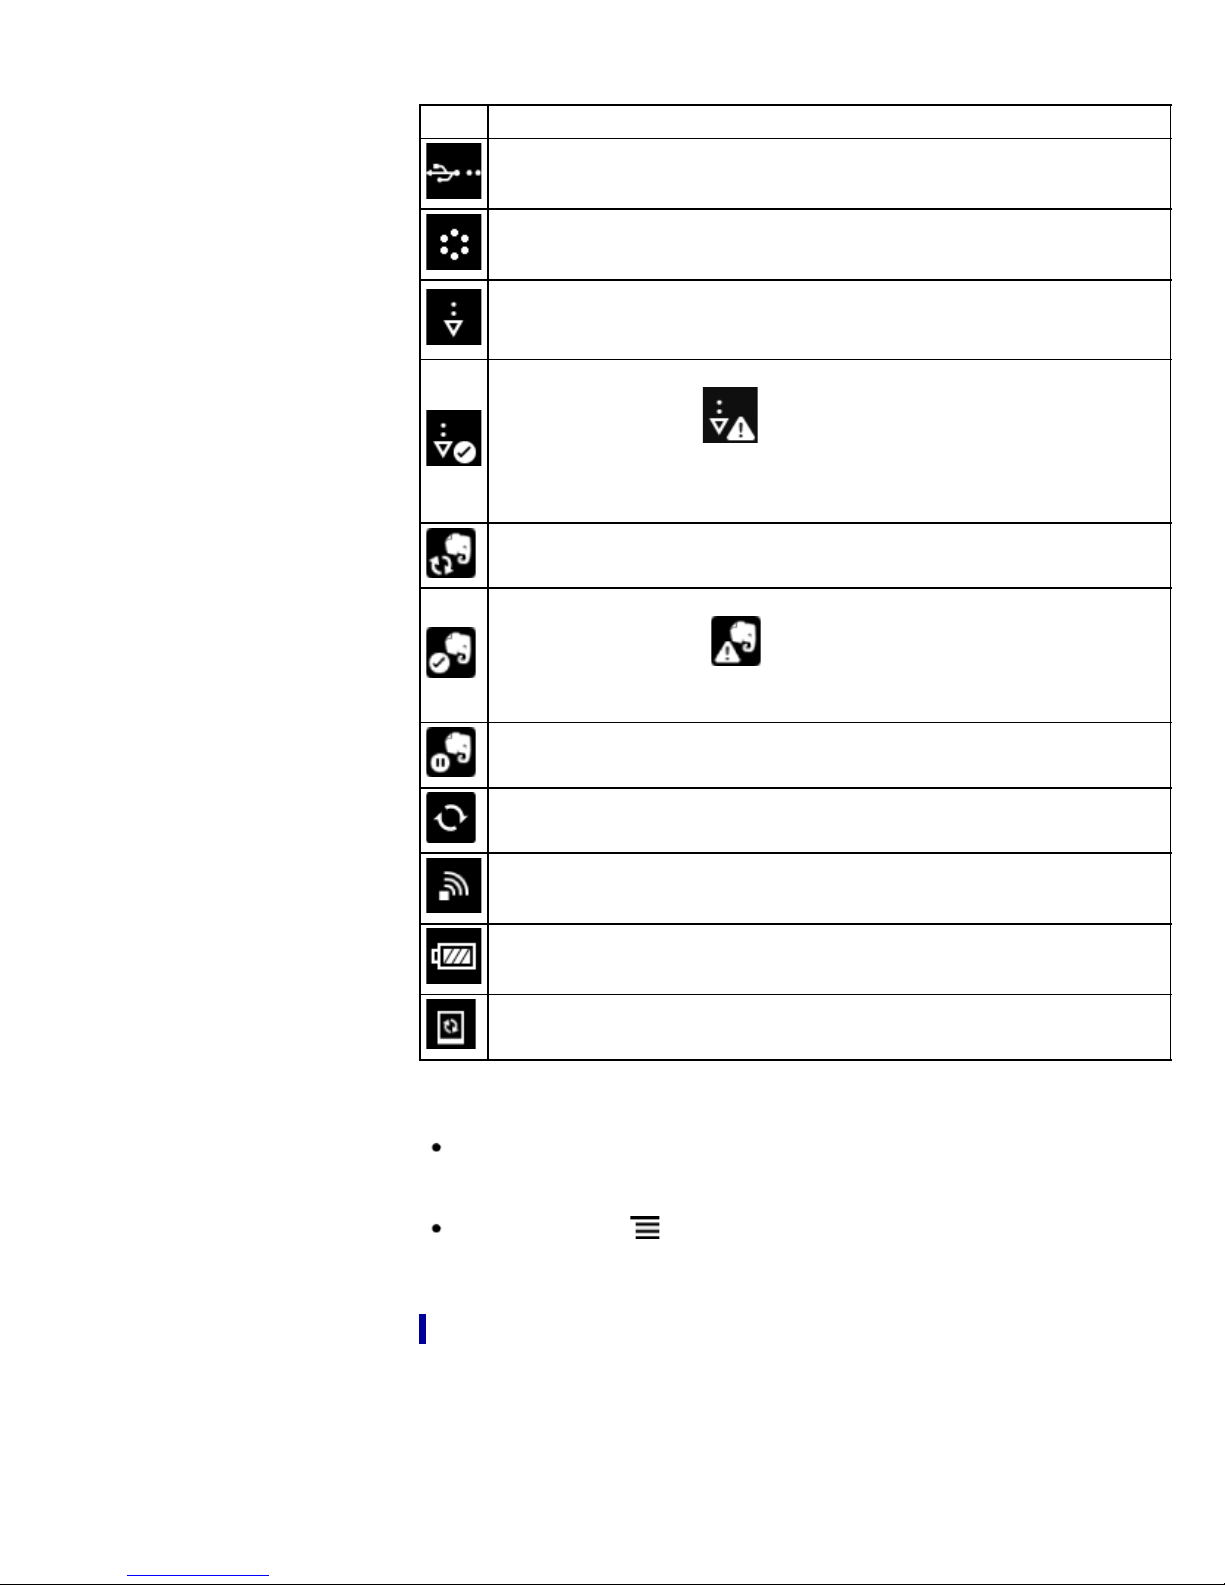
level and the status of downloading files from Reader Store.
The following items are displayed in the status bar.
Icon Indication
Connected via the USB cable.
Connecting to a network.
A download is in progress. When multiple downloads are in progress, the
number of downloads is displayed next to this icon.
This icon is also shown when downloading the firmware update.
A download has completed.
If downloading fails, the
The icon disappears when you open the notification window and tap [Clear], or
when you tap the downloaded items in the [Notification] list.
This icon is also shown when firmware download is complete.
Evernote synchronizing in progress.
Evernote synchronizing completed.
If synchronizing fails, the
disappears when you open the notification window and tap [Clear], or when
you tap a synchronized item in the [Notification] list.
The icon appears when Evernote synchronizing stops.
Updating database.
Wi-Fi network signal strength. See Details.
Current battery level. See Details.
(Fail) icon is displayed.
(Fail) icon will be displayed. The icon
The icon appears when new firmware is found.
Note
Depending on the situation, not all icons will be displayed at once.
Tip
When you press the
displayed at the left side of the status bar for approximately 5 seconds.
(Menu) button from the [Home] screen, the time is
Notification window
Tapping on the status bar reveals the notification window, which contains networkrelated items and other current operations.
Page 45
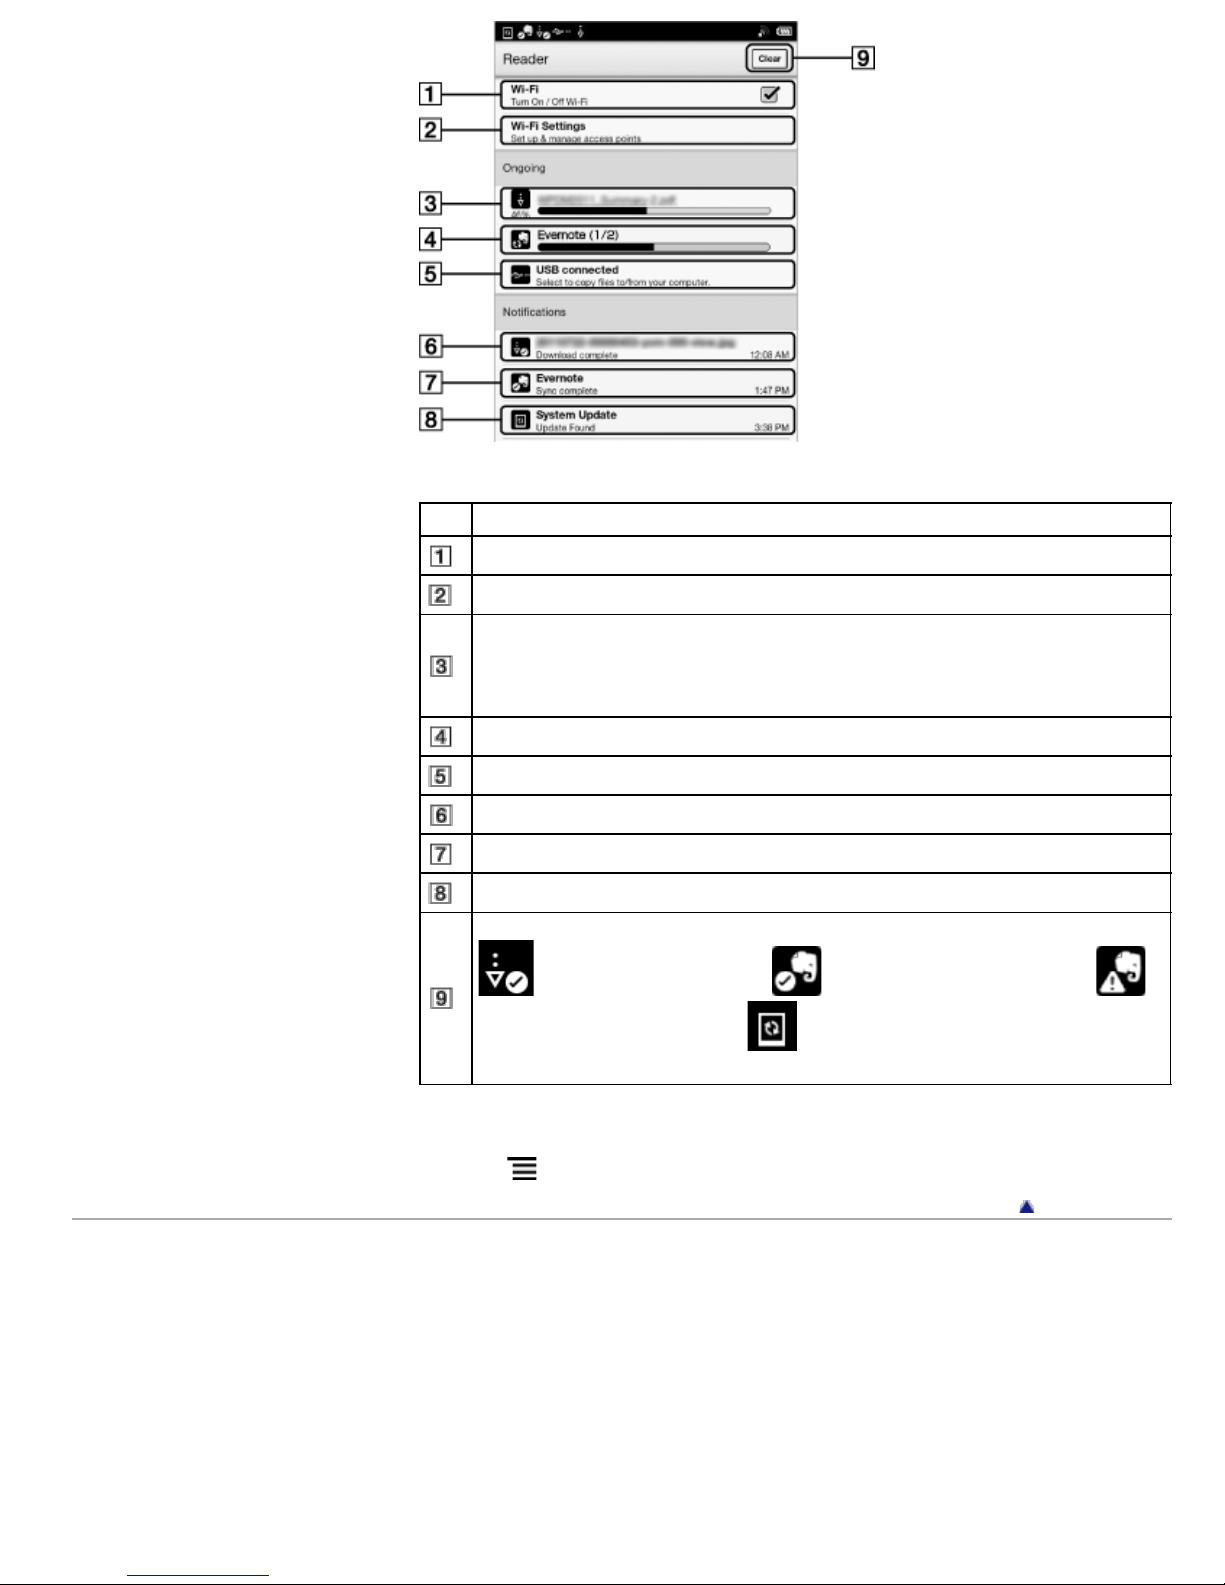
Item Description
Turn [Wi- Fi] on/off. See Details.
Go to the [Wi- Fi Settings] screen. See Details.
Displays the status of items that are downloading from Reader Store or the
Web.
The progress bar indicates how long an item download will take from Reader
Store or the Web.
Displayed when Evernote synchronizing is in progress.
Enter data transfer mode. See Details.
An item that has been downloaded. Tap to open the item.
Item with which Evernote synchronizing has completed. Tap to open.
Displayed when new firmware is found.
Displayed when notifications are displayed. Tap to clear the notification list. The
(Download complete) icon, (Evernote sync complete) icon,
(Evernote sync failed) icon and (New firmware is found) icon also
disappear from the status bar.
Depending on the status of the Reader, other items may also appear in the notification
window.
Press the
(Menu) button to close the notification window.
Go to page top
Copyright 2013 Sony Corporation
Page 46
Reader™ User Guide
Getting started
Search
Top page > Basic Operations > [Home] Screen > Touchscreen Operations
Print
Basic Operations
Adding/Getting Content
Browsing Content Lists
Reading
Organizing
Other Applications
Settings
Other Information
Contents list
Touchscreen Operations
The touchscreen recognizes the following gestures.
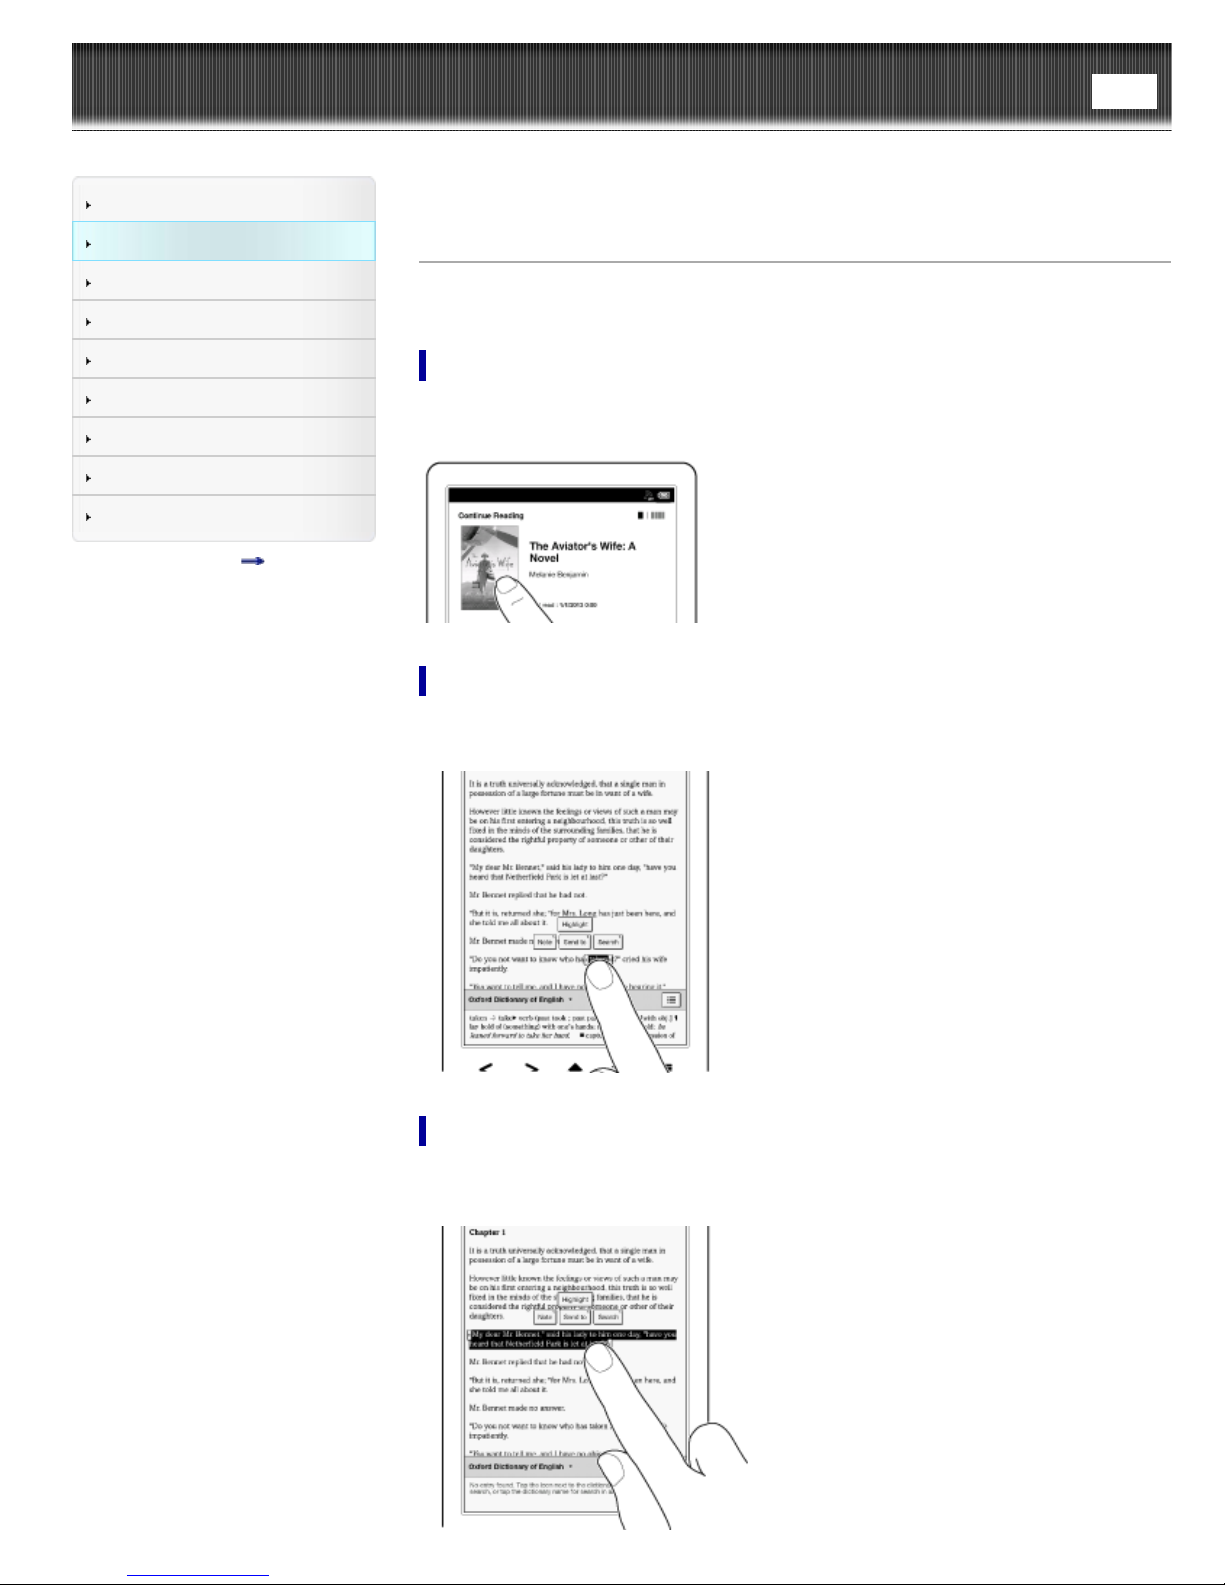
Tap
Tap an icon, a button or a menu item and raise your finger quickly to select or perform
an action.
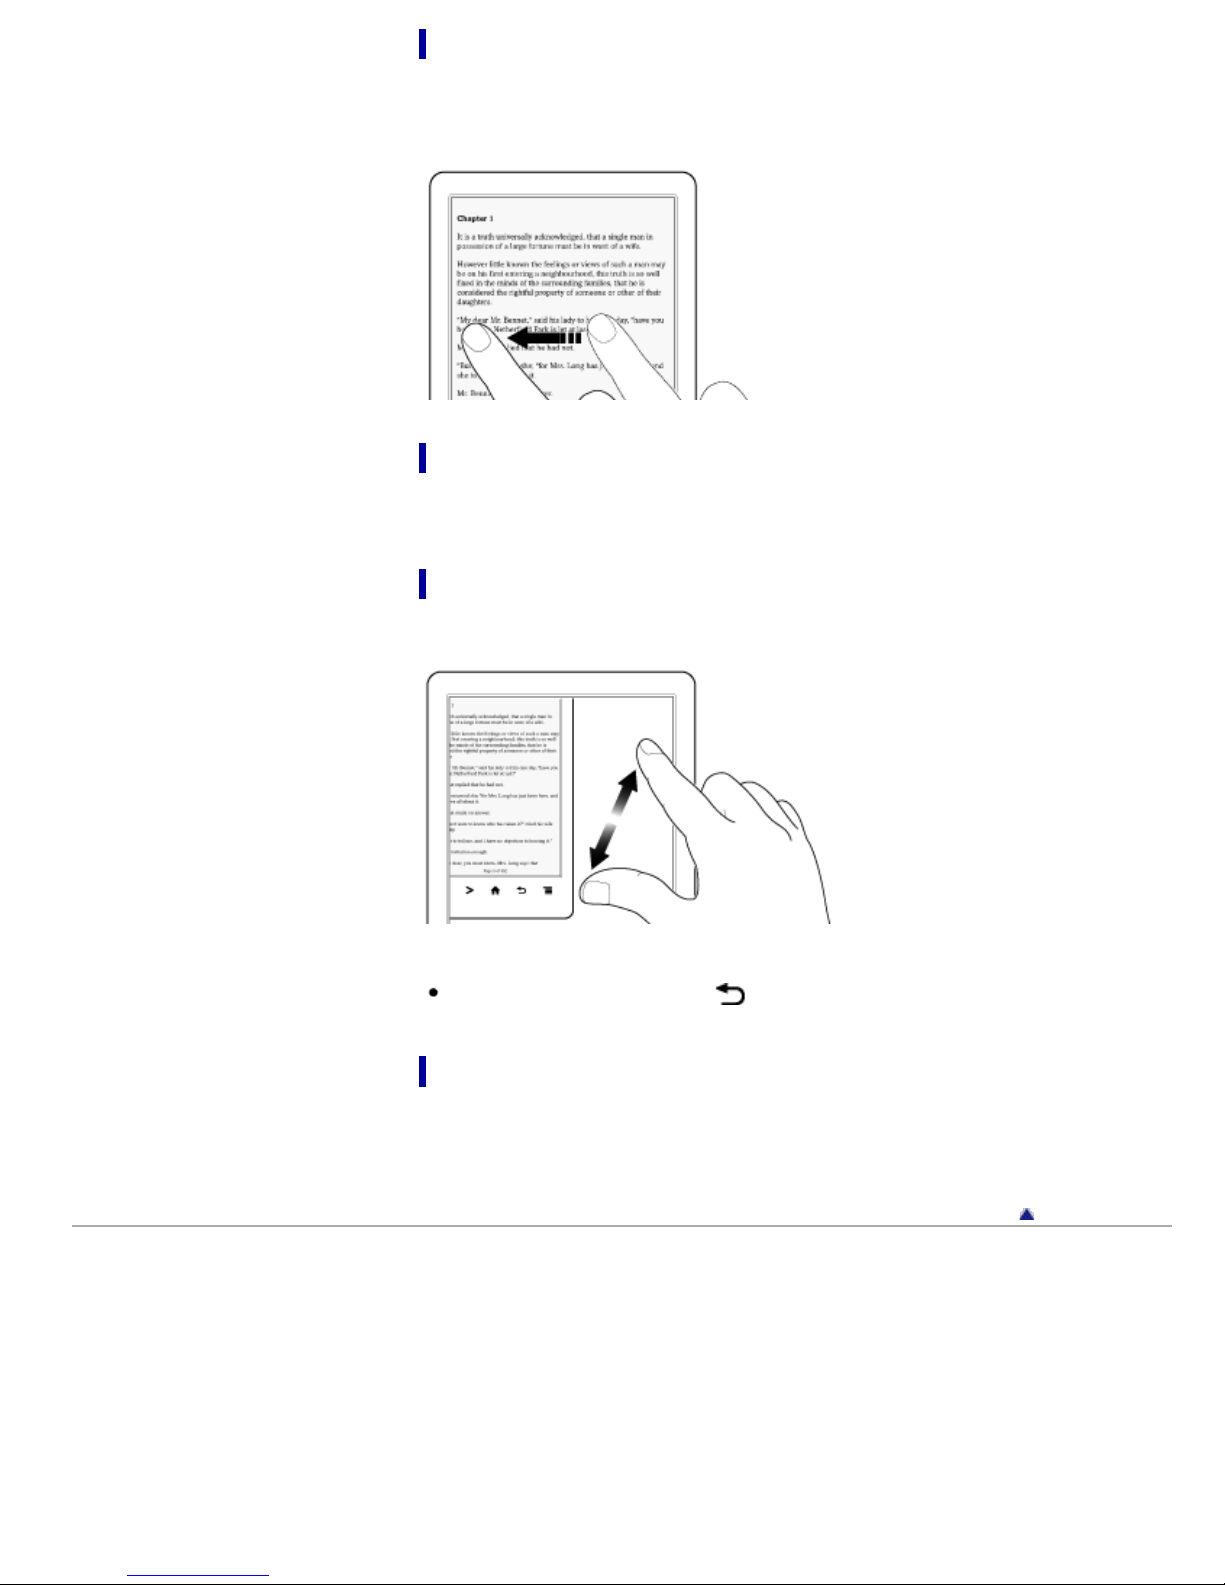
Tap and hold
Tap and hold your finger to select a word and display a pop- up menu for further
operations.
Tap, hold and drag
Touch and hold your finger to the display and drag your finger; you can select a group
of text and display a pop- up menu for further operations.
Page 47
Swipe
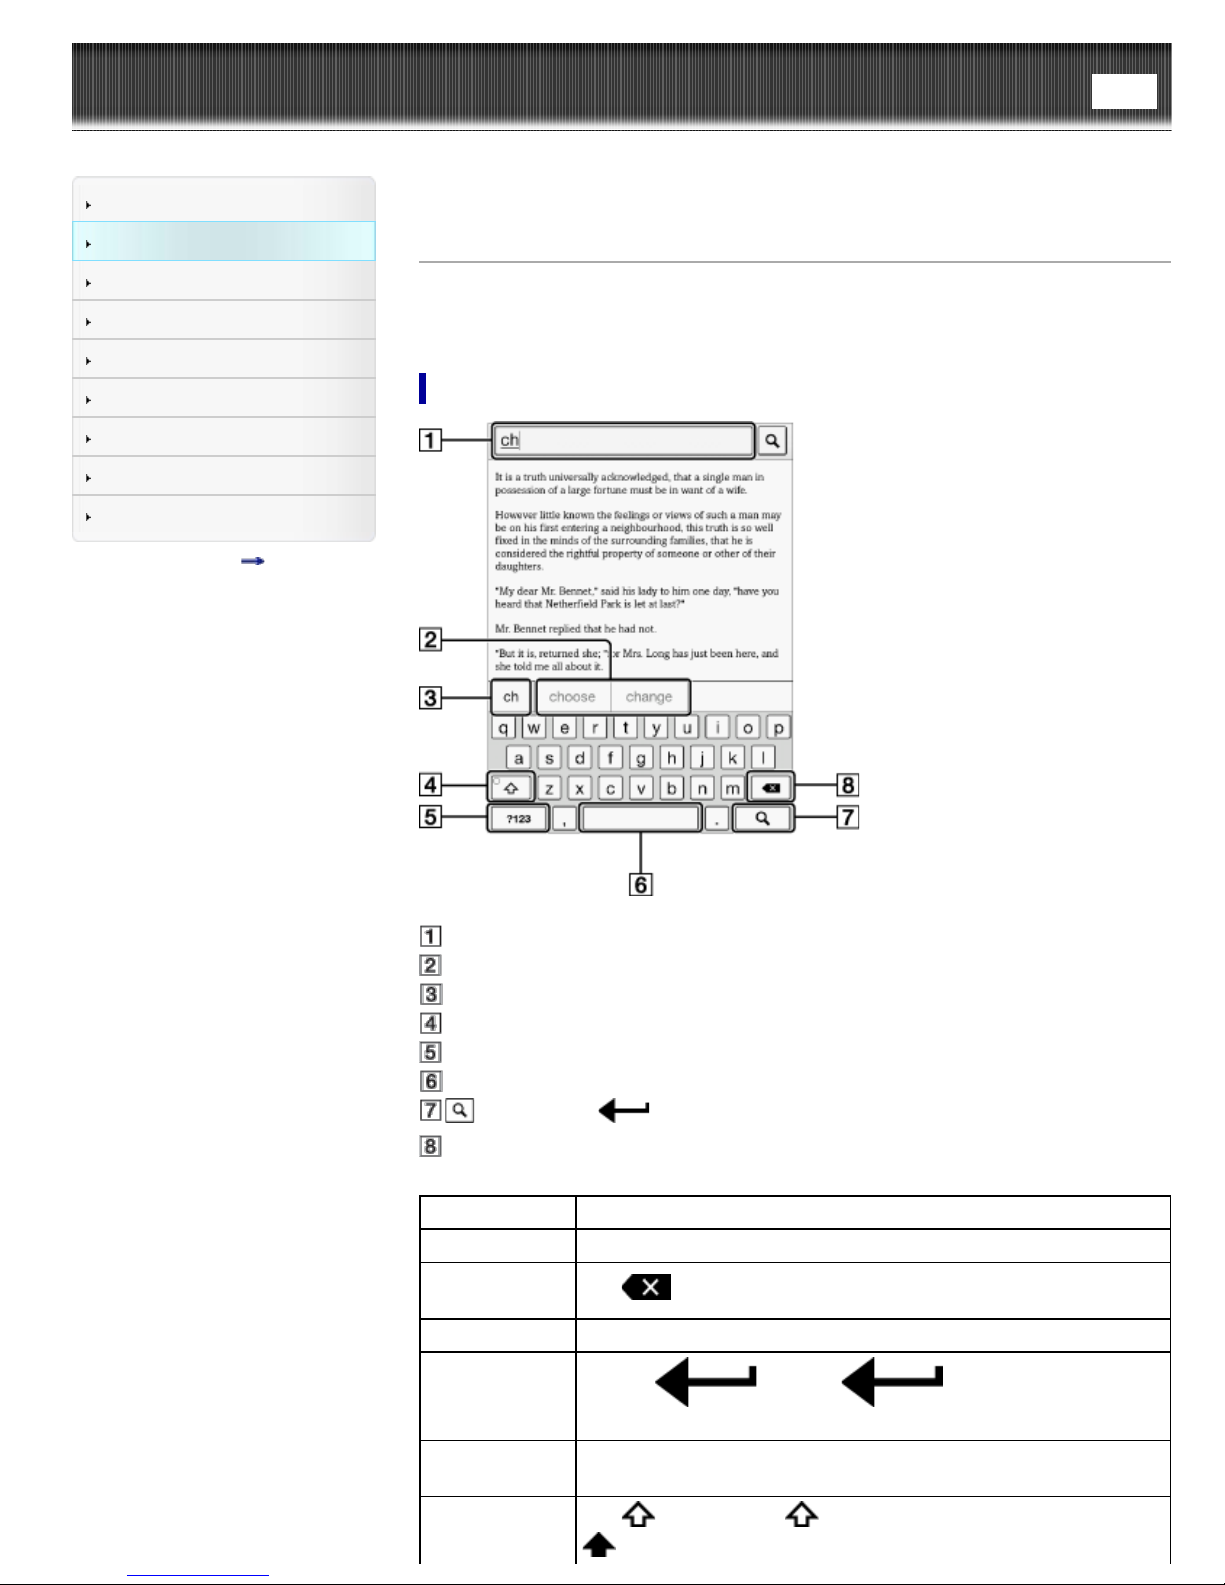
Slide your finger gently and swiftly on the touchscreen to turn the page; you can turn the
page forward by swiping to the left, or backward by swiping to the right. You can also
navigate pages of content lists.
Swipe and hold
To turn multiple pages continuously, swipe and hold your finger on the screen. Release
your finger to stop.
Pinch
Pinch your fingers in or out to zoom in or out of the current page or image.
Note
To exit zoom mode, press the
(Back) button.
Drag
Touch and drag your finger to reposition a zoomed - in page or image. The page or
image is repositioned after you release your finger.
Go to page top
Copyright 2013 Sony Corporation
Page 48
Reader™ User Guide
again.
Getting started
Search
Top page > Basic Operations > [Home] Screen > On-Screen Keyboard
Print
Basic Operations
Adding/Getting Content
Browsing Content Lists
Reading
Organizing
Other Applications
Settings
Other Information
Contents list
On-Screen Keyboard
The on -screen keyboard is used when you need to type. If the keyboard does not
automatically appear, tap the input area on the screen.
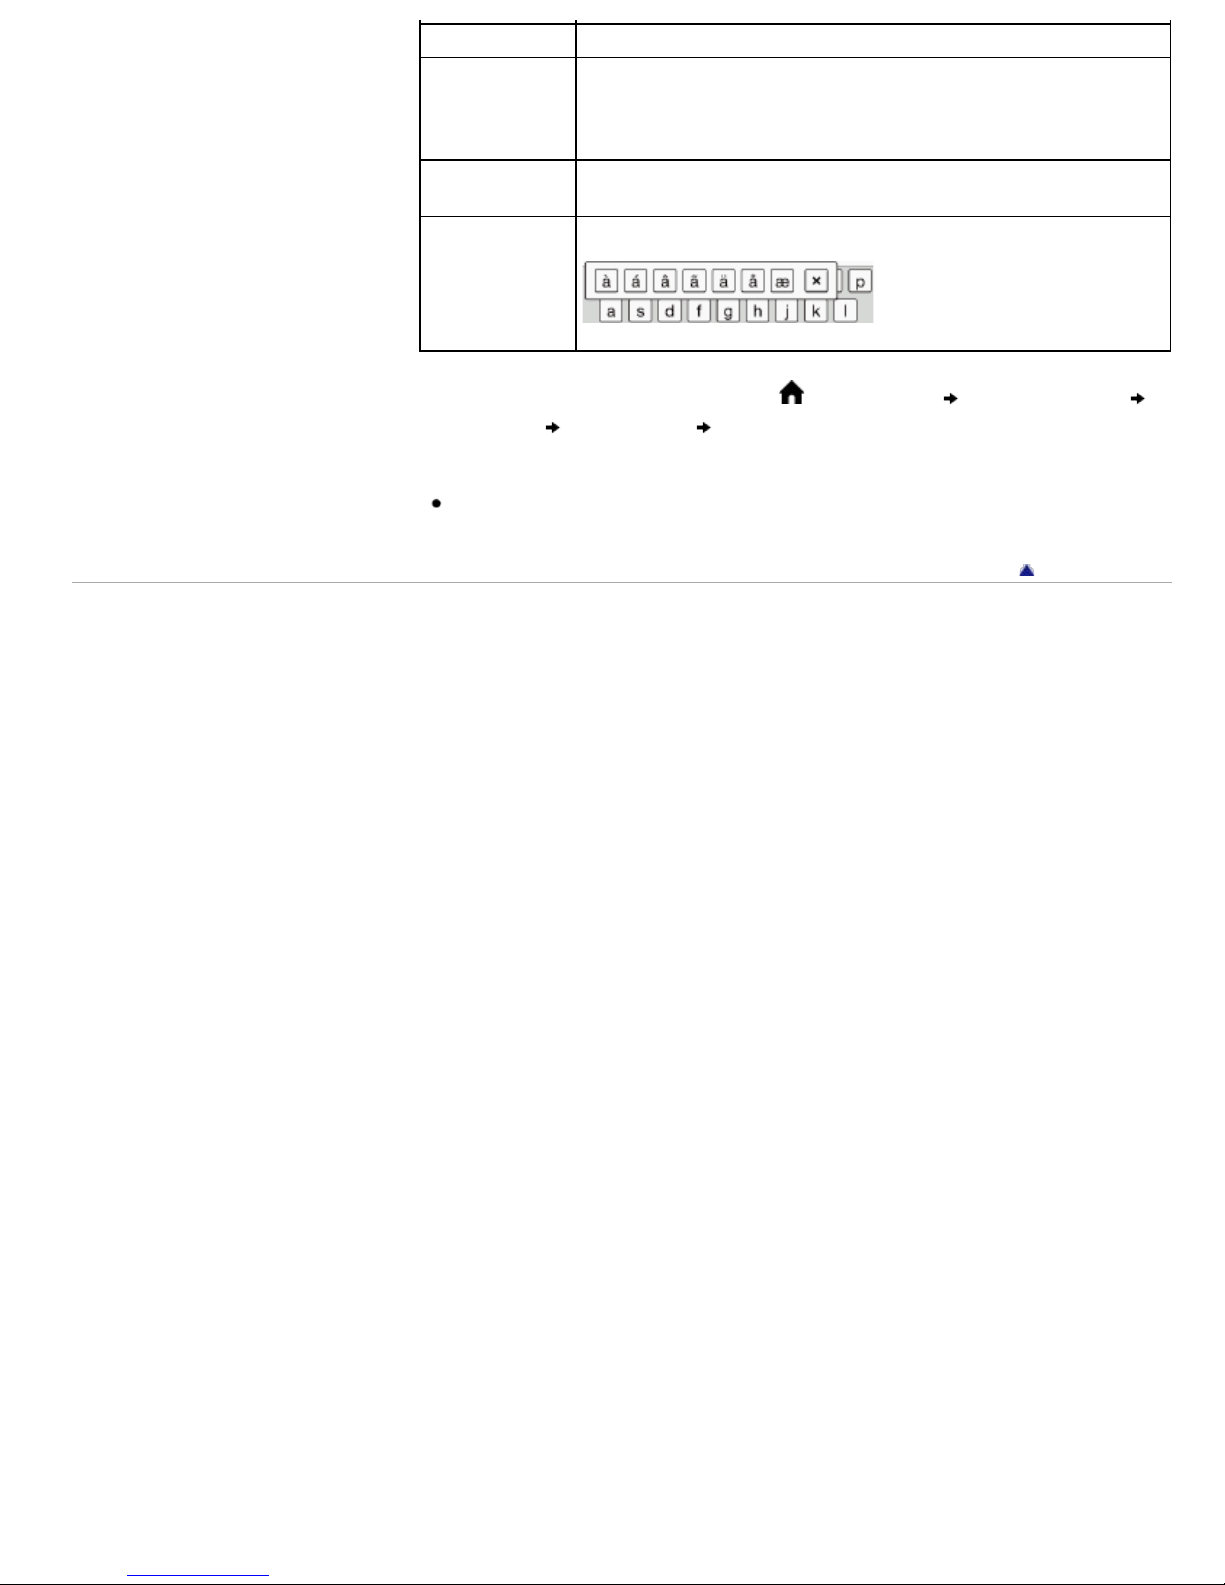
On-screen keyboard layout
Input area
Keyboard history
Current word input box
Shift key/[ALT]
[?123]/[ABC]
Space
(Search icon)/ (Line feed icon)/[Go]
Backspace
To Do this
Input text Tap the input area.
Delete a
character
Finish typing Tap [Go]/[Done].
Insert line feed
Switch the
keyboard type
Tap
Tap the
when multi -line input is available.
Tap [ ?123] to display the symbol keyboard. Tap [ALT] to switch to
additional characters. Tap [ABC] to return to the alphabetical keys.
.
key. The key is enabled only
Capitalize a
single letter
Tap
. Tap and hold to activate caps lock. To cancel, tap
Page 49
Enter a space Tap the space key.
Enter a
previously
registered word
Move the cursor
in the input area
A list of words you registered to the keyboard history* displayed next
to the current word input box. Tap the desired word to enter it.
Tap and hold the current word input box to register the word in it to
the keyboard history. (The word must consist of at least 3 letters.)
Tap the location to which you want to move the cursor.
Tap and hold a key and choose one from the keys.
Type extended
characters
* To clear the keyboard history, press the (Home) button tap [Applications]
[Settings] [Initialization] [Clear Keyboard History].
Note
The available types of keyboards and input methods differ depending on the
application.
Go to page top
Copyright 2013 Sony Corporation
Page 50
Reader™ User Guide
Getting started
Search
Top page > Adding/Getting Content > Adding Content > Adding Content
Print
Basic Operations
Adding/Getting Content
Browsing Content Lists
Reading
Organizing
Other Applications
Settings
Other Information
Contents list
Adding Content
Transferring content via the Reader application (Reader for
PC/Mac)
You can use the Reader application to transfer eBooks and pictures to the Reader. You
will need to install the Reader application and organize content on your computer in
advance. You can also backup the contents on the Reader to the Reader application.
Transferring content via drag-and-drop
You can directly transfer content by drag- and - drop to your computer.
1. Connect the Reader to your computer using the supplied USB cable.
Make sure the Reader is in a state that can transfer data. See Details.
2. For Windows users, click on the “Start” menu
double - click the “READER” drive, and then drag and drop your data onto the
“READER” drive.
For Mac users, double- click the “READER” drive, and then drag and drop your data
onto the “READER” drive.
3. When transfer is complete, use the safely remove hardware function of your
computer before disconnecting the USB cable from the Reader and your computer.
Content will be sent to its corresponding application based on the file format of the
content.
Personal documents other than pictures files will be sent to the [Books] application.
“Computer” or “My Computer”
Note
Content transferred via drag-and -drop may not be displayable on the Reader, or
thumbnails of the content may not be properly displayed on the Reader. Sony
recommends that you transfer data via the Reader application.
Do not delete any system default folders created by the Reader on the “READER”
drive, the “SETUP” drive or the microSD card.
If you disconnect the USB cable while data is being transferred, data corruption
may occur. To disconnect the Reader or the microSD card when the Reader is
connected to your computer, make sure to use the safely remove hardware function
of your computer, and then disconnect the USB cable.
Do not format the Reader or your microSD card via your computer. If you have
formatted the Reader or microSD card on your computer, the Reader may not be
able to display transferred content. In this case, use the Reader’s [Format Memory]
function to reformat the Reader and your microSD card. See Details.
Tip
When you transfer data to the microSD card, insert the microSD card to the Reader
in Step 1, and drag- and -drop to the microSD (removable disk) drive in Step 2
above.
For details on the system requirements for the Reader application, see Details.
For details on supported file formats, see Details.
Go to page top
Copyright 2013 Sony Corporation
Page 51
Reader™ User Guide
Getting started
Basic Operations
Adding/Getting Content
Top page > Adding/Getting Content > Adding Content > Buying eBooks and
Periodicals* at Reader Store*
Buying eBooks and Periodicals* at Reader Store*
Search
Print
Browsing Content Lists
Reading
Organizing
Other Applications
Settings
Other Information
Contents list
* Available in certain countries/regions only. Please visit your local Reader Store web
page for more information. Features described in this section only appear on your
Reader if your local Reader Store supports them.
Before starting
1. Configure Wi-Fi settings of the Reader to access Reader Store. See Details.
2. Press the
(Home) button tap [Reader Store].
Creating a Reader Store account
In order to purchase and download eBooks or periodicals, you need to create an
account at Reader Store.
Tap the input area and enter your information using the on -screen keyboard. Unless
being asked to create an Adobe ID and password, your Reader Store ID (your e-mail
address) and password become your Adobe ID and password. Changing your Reader
Store password will not automatically change the password of your Adobe ID. Following
on- screen instructions, the Reader will be authorized to view purchased contents after
being downloaded.
Buying eBooks and periodicals
Following steps will guide you to sign in the Reader Store and purchase contents with
your Reader.
1. Sign in to your account.
If you do not have an account, create one by following Reader Store instructions.
If you already have a Reader Store account, sign in via your e-mail address and
password.
You may be asked to enter your Adobe ID and password when necessary.
2. Select or search for the title you wish to purchase.
Follow Reader Store instructions to complete your purchase. Depending on your
regional Reader Store, you may be instructed to tap ‘Download’ link to begin
downloading. Otherwise, downloading will start.
About auto delivery
Once you have subscribed to newspapers/magazines at Reader Store, newly published
issues will be delivered to the Reader automatically. To ensure this process, confirm the
following:
A Wi -Fi network connection is available. See Details.
When a new issue is delivered to the Reader, it will be displayed under [Recently
Added] on the [Home] screen. You can also find the issue from the [Periodicals] list.
Note
If you miss any new issues while a wireless network is unavailable, download them
by going to [My Account] at Reader Store, where previous issues are available.
The Wi-Fi network features (including the auto delivery feature) become unavailable
while the Reader is connected to your computer via USB and is in data transfer
mode.
Page 52
Reader Store notifications
You will automatically receive updates—like book and periodical recommendations,
special promotions and exclusive offers—from the Reader Store on the [Home] screen.
To ensure this process, confirm the following:
A Wi -Fi network connection is available. See Details.
Note
To turn [Reader Store Notifications] [On] or [Off], tap [Settings]
Settings]
When you close the [Reader Store Notifications] window, your current
recommendations will not be displayed the next time you go to the [Home] screen.
However, the window will be displayed again when Reader Store sends you new
recommendations.
[Reader Store Notifications].
[General
Navigating Reader Store
To return to the previous page of Reader Store, press the (Back) button. (The < >
(Page turn) buttons and the zoom in function are disabled.)
Pressing the
(Menu) button allows you to display the options items for navigation.
Navigation
method
[Store Home] Goes to the top page of Reader Store.
[My Account] Views your purchase history and re -download purchased content.
[Refresh /
Stop]
[Forward] Advances to a previously viewed page.
[Continue
Reading]
[More] Displays more option items.
[Help and
Support]
[Legal
Information]
Description
Updates the content displayed on the Reader Store page, or stops
loading the page.
Closes the [Reader Store] application and returns to the last read
page of your last read book.
Jumps to the FAQ page of Reader Store.
Displays legal information about Reader Store.
Checking downloaded content
When downloading content from Reader Store, you can check the download progress in
the status bar and by tapping it to display the notification window. See Details.
When you exit Reader Store, your four most recent purchases are displayed under
[Recently Added] on the [Home] screen. You can check the purchased content in
[Bookshelves]
When you are subscribing to newspapers and magazines, all content is stored in the
[Periodicals] application.
[Purchased Content].
Browsing the Purchased History
You can check the purchased books/periodicals from Reader Store.
1. Tap [Bookshelves].
2. Tap [Books]. Alternatively, press
The pop-up menu opens.
3. Tap [Purchased Content].
Contents purchased from Reader Store are displayed.
Tip
(Menu) button [Choose Bookshelf].
Page 53

In addition to checking eBooks downloaded from Reader Store, you can also check
for purchased eBooks yet to be downloaded. If you have not logged in to Reader
Store yet, [Purchased Content] in the pop-up menu is not shown.
You can also post the downloaded books/periodicals information to Facebook. To
post the downloaded books/periodicals information, tap and hold the title of
books/periodicals
[Post to Facebook].
Accessing Reader Store from your computer
In addition to shopping at Reader Store from your computer, you can transfer eBooks
from your computer to the Reader using the Reader application. Install either Reader™
for PC or Reader™ for Mac
See Details.
Copyright 2013 Sony Corporation
®
by launching the corresponding installer on the Reader.
Go to page top
Page 54
Reader™ User Guide
Getting started
Search
Top page > Browsing Content Lists > Content Lists > Browsing Content List Pages
Print
Basic Operations
Adding/Getting Content
Browsing Content Lists
Reading
Organizing
Other Applications
Settings
Other Information
Contents list
Browsing Content List Pages
The Reader organizes content by content type and file format using applications. For
example, eBooks or your personal documents (such as PDF files or text files) are stored
in the [Books] application, newspapers/magazines in the [Periodicals]* application and
pictures in the [Pictures] application, etc.
* Available in certain countries/regions only.
Content list pages allow you to sort content, as well as search content on the Reader.
The following instructions use the [Books] application as an example.
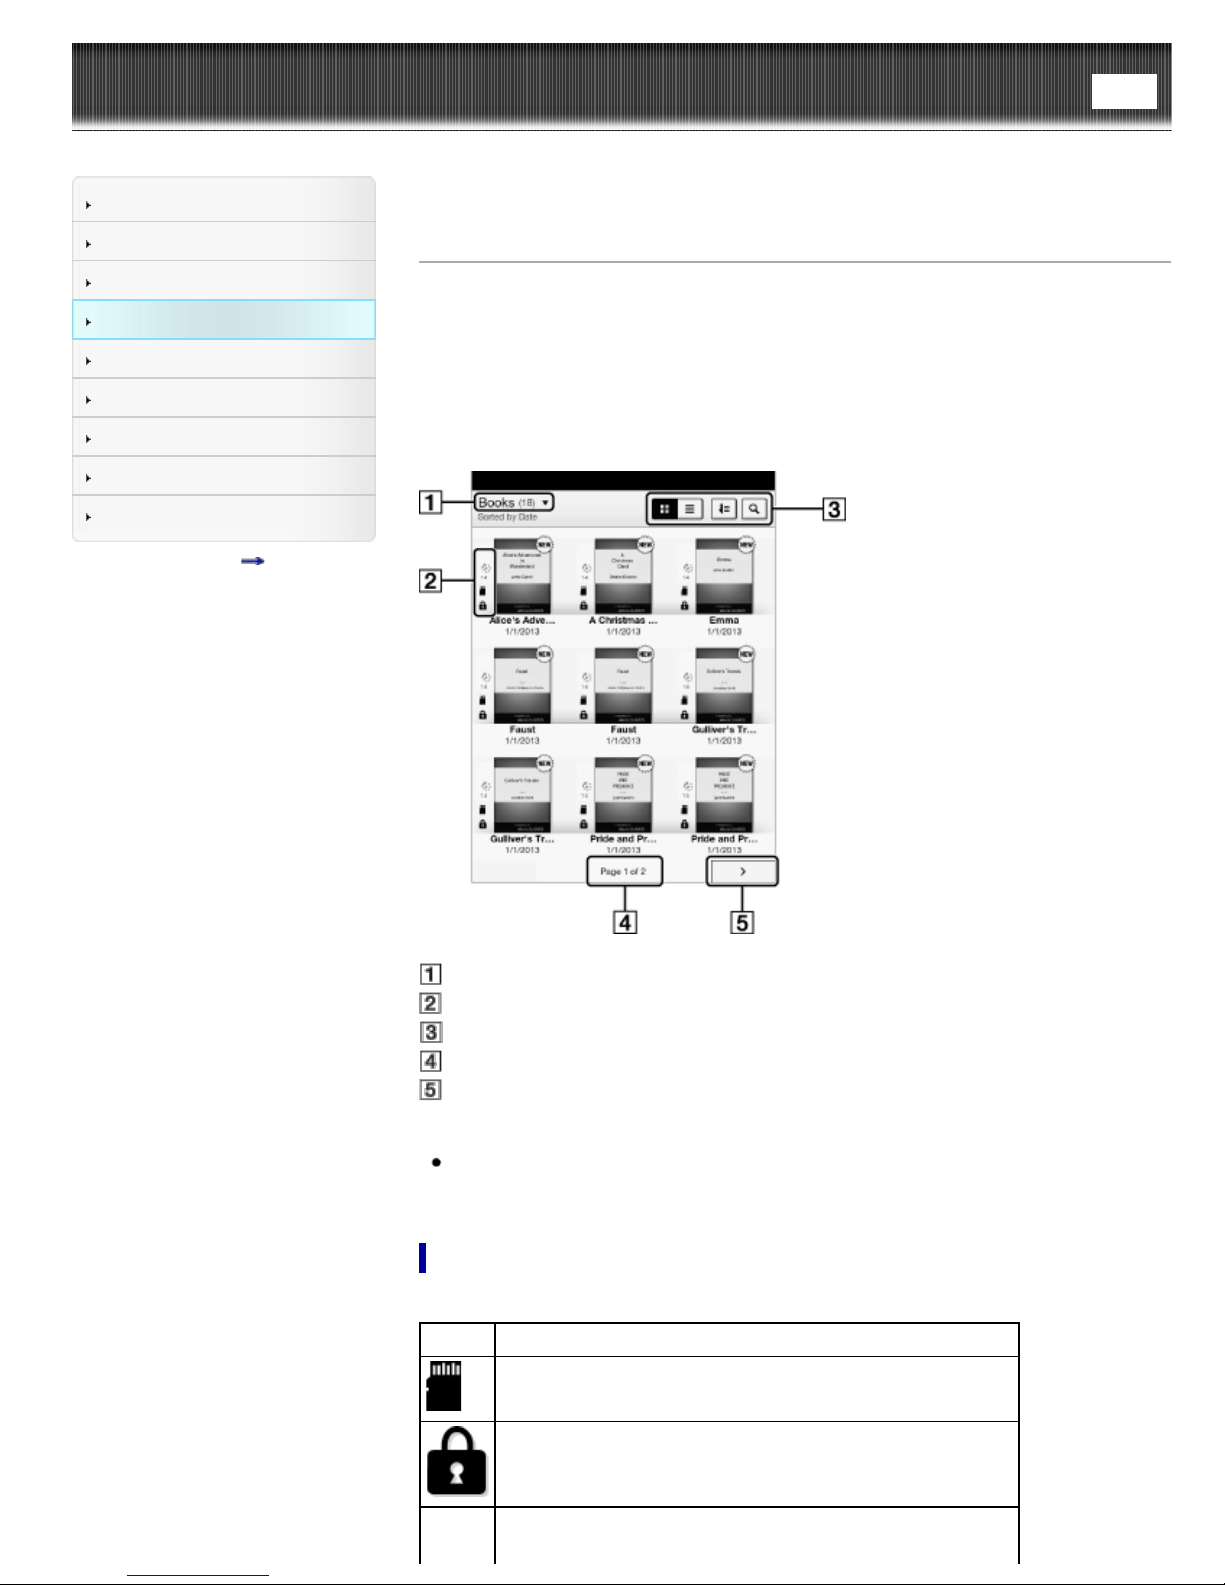
Tap to choose the bookshelf
Status icons
Tool icons Details
Page indicator
Page navigation icon
Tip
Depending on the application, several tools are available for content list pages. See
Details.
Status icons
Icon Description
The item is stored on the microSD card.
The item is protected from deletion. See Details.
The item has not been opened.*
Page 55
The item has expired.* See Details.
The item expires in the given number of days.* See Details.
* This icon is displayed for books/periodicals only.
Navigation
Navigation method Description
Page indicator
Page navigation icon or the < (Previous)
button
Page navigation icon or the > (Next) button View the next page or item.
Copyright 2013 Sony Corporation
Display the page jump panel. See
Details.
View the previous page or item.
Go to page top
Page 56
Reader™ User Guide
Getting started
Basic Operations
Adding/Getting Content
Search
Top page > Browsing Content Lists > Content Lists > Browsing in Thumbnail View and
Print
List View
Browsing in Thumbnail View and List View
Browsing Content Lists
Reading
Organizing
Other Applications
Settings
Other Information
Contents list
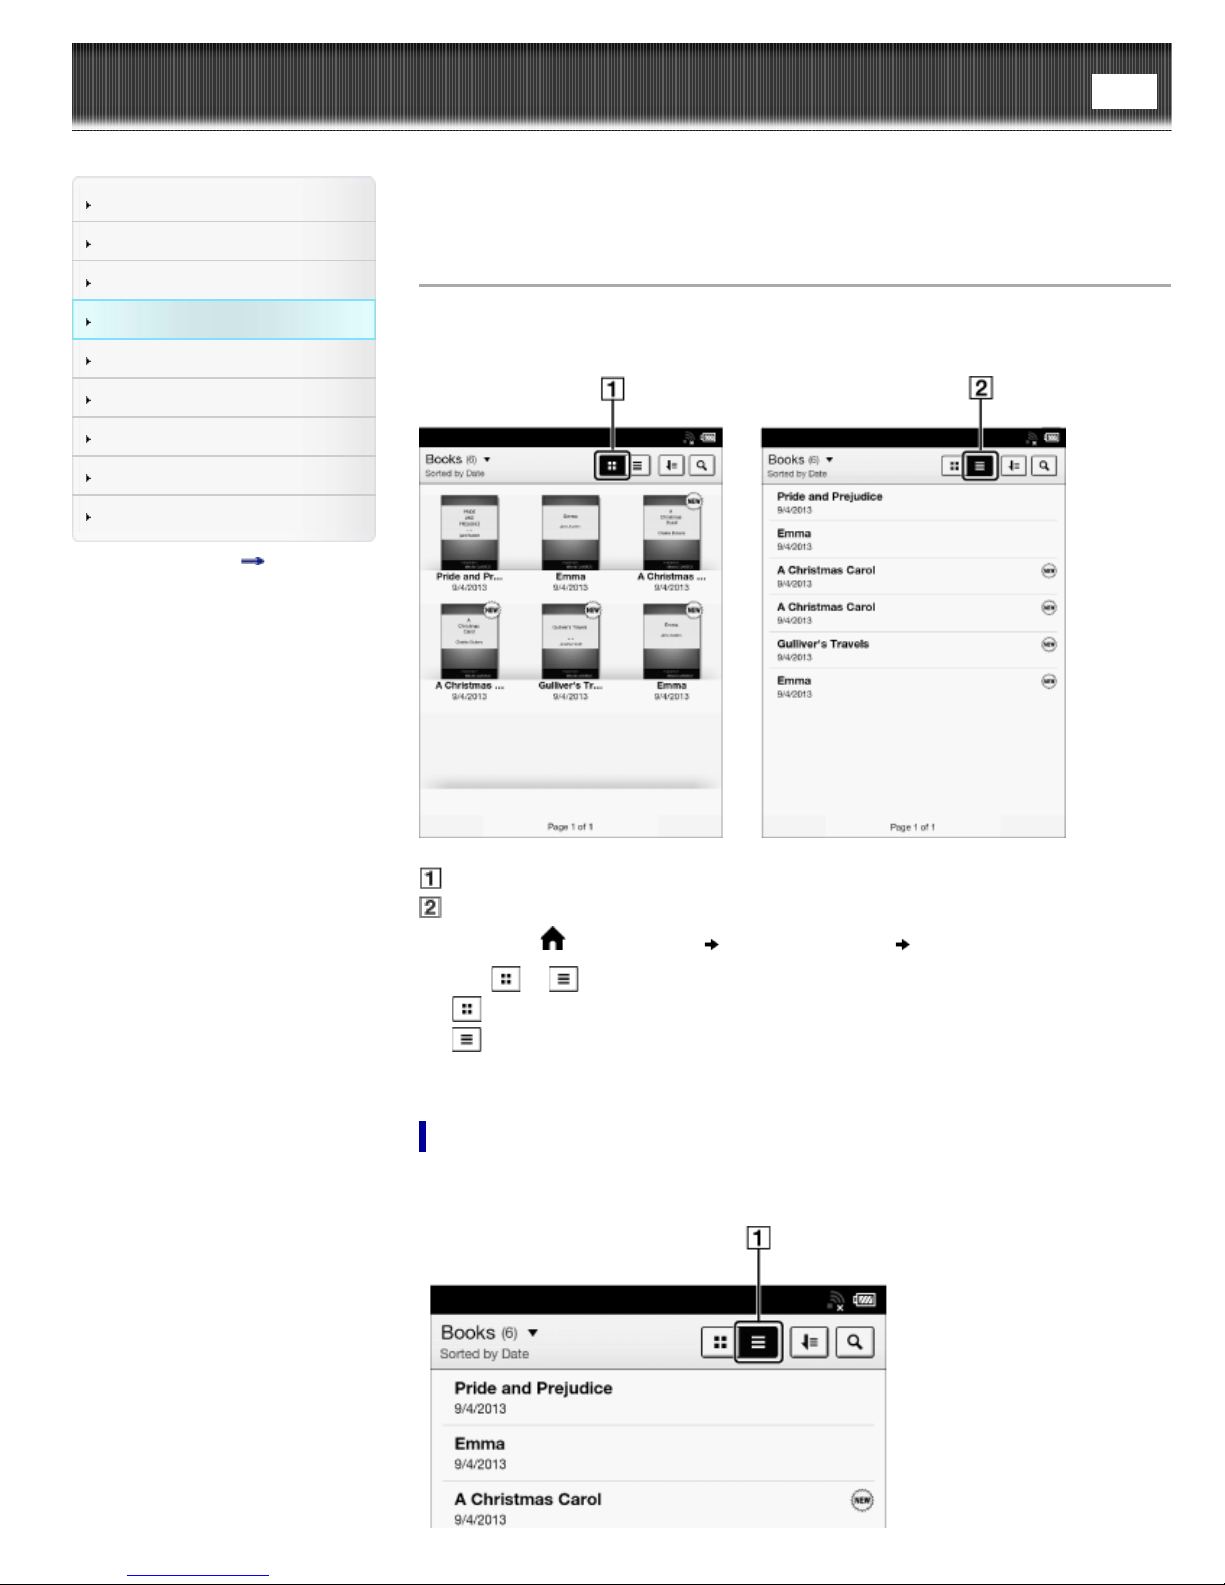
Content can be displayed as individual thumbnails or in a list.
The following instructions use the [Books] application as an example.
Thumbnail view icon
List view icon
1. Press the
2. Tap
displays thumbnails of content.
displays a list of content.
* Some applications only allow list view.
(Home) button tap [Bookshelves] [Books].
or .*
Adjusting the title view
The titles of some books/periodicals may be cut off if they are too long. To avoid this,
you can set the Reader to display titles across two lines instead of one line.
Page 57
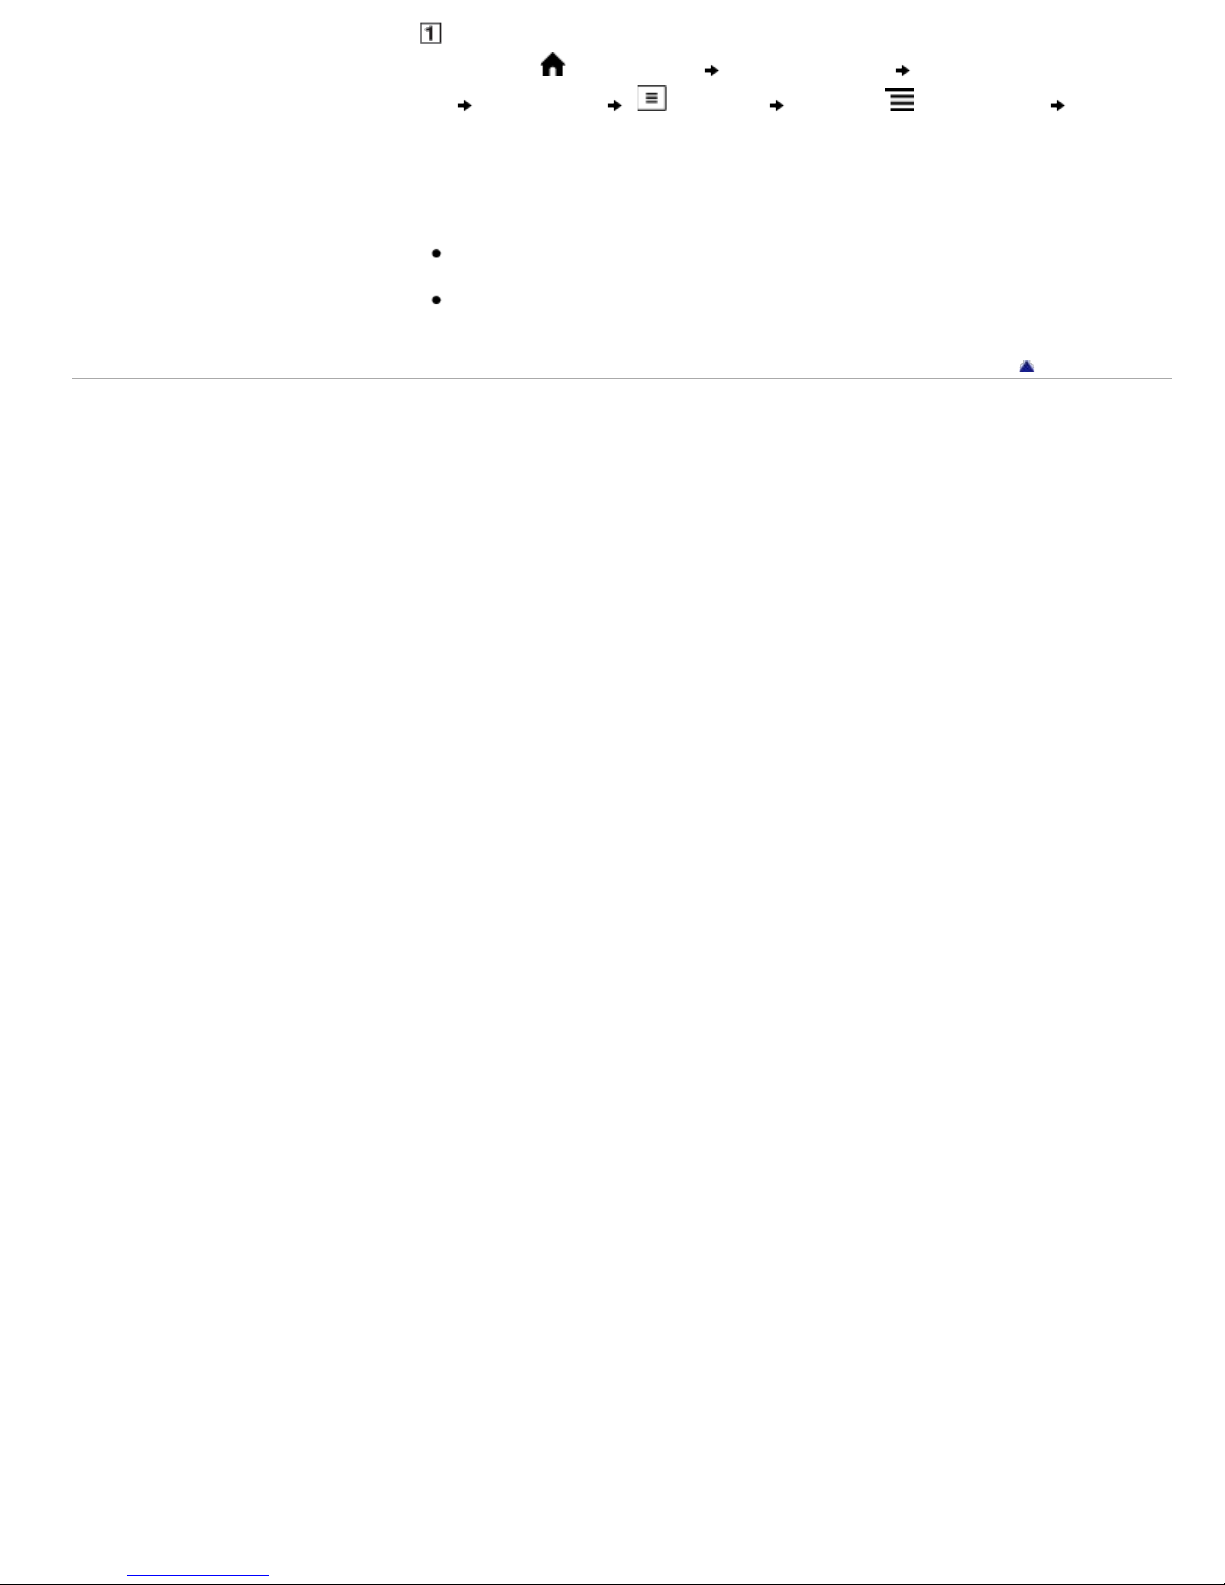
List view
1. Press the (Home) button tap [Bookshelves] [Books], or tap [Applications]
[Periodicals]* (List view) press the (Menu) button tap [Title
(2 Line View)].
* Available in certain countries/regions only.
Titles are displayed on two lines.
Tip
When you tap [Bookshelves], any previously displayed content from [Books],
[Collections], [Purchased Content] and [Evernote] will be shown.
The [Purchased Content] function only appears on your Reader if your local Reader
Store supports the feature
Go to page top
Copyright 2013 Sony Corporation
Page 58
Reader™ User Guide
Getting started
Basic Operations
Adding/Getting Content
Search
Top page > Browsing Content Lists > Content Lists > Using the Page Jump Panel in
Content List Pages
Using the Page Jump Panel in Content List Pages
Print
Browsing Content Lists
Reading
Organizing
Other Applications
Settings
Other Information
Contents list
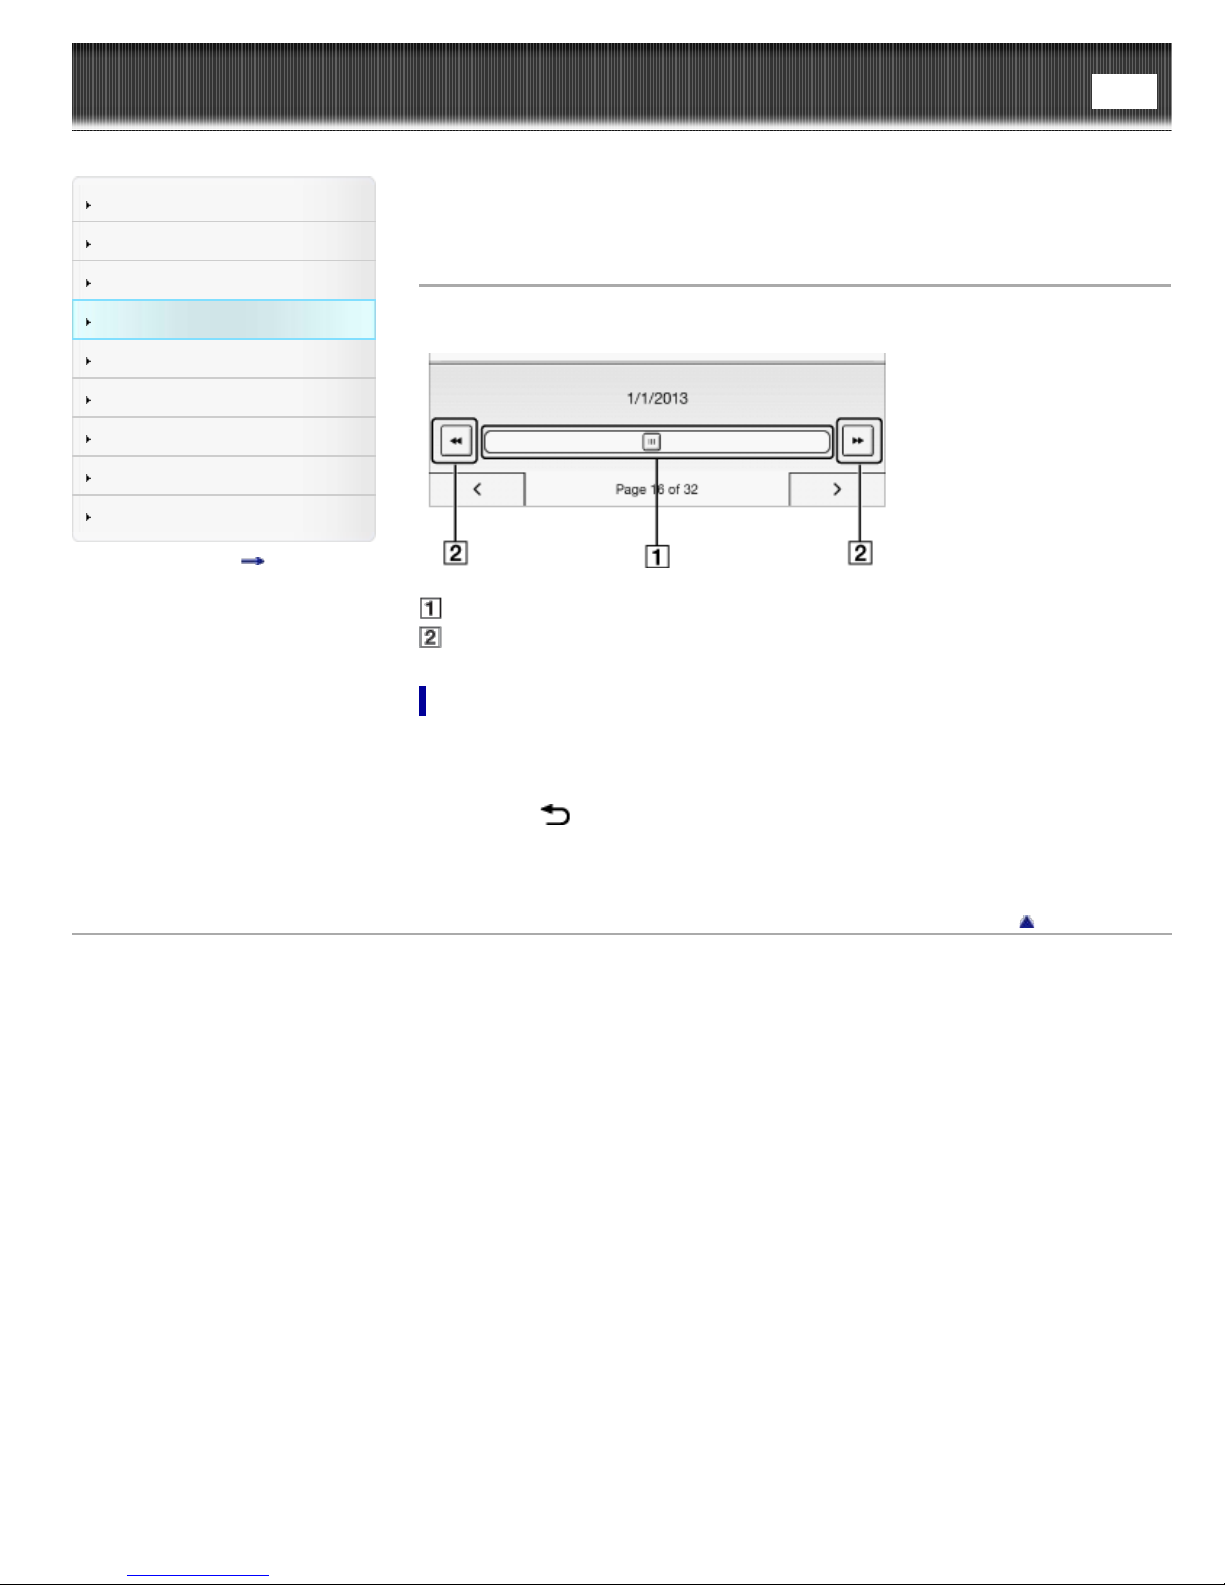
Content list pages can be turned conveniently via the page jump panel.
Page jump bar
Page skip icon
To use the page jump bar
1. When viewing a content list page, tap the page indicator at the bottom of the
screen.
2. Tap and slide the bar left or right to navigate back or forward.
Press the
Skipping 10 pages at a time
When the page jump bar is displayed, tap << or >> (Page skip) to skip back 10 pages
or skip forward 10 pages at a time.
Copyright 2013 Sony Corporation
(Back) button to hide the page jump panel.
Go to page top
Page 59
Reader™ User Guide
Getting started
Search
Top page > Browsing Content Lists > Content Lists > Finding Content with a Keyword
Print
Basic Operations
Adding/Getting Content
Browsing Content Lists
Reading
Organizing
Other Applications
Settings
Other Information
Contents list
Finding Content with a Keyword
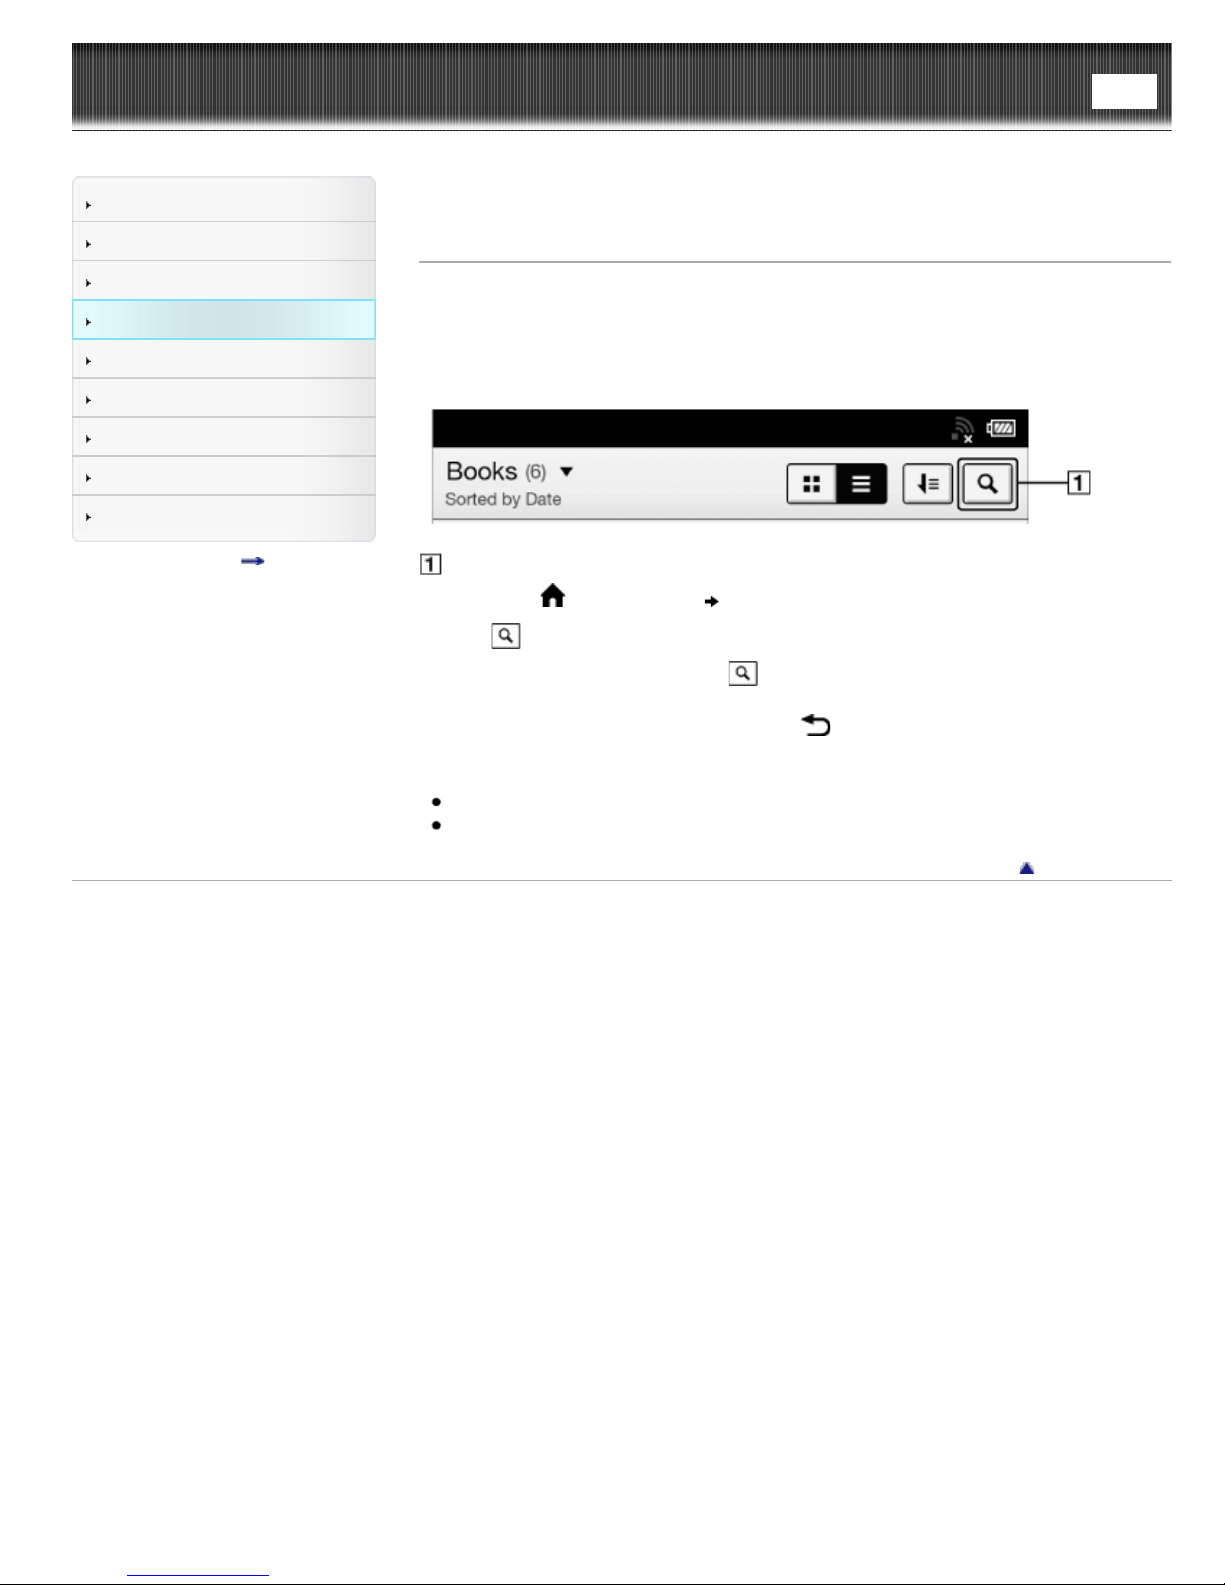
You can find a specific item quickly with a keyword search.
You can locate a book or author of a book on the Reader via the [Books] application, or
search for annotations via the [All Notes] application, etc.
The following instructions use the [Books] application as an example.
Search icon
1. Press the
2. Tap
3. Input a search keyword and tap
The view shows only the items that satisfy the search criteria.
To exit the search result view, press the
Note
Some applications do not support keyword searching.
The available search target varies among content types.
(Home) button tap [Bookshelves].
; the keyword input area and the on -screen keyboard appear.
.
(Back) button.
Copyright 2013 Sony Corporation
Go to page top
Page 60
Reader™ User Guide
Getting started
Basic Operations
Adding/Getting Content
Search
Top page > Browsing Content Lists > Content Lists > Posting Book information to
Posting Book information to Facebook
Print
Facebook
Browsing Content Lists
Reading
Organizing
Other Applications
Settings
Other Information
Contents list
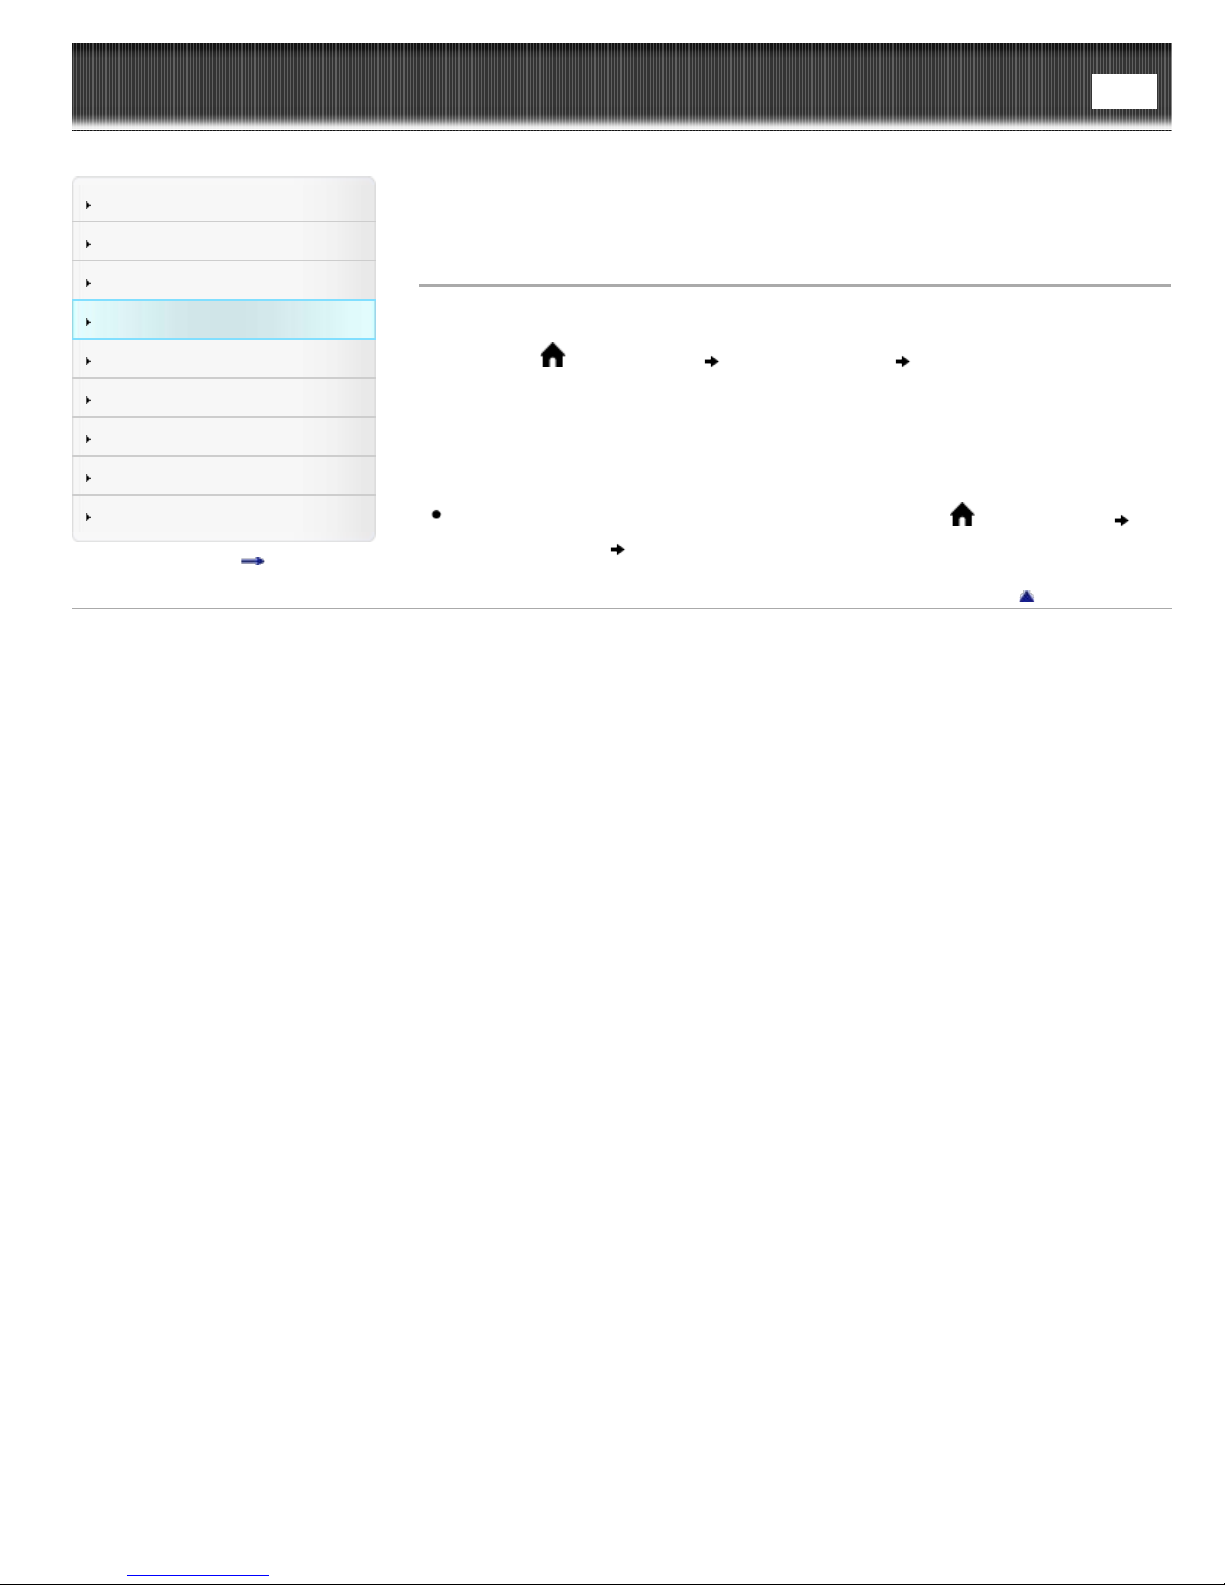
You can post the book title and author information to Facebook.
1. Press the
you wish to post.
2. Tap [Post to Facebook].
The selected book information is posted to Facebook.
Note
Before posting to Facebook, you need to log in. Press the
tap [Applications] [Facebook Setup].
Copyright 2013 Sony Corporation
(Home) button tap [Bookshelves] tap and hold the book that
(Home) button
Go to page top
Page 61
Reader™ User Guide
Getting started
Search
Top page > Browsing Content Lists > Content Lists > Tools
Print
Basic Operations
Adding/Getting Content
Browsing Content Lists
Reading
Organizing
Other Applications
Settings
Other Information
Contents list
Tools
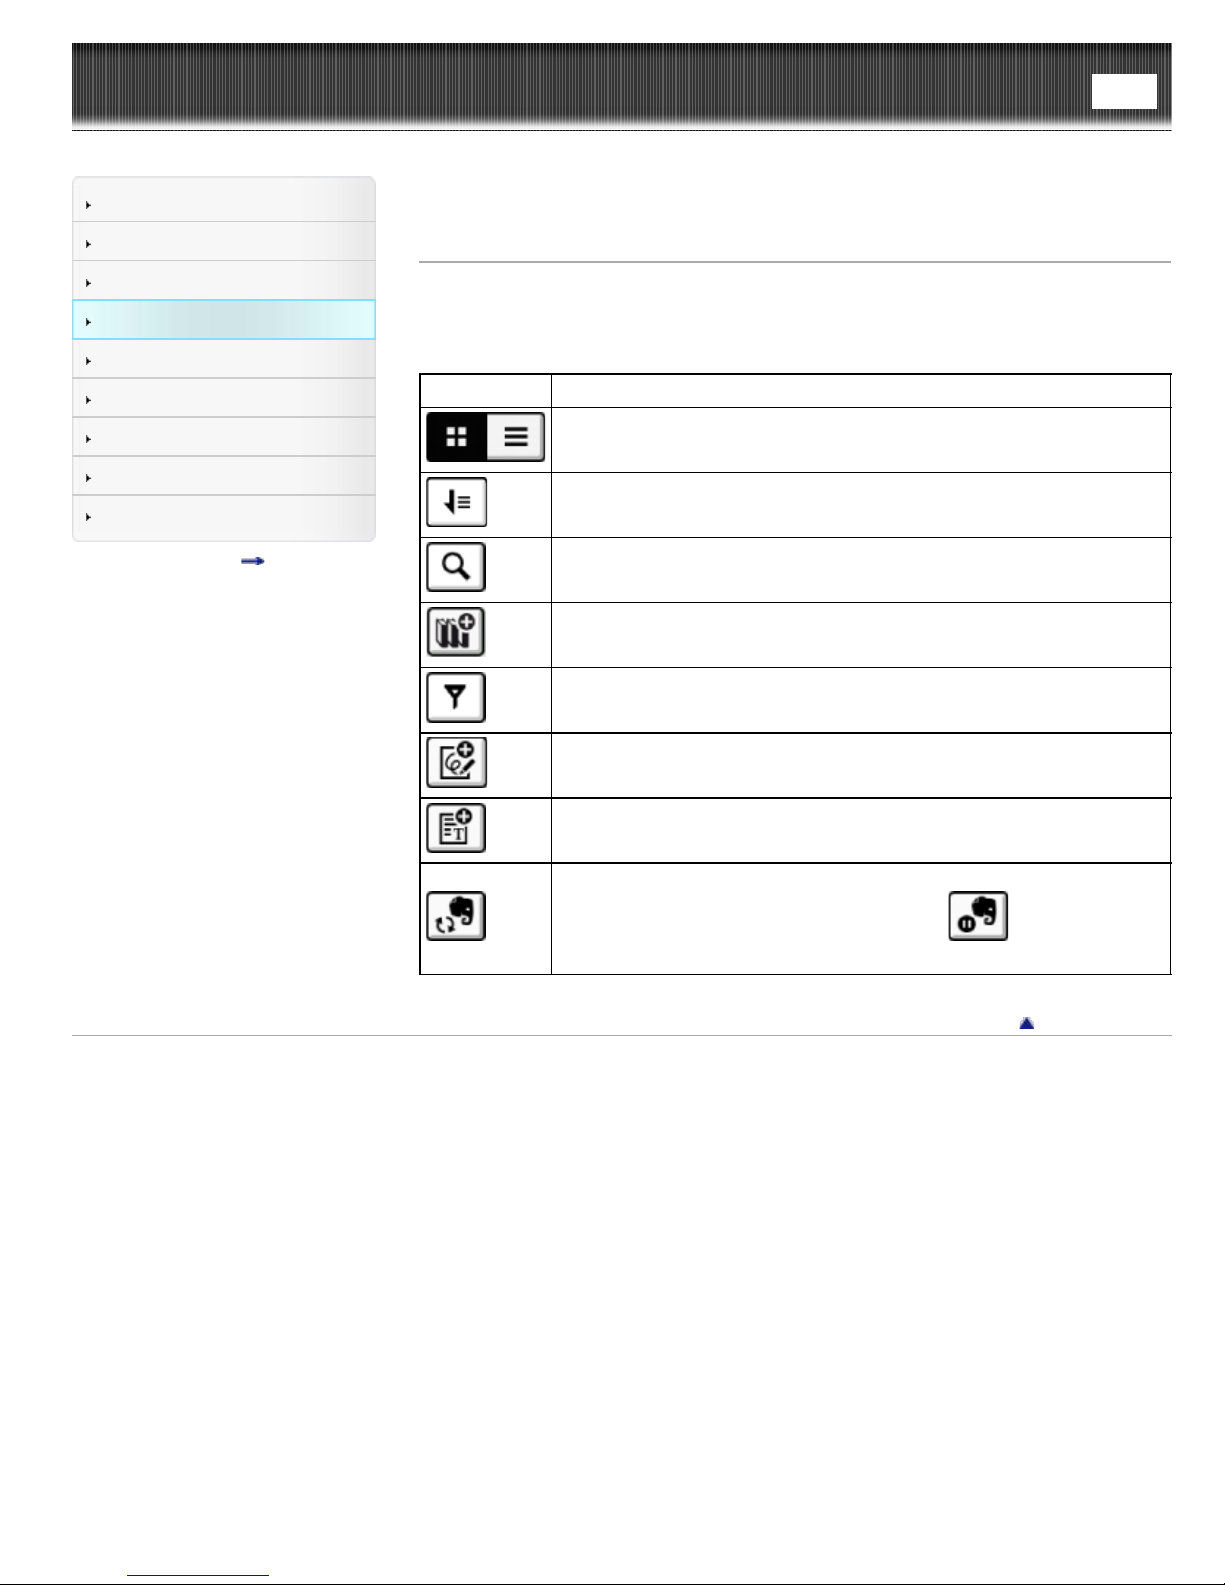
Below is a list of the tools available on each application’s content list page.
Not all tools are available in each application.
Tool icon Description
Changes the view between the thumbnail view and the list view. See
Details.
Changes the sort order.
Finds content with a keyword. See Details.
Creates a new collection.
Specifies the notes type to view in the list.
Creates a new drawing.
Creates a new memo.
Synchronizing with Evernote. See Details.
During syncronization, the icon will change to
syncronization).
Copyright 2013 Sony Corporation
(tap to stop
Go to page top
Page 62
Reader™ User Guide
Getting started
Search
Top page > Browsing Content Lists > Content Lists > Using (Menu) Items
Print
Basic Operations
Adding/Getting Content
Browsing Content Lists
Reading
Organizing
Other Applications
Settings
Other Information
Contents list
Using (Menu) Items
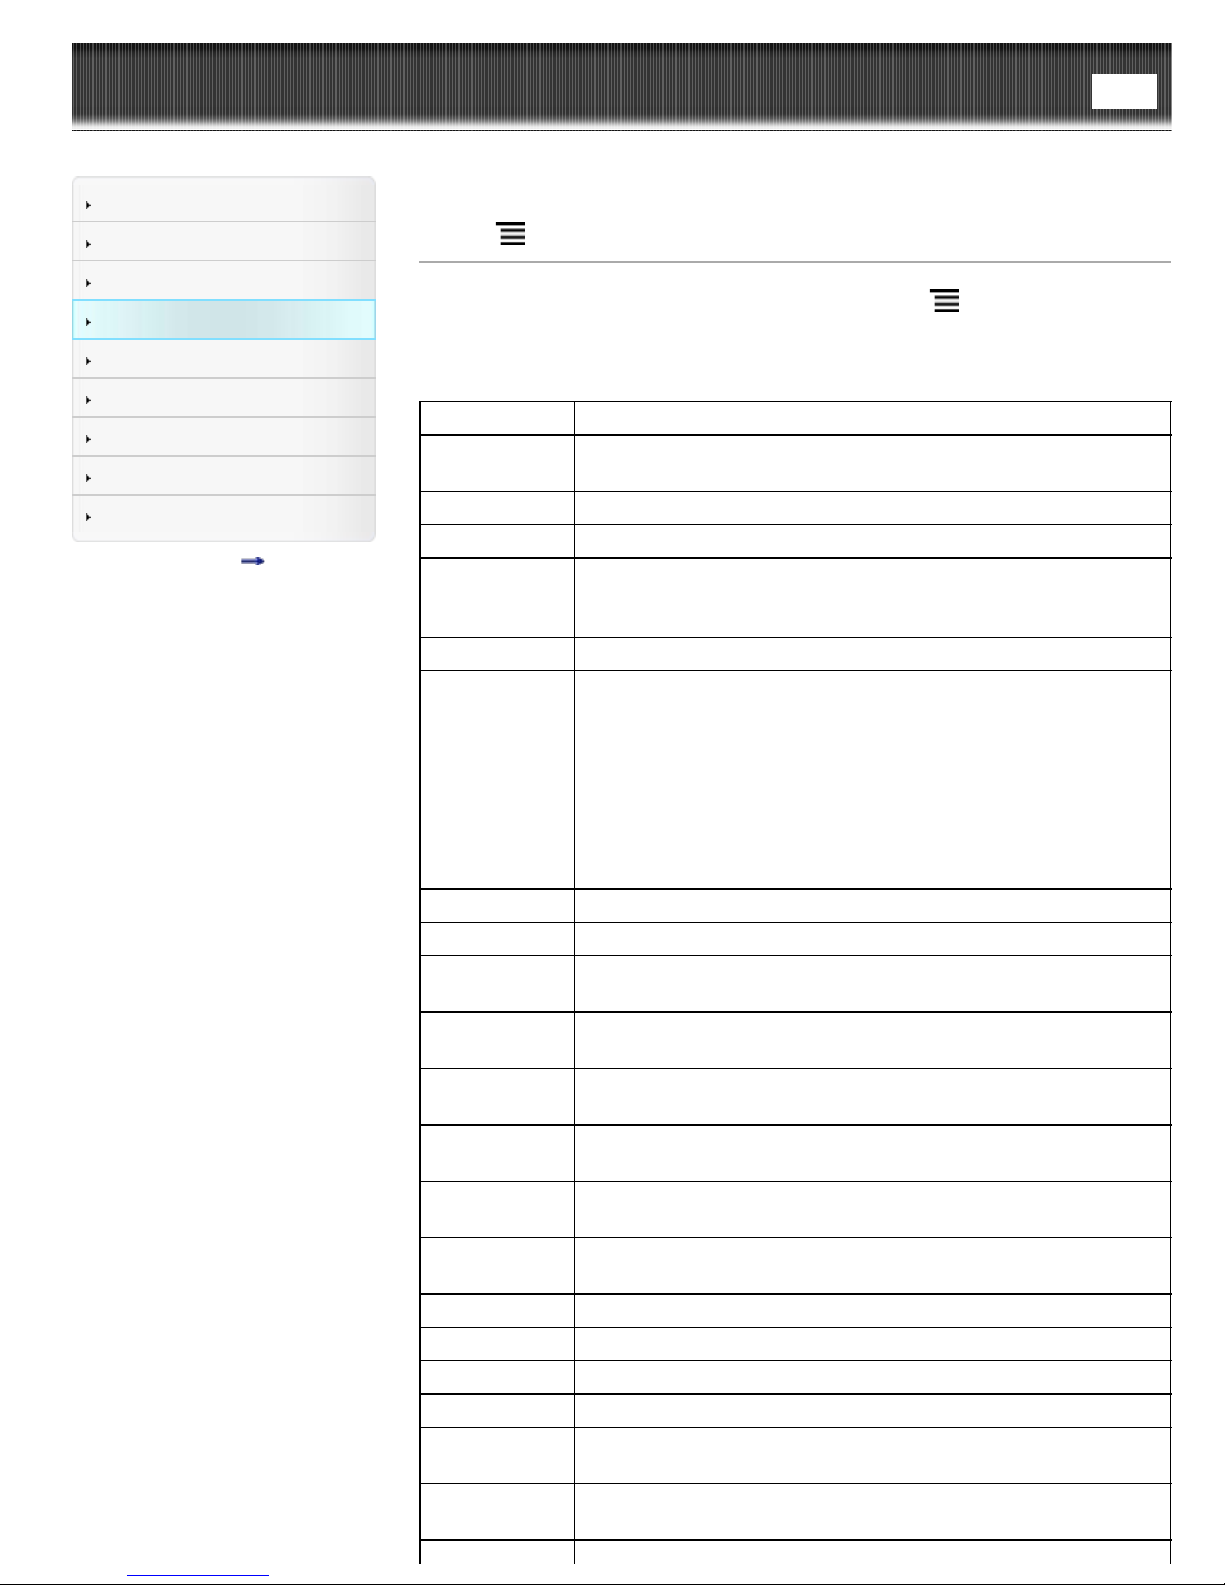
Below is a list of option items available when you press the (Menu) button on each
application’s content list page.
Not all options are available in each application.
Option Description
[Add to
Collection]
[Delete Books] Deletes one or more books from the Reader. See Details.
[Protect Books] Protects one or more books from deletion. See Details.
[Title (1 Line
View)]/[Title (2
Line View)]
[Return Books] Shows how to return a public library eBook. See Details.
[Choose
Bookshelf]
[Delete Issues] Deletes one or more issues from the Reader. See Details.
[Protect Issues] Protects one or more issues from deletion. See Details.
[Manage
Subscription]
[Move to
Collection]
[Remove
Content]
[Rename
Collection]
[Post to
Facebook]
[Organize to
Collection]
[Sync] Synchronizing with Evernote. See Details.
[Delete Notes] Deletes one or more notes.
[Delete Memos] Deletes one or more text memos. See Details.
[Protect Memos] Protects one or more text memos. See Details.
[Delete
Drawings]
[Protect
Drawings]
Adds one or more books to a collection. See Details.
Displays the full title string without truncating it. See Details.
Open the pop -up menu and you can choose from following
submenu.
[Books] Displays the book.
[Collections] Displays the collections.
[Purchased Content]* Displays the purchased eBooks.
[Evernote] Displays items downloaded from Evernote.
* Available in certain countries/regions only. The [Purchased
Content] function only appears on your Reader if your local Reader
Store supports the feature.
Manages the number of the issues that you want to store. See
Details.
Moves one or more books to a collection.
Removes items from a collection that you have created. See Details.
Renames a collection. See Details.
Posts a book collection information. See Details.
Moves one or more items of [Default Collection] to other collections
created by the user. See Details.
Deletes one or more drawings. See Details.
Protects one or more text memos/drawings. See Details.
Page 63

[Delete Pictures] Deletes one or more pictures. See Details.
[Settings] Changes the slideshow interval. See Details.
Copyright 2013 Sony Corporation
Go to page top
Page 64
Reader™ User Guide
Getting started
Search
Top page > Reading > Reading eBooks > Opening a Book
Print
Basic Operations
Adding/Getting Content
Browsing Content Lists
Reading
Organizing
Other Applications
Settings
Other Information
Contents list
Opening a Book
1. Press the (Home) button tap [Bookshelves].
The [Books] content list opens. See Details.
2. Tap a book.
The book opens.
You can also open a book by tapping and holding the book you want to open.
To navigate within a book, see Details.
Tip
When [Collections], [Purchased Content]* or [Evernote] appears, tap the top-left
corner of the screen to show [Books]. Alternatively, press the
tap [Choose Bookshelf] to show [Books].
* Available in certain countries/regions only. The [Choose Bookshelf] function only
appears on your Reader if your local Reader Store supports the feature.
Copyright 2013 Sony Corporation
(Menu) button
Go to page top
Page 65
Reader™ User Guide
Getting started
Search
Top page > Reading > Reading eBooks > Page Navigation
Print
Basic Operations
Adding/Getting Content
Browsing Content Lists
Reading
Organizing
Other Applications
Settings
Other Information
Contents list
Page Navigation
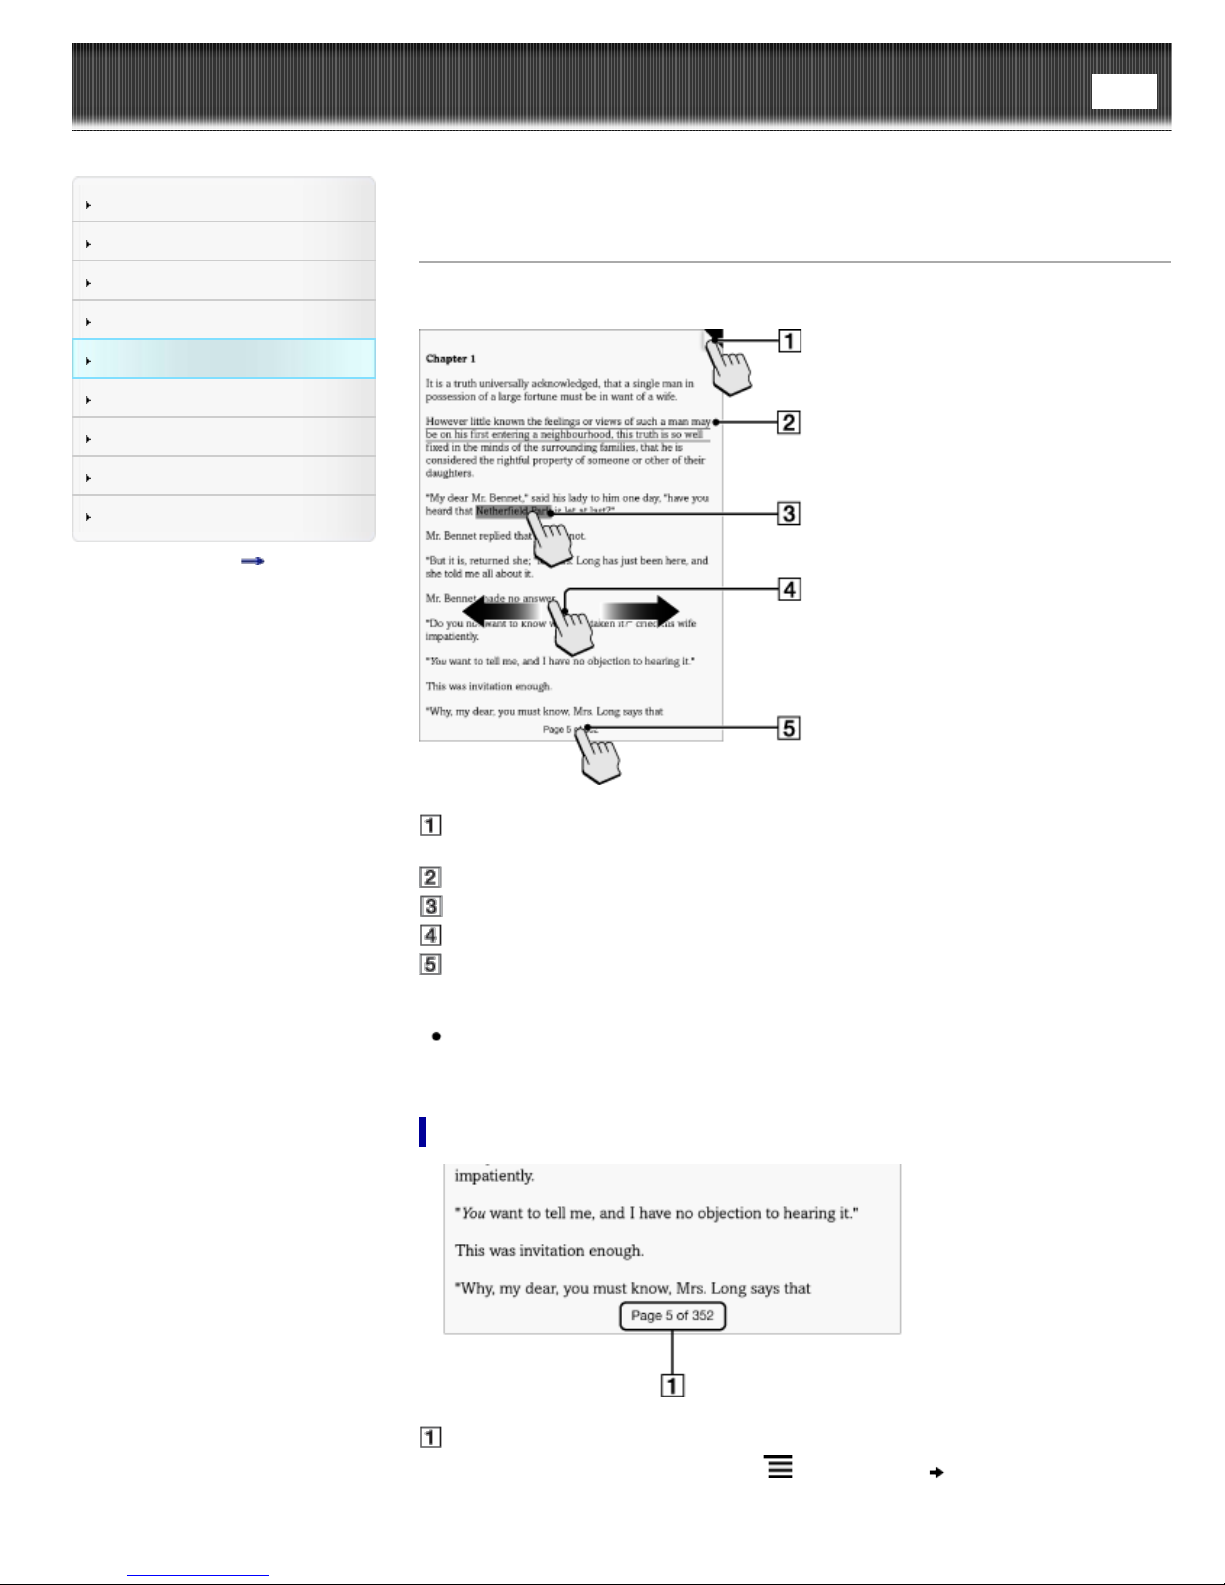
There are several ways to navigate through books.
Tap to add a bookmark Details
Tap and hold to add a note
Draw a handwritten note Details
Tap and hold to open option items Details
Swipe the screen to turn the page
Tap to open the page navigation panel.
Tip
If you select the [Refresh Display] checkbox from [Application Preferences], the
display refreshes at each page turn. See Details.
Using the page navigation panel
Page indicator
1. Tap the page indicator, or press the
open the page navigation panel.
Using the paging bar
(Menu) button tap [Navigate Page] to
Page 66
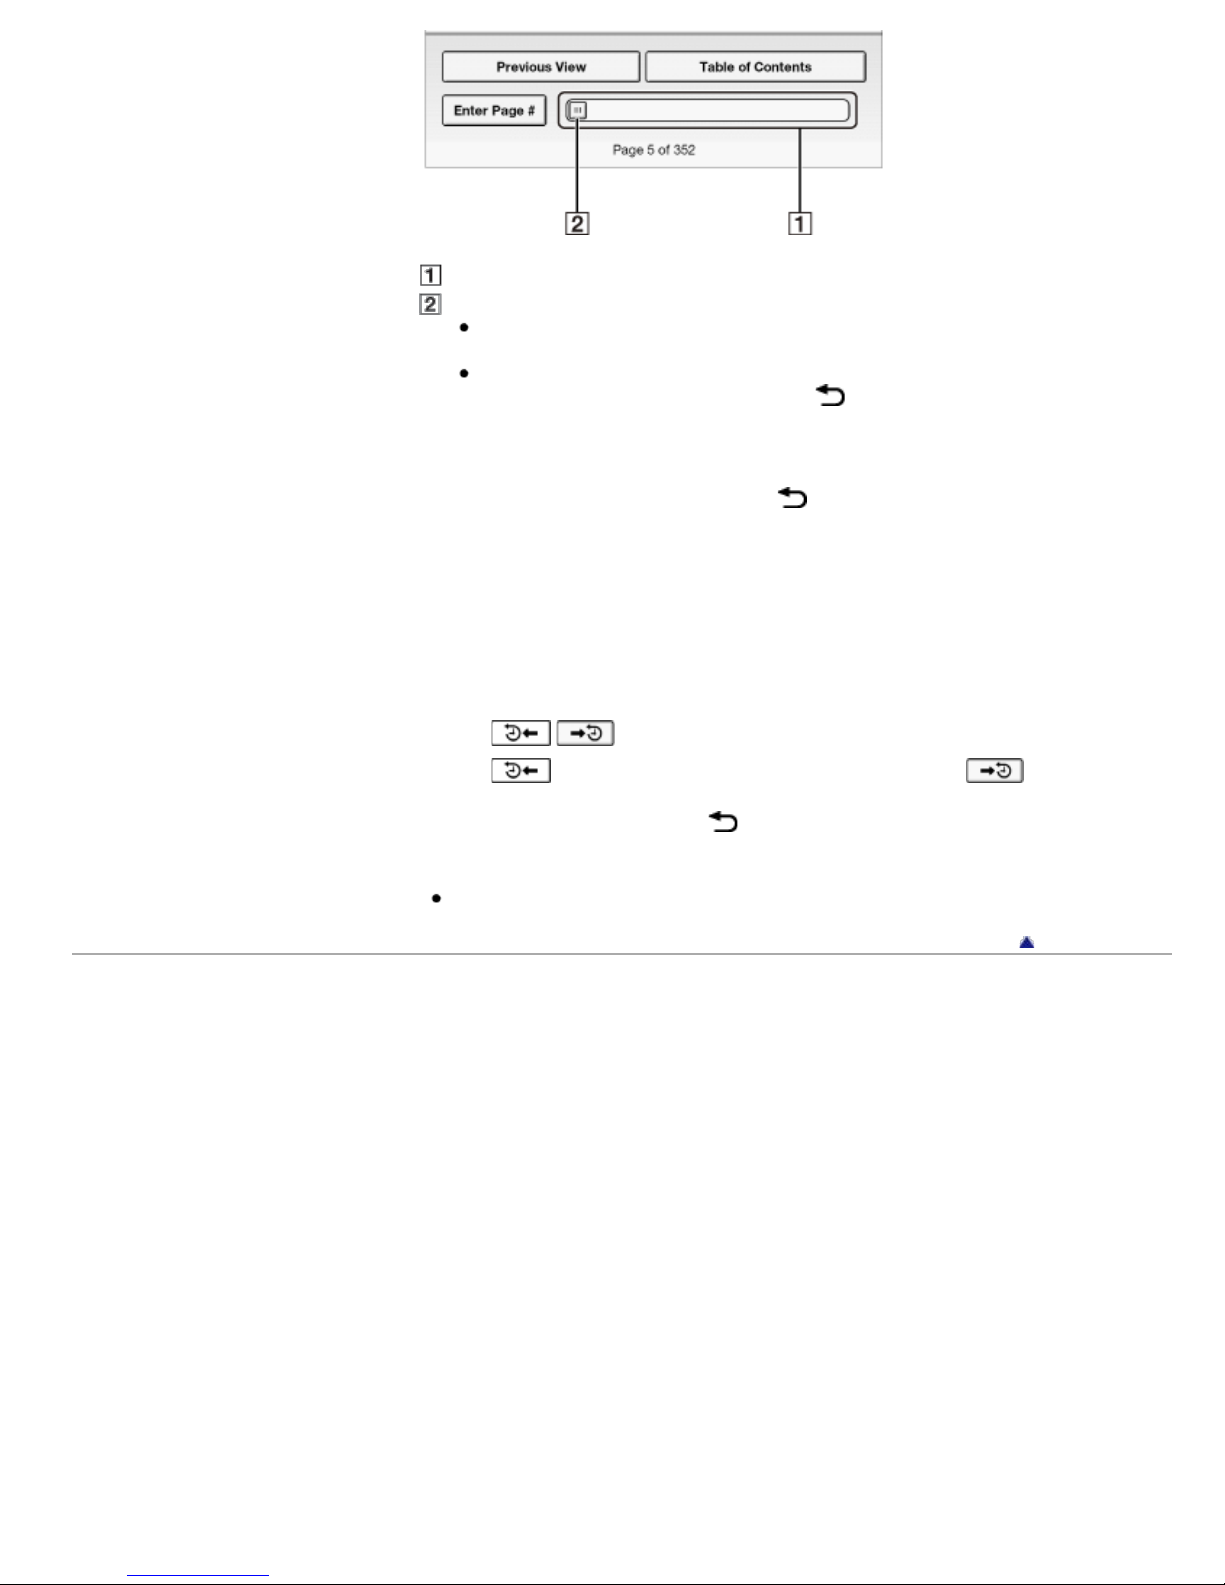
Paging bar
Slider
Tap on a point on the paging bar to jump to a page that corresponds with that
point.
Tap and drag the slider.
To close the page navigation panel, press the
(Back) button.
Using [Table of Contents]
1. Tap [Table of Contents].
To return to the book page, press the
2. Tap to open the selected chapter or section.
(Back) button.
Using [Enter Page #]
1. Tap [Enter Page #] to enter the page number with the on-screen numeric keyboard,
and tap [OK].
Jumping to viewed pages
1. Tap [Previous View].
The
/ (Page history) icons are displayed.
2. Tap
the page display history.
To cancel page history, press the
Tip
This is the same operation for when you tap on a highlighted link.
Copyright 2013 Sony Corporation
to go backward in the page display history. Tap to go forward in
(Back) button.
Go to page top
Page 67
Reader™ User Guide
Getting started
Search
Top page > Reading > Reading eBooks > Appearance
Print
Basic Operations
Adding/Getting Content
Browsing Content Lists
Reading
Organizing
Other Applications
Settings
Other Information
Contents list
Appearance
Changing the orientation
You can view books or periodicals in either portrait or landscape mode.
1. When viewing a book or periodical, press the
[Orientation].
The screen orientation changes.
Portrait mode
Landscape mode
(Menu) button tap [More]
Note
The orientation can be changed for the [Books], [Periodicals]*, [Browser] and
[Pictures] applications. Changing the orientation in one application does not affect
the orientation setting of the other applications.
* Available in certain countries/regions only.
Changing the font and font size
You can change the font and font size to your preference.
1. When viewing a book or periodical, press the
The font bar is displayed.
2. To change the font size, tap on one of the font size icons. The book or periodical
will be updated to apply the specified font size.
Press the
3. To change the font, tap [Original] and select from one of the fonts in the list.
Press the
The book or periodical will be updated to apply the specified font and font size.
(Back) button when done.
(Back) button when done.
(Menu) button tap [Font].
Note
Page 68
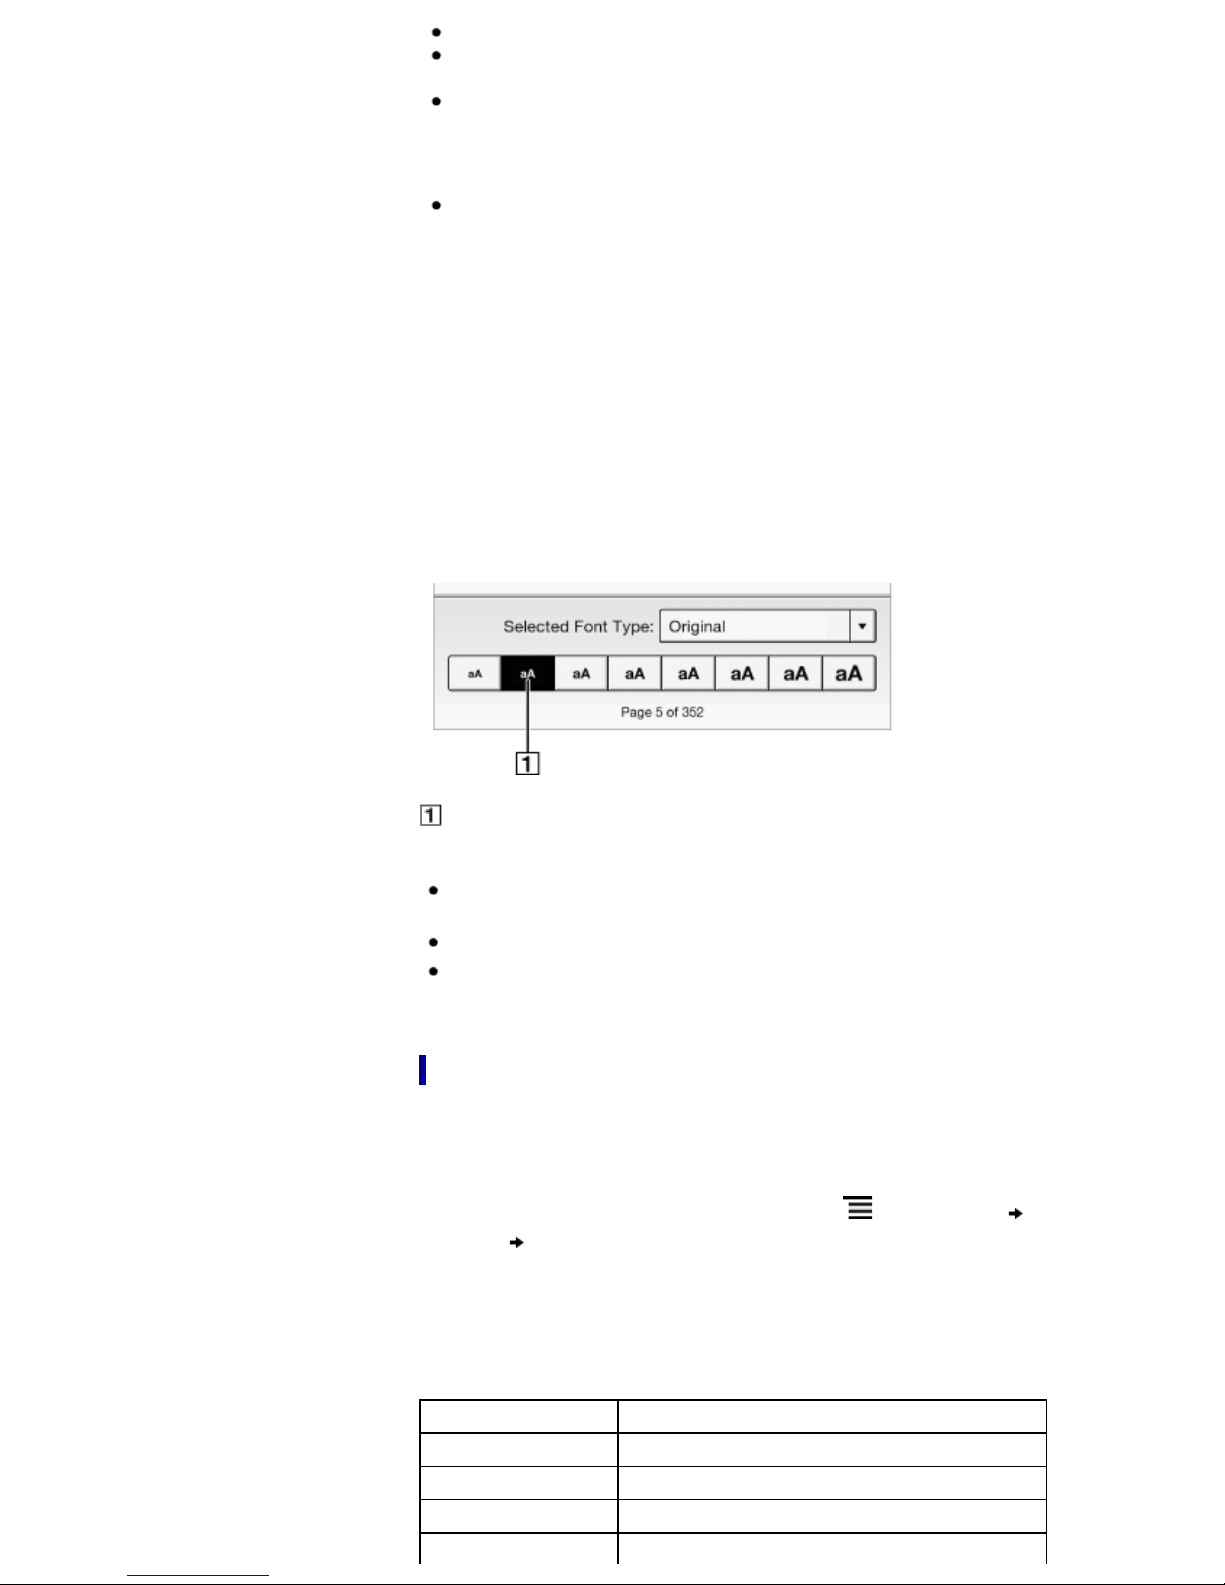
The font size and font of some content with embedded fonts may not change.
When you select other than the [Original] font, performance may be slightly lower
when opening books or turning pages.
When you select other than the [Original] font, boldface/italics/italicized boldface
may not be displayed correctly.
Tip
You can change the default font for all content in the [Books] and [Periodicals]*
applications. See Details.
* Available in certain countries/regions only.
About PDF files
The Reader provides the ability to display most text- based PDF files in several font
sizes. Documents are displayed in the default font position with their original layouts.
Due to the complex nature of PDF files, in certain situations when you change the font
size, only text will appear. This is because some tables and graphics may be
reformatted and altered during the reflow process.
Also, in cases where PDF files are created using image data only, there is no text to
reflow or resize.
In these cases, if retaining the original layout of a PDF file is required, Sony
recommends that you view the PDF file at its original font size.
To display the original layout
Note
If you modified the default font size with [Font Size Preference] under [Settings],
return it to its original layout to view PDF files normally.
To view the document in a different size, use the zoom in function.
When you view PDF files in other than their original layout, some functions such as
highlighting or searching may not work correctly.
Changing the page mode
You can change the page viewing style for PDF files. This is convenient for viewing
pages with text arranged in columns.
This mode remains active as you continue reading. The setting applies only to the
currently open book.
1. When viewing a book or periodical, press the
View]
The [Page Mode] screen appears.
2. Choose from one of the following options.
[Page Mode].
(Menu) button tap [Customize
Option Description
[Original] Set to the default view.
[2-Column Split] Splits the page into two columns and two rows.
[3-Column Split] Splits the page into three columns and two rows.
[Fit Landscape Width] Displays the page fit to landscape view.
Page 69
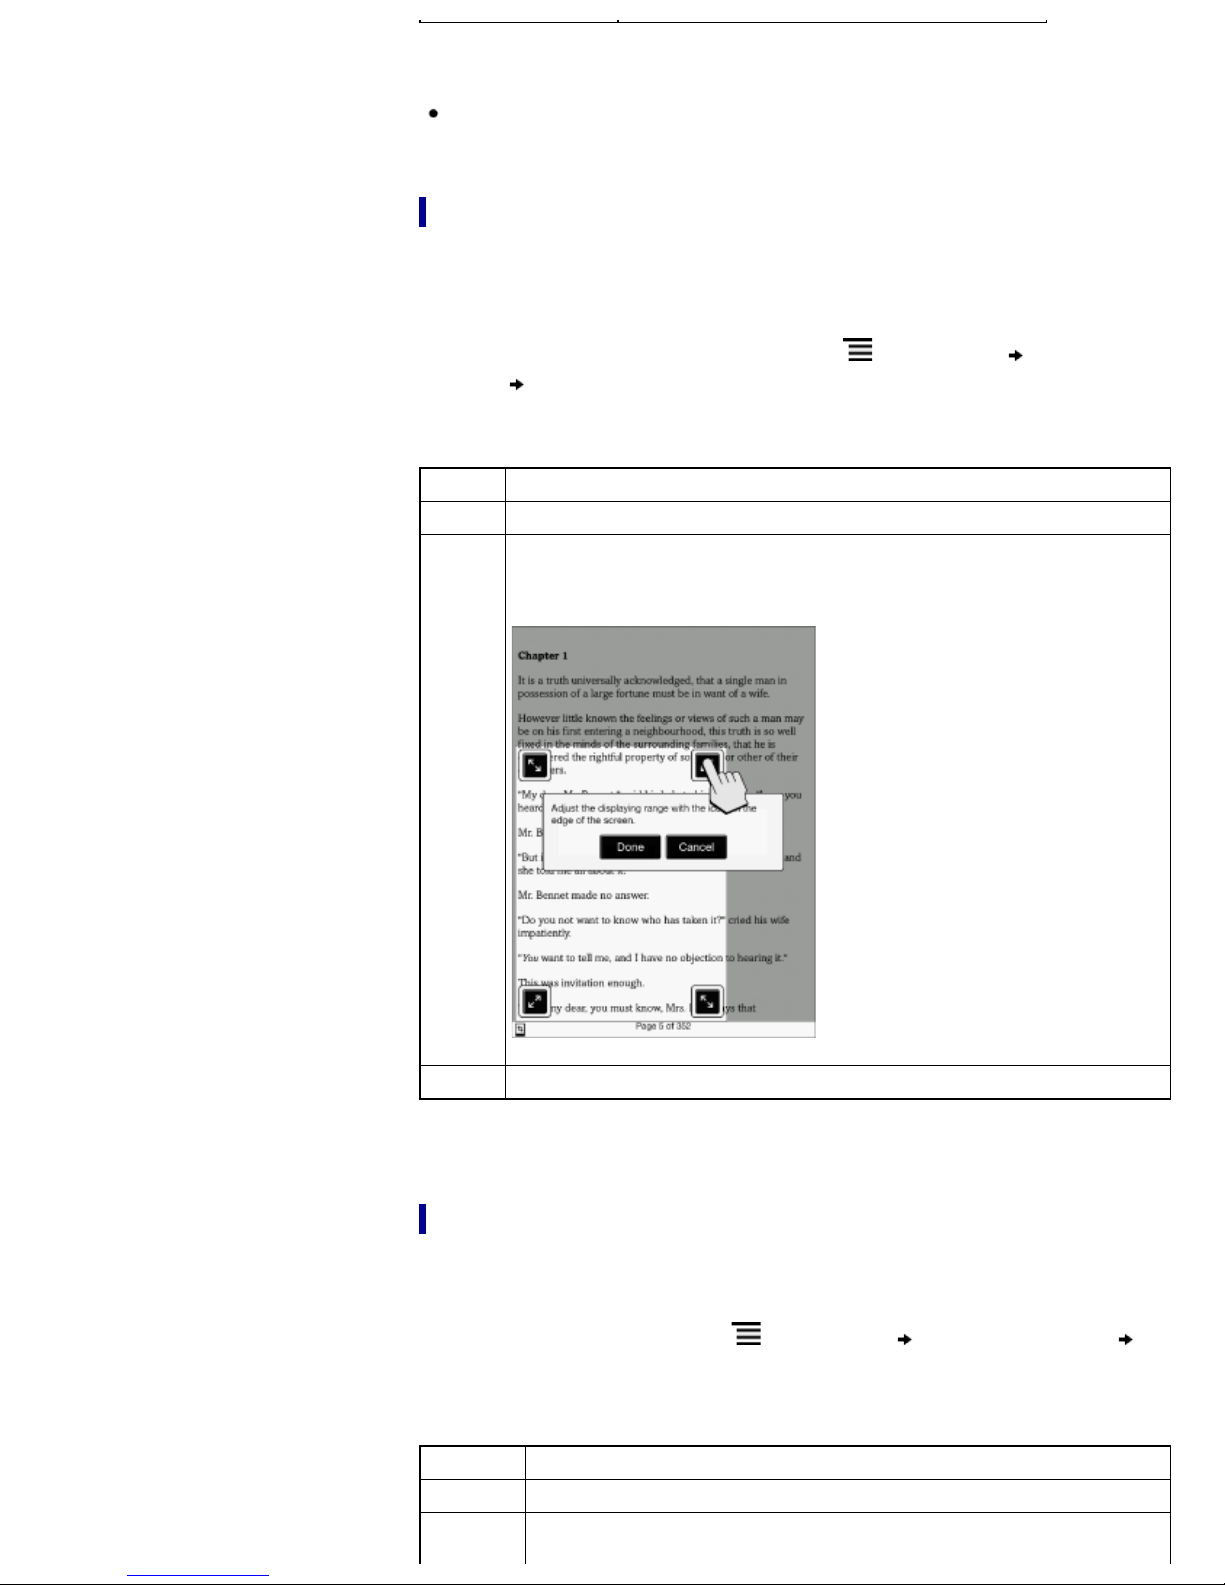
Note
In order to attach a handwritten note, the page mode needs to be restored to
[Original].
Cropping a page
You can crop the page margins to create a wider viewing area. This is convenient for
viewing pages that have large margins.
This mode remains active as you continue reading. The setting applies only to the
currently open book.
1. When viewing a book or periodical, press the
View]
2. Choose from one of the following options.
Option Description
[Uncrop] Disables cropping.
[Manual]
[Crop Page].
Allows you to adjust the crop area manually by dragging arrows at the
corners. Tap [Done] to set the area, or tap [Cancel] to cancel editing the
crop area.
(Menu) button tap [Customize
[Auto] Automatically crops the margins of a document.
Adjusting the brightness and contrast
A page that is hard to read, such as a scanned or color-converted document, can be
made more readable by adjusting the brightness and contrast. This mode remains active
as you continue reading. The setting applies only to the currently open book.
1. When viewing a book, press the
[Adjust View].
2. Choose from one of the following options.
Option Description
[Original] Displays the page in the original quality.
[Saturated]
Improves readability by emphasizing contrast.
(Menu) button tap [Customize View]
Page 70
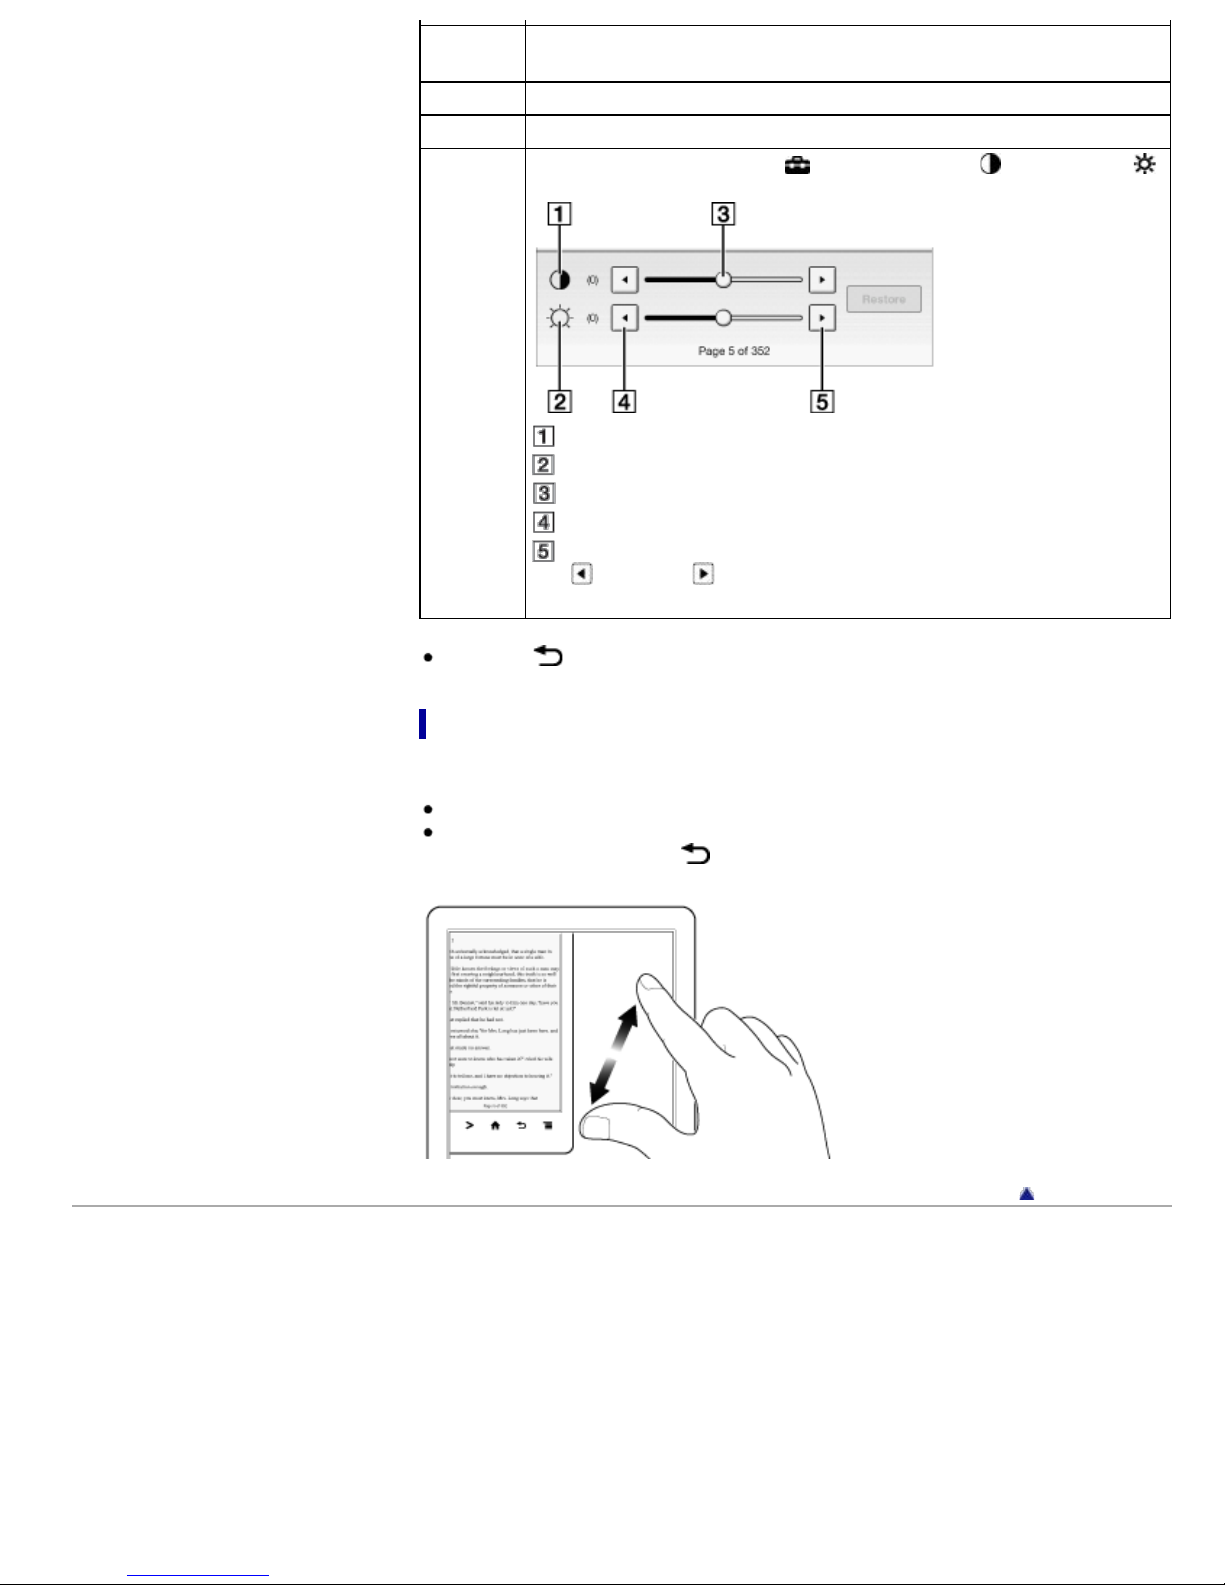
[Details]
[Brighter] Increases the brightness.
[Darker] Decreases the brightness.
Backlight compensation; brings up details in a dark area.
[Custom]
Press the
Zooming in
Create a custom setting. Tap
(Brightness).
Contrast
Brightness
Slider
Lower
Higher
Tap
Tap [Restore] to revert to the previously saved custom settings.
(Lower) or (Higher), or tap on the slider.
(Back) button when done.
(Settings) to adjust (Contrast) and
Use the zoom function when you want to temporarily zoom in on part of a page.
The viewer shows the zoom bar and viewing position indicator while in zoom mode.
Pinch out to zoom in.
Pinch in to zoom out.
To exit zoom mode, press the
Copyright 2013 Sony Corporation
(Back) button.
Go to page top
Page 71
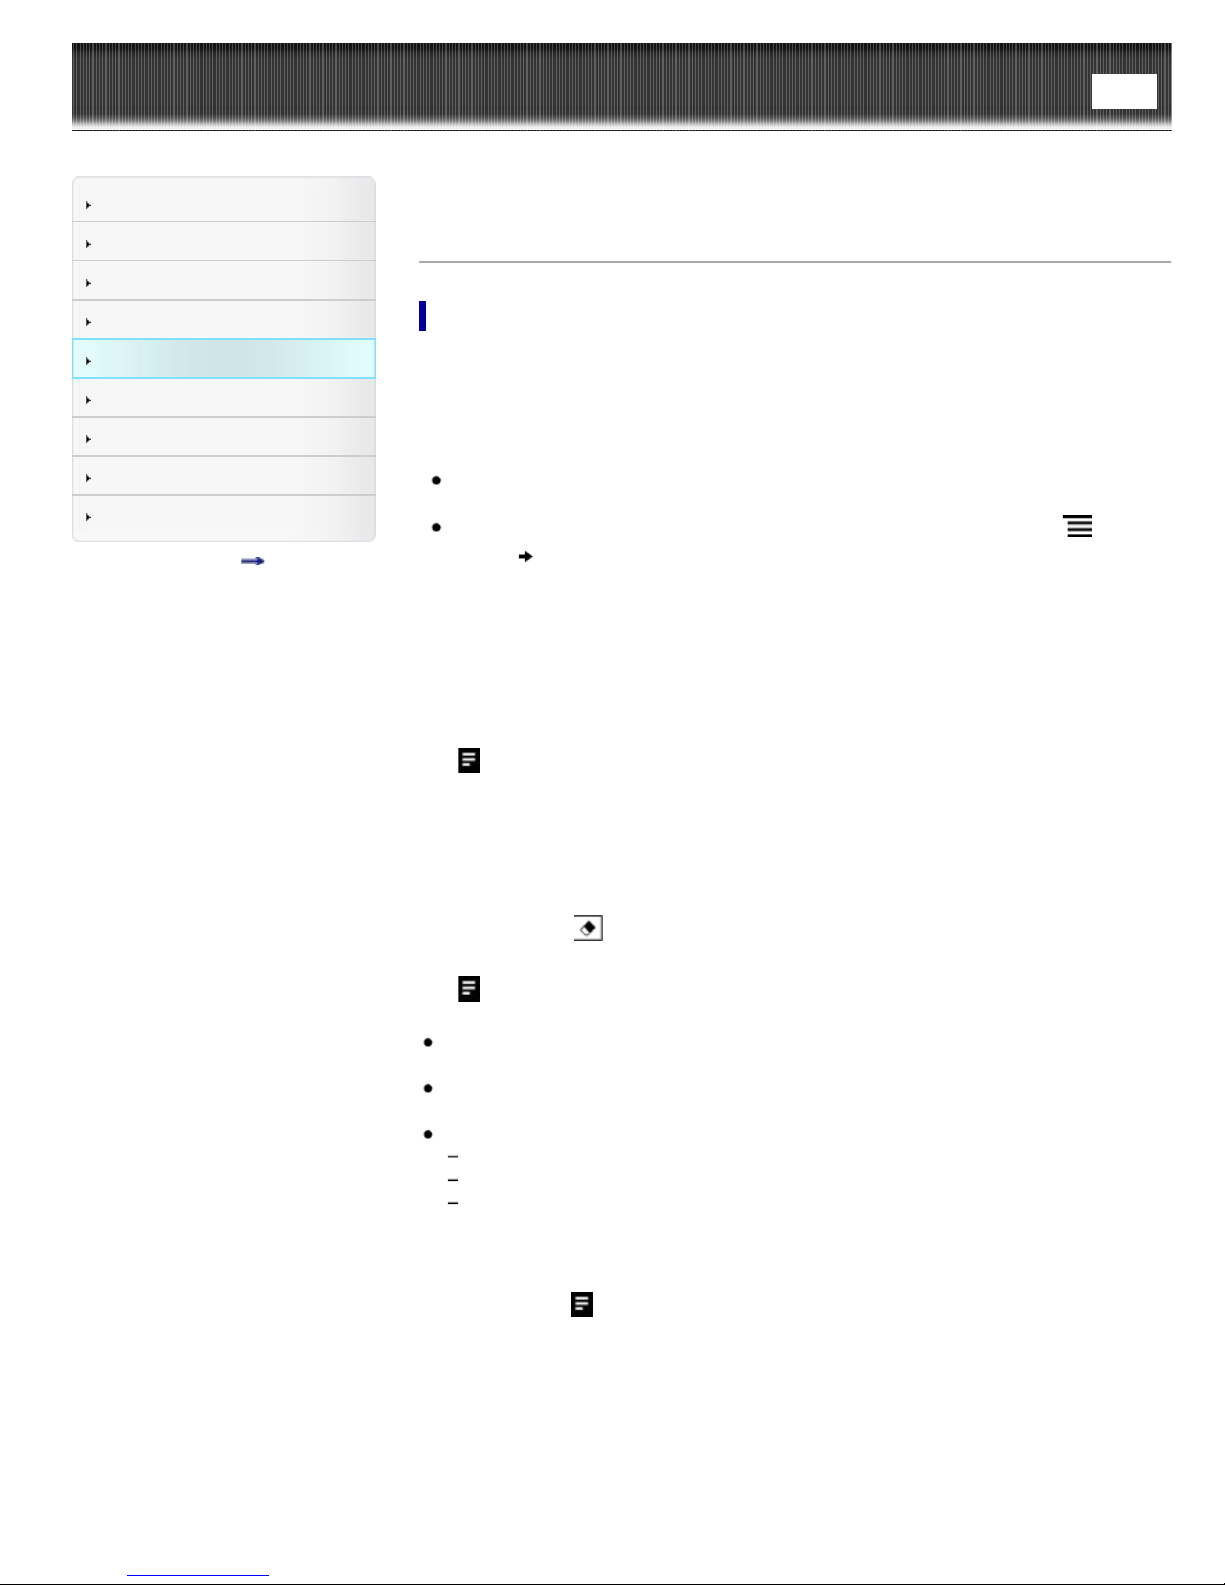
Reader™ User Guide
Getting started
Search
Top page > Reading > Reading eBooks > Annotations
Print
Basic Operations
Adding/Getting Content
Browsing Content Lists
Reading
Organizing
Other Applications
Settings
Other Information
Contents list
Annotations
Bookmarking a page
You can bookmark a page and take a note so that you will remember what the
bookmark is for.
1. Tap the top right corner of the page.
Tip
To search, sort and view all annotations across all books and periodicals, use the
[All Notes] application. See Details.
To search annotations for the currently open book/periodical, press the
button
tap [Notes].
Adding text notes
1. Tap and hold the bookmark.
2. Tap [by Keyboard].
3. Type the notes using the on- screen keyboard.
4. Tap [Save].
The
icon appears on the bookmark, indicating that a note is attached.
Adding handwritten notes
1. Tap and hold the bookmark.
2. Tap [by Drawing].
3. Draw with your finger on the drawing pad.
To erase, tap
4. Tap [Save].
The
Notes on handwriting
icon appears on the bookmark, indicating that a note is attached.
While writing, make sure that you are not touching another area on the touchscreen;
this could affect the notes that you write with your finger.
To ensure that your notes are correctly saved, do not handwrite notes too close to
the edge of the touchscreen.
If you experience difficulties when handwriting or drawing on the Reader:
avoid applying excessive pressure to the touchscreen.
try not to handwrite or draw too quickly.
this functionality is not designed for very detailed drawings or for writing small
characters.
(Erase), and then tap the line(s) you want to erase.
(Menu)
Editing notes
1. Tap and hold on the bookmark.
The notepad or the drawing pad opens.
2. Tap [Edit].
The on -screen keyboard or the drawing pad opens.
3. Edit the note.
4. Tap [Save].
The notepad or the drawing pad closes, returning to the viewer.
Removing a bookmark
1. Tap the bookmark.
Page 72
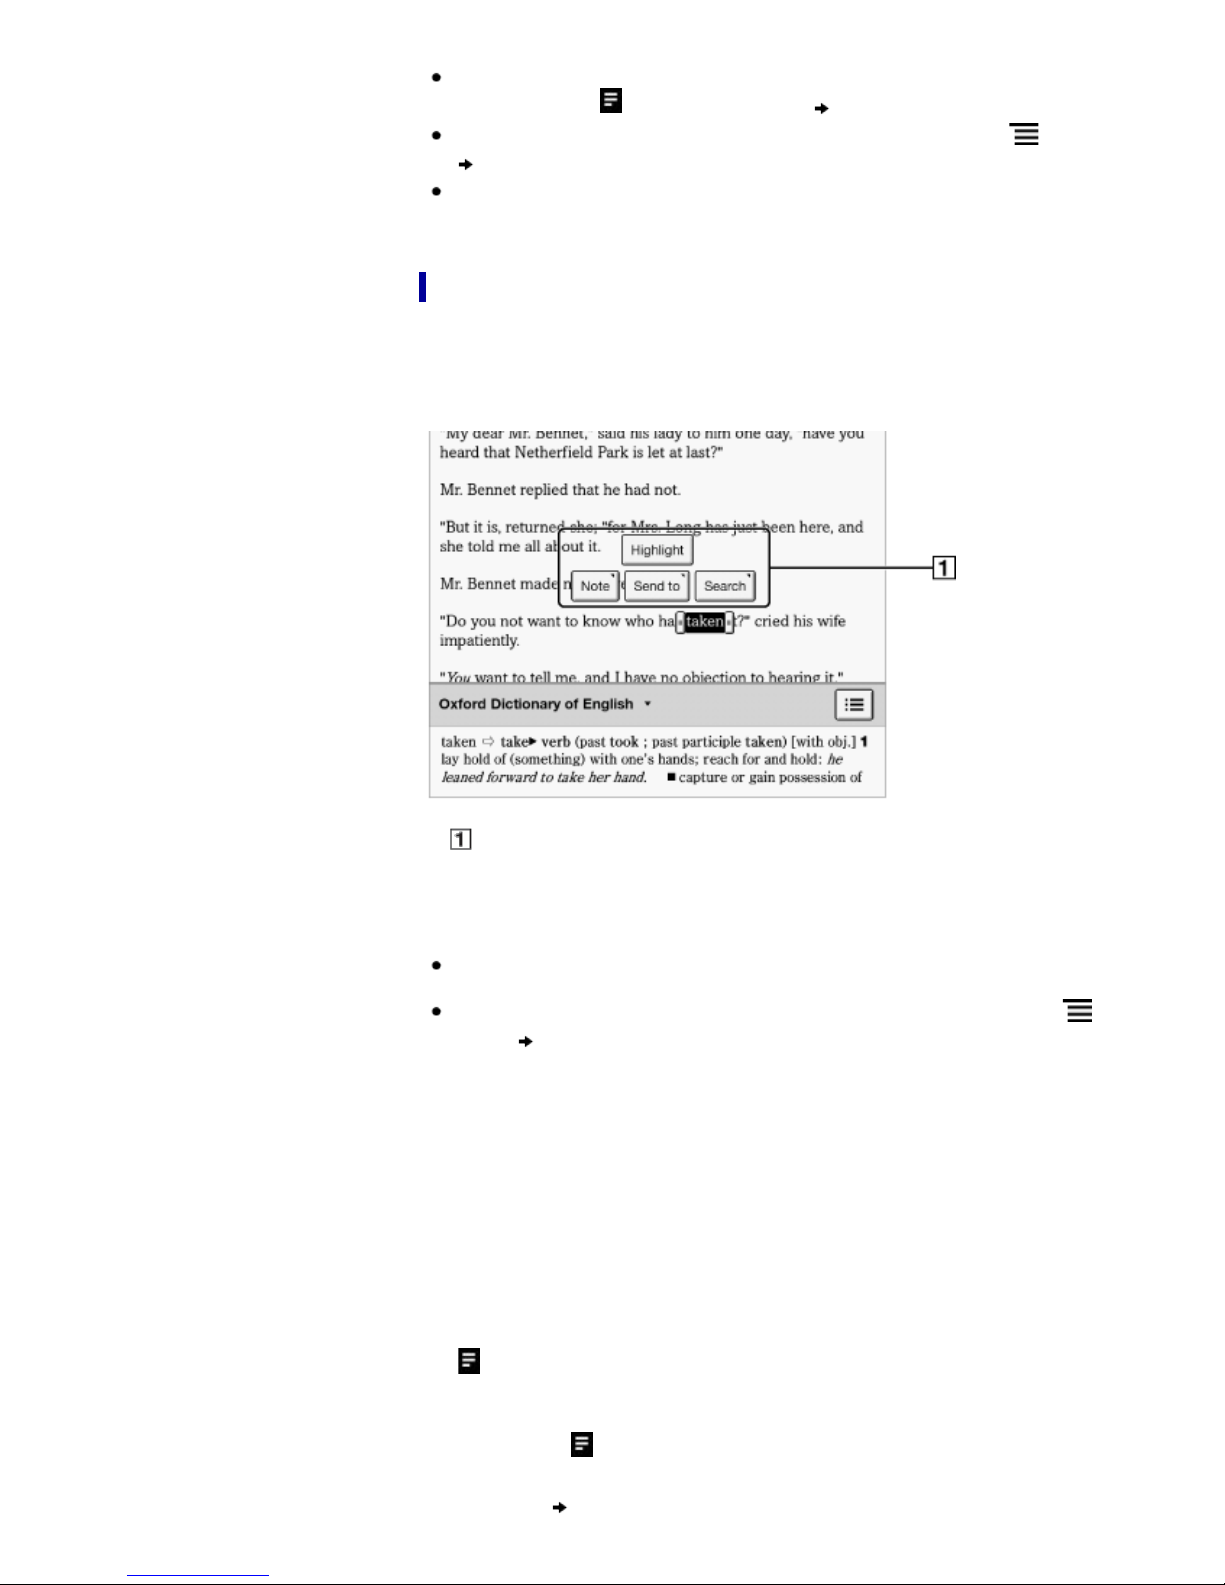
Tip
This will remove the bookmark and any note attached to it. To delete only a note,
tap and hold the
To delete all bookmarks in the current book/periodical, press the
tap [Notes]. See Details.
To delete annotations across all books and periodicals, use the [All Notes]
application. See Details.
icon and tap [Delete] [Yes].
(Menu) button
Highlighting words on a page
You can highlight words and take notes.
1. Tap and hold the first word and drag across to the last word of the section you
would like to highlight.
The pop-up menu appears.
Pop-up menu
2. Tap [Highlight].
The selected words are now highlighted.
Tip
To search, sort and view all annotations across all books and periodicals, use the
[All Notes] application. See Details.
To search annotations for the currently open book/periodical, press the
button
tap [Notes]. See Details.
Adding text notes or handwritten notes to a highlight
1. Tap and hold a highlighted word.
The pop-up menu appears.
2. Select [Note].
3. Select from [by Keyboard] and [by Drawing].
Create a note.
For a text note, see Details.
For a handwritten note, see Details.
4. Tap [Save].
To cancel adding notes, tap [Cancel].
The
icon appears at the beginning of the highlight, indicating that a note is attached.
Editing notes on a highlight
(Menu)
1. Tap and hold at the beginning of the highlight.
The pop-up menu appears.
2. Tap [Note]
The on -screen keyboard or the drawing pad opens.
[Edit].
Page 73
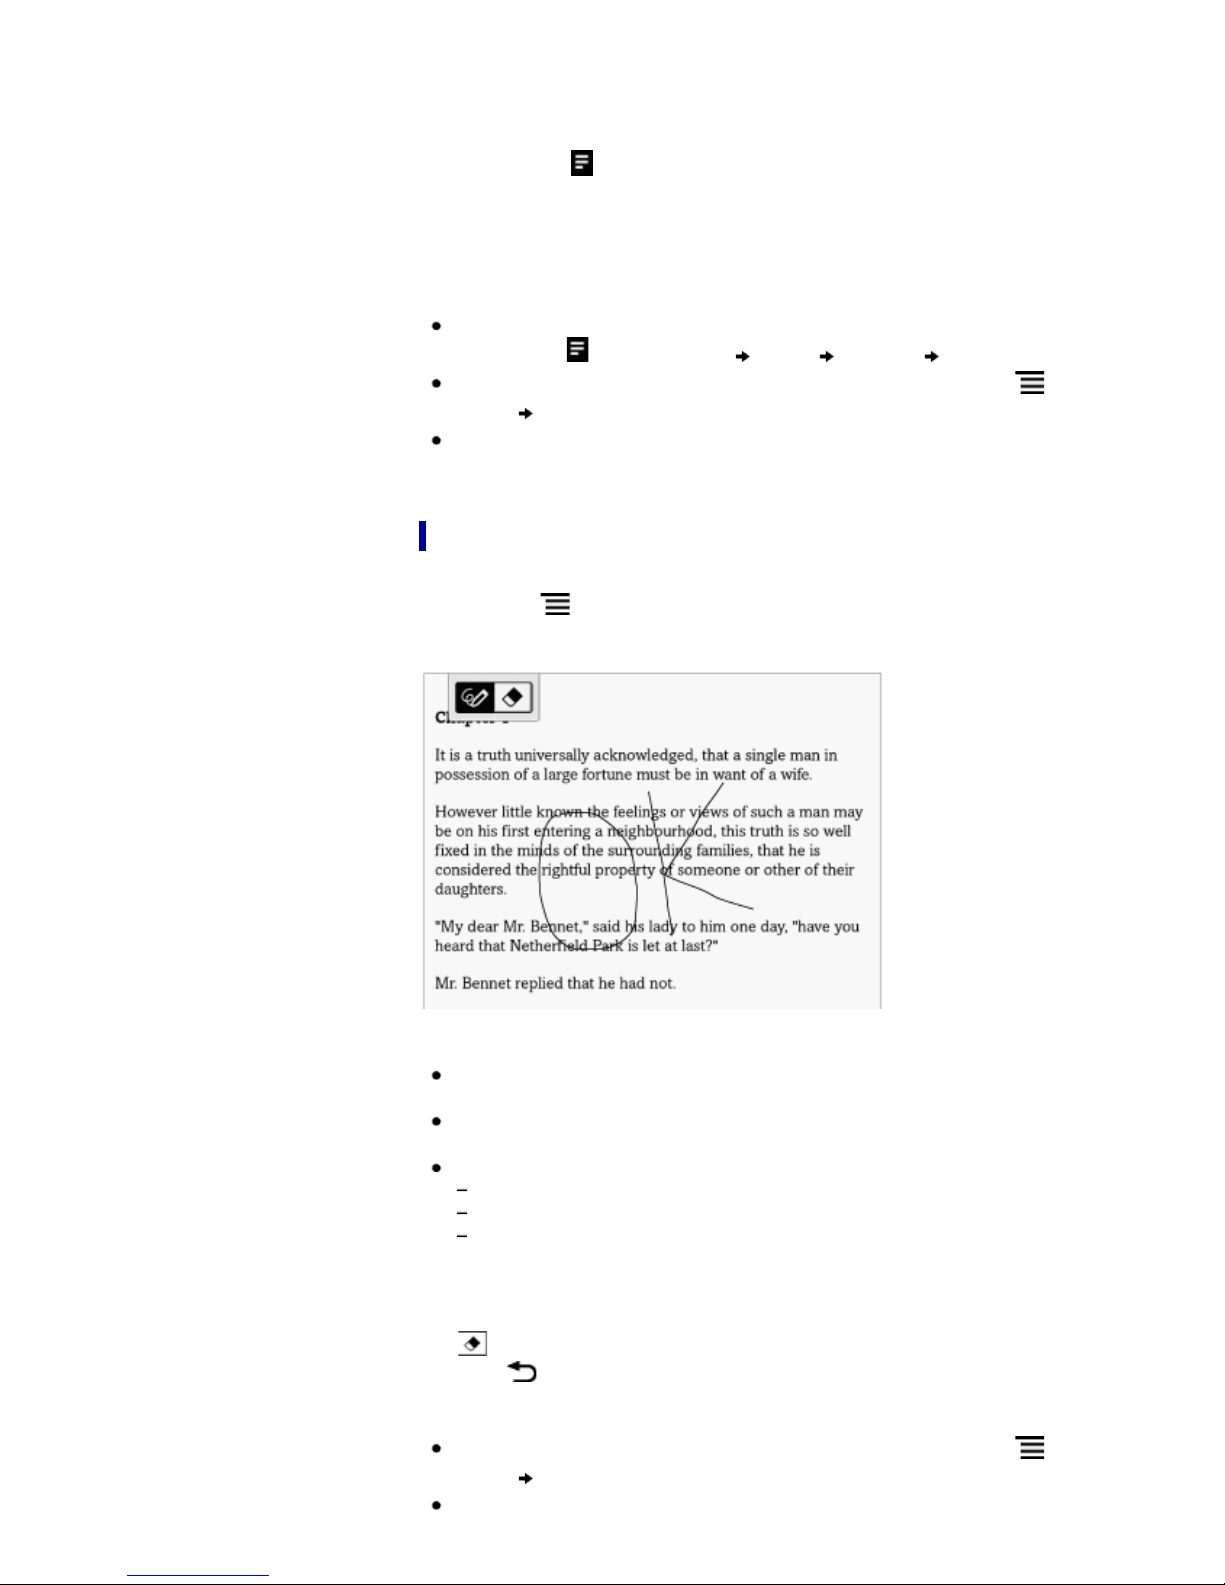
3. Edit the note.
4. Tap [Save].
The notepad or the drawing pad closes, returning to the viewer.
Removing highlights
1. Tap and hold at the beginning of the highlight.
The pop-up menu appears.
2. Tap [Remove Highlight].
3. Tap [Yes] when prompted.
Tip
This will remove the highlight and any note attached to it. To delete only a note, tap
and hold the
To delete all annotations in the current book/periodical, press the
button
To delete annotations across all books and periodicals, use the [All Notes]
application. See Details.
Handwriting a note on a page
You can use your finger and draw directly on a page.
icon, tap [Note] [Edit] [Delete] [Yes].
(Menu)
tap [Notes]. See Details.
1. Press the
2. Tap [Handwriting] and use your finger to draw a line.
Note
While writing, make sure that you are not touching another area on the
touchscreen; this could affect the notes that you write with your finger.
To ensure that your notes are correctly saved, do not handwrite notes too close to
the edge of the touchscreen.
If you experience difficulties when handwriting or drawing on the Reader:
avoid applying excessive pressure to the touchscreen.
try not to handwrite or draw too quickly.
this functionality is not designed for very detailed drawings or for writing small
characters.
(Menu) button.
To delete a drawn line
Tap (Erase) and drag across the drawn line.
Press the
Tip
To delete all annotations in the current book/periodical, press the
button
To delete annotations across all books and periodicals, use the [All Notes]
application. See Details.
(Back) button when you are done to continue reading.
tap [Notes]. See Details.
(Menu)
Page 74

Hiding annotations
You can set the viewer to show or hide the annotations that you have made to the
book. This is convenient for when a highlight overlaps with a link.
1. Press the
The option items appear.
2. Tap [More].
3. Tap [Settings].
4. Tap [Show Notes].
Check the checkbox to show annotations.
Uncheck it to hide annotations.
5. Press the
(Menu) button.
(Back) button when done.
Synchronizing reading-related information
The [Page Sync] function only appears on your Reader if your local Reader Store
supports the feature which synchronizes bookmarks, highlighted passages and your last
read page across compatible Reader devices and applications.
To turn on the [Page Sync] feature, confirm the following:
Log in to the Reader Store.
[Page Sync] in [Application Preferences] is set to [On]. See Details.
A wireless network is available. See Details.
To retrieve the latest reading-related information to your compatible reading device
While viewing a page, press the
Tip
Compatible reading devices are updated with the latest bookmarks, typed notes and
your current page when the Reader enters sleep mode.
(Menu) button tap [Page Sync].
Note
Handwritten notes and text notes attached to bookmarks or highlights cannot be
synchronized.
This function is available only with contents purchased at Reader Store supporting
this feature.
However, if information is synchronized to the Reader from a compatible device, existing
handwritten notes and text notes in the Reader will not be overwritten.
Finding annotations within a book or periodical
You can search and view all annotations (bookmarks/highlights/handwritten notes) in
the currently open book or periodical.
To search, sort and view all annotations across all books and periodicals, use the [All
Notes] application. See Details.
1. Press the
The annotations in the book/periodical are listed.
Press the
(Menu) button tap [Notes].
(Back) button to return to the book.
Page 75
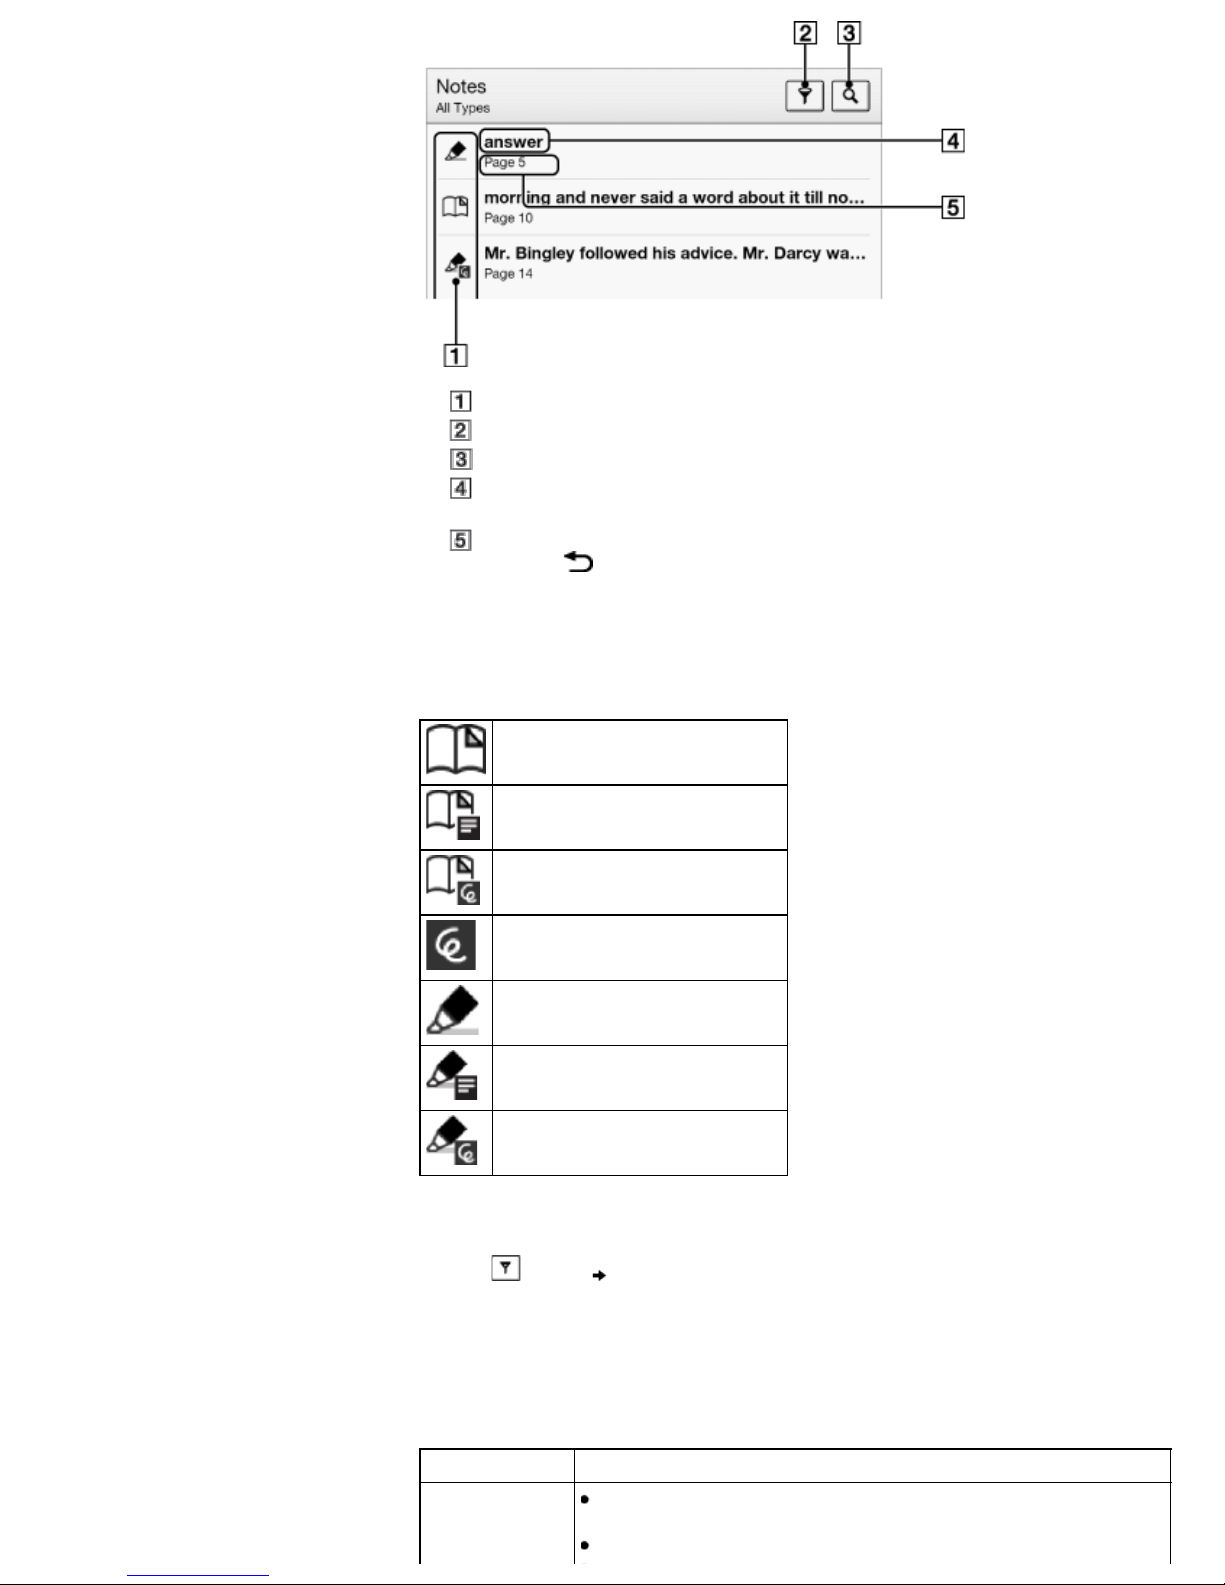
Note icons
Filter note type
Search icon
Headline (the highlighted text, the text note, the beginning text of the bookmarked
page, or the beginning text of the page with the handwritten note)
Page number of the note
Press the
2. Tap a note in the list.
The page containing the selected note is displayed.
(Back) button to return to the book.
Note icons
Bookmark only
Bookmark with text notes
Bookmark with handwritten notes
Handwritten note on a page
Highlight only
Highlight with text notes
Highlight with handwritten notes
Filtering
1. Tap (Filter) tap one of the annotation types.
Annotations of the type that you select are shown.
Searching for notes via keyword
You can perform a search for all or one of the specific note types.
The search target changes depending on the type of annotation that is being searched.
Item type Target
Bookmarks only: The first 100 characters of bookmarked pages
For [Bookmark]
are searched.
Bookmark text notes: Entire text notes are searched.
Page 76
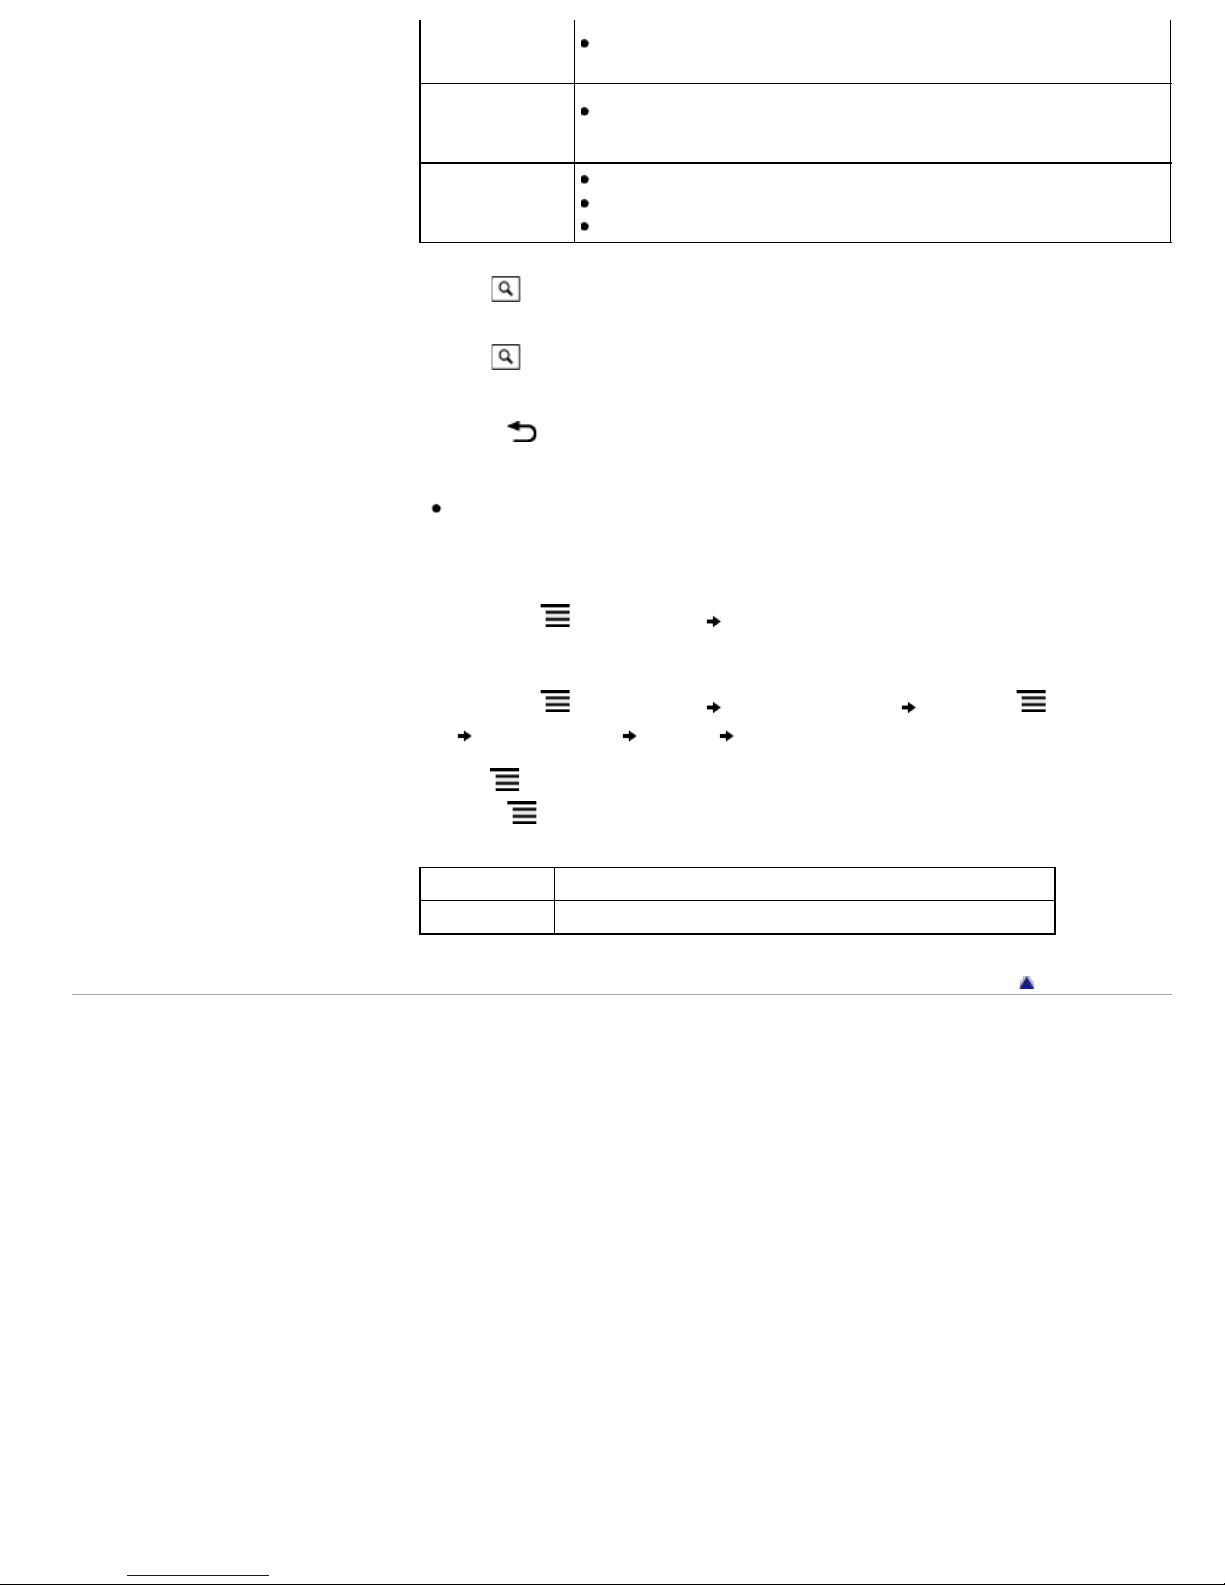
items
For
[Handwriting]
items
For [Highlight]
items
Bookmark handwritten notes: The first 100 characters of
bookmarked pages are searched.
The first 100 characters of pages with handwriting on them are
searched.
Highlights only: The highlighted words are searched.
Highlight text notes: Entire text notes are searched.
Highlight handwritten notes: The highlighted words are searched.
1. Tap
2. Type a search keyword using the on-screen keyboard.
3. Tap
The [Search Results] view is shown.
The view shows notes that satisfy the search criteria.
Press the
Note
If you apply a filter before searching, the search will be performed only on the
filtered items.
(Search).
(Search) next to the search box.
(Back) button to return to the [Notes] list.
To delete annotations
1. Press the (Menu) button tap [Delete Notes]. See Details.
To delete all annotations
1. Press the (Menu) button tap [Delete Notes] press the (Menu) button
tap [Select All] [Done] [Yes].
Using (Menu) Items
Press the (Menu) button from the [Notes]/[All Notes] list to select an option.
Option Description
[Delete Notes] Deletes one or more notes from the Reader. See Details.
Copyright 2013 Sony Corporation
Go to page top
Page 77
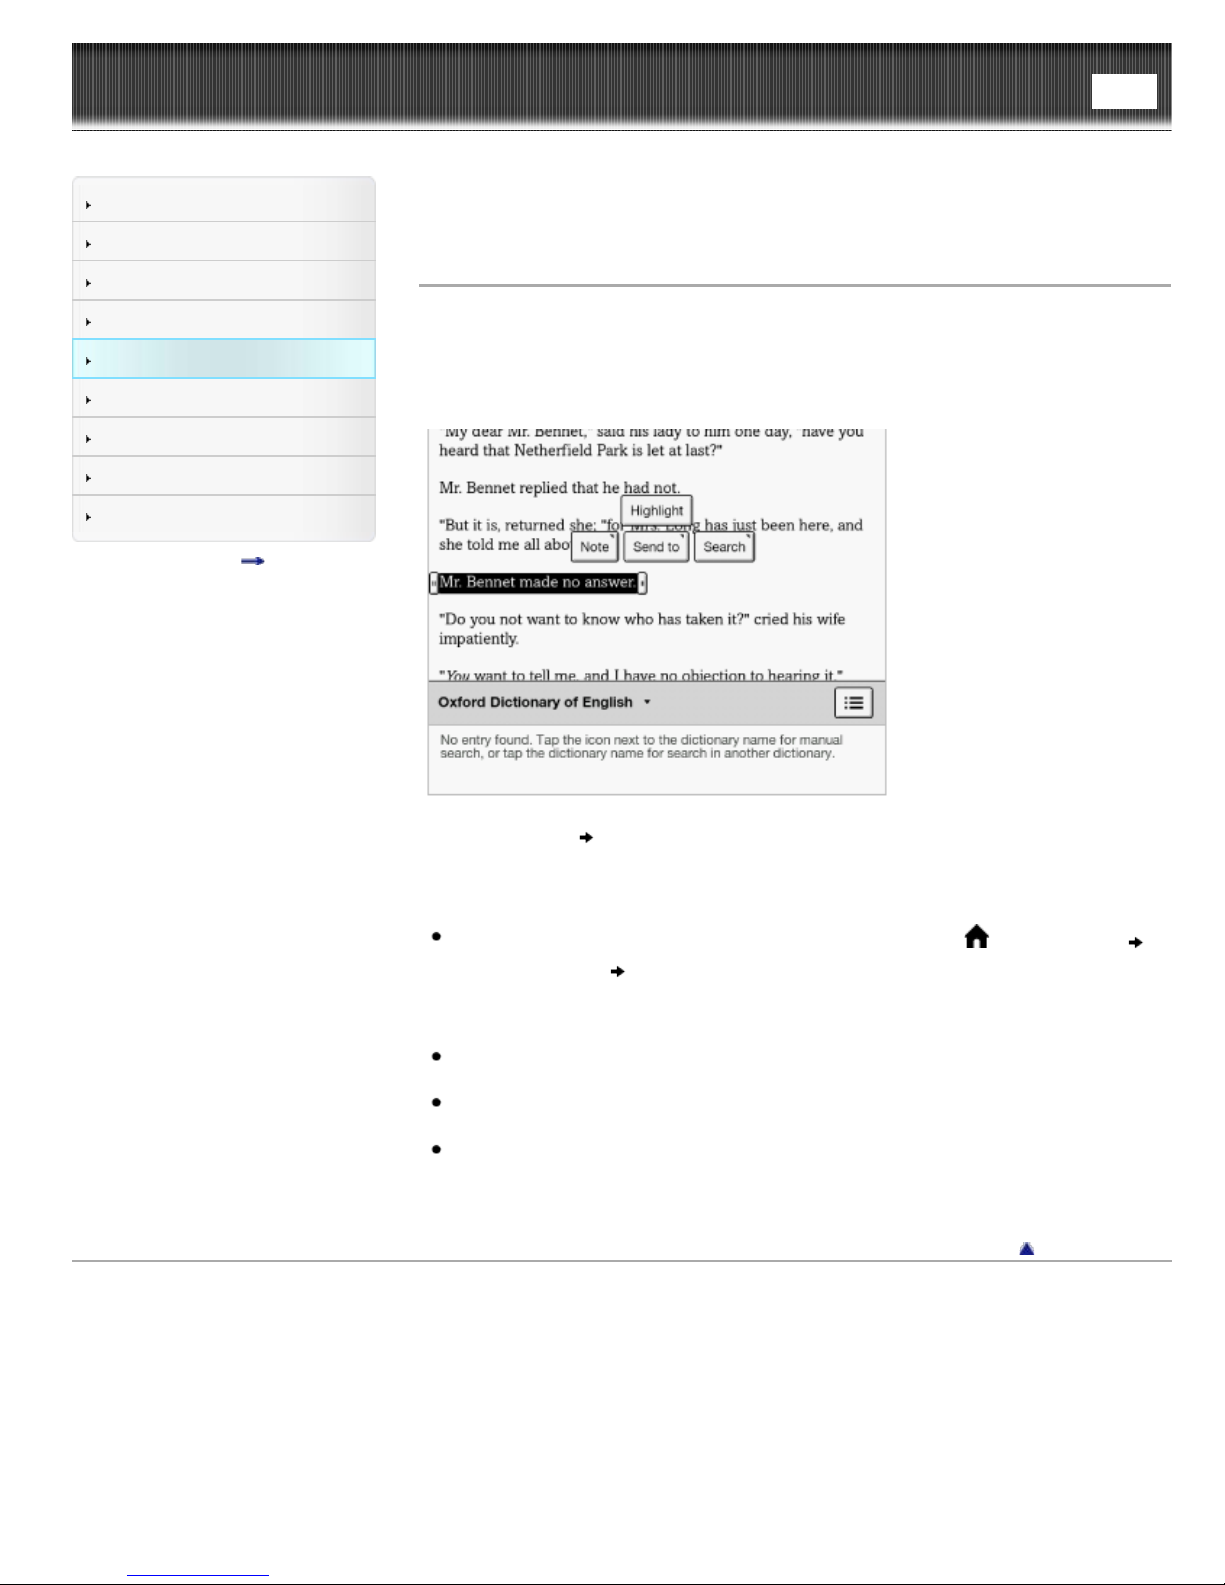
Reader™ User Guide
Getting started
Basic Operations
Adding/Getting Content
Search
Top page > Reading > Reading eBooks > Uploading Highlighted Words on a Page to
Evernote
Uploading Highlighted Words on a Page to Evernote
Print
Browsing Content Lists
Reading
Organizing
Other Applications
Settings
Other Information
Contents list
You can upload highlighted words and take notes to Evernote.
1. Tap and hold the first word and drag to the last word of the section you would like
to upload.
The pop-up menu appears.
2. Tap [Send to] [Evernote]
The selected words are now uploaded.
Note
Before uploading to Evernote, you need to log in. Press the
tap [Applications] [Evernote Setup].
Tip
Before you upload the highlighted words, you can also upload with your memo in
the preview screen.
If the highlighted words are attached with text notes or handwritten notes, you can
upload those, too.
Items that were purchased from Reader Store or eBook store may not upload
depending on country/region.
Copyright 2013 Sony Corporation
(Home) button
Go to page top
Page 78
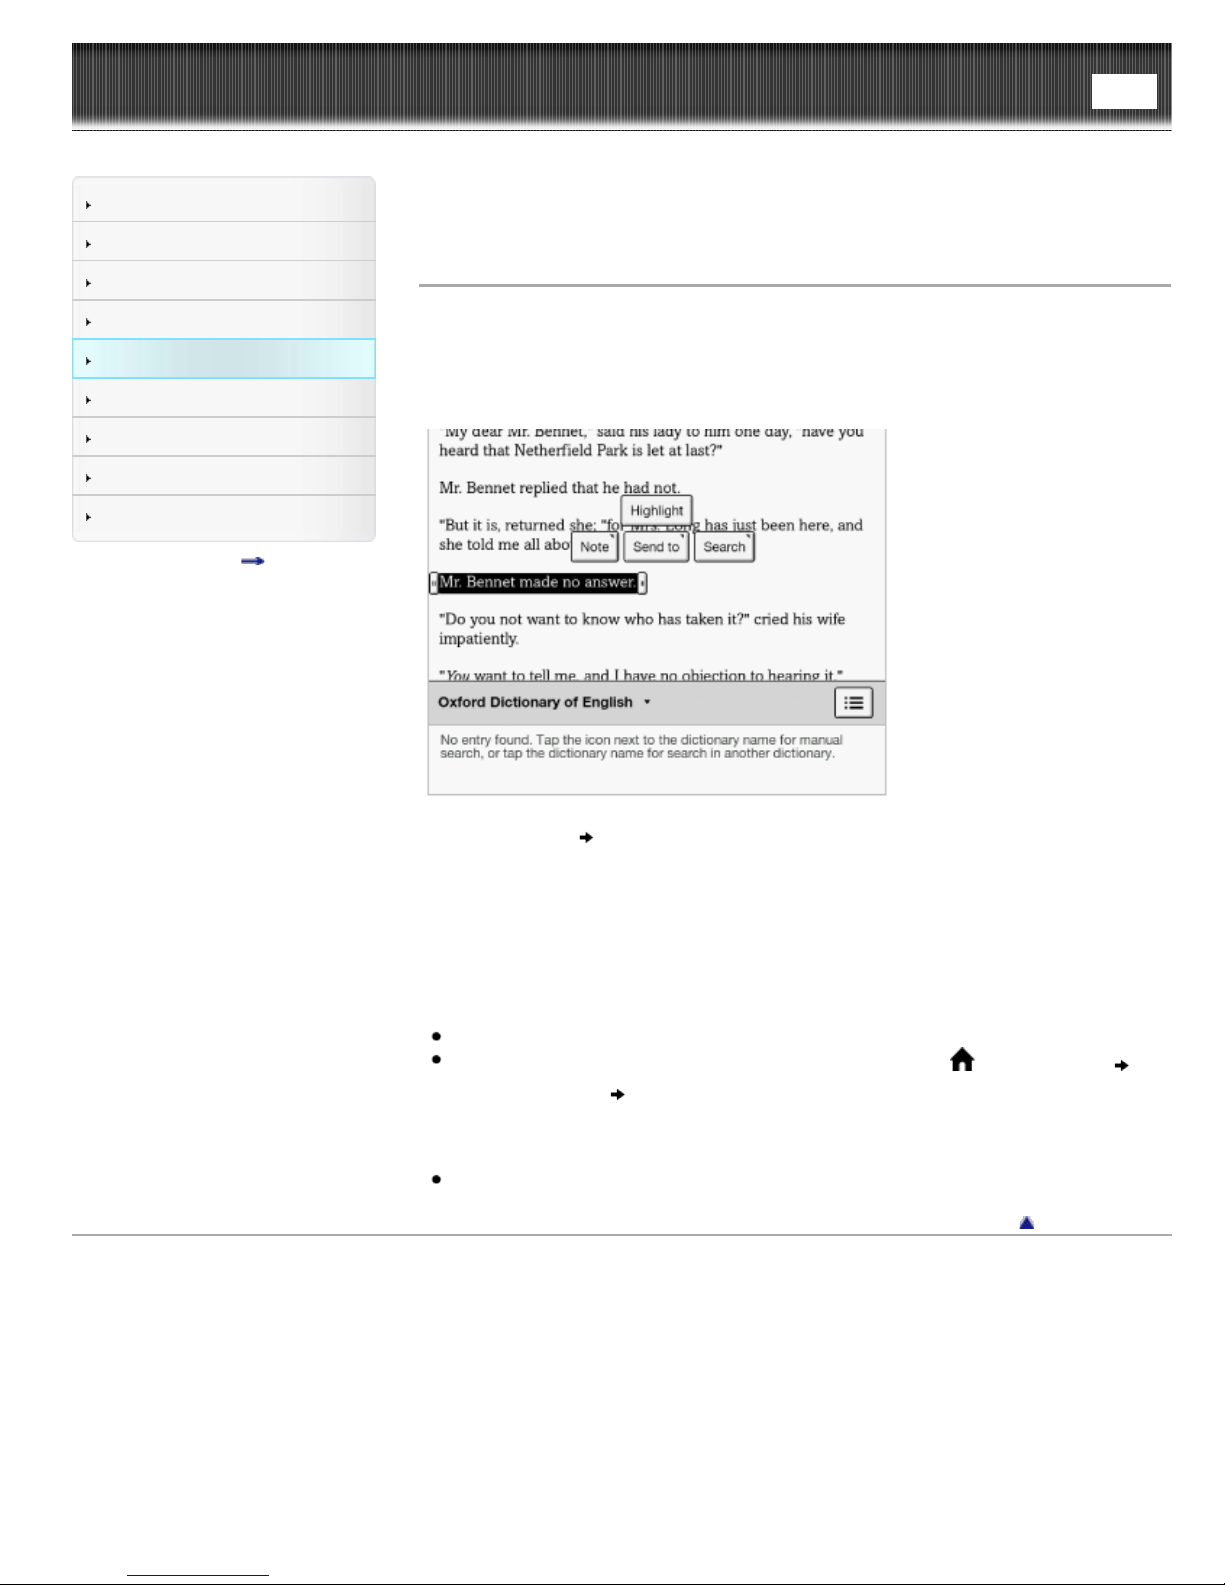
Reader™ User Guide
Getting started
Basic Operations
Adding/Getting Content
Search
Top page > Reading > Reading eBooks > Posting Highlighted Words on a Page to
Posting Highlighted Words on a Page to Facebook
Print
Facebook
Browsing Content Lists
Reading
Organizing
Other Applications
Settings
Other Information
Contents list
You can post highlighted words to Facebook.
1. Tap and hold the first word and drag to the last word of the section you would like
to post.
The pop-up menu appears.
2. Tap [Send to] [Facebook].
The dialog box appears.
You can confirm the highlighted words, and enter your comment in the preview
screen before posting.
3. Tap [Post].
The selected words are now posted.
Note
Selected items may not be posted where a limitation is applied.
Before posting to Facebook, you need to log in. Press the
tap [Applications] [Facebook Setup].
Tip
Highlighted words may be posted up to 140 characters.
Copyright 2013 Sony Corporation
(Home) button
Go to page top
Page 79
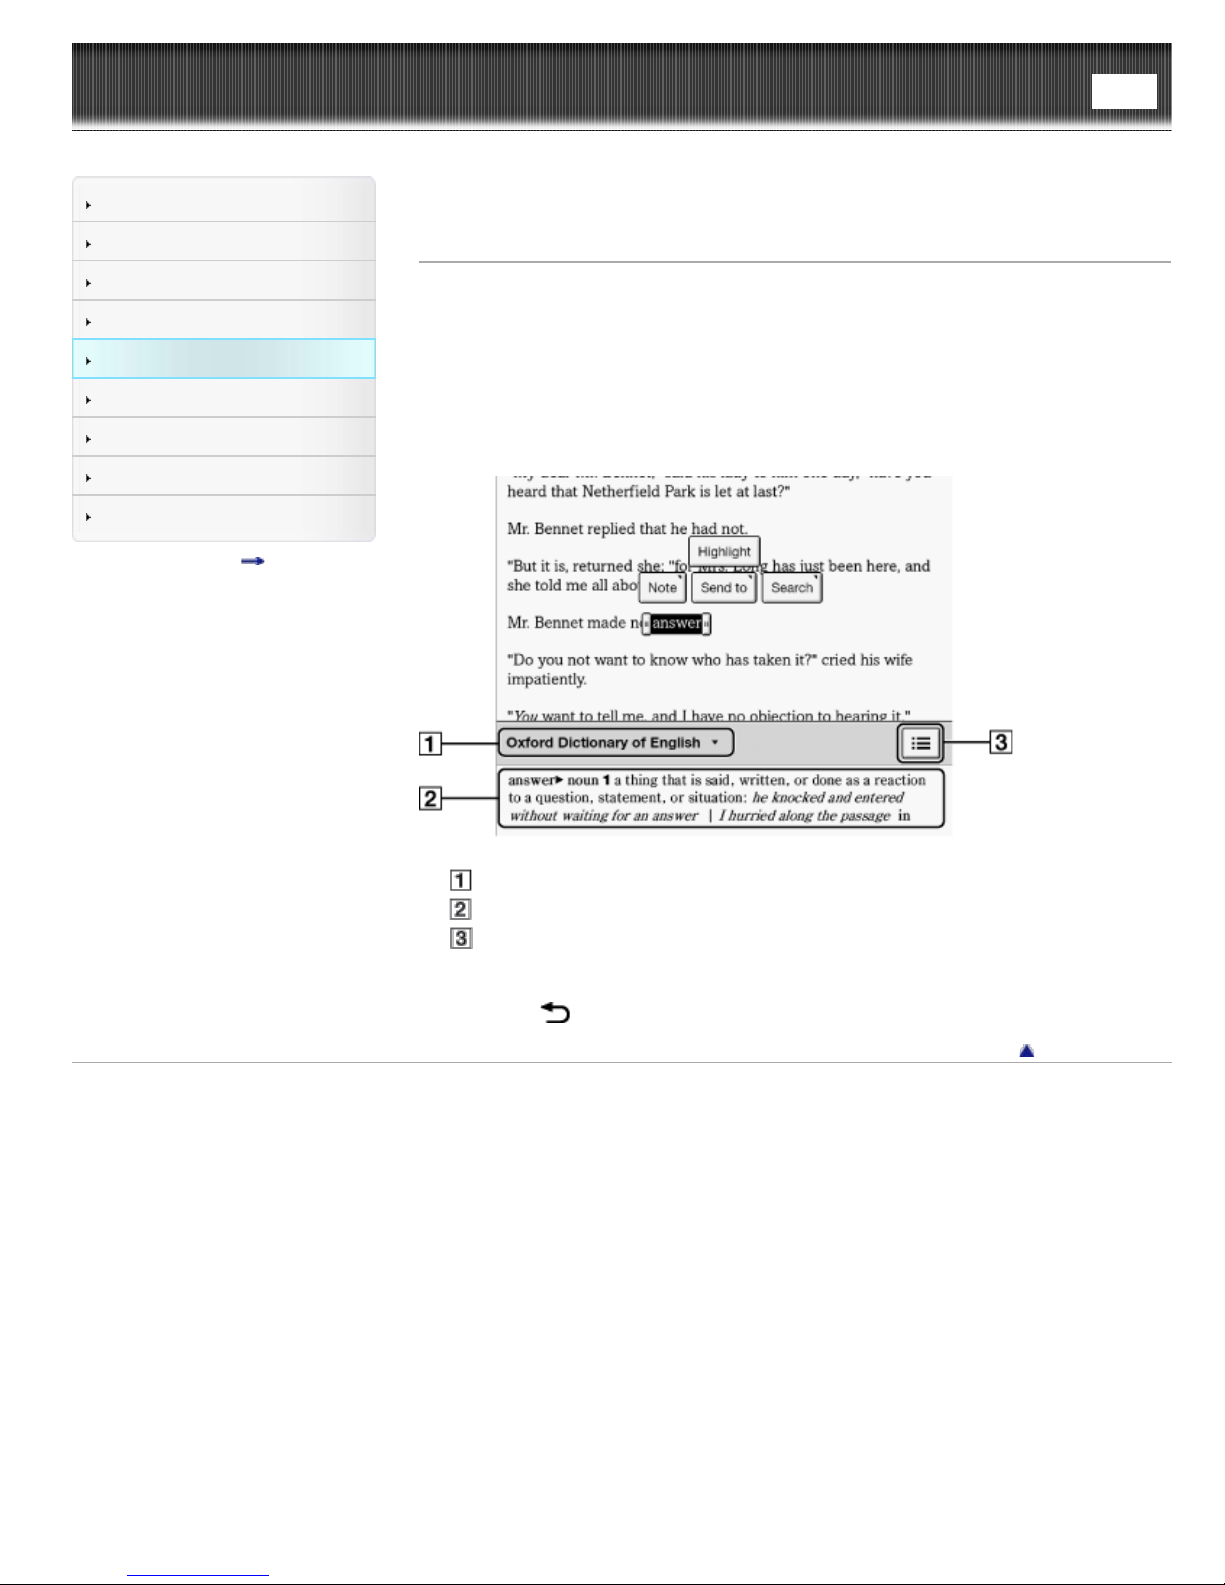
Reader™ User Guide
Getting started
Search
Top page > Reading > Reading eBooks > Using the Dictionary
Print
Basic Operations
Adding/Getting Content
Browsing Content Lists
Reading
Organizing
Other Applications
Settings
Other Information
Contents list
Using the Dictionary
The Reader has built-in dictionaries to assist you with looking up the definition of a word
on a page.
You can choose one of several bilingual dictionaries to use. See Details.
Only the dictionaries included on the Reader can be used. New dictionaries cannot be
installed or added.
1. Tap and hold a word on a page.
The dictionary panel is displayed at the bottom.
Title of the current dictionary. Tap to change the dictionary.
Definition area. Tap to open the dictionary viewer. See Details.
Tap to display a list of candidate words. See Details.
2. Tap the definition area. The definition is displayed in the dictionary viewer.
To go to the next page, either swipe or press the < or > (Page turn) buttons.
Press the
Copyright 2013 Sony Corporation
(Back) button to return to the book page.
Go to page top
Page 80
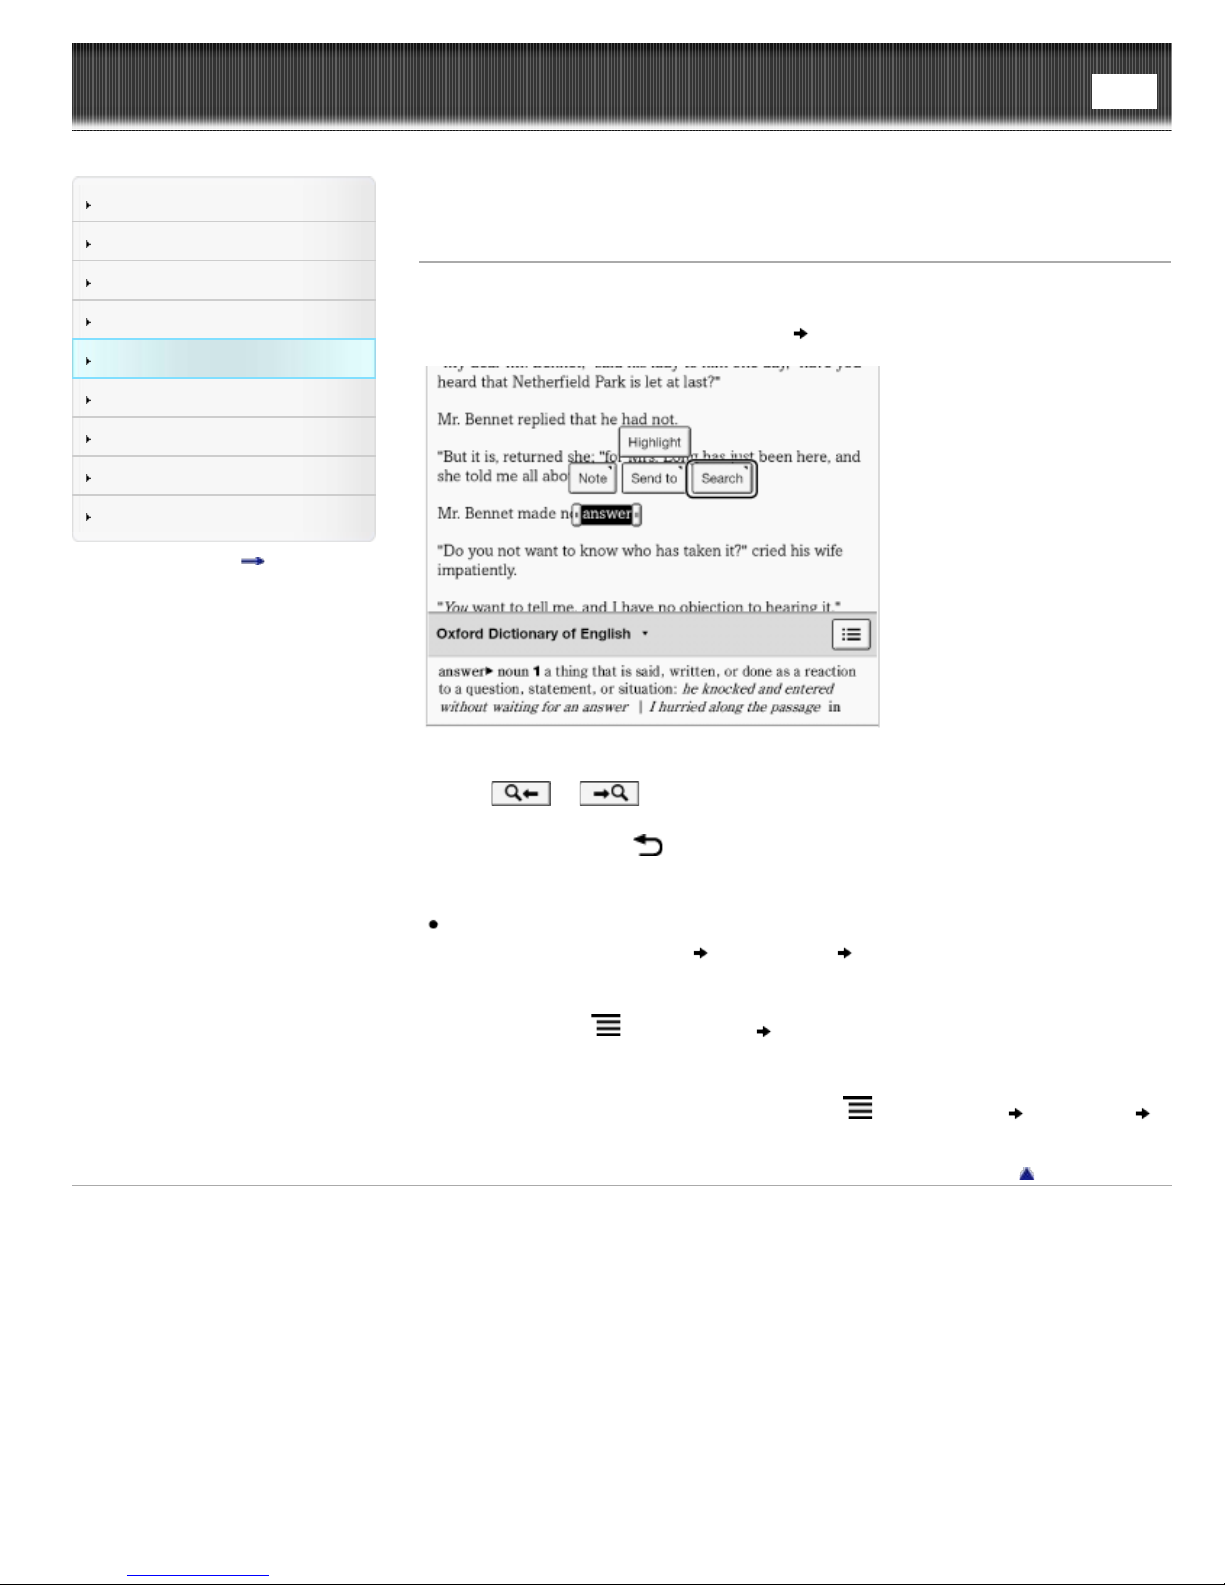
Reader™ User Guide
Getting started
Search
Top page > Reading > Reading eBooks > Finding Keywords in a Book
Print
Basic Operations
Adding/Getting Content
Browsing Content Lists
Reading
Organizing
Other Applications
Settings
Other Information
Contents list
Finding Keywords in a Book
You can find pages that contain specific words using a keyword search.
1. Tap and hold a word, and tap [Search]
2. A page that includes the keyword for which you searched is displayed.
Tap
keyword.
To cancel, press the
or to display to the previous/next page that contains the selected
(Back) button.
[in This Book] in the pop- up menu.
Tip
You can find the definition of a word and more at the Wikipedia and Google Web
sites. Tap and hold a word
[Browser] application will open to the Wikipedia or Google Web site and search for
the word. (A Wi-Fi network connection is necessary. See Details.) To return to the
book, press the
You can also directly enter the keyword for a search.
1. When viewing a book or periodical, press the
[Search], and enter the keyword using the on -screen keyboard.
Copyright 2013 Sony Corporation
(Menu) button tap [Continue Reading].
tap [Search] [Wikipedia] or [Google]. The
(Menu) button tap [More]
Go to page top
Page 81
Reader™ User Guide
Getting started
Search
Top page > Reading > Reading eBooks > Changing Book Page Settings
Print
Basic Operations
Adding/Getting Content
Browsing Content Lists
Reading
Organizing
Other Applications
Settings
Other Information
Contents list
Changing Book Page Settings
The following settings are available for the current book or periodical issue you are
reading.
1. When viewing a book or periodical, press the
[Settings].
2. Choose from one of the following options.
Option Description
[Show
Notes]
[Info] Information for the book or periodical that is currently open is displayed.
To return to the book/periodical, press the
Copyright 2013 Sony Corporation
This is convenient when notes are obscuring your view of the text. See
Details.
(Back) button.
(Menu) button tap [More]
Go to page top
Page 82
Reader™ User Guide
Getting started
Search
Top page > Reading > Reading eBooks > Using (Menu) Items
Print
Basic Operations
Adding/Getting Content
Browsing Content Lists
Reading
Organizing
Other Applications
Settings
Other Information
Contents list
Using (Menu) Items
Below is a list of option items available when you press the (Menu) button from the
book/periodical viewer.
Option Description
[Navigate
Page]
[Notes] Displays a list of annotations in the book. See Details.
[Font] Changes the font and font size. See Details.
[Customize
View]
[Handwriting] Allows you to draw on a page. See Details.
[More] Displays more option items.
[Page Sync]*
[Search] Finds pages with a keyword. See Details.
[Post to
Facebook]
[Orientation] Changes to portrait or landscape mode. See Details.
[Settings] Changes book settings. See Details.
Selects a method for navigating through a book. See Details.
Adjusts the page mode (see Details), crops the page margins (see
Details) or adjusts the brightness (see Details).
Sets synchronization of bookmarks, highlights and your current page
across your compatible reading devices, like handhelds. See Details.
Post the highlighted text with your comments. See Details.
* Available in certain countries/regions only.
Copyright 2013 Sony Corporation
Go to page top
Page 83
Reader™ User Guide
Getting started
Search
Top page > Reading > Reading Periodicals > Opening a Periodical Issue*
Print
Basic Operations
Adding/Getting Content
Browsing Content Lists
Reading
Organizing
Other Applications
Settings
Other Information
Contents list
Opening a Periodical Issue*
* Available in certain countries/regions only.
Newspapers and magazines that you have purchased at Reader Store are downloaded
to [Periodicals] on the [Home] screen.
1. Press the
The periodicals content list opens.
2. Tap a periodical title.
The issues list opens.
3. Tap an issue.
The issue opens.
4. Use the navigation bar as you read. See Details.
To browse the periodicals and issue content list, see Details.
When viewing the periodicals and issues content lists, you can use option items by
pressing the
Copyright 2013 Sony Corporation
(Home) button tap [Applications] [Periodicals].
(Menu) button. See Details.
Go to page top
Page 84
Reader™ User Guide
Getting started
Search
Top page > Reading > Reading Periodicals > Managing Periodicals*
Print
Basic Operations
Adding/Getting Content
Browsing Content Lists
Reading
Organizing
Other Applications
Settings
Other Information
Contents list
Managing Periodicals*
* Available in certain countries/regions only.
In the issue list, you can keep only recent issues and delete previous issues
automatically.
1. Press the
periodical.
2. Press
The management dialog appears.
3. Tap the desired setting
Tip
If the number of issues on the Reader is larger than the number of issues that you
set to be stored, [Are you sure you want to delete the extra issue(s) now ?] appears.
If you want to delete these extra issues immediately, tap [Yes].
If you have issues that you do not want to delete, protect them using [Protect
Issues] from the list of option items. See Details.
Note
The [Manage Subscription] issue number setting applies to the combined number of
issues on the Reader’s internal memory and the microSD card.
(Home) button tap [Applications] [Periodicals] tap a
(Menu) button tap [Manage Subscription].
[Save].
Copyright 2013 Sony Corporation
Go to page top
Page 85
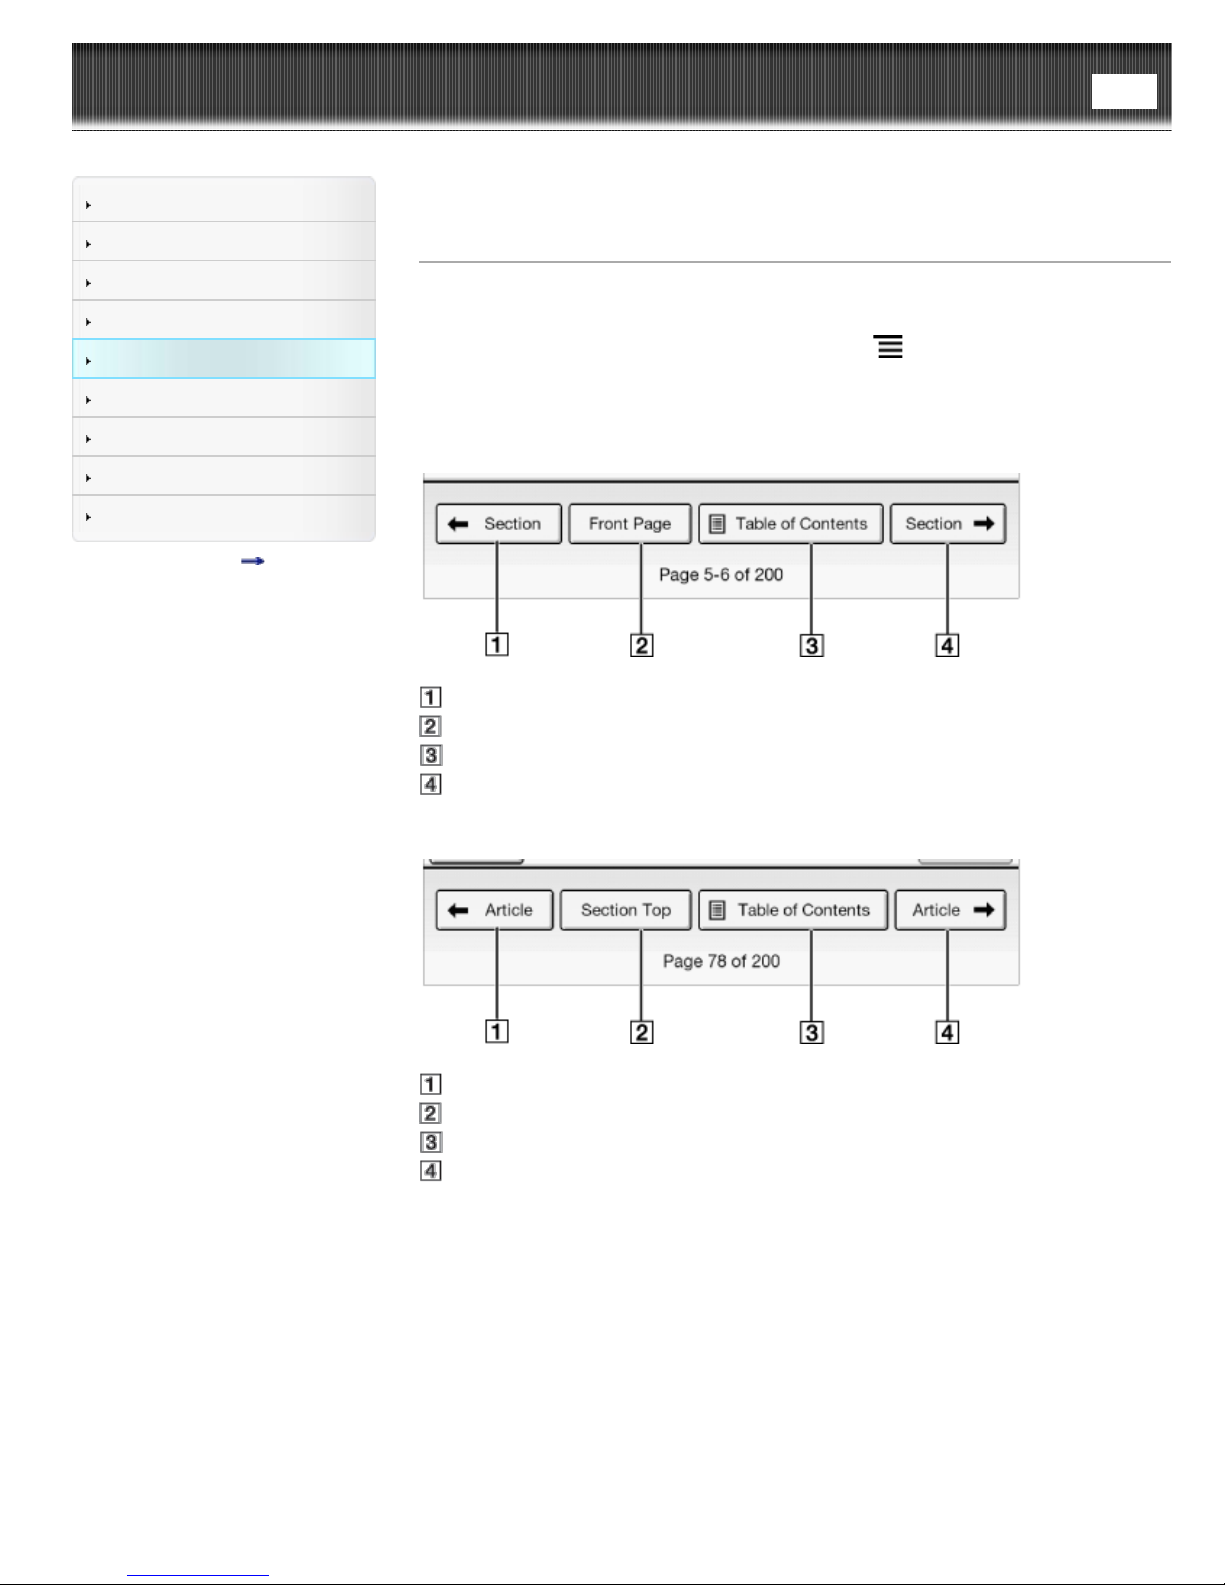
Reader™ User Guide
Getting started
Search
Top page > Reading > Reading Periodicals > Page Navigation
Print
Basic Operations
Adding/Getting Content
Browsing Content Lists
Reading
Organizing
Other Applications
Settings
Other Information
Contents list
Page Navigation
You can add bookmarks and notes to a page in the same manner as books. See
Details.
For the option items that appear when you press the
Periodicals also feature the navigation bar, which helps redirect you to sections of a
periodical.
Navigation items for a section
Previous section
Return to the first page
Table of Contents
Next section
(Menu) button, see Details.
Navigation items for an article
Previous article
Return to the first page of the section
Table of Contents
Next article
Appearance
See Details.
Annotations
See Details.
Using the Dictionary
See Details.
Finding Pages with a Keyword
See Details.
Changing Periodical Page Settings
Page 86

See Details.
Go to page top
Copyright 2013 Sony Corporation
Page 87
Reader™ User Guide
Getting started
Search
Top page > Organizing > Organizing Your Content > Deleting a Single Item
Print
Basic Operations
Adding/Getting Content
Browsing Content Lists
Reading
Organizing
Other Applications
Settings
Other Information
Contents list
Deleting a Single Item
You can delete individual items.
The following instructions use the [Books] application as an example; this feature is also
available in other applications.
1. Press the
2. Tap and hold an item.
The option items appear.
3. Tap [Delete].
4. Tap [Yes] when prompted.
The item is deleted from the Reader.
Note
If [Books] is not shown, press the
show [Books].
Depending on the application, it may not be possible to delete certain files.
Sony recommends that you create a backup of the contents of the Reader using
the Reader application before deleting an item.
Copyright 2013 Sony Corporation
(Home) button tap [Bookshelves].
(Menu) button tap [Choose Bookshelf] to
Go to page top
Page 88
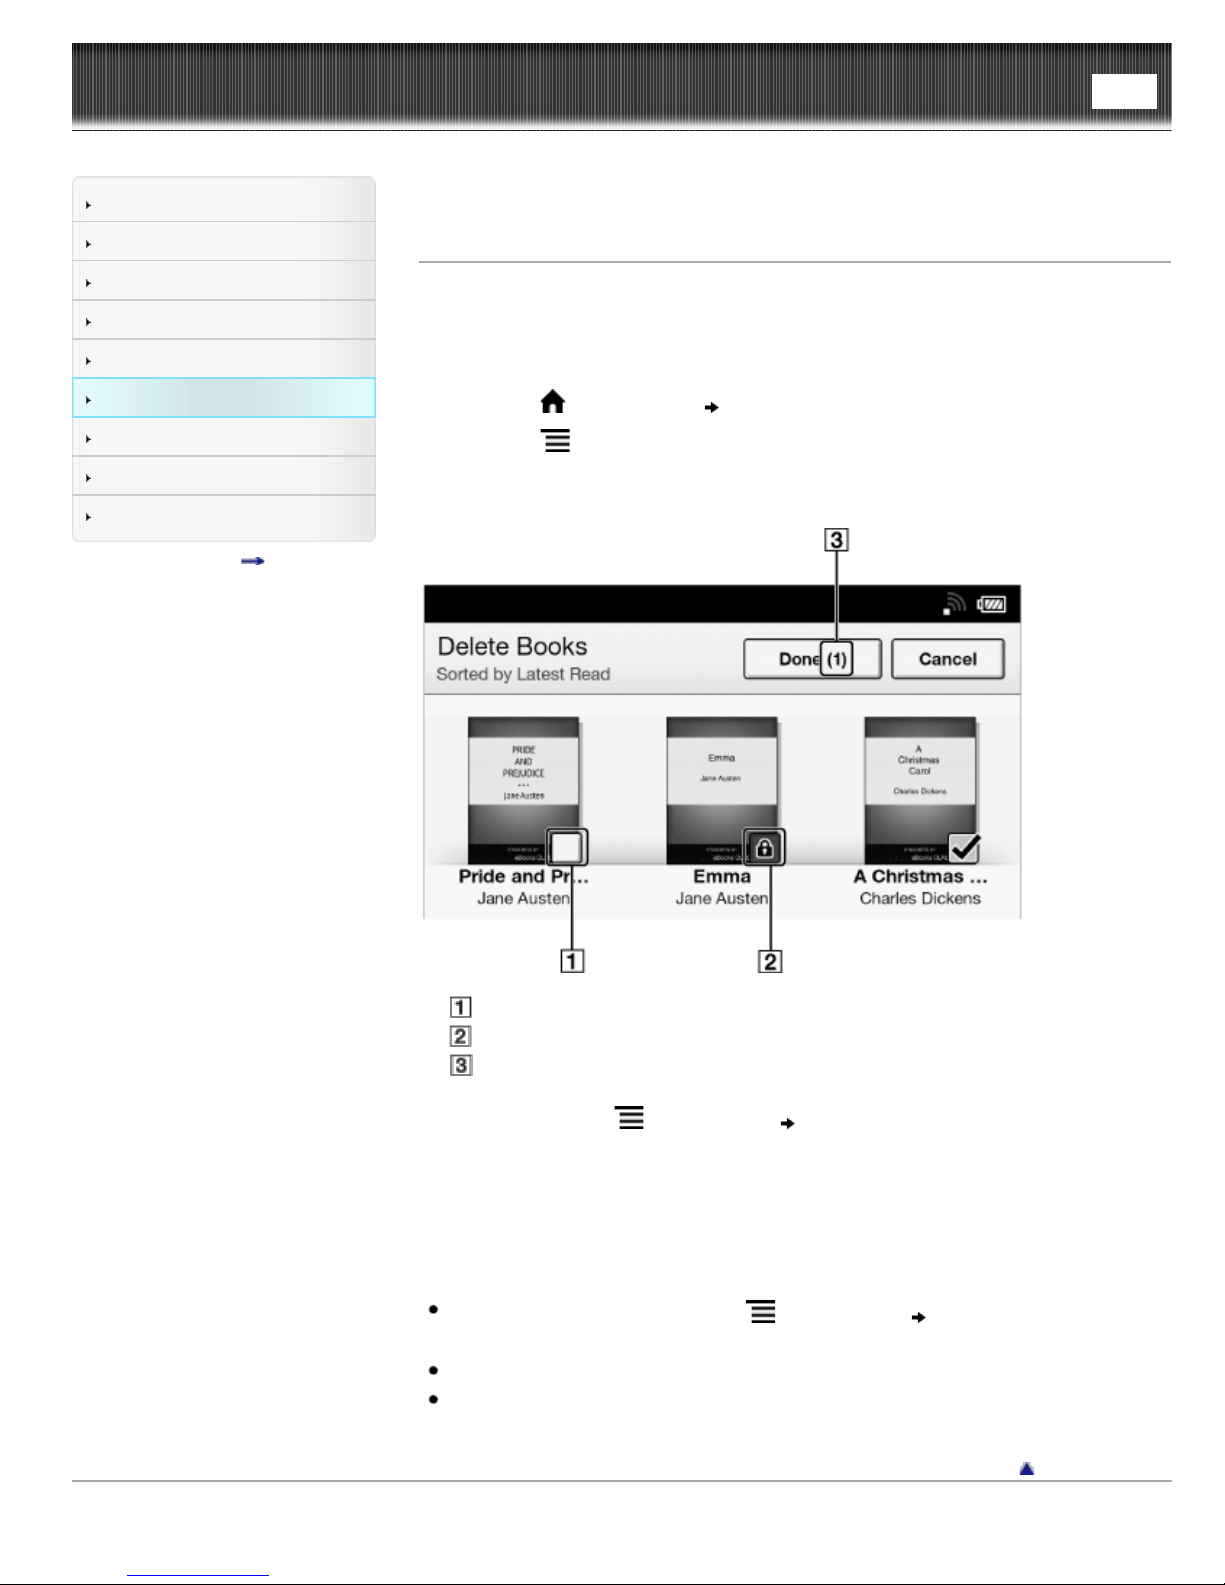
Reader™ User Guide
Getting started
Search
Top page > Organizing > Organizing Your Content > Deleting Multiple Items at Once
Print
Basic Operations
Adding/Getting Content
Browsing Content Lists
Reading
Organizing
Other Applications
Settings
Other Information
Contents list
Deleting Multiple Items at Once
You can delete multiple items at once. This is convenient for clearing up space on the
Reader.
The following instructions use the [Books] application as an example; this feature is also
available in other applications.
1. Press the
2. Press the
3. Tap [Delete Books].
Boxes appear next to the thumbnails or list entries.
(Home) button tap [Bookshelves].
(Menu) button.
Box
Protect icon
Selected number of items
4. Tap to check the items to delete.
You can press the
items.
5. Tap [Done].
6. Tap [Yes] when prompted.
The selected items are deleted from the Reader.
Note
If [Books] is not shown, press the
show [Books].
Depending on the application, it may not be possible to delete certain files.
Sony recommends that you create a backup of your files using the Reader
application.
Copyright 2013 Sony Corporation
(Menu) button tap [Select All] if you wish to delete all
(Menu) button tap [Choose Bookshelf] to
Go to page top
Page 89
Reader™ User Guide
Getting started
Search
Top page > Organizing > Organizing Your Content > Protecting a Single Item
Print
Basic Operations
Adding/Getting Content
Browsing Content Lists
Reading
Organizing
Other Applications
Settings
Other Information
Contents list
Protecting a Single Item
You can protect an item so that you will not delete it accidentally.
The following instructions use the [Books] application as an example; this feature is also
available in other applications.
1. Press the
2. Tap and hold an item.
The option items appear.
3. Tap [Protect].
You can remove the protection from the item in the same manner. Tap [Unprotect] in
Step 3 above.
Note
If [Books] is not shown, press the
show [Books].
This protection feature works only on the Reader. Protected content may still be
deleted via your computer.
Copyright 2013 Sony Corporation
(Home) button tap [Bookshelves].
(Menu) button tap [Choose Bookshelf] to
Go to page top
Page 90
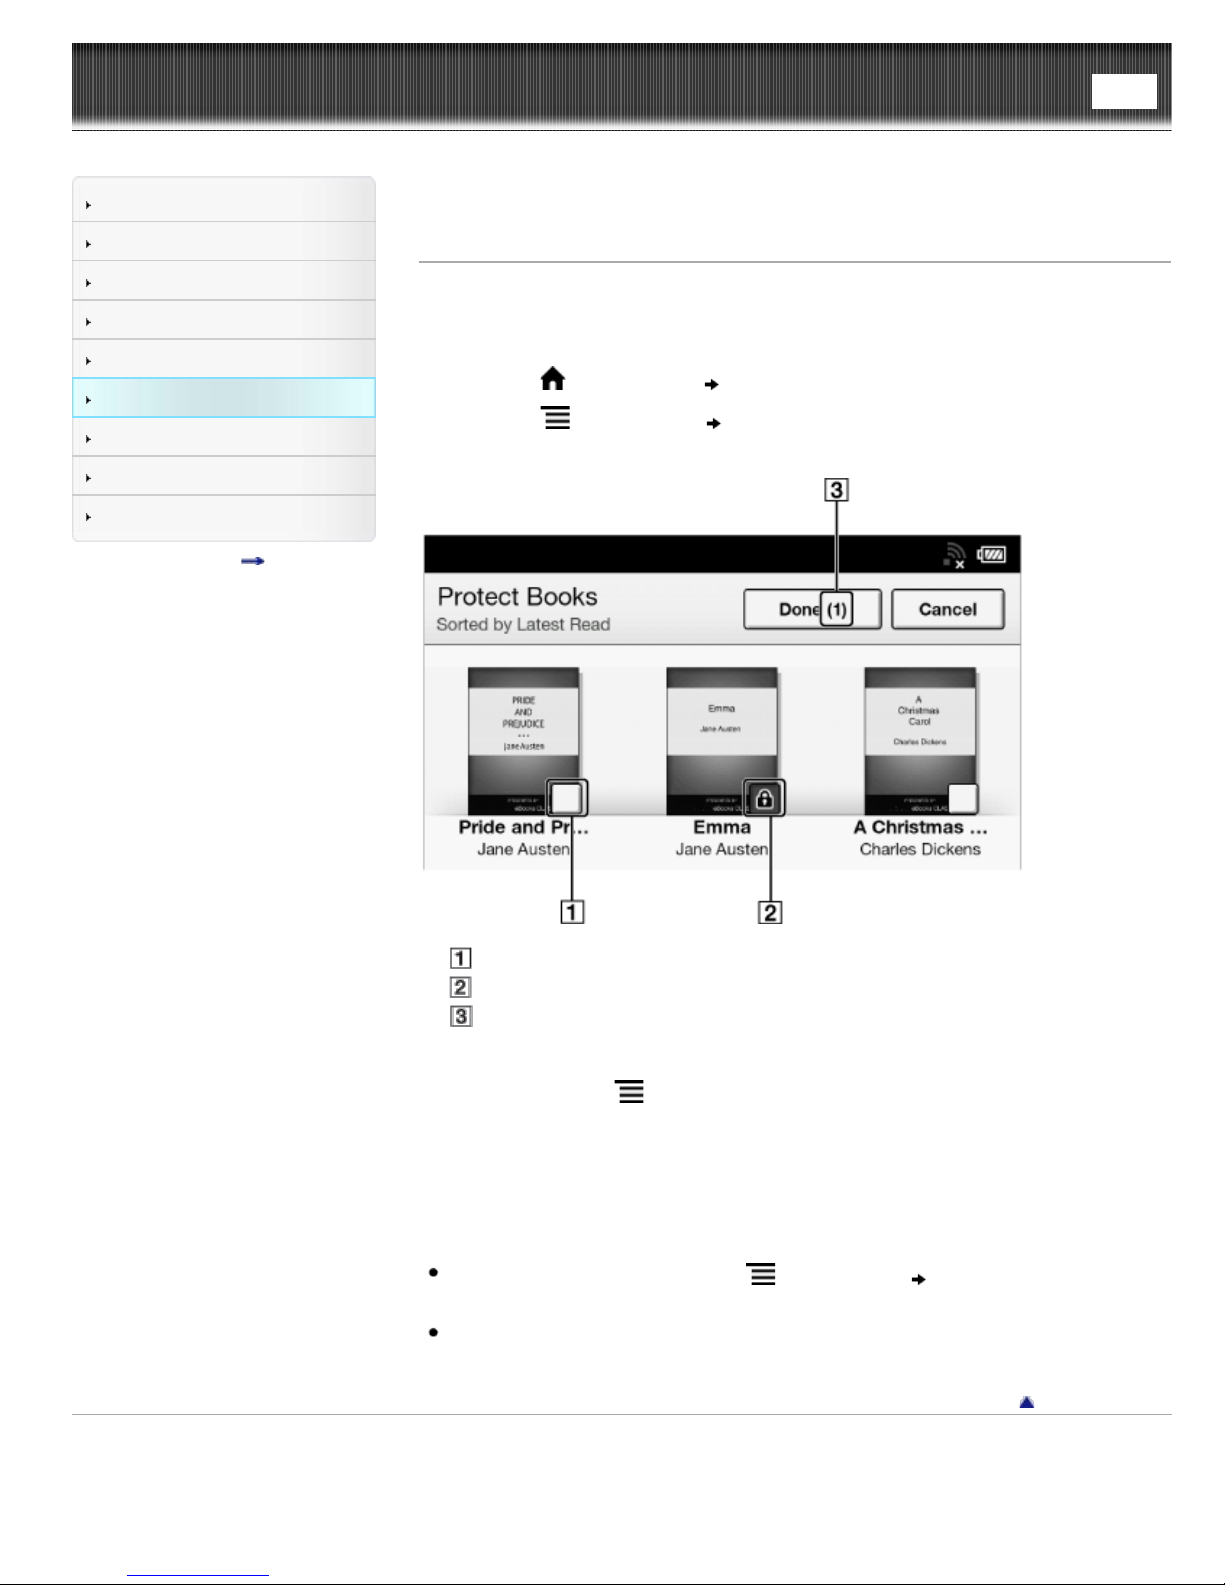
Reader™ User Guide
Getting started
Search
Top page > Organizing > Organizing Your Content > Protecting Multiple Items at Once
Print
Basic Operations
Adding/Getting Content
Browsing Content Lists
Reading
Organizing
Other Applications
Settings
Other Information
Contents list
Protecting Multiple Items at Once
You can protect one or more items at once.
The following instructions use the [Books] application as an example; this feature is also
available in other applications.
1. Press the
2. Press the
Boxes appear next to the thumbnails or list entries.
(Home) button tap [Bookshelves].
(Menu) button tap [Protect Books].
Box
Protect icon
Selected number of items
3. Tap the box of the item to be protected.
Selected items are indicated with a protect icon.
You can press the
items.
4. Tap [Done].
The protect icon appears next to the protected items. You can remove protection in Step
3 above by tapping items with the protect icon.
Note
If [Books] is not shown, press the
show [Books].
The protection feature works only on the Reader. Protected content may still be
deleted via your computer.
Copyright 2013 Sony Corporation
(Menu) button and tap [Select All] if you wish to protect all
(Menu) button tap [Choose Bookshelf] to
Go to page top
Page 91
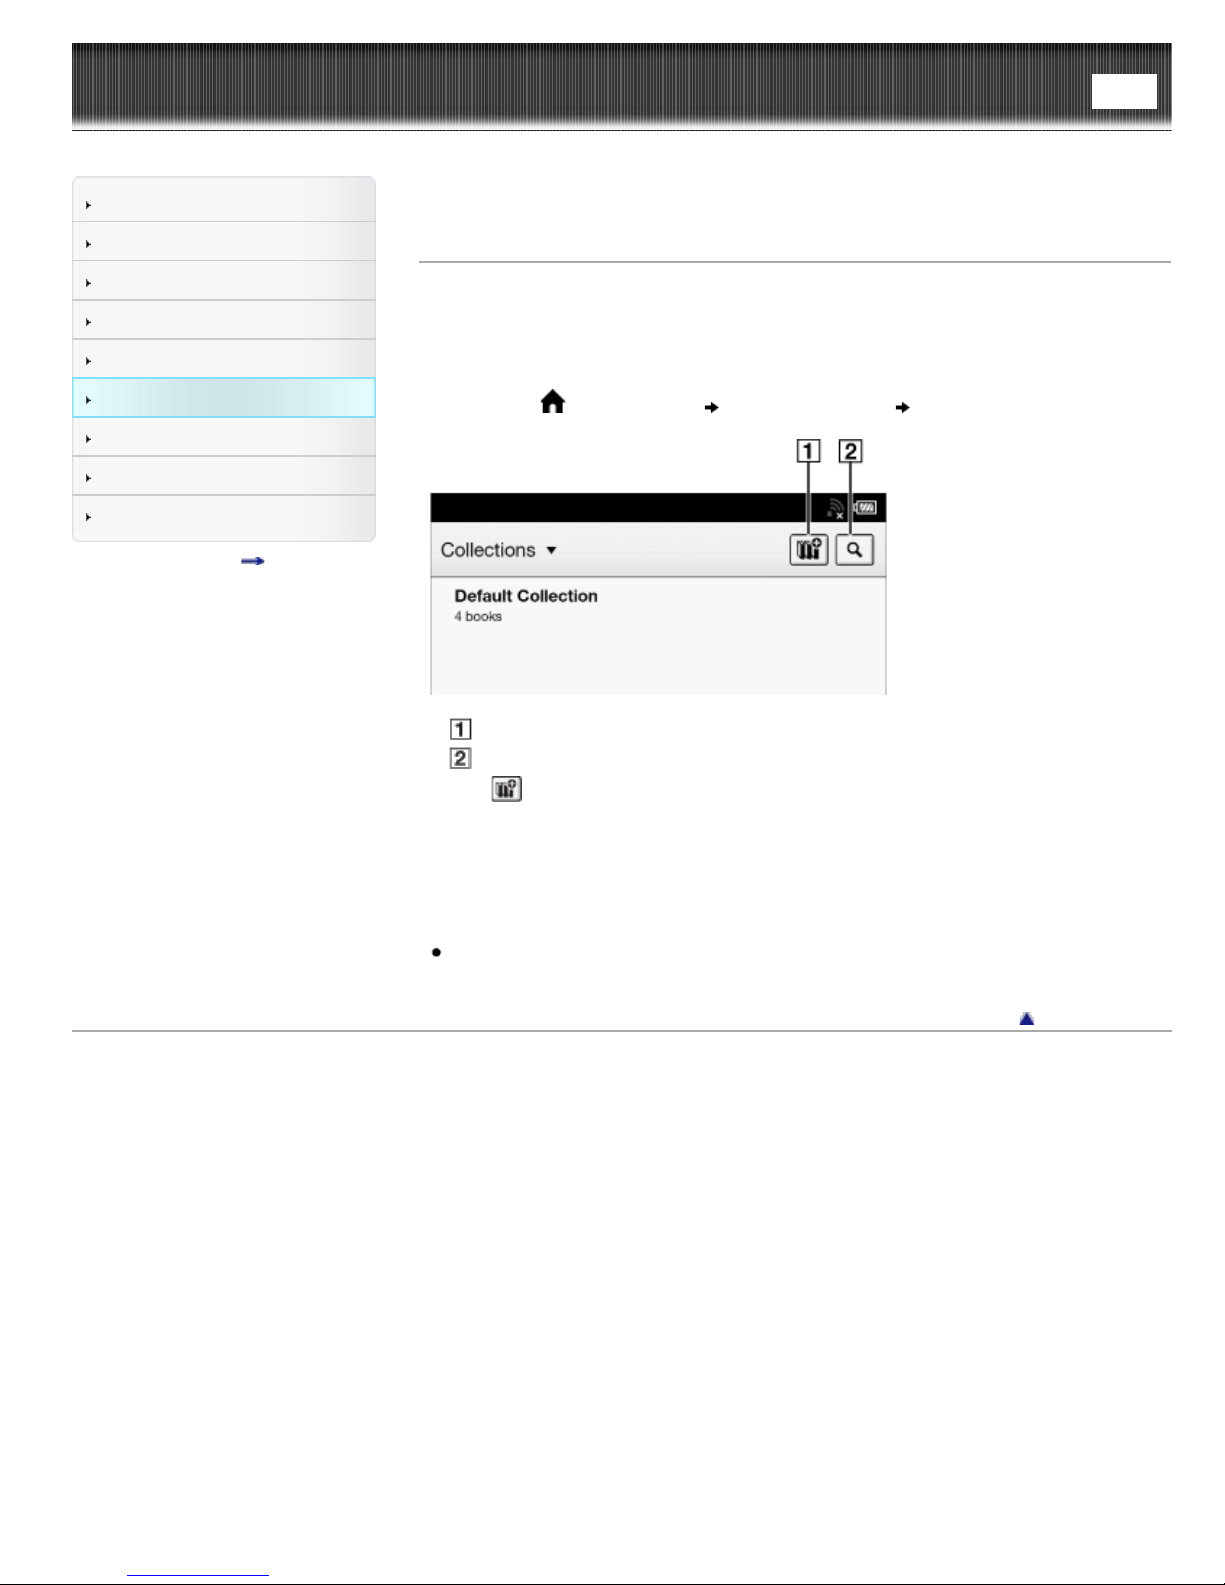
Reader™ User Guide
Getting started
Search
Top page > Organizing > Using Collections > Creating a Collection
Print
Basic Operations
Adding/Getting Content
Browsing Content Lists
Reading
Organizing
Other Applications
Settings
Other Information
Contents list
Creating a Collection
A collection is a custom set of books and other items that you create from items on the
Reader. It is a unique and convenient way to organize your items.
You can organize and personalize your content by creating collections by subject matter,
date, genre or anything that best suits your purpose.
1. Press the
Create a new collection
Search by collection name
2. Tap
3. Enter a collection name using the on- screen keyboard and tap [OK].
4. Select the location to store the collection.
A new collection is added to the [Collections] list.
(Home) button tap [Bookshelves] [Collections].
.
Tip
You can also create and sync collections with the Reader application. For details,
refer to the [Help] menu of the Reader application.
Go to page top
Copyright 2013 Sony Corporation
Page 92
Reader™ User Guide
Getting started
Search
Top page > Organizing > Using Collections > Adding Items to a Collection
Print
Basic Operations
Adding/Getting Content
Browsing Content Lists
Reading
Organizing
Other Applications
Settings
Other Information
Contents list
Adding Items to a Collection
You can add items to existing collections.
From the [Collections] application
1. Press the (Home) button tap [Bookshelves].
2. Tap [Default Collection].
3. Press the
4. Select the collection that you wish to move.
5. Select one or more books from the list.
Selected items are indicated with check marks.
6. Tap [Done].
From the [Books] and [Periodicals]* applications
* Available in certain countries/regions only.
1. Press the
[Periodicals].
For periodicals, tap the periodical title to view its issues list.
(Menu) button tap [Organize to Collection].
(Home) button tap [Bookshelves] or [Applications]
2. Press the
3. Tap a collection that you have created that appears in the list.
4. Select one or more books or periodical issues that you wish to add.
Selected items are indicated with a check.
5. Tap [Done].
Note
A collection and its items must be stored in the same location. For example, if the
book/periodical is stored on the Reader’s internal memory, you may not add items
stored on a microSD card to the collection.
Tip
Any books that have not been added to a collection are contained in [Default
Collection].
When you add a book/periodical to a collection, it is moved from [Default
Collection].
When moving an item from [Organize to Collection] or [Add to Collection], you can
create a new collection to move the item to. To create a new collection, tap
the upper -right corner of the screen.
Copyright 2013 Sony Corporation
(Menu) button tap [Add to Collection].
Go to page top
in
Page 93
Reader™ User Guide
Getting started
Search
Top page > Organizing > Using Collections > Removing Items from a Collection
Print
Basic Operations
Adding/Getting Content
Browsing Content Lists
Reading
Organizing
Other Applications
Settings
Other Information
Contents list
Removing Items from a Collection
You can remove one or more items from a collection that you have created.
1. Press the
have created
You can also tap and hold an item
2. Tap one or more items.
Selected items are indicated with a check.
3. Tap [Done].
4. Tap [Yes] when prompted.
The selected item(s) will be removed from the collection.
Note
If you have deleted an item from [Books] or [Periodicals]*, it will be automatically
removed from all of the collections with which it was associated.
Removing items from a collection does not delete them from the Reader or their
stored locations.
If you remove an item from a collection that does not exist in other collections, its
original will be moved back to the [Default Collection] in the Reader. If you remove
an item that exists in another collection(s), it will remain in the other collection(s),
and not be moved back to the [Default Collection].
* Available in certain countries/regions only.
(Home) button tap [Bookshelves] tap a collection that you
press the (Menu) button tap [Remove Content].
tap [Remove].
Tip
You can remove all items at once. After completing Step 1 above, press the
(Menu) button [Select All].
Go to page top
Copyright 2013 Sony Corporation
Page 94
Reader™ User Guide
Getting started
Search
Top page > Organizing > Using Collections > Renaming a Collection
Print
Basic Operations
Adding/Getting Content
Browsing Content Lists
Reading
Organizing
Other Applications
Settings
Other Information
Contents list
Renaming a Collection
You can change the name of a collection.
1. Press the
have created
You can also tap and hold a collection that you have created
2. Enter a new name for the collection using the on-screen keyboard.
3. Tap [OK].
Copyright 2013 Sony Corporation
(Home) button tap [Bookshelves] tap a collection that you
press the (Menu) button tap [Rename Collection].
tap [Rename].
Go to page top
Page 95
Reader™ User Guide
Getting started
Search
Top page > Organizing > Using Collections > Deleting a Collection
Print
Basic Operations
Adding/Getting Content
Browsing Content Lists
Reading
Organizing
Other Applications
Settings
Other Information
Contents list
Deleting a Collection
You can delete a collection that you have created.
1. Press the
tap [Delete Collections].
You can also tap and hold a collection that you have created
2. Tap the collection to be deleted.
Selected items are indicated with a check.
3. Tap [Done].
4. Tap [Yes] when prompted.
The selected item(s) will be removed from the collection.
Note
Deleting a collection does not delete content from the Reader or their stored
locations.
Copyright 2013 Sony Corporation
(Home) button tap [Bookshelves] press the (Menu) button
tap [Delete].
Go to page top
Page 96
Reader™ User Guide
Getting started
Search
Top page > Organizing > Using Collections > Posting a Collection to Facebook
Print
Basic Operations
Adding/Getting Content
Browsing Content Lists
Reading
Organizing
Other Applications
Settings
Other Information
Contents list
Posting a Collection to Facebook
You can post your book collection information to Facebook.
1. Press the
have created
The collection information is posted to Facebook.
Note
Before posting to Facebook, you need to log in. Press the
tap [Applications] [Facebook Setup].
Copyright 2013 Sony Corporation
(Home) button tap [Bookshelves] tap the collection that you
press the (Menu) button tap [Post to Facebook].
(Home) button
Go to page top
Page 97
Reader™ User Guide
Getting started
Search
Top page > Organizing > Using Collections > Using (Menu) Items
Print
Basic Operations
Adding/Getting Content
Browsing Content Lists
Reading
Organizing
Other Applications
Settings
Other Information
Contents list
Using (Menu) Items
Below is a list of option items available when you press the (Menu) button from a
collection list.
Option Description
[Delete
Collections]
[Choose
Bookshelf]
* If you have not logged in to Reader Store yet, [Purchased Content] is not shown.
Available in certain countries/regions only. The [Purchased Content] function only
appears on your Reader if your local Reader Store supports the feature.
Copyright 2013 Sony Corporation
Deletes collections that you created. See Details.
Shows the following pop-up menu. Alternatively, tap the title or press
(Menu) button [Choose Bookshelf].
[Books]
[Collections]
[Purchased Content]*
[Evernote]
Go to page top
Page 98
Reader™ User Guide
Getting started
Basic Operations
Adding/Getting Content
Search
Top page > Other Applications > Public Libraries > Borrowing eBooks from Public
Borrowing eBooks from Public Libraries*
Print
Libraries*
Browsing Content Lists
Reading
Organizing
Other Applications
Settings
Other Information
Contents list
* Available in certain countries/regions only.
Many public libraries (available in certain countries/regions only) offer digital library
services so that you can borrow eBooks for the Reader with your library card.* You can
download them directly to the Reader.
* Using public library services requires a library card. For details, contact your local
library.
Locating your public library
1. Configure Wi-Fi settings of the Reader to access your public library. See Details.
2. Press the
Follow the directions on the screen to use public library services.
For using the browser, see Details. For using the browser option items, see Details.
(Home) button tap [Applications] [Public Library].
Borrowing eBooks
1. Find what you wish to borrow via the public library Web site.
2. Follow the site instructions and download the book. You can check the downloading
progress in the status bar and by tapping it to display the notification window. See
Details.
You may be asked to specify the lending period.
Once the title has downloaded, it will be stored in the [Books] application.
You can check the loan periods for borrowed eBooks by viewing the icons in the
[Books] content list. See Details.
Returning eBooks
1. Configure Wi-Fi settings of the Reader to access your public library. See Details.
2. Press the
(Menu) button tap [Return Books].
3. Tap the book you want to return. A check mark appears next to the selected book.
You can select multiple books.
4. Tap [Done]
You can check the returning progress in the status bar and by tapping it to display
the notification window. See Details.
The selected books are returned.
Note
If you reach the limit for borrowed eBooks, the public library may prevent you from
borrowing more until you return some of the eBooks you have borrowed.
Some public libraries may allow you to return eBooks early.
Copyright 2013 Sony Corporation
(Home) button tap [Bookshelves] [Books] press the
[Yes].
Go to page top
Page 99
Reader™ User Guide
Getting started
Search
Top page > Other Applications > Web Browsing > Browsing the Web
Print
Basic Operations
Adding/Getting Content
Browsing Content Lists
Reading
Organizing
Other Applications
Settings
Other Information
Contents list
Browsing the Web
The Reader has a Web browser that enables you to visit Web sites and download files
and images directly to the Reader, saved under [Books] and [Pictures] applications.
1. Make sure that Wi- Fi is set up and turned on.
2. Press the
3. Navigate to a Web site.
Tap
Tap the URL box and type the URL address using the on-screen keyboard, and
tap [Go].
4. Browse the Web site.
Press the < (Previous) button to scroll up.
Press the > (Next) button to scroll down.
Tap and drag to move the view area.
Press the
Note
You must agree to the terms and conditions before using [Browser]. Please read
the terms and conditions carefully. When you tap [Accept], [Browser] opens.
Tip
You can press the
last read page of your last read book.
(Home) button tap [Applications] [Browser].
(Bookmarks) tap one of the bookmarks.
(Back) button to go back to the previous Web page.
(Menu) button tap [Continue Reading] to return to the
Copyright 2013 Sony Corporation
Go to page top
Page 100
Reader™ User Guide
Getting started
Search
Top page > Other Applications > Web Browsing > Browsing Tools
Print
Basic Operations
Adding/Getting Content
Browsing Content Lists
Reading
Organizing
Other Applications
Settings
Other Information
Contents list
Browsing Tools
Zooming in
While in zoom mode, the zoom bar is shown at the bottom- right of the screen.
Pinch out to zoom in.
Pinch in to zoom out.
Double-tap to fit the page to the window size.
To exit zoom mode, press the
Capturing a screenshot
You can capture the current page as a screenshot.
1. When viewing a Web page, press the
[Capture Screenshot] [OK].
Screenshots are stored in the [Pictures] application. See Details.
Copyright 2013 Sony Corporation
(Back) button.
(Menu) button tap [More]
Go to page top
 Loading...