

Page 1

TABLE OF CONTENTS
English8188
SAFETY INSTRUCTIONS .................................................................. 2
INTRODUCTION ............................................................................. 4
Package Contents ..................................................................... 4
Installing or Removing the Tilt/Swivel Base ............................ 5
Specifications ........................................................................... 6
Recommended Use of the Monitor .......................................... 7
CONTROLS AND ADJUSTMENTS ................................................... 8
Front User Controls. ................................................................ 8
"General" ................................................................................. 9
"Picture" .................................................................................. 9
"Geometry" .............................................................................. 9
"Color" ..................................................................................... 9
"Advance" .............................................................................. 10
Moire ............................................................................. 10
Convergence .................................................................. 10
Purity.............................................................................. 10
Degauss .......................................................................... 10
"Property" .............................................................................. 10
Status .............................................................................. 11
Recall ............................................................................. 11
Language ........................................................................ 11
"Signal" .................................................................................. 11
Contrast ................................................................................. 11
Energy Declaration ................................................................ 12
TECHNICAL INFORMATION......................................................... 13
Compatibility ......................................................................... 13
Pin Assignment ............................................................... 13
Pin Assignments of the BNC and USB Connectors ......... 13
Preset Timing Chart ........................................................ 14
TROUBLESHOOTING .................................................................... 15
DIMENSION .................................................................................. 16
English
1
¨¨¨
Page 2

SAFETY INSTRUCTIONS
1. Please read carefully all of these instructions below and keep the manual
for later use.
2. Please install the swivel base for this product before using it.
English
3. The voltage ratings and the rated frequency are on the overlay centered
at the rear side of this product. Do not connect with any other sources
of voltage or frequency, and, please follow all warnings and instructions
marked on the product.
4. Unplug this product from the wall outlet before cleaning and use a
damp cloth to clean it. Do not use liquid cleaners or aerosol cleaners.
5. Do not expose this product to rain or moisture.
6. Do not place this product on an unstable cart, stand, or table. The
product may fall, causing serious damage to the product.
7. Do not block or cover ventilating openings with cloth or other material.
Neither should this product be placed near or over a radiator or a heat
register, nor should the product be placed in a built-in installation
unless proper ventilation is provided.
8. This product is equipped with a 3-wire grounding model plug. This
plug will only fit into a grounding-model power outlet. This is a safety
feature. If you are unable to insert the plug into the outlet, contact
your electrician to replace your obsolete outlet. Do not defeat the safety
purpose of the grounding-model plug. Choose a Tandem Blade
attachment plug configuration power cord for 230V AC input.
Due to the safety requirements of different areas, please select a suitable
power cord according to the following rules, in addition to the electric
rating:
A. Northern America area: Please select a UL listed and CSA certified
power cord.
B. Germany: Please select a VDE certified power cord.
C. Nordic countries: Please select a power cord certified by SEMKO,
NEMKO, DEMKO or FIMKO.
D. The other areas: Please select a power cord suitable to the local
power system and power outlet.
2
¨¨¨
Page 3

SAFETY INSTRUCTIONS
English8388
Usually when this product is sold a suitable power cord is provided by
the manufacturer. However, this product is sometimes resold or
transported to another area with a different power system and safety
requirements. Please pay attention to the selection of a suitable power
cord.
The plug on the power cord is intended to serve as the disconnect
device, the socket-outlet shall be installed near the equipment and
shall be easily accessible.
9. Do not allow anything to rest on the power cord. Do not locate this
product where persons can walk on the cord.
10. Never push objects of any kind into this product through cabinet slots
as they may touch dangerous voltage points or short out parts that
could result in the risk of fire or electric shock. Never spill liquid of
any kind on the product.
11. Do not attempt to service this product yourself, as opening or removing
covers may expose you to dangerous voltage points, or other risks.
Refer all servicing to service personnel.
12. Unplug this product from the wall outlet and refer servicing to qualified
service personnel under the following conditions.
English
A. When the power cord or plug is damaged or frayed.
B. If liquid has been spilled into the product.
C. If the product has been exposed to rain or water.
D. If when the operating instructions are followed, the product does
not operate normally, adjust only those controls that are covered
by the operating instructions since improper adjustment of other
controls may result in damage and will often require extensive work
by a qualified technician to restore the product to normal operation.
E. If the product has been dropped or the cabinet has been damaged.
F. If the product exhibits a distinct change in performance, indicating
a need for service.
3
¨¨¨
Page 4
INTRODUCTION
Introduction
The monitor is a multiple frequency high-resolution color monitor for IBM
compatible PC's or Macintosh and workstation systems. The monitor is
equipped with microprocessor based intelligence and multiple frequency
English
scanning capability, allowing it to provide maximum compatibility for various
system platforms.
The monitor uses the latest screen technology including a 0.24mm SONY FD
Trinitron® CRT to display crisp text and vivid color graphics. The full-function
digital control and On-Screen Display (OSD) system provides easy adjustment
of image geometry and color settings for different display modes with the
precision of a fixed frequency monitor.
The monitor also has full ergonomic features. In addition to the friendly controls
and user comfort features, the emission level of the electric and magnetic field
is kept low to meet the Swedish MPR II and TCO standards.
The monitor is also equipped with energy saving functions; it is compatible
with the VESA power saving standards.
Furthermore, the monitor has a built-in USB (Universal Series Bus) hub. Please
refer to the "USB SetUp Guide" for USB hub use information.
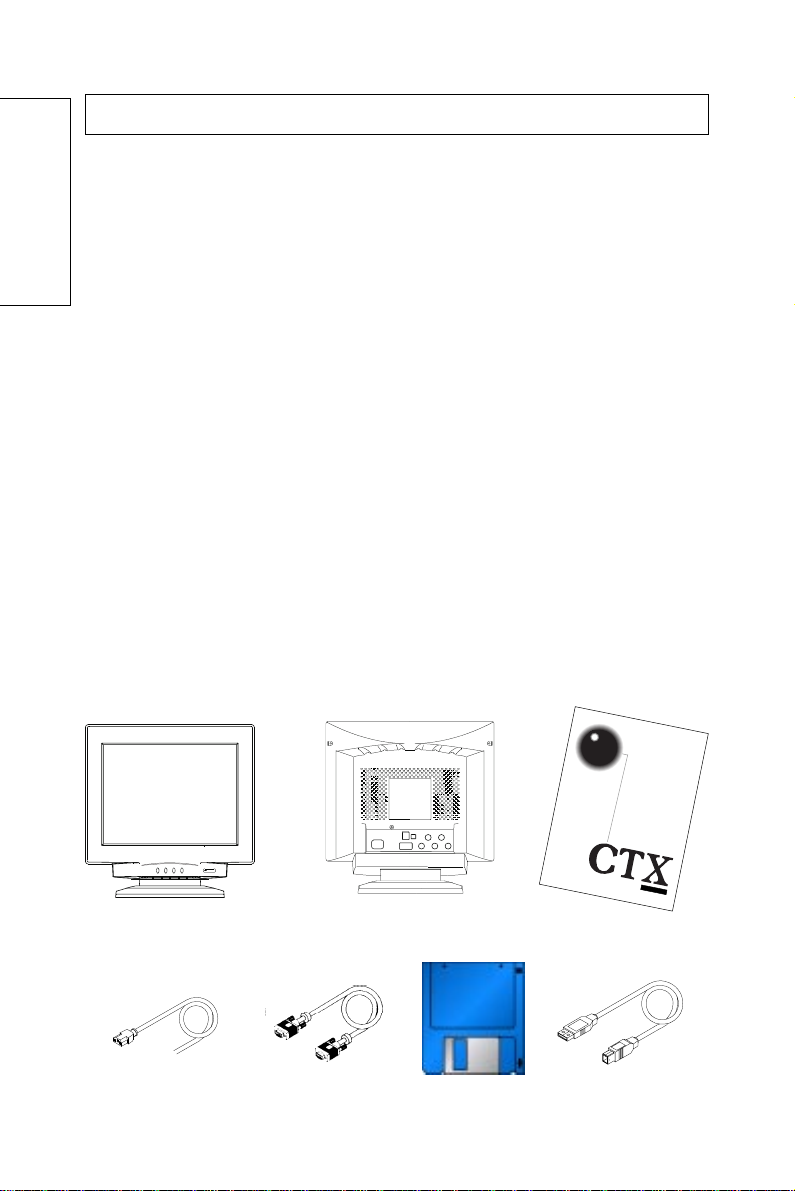
Package Contents
The following lists all of the items included in the monitor package box. Please
save the original box and packing materials for future transportation or shipment
of the monitor.
Front View
Power Cord Signal Cable
4
¨¨¨
Rear View
Diskette
PR960F
User's Manual
User's Manual
USB Cable
Page 5
INTRODUCTION
English8588
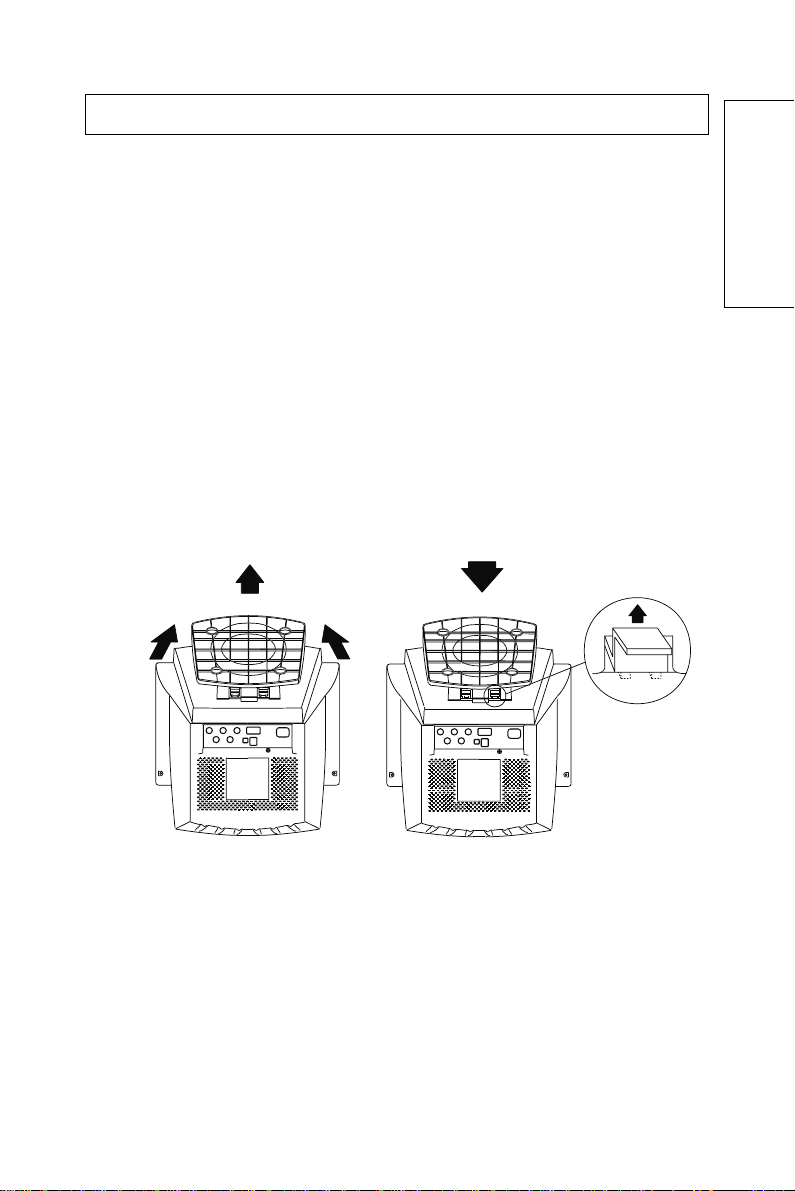
Installing or Removing the Tilt/Swivel Base
1.Turn off the system and all attached peripherals.
2.Carefully set the monitor upside down.
Remove the Tilt/Swivel Base:
1.Squeeze and hold the latches.
2.Pull the tilt/swivel base to the rear of the monitor and lift to remove the
base.
Installing the Tilt/Swivel Base:
1.Align the base with the slots on the bottom of the monitor and insert the tilt/
swivel base into the slots.
2.Push the tilt/swivel base firmly toward the front of the monitor until the
latches click into the locked position.
English
Install Remove
5
¨¨¨
Page 6

INTRODUCTION
Specifications
Color Picture Tube 19" (18" viewable screen size) diagonal measurement,
English
AG Pitch 0.24 mm(center)
Input Signal Video: 0.7 Vp-p/75 ohm, analog positive
Scan Frequency Horizontal: 30 to 110 kHz automatically
Max. Resolution 1600 x 1200 pixel, non-interlaced
Display Colors Analog input, unlimited colors
Pixel Rate 232.5 MHz
Plug & Play DDC 1 / DDC 2B
USB Downstream port x 4
Power Supply 100-120 VAC/200-240 VAC, 50/60 Hz (automatically)
Power Consumption 125W max.
Dimensions 460(W) x 469(H) x 485(D) mm
Weight 31 kgs(G.W.), 26.5 kgs(N.W.)
Environment Operating Temperature: 0°C to 35°C
Consideration Humidity 20% to 80%
90 degree deflection, SONY FD Trinitron® CRT, anti-
glare, anti-reflection, anti-static, medium short
persistence phosphor
Sync: Separate Sync.: TTL Level
Horizontal Sync.: positive/negative
Vertical Sync.: positive/negative
Composite Sync.: TTL Level, positive/negative
on green video
(0.3Vp-p Negative)
Vertical: 50 to 160 Hz automatically
Per downstream port support current 500mA(Max.)
Storage Temperature: 20°C to 60°C
Humidity 10% to 90%
Note: Specifications are subject to change without notice.
6
¨¨¨
Page 7

INTRODUCTION
English8788
Recommended Use of the Monitor
When setting up and using the monitor, pay special attention to the following
for optimum performance:
Do not use your monitor against a bright background or where sunlight or
other light sources will shine directly on the screen.
The monitor should be placed just below eye level (10°~15°) for optimum
viewing.
Set the monitor's brightness to match ambient room light.
For optimum focus, the contrast control should not be set to the maximum
level unless the input signal level is extremely low. Also, the brightness
control should be set to a point where the overall background area just
begins to disappear.
Allow adequate ventilation around the monitor so that the heat from the
monitor can be properly dissipated.
Neither the monitor itself, nor any other heavy objects, should rest on the
power cord. Damage to the power cord can cause fire or an electric shock.
Keep the monitor away from high-capacity transformers, electrical motors,
or other strong magnetic fields.
Your monitor should not be used in damp, dusty, or dirty areas.
Handle your monitor with care when transporting it.
English
CAUTION
Do not scrape or knock the surface of the CRT with a pen, a
screwdriver and so on.
Clean the CRT surface with a lint-free, nonabrasive, soft cloth, do
not use a solution or glass cleaner containing corpuscles like
abrasives, alcohols and alkalines.
!
ê
7
¨¨¨
Page 8
CONTROLS AND ADJUSTMENTS
Controls and Adjustments
Once you have installed the monitor with your system, please read the
instructions of this section which give you some guidelines on how to use the
monitor more efficiently. It leads you through the various function of the user
controls and explains how to adjust the monitor to your personal preference.
English
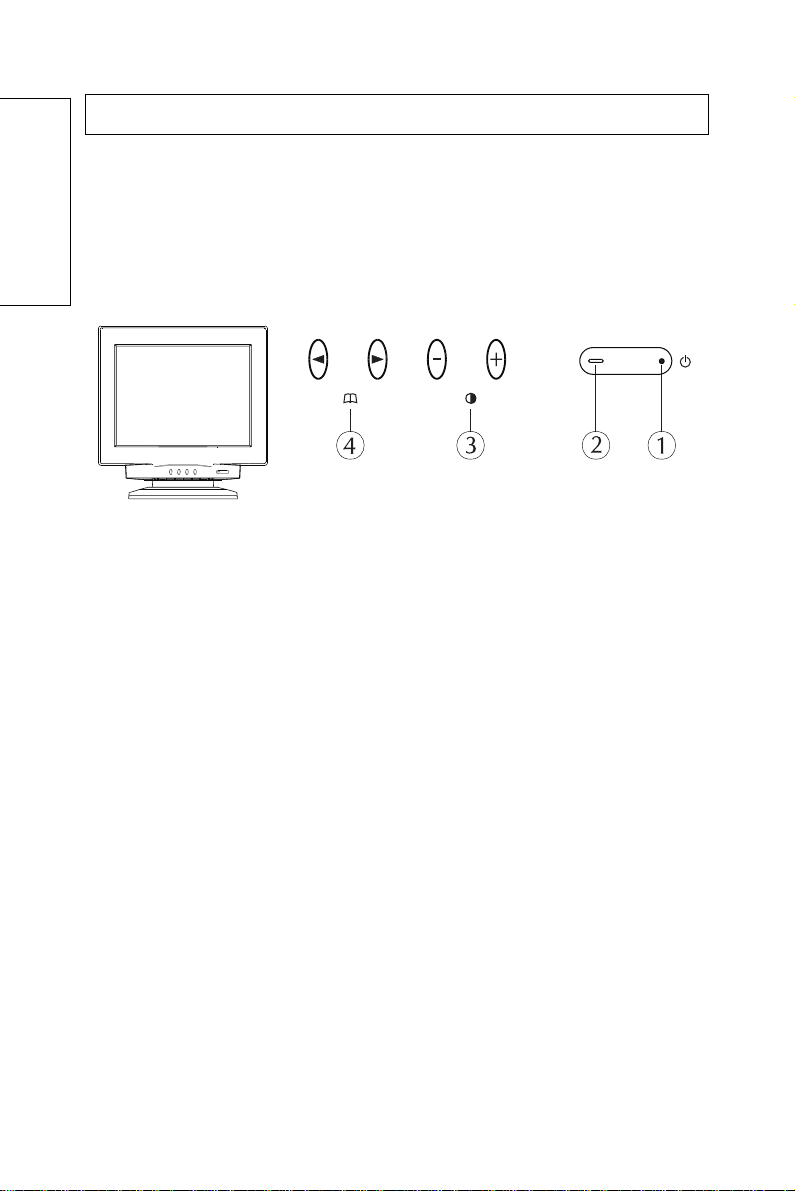
Front User Controls
1. Power Switch
To turn the monitor on or off.
2. Power LED Indicator
As long as the monitor is powered, this indicator is lit. In normal operation, it
lights green. While in stand-by mode, the indicator lights yellowish-green,
while in off mode it is amber.
3. Adjust Keys
To adjust the parameter of the selected function.
To adjust the contrast level of the screen.
4. Menu Key
To display and select the "General", "Picture", "Geometry", "Color",
"Advance", "Property", "Signal" functions.
Power Saving Note:
This monitor is equipped with a automatic power-saving circuitry design that
will work with any computer which meets the VESA DPMS standard. It also
meets the ENERGY STAR low power state definition.
8
¨¨¨
Page 9
CONTROLS AND ADJUSTMENTS
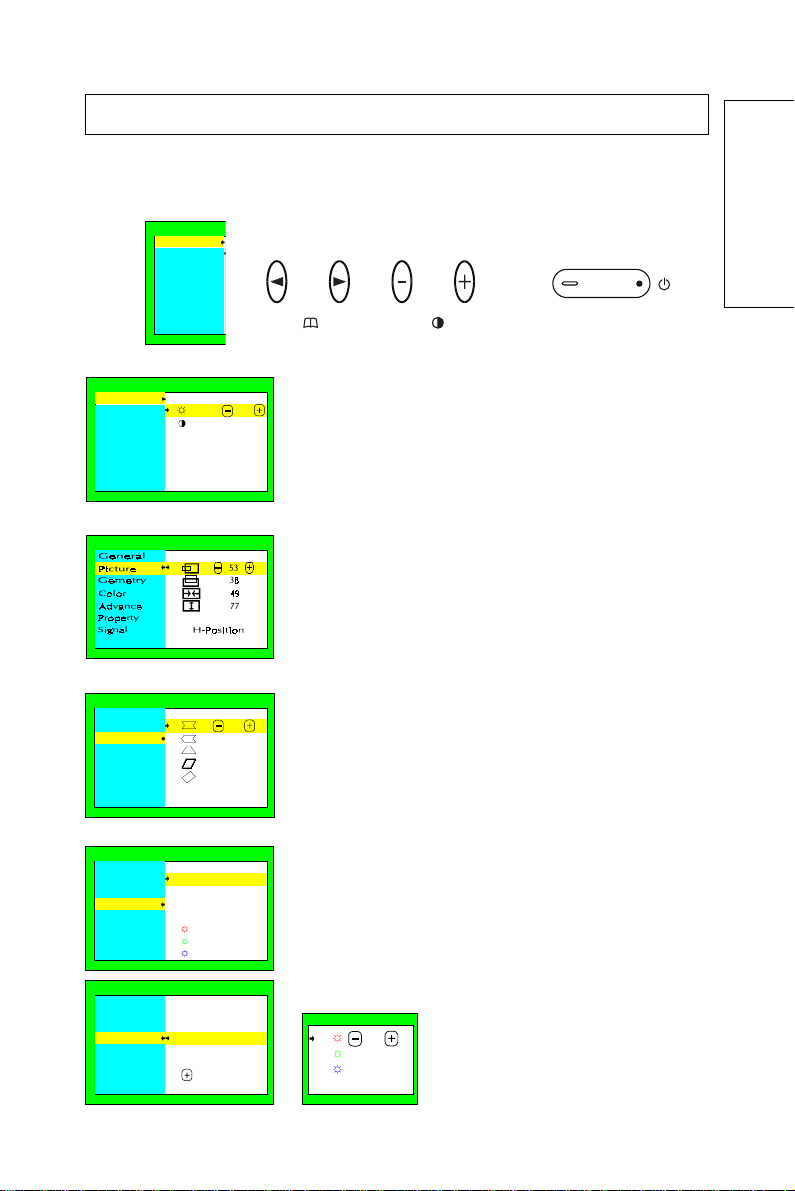
(1) Press "3" or "4" to open the On-Screen menu function. Seven adjustment
functions will appear on the On-Screen menu.
Press "3" key to scroll down through the selections.
General
Picture
Geometry
Color
Advance
Property
Signal
A.General
General
Picture
Geometry
Color
Advance
Property
Signal
English8988
50
100
Brightness
a. Press "4" to select Brightness or Contrast.
b. Press "+" or "" for preferred picture.
English
B. Picture
C. Geometry
General
Picture
Geometry
Color
Advance
Property
Signal
D. Color
General
Picture
Geometry
Color
Advance
Property
Signal
General
Picture
Geometry
Color
Advance
Property
Signal
Sidepin
9300°K
6500°K
5000°K
User
9300°K
6500°K
5000°K
User
:Proceed
a. Press "4" to select Vertical and Horizontal position,
Vertical and Horizontal size.
b. Press "+" or "" for preferred picture.
a. Press "4" to select Side-pin, Balance, Keystone,
50
50
50
63
78
Parallel and Rotation.
b. Press "+" or "" for preferred picture.
a. Press "4" to select various white color temperature
standards.
b. In User item press "+" to confirm action color
65
65
65
adjustment.
c. Press "4" to select Red, Green and Blue.
d. Press "+" or "" to increase or decrease density.
70
70
70
User
9
¨¨¨
Page 10
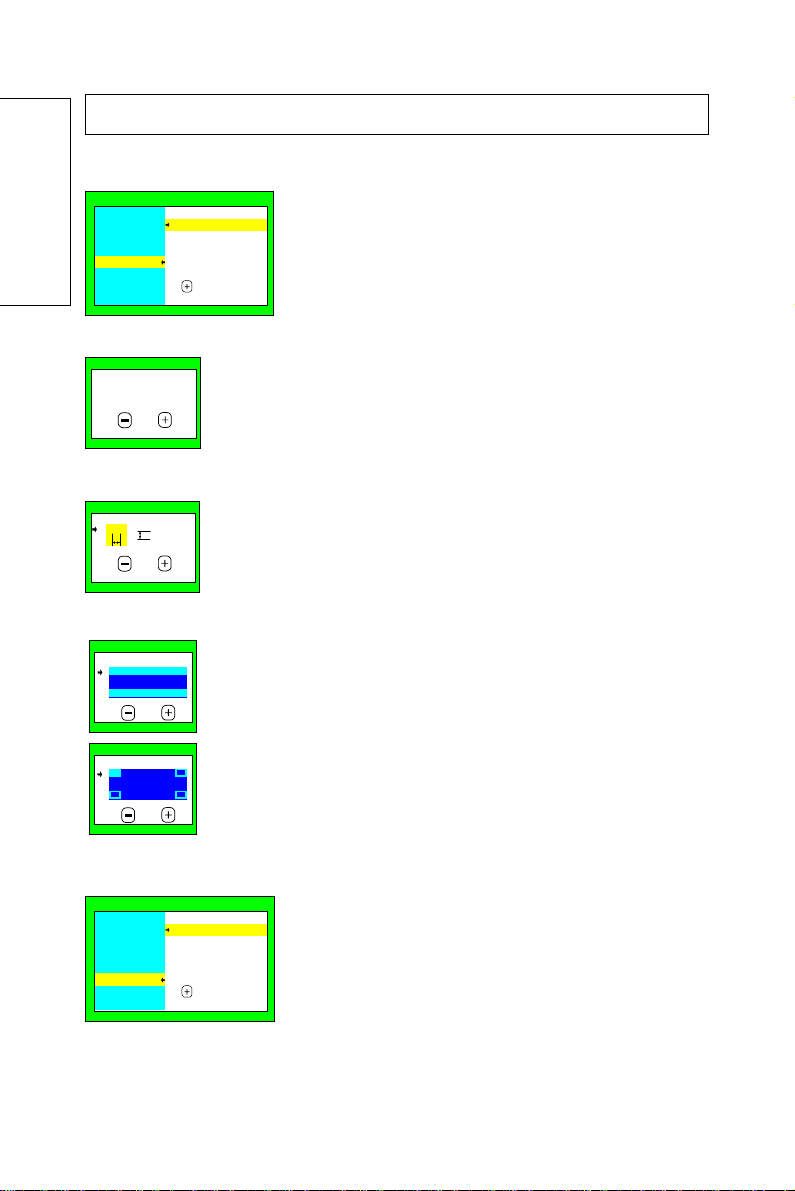
E. Advance
General
Picture
Geometry
Color
Advance
English
Property
Signal
E-1. Moire
Moire
0
E-2. Converge
R
B
50
E-3. Purity
Purity
50
Purity
CONTROLS AND ADJUSTMENTS
a. Press "4" to select Moire, Converge or Degauss.
b. Press "+" to proceed.
c. Press "+" or "" to gain preferred picture.
a. In Moire, press "+" to proceed.
b. Press "+" or "" to gain preferred picture.
a. In Converge, press "+" to proceed.
b.Press "4" to select Horizontal or Vertical adjust.
c. Press "+" or "" to gain preferred picture.
a. At Purity item, press "+" to proceed.
b.Press "4" to select the function you want to adjust.
Color purity can be adjusted in the top and bottom
rows, and, the four corners of the screen.
c. Press "+" or "" to gain preferred color uniformity.
R
B
Moire
Converge
Purity
Degauss
:Proceed
50
F. Property
General
Picture
Geometry
Color
Advance
Property
Signal
10
¨¨¨
Status
Recall
Language
:Proceed
Press "4" to select Status, Recall or Language sub-
manual.
Page 11
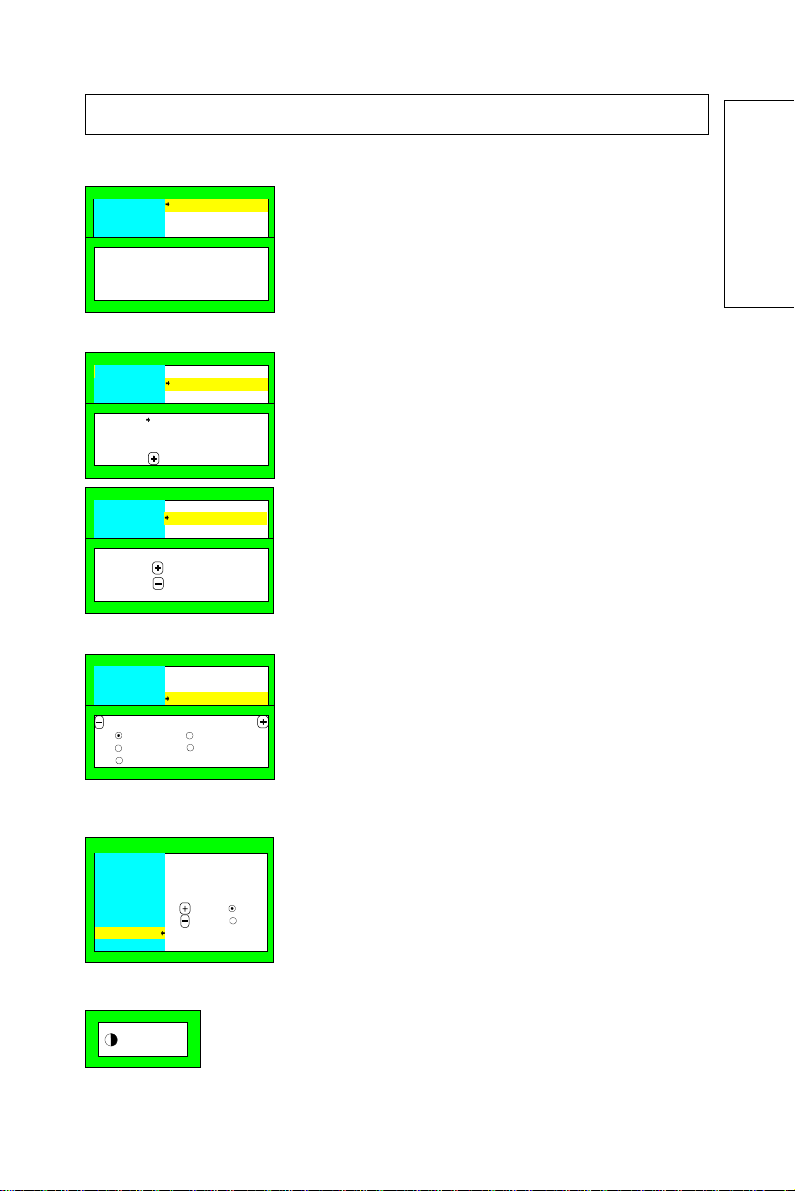
F-1. Status
General
Picture
Geometry
640x480
H:31.5KHz
V:60.5 Hz
F-2. Recall
General
Picture
Geometry
:Proceed
CONTROLS AND ADJUSTMENTS
English81188
Status
Recall
Language
Status
Recall
Langua g e
Picture
Converge
Purity
The status show the current input signal information
such as Resolution, Horizontal Frequency and Vertical
Frequency.
a. Press "4" to select factory setting of picture or
converge.
b. Press "+" to preceed.
c. "+" confirms action, "" cancels action.
English
General
Picture
Geometry
Confirm
:Yes
:No
F-3. Language
General
Picture
Geometry
English
França is Español
Italiano
G. Signal
General
Picture
Geometry
Color
Advance
Property
Signal
(2) Contrast.
:100
Status
Recall
Langua g e
Status
Recall
Langua ge
Deutsch
Input
:D15
:BNC
Press "+" or "" to select the Language for OSD only.
Press "+" or "" to select the input Signal from D-15
or BNC connector.
When OSD is off, "+" or "" will increase or decrease
contrast.
11
¨¨¨
Page 12
CONTROLS AND ADJUSTMENTS
Energy Declaration
This monitor is equipped with a function for saving energy which supports the
VESA Display Power Management Signaling (DPMS) standard. This means that
the monitor must be connected to a computer which also supports the VESA
DPMS standard to fulfill the requirements of the NUTEK specification 803299/
English
94/96. The time settings for switching to a power saving mode are adjusted
from the system unit by software. From the first indication of inactivity to power
saving position A2 the total time must not be set to more than 70 minutes.
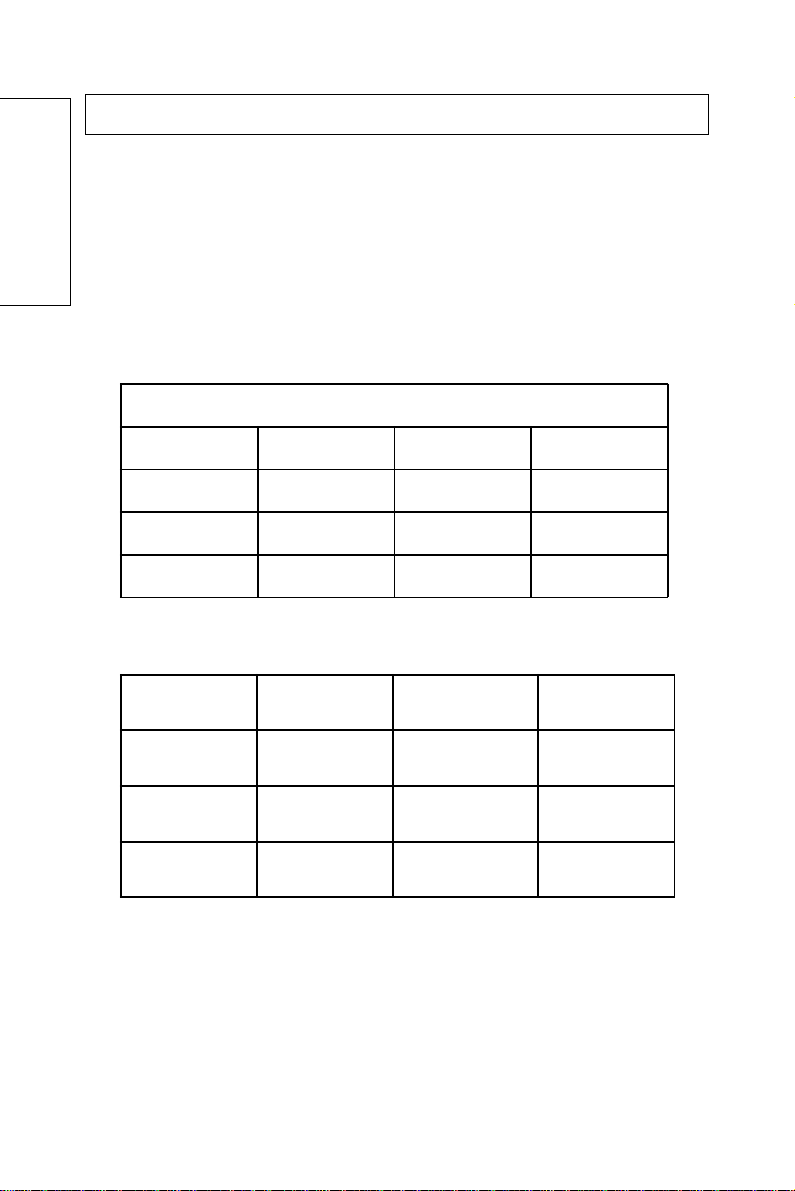
1. VESA Power-Management Proposal
VESA DPMS Standard
H. sync V. sync Video State
Off On Blank Stand-by
On Off Blank Suspend
Off Off Blank Off
2. Power Consumption (120/230 Vac)
12
¨¨¨
NUTEK V ESA state LED indicat or
Normal
operation
Power Saving
Position A1
Power Saving
Position A2
On Green
Suspend Yellowish-green
Off Amber
Power
Consumption
<125W
≤15W
≤8W
Page 13
TECHNICAL INFORMATION
Compatibility
This color monitor supports multiple operating platforms such as IBM
compatible and Macintosh family computers. This section provides you with
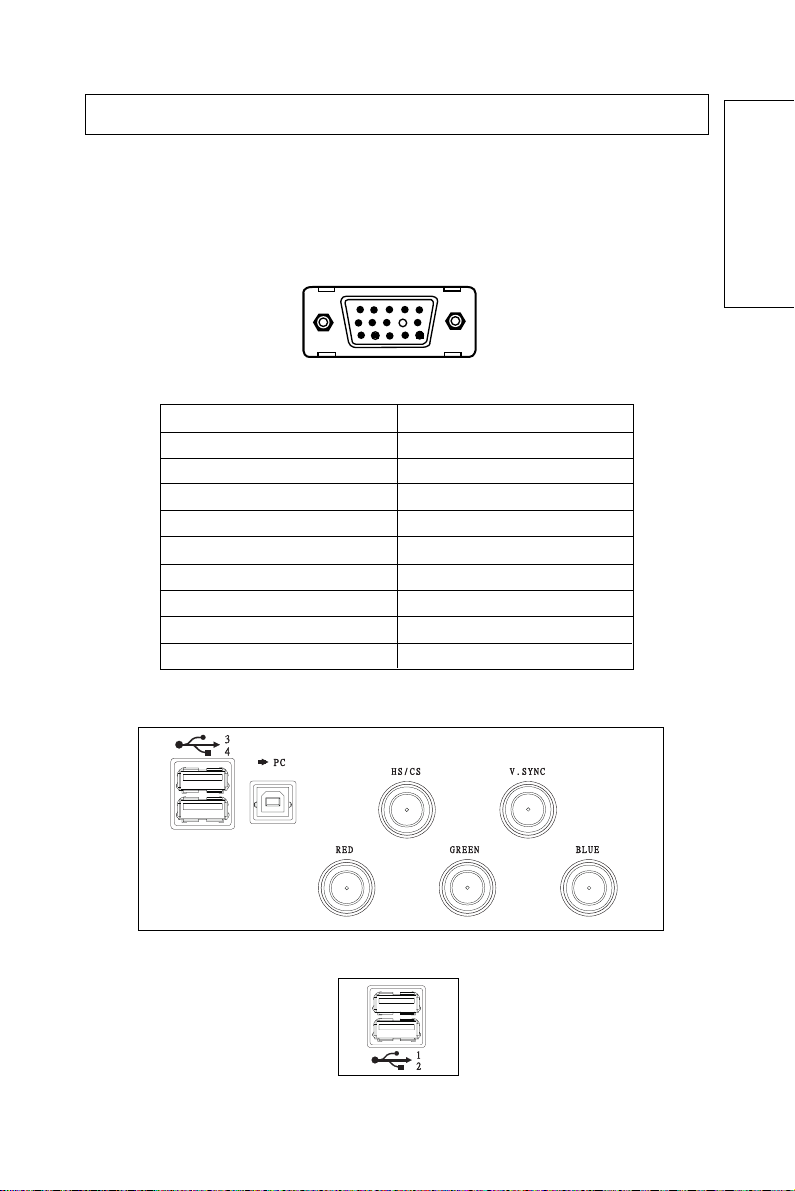
detailed information on the pin assignment of the D-Sub connector and the
preset timing chart of the prevailing video standards.
Pin Assignment
English81388
1
6
11
Male Mini D-15 Connector
Signal 15 Pin Mini D-Sub
Red Video 1
Green Video 2
Blue Video 3
Horizontal Sync 13
Vertical Sync 14
Ground 4,5,6,7,8,10,11
No Connection 9
SDA (DDC) 12
SCL (DDC) 15
5
10
15
English
Pin Assignments of the BNC and USB Connectors
Back
Side
13
¨¨¨
Page 14
¨¨¨
14
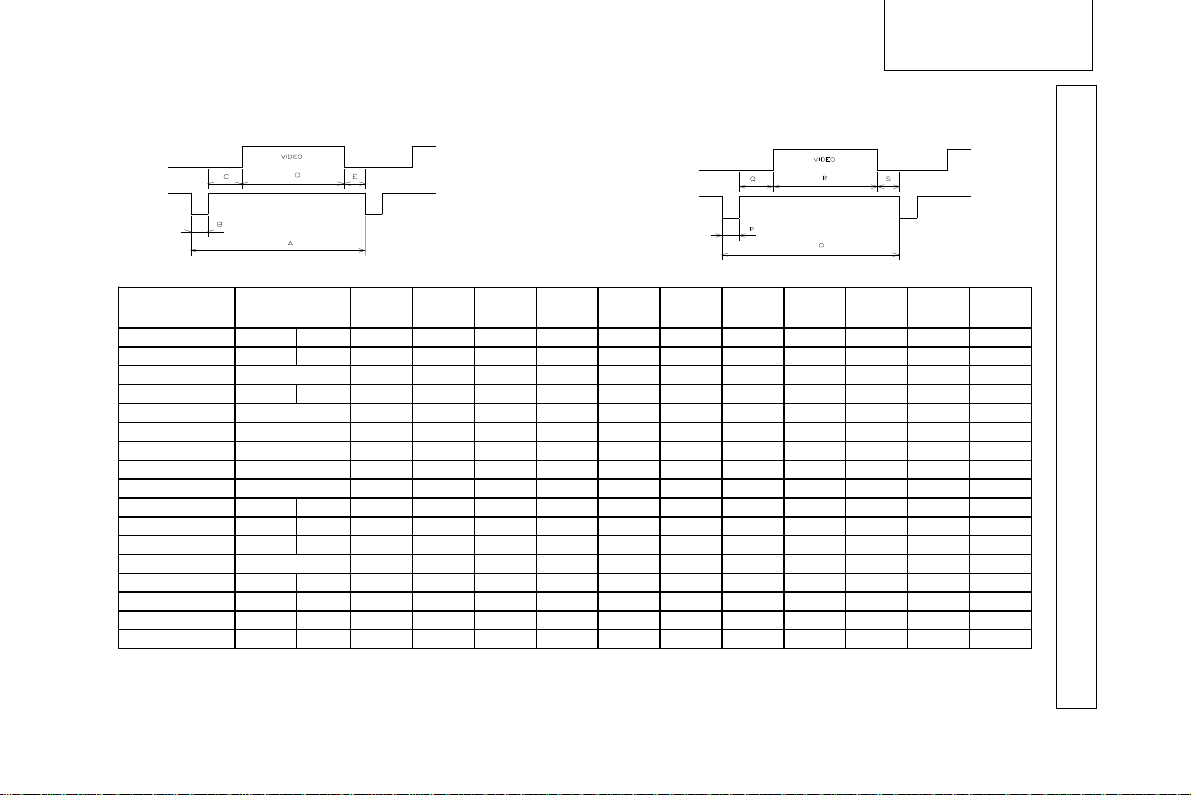
Preset Timing Chart
English
Note:This monitor is equipped with a micro-processor which allows the user
to set his own preferred mode(s) beyond those standard mode listed
below.
TECHNICAL INFORMATION
HORIZONTAL
Display For mat
Hotizontal Dots 640 720 640 832 800 1152 1024 1024 1024 1280 1280 1600 1600
Vertical Lines 480 400 480 624 600 864 768 768 768 1024 1024 1200 1200
H. Frequency(kHz) 31.469 43.269 49.726 53.674 67.500 60.024 68.677 80.468 79.976 91.146 93.750 106.962
H. Sync. Polarity OFF-LOW + + + + + + + +
Aµ s (Perio d) 31 .77 8 23. 111 20.1 10 18.6 31 14.81 5 16. 66 0 14.56 1 12 .427 12.5 04 10.97 1 10.6 67 9.3 49
*Bµs (Pulse Width) 3.813 1.556 1.117 1.138 1.185 1.219 1.016 1.073 1.067 1.016 0.948 0.962
Cµs (Back Porch) 1.907 2.222 3.910 2.702 2.370 2.235 2.201 1.945 1.837 1.422 1.501 1.237
Dµs (Active Area) 25.422 17.778 14.524 14.222 10.667 13.003 10.836 9.309 9.481 8.127 7.901 6.874
Eµs (Front Porch) 0.636 1.555 0.559 0.569 0.593 0.203 0.508 0.100 0.119 0.406 0.316 0.275
V. Frequency(Hz) 59.940 70.087 85.008 74.552 85.062 75.000 75.030 84.997 99.836 75.024 85.024 75.000 85.026
V. Sync. Polarity + OFF-LOW + + + + + + + +
Oms (P erio d) 16.6 83 14.268 11.76 3 13.4 13 11. 75 6 13.33 3 13.3 28 11. 765 10.01 6 13.32 9 11.76 1 13 .333 11 .76 1
Pms (Pulse Width) 0.064 0.069 0.060 0.056 0.044 0.050 0.044 0.037 0.038 0.033 0.032 0.028
Qms (Back Porch) 1.049 1.112 0.578 0.784 0.503 0.474 0.466 0.524 0.423 0.475 0.483 0.491 0.505
Rms (Active Area) 15.253 12.711 11.093 12.549 11.179 12.800 12.795 11.183 9.544 12.804 11.234 12.800 11.219
Sms (Front Porch) 0.318 0.381 0.023 0.020 0.018 0.015 0.017 0.014 0.012 0.012 0.011 0.011 0.009
Pixel Rate (MHz) 25.175 28.322 36.000 57.284 56.250 108.000 78.751 94.500 110.000 135.000 157.500 202.500 232.750
VGA
VESA
640x480
at 85 Hz
MAC
832x624
at 75 Hz
VESA
800x600
at 85 Hz
MAC
1152x864
at 75Hz
VESA
1024x768
at 75 Hz
VESA
1024x768
at 85 Hz
1024x768
at 100Hz
VERTICAL
VESA
1280x1024
at 75 Hz
VESA
1280x1024
at 85 Hz
VESA
1600x1200
at 75 Hz
* Bµs (Pulse Width) should be more than 0.5 µs.
To reduce visual tiredness and eye strain, it is recommended to choose the highest refresh modes available.
VESA
1600x1200
at 85 Hz
Page 15
TROUBLESHOOTING
Troubleshooting
Before calling an authorized service center please check that the items below
are properly connected or set.
In case of using a non-standard signal, please check the pin assignments and
the signal timing of your adapter with the specifications outlined in sections
"Pin Assignment Table" and "Preset Timing Chart".
Problem Items to check
No picture Power Switch should be in the ON position and the power cord should be properly connected.
"No Signal Input" is displayed on
the screen
Display i mage is not centered ,
too small, or to o large
Image is scrolling or unstable The signal cable should be completely attached to the computer.
Picture is fuzzy Adjust the Contrast and Brightness Controls.
Picture bounces or a wave
pattern is present in the picture
Edges of th e displ ay image are
curved eit her inward or out ward
Color looks blotchy Press the Degauss button once.
No Plug & Play functionality Check if the host system is Plug & Play compatible.
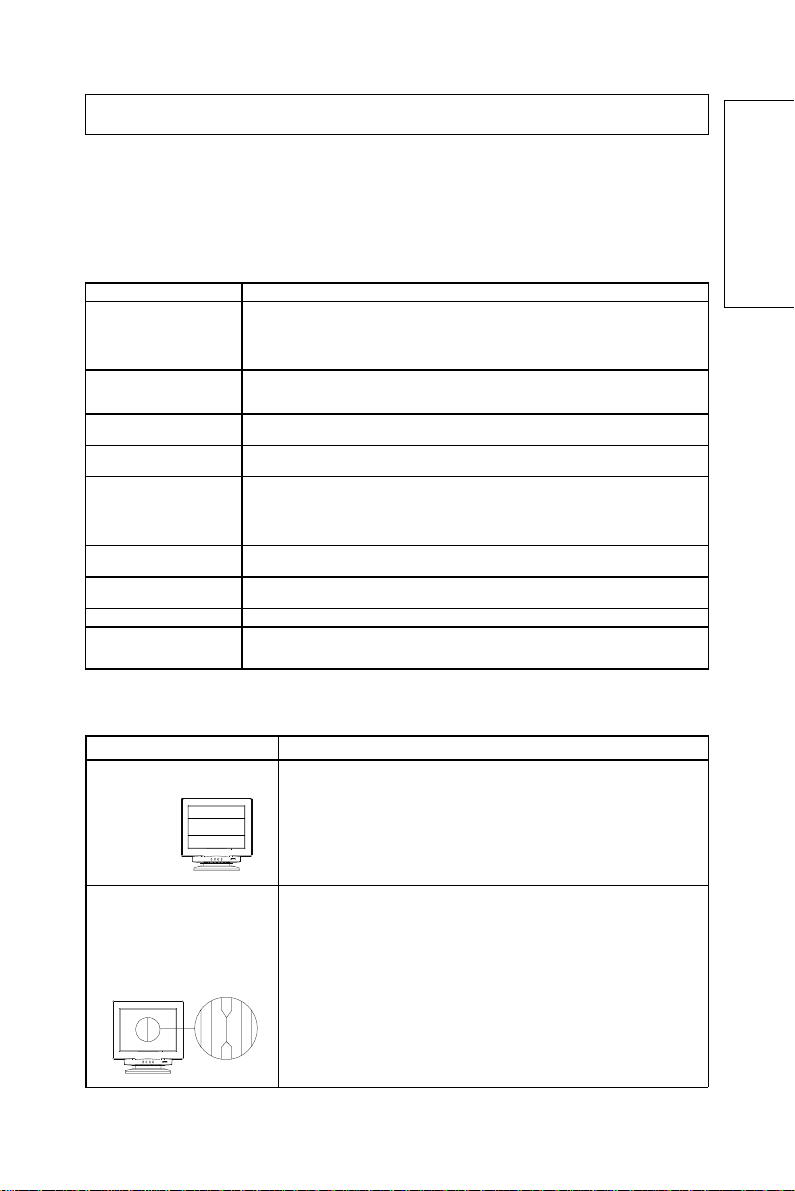
Our PR960F has built-in SONY FD Trinitron® CRT. The CRT is very sensitive
to shocks and vibrations that may occur during transportation. Following are
some adjustment tips when below mentioned symptoms occur.
Symptom Tip
Two horizontal lines are visible
on the screen
English81588
Check the color of the po wer LED indicator; if it is oran ge, then th e monitor is in a power
saving mode.
Check if the horizon tal/vertical frequ ency are ou t of range.
Maximize the Bri ghtness an d Con trast controls.
The video card should be completely seated in its slot.
The computer power switch should be in the ON position.
The signal cable should be completely connected to the video card/computer.
Change the Po sition and Si ze controls to adjust th e image.
Check the pin assignments and signal timings of the monitor and your video card.
Push the degauss button once.
CAUTION: A minimum interval of 20 minutes should exist before the degauss button is pressed
a second time when not switching between modes.
Do not hold the button down continuously.
Relocate electrical devices that may be causing electrical interference.
See the insid e front cover of thi s manu al for FCC infor mation.
Adjust the Pincushion control.
Check if the VGA card is DDC 1/DDC 2B compatible.
Check if Window '95 is installed and the software key for DDC function is enabled).
This is normal charactristic of SONY FD Trinitron
These are damper wires which are attached to the aperture grille are
designed to dampe n and prevent shock and vibration in the
aperture grill.
CRT .
®
English
Black fine vertical lines are
visible on the screen. Shock
and vibration may cause the
aperture grill to misallign
resulting in a few fine black
vertical lines across the screen
Degaussing the screen.
Tap lightly (do not hit) the side of the monitor.
If above mentioned remedies do not work, please do the following:
1. Display full white window or wallpaper background over the area
where the black lines appears.
2. Set Contrast and Brightness to the maximum, wait for a moment until
the problem is corrected. You may try to tap lightly the side of the
monitor to help expedite the alignment.
¨¨¨
15
Page 16
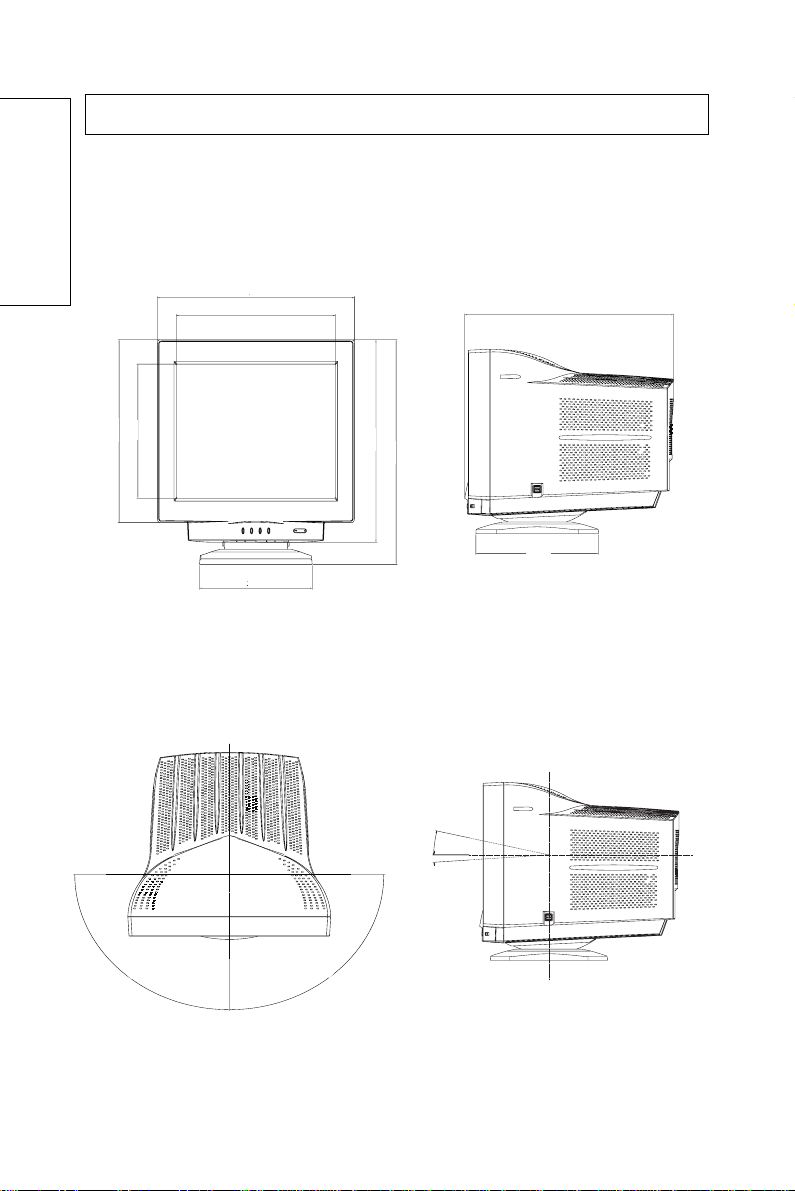
unit: mm
English
382.0
280.0
460.0
372.0
263.0
DIMENSIONS
423.0
469.0
485.0
285.0
16
¨¨¨
90°
13°
4°
90°
 Loading...