

Page 1

Important Information
Before you use your device, please read the
Important
Information
provided in your device regarding warranty,
safety and handling information.
Protecting your device from water
and dust
Your device has IP (Ingress Protection) ratings of IP65 and
IP68. These ratings mean that your device is dust tight and
is protected against low pressure water stream as well as
against the effects of submersion for 30 minutes in fresh
(non-saline) water up to 1.5 metres deep.
Always firmly attach all covers to ensure the water and dust
resistance of the device. If liquid is detected inside the
device, for example, underneath one of the covers, your
warranty will be void.
Before using your device in water and in dusty conditions,
refer to the relevant section of the User guide for your
device for more detailed information. An online User guide
as well as a downloadable version is available at
www.sonymobile.com/support
.
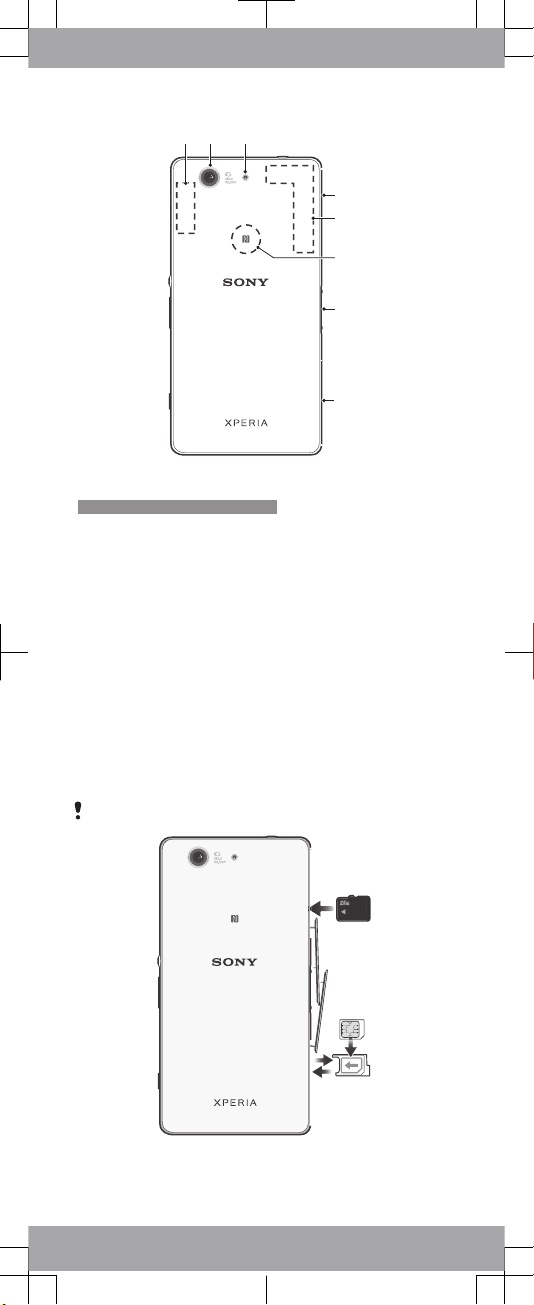
Overview
24 6
7
8
9
11
1 3 5
12 10
ID: ILL-14AS-FRONT-OVERVIEW
Page 2
16
14
20
13
18
19
17
15
ID: ILL-14AS-BACK-OVERVIEW
1. Charging/Notification
light
2. Proximity/Light sensor
3. Headset jack
4. Second microphone
5. Ear speaker/Second
loudspeaker
6. Front camera lens
7. Power key
8. Volume/Zoom key
9. Camera key
10. Main microphone
11. Main loudspeaker
12. Strap hole
13. Wi-Fi/Bluetooth antenna
area
14. Main camera lens
15. Camera light
16. Cover for memory card slot
and charger/USB cable port
17. GPS antenna area
18. NFC™ detection area
19. Charging dock connector
20. Nano SIM card slot cover
Assembly
Your device only supports nano SIM cards.
Page 3
ID: ILL-14AS-INSERT-SIM-AND-MEM-CARD
Make sure you insert the nano SIM card into the nano SIM
card holder before inserting it into the device. Also, don’t
confuse the nano SIM card slot with the memory card slot.
To insert the nano SIM card
If you insert the nano SIM card while the device is
powered on, the device restarts automatically.
1
Detach the cover for the nano SIM card holder.
2
Using a fingernail or other similar object, drag out the nano
SIM card holder.
3
Place the nano SIM card in the nano SIM card holder, then
reinsert the holder.
4
Re-attach the cover.
Make sure you reinsert the nano SIM card holder in the
correct orientation. When you drag the holder out to insert
the nano SIM card, do not turn the holder around.
To insert the memory card
1
Remove the memory card slot cover.
2
With the gold coloured contacts facing down, insert the
memory card into the memory card slot, then re-attach the
memory card slot cover.
Basics
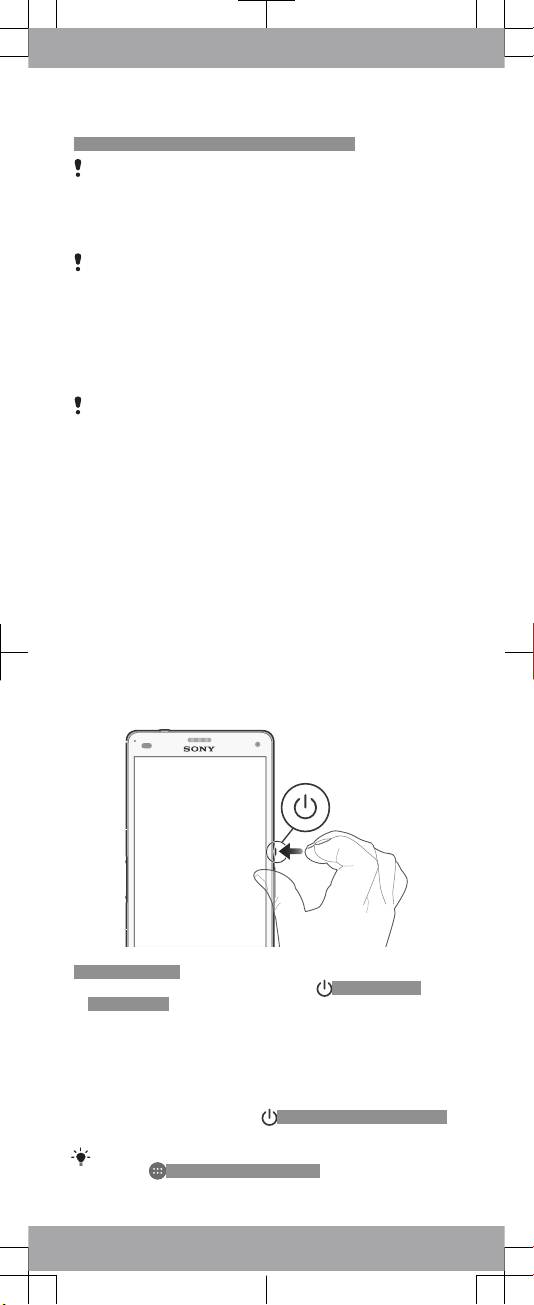
Turning on the device
Make sure that the battery is charged for at least 30 minutes
before you turn on the device for the first time.
To turn on the device
ID: ILL-14AS-ON
1
Press and hold down the power key ID: KEY-ANDPOWER-K90 until the device vibrates.
2
Wait a while for the device to start.
Waking up the screen
To activate the screen
•
Briefly press the power key ID: KEY-AND-POWER-K90.
•
If Tap to wake up mode is enabled, double-tap the screen.
To enable Tap to wake up mode, go to the Home screen,
then tap ID: ICN-AND-APP-TRAY > Settings [settings_la-
bel] > Display [display_settings_title] > Tap to wake up
[touch_to_wake_up] .
Page 4

Setting up your device
Setup guide
The first time you start your device, a setup guide opens to
help you configure basic settings, sign in to some accounts
(for example, your Google™ account), and personalise your
device. You can also manually access the setup guide at a
later stage.
To access the setup guide manually
1
From the Home screen, tap
ID: ICN-AND-APP-TRAY.
2
Tap ID: ICN-SONY-APP-SETTINGS > Setup guide [se-
tupguide_settings_title] .
Accessing settings
View and change settings for your device from the Settings
menu. The Settings menu is accessible from both the
Application screen and the Quick settings panel.
To access your device settings
1
From your Home screen, tap
ID: ICN-AND-APP-TRAY.
2
Find and tap
ID: ICN-SONY-APP-SETTINGS.
Transferring your contacts
Xperia™ Transfer is an application within the PC Companion
and the Sony Bridge for Mac computer programs that helps
you to collect contacts from your old device and transfer
them to your new device. Xperia™ Transfer supports several
device brands, including iPhone, Samsung, HTC, BlackBerry,
LG, and Nokia.
You need:
•
An Internet-connected computer.
•
A USB cable for your old device.
•
A USB cable for your new Android™ device.
•
Your old device.
•
Your new Android™ device.
To transfer contacts to your new device
1
Search and download PC Companion (on a PC) or Bridge
for Mac (on a Mac computer) from
www.sonymobile.com
if
the application is not already installed.
2
After successful installation, open the PC Companion
application or the Sony Bridge for Mac application, then
click
Xperia™ Transfer
and follow the relevant instructions
to transfer your contacts.
Page 5

Finding your way
ID: SCR-14AS-HOMESCREEN
Using the keys
ID: ILL-14AS-HARDWARE-KEYS
ID: KEY-AND-
BACK
Back navigation key
•
Go back to the previous screen
within an application or close the
application.
ID: KEY-AND-
HOME
Home navigation key
•
Exit an application and go back to
the Home screen.
ID: KEYOPEN-RECENTAPPS
Task navigation key
•
Open the recently used applications
window and the small apps bar.
ID: ICN-AND-
APP-TRAY
Application screen
•
Open the Application screen.
Basic applications and settings
ID: ICN-SONY-
APP-DIALER
Make phone calls by dialling the
number manually or by using the
smart dial function.
ID: ICN-SONY-
APP-MESSAGING
Use the Messaging application to
send and receive text and
multimedia messages.
ID: ICN-SONY-
APP-MARKET-PLACE
Go to Google Play™ to download
free and paid applications for your
device.
Page 6

ID: ICN-SONY-
APP-SETTINGS
Optimise the device settings to suit
your own requirements.
Status and notifications
To open or close the Notification panel
ID: SCR-14AS-DOWN-UP-NOTIFICATION-PANEL
Drag down two fingers instead of one to open the Quick
settings panel instead.
Support on the web
ID: ILL-SERVICE
Visit
www.sonymobile.com/support
to access a range of
support options for your device, including downloads,
troubleshooting tips and a User guide.
Page 7

Legal information
Sony D5803/D5833[Textvar-Product] [Textvar-Phone-
type]
Publication number: 1286-1999.1 [Textvar-Partnr-i-ROW-basic]
This Startup guide is published by Sony Mobile
Communications Inc. or its local affiliated company, without
any warranty. Improvements and changes to this Startup
guide necessitated by typographical errors, inaccuracies of
current information, or improvements to programs and/or
equipment, may be made by Sony Mobile Communications
Inc. at any time and without notice. Such changes will,
however, be incorporated into new editions of this Startup
guide. All illustrations are for illustration only and may not
accurately depict the actual device.
See regulatory information such as the CE mark in the
relevant label tray in the device.
All product and company names mentioned herein are the
trademarks or registered trademarks of their respective
owners. Any rights not expressly granted herein are reserved.
Visit
www.sonymobile.com/us/legal/
for more information.
Product compliance: This product has been manufactured by
or on behalf of Sony Mobile Communications Inc., 1-8-15
Konan, Minato-ku, Tokyo 108-0075, Japan. Inquiries related
to product compliance based on national legislation shall be
addressed to Sony Mobile Quality Office, Sony Mobile
Communications Inc., 1-8-15 Konan, Minato-ku, Tokyo
108-0075, Japan. For any service or guarantee matters,
please refer to the contact details provided in the separate
service or guarantee documents.
© 2014 Sony Mobile Communications Inc. All rights reserved.
To view the CE mark and the FCC ID
FCC ID: PY7PM-XXXX
ID: ILL-14AS-CEMARK
1
Detach the cover for the nano SIM card holder.
2
Insert the tip of an unfolded paper clip (or a similar object
with a long, fine tip) into the hole in the label tray, then drag
the tray outwards. The information is displayed on the tray.
Page 8

Startup guide
Xperia™ Z3 Compact
D5803/D5833
Sony Mobile Communications Inc.
1-8-15 Konan, Minato-ku, Tokyo 108-0075, Japan
www.sonymobile.com
 Loading...